

Page 1
EEE-ESP-06-001-A
Support Paper
containing:
Epson How To Guides
Epson Support Bulletins
Please visit the European Epson Support at:
http://esupport.epson-europe.com
Page 2
Support Paper
Doc-ID: EEE-TP-TG-06-009 Rev. A • 10/03/2006
How To Guide
Model: Epson PageProofer EX
Subject: Printing with Epson PageProofer EX a XXL banner
In this How to Guide we will show you how to print with the application Epson PageProofer
EX a large banner. In our example we are going to print a banner of 2 ½ m, but you can print
banners up to 15 m
use the Epson Stylus Pro 7800/9800 or Epson Stylus Photo R2400. We took the screenshots
from the Mac version, but Windows will look and work similar.
Description:
Like other imaging applications Epson PageProofer EX has some limitations regarding the
image size you can import:
The number of pixels per line must be more than 250 but less than 25.000.
The number of total pixels must be more than 62.500 but less than 64.000.000.
1
. As printer we are using the Epson Stylus Pro 4800, but you can also
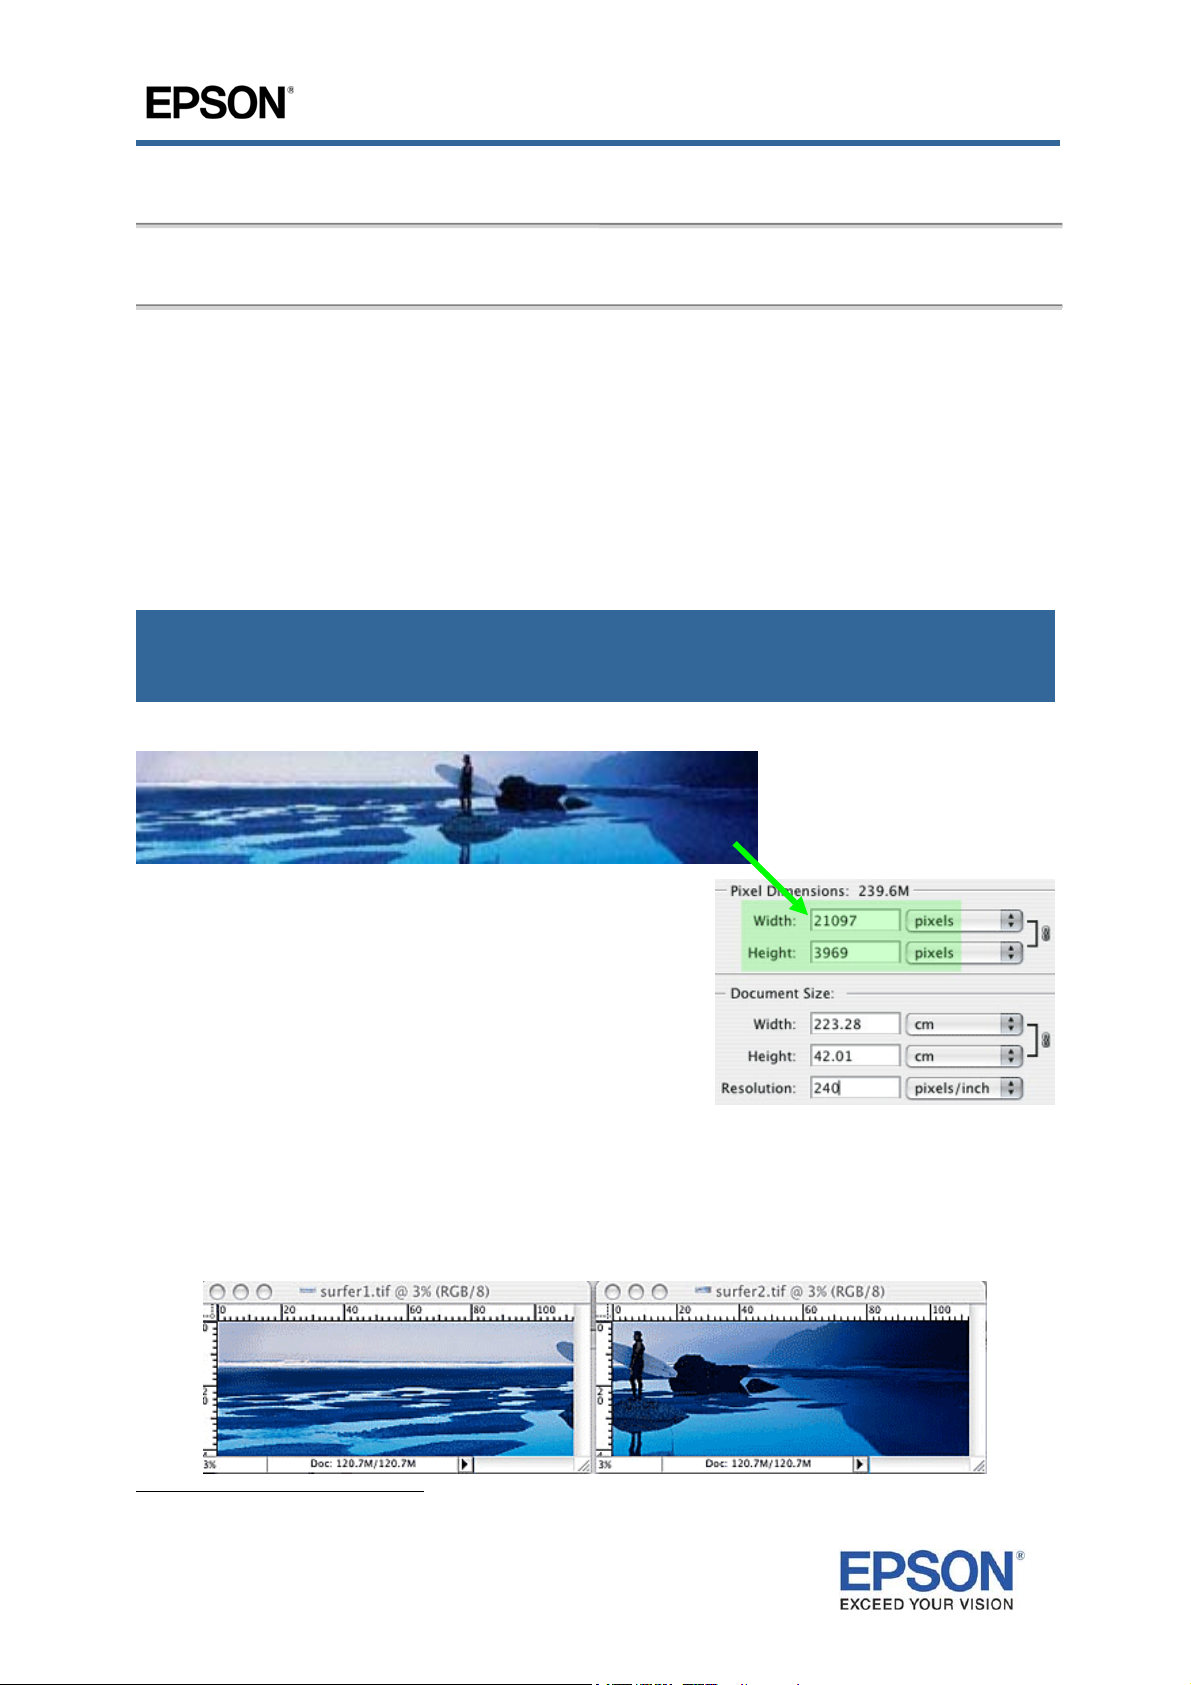
The image we are going to print exceeds the maximum allowed total pixel number!
When you multiply 21.097 x 3.969 pixels you have in
total 83.733.993 pixels. This number exceeds the
maximum allowed pixel number of 64.000.000.
The result is that we wouldn’t be able to import the
image into Epson PageProofer EX. Therefore we need to
trick a little bit:
Open the image in an image editing application and cut the image with a little bit of overlap
(the overlap will help us later to position the images without any gap to each other) into two
parts (or even more) that fall into the Epson PageProofer EX supported pixel size.
Here is our image after the cut treatment. We have now two images with less than 64.000.000
pixels. These two images we are going to import into an Epson PageProofer EX template:
1
The maximum printable banner length depends on the printer model, page size and print settings
Page :1 /6
http://esupport.epson-europe.com
Page 3
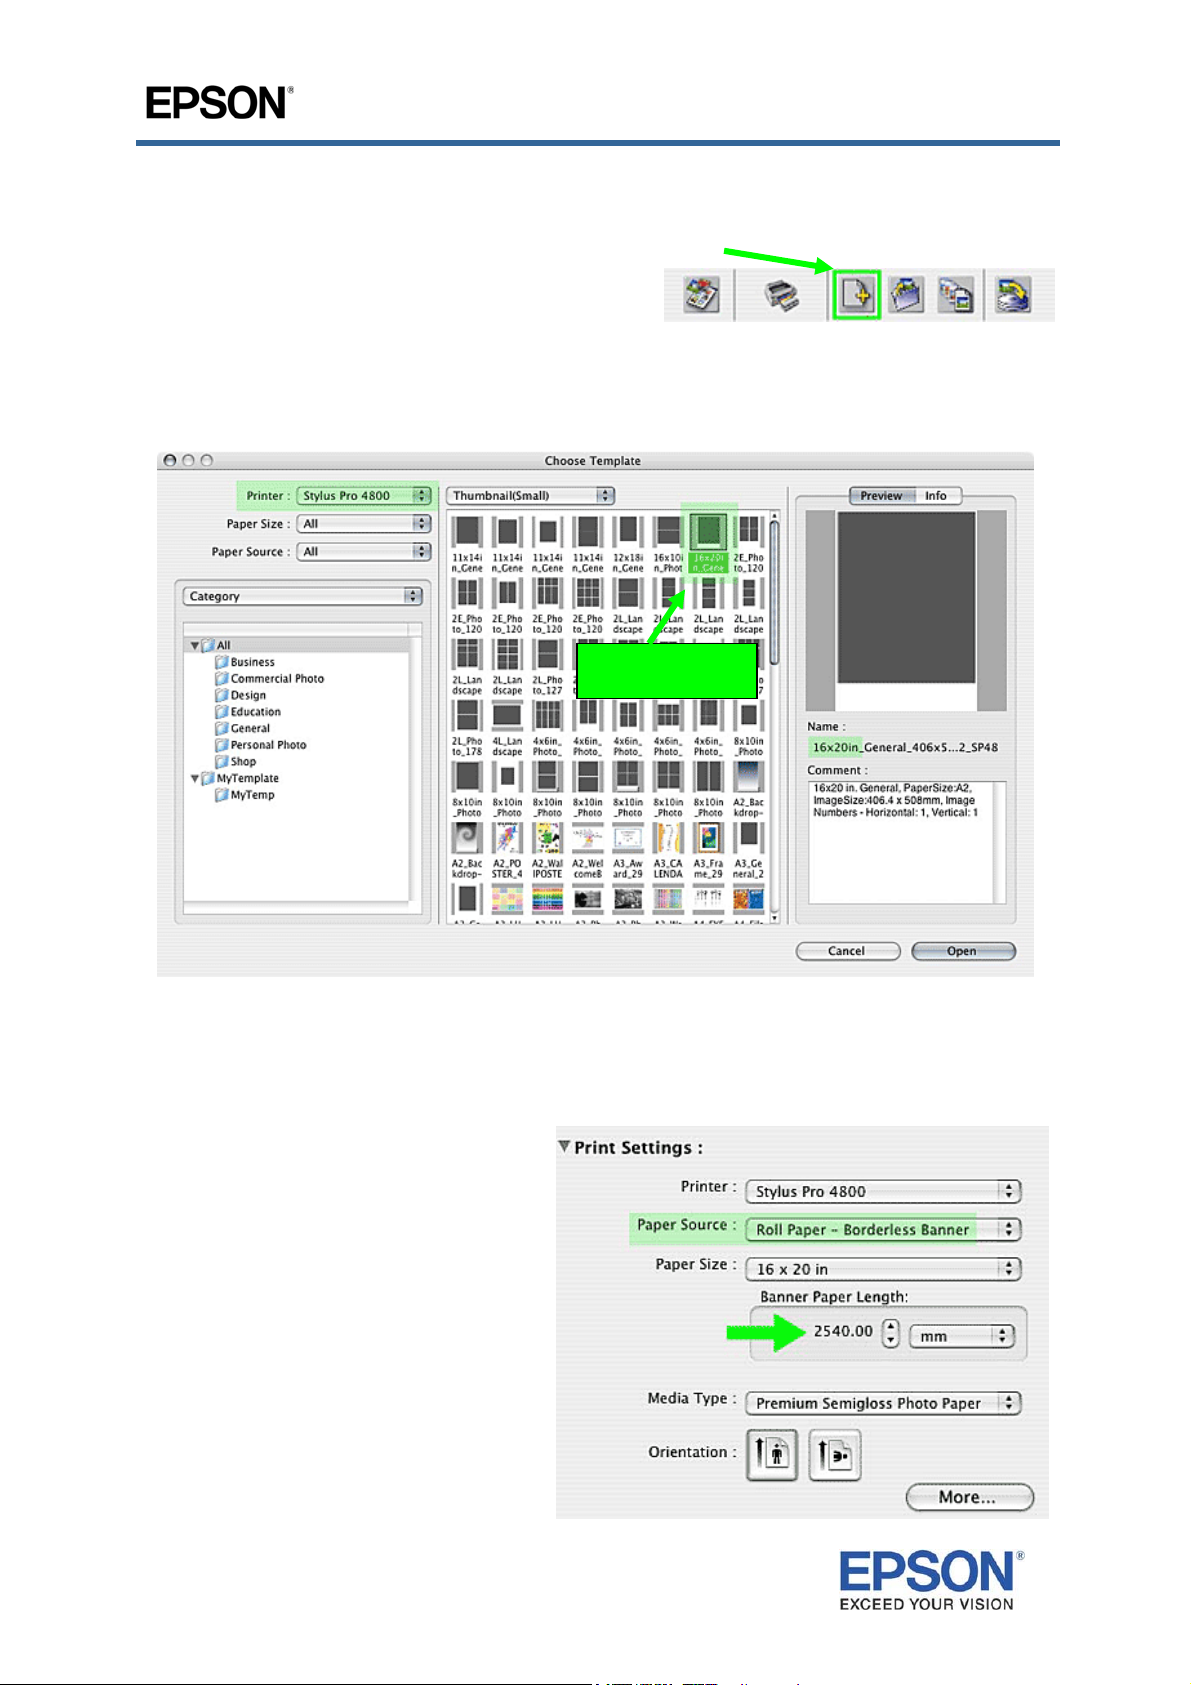
So as next step we open Epson PageProofer EX and start a new file.
Go to the menu bar and choose File > New or click the New button of the icon bar.
From the appearing Choose Template window we can select any template. In our example
we selected a very basic template with one image placed on the page for the printer Stylus
Pro 4800. However at this step it does not really matter which template you select as we will
change the template parameters manually.
Support Paper
Doc-ID: EEE-TP-TG-06-009 Rev. A • 10/03/2006
Any template
Select a template and click the button Open.
The selected template will open in the main window of Epson PageProofer EX. Now you are
going to adjust the selected template manually by first changing the print settings.
Select in the print settings on the left
top of the main window your printer (i.e.
Stylus Pro 4800). Then change the
paper source to roll paper - banner (or
roll paper - borderless banner like in
this example), choose the paper size of
the media you are going to use and the
correct media type.
Note how the area of the banner paper
length changes from deactivated to
activated status once you changed the
paper source to a banner setting!
Page :2 /6
http://esupport.epson-europe.com
Page 4

The banner paper length will be the total length of our print. Nevertheless we are not
sending only on page of 2 ½ m to the printer driver. Instead we tile the image into several
pages that we send to the printer driver. The paper size defines the size of the image tiles. In
our example it means that we produce a print of 2 ½ m. But the printer driver will spool 5
pages as 16x20 inch fit 5 times into 2 ½ m. Due to the banner setting in paper source each
of the 5 pages or image tiles will print without gap to each other. The banner setting forces
the printer not to perform a paper feed between the 5 pages.
So make sure you changed the banner paper length to a size where your image(s) can fit in.
In our example 2 ½ m are big enough.
Next we have to prepare the image orientation and image frame size into which we are
importing our images.
Select from the menu bar Object > Image Preferences >
Auto Rotation and select a portrait orientation.
Support Paper
Doc-ID: EEE-TP-TG-06-009 Rev. A • 10/03/2006
Please note: If you set up a wrong orientation you can
rotate your placed image at any time afterwards by
selecting the image and from the menu bar Image >
Rotate & Flip > 180 degrees (or appropriate).
Next select from the menu bar Object > Image
Preferences > Size.
We need to insert our images in their original image
proportion and size.
Page :3 /6
http://esupport.epson-europe.com
Page 5

Support Paper
Switch from the dimensions set up to the ratio set up. Set
width and height to 100% each.
This will keep the original image size when we are going to
import the images in the Epson PageProofer EX template.
We are ready to import the two images into the Epson PageProofer EX template.
From the menu bar select Object > Get Image or click the Get Image icon.
Doc-ID: TechExchange Name • 10/03/2006
Then browse to the directory on your Mac or PC where you stored
the two images and click the button Open.
The two images will now have a gap in-between. This gap will
vanish when we have stitched the images accurately together.
Since we must be able to overlap images and move images freely
on the Epson PageProofer EX template with the help of our
keyboard’s arrow keys we need to change the layout mode. We
will change from the Automatic Layout Mode to the Free Layout
Mode.
In the menu bar select Layout > Layout Mode >
Free Layout.
Now we are able to move our images with the help of the arrow keys of our keyboard onto each
other. Epson PageProofer EX lets you even define the distance of the arrow key increments. As we
have to overlap the two images very accurate we want to use a fine arrow key increment.
Page: 4/6 http://esupport.epson-europe.com
Page 6

Support Paper
In the menu bar click on PageProofer EX > Preferences and
select an arrow-key increment of about 1 mm. Then click the
button OK.
It will be still hard to stitch the two images together, as we see
only a low resolution image preview on the template. So we need
to change to a finer resolution.
Select from the menu bar Image > Color- Matched View.
After this action the image preview resolution will change. With
the fine preview you can now move the images together.
Doc-ID: TechExchange Name • 10/03/2006
Before: After:
Now select the lower image and use the arrow keys of your keyboard to move the lower image up to
the top image until you can’t see any white gap or any wrong overlap. If necessary zoom into the
template page so you will recognize the correct overlap easier.
The image halves before and after stitching them correctly together:
Before:
After:
Full view:
Page: 5/6 http://esupport.epson-europe.com
Page 7

Support Paper
Before we print we are going to check, if all our print settings are correctly set up.
Open the Print Preferences from the menu bar File >
Print Preferences or by clicking the button More from
the Print Settings in the Epson PageProofer EX main
window.
Check and adjust the settings, then click the OK
button.
Then you can print the file by click on the print icon.
Doc-ID: TechExchange Name • 10/03/2006
The print job will be send to the Epson Stylus Pro 4800
printer driver. The application Epson PageProofer EX
sends several pages. The one print job is tiled into
several pages. The Epson Stylus Pro 4800 printer
driver receives 5 pages and not only 1 page. But due
to the banner print setting, the Epson Stylus Pro 4800
does not perform a paper feed after each of the 5
pages.
So you will get one print out of 2 ½ m.
Page: 6/6 http://esupport.epson-europe.com
Page 8

Support Paper
Doc-ID: EEE-TP-SW-05-006-B • 16/01/2006
Support Bulletin
Model: Epson Stylus Pro 4400/4800, 7400/7800, 9400/9800
Espon Stylus Photo R-1800, R-2400
Subject: List of ICC profile acronyms and their corresponding media type
The ICC profiles that are included with the Epson driver package are labeled by their acronyms or
by incomplete names. This document contains a list of the ICC profile names and their
corresponding media type.
• The “xx” in “Proxx00” is a replacement character for the first two letters in the printer’s name,
i.e. “Pro4800”.
• If you have Matte black ink installed on your printer, use ICC profiles with the ending “MK”.
• If you have Photo black ink installed on your printer, use ICC profiles with the ending “PK”.
• Sometimes you may find ICC profiles with the ending “250”. Use these ICC profiles when
you use the particular media in 250 grammage.
• All profiles are intended to use with any driver resolution available.
Stylus Pro 4400 / 4800 /
Media Type: Profile Name: Profile Name:
Archival Matte Paper Proxx00 ARMP SPRxx00 Archival Matte
Double Sided Matte Paper N/A SPRxx00 D-S Matte Paper
DoubleWeight Matte Paper Proxx00 DWMP N/A
Enhanced Adhesive Synthetic Paper Proxx00 EASP N/A
Enhanced Matte Paper Proxx00 EMP SPRxx00 Enhanced Matte
Enhanced Matte Poster Board Proxx00 EMPB N/A
Enhanced Synthetic Paper Proxx00 ESP N/A
Generic EPSON Profile Proxx00 Standard N/A
Matte Paper HeavyWeight N/A SPRxx00 Matte Paper - HW
Photo Glossy Paper Proxx00 PGP N/A
Photo Paper A.K.A. Glossy Photo
Paper
Photo Quality Inkjet Paper Proxx00 PQIJP SRPxx00 Photo Qlty IJP
Photo Semigloss Paper Proxx00 PSP N/A
PremierArt Water Resistant Canvas Proxx00 Canvas N/A
Premium Glossy Photo Paper Proxx00 PGPP SPRxx00 PremiumGlossy
Premium Luster Photo Paper Proxx00 PLPP SPRxx00 PremiumLuster
Premium Semigloss Photo Paper Proxx00 PSPP SPRxx00 PremiumSemigloss
Premium Semimatte Photo Paper Proxx00 PSmPP SPRxx00 PremiumSemimatte
Proofing Paper Semimatte Paper Proxx00 PPSmC SPRxx00 ProofingSemimatte
SingleWeight Matte Paper Proxx00 SWMP N/A
Textured Fine Art Paper Proxx00 TFAP N/A
Ultrasmooth Fine Art Paper Proxx00 USFAP SPRxx00 UsmoothFine Art
Velvet Fine Art Paper Proxx00 VFAP SPRxx00 Velvet Fine Art
Water Color Paper Radiant White Proxx00 WCRW SPRxx00 WC Paper - RW
7400 / 7800 / 9400 / 9800
Proxx00 PPG N/A
Stylus Photo R1800 / R2400
Page: 1/1 http://esupport.epson-europe.com
 Loading...