

Page 1
®
Color Inkjet Printer
No part of this publication may be reproduced, stored in a retrieval system, or transmitted
in any form or by any means, electronic, mechanical, photocopying, recording, or otherwise,
without the pr ior written permission of Seik o Epson Corporation. The info rmation contained
herein is designed only for use with this Epson printer. Epson is not responsible for any use
of this information as applied to other printers.
Neither Seiko Epson Corporation nor its affiliates shall be liable to the purchaser of this
product or third parties for damages, losses, costs, or expenses incurred by the purchaser or
third parties as a result of accident, misuse, or abuse of this product or unauthorized
modifications, repairs, or alterations to this product, or (excluding the U.S.) failure to strictly
comply with Seiko Epson Corporation's operating and maintenance instructions.
Seiko Epson Corporation shall not be liable for any damages or problems arising from the
use of any options or any consumable products other than th ose designated as Original Epson
Products or Epson Approved Products by Seiko Epson Corporation.
Seiko Epson Corporation shall not be held liable for any damage resulting from
electromagnetic interference that occurs from the use of any interface cables other than those
designated as Epson Approved Products by Seiko Epson Corporation.
®
EPSON
Corporation.
is a registered trademark and EPSON STYLUS™ is a trademark of Seiko Epson
PRINT Image Matching™ and the PRINT Image Matching logo are trademarks of Seiko
Epson Corporation. Copyright © 2001 Seiko Epson Corporation. All rights reserved.
®
Microsoft
Apple
Part of the photo data stored on the Printer Software CD- ROM is licensed from Design
Exchange Co., Ltd. Copyright © 2000 Design Exchange Co., Ltd. All rights reserved.
General Notice: Other product names used herein are for identification purposes only and may be
trademarks of their respective owners. Epson disclaims any and all rights in those marks.
Copyright © 2005 Seiko Epson Corporation. All rights reserved.
and Windows® are registered trademarks of Microsoft Corporation.
®
and Macintosh® are registered trademarks of Apple Computer, Inc.
1
Page 2

Contents
Printer Parts and Control Panel Functions
Printer Parts. . . . . . . . . . . . . . . . . . . . . . . . . . . . . . . . . . . . . . . . . . . . . . 10
Control Panel . . . . . . . . . . . . . . . . . . . . . . . . . . . . . . . . . . . . . . . . . . . 12
Buttons . . . . . . . . . . . . . . . . . . . . . . . . . . . . . . . . . . . . . . . . . . . . . 12
Lights. . . . . . . . . . . . . . . . . . . . . . . . . . . . . . . . . . . . . . . . . . . . . . . 13
Safety Instructions
Important Safety Instructions. . . . . . . . . . . . . . . . . . . . . . . . . . . . . . . 14
When setting up your printer . . . . . . . . . . . . . . . . . . . . . . . . . . 14
When choosing a place for the printer. . . . . . . . . . . . . . . . . . . 16
When using the printer. . . . . . . . . . . . . . . . . . . . . . . . . . . . . . . . 16
When handling the ink cartridges . . . . . . . . . . . . . . . . . . . . . . 17
Warnings, Cautions, and Notes . . . . . . . . . . . . . . . . . . . . . . . . . . . . . 19
Chapter 1 How to Print
Introduction. . . . . . . . . . . . . . . . . . . . . . . . . . . . . . . . . . . . . . . . . . . . . . 20
Printing Photos . . . . . . . . . . . . . . . . . . . . . . . . . . . . . . . . . . . . . . . . . . . 23
Handling single sheets of paper . . . . . . . . . . . . . . . . . . . . . . . . 23
Driver settings for Windows . . . . . . . . . . . . . . . . . . . . . . . . . . . 24
Driver settings for Mac OS X. . . . . . . . . . . . . . . . . . . . . . . . . . . 25
Driver settings for Mac OS 9 . . . . . . . . . . . . . . . . . . . . . . . . . . . 27
Printing on Roll Paper . . . . . . . . . . . . . . . . . . . . . . . . . . . . . . . . . . . . . 29
Handling roll paper . . . . . . . . . . . . . . . . . . . . . . . . . . . . . . . . . . 29
Driver settings for Windows . . . . . . . . . . . . . . . . . . . . . . . . . . . 30
Driver settings for Mac OS X. . . . . . . . . . . . . . . . . . . . . . . . . . . 32
Driver settings for Mac OS 9 . . . . . . . . . . . . . . . . . . . . . . . . . . . 35
Printing on Thick Paper. . . . . . . . . . . . . . . . . . . . . . . . . . . . . . . . . . . . 38
Driver settings for Windows . . . . . . . . . . . . . . . . . . . . . . . . . . . 38
Driver settings for Mac OS X. . . . . . . . . . . . . . . . . . . . . . . . . . . 40
2
Page 3

Driver settings for Mac OS 9. . . . . . . . . . . . . . . . . . . . . . . . . . . .42
Printing Text. . . . . . . . . . . . . . . . . . . . . . . . . . . . . . . . . . . . . . . . . . . . . .43
Handling single sheets of paper. . . . . . . . . . . . . . . . . . . . . . . . .43
Driver settings for Windows. . . . . . . . . . . . . . . . . . . . . . . . . . . .44
Driver settings for Mac OS X . . . . . . . . . . . . . . . . . . . . . . . . . . .45
Driver settings for Mac OS 9. . . . . . . . . . . . . . . . . . . . . . . . . . . .47
Printing Web Pages . . . . . . . . . . . . . . . . . . . . . . . . . . . . . . . . . . . . . . . .49
Handling single sheets of paper. . . . . . . . . . . . . . . . . . . . . . . . .49
Using EPSON Web-To-Page for Windows. . . . . . . . . . . . . . . .49
Using the Printer Driver for Mac OS X . . . . . . . . . . . . . . . . . . .51
Using the Printer Driver for Mac OS 9 . . . . . . . . . . . . . . . . . . .53
Chapter 2 Various Printing Options
Introduction to Various Printing Options . . . . . . . . . . . . . . . . . . . . .56
B&W Photo Printing . . . . . . . . . . . . . . . . . . . . . . . . . . . . . . . . . . . . . . .60
Compatible media . . . . . . . . . . . . . . . . . . . . . . . . . . . . . . . . . . . .60
Driver settings for Windows. . . . . . . . . . . . . . . . . . . . . . . . . . . .61
Driver settings for Mac OS X . . . . . . . . . . . . . . . . . . . . . . . . . . .63
Driver Settings for Mac OS 9 . . . . . . . . . . . . . . . . . . . . . . . . . . .64
Borderless Printing . . . . . . . . . . . . . . . . . . . . . . . . . . . . . . . . . . . . . . . .66
Compatible media . . . . . . . . . . . . . . . . . . . . . . . . . . . . . . . . . . . .67
Preparing the print data . . . . . . . . . . . . . . . . . . . . . . . . . . . . . . .68
Printing from EPSON Easy Photo Print . . . . . . . . . . . . . . . . . .68
Printing from the printer driver. . . . . . . . . . . . . . . . . . . . . . . . .69
Double-Sided Printing . . . . . . . . . . . . . . . . . . . . . . . . . . . . . . . . . . . . .75
Standard double-sided printing for Windows. . . . . . . . . . . . .77
Standard double-sided printing for Mac OS 9. . . . . . . . . . . . .81
Folded Booklet double-sided printing for Windows . . . . . . .83
Folded Booklet double-sided printing for Mac OS 9 . . . . . . .87
Fit to Page Printing . . . . . . . . . . . . . . . . . . . . . . . . . . . . . . . . . . . . . . . .91
Driver settings for Windows. . . . . . . . . . . . . . . . . . . . . . . . . . . .91
Driver settings for Mac OS 9. . . . . . . . . . . . . . . . . . . . . . . . . . . .94
Pages Per Sheet Printing. . . . . . . . . . . . . . . . . . . . . . . . . . . . . . . . . . . .96
Driver settings for Windows. . . . . . . . . . . . . . . . . . . . . . . . . . . .96
Driver settings for Mac OS X . . . . . . . . . . . . . . . . . . . . . . . . . . .99
Driver settings for Mac OS 9. . . . . . . . . . . . . . . . . . . . . . . . . . .102
Poster Printing . . . . . . . . . . . . . . . . . . . . . . . . . . . . . . . . . . . . . . . . . . .105
3
Page 4

Driver settings for Windows . . . . . . . . . . . . . . . . . . . . . . . . . . 105
Driver settings for Mac OS 9 . . . . . . . . . . . . . . . . . . . . . . . . . . 109
How to make a poster from your printouts . . . . . . . . . . . . . 111
Watermark Printing . . . . . . . . . . . . . . . . . . . . . . . . . . . . . . . . . . . . . . 114
Printing the watermark for Windows . . . . . . . . . . . . . . . . . . 114
Printing the watermark for Mac OS 9 . . . . . . . . . . . . . . . . . . 117
Creating your own watermark for Windows . . . . . . . . . . . . 120
Creating your own watermark for Mac OS 9 . . . . . . . . . . . . 121
Chapter 3 Printer Software Settings
For Windows. . . . . . . . . . . . . . . . . . . . . . . . . . . . . . . . . . . . . . . . . . . . 124
Printer software introduction . . . . . . . . . . . . . . . . . . . . . . . . . 124
Making settings on the Main menu . . . . . . . . . . . . . . . . . . . . 125
Making settings on the Page Layout menu. . . . . . . . . . . . . . 144
Making settings on the Maintenance menu . . . . . . . . . . . . . 147
Getting information through online help . . . . . . . . . . . . . . . 154
For Mac OS X . . . . . . . . . . . . . . . . . . . . . . . . . . . . . . . . . . . . . . . . . . . 156
Printer software introduction . . . . . . . . . . . . . . . . . . . . . . . . . 156
Page Setup Dialog Box. . . . . . . . . . . . . . . . . . . . . . . . . . . . . . . . . . . . 157
Page Setup dialog box settings . . . . . . . . . . . . . . . . . . . . . . . . 157
Print Dialog Box . . . . . . . . . . . . . . . . . . . . . . . . . . . . . . . . . . . . . . . . . 159
Print dialog box settings. . . . . . . . . . . . . . . . . . . . . . . . . . . . . . 159
EPSON Printer Utility . . . . . . . . . . . . . . . . . . . . . . . . . . . . . . . . . . . . 170
Epson printer utility functions . . . . . . . . . . . . . . . . . . . . . . . . 170
For Mac OS 9 . . . . . . . . . . . . . . . . . . . . . . . . . . . . . . . . . . . . . . . . . . . . 172
Printer Software Introduction . . . . . . . . . . . . . . . . . . . . . . . . . 172
Page Setup Dialog Box . . . . . . . . . . . . . . . . . . . . . . . . . . . . . . . 173
Print Dialog Box . . . . . . . . . . . . . . . . . . . . . . . . . . . . . . . . . . . . . . . . . 176
Print Dialog Box. . . . . . . . . . . . . . . . . . . . . . . . . . . . . . . . . . . . . 176
Layout dialog box . . . . . . . . . . . . . . . . . . . . . . . . . . . . . . . . . . . 192
Printer utilities . . . . . . . . . . . . . . . . . . . . . . . . . . . . . . . . . . . . . . 193
Getting information through online help . . . . . . . . . . . . . . . 195
4
Page 5

Chapter 4 Using Your Software
Software Information . . . . . . . . . . . . . . . . . . . . . . . . . . . . . . . . . . . . .196
Overview of EPSON Creativity Suite. . . . . . . . . . . . . . . . . . . . . . . .198
EPSON File Manager . . . . . . . . . . . . . . . . . . . . . . . . . . . . . . . . . . . . .199
Starting EPSON File Manager . . . . . . . . . . . . . . . . . . . . . . . . .200
Printing Photos the Easy Way . . . . . . . . . . . . . . . . . . . . . . . . . . . . . .201
Starting EPSON Easy Photo Print . . . . . . . . . . . . . . . . . . . . . .201
Creating Professional Looking Photos. . . . . . . . . . . . . . . . . . . . . . .202
Starting EPSON Darkroom Print . . . . . . . . . . . . . . . . . . . . . . .203
Printing RAW format file images . . . . . . . . . . . . . . . . . . . . . . . . . . .203
Starting EPSON RAW Print . . . . . . . . . . . . . . . . . . . . . . . . . . .204
Attaching Images to E-mail . . . . . . . . . . . . . . . . . . . . . . . . . . . . . . . .204
Starting EPSON Attach to E-mail. . . . . . . . . . . . . . . . . . . . . . .205
Printing Web Pages to Fit to Your Paper Size. . . . . . . . . . . . . . . . .205
Accessing EPSON Web-To-Page . . . . . . . . . . . . . . . . . . . . . . .206
EPSON Easy Print Module. . . . . . . . . . . . . . . . . . . . . . . . . . . . . . . . .207
Uninstalling Creativity Suite Applications . . . . . . . . . . . . . . . . . . .207
For Windows. . . . . . . . . . . . . . . . . . . . . . . . . . . . . . . . . . . . . . . .207
For Mac OS X. . . . . . . . . . . . . . . . . . . . . . . . . . . . . . . . . . . . . . . .208
Chapter 5 Replacing Ink Cartridges
Replacing an Empty Ink Cartridge . . . . . . . . . . . . . . . . . . . . . . . . . .209
Using the printer's control panel buttons . . . . . . . . . . . . . . . .210
Using the EPSON Status Monitor . . . . . . . . . . . . . . . . . . . . . .216
Replacing an Ink Cartridge . . . . . . . . . . . . . . . . . . . . . . . . . . . . . . . .216
Using the printer’s control panel buttons . . . . . . . . . . . . . . . .218
Changing the Black Ink Cartridges to Suit the Paper Type. . . . . .222
Replacing an ink cartridge . . . . . . . . . . . . . . . . . . . . . . . . . . . .225
Setting the ink cartridge information . . . . . . . . . . . . . . . . . . .229
Checking the Ink Supply . . . . . . . . . . . . . . . . . . . . . . . . . . . . . . . . . .231
For Windows. . . . . . . . . . . . . . . . . . . . . . . . . . . . . . . . . . . . . . . .231
For Macintosh . . . . . . . . . . . . . . . . . . . . . . . . . . . . . . . . . . . . . . .233
5
Page 6

Chapter 6 Improving Print Quality
Checking the Printer Status . . . . . . . . . . . . . . . . . . . . . . . . . . . . . . . 236
For Windows . . . . . . . . . . . . . . . . . . . . . . . . . . . . . . . . . . . . . . . 236
For Mac OS X . . . . . . . . . . . . . . . . . . . . . . . . . . . . . . . . . . . . . . . 240
For Mac OS 9 . . . . . . . . . . . . . . . . . . . . . . . . . . . . . . . . . . . . . . . 242
Checking the Print Head Nozzles . . . . . . . . . . . . . . . . . . . . . . . . . . 248
Using the Nozzle Check utility . . . . . . . . . . . . . . . . . . . . . . . . 249
Using the control panel buttons . . . . . . . . . . . . . . . . . . . . . . . 251
Cleaning the Print Head . . . . . . . . . . . . . . . . . . . . . . . . . . . . . . . . . . 252
Using the Auto Nozzle Check and Cleaning utility. . . . . . . 253
Using the Head Cleaning utility . . . . . . . . . . . . . . . . . . . . . . . 258
Using the control panel buttons . . . . . . . . . . . . . . . . . . . . . . . 264
Aligning the Print Head . . . . . . . . . . . . . . . . . . . . . . . . . . . . . . . . . . 265
For Windows . . . . . . . . . . . . . . . . . . . . . . . . . . . . . . . . . . . . . . . 266
For Mac OS X . . . . . . . . . . . . . . . . . . . . . . . . . . . . . . . . . . . . . . . 266
For Mac OS 9 . . . . . . . . . . . . . . . . . . . . . . . . . . . . . . . . . . . . . . . 267
Chapter 7 Troubleshooting
Diagnosing the Problem . . . . . . . . . . . . . . . . . . . . . . . . . . . . . . . . . . 268
Error indicators . . . . . . . . . . . . . . . . . . . . . . . . . . . . . . . . . . . . . 269
EPSON Status Monitor . . . . . . . . . . . . . . . . . . . . . . . . . . . . . . . 272
Running a printer operation check. . . . . . . . . . . . . . . . . . . . . 272
Print Quality Problems . . . . . . . . . . . . . . . . . . . . . . . . . . . . . . . . . . . 274
Horizontal banding. . . . . . . . . . . . . . . . . . . . . . . . . . . . . . . . . . 274
Vertical misalignment or banding . . . . . . . . . . . . . . . . . . . . . 275
Incorrect or missing colors. . . . . . . . . . . . . . . . . . . . . . . . . . . . 276
Blurry or smeared printout . . . . . . . . . . . . . . . . . . . . . . . . . . . 277
Printout Problems Not Related to Print Quality . . . . . . . . . . . . . . 278
Incorrect or garbled characters . . . . . . . . . . . . . . . . . . . . . . . . 278
Incorrect margins. . . . . . . . . . . . . . . . . . . . . . . . . . . . . . . . . . . . 279
Inverted image. . . . . . . . . . . . . . . . . . . . . . . . . . . . . . . . . . . . . . 279
Blank pages print. . . . . . . . . . . . . . . . . . . . . . . . . . . . . . . . . . . . 279
Printout has smears. . . . . . . . . . . . . . . . . . . . . . . . . . . . . . . . . . 280
Printing is too slow . . . . . . . . . . . . . . . . . . . . . . . . . . . . . . . . . . 281
Paper Does Not Feed Correctly . . . . . . . . . . . . . . . . . . . . . . . . . . . . 282
Paper does not feed. . . . . . . . . . . . . . . . . . . . . . . . . . . . . . . . . . 282
6
Page 7

Multiple pages feed . . . . . . . . . . . . . . . . . . . . . . . . . . . . . . . . . .283
The paper jams . . . . . . . . . . . . . . . . . . . . . . . . . . . . . . . . . . . . . .283
Paper improperly loaded . . . . . . . . . . . . . . . . . . . . . . . . . . . . .285
Paper is not ejected fully or is wrinkled . . . . . . . . . . . . . . . . .285
Thick Paper is ejected when sending a thick paper print
job . . . . . . . . . . . . . . . . . . . . . . . . . . . . . . . . . . . . . . . . . . . . . . .286
Thick Paper does not eject properly after a thick paper
print job is finished . . . . . . . . . . . . . . . . . . . . . . . . . . . . . . . .286
Printer Does Not Print . . . . . . . . . . . . . . . . . . . . . . . . . . . . . . . . . . . .286
All lights are off . . . . . . . . . . . . . . . . . . . . . . . . . . . . . . . . . . . . .286
Lights came on and then went out. . . . . . . . . . . . . . . . . . . . . .287
Only the power light is on. . . . . . . . . . . . . . . . . . . . . . . . . . . . .287
The error light is flashing or on . . . . . . . . . . . . . . . . . . . . . . . .288
Error light is on and power light is flashing. . . . . . . . . . . . . .288
Print Head Carriage Problem . . . . . . . . . . . . . . . . . . . . . . . . . . . . . .289
Correcting USB Problems. . . . . . . . . . . . . . . . . . . . . . . . . . . . . . . . . .289
USB connections . . . . . . . . . . . . . . . . . . . . . . . . . . . . . . . . . . . . .289
Windows operating systems. . . . . . . . . . . . . . . . . . . . . . . . . . .290
Printer software installation . . . . . . . . . . . . . . . . . . . . . . . . . . .290
Communication Error. . . . . . . . . . . . . . . . . . . . . . . . . . . . . . . . . . . . .295
The power light does not turn on. . . . . . . . . . . . . . . . . . . . . . .295
The power light is on but nothing prints . . . . . . . . . . . . . . . .295
Canceling Printing. . . . . . . . . . . . . . . . . . . . . . . . . . . . . . . . . . . . . . . .296
Using the control panel buttons. . . . . . . . . . . . . . . . . . . . . . . .296
For Windows XP and 2000 . . . . . . . . . . . . . . . . . . . . . . . . . . . .297
For Windows Me and 98 . . . . . . . . . . . . . . . . . . . . . . . . . . . . . .297
For Macintosh . . . . . . . . . . . . . . . . . . . . . . . . . . . . . . . . . . . . . . .299
Chapter 8 Other Information
Setting Up Your Printer on a Network. . . . . . . . . . . . . . . . . . . . . . .302
For Windows XP and 2000 . . . . . . . . . . . . . . . . . . . . . . . . . . . .302
For Windows Me and 98 . . . . . . . . . . . . . . . . . . . . . . . . . . . . . .306
For Mac OS X. . . . . . . . . . . . . . . . . . . . . . . . . . . . . . . . . . . . . . . .309
For Mac OS 9 . . . . . . . . . . . . . . . . . . . . . . . . . . . . . . . . . . . . . . . .310
Increasing the Print Speed . . . . . . . . . . . . . . . . . . . . . . . . . . . . . . . . .313
General tips . . . . . . . . . . . . . . . . . . . . . . . . . . . . . . . . . . . . . . . . .313
7
Page 8

Using the Speed & Progress dialog box
(Windows only). . . . . . . . . . . . . . . . . . . . . . . . . . . . . . . . . . . 315
Updating and Uninstalling Software . . . . . . . . . . . . . . . . . . . . . . . 318
Updating the printer software in Windows Me, XP,
or 2000. . . . . . . . . . . . . . . . . . . . . . . . . . . . . . . . . . . . . . . . . . . 318
Uninstalling the printer software . . . . . . . . . . . . . . . . . . . . . . 318
Uninstalling the User's Guide . . . . . . . . . . . . . . . . . . . . . . . . . 321
Cleaning the Printer . . . . . . . . . . . . . . . . . . . . . . . . . . . . . . . . . 322
Transporting the Printer . . . . . . . . . . . . . . . . . . . . . . . . . . . . . . . . . . 324
Options and Consumable Products. . . . . . . . . . . . . . . . . . . . . . . . . 326
Consumable products. . . . . . . . . . . . . . . . . . . . . . . . . . . . . . . . 326
Exif Print and PRINT Image Matching . . . . . . . . . . . . . . . . . . . . . . 328
Effectiveness. . . . . . . . . . . . . . . . . . . . . . . . . . . . . . . . . . . . . . . . 328
How to use . . . . . . . . . . . . . . . . . . . . . . . . . . . . . . . . . . . . . . . . . 332
Printer Specifications . . . . . . . . . . . . . . . . . . . . . . . . . . . . . . . . . . . . . 333
Printing . . . . . . . . . . . . . . . . . . . . . . . . . . . . . . . . . . . . . . . . . . . . 333
Paper . . . . . . . . . . . . . . . . . . . . . . . . . . . . . . . . . . . . . . . . . . . . . . 333
Ink Cartridges . . . . . . . . . . . . . . . . . . . . . . . . . . . . . . . . . . . . . . 337
Mechanical . . . . . . . . . . . . . . . . . . . . . . . . . . . . . . . . . . . . . . . . . 339
Electrical . . . . . . . . . . . . . . . . . . . . . . . . . . . . . . . . . . . . . . . . . . . 340
Environmental . . . . . . . . . . . . . . . . . . . . . . . . . . . . . . . . . . . . . . 340
Standards and Approvals . . . . . . . . . . . . . . . . . . . . . . . . . . . . 341
System Requirements . . . . . . . . . . . . . . . . . . . . . . . . . . . . . . . . . . . . 342
For Windows . . . . . . . . . . . . . . . . . . . . . . . . . . . . . . . . . . . . . . . 342
For Macintosh . . . . . . . . . . . . . . . . . . . . . . . . . . . . . . . . . . . . . . 344
Using the User's Guide. . . . . . . . . . . . . . . . . . . . . . . . . . . . . . . 345
Paper Handling. . . . . . . . . . . . . . . . . . . . . . . . . . . . . . . . . . . . . . . . . . 346
Loading single sheets of paper . . . . . . . . . . . . . . . . . . . . . . . . 346
Loading Thick Paper. . . . . . . . . . . . . . . . . . . . . . . . . . . . . . . . . 347
Loading Single Sheets of Paper into the Rear Manual Feed
Slot . . . . . . . . . . . . . . . . . . . . . . . . . . . . . . . . . . . . . . . . . . . . . . . . . . 349
Using special media . . . . . . . . . . . . . . . . . . . . . . . . . . . . . . . . . 354
Loading capacities for Epson special media . . . . . . . . . . . . . 356
Attaching the Multi - Sheet Matte Support . . . . . . . . . . . . . . 357
Loading and removing roll paper. . . . . . . . . . . . . . . . . . . . . . 359
Driver Settings . . . . . . . . . . . . . . . . . . . . . . . . . . . . . . . . . . . . . . . . . . 366
Accessing the printer software for Windows . . . . . . . . . . . . 366
Accessing the printer software for Mac OS X . . . . . . . . . . . . 367
Accessing the printer software for Mac OS 9 . . . . . . . . . . . . 368
8
Page 9

Media type settings . . . . . . . . . . . . . . . . . . . . . . . . . . . . . . . . . .369
Making User Defined paper sizes for Windows . . . . . . . . . .372
Making User defined paper sizes for Mac OS X . . . . . . . . . .374
Making User Defined paper sizes for Mac OS 9 . . . . . . . . . .376
Appendix A Customer Support
Contacting Customer Support. . . . . . . . . . . . . . . . . . . . . . . . . . . . . .379
Technical Support Web Site . . . . . . . . . . . . . . . . . . . . . . . . . . . . . . . .380
Glossary
Index
9
Page 10

Printer Parts and Control Panel Functions
Printer Parts
paper support
extension
paper support
top printer cover
front printer
cover
edge guides
roll paper knob
rear edge guide
roll paper holder
output tray
extension
output tray
roll paper support
rear manual feed slot
USB interface
cable connector
IEEE 1394 interface cable connector
10 Printer Parts and Control Panel Functions
Page 11
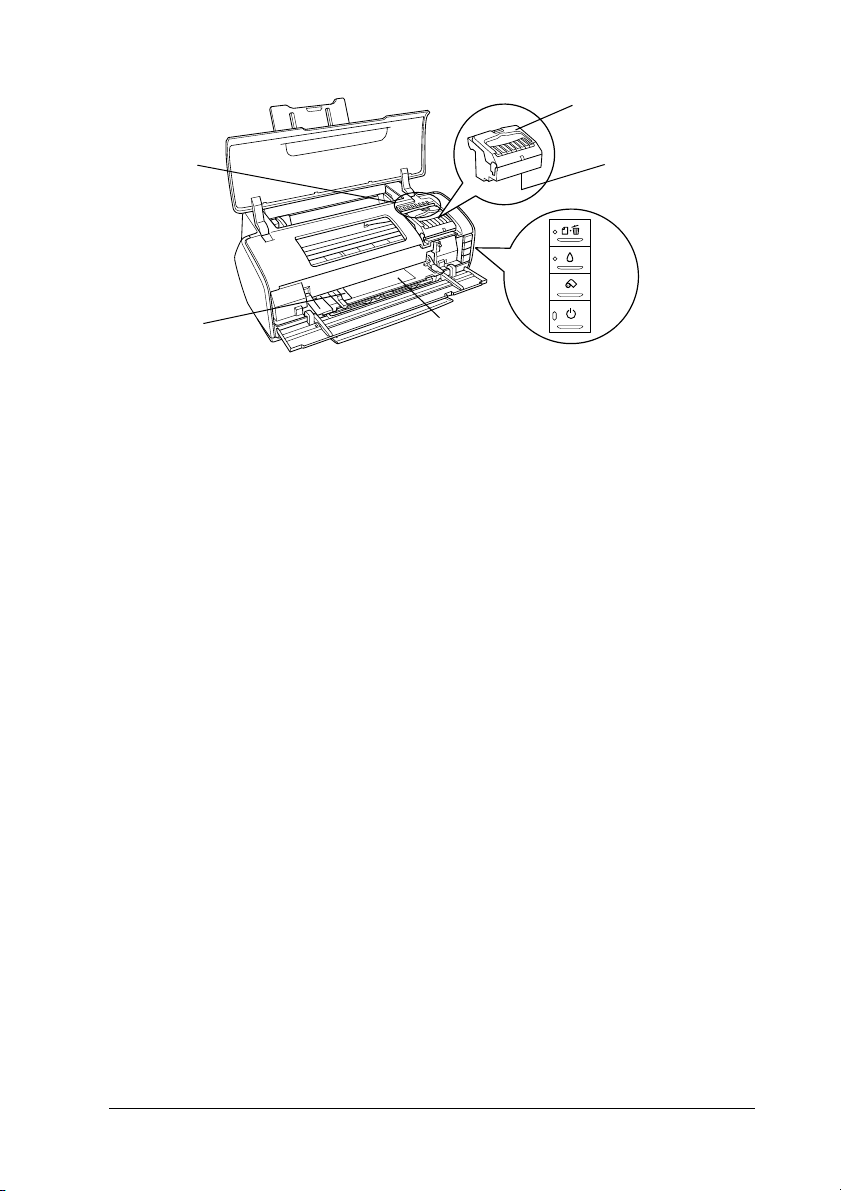
cartridge cover
ink out light
front edge guide
front manual
feed slot
print head
control panel
Printer Parts and Control Panel Functions 11
Page 12
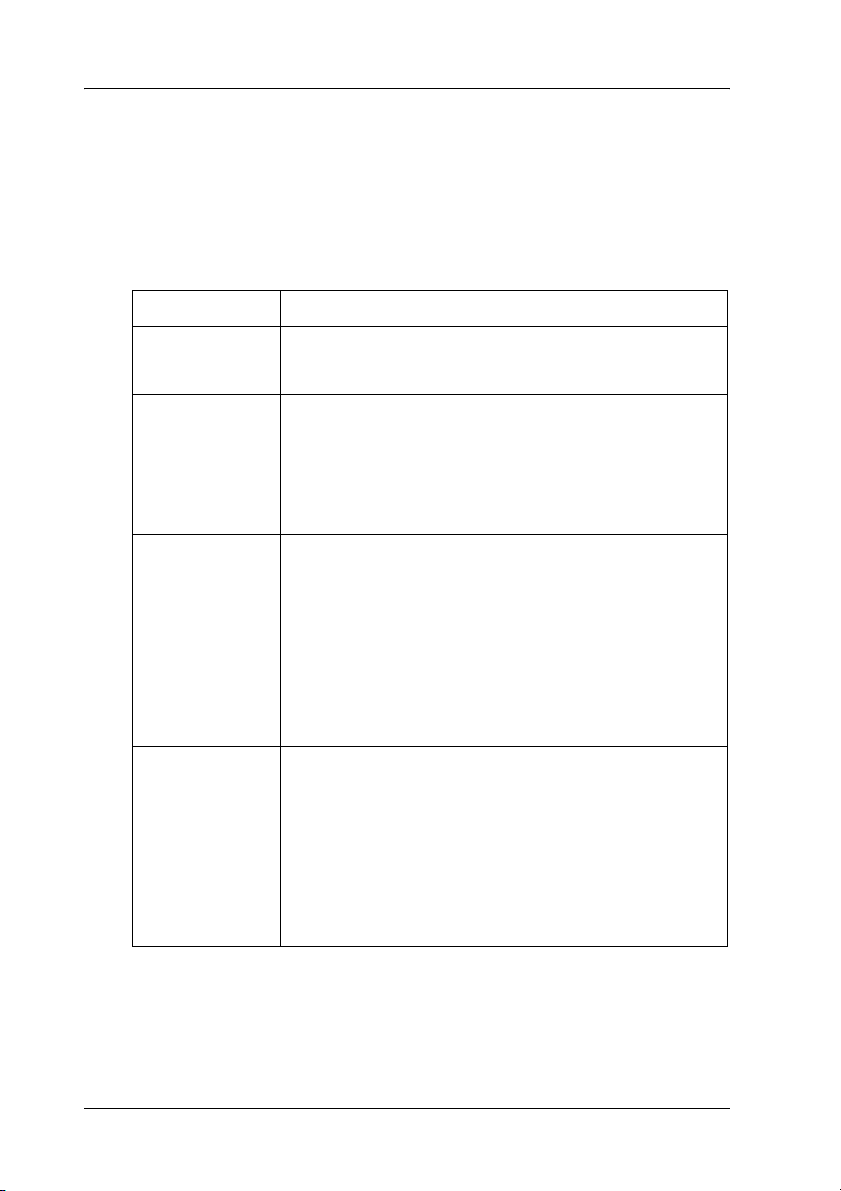
Control Panel
Buttons
Button Function
P
power
)
paper
H
ink
z
roll paper
Turns the printer on and off.
Loads or ejects paper.
Resumes printing if pressed after a paper out error or
double feed error.
Cancels the printing of a print job if pressed while
printing.
Moves the print head to the ink cartridge replacement
position.
Move the print head to the ink check position when an
empty ink cartridge is detected.
Returns the print head to its home position after ink
cartridge replacement.
Performs print head cleaning if held down for three
seconds when the H ink out light is off.
Prints a cutting guideline and feeds roll paper to a
position where it can be easily removed from the sheet
feeder if pressed after printing.
Feeds roll paper to the printing position if pressed after
cutting the paper.
Feeds roll paper in reverse to a position where it can be
easily removed from the roll paper feeder if pressed for
3 seconds.
12 Printer Parts and Control Panel Functions
Page 13
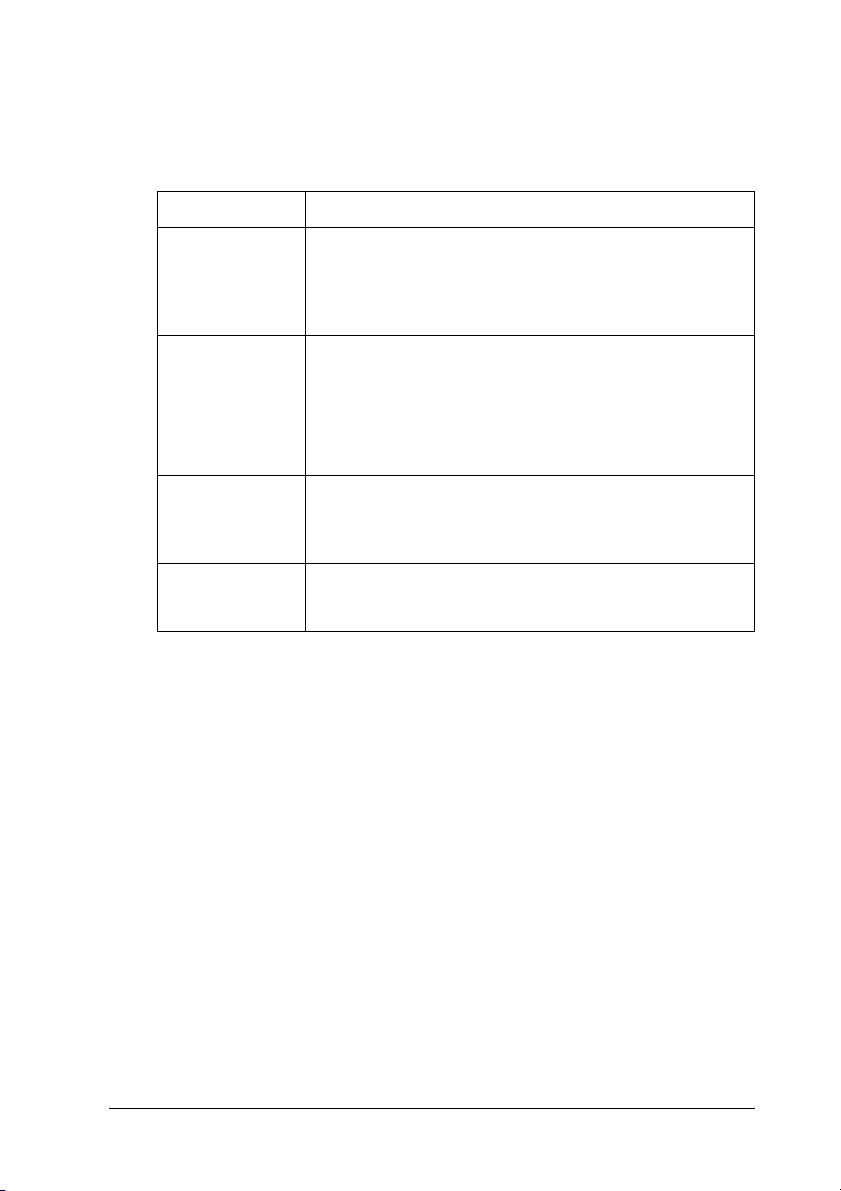
Lights
Light Description
P
power
m
paper out
H
ink error
ink out On when an ink cartridge is empty or not installed.
On when the printer is on.
Flashing when the printer is receiving data, printing,
having an ink cartridge replaced, charging ink, or
cleaning the print head.
On when the printer is out of paper.
Flashing when the paper tray is jammed, or when the
output tray is in an incorrect position.
Flashing when paper is not fed straight into the rear
manual feed slot.
On when an ink cartridge is empty or not installed.
Flashing when an ink cartridge is nearly empty, or when
the wrong color ink cartridge is installed.
Flashing when an ink cartridge is nearly empty.
Printer Parts and Control Panel Functions 13
Page 14

Safety Instructions
Important Safety Instructions
Read all of the instructions in this section before using your
printer. Also, be sure to follow all warnings and instructions
marked on the printer.
When setting up your printer
Observe the following when setting up the printer:
❏ Do not block or cover the vents and openings in the printer.
❏ Use only the type of power source indicated on the printer’s
label.
❏ Use only the power cord that comes with this product. Use of
another cord may result in fire or electric shock.
❏ This product’s power cord is for use with this product only.
Use with other equipment may result in fire or electric shock.
❏ Be sure your AC power cord meets the relevant local safety
standard.
❏ Avoid using outlets on the same circuit as photocopiers or air
control systems that regularly switch on and off.
❏ Avoid electrical outlets controlled by wall switches or
automatic timers.
14 Safety Instructions
Page 15

❏ Keep the entire computer system away from potential sources
of electromagnetic interference, such as loudspeakers or the
base units of cordless telephones.
❏ Do not use a damaged or frayed power cord.
❏ If you use an extension cord with the printer, make sure that
the total ampere rating of the devices plugged into the
extension cord does not exceed the cord’s ampere rating. Also,
make sure that the total ampere rating of all devices plugged
into the wall outlet does not exceed the wall outlet’s ampere
rating.
❏ Do not attempt to service the printer yourself.
❏ Unplug the printer and refer servicing to qualified service
personnel under the following conditions:
The power cord or plug is damaged; liquid has entered the
printer; the printer has been dropped or the casing damaged;
the printer does not operate normally or exhibits a distinct
change in performance.
❏ If you plan to use the printer in Germany, the building
installation must be protected by a10 or 16 amp circuit breaker
to provide adequate short-circuit protection and over-current
protection for this printer.
❏ When connecting this product to a computer or other device
with a cable, ensure the correct orientation of the connectors.
Each connector has only one correct orientation. Inserting a
connector in the wrong orientation may damage both devices
connected by the cable.
Safety Instructions 15
Page 16

When choosing a place for the printer
Observe the following when choosing a place for the printer:
❏ Place the printer on a flat, stable surface that extends beyond
the base of the printer in all directions. If you place the printer
by the wall, leave more than 40 cm between the back of the
printer and the wall. The printer will not operate properly if
it is tilted at an angle.
❏ When storing or transporting the printer, do not tilt it, stand
it on its side, or turn it upside down. Otherwise, ink may leak
from the cartridges.
❏ Leave enough space in front of the printer for the paper to be
fully ejected.
❏ Avoid places subject to rapid changes in temperature and
humidity. Also, keep the printer away from direct sunlight,
strong light, or heat sources.
❏ Avoid places subject to dust, shocks, or vibrations.
❏ Leave enough room around the printer to allow for sufficient
ventilation.
❏ Place the printer near a wall outlet where the plug can be
easily unplugged.
When using the printer
Observe the following when using the printer:
❏ Do not insert objects through the slots in the printer.
❏ Take care not to spill liquid on the printer.
16 Safety Instructions
Page 17

❏ Do not put your hand inside the printer or touch the ink
cartridges during printing.
❏ Do not move the print head by hand; otherwise, you may
damage the printer.
❏ Always turn the printer off using the P power button. When
this button is pressed, the P power light flashes. Do not
unplug the printer or turn off the power to the outlet until the
P power light stops flashing.
❏ Before transporting the printer, make sure that the print head
is in the home (far right) position and the ink cartridges are
in place.
❏ Leave the ink cartridges installed. Removing the cartridges
can dehydrate the print head and may prevent the printer
from printing.
When handling the ink cartridges
Observe the following when handling the ink cartridges:
❏ Keep ink cartridges out of the reach of children. Do not allow
children to drink from or otherwise handle the cartridges.
❏ Shake the new ink cartridges four or five times before opening
the packages.
❏ Do not shake the ink cartridges after opening the packages;
this can cause leakage.
❏ Be careful when you handle used ink cartridges, as there may
be some ink remaining around the ink supply port. If ink gets
on your skin, wash the area thoroughly with soap and water.
If ink gets into your eyes, flush them immediately with water.
If discomfort or vision problems remain after a thorough
flushing, see a doctor immediately.
Safety Instructions 17
Page 18

❏ Do not remove or tear the label on the cartridge; this can cause
leakage.
❏ Install the ink cartridge immediately after you remove it from
its package. If you leave a cartridge unpacked for a long time
before using it, normal printing may not be possible.
❏ Do not use an ink cartridge beyond the date printed on the
cartridge carton: otherwise, it may result in reduced print
quality. For best results, use up the ink cartridges within six
months of first installing them.
❏ Do not dismantle the ink cartridges or try to refill them. This
could damage the print head.
❏ After bringing an ink cartridge inside from a cold storage site,
allow it to warm up at room temperature for at least three
hours before using it.
❏ Store ink cartridges in a cool, dark place.
❏ Do not touch the green IC chip on the side of the cartridge.
Doing so may prevent normal operation and printing.
❏ The IC chip on this ink cartridge retains a variety of cartridge
related-information such as the amount of ink remaining, so
that the cartridge may be removed and reinserted freely.
However, each time the cartridge is inserted, some ink is
consumed because the printer automatically performs a
reliability check.
❏ If you remove an ink cartridge for later use, protect the ink
supply area from dirt and dust and store it in the same
environment as the printer. A valve in the ink supply port
makes covers or plugs unnecessary, but the ink may stain
items that come into contact with this area of the cartridge.
Do not touch the ink supply port or the surrounding area.
❏ Store ink cartridge with its label facing upward. Do not store
cartridge upside down.
18 Safety Instructions
Page 19

ENERGY STAR
®
Compliance
As an ENERGY STAR® Partner, Epson has
determined that this product meets the
®
STAR
guidelines for energy efficiency.
ENERGY
The International
a voluntary partnership with the computer and office equipment
industry to promote the introduction of energy-efficient personal
computers, monitors, printers, fax machines, copiers, scanners,
and multifunction devices in an effort to reduce air pollution
caused by power generation. Their standards and logos are
uniform among participating nations.
ENERGY STAR
®
Office Equipment Program is
Warnings, Cautions, and Notes
Warnings
must be followed carefully to avoid bodily injury.
w
Cautions
must be observed to avoid damage to your equipment.
c
Notes
contain important information and useful tips on the operation of your
printer.
Safety Instructions 19
Page 20
Chapter 1
How to Print
Introduction
This section guides you through the procedures for different
kinds of printing.
“Printing Photos” on page 23
Explains how to print color or black-and-white photos on various
sizes or kinds of single-sheet paper.
20 How to Print
Page 21
“Printing on Roll Paper” on page 29
Explains how to use the main function of the roll paper setting,
printing banners. This allows you to print panoramic photos or
continuous documents on roll paper.
“Printing on Thick Paper” on page 38
Explains how to print documents and images on thick paper.
1
1
1
1
1
1
1
1
How to Print 21
1
1
1
1
Page 22

“Printing Text” on page 43
Explains how to print documents and images on various sizes or
kinds of single-sheet paper.
“Printing Web Pages” on page 49
Explains how to print web pages on various sizes or kinds of
single-sheet paper.
22 How to Print
Page 23
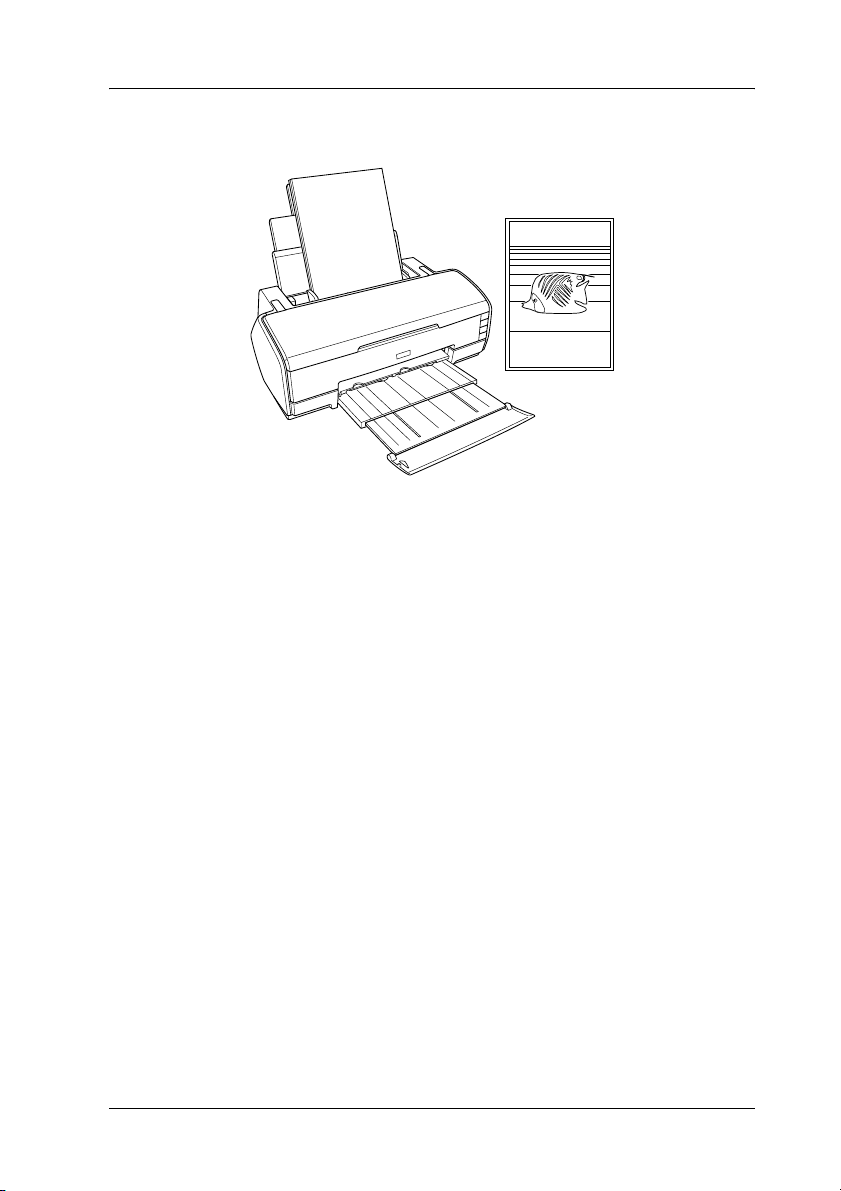
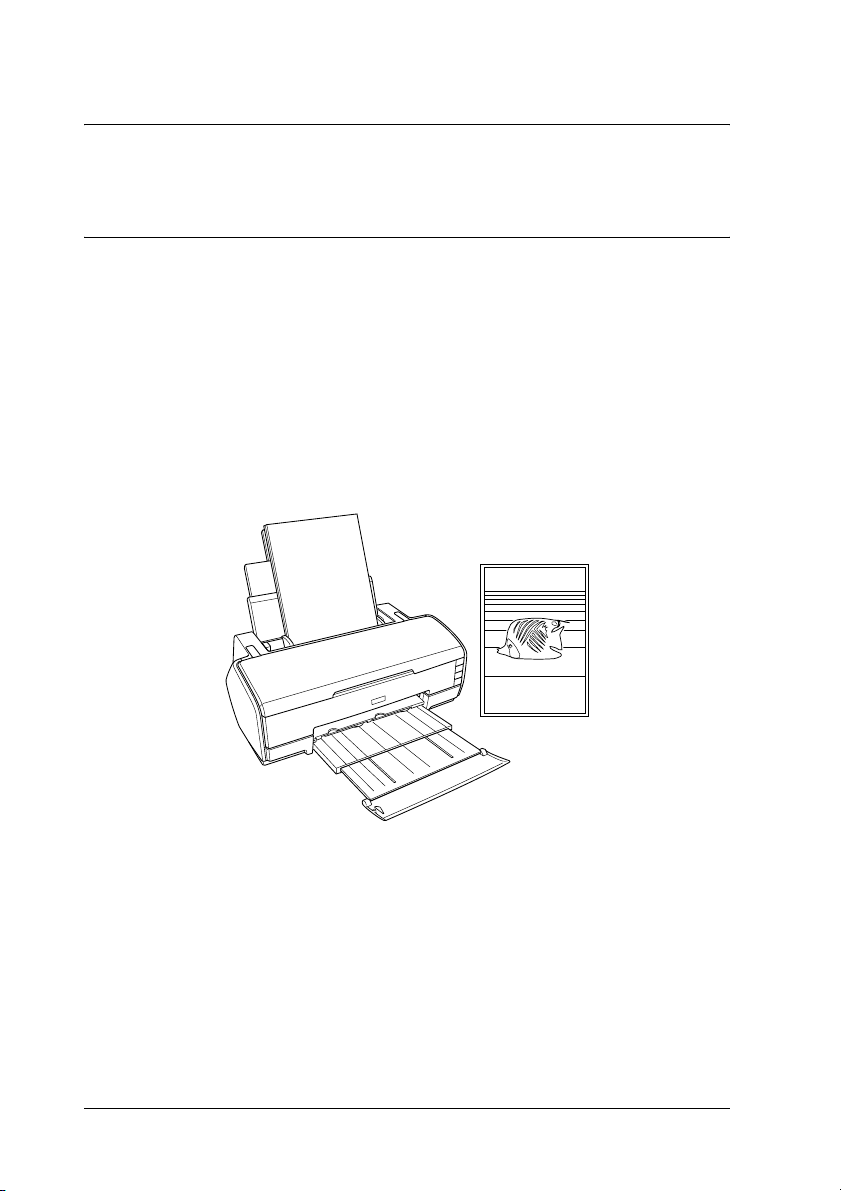
Printing Photos
1
1
1
1
1
Handling single sheets of paper
Refer to the section below for details on loading single sheets of
paper.
“Loading single sheets of paper” on page 346
Some types of special media, such as Velvet Fine Art Paper,
Watercolor Paper-Radiant White and UltraSmooth Fine Art
Paper, should be loaded into the rear manual feed slot. Refer to
the section below for details on loading single sheets of paper into
the rear manual feed slot.
“Loading Single Sheets of Paper into the Rear Manual Feed
Slot” on page 349
When using special media, refer to the section below.
“Using special media” on page 354
1
1
1
1
1
1
1
How to Print 23
Page 24

Using software such as EPSON Easy Photo Print or EPSON
Darkroom Print, which are included on the CD-ROM, is the
easiest way to make printouts on this printer. For details, see the
following section.
“EPSON Creativity Suite” on page 198
Driver settings for Windows
Note:
If you want to print high quality black-and-white photos, use Advanced
B&W Photo. For more details, see the following section.
& See “B&W Photo Printing” on page 60
1. Open the file you want to print.
2. Access the printer driver.
“Accessing the printer software for Windows” on page 366
3. Click the Main tab, then make the Quality Option setting. See
the following section for details on the Quality Option
settings.
& See “Quality Option” on page 126
4. Select Sheet as the Source setting when feeding paper into
the sheet feeder. Select Manual - Roll as the Source setting
when feeding paper into the rear manual feed slot.
5. Make the appropriate Type setting.
“Media type settings” on page 369
6. Make the appropriate Size setting. You can also define a
custom paper size. For details, see the following section.
“Making User Defined paper sizes for Windows” on page 372
24 How to Print
Page 25

7. Select Portrait (tall) or Landscape (wide) to change the
orientation of your printout.
8. Click OK to close the printer driver settings dialog box.
1
1
1
1
1
1
1
9. Print your data.
Driver settings for Mac OS X
1. Open the file you want to print.
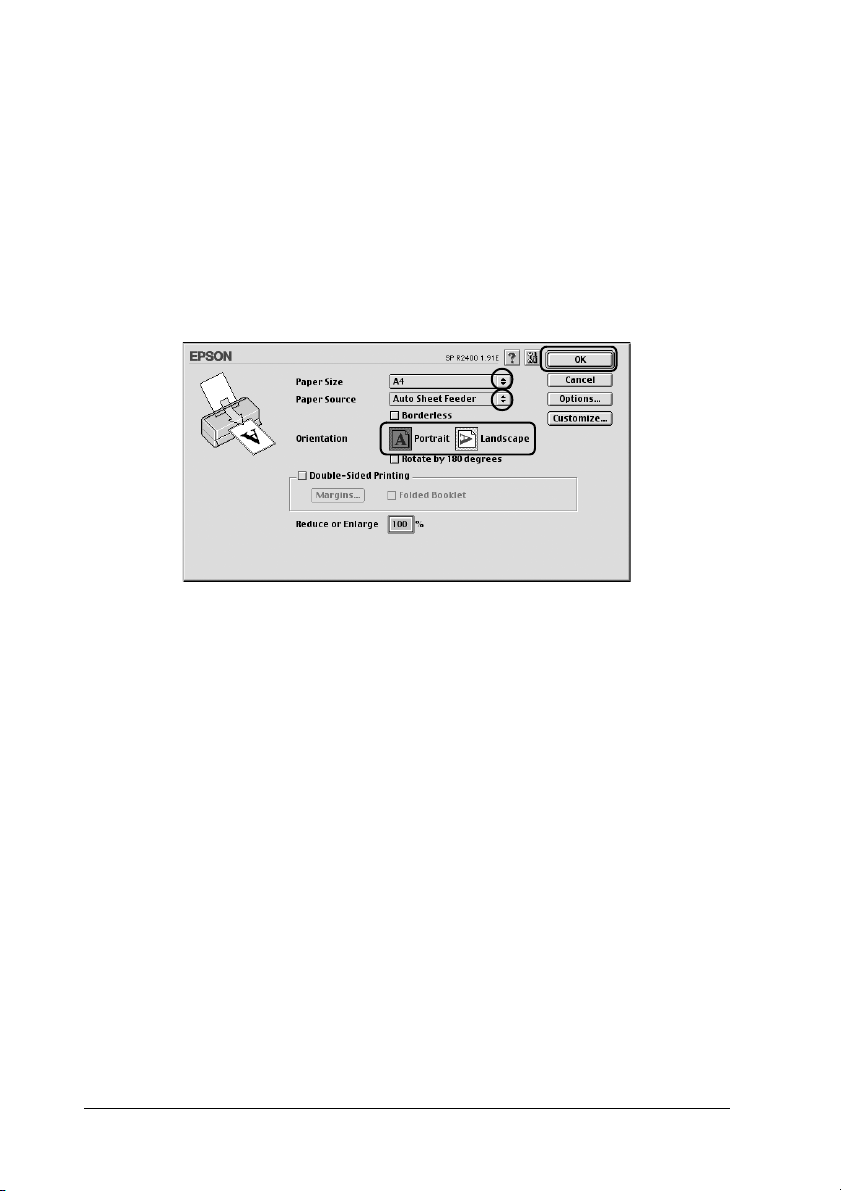
2. Access the Page Setup dialog box.
“Accessing the printer software for Mac OS X” on page 367
3. Select Stylus Photo R2400 as the Format for setting.
4. Make the appropriate Paper Size and Orientation settings.
How to Print 25
1
1
1
1
1
Page 26
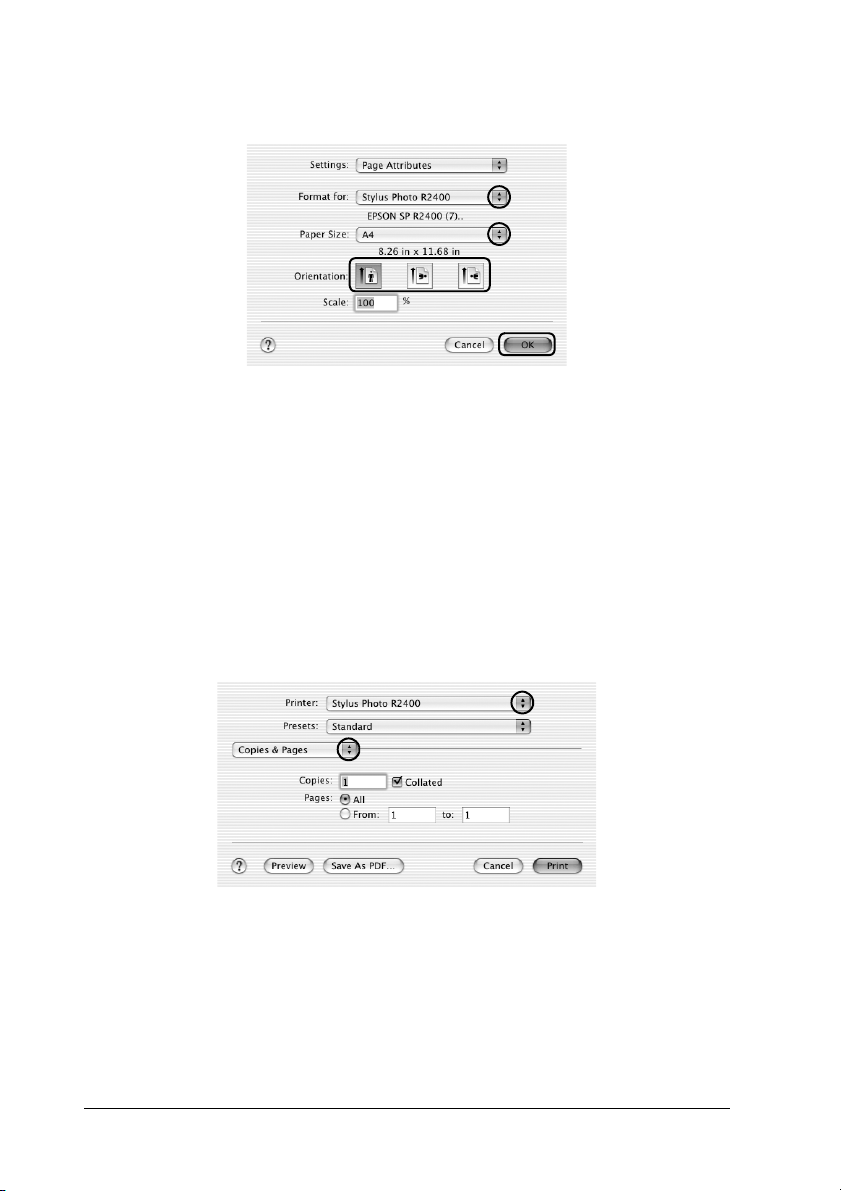
5. Click OK to close the Page Setup dialog box.
6. Access the Print dialog box.
“Accessing the printer software for Mac OS X” on page 367
7. Select Stylus Photo R2400 as the Printer setting, then make
the Copies & Pages settings.
Note:
The Copies & Pages settings available are a standard feature of Mac
OS X. See your operating system’s documentation for details.
8. Select Print Settings from the pop-up menu.
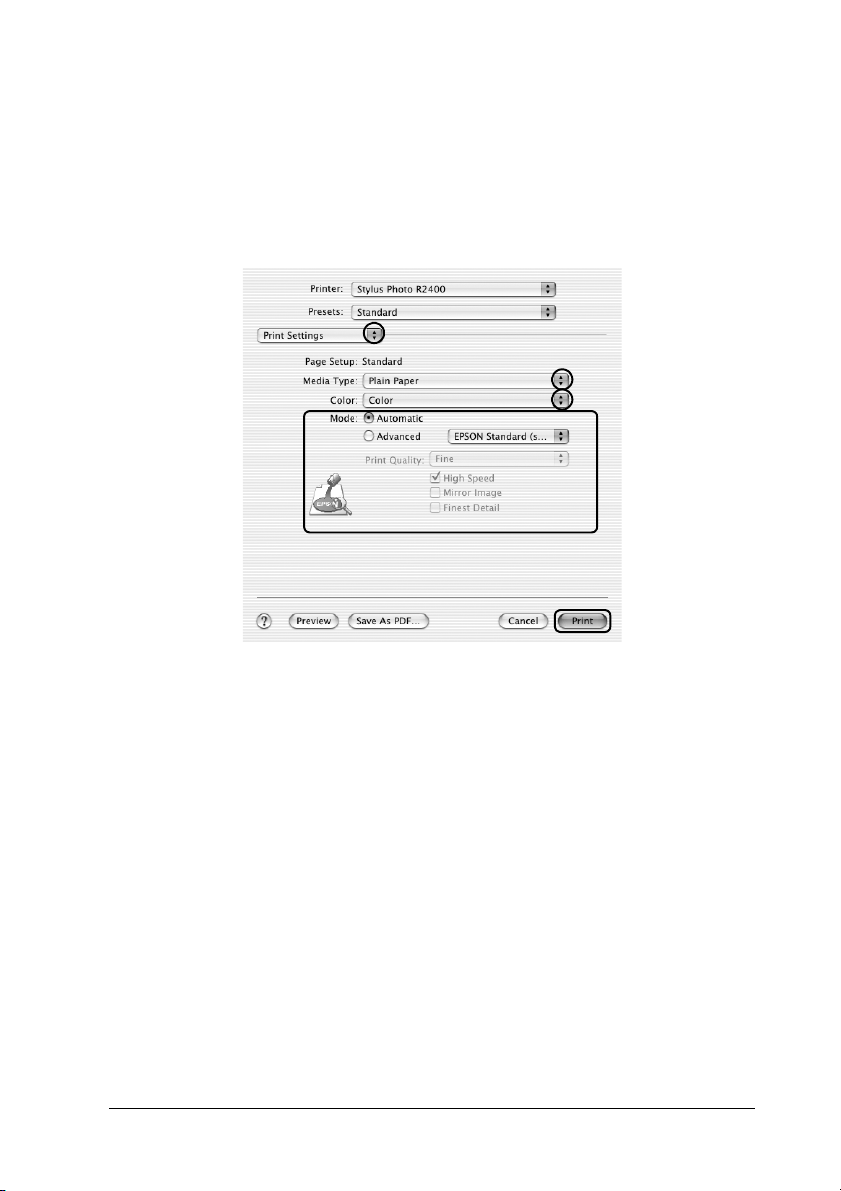
9. Make the appropriate Media Type, Color, and Mode settings.
& See “Print Settings” on page 161
“Media type settings” on page 369
26 How to Print
Page 27
Note:
If you want to print high quality black-and-white photos, use
Advanced B&W Photo. For more details, see the following section.
& See “B&W Photo Printing” on page 60
1
10. Click Print to start printing.
Driver settings for Mac OS 9
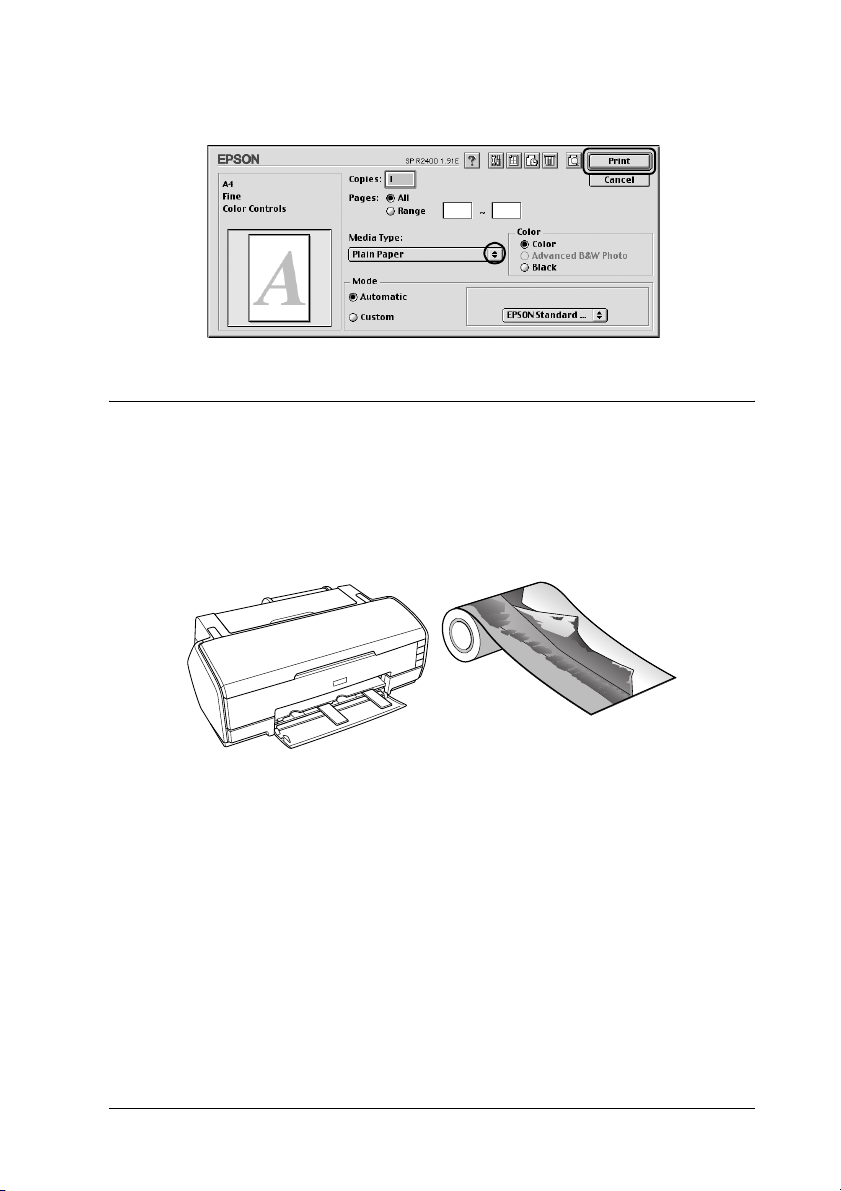
1. Open the file you want to print.
1
1
1
1
1
1
1
1
2. Access the Page Setup dialog box.
“Accessing the printer software for Mac OS 9” on page 368
3. Make the appropriate Paper Size setting. You can also define
a custom paper size. For details, see the following section.
“Making User Defined paper sizes for Mac OS 9” on page 376
How to Print 27
1
1
1
Page 28
4. Select Auto Sheet Feeder as the Paper Source when feeding
paper into the sheet feeder. Select Manual - Roll as the Paper
Source when feeding paper into the rear manual feed slot.
5. Select Portrait (tall) or Landscape (wide) to change the
orientation of your printout.
6. Click OK to save the settings and close the Page Setup dialog
box.
7. Access the Print dialog box.
“Accessing the printer software for Mac OS 9” on page 368
8. Make the appropriate Media Type setting.
“Media type settings” on page 369
Note:
If you want to print high quality black-and-white photos, use
Advanced B&W Photo. For more details, see the following section.
& See “B&W Photo Printing” on page 60
28 How to Print
Page 29
9. Click Print to start printing.
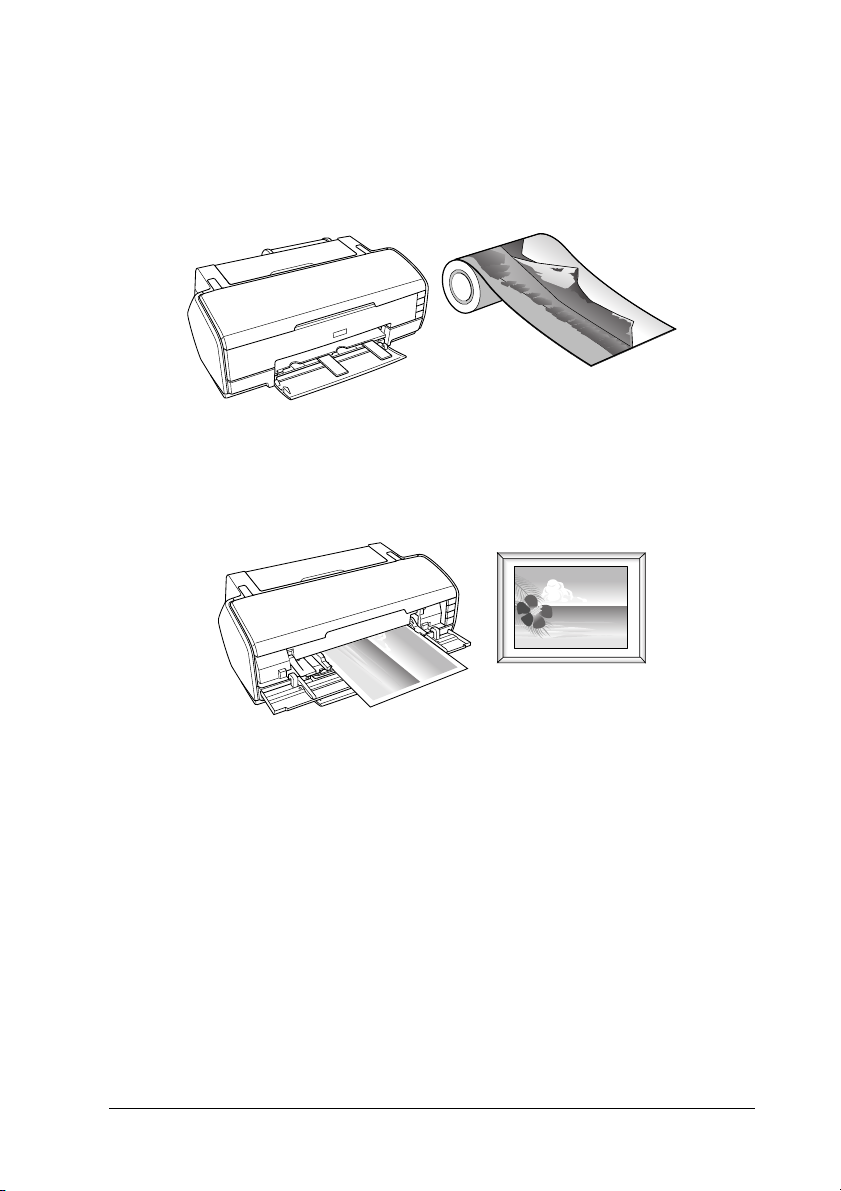
Printing on Roll Paper
Printing on roll paper allows you to perform high quality banner
printing. This means you can print panoramic photos, or a
continuous document, rather than individual pages.
1
1
1
1
1
1
1
Handling roll paper
Refer to the section below for loading roll paper.
“Loading the roll paper” on page 359
1
1
1
1
1
How to Print 29
Page 30

Driver settings for Windows
Note:
❏ You can change the margins for roll paper with the printer driver
settings. Refer to the section below to print without margins on
either side of your printout.
& See “Borderless Printing” on page 66
❏ In this section you will learn how to print a banner on roll paper
with margins on both sides of your printout.
1. Open the file you want to print.
2. Access the printer driver.
“Accessing the printer software for Windows” on page 366
3. Click the Main tab, then make the Quality Option setting. See
the following section for details on the Quality Option
settings.
& See “Quality Option” on page 126
4. Select Roll as the Source setting.
5. Make appropriate Options settings in the Roll Paper Options
dialog box.
Selecting Banner Mode means you can print data as a
banner. This allows you to print long documents as a
continuous sheet rather than as individual sheets.
Selecting Cut Sheet Mode means you can print
standard-sized data. This allows you to print documents as
individual sheets rather than as a continuous sheet.
6. Click OK to return to the Main menu.
7. Select the appropriate Type setting.
“Media type settings” on page 369
30 How to Print
Page 31

8. Select the appropriate Size setting.
9. Select Portrait (tall) or Landscape (wide) to change the
orientation of your printout.
1
1
1
1
1
1
1
1
Note:
Do not select Sheet as the Source setting when roll paper is loaded
in the rear manual feed slot. Doing so causes unnecessary paper to
feed after each document. If you have already started printing, cancel
printing from the printer software.
& See “Canceling Printing” on page 296
How to Print 31
1
1
1
1
Page 32

10. Click OK to close the driver setting dialog box.
11. Print your data.
12. Cut the roll paper.
“Cutting the roll paper” on page 364
Note:
Wait until the printer stops printing and feeding paper. Cut off the
paper at the back of the printer, and then turn off the printer. The
remaining paper is ejected.
Driver settings for Mac OS X
Note:
❏ You can change the margins for roll paper with the printer driver
settings. Refer to the section below to print without margins on
either side of your printout.
& See “Borderless Printing” on page 66
❏ In this section you will learn how to print a banner on roll paper
with margins on both sides of your printout.
1. Open the file you want to print.
2. Access the Page Setup dialog box.
“Accessing the printer software for Mac OS X” on page 367
3. Select Stylus Photo R2400 as the Format for setting.
4. Make the appropriate Paper Size setting according to the type
of roll paper printing you want to perform.
5. Make the appropriate Orientation setting.
32 How to Print
Page 33

6. Click OK to close the Page Setup dialog box.
7. Access the Print dialog box.
1
1
1
1
“Accessing the printer software for Mac OS X” on page 367
8. Select Stylus Photo R2400 as the Printer setting, then make
the Copies & Pages settings.
Note:
The Copies & Pages settings available are a standard feature of Mac
OS X. See your operating system’s documentation for details.
9. Select Print Settings from the pop-up menu.
10. Make the appropriate Media Type, Color, and Mode settings.
& See “Print Settings” on page 161
1
1
1
1
1
1
1
1
How to Print 33
Page 34

“Media type settings” on page 369
11. Select Roll Paper Option from the pop-up menu.
12. Make the appropriate Roll Paper Option setting.
13. Click Print to start printing.
34 How to Print
Page 35

Note:
This screen shot appears when A4 (roll paper) is selected as the paper
size.
14. Cut the roll paper.
“Cutting the roll paper” on page 364
1
1
Note:
Wait until the printer stops printing and feeding paper. Cut off the
paper at the back of the printer, and then turn off the printer. The
remaining paper is ejected.
Driver settings for Mac OS 9
Note:
❏ You can change the margins for roll paper with the printer driver
settings. Refer to the section below to print without margins on
either side of your printout.
& See “Borderless Printing” on page 66
❏ In this section you will learn how to print a banner on roll paper
with margins on both sides of your printout.
1. Open the file you want to print.
2. Access the Page Setup dialog box.
“Accessing the printer software for Mac OS 9” on page 368
3. Select the appropriate Paper Size setting.
1
1
1
1
1
1
1
1
4. Select Roll Paper as the Paper Source setting.
5. Select Portrait (tall) or Landscape (wide) to change the
orientation of your printout.
6. Make appropriate Roll Paper Option settings.
How to Print 35
1
1
Page 36

Selecting Banner means you can print data as a banner. This
allows you to print long documents as a continuous sheet
rather than as individual sheets.
Selecting Cut sheet means you can print standard-sized data.
This allows you to print documents as individual sheets
rather than as a continuous sheet.
7. Click OK to save your settings and close the Page Setup dialog
box.
Note:
Do not select Auto Sheet Feeder as the Paper Source setting
when roll paper is loaded in the rear manual feed slot. Doing so
causes unnecessary paper to feed after each document. If you have
already started printing, cancel printing from the printer software.
& See “Canceling Printing” on page 296
8. Access the Print dialog box.
“Accessing the printer software for Mac OS 9” on page 368
9. Select the appropriate Media Type setting.
“Media type settings” on page 369
36 How to Print
Page 37

Note:
Do not select PhotoEnhance as the Mode setting, because it may
cause gaps in your printout.
10. Click Print to start printing.
11. Cut the roll paper.
1
1
1
1
1
“Cutting the roll paper” on page 364
Note:
Wait until the printer stops printing and feeding paper. Cut off the
paper at the back of the printer, and then turn off the printer. The
remaining paper is ejected.
1
1
1
1
1
1
1
How to Print 37
Page 38

Printing on Thick Paper
You can print high quality images and documents on thick paper.
Refer to the section below for loading thick paper.
“Loading Thick Paper” on page 347
Driver settings for Windows
1. Open the file you want to print.
2. Access the printer driver.
“Accessing the printer software for Windows” on page 366
3. Click the Main tab, then make the Quality Option setting. See
the following section for details on the Quality Option
settings.
& See “Quality Option” on page 126
4. Select Manual - Front as the Source setting.
Note:
Borderless printing is not available when Manual - Front is
selected.
38 How to Print
Page 39

5. Make the appropriate Type setting.
“Media type settings” on page 369
6. Make the appropriate Size setting.
7. Select Portrait (tall) or Landscape (wide) to change the
orientation of your printout.
1
1
1
1
1
1
1
1
8. Click OK to close the driver setting dialog box.
9. Print your data.
How to Print 39
1
1
1
1
Page 40

Driver settings for Mac OS X
1. Open the file you want to print.
2. Access the Page Setup dialog box.
“Accessing the printer software for Mac OS X” on page 367
3. Select Stylus Photo R2400 as the Format for setting.
4. Make the appropriate Paper Size setting, make sure the paper
size you select is followed by Manual - Front, for example A4
(Manual - Front).
Note:
Borderless printing is not available when Manual - Front is
selected.
5. Make the appropriate Orientation setting.
6. Click OK to close the Page Setup dialog box.
7. Access the Print dialog box.
“Accessing the printer software for Mac OS X” on page 367
8. Select Stylus Photo R2400 as the Printer setting, then make
the Copies & Pages settings.
40 How to Print
Page 41

Note:
The Copies & Pages settings available are a standard feature of Mac
OS X. See your operating system’s documentation for details.
1
1
1
1
9. Select Print Settings from the pop-up menu.
10. Make the appropriate Media Type, Color, and Mode settings.
& See “Print Settings” on page 161
“Media type settings” on page 369
11. Click Print to start printing.
1
1
1
1
1
1
1
1
How to Print 41
Page 42

Driver settings for Mac OS 9
1. Open the file you want to print.
2. Access the Page Setup dialog box.
“Accessing the printer software for Mac OS 9” on page 368
3. Make the appropriate Paper Size setting.
4. Select Manual - Front as the Paper Source setting.
Note:
Borderless printing is not available when Manual - Front is
selected.
5. Select Portrait (tall) or Landscape (wide) to change the
orientation of your printout.
6. Click OK to save the settings and close the Page Setup dialog
box.
7. Access the Print dialog box.
“Accessing the printer software for Mac OS 9” on page 368
8. Select the appropriate Media Type setting.
“Media type settings” on page 369
42 How to Print
Page 43

9. Click Print to start printing.
Printing Text
1
1
1
1
1
1
1
Handling single sheets of paper
Refer to the section below for details on loading single sheets of
paper.
“Loading single sheets of paper” on page 346
When using special media, refer to the section below.
“Using special media” on page 354
How to Print 43
1
1
1
1
1
Page 44

Driver settings for Windows
1. Open the file you want to print.
2. Access the printer driver.
“Accessing the printer software for Windows” on page 366
3. Click the Main tab, then make the Quality Option setting. See
the following section for details on the Quality Option
settings.
& See “Quality Option” on page 126
4. Select Sheet as the Source setting.
5. Make the appropriate Type setting.
“Media type settings” on page 369
6. Make the appropriate Size setting. You can also define a
custom paper size. For details, see the following section.
“Making User Defined paper sizes for Windows” on page 372
44 How to Print
Page 45

7. Select Portrait (tall) or Landscape (wide) to change the
orientation of your printout.
8. Click OK to close the printer driver settings dialog box.
1
1
1
1
1
1
1
9. Print your data.
Driver settings for Mac OS X
1. Open the file you want to print.
2. Access the Page Setup dialog box.
“Accessing the printer software for Mac OS X” on page 367
3. Select Stylus Photo R2400 as the Format for setting.
4. Make the appropriate Paper Size and Orientation settings.
How to Print 45
1
1
1
1
1
Page 46

5. Click OK to close the Page Setup dialog box.
6. Access the Print dialog box.
“Accessing the printer software for Mac OS X” on page 367
7. Select Stylus Photo R2400 as the Printer setting, then make
the Copies & Pages settings.
Note:
The Copies & Pages settings available are a standard feature of Mac
OS X. See your operating system’s documentation for details.
8. Select Print Settings from the pop-up menu.
9. Make the appropriate Media Type, Color, and Mode settings.
& See Print Settings
“Media type settings” on page 369
46 How to Print
Page 47

10. Click Print to start printing.
Driver settings for Mac OS 9
1. Open the file you want to print.
1
1
1
1
1
1
1
2. Access the Page Setup dialog box.
“Accessing the printer software for Mac OS 9” on page 368
3. Make the appropriate Paper Size setting. You can also define
a custom paper size. For details, see the following section.
“Making User Defined paper sizes for Mac OS 9” on page 376
4. Select Auto Sheet Feeder as the Paper Source.
5. Select Portrait (tall) or Landscape (wide) to change the
orientation of your printout.
How to Print 47
1
1
1
1
1
Page 48

6. Click OK to save the settings and close the Page Setup dialog
box.
7. Access the Print dialog box.
“Accessing the printer software for Mac OS 9” on page 368
8. Make the appropriate Media Type setting.
“Media type settings” on page 369
9. Click Print to start printing.
48 How to Print
Page 49

Printing Web Pages
Handling single sheets of paper
1
1
1
1
1
Refer to the section below for details on loading single sheets of
paper.
“Loading single sheets of paper” on page 346
When using special media, refer to the section below.
“Using special media” on page 354
Using EPSON Web-To-Page for Windows
Using the EPSON Web-To-Page application enables you to print
web pages easily and fit the pages to print within the width of
your selected paper.
1. Open the file you want to print. If you have installed EPSON
Web-To-Page, the EPSON Web-To-Page toolbar appears on
the Internet Explorer window.
1
1
1
1
1
1
1
How to Print 49
Page 50

2. Click the Print button on the toolbar. The Print dialog box
appears.
Note:
If you want to preview the layout of your printout, click the Preview
button on the toolbar. For more information on EPSON
Web-To-Page, choose User’s Guide from the Web-To-Page
pulldown menu on the toolbar.
3. Right-click on the icon of your printer, and choose Printing
Preferences in Windows XP and 2000, or Properties in
Windows Me and 98.
4. Click the Main tab, then make the Quality Option setting. See
the following section for details on the Quality Option
settings.
“Quality Option” on page 126
5. Select Sheet as the Source setting.
6. Make the appropriate Type setting.
“Media type settings” on page 369
7. Make the appropriate Size setting. You can also define a
custom paper size. For details, see the following section.
“Making User Defined paper sizes for Windows” on page 372
50 How to Print
Page 51

8. Select Portrait (tall) or Landscape (wide) to change the
orientation of your printout.
9. Click OK to close the printer driver settings dialog box.
1
1
1
1
1
1
1
10. Print your data.
Using the Printer Driver for Mac OS X
Note:
EPSON Web-To-Page is an application only available to Windows
users. Macintosh users can print web pages using the printer driver in
Mac OS X.
1. Open the file you want to print.
2. Access the Page Setup dialog box.
“Accessing the printer software for Mac OS X” on page 367
How to Print 51
1
1
1
1
1
Page 52

3. Select Stylus Photo R2400 as the Format for setting.
4. Make the appropriate Paper Size and Orientation settings.
5. Click OK to close the Page Setup dialog box.
6. Access the Print dialog box.
“Accessing the printer software for Mac OS X” on page 367
7. Select Stylus Photo R2400 as the Printer setting, then make
the Copies & Pages settings.
Note:
The Copies & Pages settings available are a standard feature of Mac
OS X. See your operating system’s documentation for details.
52 How to Print
Page 53

8. Select Print Settings from the pop-up menu.
9. Make the appropriate Media Type, Color, and Mode settings.
“Print Settings” on page 161
“Media type settings” on page 369
10. Click Print to start printing.
1
1
1
1
1
1
1
1
Using the Printer Driver for Mac OS 9
Note:
EPSON Web-To-Page is an application only available to Windows
users. Macintosh users can print web pages using the printer driver in
Mac OS 9.
1. Open the file you want to print.
2. Access the Page Setup dialog box.
“Accessing the printer software for Mac OS 9” on page 368
How to Print 53
1
1
1
1
Page 54

3. Make the appropriate Paper Size setting. You can also define
a custom paper size. For details, see the following section.
“Making User Defined paper sizes for Mac OS 9” on page 376
4. Select Auto Sheet Feeder as the Paper Source.
5. Select Portrait (tall) or Landscape (wide) to change the
orientation of your printout.
6. Click OK to save the settings and close the Page Setup dialog
box.
7. Access the Print dialog box.
“Accessing the printer software for Mac OS 9” on page 368
8. Make the appropriate Media Type setting.
“Media type settings” on page 369
54 How to Print
Page 55

9. Click Print to start printing.
1
1
1
1
1
1
1
How to Print 55
1
1
1
1
1
Page 56

Chapter 2
Various Printing Options
Introduction to Various Printing Options
This printer provides you with a variety of different printing
options. You can print in various formats, and you can print using
many different types of paper.
The sections that follow the introduction explain procedures for
each type of printing. Click the title of each printing option to see
more details.
“B&W Photo Printing” on page 60
Lets you print black-and-white photos using the Advanced B&W
Photo mode.
56 Various Printing Options
Page 57

“Borderless Printing” on page 66
Lets you print without margins on all four sides of the paper.
“Double-Sided Printing” on page 75
Lets you print on both sides of the paper.
Note:
This feature is not available with Mac OS X.
2
2
2
2
2
2
2
2
“Fit to Page Printing” on page 91
Lets you automatically enlarge or reduce the size of your
document to fit the paper size selected in the printer software.
Various Printing Options 57
2
2
2
2
Page 58

Note:
This feature is not available with Mac OS X.
“Pages Per Sheet Printing” on page 96
Lets you print two or four pages on a single sheet of paper.
“Poster Printing” on page 105
Lets you enlarge material on a single document page to cover 4,
9, or 16 printed sheets of paper, and then make a poster.
58 Various Printing Options
Page 59

Note:
This feature is not available with Mac OS X.
2
2
2
2
2
“Watermark Printing” on page 114
Lets you print text or an image as a watermark on your printout.
Note:
This feature is not available with Mac OS X.
For example, you can put “Confidential” on an important
document.
2
2
2
2
2
2
2
Various Printing Options 59
Page 60

B&W Photo Printing
Advanced B&W Photo mode allows you to print high quality
black-and-white photos.
Compatible media
You can use the following media with this feature.
Premium Glossy Photo Paper A3+, A3, A4, 10 × 15 cm (4 × 6 in),
Premium Luster Photo Paper A3+, A3, 210 mm × 10 m,
Premium Semigloss Photo
Paper
Matte Paper-Heavyweight A3+, A3, A4
Watercolor Paper-Radiant
White
Archival Matte Paper A3+, A3, A4
Double-Sided Matte Paper A4
Velvet Fine Art Paper A3+
UltraSmooth Fine Art Paper A3+
60 Various Printing Options
210 mm × 10 m, 329 mm × 10 m
(Roll paper)
329 mm × 10 m (Roll paper)
A3+, A3, A4, 100 mm × 8 m,
210 mm × 10 m,
329 mm × 10 m (Roll paper)
A3+
Page 61

Driver settings for Windows
1. Open the file you want to print.
2. Access the printer driver. For details, see the following
section.
“Accessing the printer software for Windows” on page 366
3. Click the Main tab, and then click Advanced.
4. Select Sheet as the Source setting when feeding paper into
the sheet feeder. Select Manual - Roll as the source setting
when feeding paper into the rear manual feed slot.
5. Make the appropriate Type setting. For details, see the
following section.
“Media type settings” on page 369
Note:
Advanced B&W Photo is available depending on the ink cartridge
installed (Photo Black or Matte Black), the media type setting, and
the print quality setting. For most media types, select Best Photo
or Photo RPM as the print quality setting.
2
2
2
2
2
2
2
2
6. Make the appropriate Size setting. You can also define a
custom paper size. For details, see the following section.
“Making User Defined paper sizes for Windows” on page 372
7. Select Portrait (tall) or Landscape (wide) to change the
orientation of your printout.
Various Printing Options 61
2
2
2
2
Page 62

8. Select Advanced B&W Photo as the Color Management
setting. This makes the Color Toning drop-down menu
available. Select one of the following settings.
Neutral Applies standard color correction for
black-and-white photos.
Cool Applies a cool tone to your photos.
Warm Applies a warm tone to your photos.
Sepia Applies a sepia tone to your photos.
For details on making advanced settings in this mode, see the
following section.
“Advanced B&W Photo” on page 136
9. Click OK to close the printer driver settings dialog box.
10. Print your data.
62 Various Printing Options
Page 63

Driver settings for Mac OS X
1. Open the file you want to print.
2. Access the Page Setup dialog box. For details, see the
following section.
“Accessing the printer software for Mac OS X” on page 367
3. Select Stylus Photo R2400 as the Format for setting.
4. Make the appropriate Paper Size and Orientation settings.
5. Click OK to close the Page Setup dialog box.
6. Access the Print dialog box.
“Accessing the printer software for Mac OS X” on page 367
7. Select Stylus Photo R2400 as the Printer setting.
8. Select Print Settings from the pop-up menu.
9. Make the appropriate Media Type and Print Quality settings,
and then select Advanced B&W Photo as the Color setting.
2
2
2
2
2
2
2
2
Note:
Advanced B&W Photo is available depending on the ink cartridge
installed (Photo Black or Matte Black), the media type setting, and
the print quality setting. For most media types, select Best Photo
or Photo RPM as the print quality setting.
10. From the Color Toning pop-up menu, select one of the
following settings.
Neutral Applies standard color correction for
black-and-white photos.
Cool Applies a cool tone to your photos.
Various Printing Options 63
2
2
2
2
Page 64

Warm Applies a warm tone to your photos.
Sepia Applies a sepia tone to your photos.
For details on making advanced settings in this mode, see the
following section.
“When Advanced B&W Photo is selected as the Color setting
in Print Settings” on page 164
11. Click Print.
Driver Settings for Mac OS 9
1. Open the file you want to print.
2. Access the Page Setup dialog box. For details, see the
following section.
“Accessing the printer software for Mac OS 9” on page 368
64 Various Printing Options
Page 65

3. Make the appropriate Paper Size setting. You can also define
a custom paper size. For details, see the following section.
“Making User Defined paper sizes for Mac OS 9” on page 376
2
4. Select Auto Sheet Feeder as the Paper Source when feeding
paper into the sheet feeder. Select Manual - Roll as the Paper
Source when feeding paper into the rear manual feed slot.
5. Select Portrait (tall) or Landscape (wide) to change the
orientation of your printout.
6. Click OK to save your settings and close the Page Setup dialog
box.
7. Access the Print dialog box.
“Accessing the printer software for Mac OS 9” on page 368
8. Make the appropriate Media Type setting.
Note:
Advanced B&W Photo is available depending on the ink cartridge
installed (Photo Black or Matte Black), the media type setting, and
the print quality setting. For most media types, select Best Photo
or Photo RPM as the print quality setting.
9. Select Advanced B&W Photo as the Color setting.
2
2
2
2
2
2
2
2
10. Select Automatic as the Mode setting, and then select one of
the following settings from the pop-up menu.
Neutral Applies standard color correction for
black-and-white photos.
Cool Applies a cool tone to your photos.
Warm Applies a warm tone to your photos.
Sepia Applies a sepia tone to your photos.
Various Printing Options 65
2
2
2
Page 66

If you select Custom as the Mode setting, the Advanced
button is available. For more details on advanced settings, see
the following section.
“Advanced B&W Photo:” on page 183
11. Click Print to start printing.
Borderless Printing
This printer allows you to print without margins on all four sides
of the paper. Follow the steps described below for Borderless
printing.
Note:
This feature is not available for all media and driver settings.
66 Various Printing Options
Page 67

Compatible media
You can use the following media with this feature:
Matte Paper - Heavyweight A3+, A3, A4
Archival Matte Paper A3+, A3, A4
Premium Glossy Photo Paper A3+, A3, A4, 10 × 15 cm (4 × 6
Premium Luster Photo Paper A3+, A3, 210 mm × 10 m,
Premium Semigloss Photo
Paper
Watercolor Paper-Radiant
White
UltraSmooth Fine Art Paper A3+
Velvet Fine Art Paper A3+
Proofing Paper Semimatte A3+, 329 mm × 10 m (Roll paper)
Note:
❏ Printing with this feature takes longer than with normal printing.
in.), 329 mm × 10 m,
210 mm × 10 m (Roll paper)
329 mm × 10m (Roll paper)
A3+, A3, A4, 329 mm × 10 m,
210 mm × 10 m,
100 mm × 8 m (Roll paper)
A3+
2
2
2
2
2
2
2
2
❏ Print quality may decline in the top and bottom areas of the printout,
or the area may be smeared when printing on media other than those
listed above. Print a single sheet to check the quality before printing
large jobs.
❏ Borderless printing is not available when Manual - Front is
selected as the Source setting.
Various Printing Options 67
2
2
2
2
Page 68

Preparing the print data
Because this option enlarges the image to a size slightly larger
than the paper size, the portion of the image that extends beyond
the edges of the paper is not printed.
When creating print data in an application, note the following:
Printing on roll paper
When using this feature with roll paper and Banner Mode is
selected in the Roll Paper Options dialog box (Windows) or
Banner is selected as the Roll Paper Option setting in the Page
Setup dialog box (Mac OS X), you need to use your image-editing
software to make the Image 4mm wider than the roll paper.
If your application has margin settings, make sure they are set to
zero before printing.
Printing on single sheets
You need to adjust the data to the size of the paper. If your
application has margin settings, make sure they are set to zero
before printing.
Printing from EPSON Easy Photo Print
Using EPSON Easy Photo Print included on the CD-ROM is the
easiest and quickest way to create borderless photos with this
product. EPSON Easy Photo Print also includes a number of
features that help you create outstanding photos.
Note:
EPSON Easy Photo Print does not support Mac OS 9.
68 Various Printing Options
Page 69

For Windows
1. Access EPSON Easy Photo Print.
For Windows XP, click the Start button, point to All Programs,
point to EPSON Creativity Suite, then choose EPSON Easy
Photo Print.
For Windows Me, 98, and 2000, click the Start button, point
to Programs, point to EPSON Creativity Suite, then choose
EPSON Easy Photo Print.
2. Print images from EPSON Easy Photo Print.
To learn how to print your photos, click the Help button to view
instructions in the EPSON Easy Photo Print User's Guide.
For Mac OS X
1. Double-click the Applications folder in Macintosh HD,
EPSON folder, then Creativity Suite. Double-click the Easy
Photo Print folder, then the EPSON Easy Photo Print icon.
2. Print images from EPSON Easy Photo Print.
To learn how to print your photos, choose User's Guide from Help
menu to view instructions in the EPSON Easy Photo Print User's
Guide.
2
2
2
2
2
2
2
2
Printing from the printer driver
Driver settings for Windows
After you have loaded the media, change your printer driver
settings for Borderless printing.
1. Access the printer driver.
“Accessing the printer software for Windows” on page 366
Various Printing Options 69
2
2
2
2
Page 70

2. Click the Main tab, then make the Quality Option setting. See
the following section for details on the Quality Option
settings.
& See “Quality Option” on page 126
3. Select the Borderless check box.
4. Make the appropriate Type setting.
“Media type settings” on page 369
5. Make the appropriate Size setting.
6. Click OK to close the printer driver settings dialog box.
After finishing all steps above, start printing. Print one test copy
and examine the results before printing an entire job.
70 Various Printing Options
Page 71

Note:
You can control the amount of the image that extends beyond the edges
of the paper during borderless printing. When the Borderless check box
is selected on the Main menu, the Borderless Expansion slider
becomes available on the Page Layout menu.
Driver settings for Mac OS X
2
2
After you have loaded the media, change your printer driver
settings for Borderless printing.
1. Access the Page Setup dialog box.
“Accessing the printer software for Mac OS X” on page 367
2. Select Stylus Photo R2400 as the Format for setting.
3. Make the appropriate Paper Size setting according to the type
of borderless printing you want to perform.
4. Make the appropriate Orientation setting.
5. Click OK to close the Page Setup dialog box.
2
2
2
2
2
2
2
2
6. Access the Print dialog box.
“Accessing the printer software for Mac OS X” on page 367
Various Printing Options 71
2
2
Page 72

7. Select Stylus Photo R2400 as the Print setting, then make the
Copies & Pages settings.
Note:
The Copies & Pages settings available are a standard feature of Mac
OS X. See your operating system’s documentation for details.
8. Select Print Settings from the pop-up menu.
9. Make the appropriate Media Type, Color, and Mode settings.
& See “Print Settings” on page 161
“Media type settings” on page 369
72 Various Printing Options
Page 73

10. Click Print to start printing.
Note:
❏ Print one test copy and examine the results before printing an entire
job.
❏ You can control the amount of the image that extends beyond the
edges of the paper during borderless printing.
& See “Expansion” on page 168
2
2
2
2
2
2
2
2
Driver settings for Mac OS 9
After you have loaded the media, change your printer driver
settings for Borderless printing.
1. Access the Page Setup dialog box.
“Accessing the printer software for Mac OS 9” on page 368
2. Make the appropriate Paper Size setting.
3. Select the Borderless check box.
Various Printing Options 73
2
2
2
2
Page 74

4. Click OK to save the settings and close the Page Setup dialog
box.
5. Access the Print dialog box.
“Accessing the printer software for Mac OS 9” on page 368
6. Make the appropriate Media Type setting.
“Media type settings” on page 369
7. Click Print to start printing.
Note:
❏ Print one test copy and examine the results before printing an entire
job.
74 Various Printing Options
Page 75

❏ You can control the amount of the image that extends beyond the
edges of the paper during borderless printing. When the Borderless
check box is selected on the Page Setup dialog box, the Borderless
Expansion slider becomes available.
Double-Sided Printing
There are two types of double-sided printing available. Standard
double-sided printing allows you to print the odd-numbered
pages first. Once these pages are printed, they can be reloaded to
print the even-numbered pages onto the opposite side of the
paper.
2
2
2
2
2
2
2
Folded Booklet double-sided printing allows you to make
single-fold booklets. To create it, the pages that appear on the
outside (after the page is folded) are printed first. The pages that
will appear inside the booklet can then be printed after the paper
is reloaded into the printer as shown in the illustration below.
Various Printing Options 75
2
2
2
2
2
Page 76

✽
1
Single-fold booklet
✽: Binding edge
24
35 9
678101112
A booklet can be created by printing pages 1 and 4 on the first
sheet of paper, pages 5 and 8 on the second sheet of paper, and
pages 9 and 12 on the third sheet of paper. After these sheets are
reloaded into the sheet feeder, you can then print pages 2 and 3
on the back of the first sheet of paper, pages 6 and 7 on the back
of the second sheet of paper, and pages 10 and 11 on the back of
the third sheet of paper. The resulting pages can then be folded
and bound together into a booklet.
Note:
❏ This feature is not available with Mac OS X.
❏ This feature is not available when selecting the Borderless check
box on the Main menu (Windows) or in the Page Setup dialog box
(Macintosh).
❏ This feature is not available when the printer is accessed over a
network or is used as a shared printer.
76 Various Printing Options
Page 77

❏ Depending on the media type, stacks of up to 30 sheets can be loaded
into the sheet feeder during double-sided printing.
❏ Only use media types that are suitable for double-sided printing.
Otherwise, the printout quality may deteriorate.
❏ Depending on the media type and the amount of ink used to print
text and images, ink may bleed through to the other side of the paper.
❏ The surface of the paper may be smeared during double-sided
printing.
Standard double-sided printing for Windows
2
2
2
2
Follow the steps below to print odd- and even-numbered pages
onto opposite sides of the sheet.
1. Access the printer driver.
“Accessing the printer software for Windows” on page 366
2. Click the Main tab, then make the Quality Option setting. See
the following section for details on the Quality Option
settings.
& See “Quality Option” on page 126
3. Select Sheet as the Source setting.
4. Make the appropriate Type setting.
“Media type settings” on page 369
5. Make the appropriate Size setting.
2
2
2
2
2
2
2
2
Various Printing Options 77
Page 78

6. Select Portrait (tall) or Landscape (wide) to change the
orientation of your printout.
7. Click the Page Layout tab, then select the Double-Sided
Printing check box.
78 Various Printing Options
Page 79

8. Click Margins to open the Margins dialog box.
2
2
2
2
2
2
9. Specify the edge of the paper where the binding will be
placed. You can choose Left, Top, or Right.
10. Choose cm or inch as the Unit setting. Then, specify the width
of the binding margin. You can enter any width from 0.3 cm
to 3.0 cm, or from 0.12 inches to 1.18 inches.
Various Printing Options 79
2
2
2
2
2
2
Page 80

Note:
The actual binding margin may be different from the specified
settings depending on your application. Experiment with a few
sheets to examine actual results before printing the entire job.
11. Click OK to return to the Page Layout menu. Then, click OK
to save your settings.
12. Load paper into the sheet feeder, then send the print job from
your application. Instructions for generating the
even-numbered pages will be displayed while the
odd-numbered pages are printed.
“Loading single sheets of paper” on page 346
13. Follow the on-screen instructions to reload the paper.
Note:
❏ The paper may curl during printing due to the amount of ink
used. Should this occur, slightly curl the sheets in the opposite
direction before reloading them into the printer.
❏ Align the sheet stack by tapping its edges against a hard, flat
surface before reloading the stack into the printer.
❏ Follow the instructions provided when reloading the printouts.
Paper jams or improperly placed binding margins may occur if
the printouts are not reloaded correctly.
80 Various Printing Options
Page 81

❏ If a paper jam occurs, refer to the following.
& See “The paper jams” on page 283
14. Once the paper is reloaded, click Resume to print the
even-numbered pages.
Standard double-sided printing for Mac OS 9
Follow the steps below to print odd- and even-numbered pages
onto opposite sides of the sheet.
1. Access the Page Setup dialog box.
2
2
2
2
“Accessing the printer software for Mac OS 9” on page 368
2. Make the appropriate Paper Size setting.
3. Select Auto Sheet Feeder as the Paper Source.
4. Select Portrait (tall) or Landscape (wide) to change the
orientation of your printout.
5. Select the Double-Sided Printing check box.
6. Click Margins.
2
2
2
2
2
2
2
2
Various Printing Options 81
Page 82

7. Specify the edge of the paper where the binding will be
placed. You can choose Left, Top, or Right.
8. Specify the width of the binding margin in the text box. You
can enter any width from 0.12 inch to 1.18 inch or from 0.3 cm
to 3.0 cm.
Note:
The actual binding margin may be different from the specified
settings depending on your application. Experiment with a few
sheets to examine actual results before printing the entire job.
9. Click OK to return to the Page Setup dialog box. Then, click
OK to save your settings and close the dialog box.
10. Access the Print dialog box.
“Accessing the printer software for Mac OS 9” on page 368
11. Make the appropriate Media Type setting.
“Media type settings” on page 369
12. Load paper into the sheet feeder, then click Print to start
printing. Instructions for generating the even-numbered
pages will be displayed while the odd-numbered pages are
printed.
82 Various Printing Options
Page 83

“Loading single sheets of paper” on page 346
2
2
2
13. Follow the on-screen instructions to reload the paper.
Note:
❏ The paper may curl during printing due to the amount of ink
used. Should this occur, slightly curl the sheets in the opposite
direction before reloading them into the printer.
❏ Align the sheet stack by tapping its edges against a hard, flat
surface before reloading the stack into the printer.
❏ Follow the instructions provided when reloading the printouts.
Paper jams or improperly placed binding margins may occur if
the printouts are not reloaded correctly.
❏ If a paper jam occurs, refer to the following.
& See “The paper jams” on page 283
14. Once the paper is reloaded, click Resume to print the
even-numbered pages.
Folded Booklet double-sided printing for Windows
2
2
2
2
2
2
2
2
Use the following steps to create a folded booklet as described in
the beginning of this section.
Various Printing Options 83
2
Page 84

1. Access the printer driver.
“Accessing the printer software for Windows” on page 366
2. Click the Main tab, then make the Quality Option setting. See
the following section for details on the Quality Option
settings.
& See “Quality Option” on page 126
3. Select Sheet as the Source setting.
4. Make the appropriate Type setting.
“Media type settings” on page 369
5. Make the appropriate Size setting.
6. Select Portrait (tall) or Landscape (wide) to change the
orientation of your printout.
84 Various Printing Options
Page 85

7. Click the Page Layout tab and select the Double-Sided
Printing check box. Then, select the Folded Booklet check
box.
8. Click Margins to open the Margins dialog box.
2
2
2
2
2
2
2
9. Specify the edge of the paper where the binding will be
placed. You can choose Left, Top, or Right.
Note:
When Portrait is selected as the Orientation setting on the Main
menu, the Left or Right binding positions are available. The Top
binding position is available when Landscape is selected as the
Orientation setting.
Various Printing Options 85
2
2
2
2
2
Page 86

10. Choose cm or inch as the Unit setting. Specify the width of
the binding margin. You can enter any width from 0.3 cm to
3.0 cm, or from 0.12 inches to 1.18 inches. The specified margin
width will be used on both sides of the fold. For example, if a
10-mm margin is specified, a 20-mm margin will be inserted
(a margin of 10 mm will be placed on each side of the fold).
Portrait Landscape
✽: Folding edge
✽✽: Margin
86 Various Printing Options
✽
✽ ✽
Page 87

11. Click OK to return to the Page Layout menu. Then, click OK
to save your settings.
12. Load paper into the sheet feeder, then send the print job from
your application. Instructions for printing the inside pages
will be displayed while the outside pages are printed.
“Loading single sheets of paper” on page 346
13. Follow the on-screen instructions to reload the paper.
2
2
2
Note:
❏ The paper may curl during printing due to the amount of ink
used. Should this occur, slightly curl the sheets in the opposite
direction before reloading them into the printer.
❏ Align the sheet stack by tapping its edges against a hard, flat
surface before reloading the stack into the printer.
❏ Follow the instructions provided when reloading the printouts.
Paper jams or improperly placed binding margins may occur if
the printouts are not reloaded correctly.
❏ If a paper jam occurs, refer to the following.
& See “The paper jams” on page 283
14. Once the paper is reloaded, click Resume to print the inside
pages.
15. Once printing is complete, fold the sheets and bind them
together using a stapler or other binding method.
Folded Booklet double-sided printing for Mac OS 9
2
2
2
2
2
2
2
2
Use the following steps to create a folded booklet as described in
the beginning of this section.
Various Printing Options 87
2
Page 88

1. Access the Page Setup dialog box.
“Accessing the printer software for Mac OS 9” on page 368
2. Make the appropriate Paper Size setting.
3. Select Auto Sheet Feeder as the Paper Source.
4. Select the Double-Sided Printing check box. Then, select the
Folded Booklet check box.
5. Click Margins.
6. Specify the edge of the paper where the binding will be
placed. You can choose Left, Top, or Right.
Note:
When Portrait is selected as the Orientation setting in the Page
Setup dialog box, the Left or Right binding positions are available.
The Top binding position is supported when Landscape is
selected as the Orientation setting.
88 Various Printing Options
Page 89

7. Specify the width of the binding margin in the text box. You
can enter any width from 0.12 inch to 1.18 inch or from 0.3 cm
to 3.0 cm.The specified margin width will be used on both
sides of the fold. For example, if a 10-mm margin is specified,
a 20-mm margin will be inserted (a margin of 10 mm will be
placed on each side of the fold).
✽
✽ ✽
2
2
2
2
2
2
Portrait Landscape
✽: Folding edge
✽✽: Margin
8. Click OK to return to the Page Setup dialog box. Then, click
OK to save your settings and close the dialog box.
9. Access the Print dialog box.
“Accessing the printer software for Mac OS 9” on page 368
Various Printing Options 89
2
2
2
2
2
2
Page 90

10. Make the appropriate Media Type setting.
“Media type settings” on page 369
11. Load paper into the sheet feeder, then click Print to start
printing. Instructions for printing the inside pages will be
displayed while the outside pages are printed.
“Loading single sheets of paper” on page 346
12. Follow the on-screen instructions to reload the paper.
Note:
❏ The paper may curl during printing due to the amount of ink
used. Should this occur, slightly curl the sheets in the opposite
direction before reloading them into the printer.
❏ Align the sheet stack by tapping its edges against a hard, flat
surface before reloading the stack into the printer.
❏ Follow the instructions provided when reloading the printouts.
Paper jams or improperly placed binding margins may occur if
the printouts are not reloaded correctly.
❏ If a paper jam occurs, refer to the following.
& See “The paper jams” on page 283
13. Once the paper is reloaded, click Resume to print the inside
pages.
90 Various Printing Options
Page 91

14. Once printing is complete, fold the sheets and bind them
together using a stapler or other binding method.
2
Fit to Page Printing
You can use the Fit to Page printing function when you want to
print, for example, an A4 size document on another size paper.
Fit to Page printing automatically fits images or text you want to
print to the paper size you select in the printer software, or it
allows you to manually resize the image.
Note:
❏ This feature is not available with Mac OS X.
❏ This feature is not available when selecting the Borderless check
box on the Main menu (Windows) or in the Page Setup dialog box
(Macintosh).
2
2
2
2
2
2
2
2
2
Driver settings for Windows
1. Access the printer driver.
“Accessing the printer software for Windows” on page 366
2
2
Various Printing Options 91
Page 92

2. Click the Main tab, then make the Quality Option setting. See
the following section for details on the Quality Option
settings.
& See “Quality Option” on page 126
3. Select Sheet as the Source setting.
4. Make the appropriate Type setting.
“Media type settings” on page 369
5. Make the appropriate Size setting.
6. Select Portrait (tall) or Landscape (wide) to change the
orientation of your printout.
92 Various Printing Options
Page 93

7. Click the Page Layout tab, then select the Reduce/Enlarge
Document check box. You can select the following settings
to change the size of your document.
2
By Output Paper
Size
By Percentage Allows you to manually reduce or enlarge an
8. Select the paper size loaded in your printer from the
drop-down list when selecting By Output Paper Size, or use
the arrows to choose a percentage when selecting By
Percentage.
Proportionally enlarges or reduces the size of
your document to make it fit the paper size
selected in the By Output Paper Size list.
image. Click the arrows to select a percentage
between 10 and 400.
2
2
2
2
2
2
2
2
9. Click OK to close the printer driver settings dialog box.
After finishing all steps above, start printing.
Various Printing Options 93
2
2
2
Page 94

Driver settings for Mac OS 9
1. Access the Page Setup dialog box.
“Accessing the printer software for Mac OS 9” on page 368
2. Make the appropriate Paper Size setting.
3. Select Auto Sheet Feeder as the Paper Source.
4. Select Portrait (tall) or Landscape (wide) to change the
orientation of your printout.
5. Click OK to save the settings and close the Page Setup dialog
box.
6. Access the Print dialog box.
“Accessing the printer software for Mac OS 9” on page 368
7. Make the appropriate Media Type setting.
“Media type settings” on page 369
94 Various Printing Options
Page 95

8. Click the Layout icon button.
2
2
2
9. Select the Fit to Page check box.
10. Select the paper size loaded in your printer from the Output
Paper Size list.
11. Click OK to save the settings and close the Layout dialog box.
12. Click Print to start printing.
2
2
2
2
2
2
2
2
Various Printing Options 95
2
Page 96

Pages Per Sheet Printing
Pages Per Sheet printing allows you to print two or four pages on
single sheets of paper.
Note:
This feature is not available when selecting the Borderless check box
on the Main menu (Windows) or in the Page Setup dialog box (Mac OS
9).
Driver settings for Windows
1. Access the printer driver.
“Accessing the printer software for Windows” on page 366
2. Click the Main tab, then make the Quality Option setting. See
the following section for details on the Quality Option
settings.
& See “Quality Option” on page 126
3. Select Sheet as the Source setting.
4. Make the appropriate Type setting.
“Media type settings” on page 369
5. Make the appropriate Size setting.
96 Various Printing Options
Page 97

6. Select Portrait (tall) or Landscape (wide) to change the
orientation of your printout.
2
2
2
2
2
2
2
Various Printing Options 97
2
2
2
2
2
Page 98

7. Click the Page Layout tab, select Multi-page, then select
Pages Per Sheet.
8. Make the following settings for Pages Per Sheet printing.
2, 4 Prints two or four pages of your document on a
Print Page
Borders
Page Order Allows you to specify the order in which the
single piece of paper.
Prints frames around the pages printed on each
sheet.
pages will be printed on the sheet of paper.
Some settings may be unavailable, depending
on the Orientation setting on the Main menu.
9. Click OK to close the printer driver settings dialog box.
After finishing all of the steps above, start printing.
98 Various Printing Options
Page 99

Driver settings for Mac OS X
1. Access the Page Setup dialog box.
“Accessing the printer software for Mac OS X” on page 367
2. Select Stylus Photo R2400 as the Format for setting.
3. Make the appropriate Paper Size and Orientation settings.
4. Click OK to close the Page Setup dialog box.
5. Open the Print dialog box.
“Accessing the printer software for Mac OS X” on page 367
2
2
2
2
2
2
2
2
6. Select Stylus Photo R2400 as the Printer setting, then make
the Copies & Pages setting.
Various Printing Options 99
2
2
2
2
Page 100

Note:
The Copies & Pages settings available are a standard feature of Mac
OS X. See your operating system’s documentation for details.
7. Select Layout from the pop-up menu.
8. Make the following settings.
Pages per
Sheet
Layout
Direction
Border Prints a border around the pages printed on each
Prints multiple pages of your document on a single
piece of paper. You can choose from 1, 2, 4, 6, 9,
or 16.
Allows you to specify the order in which the pages
will be printed on the sheet of paper.
sheet. You can choose from None, Single hairline,
Single thin line, Double hairline, or Double thin line.
100 Various Printing Options
 Loading...