

Page 1
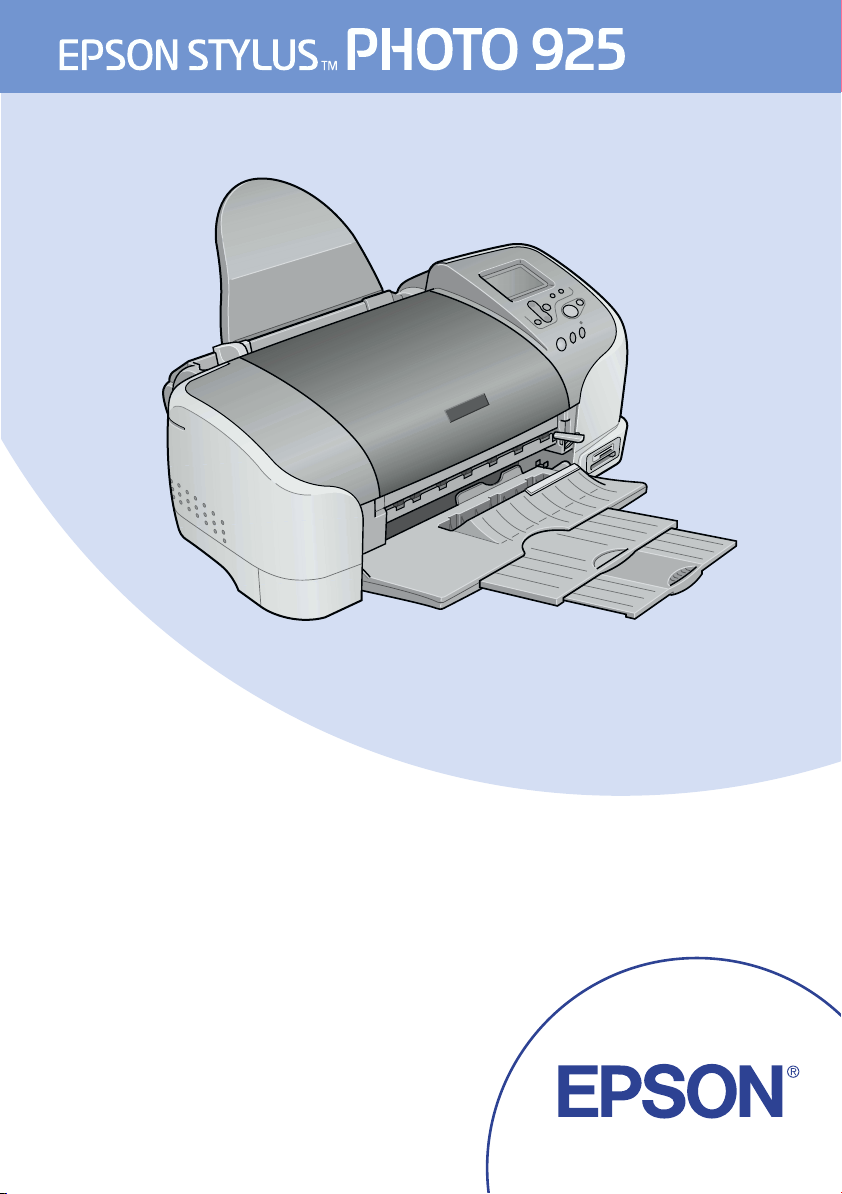
User's Guide
4022440-00
EUL
Page 2

Page 3

User’s Guide
Where to Find Information . . . . . . . . . . . . . . . . . . . . . . .2
Safety Instructions. . . . . . . . . . . . . . . . . . . . . . . . . . . . . .4
Printer Parts and Control Panel Functions . . . . . . . . .12
Direct Printing Basics . . . . . . . . . . . . . . . . . . . . . . . . . .16
Various Setting Options . . . . . . . . . . . . . . . . . . . . . . . .30
Using Roll Paper . . . . . . . . . . . . . . . . . . . . . . . . . . . . . .57
Replacing Ink Cartridges . . . . . . . . . . . . . . . . . . . . . . 71
Maintenance . . . . . . . . . . . . . . . . . . . . . . . . . . . . . . . .78
English
Troubleshooting . . . . . . . . . . . . . . . . . . . . . . . . . . . . . .85
Customer Support . . . . . . . . . . . . . . . . . . . . . . . . . . . .99
Options and Consumable Products . . . . . . . . . . . . .132
Printer Specifications . . . . . . . . . . . . . . . . . . . . . . . . . 138
Page 4

Where to Find Information
Setup
This guide will help you set up and begin using your printer. It
includes information on setting up your printer and installing the
printer software.
Photo Print Software Setup
This guide provides information on installing EPSON
PhotoQuicker, EPSON PhotoStarter and EPSON CardMonitor. It
also contains uninstalling and system requirements.
Quick Reference
This guide provides a simplified procedure for printing without
a computer. It also contains color and layout samples.
User’s Guide
This guide provides information for direct printing,
troubleshooting tips and customer support information.
EPSON PhotoQuicker User’s Guide
This guide, included on the CD-ROM, this guide provides
information on the EPSON PhotoQuicker utility and
troubleshooting tips.
Reference Guide included on the CD-ROM
The Reference Guide contained on the CD-ROM provides
detailed information about printer software settings, printing on
special paper, maintenance, and problem solving.
2
Page 5

All rights reserved. No part of this publication may be reproduced, stored in a retrieval
system, or transmitted in any form or by any means, electronic, mechanical, photocopying,
recording, or otherwise, without the prior written permission of SEIKO EPSON
CORPORATIO N. The information contained h erein is designed only for use with th is EPSON
printer. EPSON is not responsible for any use of this information as applied to other printers.
Neither SEIKO EPSON CORPORATION nor its affiliates shall be liable to the purchaser of
this product or third parties for damages, losses, costs, or expenses incurred by the purchaser
or third parties as a result of accident, misuse, or abuse of this product or unauthorized
modifications, repairs, or alterations to this product, or (excluding the U.S.) failure to strictly
comply with SEIKO EPSON CORPORATION's operating and maintenance instructions.
SEIKO EPSON C ORPORATION shall not be liable fo r any damages or problems arising from
the use of any options or any consumable products other than those designated as Original
EPSON Products or EPSON Approved Products by SEIKO EPSON CORPORATION.
SEIKO EPSON CORPORATION shall not be held liable for any damage resulting from
electromagnetic interference that occurs from the use of any interface cables other than those
designated as EPSON Approved Products by SEIKO EPSON CORPORATION.
EPSON is a registered trademark and EPSON Stylus is a trademark of SEIKO EPSON
CORPORATION.
Copyright 2001 SEIK O EPSON CORPORATION. All rights reserve d. PRINT Image Matching
is a trademark of SEIKO EPSON CORPORATION. The PRINT Image Matching logo is a
trademark of SEIKO EPSON CORPORATION.
Microsoft and Windows are registered trademarks of Microsoft Corporation.
English
Apple and Macintosh are registered trademarks of Apple Computer, Inc.
DPOF is a trademark of CANON INC., Eastman Kodak Company, Fuji Photo Film Co., Ltd.
and Matsushita Electric Industrial Co., Ltd.
®
Zip
is a registered trademark of Iomega Corporation.
General Notice: Other product names used herein are for identification purposes only and may be
trademarks of their respective owners. EPSON disclaims any and all rights in those marks.
Copyright © 2002 by SEIKO EPSON CORPORATION, Nagano, Japan.
3
Page 6

Safety Instructions
Important Safety Instructions
Read all of the instructions in this section before using your
printer. Also, be sure to follow all warnings and instructions
marked on the printer.
When setting up your printer
Observe the following when setting up the printer:
❏ Do not block or cover the openings in the printer’s cabinet.
❏ Use only the type of power source indicated on the printer’s
label.
❏ Be sure your AC power cord meets the relevant local safety
standard.
❏ Connect all equipment to properly grounded power outlets.
Avoid using outlets on the same circuit as photocopiers or air
control systems that regularly switch on and off.
❏ Avoid electrical outlets controlled by wall switches or
automatic timers.
❏ Keep the entire computer system away from potential sources
of electromagnetic interference, such as loudspeakers or the
base units of cordless telephones.
❏ Do not use a damaged or frayed power cord.
4
Page 7

❏ If you use an extension cord with the printer, make sure that
the total ampere rating of the devices plugged into the
extension cord does not exceed the cord’s ampere rating. Also,
make sure that the total ampere rating of all devices plugged
into the wall outlet does not exceed the wall outlet’s ampere
rating.
❏ Do not attempt to service the printer yourself.
❏ Unplug the printer and refer servicing to qualified service
personnel under the following conditions:
The power cord or plug is damaged; liquid has entered the
printer; the printer has been dropped or the cabinet damaged;
the printer does not operate normally or exhibits a distinct
change in performance.
❏ If you plan to use the printer in Germany, the building
installation must be protected by a 10 or 16 amp circuit
breaker to provide adequate short-circuit protection and
over-current protection for this printer.
English
When choosing a place for the printer
Observe the following when choosing a place for the printer:
❏ Place the printer on a flat, stable surface that extends beyond
the printer base in all directions. If you place the printer by
the wall, leave more than 10 cm between the back of the
printer and the wall. The printer will not operate properly if
it is tilted at an angle.
❏ When storing or transporting the printer, don't tilt it, stand it
on its side or turn it upside down. Otherwise ink may leak
from the cartridge.
❏ Leave enough space in front of the printer for the paper to be
fully ejected.
5
Page 8

❏ Avoid places subject to rapid changes in temperature and
humidity. Also, keep the printer away from direct sunlight,
strong light, or heat sources.
❏ Avoid places subject to dust, shocks, and vibrations.
❏ Leave enough room around the printer to allow for sufficient
ventilation.
❏ Place the printer near a wall outlet where the plug can be
easily unplugged.
When using the printer
Observe the following when using the printer:
❏ Do not insert objects through the slots in the printer’s cabinet.
❏ Take care not to spill liquid on the printer.
❏ Do not put your hand inside the printer or touch the ink
cartridges during printing.
❏ Do not move the print head by hand; otherwise, you may
damage the printer.
❏ Always turn the printer off using the P power button. When
this button is pressed, the memory card light flashes briefly
and then goes out. Do not unplug the printer or turn off the
power to the outlet until the memory card light stops flashing.
❏ Before transporting the printer, make sure that the print head
is in the home (far right) position and the ink cartridges are
in place.
❏ Leave the ink cartridges installed. Removing the cartridges
can dehydrate the printer head and may prevent the printer
from printing.
6
Page 9

When using a memory card
❏ Do not remove the memory card or turn off the printer power
while the computer and the memory card are communicating
(when the card slot light is flashing).
❏ The handling method varies depending on the storage media.
Be sure to refer to the documentation packaged with your
memory card and storage media for details.
❏ You can only use the memory cards matching the printer
specification.
When using the display or the optional Preview Monitor
❏ Your LCD panel may contain a few small bright or dark spots.
These are normal and do not mean that your LCD monitor is
broken.
❏ Only use a dry, soft cloth to clean the display or the optional
Preview Monitor. Do not use liquid or chemical cleansers.
English
❏ If the display on the printer or the Preview Monitor’s LCD
panel is damaged, contact your dealer. If the liquid crystal
solution gets on your hands, wash them thoroughly with soap
and water. If the liquid crystal solution gets into your eyes,
flush them immediately with water. If discomfort or vision
problems remain after a thorough flushing, see a doctor
immediately.
❏ Always attach the cover on the Preview Monitor slot, unless
using the optional Preview Monitor.
7
Page 10

When handling the ink cartridges
Observe the following when handling the ink cartridges:
❏ Keep ink cartridges out of the reach of children. Do not allow
children to drink from or otherwise handle the cartridges.
❏ Be careful when you handle used ink cartridges, as there may
be some ink remaining around the ink supply port. If ink gets
on your skin, wash the area thoroughly with soap and water.
If ink gets into your eyes, flush them immediately with water.
If discomfort or vision problems remain after a thorough
flushing, see a doctor immediately.
❏ Do not shake an ink cartridge; this can cause leakage.
❏ Install the ink cartridge immediately after you remove it from
its package. Leaving the cartridge unpacked for a long time
before use may result in reduced print quality.
❏ Do not use an ink cartridge beyond the date printed on the
cartridge carton. For best results, use up the ink cartridges
within six months of installing them.
❏ Do not dismantle the ink cartridges or try to refill them. This
could damage the print head.
❏ After bringing an ink cartridge inside from a cold storage site,
allow it to warm up at room temperature for at least three
hours before using it.
❏ Store ink cartridges in a cool, dark place.
❏ Do not touch the green IC chip on the side of the cartridge.
This may affect normal operation and printing.
8
Page 11

❏ The IC chip on this ink cartridge retains a variety of cartridge
related-information, such as the amount of ink remaining, so
that a cartridge may be removed and reinserted freely.
However, each time the cartridge is inserted, some ink is
consumed because the printer automatically performs a
reliability check.
❏ If you remove an ink cartridge for later use, protect the ink
supply area from dirt and dust and store it in the same
environment as the printer. A valve in the ink supply port
makes covers or plugs unnecessary, but the ink may stain
items that come in contact with this area of the cartridge. Do
not touch the ink supply port or surrounding area.
When using the Automatic Roll Paper Cutter
❏ Keep the cutter out of the reach of children.
❏ Do not touch the paper ejection slot and cutter blade.
❏ Do not place the cutter on an unstable surface (such as on an
unstable table or a tilted surface).
English
❏ Do not disassemble or modify the cutter.
ENERGY STAR
The International
a voluntary partnership with the computer and office equipment
industry to promote the introduction of energy-efficient personal
computers, monitors, printers, fax machines, copiers, and
scanners in an effort to reduce air pollution caused by power
generation.
®
Compliance
As an ENERGY STAR® Partner, EPSON has
determined that this product meets the
®
STAR
guidelines for energy efficiency.
ENERGY STAR
®
Office Equipment Program is
ENERGY
9
Page 12

Information for United Kingdom Users
Use of options
EPSON (UK) Limited shall not be liable against any damages or
problems arising from the use of any options or consumable
products other than those designated as Original EPSON
Prod uc ts or EPSON Approved Products by EPSON (UK) Limited.
Safety information
Warning:
This appliance must be earthed. Refer to the rating plate for the
w
voltage and check that the appliance voltage corresponds to the
supply voltage.
Important:
The wires in the mains lead fitted to this appliance are coloured
in accordance with the following code:
Green and yellow — Earth
Blue — Neutral
Brown — Live
If you have to fit a plug:
As the colours of the mains lead of this appliance may not match
the coloured markings used to identify the terminals in a plug,
please observe the following:
❏ The green and yellow wire must be connected to the terminal
in the plug which is marked with the letter E or the earth
symbol (G).
❏ The blue wire must be connected to the terminal in the plug
marked with the letter N.
10
Page 13

❏ The brown wire must be connected to the terminal in the plug
marked with the letter L.
❏ If the plug is damaged, replace the cord set or consult a
qualified electrician.
❏ Replace fuses only with fuses of the correct size and rating.
Warnings, Cautions, and Notes
Warnings
must be followed carefully to avoid bodily injury.
w
Cautions
must be observed to avoid damage to your equipment.
c
Notes
contain important information and useful tips on the operation of your
printer.
English
11
Page 14
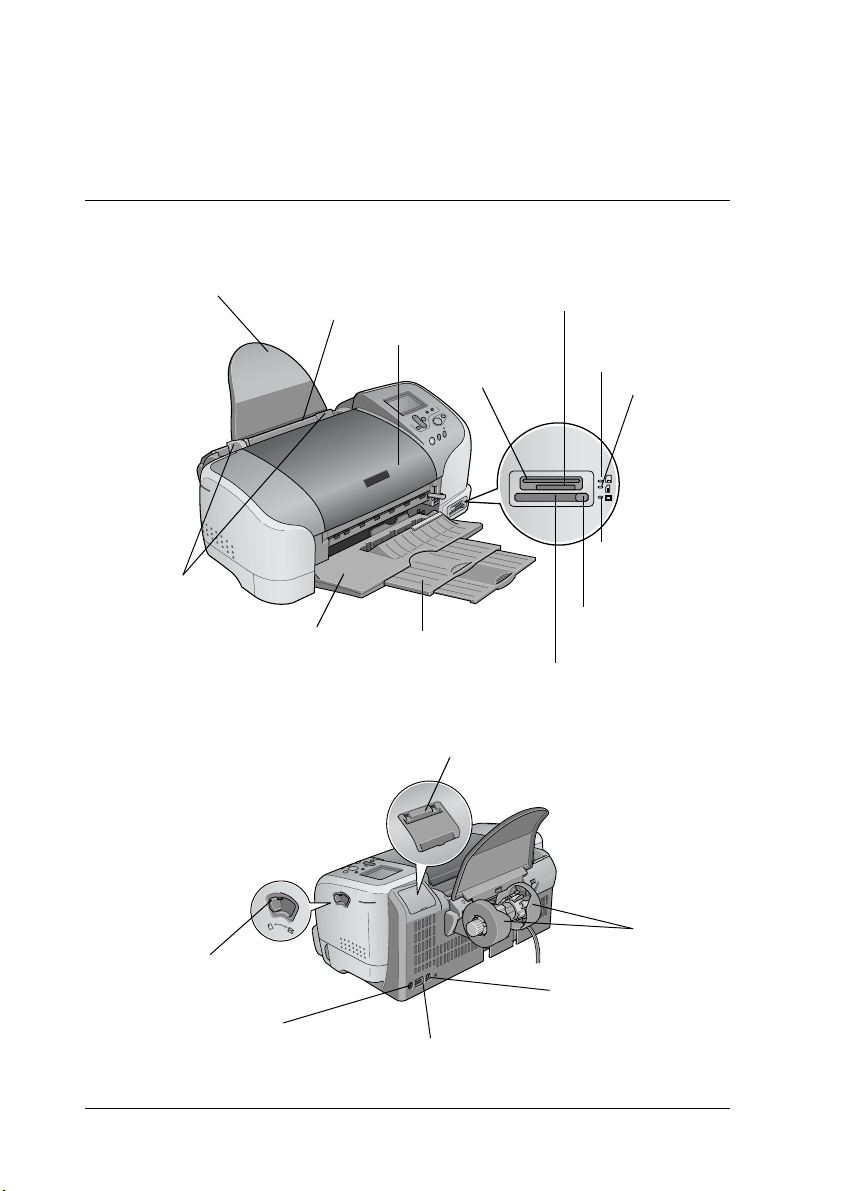
Printer Parts and Control Panel Functions
Printer Parts
paper support
edge guides
sheet feeder
output tray
Memory Stick memory card slot
printer cover
SmartMedia
memory card slot
output tray
extension
preview monitor slot
SmartMedia
memory card light
Memory
Stick
memory
card light
CompactFlash
memory card
light
card eject
button
CompactFlash Type II
memory card slot
adjust lever
preview monitor cable
connector
12
roll paper
holder
computer USB
connector
backup drive USB connector
Page 15
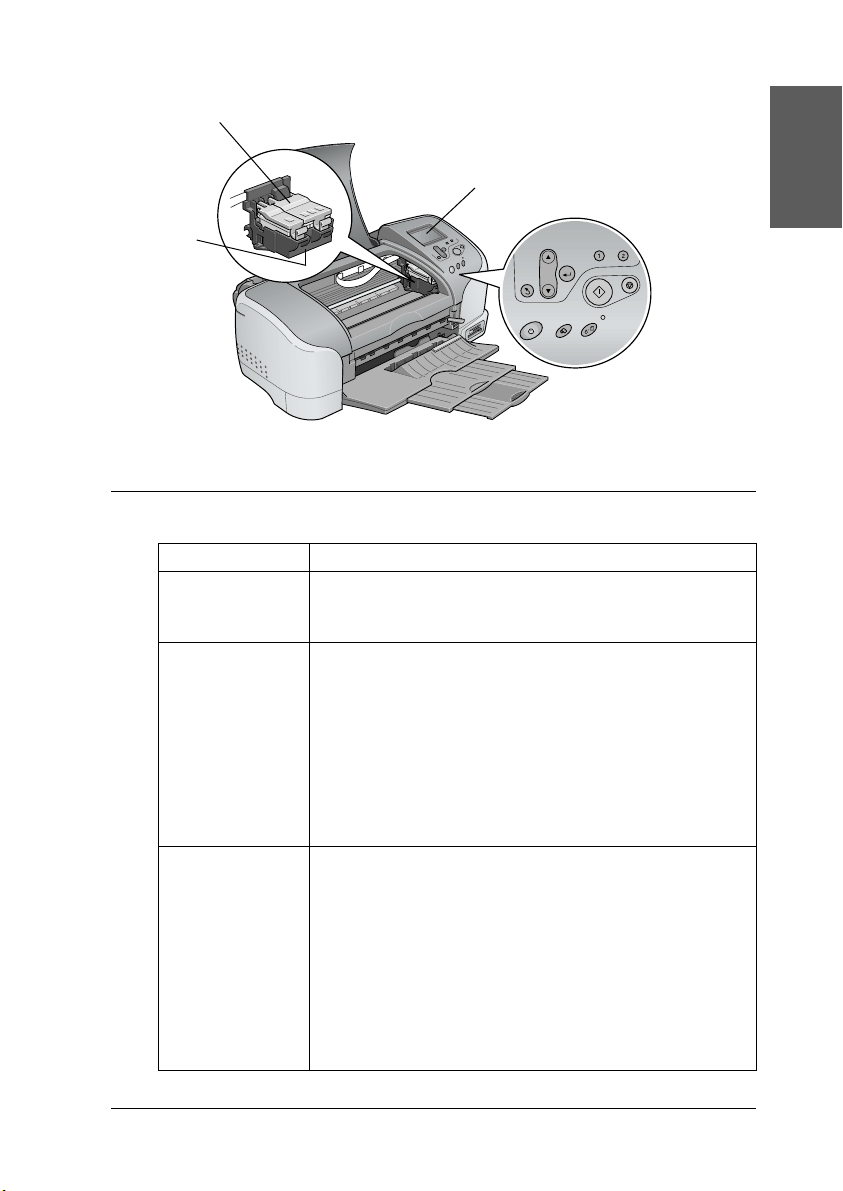
ink cartridge clamps
print head
Buttons
Button Function
P
power
b
maintenance
z
roll paper
LCD panel
control panel
Turns the printer on and off.
Clears the following errors or displays an instruction.
No ink
No ink cartridge/abnormality
No paper (cut sheet only)
Paper jam
Performs the Ink Cartridge Replacement utility.
Displays the Advanced Settings menu while the
( maintenance light is off.
Loads and ejects the roll paper.
Cuts and ejects the roll paper when the print job is
finished, then rewinds the roll paper to the startposition
for printing.
When held down for more than 3 seconds, rewinds the
roll paper to a position where it can be removed from
the sheet feeder.
Prints a nozzle check pattern when pressed while
turning on the printer.
English
13
Page 16

Control panel
1
5
2
3
11
4
10
9
7
6
8
1. LCD panel: Shows the items and settings you change with the
buttons on the control panel.
2. Up/Down arrow buttons: Move the cursor on the LCD panel.
Increase and decrease numbers being entered.
3.Back button: Returns to the main menu.
4. Select button: Selects the item to be set.
5. Custom buttons: Store the current settings on the LCD panel
when held down for more than 2 seconds. Load the stored settings
when pressed.
6. Cancel button: Cancels print operations, or the settings on the
LCD panel.
14
Page 17

7. Print button: Starts printing with the settings selected via the
buttons on the control panel.
8. Maintenance light: On or flashes when an error occurs. Check
the description of the error in the LCD panel.
9. Maintenance button: Refer to “Buttons” on page 13 for details.
10. Roll paper button: Refer to “Buttons” on page 13 for details.
11. Power button: Refer to “Buttons” on page 13 for details.
Note:
The buttons on the control panel only affect direct printing from a
memory card.
English
15
Page 18
Lights
Light Description
(
maintenance
SmartMedia
memory card
Memory Stick
memory card
CompactFlash
memory card
On or flashes when an error occurs. On the LCD panel,
check the description of the error.
On when a SmartMedia memory card is inserted into the
SmartMedia memory card slot and the slot is valid.
Flashes when the printer is accessing the SmartMedia
memory card.
On when a Memory stick memory card is inserted into the
Memory stick memory card slot and the slot is valid.
Flashes when the printer is accessing the Memory stick
memory card.
O n w h e n a C om p ac t F la s h m e mo r y ca r d i s in s e rt e d i n to t he
CompactFlash memory card slot and the slot is valid.
Flashes when the printer is accessing the CompactFlash
memory card.
Direct Printing Basics
Introduction
Before printing your photographs without a computer, be sure to
read this chapter to know how to make settings on the LCD panel.
The instruction below show an example setting to print a selected
photo directly from a memory card. Before you can print, you
need A4-size plain paper and an memory card containing suitable
digital photo data.
16
Page 19
Note:
❏ Always test a few sheets of paper to make sure of the print results
before printing large jobs.
❏ We recommend disconnecting the USB cable when printing directly
from a memory card.
For available paper and loading capacities, refer to “Loading A4
Paper” on page 17.
For printing a selected photo, refer to “Printing a Selected Photo”
on page 23.
For various setting options, refer to “Various Setting Options” on
page 30.
For printing from a computer, refer to online Reference Guide.
Loading A4 Paper
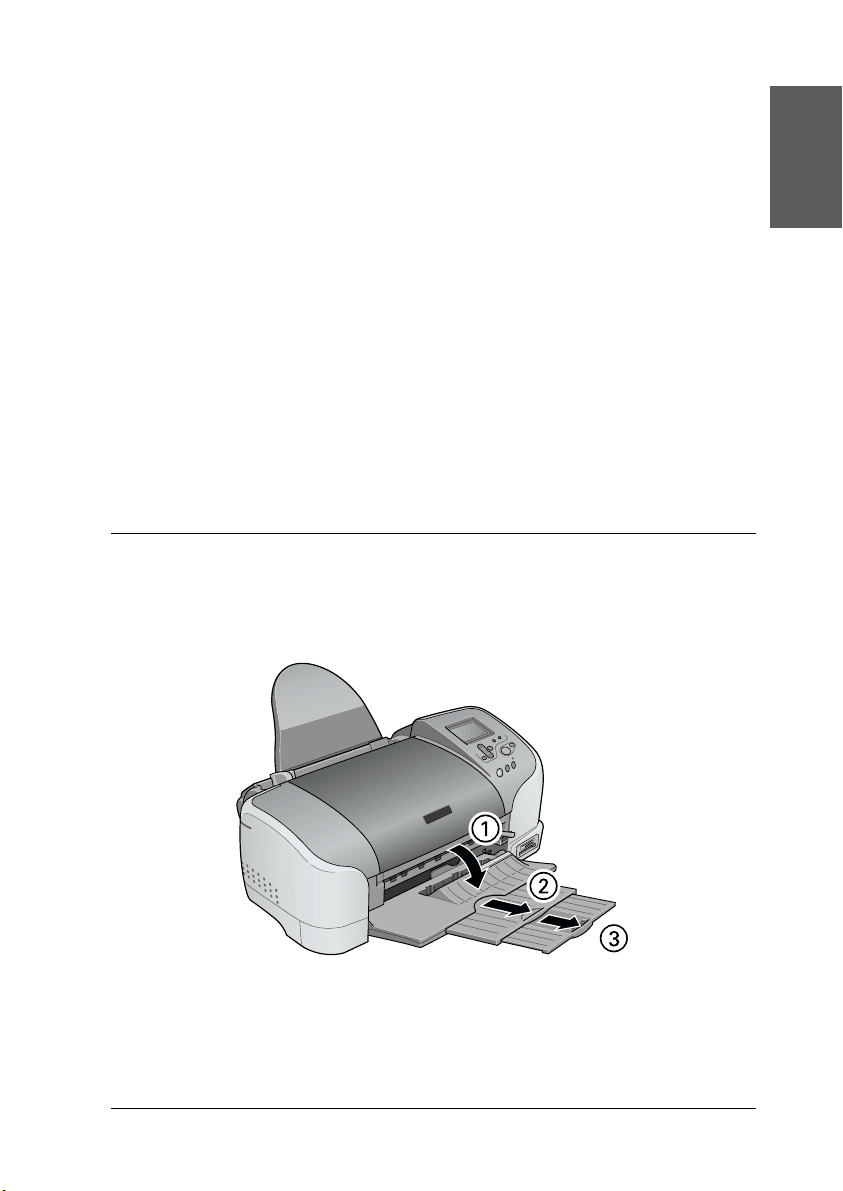
1. Lower the output tray and slide out the extension.
English
17
Page 20
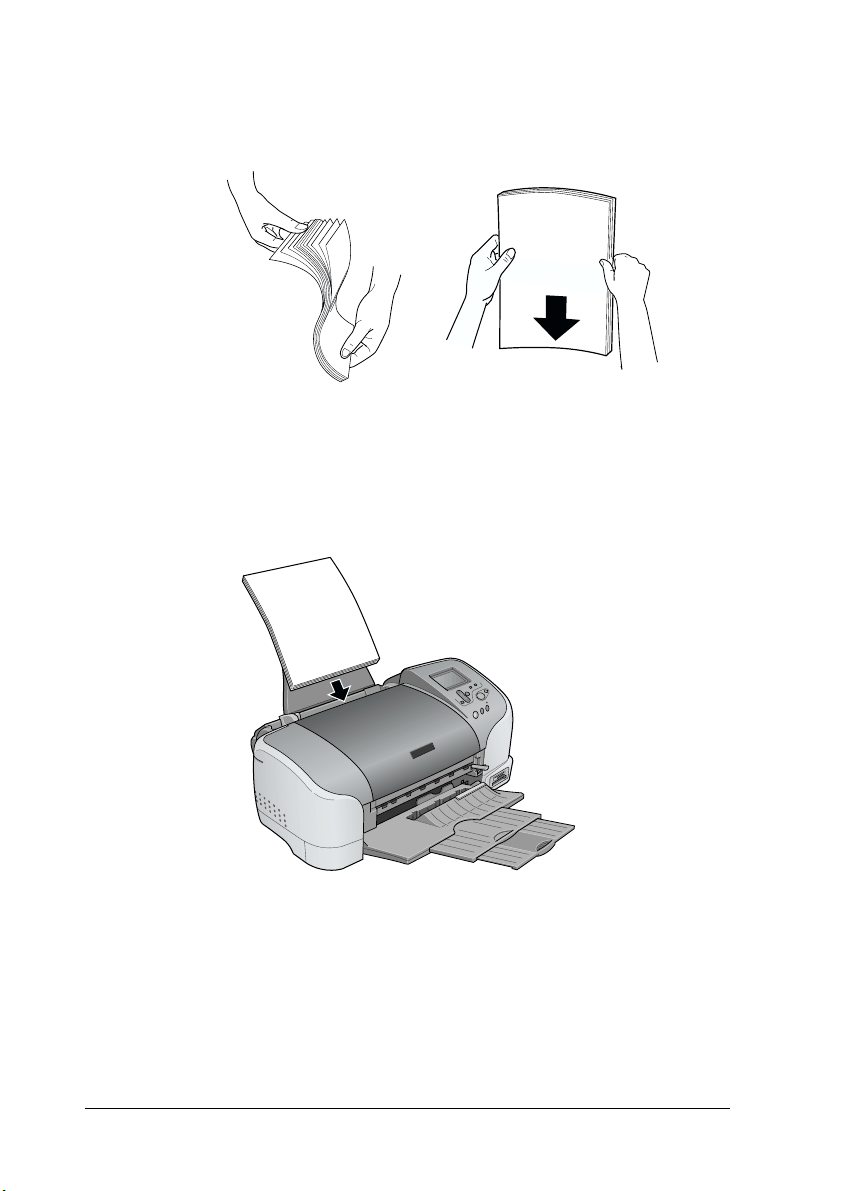
2. Fan a stack of plain paper; then tap it on a flat surface to even
the edges.
3. With the printable side up, load the paper so it is against the
right edge guide, and slide it into the sheet feeder. The loading
capacity for plain paper is shown by the arrow mark on the
left edge guide.
18
Page 21
Paper Loading Capacity
Plain paper Up to arrow mark on the left edge
EPSON Photo Paper Up to 20 sheets of Photo Paper.
EPSON Matte
Paper-Heavyweight
EPSON Premium Glossy Photo
Paper
EPSON Premium Semigloss
Photo Paper
EPSON ColorLife Photo Paper One sheet at a time.
EPSON Photo Stickers 16 One sheet at a time.
EPSON Iron-On Cool Peel
Transfer Paper
guide.
One sheet at a time for 200 × 300
mm Photo Paper.
Up to 20 sheets.
One sheet at a time.
One sheet at a time.
One sheet at a time.
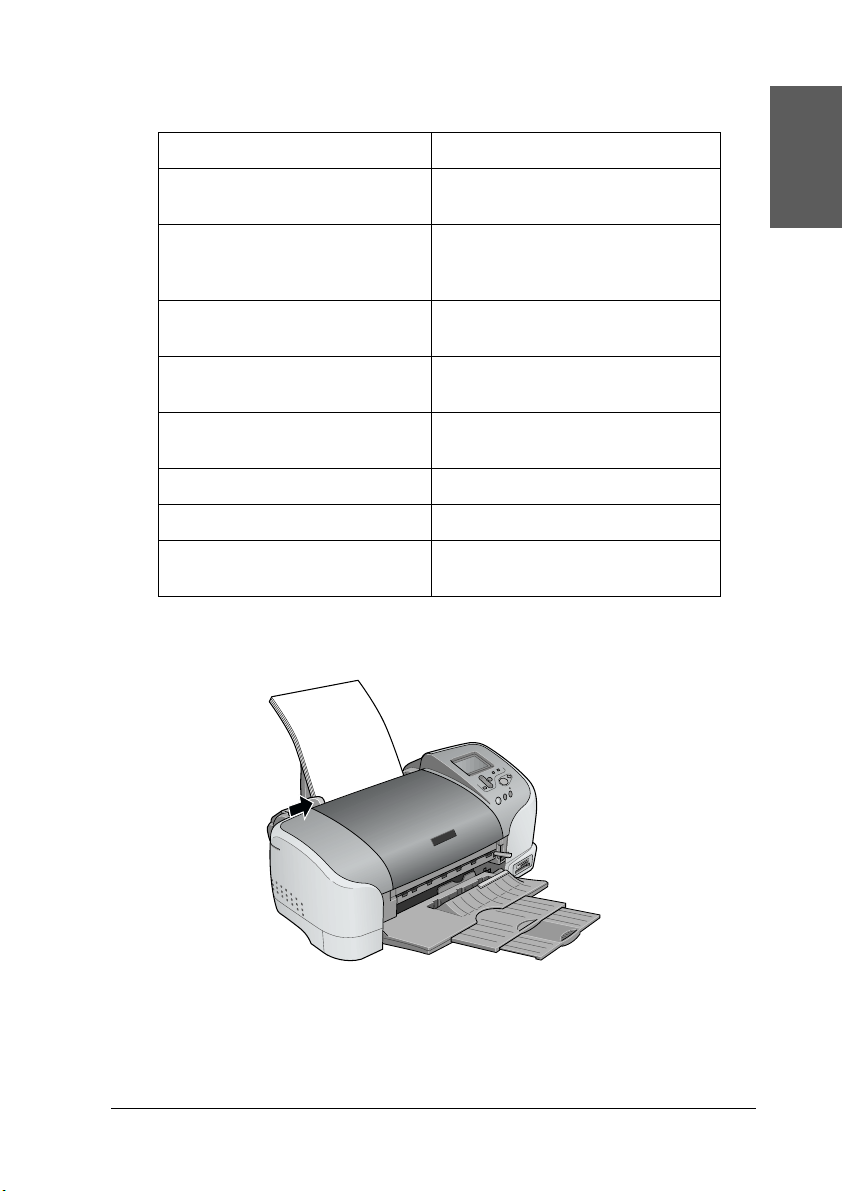
4. Slide the left edge guide against the paper.
English
Note:
Be sure to make the left edge guide flush against the paper or the
paper will not feed properly into the printer.
19
Page 22
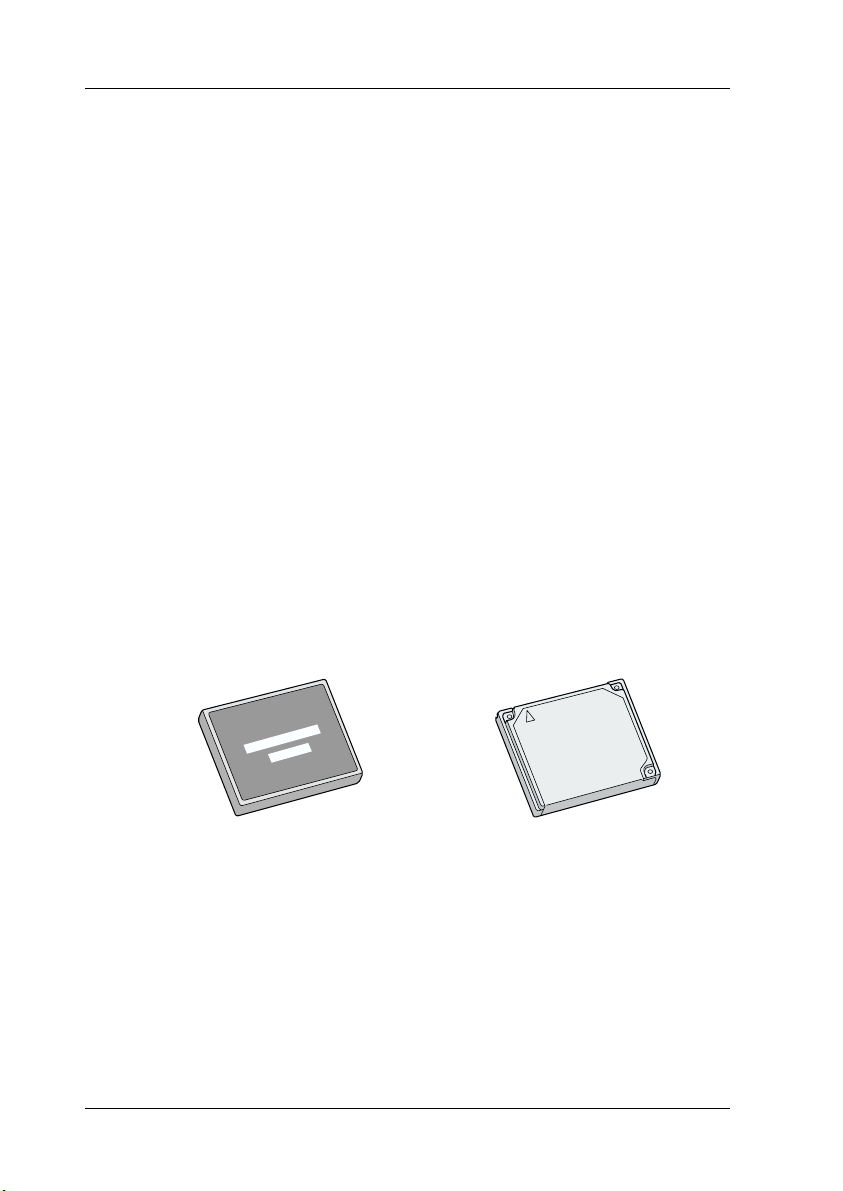
Loading Memory Cards
Loadable storage media
Digital photographs are stored either in the digital camera’s
built-in memory or in card-type memory, which can be inserted
and removed from the camera. The latter is referred to as “storage
media”. The types of storage media that can be used with this
printer are shown below.
Caution:
The handling method varies depending on the storage media. Be
c
sure to refer to the documentation packaged with your memory
card for details.
Note:
❏ Appearance may vary.
❏ See “Data format on a memory card” on page 21 for the
specifications of memory cards that can be used with the printer.
20
CompactFlash Microdrive
Page 23

Memory Stick SmartMedia
Data format on a memory card
You can use image files that meet the following requirements with
this printer.
English
Digital camera Based on DCF version 1.0 standards
*1
File format JPEG format image files*2 taken with a DCF
version 1.0 standard-compliant digital
camera
Image size Vertical 160 to 4200 pixels, horizontal 160
to 4200 pixels
Number of files Up to 999 files on a memory card
*1
:DCF stands for the “Design rule for Camera File system” standards, set by the
Japan Electronics and Information Technology Industries Association (JEITA).
*2
:Meets Exif version 1.0/2.0/2.1/2.2.
Note:
The file names containing double-byte characters are not valid when
printing directly from a memory card.
21
Page 24
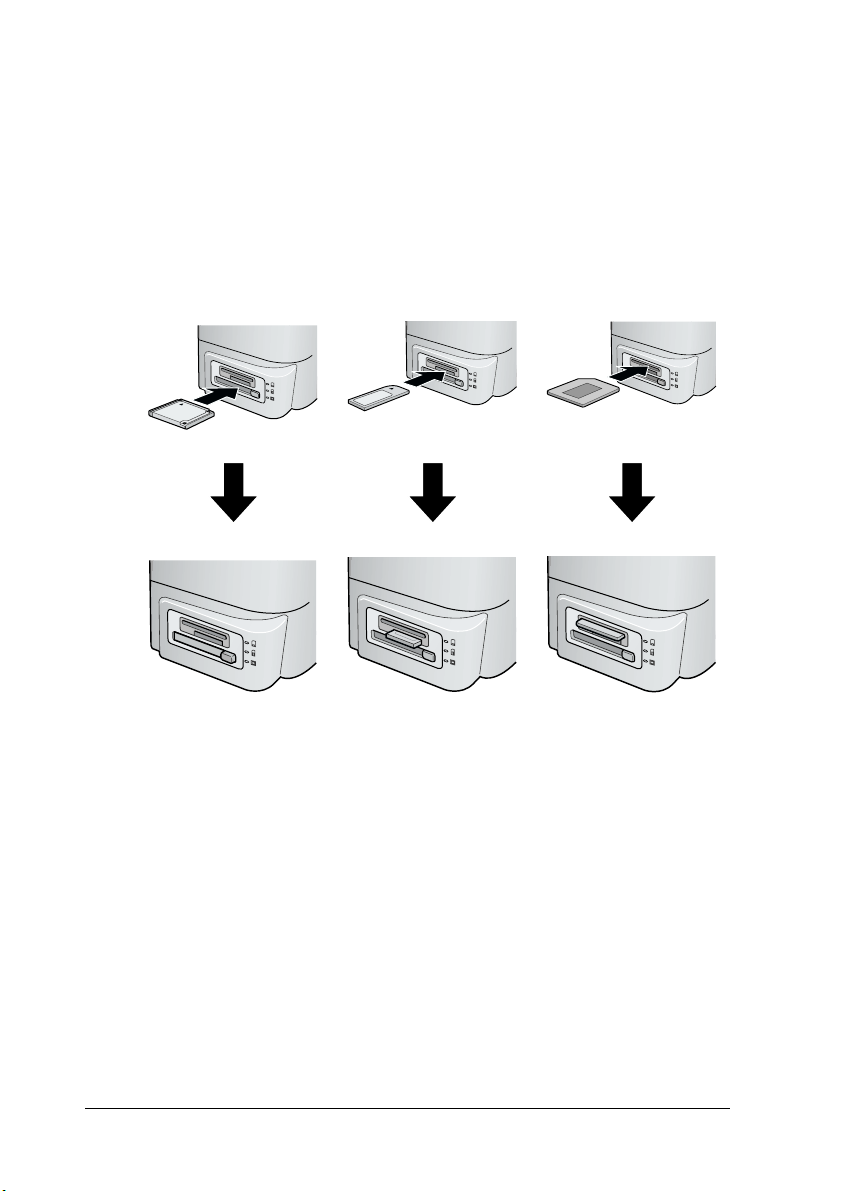
Inserting memory cards
Turn the printer on, and then insert a memory card straight, as
shown in the illustration. When the memory card is inserted
correctry, the memory card light corresponding to the card comes
on and settings on the LCD panel are intialized.
22
CompactFlash/
Microdrive
Caution:
❏ Insert a SmartMedia so the top of the card (the black side)
c
faces upward, as shown in the illustration.
❏ Loading a memory card in other way may damage the printer,
memory card, or both.
❏ Do not insert several kinds of memory card at the same time.
Eject the loaded memory card before inserting the other kind
of memory card.
Memory Stick SmartMedia
Page 25
Printing a Selected Photo
Index print
You can print one or more copies of an index of all the
photographs on a loaded memory card. An index can be helpful
in selecting which photos you want to print.
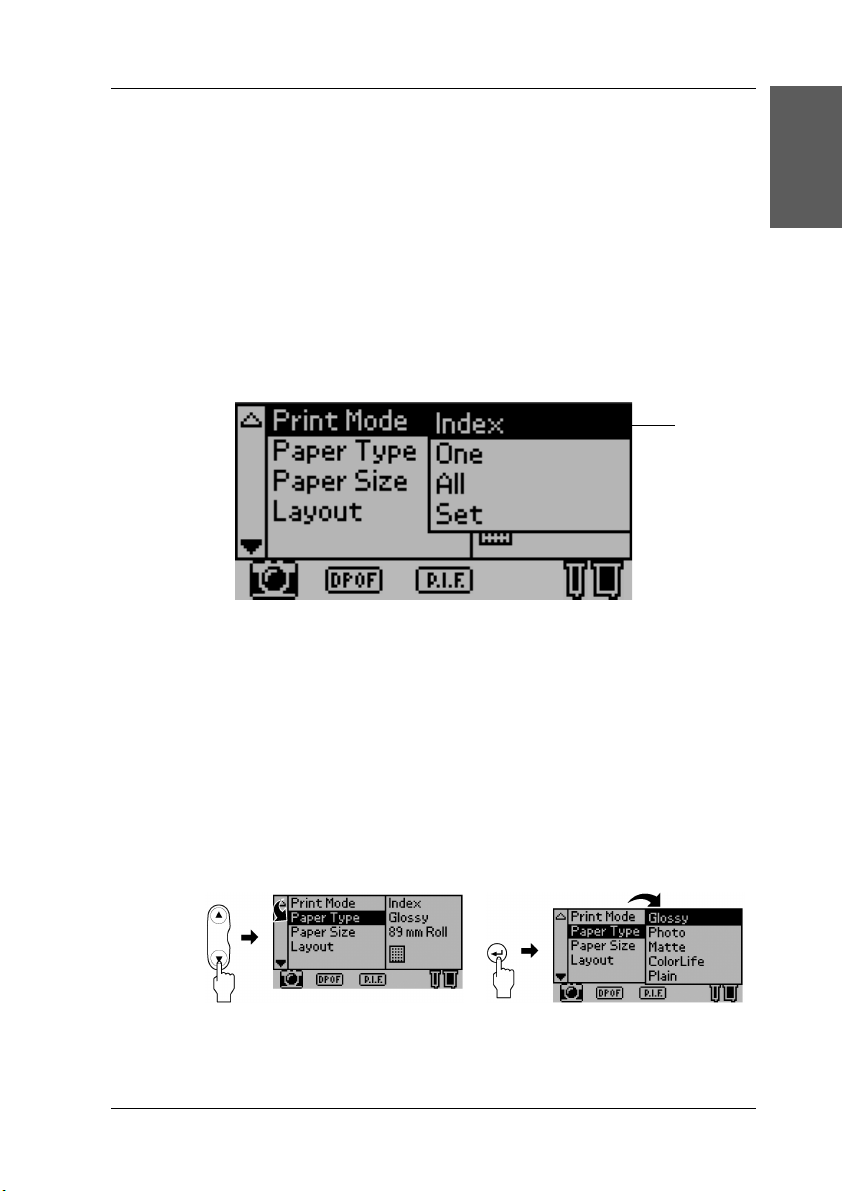
1. Make sure that the Print Mode is set to Index.
Note:
When you insert a memory card, the Print Mode returns to Index.
If a different mode has been selected, use the u or d button to select
Print Mode menu, then press Select button to open the submenu.
Press the u or d arrow button again to select Index and press the
Select button.
English
1
2. Press the u or d buttons to select Paper Type, then press the
Select button to open the Paper Type menu.
23
Page 26
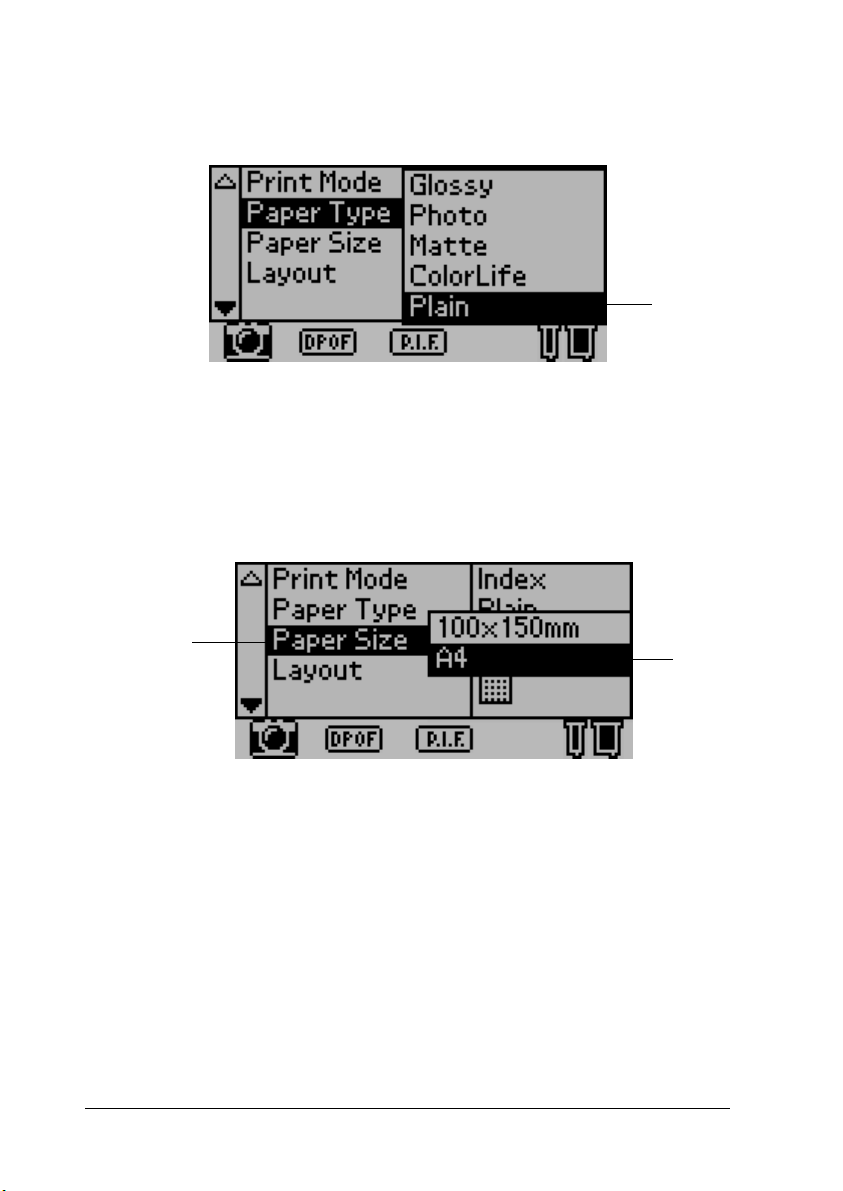
3. Press the u or d buttons to select Plain in the Paper Type
menu, then press the Select button.
3
4. Press the u or d buttons to select Paper Size, then press the
Select button to open the Paper Size menu.
5. Press the u or d buttons to select A4 in the Paper Size menu,
then press the Select button.
24
4
5
Page 27
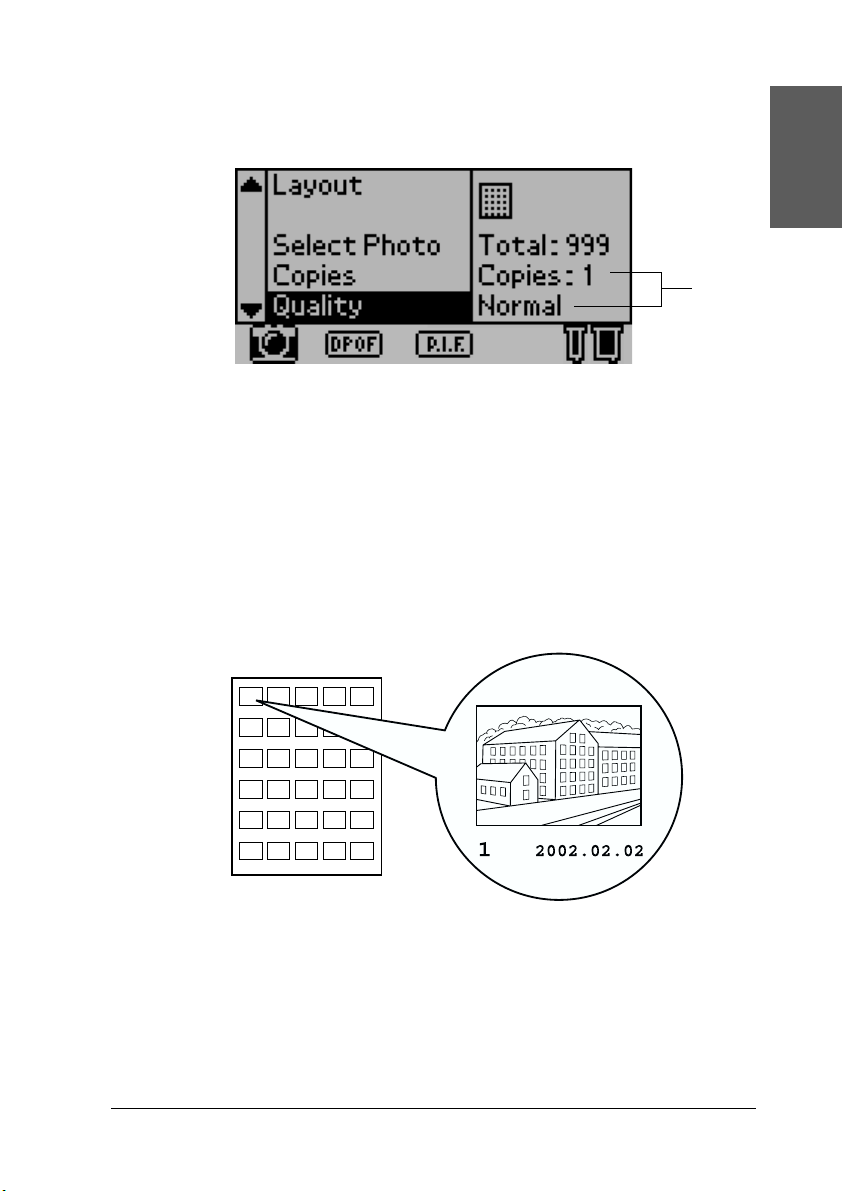
6. Scroll down the window with using d button to make sure
the Quality and number of copies that you want to print.
7. Press the Print button to print Index.
Single photo print
You can print one photo from the index. The example here is to
print a single photo on the A4 size of plain paper with no margins
and normal print quality.
English
6
Index Photo Number
1. From the index, find the number of the photo that you want
to print out. The number is printed under the photo.
25
Page 28

Note:
The photo number is also displayed in the optional Preview Monitor.
See “Preview Monitor Black version” on page 133 for details.
2. Press the u or d buttons to select Print Mode, the press the
Select button to open the Print Mode menu.
Select One in the Print Mode menu, then press the Select
button.
3. Similarly, select Plain as the Paper Type setting, then select
A4 as the Paper Size setting.
4. Select Layout from the LCD panel, and then press the Select
button to open the Layout menu.
Select in the Layout menu, then press the Select button. It
means No margin printing of cut sheet.
2
3
26
4
Page 29
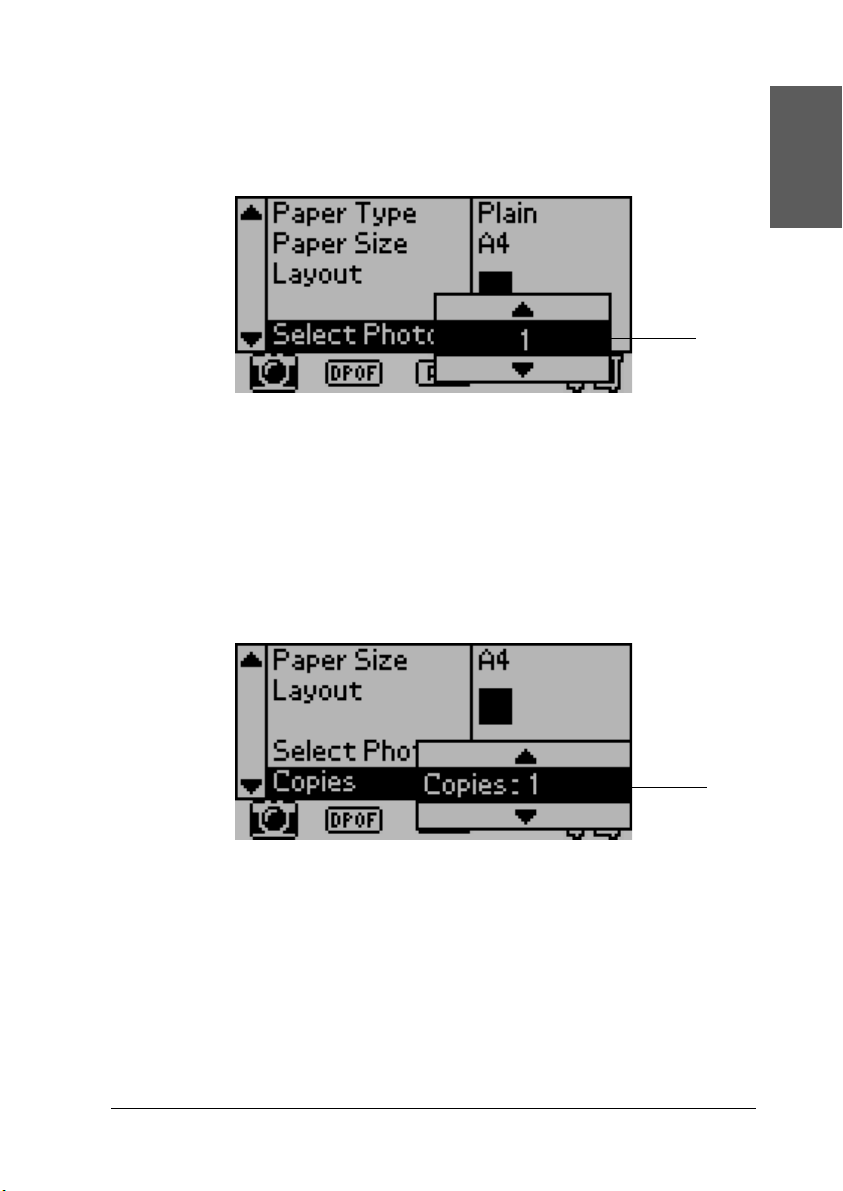
5. Select Select Photo, press the Select button to open the
Photo Number selector, select the number of the photo that
you want to print, and then press the Select button.
5
Note:
Nothing is printed out if you select a number that is not in the list
printed with Index Print.
6. Select Copies, press the Select button to open the Copies
counter, select Copies:1 from the Copies counter, and then
press the Select button.
English
6
27
Page 30

7. Select Quality, press the Select button to open the Quality
menu, select Normal, and then press the Select button.
7
8. Confirm all of the panel settings, and then press the Print
button to print a selected photo.
Cancelling printing
To stop printing in progress, press the Cancel button. The printer
will cancel all print jobs and stop printing, and eject any pages
that were printing. Depending on the printer’s status, printing
may not stop immediately.
Ejecting Memory Cards
After printing all of the jobs, eject the memory card.
28
Page 31

1. Make sure that the memory card lights are not flashing.
2. Press the button as shown in the illustration to eject the
Compact Flash.
Pull the card out as shown the illustration to eject the Memory
Stick or SmartMedia.
English
Caution:
Do not eject memory cards or turn off power to the printer
c
while printing or while the memory card light is flashing.
Doing so can cause data to be lost.
29
Page 32

Various Setting Options
Using the LCD Control Panel
Main settings
1
2
3
4
1. Print Mode
In this menu, you can select how to print data stored in a memory
card.
Index Print an index of all photographs on the memory card.
One Print a single, selected photograph from the memory card.
All Print all Photographs on the memory card.
Set Print selected photographs from the memory card.
DPOF This option is automatically displayed when a memory card
2. Paper Type
30
contains data whose printing instruction is set with a
DPOF-compatible digital camera. This option does not work
for data not compatible with DPOF even if selected.
Page 33

In this menu, the print paper can be selected.
Glossy Print on EPSON Premium Glossy Photo Paper or EPSON
Premium Semigloss Photo Paper.
Photo Print on EPSON Photo Paper.
Matte Print on EPSON Matte paper-heavy weight.
ColorLife Print on EPSON ColorLife Photo paper.
Plain Print on the plain paper, EPSON Premium Ink Jet Plain
Paper or EPSON Bright White Ink Jet Paper.
Stickers Print on EPSON Photo Stickers 16.
Iron-on Print on EPSON Iron-On Cool Peel Transfer Paper.
3. Paper Size
In this menu, the size of the print paper can be selected. The print
size is automatically scaled up/down depending on the
combination of paper size and layout used.
89 mm Roll Print on 89 mm width roll paper.
100 mm Roll Print on 100 mm width roll paper.
127 mm Roll Print on 127 mm width roll paper.
210 mm Roll Print on 210 mm width roll paper.
English
LPrint on L size (89mm× 127 mm) sheet paper.
2L Print on 2L size (127 mm × 178 mm) sheet paper when
Glossy is selected as the Paper Type.
100 × 150 mm Print on 100 × 150 mm size sheet paper.
A4 Print on A4 size (210 mm × 297 mm) sheet paper.
4. Layout
In this menu, the print layout can be specified.
31
Page 34

Note:
Layout cannot be set if Index is selected in the Print Mode menu
and Sticker is selected in the Paper Type menu.
No Margin, Portrait: Prints without margin. Portrait layout
(longer side is in the paper feed
direction).
No Margin, Landscape: Prints without margin. Landscape
Single: Prints with margin of 3 mm at each
Double: Prints two images (extended) in two
Triple: Prints three images (extended) in
Quarter: Prints four images (portrait) in two
Octet: Prints eight images (extended) in
20: Prints 20 images (extended) in five
Panoramic: Prints one image in one page as a
layout (shorter side is in the paper
feed direction). This is avail able with
roll paper only.
side. Portrait layout.
lows in one page.
three lows in one page.
lows (two each low) in one page.
four lows (two each low) in one
page.
lows (four each low) in one page.
panorama picture by being
cropped in horizontal, or vertical.
This is available with roll paper only.
Variable size: Prints multiple sizes in one page.
When printing on the total surface area of the selected paper, keep
note the following.
❏ Printing with this setting selected takes longer than for
normal printing.
32
Page 35

❏ Because this setting enlarges the image to a size slightly larger
than the paper size, the portion of the image that extends
beyond the edges of the paper will not be printed.
❏ Print quality may decline in the top and bottom areas of the
printout, or the area may be smeared when printing on the
sheet paper.
❏ We recommend printing a single sheet to check quality before
printing large jobs.
5
6
7
8
5. Select Photo
This specifies photo that you want to print by number when the
printer is in One or Set mode. The total number of photographs
on the memory card is displayed when the printer is in the All or
Index mode. To confirm the photo number, print Index or use
optional Preview Monitor.
English
6. Copies
The number on Copies setting depends on the Print Mode.
You can specify the number of copies from 1 to 100.
33
Page 36

All Specifies how many times to print all photos on the
Index Specifies how many times to print the index.
One Specifies how many times to print a selected photo.
Set Displays how many copies to be printed. It depends on
memory card.
Paper Size, Layout, the number of copies specified in the
Set mode. Up to ten copies can be made when Set is
selected in the Print Mode menu.
7. Quality
This selects the photo quality.
Normal Prints fast, saving ink. This setting is good for draft printing.
High Prints as high quality, but with reduced speed.
Super High Prints as the highest quality, but slower than High setting.
8. Advanced Settings
Various advanced settings such as Automatic Correction, Back
up, Ink Replacement and so on. Refer to the “Advanced settings”
on page 39.
Main Settings
Print all photographs on the memory card
All: Print all photographs on the memory card.
1. Select All as the Print Mode.
34
Page 37

2. Select the desired Paper Type, Paper Size, and Layout for
printing.
1
2
3. Scroll down the LCD panel settings, then specify the number
of copies for each photo.
4. Select the Quality for printing.
3
4
English
5. Press the Print button to print all photographs on the memory
card.
Print index print from the memory card
Index: Print an index of all photographs on a memory card.
Refer to “Index print” on page 23.
35
Page 38

Single photo print
One: Print a single, selected photograph from the memory card.
Refer to “Single photo print” on page 25.
Print multiple selected photographs
Set: Print selected photographs from the memory card.
1. Select Set as the Print Mode.
2. Select the Paper Type, Paper Size, Layout that you want to
print.
1
2
3. Press the u or d buttons to select Select Photo, then press
Select button. The Select Photo submenu is displayed.
36
Page 39

4. Press the u or d button to choose Select and press the Select
button.
4
5. Press the u or d button to select No. and press the Select
button.
5
English
6. Press the u or d button to select the photo number you want
to print, and press the Select button.
6
37
Page 40

7. Similarly, select the number of copies you want to print from
Copies. It can set up to 10 copies.
8. Press the u or d button to select Enter and press the Select
button. The photo number and number of copies you selected
are registered in the Select Photo submenu.
7
8
9. Repeat steps 4 to 8 in order to register several photos.
10. When all the photo numbers you want to print have been
registered, select Close and press the Select button; the
screen returns to the main menu.
11. Select print Quality that you want to print.
12. Press Print button to print multiple selected photographs.
38
10
Page 41

Advanced settings
Photo Number
The default setting here is ALL, which means the settings will
affect all of the photos to print. If ALL or Set is selected in Print
Mode, you can specify the number of the photo that you want to
adjust by using Advanced Settings.
Automatic Correction
This printer is able to correct the color of the printouts
automatically. There are two kinds of correction available. By
default, the setting is P.I.M.
For printing with PRINT Image Matching, see “Printing with
PRINT Image Matching” on page 56.
P.I.M.
(PRINT Image
Matching)
PhotoEnhance Images imported from the memory card are
Print with PRINT Image Matching function. If the
photo data does not include PRINT Image
Matching data, print with PhotoEnhance.
automatically enhanced. Printing requires more
time, but the image is enhanced to ensure higher
picture quality.
English
None Print with no automatic correction.
39
Page 42

Enhancements
The setting options below are to enhance the color of printouts.
Select PhotoEnhance in Automatic Correction before making this
setting. By default, the setting is Standard. Refer to the Quick
Reference for samples of photos with enhancements.
Standard Print with no enhancement.
People Optimize the photos of people.
Scenery Optimize outdoor scenery, such as mountains, sky, and
oceans.
Sunset Optimize on evening scene or sunset.
Night Optimize a night scene.
Backlit Optimize a bright scene.
Macro Optimize a close-up photography.
Brightness
This setting is to adjust the brightness of your printouts. By
default, the setting is Standard.
40
Brightest Adjust the color of printouts brighter.
Brighter Adjust the color of printouts slightly brighter.
Standard No brightness adjustment.
Darker Adjust the color of printouts slightly darker.
Darkest Adjust the color of printouts darker.
Page 43

Saturation
This setting is to adjust the vividness of your printouts. By default,
this setting is Standard.
Most Adjust the color of printouts more vividly.
More Adjust the color of printouts slightly more vividly.
Standard No vividness adjustment.
Less Adjust the color of printouts slightly duller.
Least Adjust the color of printouts duller.
Sharpness
This setting is to adjust the sharpness of your printouts. By
default, the setting is Standard.
Sharpest Adjust the outline of the subjects sharper.
Sharper Adjust the outline of the subjects slightly sharper.
Standard No sharpness adjustment.
English
Softer Adjust the outline of the subjects slightly softer.
Softest Adjust the outline of the subjects softer.
Zoom
It is possible to zoom in on a photo relative to the specified point
and print out the zoomed view. The image printed is trimmed to
the size of the original photo.
The base point can be selected from nine options: Upper Left,
Center Left, Lower Left, Upper Center, Center, Lower Center,
Upper Right, Center Right, and Lower Right. It is possible to select
either 1.2 or 1.5 times for each option.
41
Page 44

Example. Center 1.5
Note:
❏ It is possible to check the trimming status by mounting the optional
Preview Monitor. See “Preview Monitor Black version” on page
133 for details.
❏ Since the photo is zoomed, the image may become blurry depending
on the resolution of the original photo.
Frame
It is possible to superimpose an ornamental frame stored in the
printer on a photo and to print it out. One frame and one photo
can be superimposed for printing one framed photo. The frame
can be superimposed in the All, One, and Set print modes. It is
possible to print out a list of frames that can be used. See “Print
Frame Samples” on page 49.
Note:
Because the frames are for printing stickers, the output may become
blurry if the size of the frame exceeds the size of the sticker when printing.
42
Page 45

Roll Paper Cut
When roll paper is used for printing, whether the paper is cut
automatically by page can be selected. Also, this setting is not lost
when the printer’s power is turned off. By default, the setting is
None.
None The running roll paper is printed without
being cut between pages. No blank paper
is ejected between pages.
English
Single cut In this one-cut method, no blank paper is
Double cut In this two-cut method, the cut position does
ejected between pages.
not deviate, but a few centimeters of blank
paper is ejected after cutting.
Date
This setting is to print the date information contained in your
photo data. By default, the setting is None.
Print examples when the photo data includes the date information
of December 31, 2002.
None Does not print and date information.
yyyy.mm.dd 2002.12.31
mm.dd.yyyy 12.31.2002
dd.mm.yyyy 31.12.2002
mmm.dd.yyyy Dec.31.2002
dd.mmm.yyyy 31.Dec.2002
43
Page 46

Time
This setting is to print the time information contained in your
photo data. By default, the setting is None.
Print examples when the photo data includes the time
information of 10:00 p.m.
None Does not print and time information.
12-hour system 10:00
24-hour system 22:00
Photo Information
If your photo data contains the photo information conforms to
Exif standard, the information can be printed with this setting.
Following information will be printed:
Exposure time/Shutter speed (Exposure time takes precedence if
both values exist. ex. 1/30s)
F number (ex. F2.8)
ISO speed rate (ex. ISO100)
By default, the setting is Off.
On Prints photo information.
Off Does not print any photo information.
44
Page 47

Fit to Frame
This setting is to automatically trim off the image that extend
beyond the margins of the selected print size, so that the printed
result matches the specified print size. Either the top and bottom
areas or the left and right areas of the image will be trimmed,
depending on the aspect ratio of the original photo and the
selected print size. By default, this setting is On.
On Trims off the image.
Off Does not trim off the image
Resize each photo (without trimming it) so that it fits inside the
print area specified in the Select a Print Layout dialog box.
Margins may appear at the left and right of the photo, depending
on the print size and aspect ratio.
Bidirectional Printing
This setting activates bidirectional printing so your printer prints
both left-to-right and right-to-left. Bidirectional printing speeds
up printing, but decreases print quality. By default, this setting is
On.
English
Note:
If misaligned vertical lines appear during bidirectional printing, you
may need to align the print head. To align the print head, see “Aligning
the Print Head” on page 81.
45
Page 48

Crop Marks
This function prints crop marks on each page, which make it
easier to cut the photos after printing. By default, the setting is
none.
None Does not print crop marks.
Include Prints crop marks.
Sticker Adjustment: Up/Down
The print position for printing on the Photo Sticker, A6 size, 16
stickers/sheet is fine adjusted. The position can be adjusted
between -5 and +5 (-2.5 mm and +2.5 mm). The adjustment is set
in units of 0.5 mm. The position of the image is shifted toward the
top of the paper if + is selected. By default, the setting is 0.
The position of the image is shifted toward the bottom of the
paper if – is selected.
Sticker Adjustment: Left/Right
The print position for printing on the Photo Sticker, A6 size, 16
stickers/sheet is fine adjusted. The position can be adjusted
between -5 and +5 (-2.5 mm and +2.5 mm). The adjustment is set
in units of 0.5 mm. The position of the image is shifted toward the
right side of the paper if + is selected. By default, this setting is 0.
The position of the image is shifted toward the left side of the
paper if – is selected.
Ink Cartridge Replacement
The ink cartridge can be replaced by selecting this option.
46
Page 49

“Replacing an Ink Cartridge” on page 72.
Head Cleaning
The print head can be cleaned by selecting this option.
See “Cleaning the Print Head” on page 79 for how to clean it.
Nozzle Check
A nozzle check pattern is printed out by selecting this option.
See “Checking the Print Head Nozzles” on page 78 for how to
print it.
Paper Feed/Paper Eject
This option feeds or ejects the paper. The action is the same as
pressing the roll paper button.
Version Information
English
The printer version information is displayed.
Print Head Alignment
The print head can be aligned by selecting this option.
See “Aligning the Print Head” on page 81 for information on how
to perform the alignment.
47
Page 50

Cutting Position Adjustment
The cutting position of the auto cutter can be adjusted by selecting
this option.
See “Using Automatic Roll Paper Cutter” on page 69 for
information on how to perform the alignment.
LCD Contrast
The contrast of the LCD panel can be adjusted by selecting this
option.
Backup
It is possible to store the contents of a memory card in an external
storage device, such as an MO drive, Zip® drive or SD memory
card reader/writer, by connecting it to the printer.
Note:
❏ Insert a storage medium that satisfies the following conditions in
the external storage device before you start backing up.
❏The medium must be formatted for DOS/Windows format.
❏The medium must have enough free memory space for backup.
❏The medium must have only one partition.
❏Backup cannot be performed while printing to the printer from a
computer.
❏ The available MO disk capacities are 128, 230, and 640 MB.
❏ You cannot back up while printing from the computer to the printer.
48
Page 51

❏ Do not connect the external storage device while the computer is
accessing the memory card inserted in the printer.
❏ You can back up 512 times to one storage medium.
❏ The message “Cannot recognize the loaded media.” is displayed on
the LCD panel if the format of the inserted medium is not
DOS/Windows-compatible. Follow the instructions on the LCD
panel to format the medium.
Connect the external storage device to the printer and operate
according to the instructions displayed on the screen. See the
following section, “Printing with an External Device” on page 54
for how to connect an external storage device.
Caution:
Do not remove the medium inserted in the external storage device
c
and disconnect the cable from the printer while backing up.
Print Frame Samples
It is possible to print a list of frames that can be used by selecting
this option.
English
Follow the instructions displayed on the LCD panel to print the
frame samples.
The letters printed in the lower right corner of the frame samples
have the following meanings.
s Frame data for Sticker Size
Frame data that have pixels of 640 or less (horizontal) and 480 or
less (vertical) dots is appropriate for Sticker print layout.
49
Page 52

Memory Card Overwrite
This option sets whether or not writing from a computer to a
memory card is allowed when the printer is connected to the
computer. By default, the setting is Enable.
Enable Writing to the card from computer is allowed. Writing, deleting,
formatting, and creation of files/directories are possible.
Disable Writing to the card from computer is prohibeted. Writing,
deleting, formatting, and creation of files/directories are not
possible.
Language
The language displayed on the LCD panel can be selected with
this option.
PRINT Image Matching
50
✽
Page 53

✽ The camera icon appears when the first photograph in the memory
card has PRINT Image Matching information and when One, All or Set
is selected in Print Mode. Refer to “How is PRINT Image Matching
used?” in the online Reference Guide for details.
DPOF settings
1
This printer conforms to DPOF (Digital Print Order Format)
version 1.10. DPOF lets you set the photo numbers and the
number of copies for photos on the digital camera before you
print. To create DPOF data that supports DPOF, you must use a
digital camera that supports DPOF. For the details about DPOF
settings, see your digital camera’s documentation.
English
2
1. Load paper and a memory card which contains DPOF data.
DPOF icon appears and Print Mode turns into DPOF as soon
as you load the memory card. To exit DPOF mode, select the
other settings as the Print Mode.
2. Make Paper Type, Paper Size, Page Layout, Quality settings.
The copies menu shows the number of sheets of paper
required for the selected layout.
Note:
Page Layout setting is not available when the DPOF settings are
for an Index print.
51
Page 54

3. Press the Print button to start printing.
PRINT Image Framer
✽ P.I.F. icon appears when the frame data for PRINT Image Framer is
included in the memo ry card. Contact your regional customer suppo rt
for details.
✽
Storing and Loading the Settings
You can store the settings on the LCD panel you use frequently
to each of two Custom buttons and load the stored settings easily
by pressing the Custom buttons.
You can store the following settings:
❏ Print Mode
❏ Paper Type
❏ Paper Size
❏ Layout
52
Page 55

❏ Automatic Correction in Advanced Settings
❏ Enhancement in Advanced Settings
❏ Brightness in Advanced Settings
❏ Saturation in Advanced Settings
❏ Sharpness in Advanced Settings
Note:
❏ You cannot store or load the settings when an error occurs, printing
the nozzle check pattern and cleaning the print head.
❏ You cannot store the settings for Automatic Correction,
Enhancement, Brightness, Saturation and Sharpness when
All is set as Photo Number in Advanced Settings.
Follow the steps below to store the settings on the LCD panel to
the Custom buttons.
1. Make the settings that you want use.
2. Press the Custom 1 or Custom 2 button for more than two
seconds. The message “The present settings have been saved
as Custom 1 (or Custom 2)” is displayed in the LCD panel.
If you want to load the stored settings, press the Custom 1 or
Custom 2 button.
English
53
Page 56

Printing with an External Device
Connecting an external device
Caution:
❏ Not all of the devices that can be connected with USB cable
c
are supported. Contact your regional customer support for
details.
❏ Do not connect USB devices other than an external storage
device, such as a printer or mouse. The printer may fail.
❏ Do not connect the external storage device while the
computer is accessing the memory card inserted in the
printer.
Note:
❏ A USB cable is necessary in order to connect the printer with the
external storage device.
❏ Use a USB cable of 2m or less.
❏ A USB hub cannot be used.
❏ Even if the printer is connected to a computer, the computer cannot
recognize the external storage device.
1. Turn on the printer.
54
Page 57

2. Insert the USB cable to the backup drive USB connector and
insert the other connector into the external storage device.
Printing from an external device
1. Insert a medium that contains photo data into the external
storage device.
2. If a memory card has been inserted in the memory card slot,
remove it.
English
Note:
❏ If a memory card is inserted in the memory card slot, the printer
does not recognize the external storage device; it prints out the
photo data in the memory card.
❏ Select the folder in which the photo data you want to print out
is registered using the Folder Selection menu if data in the
external storage device has been backed up using the backup
function of the printer. The Folder Selection menu is displayed
when data in the external storage device is recognized and
setting in the Print Mode is changed.
3. Set the individual items using the same procedure as when
printing from a memory card, and perform printing.
55
Page 58

Exif Print
Exif2.2, a new standard for digital cameras, also called “Exif
Print.”, has been established to make the use of fine digital photos
easier.
Printing with PRINT Image Matching
How is PRINT Image Matching used?
This product supports PRINT Image Matching and PRINT Image
Matching II. When used in combination, PRINT Image Matching
or PRINT Image Matching II enabled digital still cameras, printers
and software help photographers to produce images more
faithful to their intentions.
The PRINT Image Matching function can be utilized if this
EPSON printer is used to print images from input devices, such
as digital cameras, loaded with the PRINT Image Matching
function. Print commands are attached to image data for printing
if photos are taken with an input device loaded with the PRINT
Image Matching function.
Note:
❏ See the relevant input device instruction manual for details
concerning the use of devices loaded with the PRINT Image
Matching function.
❏ Please check with the input device manufacturer to determine
whether it is loaded with the PRINT Image Matching function.
56
Page 59

Printing without a PC
Insert the digital camera memory card into the memory card slot,
specify the image to be printed to retrieve print commands
registered in the image file and print.
Media for which PRINT Image Matching is enabled
PRINT Image Matching is enabled when the following media are
used:
Plain Paper/EPSON Premium Ink Jet Plain Paper/
EPSON Bright White Ink Jet Paper/EPSON Photo Paper/
EPSON Matte Paper-Heavyweight/
EPSON Premium Glossy Photo Paper/
EPSON Premium Semigloss Photo Paper/
EPSON ColorLife Photo Paper
Using Roll Paper
English
Using the Roll Paper Holder
With the roll paper holder mounted on the printer, you can print
in roll paper format, which is convenient for banner printing.
When you are printing using the roll paper holder, keep the
following in mind:
❏ Load the paper printable side up.
❏ Use flat, undamaged paper. If the paper is curled, flatten it
before loading to avoid paper feeding problems.
❏ Always handle the paper by the edges.
57
Page 60

❏ Provide ample space in front of the printer for the paper to
eject fully.
❏ Make sure that the output tray is down and the output tray
extension is closed.
❏ Check that the end of the paper is cut cleanly, perpendicular
to the long axis of the paper. If it is cut on a diagonal or not
cleanly, the paper may not feed smoothly or the print may
extend off the edge of the paper.
❏ EPSON recommends using media distributed by EPSON to
ensure high-quality results.
See “Loading Roll Paper” on page 58 for how to set roll paper.
Loading Roll Paper
Follow the directions below to mount the roll paper holder and
load the following types of roll paper.
Photo Paper (100 mm × 8m)
Photo Paper (210 mm × 10 m)
Premium Glossy Photo Paper (100 mm × 8m)
Premium Glossy Photo Paper (127 mm × 8m)
Premium Glossy Photo Paper (210 mm × 10 m)
Premium Semigloss Photo Paper (100 mm × 8m)
58
Page 61

1. Load roll paper in the roll paper holder.
Note:
Remove the transparent sheet after setting the roll paper into the
holders.
2. Check that the end of the roll is cut perpendicularly to the
edges as shown, using a triangle.
English
Caution:
Always use a triangle or other tool to ensure that the end of
c
the roll is cut perpendicularly. A diagonal cut may cause
paper feed problems.
59
Page 62

3. To flatten the roll paper, place it printable-side up between
the pages of the instruction booklet packaged with the roll
paper to protect it. Then, roll the booklet in the direction
opposite of the paper’s curl.
4. Remove the paper support and lower the output tray, slide
out the extension (for other than 210 mm roll paper) or attach
the catcher (for 210 mm roll paper), and then turn on the
printer.
For other than 210 mm roll paper
60
Note:
For details on attaching the catcher for 210 mm roll paper, refer to
“Attaching the Catcher for 210 mm Roll Paper” on page 63.
Page 63

5. Insert the roll paper holder into the slot at the rear of the
printer.
6. Gently insert the end of the paper into the printers as far as it
will go, flush with the right edge guide. Slide the left edge
guide against the left edge of the printer.
English
61
Page 64

7. To load the paper correctly, you must hold the paper in place
with your hand while you press the
paper will feed into the printer.
8. Open the printer cover and make sure that the paper is
feeding correctly. If it is not straight, press the
button for at least three seconds to eject the paper. The
maintenance light comes on. Press the
clear the error, then feed the paper again.
z roll paper button. The
z roll paper
z roll paper button to
The roll paper is now loaded.
62
Page 65

Attaching the Catcher for 210 mm Roll Paper
To receive the 210 mm roll paper cut off by the cutter, attach the
catcher for 210 mm roll paper. Follow the steps below.
Caution:
❏ When using the catcher for 210 mm roll paper, move the
c
printer to the edge of the desk or table. Be careful not to let
the printer fall from the desk or table when moving it. In
addition, do not place the printer on an unstable surface.
❏ Care should be taken not to damage your eyes with the tip of
the catcher.
❏ Keep the catcher out of the reach of children.
Note:
You do not need to attach the catcher for 210 mm roll paper when cutting
the roll paper other than 210 mm.
1. Remove the protective cap from the tip of the catcher for
210 mm roll paper.
English
Note:
❏ Store the removed protective cap in a safe place.
63
Page 66

❏ Attach the protective cap when storing the catcher for 210 mm
roll paper.
2. Insert the left tip into the left hole on the front panel of the
printer.
3. Insert the right tip into the right hole on the front panel of the
printer.
64
Page 67

Caution:
❏ The catcher for 210 mm roll paper can hold only one sheet.
c
When one sheet is printed, immediately remove the sheet from
the catcher.
❏ To remove the catcher for 210 mm roll paper, pull out the tip
of the catcher being inserted in the printer hole diagonally.
Printing on Roll Paper
Once you have prepared your roll paper and it is loaded in the
printer, you must make settings in the LCD panel in order to print.
Note:
❏ Always check the ink levels before printing on roll paper as replacing
ink cartridges while the roll paper is loaded can smear the paper.
❏ We recommend replacing the roll paper with a new roll when there
is 20 cm remaining. Otherwise, print quality may be compromised
on the remaining portion.
English
❏ Do not select A4, 100
Size setting when roll paper is loaded in the sheet feeder. Doing so
causes unnecessary paper to be fed after each print job. If you have
already started printing, press the Cancel button. Wait until the
printer stops printing and feeding paper. Cut off the paper at the
back of the printer, then turn off the printer. The remaining paper
is ejected.
×
150 mm, L or 2L sheet paper for the Paper
Cutting the Remaining Last Photo after Printing
Follow the directions below to cut the last photo remaining in the
printer when printing is completed.
65
Page 68

1. Wait until the last photo is printed and printing stops
completely. The last photo remains in the printer without
being cut.
2. Press the z roll paper button to cut the photo.
Caution:
❏ After roll paper is cut, do not pull the printed roll paper until
c
the paper is completely ejected. Otherwise you may damage
the printer.
❏ If printing is done on premium glossy photo paper or
premium semigloss photo paper, remove the photos from the
output tray immediately after printing, and spread the photos
one by one. If they are stacked, the color of the stacked areas
may change.
Printing area and margins
You can change the printing area and the margins for roll paper
with the printer driver settings. There are two margin settings.
One setting creates a 3 mm margin on both sides of your printout.
The other setting prints with no margins on either side of your
printout.
66
Page 69

To print data with no margins between separate files, as shown
below, do not press the
Standard margins No margins
Note:
The top margin is automatically set to 20 mm, regardless of the margin
setting.
z roll paper button between print jobs.
Removing Roll Paper
Follow the directions below to remove the paper from the printer.
1. After printing is completed, the last photo printed remains in
the printer without being cut. Press the roll paper button to
cut the photo remaining in the printer.
English
Note:
❏ Depending on the size of the photos, two photos may remain in the
printer without being cut. Press the roll paper button in this case as
well; both photos are cut.
❏ The Auto Cut settings can be changed. See “Using Automatic Roll
Paper Cutter” in the online Reference Guide for the detailed
explanation on how to do this.
67
Page 70

2. Hold down the z roll paper button for about 3 seconds. The
paper feeds in reverse to a position where it can be easily
removed from the sheet feeder at the back of the printer. If it
does not feed to this position, repeat this step. A message
indicating that the roll paper is removed appears on the
display.
3. Turn the roll paper knob and roll up the roll paper.
68
Page 71

4. Gently remove the paper, then press the z roll paper button
to clear maintenance light.
Storing EPSON Roll Paper
Return unused paper to the original package as soon as you finish
printing. EPSON recommends storing your printouts in a
resealable plastic bag. Keep them away from high temperature,
humidity, and direct sunlight.
Using Automatic Roll Paper Cutter
English
Note:
Refer to “Roll Paper Cut” on page 43 for printing on roll paper using
the cutter.
Cutting position adjustment with Automatic Roll Paper Cutter
Make sure to adjust the cutting position to improve its precision.
Follow the procedure described in the next section in order to
adjust the cutting position of the cutter.
69
Page 72

Note:
❏ Before adjusting the cutter position, it is necessary to turn the
printer on and set the roll paper.
See for more details about roll paper setting.
❏ To maintain a precise cutting position, we recommended to adjust
the cutting position each time you change the type or size (width)
of roll paper.
Using the control panel
1. Press the ( maintenance button to display the Advanced
Settings menu.
2. Press the d button to position the cursor at the Cutting
Position Adjustment and press the Select button.
3. Check that the roll paper is set and press the Custom 1 button.
The cutting position adjustment pattern is printed out, and
the roll paper is automatically cut.
4. Look at the cutting position adjustment pattern and find the
number for which the color boundary is cut with the highest
precision.
5. Press the u or d buttons to position the cursor at the number
identified in step 4, and press the Select button.
70
Page 73

Replacing Ink Cartridges
Checking the Ink Supply
Using the LCD panel
To check which cartridge requires replacing, check the LCD
panel.
✽✽✽
✽ Black ink icon
✽✽ Color ink icon
English
Ink icon indicates the amount of the ink remaining as follows:
Black ink icon Color ink icon Status
blinks blinks Ink cartridge is empty. Replace
with a new one.
Black ink cartridge: T026
Color ink cartridge: T027
and blink and blink Ink cartridge is nearly empty.
comes on comes on Ink remaining
71
Page 74

Replacing an Ink Cartridge
This printer uses ink cartridges equipped with IC chips. The IC
chip accurately monitors the amount of ink used by each
cartridge, so even if a cartridge is removed and later inserted
again, all of its ink can be used. However, some ink is consumed
each time the cartridge is inserted because the printer
automatically checks reliability.
You can replace an ink cartridge by using the printer’s control
panel or by using the Status Monitor utility. To replace an ink
cartridge using the b maintenance button on the printer’s control
panel, follow the steps below. To replace an ink cartridge or check
ink levels using the Status Monitor utility or LCD panel.
Warning:
❏ Keep ink cartridges out of the reach of children. Do not allow
w
children to drink from or otherwise handle the cartridges.
❏ Be careful when you handle the used ink cartridges, as there
may be some ink around the ink supply port. If ink gets on
your skin, wash the area thoroughly with soap and water. If
ink gets into your eyes, flush them immediately with water.
If discomfort or vision problems remain after a thorough
flushing, see a physician immediately.
72
Page 75

Caution:
❏ EPSON recommends the use of genuine EPSON ink
c
cartridges. Other products not manufactured by EPSON
may cause damage to your printer not covered by EPSON's
warranties.
❏ Leave the old cartridge installed in the printer until you have
obtained a replacement, or ink remaining in the print head
nozzles may dry out.
❏ Do not refill the ink cartridges. The printer calculates the
amount of ink remaining using an IC chip on the ink
cartridge. Even if the cartridge is refilled, the amount of ink
remaining will not be recalculated by the IC chip and the
amount of ink available for use will not change.
Note:
❏ You cannot continue printing with one ink cartridge empty, even if
the other cartridge still contains ink. Before printing, replace the
empty cartridge.
❏ In addition to the ink used during document printing, ink is
consumed during the print head cleaning operation, during the
self-cleaning cycle which is performed when the printer is turned
on, and during ink charging when the ink cartridge is installed in
the printer.
English
❏ If you replace the ink cartridges while the roll paper is loaded, the
media may be smeared.
For more information about ink cartridges, see “When handling
the ink cartridges” on page 8.
1. Make sure that the printer is on, but not printing, then open
the printer cover.
73
Page 76

Note:
You can identify the status of the printer condition. The ink part of
the black or color ink icon displayed in the LCD panel flashes when
the ink runs low. When the ink runs out, the entire ink icon flashes
and a message is displayed.
2. Check that the message “ink out” is displayed in the LCD
panel and press the maintenance button. This message is not
displayed if there is some ink left. In this case, press the
maintenance button, make sure Ink Cartridge Replacement is
selected, and press the Select button. To find out which
cartridge requires replacing, see “Checking the Ink Supply”
on page 71.
3. Follow the instructions on the screen and press the Custom 1
button. The ink cartridge moves slowly to the ink replacement
position.
Caution:
Do not move the print head by hand, as this may damage the
c
printer. Always press the ( maintenance button to move it.
4. Lift up the ink cartridge clamp as far as it will go. Take the
cartridge out of the printer. If the cartridge is empty, dispose
of it properly. Do not take the used cartridge apart or try to
refill it.
74
Warning:
If ink gets on your hands, wash them thoroughly with soap
w
and water. If ink gets into your eyes, flush them immediately
with water. If discomfort or vision problems remain after a
thorough flushing, see a physician immediately.
Page 77

5. Remove the new ink cartridge from its protective bag and
then only peel off the yellow tape seal. Do not touch the green
IC chip on the side of the cartridge.
black ink cartridge (T026) color ink cartridge (T027)
English
75
Page 78

Caution:
❏ You must remove the yellow tape seal from the cartridge
c
before installing it, or the cartridge will become unusable
and you will be unable to print.
❏ If you have installed an ink cartridge without removing
the yellow tape seal, you must remove the cartridge and
install a new one. Prepare the new cartridge by removing
the yellow tape seal, then install it in the printer.
❏ Do not remove the blue portion of the tape seal from the
top of the cartridge, or the print head may become clogged
and be unable to print.
❏ Do not remove the tape seal from the bottom of the
cartridge or the ink will leak.
❏ Do not remove the green IC chip from the side of the
cartridge. If you install an ink cartridge without an IC
chip, the printer may be damaged.
❏ Do not touch the green IC chip on the side of the
cartridge, or normal operation and printing may not be
possible.
76
Do not touch this part.
Page 79

6. Align the tabs on the ink cartridge so that they are resting on
the tabs protruding from the base of the opened ink cartridge
c l am p. P us h t h e c la mp s do w n u n ti l t h ey l oc k f i rm l y i n t o pl ac e.
Make sure that the ink cartridge tabs are not under the hinges
protruding from the base of the opened ink cartridge clamp.
Caution:
After you remove an ink cartridge from the printer, please
c
insert a new one immediately. If no cartridge is present, the
print head may dry out and become unable to print.
7. Press the custom 1 button. The print head will move and
begins charging the ink delivery system. When the ink
charging process is finished, the print head will return to its
home position.
English
Caution:
The progress meter is displayed in the LCD panel while the
c
ink is being charged. Never turn the power supply to the
printer off before the completion message is displayed. Doing
so can result in incomplete charging of ink.
8. When the message “Ink cartridge replacement is complete” is
displayed in the LCD panel, press the Custom 1 button.
9. Close the printer cover.
77
Page 80

Maintenance
Checking Printer Condition and Maintaing
Checking the Print Head Nozzles
If you find that the printed image is unexpectedly faint or dots in
the printed image are missing, you may be able to identify the
problem by checking the print head nozzles.
Using the control panel buttons
Follow the steps below to check the print head nozzles using the
control panel buttons.
1. Make sure that A4 or Letter size paper is loaded in the sheet
feeder.
2. Press the
3. Press d button to position the cursor at Nozzle Check and
press the Select button.
4. Follow the instructions displayed in the LCD panel and press
the Custom 1 button.
5. The nozzle check pattern is printed out. See the following
explanation. If it is necessary to clean the print head, press the
Custom 2 button to clean the print head.
78
( maintenance button.
Page 81

The printer will print an operation check page that includes a
nozzle check pattern. Below are sample printouts.
Good sample
Print head needs to be cleaned
Segments are missing
The above sample may be shown in black and white, but the actual test
prints in color (CMYK).
If the nozzle check page does not print satisfactorily (for example,
if any segment of the printed lines is missing), there is a problem
with the printer. This could be a clogged ink nozzle or a
misaligned print head. See the next section for details on cleaning
the print head. For information on aligning the print head, see
“Aligning the Print Head” in the online Reference Guide.The nozzle
check page also indicates the amount of ink remaining in each
cartridge. BK: shows the amount of remaining black ink, and CL:
shows the amount of remaining color ink.
English
Cleaning the Print Head
If you find that the printed image is unexpectedly faint or dots in
the printed image are missing, you may be able to solve these
problems by cleaning the print head, which ensures that the
nozzles are delivering ink properly.
79
Page 82

Note:
❏ Print head cleaning uses both color and black ink. To avoid wasting
ink, clean the print head only if print quality declines (for example,
if the printout is blurry or the color is incorrect or missing).
❏ Use the Nozzle Check utility first to confirm that the print head
needs to be cleaned. This saves ink.
❏ You cannot clean the print head if the message “ink end” is displayed
in the LCD panel and the ink icon flashes. Replace the appropriate
ink cartridge first.
❏ Do not start the Head Cleaning or Nozzle Check utility while
printing is in progress, or your printout may be marred.
Using the control panel buttons
Follow the steps below to clean the print head using the control
panel buttons.
1. Check that no warnings or errors are displayed in the LCD
Panel.
Note:
You cannot clean the print head if the message “ink end” is displayed
in the LCD panel and the ink icon flashes, you cannot clean the head
and this operation will start the ink cartridge replacement
procedure. If you do not want to replace an ink cartridge at this
moment, press custom 1 button to return the print head to its home
position.
2. Press the
3. Press d button to position the cursor at Head Cleaning and
press the Select button.
( maintenance button.
80
Page 83

Caution:
Never turn the power supply to the printer off while the
c
progress meter is displayed in the LCD panel. Doing so may
damage the printer.
4. Follow the instructions shown on the display and press the
Custom 1 button.
5. The print head cleaning will start.
If print quality has not improved after repeating this procedure
four or five times, turn the printer off and leave it alone overnight,
then try head cleaning again.
If the print quality still has not improved, one or both of your ink
cartridges may be old or damaged and may need to be replaced.
To replace an ink cartridge before it is empty, see “Replacing an
Ink Cartridge” on page 72.
If print quality remains a problem after replacing the ink
cartridges, contact your dealer.
Note:
To maintain print quality, we recommend turning on the printer for at
least one minute every month.
English
Aligning the Print Head
If you notice misalignment of vertical lines, you may be able to
solve this problem from the LCD panel.
Using the control panel buttons
Follow the steps below to align the print head using the control
panel buttons.
1. Check that no warnings or errors are displayed in the LCD
Panel.
81
Page 84

2. Press the ( maintenance button.
3. Press d button to position the cursor at Print Head Alignment
and press the Select button.
4. Follow the instructions displayed on the LCD panel to align
the print head using the following alignment sheet printed
during alignment.
5. Press the Custom 1 button to finish.
Cleaning the Printer
To keep your printer operating at its best, clean it thoroughly
several times a year as follows.
1. Unplug the printer’s power cord.
2. Remove any paper from the sheet feeder.
82
Page 85

3. Use a soft brush to carefully clean away all dust and dirt from
the sheet feeder.
4. If the outer case or the inside of the sheet feeder is dirty, wipe
it with a soft, clean cloth dampened with mild detergent. Keep
the printer cover closed to prevent water from getting inside.
5. If the inside of the printer accidentally gets soiled with ink,
wipe it off with a damp cloth.
Warning:
Be careful not to touch the gears or rollers inside the printer.
w
Caution:
❏ Be careful not to wipe grease on the metal parts under the ink
c
carriage passage.
❏ Never use alcohol or thinner to clean the printer, as these
chemicals can damage the components as well as the case.
❏ Be careful not to get water on the printer mechanism or
electronic components.
❏ Do not use a hard or abrasive brush.
English
❏ Do not spray the inside of the printer with lubricants.
Unsuitable oils can damage the mechanism. Contact your
dealer or a qualified service person if lubrication is needed.
❏ Only use a dry, soft cloth to clean the display and the optional
Preview Monitor. Do not use liquid or chemical cleansers.
Transporting the Printer
If you need to transport your printer, carefully prepare and repack
it as described below using the original box (or a similar box that
the printer fits snugly into) and packing materials. Follow the
steps below.
83
Page 86

Caution:
❏ When storing or transporting the printer, don't tilt it, put it
c
vertically or turn it upside down. Otherwise, ink may leak
from the cartridge.
❏ Leave the ink cartridges installed. Removing the cartridges
can dehydrate the printer head and may prevent the printer
from printing.
1. Open the printer cover and make sure that the print head is
in the home (far right) position. If not, plug in the printer, wait
until the print head returns to the home position, then close
the printer cover and unplug the printer.
2. Disconnect the interface cable from the printer.
3. Remove the paper from the sheet feeder and remove the paper
support.
4. Open the printer cover again. Secure the ink cartridge holder
to the printer with the protective material and tape as shown
below, then close the printer cover.
5. Raise the output tray.
6. Attach the protective materials to both sides of the printer.
84
Page 87

7. Repack the printer and power cord in the original box.
8. Keep the printer level during transport.
Troubleshooting
The solutions herein are for problems when printing directly from
a memory card.
If a problem occurs while printing from a computer, refer to the
online Reference Guide.
Error/Warning Display
You can identify many common printer problems using the
display on your printer’s control panel.
Error
Display Solution
English
Black ink out.
Black: T026
The genuine EPSON ink cartridge listed above is
recommended. Press the Maintenance button
for ink cartridge replacement.
Color ink out.
Color: T027
The genuine EPSON ink cartridge listed above is
recommended. Press the Maintenance button
for ink cartridge replacement.
Black and Color ink out.
Black: T026
Color: T027
The genuine EPSON ink cartridges listed above
are recommended. Press the Maintenance
button for ink cartridge replacement.
Replace the black
ink cartridge with a
new one.
Replace the color
ink cartridge with a
new one.
Replace the black
and color ink
cartridges with new
ones.
85
Page 88

Paper is not set correctly.
Set the paper correctly, then press the Roll Paper
button if using roll paper, or press the
Maintenance button if using sheet paper.
Load paper in the
sheet feeder, and
press the
( maintenance
button to turn this
light off. The printer
resumes printing.
Roll paper has been backed out of the printer or
there is a paper jam. For roll paper, use the roll
paper knobs to rewind the paper onto the roll,
then press the Roll Paper button. For jammed
paper, see your printer documentation for
information about cleaning the jam.
Color ink cartridge not correctly installed.
Color: T027
The genuine EPSON ink cartridge listed above is
recommended.
Roll paper backout:
Use the roll paper
knobs to rewind the
paper onto the roll,
and then press the
z paper button.
Paper jam:
Take all the paper
out of the feeder,
reload it, and then
press the
( maintenance
button to turn this
light off. If the light
continues to flash,
turn off the printer
and gently pull all
the paper out of the
printer. If it tears and
pieces remain inside
the printer, open the
printer cover and
remove the pieces
of paper. Turn on th e
printer and try again.
Reinstall the cartridge.
86
Black ink cartridge not correctly installed.
Black: T026
The genuine EPSON ink cartridge listed above is
recommended.
Black and Color ink cartridges not correctly
installed.
Black: T026
Color: T027
The genuine EPSON ink cartridges listed above
are recommended.
Page 89

Cutter error. See your printer documentation for
information about clearing the error.
Turn the printer off,
remove any jammed
paper, and then turn it
on again. If the error is
not cleared, contact
your dealer.
English
Unable to cut. See your printer documentation
for information about clearing the error.
The inserted card cannot be used with this
printer.
Smart Media card inserted incorrectly. Eject the SmartMedia
General error
See your printer documentation for information
about clearing the error.
Turn the printer off,
remove any jammed
paper, and then turn it
on again.
Use a compatible and
formatted memory
card.
card, confirm both
sides are correct, and
then insert again.
Turn the printer off,
and after a few
seconds, turn it on
again. If the error is
not cleared,
contact your dealer.
87
Page 90

Error Display Other
Ink low Ink icon blinks Obtain a replacement ink
Printing from
computer*
Irregular
external
device.*
*1 This warning app ears when the Print button is pu shed, and it disappears after
three seconds.
*2 This warning is displayed for one second every 3 seconds.
2
Communicating with
1
computer. Please wait.
Connected device
cannot be used.
cartridge.
Start printing from the
control panel aft er printing
from the computer is
completed.
Connect on external
storage device that is
compatible with the
printer.
Print Quality Problems
Horizontal banding
Try one or more of these solutions:
❏ Make sure that the printable side of the paper is face up in the
sheet feeder.
❏ Run the Head Cleaning utility to clear any clogged ink
nozzles. “Cleaning the Print Head” on page 79.
❏ Make sure that the Media Type selected in the LCD panel is
appropriate for the type of media loaded in the printer.
88
Page 91

❏ Make sure that the position of the adjust lever is appropriate
for the media type. When printing on media of normal
thickness, set the adjust lever to the
on envelopes or thick media, set the position to
m position. When printing
^.
Vertical misalignment or banding
Try one or more of these solutions:
❏ Make sure that the printable side of the paper is face up in the
sheet feeder.
❏ Run the Head Cleaning utility to clear any clogged ink
nozzles. “Cleaning the Print Head” on page 79.
❏ Make sure that the Media Type setting selected in the Control
Panel is appropriate for the type of media loaded in the
printer.
❏ Make sure that the position of the adjust lever is appropriate
for the media type. When printing on media of normal
thickness, set the adjust lever to the
on envelopes or thick media, set the position to ^.
m position. When printing
English
Color gaps
Try one or more of these solutions:
❏ Make sure that your paper is not damaged, dirty, or too old.
Also, make sure that the printable side of the paper is face up
in the sheet feeder.
❏ Run the Head Cleaning utility to clear any clogged ink
nozzles.
“Cleaning the Print Head” on page 79.
89
Page 92

❏ Check the LCD panel. If the ink icon is flashing or a message
is displayed, replace the appropriate ink cartridge.
& See “Replacing an Ink Cartridge” on page 72.
❏ Make sure that the Media Type setting selected in the Control
Panel is appropriate for the type of media that is loaded in the
printer.
Incorrect or missing colors
Try one or more of these solutions:
❏ Run the Head Cleaning utility. If colors are still incorrect or
missing, replace the color ink cartridge. If the problem
persists, replace the black ink cartridge. See “Replacing an Ink
Cartridge” on page 72 for details.
❏ Make sure that you are not using an ink cartridge with an
expired date printed on the cartridge carton. Also, if you have
not used the printer for a long time, replace with new ink
cartridges. See “Replacing an Ink Cartridge” on page 72.
Blurry or smeared printout
Try one or more of these solutions:
❏ Make sure that the printer is on a flat, stable surface that
extends beyond the printer base in all directions. The printer
will not operate properly if it is tilted.
❏ Make sure that your paper is dry and that the printable side
is facing up. Also, make sure that you are using an acceptable
paper type. See “Paper” on page 139 for specifications.
❏ If the paper is curled toward the printable side, flatten it or
curl it slightly in the opposite direction.
90
Page 93

❏ Set the adjust lever to the ^ position, and make sure the
Media Type setting in the LCD panel is correct.
❏ Remove each sheet from the output tray as it is printed,
especially if you are using transparencies.
❏ If you are printing on glossy media, place a support sheet (or
a sheet of plain paper) beneath the stack, or load only one
sheet at a time.
English
❏ When printing on thick media, set the adjust lever to the
position.
❏ Run the Head Cleaning utility.
❏ Load and eject dry paper several times. If the problem
persists, ink may have leaked inside the printer, so wipe the
inside of the printer with a soft, clean cloth.
Wipe here
Warning:
Be careful not to touch the gears or rollers inside the printer.
w
Caution:
Be careful not to wipe grease on the metal parts under the
c
print head path.
^
91
Page 94

Printout Problems Not Related to Print Quality
If one of the following problems has occurred, try the solutions
listed for the problem.
❏ Blank pages print
❏ Printout has smears on the bottom edge
❏ Printing is too slow
Blank pages print
❏ Run the Head Cleaning utility to clear any clogged nozzles.
“Cleaning the Print Head” on page 79.
Printout has smears on the bottom edge
❏ If the paper is curled toward the printable side, flatten it or
curl it slightly in the opposite direction.
❏ Set the adjust lever to the
^ position.
Printing is too slow
❏ Make sure that the Media Type setting in the LCD panel is
correct.
Paper Does Not Feed Correctly
If one of the following problems has occurred, try the solution(s)
listed for that problem.
92
Page 95

❏ Paper does not feed
❏ Multiple pages feed
❏ The paper jams
❏ Paper is not ejected fully or is wrinkled
Paper does not feed
Remove the stack of paper and make sure of the following:
❏ The paper is not curled or creased.
❏ The paper is not too old. See the instructions that came with
the paper for more information.
❏ The paper is not loaded higher than the arrow on the left edge
guide.
❏ Paper is not jammed inside the printer. If it is, remove the
jammed paper.
❏ The black and/or color ink cartridges are not empty. If one is,
replace the appropriate cartridge. To determine which
cartridge is empty, see “Replacing an Ink Cartridge” on page
72.
English
Load the paper again. Make sure that you follow any special
loading instructions that came with your paper. Also see “Media
Types” on page 134.
93
Page 96

Multiple pages feed
❏ For the users directly printing from memory card, do not
select A4, 100 × 150 mm L or 2L sheet paper for the Paper Size
setting when roll paper is loaded in the sheet feeder. Doing
so causes unnecessary paper to be fed after each print job. If
you have already started printing, press the Cancel button.
Wait until the printer stops printing and feeding paper. Cut
off the paper at the back of the printer, then turn off the
printer. The remaining paper is ejected.
❏ Make sure that the paper stack fits under the arrow mark
located on the inside surface on the left edge guide.
❏ Make sure that the left edge guide is snug to the left edge of
the paper.
❏ Make sure that the paper is not curled or folded. If so, flatten
it or curl it slightly toward the opposite side before loading.
❏ Make sure that the position of the adjust lever is appropriate
for the media type. When printing on media of normal
thickness, set the adjust lever to the
on envelopes and thick media, set the position to
m position. When printing
^.
❏ Remove the stack of paper and make sure that the paper is
not too thin. See “Paper” on page 139 for specifications. Fan
the edges of the stack to separate the sheets, then reload the
paper.
Paper jams
For a sheet paper jam, turn the printer off, open the printer cover,
remove all of the paper inside including any torn pieces, close the
printer cover, turn the printer on, and then reload the paper in the
sheet feeder.
94
Page 97

For a roll paper jam, hold down the z roll paper button for about
3 seconds to feed the paper in reverse, hold down the z roll paper
button for about 3 seconds to feed the paper in reverse again, and
then roll up the then roll paper.
If the error does not clear, turn the printer off, open the printer
cover, gently remove the roll paper backward, and then close the
printer cover.
Note:
If you cannot remove a foreign object easily by yourself, do not use force
and do not disassemble the printer. Call your dealer for assistance.
If your paper jams frequently, make sure of the following:
❏ The paper is smooth, not curled or wrinkled.
❏ The printable side of the paper is face up in the sheet feeder.
❏ The paper stack was fanned before loading.
❏ The paper is not loaded above the arrow on the left edge
guide.
English
❏ The number of sheets in the paper stack does not exceed the
limit specified for that media.
❏ The left edge guide is adjusted to fit your paper.
❏ The printer is on a flat, stable surface that extends beyond the
printer base in all directions. The printer will not operate
properly if it is tilted.
95
Page 98

Paper improperly loaded
If you have loaded the paper too far into the printer, the printer
cannot feed the paper correctly. Turn the printer off and gently
remove the paper. Then turn the printer on and reload the paper
properly.
Paper is not ejected fully or is wrinkled
Try one or more of these solutions:
❏ If the paper does not eject fully, press the
button, then open the printer cover and remove the paper.
Also, check the Paper Size setting in the Control Panel.
❏ If the paper is wrinkled when it comes out, it may be damp
or too thin. Load a new stack.
Note:
Store any unused paper in its original packaging in a dry area. See
“Paper” on page 139 for specifications.
( maitenance
Printer Does Not Print
If the printer does not print, check and see if one of the following
error indications is displayed, then try the solutions listed.
❏ LCD panel is off.
❏ Only the LCD panel is on
❏ The
❏ One of the ink out lights is flashing or on
( maintenance light is flashing or on
❏ Ink out lights are on and the other lights are flashing
96
Page 99

LCD panel is off
Try one or more of these solutions:
❏ Press the P power button to make sure that the printer is on.
❏ Turn off the printer and make sure that the power cord is
securely plugged in.
❏ Make sure that your outlet works and is not controlled by a
wall switch or timer.
Only the LCD panel is on
Try one or more of these solutions:
❏ Make sure that there is no packing material in the printer.
❏ If the printer sounds like it is trying to print, but is unable to,
run the Head Cleaning utility.
If this does not work, replace the ink cartridges. See
“Replacing an Ink Cartridge” on page 72 for instructions.
LCD panel displays a warning or error message
English
If the LCD panel displays a warning or error message, follow the
instructions. See “Error/Warning Display” on page 85 for the
explanation of warnings and error messages.
Lights came on and then went out
The printer’s voltage may not match the outlet rating. Turn off the
printer and unplug it immediately, then check the printer labels.
97
Page 100

If the voltage does not match, DO NOT PLUG YOUR PRINTER
BACK IN. Contact your dealer.
Maintenance light is flashing or on
Try one or more of these solutions:
❏ If the
❏ If the
❏ If the
❏ If the
( maintenance light is on and paper is jammed in the
printer, remove the paper from the printer.
( maintenance light is on and no paper is loaded, load
more paper in the sheet feeder.
( maintenance light is flashing, ink is low. Obtain a
replacement cartridge of the appropriate type. To determine
which cartridge is low, see “Replacing an Ink Cartridge” on
page 72.
( maintenance light is on and ink is out, replace the
appropriate ink cartridge. To determine which ink cartridge
is empty, see “Replacing an Ink Cartridge” on page 72.
Cancelling Printing
If you encounter problems while printing, you may need to cancel
printing. To stop printing in progress, press Cancel button. The
printer will cancel all print jobs and stop printing, and eject any
pages which is printing. Depending on the printer’s status,
printing may not stop immediately.
98
 Loading...