

Page 1
®
Page 2

Copyright Notice
All rights reserved. No part of this publication may be reproduced, stored in a retrieval system, or transmitted in
any form or by any means, electronic, mechanical, photocopying, re cording, or otherwise, without the prior
written permission of SEIKO EPSON CORPORATION. The information contained herein is designed only for
use with this EPSON printer. EPSON is not responsible for any use of this information as applied to other
printers.
Neither SEIKO EPSON CORPORATION nor its affiliates shall be liable to the purchaser of this product or third
parties for damages, losses, costs, or expenses incurred by purchaser or third parties as a result of: accident, misuse,
or abuse of this product or unauthorized modifications, repairs, or alterations to this product, or (excluding the
U.S.) failure to strictly comply with SEIKO EPSON CORPORATION’s operating and maintenance instructions.
SEIKO EPSON CORPORATION shall not be liable for any damages or problems arising from the use of any
options or any consumable products other than those designated as Original EPSON Products or EPSON
Approved Products by SEIKO EPSON CORPORATION.
A Note Concerning Responsible Use of Copyri ghted Materials
Ink jet printers, digital cameras, and scanners, like photocopiers and conventional cameras, can be misused by
improper copying and reprinting of copyrighted material. While some countries’ laws permit limited copying of
copyrighted material in certain circumstances, those circumstances may not be as broad as some people assume.
EPSON encourages each user to be responsible and respectful of the copyright laws when using ink jet printers,
digital cameras, and scanners.
Trademarks
EPSON, EPSON Stylus, EPSON Photo Stickers, and MicroWeave are registered trademarks and PRINT Image
Matching is a trademark of SEIKO EPSON CORPORATION.
ColorLife, BorderFree, PhotoEnhance, and EPSON Software are trademarks, and EPSON Print Lab, EPSON
PhotoCenter, EPSON Store, and SoundAdvice are service marks of Epson Americ a, I nc.
2
General Notice: Other product names used herein are for identification purposes only and may be trademarks of
their respective owners. EPSON disclaims any and all rights in those marks.
The E
NERGY STAR emblem does not represent EPA endorsement of any product or service.
Printed on recycled paper CPD-15861R1
Copyright © 2003 by Epson America, Inc. 4/03
Page 3

Contents
WELCOME! . . . . . . . . . . . . . . . . . . . . . . . . . . . . . . . . . . . . . . . . 7
About Your Software . . . . . . . . . . . . . . . . . . . . . . . . . . . . . . . . . . . . . . . . . . . . . . . . . . 8
About Your Documentation . . . . . . . . . . . . . . . . . . . . . . . . . . . . . . . . . . . . . . . . . . . . . 9
Using the EPSON Printer Information Center . . . . . . . . . . . . . . . . . . . . . . . . . . . . . . 10
Launching the Animations . . . . . . . . . . . . . . . . . . . . . . . . . . . . . . . . . . . . . . . . . . . 10
Launching the Manual . . . . . . . . . . . . . . . . . . . . . . . . . . . . . . . . . . . . . . . . . . . . . . 11
LOADING PAPER . . . . . . . . . . . . . . . . . . . . . . . . . . . . . . . . . . . 13
Loading Single Sheets . . . . . . . . . . . . . . . . . . . . . . . . . . . . . . . . . . . . . . . . . . . . . . . . . . 13
Loading Roll Paper . . . . . . . . . . . . . . . . . . . . . . . . . . . . . . . . . . . . . . . . . . . . . . . . . . . . 14
Loading Envelopes . . . . . . . . . . . . . . . . . . . . . . . . . . . . . . . . . . . . . . . . . . . . . . . . . . . . 17
Loading Special Papers . . . . . . . . . . . . . . . . . . . . . . . . . . . . . . . . . . . . . . . . . . . . . . . . . 19
Storing Your Photos . . . . . . . . . . . . . . . . . . . . . . . . . . . . . . . . . . . . . . . . . . . . . . . . . . . 20
PRINTING IN WINDOWS . . . . . . . . . . . . . . . . . . . . . . . . . . . . . 21
Printing From an Application . . . . . . . . . . . . . . . . . . . . . . . . . . . . . . . . . . . . . . . . . . . 22
Selecting Default Settings . . . . . . . . . . . . . . . . . . . . . . . . . . . . . . . . . . . . . . . . . . . . . . . 24
Customizing Windows Print Settings . . . . . . . . . . . . . . . . . . . . . . . . . . . . . . . . . . . . . . 25
Selecting the Correct Paper Type . . . . . . . . . . . . . . . . . . . . . . . . . . . . . . . . . . . . . . . . . 27
Printing Borderless Photos on Cut Sheets . . . . . . . . . . . . . . . . . . . . . . . . . . . . . . . . . . 28
PRINTING ON A MACINTOSH . . . . . . . . . . . . . . . . . . . . . . . . . 31
Printing with Macintosh OS 8.6 to 9.x . . . . . . . . . . . . . . . . . . . . . . . . . . . . . . . . . . . . 32
Printing with Macintosh OS X . . . . . . . . . . . . . . . . . . . . . . . . . . . . . . . . . . . . . . . . . . . 35
Customizing Macintosh Print Settings . . . . . . . . . . . . . . . . . . . . . . . . . . . . . . . . . . . . . 38
Macintosh OS 8.6 to 9.x . . . . . . . . . . . . . . . . . . . . . . . . . . . . . . . . . . . . . . . . . . . . 38
Macintosh OS X . . . . . . . . . . . . . . . . . . . . . . . . . . . . . . . . . . . . . . . . . . . . . . . . . . 40
Selecting the Correct Media Type . . . . . . . . . . . . . . . . . . . . . . . . . . . . . . . . . . . . . . . . 42
Contents 3
Page 4

Printing Borderless Photos on Cut Sheets . . . . . . . . . . . . . . . . . . . . . . . . . . . . . . . . . . . 43
Macintosh OS 8.6 to 9.x . . . . . . . . . . . . . . . . . . . . . . . . . . . . . . . . . . . . . . . . . . . . 44
Macintosh OS X . . . . . . . . . . . . . . . . . . . . . . . . . . . . . . . . . . . . . . . . . . . . . . . . . . 45
PRINTING ON CDS AND SPECIAL MEDIA . . . . . . . . . . . . . . . 47
Printing on CDs and DVDs . . . . . . . . . . . . . . . . . . . . . . . . . . . . . . . . . . . . . . . . . . . . . 47
Cleaning the Roller . . . . . . . . . . . . . . . . . . . . . . . . . . . . . . . . . . . . . . . . . . . . . . . . 48
Designing CDs and DVDs . . . . . . . . . . . . . . . . . . . . . . . . . . . . . . . . . . . . . . . . . . . 49
Inserting a CD or DVD . . . . . . . . . . . . . . . . . . . . . . . . . . . . . . . . . . . . . . . . . . . . . 53
Printing Your Design . . . . . . . . . . . . . . . . . . . . . . . . . . . . . . . . . . . . . . . . . . . . . . . 56
Adjusting the Print Position . . . . . . . . . . . . . . . . . . . . . . . . . . . . . . . . . . . . . . . . . . 57
Adjusting the Print Density . . . . . . . . . . . . . . . . . . . . . . . . . . . . . . . . . . . . . . . . . . 59
Printing on Roll Paper . . . . . . . . . . . . . . . . . . . . . . . . . . . . . . . . . . . . . . . . . . . . . . . . . 61
Windows . . . . . . . . . . . . . . . . . . . . . . . . . . . . . . . . . . . . . . . . . . . . . . . . . . . . . . . . 61
Macintosh OS 8.6 to 9.x . . . . . . . . . . . . . . . . . . . . . . . . . . . . . . . . . . . . . . . . . . . . 63
Macintosh OS X . . . . . . . . . . . . . . . . . . . . . . . . . . . . . . . . . . . . . . . . . . . . . . . . . . 64
Removing Your Photos and Paper . . . . . . . . . . . . . . . . . . . . . . . . . . . . . . . . . . . . . 67
Printing on Card Stock or Matte Board . . . . . . . . . . . . . . . . . . . . . . . . . . . . . . . . . . . . 69
MAINTAINING YOUR PRINTER . . . . . . . . . . . . . . . . . . . . . . . . 73
Cleaning the Print Head . . . . . . . . . . . . . . . . . . . . . . . . . . . . . . . . . . . . . . . . . . . . . . . . 73
Running the Head Cleaning Utility . . . . . . . . . . . . . . . . . . . . . . . . . . . . . . . . . . . . 74
Examining the Nozzle Check Pattern . . . . . . . . . . . . . . . . . . . . . . . . . . . . . . . . . . . 75
Replacing an Ink Cartridge . . . . . . . . . . . . . . . . . . . . . . . . . . . . . . . . . . . . . . . . . . . . . . 76
Checking the Ink Supply . . . . . . . . . . . . . . . . . . . . . . . . . . . . . . . . . . . . . . . . . . . . 76
Purchasing Ink Cartridges . . . . . . . . . . . . . . . . . . . . . . . . . . . . . . . . . . . . . . . . . . . 77
Ink Cartridge Precautions . . . . . . . . . . . . . . . . . . . . . . . . . . . . . . . . . . . . . . . . . . . . 78
Removing and Installing Ink Cartridges . . . . . . . . . . . . . . . . . . . . . . . . . . . . . . . . . 78
Aligning the Print Head . . . . . . . . . . . . . . . . . . . . . . . . . . . . . . . . . . . . . . . . . . . . . . . . 81
Cleaning the Printer . . . . . . . . . . . . . . . . . . . . . . . . . . . . . . . . . . . . . . . . . . . . . . . . . . . 84
Transporting the Printer . . . . . . . . . . . . . . . . . . . . . . . . . . . . . . . . . . . . . . . . . . . . . . . . 85
4 Contents
Page 5

INSTALLING YOUR PRINTER SOFTWARE . . . . . . . . . . . . . . . 87
Installing Printer Software on Macintosh OS 8.6 to 9.x . . . . . . . . . . . . . . . . . . . . . . . . 87
Installing Your Printer Driver . . . . . . . . . . . . . . . . . . . . . . . . . . . . . . . . . . . . . . . . 87
Installing Optional Software . . . . . . . . . . . . . . . . . . . . . . . . . . . . . . . . . . . . . . . . . 88
SOLVING PROBLEMS . . . . . . . . . . . . . . . . . . . . . . . . . . . . . . . 89
Printer Parts . . . . . . . . . . . . . . . . . . . . . . . . . . . . . . . . . . . . . . . . . . . . . . . . . . . . . . . . . 90
Diagnosing Printer Problems . . . . . . . . . . . . . . . . . . . . . . . . . . . . . . . . . . . . . . . . . . . . 91
Running a Printer Check . . . . . . . . . . . . . . . . . . . . . . . . . . . . . . . . . . . . . . . . . . . . 92
Problems and Solutions . . . . . . . . . . . . . . . . . . . . . . . . . . . . . . . . . . . . . . . . . . . . . . . . 94
Setup and Software Installation Problems . . . . . . . . . . . . . . . . . . . . . . . . . . . . . . . 94
Printer Problems . . . . . . . . . . . . . . . . . . . . . . . . . . . . . . . . . . . . . . . . . . . . . . . . . . 95
Quality Problems . . . . . . . . . . . . . . . . . . . . . . . . . . . . . . . . . . . . . . . . . . . . . . . . . . 96
Paper Problems . . . . . . . . . . . . . . . . . . . . . . . . . . . . . . . . . . . . . . . . . . . . . . . . . . . 98
CD/DVD Printing Problems . . . . . . . . . . . . . . . . . . . . . . . . . . . . . . . . . . . . . . . . . 99
Miscellaneous Problems . . . . . . . . . . . . . . . . . . . . . . . . . . . . . . . . . . . . . . . . . . . . . 100
Uninstalling and Reinstalling Printer Software . . . . . . . . . . . . . . . . . . . . . . . . . . . . . . . 102
Windows . . . . . . . . . . . . . . . . . . . . . . . . . . . . . . . . . . . . . . . . . . . . . . . . . . . . . . . . 102
Macintosh OS 8.6 to 9.x . . . . . . . . . . . . . . . . . . . . . . . . . . . . . . . . . . . . . . . . . . . . 102
Macintosh OS X . . . . . . . . . . . . . . . . . . . . . . . . . . . . . . . . . . . . . . . . . . . . . . . . . . 103
Where To Get Help . . . . . . . . . . . . . . . . . . . . . . . . . . . . . . . . . . . . . . . . . . . . . . . . . . . 103
REQUIREMENTS AND NOTICES . . . . . . . . . . . . . . . . . . . . . . . 105
Windows System Requirements . . . . . . . . . . . . . . . . . . . . . . . . . . . . . . . . . . . . . . . . . . 105
Macintosh System Requirements . . . . . . . . . . . . . . . . . . . . . . . . . . . . . . . . . . . . . . . . . 105
Important Safety Instructions . . . . . . . . . . . . . . . . . . . . . . . . . . . . . . . . . . . . . . . . . . . . 106
Ink Cartridge Safety Instructions . . . . . . . . . . . . . . . . . . . . . . . . . . . . . . . . . . . . . . 107
FCC Compliance Statement . . . . . . . . . . . . . . . . . . . . . . . . . . . . . . . . . . . . . . . . . . . . 108
Declaration of Conformity . . . . . . . . . . . . . . . . . . . . . . . . . . . . . . . . . . . . . . . . . . . . . . 109
Energy Star Compliance . . . . . . . . . . . . . . . . . . . . . . . . . . . . . . . . . . . . . . . . . . . . . . . . 109
Epson America, Inc. Limited Warranty . . . . . . . . . . . . . . . . . . . . . . . . . . . . . . . . . . . . 110
INDEX . . . . . . . . . . . . . . . . . . . . . . . . . . . . . . . . . . . . . . . . . . . . 113
Contents 5
Page 6

6 Contents
Page 7

Welcome!
Your EPSON Stylus® Photo 900 is a full-featured photo and CD/DVD printer.
Outstanding printouts result from these advanced features:
■ EPSON’s 6-color photo inks let you print up to 5760 × 720 optimized dpi
(dots per inch)
■ Ultra fine 4-picoliter ink droplets give you finer shadow detail, dazzling
highlights, and better fill across a wider range of colors
■ Direct CD/DVD printing lets you create customized “labels”—with your own
photos, text, and artwork—for all the CDs you burn
■ True BorderFree
™
frame-ready prints on select 4 × 6, 5 × 7, 8 × 10, and letter-size
papers
■ Roll paper feeder enables continuous printing of multiple photos
■ Straight-through paper path for thick paper gives you more media choices than
ever before
7
Page 8

About Your Software
Your printer CD-ROM includes all the software you need for printing. See the
Start Here sheet for installation instructions.
■ Your printer driver runs your printer and lets you control how your documents
look. You can’t print without it.
Tip: It’s a good idea to check EPSON’s support website periodically for free
updates to your printer driver. Visit http://support.epson.com. Download
instructions are posted for your convenience.
■
Your EPSON Printer Information Center gives you quick, on-screen access to
information about your printer. It includes EPSON Print Show animated
tutorials on loading roll paper, loading CDs and DVDs, replacing ink cartridges,
and other tasks. It also includes an on-screen User’s Guide for complete
information about your printer.
■ Your photo software includes these great tools:
EPSON Software™ Film Factory™ is a photo managem ent p rogram tha t lets y ou
organize, beautify, and print your photos in a flash. Supports PRINT Image
Matching™ (P.I.M. I and II) and Exif Print. (P.I.M. support not available for
Mac®OS X.)
P.I.M. II Plug-in for Adobe® Photoshop® lets you retain PRINT Image
Matching image quality when you import JPEG files from your PIM-enabled
digital camera. (Compatible with Photoshop 6.0, 7.0, and Photoshop Elements
1.0 and 2.0.)
EPSON PhotoCenter is EPSON’s free photo-sharing website where you can
store, organize, and share your photos; print high-resolution photos; and create
free online postcards. Add a link to EPSON PhotoCenter on your desktop with
your software installer.
■ EPSON Print CD lets you print directly on CDs and DV Ds. Add y our own text,
photos, and graphics for professional-looking results. Works with all ink jet
printable CDs and DVDs. (EPSON Print CD not available for Mac OS X.)
8 Welcome!
SM
Page 9

About Your Documentation
To set up your printer and install its software, see the Start Here sheet.
This book contains system requirements, important safety information, your
warranty, and instructions on:
■ Using the EPSON Printer Information Center
■ Loading all types of paper
■ Printing with Windows or on a Macintosh
■ Printing on CDs and special media
■ Maintaining your printer
■ Solving basic problems
Please follow these guidelines throughout:
Warnings must be followed carefully to avoid bodily injury.
Cautions must be observed to avoid damage to your equipment.
Notes contain important information about your printer.
Tips contain hints for better printing.
For more details about your printer, see your Print Show animated tutorials and
User’s Guide, as described on page 10.
Welcome! 9
Page 10
Using the EPSON Printer Information Center
Need help loading paper, loading CDs or DVDs, or changing an ink cartridge? Use
the EPSON Printer Information Center (EPIC) to view printer animations that
quickly show you how. EPIC also includes an on-screen User’s Guide with additional
printer details. Follow the instructions on the Start Here sheet to install the EPSON
Printer Information Center, if you haven’t already.
Note: You need a browser—such as Microsoft® Internet Explorer® 4.0 or later or
Netscape
different browser, the pages may not display correctly.
®
Navigator® 3.0 or later—to view the manual. If you are using a
Launching the Animations
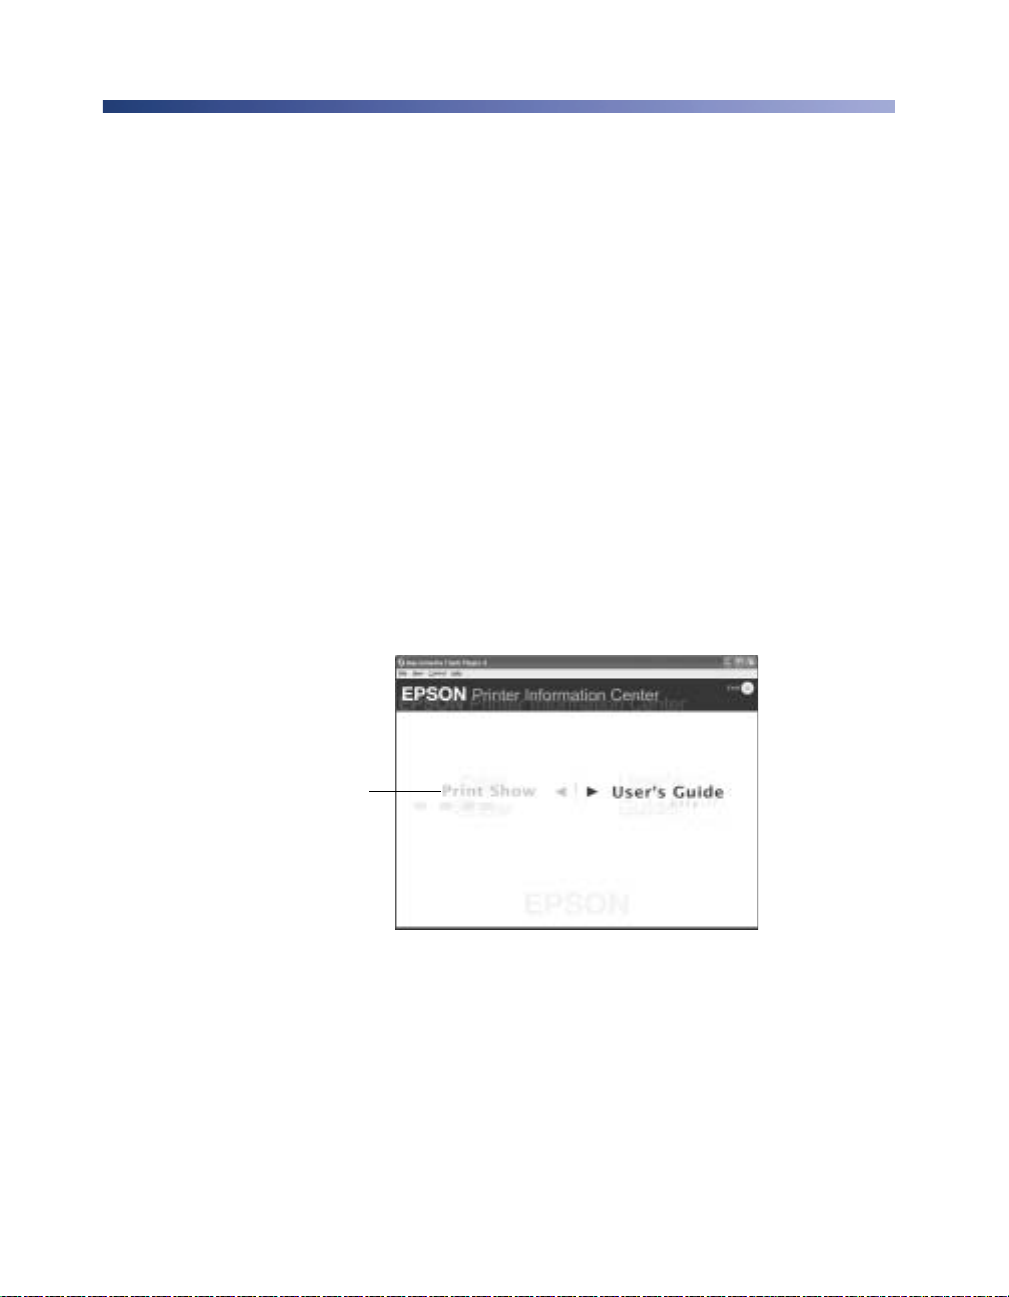
1. Double-click the EPSON Printer Information Center icon on your desktop.
2. Click Print Show.
Click Print Show
10 Welcome!
Page 11
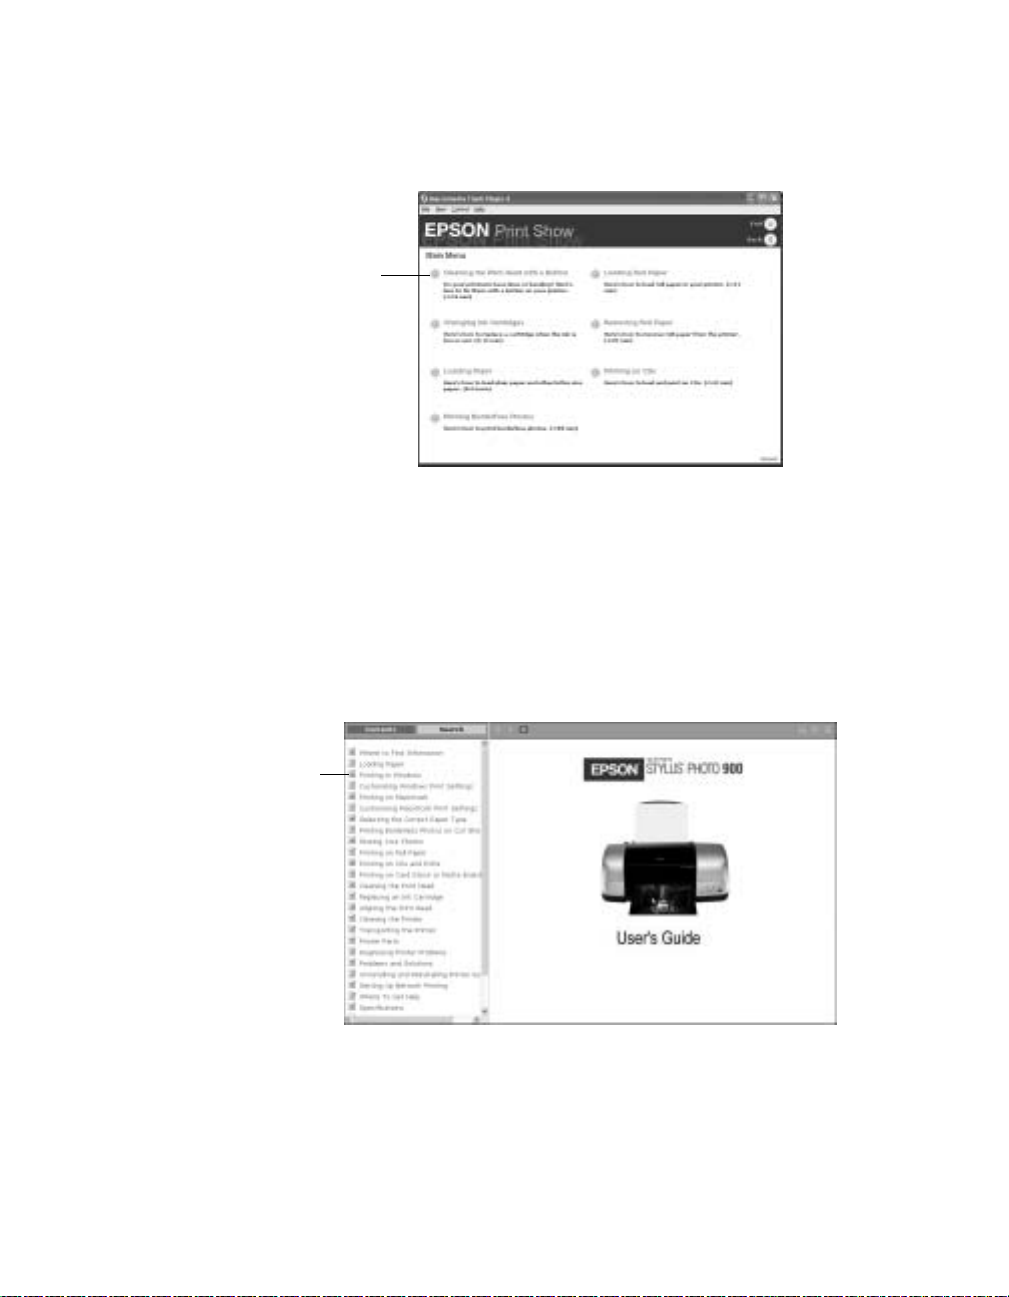
3. Click a title.
Use the program tools to pause a movie, replay a step, or skip ahead.
Click a topic to
view a movie
4. Click
Exit to exit EPSON Print Show.
Launching the Manual
1. Double-click the EPSON Printer Information Center icon on your desktop.
2. Click User’s Guide. You see this screen:
Click a topic
3. Click on the topic you want to view.
Welcome! 11
Page 12

12 Welcome!
Page 13
Loading Paper
You can load a variety of paper types in your printer, as described in these sections:
■ “Loading Single Sheets” below
■ “Loading Roll Paper” on page 14
■ “Loading Envelopes” on page 17
■ “Loading Special Papers” on page19
For information about loading paper in the manual feed slot see “Printing on CDs
and Special Media” on page 47.
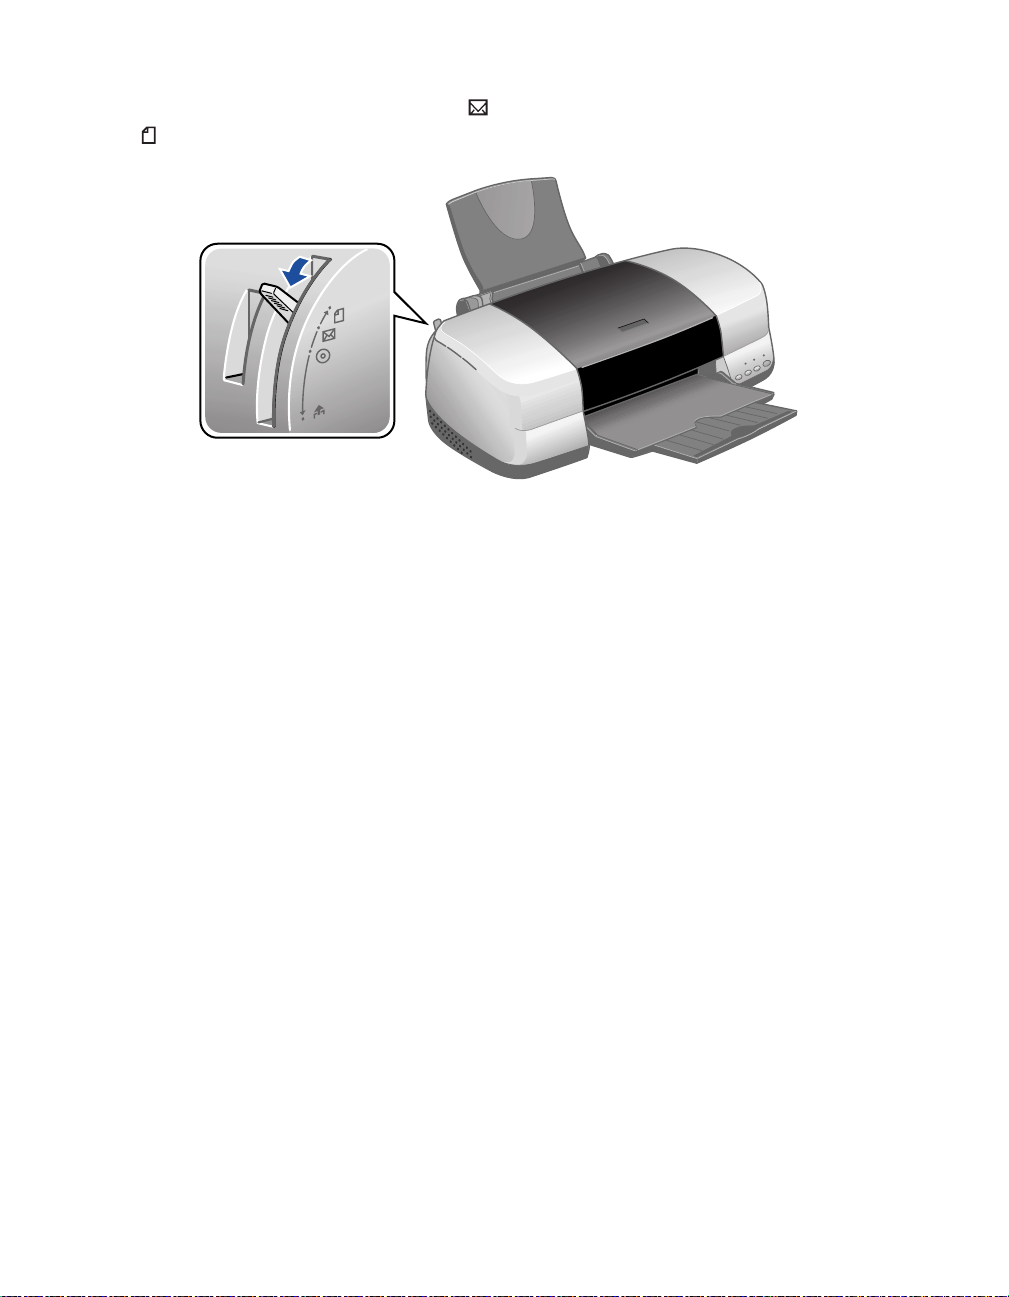
Loading Single Sheets
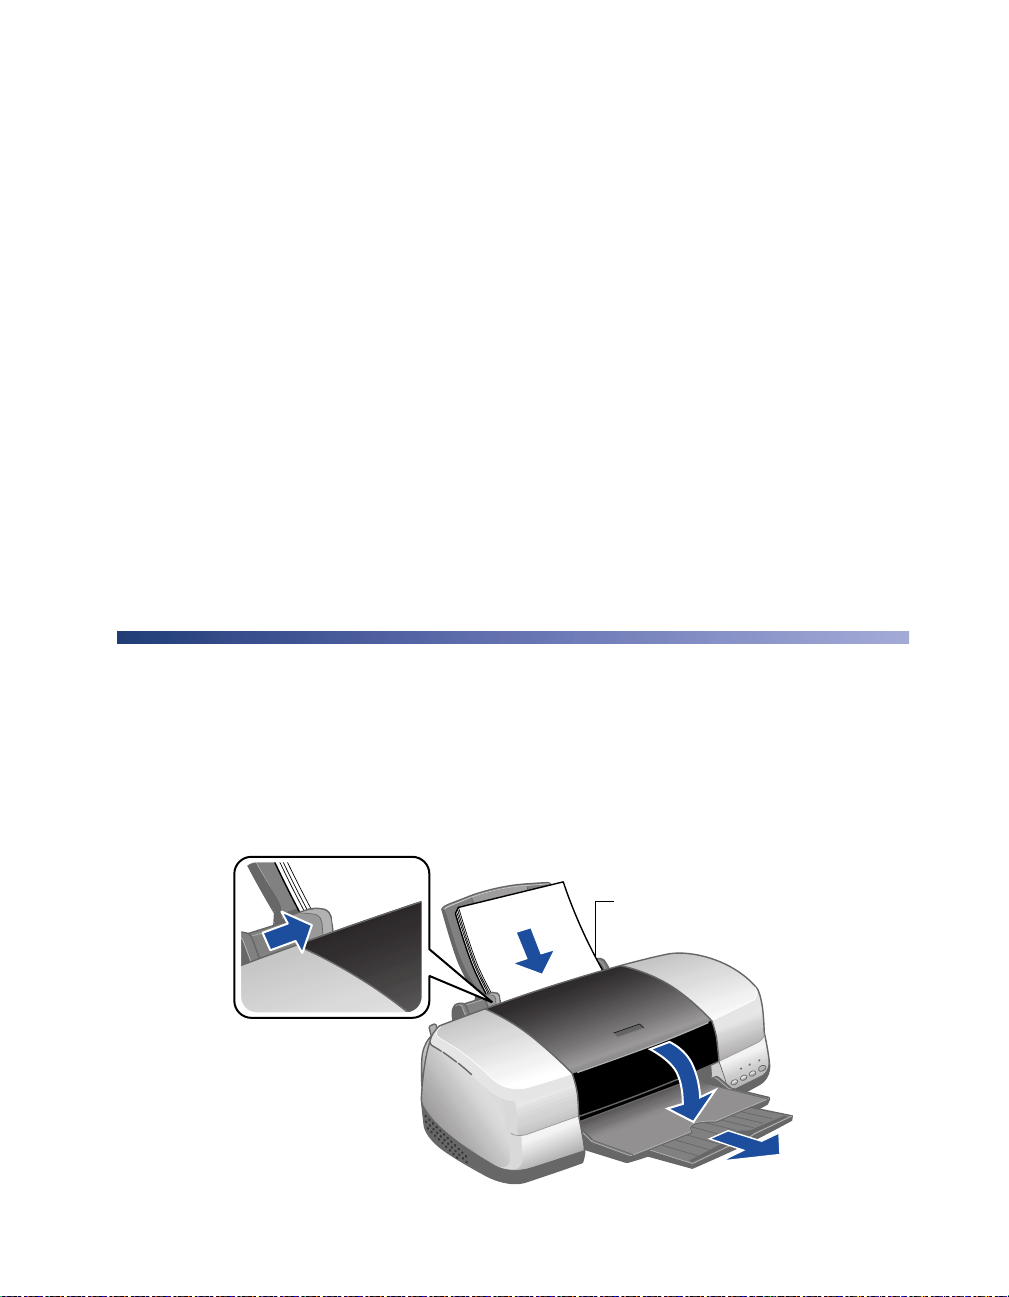
1. Insert your paper against the right edge of the sheet feeder.
2. Slide the left edge guide against the paper (but not too tightly).
3. Open the output tray and its extension.
Insert paper against
the right edge
Slide the left edge
guide against the paper
13
Page 14
Also be sure to:
■ Load the printable side face-up. It’s often whiter or brighter than the other side.
■ Load letterhead or preprinted paper into the printer top edge first.
■ Don’t load paper above the arrow on the left edge guide.
■ Load up to approximately 100 sheets of plain paper at time.
Loading Roll Paper
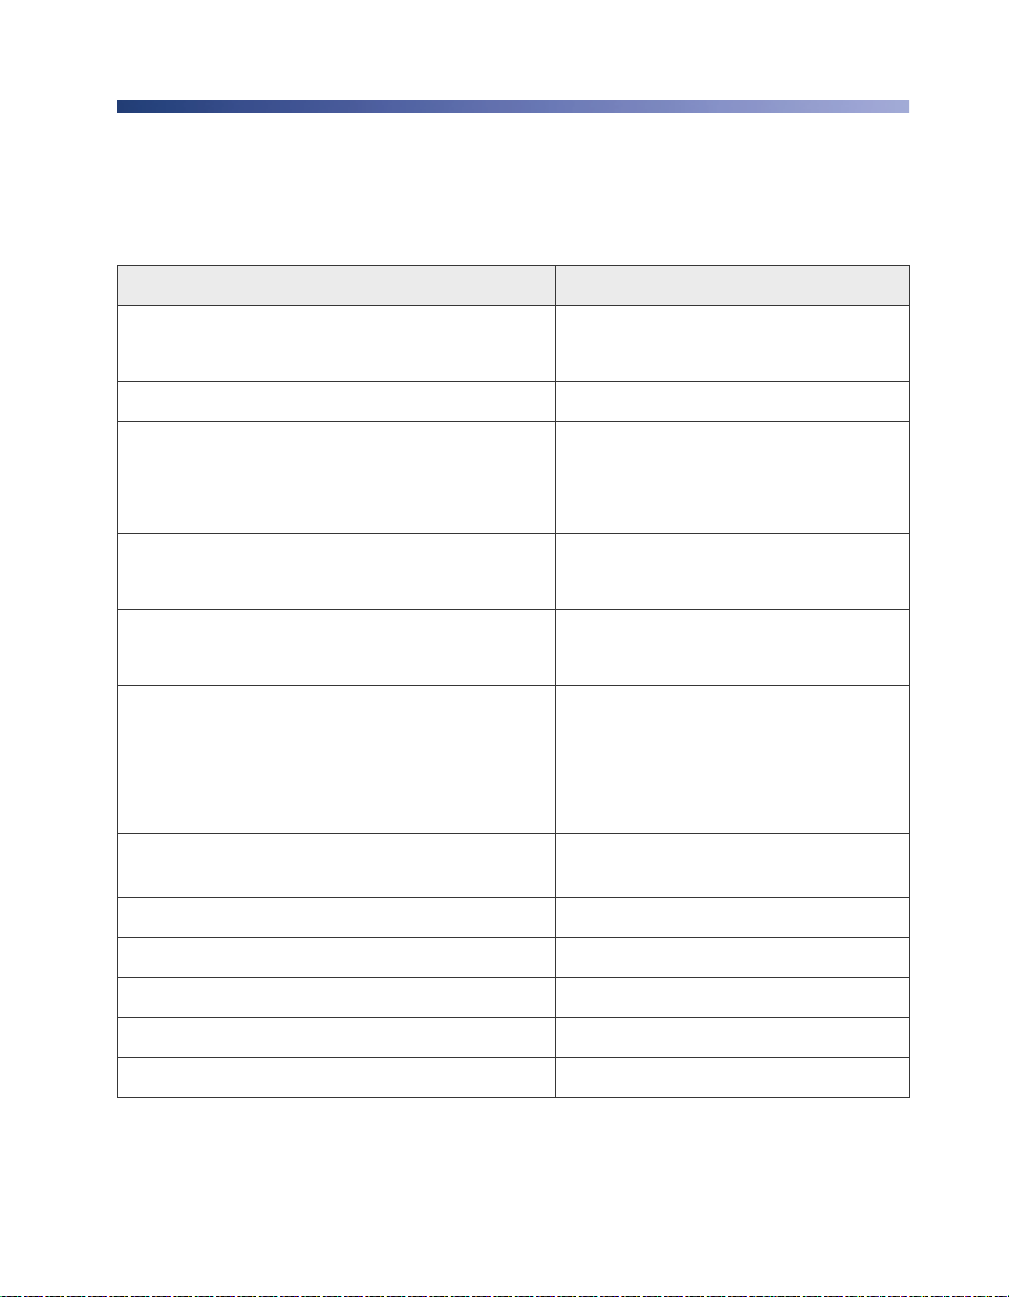
You can load the following types and sizes of roll paper:
Paper name Roll sizes
EPSON Premium Glossy Photo Paper 4 inches × 26 feet
8.3 inches (A4) × 32.8 feet
EPSON Premium Semigloss Photo Paper 4 inches × 26 feet
EPSON Premium Luster Photo Paper 8.3 inches (A4) × 32.8 feet
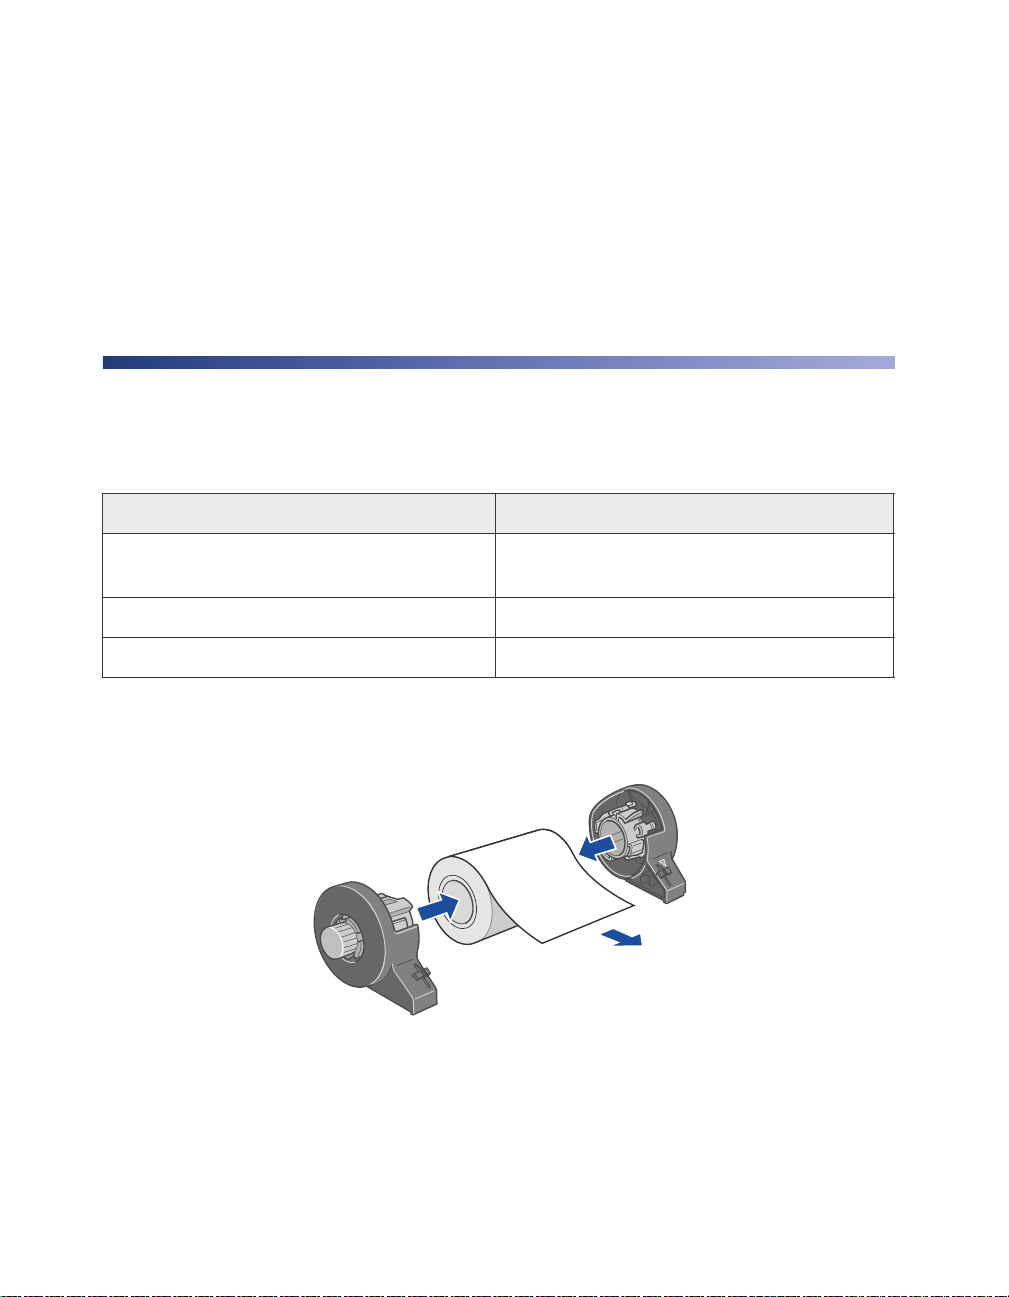
1. Remove the tape and protective paper from the end of the roll. Then insert the
holders into the roll of paper as shown.
2. Make sure the end of the paper is cut straight across, with 90° corners. If the end
is cut diagonally, you may have problems feeding the paper.
14 Loading Paper
Page 15
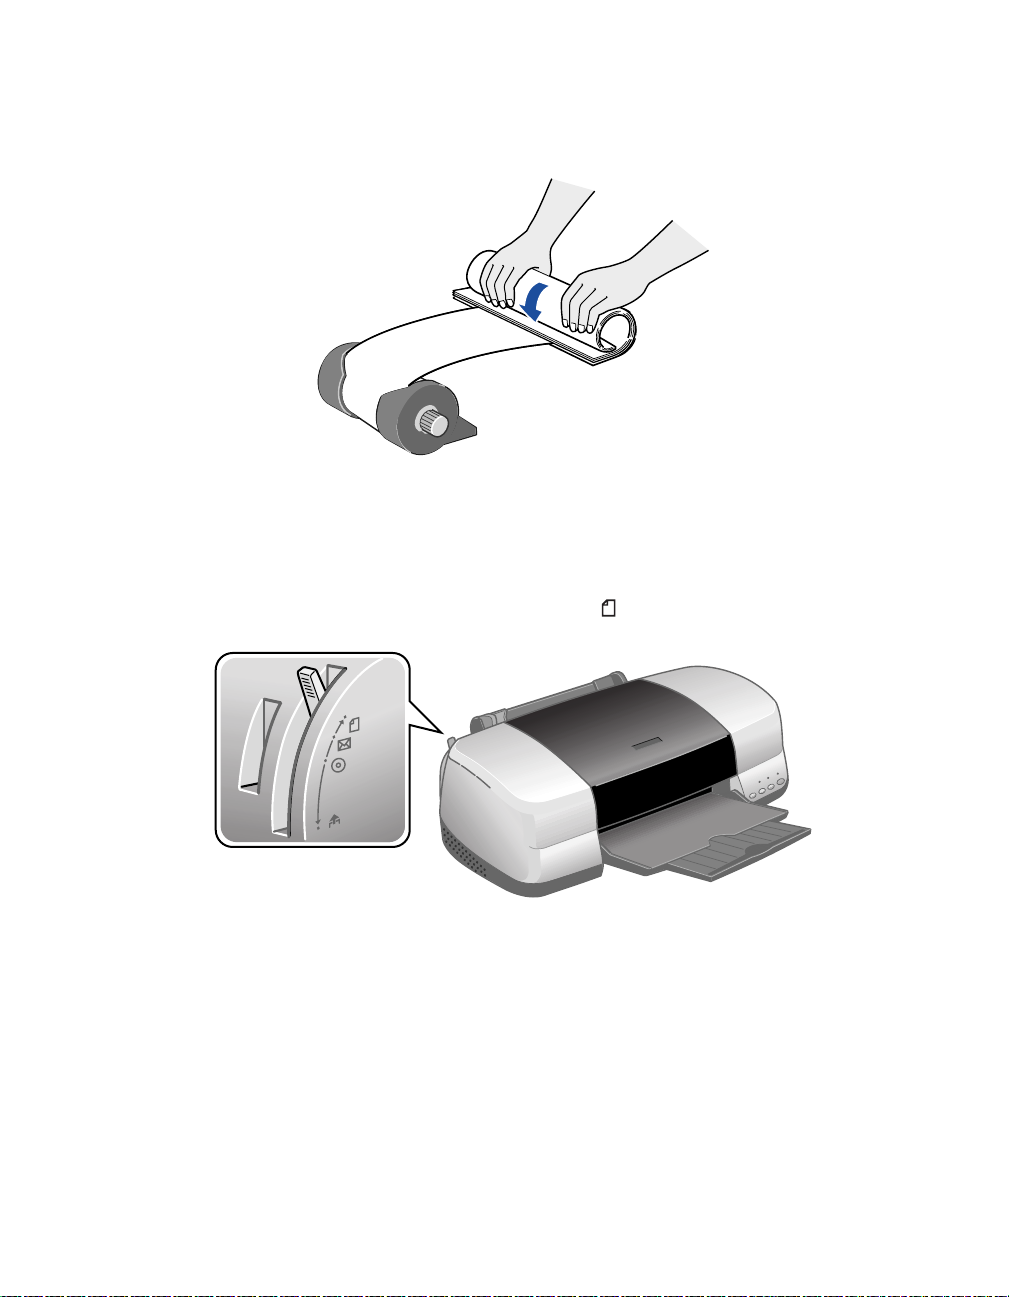
3. If the paper curls at the end, fold a sheet of paper over the end and roll it
backward to uncurl it.
Avoid touching the printable surface of the roll paper.
4. Remove any pap er that’s in the shee t feeder at the to p of the printer. Then re move
the paper support, lower the output tray, and turn on the printer.
5. Make sure the paper thickness lever is set to the position.
Loading Paper 15
Page 16
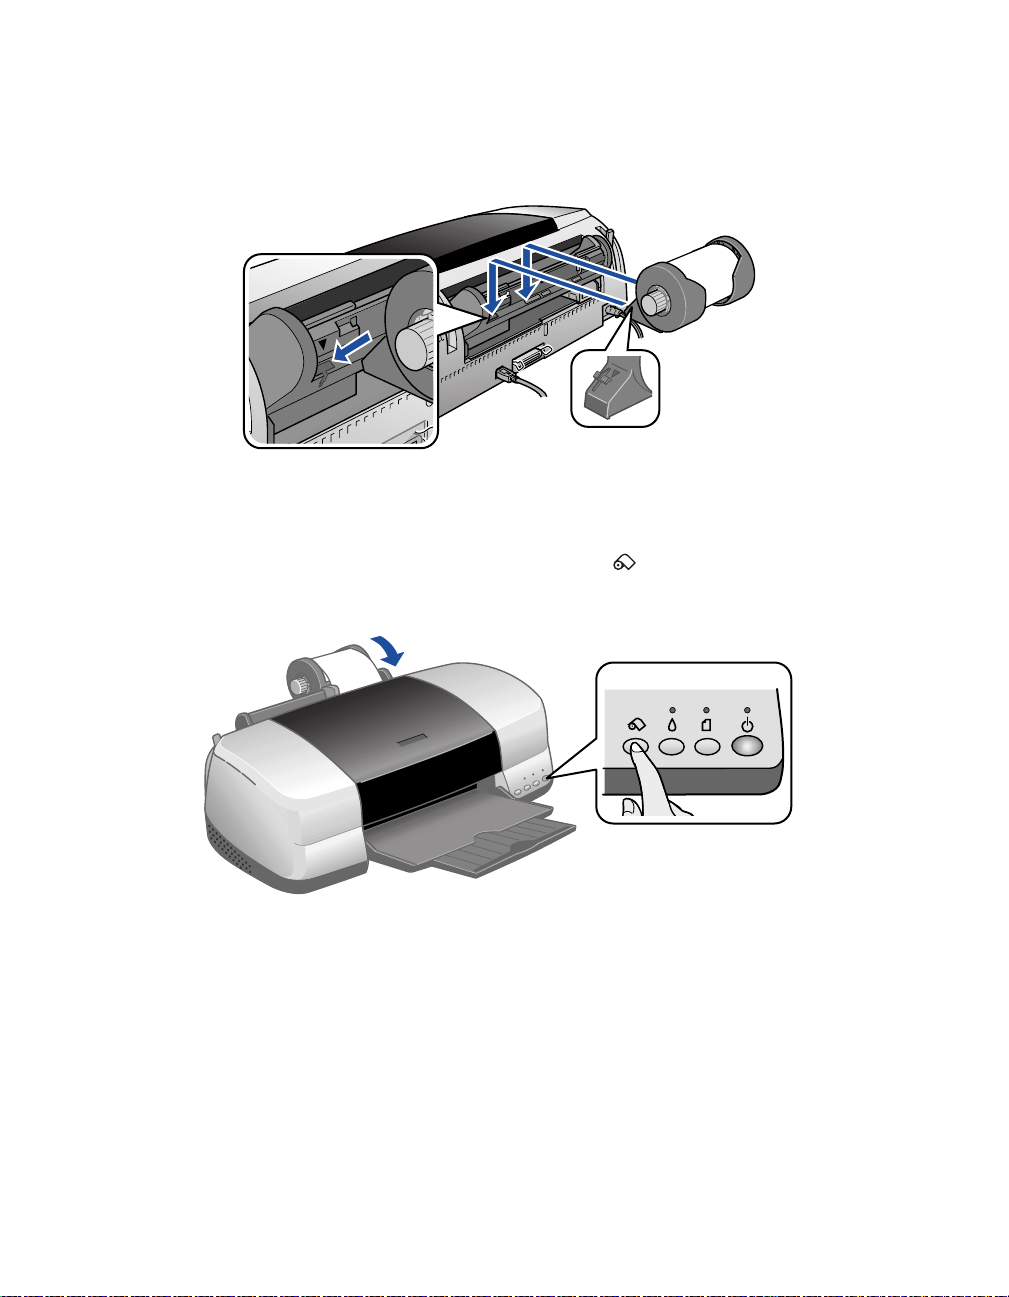
6. Install the roll paper holders on the printer. Insert the left holder into the far left
slot, then insert the other holder into the appropriate slot on the right (either the
4-inch slot as shown, or the 8.3-inch slot further on the right).
7. Pull out approximatel y six inches of paper and insert it in to the sh eet feeder. Th en
slide the left edge guide against the paper (but not too tightly).
8. Hold the paper in place by the edges and press the roll paper button until the
printer feeds the paper automatically.
9. To verify that the paper is loaded straight, open the printer cover and look into
the printer.
16 Loading Paper
Page 17
If the paper is crooked, press the roll paper button and hold it for three
seconds to back the paper all the way out.
Then turn the roll paper hold er knobs to roll up the paper. Press the roll paper
button to clear the paper out error. Repeat steps 7 through 9 to reload the paper.
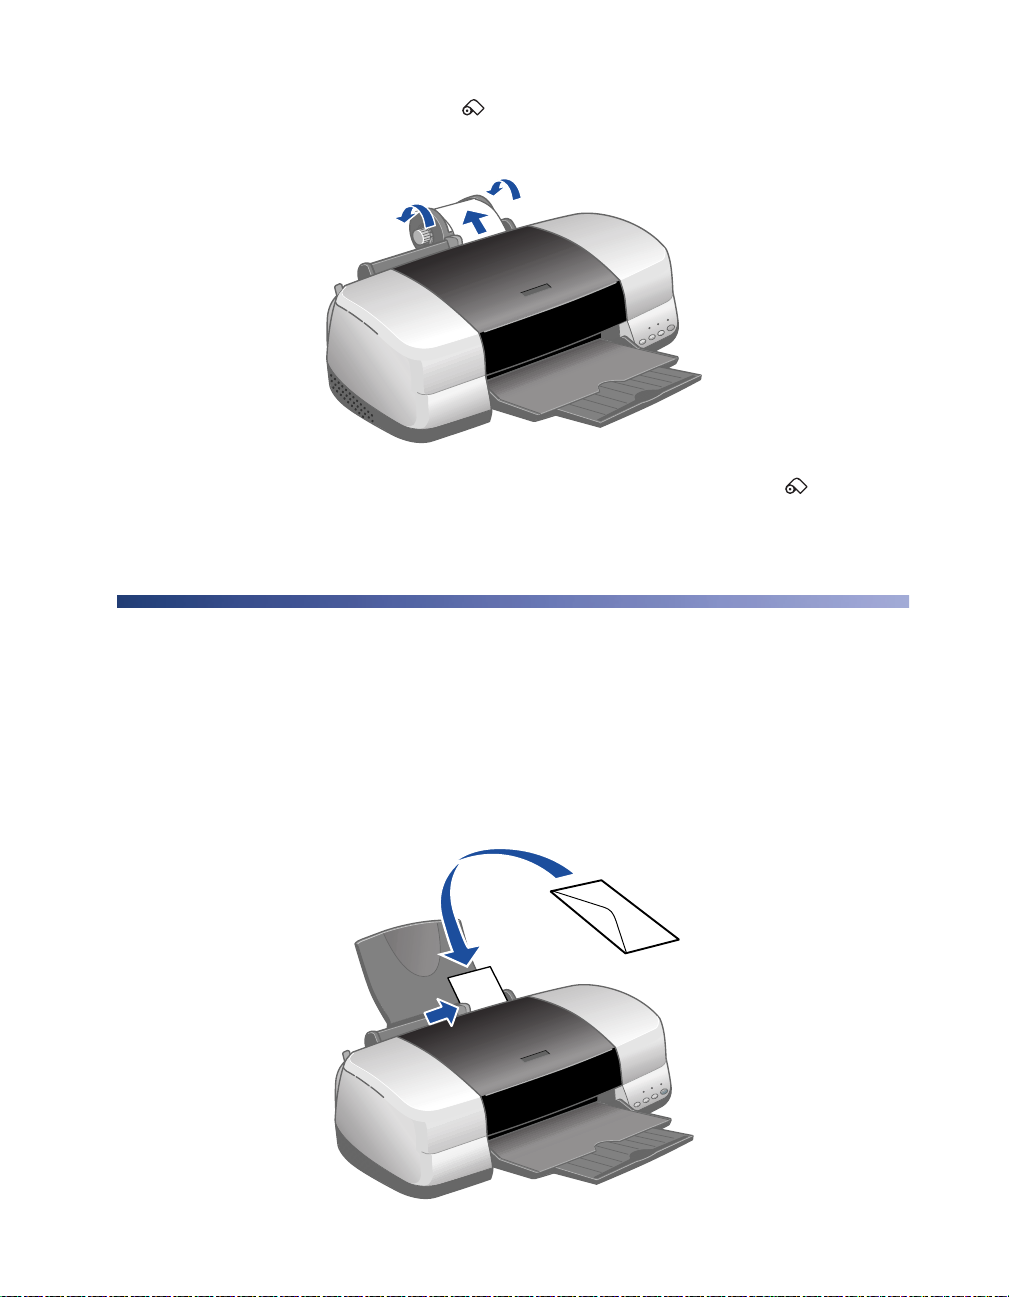
Loading Envelopes
1. Open the output tray and its extension.
2. Load up to 10 envelopes at a time, flap edge left, printable side up, against the
right edge of the sheet feeder.
3. Slide the left edge guide against the envelopes (but not too tightly).
Loading Paper 17
Page 18
4. Set the paper thickness lever to the position (remember to set it back to the
position when you’re done).
Note: For best results, press each envelope flat before loading, or load one
envelope at a time.
Select the following settings when printing on envelopes:
■ Plain paper as the Type or Media Type setting
■ The correct envelope s ize as th e Si ze (Wind ows) or Pape r S ize (Maci nto sh ) set tin g
■ Landscape as the Orientation setting
For instructions on selecting these settings, see:
■ “Printing in Windows” on page 21
■ “Printing with Macintosh OS 8.6 to 9.x” on page 32
■ “Printing with Macintosh OSX” on page 35
18 Loading Paper
Page 19
Loading Special Papers
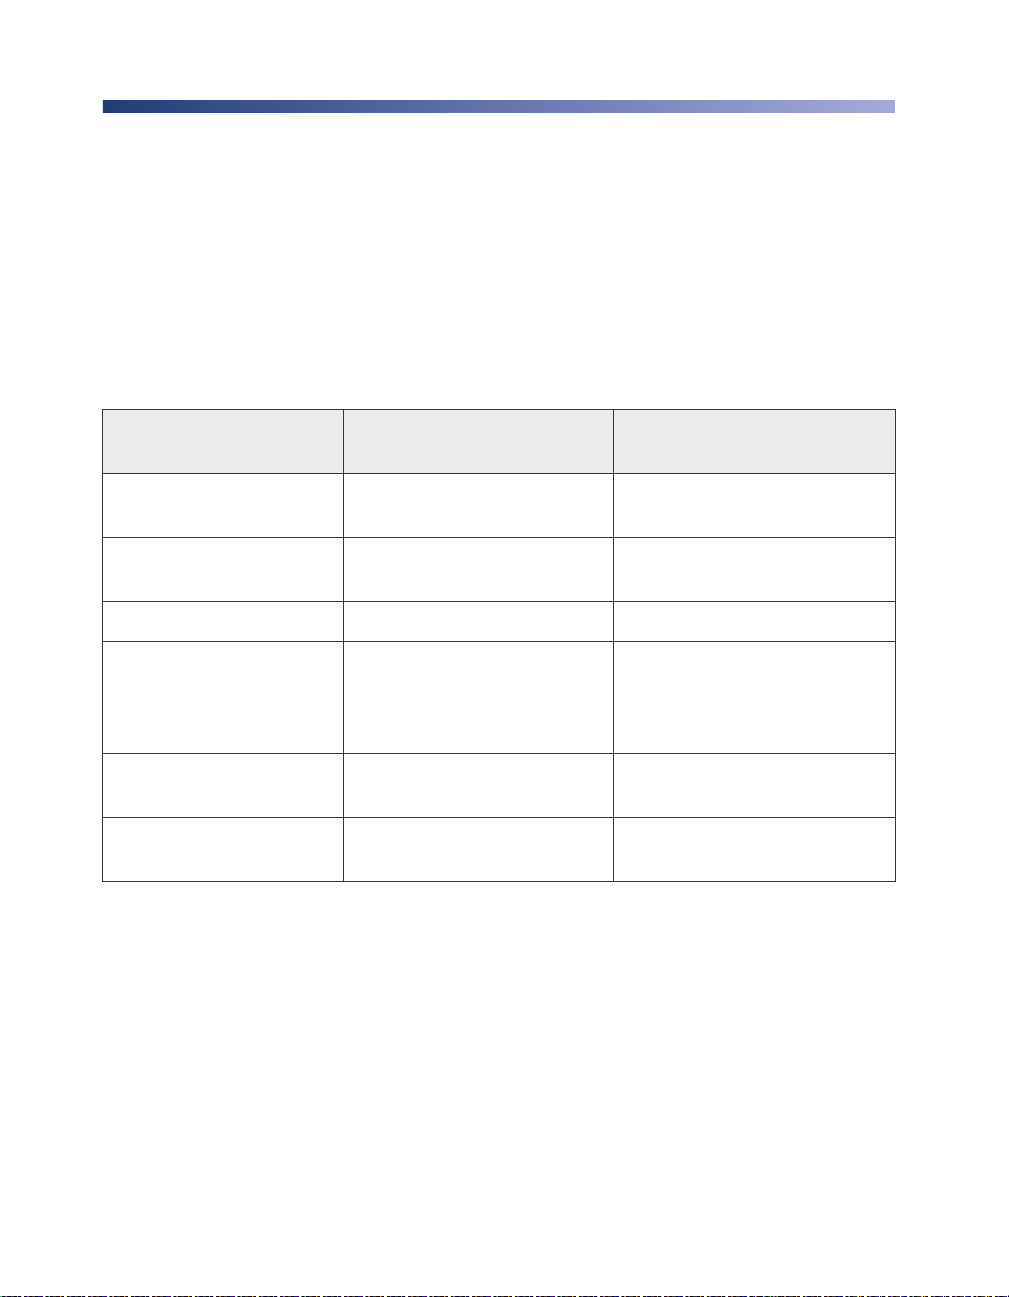
To load EPSON ink jet papers, follow these guidelines:
Paper type Loading capacity
Premium Bright White Paper 100 sheets
Photo Quality Ink Jet Paper 65 sheets
Photo Quality Ink Jet Cards 30 cards with a support sheet beneath the stack
Glossy Photo Paper or Photo Paper 20 sheets
Panoramic Photo Paper 1 sheet with a support sheet beneath the sheet
Matte Paper Heavyweight
Double-Sided Matte Paper
ColorLife Photo Paper 1 sheet with a support sheet beneath the sheet
Double-Sided Matte Paper
Premium Glossy Photo Paper
Premium Semigloss Photo Paper
Premium Luster Photo Paper
Ink Jet Transparencies
Iron-On Transfer Paper
Photo Stickers
Photo Quality Self Adhesive Sheets
Glossy Photo Greeting Cards
■ Load all paper with the printable side up. It’s usually whiter or brighter than the
20 sheets with a support sheet beneath the
stack
1 sheet
other side.
■ If the paper has a cut corner, position it in the upper right corner as you load it in
the sheet feeder.
■ Check the paper package for additional instructions on using special papers.
Loading Paper 19
Page 20

Storing Your Photos
With proper care, photographs from your EPSON Stylus Photo printer will last for
many years. The special EPSON inks designed for your printer are formulated to
achieve improved lightfastness when used with EPSON papers for prints that are
properly displayed or stored.
Tip: For best results, always use EPSON papers.
As with traditional photos, proper care will minimize color changes and lengthen
display life:
■ For display, EPSON recommends that prints be framed under glass or a
protective plastic sleeve to protect them from atmospheric contaminants like
humidity, cigarette smoke, and high levels of ozone.
■ As with all photographs, keep your prints away from direct sunlight.
■ For proper storage, EPSON recommends that you keep your prints in a photo
album or plastic photo storage box in acid free, archival sleeves commonly
available from most camera stores.
Note: Always keep unused paper in the original package.
To order EPSON paper, contact your dealer or call the EPSON Store at
(800) 873-7766 or visit www.epsonstore.com (U.S. sales only). In Canada please call
(800) 463-7766 for dealer referral.
20 Loading Paper
SM
Page 21

Printing in Windows
Before you start, make sure your printer is set up and its software is installed as
described on the Start Here sheet.
Whenever you print, make sure you do the following:
■ Use the right paper.
For the best-looking photos, most vivid colors, and greatest detail, always use
genuine EPSON papers and EPSON inks.
■ Choose the right printer settings.
Your printer automatically adjusts itself for each type of paper. That’s why printer
settings are important . They te ll your pr inter what kin d of pap er you’re us ing and
what type of print you want. Make sure you check your printer settings every t ime
you print.
See these sections for instructions on selecting printer settings:
■ “Printing From an Application” on page 22
■ “Selecting Default Settings” on page24
21
Page 22

Printing From an Application
After you create a docume nt in a software prog ram, fo llow t hese ste ps to print i t using
the basic printer settings:
1. From the file menu, click Print. You see a Print window like this one:
Select your printer name here
Click here to open
your printer software
2. Make sure EPSON Stylus Photo 900 is selected.
3. Click the Preferences or Properties button. (If you see a Setup, Printer, or
Options button, click it. Then click Preferences or Properties on the next
screen.)
22 Printing in Windows
Page 23
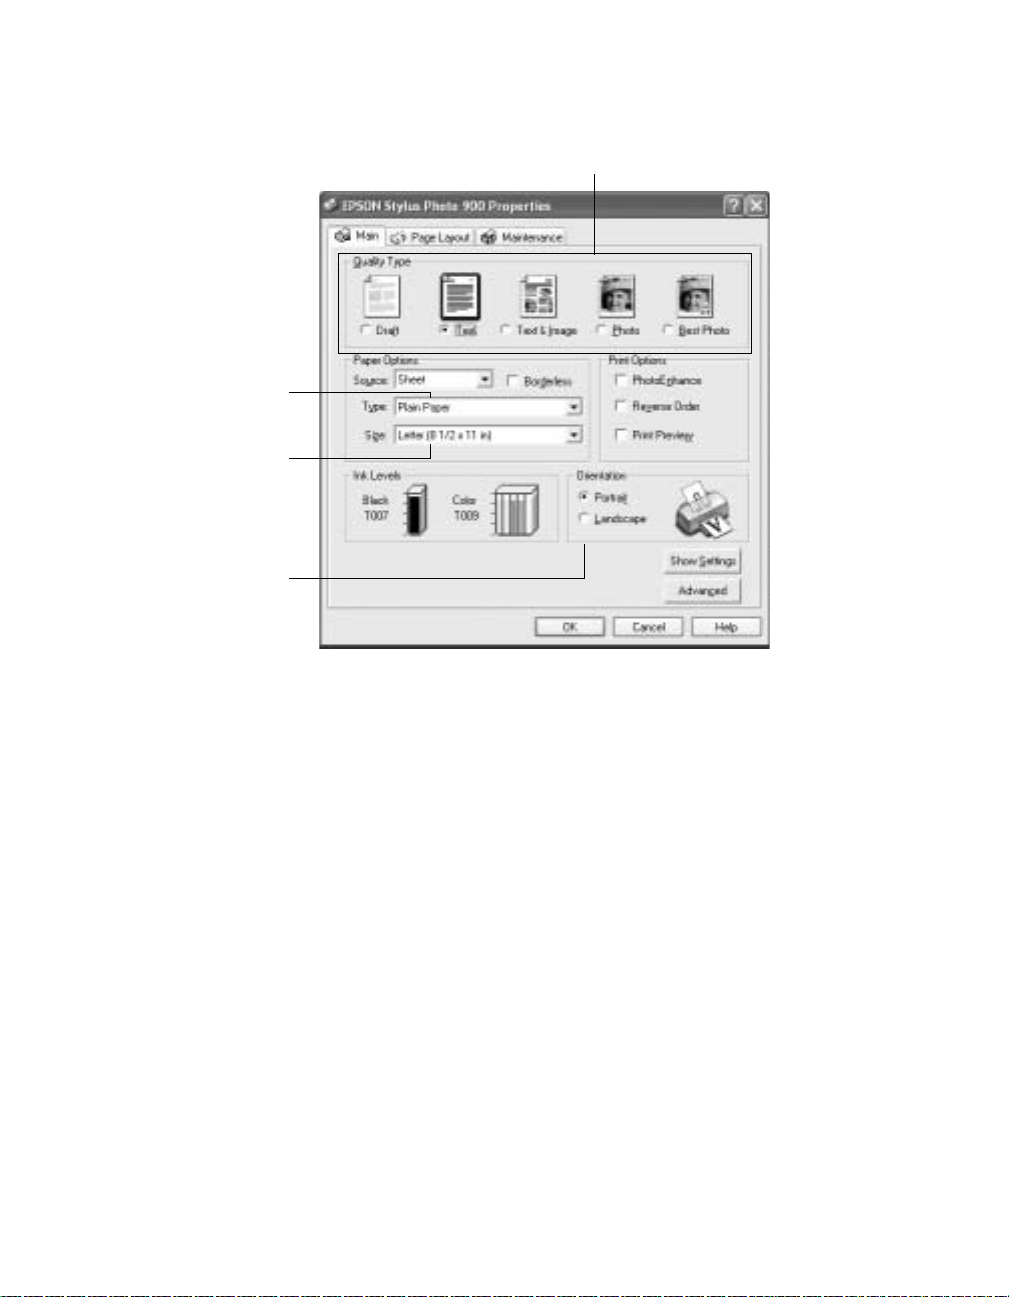
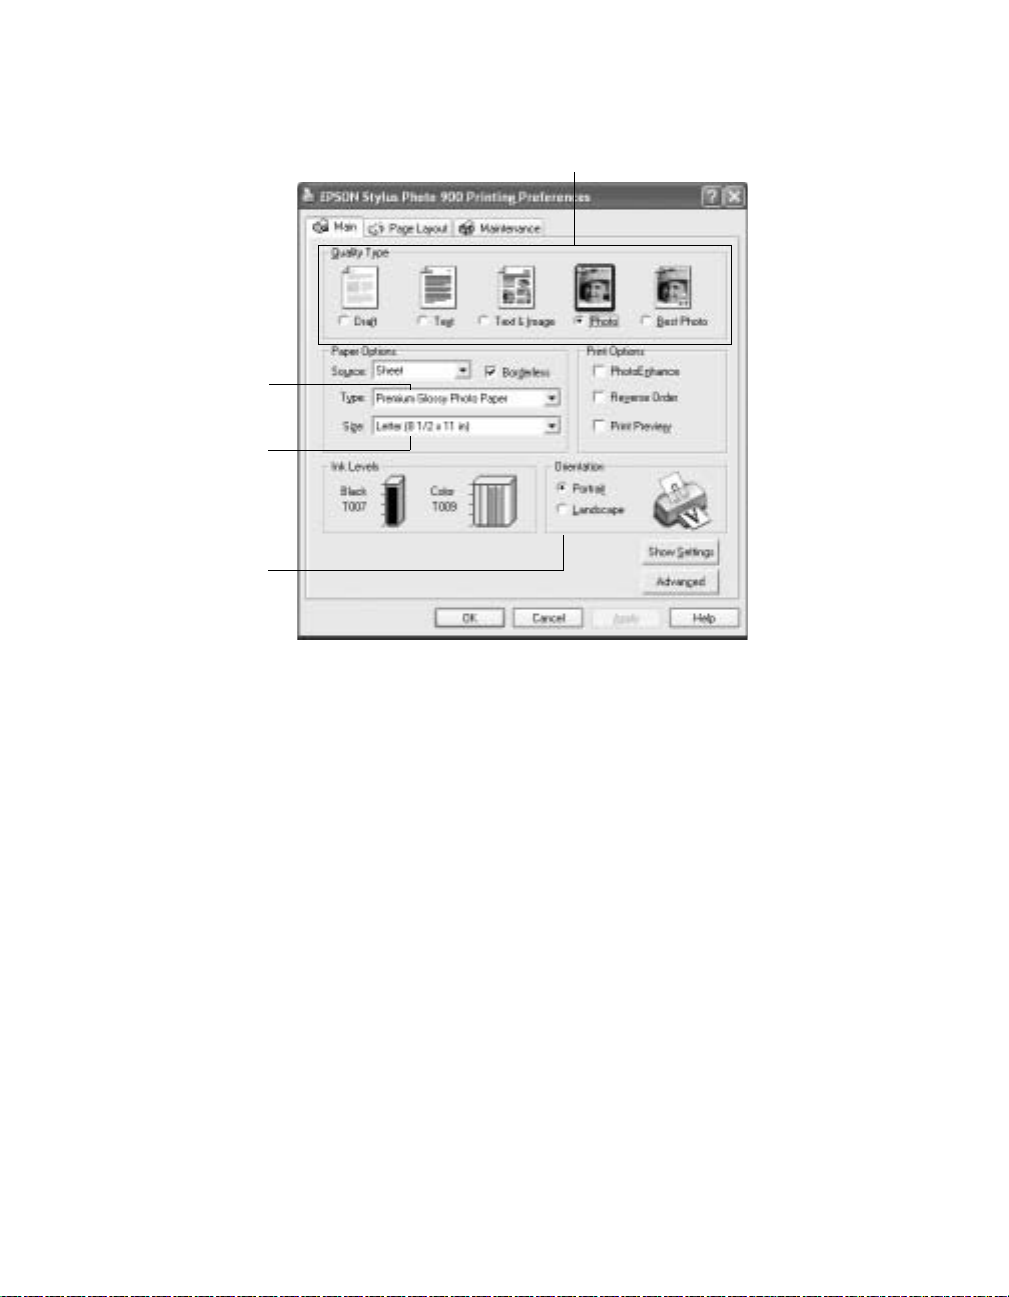
4. Select the following in the properties window:
Select the type of document you’re printing
Select your paper
Type
Select your paper
Size
Select your
document or
image orientation
5. Select from these
for rough drafts with reduced print quality
Draft:
Quality Types:
Text: For text-only documents with higher text quality
Text & Image: For documents with text and images with higher quality
Photo: For photos and graphics with good quality and speed
Best Photo: For photos or graphics with high print quality
Note: The Quality Type settings on this screen give you the best combination of
quality and speed for most prints. For the highest quality (Photo RPM) on
selected papers, click the Advanced button on the Main tab. Then see
“Customizing Windows Print Settings” on page 25 for instructions on selecting
Photo RPM.
6. Select the paper Type for the paper you’ve loaded. See “Selecting the Correct
Paper Type” on page 27 for more information about paper types.
7. Select other settings as shown above.
Tip: For more information about printer settings, click the ? or Help button.
Printing in Windows 23
Page 24

8. Click OK.
9. At the Print window, click OK or Print to start printing.
During printing, this window appears and shows the progress of your print job. You
can use the buttons to cancel, pause, or resume printing. You can also see how much
ink you have left.
Click to cancel printing
Click to pause or resume printing
Selecting Default Settings
Your printer settings only apply to the program you’re currently using. If you want,
you can change the Windows default printer settings for all your programs.
1. Right click the printer icon in the lower right corner of your screen (taskbar).
2. Select Printer Settings. You see the window shown in “Printing From an
Application” on page22.
3. Select the default settings you want for all your applications, then click
You can still change the printer settings in your program, if necessary.
24 Printing in Windows
OK.
Page 25
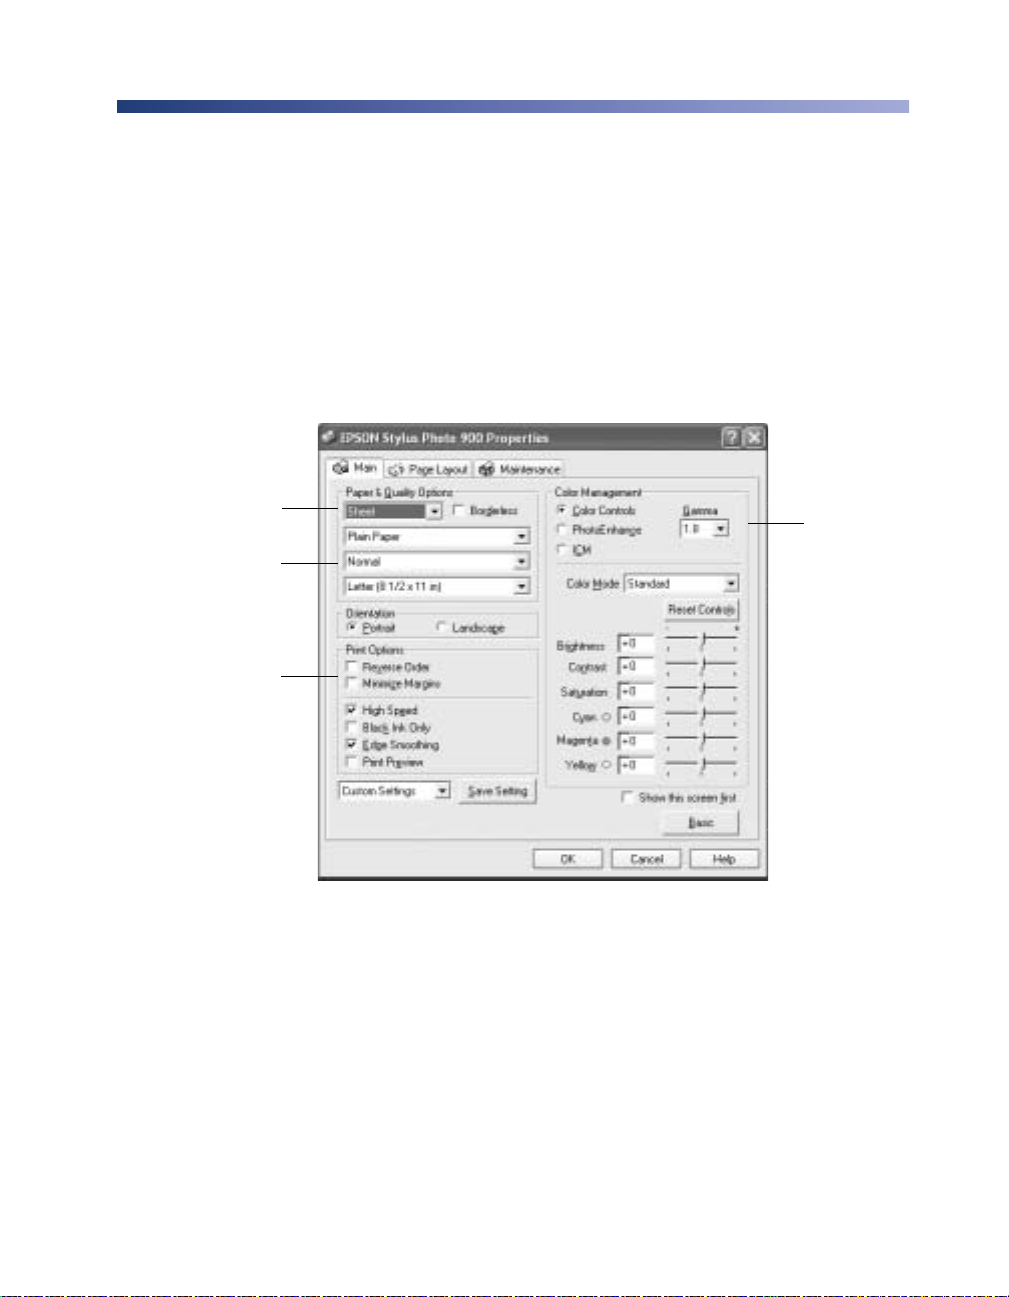
Customizing Windows Print Settings
You can use advanced settings for color matching, printing at a higher resolution, or
selecting a variety of special effects and layouts.
1. On the Main tab, click the Advanced button in the bottom right corner of the
window.
2. If you see a warning note, click Continue.
3. Select the following advanced settings as necessary:
Select Paper & Quality
Options as necessary
Click here to select
Photo RPM (5760 ×
720) for the best print
quality on photo and
glossy paper types
Select Print Options
as necessary
Note: For the highest print quality, select Photo RPM. Please note that printing
will take longer in this mode.
For more information about advanced settings, or instructions on saving them as
a group so you can reuse them later, click the ? or Help button. If you want to use
the Advanced screen each time you access your printer settings, select the
Show this sc re en first checkbox.
Select a color
management
method
(To choose
No Color
Adjustment,
click ICM
first)
Printing in Windows 25
Page 26
4. Once you’ve finished selecting advanced settings, you can:
■ Click OK to save your settings, return to the Print dialog box, and print.
■ Click the Basic button to return to the Basic settings.
■ Click the Page Layout tab and continue with step 5 to select layout options.
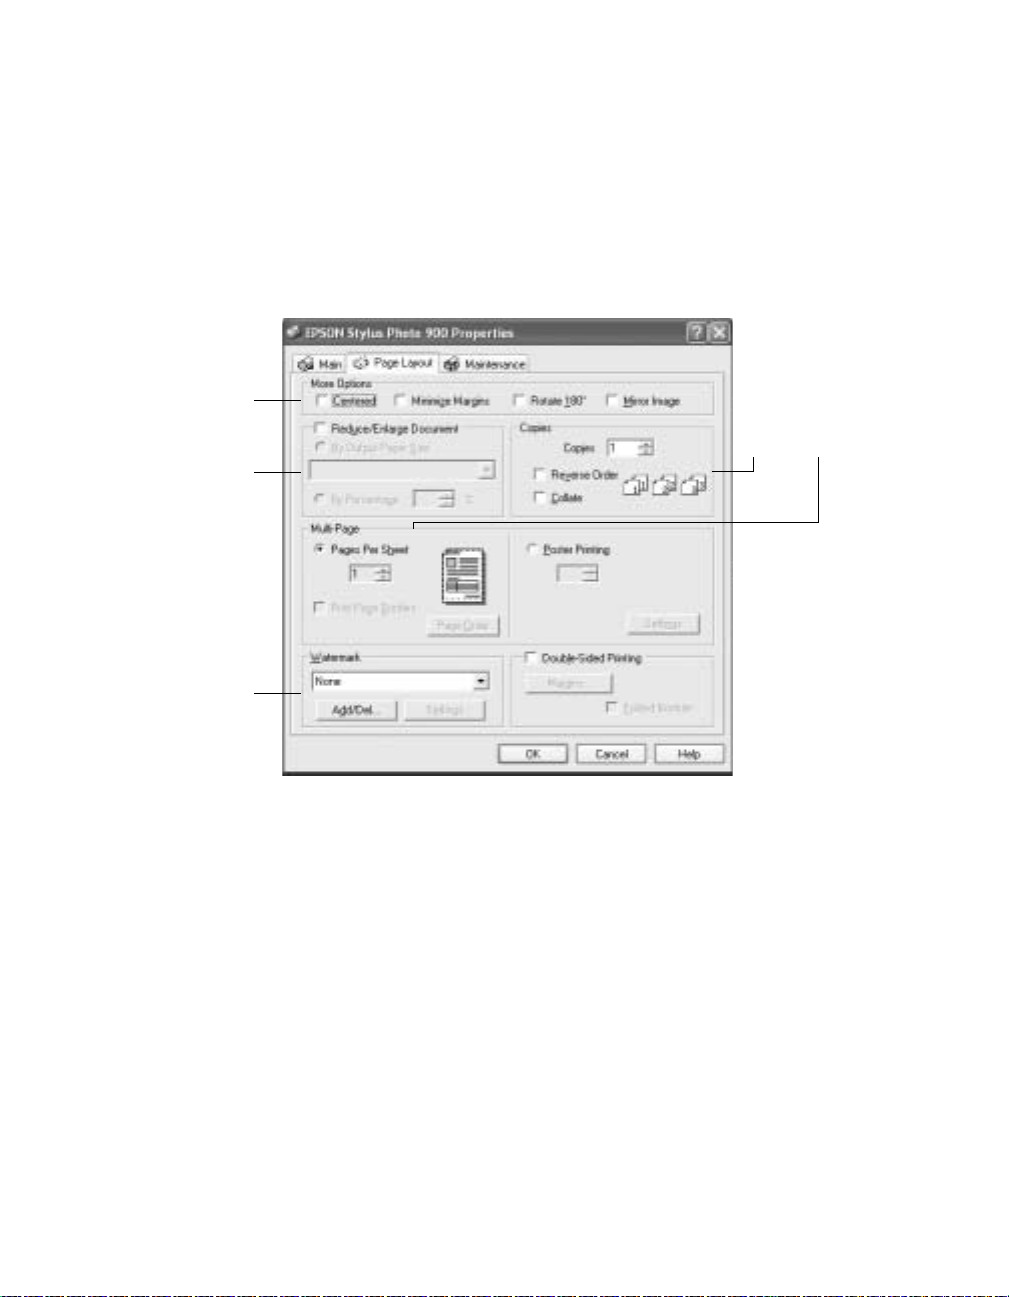
5. Select the following page layout settings as necessary:
Select image
position options
here
Select image resizing
options here; these
affect only your
printed image
Add a watermark to
printed page here
Select multi-page
document options
here and here
Note: For more information on page layout settings, click the ? or Help button.
6. Click OK to save your settings, then click OK or Print.
26 Printing in Windows
Page 27
Selecting the Correct Paper Type
Select the correct paper Type setting so your printer knows what kind of paper you’re
using and adjusts the ink coverage accordingly.
For this paper Select this paper Type setting
Plain paper sheets or envelopes
EPSON Premium Bright White Paper
EPSON Iron-On Transfer Paper 360 dpi Ink Jet Paper
EPSON Photo Quality Ink Je t Pape r
EPSON Photo Quality Ink Jet Ca rds
EPSON Photo Quality Self Adhesive Sheets
EPSON Matte Paper Heavyweight
EPSON Double-Sided Matte Paper
EPSON Photo Paper
EPSON Panoramic Photo Paper
EPSON Glossy Photo Paper
EPSON All Purpose Glossy Paper
EPSON Photo Quality Gloss y Pape r
EPSON Glossy Photo Greeting Cards
EPSON Premium Glossy Photo Paper
(including roll paper)
Plain paper
Photo Quality Ink Jet Paper
Matte Paper - Heavyweight
Photo Paper
Glossy Photo Paper
Premium Glossy Photo Paper
EPSON Premium Luster Photo Paper Premium Luster Photo Paper
EPSON Premium Semigloss Photo Paper Premium Semigloss Photo Paper
EPSON Photo Stickers
EPSON ColorLife
EPSON Ink Jet Transpar encies Ink Jet Transparencies
®
™
Photo Paper ColorLife Photo Paper
Photo Quality Glossy Film
Printing in Windows 27
Page 28
Printing Borderless Photos on Cut Sheets
You can print your photos with no margins, extending the image all the way to the
edges of the page.
Note: For instructions on printing borderless photos on roll paper, see “Loading
Roll Paper” on page 14.
Although borderless printing is a bit slower, you get beautiful snapshots and
enlargements, without trimming, on these papers and sizes:
Paper type or Media Type
Paper name Sizes
setting
EPSON Matte Paper
Heavyweight
EPSON Glossy Photo
Paper
EPSON Photo Paper Letter (8.5 × 11 inches) Photo Paper
EPSON Premium
Glossy Photo Paper
EPSON Premium
Semiglos s Photo Paper
EPSON Premium Luster
Photo Paper
8 × 10
Letter (8.5 × 11 inches)
Letter (8.5 × 11 inches) Glossy Photo Paper
4 × 6
5 × 7
8 × 10
Letter (8.5 × 11 inches)
Letter (8.5 × 11 inches) Premium Glossy Photo
Letter (8.5 × 11 inches) Premium Luster Photo Paper
Matte Paper - Heavyweight
Premium Glossy Photo
Paper
Paper
Follow these steps to print borderless photos:
1. Start your photo program and open your photo.
2. Open the File menu and click Print. Then click Properties or Preferences.
28 Printing in Windows
Page 29
You see the following screen:
Select your paper
Type
Select your paper
Size
Select your
document or
image orientation
Select the type of document you’re printing
3. Select
Photo or Best Photo as the Quality Type setting.
4. Choose Sheet as the paper Source setting.
5. Select one of the following paper types:
■ Matte Paper Heavyweight
■ Photo Paper
■ Glossy Photo Paper
■ Premium Glossy Photo Paper
■ Premium Luster Photo Paper
■ Premium Semigloss Photo Paper
6. Click the Borderless checkbox. Read the message and click OK.
7. Select your paper Size setting
8. Select Portrait or Landscape as the orientation setting.
Click
OK, then click OK or Print.
Printing in Windows 29
Page 30

30 Printing in Windows
Page 31

Printing on a Macintosh
Before you start, make sure your printer is set up and its software is installed as
described on the Start Here sheet.
Whenever you print, make sure you do the following:
■ Use the right paper.
For the best-looking photos, most vivid colors, and greatest detail, always use
genuine EPSON papers and EPSON inks.
■ Choose the right printer settings.
Your printer automatically adjusts itself for each type of paper. That’s why printer
settings are important . They te ll your pr inter what kin d of pap er you’re us ing and
what type of print you want. Make sure you check your printer settings every t ime
you print.
See these sections for instructions on selecting printer settings:
■ “Printing with Macintosh OS 8.6 to 9.x” on page 32
■ “Printing with Macintosh OSX” on page 35
31
Page 32

Printing with Macintosh OS 8.6 to 9.x
Before you begin make sure you selected your printer in the Chooser as described in
“Installing Your Printer Driver” on page87.
1. From the File menu, select Page Setup. Select the following settings:
Make sure you see SP 900
Select your paper size
Select your paper source
Select your document
or image orientation
2. Click OK to close the Page Setup window.
3. From the File menu, select Print. You see a window like this one:
32 Printing on a Macintosh
Select the type of
paper you’re using
Select Color or
Black Ink
Select higher quality or faster printingSelect Automatic mode
Page 33

4. Select the following settings:
■ Choose your paper from the Media Type list. See “Selecting the Correct
Media Type” on page 42 for details.
■ Select Color to print a color document or black and white photograph. To
print a black text document, click Black.
■ Choose Automatic to get good printing results for most projects.
■ Set the slider to Quality to select high-quality printing, or Speed for faster
printing. (The slider is not available for all paper types.)
Note: The Quality setting on this screen gives you the best combination of quality
and print speed for most prints. For the highest print quality (Photo RPM) on
selected papers, click Custom then click the Advanced button and see
“Customizing Macintosh Print Settings” on page 38 for instructions on selecting
Photo RPM.
5. You can also do the following:
■ Click to reduce/enlarge your printed image, print multi-page layouts, or
add a watermark.
■ Click to control background printing and schedule print jobs.
■ Click , then click Preview to preview your printout.
■ Click to check your ink levels.
Tip: For more information about printer settings, click the ? button.
6. Click Print.
Printing on a Macintosh 33
Page 34

7. If you turned on background printing, you can select EPSON Monitor IV from
the Application menu in the upper right corner of your screen. You see the
EPSON Monitor window:
Select your print job,
then click here to
cancel printing
Click here to show
or hide the print
settings
Note: If you’re not using background printing and you need to cancel printing,
hold down the key and press the . (period) key.
Click to check
ink levels
34 Printing on a Macintosh
Page 35

Printing with Macintosh OS X
If you’re using an OS X compatible printing application, follow the steps below to
print a document. (If you’re using an application that’s compatible only with
Macintosh Classic mode, follow the steps in “Printing with Macintosh OS 8.6 to9.x”
on page 32 instead.)
Before you begin, make sure you added your printer to the Print Center as described
on the Start Here sheet.
1. From the File menu, select
Page Setup. Select the following settings:
Select your printer
name from the list
Select your paper size
Select your document
or image orientation
2. Select your printer from the Format for drop-down list.
Tip: To print with minimized margins feat ur e, selec t Stylus Photo 900
(Standard - Minimize Margins) from the Format for list. Make sure you choose
the same option as the printer setting in the Print window.
Caution: When printing non-borderless print jobs using a custom page size,
make sure the selected size matches the paper you loaded and is within the
printable area for your printer. For example, never choose a size wider than 9
inches or longer than 44 inches.
3. Click OK to close the Page Setup window.
Printing on a Macintosh 35
Page 36

4. From the File menu select Print. You see a window like this one:
Select the same
printer name you
chose in step 2.
Select Print Settings
from the list
5. Select your printer name from the Printer drop-down list.
Note: Make sure you chose the same printer that you selected in step 2.
6. Select Print Settings from the list.
7. Select the following Print Settings as necessary:
Select the type of
paper you’re using
Select Automatic
mode
Note: For more information about printer settings, click the Help button.
The Quality setting on this screen gives you the best combination of quality and
print speed for most prints. For the highest print quality (Photo RPM) on selected
papers, click Custom, then click the Advanced button and see “Customizing
Macintosh Print Settings” on page 38.
36 Printing on a Macintosh
Select Color or
Black Ink
Select higher
quality or faster
printing (if available)
Page 37

8. You can also choose other print settings by selecting these options in the
pull-down menu:
■ Copies & Pages, to select the number of copies or a page range
■ Layout, to select page layout options
■ Output Options, to save your print job as a PDF file
■ Color Management, to select ColorSync,
®
adjust the color controls, change
the gamma setting, or turn off color adjustments in the printer software
■ Summary, to view a list of all your selections
■ Save Custom Setting (OS X 10.1.x only), to save your selections for future
use (OS X 10.2.x, select Save As from the Presets pull-down menu instead)
9. Click Print.
10. To monitor the progress of your print job, click the Print Center icon when
it appears in the dock on the bottom of your desktop.
With OS X 10.2.x, double-click Stylus Photo 900 in the Printer List window.
You see a screen like this:
11. Monitor the progress of your print job or do one of the following:
■ Click the print job, then click Delete to delete the job
■ Click the print job, then click Hold to pause printing
■ Click a print job marked “Hold” and click Resume to resume printing
12. When you’re finished, close Print Center.
Printing on a Macintosh 37
Page 38

Customizing Macintosh Print Settings
Macintosh OS 8.6 to 9.x
You can use advanced settings for color matching, printing at a higher resolution, or
selecting a variety of special effects and layouts.
1. On the printer settings window, click Custom, then click the Custom Settings
list to open it.
Click Custom, then choose:
Economy (to save ink on plain paper) or
ColorSync (to match printed colors with
compatible device colors) from the Custom
Settings list
Note: For more information on custom settings, click the ? button.
2. If you’re finished selecting custom settings, click Print to print your document.
To select more custom settings, go to step 3.
3. To access advanced settings click
38 Printing on a Macintosh
Custom, then click Advanced.
Page 39

4. Select these advanced settings as necessary:
Click here to select Photo
RPM (5760 × 720) for the
best print quality on certain
paper types
Select various print
options here
Select color management
settings here
Note: For the highest print quality, select Photo RPM. Please note that printing
will take longer in this mode.
For more information on advanced settings, or instructions on saving them as a
group so you can reuse them later, click the
? button.
5. Click OK to save your settings, then click Print.
Printing on a Macintosh 39
Page 40

Macintosh OS X
You can use advanced settings for color matching, printing at a higher resolution, or
selecting a variety of special effects and layouts.
1. On the printer settings window, click
Custom, then click the Custom Settings
list to open it.
Click Custom, then choose:
Economy (to save ink on plain paper) or
ColorSync (to match printed colors
with compatible device colors)
2. If you’re finished selecting custom settings, click Print to print your document.
To select more custom settings, go to step 3.
3. To access advanced settings, click
40 Printing on a Macintosh
Advanced Settings.
Page 41

4. Select these advanced settings as necessary:
Click here to select Photo RPM
(5760 × 720) for the best print
quality on certain paper types
Select various print options here
To select color management
settings, select Color Management
from the Print Settings pull-down
menu
Note: For the highest print quality, select Photo RPM. Please note that printing
will take longer in this mode.
For more information on advanced settings, or instructions on saving them as a
group so you can reuse them later, click Help.
5. Click Print.
Printing on a Macintosh 41
Page 42

Selecting the Correct Media Type
Select the correct Media Type setting so your printer knows what kind of paper
you’re using and adjusts the ink coverage accordingly.
For this paper Select this Media Type setting
Plain paper sheets or envelopes
EPSON Premium Bright White Paper
EPSON Iron-On Transfer Paper 360 dpi Ink Jet Paper
EPSON Photo Quality Ink Je t Pape r
EPSON Photo Quality Ink Jet Ca rds
EPSON Photo Quality Self Adhesive Sheets
EPSON Matte Paper Heavyweight
EPSON Double-Sided Matte Paper
EPSON Photo Paper
EPSON Panoramic Photo Paper
EPSON Glossy Photo Paper
EPSON Photo Quality Gloss y Pape r
EPSON Glossy Photo Greeting Cards
EPSON Premium Glossy Photo Paper Premium Glossy Photo Paper
EPSON Premium Luster Photo Paper Premium Luster Photo Paper
EPSON Premium Semigloss Photo Paper Premium Semigloss Photo Paper
Plain paper
Photo Quality Ink Jet Paper
Matte Paper - Heavyweight
Photo Paper
Glossy Photo Paper
EPSON Photo Stickers Photo Quality Glossy Film
EPSON ColorLife Photo Paper ColorLife Photo Paper
EPSON Ink Jet Transpar encies Ink Jet Transparencies
42 Printing on a Macintosh
Page 43

Printing Borderless Photos on Cut Sheets
You can print your photos with no margins, extending the image all the way to the
edges of the page.
Note: For instructions on printing borderless photos on roll paper, see “Loading
Roll Paper” on page 14.
Although borderless printing is a bit slower, you get beautiful snapshots and
enlargements, without trimming, on these papers and sizes:
Paper type or Media Type
Paper name Sizes
setting
EPSON Matte Paper
Heavyweight
EPSON Glossy Photo
Paper
EPSON Photo Paper Letter (8.5 × 11 inches) Photo Paper
EPSON Premium
Glossy Photo Paper
EPSON Premium
Semiglos s Photo Paper
EPSON Premium Luster
Photo Paper
8 × 10
Letter (8.5 × 11 inches)
Letter (8.5 × 11 inches) Glossy Photo Paper
4 × 6
5 × 7
8 × 10
Letter (8.5 × 11 inches)
Letter (8.5 × 11 inches) Premium Glossy Photo
Letter (8.5 × 11 inches) Premium Luster Photo Paper
Matte Paper - Heavyweight
Premium Glossy Photo
Paper
Paper
See these sections for instructions on selecting printer settings:
■ “Macintosh OS 8.6 to 9.x” on page 44
■ “Macintosh OS X” on page 45
Printing on a Macintosh 43
Page 44

Macintosh OS 8.6 to 9.x
1. Start your photo program and open your photo file.
2. Open the File menu and click Page Setup. You see the following:
3. Select your Paper Size.
4. Choose
Auto Sheet Feeder as the Paper Source.
5. Click the Borderless checkbox. Read the message and click OK.
6. Select Portrait or Landscape as the orientation setting.
7. When you have finished making page setup settings, click OK.
8. Open the File menu and click Print.
9. Select one of the following Media Types:
■ Matte Paper - Heavyweight
■ Photo Paper
■ Glossy Photo Paper
■ Premium Glossy Photo Paper
■ Premium Luster Photo Paper
■ Premium Semigloss Photo Paper
10. Select Quality (for higher quality) or Speed (for faster printing) using the slider.
11. Click Print.
44 Printing on a Macintosh
Page 45

Macintosh OS X
1. Start your photo program and open your photo file.
2. Open the File menu and click Page Setup. You see the following:
Select Stylus Photo 900(Sheet
Feeder - Borderless)
3. Select
Stylus Photo 900(Sheet Feeder - Borderless) in the Format for
drop-down list.
Caution: When printing borderless photos, select one of the supported paper
sizes listed in the table on page 43; never select a custom or unsupported paper
size or ink may spray inside your printer.
4. Select your Paper Size.
5. Select your document or image orientation.
6. Click OK.
Printing on a Macintosh 45
Page 46

7. Open the File menu and click Print. You see the following:
Select Stylus Photo 900(Sheet
Feeder - Borderless)
8. Select
Stylus Photo 900(Sheet Feeder - Bor derless) in the Prin ter drop-down
list.
Note: Make sure you chose the same printer that you selected in step 3.
9. Select Print Settings from the list.
10. Select one of the following Media Types:
■ Matte Paper Heavyweight
■ Photo Paper
■ Glossy Photo Paper
■ Premium Glossy Photo Paper
■ Premium Luster Photo Paper
■ Premium Semigloss Photo Paper
11. Select Quality (for higher quality) or Speed (for faster printin g) using the slide r.
12. Click Print.
46 Printing on a Macintosh
Page 47

Printing on CDs and Special Media
Your EPSON Stylus Photo 900 gives you several options for specialized printing:
■ You can print directly on ink-jet printable CDs and DVDs using your own
photos, text, and artwork.
■ You can print a series of photos on roll paper.
■ You can use the manual feed slot to print on heavy materials such as card stock
and matte board up to 1.3 mm thick.
Follow the instructions in these sections:
■ “Printing on CDs and DVDs” below
■ “Printing on Roll Paper” on page 61
■ “Printing on Card Stock or Matte Board” on page 69
Printing on CDs and DVDs
Your printer includes a special tray that lets you print customized text, graphics, and
photos directly on any ink-jet printable CD or DVD. The EPSON Print CD
software makes it easy to import your own photos, add text, and modify your designs
with a variety of special effects. You can print on both regular 12-cm CDs and 8-cm
mini CDs.
Caution: Thermal printable CDs and DVDs should not be used with this printer.
You can order ink-jet printable CDs and DVDs from several websites, for example,
www.pcmall.com, www.cdw.com, www.warehouse.com, www.zones.com,
www.macconnection.com, and www.pcconnection.com. Make sure you purchase
CDs and DVDs that have an ink-jet printable surface.
47
Page 48

Follow the steps in these sections:
■ “Cleaning the Roller” on page 48
■ “Designing CDs and DVDs” on page49
■ “Inserting a CD or DVD” on page 53
■ “Printing Your Design” on page 56
■ “Adjusting the Print Position” on page57
■ “Adjusting the Print Density” on page 59
Cleaning the Roller
Before you print on CDs or DVDs, it’s a good idea to clean the roller inside the
printer. You can do this by feeding and ejecting several sheets of plain paper.
1. Make sure the printer is turned on and letter-size paper is loaded.
2. Press the paper button to feed the paper into the printer.
3. Press the paper button again to eject the paper.
4. Repeat steps 2 and 3 several times.
48 Printing on CDs and Special Media
Page 49

Designing CDs and DVDs
You can use EPSON Print CD to create and print a design with images , graphics, an d
text. You can use your own photos or choose from a selection of photographic and
abstract images included with the program.
Note: EPSON Print CD software is not available for Mac OS X.
The easiest way to create your own design is to start with an existing file and then
personalize it for your own use.
1. Start EPSON Print CD.
2. Click the Open icon or select Open from the File menu.
3. Select Sample1.ec2 and click OK (Windows), or sample01 and click Open
(Macintosh).
You see the Midnight Music CD on the workspace:
Windows
Macintosh
Printing on CDs and Special Media 49
Page 50

4. To change the background image, click the Background icon (Windows) or
choose
Background from the Insert menu (Macintosh). You see a window like
the following:
Click here to
select a new
background image
Windows
Macintosh
5. Click Select Image (Windows) or Select Background (Macintosh).
You see the following:
Windows
6. Select one of the images included with the program, and click
Open (Macintosh). (You can also click the TWAIN button to scan in an image or
download one from your digital camera.)
50 Printing on CDs and Special Media
Macintosh
OK (Windows) or
Page 51

If you want to choose one of your own images, do one of the following:
■ Windows: Click the File tab, then click Browse to locate the folder where
your images are sto r ed a nd click
OK. You see thumbnail images o f al l th e fi les
in the folder. Select your image and click OK.
■ Macintosh: Locate the folder where your images are stored, then select the
one you want and click
Open.
7. If you want to modify the template or enhance your image, click
Adjustment
(Windows), or use any of the available editing features (Ma cintosh ).
Image
You can adjust the brightness, contrast, and gamma, or apply mosaic, blur, or
special color effects.
Macintosh
Windows
Printing on CDs and Special Media 51
Page 52

8. To edit the text, do one of the following:
■ Windows: Double-click any text block on the CD image to open the text
editing window. Enter your text and use the tabs to apply formatting and
special effects, then click
■ Macintosh: Use any of the options on the Text Settings palette. You can also
OK.
use the options on the Color Settings and Object Settings palettes.
Windows
Click here to curve
a line of text
9. To curve a single line of text, click the text, then drag the red “handle” up or
down.
10. When you’re finished, choose
Note: To check your design, it’s a good idea to print it on a sheet of plain paper
before printing on a CD or DVD. Make sure you have plain paper loaded in the
printer, then follow the instructions in “Printing Your Design” on page 56 to print.
When you’re ready to load a CD or DVD, follow t he in st ruct ion s in “I ns erti ng a C D
or DVD” on page 53.
52 Printing on CDs and Special Media
Macintosh
Save as from the File menu to save your file.
Page 53

Inserting a CD or DVD
Make sure the data, music, or video is burned on your ink-jet printable CDs or DVDs
before you print. Otherwise, dirt or scratches on the surface may cause errors when
you burn the data. If you plan to print large numbers of CDs or DVDs, it’s a good
idea to print a small sample, then wait a day and check the quality to make sure it is
satisfactory.
If you want to check the pri nt position or color, se e the instructions for “A djusting the
Print Position” on page57 and “Adjusting the Print Density” on page 59.
Before you insert a CD or DVD, make sure the printer is turned on. Otherwise, the
disc may not be positioned correctly.
Then follow these steps:
1. Push in the output tray extension, but leave the tray open.
2. Set the paper thi ckness le ver to the position. The paper light begins flashing
rapidly.
Printing on CDs and Special Media 53
Page 54

3. Place the CD or DVD on the CD tray with the white or printable side face-up.
4. Slide the edge guide to the right to make room for the tray.
54 Printing on CDs and Special Media
Page 55

5. Insert the tray against the left side of the feeder.
6. Open the printer cover and push the tray into the printer, aligning the white line
on the tray with the edges of the printer rollers.
Printer rollers
White line
7. Slide the edge guide against the tray.
Printing on CDs and Special Media 55
Page 56

8. Set the paper thickness lever to the position. The paper light goes out.
9. Close the printer cover. Then follow the instructions in “Printing Your Design”
below to print with EPSON Print CD.
Printing Your Design
After you have created your design and loaded a CD or DVD, you’re ready to print.
1. Open the File menu and select Printer Settings (Windows) or Page Setup
(Macintosh).
2. Make sure your EPSON Stylus Photo 900 is selected, and the Paper Source is set
to Manual or Manual Feed.
Windows
Select the Manual or Manual Feed paper source
56 Printing on CDs and Special Media
Macintosh
Page 57

3. Click OK.
4. Open the File menu and select Print, or click the Print button. You see this
screen:
MacintoshWindows
5. Click
OK (Windows) or Print (Macintosh).
Note: After you print, handle the CD or DVD carefully. To allow the ink to dry fully,
wait at least 24 hours before playing the disc or inserting it in a drive. Keep
printed discs away from moisture and direct sunlight.
When you’re finished printing on CDs and DVDs, make sure you return the paper
thickness lever to the position.
Caution: Don’t move the paper thickness lever during printing; this could damage
your printer.
If you want to check the pri nt position or color, se e the instructions for “A djusting the
Print Position” on page57 and “Adjusting the Print Density” on page 59.
Adjusting the Print Position
If your printed images and text are not centered or positioned the way you want, you
may need to adjust the printing position. Use the blank cardboard check disk
included with your printer, or an extra CD. You can also use these steps to check the
position before you print on a CD or DVD:
1. Place the position check disk (or an extra CD) on the CD tray and insert it into
the printer, as described on page 53.
2. Start EPSON Print CD.
Printing on CDs and Special Media 57
Page 58

3. Follow the instructions in “Printing Your Design” on page 56 to make sure your
EPSON Stylus Photo 900 is selected, and the Paper Source is set to
Manual Feed.
Manual or
4. Select Print from the File menu, or click the Print button. You see this screen:
Windows
Select this setting
Macintosh
5. Select Print Position Confi rmation (or Check) Pattern and click OK
(Windows) or Print (Macintosh). The confirmation pattern is printed on the
check disk or CD.
6. Remove the check d isk or CD and measur e th e dist ance from the e dge of th e hol e
to the small cross marks (distances labeled A and B as shown). You’ll need a
millimeter ruler for these measurements.
58 Printing on CDs and Special Media
Page 59

7. Open the File menu and select Adjust Print Position. You see this screen:
Windows
8. Make sure
Enter measurements here
Enter Values or Value Entry is checked, then input the A dis tance in
Macintosh
the Height (Top) or Top Space box. Enter the B distance in the Width (Right)
or Right Space box.
9. Click OK to save the measurements to the EPSON Print CD program.
Adjusting the Print Density
If ink smears on your printed CDs or DVDs, you may need to adjust the color
saturation or ink density. CDs from different manufacturers may absorb ink
differently, so you may need to adjust the density for each type of disc. Follow these
instructions to print a color saturation check pattern, and then make adjustments as
necessary.
1. Insert a test CD or DVD for printing, as described on page53.
2. Start EPSON Print CD.
3. Follow the instructions in “Printing Your Design” on page 56 to make sure your
EPSON Stylus Photo 900 is selected, and the Paper Source is set to
Manual Feed
.
Printing on CDs and Special Media 59
Manual or
Page 60

4. Select Print from the File menu, or click the Print button. You see this screen:
Windows
5. Select
Select this setting
Print Density Confirmation (or Check) Pattern and click OK
Macintosh
(Windows) or Print (Macintosh).
6. After the pattern is print ed, examine the printed CD or DVD and make the Print
Color Correction
(or Color Correction) setting lighter or darker as necessary.
You can print three density patterns on one disc. Each pattern is printed in a
different location.
After the first pattern is printed, adjust the setting, then repeat steps 4 through 6,
selecting Second or Second Time to print the second pattern.
If you want to try a third Color Correction setting, you can repeat steps 4 through
6 again and select Third or Third Time.
7. Remove the CD or DVD and let it dry for at least 24 hours. Then check the
saturation levels again.
Note: You can also use the Brightness and Contrast settings in EPSON Print CD
to adjust color saturation. See “Designing CDs and DVDs” on page 49 for
instructions.
60 Printing on CDs and Special Media
Page 61

Printing on Roll Paper
Before you print on roll paper, make sure the pa per is loaded corre ctly, as described in
“Loading Roll Paper” on page 14. Follow the steps in the next sections to select your
roll paper settings in Windows or Macintosh.
■ “Windows” below
■ “Macintosh OS 8.6 to 9.x” on page 63
■ “Macintosh OS X” on page 64
■ “Removing Your Photos and Paper” on page 67
Windows
1. Open your photo file and resize it as necessary.
2. Open the File menu and click Print.
3. Click Properties or Preferences. You see this screen:
4. Choose Photo or Best Photo as the Quality Type.
Printing on CDs and Special Media 61
Page 62

5. Choose Roll as the paper Source. The Roll Paper Options window pops up, as
shown above.
6. Select one of the following Roll Paper Options:
■ Banner Mode: Makes multi-page documents print as one large page. When
the Save roll paper option is checke d, the printer stops prin ting after the last
word or image is printed.
■ Cut Sheet Mode: Prints multi-page documents as individual pages. When
the Print page frame option is checked, the printer prints a dashed line
between each page.
7. Click Borderless if you want to print borderless photos.
8. Select one of the following as the paper Type, depending on the paper you’re
using:
■ Premium Glossy Photo Paper
■ Premium Semigloss Photo Paper
■ Premium Luster Photo Paper
9. Select the photo size as the paper Size setting.
10. Click OK, then click OK or Print.
After your photos are printed, see “Removing Your Photos and Paper” on page67.
62 Printing on CDs and Special Media
Page 63

Macintosh OS 8.6 to 9.x
1. Open your photo file and resize it as necessary.
2. Open the file menu and select Page Setup. You see this screen:
3. Select the photo size as the Paper Size.
4. Choose
Roll Paper as the Paper Source.
5. Click Borderless if you want to print borderless photos.
6. Select one of the following Roll Paper Options:
■ Banner Mode: Makes multi-page documents print as one large page. When
the Save roll paper option is checke d, the printer stops prin ting after the last
word or image is printed.
■ Cut Sheet Mode: Prints multi-page documents as individual pages. When
Print page frame option is checked, the printer prints a dashed line
the
between each page.
7. Click
OK.
8. Open the file menu and select Print.
9. Select one of the following as the Media Type, depending on the paper you’re
using:
■ Premium Glossy Photo Paper
■ Premium Semigloss Photo Paper
■ Premium Luster Photo Paper
Printing on CDs and Special Media 63
Page 64

10. Select Quality (for higher print quality) or Speed (for faster printing) using the
slider.
11. Click
Print.
After your photos are printed, see “Removing Your Photos and Paper” on page67.
Macintosh OS X
1. Open your photo file and resize it as necessary.
2. Open the File menu and select Page Setup. You see this screen:
Select your printer
name from the list
3. Select Stylus Photo 900(Roll Paper) in the Format for drop-down list.
To print borderless photos, select Stylus Photo 900(Roll Paper - Borderless)
or Stylus Photo 900(Roll Paper - Borderless Banner).
Caution: When printing photos on roll paper using a custom paper size, make
sure the selected size is within the printable area for your printer. For example,
never choose a size wider than 9 inches or longer than 44 inches.
4. Select the photo size as the Paper Size.
5. Click OK.
64 Printing on CDs and Special Media
Page 65

6. Open the File menu and select Print.
u
Select the same
printer name yo
chose in step 3
7. Select Stylus Photo 900(Roll Paper) from the Printer drop-down list.
If you selected a different Roll Paper option, make sure you select the same one as
you chose in step 3.
Note: Make sure you chose the same printer that you selected in step 3.
8. Select Roll Paper Options from the drop down list. You see this window:
Printing on CDs and Special Media 65
Page 66

9. Choose one of the following, depending on the Roll Paper setting you selected:
■ Banner Mode: Makes multi-page documents print as one large page. When
the
Save roll paper option is checked, the printer stops printin g after the last
word or image is printed.
■ Cut Sheet Mode: Prints multi-page documents as individual pages. When
Print page frame option is checked, the printer prints a dashed line
the
between each page.
10. Select
Print Settings from the list.
11. Select one of the following as the Media Type, depending on the paper you’re
using:
■ Premium Glossy Photo Paper
■ Premium Semigloss Photo Paper
■ Premium Luster Photo Paper
12. Select Quality (for higher print quality) or Speed (for faster printing) using the
slider.
13. Click Print.
After your photos are printed, see “Removing Your Photos and Paper” on page67.
66 Printing on CDs and Special Media
Page 67

Removing Your Photos and Paper
After your photos are printed, you can either send another print job or cut off the
photos and remove the paper from the printer.
1. Press the roll paper button to print a cutting line. The printer feeds the paper
to the cutting position.
2. Cut the paper alo ng the do tte d li ne , bei ng care ful n ot t o pu ll t he pa pe r as yo u cut
it.
3. When you’re finished printing on roll paper, you need to “unload it” from the
printer. Press and hold the roll paper button for three seconds. The paper
feeds backwards out of the printer.
You can also set the paper thickness lever to the manual feed position, then
turn the knobs to roll up the paper. Make sure you return the lever to the
position after you remove the paper.
Printing on CDs and Special Media 67
Page 68

4. Turn the knobs to roll the rest of the paper onto the holder. Then press the
roll paper button to turn off the red paper light.
5. Pull the roll pape r holder out of its mount ing slots and remove the rol l paper from
the holder.
6. Return the unused roll to its original package.
Store your printouts in resealable plastic bags, photo albums, or glass-covered picture
frames. Keep both printed and unused roll paper away from high temperatures,
humidity, and direct sunlight.
68 Printing on CDs and Special Media
Page 69

Printing on Card Stock or Matte Board
You can use the manual feed slot in the back of the printer to print on white card
stock or matte board up to 1.3 mm (0.051 inch or 51 mil) thick, in the following
sizes: letter, legal, or A4 size.
Before you start, remove the paper support. Then turn the printer on. (The printer
must be on to load card stock correctly.)
1. Push in the output tray extension, but leave the tray open.
2. Set the paper thi ckness le ver to the position. The paper light begins flashing
rapidly.
3. Slide the edge guide to the right to make room for the card stock.
Printing on CDs and Special Media 69
Page 70

4. Open the printer cover and place a sheet of card stock against the left side of the
manual feed slot, with the side you want to print on facing up.
5. Slide the card stock into the printer until the leading edge is 1 cm (0.4 inches)
from the gray rollers.
Printer rollers
1 cm
6. Slide the edge guide against the card stock.
70 Printing on CDs and Special Media
Page 71

7. Set the paper thickness lever to the position. (If the print quality is not
satisfactory, try setting the paper thickness lever to the position for the next
print.)
If you’re using the manual feed slot to print on paper rather than card stock, set
the paper thickness lever to the position.
8. Close the printer cover and press the button to feed the card stock into the
printer.
Note: If the paper light flashes, make sure the paper thickness lever is set
correctly, then press the button again.
9. Before you print, make sure you select Manual or Manual Feed as the paper
source in your printer software (see “Printing in Windows” on page 21 or
“Printing on a Macintosh” on page 31).
When you’re finished printing on card stock, make sure you return the paper
thickness lever to the position.
Caution: Don’t move the paper thickness lever during printing; this could damage
your printer.
Printing on CDs and Special Media 71
Page 72

72 Printing on CDs and Special Media
Page 73

Maintaining Your Printer
Follow the instructions in this chapter to keep your printer working at its best and to
prepare it for moving, if necessary:
■ “Cleaning the Print Head” below
■ “Replacing an Ink Cartridge” on page76
■ “Aligning the Print Head” on page 81
■ “Cleaning the Printer” on page 84
■ “Transporting the Printer” on page 85
For more details, see your on-screen User’s Guide.
Cleaning the Print Head
If your printouts are unexpectedly lig ht, or dots or l ine s are m is sing , you may n eed to
clean the print head. This unclogs the nozzles so they can deliver ink properly. Print
head cleaning uses ink, so clean it only if quality declines.
This section explains how to clean the print head using the Head Cleaning utility.
You can also clean the print head by holding down the button on the printer for
three seconds. (This only works when the red light is off.)
Caution: When you don’t turn on your printer for a long time, print quality can
decline, so turn it on and print a few pages at least once a month to maintain
good print quality.
73
Page 74

Running the Head Cleaning Utility
1. Make sure the print er is turned on but not printing, and th e red ink light is off.
(If the ink light is flashing or on, you need to replace a cartridge; see page 76
for details.)
2. Windows: Right-click the printer icon on your taskbar (in the lower right
corner of your screen). Select
Macintosh OS 8.6 to 9.x: Open the File menu and choose Page Setup or Print.
Click the Utility button, then click the Head Cleaning button.
Macintosh OS X: Open the Applications folder and select EPSON Printer
Utility
. Select SP 900 in the printer list, click OK, and select Head Cleaning.
3. Follow the instructions on the screen to clean the print head.
Head Cleaning.
Cleaning takes about 45 seconds. The printer makes noise and the green
power light flashes.
Caution: Never turn off the printer while the green power light is flashing,
unless the printer hasn’t moved or made noise for more than 5 minutes.
4. When the green power light stops flashing, make sure paper is loaded in the
printer, then do the following:
Windows: Click Prin t nozzle check pattern. Then click Print.
Macintosh: Click Confirmation, then click Next.
74 Maintaining Your Printer
Page 75

The nozzle check pattern prints (see “Examining the Nozzle Check Pattern”
below for details).
5. If the nozzle check pattern has no gaps or white lines, click
Finish.
If the pattern has white lines, click Clean to clean the print head again.
If you don’t see any improvement after cleaning three or four times, refer to
“Problems and Solutions” on page 94.
You can also turn the printer off and wait overnight—this allows any dried ink to
soften—and then try cleaning the print head again.
Examining the Nozzle Check Pattern
Examine the nozzle check pattern you printed. Each staggered line should be solid,
with no gaps, as shown.
■ If your printout looks okay, you’re done.
■ If you see any gaps (as shown below), clean the print head again; see “Running the
Head Cleaning Utility” on page 74 for instructions.
Maintaining Your Printer 75
Page 76

Replacing an Ink Cartridge
■ When the red ink light flashes, one or more ink cartridges are low on ink.
■ When the red ink light stays on, you need to replace the cartridge(s).
When you print, you’ll also see a message on your screen telling you whi ch cartridge is
low or empty.
When a cartridge is more th an s ix month s old , yo u may n ee d to rep lac e it if pri ntouts
don’t look their best. If the quality doesn’t improve after cleaning and aligning the
print head, you can replace the cartridge even if the red ink light is off.
Checking the Ink Supply
To check your ink supply, do the following:
■ Windows: Double-click the icon on the Windows taskbar. You see a window
like this:
■ Macintosh OS 8.6 to 9.x: From the File menu, select Print, then click the ink
icon.
■ Macintosh OS X: Choose Applications > EPSON Printer Utility > SP 900 >
Status Monitor
.
76 Maintaining Your Printer
Page 77

You see a window like this:
Click a cartridge image to
display information about
the cartridge.
Purchasing Ink Cartridges
Use these EPSON ink cartridges within six months of installing them and before the
expiration date on the package:
Ink cartridge Part number
Black T007201
Color T009201
Caution: To ensure good results, use genuine EPSON ink cartridges and do not
refill them. Other products may cause damage to your printer not covered by
EPSON’s warranty.
When you need new ink cartridges, contact your dealer, or call the EPSON Store at
(800) 873-7766 or visit www.epsonstore.com (U.S. sales only). In Canada, please call
(800) 463-7766 for dealer referral.
Maintaining Your Printer 77
Page 78

Ink Cartridge Precautions
Warning: Keep ink cartridges out of the reach of children.
If ink gets on your hands, wash them thoroughly with soap and water. If ink gets
in your eyes, flush them thoroughly with water.
Caution: To avoid damaging the printer, never move the print head by hand.
You cannot print if an ink cartridge is empty. Even though you have a second
black cartridge, you cannot print if one is empty. Leave the empty cartridge
installed in the printer until you have obtained a replacement. Otherwise the ink
remaining in the print head nozzles may dry out.
Removing and Installing Ink Cartridges
Be sure you have a new ink cartridge before you begin. Once you start replacing a
cartridge, you must complete all the steps in one session.
1. Make sure the printer is turned on (the green power light should be on, but
not flashing). Then open the printer cover.
2. Press and release the ink button. The print head moves to the ink cartridge
replacement position.
78 Maintaining Your Printer
Page 79

The red light also begins to flash or remains on.
■ If it flashes at the same speed as the green light, replace the black cartridge.
■ If it flashes twice as fast as the green light, replace the color ink cartridge.
■ If it remains on, replace both cartridges.
Note: You can also use the Status Monitor to find out which cartridge is out of
ink. See “Checking the Ink Supply” on page 76 for more information.
The color cartridge is on the right and the black is on the left.
3. Pull up the ink cartridge clamp. The cartridge rises up from its holder.
4. Lift the cartridge out of the printer and dispose of it carefully.
5. Remove the new cartridge from its package . Then remo ve only the yellow tape seal
on top.
Caution: Don’t touch the green circuit board on the back of the ca rtridge; you
may inhibit normal operation and printing.
Maintaining Your Printer 79
Page 80

6. Lower the new cartridge down into the holder.
Make sure the tabs rest on the hooks in back.
Hooks
Caution: Don’t place the cartridge tabs under the hooks; you may damage the
clamp when you close it.
7. Press down firmly on the ink cartridge clamp until it snaps in place.
8. If you need to replace the other ink cartridge, repeat steps 3 through 7 before
continuing with step 9.
9. Close the printer cover and press the ink button. The printer begins charging
the ink delivery system.
80 Maintaining Your Printer
Page 81

The green power light flashes and the printer makes noise. Charging takes
about half a minute. When it’s finished, the green power light stops flashing
and stays on, and the red light goes out.
Caution: Never turn off the printer while the green power light is flashing,
unless the printer hasn’t moved or made noise for more than 5 minutes.
Aligning the Print Head
If your printouts contain misaligned vertical lines, or you see light or dark horizontal
banding, you may need to align the print head.
1. Turn on the printer.
2. Load several sheets of paper.
3. Windows: Right-click the printer icon on your taskbar (in the lower right
corner of your screen). Select Print Head Alignment.
Macintosh OS 8.6 to 9.x: From the File menu, select Page Setup or Print. Cli ck
the Utility button, then click the Print Head Alignment button.
Macintosh OS X: Open the Applications folder and select EPSON Printer
Utility
Alignment.
. Select SP 900 in the printer list, click OK, and select Print Head
4. Follow the instructions on the screen to print a test page. You see this window:
Maintaining Your Printer 81
Page 82

5. On the test page, select the pattern with the two vertical lines most precisely
printed on top of each other. You may need to use a magnifying glass or loupe.
Select one pattern each for row s 1 through 3. Enter the numbe r of the best patt ern
for each row in the corresponding boxes on the screen. Then click
If you can’t find an aligned patte rn, choos e the one th at’s closest to being al igned.
Then click Realignment to print another test page and repeat this step.
6. After you click Next, you see this window:
Next.
7. Click Print to print the first pattern on the next test page.
82 Maintaining Your Printer
Page 83

8. After it prints, remove and reload the test page as shown, with pattern row #1 on
the right.
9. Click
Print again to print the second test pattern.
10. On the test page, select a box for colum ns 1 and 2 that does no t conta in an y li gh t
or dark banding.
Maintaining Your Printer 83
Page 84

11. Enter the number of the best looking box in each column in the corresponding
boxes on the screen and click
If you can’t find a box that doesn’t contain banding, choose the one that looks the
best. Then click Realignment to print another test page and repeat steps 6
through 11.
Finish.
Cleaning the Printer
To keep your printer working at its best, you should clean it several times a year.
1. Turn off the printer, unplug the power cord, and disconnect the cable.
2. Remove all the paper, then use a soft brush to clean the sheet feeder.
3. If the outer case or inside of the sheet feeder is dirty, clean it with a soft cloth
dampened with mild detergent. Keep the printer cover closed to prevent water
from getting inside.
84 Maintaining Your Printer
Page 85

4. If ink accidentally gets inside the printer, wipe it off with a damp cloth.
Clean here
Warning: Don’t touch the gears or any other parts inside the printer.
Caution: Never use a hard or abrasive brush, or benzine, alcohol, or paint thinner
for cleaning; they can damage the printer components and case.
Don’t get water on the printer components and don’t spray lubricants or oils
inside the printer.
Transporting the Printer
If you need to ship your printer, you must prepare it for transportation in its original
box or one of a similar size.
Caution: To avoid damage, always leave the ink cartridges installed when
transporting the printer.
1. Open the printer co ver and turn on the pr inter. Wait unti l the p rint he ad locks in
the far right position, then turn off the printer.
2. Unplug the power cord from the electrical outlet. Then disconnect the printer
cable from the printer.
3. Remove any paper from the printer, t hen remove the paper supp ort and roll p aper
holders.
Maintaining Your Printer 85
Page 86

4. Open the printer cove r. Secure the ink ca rtridge hol der with the pla stic ins ert that
came with your printer (or secure it to the case with tape).
Plastic insert
Caution: Be sure to remove the insert after installin g the printer in its new
location.
5. Close the printer cover, push in the output tray extension, then close the output
tray.
6. Repack the printer and its attachments in the original box using the protective
materials that came with them.
Keep the printer level as you transport it.
After transporting t he printer, remo ve the plas tic insert or tape se curing the prin t head
and test your printer. If you notice a decline in prin t qual ity , cle an t he p rint he ad (s ee
page 73); if output is misaligned, align the print head (see page 81).
86 Maintaining Your Printer
Page 87

Installing Your Printer Software
Before you instal l yo ur prin ter softwa re , fo llo w the s te ps o n t he Start Here sheet to set
up your printer and connect it to your computer.
If you’re using Windows XP, Windows 2000, Windows ME, Windows 98, or
Macintosh OS X, follow the software installation instructions on the Start Here sheet.
If you’re using Macintosh OS 8.6 to 9.x, follow the instructions in this chapter to
install your printer software.
Installing Printer Software on Macintosh OS 8.6 to 9.x
Before you start, make sure your printer is set up, connected to your computer, and
turned on, as described on the Start Here sheet. Installation takes place in several
phases. Follow the instructions in the two sections below, first to install your printer
driver, and then to install additional software.
Installing Your Printer Driver
1. Make sure your printer is connected and turned on. Then turn on your
Macintosh.
2. Insert the EPSON CD-ROM in your CD-ROM or DVD drive.
3. Select the
double-click the
4. Read and agree to the license agreement to continue the installation.
5. Click Printer Driver and follow the instructions on the screen to install the
software and restart your Macintosh.
EPSON CD-ROM icon on your desktop, if necessary, then
EPSON OS 8 and 9 Installer icon in the window that opens.
87
Page 88

6. After your Macintosh restarts, register your printer with EPSON as instructed.
7. Open the Chooser from the Apple menu.
8. Select SP 900 and select your USB port.
9. Turn on background printing, then close the Chooser.
Follow the instructions in the next section to finish the installation.
Installing Optional Software
1. Double-click the EPSON CD-ROM icon then click the EPSON OS 8 and 9
Installer
2. Click EPSON Printer Information Center, then follow the instructions on the
screen to install it on your desktop.
3. Click Photo Software and click the button for each program to learn more
about it. If you want the program, click Install and follow the instruction s on t he
screen. Then click Back to return to the Photo Software menu.
Note: If you see a message about inst alling QuickTime,® click Yes and follow the
instructions on the screen. You don't need a registration number.
icon in the window that opens.
4. When you’re finished, close any open windows and click Back.
5. Click CD Printing Soft ware, then follow t he in structio ns on the scree n to install
EPSON Print CD.
6. Close any open windows and click Exit at the Install Menu.
7. Restart your computer if prompted. You’re ready to print.
88 Installing Your Printer Software
Page 89

Solving Problems
See “Diagnosing Printer Problems” on page91 to help determine what the cause of
your printer problem may be. Then see these sections for solutions:
■ “Setup and Software Installation Problems” on page 94
■ “Printer Problems” on page 95
■ “Quality Problems” on page96
■ “Paper Problems” on page 98
■ “CD/DVD Printing Problems” on page 99
■ “Miscellaneous Problems” on page 100
■ “Uninstalling and Reinstalling Printer Software” on page102
■ “Where To Get Help” on page 103
Tip: It’s a good idea to check EPSON’s support web site periodically for free
updates to your printer driver. Visit http://support.epson.com. Download
instructions are posted for your convenience.
89
Page 90

Printer Parts
Sheet feeder
Edge guide
Paper support
Roll paper holders
USB interface
Parallel interface
Output tray
Manual feed slot
Manual feed edge guide
Roll paper button
Ink button
Output tray extension
Printer cover
Power button
Paper button
Paper thickness
lever
90 Solving Problems
Page 91

Diagnosing Printer Problems
First, check the printer’s lights (see below) or run a printer check (see page92).
Lights Explanation
Green power light
flashes
Red paper light on Your paper ran out. Load more paper and press the paper
Red paper light flashes Paper is jammed in the printer.
Red paper light flashes
quickly
Red ink light flashes One of the cartridges is low on ink. Check the message that
The printer is receiving a print job, replacing an ink cartridge,
charging ink, or cleaning the print head.
button.
Press the paper button to eject the jammed paper. If the
light is still flashing, open the cover and remove all paper,
including any jammed or torn pieces. Then reload paper and
press the paper button to continue printing.
You can also set the paper thickness lever to the position,
pull the jammed paper out, then return the lever to the
position.
If you’re using roll paper, press the roll paper button. If the
roll paper is jammed, you may need to remove the paper, then
reload it to continue printing (see “Removing Your Photos and
Paper” on page 67).
The paper thickness lever is set incorrectly.
Set the paper thickness lever to the correct setting for the
paper that you loaded in the printer. See “Loading Paper” on
page 13 for instructions.
appears on your screen to determine which cartridge is low or
follow the instructions in “Checking the Ink Supply” on
page 76. Make sure you have a replacement cartridge.
Red ink
Green
red ink light are on
light on One of the cartridges is out of ink or not installed. Make sure
power light and
you have a replacement cartridge, then follow the steps in
“Removing and Installing Ink Cartridges” on page 78 to install
it.
If you have just installed a new cartridge, it may be
incompatible with the printer or incorrectly installed. Reinstall it
or replace it with the correct cartridge, as described page 78.
One or both of the ink cartridges is not installed correctly.
Reinstall it as described on page 78.
Solving Problems 91
Page 92

Lights Explanation
Green power light is off;
red paper and red ink
lights flashing alternately
Green power light is off;
red paper and red ink
lights flashing
Paper may be blocking movement of the print head. Turn off
the printer, then open the cover and remove any jammed paper
or other foreign objects. Turn the printer back on again. If the
lights are still on, contact your dealer or EPSON as described in
“Where To Get Help” on page 103.
The printer may have an internal error. Turn off the printer, wait
a few seconds, and turn it on again. If the lights are still
flashing, contact your dealer or EPSON as described in “Where
To Get Help” on page 103.
Running a Printer Check
You can run a printer check to determine whether a problem comes from the printer
or some other source.
1. Turn off your printer and computer.
2. Disconnect the printer’s interface cable.
3. Load letter-size paper in the printer.
4. Hold down the paper button, then press and release the power button.
When printing starts, release both buttons.
A test page prints showing the printer’s ROM version number, an ink counter
code, and a nozzle check pattern. (If the pattern has gaps, you need to clean the
print head as described on page 73.)
92 Solving Problems
Page 93

■ If the test page prints, the problem probably lies in your software settings,
interface cable, or computer, or your software may not be installed correctly.
■ If the test page doesn’t print, you may have a problem with your printer.
Try the suggestions in “Problems and Solutions” on page94. If nothing works,
contact your dealer or EPSON as described in “Where To Get Help” on
page 103.
5. Turn off the printer, reconnect the interface cable, then turn on your printer and
computer.
Solving Problems 93
Page 94

Problems and Solutions
Setup and Software Installation Problems
The printer makes noise after ink
cartridge installation.
■ When you install ink cartridges,
the printer must charge its prin t
head for a minute or so. Wait
until it’s finished (the green
power light stops flashing)
before you turn off the printer,
or it may use excess in k the n ext
time you turn it on.
■ Make sure the ink cartridges are
inserted completely and no
packing material remains in the
printer. Turn off the printer,
wait a moment, then turn it
back on.
You’re having problems installing
the printer software.
■ Close other programs, includin g
screen savers and virus
protectors, and install again.
■ If the SP 900 icon doesn’t
appear in the Macintosh
Chooser, you may have an
extension conflict. Turn off any
unnecessary extensions and
restart.
■ If you see an error message with
Windows 2000, you may not
have software installation
privileges. Contact your System
Administrator.
■ If you’re using Windows and
the USB port, make sure your
system was not upgraded from
Windows 95; the USB driver
may not install correctly.
■ Make sure your printer is turned
on and its cable is securely
connected at both ends. Follow
the installation steps on the
Start Here sheet or page 87
(Mac OS 8.6 to 9.x), and make
sure your system meets the
requirements on page 105.
94 Solving Problems
■ Make sure the USB Controller
is working properly in Device
Manager. See your Windows
help system for details.
■ If you’re printing over a
network, see “Setting Up
Network Printing” in your
on-screen User’s Guide for
instructions on configuring your
printer for use on a network.
Page 95

Printer Problems
Only the green power light is
on, but nothing prints.
■ Make sure the interface cable is
securely connected at both ends
and meets the system
requirements; see page 105.
■ Run a printer check as descri bed
on page 92. If the test page
prints, make sure your software
is installed correctly.
■ If you’re printing on a network,
make sure you set up your
printer for network printing, as
described in “Setting Up
Network Printing” in your
on-screen User’s Guide.
The printer sounds as though it is
printing, but nothing prints.
■ The print head nozzles may
need cleaning; see page 73 for
instructions.
Printing is too slow.
Make sure your system meets the
system requirements listed on
page 105. If you’re printing a
high-resolution image, you need
more than the minimum
requirements. You may also need to:
■ Clear space on your hard drive
or run a defragmen tatio n ut ili ty.
■ Close open programs that
you’re not using.
■ Increase your system’s memory
(RAM).
For the fastest printing, try these
tips:
■ Select Draft as the Quality Typ e
(Windows) or set the
Quality/Speed slider to Speed
(Macintosh).
■ In the Advanced window, turn
High Speed on (Windows) or
MicroWeave
Speed
on (Macintosh).
®
off and High
■ The printer won’t operate
properly if it’s tilted or at an
angle. Place it on a flat, stable
surface.
Your printer makes noise when
you turn it on or after it has been
sitting for awhile.
Your printer is performing routine
maintenance.
■ If your printer is connected to a
USB hub, disconnect any
unused USB devices.
■ If you’re using the parallel port,
enable ECP/DMA mode on
your computer’s parallel port.
See your computer
documentation or the
manufacturer for instructions.
Solving Problems 95
Page 96

Quality Problems
You see banding (light lines).
■ Clean the print head nozzles; see
page 73 for instructions.
■ Try using Automatic mode
(Macintosh only); See “Printing
on a Macintosh” on page 31 for
instructions.
■ Align the print head as
described on page 81.
■ Make sure Maximum
(Windows),
Margins
Minimize
(Macintosh 8.6 to
9.x), or Stylus Photo
900(Standard - Minimize
Margins)
(Macintosh OS X) is
not selected. Banding may occur
in the expanded area.
■ Select a higher Quality Type or
Print Quality and turn off High
Speed
mode; see “Printing in
Windows” on page 21 or
“Printing on a Macintosh” on
page 31.
■ Make sure the paper Type
(Windows) or Media Type
(Macintosh) setting matches
your paper; see page 27
(Windows) or page 42
(Macintosh) for guidelines.
■ Make sure the printable side of
the paper is face up.
■ The ink cartridges may need
replacing; see page 76.
Your print is blurry or smeared.
■ Make sure your paper isn’t
damp, curled, or loaded face
down.
■ Use a support shee t wit h spe cia l
paper, or try loading your paper
one sheet at a time.
■ Make sure your paper meets the
specifications listed in the
on-screen User’s Guide.
96 Solving Problems
Page 97

■ Use EPSON papers for proper
saturation and ink absorption.
■ Check the paper thicknes s lever.
Set it to for most papers and
for envelopes; for CDs or
DVDs, see page 53 or for heavy
stock, see page69.
■ Align the print head as
described on page 81.
Your printout is faint or has gaps.
■ Make sure your paper isn’t
damaged, old, dirty, or loaded
face down. If it is, load new
paper, face up. For best results,
use genuine EPSON paper.
Your printout is grainy.
■ Use a higher quality paper or
select a higher Quality Type or
Print Quality setting; see
“Printing in Windows” on
page 21 or “Printing on a
Macintosh” on page 31.
■ Align the print head as
described on page 81.
■ Increase the im ag e r esolu t ion o r
print it in a smaller size; see your
software documentation.
■ Clean the print head nozzles; see
page 73 for instructions.
■ The ink cartridges may be old or
low on ink; see “Checking the
Ink Supply” on page 76.
■ Make sure the paper Type
(Windows) or Media Type
(Macintosh) setting matches
your paper; see page 27
(Windows) or page 42
(Macintosh) for guidelines.
You see wrong or missing colors.
■ Make sure Black ink only is off
(Windows) or Color Ink is
selected (Macintosh), even for
black and white photographs.
■ Clean the print head nozzles; see
page 73 for instructions.
■ The ink cartridges may be old or
low on ink; see “Checking the
Ink Supply” on page 76.
■ Try turning off PhotoEnhance.
™
Also check if you’re using a
special effect that alters image
colors, like Sepia.
Solving Problems 97
Page 98

■
Try using Automatic mode
(Macintosh only). See “Printin g
on a Macintosh” on page 31 for
instructions.
■ If it’s wrinkled when it ejects,
the paper may be damp or too
thin. Load new paper.
■ Try changing the Gamma
setting. See “Customizing
Windows Print Settings” on
page 25 or “Customizing
Macintosh Print Settings” on
page 38 to access the Advanced
settings.
■ Your printed colors can never
exactly match your on-screen
colors. However, you can use a
color management system—
such as ICM (Windows) or
ColorSync (Macintosh)—to get
as close as possible. See
“Customizing Windows Print
Settings” on page25 or
“Customizing Macintosh Print
Settings” on page38 for details.
Paper Problems
Paper sheets don’t feed correctly
or jam in the printer.
■ If paper doesn’t feed or multipl e
pages feed, remove it from the
sheet feeder. Fan the edges of
the sheets, reload them against
the right side of the feeder, and
slide the edge guide snugly, but
not too tightly, against the
paper. Don’t load paper above
the arrow on the left edge guide.
■ If paper jams, press the paper
button. If necessary, open the
cover and remove any jammed
or torn pieces. Load new paper
and press the paper button.
You can also set the paper
thickness lever to the
position, pull out the jammed
paper, and then return the lever
to the position.
Paper doesn’t eject fully or is
wrinkled.
■ If the paper doesn’t eject fully,
you may have set the wrong
paper size. Press the paper
button to eject the paper, then
select the correct paper size.
98 Solving Problems
Card stock doesn’t feed correctly
or jams in the printer.
Follow the steps in “Printing on
Card Stock or Matte Board” on
page 69 to use the manual feed slot.
Page 99

Roll paper doesn’t feed correctly
or jams in the printer.
■ Cut the end of the paper
straight across. If it’s cut
diagonally, the pape r won’t feed
smoothly.
■ If the roll paper end is curled,
place the end inside a folded
sheet of paper and roll it
backwards against the curl.
■ As you load the paper, gently
hold it in the roll paper feeder
with your hand; don’t force the
paper into the feeder.
■ Select Roll or Roll Paper as the
Source or Paper Source in your
print settings. If you select
another setting, too much paper
will feed.
CD/DVD Printing Problems
Images and text are not centered
on the CD/DVD.
Adjust the print position as
described in “Adjusting the Print
Position” on page57.
Ink smears on the CD/DVD or
printing is too light.
Adjust the print density as described
in “Adjusting th e Prin t De nsit y” on
page 59. You can also adjust the
brightness or contrast, as described
in “Designing CDs and DVDs” on
page 49.
Make sure you’re using ink-jet
printable CDs.
■ If extra paper feeds, press the
roll paper button for three
seconds to rewind the paper
(repeat if necessary to back it all
the way out). If the paper
light is on, press the paper
button to turn it off. Reload the
paper as described in “Loading
Roll Paper” on page14.
Printed CDs or DVDs are dirty.
Clean the roller as described in
“Cleaning the Roller” on page48.
The paper light flashes quickly.
Make sure the paper thickness lever
is set to the position; see
“Inserting a CD or DVD” on
page 53.
Solving Problems 99
Page 100

Miscellaneous Problems
The image is inverted, as if viewed
in a mirror.
Turn off
Horizontal
or the mirror setting in your
program. See “Customizing
Windows Print Settings” on
page 25 or “Customizing
Macintosh Print Settings” on
page 38 to access Advanced settings.
Mirror Image or Flip
in the printer software
■ Make sure your printer is
selected in the Print window
(Windows), is the active printer
in the Chooser (Macintosh OS
8.6 to 9.x), or is selected in the
Format for drop-down list on
the Page Setup window and
Printer drop-down list on the
Print window (Macintosh
OS X).
■ If you’re using a switch box or
USB hub with your printer,
connect the printer directly to
your computer instead.
The printer prints blank pages.
■ Make sure your printer is
selected in the Print window
(Windows), is the active printer
in the Chooser (Macintosh OS
8.6 to 9.x), or is selected in the
Format for drop-down list on
the Page Setup window and
Printer drop-down list on the
Print window (Macintosh
OS X).
■ Clean the print head nozzles; see
“Cleaning the Print Head” on
page 73 for instructions.
You see incorrect characters.
■ Make sure the interface cable is
securely connected at both ends
and meets the system
requirements on page 105.
The margins are incorrect.
■ Make sure the paper settings are
correct for your paper size. See
“Printing in Windows” on
page 21 or “Printing on a
Macintosh” on page 31.
■ Choose the correct margins for
your paper size. The margins
must be within the printable
area of the page; see “Printable
Area” in your on-screen User’s
Guide.
■ If you’re using Macintosh OS X
make sure you choose the same
printer in the Page setup
window and the Print window.
■ Place your paper against the
right side of the sheet feeder
with the edge guide snug against
it.
100 Solving Problems
 Loading...