

Page 1
User's Guide
CMP0139-00 EN
Page 2

SC-T5100 Series/SC-T3100 Series/SC-T5100N Series/SC-T3100N Series User's Guide
Contents
Contents
Introduction
Notes on Manuals.......................... 5
Meaning of Symbols...................... 5
Illustrations............................ 5
Product Model Descriptions................ 5
Manual Organization..................... 5
Viewing PDF Manuals..................... 5
Printer Parts.............................. 7
Front................................. 7
Inside................................. 9
Back................................. 11
Control panel.......................... 13
Home screen operations.................. 13
Features of Printer......................... 16
Realizing High Resolution................. 16
Insistence on Ease-of-Use................. 16
Notes on Usage and Storage.................. 17
Installation space........................ 17
Notes when using the printer............... 18
Notes when not using the printer............ 18
Notes on handling ink cartridges............ 19
Notes on handling paper.................. 20
Saving Power............................. 21
Introducing the Software
Provided
Built-in Soware in the Printer. . . . . . . . . . . . . . . . 23
How to Use Web Cong..................... 24
Updating Soware or Installing Additional
Soware................................ 25
Uninstalling Soware...................... 26
Soware
How to Start........................... 24
Closing............................... 24
Function Summary...................... 24
Checking Whether Updates Available and
Updating Soware....................... 25
Receiving Update Notications............. 25
Windows............................. 26
Mac................................. 26
......................... 22
Loading and Setting the Paper
Notes on Loading the Paper.................. 27
Paper Load Position........................ 27
Loading and Removing the Roll Paper.......... 28
Loading Roll Paper...................... 28
Cutting the Roll Paper.................... 30
Removing Roll Paper..................... 32
Loading and Removing Paper in/from the Auto
Sheet Feeder............................. 34
Attaching and Removing the Stacker (for
Plain Paper)........................... 34
Loading Paper in the Auto Sheet Feeder. . . . . . . 34
Removing Paper from the Auto Sheet Feeder. . . 36
Loading and Removing Cut Sheet(1 sheet)....... 37
Loading Cut Sheet(1 sheet)................ 37
Removing Cut Sheet (1 Sheet).............. 38
Setting Loaded Paper....................... 39
For Roll Paper.......................... 39
For Auto Sheet Feeder / Cut Sheet(1 sheet). . . . . 41
Optimizing Paper Settings (Media Adjust)....... 43
Notes on Making Adjustments.............. 43
Adjustment Procedure.................... 43
Printing with the Printer Driver from
Your Computer
Basic Operating Procedures (Windows)......... 46
Printing Procedure...................... 46
Canceling Printing...................... 48
Customizing the Printer Driver............. 49
Basic Operating Procedures (Mac)............. 52
Printing Procedure...................... 52
Canceling Printing...................... 55
Customizing the Printer Driver............. 55
Printing CAD Drawings.................... 57
Enlargements and Horizontal and Vertical
Banners................................ 59
Fitting Documents to the Width of the Roll
Paper................................ 60
Fitting Documents to the Output Size......... 61
Choosing a Print Size..................... 63
Printing at Non-Standard Sizes............... 64
Correct color and print..................... 68
Color Management Printing.................. 72
About Color Management................. 72
Color Management Print Settings............ 72
Setting color management with the applications. 73
Setting color management with the printer
driver................................ 75
Multi-Page Printing (N-up).................. 79
2
Page 3

SC-T5100 Series/SC-T3100 Series/SC-T5100N Series/SC-T3100N Series User's Guide
Contents
Manual 2-Sided Printing (Windows Only)....... 80
Notes on Using 2-Sided Printing............ 80
Setting Procedures for Printing............. 80
Folded 2-Sided Printing (Windows only). . . . . . . . 82
Poster Printing (Windows Only).............. 83
Printing Multiple Documents (Layout Manager)
(Windows Only).......................... 88
Setting Procedures for Printing............. 88
Saving and Recalling Settings............... 89
Printing Using the HP-GL/2 or HP RTL
Mode from a Computer
Printer Settings........................... 91
Basic Print Settings...................... 91
HP-GL/2 Specic Print Settings............. 91
CAD Application Settings................... 92
Changing the Network Connection
Methods
Switching to Wired LAN.................... 93
Switching to Wireless LAN................... 93
Directly Connection Wirelessly (Wi-Fi Direct). . . . 94
Maintenance
Clear Print Head Clogs.................... 134
Checking for Clogged Print Head, and
Cleaning............................. 134
Powerful Cleaning...................... 134
Replacing Consumables.................... 135
Handling of Used Consumables............ 135
Replacing Ink Cartridges................. 135
Maintenance Box Replacement............. 137
Replacing the Cutter.................... 138
Problem Solver
What to do When a Message is Displayed. . . . . . . 140
When a Maintenance Call/Printer Error Occurs. . 141
Troubleshooting......................... 142
You cannot print (because the printer does
not work)............................ 142
e printer sounds like it is printing, but
nothing prints......................... 144
e prints are not what you expected........ 145
Feeding or ejecting problems.............. 150
Others.............................. 152
Appendix
Printing Using AirPrint
Making Enlarged Copies with an A3
or A4 Scanner
Connecting the Scanner..................... 96
Making Enlarged Copies.................... 97
Placing Documents in the Scanner............. 97
Using the Menu
Menu List............................... 99
Paper Setting menu....................... 109
Roll Paper menu....................... 109
Auto Sheet Feeder menu................. 112
Cut Sheet(1 sheet) menu................. 113
Printer Status menu....................... 114
Settings menu........................... 115
General Settings....................... 115
Maintenance.......................... 131
Printer Status/Print..................... 132
Enlarged Copy menu...................... 133
Options and Consumable Products............ 154
Epson Special Media.................... 154
Ink cartridges......................... 154
Others.............................. 155
Supported Media......................... 157
Epson Special Media Table................ 157
Supported Commercially Available Paper. . . . . 160
Printable area........................... 163
Roll Paper............................ 163
Cut Sheet (Auto Sheet Feeder)............. 165
Cut Sheet (1 Sheet)..................... 165
Moving or Transporting the Printer........... 166
Moving to a Dierent Location in the Same
Building............................. 166
When Transporting..................... 167
Handling if Transporting/Leaving the Printer
in an Environment of -10°C or Less......... 167
System Requirements...................... 169
Printer Driver......................... 169
Web Cong........................... 170
Specications Table....................... 171
For European users..................... 172
3
Page 4

SC-T5100 Series/SC-T3100 Series/SC-T5100N Series/SC-T3100N Series User's Guide
Contents
Where To Get Help
Technical Support Web Site................. 174
Contacting Epson Support.................. 174
Before Contacting Epson................. 174
Help for Users in North America........... 175
Help for Users in Europe................. 175
Help for Users in Australia................ 175
Help for Users in Singapore............... 176
Help for Users in ailand................ 176
Help for Users in Vietnam................ 176
Help for Users in Indonesia............... 176
Help for Users in Hong Kong.............. 177
Help for Users in Malaysia................ 177
Help for Users in India................... 177
Help for Users in the Philippines........... 178
4
Page 5
SC-T5100 Series/SC-T3100 Series/SC-T5100N Series/SC-T3100N Series User's Guide
Introduction
Introduction
Notes on Manuals
Meaning of Symbols
Wa r ni n g :
Caution:
Important:
c
Note:
Warnings must be followed to
avoid serious bodily injury.
Cautions must be followed to
avoid bodily injury.
Important must be followed to
avoid damage to this product.
Notes contain useful or
additional information on the
operation of this product.
Setup Guide
(booklet)
Operator's Guide
(booklet or PDF)
General Information
(PDF)
Online Manual
User's Guide
(this manual)
Administrator's
Guide (PDF)
Provides information on how
to setup the printer after
unpacking it from the box.
Make sure you read this
manual to perform operations
safely.
Provides selected information
on how to use the printer and
frequently used features of the
printer.
Provides important safety
instructions, printer
specications
details.
Provides overall information
and instructions on using the
printer and on solving
problems.
Provides network
administrators with
information on management
and printer settings.
Viewing PDF Manuals
and contact
U
Indicates related reference
content.
Illustrations
illustrations may
e
you are using. Please be aware of this when using the
manuals.
slightly from the model
dier
Product Model Descriptions
Some models described in this manual may not be
sold in your country or region.
Manual Organization
e manuals for the product are organized as shown
below.
is section uses the Adobe Acrobat Reader DC as an
example to explain the basic operations for viewing
the PDF in Adobe Acrobat Reader.
You can view the PDF manuals using Adobe Acrobat
Reader or Preview (Mac).
5
A
Click to print the PDF manual.
Page 6

SC-T5100 Series/SC-T3100 Series/SC-T5100N Series/SC-T3100N Series User's Guide
Introduction
B
Each time it is clicked the bookmarks are hidden
or shown.
C
Click the title to open the relevant page.
Click [+] to open the titles lower in the hierarchy.
D
If the reference is in blue text, click the blue text to
open the relevant page.
To return to the original page, do the following.
For Windows
While pressing the Alt key, press the key.
For Mac
While pressing the command key, press the
key.
E
You can input and search for keywords, such as the
names of items you want to
For Windows
conrm.
Right click on a page in the PDF manual and select
Find in the menu that is displayed to open the
search toolbar.
For Mac
Select Find in the Edit menu to open the search
toolbar.
F
To enlarge the text in the display that is too small
to see well, click
. Click to reduce the size.
To specify a part of an illustration or screenshot to
enlarge, do the following.
For Windows
Right click on the page in the PDF manual and
select Marquee Zoom in the menu that is
displayed. e pointer changes to a magnifying
glass, use it to specify the range of the place you
want to enlarge.
For Mac
Click View menu - Zoom - Marquee Zoom in this
order to change the pointer to a magnifying glass.
Use the pointer as a magnifying glass to specify the
range of the place you want to enlarge.
G
Opens the previous page or next page.
6
Page 7
SC-T5100 Series/SC-T3100 Series/SC-T5100N Series/SC-T3100N Series User's Guide
Introduction
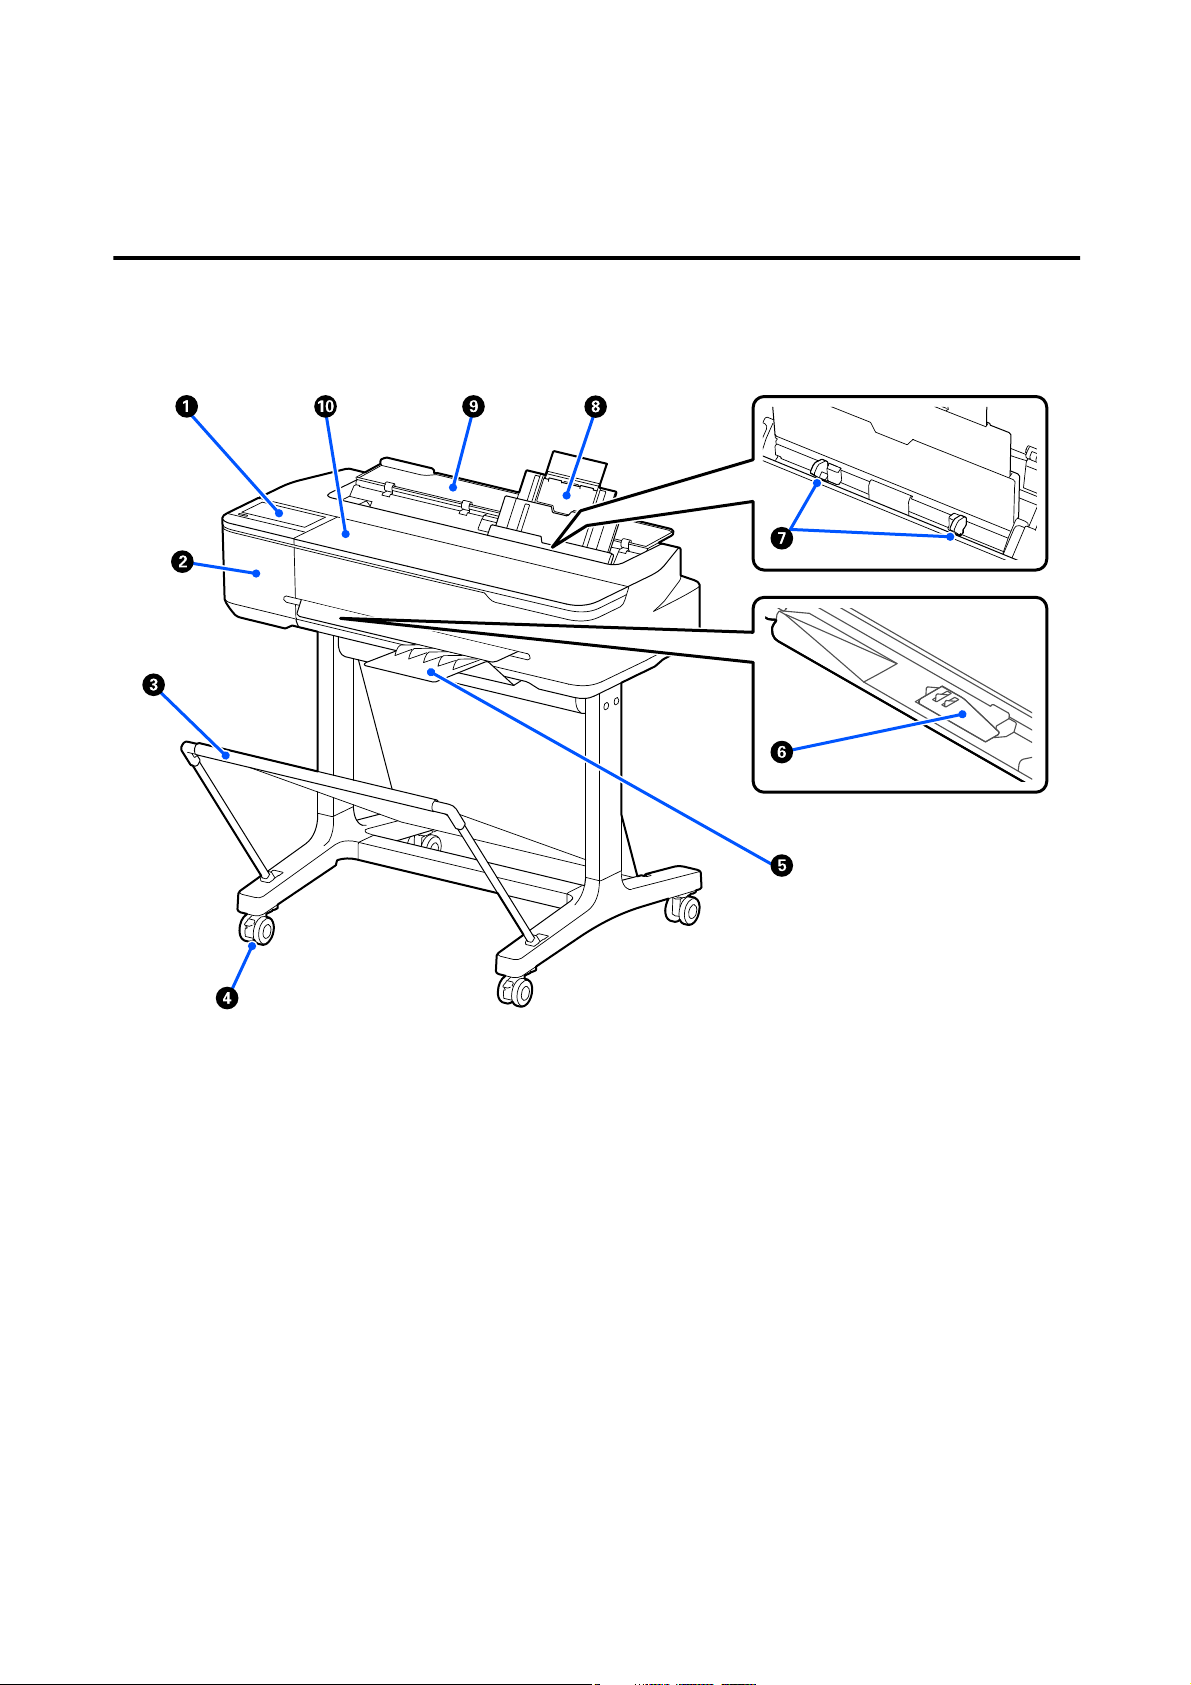
Printer Parts
Front
e illustration shows the SC-T3100 Series (24 inch model with stand).
A Control panel
U “Control panel” on page 13
B Cutter cover
Open when replacing the cutter.
U “Replacing the Cutter” on page 138
C Paper basket
Output from the printer collects in this basket, keeping the media clean and free of creases.
A dedicated stand that comes with a paper basket is provided as an option for SC-T3100N Series and
SC-T5100N Series.
U “Options and Consumable Products” on page 154
7
Page 8

SC-T5100 Series/SC-T3100 Series/SC-T5100N Series/SC-T3100N Series User's Guide
Introduction
D Casters
ere are two casters on each leg. e casters are normally kept locked once the printer is in place.
E Stacker (for plain paper)
Attach this stacker to the front of the printer in this way when continuously printing multiple sheets of plain
paper from the auto sheet feeder. e printed paper is stacked in this tray aer ejection. Remove the stacker
when using roll paper or Cut Sheet (1 sheet).
U “Attaching and Removing the Stacker (for Plain Paper)” on page 34
F B1 width paper support (SC-T5100 Series/SC-T5100N Series only)
For roll paper or cut sheet (1 sheet) equivalent to B1 width (718 to 738 mm) only, raise the B1 width paper
support before printing to prevent scung and soiling of the print surface.
U “Loading Roll Paper” on page 28
U “Loading Cut Sheet(1 sheet)” on page 37
G Edge guides
Slide these guides against the le and right edges of the paper loaded in the auto sheet feeder. It can prevent
paper from being fed skewed.
H Auto sheet feeder
is allows you to load multiple sheets of A3 to A4 cut sheet. e loaded paper is automatically fed and printed
continuously.
U “Loading Paper in the Auto Sheet Feeder” on page 34
I Cut sheet cover
Open this cover when using the auto sheet feeder or when loading a cut sheet of paper.
U “Loading Cut Sheet(1 sheet)” on page 37
When loading roll paper, open this cover and then open the roll paper cover.
To prevent dust from accumulating inside the printer, use the printer with this cover closed when not using the
auto sheet feeder and when not loading a cut sheet of paper.
J Front cover
Open this cover when replacing ink cartridges or clearing a paper jam.
8
Page 9
SC-T5100 Series/SC-T3100 Series/SC-T5100N Series/SC-T3100N Series User's Guide
Introduction
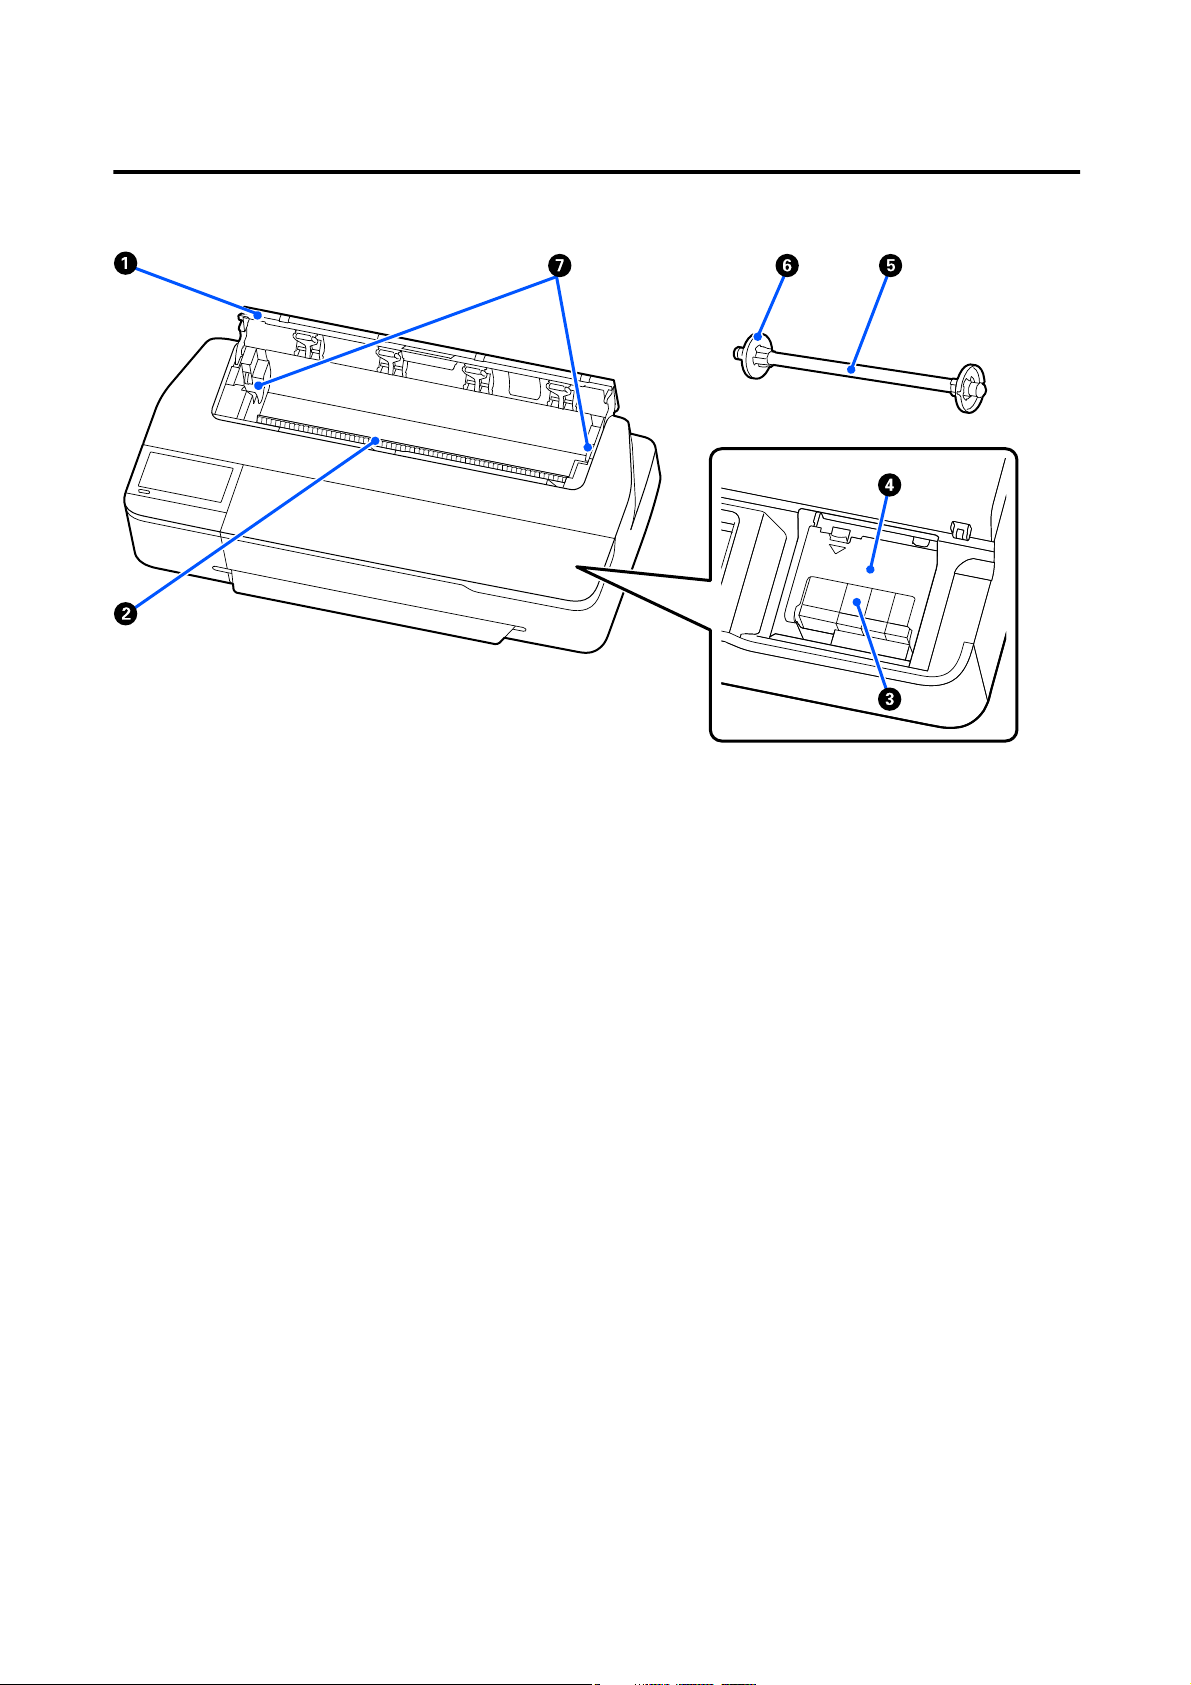
Inside
A Roll paper cover
is cover protects the loaded roll paper and prevents dust from entering inside the printer. Except when load‐
ing or removing roll paper, it should be closed when using the printer.
U “Loading Roll Paper” on page 28
B Paper slot
is is the slot through which roll paper or single sheets of cut sheet are fed during printing. Feed single sheets
one at a time.
C Ink cartridges
Install cartridges into all slots.
U “Replacing Ink Cartridges” on page 135
D Cartridge cover
Open when replacing ink cartridges.
E Spindle
When loading roll paper into the printer, insert this through the roll paper.
F Movable
is xes the roll paper placed on the spindle. Attach or detach it when placing or removing roll paper on/from
the spindle.
ange
(transparent)
9
Page 10

SC-T5100 Series/SC-T3100 Series/SC-T5100N Series/SC-T3100N Series User's Guide
Introduction
G Spindle holder
Place the spindle in this holder aer it is attached to the roll paper. ere is a holder on both the le and right
sides.
U “Loading Roll Paper” on page 28
10
Page 11

SC-T5100 Series/SC-T3100 Series/SC-T5100N Series/SC-T3100N Series User's Guide
Introduction
Back
A Maintenance box cover
Open the cover when replacing the Maintenance Box.
B Maintenance Box
is container is for collecting the waste ink.
U “Maintenance Box Replacement” on page 137
C AC inlet
Connect the supplied power cable here.
D LAN port
Connects the LAN cable.
E Status light (green, orange)
e color indicates the network transmission speed.
O:
Orange:
10BASE-T
100BASE-T
Green:
1000BASE-T
11
Page 12

SC-T5100 Series/SC-T3100 Series/SC-T5100N Series/SC-T3100N Series User's Guide
Introduction
F Data light (yellow)
e network connection status and data reception are indicated by a lit or ashing light.
On:
Flashing:
G OPTION port
Connected.
Receiving data.
Connect a scanner to perform enlarged copying.
U “Making Enlarged Copies with an A3 or A4 Scanner” on page 96
H USB port
Connects the USB cable.
I Ve nts
Do not block the vents.
U “Installation space” on page 17
12
Page 13
SC-T5100 Series/SC-T3100 Series/SC-T5100N Series/SC-T3100N Series User's Guide
Introduction
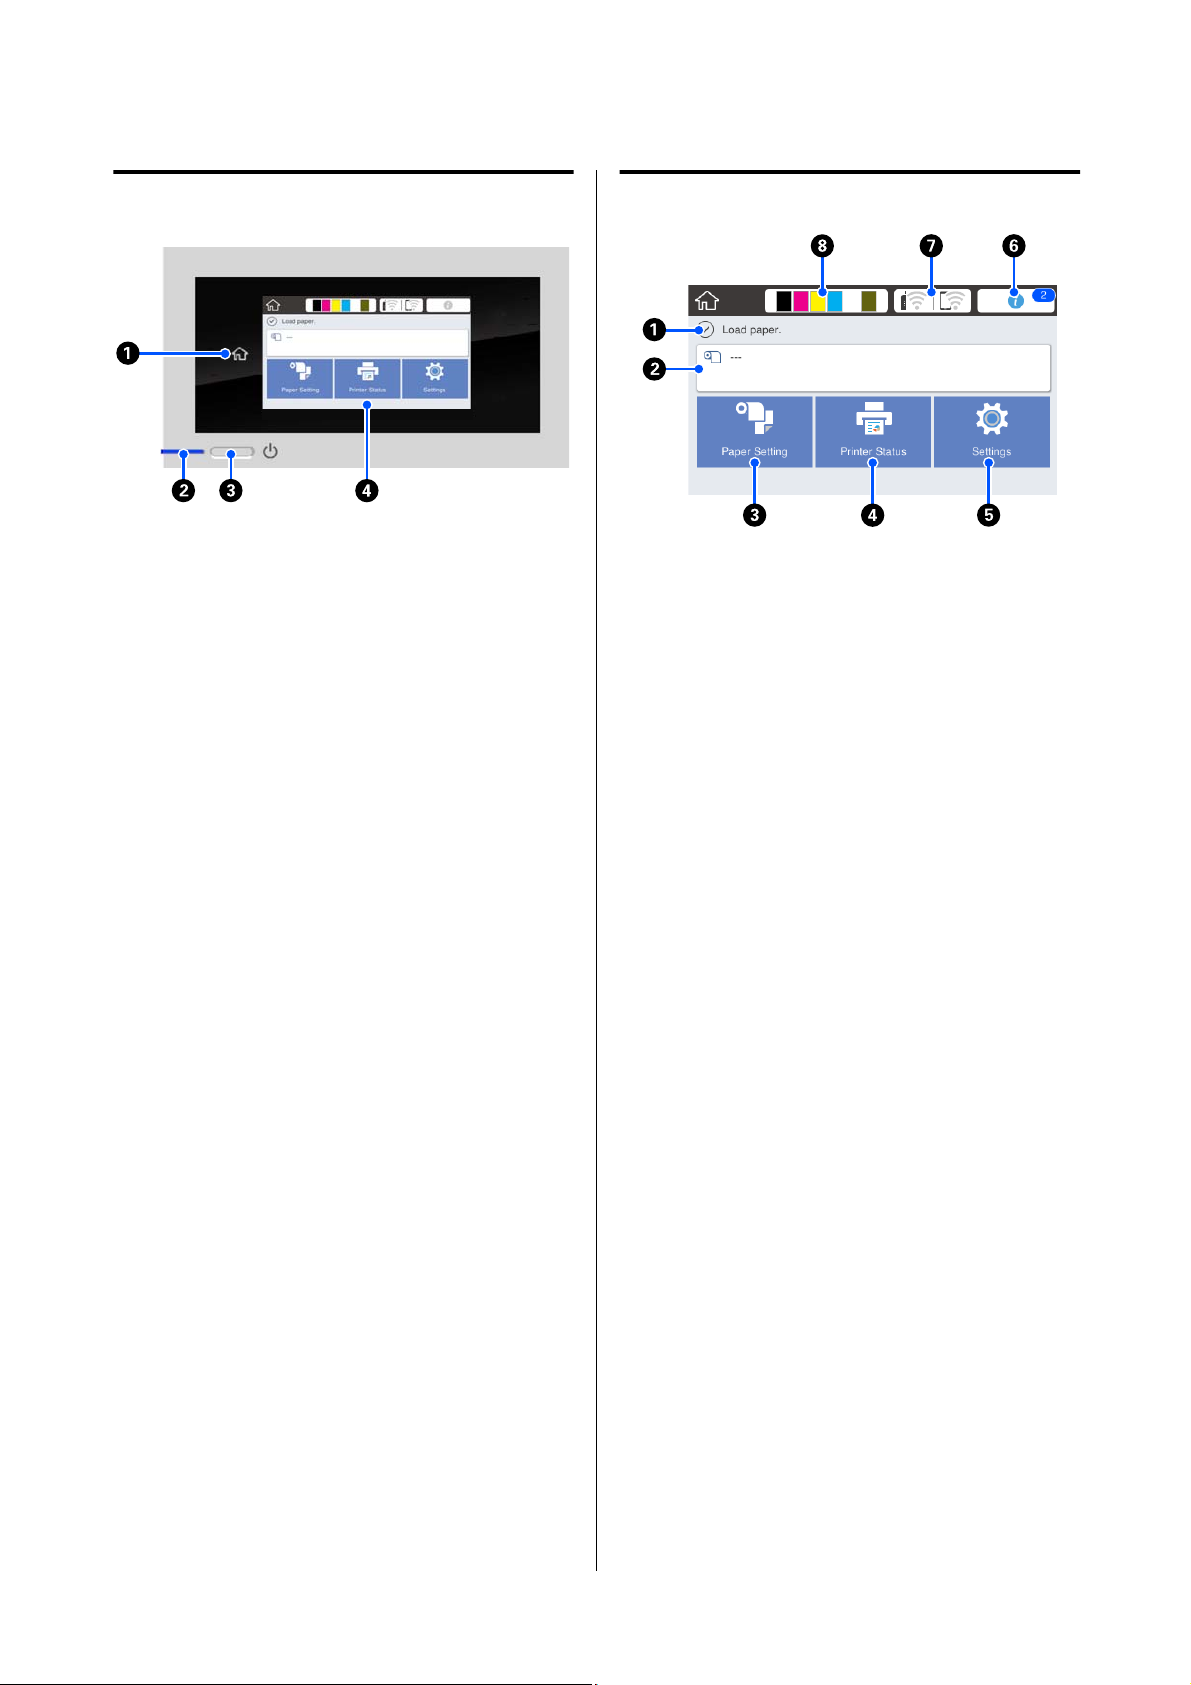
Control panel
A Home button
Touch this button while a menu is displayed to
return to the Home screen. e home button is
when it cannot be used during operations such as
paper feeding.
B
P light (power light)
On : e power is on.
o
Home screen operations
Overview of Home screen operations U Operator's
Guide (booklet or PDF)
A Information display area
Displays the printer's status, error messages, and so
on.
Flashing :
printer is performing a process
e
such as starting up, powering o, data
receiving, or print head cleaning.
Please wait without performing any
operation until this light stops
ashing. Do not disconnect the power
cord.
:
O
C
P button (power button)
power is
e
o.
Turns the power on and o.
D Screen
is is a touch panel to display the printer's status,
menus, error messages, and so on. You can select
the menu items and options displayed on this
screen by gently touching (tapping) them, and
scroll the screen by moving your nger while it
remains touching the screen.
B Roll paper information area
❏ When roll paper is loaded
Displays information on the loaded roll paper. When
Paper Remaining is set to On, the approximate
remaining amount (remaining length) is displayed.
Touching this area displays a menu to perform
operations such as setting and adjusting the roll
paper.
U “Roll Paper menu” on page 109
❏ When roll paper is not loaded
Displays "---". Touching this area displays the
procedure for loading roll paper.
C Paper Setting menu button
13
Page 14
SC-T5100 Series/SC-T3100 Series/SC-T5100N Series/SC-T3100N Series User's Guide
Introduction
Touch this button when loading, removing, setting,
or adjusting paper.
❏ See the following for more details on Roll Paper.
U “Loading and Removing the Roll Paper” on
page 28
Menu descriptions U “Roll Paper menu” on
page 109
❏ See the following for more details on Auto Sheet
Feeder.
U “Loading and Removing Paper in/from the Auto
Sheet Feeder” on page 34
Menu descriptions U “Auto Sheet Feeder menu”
on page 112
❏ See the following for more details on Cut Sheet(1
sheet).
U “Loading and Removing Cut Sheet(1 sheet)” on
page 37
Menu descriptions U “Cut Sheet(1 sheet) menu”
on page 113
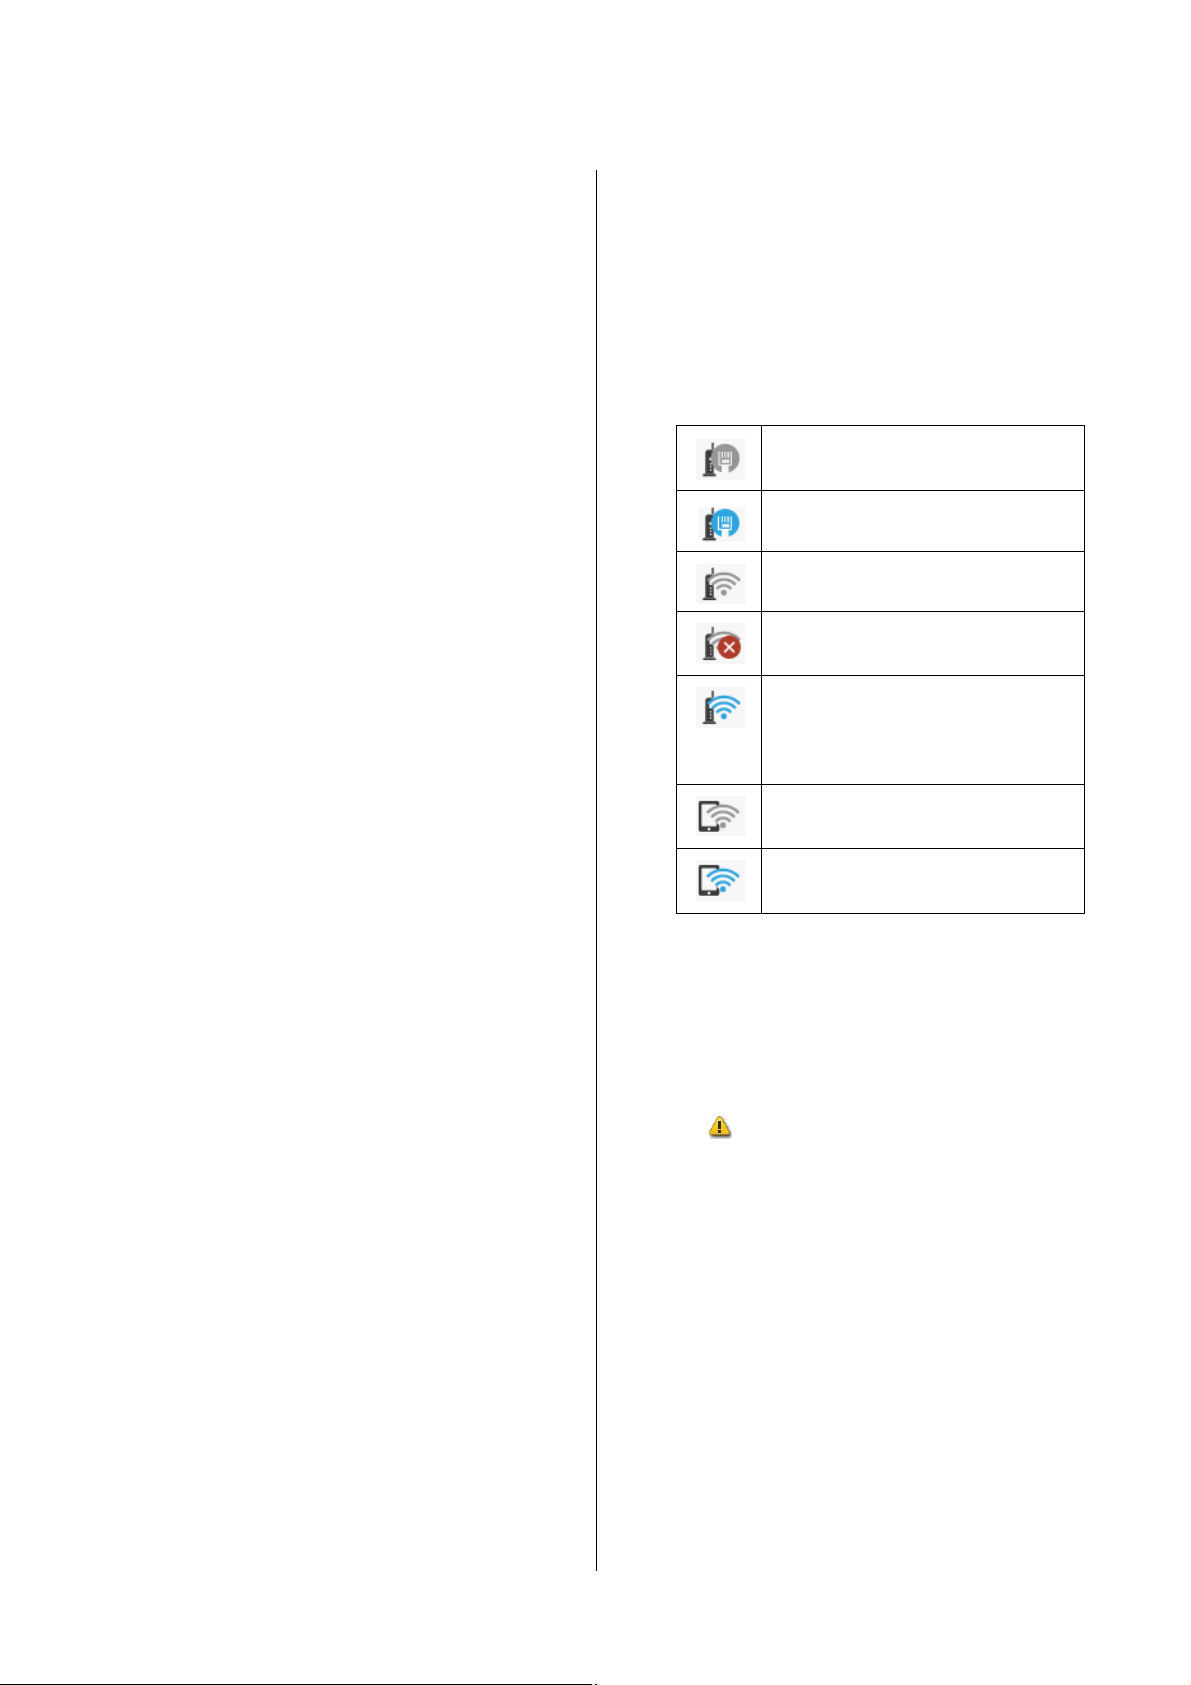
D Printer Status menu button
Touch this button when you want to check the
status of consumables or details of displayed
notications.
U “Printer Status menu” on page 114
e network connection status is indicated by an
icon as shown below.
Touching the icon allows you to switch the net‐
work connection status.
U “Changing the Network Connection Methods”
on page 93
Not connected to a wired LAN or the
wired LAN or wireless LAN not set.
Connected to a wired LAN.
Wireless LAN (Wi-Fi) is disabled.
Searching for SSID, IP address not set,
or signal strength is 0 or poor.
Connected to a wireless LAN (Wi-Fi).
The number of lines indicates the
signal strength. The more lines there
are, the better the signal strength.
Wi-Fi Direct (simple AP) connection is
disabled.
E Settings menu button
Touch this button when you want to perform
maintenance or congure the printer operation
settings, network settings, or other settings. See the
following for more details.
U “Settings menu” on page 115
F Information icon
When there are
notications,
such as consumable
remaining amount low warnings, the number of
notications is indicated by a badge at the top right
of this icon. If you touch this icon when the badge
is displayed, a list of the notications that require
your action is displayed. Touching each item
displays instructions on what to do. If you do not
perform the actions, the badge will not disappear.
G Network icon
Wi-Fi Direct (simple AP) connection is
enabled.
H Consumables status icon
Estimates of the remaining amounts of ink
cartridges and the empty space in the Maintenance
Box are indicated by the length of the bars.
shorter a bar is, the lower the remaining amount of
ink or space.
When
is displayed, the remaining amount of
the corresponding ink cartridge or the amount of
empty space in the Maintenance Box is low.
Touching the icon displays the consumables status
screen so that you can check the ink cartridge and
Maintenance Box product numbers. is is a
shortcut button for Supply Status in the Printer
Status menu.
U “Printer Status menu” on page 114
e
14
Page 15
SC-T5100 Series/SC-T3100 Series/SC-T5100N Series/SC-T3100N Series User's Guide
Introduction
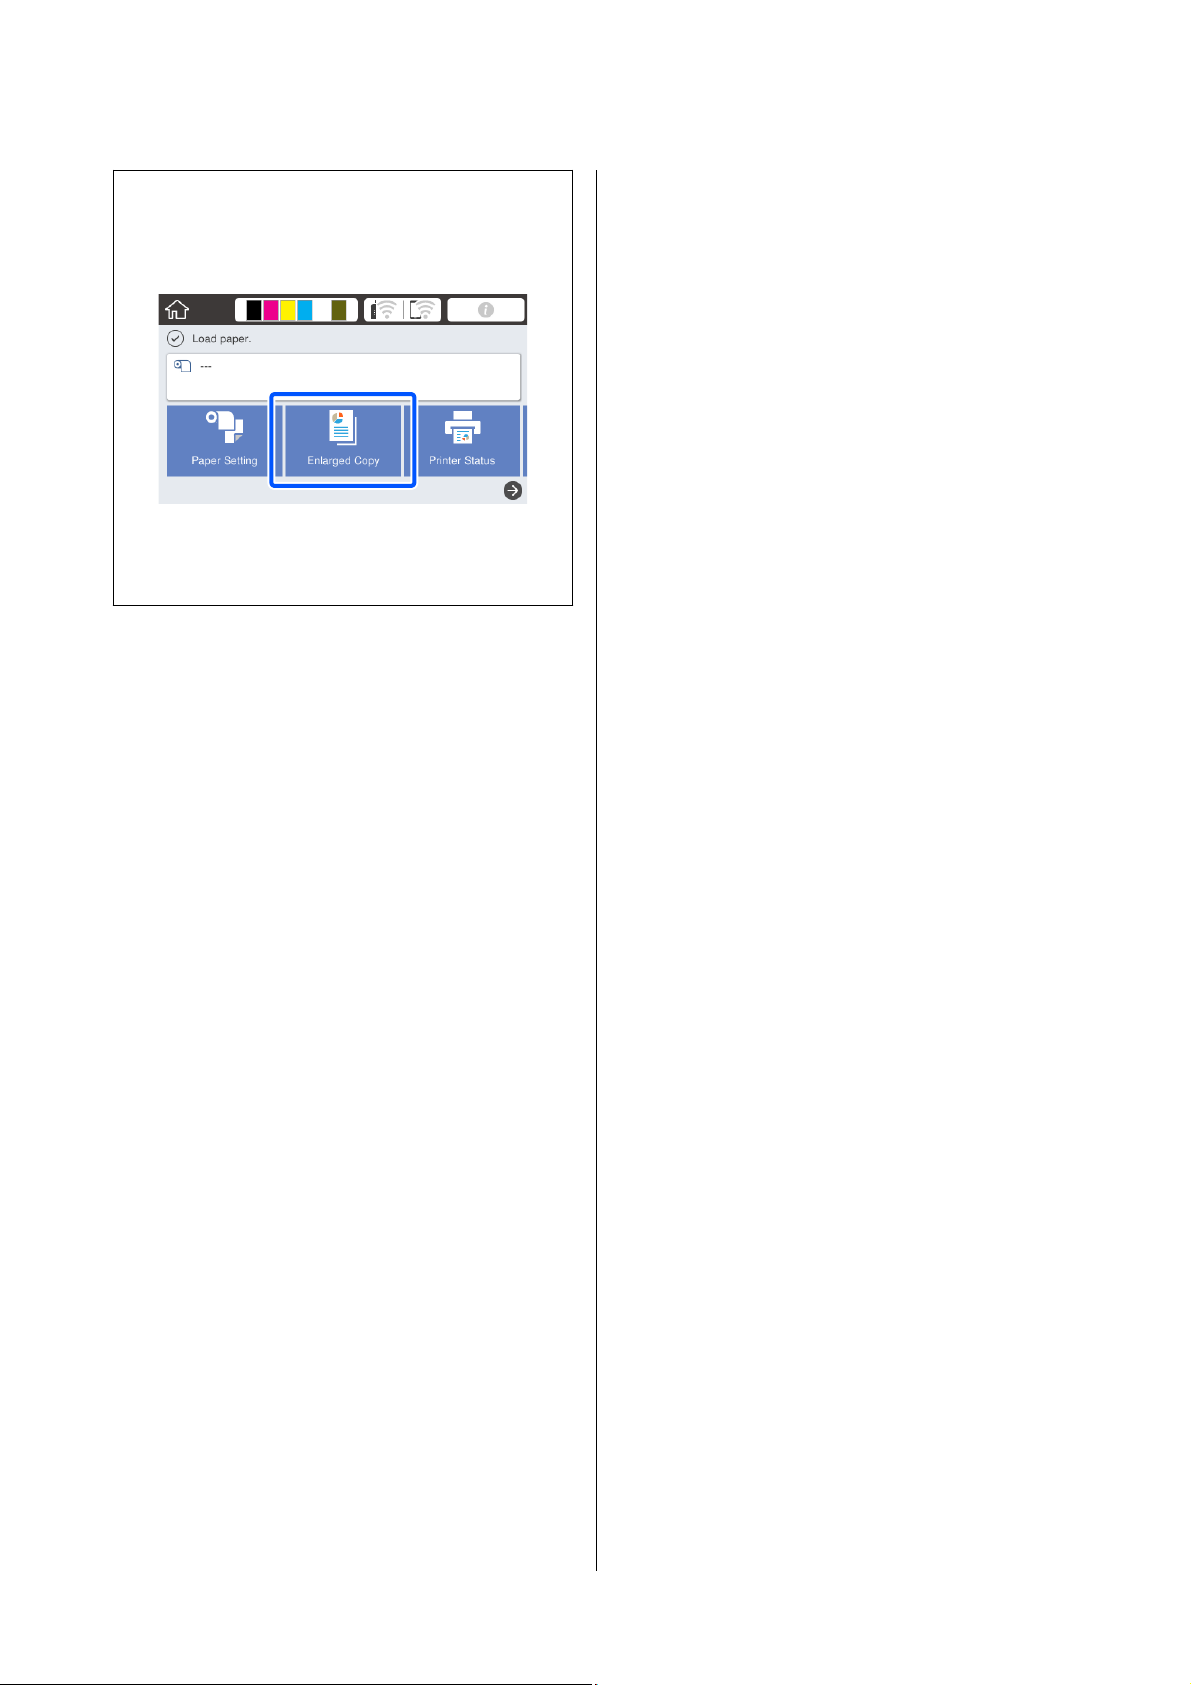
Note:
When you connect an Epson A3 or A4 scanner to the
printer, Enlarged Copy appears to allow you to easily
make enlarged copies.
U “Making Enlarged Copies with an A3 or A4
Scanner” on page 96
15
Page 16

SC-T5100 Series/SC-T3100 Series/SC-T5100N Series/SC-T3100N Series User's Guide
Introduction
Features of Printer
Realizing High Resolution
CAD drawings that are clear, legible, and can even be used safely outdoors
Newly-developed Epson UltraChrome XD2 ink
enables the printer to produce extremely detailed
drawings both in black and white and in color.
supplied printer driver
e
making it easier to optimize printing for line drawing
and, through unsurpassed reproduction of line
drawing and
diagonals, and curves, ensuring the best possible
results when the printer is used for drawings.
In addition, you can even safely take your drawings
outdoors with you because they are printed using ink
with excellent water resistance.
lines in the form of connected lines,
ne
a line drawing mode,
oers
Insistence on Ease-of-Use
Space-saving large-format printer
is printer is compact and lightweight compared to
previous large-format Epson printers, so you will have
no trouble nding a location to place it. e model
without a stand can even be placed on a drawing
storage cabinet or the like. See the following for
dimensions.
U
“Specications
Automatic switching between auto sheet feeder (cut sheet) and roll paper
is printer allows not only roll paper to be loaded but
also multiple sheets of A3 size or smaller sheet to be
loaded in the auto sheet feeder at the same time. When
you select either of these two Source settings of the
printer driver, the paper is switched automatically to
allow you to print easily.
Table” on page 171
U “Printing CAD Drawings” on page 57
Posters and displays that are vivid and also allow for short-term outdoor display
Posters with vivid hues can be printed simply by
selecting, for example, Poster (Photo)/Perspective in
Select Target of the supplied printer driver.
Short-term outdoor display is even supported since
ink that also has excellent light fastness is used.
Your posters will last even longer if you use lamination
processing.
e eect diers
depending on the paper.
Smooth operation while checking the operating instructions on the screen
In addition to having a screen design that enables
intuitive operation, this printer allows you to check
illustrated instructions of operations such as how to
load paper.
U Operator's Guide (booklet or PDF)
Printer driver that is simple and easy to operate
Print settings can be optimized simply by choosing the
desired use or target. is spares you the trouble of
adjusting print settings individually. When you select a
Source setting, printing failures due to paper loading
mistakes are reduced because the size and type of
paper loaded in the printer are applied automatically.
In addition to checking the set conditions in an
illustration in the printer driver, you can also check a
detailed image in the preview screen before printing.
16
Page 17
SC-T5100 Series/SC-T3100 Series/SC-T5100N Series/SC-T3100N Series User's Guide
Introduction
Support for wireless LAN connection
is printer can be freely placed where desired without
considering cable routing because it can connect with
a computer via a wireless LAN to print. Of course, it
also supports a wired LAN connection.
Furthermore, even if your device is not connected to a
LAN, this printer also allows printing by directly
connecting with it using Wi-Fi Direct. From an iOS
device, you can also print easily using AirPrint.
U “Switching to Wireless LAN” on page 93
U “Directly Connection Wirelessly (Wi-Fi Direct)”
on page 94
U “Printing Using AirPrint” on page 95
Notes on Usage and Storage
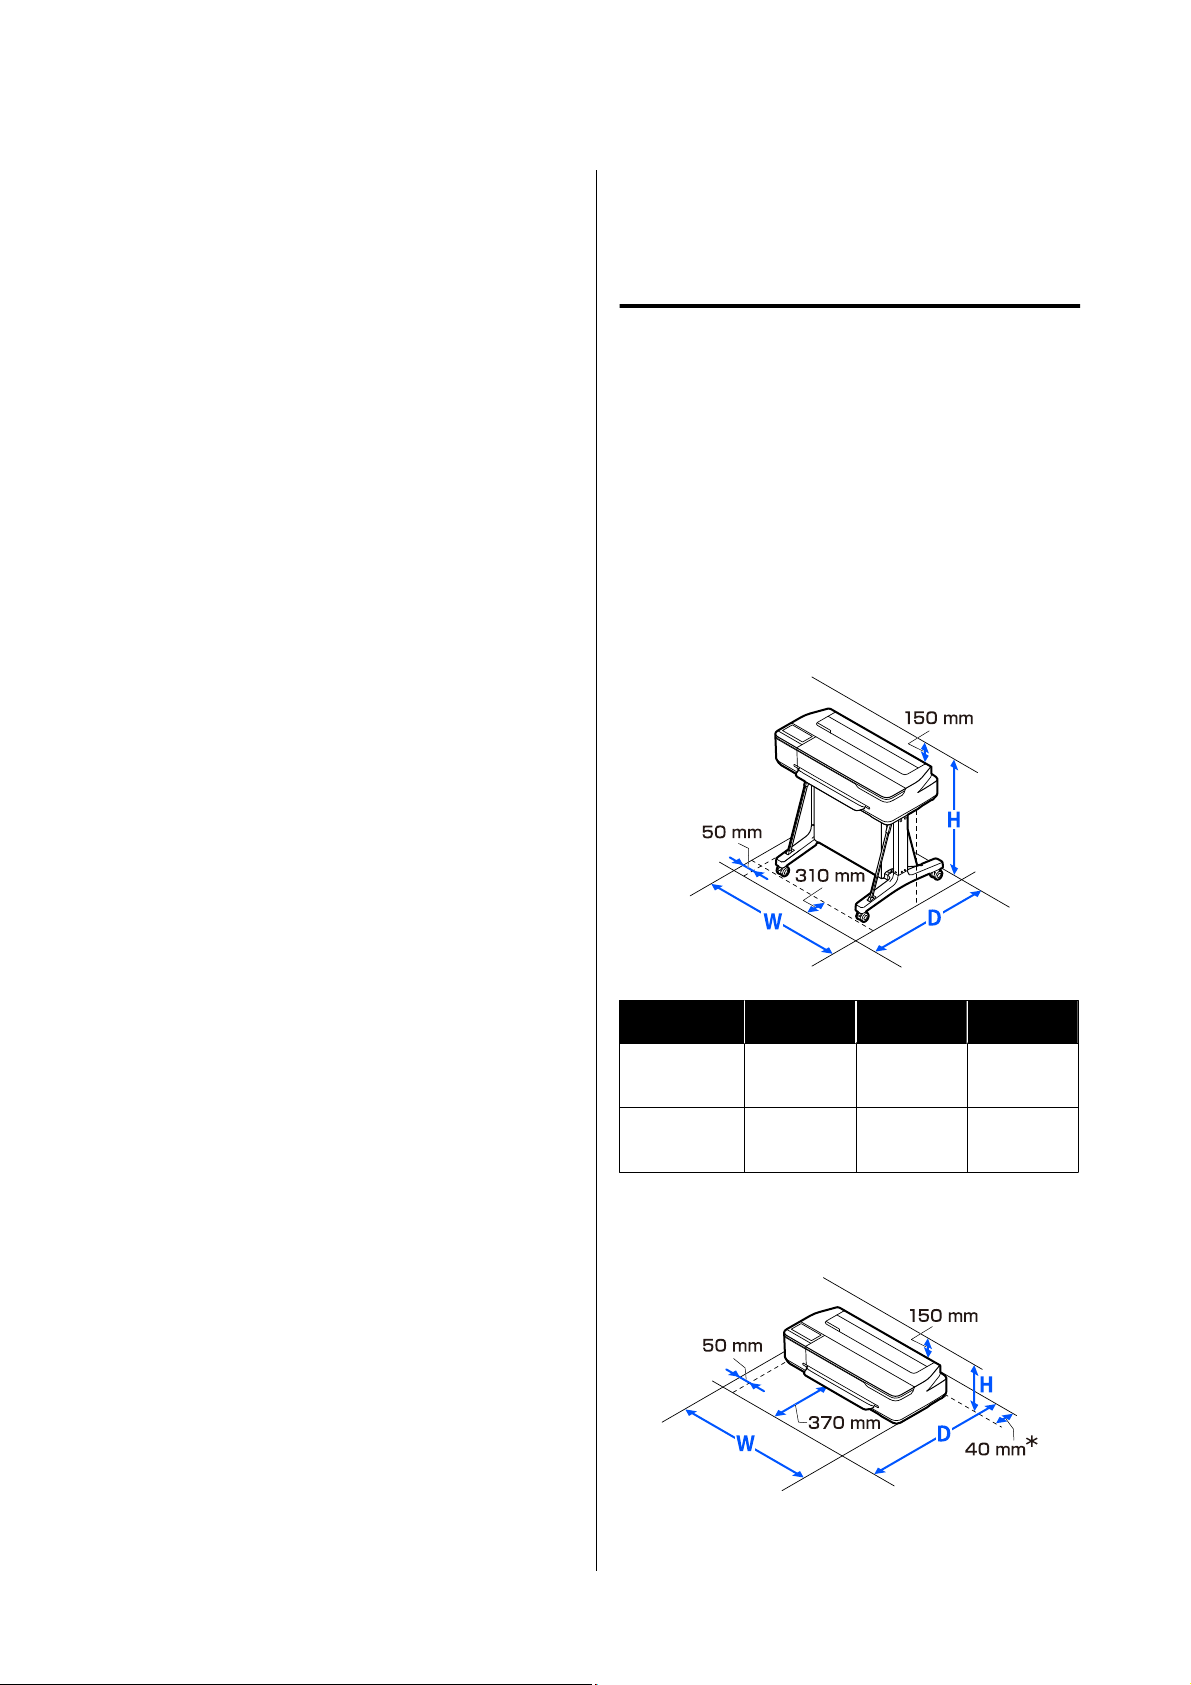
Installation space
Make sure that you secure the following space, clear of
any other objects, so that paper ejection and
consumable replacement are not obstructed.
See the
dimensions of the printer.
U “Specications Table” on page 171
SC-T5100 Series/SC-T3100 Series
“Specications
Table“ for the external
WD H
SC-T5100
Series
SC-T3100
Series
SC-T5100N Series/SC-T3100N Series
1318 mm 1270 mm 1063 mm
1020 mm 1270 mm 1063 mm
17
Page 18
SC-T5100 Series/SC-T3100 Series/SC-T5100N Series/SC-T3100N Series User's Guide
Introduction
WD H
SC-T5100N
Series
SC-T3100N
Series
*At least 130 mm of space is required at the back when
replacing the Maintenance Box.
1318 mm 915 mm 380 mm
1020 mm 915 mm 380 mm
Notes when using the printer
Note the following points when using this printer to
avoid breakdowns, malfunctions, and print quality
decline.
❏ When using the printer, observe the operating
temperature and humidity range described in the
"Specications Table".
U “Specications Table” on page 171
Even when the conditions above are met, you may
not be able to print properly if the environmental
conditions are not suitable for the paper. Be sure
to use the printer in an environment where the
paper's requirements are met. For more details,
see the documentation supplied with the paper.
Also, when operating in dry areas, air conditioned
environment, or under direct sunlight, maintain
the appropriate humidity.
❏ Do not install the printer next to heat sources or
directly in the path of air from a ventilator or air
conditioner. Failure to observe this precaution
could result in the print head nozzles drying and
clogging.
❏ e print head may not be capped (i.e., may not
move to the right-hand side) if an error occurs
and the printer is turned o without rst resolving
the error. Capping is a function for automatically
covering the print head with a cap (lid) to prevent
the print head from drying out. In this case, turn
on the power and wait a while until capping is
performed automatically.
❏ When the power is on, do not remove the power
plug or cut the power at the breaker. e print
head may not be capped properly. In this case,
turn on the power and wait a while until capping
is performed automatically.
❏ Even when printing is not performed, some of
each color of ink will be consumed by ink
cartridge replacement, print head cleaning, and
other maintenance operations needed to keep the
print head in good condition.
❏ e printer may automatically perform print head
cleaning to maintain good printing quality. Please
wait until cleaning nishes without opening any of
the covers or turning o the power.
Notes when not using the printer
If you are not using it, note the following points when
storing the printer. If it is not stored correctly, you may
not be able to print properly the next time it is used.
❏ When storing the printer, store it at with the ink
cartridges installed. Do not place the printer tilted,
upright, or upside down.
❏ If you do not print for a long time, the print head
nozzles may become clogged. We recommend that
you print once a week to prevent the print head
from clogging.
❏
❏ Store the printer
❏ To prevent the accumulation of dust and other
roller may leave an impression on paper that
e
is le in the printer. is can also cause wavy or
curled paper resulting in paper feeding problems
or the print head could be scratched. Remove any
paper when storing.
aer conrming
head has been capped (the print head is
positioned at the far right). If the print head is
uncapped for a long time, the print quality may
decline.
Note:
If the print head is not capped, turn the printer on,
and then turn it o.
foreign matter in the printer, close all covers
before placing it in storage.
If the printer will be not be used for an extended
period, protect it with an anti-static cloth or other
cover.
e print head nozzles are very small, and they
can become clogged easily if ne dust gets on the
print head, and you may not be able to print
properly.
that the print
le
18
Page 19

SC-T5100 Series/SC-T3100 Series/SC-T5100N Series/SC-T3100N Series User's Guide
Introduction
❏ e print head may fail if the environmental
temperature becomes -10°C or lower. If the
environmental temperature in the room or during
transport is expected to become -10°C or lower, be
sure to discharge the ink in advance.
U “Handling if Transporting/Leaving the
Printer in an Environment of -10°C or Less” on
page 167
Notes on handling ink cartridges
Note the following points when handling ink
cartridges to maintain good print quality.
❏ e ink cartridges packaged with your printer are
partly used during initial setup. In order to
produce high quality printouts, the print head in
your printer will be fully charged with ink. is
one-o
therefore these cartridges may print fewer pages
compared to subsequent ink cartridges.
❏ e Initial Cartridge included together with the
printer are designed for printer setup and not for
resale or later use. Aer some ink is used for
charging, the rest is available for printing. For the
initial setup, make sure to use Initial Cartridge.
process consumes a quantity of ink and
❏ Do not touch the IC chips on the ink cartridges.
You may not be able to print properly.
U “Replacing Ink Cartridges” on page 135
❏ Install the ink cartridges for all the colors. Printing
is not possible if they are not all installed.
❏ Do not leave the printer without ink cartridges
installed. e print head nozzles may dry and
printing may become no longer possible.
❏ e ink level and other data are stored in the IC
chip, allowing cartridges to be used
removed and replaced. However, if an ink
cartridge with not much ink remaining is removed
and reinstalled, it may not be usable because some
ink is consumed to ensure the reliability of the
printer.
❏ To avoid getting dust on the ink supply port, store
a removed partially used ink cartridge with the
ink supply port downward or horizontal in the
same environment as this product. e ink supply
port has a valve in it so it does not need to be
capped.
❏ Removed ink cartridges may have ink around the
ink supply port, so be careful not to get any ink on
the surrounding area when removing the
cartridges.
aer
being
❏ We recommend that ink cartridges be stored at
room temperature out of direct sunlight and used
before the expiry date printed on the packaging.
❏ To ensure good results, use all the ink in the
cartridges within 6 months of opening the
packages.
❏ Do not open the ink cartridge package until you
are ready to install it in the printer. e cartridge
is vacuum packed to maintain its reliability.
❏ Ink cartridges that have been stored at low
temperatures for an extended period should be
allowed to return to room temperature over a
period of at least three hours.
❏ Be sure to peel o the tape (yellow) before
installing an ink cartridge. If you attempt to
forcibly install an ink cartridge without removing
the tape, the printer may become unable to print
properly. Never peel o anything else such as the
lm or label. Ink may leak.
❏ To maintain the quality of the print head, this
printer stops printing before ink cartridges are
completely expended.
❏ Although the ink cartridges may contain recycled
materials, this does not
performance.
❏ Do not dismantle or remodel ink cartridges. You
may not be able to print properly.
❏ Do not drop or otherwise subject an ink cartridge
to a strong impact. Ink may leak from the
cartridge.
❏ Even when the printer is not in use, some of each
color of ink will be consumed by ink cartridge
replacement, print head cleaning, and other
maintenance operations needed to keep the print
head in good condition.
printer function or
aect
19
Page 20

SC-T5100 Series/SC-T3100 Series/SC-T5100N Series/SC-T3100N Series User's Guide
Introduction
❏ A mixture of color inks may be used to print black
depending on the paper type and print quality
settings even for black and white and grayscale
printing.
Notes on handling paper
Note the following points when handling and storing
the paper. If the paper is not in good condition, print
quality may decline.
Check the documentation supplied with each paper.
Notes on Handling
❏ Use Epson special media under normal room
conditions (temperature: 15 to 25°C, humidity: 40
to 60%).
❏ Do not fold the paper or scratch the surface of the
paper.
❏ Remove roll paper that is not in use from the
printer. Rewind it correctly and then store it in the
original packaging that came with the roll paper. If
you leave the roll paper in the printer for a long
time, its quality may decline.
Notes on handling printed paper
To maintain long lasting, high quality print results,
note the following points.
❏ Do not rub or scratch print outs. If they are
rubbed or scratched, the ink may peel o.
❏ Do not touch the surface of print outs. e ink
may peel o.
❏ Make sure the print outs are completely dry before
folding of stacking; otherwise, the color may
change where they touch (leaves a mark). ese
marks will disappear if they are separated
immediately and dried; however, they will remain
if not separated.
❏ Avoid touching the printable surface of the paper
with your bare hands. Moisture and oils from your
hands can aect print quality.
❏ Handle paper by the edges. We recommend
wearing cotton gloves.
❏ Changes in temperature and humidity may cause
paper to become wavy or curled. Check the
following points.
❏ Load the paper just before printing.
❏ Do not use wavy or curled paper.
For roll paper, cut o the wavy or curled parts
and then load it again.
For cut sheets, use new paper.
❏ Do not wet the paper.
❏ Do not throw away the paper packaging as you
can use it for storing the paper.
❏ Avoid locations that are subject to direct sunlight,
excessive heat, or humidity.
❏ Keep cut sheets in their original package
opening, and keep them in a
at
place.
aer
❏ If you put the print outs in an album before they
are completely dry, they may be blurred.
❏ Do not use a dryer to dry the print outs.
❏ Avoid d irect sunlight.
❏ Prevent color distortion while displaying or
storing the print outs by following the instructions
in the paper's documentation.
Note:
Typically, print outs and photos fade over time (color
distortion) due to the eects of light and various
constituents in the air. is also applies to Epson special
media. However, with the correct storage method, the
degree of color distortion can be minimized.
❏ See the documentation supplied with Epson special
media for detailed information on handling the
paper aer printing.
❏ e colors of photos, posters, and other printed
materials appear dierent under dierent lighting
conditions (light sources
from this printer may also appear dierent under
dierent light sources.
* Light sources include sunlight, uorescent light,
incandescent light, and other types.
*
). e colors of print outs
20
Page 21

SC-T5100 Series/SC-T3100 Series/SC-T5100N Series/SC-T3100N Series User's Guide
Introduction
Saving Power
e printer enters sleep mode or turns o
automatically if no operations are performed for a set
period. You can adjust the time before power
management is applied. Any increase will aect the
product's energy eciency. Please consider the
environment before making any change.
Sleep mode
e printer enters sleep mode when there are no
errors, no print jobs being received, and no control
panel or other operations performed. When the
printer enters sleep mode, the control panel's screen
turns o and the internal motors and other parts
switch o to consume less power.
Sleep mode is exited if a print job is received or the
screen of the control panel is touched.
delay before the printer enters sleep mode can be
e
selected from values between 1 and 210 minutes. At
default settings, the printer enters sleep mode if no
operations are performed for 15 minutes. e delay
can be changed from the Basic Settings menu.
Power O Timer settings can be changed from the
Basic Settings menu.
U “General Settings - Basic Settings” on page 115
U “General Settings - Basic Settings” on page 115
Note:
When the printer enters sleep mode, the control panel's
screen goes blank as if the power has been turned o,
but the P light remains lit.
Power O Timer
is function automatically turns the printer o if no
errors occur, no print jobs are received, and no control
panel or other operations are performed for a set
period of time.
default setting
e
model.
❏ SC-T5100/SC-T5100N/SC-T5180/SC-T5180N/
SC-T3100/SC-T3100N/SC-T3180N
Set to 8h.
❏ SC-T5130/SC-T5160/SC-T5160N/SC-T3130/
SC-T3130N/SC-T3160/SC-T3160N
Set to O.
as follows depending on the
diers
21
Page 22
SC-T5100 Series/SC-T3100 Series/SC-T5100N Series/SC-T3100N Series User's Guide
Introducing the Software
Introducing the Software
Provided Software
e following table lists the provided soware.
e supplied soware disc contains the soware for Windows. When using a Mac or a computer without a disc
drive, download the soware from http://epson.sn and then install it.
For details on the various soware, see the online help of each soware or the Administrator's Guide (online
manual).
Note:
Convenient soware compatible with this printer is introduced on the Epson website. Please check the information from
the following link.
http://www.epson.com
Software Name Function
Printer Driver Install the printer driver to take full advantage of the functionality of this printer when
printing.
U “Printing with the Printer Driver from Your Computer” on page 46
EPSON Software Updater Software to check whether there is any software update information and then notify
you and install the software if an update is available. It allows you to update the
rmware and already installed software of the printer.
U “Updating Software or Installing Additional Software” on page 25
LFP Print Plug-In for Oce
(Windows Only)
EpsonNet Cong Software to congure the initial settings of the network or change the settings of the
Plug-in software for Microsoft Oce applications (Word, Excel, and PowerPoint).
Installing this plug-in displays ribbon items in Oce applications that give quick access
to horizontal and vertical banner printing and enlarged printing.
It can be installed by selecting it in the Additional Installation screen when installing the
software. You can also install it later with EPSON Software Updater.
The supported Microsoft versions are shown below.
Oce 2003/Oce 2007/Oce 2010/Oce 2013/Oce
network in bulk when installing or relocating Epson printers and scanners.
EpsonNet Cong is not installed automatically. Download it from the Epson website and
then install it if necessary.
http://www.epson.com
For Windows, you can install the software from the following folder on the supplied
software disc.
\\Network\EpsonNetCong
U Administrator's Guide
2016
22
Page 23

SC-T5100 Series/SC-T3100 Series/SC-T5100N Series/SC-T3100N Series User's Guide
Introducing the Software
Built-in Software in the Printer
e following soware comes preinstalled in the printer. Start and use it from a Web browser via the network.
Software Name Function
Web Cong The network security settings can be congured from Web Cong. This software also
has an email notication function for notifying of printer errors and other problems.
U “How to Use Web Cong” on page 24
23
Page 24
SC-T5100 Series/SC-T3100 Series/SC-T5100N Series/SC-T3100N Series User's Guide
Introducing the Software
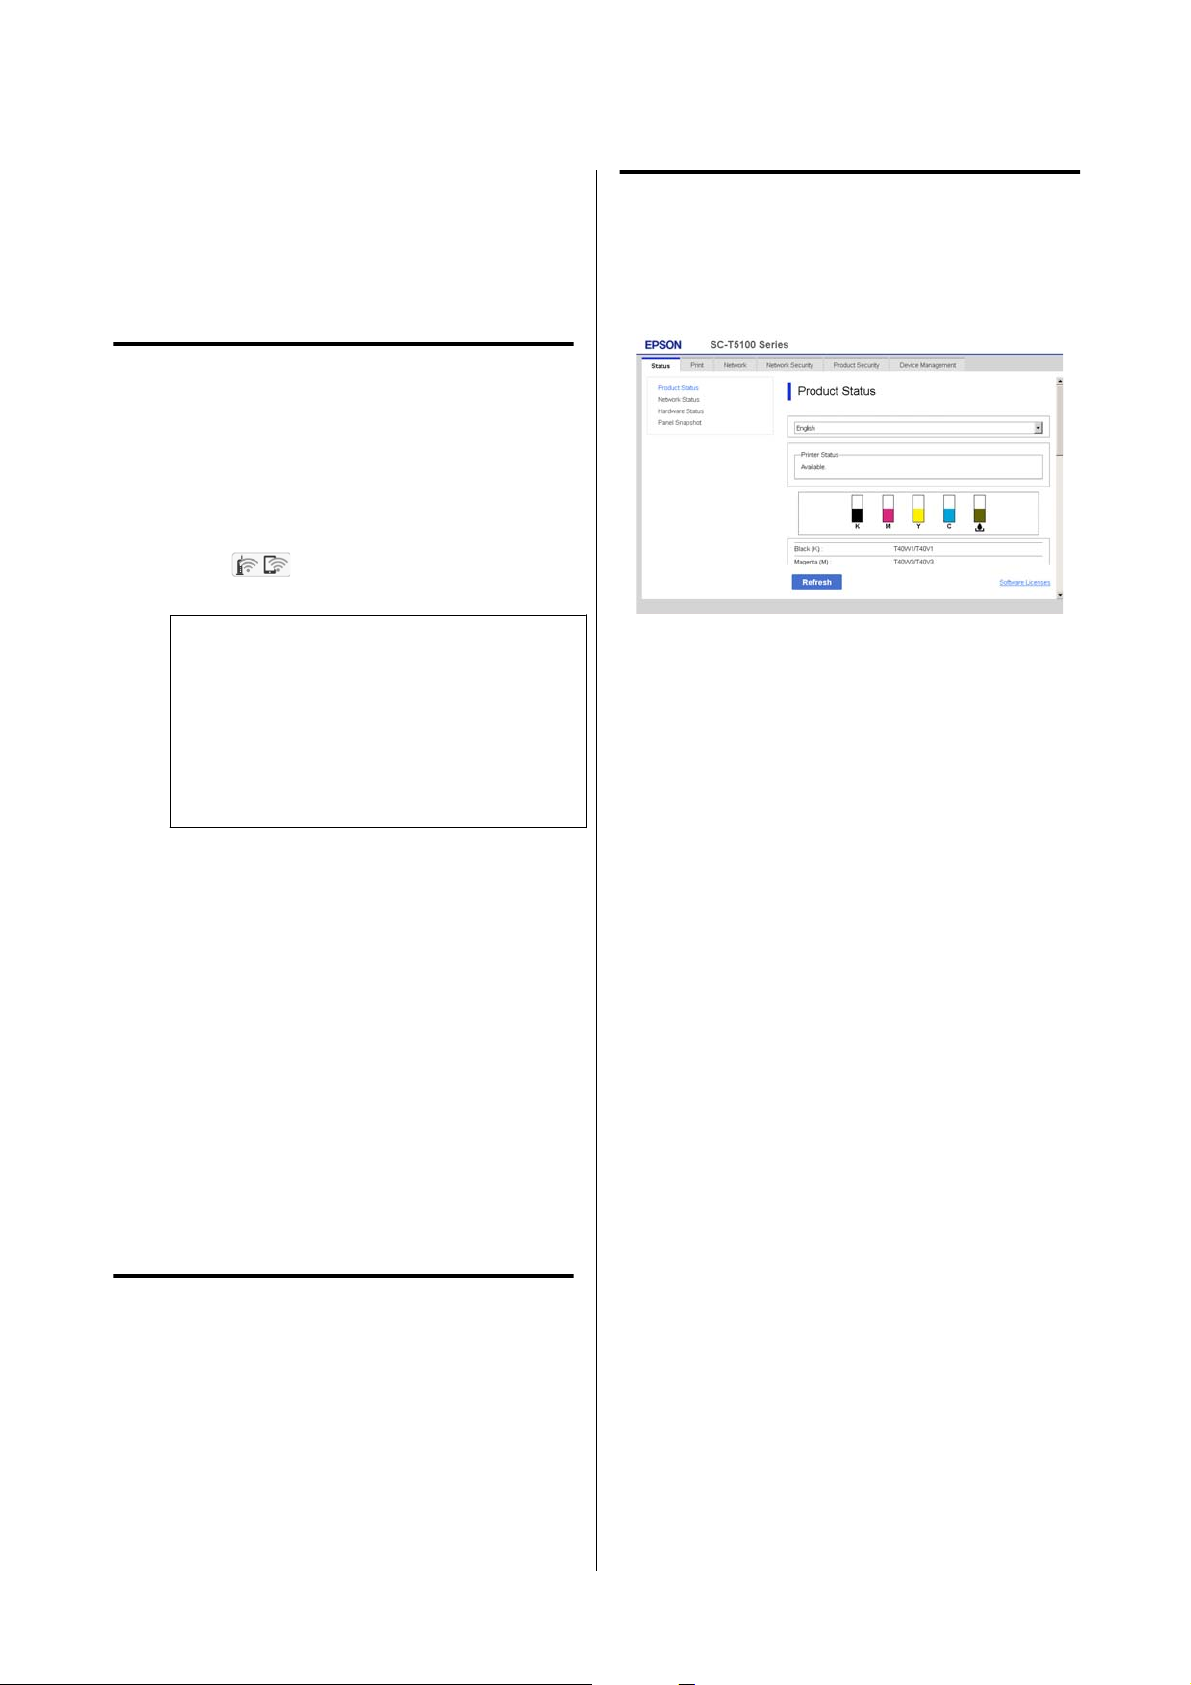
How to Use Web
is section describes how to start the soware and
provides a summary of its functions.
Cong
How to Start
Start the soware from a web browser on a computer
or smart device that is connected to the same network
as the printer.
Check the IP address of the printer.
A
To u ch
connected network, and check the IP address.
Note:
e IP address can also be checked by printing a
network connection check report. A report can be
printed by touching the following in order from
the Home screen.
Settings - General Settings - Network Settings Connection Check
on the Home screen, select the
Function Summary
is section introduces the main functions of Web
Cong. For more details, see the Administrator's
Guide.
Main Functions
❏ Check the printer's status, such as the remaining
amount of ink.
❏ Check and update the printer's rmware version.
Start a Web browser on a computer or smart
B
device connected to the printer via the network.
Enter the IP address of the printer in the
C
address bar of the Web browser and press the
Enter or Return key.
Format:
IPv4: http://IP address of printer/
IPv6: http://[IP address of printer]/
Example:
IPv4: http://192.168.100.201/
IPv6: http://[2001:db8::1000:1]/
Closing
Close the Web browser.
❏ Congure the printer's network settings and
advanced security settings, such as SSL/TLS
communication, IPsec/IP ltering, and
IEEE802.1X, which cannot be congured with the
printer alone.
❏ Edit the custom paper settings and export and
import the settings.
e custom paper settings registered in Settings -
General Settings - Printer Settings - Custom
Paper Setting of the printer can be changed as
well as exported to a le and then imported
(registered) to another printer.
when you install multiple printers and want to use
common custom paper settings for them.
is convenient
is
24
Page 25
SC-T5100 Series/SC-T3100 Series/SC-T5100N Series/SC-T3100N Series User's Guide
Introducing the Software
Updating Software or Installing Additional Software
When you install the soware during setup as
described in the Setup Guide, Epson
is installed. Epson
update the rmware and already installed soware in
your computer as well as install additional soware
compatible with the printer.
Note:
e soware is updated as needed for greater
convenience and more robust functionality. We
recommend setting to receive update notications with
Epson Soware Updater and updating the soware as
soon as possible when there is a notication.
Soware
Updater allows you to
Soware
Checking Whether Updates
Updater
Select the
C
and then update them.
Follow the on-screen instructions.
c
Do not turn o the computer or printer
during the update.
Note:
Soware not displayed in the list cannot be
updated with Epson Soware Updater. Check the
latest versions of soware on the Epson website.
Please note that you cannot update or install
soware using Epson Soware Updater if you are
using a Windows Server OS. Download the
soware from the Epson website.
http://www.epson.com
soware
Important:
or manuals to be updated
Receiving Update Notications
Available and Updating
Software
Check that the computer and printer are in the
A
following states.
❏ Computer is connected to the Internet.
❏ Printer and computer can communicate.
Start Epson
B
❏ Windows
Soware
Display the list of all the programs and then
click Epson Soware Updater in the Epson
Soware folder.
Note:
❏ If you press the Windows key (key with
Windows logo mark) on the keyboard and
then type the soware name in the search box
of the displayed window, the soware appears
immediately.
❏ e soware can also be started by clicking
the printer icon on the Taskbar of the desktop
and then selecting Soware Update.
Updater.
Windows
Start Epson Soware Updater.
A
Click Auto update settings.
B
Select the interval to perform the update check
C
in the Interval to Check eld of the printer and
then click OK.
Mac
e soware is set by default to check and notify
whether there are updates every 30 days.
❏ Mac
Select Go - Applications - Epson
EPSON Soware Updater.
Soware
-
25
Page 26
SC-T5100 Series/SC-T3100 Series/SC-T5100N Series/SC-T3100N Series User's Guide
Introducing the Software
Uninstalling Software
Windows
Important:
c
❏ You must log in as an Administrator.
❏ If the password or conrmation of an
administrator is requested, enter the password
and then continue with the operation.
Turn o the printer, and unplug the interface
A
cable.
Close all applications running on your
B
computer.
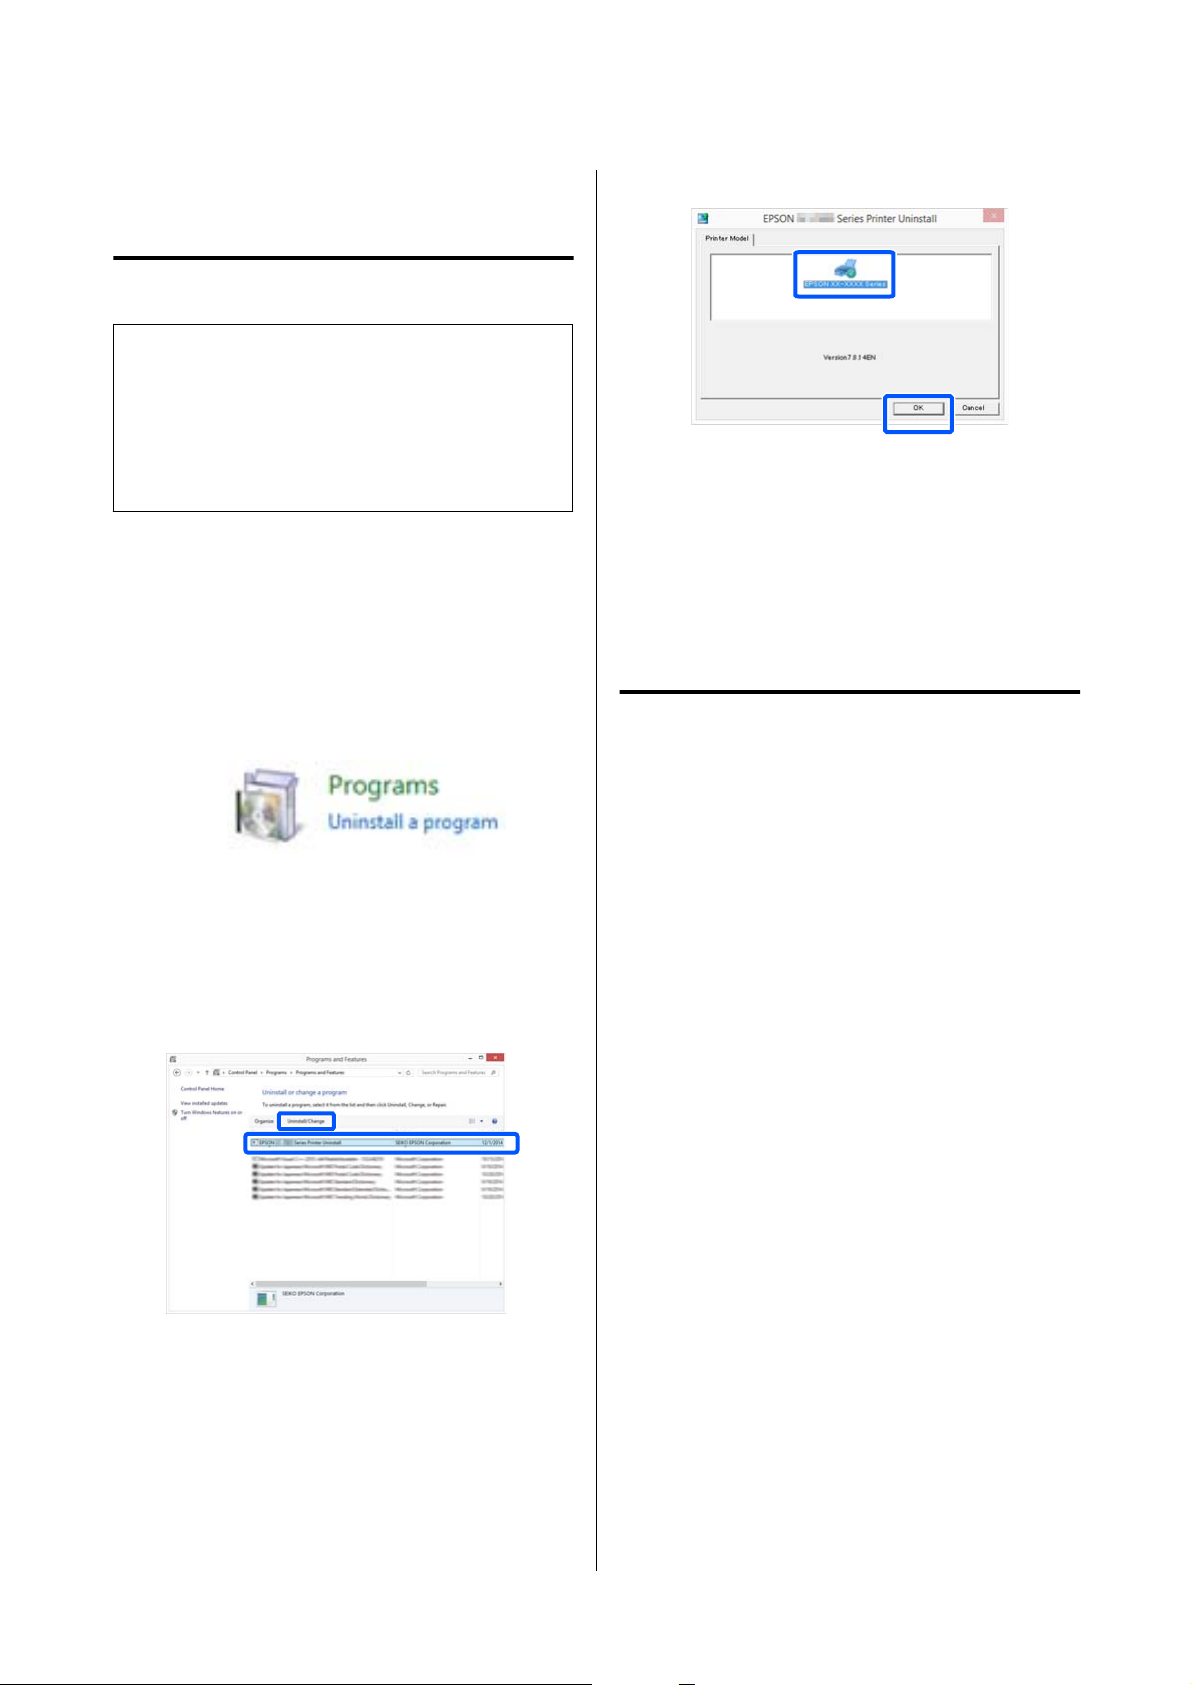
Go to the Control Panel and click Uninstall a
C
program from the Programs category.
Select the printer icon, and then click OK.
E
Follow the on-screen instructions to continue.
F
When the delete conrmation message appears,
click Ye s .
Restart the computer if you are reinstalling the printer
driver.
Mac
When reinstalling or upgrading the printer driver or
other soware, follow the steps below to uninstall the
target soware rst.
Select the soware you want to remove and
D
then click Uninstall/Change (or Change/
Remove / Add/Remove).
You can remove the printer driver and EPSON
Status Monitor 3 by selecting EPSON
SC-XXXXX Printer Uninstall.
Printer Driver
Use the "Uninstaller".
Downloading the Uninstaller
Download Uninstaller from the Epson website.
http://www.epson.com/
Using the Uninstaller
Follow the instructions on the Epson website.
Other Software
Drag and drop folder with the soware name from the
Applications folder into Tr a sh to delete.
26
Page 27
SC-T5100 Series/SC-T3100 Series/SC-T5100N Series/SC-T3100N Series User's Guide
Loading and Setting the Paper
Unsupported paper
Loading and Setting
Do not use paper that is wavy, torn, cut, folded, too
the Paper
thick, too thin, has a sticker axed, etc. Doing so may
cause paper jams or soiled prints. See the following for
paper supported by the printer.
Notes on Loading the Paper
Caution:
Do not rub the edges of the paper with your hands.
e edges of the paper are thin and sharp and
could cause an injury.
Do not leave paper loaded in the printer
roller may leave an impression on paper that is
e
in the printer. In addition, the paper may become
wavy or curled due to damp, which may cause paper
feeding problems, paper jams, or soiled prints.
We recommend that you return the paper to its
original package and store it at, and take it out of the
package for use when printing.
Do not load roll paper with the right and left edges
uneven
le
U “Epson Special Media Table” on page 157
U “Supported Commercially Available Paper” on
page 160
Paper Load Position
position to load paper
e
shape and size of the paper to be loaded. See the
following for more details on the paper that can be
used with the printer.
U “Supported Media” on page 157
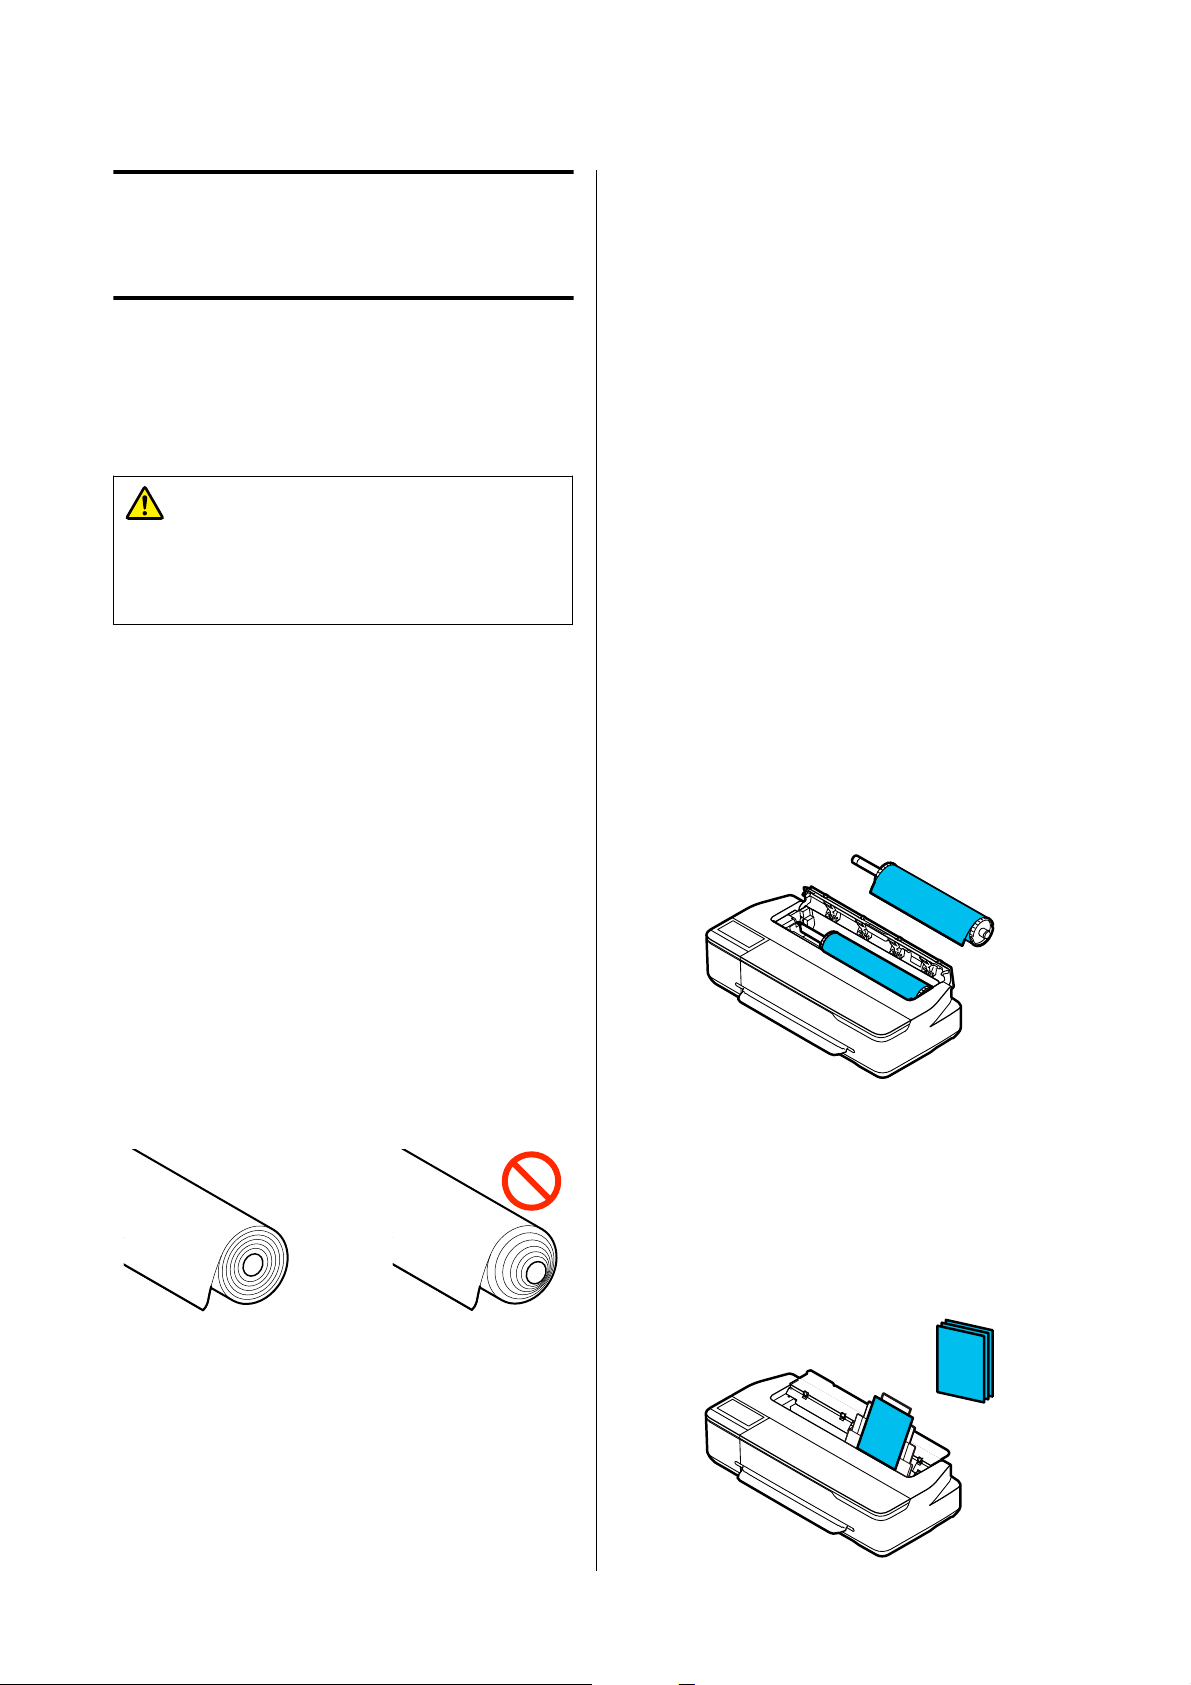
Roll Paper
Roll paper from 329 mm to the maximum printable
width can be loaded.
depending on the
diers
Loading roll paper with the right and le edges
uneven may cause paper feeding problems or paper
meandering may occur during printing. Rewind the
paper to make the edges even, or use roll paper with
no problem.
Do not load curled paper
Loading curled paper may cause paper jams or soiled
prints. Flatten the paper before use by bending it in
the opposite way or use paper with no problem.
Auto Sheet Feeder
Multiple sheets of A3 to A4 paper can be loaded. e
number of sheets that can be loaded at once diers
depending on the paper. See the following for more
details.
U “Cut Sheet” on page 158
27
Page 28
SC-T5100 Series/SC-T3100 Series/SC-T5100N Series/SC-T3100N Series User's Guide
Loading and Setting the Paper
Cut Sheet(1 sheet)
One sheet of cut paper from A4 to the maximum
printable width can be loaded.
Note:
❏ e paper slot for Roll Paper and Cut Sheet(1 sheet)
is the same. Insert either one into the paper slot.
❏ Paper can be loaded in the auto sheet feeder while
leaving roll paper loaded. You can switch to one of
the paper sources in the printer driver.
Loading Roll Paper
Caution:
Make sure to grip the anges of the spindle when
loading a roll paper. If you hold and load the roll
paper by gripping the other parts, your hand or
nger may get injured.
Note:
You can load the paper while viewing the loading
procedure on the screen. To view the procedure on the
screen, touch the Roll paper information area of the
Home screen.
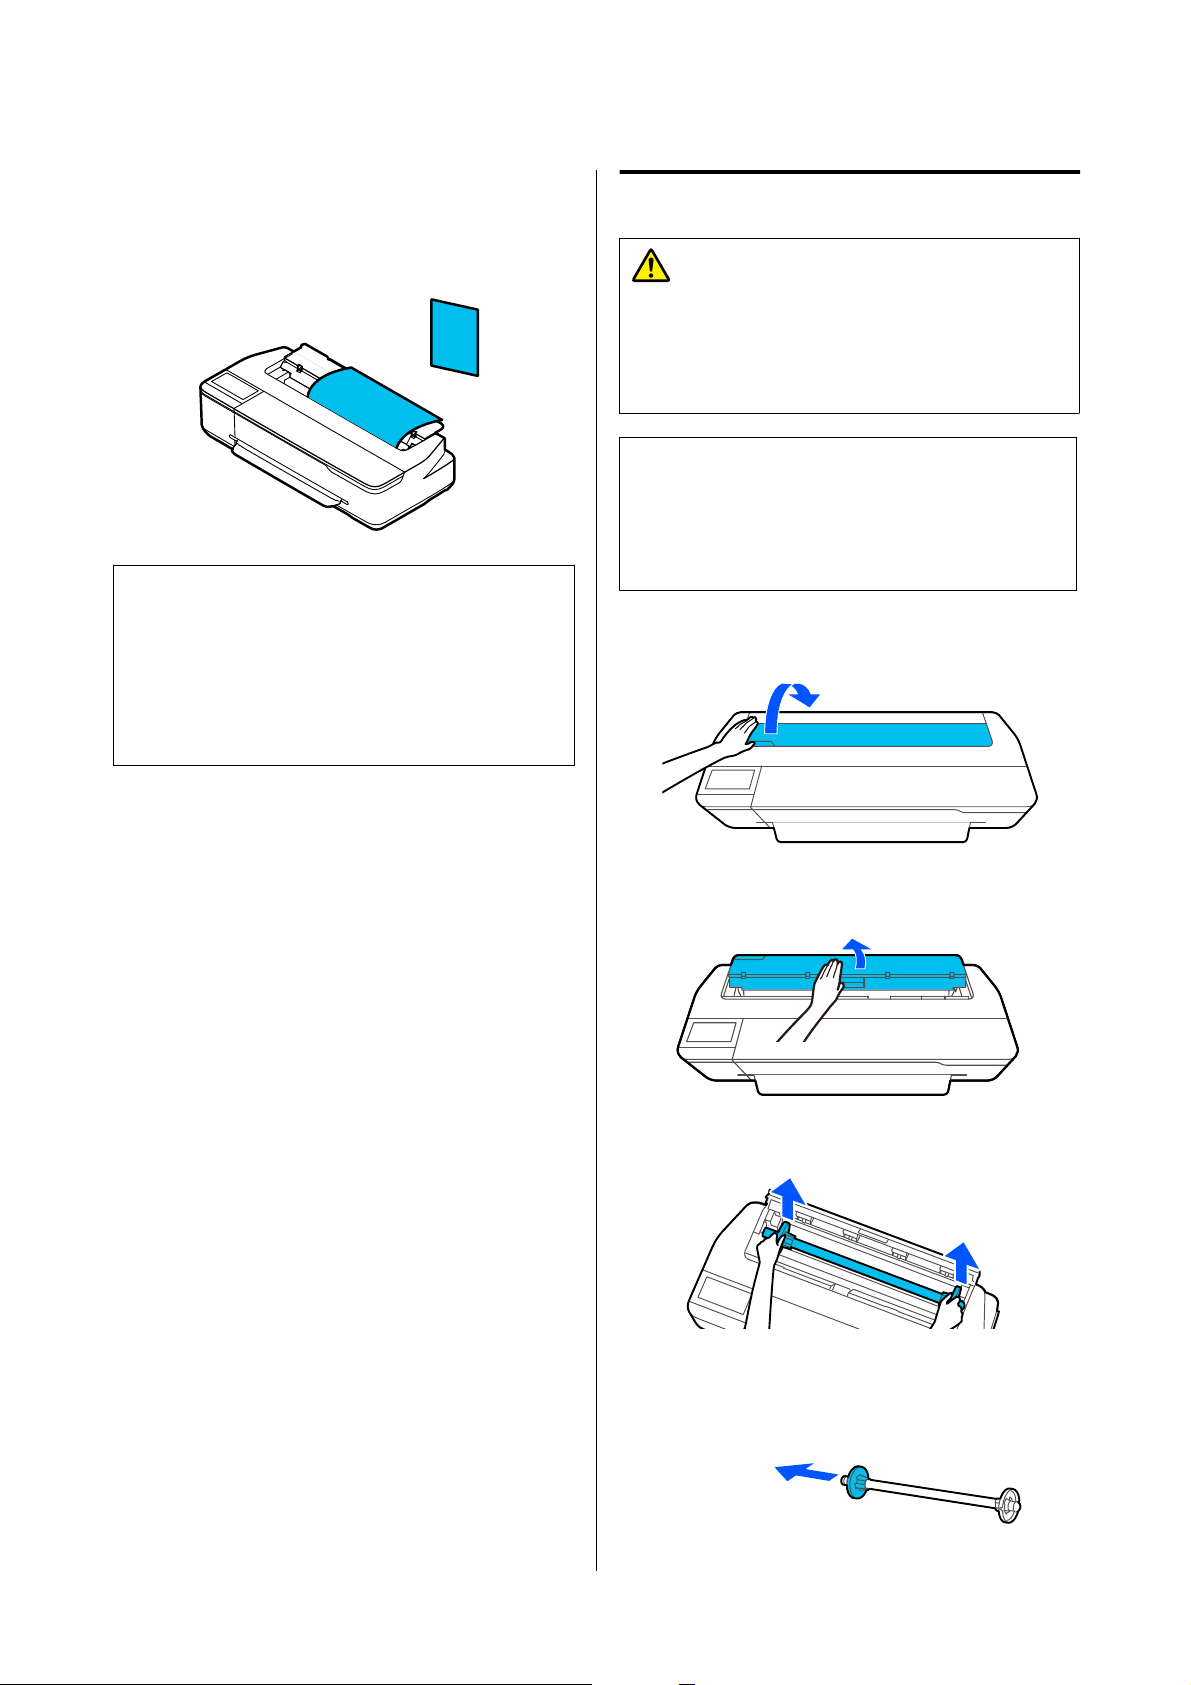
Check that "Load paper." is displayed on the
A
Home screen and then open the cut sheet cover.
Loading and Removing the Roll Paper
Place the roll paper on the supplied spindle and then
load the roll paper in the printer.
When replacing paper, remove the loaded paper rst.
U “Removing Roll Paper” on page 32
U “Removing Cut Sheet (1 Sheet)” on page 38
When paper is loaded in the auto sheet feeder, remove
it and then load it again aer you nish loading or
removing the roll paper. Before printing on roll paper,
remove the stacker.
U “Removing Paper from the Auto Sheet Feeder” on
page 36
U “Attaching and Removing the Stacker (for Plain
Paper)” on page 34
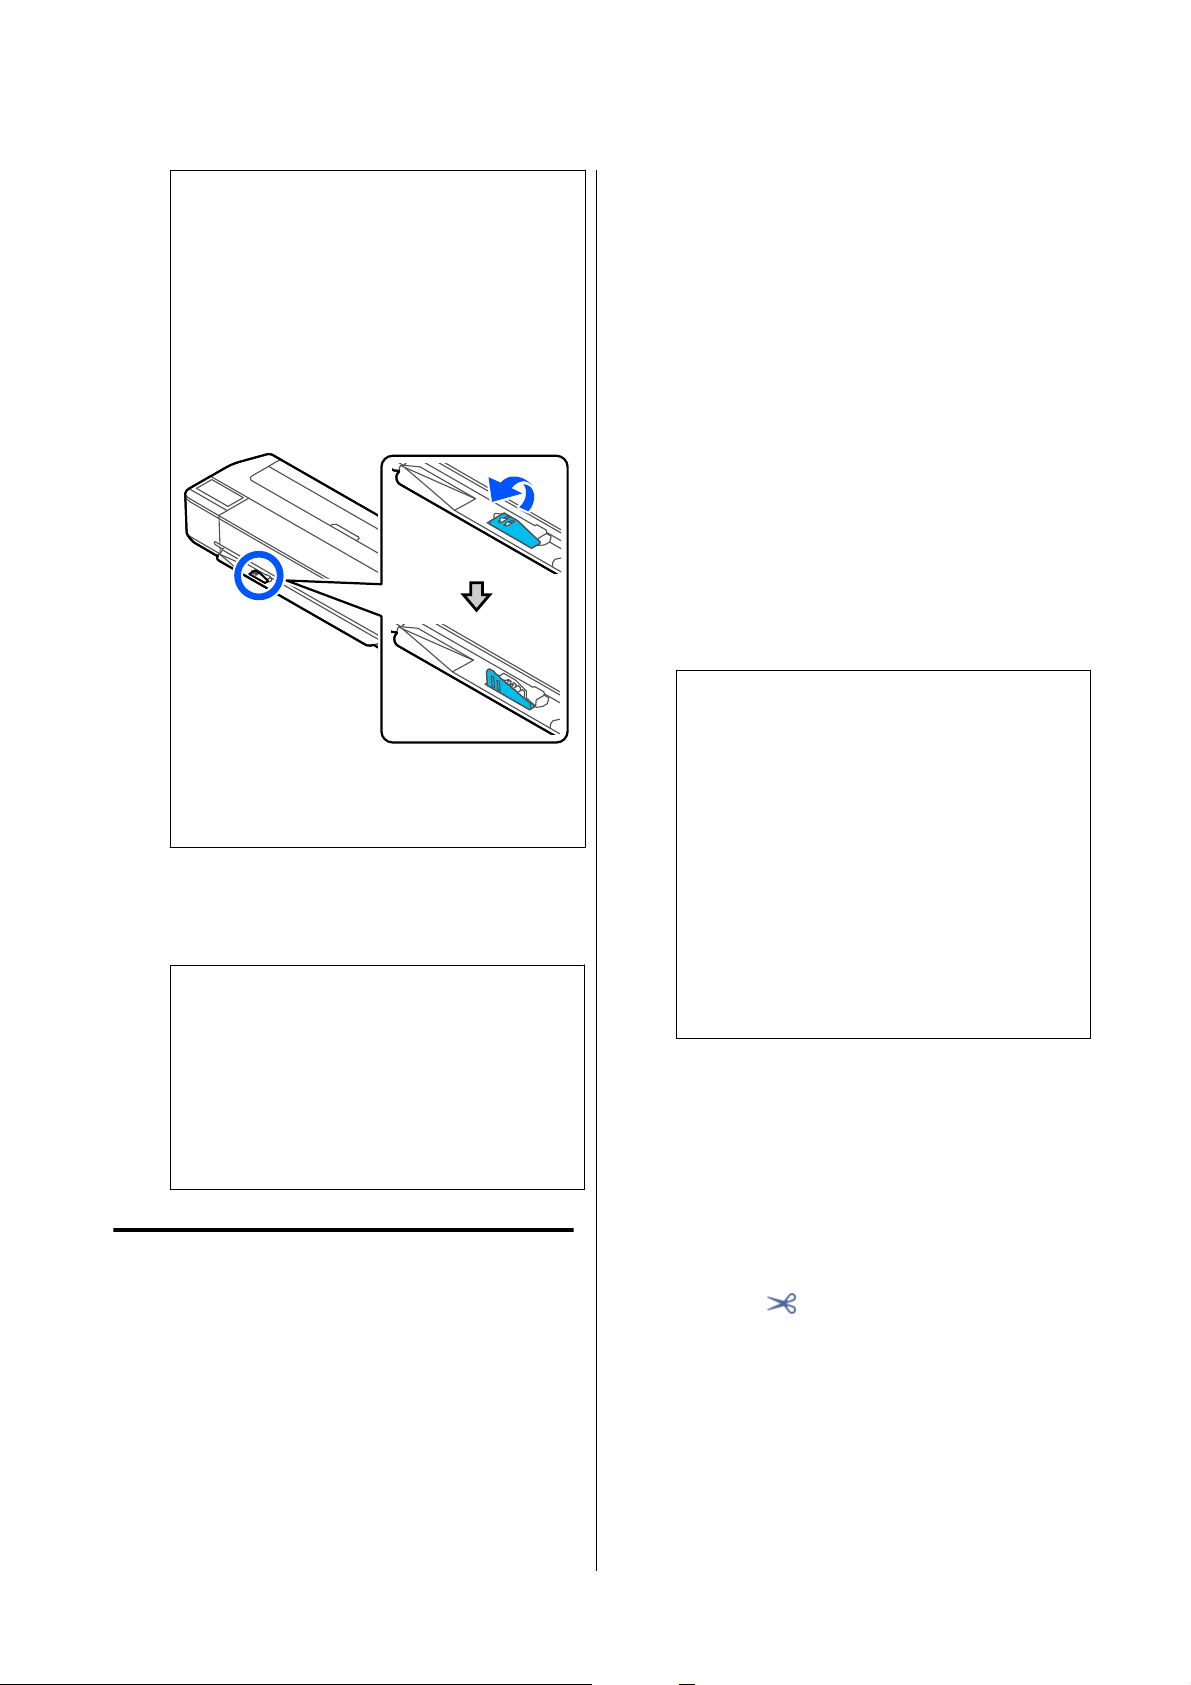
Release the central lock, and then open the roll
B
paper cover.
Remove the inserted spindle.
C
Pull o the transparent ange from the spindle.
D
28
Page 29
SC-T5100 Series/SC-T3100 Series/SC-T5100N Series/SC-T3100N Series User's Guide
Loading and Setting the Paper
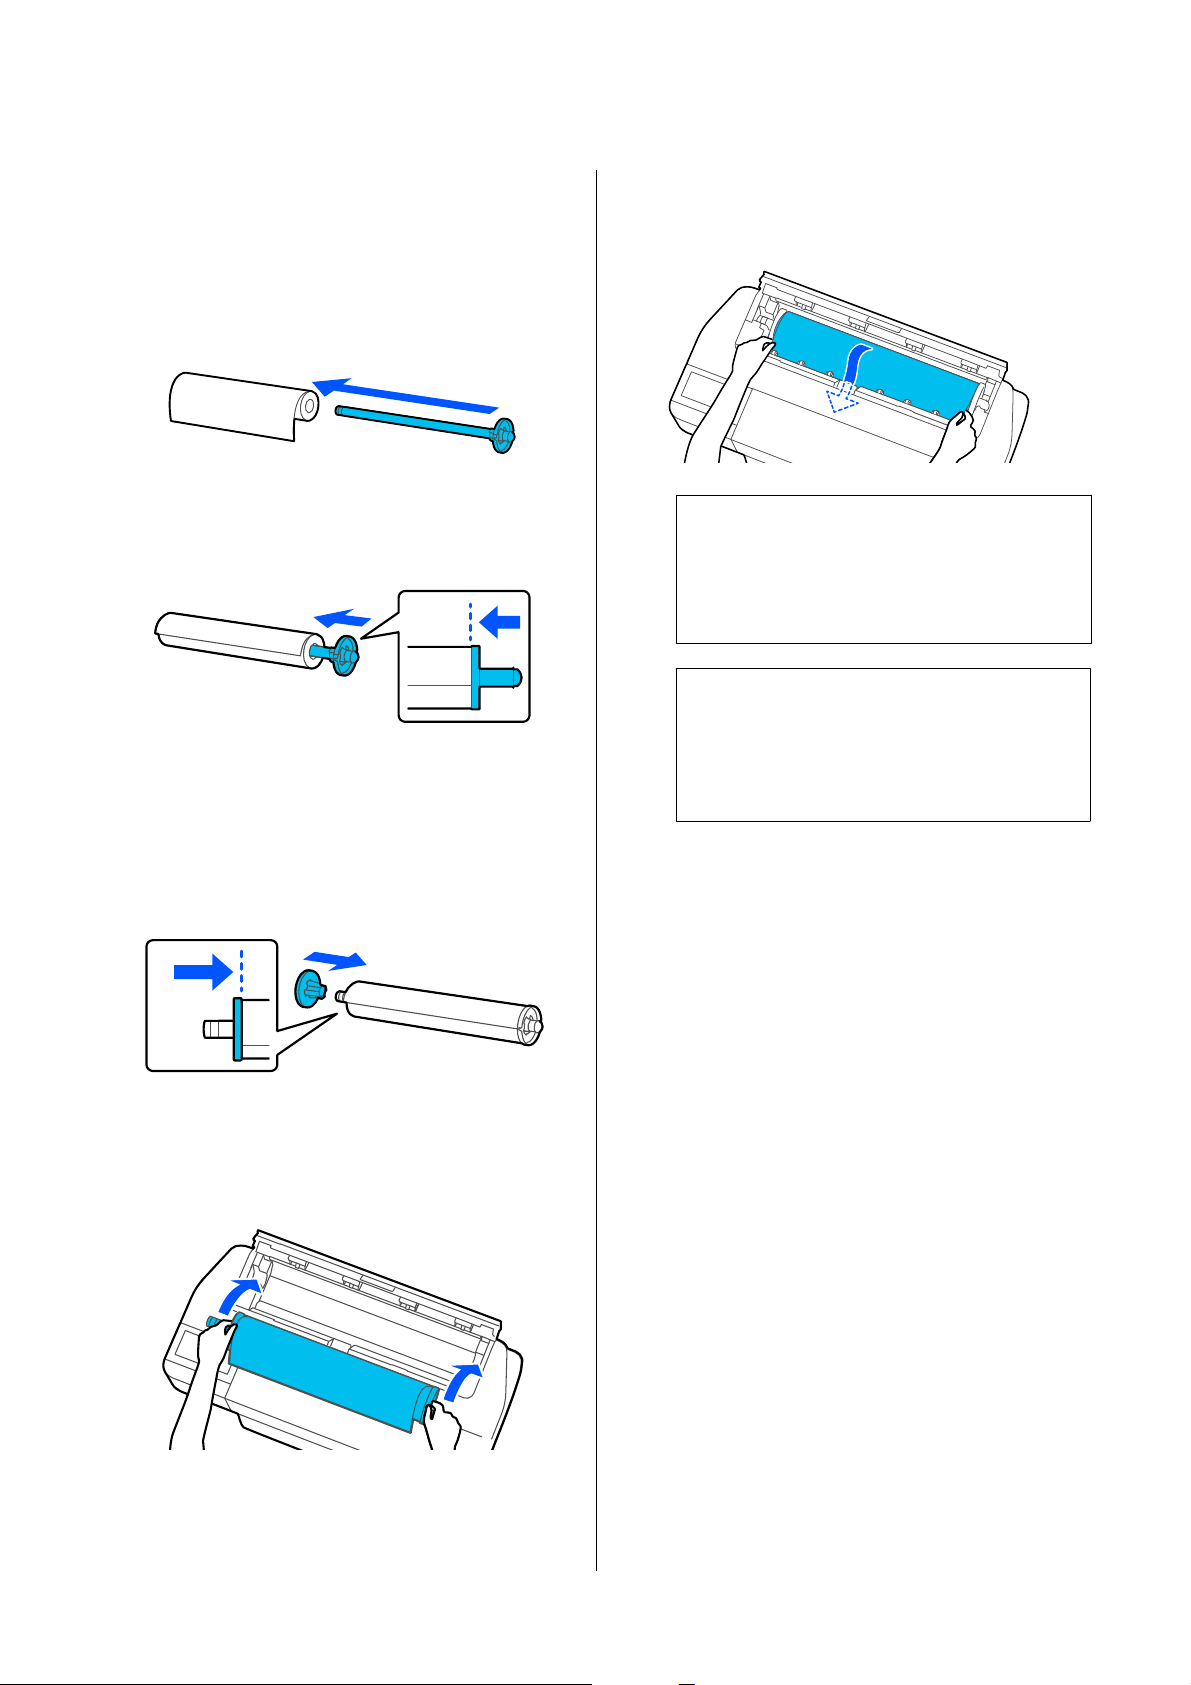
Place the roll paper on a
E
insert the spindle.
With the black ange is on the right, orient the
roll paper so that the leading edge is as shown
in the gure below.
Push the
F
no gap between the ange and roll paper.
Attach the transparent ange and push it until
G
there is no gap between the
paper.
to the roll paper until there is
ange
surface and then
at
ange
and roll
Check that the leading edge of the roll paper is
I
not bent and then insert it into the paper slot
until you hear a beep.
Important:
c
Hold the paper edges and insert the paper
straight into the paper slot. Inserting it
skewed will cause a skew error or paper jam.
Note:
If the leading edge of the roll paper is not
horizontal or not cut cleanly, it will be cut
automatically
will not be cut if Auto Cut is set to O.
loading completes. However, it
aer
If there are gaps between the anges at both
ends and the roll paper, the paper may be fed
skewed resulting in an error.
Orient the paper roll so that the black
H
the spindle is on the right side and then insert
the spindle shas into the cavities in the le and
right of the spindle holder.
ange
of
Close the roll paper cover and cut sheet cover.
J
On the displayed screen, set the paper type that
K
matches the loaded paper and set remaining
amount management if necessary.
Not setting the appropriate paper type will
cause print quality trouble. See the following for
more details on the paper types and remaining
amount settings.
U “For Roll Paper” on page 39
29
Page 30
SC-T5100 Series/SC-T3100 Series/SC-T5100N Series/SC-T3100N Series User's Guide
Loading and Setting the Paper
Important:
c
When paper equivalent to B1 width is
loaded in SC-T5100 Series/SC-T5100N
Series
Raise the B1 width paper support as shown in
the gure only when you have loaded B1
width (718 to 738 mm) paper. If you do not
raise the B1 width paper support, the print
surface may be scued or soiled.
Leave the support lowered when printing to a
size other than equivalent to B1 width.
❏ When printing of one page is nished
roll paper is cut before printing of the next
e
page starts.
If you do not want to cut each page or you want to cut
at a desired position, see the following procedure.
Cutting after Last Page Printed or at Desired Position
Turn o auto cut in the printer driver, print, and then
cut using the Feed/Cut Paper menu of the printer
aer printing nishes.
Select O in Advanced - Roll Paper Option -
A
Auto Cut of the printer driver and then print.
Leave the auto cut setting of the printer on.
Note:
❏ e auto cut setting of the printer driver has
priority over that of the printer. e auto cut
setting of the printer driver is reset to the
default setting of Normal Cut when the
application closes.
For SC-T5100 Series and SC-T3100 Series,
L
check that the paper basket attached to the
stand is open.
Note:
Close the paper basket before printing banners or
other documents of sizes that will not t in the
paper basket. Before the paper ejected from the
printer touches the oor, we suggest that you take
it in both hands close to the paper eject slot and
continue to lightly support it until printing is
complete.
Cutting the Roll Paper
Auto Cut
Auto Cut is set to On for the printer by default. When
On is set, the roll paper is cut automatically at the
following times.
❏ To turn o auto cut when HP-GL/2 mode
printing or enlarged copying, turn o the
auto cut setting of the printer. Touch the Roll
paper information area - Advanced Media
Setting - Auto Cut - O from the Home
screen. e change to the setting is saved as a
setting of the currently selected paper type.
Touch the Roll paper information area -
B
Feed/Cut Paper from the Home screen of the
printer
Use the buttons displayed on the screen to cut
and feed the paper.
When cutting at the printer default cut
position (right aer the bottom margin)
Touch t h e
and the paper leading edge returns to the print
wait position.
printing
aer
nishes.
(Cut) button. e paper is cut
❏ When the leading edge is detected as not
horizontal
the roll paper is loaded, the leading edge
Aer
part is cut straight.
30
Page 31

SC-T5100 Series/SC-T3100 Series/SC-T5100N Series/SC-T3100N Series User's Guide
Loading and Setting the Paper
When cutting at desired position
Touch and hold down the (Forward) or
(Backward) button until the position you
want to cut comes to the position of the
dotted line in the gure.
A cut position cannot be set further inside
than the bottom margin.
Touch t h e (Cut) button.
paper is cut.
e
Important:
c
❏ If commercially available synthetic or canvas
paper is cut with the built-in cutter, the cutter
may be damaged or its life may be shortened.
When using such paper, cut the paper with
scissors as described in the following
procedure.
❏ Do not use a cutter. e printer may be
damaged.
Tu r n o the auto cut setting and then print.
A
To print cut lines, turn o the auto cut setting of
the printer. When printing via the printer
driver, also turn o the setting of the printer
driver.
❏ Printer settings
Roll paper information area - Advanced
Media Setting - Auto Cut - O from the
Home screen.
Note:
When the length of
than the following length, the paper is fed
automatically until the required length is obtained
at the time of cutting.
❏ Plain paper or tracing paper: 100 mm
❏ Photo paper or coated paper: 80 mm
❏ Synthetic paper and other thick paper:
60 mm
in the gure is shorter
Cutting Commercially Available Synthetic or Canvas Paper with Scissors
❏ Printer driver settings
Advanced - Roll Paper Option - Auto Cut O
Touch the Roll paper information area -
B
Feed/Cut Paper from the Home screen of the
printer aer printing nishes.
Operate the buttons displayed on the screen.
C
When printing cut lines at the printer default
position (right aer the bottom margin)
Touch t h e
cut lines selection screen appears.
When printing cut lines at desired position
Touch and hold down the
(Backward) button until the position you want
to print the cut lines comes to the position of
the dotted line in the
(Cut) button. e cut or print
(Forward) or
gure.
When using commercially available paper that cannot
be cleanly cut with the cutter of the printer, print cut
lines and cut the paper with scissors.
31
Page 32

SC-T5100 Series/SC-T3100 Series/SC-T5100N Series/SC-T3100N Series User's Guide
Loading and Setting the Paper
Cut lines cannot be printed further inside than
the bottom margin. Once you have
moving the paper, touch
print cut lines selection screen appears.
To u ch Print Cutting Guideline.
D
Cut lines are printed and the paper is ejected
automatically to a position where it can be
easily cut with scissors.
Cut the paper along the cut lines with scissors
E
and then touch Done.
e paper rewinds to return the paper leading
edge to the print wait position.
nished
(Cut). e cut or
Removing Roll Paper
is section describes how to remove and store roll
paper aer printing. e rollers may leave impressions
on roll paper if you leave the paper loaded in the
printer.
Release the central lock, and then open the roll
C
paper cover.
To u ch Remove.
D
e paper is rewound and ejected.
Note:
If printed paper is not cut and remains, a
conrmation screen appears.
To uc h Cut to cut the paper at the default cut
position or touch Print Cutting Guideline to
print cut lines at the default position.
If you want to change the cut position or cut
lines print position to desired position, touch
Close and change the position in the Feed/Cut
Paper menu.
Note:
You can remove the paper while viewing the procedure
on the screen. To view the procedure on the screen,
touch the Roll paper information area - Remove from
the Home screen.
When the trailing edge of printed paper is held
A
in the printer, pull out the paper toward you by
holding both edges of the paper with your
hands.
e printed paper will drop out automatically if
the next printing is started.
Open the cut sheet cover.
B
See the following for more details.
U “Cutting the Roll Paper” on page 30
Hold the anges on both ends of the spindle
E
and remove the spindle from the spindle holder.
Detach the transparent ange from the spindle.
F
Remove the spindle from the roll paper.
G
32
Page 33

SC-T5100 Series/SC-T3100 Series/SC-T5100N Series/SC-T3100N Series User's Guide
Loading and Setting the Paper
Important:
c
rewinding the roll paper carefully, store
Aer
it in the original package.
Attach the transparent
H
return the spindle in the printer.
Close the roll paper cover and cut sheet cover.
to the spindle and
ange
I
33
Page 34

SC-T5100 Series/SC-T3100 Series/SC-T5100N Series/SC-T3100N Series User's Guide
Loading and Setting the Paper
Loading and Removing Paper in/from the Auto Sheet Feeder
Attaching and Removing the Stacker (for Plain Paper)
Attach the supplied stacker before continuously
printing multiple sheets of plain paper from the auto
sheet feeder. e number of sheets that can be ejected
to the stacker is approximately 20.
However, when printing on roll paper or cut sheet (1
sheet), remove the stacker so that the paper can be
ejected smoothly.
How to attach
Attach the stacker by inserting the hooks of the stacker
straight into the holes in the front of the printer.
How to remove
Remove the stacker by pulling it toward you.
Loading Paper in the Auto Sheet Feeder
Note:
❏ e number of sheets that can be loaded in the
auto sheet feeder diers depending on the paper.
See the following for more details.
U “Cut Sheet” on page 158
U “Supported Commercially Available Paper” on
page 160
❏ You can load the paper while viewing the
procedure on the screen. To view the procedure on
the screen, touch Paper Setting - Auto Sheet
Feeder from the Home screen.
Check that "Load paper." or "Ready" is
A
displayed on the Home screen and then open
the cut sheet cover.
34
Page 35

SC-T5100 Series/SC-T3100 Series/SC-T5100N Series/SC-T3100N Series User's Guide
Loading and Setting the Paper
Tilt the auto sheet feeder toward the back and
B
then pull it out upward.
Load sheets of paper with the print side facing
C
up in the auto sheet feeder.
Align the paper edges and then load the paper.
Important:
c
Insert all paper in portrait orientation.
Inserting paper in landscape orientation may
cause a decline in print quality.
Slide the edge guides against the edges of the
D
paper.
If the edge guides are positioned away from the
paper edges, the paper could be fed skewed,
which may cause a skew error or paper jam.
On the displayed screen, set the paper type and
E
size that match the loaded paper.
Not setting the appropriate paper type will
cause print quality trouble. See the following for
more details on the paper types and sizes.
U “For Auto Sheet Feeder / Cut Sheet(1
sheet)” on page 41
35
Page 36

SC-T5100 Series/SC-T3100 Series/SC-T5100N Series/SC-T3100N Series User's Guide
Loading and Setting the Paper
Removing Paper from the Auto Sheet Feeder
Widen the edge guides and then remove the
A
paper.
Fold down the auto sheet feeder and then tilt it
B
to the front.
36
Close the cut sheet cover.
C
Page 37

SC-T5100 Series/SC-T3100 Series/SC-T5100N Series/SC-T3100N Series User's Guide
Loading and Setting the Paper
Loading and Removing Cut Sheet(1 sheet)
Loading Cut Sheet(1 sheet)
When roll paper is loaded, remove it.
U “Removing Roll Paper” on page 32
When paper is loaded in the auto sheet feeder, remove
it and then fold down the auto sheet feeder. Also, if the
stacker is attached, remove it.
U “Removing Paper from the Auto Sheet Feeder” on
page 36
U “Attaching and Removing the Stacker (for Plain
Paper)” on page 34
Check that "Load paper." is displayed on the
A
Home screen and then touch Paper Setting Cut Sheet(1 sheet).
Open the cut sheet cover.
B
Important:
c
Insert all paper in portrait orientation.
Inserting paper in landscape orientation may
cause a decline in print quality.
Insert the leading edge of the paper straight into
D
the paper slot until you hear a beep.
Important:
c
Hold the paper edges and insert the paper
straight into the paper slot. Inserting it
skewed will cause a skew error or paper jam.
Load a sheet of paper with the print side facing
C
up, and then align its right edge with the mark
line on the right and its
line for the paper size.
edge with the mark
le
On the displayed screen, set the paper type and
E
size that match the loaded paper.
Not setting the appropriate paper type will
cause print quality trouble. See the following for
more details on the paper types and sizes.
U “For Auto Sheet Feeder / Cut Sheet(1
sheet)” on page 41
37
Page 38

SC-T5100 Series/SC-T3100 Series/SC-T5100N Series/SC-T3100N Series User's Guide
Loading and Setting the Paper
Important:
c
When B1 size paper is loaded in SC-T5100
Series/SC-T5100N Series
Raise the B1 width paper support as shown in
the gure only when you have loaded B1
width (718 to 738 mm) paper. If you do not
raise the B1 width paper support, the print
surface may be scued or soiled.
e trailing edge of the paper stops in the state in
which is held in the printer
will drop out automatically if the next printing is
started before it is removed by hand.
printing. e paper
aer
Leave the support lowered when printing to a
size other than equivalent to B1 width.
For SC-T5100 Series and SC-T3100 Series,
F
check that the paper basket attached to the
stand is open.
Removing Cut Sheet (1 Sheet)
When Removing Unprinted Cut Sheet
To uc h Paper Setting - Cut Sheet(1 sheet) - Remove
from the Home screen.
e paper is ejected.
When Removing Printed Cut Paper
Pull out the paper toward you by holding the edges of
the paper with your hands.
38
Page 39

SC-T5100 Series/SC-T3100 Series/SC-T5100N Series/SC-T3100N Series User's Guide
Loading and Setting the Paper
Setting Loaded Paper
For Roll Paper
Congure the following settings aer loading roll
paper.
Paper Type Settings
is the most important setting to obtain the
is
optimum print results. Not setting a paper type that
matches the loaded paper will cause wrinkles, scung,
uneven colors, and other trouble.
Manage Remaining Amount Settings
If you enable the Manage Remaining Amount setting
and then enter the total length of the loaded roll paper,
an estimate of the remaining amount of roll paper will
be displayed on the Home screen of the printer and on
the screen of the printer driver. Furthermore, a
notication can also be displayed when the remaining
amount has become low.
e remaining amount values are saved associated
with the paper types. is enables, for example, the
remaining amount to be managed separately for plain
paper and tracing paper.
Note:
If you want to use remaining amount management
with two roll paper of the same paper type but dierent
widths, register the width of one of them in Custom
Paper Setting. Custom Paper Setting registration adds a
new paper type setting. Perform the registration in
Settings - General Settings - Printer Settings Custom Paper Setting. For details on Custom Paper
Setting, see the following Custom Paper Setting menu.
How to Set
e currently set paper type is shown on the
A
screen displayed
When changing Paper Type
Proceed to step 2.
When setting Paper Remaining without
changing Paper Type
Proceed to step 5.
When not changing either of them
To u ch OK. You can start printing once Ready
appears on the screen.
Note:
e settings are conrmed if no operations are
performed for 90 seconds on the above screen. To
change the settings later, touch the Roll paper
information area - Change Paper Type from the
Home screen and then congure the settings.
To u ch Paper Type.
B
e following paper type selection screen
appears.
loading roll paper.
aer
U “General Settings - Printer Settings” on page 117
Note:
e most recently selected three paper types are
displayed in addition to Others.
39
Page 40

SC-T5100 Series/SC-T3100 Series/SC-T5100N Series/SC-T3100N Series User's Guide
Loading and Setting the Paper
Select the paper type that matches the loaded
C
roll paper.
Epson Special Media
Select the same product name as the one shown
on the package of the paper.
Commercially available non-Epson paper
Select from the following commercially
available paper types.
❏ Plain paper
❏ Coated Paper(Generic)
❏ Photo Paper(Generic)
❏ Tr acing Paper
❏ Tr acing Paper <LowDuty>
❏ Matte Film
To select a paper type that is not displayed on
the screen, touch Others.
To u ch Paper Remaining.
E
To u ch Setup.
F
e setting changes to On, and Remaining
Amount and Remaining Alert are enabled.
Touch each one and enter a value as follows.
❏ Remaining Amount: Total length of roll paper
(see the manual supplied with the roll paper)
❏ Remaining Alert: Remaining amount value
that will be the timing for displaying the
remaining amount warning notication.
Select a category and select the target paper
type.
Note:
If you scroll downward in the category selection
screen, Custom Paper appears. To select custom
paper that has already been registered, touch
Custom Paper.
When a paper type is selected, the screen
D
returns to the one in step 1.
If you will not set the remaining amount
management setting, touch OK.
Note:
On the keypad screen for entering a numeric
value, enter numbers that include a number of the
rst decimal place. For example, if you want to
enter 5 m, touch [5] and [0].
To u ch at the top le of the screen to return
G
to the screen of step 5 and then touch OK.
You c a n st art p r i n t ing once Ready appears on
the screen.
Note:
If you replace the paper aer the remaining amount
indication has become 0 m or the paper has actually
run out, Remaining Amount returns to the default
setting value of 30 m.
40
Page 41

SC-T5100 Series/SC-T3100 Series/SC-T5100N Series/SC-T3100N Series User's Guide
Loading and Setting the Paper
For Auto Sheet Feeder / Cut Sheet(1 sheet)
Congure the following settings aer loading paper in
the Auto Sheet Feeder or loading Cut Sheet(1 sheet).
Paper Type Settings
is is the most important setting to obtain the
optimum print results. Not setting a paper type that
matches the loaded paper will cause wrinkles, scung,
uneven colors, and other trouble.
Paper Size Setting
e paper size of paper loaded in the auto sheet feeder
or loaded Cut Sheet(1 sheet) is not detected
automatically. Set the size of the loaded paper.
How to Set
currently set paper type is shown on the
e
A
screen displayed
loading cut sheet.
aer
Note:
e settings are conrmed if no operations are
performed for 90 seconds on the above screen. To
change the settings later, touch the following in
order from the Home screen and then congure
the settings.
❏ Auto Sheet Feeder
Paper Setting - Auto Sheet Feeder - Change
Paper Type/Paper Size
❏ Cut Sheet(1 sheet)
Paper Setting - Cut Sheet(1 sheet) - Change
Paper Type/Paper Size
To u ch Paper Type.
B
e following paper type selection screen
appears.
When changing Paper Type
Proceed to step 2.
When changing Paper Size without changing
Paper Type
Proceed to step 4.
When not changing either of them
To u ch OK. You can start printing once Ready
appears on the screen.
Note:
e most recently selected three paper types are
displayed in addition to Others.
Select the paper type that matches the loaded
C
paper.
Epson Special Media
Select the same product name as the one shown
on the package of the paper.
Commercially available non-Epson paper
Select from the following commercially
available paper types.
❏ Plain paper
❏ Coated Paper(Generic)
❏ Photo Paper(Generic)
❏ Tr acing Paper
❏ Tr acing Paper <LowDuty>
41
❏ Matte Film
Page 42

SC-T5100 Series/SC-T3100 Series/SC-T5100N Series/SC-T3100N Series User's Guide
Loading and Setting the Paper
Select a category and select the target paper
To select a paper type that is not displayed on
the screen, touch Others.
size.
Note:
Setting non-standard size
Select a category and select the target paper
type. When a paper type is conrmed, the
screen returns to the one in step 1.
Note:
If you scroll downward in the category selection
screen, Custom Paper appears. To select custom
paper that has already been registered, touch
Custom Paper.
To u ch Paper Size.
D
If you will not change the paper size, touch OK.
Auto Sheet Feeder
For a non-standard size, touch
the end of the list and then enter the paper width
and length.
On the keypad screen for entering a numeric
value, enter numbers that include a number of the
decimal place. For example, if you want to
rst
enter 5 m, touch [5] and [0].
When the screen of step 1 is redisplayed, touch
E
OK.
You c a n st art p r i n t ing once Ready appears on
the screen.
User-Dened
at
Cut Sheet(1 sheet)
42
Page 43

SC-T5100 Series/SC-T3100 Series/SC-T5100N Series/SC-T3100N Series User's Guide
Loading and Setting the Paper
Optimizing Paper Settings (Media Adjust)
Perform Media Adjust in the following cases. It allows
you to adjust the settings to perform printing
appropriately with the paper to be used easily in
wizard format.
❏ When there are streaks in print results or ruled
lines are duplicated or text is blurred
❏ When registered with custom paper settings
adjustment results are stored until the next time
e
adjustment is performed. Aer adjustment is
complete, you will be able to perform printing
appropriately by simply selecting that paper type.
Note:
Adjustment for paper registered with custom
paper settings
With roll paper and cut sheet, the paper settings for
optimal printing dier even when the paper type is
exactly the same. When using both roll paper and cut
sheet of the same paper type, register custom paper
separately and also make the adjustments separately.
Custom Paper Setting registration adds a new paper
type setting. Perform the registration in Settings -
General Settings - Printer Settings - Custom Paper
Setting.
For details on Custom Paper Setting, see the following
Custom Paper Setting menu.
U “General Settings - Printer Settings” on page 117
Notes on Making Adjustments
❏ Correctly load the paper that actually requires
adjustment and then select the paper type that
matches the loaded paper.
Adjustment Procedure
e adjustment procedure is performed in wizard
format. When you proceed with operations in
accordance with the instructions displayed on the
screen, a set of adjustment patterns will be printed
twice.
Adjustment is performed by visually checking both the
and second sets of patterns and specifying the
rst
optimal patterns.
e following shows the length and number of sheets
of paper used for adjustment pattern printing.
Roll paper: Approx. 420 mm
Auto sheet feeder: 2 sheets of A4 or A3
Cut sheet: 1 sheet for A2 or larger, 2 sheets for smaller
than A2
Touch the following in order from the Home
A
screen.
❏ Roll paper
Roll paper information area - Media Adjust
❏ Auto Sheet Feeder
Paper Setting - Auto Sheet Feeder - Media
Adjust
❏ Cut Sheet(1 sheet)
Paper Setting - Cut Sheet(1 sheet) - Media
Adjust
To u ch Start.
B
Printing of the rst set of adjustment patterns
starts.
Important:
c
When using A2 size or larger cut sheet, or
using roll paper with the auto cut turned o,
the paper cannot be removed to print the
second set of patterns even though printing of
the rst set of patterns has nished. Do not
pull the printed paper.
❏ If paper with visible curls, wrinkles, waves, folds,
or bends is used, correct adjustment may not be
possible. Remove curled, wavy, or folded sections
by cutting them o.
Note:
A print head nozzle clogging check is performed
automatically before adjustment pattern printing.
If nozzles are determined to be clogged, cleaning
starts and the adjustment patterns will be printed
aer cleaning nishes.
43
Page 44

SC-T5100 Series/SC-T3100 Series/SC-T5100N Series/SC-T3100N Series User's Guide
Loading and Setting the Paper
Enter the numeric value of the pattern with the
C
least streaks among the printed adjustment
patterns of #1 and then touch Adjustment #2.
In the following example, pattern 0 has the least
streaks so you would enter 0.
If there is no dierence between two adjacent
patterns and you are unsure which is the best
one to choose, enter the numeric value that
comes between them. For example, if you are
unsure whether to enter pattern 0 or 2, enter 1.
Enter the numeric value of the pattern with the
D
least streaks among the adjustment patterns of
#2 in the same way as for #1 and then touch
Adjustment #3.
Enter the numeric value of the pattern with the
E
most visible straight line among the adjustment
patterns of #3 and then touch Adjustment #4.
Important:
c
When using A2 size or larger cut sheet, or
using roll paper with the auto cut turned o,
the part with the
on it is pulled inside the printer in order to
print the second set of patterns. Do not touch
the paper with your hands.
Enter the numeric value of the pattern with the
H
least streaks among the printed adjustment
patterns of #1 and then touch Adjustment #2.
In the following example, pattern 0 has the least
streaks so you would enter 0.
Enter the numeric value of the pattern with the
I
least streaks among the adjustment patterns of
#2 in the same way as for #1 and then touch
Adjustment #3.
set of patterns printed
rst
In the following example, pattern 0 has the
most visible straight line so you would enter 0.
If there is no dierence between two adjacent
patterns and you are unsure which is the best
one to choose, enter the numeric value that
comes between them. For example, if you are
unsure whether to enter pattern 0 or 2, enter 1.
Enter the numeric value of the pattern with the
F
most visible straight line among the adjustment
patterns of #4 in the same way as for #3.
To u ch OK.
G
Printing of the second set of adjustment
patterns starts. For cut sheet smaller than A2
size, load the second sheet of paper.
Enter the numeric value of the pattern with the
J
least streaks among the adjustment patterns of
#3 and then touch OK.
In the following example, pattern 0 has the least
streaks so you would enter 0.
If there is no dierence between two adjacent
patterns and you are unsure which is the best
one to choose, enter the numeric value that
comes between them. For example, if you are
unsure whether to enter pattern 0 or 2, enter 1.
44
Page 45

SC-T5100 Series/SC-T3100 Series/SC-T5100N Series/SC-T3100N Series User's Guide
Loading and Setting the Paper
e adjustment results are saved as settings of the
currently selected paper type. e optimal printing
results can be obtained from the next time by simply
selecting that paper type.
45
Page 46

SC-T5100 Series/SC-T3100 Series/SC-T5100N Series/SC-T3100N Series User's Guide
Printing with the Printer Driver from Your Computer
Select the printer in Printer and then click
Printing with the
C
Printer Properties.
Printer Driver from
Your Computer
Basic Operating Procedures (Windows)
Printing Procedure
is section describes the basic procedure to print
various data, including the data of Word, Excel, and
PowerPoint of
Acrobat, using the printer driver from a computer.
Turn on the printer, and load the paper.
Microso Oce
and PDFs of Adobe
A
U “Loading Roll Paper” on page 28
U “Loading Paper in the Auto Sheet Feeder”
on page 34
U “Loading Cut Sheet(1 sheet)” on page 37
When you have created the data in the
B
application, click Print in the File menu.
e printer driver dialog will be displayed.
Note:
When printing a PDF le
In the Print dialog box of Adobe Acrobat, select
the Actual size (or Page Scaling: None) radial
button and Choose paper source by PDF page
size check box. To enlarge or reduce the size,
congure
dialog box.
the setting in the printer driver settings
46
Check Document Size on the Printer Settings
D
tab of the printer driver.
e paper size set in the application is displayed
automatically. However, the paper sizes (page
sizes) of some applications such as PowerPoint
may not be displayed correctly. In such a case,
click Settings... and specify the size in the
displayed Change Paper Size dialog box.
Page 47

SC-T5100 Series/SC-T3100 Series/SC-T5100N Series/SC-T3100N Series User's Guide
Printing with the Printer Driver from Your Computer
If the desired size is not available in the
pull-down menu of the Change Paper Size
dialog box, click Custom Paper Size... and then
set and save a custom size.
U “Printing at Non-Standard Sizes” on
page 64
Set Output Size.
E
To enlarge or reduce the size, select from the
pull-down menu below the Document Size.
For Roll Paper Width (Paper Size when cut
sheet) and Media Type, the settings
in the control panel of the printer are applied
automatically.
Note:
If the paper is loaded or changed aer opening the
printer driver's dialog box, the paper size and
paper type settings
not be applied. In this case, click the Acquire Info
button to apply the settings.
congured
congured
on the printer will
See the following for more details on
enlargement settings.
U “Enlargements and Horizontal and Vertical
Banners” on page 59
Select Source and check the roll paper width
F
(paper size when cut sheet) and paper type.
Select from Roll Paper, Auto Sheet Feeder, and
Sheet. If you select a paper source for which
paper is not loaded in the printer,
appears.
Select Select Target in Print Quality.
G
Choose an option according to the type of
document and how it will be used.
To set the color correction method or color
balance in detail to match your preferences,
clear the Simple Settings check box. See the
following for more details.
47
U “Correct color and print” on page 68
Page 48

SC-T5100 Series/SC-T3100 Series/SC-T5100N Series/SC-T3100N Series User's Guide
Printing with the Printer Driver from Your Computer
Check that the Print Preview check box is
H
selected and then click OK.
If a preview is not necessary, clear the check box
and then click OK.
Note:
In the print preview, you can check and change
the print settings while viewing the image to be
actually printed. We recommend to check with the
preview when printing on roll paper or large-sized
paper.
Click Print in the Print dialog box of the
I
application.
Note:
See the printer driver help for more details on setting
items. You can display the help in the following two
ways:
❏ Click Help at the bottom right of the screen.
❏ Right-click the item you want to check and then
click Help. (is is not possible in the print preview
screen.)
Canceling Printing
are a few ways to stop printing operations
ere
depending on the situation. When the computer has
nished
the print job from the computer. Cancel on the printer.
Canceling from a Computer
When the Progress Bar is displayed
Click Cancel.
sending data to the printer, you cannot cancel
e print preview screen appears.
Check the print settings in the print preview
J
screen, and if there is no problem, click Print to
start printing.
e icons and menus at the top of the preview
screen allow you to change the image display
settings. You can change the print settings using
the menus on the right side. See the help for
more details.
When the Progress Bar is not displayed
Click the printer icon on the taskbar.
A
Whether or not an icon is displayed depends on
the settings selected for Windows.
48
Page 49

SC-T5100 Series/SC-T3100 Series/SC-T5100N Series/SC-T3100N Series User's Guide
Printing with the Printer Driver from Your Computer
Select the print data you want to cancel and
B
click Cancel in the Document menu.
To cancel all print data, click Cancel All
Documents in the Printer menu.
If the job has been sent to the printer, print data
is not displayed on the above screen.
Canceling on the printer
Open View devices and printers or Devices
A
and Printers.
Windows 10/8.1/8/7
Click in the following order: Hardware and
Sound (or Hardware) > View devices and
printers (or Devices and Printers).
Windows Vista
Click in the following order: Hardware and
Sound and then Printer.
Windows XP
Click in the following order: Printers and
Other Hardware, and then Printers and Faxes.
Note:
If your Windows XP Control Panel is in Classic
Vie w, click Start, Control Panel, and then
Printers and Faxes.
Right-click your printer icon, and click
B
Printing preferences.
e Cancel button is displayed on the control panel
screen during printing. Touch the Cancel button.
print job is canceled even in the middle of printing. It
may take a while before the printer returns to the
ready status.
However, print jobs in the print queue on a computer
cannot be deleted in this way. Use the procedure of
"Canceling from a Computer" to delete print jobs in
the print queue.
e
Customizing the Printer Driver
You can save the settings or change the display items
as you prefer.
Saving Frequently Used Settings
If you start the printer driver from the Control Panel,
change the settings to those you use frequently, and
then save the settings, the printer driver's dialog box
will be displayed with the saved settings from any
application that it is displayed.
C
printer driver setting screen is displayed.
e
49
Page 50

SC-T5100 Series/SC-T3100 Series/SC-T5100N Series/SC-T3100N Series User's Guide
Printing with the Printer Driver from Your Computer
Make the necessary settings. ese settings
become the default settings of the printer driver.
Saving various settings as your Select Settings
You can save all printer driver settings as a Select
Setting. is allows you to easily load settings that
have been stored in Select Settings, and repeatedly
print using exactly the same settings.
Set each item on the Printer Settings, Layout,
A
and Advanced tabs to the settings you want to
save as Select Settings.
Click Custom Settings.
B
Note:
How to share Select Setting with multiple
computers
Select the settings you want to share, click
Export..., and then export the settings to a
Display the same screen of the printer driver on
another computer, click Import..., and then
import the settings.
le.
Rearranging display items
e display items of Select Setting, Media Type, and
Paper Size can be arranged as follows to display the
ones you use normally right away.
❏ Hide unnecessary items.
❏ Rearrange in an order of most frequent use.
❏ Arrange in groups (folders).
Click Utility tab - Menu Arrangement.
A
Enter the desired name in Name, and then click
C
Save.
You can save up to 100. e saved select settings
can be recalled from Select Setting.
50
Page 51

SC-T5100 Series/SC-T3100 Series/SC-T5100N Series/SC-T3100N Series User's Guide
Printing with the Printer Driver from Your Computer
Select Edit Item.
B
Change the display order and groups in List.
C
❏ You can move and order items by dragging
and dropping.
❏ To add a new group (folder), click Add
Group....
Click Save.
D
❏ To delete a group (folder), click Delete
Group.
❏ Drag and drop unnecessary items to Not
Display.
Note:
When Delete Group is performed, the group
(folder) is deleted, but the settings in the deleted
group (folder) remain. Delete them individually
from List in the save location.
51
Page 52

SC-T5100 Series/SC-T3100 Series/SC-T5100N Series/SC-T3100N Series User's Guide
Printing with the Printer Driver from Your Computer
Basic Operating Procedures (Mac)
Printing Procedure
section describes the basic procedure to print
is
using the printer driver from a computer.
Basic Printing Procedure
Turn on the printer, and load the paper.
A
U “Loading Roll Paper” on page 28
U “Loading Paper in the Auto Sheet Feeder”
on page 34
U “Loading Cut Sheet(1 sheet)” on page 37
When you have created the data in the
B
application, click Print in the File menu.
Note:
If page settings are not displayed in the print
dialog, click the "page settings" option (e.g., Page
Setup) in the File menu.
Check that this printer is selected, and then set
D
the paper size.
Click Show Details (or ) at the bottom of
C
the screen.
ere are three options for each paper size. For
example, if you click the A2 size, the following
three options appear.
❏ A2
❏ A2 (Retain Scale)
❏ A2 (Roll Paper - Banner)
Normally, select the option without parenthesis
(A2 in the example above). Select the other two
options at the following times.
Retain Scale
PDF and image data may be printed reduced
slightly even when the output size is set to Same
as Paper Size in the following procedure. is
occurs to make sure there are the margins
required by the printer (3 mm on each the
and right). Select this when you want to print at
the actual size without reducing the size.
Roll Paper - Banner
Select this when printing a banner to roll paper
from an application designed for banner
printing.
le
52
Page 53

SC-T5100 Series/SC-T3100 Series/SC-T5100N Series/SC-T3100N Series User's Guide
Printing with the Printer Driver from Your Computer
Select Printer Settings from the list and set
E
Output Size.
If Printer Settings is not displayed in the list,
the dedicated printer driver for this printer has
not been added. See the following and then add
the printer driver.
U “How to Select the Dedicated Printer
Driver for is Printer” on page 54
To enlarge or reduce the size, select from the
pull-down menu below the Paper Size.
For Roll Paper Width (Paper Size when cut
sheet) and Media Type, the settings
in the control panel of the printer are applied
automatically.
congured
See the following for more details on
enlargement settings.
U “Enlargements and Horizontal and Vertical
Banners” on page 59
Select Paper Source and check the roll paper
F
width (paper size when cut sheet) and paper
type.
Select from Roll Paper, Auto Sheet Feeder, and
Sheet. If you select a paper source for which
paper is not loaded in the printer,
Note:
If the paper is loaded or changed aer opening the
printer driver's dialog box, the paper size and
paper type settings congured on the printer will
not be applied. In this case, click the Acquire Info
button to apply the settings.
appears.
53
Page 54

SC-T5100 Series/SC-T3100 Series/SC-T5100N Series/SC-T3100N Series User's Guide
Printing with the Printer Driver from Your Computer
Select Select Target in Print Quality.
G
Choose an option according to the type of
document and how it will be used.
Check the print settings in the print preview
I
screen, and if there is no problem, click Print to
start printing.
e icons and menus at the top of the preview
screen allow you to change the image display
settings. You can change the print settings using
the menus on the right side. See the help for
more details.
To set the color correction method or color
balance in detail to match your preferences,
clear the Simple Settings check box. See the
following for more details.
U “Correct color and print” on page 68
Check that the Print Preview check box is
H
selected and then click Print.
If a preview is not necessary, clear the check box
and then click Print.
Note:
In the print preview, you can check and change
the print settings while viewing the image to be
actually printed. We recommend to check with the
preview when printing on roll paper or large-sized
paper.
Note:
See the printer driver help for more details on setting
items. Click
to display Help.
in the printer driver settings dialog box
How to Select the Dedicated Printer Driver for This Printer
You can print using AirPrint from a Mac computer.
However, printing by automatically tting the
document to the width of the roll paper and selecting a
print quality suitable for the print target are not
possible. If the menus described in the previous
section "Basic Printing Procedure" are not displayed,
select the dedicated printer driver for the printer in
Printer. e dedicated printer driver for this printer is
displayed as follows.
❏ When USB connection: EPSON SC-TXXXX
❏ When network connection: EPSON TXXXX or
EPSON TXXXX-YYYYYY
*: "XXXX" is the product model number. "YYYYYY" is the last
six digits of the MAC address.
If the dedicated printer driver for this printer is not
displayed in the list, add it with the following
procedure.
54
Page 55

SC-T5100 Series/SC-T3100 Series/SC-T5100N Series/SC-T3100N Series User's Guide
Printing with the Printer Driver from Your Computer
Select System Preferences - Printers &
A
Scanners (Print & Scan or Print & Fax) from
the Apple menu.
Click [+] and select Add Printer or Scanner.
B
When the list of devices appears, select the
C
dedicated printer driver for this printer and
click Add.
Canceling Printing
are a few ways to stop printing operations
ere
depending on the situation. When the computer has
nished sending data to the printer, you cannot cancel
the print job from the computer. Cancel on the printer.
Canceling from a Computer
Click the icon of this printer in the Dock.
A
However, print jobs in the print queue on a computer
cannot be deleted in this way. Use the procedure of
"Canceling from a Computer" to delete print jobs in
the print queue.
Customizing the Printer Driver
You can assign a name to frequently used setting
information (paper size and each item of the basic
settings) and then save the information to Presets.
is allows you to easily load settings and repeatedly
print using exactly the same settings.
Saving Frequently Used Settings as Preset
Set each item on the Paper Size and Printer
A
Settings tabs to the settings you want to save as
Presets.
Click Save Current Settings as Preset in
B
Presets.
Select the job you want to cancel, and then click
B
Delete.
If the job has been sent to the printer, print data
is not displayed on the above screen.
Canceling on the printer
e Cancel button is displayed on the control panel
screen during printing. Touch the Cancel button. e
print job is canceled even in the middle of printing. It
may take a while before the printer returns to the
ready status.
Enter a name, and then click OK.
C
Note:
When All printers is selected from Preset
Available For, you can select the saved Presets
from all printer drivers installed on your
computer.
55
Page 56

SC-T5100 Series/SC-T3100 Series/SC-T5100N Series/SC-T3100N Series User's Guide
Printing with the Printer Driver from Your Computer
e settings are saved to Presets. You can then
select the settings you saved from Presets.
Deleting from Presets
Click Show Presets... in Presets of the Print
A
dialog box.
Select the setting you want to delete, click
B
Delete, and then click OK.
56
Page 57

SC-T5100 Series/SC-T3100 Series/SC-T5100N Series/SC-T3100N Series User's Guide
Printing with the Printer Driver from Your Computer
Printing CAD Drawings
ere are the following two methods to print CAD
drawings.
Printing with the printer driver
is method is best suited for printing CAD drawings
such as the appearance views of buildings at high
quality.
using the printer driver from AutoCAD 2018.
section describes the procedure to print
is
Open the data to be printed and then click Plot.
A
Select the printer in Printer/plotter and then
B
click Properties.
Important:
c
If lines or parts in your drawing are not printed
properly, print using the HP-GL/2 or HP RTL
mode.
Printing using the HP-GL/2 or HP RTL mode
is method is best suited for printing CAD and GIS
drawings such as maps and blueprints.
You can print from an application that supports
HP-GL/2 (compatible with HP Designjet 750C) and
HP RTL. See the following for more details.
Click Custom Properties.
C
U “Printing Using the HP-GL/2 or HP RTL Mode
from a Computer” on page 91
e printer driver's dialog box for this printer
appears.
57
Page 58

SC-T5100 Series/SC-T3100 Series/SC-T5100N Series/SC-T3100N Series User's Guide
Printing with the Printer Driver from Your Computer
Set Output Size and Source in the printer driver.
D
U “Basic Operating Procedures (Windows)”
on page 46
U “Basic Operating Procedures (Mac)” on
page 52
Select CAD/Line Drawing - Black, CAD/Line
E
Drawing - Color, or CAD/Line Drawing Bi-Level from the Select Target list.
Windows
Check other settings, and then start printing.
F
Note:
If the output size is portrait and the height is
smaller than the width of the roll paper, the print
image is printed rotated 90° to save paper.
function is enabled if the Auto Rotate check box is
selected in Roll Paper Option on the Advanced
tab.
is
Mac
58
Page 59

SC-T5100 Series/SC-T3100 Series/SC-T5100N Series/SC-T3100N Series User's Guide
Printing with the Printer Driver from Your Computer
Enlargements and Horizontal and Vertical Banners
e printer driver can enlarge or reduce documents
for
dierent
methods.
Before printing at non-standard sizes, including
vertical or horizontal banners and documents with
equal sides, enter the desired paper size in the printer
driver.
U “Printing at Non-Standard Sizes” on page 64
❏ Fit to Roll Paper Width
Automatically enlarges or reduces the image size
to t the roll paper width.
paper sizes.
are three setting
ere
❏ Specify Size
You can specify the enlargement or reduction
ratio. Use this method for a non-standard paper
size.
Note:
❏ When printing from applications designed
expressly for horizontal or vertical banners, adjust
printer driver settings as described in the
application documentation.
❏ When using a Windows application designed for
banners, select Print Banner on the Layout tab if
necessary.
❏ Fit to Output Size
Automatically enlarges or reduces the image size
to t the paper size.
59
Page 60

SC-T5100 Series/SC-T3100 Series/SC-T5100N Series/SC-T3100N Series User's Guide
Printing with the Printer Driver from Your Computer
Fitting Documents to the Width of the Roll Paper
Check the document size (or paper size) setting
A
on the Printer Settings tab of the printer driver.
Windows
Display the Printer Settings tab of the printer
driver from the application and check that the
document size is the same as the setting of the
application.
If the size is dierent, select the correct size
from the pull-down menu.
U “Basic Operating Procedures (Mac)” on
page 52
Note:
In the case of an application without a page setup
menu item, you can set the paper size if you open
the Print dialog box from the Print menu item.
Click Fit to Roll Paper Width on the Printer
B
Settings tab of the printer driver and select
either Fit Short Side to Roll Paper Width or
Fit Long Side to Roll Paper Width.
Windows
If it
correct size in the Change Paper Size dialog
box.
U “Basic Operating Procedures (Windows)”
on page 46
Mac
Open the page setup screen of the application
and check that this printer is selected in Printer
and check the paper size.
Select a paper size that does not have (Retain
Scale) or (Roll Paper - Banner).
click Settings... and specify the
diers,
Mac
60
Page 61

SC-T5100 Series/SC-T3100 Series/SC-T5100N Series/SC-T3100N Series User's Guide
Printing with the Printer Driver from Your Computer
Fit Short Side to Roll Paper Width
Select this when you want to print with the
print image enlarged to the maximum size for
the loaded roll paper.
Fit Long Side to Roll Paper Width
Select this when you want to print with the
print image enlarged as much as possible to the
extent that paper will not be wasted.
Fitting Documents to the Output Size
Check the document size (or paper size) setting
A
on the Printer Settings tab of the printer driver.
Windows
Display the Printer Settings tab of the printer
driver from the application and check that the
document size is the same as the setting of the
application.
Check other settings, and then start printing.
C
If it
correct size in the Change Paper Size dialog
box.
U “Basic Operating Procedures (Windows)”
on page 46
Mac
Open the page setup screen of the application
and check that this printer is selected in Printer
and check the paper size.
Select a paper size that does not have (Retain
Scale) or (Roll Paper - Banner).
click Settings... and specify the
diers,
61
Page 62

SC-T5100 Series/SC-T3100 Series/SC-T5100N Series/SC-T3100N Series User's Guide
Printing with the Printer Driver from Your Computer
If the size is dierent, select the correct size
from the pull-down menu.
U “Basic Operating Procedures (Mac)” on
page 52
Select Fit to Output Size on the Printer Settings
B
tab of the printer driver.
Windows
Select the desired size from the Output Size
C
pull-down menu.
Windows
Mac
Mac
Check other settings, and then start printing.
D
62
Page 63

SC-T5100 Series/SC-T3100 Series/SC-T5100N Series/SC-T3100N Series User's Guide
Printing with the Printer Driver from Your Computer
Choosing a Print Size
Check the document size (or paper size) setting
A
on the Printer Settings tab of the printer driver.
Windows
Display the Printer Settings tab of the printer
driver from the application and check that the
document size is the same as the setting of the
application.
U “Basic Operating Procedures (Mac)” on
page 52
Note:
In the case of an application without a page setup
menu item, you can set the paper size if you open
the Print dialog box from the Print menu item.
Display the Output Size input screen from the
B
Printer Settings tab of the printer driver.
Windows
Select Others... and then select Specify Size in
the displayed Output Size dialog box.
If it
correct size in the Change Paper Size dialog
box.
U “Basic Operating Procedures (Windows)”
on page 46
Mac
Open the page setup screen of the application
and check that this printer is selected in Printer
and check the paper size.
Select a paper size that does not have (Retain
Scale) or (Roll Paper - Banner).
click Settings... and specify the
diers,
Mac
Select Specify Size.
If the size is dierent, select the correct size
from the pull-down menu.
63
Page 64

SC-T5100 Series/SC-T3100 Series/SC-T5100N Series/SC-T3100N Series User's Guide
Printing with the Printer Driver from Your Computer
Select the size
C
Width, Length, and Scale to and then enter the
setting value.
e print image is enlarged or reduced so that it
becomes the specied width, length, or scale
while maintaining the aspect ratio of the print
data.
Windows
Mac
specication
method from
Printing at Non-Standard Sizes
Before printing at non-standard sizes, including
vertical or horizontal banners and documents with
equal sides, save the desired paper size in the printer
driver. Once they have been saved in the printer
driver, custom sizes can be selected in the application
Page Setup and other print dialogs.
e following sizes can be used.
Paper
Width
SC-T5100 Series /
SC-T5100N Series
89 to 914 mm
Check other settings, and then start printing.
D
SC-T3100 Series /
SC-T3100N Series
Paper
*
Length
*: The paper length can be longer when using an application
that supports banner printing. However, the actual print
size depends on the application, the paper size loaded in
the printer, and the computer environment.
Important:
c
❏
e
mm wide × 127 mm long. When a smaller size
than this is set in Custom Paper Size... of the
printer driver, trim the unnecessary margins.
❏ For Custom Paper Sizes of a Mac, although
you can specify a large paper size which
cannot be loaded in this printer, it will not be
printed properly.
❏ e available output size is limited depending
on the application.
127 to 18000 mm
smallest size supported by the printer is 89
89 to 610 mm
64
Page 65

SC-T5100 Series/SC-T3100 Series/SC-T5100N Series/SC-T3100N Series User's Guide
Printing with the Printer Driver from Your Computer
Making Settings in Windows
Display the Printer Settings tab of the printer
A
driver from the application and then click
Custom Paper Size....
e User-Dened Paper Size dialog box
appears.
Set the paper size to use in the User-Dened
B
Paper Size dialog box and then click Save.
Note:
❏ To change the paper size you saved, select the
paper size name from the list on the le.
❏ To delete a saved paper size, select the paper
size name from the list on the le of the
screen and then click Delete.
❏ You can save up to 100 paper sizes.
Click OK to close the
C
dialog box. Also close the printer driver's dialog
box.
Registration of the user-dened size is now
complete.
Select the registered paper size in, for example,
D
the page size settings of the application and
then create the data.
Note:
If the registered paper size is not displayed in the
application, check whether it exceeds the sizes
supported by the application.
User-Dened
Paper Size
❏ e Paper Size Name is displayed as an
document size or output size option. Set a
meaningful name such as "400x500mm" or
"Horizontal Banner".
❏ To v i ew the Paper Width and Paper Height
values for a standard size close to the desired
custom size, select the appropriate option in
Base Paper Size.
❏ If you select an aspect ratio in Fix Aspect
Ratio and select Landscape or Portrait for
Base, you can set the size by just entering a
value in either Paper Width or Paper Height.
When you have
E
display the Printer Settings tab of the printer
driver from the Print dialog box.
e registered paper size is displayed in Paper
Size on the Printer Settings tab.
U “Basic Operating Procedures (Windows)”
on page 46
Check other settings, and then start printing.
nished
creating the data,
F
65
Page 66

SC-T5100 Series/SC-T3100 Series/SC-T5100N Series/SC-T3100N Series User's Guide
Printing with the Printer Driver from Your Computer
Settings in Mac
Open the page setup screen of the application
A
and check that this printer is selected in Printer
and then select Manage Custom Sizes from
Paper Size.
U “Basic Operating Procedures (Mac)” on
page 52
Enter values in Width and Height of the Paper
C
Size, enter the margins, and then click OK.
e ranges of page sizes and margin sizes that
can be specied dier depending on your
printer model and the settings on the printer.
U “Printable area” on page 163
Note:
❏ To edit a saved custom size, choose its name
from the list on the le.
Note:
In the case of an application without a page setup
menu item, the paper size settings can be
displayed by opening the Print dialog box from the
Print menu item.
Click + and then enter the paper size name.
B
❏ To duplicate a saved paper size, select its
name from the list on the le of the screen
and click Duplicate.
❏ To delete a saved paper size, select its name
from the list on the le of the screen and click
-.
❏ e custom paper size setting diers
depending on the operating system version.
See your operating system's documentation
for details.
Click OK to close the Custom Paper Sizes
D
dialog box. Also close the printer driver's dialog
box by clicking Cancel.
Registration of the custom paper size is now
complete.
Select the registered paper size in, for example,
E
the page size settings of the application and
then create the data.
66
Note:
If the registered paper size is not displayed in the
application, check whether it exceeds the sizes
supported by the application.
Page 67

SC-T5100 Series/SC-T3100 Series/SC-T5100N Series/SC-T3100N Series User's Guide
Printing with the Printer Driver from Your Computer
When you have
F
display the Printer Settings tab of the printer
driver from the Print dialog box.
e registered paper size is displayed in
Document Size on the Printer Settings tab.
U “Basic Operating Procedures (Mac)” on
page 52
Check other settings, and then start printing.
nished
creating the data,
G
67
Page 68

SC-T5100 Series/SC-T3100 Series/SC-T5100N Series/SC-T3100N Series User's Guide
Printing with the Printer Driver from Your Computer
Correct color and print
e optimal method is selected from the following
color correction methods for each print target in the
print quality settings of the printer driver.
❏ EPSON Standard (sRGB)
Optimizes the sRGB space and corrects the color.
❏ Business Graphics
Performs color correction to sharpen your images
based on the sRGB space.
❏ Line Drawing
Optimizes color correction for line drawing by
processing the border between lines and the
background as discontinuous.
❏ GIS
Performs the optimal printing for topographic
maps and other data of the geographic
information system (GIS).
❏ ICM
Performs color management to match the colors
in the image data to those in the printed output
(Windows only).
U “Color Management Printing” on page 72
❏
(No Color Adjustment)
O
Color correction is not performed by the printer
driver. Choose if color management is performed
by the application.
U “Color Management Printing” on page 72
If you clear the Simple Settings check box, you can
check which of the above color correction methods is
used. Standard of Select Target is the most suitable
setting for the currently selected paper type.
Clicking the Settings... button allows you to, for
example,
Contrast, Saturation, and color balance.
Use this option when the application in use does not
have a color correction function.
Note:
e color correction options available vary with the
operating system and the type of paper used.
If you want to select the color correction method
yourself, select Custom at the very bottom of the print
target list.
adjust the Gamma, Brightness,
nely
Making Settings in Windows
When using applications featuring a color
A
management function, specify how to adjust
colors from these applications.
When using applications without a color
management function, start from Step 2.
Depending on the type of the application, make
the settings following the table below.
Adobe Photoshop CS3 or later
Adobe Photoshop Elements 6 or later
Adobe Photoshop Lightroom 1 or later
68
Page 69

SC-T5100 Series/SC-T3100 Series/SC-T5100N Series/SC-T3100N Series User's Guide
Printing with the Printer Driver from Your Computer
OS Color Management
Settings
Windows 10,
Windows 8.1,
Windows 8,
Windows 7,
Windows Vista
Windows XP
(Service Pack 2 or
later and .NET 3.0
or later)
Windows XP
(other than the
above)
In other applications, set No Color
Management.
Note:
For information on supported platforms, see the
website for the application in question.
Printer Manages Colors
No Color Management
Display the Printer Settings tab of the printer
B
driver and then clear the Simple Settings check
box in the Print Quality area.
U “Basic Operating Procedures (Windows)”
on page 46
Select the print target. If you want to select the
C
color correction method yourself, select
Custom at the very bottom of the list.
When Custom is selected for the print target,
D
select the color and color correction method
settings.
Setting example of Adobe Photoshop CC
Open the Print dialog box.
Select Color Management, select Printer
Manages Colors in Color Handling, and click
Print.
69
Page 70

SC-T5100 Series/SC-T3100 Series/SC-T5100N Series/SC-T3100N Series User's Guide
Printing with the Printer Driver from Your Computer
If necessary, click Settings... and then adjust
E
items such as the Gamma, Brightness, Contrast,
Saturation, and color balance.
See the printer driver help for more details on
each item.
Note:
You can adjust the correction value by checking
the sample image on the le side of the screen.
Furthermore, you can select Color Circle or Slide
Bar of Color Adjustment Method and nely
adjust the color balance.
Setting example of Adobe Photoshop CC
Open the Print dialog box.
Select Color Management, select Printer
Manages Colors in Color Handling, and click
Print.
Display the Print screen.
B
U “Basic Operating Procedures (Mac)” on
page 52
Select Color Matching from the list, and then
C
click EPSON Color Controls.
Check other settings, and then start printing.
F
Settings in Mac
When using applications featuring a color
A
management function, specify how to adjust
colors from these applications.
When using applications without a color
management function, start from Step 2.
When using the following applications, set the
color management setting to Printer Manages
Colors.
Adobe Photoshop CS3 or later
Adobe Photoshop Elements 6 or later
Adobe Photoshop Lightroom 1 or later
In other applications, set No Color
Management.
Note:
For information on supported platforms, see the
website for the application in question.
Note:
EPSON Color Controls will not be available in
the following applications if Step 1 is omitted.
❏ Adobe Photoshop CS3 or later
❏ Adobe Photoshop Lightroom 1 or later
❏ Adobe Photoshop Elements 6 or later
70
Page 71

SC-T5100 Series/SC-T3100 Series/SC-T5100N Series/SC-T3100N Series User's Guide
Printing with the Printer Driver from Your Computer
Select Printer Settings from the list and then
D
clear the Simple Settings check box in the
Print Quality area.
If necessary, click Settings... and then adjust
G
items such as the Gamma, Brightness, Contrast,
Saturation, and color balance.
See the printer driver help for more details on
each item.
Select the print target. If you want to select the
E
color correction method yourself, select
Custom at the very bottom of the list.
When Custom is selected for the print target,
F
select the color and color correction method
settings.
Check other settings, and then start printing.
H
71
Page 72

SC-T5100 Series/SC-T3100 Series/SC-T5100N Series/SC-T3100N Series User's Guide
Printing with the Printer Driver from Your Computer
Color Management Printing
About Color Management
Even when using the same image data, the original
image and the displayed image may look
the printed results may look dierent to the image you
see on the display.
characteristics when input devices such as scanners
and digital cameras capture colors as electronic data,
and when output devices such as display screens and
printers reproduce colors from the color data. e
color management system is a means to adjust
dierences in color conversion characteristics among
input and output devices. A color management system
is included with operating systems such as Windows
and Mac OS, in addition to image processing
applications. Windows and Mac OS X include the
ICM and ColorSync color management systems,
respectively.
occurs due to the
is
dierent,
dierence
and
in
Color Management Print Settings
You can perform color management printing using
this printer's printer driver in the following two ways.
Choose the best method according to the application
you are using, the operating system environment, the
aim of the print out, and so on.
Setting color management with the applications
method is for printing from applications that
is
support color management. All color management
processes are carried out by the application's color
management system.
want to obtain the same color management print
results using a common application among dierent
operating system environments.
U “Setting color management with the applications”
on page 73
Setting color management with the printer driver
method is useful when you
is
In a color management system, a color denition le
called a "Prole" is used to perform color matching
between devices. (is le is also called an ICC
prole.) e prole of an input device is called an
input prole (or source prole), and the prole of an
output device, such as a printer, is called a printer
prole (or output prole). A prole is prepared for
each media type in this printer's driver.
e color conversion areas by the input device and the
color reproduction area by the output device
a result, there are color areas that do not match even
when performing color matching using a prole. In
addition to specifying
system also species conversion conditions for areas
where color matching failed as "intent". e name and
type of intent vary depending on the color
management system you are using.
You cannot match the colors on the printed results and
display by color management between the input device
and the printer. To match both colors, you need to
perform color management between the input device
and the display as well.
proles,
the color management
dier.
As
e printer driver uses the operating system's color
management system and carries out all color
management processes. You can
management settings in the printer driver using the
following two methods.
❏ Host ICM (Windows) / ColorSync (Mac OS X)
Set when printing from applications that support
color management. is is eective in producing
similar print results from dierent applications
under the same operating systems.
U “Color Management Printing by Host ICM
(Windows)” on page 75
U “Color Management Printing by ColorSync
(Mac)” on page 76
❏ Driver ICM (Windows only)
allows you to perform color management
is
printing from applications that do not support
color management.
U “Color Management Printing by Driver
ICM(Windows Only)” on page 77
congure
the color
72
Page 73

SC-T5100 Series/SC-T3100 Series/SC-T5100N Series/SC-T3100N Series User's Guide
Printing with the Printer Driver from Your Computer
Setting proles
Settings for the input prole, printer prole, and intent
(matching method) vary between three types of color
management printing since their color management
engines are used dierently. is is because color
management usage
settings in the printer driver or application as
described in the following table.
Input
prole
settings
Driver ICM
(Windows)
Host ICM
(Windows)
ColorSync
(Mac OS X)
Application Application Application Application
Printer
Driver
Application Printer
Application Printer
between the engines. Make
diers
Printer
prole
settings
Printer
Driver
Driver
Driver
Intent
settings
Printer
Driver
Printer
Driver
Application
Setting color management with the applications
Print using applications with a color management
function. Make the color management settings in the
application and disable the printer driver's color
adjustment function.
Make color management settings in the
A
applications.
Setting example of Adobe Photoshop CC
Open the Print dialog box.
Select Color Management, select Photoshop
Manages Colors in Color Handling, select
Printer Prole and Rendering Intent, and click
Print.
Printer
when performing color management are installed with
the printer's printer driver. You can select the prole
from the printer driver's settings screen.
You can select the prole from the printer driver's
settings screen.
U “Color Management Printing by Driver
ICM(Windows Only)” on page 77
U “Color Management Printing by Host ICM
(Windows)” on page 75
U “Color Management Printing by ColorSync
(Mac)” on page 76
U “Setting color management with the applications”
on page 73
proles
for each paper type that is needed
Display the printer driver's settings screen
B
(Windows) or Print screen (Mac).
Make printer driver settings.
For Windows
U “Basic Operating Procedures (Windows)”
on page 46
For Mac
U “Basic Operating Procedures (Mac)” on
page 52
73
Page 74

SC-T5100 Series/SC-T3100 Series/SC-T5100N Series/SC-T3100N Series User's Guide
Printing with the Printer Driver from Your Computer
Set color management to
C
For Windows
Clear the Simple Settings check box in the
Print Quality area of the Printer Settings tab
and select O (No Color Adjustment) from the
print target list.
o.
For Mac
Select Printer Settings from the list and clear
the Simple Settings check box in the Print
Quality area, and select O (No Color
Adjustment) from the print target list.
Note:
In Windows 7, Windows Vista, and Windows XP
(Service Pack 2 or later and .NET 3.0), O (No
Color Adjustment) is selected automatically.
Check other settings, and then start printing.
D
74
Page 75

SC-T5100 Series/SC-T3100 Series/SC-T5100N Series/SC-T3100N Series User's Guide
Printing with the Printer Driver from Your Computer
Setting color management with the printer driver
Color Management Printing by Host ICM (Windows)
Use image data in which an input prole has been
embedded. Also, the application must support ICM.
Make the settings for color adjustment using
A
the application.
Depending on the type of the application, make
the settings following the table below.
Adobe Photoshop CS3 or later
Adobe Photoshop Elements 6.0 or later
Adobe Photoshop Lightroom 1 or later
OS Color Management
Settings
Windows 8.1,
Windows 8,
Windows 7,
Windows Vista
Windows XP
(Service Pack 2 or
later and .NET 3.0
or later)
Windows XP
(other than the
above)
Printer Manages Colors
No Color Management
Setting example of Adobe Photoshop CC
Open the Print dialog box.
Select Color Management, select Printer
Manages Colors in Color Handling, and click
Print.
When using an application without a color
management function, start from step 2.
Clear the Simple Settings check box in the
B
Print Quality area on the Printer Settings tab of
the printer driver and then select ICM from the
Select Target list.
U “Basic Operating Procedures (Windows)”
on page 46
In other applications, set No Color
Management.
Note:
For information on supported platforms, see the
website for the application in question.
75
Page 76

SC-T5100 Series/SC-T3100 Series/SC-T5100N Series/SC-T3100N Series User's Guide
Printing with the Printer Driver from Your Computer
Click Settings....
C
Select Host ICM in ICM Mode.
D
See the printer driver help for more details.
e printer prole corresponding to the Media
*
selected on the Printer Settings tab is set
Type
automatically and is displayed in the Printer
Prole Description area.
Color Management Printing by ColorSync (Mac)
Use image data in which an input
embedded. Also, the application must support
ColorSync.
Note:
Depending on the application, color management
printing by ColorSync may not be supported.
Disable the color management functions in the
A
application.
Display the Print screen.
prole
has been
B
U “Basic Operating Procedures (Mac)” on
page 52
Select Color Matching from the list, and then
C
click ColorSync.
To change the prole, select the Show all
proles check box.
*: If Source is selected on the Printer Settings
tab, the paper type set on the printer is set
automatically. Media Type becomes Use Printer
Settings, and the paper type name is displayed
on the right side.
printer
e
currently selected paper type
automatically and displayed at the bottom of
the prole area. To change the prole, select the
desired prole from the Prole pull-down
menu.
*: It is set in the screen displayed by selecting
Printer Settings from the list. If Source is
selected, the paper type set on the printer is set
automatically, and Use Printer Settings is
displayed. e paper type name is displayed on
the right side of it.
corresponding to the
prole
*
is specied
Check other settings, and then start printing.
E
Check other settings, and then start printing.
D
76
Page 77

SC-T5100 Series/SC-T3100 Series/SC-T5100N Series/SC-T3100N Series User's Guide
Printing with the Printer Driver from Your Computer
Color Management Printing by Driver ICM (Windows Only)
e printer driver uses its own printer proles to
perform color management. You can use the following
two color correction methods.
❏ Driver ICM (Basic)
Specify one type of prole and intent for
processing the entire image data.
❏ Driver ICM (Advanced)
e printer driver distinguishes the image data
into the Image, Graphics, and Te x t areas. Specify
a
dierent prole
areas.
When using applications featuring a color
management function
Make the settings for color processing using the
application before making printer driver settings.
Depending on the type of the application, make the
settings following the table below.
and intent for each of the three
Open the Print dialog box.
Select Color Management, select Printer Manages
Colors in Color Handling, and click Print.
Clear the Simple Settings check box in the
A
Print Quality area on the Printer Settings tab of
the printer driver and then select ICM from the
Select Target list.
Adobe Photoshop CS3 or later
Adobe Photoshop Elements 6.0 or later
Adobe Photoshop Lightroom 1 or later
OS Color Management
Settings
Windows 8.1,
Windows 8,
Windows 7,
Windows Vista
Windows XP (Service Pack
2 or later and .NET 3.0 or
later)
Windows XP (other than
the above)
In other applications, set No Color Management.
Note:
For information on supported platforms, see the website
for the application in question.
Printer Manages Colors
No Color Management
U “Basic Operating Procedures (Windows)”
on page 46
Setting example of Adobe Photoshop CC
77
Page 78

SC-T5100 Series/SC-T3100 Series/SC-T5100N Series/SC-T3100N Series User's Guide
Printing with the Printer Driver from Your Computer
Click Settings....
B
Select Driver ICM (Basic) or Driver ICM
C
(Advanced) in ICM Mode of the ICM dialog
box.
Intent Explanation
Relative
Colorimetric
Absolute
Colorimetric
Converts the data so that a set
of color gamut and white point
(or color temperature)
coordinates in the original data
match their corresponding print
coordinates. This feature is used
for many types of color
matching.
Assigns absolute color gamut
coordinates to the original and
print data and converts the
data. Therefore, color tone
adjustment is not performed on
any white point (or color
temperature) for the original or
print data. This feature is used
for special purposes such as
logo color printing.
Check other settings, and then start printing.
D
If you select Driver ICM (Advanced), you can
specify the prole and intent for each of image
data such as photos, graphics data, and text
data.
Intent Explanation
Saturation Keeps the current saturation
unchanged and converts the
data.
Perceptual Converts the data so that a
more visually natural image is
produced. This feature is used
when a wider gamut of color is
used for image data.
78
Page 79

SC-T5100 Series/SC-T3100 Series/SC-T5100N Series/SC-T3100N Series User's Guide
Printing with the Printer Driver from Your Computer
Multi-Page Printing
(N-up)
Two or four consecutive pages can be printed on a
single sheet.
Making Settings in Windows
Note:
In Windows, you can use the Reduce/Enlarge function
(Fit to Page) to print the data on dierent sizes of paper.
U “Printing at Non-Standard Sizes” on page 64
Set Number of pages per sheet and Page
B
Order in the Print Layout dialog box.
If the Print page frames check box is selected,
page frames are printed on each page.
Check other settings, and then start printing.
C
Settings in Mac
Display the Layout tab of the printer driver and
A
select the Page Layout check box. en, select
N-up and click the Settings button.
U “Basic Operating Procedures (Windows)”
on page 46
Display the Print dialog box, select Layout from
A
the list, and specify the number of pages per
sheet and so on.
U “Basic Operating Procedures (Mac)” on
page 52
79
Page 80

SC-T5100 Series/SC-T3100 Series/SC-T5100N Series/SC-T3100N Series User's Guide
Printing with the Printer Driver from Your Computer
Note:
You can print frames around arranged pages
using the Border function.
Check other settings, and then start printing.
B
Manual 2-Sided Printing (Windows Only)
is function is enabled only when Auto Sheet Feeder
is selected in Source. It is not available when Roll
Paper or Sheet is selected.
is function allows printing on both sides by turning
over the paper
and then printing the odd pages.
Notes on Using 2-Sided Printing
Observe the following points when performing
2-sided printing.
❏ Use paper compatible with 2-sided printing.
❏ Depending on the paper type and data to be
printed, the ink may bleed through to the other
side of the paper.
printing of the even pages
aer
nishes
❏ Performing 2-sided printing continuously may
cause the print quality to decline or a paper jam. If
the print quality declines, reduce the ink density
in the printer driver or print one sheet at a time.
❏ If 2-sided printing is performed continuously, the
inside of the printer may become soiled with ink.
If the paper is soiled from the rollers aer
printing, perform cleaning. U “Smearing occurs
on printed matter from the auto sheet feeder.” on
page 148
Note:
Paper can be further saved by performing 2-sided
printing in combination with multi-page printing.
U “Multi-Page Printing (N-up)” on page 79
Setting Procedures for Printing
Load the paper in the auto sheet feeder.
A
U “Loading Paper in the Auto Sheet Feeder”
on page 34
80
Page 81

SC-T5100 Series/SC-T3100 Series/SC-T5100N Series/SC-T3100N Series User's Guide
Printing with the Printer Driver from Your Computer
Display the Printer Settings tab of the printer
B
driver and select Auto Sheet Feeder in Source.
U “Basic Operating Procedures (Windows)”
on page 46
Display the Layout tab of the printer driver and
C
select the 2-sided printing check box.
Check other settings, and then start printing.
D
When the guide screen appears aer printing of
E
the odd pages is
following the instructions on the screen and
then click Resume.
nished,
load the paper again
Note:
❏ If you click Margin Setting, you can set
Binding Edge and Binding Margin. Perform
a test print because the set binding margin
width and the actual print result may dier
depending the application used.
❏ Selecting the Folded Booklet check box
enables printing to make a booklet. In the
example in the gure below, the pages that
will be on the inside when the paper is folded
into two (pages 2, 3, 6, 7, 10, and 11) are
printed rst.
81
Page 82

SC-T5100 Series/SC-T3100 Series/SC-T5100N Series/SC-T3100N Series User's Guide
Printing with the Printer Driver from Your Computer
Folded 2-Sided Printing (Windows only)
Two consecutive pages can be printed on a single
sheet. e second page is ipped 180° and printed
adjacent to the
folded to make a 2-sided document.
Display the Layout tab of the printer driver and
A
select the Page Layout check box.
Folded Double-Side and click the Settings...
button.
page, allowing the paper to be
rst
en,
select
Set Binding Edge and Binding Margin in the
B
Folded Double-Side Setting dialog box.
Check other settings, and then start printing.
C
U “Basic Operating Procedures (Windows)”
on page 46
82
Page 83

SC-T5100 Series/SC-T3100 Series/SC-T5100N Series/SC-T3100N Series User's Guide
Printing with the Printer Driver from Your Computer
Poster Printing (Windows Only)
A single page can be printed across multiple sheets.
e sheets can then be joined together to form large
posters (up to 16 times the original size).
Display the Layout tab of the printer driver and
A
select the Page Layout check box.
Poster and click the Settings... button.
U “Basic Operating Procedures (Windows)”
on page 46
en,
select
Set Number of panels in the Poster dialog box.
B
If you want to print marks to serve as a guide
C
when joining together paper printed with
poster printing, select the Print Cutting Guides
check box.
83
Overlapping Alignment Marks
Prints guides for joining the paper with
overlapping. e
the overlapping portions.
nished
size is smaller only for
Page 84

SC-T5100 Series/SC-T3100 Series/SC-T5100N Series/SC-T3100N Series User's Guide
Printing with the Printer Driver from Your Computer
Print page frames
Prints frames for joining the paper without
overlapping.
Check other settings, and then start printing.
D
Joining poster sheets when multi-page printing
If Overlapping Alignment Marks is selected, join
guides (indicated by the lines drawn through and
around the X marks in the illustration below) will be
printed on each sheet.
e following section describes how to join four
printed pages together.
Note:
If the output is in color, the join guides will be in blue
and the cut guides in red; otherwise, all the guides will
be printed in black.
84
Page 85

SC-T5100 Series/SC-T3100 Series/SC-T5100N Series/SC-T3100N Series User's Guide
Printing with the Printer Driver from Your Computer
Ready the two top sheets and trim the excess
A
from the le sheet by cutting along the line
joining the two join guides (the centers of the X
marks).
With the two sheets overlapping, trim the
C
excess by cutting along the line joining the two
cut guides (the lines to the
of the X marks).
le
Lay the upper
B
sheet. Lineup the X marks as shown in the
illustration below, and temporarily fasten them
using an adhesive tape on the back.
sheet on top of upper right
le
Rejoin the two sheets.
D
Use an adhesive tape to stick the backs of the
sheets together.
Repeat steps 1 to 4 for the lower two sheets.
E
85
Page 86

SC-T5100 Series/SC-T3100 Series/SC-T5100N Series/SC-T3100N Series User's Guide
Printing with the Printer Driver from Your Computer
Trim the bottom from the upper sheets by
F
cutting along the line joining the two guides
(the lines above the X marks).
Lay the upper sheet on top of the lower sheet.
G
Lineup the X marks as shown in the illustration
below, and temporarily fasten them using an
adhesive tape on the back.
With the two sheets overlapping, trim the
H
excess by cutting along the line joining the two
cut guides (the lines above the X marks).
86
Page 87

SC-T5100 Series/SC-T3100 Series/SC-T5100N Series/SC-T3100N Series User's Guide
Printing with the Printer Driver from Your Computer
Join the upper and lower sheets together.
I
Use an adhesive tape to stick the backs of the
sheets together.
joining all the sheets, trim o the borders
Aer
J
by cutting along the cut guides (outside the X
marks).
87
Page 88

SC-T5100 Series/SC-T3100 Series/SC-T5100N Series/SC-T3100N Series User's Guide
Printing with the Printer Driver from Your Computer
Printing Multiple Documents (Layout Manager) (Windows Only)
Documents created in dierent applications can be
printed together in your choice of layout. is allows
you to improve print work eciency and conserve
paper.
Sample Multi-Document Layout
Sample Free Vertical/Horizontal Layout
Setting Procedures for Printing
A
Open the
application.
you want to print in your
le
Select the Layout Manager check box on the
B
Printer Settings tab of the printer driver and
check that the size set in the application is
displayed in Document Size.
U “Basic Operating Procedures (Windows)”
on page 46
88
Note:
Document Size is the size of the document to be
placed on the Layout Manager screen. e actual
printing paper size is set in the screen in Step 6.
Page 89

SC-T5100 Series/SC-T3100 Series/SC-T5100N Series/SC-T3100N Series User's Guide
Printing with the Printer Driver from Your Computer
Click OK. When printing from an application,
C
the Layout Manager screen opens.
e print data is not printed, but one page is
placed on the paper of the Layout Manager
screen as one object.
Leaving the Layout Manager screen open,
D
repeat steps 1 to 3 until all the print data has
been added to the layout.
e objects are added to the Layout Manager
screen.
Arrange the objects on the Layout Manager
E
screen.
Objects can be moved or resized by dragging as
well as rearranged or rotated using the tool
buttons or the options in the Object menu.
e overall size and placement of the objects
can be changed using the Preferences and
Arrangement options in the File menu.
See the Layout Manager screen help for more
details on each function.
Click Properties in the File menu and set the
F
print settings in the printer driver dialog box.
Set Print Quality in the Media Settings dialog
box.
Click the File menu in the Layout Manager
G
screen, and then click Print.
Printing starts.
Saving and Recalling Settings
layout and setting information on the Layout
e
Manager screen can be saved as a
close your application in the middle of a job, you can
save it to a
work.
and then open it later to continue your
le
Saving
Click the File menu on the Layout Manager
A
screen, and then click Save As....
Enter the le name, select the location, and
B
then click Save.
If you need to
le.
89
Close the Layout Manager screen.
C
Page 90

SC-T5100 Series/SC-T3100 Series/SC-T5100N Series/SC-T3100N Series User's Guide
Printing with the Printer Driver from Your Computer
Opening saved les
Right-click the printer icon ( ) on the
A
Windows taskbar, and then click Layout
Manager in the displayed menu.
e Layout Manager screen appears.
Note:
When the printer icon is not displayed on the
Windows taskbar
Open the Utility tab of the printer driver and click
the Monitoring Preferences. Select the Register
the shortcut icon to the taskbar check box in the
Monitoring Preferences dialog box.
Click Open in the File menu on the Layout
B
Manager screen.
Select the location and open the required le.
C
90
Page 91

SC-T5100 Series/SC-T3100 Series/SC-T5100N Series/SC-T3100N Series User's Guide
Printing Using the HP-GL/2 or HP RTL Mode from a Computer
Printing Using the
HP-GL/2 or HP RTL
Mode from a
Computer
e printer can emulate* HP-GL/2 (compatible with
HP Designjet 750C) and HP RTL. is section
describes the settings of the printer and the settings in
the CAD application for printing while emulating.
* Not all functions are supported. If you will use an
untested application, test its output in advance.
For a list of applications that have been tested, visit
the Epson website at http://www.epson.com.
Basic Print Settings
To u ch Settings - General Settings - Printer
A
Settings - Universal Print Settings from the
Home screen.
Check Paper Source and change the setting if
B
necessary.
e default setting is Roll Paper. When
HP-GL/2 or HP RTL print data is sent, an error
occurs if paper is not loaded for the paper
source set here.
Check the other items and make changes if
C
necessary.
See the following for more details on Universal
Print Settings items.
U “General Settings - Printer Settings” on
page 117
Important:
c
printer may not perform as expected if the size
e
of the data to be printed is extremely large.
Note:
CAD drawings can also be printed using the CAD/ line
drawing mode of the supplied printer driver. We
recommend printing from the printer driver when you
want to print with better image quality.
U “Printing CAD Drawings” on page 57
Printer Settings
Change the printer settings for printing in the
HP-GL/2 or HP RTL mode as necessary in the control
panel of the printer. e printer settings include basic
print settings such as the paper source and margins
(Universal Print Settings) and HP-GL/2 specic
settings such as palette settings (HP-GL/2 Unique
Settings).
HP-GL/2 Specic Print Settings
If you want to change HP-GL2 specic settings such as
rotating print data, merging lines, and changing the
Dene Palette set in the application, use the following
procedure.
To u ch Settings - General Settings - Printer
A
Settings - HP-GL/2 Unique Settings from the
Home screen.
Touch and change the settings of the desired
B
items.
See the following for more details on HP-GL/2
Unique Settings items.
U “General Settings - Printer Settings” on
page 117
91
Page 92

SC-T5100 Series/SC-T3100 Series/SC-T5100N Series/SC-T3100N Series User's Guide
Printing Using the HP-GL/2 or HP RTL Mode from a Computer
Note:
When HP-GL/2 or HP RTL printing is not performed
properly
e printer automatically determines whether normal
printing from the printer driver or emulation printing
of HP-GL/2 or HP RTL from the sent print data and
then switches the print mode accordingly. If mode
switching is not performed correctly and printing is not
performed properly, congure the setting as follows.
❏ When the computer and printer are connected via
USB
Select Settings - General Settings - Printer
Settings - Printing Language - USB from the
Home screen and then change the setting from
Auto to HP-GL/2.
❏ When the computer and printer are connected via
a network
Select Settings - General Settings - Printer
Settings - Printing Language - Network from the
Home screen and then change the setting from
Auto to HP-GL/2.
❏ SC-T3100 Series/SC-T3100N Series:
HP Designjet 750C C3195A
To print from the printer driver as usual
or HP RTL nishes, return the setting to Auto.
aer
HP-GL/2
CAD Application Settings
Set the output device as follows according to your
model. is explanation uses AutoCAD 2018 as an
example.
Click Plot.
A
Set the plotter in Printer/plotter.
B
❏ SC-T5100 Series/SC-T5100N Series:
HP Designjet 750C C3196A
92
Page 93

SC-T5100 Series/SC-T3100 Series/SC-T5100N Series/SC-T3100N Series User's Guide
Changing the Network Connection Methods
Connect your router and the printer with a
Changing the
E
LAN cable.
Network Connection
Methods
e printer can connect to a wired LAN or a wireless
LAN. Furthermore, it also supports Wi-Fi Direct
(Simple AP) which allows a smart device or other
device to directly connect wirelessly with the printer
even when there is no wired LAN or wireless LAN
environment.
e printer cannot connect to a wired LAN and
wireless LAN at the same time. A Wi-Fi Direct
connection is possible regardless of whether or not the
printer is connected to a network.
is section describes the procedures to use to switch
the connection method.
Note:
See the Administrator's Guide (online manual) for
details on the network settings.
Switching to Wired LAN
To u ch on the Home screen.
A
Note:
e shape and color of the icon dier depending
on the connection status.
U “Home screen operations” on page 13
To u ch Description.
B
To u ch Wired LAN Connection Method.
C
To u ch Start Setup.
D
e process to disable the wireless LAN
connection with the access point starts. Wait
until the e Wi-Fi connection is disabled.
message appears.
See the following for the location of the
printer's LAN port.
U “Back” on page 11
Switching to Wireless LAN
e SSID (network name) and password of the access
point to which the printer is to be connected are
required. Conrm them in advance. e printer can be
connected to a wireless LAN while the LAN cable is
still connected.
Note:
If your access point supports WPS (Wi-Fi Protected
Setup), the printer can be connected using Push Button
Setup(WPS) or PIN Code Setup(WPS) without using
an SSID and password.
U “General Settings - Network Settings” on page 127
To u ch on the Home screen.
A
Note:
e shape and color of the icon dier depending
on the connection status.
U “Home screen operations” on page 13
To u ch Router.
B
To u ch Start Setup.
C
Details of the wired LAN connection status are
displayed.
To u ch Change to Wi-Fi connection., check the
D
displayed message, and touch Ye s .
To u ch Wi-Fi Setup Wizard.
E
Select the desired SSID.
F
If the desired SSID is not displayed, touch
Search Again to update the list. If it is still not
displayed, touch Enter Manually and directly
enter the SSID.
93
Page 94

SC-T5100 Series/SC-T3100 Series/SC-T5100N Series/SC-T3100N Series User's Guide
Changing the Network Connection Methods
To u ch Enter Password and enter the password.
G
Note:
❏
Dierentiate
lowercase when entering the password.
❏ If the SSID was entered directly, set Password
to Available before entering the password.
When input is
between uppercase and
nished,
touch OK.
H
Check the settings and then touch Start Setup.
I
To u ch OK to nish the procedure.
J
If the connection fails, select Print Check
Report to print a network connection check
report. You can check the measure to take in the
report.
Close the Network Connection Settings screen.
K
Directly Connection
To u ch Wi-Fi Direct.
B
When Wi-Fi Direct is already enabled, the
network (SSID), password, number of
connected devices, etc. are displayed. Proceed
to step 5.
Note:
When any of the displayed network (SSID), device
name, etc. is partially not visible because it is cut
o at the right edge of the screen, touch the
corresponding item to display the entire setting
value.
To u ch Start Setup.
C
To u ch Start Setup.
D
Wi-Fi Direct is enabled and the network
(SSID), password are displayed.
Open the Wi-Fi setting screen on the device
E
you want to connect with the printer, select the
SSID displayed on the screen of the printer, and
enter the password just as it is displayed on the
screen.
Wirelessly (Wi-Fi Direct)
A direct connection with the printer can be established
temporarily when, for example, the printer is not
connected to a network or you do not have permission
to log on to the network.
Wi-Fi Direct is disabled by default. e following
describes the procedure from enabling Wi-Fi Direct to
connecting.
Note:
e printer can connect with up to four smart devices
or computers at the same time. If you want to connect
another device when there are already four devices
connected, disconnect the connection with the printer
from an already connected device.
To u ch on the Home screen.
A
Note:
e shape and color of the icon dier depending
on the connection status.
U “Home screen operations” on page 13
When a connection is established, touch Close
F
to
To u ch Close on the screen of the printer to
G
close the network connection settings screen.
When the printer driver is installed on the connected
device, you can print using the printer driver.
You can print using AirPrint from a Mac computer or
iOS device.
U “Printing Using AirPrint” on page 95
Note:
When you turn o the power of the printer, the
connections with connected devices are all disconnected.
To re c onn e ct
the procedure again from step 1.
the procedure.
nish
aer
turning the printer back on, perform
94
Page 95

SC-T5100 Series/SC-T3100 Series/SC-T5100N Series/SC-T3100N Series User's Guide
Printing Using AirPrint
Tap the printer icon or Print.
Printing Using
AirPrint
You can easily print wirelessly using AirPrint from an
iPhone, iPad, or iPod touch running the latest iOS or
from one of the latest Mac computers.
is section describes the procedure to print from a
smart device.
E
Note:
e print option is not displayed for an
application that does not support AirPrint. Check
whether it is supported in the help or other
documentation of the application.
Ta p Select Printer and select the printer from
F
the displayed list.
Ta p Print to start printing.
G
Note:
Printing such as the following is not possible with
AirPrint.
❏ Printing by automatically tting the document to
the roll paper width
❏ Printing by automatically enlarging or reducing to
t the output paper size
❏ Setting a print quality suitable for the print target
For such printing, please use the printer driver.
U “How to Select the Dedicated Printer Driver for is
Printer” on page 54
Connect the smart device and printer via
A
wireless LAN or Wi-Fi Direct.
See the following for more details.
U “Switching to Wireless LAN” on page 93
U “Directly Connection Wirelessly (Wi-Fi
Direct)” on page 94
Load the paper in the printer.
B
Open the document or photo to be printed on
C
your smart device.
Tap the share icon to display the print option.
D
95
Page 96

SC-T5100 Series/SC-T3100 Series/SC-T5100N Series/SC-T3100N Series User's Guide
Making Enlarged Copies with an A3 or A4 Scanner
Unsupported paper types
Making Enlarged
e following paper cannot be used for enlarged
Copies with an A3 or
copying.
❏ Enhanced Adhesive Synthetic Paper
A4 Scanner
❏ Enhanced Low Adhesive Synthetic Paper
Connecting an Epson A3 or A4 scanner to the printer
makes creating enlarged copies a snap; no computer is
required.
Supported scanners
❏ DS-530
❏ DS-6500
❏ DS-60000
Check the Epson website for the latest information on
supported scanners.
http://www.epson.com
Supported Sizes
Document Size
5 x 7 inch
Letter
A5
B5
A4
B4
A3
User-Dened
*2
*1
Output Size
A2
US C (17x22in)
JIS B2
US D (22x34in)
A1
*3
JIS B1
US E (34x44in)
*3
A0
User-Dened
*3
*4
U “Epson Special Media Table” on page 157
Connecting the Scanner
Ready both the printer and the scanner.
A
For information on setting up the scanner, see
the documentation supplied with the scanner.
Turn the printer and scanner
o.
B
Connect the scanner to the printer using the
C
USB cable supplied with the scanner.
*1 Diers depending on the specications of the scanner to
be connected.
*2 89 to 297 mm wide (216 mm when A4 scanner)
*3 Not supported by SC-T3100 Series/SC-T3100N Series.
*4 89 to 914 mm wide (up to 610 mm for SC-T3100 Series/
SC-T3100N Series)
Supported paper
Roll paper only. Enlarged copying to cut sheet is not
possible.
96
Important:
c
Connect the scanner directly to the printer.
Enlarged copies are only available when the
scanner is connected directly to the printer.
Page 97

SC-T5100 Series/SC-T3100 Series/SC-T5100N Series/SC-T3100N Series User's Guide
Making Enlarged Copies with an A3 or A4 Scanner
Making Enlarged Copies
Turn the printer and scanner on.
A
e devices may be turned on in any order.
Load roll paper supported by the enlarged
B
copying function into the printer.
U “Loading Roll Paper” on page 28
Place the document on the scanner glass or in
C
the auto document feeder (ADF).
U “Placing Documents in the Scanner” on
page 97
For information on using the scanner, see the
documentation supplied with the device.
To u ch Enlarged Copy on the Home screen.
D
e enlarged copy dialog box is displayed.
Important:
c
image quality may decline or streaks may
e
appear depending on the document or
magnication.
If streaks appear, try performing paper
adjustment.
U “Optimizing Paper Settings (Media
Adjust)” on page 43
If the problem is not resolved, refer to the
scanner manual and then clean the inside of
the scanner.
Note:
If you touch
to frequently used copy settings and then register
them to Presets.
e screen for entering a name can be switched as
shown below with the button marked.
(Presets), you can assign a name
Note:
If Enlarged Copy is not displayed on the Home
screen, check the following.
❏ Are the connectors of the USB cable
connecting the printer and scanner inserted
rmly?
❏ Is the power of the scanner on?
❏ Is the scanner a model that supports enlarged
copying?
Select the size of the document loaded in the
E
scanner in Original Size and set the
enlargement setting in Reduce/Enlarge.
If you set Auto Fit Page to On, printing is
performed by automatically enlarging to t the
width of the roll paper loaded in the printer.
Also, each touch of the following bottom le icon
switches the input method as follows.
ABC: Enters alphabet letters
123#: Enters numbers and symbols
Touch the numeric value for the number of
F
copies and then enter the number of copies in
the keypad screen.
To u ch to start copying.
G
Copying can also be started by touching the ]
button of the scanner.
Placing Documents in the Scanner
Failure to observe the following precautions when
placing the original in the scanner may result in
reduced print quality or scanning failures.
97
Page 98

SC-T5100 Series/SC-T3100 Series/SC-T5100N Series/SC-T3100N Series User's Guide
Making Enlarged Copies with an A3 or A4 Scanner
❏ DS-530 is a scanner that scans both sides
simultaneously but it cannot scan both sides of the
document with enlarged copying. Place the side
you want copying facing downward in the ADF.
❏ Be sure to insert the original in landscape (wide)
orientation.
❏ If there are documents both on the glass and in
the ADF, the document in the ADF will be
scanned.
Remove documents from the ADF before placing
a document on the glass.
❏
❏ When multiple copies are made from an original
❏ Use the ADF to scan multi-page documents.
❏ If multiple copies are set for scanning multiple
ADF can not be used when:
e
❏ When JIS B1 or A0 is selected for Reduce/
Enlarge and multiple copies will be made
❏ e original is printed on thick stock (e.g.,
postcards or photographs)
placed on the glass, the original may be scanned
once for each copy.
Wait until all the copies have been printed before
opening the scanner cover.
sheets continuously, the copies will be printed on a
page basis as shown below.
Example: Order in which pages are output when
the printer is used to make two copies of a two
page document
98
Page 99

SC-T5100 Series/SC-T3100 Series/SC-T5100N Series/SC-T3100N Series User's Guide
Using the Menu
Using the Menu
Menu List
e items and options available in the menu are described below. See the reference pages for more details on each
item.
Paper Setting
e Paper Setting menu is displayed if paper is loaded.
Details of each item U “Paper Setting menu” on page 109
Settings item Settings value
Roll Paper
Remove Display the removal method
Feed/Cut Paper Backward, Forward, Cut
Media Adjust Start
Advanced Media Setting
Platen Gap 1.6, 2.1, 2.6
(Displayed when in Paper Type, Custom Paper is selected.)
Top/Bottom Margins Standard, Top 3 mm/Bottom 3 mm, Top 15 mm/Bottom 15 mm,
Top 45 mm/Bottom 15 mm
Back Tension Auto, Standard, High, Extra High
Drying Time
Drying Time per Pass 0 to 10.0 sec
Drying Time per Page 0 to 60 min
Auto Cut On, O
Manage Remaining Amount
Setup On, O
Remaining Amount 5.0 to 150.0 m
Remaining Alert 1.0 to 15.0 m
99
Page 100

SC-T5100 Series/SC-T3100 Series/SC-T5100N Series/SC-T3100N Series User's Guide
Using the Menu
Settings item Settings value
Change Paper Type
Paper Type
Plain paper Display supported paper types
Coated Paper(Generic)
Premium Glossy Sheet
Others
Auto Sheet Feeder
Media Adjust Start
Change Paper Type/Paper Size
Paper Type
Plain paper Display supported paper types
Coated Paper(Generic)
Premium Glossy Sheet
Others
Paper Size Display supported paper sizes
Cut Sheet(1 sheet)
100
 Loading...