

Epson PL Home Cinema 20 User Manual

Copyright Notice
All rights reserved. No part of this publication may be reproduced, stored in a retrieval system, or transmitted in
any form or by any means, electronic, mechanical, photocopying, recording, or otherwise, without the prior
written permission of Seiko Epson Corporation. The information contained herein is designed only for use with
this Epson product. Epson is not responsible for any use of this information as applied to other products.
Neither Seiko Epson Corporation nor its affiliates shall be liable to the purchaser of this product or third parties for
damages, losses, costs, or expenses incurred by purchaser or third parties as a result of: accident, misuse, or abuse of
this product or unauthorized modifications, repairs, or alterations to this product, or (excluding the U.S.) failure to
strictly comply with Seiko Epson Corporation’s operating and maintenance instructions.
Seiko Epson Corporation shall not be liable for any damages or problems arising from the use of any options or
any consumable products other than those designated as Original Epson Products or Epson Approved Products by
Seiko Epson Corporation.
Epson is a registered trademark and Exceed Your Vision is a trademark of Seiko Epson Corporation.
PrivateLine and PowerLite are registered trademarks and Extra Care, Epson Connection, and Epson Store are
service marks of Epson America, Inc.
Pixelworks, DNX, and the DNX logo are trademarks of Pixelworks, Inc.
General Notice: Other product names used herein are for identification purposes only and may be trademarks of
their respective owners. Epson disclaims any and all rights in those marks.
2
© 2005 Epson America, Inc. 6/05
CPD-20172

Contents
Welcome! 5
Registration and Warranty 5
Projector Parts 6
Projector Controls 7
Optional Accessories 8
About This Manual 9
Getting More Information 9
Using the Projector 11
Choosing a Location 11
Adjusting the Picture 13
Controlling Your Presentation 15
Adjusting the Volume 15
English
Freezing the Action 15
Turning Off the Picture and Sound 15
Using the Projector’s Menu System 16
Changing Menu Settings 16
Adjusting the Appearance of the Picture 17
Using Advanced Picture Settings 19
Using On-screen Display Features 21
Customizing Projector Operation 22
Viewing Lamp Usage and Other Information 23
Restoring the Default Settings 24
Caring for the Projector 25
Cleaning the Lens 25
Cleaning the Projector Case 25
Contents 3

Cleaning and Replacing the Air Filters 26
Replacing the Lamp 27
Resetting the Lamp Timer 29
Storing the Projector 29
Transporting the Projector 29
Problem Solving 31
What To Do When the Lights Flash 31
Solving Projector Problems 32
Solving Picture Problems 34
Where To Get Help 38
Specifications and Notices 39
Projector Specifications 39
Important Safety Information 42
FCC Compliance Statement 44
Declaration of Conformity 45
Epson America, Inc. Limited Warranty 45
Index 47
4 Contents

Welcome!
The Epson® PowerLite® Home 20 Theater Projector lets you enjoy high-quality projection in
the relaxing environment of your own home. It offers these powerful features:
■ Adjustable color modes with built-in cinema filter for great viewing
■ 16:9 LCD panel for wide format projection
■ Flexible setup configurations for front or rear projection and ceiling-mounted installation
■ Short lens focus; you can project a 120-inch diagonal image with the projector just
10 feet away
■ 1200 ANSI lumens
■ 1000:1 contrast ratio
■ Parental control through the projector’s child lock function
■ Lock port for optional Kensington
■ Toll-free two-year priority technical support
®
MicroSaver® anti-theft device
Registration and Warranty
The Epson PowerLite Home 20 projector comes with a basic two-year carry-in warranty. For
details, see page 45.
In addition, Epson offers free Extra Care Home Service during your warranty period. In the
unlikely event of an equipment failure, you won’t have to wait for your unit to be repaired.
Instead, Epson will ship you a replacement unit anywhere in the United States or Canada,
usually via overnight delivery. See your Extra Care Home Service brochure for details.
We encourage you to please register your projector. To register, simply fill out the registration
card that came with your projector and mail it to Epson. Or you can register online at
http://www.epson.com/webreg. Registering also lets you receive special updates on new
accessories, products, and service.
SM
Welcome! 5
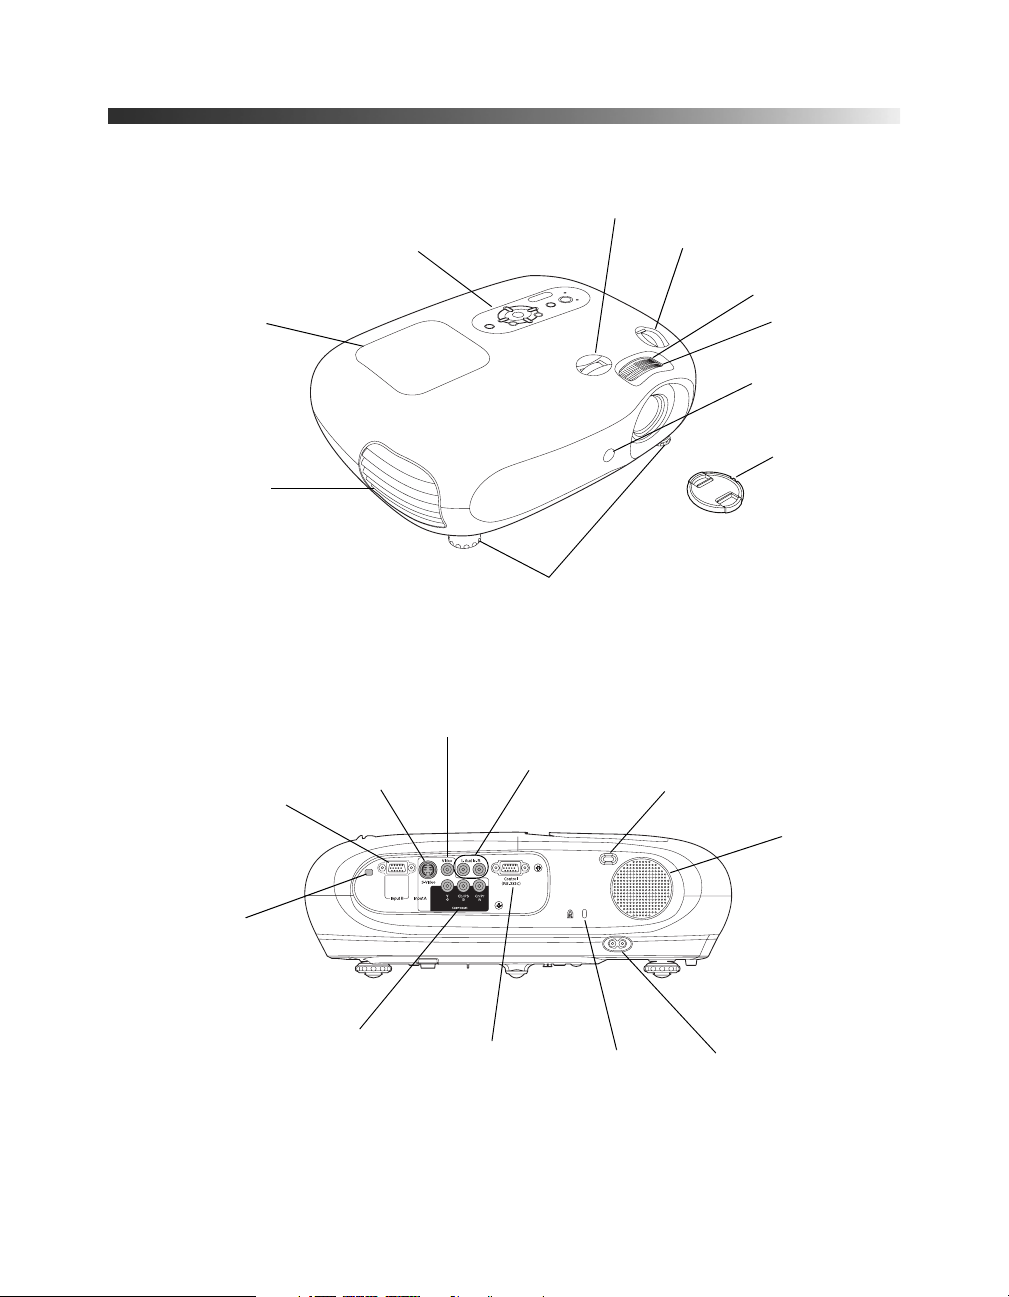
Projector Parts
Control panel
Lamp cover
Ventilation slots
Horizontal lens shift
Vertical lens shift
Zoom ring
Focus ring
Infrared receiver
(for remote control)
Lens cover
Adjustable
feet
Video port
(composite video)
Input B (computer)
Infrared receiver
6 Welcome!
S-video port
Component video port
Audio ports
Control port (for
service use only)
Kensington
security lock
Lamp cover release slot
Speaker
AC power inlet

Projector Controls
u
Power button
Turns the projector on and off
Power light
Indicates
operating status
Warning light
Alerts you to
problems
Source button
Switches the
video input source
Power buttons
Turn the projector
on and off
Source buttons
Switch between equipment
connected to the projector
Picture buttons
Adjust brightness, contrast,
color temperature, and skin
tones. Also let you select a color
mode or recall memory settings.
Menu button
Displays or hides
projector’s menus
dlr Arrow and Enter buttons
Navigate menus and select menu
options
Menu button
Displays or hides
projector menus
udlr Arrow buttons
Navigate menus
Enter button
Selects menu options
Esc button
Exits the current
function or menu
Aspect button
Changes the
picture’s aspect ratio
Keystone correction buttons
Adjust screen shape
Volume buttons
Adjust speaker volume
A/V Mute button
Turns off audio and video
Aspect button
Changes the picture’s
aspect ratio
Still button
Freezes the picture and sound
Auto button
Optimizes computer images
Keystone buttons
Adjust screen shape
Volume buttons
Adjust speaker volume
ESC button
Exits the current function
or menu
Welcome! 7
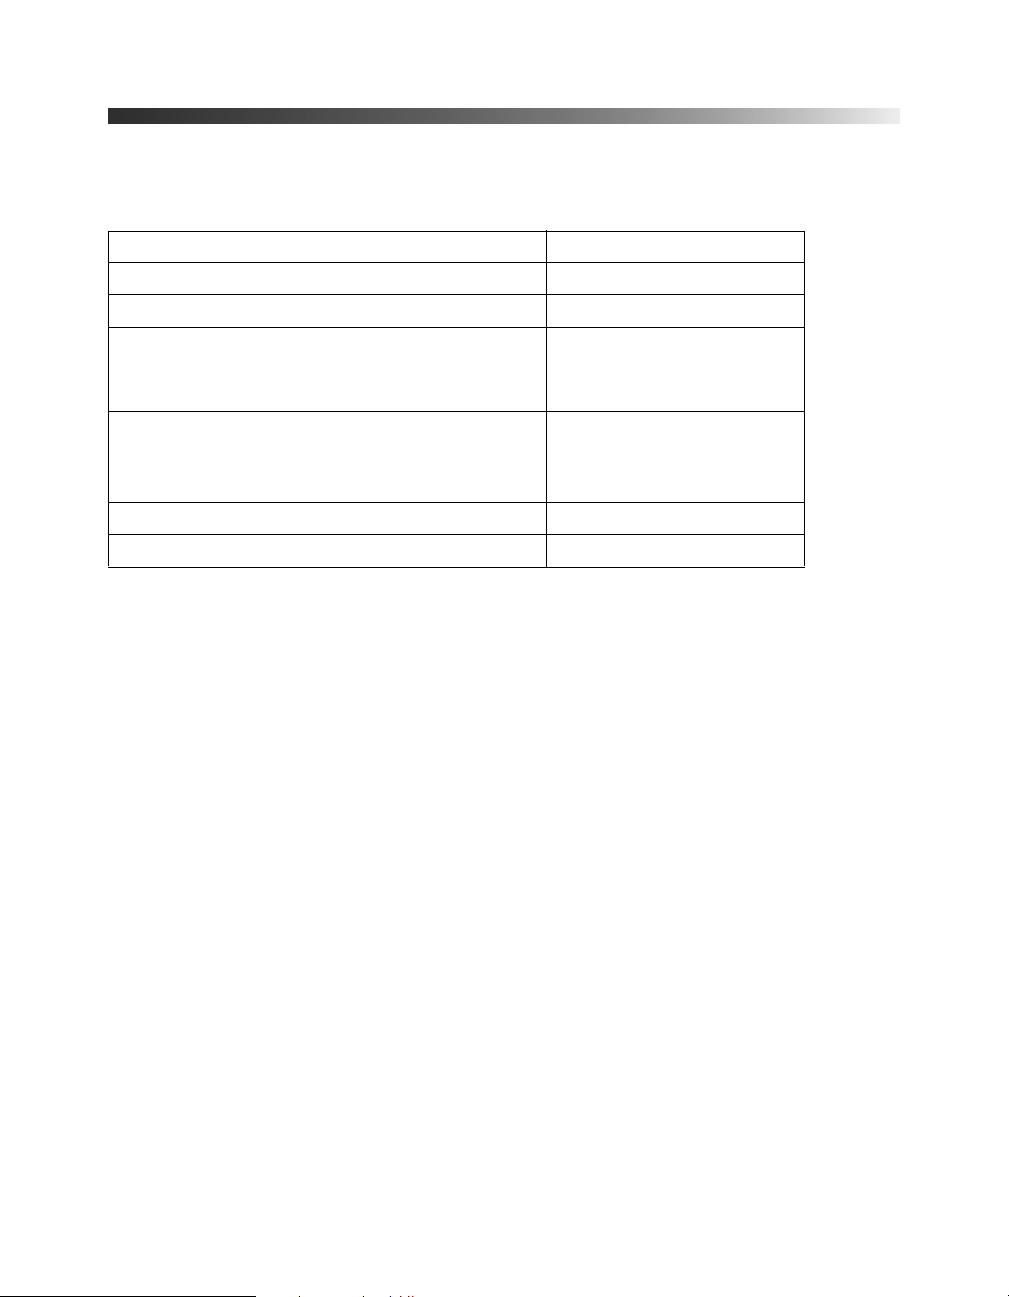
Optional Accessories
Epson provides the following optional accessories for the projector:
Product Part number
Replacement lamp ELPLP33
Air filter replacement ELPAF09
Customized carrying cases:
Samsonite® wheeled soft case
Samsonite soft shoulder bag
Ceiling mount
Suspension adapter
False ceiling plate
Kensington security lock ELPSL01
S-video cable F8V308X25
You can purchase these accessories from an Epson authorized reseller. To find the nearest
reseller, please call 800-GO-EPSON (800-463-7766). To purchase online, visit
www.epsonstore.com (U.S. sales only). In Canada, please call (800) 463-7766 for reseller
referral.
ELPKS35
ELPKS43
ELPHT020
ELPHTAPL
ELPHTFCP
8 Welcome!

About This Manual
See the Quick Setup sheet to connect the projector to your video or computer equipment.
This book contains information on using the projector, in addition to maintenance
instructions, troubleshooting tips, important safety instructions, specifications, and warranty
information.
Please follow these guidelines as you read through the manual:
Warnings: Must be followed carefully to avoid bodily injury.
Cautions: Must be observed to avoid damage to your equipment.
Notes: Contain important information about your projector.
Tips: Contain helpful projection tips.
Getting More Information
Need additional help? Take advantage of Epson’s automated support services 24 hours a day
at http://support.epson.com. Use this site to view FAQs (Frequently Asked Questions) or
product information and e-mail your questions to Epson support.
If you need more help, you can use the Epson PrivateLine
(800) 637-7661 and enter the PIN on the PrivateLine support card that came with your
projector.
®
Support service. Call
Welcome! 9

10 Welcome!
Using the Projector
Follow the instructions in this section to choose a location for the projector, adjust the
picture, control projector operation, and use the menu system.
Choosing a Location
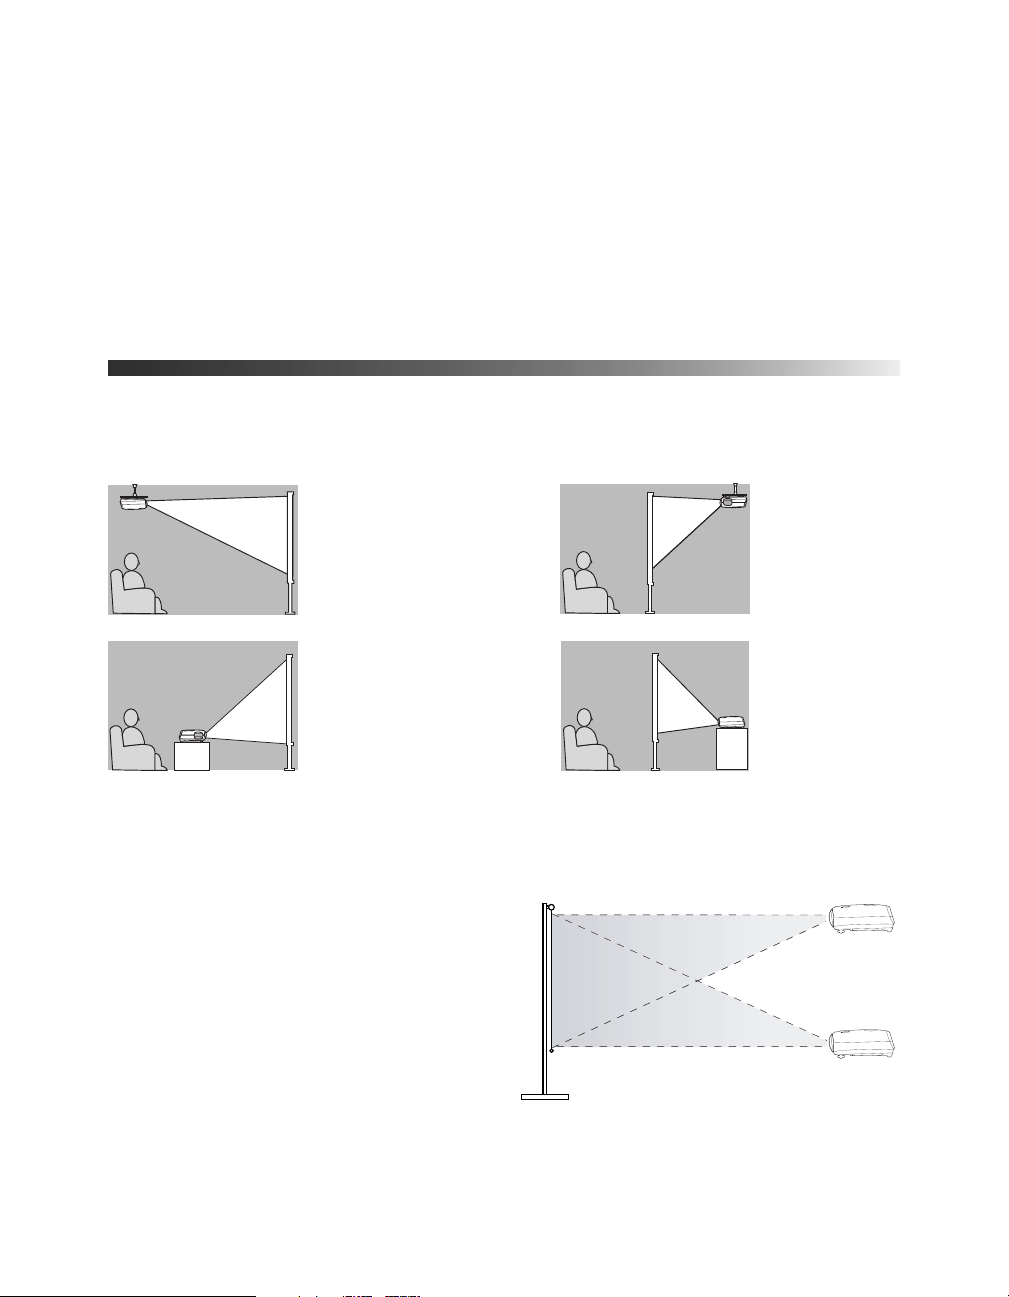
You can set up the projector for these four viewing arrangements:
Front/Ceiling
Front
If you install the projector in a rear or overhead position, you need to invert and/or mirror the
image by selecting the correct Projection option (see page 20). Professional installation is
recommended if you want to attach the projector to the ceiling.
Ideally, place the projector at a height so its
lens is between the top and bottom of the
screen. That way, you can keep the projector
level and use the vertical lens shift dial to
position the image (see page 13). This
produces the best-looking picture.
If you place the projector above or below
screen level, you have to tilt it up or down to
aim the image at the screen; this distorts the
shape of the image, but you can correct it
with the projector’s Keystone function (see page 14).
Rear/Ceiling
Rear
Using the Projector 11
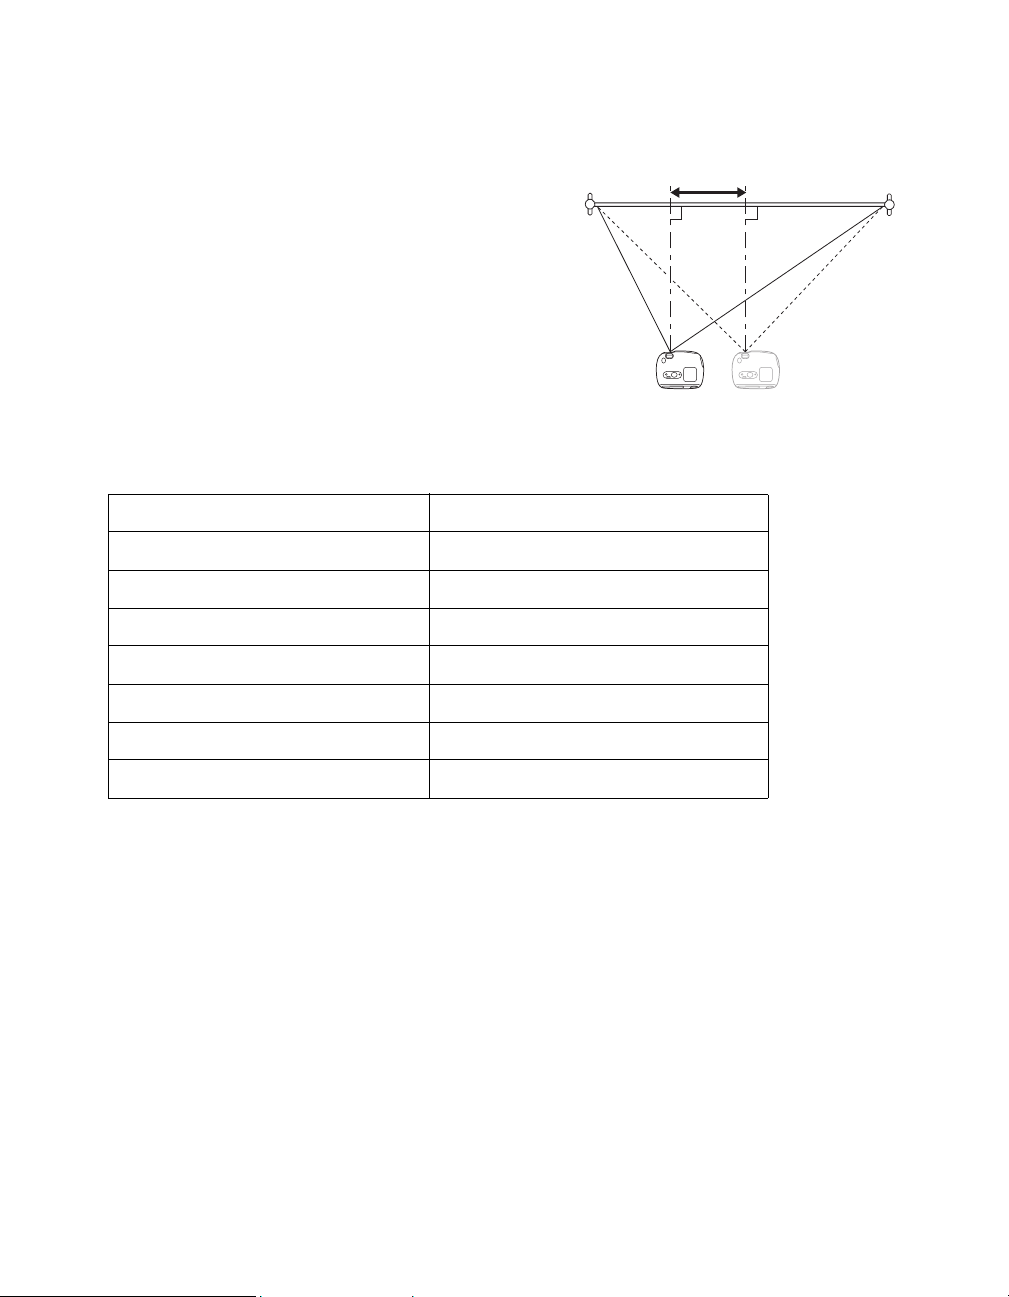
To project a rectangular (non-distored) image, you do
not need to align the projector exactly with the center
of the screen. By using the horizontal lens shift dial,
you can place the projector to the left or right of the
screen’s center, by up to 25 percent of the image’s
width when projecting with a 16:9 aspect ratio. Make
sure the projector faces straight ahead (at a 90-degree
angle to the screen).
Note: If you place the projector too far left or right, your
image will not be rectangular.
Place the projector at a suitable distance from the
screen to obtain the desired image size, as indicated
below. Note that the Zoom adjustment also affects image size.
Image size (16:9) Projection distance
30 in. (26 × 15 in.) 2.4 to 3.7 feet
40 in. (35 × 20 in.) 3.2 to 4.9 feet
60 in. (51 × 28 in.) 4.9 to 7.4 feet
80 in. (71 × 39 in.) 6.6 to 9.9 feet
Projector can be moved from
center by up to 25 percent of
the image’s width
90°
100 in. (87 × 47 in.) 8.2 to 12.4 feet
200 in. (173 × 98 in.) 16.5 to 24.8 feet
300 in. (260 × 146 in.) 24.8 to 37.3 feet
When placing the projector, keep these considerations in mind:
■ Make sure there is plenty of space for ventilation around and under the projector. Do not
set the projector on top of loose materials that could block the vents underneath.
■ Make sure the projector is within 6 feet of a grounded electrical outlet or extension cord.
12 Using the Projector
Adjusting the Picture
Follow the steps on the Quick Setup sheet to connect the projector to your equipment, turn it
on, and select the image source. Once you see your picture, you may need to make certain
adjustments.
Note: If you don’t see a picture, or the picture doesn’t look right, see page 34 for troubleshooting
instructions.
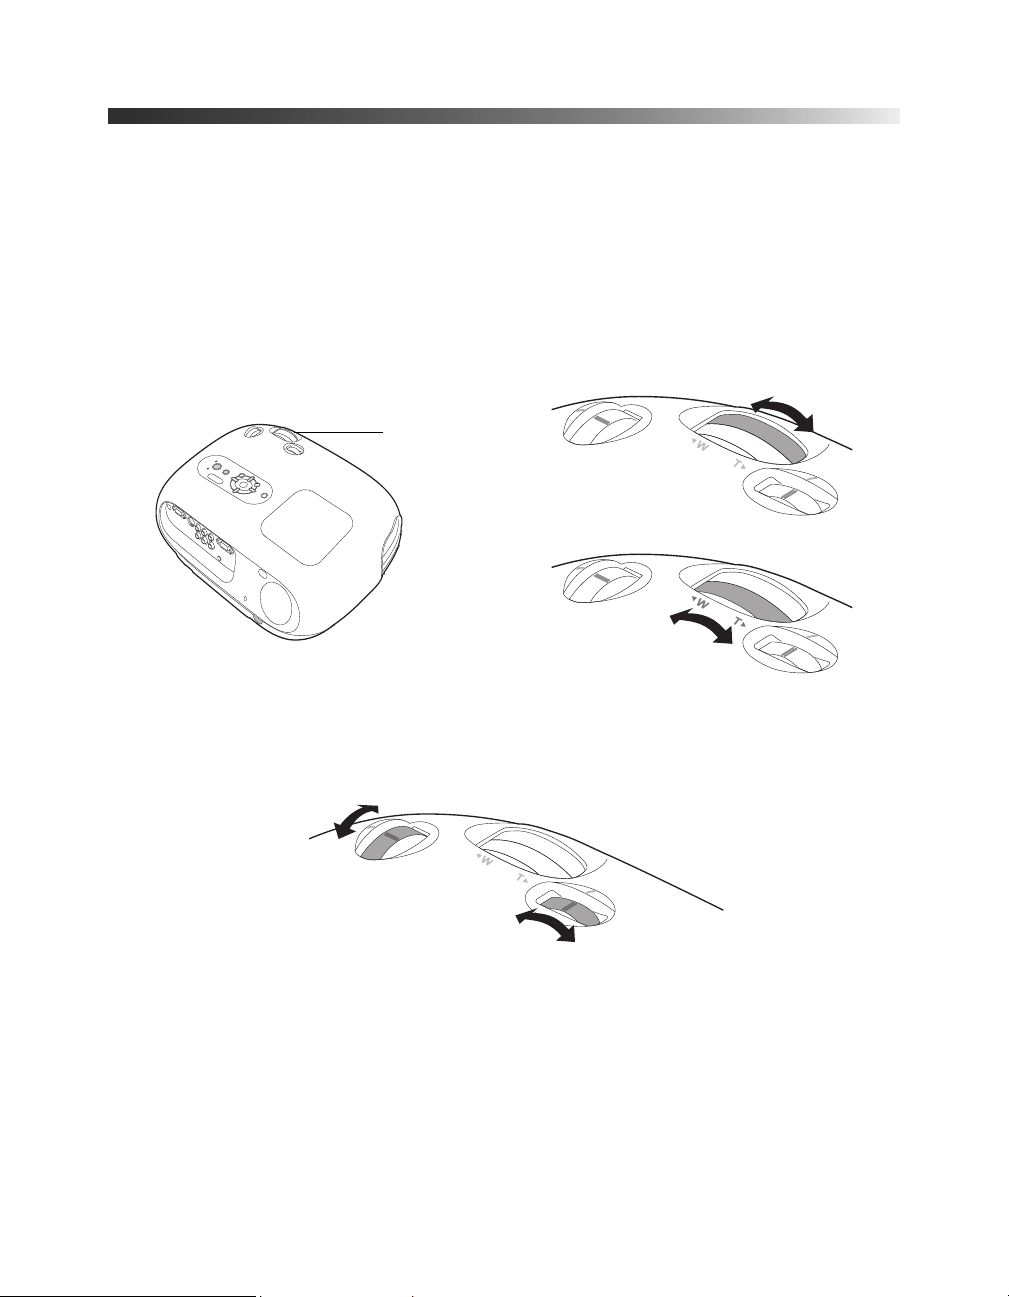
1. Rotate the focus ring to sharpen the picture, or the zoom ring to reduce or enlarge it.
Focus ring
Focus and
zoom rings
Zoom ring
2. If the image is not centered on the screen, use the horizontal and vertical lens shift dials
to adjust its position.
Up
Down
Left
Right
Note: The lens shift feature cannot move the image both horizontally and vertically by the full
amount. For example, if you have moved the image all the way up, then you cannot shift it all
the way to the right or left at the same time.
Using the Projector 13
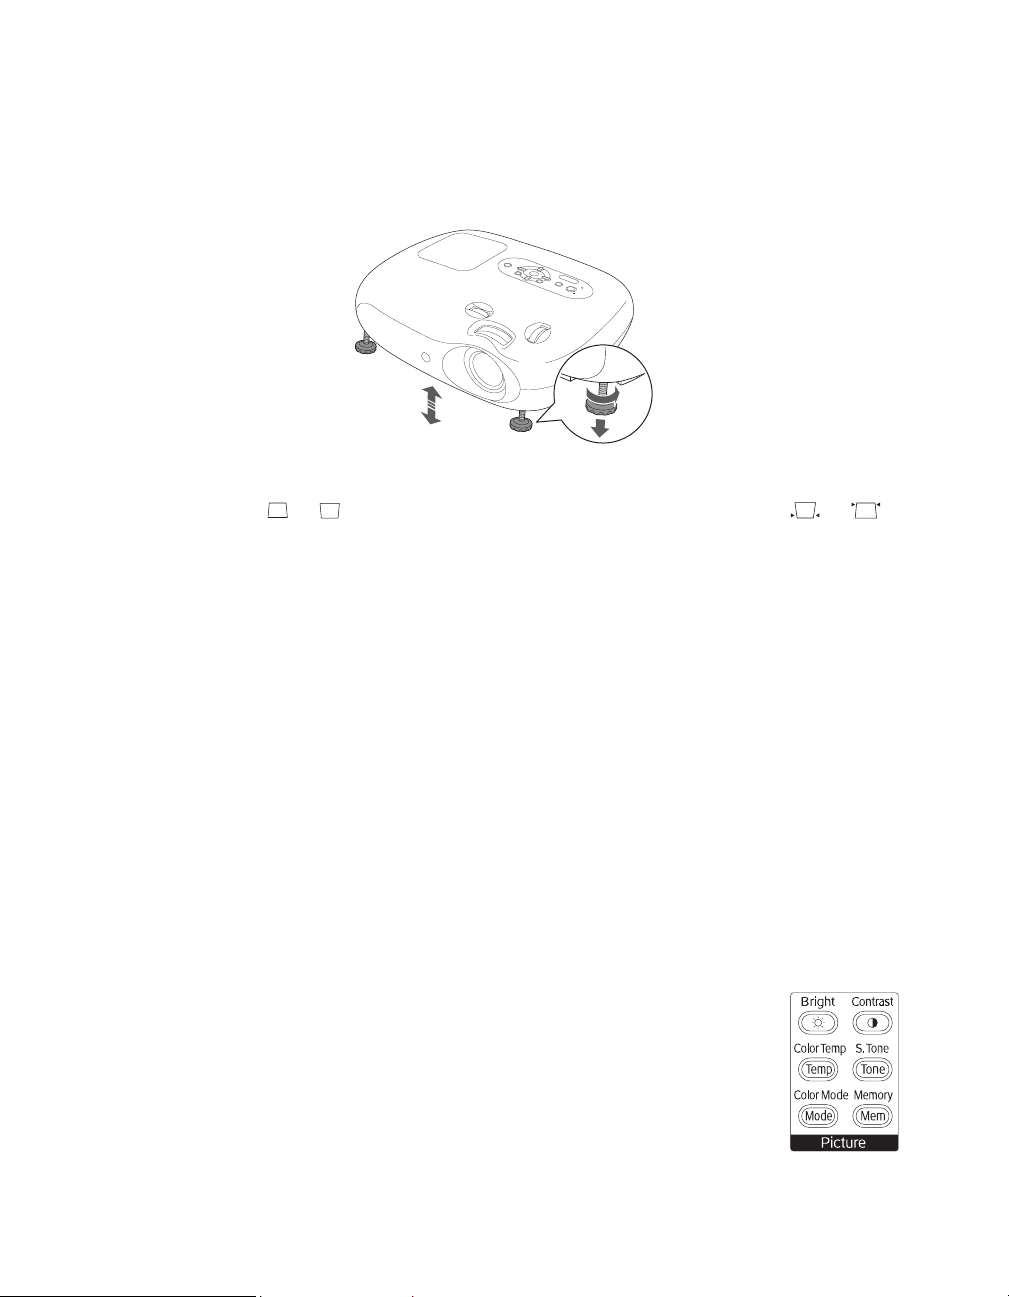
3. If you still need to raise the height of the image after using the vertical lens shift dial, lift
the front of the projector and rotate the adjustable feet until the image is positioned
correctly. You can also use the feet to correct the angle of the image if it’s tilted
horizontally.
4. If you raise or lower the image by tilting the projector, the image becomes “keystoned”
and looks like or . To return the image to a rectangular shape, use the or
Keystone button on the projector or remote control.
5. To change the picture’s aspect ratio (ratio between length and height), press the
button on the projector or remote control. Choose from these settings:
■ Auto
To automatically display the image in the correct size.
■ Normal
For standard TV broadcasts, computer images, or images having a 4:3 aspect ratio.
■ Squeeze
For DVDs or video recordings made in a compressed (anamorphic) 16:9 format,
sometimes called “Squeeze Mode.”
■ Zoom
For images having a 16:9 aspect ratio (wide-screen or letterbox format).
Note: If you display a 4:3 image using the Zoom setting, the edges of the image will be cut off.
You can use the Zoom Caption option to resize and position the image to your liking (see
page 19).
6. Use the Picture buttons on the remote control to adjust the brightness,
contrast, and color. See page 17 for more information about using these
settings.
Note: Before selecting the Color Mode or other picture settings, make sure the
Setup Level is set correctly (see page 20).
Aspect
14 Using the Projector
Controlling Your Presentation
Use these settings to control the projector’s speaker volume, temporarily freeze the picture, or
turn off the picture and sound.
Adjusting the Volume
When an audio source is connected to the projector’s Audio port, use the and Volume
buttons on the projector or remote control to adjust the sound output from of the projector’s
speaker.
Freezing the Action
To freeze the action temporarily on the screen, press the
Still button on the remote control. This freezes any moving
images until you press the
Note: The sound from your video source continues to be heard
while the image is frozen. You need to press the pause button
on your video source if you wish to resume playback where
you stopped it.
Still button again.
Still
button
A/V Mute
button
Turning Off the Picture and Sound
You can use the A/V Mute button on the remote control to
darken your screen and turn off the sound.
■ To turn off the picture and sound, press the A/V Mute
button. The screen goes dark.
■ To turn the picture and sound back on, press the
A/V Mute button again.
Note: Your video source continues to play while the screen is dark. You should pause the video if
you wish to resume playback where you stopped it.
Using the Projector 15
 Loading...