

Page 1
Last Update on Jan 31. 2017
ConeColorR Ink Fill and Use Instructions for the
Continuous Ink System (CIS) for the Epson
P600 Series Printer
Please read the instructions below carefully. This system is not fool-proof and careful steps must be taken to
ensure a correct and trouble-free conversion.
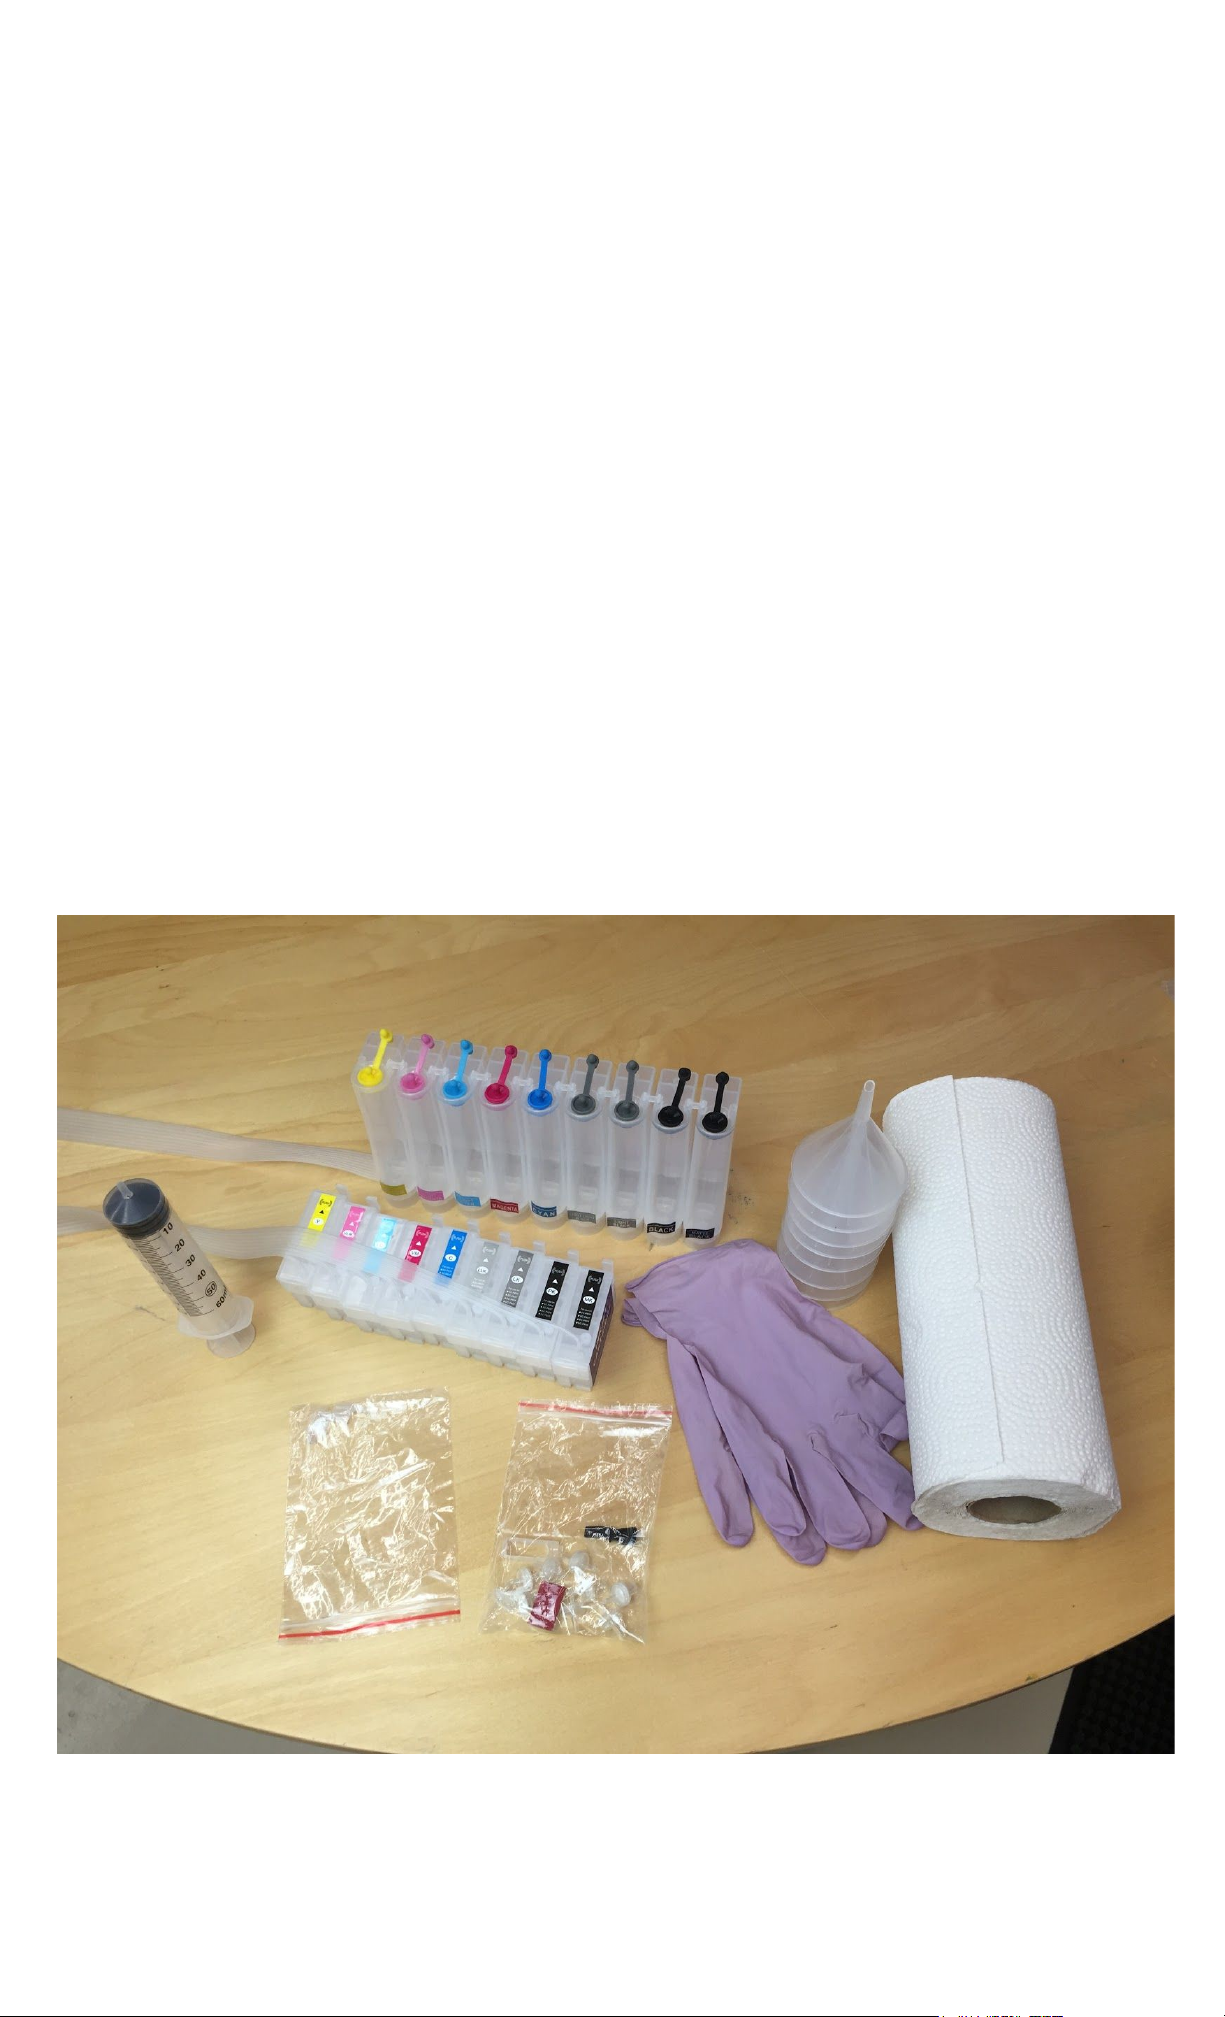
Check that you have ALL OF THESE: A clean workbench. Rubber gloves. Primer tips, Syringes.
Good light. Windex or SimpleGreen. Paper towels. A sink with water. Patience.
INSTRUCTIONS:
1. If you have a new printer, take it out of the box and install the Epson OEM ink cartridges into the printer and turn
the printer on. This will charge the printer with its first breath of ink. Do not put the CIS system into a brand-new
inkless printer, it won’t work first-time without OEM cartridges (carts). If you’ve been printing with your printer for a
while you’re all set to just put the new CIS in.
2. Unbox your P600 CIS system. Carefully unwrap the ink carts and ink tanks without twisting or stressing the
tubing connecting the two systems.
TM
Page 2
Last Update on Jan 31. 2017
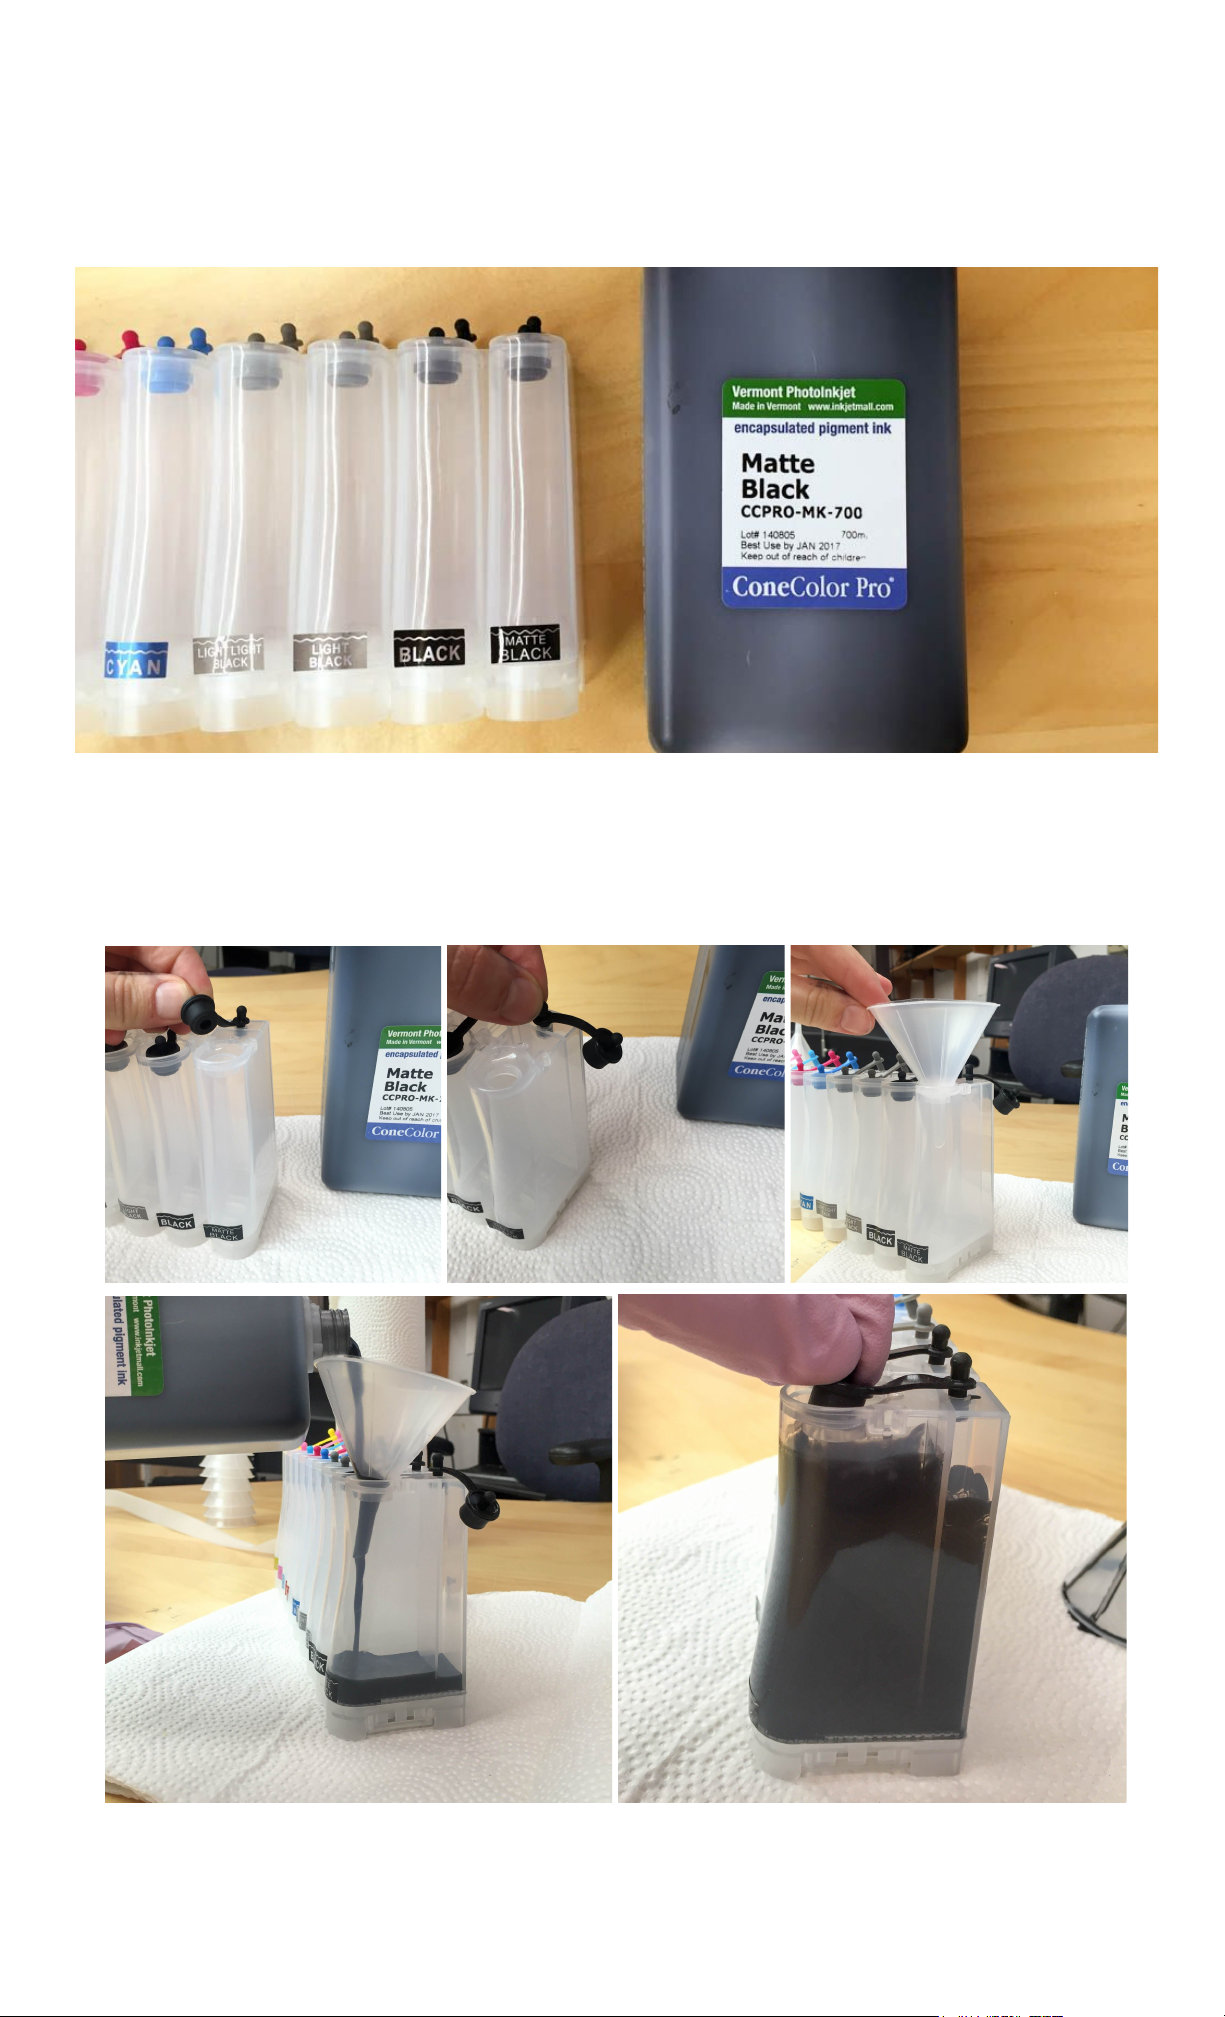
3. Take out your ink and identify which ink bottle will be poured into which CIS tank. The tanks have small stickers
at their bottom that marks the ink-shade they are designated for. ConeColor Pro inks are easy, just match each
bottle with each ink-tank.
4. Fill each tank one-at-a-time by pulling the tab and air lock unit at the top of the tank and then pouring the correct
ink through a funnel. Leave about 1/4” of space at the top of each tank. Plug both holes at the top of the tank back
up again before you go to fill the next tank. Fill all the tanks!
Page 3
Last Update on Jan 31. 2017
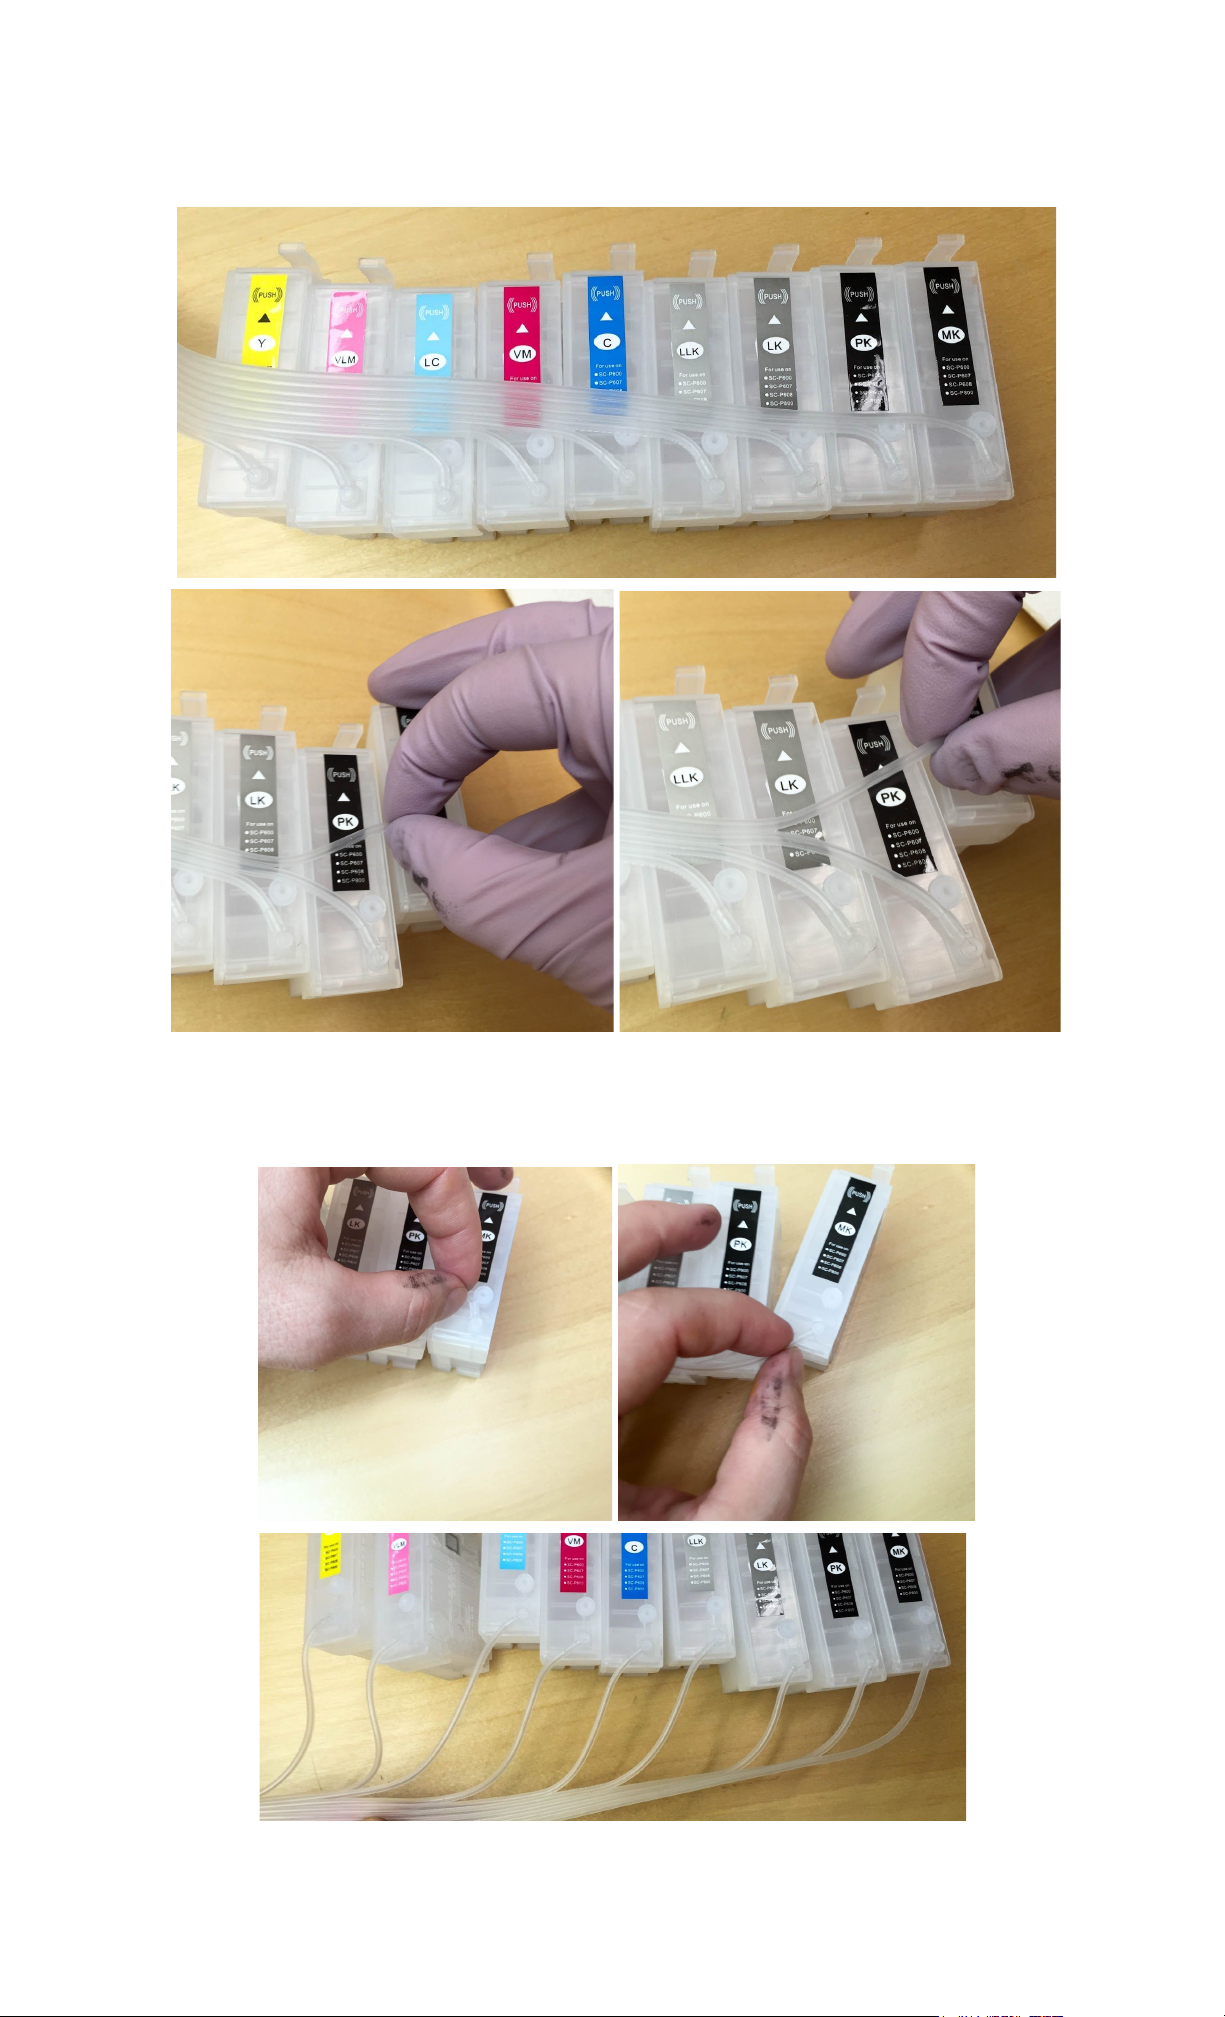
5. Gently separate the ink carts from each-other by pulling their ink lines out as shown in the diagram below.
6. Rotate each ink inlet about 90 degrees as shown below. This will allow the ink lines to exit the printer at the right
angle without restricting ink flow (very important).
Page 4
Last Update on Jan 31. 2017
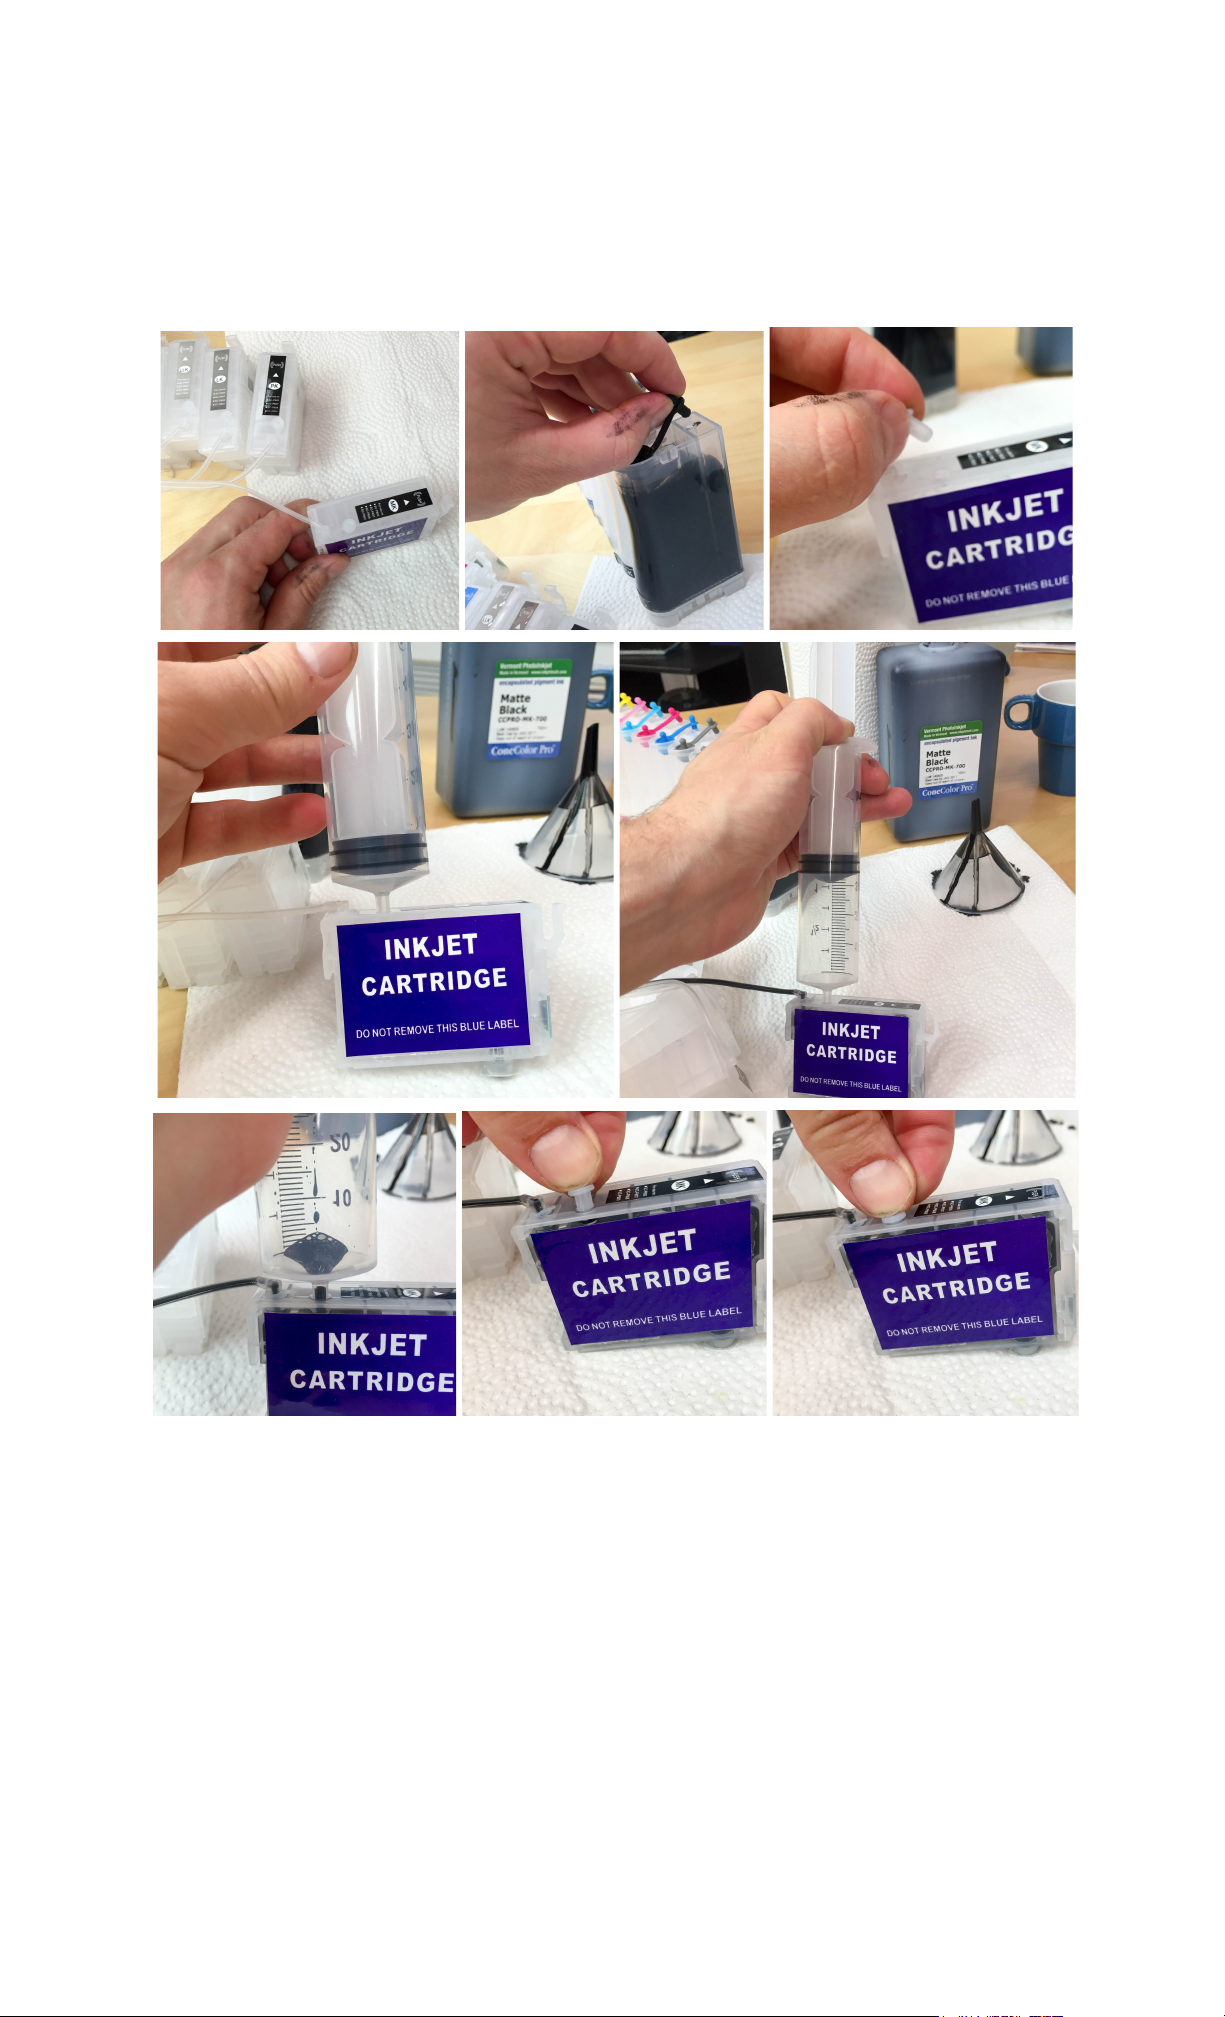
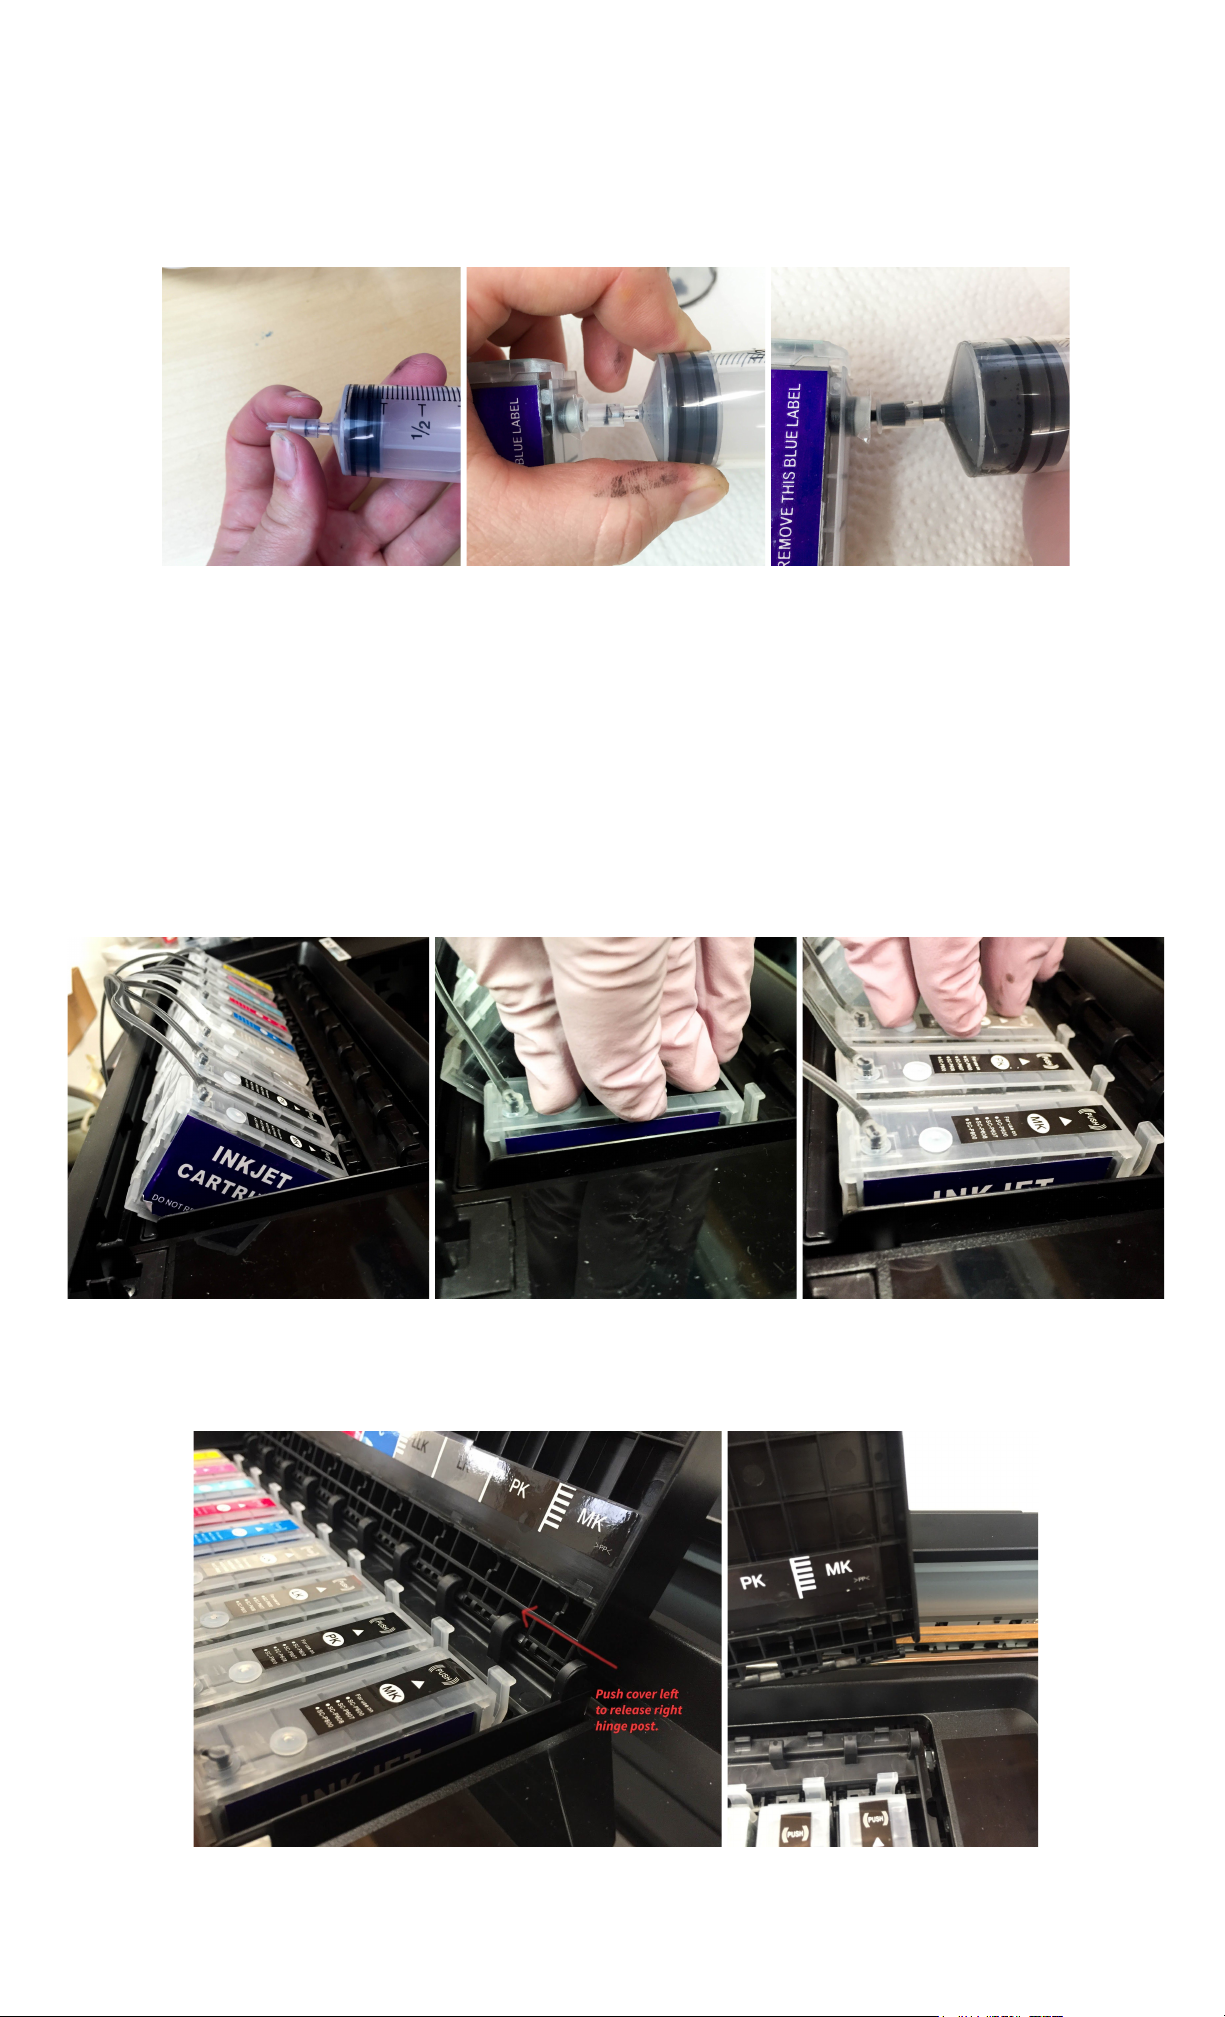
7. Unplug the air lock on one filled tank; unplug the air lock on its corresponding ink cartridge. Insert the end of your
syringe into the cartridge and pull/hold to create suction. You will see the ink go from the tank into the cartridge. It
will take 75 to 95 seconds for the cartridge to fill. Once it starts to enter the tip of the syringe, plug the air-vent on
the main tank, pull the syringe out, and plug the air-vent on the cartridge. There will be a small amount of air in the
cartridge and line THIS IS OK. Repeat this for all cartridges.
Page 5
Last Update on Jan 31. 2017
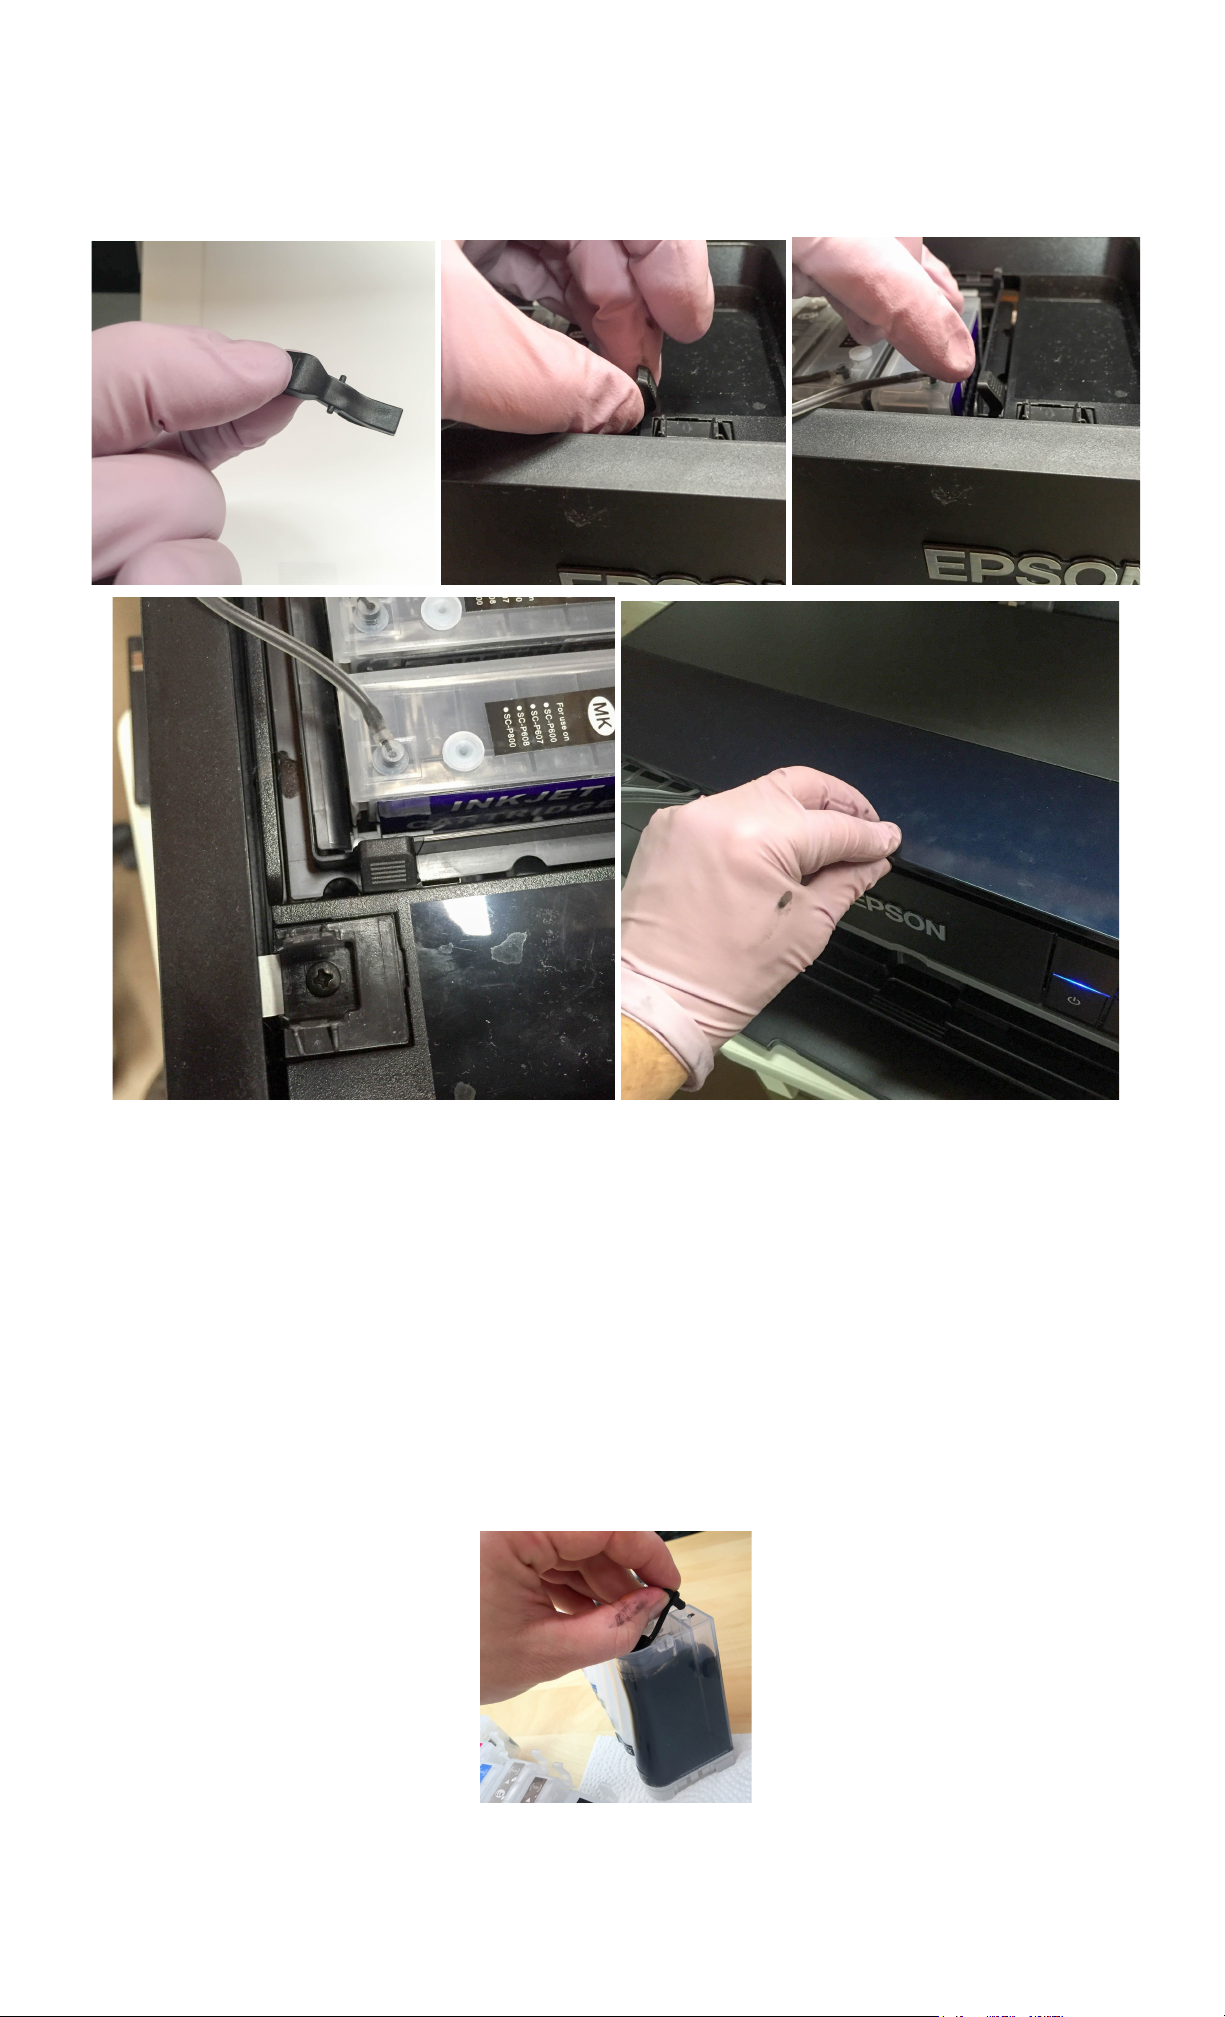
8. Prime each ink cartridge by taking a syringe with a priming tip applied, sticking it into the cartridge outlet area
(breaking the plastic film), and pulling a small amount of ink out. This ensures no air-lock problems when printing.
This step is key. If you forget to do this, you will have all sorts of issues.
9. Hold the carts together, and tap their bottom middle against the edge of a table with the outlets facing down
slightly. This nocks any more air-bubbles free inside of each cartridge.
10. Make sure your printer is off.
11. Place the CIS tanks on a base to the left of the printer (old National Geographics work really well) so that the
top
of the tanks are flush with the top
of the printer.
12. Open the printer, pull out your OEM ink cartridges, and carefully place the CIS cartridges into their correct
locations. Push down on each cartridge to lock into the printer as shown in the photos below.
13. You need to get rid of the ink cover. Now open the ink cover and push it left to release the right ink post.
Bring the right part of the cover out and up and then pull the left ink post out. The cover will then come off
entirely.
Page 6
Last Update on Jan 31. 2017
14. Place the small black sensor-switcher into the correct position in the printer as shown below and close the
printer lid. Make sure to remove this before removing ANY cartridge. Otherwise the cartridge will become corrupted.
15. Turn your printer on. The printer will say there are non-genuine inks installed, press “proceed” through all of
this.
16. Do one head cleaning and then a nozzle check.
17. It takes about 20 normal photo prints for the ConeColor Pro ink to start actually printing through the print-head.
If you want to force this instead of letting it happen naturally as you print, you can use the Purge Procedure listed
below in this document (we don’t really recommend that.)
18. ICC Profiles can be found here: goo.gl/zoR60b
19. REMEMBER!!! Always have the vent tabs open when you are printing. Close the vent-tabs when you are
not printing.
Page 7

Last Update on Jan 31. 2017
**********
Pigment Ink:
Pigment ink can be difficult to keep in solution and settles if not regularly agitated. To keep the ink printing at full density, gently
shake the CIS ink bottles every 1-2 weeks to keep the pigment in solution. If the printer is not used for two weeks or more, shake
the ink bottles then do 1-2 Cleaning Cycles. This will purge the settled ink from the CIS and printer’s internal ink tubes and fill with
ink from the shaken bottles.
Use Often:
Use the printer on a regular basis for best function. To keep the ink moving thru the ink lines and the head moist, print a small
image or do a cleaning cycle every week if the printer is not used regularly. It is not recommended to leave pigment ink installed in
a printer that will not be used for several months at a time- please contact our support department if you need to leave your printer
unused for two months or more.
Preventative Maintenance:
Keep the capping station clean to keep the print head clean and printing well. Cleaning procedures are located here:
goo.gl/SdNxWO. Depending on frequency of printing, the capping station should be cleaned at least once a month to help keep
the print head clean.
Humidity:
Monitor and maintain humidity levels between 40-60% in the printing area. Both low and high humidity can cause problems with
the printer, ink and paper.
Auto-resetting chips:
The chips on this system auto-reset when they are near empty. When a chip resets, the printer will stop whatever it’s doing and
say it can’t recognize the cartridge. Open the top cover, lift the ink cover sensor key, and place it back in. Close the top cover. It
will read as non-genuine but full, and the printer will continue printing where it left off.
These chips are delicate. Do not get them wet and make sure your room is not too full of static. Static shock can kill a printer chip
and make it un-recognized by the printer.
Warning: Never trick the printer into working with the top cover open. If an auto-reset chip resets and you have the cover open but
the printer thinks the cover is closed, it will corrupt the chip when you pull it out of the printer. This has happened to us in our
testing lab a few times and is very frustrating.
Purging the P600:
If you are wanting to use up a lot of ink to clear a line with Piezoflush, new ConeColor Ink, or Piezography Ink, you need to print
purge sheets and not do cleanings. Please visit this URL to view the general purging instructions: goo.gl/c5b6Wl
It takes about 15
Replacing a cartridge chip:
Pry the plastic old chip base off the cart using a small straight screwdriver or similar tool (there are tabs that hold the chip base to
the cart). Slide the top of the new chip base V notch under the locking tab on the front of the cart, then push the bottom of the chip
base so it snaps down onto the cart. Make sure the chip and plastic base are fully attached to the cartridge before installing into
the printer. Please visit this URL for images and more detailed instructions: goo.gl/nREzeU
HELPFUL INFORMATION
sheets of normal 8.5x11 laser paper to flush a single line of ink.
**********
Warning! PK and MK switching:
If you are set on PK and it’s very very low, you don’t want to switch to MK. You may not be able to switch back to PK at that point
and the printer will not be able to reset the PK cartridge back to full. When at low PK (3 pixels high on the display), you need to
make sure to print a FLUSH sheet (or a few more regular PK images) so that the PK ink cartridge resets to full before you switch
to MK. (See our flushing procedure above.)
Page 8

Last Update on Jan 31. 2017
Warranty, Support, & Return Policies:
INSTRUCTIONS AND TECHNICAL SUPPORT POLICY
We provide free technical support for our products provided that you have read the instructions. It is your responsibility to read the instructions for your product.
We urge you to read these instructions ahead of time and we provide them in the instructions tab of those of our products which require careful attention. You
can read these instructions by either viewing or printing the pdf and web pages that we provide in the Instructions Tab of an item. Although we ship our items
with instructions or a link to the latest instructions, please take the time to make sure that you have and are familiar with the instructions before you apply for
technical support.
RETURN POLICIES
Although we value you as our customer, we cannot accept returns on opened merchandise because you tried it and didn't like it or because you ordered the
wrong thing and didn’t notice before you opened it. Please read the product information on our web site carefully and be sure you are ordering the product you
want; check again before opening. InkjetMall will accept authorized returns on unopened merchandise for 15 days from receipt for a full refund on the
merchandise only, less a 15% restocking fee. Returned merchandise must be in saleable condition in its original packaging. Authorized returns must be
received within 15 days of an RMA being issued and will not be accepted after that.The customer must call customer service to return the product and we issue
an RMA number to the customer and we advise the customer as follows:When returning your order to the address listed on the packing list, which came with
the original shipment, please be sure to return all items that came with the order so that you will receive proper credit.When shipping the order back to us via
UPS, DHL or FedEx please be sure to obtain a tracking number and insure the package in case it is lost in transit! The tracking number will allow you trace the
package in case it is lost and will permit you to file a claim with UPS, DHL or FedEx.If you ship the order back to us via the Post Office, be sure to request
Delivery Confirmation and insure the package.The customer is responsible for the return shipping cost and the order Shipping and Handling is not refundable.
DEFECTIVE MERCHANDISE AND WARRANTIES POLICY
For any merchandise that was manufactured by and purchased directly from InkjetMall, which is defective in workmanship or material and for which you make
a claim within thirty (30) days after receipt of the merchandise, we will elect to either repair, replace, or refund the purchase price. When making such a claim,
you must submit both the original packing slip and the defective merchandise itself, unless these conditions are waived by us in writing. This paragraph
constitutes our sole obligation as to the merchandise, and you acknowledge that this paragraph sets forth your exclusive remedy for any breach of warranty or
other duty related to the merchandise or quality thereof. Any refund for merchandise shall not include shipping and handling or replacement fees.
All defective merchandise not manufactured by InkjetMall is warranted by the manufacturer, not by InkjetMall. Returns are subject to approval by the
manufacturer. Shipping charges on defective merchandise are not refundable!!
If you believe your merchandise was defectively manufactured, please call our Customer Service department. Some items may require technical support to
ascertain if you are using them correctly or if you are using them with incompatible products. If it is determined that the merchandise is defective, you will be
issued an RMA#.The customer must call customer service to return the product and we issue an RMA number to the customer and we advise the customer as
follows: All returned items are subject to inspection for use and damage before credit is issued. You may incur additional charges if product is returned in
damaged condition.When returning your order to the address listed on the packing list, which came with the original shipment, please be sure to return all items
that came with the order so that you will receive proper credit.When shipping the order back to us via UPS, DHL or FedEx please be sure to obtain a tracking
number and insure the package in case it is lost in transit! The tracking number will allow you trace the package in case it is lost and will permit you to file a
claim with UPS, DHL or FedEx.If you ship the order back to us via the Post Office, be sure to request Delivery Confirmation and insure the package.
DISCLAIMER, EXCLUSION OF WARRANTIES
EXCEPT AS EXPRESSLY PROVIDED IN THIS AGREEMENT, WE MAKE NO OTHER WARRANTIES, EXPRESS OR IMPLIED, OR ARISING BY CUSTOM
OR TRADE USAGE AND, SPECIFICALLY, MAKE NO WARRANTY OF MERCHANTABILITY OR FITNESS FOR A PARTICULAR PURPOSE AND ANY
WARRANTIES, CONDITIONS, REPRESENTATIONS, INDEMNITIES AND GUARANTEES WITH RESPECT TO THE MERCHANDISE ARE HEREBY
SUPERSEDED, EXCLUDED AND DISCLAIMED. THE EXPRESS WARRANTY CONTAINED IN PARAGRAPH 1 HEREIN CONSTITUTES THE SOLE AND
EXCLUSIVE WARRANTY MADE BY US AND IS IN LIEU OF ALL OTHER WARRANTIES. IN NO EVENT SHALL WE BE LIABLE FOR ANY
CONSEQUENTIAL, INDIRECT, SPECIAL, PUNITIVE OR INCIDENTAL DAMAGES OR LOST PROFITS, EVEN IF WE WERE ADVISED OF THE
POSSIBILITY OF THE SAME IN ADVANCE. OUR AGGREGATE LIABILITY IN ANY EVENT IS LIMITED TO THE AMOUNT ACTUALLY PAID BY YOU.
RETURN PROCEDURES:
● InkjetMall will only accept authorized returns.
● All returns must have a Return Merchandise Authorization (RMA) number.
● RMA numbers are only available through Customer Service.
● Please call 888-426-6323 to receive an RMA number.
● No returns will be accepted without an RMA# on the box or label.
● InkjetMall will refund the full amount of the merchandise less a 15% restocking fee on unopened, sealed merchandise only, returned within 15 days
of receipt.
● Shipping costs will be the responsibility of the customer.
● No credit will be given until the merchandise has been returned.
● Credits will be processed within 7-10 business days from date of receipt.
● Returns must be made to the address given by your support representative.
 Loading...