

Page 1
English
User’s Guide
1
Page 2

No part of this publication may be reproduced, stored in a retrieval system, or transmitted in any form or by any means, electronic, mechanical,
photocopying, recording, or otherwise, without the prior written permission of Seiko Epson Corporation. The information contained herein is
designed only for use with this Epson product. Epson is not responsible for any use of this information as applied to other products.
Neither Seiko Epson Corporation nor its affiliates shall be liable to the purchaser of this product or third parties for damages, losses, costs, or
expenses incurred by the purchaser or third parties as a result of accident, misuse, or abuse of this product or unauthorized modifications, repairs,
or alterations to this product, or (excluding the U.S.) failure to strictly comply with Seiko Epson Corporation’s operating and maintenance
instructions.
Seiko Epson Corporation shall not be liable for any damages or problems arising from the use of any options or any consumable products other
than those designated as Original Epson Products or Epson Approved Products by Seiko Epson Corporation.
Seiko Epson Corporation shall not be held liable for any damage resulting from electromagnetic interference that occurs from the use of any
interface cables other than those designated as Epson Approved Products by Seiko Epson Corporation.
®
EPSON
is a registered trademark and EPSON Stylus™ is a trademark of Seiko Epson Corporation.
Copyright 2002 Seiko Epson Corporation. All rights reserved. USB DIRECT-PRINT™ is a trademark of Seiko Epson Corporation. The USB
DIRECT-PRINT logo is a trademark of Seiko Epson Corporation.
®
Microsoft
Apple
and Windows® are registered trademarks of Microsoft Corporation.
®
and Macintosh® are registered trademarks of Apple Computer, Inc.
SD™ is a trademark.
QuickTime and the QuickTime logo are trademarks or registered trademarks of Apple Computer, Inc., used under license.
General Notice: Other product names used herein are for identification purposes only and may be trademarks of their respective owners. Epson
disclaims any and all rights in those marks.
Copyright © 2005 Seiko Epson Corporation. All rights reserved.
2
Page 3

Contents
English
Chapter 1 Introduction
Main Features . . . . . . . . . . . . . . . . . . . . . . . . . . . . . . . . . . . . 6
Important Safety Instructions . . . . . . . . . . . . . . . . . . . . . . . 7
Warnings, Cautions, and Notes . . . . . . . . . . . . . . . . 7
When using P-4000 . . . . . . . . . . . . . . . . . . . . . . . . . . . 7
When using the battery . . . . . . . . . . . . . . . . . . . . . . . 8
When Storing the batteries . . . . . . . . . . . . . . . . . . . . 9
When Disposing of the batteries. . . . . . . . . . . . . . . . 9
When using the AC adapter . . . . . . . . . . . . . . . . . . 10
When using a memory card . . . . . . . . . . . . . . . . . . 12
When using the LCD . . . . . . . . . . . . . . . . . . . . . . . . 12
When storing, maintaining, or transporting
P-4000. . . . . . . . . . . . . . . . . . . . . . . . . . . . . . . . . . . 12
Safety information for United Kingdom users . . . 13
For United Kingdom, Hong Kong, and
Singapore users . . . . . . . . . . . . . . . . . . . . . . . . . . 13
Chapter 2 Getting Started
Unpacking Your P-4000 . . . . . . . . . . . . . . . . . . . . . . . . . . . 14
Parts . . . . . . . . . . . . . . . . . . . . . . . . . . . . . . . . . . . . . . . . . . . 15
Setting Up the P-4000 . . . . . . . . . . . . . . . . . . . . . . . . . . . . . 17
Charging the battery. . . . . . . . . . . . . . . . . . . . . . . . . 17
Turning the power on . . . . . . . . . . . . . . . . . . . . . . . . 20
Turning the power off. . . . . . . . . . . . . . . . . . . . . . . . 21
Holding the button operations . . . . . . . . . . . . . . . .22
How to use the Home screen . . . . . . . . . . . . . . . . . . 22
About the stand . . . . . . . . . . . . . . . . . . . . . . . . . . . . .23
Chapter 3 Using Memory Cards
Setting and Removing a Memory Card . . . . . . . . . . . . . . 24
Available types of memory cards . . . . . . . . . . . . . . 24
Setting a memory card into the CF Card slot . . . . 25
Removing a memory card from the CF Card
slot. . . . . . . . . . . . . . . . . . . . . . . . . . . . . . . . . . . . . . 25
Setting a memory card into the SD Card slot . . . . 26
Removing a memory card from the SD Card
slot. . . . . . . . . . . . . . . . . . . . . . . . . . . . . . . . . . . . . . 26
Copying Data from a Memory Card to P-4000 . . . . . . . . 27
Chapter 4 Viewing and Playing Data
Viewing Images . . . . . . . . . . . . . . . . . . . . . . . . . . . . . . . . . . 29
Available types of image data . . . . . . . . . . . . . . . . . 29
How to see the screen . . . . . . . . . . . . . . . . . . . . . . . . 30
3
Page 4

Displaying images . . . . . . . . . . . . . . . . . . . . . . . . . . .31
Displaying images as a slide show . . . . . . . . . . . . .35
Playing Videos/Audio . . . . . . . . . . . . . . . . . . . . . . . . . . . . 35
Available types of video/audio data . . . . . . . . . . . 35
Playing videos/audio with P-4000 . . . . . . . . . . . . . 37
Using buttons while playing videos/audio. . . . . . 37
Chapter 5 Managing Data
Using the Albums . . . . . . . . . . . . . . . . . . . . . . . . . . . . . . . .39
About the PC_DATA folder. . . . . . . . . . . . . . . . . . .39
Copying the favorite data to an album. . . . . . . . . . 40
Creating a new album . . . . . . . . . . . . . . . . . . . . . . . .42
Changing an album’s name . . . . . . . . . . . . . . . . . . . 43
Deleting an album . . . . . . . . . . . . . . . . . . . . . . . . . . . 44
Setting an album shortcut. . . . . . . . . . . . . . . . . . . . . 45
Deleting Data . . . . . . . . . . . . . . . . . . . . . . . . . . . . . . . . . . . .46
Protecting Data. . . . . . . . . . . . . . . . . . . . . . . . . . . . . . . . . . .48
Setting an Album/Folder Thumbnail. . . . . . . . . . . . . . . . 49
Using the Pop Up Menu . . . . . . . . . . . . . . . . . . . . . . . . . . .49
Settings available in the pop up menu . . . . . . . . . . 49
Chapter 6 Direct Printing
Preparing to Print. . . . . . . . . . . . . . . . . . . . . . . . . . . . . . . . .51
Supported printers. . . . . . . . . . . . . . . . . . . . . . . . . . . 51
Available types of paper. . . . . . . . . . . . . . . . . . . . . .51
Connecting P-4000 to a printer . . . . . . . . . . . . . . . .51
Printing Images. . . . . . . . . . . . . . . . . . . . . . . . . . . . . . . . . . 53
Printer settings . . . . . . . . . . . . . . . . . . . . . . . . . . . . . 54
Set print quantities . . . . . . . . . . . . . . . . . . . . . . . . . . 54
Chapter 7 Using P-4000 With Other Devices
Using P-4000 With a Computer . . . . . . . . . . . . . . . . . . . . 56
Connecting P-4000 to a computer. . . . . . . . . . . . . . 56
Disconnecting P-4000 from a computer. . . . . . . . . 58
Using A/V Out . . . . . . . . . . . . . . . . . . . . . . . . . . . . . . . . . . 58
Chapter 8 Customizing Settings
Changing the P-4000 Settings . . . . . . . . . . . . . . . . . . . . . . 60
Chapter 9 Operating the Software
System Requirements. . . . . . . . . . . . . . . . . . . . . . . . . . . . . 62
For Windows . . . . . . . . . . . . . . . . . . . . . . . . . . . . . . . 62
For Macintosh . . . . . . . . . . . . . . . . . . . . . . . . . . . . . . 62
About the Software. . . . . . . . . . . . . . . . . . . . . . . . . . . . . . . 63
Installing the Software . . . . . . . . . . . . . . . . . . . . . . . . . . . . 63
For Windows users. . . . . . . . . . . . . . . . . . . . . . . . . . 63
For Macintosh users . . . . . . . . . . . . . . . . . . . . . . . . . 64
Starting the Software . . . . . . . . . . . . . . . . . . . . . . . . . . . . . 64
For Windows . . . . . . . . . . . . . . . . . . . . . . . . . . . . . . . 64
For Macintosh . . . . . . . . . . . . . . . . . . . . . . . . . . . . . . 65
Uninstalling the Software . . . . . . . . . . . . . . . . . . . . . . . . . 65
4
Page 5

Finding More Information. . . . . . . . . . . . . . . . . . . . . . . . . 65
Chapter 10 Maintenance and Troubleshooting
Cleaning the P-4000 . . . . . . . . . . . . . . . . . . . . . . . . . . . . . . 66
Troubleshooting . . . . . . . . . . . . . . . . . . . . . . . . . . . . . . . . . 66
Error messages/Icons. . . . . . . . . . . . . . . . . . . . . . . . 66
Problems and solutions . . . . . . . . . . . . . . . . . . . . . . 67
Power supply problems. . . . . . . . . . . . . . . . . . . . . . 68
Viewing and playing problems . . . . . . . . . . . . . . . 68
Data operation problems . . . . . . . . . . . . . . . . . . . . . 69
Printing problems . . . . . . . . . . . . . . . . . . . . . . . . . . . 70
Resetting P-4000 . . . . . . . . . . . . . . . . . . . . . . . . . . . . . . . . . 70
Contacting Customer Support . . . . . . . . . . . . . . . . . . . . . 71
Technical Support Web Site. . . . . . . . . . . . . . . . . . . . . . . . 71
Appendix A Appendix
Standards and Approvals . . . . . . . . . . . . . . . . . . . . . . . . . 72
P-4000 (Model: G941B). . . . . . . . . . . . . . . . . . . . . . . 72
AC adapter (Model: A351H). . . . . . . . . . . . . . . . . . 72
Battery (Model: D111A) . . . . . . . . . . . . . . . . . . . . . . 73
Specifications . . . . . . . . . . . . . . . . . . . . . . . . . . . . . . . . . . . . 73
General . . . . . . . . . . . . . . . . . . . . . . . . . . . . . . . . . . . . 73
Electrical . . . . . . . . . . . . . . . . . . . . . . . . . . . . . . . . . . . 74
Interface . . . . . . . . . . . . . . . . . . . . . . . . . . . . . . . . . . . 74
Battery. . . . . . . . . . . . . . . . . . . . . . . . . . . . . . . . . . . . . 74
AC adapter. . . . . . . . . . . . . . . . . . . . . . . . . . . . . . . . . 74
About Optional Accessories. . . . . . . . . . . . . . . . . . . . . . . . 75
English
5
Page 6

Chapter 1
Introduction
Main Features
With P-4000, you can easily view, keep, and print
images you have taken with a digital camera. You can
also play videos and audio. The main features are
described below.
❏
Epson Photo Fine is a high-resolution liquid
crystal display. You can view images easily in
high resolution anywhere, anytime without a
computer or other special device.
❏ You can play videos and audio easily anywhere,
anytime without a computer or other special
device.
❏ You can print images directly to your Epson
printer that supports USB DIRECT-PRINT.
❏ You can save images, videos, and audio in P-4000.
6 Introduction
Note:
❏ Do not expose the P-4000 to severe impact, doing so
may cause malfunctions especially during turning
operations.
❏ We strongly recommend you back up files stored on the
HDD to another storage device periodically.
❏ Epson is not liable for any problems resulting from the
loss or corruption of data on the HDD.
Page 7

Important Safety Instructions
Read all of these instructions before using P-4000, and
keep this guide handy for later reference. Follow all
warnings and instructions marked on P-4000 and the
options.
Warnings, Cautions, and Notes
Warnings
w
must be followed carefully to avoid bodily injury.
Cautions
c
must be observed to avoid damage to your equipment.
Notes
contain important information and useful tips on the
operation of your product.
When using P-4000
❏ Follow all warnings and instructions marked on
this product.
❏ Use only AC adapter model A351H and Li-ion
battery model D111A with this product.
❏ When connecting this product to a computer or
other device with a cable, ensure the correct
orientation of the connectors. Each connector has
only one correct orientation. Inserting a connector
in the wrong orientation may damage both
devices connected by the cable.
❏ Do not insert objects into the slots or openings on
this product.
❏ Do not touch the components inside this product
unless instructed to do so in the user
documentation. Never force this product’s
components into place. Although this product is
designed to be sturdy, rough handling can
damage it.
❏ Never spill liquid onto this product.
❏ If this product emits unusual noises, odors, or
smoke, cancel the current operation and turn it off
immediately. Remove the battery and disconnect
the AC adapter from the product, then unplug the
AC adapter from the power outlet. Contact our
Customer Support.
❏ To prevent fire or electric shock, do not cover this
product with a blanket or other covering that may
give off a static electric shock.
English
1
1
1
1
1
1
1
1
1
1
Introduction 7
Page 8

❏ To prevent fire or electric shock, do not expose
this product or its options to rain or moisture.
❏ Use only AC adapter model A351H and P-4000
(Model G941B) to charge batteries.
❏ To prevent fire or explosion, do not use this
product where flammable or volatile gas is stored.
❏ Do not use this product outdoors during a
thunderstorm.
❏ Do not use this product after moving it between
extreme temperatures, which may cause
condensation to form on electronic parts.
❏ If you use this product in places where the use of
electronic devices is limited, such as in airplanes
or hospitals, follow all instructions in those
places.
When using the battery
❏ If battery a cid gets into you r ey es or on you r sk in,
immediately rinse the affected area thoroughly
with water and seek medical treatment. If a
battery is swallowed, seek medical treatment
immediately.
❏ Use only an Epson Li-ion battery for P-4000
according to the directions in the user
documentation.
❏ Do not use the battery that comes with this
product for other devices.
❏ To protect against short-circuiting, do not remove
the outside case of the battery.
❏ Do not handle the battery with wet hands or use
them near water.
❏ Do not expose the battery to water or high
humidity.
❏ Do not drop, puncture, disassemble, mutilate, or
short-circuit the battery.
❏ Do not place the battery near or into fire or water.
❏ Do not use batteries that are leaking or damaged
in any way.
❏ Do not charge the battery on devices except this
product.
❏ Do not charge the battery near open flame or in
very hot locations.
❏ Keep batteries away from heat sources.
8 Introduction
Page 9

❏ Do not leave the battery in a vehicle to prevent the
battery from overheating.
❏ Do not insert objects into any openings as they
may touch dangerous voltage points or
short-circuit components.
❏ Prevent the battery from coming into contact with
metal objects that could short-circuit it, such as
coins or keys.
❏ Do not insert the battery into power outlets or
other power sources such as car cigarette lighter
sockets.
❏ Do not solder wires or terminals directly to the
battery.
❏ Do not touch battery terminals.
❏ Keep batteries away from open flame if they leak
or smell strange.
❏ If overheating, discoloration, or distortion occur,
remove the battery from this product and do not
use it.
❏ Charge the battery before using it if it has not been
used for a long period.
When Storing the batteries
❏ When not using this device for a long period,
remove the batteries from this product and store
them separately.
❏ Do not store batteries where the temperature or
humidity is very high.
❏ Store batteries out of children’s reach.
When Disposing of the batteries
Before disposing of batteries, make sure you discharge
them completely.
Warning:
w
❏ Be sure to securely cover the all end of the battery
with tape to prevent combustion or explosion
when disposing.
❏ Do not dispose of batteries as ordinary refuse.
Instead, dispose of them in a collection or recycle
box in accordance with local laws.
❏ Do not incinerate or dispose of the battery in fire.
English
1
1
1
1
1
1
1
1
1
1
Introduction 9
Page 10

For European users:
Do not dispose of batteries with ordinary refuse.
Instead, dispose of them in a recycle box in accordance
with local laws.
For users in the United States and Canada:
❏ Place the AC adapter near an electrical outlet
where the power cord can be easily unplugged.
❏ The AC adapter and AC power cable are designed
for use and provided with this product. Do not
attempt to use them with other electronic devices
unless specified.
❏ Do not remove the AC adapter from this device
during operations (connecting the AC adapter
during operations is possible).
This mark indicates that the battery will be
recycled by RBRC. When you dispose of
the battery, contact RBRC.
When using the AC adapter
❏ Use only the type of power source indicated on
the AC adapter’s label, and always supply power
directly from a standard, domestic power outlet
with a power cord that meets the relevant local
safety standards. If you are not sure of the power
supply specifications in your area, contact your
local power company or contact our Customer
Support.
10 Introduction
❏ The AC adapter included is designed for use with
this product. Use of any other adapter could result
in fire, electrical shock, or injury.
❏ Use only AC adapter model A351H with P-4000.
❏ Make sure the total amperage of all devices
plugged into the power outlet does not exceed the
power outlet’s ampere rating.
❏ Do not connect the AC adapter when the battery
is not installed. Otherwise, P-4000 may be
damaged.
Page 11

❏ If you plan to use this product in Germany, the
building installation must be protected by a 16
amp circuit breaker to provide adequate
short-circuit protection and over-current
protection for this product.
❏ To prevent fire or electric shock, do not cover the
AC adapter with a blanket or similar covering.
❏ Position this product’s power cord so that it will
not be stepped on or run over.
English
1
1
❏ Do not use a damaged or frayed AC adapter.
❏ If you use an extension cord with this product,
make sure the total amperage of all devices
plugged into the extension cord does not exceed
the cord’s amperage rating.
❏ Never disassemble, modify, or attempt to repair
the AC adapter by yourself except as specifically
explained in this guide.
❏ Do not use power outlets controlled by wall
switches or automatic timers.
❏ Do not use power outlets on the same circuit as
large motors or other appliances that may cause
voltage fluctuations.
❏ Avoid using outlets on the same circuit as
photocopies or air control systems that regularly
switch on and off.
❏ Do not place any objects on the power cord and
the AC adapter.
❏ Keep the power cord straight at the ends and at
the points where it enters the transformer.
❏ The power cord should be placed to avoid
abrasions, cuts, fraying, crimping, kinking, and
other damage.
❏ If the AC plug does not fit your outlet, have a
proper outlet installed by a qualified electrician.
❏ Remove the AC plug from the outlet during
lightning storms.
For US and Canadian users:
Use the included power cord or a 6 to 10 foot
UL-approved type SPT-2 or heavier type, 2 × 18 AWG
cord with a 125 V 10 A plug and 125 V 7 A connector.
Introduction 11
1
1
1
1
1
1
1
1
Page 12

When using a memory card
❏ Only memory cards designed for the product’s
specifications can be used.
❏ Do not remove a memory card or turn off the
product while the Access lamp is flashing. See
“LCD and control panel” on page 16 to find where
the Access lamp is.
❏ Only use a soft, dry cloth to clean the display. Do
not use liquid or chemical cleaners.
When storing, maintaining, or transporting P-4000
❏ Do not store this product outdoors.
❏ Do not store this product near water.
When using the LCD
❏ The LCD panel on this product may contain a few
small bright or dark spots. These are normal and
do not mean that your LCD panel is damaged in
any way.
❏ If the LCD panel on this product is damaged,
consult your dealer.
❏ If the liquid crystal solution contained in the LCD
panel on this product leaks out and gets onto your
hands, wash them thoroughly with soap and
water. If it gets into your eyes, flush them
immediately with water. If discomfort or vision
problems remain after a thorough flushing, see a
doctor immediately.
12 Introduction
❏ Do not store this product in a location subject to
high temperature or humidity.
❏ Do not store this product in a location subject to
rapid changes in temperature or humidity.
❏ Do not store this product in a location subject to
direct sunlight or strong light sources.
❏ Unplug this product from the power outlet before
cleaning it. Use a damp cloth for cleaning and do
not use liquid or aerosol cleaners.
Page 13

❏ Remove the battery from and unplug this product
and refer servicing to qualified service personal
under the following conditions: The power cord
or plug is damaged; liquid has entered this
product or its options; this product or its options
have been dropped or the case is damaged; this
product or its options do not operate normally or
exhibit a distinct change in performance.
Safety information for United Kingdom users
The following safety information applies to the AC
adapter.
Warning:
w
Refer to the rating plate for the voltage and check that
the appliance voltage corresponds to the supply
voltage.
Important:
The wires in the mains lead fitted to this appliance are
colored in accordance with the following code:
Blue — Neutral
Brown — Live
As the colours of the wires in the mains lead of this appliance
may not correspond with the coloured markings identifying
the terminals in your plug, proceed as follows;
The blue wire must be connected to the terminal in the plug
marked with the letter N.
The brown wire must be connected to the terminal in the
plug marked with the letter L.
If damage occurs to the plug, replace the cord set or consult
a qualified electrician.
For United Kingdom, Hong Kong, and Singapore users
Replace fuses only with fuses of the correct size and
rating.
English
1
1
1
1
1
1
1
1
1
1
Introduction 13
Page 14
Chapter 2
Getting Started
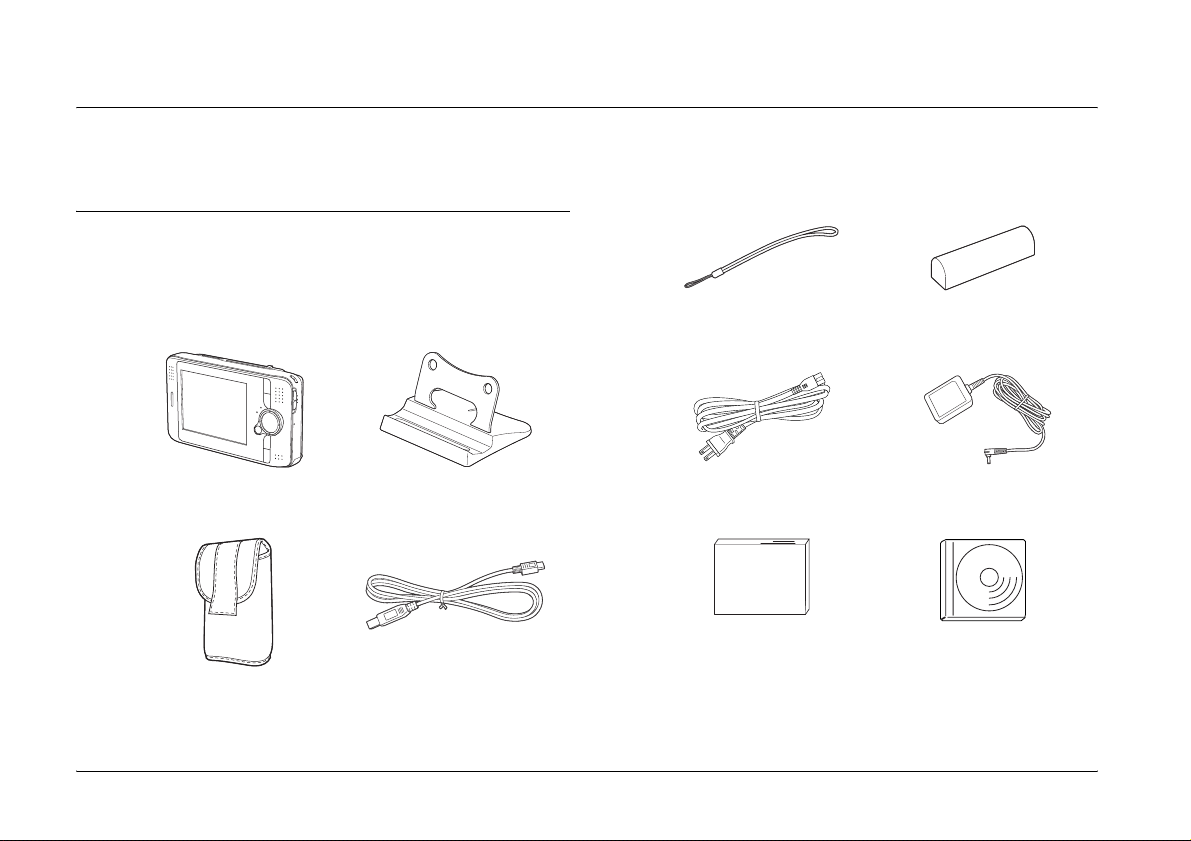
Unpacking Your P-4000
Make sure that all of the items shown below were
included in the box with your P-4000.
Strap
Lithium-ion battery
P-4000
Carrying case
14 Getting Started
Stand
USB cable
Power cable* AC adapter
User’s Guide (this guide)
* The plug type for the power cable may vary, depending on the
local standards.
Software CD-ROM
Page 15
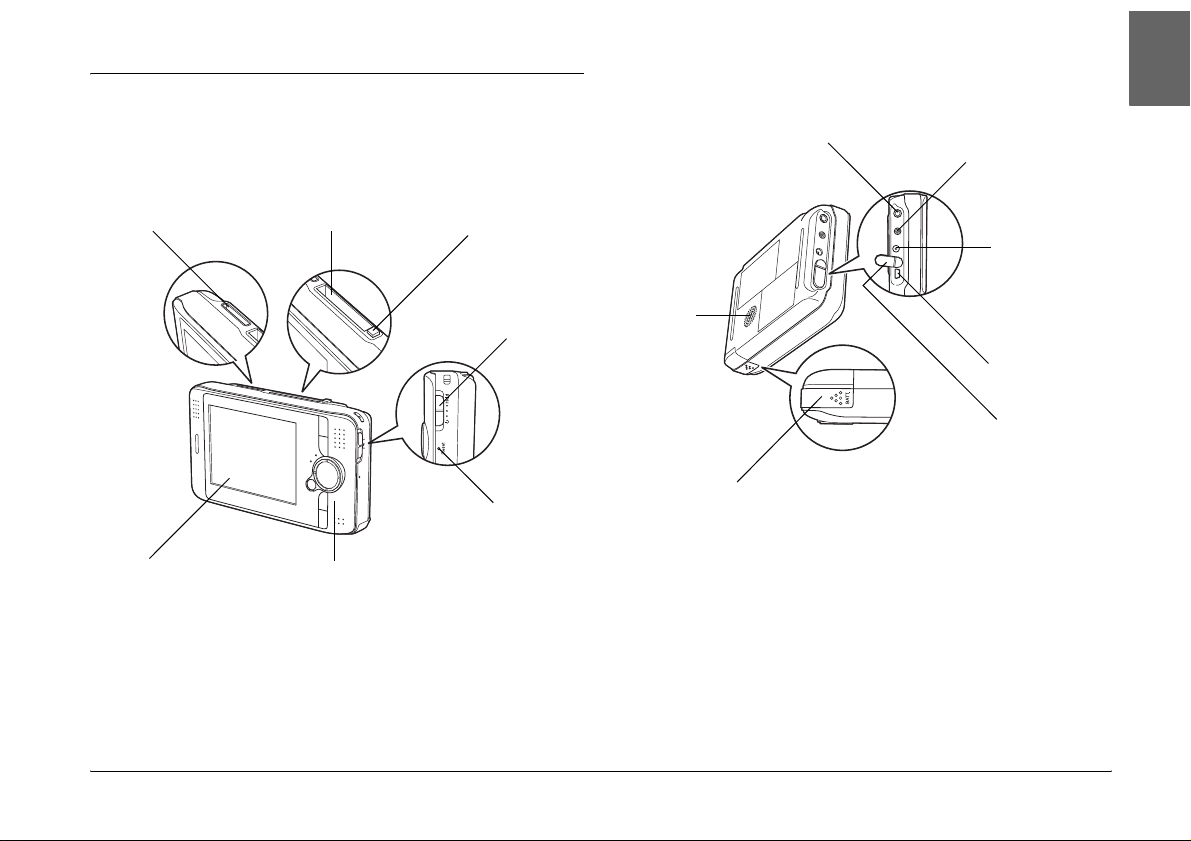
Parts
Front
SD Card slot
CF Card slot
CF Card slot
eject button
Power switch
with Hold
function
Back
Speaker
A/V Out connector
Headphone connector
AC adapter
connector
English
2
2
2
2
LCD
Control panel
Reset button
Battery cover
USB connector
USB connector
rubber cover
Getting Started 15
2
2
2
2
2
2
Page 16
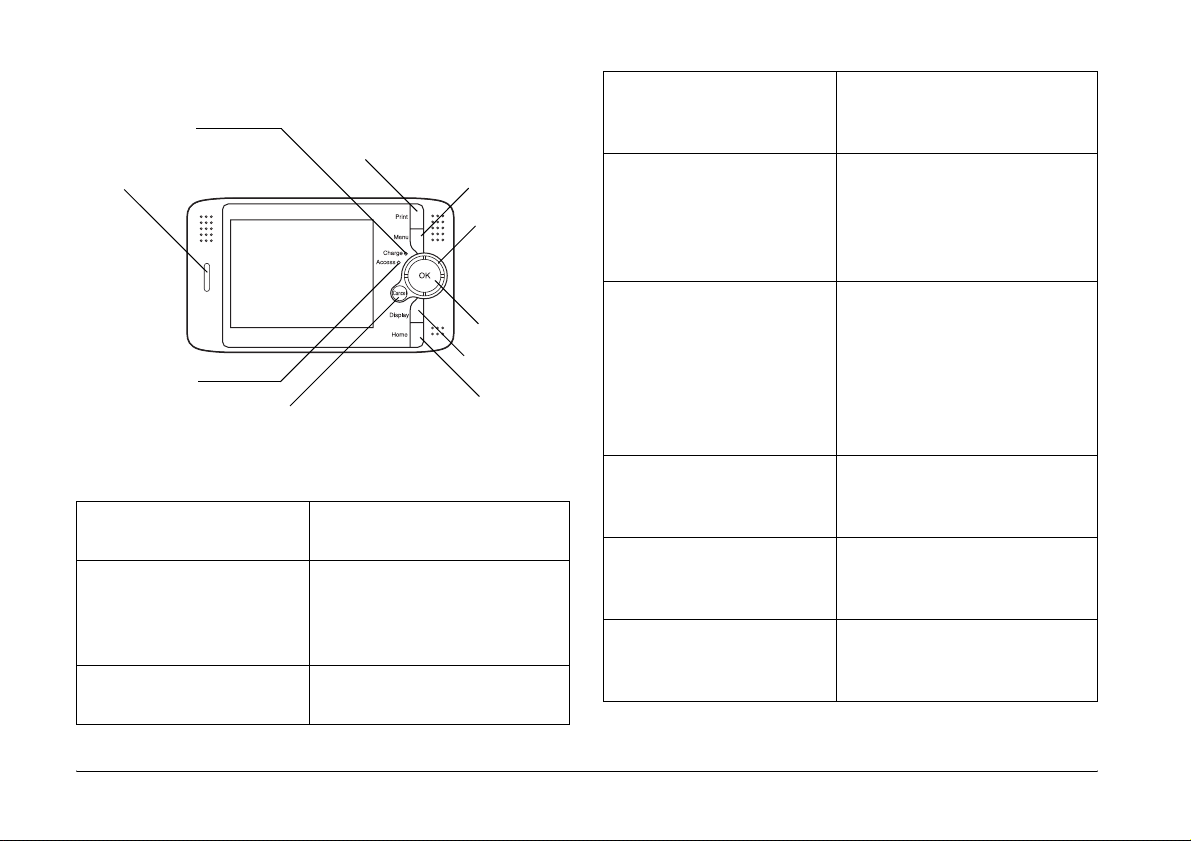
LCD and control panel
Charge lamp
Print button
Illumination lamp
Access lamp
Cancel button
Print button Press this button to display
the Print menu.
Menu button Press this button to display
the pop up menu. For details,
see “Using the Pop Up
Menu” on page 49.
Charge lamp (Green) On when the battery is being
charged.
Menu button
4-way ring
OK button
Display button
Home button
Access lamp (Orange) Flashes when accessing data
on the HDD or a memory
card.
4-way ring
(Up/ Down/Left/Right
button)
Press this button to move the
cursor or highlight. You can
select an object by pressing
this button to the right, left,
up, or down.
Illumination lamp (Blue) Flashes during such
operations as turning the
power on, or during
printing.
The light also flashes when
P-4000 is in the LCD
power-off mode.
OK button Press this button to
determine the selection and
proceed to the next step.
Cancel button Press this button to cancel the
selection and return to the
previous screen.
Display button Press this button to display
information, instructions, or
messages.
16 Getting Started
Page 17
Home button Press this button to go back
to the Home screen.
Setting Up the P-4000
2. Insert the battery into the compartment in the
direction of the arrow on the battery.
arrow
English
2
2
After unpacking your P-4000, set it up so it is ready to
use. This section describes how to charge the battery
and turn the power on and off.
Charging the battery
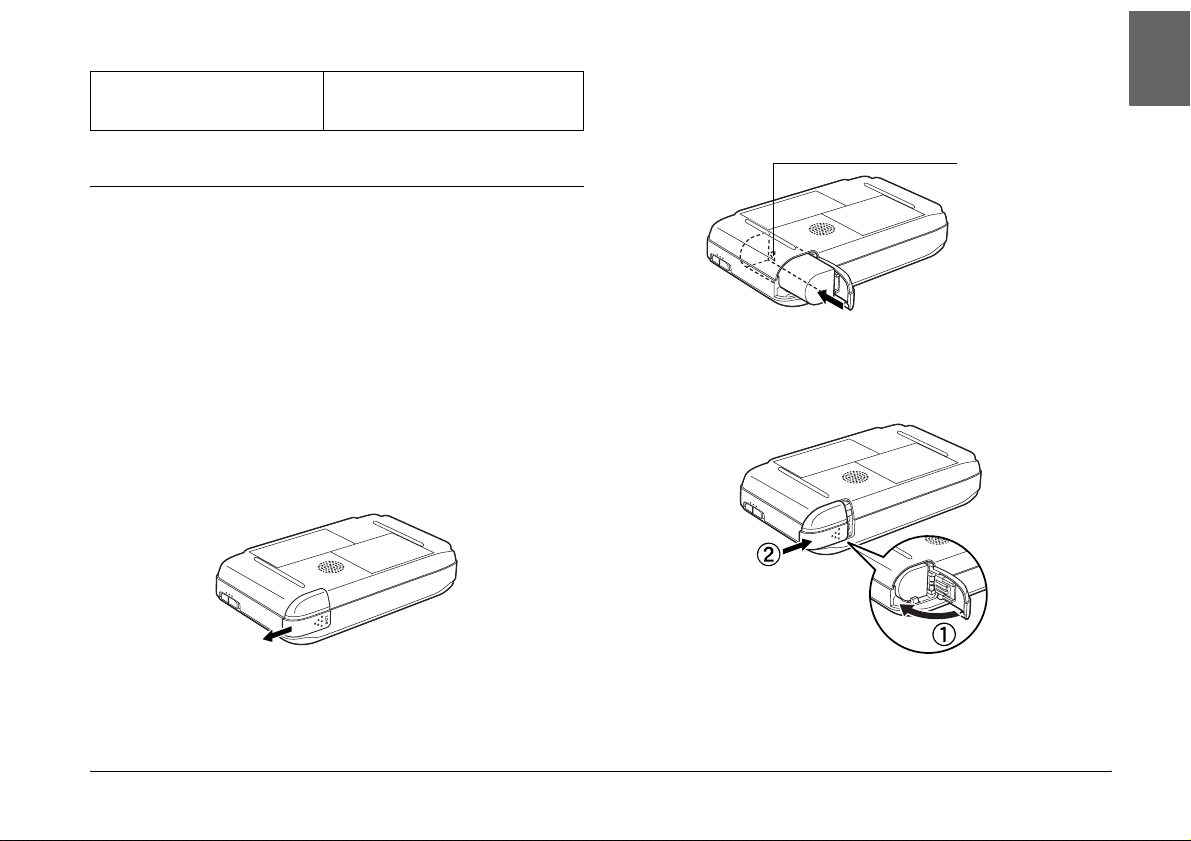
Installing the battery
1. Slide the battery cover to the left.
The battery cover opens.
3. Close the battery cover and slide it to the right
until it clicks.
BATT.
Getting Started 17
2
2
2
2
2
2
2
2
Page 18
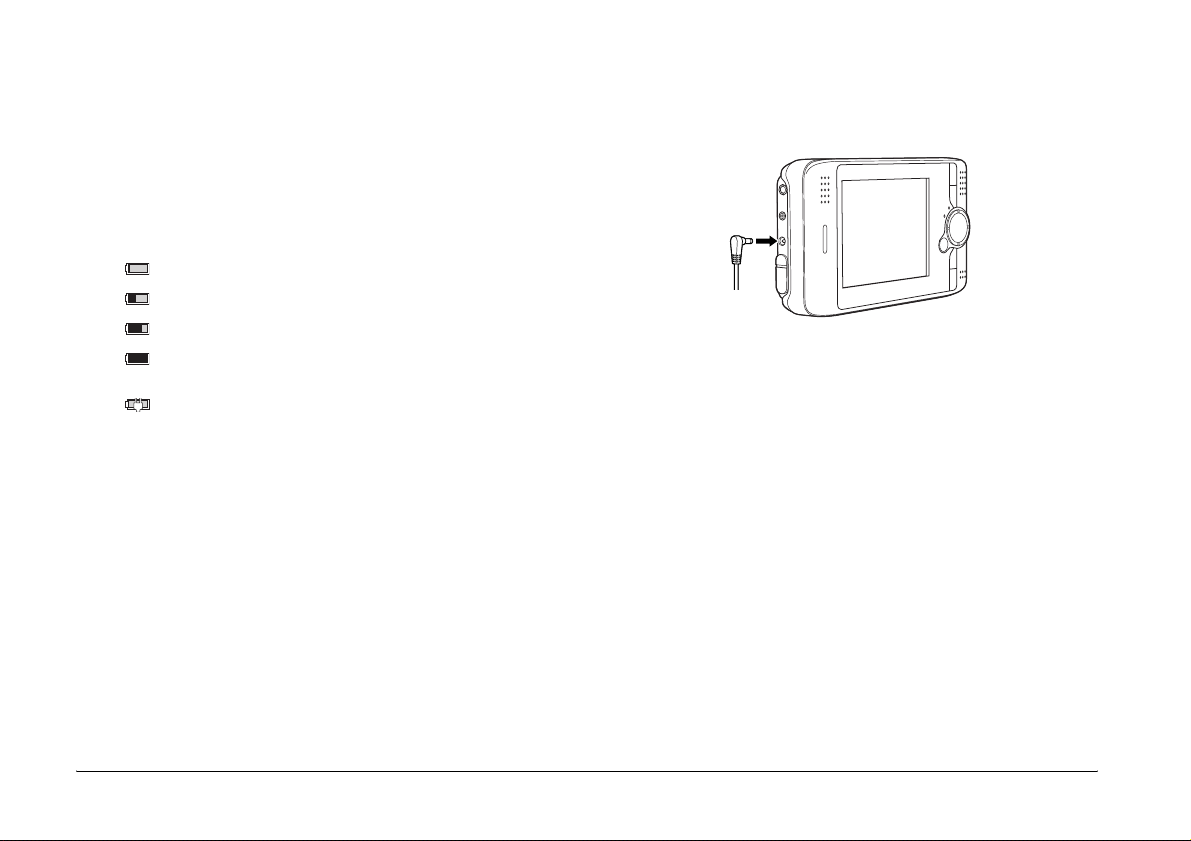
Charging the battery
After installing the battery, charge the battery using
the AC adapter.
Note:
The battery status is always displayed at the top right corner
of the LCD.
: Indicates sufficient battery power.
: Indicates moderate battery power.
: Indicates low battery power.
: Indicates battery power is running out. P-4000 is shut down
automatically. Charge the battery using the AC adapter.
: Indicates the AC adapter is connected to P-4000.
2. Connect the AC adapter to P-4000 as shown below
and plug the other end into a power outlet.
The Charge lamp is on during charging. When the
battery is fully charged, the Charge lamp turns off. It
takes about 3 hours to fully charge the battery when
P-4000 is off. It takes more when you are operating it.
1. Make sure that the battery is installed.
Caution:
c
Do not connect the AC adapter when the battery is
not installed. Doing so may cause P-4000 to be
damaged.
18 Getting Started
Note:
P-4000 stops charging, if the battery becomes hot when
operating it during charging. In that case, it starts charging
again when it cools down.
Page 19

Removing the battery
1. Make sure that P-4000 is turned off.
Caution:
c
❏ Remove the AC adapter if it is connected to
P-4000.
4. Pull out the battery. Then close the battery cover.
English
2
2
❏ Never remove the battery while P-4000 is
turned on. Doing so may cause data in the
card or HDD to be lost or damaged.
2. Open the battery cover.
3. Push the catch down.
The battery is pushed out.
Warning:
w
Do not carry loose batteries in your pockets.
Getting Started 19
2
2
2
2
2
2
2
2
Page 20
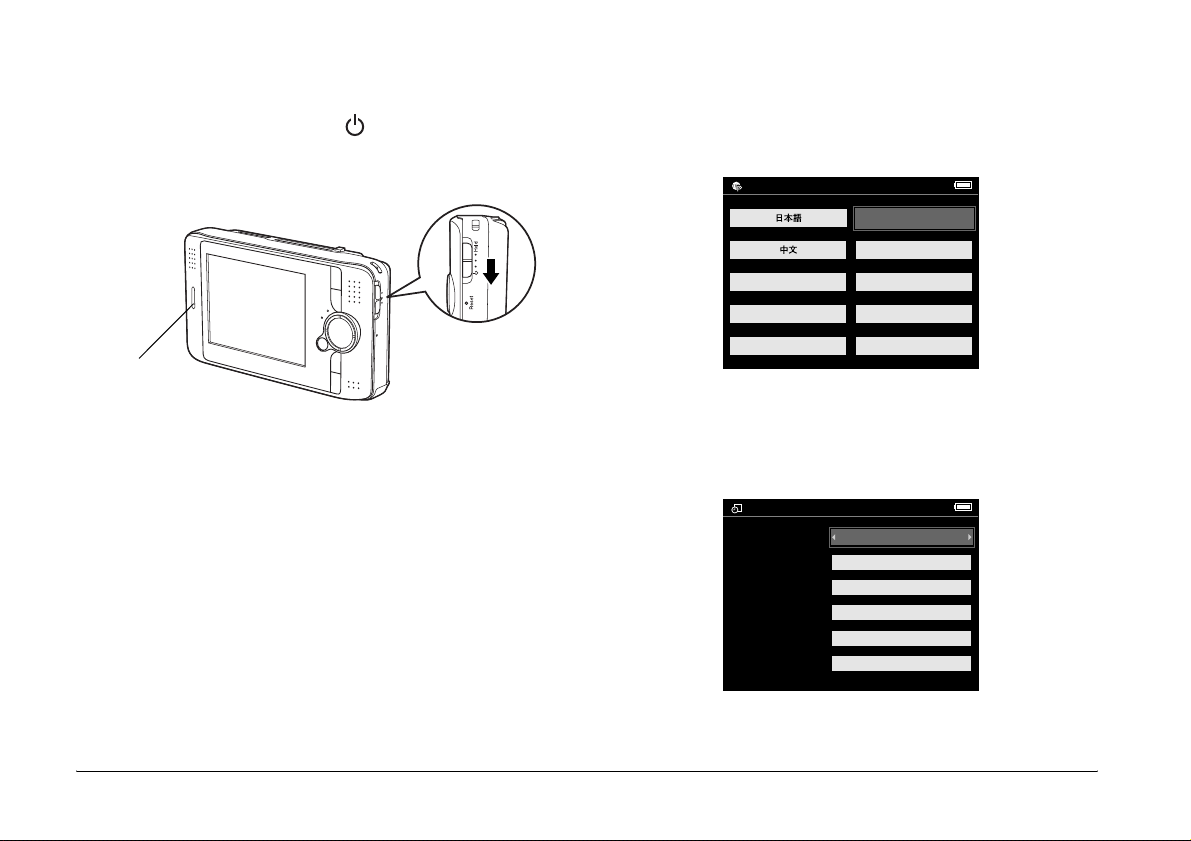
Turning the power on
Slide the power switch to as shown below. The
power switch will return to the original position.
illumination
lamp
The illumination lamp turns on.
When you turn on P-4000 the first time, the Language
setting screen and Date and time settings screen are
displayed. Follow the instructions below.
1. The Language setting screen appears. Select the
language you want to use with the 4-way ring,
and press the OK button.
Language setting
English (Intl.)
Francais
Deutsch
Espanol
Italiano
Nederlands
2. The Date and time settings screen appears. Press
the Right or Left button on the control panel to
change the value of the selected item.
Date and time
Year
Month
Day
Hour
Minute
Date Format
2004
Jul
26
13
07
YYYYMMDD
20 Getting Started
Page 21
3. After you finish making the setting, select a
different item by pressing the UP or Down button
on the control panel.
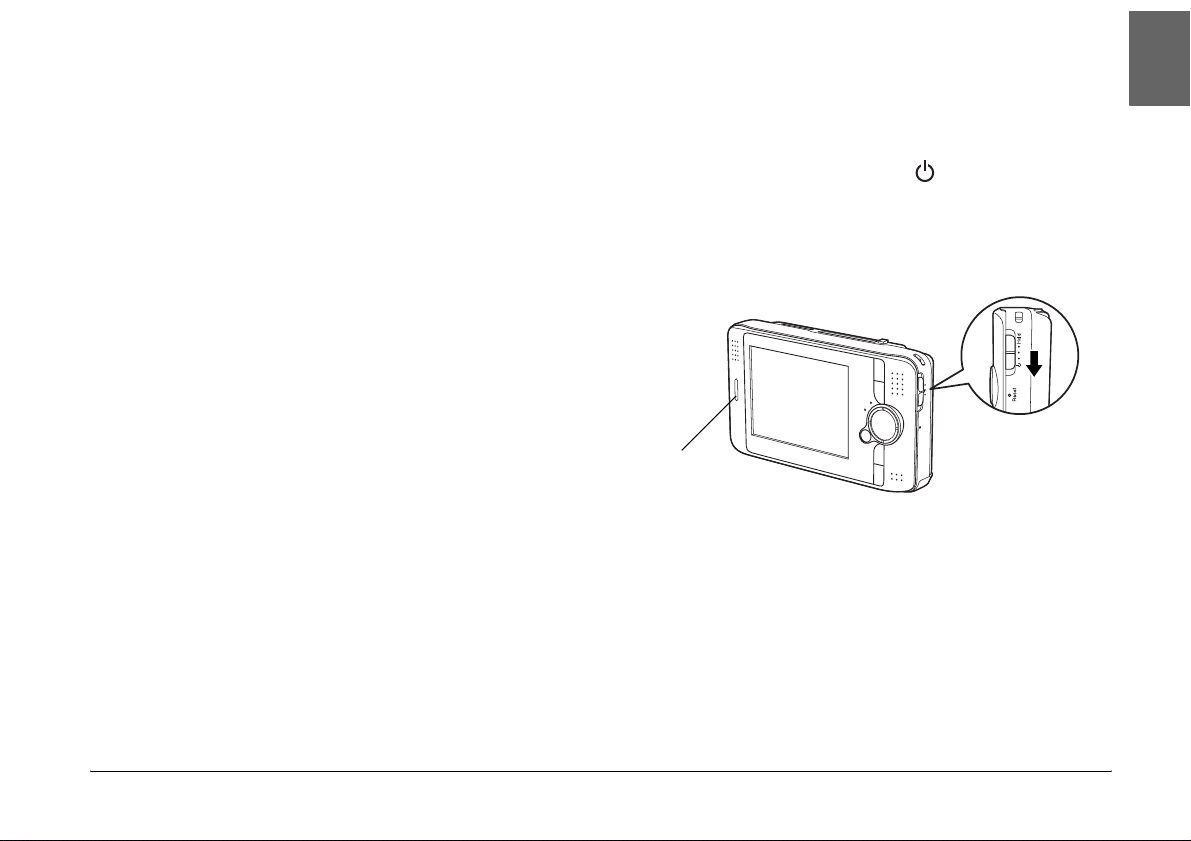
Turning the power off
1. Make sure that the Access lamp is off.
English
2
4. Repeat steps 2 and 3 until you finish making the
date and time settings.
5. After you finish making all settings, press the OK
button.
Note:
❏ If you remove the battery from P-4000, the date and
time settings will be erased after approximately one day
at the most.
❏ If the date and time settings are erased, the Date and
time settings screen is displayed when you turn on
P-4000 next time.
❏ After changing the battery, make sure that the date and
time is set correctly. If necessary, set the date and time
again.
❏ You can change the settings later. See “Changing the
P-4000 Settings” on page 60 for details about setting
the date and time settings.
2. Slide the power switch to as shown below and
hold it down for several seconds until the
illumination lamp turns off. The power switch
will return to the original position.
illumination
lamp
2
2
2
2
2
2
2
2
2
Getting Started 21
Page 22

Holding the button operations
How to use the Home screen
You can make the buttons of P-4000 ineffective
temporarily by sliding the power switch to Hold as
shown below.
Note:
❏ To deactivate hold, slide the power switch back to the
middle.
❏ Putting the button operations on hold is a useful
function when you put P-4000 in your bag while
listening to audio with the headphones.
When turning P-4000 on, the Home screen appears
first. All the operations can be started from this screen.
You can return to the Home screen by pressing the
Home button.
Battery icon
Home
Albums Memory CardSaved Data
Album
shortcut
Latest Data Settings
Battery icon Indicates the remaining
charge in the battery. See
“Charging the battery” on
page 17 for details.
22 Getting Started
Page 23
Saved Data Select to display folders that
include data saved in P-4000
from memory cards.
Latest Data Select to display the latest
data saved in P-4000 from a
memory card.
Albums Select to display albums. See
“Using the Albums” on page
39 to find information on the
albums.
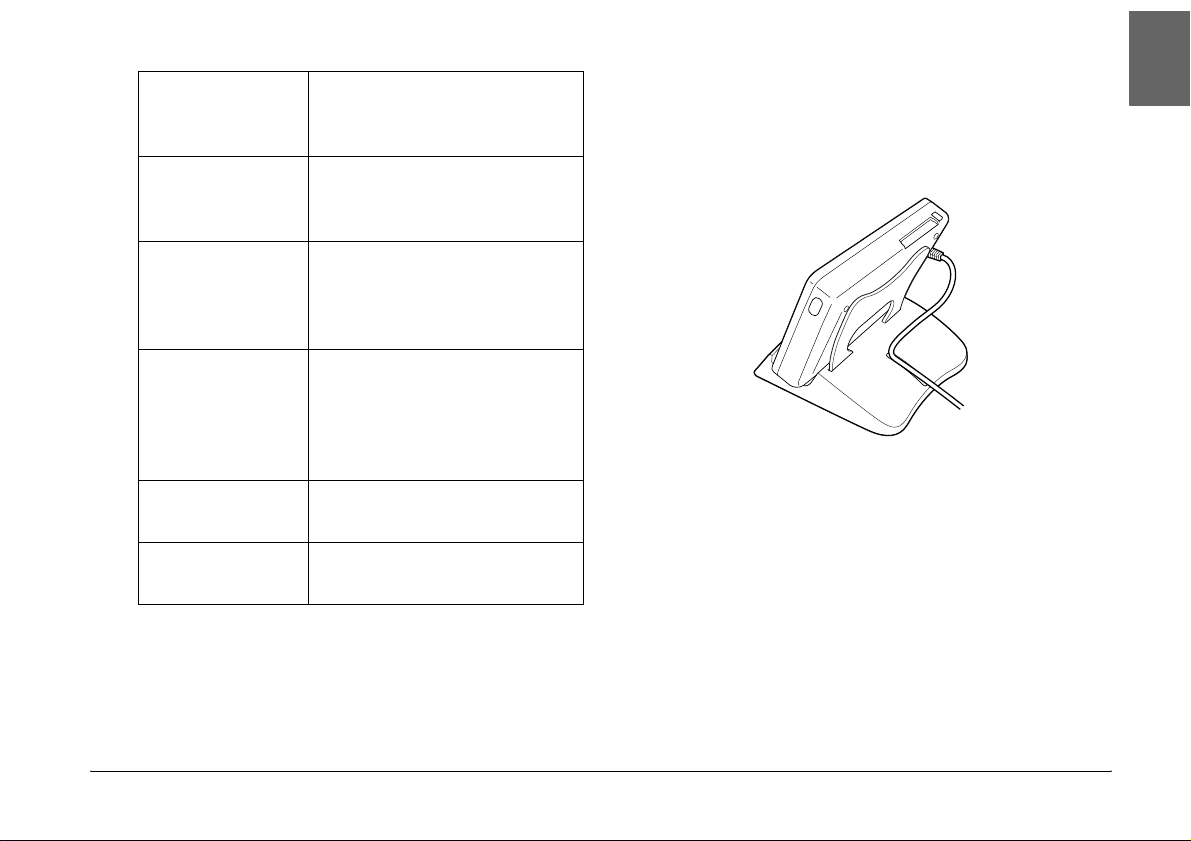
About the stand
You can use the stand when you view images and play
movies. Set P-4000 to the stand as shown below.
English
2
2
2
2
Album shortcut Select to access a favorite
album. You can set a shortcut
icon for an album. See
“Setting an album shortcut”
on page 45 for details.
Memory Card Select to display or copy data
in the memory cards.
Settings Select to set P-4000’s various
settings.
You can also use the pop up menu by pressing the
Menu button. For details, see “Using the Pop Up
Menu” on page 49.
2
2
2
2
2
2
Getting Started 23
Page 24

Chapter 3
Using Memory Cards
Setting and Removing a Memory Card
P-4000 provides you with the CF Card slot and SD
Card slot.
This section describes how to set memory cards and
copy data from them.
Caution:
c
❏ To use a memory card correctly, read manuals
provided with the memory card.
❏ Never remove a memory card while the Access
lamp flashes. Doing so may cause data in the
card or HDD to be lost or damaged.
❏ Do not put stickers on memory cards. The sticker
may peel off, preventing the card from being
ejected and damaging P-4000.
❏ Avoid using or storing the card in direct
sunlight, or in places that are extremely hot,
humid, or dusty.
24 Using Memory Cards
Available types of memory cards
The following memory cards are available.
❏ CF (CompactFlash) memory card (Type1/Type2
and 3.3 V, including Micro Drive)
❏ SD memory card
❏ MultiMedia Card
Note:
A commercially available CF adapter is needed to use other
memory cards. Contact our customer support for details.
Page 25

Setting a memory card into the CF Card slot
You can set a CF card or other card with the CF adapter
in the CF Card slot.
Insert the memory card into the memory card slot with
the back side up to the LCD side. Then push the
memory card fully into the slot.
Removing a memory card from the CF Card slot
1. Make sure that the Access lamp is off.
Caution:
c
Never remove a memory card while the Access
lamp flashes. Doing so may cause data in the
card to be lost or damaged.
English
3
3
3
back side
Note:
Insert memory cards in the correct direction. Otherwise, the
memory card and P-4000 may be damaged.
2. Push the eject button down and it comes out. Then
push it again.
3. The memory card is pushed out. Pull out the
memory card.
Using Memory Cards 25
3
3
3
3
3
3
3
Page 26

Note:
When using the memory card set in the CF adapter, do
not remove only the memory card. Remove the CF
adapter from the P-4000.
Setting a memory card into the SD Card slot
Note:
Insert memory cards in the correct direction. Otherwise, the
memory card and P-4000 may be damaged.
Removing a memory card from the SD Card slot
You can set an SD memory card or MultiMedia card
in the SD Card slot.
Insert the memory card into the memory card slot with
the back side up to the LCD side. Then push the
memory card fully into the slot.
back side
26 Using Memory Cards
1. Make sure that the Access lamp is off.
Caution:
c
Never remove a memory card while the Access
lamp flashes. Doing so may cause data in the
card to be lost or damaged.
2. Push the top part of the memory card.
Page 27

3. The memory card is pushed out. Pull out the
memory card.
4. In the Memory Card operation screen, select
Copy Data from Memory Card by using the Up
or Down button and press the OK button.
English
3
Copying Data from a Memory Card to P-4000
Note:
When the battery is low, copying may not be completed. Use
the AC adapter if this happens.
1. Set the memory card.
2. Select Memory Card in the Home screen and
press the OK button.
3. If necessary, select the memory card from which
you wish to copy the data.
Home
Albums Memory CardSaved Data
Copy Data from Memory Card
Create Album After Copying Data
Browse the Memory Card
Latest Data Settings
Note:
❏ If you wish to make an album after copying, select
Create Album After Copying Data and
press the OK button. Then select an album in
which to copy the data, or create a new album. See
“Creating a new album” on page 42 for
instructions on creating a new album.
3
3
3
3
3
3
3
3
3
Using Memory Cards 27
Page 28

❏ The confirmation dialog box below appears if the
Delete Data After Copying setting in Copy Mode
settings is set to Confirm. For details, see
“Changing the P-4000 Settings” on page 60.
The data you selected are copied in a folder that is
automatically made in P-4000. The folder is named
according to the date, for example “20030325.XXX.”
XXX is the number assigned according to the copying
order.
Home
Do you want to delete data on the
memory card after copying it?
Copied data is verified before deletion.
Albums Memory CardSaved Data
YES
NO
Latest Data Settings
5. Copying starts and the following dialog box
appears.
Home
Albums Memory CardSaved Data
Copying data...
Cancel
Latest Data Settings
Note:
You can also copy data from P-4000 to a memory card by
using the pop up menu. See “Using the Pop Up Menu” on
page 49 for details.
28 Using Memory Cards
Page 29

Chapter 4
Viewing and Playing Data
English
4
4
Viewing Images
This section describes how to view images in the
P-4000’s HDD or the memory cards. When you would
like to manage the data while connected to your
computer, see “Using P-4000 With a Computer” on
page 56.
Available types of image data
P-4000 supports images in the following format.
Supported Files Extension Details
JPEG* .jpg
.jpeg
TIFF .tif
.tiff
Minimum size: 160 × 120 pixels
Maximum size: 17.8 megapixels
Maximum image aspect ratio:
8 : 1
TIFF files that have been
scanned with EPSON F-3200
Scanner.
(displayed only as thumbnails)
Supported Files Extension Details
RAW** .nef
* The progressive JPEG format is not supported.
** P-4000 supports images in RAW format that you have taken with
a digital camera produced by Nikon, Canon, KONICAMINOLTA,
PENTAX, or Epson.
***RAW formatted images taken with an OLYMPUS digital camera
can be displayed only as thumbnails.
.crw
.erf
.cr2
.mrw
.pef
.orf***
Viewing and Playing Data 29
JPEG data stored in the header
of RAW files are displayed.
4
4
4
4
4
4
4
4
Page 30

How to see the screen
f
When you use the P-4000, you will find many icons on
the screen. The illustration below shows what those
icons indicate.
Albums
a
PC_DATA Scenery Flower Travel
Album1 Travel2 New Album3
d
Photo Favorite Album4
e
Albums / XXXXX
DSC00001 DSC00002.mpg DSC00003.tif DSC00004.JPG
n
m
XXXXX05.mp3 DSC00006.JPG DSC00007.JPG DSC00007.txt
l
DSC00008.erf
k
g
b
c
h
i
j
a Indicates the PC_DATA folder. See “About the PC_DATA
folder” on page 39 for details.
b Indicates the battery status. See “Charging the battery”
on page 18 for details.
c Indicates a folder that includes an audio file and does not
include image or video files.
d Indicates that the album is set as an album shortcut.
e Indicates a folder that was made on a computer and
copied to an album in P-4000.
f Indicates a supported movie file.
g Indicates an image file in TIFF format.
h Indicates an image file with P.I.F. frame.*
i Indicates unsupported data, such as a document.**
j Indicates an unsupported image file.
k Indicates that the data is locked. See “Protecting Data”
on page 48 for details.
l Indicates an image file in RAW format.
m Indicates that the print order setting is set for the image.
The number next to the icon indicates the print quantity.
n Indicates a supported audio file.
* P.I.F. icons are displayed only in Saved Data.
** You can set whether unsupported files are displayed or not. The
factory setting is Hide. See “Changing the P-4000 Settings” on
page 60 for details.
30 Viewing and Playing Data
Page 31

Note:
❏ Files whose names contain characters other than
alphanumeric are not displayed.
❏ When you select an album, data and subfolders
included directly in the selected folder are displayed.
Subfolders are displayed as icon.
❏ When you select a folder in the Saved Data, all data
including data in subfolders are displayed and
subfolders are not displayed.
❏ Information or instructions are displayed by pressing
the Display button. Information and instructions vary
depending on the screen when you press the Display
button.
Displaying images
You can display all images in the Saved Data, Albums,
or memory cards as thumbnails. You can also display
an image in full-screen format by selecting the
specified image from the listed images.
2. For images in P-4000, select Saved Data or
Albums in the Home screen, press the OK button,
and go to step 5.
For images in the memory card, select Memory
Card in the Home screen, press the OK button,
and go to the next step.
Home
Albums Memory CardSaved Data
Latest Data Settings
Note:
You can also access the latest saved folder by selecting
Latest Data. When you select Latest Data, go to
step 6.
English
4
4
4
4
4
4
4
4
1. If you want to view images in a memory card,
make sure that you set the memory card in the
card slot.
4
4
Viewing and Playing Data 31
Page 32

3. Select the memory card that includes the images
that you want to view.
Home
4. In the Memory Card operation screen, select
Browse the Memory Card by using the Up or
Down button, and press the OK button. Skip the
next step and go to step 6.
Albums Memory CardSaved Data
Select a memory card
CompactFlash
SD Memory Card
Latest Data Settings
Note:
This screen is displayed only when two memory cards
are set.
Home
Albums Memory CardSaved Data
Copy Data from Memory Card
Create Album After Copying Data
Browse the Memory Card
Latest Data Settings
5. Folders or albums including data such as images,
videos, or audio appear. Select the folder or album
which includes images you want to view by using
the 4-way ring, and press the OK button.
Saved Data
20040829\002 20040827\001 20040820\001 20040818\003
20040815\001 20040813\001 20040810\002 20040805\001
20040801\005 20040720\002 20040715\003 20040630\001
32 Viewing and Playing Data
Page 33

Note:
❏ In the Saved Data screen, folders are displayed as
grouped for every memory card.You can change
the setting to display folders as grouped for every
saved date. See “Using the Pop Up Menu” on page
49 or “Changing the P-4000 Settings” on page 60
for details.
❏ Holding the Up or Down button for a few seconds
switches pages without moving the highlight.
6. Thumbnails of the images and other data are
displayed. Select the image you want to view, and
press the OK button.
Saved Data / 2004.08.26
DSC00321.JPG DSC00322.mpg DSC00323.JPG DSC00324.JPG
DSC00325.JPG DSC00326.JPG DSC00327.JPG DSC00328.JPG
DSC00329.JPG DSC00330.JPG DSC00331.JPG
Note:
Holding the Up or Down button for a few seconds
switches pages without moving the highlight.
7. The selected image is enlarged to fit the full
screen.
Note:
Pressing the Right displays the next image and
pressing the Left button displays the previous image.
Video, audio, and unsupported data are skipped.
Functions when displaying an image in the full screen
When you display an image in the full screen, the
following functions are available.
Zooming in an image
Press the OK button. The image is zoomed in.
English
4
4
4
4
4
4
4
4
4
4
Viewing and Playing Data 33
Page 34

Note:
❏ Pressing the Cancel button zooms out the image.
❏ You cannot rotate the JPEG files larger than 8.9
megapixels.
❏ Pressing the Cancel button for a few seconds zooms
the image out to the full screen.
❏ You can move the part of the image displayed by
pressing the 4-way ring.
Rotating an image
Note:
This function is available only for images in albums.
1. Press the Menu button to display the pop up
menu, then select Rotate.
2. The r icon is displayed next to Rotate. Press the
Right button.
3. The sub menu appears. Select Right to rotate the
image 90° clockwise or Left to rotate it 90°
counterclockwise.
Note:
❏ You can select other images in the folder to rotate
by selecting Right-Select or Left-Select in the
sub menu.
4. Press the OK button. Rotating the image starts.
Displaying information
Press the Display button. Exif information on the
image is displayed. You can switch the displayed
information to the histograms or operating
instructions by pressing the Display button.
34 Viewing and Playing Data
Page 35

Displaying images as a slide show
You can display images in a folder or memory card as
a slide show.
Note:
❏ Only images in the JPEG format can be displayed as a
slide show.
❏ It may take a long time to display depend on an image
you select.
1. Select a folder or data you want to display as a
slide show.
The slide show starts.
Note:
❏ The slide show effect, duration, and BGM (Back
Ground Music) can be selected. See “Using the
Pop Up Menu” on page 49, or “Changing the
P-4000 Settings” on page 60 for details.
❏ When BGM is set, you can turn the volume up or
down by pressing the Up or Down button.
Playing Videos/Audio
English
4
4
4
4
4
2. Press the Menu button to display the pop up
menu. Then select Start Slide Show and press the
OK button.
Albums
Edit Album Name
Set as Album Shortcut
PC_DATA Scenery Flower Travel
Lock
Start Slide Show
Sort by Album Name
Copy to Memory Card
Delete Album
Album1 Travel2
Photo Favorite Album4
New Album3
This section describes how to play videos and audio
in the P-4000’s HDD or the memory cards.
Available types of video/audio data
P-4000 supports video/audio data in the following
format.
Viewing and Playing Data 35
4
4
4
4
4
Page 36

Video
File
Format
AVI MPEG4
MOV MPEG4
MP4 MPEG4
Video codec Audio codec Detail*
(Simple
Profile)
Motion-JPEG ALaw
(Simple
Profile)
Motion-JPEG ALaw
(Simple
Profile)
AAC
MP3
µLaw
PCM
AAC Minimum resolution:
µLaw
PCM
AAC Minimum resolution:
Minimum resolution:
160 × 112 pixels
Maximum resolution:
640 × 480 pixels
Maximum bit rate:
2.5 Mbps (Ave.) (at 30 fps)
Minimum resolution:
160 × 112 pixels
Maximum resolution:
640 × 480 pixels
Maximum bit rate: 3 Mbps
160 × 112 pixels
Maximum resolution:
640 × 480 pixels
Maximum bit rate:
2.5 Mbps (Ave.) (at 30 fps)
Minimum resolution:
160 × 112 pixels
Maximum resolution:
640 × 480 pixels
Maximum bit rate: 3 Mbps
160 × 112 pixels
Maximum resolution:
640 × 480 pixels
Maximum bit rate:
2.5 Mbps (Ave.) (at 30 fps)
File
Format
ASF MPEG4
Video codec Audio codec Detail*
(Simple
Profile)
* P-4000 supports video data of up to 2 GB.
ADPCM Minimum resolution:
160 × 112 pixels
Maximum resolution:
640 × 480 pixels
Maximum bit rate:
2.5 Mbps (Ave.) (at 30 fps)
Audio
File Format Audio codec Detail*
M4A AAC (MPEG4) Maximum bit rate: 320 kbps
MP3 MP3 Maximum bit rate: 320 kbps
* P-4000 supports audio data of up to100 MB.
Note:
❏ Some data cannot be played with P-4000 depending on
the files.
❏ WMV, MPEG1/2, and DVD-Video are not supported.
(48 kHz, 16 bit Stereo)
(48 kHz, 16 bit Stereo)
36 Viewing and Playing Data
Page 37

Playing videos/audio with P-4000
Select a video or audio that you want to play in the
P-4000 or a memory card, and press the OK button.
Saved Data / 2004.08.26
❏ You can listen to the audio using the headphones.
When doing so, make sure that you insert the
headphone cable into the headphone connector.
Using buttons while playing videos/audio
English
4
4
DSC00321.JPG DSC00322.mpg DSC00323.JPG DSC00324.JPG
DSC00325.JPG DSC00326.JPG DSC00327.JPG DSC00328.JPG
DSC00329.JPG DSC00330.JPG DSC00331.JPG
The selected video or audio starts playing.
Note:
❏ All videos are played with the LCD resolution (640
480 pixel).
❏ When no key operations are performed for a few seconds
while playing audio, the LCD turns off to conserve the
battery. The LCD turns on when you press any button.
❏ You can register audio data as the slide show BGM
using the pop up menu. See “Using the Pop Up Menu”
on page 49 for details.
×
The tables below describe how the buttons work while
playing videos/audio.
videos
Button Function
OK button* Pause the video
Cancel button Stop the video and return to the
Up button Turn the volume up
Down button Turn the volume down
Left button** Rewind the video
Right button** Forward the video
* You can start playing the video again by pressing the OK button
while it is paused.
** Pressing the Left /Right button for a few second s rewinds/forwards
the video continuously.
previous screen.
Viewing and Playing Data 37
4
4
4
4
4
4
4
4
Page 38

Audio
Button Function
OK button* Pause the audio
Cancel button Stop the audio and return to the
Up button Turn the volume up
Down button Turn the volume down
Left button** Skip back to the beginning of the
Right button** Skip to the next audio.
* You can start playing the audio again by pressing the OK button
while it is paused.
** Pressing the Left/Right button for a few seconds rewinds/forward
the audio.
previous screen.
audio that is currently playing. If you
press the button at the beginning of
the audio, the audio is skipped back to
the previous one.
38 Viewing and Playing Data
Page 39

Chapter 5
Managing Data
English
5
5
Using the Albums
In the Albums, you can create albums copying your
favorite images, videos, and audio from the Saved
Data or a memory card and manage these data. You
can classify and manage your data easily by making
albums.
Albums already named exist as a default, and you can
also name albums as you like.
For easy operation, you can create album shortcuts on
the Home screen. See “Setting an album shortcut” on
page 45 for details.
About the PC_DATA folder
In the Albums, PC_DATA folder exists as a default.
When you copy data from your computer to P-4000
using the Explorer or Finder, copy data to the
PC_DATA folder.
Albums
PC_DATA Scenery Flower Travel
Album1 Travel2 New Album3
Photo Favorite Album4
Note:
❏ The name of the PC_DATA folder cannot be changed.
❏ The PC_DATA folder cannot be deleted.
Managing Data 39
5
5
5
5
5
5
5
5
Page 40

❏ You cannot set the data in the PC_DATA folder as an
album thumbnail.
2. Press the Menu button to display the pop up
menu, and select Copy to Album by using the Up
or Down button.
Copying the favorite data to an album
1. Select the data to be copied to an album in the
thumbnails screen.
Saved Data / 2004.08.26
DSC00321.JPG DSC00322.mpg DSC00323.JPG DSC00324.JPG
DSC00325.JPG DSC00326.JPG DSC00327.JPG DSC00328.JPG
DSC00329.JPG DSC00330.JPG DSC00331.JPG
Note:
You can also select an image in full screen or a folder.
In that case, go to the next step and skip 3 and 4.
Saved Data / 2004.08.26
Copy to Album
Set as Folder Thumbnail
DSC00331.JPG DSC00330.mpg DSC00329.JPG DSC00328.JPG
Lock
Start Slide Show
Copy to Memory Card
Print Order
Delete
DSC00327.JPG DSC00326.JPG DSC00325.JPG DSC00324.JPG
DSC00323.JPG DSC00322.JPG DSC00321.JPG
3. The r icon is displayed next to Copy to Album.
Press the Right button.
40 Managing Data
Page 41

4. The sub menu appears. If you want to copy only
the selected data to an album, select This Data. If
you want to copy all the data in the folder, select
All. If you want to select the data to be copied,
select Select. Then press the OK button.
Saved Data / 2004.08.26
Copy to Album
Set as Folder Thumbnail
DSC00331.JPG DSC00330.mpg DSC00329.JPG DSC00328.JPG
Lock
Start Slide Show
Copy to Memory Card
Print Order
Delete
DSC00327.JPG DSC00326.JPG DSC00325.JPG DSC00324.JPG
DSC00323.JPG DSC00322.JPG DSC00321.JPG
This Data
All
Select
Note:
When you select Select, data in the folder are
displayed as thumbnails. Select the data you want to
copy and press the OK button. The selected data is
checked. After all the data you want to copy to an album
are selected, press the Menu button.
Select Image for Album
DSC00331.JPG DSC00330.mpg DSC00329.JPG DSC00328.JPG
DSC00327.JPG DSC00326.JPG DSC00325.JPG
Press Menu to finish selection
DSC00324.JPG
5. Select an album in which to copy the data, and
press the OK button.
English
5
5
5
5
5
5
Saved Data / 2004.08.26
Please select an album
DSC00331.JPG DSC00330.mpg DSC00329.JPG DSC00328.JPG
New
PC_DATA
Scenary
Flower
Travel
DSC00327.JPG DSC00326.JPG DSC00325.JPG DSC00324.JPG
Album1
Travel2
DSC00323.JPG DSC00322.JPG DSC00321.JPG
Managing Data 41
5
5
5
5
Page 42

Copying to the album starts.
Note:
You can make a new album by selecting New. See the
following “Creating a new album” for details.
Creating a new album
1. Follow steps 1 through 4 of “Copying the favorite
data to an album” on page 40.
2. Select New and press the OK button.
Saved Data / 2004.08.26
Please select an album
DSC00331.JPG DSC00330.mpg DSC00329.JPG DSC00328.JPG
New
PC_DATA
Scenary
Flower
Travel
DSC00327.JPG DSC00326.JPG DSC00325.JPG DSC00324.JPG
Album1
Travel2
DSC00323.JPG DSC00322.JPG DSC00321.JPG
3. If you want to use one of the preset album names,
select the album’s name from the displayed list,
and press the OK button. Copying data to the
album starts.
Saved Data / 2004.08.26
Please select album name
DSC00331.JPG DSC00330.mpg DSC00329.JPG DSC00328.JPG
Text Input
Favorites
Album
Family
Children
DSC00327.JPG DSC00326.JPG DSC00325.JPG DSC00324.JPG
Travel
Snapshot
DSC00323.JPG DSC00322.JPG DSC00321.JPG
Note:
When you select a name which already exists, the new
album is named with a number at the end of its name.
If you want to name the album yourself, select
Text Input and press the OK button. Then go to
the next step.
42 Managing Data
Page 43

4. The on-screen keyboard appears. Select a letter by
using the 4-way ring and press the OK button to
input the selected letter.
Saved Data / 2004.08.26
DSC00331.JPG DSC00330.mpg DSC00329.JPG DSC00328.JPG
A B C D E F G
H I J K L M N
O P Q R S T U
DSC00327.JPG DSC00326.JPG DSC00325.JPG DSC00324.JPG
V W X Y Z _
DSC00323.JPG DSC00322.JPG DSC00321.JPG
Note:
❏ To switch the letters between uppercase and
lowercase, select CAPS and press the OK button.
❏ To delete the last letter input, press the Cancel
button or select BACKSPACE on the screen and
press the OK button. To delete everything that
was input, select Cancel on the screen and press
the OK button.
5. After you input the name, select OK on the screen
by using the 4-way ring and press the OK button
to fix it.
T
CAPS
Cancel OK
BACKSPACE
1 2 3
4 5 6
7 8 9
0
Changing an album’s name
1. Select an album that you want to change the name
of, in the Albums.
Albums
PC_DATA Scenery Flower Travel
Album1 Travel2
Photo Favorite Album4
2. Press the Menu button to display the pop up
menu.
New Album3
English
5
5
5
5
5
5
5
5
5
Managing Data 43
5
Page 44

3. Select Edit Album Name by using the Up or
Down button, and press the OK button.
Albums
Edit Album Name
Set as Album Shortcut
PC_DATA Scenery Flower Travel
Lock
Start Slide Show
Sort by Album Name
Copy to Memory Card
Delete Album
Album1 Travel2
Photo Favorite Album4
New Album3
4. Follow steps 4 through 5 of “Creating a new
album” on page 42.
Deleting an album
1. Select an album to delete in the Albums.
Albums
PC_DATA Scenery Flower Travel
Album1 Travel2
Photo Favorite Album4
2. Press the Menu button to display the pop up
menu, and select Delete Album by using the Up
or Down button. Then press the OK button.
Albums
Edit Album Name
Set as Album Shortcut
PC_DATA Scenery Flower Travel
Lock
Start Slide Show
Sort by Album Name
Copy to Memory Card
Delete Album
Album1 Travel2
New Album3
New Album3
44 Managing Data
Photo Favorite Album4
Page 45

3. The confirmation dialog box appears. Select Yes
and press the OK button.
1. Select an album that you want to make an album
shortcut for.
English
5
Albums
PC_DATA Scenery Flower Travel
Are you sure you want to delete the data?
Yes
Album1 Travel2
Photo Favorite Album4
New Album3
No
Note:
If the deleted album was set as the album shortcut, the
shortcut on the Home screen is also deleted.
Setting an album shortcut
You can create an album shortcut on the Home screen.
The shortcut enables you to access your favorite
albums easily.
Albums
PC_DATA Scenery Flower Travel
Album1 Travel2
Photo Favorite Album4
New Album3
2. Press the Menu button to display the pop up
menu, and select Set as Album Shortcut by using
the Up or Down button. Then press the OK
button.
Albums
Edit Album Name
Set as Album Shortcut
PC_DATA Scenery Flower Travel
Lock
Start Slide Show
Sort by Album Name
Copy to Memory Card
Delete Album
Album1 Travel2
Photo Favorite Album4
New Album3
5
5
5
5
5
5
5
5
5
Managing Data 45
Page 46

Note:
When you set an album as an album shortcut, icon is
displayed on that album.
2. Press the Menu button to display the pop up
menu, and select Delete by using the Up or
Down button.
Saved Data / 2004.08.26
Deleting Data
1. Select the data that you want to delete in the
thumbnails screen.
Saved Data / 2004.08.26
DSC00321.JPG DSC00322.mpg DSC00323.JPG DSC00324.JPG
DSC00325.JPG DSC00326.JPG DSC00327.JPG DSC00328.JPG
DSC00329.JPG DSC00330.JPG DSC00331.JPG
Note:
You can also select an image in full screen or a folder.
In that case, go to the next step and skip 3 and 4.
46 Managing Data
Copy to Album
Set as Folder Thumbnail
DSC00331.JPG DSC00330.mpg DSC00329.JPG DSC00328.JPG
Lock
Start Slide Show
Copy to Memory Card
Print Order
Delete
DSC00327.JPG DSC00326.JPG DSC00325.JPG DSC00324.JPG
DSC00323.JPG DSC00322.JPG DSC00321.JPG
3. The r icon is displayed next to Delete. Press the
Right button.
Page 47

4. The sub menu appears. If you want to delete only
the selected data, select This Data. If you want to
delete all the data in the folder, select All. If you
want to select the data to be deleted in the folder,
select Select. Then press the OK button.
Saved Data / 2004.08.26
Copy to Album
Set as Folder Thumbnail
DSC00331.JPG DSC00330.mpg DSC00329.JPG DSC00328.JPG
Lock
Start Slide Show
Copy to Memory Card
Print Order
Delete
DSC00327.JPG DSC00326.JPG DSC00325.JPG DSC00324.JPG
DSC00323.JPG DSC00322.JPG DSC00321.JPG
This Data
All
Select
Note:
When you select Select, data in the folder are
displayed as thumbnails. Select the data you want to
delete and press the OK button. The selected data is
checked. After all the data you want to delete are
selected, press the Menu button to delete the selected
data.
Select Images to Delete
DSC00321.JPG DSC00322.mpg DSC00323.JPG DSC00324.JPG
DSC00325.JPG DSC00326.JPG DSC00327.JPG
DSC00328.JPG
English
5
5
5
5
5
Press Menu to finish selection
5
5
5
5
5
Managing Data 47
Page 48

5. The confirmation dialog box appears. Select Yes
and press the OK button.
Protecting Data
Saved Data / 2004.08.26
DSC00331.JPG DSC00330.mpg DSC00329.JPG DSC00328.JPG
Are you sure you want to delete the data?
DSC00327.JPG DSC00326.JPG DSC00325.JPG DSC00324.JPG
DSC00323.JPG DSC00322.JPG DSC00321.JPG
Yes
No
You can lock the selected data or folder. When the item
is locked, the icon is displayed and cannot be
deleted or rotated.
1. Select the data or folder that you want to lock.
2. Press the Menu button to display the pop up
menu, and select Lock by using the Up or Down
button. Then press the OK button.
Saved Data / 2004.08.26
Copy to Album
Set as Folder Thumbnail
DSC00331.JPG DSC00330.mpg DSC00329.JPG DSC00328.JPG
Lock
Start Slide Show
Copy to Memory Card
Print Order
Delete
DSC00327.JPG DSC00326.JPG DSC00325.JPG DSC00324.JPG
DSC00323.JPG DSC00322.JPG DSC00321.JPG
Note:
The lock on the data remains in effect until you unlock it,
even if yo turn off the P-4000.
48 Managing Data
Page 49

Setting an Album/Folder Thumbnail
You can set your favorite data as thumbnails for the
album or folder in the Saved Data.
1. Select the data you want to set as the thumbnail
for the album or folder in the Saved Data.
2. Press the Menu button to display the pop up
menu, and select Set as the Album Thumbnail
or Set as Folder Thumbnail by using the Up or
Down button. Then press the OK button.
Saved Data / 2004.08.26
Copy to Album
Set as Folder Thumbnail
DSC00331.JPG DSC00330.mpg DSC00329.JPG DSC00328.JPG
Lock
Start Slide Show
Copy to Memory Card
Print Order
Delete
DSC00327.JPG DSC00326.JPG DSC00325.JPG DSC00324.JPG
Using the Pop Up Menu
Pressing the Menu button displays the pop up menu.
The menu varies depending on the situation when you
press the Menu button. See the following table for
details.
Saved Data / 2004.08.26
Copy to Album
Set as Folder Thumbnail
DSC00331.JPG DSC00330.mpg DSC00329.JPG DSC00328.JPG
Lock
Start Slide Show
Copy to Memory Card
Print Order
Delete
DSC00327.JPG DSC00326.JPG DSC00325.JPG DSC00324.JPG
DSC00323.JPG DSC00322.JPG DSC00321.JPG
Settings available in the pop up menu
English
5
5
5
5
5
5
5
DSC00323.JPG DSC00322.JPG DSC00321.JPG
Setting Detail
Copy from Memory
Card
Copy to Album Copy the selected data or folder to an album.
Copy the selected data in a memory card to the
HDD.
See “Copying the favorite data to an album” on
page 40 for details.
Managing Data 49
5
5
5
Page 50

Setting Detail
Copy to Memory
Card
Delete Delete a selected data or folder. See “Deleting
Delete Album Delete the selected album. See “Deleting an
Display P.I.F.
Frames*
Edit Album Name Change the selected album’s name. You can
Lock / Unlock Lock or unlock the selected data or folder. See
Memory Card Basis
/ Daily Basis
Print Order Set how many copies you wish to print of the
Register to Slide
show BGM
Rotate Rotate a selected image in the album 90°. If a
Copy the selected data or folder to a memory
card.
Data” on page 46 for details.
album” on page 44 for details.
Display the selected image with P.I.F. frame if the
selected image includes the P.I.F data. You can
stop the P.I.F mode by pressing the Cancel
button.
name it as you like using the on-screen
keyboard. See “Changing an album’s name”
on page 43 for details.
“Protecting Data” on page 48 for details.
Set how to display the folders in the Saved Data.
Folders can be displayed as grouped for every
memory card or every saved date.
selected images. See “Set print quantities” on
page 54 for details.
Register the selected audio data as the slide
show BGM.
image is locked or has the auto-rotation Exif tag
whose value is 2, 3, 4, 5, 6, 7, or 8, it cannot be
rotated.
Setting Detail
Set as Album
Shortcut / Delete
from Album
Shortcut
Set as the Album
Thumbnail / Set as
Folder Thumbnail
Slide Show BGM** Select the BGM which is played during the slide
Slide Show
Duration**
Slide Show Effect** Select one of the five slide show effects. The slide
Sort by Album
Name
Sort by Date Sort albums by created date.
Start Slide Show Images in the selected album or folder in Saved
* P.I.F is an abbreviation for Print Image Framer, which is a function
that enables an image to have a frame. Most of the Epson digital
cameras support this function.
** These settings are available only when a slide show is played.
Set the selected album as a shortcut that is
displayed on the Home screen. You can set up
to 3 shortcuts. Or, delete the selected shortcut.
See “Setting an album shortcut” on page 45 for
details.
Set the selected data as an album’s / folder’s
icon.
show.
Select the duration to switch the images during
the slide show.
show is executed with the selected effect.
Sort albums by name.
Data are displayed as a slide show. See
“Displaying images as a slide show” on page 35
for details
50 Managing Data
Page 51

Chapter 6
Direct Printing
English
6
6
Preparing to Print
You can print an image by connecting P-4000 directly
to a printer. This section describes how to print the
images on the P-4000.
Supported printers
P-4000 supports printers that are compatible with USB
DIRECT-PRINT.
Available types of paper
P-4000 supports the following sizes and types of
paper.
Paper Size
Premium Glossy Photo Paper 4 × 6 in., 10 × 15 cm,
5 × 7 in., Letter, A4
Premium Semigloss Photo Paper
Note:
For details about paper, see your printer’s manuals.
Connecting P-4000 to a printer
The following procedure shows how to connect the
P-4000 to the Stylus Photo R300/310. For other
printers, refer to your printer’s manual.
Direct Printing 51
6
6
6
6
6
6
6
6
Page 52

1. Make sure that P-4000 and the printer are turned
off. Then remove the USB connector rubber cover.
2. Connect the USB cable to the P-4000.
3. Connect the other end of the USB cable to the
connector on the printer.
Note:
❏ See your printer’s manual for the location of the
cable connector on your printer.
❏ Remove the USB cable when you operate P-4000
if it is not connected to a computer or printer.
52 Direct Printing
Page 53

Printing Images
Note:
Use the AC adapter when printing.
1. Select the image to print.
2. Press the Print button.
Note:
When you select Selected Images to Print, the
following screen appears. You can add some images to
the previously set images to print. See “Set print
quantities” on page 54 for details.
Select Photos for print order
English
6
6
6
3. If you want to print only the selected image, select
Print This Image. If you want to print all the
images in the folder, select Print All Images. If you
want to select the images to be printed in the
folder, select Selected Images to Print. Then
press the OK button.
Print
Print This Image
Print All Image
Select Images to Print
Number of Print Orders 2
Total Sheets 08
3
DSC00331. JPG
ONON2003.10.25
Press OK for the Print Settings screen
640+480
4. In the Print Settings screen, make the appropriate
settings by using the 4-way ring and press the OK
button.
Select Photos to Print
Number of Prints
Print Date
Paper
Layout
Print Mode
Print P.I.F. Frames
Press OK to start printing
1
ON
4×6 in. Prem. Glossy
Borderless
Best Photo
Yes
Direct Printing 53
6
6
6
6
6
6
6
Page 54

Note:
❏ See the following “Printer settings” for details of
each setting.
❏ The settings you made will be cleared when the
image has finished printing.
❏ You cannot print the JPEG file if the vertical or
the horizontal size of the image exceeds 4600
pixels.
Printing starts. The LCD turns off during printing
and turns on again when the printing is finished.
The LCD also turns on when you press any button
during printing.
Printer settings
Setting Detail
Number of Prints Set the number of copies to print.
Print Date* Set whether or not to print the date when the
photo was taken.
Paper** Set the type of paper to use.
Layout** Set the layout of the printed images.
Print Mode** Select the print mode.
Print P.I.F. Frames Set to whether or not to print the P.I.F. Frame if
the selected images include the P.I.F. data.
* If the image does not have the date information, the date of the
file is printed.
** The value which has been set becomes the default setting from
the next time.
Set print quantities
You can select the images and set the quantities to
print before you start the printing process.
1. Select the image in the thumbnails screen or in the
full screen.
54 Direct Printing
Page 55

2. Press the Menu button to display the pop up
menu, and select Print Order by using the Up or
Down button.
Saved Data / 2004.08.26
Copy to Album
Set as Folder Thumbnail
DSC00331.JPG DSC00330.mpg DSC00329.JPG DSC00328.JPG
Lock
Start Slide Show
Copy to Memory Card
Print Order
Delete
DSC00327.JPG DSC00326.JPG DSC00325.JPG DSC00324.JPG
Note:
If you select the image in full screen, the screen that
appears on your LCD is different from the above, but
the instruction is the same.
4. After you set the quantity, select a different image
by using the Right or Left button.
5. Repeat steps 3 and 4 until you set the print
quantities for all images you want to print. Then
press the OK button.
English
6
6
6
6
DSC00323.JPG DSC00322.JPG DSC00321.JPG
3. Press the Up or Down button to change the
quantity of the selected image to print.
Select Photos for print order
Total Sheets 08
3
DSC00331. JPG
ONON2003.10.25
Press OK for the Print Settings screen
640+480
Note:
❏ To print the images you set, follow the
instructions in “Printing Images” on page 53.
❏ The settings you made will be cleared when the
image has finished printing.
Direct Printing 55
6
6
6
6
6
6
Page 56

Chapter 7
Using P-4000 With Other Devices
Using P-4000 With a Computer
Connect P-4000 to a computer to display data on the
monitor, copy data from the computer to P-4000, or
from P-4000 to the computer. The computer
recognizes P-4000 as an external HDD.
When using P-4000 with your computer, install the
software from the software CD-ROM. For details, see
“Installing the Software” on page 63.
Note:
When using P-4000 while it is connected to a computer, use
the AC adapter.
56 Using P-4000 With Other Devices
Connecting P-4000 to a computer
1. Connect the AC adapter to P-4000. Then, turn on
P-4000 and your computer.
Page 57

2. Connect the USB cable to your computer. Then
remove the USB connector rubber cover and
connect the other end of the USB cable to P-4000.
Note:
❏ You cannot move data in the memory card to your
computer.
English
7
The PC peripheral mode icon ( ) is displayed
for a short time, then the LCD turns off.
Note:
The LCD turns on when any button is pressed.
3. Start EPSON Photo!4, which you have installed
on your computer from the CD-ROM. You can
display or copy data with EPSON Photo!4. See the
online EPSON Photo!4 User’s Guide for
instructions.
❏ When you see HDD of P-4000 in your computer,
the “Albums” folder corresponds to Albums and
the “Cards” folder corresponds to Saved Data.
❏ Do not change the name of the album folder
(“Albums”), card folder (“Cards”) and the folders
under these two folders.
❏ When you copy data from your computer using
the Explorer or Finder to P-4000, copy data to
\Albums\PC_DATA. This folder exists as a
default.
❏ Remove the USB cable when you operate P-4000
if it is not connected to a computer or printer.
7
7
7
7
7
7
7
7
7
Using P-4000 With Other Devices 57
Page 58

Disconnecting P-4000 from a computer
For Windows users
1. Click Unplug or Eject Hardware on the
computer screen.
For Macintosh users
1. Drag and drop the P-4000 icon to the trash can on
the computer screen.
2. Turn off P-4000 and remove the USB cable from
the computer.
3. Remove the USB cable from P-4000.
Using A/V Out
Note:
The above message varies depending on your version
of Windows.
2. Turn off P-4000 and remove the USB cable from
the computer.
Note:
On Windows 98, when removing the cable from the
computer after storing data to the computer without
turning the computer off, the blue screen is displayed.
To avoid this, turn the computer off before removing
the cable.
3. Remove the USB cable from P-4000.
58 Using P-4000 With Other Devices
P-4000 has an A/V Out connector. You can play slide
shows and videos on the monitor just like on the LCD
of P-4000 by connecting P-4000 to a monitor device,
such as a TV, that has a video input connector.
Follow the instructions below to view images or play
videos on TV.
1. Set the Video Out setting on P-4000 to the signal
method of your TV.
Note:
See “Changing the P-4000 Settings” on page 60 for
instructions on how to change the setting.
Page 59

2. Connect a commercially available AV cable to the
TV. Then connect the other end of the AV cable to
P-4000.
English
7
7
7
7
7
7
3. Set the TV display to video input from P-4000.
Note:
❏ You can connect the AV cable to P-4000 even when
P-4000 is on.
❏ The LCD turns off when you connect an AV cable to
P-4000.
❏ Some monitors cannot display full images and the top
and bottom parts may be missing.
7
7
7
7
Using P-4000 With Other Devices 59
Page 60

Chapter 8
Customizing Settings
This section describes how to customize P-4000
settings. You can customize various settings for
displaying and copying images, or turn on the sound
setting to make your P-4000 more fun to use.
Changing the P-4000 Settings
The settings described in the following sections can be
changed from the Settings menu. To display the
Settings menu, select Settings in the Home screen and
press the OK button.
Settings
SoundLCD Brightness
Slide Show
NTSC
PAL
Copy Mode
View ModePower Save
Date and timeVideo Out
Hard DriveLanguage
The following table shows details of each setting.
LCD Brightness
setting
Sound settings Button Beep When this setting is set to ON, a
Slide Show
settings
LCD
Brightness
Volume You can set the volume for playing
Effects Select one of the five slide show
Slideshow
BGM
Duration Set the duration to switch the
Change the brightness of the LCD.
Select an appropriate brightness
by using the Right or Left button.
beep sounds when you do some
operations.
audio and video.
effects. The slide show is executed
with the selected effect.
Select the BGM which is played
during the slide show. You can
select None, one of the five default
audio, or audio data in the same
folder.
images during a slide show. You
can set the duration by moving the
slidebar from 3 seconds to 30
minutes.
60 Customizing Settings
Page 61

Copy Mode
setting
Power Save
settings
View Mode
settings
Video Out
setting
Date and time
settings
Delete Data
After Copying
Time before
LCD
power-off
Time before
power-off
Auto-rotation Set whether to rotate the images
Folder view
mode
Unsupported
Files
Video out* Select the signal method from
Date and
time**
Set whether to delete the images in
the memory card after copying
them to the HDD automatically or
n ot. Wh en ON is se t, t he im ag es ar e
deleted. When Confirm is set, the
dialog box that confirms deleting
images appears before copying.
Set the time after which the LCD’s
backlight turns off and the LCD
goes blank if there are no
operations. You can set the time by
moving the slidebar from 1 minute
to 10 minutes.
Set the time until the power is shut
down automatically if there are no
operations to save the battery. You
can set the time by moving the
slidebar from 1 minute to 15
minutes.
automatically according to the Exif
information.
Set how to display the folders in the
Saved Data. When selecting Daily
basis, the folders are displayed on
a daily basis.
Set whether the files in unsupported
formats are displayed as
thumbnails or not.
either NTSC or PAL.
Set the date and time.
Language
setting
Hard Drive Free Space The HDD free space is displayed.
* After changing the setting, reconnect the VIDEO cable.
** When you change Date Format, the display of the Date and time
settings screen also changes.
Language Choose a language from among
eight languages.
English
8
8
8
8
8
8
8
8
8
8
Customizing Settings 61
Page 62

Chapter 9
Operating the Software
System Requirements
The system requirements for using P-4000 with a
computer are shown in the following table.
For Windows
OS Microsoft® Windows® 98SE, Me, 2000
Processor Pentium 1 GHz or higher
Memory 128 MB or more
Hard disk 50 MB or more free space is required for
Display SVGA (800x600) or higher,
Port USB port (type A connector)
62 Operating the Software
Professional, XP Home Edition, XP Professional
installation
1 GB or more free space is required for operation
16 bit color or higher
For Macintosh
Mac OS® 9.1 or later Mac OS X 10.2 or later
Processor PowerPC G3 233MHz or
Memory 128 MB or more 256 MB or more
Hard disk 50 MB or more free space is required for installation
Display 800x600 or higher, 32000 colors or more
Port USB port (type A connector)
higher
1 GB or more free space is required for operation
PowerPC G3 700MHz or
higher
Page 63

About the Software
The software CD-ROM provided with P-4000 includes
the following software.
EPSON Photo!4 EPSON PhotoQuicker
QuickTime Epson Storage Viewer USB
driver (Windows 98 only)
EPSON PhotoStarter EPSON CardMonitor
To install the software, follow the instructions in the
next section.
Note:
The CameraStarter and AutoDownloader functions, which
are part of EPSON Photo!4, cannot be used with P-4000.
These functions are available only with EPSON digital
cameras.
Installing the Software
Insert the software CD in the CD-ROM or DVD drive,
and then start the installer following the instructions
below.
For Windows users
Note:
For Windows XP and Windows 2000, you need the
administrative privilege to install the software.
1. The installer starts automatically. If necessary,
start it by double-clicking the EPSON CD-ROM
icon.
2. If a message appears to prompt you to disable
your antivirus software, click Continue.
3. If you are prompted to select a language, select
your preferred language.
4. On the Software Installation screen, click Install.
Follow the on-screen instruction until all of the
software is installed.
5. When a message appears to indicate that
installation is complete, click Exit or Restart Now.
Note:
When Restart Now appears, click this button to
restart your computer.
English
9
9
9
9
9
9
9
9
9
Operating the Software 63
9
Page 64

For Macintosh users
1. For Mac OS X users:
Double-click the EPSON CD-ROM icon on your
desk top.
Double-click Mac OS X icon in the EPSON folder.
For Mac OS 9 users:
Double-click the EPSON CD-ROM icon on your
desk top.
Double-click Mac OS 9 icon in the EPSON folder.
2. If a message appears to prompt you to disable
your antivirus software, click Continue.
Note:
When Restart Now appears, click this button to
restart your computer.
Starting the Software
This section describes how to start the software.
For Windows
Software Menu
3. If you are prompted to select a language, select
your preferred language.
4. On the Software Installation screen, click Install.
Follow the on-screen instruction until all of the
software is installed.
For Mac OS X users:
If the Authenticate window appears, click the key
icon, enter the administrator’s name and
password, and then click OK.
5. When a message appears to indicate that
installation is complete, click Exit or Restart Now.
64 Operating the Software
EPSON Photo!4 Click Start, point to All Programs (or
EPSON
PhotoQuicker
Programs), and then select EPSON
Camera. Select EPSON Photo!4, and
then click EPSON Photo!4.
Click Start, point to All Programs (or
Programs), and then select EPSON
PhotoQuicker. Click EPSON
PhotoQuicker3.4.
Page 65

For Macintosh
Software Menu
EPSON Photo!4 Double-click the EPSON Photo!4 icon in
EPSON
PhotoQuicker
the EPSON Photo!4 program folder.
Double-click the EPSON PhotoQuicker
icon in the EPSON PhotoQuicker program
folder on your desktop.
Finding More Information
To learn more about the software provided on the
software CD-ROM, see the online EPSON Photo!4 or
EPSON PhotoQuicker User’s Guide.
Start the software and access the online User’s Guide
and then follow the steps below.
English
9
9
9
Uninstalling the Software
Execute an uninstall program for each application. For
details, see online help for each applications.
Software To start online User’s Guide...
EPSON Photo!4 From the Help menu (Windows), Apple
EPSON
PhotoQuicker
Note:
You can access the online EPSON Photo!4 or EPSON
PhotoQuicker User’s Guide using the Start menu in
Windows, or in Macintosh, double-click the MANUAL
folder in each of the software’s program folders, and then
double-click INDEX.HTM.
menu (Mac OS 8.6 to 9.X) or EPSON
Photo!4menu (Mac OS X), click EPSON
Photo!4 Help.
Click the Help button on the dialog box.
Operating the Software 65
9
9
9
9
9
9
9
Page 66

Chapter 10
Maintenance and Troubleshooting
Cleaning the P-4000
To keep your P-4000 operating at its best, you should
clean it thoroughly several times a year. Before you
perform any maintenance on P-4000, be sure to read
the “Important Safety Instructions” on page 7. Then
follow these guidelines.
❏ Be sure to turn P-4000 off before cleaning.
❏ Use a clean, dry cloth to keep P-4000 free of dust.
❏ Do not use harsh or abrasive cleaners.
❏ If necessary, clean the battery contacts with a dry
cloth.
66 Maintenance and Troubleshooting
Troubleshooting
When a problem occurs, an error message or icon
usually appears in the LCD. Refer to the following
section to solve the problem.
Error messages/Icons
Error message/Icon Description
A file access error has occurred.
Do not eject the memory card if it
is being accessed.
An error occurred while verifying.
Files will not be deleted.
Some errors occurred while
copying. Copying was canceled.
Some errors occurred while
deleting files. The operation was
canceled.
Wait until the Access lamp turns
off, and reinsert the memory card
and try again.
Some files failed to be deleted.
Check the data.
Some files were skipped, the
memory card may be
write-protected. Check the
memory card and try again.
Some files were skipped, the
memory card may be
write-protected. Check the
memory card and try again.
Page 67

Error message/Icon Description
There is no response from the
printer. Make sure the printer is on.
You must set the date and time to
ensure correct operation.
Make sure that your printer is on
and the USB cable is connected
correctly.
Check your printer and printer’s
manual.
See “Changing the P-4000
Settings” on page 60 and set the
date and time.
Wait until P-4000 cools down.
Problems and solutions
Use the information in this section to find the source
of and solution to P-4000 problems.
Determine the type of problem that occurred, and see
the appropriate section below:
“Power supply problems” on page 68
“Viewing and playing problems” on page 68
“Data operation problems” on page 69
English
10
10
10
10
The battery power is running out.
Charge the battery. See
“Charging the battery” on page
17 for details.
Press the reset button. See
“Resetting P-4000” on page 70 to
find how to use the reset button.
“Printing problems” on page 70
Maintenance and Troubleshooting 67
10
10
10
10
10
10
Page 68

Power supply problems
The data is not displayed.
The power does not turn on.
Cause What to do
The battery has run out. When the icon is displayed
on the top right corner of the
LCD, the battery has run out. See
“Charging the battery” on page
17 and charge the battery.
The battery is set
incorrectly.
Make sure that the battery is
installed correctly. See
“Installing the battery” on page
17.
Viewing and playing problems
The data is not displayed.
Cause What to do
The image format is not
supported.
See “Available types of image
data” on page 29 and make sure
the image format is supported.
Cause What to do
The video or audio data
you selected is not
supported.
The data is broken. Copy the data again.
The LCD Brightness
setting is too dark.
The video cable is
connected to P-4000.
See “Available types of
video/audio data” on page 35
and make sure the data is
supported.
See “Changing the P-4000
Settings” on page 60 and make
sure the LCD Brightness setting
is set properly.
Disconnect the VIDEO cable to
display the LCD.
The movie is not displayed clearly or stops abruptly.
Cause What to do
The bit rate of the data is
too high.
Check the bit rate. See
“Available types of video/audio
data” on page 35 for details.
68 Maintenance and Troubleshooting
Page 69

Sound breaks off when the video or audio is played.
Cause What to do
Cannot copy.
Cause What to do
English
10
The bit rate of the data is
too high.
No sound comes out when a video is played.
Cause What to do
The Audio Codec of the
data is not supported.
Check the bit rate. See
“Available types of video/audio
data” on page 35 for details.
Check the file format. See
“Available types of video/audio
data” on page 35 for details.
Data operation problems
Cannot copy.
Cause What to do
The space available on the
HDD is not sufficient to
copy all of the data in the
memory card.
Delete unnecessary data in the
HDD or reduce the number of
data to copy from the memory
card.
The data may be broken. Try to copy a different data.
Cannot delete.
Cause What to do
The data is locked. See “Using the Pop Up Menu”
on page 49 and unlock the data
to delete it.
10
10
10
10
10
10
10
10
10
Maintenance and Troubleshooting 69
Page 70

Printing problems
Resetting P-4000
Cannot print.
Cause What to do
The printer is not
supported.
The printer’s power is off. Turn on the printer.
The USB cable is not
connected correctly.
The data is broken. Try to copy a different data.
See “Supported printers” on
page 51 and make sure that your
printer supports direct print
with P-4000.
See “Connecting P-4000 to a
printer” on page 51 and
reconnect P-4000 to the printer.
When an error occurs and operations cannot be done,
you can reset P-4000 by pressing the reset button with
a thin object as shown below.
70 Maintenance and Troubleshooting
Page 71

Contacting Customer Support
If your Epson product is not operating properly and
you cannot solve the problem using the
troubleshooting information in your product
documentation, contact customer support services for
assistance. Check your Pan-European Warranty
Document for information on how to contact EPSON
Customer support. They will be able to help you much
more quickly if you give them the following
information:
Technical Support Web Site
Go to http://www.epson.com and select the Support
section of your local EPSON web site for the latest
drivers, FAQs, manuals and other downloadables.
Epson's Technical Support Web Site provides help
with problems that cannot be solved using the
troubleshooting information in your printer
documentation.
English
10
10
10
10
❏ Product serial number
(The serial number label is usually on the back of
the product.)
❏ Product model
❏ Product software version
(Click About, Version Info, or similar button in
the product software.)
❏ Brand and model of your computer
❏ Your computer operating system name and
version
❏ Names and versions of the software applications
you normally use with your product
10
10
10
10
10
10
Maintenance and Troubleshooting 71
Page 72

Appendix A
Appendix
Standards and Approvals
P-4000 (Model: G941B)
U.S. model:
EMC FCC Part 15 Subpart B Class B
CSA C108.8 Class B
European model:
EMC Directive 89/336/EEC EN 55022 Class B
Taiwan model:
EMC CNS13438 Class B
72 Appendix
EN 55024
EN 61000-3-2
(Use with AC adapter)
EN 61000-3-3
(Use with AC adapter)
AC adapter (Model: A351H)
U.S. model:
Safety UL60950
CSA C22.2 No.60950
EMC FCC Part 15 Subpart B Class B
CSA C108.8 Class B
European model:
Low Voltage Directive 73/23/EEC
EMC Directive 89/336/EEC
Taiwan model:
EMC CNS13438 Class B
EN 60950
EN 55022 Class B
EN 55024
EN 61000-3-2
EN 61000-3-3
Page 73

Battery (Model: D111A)
U.S. model:
Safety UL2054
European model:
EMC Directive 89/336/EEC EN 55022 Class B
Specifications
General
CPU TMS320DM270
LCD EPSON VGA TFT LCD
HDD 2.5" HDD (80 GB)
FAT 32
EN 55024
Dimensions
and weight
Temperature Operating: 5 to 35°C**
Humidity
(without
condensation)
Altitude Operating: 3048 m / 10000 ft or less
Memory card*** CompactFlash memory card (Type1/Type2
Power sources Lithium-ion battery (Model: D111A)
Battery life
(when fully
charged) ****
* Dimensions do not include projections.
** Charging is recognized as operating.
*** A commercially available CF adapter is needed to use other
memory cards. Contact our customer support for details.
**** Times may vary depending on the memory card being used,
the number of files, ambient temperature, and other factors.
Height: 84 mm (3.3 inches)*
Width: 147 mm (5.8 inches)*
Depth: 31.4 mm (1.2 inches)*
Weight: Approx. 415 g (0.9 lb) (including the
battery)
Non-operating: -20 to 60°C
Operating: 30 to 80%**
Non-operating: 10 to 80%
Non-operating: 12192 m / 40000 ft or less
and 3.3 V, including Mic roDrive), SD memory
card, MultiMedia Card
AC adapter (Model: A351H)
Approx. 3.2 hours when playing a slide show
(in the default settings)
Approx. 2.7 hours when playing video
(MPEG4, 1 Mbps)
Approx. 4.7 hours when playing audio (MP3,
128 kbps, using the headphones)
English
A
A
A
A
A
A
A
A
A
A
Appendix 73
Page 74

Electrical
Battery
Input voltage DC 5.0 V
Rated current Maximum 2.3 A
Power consumption 4 W (Using with the battery)
9 W (Using with the AC adapter)
Interface
USB connector One USB 2.0 (Mass Storage Class)
A/V Out connector Quadrupole mini pin jack (Ø 3.5 mm)
Headphone Out
Connector
CF Card slot One slot (Type1/Type2, 3.3V) for
SD Card slot One slot for SD memory card and
interface for Slave
M3 stereo mini pin jack (Ø 3.5 mm)
CompactFlash memory card and
MicroDrive
MultiMedia card
Type Lithium Ion Battery
Model D111A
Size (H × W × L) 22.45 mm × 20.4 mm × 71 mm
Ratings 3.7 V, 2600 mAh (Typ.)
Temperature Storing: -20 to 40°C*
* Keep the battery in a cool place when storing it for a long period.
AC adapter
Model A351H
Input AC 100 - 240 V, 50 - 60 Hz, 0.3 A - 0.1 A
Output DC 5.0 V, 2.3 A
Power
consumption
Maximum 18 W
74 Appendix
Page 75

About Optional Accessories
The following options are available for P-4000.
English
A
optional product product code
Lithium Ion Battery
(Model: D111A)
*The asterisk (✽) is a substitute for the last digit, which varies by
country.
B32B81826
✽*
A
A
A
A
A
A
A
A
A
Appendix 75
Page 76

Glossary
The following definitions apply specifically to P-4000.
AAC
An audio compression standard with high compression
efficiency.
Exif (Exchanged Image File Format)
A file format for JPEG data to add image information, such as
thumbnails, date photo taken, and image size.
JPEG
A file format for strong color and grayscale images in
compressed files. Data saved using the JPEG format generally
receives greater compression than data saved using TIFF and
other formats.
MPEG4
An audio compression standard with high compression
efficiency.
Motion-JPEG
A video compression algorithm that plays video by displaying
still photos (JPEG files) continuously at a high speed.
MP3
An audio compression standard that can compress data to the
ratio of 10% without decreasing sound quality.
NTSC/PAL
Broadcast analog color TV standards. NTSC is used mainly in
Japan, North America, and various South American countries.
PAL is used mainly in Western Europe (except France), China,
and some other Asian countries.
pixel
Short for picture element. Each image is composed of a number
of pixels. Pixels are also counted in units of dots.
Progressive JPEG
A kind of the JPEG format. An image in the progressive JPEG is
displayed by gradually improving the resolutions.
RAW
A file for unprocessed data output from the CCD. You need to
install special software to display the raw data.
TIFF (Tagged Image File Format)
A file format that can store an image in different resolutions or
coding to one file.
USB DIRECT-PRINT
A function that enables you to print directly from a device
connected to your printer via a USB cable.
76 Glossary
Page 77

Index
English
A
AC adapter
connecting, 18
Album
about, 39
changing the name, 43
creating, 42
deleting, 44
Approvals, 72
Audio
available types, 35
playing, 37
Available types of image data, 29
Available types of memory cards, 24
Available types of paper, 51
Available types of video/audio data, 35
B
Battery
charging, 18
installing, 17
removing, 19
C
Changing P-4000 settings, 60
Charging the battery, 18
Cleaning P-4000, 66
Connecting
to a computer, 56
to a printer, 51
Contacting EPSON, 71
Customer support, 71
Customizing settings, 60
D
Data
copying from a memory card to P-4000, 27
copying image, 40
deleting, 46
displaying on the computer’s monitor, 56
Direct printing, 51
Displaying images, 29
E
Error messages/Icons, 66
H
Holding the button operations, 22
How to use the menu, 22
Index 77
Page 78

I
Image
available types, 29
copying to an album, 40
displaying as a slide show, 35
displaying as thumbnails, 31
viewing, 29
Installing
battery, 17
software, 63
M
Main features, 6
Main menu, 22
Memory card
available types, 24
removing, 25, 26
P
Parts and their functions, 15
back, 15
front, 15
LCD and control panel, 16
Pop up menu, 49
Printing
printing images, 53
setting print quantity, 54
Problems and solutions, 67
R
Removing a memory card, 25, 26
Resetting P-4000, 70
S
Setting
copy mode settings, 60
date and time settings, 60
language setting, 60
LCD brightness setting, 60
power save settings, 60
slide show settings, 60
sound setting, 60
video out setting, 60
view mode settings, 60
Setting up P-4000, 17
Software
finding more information, 65
installing, 63
starting, 64
system requirements, 62
uninstalling, 65
Specifications
AC adapter, 74
battery, 74
electrical, 74
general, 73
interface, 74
standards and approvals, 72
Standards, 72
Supported printers, 51
78 Index
Page 79

T
Technical support, 71
Troubleshooting, 66
data operation problems, 69
power supply problems, 68
printing problems, 70
viewing and playing problems, 68
Turning the power off, 21
Turning the power on, 20
U
Uninstalling
software, 65
Unpacking P-4000, 14
Using
albums, 39
pop up menu, 49
video output, 58
V
Video
available types, 35
playing, 37
English
Index 79
Page 80

80 Index
 Loading...