

Page 1

®
24-pin Dot Matrix Printer
All rights reserved. No part of this publication may be reproduced, stored in a retrieval
system, or transmitted in any form or by any means, electronic, mechanica l , photocopying,
recording, o r otherwise, with ou t th e p rior written permission of Seiko Eps on Corporation.
The information contained her ein is designed onl y for use with this Eps on print er. Epso n is
not responsible for any use of this information as ap p lied to other printers.
Neither Seiko E p son Corporation no r it s affiliates shall be lia b le to the purchaser of th is
product or third parties for damages, losses, costs, or expenses incurred by the purchaser or
third parties as a result of: ac c id e nt, mi suse , or ab use of this product or unauthorized
modifications, repairs, or alter ations to this prod uct, or (excludin g the U.S.) failure to stri ctly
comply with Seiko Epson Co rp oration’s oper ating and maintena nce ins t r u ctions.
English
Seiko Epson Corporation shall not be liable for any damages or problems arising from the
use of any options or any consumable products other than those designated as Original Epson
Products or Epson Approved Products by Seiko E p son Corporation.
EPSON and EPSON ESC/ P are re gi st e red t rad emarks of Seiko Epson Corporat ion .
Microsoft, Windows, and Windows NT are registered trademarks of Microsoft Corporation.
IBM is a registered trad e ma rk of International Business Machines Corporation.
General Notice: Other product names used herein are for identification purposes only and may be
trademarks of their respective owners. Epson disclaims any and all rights in those marks.
Copyright © 2004 by Seiko Epson Corporation, Nagano, Japan.
Setup Guide
1
Page 2

Contents
Introduction
Where to Find More Information. . . . . . . . . . . . . . . . . . . . . . . . . . . . . 3
FCC Compliance Statement for United States Users . . . . . . . . . . . . 3
WARNING. . . . . . . . . . . . . . . . . . . . . . . . . . . . . . . . . . . . . . . . . . . 4
Chapter 1 Setting up the Printer
Unpacking the Printer . . . . . . . . . . . . . . . . . . . . . . . . . . . . . . . . . . . . . . 6
Remove the protective materials. . . . . . . . . . . . . . . . . . . . . . . . . 6
Assembling the Printer . . . . . . . . . . . . . . . . . . . . . . . . . . . . . . . . . . . . . 7
Connecting the Printer to Your Computer. . . . . . . . . . . . . . . . . . . . 11
Connecting the printer . . . . . . . . . . . . . . . . . . . . . . . . . . . . . . . . 11
Plugging in the Printer. . . . . . . . . . . . . . . . . . . . . . . . . . . . . . . . 12
Chapter 2 Safety Instructi o n s
Warnings, Cautions, and Notes . . . . . . . . . . . . . . . . . . . . . . . . . . . . . 13
Hot Parts Caution Symbol . . . . . . . . . . . . . . . . . . . . . . . . . . . . . . . . . 13
Important Safety Instructions. . . . . . . . . . . . . . . . . . . . . . . . . . . . . . . 13
2
Page 3

Introduction
Where to Find More Information
This Setup Guide provides y ou with instructions on operating the
impact dot matrix printer PLQ-20/PLQ-20M. You can find
information on the basic operation in this guide. But if you wish
for more information, refer to the Reference Guide, Paper
Specification, and Programming Guide . These guides are included
on the User CD-ROM. If you want the User CD-ROM, contact
your dealer.
FCC Compliance Statement for United States
Users
This equipment has been tested and found to comply with the
limits for a Class B digita l devi ce, purs uant to Pa rt 15 of the FCC
Rules. These limits are de signed to provide reasonab le protection
against harmful interference in a residential installation. This
equipment generates, uses, and can radiate radio frequency
energy and, if not installed and used in accordance with the
instructions, may cause harmful interference to radio or television
reception. However, there is no guarantee that interference will
not occur in a particular instal lation. If this equipment does cause
interference to radio and television re ception, whic h can be
determined by turning the equipment off and on, the user is
encouraged to try to correct the interference by one or more of the
following measures.
English
❏ Reorient of relocate the receiving antenna
❏ Increase the separation between the equipment and receiver
Introduction 3
Page 4

❏ Connect the equipment into an outlet on a circuit different
from that to which the receiver is connected
❏ Consult the dealer or an exp erienced radio/TV technic ian for
help
WARNING
The connection of a non-shielded equip ment interface cable to this
equipment will invalidate the FCC Certification of this device and
may cause interference levels which exceed th e limits established
by the FCC for this equipment. It is the respo nsibilit y of the user
to obtain and use a shielded equipment interface cable with this
device. If this equipment has more than one interfa ce connector,
do not leave cables connected to unused interfaces.
Changes or modifications not expressly approved by the
manufacturer could void the user’s authority to operate the
equipment.
For Canadian users
This Class B di gital ap paratu s compl ies wit h Canadi an ICES- 003.
Cet appareil numérique de la classe B est conforme à la norme
NMB-003 du Canada.
DECLARATION of CONFORMITY
According to 47CFR, Part 2 and 15 for Class B Personal Computers
and Peripherals; and/or CPU Boards and Power Supplies used
with Class B Personal Computers:
We:
Located at:
EPSON AMERICA, INC.
MS 3-13
3840 Kilroy Airport Way
Long Beach, CA 90806
Telephone: (562) 290-5254
4 Introduction
Page 5

Declare under sole responsibility that the product identifi ed
herein, complies with 47CFR Part 2 and 15 of the FCC rules as a
Class B digital de vice . Eac h product marke ted, is ide nti cal t o the
representative unit tested and found to be compliant with the
standards. Records maintained continue to reflect the equipment
being produced can be expected to be within the variation
accepted, due to quantity production and testing on a statistical
basis as required by 47CFR §2.909 Operation is subject to the
following two conditions: (1) th is device may not cause harmful
interference, and (2) this device must accept any interference
received, including interference that may cause undesired
operation.
English
Trade Name:
Type of Product:
Model:
EPSON
Dot Impact Printer
P381A
Introduction 5
Page 6
Chapter 1
Setting up the Printer
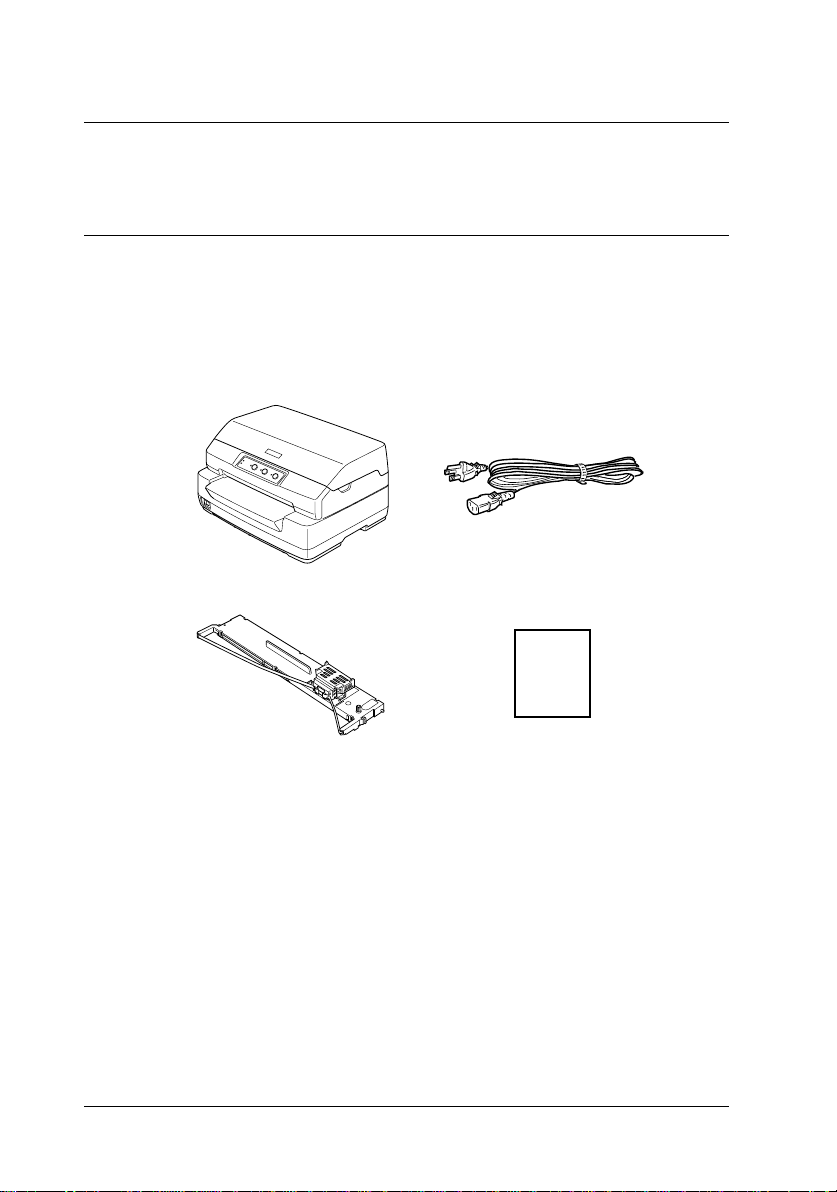
Unpacking the Printer
These items are included in the box with your printer.
printer
ribbon cartridge Setup Guide
power code
Remove the protective materials
Follow the directions writ ten on the cardboard box to remove the
protective materials.
Save all packing and pr otective materials in case you need to ship
the printer in the future.
6 Setting up the Printer
Page 7

Assembling the Printer
1. Make sure the printer is turned off and unplugged .
2. Hold both sides of the printer cover and move it upward to
open it.
3. Push the release lever to move the upp er mechanism forward.
Make sure that you push the lever until it clicks.
1
English
1
1
1
1
1
1
1
Setting up the Printer 7
1
1
1
1
Page 8

4. Slide the print head to the middle of the printer by hand.
5. Remove the ribbon cartridge from the package.
6. Place the plastic hooks on the ribbon cartridge into the slots
of the printe r. Then press both sides of the cartridge until it
clicks into place.
8 Setting up the Printer
Page 9

7. Hold both sides of the rib bon gui de and pul l i t down until it
is out of the cartridge.
1
English
1
1
1
1
8. Put the ribbon guide at the bottom of the print head and push
it up until it clicks into place.
1
1
1
1
1
1
1
Setting up the Printer 9
Page 10

9. Turn the ribbon-tighte ning knob to help feed the ribbon int o
place.
Caution:
The ribbon should not be twisted or creased.
c
10. Pull the release lever back to move the upper me chanism to
its original position. Make sure that you pull the lever until it
clicks.
10 Setting up the Printer
Page 11

Caution:
Make sure that you move the upper mechanism by pulling
c
the release lever. Do not pull the mechanism by hand. It may
damage the printer.
11. Close the printer cover.
Connecting the Printer to Your Computer
Connecting the printer
1
English
1
1
1
Make sure both the printer and computer are turned off, then
connect the interface into the printer and computer. Use USB,
Serial, or Parallel cable to connect the printer and computer.
Note:
The interface cable connectors have only one correct orientation. Ensure
the correct orientation of a connector before inserting it into the
appropriate port.
Serial
USB
Parallel
1
1
1
1
1
1
1
1
Setting up the Printer 11
Page 12

Plugging in the Printer
Make sure the printer is turned off, then plug the power cord into
the printer’s AC inlet and a properly grounded electrical outlet.
12 Setting up the Printer
Page 13

Chapter 2
Safety Instructions
Warnings, Cautions, and Notes
Warnings must be followed carefully to avo id bodily injury.
w
Cautions must be observed to avoid damage to your equipment.
c
Notes contain important information and useful tips on the operation
of your printer.
Hot Parts Caution Symbol
This symbol is placed on the print head and other
K
parts to indicate that they may be hot. Never touch
those parts just after the p rinter has been used. Let
them cool for a few minutes before touching them.
2
English
2
2
2
2
2
2
2
Important Safety Instructions
Read all of these safety instructions before using the printer. In
addition, follow all warnin gs and instruct ions marked on the
printer itself.
Safety Instructions 13
2
2
2
2
Page 14

When setting up the printer
Caution:
Be sure the AC power cord meets the relevant local safety
c
standards.
❏ Do not place the printer on an unstable surface or near a
radiator or heat source.
❏ Place the printer on a flat sur face. The printer will n ot operate
properly if it is tilted or placed at an angle.
❏ Do not place this product on a soft, unstable surface like a bed
or a sofa, or a small, enclo sed area, as this restricts ventilation.
❏ Do not block or cover the slots and openings in the printer’s
cabinet, and do not insert objects through the slots.
❏ Use only the type of power source indic ated on the p ri nter ’s
label. If you are not sure of the power supply specifications in
your area, contact your local power company or consult your
dealer.
❏ Connect all equipment to properly grounded electrical
outlets. Avoid using outlets on the same circuit as
photocopiers or air control systems that regularly switch on
and off.
❏ Do not use a damaged or frayed power cord.
❏ The power cord should be placed to avoid abrasions, cuts,
fraying, crimping, kinking, and other damage.
❏ If you use an extension cord with the printer, make sure the
total ampere rating of all devices plugged into the exte ns ion
cord does n ot exceed the cord’s ampere rating. Also, make
sure the total ampere of all devices plugged into the electrical
outlet does not exceed the electrical outlet’s ampere rating.
14 Safety Instructions
Page 15

❏ Use only the power cord that comes with this product. Use of
another cord may result in fire or electric shock.
❏ This product’s power cord is for use with this product only.
Use with other equipment may result in f ire or elect ric shock .
❏ When connecting this product to a computer or other devi ce
with a cable, ensure the c orrect orientation o f the connect ors.
Each connector has only one correct orientation. Inserting a
connector in the wrong orientation may damage b oth devices
connected by the cable.
❏ Place the printer where you can easily connect i t to a network
interface cable, if necessary.
2
English
2
2
2
❏ Leave adequate room around the printer for easy operation
and maintenance.
❏ Avoid places subject to shocks and vibrations.
❏ Place the printer near a wall outlet where you can easily
unplug the power code.
❏ Keep the entire computer system away fro m potential sources
of electromagnetic interference, such as loudspeakers or the
base units of cordless telephones.
❏ Avoid electrical outlet controlled by wall switches or
automatic timers. An interruption in power can erase
information in the memory of your printer or computer. Also
avoid outlets on the same circuit as large motors or other
appliances that can cause voltage fluctuations.
❏ Use a grounded power outlet; do not use an adapter plug.
❏ If you plan to use a printer stand, follow these guidelin es:
Use a stand that can support at least 15 kg (33.1 lb) for PLQ-20
or 17 kg (37.5 lb) for PLQ-20M.
2
2
2
2
2
2
2
2
Safety Instructions 15
Page 16

Never use a stand that tilts the printer. The printer should
always be kept level.
Position your print er’s power cord and inter face cable so they
do not interfere with paper feeding. If possible, secure the
cables to a leg of the printer stand.
When maintaining the printer
❏ Unplug the printer befor e cleaning it, and always clean it wit h
a piece of damp cloth only.
❏ Do not spill liquid onto the printer .
❏ Except as specifical ly expla ined in this g uide, do not at tempt
to service the printer yourself.
❏ Unplug the printer and refer servicing to qualified service
personnel under the following conditions:
i. If the power cord or plug is damaged.
ii. If liquid has entered the printer.
iii. If the printer has been dropped or the cabinet damaged.
iv. If the printer does not operate normally or exhibits a
distinct change in performance.
❏ Adjust only those controls that are covered by the operating
instructions.
❏ If you plan to use the printer in Germany, observe the
following:
To provide adequate short-circuit protection and
over-current protection for this printer, the building
installation must be protected by a 10- or 16-amp circuit
breaker.
16 Safety Instructions
Page 17

When loading paper
❏ Use passbooks and paper that have more than 60%
reflectance.
❏ When you use a passbook, set Passbook mode to On and set
Binding mode to the method for the passbook’s binding in the
default settings mode.
❏ Do not load passbooks that are cr eased or ha ve r ip ped se am.
❏ Do not use a passbook that has any metallic parts such as
staplers or metal clips.
❏ Do not use a passbook with sticky parts such as stamps or
seals.
❏ Do not use a passbook that has any pages smaller than the
cover page.
❏ Do not print on the front or back cover of a passbook. Print ing
can be done only when the passbook is opened.
❏ When you use paper that is shorter than 110.0 mm, set the
paper eject directi on t o f ro n t. T he f act ory s et def au lt is f r ont.
Refer to the Programming Guide for details.
2
English
2
2
2
2
2
2
2
❏ Do not insert paper that is curled or has been fold ed into the
slot when you load it.
❏ Do not punch holes in the area from 25.0 to 40.0 mm fr om the
left edge of paper.
When operating the printer
❏ Avoid using or storing the printer in places subject to rapid
changes in temperature and humidity. Keep it away from
direct sunlight, strong light, heat sources or excessive
moisture or dust.
Safety Instructions 17
2
2
2
2
Page 18

❏ Adjust only those controls that are covered in the user
documentation. Improper adjustment of other controls may
result in damage requiring extensive repair by a qualified
technician.
❏ Whenever you turn off the printer, wait at l east fi ve seconds
before turning it back on; otherwise, you may damage the
printer.
❏ Do not turn off the printer while it is printing the self-test.
Always press the Offline button to pause printing. Then turn
off the printer.
❏ Do not turn off the printer while it is printing the hex dump.
Always press the Offline button to pause printing. Then turn
off the printer.
❏ Do not reconnect the power cord to an electrical outlet that
has the wrong voltage for your printer.
❏ Never replace the print head yourself; you may damage the
printer. Also, othe r parts of the printer must be checked when
the print head is replaced.
❏ You need to move the print head by hand to replace the ribbon
cartridge. If you have just used the printer, the print head may
be hot; let it cool for a few m inutes before touching it.
Note for German-speaking users:
Bei Anschluss des Druckers an die Stromversorgung muss
sichergestellt werden, dass die Gebaudeinstallation mit einer 10 Aoder 16 A-Sicherung abgesichert ist.
18 Safety Instructions
Page 19

ENERGY STAR
®
Compliance
As an
ENERGY STAR
has determined that this product meet s
ENERGY STAR
the
energy efficiency.
The International ENERGY STAR® Office Equipment Program is
an international program that promotes energy saving through
the penetration of energy efficient computers and other office
equipment. The program backs the development and
dissemination of products wi th functions that effectively red uce
energy consumption. It is an open system in which business
proprietors can particip ate voluntarily. The targeted produ cts are
office equipment such as computers, monitors, printers,
facsimiles, copiers, scanners, and multifunction devices. Their
standards and logos are uniform among participating nations.
®
Partner, Epson
®
guidelines for
2
English
2
2
2
2
2
2
2
Safety Instructions 19
2
2
2
2
Page 20

20 Safety Instructions
 Loading...