

Page 1

P-3000/P-5000
Basics
Page 2

Copyright Notice
All rights reserved. No part of this publication may be reproduced, stored in a
retrieval system, or transmitted, in any form or by any means, electronic,
mechanical, photocopying, recording, or otherwise, without the prior written
permission of Seiko Epson Corporation. The information contained herein is
designed only for use with this Epson product. Epson is not responsible for
any use of this information as applied to other equipment.
Neither Seiko Epson Corporation nor its affiliates shall be liable to the
purchaser of this product or third parties for damages, losses, costs, or expenses
incurred by the purchaser or third parties as a result of accident, misuse, or
abuse of this product or unauthorized modifications, repairs, or alterations to
this product, or (excluding the U.S.) failure to strictly comply with Seiko
Epson Corporation’s operating and maintenance instructions.
Seiko Epson Corporation shall not be liable for any damages or problems
arising from the use of any options or any consumable products other than
those designated as Original Epson Products or Epson Approved Products by
Seiko Epson Corporation.
Trademarks
Epson and Photo Fine are registered trademarks and Exceed Your Vision is a
trademark of Seiko Epson Corporation.
Epson Connection is a service mark of Epson America, Inc.
QuickTime and the QuickTime logo are trademarks or registered trademarks
of Apple, Inc., used under license.
DivX, DivX Certified, and associated logos are trademarks of DivX, Inc. and
are used under license.
CompactFlash is a registered trademark of SanDisk Corporation.
SD is a trademark of SD Card.
General notice: Other product names used herein are for identification
purposes only and may be trademarks of their respective owners. Epson
disclaims any and all rights in those marks.
Patents 5,809,336 5,784,584 6,598,148
© 2007 Epson America, Inc. 3/07 CPD-22470R1
2
Page 3

Contents
Introduction 5
About Your Software and User’s Guide 6
Getting Started 7
Unpacking Your P-3000/P-5000 7
Installing the Battery 8
Charging the Battery 9
Turning the Viewer On and Off 10
Setting the Language, Date, and Time 11
Installing Your Software and User’s Guide 13
Using Memory Cards 16
Inserting and Removing Memory Cards 16
Copying Files from a Memory Card 20
Supported File Formats 24
Viewing Photos and Videos 25
Viewing Photos 25
Rating Photos 28
Creating a Slide Show 29
Playing Videos 30
Showing Photos and Videos on a TV 32
3
Page 4

Using the Viewer with USB Devices 34
Connecting a USB Device 35
Copying Files to the Viewer 36
Copying Files to the USB Device 37
Playing Music 41
Copying Music Files from Your Computer 41
Playing Audio Files 43
Managing Your Files 47
Copying Files to a Folder 47
Deleting Files or Folders 50
Backing Up Files to Your Computer 51
Solving Problems 53
Operating Problems 53
Viewing Problems 54
Replacing the Battery 55
Where To Get Help 55
Appendix 57
Important Safety Instructions 57
Responsible Use of Copyrighted Materials 59
Epson America, Inc. Limited Warranty 62
Index 65
4
Page 5

Introduction
Your Epson® P-3000/P-5000 multimedia storage viewer
lets you enjoy photos, videos, and music wherever you
go. Its features include:
◗ Large, high-quality 4-inch LCD with Photo Fine
Ultra technology and true Adobe® RGB
◗ Support for JPEG files and RAW files from select
digital SLR cameras
◗ MP3 and AAC audio with music playlists
◗ MPEG4, Motion JPEG, and DivX
™
(with DRM)
video
◗ 40GB (P-3000) or 80GB (P-5000) hard drive
◗ Two slots for CompactFlash
®
and SD™ (Secure
Digital) memory cards
◗ Hi-speed USB 2.0 interface to share data with other
USB devices
®
◗ Link2 software to transfer and manage your files
from a PC or Macintosh
◗ Direct printing to PictBridge
®
computer
®
printers (see the
on-screen User’s Guide for instructions)
◗ Video output to display pictures on a TV or
projector
5
Page 6

About Your Software and User’s Guide
The following software is included on your P-3000/
P-5000 multimedia storage viewer:
◗ Epson Link2 software to transfer photos, videos, and
music back and forth between your computer and
viewer
◗ Epson P-3000/P-5000 User’s Guide for instructions
on all the features of your viewer
◗ Apple
®
QuickTime® 7 for Windows
See page 13 to install the software on your computer and
view your User’s Guide.
®
6
Page 7
Getting Started
Follow the instructions in this section to set up your
P-3000/P-5000.
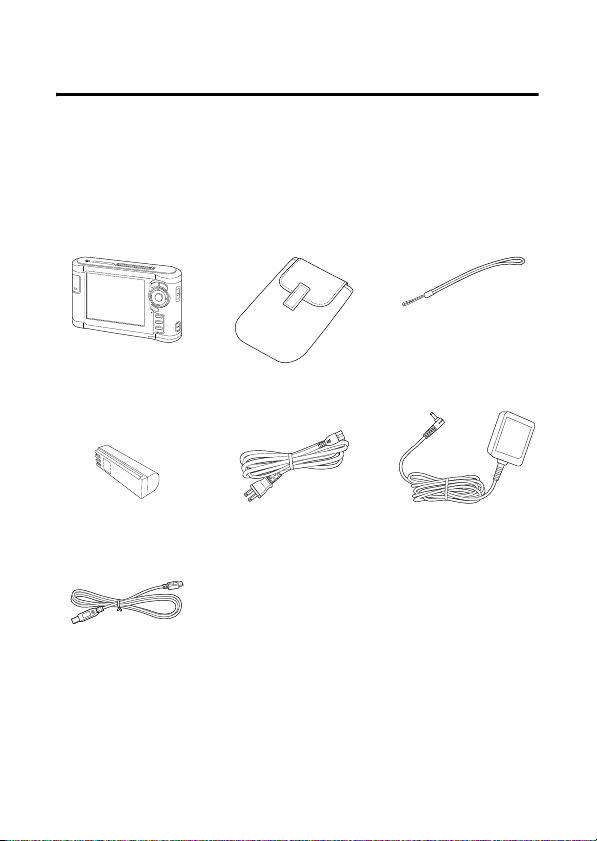
Unpacking Your P-3000/P-5000
Strap
Epson P-3000/P-5000
Carrying case
Lithium-ion battery
USB cable
Power cord
AC adapter
7
Page 8
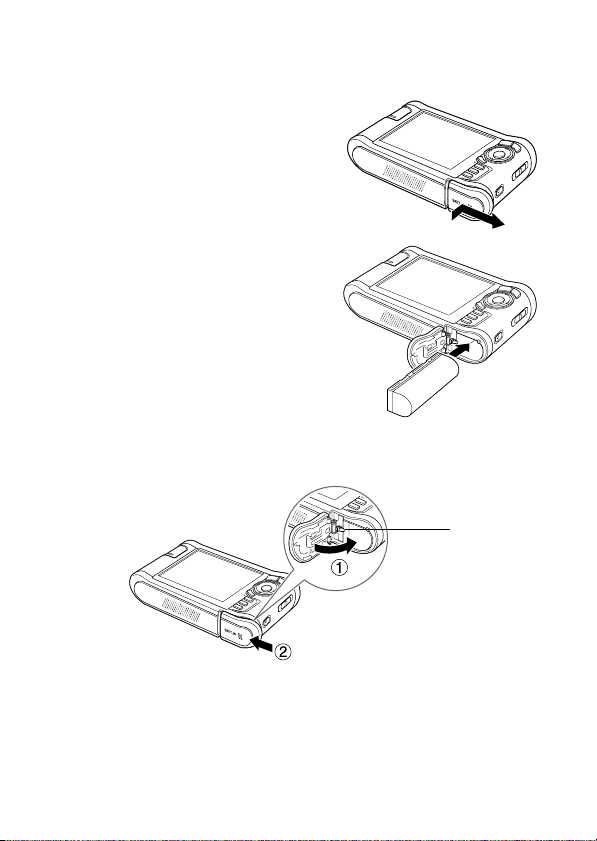
Installing the Battery
1 Open the battery cover.
2 Insert the battery.
3 Close the battery cover.
Latch for
removing
battery
Note:
If you need to remove the battery, open the battery cover,
then push the latch (shown above) to the left.
8
Page 9
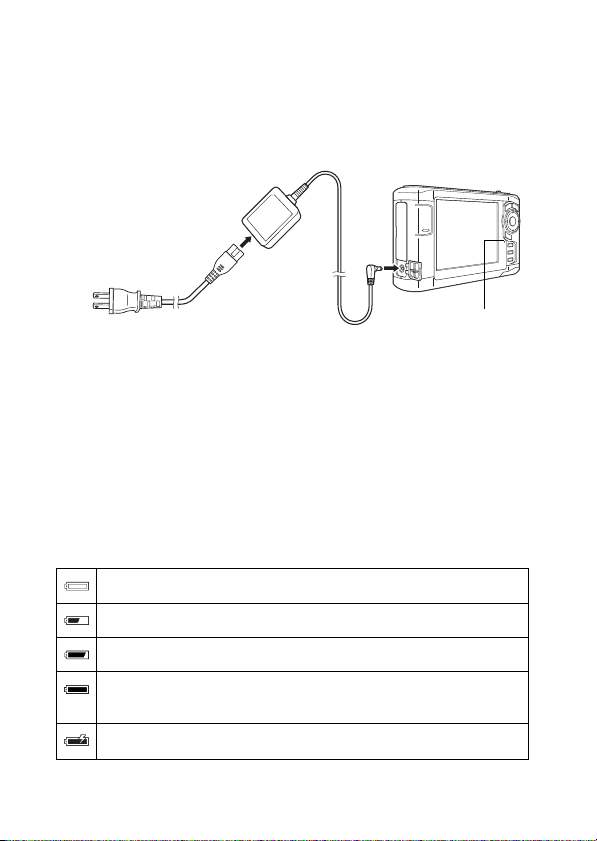
Charging the Battery
Plug the AC adapter into the viewer. Connect the power
cord to the adapter and plug it into an electrical outlet.
Charge light
The
Charge light turns on. It takes about 3.5 hours to
charge the battery when the viewer is not in use.
Caution:
Do not use the viewer without the battery installed. Turn off
the viewer before disconnecting the adapter.
The battery status is displayed in the upper-right corner
of the screen when the viewer is on:
Battery is fully charged.
Battery power is about half full.
Battery power is low.
Battery power is running out. Charge the battery using the
AC adapter.
Battery is charging.
9
Page 10

Turning the Viewer On and Off
To turn on the viewer, slide the power switch down and
release it.
Turning Off the Viewer
To turn off the viewer, make sure the memory card access
light is off (see page 17), then slide the power switch
down and hold it until you see the message
Down
.
Note:
If the viewer is in sleep mode, press any button to wake it.
Then turn it off as described above.
If the viewer is idle for 10 minutes, it shuts off automatically
to save battery power. See the on-screen User’s Guide if
you want to change this setting.
Shutting
10
Page 11

Setting the Language, Date, and Time
When you turn on the viewer the first time, you see the
Language setting screen:
1 Press OK to select English. You see a message about
setting the date.
2 Press OK. You see the Date and Time screen:
11
Page 12
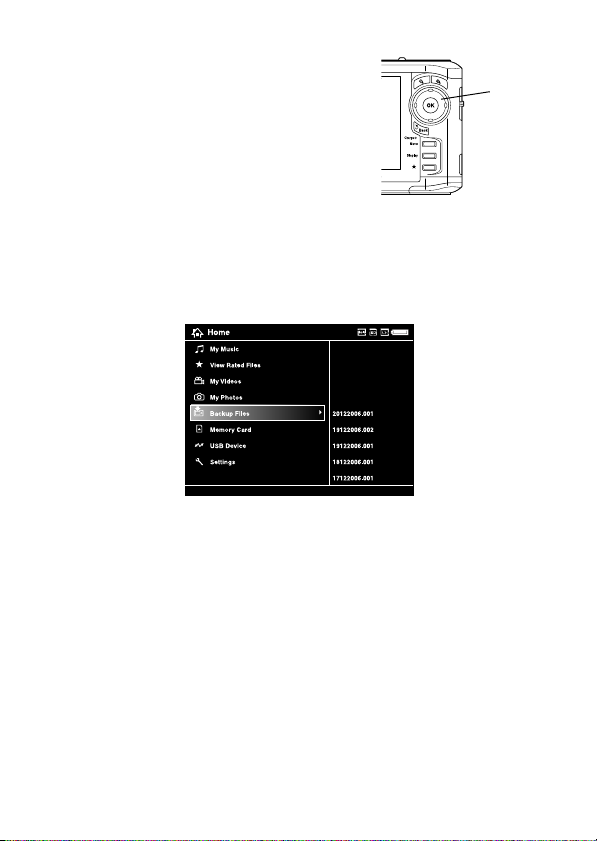
3 Press right or left on the 4-way
ring to highlight a setting to
4-way
ring
change.
4 Press up or down to change the
setting.
5 When you’re done changing the date and time,
highlight
You see the Home screen:
Note:
If you remove the battery, the date and time settings will be
erased after about one day. The next time you turn on the
viewer, the Date and Time screen will be displayed.
If you want to change the settings at any time, select
Settings on the Home screen, then select Date and Time.
Complete and press OK.
12
Page 13
Installing Your Software and User’s Guide
To transfer files between your computer and viewer,
convert video and audio files, and create music playlists,
you need to install the Epson Link2 software. The
P-3000/P-5000 User’s Guide installs with the software
and gives detailed instructions on using the viewer, safety
instructions, and other information.
Note:
During the installation process you may need to enter your
administrator name and password.
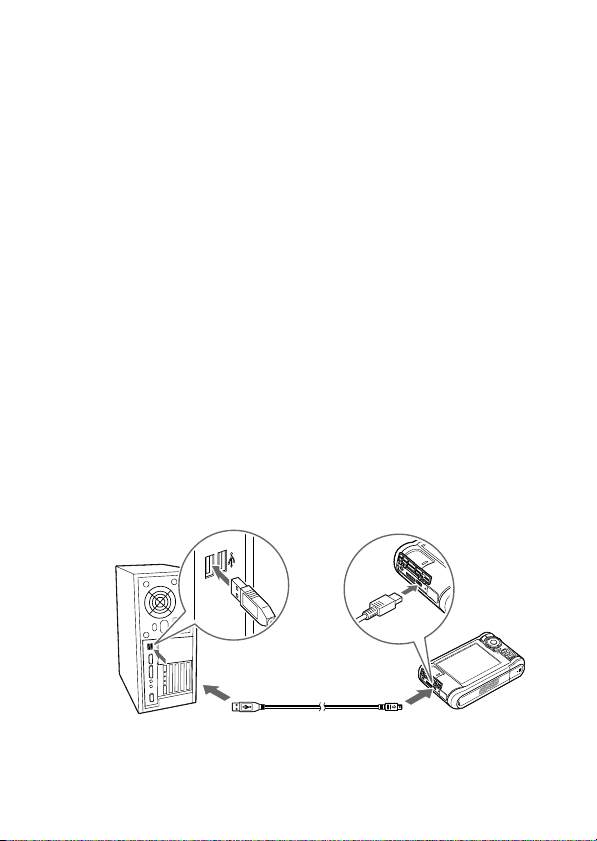
1 Connect the AC adapter to your viewer (see page 9).
2 Turn on the viewer and your computer.
3 Use the included USB cable to connect the viewer to
your computer.
Smaller endLarger end
The viewer LCD screen turns off and your computer
recognizes the viewer as a remmovable drive.
13
Page 14

4 Open the P-3000 or P-5000 drive on your computer
by double-clicking it.
5 Double-click the installation software located in the
root of the drive:
◗ Windows:
P-5000_WIN_SOFTWARE
◗ Macintosh: P-3000_MAC_SOFTWARE or
P-5000_MAC_SOFTWARE
Note: In Windows Vista,™ if you see the User Account
Control screen during installation, click Allow.
P-3000_WIN_SOFTWARE or
6 Macintosh OS X: Double-click the Mac OS X icon
to continue the installation.
7 Follow the instructions on your computer screen to
install the Epson Link2 software, Apple QuickTime
(Windows only), and User’s Guide.
8 When installation is complete, click Exit.
9 When you see the product registration screen,
register your P-3000/P-5000 as instructed.
10 Restart your computer to use the installed software.
14
Page 15

Note:
To view the User’s Guide, double-click its icon on your
desktop. You need to have Adobe Reader
installed on your system to view the guide. You can
download this application at www.adobe.com.
Do not remove the software from the viewer after installing
it on your computer, in case you need to reinstall it.
®
or Acrobat®
15
Page 16

Using Memory Cards
Follow the instructions in this section to insert a memory
card and copy files to your P-3000/P-5000.
Inserting and Removing Memory Cards
The P-3000/P-5000 supports the following types of
memory cards:
◗ CompactFlash (CF) memory card (Type1/Type2)
and MicroDrive
™
◗ SD (Secure Digital) and SD HC™ (High Capacity)
memory cards (up to 2 GB)
◗ MultiMediaCard
™
(up to 1GB)
With a commercially available CompactFlash adapter,
you can use many other types of memory cards in the
CF Card slot, such as miniSD,
®
Stick
Duo, Memory Stick PRO Duo,™ and xD-Picture
™
Card.
™
RS-MMC, Memory
16
Page 17
Caution:
Never remove a memory card while the memory card access
light is flashing, or files may be lost or damaged. Make sure
you insert memory cards in the correct orientation, or the card
and viewer may be damaged.
Do not put labels or stickers on memory cards. The sticker
may peel off, preventing the card from being ejected and
damaging the viewer.
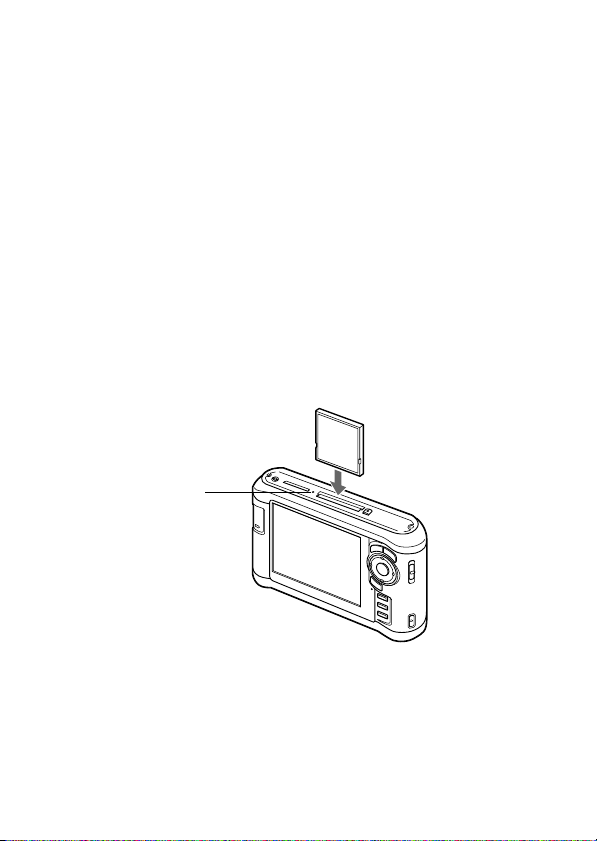
Using the CF Card Slot
Insert the memory card into the slot with the label facing
forward. Then push the memory card all the way into
the slot.
Memory card
access light
If you are using a CompactFlash adapter, put the card
into the adapter and insert the adapter into the slot.
17
Page 18
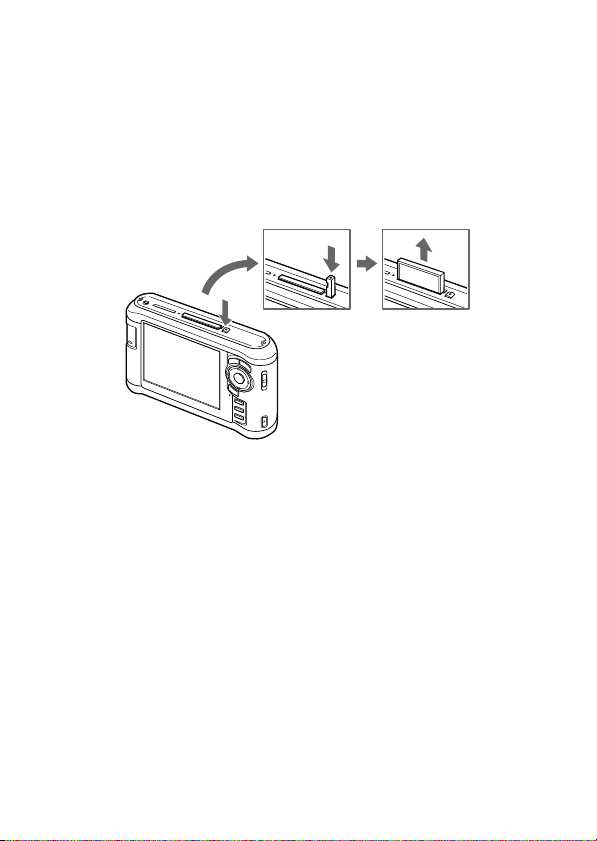
To remove a card from the CF Card slot, first make sure
the memory card access light is off. Then press the eject
button and pull out the card.
If the button is not sticking out, press it once to pop it
out, then press it again to eject the card.
Note:
If you are using a CompactFlash adapter, remove the
adapter from the viewer; do not remove only the memory
card.
18
Page 19
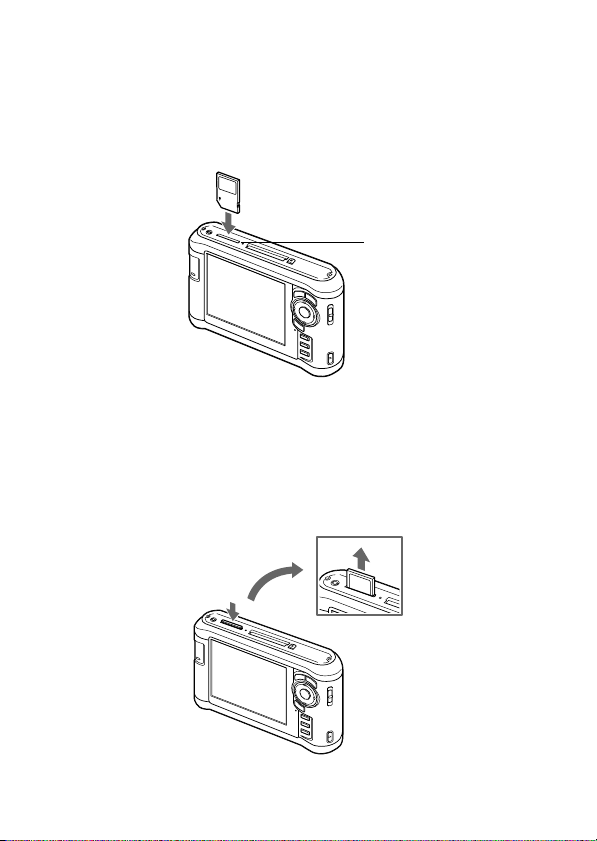
Using the SD Card Slot
Insert an SD or SD HC card into the slot as shown
below. Insert it fully into the viewer.
Memory card
access light
To remove a card from the
SD Card slot, first make sure
the memory card access light is off. Then press in on the
top of the card. When the card pops out, pull it out of
the slot.
19
Page 20
Copying Files from a Memory Card
After you insert a memory card (as described on page 17
or 19), you can copy some or all of the files on the card
to the Backup Files folder on the viewer.
Copying All files
1 On the Home screen, use the 4-way ring to highlight
Memory Card, then press OK. You see this menu:
Memory Card
CF Memory Card Backup
Browse CF Memory Card
SD Memory Card Backup
Browse SD Memory Card
2 Select CF Memory Card Backup or SD Memory
Card Backup
a folder that is automatically created in the Backup
Files folder on the viewer.
Note:
The folder is named according to the date, for example,
12252006.001. You can change the date format by
selecting Settings > Date and Time on the Home
screen (see page 11). Folders are numbered in the order
they are copied.
, then press OK. The files are copied to
20
Page 21
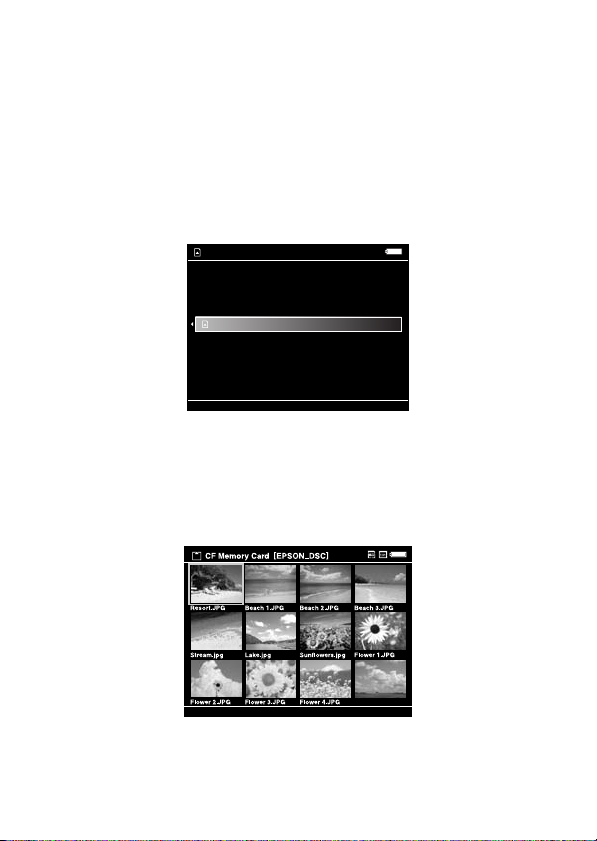
3 When the backup is complete, you see thumbnail
images of the copied photos.
Copying Selected Files
1 On the Home screen, use the 4-way ring to highlight
Memory Card, then press OK. You see this menu:
Memory Card
CF Memory Card Backup
Browse CF Memory Card
SD Memory Card Backup
Browse SD Memory Card
2 Select Browse CF Memory Card or Browse SD
Memory Card,
displayed.
then press OK. You see your photos
Vista.JPG
3 Press the Menu button to display the popup menu.
21
Page 22

4 Use the 4-way ring to select Backup, then press OK.
Your photos are displayed with white check boxes:
Check box
Vista.JPG
5 Use the 4-way ring to highlight each photo you want
to copy and press to select it. The selected items
are displayed with red check marks.
Tip:
To select all files and folders, press Menu and choose
Select All.
6 When you are finished selecting photos, press OK.
Your files are copied to the Backup Files folder on
the viewer (see page 20).
22
Page 23

Deleting Files After Copying
You can have files automatically deleted after you copy
them to the viewer.
1 On the Home screen, use the 4-way ring to select
Settings and press OK.
2 Select File Operation and press OK.
3 Select Delete After Copying and press OK.
4 Press up or down on the 4-way ring to choose one of
the following settings:
Delete if you want files on memory cards to be
◗
automatically deleted, without a warning
message, after copying.
◗
Do Not Delete if you do not want files on
memory cards to be deleted after copying.
◗
Confirm if you want the viewer to ask whether
to delete the files from the memory card after
copying.
5 When you are finished, press OK. Press Back to
return to the previous screen.
23
Page 24

Supported File Formats
The P-3000/P-5000 supports these image formats:
Image files Extension Details
JPEG .jpg
.jpeg
RAW .arw
.cr2
.crw
.dng
.erf
Minimum size: 72 × 72 pixels
Maximum size: 30 megapixels
Maximum image aspect ratio: 3:1
Non-progressive JPEG files only
JPEG data stored in the header of
.mrw
RAW files is displayed.
.nef
.orf
.pef
.raf
The P-3000/P-5000 supports these video file formats:
.avi .mov .mpe .asf
.div .mp4 .vob .wmv
.divx .mpg .mod .m4v
For more details about the supported file formats,
see the on-screen User’s Guide. You can also check at
http://support.epson.com for the latest information on
supported RAW camera files.
24
Page 25

Viewing Photos and Videos
Follow the instructions in this section to view photos,
create slide shows, and play videos on your P-3000/
P-5000.
To share your images, slide shows, and videos with a
larger audience, you can connect the viewer to a TV or
projector (see page 32).
Viewing Photos
After you’ve copied files from a memory card, you can
view them in various ways. You can display the images
at full-screen, zoom in, or show several types of
photographic information. You can also rate photos
and display them according to their rating.
1 Use the 4-way ring to select Backup Files or My
Photos
Note:
If you’ve copied photos from a memory card or USB
device, they’re stored in Backup Files. To move them to
My Photos or place them in a new folder, see page 47.
, then press OK.
25
Page 26

2 If necessary, select the folder containing the images
you want to view, then press
folder, skip this step.) You see a screen like this:
To move to the next screen, press down on the 4-way
ring and hold.
OK. (If there is no
3 Select the image you want to view, then press OK.
The selected image is enlarged to fill the screen.
Zooming an Image
When viewing an image at full-screen, you can zoom in
or pan around to see details.
◗ To zoom in, press the
zoom in up to 400%.
◗ To zoom out, press the button. Continue
pressing it to zoom all the way out.
◗ To move around a zoomed image, use the 4-way
ring.
button. Keep pressing it to
26
Page 27

Changing How Files Are Displayed
You can change your view of the files by pressing the
Display button while in a folder:
Thumbnails (12 per screen) Mini-thumbnails (64 per screen)
Details
My Photos
27
Page 28

Displaying Image Information
To view information about an image shown at fullscreen, press the
Display button. Press Display again to
view additional information and a histogram like the
following:
28/12/2006 12:30:08
Press
Display a third time to view the over- or under-
exposure preview, which highlights areas at both ends of
the brightness range. See the on-screen User’s Guide for
more information.
Rating Photos
You can use the button to rate your photos from 1 to
5, and then view just the photos you’ve rated.
1 Highlight a photo you want to rate.
2 Press the button up to 5 times to change the
rating, or press it again to clear the setting.
28
Page 29

3 To view rated photos, select View Rated Files on
the Home screen and press
OK.
4 Select the rating level you want to view, and press
OK. The rated photos appear on the screen.
If you delete files on the Rating screen or copy them to a
new folder, this does not move or delete the original files.
Also, you can use the Link2 software to move images and
their ratings to your computer for use with certain
applications (see your on-screen User’s Guide for details).
Creating a Slide Show
You can display images in a folder as a slide show and
add custom transitions and your own background music.
1 Select the folder you want to display as a slide show.
2 Press the Menu button. You see this screen:
3 Select Slide Show and press OK. The slide show
starts. To stop the slideshow, press the
Back button.
29
Page 30

Slide Show Settings
You can select transition effects, timing, and background
music for the slide show. To change the settings, select
Settings on the Home screen, press OK, then select
Slide Show.
Effects: Choose one of five slide transition effects.
◗
◗
Duration: Choose the time between slide
transitions. You can select from 1 to 30 seconds.
◗
Slide Show Music: Choose background music for
the slide show. You can select none, one of three
presets, or a music playlist you’ve created.
◗
Clock: Choose whether to display the current time
in the corner of the screen.
Playing Videos
1 Use the 4-way ring to select My Videos, then press
OK.
Note:
If you’ve copied videos from a memory card or USB
device, they’re stored in Backup Files. To move them to
My Videos or place them in a new folder, see page 47.
2 If necessary, select the folder containing the video
you want to play, then press
folder, skip this step.)
OK. (If there is no
30
Page 31

3 Highlight the video file you want to play and press
OK. The video starts playing.
Note:
You can set the video screen size by selecting Play at
Full Screen or Play at Original Size from Play Settings
in the pop-up menu. Setting Play at Full Screen
displays the image by adjusting the longest side to the
LCD display without changing the aspect ratio.
4 You can do the following while watching a video:
◗ To pause or resume playing the video, press
OK.
◗ To adjust the volume, press or .
◗ To rewind or fast-forward, press left or right on
the 4-way ring. Press repeatedly to increase the
speed. (This function may not work with some
videos.)
◗ To stop the video and return to the previous
screen, press
Back.
The viewer remembers where you stopped.
When you resume, playback starts 3 seconds
before the stop point (for videos longer than
1 minute). If you want to play the video from
the beginning, select
Play Settings from the
pop-up menu.
31
Page 32

◗ To view information about the video, press
Display. You see information like the following:
:15/12/2006 12:24
Showing Photos and Videos on a TV
You can connect the P-3000/P-5000 to a TV or
projector and view your images, videos, and slide shows.
You will need a camcorder AV cable (3.5-mm to 3 RCA),
available at many electronics stores.
1 Connect the cable’s three RCA plugs to the video
and audio
IN jacks on your TV or projector.
32
Page 33

2 Connect the cable’s mini-plug to the A/V Out jack
on the side of the viewer.
The viewer’s LCD screen turns off.
3 Set the TV or projector to display video input from
the viewer.
Now you can use all of the viewer’s controls to show
photos, videos, and slide shows on your TV or projector.
Note:
Some TVs may crop your images at the top and bottom, or
you may notice some flickering, for example, near the edges
of the screen. This is a normal result of your viewer’s high
image resolution.
33
Page 34

Using the Viewer with USB Devices
You can connect a flash memory drive or other USB
device to your P-3000/P-5000 and copy files to or from
the device.
The viewer supports devices that are compatible with the
USB Mass Storage specification, including:
◗ Digital cameras
◗ Flash memory drives
◗ Memory card readers
◗ External hard drives
◗ Epson multimedia storage viewers
Note:
USB hubs are not supported, and some USB devices may
not work without a power connection. Epson cannot
guarantee the compatibility of any device.
34
Page 35

Connecting a USB Device
Before you connect a USB device, connect the AC
adapter to the viewer and plug it in if possible. If your
USB device has an AC adapter, use it to prevent the
possible loss of files during transfer.
1 Open the connector cover on the side of the viewer.
2 Plug the device into the Host USB connector on the
side of the viewer.
If the device has a USB cable, connect one end of the
cable to the device and the other end to the
USB connector on the viewer.
Host
Note:
To prevent a possible malfunction, do not use both USB
connectors on the viewer at the same time.
3 Turn on the viewer and the USB device if necessary.
35
Page 36

Copying Files to the Viewer
After you connect a USB device, you can copy all the
files to the viewer, or select individual files to copy.
1 On the Home screen, use the 4-way ring to highlight
USB Device, then press OK.
You see the USB Device menu:
USB Device
Backup USB device to Viewer
Browse USB Device
Copy all Backup Files
2 Do one of the following:
◗ To copy all files, select
Viewer
, then press OK. The files are copied to a
folder that is automatically created in the
Backup Files folder on the viewer.
The folder is named according to the date, for
example,
12252006.001. You can change the
date format by selecting
Time
on the Home screen (see page 11). Folders
are numbered in the order they are copied.
36
Backup USB device to
Settings > Date and
Page 37

◗ To copy selected files, select Browse USB
Device
OK
steps 3 through 6 on pages 21 to 22.
in the USB Device menu, then press
. You see your photos displayed. Then follow
3 Wait until all the files are copied, then disconnect
the USB device.
Copying Files to the USB Device
After you connect a USB device, you can copy files from
the viewer. You can copy all the files or selected files from
the viewer to the USB device.
If your USB device has an AC adapter, connect the
adapter and plug it in before starting.
Backing Up All Files to a USB Device
This process may take some time, depending on the
volume of data in the viewer.
1 Follow the instructions on page 35 to connect the
USB device.
2 On the Home screen, use the 4-way ring to highlight
USB Device, then press OK.
37
Page 38

3 In the USB Device menu, select Copy all Backup
.
Files
USB Device
Backup USB device to Viewer
Browse USB Device
Copy all Backup Files
4 Press OK, then wait while the files are copied.
Copying Selected Files to a USB Device
You can select individual files or folders to copy.
1 Follow the instructions on page 35 to connect the
USB device.
2 Select the file or folder you want to copy.
3 Press the Menu button.
My Photos/2006.1205
Copy/Move
Edit
Rate
EPV2014.JPG EPV2171.JPG EPV2242.JPG EPV2269.JPG
Sort
Photo Print
Wallpaper and Icon Settings
Slide Show
EPV2273.JPG EPV2279.JPG EPV2283.JPG EPV2314.JPG
Settings
Return to HOME
Delete
EPV0013.TXT EPV2619.JPG EPV2620.JPG EPV0480.MP3
Down the Black
Beaches
38
Page 39

4 Select Copy/Move, then press OK.
5 Select Copy to USB Device, then press OK.
◗ If you selected a folder, all the files are copied to
the USB device. Wait until all the files are
copied, then disconnect the device.
◗ If you selected an individual file, you see your
photos displayed with white check boxes.
Continue with steps 6 and 7 below.
Select Files to Delete
Check box
EPV2014.JPG EPV2171.JPG EPV2242.JPG EPV2269.JPG
EPV2273.JPG EPV2279.JPG EPV2283.JPG EPV2314.JPG
Down the Black
EPV0013.TXT
EPV2619.JPG EPV2620.JPG EPV0480.MP3
Beaches
6 Use the 4-way ring to highlight each photo you want
to copy and press to select it. The selected items
are displayed with red check marks.
7 When you are finished selecting photos, press OK.
Your files are copied to the USB device. When the
copy is complete, you can disconnect the device.
39
Page 40

40
Page 41

Playing Music
You can copy audio files from your computer and play
them on the P-3000/P-5000. You can create playlists
using your computer and the Epson Link2 software, or
using the viewer itself. See your on-screen User’s Guide
for instructions on creating a playlist and adjusting audio
equalizer settings.
Copying Music Files from Your Computer
The viewer can store up to 10,000 audio files. It supports
the following audio formats without copyright
protection and with a maximum file size of 100MB:
◗ M4A
◗ MP3
◗ WMA
Other audio file formats, such as .WAV, can be converted
by the Link2 software. See your on-screen User’s Guide
for more information about audio file formats.
Make sure you have installed the Epson Link2 software,
as described on page 13. Then follow the instructions on
page 42 to transfer your files.
41
Page 42

1 Use the included USB cable to connect the viewer to
your computer.
Smaller endLarger end
2 Double-click the Epson Link2 icon on your desktop
to open the program.
3 Click My Music, then locate the audio files you
want to copy from your computer.
Caution:
The viewer will rename the audio files to make them
playable. Always keep backup copies of your songs, and
never transfer your only copies to the viewer.
4 Click the down arrow in the center of the screen to
transfer the files to your viewer.
42
Page 43

5 Disconnect the viewer from your computer:
◗ Windows: Right-click the icon in the lower
right corner of your screen and select
Remove Hardware
Hardware
. Then remove the USB cable.
or Unplug or Eject
Safely
◗ Macintosh: Drag and drop the viewer icon to
the trash, then remove the USB cable.
6 If you see a message on the viewer asking you to
update the music list, click
OK.
Playing Audio Files
You can connect headphones to the jack on top of the
viewer, or listen through the viewer’s built-in speaker.
1 Select My Music on the Home screen using the
4-way ring, then press
Home
OK.
My Music
View Rated Files
My Videos
My Photos
Backup Files
Music List
Resume
43
Page 44

Note:
To continue playing from a previously played track,
Resume, then press OK.
select
2 Select Music List, then press OK. If you don’t see
the songs you transferred to the viewer, select
Update Music List and press OK.
3 Select a category to start playback, then press right
on the 4-way ring.
You can narrow your search by selecting the items in
the following order using the 4-way ring. Select
at the top of the list to include all items in the list.
◗ Artist - Artist name - Album name - Track name
◗ Album - Album name - Track name
◗ Genre - Genre name - Artist name - Album
name - Track name
◗ All - Track name
◗ Playlist - Playlist name - Track name
◗ Update Music List (to update audio files after
transferring them from your computer)
All
44
Page 45

4 Select the track you want using the 4-way ring, then
press
OK.
Controlling Audio Playback
You can do the following while listening to music or
audio files:
◗ To play or pause music, press
OK.
◗ To adjust the volume, press or .
◗ To skip back or forward, press left or right on the
4-way ring. Press and hold to rewind or fast-forward.
◗ To return to the previous screen (without stopping
the audio), press
the audio stops when you press
Back. (If you are not in My Music,
Back.)
◗ To display information about the audio file such as
codec, bit rate, and sampling rate, press
Display.
45
Page 46

Setting Repeat and Shuffle Options
In My Music, press the
Mode
. Then set the following items using the 4-way
ring and press
OK.
First select either
Menu button and select Play
Shuffle or Normal Play Order to set
the playback order, then select the desired repeat
play mode.
To play... Select...
Current category in random order Shuffle
Current category in normal order
repeatedly
Current category once No Repeat
Current track repeatedly Repeat One Song
Current category repeatedly Repeat All
Normal Play Order
46
Page 47

Managing Your Files
You can copy the files you’ve backed up from memory
cards or USB drives to your own folders for special
purposes, such as portfolios. You can also back up files
from the viewer to your computer.
Copying Files to a Folder
1 Open a folder to the thumbnail view, as shown
below, and highlight the file or folder you want to
copy.
Highlight a file
2 Press the Menu button, then select Copy/Move.
3 Select Copy to Folder.
4 Use the 4-way ring to highlight each additional item
you want to copy and press to select it. The
selected items are displayed with red check marks.
47
Page 48

Tip:
To select all files and folders, press Menu and choose
Select All. To select more than one file or folder, you
must be viewing them on the thumbnail, minithumbnail, or detailed list screen (see page 27).
5 Press OK.
6 Use the 4-way ring to select the folder where you
want to copy the items. Then do one of the
following:
◗ To copy the items into the selected folder, press
OK. Your items are copied.
◗ To copy the items into a new subfolder within
the selected folder, highlight
Folder
and press OK. Then see “Creating a New
Folder” on page 49 to enter a name for the new
folder and copy the items.
Tip:
It’s easier to manage your files if you to copy them into
a folder you’ve named, instead of placing them in the
root of a main folder (such as My Photos or My Videos).
You can delete files from their original location when
copying them. Press the Menu button and select
Settings > File Operation. Then change Delete After
Copying to either Delete (to clear the files from the
original location automatically after copying them) or
Confirm (to ask each time if you want to clear them).
Create New
48
Page 49

Creating a New Folder
1 To copy items to a new folder, follow steps 1 through
6 in the previous section.
When you select
Create New Folder and press OK,
the on-screen keyboard appears with the current date
entered as the default name for the folder.
07232007.001
You can either keep the name or enter a new one.
2 To keep the current name, use the 4-way ring to
highlight
to the new folder.
Done and press OK. Your files are copied
3 To enter a new name, use the Back (backspace)
button to clear the current name. Then enter a new
name using the 4-way ring (highlight each character
and press OK to enter it).
4 After entering the name, highlight Done and press
OK. Your files are copied.
49
Page 50

Note:
You can rename a folder by highlighting it, pressing the
Menu button, and selecting Edit > Rename.
Deleting Files or Folders
1 Highlight the file or folder you want to delete.
2 Press the Menu button, then select Delete.
3 If you’re viewing files on the thumbnail screen, use
the 4-way ring to highlight each additional item you
want to delete and press to select it. The selected
items are displayed with red check marks. Press
OK to finish the selection.
Tip:
To select all files and folders, press Menu and choose
Select All. To select more than one file or folder, you
must be viewing them on the thumbnail, minithumbnail, or detailed list screen (see page 27).
4 At the confirmation screen, select Yes and press OK.
Your files are deleted.
Note:
You can lock files and folders to prevent them from being
accidentally deleted. See the on-screen User’s Guide for
details.
50
Page 51

Backing Up Files to Your Computer
You can automatically copy all the files from the viewer’s
Backup Files folder to your computer.
1 Connect the AC adapter to your P-3000/P-5000.
2 Turn on the viewer and your computer.
3 Use the included USB cable to connect the viewer to
your computer.
Smaller endLarger end
The viewer LCD screen turns off.
Note:
Although your computer may recognize the viewer as a
removable drive, it is best to transfer files using the
Epson Link2 software.
4 Double-click the Epson Link2 icon on your desktop
to open the program.
51
Page 52

5 If you see a message that Link2 has found files in
your viewer’s Backup Files folder, click
the files.
Note:
Only files that haven’t already been copied will be
transferred.
Yes to copy
6 When the transfer is complete, disconnect the viewer
from your computer:
◗ Windows: Right click the icon in the lower right
corner of your screen and select
Remove Hardware
Hardware
. Then remove the USB cable.
or Unplug or Eject
◗ Macintosh: Drag and drop the viewer icon to
the trash, then remove the USB cable.
For more information on using Epson Link2 to move
files, see your on-screen Epson Link2 User’s Guide. Click
the
? in the upper-right corner of the Link2 software to
view the guide.
Safely
52
Page 53

Solving Problems
Check this list of common problems and possible
solutions. For more troubleshooting tips, check the
P-3000/P-5000 User’s Guide on your computer. (See
page 13 for instructions on installing and viewing the
guide.)
Operating Problems
The power doesn’t turn on.
◗ The battery may need recharging. Connect the AC
adapter as shown on page 9.
◗ The battery may need to be replaced. See page 55.
You can’t copy files to or from the viewer.
◗ Make sure you have sufficient space on the viewer’s
hard drive. To check the available space, select
Settings on the Home screen, then select Hard
Drive Capacity
◗ If you’re using an external USB device with the
viewer, connect the AC adapter to the viewer.
.
The buttons on the viewer don’t work.
◗ Make sure the power switch isn’t in the
position.
Hold
53
Page 54

◗ The viewer may need to be reset. Gently insert the
end of a paper clip into the
Reset button next to the
viewer’s USB ports.
Viewing Problems
The LCD screen is dark.
◗ The screen may have turned off automatically to save
power, or the viewer may have shut down. Press any
button to turn the screen back on, or press down on
the power switch to turn the viewer on.
◗ If you’ve connected the viewer to your TV or
computer, the LCD screen turns off. Make sure a
video cable is not connected to the viewer.
◗ Try adjusting the screen brightness. Select
on the Home screen, then select
LCD Brightness.
select
View Mode, and
Settings
Images or videos are not displayed correctly, or sound
doesn’t play correctly.
◗ If an image doesn’t appear or appears as
?, it may
not be in a supported file format. See page 24 for
supported formats.
For audio and video, make sure the bit rate and
audio codec of your file are supported. See the
on-screen User’s Guide for details.
54
Page 55

Replacing the Battery
You can purchase a replacement lithium-ion battery
(B32B818262) from an Epson authorized reseller.
To find the nearest reseller, call 800-GO-EPSON
(800-463-7766). Or you can purchase online at
www.epsonstore.com (U.S. sales) or www.epson.ca
(Canadian sales).
Where To Get Help
Epson provides these technical support services:
Internet Support
Visit Epson’s support website at
http://support.epson.com and select your product for
solutions to common problems. You can download
software and documentation, get FAQs and
troubleshooting advice, or e-mail Epson with your
questions.
55
Page 56

Speak to a Support Representative
Before you call Epson for support, please have the
following information ready:
◗ Product name (Epson P-3000 or P-5000)
◗ Product serial number (located on the bottom of the
viewer)
◗ Proof of purchase (such as a store receipt) and date of
purchase
◗ Computer configuration
◗ Description of the problem
Then call:
◗ U.S.: (562) 276-4303, 6
AM to 6 PM, Pacific Time,
Monday through Friday.
◗ Canada: (905) 709-3839, 6
AM to 6 PM, Pacific
Time, Monday through Friday.
Toll or long distance charges may apply.
56
Page 57

Appendix
Important Safety Instructions
Additional safety information for the P-3000/P-5000 can be found in
the on-screen User’s Guide. See page 13 for instructions on installing
and viewing the guide.
Battery Safety Instructions
Warning:
There is a risk of explosion if the battery is replaced by the incorrect type. Use
a new battery of the specified type only. Dispose of used batteries according
to the instructions.
◗ If battery acid gets into your eyes or on your skin, immediately
rinse the affected area thoroughly with water and seek medical
treatment. If a battery is swallowed, seek medical treatment
immediately.
◗ Use only an Epson lithium-ion battery for the P-3000/P-5000
according to the instructions in this manual.
◗ Use only AC adapter model A351H and the P-3000/P-5000
(model G961A/G961B) to charge batteries.
◗ Do not use the battery that comes with this product for other
devices.
◗ To protect against short-circuiting, do not remove the outside
sleeves of the battery.
◗ Do not handle the battery with wet hands or use it near water.
◗ Do not expose the battery to water or high humidity.
◗ Do not drop, puncture, disassemble, mutilate, or short-circuit the
battery.
◗ Do not place the battery near or into fire or water.
◗ Do not use batteries that are leaking or damaged in any way.
◗ Do not charge the battery on devices except this product.
57
Page 58

◗ Do not charge the battery near open flame or in very hot
locations.
◗ Keep batteries away from heat sources.
◗ Do not leave the battery in a vehicle to prevent the battery from
overheating.
◗ Do not insert objects into any openings as they may touch
dangerous voltage points or short-circuit components.
◗ Prevent the battery from coming into contact with metal objects
that could short-circuit it, such as coins or keys.
◗ Do not insert the battery into power outlets or other power
sources such as car cigarette lighter sockets.
◗ Do not solder wires or terminals directly to the battery.
◗ Do not touch battery terminals.
◗ Keep batteries away from open flame if they leak or smell strange.
◗ If overheating, discoloration, or distortion occur, remove the
battery from this product and do not use it.
◗ Charge the battery before using it if it has not been used for a long
period.
◗ Do not connect the AC adapter when the battery is not installed.
Otherwise, the P-3000/P-5000 may be damaged.
◗ Remove the battery and unplug this product and refer servicing to
qualified service personnel under the following conditions: The
power cord or plug is damaged; liquid has entered this product or
its options; this product or its options have been dropped or the
case is damaged; this product or its options do not operate
normally or exhibit a distinct change in performance.
Storing the Battery
◗ When not using this device for a long period, remove the battery
from this product and store it separately.
◗ Do not store batteries where the temperature or humidity is very
high.
◗ Store batteries out of children’s reach.
58
Page 59

Disposing of the Battery
Before disposing of the battery, make sure you discharge it
completely.
For users in North America: This mark indicates that the
battery will be recycled by the RBRC. When you are ready
to dispose of the battery, contact the RBRC at
(800) 822-8837.
Warning:
Be sure to securely cover the end of the battery with tape to prevent
combustion or explosion when disposing of it.
Do not incinerate or dispose of the battery in fire.
Do not dispose of batteries as ordinary refuse. Instead, dispose of them in a
collection or recycle box in accordance with local laws.
WARNING:
The cords included with this product contain chemicals, including lead, known
to the State of California to cause birth defects or other reproductive harm.
Wash hands after handling. (provided in accordance with Proposition 65 in
Cal. Health & Safety Code § 25249.5 et seq)
Responsible Use of Copyrighted Materials
Epson encourages each user to be responsible and respectful of the
copyright laws when using any Epson product. While some countries’
laws permit limited copying or reuse of copyrighted material in
certain circumstances, those circumstances may not be as broad as
some people assume. Contact your legal advisor for any questions
regarding copyright law.
59
Page 60

FCC Compliance Statement
For United States Users
This equipment has been tested and found to comply with the limits
for a class B digital device, pursuant to Part 15 of the FCC Rules.
These limits are designed to provide reasonable protection against
harmful interference in a residential installation. This equipment
generates, uses, and can radiate radio frequency energy and, if not
installed and used in accordance with the instructions, may cause
harmful interference to radio and television reception. However,
there is no guarantee that interference will not occur in a particular
installation. If this equipment does cause interference to radio and
television reception, which can be determined by turning the
equipment off and on, the user is encouraged to try to correct the
interference by one or more of the following measures:
◗ Reorient or relocate the receiving antenna
◗ Increase the separation between the equipment and receiver
◗ Connect the equipment into an outlet on a circuit different from
that to which the receiver is connected
◗ Consult an experienced radio/TV technician for help.
WARNING: The connection of a non-shielded equipment interface
cable to this equipment will invalidate the FCC Certification of this
device and may cause interference levels that exceed the limits
established by the FCC for this equipment. It is the responsibility of
the user to obtain and use a shielded equipment interface cable with
this device. If this equipment has more than one interface connector,
do not leave cables connected to unused interfaces. Changes or
modifications not expressly approved by the manufacturer could void
the user’s authority to operate the equipment.
60
Page 61

For Canadian Users
This Class B digital apparatus complies with Canadian ICES-003.
Cet appareil numérique de la classe B est conforme à la norme NMB-003
du Canada.
Declaration of Conformity
According to 47CFR, Part 2 and 15 for Class B Personal Computers
and Peripherals; and/or CPU Boards and Power Supplies used with
Class B Personal Computers:
We: Epson America, Inc.
Located at: MS 3-13
3840 Kilroy Airport Way
Long Beach, CA 90806
Telephone: (562) 290-5254
Declare under sole responsibility that the product identified herein,
complies with 47CFR Part 2 and 15 of the FCC rules as a Class B
digital device. Each product marketed is identical to the
representative unit tested and found to be compliant with the
standards. Records maintained continue to reflect the equipment
being produced can be expected to be within the variation accepted,
due to quantity production and testing on a statistical basis as
required by 47CFR §2.909. Operation is subject to the following two
conditions: (1) this device may not cause harmful interference, and
(2) this device must accept any interference received, including
interference that may cause undesired operation.
Trade Name: Epson
Type of Product: Multimedia Storage Viewer
Model: G961A (P-3000) or G961B (P-5000)
Product Epson P-3000/P-5000
61
Page 62

Epson America, Inc. Limited Warranty
What Is Covered: Epson America, Inc. (“Epson”) warrants to the
first retail purchaser that the Epson product enclosed with this
limited warranty statement, if purchased and used in the United
States or Canada, will be free from defects in workmanship and
materials for a period of one (1) year from the date of original
purchase. For warranty service, you must provide proof of the date of
original purchase.
What Epson Will Do To Correct Problems: Should your Epson
product prove defective during the warranty period, please call
the Epson Connection
(905) 709-3839 in Canada for warranty instructions and return
authorization. An Epson service technician will provide telephone
diagnostic service to determine whether the product requires service.
If service is needed, Epson will, at its option, repair or exchange the
product without charge for parts or labor. If the product requires
repair or replacement, it is your responsibility to package it in its
original container or an equivalent, along with proof of the date of
original purchase and ship it to Epson. Packaging and shipping costs
incurred in presenting your Epson product for warranty service are
your responsibility. Return shipping costs from the Epson repair
facility are Epson’s responsibility. When warranty service involves the
exchange of the product or of a part, the item replaced becomes
Epson property. The replacement product or part may be new or
refurbished to the Epson standard of quality, and, at Epson’s option,
may be another model of like kind and quality. Epson’s liability for
replacement of the covered product will not exceed the original retail
selling price of the covered product. Exchange products and parts
assume the remaining warranty period of your original product
covered by this limited warranty.
SM
at (562) 276-4303 in the U.S. and
62
Page 63

What This Warranty Does Not Cover: This warranty does not apply
to refurbished or reconditioned products. This warranty covers only
normal use in the United States and Canada. This warranty is not
transferable and will not apply to products purchased from an end
user. This warranty does not cover damage to the Epson product
caused by parts or supplies not manufactured, distributed or certified
by Epson. This warranty does not cover third party parts,
components or peripheral devices added to the Epson product after
its shipment from Epson. This warranty does not cover loss or
recovery of any data or software stored on the product. Epson is not
responsible for warranty service should the Epson label or logo or the
rating label or serial number be removed or should the product fail to
be properly maintained or fail to function properly as a result of
misuse, abuse, improper installation, neglect, improper shipping,
damage caused by disasters such as fire, flood, and lightning,
improper electrical current, software problems, interaction with nonEpson products, or service other than by an Epson Authorized
Servicer. If a claimed defect cannot be identified or reproduced, you
will be held responsible for costs incurred.
THE WARRANTY AND REMEDY PROVIDED ABOVE ARE
EXCLUSIVE AND IN LIEU OF ALL OTHER EXPRESS OR
IMPLIED WARRANTIES INCLUDING, BUT NOT LIMITED
TO, THE IMPLIED WARRANTIES OF MERCHANTABILITY,
NON-INFRINGEMENT OR FITNESS FOR A PARTICULAR
PURPOSE. SOME LAWS DO NOT ALLOW THE EXCLUSION
OF IMPLIED WARRANTIES. IF THESE LAWS APPLY, THEN
ALL EXPRESS AND IMPLIED WARRANTIES ARE LIMITED
TO THE WARRANTY PERIOD IDENTIFIED ABOVE.
UNLESS STATED HEREIN, ANY STATEMENT OR
REPRESENTATIONS MADE BY ANY OTHER PERSON OR
63
Page 64

FIRM ARE VOID. EXCEPT AS PROVIDED IN THIS
WRITTEN WARRANTY, NEITHER EPSON AMERICA, INC.,
NOR ITS AFFILIATES SHALL BE LIABLE FOR ANY LOSS,
INCONVENIENCE, OR DAMAGE, INCLUDING DIRECT,
SPECIAL, INCIDENTAL OR CONSEQUENTIAL DAMAGES,
RESULTING FROM THE USE OR INABILITY TO USE THE
EPSON PRODUCT, OR FOR LOST DATA OR LOST
SOFTWARE WHETHER RESULTING FROM BREACH OF
WARRANTY OR ANY OTHER LEGAL THEORY.
In Canada, warranties include both warranties and conditions.
Some jurisdictions do not allow limitations on how long an implied
warranty lasts and some jurisdictions do not allow the exclusion or
limitation of incidental or consequential damages, so the above
limitations and exclusions may not apply to you. This warranty gives
you specific legal rights, and you may also have other rights which
vary from jurisdiction to jurisdiction.
To find the Epson Authorized Reseller nearest you, visit our website
at www.epsonstore.com (U.S. sales) or www.epson.ca (Canadian
sales).
To find the Epson Customer Care Center nearest you, visit
http://support.epson.com or write to:
Epson America, Inc., P. O. Box 93012, Long Beach, CA 90809-3012
64
Page 65

Index
A
A/V cable, 32
AC adapter, connecting, 9
Access light, 17, 19
Audio
copying files to viewer,
41 to 43
file formats, 41
playing, 43 to 46
problems, 54
B
Backing up
memory card, 20 to 22
USB device, 36
viewer, 37 to 38, 51 to 52
Backup Files folder
copying files from,
47 to 50
copying files to, 20, 22, 36
Battery
charging, 9
installing, 8
recycling, 59
replacing, 55
safety, 57 to 59
storing, 58
C
Cable, A/V, 32
CF Card slot, 17 to 18
CompactFlash
adapter,
cards, 16, 17 to 18
Computer, backing up to,
16
51 to 52
D
Date and time, setting,
11 to 12, 20, 36
Declaration of Conformity, 61
Deleting files, 23, 48, 50
Details view, 27
Disk space, 53
Display button, 27 to 28
Displaying
folder views, 27
image information, 28
E
Epson
contacting, 55 to 56
Link2 software, 6
Store, 55
warranty, 62 to 64
65
Page 66

F
FCC Compliance Statement,
60 to 61
File formats, 24, 41
Files
copying from memory
20 to 22
card,
copying to and from USB
devices, 36 to 39
copying to computer,
51 to 52
deleting, 23, 48, 50
locking, 50
moving to folder, 47 to 49
problems, 53
Flickering, 33
Folder view, changing, 27
Folders
creating,
renaming, 50
viewing contents, 27
48 to 49
H
Hard drive space, 53
Headphones, 43
Hold button, 53
I
Images
copying to folder, 47 to 49
displaying as slide show, 29
displaying information, 28
file formats, 24
problems, 33, 54
rating, 28 to 29
viewing, 25 to 28
viewing on TV, 32 to 33
zooming, 26
K
Keyboard, on-screen, 49
L
Language, selecting, 11
Link2 software
about, 6
installing, 13 to 15
moving ratings with, 29
transferring data, 51
transferring music files, 42
Locking files, 50
66
Page 67

M
Memory card
access light, 17, 19
adapter, 16
copying files, 20 to 22
deleting files, 23
inserting and removing,
16 to 19
types, 16
Mini-thumbnail view, 27
Music
copying to viewer, 41 to 43
file formats, 41
playing, 43 to 46
P
P-3000/P-5000, see Viewer
Photos, see Images
Playing
43 to 46
music,
videos, 30 to 32
Problems, solving, 53 to 54
Protecting files, 50
RAW files, 24
Renaming folder, 50
Resetting viewer, 54
S
Safety instructions, 57 to 59
Screen problems, 54
SD Card slot, 19
SD cards, 16
Setting up viewer, 7 to 15
Shuffle, 46
Shutting down viewer, 10
Sleep mode, 10
Slide show
30
clock,
creating, 29
duration, 30
effects, 30
music, 30
Software
description,
installing, 13 to 15
Support, technical, 55 to 56
6
Q
QuickTime, installing, 14
R
Rating images, 28 to 29
T
Technical support, 55 to 56
Thumbnail view, 27
Troubleshooting, 53 to 54
Turning viewer on and off, 10
67
Page 68

TV
connecting to,
displaying on, 32 to 33
32
U
Unpacking, 7
USB devices
connecting, 35
copying files, 36 to 39
types, 34
User’s Guide
6
about,
installing, 13 to 15
V
Video
file formats, 24
playing, 30 to 32
problems, 54
screen size, 31
viewing on TV, 32 to 33
Viewer
features, 5
resetting, 54
setting up, 7 to 15
sleep mode, 10
turning on and off, 10
Z
Zooming images, 26
W
Warranty, 62 to 64
68
Page 69

Menu button
Press to display
a pop-up menu
Activity light
Flashes blue during
power on, printing,
file transfer, and
computer connection
Charge light
Green indicates battery
charging; orange
indicates problems
button
Press to select a
file or rate a photo
from 1-5 stars
Zoom buttons
Press to zoom a
photo in or out, or
adjust the volume
for music or video
4-way ring
Press to select a photo
or option in a menu
OK button
Press to select an
option, open a folder,
display a photo, or
play music or video
Back button
Press to cancel your
selection or return to
the previous display
Display button
Press to change the
display or view photo
information
Page 70

SD Card slot CompactFlash Card slot
Headphone
connector
Card access light
CompactFlash Card eject button
Power switch
Host USB connector
(for camera, card reader,
flash drive, etc.)
AV Out connector
Battery
cover
Speaker
Cover
Reset button
AC adapter
connector
Device USB connector
(for computer)
 Loading...