

Page 1
®
English
User’s Guide
1
Page 2

All rights reserved. No part of this publication may be reproduced, stored in a retrieval system, or transmitted in any form or by any means,
electronic, mechanical, photocopying, recording, or otherwise, without the prior written permission of SEIKO EPSON CORPORATION. The
information contained herein is designed only for use with this EPSON product. EPSON is not responsible for any use of this information as applied
to other products.
Neither SEIKO EPSON CORPORATION nor its affiliates shall be liable to the purchaser of this product or third parties for damages, losses, costs,
or expenses incurred by the purchaser or third parties as a result of accident, misuse, or abuse of this product or unauthorized modifications,
repairs, or alterations to this product, or (excluding the U.S.) failure to strictly comply with SEIKO EPSON CORPORATION’s operating and
maintenance instructions.
SEIKO EPSON CORPORATION shall not be liable for any damages or problems arising from the use of any options or any consumable products
other than those designated as Original EPSON Products or EPSON Approved Products by SEIKO EPSON CORPORATION.
SEIKO EPSON CORPORATION shall not be held liable for any damage resulting from electromagnetic interference that occurs from the use of
any interface cables other than those designated as EPSON Approved Products by SEIKO EPSON CORPORATION.
EPSON is a registered trademark and EPSON Stylus is a trademark of SEIKO EPSON CORPORATION.
Microsoft and Windows are registered trademarks of Microsoft Corporation.
Apple and Macintosh are registered trademarks of Apple Computer, Inc.
SD is a trademark.
General Notice: Other product names used herein are for identification purposes only and may be trademarks of their respective owners. EPSON
disclaims any and all rights in those marks.
Copyright © 2003 by SEIKO EPSON CORPORATION, Nagano, Japan
2
Page 3

Contents
English
Chapter 1 Introduction
Main Features . . . . . . . . . . . . . . . . . . . . . . . . . . . . . . . . . . . . .7
Safety Instructions . . . . . . . . . . . . . . . . . . . . . . . . . . . . . . . . .7
Warnings, Cautions, and Notes . . . . . . . . . . . . . . . . .7
Chapter 2 Getting Started
Unpacking Your PhotoPC P-1000 . . . . . . . . . . . . . . . . . . .14
Parts and Their Functions . . . . . . . . . . . . . . . . . . . . . . . . . .15
Setting Up PhotoPC P-1000. . . . . . . . . . . . . . . . . . . . . . . . .17
Charging the battery . . . . . . . . . . . . . . . . . . . . . . . . .17
Setting and removing a memory card. . . . . . . . . . .19
Turning the power on . . . . . . . . . . . . . . . . . . . . . . . .22
Turning the power off . . . . . . . . . . . . . . . . . . . . . . . .24
How to use the menu. . . . . . . . . . . . . . . . . . . . . . . . .24
About the stand . . . . . . . . . . . . . . . . . . . . . . . . . . . . .25
About the AC adapter . . . . . . . . . . . . . . . . . . . . . . . .25
Chapter 3 Viewing and Managing Images
Viewing Images. . . . . . . . . . . . . . . . . . . . . . . . . . . . . . . . . . 27
Available types of image files . . . . . . . . . . . . . . . . . 27
Displaying images as thumbnails. . . . . . . . . . . . . . 27
Displaying images as a slide show. . . . . . . . . . . . . 29
Zooming an image . . . . . . . . . . . . . . . . . . . . . . . . . . 30
Copying or Deleting the Images . . . . . . . . . . . . . . . . . . . . 31
Copying images from a memory card to
PhotoPC P-1000 . . . . . . . . . . . . . . . . . . . . . . . . . . 31
Copying images from PhotoPC P-1000 to a
memory card. . . . . . . . . . . . . . . . . . . . . . . . . . . . . 32
Copying images from the Card Case to
an album . . . . . . . . . . . . . . . . . . . . . . . . . . . . . . . . 33
Deleting images. . . . . . . . . . . . . . . . . . . . . . . . . . . . . 34
Using Albums . . . . . . . . . . . . . . . . . . . . . . . . . . . . . . . . . . . 34
About the Album Case. . . . . . . . . . . . . . . . . . . . . . . 34
Copying a favorite image to an album. . . . . . . . . . 34
Copying all the images in a folder to
an album . . . . . . . . . . . . . . . . . . . . . . . . . . . . . . . . 35
Using the Pop Up Menu. . . . . . . . . . . . . . . . . . . . . . . . . . . 36
3
Page 4

Chapter 4 Direct Printing
Before Printing . . . . . . . . . . . . . . . . . . . . . . . . . . . . . . . . . . .40
Supported printers. . . . . . . . . . . . . . . . . . . . . . . . . . . 40
Available types of paper. . . . . . . . . . . . . . . . . . . . . .40
Connecting PhotoPC P-1000 to a printer . . . . . . . . 41
Selecting the appropriate printer driver. . . . . . . . . 41
Printing Images . . . . . . . . . . . . . . . . . . . . . . . . . . . . . . . . . .43
Sound setting. . . . . . . . . . . . . . . . . . . . . . . . . . . . . . . 55
LCD setting . . . . . . . . . . . . . . . . . . . . . . . . . . . . . . . . 55
Power save settings . . . . . . . . . . . . . . . . . . . . . . . . . 56
Video out setting. . . . . . . . . . . . . . . . . . . . . . . . . . . . 56
Copy mode settings . . . . . . . . . . . . . . . . . . . . . . . . . 57
Album shortcut settings. . . . . . . . . . . . . . . . . . . . . . 57
Changing the Printer Driver Settings . . . . . . . . . . . . . . . 58
Chapter 5 Using PhotoPC P-1000 With Other Devices
Using PhotoPC P-1000 With a Computer . . . . . . . . . . . .45
Displaying images on the monitor . . . . . . . . . . . . . 45
Using Video Output . . . . . . . . . . . . . . . . . . . . . . . . . . . . . . 46
Storing Images to a CD-R/RW . . . . . . . . . . . . . . . . . . . . .46
Chapter 6 Customizing Settings
Customizing Albums . . . . . . . . . . . . . . . . . . . . . . . . . . . . . 49
Creating a new album . . . . . . . . . . . . . . . . . . . . . . . .49
Changing an album’s name . . . . . . . . . . . . . . . . . . . 50
Copying an album to CD-R/RW. . . . . . . . . . . . . . . 51
Deleting an album . . . . . . . . . . . . . . . . . . . . . . . . . . . 51
Changing PhotoPC P-1000 Settings. . . . . . . . . . . . . . . . . . 52
Display settings . . . . . . . . . . . . . . . . . . . . . . . . . . . . .53
Slide show settings . . . . . . . . . . . . . . . . . . . . . . . . . .53
Language setting . . . . . . . . . . . . . . . . . . . . . . . . . . . . 54
Date and time settings. . . . . . . . . . . . . . . . . . . . . . . .54
4
Chapter 7 Operating the Software
System Requirements. . . . . . . . . . . . . . . . . . . . . . . . . . . . . 59
Installing the Software . . . . . . . . . . . . . . . . . . . . . . . . . . . . 60
Starting the Software . . . . . . . . . . . . . . . . . . . . . . . . . . . . . 61
For Windows . . . . . . . . . . . . . . . . . . . . . . . . . . . . . . . 61
For Macintosh . . . . . . . . . . . . . . . . . . . . . . . . . . . . . . 61
Uninstalling the Software . . . . . . . . . . . . . . . . . . . . . . . . . 61
Finding More Information. . . . . . . . . . . . . . . . . . . . . . . . . 62
Chapter 8 Maintenance and Troubleshooting
Cleaning PhotoPC P-1000 . . . . . . . . . . . . . . . . . . . . . . . . . 63
Troubleshooting . . . . . . . . . . . . . . . . . . . . . . . . . . . . . . . . . 63
Status and error messages. . . . . . . . . . . . . . . . . . . . 63
Problems and solutions . . . . . . . . . . . . . . . . . . . . . . 66
Power supply problems. . . . . . . . . . . . . . . . . . . . . . 67
Image display problems . . . . . . . . . . . . . . . . . . . . . 67
Image operation problems. . . . . . . . . . . . . . . . . . . . 67
Printing problems. . . . . . . . . . . . . . . . . . . . . . . . . . . 68
Page 5

Registering a new printer driver . . . . . . . . . . . . . . . . . . . .69
Using Printer Utilities . . . . . . . . . . . . . . . . . . . . . . . . . . . . .70
Resetting PhotoPC P-1000. . . . . . . . . . . . . . . . . . . . . . . . . .72
Contacting Customer Support . . . . . . . . . . . . . . . . . . . . . .72
Appendix A Appendix
Standards and Approvals . . . . . . . . . . . . . . . . . . . . . . . . . .75
PhotoPC P-1000 . . . . . . . . . . . . . . . . . . . . . . . . . . . . .75
AC adapter . . . . . . . . . . . . . . . . . . . . . . . . . . . . . . . . .75
Specifications. . . . . . . . . . . . . . . . . . . . . . . . . . . . . . . . . . . . .75
General. . . . . . . . . . . . . . . . . . . . . . . . . . . . . . . . . . . . .75
Electrical. . . . . . . . . . . . . . . . . . . . . . . . . . . . . . . . . . . .76
Interface . . . . . . . . . . . . . . . . . . . . . . . . . . . . . . . . . . . .76
Battery . . . . . . . . . . . . . . . . . . . . . . . . . . . . . . . . . . . . .76
AC adapter (P62L) . . . . . . . . . . . . . . . . . . . . . . . . . . .77
About Optional Accessories . . . . . . . . . . . . . . . . . . . . . . . .77
English
5
Page 6

6
Page 7

Chapter 1
Introduction
1
1
English
Main Features
With PhotoPC P-1000, you can easily view, keep, and
print images you have taken with a digital camera. The
main features are described below.
❏ You can view images easily in high resolution
anywhere, anytime without a computer or other
special device.
❏ You can print images directly to your EPSON
photo printer. PhotoPC P-1000 can connect with
various EPSON photo printers without a
computer and print images directly.
❏ You can store images in PhotoPC P-1000, and you
can also archive the images in a CD-R/RW.
Note:
❏ Do not expose the PhotoPC P-1000 to severe impact,
doing so may cause malfunctions especially during
turning operations.
❏ We strongly recommend you back up files stored on the
HDD to another storage device periodically.
❏ EPSON is not liable for any problems resulting from
the loss or corruption of data on the HDD.
Safety Instructions
Read all of these instructions before using PhotoPC
P-1000, and keep this guide handy for later reference.
Follow all warnings and instructions marked on
PhotoPC P-1000 and the options.
Warnings, Cautions, and Notes
Warnings
w
must be followed carefully to avoid bodily injury.
Cautions
c
must be observed to avoid damage to your equipment.
Introduction 7
1
1
1
1
1
1
1
1
Page 8

Notes
contain important information and useful tips on the
operation of your product.
❏ To prevent fire or electric shock, do not cover this
product with a blanket or other covering that may
give off a static electric shock.
When using PhotoPC P-1000
❏ Follow all warnings and instructions marked on
this product.
❏ Do not insert objects into the slots or openings on
this product.
❏ Do not touch the components inside this product
unless instructed to do so in the user
documentation. Never force this product’s
components into place. Although this product is
designed to be sturdy, rough handling can
damage it.
❏ Never spill liquid onto this product.
❏ If this product emits unusual noises, odors, or
smoke, cancel the current operation and turn it off
immediately. Remove the battery and disconnect
the AC adapter from the product, then unplug the
AC adapter from the power outlet. Contact our
Customer Support.
❏ To prevent fire or electric shock, do not expose
this product or its options to rain or moisture.
❏ To prevent fire or explosion, do not use this
product where flammable or volatile gas is stored.
❏ Do not use this product outdoors during a
thunderstorm.
❏ Do not use this product after moving it between
extreme temperatures, which may cause
condensation to form on electronic parts.
When using the battery
❏ If battery a cid gets into your eye s or on your sk in,
immediately rinse the affected area thoroughly
with water and seek medical treatment. If a
battery is swallowed, seek medical treatment
immediately.
❏ Use only an EPSON Li-ion battery for PhotoPC
P-1000 according to the directions in the user
documentation.
8 Introduction
Page 9

❏ Do not use the battery that comes with this
product for other devices.
❏ To protect against short-circuiting, do not remove
the outside sleeves of the battery.
❏ Do not handle the battery with wet hands or use
them near water.
❏ Do not expose the battery to water or high
humidity.
❏ Do not insert objects into any openings as they
may touch dangerous voltage points or
short-circuit components.
❏ Prevent the battery from coming into contact with
metal objects that could short-circuit it, such as
coins or keys.
❏ Do not insert the battery into power outlets or
other power sources such as car cigarette lighter
sockets.
1
1
1
1
English
❏ Do not drop, puncture, disassemble, mutilate, or
short-circuit the battery.
❏ Do not place the battery near or into fire or water.
❏ Do not use batteries that are leaking or damaged
in any way.
❏ Do not charge the battery on devices except this
product.
❏ Do not charge the battery near open flame or in
very hot locations.
❏ Keep batteries away from heat sources.
❏ Do not solder wires or terminals directly to the
battery.
❏ Do not touch battery terminals.
❏ Keep batteries away from open flame if they leak
or smell strange.
❏ If overheating, discoloration, or distortion occur,
remove the battery from this product and do not
use it.
When Storing the batteries
❏ When not using this device for a long period,
remove the batteries from this product and store
them separately.
Introduction 9
1
1
1
1
1
1
Page 10
❏ Do not store batteries where the temperature or
humidity is very high.
❏ Store batteries out of children’s reach.
❏ Discharge the battery completely before storing it
for a long time.
❏ When not using the battery for a long time, charge
the battery and then discharge it completely about
once a year during storage.
When Disposing of the batteries
Before disposing of batteries, make sure you discharge
them completely.
For the Netherlands users:
Do not dispose of the batteries with ordinary refuse.
Instead, dispose of them as small chemical waste in
accordance with local laws, and the following Dutch
Government Gazette 45, KCA Marking:
Bij dit produkt zijn batterijen geleverd.
Wanneer deze leeg zijn, moet u ze niet
weggooien maar inleveren als KCA.
For German users:
Do not dispose of batteries with ordinary refuse.
Instead, dispose of them in a recycle box in accordance
with local laws.
Warning:
w
❏ Be sure to securely cover the all end of the battery
with tape to prevent combustion or explosion
when disposing.
❏ Do not dispose of batteries as ordinary refuse.
Instead, dispose of them in a collection or recycle
box in accordance with local laws.
10 Introduction
When using the AC adapter
❏ Use only the type of power source indicated on
the AC adapter’s label, and always supply power
directly from a standard, domestic power outlet
with a power cord that meets the relevant local
safety standards.
❏ Place the AC adapter near an electrical outlet
where the power cord can be easily unplugged.
Page 11

❏ The AC adapter is designed for use and provided
with this product. Do not attempt to use it with
other electronic devices unless specified.
❏ Do not remove the AC adapter from this device
during operations.
❏ The AC adapter included is designed for use with
this product. Use of any other adapter could result
in fire, electrical shock, or injury.
❏ Use only the power source that meets the power
requirements indicated on the label attached to
the product. If you are not sure of the power
supply specifications in your area, contact our
local power company or contact our Customer
Support.
❏ Make sure the total amperage of all devices
plugged into the power outlet does not exceed the
power outlet’s ampere rating.
❏ If you plan to use this product in Germany, the
building installation must be protected by a 16
amp circuit breaker to provide adequate
short-circuit protection and over-current
protection for this product.
❏ Do not use a damaged or frayed AC adapter.
❏ If you use an extension cord with this product,
make sure the total amperage of all devices
plugged into the extension cord does not exceed
the cord’s amperage rating.
❏ Never disassemble, modify, or attempt to repair
the AC adapter by yourself except as specifically
explained in this guide.
❏ Do not use power outlets controlled by wall
switches or automatic timers.
❏ Do not use power outlets on the same circuit as
large motors or other appliances that may cause
voltage fluctuations.
❏ Avoid using outlets on the same circuit as
photocopies or air control systems that regularly
switch on and off.
❏ Position this product’s power cord so that it will
not be stepped on or run over.
❏ Do not place any objects on the power cord and
the AC adapter.
❏ Keep the power cord straight at the ends and at
the points where it enters the transformer.
1
1
1
1
1
1
1
1
1
1
English
Introduction 11
Page 12

❏ The power cord should be placed to avoid
abrasions, cuts, fraying, crimping, kinking, and
other damage.
❏ If you cannot insert the plug into the power outlet,
contact an electrician.
When using a memory card
❏ Only memory cards designed for the product’s
specifications can be used.
❏ If the liquid crystal solution contained in the LCD
panel on this product leaks out and gets onto your
hands, wash them thoroughly with soap and
water. If it gets into your eyes, flush them
immediately with water. If discomfort or vision
problems remain after a thorough flushing, see a
doctor immediately.
❏ Only use a soft, dry cloth to clean the display. Do
not use liquid or chemical cleaners.
❏ The methods for using memory cards vary
according to card type. Be sure to refer to the
documentation included with your memory card
for details.
❏ Do not remove a memory card or turn off the
product while the ACCESS light is flashing.
When using the LCD
❏ The LCD panel on this product may contain a few
small bright or dark spots. These are normal and
do not mean that your LCD panel is damaged in
any way.
❏ If the LCD panel on this product is damaged,
consult your dealer.
12 Introduction
When storing, maintaining, or transporting
PhotoPC P-1000
❏ Do not store this product outdoors.
❏ Do not store this product near water.
❏ Do not store this product in a location subject to
high temperature or humidity.
❏ Do not store this product in a location subject to
rapid changes in temperature or humidity.
❏ Do not store this product in a location subject to
direct sunlight or strong light sources.
Page 13

❏ Unplug this product from the power outlet before
cleaning it. Use a damp cloth for cleaning and do
not use liquid or aerosol cleaners.
As the colours of the wires in the mains lead of this appliance
may not correspond with the coloured markings identifying
the terminals in your plug, proceed as follows;
1
English
❏ Remove the battery from and unplug this product
and refer servicing to qualified service personal
under the following conditions: The power cord
or plug is damaged; liquid has entered this
product or its options; this product or its options
have been dropped or the case is damaged; this
product or its options do not operate normally or
exhibit a distinct change in performance.
Safety information for United Kingdom users
The following safety information applies to the AC
adapter.
Warning:
w
Refer to the rating plate for the voltage and check that
the appliance voltage corresponds to the supply
voltage.
Important:
The wires in the mains lead fitted to this appliance are
colored in accordance with the following code:
Blue — Neutral
Brown — Live
The blue wire must be connected to the terminal in the plug
marked with the letter N.
The brown wire must be connected to the terminal in the
plug marked with the letter L.
If damage occurs to the plug, replace the cord set or consult
a qualified electrician.
For United Kingdom, Hong Kong, and Singapore
users
Replace fuses only with fuses of the correct size and
rating.
1
1
1
1
1
1
1
1
1
Introduction 13
Page 14
Chapter 2
Getting Started
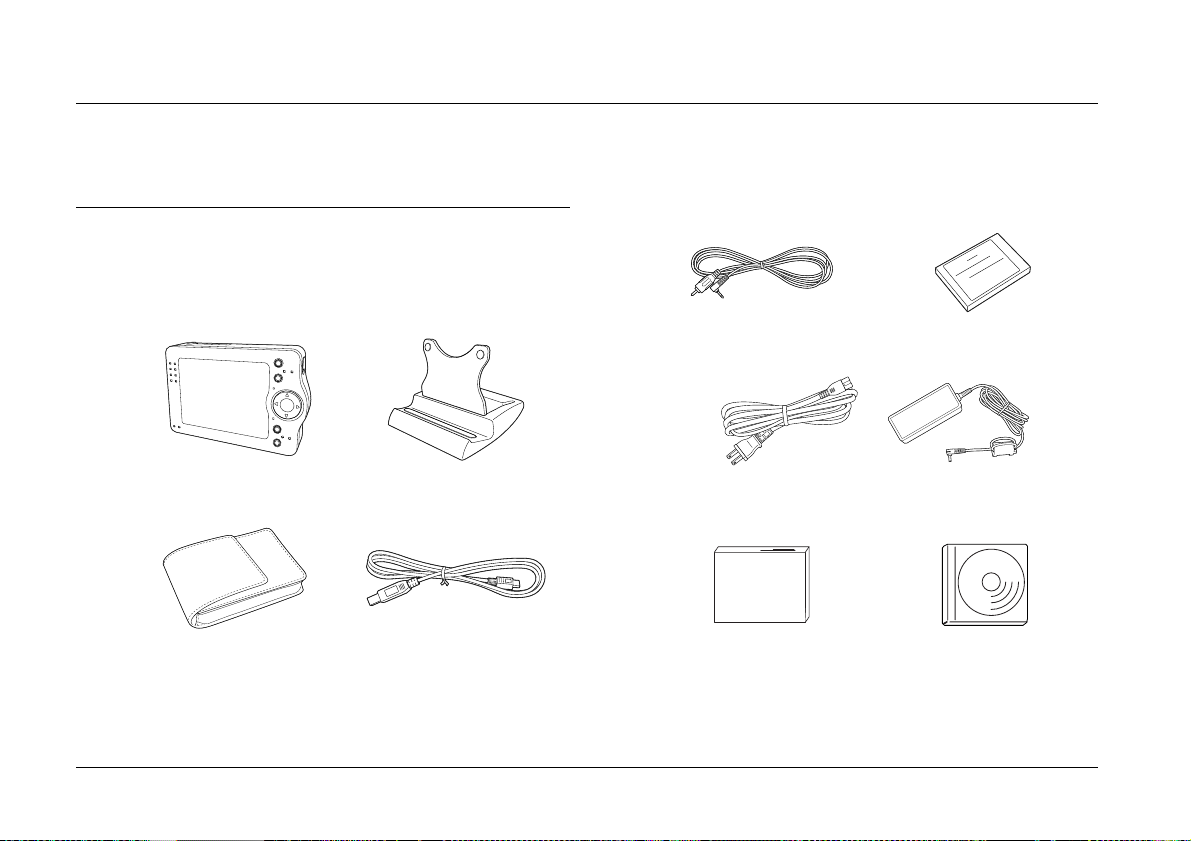
Unpacking Your PhotoPC P-1000
Make sure that all of the items shown below were
included in the box with your PhotoPC P-1000.
VIDEO cable Lithium-ion battery
PhotoPC P-1000 Stand
Carrying case USB cables (two types)
14 Getting Started
AC adapter*
User’s Guide (this guide) Software CD-ROM
* The plug type for the AC adapter may vary, depending on the
local standards.
Page 15
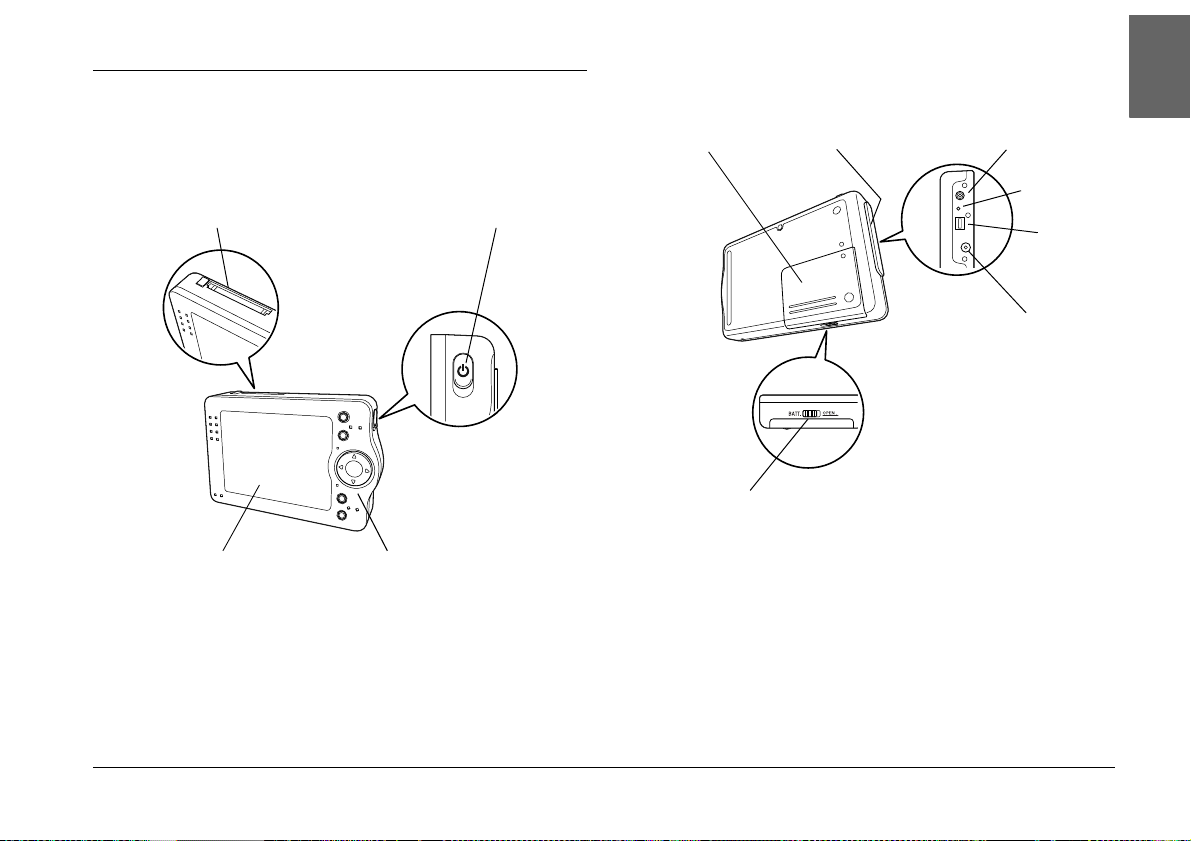
Parts and Their Functions
Front
memory card slot
power switch
Back
battery cover
connector cover
video output connector
reset switch
USB
interface
connector
2
2
2
English
LCD
control panel
battery cover release
AC adapter
connector
Getting Started 15
2
2
2
2
2
2
2
Page 16
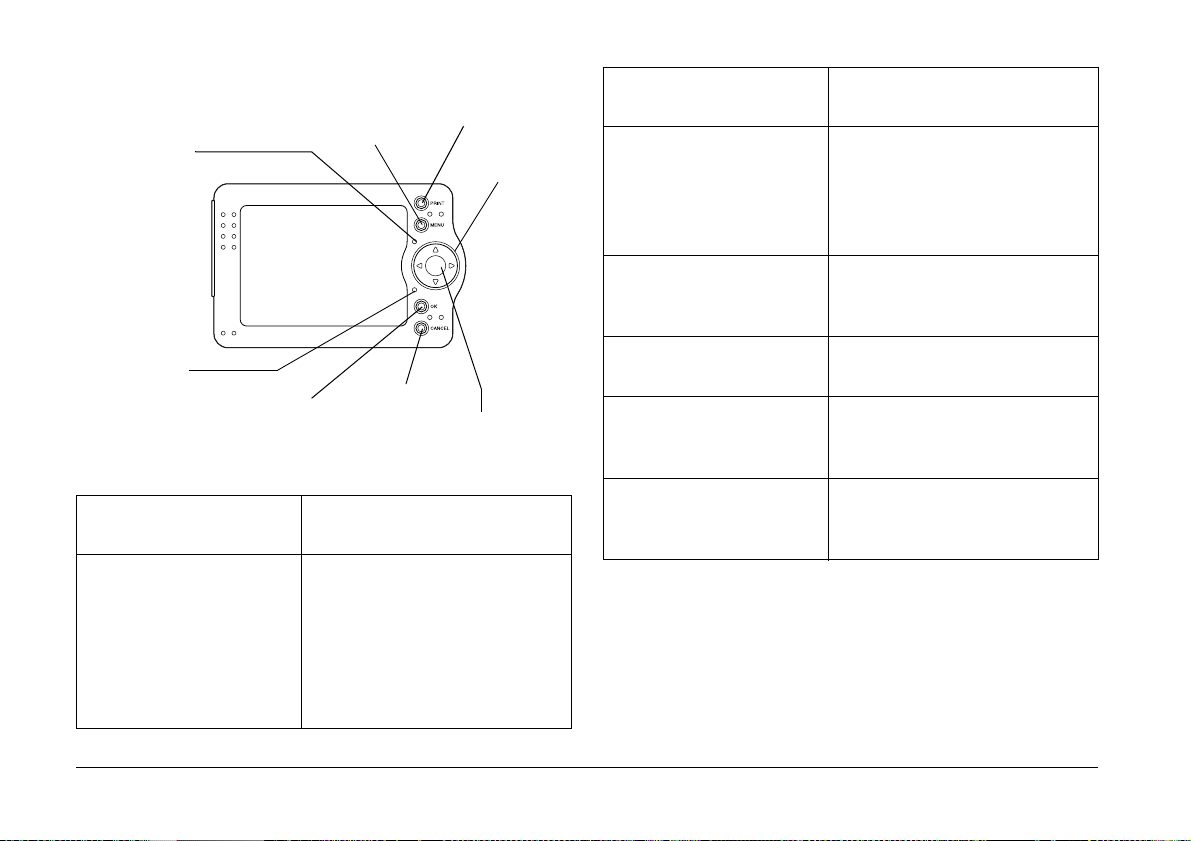
LCD and control panel
ACCESS light
MENU button
PRINT button
Four-way
button
ACCESS light (Red) On when accessing data on
the HDD or a memory card.
Four-way button
(Up/ down/Left/Right)
Press this button to move the
cursor or highlight. You can
select an object by pressing
this button to the right, left,
up, or down.
CHARGE light
OK button
CANCEL button
ILLUMINATION light
PRINT button Press this button to display
the Print menu.
MENU button Press this button once to
display the pop up menu. For
details, see “Using the Pop Up
Menu” on page 36.
Hold this button down for a
short time to delete the
selected image or folder.
16 Getting Started
ILLUMINATION light
(Blue)
Flashes during such
operations as turning the
power on, or during printing.
CHARGE light (Green) Flashes when the battery is
being charged.
OK button Press this button to determine
the selection and proceed to
the next step.
CANCEL button Press this button to cancel the
selection and return to the
previous screen.
Page 17
Setting Up PhotoPC P-1000
After unpacking your PhotoPC P-1000, set it up so it
is ready to use. This section describes how to charge
the battery, set the memory card, and turn the power
on and off.
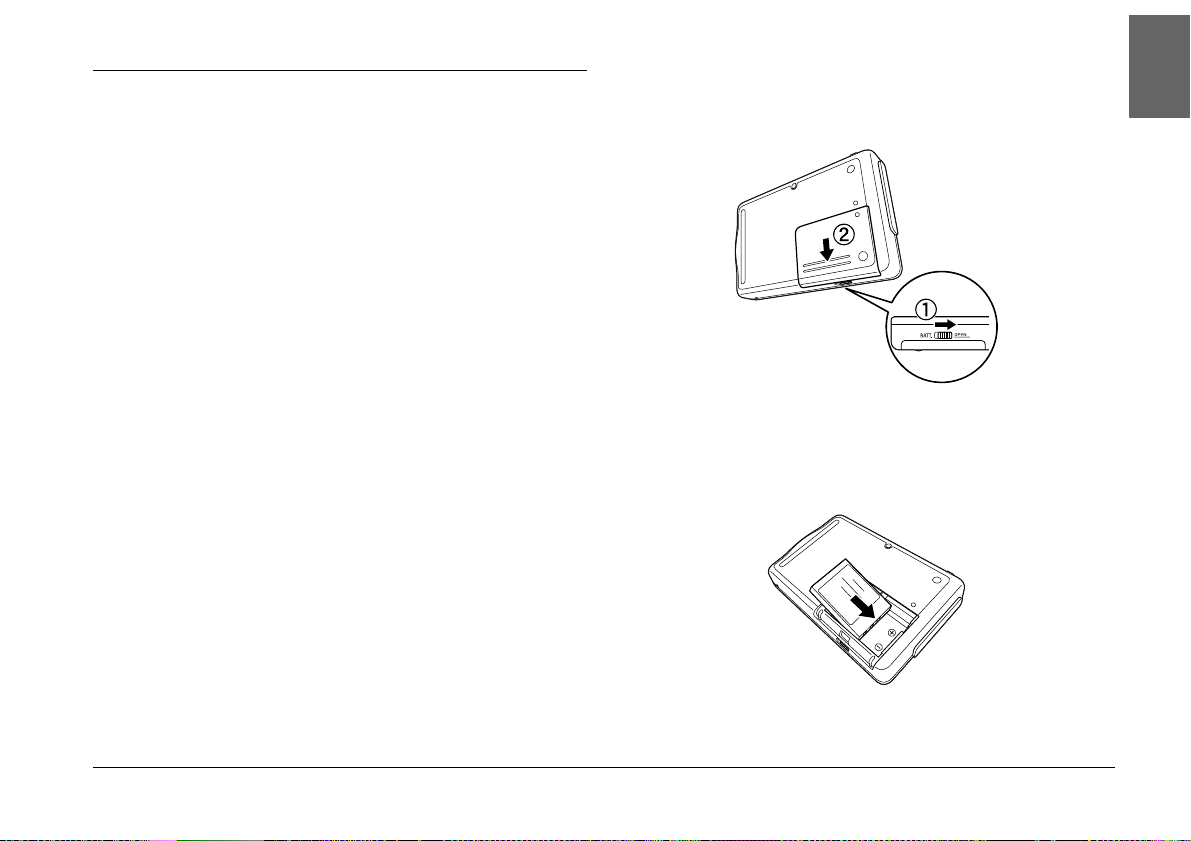
Charging the battery
1. Slide the battery cover release as shown below
and remove the battery cover.
2
2
2
English
Your PhotoPC P-1000 comes with a lithium-ion
battery. See the following sections for details on
installing and replacing it.
Installing the battery
Install the battery as shown in the instructions below.
2. Insert the battery into the compartment,
positioning the + and - ends with those on the
inside of the compartment.
Getting Started 17
2
2
2
2
2
2
2
Page 18
Warning:
w
Do not carry loose batteries in your pockets.
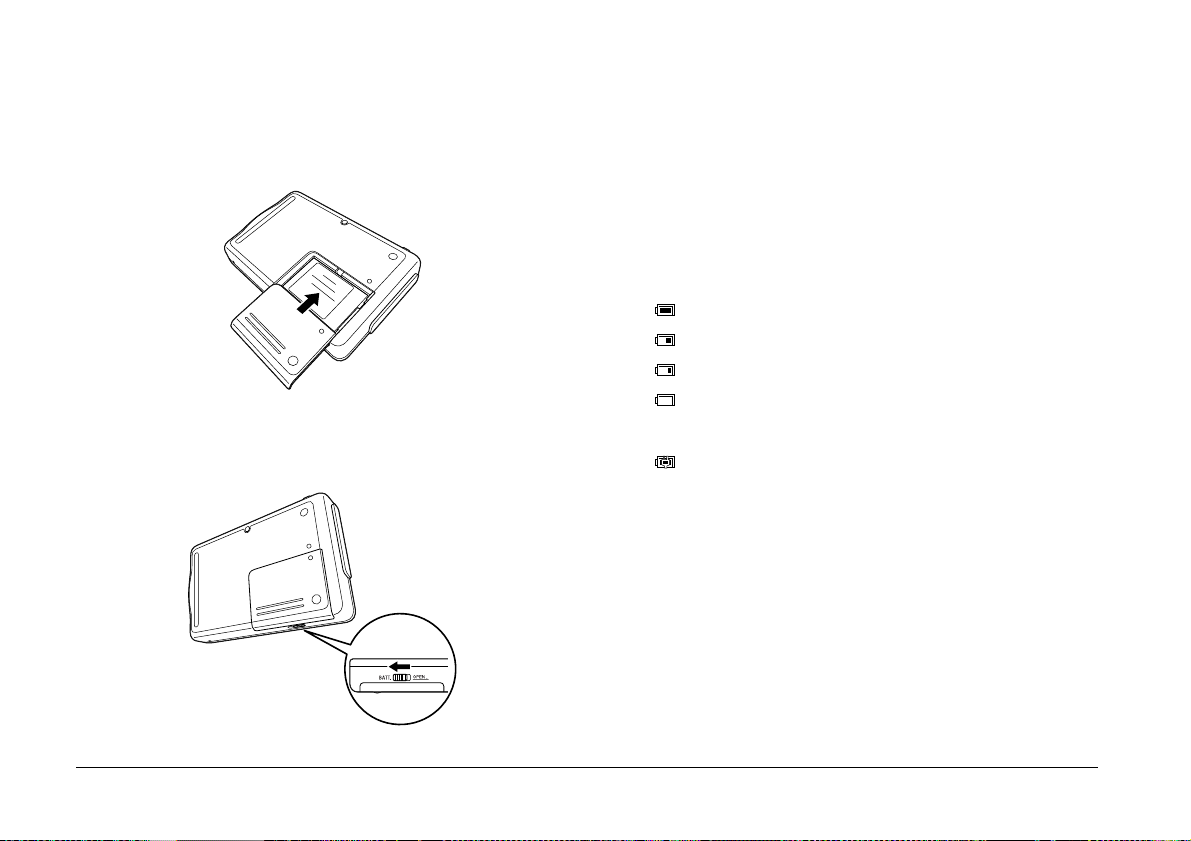
3. Reattach the battery cover.
4. Slide the battery cover release as shown below to
lock the cover.
Charging the battery
After installing the battery, charge the battery using
the AC adapter. If the battery is out of power, PhotoPC
P-1000 turns off automatically. Be sure to recharge the
battery.
Note:
The battery status is always displayed at the top right corner
of the LCD.
: Indicates sufficient battery power.
: Indicates moderate battery power.
: Indicates low battery power.
: Indicates battery power is running out. PhotoPC P-1000 is
shut down automatically. Charge the battery using the AC
adapter.
: Indicates the battery is charging.
18 Getting Started
Page 19
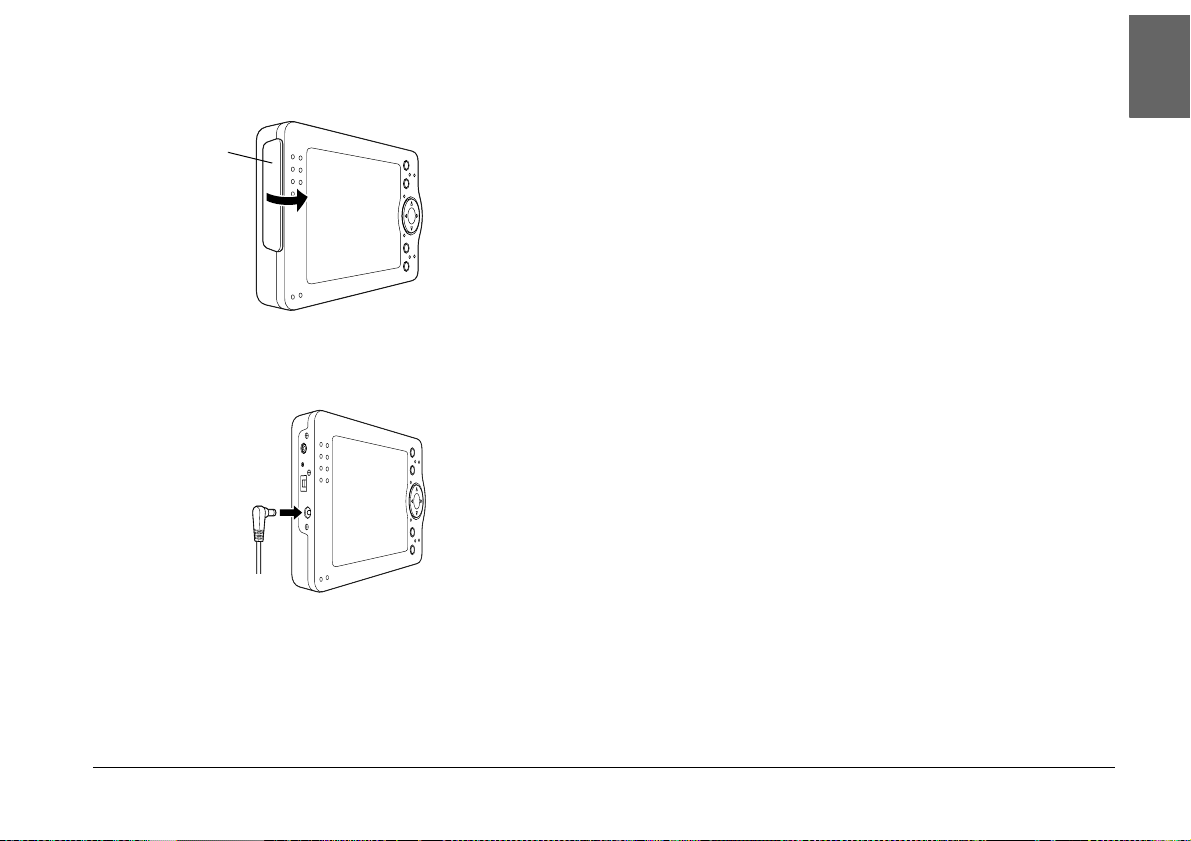
1. Remove the connector cover.
connector cover
The CHARGE light flashes during charging. When the
battery is fully charged, the CHARGE light turns off.
It takes about 3.5 hours to fully charge the battery.
Setting and removing a memory card
2
2
English
2. Connect the AC adapter to PhotoPC P-1000 and a
power outlet as shown below.
Caution:
c
Do not connect the AC adapter when the battery is
not installed. Doing so may cause PhotoPC P-1000
to be damaged.
This section describes how to set a memory card. See
“Available types of memory cards” on page 20 for the
types of memory cards that can be used.
Caution:
c
❏ To use a memory card correctly, read manuals
provided with the memory card. When using
other devices with a memory card, read manuals
provided with those devices also.
❏ Never remove a memory card while the
ACCESS light is on. Doing so may cause data
in the card or HDD to be lost or damaged.
❏ Avoid using or storing the card in direct
sunlight, or in places that are extremely hot,
humid, or dusty.
Getting Started 19
2
2
2
2
2
2
2
2
Page 20
Available types of memory cards
The following memory cards are available.
❏ CF (CompactFlash) memory card (Type 1 and
Type 2, 3.3 V, including MicroDrive)
❏ SD memory card
❏ Memory Stick
❏ Smart Media (3.3 V only)
❏ MultiMedia Card
❏ xD-Picture Card
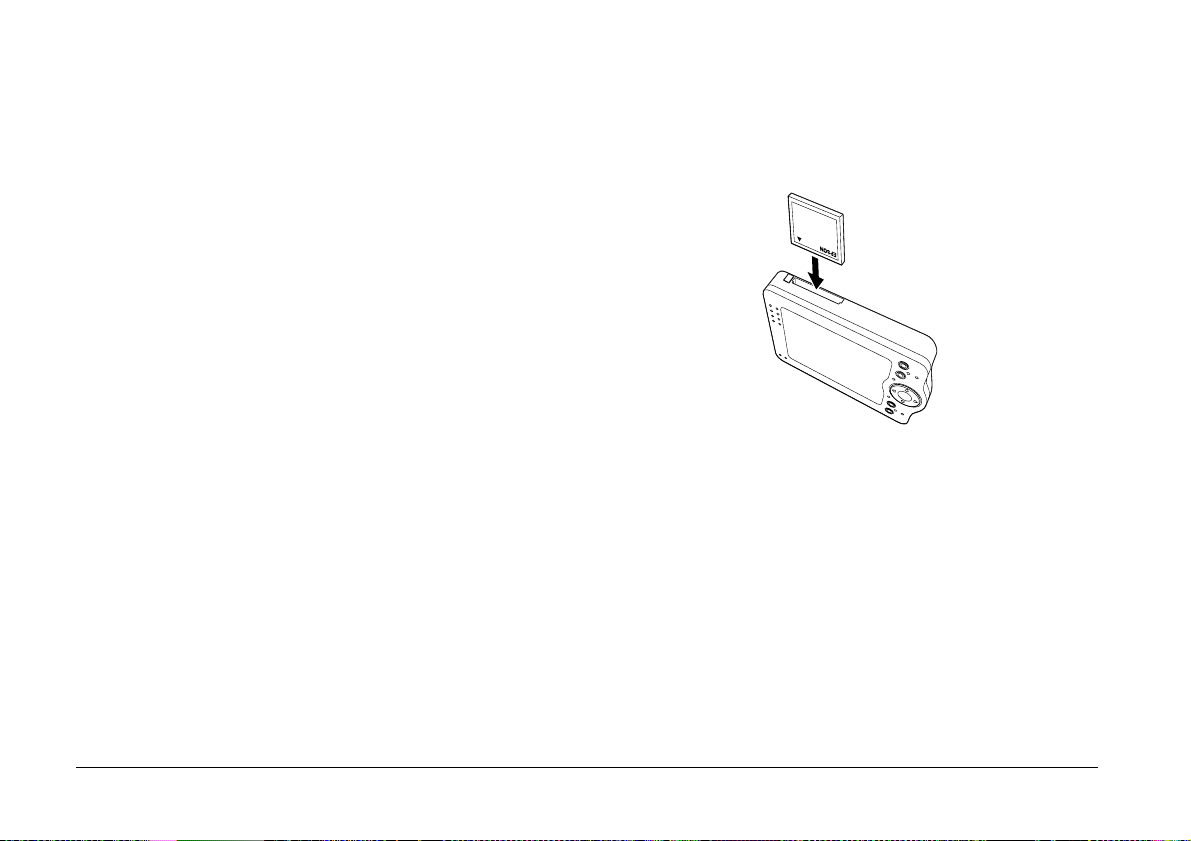
Setting a memory card
1. Insert the memory card into the memory card slot
facing up.
Note:
A commercially available CF adapter is needed to use any
memory cards other than CF cards.
20 Getting Started
Note:
Insert memory cards in the correct direction.
Otherwise, the memory card and PhotoPC P-1000 may
be damaged.
Page 21
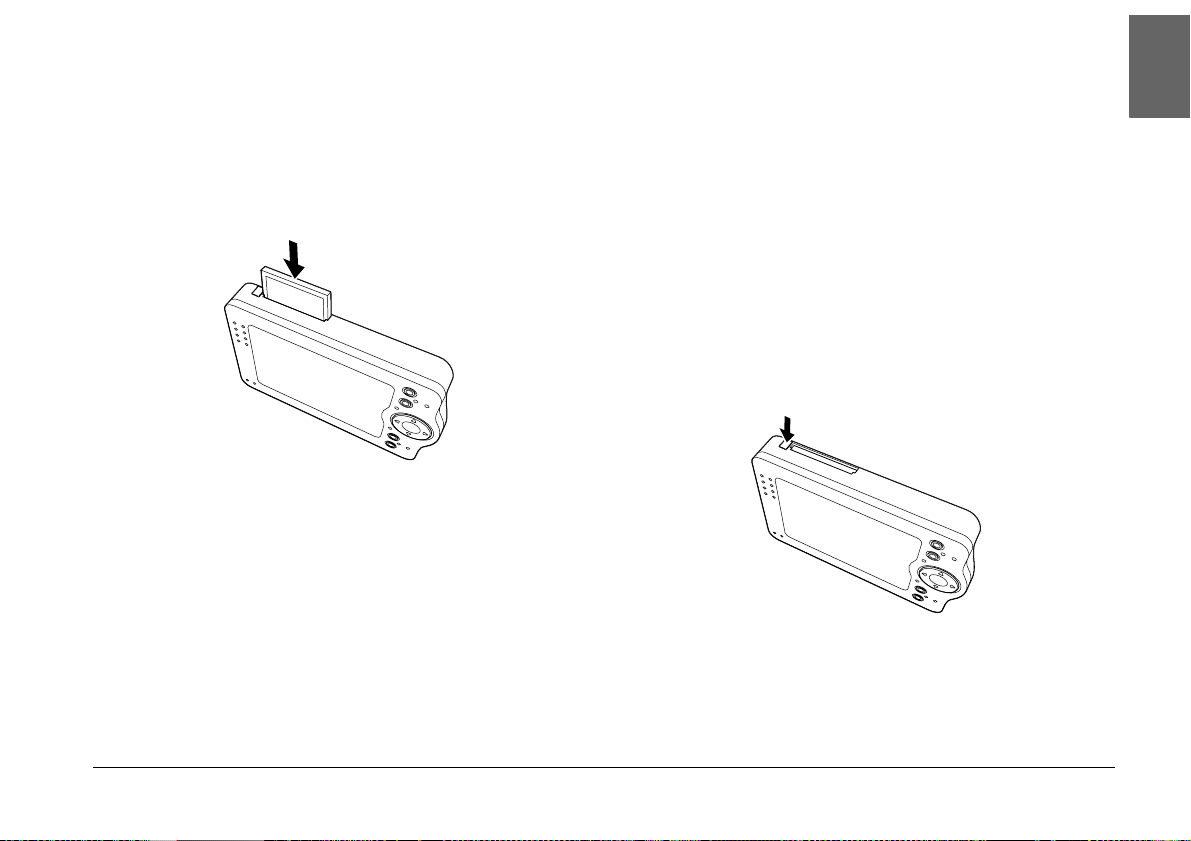
2. Push the memory card into the slot until the
memory card lock clicks.
Removing a memory card
1. Make sure that the ACCESS light is off.
2
English
Note:
When inserting the memory card, the eject button does
not pushed out.
Caution:
c
❏ Never remove a memory card while the
ACCESS light is on. Doing so may cause data
in the card to be lost or damaged.
2. Push the eject button down.
Note:
When the memory card is not ejected, push the eject
button again. The memory card is pushed out.
The memory card is pushed out.
2
2
2
2
2
2
2
2
2
Getting Started 21
Page 22
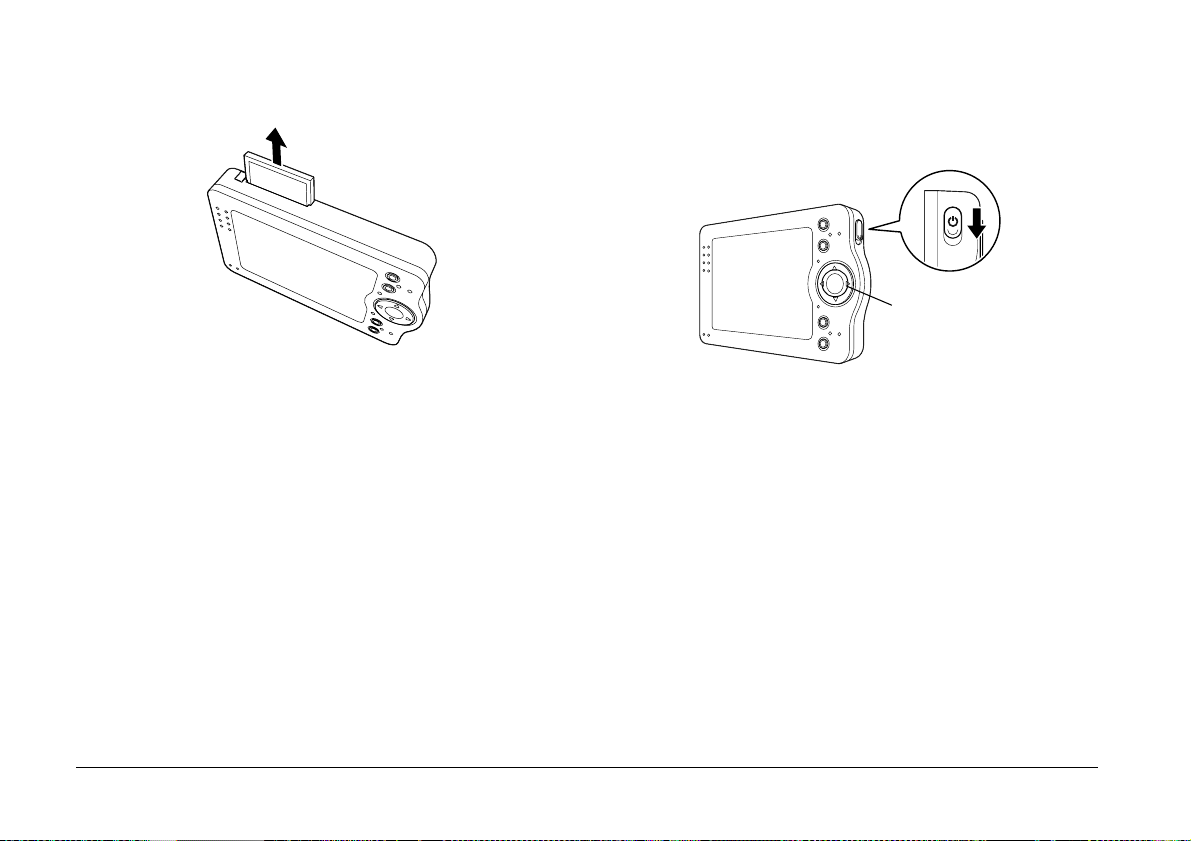
3. Pull out the memory card.
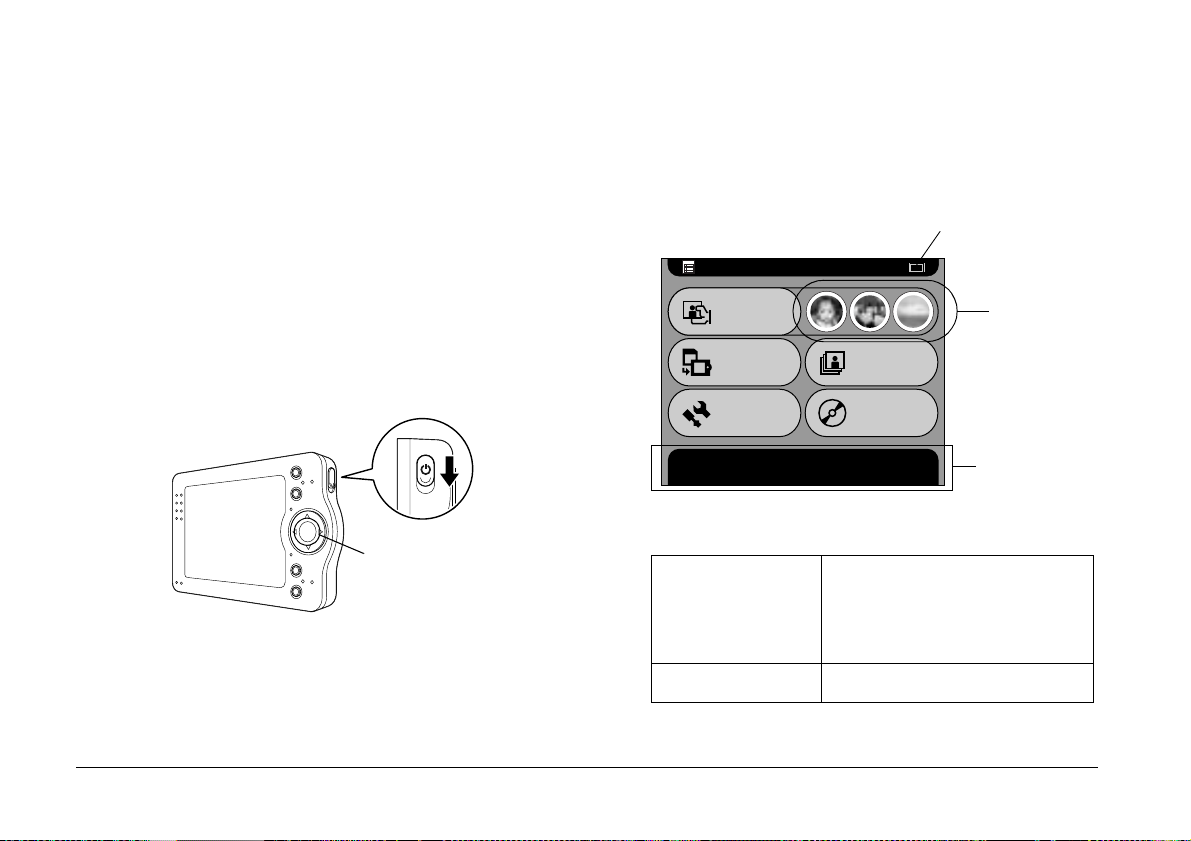
Turning the power on
1. Slide the power switch as shown below.
ILLUMINATION light
Note:
When using the memory card set in the CF adapter, do
not remove only the memory card. Remove the CF
adapter from the PhotoPC P-1000.
22 Getting Started
The ILLUMINATION light turns on.
Page 23
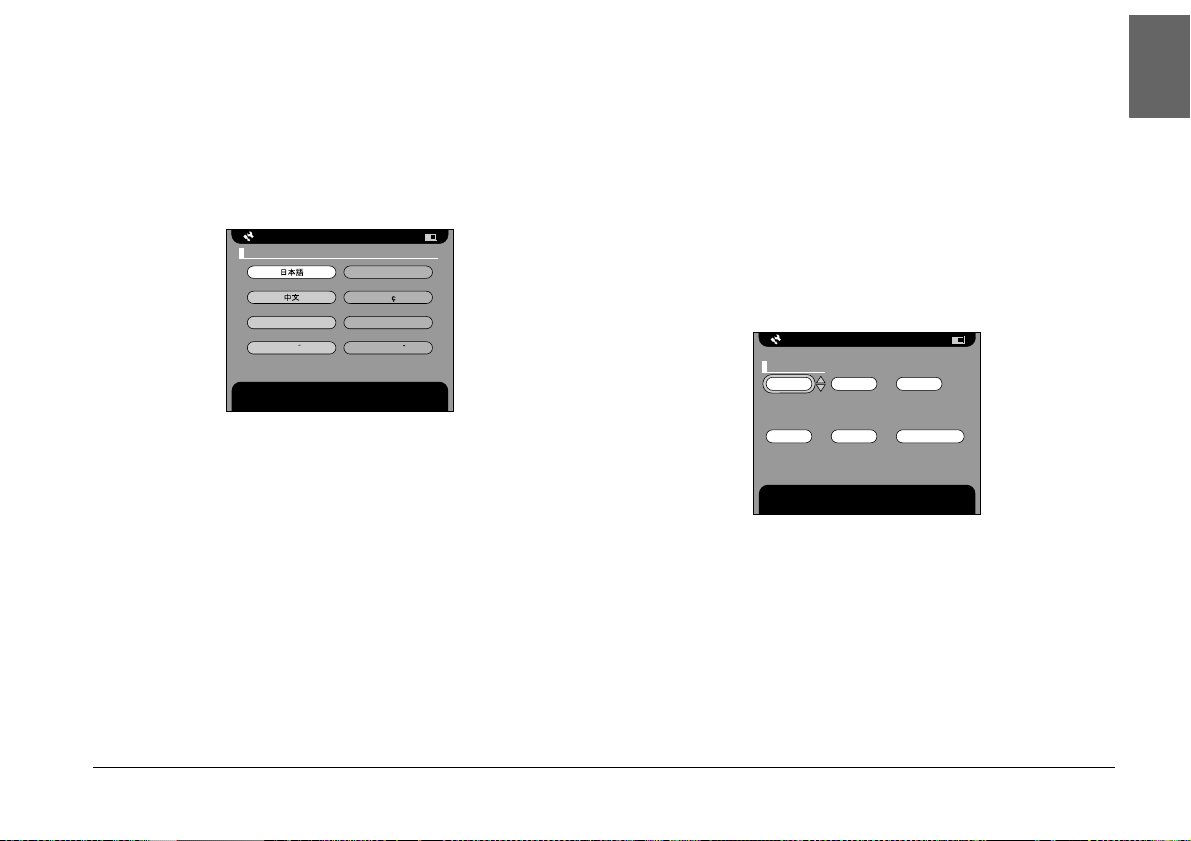
Setting the language
When you turn on PhotoPC P-1000 the first time, the
language setting screen is displayed. Select the
language you want to use with the Four-way button,
and press the OK button.
Language Setting
Language
Deutsch Italiano
Press OK to select and return to the previous screen. Press
cancel to disregard the selection.
English
Fran ais
PortuguesEspanol
Setting the date and time
When you turn on PhotoPC P-1000 for the first time,
the Date and Time Settings screen is displayed after
you select the language. Set the date and time.
Note:
❏ If you remove the battery from PhotoPC P-1000, the
date and time settings will be erased after
approximately two days maximum after the last time
to used P-1000.
❏ After changing the battery, make sure that the date and
time is set correctly. If necessary, set the date and time
again.
❏ You can change the settings later. See “Changing
PhotoPC P-1000 Settings” on page 52 for details about
setting the date and time settings.
1. Turn the power on. The Date and Time Settings
screen appears.
Date and Time Settings
Year:
Hour:
Use the up or down button to select the year. Press OK to
apply the setting.
2. Press the UP and Down buttons on the control
panel to change the value of the selected item.
3. After you finish making settings, select a different
item by pressing the Right and Left buttons on the
control panel.
2003
12
Month:01Day:
01
Minute:00Format:
YYYY.MM.DD
2
2
2
2
2
2
2
2
2
English
Getting Started 23
2
Page 24
4. Repeat steps 2 and 3 until you finish making the
date and time settings.
5. After you finish making all settings, press the OK
button.
How to use the menu
When turning PhotoPC P-1000 on, the Main Menu
appears first. All the operations can be started from
this screen.
Turning the power off
1. Make sure that the ACCESS light is off.
2. Slide the power switch as shown below and hold
it down for several seconds until the
ILLUMINTATION light turns off.
ILLUMINATION light
24 Getting Started
Battery icon
Main Menu
Browse
Copy to the
HDD
Settings
Browse pictures in the HDD, on a memory card, or CD-R/RW.
Press OK to continue.
Slide Show
Copy to
CD-R/RW
Shortcut icons
Message area
Battery icon Indicates the remaining
charge in the battery. See
“Charging the battery” on
page 18 for details.
Browse Select to display images.
Page 25
Shortcut icons Select to access a favorite
album. You can set a shortcut
icon for an album. See
“Album shortcut settings” on
page 57 for details.
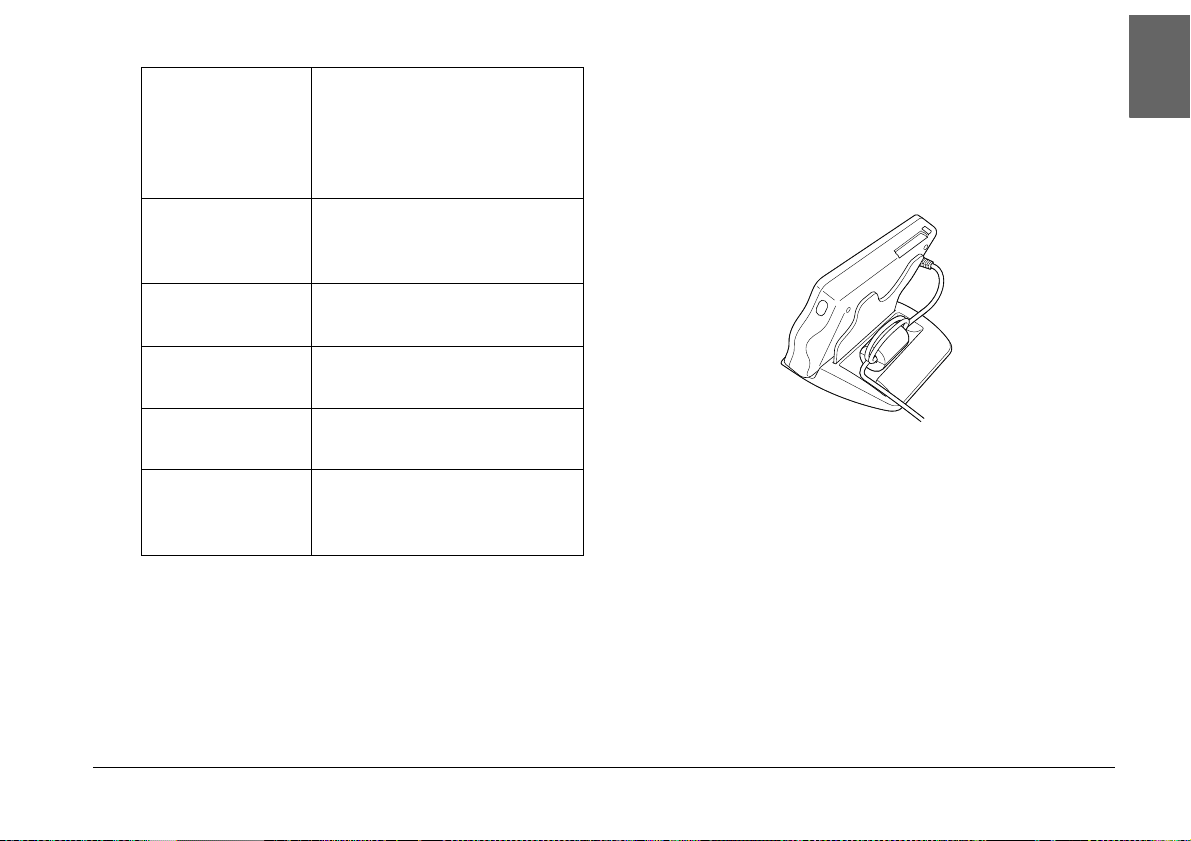
About the stand
You can view images on the digital photo stand.
Set PhotoPC P-1000 to the stand as shown below.
2
2
English
Copy to the
HDD
Slide Show Select to display the images in
Settings Select to set PhotoPC P-1000’s
Copy to
CD-R/RW
Message area A message concerning the
You can also use the pop up menu by pressing the
MENU button. For details, see “Using the Pop Up
Menu” on page 36.
Select to copy images from
the memory card to the
PhotoPC P-1000’s HDD.
an Album as a slide show.
various settings.
Select to store images from
the HDD to a CD-R/RW.
current selection is
displayed.
About the AC adapter
PhotoPC P-1000 comes with the AC adapter (P62L).
Warning:
w
❏ Only use the AC adapter provided, which is
designed for the PhotoPC P-1000. Using
another adapter could cause fire, electrical shock,
or injury.
Getting Started 25
2
2
2
2
2
2
2
2
Page 26

❏ Do not use the AC power cable or the adapter for
any purpose other than powering your PhotoPC
P-1000.
❏ If the AC plug does not fit your outlet, have a
proper outlet installed by a qualified electrician.
❏ To avoid radiation danger, do not expose or
remove the ferrite core.
❏ To prevent fire or electric shock, do not cover the
AC adapter with a blanket or similar covering.
❏ Do not connect the AC adapter when the battery
is not installed. Otherwise, PhotoPC P-1000
may be damaged.
❏ Do not remove the AC adapter from this device
during operations (connecting the AC adapter
during operations is possible).
Use the AC adapter in the following situations.
❏ When charging the battery.
❏ When managing images while connected to a
computer, CD-RW drive, or printer.
26 Getting Started
Page 27

Chapter 3
Viewing and Managing Images
3
3
English
Viewing Images
This section describes how to view, copy, and delete
images in the PhotoPC P-1000’s HDD (Card Case) or
the memory card. When you would like to manage
images while connected to your computer, see “Using
PhotoPC P-1000 With a Computer” on page 45.
Note:
Images with an odd number of pixels, such as 1601 × 1201,
are displayed with one line of pixels on the bottom and right
sides missing.
Available types of image files
Only images in the JPEG format can be displayed on
PhotoPC P-1000.
Note:
❏ The progressive JPEG format is not supported.
❏ Images of up to 6 megapixels can be displayed.
❏ Files, except jpeg format (video or sound files etc.),
cannot be displayed or played on PhotoPC P-1000.
However, it is possible to copy these files from a
memory card to the HDD.
Displaying images as thumbnails
You can display all images stored in PhotoPC P-1000
or a memory card as thumbnails. You can also display
an image in full-screen format by selecting the
specified image from the listed images.
1. Turn the power on.
Viewing and Managing Images 27
3
3
3
3
3
3
3
3
Page 28

2. In the Main Menu, select Browse and press the
OK button.
Main Menu
Browse
Copy to the
HDD
Settings
Browse pictures in the HDD
Press OK to continue.
Slide Show
Copy to
CD-R/RW
, on a memory card, or CD-R/R
W.
The Browse menu appears.
3. To display images stored in a memory card, set
the memory card.
4. In the Browse menu, select the location of the
images you want to view by using the Up and
Down button, and press the OK button.
Browse
Album Case
Card Case
Memory Card
CD-R/RW
Press OK to browse the Album Case.
5. If necessary, select a folder, an album or a card
folder.
¥Cards
1
20021218.001220021218.003320021218.004
28 Viewing and Managing Images
Press OK to browse this car
the previous screen.
d folder. Press Cancel to return to
Thumbnails of the stored images and folders are
displayed.
Page 29

Note:
❏ When viewing images in the folders, select a folder
and press the OK button. Images stored in the
folder are displayed as thumbnails.
❏ Unsupported data is displayed as the icon.
6. Select an image which you want to display in
full-screen format, and press the OK button.
¥Cards¥20021218. 003¥DCIM¥101EPSON
1
2 3
09
Press OK to view this photo.
previous screen. Press Print to print this photo.
Press Cancel to return to the
Displaying images as a slide show
You can display images stored in the album as a slide
show. For details about the album, see “Using
Albums” on page 34.
1. In the Main Menu, select Slide Show by using the
Four-way button and press the OK button.
Main Menu
Browse
Copy to the
HDD
Settings
Start album slide show. Press OK to contin
Slide Show
Copy to
CD-R/RW
ue.
3
3
3
3
3
3
English
The selected image is enlarged to fit the full
screen.
Note:
You can do various operations to the displayed image
by using the pop up menu. See “Using the Pop Up
Menu” on page 36 for details.
3
3
3
3
Viewing and Managing Images 29
Page 30

2. Select the album and press the OK button.
¥Albums
1
1. Display an image in full-screen format as
described in “Displaying images as thumbnails”
on page 27.
Favourites2Christmas3Travels
Press OK to start the slide sho
previous screen.
w. Press Cancel to return to the
The slide show starts.
Zooming an image
You can zoom in or out of an image displayed in
full-screen format.
Model Name
: PhotoPC 8100Z
Date
: 2001.12.31 22:31
Size
: 1600 × 1200
Focus Length
: 20.20m
F Number
: F2.8
Shutter Speed(s)
: 1/258 M
Expousure Bias
: 0.0
Flash
: off
Metering Mode
: Divided
2
2. Press the OK button.
Model Name
: PhotoPC 8100Z
Date
: 2001.12.31 22:31
Size
: 1600 × 1200
Focus Length
: 20.20m
F Number
: F2.8
Shutter Speed(s)
: 1/258 M
Expousure Bias
: 0.0
Flash
: off
Metering Mode
: Divided
Note:
❏ Every time you press the OK button, the zoom
ratio changes.
30 Viewing and Managing Images
Page 31

❏ You can move the part of the image displayed by
pressing the Four-way button.
2. In the Main Menu, select Copy to the HDD by
using the Four-way button and press the OK
button.
3
English
Copying or Deleting the Images
This section describes how to copy or delete images
stored in the HDD or memory card.
Copying images from a memory card to
PhotoPC P-1000
Note:
When the battery is low, copying may not be completed. Use
the AC adapter if this happens.
1. Set the memory card.
Main Menu
Browse
Copy to the
HDD
Settings
Copy a memory card into the Car
copying.
3. When deleting the images after copying, select
Yes, or if not, select No in the displayed dialog
box and press the OK button.
Copy to the HDD
Do you want to delete all files
on the memory card? All files
are verified as copied before
deletion.
Press OK to disregard delete command.
Slide Show
Copy to
CD-R/RW
d Case. Press OK to start
Yes No
3
3
3
3
3
3
3
3
3
Viewing and Managing Images 31
Page 32

Note:
This dialog box appears when the Clear memory card
after copying setting in Copy Mode settings is set to
Confirm. For details, see “Copy mode settings” on
page 57.
4. Select the album in which to store the copied
image, then press the OK button.
Copying starts and the following dialog box appears.
Copy to the HDD
Copying all files in the memory
card to the 20030214.001 in the
Card Case.
. . .
Copy to the HDD
Favourites
Travels
New
Press OK to select the option.
previous screen.
Press Cancel to return to the
Note:
This dialog box appears when the Save images in album
after copying setting in Copy Mode settings is set to
Confirm. For details, see “Copy mode settings” on
page 57.
32 Viewing and Managing Images
Press the Cancel button to cancel cop
ying.
The copied images are stored in a card folder of the
Card Case. The card folder is named according to the
date, for example “20030325.XXX”. XXX is the number
assigned according to the copying order.
Copying images from PhotoPC P-1000 to a
memory card
You can copy images in PhotoPC P-1000 to a memory
card in two ways. One is to copy all images in a
specified card folder to a memory card at once.
Another is to copy only an image that you select.
1. Set the memory card.
Page 33

Note:
Insert a blank memory card. Otherwise, the data is not
copied.
2. Select a card folder or an image that you want to
copy.
¥Cards¥20021218. 003¥DCIM¥101EPSON
1
2 3
09
3. Press the MENU button to display the pop up
menu, and select Copy to Memory Card by
using the Up and Down buttons, then press the
OK button.
¥Cards¥20021218. 003¥DCIM¥101EPSON
2 3
1
09
Delete
Copy All Images to Album
Copy to Memory Card
Slide Show
Lock
Return to Main Menu
PC View Mode
Hide Unsupported Files
3
3
3
3
English
Press OK to view this photo.
previous screen. Press Print to print this photo.
Press Cancel to return to the
Note:
You cannot select an album.
Press OK to view this photo.
Press Cancel to return to the pre
Press Print to print this photo.
vious screen.
Copying images from the Card Case to an
album
You can store your favorite images to an album. See
“Using Albums” on page 34 about an album and
Album Case. For details about copying to an album,
see “Copying a favorite image to an album” on page
34 and “Copying all the images in a folder to an
album” on page 35.
Viewing and Managing Images 33
3
3
3
3
3
3
Page 34

Deleting images
1. Select an image or a folder to delete.
¥Cards¥20021218. 003¥DCIM¥101EPSON
1
2 3
09
Using Albums
The album and Album Case are one of the useful
functions. You can store favorite images from the card
folder or memory card as an album and manage these
images.
About the Album Case
Press OK to view this photo.
previous screen. Press Print to print this photo.
Press Cancel to return to the
2. Press the MENU button to display the pop up
menu.
3. Select Delete by using the Up and Down buttons
and press the OK button.
¥Cards¥20021218. 003¥DCIM¥101EPSON
2 3
1
09
Delete
Copy All Images to Album
Copy to Memory Card
Slide Show
Lock
Return to Main Menu
PC View Mode
Hide Unsupported Files
Press OK to view this photo.
Press Cancel to return to the pre
Press Print to print this photo.
vious screen.
The selected item is deleted.
34 Viewing and Managing Images
There is an Album Case in PhotoPC P-1000. The
Album Case manages albums which you make. You
can manage multiple albums in the Album Case. To
access the Album Case, select Browse in the Main
Menu, then select Album Case in the Browse menu.
Copying a favorite image to an album
1. Display the image to be copied to an album.
Note:
You can select an image from the HDD, memory card,
or CD-R/RW.
2. Press the MENU button to display the pop up
menu.
Page 35

3. Select Copy to Album by using the Up and
Down buttons, and press the OK button.
Model Name
: PhotoPC 8100Z
Date
: 2001.12.31 22:31
Size
: 1600 × 1200
Focus Length
: 20.20m
F Number
: F2.8
Delete
Shutter Speed(s)
: 1/258 M
Rotate
Expousure Bias
: 0.0
Flash
: off
Copy to Album
Metering Mode
: Divided
Copy All Images to Album
Copy to Memory Card
Slide Show
Lock
Increase Number of Copies
2
The Copy to Album dialog box appears.
4. Select an album in which to store the image, and
press the OK button.
Copy to Album
Favourites
Travels
New
Press OK to select the option.
previous screen.
Press Cancel to return to the
Note:
You can make a new album by selecting New and
select the new album’s name from the displayed list.
A dialog box confirming to copy appears and
copying starts.
Copying all the images in a folder to an
album
1. Select the folder to be copied to an album.
¥Cards
1
20021218.001220021218.003320021218.004
Press OK to browse this car
the previous screen.
Note:
You can select a folder from the HDD, memory card,
or CD-R/RW.
2. Press the MENU button to display the pop up
menu.
d folder. Press Cancel to return to
3
3
3
3
3
3
3
3
3
3
English
Viewing and Managing Images 35
Page 36

3. Select Copy All Images to Album by using the
Up and Down buttons, and press the OK button.
¥Cards
1
Delete
Rotate
20021218.001220021218.003320021218.004
Copy to Album
Copy All Images to Album
Copy to Memory Card
Slide Show
Lock
Increase Number of Copies
Press OK to browse this card folder.
Press Cancel to return to the pre
vious screen.
The Copy All Images to Album dialog box
appears.
4. Select an album to store the image, and press the
OK button.
Copy All Images to Album
Favourites
Travels
New
Press OK to select the option.
previous screen.
Press Cancel to return to the
Note:
You can make a new album by selecting New and
select the new album’s name from the displayed list.
A dialog box confirming to copy appears and
copying starts.
Using the Pop Up Menu
Pressing the MENU button displays the pop up menu.
The menu varies depending on the situation when you
press the MENU button.
¥Cards¥20021218. 003¥DCIM¥101EPSON
1
2 3
09
Delete
Copy All Images to Album
Copy to Memory Card
Slide Show
Lock
Return to Main Menu
PC View Mode
Hide Unsupported Files
Press OK to view this photo.
Press Cancel to return to the previous screen.
Press Print to print this photo.
36 Viewing and Managing Images
Page 37

Delete
Delete a selected image or folder. Then, select Yes in
the dialog box that confirms to delete the selected item,
and press the OK button to delete.
Note:
When selecting items stored in the CD-R/RW, this
command is not displayed.
Copy to Memory Card
Copy the selected image or card folder to a memory
card.
Copy to HDD
Copy the selected album or card folder in the
CD-R/RW to the HDD.
3
3
3
English
Rotate
Rotate a selected image in the album 90° clockwise.
Locked images cannot be rotated.
Note:
An odd size image is cut the one pixel of the bottom and
right sides when the image is rotated.
Copy to Album
Copy the selected image to an album.
Copy All Images to Album
Copy all images listed to a specified album.
Slide Show
Images in the selected album or card folder are
displayed as a slide show.
Lock/Unlock
Lock or unlock the selected image or folder. When the
item is locked, the icon is displayed and cannot be
deleted or rotated. When the selected item is already
locked, the lock is released by using this command.
Note:
❏ The images inside the folder can be deleted even if the
folder is locked.
❏ You cannot add images to the locked album. The locked
album is not displayed.
Viewing and Managing Images 37
3
3
3
3
3
3
3
Page 38

Increase Number of Copies
Increase the number of copies by one sheet. This
setting is valid until printing is executed.
Note:
You can increase the number of copies up to 99.
Decrease Number of Copies
Decrease the number of copies by one sheet. This
setting is valid until printing is executed.
Increase Number of Copies for All
Increase the number of copies by one sheet for all
images displayed. This command is available in the
Select Photos screen. This setting is valid until printing
is executed.
Note:
You can increase the number of copies up to 99.
Reset Number of Copies for All
Reset the number of copies to 0 for all images
displayed. This command is available in the Select
Photos screen.
Information ON/OFF
Turn the information that is displayed in the image
screen on or off. Information about the image and
battery status icon are hidden when OFF.
Return to Main Menu
Close the pop up menu and return to the Main Menu.
PC/DSC View Mode
Change the view mode of the card folder. When PC
mode is selected, all images and folders are displayed
in the current folder. When DSC mode is selected,
only the images in the correct folder are displayed.
Note:
❏ You cannot change the view mode of the album folder
from the PC mode.
❏ The default setting of the card folder is set to the DSC
mode.
Show/Hide Unsupported Files
Change whether or not to display unsupported files.
38 Viewing and Managing Images
Page 39

Change Album Name
Change the selected album’s name. You can select the
name from the displayed list. When you select a name
which already exists, the new album is given a number
after its name.
3
3
English
Set as the Album Thumbnail
Set the selected image as an album or card folder’s
icon.
Select to Copy/Undo Copy Command
Reserve or cancel copying of the selected image.
Note:
Copy reservations that have been made are cleared when
switching the folder to display.
Select to Delete/Undo Delete Reservation
Command
Reserve or cancel deleting of the selected image or
folder.
Note:
Delete reservations that have been set are cleared when
switching the folder to display.
3
3
3
3
3
3
3
3
Viewing and Managing Images 39
Page 40

Chapter 4
Direct Printing
Before Printing
You can print an image by connecting PhotoPC P-1000
directly to a printer. This section describes how to
print the images on the PhotoPC P-1000.
Supported printers
PhotoPC P-1000 supports printers listed below.
PhotoPC P-1000 comes with two USB cables. Choose
either of the cables depending on your printer.
Printer model Cable
Stylus Photo 810, Stylus Photo 820,
Stylus Photo 830, Stylus Photo 830U,
Stylus Photo 900, Stylus Photo 950,
Stylus Photo 960, Stylus Photo 2100,
Stylus Photo 2200
Stylus Photo 935
40 Direct Printing
Available types of paper
PhotoPC P-1000 supports the following sizes and
types of paper.
Paper Size
Premium Glossy Photo Paper 4 × 6 in.*, 10 × 15 cm,
Premium Semigloss Photo Paper
* Stylus Photo 935 is not supported.
Note:
For details about paper, see your printer’s manuals.
5 × 7 in., Letter*, A4
Page 41

Connecting PhotoPC P-1000 to a printer
The following procedure shows how to connect the
PhotoPC P-1000 to the Stylus Photo 960. For other
printers, refer to your printer’s manual.
1. Make sure that PhotoPC P-1000 and the printer
are turned off.
2. Remove the connector cover and connect the USB
cable.
3. Connect the other end of the USB cable to the
connector on the printer.
Note:
See your printer’s manual for the location of the cable
connector on your printer.
4
4
4
4
4
4
English
Note:
❏ Keep the connector cover in a safe place.
❏ Use the appropriate cable for your printer. See
“Supported printers” on page 40 for details.
Selecting the appropriate printer driver
When printing images the first time, set the
appropriate printer driver for the PhotoPC P-1000.
Note:
When you change the language setting, the printer driver
settings are automatically reset. So you need to set the
printer driver again.
Direct Printing 41
4
4
4
4
Page 42

1. Press the PRINT button.
2. In the Print menu, select Printer Settings by using
the Four-way button and press the OK button.
Print
Print This Photo
Print All Photos
Select Photos
Number of Photos:
Utilities Printer Settings
Press OK or Print to continue. Press Cancel to return to the
previous screen.
The Printer Settings screen appears.
3. Select Select Printer and press the OK button.
Printer Settings
Select Printer
Current Printer:
Stylus Photo 810
Install Printer Driver
Show Driver Information
4. Select your printer from the displayed list, and
press the OK button.
Printer Settings
Select Printer
Select a printer:
Current Printer
Stylus Photo 810
Stylus Photo 810
Stylus Photo 820
Install Printer Driver
Stylus Photo 830
Stylus Photo 830 U
Show Driver Information
Stylus Photo 900
Press OK or PRINT to select this printer. Press Cancel to
return to the previous screen.
Note:
❏ An error message that the printer driver cannot
be found is displayed, contact our Customer
Support.
❏ For information about registering a new printer
driver, see “Registering a new printer driver” on
page 69.
Press OK or PRINT to change a printer.
42 Direct Printing
Page 43

Printing Images
Note:
Use the AC adapter when printing.
1. Select the image to print.
2. Press the PRINT button.
Note:
❏ To print only the image you choose, select Print
This Photo.
❏ To print all the images in the selected folder, select
Print All Photos.
❏ To add images to be printed or to print the selected
images, select Select Photos.
4
4
4
English
Note:
If the printer is not selected, the Printer Settings screen
appears. Select the printer to be used.
3. In the Print menu, select the printing mode, and
press the OK button.
Print
Print This Photo
Print All Photos
Select Photos
Number of Photos:1
Utilities Printer Settings
Press OK or PRINT to contin
the previous screen.
ue. Press CANCEL to return to
4. In the Print Settings screen, make the appropriate
settings by using the Four-way button and press
the OK button.
Print Settings
Number of Copies
Print Date
Paper
Layout
Print Quality
Copy number affects the total n
Print to start printing. The LCD display turns off
A4
Premium Glossy Photo Paper
High
01
Print
1 Picture
with borderless
umber of copies. Press OK or
.
Note:
❏ For details about the print settings, see “Changing
the Printer Driver Settings” on page 58.
Direct Printing 43
4
4
4
4
4
4
4
Page 44

❏ When you select Select Photos in step 3, the
Select Photos dialog box appears. Select images to
print and press the OK button.
Select Photos
0001/0024
Date:2001.12.31 22:31
Resolution**:1600×1200
01
Total 01
09
09
Use the left or right button to select a photo. Use the up or
down button to select the n
or PRINT to select layout.
00 00
umber of copies to print. Press OK
Printing starts. The LCD turns off during printing.
The LCD turns on when you press any button.
44 Direct Printing
Page 45

Chapter 5
Using PhotoPC P-1000 With Other Devices
5
5
English
Using PhotoPC P-1000 With a Computer
Connect PhotoPC P-1000 to a computer to display
images on the monitor, copy images from the
computer to PhotoPC P-1000, or from PhotoPC P-1000
to the computer.
When using PhotoPC P-1000 with your computer,
install the software which comes with your digital
camera. If the software is unavailable, install the
software from the software CD-ROM. For details, see
“Installing the Software” on page 60.
Note:
❏ When using PhotoPC P-1000 while it is connected to
a computer, use the AC adapter.
❏ When removing the USB cable, refer to your
computer’s manual and follow the instructions.
❏ On Windows 98, when removing the cable from the
computer after storing images to the computer without
turning the computer off, the blue screen is displayed.
To avoid this, turn the computer off before removing
the cable.
Displaying images on the monitor
1. Connect the AC adapter to P-1000. Then, turn on
P-1000 and your computer.
2. Connect the USB cable to your computer.
Using PhotoPC P-1000 With Other Devices 45
5
5
5
5
5
5
5
5
Page 46

3. Connect the other end of the USB cable to P-1000.
Using Video Output
PhotoPC P-1000 has a video output connector. You
can view images on the monitor with a video input
connector.
Storing Images to a CD-R/RW
The PC peripheral mode icon ( ) is displayed
about one minute, then the LCD turns off.
Note:
The LCD turns on when any button is pressed.
4. Start the software which comes with your digital
camera, and select the image to display.
Note:
❏ You cannot display images stored in the memory
card on the monitor.
❏ Do not change the name of the Album Case
(“Albums”), Card Case (“Cards”) folders and the
folders under these two folders.
46 Using PhotoPC P-1000 With Other Devices
When connected to a CD-RW drive with the USB cable
provided with PhotoPC P-1000, you can archive
images to a CD-R/RW.
Note:
When using PhotoPC P-1000 while it is connected to a
computer, use the AC adapter.
Page 47

1. Make sure PhotoPC P-1000 and the CD-RW drive
are turned off, and connect PhotoPC P-1000 to
your CD-RW drive.
4. In the Copy to CD-R/RW screen, select the
location in which the images to archive are stored,
and press the OK button.
5
English
2. Turn on the CD-RW drive, then PhotoPC P-1000.
3. In the Main Menu, select Copy to CD-R/RW by
using the Four-way button, and press the OK
button.
Main Menu
Browse
Copy to the
HDD
Settings
Copy albums or card folders to a CD-R/RW. Press OK to
continue.
Slide Show
Copy to
CD-R/RW
Copy to CD-R/RW
Album Case
Card Case
Press OK to copy albums.
5. Select a folder to archive, and press the OK button.
icon is attached to the selected folder.
Note:
❏ You can cancel the selected folder by selecting the
folder and press the OK button again.
5
5
5
5
5
5
5
5
5
Using PhotoPC P-1000 With Other Devices 47
Page 48

❏ You can select multiple folders.
Copy to CD-R/RW
1
Favourites2Birthday
Press OK to select this option.
settings.
Size:128MB
Available Disk Space:400MB
Press Cancel to finish making
6. Press the MENU button and select Burn to CD.
Copy to CD-R/RW
1
Favourites2Birthday
Size:128MB
Available Disk Space:400MB
Delete
Copy All Images to Album
Slide Show
Lock
Return to Main Menu
Hide Unsupported Files
Burn to CD
Select to Delete
7. Confirm the message in the displayed dialog box,
and press the OK button.
Copy to CD-R/RW
1
Favourites2Birthday
Once you have started
copying to a CDR/RW,
do not cancel the operation.
Otherwise, the CD-R/RW
media will become corrupted.
Copying can take up to one
hour.
Press OK to start copying to a CD-R/RW. Press Cancel to
return to the previous screen.
Size:128MB
Available Disk Space:400MB
Writing to the CD-R/RW starts.
Note:
When you press the CANCEL button after selecting
images at step 5, the following dialog box is displayed.
Select Start Copying to CD-R/RW, and press the
OK button.
Press OK to select this option.
settings.
Press Cancel to finish making
48 Using PhotoPC P-1000 With Other Devices
Copy to CD-R/RW
1
Favourites220021210.001
Select one of the following:
Start Copying to CD-R/RW
Cancel
Press OK to start copying to a CD-R/RW. Press Cancel to
return to the previous screen.
Size:128MB
Available Disk Space:400MB
Page 49

Chapter 6
Customizing Settings
6
English
This section describes how to customize PhotoPC
P-1000 settings. You can customize various settings
for displaying and copying images, or turn on the
sound setting to make your PhotoPC P-1000 more fun
to use.
Customizing Albums
You can store your favorite images as an album.
Albums are managed in the Album Case. The Album
Case is displayed by selecting Browse in the Main
Menu, then selecting Album Case.
An album named Favorite already exists as a default.
You can add and delete different albums as you like.
You can also create an album shortcut on the Main
Menu. The shortcut enables you to access your
favorite albums easily. For details, see “Album
shortcut settings” on page 57.
This section describes how to create, copy, and delete
albums.
Creating a new album
1. Select an image to store in the new album.
2. Press the MENU button to display the pop up
menu.
3. Select Copy to Album, by using the Up and
Down buttons and press the OK button.
Model Name
: PhotoPC 8100Z
Date
: 2001.12.31 22:31
Size
: 1600 × 1200
Focus Length
: 20.20m
F Number
: F2.8
Delete
Shutter Speed(s)
: 1/258 M
Rotate
Expousure Bias
: 0.0
Flash
: off
Copy to Album
Metering Mode
: Divided
Copy All Images to Album
Copy to Memory Card
Slide Show
Lock
Increase Number of Copies
2
6
6
6
6
6
6
6
6
6
Customizing Settings 49
Page 50

4. Select New from the displayed list, and press the
OK button.
Copy to Album
Changing an album’s name
1. Select an album that you want to change the name
of, in the Album Case.
Favourites
Travels
New
Press OK to select the option.
previous screen.
Press Cancel to return to the
5. Select the album’s name from the displayed list,
and press the OK button.
Copy to Album
Select one of the following:
Favorites
Family
Travel
Hobbies
Christmas
Press OK to select the option.
previous screen.
Press Cancel to return to the
Note:
When you select a name which already exists, the new
album is named with a number at the end of its name.
¥Albums
1
Favourites2Christmas3Travels
Press OK to start the slide sho
previous screen.
w. Press Cancel to return to the
2. Press the MENU button to display the pop up
menu.
50 Customizing Settings
Page 51

3. Select Change Album Name by using the Up
and Down buttons, and press the OK button.
¥Albums
1
Delete
Copy All Images to Album
Favourites2Christmas3Travels
Slide Show
Lock
Return to Main Menu
Hide Unsupported Files
Change Album Name
Select to Delete
Copying an album to CD-R/RW
You can copy an album to the CD-R/RW. For details,
see “Storing Images to a CD-R/RW” on page 46.
Deleting an album
1. Select an album to delete in the Album Case.
6
6
6
English
Press OK to start the slide sho
previous screen.
w. Press Cancel to return to the
4. Select the new name from the displayed name list,
and press the OK button.
Copy to Album
Select one of the following:
Favorites
Family
Travel
Hobbies
Christmas
Press OK to select the option.
previous screen.
Press Cancel to return to the
Note:
When you select a name which already exists, the new
album is named with a number at the end of its name.
¥Albums
1
Favourites2Christmas3Travels
Press OK to start the slide sho
previous screen.
w. Press Cancel to return to the
Customizing Settings 51
6
6
6
6
6
6
6
Page 52

2. Press the MENU button to display the pop up
menu, and select Delete, then press the OK
button.
¥Albums
1
Delete
Copy All Images to Album
Favourites2Christmas3Travels
Slide Show
Lock
Return to Main Menu
Hide Unsupported Files
Change Album Name
Select to Delete
Press OK to start the slide sho
previous screen.
w. Press Cancel to return to the
Changing PhotoPC P-1000 Settings
The settings described in the following sections can be
changed from the Settings menu. To display the
Settings menu, select Settings in the Main Menu and
press the OK button.
Settings
Album Shortcut Copy Mode
Display Slide Show
LCD Sound
Power Save Video Out
Date and Time Language
Disk space available in HDD:8.2GB/R4CC810V
Press OK to select the album shortcut.
er.10.0
52 Customizing Settings
Page 53

Display settings
This menu provides the settings for displaying
images.
Display Settings
Memory card or card folder view mode:
PC View Mode DSC View Mode
Unsupported files setting:
Show Hide
Photo information setting:
Show Hide
Show images in current folder in PC View mode. Press OK to
apply the selection. Press Cancel to disregard.
Memory card or card folder view mode
You can select the view mode for a memory card or
card folder from the DSC mode or PC mode. When
PC mode is selected, images and folders are
displayed in a hierarchy of folders and subfolders.
When DSC mode is selected, all images in the current
folder (including images in subfolders) are displayed
at the same time.
Photo information setting
Set whether the photo information is displayed or not
when an image is displayed in full-screen format.
Slide show settings
This menu provides the settings for running a slide
show.
Slide Show Settings
Slide show effect:
ON OFF
Slide show duration:
3 s 5 s
Select the desired item and press the OK button.
Slide show effect
When selecting ON, the slide show is executed with
effects and display intervals which are set as a default.
5 min1 min30 s20 s10 s
6
6
6
6
6
6
6
6
English
Unsupported files setting
When selecting Hide, the files of unsupported formats
are not displayed as thumbnails.
Note:
❏ When this setting is ON, the slide show duration
setting is invalid.
Customizing Settings 53
6
6
Page 54

❏ It may take a long time to display depend on a image
you select.
Slide show duration
Set the interval to switch the images during a slide
show. You can set the interval by moving the slidebar
from 3 seconds to 5 minutes. The default setting is 10
seconds.
Language setting
You can change the language used in menus.
Date and time settings
You can set the date and time. For details, see “Setting
the date and time” on page 23.
Date and Time Settings
Year:
Hour:
Use the up or down button to select the year. Press OK to
apply the setting.
2003
12
Month:01Day:
01
Minute:00Format:
YYYY.MM.DD
Language Setting
Language
Deutsch Italiano
Press OK to select and return to the previous screen. Press
cancel to disregard the selection.
English
Fran ais
PortuguesEspanol
Language
Choose a language from among eight languages.
54 Customizing Settings
Note:
When you change Format, the display of the Date and Time
Settings screen also changes.
Page 55

Sound setting
You can set the operating sound.
LCD setting
You can change the brightness of the LCD.
6
English
Sound Setting
Sound:
ON OFF
Press OK to apply the Sound setting and return to the previous
screen. Press Cancel to disregard the change.
Sound
When this setting is set to ON, a beep sounds when
you do some operations.
LCD Setting
LCD brightness:
Dark Bright
Use the left or right button to adjust the LCD screen
brightness. Press OK to apply the setting and return to the
previous screen.
LCD brightness
Change the brightness of the LCD. Select an
appropriate brightness by using the Right and Left
buttons.
6
6
6
6
6
6
6
6
6
Customizing Settings 55
Page 56

Power save settings
Video out setting
This menu provides the settings for the power save
mode.
Power Save Settings
Auto backlight control duration:
1 min 5 min
Auto power off duration:
1 min 10 min
The LCD screen goes dark when Photo Viewer is idle for this
period of time. Press OK to apply the setting and return to the
previous screen.
Auto backlight control duration
Set the time after which the LCD’s backlight turns off
if there are no operations. You can set the time by
moving the slidebar from 1 minute to 5 minutes. The
default setting is 3 minutes.
Auto power off duration
Set the time until the power is shut down
automatically if there are no operations to save the
battery. You can set the time by moving the slidebar
from 1 minute to 10 minutes. The default setting is 5
minutes.
You can select the video output signal method.
Video Out Setting
Video out:
NTSC PAL
Press OK to select and return to the previous screen. Press
cancel to disregard the selection.
Video out
Select the signal method from either NTSC or PAL.
Note:
After changing the setting, reconnect the VIDEO cable.
56 Customizing Settings
Page 57

Copy mode settings
You can change the settings for the action after images
are copied to the HDD.
Copy Mode Settings
Clear memory card after copying:
OFF ON Confirm
Favorite
ying:
vious screen.
Press OK
Save images in album after cop
OFF ON Confirm
Default album for copied images:
Memory card data will be deleted without verification.
to apply the setting and return to the pre
Clear memory card after copying
Set whether to delete the images in the memory card
after copying them to the HDD automatically or not.
When ON is set, the images are deleted. When
Confirm is set, the dialog box that confirms deleting
images appears before copying.
Default album for copied images
Set the default album to store images in when the Save
images in album after copying setting is set to ON.
Album shortcut settings
Album Shortcut Settings
Shortcut 1:
Shortcut 2:
Shortcut 3:
Use the left or right button to change the album shortcut.
Press OK to apply the setting and return to the pre
screen.
Shortcut 1, 2, and 3
Set the album shortcut displayed on the Main Menu.
Favorites
Travel
Hobbies
vious
6
6
6
6
6
6
6
English
Save images in album after copying
Set whether to copy the images in the HDD to an
album after copying them from the memory card or
not. When ON is set, the images are copied
automatically. When Confirm is set, the dialog box to
select the album appears before copying.
6
6
6
Customizing Settings 57
Page 58

Changing the Printer Driver Settings
When printing images directly to the printer, you can
set the print settings on PhotoPC P-1000.
Print Settings
Number of Copies
Print Date
Paper
Layout
Print Quality
Copy number affects the total n
Print to start printing. The LCD displa
A4
Premium Glossy Photo Paper
High
umber of copies. Press OK or
Number of Copies
Set the number of copies to print.
Print Date
Set whether or not to print the date when the photo
was taken.
Print
1 Picture
with borderless
y turns off.
01
Paper
Set the type of paper to use.
Note:
The value which has been set becomes the default setting
from the next time.
Layout
Set the layout of the printed images.
Note:
The value which has been set becomes the default setting
from the next time.
Print Quality
Select the print quality.
Note:
The value which has been set becomes the default setting
from the next time.
Note:
If the image does not have the date information, the date of
the file is printed.
58 Customizing Settings
Page 59

Chapter 7
Operating the Software
7
7
English
System Requirements
The system requirements for using PhotoPC P-1000
with a computer are as follows:
Windows OS: Microsoft® Windows® 98,
Me, 2000 Professional, XP
Home Edition, XP
Professional
memory: 64 MB or more
hard disk: 50 MB or more free space is
required for installation
170 MB or more free space is
required for operation
display: SVGA (800x600) or higher,
16 bit color or higher
port: USB port (type A connector)
Macintosh OS: Mac OS® 8.6 to 9.x, Mac OS X
10.2 or later
hard ware: PowerPC G3 233MHz or
higher
memory: 42 MB or more application
memory
hard disk: 50 MB or more free space is
required for installation
170 MB or more free space is
required for operation
display: 800x600 or higher, 32000
colors or more
Note:
When using the software on MacOS 8.6, download a driver
from the Apple website.
Download site:
http://docs.info.apple.com/article.html?artnum=60394
The URL address of the download site may be different from
the one shown here.
Operating the Software 59
7
7
7
7
7
7
7
7
Page 60

Installing the Software
1. Insert the software CD-ROM into the CD-ROM
drive.
For Windows users:
The EPSON Installer Program dialog box appears
automatically.
Note:
If the EPSON Installation Program dialog box does not
appear, click the CD-ROM icon, and then select
Open from the File menu. Then double-click SETUP.
EXE.
For Mac OS 8.6 to 9.x users:
Double-click the EPSON icon inside the EPSON
folder.
For Mac OS X users:
Double-click the Mac OS X folder inside the
EPSON folder, and then click the EPSON icon.
Note:
When the authentication dialog box for assigning
administrator privileges appears, enter the user name
and password, and then click OK.
2. Select the software to install, then click Install.
Note:
❏ You can install the following software:
EPSON Photo!4
EPSON Photo Quicker
USB driver (Windows 98 only)
❏ The first time you install the software, you should
install all of them. Or to select which software to
install, click Advanced.
3. Follow the on-screen instructions until all of the
software is installed. When a message appears to
inform you that the installation is complete, click
OK.
Note:
The CameraStarter and AutoDownloader functions, which
are part of EPSON Photo!4, cannot be used with P-1000.
These functions are available only with EPSON digital
cameras.
60 Operating the Software
Page 61

Starting the Software
This section describes how to start the software.
For Windows
Uninstalling the Software
Execute an uninstall program for each application. For
details, see online help for each applications.
7
7
English
Software Menu
EPSON Photo!4 Click Start, point to All Programs (or
EPSON
PhotoQuicker
For Macintosh
Software Menu
EPSON Photo!4 Double-click the EPSON Photo!4 icon in
EPSON
PhotoQuicker
Programs), and then select EPSON
Camera. Select EPSON Photo!4, and
then click EPSON Photo!4.
Click Start, point to All Programs (or
Programs), and then select EPSON
PhotoQuicker. Click EPSON
PhotoQuicker3.4.
the EPSON Photo!4 program folder.
Double-click the EPSON PhotoQuicker
icon in the EPSON PhotoQuicker program
folder on your desktop.
7
7
7
7
7
7
7
7
Operating the Software 61
Page 62

Finding More Information
To learn more about the software provided on the
software CD-ROM, see the online EPSON Photo!4 or
EPSON PhotoQuicker User’s Guide.
Start the software and access the online User’s Guide
and then follow the steps below.
Software To start online User’s Guide...
EPSON Photo!4 From the Help menu (Windows), Apple
EPSON
PhotoQuicker
menu (Mac OS 8.6 to 9.X) or EPSON
Photo!4menu (Mac OS X), click EPSON
Photo!4 Help.
Click the Help button on the dialog box.
Note:
You can access the online EPSON Photo!4 or EPSON
PhotoQuicker User’s Guide using the Start menu in
Windows, or in Macintosh, double-click the MANUAL
folder in each of the software’s program folders, and then
double-click INDEX.HTM.
62 Operating the Software
Page 63

Chapter 8
Maintenance and Troubleshooting
8
8
English
Cleaning PhotoPC P-1000
To keep your PhotoPC P-1000 operating at its best, you
should clean it thoroughly several times a year. Before
you perform any maintenance on PhotoPC P-1000, be
sure to read the “Safety Instructions” on page 7. Then
follow these guidelines.
❏ Be sure to turn PhotoPC P-1000 off before
cleaning.
❏ Use a clean, dry cloth to keep PhotoPC P-1000 free
of dust.
❏ Do not use harsh or abrasive cleaners.
❏ If necessary, clean the battery contacts with a dry
cloth.
Troubleshooting
When a problem occurs, an error message usually
appears in the LCD. Refer to the following section to
solve the problem.
Status and error messages
Error message Description
A fatal error has occurred.
Cannot continue the
operation.
A fatal error has occurred.
Failed to copy to the
CD-R/RW.
Maintenance and Troubleshooting 63
Turn the power off and on
again. If the error message is
displayed again, contact our
Customer Support.
Turn the power off and on
again. If the error message is
displayed again, confirm
that the CD-R/RW and
CD-RW drive are not
malfunctioning.
8
8
8
8
8
8
8
8
Page 64

A fatal error has occurred.
Press any button to turn off
power.
Turn the power off by pressing
any button and then turn it on
again. If the error message is
displayed again, contact our
Customer Support.
Cannot find the album. It
may be renamed or deleted.
There is no album which is
assigned to the album
shortcut or in the specified
location. Make sure that the
album exists and try again.
A file access error has
occurred. Do not eject the
memory card while it is being
accessed.
An unusually high
temperature was detected.
Photo Viewer will turn off
soon.
A printer error has occurred. Check your printer and
Battery power is low.
Connect the AC adapter to
ensure proper operation.
Cannot continue deleting
files because an error has
occurred. Some files have
been deleted but others
have not. Go to next step.
Cannot find any card folders.
It seems that nothing has
been copied yet.
Cannot find the Album Case.
It may be renamed or
deleted.
Wait until the ACCESS light
turns off, and reinsert the
memory card and try again.
Wait until PhotoPC P-1000
cools down.
printer’s manual and clear
the error.
Connect the AC adapter
and charge the battery.
Some files cannot be
deleted, the memory card
may be write-protected.
Check the memory card and
try again.
There is no card folder in the
specified location. Make sure
that the card folder exists
and try again.
There is no Album Case in the
specified location. Make sure
that the Album Case exists
and try again.
Cannot find the Card Case.
It may be renamed or
deleted.
Failed to save the result.
Cancel the operation and
return to the previous screen.
An error occurred while
accessing the HDD. Please
try printing again.
HDD access error has
occurred. Failed to copy to
the CD-R/RW.
Memory card must be empty
to copy back a card folder.
Parts inside the printer require
adjustment. Please refer to
the printer’s documentation.
Please check the ink
cartridges.
There is no Card Case in the
specified location. Make sure
that the Card Case exists an d
try again.
W he n S e le c t t o C o py c an no t
be executed correctly.
Execute the operation again.
An error has occurred while
printing. Printing has failed.
Try to print the data again.
An error has occurred while
writing to the CD-R/RW.
Writing has failed. Try to copy
the data again.
Confirm that the memory
card is empty.
The parts inside of the printer
need to be replaced or
adjusted. See your printer’s
manual.
The ink cartridges have run
out or have been installed
incorrectly. Check your
printer and printer’s manual,
and install the cartridges
correctly.
64 Maintenance and Troubleshooting
Page 65

Please install the ink
cartridges.
Ink cartridges have not been
installed in your printer. See
your printer’s manual and
install the ink cartridges.
The media is not available.
Please insert a blank
CD-R/RW.
The CD-R/RW inserted in the
CD-RW drive is full. Insert a
blank CD-R/RW and try the
operation again.
8
English
Printer does not match the
printer driver. Please check
the printer driver setting.
Printer driver cannot be
found. Reinstall the printer
driver.
Printer Error: paper jam. Clear
the paper jam and continue
printing.
Printer Error: paper out.
Please load paper.
Some errors occurred while
copying. Any data on the
memory card will not be
deleted.
Some errors occurred while
copying. Copying was
canceled.
Some errors occurred while
deleting files. The operation
was canceled.
See “Selecting the
appropriate printer driver” on
page 41 and select an
appropriate printer driver.
Cannot find printer driver.
Make sure that the printer
driver is stored in the root
folder of the HDD or the
memory card.
Check your printer and
printer’s manual, and
remove the jammed paper.
Check your printer and
printer’s manual, and load
paper.
Some files to be copied or
deleted from the memory
card were skipped. The files
may be damaged.
Some files were skipped, the
memory card may be
write-protected. Check the
memory card and try again.
Some files were skipped the
memory card may be
write-protected. Check the
memory card and try again.
The memory card is smaller
than the card folder. Please
insert a memory card larger
than xx MB and try again.
There are some invalid
images which cannot be
printed.
There is no response from the
printer.
The selected paper size
cannot be used with the
connected printer. Select a
paper size that is compatible
with the printer.
The storage capacity of the
HDD is less than what is
needed for the files you are
copying. Copying was
canceled.
All the selected images or
folders cannot be copied
because the total size is too
large. Insert a larger memory
card or reduce the number
of images.
The image data may be
damaged.
Make sure that the USB cable
is connected correctly.
Check your printer and
printer’s manual.
See “Available types of
paper” on page 40 and
select the paper size again.
All the selected images or
folders cannot be copied
because the total size is too
large. Delete unnecessary
images in the HDD or reduce
the number of images to
copy.
8
8
8
8
8
8
8
8
8
Maintenance and Troubleshooting 65
Page 66

The storage capacity of the
HDD is less than what is
needed for the files you are
copying. Copying was
suspended.
This image cannot be
displayed.
This item cannot be deleted
because it is locked.
This operation is not
applicable for this printer.
This printer’s head alignment
function is not supported.
All the selected images or
folders cannot be copied
because the total size is too
large. Delete unnecessary
images in the HDD or reduce
the number of images to
copy.
Unsupported image format
cannot be displayed.
See “Using the Pop Up Menu”
on page 36 and unlock the
image to delete it.
The printer may not be
supported. See “Supported
printers” on page 40 for
details.
The printer does not support
the Head Alignment
function.
Problems and solutions
Use the information in this section to find the source
of and solution to PhotoPC P-1000 problems.
Determine the type of problem that occurred, and see
the appropriate section below:
“Power supply problems” on page 67
“Image display problems” on page 67
“Image operation problems” on page 67
“Printing problems” on page 68
You must set the date and
time to ensure correct
operation. Please make the
Date and Time settings.
See “Setting the date and
time” on page 23 and set the
date and time.
66 Maintenance and Troubleshooting
Page 67

Power supply problems
The power does not turn on.
Cause What to do
The battery has run out. When the icon is displayed
on the top right corner of the
LCD, the battery has run out. See
“Charging the battery” on page
18 and charge the battery.
The battery is set
incorrectly.
Make sure that the battery is
installed correctly. See
“Installing the battery” on page
17.
Image display problems
The image is not displayed.
Cause What to do
The image format is not
supported.
See “Available types of image
files” on page 27 and make sure
the image format is supported.
The image data is broken. Copy the image again.
The LCD bri ghtness setting
is too dark.
The battery is set
incorrectly.
The VIDEO cable is
connected to PhotoPC
P-1000.
See “LCD setting” on page 55
and make sure the LCD
brightness setting is set
properly.
Make sure that the battery is
installed correctly. See
“Installing the battery” on page
17.
Disconnect the VIDEO cable to
display the LCD.
Image operation problems
Cannot copy.
Cause What to do
The space available on the
HDD is not sufficient to
copy all of the data in the
memory card.
Delete unnecessary images in
the HDD or reduce the number
of images to copy from the
memory card.
8
8
8
8
8
8
8
8
8
8
English
Maintenance and Troubleshooting 67
Page 68

Trying to copy images to a
CD-R that is full.
The image data may be
broken.
Yo u c an not copy i ma ge s to a full
CD-R.
Try to copy a different image.
Printing problems
Cannot print.
Cause What to do
Cannot delete.
Cause What to do
The image is locked. See “Using the Pop Up Menu”
on page 36 and unlock the image
to delete it.
Trying to delete images in
the CD-R.
You cannot delete images in the
CD-R.
Cannot store images to the CD-R/RW.
Cause What to do
Trying to copy images to a
CD-R that is full.
The total size of the images
is larger than the space on
the CD-R/RW.
You cannot copy images to the
filled CD-R.
Confirm the total size and
reduce it.
68 Maintenance and Troubleshooting
The printer is not
supported.
The printer’s power is off. Turn on the printer.
The USB cable is not
connected correctly.
The image data is broken. Try to copy a different image.
See “Supported printers” on
page 40 and make sure that your
printer supports direct print
with PhotoPC P-1000.
Then, see “Selecting the
appropriate printer driver” on
page 41 and select the printer
that you want to use in the
Printer Settings screen.
See “Connecting PhotoPC
P-1000 to a printer” on page 41
and reconnect PhotoPC P-1000
to the printer.
Page 69

Registering a new printer driver
When a printer driver is updated, you can register the
updated printer driver with the following procedure.
1. Press the PRINT button.
2. In the Print menu, select Printer Settings by using
the Up and Down keys and then press the OK
button.
3. Select Install Printer Driver and press the OK
button.
Printer Settings
Select Printer
Current Printer:
Stylus Photo 810
Install Printer Driver
Show Driver Information
Press OK or Print to install or update a printer driver.
8
8
8
8
English
Print
Print This Photo
Print All Photos
Select Photos
Number of Photos:
Utilities Printer Settings
Press OK or Print to continue. Press Cancel to return to the
previous screen.
The Printer Settings screen appears.
After the printer driver is found, installation
starts.
Note:
When a printer driver cannot be found, an error is
displayed. Make sure that the printer driver is stored
in the root folder of the HDD or the memory card.
Maintenance and Troubleshooting 69
8
8
8
8
8
8
Page 70

4. Select the printer which you want to install and
press the OK button.
Displaying the Utilities menu
1. Press the PRINT button.
Printer Settings
Select Printer
Select a printer:
Current Printer
Stylus Photo 810
Stylus Photo 810
Stylus Photo 820
Install Printer Driver
Stylus Photo 830
Stylus Photo 830 U
Show Driver Information
Stylus Photo 900
Press OK or PRINT to select this printer. Press Cancel to
return to the previous screen.
Using Printer Utilities
You can confirm the printer’s status from the PhotoPC
P-1000. You can also execute head cleaning on your
printer by using PhotoPC P-1000.
Note:
These utilities cannot be used with Stylus Photo 935.
2. In the Print menu, select Utilities by using the Up
and Down buttons, then press the OK button.
Print
Print This Photo
Print All Photos
Select Photos
Number of Photos:
Utilities Printer Settings
Press OK or Print to continue. Press Cancel to return to the
previous screen.
The Utilities menu appears.
70 Maintenance and Troubleshooting
Page 71

Using the Utilities
Utilites
Head Cleaning
Nozzle Check
Ink Levels
Head Alignment
Ink Levels
Confirm the remaining in the ink cartridges in the
printer that is currently connected.
Head Alignment
Adjust the printing accuracy when doing
bi-directional printing.
8
8
8
English
Press OK to continue. Press Cancel to return
to the previous screen.
Head Cleaning
Execute the head cleaning on the printer that is
currently connected. After head cleaning, you can
check the condition of the print head by printing the
nozzle check pattern.
Nozzle Check
Print the nozzle check pattern. You can check the
condition of the print head. When the nozzle check
pattern is not printed clearly, execute head cleaning.
8
8
8
8
8
8
8
Maintenance and Troubleshooting 71
Page 72

Resetting PhotoPC P-1000
Contacting Customer Support
This section describes how to reset PhotoPC P-1000
when a error occurs and operations cannot be done.
1. Remove the connector cover.
2. Press the Reset button with a thin object.
If your EPSON product is not operating properly and
you cannot solve the problem using the troubleshooting
information in your product documentation, contact
customer support services for assistance. If customer
support for your area is not listed below, contact the
dealer where you purchased your product.
Customer support will be able to help you much more
quickly if you give them the following information:
❏ Product serial number
(The serial number label is usually on the back of
the product.)
❏ Product model
❏ Product software version
(Click About, Version Info, or similar button in
the product software.)
❏ Brand and model of your computer
❏ Your computer operating system name and version
❏ Names and versions of the software applications
you normally use with your product
72 Maintenance and Troubleshooting
Page 73

For users in the United Kingdom and the
Republic of Ireland
URL http://www.epson.co.uk
Telephone
(UK)
(The Republic
of Ireland)
08701 637 766
01 679 9016
For users in Scandinavia
URL http://www.epson.com
Telephone Denmark 80 88 11 27
Finland 0800 523 010
Norway 800 11 828
Sweden 08 445 12 58
For users in South Africa
8
8
8
8
English
For users in the Middle East
URL http://www.epson.com
E-mail epson_support@compubase.
co.ae
Telephone +971 4 352 4488
Fax +971 4 351 6617
URL www.epson.co.za
Telephone (011) 444-5223 or
0800 600 578
For user in France
Support Technique EPSON France,
0 892 899 999 (0,34 E/minute)
Ouvert du lundi au samedi de 9h00 à 20h00 sans
interruption
http://www.epson.fr/support/selfhelp/frenc
h.htm pour accéder à l'AIDE EN LIGNE.
Maintenance and Troubleshooting 73
8
8
8
8
8
8
Page 74

http://www.epson.fr/support/services/index.
shtml pour accéder aux SERVICES du support
technique.
For user in Germany
EPSON Service Center c/o Exel Hünxe GmbH
Werner-Heisenberg-Strase 2
46569 Hünxe
For user in Italy
EPSON Italia S.p.a.
Via M. Viganò de Vizzi, 93/95
20092 Cinisello Balsamo (MI)
Tel. 02.660.321
Fax. 02.612.36.22
Assistenza e Servizio Clienti
For users in Spain
URL http://www.epson.es
E-mail soporte@epson.es
Telephone 902 40 41 42
Fax 93 582 15 16
For users in Portugal
URL http://www.epson.pt
E-mail apoio_clientes@epson.pt
Telephone 707 222 000
Fax 21 303 54 90
TECHNICAL HELPDESK
02.268.300.58
http://www.epson.it
74 Maintenance and Troubleshooting
Page 75

Appendix A
Appendix
A
A
English
Standards and Approvals
PhotoPC P-1000
European model:
EMC Directive 89/336/EEC EN 55022 Class B
AC adapter
European model:
Low Voltage Directive 73/23/EEC
EMC Directive 89/336/EEC
EN 55024
EN 60950
EN 55022 Class B
EN 55024
EN 61000-3-2
EN 61000-3-3
Specifications
General
CPU: TMS320DM310
LCD: EPSON VGA TFT LCD
HDD: 1.8" HDD (10 GB)
FAT 32
Dimensions
and weight:
Temperature: Operating: 5 to 35°C
Height 91.5 mm (3.6 inches)
Width 142 mm (5.59 inches)
Depth 23 mm (0.91 inches)
Weight Approx. 317 g
Non-operating: -20 to 60°C
A
A
A
A
A
A
A
A
Appendix 75
Page 76

Humidity:
(without
Operating: 30 to 80%
Non-operating: 10 to 80%
condensation)
Memory card: CompactFlash memory card (Type
1/Type 2, includin g MicroDrive), SD
memory card, Memory Stick, Smart
Media, MultiMedia Card,
xD-Picture Card
Note:
A commercially available CF adapter is
needed to use any memory cards other than
CF cards.
Interface
USB connector: One USB (ver 1.1) interface for Host
and Slave connection
VIDEO output
Composite Output (NTSC/PAL)
connector:
Battery
Type: Lithium Ion Battery
Model: B6345
Power sources: Lithium-ion battery
AC adapter (P62L, Model: A211H)
Electrical
Input voltage DC 6 V
Rated current Maximum 2 A
Power consumption 7.2 W (Using with the battery)
9.6 W (Using with the AC adapter)
76 Appendix
Size:
35.2 mm × 53 mm × 7 mm
(H x W x D)
Ratings: 3.7 V, 1035mAh
Temperature: Operating: 5 to 35°C
Non-operating: -20 to 60°C*
* When storing for a long period, do
not keep a place in high
temperature.
Humidity:
(without
Operating: 30 to 80%
Non-operating: 10 to 80%
condensation)
Page 77

AC adapter (P62L)
Model: A211H
Input: AC 100 - 240 V
Output: DC 6.0 V, 2.0 A
A
A
English
Power
consumption:
Dimensions
and weight:
About Optional Accessories
The following options are available for PhotoPC
P-1000.
❏ Lithium Ion Battery (Model: B6345)
16 W
Height: 91.5 mm (3.6 inches)
Width: 142 mm (5.59 inches)
Depth: 23 mm (0.91 inches)
A
A
A
A
A
A
A
A
Appendix 77
Page 78

Glossary
The following definitions apply specifically to
PhotoPC P-1000.
application
A software program that helps you carry out a particular task,
such as word processing, image editing, or financial planning.
brightness
The lightness or darkness of an image.
default
A value or setting that takes effect when the equipment is turned
on, reset, or initialized. Also known as a factory setting.
drive
A memory device, such as a CD-ROM, hard disk, or floppy disk
drive.
driver
Software that sends instructions to a computer peripheral to tell
it what to do. For example, your printer driver accepts print data
from your PhotoPC P-1000 and sends instructions to the printer
on how to print this data.
Together, the printer driver and printer utilities are referred to
as “printer software”.
image
Data representing a two-dimensional scene. A digital imagoes
composed of pixels arranged in a rectangular array with a
certain height and width. Each pixel may consist of one or more
bits of information, representing the brightness of the image at
that point.
ink cartridge
Contains the ink that your printer uses to print.
interface
A piece of hardware, a method, or a standard used to connect
the computer and the camera.
interface cable
The cable that connects PhotoPC P-1000 to the printer or other
devices.
JPEG
A file format for strong color and grayscale images in
compressed files. Data saved using the JPEG format generally
receives greater compression than data saved using TIFF and
other formats.
nozzles
Fine tubes in the print head through which ink is sprayed onto
the page. Print quality may decline if the print head nozzles are
clogged.
78 Glossary
Page 79

pixel
Short for picture element. Each image is composed of a number
of pixels. Pixels are also counted in units of dots.
port
An interface channel through which data is transmitted between
devices.
printer driver
See “driver” on page 78.
printer utilities
See “utilities” on page 79.
reset
To return PhotoPC P-1000 to its defaults
thumbnails
Small representations of images.
USB interface
Universal Serial Bus interface. Enables the user to connect up to
127 peripheral devices (such as keyboards, mice, and printers)
to the computer through a single, general-purpose port.
utilities
Software that allows you to monitor and maintain your printer.
Together, utilities and the printer driver are referred to as
“printer software”.
English
zoom
To show a smaller area of an image at a higher magnification
(zoom in) or a larger area at a lower magnification (zoom out).
Glossary 79
Page 80

Index
A
About the album case, 34
AC adapter
about, 25
connecting, 18
Album
about, 34
changing the name, 50
copying image, 34
creating, 49
customizing, 49
deleting, 51
Album shortcut settings, 57
Available types of image files, 27
Available types of memory cards, 20
Available types of paper, 40
B
Battery
charging, 17, 18
installing, 17
C
Changing PhotoPC P-1000 settings, 52
Changing the printer driver settings, 58
Charging the battery, 17, 18
Cleaning PhotoPC P-1000, 63
Connecting
to a CD-RW drive, 46
to a computer, 45
to a printer, 41
Contacting EPSON, 72
Copying the images, 31
Copy mode settings, 57
Customer support, 72
Customizing settings, 49
D
Date and time settings, 23, 54
Deleting the images, 31
Direct printing, 40
Displaying images, 27
Displaying the utilities menu, 70
Display settings, 53
H
How to use the menu, 24
I
Image
available types, 27
copying from a memory card to PhotoPC P-1000, 31
80 Index
Page 81

copying from PhotoPC P-1000 to a memory card, 32
copying from the card case to an album, 33
copying to an album, 34
displaying as a slide show, 29
displaying as thumbnails, 27
storing to a CD-R/RW, 46
viewing, 27
zooming, 30
image
deleting, 34
displaying on the computer’s monitor, 45
Installing
battery, 17
software, 60
Pop up menu, 36
Power save settings, 56
Printer driver
registering, 69
selecting, 41
Printer utilities, 70
Printing images, 43
Problems and solutions, 66
R
Registering a new printer driver, 69
Removing a memory card, 21
Resetting PhotoPC P-1000, 72
English
L
Language setting, 23, 54
LCD setting, 55
M
Main features, 7
Main menu, 24
Memory card
available types, 20
removing, 21
P
Parts and their functions, 15
back, 15
front, 15
LCD and control panel, 16
S
Setting
album shortcut settings, 57
copy mode settings, 57
date and time, 23
date and time settings, 54
display settings, 53
language setting, 23, 54
LCD setting, 55
power save settings, 56
slide show settings, 53
sound setting, 55
video out setting, 56
Setting up PhotoPC P-1000, 17
Slide show settings, 53
Software
finding more information, 62
installing, 60
Index 81
Page 82

starting, 61
system requirements, 59
uninstalling, 61
Sound setting, 55
Specifications
AC adapter, 77
battery, 76
electrical, 76
general, 75
interface, 76
Status and error messages, 63
Supported printers, 40
T
Technical support, 72
Troubleshooting, 63
image display problems, 67
image operation problems, 67
operating images problems, 67
power supply problems, 67, 68
printing problems, 68
Turning the power off, 24
Turning the power on, 22
U
Uninstalling
software, 61
Unpacking PhotoPC Player, 14
Using
albums, 34
pop up menu, 36
printer utilities, 70
video output, 46
V
Video out setting, 56
Z
Zooming an image, 30
82 Index
 Loading...