

Page 1
Network Conguration Guide
© 2015 Seiko Epson Corporation. All rights reserved.
Page 2

Contents
Before completing settings 5
Network settings conguration ................................................... 5
Wireless LAN connection ................................................................................................................6
Wired LAN connection .....................................................................................................................8
Selecting a connection method ................................................... 9
Connection settings for connecting to computer 11
Setting up a wireless LAN connection
(Infrastructure Mode) ................................................................11
Conguring settings for a wireless LAN using automatic push button
conguration (WPS) ................................................................................................................12
Wireless LAN settings using a PIN code (when automatically acquiring
the IP address from the printer) .......................................................................................... 20
Conguring settings for a wireless LAN manually .............................................................. 27
Setting up a wireless LAN connection (Simple AP Mode) .....39
Conguring settings for a wireless LAN in Simple AP Mode
using automatic push button conguration (WPS) .....................................................40
Conguring settings for a wireless LAN in Simple AP Mode manually ....................... 48
How to disconnect the printer from Simple AP Mode ...................................................... 54
Conguring settings for a wired LAN connection ..................55
Setting the IP address for the printer manually ...................................................................61
Page 3

Contents
Connecting from a portable terminal 64
Epson iLabel application for portable terminals ....................64
Connecting to a printer from a portable terminal
such as a smartphone or tablet ............................................... 66
Adding a second computer or portable terminal 67
Adding a computer .......................................................................67
Adding a terminal such as a smartphone or tablet ................71
Checking/changing the printer network settings 72
How to check the network settings on the printer alone .....72
How to check from a computer ..................................................74
Network settings details that can be checked/changed .................................................77
Sending the network settings to the printer ........................................................................ 88
Initializing the Network Settings 89
Page 4

Contents
Troubleshooting 91
Troubleshooting issues with network settings made
using the software disc .............................................................92
Troubleshooting issues with network settings made
using the Network Conguration Tool ...................................93
Troubleshooting issues with wireless LAN connections
(Infrastructure Mode) ................................................................97
Troubleshooting issues with wireless LAN connections
(Simple AP Mode) ................................................................... 100
Troubleshooting issues with wired LAN connections ......... 104
Methods for resolving issues with not being able to
connect at all ............................................................................ 106
Trademarks/Notation 107
Trademarks .....................................................................................................................................107
Copyrights .......................................................................................................................................107
Notation ...........................................................................................................................................107
Note ...................................................................................................................................................108
Page 5

Before completing settings
Network settings conguration
Important
While installing the printer driver or other software, do not connect a network cable, a
USB cable, or any other connection cable to the printer until you are instructed to do so.
This printer is compatible with the below types of network connections. Choose whichever
one you want to connect to.
• Wireless LAN (Infrastructure Mode)
• Wireless LAN (Simple AP Mode)
• Wired LAN
Note that wireless LAN connections, wired LAN connections, and USB connections can be
used together at the same time in any combination.
Important
If there are multiple computers and printers connected together, the connection
method by which printing data is rst sent is given rst priority, regardless of the
connection method used including USB connections. Try printing again if an error
message appears.
Memo
This document lists network connection methods for connecting computers and
printers together using the Windows operating system. If using the Mac OS X operating
system, refer to the "Label Editor Lite for Macintosh User's Guide."
5
Page 6
Before completing settings
Wireless LAN connection
There are two types of wireless LAN connections available, one of which uses an access
point to connect and the other which does not. Select the connection method that best
matches your network environment.
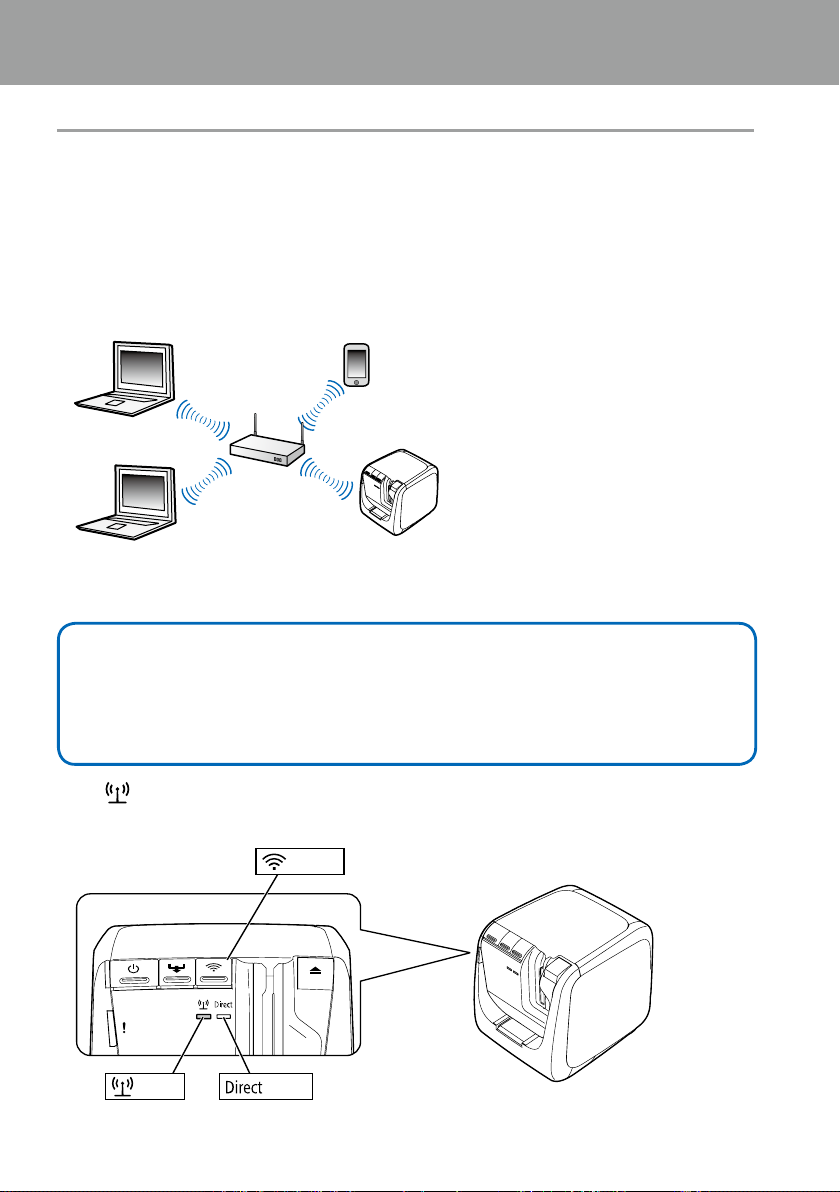
When using an access point (Infrastructure Mode)
Infrastructure Mode is a communications mode that connects through a commercial access
point, broadband router, or similar tool. Users connect via access points, which allows them
to set up the computer and printer separately in dierent areas.
There are two conguration methods available, an automatic conguration method set up
using Wi-Fi Protected Setup (WPS) and a manual conguration method.
Memo
With Wi-Fi Protected Setup (WPS), there are a wireless LAN conguration method, a
pushbutton method, and a PIN code method available that are certied by the Wi-Fi
Alliance, an association that promotes wireless LAN technology.
The lamp lights up when the printer is in Infrastructure Mode and connected to a
wireless LAN.
Button
Lamp
6
Lamp
Page 7
Before completing settings
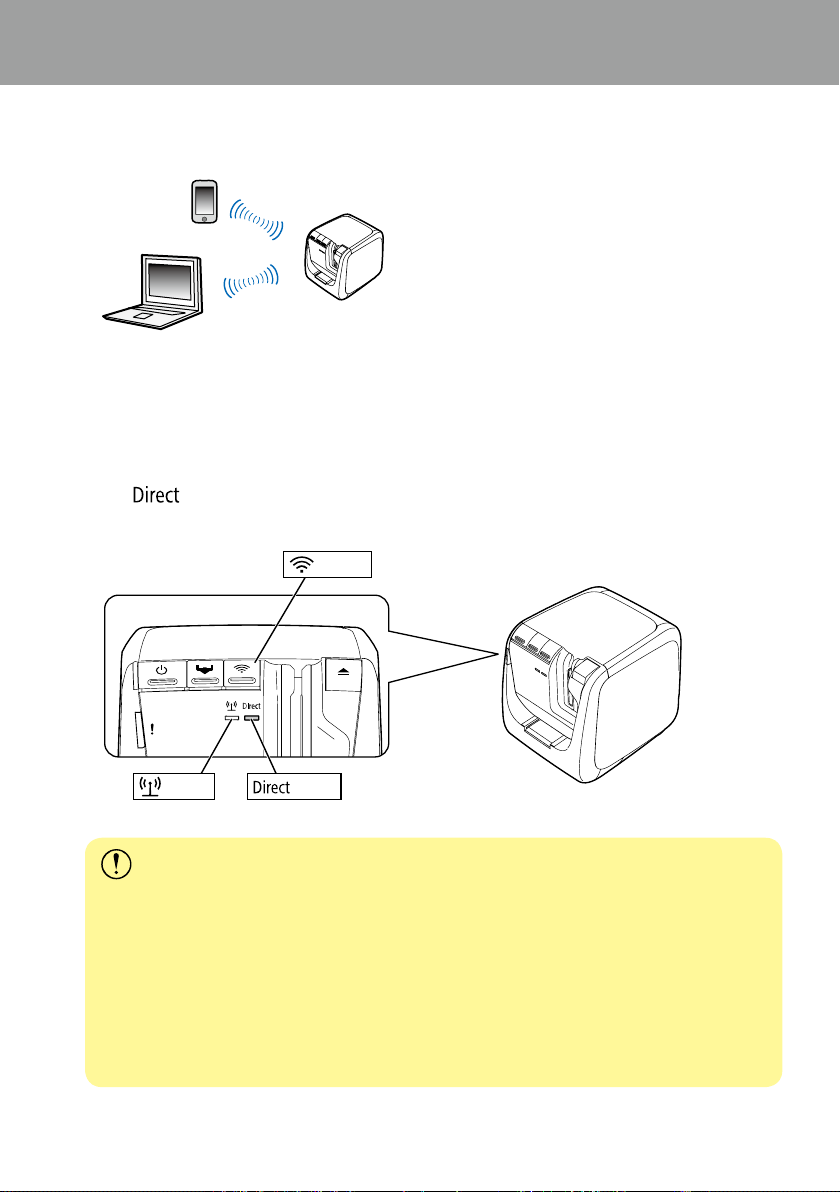
When not using an access point (Simple AP Mode)
In this mode, a computer, Smartphone, or other device communicates directly with the
printer via a wireless connection without using an access point.
The below conditions must be met before this connection mode can be used.
• The computer or portable terminal to be connected is set up for wireless LAN and the
wireless LAN switch is turned on
• The computer is not connected to a wireless LAN
• The computer is set up to acquire an IP address automatically
The
lamp is turned on when the printer is congured for Simple AP Mode.
Button
Lamp
Important
• Up to four devices can be connected at the same time with connections using
Simple AP Mode. You will not be able to connect a fth or subsequent device if there
are already four devices connected.
• You will not be able to connect to any devices connected to units other than the
printer or to the Internet while connected to the printer. Your Internet connection
will be disconnected when you run this conguration.
• The security mode is xed to WPA2-PSK (AES).
Lamp
7
Page 8

Before completing settings
Wired LAN connection
This method allows users to connect to the printer via a hub, router, or similar device using
a wired cable.
8
Page 9
Before completing settings
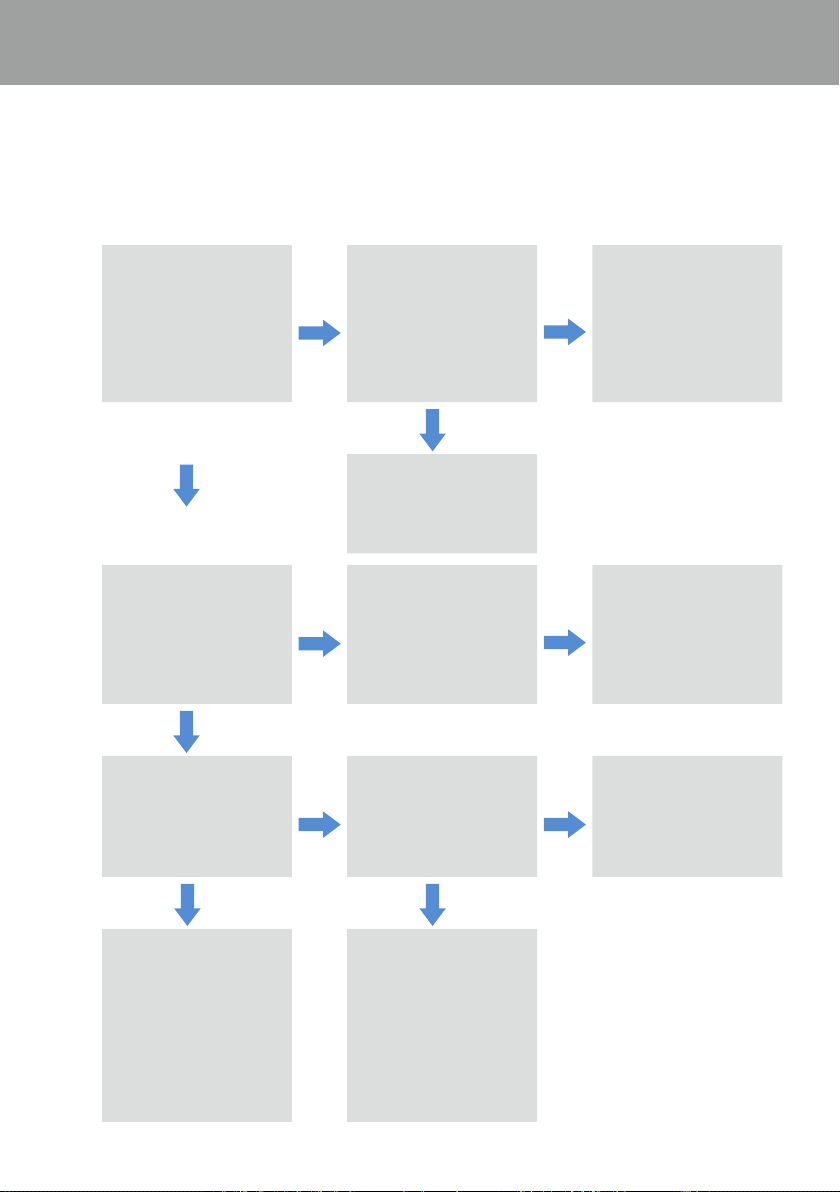
No
Selecting a connection method
Select the method that best matches your system environment. If not sure which
connection method to use, use the below owchart to guide you through the available
selections.
Can the computer be
connected to the Internet?
Yes
Is there a broadband
router or access point
available and does the
computer have a wireless
LAN function?
Yes
You can use a Wireless LAN
(Infrastructure Mode).
Do you want to use
automatic conguration
for the access point?
Does the computer come
with a wireless LAN
function?
No
You can use a USB
connection.
Check the manual
provided with each
product.
Is there an LAN cable
connected to the
computer?
No
Is the access point
compatible with automatic
Yes
conguration using the
WPS button?
No
You can use a Wireless
LAN (Simple AP Mode)
connection.
Yes
Check the next page for
connection procedures.
ÎSetting up a wireless LAN
connection (Simple AP Mode)
(p.39)
You can use a Wired LAN
connection. Check the
next page for connection
Yes
procedures.
ÎConguring settings
for a wired LAN connection
(p.55)
Check the next page for
connection procedures.
Yes
ÎConguring settings for a
wireless LAN using automatic
push button conguration
(WPS) (p.12)
No
Check the next page
if the access point is
Check the next page for
manual conguration
procedures.
ÎConguring settings
for a wireless LAN manually
(p.27)
compatible with automatic
conguration using a PIN
code.
ÎWireless LAN settings
using a PIN code (when
automatically acquiring the
IP address from the printer)
(p.20)
9
Page 10

Before completing settings
If connecting a device other than a computer to the printer, follow the procedures in
Connecting from a portable terminal (p.64).
Important
You will need part or all of the information listed below if planning to congure wireless
LAN settings manually or wanting to use a xed IP address for the printer. Check with
your network administrator in advance. Getting everything ready in advance will allow
you to set up your network smoothly.
Information necessary for setting up a xed IP address
• IP address set for the printer
• Subnet mask
• Default gateway
Information necessary for conguring a wireless LAN manually
• SSID set to the access point
• Security authentication method for the wireless LAN set to the access point
• Encryption method for the wireless LAN set to the access point
• Pre-Shared Key (PSK) set to the access point
• WEP key set to the access point
10
Page 11
Connection settings for connecting to computer
Use the DVD-ROM that came with the printer to congure the connection settings for
connecting to computer. Insert the DVD-ROM into the disc drive on the computer, and
follow the instructions on screen to install the printer driver and congure the network
settings. There are three dierent methods available for connecting to a computer, which
are listed below. Select the method that best matches your system environment.
Important
While installing the printer driver or other software, do not connect a network cable, a
USB cable, or any other connection cable to the printer until you are instructed to do so.
Memo
The network settings can be checked and changed later on. For details, check the page
listed below.
ÎChecking/changing the printer network settings (p.72)
Setting up a wireless LAN connection (Infrastructure Mode)
Here, a description will be provided of the method for setting up a wireless LAN connection
in Infrastructure Mode. Select one of the below methods for conguring the settings.
ÎConguring settings for a wireless LAN using automatic push button conguration (WPS)
(p.12)
ÎWireless LAN settings using a PIN code (when automatically acquiring the IP address
from the printer) (p.20)
ÎRefer to the “Memo“ in Conguring settings for a wireless LAN using automatic push
button conguration (WPS) (p.12)
ÎConguring settings for a wireless LAN manually (p.27)
Important
In order for wireless LAN settings to be congured, the computer needs to be connected
to a wireless LAN device such as an access point or router.
11
Page 12
Connection settings for connecting to computer
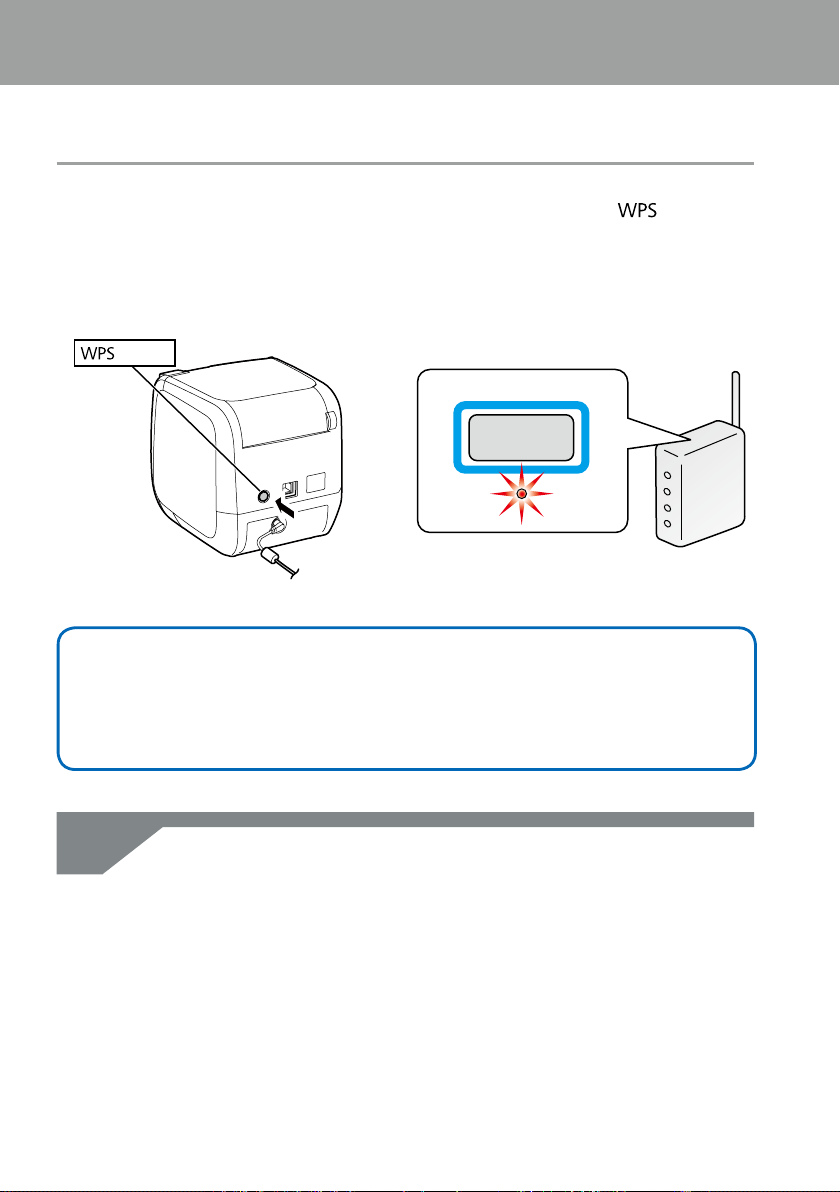
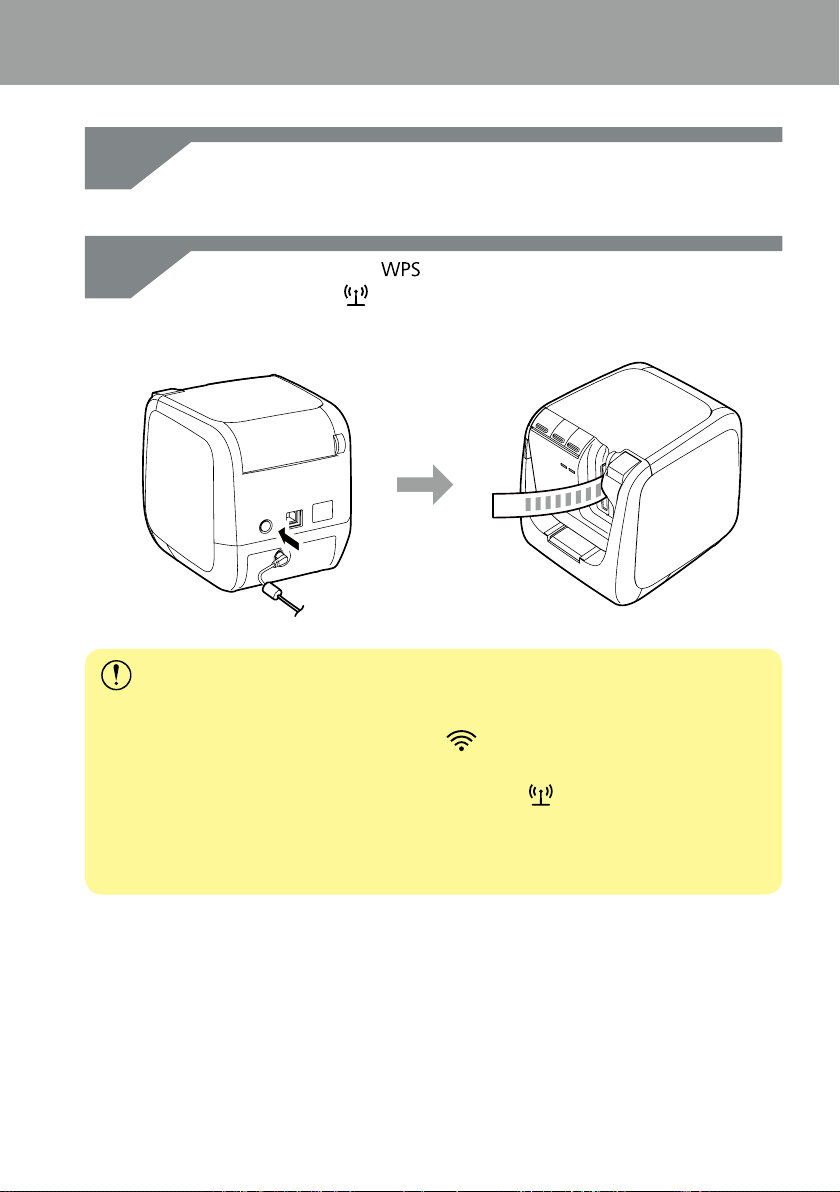
Conguring settings for a wireless LAN using automatic
push button conguration (WPS)
This conguration method can be selected when a WPS-enabled access point is used and
other wireless devices (handsets) are set using the WPS button. Press the
the back of the printer and the WPS button on the access point to start communications
between the printer and access point and to trigger the necessary network settings to
congure automatically. Other wireless devices (handsets) will also need to be set using the
WPS button in order to enable this method to be used.
button
WPS
button on
Memo
When conguring the wireless LAN settings, set the computer, printer, and access point
up nearby to make it easier to run them as you will need to use all three to complete
the procedures.
1.
12
Insert the included DVD-ROM into the disc drive on the connected computer.
Follow the instructions on screen to proceed.
Page 13
Connection settings for connecting to computer
2.
3.
4.
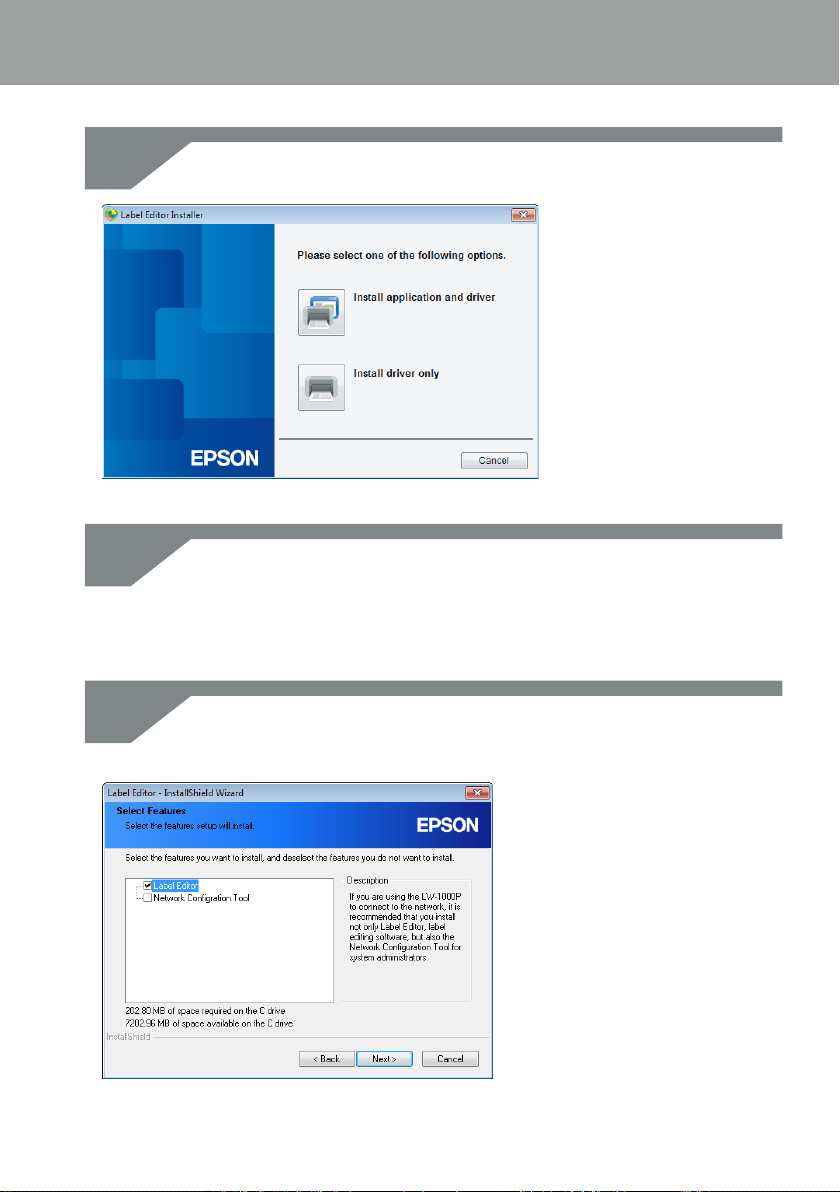
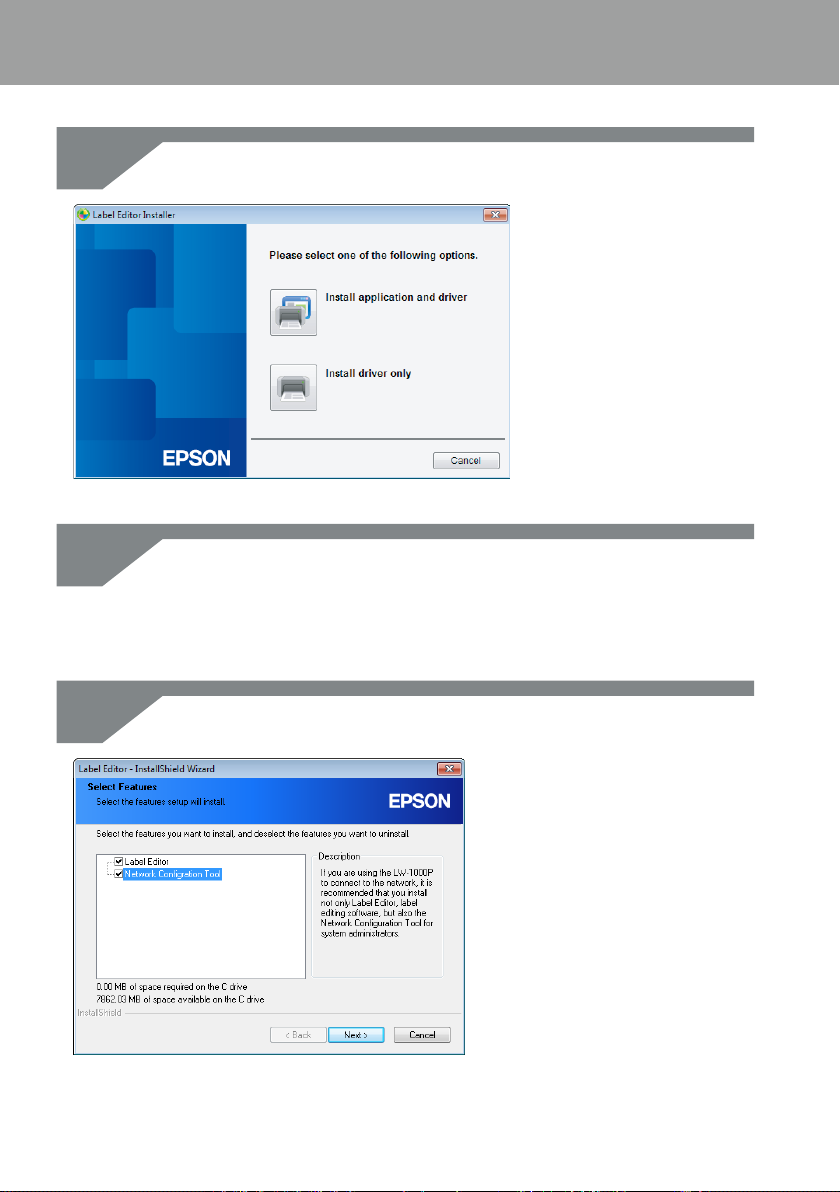
Press the [Install application and driver] button.
Check the content of the displayed License Agreement, and click [Agree]
to signify that you have read and agree to the terms and conditions of the
License Agreement. Next, follow the instructions on screen to proceed with the
installation process.
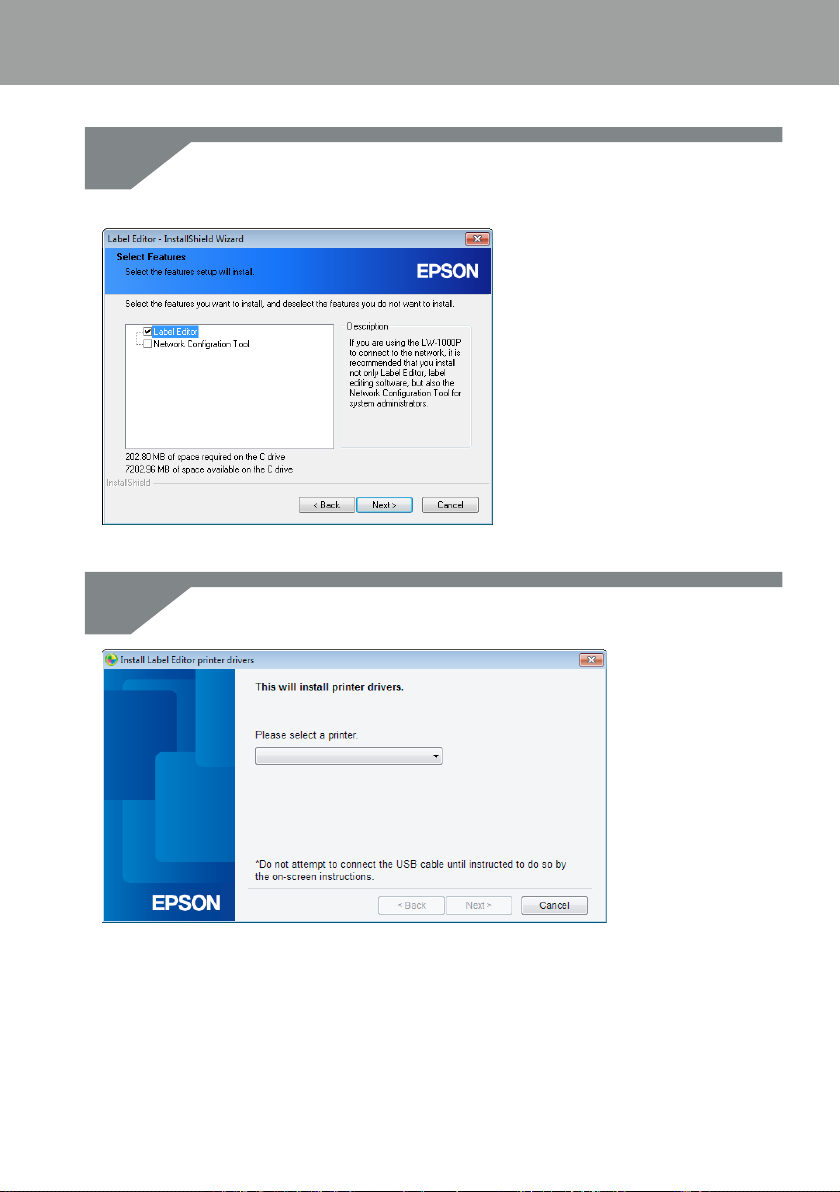
Label Editor is already selected.
Install the Network Conguration Tool if needed.
13
Page 14

Connection settings for connecting to computer
5.
6.
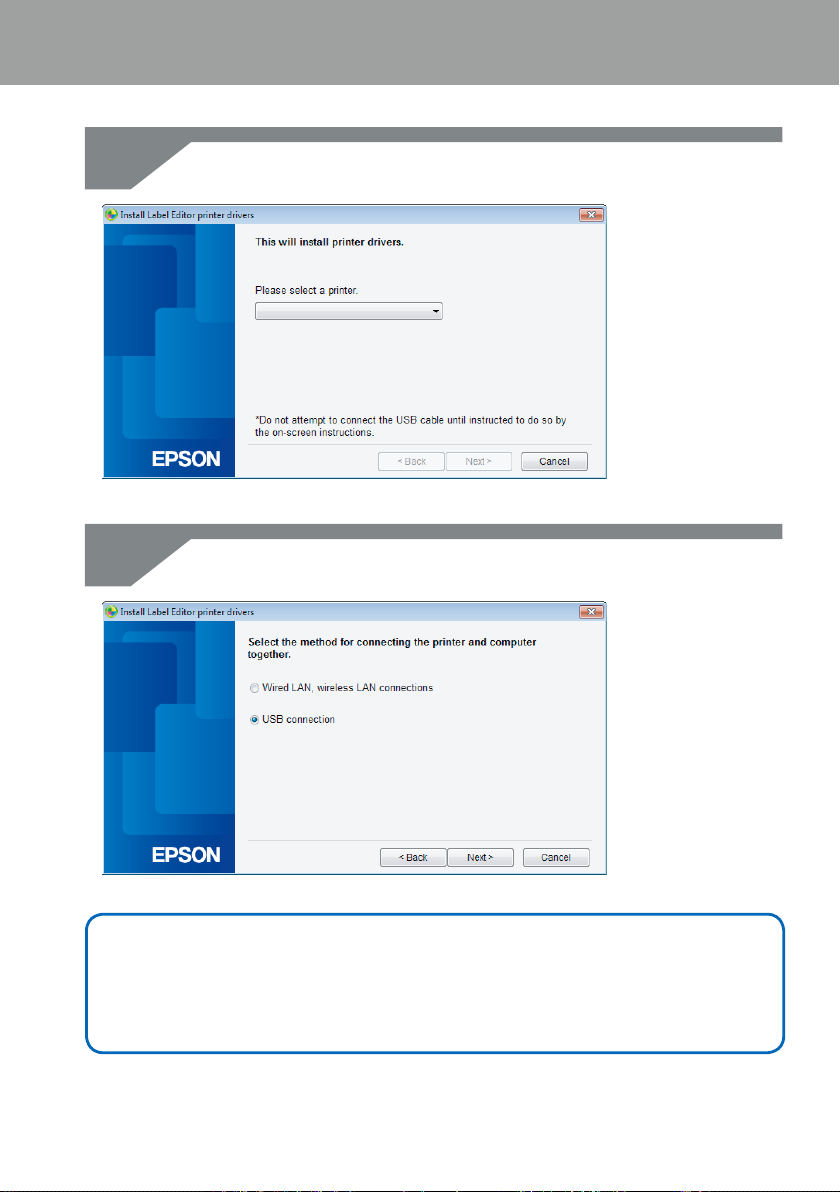
Select a model (the printer to be used).
Select [Wired LAN, wireless LAN connections].
14
Page 15
Connection settings for connecting to computer
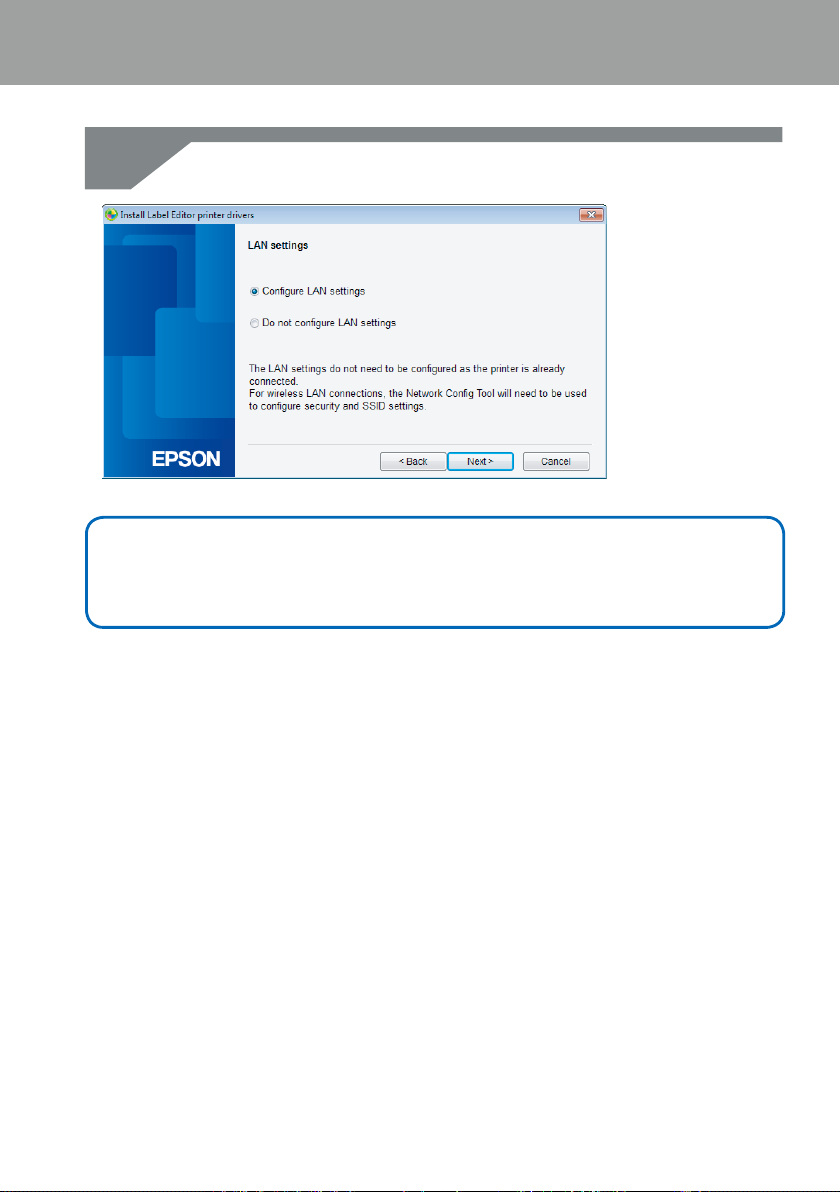
7.
Select [Congure LAN settings].
Memo
If the network settings have already been congured on the printer (when adding a
computer to connect or something similar), select [Do not congure LAN settings].
15
Page 16
Connection settings for connecting to computer
8.
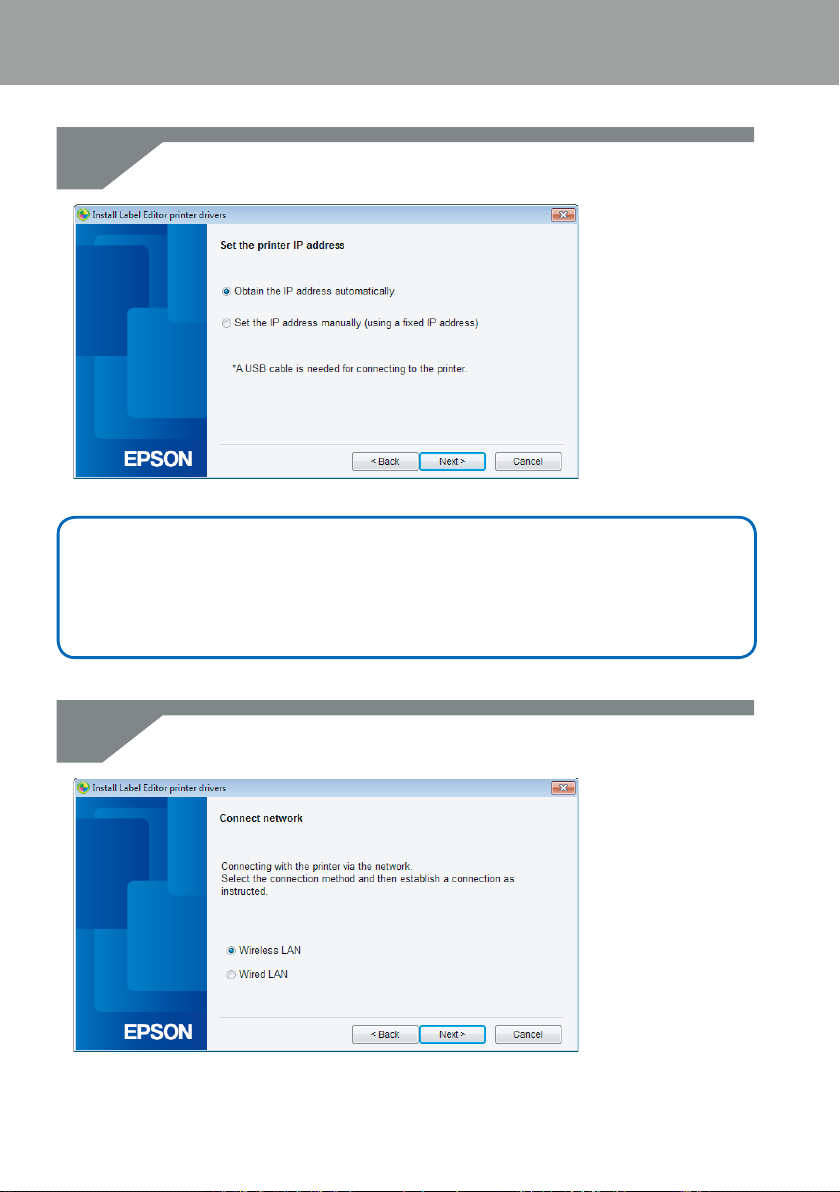
Select [Obtain the IP address automatically].
Memo
Check the procedures on the next page to set the IP address for the printer manually.
ÎRefer to the “Memo“ in Wireless LAN settings using a PIN code (when automatically
acquiring the IP address from the printer) (p.20)
9.
Select [Wireless LAN].
16
Page 17
Connection settings for connecting to computer
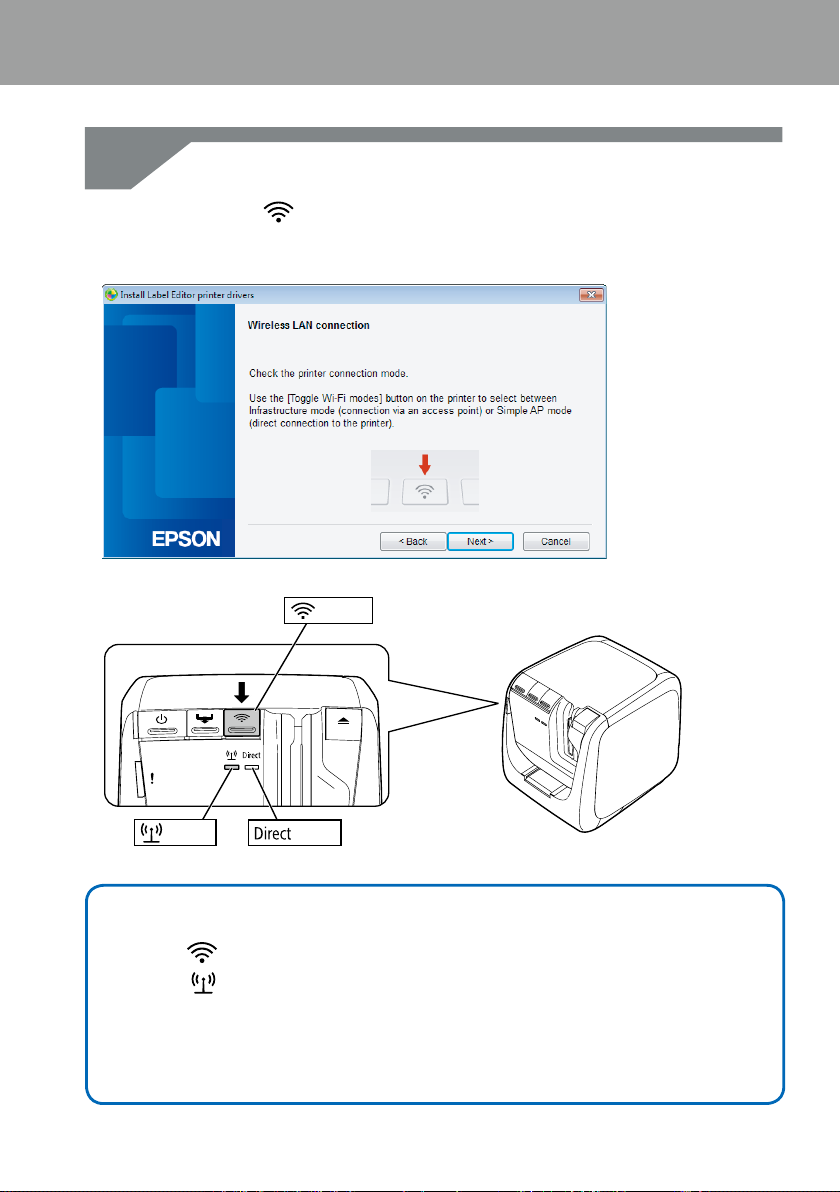
10.
With the network cable and USB cable left unconnected, turn on the power to
the printer.
Press the
modes until you get to Infrastructure Mode.
button repeatedly to scroll through the printer connection
Button
Lamp
Lamp
Memo
Press the button to switch the printer mode to Infrastructure Mode, which will
cause the
You can also check the printer connection mode by printing out the network status
from the printer. Check the next page for details.
ÎHow to check the network settings on the printer alone (p.72)
lamp to start ashing.
17
Page 18
Connection settings for connecting to computer
11.
12.
Follow the instructions on the screen to proceed with the settings
conguration procedure.
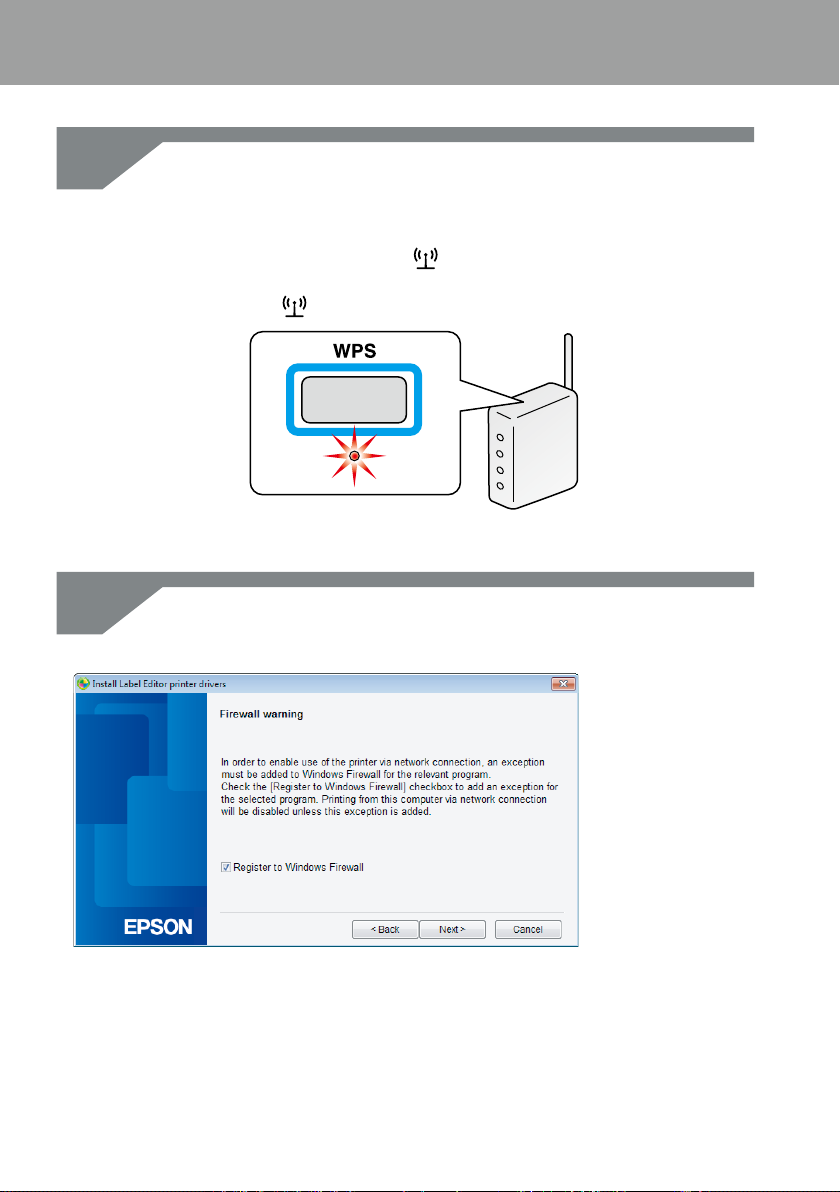
Once the instruction to press the [WPS] button for the access point appears
on the screen, check to make sure that the printer power is turned on and
then press the [WPS] button. The
signaling the start of automatic conguration. Once the settings have been
congured, the
Check the [Register to Windows Firewall] checkbox, and proceed to the next
screen.
lamp
will light up solid.
lamp
on the printer will begin to ash,
18
Page 19
Connection settings for connecting to computer
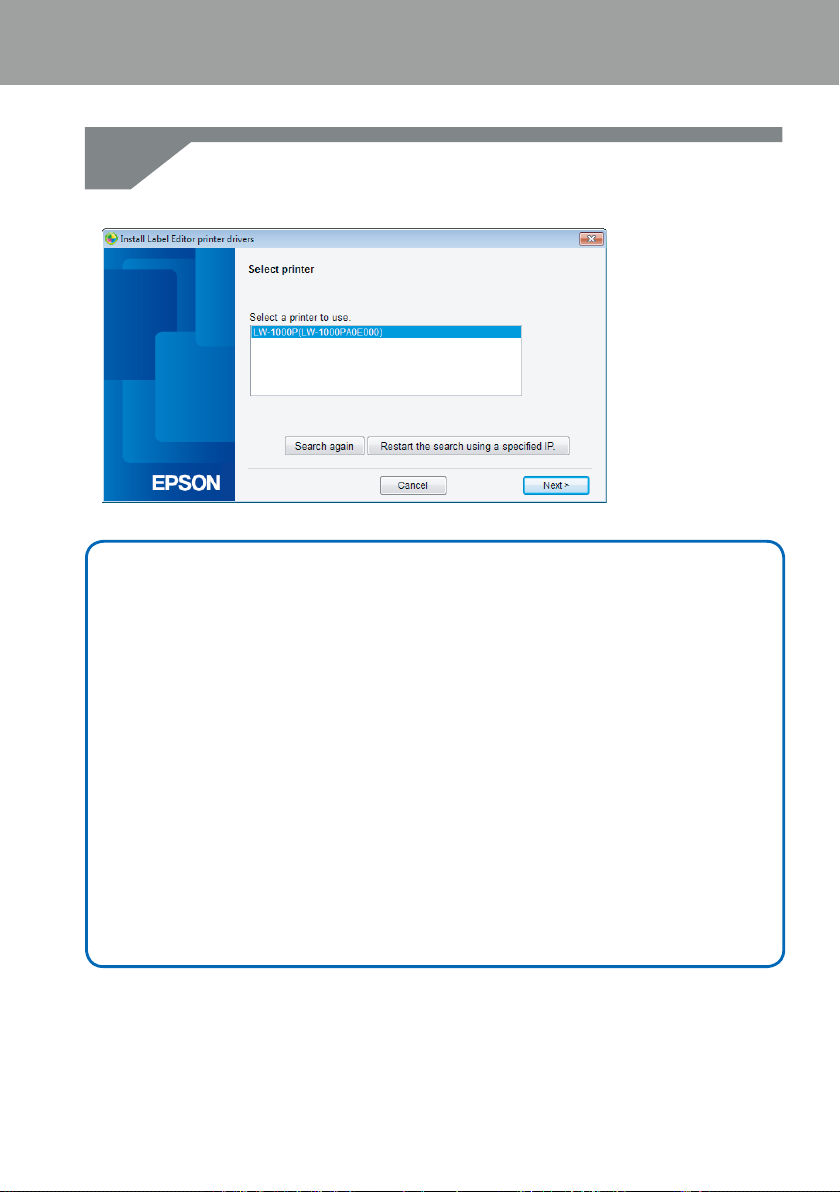
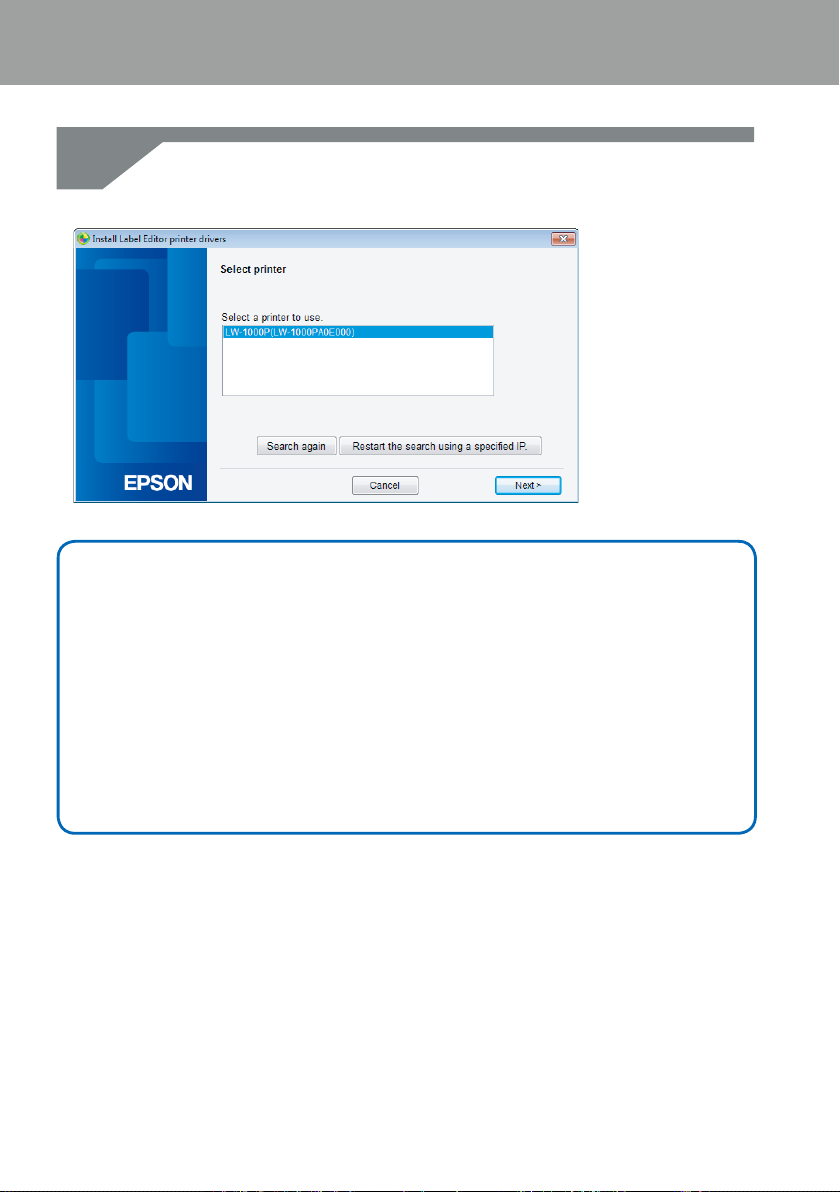
13.
The installer will search the network and display a list of printers that are
connected to the network. Select the printer to be used.
Memo
• The printer will appear once the network settings have been congured.
Try completing the following procedures if the printer fails to show up:
If the IP address was set manually:
Press the [Restart the search using a specied IP], and input the specied IP
address on the screen that appears.
If the IP address was obtained automatically:
Press the [Search again] button.
If the printer still fails to appear even after you have completed the above, it
indicates that the printer network settings have not been congured completely.
Try starting over from the beginning.
• Searches made using the [Search again] button will only be performed within the
same network segment. To connect to a printer in a network segment outside of
the range of the router, check the IP address of the printer that you wish to connect
to and try searching again using [Restart the search using a specied IP].
If you follow the instructions shown on screen to continue conguring the settings, the
network printer driver will begin installing. The settings conguration process will nish
when the installation is completed.
Print a test page from the Label Editor to check to ensure that the printer is running
correctly. For details, check the Label Editor User's Guide.
19
Page 20
Connection settings for connecting to computer
Wireless LAN settings using a PIN code (when automatically acquiring the IP address from the printer)
This conguration method can be selected if the access point used is compatible with a
WPS PIN code input method. The description here lists procedures for when the IP address
for the printer is to be acquired automatically. After the network settings have been
congured for the printer and access point, install the printer driver and other necessary
software, if any, using the included DVD-ROM.
Memo
• A PIN code issued by an access point cannot be registered and set for a printer.
• For details on how to register a PIN code to an access point, refer to the manual for
the access point.
• When conguring the wireless LAN settings, set the computer, printer, and access
point up nearby to make it easier to run them as you will need to use all three to
complete the procedures.
• To set the IP address on the printer manually, refer to Conguring settings for a
wireless LAN manually (p.27) to congure the network settings on the printer
and then complete the below procedures starting from Step 1 to set the IP address.
Important
If planning to congure the settings automatically using a PIN code, use the included
tape cartridge to print the PIN code out from the printer.
20
Page 21
Connection settings for connecting to computer
1.
2.
Insert a tape cartridge into the printer, and turn on the power.
Press and hold down the
least 3 seconds. The
be printed out from the printer.
Important
The PIN code cannot be printed out in any other mode except for Infrastructure Mode.
If unable to print out the PIN code, press the
the printer connection modes until you get to Infrastructure Mode. You can conrm that
the printer is set to Infrastructure Mode by whether the
also check by printing out the network status. Check the next page for details on how to
print out the network status.
ÎHow to check the network settings on the printer alone (p.72)
button located on the back of the printer for at
lamp
will begin ashing, and the [PIN code] will then
button repeatedly to scroll through
lamp is ashing. You can
21
Page 22

Connection settings for connecting to computer
3.
4.
5.
Register the PIN code to the access point while the
lamp
will light up solid as soon as the connections to and settings for the
access point have been completed.
Important
If the lamp is turned o, it indicates that the network settings have not been
congured properly. Return to Step 2 to try conguring the network settings.
Insert the included DVD-ROM into the disc drive on the connected computer.
Follow the instructions on screen to proceed.
Press the [Install application and driver] button.
lamp
is still ashing. The
22
6.
Check the content of the displayed License Agreement, and click [Agree]
to signify that you have read and agree to the terms and conditions of the
License Agreement. Next, follow the instructions on screen to proceed with the
installation process.
Page 23
Connection settings for connecting to computer
7.
8.
Label Editor is already selected.
Install the Network Conguration Tool if needed.
Select a model (the printer to be used).
23
Page 24

Connection settings for connecting to computer
9.
10.
Select [Wired LAN, wireless LAN connections].
Select [Do not congure LAN settings].
24
Page 25

Connection settings for connecting to computer
11.
Check the [Register to Windows Firewall] checkbox, and proceed to the next
screen.
25
Page 26
Connection settings for connecting to computer
12.
The printer set to the PIN code will appear on the screen. Select this printer to
proceed.
Memo
• The printer will appear once the network settings have been congured.
If the printer fails to appear, press the [Search again] button to try again.
If the printer still fails to appear even after you have completed the above, it
indicates that the printer network settings have not been congured completely.
Try starting over from the beginning.
• Searches made using the [Search again] button will only be performed within the
same network segment. To connect to a printer in a network segment outside of
the range of the router, check the IP address of the printer that you wish to connect
to and try searching again using [Restart the search using a specied IP].
If you follow the instructions shown on screen to continue conguring the settings, the
network printer driver will begin installing. The settings conguration process will nish
when the installation is completed.
Print a test page from the Label Editor to check to ensure that the printer is running
correctly. For details, check the Label Editor User's Guide.
26
Page 27

Connection settings for connecting to computer
Conguring settings for a wireless LAN manually
This is a conguration method in which all information needed to congure a wireless LAN
connection is input manually.
Install the Network Conguration Tool using the included DVD-ROM. Next, connect the
printer to a computer with a USB cable, congure the necessary network settings, and then
install the network printer driver using the DVD-ROM again.
Important
Part or all of the below information will be needed to congure wireless LAN settings
manually. Check with your network administrator in advance.
Information necessary for setting up a xed IP address
• IP address set for the printer
• Subnet Mask
• Default Gateway
Information necessary for conguring a wireless LAN manually
• SSID set to the access point
• Security authentication method for the wireless LAN set to the access point
• Encryption method for the wireless LAN set to the access point
• Pre-Shared Key (PSK) set to the access point
• WEP key set to the access point
1.
Insert the included DVD-ROM into the disc drive on the connected computer.
Follow the instructions on screen to proceed.
27
Page 28
Connection settings for connecting to computer
2.
3.
4.
Press the [Install application and driver] button.
Check the content of the displayed License Agreement, and click [Agree]
to signify that you have read and agree to the terms and conditions of the
License Agreement. Next, follow the instructions on screen to proceed with the
installation process.
Label Editor and the Network Conguration Tool are already selected.
28
Page 29
Connection settings for connecting to computer
5.
6.
Select a model (the printer to be used).
Select [USB connection].
Memo
The USB printer driver will need to be installed before you can use the Network
Conguration Tool. Select [USB connection] and install the USB printer driver.
29
Page 30
Connection settings for connecting to computer
7.
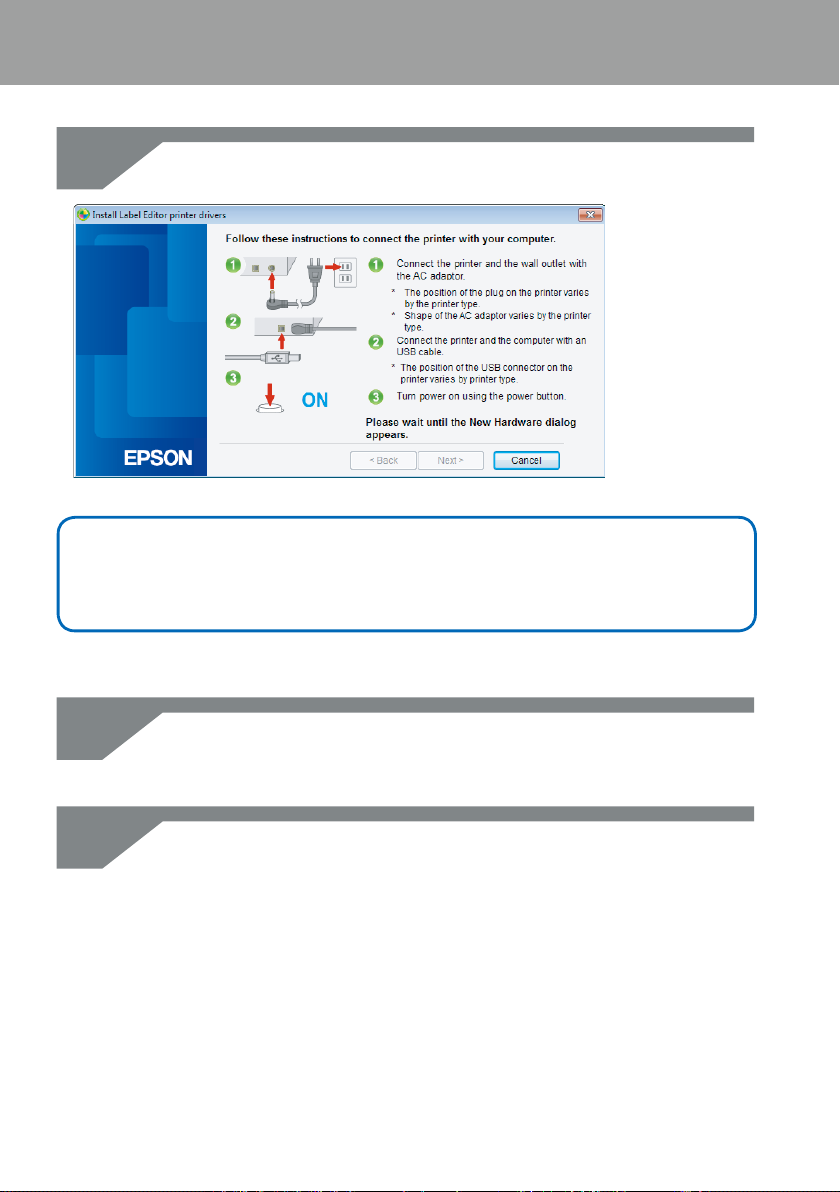
Follow the instructions on the screen to install the USB printer driver.
Memo
Follow the instructions shown on the screen to connect the computer and printer
together using a USB cable.
8.
Close the installer once you have nished installing the USB printer driver.
30
9.
Start up the Network Conguration Tool.
Click [Start] - [All Programs] (or [Programs]) - [EPSON] - [PrinterCongTool] [Network Cong Tool], in the order given.
Page 31

Connection settings for connecting to computer
10.
Select a printer.
Memo
The USB printer driver may not be installed correctly if the printer fails to appear.
Try reinstalling the USB printer driver starting from the beginning of the installation
procedures.
31
Page 32

Connection settings for connecting to computer
11.
The conguration tool menu appears.
Memo
For details on how to use the Network Conguration Tool, check the next page.
ÎChecking/changing the printer network settings (p.72)
32
Page 33

Connection settings for connecting to computer
12.
Select [Network] - [Wireless] - [Basic] from the tree menu at left and then select
[Infrastructure] from the [Communication Mode] that appears at right.
Important
Do not press the [Send] button until explicitly instructed to do so in the procedures
listed in this manual.
Wait until all settings have been congured and then press the [Send] button to send
the setting details to the printer.
33
Page 34

Connection settings for connecting to computer
13.
Memo
Enter the network settings information that you have prepared in advance.
34
• Check to make sure that all necessary settings have been entered correctly.
• Press the [Select an SSID] button to pull up the SSID for the wireless LAN detected
by the printer. You will then be able to select the desired SSID, if the one you want is
listed.
Page 35

Connection settings for connecting to computer
14.
After entering and checking the information to make sure that it is all correct,
press the [Send] button.
Important
Check the below details if any error messages appear after you press the [Send] button.
If a communications error appears:
Check the printer power and USB cable connection status to make sure that the
power is on and the cable connected, and try pressing the [Send] button again.
If a settings error appears:
One or more of the entered setting values may be invalid or incorrect. Double-check
the entered information again and correct any problems.
If an administrator password has been set using the Network Conguration Tool, a
screen asking for the password will appear when the [Send] button is pressed. You will
not be able to congure the network settings unless you enter the correct password
here.
ÎTo change the password used to change the settings (p.87)
35
Page 36

Connection settings for connecting to computer
15.
Press the [Update to the latest information] button to upload the information
sent to the printer, and check to make sure everything is set correctly.
36
16.
17.
Press the [Cancel] button to exit the Network Conguration Tool.
Disconnect the USB cable from the printer and computer.
Run the installer from the DVD-ROM once again.
Double-click on the Setup.exe located on the DVD-ROM as checked in Explorer.
Page 37

Connection settings for connecting to computer
18.
19.
Follow the instructions shown on the screen to proceed unitl the next screen
appears.
Once the screen appears, select [Wired LAN, wireless LAN connections].
Select [Do not congure LAN settings].
37
Page 38

Connection settings for connecting to computer
20.
Select the printer to be used.
Memo
• The printer will appear once the network settings have been congured.
When the IP address for the printer is set to be acquired automatically:
If the printer fails to appear, press the [Search again] button to try again.
When the IP address for the printer is set to be xed:
Press the [Restart the search using a specied IP], and input the specied IP address.
If the printer still fails to appear even after you have completed the above, it
indicates that the printer network settings have not been congured correctly. Try
starting over from Step 9.
• Searches made using the [Search again] button will only be performed within the
same network segment. To connect to a printer in a network segment outside of
the range of the router, check the IP address of the printer that you wish to connect
to and try searching again using [Restart the search using a specied IP].
If you follow the instructions shown on screen to continue conguring the settings, the
network printer driver will begin installing. The settings conguration process will nish
when the installation is completed.
Print a test page from the Label Editor to check to ensure that the printer is running
correctly. For details, check the Label Editor User's Guide.
38
Page 39

Connection settings for connecting to computer
Setting up a wireless LAN connection (Simple AP Mode)
Here, a description will be provided of the method for setting up a wireless LAN connection
in Simple AP Mode.
The below conditions must be met before this connection mode can be used.
• The computer or phone to be connected is set up for wireless LAN and the wireless LAN
switch is turned on
• The computer is not connected to a network through a wireless LAN.
• The computer or phone is set up to acquire an IP address automatically
There are two methods available for conguring settings for a wireless LAN in Simple AP
Mode, as described below. First, try to congure the settings using the push button. If that
does not work to connect the printer, next try to congure the settings manually.
ÎConguring settings for a wireless LAN in Simple AP Mode using automatic push button
conguration (WPS) (p.40)
ÎConguring settings for a wireless LAN in Simple AP Mode manually (p.48)
Important
• Up to four devices can be connected at the same time with connections using
Simple AP Mode. You cannot connect a fth or subsequent device.
• You cannot connect devices other than a printer or connect to the Internet. Your
Internet connection will be disconnected when you run this conguration.
• The security mode is xed to WPA2-PSK (AES).
39
Page 40

Connection settings for connecting to computer
Conguring settings for a wireless LAN in Simple AP
Mode using automatic push button conguration (WPS)
1.
2.
3.
Insert the included DVD-ROM into the drive on the computer to be connected
and follow the instructions on screen to add the computer.
Press the [Install application and driver] button.
Check the content of the displayed License Agreement, and click [Agree]
to signify that you have read and agree to the terms and conditions of the
License Agreement. Next, follow the instructions on screen to proceed with the
installation process.
40
Page 41

Connection settings for connecting to computer
4.
5.
Label Editor is already selected.
Install the Network Conguration Tool if needed.
Select a model (the printer to be used).
41
Page 42

Connection settings for connecting to computer
6.
7.
Select [Wired LAN, wireless LAN connections].
Select [Congure LAN settings].
42
Page 43

Connection settings for connecting to computer
8.
Select [Wireless LAN].
43
Page 44

Connection settings for connecting to computer
9.
Once the next screen appears, leave the network cable and USB cable left
unconnected, and turn on the power to the printer. Press the
repeatedly to scroll through the printer connection modes until you get to
Simple AP Mode.
Button
button
Lamp
Lamp
Memo
The lamp will light up if the printer is set to Simple AP Mode.
You can also check the printer connection mode by printing out the network status
from the printer. Check the next page for details.
ÎHow to check the network settings on the printer alone (p.72)
44
Page 45

Connection settings for connecting to computer
10.
11.
Follow the instructions on the screen to proceed with the settings
conguration procedure.
Once the instruction to press the
screen, check to make sure that the printer power is turned on and then press
the
The
automatic conguration.
Click the Network Connection icon on the taskbar on your computer, and
select the connection with the same SSID for the network status information.
The printer and computer will communicate with each other to congure
the settings. Once the settings have been congured, the
printer will light up.
button.
lamp on the printer will begin to ash, signaling the start of
button on the printer appears on the
lamp on the
45
Page 46

Connection settings for connecting to computer
12.
Check the [Register to Windows Firewall] checkbox, and proceed to the next
screen.
46
Page 47

Connection settings for connecting to computer
13.
Select a printer.
Memo
The printer will appear if it is set to Simple AP Mode.
If the printer fails to appear, press the [Search again] button to try again.
If the printer still fails to appear, check that the printer is set to the correct wireless LAN
mode, and try running the search again.
Check the procedures on the next page to congure the network settings manually
in Simple AP Mode if unable to get the settings congured properly using the above
steps.
ÎConguring settings for a wireless LAN in Simple AP Mode manually (p.48)
If you follow the instructions shown on screen to continue conguring the settings, the
network printer driver will begin installing. The settings conguration process will nish
when the installation is completed.
Print a test page from the Label Editor to check to ensure that the printer is running
correctly. For details, check the Label Editor User's Guide.
47
Page 48

Connection settings for connecting to computer
Conguring settings for a wireless LAN in Simple AP
Mode manually
If not able to congure the settings for a wireless LAN in Simple AP Mode using automatic
push button conguration (p.40), try the procedures included here to congure the
settings.
After switching the printer mode to Simple AP Mode, change the wireless LAN settings on
the computer manually.
1.
With the network cable and USB cable left unconnected, turn on the power to
the printer.
Press the
modes until you get to Simple AP Mode.
Lamp
button repeatedly to scroll through the printer connection
Button
Lamp
Memo
The lamp will light up if the printer is set to Simple AP Mode.
2.
Press and hold down the button for at least 3 seconds, which will cause
the network status to be printed out.
Memo
Check the next page for details on how to print out the network status.
ÎHow to check the network settings on the printer alone (p.72)
48
Page 49

Connection settings for connecting to computer
3.
Check the network status information that was printed out.
Congure the network settings using the [SSID] and [Password] listed in the
<WLAN Simple AP> box.
<General><WLAN Simple AP>
Software 2.222 SSIDDIRECT-LW-1000PXXXXXXXX
PrinterLW-1000PXXXXXX Password 12345678
Bonjour EPSON LW-1000P
WLAN Mode Infrastructure
<LAN>
IP Auto(192.168.0.1/255.255.255.0)
MAC XXXXXXXXXXXX
<WLANInfrastructure>
IP Auto(0.0.0.0/255.255.255.0)
MAC XXXXXXXXXXXX
SSID SSIDXXXXXXXX
4.
Click the Network Connection icon on the taskbar on your computer, and
select the connection with the same SSID for the network status information.
Once the screen asking for you to input the security key appears, enter the details listed
under "Password" in the network status information.
49
Page 50

Connection settings for connecting to computer
5.
6.
7.
Insert the included DVD-ROM into the drive on the computer to be connected
and follow the instructions on screen to add the computer.
Press the [Install application and driver] button.
Check the content of the displayed License Agreement, and click [Agree]
to signify that you have read and agree to the terms and conditions of the
License Agreement. Next, follow the instructions on screen to proceed with the
installation process.
50
Page 51

Connection settings for connecting to computer
8.
9.
Label Editor is already selected.
Install the Network Conguration Tool if needed.
Select a model (the printer to be used).
51
Page 52

Connection settings for connecting to computer
10.
11.
Select [Wired LAN, wireless LAN connections].
Select [Do not congure LAN settings].
52
Page 53

Connection settings for connecting to computer
12.
Select a printer.
Memo
If the printer fails to appear, press the [Search again] button to try again.
If the printer still fails to appear, check that the printer is set to the correct wireless LAN
mode, and try running the search again or start over from the beginning.
If you follow the instructions shown on screen to continue conguring the settings, the
network printer driver will begin installing. The settings conguration process will nish
when the installation is completed.
Print a test page from the Label Editor to check to ensure that the printer is running
correctly. For details, check the Label Editor User's Guide.
53
Page 54

Connection settings for connecting to computer
How to disconnect the printer from Simple AP Mode
Up to four wireless devices can be connected to a printer in Simple AP Mode.
If you attempt to connect other wireless devices than the ones already connected (a
fth or subsequent device), the Wi-Fi connection for devices not using the printer will be
disconnected (either the device will be connected to a dierent network or the Wi-Fi will be
turned o).
This will allow you to connect new devices to the printer.
Memo
If unable to specify a single device connected to the printer, change the Pre-Shared
Key (PSK) for Simple AP Mode on the printer to enable up to four wireless devices to be
connected at a time. Make sure to proceed carefully when attempting to change the
Pre-Shared Key (PSK) for Simple AP Mode as all Wi-Fi connections for devices already
connected will be disconnected if the Pre-Shared Key (PSK) for Simple AP Mode is
changed.
Check the next page for details on how to change the security key.
ÎChecking/changing the printer network settings (p.72)
54
Page 55

Connection settings for connecting to computer
Conguring settings for a wired LAN connection
Connect the computer and printer to a commercial broadband router or hub via a LAN
cable.
Important
The computer needs to be connected to a network device such as a router and the
network enabled in advance before you will be able to proceed.
1.
2.
3.
Insert the included DVD-ROM into the drive on the computer to be connected
and follow the instructions on screen to add the computer.
Press the [Install application and driver] button.
Check the content of the displayed License Agreement, and click [Agree]
to signify that you have read and agree to the terms and conditions of the
License Agreement. Next, follow the instructions on screen to proceed with the
installation process.
55
Page 56

Connection settings for connecting to computer
4.
5.
Label Editor is already selected.
Install the Network Conguration Tool if needed.
Select a model (the printer to be used).
56
Page 57

Connection settings for connecting to computer
6.
7.
Select [Wired LAN, wireless LAN connections].
Select [Congure LAN settings].
57
Page 58

Connection settings for connecting to computer
8.
Select [Obtain the IP address automatically].
Memo
Check the procedures on the next page to set the IP address for the printer manually.
ÎSetting the IP address for the printer manually (p.61)
9.
Select [Wired LAN].
58
Page 59

Connection settings for connecting to computer
10.
11.
Follow the instructions on the screen, and connect the printer to the hub or
broadband router using a network cable.
Check the [Register to Windows Firewall] checkbox, and proceed to the next
screen.
59
Page 60

Connection settings for connecting to computer
12.
The installer will search the network and display a list of printers that are
connected to the network. Select the printer to be used.
Memo
• The printer will appear once the network settings have been congured.
Try completing the following procedures if the printer fails to show up:
If the IP address was set manually:
Press the [Restart the search using a specied IP], and input the specied IP address
on the screen that appears.
If the IP address was obtained automatically:
Press the [Search again] button.
If the printer still fails to appear even after you have completed the above, it
indicates that the printer network settings have not been congured completely.
Try starting over from the beginning.
• Searches made using the [Search again] button will only be performed within the
same network segment. To connect to a printer in a network segment outside of
the range of the router, check the IP address of the printer that you wish to connect
to and try searching again using [Restart the search using a specied IP].
If you follow the instructions shown on screen to continue conguring the settings, the
network printer driver will begin installing. The settings conguration process will nish
when the installation is completed.
Print a test page from the Label Editor to check to ensure that the printer is running
correctly. For details, check the Label Editor User's Guide.
60
Page 61

Connection settings for connecting to computer
Setting the IP address for the printer manually
Complete the below procedures to manually congure the necessary settings to use a xed
IP address of the printer when the below screen appears while the network settings are
being congured using the DVD-ROM.
Memo
The information needed for setting an IP address manually is as listed below. Check
with your network administrator beforehand to prepare all information needed and
help the process go more smoothly.
Printer IP address
Subnet Mask
Default Gateway
1.
When the below screen appears while the network settings are being
congured using the DVD-ROM, select [Set the IP address manually (using a
xed IP address)].
61
Page 62

Connection settings for connecting to computer
2.
3.
Install the USB printer driver in order to set the IP address for the printer. Follow
the instructions shown on screen to install the printer driver.
Important
Follow the instructions shown on the screen to connect the printer and computer
together using a USB cable. Be sure to leave the USB cable connected once the USB
printer driver has been installed as you will need it to set the IP address.
Select [Wired LAN].
62
4.
Enter the IP Address, Subnet Mask, and Default Gateway for the printer.
Page 63

Connection settings for connecting to computer
5.
Once the next screen appears, disconnect the USB cable from the printer.
Next, select the network connection method to be used and proceed with
conguring the settings.
63
Page 64

Connecting from a portable terminal
A description will be provided of methods for connecting a portable terminal such as a
smartphone or tablet to a printer that has had its network settings congured.
Important
You will need to congure the network settings in advance on the printer depending on
the connection method.
• The printer will be set to Simple AP Mode for cases involving one printer and one
portable terminal device.
ÎSetting up a wireless LAN connection (Simple AP Mode) (p.39)
• If connecting the printer via a network, the printer will be connected to the network.
ÎSetting up a wireless LAN connection (Infrastructure Mode) (p.11)
Epson iLabel application for portable terminals
In order to print labels on the printer from your smartphone or tablet device, you will need
to install software that supports your particular smartphone or tablet device.
Compatible operating system environments for the software are listed below together with
the source of the software.
64
Compatible
operating
systems (OS)
Applicable
device models
Source
iOS7.0 or later, or iOS8.0 or later
iPhone6 plus, iPhone6, iPhone5S,
iPhone5C, iPhone5, iPhone4, iPhone4S,
iPod touch 5th generation,
iPad Air2, iPad mini3, iPad Air,
iPad mini (Retina), iPad mini,
iPad 4th generation,
iPad 3rd generation, iPad2
Android4.0/4.1/4.2/4.3/4.4,
Android5.0/5.1
Smartphone or tablet devices with
the above operating systems
Page 65

Connecting from a portable terminal
Memo
• Check the Seiko Epson Corporation for the latest information on compatible
operating systems.
Îhttp://www.epson.com
• For details on how to install individual applications and their associated functions
and features, check the pages provided by the distributors of the software directly.
• The smartphone or tablet to which the application is to be downloaded must have
its wireless LAN function turned on and be in an environment where it can connect
to a network before the application can be downloaded. Check the manual for your
portable terminal device for instructions on how to congure network settings for
your smartphone or tablet.
65
Page 66

Connecting from a portable terminal
Connecting to a printer from a portable terminal such as a smartphone or tablet
Below is a description of the procedures for connecting to a printer using the Epson iLabel
application for portable terminals.
1.
2.
Start up the application, tap
applicable printers that can be used on the print setting menu.
A list will come up that lists the applicable printers that can be used.
Select the printer that you are using from the list to start printing.
on the tool bar, and then display the list of the
Memo
Check the following points if the printer fails to show up:
• Is the wireless LAN function on your smartphone or tablet enabled?
• Are the network settings congured correctly on the printer?
66
Page 67

Adding a second computer or portable terminal
Below is a description of the procedures for enabling the printer to be used on a separate
computer (a second or subsequent computer) or portable terminal device other than the
computer used to congure the network settings for the printer via a network.
Adding a computer
The included DVD-ROM will be used to add another computer.
1.
2.
3.
Insert the included DVD-ROM into the drive on the computer to be connected
and follow the instructions on screen to add the computer.
Press the [Install application and driver] button.
Check the content of the displayed License Agreement, and click [Agree]
to signify that you have read and agree to the terms and conditions of the
License Agreement. Next, follow the instructions on screen to proceed with the
installation process.
67
Page 68

Adding a second computer or portable terminal
4.
5.
Label Editor is already selected.
Install the Network Conguration Tool if needed.
Select a model (the printer to be used).
68
Page 69

Adding a second computer or portable terminal
6.
7.
Select [Wired LAN, wireless LAN connections].
Select [Do not congure LAN settings].
69
Page 70

Adding a second computer or portable terminal
8.
Select a printer.
Memo
• The printer will appear once the network settings have been congured.
Try completing the following procedures if the printer fails to show up:
If the IP address was set manually:
Press the [Restart the search using a specied IP], and input the specied IP address
on the screen that appears.
If the IP address was obtained automatically:
Press the [Search again] button.
If the printer still fails to appear even after you have completed the above, it
indicates that the printer network settings have not been congured completely.
Try starting over from the beginning.
• Searches made using the [Search again] button will only be performed within the
same network segment. To connect to a printer in a network segment outside of
the range of the router, check the IP address of the printer that you wish to connect
to and try searching again using [Restart the search using a specied IP].
If you follow the instructions shown on screen to continue conguring the settings, the
network printer driver will begin installing. The settings conguration process will nish
when the installation is completed.
Print a test page from the Label Editor to check to ensure that the printer is running
correctly. For details, check the Label Editor User's Guide.
70
Page 71

Adding a second computer or portable terminal
Adding a terminal such as a smartphone or tablet
Install the application using the procedures outlined in Connecting to a printer from a
portable terminal such as a smartphone or tablet (p.66).
Start up the application, tap
printers that can be used on the print setting menu.
A list will come up that lists the applicable printers that can be used.
on the tool bar, and then display the list of the applicable
71
Page 72

Checking/changing the printer network settings
There are two methods available for checking the network settings for the printer, one is to
check by printing the network status from the printer and the other is to check using the
Network Conguration Tool. You can use the Network Conguration Tool to make changes
to the printer network settings.
How to check the network settings on the printer alone
You can check the network settings by printing the network status from the printer.
Memo
To print the network settings from the printer, make sure to insert tape that is as wide
as possible. Note that pre-cut labels cannot be used to print out network settings.
1.
Check to make sure that the printer is not currently printing and then press
Button
button
for at least 3 seconds.
and hold down the
72
Page 73

Checking/changing the printer network settings
2.
3.
The network setting details will be printed out.
<General><WLAN Simple AP>
Software 2.222 SSIDDIRECT-LW-1000PXXXXXXXX
PrinterLW-1000PXXXXXX Password 12345678
Bonjour EPSON LW-1000P
WLAN Mode Infrastructure
<LAN>
IP Auto(192.168.0.1/255.255.255.0)
MAC XXXXXXXXXXXX
<WLANInfrastructure>
IP Auto(0.0.0.0/255.255.255.0)
MAC XXXXXXXXXXXX
SSID SSIDXXXXXXXX
The types of details printed out on the tape are as listed below.
Item Printing examples Description
<General> --- Prints out general setting details.
Software 2.222 Prints out the printer rmware version.
Printer LW-1000PXXXXXX Prints out the printer name.
Bonjour
EPSON LW-1000P
Prints out the Bonjour service name.
Prints out the name of one of the below printer
WLAN Mode Infrastructure
wireless LAN modes.
Infrastructure/Simple AP/Disable Wi-Fi
<LAN> --- Prints out the settings for the Wired LAN.
IP
Auto (192.168.0.1/
255.255.255.0)
Prints out the specied IP address and subnet
mask. Displays that the IP address is to be
acquired automatically when Auto is printed out.
MAC XXXXXXXXXXXX Prints out the MAC address for the Wired LAN.
<WLAN Infrastructure> ---
IP
Auto (0.0.0.0/
255.255.255.0)
Prints out the settings for the wireless LAN
Infrastructure Mode.
Prints out the specied IP address and subnet
mask. Displays that the IP address is to be
acquired automatically when Auto is printed out.
MAC XXXXXXXXXXXX Prints out the MAC address for the wireless LAN.
SSID SSIDXXXXXXXX Prints out the SSID for the participating network.
<WLAN Simple AP> --- Prints out the settings for Simple AP Mode.
73
Page 74

Checking/changing the printer network settings
Item Printing examples Description
SSID
Password 12345678 Prints out the password used in Simple AP Mode.
DIRECT-LW1000PXXXXXXXX
Prints out the SSID used in Simple AP Mode.
How to check from a computer
To check the network settings from a computer, use the Network Conguration Tool, which
is installed at the same time as Label Editor.
Important
• If the Network Conguration Tool was not installed when the printer driver was
installed, use the included DVD-ROM to install it at this time in order to proceed.
• The network settings for the printer cannot be checked from a computer that does
not have the proper USB printer driver or network printer driver installed.
• In order to check the network settings from a computer, you will need to have the
printer and computer connected together using a USB cable or through a wired or
wireless LAN.
74
1.
Start up the Network Conguration Tool.
Click [Start] - [All Programs] (or [Programs]) - [EPSON] - [PrinterCongTool] [Network Cong Tool], in the order given.
Page 75

Checking/changing the printer network settings
2.
Select a printer.
Memo
The USB printer driver may not be installed correctly if the printer fails to appear.
Try reinstalling the USB printer driver starting from the beginning of the installation
procedures.
75
Page 76

Checking/changing the printer network settings
3.
4.
The conguration tool menu appears.
Select the item that you wish to check from the tree menu at left and then
check the network settings for that item.
76
Important
• When making changes to the network settings, check to conrm that the name of
the printer for which settings are to be changed appears in the upper left on the
screen.
• If there is a password set for the printer in the Network Conguration Tool, you will
not be able to make changes to the network settings unless you enter the correct
password.
Page 77

Checking/changing the printer network settings
Network settings details that can be checked/changed
Select the details that you wish to check/set from the below list of items. Descriptions for
items are listed on the specied reference pages.
Setting to check/change Setting item
General settings
To check/change the name of the printer
used on the network
Wireless LAN settings
To check/change the wireless LAN mode
Wireless LAN
connection status
To check/change
the Infrastructure
Mode settings
To check/change
Simple AP Mode
settings
IP address settings
Security settings
Wireless LAN
connection status
IP address settings
Security settings
Congurable
Printer Name Yes
Bonjour Service Name Yes
Wireless LAN mode Yes
Wireless LAN MAC Address No
Connection status No
Wireless LAN usage
standards
How to acquire the IP
address
IP Address Yes
Subnet Mask Yes
Default Gateway Yes
Authentication Method Yes
Encryption Method Yes
SSID Yes
Security key
(Passphrase)
Wireless LAN usage
standards
DHCP server status No
Publication Start IP
Address
Specied IP address No
Subnet Mask No
Authentication Method No
Encryption Method Yes
SSID Yes
Security key
(Passphrase)
No
Yes
Yes
No
No
Yes
Reference
page
p.79Bonjour Name Yes
p.80
p.81
p.83
77
Page 78

Checking/changing the printer network settings
Setting to check/change Setting item
Wired LAN settings
To check/conrm the wired LAN
connection status
To check/change the IP address settings
Printer settings
To check the software information Firmware version No
To check the printer time-out settings Print Timeout Yes
To change the password used to change
the settings
Important
Connection status No
Wired LAN MAC Address No
How to acquire the IP
address
IP Address Yes
Subnet Mask Yes
Default Gateway Yes
Password Yes p.87
Congurable
Yes
Reference
• In order to change the network settings for the printer, press the [Send] button
at the bottom of the screen, sending all setting values that can be set using the
Network Conguration Tool including items not shown on screen to the printer,
which will reect the changes.
To change the network settings, rst conrm that all settings have been congured
as desired and then press the [Send] button.
• Before attempting to make changes to the network settings, rst press the [Update
to the latest information] button, check the values set on the printer, and then make
changes as desired.
• Press the Cancel button to reject changes made to the network settings and close
the Network Conguration Tool.
page
p.85
p.86
78
Page 79

Checking/changing the printer network settings
To check/change the name of the printer used on the network
Screen that appears when you select [Network] - [Shared] - [Basic] in the tree menu at left.
Item details that can be checked/changed are as listed below.
(1)
(2)
(3)
# Item
1 Printer Name Yes
2 Bonjour Name Yes
3 Bonjour Service Name Yes
Congurable
Setting details
Name of the printer used on the network. The printer
is displayed under this name when checked from a
Windows-based computer.
Bonjour name of the printer used on the network. The
printer is displayed under this name when checked
from a Mac OS-based computer.
The printer is displayed under this name when checked
from an application on an iOS-based or Android OSbased portable terminal device.
79
Page 80

Checking/changing the printer network settings
To check/change the wireless LAN mode
Screen that appears when you select [Network] - [Wireless] - [Basic] in the tree menu at left.
Item details that can be checked/changed are as listed below.
(1)
80
# Item
1 Communication Mode Yes
Congurable
Setting details
Indicates the communications mode that the printer is
set to.
You can select and change back and forth between any
of the three available modes: Infrastructure, Simple AP,
and Disable Wi-Fi.
Displays information for the MAC address used in
Infrastructure Mode and Simple AP Mode.
Page 81

Checking/changing the printer network settings
To check/change the Infrastructure Mode settings
Screen that appears when you select [Network] - [Wireless] - [Infrastructure] in the tree
menu at left.
Item details that can be checked/changed are as listed below.
(1)
(2)
(3)
(4)
(5)
(6)
(7)
(8)
(9)
(10)
81
Page 82

Checking/changing the printer network settings
# Item
Wireless Connection
1
Status
2 Auto/Manual Yes
3 IP Address Yes* IP address set for the printer.
4 Subnet Mask Yes*
5 Default Gateway Yes*
Authentication
6
Method
7 Encryption Method Yes
8 SSID Yes
9 PSK (Pre-Shared Key) Yes
10 WEP Key Ye s
Congurable
No
Yes
Setting details
Displays the wireless LAN status as Online or Oine.
Press the [Conrm Connection] button to update to the
latest connection status. Also displays the applicable
standards for the wireless LAN that you are connected
to.
You can select between [Auto] and [Manual] as the
method to use to acquire the IP address. When [Auto]
is selected, the IP Address, Subnet Mask, and Default
Gateway are set automatically.
Subnet mask of the network that the printer is
connected to.
Default gateway of the network that the printer is
connected to.
Security authentication method for the wireless LAN
that the printer is set to.
You can select from any of the following four types:
Open/Shared/WPA-PSK/WPA2-PSK
Encryption method for the wireless LAN that the printer
is set to.
You can select from any of the following four types:
None/WEP/TKIP/AES
Displays the SSID of the network that the printer is
connected to. Press the [Select an SSID] to pull up a list
of SSIDs detected by the printer and then select the
network that you are connected to.
Displays the passphrase used in encrypted
communications Used when a TKIP or AES is used in
the Encryption Method.
Displays the WEP key used in encrypted
communications Used when a WEP is used in the
Encryption Method.
*You can set this option if [Manual] is selected as the method for acquiring the IP address.
82
Page 83

Checking/changing the printer network settings
To check/change Simple AP Mode settings
Screen that appears when you select [Network] - [Wireless] - [Simple AP] in the tree menu
at left.
Item details that can be checked/changed are as listed below.
(1)
(2)
(3)
(4)
(5)
(6)
(7)
(8)
# Item
1 Wireless Mode No
2 DHCP Settings No
3 IP Address No IP address set to the printer used in Simple AP Mode.
4 Subnet Mask No Subnet mask used in Simple AP Mode.
Authentication
5
Method
6 Encryption Method Yes
7 SSID Yes
Congurable
No
Setting details
Displays the applicable standards for the wireless LAN
that you are connected to.
Displays the DHCP server status and publication start IP
address for the printer.
Security authentication method for the wireless LAN
that the printer is set to.
WPA2-PSK is selected automatically.
Encryption method for the wireless LAN that the printer
is set to.
AES is selected automatically.
Displays the SSID used by the printer in Simple AP
Mode.
"DIRECT-" will always be added to the beginning of the
SSID.
83
Page 84

Checking/changing the printer network settings
# Item
8 PSK (Pre-Shared Key) Yes
Important
Congurable
Setting details
Displays the PSK (Pre-Shared Key) used by the printer in
Simple AP Mode.
If you make changes to the Encryption Method, SSID, or PSK (Pre-Shared Key), the
wireless devices connected in Simple AP Mode will be disconnected and will need to be
recongured. Make sure to proceed carefully when attempting to change the SSID and
PSK (Pre-Shared Key) for connected devices.
84
Page 85

Checking/changing the printer network settings
To check/conrm the wired LAN connection status
Screen that appears when you select [Network] - [Wired] - [Basic] in the tree menu at left.
Item details that can be checked/changed are as listed below.
(1)
(2)
(3)
(4)
(5)
(6)
# Item
Wired Connection
1
Status
2 Wired MAC Address No
3 Auto/Manual Yes
4 IP Address Yes* IP address set for the printer.
5 Subnet Mask Yes*
6 Default Gateway Yes*
Congurable
No
Setting details
Displays the connection status of the wired LAN. Press
the [Conrm Connection] button to update to the
latest connection information.
Displays the MAC address of the printer used when
connected to a wired LAN.
You can select between [Auto] and [Manual] as the
method to use to acquire the IP address. When [Auto]
is selected, the IP Address, Subnet Mask, and Default
Gateway are set automatically.
Subnet mask of the network that the printer is
connected to.
Default gateway of the network that the printer is
connected to.
*You can set this option if [Manual] is selected as the method for acquiring the IP address.
85
Page 86

Checking/changing the printer network settings
To check the software information/To check the printer time-
out settings
Screen that appears when you select [Printer] - [Basic] in the tree menu at left.
Item details that can be checked/changed are as listed below.
(1)
(2)
86
# Item
1 Firmware No Displays the rmware version of the printer.
2 Print Timeout Ye s
Congurable
Setting details
Displays whether the printer is set to wait to receive
print data until after a certain number of seconds
have passed when printing is done via a network.
Page 87

Checking/changing the printer network settings
To change the password used to change the settings
Screen that appears when you select [Printer] - [Password] in the tree menu at left.
Item details that can be checked/changed are as listed below.
(1)
(2)
# Item
Change the
1
administrator password
2 Administrator Password Yes
Important
Congurable
Yes
Setting details
Select this check box when you change the
administrator password.
Used to enter the new password that is to be set. The
new password needs to be entered twice to conrm
the changes.
If a password is set to the printer during this step,
the password will need to be authenticated if you
attempt to make changes to the network settings
from the included DVD-ROM or from the Network
Conguration Tool.
Note that if you leave the password line blank when you make changes, the password
will remain blank.
87
Page 88

Checking/changing the printer network settings
Sending the network settings to the printer
After making changes to the network settings, press the [Send] button at the bottom of
the screen to send the edited settings details to the printer and complete the conguration
procedures.
Important
If there is a password for making changes set, the password entry screen will appear
when you press the [Send] button. Enter the password that was set. To reset the
password, you will need to initialize the printer to reset it to default settings. Once you
have nished initializing the printer, recongure all settings including the network
settings.
ÎInitializing the Network Settings (p.89)
88
Page 89

Initializing the Network Settings
Complete the below procedures to initialize the network settings for the printer.
Important
When the initialization process is run for the network settings, all settings related to
Wireless LAN (Infrastructure Mode/Simple AP Mode) and Wired LAN are initialized and
reset back to their factory defaults. The password used to change the network settings
will also be reset.
1.
2.
Button
Check to make sure that the power to the printer is turned o.
Hold down the
the front of the printer while turning on the power to the printer.
button
on the back of the printer and the
button
Button
on
89
Page 90

Initializing the Network Settings
3.
Lamp
4.
The
lamp,
network settings will then begin.
Lamp
The printer power will be turned o automatically once initialization of the
network settings is completed.
lamp
, and
Lamp
lamp
will light up, and initialization of the
Memo
If initializing the network settings, make sure to recongure the network settings once
the initialization process is completed.
90
Page 91

Troubleshooting
This section lists troubleshooting procedures for resolving issues with the network settings
for the printer.
ÎTroubleshooting issues with network settings made using the included DVD-ROM
(p.92)
ÎTroubleshooting issues with network settings made using the Network Conguration
Tool (p.93)
ÎTroubleshooting issues with wireless LAN connections (Infrastructure Mode) (p.97)
ÎTroubleshooting issues with wireless LAN connections (Simple AP Mode) (p.100)
ÎTroubleshooting issues with wired LAN connections (p.104)
ÎMethods for resolving issues with not being able to connect at all (p.106)
Memo
If unable to resolve issues using the Troubleshooting section in this manual, use the
Internet to connect to the Seiko Epson Corporation homepage and check the "FAQ"
section for further details.
Îhttp://www.epson.com
91
Page 92

Troubleshooting
Troubleshooting issues with network settings
made using the included DVD-ROM
A "Unable to communicate with the printer. Connect the USB
cable to the printer and turn the power on." message appears
In order to install the USB printer driver, even when using the printer via a network,
you will need to connect the printer to a computer using a USB cable. Check the USB
connection status for the printer and computer.
A "Printer cannot be found. Check the connection to the
printer." message appears
Check to make sure that the printer is not exhibiting any of the statuses listed below.
• The message appears when you press the [Search again] button on the [Select printer]
screen. If the network settings for the printer were congured such that the printer and
the computer used to install the software were placed in dierent network segments
(that is, the printer is connected to a network outside of the range of the router as
viewed from the computer), the printer will not be found during searches using the
[Search again] button.
In such cases, use the [Restart the search using a specied IP] button to search again
using a specied IP address.
• The network settings for the printer may not be congured correctly.
Have your network administrator check the information needed for conguring the
network settings and then try to congure the settings again.
92
Page 93

Troubleshooting
Troubleshooting issues with network settings
made using the Network Conguration Tool
A "Exchanging data for acquiring the printer information did
not complete. Check the connection with the printer." message
appears
Check to make sure that the printer is not exhibiting any of the statuses listed below.
• Is the printer currently printing?
If the printer is currently printing, wait until it is nished and then try again.
• Is the printer power turned o?
Check to make sure that the power to the printer is turned on, and turn it on if it is not,
and then try again.
• Check the status of the network. Check to make sure that the printer is communicating
via the network. If unable to check the network status yourself, contact your network
administrator for assistance.
A "Unable to complete the settings because the password was
invalid." message appears.
If you set a password to the printer during setup, you will need to enter that same
password again when you attempt to change the network settings. Make sure to enter the
correct password set to the printer. If you have forgotten the password or do not know
what it is, contact your network administrator for assistance.
If necessary, reset the network settings to their initial default settings.
ÎInitializing the Network Settings (p.89)
Reset the network settings for the printer to the default settings and then recongure the
settings.
• Wireless LAN settings (Infrastructure Mode)
ÎSetting up a wireless LAN connection (Infrastructure Mode) (p.11)
• Direct connection without using an access point
ÎSetting up a wireless LAN connection (Simple AP Mode) (p.39)
• Wired LAN connection
ÎConguring settings for a wired LAN connection (p.55)
93
Page 94

Troubleshooting
A "Unable to set the data on the printer. Check the settings."
message appears.
Check to conrm that there are no errors, omissions, or other problems with the data input
to the Network Conguration Tool.
A "If the printer IP address or printer name (printer name,
Bonjour name, or Bonjour service name) is changed,
communication may become no longer possible." message
appears.
Clicking the [Conrm] button on the screen to accept changes to the IP address or name
of the printer in the Network Conguration Tool will cause printing to be disabled unless
the network printer driver settings are changed.
If unable to print, complete the below procedures in the order given to update the
settings on the network printer driver.
1.
2.
Open the “Devices and Printers” (“Printers” for Windows Vista) window.
Windows 10:
Click the start button and select [Settings]. Enter [Devices and Printers] in the
search box. When it appears in the serach result eld, click it.
Windows 8.1/8:
Press the [X] key while holding down the [Windows] key and then click [Control
Panel] from the list that pops up.
In [Control Panel], click on [Devices and Printers].
Windows 7:
Click on [Start] - [Devices and Printers] in the order given.
Windows Vista:
Click on [Start] - [Control Panel] - [Hardware and Sound] - [Printer] in the order
given.
Right-click on the icon for the printer for which the network settings were
changed and then click on [Printer properties].
94
Page 95

Troubleshooting
3.
4.
Click on [Ports], select the port that is checked o in [Ports], and then click
[Congure Port...].
Enter the newly set IP address on the displayed screen, check the checkbox for
“Yes” under [Tracking by printer name], and then press the [OK] button.
95
Page 96

Troubleshooting
Memo
If unable to congure the settings properly, try installing the network printer driver
from the included DVD-ROM.
ÎConnection settings for connecting to computer (p.11)
To switch the printer for which network settings are to be
checked/changed
Press the [Cancel] button to exit the Network Conguration Tool. Then, restart the Network
Conguration Tool, and select a printer.
96
Page 97

Troubleshooting
Troubleshooting issues with wireless LAN connections (Infrastructure Mode)
Is the power for the network device (access point/broadband
router) turned on?
Check to make sure that the power on the network device is turned on. If the power is
already turned on, check to ensure that the network is not currently being used and then
turn the power o and back on again.
Are the printer and network device (access point/broadband
router) close enough to be within range of each other?
Are there any obstacles that could be interfering with the
signals?
Try moving the computer and network device closer together and removing any obstacles
that may be causing interference.
Are you using the equipment near the printer that emits
electromagnetic waves (such as a microwave oven or digital
cordless telephone) or a wireless device?
If you attempt to use the printer around devices that emit electromagnetic waves
or wireless devices, signals emitted by such devices may interfere with printer
communications, causing problems. Move the computer and network device (access
point/broadband router) away from any such problematic equipment.
Turn the printer power o and then back on again to reset it.
You may not be able to connect the printer and network device (access point/broadband
router) temporarily depending on the order in which you turned power on to the devices.
After turning power back on to the printer, wait around 1 min. and then check the
connection status.
Is the printer set to Infrastructure Mode?
Check the lamp on the printer to make sure that it is illuminated. If it is turned o, press
the
button to switch the settings.
97
Page 98

Troubleshooting
Is the correct SSID set to the printer?
The printer will not be able to connect to the network device (access point/broadband
router) if the SSID of the printer is dierent from that used for the network device. If
connecting in Simple AP Mode, you will not be able to connect the printer to the network
if the name of the network in Simple AP Mode and the SSID set for the printer are dierent.
Check the SSIDs for the connection device and printer to see if they are the same or not.
Memo
Refer to the next page for procedures on how to check the SSID set for the printer.
ÎChecking/changing the printer network settings (p.72)
If not able to nd the SSID for the network device being used, check the manual for the
network device or ask the person who congured the network settings for assistance.
Are the devices using the same wireless network security
method as that set for the printer?
The devices will not be able to connect if the printer, computer, and network device (access
point/broadband router) are set up under dierent wireless network security methods.
Recongure the settings in such cases so that the printer, computer, and network device
all use the same wireless network security method. If unsure how to proceed, check the
manual for your network device or consult with the person who congured the network
settings for the devices.
Is the privacy separator function enabled on the network
device (access point/broadband router)?
The printer and computer will not be able to communicate with each other if the privacy
separator function (a function that prevents devices connected to the same access point
from connecting to each other) is enabled on the network device being used. Follow
the instructions in the manual for your network device to disable the privacy separator
function.
98
Page 99

Troubleshooting
Are there several dierent computers and network devices
connected to the same network?
When there are several computers and network devices connected to a network, the IP
addresses for the computers and network devices may not be able to be acquired from the
DHCP server, resulting in the device or devices not being able to connect to the network.
Turn o or disconnect any computer or network device not being used to increase the
number of IP addresses available.
Is the same IP address being used for more than one computer
or other device?
If the same exact IP address is used for more than one device connected to a network such
as a printer or computer, network communications may become unstable or drop out.
Check the IP address for each device and reset the IP addresses for any devices using the
same one.
Memo
Proceed to the below page if still not able to connect even after checking the above
items.
ÎMethods for resolving issues with not being able to connect at all (p.106)
99
Page 100

Troubleshooting
Troubleshooting issues with wireless LAN connections (Simple AP Mode)
If unable to connect to the Internet while attempting to connect a
printer in Simple AP Mode when using a USB-based mobile data
communications terminal to connect a Windows-based computer
to the Internet
When both a Simple AP Mode connection to connect a printer is used with a low-speed
mobile data communications device is used to connect to the Internet at the same time,
the printer connection is prioritized, which may cause the Internet connection to drop out.
Complete the below procedures to set up your system if unable to connect your computer
to the Internet.
1.
Pull up the Windows [Network Connections] screen.
Windows 10:
Click the start button and select [Settings] - [Network & Internet]. Click [Wi-Fi]
on the right side of the window, and click [Change adapter options].
Windows 8.1/8:
Press the [X] key while holding down the [Windows] key and then click [Control
Panel] from the list that pops up.
In [Control Panel], select [Network and Internet] - [Network and Sharing Center]
- [Change adapter settings] in the order given.
Windows 7:
Click on [Start] - [Control Panel] - [Network and Internet] - [Network and
Sharing Center] - [View network status and tasks] - [Change adapter settings]
in the order given.
Windows Vista:
Click on [Start] - [Network and Internet] - [Network and Sharing Center] [Manage network connections] in the order given.
100
 Loading...