

Page 1
All rights
system, or transmitted in any form or by any means, electronic, mechanical, photocopying,
recording, or otherwise,
No patent liability is
Neither is any liability assumed for damages resulting from the use of the information
contained herein.
Neither Seiko Epson Corporation nor its affiliates shall be liable to the purchaser of this
product or third parties for damages, losses, costs, or expenses incurred by purchaser or
third parties as a result of: accident,
modifications, repairs, or alterations to this product.
Seiko Epson Corporation and its affiliates shah not be liable against any damages or
problems arising from the use of any options or any consumable products other than those
designated as Original EPSON Products or EPSON Approved Products by Seiko Epson
Corporation.
EPSON and EPSON ESC/P are registered trademarks and EPSON ESC/P2 is a trademark
of Seiko Epson Corporation.
General Notice: Other product names used herein are for identification purposes only and may be
trademarks of their respective companies.
Copyright © 1995 by Seiko Epson Corporation, Nagano, Japan.
reserved. No part of this publication may be reproduced, stored in a retrieval
without the prior written
assumed with respect to the use of the information contained herein.
misuse, or abuse of this product or unauthorized
permission
of Seiko Epson Corporation.
User’s Guide
Page 2

Printer Update
Please update the information in your User’s Guide with the
information given below.
On page 1-15, replace the original text with the new
information below.
Setting Up Your Software
Refer to the following sections for printer driver installation
instructions.
For Microsoft Windows users
If Microsoft Windows is installed on your computer, follow
the steps below to install the correct driver for your printer.
If you are using Windows 3.1, follow these steps:
1.
Make sure Windows is
window is open.
2.
Insert the floppy disk containing the driver into your floppy
disk drive.
Click
File;
3.
Type
4.
5.
Select your printer’s name in the Printer Model window and
click
Click
6.
Copyright © 1996 by Seiko Epson Corporation,
Nagano, Japan
then click
A: SETUP
(or
Continue.
OK.
running and the Program Manager
Run.
B: SETUP); then click OK.
The printer driver installs automatically.
4005786
M01-00
Page 3

On page 1-15, add the information below.
Installing the driver for Windows 95 users
Follow these steps to install the printer driver using the
Windows 95 plug-and play capabilities:
Note:
To install the
capabilities, your computer’s parallel port must be an IEEE-2284
(ECP or EPP compatible) bidirectional parallel port. See
computer documentation for
1.
Make sure plain paper is loaded in the printer and the
printer is connected to the computer’s parallel port. (The
paper is used to perform a test print in step 11.)
2.
Turn off your printer and computer, if necessary.
3.
Turn on the printer first; then turn on the computer. Your
computer begins loading Windows 95.
4.
If you defined a password, enter it at the prompt. You see
the New Hardware Found screen.
driver
using the Windows 95 plug-and play
more
information.
your
Note:
If you do not see the New Hardware Found screen, please follow
the procedure under “Installing the driver while running
Windows 95,” the next section.
5. Make sure your printer model name is displayed on the
screen.
hardware manufacturer
other buttons.
Note:
The next time you turn
driver, Windows 95 may display the New Hardware Found
screen again. In this case, click the
radio button; then click
Then
click the
Driver from disk provided by
button. Do not select any of the
on
your computer after installing the
Do not install a driver
OK.
This screen does not appear again.
2
Page 4

6.
Click
OK. You see the
7.
Insert the Windows printer driver disk in a disk drive.
8.
If you inserted the disk in drive A, click
change the drive letter in the Copy manufacturer’s files
from box and click
9.
At the next screen you can type a unique name for the
printer in the Printer name box. We recommend that you
keep the model name as shown. The program will copy
the files to your hard disk and add an icon to the Printers
folder using the printer name you assign.
To use the printer as the default printer for Windows 95
applications, select
Install From Disk screen.
OK.
Yes. (No
is the default setting.)
OK.
Otherwise,
10. Click the
11.
In the next screen, select
12. Click the
13.
Choose
printed correctly. If it did not print correctly, choose
and follow the directions on the screen.
To access the driver, see “Checking the printer driver
settings,” page 5 of this supplement.
Next
button.
YES
to print a test page.
Finish
button.
Yes
in the test page confirmation dialog if the page
N
O
3
Page 5

Installing the driver while running Windows 95
If you are using Windows 95, follow the steps below.
1.
In the Desktop window, double-click the
icon.
2.
Double-click the
3.
Double-click the
4.
Click the
Next
Printers
folder.
Add Printer
button.
icon.
My Computer
Select the
5.
Then click the
Click the
6.
7.
Insert the floppy disk containing the driver into your
computer’s floppy disk drive.
Type
8.
Select your printer’s name in the dialog box, then click the
9.
Next
10.
Select the port you want to use with this printer.
11. Click the
12.
Select the
printer the default printer. Otherwise, select the
button.
13. Click the
14.
Click the
15. Click
16.
In the dialog box that appears, choose
printed satisfactorily. If it didn’t print satisfactorily,
choose NO and follow the directions that appear on your
screen.
Local printer
Next
Have Disk
A: WIN 95
button.
Next
button.
Yes
radio button if you want to make your
Next
button.
Yes
radio button to print a test page.
Finish.
or
Network printer
button.
button.
(or
B: WIN 95); then click OK.
Yes
radio button.
N
O
if the test page
radio
4
Page 6

On page 1-16, add the information below. If you are using
Windows 3.1, refer to the information in your User’s Guide.
Checking the printer driver settings
If you are using Windows 95, follow these steps to select the
appropriate settings.
1.
In the Desktop window, click the
2.
Select
Settings; then
3. Right-click on your printer icon.
click
Printers.
4. Choose Properties.
5.
Select the paper size you have loaded in the printer from the
Paper size list on the Paper menu. If you don’t see your
paper size, scroll through the list, and select the correct
size. The diagram on the screen changes according to the
paper size you select.
6.
Select Portrait or Landscape orientation. The diagram on the
screen changes according to the orientation you select.
7.
Select the paper source.
Start
button.
8.
Select the resolution on the Graphics menu.
9.
Make any other settings you wish, and click
are finished.
OK
when you
5
Page 7

On pages 1-18 through l-20, replace the original information
with the new information below.
DOS printer utilities
Your printer driver disk includes the EPSON Remote! and
EPSON Calibration utilities. You can use EPSON Remote! to
change the printer’s default settings from your computer
instead of the control panel. EPSON Calibration is used to
properly align your printout.
Installing EPSON printer utilities
To install the utilities, follow these steps:
1.
Insert the floppy disk containing the printer utilities into
your computer’s disk drive.
2.
From the DOS prompt, type
press
Enter.
In the screen that appears, select your printer’s name in the
3.
Printer Model window and press
as the default directory.
4.
Press
Enter.
directory on drive C.
All the necessary files are copied to the EPUTIL
A: SETUP
(or
Enter. C: EPUTIL
B: SETUP); then
appears
Using EPSON printer utilities
To use your EPSON utilities, follow these steps:
1.
From the DOS prompt, change the current directory to the C
drive.
2.
To use the EPSON Remote!
Enter,
CALIBRAT,
3. Follow the instructions on the screen to use either utility.
or to use the EPSON Calibration utility, type
and press
Enter.
utility,
type
PRNSET,
6
and press
Page 8
On pages 2-11, and 2-12, replace the original illustrations as
follows:
1.
Please replace the illustration on page 2-11 of your
Guide
with the illustration below.
2.
Please replace the illustration on the upper portion of page
2-12 of your
User’s Guide
with the illustration below.
User's
7
Page 9

On page 5-3, add the information below.
When replacing the ribbon cartridge or ribbon pack, you can
use the cartridge and pack listed below, in addition to the
products listed in your User's
Guide.
Ribbon cartridge
Ribbon pack
S015086
S010033
Printed in Japan 96.02-16
Page 10
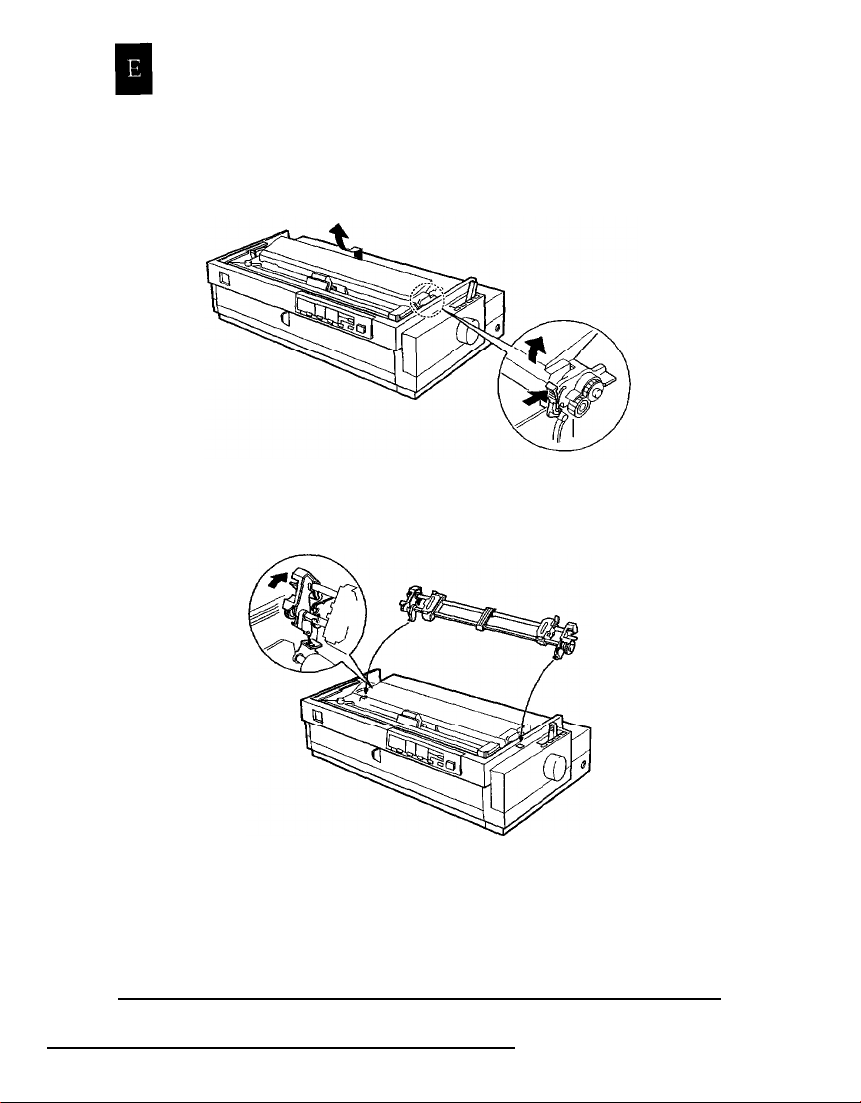
Printer Parts
Page 11

FCC Compliance Statement
For United States Users
This equipment has been tested and found to comply with the limits for a Class B digital
device, pursuant to Part 15 of the FCC Rules. These limits are designed to provide
reasonable protection against harmful interference in a residential installation. This
equipment generates, uses and can radiate radio frequency energy and, if not installed
and used in accordance with the instructions, may cause harmful interference to radio or
television reception. However, there is no guarantee that interference will not occur in a
particular installation. If this equipment
reception, which can be determined by turning the equipment off and on, the user is
encouraged to try to correct the interference by one or more of the following measures.
Reorient or relocate the receiving antenna
Increase the separation between the equipment and receiver
Connect the equipment into an outlet on a circuit different from that to which the
receiver is connected
Consult the dealer or an experienced radio/TV technician for help.
does cause interference to radio and
television
WARNING
The connection of a nonshielded equipment interface cable to this equipment will
invalidate the FCC Certification of this device and may cause interference levels which
exceed the limits established by the FCC for this equipment. It is the responsibility of the
user to obtain and use a shielded equipment interface cable with this device. If this
equipment has more than one interface connector, do not leave cables connected to
unused interfaces.
Changes or modifications not expressly approved by the manufacturer could void the
user’s authority to operate the equipment.
For Canadian Users
This digital apparatus does not exceed the Class B limits for radio noise emissions from
digital apparatus as sat out in the radio interference regulations of the Canadian
Department of communications.
Le présent appareil numérique n'émet pas de bruits radioélectriques dépassant les limites
applicables aux appareils numériques de Classe B prescrites dans le règlement sur le
brouillage radioélectrique édicté par le Ministère des Communications du Canada.
ii
Page 12

Declaration of Conformity
According to ISO/IEC Guide 22 and EN 45014
Manufacturer:
Address:
Representative:
Address:
Declares that the Product:
Product Name:
Type Name:
Model:
Conforms to the following Directive(s) and Norm(s):
Directive 89/336/EEC:
Directive 73/23/EEC:
Directive 90/384/EEC:
SEIKO EPSON CORPORATION
3-5, Owa 3-chome, Suwa-shi,
Nagano-ken 392 Japan
EPSON EUROPE B.V.
Prof. J. H. Bavincklaan 5 1183 AT Amstelveen
The Netherlands
Dot Matrix printer
FX-2170
P920A
EN 55022 Class B
EN 50082-1
IEC 801-2
IEC 801-3
IEC 801-4
EN 60950
EN 45501
August 1995
M. Hamamoto
President of EPSON EUROPE B.V.
iii
Page 13

Where to Get Help for
United States Users
EPSON provides customer support and service through a nationwide
network of Authorized EPSON Customer Care Centers.
EPSON also provides the following support services in the U.S. and
Canada through the EPSON Connection
Technical assistance with the installation, configuration, and
operation of EPSON products
Assistance in locating your nearest Authorized EPSON Reseller or
Customer Care Center
Customer Relations
EPSON technical information library fax service
Product literature on current and new products
You can purchase ribbons, supplies, parts, documentation, and
accessories for your EPSON products from EPSON Accessories at
(800) 873-7766 (U.S. sales only). In Canada, call (800) BUY-EPSON for
sales locations.
SM
at (800) 922-8911:
iv
Page 14

CompuServe® online support
If you have a modem, the fastest way to access helpful tips, specifications,
drivers, application notes, and bulletins is through the Epson America
Forum on CompuServe.
If you are not
free introductory membership as an owner of an EPSON product. This
membership entitles you to:
An introductory $15 credit on CompuServe
Your own user ID and password
A complimentary subscription to CompuServe
CompuServe’s monthly publication.
To take advantage of this offer, call (800) 848-8199 in the United States
and Canada and ask for representative #529. In other countries, call
(614) 529-1611 or your local CompuServe access number.
If you are already a CompuServe member, simply type GO EPSON at the
menu prompt to reach the Epson America Forum.
currently a member of CompuServe, you are eligible for a
Magazine,
For United Kingdom Users
Use of options
Epson (UK) Limited shall not be liable against any damages or problems
arising from the use of any options or consumable products other than
those designated as Original Epson products or Epson Approved
Products by Epson (UK) Limited.
V
Page 15

Safety information
warning:
This appliance must be earthed. Refer to rating plate for voltage and check that
the appliance voltage corresponds to the supply voltage.
Important:
The wires in the mains lead fitted to this appliance are coloured in accordance
with the following code:
Green and yellow - Earth
Blue -Neutral
Brown - Live
As the colours of the wires in the mains lead of this appliance may not
correspond with the coloured markings identifying the terminals in your
plug, proceed as follows:
The green and yellow wire must be connected to the terminal in the
plug which is marked with the letter E or with the earth symbol (G)
or coloured green or green and yellow.
The blue wire must be connected to the terminal in the plug marked
with the letter N or coloured black.
The brown wire must be connected to the terminal in the plug
marked with the letter L or coloured red.
If damage occurs to the plug, replace the cord set or consult a qualified
electrician.
Replace fuses only with a fuse of the correct size and rating.
vi
Page 16

Important Safety Instructions
Before using your printer, read the following safety instructions to make
sure you use the printer safely and effectively.
Turn off and unplug the printer before cleaning. Clean with a damp
cloth only. Do not spill liquid on the printer.
Do not place the printer on an unstable surface or near a radiator or
heat register.
Do not block or cover the openings in the printer’s cabinet. Do not
insert objects through the slots.
Use only the type of power source indicated on the printer’s label.
Connect all equipment to properly grounded power outlets.
using outlets on the same circuit as photocopiers or air control
systems that regularly switch on and off.
Do not let the power cord become damaged or frayed.
If you use an extension cord with the printer, make sure the total
ampere rating of the devices plugged into the extension cord does
not exceed the cords ampere rating. Also, make sure the total of all
devices plugged into the wall outlet does not exceed 15 amperes.
Except as specifically explained in this guide, do not attempt to
service the printer yourself.
Unplug the printer and refer servicing to qualified service personnel
under the following conditions:
If the power cord or plug is damaged; if liquid has entered the printer; if
the printer has been dropped or the cabinet damaged; if the printer
does not operate normally or exhibits a distinct change in
performance. Adjust only those controls that are covered by the
operating instructions.
Avoid
vii
Page 17

Contents
Introduction
Options
How to Use This Manual
Warnings, Cautions, and Notes
Chapter 1
Choosing a Place for the Printer
Unpacking the Printer
Installing the Ribbon Cartridge
Plugging in the Printer
Running the Self Test
Connecting the Printer to Your Computer
Setting Up Your Software
..................................
........................
....................
Setting Up the printer
....................
.........................
....................
.........................
..........................
..............
.......................
Microsoft Windows and all Windows programs
Checking the printer driver settings.
Using non-Windows software
Printer utilities
...........................
..............
..................
.......
2
3
4
1-2
1-4
1-5
1-10
1-10
1-14
1-15
1-15
1-16
1-17
1-18
ix
Page 18

Chapter 2 Paper
Handling
Selecting the Paper Feeding Method
Setting the paper release lever
Using Single Sheets
...........................
Loading single sheets from the top
Loading single sheets from the front
Using Continuous Paper
........................
Selecting the tractor position and paper path
Changing tractor positions
Loading the front push tractor
Loading the rear push tractor
Loading the pull tractor
Loading the push/pull tractor.
Removing paper from the tractor
.................
..................
...............
..............
.........
....................
..................
..................
.....................
.................
................
Switching Between Continuous Paper and Single Sheets
Switching to single sheets
Switching to continuous paper
Printing on Special Paper
Adjusting the paper thickness lever
Multipart forms
Labels
................................
Envelopes
Postcards
Roll paper
..........................
.............................
..............................
.............................
....................
.................
.......................
..............
.....
2-2
2-2
2-3
2-3
2-6
2-8
2-8
2-9
2-12
2-15
2-19
2-22
2-23
2-24
2-24
2-25
2-25
2-26
2-27
2-28
2-29
2-29
2-29
X
Page 19

Chapter 3
Using the printer
Control Panel
Lights
Buttons
Other control panel features
Changing the Default Settings
Selecting an instruction sheet language
Selecting items and changing settings.
Default setting item functions
Micro Adjust
Tear-Off
Using auto tear-off mode
Using the Tear Off/Bin button
Bid Adjustment
Barcode Printing
Chapter 4
Cut-Sheet Feeders
Installing the high capacity cut-sheet feeder
Loading paper with the high capacity cut-sheet feeder
Assembling the double bin cut-sheet feeder
Switching between continuous paper and the cut-sheet
feeder
Selecting single-sheets, postcards, or envelopes
Pull Tractor
Loading paper with the push tractor and the optional pull
tractor..
Roll Paper Holder
Interface Cards
Installing an interface card
The C82305] or C82306] serial interface card
...............................
................................
...............................
...................
.....................
.............
.............
..................
...............................
..................................
.....................
..................
.............................
.............................
Using Printer
............................
...............................
................................
.............................
............................
..............................
Options
..........
....
..........
........
....................
........
3-2
3-2
3-4
3-6
3-7
3-7
3-8
3-9
3-13
3-15
3-16
3-17
3-17
3-18
4-2
4-2
4-4
4-6
4-6
4-7
4-8
4-8
4-9
4-12
4-12
4-14
xi
Page 20

Chapter 5
Maintenance and Transportation
Cleaning the Printer
Replacing the Ribbon
Transporting the Printer
Chapter 6
Power Supply
Power is not being supplied
Printing..
The printer does not print
The print is faint or uneven
Dots are missing in printed characters or graphics
Printed characters are not what you expect
The print position is not what you expect
Paper Handling
Single sheets do not feed properly
Continuous paper does not feed properly
Options
The paper does not feed properly with the cut-sheet
Continuous paper does not feed properly when
Troubleshooting
................................
..................................
feeder
using the pull tractor with the push tractor
...............................
..........................
..........................
........................
..............................
...................
....................
...................
..........
...........
.............................
...............
...........
.........
......
5-2
5-3
5-4
6-2
6-2
6-3
6-3
6-4
6-5
6-5
6-6
6-7
6-7
6-8
6-10
6-10
6-12
xii
Page 21

Appendix
Specifications, Command Summary, and
Character Tables
Printer Specifications
Printing
Paper
Paper alignment
Printable area.
Mechanical
Electrical
Environmental
Safety approvals
CE marking
Interface specifications
Using Commands
Sending printer
Using the command
Commands Arranged by Topic
General operation
Paperfeeding
Page format.
Print position motion
Font selection
Font enhancement
Character handling
Spacing
Bit image
Barcode
Character Tables
International Character Sets
Graphics Character Tables
...............................
................................
...............................
...............................
..........................
..........................
...........................
.............................
..............................
...........................
..........................
.............................
......................
............................
commands.
summary
.........................
......
............................
.......................
............................
.........................
........................
..............................
.............................
...................
..................
....................
....................
...................
....................
A-2
A-2
A-4
A-7
A-8
A-9
A-10
A-11
A-11
A-12
A-12
A-17
A-17
A-17
A-18
A-18
A-18
A-19
A-19
A-20
A-21
A-22
A-24
A-24
A-25
A-28
A-28
A-28
Index
xiii
Page 22

Chapter 1
Setting Up the Printer
Choosing a Place for the Printer
Unpacking the Printer
Installing the Ribbon Cartridge
Plugging in the Printer
Running the Self Test
Connecting the Printer to Your Computer
Setting Up Your Software
Microsoft Windows and all Windows programs
Checking the printer driver settings
Using non-Windows software
Printer utilities
.........................
.........................
..........................
............................
....................
....................
..............
.......................
................
....................
.........
1-2
1-4
1-5
1-10
1-10
1-14
1-15
1-15
1-16
1-17
1-18
Setting Up the Printer
1-1
Page 23

Choosing a Place for the Printer
When selecting a place to set up your printer, be sure to follow
these guidelines:
Place the printer on a flat, stable surface, close enough to
the computer for the interface cable to reach it.
Leave adequate room around the printer for easy operation
and maintenance.
Avoid locations that are subject to direct sunlight, excessive
heat, moisture, or dust.
Use a properly grounded electrical outlet; do not use an
adapter plug.
Place the printer where you can easily unplug the power
cord.
Avoid electrical outlets controlled by wall switches or
automatic timers. Accidental disruption of power can erase
information in the memory of your printer or computer.
Avoid outlets on the same circuit as large motors or other
appliances that can cause voltage fluctuations.
1-2
Keep the entire computer system away from potential
sources of electromagnetic interference, such as
loudspeakers or the base units of cordless telephones.
Setting Up the Printer
Page 24

If you plan to use a printer stand, follow these guidelines:
Use a stand that supports at least 26 kg (57.8 lbs).
Never use a stand that tilts the printer at an angle of more
than 15 degrees from horizontal. If you install a cut-sheet
feeder, the stand must keep your printer level.
If you plan to load continuous paper through the bottom of
the printer, choose a stand that provides an unobstructed
paper path.
Position your printer’s power cord and interface cable so
they do not interfere with paper feeding. If possible, secure
the cables to a leg of the printer stand.
Align the paper stack so that the paper feeds straight into
the tractor’s sprocket units.
Setting Up the Printer
1-3
Page 25

Unpacking the Printer
Your printer box should include an EPSON printer driver disk
and the following items:
Note:
In some locations the power cord may be permanently attached to the
printer.
Keep the packing materials in case you need to transport your
printer.
Caution:
There are several versions of the printer designed for different
voltages, and it is not possible to adjust the printer for use at
another voltage. If the label on the back of the printer does not
show the correct voltage for your country, contact your dealer.
1-4
Setting up the Printer
Page 26
Installing the Ribbon Cartridge
Before installing the ribbon cartridge, make sure that the power
cord is not plugged into an electrical outlet.
Lift the printer cover up and off.
1.
Slide the print head to the ribbon installation position (the
2.
indented portion of the paper tension unit.)
Setting Up the Printer
1-5
Page 27
3.
Remove the plastic separator from the middle of the ribbon
cartridge and discard the separator.
4.
Hold the cartridge with the ribbon-tightening knob facing you.
Place the bottom edge of the cartridge into the printer so that
the notch on each end of the cartridge fits over the small peg
on each side of the printer.
1-6
5.
Lay the cartridge flat and press gently until it clicks into place on
both ends.
Setting Up the Printer
Page 28
6. Lift the ribbon guide and insert it firmly over the metal pins
behind the print head. Press down on the guide until it clicks
into place. Make
that it is in place behind the print head. Turn the ribbontightening knob to remove any slack in the ribbon.
7.
Slide the print head from side to side to make sure it moves
smoothly.
sure the
ribbon is not twisted or creased and
Setting Up the Printer
1-7
Page 29
8.
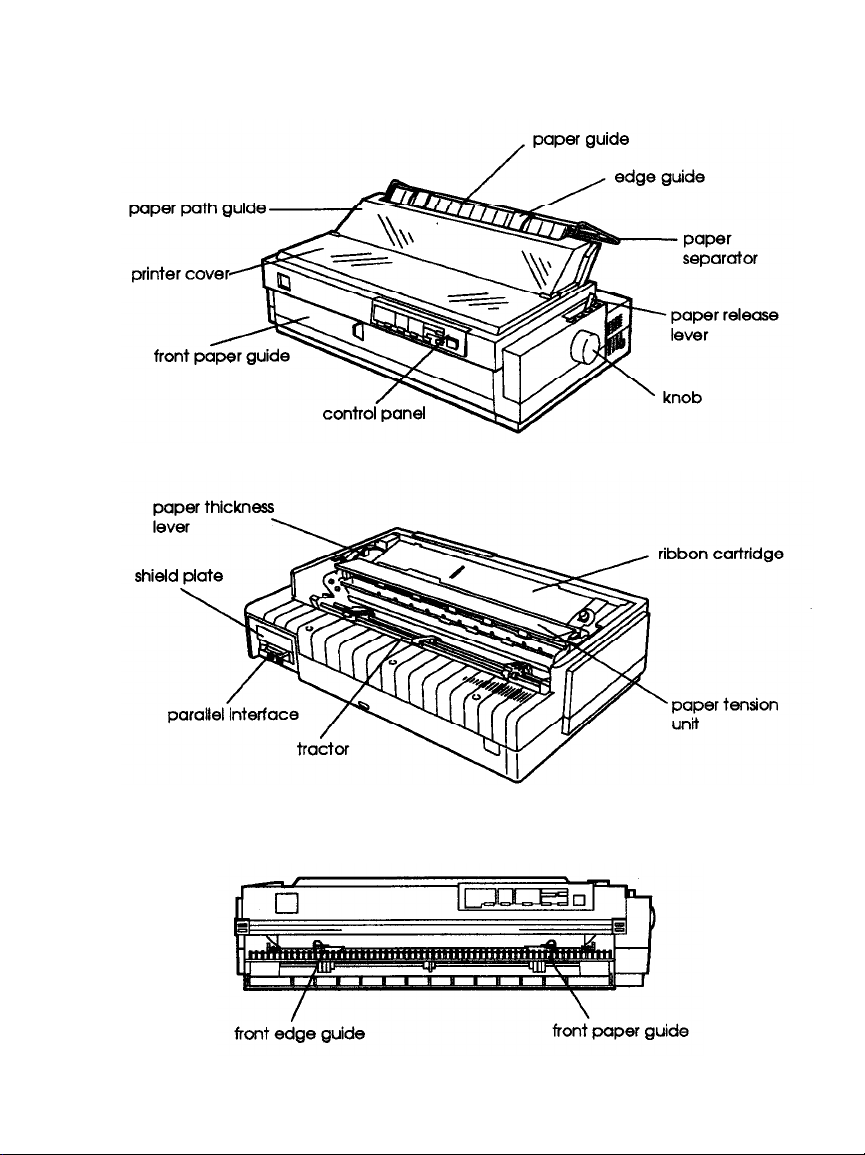
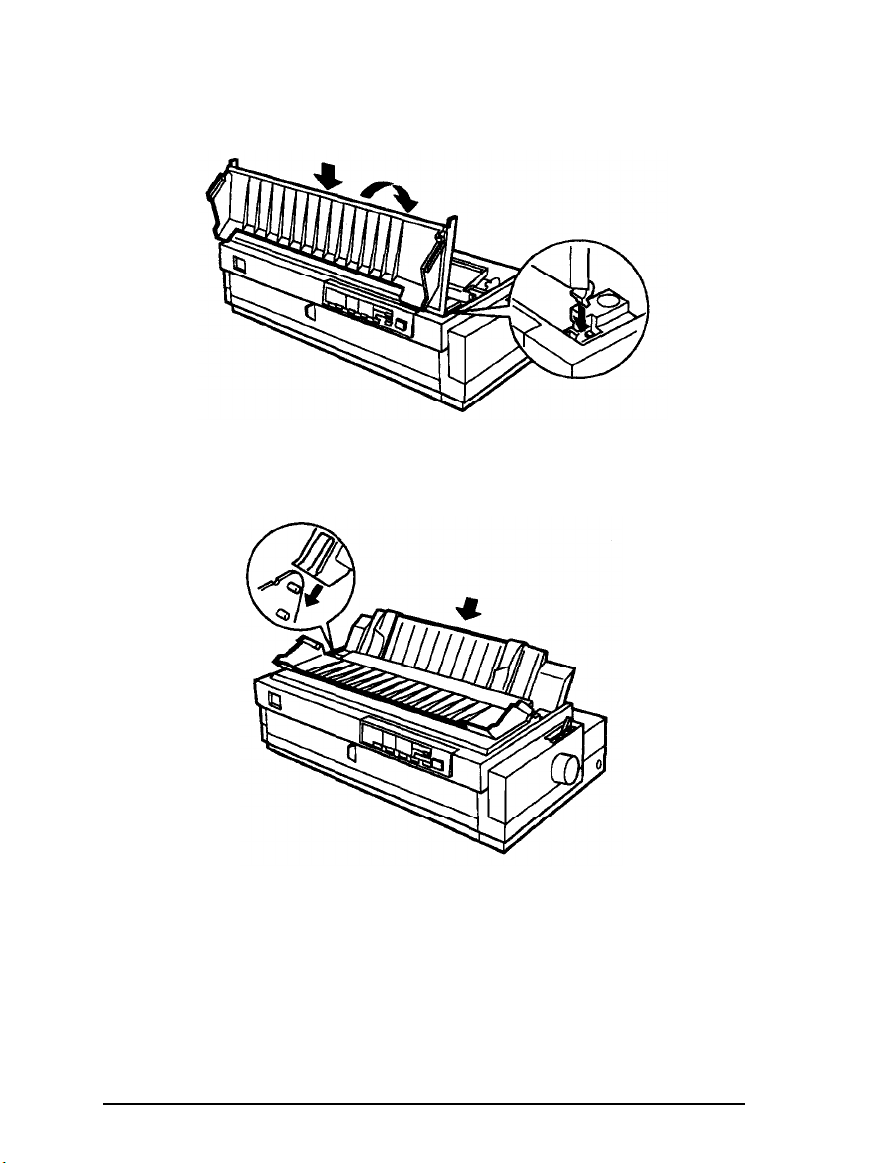
Replace the printer cover by first inserting the front tabs into the
slots near the front of the printer; then lower it into place.
9. Attach the paper guide by sliding the slots on the bottom of the
paper guide over the pegs behind the paper tension unit.
1-8
Setting
Up the Printer
Page 30

Insert the paper separator into the paper guide.
10.
Lift the paper path guide and rest it against the paper guide.
11.
Note:
Always close the printer cover before printing. The printer stops printing
when the cover is open.
Setting Up the Printer
1-9
Page 31

Plugging in the Printer
1.
Make sure the printer is turned off.
2. Check the label on the back of the printer to make sure the
voltage matches that of your electrical outlet.
Caution:
If the rated voltage and your outlet voltage do not match,
contact your dealer assistance. Do not plug in the power
cord.
3.
If the power cord is not attached to the printer, connect the
appropriate end to the AC inlet on the printer’s rear panel.
4.
Plug the power cord into a properly grounded electrical outlet.
Running the Self Test
You can run a self test on the printer in near letter quality or draft
mode, with either continuous paper or single sheets. You can load
the paper from the rear, front, top, or bottom. The following steps
describe how to run the test on single-sheet paper, loaded from
the top. See Chapter 2 for more information on paper handling.
1-10
Setting Up the Printer
Page 32

The printer prints the self test in the currently selected font.
1.
Make sure the printer is turned off and the paper path guide is
open.
2.
Move the paper release lever to the single-sheet position.
3.
For the near letter quality test, hold down the
button while you turn on the printer. For draft printing, hold
down the
LF/FF
button while you turn on the printer.
Load/Eject
Setting Up the Printer
1-11
Page 33

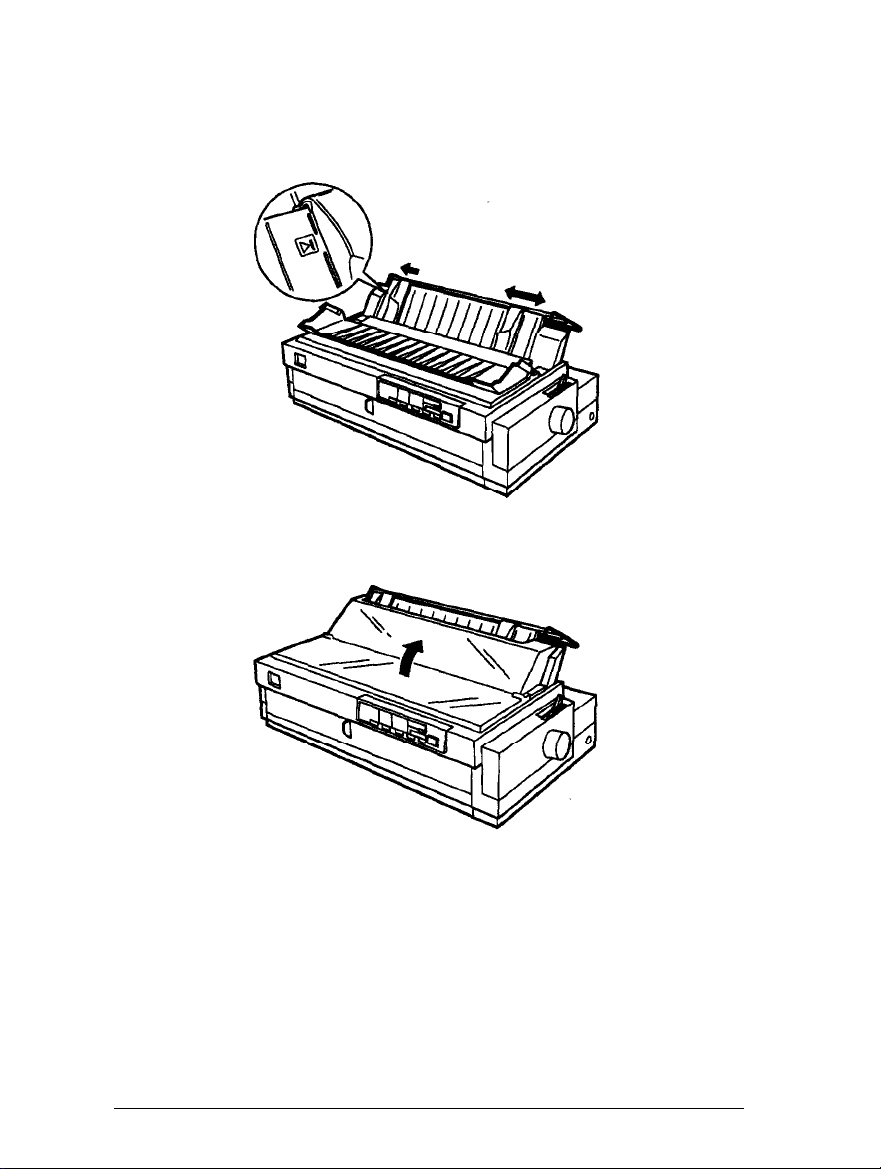
4. Move the left edge guide until it locks in place next to the arrow
guide mark. Then adjust the right edge guide to match the
width of your paper.
Caution:
Run the self test using paper at least 360 mm (14 inches) wide;
otherwise, the print head prints directly on the platen.
5. Lift the paper path guide and rest it against the paper guide.
1-12
Setting Up the Printer
Page 34

6.
Insert a sheet of paper between the edge guides until it meets
resistance. Make sure you adjust the edge guides to match the
width of your paper. After a few seconds, the printer feeds the
paper to the loading position and begins printing the self test.
Note:
Always close the printer cover before printing. The printer stops priding
when the cover is open.
7.
To stop the self test temporarily, press the Pause button.
8.
To end the self test, press the Pause button, then turn off the
printer. Here is part of a typical self test:
Setting Up the Printer
1-13
Page 35

Connecting the Printer to Your Computer
If the self test printed correctly, you are ready to connect your
printer to the computer. Use a 36-pin cable to connect your
computer to your printer’s built-in parallel interface. Follow these
steps:
1.
Make sure both the printer and computer are turned off; then
plug the cable connector securely into the printer’s parallel
interface connector. Squeeze the wire clips together until they
lock in place on either side of the connector.
Note:
If your cable has a ground wire, connect it to the ground connector
beneath the interface connector.
2. Plug the other end of the cable into the computer. (If there is a
ground wire at the computer end of the cable, attach it to the
ground connector at the back of the computer.)
1-14
Setting Up the Printer
Page 36

Setting Up Your Software
Most software lets you specify the type of printer you use so that
you can take full advantage of the printer’s features. Your
software probably provides an installation or setup section that
presents a list of printers.
Microsoft Windows and all Windows programs
If Microsoft® Windows™ is installed on your computer system,
follow the steps below to install the correct driver for your printer.
Your printer will work correctly for all your Windows programs,
such as Word for Windows, Lotus® 1-2-3® for Windows, and
CorelDRAW!®.
If Windows is not already installed on your system, run the
Windows setup program as described in the documentation that
comes with the program. Then follow the steps below to install the
correct printer driver.
Make sure Windows is running and that the Main window is
1.
open.
2.
Insert the EPSON driver disk into your computer’s diskette drive
slot.
From the File menu
3.
4.
Type
A:\DRIVER\SETUP,
drive A is the diskette drive.)
5.
Select FX-2170 as the Printer Model and click
printer driver installs automatically.
6.
Click
OK.
choose Run.
and choose
OK.
(This assumes that
Continue.
Setting Up the Printer
The
1-15
Page 37

Checking the printer driver settings
before you start printing, you should make sure that the driver
settings match your document requirements. While many
Windows applications override the printer settings made with the
driver, some do not. because of this, you must choose the correct
settings to get the results you expect.
Be sure to check the following:
Resolution
Paper size
Orientation
Paper source
Follow these steps to select the appropriate settings:
In the Main window, double-click the
1.
2.
Double-click the
highlighted.
3.
Click the Setup button in the Print Setup menu.
4.
Select the paper size you have loaded in the printer from the
Paper Size list. If you don’t see your paper size in the list, use
the arrows on the right to scroll through the list. The diagram
on the screen changes according to the paper size you select.
The printing resolution in
inch (dpi).
The size of the paper loaded in the
printer.
The direction of printing on the page
(portrait or landscape).
Tractor, manual feed, or sheet feeder.
control Panel
Printers
icon. Make sure your printer is
dots
icon.
per
1-16
Select Portrait or Landscape orientation. The diagram on the
5.
screen changes according to the orientation you select.
6.
Select the resolution you desire.
7.
Select the paper source.
Setting Up the Printer
Page 38

8. Click
Options
You can control intensity by clicking the arrow to darker or
lighter; you can control dithering by choosing None, Coarse,
or Fine.
to open the option menu.
Using non- Windows software
Most DOS software programs include drivers for ESC/P printers.
Also, DOS programs require you to select from a list of printers to
install the printer driver. If your printer is not included in the list,
contact your software manufacturer to see if there is an update.
If your printer driver is not available, select the first printer driver
available in the list below.
FX-870/1170
FX-850/1050
FX-800/1000
EX-800/1000
FX-85/105
FX-80+/100+
FX-80/100
See the program’s documentation for instructions on selecting the
driver.
Setting Up the Printer
1-17
Page 39

Printer utilities
The following DOS utilities are included with the printer:
Epson Remote! utility allows you to change the printer’s
default settings from your computer.
Epson Calibration utility lets you adjust the printing
alignment from your computer. Use this utility when the
lines in your printout do not appear to be aligned properly.
Installing Epson Remote!
Follow these steps to install Epson Remote! on your hard disk
drive:
1.
Insert the diskette containing the EPSON Remote! utility into
your computer’s diskette drive.
In DOS, access the drive where you have loaded the diskette.
2.
Change the directory to
3.
diskette is in drive A).
4.
Type
INSTALL
For example, type
(space)
UTILITY (that
[drive name]
INSTALL C: EPREMOTE,
is,
type A:\UTILITY
(space)
[directory name]
and press
if the
Enter.
Note:
Do not type a backslash (\) between the parameters. Use the space bar.
The installation is completed automatically.
1-18
Setting Up the Printer
Page 40

Using Epson Remote!
To make changes to the default settings with Epson Remote!,
follow these steps:
1.
Change to the directory you specified, for example:
C:\EPREMOTE\.
Type
2.
3.
4.
5.
6.
PANEL (C:\EPREMOTE\PANEL),
You’ll see the printer settings that can be changed while the
printer is on, for example, the bin selection and print directian.
Change the desired settings.
Press
F1 to
save the
printer.)
Press
F2 to
leave the menu.
Type
PRNSET (C:\EPREMOTE\PRNSET),
You’ll see the printer’s default settings, which are described in
“Changing the Default Settings” in Chapter 3.
settings. (The settings
and press
are then sent to the
and press
Enter.
Enter.
Change the desired settings.
7.
Press
F1
8.
to save your settings and
F2
to leave the menu.
Setting Up the Printer
1-19
Page 41

Using Epson Calibration
To run the CALIBRAT.EXE utility program, follow these steps:
1.
Insert the diskette containing the calibration utility into your
computer’s diskette drive.
2. In DOS, access the drive where you have loaded the diskette.
3. Change the current directory to UTILITY (that is, type
A:\UTILITY if
4
Type
CALIBRAT,
5.
Follow the instructions on the screen to calibrate your printer.
the diskette is in drive A).
and press
Enter.
Note:
You can
also copy the program from the diskette to your hard disk Then
change the current directory (or set the path to the directory), type
CALIBRAT,
and
press Enter.
1-20
Setting Up the Printer
Page 42

Chapter 2
Paper Handling
Selecting the Paper Feeding Method
Setting the paper release lever
Using Single Sheets
Loading single sheets from the top
Loading single sheets from the front
Using Continuous Paper
Selecting the tractor position and paper path
Changing tractor positions
Loading the front push tractor
Loading the rear push tractor
Loading the pull tractor
Loading the push/pull tractor
Removing paper from the tractor
Switching Between Continuous Paper and Single Sheets
Switching to single sheets
Switching to continuous paper
Printing on Special Paper
Adjusting the paper thickness lever
Multipart forms
Labels
Envelopes
Postcards
Roll paper
..................................
................................
...........................
........................
.......................
......................
........................
............................
...............................
...............................
.................
...................
.................
.................
...........
.....................
...................
....................
...................
..................
......
...................
................
2-2
2-2
2-3
2-3
2-6
2-8
2-8
2-9
2-12
2-15
2-19
2-22
2-23
2-24
2-24
2-25
2-25
2-26
2-27
2-28
2-29
2-29
2-29
Paper Handling 2-1
Page 43

Selecting the Paper Feeding Method
The printer can accommodate almost any type of paper with front,
rear, and bottom paper slots plus a tractor that can be mounted in
two different positions—front and top.
This chapter explains the various methods of paper handling and
includes recommendations on the feeding methods best suited to
your specific needs.
Setting the paper release lever
First you need to set the paper release lever for the type of paper
and feeding method you want to use. The paper release lever has
four positions, with icons indicating the type of paper and paper
path for each position.
2-2 Paper Handling
Page 44

Single-sheet position-for all single sheets (including
envelopes and postcards), whether loaded from
front, top, the optional cut-sheet feeders, or the roll
paper holder.
Front push and front push/pull tractor position-for
continuous paper when the tractor unit is installed
in the front.
Rear push and rear push/pull tractor position-for
continuous paper when the tractor unit is installed
in the rear.
Pull tractor position-for continuous paper when
the tractor unit is installed on the top. In this case,
you can load paper from the front, rear, or bottom.
Using Single Sheets
You can print on single sheets of paper from 101 to 420 mm (4.0 to
16.5 inches) wide. You can load single sheets from either the top or
front
of the printer.
Loading single sheets from the top
1.
Move the paper release lever to the single-sheet position. Make sure
the paper guide is installed and the paper path guide is open.
Paper Handling 2-3
Page 45
Turn on the printer. Slide the left edge guide until it stops next to
2.
the arrow on the paper guide. Then adjust the right edge
guide to match the width of your paper.
Lift the paper path guide and rest it against the paper guide.
3.
2-4 Paper Handling
Page 46

4.
Insert the paper firmly between the edge guides until it meets
resistance. After a few seconds, the printer advances the paper
to the loading position. You are now ready to print.
Note:
Always close the printer cover before printing. The printer stops printing
when the cover is open.
Caution:
Do not use the knob on the right side
of
the printer except to clear
paper jams when the printer is off. Otherwise, you may damage
the printer or cause it to lose the
top-of-form position.
If the platen turns but the printer doesn’t load the paper,
completely remove the paper and re-insert it more firmly.
To eject the paper, press the
Load/Eject
button.
Paper Handling
2-5
Page 47

Loading single sheets from the front
1.
Move the paper release lever to the single-sheet position and
open the front cover. Make sure the paper path guide rests
against the paper guide.
2.
Turn on the printer.
3. Position the left edge guide as shown below. (Printing starts at
the arrow mark.) See the Appendix for more information on
the left margin position.
2-6 Paper Handling
Page 48

4.
While aligning the paper’s left and right edges with the edge
guides, insert the paper firmly until it meets resistance. After a
few seconds, the printer loads the paper to the loading
position. You are now ready to print.
Note:
Always close the printer cover before printing. The printer stops printing
when the cover is open.
Caution:
Do not use the knob on the right side of the printer except to clear
paper jams when the printer is off. Otherwise, you may damage
the printer or cause it to lose the top-of-form position.
If the platen turns but the printer doesn’t load the paper,
completely remove the paper and re-insert it more firmly.
To eject the paper, press the
Load/Eject
button.
Paper Handling 2-7
Page 49

Using Continuous
Paper
The printer’s paper-handling system allows you to load
continuous paper through the front, rear, or bottom.
You can print on continuous paper from 101 to 406 mm (4 to 16
inches) wide.
To print on continuous paper, you need to install the tractor unit
in the front or pull position. Be sure you set the paper release lever
correctly.
Note:
The rear push tractor cannot be removed.
Selecting the tractor position and paper path
The table below lists the different ways to feed continuous paper.
Always set the paper release lever to the position indicated for the
paper feed method you are using.
Tractor
position
Front push
tractor and
front push/pull
Rear push
tractor and
rear push/pull
Pull tractor
Paper release
lever position
2-8 Paper Handling
Paper paths
Page 50

Make sure you align your paper supply with the paper loaded in
the tractor so the paper feeds smoothly into the printer.
If you feed paper through the bottom paper slot, use a printer
stand that has a large enough opening for paper to feed from the
bottom without obstruction.
Changing tractor positions
You can use the removable tractor unit as either a front push
tractor or a pull tractor; you just change the tractor position
according to your paper feeding method.
Note:
The rear push tractor cannot be removed.
Using the front push tractor position
Before installing the tractor in the front position, you need to
remove it from its current position (top) by pressing the tractor’s
lock tabs while you lift it off the printer.
1.
Make sure the printer is turned off.
Paper Handling 2-9
Page 51

2.
Open the front paper guide and remove it by grasping the fins
on both sides and pulling it straight out of the printer.
Note:
When loading multipart forms that are bound on only one side by
line gluing, always use the rear push tractor. This type
of form
cannot be fed from the front push tractor.
3.
Push the tractor into the printer’s mounting slot as shown below.
You are now ready to load continuous paper with the front
push tractor.
To remove the tractor unit, press its lock tabs, tilt it forward, and
lift it out of the printer.
2-10 Paper Handling
Page 52

Using the pull tractor position
Before installing the tractor in the top position, you need to
remove it from its current position (front) by pressing the tractor’s
lock tabs while you lift it off the printer.
1.
Make sure the printer is turned off.
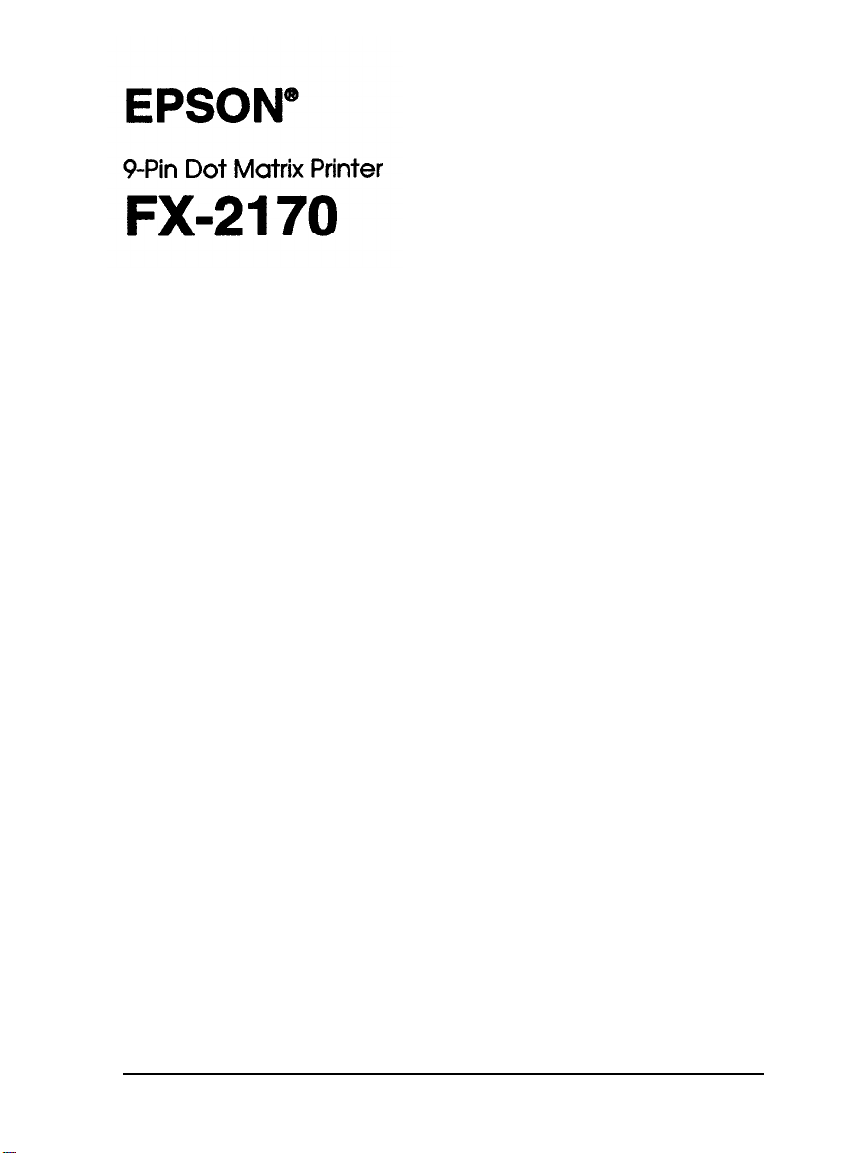
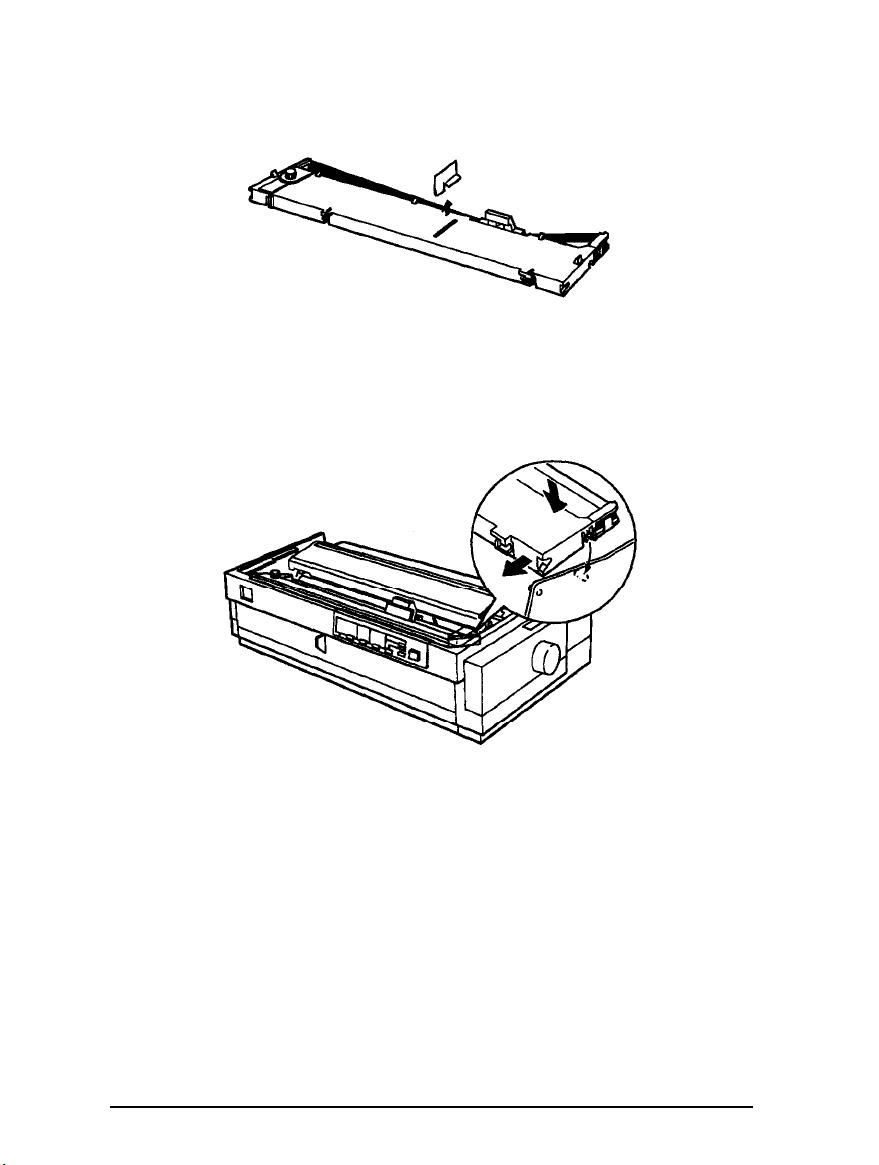
2. Lift the printer cover and paper guide up and off the printer.
3.
Grasp both ends of the clear plastic paper-tension unit, raise the
front of the unit, and lift it off the printer.
Note:
Check the paper thickness lever position to ensure that it wasn’t moved
during pull tractor installation. See ‘Adjusting the paper thickness
lever” later in this chapter for the correct lever position.
Warning:
Never move the print
head while the printer is turned on; this can
damage the printer. Also, if you just used the printer, the print
head may be hot. Let it cool for a few minutes before touching it.
Paper Handling 2-11
Page 53

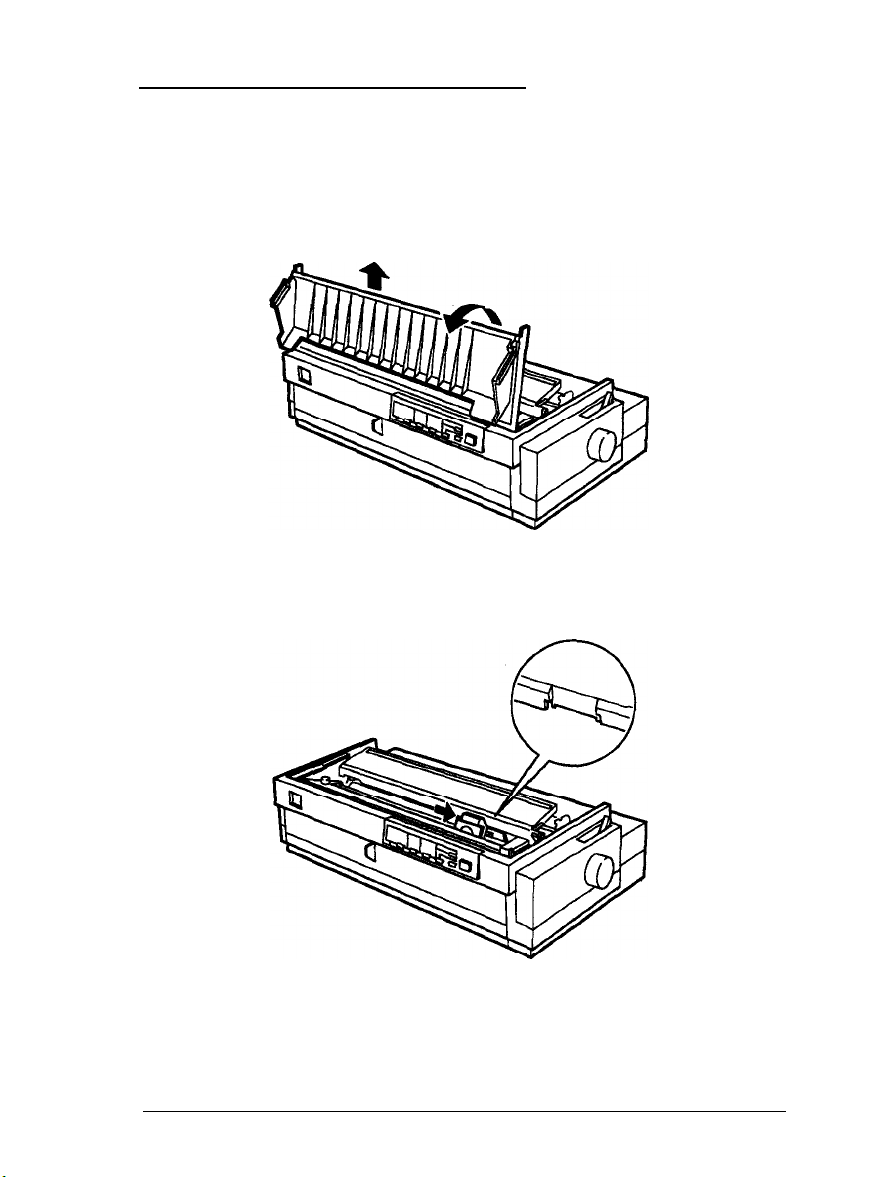
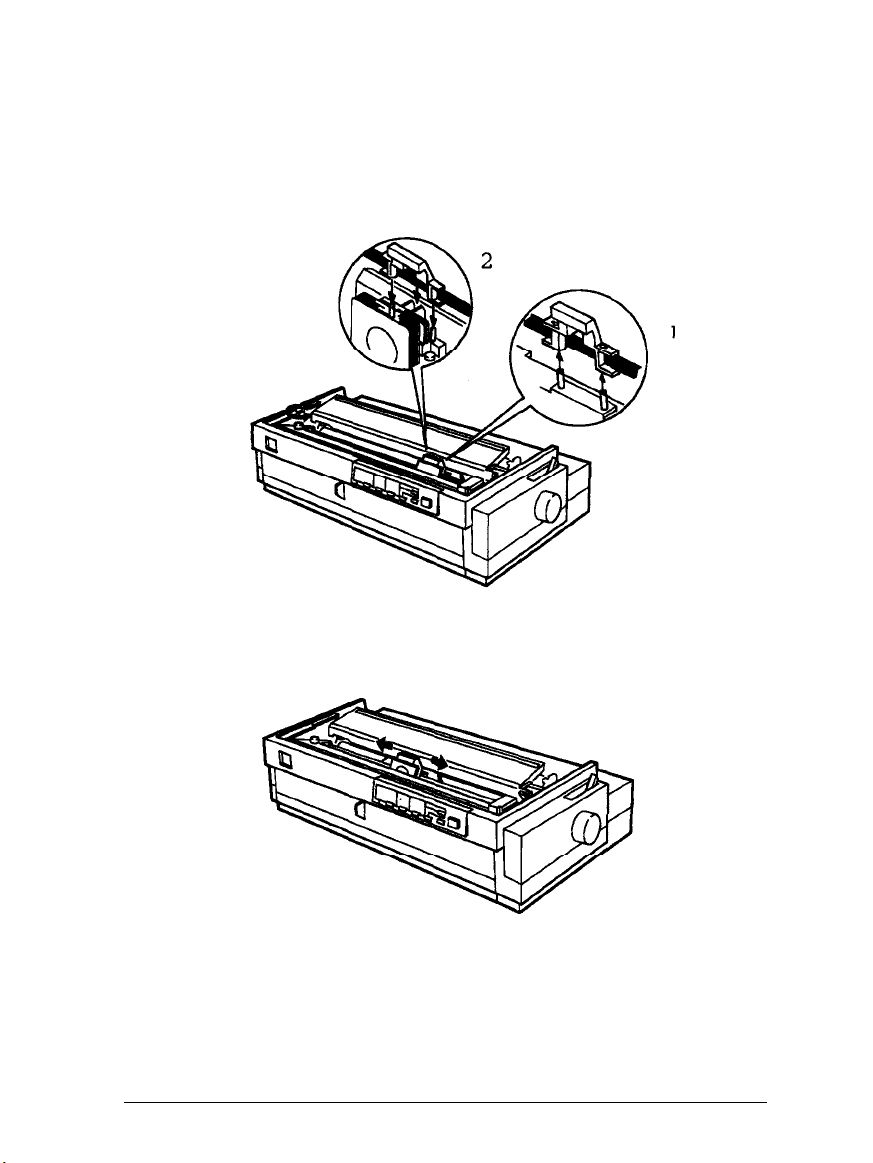
4. Push the tractor into the printer’s mounting slot as shown below.
To remove the tractor unit, hold down its lock tabs, tilt it back, and
lift it off the printer.
Loading the front push tractor
1.
Make sure the printer is turned off.
2. Remove the front paper guide as shown below. Make sure the
tractor is in the front mounting slot and the paper release lever
is set to the front push tractor position.
2-12 Paper Handling
Page 54

3.
Release the sprockets by pushing the sprocket locks backward.
4.
Position the left sprocket as shown below. (Printing starts at the
arrow mark.) See the Appendix for more information on the
left margin position.
5.
Lock the sprocket in place. Then slide the right sprocket to match
the width of your paper, but do not lock it.
Paper
Handling 2-13
Page 55

Make sure your paper has a clean, straight edge. Then open the
6.
sprocket covers and fit the holes of the paper over the tractor
pins.
Close the sprocket covers.
7.
Slide the right sprocket to remove any slack in the paper; then
8.
lock it in place.
Attach the front paper guide.
9.
Slide the left and right edge guides to the center of the paper
10.
guide.
2-14 Paper Handling
Page 56

11.
Turn on the printer. When the printer receives data, it
automatically loads the paper before printing.
Note:
Always close the printer cover before printing. The printer stops
printing when the cover is open.
You can also advance the paper to the loading position by
pressing the
Load/Eject button.
Advance the paper behind the printer guide as shown below.
Make sure the paper path guide rests against the
paper guide.
Caution:
Do
not use the knob on the right side of the printer except to clear
paper jams when the printer is off. Otherwise, you may damage
the printer or cause
it to lose the tap-of-form position.
Loading the rear push tractor
1.
Make sure the printer is turned off.
2.
Remove the printer cover and paper guide.
Paper Handling 2-15
Page 57

Make sure the paper release lever is set to the rear push tractor
3.
position.
Release the sprockets by pushing the sprocket locks forward.
4.
2-16 Paper Handling
Page 58

5. Slide the left sprocket to the left margin of the paper using the
scale on the printer as shown below. (Printing starts at the “0”
mark. See the Appendix for more information on the left
margin position.) Then slide the right sprocket to match the
width of your paper, but do not lock it.
6. Make sure your paper has a clean, straight edge. Then open the
sprocket covers and fit the holes of the paper over the tractor
pins.
7.
Close the sprocket covers.
Paper Handing 2-17
Page 59

8.
Slide the right sprocket to remove any slack in the paper; then
lock it in place.
9.
Attach the printer cover and paper guide.
Note:
Advance the paper behind the printer guide as shown below. Make
sure the paper path guide rests against the paper guide.
10.
Slide the left and right edge guides to the center of the paper
guide.
11.
Turn on the printer. When the printer receives data, it
automatically loads the paper before printing.
Note:
Always close the printer cover before printing. The printer stops
printing when the cover is open.
You can also advance the paper to the loading position by
pressing the
Load/Eject button.
Caution:
Do not use the knob on the right side of the printer except to clear
paper jams when the printer is off. Otherwise, you may damage
the printer or cause it to lose the top-of-form position.
2-18 Paper Handling
Page 60

Loading the pull tractor
1.
Make sure the printer is turned off.
2.
Remove the printer cover and paper guide.
3.
Make sure the tractor is in the pull tractor position and the paper
release lever is set to the pull tractor position.
4. Release the sprockets by pushing the sprocket locks forward.
Paper Handling 2-19
Page 61

5. Slide the left sprocket to the left margin of the paper using the
scale at the rear of the tractor as a guide. (Printing starts at the
“0” mark. See the Appendix for more information on the left
margin position.) Then slide the right sprocket to match the
width of your paper, but do not lock it.
6. Make sure your paper has a clean, straight edge. Open the
sprocket covers and insert paper from either the top, rear, or
bottom paper slot. Then fit the holes of the paper over the
tractor pins.
7.
Close the sprocket covers.
8.
Slide the right sprocket to remove any slack in the paper; then
lock it in place.
2-20 Paper Handling
Page 62

9. Attach the printer cover and paper guide.
Note:
Advance the paper behind the printer guide as shown below. Make
sure the paper path guide rests against the paper guide.
10.
Slide the left and right edge guides to the center of the paper
guide.
11. Turn on the printer. When the printer receives data, it
automatically loads the paper before printing.
Note:
Always dose the printer cover before printing. The printer stops
printing when the cover is open.
You can also advance the paper to the loading position by
pressing the
Load/Eject
button.
Caution:
Do
not use the knob on the right side of the printer except to clear
paper jams when the printer is off. Otherwise, you may damage
the printer or cause it to lose the top-of-form position.
Paper Handling 2-21
Page 63

Loading the push/pull tractor
To use the push and pull tractors in combination, you must first
purchase the optional pull tractor. See Chapter 4 for more
information on printer options.
Note:
The standard rear push tractor cannot be removed.
To load paper in the tractor, follow these steps:
Make sure the tractor is in the push/pull tractor position and the
1.
paper release lever is set to either the front push or rear push
tractor position.
2.
Load paper in the front or rear push tractor as described in the
previous sections.
Push the
3.
Fit the paper to the pull tractor’s sprocket as described in the
4.
previous section.
Move the paper release lever to the pull tractor position, and use
5.
micro adjust (described in the next chapter) to remove any
slack in the paper.
Move the paper release lever back to the push tractor position.
6.
7.
Attach the paper guide and printer cover.
LF/FF
2-22 Paper Handling
button to advance the paper to the next page.
Page 64

8.
Slide the left and right edge guides to the center of the paper guide.
9. Raise the paper path guide and rest it against the paper guide.
Caution:
Do not use the knob on the right side of the printer except to clear
paper jams when the printer is off. Otherwise, you may damage
the printer or cause it to lose the
top-of--form
position.
Note:
Always close the printer cover before printing. The printer stops
printing when the cover is open.
Advance the paper behind the printer guide as shown below.
Make sure the paper path guide rests against the paper guide.
Removing paper from the tractor
1.
To remove continuous paper, press the
the paper’s perforation to the tear-off edge of the printer cover.
Tear Off/Bin
button to feed
Note:
If
the
page perforation is not properly aligned with the tear-off edge,
you can adjust the tear-off position using micro adjust. See Chapter
3.
2.
Tear off the paper.
3.
Press the
backward out of the printer and into the standby position.
Load/Eject
button to feed the continuous paper
Paper Handling 2-23
Page 65

Caution:
Make sure you tear off your printed document
Load/Eject
button.
Reverse feeding several pages at a time may
before
pressing
the
cause a paper jam.
Switching Between Continuous Paper and Single Sheets
When using the push tractor in the front or rear position, you can
easily switch between continuous and single-sheet printing
without removing the paper.
Switching to
To switch from continuous paper to single sheets, follow these
steps:
1.
2. Tear off the printed pages.
single
If any printed sheets remain in the printer, press the
Tear Off /Bin
position.
sheets
button to advance the paper to the tear-off
Caution:
Always tear off paper before back-feeding paper through
the printer; back-feeding too many sheets can cause a
paper jam.
Never back-feed labels. Labels can easily come off their
backing and jam the printer.
3.
Press the
paper backward to the standby position. The paper is still
attached to the push tractor but is no longer in the paper path.
4.
Move the paper release lever to the single-sheet position.
Load/Eject
button. The printer feeds the continuous
5.
Adjust the edge guides to match the width of your paper.
2-24 Paper Handling
Page 66

You can now load single sheets as described in “Using Single
Sheets,” earlier in this chapter.
Switching to continuous paper
To switch from single sheets back to continuous paper, follow
these steps:
1.
If a single sheet is in the paper path, press the
button to eject it.
2. Move the paper release lever to the push or pull tractor position.
The printer advances the continuous paper to the loading position
when it receives data.
Load/Eject
Printing on Special Paper
In addition to printing on single sheets and continuous paper,
your printer can print on a wide variety of other paper types, such
as envelopes, labels, postcards, roll paper, and multipart forms.
before printing on special types of paper, you need to change the
paper thickness setting.
Caution:
When printing on labels or multipart forms, make sure
that
your software
settings
keep the printing entirely
within the printable area.
Always return the paper
thickness
lever to position 0
when you return to printing on ordinary paper.
Paper Handling 2-25
Page 67

Adjusting the paper thickness lever
Set the paper thickness lever to match the thickness of your paper
according to the table below.
Paper type
Thin paper
Ordinary paper (single sheets or
Multipart forms (carbonless)
Labels.
Envelopes
2 sheets (original
3 sheets (original
4 sheets (original
5 sheets (original
6 sheets (original
Postcards
+1copy)
+2copies)
+3copies)
+4copies)
+ 5 copies)
continuous)
lever position
0 or 1
0
1
3
4
5
6
2
4 to 5
Note:
When operating your printer under low temperature conditions
(5°C or less), set the lever one position lower to improve print
quality.
When operating your printer under high temperature conditions
(35°C or more), set the lever one position higher to improve print
quality.
2-26
Paper Handling
Page 68

Multipart forms
Your printer can print on both single-sheet and continuous
multipart forms. You can load single-sheet multipart forms in both
the front and top paper slots. You can load continuous multipart
forms from the front, rear, and bottom.
Note:
Use only carbonless multipart
You can use multipart forms of up to six parts, including the
original. Make sure you set the paper thickness lever to the proper
position.
You load multipart forms the same way as single sheets or
continuous paper. For best results with continuous multipart
forms, you should use the tractor installed in the pull tractor
position and load paper from either the front or rear tractor. When
you load paper from the front, you must use the optional pull
tractor because the rear push tractor cannot be removed.
For details, see “Using Single Sheets” or “Loading Continuous
Paper,” earlier in this chapter. Also be sure to set the loading
position as described in ‘Micro Adjust” in Chapter 3.
forms.
Caution:
When printing multipart forms, make sure the printing
stays entirely within the printable area of the
more information on the printable area, see the Appendix.)
Use multipart forms only under normal operating
conditions.
When loading single-sheet multipart forms that are
at the top by linegluing, always use the top paper path.
you plan to print on forms that are joined at either the top
or side by line gluing, use the front paper path.)
Load multipart forms that are free of wrinkles and waves.
Paper Handling 2-27
forms.
(For
bound
(If
Page 69

Labels
When selecting labels for printing, always choose the type
mounted on a continuous backing sheet with sprocket holes for
use with a tractor. Do not try to print labels as single sheets
because the shiny backing sheet does not feed properly.
Load labels from either the front or bottom (not rear) paper slots
with the tractor in the pull tractor position. You load them the
same way that you load continuous paper, except you set the
paper thickness lever to position 2. See “Using Continuous Paper”
earlier in this chapter for details.
Caution:
Never
Off/Bin
jam the printer.
feed
labels
backward
with the
Load/Eject
or
Tear
buttons. Labels can easily peel off the backing and
2-28
Since labels are especially sensitive to temperature
humidity, use
conditions.
Do not leave labels loaded in the printer between jobs; they
curl around the platen and may jam when you resume
printing.
To remove labels from the paper path after you finish
printing, first tear off the labels at a point before the paper
slot.
Then use
labels out of the printer.
Paper Handling
them
only under normal operating
the
LF/FF
button to advance
the
remaining
and
Page 70

Envelopes
You can load envelopes only from the top paper slot, following
the guidelines below:
Always set the paper thickness lever to position 4 to 5 to
match the thickness of the envelope.
Always feed an envelope by pushing the wide edge into
the printer until it meets resistance.
Caution:
Use envelopes only under normal operating
conditions.
Printing on the edge
of
an envelope can damage
the
print
head. Make sure the printing stays entirely within the
printable area of the envelopes. See the Appendix
for
details.
Postcards
You can load postcards from the front and top paper slots. Load
cards only under normal operating conditions. Set the Card mode
using the
button descriptions in Chapter 3 for more information.
Tear Off/Bin
button.
See
the
Tear Off/Bin light
and
Note:
When the length of the card is less than 14.8 cm (5.8 inches), use
the
top paper slot. See
the
Appendix for details.
Use postcards only under normal operating conditions.
Roll paper
Load roll paper from the top paper slot. See “Roll paper holder” in
Chapter 4 for more information.
Paper Handling 2-29
Page 71

Chapter 3
Using the Printer
Control Panel
Lights
Buttons
Other control panel features
Changing the Default settings
Selecting an instruction sheet language
Selecting items and changing settings
Default setting item functions
Micro Adjust
Tear-Off
Using auto tear-off mode
Using the Tear Off/Bin button
Bid Adjustment
Barcode Printing
...............................
..................................
.................................
.....................
.....................
....................
...............................
..................................
......................
...................
.............................
.............................
..............
...............
3-2
3-2
3-4
3-6
3-7
3-7
3-8
3-9
3-13
3-15
3-16
3-17
3-17
3-18
Using the Printer
3-1
Page 72

This chapter covers basic operation of your printer, including the
control panel lights and buttons, the printer’s default settings, and
other functions.
Control
Panel
The indicator lights on the control panel let you monitor the
current status of the printer, and the buttons let you control many
printer settings.
Lights
Paper Out
On when the printer runs out of paper or paper is jammed.
Pause
On when the printer is not ready to print data, paper is out
jammed,
press the
when the micro adjust function is enabled or the print head is too
hot.
(red)
(orange)
or
the cover
is
Pause button
open. The
to pause printing. The
Pause light
Pause
or
is off, unless you
light flashes
3-2
Using
the
Printer
Page 73

Tear Off /Bin (two lights, green)
The
Tear Off /Bin
selection status is displayed by two lights:
Tear off position
Bin 1
Bin2
Card
= Flashing,
l
Both lights are off when continuous paper is not in the tear-off position.
l
You can print postcards in Card mode.
q
= On, n = Off
Font (two lights, green)
The font selection status is displayed by two font lights on the
control panel:
Draft
Roman
sans serif
Pitch (three lights, green)
The pitch selection status is displayed by three pitch lights:
10 cpi
12 cpi
15 cpi
17 cpi
20
cpi
PS (Proportional spacing)
= On,
= Off
Note:
All of the lights above are on when a fatal error occurs.
Using the Printer
3-3
Page 74

Buttons
Operate
Press this button to turn the printer on or off.
Pause
Press this button to temporarily stop printing and to resume
printing. Holding it down for at least 3 seconds when the printer
is in the standby mode enables the micro adjust function. Pressing
it again disables this function. See “Micro Adjust” later in this
chapter for details.
Load/Eject
Press this button to load single-sheet or continuous paper to the
loading position. However, the printer normally loads paper
automatically. If single-sheet paper is already in the loading
position, use this button to eject the sheet. If continuous paper is
in the loading or tear-off position, press this button to feed it
backward to the standby position.
LF/FF
Press this button briefly to feed the paper forward one line. Hold
the button down to eject a single sheet of paper or advance
continuous paper to the top of the next page. You can also use this
button to load a single sheet of paper from the cut-sheet feeder or
to feed continuous paper from the standby position to the loading
position.
(line feed/form
feed)
Tear Off /Bin
Pressing this button moves a page to the tear-off position, and
pressing it again moves the next page to the top-of-feed position.
When cut sheets are used, pressing it selects the cut-sheet feed bin
number. Use the Card mode (Bin 1 selected) to print on postcards.
3-4
using the Printer
Page 75

Font
Press this button to select one of the following fonts:
Draft, Roman, Sans Serif
Pitch
Press this button to select one of the following pitches:
10 cpi, 12 cpi, 15 cpi, 17 cpi, 20 cpi, or proportional spacing (PS).
Note:
The typestyle samples on the control panel are meant as guides only;
actual printed results may differ slightly.
Using the Printer
3-5
Page 76

Other control panel features
The control panel also gives you to access to several other
functions. To activate the functions listed below, turn on the
printer while pressing one of buttons, as follows:
Load/Eject
LF/FF
Pitch
Load/Eject
and
Pause
LF/FF
Performs a near letter quality self
test. See Chapter 1 for details.
Performs a draft self test. See
Chapter 1 for details.
Activates the Default Setting mode.
See “Changing the Default Settings”
in this chapter.
Prints a data dump. All the input
data are printed as hexadecimal
numbers and corresponding
characters. See “Problems and
Solutions” in Chapter 6.
Starts the Bid adjustment. See “Bid
Adjustment” in this chapter.
3-6
Using the Printer
Page 77

Changing the Default Settings
The default settings control many basic functions of the printer.
While you can control many of these functions through your
software or printer driver, you may sometimes need to change a
default setting from the printer’s control panel through the Default
Setting mode.
To enter Default Setting mode, hold down the
turning on the printer. The printer prints an instruction sheet.
Follow the instructions on this sheet, and in this section, to change
settings using the Default Setting mode.
Pitch
button while
Selecting an instruction sheet language
Follow these steps to select the language in which you want to
print the rest of the Default Setting mode instructions:
1.
Press the
language you want to select.
2.
Press the
3.
Press the
Pitch
button until the
Tear Off /Bin
Font
button to print out the instruction.
button to save your selection.
Pitch
lights indicate the
Using the Printer
3-7
Page 78

Selecting items and changing settings
Follow the steps below to select items and change their settings.
The available items and settings are listed on the instruction sheet
and in the table on the next page.
1.
Press the
you want to change.
2.
Press the
for that item is indicated by the
lights.
3. Repeat steps 1 and 2 for any additional items you want to
change.
printer saves the settings you selected.
4. When you finish changing the settings, turn off the printer.
The following table lists the items you can change and their
available settings. Default settings are bold. Each item is described
in the following section.
Pitch
button until the
Tear Off/Bin
Each time
you press the
Pitch lights
indicate the item
button until the setting you want to use
Tear Off/Bin
Tear Off/Bin
and
Pause
button, the
3-8
Item
Character table
International character set for
italic table
Page length for front tractor
Using the Printer
Settings
Standard model:
Italic, PC 437, PC 850, PC 860, PC 863,
PC 865, PC 861, BRASCII, Abicomp,
ISO Latin 1, Roman 8
All other models:
Italic, PC 437, PC 437 Greek, PC 850,
PC
852,
PC 853, PC
PC 866, PC 869, ISO Latin 1T.
ISO 8859-7. MAZOWIA, Code MJK,
Bulgaria, Estonia, PC774, ISO Latin 2,
PC 866 LAT.
Italic U.S.A. Italic France,
Italic Germany, Italic U.K.,
Italic Denmark, Italic Sweden, Italic
Italy, Italic Spain
3, 3.5, 4, 5.5, 6, 7, 8, 8.5, 11, 70/6, 12,
14.17 inches
855,
PC
857,
Page 79

Item
Page length for rear tractor
High speed draft
Print direction
Software
Interface mode
Auto interface wait time
Input buffer
Skip-over-perforation
Auto tear off
Auto line feed
Auto CR ‘2
0 slash
Buzzer
Roll paper
Settings
3, 3.5, 4, 5.5, 6, 7, 8.5, 11,70/6, 12,
14, 17 inches
On Off
BI-d., Uni-d.
ESC/P, IBM 2381 plus
Auto, Parallel I/F, Option I/F
10 sec.. 30 sec.
On, Off
on.011
On. Off
on, off
on, Off
On, Off
On, Off
On, Off
Default setting item functions
I
I
I
This section describes each of the default setting item functions.
Character table
Your printer has 11 standard character tables as well as tables for
19 other countries. See the Appendix for character samples.
International character set for Italic table
You can change 8 characters in the Italic character table to suit
your printing needs. Since these characters are often used in other
languages, they are named after countries and are referred to as
international character sets. See the Appendix for character
samples.
Using the Printer
3-9
Page 80

Page length for front and rear tractor
For paper fed through the front or rear tractor, you can set the
page length to one of the following: 3, 3.5, 4, 5.5, 6, 7, 8, 8.5, 11,
70/6, 12, 14, or 17 inches.
High speed draft
When you select high speed draft, the printer can print up to 440
cps (characters per second) at 10 cpi in draft mode. If you select
normal speed draft, it prints up to 330 cps at 10 cpi in draft mode.
Print direction
You can select auto print direction, unidirectional printing, or
bidirectional printing. Printing is normally bidirectional; however,
unidirectional printing allows for precise vertical printing
alignment.
Software
When you select ESC/P, the printer operates in the EPSON ESC/P
mode. When you select IBM, the printer emulates an IBM printer.
Interface mode
The printer has two interfaces: parallel and Type-B (optional).
You can choose parallel, optional, or automatic for the interface
mode.
Auto interface wait time
The printer determines which interface is receiving data and
switches to that interface until the end of the print job (when no
data is received from the selected interface for the amount of time
specified). You can specify either 10 seconds or 30 seconds.
3-10
Using the Printer
Page 81

Input buffer
The input buffer stores data sent from your computer. The input
buffer can store up to 64KB of data, so you can free your computer
for other tasks while the printer prints. When the buffer is off, the
buffer can store no data, so the computer must wait for the printer
to print each character before sending the next.
Skip over perforation
This feature is available only when continuous paper is selected.
When you turn on this feature, the printer provides a one-inch
(25.4 mm) margin between the last line printed on one page and
the first line printed on the next page. because most application
programs set their own top and bottom margins, you should use
this feature only if your program does not provide them.
Auto tear-off
When you use continuous paper with the front or rear push
tractor, this feature advances the paper perforation to the tear-off
position, where you can then easily tear off the printed page.
When the printer again receives data, it automatically advances
the paper to the top-of-form position and starts printing, so you
can use all of the next sheet. When auto tear-off is disabled (off),
you must perform the tear-off function manually by pressing the
Tear Off /Bin
information.
button. See ‘Tear Off” later in this chapter for more
Auto line feed
When auto line feed is on, the printer accompanies each carriage
return (CR) code received with a line feed (LF) code.
Using the
Printer
3-11
Page 82

Auto carriage return
When the auto carriage return feature is on, each line feed (LF)
code or ESC J (n/216-inch line feed) code is accompanied by a
carriage return (CR) code and the printer moves the next print
position to the left margin. When this feature is off, you must send
the CR code after the line feed code to move the print position to
the left margin. This feature is available in IBM emulation mode
only.
0 slash
The zero character has a slash (Ø) when this setting is on; it has no
slash (0) when the setting is off. This allows you to easily
distinguish between an uppercase “O” character and a zero.
Buzzer (Beep)
The printer beeps when some errors occur. See “Troubleshooting”
in Chapter 6 for more information.
Roll paper
When you turn on this mode, roll paper is not recognized as
single-sheet paper even if the paper release lever is set to the
single-sheet position. This means that the paper is not ejected and
advanced forward to the next page with the
LF/FF
button.
3-12
Using
the Printer
Page 83

Micro Adjust
The micro adjust feature allows you to move paper forward or
backward in l/216-inch increments. You can use this feature to
adjust the loading and tear-off positions.
This section explains how to use micro adjust. See the next section
for information on adjusting the tear-off position.
The loading position is the position of the paper after it has been
automatically loaded by the printer. If your printing appears too
high or low on the page, change the loading position with the
micro adjust feature as follows:
1.
Make sure the printer is turned on. If necessary, lift the printer
cover up so you can see the paper position.
2. Load either continuous or single-sheet paper. (Load continuous
paper by pressing the
Load/Eject
button.)
3. Hold down the
light starts flashing.
Pause
button for three seconds. The Pause
Using the
Printer
3-13
Page 84

4.
Press the
down on the page,
loading position up on the page.
For continuous paper, mark a point 6.5 mm above the perforation
and position the paper as shown. This gives you an 8.5 mm
margin.
Load/Eject
or
button to move the loading position
press the
LF/FF
button to move the
3-14
Note:
The printer has a minimum and maximum loading position. If
you try to advance the loading position beyond these limits,
the
printer beeps and the paper stops moving.
When the paper reaches
printer beeps and paperfeeding pauses briefly. Use
setting as a reference
the factory-set
point
when adjusting the loading position.
loading position, the
the factory
using the Printer
Page 85

5.
Press the
micro adjust mode.
Pause
button or send data to the printer to leave the
Note:
For both cut sheet and continuous paper, the printer remembers this new
position even after it has been turned off and back on.
Tear-Off
After you have finished printing, you can use the tear-off feature
to advance continuous paper on the push tractor to the tear-off
edge of the printer. You can then easily tear off printed sheets.
When you resume printing the printer automatically feeds paper
back to the loading position so you can save paper that would
normally be lost between documents.
You can use the tear-off feature in two ways: by setting the default
setting to select auto tear-off mode, or by pressing the
Tear Off /Bin
If the perforation between pages is not aligned with the tear-off
edge, you can adjust the tear-off position using the micro adjust
feature as described in the previous section.
button on the control panel.
Caution:
Never use the tear-off feature to reverse-feed labels; they
may come off their backing and jam the printer.
Never reverse-feed continuous paper when using the pull
tractor; the paper could come off the pull tractor and jam
the printer.
Using the Printer
3-15
Page 86

Using auto tear-off mode
When you select the auto tear-off mode default setting, the printer
advances continuous paper to the tear-off position when you
finish printing.
The printer advances paper to the tear-off position only when the
printer receives a full page of data or a form-feed command and
no more data is received for three seconds.
Select tear-off using the Default Setting mode as described earlier
in this chapter. Also make sure the page length for continuous
paper is selected correctly in the Default Setting mode. Be sure
you turn off the printer to exit from the Default Setting mode, and
then turn it on again.
1.
Print on continuous paper loaded on the front or rear push
tractor (as described in Chapter 2). When you finish printing,
the printer advances the perforation of the final printed page
to the tear-off position.
2.
Tear off all printed pages.
3.
When you resume printing, the printer automatically feeds the
paper back to the loading position and begins printing. If the
perforation does not meet the tear-off edge, you can adjust the
tear-off position using the micro adjust feature as
the previous section.
described in
You can leave auto tear-off mode on even when you are using
single sheets because the mode is disabled when you move the
paper release lever to the single-sheet position.
Note:
Don’t turn on the auto tear-of mode when using the pull tractor. Set
auto tear-off mode to off in
the
3-16
Tear Off/Bin
Using
button
the Printer
the
Default Setting mode, or avoid touching
when using
the pull tractor.
Page 87

Using the Tear Off/Bin button
Whether or not the printer is in auto tear-off mode, you can use
the
Tear Off/Bin
tear-off position by following the steps below:
1.
Make sure printing has finished. Then press the
button until the two lights on the control panel start flashing.
The printer advances the paper to the tear-off edge.
2. Tear off all printed pages. If the perforation is not aligned with
the tear-off edge, adjust the tear-off position using the micro
adjust feature. See “Micro Adjust,” earlier in this chapter.
3. When you resume printing the printer feeds the paper back
to the loading position and begins printing. (You can also
manually feed the paper back to the loading position by
pressing the
button to advance continuous paper to the
Tear Off/Bin
Tear Off /Bin
button.)
Bi-d Adjustment
When using bidirectional printing, you may notice that the lines in
your printout are not properly aligned. To correct this problem,
use the printer’s Bid Adjustment mode as follows:
1.
Make sure continuous paper is loaded in the printer.
2.
Hold down the
instructions for adjusting Bid alignment are printed, along
with the first set of alignment patterns.
3.
Follow the instructions on the printout.
4. After completing Bid adjustment, turn off the printer.
Pause
button while you turn on the printer. The
Using the Printer
3-17
Page 88

Barcode Printing
Your printer has powerful barcode printing capabilities and
includes the following resident barcode fonts: EAN-13, EAN-8,
Interleaved 2 of 5, UPC-A, UPC-E, Code 39, Code 128, and
POSTNET. See the Appendix for more information about the
Barcode Print command.
3-18
using the Printer
Page 89

Chapter 4
Using Printer Options
Cut-Sheet Feeders . . . . . . . . . . . . . . . . . . . . . . . . . . . . 4-2
Installing the high capacity cut-sheet feeder
Loading paper with the high capacity cut-sheet feeder . . . . . 4-4
Assembling the double bin cut-sheet feeder . . . . . . . . . . . . 4-6
Switching between continuous paper and the cut-sheet
feeder . . . . . . . . . . . . . . . . . . . . . . . . . . . . . . . 4-6
Selecting single-sheets, postcards, or envelopes . . . . . . . . . 4-7
Pull Tractor . . . . . . . . . . . . . . . . . . . . . . . . . , . . . . . . 4-8
Loading paper with the push tractor and the optional pull
tractor . . . . . . . . . . . . . . . . . . . . . . . . . . . . . . . 4-8
. . . . . . . . . . . 4-2
Roll Paper Holder
Interface Cards
Installing an interface card.
The C82305*
............................
..............................
or C82306* serial interface card
.....................
..........
Using Printer Options
4-9
4-12
4-12
4-14
4-1
Page 90

This chapter describes how to use optional equipment with your
printer, including cut-sheet feeders, a pull tractor, a roll paper
holder, and interface cards.
Cut-Sheet Feeders
Two cut-sheet feeders are available for use with your printer.
Printer model
Fx-2170 C80673*
The asterisk (*) is a substitute for the last digit, which varies by country,
Contact your local EPSON dealer for the part number in your country.
High capacity (Bin 1)
Second bin (Bin 2)
C80674*
By connecting both cut-sheet feeders, you can operate them as a
double bin cut-sheet feeder. This allows you to load two different
types of paper. See “Assembling the double bin cut-sheet feeder”
later in this chapter.
Before you install your cut-sheet feeder, assemble it by following
the instructions in the manual that comes with it.
Note:
The second bin cut-sheet feeder can only be used in combination with the
high capacity cut-sheet feeder.
Installing the high capacity cut-sheet feeder
1.
Make sure the printer is turned off.
2.
Remove the paper guide and the printer cover.
4-2
Using Printer Options
Page 91

3.
If the standard tractor is installed in the pull tractor position,
remove it. If the optional pull tractor is installed, remove it. In
either case, make sure the paper tension unit is not installed.
Note:
Store the paper guide and optional pull tractor in a safe place; you
will need them if you remove the cut-sheetfeeder.
4.
Move the printer head to the ribbon installation position.
5.
Hold the cut-sheet feeder in both hands and press back the latch
levers on each side. Fit the notches in the cut-sheet feeder over
the mounting posts on the printer. Release the latch levers and
lower the cut-sheet feeder until it rests on the printer.
6. Insert the cable into the connector as shown above.
7.
Replace the printer cover.
You are now ready to load paper with your cut-sheet feeder. To
remove the cut-sheet feeder, reverse the steps above.
Using Printer Options
4-3
Page 92

loading paper with the high capacity cut-sheet feeder
Load paper using the high capacity cut-sheet feeder as follows:
1.
Turn off the printer.
2.
Push down the center support. Slide the left paper guide so it is
aligned with the arrow mark on the back side of the center
support. Next, slide the right paper guide to match the width
of your paper. Slide the paper stacker midway between the
paper guides.
4-4
3.
Pull the paper-set levers all the way forward until the paper
guides retract and lock open to allow for paper loading.
Using Printer Options
Page 93
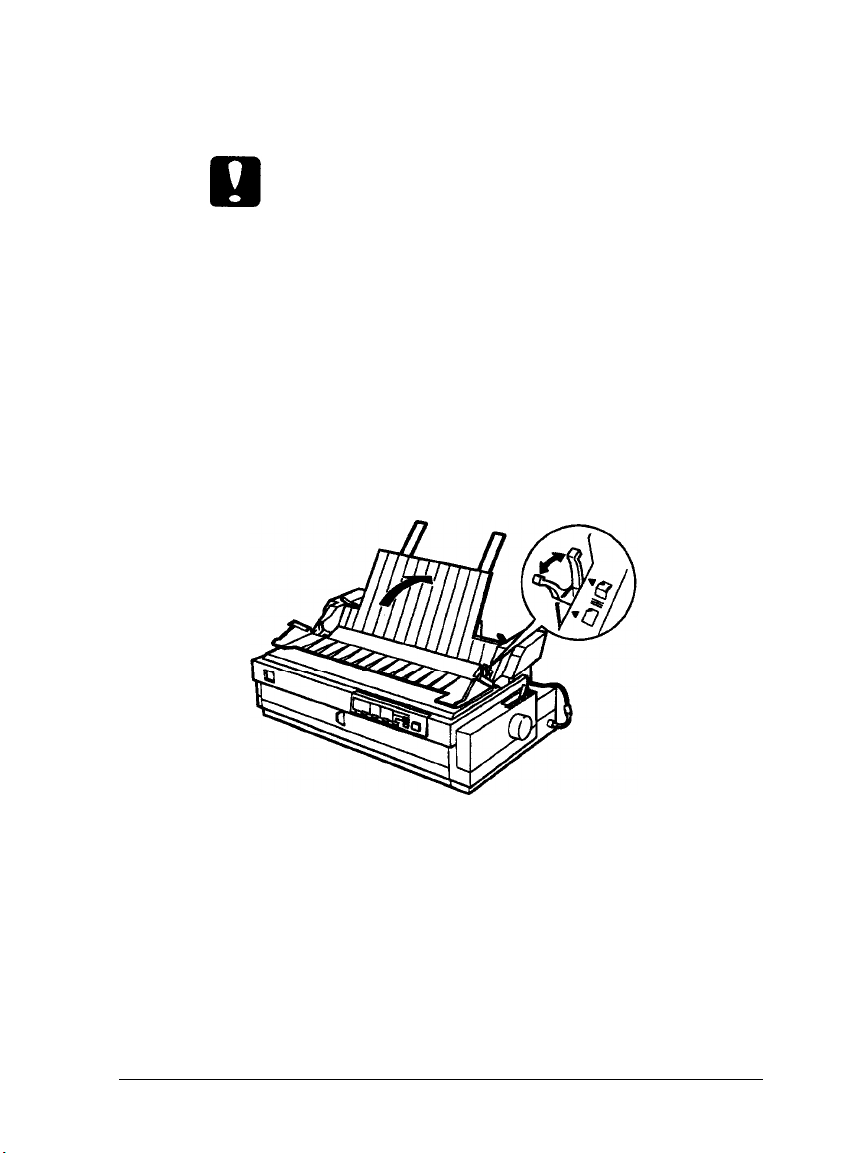
4. Fan a stack of paper (up to 150 sheets); then tap the side and
bottom of the stack on a flat surface to even it up.
Caution:
Do not use labels in the cut-sheet feeder.
5.
Insert the paper along the left paper guide.
6.
Adjust the position of the right paper guide so that it matches
your paper’s width. Make sure the position of the guide allows
the paper to move up and down freely.
7.
Push back the paper-set levers to clamp the paper against the
guide rollers.
8. Lift up the center support and select single sheet or continuous
paper by moving the paper selection lever as shown below.
Note:
When the cut-sheet feeder is installed, you can still load single sheets
using the top paper guide or the front paper slot.
The cut-sheet feeder loads paper when you send data to the
printer (as long as the Pause light is not on). You can also load
paper by pressing the
Load/Eject
button.
Using Printer Options
4-5
Page 94

Assembling the double bin cut-sheet feeder
You can connect the high capacity cut-sheet feeder to the second
bin cut-sheet feeder to create a double bin cut-sheet feeder. See the
cut-sheet feeder option manuals for more information.
You cannot use the second bin feeder without the high capacity
feeder.
1.
Install the assembled double bin cut-sheet feeder on the printer.
See “Installing the high capacity cut-sheet feeder” in the
previous section.
2.
Select the bin number by pressing the
light of the currently selected bin comes on.
Note:
You may be able to specify the bin number using your application
programs. See your software manuals for details.
Tear Off/Bin
button. The
Switching
between continuous paper and the
cut-sheet feeder
You can easily switch between continuous paper and cut-sheet
feeder operation without removing the continuous paper.
Switching to continuous paper
1.
If any single sheets are in the paper path, press the
button to eject them.
2.
Move the paper release lever to the push tractor position.
3.
Move the paper selection lever to the continuous paper position.
l
Note:
When you print several pages of continuous paper, guide the paper over
the center support and out the back of the printer, as it prints.
4-6
Using Printer Options
Load/Eject
Page 95

Switching to the cut-sheet feeder
1.
If any printed continuous paper remains in the printer, press the
Tear Off/Bin
position.
2.
Tear off the printed pages.
3.
Press the
backward to the standby position. The paper is still attached
to the push tractor but is no longer in the paper path.
4.
Move the printer’s paper release lever to the single-sheet
position.
5. Move the cut-sheet feeder’s paper selection lever to the
single-sheet position.
button to advance the paper to the tear-off
Load/Eject
button. The printer feeds the paper
Selecting single-sheets, postcards, or envelopes
You can select either single-sheet paper, postcards, or envelopes
using the lever on the first bin. You’ll see the icons next to the
lever. Move the lever to the proper position before loading your
paper.
Using Printer Options
4-7
Page 96

Pull Tractor
The optional pull tractor (C80032*) provides optimum continuous
paper handling. (The asterisk (*) is a substitute for the last digit of
the product number, which varies by country.)
The pull tractor is especially useful with continuous multipart
forms. For best results, use the optional pull tractor along with
your standard tractor installed in the front push tractor position.
See Chapter 2 for instructions.
Note:
You cannot remove the rear push tractor. When you load continuous
paper from the front paper path with the pull tractor on top, you can
install the optional pull tractor in the pull tractor position.
Loading paper with the push tractor and the optional
pull tractor
1.
Make sure the printer is turned off and the standard tractor is
installed in the push tractor position.
2. Remove the paper tension unit by lifting it up and off the printer.
3.
Install the optional pull tractor in the pull tractor position as
described in “Using the pull tractor position” in Chapter 2.
Note:
The optional pull tractor cannot be installed in the rear push tractor
position.
4. Make sure that the paper release lever is in the push tractor
position.
5. Load the paper in the push tractor as described in Chapter 2.
6. Press the
4-8
Using Printer Options
LF/FF
button to advance the paper to the next page.
Page 97

7.
Fit the paper to the pull tractor’s sprocket.
8.
Move the paper release lever to the pull tractor position and use
micro adjust, described in Chapter 3, to remove any slack in
the paper.
9. Move the paper release lever back to the push tractor position.
10.
Attach the paper guide and printer cover. Raise the paper path
guide and rest it against the paper guide.
Note:
When you are using more than one continuous paper source, guide the
paper over the paper guide and
feed
it out the back of the printer, as it
prints.
Caution:
Do not use the knob on the right side of the printer except to clear
paper jams when the printer is off. Otherwise, you may damage
the printer
or cause
it to
lose
the
top-of-form position.
Roll Paper Holder
The optional roll paper holder (#8310) allows you to use your
printer with 8.5-inch roll paper like that used with telex machines.
Before you use roll paper, set the default setting of roll paper to
on. See “Changing the Default Settings” in Chapter 3 for details.
To use the roll paper holder, follow the steps below.
Note:
This option is not available in all countries.
1.
Turn off the printer and make sure the paper release lever is at
the single-sheet position.
Using Printer Options
4-9
Page 98

2.
Position the roll paper holder beneath the printer as shown
below. Fit the two holes in the base onto the two positioning
pegs on the bottom of the printer.
Caution:
Be careful to
avoid
dropping the roll paper
holder when lifting the
printer. Only the printer’s weight holds it in place.
3.
Cut the leading edge of the roll paper straight across. Slide the
roll paper holder shaft through the center of the paper roll.
4-10
4.
Set the shaft and paper roll onto the roll paper holder so that
paper feeds from the bottom of the roll.
using Printer Options
Page 99

Bring the leading edge of the paper up over the rear push tractor
5.
and insert it into the printer path until you feel resistance.
Note:
Use the rear push tractor paper path as shown below.
6.
Install the paper guide and the printer cover.
7.
Turn on the printer. The roll paper loads automatically.
Using Printer Options
4-11
Page 100

Interface Cards
You can use optional interface cards to supplement your printer’s
built-in parallel interface. The EPSON interface cards below are
compatible with your printer. (Not all interfaces are available in all
countries.)
The asterisk (]) is a substitute for the last digit, which varies by country.
If you are unsure whether you need an optional interface or
would like to know more about interfaces, contact your dealer.
Installing an interface card
Follow the steps below to install an optional interface card.
1.
Make sure the printer is turned off. Unplug the printer’s power
cord and disconnect the interface cable.
4-12
Using Printer Options
 Loading...