

Page 1
EPSON FX-880/ FX-1180
13
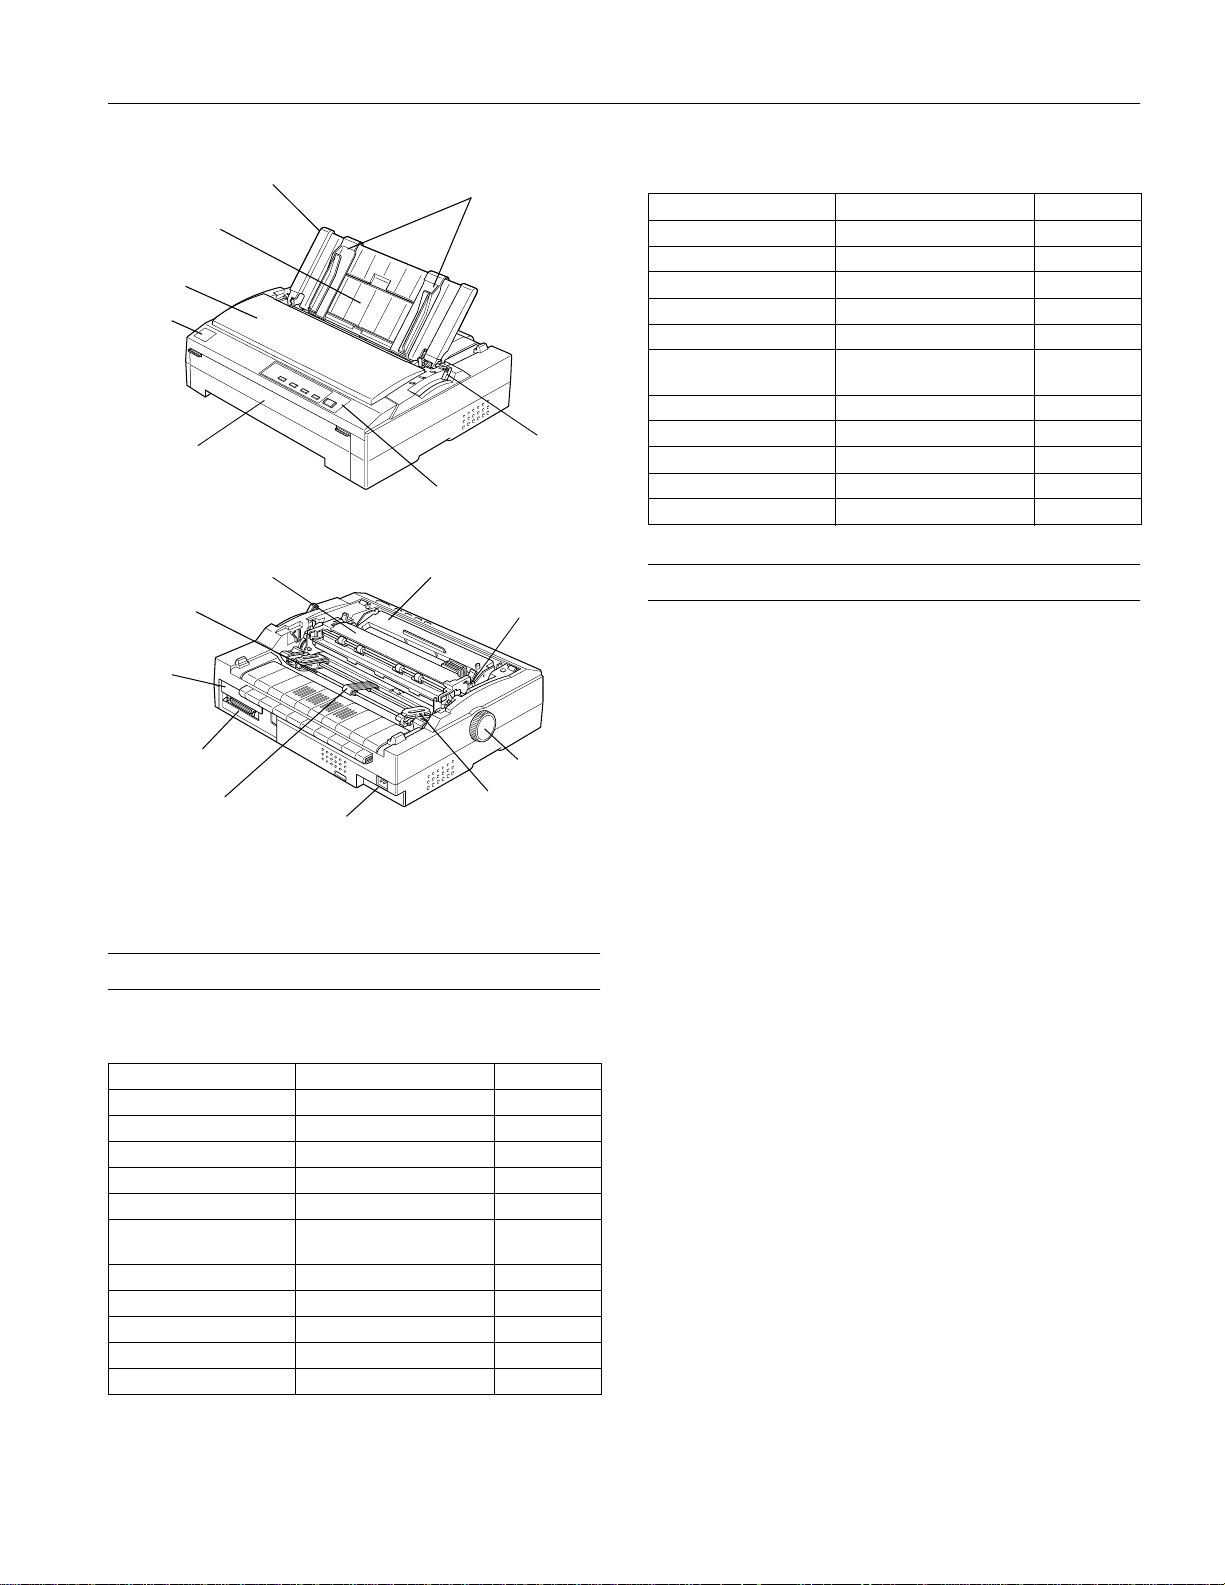
continuous
paper support*
printer cover
logo plate
front cover
paper tension unit
tractor
optional
interface
cover
parallel interface
* The paper guide support frame is beneath the continuous
paper support.
** The center support and sprockets are parts of the tractor.
paper guide
center support**
edge guides
paper release
lever
control panel
ribbon cartridge
paper
thickness
lever
knob
sprocket**
AC inlet
User Replaceable Parts
FX-880
User Replaceable Part Parts Price List Name Part Number
Front cover Cover, front 1036539
Knob Knob 1036511
Logo plate Logo plate 1037486
Optional interface cover Upper connector cover 1002045
Paper guide Sheet guide assembly, rear 1036541
Paper guide support
frame
Paper tension unit N/A N/A
Paper thickness lever cap Cap cover 1025333
Printer cover Cover assembly, printer 1036540
Ribbon cartridge Ribbon cartridge #8750
Tractor Tractor assembly 1036538
Support frame, sheet guide 1036506
FX-1180
User Replaceable Part Parts Price List Name Part Number
Front cover Cover, front 1038524
Knob Knob 1039337
Logo plate Logo plate 1039511
Optional interface cover Upper connector cover 1037223
Paper guide Sheet guide assembly, rear 1038525
Paper guide support
frame
Paper tension unit N/A N/A
Paper thickness lever cap Cap cover 1039356
Printer cover Cover assembly, printer 1038533
Ribbon cartridge Ribbon cartridge #8755
Tractor Tractor assembly 1038519
Support frame, sheet guide 1039332
Options
Paper Handling Options
High-capacity cut-sheet feeder (C806381 for FX-880,
C806401 for FX-1180)
Feeds up to 150 sheets of paper or 25 plain bond
envelopes into the printer without reloading. You can
load single-sheet paper, single-sheet multi-part forms, or
envelopes.
Single-bin cut-sheet feeder (C806371 for FX-880, C806391
for FX-1180)
Feeds up to 50 sheets of paper into the printer without
reloading. You can load only ordinary single sheets in this
feeder.
Additional tractor unit (C800201 for FX-880, C800211 for
FX-1180)
Use the additional tractor in the pull position along with
your standard tractor installed in the front or rear push
position to improve paper handling and reduce the
chance of paper jams. This setup is especially useful with
continuous multi-part forms.
Roll paper holder (#8310)
Allows you to use your printer with 8.5-inch roll paper
like that used with telex machines.
Front sheet guide (C814001 for FX-880, C814011 for
FX-1180)
Allows you to load single sheets and carbonless singlesheet multi-part forms of up to 6 parts.
11/98 EPSON FX-880/FX-1180
- 1
Page 2

EPSON FX-880/FX-11 80
Front paper guide (C814021 for FX-880, C814031 for
FX-1180)
Allows you to load single sheets and carbonless singlesheet multi-part forms of up to 6 parts without removing
the tractor from the front push position.
Optional Interface Cards
You can install one of the following EPSON interface cards in
your printer.
Card Type Model Number
Serial interface C823051
32KB intelligent serial interface C823071
Coax interface C823141
Twinax interface C823151
Type B bidirectional parallel C823452
Multi-protocol Ethernet print server C823572
Printer Specifications
Mechanical
Printing method: 9-pin impact dot matrix
Printing speed: High speed draft: 410 cps at 10 cpi (max.
455 cps at 12 cpi)
Paper feed
methods:
Friction (front, rear)
Push tractor (front, rear)
Pull tractor (front, bottom, rear)
Push and pull tractor (additional tractor is
required)
Cut-sheet feeder (optional)
Roll paper holder (optional)
Paper feed speed: Continuous: 5 inches/second
Intermittent: 62 ms/line at 1/6-inch line
spacing
Paper capacity: Single-bin cut-sheet feeder holds up to
50 sheets of 22 lb (82 g/m
Note:
The total thickness of the paper stack can be up
to 0.20 inch (5 mm).
2
) paper
High-capacity cut-sheet feeder:
up to 150 sheets of 22 lb (82 g/m
2
) paper
up to 25 plain or bond envelopes
up to 30 airmail envelopes
Note:
The total thickness of the paper stack can be up
to 0.59 inch (15 mm).
Draft: 310 cps at 10 cpi
Near letter quality: 77 cps at 10 cpi
Printing
direction:
Bidirectional logic seeking for text and
graphics printing. Unidirectional text or
graphics printing can be selected using
software commands.
Line spacing: 1/6-inch or programmable in 1/216-inch
increments
Printable
columns:
FX-880: 80 columns (at 10 cpi)
FX-1180: 136 columns (at 10 cpi)
Resolution: Maximum 240 × 144 dpi (near letter
quality)
Interfaces: One standard bidirectional, 8-bit, parallel
interface with IEEE 1284 nibble mode
support and one optional interface slot.
Buffer: 32KB or 0KB (selectable in the default-
setting mode or the EPSON Remote!
utility)
Built-in fonts: Bitmap fonts:
EPSON Draft 10, 12, 15 cpi
EPSON Roman 10, 12, 15 cpi,
proportional
EPSON Sans Serif 10, 12, 15 cpi,
proportional
Barcode fonts:
EAN-13, EAN-8, Interleaved 2 of 5,
UPC-A, UPC-E, Code 39, Code 128,
POSTNET
Character tables: One Italic and 10 graphical character tables.
(Nineteen graphical character tables are
available in some countries.)
Character sets: 13 international character sets
2 - EPSON FX-880/FX-1180
11/98
Page 3
EPSON FX-880/ FX-1180
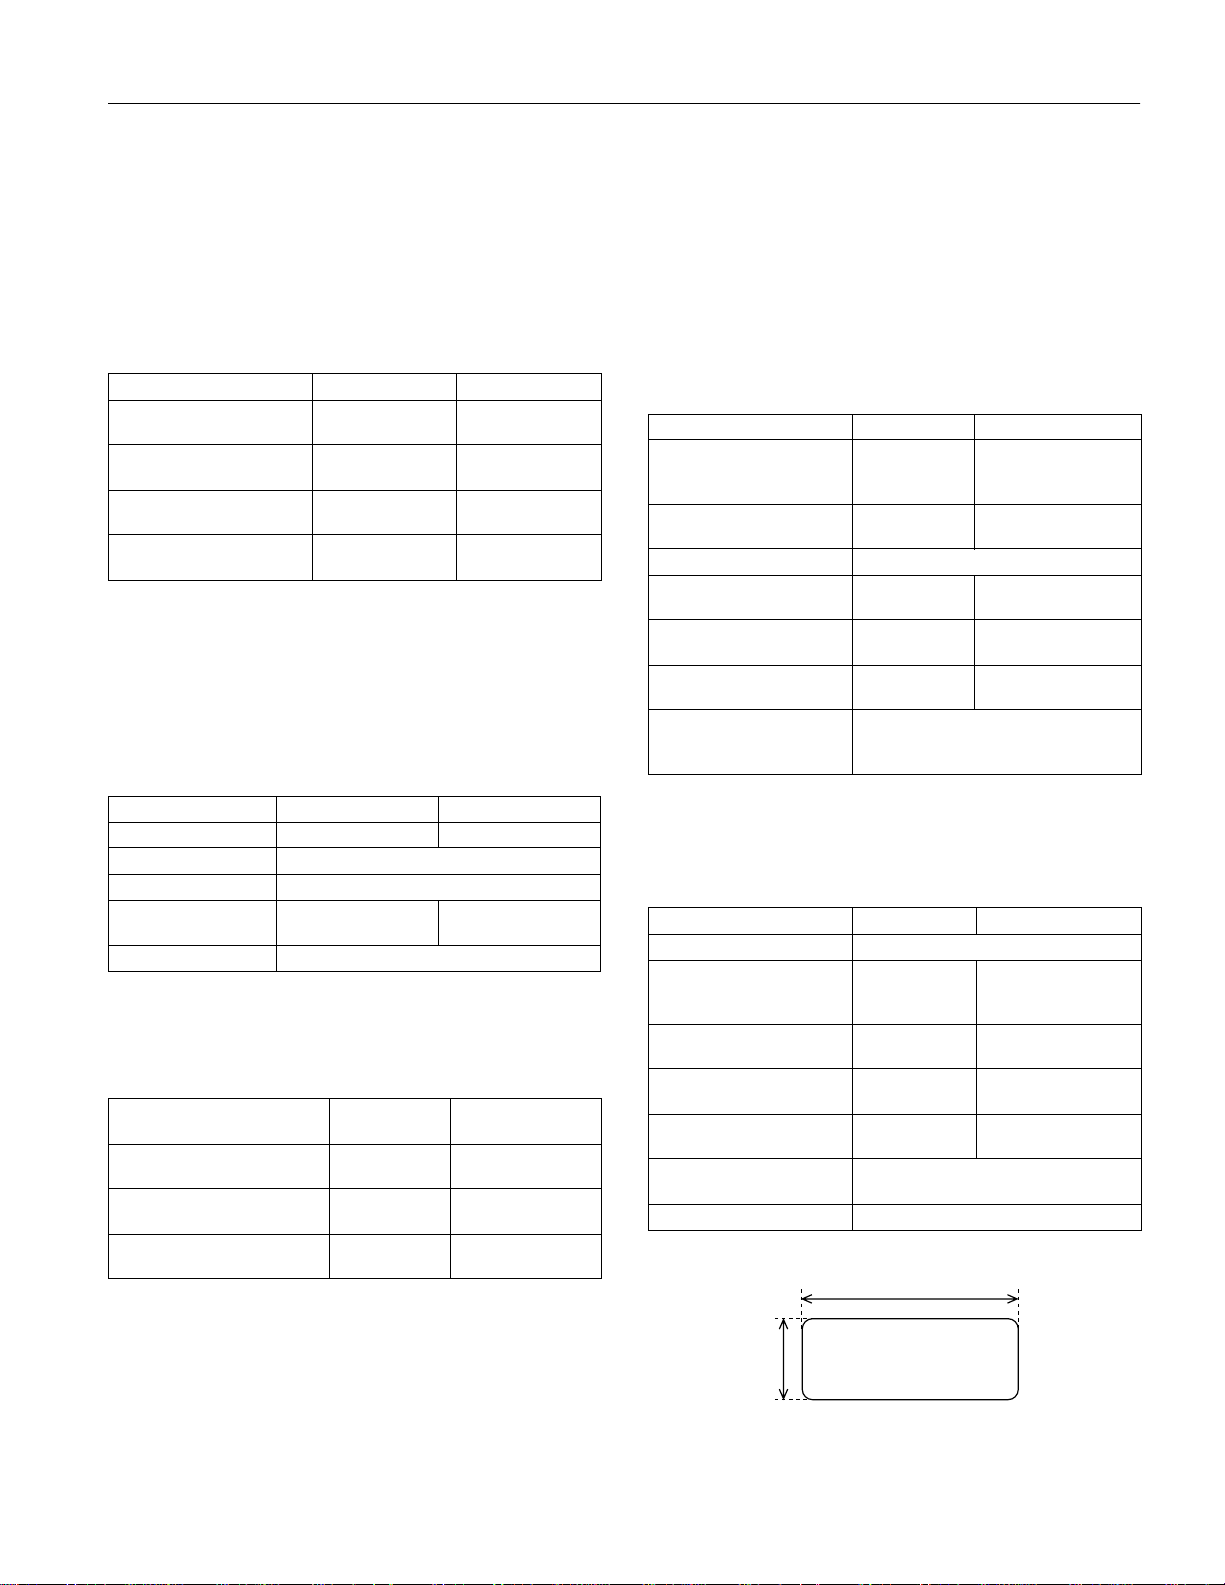
2.5 inches (63.5 mm) min.
corner radius = 0.1 inch (2.5 mm) min.
15/16 inch
(23.8 mm) min.
Reliability: Total print 6.5 million lines
volume: (except print head)
Print head life: approx. 200 million
characters
(draft 10 cpi,
14 dots/character)
Dimensions and weight:
FX-880 FX-1180
Height (inches)
(mm)
Width (inches)
(mm)
Depth (inches)
(mm)
Weight (approx.) (lb)
(kg)
6.1
154
16.3
415
13.8
350
16.8
7.6
6.1
154
23.2
590
13.8
350
21.2
9.6
Ribbon: Black ribbon cartridge (#8750 for FX-880,
#8755 for FX-1180)
Ribbon life of approx. 3 million characters
(draft 10 cpi, 14 dots/character)
Electrical
Paper
Note:
Use recycled paper, labels, envelopes, and roll paper only under
normal temperature and humidity conditions, as follows:
Temperature 59° to 77° F (15° to 25° C)
Humidity 30% to 60% RH
Do not load paper that is curled or has been folded.
Continuous paper (ordinary and multi-part):
Minimum Maximum
Width
Length (inches)
(one page) (mm)4101.6
Copies 1 original + 5 copies
Total thickness (inches)
Weight (lb)
(ordinary page) (g/m
Weight (one sheet (lb)
of multi-part) (g/m
Quality Plain paper, recycled paper, and
(inches)
(mm)4101.6
(mm)
0.0025
0.065
2
)1452
2
)1240
carbonless multi-part forms with spot
gluing or paper stapling on both sides
FX-880: FX-1180:
10 16
254 406.4
22
558.8
0.018
0.46
22
82
15
58
120 V Model 220 to 240 V Model
Input voltage range 103.5 to 132 V 198 to 264 V
Rated frequency range 50 to 60 Hz
Input frequency range 49.5 to 60.5 Hz
Rated current 0.7 A (maximum
1.6 A)
Power consumption Approx. 36 W (ISO/IEC 10561 letter pattern)
0.4 A (maximum
0.9 A)
Note:
Check the label on the back of the printer for your printer’s voltage.
Environmental
Temperature
Operation 41
Operation (recycled paper,
envelopes, labels, or roll paper)
Storage –22
(5
59
(15
(–30
°
to 95° F
°
to 35° C)
°
to 77° F
°
to 25° C)
°
to 140° F
°
to 60° C)
Humidity (without
condensation)
10% to 80% RH
30% to 60% RH
0% to 85% RH
Continuous labels (front and bottom entry only):
Note:
Use only labels mounted on continuous backing sheets.
Minimum Maximum
Label size See figure below
Backing sheet (inches)
width (mm)4101.6
Backing sheet (inches)
length (mm)4101.6
Backing sheet (inches)
thickness (mm)
Total (inches)
thickness (mm)
Label weight (lb)
(g/m
Quality Plain paper
0.0028
0.07
0.0063
0.16
2
)
FX-880: FX-1180:
10 16
254 406.4
22
558.8
0.0035
0.09
0.0075
0.19
17
68
11/98 EPSON FX-880/FX-1180
- 3
Page 4
EPSON FX-880/FX-11 80
Single sheets:
Front Entry Rear Entry
Minimum Maximum Minimum Maximum
Width
5.8 in.
148 mm
Length 7.2 in.
182 mm
Thickness 0.0025 in.
0.065 mm
Weight 14 lb
52 g/m
Quality Plain paper, bond paper, and recycled paper
FX-880: FX-1180:
10.1 in. 16.5 in.
257mm 420mm
14.3 in.
364 mm
0.0055 in.
0.14 mm
24 lb
2
90 g/m
5.8 in.
148 mm
3.6 in.
92 mm
0.0025 in.
0.065 mm
2
14 lb
52 g/m
FX-880: FX-1180:
10.1 in. 16.5 in.
257mm 420mm
14.3 in.
364 mm
0.0055 in.
0.14 mm
24 lb
2
90 g/m
2
Single-sheet multi-part forms (for the optional front sheet or
front paper guide only):
Minimum Maximum
Width
Length (inches)
Copies 1 original + 5 copies
Total thickness (inches)
Weight (one sheet (lb)
of multi-part) (g/m
Quality Carbonless multi-part forms with a line of
(inches)
(mm)
(mm)
(mm)
2
)1240
5.8
148
7.2
182
0.0047
0.12
glue at the top or the side of the form
FX-880: FX-1180:
10.1 16.5
257 420
14.3
364
0.018
0.46
15
58
Envelopes (rear entry only):
Minimum Maximum
Envelope size
(No. 6)
Envelope size
(No. 10)
Total thickness (inches)
Weight (lb)
Quality Bond envelopes, plain envelopes,
Width (inches)
Length (inches)
Width (inches)
Length (inches)
(mm)
(mm)
(mm)
(mm)
(mm)
(g/m
2
6.5
165
3.6
92
9.5
241
4.1
105
0.0063
0.16
Differences in thickness within
the printable area must be less
than 0.0098 inch (0.25 mm).
)1245
and airmail envelopes without
glue on the flap
0.020
0.52
24
90
Roll paper (rear entry only, and requires optional roll paper
holder):
Minimum Maximum
Width (inches)
Length (inches)
Thickness (inches)
Weight (lb)
Quality Plain paper
(mm)
(mm)
(mm)
(g/m
0.0028
0.07
14
2
)
52
8.5
216
—
0.0035
0.09
22
82
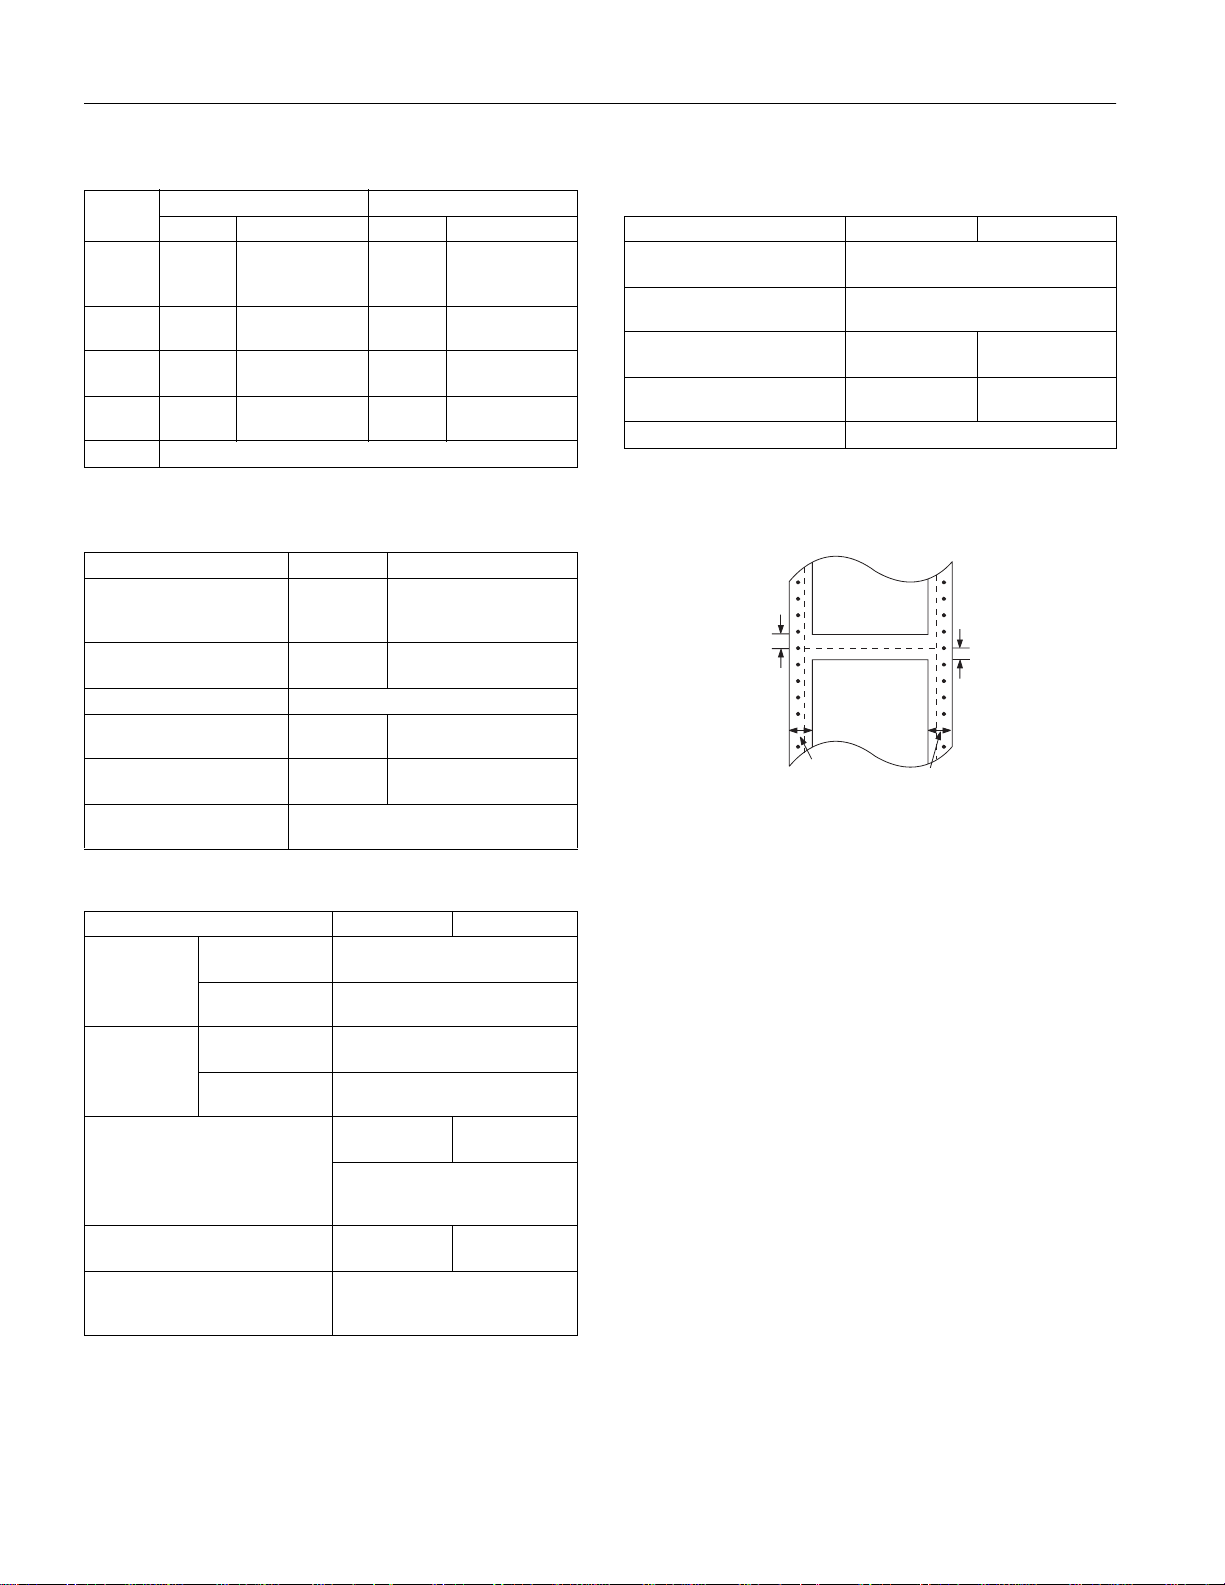
Printable Area
Continuous paper:
printable area
A
printable area
B
A The minimum top and bottom margins (above and below the
perforation) are 0.17 inch (4.2 mm).
B The minimum left and right margins are 0.51 inch (13 mm).
For the FX-880, the maximum printable width is 8 inches
(203.2 mm). For paper wider than 9 inches (229.2 mm),
the side margins increase to match the width of the paper.
For the FX-1180, the maximum printable width is 13.6 inches
(345.4 mm). For paper wider than 14.6 inches (371.4 mm), the
side margins increase to match the width of the paper.
A
B
4 - EPSON FX-880/FX-1180
11/98
Page 5
EPSON FX-880/ FX-1180
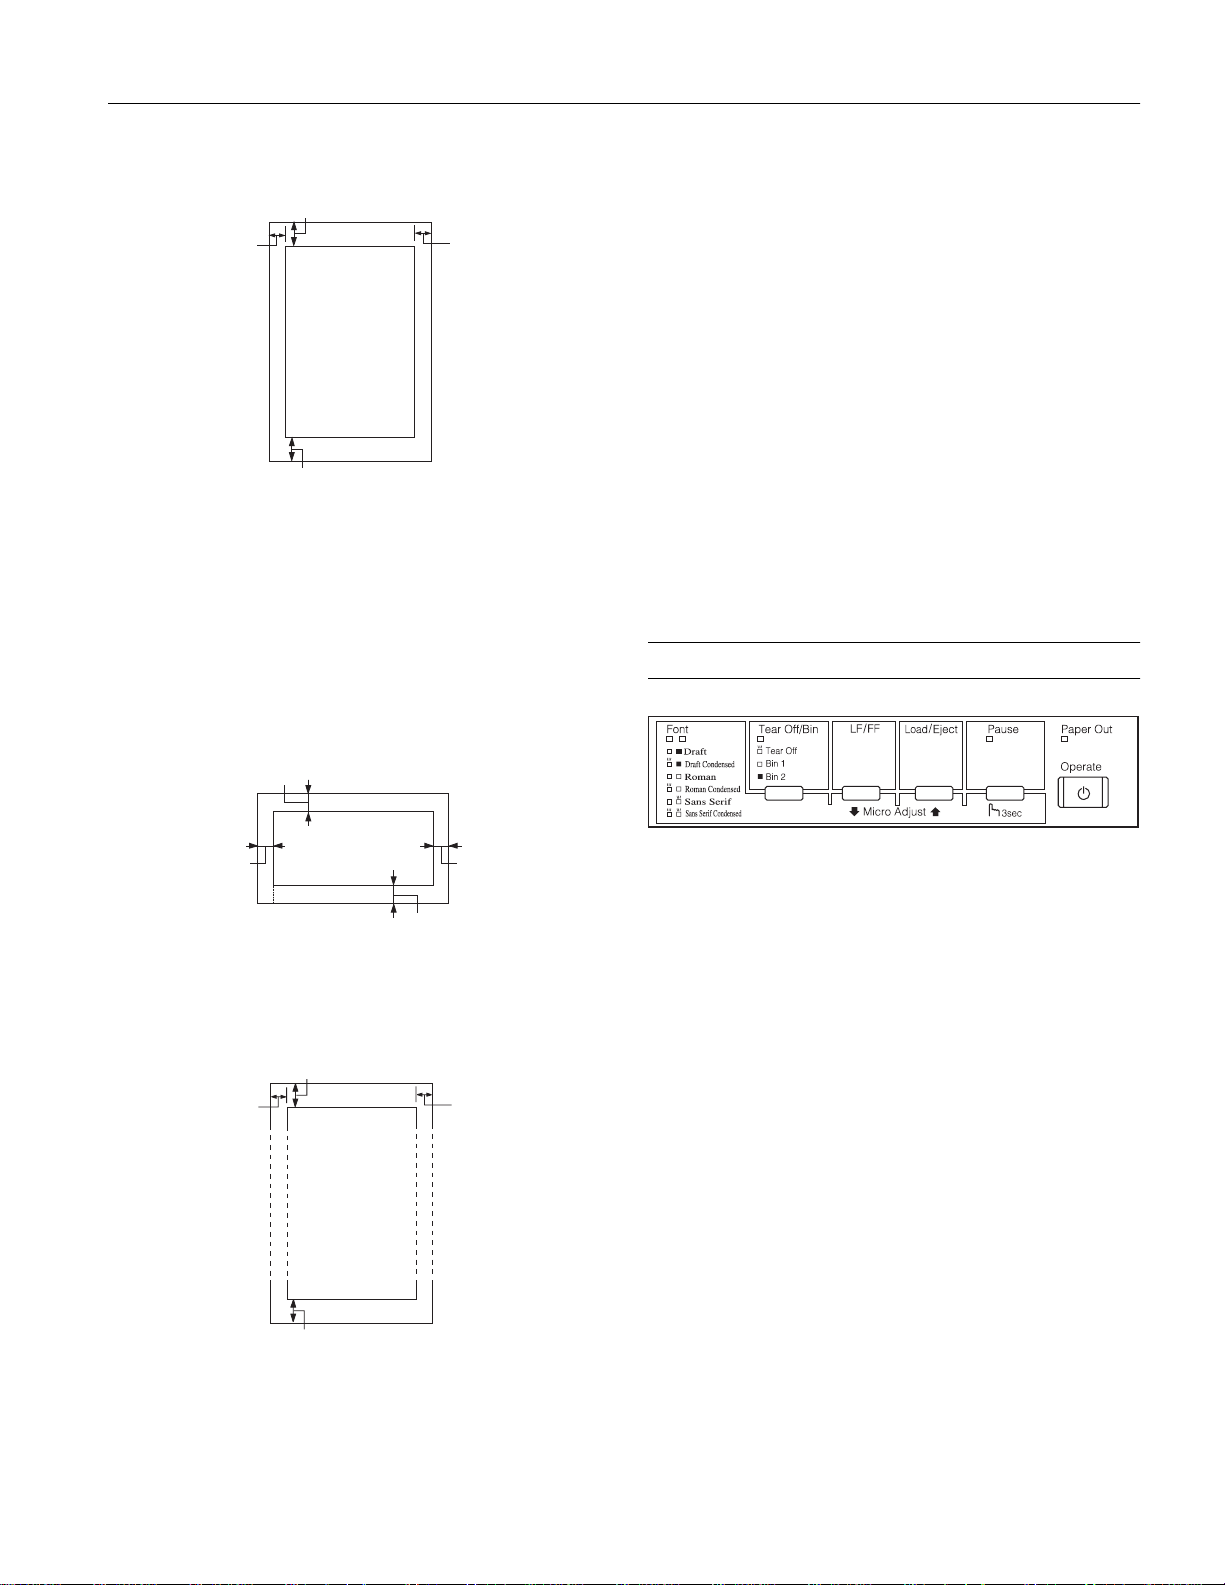
Single sheets:
A
B
printable area
A
A The minimum top and bottom margins are 0.17 inch (4.2 mm).
B The minimum left and right margins are 0.12 inch (3 mm).
For the FX-880, the maximum printable width is 8 inches
(203.2 mm). For paper wider than 8.2 inches (209.2 mm),
the side margins increase to match the width of the paper.
For the FX-1180, the maximum printable width is 13.6 inches
(345.4 mm). For paper wider than 13.8 inches (351.4 mm), the
side margins increase to match the width of the paper.
B
Envelopes:
A The minimum top and bottom margins are 0.17 inch (4.2 mm).
B The minimum left and right margins are 0.12 inch (3 mm). The
maximum printable width is 8 inches (203.2 mm) for the FX-880
and 13.6 inches (345.4 mm) for the FX-1180.
Safety Approvals
120 V model:
Safety standards UL1950
CSA C22.2 No. 950
EMI FCC part 15 subpart B class B
CSA C108.8 class B
220 to 240 V model:
Safety standards EN 60950 (VDE, NEMKO)
EMI EN 55022 (CISPR pub. 22) class B
AS/NZS 3548 class B
Acoustic noise: Approx. 55 dB (A) (ISO 7779 pattern)
Control Panel Buttons and Lights
A
BB
A The minimum top and bottom margins are 0.17 inch (4.2 mm).
B The minimum left and right margins are 0.12 inch (3 mm).
printable area
A
Roll paper:
A
B
printable area
A
B
Font Lights
Indicate which font is selected. See Chapter 5 of the User’s
Guide for more information.
Tear Off/Bin Button
❏ Feeds continuous paper forward to the tear-off position.
❏ Feeds continuous paper backward from the tear-off position
to the top-of-form position.
❏ Selects a cut-sheet feeder bin when the cut-sheet feeder is
installed.
❏ Selects a font when the printer is in the font selection mode.
Tear Off/Bin Light
❏ Flashes when continuous paper is in the tear-off position.
❏ On when bin 1 of the optional cut-sheet feeder is selected.
❏ Off when bin 2 of the optional cut-sheet feeder is selected.
11/98 EPSON FX-880/FX-1180
- 5
Page 6

n
n
f
f f f
EPSON FX-880/FX-11 80
LF/FF Button
❏ Feeds paper line by line.
❏ Ejects a single sheet or advances continuous paper to the
next top-of-form position when held down.
Load/Eject Button
❏ Loads a single sheet of paper.
❏ Ejects a single sheet of paper if a sheet is loaded.
❏ Loads continuous paper from the standby position.
❏ Feeds continuous paper backward to the standby position.
Micro Adjust Buttons
Let you adjust the top-of-form and tear-off positions using the
down or up arrow buttons.
Pause Button
❏ Stops printing temporarily, and resumes printing when
pressed again.
❏ When held down for three seconds, enters the micro adjust
mode. When pressed again, exits the micro adjust mode.
Pause Paper Out Beep Pattern
❏ No paper is loaded in the selected paper source.
❏ The paper is not loaded correctly.
n ●●●
Load paper in the selected paper source, remove and reload
your paper, or select a different paper source with the paper
release lever. The
button to turn off the
Pause Beep Pattern
n ●●●●●
Paper Out light goes off. Press the Pause
Pause light.
The paper release lever is set to the wrong position.
Set the paper release lever to the position for the paper source
you want to use. If paper from another paper source is
currently in the paper path, press the
Load/Eject button to
eject the paper; then move the paper release lever to the
desired position.
Pause Paper Out Beep Pattern
❏ Continuous paper does not feed to the standby position.
f ●●●
Pause Light
❏ On when the printer is paused.
❏ Flashes when the printer is in the micro adjust mode.
Paper Out Light
❏ On when no paper is loaded or paper is not loaded correctly
in the selected paper source.
❏ Flashes when paper has not been fully ejected or a paper jam
has occurred.
Operate Button
Turns the printer on and off. The printer is off when the top
of this button is even with the button protectors.
Error Indicators
Light Status Beep Pattern
n = on ●●● short series of beeps (three times)
o = off ●●●●● long series of beeps (five times)
f = flashing
If a printer error occurs, use the control panel lights to
determine the problem and solution.
Tear off the printed page at the perforation; then press the
Load/Eject button. The paper feeds to the standby
position.
❏ A single sheet of paper is not fully ejected.
Press the
❏ Paper is jammed in the printer.
Load/Eject button to eject the sheet.
Clear the paper jam as described on page 13.
Pause Paper Out
f
The print head is overheated.
Wait a few minutes; the printer resumes printing
automatically once the print head cools.
Font Tear Off/Bin Pause Paper Out
f
An unknown printer error has occurred.
Turn off the printer and leave it off for several minutes; then
turn it on again. If the error recurs, contact your dealer.
Note:
The printer beeps once if you press a control panel button when the
corresponding function is not available.
6 - EPSON FX-880/FX-1180
11/98
Page 7

EPSON FX-880/ FX-1180
Status Monitor
The EPSON Status Monitor 2 utility program comes with the
printer and is for use only with Windows
status of the printer, indicates when errors occur, and provides
troubleshooting tips.
®
95. It monitors the
Paper Positions
Top-of-Form Position
The letters ABC above are printed at the top-of-form position.
The top-of-form position is the position where the printer
starts printing on a page of single-sheet or continuous paper.
Note:
See page 4 for information on the printable area of your paper.
Tear-off Position
Your continuous paper is in the tear-off position when the
perforation is aligned with the printer’s tear-off edge, so you
can easily tear off your printed document.
Standby Position
Your continuous paper is in the standby position when it is
attached to the tractor but not loaded in the printer.
Available Paper Paths
Printing on Continuous Paper
You can choose from three tractor positions (front push, rear
push, and pull) and three paper entry slots (front, rear, and
bottom) for continuous paper printing. The tractor is installed
in the rear push position when the printer is shipped.
If you often need to tear off sheets of continuous paper (for
example, if you print purchase orders or sales slips), it is best
to use the front or rear push tractor. This allows you to use the
printer’s tear-off edge to easily tear off printed sheets of
continuous paper at the perforation. Also, when continuous
paper is loaded on a push tractor, you can load single sheets of
paper from the paper guide without removing the continuous
paper.
If you often print on thick or heavy continuous paper, such as
multi-part forms or continuous paper with labels, use the
tractor in the pull position. The pull tractor provides the best
paper jam prevention, and allows you to load continuous
paper from the front, rear, or bottom of the printer. However,
you cannot use the tear-off feature with the pull tractor.
Note:
To use a pull tractor, you can install the tractor that comes with the
printer in the pull position, or you can purchase the optional additional
tractor (C800201 for FX-880, C800211 for FX-1180) and install it in the
pull position.
If you use the push tractor with the optional tractor in the pull
position, you can create a push/pull tractor combination. This
improves continuous paper feeding and is recommended for
printing on continuous pre-printed forms, multi-part forms,
or labels, and for printing high-quality graphics.
The table below summarizes the paper paths available for
printing on continuous paper.
Paper Path Description
Front push tractor
Front paper slot
Rear push tractor
Rear paper slot
Pull tractor
Front paper slot
Pull tractor
Bottom paper slot
The paper path from the front slot is almost
straight, which reduces the chance of paper
jams. Use the front slot when you are printing
on thick paper such as multi-part forms.
Do not load thick paper, such as multi-part
forms with 5 or 6 parts (1 original plus 4 or 5
copies) in the rear slot. The paper path from the
rear slot is curved, and thick continuous paper
performs best with a straight paper path.
The paper path from the front slot is almost
straight, which reduces the chance of paper
jams. Use the front slot when you are printing
on thick paper such as multi-part forms or
continuous paper with labels.
Because the bottom slot has the straightest
paper path, it is ideal for printing on thick paper,
such as multi-part forms or continuous paper
with labels.
Note:
When loading paper in the bottom slot, be sure
to use a printer stand with an opening large
enough so that the paper can feed through it
without obstruction.
11/98 EPSON FX-880/FX-1180
- 7
Page 8

EPSON FX-880/FX-11 80
Paper Path Description
Pull tractor
Rear paper slot
Rear push tractor and
pull tractor
Rear paper slot
Front push tractor
and pull tractor
Front paper slot
Caution:
Do not load continuous paper with labels in the rear
slot; the labels may come off the backing sheet inside
the printer and cause a jam.
Note:
If you leave the standard tractor in the rear push position and install
the optional tractor in the front push position, you can load one type
of continuous paper onto the front push tractor and another type onto
the rear push tractor. You can easily switch between the two paper
types using the paper release lever. Before moving the paper release
lever, always press the Load/Eject button to feed the paper in the
paper path backward to the standby position.
You can load ordinary continuous paper in the
rear slot. However, loading thick paper in the
rear slot is not recommended because the
paper path from the rear slot is curved and a
paper jam may occur.
To use the rear push tractor with the pull
tractor, you need to install the optional
additional tractor. The rear slot is not
recommended for thick paper.
To use the front push tractor with the pull
tractor, you need to install the optional
additional tractor.
Printing on Single Sheets
You can load ordinary single sheets (not single-sheet multipart forms) and envelopes one at a time from the top of the
printer, using the paper guide that comes with the printer.
Paper Release Lever Positions
Use the paper release lever to select which paper source you
want the printer to load paper from. The table below shows
the corresponding paper path(s) for each paper release lever
position.
Single-sheet position
For loading single sheets from the top (from the
paper guide or an optional cut-sheet feeder) or from
the optional sheet or paper guide in the front.
Front push tractor position
For loading continuous paper from the tractor
installed in the front push position. Also set the
lever to this position when using the pull and front
push tractors in combination.
Rear push tractor position
For loading continuous paper from the tractor
installed in the rear push position. Also set the lever
to this position when using the pull and rear push
tractors in combination.
You can also load single-sheet paper using an optional cutsheet feeder, front sheet guide, or front paper guide.
8 - EPSON FX-880/FX-1180
Pull tractor position
For loading continuous paper from the tractor
installed on top of the printer in the pull position.
When the tractor is in the pull position, you can
load paper in the printer from the front, rear, or
bottom slot.
11/98
Page 9

Paper Thickness Lever Positions
-1
0
1
2
3
4
5
6
The paper thickness lever is located under the printer cover.
You need to set the paper thickness lever for the type of paper
you are using, as shown in the table below.
Paper Type Lever Position
Ordinary paper (single sheets or continuous paper) 0
Carbonless multi-part forms with:
2 parts (original + 1 copy)
3 parts (original + 2 copies)
4 parts (original + 3 copies)
5 parts (original + 4 copies)
6 parts (original + 5 copies)
Thin paper –1 or 0
Continuous paper with labels 2
Envelopes 2 to 6
1
2
3
4
5
EPSON FX-880/ FX-1180
Rear push tractor
Load paper printable side down.
1. If you are using the front push tractor, remove the front
cover.
If you are using the rear push tractor, remove the paper
guide.
2. Open both sprocket covers.
3. Fit the first four holes of the paper over the sprocket pins (as
shown above). Then close the sprocket covers.
Note:
Make sure the left and right sprockets are positioned properly
for your paper’s width. If they are too far apart or there is any
slack in the paper, you need to move the sprockets.
Paper Handling
Loading Continuous Paper Onto a Push Tractor
Front push tractor
Load paper printable side up.
4. If you are using the front push tractor, reattach the front
cover.
If you are using the rear push tractor, reattach the paper
guide.
5. Make sure the paper release lever is in the correct position.
6. Make sure that the paper guide is lying flat on the printer
and the continuous paper support is in the upright position.
Removing the Printed Document from a Push Tractor
1. Make sure the Tear Off/Bin light is flashing. (You may need
to press the
Tear Off/Bin light is flashing, your paper is in the tear-off
position.
Tear Off/Bin button.) When the
11/98 EPSON FX-880/FX-1180
- 9
Page 10

EPSON FX-880/FX-11 80
2. Tear off the printed document at the perforation using the
tear-off edge of the printer cover. (Pull it toward you for a
clean cut.)
3. Press the
Load/Eject button to feed the continuous paper
backward out of the printer and into the standby position.
Caution:
Always tear off your printed document before you
press the Load/Eject button. Reverse feeding several
pages at a time may cause a paper jam.
Removing Continuous Paper With Labels
1. Tear off the fresh supply of continuous labels at the
perforation nearest the paper entry slot.
Switching to Printing on Single Sheets
You can easily switch from printing on continuous paper with
a push tractor to printing on single sheets without having to
remove or reload paper. Follow the steps below.
Note:
❏ If continuous paper with labels is loaded in the printer, remove it
before switching to single-sheet printing.
❏ If the tractor is in the pull position, remove any continuous paper
from it before switching to single-sheet printing.
1. If any printed pages of continuous paper remain in the
printer, press the
the tear-off position, and then tear them off.
Caution:
Tear off your printed document before you press the
Load/Eject button in the next step. Reverse feeding
several pages at a time may cause a paper jam.
Never use the knob to eject paper while the printer is
on; this may damage the printer or cause it to lose the
tear-off or top-of-form position.
2. Press the Load/Eject button to feed the continuous paper
backward to the standby position.
3. Lower the continuous paper support on the paper guide
until it clicks into place, then move the paper guide to the
upright position.
Tear Off/Bin button to advance them to
tear here
2. Hold down the
from the printer.
Caution:
Never press the Load/Eject or Tear Off/Bin button
when printing on labels. When fed backward, labels
can easily come off the backing sheet and cause a
jam.
LF/FF button to eject the remaining labels
4. Load single sheets in the printer.
5. Set the paper release lever to the single-sheet position.
Switching to Printing on Continuous Paper
To switch from printing on single sheets to printing on
continuous paper with the front or rear push tractor, follow
the steps below.
Note:
To switch from printing with the optional front sheet guide to printing
with the front push tractor, you need to remove the front sheet guide.
1. If a single sheet remains in the printer, press the Load/Eject
button to eject it.
Caution:
Never use the knob to eject paper while the printer is
on; this may damage the printer or cause it to lose the
tear-off or top-of-form position.
2. Make sure that the tractor is installed in the front or rear
push position and that continuous paper is loaded on the
tractor.
3. Set the paper release lever to the appropriate position.
10 - EPSON FX-880/FX-1180
11/98
Page 11

EPSON FX-880/ FX-1180
Adjusting the Top-of-Form Position
If your printing begins too high or low on the page, you can
use the micro adjust feature to adjust the top-of-form position
as described below.
Caution:
Never use the knob to adjust the top-of-form position;
this may damage the printer or cause it to lose the topof-form position.
Note:
❏ Your top-of-form position setting remains in effect until you
change it, even if you turn off the printer.
❏ The top margin setting made in some application software
overrides the top-of-form position setting you make with the
micro adjust feature. If necessary, adjust the top-of-form position
using your software.
1. Make sure the printer is turned on and paper is loaded.
2. If you are using a push tractor, press the
to advance the paper to the current top-of-form position. If
necessary, lift up the printer cover so you can see the paper
position.
3. Hold down the
Pause light starts flashing and the printer enters the micro
Pause button for about three seconds. The
adjust mode.
4. Press the
Load/Eject U and LF/FF D buttons to move the
top-of-form position up or down on the page.
Load/Eject button
Advancing the Paper to the Tear-off Edge
If you use the front or rear push tractor, you can use the tearoff feature to advance your continuous paper to the printer’s
tear-off edge when you finish printing. You can then easily
tear off the printed document.
As described below, you can use the tear-off feature in two
ways: manually by pressing the printer’s
or automatically by turning on the auto tear-off mode. The
Tear Off/Bin light flashes when the paper is in the tear-off
position.
Caution:
Never use the tear-off feature to feed continuous
paper with labels backward; they may come off the
backing sheet and jam the printer.
Never reverse feed continuous paper loaded on the
pull tractor using the Tear Off/Bin button; the paper
may come off the pull tractor and jam the printer.
Using the Tear Off/Bin Button
After the printer finishes printing your document, press the
Tear Off/Bin button to advance the paper to the tear-off edge.
Note:
If the Tear Off/Bin light is flashing, the paper is in the tear-off position.
If you press the Tear Off/Bin button, the printer feeds your paper to
the next top-of-form position.
Advancing Paper to the Tear-off Position
Automatically
To automatically advance your printed documents to the tearoff position, you need to turn on the auto tear-off mode and
select the appropriate page length for continuous paper in the
default-setting mode. For instructions, see “Using the
Default-Setting Mode” on page 13.
Tear Off/Bin button,
Note:
❏ The printer has a minimum and a maximum top-of-form
position. If you try to adjust it beyond these limits, the printer
beeps and stops moving the paper.
❏ When the paper reaches the default top-of-form position, the
printer also beeps and stops moving the paper briefly. You
can use the default setting as a reference point when
adjusting the top-of-form position.
5. Press the Pause button to exit micro adjust mode.
When auto tear-off is on, the printer automatically advances
the paper to the tear-off position whenever it receives a full
page of data or a form feed command followed by no more
data.
Adjusting the Tear-off Position
If your paper’s perforation is not aligned with the tear-off
edge, you can use the micro adjust feature to move the
perforation to the tear-off position. Follow the steps below.
Caution:
Never use the knob to adjust the tear-off position; this
may damage the printer or cause it to lose the tear-off
position.
11/98 EPSON FX-880/FX-1180
- 11
Page 12

EPSON FX-880/FX-11 80
paper tension unit
Note:
Your tear-off position setting remains in effect until you change it,
even if you turn off the printer.
1. Make sure the Tear Off/Bin light is flashing (the paper is at
the current tear-off position). You may need to press the
Tear Off/Bin button.
2. Hold down the
Pause light begins flashing and the printer enters the micro
Pause button for about three seconds. The
adjust mode.
3. Press the
Load/Eject U and LF/FF D buttons to feed the
paper backward or forward until the paper perforation is
aligned with the tear-off edge of the printer cover.
tear-off edge
2. Press up the tabs on the paper tension unit, then lift the
front of the unit and pull it up and out of the printer.
3. Make sure that the print head is not hot; then slide the print
head to the middle of the printer by hand.
ribbon cartridge handle
print head
Note:
The printer has a minimum and a maximum tear-off position. If
you try to adjust the tear-off position beyond these limits, the
printer beeps and stops moving the paper.
4. Press the Pause button to turn off micro adjust mode.
Then tear off the printed pages.
When you resume printing, the printer automatically feeds the
paper back to the top-of-form position and begins printing.
Replacing the Ribbon Cartridge
Warning:
You need to move the print head by hand to install or
replace the ribbon cartridge. If you just used the
printer, the print head may be hot; let it cool before
you replace the ribbon cartridge.
Caution:
Make sure the printer is off and unplugged from the
electrical outlet. Moving the print head while the
printer is on may damage the printer.
1. Remove the printer cover.
4. Grasp the used ribbon cartridge by its handle and pull it up
and out of the printer.
5. Turn the ribbon-tightening knob of the new ribbon
cartridge in the direction of the arrow to remove any slack
in the ribbon.
12 - EPSON FX-880/FX-1180
11/98
Page 13

EPSON FX-880/ FX-1180
6. Hold the ribbon cartridge by its handle and push it firmly
down into position; then press down both ends of the
cartridge to fit the plastic hooks into the slots.
7. Use a pointed object, such as a ball point pen, to guide the
ribbon between the print head and ribbon guide while you
turn the ribbon-tightening knob to help feed the ribbon
into place.
Clearing Paper Jams
1. Press the Operate button to turn off the printer.
2. Remove the printer cover.
3. If continuous paper is jammed in the printer, tear off the
fresh supply at the perforation nearest the paper entry slot.
4. Turn the knob on the left side of the printer away from you
to eject the paper in the printer.
Caution:
Always turn off the printer before you use the knob;
otherwise the printer may be damaged or the top-ofform or tear-off position may be lost.
8. Slide the print head from side to side to make sure it moves
smoothly.
9. Install the paper tension unit by placing it on the printer’s
mounting pegs and lowering it into place. Press down both
ends of the unit until it clicks into place.
10. Replace the printer cover.
5. Remove any remaining pieces of paper. If the paper is stuck
where the printer ejects it, gently pull the paper out of the
printer.
6. Replace the printer cover and press the
turn on the printer. Make sure the
flashing and the
Pause light is off.
Operate button to
Paper Out light is not
Using the Default-Setting Mode
The default settings control many printer functions. While
you can often set these functions through your software or
printer driver, you may sometimes need to change a default
setting from the printer’s control panel using the defaultsetting mode.
The following tables summarize the default-setting mode
settings and options. The factory settings are bold.
11/98 EPSON FX-880/FX-1180
- 13
Page 14

EPSON FX-880/FX-11 80
Default-Setting Mode 1
Setting Options
Skip over perforation
Auto tear-off
Auto line feed
Print direction
Software
I/F (interface) mode
Auto I/F (interface) wait time
0 slash
High speed draft Off,
Input buffer Off,
Buzzer Off,
Auto CR (carriage return)*
IBM character table* Table 2,
* These settings are available only in IBM 2380/2381 Plus emulation
mode (IBM 2380 Plus for FX-880, IBM 2381 Plus for FX-1180).
Off
, On
Off
, On
Off
, On
Bi-D
, Uni-D
ESC/P
, IBM 2380 Plus for FX-880,
IBM2381 Plus for FX-1180
Auto
, Parallel, Optional
10 seconds
0
, 0/
Off
On (10 cpi)
On
On
, On
Table1
, 30 seconds
, On (12 cpi)
Default-Setting Mode 2
Setting Options
Page length for front
tractor
Page length for rear tractor Length in inches: 3, 3.5, 4, 5.5, 6, 7, 8,
Character table Standard model:
International character set
for Italic table*
Length in inches: 3, 3.5, 4, 5.5, 6, 7, 8,
8.5, 11, 70/6, 12, 14, 17
8.5, 11, 70/6, 12, 14, 17
Italic
PC 860, PC 863, PC 865, PC 861,
BRASCII, Abicomp, Roman 8, ISO Latin 1
All other models: Italic, PC 437, PC 850,
PC 437 Greek, PC 853, PC 855, PC 852,
PC 857, PC 866, PC 869, MAZOWIA,
code MJK, ISO 8859-7, Bulgaria, PC 774,
Estonia, PC 866 LAT., ISO 8859-2, PC 866
UKR
Italic U.S.A.
Italic U.K., Italic Denmark 1, Italic
Sweden, Italic Italy, Italic Spain 1
, Italic France, Italic Germany,
, PC 437, PC 850,
Caution:
Whenever you turn off the printer, wait at least five
seconds before turning it back on; otherwise, you may
damage the printer.
2. Using the tables above, determine whether the setting you
want to change is in default-setting mode 1 or 2.
3. To change settings in default-setting mode 1, hold down
the
Tear Off/Bin button while you press the Operate
button to turn on the printer. To change settings in defaultsetting mode 2, hold down the
buttons while you press the
Tear Off/Bin and LF/FF
Operate button to turn on the
printer.
The printer enters the default-setting mode you selected and
prints the language selection instructions (one page).
4. Press the
Pause lights indicate the language you want, as described in
Load/Eject button until the Paper Out and
the language selection instructions.
5. Press the
Tear Off/Bin button to print the default-setting
mode instructions (two pages) in the language you selected.
The printed instructions list the settings you can change,
describe how to change them, and show you how the
control panel lights help you make settings. Use these
instructions to change the printer’s default settings from the
control panel.
Note:
The arrows in the instructions indicate the printer’s current
settings.
6. To save your settings and turn off the printer, press the
Operate button. This also exits the default-setting mode.
Note:
You may exit the default-setting mode any time by turning off the
printer while it is paused. Any settings you have made remain in
effect until you change them again.
* The options available for this setting vary depending on the country.
Changing Default Settings
Follow the steps below to enter the default-setting mode and
change the printer’s default settings.
Note:
❏ To print the language selection and default-setting mode
instructions, you need three sheets of letter- or A4-size paper or
three pages of continuous paper that is at least 11 inches
(279 mm) long and 8.3 inches (210 mm) wide.
❏ If you use single sheets, you need to load a new sheet of paper
each time the printer ejects a printed sheet from the paper guide.
1. Make sure paper is loaded and the printer is turned off.
14 - EPSON FX-880/FX-1180
Aligning Vertical Lines in Your Printout
If you notice that the vertical lines in your printout are not
properly aligned, you can use the printer’s bidirectional
adjustment mode to correct this problem.
During bidirectional adjustment, the printer prints three
sheets of alignment patterns, labeled High Speed Draft, Draft,
and NLQ (near letter quality). As described below, you select
the best alignment pattern from each sheet.
11/98
Page 15

EPSON FX-880/ FX-1180
Note:
To print the instruction sheet and alignment patterns, you need four
single sheets or four pages of continuous paper of at least the
following sizes:
Paper Type FX-880 FX-1180
Continuous paper 9.5 x 11 inches
(241 x 279 mm)
Single-sheet paper Letter or A4 A3 landscape
❏ If you use single sheets, you need to load a new sheet of paper
each time the printer ejects a printed sheet from the paper guide.
14.8 x 11 inches
(376 x 279 mm)
Follow these steps to perform the bidirectional adjustment:
1. Make sure paper is loaded and the printer is turned off.
Caution:
Whenever you turn off the printer, wait at least five
seconds before turning it back on; otherwise you may
damage the printer.
2. While holding down the Pause button, press the Operate
button to turn on the printer. The printer enters the
bidirectional adjustment mode and then prints instructions
and the first set of alignment patterns.
3. As described in the instructions, compare the alignment
patterns and select the pattern with the best alignment.
Then select the pattern with the best alignment for each of
the remaining sets of alignment patterns.
4. After you select the best pattern in the final set of alignment
patterns and save your selection by pressing the
Tear Off/Bin button, press the Operate button to turn off
the printer and exit the bidirectional adjustment mode.
To perform a self test, follow these steps:
1. Make sure paper is loaded and the printer is turned off.
Caution:
Whenever you turn off the printer, wait at least five
seconds before turning it back on; otherwise you may
damage the printer.
2. To run the test using the Draft font, hold down the LF/FF
button while you press the
Operate button to turn on the
printer. To run the test using the printer’s near letterquality fonts, hold down the
Load/Eject button while you
turn on the printer. Either self test can help you determine
the source of your printing problem; however, the draft self
test prints faster than the near letter-quality test.
After a few seconds, the printer loads the paper
automatically, and then begins printing the self test.
A series of characters is printed.
Note:
To temporarily stop the self test, press the Pause button. To
resume the test, press the Pause button again.
3. To end the self test, press the Pause button to stop
printing. If a printed page remains in the printer, press the
Load/Eject button to eject it. Then turn off the printer.
Caution:
Do not turn off the printer while it is printing. Always
press the Pause button to stop printing and the Load/
Eject button to eject the printed page before you turn
off the printer.
Printing a Self Test
Running the printer’s self test helps you determine whether
the printer or the computer is causing the problem:
❏ If the self test results are satisfactory, the printer is working
properly and the problem probably results from your
printer driver settings, application settings, computer, or
interface cable. (Be sure to use a shielded interface cable.)
❏ If the self test does not print properly, there is a problem
with the printer.
You can print the self test using either single sheets or
continuous paper.
Note:
Use paper of at least the following width:
Paper Type FX-880 FX-1180
Continuous paper 9.5 inches (241 mm) 14.8 inches (376 mm)
Single-sheet paper Letter or A4 A3 landscape
Printing a Hex Dump
You can print a hexadecimal dump to isolate communication
problems between the printer and your software program. In
hex dump mode, the printer prints all data it receives from the
computer as hexadecimal values.
You can print a hex dump using either single sheets or
continuous paper.
Note:
Use paper that is at least 8.3 inches (210 mm) wide, such as letter- or
A4-size paper.
To print a hex dump, follow these steps:
1. Make sure paper is loaded and the printer is turned off.
Caution:
Whenever you turn off the printer, wait at least five
seconds before turning it back on; otherwise you may
damage the printer.
11/98 EPSON FX-880/FX-1180
- 15
Page 16

EPSON FX-880/FX-11 80
2. To enter hex dump mode, hold down both the
Load/Eject buttons while you press the Operate button to
LF/FF and
turn on the printer.
3. Open a software program and send a print job to the
printer. Your printer prints all the codes it receives in
hexadecimal format.
If characters are printable, they appear in the right column
as ASCII characters. Nonprintable codes, such as control
codes, are represented by dots. By comparing the characters
printed in the right column with the printout of the
hexadecimal codes, you can check the codes the printer is
receiving.
4. To turn off hex dump mode, press the
Pause button, eject
the printed page(s), and then turn off the printer.
Cleaning the Printer
To keep your printer operating at its best, you should clean it
thoroughly several times a year. Follow these steps:
1. Remove any paper loaded in the printer, and turn off the
printer. Then remove the paper guide. If an optional cutsheet feeder is installed, remove it.
2. Use a soft brush to carefully brush away all dust and dirt
from the outer case and paper guide.
Transporting the Printer
If you need to transport your printer some distance, carefully
repack it using the original box and packing materials, as
described below.
1. Remove any paper loaded in the printer, and turn off the
printer. Then remove the paper guide.
2. Unplug the power cord from the electrical outlet; then
disconnect the interface cable from the printer.
3. If an optional cut-sheet feeder is installed, remove it. If any
other options are installed, remove them and pack them in
their original boxes.
Warning:
If you just used the printer, the print head may be hot;
let it cool before you remove the ribbon cartridge.
4. Remove the ribbon cartridge as described on page 12.
5. Make sure the paper tension unit is installed and the tractor
is installed in the rear push position. Close the printer cover
and front cover.
6. Repack the printer, ribbon cartridge, paper guide, and
power cord (if necessary) in the original packing materials
and place them in the printer’s original box.
3. If the outer case or paper guide is still dirty, clean it with a
soft, clean cloth dampened with mild detergent dissolved in
water. Keep the printer cover and front cover closed to
prevent water from getting inside the printer.
Caution:
Never use alcohols or thinners to clean the printer;
these chemicals can damage the printer components
as well as the case.
Be careful not to get water on the printer mechanism
or electronic components.
Do not use a hard or abrasive brush.
Do not spray the inside of the printer with lubricants;
unsuitable lubricants can damage the printer
mechanism. Contact an EPSON dealer if you think
lubrication is needed.
Related Documentation
4008439 EPSON FX-880/FX-1180 User’s Guide
4008440 EPSON FX-880/FX-1180 Quick Reference
Guide
4007754 EPSON FX-880/FX-1180 Unpacking sheet
TM-FX880 EPSON FX-880 Service Manual
TM-FX1180 EPSON FX-1180 Service Manual
PL-FX880 EPSON FX-880 Parts Price List
PL-FX1180 EPSON FX-1180 Parts Price List
16 - EPSON FX-880/FX-1180
11/98
 Loading...