

Page 1
®
9-Pin Dot Matrix Printer
Quick Reference
Guide
Contents
Loading Continuous Paper With the Front
Push Tractor . . . . . . . . . . . . . . . . . . 2
Loading Continuous Paper With the Rear
Push Tractor . . . . . . . . . . . . . . . . . . 4
Removing Co ntinuous Paper From
the Front or Rear Push Tractor . . . . . . . . 6
Removing Co ntinuous Paper With Labels
From the Front Push Tractor . . . . . . . . . 7
Read your
User’s Guide
first for
complete instructions, and then
use this guide any time you need
Replacing the Ribbon Cartridge . . . . . . . . 8
information about the topics in
this guide.
EPSON is a registered trademark of SEIKO EPSON CORPORATION. Other product names used herein
are for identification purposes only and may be trademarks of their respective owners. EPSON disclaims
any and all right in those marks.
Clearing Paper Jams . . . . . . . . . . . . . . . 14
Error Indicators . . . . . . . . . . . . . . . . . . 16
Copyright © 1997 by SEIKO EPSON CORPORATION, Nagano, Japan
Printed in Japan
4008440
C01-00
Page 2
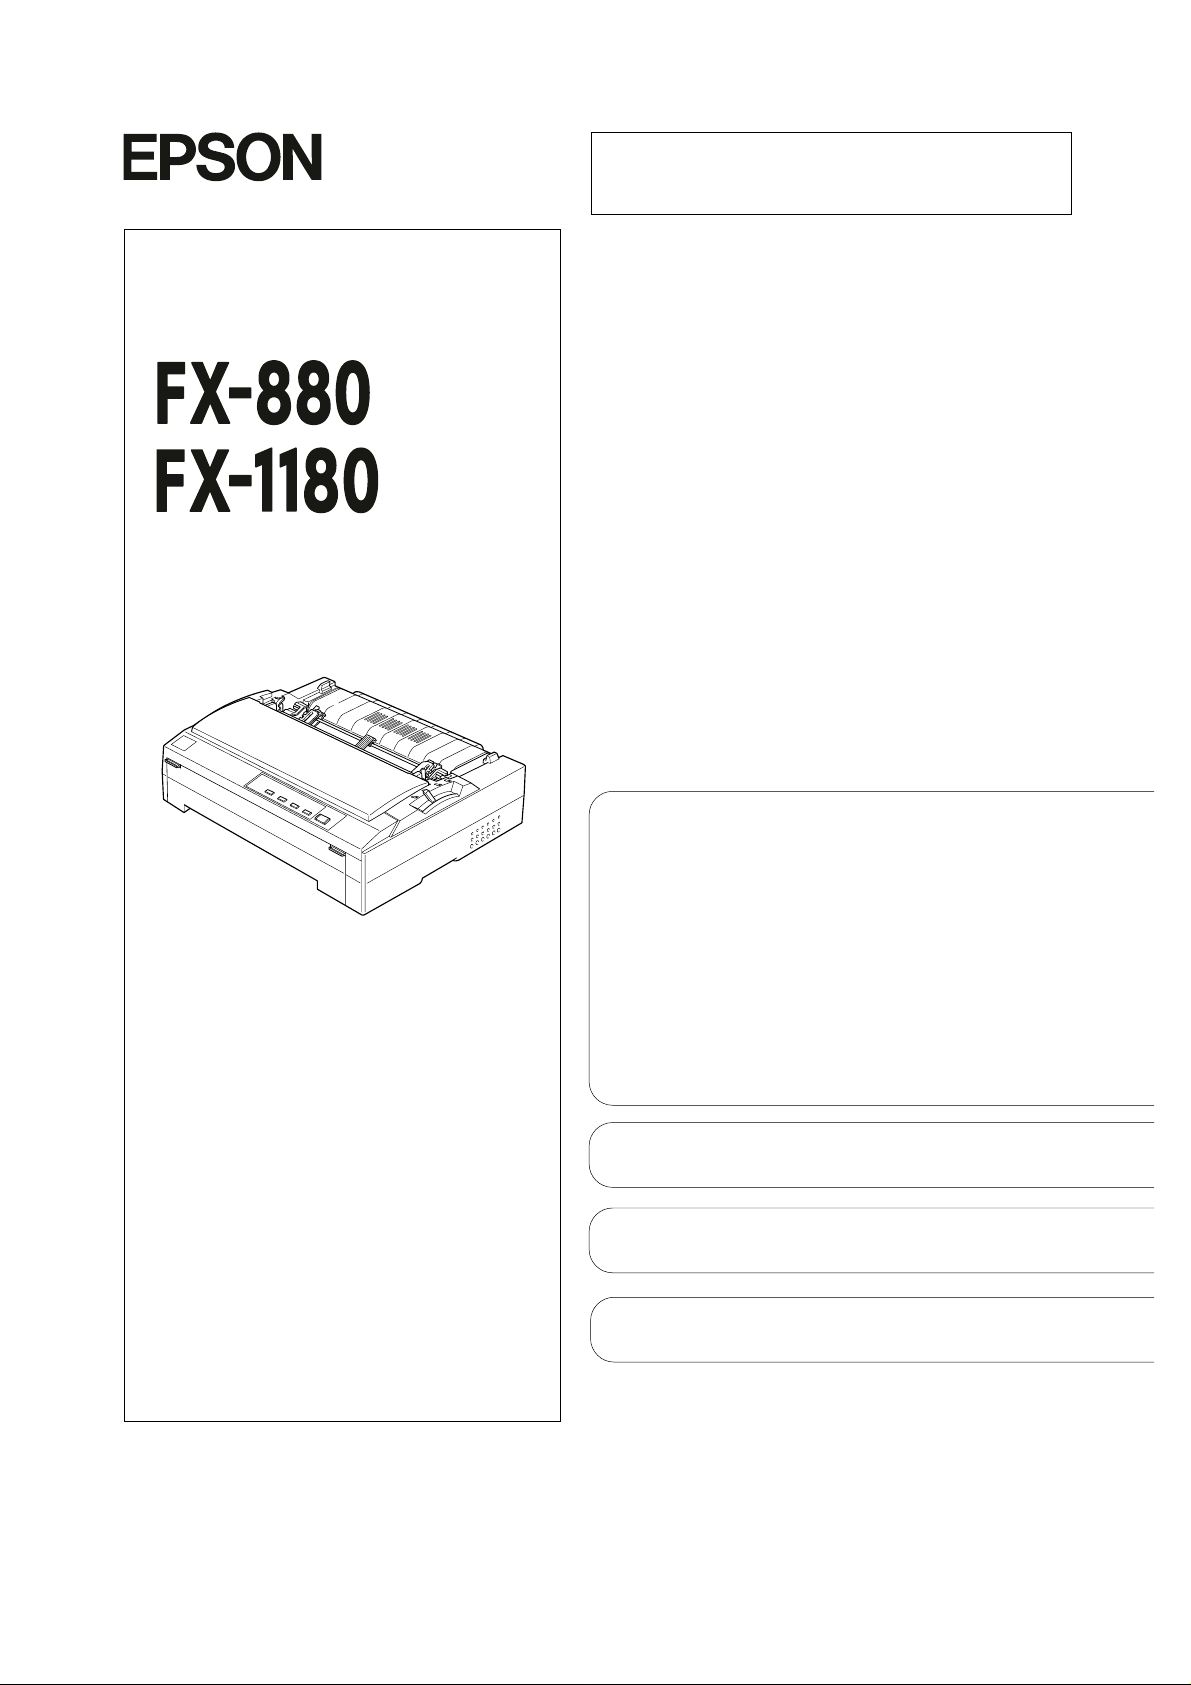
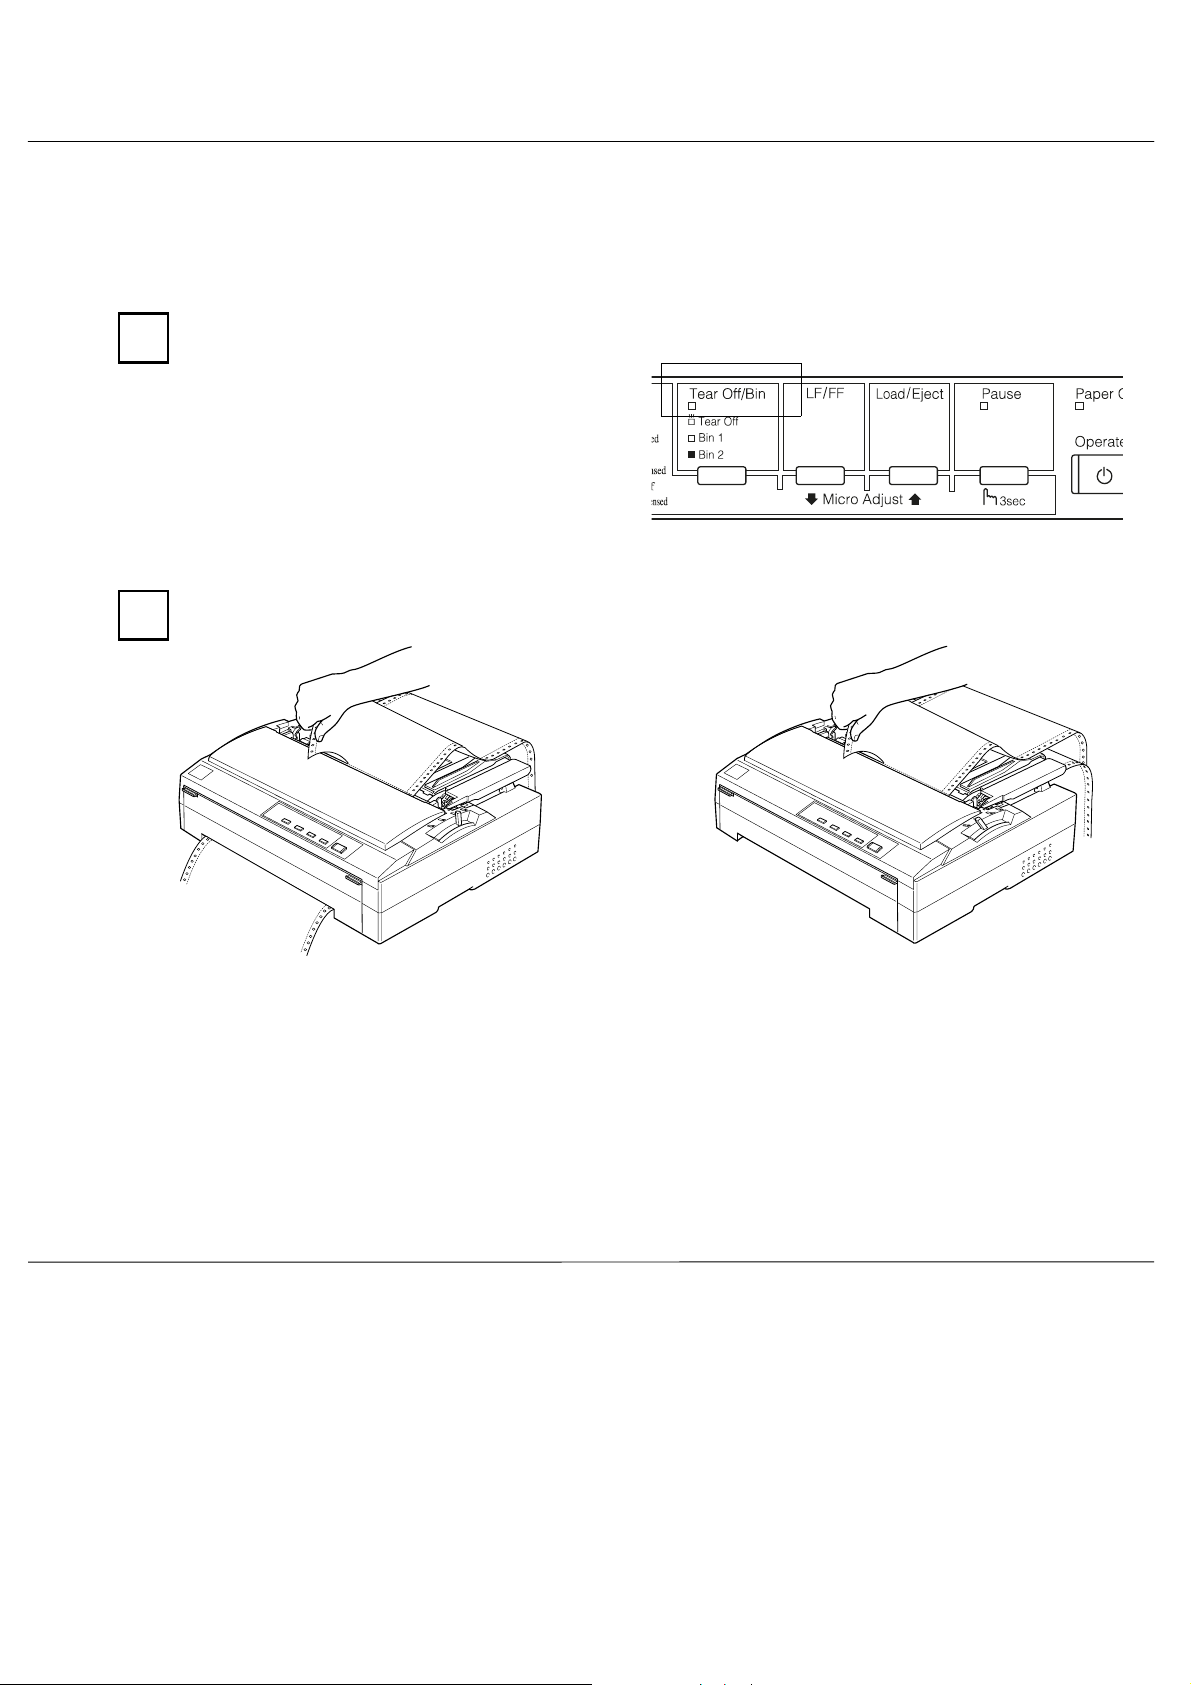
Loading Continuous Paper With the Front Push Tractor
To load continuous paper in the front push tractor, follow these steps.
1 2
1
2
Turn off the printer, then remove the
front cover.
Open both sprocket covers, and fit the
first four holes of the paper, printable
side up, over the tractor pins. Then
close the sprocket covers .
Note:
Load c o ntinuous pape r that has a clean,
straight edge to av oi d pa per jams.
Q
2
Make sure the left and right sprockets are
positioned properly for your paper’s
width.
Q
If you load continuous paper of a
different size or thickness, adjust the
position of the sprockets or change the
paper thickness lever settin g. See
Chapter 3 of the User’s G uide for
inst r u ctio ns.
Page 3

3 4
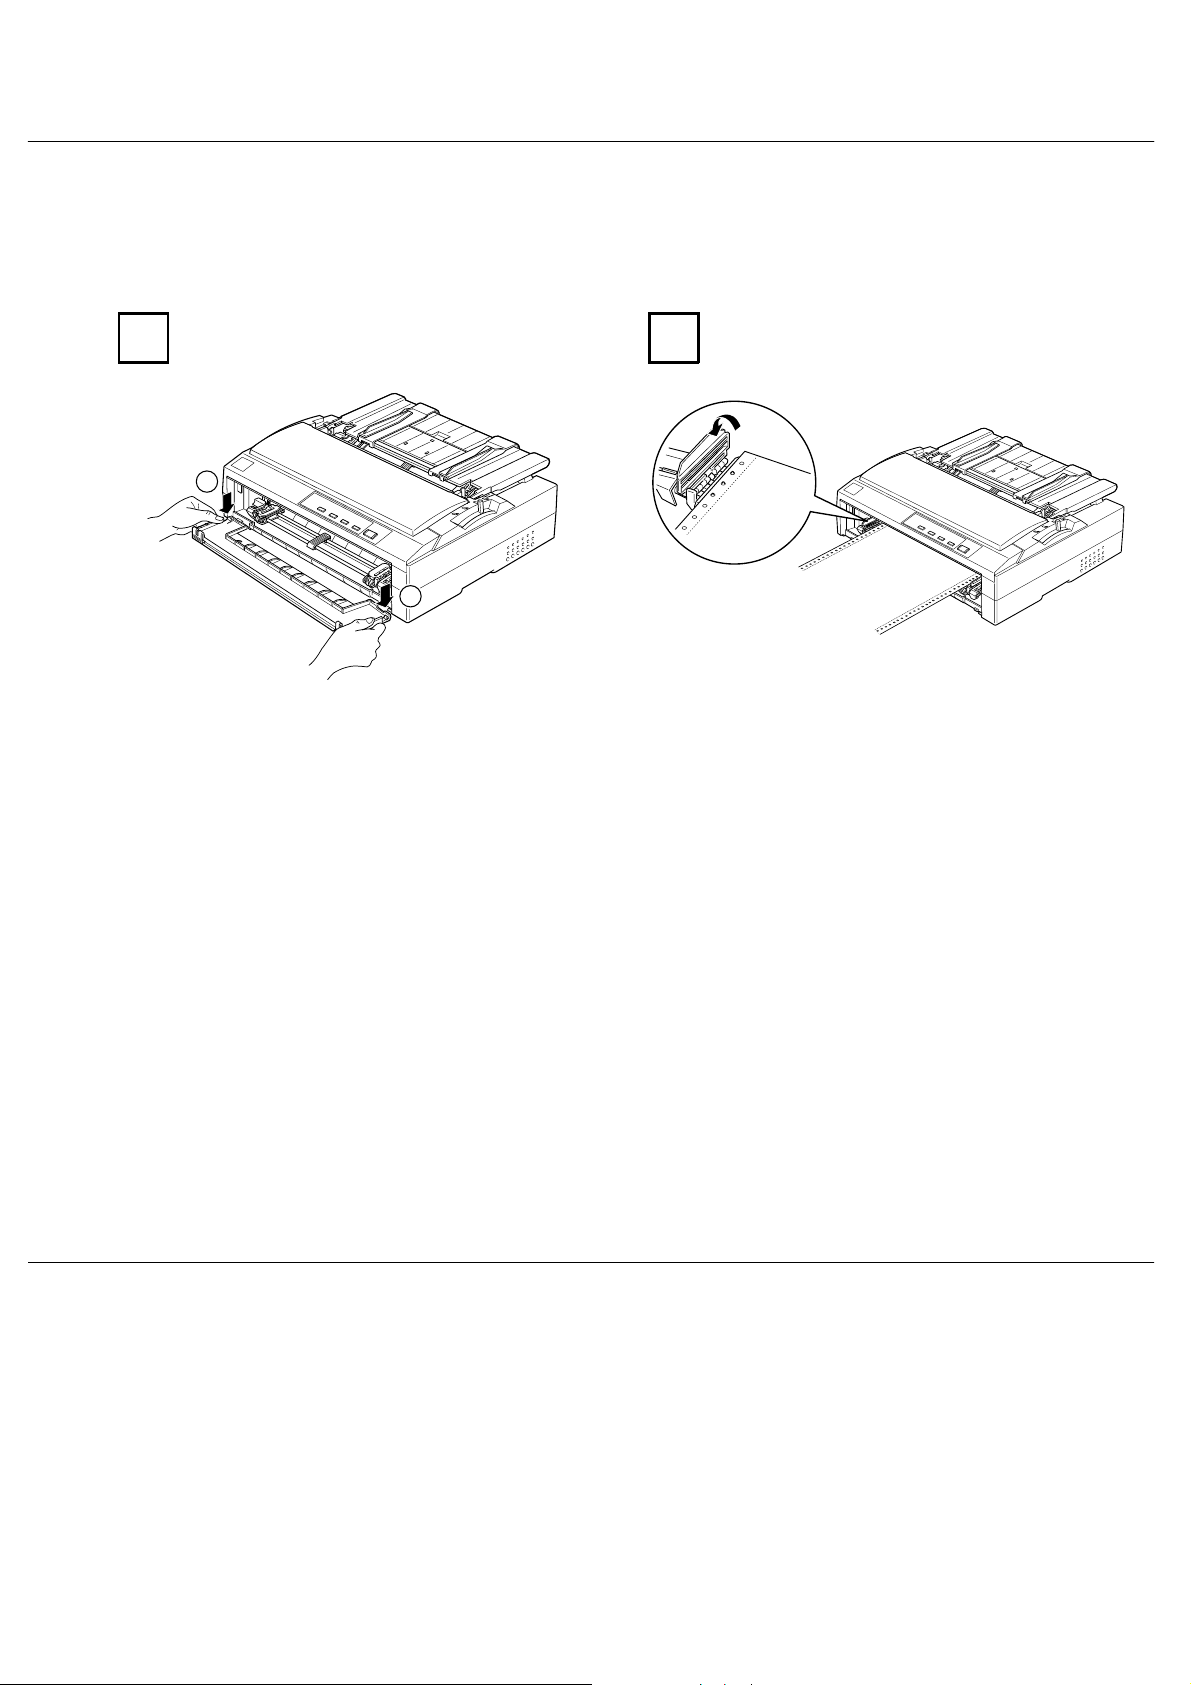
Loading Continuous Paper With the Front Push Tractor
Attach the front cover. Set the paper
release lever to the front pu sh trac tor
position.
Make sure that the paper gu id e is lying
flat on the printer an d the edge gu ides
are open all the way to the lef t and
right. Then raise the continuous paper
support.
Caution:
c
Never use the knob t o adju st th e
top-of-form po sit ion; this may dama ge t he
printer or cause it to lose the top-of-form
position.
Q
When you load continuous paper with
labels, make sure th e au to tear- off
mode is off before you start to print. If
you feed continuous labels backward
to the tear-off positi on, the labels may
come off the backing sheet and jam
the printer. See Chapte r 5 of the User’s
Guide for instructions on turning off
auto tear-off mode.
Q
If the first line of your page appears too
high or too low, use the micro adjust
feature to change its position.
3
Page 4
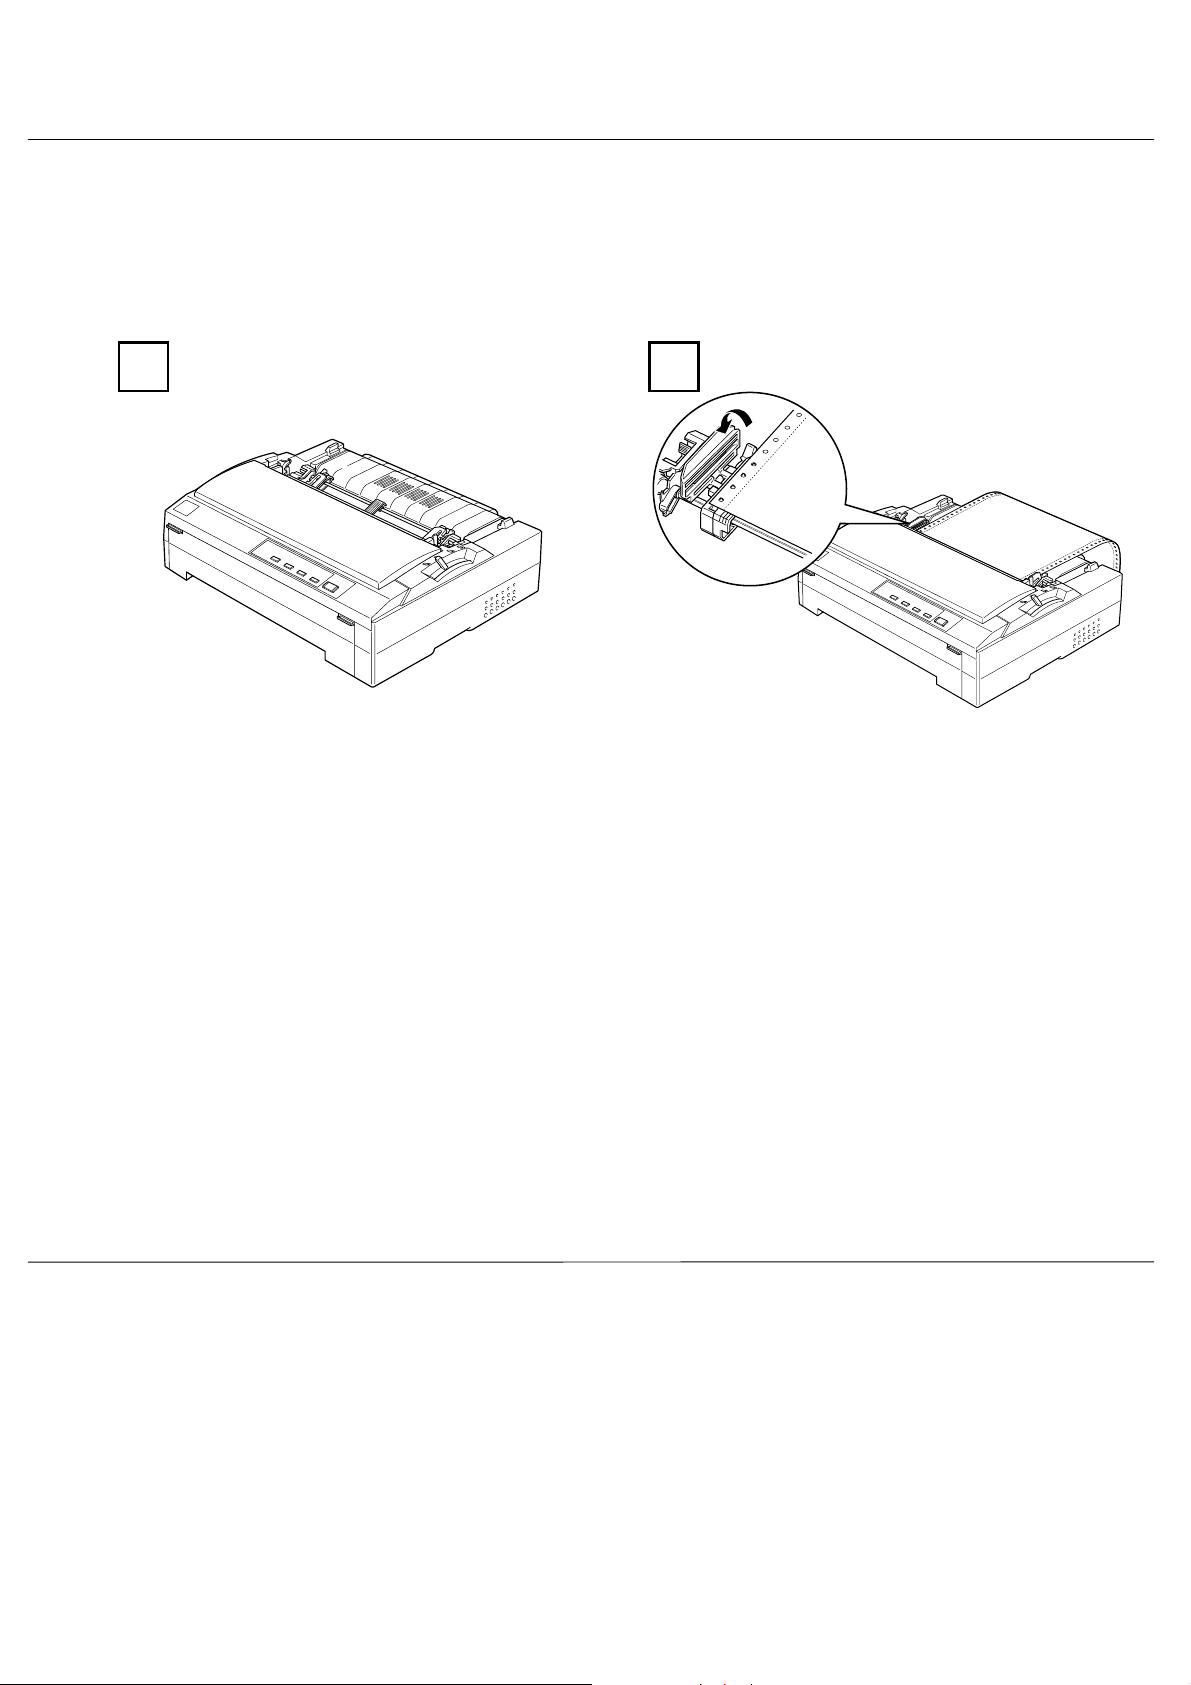
Loading Continuous Paper With the Rear Push Tractor
To load continuous paper onto the rear push trac tor, follow these steps.
1 2
Q
Q
Turn off the printer, then remove the
paper guide.
Make sure the left and right sprockets are
positioned properly for your paper’s
width.
Do not load continuous paper with labels
with the rear p ush tra c tor.
Q
Open both sprocket covers, and fit the
first four holes of the paper, printable
side down, over the tractor pins . Then
close the sprocket covers .
Note:
Load c o ntinuous pape r that has a clean,
straight edge to av oi d pa per jams.
If you load continuous paper of a
different size or thickness, adjust the
position of the sprockets or change the
paper thickness lever settin g. See
Chapter 3 of the User’s G uide for
inst r u ctio ns.
4
Page 5
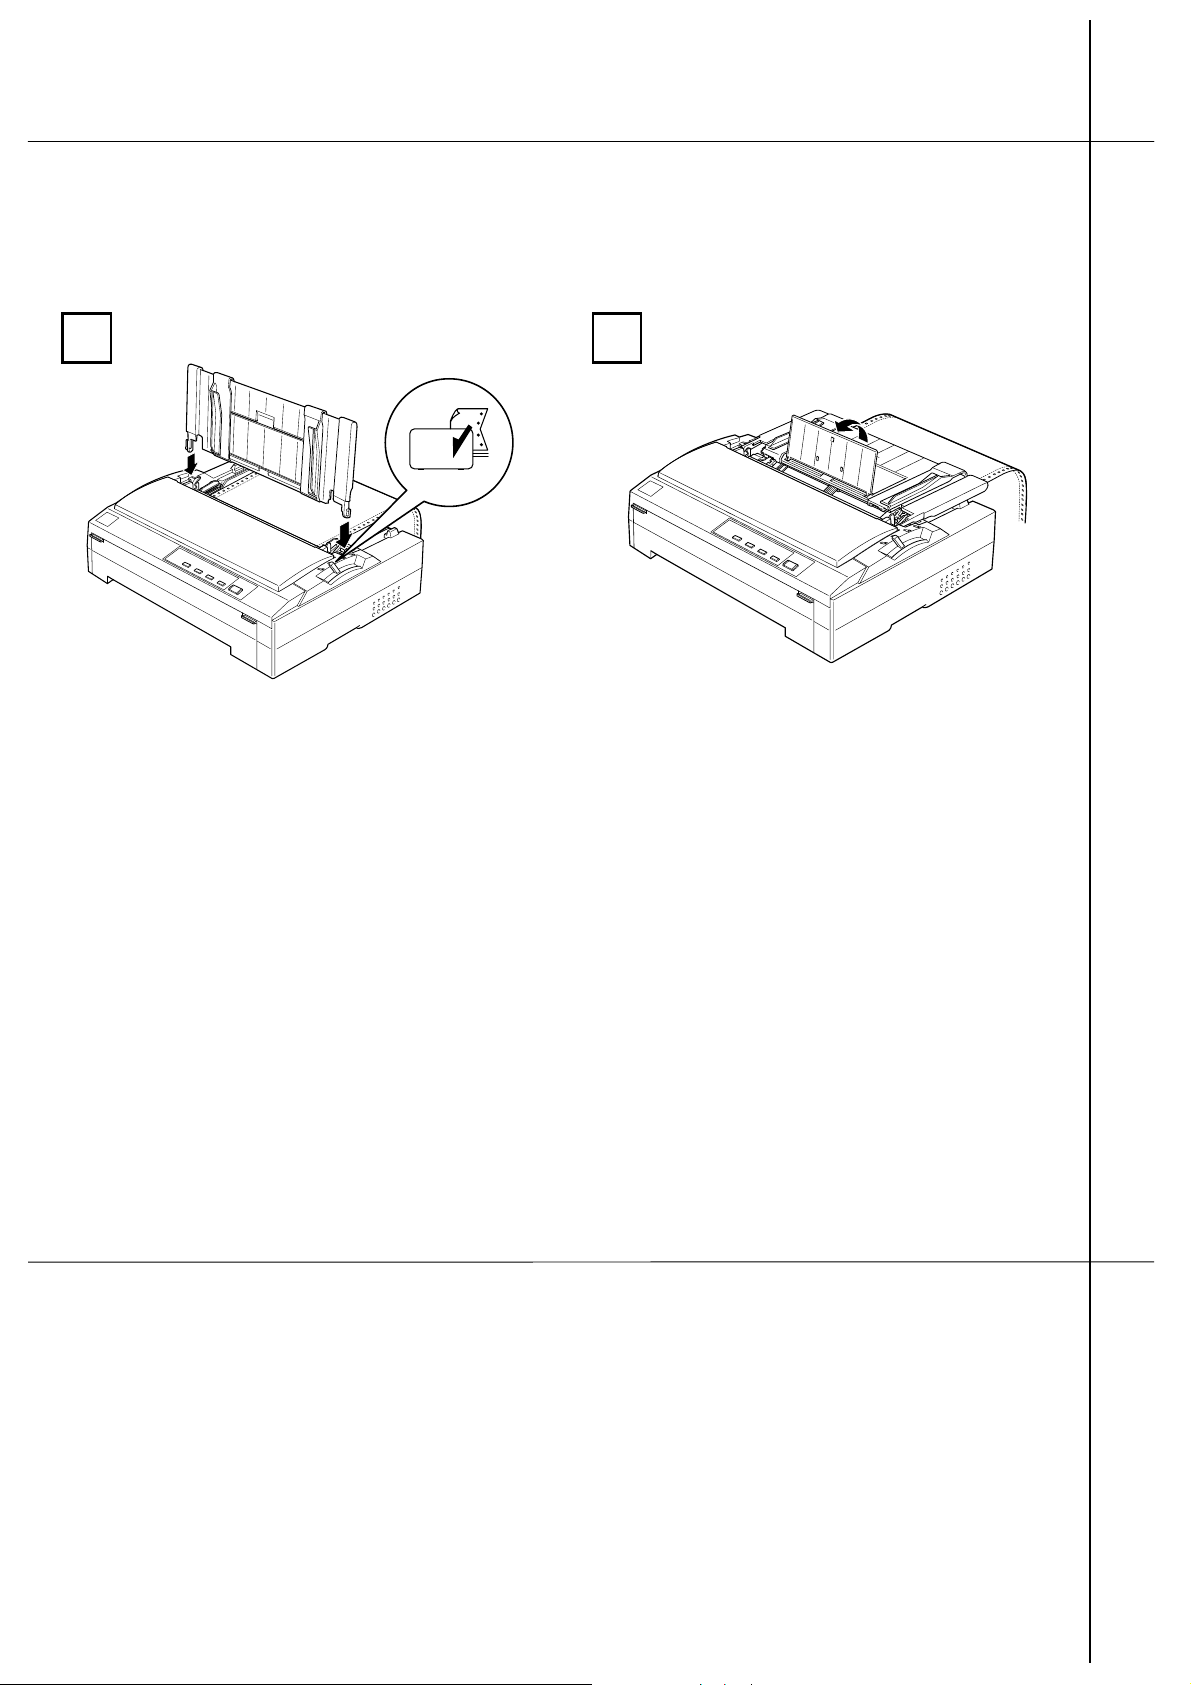
Loading Continuous Paper Wi th the Rear Push Tractor
3
Attach the paper guide. Then set the
paper release lever to the rear pus h
tractor position.
4
Make sure that the paper gu id e is lying
flat on the printer an d the edge gu ides
are open all the way to the lef t and
right. Then raise the continuous paper
support.
c
Q
Caution:
Never use the knob t o adju st th e
top-of-form po sit ion; this may dama ge t he
printer or cause it to lose the top-of-form
position.
If the first line of your page appears too
high or too low, use the micro adjust
feature to change its position.
5
Page 6
Removing Continuous Paper From the Front or Rear Push Tractor
To remove continuous paper from the front or push tractor, follow these steps.
1
Make sure the Tear Off/Bin light is
flashing. (This in d icate s you r p a per is
at the current tear-off posi tion. ) You
may need to press the Tear Off/Bin
button to advance the paper to the
tear-off position.
2
from the front push tractor from the rear push tractor
Open the paper path guide so that y ou can tear off the printed
document. Then tear it off using the prin ter’ s te ar-o ff edge.
Caution:
c
Tear off your printed d ocum ent before pressin g th e Load/Eject
button. Reve rse feeding severa l pa ges at a time may cause a paper jam.
Q
6
When you resume pr inti ng , the p rin ter
automaticall y feeds the paper
backward to the top-of-fo rm positi o n ,
and begins printing.
Q
To feed continuous paper backward from
the tear-off position into the standby
position, press the Load/Eject button.
Page 7

Removing Continuous Paper From the Front or Rear Push Tractor
Removing C on ti nuo us Pape r Wi th Labels From the Front Push Tracto r
To avoid peeling labels off the backing sheet and jamming the printer, follow the steps below when
you remove continuous paper with labels from the printer.
1
Make sure that the printer is not
printing. You may need to p r es s the
Pause butt o n to pause the printe r.
(When the prin ter is p aused, the Pause
light is on.)
2 3
Hold down the LF/FF butt on to eje c t
the remaining labels from the printer.
Caution:
c
Never feed labels backward using
the Load/Eject or Tear Off/Bin
button. When fed backward, labels
can easily come off the backing sheet
and cause a paper jam.
Removing Continuous Paper With Labels From the Front Push Tractor
Tear off the fresh supply of continuous
labe l s at the pe r f orat ion nea rest th e
paper entry slot.
7
Page 8

Replacing the Ribbon Cartridge
Ribbon Cartridge
When printing becomes fa int, you need to repl ac e the ribb on c artridge . EP SON recomm en ds you
use genuine EPSON ribbon cartridges. These cartridges are designed and manufactured to work
properly with your EPSON printer. They ensure proper operation and long life of the print head
and other printer parts.
Ribbon cartridge:
FX-880 #8750
FX-1180 #8755
c
Cautio n:
Products not manuf act ure d b y EPSO N may cause damage to your p rin ter not co vere d b y EPSO N’s
warranties.
8
Page 9

To replace the ribbon cartridge, follow the steps below.
Warning:
w
You need to move t h e print head by han d to replace the rib b on cartridge. If y ou ha ve just used the
printer, the pri nt hea d ma y b e ho t ; let it cool for a few minu te s befo re t o uching it.
1 3
Press the Operat e button to tur n o f f
the printer. The prin ter is off when the
surface of the Operate button is even
with the button protectors as shown.
Replacing the Ribbon Cartri dge
Lift the printer cover by its bac k edge
and then pull it straight up and off.
2
Unplug the printer from th e elec tri cal
outlet.
Caution:
c
Moving the pri nt hea d whil e th e
printer is on may da ma ge the
printer.
9
Page 10

Replacing the Ribbon Cartridge
4
Press up the tabs on each side of the
paper tension un it, then lif t th e fron t of
the unit and pull it up and out of the
print er.
6
handle
Grasp the used ribbon cartridge by its
handle and pull it up and out of the
printer.
5
Make sure the print h ead i s no t hot; if
it is, let it cool for a few minutes before
touching it. Then slide the print head
to the middle of the printer by hand.
10
Page 11
7 8
Replacing the Ribbon Cartri dge
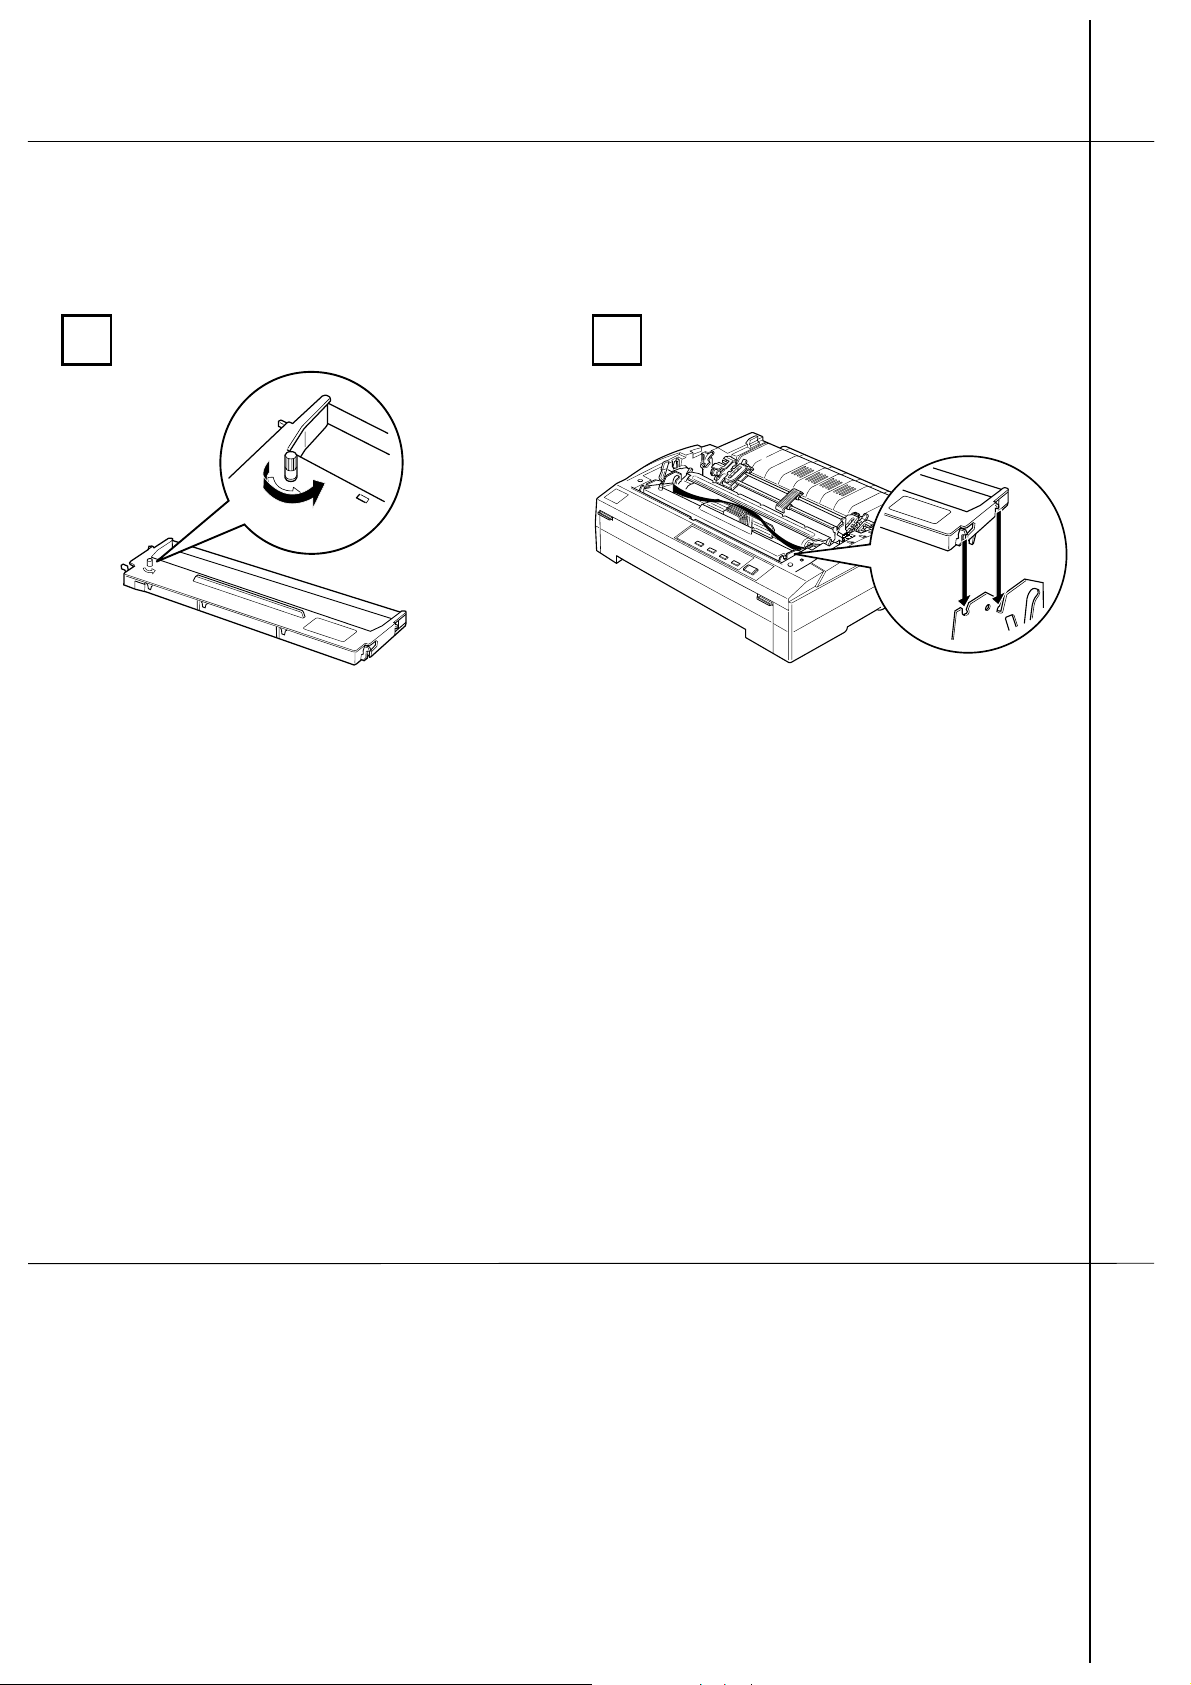
Remove the new ribbon cartridge from
the package and turn th e ri bbon tightening kn ob in th e di recti on of the
arrow to remove any slack in the
ribbon.
Hold the ribbon cartridge by its handle
and push it firmly down into position;
then press down on both ends of the
cartridge to fit the plastic hook s int o
the slots.
11
Page 12

Replacing the Ribbon Cartridge
9 10
Use a pointed obje ct , such as a bal l
point pen, to guide the ribbon between
the print head and ribbon guide while
you turn the ribbon-ti gh ten i ng knob to
help feed the ribbon into place.
Note:
Make sure the ribbon is not twisted or
creased and that it is placed behind the
print head.
Slide the print head from side to side to
make sure it moves smoothly.
12
Page 13

11 12
Replacing the Ribbon Cartridge
Install the paper tension unit by
placing it on the printer’s mounting
pegs and lowering it into place. Press
down on both ends of the unit until it
clicks into place.
Replace the printer c over b y inserting
the front tabs into the s lot s on the
printer and lowering the cover into
place. Then push it down until it clicks.
13
Page 14

Clearing Paper Jams
If the printer stops printing, the Pause light is on, and the Paper Out light is on or flashing, there is
a paper jam. To clear the paper jam, follow th es e steps:
1
Press the Op era te button to turn off
the printer.
3
2
3
If continuous paper is jammed in the
printer, tear off the fre sh supp ly at th e
perforat i on nearest th e paper entry s l ot.
Open the printer cover.
14
Page 15

Clearing Paper Jams
4
Turn the knob on the left side of the
printer away from you to remove the
paper in the printer. Remove any
remaining pieces of paper.
Caution:
c
Use the knob to clea r pa per ja ms o nly
when the printer is off. Otherwise,
you may damage the printer or lose
the top-of-form or tear-off position.
5
Attach the paper guide if necessary,
and close the printer cover. Press the
Operate button to turn on th e printer.
Make sure the Paper Out light is not
flashing and th e Pause light is off.
Q
If ejected paper has collected unde r the
printer, remove it as it ma y cause
paper jams.
15
Page 16

n
n
f f f
n
Error In dicators
Check the printer’s control panel lights and follow the appropriate instructions below. For more
information, see, Chapter 7 of your User’s Guide.
Light Status Beep patte rn
n = On
f = Flashing
lll
lllll
short series of beeps (three times)
long series of beeps (five times)
Pause Paper Out Beep pattern
n
lll
The Pause and Paper Out lights are on, and you
hear the short series of beeps.
Cause Solution
No paper is loaded in the selected paper
source.
Load paper in the selected paper source, or select a
different paper source with the paper releas e leve r. Whe n
the Paper Out light goes off, press the Paus e button to turn
off the Pause light .
The paper is not loaded correct l y. Remove the paper and reload it correc tly.
Pause Beep pattern
n
lllll
The Pause light is on and you hear the long
series of beeps.
Cause Solution
The paper release lever is set to the
wrong po sition.
Load paper in the selected paper source, then set the paper
release lever to the position for that paper path. If paper
from another paper source is loaded in the pr inte r, pr ess
the Load/Eject button to eject the paper; then move the
paper release lev e r to the des i re d posi tion.
Pause Paper Out Beep pattern
f
lll
The Pause light is on, the Paper Out light is
flashing, and you hear the short series of beeps.
Cause Solution
A single sheet of paper is not fully
Press the Load/Eject button to eject the sheet.
ejected.
Continuous paper does not feed to the
standby position.
Tear off the printed page at the perforation; then press the
Load/Eject button. The paper feeds to the st an d b y
position.
Paper is jammed in the printer. To clear a paper jam, see “Clear in g Paper Jams ” earlier in
this guide.
Pause Paper Out
f
The Pause light is on and the Paper Out light is
flashing.
Cause Solution
The print head is overheat ed . Wait a few minutes until the prin te r cools down ; the pr inte r
resumes printing auto mat ically once the pr int head c ools.
Font Tear Off/Bin Pause Paper Out
f
All the lights are flashing.
Cause Solution
An unknown printer erro r has oc curre d. Turn off the printer and leav e it off for sev e ra l minute s;
then turn it on again. If the error recurs, contact your dealer.
Page 17

 Loading...