

Page 1
FX-870/1170
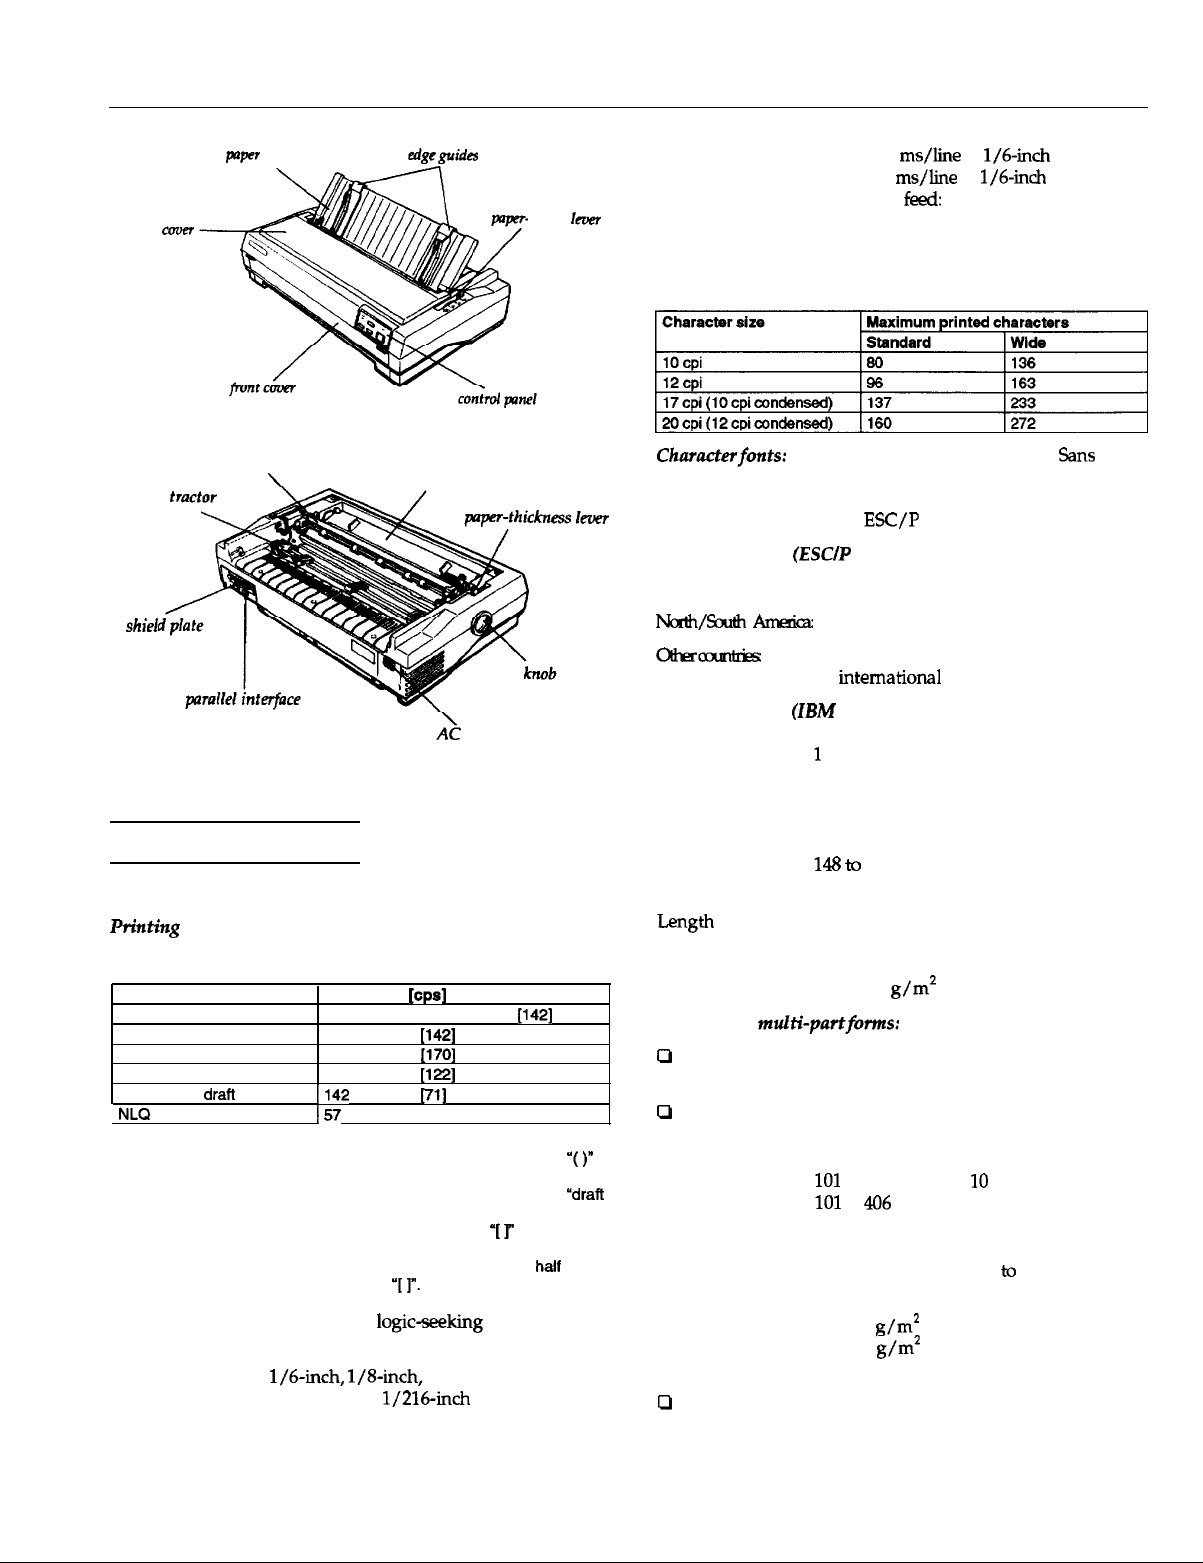
pnper guide
printer cover
paper-tension unit
\
shief
Note: The power cord is attached.
c?d@
&k?S
ribbon cartridge
.&
inlet
release
her
Paper-feed speed:
Friction: 69 ms/line at l/6-inch line spacing
Tractor: 77 ms/line at l/6-inch line spacing
Continuous feed: 3.7 inches per second
Buffer:
24 KB or 0 KB
(Selectable in the default setting mode)
Printable columns:
~~
Characterfonts:
Draft, Epson Roman, or Epson
in normal or condensed mode. You can
also select other font/pitch combinations
using
E!X/P
Character tables (ESCIF Mode):
Europe:
&rth/South
olkr-
One italic and 15 graphic character tables
*
One italic and 7 graphic character tables
One italic and 5 graphic character tables
13 international character sets
Character tables (IBM Emulation):
2 Character tables
1
Symbol sets
Paper
commands.
Sans
Serif
Printer Specifications
Printing
Printing method:
Printing
Type of letters
High-speed draft
Draft pica
Draft elite
Condensed draft pica
Emphasized draft pica
NLQ
Notes:
1)
The printing speed for high speed draft is reduced to the value in “(
with thick paper (over 0.18 mm).
2)
The printing speed for high speed draft is reduced to the value of “draft
pica” when any graphic character is in the line.
3)
The printing speed for draft is reduced to the value in “[ ]” when any italic
character is in the line.
4)
The speed for high duty printing is reduced to approximately half of each
speed, except for the printing speed in “[
speed:
normal pica
Printing direction:
Line spacing:
9-pin impact dot matrix
Print speed
380 (320)
285 [142]
342
243
1142
I57
Bidirectional
[cps]
[170]
[122]
[71)
]“.
logicseeking
[142]
for text
Unidirectional for graphics
l/6-inch, l/%inch, or programmable in
increments of
1/216-&h
Single
Width
sheets (top insertion):
148
to 257 mm (5.8 to 10.1 inches) for standard
148 to 420 mm (5.8 to 16.5 inches) for wide
L=wh
Thickness
Weight
Single-sheet
Q
bad single sheet multi-part forms only into the front slot
max. 364 mm (14.3 inches)
0.065 to 0.14 mm (0.0025 to 0.0055 inches)
52.3 to 90 g/m2 (14 to 24 lb)
multi-partfimts:
with the optional front sheet guide.
0
Use carbonless multi-part forms only.
)”
Continuous paper:
Width
Copies
Thickness
Weight
101
to 254 mm (4 to 10 inches) for standard
101
to
406
mm (4 to 16 inches) for wide
Four sheets (one original plus up to three copies)
0.065 to 0.32 mm (0.0025 to 0.012 inch) for one sheet
0.12 to 0.32
52.3
to
40 to 58.2
mm
(0.0047 to 0.012 inch) total
82
g/m2 (14 to 22
g/m2 (12 to 15
lb) for one sheet
lb) per sheet in
multi-part forms
0
Use carbonless multi-part forms only.
9-Pin Printers
10/13/92
FX-870/1170-1
Page 2
FX-870/1170
Note: You can use recycled paper with this printer. If you notice an
increase in ribbon consumtion and paper jamming, use a higher
graak
of
paper.
Labels:
Size
Thickness
Cl
Use continuous type labels only.
0
Use labels only under normal temperature and humidity
conditions.
Envelopes:
Size
Thickness
Weight
Ll
Use envelopes only under normal temperature and
humidity conditions.
63.5 x 23.8
101 x 23.8
101 x 27 mm (4 x 1.06 inches)
0.07
for backing sheet
0.16
total
No. 6 No. 10 -
0.16
45
to 90 g/m2 (12 to 24 lb)
mm (2.5 x 0.93 inches)
mm (4 x 0.93 inches)
to 0.09 mm (0.0028 to 0.0031 inches)
to 0.19 mm (0.0063 to 0.0075 inches)
166 x 92
240 x
to 0.52 mm (0.0063 to 0.0197 inches)
mm (6.5 x 3.6 inches)
104
mm (9.5 x 4.1 inches)
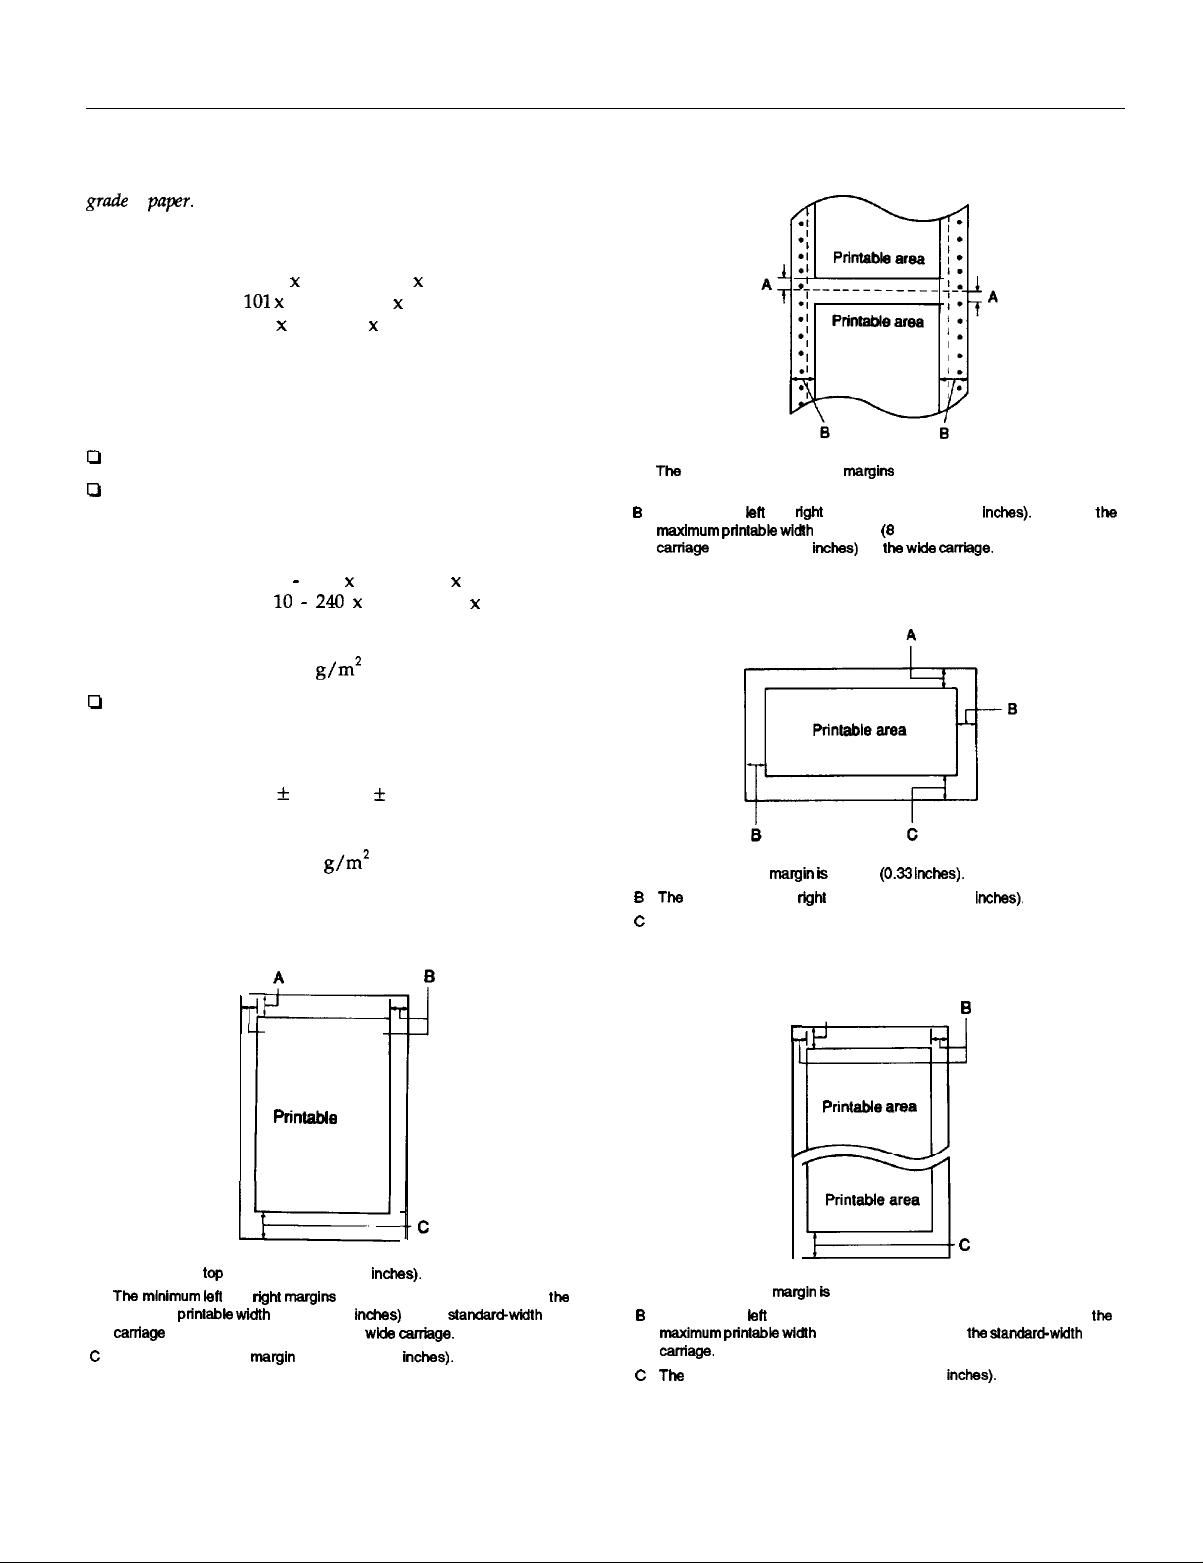
Continuous paper
A
The
minimum top and bottom mafgins (above and below the perforation) are
9 mm (0.35 inches).
B
The minimum
maximum printable width
cantags or 345 mm (13.6
Envelopes
left
and
ttght
margins am 13 mm (0.51
is 203 mm (8 inches) for the standard-wtdth
inchss)
for
the wide
carnage.
inches).
However, the
Roll paper:
Size
Thickness
Weight
Printable area:
Single sheets
216 k 3 mm (8.5f 0.12 inches)
0.07
to 0.09 mm
52.3
to 82
F”i’-
i
--
FVintabk
!
1
L!zz
A
The minimum
8
The
maximum
cantags or 345 mm (13.6 inches) for the
C The minimum bottom
top
mlnimum left
printable width
margin is 8.5 mm (0.33
and
tight margins
is 203 mm (8
margin
is 13.5 mm (0.53
(0.0028 to 0.0035
g/m2
(14 to 22 lb)
area
inches).
are 3 mm (0.12 inches). However, the
inches)
for the
wide
standard-wtdth
carriage.
incftss).
inches)
A
The minimum top
B
The minimum left and
C
The minimum bottom margin is 13.5 mm (0.53 inches).
Roll paper
margin is
8.5 mm (0.33
right
margins are 3 mm (0.12
A
c
4
Printable
Inches).
araa
1,‘1
Printable
area
Ql
A
The minimum top
B
The minimum
maxtmum prtntabie width
carriage.
C The minimum bottom margin is 13.5 mm (0.53
margin is
8.5 mm (0.33 inches).
left
and right margins are 3 mm (0.12 inches). However,
is 203 mm (8 inches) for
inches).
inches).
B
C
the
the standard-width
FX-870/1170-2
10/13/92
9-Pin Printers
Page 3
FX-870/1170
Mechanical
Paper-feed methods:
Friction (with or without optional
cut-sheet feeder)
Push tractor (front or rear)
Pull tractor
Push-pull tractor (optional)
Ribbon: Fabric ribbon cartridge
Standard: #8750
Wide:
Life expectancy at 14 dots/character:
3 million characters
MTBF:
Print head life: 100 million characters/wire
Dimensions and weight:
~!
Standard: 4000 power-on hours
Wide:
#8755
6000 power-on hours
Electrical
120 V
model:
Rated voltage:
Input voltage range:
AC 120
AC 103.5 to 132 V
V
Safety Approvals
Safety standards:
R.F.I.
UL1950
with
D3
CSA22.2
FCC part 15 subpart B class
No. 220
B
Interface Specifications
Your printer is equipped with an g-bit parallel interface.
Specifications and pin assignments
The built-in parallel interface has the following characteristics:
Datafmmat:
Synchronization: STROBE pulse
Handshake timing: BUSY and
Signal
level:
Cotmectm:
8-bit
parallel
ACKNLG
T-FL-compatible
36-pin 57-30360
equivalent
signals
Amphenol connector or
Interface Cards
You can use optional interface cards to supplement your
printer’s built-in parallel interface.
The Epson
interfaces
below are compatible with your printer.
Rated current: 1.8 A
Power consumption:
(during self-test printing in draft mode at
10
cpi)
Standard: approx. 45 W
Wide:
Rated frequency range:
50to60Hz
Input frequency range:
49.5 to 60.5 Hz
Dielectric strength (between AC line and chassis):
AC
1 second
approx. 45
1OOOV
rms 1 minute or AC
W
Environmental
Temperature: Operation:
Storage:
Humidity (without condensation):
Operation:
Storage: 5% to 85%
5” to 35°C (41” to 95°F)
-30” to 60°C (-22” to 140°F)
10% to 80% RH
RH
12OOV
~
Option Specifications
Cut-sheet feeders
Dimensions and weight:
rms
Dimensions include the printer.
9-Pin Printers 10/13/92
FX-870/1170-3
Page 4
FX-870/1170
Bin capacity:
Single sheets:
C806371
and
C806391
Up to 50 sheets of 82-g/m’ (22-lb) paper
006381
and
C806401
Up to 150 sheets of 82-g/m* (22-lb) paper
Envelopes:
006381
and
C806401
Up to 25 (plain and bond type)
Up to 30 (air mail)
MCBF:
100,000 cycles
Paper:
Paper storage conditions:
Temperature:
18"
to
22"C(64"
Humidity: 40% to 60% RH
Environmental Temperature:
Operation:
Storage:
5"
to 35°C (41” to 95°F)
-30" to 60°C
to 72°F)
(-22” to
140°F)
Paper:
Width
Paper length
Thickness
Weight
Single sheets
C814001
C814011
0.085 to 0.14 mm
(0.0025 to 0.0054 in.)
64toQOg/m2
(14 to 24 lb)
1
Multi-psrt forms
148 to 257 mm
(5.8 to 10.1 inches)
14810364mm
(5.8 lo 14.3 inches)
max. 364 mm
(max. 14.3
Inches)
0.12
too.32
(0.0047 to 0.0125 in.)
(40 to 58 g/m’) x 4
[(12
to 15 lb)] x 4
mm
Printable area:
Single sheets:
Same as single sheets from the top insertion.
(Multi-part forms)
Note:
Front sheet guiak is available
only
at the normal operating
conditions.
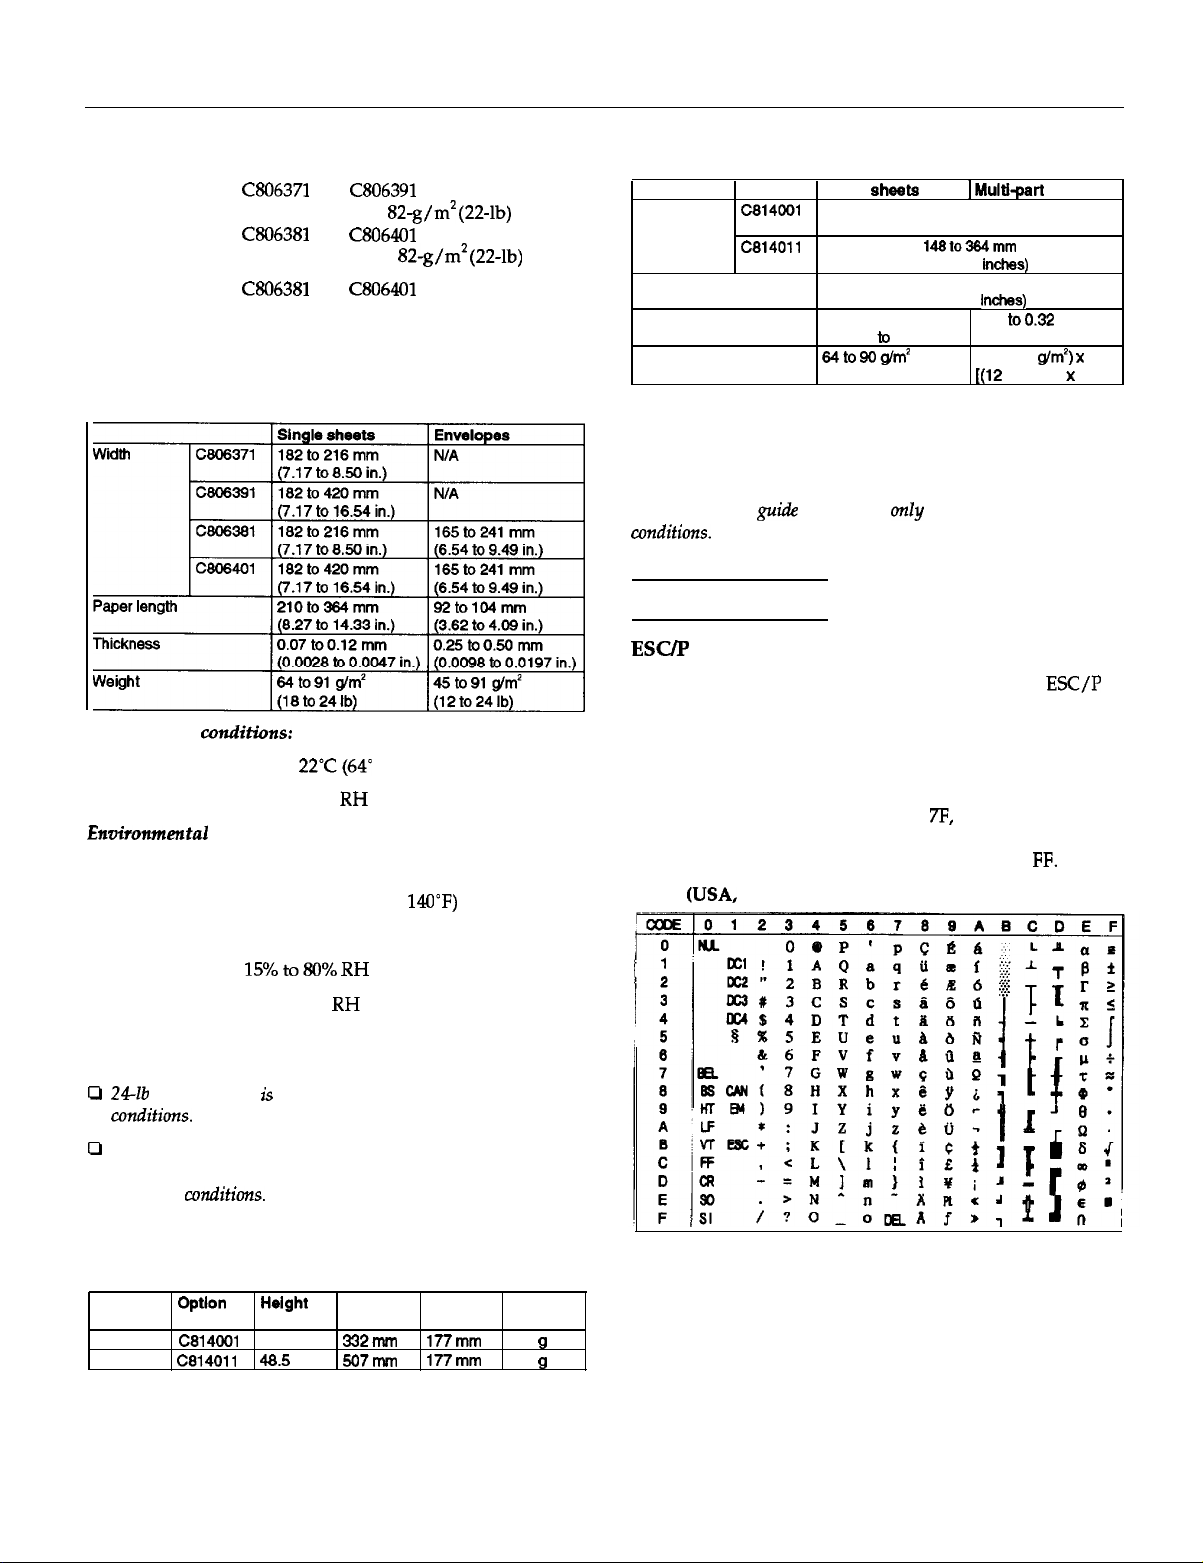
Character Tables
ESUP mode
This section lists the character tables available in the
mode.
You can select these character tables with the default-setting
mode or by using a software command.
All tables except the italic character table are the same as
PC437 table for hex codes 00 through
7F,
so only the PC437
and italic tables are shown completely. The rest of the tables
show only the characters for hex code-s 80 through FF.
PC437
(USA,
Standard Europe)
ESC/P
Humidity (without condensation):
Operation:
Storage:
15%toSO%
5%
to 85%
RH
RH
Note:
Cl
24-lb paper printing is available only at normal operating
conditions.
Cl
Cut-sheet feeder envelope printing is available only with the
C806381 or C806401
operating
conditions.
cut-sheet
feeders
and only at normal
Front sheet guide
Dimensions and weight:
Printer Optlon Helght Width Depth Weight
Standard
Wide
No.
C814001
C814011
48.5 mm
48.5 mm
332mnl 177mm
507mm
177mm
280 g
450 g
FX-870/1170-4 10/13/92
9-Pin Printers
Page 5

FX-870/1170
International character sets
The table below shows the international character sets you
can select with the default-setting mode and the ESC R
software command. For example, when you select
“Italic-France” in the default-setting mode, the characters in
the “France” row on the table below are used in the italic
character table.
The following eight international character sets can be
selected with the default-setting mode and with the ESC R
command.
ASCII code hex
7E
ASCII code hex
7E
f IIt36
0
1
COUntr/
U.S.A.
France
23 24 40 58 5C 5D SE 60 TB 7C 7D
taet\3-{:)-
t$A’ca-‘Bh&t”
The following five additional sets are available only with the
ESC R
software command.
Country
8
Japan
9 Norway
10 Denmark II
11
Spaln
II
12 Latin Amertca
23 24 40 50 5C 5D 5E 60 70 7C 7D
88ecwrv:r
wttItte~u44it~ia
YS~AE0AU4r0dU
I$diRiB'
r$diiJ&Bufn66~
PC437 (table 1)
0
COOE
0
1
2
1234-5
ML
ocl!lAQaq
lx2”
3
4
5
6
7
:
A
8
c
D
E
F
oul4DTdt
PC437 (table 2)
I 4
l cwl4D’fdt
4ga5tu*uabR
5
4
6
m
7
8
8
ALF
rscu(8HXhxiij~
Hr
*
oep*pu
6
ZBBbr
13caco
@5PUou
66PVfv
L61Vfvaaa
‘7GWgwqPQ,
)PIYiril)r
7
8 9
A
&$jLbb-
DC1 i g L D 6 *
~~26
a
ax!!
ii&f!
B
C
D
E
F
t
8
8,:
F
-LX
IBM emulation mode
This section lists the character tables available in the IBM
emulation mode. The IBM emulation mode can be selected
with the default-setting mode.
These character tables can be selected with the default setting
mode, or by using the ESC 6 (table 2) or ESC 7 (table 1)
software command.
The
PC865
tables are the same as the PC437 tables for hex
codes 00 through 7F, so only the PC437 tables are shown
completely. The PC865 tables show only the characters of hex
codes 80 through FF.
9-Pin Printers
10/13/92
PC865 (table
CaoE
0
1
2
3
4
5
6
x
0
A
0
C
0
E
F
BBAECDEF
fu
r;
1)
r?j La6-
PC865 (table
use
39ABCDEF
0
1
:
4
5
6
7
a
0
A
e
C
D
E
F
2)
FX-870/1170-5
Page 6

FX-870/1170
Symbol set
Characters defined in the following symbol set can be printed
using the ESC \ (characters) or
software command.
ESC *
(one character)
Control Panel
The control panel has four buttons and three lights for simple
control of basic printer operations.
READY
z
OPERATE
Lights
READY
On when the OPERATE
This light blinks when the printer is paused, in tear-off mode,
out of paper, or the print head is overheated.
(green)
button is on and power is supplied.
When you have finished printing on continuous paper, press
this button once to advance paper to the tear-off position.
Press it again to feed the paper backward to the loading
position.
PAPER FEED
Press this button briefly to advance paper line by line. Hold it
down to advance continuous paper to the next top-of-form
(TOF) position.
When the printer is out of paper, press this button to load
continuous paper from the paper-park position or a single
sheet from the optional cut-sheet feeder.
FONT
Press this button to select a font (draft, Epson Roman, or
Epson Sans Serif). This button also selects the normal or
condensed mode for these fonts.
ALT
The FONT
down while pressing another button for the following
functions:
U
Eject (Hold down
If the paper-release lever is in
paper is ejected. If the paper-release lever is in the
rear-tractor position, paper moves back to the paper-park
position.
CI
Entering the Micro-feed mode (Hold down
PAUSE/TEAR
printer.)
Micro feed allows you to move the paper forward or
backward in
and tear-off positions.
Ll
Bin select (Hold down
when the
When you use the optional double-bin cut-sheet feeder, you
can select the bin before loading paper.
button also functions as the
ALT
and press
PAPER FEED.)
the
OFF
when paper is already loaded in the
2/216-inch
printer is out of paper.)
increments to adjust the loading
ALT
and press
ALT
button. Hold it
single-sheet position,
front-
ALT
and press
PAUSE/TEAR OFF
or
FONT
(green)
Shows which font is selected. This light is off for draft, on for
NLQ Roman, and blinks for NLQ Sans Serif font.
CONDENSED
On for condensed printing and off for normal printing.
Buttons
(green)
OPERATE
Turns the printer on or off. The printer is off when the button
is out and on when the button is in.
PAUSE/TEAR OFF
Press this button to stop printing temporarily. Press it again
to resume printing.
FX-870/1170-6 10/13/92
Other control-panel features
Default setting mode:
Self test:
Data dump:
Hold down
you turn on the printer to perform the
self test. The self test lets you see that
your printer is operating properly and
provides a printout of the current default
settings.
Hold down
turn on the printer to enter the data
dump
users to find the cause of communication
problems between the printer and the
computer.
the PAPER FEED
the PAUSE
mode.
button while
button while you
This mode allows advanced
9-Pin Printers
Page 7

FX-870/1170
Default-Setting Mode
Default-setting listing
Your printer has internal settings that control such functions
as emulation, character pitch, and page length. These settings
are called default settings because they take effect each time
you turn on the printer.
For most users, the factory settings are best, but you
change these settings
if necessary.
This section lists the settings, describes them, and then tells
how to change them. If you see something in the list that you
need to change, notice which group
(1,2,
or 3) it is in and
check the description for further information, then see the
section on changing the settings for the group it is in.
Group 1 Features Settings
Printer
mods
Character pitch
Page length 11 in., 12 in., 6.5 in., or 70/6 in.
Skip-over-perforation
Shape of Zero Unslashed 0 or slashed
Tear off
Auto line feed Depends on interface or valid
Group 2 Festures
Character table
EPSON
ESC/P or
lOcpior12cpi
No skip or skip 1 inch
Valid or invalid
1
Settings
1
ESUP:
Italic
Germany, Italic U.K.., Italic Denmark,
Sweden, Italic Italy, Italic Spain,
PC660, PC663. PC665. BRASCII. Abicomp
IBM: PC437 (table 1) PC437 (table 2). PC665
(table 1) PCS65 (table 2)
IBM emulation
U.S.A..
Italic
0
France.
can
(A4)
Italic
Italic
PC437. PC860,
Page length
You can set the page length to 8.5, 11, 12, or 70/6 (A4) inches.
Skip-over-perforation
When you turn on this feature, the printer provides a l-inch
margin between the last line printed on
one
page and the first
line printed on the next page. Because most application
programs set their own top and bottom margins, you should
use this feature only if your program does not provide them.
Shape of Zero
The printer prints the zero character with a slash (0) when the
setting is on, or no slash (0) when the setting is off. This
allows you to easily distinguish between an uppercase “0”
character and a zero.
Tear off
When you use continuous paper with the front or rear push
tractor, you can use the tear-off feature.
When the auto tear off is valid, the printer automatically
performs the tear-off feature. The printer automatically feeds
the paper perforation to the tear-off position at the edge of
the printer cover after you complete a print job. You can then
easily tear off the printed page. When the printer again
receives data, it automatically feeds the paper backward to
the top-of-form position and starts printing.
When the auto tear off is invalid, you must perform the
tear-off function manually by pressing the
TEAR OFF
button.
Auto line feed
Group 3 Features
Input buffer
Draft print speed High or Normal
Auto carriage return
Settings
Valid or
Invalid
Valid or Invalid
Note:
You can check the character tables available with your printer
Cl
by printing the quick reference in the Group 2 default-setting
mode.
P
Most application
here.
Ifyou
program
control the printer features listed
can use your application program to control the
printer, you may never need to use the defulf-setting mode. In
fact, you
printer
nzayjind thaf
default
settings.
your program settings
override
your
Default setting descriptions
Printer mode
When you select ESC/P, the printer operates in the Epson
ESC/P mode. When you select IBM, the printer emulates an
IBM printer.
Character pitch
You can set the character pitch to 10 cpi or 12 cpi.
When the auto line feed feature is valid, each carriage return
(CR) code is always accompanied by a line feed
(LF)
code. If
your text lines overprint each other, set auto line feed to
valid. If your text lines are mistakenly double spaced, set auto
line feed to Depends on interface.
Character table
Character tables contain the characters and symbols used in
different languages. Your printer includes a wide variety of
character tables. You can check the character tables available
with your printer by printing the quick reference in the
Group 2 default setting mode.
Input buffer
The input buffer stores data sent from your computer. The
input buffer can store up to 24 KB of data, so you can free
your computer for other tasks in a shorter time while the
printer prints. When the buffer is off, the buffer can store no
data, so the computer must wait for the printer to print each
character before sending the next.
Draft print speed
When you select high-speed draft, the printer can print up to
380 cps (characters per second) at 10 cpi in draft mode. If you
select normal speed draft, you can print up to 285 cps at 10
cpi in draft mode.
9-Pin Printers 10/13/92
FX-870/1170-7
Page 8

FX-870/1170
Auto carriage return
When the auto carriage return is valid, each line feed
code or ESC J (n/216-inch line feed) code is always
accompanied by a carriage return (CR) code. The printer
always moves the next print position to the left margin when
it receives the LF or ESC J code. When this feature is invalid,
you must send the CR code after the line feed code to move
the print position to the left margin. This feature is available
in IBM emulation mode only.
Changing Group 1 default settings
1.
Make sure the printer is turned
2.
Turn on the printer while you hold down the
This enters the Group 1 default setting mode. The printer
beeps several times.
3.
Load single-sheet or continuous paper. The printer then
automatically loads the paper and prints a quick reference.
Group 1 default settings
FONT
COND.
light
Feature
off,
Settings READY
FONT
light
(LF)
button.
Note:
If
you
a!+ulf-setting
turn
oftke printer
want to
check
mock
again and print
to
exit the
the
new
default
the quick
default-setting
settings,
enter
re$rence. After
mode.
the
that,
Changing Group 2 default settings
1.
Make sure the printer is
2.
Turn on the printer while you hold down the
PAUSE
mode. The printer beeps several times.
3.
Load single-sheet or continuous paper. The printer then
automatically loads the paper and prints a quick reference
according to the emulation setting in Group 1.
ESUP
1
FONT1
buttons. This enters the Group 2 default-setting
mode character table
COND.1 READY1
turned
off.
ESUP
mode Character tables
FONT
and
ON
BLINK OFF
BLINK ON
BLINK
BLINK
Skip-over-
perforation
Shape of Zero
Tear off
BLINK Auto line feed
The
FONT
and
CONDENSED lights show
have button as many times as necessary until the
and
CONDENSED
For example, if you want to change the character spacing,
press the
FONT
CONDENSEDlight
Next, press the
READY
For example, if you want to change to 12 cpi, press the
PAUSE
If necessary, repeat this process for any other Group
features you want to change.
Exit the Group 1 default-setting mode at any time by
turning off the printer. Any changes you have made
remain in effect until you change them again.
light shows your selection.
button once to
lights match your selection.
button until the
is blinking.
PAUSE
turn
(A4)
No skip
Skip 1 inch
0
0
(with slash)
Valid OFF
Invalid
Deoends
in&ace
Valid
FONT
button to change the setting. The
the
READY
BLINK
OFF
ON
OFF
ON
ON
OFF
on
ION
which feature you
FONT
light is off and the
light on.
IBM mode character table
1
FONT 1
Note:
defaulf-setting mode
turn
1
COND.1 READY 1 IBM mode Character tables
Press the
FONT, CONDENSED
to show your selection.
For example, if you select PC437 (USA, standard Europe),
the
READY light
After you have made your selection, exit the Group 2
default-setting mode by turning off the printer.
ofthe printer
FONT
button to select the character table. The
and
READY lights
FONT
light is on, the
is off.
.?f
you want to check the new default settings, enter the
again and
to exit the default-setting mode.
CONDENSED
print
turn
on, off, or
light is off, and the
the quick
reference.
blink
After
that,
FX-870/1170-8 10/13/98
9-Pin Printers
Page 9

FX-870/1170
Changing Group 3 default settings
Group 3 default settings differ from 1 and 2. You determine
the setting by the number of beeps you hear instead of
checking the panel lights. Also, the printer does not print a
list of Group 3 default settings. To change Group 3 default
settings follow the steps below.
Make sure the printer is turned off.
1.
Hold down the
2.
turn on the printer. You then enter the Group 3
defaultsetting
Press the
3.
change the current setting. The printer beeps once or twice
to indicate your setting.
Button
PAUSE
PAPER FEED
FONT
For example if you press the
becomes invalid and the printer beeps once.
Note:
Ifyou
don’t
entering this mode, the printer beeps
automatically exits
the settings unchanged.
Once you change a feature’s
without
mode.
PAUSE
and
PAPER FEED
buttons while you
mode.
FONT, PAUSE,
1
Feature
1
Input
Draft print speed
Auto carriage return Valid Twice
press any
j?rst
exiting and
or
PAPER FEED
buffer
PAUSE
button within afeu,
the Group 3
&$.&-setting
setting,
reentering
button if you want to
1
1
button, the input buffer
seccmds after
five
times and
you cannot change it again
Group 3 default-setting
1
Settings
Valid
Invalid
High
Normal Once
Invalid
Beeps
1
Twice
Once
Twice
Once
mode, leaving
Font
I on
0
FCNT
LieM
off
Note: The settings you selectfrom
e@cf
even
after
you turn offthe printer.
‘&’
blinking
the
control panel remain in
I
CONDENSED
mm
because some application programs control character fonts
and because program commands often override panel
settings, use your application program’s print options instead
of the control panel to select character fonts if possible.
Here are sample characters for each font.
Normal Draft
!“#b%&‘O$+,-./01254367G9:;<=>?@AEICDEFGHIJK
OPQRSTUVWXYZC\3”~‘abcdetghijklatnopqrstuvwxy.?
Normal Draft
OPORSTUVYIYI[\I~~‘~bcdrfghijtlln~r~turrrlr(:~
condensed
!'4Sz4'I~tt,-.1012s456789:l~~~~OECWIJxUY
Epson Roman
!“#$%ac’( )*+,-.
/0123456759 : ; <=>-I
JK
OPQRSTUVWXYZ[\l~~‘abcdefphijkl~omretu~~~
After you make your changes, wait until the
comes on. This shows that the printer has automatically
READY
light
exited the setting mode and you can begin printing.
Character Fonts
Your printer has two draft fonts (normal and high-speed) and
two Near Letter Quality (NLQ) fonts (Epson Roman and
Epson
!%ns
Serif). You can select these through application
software and the control panel.
Use the default-setting mode (explained earlier) to choose
between normal and high-speed draft.
From the control panel you can select normal or condensed
versions of all the fonts. Condensed characters are 60 percent
as wide as normal characters.
Use
the
FONT
button and the
select the font you want. Each time you press the
button, the selection changes and the
lights come on, go off,
selection (I
On
9-Pin Printers 10/13/92
of7bli$
FONT
and
CONDENSED
FONT
and
CONDENSED
to indicate the current
.)I
blinking
lights to
FONT
).
Epson San Serif
!“#S%&’
OPQRSTUVWXYZC\I^~'
Epson San Serif
()*+,-.
condensed
/0123456789r;<=>?@ABCDEFGHIJK
abcdetghijklnnapqrstuvwxya
FX-870/1170-9
Page 10

FX-870/1170
Data Dump Mode
In data dump mode, the printer produces a printout of all the
codes it receives. To use data dump mode, follow these steps:
1.
Make sure the printer is
2.
Hold down the PAUSE button while you
3. Load the paper.
4.
Next, run an application program or a program you have
written in any programming language. Your printer prints
all the codes it receives in hexadecimal format and text, as
shown below.
5.
To turn off data dump mode, press the
stop printing and then
By reading the characters printed in the text field on the right
side of the printout or the printout of hex codes, you can
check which codes are being sent to the printer.
In the text field, characters appear as their true
characters if they are printable. Nonprintable codes, such as
control codes, are represented by dots.
turned
off.
turn
off the printer.
turn
PAUSE
ASCII
on the printer.
button to
Application Software
To use all the features of your printer, it is best to choose a
program that lists one of the FX printers on its menu. If your
program does not list one of these printers, contact the
software manufacturer to see if an update is available.
Using Continuous Paper
You can load continuous paper through the front, rear, or
bottom paper slots, depending upon the position of the
tractor unit and the placement of your paper supply.
Your printer can handle continuous paper up to 254 mm
(10.0 inches) wide on the standard-width carriage and up to
406 mm (16.0 inches) wide on the wide carriage.
To print on continuous paper, you can install the tractor unit
in one of the following positions: front, rear, or pull. Be sure
you set the paper-release lever correctly before you print.
Tractor position and available paper paths
Below are the possible ways of feeding continuous paper.
Always set the paper-release lever to the position indicated
for the paper-feed method you want to use.
Tractor
position
Front push-
tractor
Paper-release
lever position
Paper paths
Most application programs allow you to specify the type of
printer you use so that the program can take full advantage
of the printer’s features. Many of these programs provide an
installation or setup section that presents a list of printers.
Choosing from a menu
To take full advantage of your printer’s features, choose your
printer when you set up your program. If your printer is not
listed, choose from the following list (the printers are listed in
the order of preference):
FX-870 FX-1170
FX-850 FX-1050
EX-800 EX-1000
FX-86e FX-286e
FX-80+ FX-l00+
FX-80 FX-100
Epson printer
9-pin printer
If you plan to use the IBM printer emulation mode, choose
IBM Proprinter (X for narrow carriage or XL for wide
carriage), IBM Graphics printer, or IBM printer, in that order
of preference.
Rear push-
tractor
Pull-tractor
I
45
i
8
I
43
PULL
Single-sheet position
For all single sheets, whether loaded from
either
of the optional cut-sheet feeders; also for loading
single sheets from the front with the optional
guide.
Front push-tractor position
For continuous paper with the tractor unit installed in
the front.
Rear push-tractor position
For
continuous
the rear.
Pull-tractor position
For continuous paper with the tractor unit installed on
the top. In this case, you can load paper from the front,
rear, or bottom.
paper with the tractor unit installed in
the
top or
frunt
sheet
FX-870/1170-10
10/13/92
9-Pin Printers
Page 11

FX-870/1170
Additional Tractor Unit
You can improve the performance of continuous paper
handling by using two tractor units at the same time. An
additional tractor unit is available as an option. This is
especially useful for continuous preprinted forms, multi-part
forms, and labels. Using two tractor units at once is also
recommended for the highest quality graphics.
Also, if you install the tractor units in the front and rear
push-tractor positions, you can load two types of continuous
paper at the same time and switch between them by moving
the paper-release lever.
Tractor positions and paper paths
below are the various ways of feeding continuous paper with
two tractor units.
Paper path
Pull + rear
push
Rear
push-tractor
Related Documentation
TM-FX8/1170
PL-FX870
PL-FX1170
SPKFX8/1170
4001255
FX-870/1170 Service Manual
FX-870 Parts/Price List
FX-1170 Parts/Price List
FX-870/1170 Self Paced Kit
FX-870/1170 User’s Guide
I
Front push
rear push
+
I
Front push-tractor
43
or Rear push-tractor
I
Information Reference List
Engineering Change Notices
None
Product Support Bulletins
None
Technical Support Bulletins
None
9-Pin Printers
10/13/92
FX-870/1170- 11
 Loading...