

Page 1
Page 2

IMPORTANT NO TICE
All rights reserved. No part of this publication
may be reproduced, stored in a retrieval system,
or transmitted in any form or by any means,
electronic, mechanical, photocopying, recording,
or otherwise, without the prior written
permission of SEIKO EPSON CORPORATION.
The information contained herein is designed
only for use with this EPSON scanner. EPSON is
not responsible for any use of this information as
applied to other scanners.
Neither SEIKO EPSON CORPORATION nor its
affiliates shall be liable to the purchaser of this
product or third parties for damages, losses,
costs, or expenses incurred by the purchaser or
third parties as a result of: accident, misuse, or
abuse of this product or unauthorized
modifications, repairs, or alterations to this
product, or (excluding the U.S.) failure to strictly
comply with SEIKO EPSON CORPORATION’s
operating and maintenan ce instruction s.
SEIKO EPSON CORPORATION shall not be
liable for any damages or problems arising from
the use of any options or any consumable
products other than those designated as Original
EPSON Products or EPSON Approved Products
by SEIKO EPSON CORPORATION.
EPSON is a registered trademark of SEIKO
EPSON CORPORATION. Macintosh is a
registered trademar k of Apple C o mput er , In c.
Microsoft and Windows are registered
trademarks of Microsoft Corporation.
General Notice: Other produ ct names used herein
are for identification purposes only and may be
trademarks of their respective owners. EPSON
disclaims any and all rights in those marks.
Copyright © 1997 by SEIKO EPSON
CORPORATION, Nagano, Japan.
DECLARATION OF CONFORMITY
According to ISO/IEC Guide 22 and EN 45014
Manufacturer: SEIKO EPSON CORPORATION
Address: 3-5, Owa 3-chome, Su wa-shi,
Nagano-ken 392 Japan
Representative: EPSON EUROPE B.V.
Address: Prof. J. H. Bavincklaan 5 1183
AT Amstelveen
The Netherlands
Declares that the Product:
Product Name: Film scanner
Model: G621A, G621B
Conforms to the following Directive(s) and
Norm(s):
Directive 89/336/EEC:
EN 55022 Class B
EN 61000-3-2
EN 61000-3-3
EN 50082-1
IEC 801-2
IEC 801-3
IEC 801-4
Directi ve 73/23/EEC :
EN60950
March, 1997
M. Hamamoto
President of EPSON EUROPE B.V.
A NOTE CONCERNING RESPONSIBLE USE
OF COPYRIGHTED MATERIALS
Like photocopiers, film scanners can be misused
by improper photographing of copyrighted
material. Unless you have the advice of a
knowledgeable attorney, be responsible and
respectful by not photographing published
material without the permission of the copyright
holder.
Page 3

Film Scanner
®
F-R01
User’s Guide
Page 4

Contents
Safety Instructions
Important Safety Instructions . . . . . . . . . . . . . . . . . . . . 0-1
For United Kingdom Users . . . . . . . . . . . . . . . . . . . . . 0-2
Warnings, Cautions, and Notes . . . . . . . . . . . . . . . . . . . 0-4
Chapter 1
Features . . . . . . . . . . . . . . . . . . . . . . . . . . . . . . . . 1-2
System Requirements . . . . . . . . . . . . . . . . . . . . . . . . 1-3
For Windows-based systems . . . . . . . . . . . . . . . . . . 1-3
For Macintosh-based systems . . . . . . . . . . . . . . . . . . 1-4
Unpacking the Scanner . . . . . . . . . . . . . . . . . . . . . . . 1-5
Choosing a Place for the Scanner . . . . . . . . . . . . . . . . . . 1-6
Getting to Know the Scanner . . . . . . . . . . . . . . . . . . . . 1-7
Chapter 2
Connecting the Parallel Interface Model . . . . . . . . . . . . . . 2-2
Compatible operating systems . . . . . . . . . . . . . . . . . 2-2
Installing the parallel interface board . . . . . . . . . . . . . 2-2
Connecting the scanner to your PC . . . . . . . . . . . . . . 2-3
Connecting the SCSI Interface Model . . . . . . . . . . . . . . . 2-4
Compatible operating systems . . . . . . . . . . . . . . . . . 2-4
SCSI connections . . . . . . . . . . . . . . . . . . . . . . . . . 2-5
Connecting the scanner to your computer or to another SCSI
device . . . . . . . . . . . . . . . . . . . . . . . . . . . . . . 2-9
Power-on sequence . . . . . . . . . . . . . . . . . . . . . . . 2-10
Getting Started
Connecting EPSON FilmScan 200 to Your Computer
ii
Page 5

Chapter 3
Setting Up the Scanner Software
Installing the Scanner Software in Your PC . . . . . . . . . . . 3-2
Preparing the scanner before installing EPSON TWAIN . 3-2
Installing the software in Windows 95 . . . . . . . . . . . . 3-3
Installing the software in Windows 3.1x or NT 3.5x . . . . 3-8
Installing the software in Windows NT 4.0 . . . . . . . . . 3-9
Installing the Scanner Software in Your Macintosh . . . . . . . 3-10
Calibrating Your Screen . . . . . . . . . . . . . . . . . . . . . . 3-12
Chapter 4
Scanning 35 mm Film Images
Understanding 35 mm Film . . . . . . . . . . . . . . . . . . . . 4-2
Supported film types . . . . . . . . . . . . . . . . . . . . . . 4-2
Base and emulsion sides . . . . . . . . . . . . . . . . . . . . 4-3
Loading 35 mm Negatives and Positives . . . . . . . . . . . . . 4-3
Loading 35 mm Slides . . . . . . . . . . . . . . . . . . . . . . . 4-7
Capturing Images Using EPSON TWAIN . . . . . . . . . . . . 4-9
Starting EPSON TWAIN . . . . . . . . . . . . . . . . . . . . 4-9
Saving the captured image file . . . . . . . . . . . . . . . . 4-19
Removing 35 mm Film From the Carrier . . . . . . . . . . . . . 4-20
Removing 35 mm strip film from the carrier . . . . . . . . . 4-20
Removing 35 mm slides from the carrier . . . . . . . . . . . 4-21
Chapter 5
Scanning Images From Your Film Cartridge
About the Advanced Photo System . . . . . . . . . . . . . . . 5-2
Understanding film cartridges . . . . . . . . . . . . . . . . 5-2
Cartridge handling precautions . . . . . . . . . . . . . . . . 5-3
Loading Cartridge Film . . . . . . . . . . . . . . . . . . . . . . . 5-5
Capturing Images Using EPSON TWAIN . . . . . . . . . . . . 5-8
Starting EPSON TWAIN . . . . . . . . . . . . . . . . . . . . 5-8
Scanning images . . . . . . . . . . . . . . . . . . . . . . . . 5-11
Removing the Advanced Photo System film cartridge
holder . . . . . . . . . . . . . . . . . . . . . . . . . . . . . . 5-17
Saving the captured image file . . . . . . . . . . . . . . . . . 5-18
Taking the Film Cartridge Out of the Cartridge Holder . . . . 5-19
iii
Page 6

Chapter 6
Introduction . . . . . . . . . . . . . . . . . . . . . . . . . . . . . . 6-2
Selecting a Destination Device and Media Size . . . . . . . . . . 6-3
Adding Destination settings . . . . . . . . . . . . . . . . . . . 6-3
Adding Media Size settings . . . . . . . . . . . . . . . . . . . 6-6
Adjusting the Quality of Scanned Images . . . . . . . . . . . . . 6-9
Modifying visual effects . . . . . . . . . . . . . . . . . . . . . 6-10
Configuring the scanning environment . . . . . . . . . . . . 6-13
Understanding Apple ColorSync . . . . . . . . . . . . . . . 6-16
Rotating an Image . . . . . . . . . . . . . . . . . . . . . . . . . . 6-17
Getting to Know More About EPSON TWAIN
Chapter 7
Diagnosing a Problem . . . . . . . . . . . . . . . . . . . . . . . . 7-2
Error indicators . . . . . . . . . . . . . . . . . . . . . . . . . . 7-2
Testing the operation of the scanner . . . . . . . . . . . . . . 7-3
Problems and Solutions . . . . . . . . . . . . . . . . . . . . . . . 7-5
Power supply . . . . . . . . . . . . . . . . . . . . . . . . . . . 7-6
Film carrier and optional cartridge holder . . . . . . . . . . 7-7
EPSON TWAIN operation . . . . . . . . . . . . . . . . . . . 7-8
Scanning . . . . . . . . . . . . . . . . . . . . . . . . . . . . . . 7-14
Winding film in the film cartridge holder . . . . . . . . . . . 7-20
Appendix
Maintenance and Transportation . . . . . . . . . . . . . . . . . . A-2
Cleaning the scanner . . . . . . . . . . . . . . . . . . . . . . A-2
Transporting the scanner . . . . . . . . . . . . . . . . . . . . A-3
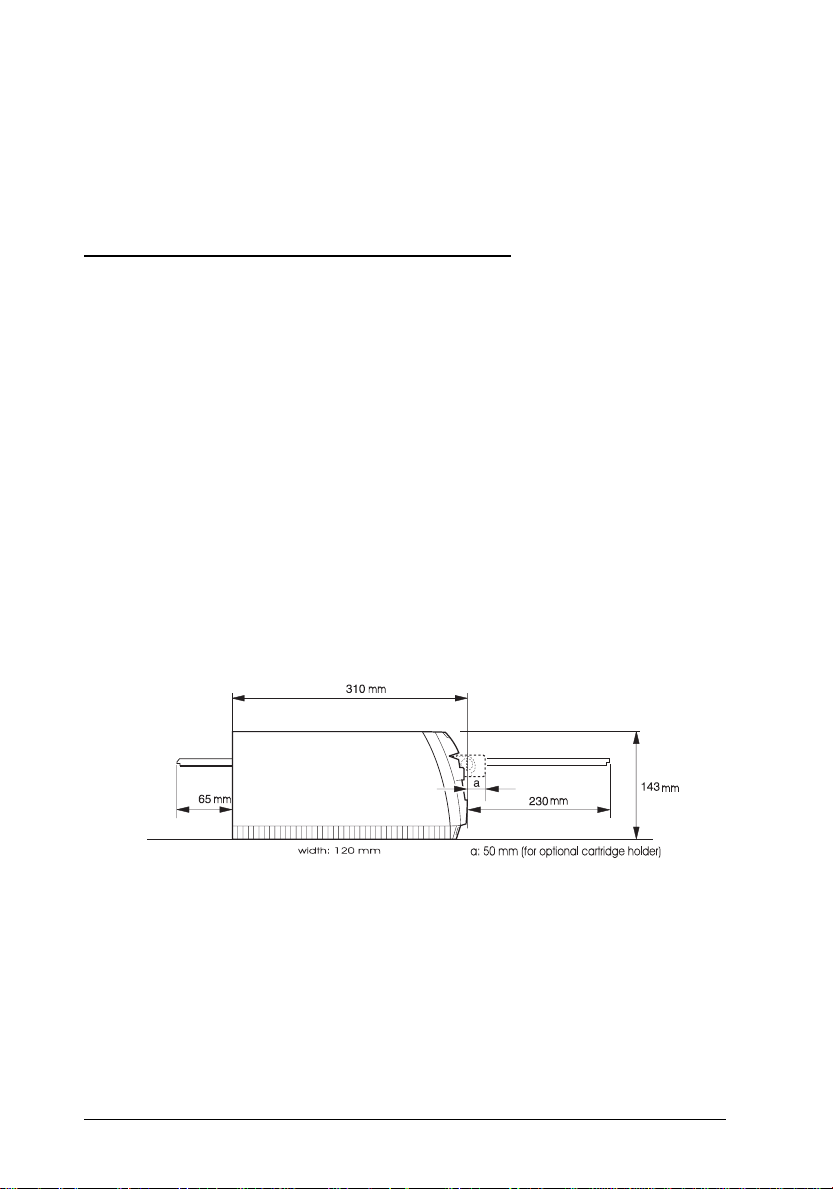
Specifications . . . . . . . . . . . . . . . . . . . . . . . . . . . . . A-4
Mechanical . . . . . . . . . . . . . . . . . . . . . . . . . . . . A-4
Electrical . . . . . . . . . . . . . . . . . . . . . . . . . . . . . . A-5
Environmental . . . . . . . . . . . . . . . . . . . . . . . . . . A-5
Safety approvals . . . . . . . . . . . . . . . . . . . . . . . . . A-6
Interface Specifications . . . . . . . . . . . . . . . . . . . . . . . . A-7
Parallel interface . . . . . . . . . . . . . . . . . . . . . . . . . A-7
SCSI interface . . . . . . . . . . . . . . . . . . . . . . . . . . . A-7
Troubleshooting
iv
Page 7

Initialization Methods . . . . . . . . . . . . . . . . . . . . . . . A-8
Contacting Customer Support . . . . . . . . . . . . . . . . . . . A-9
For United Kingdom and the Republic of Ireland users . . A-9
For Australian users . . . . . . . . . . . . . . . . . . . . . . . A-11
For Singapore users . . . . . . . . . . . . . . . . . . . . . . A-13
For Hong Kong users . . . . . . . . . . . . . . . . . . . . . . A-13
For Philippines users . . . . . . . . . . . . . . . . . . . . . . A-14
Glossary
Index
v
Page 8

vi
Page 9

Safety Instructions
Important Safety Instructions
Read all of these instructions and save them for later reference.
Follow all warnings and instructions marked on the scanner.
Unplug the scanner before cleaning. Clean with a damp
❑
cloth only. Do not spill liquid on the scanner.
Do not place the scanner on an unstable surface or near a
❑
radiator or heat source.
Do not block or cover the scanner’s openings. Do not insert
❑
objects into the openings, except as described in this
manual.
Use only the type of power source indicated on the
❑
scanner’s label.
Connect all equipment to properly grounded power
❑
outlets. Avoid using outlets on the same circuit as
photocopiers or air control systems that regularly switch
on and off.
Do not use a damaged or frayed power cord.
❑
If you use an extension cord with the scanner, make sure
❑
the total ampere rating of all devices plugged into the
extension cord does not exceed the cord’s ampere rating.
Also, make sure the total ampere rating of all devices
plugged into the wall outlet does not exceed the wall
outlet’s ampere rating.
Except as specifically explained in this user’s guide, do
❑
not attempt to service the scanner yourself.
Safety Instructions
1
Page 10

Unplug the scanner and refer servicing to qualified service
❑
personnel under the following conditions:
If the power cord or plug is damaged; if liquid has entered
the scanner; if the scanner has been dropped or the cabinet
damaged; if the scanner does not operate normally or
exhibits a distinct change in performance. Adjust only those
controls that are covered by the operating instructions.
If you plan to use the scanner in Germany, observe the
❑
following:
To provide adequate short-circuit protection and over-current
protecti on for this sca nner , the b uildin g insta llatio n mu st be
protected by a 16 Amp circuit breaker.
Bei Anschluß des Scan ner s an die Stromv ersor gu ng mu ß
sichergestellt werden, daß die Gebäudeinstallation mit
einem 16 A-Überstromschalter abgesichert ist.
For United Kingdom Users
Use of options
Epson (UK) Limited shall not be liable against any damages or
problems arising from the use of any options other than those
designated as Original EPSON Products or EPSON Approved
Products by Epson (UK) Limited.
2
Safety Instructions
Page 11

Safety information
Warning: This appliance must be earthed. Refer to rating plate
w
If you have to fit a plug:
As the colours of the mains lead of this appliance may not
match coloured markings used to identify the terminals in a
plug, please proceed as follows:
The green and yellow wire must be connected to the terminal
in the plug which is marked with the letter E or the Earth
symbol (
The blue wire must be connected to the terminal in the plug
marked with the letter N.
for voltage and check that the appliance voltage corresponds to
the supply voltage.
Important: The wires in the mains lead fitted to this appliance
are coloured in accordance with the following code:
Green and yellow — Earth
Blue — Neutral
Brown — Live
G
).
The brown wire must be connected to the terminal in the plug
marked with the letter L.
If damage occurs to the plug, replace the cord set or consult a
qualified electrician.
Replace fuses only with a fuse of the correct size and rating.
Safety Instructions
3
Page 12

Chapter 1
Getting Started
Features . . . . . . . . . . . . . . . . . . . . . . . . . . . . . . . . 1-2
System Requirements . . . . . . . . . . . . . . . . . . . . . . . . 1-3
For Windows-based systems . . . . . . . . . . . . . . . . . . 1-3
For Macintosh-based systems . . . . . . . . . . . . . . . . . 1-4
Unpacking the Scanner . . . . . . . . . . . . . . . . . . . . . . . 1-5
Choosing a Place for the Scanner . . . . . . . . . . . . . . . . . 1-6
Getting to Know the Scanner . . . . . . . . . . . . . . . . . . . 1-7
1
Getting Star te d
1-1
Page 13

Features
The EPSON FilmSca n 200 offers the follow in g features :
Parallel model-built-in bidirectional interface, compatible
❑
with Microsoft
®
Windows® 95 and 3.1x.
SCSI model-built-in SCSI interface, compatible with
Microsoft Window s 95, 3.1x, NT
®
3.5x/4.0, and Apple
Macintosh® systems.
Full color or grayscale (varying shades of gray, from black
❑
to white) scanning. You can scan full color (16 million
colors), 256 color, or grayscale images from 35 mm
negatives and positives.
You can scan 35 mm negatives and positives, as well as
❑
mounted 35 mm slides. In addition, you can scan Advanced
Photo System images using the optional cartridge holder.
Compact size. It has a smaller and narrower foot print than
❑
most scanners.
EPSON TWAIN lets you take full advantage of your
❑
scanner’s advanced features; you can change the captured
color images for output device, modify visual effects
(exposure, gamma, and sharpness setting), and control
the captured image resolution from 50 to 4800 dpi.
®
1-2
Getting Started
Page 14

System Requirements
For Windows-based systems
IBM®compatible PC with a 486 or Pentium processor
❑
Microsoft Windows 95 or Windows 3.1x, for the parallel
❑
interface model
Microsoft Windows 95, Windows 3.1x, or NT 3.5x or later
for the SCSI interface model
To use the parallel interface model, a bidirectional parallel
❑
interface board must be installed in your computer.
Because some interface boards may not be fully compatible
with your EPSON FilmScan 200, the EPSON bidirectional
parallel interface board packed with your scanner is
recommended.
To use the SCSI interface model, a SCSI interface board
must be installed in your computer.
At least 16MB of RAM (32MB recommended)
❑
1
VGA, Super VGA, or better display adapter and color
❑
monitor 640 × 480 screen resolution (800 × 600 or higher
recommended), and 256-color (65,000-color or higher
recommended)
Note:
When sanning, the required amount of free hard disk space is twice
the size of the image data file.
Getting Star te d
1-3
Page 15

For Macintosh-based systems
68000 series or Power PC proce ssor
❑
System 7.1 or later
❑
At least 16MB of RAM (32MB recommended)
❑
At least 3MB of available memory for scanning 35 mm film,
and 6MB of available memory for scanning the Advanced
Photo System cartridg e film.
Color monitor, 640 × 480 screen resolution (832 × 624 or
❑
higher recommended), and 256-color (32,000-color or
higher recommended)
Note:
When scanning, the required amount of free hard disk space is twice
the size of the image data file.
1-4
Getting Started
Page 16

Unpacking the Scanner
Make sure you have all the parts shown below.
35 mm negative and positive carrier
scanner
35 mm slide carrier
CD-ROM and/or floppy disks (media
type and quantity vary depending
on where you purchase the scanner).
Note:
❑
B80818✽
Bidirectional parallel interface board
(parallel interface model only).
❑
1
A SCSI interf ace board and/or SCSI
cable may be included with the SCSI
interface model depending on where
you purchased the scanner.
A parallel interface cable may be
included with the parallel interface
model dependin g on where you
purchased the scanner.
power cord
In some locations, the power cord come s attached to the scanner. The shape of
the AC plug varies by country; be sure the plug included is the right shape for your
location.
Getting Star te d
1-5
Page 17
Remove all protective materials packed with your scanner
before you set it up and turn on the power. Save all packaging
and protective materials in case you need to transport the
scanner later.
Choosing a Place for the Scanner
Follow the guidelines listed below when selecting a location for
your scanner:
Place the scanner on a flat, stable surface. The scanner will
❑
not operate properly if it is tilted or at an angle.
Place the scanner close enough to the computer for the
❑
interface cable to reach it easily.
Allow some space behind the scanner for the cables, and
❑
make sure to place the scanner where you can easily
unplug the power cord. Also allow sufficient space in front
of and behind the scanner so that the film carrier can move
fully forward and backward while scanning the images.
1-6
Keep the scanner away from high temperatures and
❑
humidity. Also avoid using or storing the scanner in places
subject to rapid changes of temperature and humidity.
Keep the scanner away from direct sunlight and strong
❑
light sources.
Avoid places subject to shocks and vibrations.
❑
Getting Started
Page 18
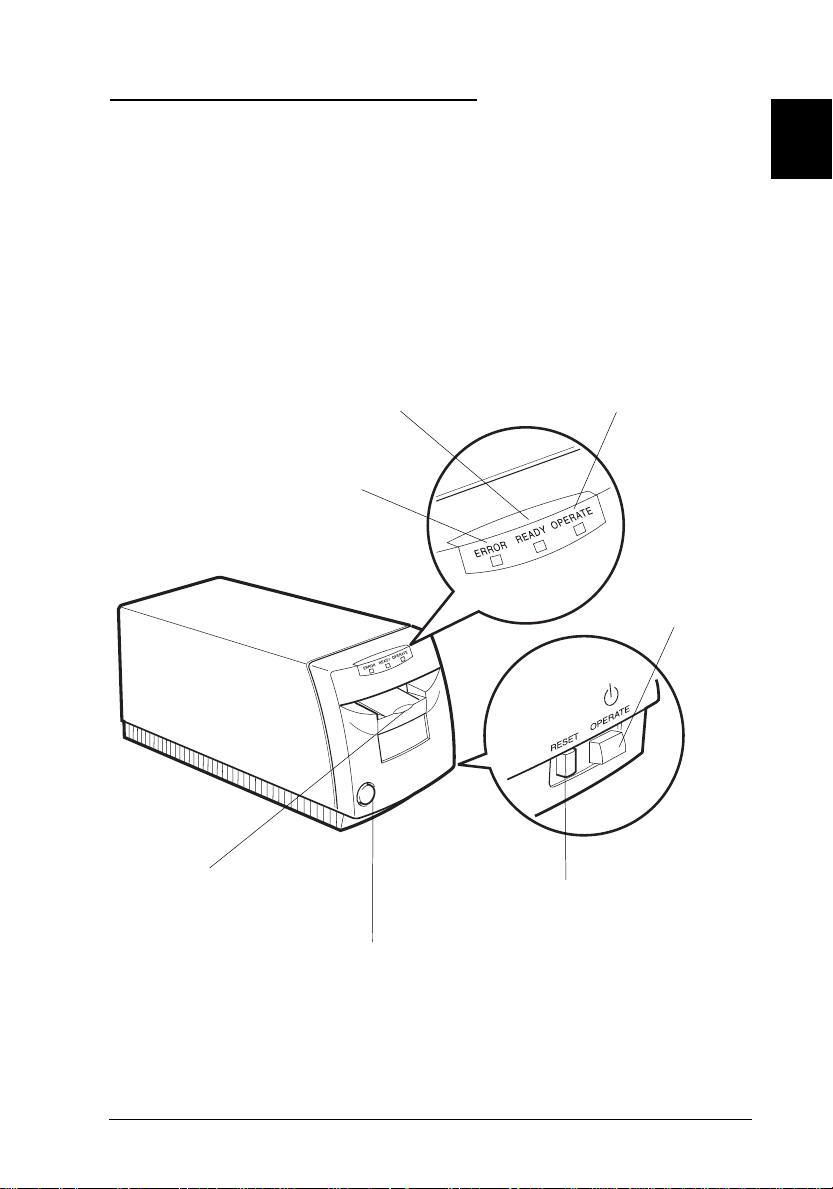
Getting to Know the Scanner
After you unpack your scanner, take a few minutes to learn
about its features, as shown below.
Front
READY light
On when the scanner is ready to scan. Flashes
to indicate that an error has occurred. See
“Error indicators” in Chapter 7 for more
information.
ERROR light
Flashing or on
if an error occurs.
OPERATE light
On when the scanner is
turned on.
1
OPERATE button
Turns on or off
the scanner.
Carrier slot and scanner door
Insert a 35 mm film carrier or
the opti onal cartridge holder
into this slot. Do not insert
other objects.
RESET button
Restarts the scanner.
Button
Press this button and push down the scanner
door befo re inserting the optional cartridge
holder into the scanner. Be sure to push down
the scanner door again
to close the door.
Getting Star te d
1-7
Page 19
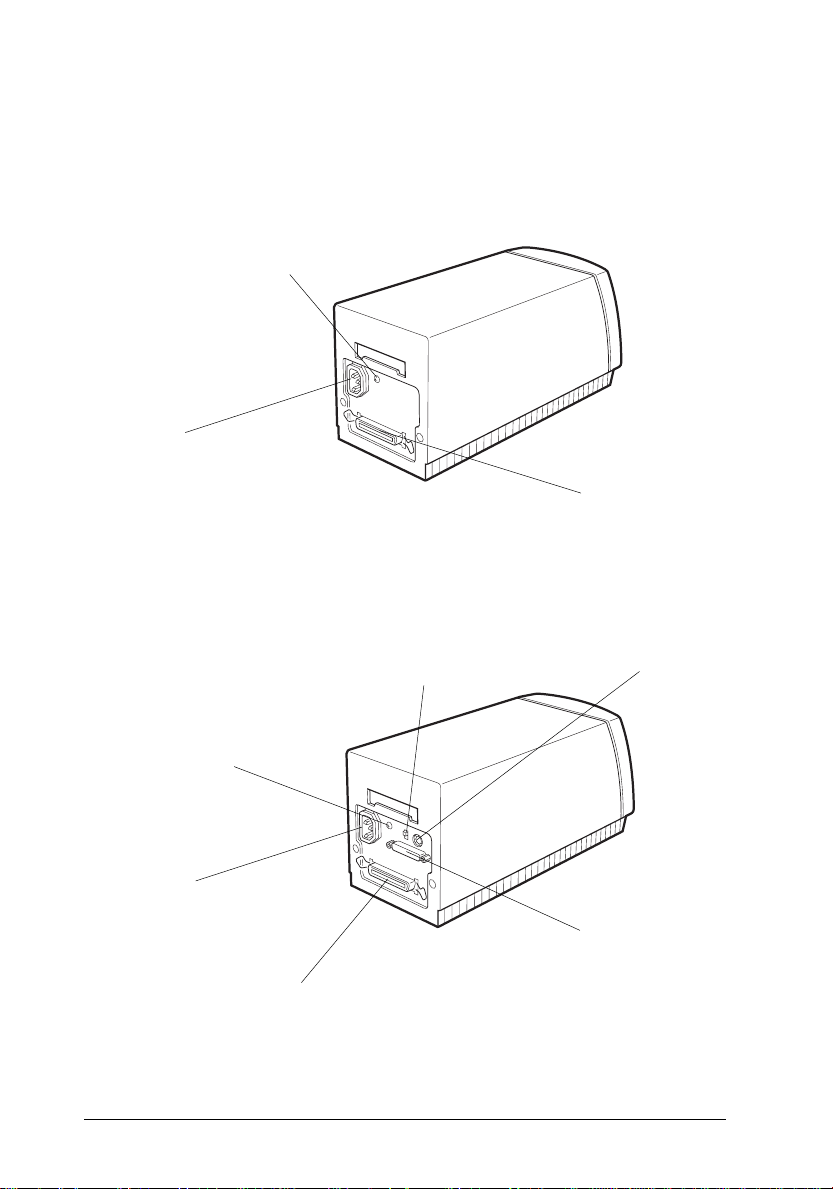
Back
Parallel interface model
Ground connector
Connect the ground wire
here if your interface cable
has one.
AC inlet
Connect the power
cord here.
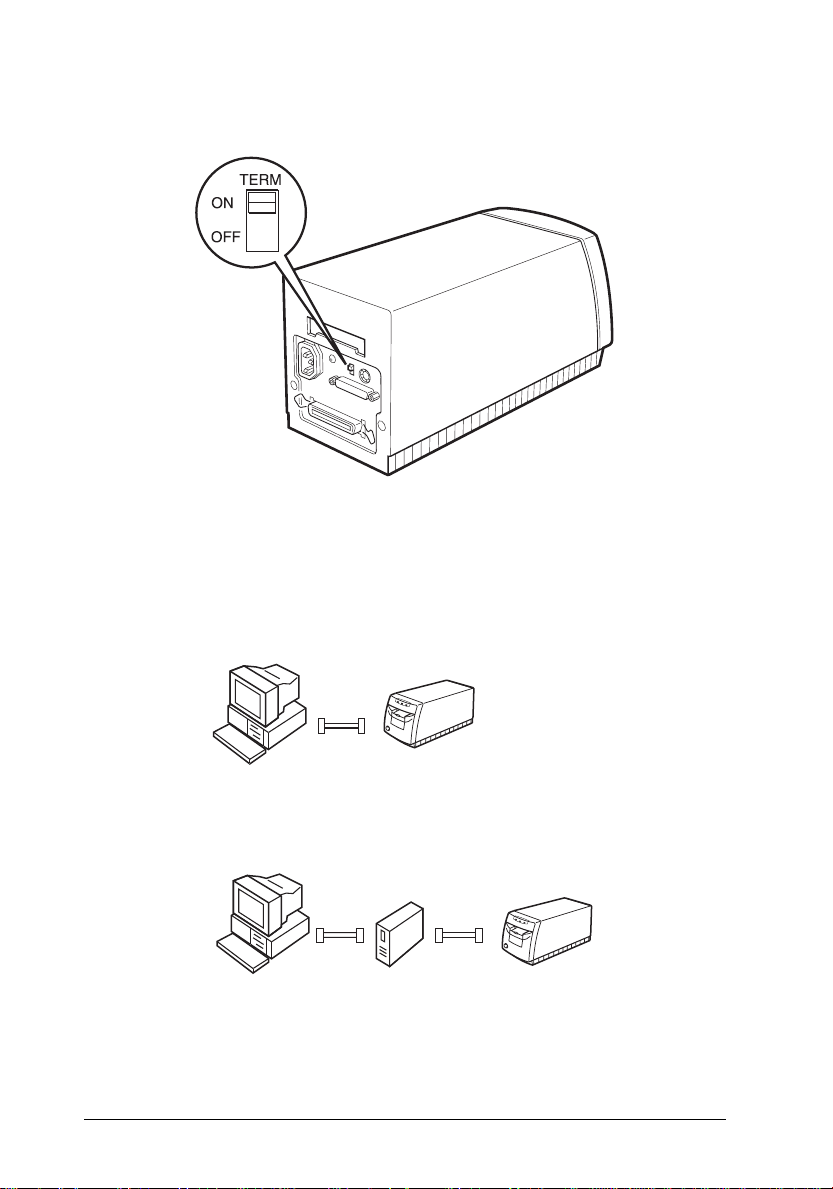
SCSI interface model
Parallel interface connector
Connect the parallel interface
cable here.
Terminator switch
Use this to turn the SCSI
terminator on or off.
SCSI ID rotary d i a l
Set the SCSI ID here.
Ground connector
Connec t the ground wire
here if your interface
cable has one.
AC inlet
Connect the power
cord here.
50-pin SCSI connector
Connect the 50-pin end of
a SCSI cable here.
1-8
Getting Started
25-pin SCSI connector
Connect the 25-pin en d of
a SCSI cable here.
Page 20

Film carrier
Cartridge hold er (op t ion)
For 35 mm negatives
or positives
For 35 mm slides
1
Code: B81309
For Adv a nced Photo System
cartridge film
✽
Getting Star te d
1-9
Page 21

1-10
Getting Started
Page 22

Chapter 2
Connecting EPSON FilmScan 200 to
Your Computer
Connecting the Parallel Interface Model . . . . . . . . . . . . . 2-2
Compatible operating systems . . . . . . . . . . . . . . . . 2-2
Installing the parallel interface board . . . . . . . . . . . . 2-2
Connecting the scanner to your PC . . . . . . . . . . . . . . 2-3
Connecting the SCSI Interface Model . . . . . . . . . . . . . . . 2-4
Compatible operating systems . . . . . . . . . . . . . . . . 2-4
SCSI connections . . . . . . . . . . . . . . . . . . . . . . . . 2-5
Connecting the scanner to your computer or to another
SCSI device . . . . . . . . . . . . . . . . . . . . . . . . . . . 2-9
Power-on sequence . . . . . . . . . . . . . . . . . . . . . . . 2-10
2
Connecting EPSON FilmScan 200 to Your Computer
2-1
Page 23

Connecting the Parallel Interface Model
Compatible operating systems
You can connect the EPSON FilmScan 200 (parallel interface
model) to a PC running the Windows 95 or 3.1 operating
system.
Note:
EPSON FilmScan 200 (parallel interface model) is incompatible with
Windows NT and Macintosh.
Installing the parallel interface board
EPSON FilmScan 200 (parallel interface model) requires a
bidirectional interface in your computer and a standard
shielded, twisted-pair parallel interface cable.
Check your computer’s specifications to see if its built-in
parallel interface is bidirectional or not. If it is not bidirectional
or if your computer does not have an available bidirectional
parallel interface, install the interface board packed with your
scanner. You also may need to change jumper settings on the
board so the settings do not conflict with your computer’s
built-in parallel interface. To install the bidirectional interface
board, see the user’s guide that came with the interface board.
2-2
Note:
Use of the EPSON Bidirectional Parallel Interface Board
❑
(B80818✽) packed with your scanner is recommended.
Remember the I/O address of the parallel interface board. You
❑
will need it when you install the scanner software later.
Connecting EPSON FilmScan 200 to Yo ur Comp uter
Page 24
Connecting the scanner to your PC
Follow the steps below to connect the EPSON FilmScan 200
(parallel interface model) to your PC.
Note:
Use a standard shielded, twisted-pair parallel interface cable.
1. Make sure that both the scanner and computer are turned
off and unplugged from any power source.
Caution:
Do not connect the scanner and computer while they are
c
turned on; otherwise damage may occur.
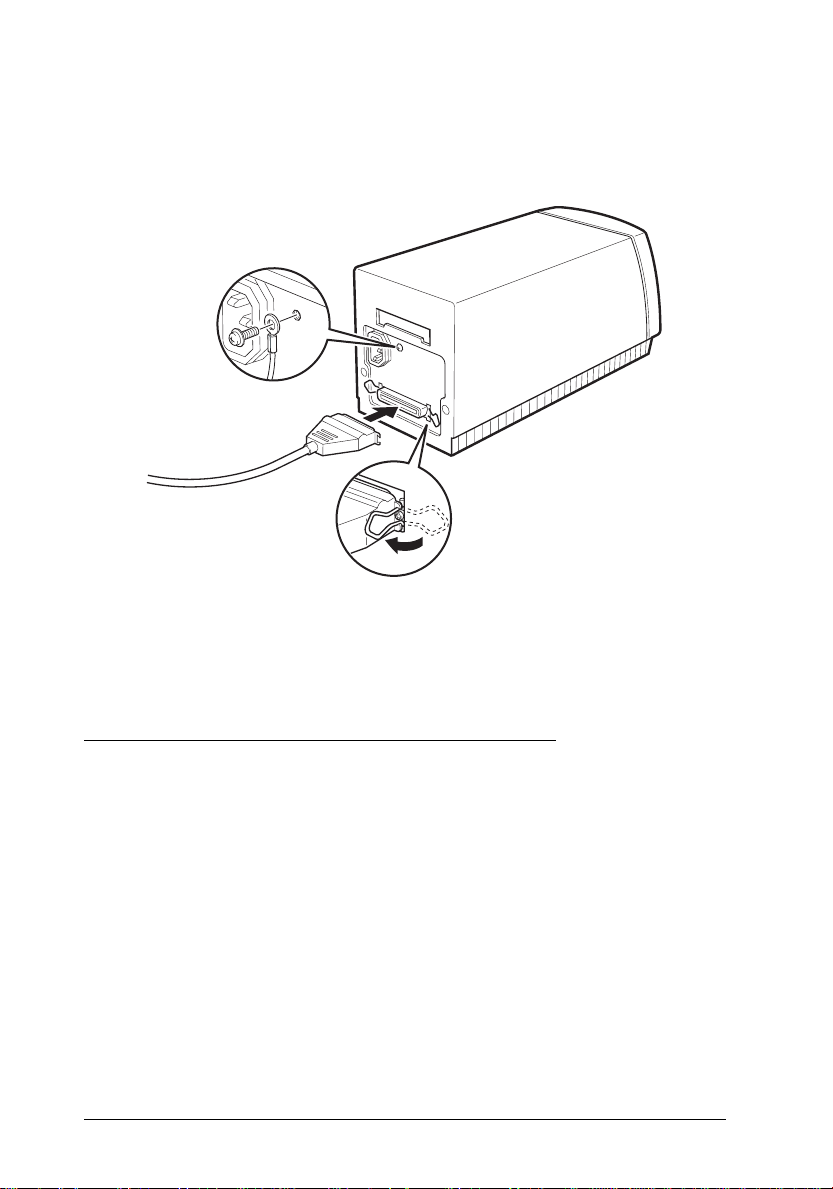
2. Connect the 25-pin end of the cable to the computer. Then
tighten the screws on the sides of the connector. Connect
the ground wire if your interface cable has one.
2
Connecting EPSON FilmScan 200 to Your Computer
2-3
Page 25
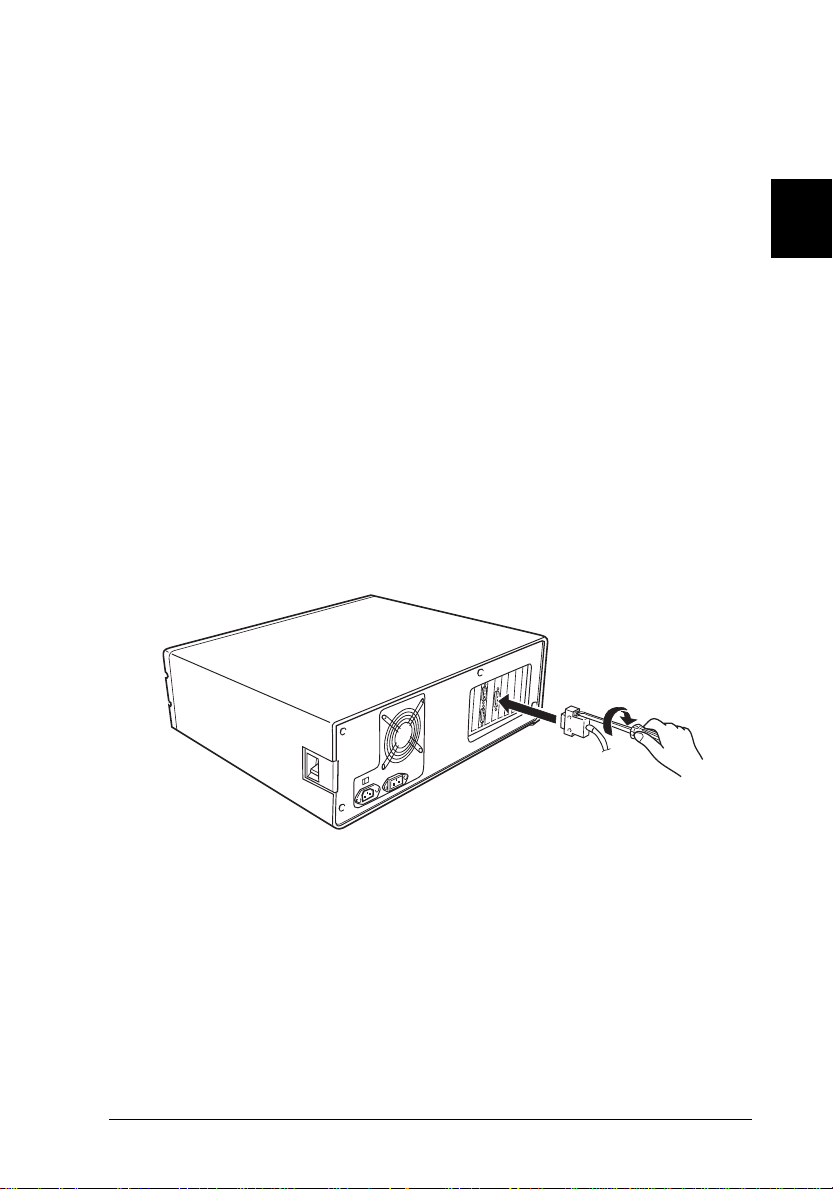
3. Plug the 36-pin end of the cable into the scanner’s interface
connector. Then squeeze the wire clips together until they
lock in place on both sides.
See Chapter 3 for instructions on installing the scanner
software. You must install the scanner software before using
your scanner.
Connecting the SCSI Interface Model
Compatible operating systems
You can connect the EPSON FilmScan 200 (SCSI interface
model) to a Macintosh or a PC running Windows 95, 3.1, or NT.
If your PC does not have a SCSI board installed, you need to
install one according to the directions that come with the SCSI
board. If your PC already has a SCSI board, connect the scanner
as described in the next section.
2-4
Connecting EPSON FilmScan 200 to Yo ur Comp uter
Page 26
Note:
If you use Windows 95 or NT, use the SCSI driver included in
Windows 95 or NT (see your system documentation for instructions)
or the driver described in the SCSI board installation documentation.
If you use Windows 3.1, use the driver packed with the SCSI board
as described in the SCSI board installation documentation.
All Macintosh computers have SCSI ports; you do not need
to install a SCSI board in a Macintosh. Follow the directions
below to set up and connect your scanner and computer.
SCSI connections
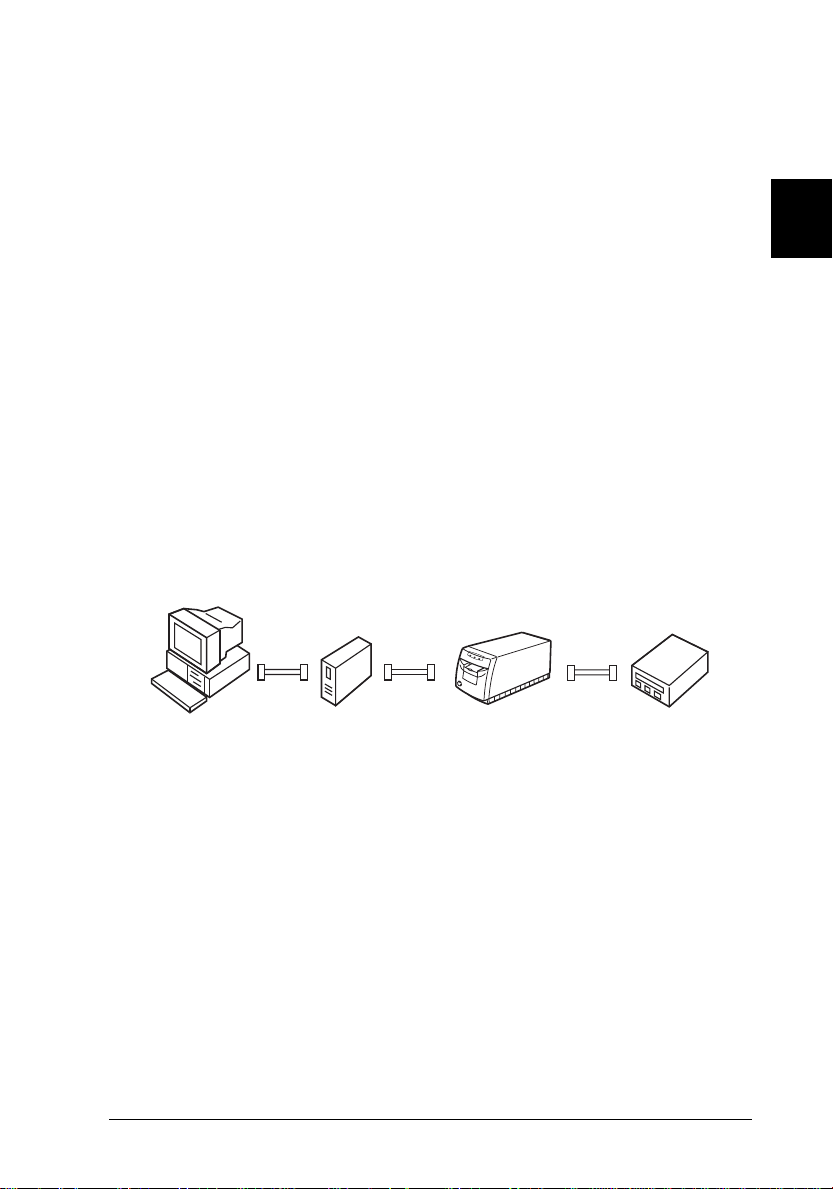
The SCSI interface allows you to connect up to eight devices,
including the computer, in what is called a “daisy chain”
arrangement. Only the first SCSI device in a daisy chain is
connected to the computer; each of the other devices is
connected to the previous device.
2
computer scanner other SCSI device
Note:
Before purchasing a SCSI cable or setting up your SCSI daisy chain,
be sure your SCSI cable(s) has the right combination of 50-pin and
25-pin connectors. The combination you need may vary depending
on the maker of your SCSI device and SCSI interface board.
other SCSI device
Connecting EPSON FilmScan 200 to Your Computer
2-5
Page 27

Each device has a SCSI ID number: the computer is usually
number 7, and each of the other devices must have a different
number between 0 and 6. Also, the first device and the last
device in the chain (not including the computer) must have
a terminator. No other device can have a terminator or if a
terminator does exist, it must be turned off. The scanner has
a 25-pin and a 50-pin SCSI connector and a built-in terminator
that can be turned on or off.
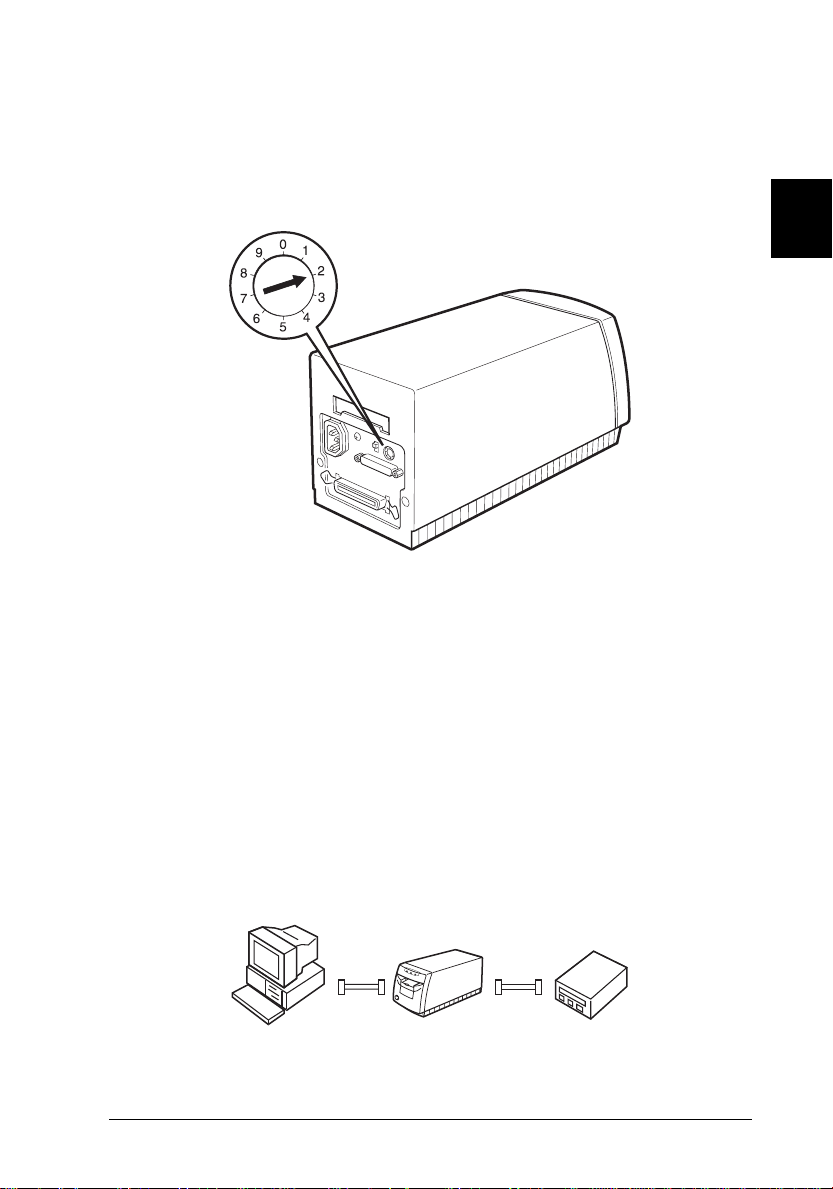
Setting the SCSI ID number
The scanner’s default SCSI ID number is 2. The computer is
usually ID number 7. If you are going to add the scanner to a
system in which one of your SCSI devices already has a SCSI ID
of 2, change the ID number of the scanner to an unused number
using the table below as a guide.
ID Availability Description
0 Not recommended Usually used for hard dis k
1 Not recommended Usually used for hard dis k
2 Factory setting of the scanner
3 Not available if your Macintosh
has a built-in CD-ROM
4
5
6
7 Not available for Macintosh Always used for the Macintosh
itself
May not be available f or
Windows
8 Not avai lable Never selected*
9 Not avai lable Never selected*
*Otherwise the scanner does not work properly.
Usually used for a PC’s host
adapter
If you need to change the SCSI ID, locate the SCSI ID rotary dial
on the rear of the scanner. Then turn the dial number to the
desired number.
2-6
Connecting EPSON FilmScan 200 to Yo ur Comp uter
Page 28
Caution:
c
Setting the termin a tor switc h
The scanner has a built-in terminator, which allows SCSI
devices to communicate properly with each other. You may
need to change the terminator switch setting according to
your computer system.
Do not set the SCSI ID to an ID number that is already
assigned to another device; otherwise the computer, scanner,
and other devices will not function properly.
2
Note:
Do not use an external terminator.
The factory setting of the terminator switch is on. If the scanner
is in the middle of a daisy chain as shown below, turn the
terminator switch off.
computer scanner other SCSI device
Connecting EPSON FilmScan 200 to Your Computer
2-7
Page 29
The terminator switch is located at the rear of the scanner.
If the scanner is the only SCSI device you connect to your
computer or if it is the last device in the daisy chain, leave the
internal SCSI terminator turned on.
only the scanner is connected = terminator on
2-8
computer scanner
the scanner is the la st device i n the daisy chain = terminator on
computer
other SCSI device
scanner
Connecting EPSON FilmScan 200 to Yo ur Comp uter
Page 30
Connecting the scanner to your computer or to
another SCSI device
Follow the steps below to connect the EPSON FilmScan 200
(SCSI interface model) to your computer or another device.
Note:
The combination of 50-pin and 25-pin connectors you need may vary
depending on the maker of your SCSI device and SCSI interface board.
1. Make sure that the scanner, the computer, and all other SCSI
devices are turned off and unplugged from any power
source.
Caution:
Do not connect the scanner to the computer or other
c
devices while they are turned on; otherwise damage may
occur.
2. Connect one end of the SCSI cable to the scanner’s SCSI
connector; then squeeze the wire clips together until they
lock in place, or tighten the screws on the sides of the
connector.
2
An exampl e using the scanner’s 50-pin interface.
Connecting EPSON FilmScan 200 to Your Computer
2-9
Page 31

Note:
❑
To connect the scanner to a SCSI device other than the
computer, the length of cable in the daisy chain must be
6 meters or less; otherwise the system may not work properly.
❑
To connect the scanner to a PC using SCSI-2, the length of
the cable must be 3 meters or less.
3. Connect the other end of the cable to the SCSI port of your
computer or another SCSI device.
4. Connect the power cables of your computer, scanner, and
other external SCSI devices to a power supply.
Note:
Before turning on your system, be sure to read “Power-on sequence”
below.
Power-on sequence
Keep the following in mind every time you turn your computer
and SCSI devices on.
❑
❑
❑
2-10
If you have an internal hard disk, turn on the scanner and
any other SCSI devices you plan to use. Wait about 30
seconds; then turn on your computer. Otherwise the
computer may not work properly.
If you have an external hard disk, turn on the scanner,
external hard disk (which should be first on the daisy
chain), and any other SCSI devices you plan to use. Wait
around 30 seconds; then turn on the computer.
You do not have to turn on unused SCSI devices even if
they are in the middle of the daisy chain.
Connecting EPSON FilmScan 200 to Your Computer
Page 32

If you use Windows 95, after you turn on the scanner and
❑
then turn on the computer, the following dialog box may
appear. Simply selec t
will not prompt you again)
Keep the following in mind every time you turn off your
computer and SCSI devices.
When you are finished using your system, turn off your
❑
computer first, then the scanner and other SCSI devices.
While using your computer, do not turn off the SCSI device
❑
that is acting as the terminator; the terminator switch must
be on.
Do not install a driver (Windows
, then click OK.
2
If you turn the scanner off and back on while using your
❑
computer, the scanner may not scan properly.
Connecting EPSON FilmScan 200 to Yo ur Comp uter
2-11
Page 33

2-12
Connecting EPSON FilmScan 200 to Your Computer
Page 34

Chapter 3
Setting Up the Scanner Software
Installing the Scanner Software in Your PC . . . . . . . . . . . 3-2
Preparing the scanner before installing EPSON TWAIN . 3-2
Installing the software in Windows 95 . . . . . . . . . . . . 3-3
Installing the software in Windows 3.1x or NT 3.5x . . . . 3-8
Installing the software in Windows NT 4.0 . . . . . . . . . 3-9
Installing the Scanner Software in Your Macintosh . . . . . . . 3-10
Calibrating Your Screen . . . . . . . . . . . . . . . . . . . . . . 3-12
3
Setting Up the Scanner Software
3-1
Page 35

Installing the Scanner Software in Your PC
After connecting the scanner to your computer, install the
Windows-based scanner software. It is included on the scanner
software C D-R O M sh ipp ed wit h yo ur sc a nn er. Y our CD
includes EPSON TWAIN and TWAIN-compliant scanning
software. To install EPSON TWAIN in Windows 95, see the next
page. To install EPSON TWAIN in Windows 3.1x or NT 3.5x, see
page 3-8. To install EPSON TWAIN in Windows NT 4.0, see page
3-9. To install the software in your Macintosh, see page 3-10.
Note:
To install the application included on your CD, see the application
user’s guide.
Preparing the scanner before installing EPSON TWAIN
Turn on the scanner and load the film carrier containing the
35 mm strip film or 35 mm slides. Make sure that the READY
light is on. You can test the connection after installing the
EPSON TWAIN. You can use the film carrrier for 35 mm strip
film or slides. To load the film carrier, see “Loading 35 mm
Negatives and Positives” or “Loading 35 mm Slides” in
Chapter 4.
Note:
Set the 35 mm strip film or slides in the carrier so that at least the
carrier’s first frame is occupied, as shown below.
For 35 mm slides
3-2
For 35 mm strip film
Setting Up the Scanner Software
Page 36

Installing the software in Windows 95
Make sure that the film carrier contains film as described in
the previous section and is loaded in the scanner; then follow
the steps below to install the scanner software for Windows 95.
1. Turn on the computer. Start Windows 95.
If you use the EPSON FilmSca n 200 (parall el interf ac e
model), proceed to step 2.
If you use the EPSON FilmSca n 200 (SC SI inte rface model),
either of the following dialog boxes may appear.
If the following dialog box appears, select
❑
install a driver (Windows will not prompt you
again)
, then click OK. Proceed to step 2.
Do not
3
Setting Up the Scanner Software
3-3
Page 37

If the following dialog box appears, click
❑
Next
.
Then click
when the following dialog box appears.
Finish
2. Insert the scanner software CD shipped with your scanner in
the CD-ROM drive.
3. Double-click the
My Computer
icon.
4. Double-click the CD-ROM drive icon. You see the EPSON folder.
3-4
Setting Up the Scanner Software
Page 38

5. Double-click the
double-click the
appears.
Note:
If the folder contains a README file, double-click it and read it.
This file contains the latest important information and any
updates regarding the application.
6. Click OK. In the next dialog box, make sure that the correct
directory name for your Windows system appears in the
Path box.
EPSON
SETUP.EXE
folder and double-click
icon. The following dialog box
Disk 1
. Then
3
Setting Up the Scanner Software
3-5
Page 39

7. Click
and the EPSON TWAIN installation starts.
OK,
Follow the on-screen instructions and when installation is
completed, the EPSON Scanner Setup dialog box appears.
8. Make sure that
scanner, or
SCSI
BiD Parallel
is selected for the SCSI model scanner in
is selected for the parallel model
the Interface pop-up list.
9. For the parallel interface model
Make sure that the port address setting matches the port
address of the interface board as shown below. (Use the
port address you wrote down when you installed the
parallel interface board.)
Interface board Port Id setting in the EPSON Scanner
LPT1 Port 378
LPT2 Port 278
Setup dialog box
Note:
❑
You do not need to change the port address setting if you
install the parallel interface board packed with your scanner
without changing jumper settings.
❑
For information on I/O port addresses, see the user’s guide
that came with the parallel interface board.
3-6
Setting Up the Scanner Software
Page 40

For the SCSI interface model
If you connect the SCSI interface model, EPSON FilmScan
200 appears automatically. If it does not appear, see
Chapter 7, “Troubleshooting.”
10. Make sure that the film carrier containing the 35 mm film is
loaded in the scanner, and that there are no obstructions
placed in the way of the slide path.
11. Click
the film carrier forward and back, and then an image from
the film in the carrier appears if the connection is correct.
If no image appears, see Chapter 7, “Troubleshooting.”
Note:
The test image may be dark when using negative film; this is
normal.
c
to check the connection. The scanner will slide
Test
Caution:
Do not touch the carrier while testing is in progress;
otherwise damage may occur.
3
Setting Up the Scanner Software
3-7
Page 41

12. Click OK to close the EPSON Scanner Setup dialog box. The
program creates an EPSON Scanner Settings icon in the
Control Panel, creates an EPSON Scanner group, and places
the EPSON Scree n Calibrat ion icon is in t he EPS ON Scanner
group.
When you have finished the entire installation, perform the
EPSON Screen Calibration as described on page 3-12.
Installing the software in Windows 3.1x or NT 3.5x
Make sure that the film carrier contains film as described on
page 3-2 and is loaded in the scanner; then follow the steps
below to install the software in Windows 3.1x or NT 3.5x:
1. Turn on the computer. Start Windows 3.1 or NT 3.5x.
2. Insert the scanner software CD shipped with your scanner in
the CD-ROM drive.
3. Open File Manager, then click the CD-ROM drive.
4. Open the EPSON directory and the Disk 1 subdirectory; then
double-click
screen.
SETUP.EXE
. Follow the instructions on the
3-8
When you see the following EPSON TWAIN Setup dialog box,
follow the steps on page 3-5 from step 6.
Setting Up the Scanner Software
Page 42

Installing the software in Windows NT 4.0
Make sure that the film carrier contains film as described on
page 3-2 and is loaded in the scanner; then follow the steps
below to install the scanner software for Windows NT 4.0.
1. Turn on the computer. Start Windows NT 4.0.
2. Insert the scanner software CD shipped with your scanner
in the CD-ROM drive.
3. Double-click the
4. Double-click the CD-ROM drive icon. You see the EPSON
folder.
5. Double-click the
double-click the
the screen.
Note:
If the folder conta ins a README file, double-click it and read it.
This file contains the latest important information and any
updates regarding the application.
When you see the following EPSON TWAIN Setup dialog
box. Follow the steps on page 3-5 from step 6.
My Computer
EPSON
SETUP.EX E
folder and double-click
icon.
. Then
Disk 1
icon. Follow the instructions on
3
Setting Up the Scanner Software
3-9
Page 43

Installing the Scanner Software in Your Macintosh
After connecting the scanner to your Macintosh, install the
Macintosh-based scanner software as described below. It is
included on the scanner software CD-ROM shipped with your
scanner. Your scanner software includes EPSON TWAIN and
TWAIN-compliant scanning software. To install EPSON
TWAIN in your PC, see page 3-2.
Note:
To install the application included on your CD, see the application
user’s guide.
Caution:
c
Follow the steps below to install the scanner software.
1. Turn on the scanner; then turn on the computer.
2. Insert the EPSON scanner software CD shipped with your
Turn off all virus protection programs before you install your
scanner software.
scanner in the CD-ROM drive.
3. Double-click the CD-ROM icon. You see the file folders that
are contained on the CD.
4. Double-click the
3-10
Setting Up the Scanner Software
EPSON FS TWAIN Disk 1
folder.
Page 44

5. Double-click the
installation program.
Note:
Be sure to read the EPSON TWAIN README file, especially if
you are also using an EPSON GT series scanner.
6. Click OK. The following dialog box appears:
Install EPSON TWAIN
icon to start the
3
Setting Up the Scanner Software
3-11
Page 45

7. Click
box appears:
. When installation finishes, the following dialog
Install
8. Click
promps you to restart the computer, click
your computer and to activate the new software.
When you have finished the entire installation, perform the
EPSON Screen Calibr atio n as describe d below .
to complete the installation. When a dialog box
Quit
Restart
Calibrating Your Screen
After you complete the software installation, use the EPSON
Screen Calibration utility to optimize the image output for your
screen.
Calibration is required because brightness levels, contrast, and
other characteristics are somewhat different for each type of
monitor. By calibrating your screen, you allow your software to
generate images that precisely match your screen’s
characteristics.
1. Start up the calibration program.
If you use Windows 95/NT 4.0:
Double-click the
EPSON Scanner folder is open, or click
Programs
Screen Calibrat ion
and
EPSON Screen Calibration
EPSON Scanner
.
, and then click
Start
icon if the
, point to
to restart
EPSON
3-12
Setting Up the Scanner Software
Page 46

If you use Windows 3.1/NT 3.5x:
Double-click the
EPSON Scanner program group.
If you use Macintosh:
Double-click the
EPSON Calibration folder.
EPSON Screen Calibration
EPSON Screen Calibration
icon in the
icon in the
2. In the following window, move the slider to the right or left
until the shades of gray of the two sets of horizontal stripes
match.
Note:
View the screen from a slight distance. The gray stripes will not
perfectly blend together; the object is to make the different tones
match as much as possible.
3
3. Click OK to register the calibration setting.
The new settings are saved. You will not need to change the
screen calibration again so long as you continue to use the
same display .
Setting Up the Scanner Software
3-13
Page 47

3-14
Setting Up the Scanner Software
Page 48

Chapter 4
Scanning 35 mm Film Images
Understanding 35 mm Film . . . . . . . . . . . . . . . . . . . . 4-2
Supported film types . . . . . . . . . . . . . . . . . . . . . . 4-2
Base and emulsion sides . . . . . . . . . . . . . . . . . . . . 4-3
Loading 35 mm Negatives and Positives . . . . . . . . . . . . . 4-3
Loading 35 mm Slides . . . . . . . . . . . . . . . . . . . . . . . 4-7
Capturing Images Using EPSON TWAIN . . . . . . . . . . . . 4-9
Starting EPSON TWAIN . . . . . . . . . . . . . . . . . . . . 4-9
Saving the captured image file . . . . . . . . . . . . . . . . 4-19
Removing 35 mm Film From the Carrier . . . . . . . . . . . . . 4-20
Removing 35 mm strip film from the carrier . . . . . . . . . 4-20
Removing 35 mm slides from the carrier . . . . . . . . . . . 4-21
4
Scanning 35 mm Film Images
4-1
Page 49

Understanding 35 mm Film
The scanner accepts over-the-counter 35 mm strip film (negative
and positive) and 35 mm color slides as well as Advanced Photo
System film. See Chapter 5 for information on Advanced Photo
System film.
Supported film types
35 mm strip film (nega t ive or po sit ive)
The scanner accepts up to a 6-image length of standard 35 mm
film. You can use either negative or positive film.
Negative film
Positive film
Color tones are opposite of what they
were in the original scene. Also, the frame
border is brown. This is the standard film
for generating prints.
Includes color slide film. Color tones are
the same as what they were in the original
scene. The frame border is black.
4-2
Scanning 35 mm Film Images
Page 50

35 mm slides
Each slide consists of a single image cut from a positive film
strip and mounted in a plastic casing or other slide frame.
Maximum allowable slide thickness is 2 mm.
Base and emulsion sides
When loading film into the carrier, always load it so that the
glossy, base side is facing up (the emulsion side should face
down). The film manufacturer’s name and film ID numbers are
readable on the base side. Or when you look at the base side,
the picture should appear in its correct orientation.
Loading 35 mm Negatives an d Positives
To prepare 35 mm negative or positive strip film (strips of up
to 6 images) for scanning, read this section.
4
Film carrier (for 35 mm strip film)
35 mm strip film
Scanning 35 mm Film Images
4-3
Page 51

1. Place the film carrier on a table or other stable surface, and
take off the upper half. Hold the sides with one hand, and
use the other hand to completely remove the upper half, as
shown below.
2. Load the film into the carrier between the small tabs, with the
film’s base side facing up. The film maker’s name and film
ID numbers are shown on the base side.
Caution:
c
Hold the film at the edges, or else use gloves. Touching the
film surface with bare hands can leave fingerprints or
other traces on the film.
4-4
Scanning 35 mm Film Images
Page 52

Note:
If you use a short film strip (less than 6 frames), load the strip
so that it touches one end of the carrier or the other. Remember
which end the film touches, so that you can easily select the
correct frame to acquire from the scanner.
3. Make sure that film is loaded correctly, and then replace
the top half of the carrier. Make sure it locks in place.
4
Scanning 35 mm Film Images
4-5
Page 53

4. Turn on the scanner, if you haven’t already, by pressing the
OPERATE
button. The READY light comes on after a few
moments.
OPERATE
READY
ERROR
OPERATE
READY
ERROR
OPERATE
RESET
5. Make sure the READY light is on, then push the film carrier
about half-way into the scanner as shown below. The
scanner slides the carrier backward and forward, and when
the READY light comes on again, the film is in the correct
position.
4-6
Scanning 35 mm Film Images
Page 54

Loading 35 mm Slides
To prepare 35 mm slides for scanning, read the following. The
carrier can hold up to four slides.
35 mm slide
slide carrier
1. Hold the slide carrier so that the arrows face up, then insert
your slide, face up, under one of the sets of tabs as shown
below. When you look at the slide from this side of the
carrier, the image in the slide should appear in its correct
orientation.
Caution:
Hold a slide by its edges. Touching the film surface can
c
leave fingerprints or other traces on the film.
Insert the slide un der the tabs.
Insert the slide so that it is face up
and the bottom of the s l ide covers
the number written on the slide
carrier.
4
Note:
You can load slides into any or all of the slots. If you load less
than four slides, remember which slots are filled, so that you can
easily select the correct frame to acquire from the scanner.
Scanning 35 mm Film Images
4-7
Page 55

2. Turn on the scanner, if you haven’t already, by pressing the
OPERATE
button. The READY light comes on after a few
moments.
OPERATE
READY
ERROR
OPERATE
READY
ERROR
OPERATE
RESET
3. Make sure the READY light is on, then load the film carrier
about half-way into the scanner with the arrow marks first
as shown below. The scanner slides the carrier backward
and forward, and the film carrier is in the correct position
when the READY light comes on again.
4-8
Scanning 35 mm Film Images
Page 56

Capturing Images Using EPSON TWAIN
This section explains how to scan images from 35 mm strip film
or slides. For instructions on scanning Advanced Photo System
film, see Chapter 5.
Starting EPSON TWAIN
Your scanner uses EPSON TWAIN to scan images. You can
scan images directly from the scanning software that comes
with your scanner or from an application program that
supports the TWAIN standard. This section describes how to
access EPSON TWAIN from the PhotoEnhancer Special Fun
Edition and Adobe
application, see the documentation that came with that
application.
Note:
The EPSON TWAIN operating procedure is the same on both
Windows and Macintosh platforms. Screen illustrations below are
from Windows 95.
1. Load the film carrier containing the 35 mm film into the
scanner as described earlier in this chapter. Make sure that
the scanner’s READY light is on.
®
Photoshop®. To access it from another
4
Note:
Before acquiring images from the 35 mm film strip, be sure that
the scanner door is up. The scanner will not operate while the
door is down. If the scanner door is down, press down and release
it to close completely.
Scanning 35 mm Film Images
4-9
Page 57

2. Make sure that your TWAIN-compliant application software
is open. If you have other TWAIN drivers installed in your
system, follow the steps below. If not, go directly to step 4.
Note:
For details on starting your application, see your application
user‘s guide.
3. Select your EPSON film scanner as the TWAIN source before
starting EPSON TWAIN. The methods shown below are for
PhotoEnhancer Special Fun Edition and Photoshop. See
your application user’s guide for instructions on selecting
the TWAIN source if necessary.
To use the PhotoEnhancer Special Fun Edition as your
❑
scanning appplication, click the
icon on the Photo
Setup
Center menu in the PhotoEnhancer Express window.
The following dialog box appears.
4-10
Select
EPSON Scanners
or
EPSON Scanners (32-bit)
for Windows 3.1x-based applications
for Windows 95/NT-based
applications as the Film Scanner setting. Select
FilmScan 200
as the Film Scanner setting for
Macintosh-based applications.
Scanning 35 mm Film Images
EPSON
Page 58

To use Adobe Photoshop, click
❑
menu. Then click
3.1x or Macintosh-based applications, or click
TWAIN Source_32
applications. The following dialog box appears.
Select TWAIN Source
for Windows 95/NT-based
Acquire
on the File
for Windows
Select
4
Select
EPSON Scanners
Scanners (32-bit)
FilmScan 200
4. Start EPSON TWAIN as described below.
Note:
For details on opening EPSON TWAIN through your application,
see your application user’s guide.
If you use the PhotoEnhancer Special Fun Edition, click
❑
the
Film Scann e r
PhotoEnhancer Express window.
If you use Adobe Photoshop, click
❑
menu; then choose
the setting you chose in step 3.
for Macintosh.
for Windows 3.1x, or select
for Windows 95/NT. Select
icon on the Photo Center menu in the
Acquire
TWAIN
or T
WAIN_32
EPSON
on the File
depending on
EPSON
Scanning 35 mm Film Images
4-11
Page 59

EPSON TWAIN window appears as shown below.
Scanning images
You are now ready to preview and scan your film images. Keep
in mind that the lower part of the EPSON TWAIN window
displays relevant help information that you can refer to for
additional guidance.
1. Make sure that the film carrier containing film is loaded
correctly in the scanner. Also, make sure the scanner is on
and open EPSON TWAIN described in the previous section.
4-12
Scanning 35 mm Film Images
Page 60

2. Click the button corresponding to the type of film loaded in
the scanner: negative strip film, positive strip film, or
slides.
negative strip
positive strip
slides
3. Select the color scheme you want to use to acquire the image.
You have three choices: full color (16 million colors), 256
colors, or grayscale (varying shades of gray, from black to
white).
full color
256 colors
grayscale
Note:
To use the full color option, you may need a video card, video
driver, and display that support at least the following number of
colors. Some application software can produce pseudo “full color”
even if your display can only generate 256 colors. See your
application user’s guide for more details if necessary.
4
Windows: 65,000 colors (16-bit color)
Macintosh: 32,000 colors
Scanning 35 mm Film Images
4-13
Page 61

4. Select the frame (or frames) that you want to preview by
clicking in the appropriate check box. A frame is selected if
a check appears in the check box.
frame number 1 2 3 4 5 6
Note:
The numbers shown above directly relate to the numbered frames
in the film carriers. To save time, keep this in mind when loading
film in the carrier and when selecting frames in the software.
1 2 3 4
4-14
1 2 3 4 5 6
35 mm Strip film
35 mm slides
Note:
You can use the
Clear All/Select All
button to deselect or select
all frames at once. The button name automatically switches each
time you click it.
Scanning 35 mm Film Images
Page 62

5. Make sure that there are no objects directly behind or in front
of the scanner, and click
images you selected. A preview image appears in the
preview window and thumbnail images for all selected
frames appear on the corresponding buttons, as shown
below.
Caution:
Do not touch the carrier or move the scanner while it is
c
operating; otherwise it may be damaged.
preview
window
thumbnail
images
Preview
. The scanner acquires the
The number
shown here
indicates the
amount of
memory
required to
store the
preview
image.
4
Note:
Be sure to preview before scanning; otherwise your scanned
image may come out marred or distorted.
6. To view a different preview image, click the corresponding
thumbnail image. The thumbnail image appears as a full
preview in the preview window.
Scanning 35 mm Film Images
4-15
Page 63

7. If necessary, crop or move the scan area of the preview image
with the pointer, which turns into the following drawing
symbols depending on where you point.
Appears in the center of the image. You
can move the scan area by dragging (click
and hold while moving the mouse) the
hand over the preview image.
Appears at the edge of the image.
or
You can move one edge at a time by
dragging the double arrow.
Appears near the edge of the image.
You can remake the scan area by
dragging the cross-hairs. Then use the
other drawing symbols to make small
adjustments to the scan area if required.
Note:
❑
The scan area you set only effects the image shown in the
preview window.
❑
Previews will generally include a portion of the film carrier
itself, resulting in a white border (scan of the strip film
carrier) or black border (scan of the slide carrier) around the
film image. You may need to crop the scan area to remove this
border.
8. Adjust image quality, image rotation, and other image
options as necessary. To make these settings, click
Configuration
, or one of the image rotation buttons. For
details on these settings, see Chapter 6, “Getting to Know
More About EPSON TWAIN.”
Note:
The settings you make only effect the image shown in the preview
window.
4-16
Scanning 35 mm Film Images
Options
,
Page 64

9. Select the destination device from the Destination pop-up list
shown below. The software automatically adjusts the color
correction and resolution settings to match the selected
device.
Note:
Usually you do not have to change the resolution setting. If you
want to change the resolution, see “Selecting a Destination
Device and Media Size” in Chapter 6.
10. Select the output size for the scanned image from the Media
Size pop-up list. See page 6-6 for details.
4
Note:
If you choose
scanner determines the size of the scanned image according to the
actual film size.
Actual Size
from the Media Size pop-up list, the
Scanning 35 mm Film Images
4-17
Page 65

11. Select the image(s) you want to scan by clicking the
appropriate check box(es). An image is selected if a check
appears in the check box.
12. Make sure that there are no objects directly behind or in
front of the scanner, and click the
the selected image(s).
Caution:
c
If you have selected more than one image for scanning, the
following dialog box appears. If your application software
does not support simultaneous scanning of multiple
images, click No, and scan one image at a time. If your
application suppports multiple-image scanning, click
Do not touch the carrier or move the scanner while it is
operating; otherwise it may be damaged.
button to acquire
Scan
Yes
.
4-18
The scanned image(s) is displayed as a new file behind
the EPSON TWAIN window. (You may need to move the
TWAIN window to view the scanned image.)
Scanning 35 mm Film Images
Page 66

13. Click
carrier out. When the carrier stops moving, pull it the rest
of the way out by hand.
If you want to begin scanning cartride film after scanning
35 mm film, simply insert the film cartridge holder
containing the cartridge film, then click the
Photo System
scanning cartridge film appears. For more information, see
Chapter 5, “Scanning Images From Your Film Cartridge.”
to eject the film carrier; the scanner pushes the
Eject
Advanced
button. The EPSON TWAIN window for
Note:
EPSON TWAIN may automatically close when scanning is
finished. If this happens, start EPSON TWAIN again.
Caution:
When you have finished scanning, be sure to take the film
c
out and store it in an appropriate film storage bag. Do not
leave film in the scanner, as internal scanner temperatures
may eventually cause the film to degrade.
14. Click
to exit EPSON TWAIN.
Close
Saving the captured image file
Save your captured image file in your TWAIN-compliant
software. A typical save procedure is described below. For
detailed information, see your application user’s guide.
1. Select
2. Select the file format.
Save or Save As
on the File menu in your application.
4
Scanning 35 mm Film Images
4-19
Page 67

3. Enter a filename; then select the destination drive and
directory.
4. Click OK or
to sav e th e im a ge file .
Save
Removing 35 mm Film From the Carrier
To remove the 35 mm film carrier from the scanner, click
the scanner pushes the carrier out. When the carrier stops
movi ng, pu ll it the res t of th e wa y o u t by ha nd .
Removing 35 mm strip film from the carrier
1. Place the film carrier on a table or other stable surface and,
using one hand to hold the carrier, remove the upper half.
2. Take the film out of the carrier.
Caution:
c
Hold the film at the edges, or else use gloves. Touching the film
surface with bare hands can leave fingerprints or other traces
on the film.
Eject
;
4-20
Scanning 35 mm Film Images
Page 68

Removing 35 mm slides from the carrier
1. Push your finger through the bottom of the carrier and push
the frame up.
Caution:
Only touch the slide’s frame area. Do not touch the film
c
itself. Touching the film surface can leave fingerprints or
other traces on the film.
2. Grasp the edge of the slide and pull it out gently in the
direction shown below.
4
Scanning 35 mm Film Images
4-21
Page 69

4-22
Scanning 35 mm Film Images
Page 70

Chapter 5
Scanning Images From Your Film Cartridge
About the Advanced Photo System . . . . . . . . . . . . . . . 5-2
Understanding film cartridges . . . . . . . . . . . . . . . . 5-2
Cartridge handling precautions . . . . . . . . . . . . . . . . 5-3
Loading Cartridge Film . . . . . . . . . . . . . . . . . . . . . . 5-5
Capturing Images Using EPSON TWAIN . . . . . . . . . . . . 5-8
Starting EPSON TWAIN . . . . . . . . . . . . . . . . . . . . 5-8
Scanning images . . . . . . . . . . . . . . . . . . . . . . . . 5-11
Removing the Advanced Photo System film cartridge
holder . . . . . . . . . . . . . . . . . . . . . . . . . . . . . . 5-17
Saving the captured image file . . . . . . . . . . . . . . . . . 5-18
Taking the Film Cartridge Out of the Cartridge Holder . . . . 5-19
5
Scanning Images From Your Film Cartridge
5-1
Page 71

About the Advanced Photo System
Cameras and film that carry the mark shown below are
compatible with the Advanced Photo System. Check for this
mark when purchasing your equipment.
In order to load an Advanced Photo System film cartridge into
the scanner, you will need the optional film cartridge holder
shown below. It can be purchased from your dealer.
Understanding film cartridges
Do not load an unprocessed film cartridge into the scanner.
❑
Use fully processed cartridges only. Do not use force to
load the cartridge, as this may cause damage to the film, the
cartridge, or the holder.
The side of the cartridge carries four symbols that indicate
❑
the film’s status. The square symbol (symbol 4 below)
indicates that the film has been processed. Do not load a
cartridge into the scanner unless its square symbol is
marked.
5-2
Scanning Images From Your Film Cartridge
code:B81309✽
Page 72

Do not turn these spindles.
1 2 3 4
Unused Partially
exposed
“Unprocessed” indicator tab
(Do not bend.)
The processing lab returns the processed film in its
❑
Fully exposed,
not processed
cartridge, together with an index sheet showing all of the
images on the film. Store the index sheet in a safe place, as
it will help you identify the images that you want to scan.
Each cartridge has its own unique ID number. This same
❑
number also appears on the corresponding index sheet, so
that there is no danger of mismatching your cartridges and
index sheets.
Cartridge handling precautions
Executing a large number of scans on the same cartridge may
cause wear on the cartridge, resulting in film damage or
inability to unwind or rewind the film. Try to complete your
scanning work with a minimum number of repetitions.
Processed
5
Scanning Images From Your Film Cartridge
5-3
Page 73

If it becomes impossible to unwind the film, the cartridge
mechanism may be bad. You may need to replace the cartridge.
Contact a photo development shop or processing lab. If you
have loaded the cartridge into the scanner as described on
page 7-20, but cannot rewind it, the cartridge holder may be
defective. Contact your dealer.
Caution:
❑
c
Never forcibly pull film out of the cartridge.
❑
Never open the cartridge’s light-blocking door (the cover
over the film outlet).
❑
Do not bend the “unprocessed” tab if the cartridge has not
yet been processed. (A bent tab indicates that the film is
processed.)
❑
Never leave the cartridge in the scanner after you have
finished scanning. Leaving the cartridge in the scanner
may result in cartridge damage or film degradation.
❑
Be sure to use the correct procedure when loading the
cartridge into or taking it out of the cartridge holder.
Never load an unprocessed cartridge into the holder.
5-4
❑
Do not turn the spindles on the cartridge holder.
❑
Do not allow water, sand, or other contaminants to enter
the cartridge.
❑
Handle the cartridge gently; it should not be dropped,
shaken, or subjected to other strong impacts. Be careful to
avoid excessive bending of the film.
Scanning Images From Your Film Cartridge
Page 74

Loading Cartridge Film
To prepare Advanced Photo System film for scanning, read this
section.
1. Turn the cartridge holder’s knob to the OPEN position and
open the cover.
2. Insert the film cartridge into the holder in the manner shown
below. Then close the cover and turn the knob to the LOCK
position.
5
Caution:
Never attempt to load an unprocessed cartridge into
c
the holder, and never press too hard when loading the
cartridge into the holder, as this may cause damage to
the cartridge, the film, or the holder.
Scanning Images From Your Film Cartridge
5-5
Page 75

3. Make sure that the film wind indicator is white.
The cartridge holder automatically checks the cartridge’s
winding mechanism when the cartridge is loaded, and the
film wind indicator appears white if the cartridge is usable.
film win d indicator
Caution:
c
If you find that the indicator is not white after loading film,
there is a problem with the winding mechanism. Do not
attempt to scan film in this cartridge; otherwise it may cause
damage to the film. Turn the knob on the cartridge holder’s
cover to the OPEN position. Open the cover and remove the
cartridge. Then contact your photo development shop or
processing lab.
4. Turn on the scanner, if you haven’t alreay, by pressing the
OPERATE
moments.
5. Press and hold the button on the front of the scanner while
pushing the door down until it clicks into place.
Note:
The READY light turns off because the scanner automatically
shuts down when the door is lowered.
5-6
Scanning Images From Your Film Cartridge
button. The READY light comes on after a few
Page 76

➁
button
6. Insert the cartridge holder into the scanner with the arrow
marks first as shown below.
The scanner automatically positions the cartridge in the
correct place. The READY light comes on to indicate that
the scanner is ready to proceed.
Note:
The film is still within the cartridge at this time and is still
wound. As long as the film is wound, you can take the cartridge
holder out of the scanner and remove or replace the film cartridge.
➀
5
Scanning Images From Your Film Cartridge
5-7
Page 77

Capturi ng Images Using EPSON TWAIN
This section explains how to scan Advanced Photo System film
images. For instructions on scanning 35 mm negatives and
positives, see Chapter 4.
Starting EPSON TWAIN
Your scanner uses EPSON TWAIN to scan images. You can
scan images directly from the scanning software that comes
with your scanner or from an application program that
supports the TWAIN standard. This section describes how to
access EPSON TWAIN from the PhotoEnhancer Special Fun
Edition and Adobe Photoshop. To access it from another
application, see the documentation that came with that
application.
Note:
The EPSON TWAIN operating procedure is the same on both
Windows and Macintosh platforms. Screen illustrations below are
from Windows 95.
1. Load the optional cartridge holder containing the cartridge
film into the scanner as described earlier in this chapter.
Make sure that the scanner’s READY light is on.
2. Make sure that your TWAIN-compliant application program
is open. If you have other TWAIN drivers installed in your
system, see step 3. If not, go directly to step 4.
Note:
For details on starting your application, see your application
user’s guide.
5-8
Scanning Images From Your Film Cartridge
Page 78

3. Select your EPSON film scanner as the TWAIN source before
starting EPSON TWAIN. The methods shown below are for
PhotoEnhancer Special Fun Edition and Photoshop. See
your application user’s guide for instructions on selecting
the TWAIN source if necessary.
To use the PhotoEnhancer Special Fun Edition as your
❑
scanning appplication, click the
Photo Center menu in the PhotoEnhancer Express
window. The following dialog box appears.
Setup
icon on the
5
Select
EPSON Scanners
or
EPSON Scanners (32-bit)
applications as the Film Scanner setting. Select
FilmScan 200
Macintosh-based applications.
To use Adobe Photoshop as your scanning application,
❑
click
Sourc e
applications, or click
Windows 95/NT-based applications. The following
dialog box appears.
as the Film Scanner setting for
Acquire
on the File menu. Then click
for Windows 3.1x or Macintosh-based
Scanning Images From Your Film Cartridge
for Windows 3.1x-based applications
for Windows 95/NT-based
EPSON
Select TWAIN
Select TWAIN Source_32
for
5-9
Page 79

Select
EPSON Scanners
Scanners (32-bit)
FilmScan 200
for Macintosh.
for Windows 3.1x, or select
for Windows 95/NT. Select
EPSON
4. Start EPSON TWAIN as described below.
Note:
For details on opening EPSON TWAIN through your application,
see your application user’s guide.
If you use the PhotoEnhancer Special Fun Edition
❑
software, click the
Film Scanner
icon in the
PhotoEnhancer window.
EPSON
If you use Adobe Photoshop, click
❑
menu; then choose
TWAIN
or
TWAIN-32
Acquire
on the File
depending on
the setting you chose in step 3.
The EPSON TWAIN window appears as shown below.
5-10
Scanning Images From Your Film Cartridge
Page 80

Scanning images
You are now ready to preview and scan your film images.
Keep in mind that the lower part of the EPSON TWAIN
window displays relevant help information that you can refer
to for additional guidance.
1. Make sure that the cartridge holder containing a film
cartridge is loaded correctly in the scanner. Also, make sure
the scanner is on and open EPSON TWAIN as described in
the previous section.
2. Specify the number of images on the film, and select the
color scheme: fill color, 256 colors, or grayscale (varying
shades of gray, from black to white).
5
full color
256 colors
Note:
To use the full color option, you may need a video card, video
driver, and display that support at least the following number of
colors. Some application software can produce pseudo “full color”
even if your display can only generate 256 colors. See your
application user’s guide for more details if necessary.
Windows: 65,000 colors (16-bit color)
Macintosh: 32,000 colors
grayscale
Scanning Images From Your Film Cartridge
5-11
Page 81

3. Select the frame (or frames) that you want to preview by
clicking in the appropriate numbered check box. A frame is
selected if a check appears in the check box.
Note:
The frame numbers under the check boxes correspond with the
frame numbers that appear on the film’s index sheet. To save
time, keep this in mind when selecting frames in the software.
Rewinds five frames
Rewinds one frame
Advances one frame
Advances five frames
Note:
You can use the
Clear All/Select All
button to deselect or select
all frames at once. The button name automatically switches each
time you click it.
4. Click
Preview
. The scanner acquires the images you selected.
A preview image appears in the preview window and
thumbnail images for all selected frames appear on the
corresponding buttons, as shown below.
5-12
Scanning Images From Your Film Cartridge
Page 82

c
Caution:
❑
Do not touch the cartridge holder or move the scanner
while the scanner is operating; otherwise it may be
damaged.
❑
The cartridge film is unwound when you preview or
scan images. Always click the
Eject
button to wind
the film and eject the cartridge holder. You can pull
the holder out of the scanner by hand; however the
film will remain unwound within the holder. If the
film is unwound in the holder, do not attempt to
remove the cartridge from the holder; otherwise you
may scratch or tear the film.
preview
window
thumbnail
images
Note:
❑
Be sure to preview images before sc anning; otherwise yo ur
scanned image may come out marred or destorted.
❑
The preview image a lways appears at size H (HDTV format:
89 × 158 mm).
❑
If the film images appear upside-down on the screen, you can
turn them right side up by clicking the
option. (Because not all cameras use the same cartridge
loading direction, some cameras will produce images that
initially appear upside down.)
5
The number
shown here
indicates the
amount of
memory
required to
store the
preview
image.
Rotate all 180 deg.
Scanning Images From Your Film Cartridge
5-13
Page 83

5. To view a different preview image, click the corresponding
thumbnail image. The thumbnail image appears as a full
preview in the preview window.
6. If necessary, crop or move the scan area of the preview image
with the pointer, which turns into the following drawing
symbols depending on where you point.
Appears in the center of the image. You
can move the scan area by dragging
(click and hold while moving the
mouse) the hand over the preview
image.
Appears at the edge of the image.
You can move one edge at a time by
or
dragging the double arrow.
Appears near the edge of the image.
You can remake the scan area by
dragging the cross-hairs. Then use the
other drawing symbols to make small
adjustments to the scan area if required.
5-14
Note:
❑
The scan area you set only effects the image shown in the
preview window.
❑
The initial previews will generally include a portion of the
film carrier itself, resulting in a white border around the film
image. You may need to crop the scan area to remove this
border.
Scanning Images From Your Film Cartridge
Page 84

7. Adjust image quality, image rotation, and other image
options, as necessary. To make these settings, click
Options, Configuration
buttons. For detailed information on theses settings, see
Chapter 6, “Getting to Know More About EPSON TWAIN.”
Note:
The settings you make only effect the image shown in the preview
window.
8. Select the destination device from the Destination pop-up
list shown below. The driver automatically adjusts the
color correction and resolution settings to match the
selected device.
Note:
Usually, you do not have to change the resolution setting. If you
want to change the resolution, see “Selecting a Destination
Device and Media Size” in Chapter 6.
, or one of the image rotation
5
9. Select the output size for the scanned image from the Media
Size pop-up list. See page 6-6 for details.
Scanning Images From Your Film Cartridge
5-15
Page 85

Note:
If you choose
scanner determines the size of the scanned image according to
the actual film size.
10. Select the image(s) you want to scan by clicking the
appropriate check box(es). An image is selected if a check
appears in the check box.
Actua l Size
from the Media Size pop-up list, the
11. Click the
Caution:
c
If you have selected more than one image for scanning, the
following dialog box appears. If your application software
does not support simultaneous scanning of multiple
images, click No, and scan one image at a time. If your
application supports multiple-image scanning, click
The scanned image(s) is displayed as a new file behind
the EPSON TWAIN window. (You may need to move the
EPSON TWAIN window to view the scanned image.)
Do not touch the cartridge holder or move the scanner
while the scanner is operating; otherwise it may be
damaged.
Scan
button.
Yes
.
12. To remove the cartridge holder, always follow the
instructions described below.
5-16
Scanning Images From Your Film Cartridge
Page 86

Removing the Advanced Photo System film cartridge holder
To rewind the film and remove the film cartridge holder, read
the following steps:
Note:
EPSON TWAIN may automatically close when scanning is finished.
If this happens, start EPSON TWAIN again.
Caution:
c
1. Click the
When you have finished scanning, be sure to take the film out
and store it in an appropriate film storage bag. Do not leave
film in the scanner, as internal scanner temperatures may
eventually cause the film to degrade.
button. The scanner rewinds the film (this
Eject
may take a moment), and then ejects the film cartridge
holder.
Caution:
Always click the
c
You can pull the holder out of the scanner by hand;
however the film will remain unwound within the holder.
If the film is unwound in the holder, do not attempt to
remove the cartridge from the holder; otherwise you may
scratch or tear the film.
Eject
button to eject the cartridge holder.
5
2. Take the cartridge holder out of the scanner, then press
down and release the scanner door to close completely.
Caution:
While the scanner is not in use, close the scanner door to
c
keep dust out of the scanner’s internal mechanisms.
Scanning Images From Your Film Cartridge
5-17
Page 87

If you want to begin scanning 35 mm film after scanning
cartridge film, simply load the film carrier containing the
35 mm film, then click the
TWAIN window for scanning 35 mm film appears. For
more information on scanning 35 mm film, see Chapter 4,
“Scanning 35 mm Film Images.”
35 mm film
button. The EPSON
3. Click
to exit EPSON TWAIN.
Close
Saving the captured image file
Save your captured image file in your TWAIN-compliant
software. A typical save procedure is described below. For
detailed information, see your applicaton user’s guide.
1. Select
2. Select the file format.
3. Enter a filename; then select the destination drive and
directory.
4. Click OK or
Save
or
New
to sav e th e file.
Save
on the File menu in your application.
5-18
Scanning Images From Your Film Cartridge
Page 88

Taking the Film Cartridge Out of the Cartridge
Holder
1. Make sure the film is wound in the holder. If the film is not
wound, it will be visible through the window shown
below.
Caution:
Do not open the cover if you see film in the window.
c
Otherwise you may scratch or tear the film. If film is
wound in the cartridge holder, see “Winding film in
the film cartridge holder” in Chapter 7.
window
2. Open the film cartridge cover by turning the knob on the
cover to the OPEN position. Remove the cartridge.
5
Scanning Images From Your Film Cartridge
5-19
Page 89

5-20
Scanning Images From Your Film Cartridge
Page 90

Chapter 6
Getting to Know More About EPSON TWAIN
Introduction . . . . . . . . . . . . . . . . . . . . . . . . . . . . . 6-2
Selecting a Destination Device and Media Size . . . . . . . . . 6-3
Adding Destination settings . . . . . . . . . . . . . . . . . . 6-3
Adding Media Size settings . . . . . . . . . . . . . . . . . . 6-6
Adjusting the Quality of Scanned Images . . . . . . . . . . . . 6-9
Modifying visual effects . . . . . . . . . . . . . . . . . . . . 6-10
Configuring the scanning environment . . . . . . . . . . . 6-13
Understanding Apple ColorSync . . . . . . . . . . . . . . 6-16
Rotating an Image . . . . . . . . . . . . . . . . . . . . . . . . . . 6-17
6
Getting to K n ow Mor e About EPSON TWAIN
6-1
Page 91

Introduction
This section descr ib es th e b utton s and ot her sc reen items sho w n
in the main EPSON TWAIN window below. Most screen items
are for both 35 mm film (positives, negatives, and slides) and
Advanced Photo System film cartridges. For 35 mm film
specific buttons, such as Film Type, see Chapter 4. For
Advanced Photo System film cartridge specific settings and
buttons, such as Number of Frames, see Chapter 5.
6-2
35 mm film EPSON TWAIN win dow
Getting to Know More About EPSON TWAIN
Page 92

Selecting a Destination Device and Media Size
Read the following for details on selecting which device
to send the scanned image file to, and see page 6-6 for
information on selecting what size to reproduce the scanned
image file at.
Adding Destination settings
Use the Destination dialog box to add new destination devices
or to change the resolution and calibration settings for existing
devices. To access this dialog box, click the
in the EPSON TWAIN window. The Destination dialog box
appears as shown below.
Destination
button
6
To add a new destination (output) device, enter the name of the
new device in the Destination Name box by highlighting and
then overwriting the name that is already displayed in the box.
To make the R esolution and Ca libr at io n set t in gs, sel ec t a
predefined setting or highlight the setting that is displayed and
overwrite it with your custom setting. Then click
Getting to K n ow Mor e About EPSON TWAIN
Save
.
6-3
Page 93

To modify the settings of an existing device, select that device
from the Destination Name list, then select a different value or
option in the Resolution and Calibration boxes, or highlight the
value or option that is displayed and overwrite it with your
custom entry.
Note:
❑
You need to click the
Save
button; otherwise the new settings
will be erased when you exit EPSON TWAIN.
❑
You will find your custom setting along with the predefined
settings in the Destination pop-up list in the EPSON TWAIN
window.
To delete a setting, select the name of a setting from the
Destination Name list and click
Delete
.
Destination Name
Displays the name of the selected output device. Predefined
output devices have predetermined Resolution and Calibration
settings. For more details about these settings, see the
following. To add your own custom output device and settings
to the Destination Name list, see the previous section.
Resolution
You can set the resolution for the scanned image file to any
value between 50 and 4800 dpi. If you are directing your
output to a printer, you should generally set the value to
approximately 1/3 the printing resolution. If you are printing
with an EPSON Stylus series printer, it is recommended that
you leave the resolution setting at its default value.
Note:
This value does not set the actual scanning resolution. The scanner
automatically selects the scanning resolution in accordance with the
Resolution setting, Media Size setting, and the specified scanning
area.
6-4
Getting to Know More About EPSON TWAIN
Page 94

Calibration
Select the final destination setting (such as display or printer)
for the scanned image from the Calibration list. Color
correction and other, similar calibration adjustments are
implemented according to the selection you make here. If the
name of the printer you are using does not appear in the
Calibration list, select
Note:
❑
Calibration is ignored when you are scanning 35 mm film
and the Pos. Film Destination Calibration option in the
Configuration dialog box (Macintosh only) is set to Apple
ColorSync (see page 6-16). In this case, the ColorSync feature
controls the color correction.
❑
Because the Calibration setting optimizes image quality for a
specific device, the quality of the image that appears on screen
may decline.
Screen
instead.
Buttons
6
OK
Save
Delete
Cancel
Puts your new settings into effect for this
session and closes the dialog box.
Saves your new destination setting to the
Destination Name list. You can choose your
new setting the next time you open EPSON
TWAIN.
Removes the currently selected device from the
Destination Name list. If you then click OK, the
device is deleted. However, if you click
instead of OK, you cancel the deletion.
Discards any settings you just made and closes
the dialog box.
Getting to K n ow Mor e About EPSON TWAIN
Cancel
6-5
Page 95

Adding Media Size settings
Use the Media Size dialog box to add a new output size or to
make detailed adjustments to a predefined setting. Media Size
settings determine the output size of scanned images. EPSON
TWAIN includes many predefined Media Size settings that
match certain paper sizes. See the table on page 6-7 for details.
To access this dialog box, click the
EPSON TWAIN window.
Media Size
button in the
To add a new output size, enter the name of the new output
size in the Media Size Name box by highlighting and then
overwriting the name of a similar setting. To make the Width
or Height settings, highlight the previous value and overwrite
it with your custom setting. To make the Unit setting, click the
arrow on the right of the setting and select your setting (you
may have to scroll through the list). Click
finished making settings for your custom output size.
To modify an existing output size, select that setting from the
Media Size Name list and make the Width, Height, and Unit
settings as necessary.
6-6
Getting to Know More About EPSON TWAIN
when you have
Save
Page 96

Note:
❑
You need to click the
Save
button; otherwise the new settings
will be erased when you exit EPSON TWAIN.
❑
You will find your custom setting along with the predefined
settings in the Media Size Name list in the EPSON TWAIN
window.
To delete a size setting, select the name of the setting from the
Media Size Name list and then click
Delete
.
The following table shows the predefined size definitions.
Media Size settings W × HDimensional
Windows Macintosh
640 × 480 screen 640 × 480 640 × 480 Pixels
unit
800 × 600 screen 800 × 600 800 × 600 Pixels
Photo Paper (Landscape) 6.0 × 4.0 6.0 × 4.0 inches
Photo Paper (Portrait) 4.0 × 6.0 4.0 × 6.0 inches
A4 landscape 29.1 × 19.3 29.1 × 19.2 cm
A4 portrait 20.4 × 28.0 20.4 × 27.9 cm
B5 landscape 25.1 × 16.5 25.1 × 16.4 cm
B5 portrait 17.6 × 24.0 17.6 × 23.9 cm
Letter (Landscape) 10.7 × 7.8 10.7 × 7.7 inches
Letter (Portrait) 8.2 × 10.3 8.2 × 10.2 inches
Note:
The Actual Size option that appears in the Media Size pop-up list in
the EPSON TWAIN window does not apear in the Media Size Name
list. For an explanation of the Actual Size option, see page 4-17 (for
35 mm film) or 5-16 (for cartridge film).
6
Getting to K n ow Mor e About EPSON TWAIN
6-7
Page 97

Factory-defined printable area on Photo Paper, A4, B5, and
Letter are shown below.
portrait
*
* 15 mm for Macintosh.
landscape
Media Size Name
Displays the name of the selected output media. Predefined
media sizes have predetermined Width, Height, and Unit
settings. For more details about these settings, see the
following. To add your own custom media size to the Media
Size Name list, see page 6-6.
*
Width
The width for the selected Media Size setting is shown here. To
change the value, highlight and overwrite it with a new value.
Height
The height for the selected Media Size setting is shown here.
To change the value, highlight and overwrite it with a new
value.
6-8
Getting to Know More About EPSON TWAIN
Page 98

Unit
The unit of measurement for the selected Media Size setting is
shown here: cm (centimeters), inches or pixels. If you make a
custom output size setting, be sure to match the Unit setting
with the kind of output you will produce; cm or inches for
paper output and pixels for screen output.
Buttons
OK
Save
Delete
Cancel
Puts your new settings into effect for this
session and closes the dialog box.
Saves your new output size setting to the Media
Size Name list. You can choose the setting the
next time you open EPSON TWAIN.
Removes the currently selected output size from
the Media Size Name list. If you then click OK,
the output size is deleted. However, if you click
Cancel
deletion.
Discards any settings you just made and closes
the dialog box.
instead of OK, you can cancel the
Adjustin g the Quality of Scanned Images
This section explains how to adjust the quality of images
captured by the scanner. EPSON TWAIN optimizes an image
according to the image quality options described below.
6
Note:
Be sure to perform the scanning process in this order; preview the
image, make image quality settings, and then scan. Otherwise
scanned images may not appear as expected.
Getting to K n ow Mor e About EPSON TWAIN
6-9
Page 99

Modifying visual effects
The following settings effect how EPSON TWAIN scans an
image. To make these settings, click the
EPSON TWAIN window. The following dialog box appears:
Note:
The settings you make only effect the image shown in the preview
window.
Options
button in the
You can make these settings by moving the appropriate slider
right or left and then releasing the slider, or by typing a new
value in the appropriate box. You can view the effect of these
changes in the preview image as you make these settin gs.
6-10
Getting to Kn ow More Abo ut EPSON TWAIN
Page 100

Exposure
Adjusts the image’s brightness level with relatively slight
effect on the overall contrast. Make the adjustment by moving
the slider or by entering a new numerical value directly into
the box. Positive values produce brighter images; negative
values produce darker images.
negative value positive value0
Gamma
Adjusts the image’s density (sometimes referred to as contrast).
This allows you to adjust the image’s mid-range brightness
level while leaving the brighter and darker areas of the image
relatively unchanged. Make the adjustment by moving the
slider or by entering a new numerical value directly into the
box. Higher values produce higher brightness.
negative value
0
positive value
6
Getting to Know More About EPSON TWAIN
6-11
 Loading...