

Page 1

User's Guide
NPD5996-01 EN
Page 2

User's Guide
Copyright
Copyright
No part of this publication may be reproduced, stored in a retrieval system, or transmitted in any form or by any
means, electronic, mechanical, photocopying, recording, or otherwise, without the prior written permission of
Seiko Epson Corporation. No patent liability is assumed with respect to the use of the information contained
herein. Neither is any liability assumed for damages resulting from the use of the information herein.
information contained herein is designed only for use with this Epson product. Epson is not responsible for any
use of this information as applied to other products.
Neither Seiko Epson Corporation nor its aliates shall be liable to the purchaser of this product or third parties for
damages, losses, costs, or expenses incurred by the purchaser or third parties as a result of accident, misuse, or
abuse of this product or unauthorized modications, repairs, or alterations to this product, or (excluding the U.S.)
failure to strictly comply with Seiko Epson Corporation's operating and maintenance instructions.
Seiko Epson Corporation and its aliates shall not be liable for any damages or problems arising from the use of
any options or any consumable products other than those designated as Original Epson Products or Epson
Approved Products by Seiko Epson Corporation.
e
Seiko Epson Corporation shall not be held liable for any damage resulting from electromagnetic interference that
occurs from the use of any interface cables other than those designated as Epson Approved Products by Seiko
Epson Corporation.
© 2018 Seiko Epson Corporation
contents of this manual and the
e
specications
of this product are subject to change without notice.
2
Page 3

User's Guide
Trademarks
Trademarks
❏ EPSON® is a registered trademark, and EPSON EXCEED YOUR VISION or EXCEED YOUR VISION is a
trademark of the Seiko Epson Corporation.
❏
Microso
States and/or other countries.
❏ Apple, macOS, and OS X are trademarks of Apple Inc., registered in the U.S. and other countries.
❏ Adobe, Adobe Reader, and Acrobat are registered trademarks of Adobe Systems Incorporated.
❏ Intel
❏ Wi-Fi, Wi-Fi Alliance, and Wi-Fi Protected Access (WPA) are registered trademarks of the Wi-Fi Alliance. Wi-Fi
Protected Setup, and WPA2 are trademarks of the Wi-Fi Alliance.
❏ e SuperSpeed USB Trident Logo is a registered trademark of USB Implementers Forum, Inc.
❏ General Notice: Other product names used herein are for identication purposes only and may be trademarks
of their respective owners. Epson disclaims any and all rights in those marks.
and Windows are either registered trademarks or trademarks of
is a registered trademark of Intel Corporation.
®
Microso
Corporation in the United
3
Page 4

User's Guide
Contents
Contents
Copyright
Trademarks
About This Manual
Introduction to the Manuals...................6
Marks and Symbols.........................6
Descriptions Used in this Manual...............6
Operating System References..................7
Important Instructions
Safety Instructions..........................8
Restrictions on Copying......................9
Scanner Basics
Part Names and Functions...................10
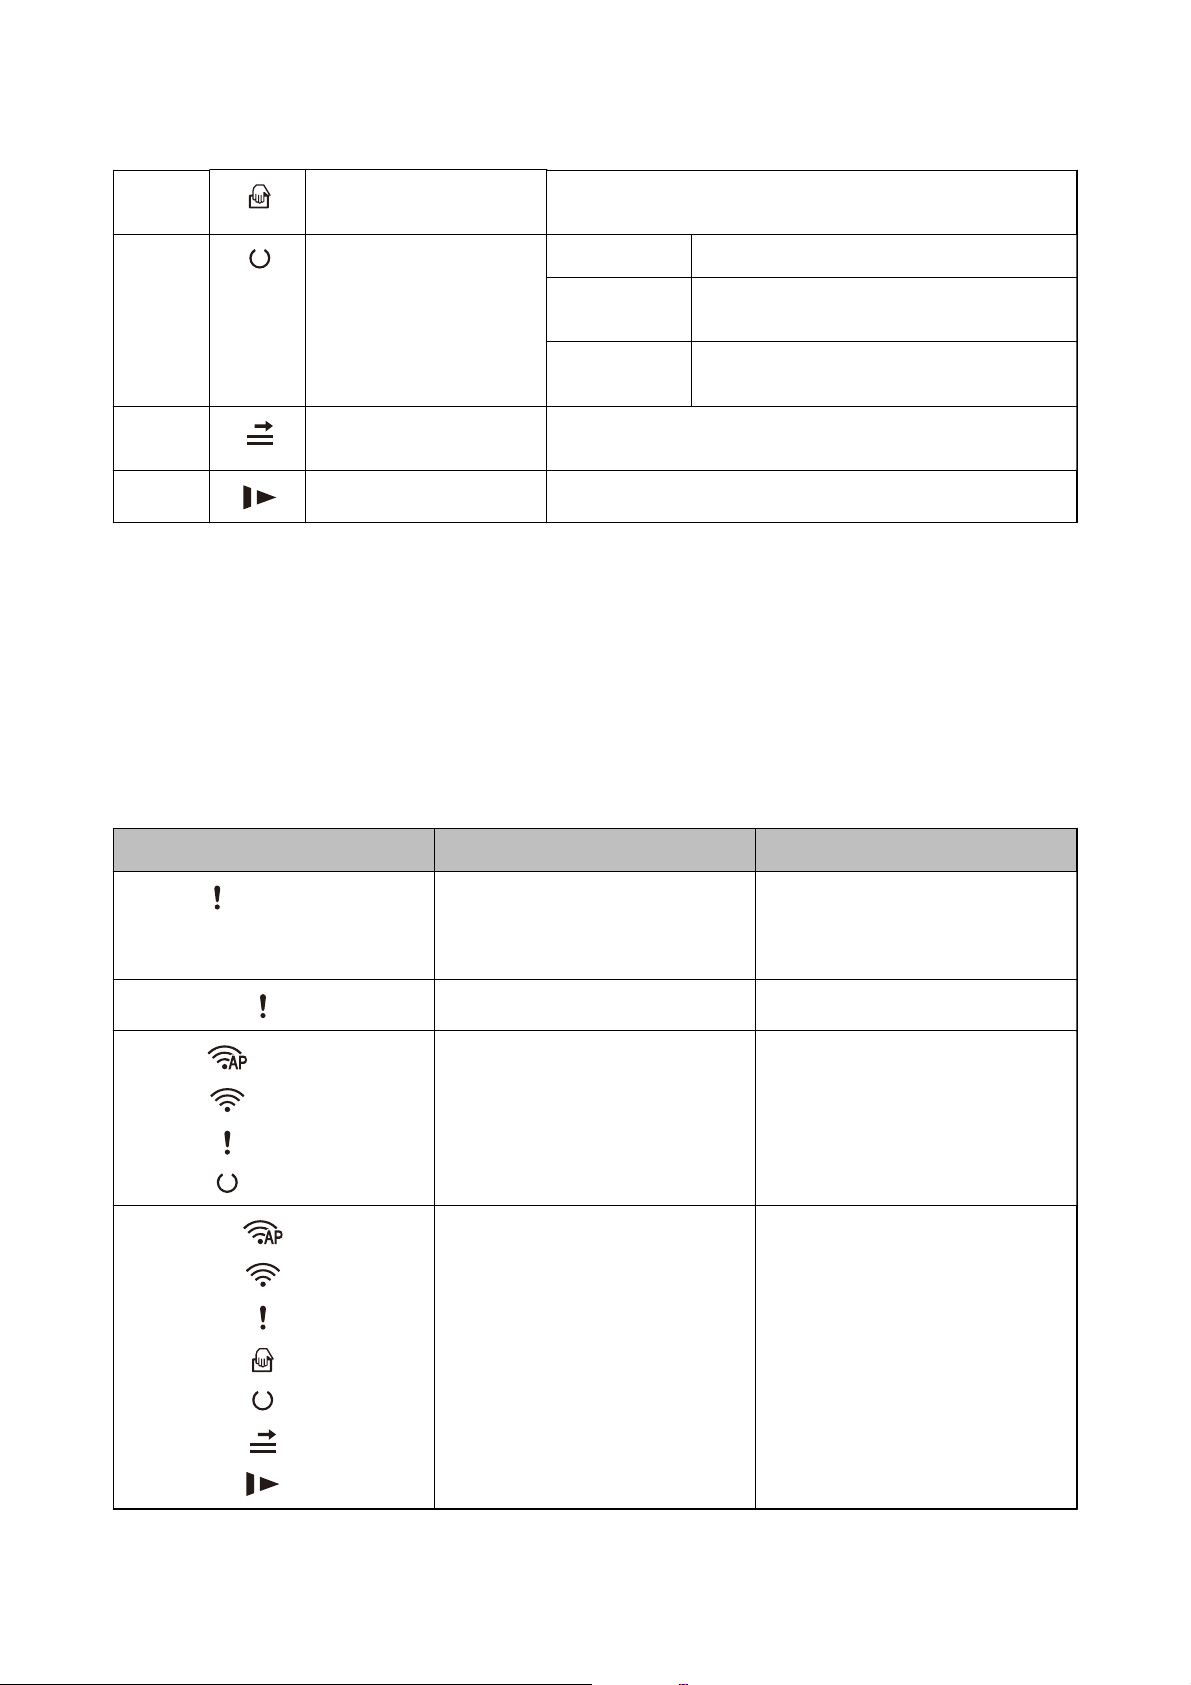
Buttons and Lights on the Control Panel.........12
Buttons...............................12
Lights................................13
Error Indicators.........................14
Information on Applications..................15
Epson FastFoto......................... 15
Epson ScanSmart........................15
EPSON Soware Updater..................15
Epson DocumentScan....................16
EpsonNet
Option Items and Consumables Information. . . . . . 16
Carrier Sheet Codes......................16
Roller Assembly Kit Codes.................16
Cleaning Kit Codes...................... 17
........................16
Cong
Loading Photos Using a Carrier Sheet.........42
Enabling or Disabling Glass Surface Dirt Alert. . .44
Changing the Application to Scan from the
Scan Button............................47
Epson FastFoto Settings.....................49
Organization Tab........................51
Enhancements Tab.......................52
Scan Settings Tab........................53
Advanced Settings Tab....................54
Upload Tab............................54
Scanner Settings Tab..................... 55
Scanning Documents or Other
Originals
Placing Documents or Other Originals..........57
General Specications for Originals being
Scanned.............................. 57
Standard Size Originals................... 59
Long Paper............................ 64
Plastic Cards...........................66
Laminated Cards........................70
Large Size Originals......................72
Irregular Shaped Originals.................75
Envelopes.............................78
Mixture of Originals......................81
Scanning Documents from Computer (Epson
ScanSmart)..............................83
Scanning Dierent Sizes or Types of
Originals One by One Continuously
(Automatic Feeding Mode).................87
Scanning Documents from Smart Device
(Epson DocumentScan).....................90
Scanning Photos
Photo Specications........................18
Types of Photos that Require Attention........19
Types of Photos that must not be Scanned. . . . . .19
How to Scan Photos........................20
Step 1: Organizing Photos..................20
Step 2: Placing Photos into the Scanner........20
Step 3: Scanning and Saving Photos.......... 24
Tips for Using Epson FastFoto.................33
Scanning Instant Photos...................33
Scanning Panoramic Photos................36
Scanning Back Side Notes on Photos..........39
Network Settings
Network Connection Types.................. 95
Wi-Fi Connection....................... 95
Wi-Fi Direct (Simple AP) Connection.........95
Connecting to a Computer...................96
Connecting to a Smart Device................ 97
Making Wi-Fi Settings from the Control Panel. . . . . 97
Making Wi-Fi Settings by Push Button Setup
(WPS)................................97
Making Wi-Fi Settings by PIN Code Setup
(WPS)................................98
Making AP Mode Settings.................98
4
Page 5

User's Guide
Contents
Checking the Network Status Using Network
Light...................................99
Replacing or Adding New Wireless Routers.......99
Changing the Connection Method to a Computer. . 99
Disabling the Network Setting from the Control
Panel..................................100
Restoring the Network Settings from the
Control Panel............................100
Maintenance
Cleaning Outside the Scanner................102
Cleaning Inside the Scanner.................102
Replacing the Roller Assembly Kit.............107
Resetting the Number of Scans.............111
Energy Saving........................... 113
Transporting the Scanner...................114
Updating Applications and Firmware.......... 115
Solving Problems
Scanner Problems........................ 117
Scanner Lights Indicate an Error............117
e Scanner Does Not Turn On............117
Paper Feeding Problems. . . . . . . . . . . . . . . . . . . . 117
Photos Are Not Fed Correctly..............117
Multiple Originals Are Fed................118
Removing Jammed Originals from the Scanner. 118
e Original Jams in the Scanner Frequently. . . 119
e Originals Get Dirty..................120
Scanning Speed Slows Down when Scanning
Continuously..........................120
Scanning Takes a Long Time...............120
Scanning Problems when Using Epson FastFoto. . .121
Straight Lines Appear....................121
e Image Quality Is Poor................ 121
Pressing the Scanner Button Does Not Start
Epson FastFoto........................ 122
Cannot Share or Upload the Photos to a Web
Service...............................122
Glass Dirt Alert Does Not Disappear.........123
Scanning Problems when Using Epson ScanSmart 123
Cannot Start Epson ScanSmart.............123
Straight Lines Appear when Scanning from
ADF................................ 124
Appears in the Background of Images. . . 124
Oset
Scanned Image or Text is Blurred........... 124
Moiré Patterns (Web-Like Shadows) Appear. . . 125
e Edge of the Original is Not Scanned
when Automatically Detecting the Size of the
Original..............................126
Character is not Recognized Correctly........126
Expanding or Contracting the Scanned Image. . 127
Cannot Solve Problems in the Scanned Image. . 127
Network Problems........................128
When You Cannot Make Network Settings. . . . 128
e Scanner Suddenly Cannot Scan over a
Network Connection......................131
Scanner Suddenly Cannot Scan Using a
e
USB Connection.........................131
Uninstalling and Installing Applications. . . . . . . . 132
Uninstalling Your Applications.............132
Installing Your Applications...............133
Technical Specications
General Scanner Specications...............134
Wi-Fi Specications.......................135
Security Protocol.........................135
Dimensional Specications..................136
Electrical Specications....................136
Scanner Electrical Specications............136
AC Adapter Electrical Specications.........136
Environmental Specications................137
System Requirements......................137
Standards and Approvals
Standards and Approvals for European Models. . . 138
Standards and Approvals for Australian Models. . . 138
Where to Get Help
Technical Support Web Site..................139
Contacting Epson Support..................139
Before Contacting Epson................. 139
Help for Users in Europe..................139
Help for Users in Australia................140
5
Page 6

User's Guide
About This Manual
About This Manual
Introduction to the Manuals
e latest versions of the following manuals are available from the Epson support website.
http://www.epson.eu/Support (Europe)
http://support.epson.net/ (outside Europe)
❏ Setup Guide (paper manual)
Provides you with information on setting up the product and installing the application.
❏ User's Guide (digital manual)
Provides instructions on using the product, maintenance, and solving problems.
As well as the manuals above, see the help included in the various Epson applications.
Marks and Symbols
Caution:
!
Instructions that must be followed carefully to avoid bodily injury.
Important:
c
Instructions that must be observed to avoid damage to your equipment.
Note:
Provides complementary and reference information.
Related Information
& Links to related sections.
Descriptions Used in this Manual
❏ Screenshots for the applications are from Windows 10 or macOS High Sierra. e content displayed on the
screens varies depending on the model and situation.
❏ Illustrations used in this manual are for reference only. Although they may
product, the operating methods are the same.
6
slightly from the actual
dier
Page 7

User's Guide
About This Manual
Operating System References
Windows
In this manual, terms such as "Windows 10", "Windows 8.1", "Windows 8", and "Windows 7" refer to the following
operating systems. Additionally, "Windows" is used to refer to all versions.
❏ Microso
❏
Microso
❏ Microso
❏ Microso
Mac OS
In this manual, "Mac OS" is used to refer to macOS High Sierra, macOS Sierra, and OS X El Capitan.
Wi n d o w s® 10 operating system
®
Wi n d o w s® 8.1 operating system
®
Wi n d o w s® 8 operating system
®
Wi n d o w s® 7 operating system
®
7
Page 8

User's Guide
Important Instructions
Important Instructions
Safety Instructions
Read and follow these instructions to ensure safe use of this product and options. Make sure you keep this manual
for future reference. Also, be sure to follow all warnings and instructions marked on the product and options.
❏ Some of the symbols used on your product and options are to ensure safety and proper use of the product. Visit
the following Web site to learn the meaning of the symbols.
http://support.epson.net/symbols
❏ Place the product and options on a at, stable surface that extends beyond the base of the product and options
in all directions. If you place the product and options by the wall, leave more than 10 cm between the back of
the product and options and the wall.
❏ Place the product and options close enough to the computer for the interface cable to reach it easily. Do not
place or store the product and options or the AC adapter outdoors, near excessive dirt or dust, water, heat
sources, or in locations subject to shocks, vibrations, high temperature or humidity, direct sunlight, strong light
sources, or rapid changes in temperature or humidity.
❏ Do not use with wet hands.
❏ Place the product and options near an electrical outlet where the adapter can be easily unplugged.
❏
AC adapter cord should be placed to avoid abrasions, cuts, fraying, crimping, and kinking. Do not place
e
objects on top of the cord and do not allow the AC adapter or the cord to be stepped on or run over. Be
particularly careful to keep the cord straight at the end.
❏ Use only the power cord supplied with the product and do not use the cord with any other equipment. Use of
other cords with this product or the use of the supplied power cord with other equipment may result in re or
electric shock.
❏ Use only the AC adapter that comes with your product. Using any other adapter could cause
shock, or injury.
❏ e AC adapter is designed for use with the product with which it was included. Do not attempt to use it with
other electronic devices unless
❏ Use only the type of power source indicated on the AC adapter’s label, and always supply power directly from a
standard domestic electrical outlet with the AC adapter that meets the relevant local safety standards.
❏ When connecting this product and options to a computer or other device with a cable, ensure the correct
orientation of the connectors. Each connector has only one correct orientation. Inserting a connector in the
wrong orientation may damage both devices connected by the cable.
❏ Avoid using outlets on the same circuit as photocopiers or air control systems that regularly switch on and o.
❏ If you use an extension cord with the product, make sure the total ampere rating of the devices plugged into the
extension cord does not exceed the cord’s ampere rating. Also, make sure the total ampere rating of all devices
plugged into the wall outlet does not exceed the wall outlet’s ampere rating.
specied.
re,
electrical
❏ Never disassemble, modify, or attempt to repair the AC adapter, product, or product options by yourself except
as specically explained in the product’s guides.
❏ Do not insert objects into any opening as they may touch dangerous voltage points or short out parts. Beware of
electrical shock hazards.
❏ If damage occurs to the plug, replace the cord set or consult a qualied electrician. If there are fuses in the plug,
make sure you replace them with fuses of the correct size and rating.
8
Page 9

User's Guide
Important Instructions
❏ Unplug the product, options, and the AC adapter, and refer servicing to qualied service personnel under the
following conditions: e AC adapter or plug is damaged; liquid has entered the product, options, or the AC
adapter; the product or the AC adapter has been dropped or the case has been damaged; the product, options,
or the AC adapter does not operate normally or exhibits a distinct change in performance. (Do not adjust
controls that are not covered by the operating instructions.)
❏ Unplug the product and the AC adapter before cleaning. Clean with a damp cloth only. Do not use liquid or
aerosol cleaners except as specically explained in the product’s guides.
❏ If you are not going to use the product for a long period, be sure to unplug the AC adapter from the electrical
outlet.
❏ Aer replacing consumable parts, dispose of them correctly following the rules of your local authority. Do not
disassemble them.
❏ Keep this product at least 22 cm away from cardiac pacemakers. Radio waves from this product may adversely
aect the operation of cardiac pacemakers.
❏ Do not use this product inside medical facilities or near medical equipment. Radio waves from this product
may adversely aect the operation of electrical medical equipment.
❏ Do not use this product near automatically controlled devices such as automatic doors or
waves from this product may adversely
these devices, and could lead to accidents due to malfunction.
aect
alarms. Radio
re
Restrictions on Copying
Observe the following restrictions to ensure the responsible and legal use of your product.
Copying of the following items is prohibited by law:
❏ Bank bills, coins, government-issued marketable securities, government bond securities, and municipal
securities
❏ Unused postage stamps, pre-stamped postcards, and other ocial postal items bearing valid postage
❏ Government-issued revenue stamps, and securities issued according to legal procedure
Exercise caution when copying the following items:
❏ Private marketable securities (stock certicates, negotiable notes, checks, etc.), monthly passes, concession
tickets, etc.
❏ Passports, driver’s licenses, warrants of tness, road passes, food stamps, tickets, etc.
Note:
Copying these items may also be prohibited by law.
Responsible use of copyrighted materials:
Products can be misused by improperly copying copyrighted materials. Unless acting on the advice of a
knowledgeable attorney, be responsible and respectful by obtaining the permission of the copyright holder before
copying published material.
9
Page 10
User's Guide
Scanner Basics
Scanner Basics
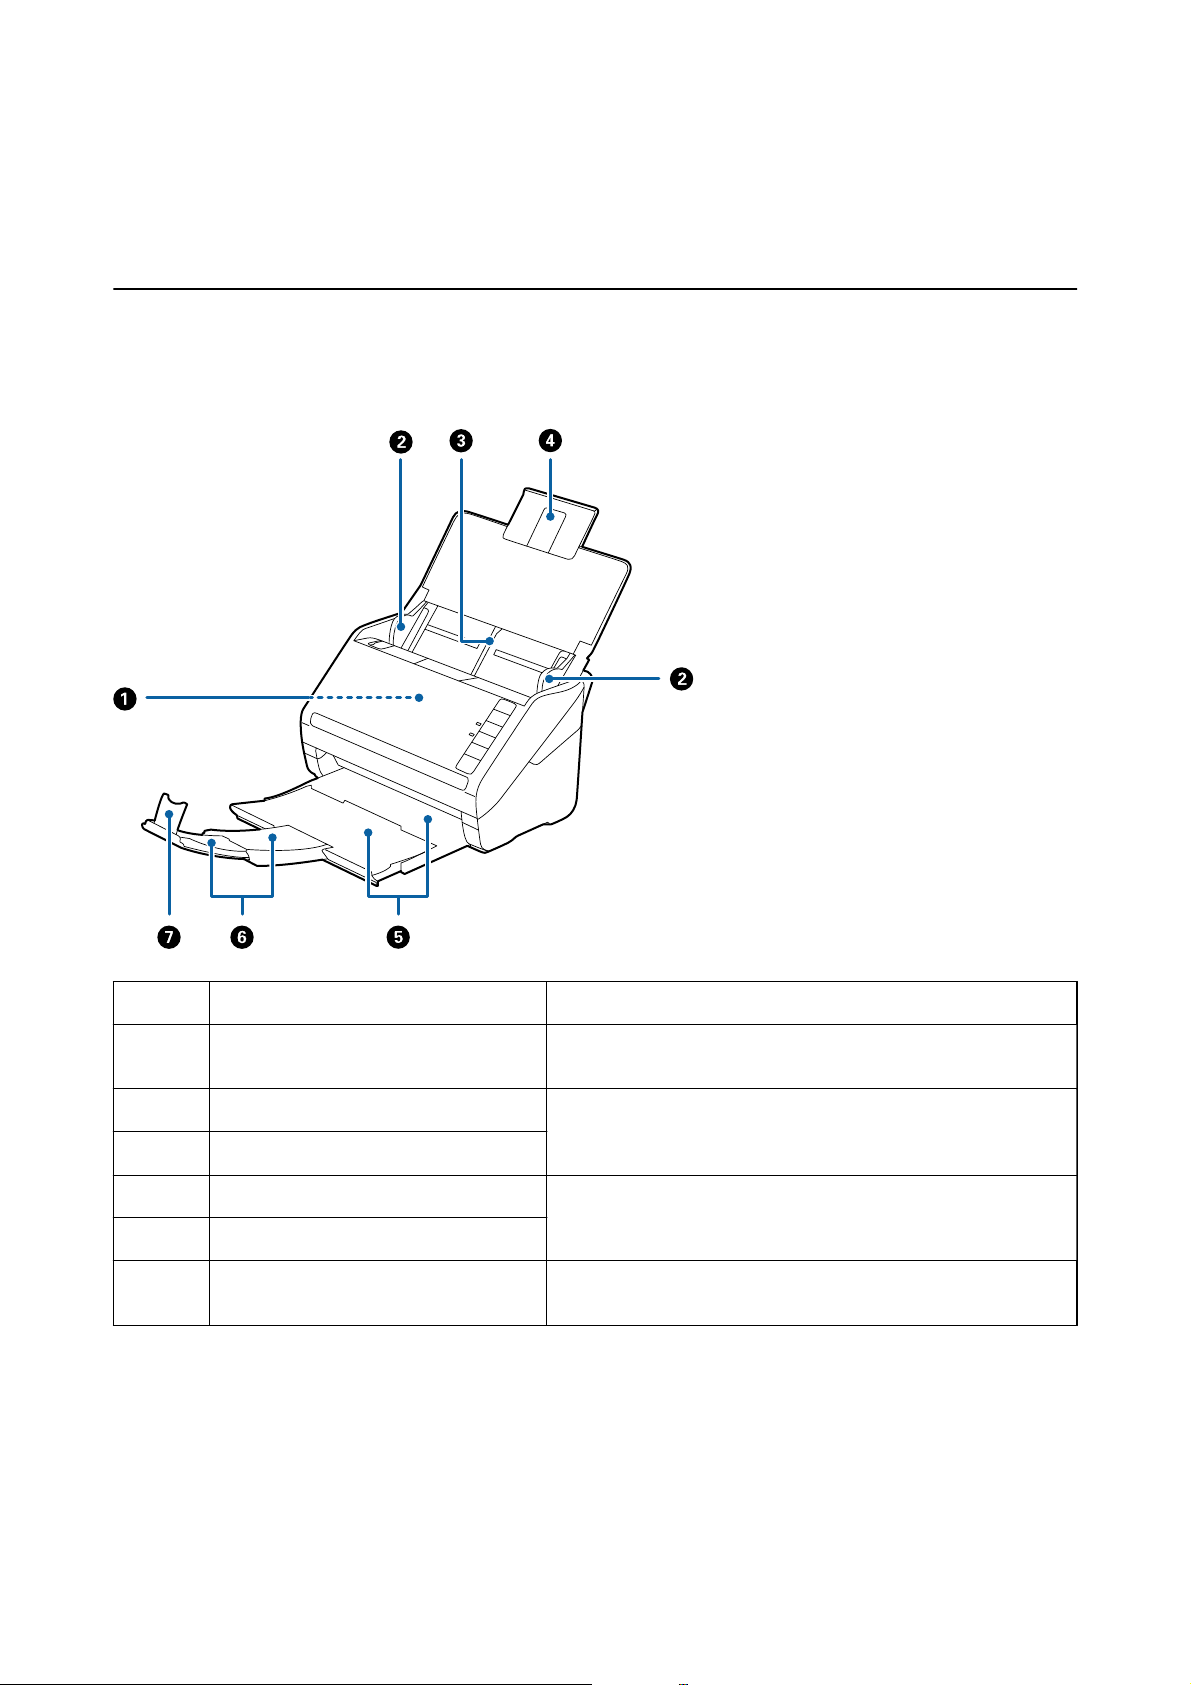
Part Names and Functions
Front
A
B
C
D
E
F
G
ADF (Automatic Document Feeder) Feeds loaded originals automatically.
Edge guides Feeds originals straight into the scanner. Slide to the edges of the
originals.
Input tray Loads originals. Pull out the tray extension if originals are too big
for the input tray. This prevents paper from curling and causing
Input tray extension
Output tray Holds originals ejected from the scanner. Pull out the extension
Output tray extension
Stopper Prevents ejected originals from falling o the extension tray. Adjust
paper jams.
tray to the length of the originals.
it to the length of the originals.
10
Page 11
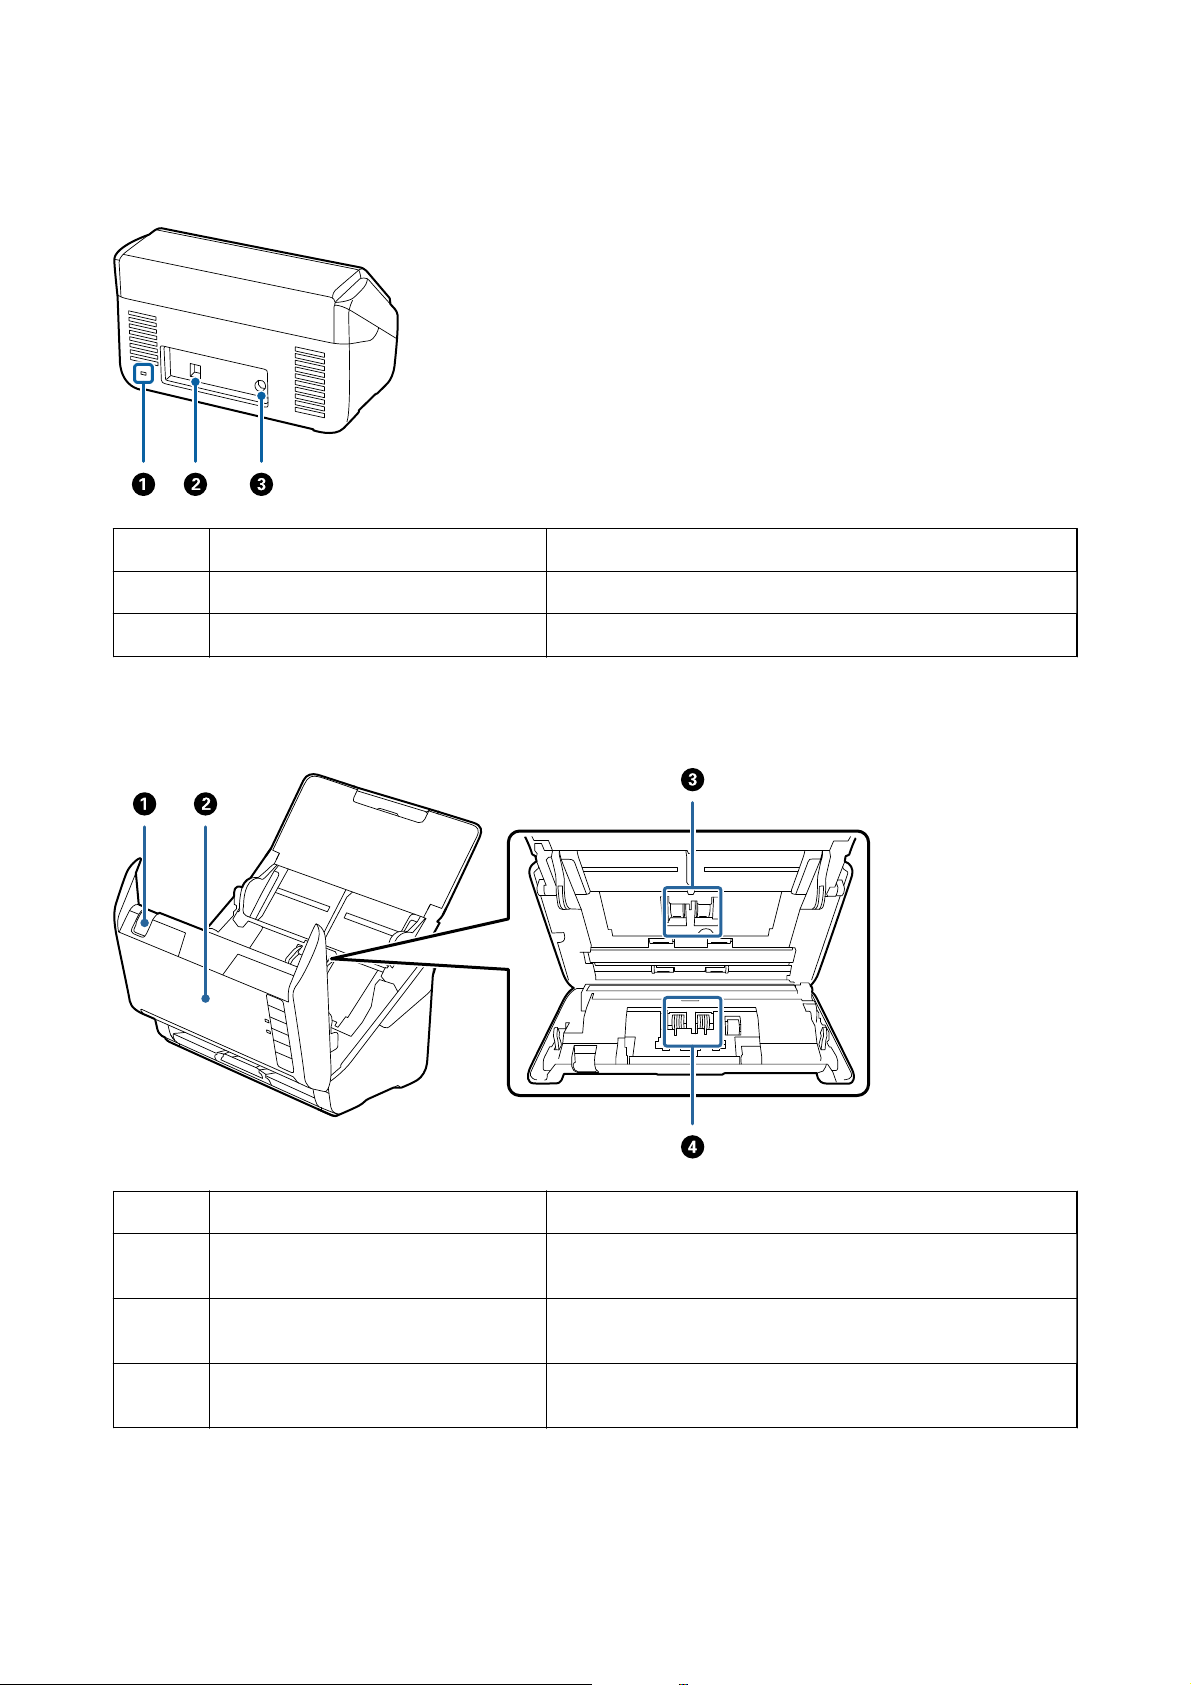
User's Guide
Back
Scanner Basics
Inside
A
B
C
Security slot Inserts a security lock for theft prevention.
USB port Connects a USB cable.
DC inlet Connects the AC adapter.
A
B
C
D
Cover open lever Pull the cover open lever and open the scanner cover.
Scanner cover Pull the cover open lever and open the scanner cover when
Pickup roller Feeds originals. This needs to be replaced when the number of
Separation roller Feeds originals separately one by one. This needs to be replaced
Related Information
&
“Cleaning Inside the Scanner” on page 102
&
“Replacing the Roller Assembly Kit” on page 107
cleaning inside of the scanner and removing jammed paper.
scans exceeds the service number of papers.
when the number of scans exceeds the service number of papers.
11
Page 12
User's Guide
Scanner Basics
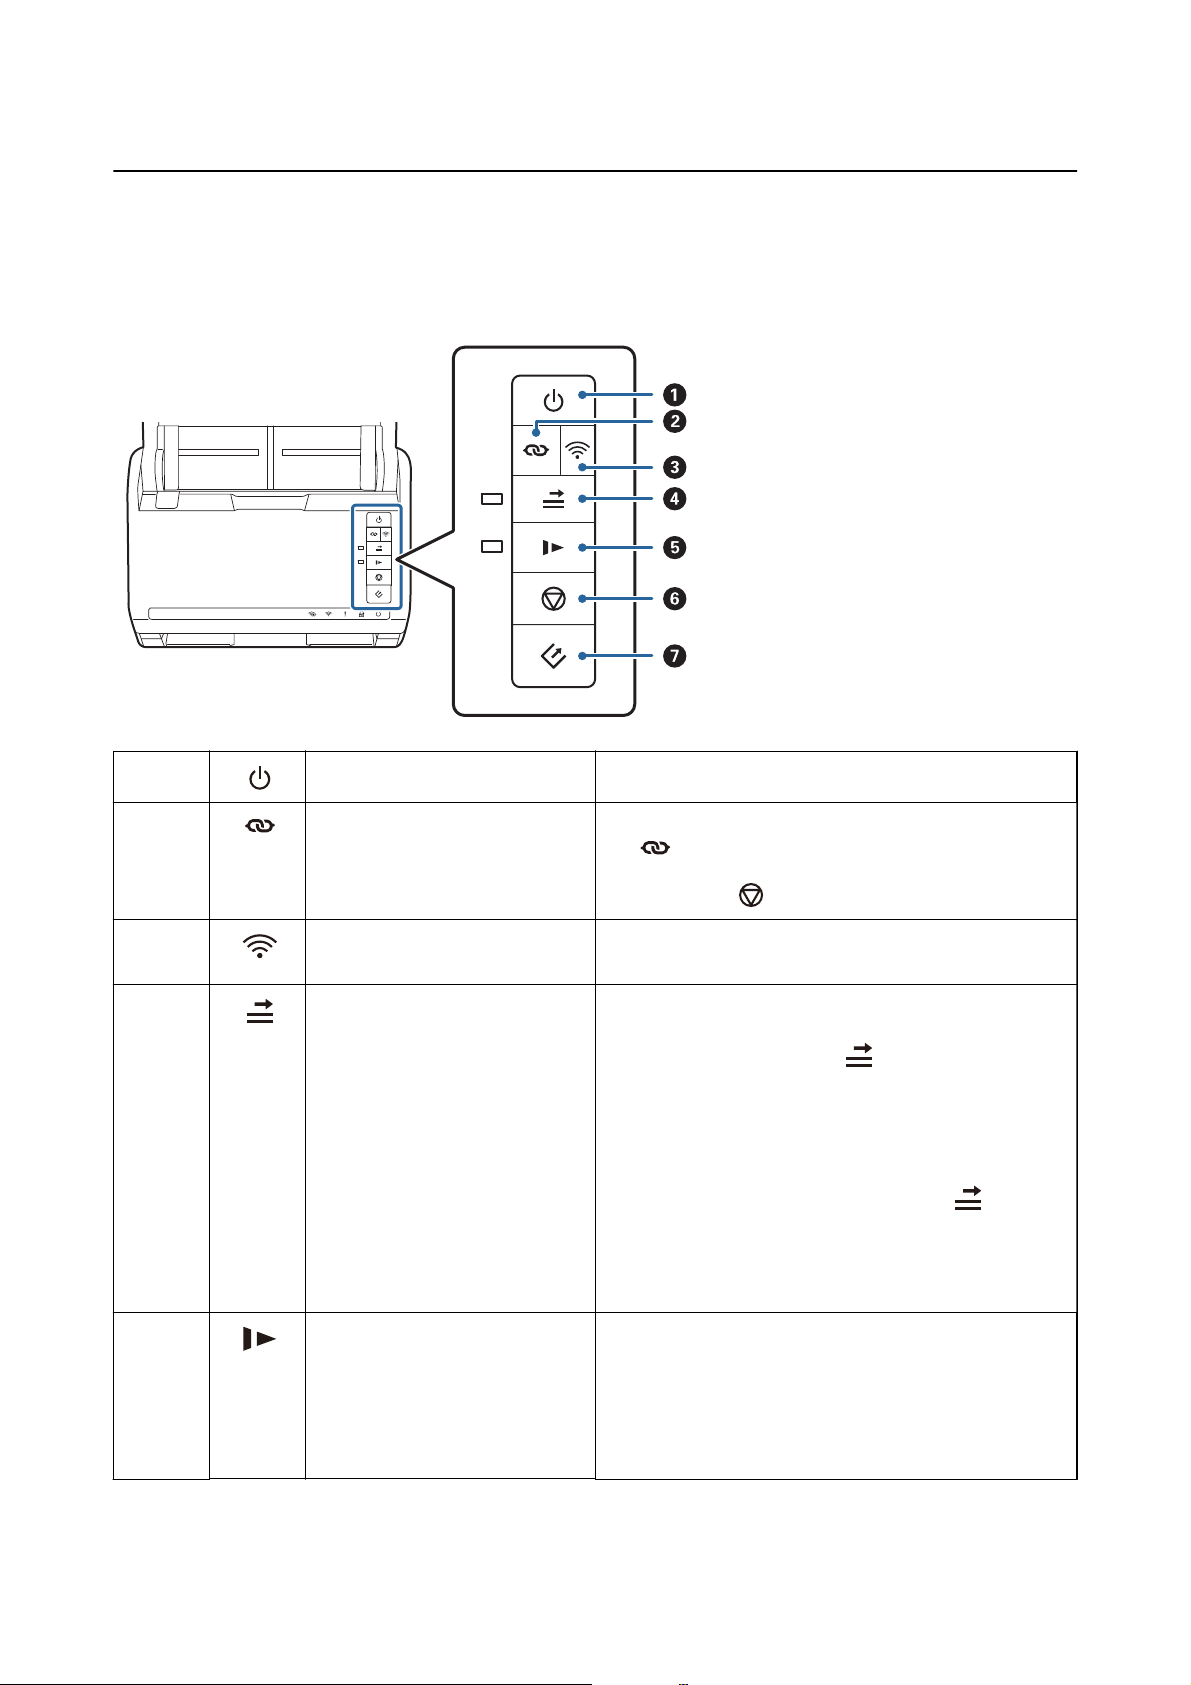
Buttons and Lights on the Control Panel
Buttons
A
B
C
D
E
Power button Turns the scanner on or o.
Wi-Fi connect button Press the WPS button on the access point, and then press
button for more than three seconds to connect to a
the
Wi-Fi network. See the chapter “Network Settings” for more
details. Press the
Wi-Fi on/o button Press this button for more than three seconds to turn o the
wireless signal. Press again to turn on the signal.
Double feed detection skip button Normally, an error occurs when detecting double feeds
when loading envelopes, plastic cards, originals with labels
or stickers, and so on. Press the
to skip this error once (one sheet). The light is on when this
is enabled. Follow the steps below to restart scanning when
a double feed error has occurred (the error light
1. Open the scanner cover, and then remove the originals.
2. Close the scanner cover, and then press the
3. Load the originals.
4. Restart scanning by pressing the start button or the
application button.
Slow mode button Slow down the feeding speed when scanning. The light is on
when this is enabled.
Press this button in the following situations:
❏ when originals jam frequently
❏ when loading thin originals
button to cancel the settings.
button before scanning
ashes).
button.
12
Page 13
User's Guide
Scanner Basics
F
G
Stop button ❏ Cancels scanning.
❏ Finishes Automatic Feeding Mode.
❏ Cancels Wi-Fi settings by push button setup (WPS).
❏ Press this to release the error when a network connection
error occurs.
❏ Cancels a rmware update over a network connection.
Start button ❏ Starts scanning. Epson FastFoto is installed as the default
scanning application.
❏ Press this when cleaning the inside of the scanner.
Additional functions are available with dierent combinations of buttons.
+ Hold down the and buttons for more than three seconds to start PIN Code Setup
(WPS). See the chapter “Network Settings” for more details.
+ Turn on the scanner while holding down the button to restore the default network
settings.
Related Information
“Network Settings” on page 95
&
“Placing Plastic Cards” on page 67
&
“Placing Laminated Cards” on page 70
&
& “Placing Envelopes” on page 79
& “Cleaning Inside the Scanner” on page 102
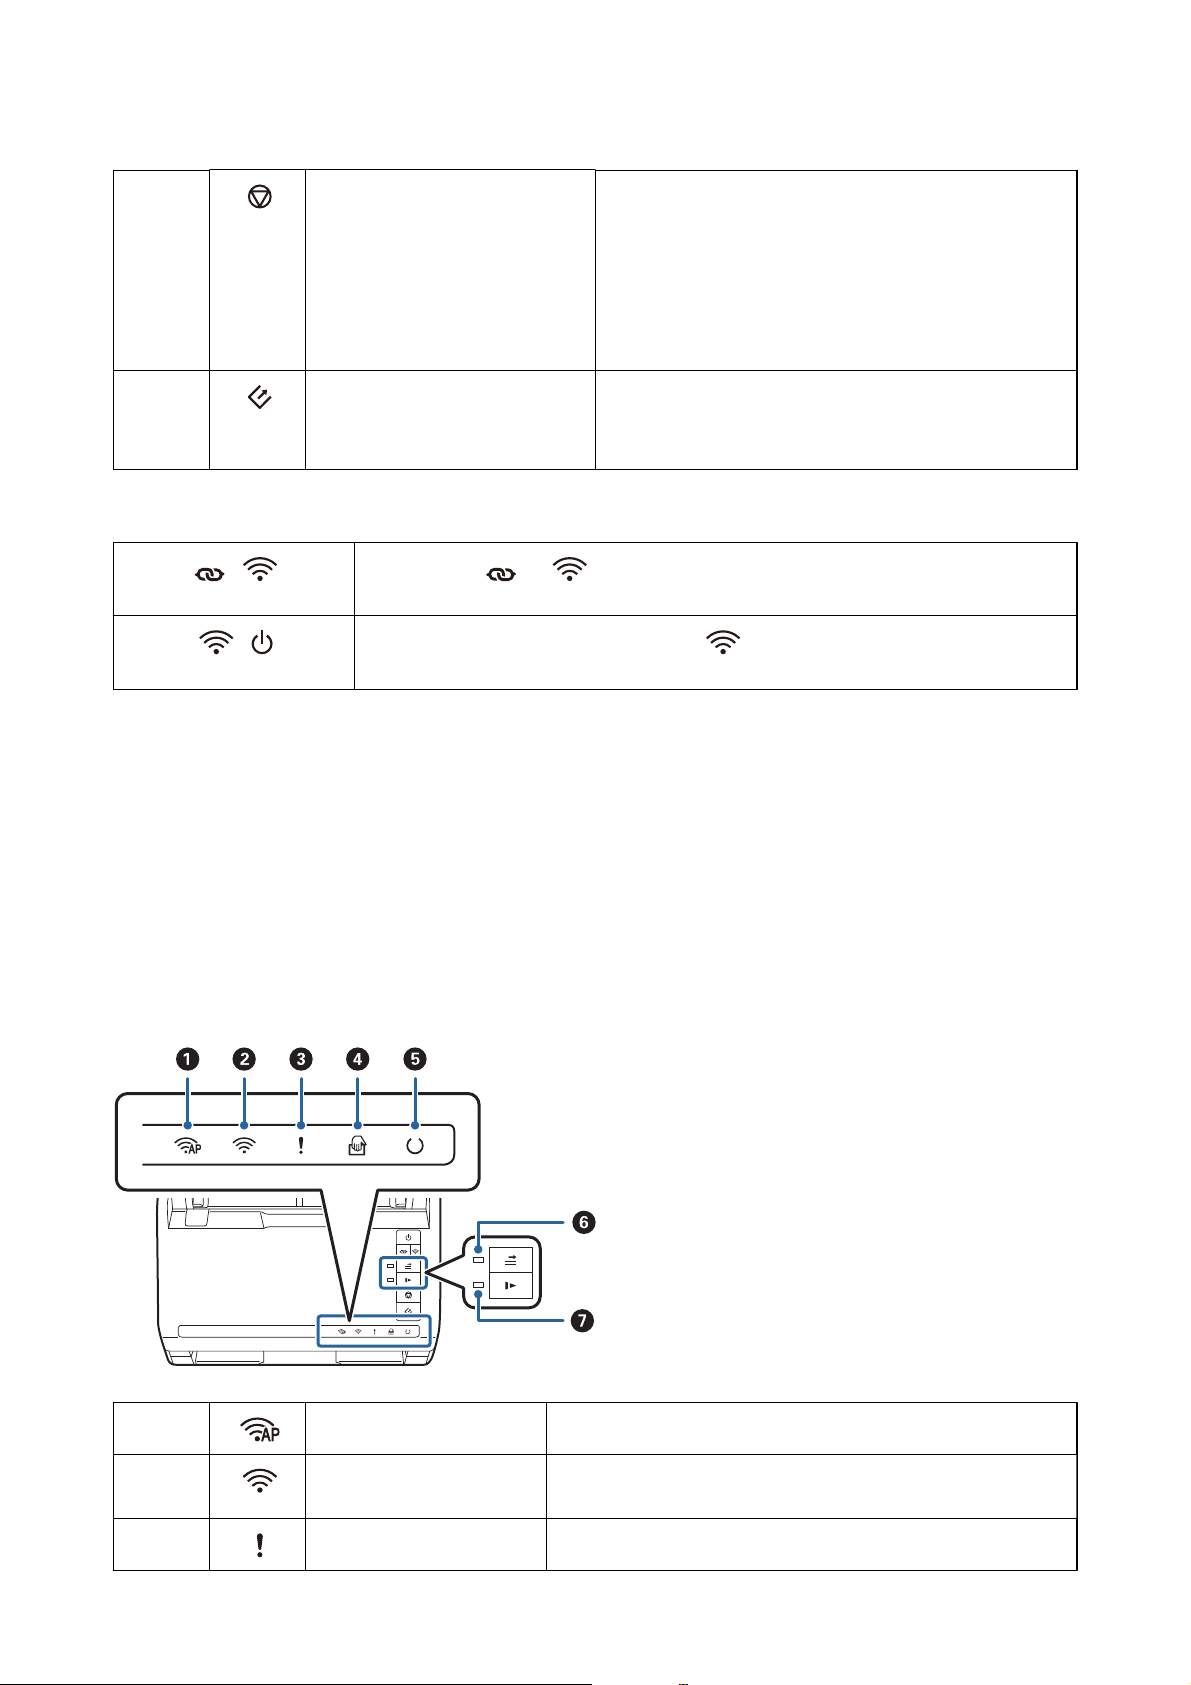
Lights
A
B
C
AP mode light Indicates that the scanner is connected wirelessly in AP mode.
Wi-Fi light Blue indicates that the scanner is connected to a wireless (Wi-Fi)
network. White indicates it is searching for an access point.
Error light An error has occurred. See “Light Error Indicators” for more details.
13
Page 14
User's Guide
Scanner Basics
D
E
F
G
Automatic Feeding Mode
light
Ready light On: The scanner is ready to be used.
Skip double feed detection
light
Slow mode light This is on during slow mode.
Related Information
& “Error Indicators” on page 14
& “Placing a Mixture of Originals at
Error Indicators
Dierent
The scanner is in Automatic Feeding Mode. Scanning starts when
an original is placed in the input tray.
Flashing: The scanner is scanning, waiting to scan,
processing, or sleeping.
O: The scanner cannot be used because the power
is o or an error has occurred.
This is on when skipping double feed detection is enabled.
Sizes” on page 82
Scanner errors
Flashing slowly
Flashing fast
Indicators Situation Solutions
A paper jam or double feed occurred. Open the scanner cover, and then re-
move jammed originals. Close the cover to release the error. Load the originals again.
On
Flashing fast
Flashing fast
Flashing fast
On
On
On
On
O
The scanner cover is opened. Close the scanner cover.
A fatal error has occurred. Turn the power o and on again. If the
error continues to occur, contact your
local dealer.
The scanner has started in recovery
mode because the
failed.
rmware
update
Follow the steps below to try to update the
1. Connect the computer and the scanner with a USB cable. (During recovery
mode, you cannot update the rmware over a network connection.)
2. Visit your local Epson website for further instructions.
rmware
again.
On
On
14
Page 15
User's Guide
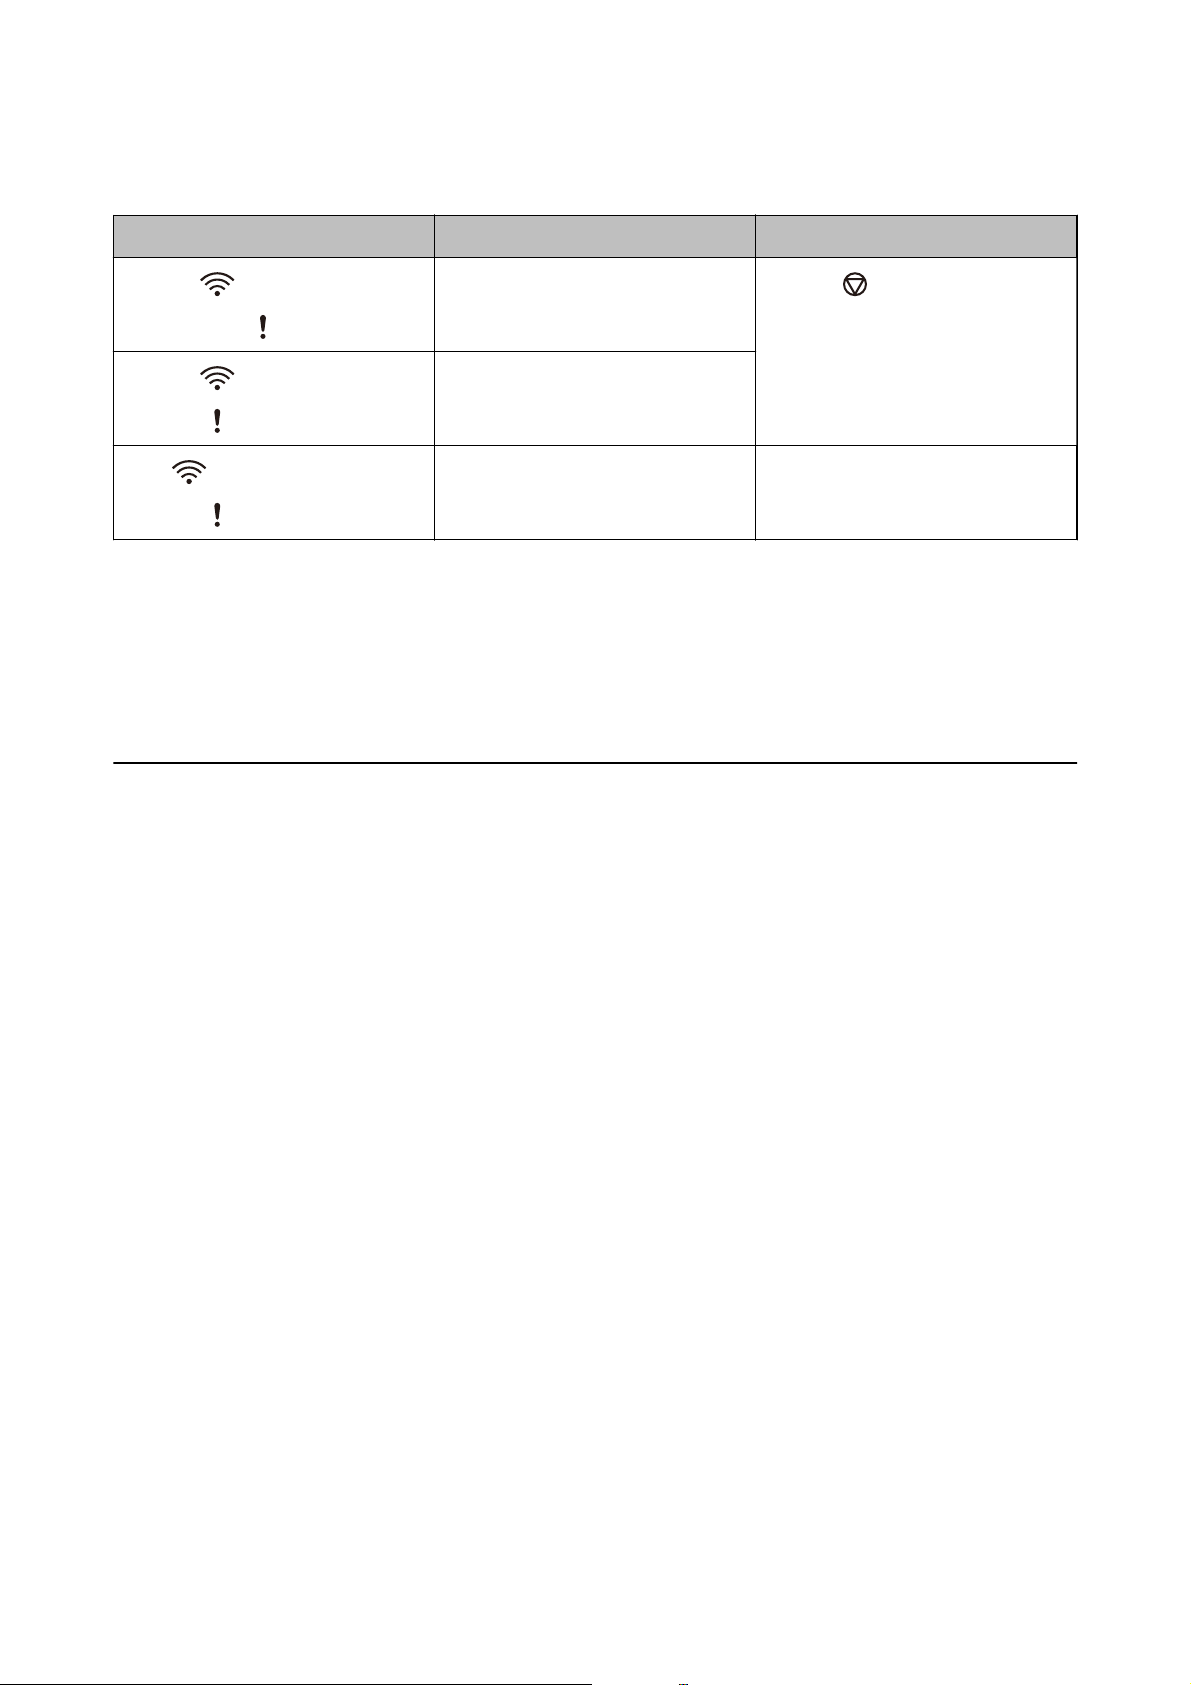
Network connection errors
Indicators Situation Solutions
Scanner Basics
Flashing slowly
On
Flashing slowly
Flashing slowly
Flashing slowly (white)
Flashing slowly
An access point settings error has occurred.
An access point settings error has occurred (a security error).
A network connection error has occurred (the Date and Time has not been
set correctly)
Press the
ror, and then restart the devices you
want to connect to the network. Reconnect to the network.
Re-set the Date and Time in Web Cong.
button to release the er-
Related Information
& “Removing Jammed Originals from the Scanner” on page 118
& “Making Wi-Fi Settings from the Control Panel” on page 97
& “Network Problems” on page 128
Information on Applications
is section introduces the application products available for your scanner. e latest application can be installed
at the Epson Web site.
Epson FastFoto
Epson FastFoto is a high-speed photo scanning application. Using Epson FastFoto, you can easily scan your photos
as digital images, and then share or upload them via the internet. You can also restore and enhance faded photos.
Epson ScanSmart
Epson ScanSmart is a document scanning application that allows you to easily scan and save the data in simple
steps.
❏ You can scan and send information to a cloud service in three easy steps.
❏ You can automatically name the documents by using the scanned information.
ese features allow you to save time when organizing documents.
EPSON Software Updater
EPSON Soware Updater is an application that checks for new or updated applications on the internet and installs
them.
You can also update the scanner’s digital manual.
15
Page 16
User's Guide
Scanner Basics
Epson DocumentScan
Epson DocumentScan is an application that allows you to scan documents through smart devices such as
smartphones and tablet devices. You can save the scanned data in smart devices or cloud services, and send by email. You can download and install this app from the App Store or Google Play.
EpsonNet Cong
EpsonNet Cong is an application that allows you to set network interface addresses and protocols. See the
operations guide for EpsonNet Cong or the application’s help for more details.
Note:
You can run Web Cong from EpsonNet Cong.
Option Items and Consumables Information
Carrier Sheet Codes
Using a Carrier Sheet allows you to scan irregular shaped originals or photos that can be easily scratched. You can
scan originals larger than A4 size with a carrier sheet by folding it in half.
Part name
Carrier Sheet B12B819051
* You can only use the carrier sheet with the code.
Related Information
& “Loading Photos Using a Carrier Sheet” on page 42
You can scan damaged or valuable photos by using the Carrier Sheet.
& “Placing Large Size Originals” on page 73
& “Placing Irregular Shaped Originals” on page 76
Codes
*
Roller Assembly Kit Codes
Parts (the pickup roller and a separation roller) should be replaced when the number of scans exceeds the service
number. You can check the latest number of scans in Epson Scan 2 Utility.
16
Page 17

User's Guide
A: pickup roller, B: separation roller
Part name Codes Life cycle
Scanner Basics
Roller Assembly Kit B12B819031
* This number was reached by consecutively scanning using Epson test original papers, and is a guide to the replacement
cycle. The replacement cycle may vary depending on dierent paper types, such as paper that generates a lot of paper dust
or paper with a rough surface that may shorten the life cycle.
200,000
*
Related Information
& “Replacing the Roller Assembly Kit” on page 107
& “Resetting the Number of Scans” on page 111
Cleaning Kit Codes
Use this when cleaning inside the scanner.
Part name Codes
Cleaning Kit B12B819291
Related Information
kit is composed of cleaning liquid and a cleaning cloth.
is
& “Cleaning Inside the Scanner” on page 102
17
Page 18

User's Guide
Scanning Photos
Scanning Photos
Using the Epson FastFoto application, you can easily scan your photos as digital images, and then share or upload
them using the Internet. You can also restore and enhance faded photos.
Note:
❏ You can only scan photos using Epson FastFoto, you cannot scan documents or other originals. If you want to scan these
originals, use the computer application Epson ScanSmart or the smart device application Epson DocumentScan.
❏ Epson FastFoto is assigned to the scanner button as the default application.
Related Information
“Changing the Application to Scan from the Scan Button” on page 47
&
You can change the default application that starts when you press the scan button.
Photo
Specications
You can load the following type of photos into the scanner.
Size Measurements Paper Type Loading Capacity
3.5×5" 89×127 mm
(3.5×5.0 in.)
4×6" 102×152 mm
(4.0×6.0 in.)
5×7" 127×178 mm
(5.0×7.0 in.)
8×10" 203×254 mm
(8.0×10.0 in.)
Instant camera size 89×102 mm
(3.5×4.0 in.)
Panoramic size 89×254 mm
(3.5×10.0 in.)
Plain photographic paper 36 photos (thickness up to
0.23 mm (0.009 in.) without
curling)
30 photos (thickness more
than 0.24 to 0.30 mm (0.009
to 0.012 in.) without curling)
Plain photographic paper 10 sheets
Instant camera
photographic paper (sheet
lm type only)
Plain photographic paper 10 sheets
1 sheet
102×304.8 mm
(4.0×12.0 in.)
Other size: Length up to
304.8 mm(12.0 in.)
Other size: Length 304.8
mm (12.0 in.) to 914.4 mm
(36.0 in.)
(Max size: 215.9×914.4 mm
(8.5×36.0 in.) )
*
Plain photographic paper 1 sheet
18
Page 19

User's Guide
Scanning Photos
Size Measurements Paper Type Loading Capacity
Photo in the Carrier Sheet 0.3 mm (0.012 in.) or less
(excluding the thickness of
the Carrier Sheet)
Note:
❏ Flatten any curled photos to a thickness of less than 2 mm (0.07 in.). It is best to scan curled photos in an environment
between 15 to 25°C (59 to 77°F) with 40 to 60% humidity. Scanning photos at lower temperatures may cause photos to
curl.
❏ Photos may stick together depending on their paper types and thickness. It is best to scan photos in an environment
between 15 to 25°C (59 to 77°F) with 40 to 60% humidity to prevent photos from sticking together.
❏ Repeatedly scanning the same photos many times may cause them to stick together. If they stick together, feed them one by
one.
Photos that cannot be
loaded directly into the
scanner
1 sheet
Types of Photos that Require Attention
following types of photos may not be successfully scanned, or might be damaged when scanning.
e
❏ Photos in shapes other than square
❏ Uneven Photos
❏ Photos curled more than 2 mm (0.08 inches)
❏ Photos with crinkles or fold lines
❏ Photos with edges that are peeling
o
❏ Photos with the inside peeling o
❏ Photos with sticky surfaces
❏ Photos with labels or stickers (stuck
rmly)
❏ Photos with hardened paste such as glue
❏ Instant camera photographic paper other than sheet lm
Note:
❏ Try to atten curled photos before scanning.
❏ Labels or stickers must be rmly stuck to the photos with no glue protruding.
Types of Photos that must not be Scanned
e following types of photos must not be scanned.
❏ Torn Pho t o s
❏ Degraded and deformed photos
❏ Photos with staples or paper clips
❏ Photos with labels or stickers (not stuck rmly)
❏ Photos with glue, liquid, oil, or gel
❏ Photos that are not fully dried
❏ Perforated photos
19
Page 20

User's Guide
Scanning Photos
❏ Photos smaller than 25.4×25.4 mm (2×2 in).
How to Scan Photos
Follow the three steps below to scan your photos.
Related Information
& “Step 1: Organizing Photos” on page 20
Organize the photos before placing them into the scanner.
& “Step 2: Placing Photos into the Scanner” on page 20
Aer organizing your photos, place them into the scanner.
& “Step 3: Scanning and Saving Photos” on page 24
Epson FastFoto automatically saves your scanned images on your computer in the folder you specify.
Step 1: Organizing Photos
Organize the photos before placing them into the scanner.
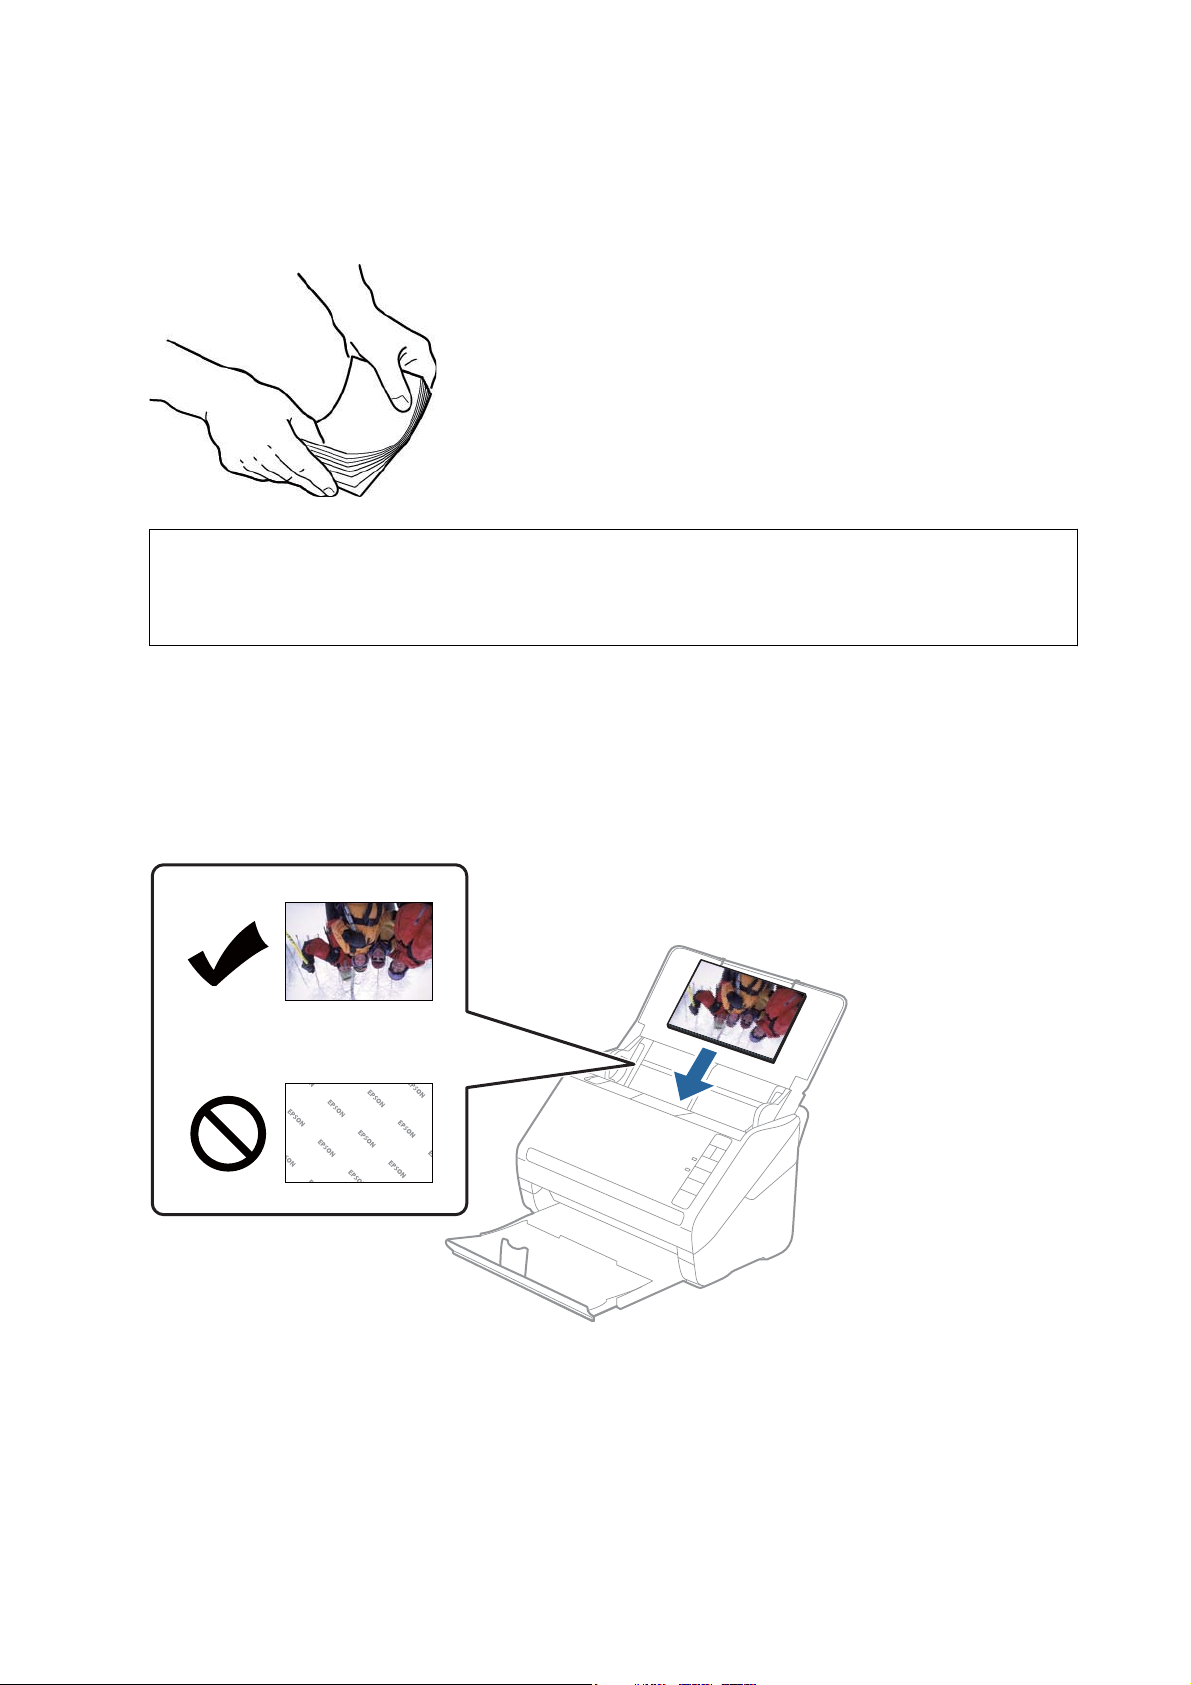
1. Prepare the photos you want to scan.
2. Use a so, dry cloth (like the microber cloth that came with your scanner) to wipe the front and back of your
photos to remove dust, dirt, or other particles that could potentially scratch your photos.
Caution:
!
Because of the speed at which photos are scanned, dust particles on your photos can cause straight lines to
appear in scanned images, and in extreme cases can lightly scratch the protective nish on your photos. We
recommend to clean the scanner rollers
3. Organize your photos by date or subject.
When scanning, you can name the images using the year, month or season, and subject, such as
"1970_Summer_Vacation".
4. Check the following if you are scanning various sizes of photos:
❏ If you have both landscape and portrait photos of the same size, you can stack them together and scan them
in one batch. You can rotate the images as necessary
Right.
every 300 scans, or even before each scanning session.
aer
scanning by clicking Edit > Rotate
aer
or Rotate
Le
❏ You can scan 4×6" and 5×7" photos in the same batch when the photos are grouped by size, with the larger
photos at the back.
Next, place the organized photos into the scanner.
Step 2: Placing Photos into the Scanner
Aer organizing your photos, place them into the scanner.
20
Page 21
User's Guide
Scanning Photos
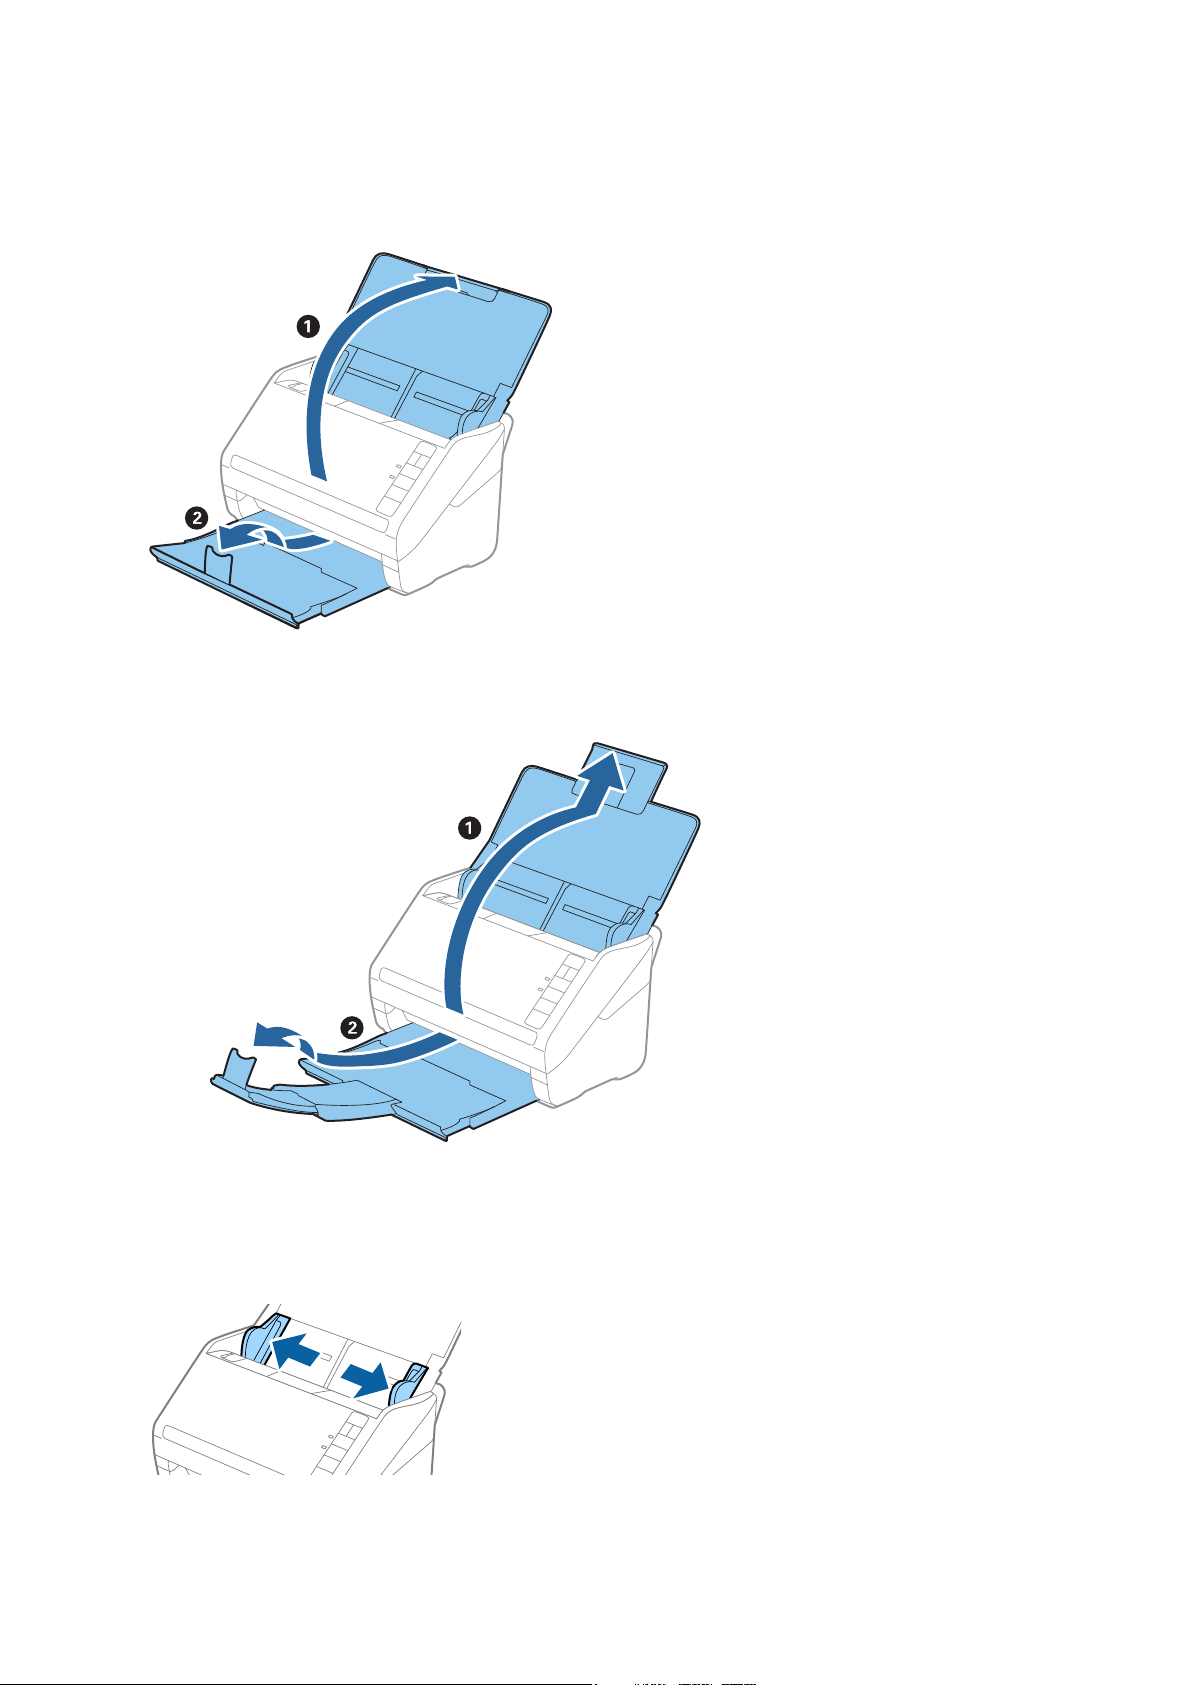
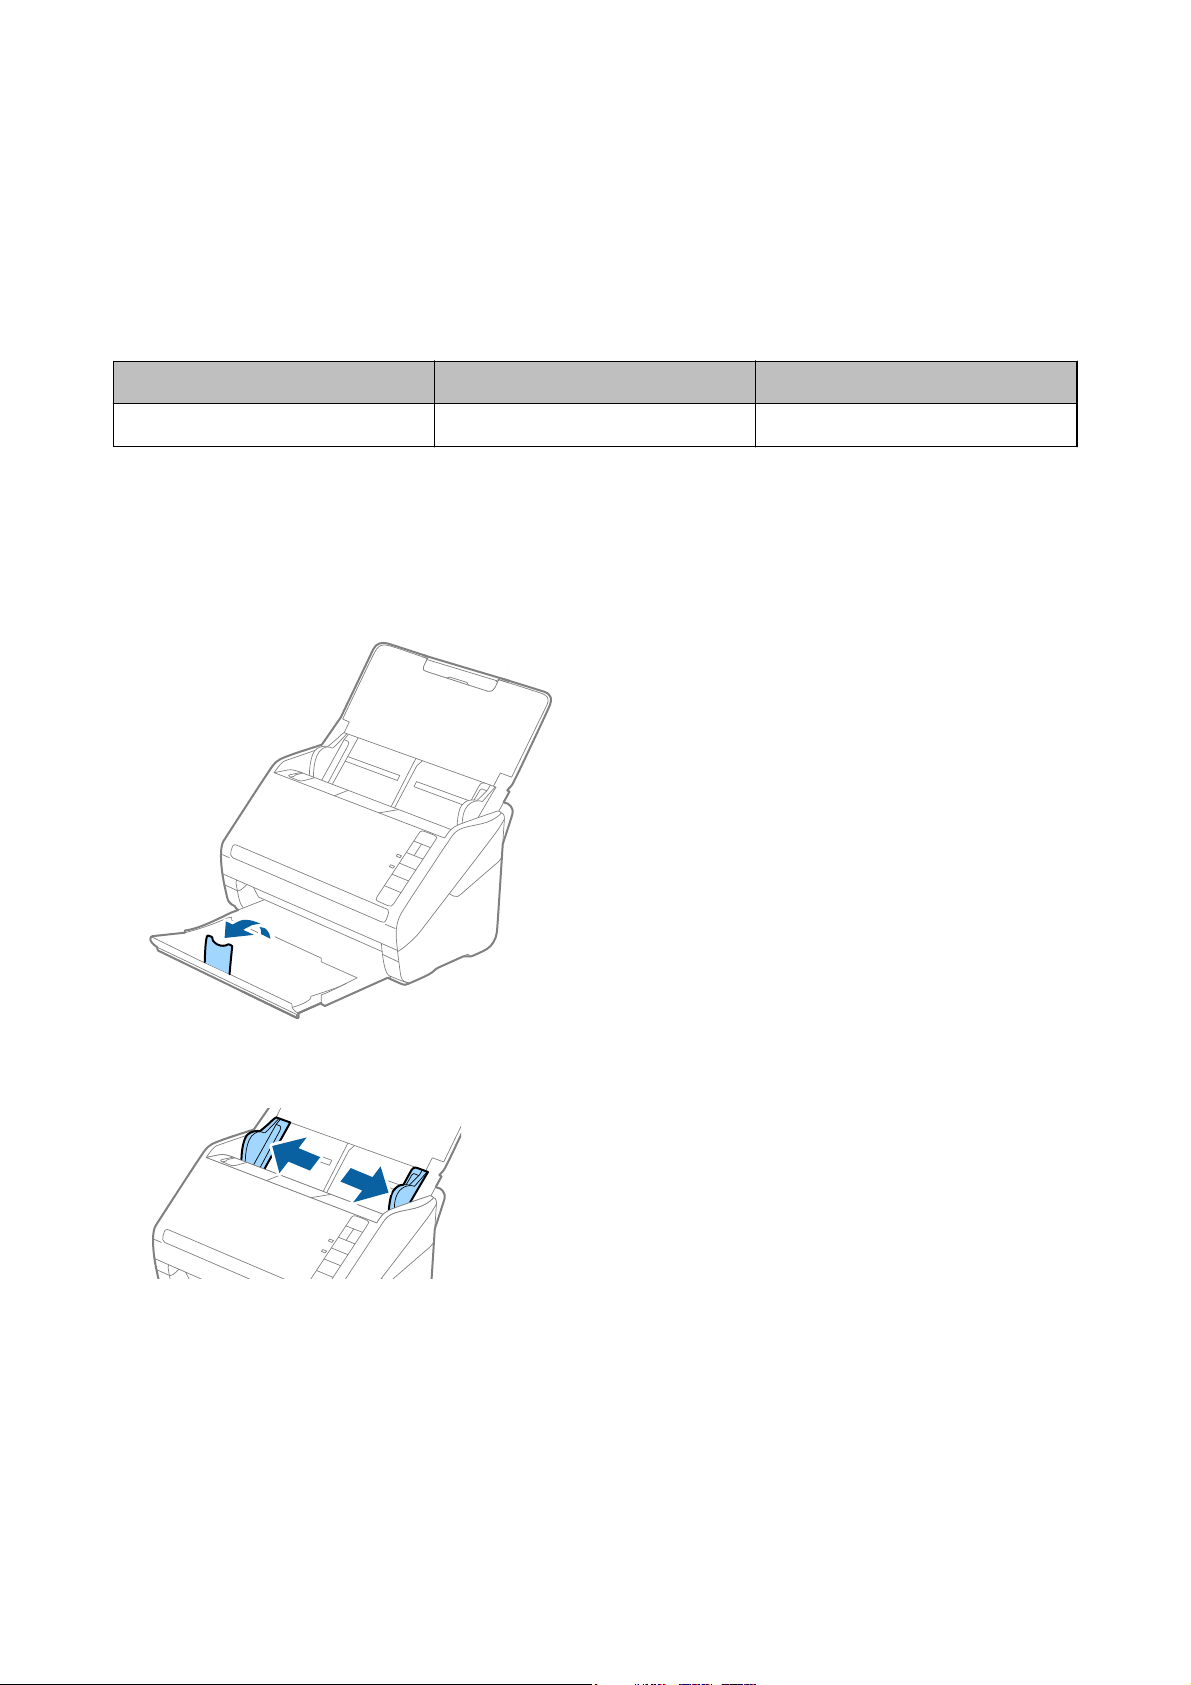
1. Open the input tray, slide out the output tray, and then raise the stopper.
Note:
❏ If you want to scan large size photos such as 5×7" or 8×10", extend the input and output tray extensions.
❏ Make sure you adjust the position of the stopper to correctly t the size of the ejected photos. If not, photos may
scatter.
2. Slide the edge guides on the input tray all the way out.
21
Page 22
User's Guide
Scanning Photos
3. Fan your stack of photos and make sure they are not stuck together.
Also,
!
Note:
It is best to scan photos in an environment between 15 to 25°C (59 to 77°F) with 40 to 60% humidity. In this condition,
curls of the photos are reduced, and photos are prevented from sticking together.
4. Load the photos into the input tray face up and top edge rst.
the curls on the edge of the photos if possible.
atten
Caution:
Stuck photos can feed through the scanner at the same time or jam in the scanner, potentially damaging your
photos or the scanner.
Slide the photos into the ADF until they meet resistance.
22
Page 23
User's Guide
Scanning Photos
Note:
❏ We recommend placing the photos horizontally.
❏ You can rotate the scanned images automatically when scanning using Epson FastFoto. Click the Settings >
Advanced Settings tab, and then enable Auto Rotation. Depending on the photos, they may not be rotated correctly.
To rotate the scanned images manually, select the image you want to rotate, and then click Edit > Rotate Le/
Rotate Right.
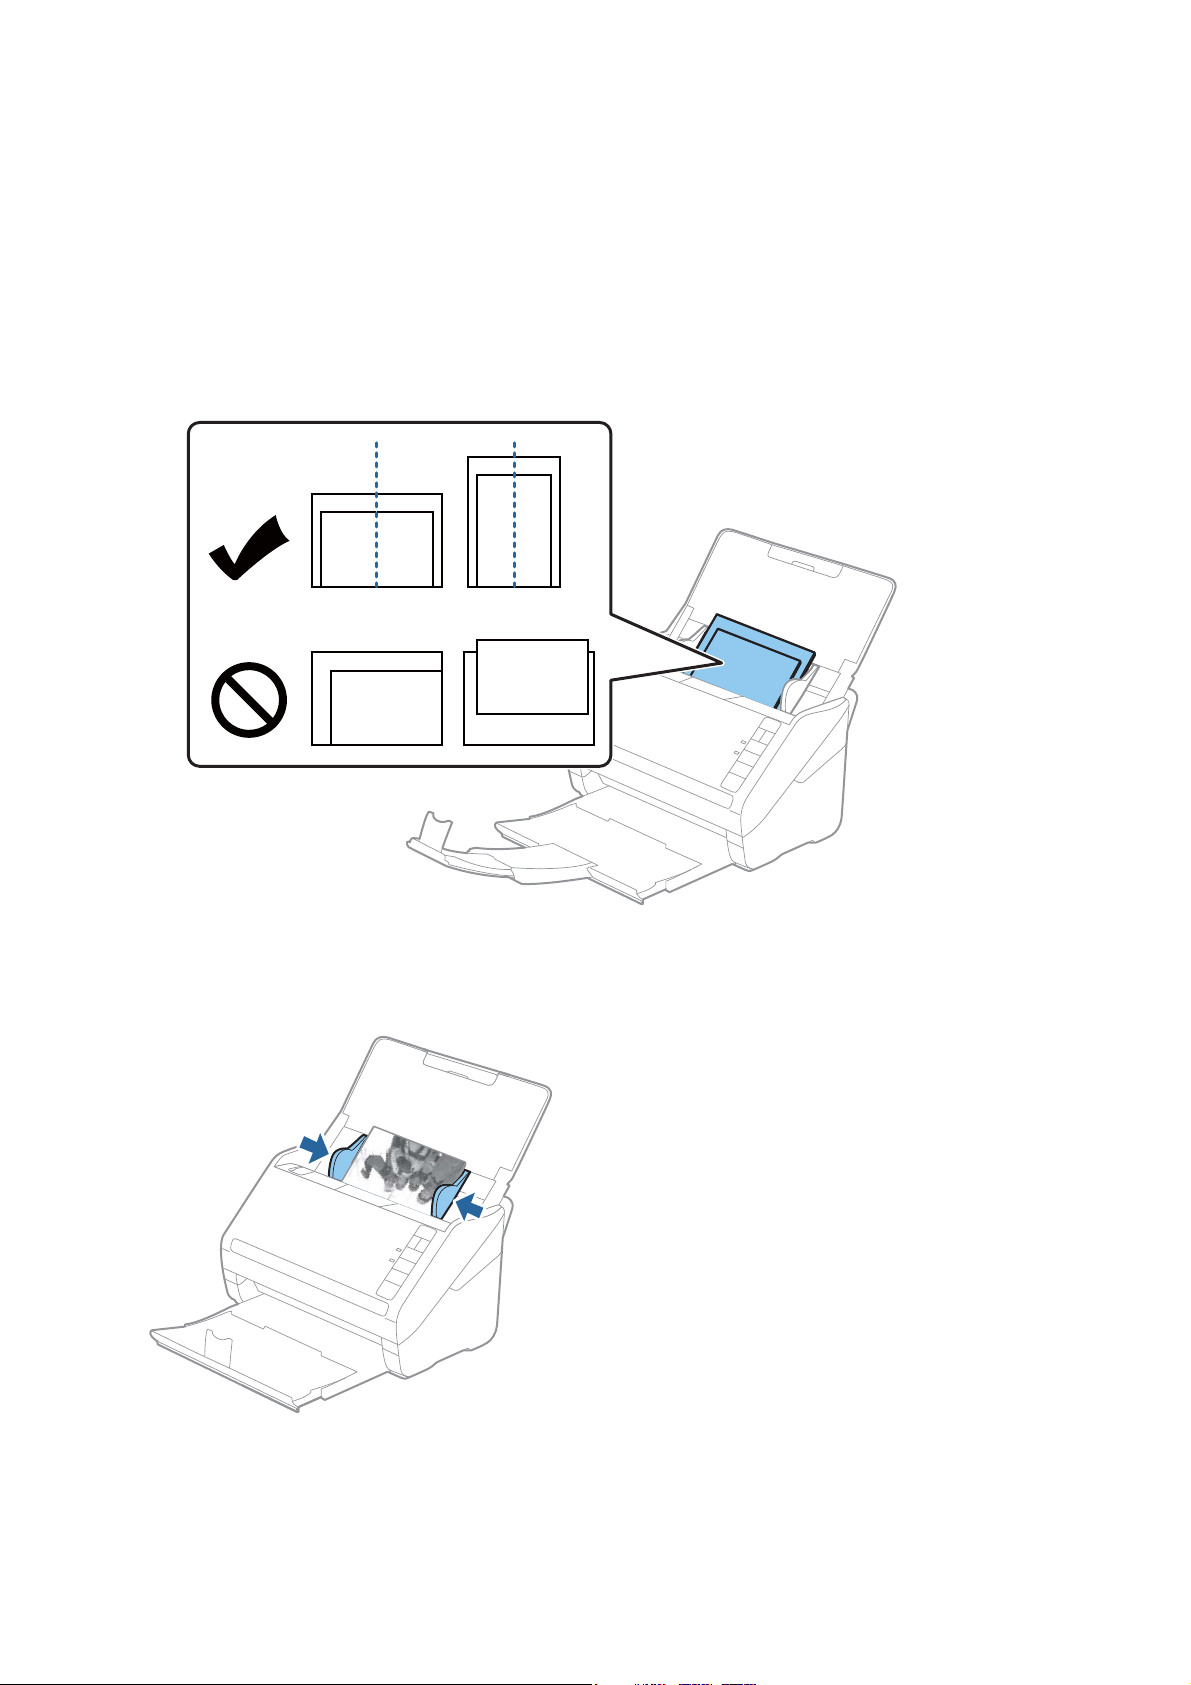
❏ If you are loading 4×6" and 5×7" photos in the same batch, align the middle of the photos and load them at the
center of the input tray with the 5×7" photos at the back and the 4×6" photos at the front.
5.
Slide the edge guides to t the edge of the photos making sure there are no gaps between the photos and the
edge guides. Otherwise, the photos may be fed skewed.
Next, start scanning using Epson FastFoto.
23
Page 24
User's Guide
Scanning Photos
Step 3: Scanning and Saving Photos
Epson FastFoto automatically saves your scanned images on your computer in the folder you specify.
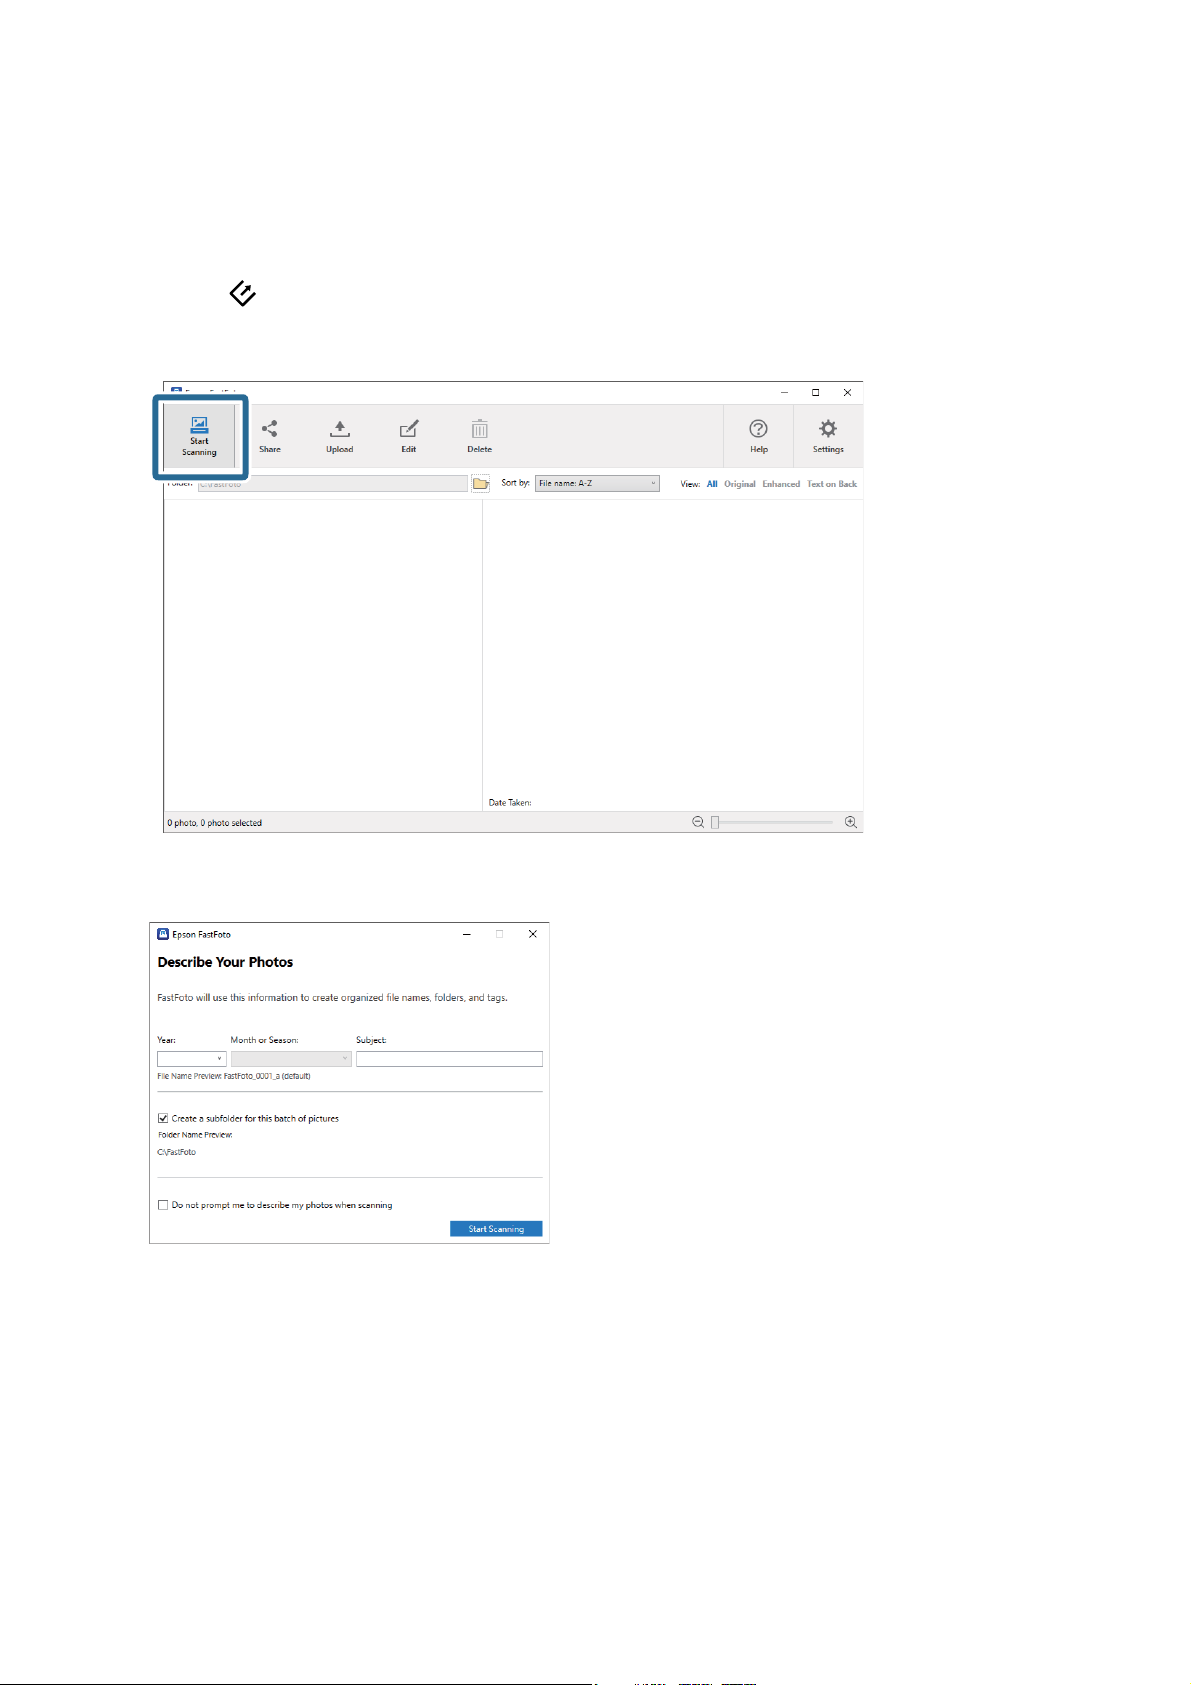
1. Click the
You c a n a l s o c li ck Start Scanning on the main screen.
2. Set the save settings on the Describe Your Photos screen.
button on the scanner to start scanning.
❏ Ye a r /Month or Season/Subject: Set the
❏ Create a subfolder for this batch of pictures: Create a new subfolder for the scanned images.
❏ Do not prompt me to describe my photos when scanning: Skip this screen the next time you scan. You
will not be prompted to describe your photos.
name settings.
le
24
Page 25

User's Guide
Scanning Photos
3. Click Start Scanning.
Note:
❏ If the glass surface dirt alert appeared when scanning, clean the glass surface inside the scanner aer scanning.
❏ If multiple photos feed through at the same time, press the
Press the button again to return to normal speed.
4. Aer scanning is completed, the following screen is displayed:
(Slow Mode) button to slow down the feeding speed.
If you want to continue scanning, click Scan Next Batch. If you are nished scanning, click Done Scanning.
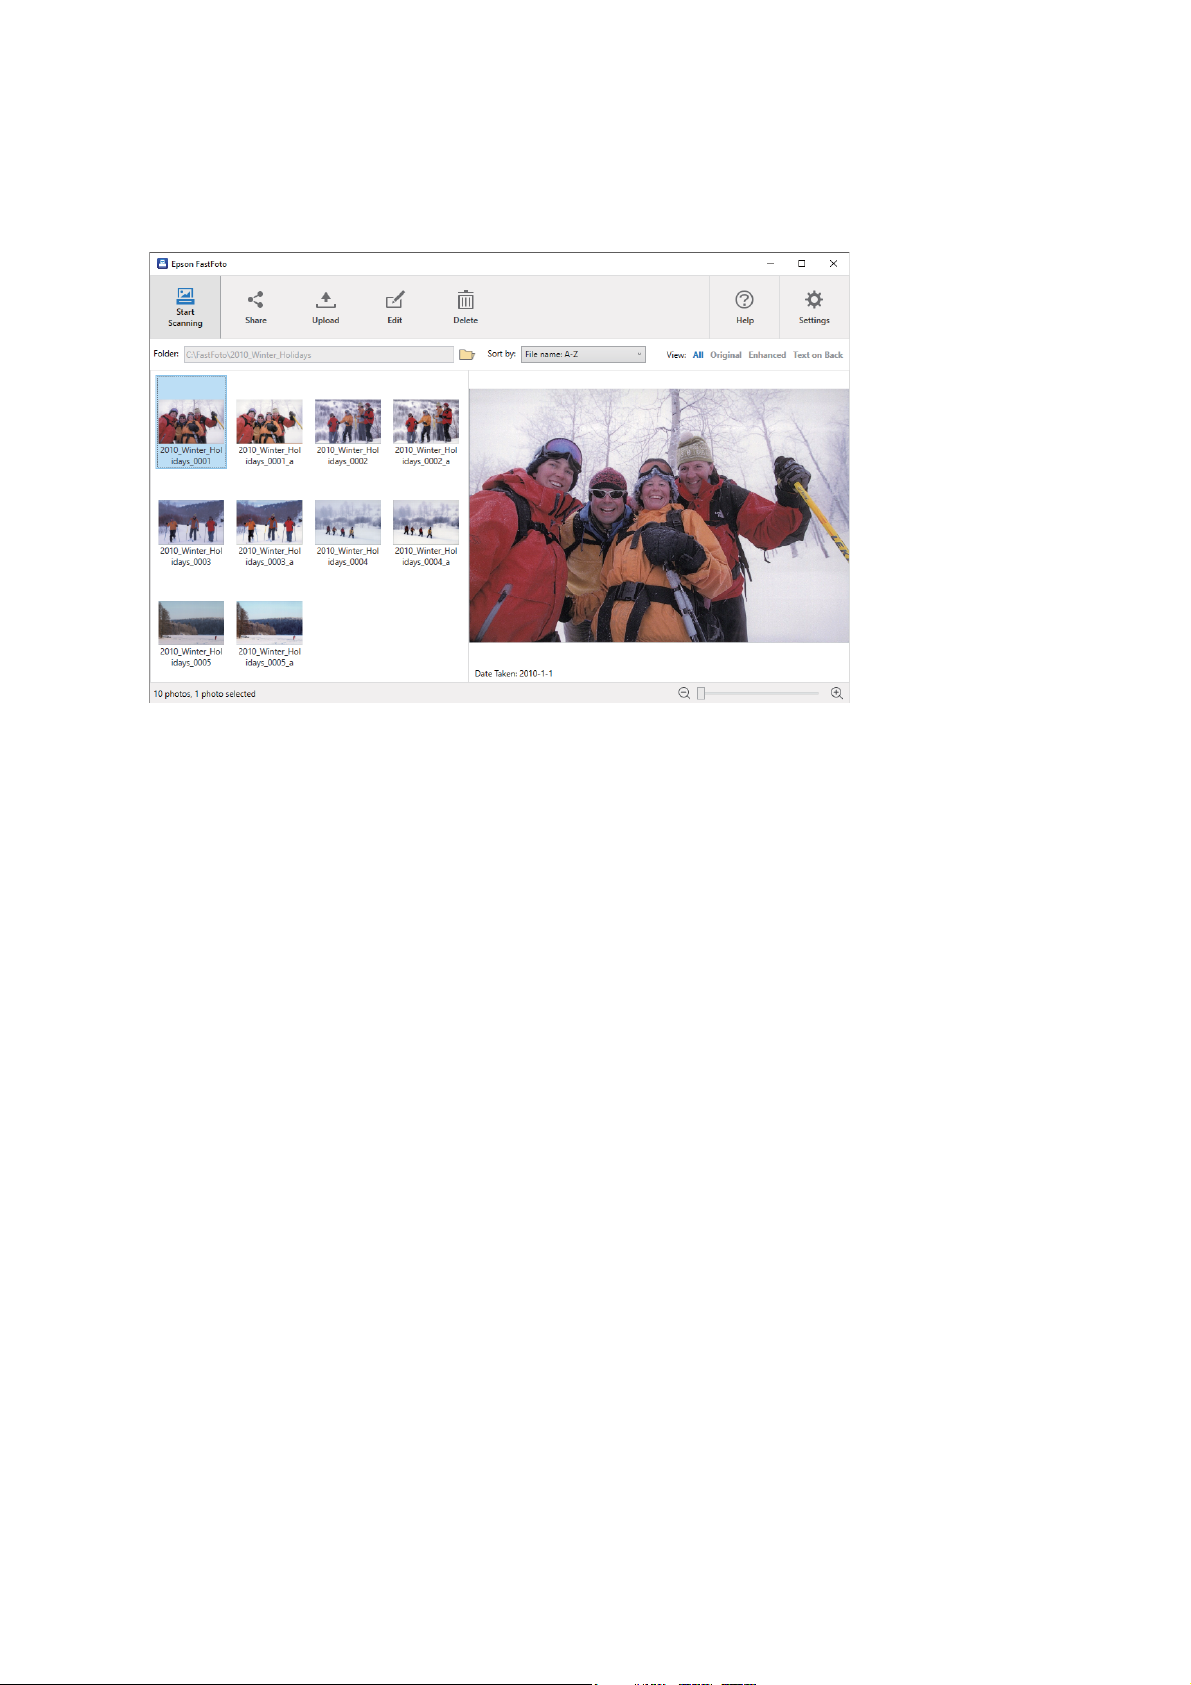
5.
photos are scanned and saved in the location you chose. Check the scanned images.
e
e following rules apply to le naming:
❏ No identier is added: ese are the original scanned images. No enhancements were applied.
❏ Added "_a" at the end:
images include automatic color enhancements.
ese
25
Page 26
User's Guide
Scanning Photos
❏ Added "_b" at the end: ese are the scanned back sides of the photo. You can enable back side scanning
from Settings > Scan Settings tab.
Aer scanning, you can share, upload, or edit the images using Epson FastFoto. You can also change the view
setting of thumbnails.
Related Information
& “Sharing Photos” on page 26
You can share scanned photos via email.
& “Uploading Photos” on page 28
You can upload scanned photos to Dropbox or Google Drive.
& “Editing Photos” on page 30
You can edit the scanned photos using features such as rotation, enhancement, red eye correction, and more.
& “Changing the Displayed Folder and umbnail View” on page 32
You can change the displayed folder and how thumbnails are viewed.
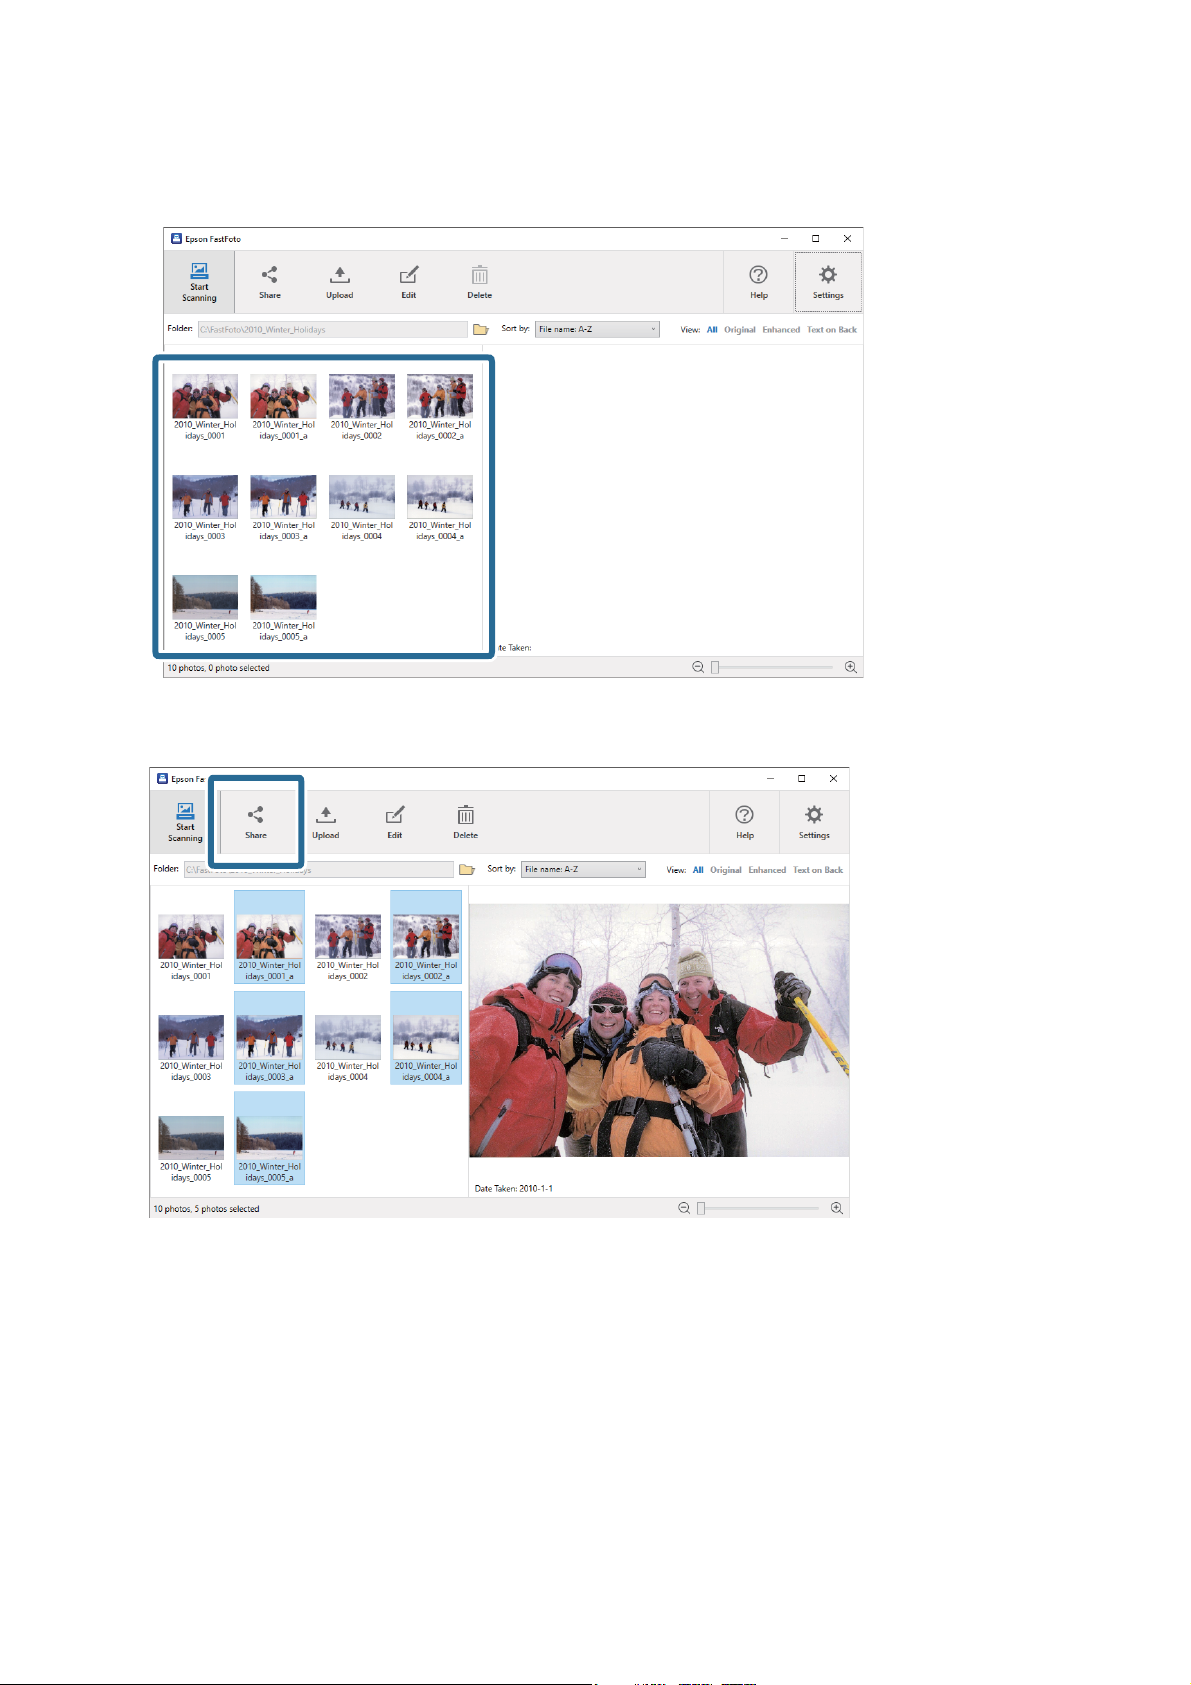
Sharing Photos
You can share scanned photos via email.
Note:
Available destination items are subject to change without notice.
26
Page 27
User's Guide
1. Select the images you want to share.
Scanning Photos
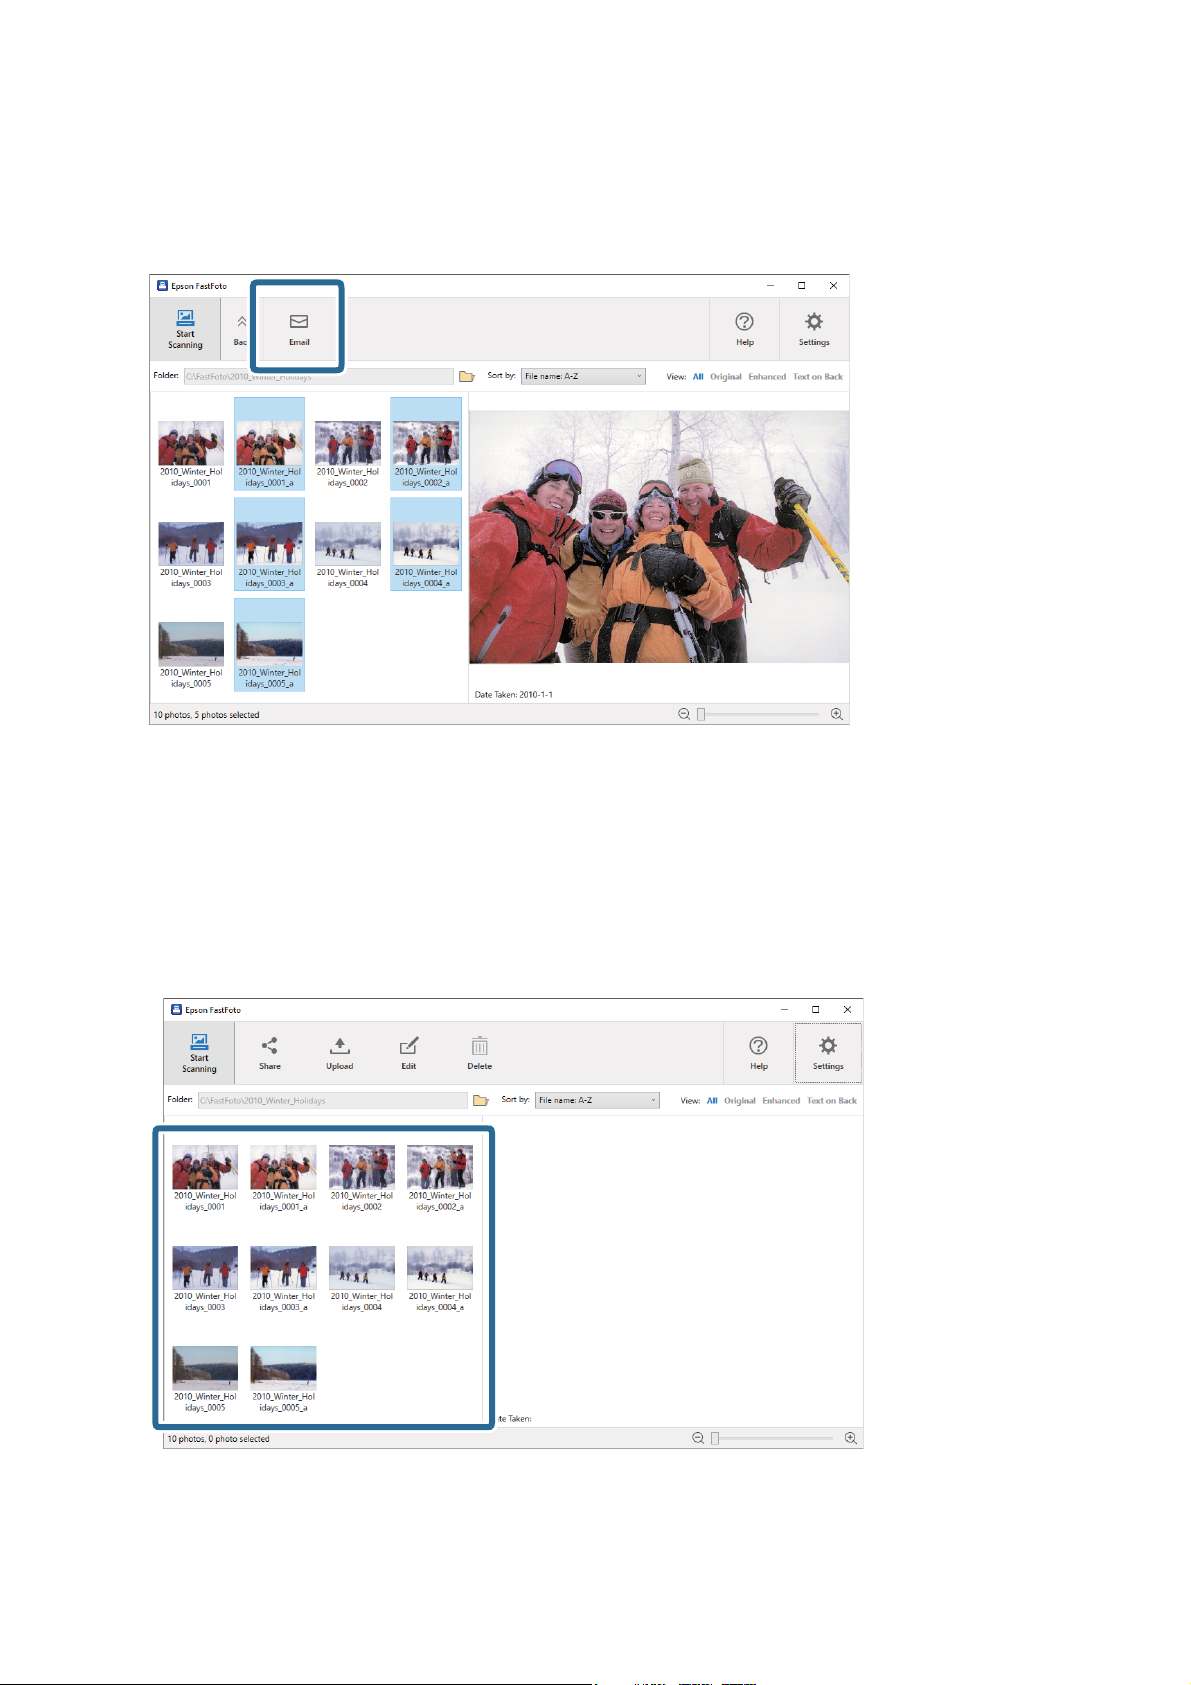
2.
Click Share.
3. Click Email.
Selected images are automatically attached in a new email. Enter the necessary information and send the
email.
27
Page 28
User's Guide
Scanning Photos
Note:
If you do not have a default email client application set up, you will be prompted to do so before you can send any
images. Epson FastFoto does not support web-based email, such as Gmail.
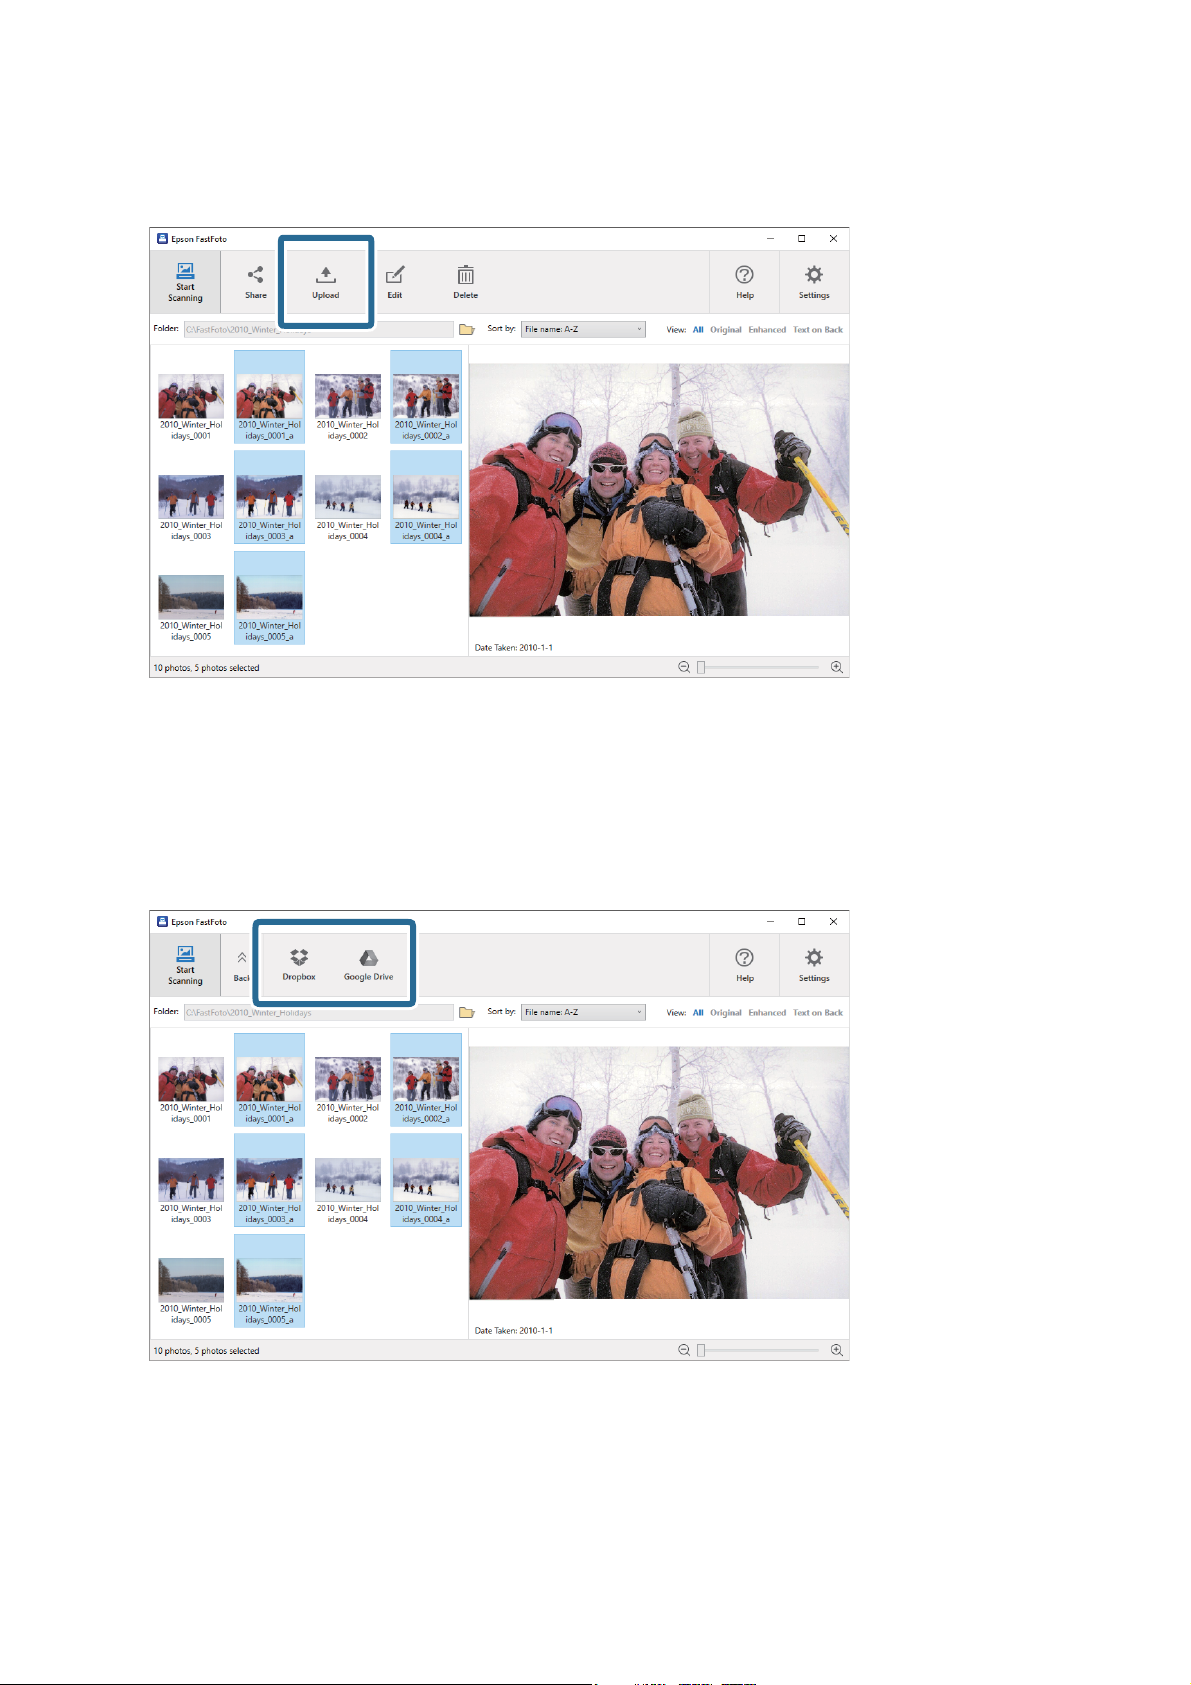
Uploading Photos
You can upload scanned photos to Dropbox or Google Drive.
Note:
Make sure the Dropbox application is installed on your computer before uploading.
1.
Select the images you want to upload.
28
Page 29
User's Guide
2. Click Upload.
Scanning Photos
3.
Click one of the following.
❏ Dropbox: Uploads images to your Dropbox folder.
❏ Google Drive: Uploads images to Google Drive.
Note:
If you have not connected your Dropbox or Google Drive account with Epson FastFoto, you will be prompted to do so.
Note:
You can automatically upload the images immediately
Upload tab, and then select the icon of the service you want to upload to.
scanning. Click Settings on the main screen, click the
aer
29
Page 30
User's Guide
Scanning Photos
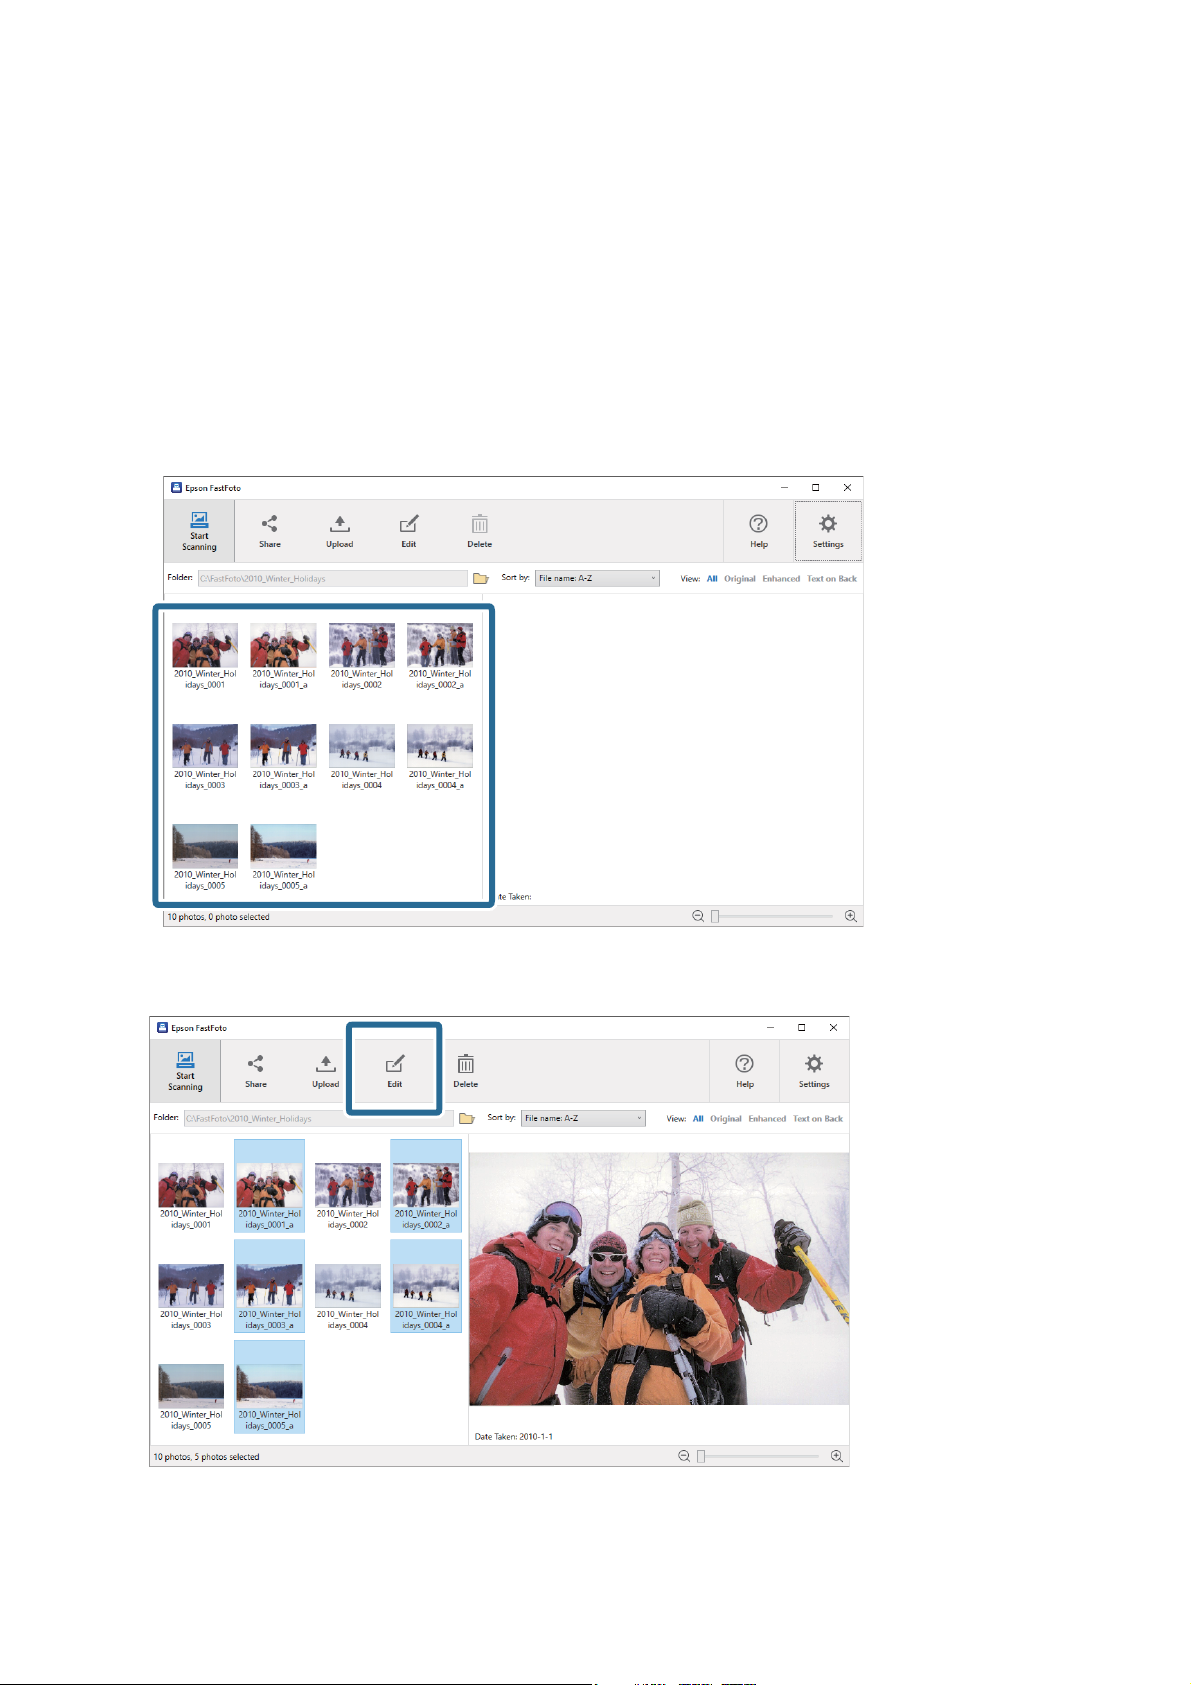
Editing Photos
You can edit the scanned photos using features such as rotation, enhancement, red eye correction, and more.
Note:
You can automatically apply the Auto Enhance, Remove Red Eye, and Restore Faded Colors when scanning. Click
Settings > Enhancements tab.
1. Select the images you want to edit.
Note:
You can select and edit multiple images except Crop (Windows only) feature.
2. Click Edit.
30
Page 31

User's Guide
3. Select the edit item on the top of the screen.
Scanning Photos
❏ Rotate Le/Rotate Right: Rotate the selected images.
❏ Crop (Windows only): Crop the image. An outline appears around the selected image in the preview pane.
Click and drag the outline to highlight the cropped area, and then click Apply to crop the image. You can
select one image each time when applying this item.
❏ Enhance: Applies photo enhancement (brightness, contrast, and saturation) to the selected images.
❏ Restore: Applies color restoration to the selected images.
❏ Red Eye: Reduces the red eye eect in the selected images.
❏ Date (Windows only): Allows you to add, edit, or remove a date on the selected images (shown as the Date
Ta ke n information).
❏ Undo All: Removes all edits from the selected images made during the current session, since you started
Epson FastFoto.
Once you exit Epson FastFoto, your edits are permanent.
31
Page 32

User's Guide
Scanning Photos
Changing the Displayed Folder and Thumbnail View
You can change the displayed folder and how thumbnails are viewed.
Folder
e current folder is displayed. You can change the folder by clicking the icon.
Sort by
You can change how thumbnails are viewed or sorted.
View
You can lter the thumbnails.
32
Page 33

User's Guide
Scanning Photos
Tips for Using Epson FastFoto
Scanning Instant Photos
You can scan instant photos.
Before scanning, check the specication of instant photos you can scan.
Size Measurement Paper Type Loading Capacity
Instant camera size 89×102 mm
(3.5×4.0 in.)
Note:
When scanning instant photos, the double feed detection feature is turned o to prevent misdetection. Instant camera
photographic paper is usually layered, so it is detected as double fed in normal scanning settings.
Instant camera
photographic paper (sheet
type only)
lm
1 sheet
33
Page 34

User's Guide
Scanning Photos
1. Change the scan setting before scanning. Click Settings on the main screen.
2. Click the Scan Settings tab.
34
Page 35

User's Guide
3. Select Instant photos.
Scanning Photos
4. Click OK to apply the settings.
If you want to scan other types of photos aer scanning, change the photo type on the Scan Settings tab.
Related Information
& “Step 3: Scanning and Saving Photos” on page 24
Epson FastFoto automatically saves your scanned images on your computer in the folder you specify.
35
Page 36

User's Guide
Scanning Photos
Scanning Panoramic Photos
You can scan panoramic photos.
Before scanning, check the specication of panoramic photos you can scan.
Measurement Loading Capacity Input and Output Tray of the Scanner
89×254 mm (3.5×10.0 in.) 10 sheets Extend the input and output tray extensions, and do not
raise the stopper.
102×304.8 mm (4.0×12.0 in.)
Other size: Length up to 304.8 mm
(12.0 in.)
Other size: Length 304.8 mm (12.0 in.)
to 914.4 mm (36.0 in.)
(Max size: 215.9×914.4 mm (8.5×36.0
in.) )
*
1 sheet Do not extend the input tray extension and output tray
extensions and do not raise the stopper.
*When scanning photos that are 393.8 mm (15.5 in.) or more, you need to change the Epson FastFoto scan
settings. See the instructions below.
36
Page 37

User's Guide
1. Click Settings on the main screen.
Scanning Photos
2. Click the Scan Settings tab.
37
Page 38

User's Guide
3. Select Panoramic photos (15.5 - 36 in).
Scanning Photos
Note:
When selecting Panoramic photos (15.5 - 36 in), you can set the resolution as 600 dpi or 300 dpi. If you select 1200
dpi, it is changed to 600 dpi automatically.
4. Click OK to apply the settings.
38
Page 39

User's Guide
Scanning Photos
Note:
❏ Support the photo as it enters into and ejects from the scanner.
❏ If you want to scan other types of photos aer scanning, change the photo type on the Scan Settings tab.
❏ For panoramic photos up to 393.7 mm (15.5 in.), you do not need to select Panoramic photos (15.5 - 36 in). You can
leave the setting as Standard photos.
Related Information
& “Step 3: Scanning and Saving Photos” on page 24
Epson FastFoto automatically saves your scanned images on your computer in the folder you specify.
Scanning Back Side Notes on Photos
When scanning photos, you can also scan the back of the photos.
If text on the back of the photos is detected, the back sides of the photos are scanned. If the back sides are blank,
the back sides of the photos are not scanned.
39
Page 40

User's Guide
1. Click Settings on the main screen.
Scanning Photos
Epson FastFoto Settings screen is displayed.
e
2. Click the Scan Settings tab.
40
Page 41

User's Guide
Scanning Photos
3. Enable Scan the back of my photos with Epson single-step technology, and then adjust the detection level
using the slider.
4. Click OK to apply the settings.
41
Page 42

User's Guide
Scanning Photos
When scanning the photos, the back side images are saved as the name ended with "_b".
Note:
No color enhancement is applied to the back side image when scanning. If you want to enhance the color, select the image
and the click Edit on the main screen.
Loading Photos Using a Carrier Sheet
You can scan damaged or valuable photos by using the Carrier Sheet.
Note:
When scanning photos using the Carrier Sheet, you can only load one sheet at a time.
1. Open the input tray and extend the input tray extension. Slide out the output tray, extend the output tray
extension, and then raise the stopper.
42
Page 43

User's Guide
Scanning Photos
2. Slide the edge guides on the input tray all the way out.
3. Place the Carrier Sheet with the illustration on the front edge facing up, and place the photo in the center of
the Carrier Sheet with the side to be scanned facing up.
4. Load the Carrier Sheet into the input tray with the top edge facing into the ADF.
Slide the Carrier Sheet into the ADF until it meets resistance.
43
Page 44

User's Guide
Scanning Photos
5. Slide the edge guides to t the edge of the Carrier Sheet making sure there are no gaps between the Carrier
Sheet and the edge guides. Otherwise, the carrier sheet may be fed skewed.
Note:
❏ You may need to stop using a Carrier Sheet that is scratched or has been scanned more than 3,000 times.
❏ Do not leave photos inside the Carrier Sheet for a long time.
❏ Only use the Carrier Sheet designed for your scanner. e Carrier Sheet is automatically recognized by the scanner
by detecting two small rectangular holes on the front edge. Keep the holes clean and not covered.
Related Information
& “Carrier Sheet Codes” on page 16
Enabling or Disabling Glass Surface Dirt Alert
You can select whether or not to detect dirt on the glass surface inside the scanner.
Note:
Depending on the dirt, it may not be detected correctly.
44
Page 45

User's Guide
1. Click Settings on the main screen.
Scanning Photos
Epson FastFoto Settings screen is displayed.
e
2. Click Device Settings on the Scanner Settings tab.
e Epson Scan 2 Utility screen is displayed.
45
Page 46

User's Guide
3. Select the Scanner Setting tab.
Scanning Photos
4. Under the Detect Glass Dirt dropdown menu, select On-Low or On-High.
If you want to disable the detection, select O.
46
Page 47

User's Guide
5. Click Set.
Scanning Photos
6. Close the Epson Scan 2 Utility screen.
Changing the Application to Scan from the Scan Button
You can change the default application that starts when you press the scan button.
47
Page 48

User's Guide
1. Click Settings on the main screen.
Scanning Photos
Epson FastFoto Settings screen is displayed.
e
2. Click Select Application on the Scanner Settings tab.
3. Select the application that starts when you press the scan button.
❏ Epson FastFoto: Launches Epson FastFoto.
❏ Epson ScanSmart: Launches Epson ScanSmart. is application is suitable for scanning and saving
documents.
application is suitable for scanning and saving photos.
is
48
Page 49

User's Guide
Scanning Photos
Note:
Epson FastFoto is selected as the default setting.
4. Aer selecting the application, close the screen to apply the setting.
Epson FastFoto Settings
You can change the application settings, such as the
format, scanning resolution, folder to save, and more.
le
49
Page 50

User's Guide
1. Click Settings on the main screen.
Scanning Photos
Epson FastFoto Settings screen is displayed.
e
2. Select one of the tabs, and then change the settings.
Related Information
& “Organization Tab” on page 51
You can change the folder save settings, le name settings, and more.
& “Enhancements Tab” on page 52
You can change the enhancement settings which are automatically applied to the scanned image when scanning.
“Scan Settings Tab” on page 53
&
You can change the scan settings such as the photo type, resolution, or le saving format.
& “Advanced Settings Tab” on page 54
You can change the advanced scan settings, such as photo rotation, back side scanning, and more.
& “Upload Tab” on page 54
50
Page 51

User's Guide
Scanning Photos
You can automatically upload the scanned image to a cloud service aer scanning.
& “Scanner Settings Tab” on page 55
You can change the scanner settings, such as the scanner to use, the scanning application that starts when you
press the scan button, or device settings.
Organization Tab
You can change the folder save settings,
Folder
Select the folder to save the scanned image.
name settings, and more.
le
File Name Prex
Enter the text you want to add at the beginning of the le name. is setting is useful if you do not set
the le naming settings on the Describe Your Photos screen before scanning.
Prompt me to describe each batch of photos before scanning
Displays the Describe Your Photos screen before scanning.
After scanning, view my photos with
Selects the application to view the scanned image aer scanning.
51
Page 52

User's Guide
Scanning Photos
Enhancements Tab
You can change the enhancement settings which are automatically applied to the scanned image when scanning.
Note:
Enhancement results may vary depending on the image contents of the photos.
Auto Enhance
Automatically adjusts the brightness, contrast, and saturation of photos.
Remove Red Eye
Automatically reduces the red-eye eect in photos.
Restore Faded Colors
Automatically restores the colors in faded photos.
Apply these enhancements
❏ Directly to the scanned photo: Only the enhanced scanned image is saved in your folder, and the
original scanned image is not saved.
❏ To a second copy of the photo (recommended): Saves two images for each photo. One is the
original scanned image, and another is the enhanced image.
52
Page 53

User's Guide
Scanning Photos
Scan Settings Tab
You can change the scan settings such as the photo type, resolution, or le saving format.
Photo type
Selects a photo type you want to scan. Applies special settings for instant and panoramic photos when
scanning.
Scan my photos at this resolution
Selects a resolution to scan your photos. Increasing the resolution increases the scanning time and le
size.
File format
Selects a le format to save the scanned image.
Note:
When you select JPEG and set the resolution to 1200 dpi or 600 dpi, the scanned image is saved at 100% JPEG quality
(compression).
If you select 300 dpi, the JPEG quality (compression) is set to 84% automatically to reduce the
scanned image.
size when saving the
le
Scan the back of my photos with Epson single-step technology
When scanning photos, you can also scan the back of the photos.
If text on the back of the photos is detected, the back sides of the photos are scanned. If the back sides
are blank, the back sides of the photos are not scanned.
53
Page 54

User's Guide
Scanning Photos
Advanced Settings Tab
You can change the advanced scan settings, such as photo rotation, back side scanning, and more.
Auto Rotation
Automatically detects the orientation of the photos, and rotates them in the correct direction.
Depending on the photos, they may not be rotated correctly.
Curled photo correction
Corrects edge brightness for photos with curled edges. Refer to the table below to enable or disable this
adjustment.
Photos curled to the backside Enable adjustment
Photos curled to the printed surface Disable adjustment
Depending on the photos, they may not be adjusted correctly.
Reduce lines and streaks
Reduces the vertical lines or streaks of the scanned image caused by dirt on the glass surface inside the
scanner.
If there is too much dirt on the scanner glass, lines and streaks may not be reduced correctly. Clean the
scanner if a message appears prompting you to do so.
Upload Tab
You can automatically upload the scanned image to a cloud service aer scanning.
54
Page 55

User's Guide
Scanning Photos
Click the icons to enable auto uploading.
Note:
❏ If you have not connected your account with Epson FastFoto, you will be prompted to do so.
❏ Make sure the Dropbox application is installed on your computer before uploading.
Scanner Settings Tab
You can change the scanner settings, such as the scanner to use, the scanning application that starts when you
press the scan button, or device settings.
Scanner
e scanner in use is displayed. If you want to use another scanner, click Change.
Select Application
Selects the default application that starts when you press the scan button.
55
Page 56

User's Guide
Device Settings
Scanning Photos
Sets the scanner device setting (power o timer, etc).
56
Page 57

User's Guide
Scanning Documents or Other Originals
Scanning Documents or Other Originals
You can scan documents or originals other than photos by using the computer application Epson ScanSmart or the
smart device application Epson DocumentScan.
Note:
❏ You cannot scan photos using Epson ScanSmart or the smart device application Epson DocumentScan.
❏ Epson FastFoto is assigned to the scanner button as the default application. If you want to use Epson ScanSmart with the
scanner button, change the settings.
Related Information
“Changing the Application to Scan from the Scan Button” on page 47
&
You can change the default application that starts when you press the scan button.
Placing Documents or Other Originals
General Specications for Originals being Scanned
Type of Original Thickness Size
Plain paper
Fine paper
Recycled paper
Post card
Business card
Envelopes
Plastic cards complying with ISO7810
ID-1 type (with or without emboss)
Laminated cards
Thermal paper
37 to 413 g/m
A8 size or less: 127 to 413 g/m
Plastic cards: 1.24 mm (0.05 in.) or less
(including emboss)
Laminated Cards: 0.8 mm (0.03 in.) or
less
Maximum: 215.9×6,096.0 mm
(8.5×240.0 in.)
Minimum: 50.8×50.8 mm (2.0×2.0 in.)
The loadable size varies depending on
the type of originals.
57
Page 58

User's Guide
Scanning Documents or Other Originals
Note:
❏ All originals must be at at the leading edge.
❏ Make sure that curls on the leading edge of the originals are kept within the following range.
must be 3 mm or less.
A
must be 1 mm or less while B is equal to or less than C. When C is equal to or more than 10 times the size of B,
B
can be more than 1 mm.
B
❏ Even when the original meets the
or the scan quality may decline depending on the paper properties or quality.
specications
for originals that can be placed in the ADF, it may not feed from the ADF
Types of Originals that Require Attention
e following types of originals may not be successfully scanned.
❏ Originals with an uneven surface such as letter head paper.
❏ Originals with crinkles or fold lines
❏ Perforated originals
❏ Original with labels or stickers
❏ Carbon-less paper
❏ Curled originals
❏ Coated paper
Note:
❏ Because carbon-less paper contains chemical substances that may harm the rollers, if paper jams occur frequently, clean
the pickup roller and the separation roller.
❏ Crinkled originals may scan better if you slow down the feeding speed during scanning or smooth out the crinkles before
loading.
❏ To scan delicate originals or originals that are easily crinkled, use the Carrier Sheet.
❏ To scan originals that are incorrectly detected as double feeds, press the
scanning.
You can also disable double feed detection from Epson ScanSmart. Click
Settings button > Main Settings tab on the Epson Scan 2 window, and then select O in Detect Double Feed.
❏ Labels or stickers must be rmly stuck to the originals with no glue protruding.
❏ Try to atten the curled originals before scanning.
(Double Feed Detection Skip) button before
Settings > Scanner Settings tab > Scan
58
Page 59

User's Guide
Scanning Documents or Other Originals
Types of Originals that Must Not be Scanned
e following types of originals must not be scanned.
❏ Booklets
❏ Non-paper original (such as clear les, fabric, and metal foil)
❏ Originals with staples or paper clips
❏ Originals with glue attached
❏ Ripped originals
❏ Heavily wrinkled or curled originals
❏ Transparent originals such as OHP
❏ Originals with carbon paper on the back
❏ Originals with wet ink
❏ Originals with sticky notes attached
Note:
❏ Do not feed valuable original artwork or important documents which you do not want to damage or deface into the
scanner directly. Misfeeding may wrinkle or damage the original. When scanning such originals, make sure you use the
Carrier Sheet.
❏ Rippled, wrinkled, or curled originals can also be scanned if you use the Carrier Sheet.
lm
Standard Size Originals
Specications of Standard Size Originals
e list of the standard size originals you can load on the scanner.
59
Page 60

User's Guide
Scanning Documents or Other Originals
Size Measurement Thickness Paper Type
Legal 215.9×355.6 mm
(8.5×14 in.)
Letter 215.9×279.4 mm
(8.5×11 in.)
A4 210×297 mm
(8.3×11.7 in.)
B5 182×257 mm
(7.2×10.1 in.)
A5 148×210 mm
(5.8×8.3 in.)
B6 128×182 mm
(5.0×7.2 in.)
A6 105×148 mm
(4.1×5.8 in.)
37 to 413 g/m Plain paper
Fine paper
Recycled paper
Loading Capacity
Thickness of the originals stack:
under 12 mm (0.47 in.)
80 g/m: 80 sheets
90 g/m: 69 sheets
104 g/m: 59 sheets
127 g/m: 50 sheets
157 g/m: 40 sheets
209 g/m: 30 sheets
256 g/m: 24 sheets
413 g/m: 14 sheets
The loading capacity varies
depending on the paper type.
Thickness of the originals stack:
under 12 mm (0.47 in.)
80 g/m: 100 sheets
90 g/m: 86 sheets
104 g/m: 74 sheets
127 g/m: 62 sheets
157 g/m: 50 sheets
209 g/m: 38 sheets
256 g/m: 30 sheets
413 g/m: 18 sheets
The loading capacity varies
depending on the paper type.
*
A8 52×74 mm
(2.1×2.9 in.)
Business Card 55×89 mm
(2.1×3.4 in.)
* You can rell the originals up to the maximum capacity during scanning.
127 to 413 g/m
210 g/m Thickness of the originals stack:
60
under 12 mm (0.47 in.)
30 sheets
Page 61

User's Guide
Scanning Documents or Other Originals
Placing Standard Size Originals
1. Open the input tray and extend the input tray extension. Slide out the output tray, extend the output tray
extension, and then raise the stopper.
Note:
❏ For A4 size or larger originals, make sure you pull out and extend the input tray extension.
❏ Make sure you pull out and extend the output tray extensions so that they are a little bit longer than the length of the
original, and raise the stopper so that the ejected originals can be stacked comfortably on the output tray.
❏e stopper can move forward and backward on the output tray extension so that you can easily adjust the stopper
position to the best position for the originals being scanned.
❏ If thick originals bump into the output tray and fall from it, store the output tray and do not use it to stack the
ejected originals.
❏ If scanned images are still aected by ejected originals hitting the surface below the scanner, we recommend placing
the scanner on the edge of a table where the ejected originals can drop freely and you can catch them.
2. Slide the edge guides on the input tray all the way out.
61
Page 62

User's Guide
Scanning Documents or Other Originals
3. Fan the originals.
Hold both ends of the originals and fan them a few times.
4. Align the edges of the originals with the printed side facing down and slide the leading edge into a wedge
shape.
5. Load the originals into the input tray facing down with the top edge facing into the ADF.
Slide the originals into the ADF until they meet resistance.
62
Page 63

User's Guide
Scanning Documents or Other Originals
6. Slide the edge guides to t the edge of the originals making sure there are no gaps between the originals and
the edge guides. Otherwise, the originals may be fed skewed.
Note:
❏ When scanning originals with punch holes such as loose leaf paper, load the originals with the holes facing the side or
facing down. ere must not be any holes within a 30 mm (1.2 inches) strip at the center of the originals. However,
there can be holes within 30 mm (1.2 inches) from the leading edge of the originals. Make sure that the edges of the
punch holes do not have burrs or curls.
❏ When scanning thin paper with crinkles that are causing paper jams or double feeds, you may be able to improve the
situation by pressing the
button once slows down the paper feeding speed; press it again to return to normal speed.
(Slow Mode) button to slow down the feeding speed. Pressing the (Slow Mode)
63
Page 64

User's Guide
Scanning Documents or Other Originals
Related Information
& “Scanning Documents from Computer (Epson ScanSmart)” on page 83
Using Epson ScanSmart, you can easily scan and save your documents.
Long Paper
Specications of Long Paper
e specication of long paper you can load into the scanner.
Size Thickness Paper Type Loading Capacity
Width: 50.8 to 215.9 mm
(2.0 to 8.5 in.)
Length: 393.8 to 6,096.0 mm
(15.5 to 240.0 in.)
50 to 130 g/m Plain paper
Placing Long Paper
1. Open the input tray, and then slide out the output tray.
1 sheet
Fine paper
Recycled paper
Note:
Do not extend the input tray extension and output tray extensions and do not raise the stopper.
64
Page 65

User's Guide
Scanning Documents or Other Originals
2. Slide the edge guides on the input tray all the way out.
3. Load the original straight into the input tray, facing down with the top edge facing into the ADF.
Slide the original into the ADF until it meets resistance.
4.
Adjust the edge guides to t the edge of the long paper making sure there are no gaps between the edge of the
paper and the edge guides. Otherwise, the originals may be fed skewed.
65
Page 66

User's Guide
Scanning Documents or Other Originals
Note:
❏ You can scan long paper up to 5,461 mm (215 inches) in length with a resolution of 300 dpi or less, and over 5,461
mm (215 inches) to 6,096 mm (240 inches) with a resolution of 200 dpi or less.
❏ You need to specify the paper size using Epson ScanSmart. Click
Settings button > Main Settings tab on the Epson Scan 2 window, and then set the Document Size.
If the paper length is 3,048 mm (120 inches) or less, you can select Auto Detect (Long Paper) to detect the size
automatically.
If the paper length is more than 3,048 mm (120 inches), you need to select Customize and enter the size of the paper.
If the paper length is 5,461 mm (215 inches) or less, you can use Detect paper length instead of entering the paper
height. If the paper is longer than 5,461 mm (215 inches), you need to enter both width and height size of the paper.
❏ Support the long paper at the input side so that it does not drop out of the ADF, and the output side so that the
ejected paper does not fall from the output tray.
Settings > Scanner Settings tab > Scan
Related Information
& “Scanning Documents from Computer (Epson ScanSmart)” on page 83
Using Epson ScanSmart, you can easily scan and save your documents.
& “Carrier Sheet Codes” on page 16
Plastic Cards
Specications
e specication of plastic card you can load into the scanner.
of Plastic Cards
66
Page 67

User's Guide
Scanning Documents or Other Originals
Size Card Type Thickness Loading Capacity Loading Direction
ISO7810 ID-1 Type
54.0×85.6 mm
(2.1×3.3 in.)
With embossing 1.24 mm (0.05 in.) or
less
Without embossing 0.76 mm (0.03 in.) or
less
1 card Horizontal (Landscape)
5 cards
Placing Plastic Cards
1. Open the input tray, and then slide out the output tray and raise the stopper.
2. Slide the edge guides on the input tray all the way out.
67
Page 68

User's Guide
Scanning Documents or Other Originals
3. Load the plastic cards into the input tray facing down with the top edge facing into the ADF.
Slide the plastic cards into the ADF until they meet resistance.
Important:
c
Do not load plastic cards vertically.
68
Page 69

User's Guide
Scanning Documents or Other Originals
4. Slide the edge guides to t the edge of the plastic cards.
Note:
To scan plastic cards, set the appropriate setting on Epson ScanSmart. Click
Settings button > Main Settings tab on the Epson Scan 2 window, and then select Plastic Card in Document Size or
set Detect Double Feed to O.
If you forget to disable Detect Double Feed and a double feed error occurs, remove the card from the ADF and then
reload it, press the
Feed for the next scan, and then scan again. e
Feed for one sheet.
(Double Feed Detection Skip) button on the scanner as shown below to disable Detect Double
(Double Feed Detection Skip) button only disables Detect Double
Settings > Scanner Settings tab > Scan
Related Information
& “Scanning Documents from Computer (Epson ScanSmart)” on page 83
Using Epson ScanSmart, you can easily scan and save your documents.
69
Page 70
User's Guide
Scanning Documents or Other Originals
Laminated Cards
Specications of Laminated Cards
e specication of laminated cards you can load into the scanner.
Size Thickness Loading Capacity
120.0×150.0 mm (4.7×5.9 in.) or less 0.8 mm (0.03 in.) or less 1 card
Placing Laminated Cards
1. Open the input tray, and then slide out the output tray and raise the stopper.
2. Slide the edge guides on the input tray all the way out.
70
Page 71

User's Guide
Scanning Documents or Other Originals
3. Load the laminated cards into the input tray facing down with the top edge facing into the ADF.
Slide the laminated cards into the ADF until they meet resistance.
4. Slide the edge guides to t the edge of the laminated cards.
71
Page 72

User's Guide
Scanning Documents or Other Originals
Note:
To scan laminated cards, set the appropriate setting on Epson ScanSmart to increase the accuracy of auto size detection.
Click
Document Size > Settings, and then select Scan laminated card.
Also, set Detect Double Feed to O.
If you forget to disable Detect Double Feed and a double feed error occurs, remove the card from the ADF and then
reload it, press the
Feed for the next scan, and then scan again. e
Feed for one sheet.
Settings > Scanner Settings tab > Scan Settings button > Main Settings tab on the Epson Scan 2 window >
(Double Feed Detection Skip) button on the scanner as shown below to disable Detect Double
(Double Feed Detection Skip) button only disables Detect Double
Related Information
& “Scanning Documents from Computer (Epson ScanSmart)” on page 83
Using Epson ScanSmart, you can easily scan and save your documents.
Large Size Originals
Specications of Large Size Originals
By using the Carrier Sheet and folding the originals in half, you can scan originals larger than A4 size, such as A3
or B4 sizes.
Size Thickness Paper Type Loading Capacity of the
Carrier Sheet
Up to A3 0.3 mm (0.012 in.) or less
(excluding the thickness of
the Carrier Sheet)
Plain paper
Fine paper
Recycled paper
10 carrier sheets
72
Page 73

User's Guide
Scanning Documents or Other Originals
Placing Large Size Originals
1. Open the input tray and extend the input tray extension. Slide out the output tray, extend the output tray
extension, and then raise the stopper.
2. Slide the edge guides on the input tray all the way out.
3. Place the Carrier Sheet with the illustration on the front edge facing up and place the original in the carrier
sheet by folding it in half so that the side to be scanned is facing out, with the right side at the front.
73
Page 74

User's Guide
Scanning Documents or Other Originals
4. Load the Carrier Sheet into the input tray with the top edge facing into the ADF.
Slide the Carrier Sheet into the ADF until it meets resistance.
5. Slide the edge guides to t the edge of the Carrier Sheet making sure there are no gaps between the Carrier
Sheet and the edge guides. Otherwise, the carrier sheet may be fed skewed.
74
Page 75

User's Guide
Scanning Documents or Other Originals
Note:
❏ You may need to stop using a Carrier Sheet that is scratched or has been scanned more than 3,000 times.
❏ To scan both sizes and stitch them together, set the appropriate setting in Epson ScanSmart. Click
Scanner Settings tab > Scan Settings button > Main Settings tab on the Epson Scan 2 window. Select Double-
Sided as the Scanning Side, and then select Le & Right from Stitch Images.
❏ When scanning a Carrier Sheet by selecting Auto Detect as the Document Size setting on Epson ScanSmart, the
image is automatically scanned by applying Paper Skew in the Correct Document Skew setting.
You can check the setting by clicking
tab on the Epson Scan 2 window.
❏ e leading edge of the original must be placed at the binding part of the Carrier Sheet when scanning an original
approximately 297 mm long. Otherwise, the length of the scanned image may be longer than intended as the scanner
scans to the end of the Carrier Sheet when you select Auto Detect as the Document Size setting in Epson
ScanSmart.
❏ Only use the Carrier Sheet designed for your scanner. e Carrier Sheet is automatically recognized by the scanner
by detecting two small rectangular holes on the front edge. Keep the holes clean and not covered.
Settings > Scanner Settings tab > Scan Settings button > Main Settings
Settings >
Related Information
& “Scanning Documents from Computer (Epson ScanSmart)” on page 83
Using Epson ScanSmart, you can easily scan and save your documents.
Irregular Shaped Originals
Specications of Irregular Shaped Originals
By using the Carrier Sheet, you can scan originals that are wrinkled, curled, very thin, or irregularly shaped.
Size Thickness Loading Capacity of the Carrier
Sheet
Up to A4 0.3 mm (0.012 in.) or less
(excluding the thickness of the Carrier
Sheet)
75
10 sheets
Page 76

User's Guide
Scanning Documents or Other Originals
Placing Irregular Shaped Originals
1. Open the input tray and extend the input tray extension. Slide out the output tray, extend the output tray
extension, and then raise the stopper.
2. Slide the edge guides on the input tray all the way out.
3. Place the Carrier Sheet with the illustration on the front edge facing up and place the original in the center of
the Carrier Sheet with the side to be scanned facing down.
76
Page 77

User's Guide
Scanning Documents or Other Originals
4. Load the Carrier Sheet into the input tray with the top edge facing into the ADF.
Slide the Carrier Sheet into the ADF until it meets resistance.
5. Slide the edge guides to t the edge of the Carrier Sheet making sure there are no gaps between the Carrier
Sheet and the edge guides. Otherwise, the carrier sheet may be fed skewed.
77
Page 78

User's Guide
Scanning Documents or Other Originals
Note:
❏ You may need to stop using a Carrier Sheet that is scratched or has been scanned more than 3,000 times.
❏ You can set the size for the original using Epson ScanSmart. Click
Settings button > Main Settings tab on the Epson Scan 2 window, and then set the Document Size.
If you cannot
or select Customize to create a custom document size.
When scanning a Carrier Sheet by selecting Auto Detect as the Document Size setting, the image is automatically
scanned by applying Paper Skew in the Correct Document Skew setting.
❏ Only use the Carrier Sheet designed for your scanner. e Carrier Sheet is automatically recognized by the scanner
by detecting two small rectangular holes on the front edge. Keep the holes clean and not covered.
an appropriate size for the original you want to scan in the Document Size list, select Auto Detect
nd
Settings > Scanner Settings tab > Scan
Related Information
& “Scanning Documents from Computer (Epson ScanSmart)” on page 83
Using Epson ScanSmart, you can easily scan and save your documents.
& “Carrier Sheet Codes” on page 16
Envelopes
Specications
e specication
Size Measurement Thickness Loading Capacity
C6 114×162 mm (4.49×6.38 in.)
DL 110×220 mm (4.33×8.66 in.)
of Envelopes
of envelopes you can load into the scanner.
0.38 mm (0.015 in.) or less 10 envelopes
(standard size)
(standard size)
78
Page 79

User's Guide
Scanning Documents or Other Originals
Placing Envelopes
1. Open the input tray and extend the input tray extension. Slide out the output tray, extend the output tray
extension, and then raise the stopper.
2. Slide the edge guides on the input tray all the way out.
79
Page 80

User's Guide
Scanning Documents or Other Originals
3. Load the envelopes into the input tray facing down making sure that the opened edge (ap side) of the
envelope is facing to the side. For envelopes with the opened edge
the envelope with the opened edge (ap side) facing up.
Slide the envelopes into the ADF until they meet resistance.
side) on the shorter side, you can load
(ap
Important:
c
Do not load envelopes with adhesives on them.
Note:
❏ Envelopes that are not opened by cutting sharply at the ap edge may not be scanned correctly.
❏ Envelopes that have not yet been sealed can be loaded with the ap open and facing up.
4.
Slide the edge guides to t the edge of the envelopes making sure there are no gaps between the envelopes and
the edge guides. Otherwise, the envelopes may be fed skewed.
80
Page 81

User's Guide
Scanning Documents or Other Originals
Note:
❏ To scan envelopes, we recommend selecting the appropriate rotation angle or Auto in Rotate in Epson ScanSmart
before scanning. Click
Epson Scan 2 window, and then set the Rotate setting.
❏ To scan envelopes, set Detect Double Feed to O in Epson ScanSmart. Click
Scan Settings button > Main Settings tab on the Epson Scan 2 window, and then set Detect Double Feed to O.
If you forget to disable Detect Double Feed and a double feed error occurs, remove the envelope from the ADF and
then reload it, press the
Double Feed for the next scan, and then scan again. e
Detect Double Feed for one sheet.
Settings > Scanner Settings tab > Scan Settings button > Main Settings tab on the
Settings > Scanner Settings tab >
(Double Feed Detection Skip) button on the scanner as shown below to disable Detect
(Double Feed Detection Skip) button only disables
Related Information
& “Scanning Documents from Computer (Epson ScanSmart)” on page 83
Using Epson ScanSmart, you can easily scan and save your documents.
Mixture of Originals
Specications of Originals that are a Mixture of Dierent Sizes
You can load a mixture of originals from 50.8×50.8 mm (2.0×2.0 in.) to A4 (or Letter) size. You can also load a
mixture of paper types or thickness.
Note:
❏ Depending on the combination of paper types or sizes, the originals may not be fed correctly and may be skewed or
jammed. We recommend that you check the scanned image if the original was skewed.
❏ Alternatively, you can scan originals of dierent paper sizes and types by loading them one by one using Automatic
Feeding Mode.
81
Page 82

User's Guide
Scanning Documents or Other Originals
Placing a Mixture of Originals at Dierent Sizes
1. Open the input tray and extend the input tray extension. Slide out the output tray, extend the output tray
extension, and then raise the stopper.
Note:
If there are any thick originals amongst the originals, to stop the thick originals from bumping into the output tray and
falling out, store the output tray and do not use it to stack the ejected originals.
2. Slide the edge guides on the input tray all the way out.
82
Page 83

User's Guide
Scanning Documents or Other Originals
3. Load the originals at the center of the input tray in descending order of paper size with the widest at the back
and the narrowest at the front.
Note:
❏ Load the originals into the input tray facing down and slightly displace the top edges at an angle facing into the ADF.
❏ Slide the originals into the ADF until they meet resistance.
❏ You can stack the originals up to 8 mm (0.31 in.).
4. Slide the edge guides to t the edges of the widest original.
Related Information
& “Scanning Documents from Computer (Epson ScanSmart)” on page 83
Using Epson ScanSmart, you can easily scan and save your documents.
Scanning Documents from Computer (Epson ScanSmart)
Using Epson ScanSmart, you can easily scan and save your documents.
83
Page 84

User's Guide
Scanning Documents or Other Originals
See the Epson ScanSmart help for details on how to use the application. is section explains how to scan and save
to a PDF
1. Place the originals on your scanner.
2. Start Epson ScanSmart.
le.
❏ Wi ndows 10
Click the start button, and then select Epson Soware > Epson ScanSmart.
❏ Windows 8.1/Windows 8
Enter the application name in the search charm, and then select the displayed icon.
❏ Wi ndows 7
Click the start button, and then select All Programs > Epson Soware > Epson ScanSmart.
❏ Mac OS
Open the Applications folder and select Epson ScanSmart.
3. Click Scan double-sided or Scan single-sided.
Scanning starts automatically.
4.
Check the scanned images, and organize them if necessary.
❏ You can also scan and add originals from Scan more.
❏ You can use the buttons at the top of the screen to rotate scanned images.
❏ You can choose to keep or discard the back sides of double-sided scanned images from Include back sides.
84
Page 85

User's Guide
Scanning Documents or Other Originals
❏ If you do not want to organize scanned images each time, select Skip this screen next time..
5. Click Next.
85
Page 86

User's Guide
Scanning Documents or Other Originals
6. Click Save on the Select Action window.
7. Check or change the save settings as necessary.
86
Page 87

User's Guide
8. Click Save.
Scanning Documents or Other Originals
e scanned image is saved to the specied folder.
Scanning Dierent Sizes or Types of Originals One by One
Continuously (Automatic Feeding Mode)
You can scan dierent sizes or types of originals one by one using Automatic Feeding Mode. In this mode, the
scanner starts scanning automatically when originals are loaded into the scanner.
1. Start Epson ScanSmart.
2.
Click
Settings.
87
Page 88

User's Guide
Scanning Documents or Other Originals
3. Click Scan Settings on the Scanner Settings tab.
e Epson Scan 2 window is displayed.
88
Page 89

User's Guide
Scanning Documents or Other Originals
4. Select Automatic Feeding Mode on the Main Settings tab.
5. Make other settings for scanning on the Epson Scan 2 window.
Note:
You can make timeout settings to
Select Settings on the Document Source list to open the Document Source Settings window. Set Automatic Feeding
Mode Timeout (minutes) on the window.
Automatic Feeding Mode.
nish
6. Click Save to close the Epson Scan 2 window.
7. Click Close to close the Settings window.
8. Click Scan double-sided or Scan single-sided.
Automatic Feeding Mode starts.
89
Page 90

User's Guide
Scanning Documents or Other Originals
light on the scanner turns on, and the Automatic Feeding Mode window is displayed on your
e
computer.
9. Adjust the edge guides, and then place the original in the ADF.
Scanning starts automatically.
10. Aer
11.
Follow the instructions of the Epson ScanSmart to save the scanned image.
scanning stops, place the next original in the ADF.
Repeat this procedure until you have scanned all originals.
Note:
❏ If you want to scan originals that are detected as double feeds, for example plastic cards or envelopes, press the
button before placing the original to skip double feed detection.
❏ If you want to scan originals that are likely to jam, for example thin paper, press the
original to slow down the scanning speed.
you have scanned all originals, press the button on the scanner to close Automatic Feeding Mode.
Aer
Note:
You can also close Automatic Feeding Mode by pressing Finish on the Automatic Feeding Mode window displayed on
your computer.
button before placing the
Scanning Documents from Smart Device (Epson DocumentScan)
Note:
❏ Epson DocumentScan only supports document scanning, not photo scanning.
❏ Connect the scanner to the smart device before scanning.
1. Place the original.
2. Start Epson DocumentScan.
90
Page 91

User's Guide
3. Tap Scan.
Scanning Documents or Other Originals
4. Make the scan settings.
❏ Document Size: Select the size of the original you placed.
❏ Image Type: Select the color for saving the scanned image.
❏ Resolution: Select the resolution.
91
Page 92

User's Guide
Scanning Documents or Other Originals
❏ Scanning Side: Select the side of the original you want to scan.
❏ Detect Double Feed: Select to detect double feed when multiple originals are fed at the same time.
❏ Skip Blank Pages: Select to skip blank pages if there are any in the originals.
❏ Image Format: Select the save format from the list.
❏ Location: Select the location to save the scanned image.
❏ File Name: Check the settings for the le name.
5. Tap Scan.
Scanning starts.
92
Page 93

User's Guide
Scanning Documents or Other Originals
6. Check the scanned image, and then tap Done.
Note:
To continue scanning, tap Scan More.
7. Tap Save.
Note:
You can rotate and sort the images by tapping the icons on the bottom of the screen.
93
Page 94

User's Guide
Scanning Documents or Other Originals
e scanned image is saved to your storage device.
94
Page 95

User's Guide
Network Settings
Network Settings
Network Connection Types
You can use the following connection methods.
Wi-Fi Connection
Connect the scanner and the computer or smart device to the wireless router. is is the typical connection
method for home or oce networks where computers are connected by Wi-Fi through the wireless router.
Related Information
& “Connecting to a Computer” on page 96
& “Connecting to a Smart Device” on page 97
& “Making Wi-Fi Settings from the Control Panel” on page 97
Wi-Fi Direct (Simple AP) Connection
Use this connection method when you are not using Wi-Fi at home or at the oce, or when you want to connect
the scanner and the computer or smart device directly. In this mode, the scanner acts as a wireless router and you
can connect the devices to the scanner without having to use a standard wireless router.
95
Page 96

User's Guide
Network Settings
e scanner can be connected by Wi-Fi and Wi-Fi Direct (Simple AP) connection simultaneously. However, if you
start a network connection in Wi-Fi Direct (Simple AP) connection when the scanner is connected by Wi-Fi, the
Wi-Fi is temporarily disconnected.
Related Information
& “Making AP Mode Settings” on page 98
Connecting to a Computer
We recommend using the installer to connect the scanner to a computer. You can run the installer using one of the
following methods.
❏ Setting up from the website
Access the following website, and then enter the product name.
http://epson.sn
Go to Setup, and then click Download in the download and connect part. Click or double-click the
downloaded le to run the installer. Follow the on-screen instructions.
❏ Setting up using the soware disc (only for the models that come with a soware disc and users with computers
with disc drives.)
Insert the soware disc into the computer, and then follow the on-screen instructions.
Selecting the Connection Methods
Follow the on-screen instructions until the following screen is displayed, and then select the method for
connecting the scanner to the computer.
Select the connection type and then click Next. Follow the on-screen instructions.
96
Page 97

User's Guide
Network Settings
Connecting to a Smart Device
You can use the scanner from a smart device. To use the scanner from a smart device, set up from Epson
DocumentScan.
Note:
If you want to connect a computer and a smart device to the scanner at the same time, we recommend connecting the
computer
1.
2. Download and install Epson DocumentScan.
3. Start Epson DocumentScan.
4. Follow the on-screen instructions to connect the scanner to your smart device.
rst.
Search for Epson DocumentScan in the App Store or Google Play.
Making Wi-Fi Settings from the Control Panel
You can make network settings from the scanner's control panel. Aer connecting the scanner to the network,
connect to the scanner from the device that you want to use (computer, smart phone, tablet, and so on.)
Related Information
& “Making Wi-Fi Settings by Push Button Setup (WPS)” on page 97
& “Making Wi-Fi Settings by PIN Code Setup (WPS)” on page 98
& “Making AP Mode Settings” on page 98
Making Wi-Fi Settings by Push Button Setup (WPS)
You can automatically set up a Wi-Fi network by pressing a button on the access point. If the following conditions
are met, you can set up by using this method.
❏ e access point is compatible with WPS (Wi-Fi Protected Setup).
❏ e current Wi-Fi connection was established by pressing a button on the access point.
Note:
If you cannot nd the button or you are setting up using the soware, see the documentation provided with the access point.
97
Page 98

User's Guide
Network Settings
1. Hold down the [WPS] button on the access point until the security light ashes.
If you do not know where the [WPS] button is, or there are no buttons on the access point, see the
documentation provided with your access point for details.
2.
Press the
connection setting starts. e
e
e
Note:
Connection fails when the
move it closer to the scanner, and then try again.
button on the scanner’s control panel until the light ashes blue (approximately 3 seconds).
light and light
light is lit blue when connection is complete.
light turns on. Aer releasing the error by pressing the button, restart the access point,
alternately.
ash
Making Wi-Fi Settings by PIN Code Setup (WPS)
You can automatically connect to an access point by using a PIN code. You can use this method to set up if an
access point is capable of WPS (Wi-Fi Protected Setup). Use a computer to enter a PIN code into the access point.
1.
Press the
in blue (approximately 3 seconds).
2.
Use your computer to enter the PIN code (an eight-digit number) on the label stuck to the scanner into the
access point within two minutes.
e connection setting starts. e
button and the button on the scanner’s control panel simultaneously until light ashes
light and light ash alternately.
is lit blue when connection is complete.
e
Note:
❏ See the manual provided with your access point for details on entering a PIN code.
❏ Connection fails when the
point, move it closer to the scanner, and then try again.
light turns on. Aer releasing the error by pressing the button, restart the access
Making AP Mode Settings
method allows you to connect the scanner directly to devices without an access point. e scanner acts as an
is
access point.
98
Page 99

User's Guide
Network Settings
Important:
c
When you connect from a smart device to the scanner using the AP mode connection, the scanner is connected to
the same Wi-Fi network (SSID) as the smart device and communication is established between them. Since the
smart device is automatically connected to other connectable Wi-Fi networks if the scanner is turned o, it is not
connected to the previous Wi-Fi network again if the scanner is turned on. Connect to the scanner’s SSID in AP
mode from the smart device again. If you do not want to connect every time you turn the scanner on or o, we
recommend using a Wi-Fi network by connecting the scanner to an access point.
1. Press the button on the scanner’s control panel.
e
2. Connect from the smart device or computer to the scanner using the scanner’s SSID and password.
Note:
❏ You can check the SSID and password on the label stuck to the scanner.
❏ See the documentation provided with your smart device or computer for the operating instructions.
light is lit blue when AP mode connection is enabled.
Checking the Network Status Using Network Light
You can check the network connection status using the network light on the scanner’s control panel.
Related Information
& “Lights” on page 13
& “Error Indicators” on page 14
Replacing or Adding New Wireless Routers
If the SSID changes due to the replacement of a wireless router, or a wireless router is added and a new network
environment is established, re-set the Wi-Fi settings.
Related Information
& “Changing the Connection Method to a Computer” on page 99
Changing the Connection Method to a Computer
Using the installer and re-set up in a dierent connection method.
❏ Setting up from the website
Access the following website, and then enter the product name.
http://epson.sn
Go to Setup, and then click Download in the download and connect part. Click or double-click the
downloaded le to run the installer. Follow the on-screen instructions.
99
Page 100

User's Guide
Network Settings
❏ Setting up using the soware disc (only for the models that come with a soware disc and users with computers
with disc drives.)
Insert the soware disc into the computer, and then follow the on-screen instructions.
Selecting Change the Connection Methods
Follow the on-screen instructions until the following screen is displayed.
Select Set up Scanner connection again (for new network router or changing USB to network, etc.) on the
Install Soware screen, and then click Next. Follow the on-screen instructions.
Disabling the Network Setting from the Control Panel
You can disable the network settings.
1.
Press the
e
Note:
Press the
button for more than 3 seconds to disable a Wi-Fi and AP mode connection.
light and light turn o when these are disabled.
button to re-connect Wi-Fi and AP mode.
Restoring the Network Settings from the Control Panel
You can restore all network settings to their defaults.
1. Turn the scanner o.
100
 Loading...