

Page 1

Epson
®
SureColor
®
F9470/F9470H
User's Guide
Page 2

Page 3

Contents
Epson SureColor F9470/F9470H User's Guide ......................................................................................... 7
Introduction to Your Printer........................................................................................................................ 8
Media Handling.......................................................................................................................................... 23
Notations Used in the Documentation.................................................................................................. 8
Printer Part Locations........................................................................................................................... 8
Product Parts - Top and Right Side ................................................................................................. 9
Product Parts - Inside.................................................................................................................... 12
Product Parts - Back...................................................................................................................... 13
Control Panel Parts ....................................................................................................................... 14
Consumables and Replacement Parts............................................................................................... 18
Printer Usage Guidelines ................................................................................................................... 19
Using Your Printer......................................................................................................................... 19
Handling Ink Packs and Ink Tanks................................................................................................. 20
Handling Media.............................................................................................................................. 21
Storing Your Printer....................................................................................................................... 21
Media Handling Precautions .............................................................................................................. 23
Loading Media.................................................................................................................................... 24
Viewing and Changing Media Settings............................................................................................... 39
Saving Sets of Media Settings............................................................................................................ 41
Printable Area and Media Size Checking........................................................................................... 42
Printing the Amount of Media Remaining........................................................................................... 44
Aligning the Print Head....................................................................................................................... 45
Media Feed Adjustment ..................................................................................................................... 46
Adjusting the Media Feed Automatically........................................................................................ 47
Adjusting the Media Feed Manually............................................................................................... 48
Adjusting the Media Feed During Printing ..................................................................................... 50
Adjusting Heating and Drying During Printing .................................................................................... 50
Cutting Media..................................................................................................................................... 51
Using the Auto Take-up Reel ............................................................................................................. 54
About the Auto Take-up Reel ........................................................................................................ 55
3
Page 4

Attaching the Take-up Roll Core to the Auto Take-up Reel ........................................................... 55
Take Up with the Printable Side In................................................................................................. 63
Take Up with the Printable Side Out.............................................................................................. 69
Removing Media from the Auto Take-up Reel............................................................................... 75
Using the Control Panel Menus................................................................................................................ 79
Accessing the Printer's Menus........................................................................................................... 79
Media Setup Menu Settings ............................................................................................................... 79
Printer Setup Menu Settings .............................................................................................................. 85
Maintenance Menu Settings............................................................................................................... 87
Printer Status Menu Settings.............................................................................................................. 89
Other Settings Menu Settings ............................................................................................................ 89
Maintenance............................................................................................................................................... 91
When to Maintain Your Product ......................................................................................................... 91
Preparing for Maintenance................................................................................................................. 93
Maintenance Supplies................................................................................................................... 93
Maintenance Precautions.............................................................................................................. 95
Using Ink Cleaner.......................................................................................................................... 96
Moving the Print Head for Maintenance......................................................................................... 97
Stirring High Density Black Ink and Fluorescent Ink........................................................................... 98
Replacing the Ink and Chip Unit....................................................................................................... 102
About Ink and Chip Unit Replacement......................................................................................... 103
Ink and Chip Unit Precautions..................................................................................................... 103
Replacing the Chip Unit and Refilling Ink..................................................................................... 104
Print Head Maintenance................................................................................................................... 117
Checking for Clogged Print Head Nozzles................................................................................... 118
Cleaning the Print Head............................................................................................................... 119
Cleaning Around the Print Heads..................................................................................................... 120
Cleaning the Anti-drying Caps.......................................................................................................... 122
Cleaning the Platen and Media Edge Guides................................................................................... 127
Cleaning the Heat Shield.................................................................................................................. 129
Replacing the Waste Ink Bottle ........................................................................................................ 131
Replacing the Head Cleaning Set .................................................................................................... 135
Replacing the Media Edge Guides................................................................................................... 140
4
Page 5

Applying Carriage Rod Grease......................................................................................................... 147
Moving or Transporting the Product ..................................................................................................... 153
Preparing to Move the Product......................................................................................................... 153
Setting Up the Product After Moving ................................................................................................ 154
Solving Problems.................................................................................................................................... 156
Product Status Messages ................................................................................................................ 156
Solving Printer Problems.................................................................................................................. 159
Printer Does Not Turn On............................................................................................................ 160
LCD Screen Shuts Off................................................................................................................. 160
After Heater Shuts Off ................................................................................................................. 160
Forgot the Administrator Password ............................................................................................. 160
Red Light Shines Inside the Printer ............................................................................................. 161
Solving Printing Problems................................................................................................................ 161
Nothing Prints.............................................................................................................................. 161
Cannot Print Over a Network....................................................................................................... 162
Print Head Moves But Nothing Prints .......................................................................................... 162
Media Is Creased ........................................................................................................................ 162
Printing Continues After Media Roll Empties............................................................................... 164
Removing Jammed Media........................................................................................................... 164
Media Does Not Feed Correctly .................................................................................................. 167
Solving Media Skew Problems......................................................................................................... 167
Parallel Adjustment Tools............................................................................................................ 168
Adjusting the Auto Take-up Reel (Parallel Adjustment)............................................................... 168
Solving Print Quality Problems......................................................................................................... 187
Nozzle Check Pattern Prints Incorrectly ...................................................................................... 188
Print Head Nozzles Remain Clogged .......................................................................................... 188
Overall Print Quality Is Poor ........................................................................................................ 189
Printed Media Is Stained or Marred............................................................................................. 190
Image Is Not Positioned Correctly On the Media......................................................................... 191
Uninstall Your Product Software....................................................................................................... 191
Uninstalling Product Software - Windows.................................................................................... 192
Where to Get Help............................................................................................................................ 193
5
Page 6

Technical Specifications ........................................................................................................................ 194
Windows System Requirements ...................................................................................................... 194
Printing Specifications...................................................................................................................... 195
Electrical Specifications ................................................................................................................... 195
Environmental Specifications........................................................................................................... 196
Dimension Specifications................................................................................................................. 196
Interface Specifications.................................................................................................................... 197
Ink Pack Specifications .................................................................................................................... 197
Media Specifications........................................................................................................................ 198
Safety and Approvals Specifications................................................................................................ 198
Notices ..................................................................................................................................................... 199
Important Safety Instructions............................................................................................................ 199
General Product Safety Instructions............................................................................................ 199
Ink Pack Safety Instructions ........................................................................................................ 201
FCC Compliance Statement............................................................................................................. 201
Binding Arbitration and Class Waiver............................................................................................... 202
Trademarks...................................................................................................................................... 205
Copyright Notice............................................................................................................................... 206
A Note Concerning Responsible Use of Copyrighted Materials................................................... 206
Copyright Attribution.................................................................................................................... 207
6
Page 7

Epson SureColor F9470/F9470H User's Guide
Welcome to the Epson SureColor F9470/F9470H User's Guide.
For a printable PDF copy of this guide, click here.
7
Page 8

Introduction to Your Printer
Refer to these sections to learn more about your printer and this manual.
Note: The SureColor F9470 is shown in most illustrations in this manual, but the instructions apply to
both models unless noted otherwise.
Notations Used in the Documentation
Printer Part Locations
Consumables and Replacement Parts
Printer Usage Guidelines
Notations Used in the Documentation
Follow the guidelines in these notations as you read your documentation:
• Warnings must be followed carefully to avoid bodily injury.
• Cautions must be observed to avoid damage to your equipment.
• Notes contain important information about your printer.
• Tips contain additional printing information.
Parent topic: Introduction to Your Printer
Printer Part Locations
Check the printer part illustrations to learn about the parts on your printer.
Product Parts - Top and Right Side
Product Parts - Inside
Product Parts - Back
Control Panel Parts
Parent topic: Introduction to Your Printer
8
Page 9
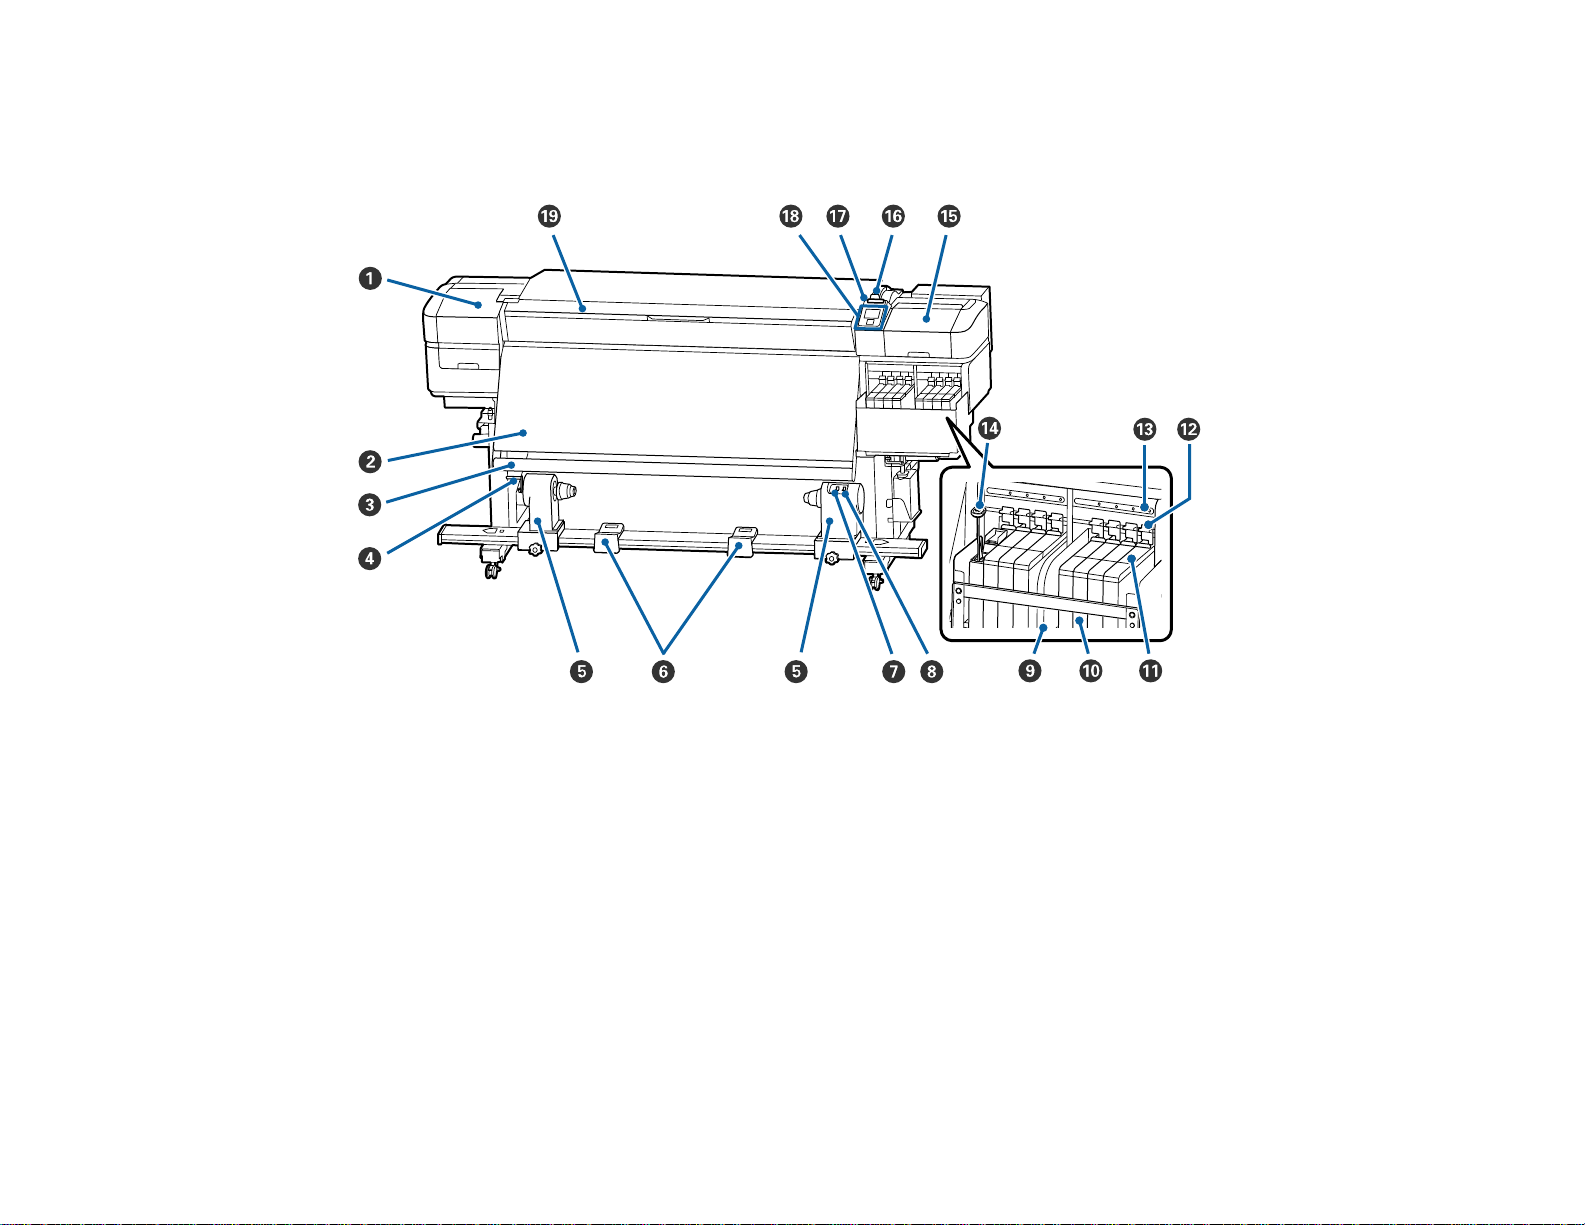
Product Parts - Top and Right Side
Front/Top
1 Maintenance cover (left)
2 After heater
3 Media guide bar
4 Roll core holder handle
5 Roll core holder (auto take-up reel)
6 Roll supports
7 Auto switch
8 Manual switch
9 Heat shield
10 Ink tank
9
Page 10
11 Slider (chip holder)
12 Lock lever
13 Chip unit check light
14 Stirring stick
15 Maintenance cover (right)
16 Media loading lever
17 Alert light
18 Control panel
19 Front cover
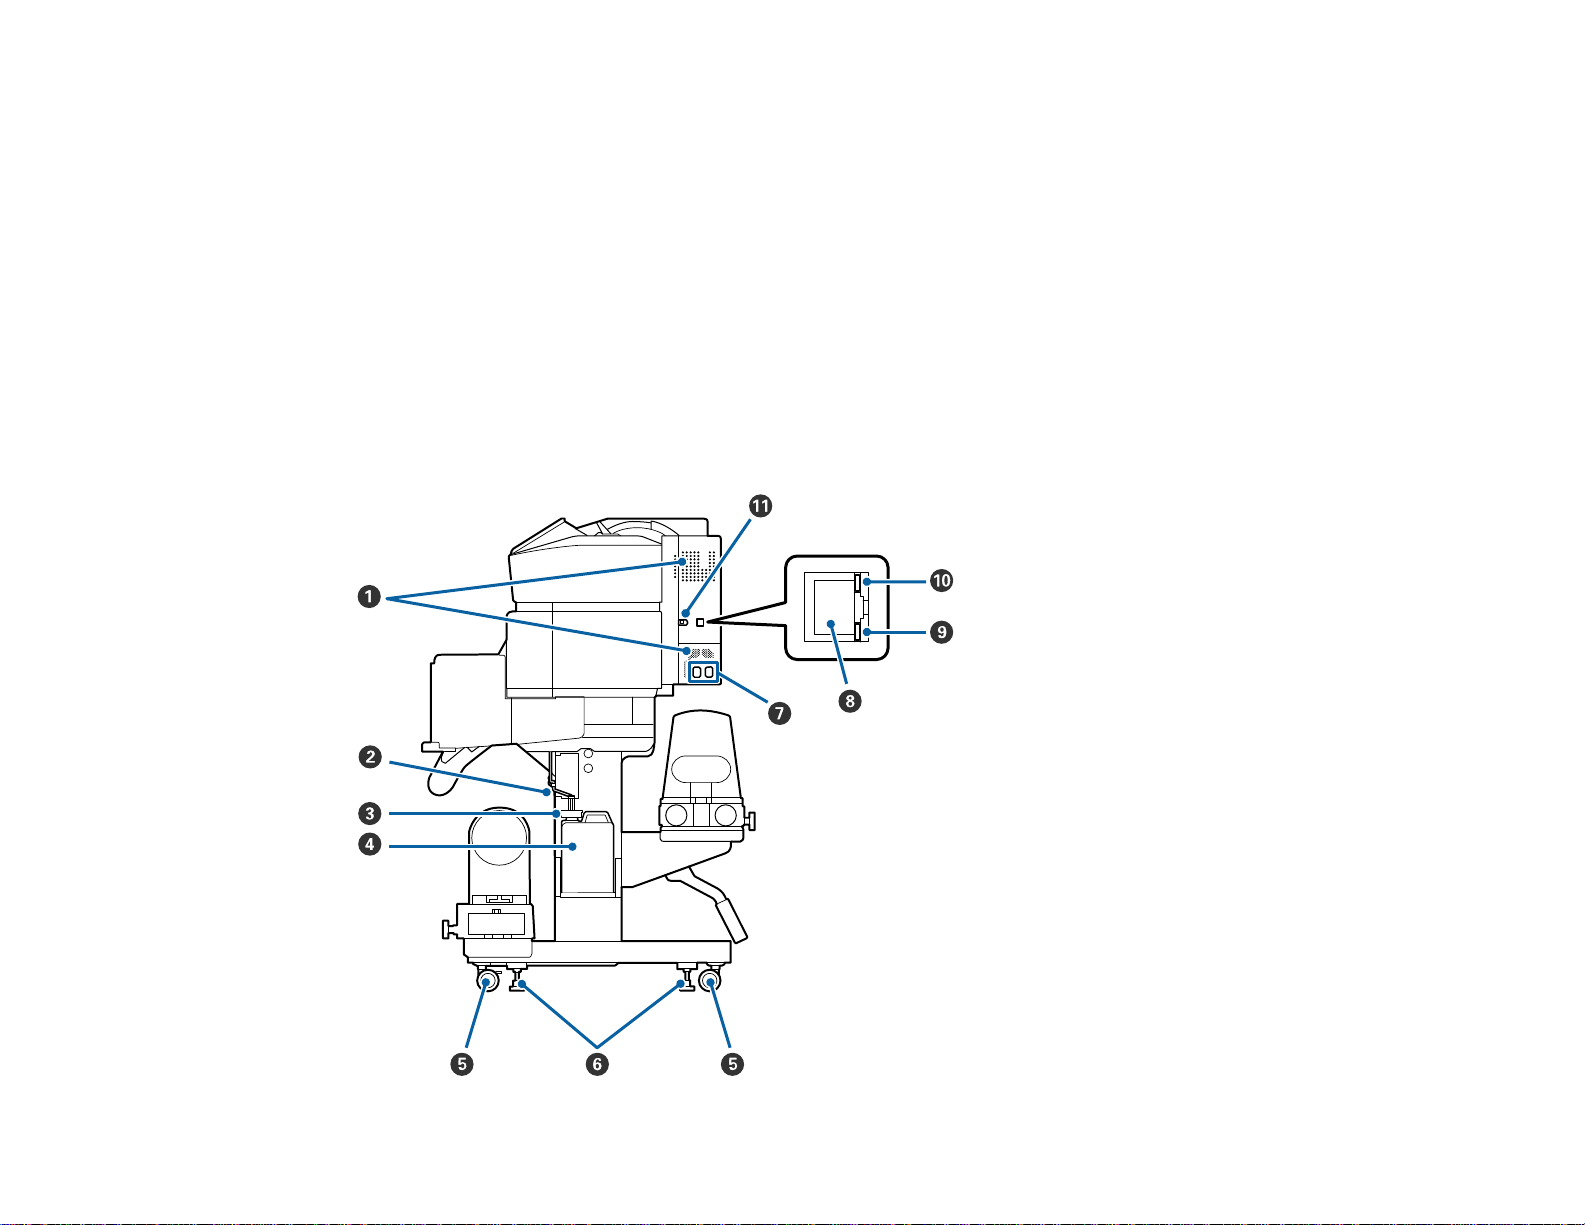
Right Side
10
Page 11
1 Airflow vents
2 Waste ink tube
3 Waste ink bottle stopper
4 Waste ink bottle
5 Casters
6 Adjusters
7 AC inlet #1 and #2
8 LAN port
9 Data light (orange)
10 Status light
Red: 100Base-TX
Green: 1000Base-T
11 USB port
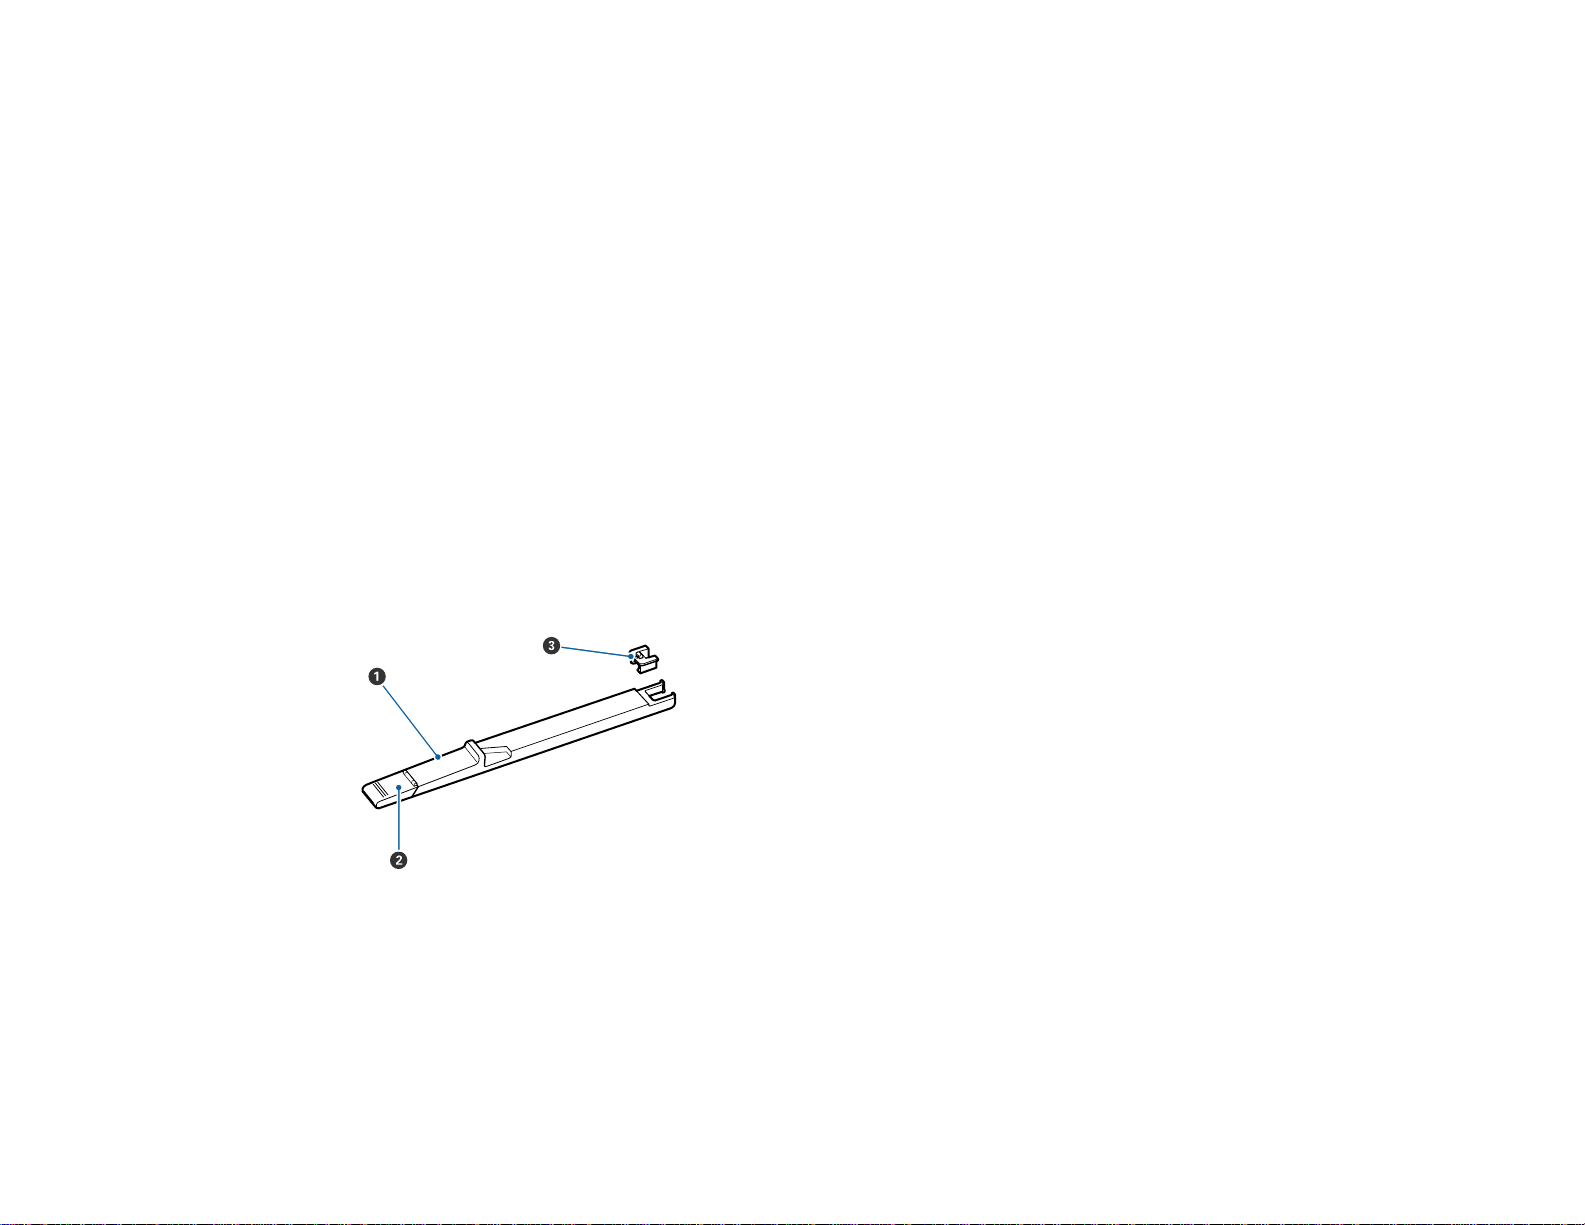
Slider (Chip Holder) Parts
1 Slider
2 Ink inlet cover
3 Chip unit
Parent topic: Printer Part Locations
11
Page 12
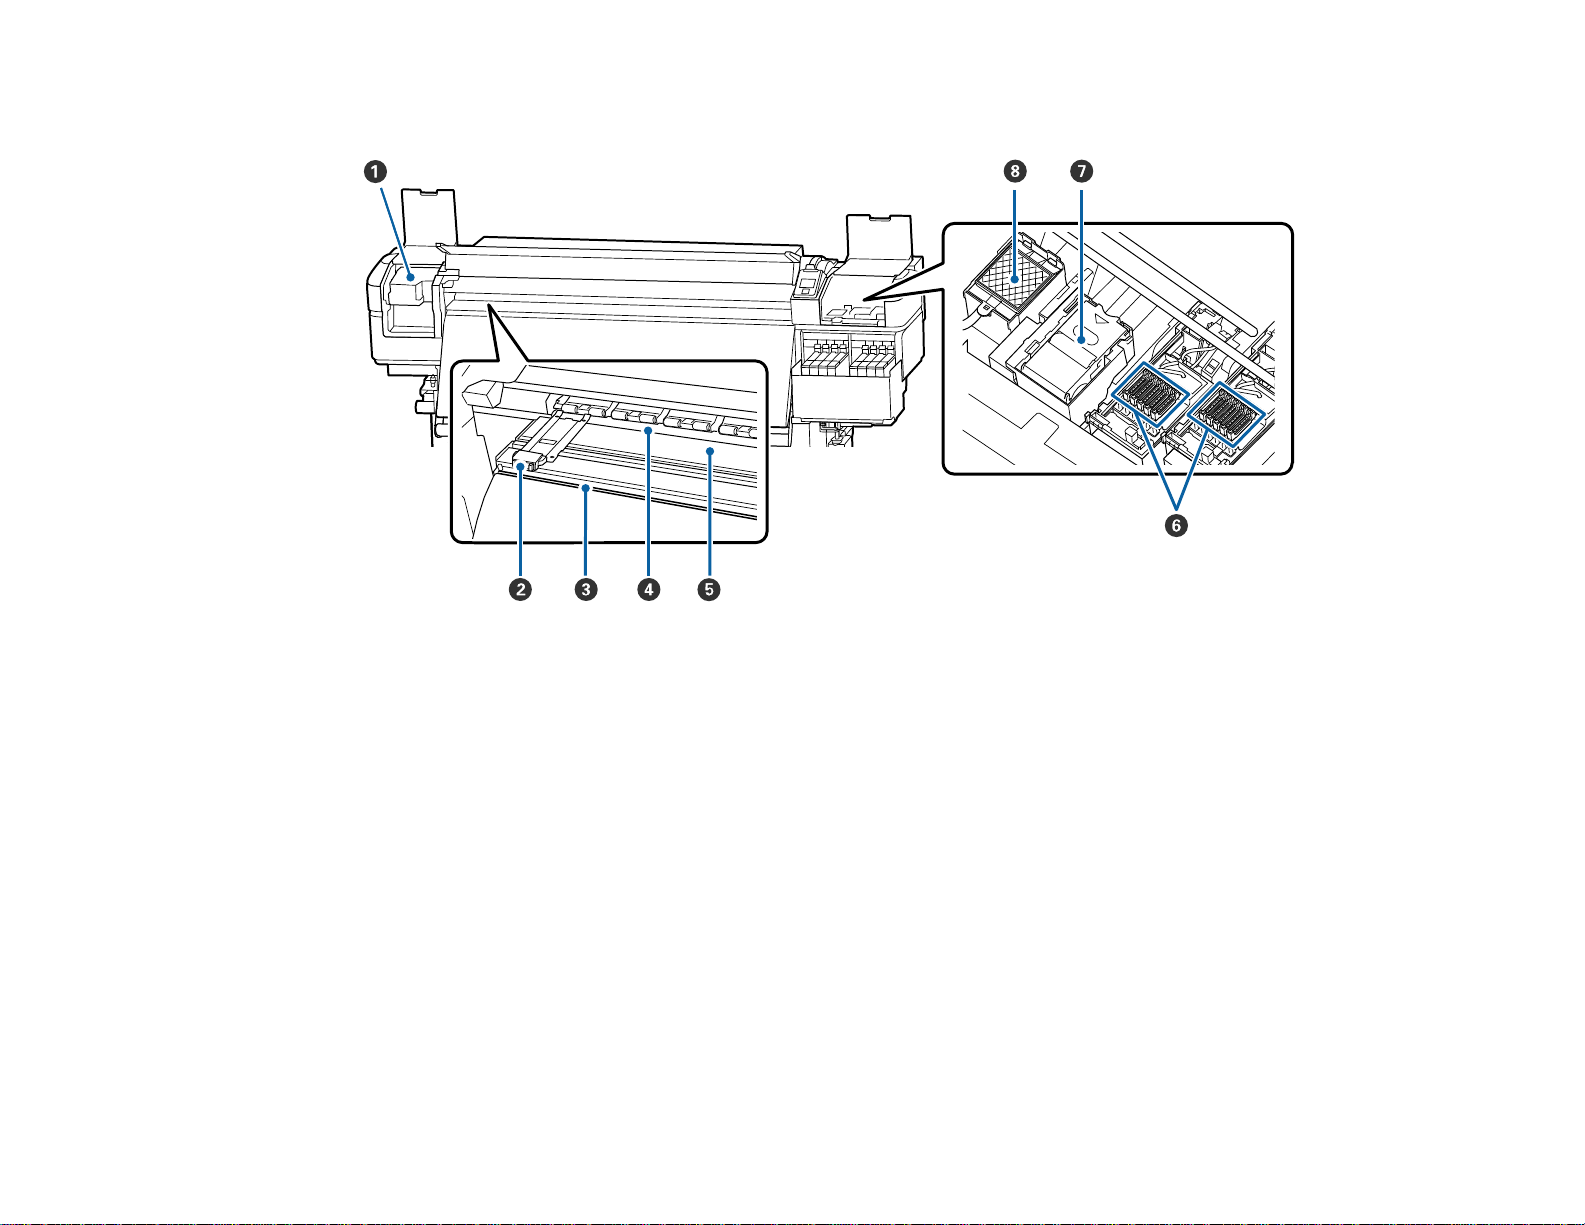
Product Parts - Inside
1 Print head
2 Media edge guide
3 Cutter groove
4 Pressure rollers
5 Platen
6 Anti-drying caps
7 Wiper unit
8 Flushing pad
Parent topic: Printer Part Locations
12
Page 13
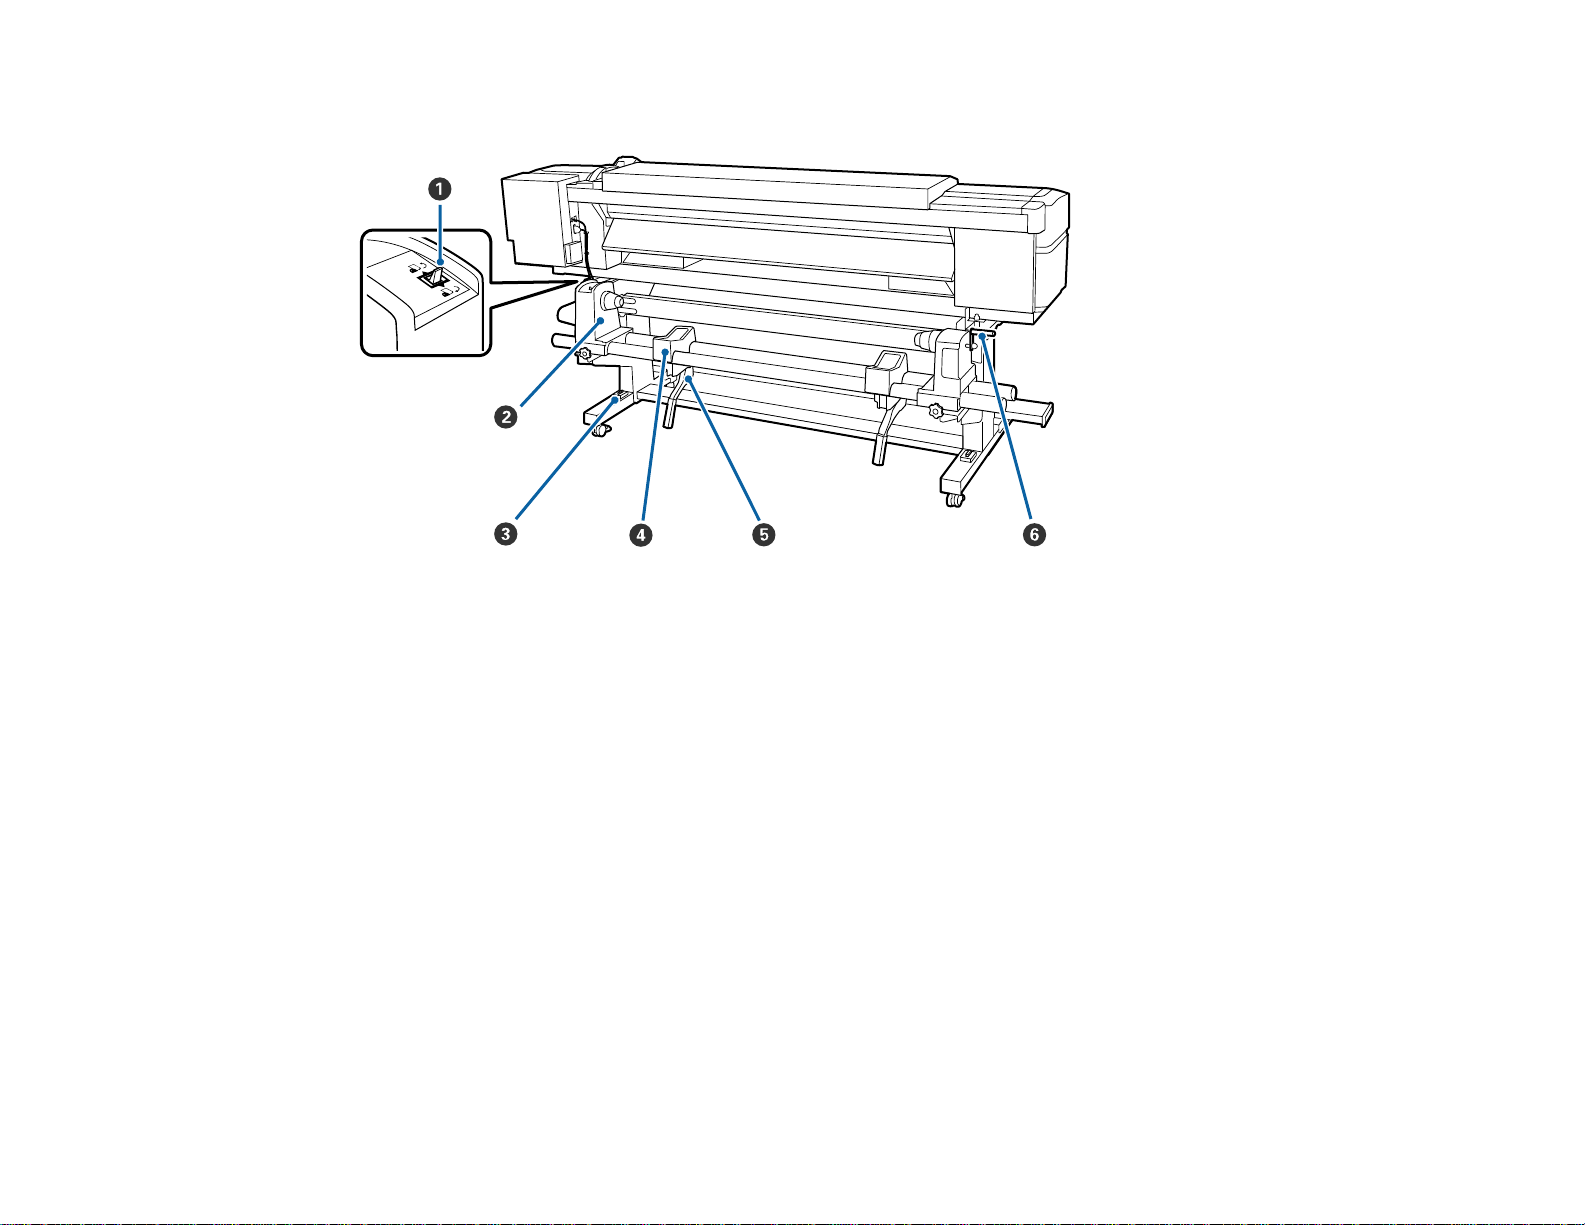
Product Parts - Back
1 Drive switch
2 Roll core holder (media feeding unit)
3 Level gauge
4 Roll support
5 Lift lever
6 Roll core holder handle
Parent topic: Printer Part Locations
13
Page 14
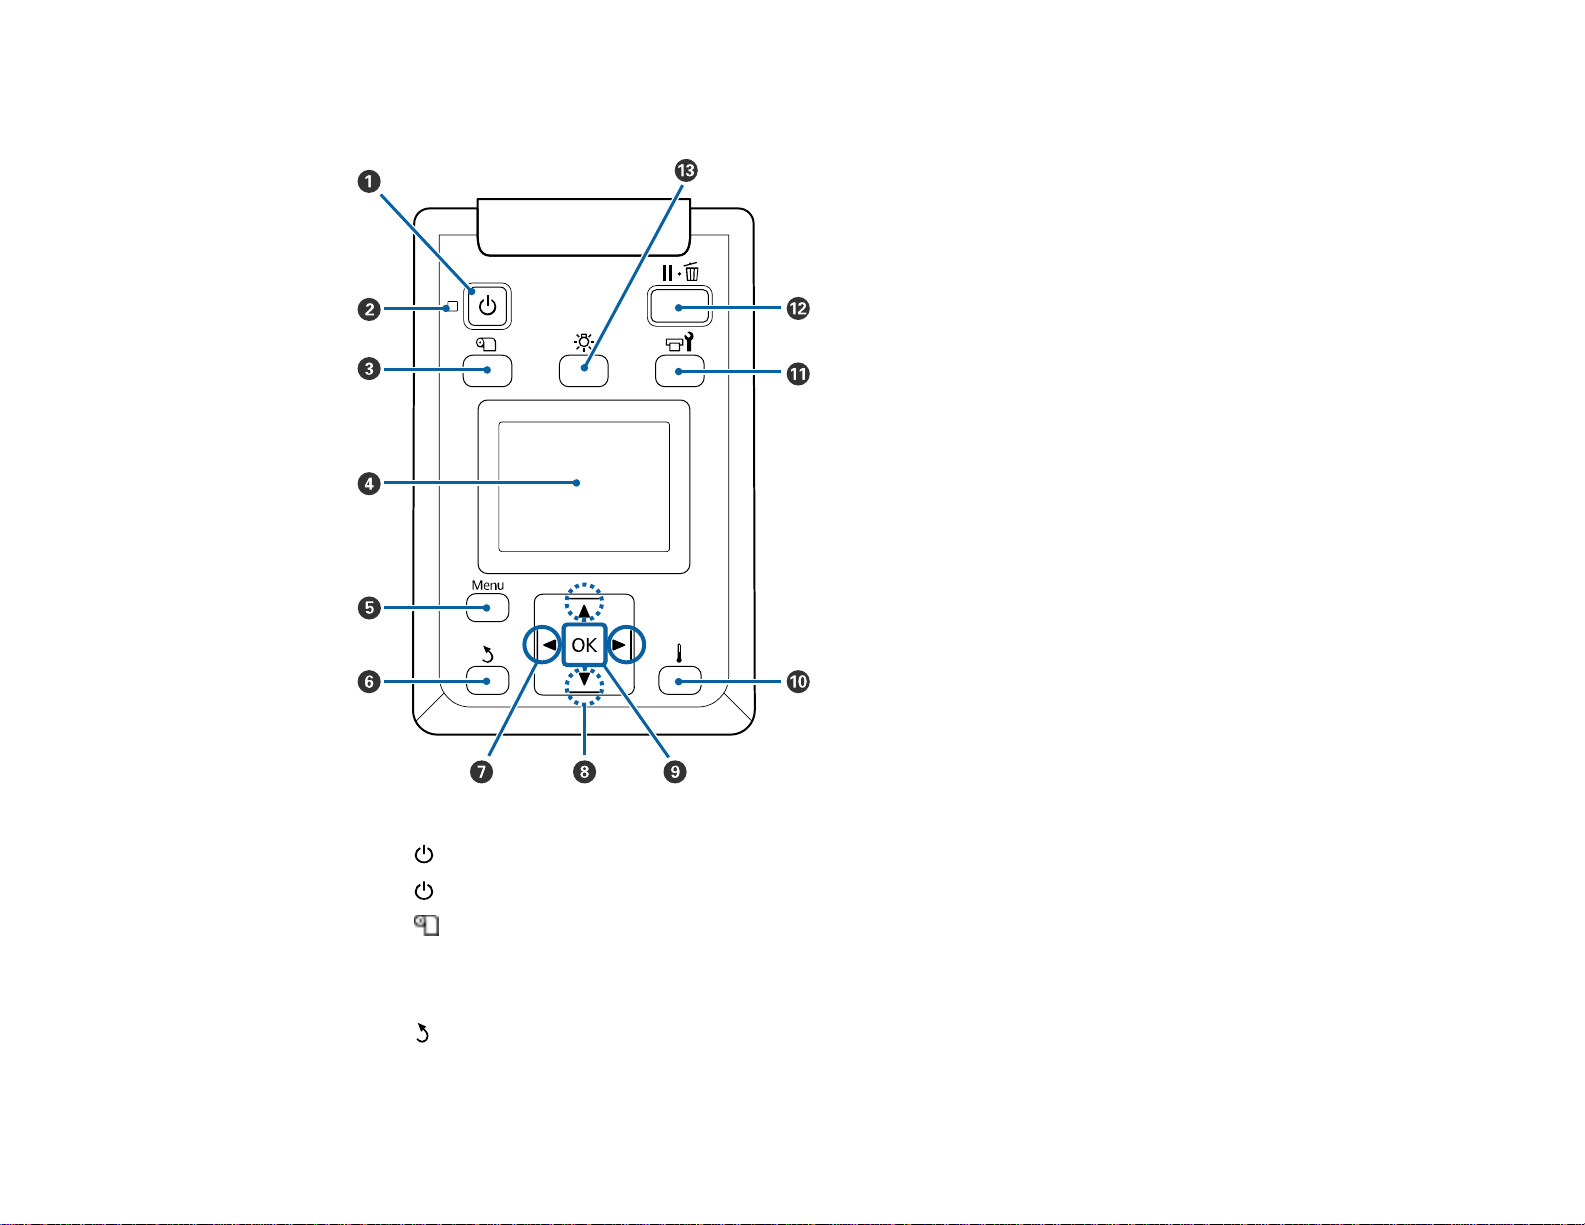
Control Panel Parts
1
2
3 media setup button
4 LCD screen
5 Menu button
6
7 Left and right arrow buttons
power button
power light
back button
14
Page 15
8 Up and down/media feed buttons
9 OK button
10 heat/drymenu button
11
12
13
maintenance button
pause/cancel button
internal light button
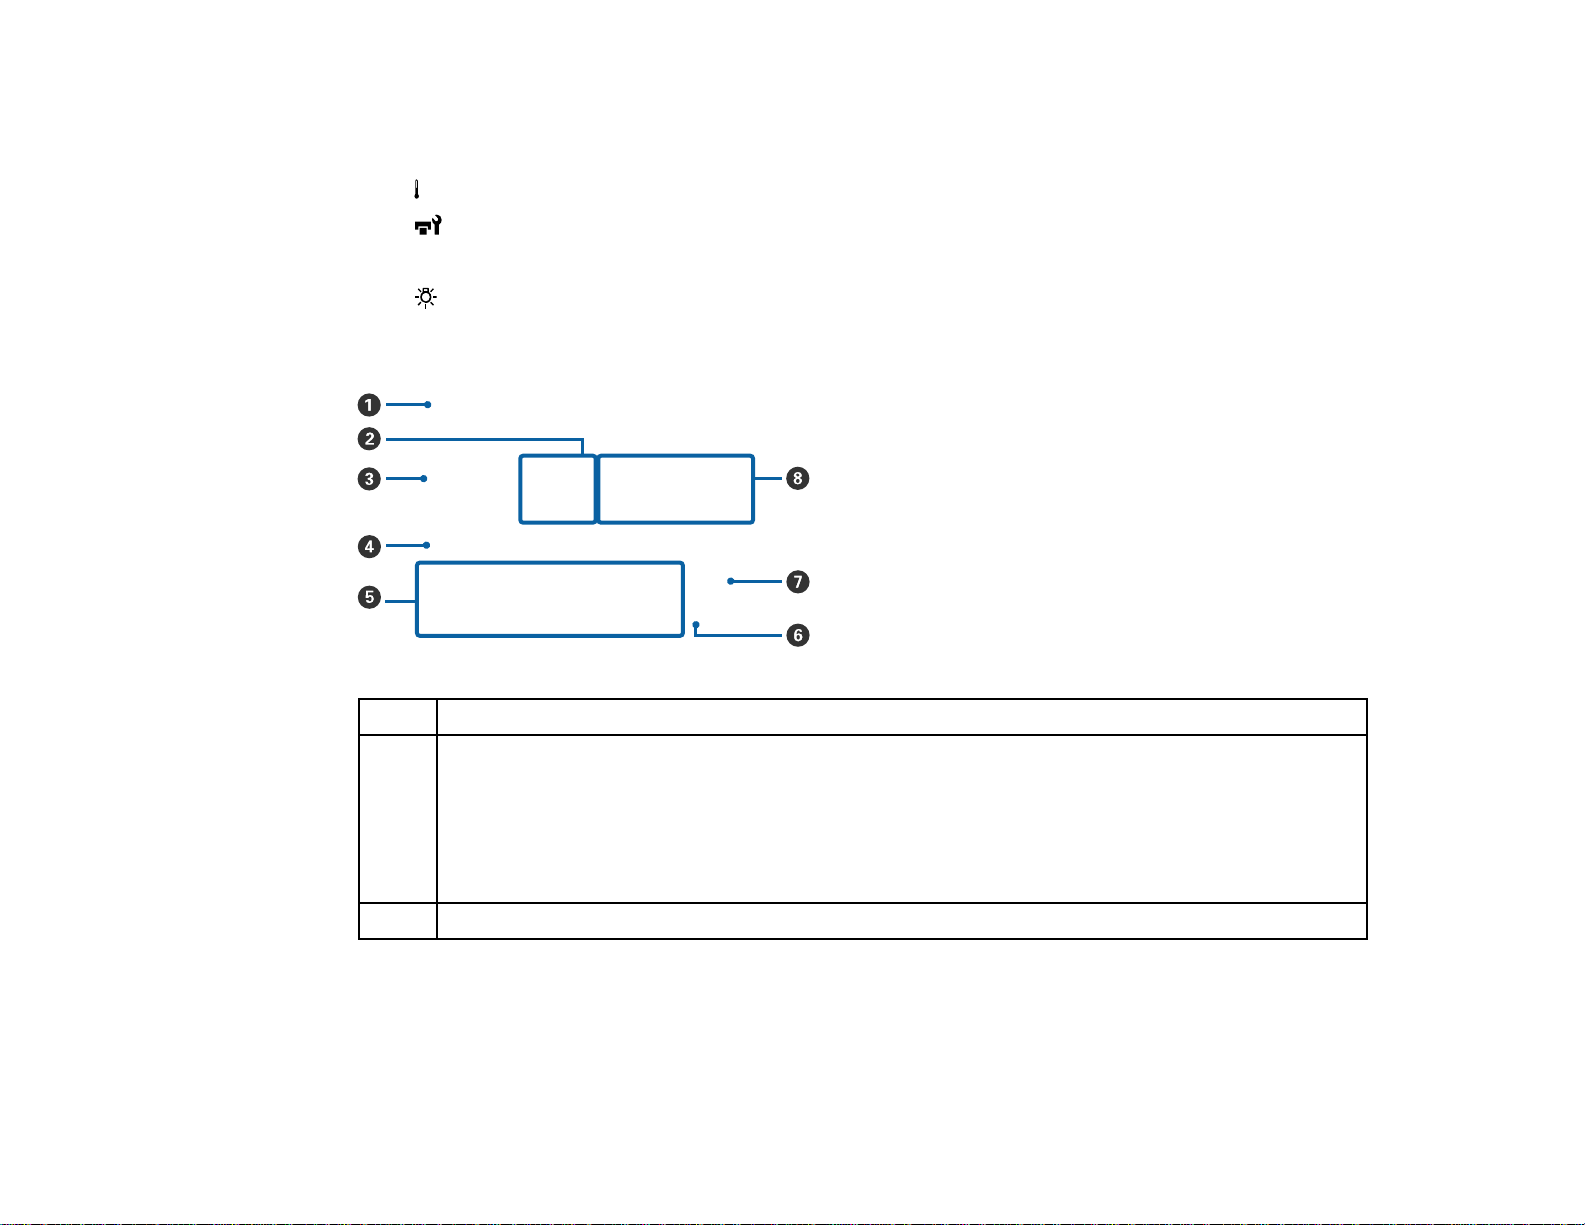
LCD Screen Display
1 Status messages
2 After heater temperature status
: After heater is the selected temperature
: After heater has not yet reached the selected temperature
3 Feed adjustment information, if you have entered a value during printing
15
Page 16
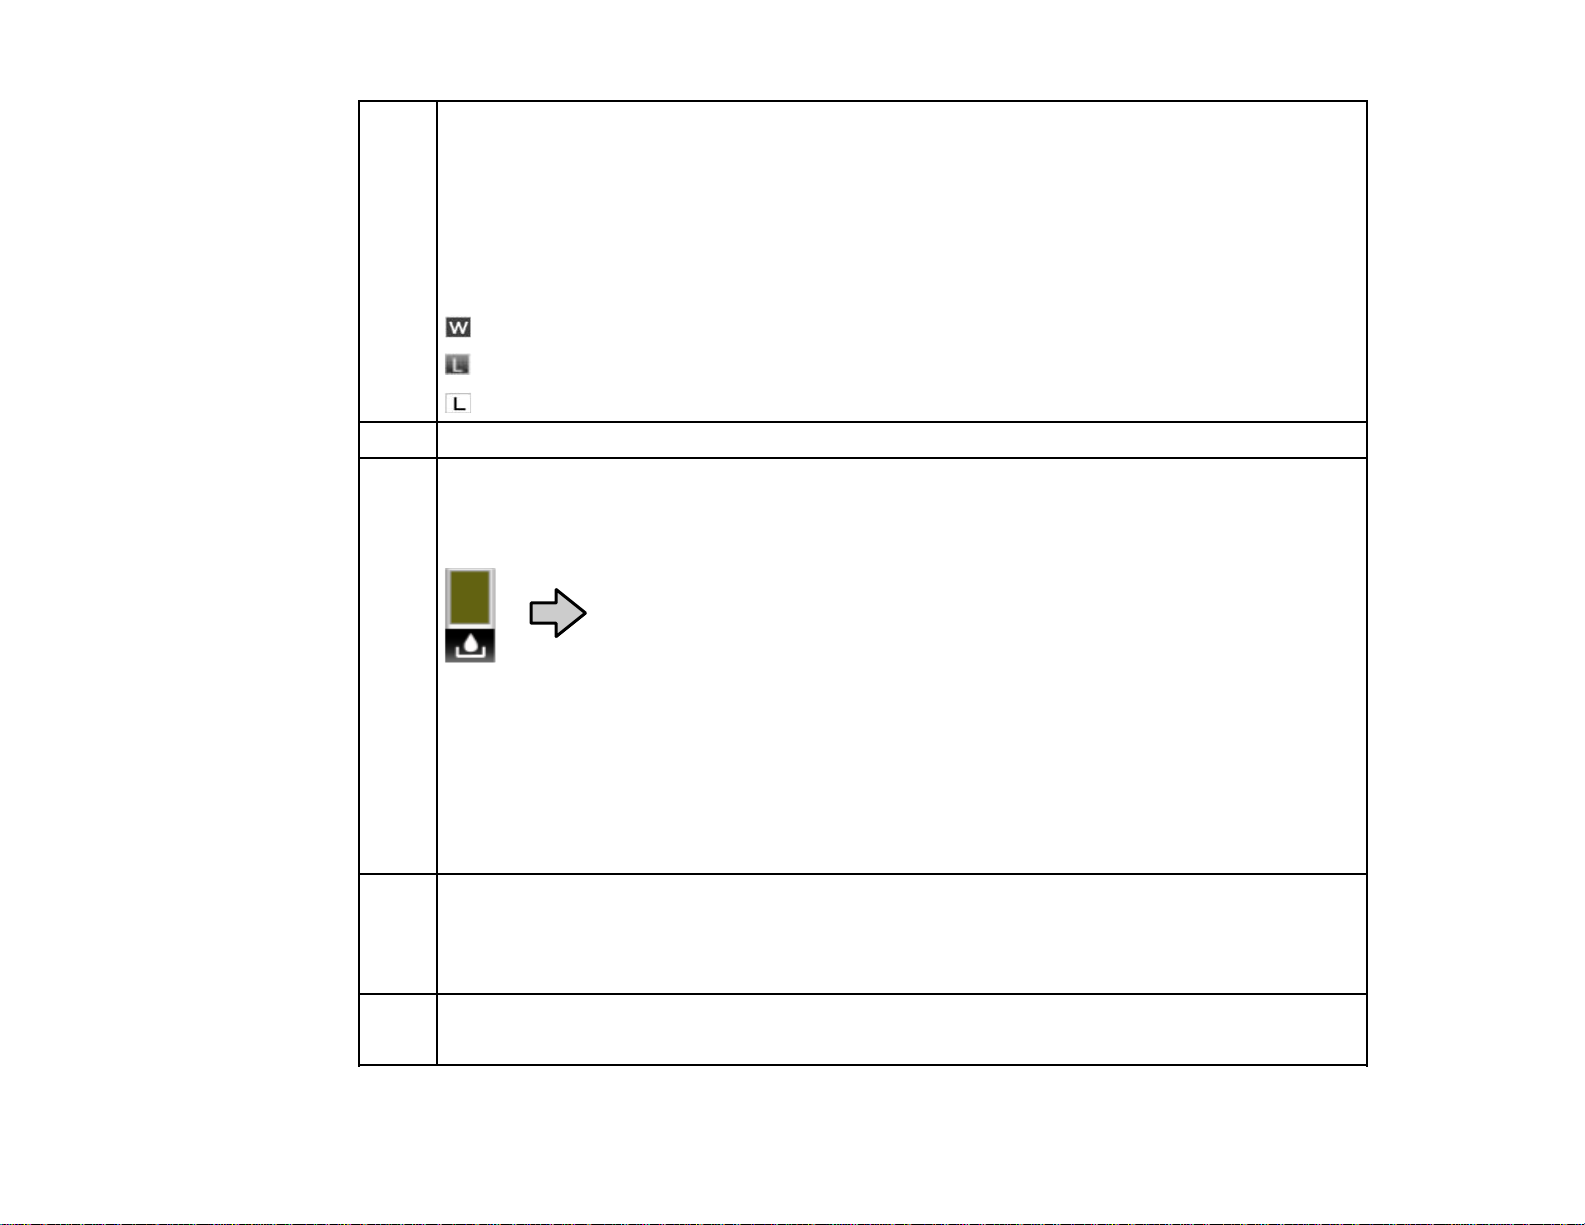
4 Media information
Displays, from left to right, the selected media (0 indicates RIP settings are in use), platen gap,
media width, and remaining media.
: platen gap is 1.6
: platen gap is 2.0
: platen gap is 2.5
: width of loaded media
: remaining length of loaded media (increments of 3.9 in [0.1 m])
: remaining length of loaded media (increments of 39.4 in [1 m])
5 Chip unit status (see the next table)
6 Waste ink bottle status
The waste ink bottle status indicates the waste ink level and changes from normal (left) to
warning or error status (right) if necessary.
: Waste ink bottle is almost full; prepare a new waste ink bottle
: Waste ink bottle is full; replace the waste ink bottle
7 Head cleaning set status
: The level on the icon goes down as replacement time approaches
8 Cleaning notification
Displays the time or remaining media length before an automatic or periodic cleaning occurs
16
Page 17
Chip unit status
The chip unit status (1) changes from normal (left) to warning or error
status (right) if necessary.
The ink color is shown below (2).
• FY: Fluorescent Yellow (SureColor F9470H)
• FP: Fluorescent Pink (SureColor F9470H)
• HDK: High Density Black
• Y: Yellow
• M: Magenta
• C: Cyan
Remaining ink level indicators
Ink is low
Ink is nearing the end of its life. Check the remaining ink in the ink tank
using the scale on the ink pack and, if necessary, refill the ink and
replace the chip unit.
Ink is out and printing is stopped. Replace the chip unit and refill the ink.
A chip unit for automatic charging is mounted. When ink gets low, a low
ink warning does not appear. If the icon is flashing, the chip has been
removed.
The lock lever is raised; automatic charging cannot occur. Lower the lock
lever.
The chip unit is mounted incorrectly or incompatible.
17
Page 18
Check the displayed chip unit message.
Parent topic: Printer Part Locations
Related references
Media Setup Menu Settings
Related tasks
Replacing the Waste Ink Bottle
Replacing the Head Cleaning Set
Replacing the Chip Unit and Refilling Ink
Consumables and Replacement Parts
You can purchase genuine Epson ink, paper, and accessories from an Epson authorized reseller. To
find the nearest reseller, visit proimaging.epson.com (U.S.) or proimaging.epson.ca (Canada), select
your product series and product, and click the Where to Buy button. Or call 800-GO-EPSON (800-463-
7766) in the U.S. or 800-807-7766 in Canada.
Caution: Using ink from an non-genuine ink pack may result in a malfunction. Epson shall not be held
responsible for any damages or problems with the product that may occur when using non-genuine ink
packs.
Ink pack Part number
High-Density Black C13T46C820
Cyan C13T46C220
Magenta C13T46C320
Yellow C13T46C420
Fluorescent Yellow
(SureColor F9470H)
Fluorescent Pink
(SureColor F9470H)
C13T46C620
C13T46C520
18
Page 19
Replacement part Part number
Maintenance kit C13S210063
Waste ink bottle T724000
Media edge guide C932121
Head cleaning set C13S210051
Cleaning stick C13S090013
Cleaning wipes C13S090016
Option Part number
1-year extended Epson
Preferred Plus service plan
Parent topic: Introduction to Your Printer
Printer Usage Guidelines
Follow the guidelines in these sections as you use your printer, consumables, and print media.
Using Your Printer
Handling Ink Packs and Ink Tanks
Handling Media
Storing Your Printer
Parent topic: Introduction to Your Printer
Using Your Printer
Follow these guidelines as you use your printer:
• Operate the printer only within the specified operating temperature and humidity range for your
product and your media.
• Check to make sure you maintain the specified humidity range, especially in dry areas or air
conditioned environments.
• Keep the printer out of direct sunlight.
EPPF90SB1
• Do not install the printer next to heat sources or directly in the path of exhaust from a ventilator or air
conditioner. Failure to observe this precaution could result in the print head nozzles drying out and
clogging.
19
Page 20

• Make sure the product work space is kept free of dust or lint that could damage your product or clog
the print head nozzles.
• Use the product in a sufficiently ventilated area.
• When using a commercially available heater, operate it only within the specified temperature range to
maintain print quality and prevent clogging the print head nozzles.
• Perform maintenance operations according to usage frequency or at the recommended intervals.
Failure to perform regular maintenance could reduce print quality or damage the print head.
• Do not bend or pull on the waste ink tube. Otherwise ink may leak inside or outside the printer.
• Be sure that the waste ink bottle is installed whenever the printer is turned on.
• If an error occurs and the printer is turned off without first resolving the error, the print head may not be
in the home position, which may cause the print head to dry out. In this case, turn on the power and
wait until the carriage is in the home position.
• When the printer is on, do not disconnect the power cable or cut the power at the circuit breaker. The
print head may not be in the home position. In this case, turn on the power and wait a while until the
print head is in the home position.
• For consistent color, maintain a constant room temperature between 59 °F (15 °C) and 77 °F (25 °C).
Note: To keep the print head in the optimum operating condition, ink is used in maintenance operations
such as head cleaning in addition to printing.
Parent topic: Printer Usage Guidelines
Related references
Environmental Specifications
Handling Ink Packs and Ink Tanks
Follow these guidelines as you handle the ink packs and ink tanks:
• Do not remove the ink tanks. Ink tanks are calibrated at installation and removing them can decrease
their functionality.
• Do not place items on an ink tank or subject the ink tanks to strong impacts, or the tank may detach. If
an ink tank comes off, contact Epson support.
• Store ink packs at room temperature, out of direct sunlight.
• To ensure print quality, use all the ink in the ink pack before the date printed on the ink pack or within
25 days of refilling the ink tank, whichever is earlier.
20
Page 21

• Allow ink packs that have been stored at low temperatures for an extended period of time to return to
room temperature for four hours before use.
• Refill the ink tank as soon as possible after opening an ink pack.
• When refilling an ink tank, use all of the ink in the ink pack at once.
Parent topic: Printer Usage Guidelines
Related references
Ink Pack Specifications
Handling Media
Follow these guidelines as you handle or store media:
• Read and follow the guidelines provided with each type of media.
• Do not fold the media or otherwise damage its printable surface.
• Do not touch the printable surface. This prevents oil from your hands from causing print quality
problems.
• When handling media, hold it by both edges, preferably while wearing cotton gloves.
• Keep the media dry and avoid storage locations subject to direct sunlight, excessive heat, and high
humidity.
• Retain the media packaging materials so you can use it to store unused media.
• After printing, do not touch, rub, or scratch the printed surface to avoid removing the ink.
• Dry printed media completely before folding or stacking it, or the printed surface may be damaged.
• Keep printed media out of direct sunlight.
• Display and store printed media as instructed in the media documentation.
• When you are not printing on media, remove it from the printer and place it in its original packaging to
prevent deterioration.
Parent topic: Printer Usage Guidelines
Storing Your Printer
Follow these guidelines if you need to store your printer for a long period:
• If the printer is not used for an extended period of time with the power off, clean the print head nozzles.
Turn the printer on at least once every two weeks to automatically clean the print head and prevent the
nozzles from clogging. If you do not turn on the printer for a long time, the printer may malfunction.
21
Page 22

• If you will not use the printer for more than two weeks, maintenance must be performed by a service
engineer before and after this period. Contact Epson support.
• Even if the printer is not turned on, ink that has accumulated in the waste ink tube may leak out. Make
sure the waste ink bottle is installed even when the printer is not on.
• Remove any loaded media before storing the printer to prevent the pressure rollers from causing
creases in the media, which may cause jams or damage to the print head.
• Make sure that the print head is in the home position before storing the printer. If it is left away from the
home position for a long time, the print quality may decline.
• Close all the covers on the printer to prevent dust and debris from getting in. If the printer will be not be
used for an extended period of time, protect it with an anti-static cloth or other cover. The print head
nozzles can become clogged if fine dust gets on the print head, and you may not be able to print
properly.
• Store the printer on a level surface; do not store it on angle, on its end, or upside down.
Parent topic: Printer Usage Guidelines
Related references
Where to Get Help
Related tasks
Cleaning the Print Head
Cutting Media
22
Page 23

Media Handling
See these sections to load and handle media on your product.
Note: The SureColor F9470 is shown in most illustrations in this manual, but the instructions apply to
both models unless noted otherwise.
Media Handling Precautions
Loading Media
Viewing and Changing Media Settings
Saving Sets of Media Settings
Printable Area and Media Size Checking
Printing the Amount of Media Remaining
Aligning the Print Head
Media Feed Adjustment
Adjusting Heating and Drying During Printing
Cutting Media
Using the Auto Take-up Reel
Media Handling Precautions
Follow these guidelines as you load media in your product and remove printed media.
• Be careful when you touch the after heater and media edge guides; they may be hot and could burn
you.
• Take care not to trap your fingers when opening and closing the front cover.
• Do not rub your hands along the edges of the media; the sharp edges could cut you.
• Media is very heavy, so use at least two people to carry the rolls.
• Load media just before printing on it to avoid creases from the pressure rollers; creases may cause
jams or cause the media to rub against the print head.
23
Page 24

• Do not place unwrapped media directly on the floor or press it against your clothing to avoid damaging
the media surface.
• Place unused media in its original packaging for storage.
• Do not load media if the edges are uneven on the roll; this could cause feeding problems. Rewind the
media on the roll or use a different roll.
Parent topic: Media Handling
Loading Media
Before loading media in your printer, review and follow the media handling guidelines for the best results.
Caution: Wait until just before printing to load media. This avoids creases in the media that may be
caused by the pressure rollers. Creased, wavy, or curled media could cause it to jam inside the printer or
contact the print head.
1. Press the power button and wait until you see this message on the LCD screen: Load media.
24
Page 25
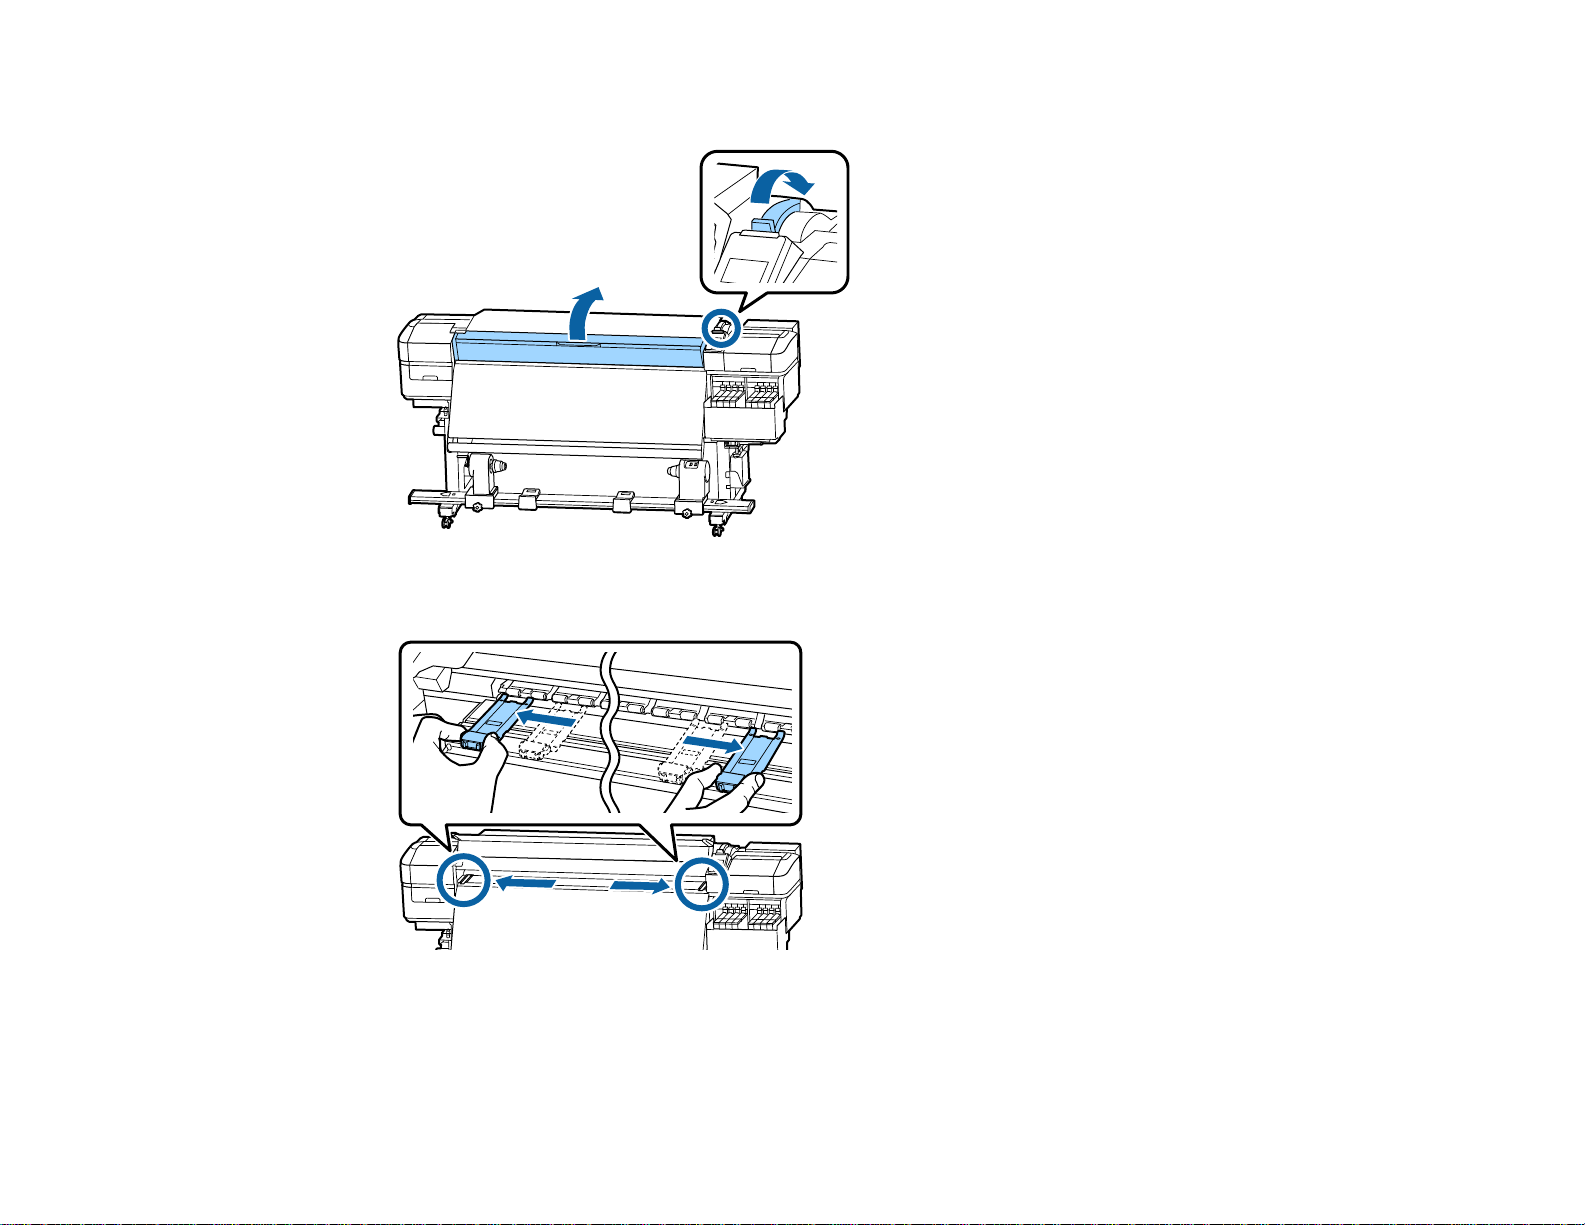
2. Open the front cover and raise the media loading lever.
3. Grasp the tabs on the media edge guides and slide them out of the way.
25
Page 26
4. On the back of the product, loosen the right roll core holder locking screw and slide the roll core
holder all the way out.
Note: If the right holder handle shaft is not visible, rotate the handle forward until it stops or the
media cannot load properly.
5. Move the left roll core holder to the correct position for the media roll size you are loading.
26
Page 27
6. Hold down the left roll core holder and tighten the locking screw so the roll core holder does not
move.
7. Place your media on the roll supports temporarily, making sure the printable side of the media on the
roll faces the correct direction.
27
Page 28
Printable side out
Printable side in
8. On the left side of the product, raise the lift lever to lift the media into position.
28
Page 29
9. Firmly insert the roll core onto the left roll core holder.
Note: If your roll is too small to lift into place with the lift lever, lift it onto the roll core holder by hand.
10. On the right side of the product, raise the lift lever to lift the media into position.
29
Page 30
11. Firmly push the right roll core holder into the roll core.
30
Page 31

12. Push the right roll core holder twice to securely insert it into the roll core.
Note: Make sure the roll core holder is fully inserted into the roll core or media may not feed
correctly, may slip during printing, or may cause banding in your printouts.
31
Page 32

13. Hold down the right roll core holder and tighten the locking screw so the roll core holder does not
move.
Note: Make sure the locking screw is fully secured or the roll core holder may move during printing,
causing banding in your printouts.
32
Page 33

14. Rotate the handle shown here until part A is hidden from view, then stop turning the handle.
Caution: Once part A is hidden, do not turn the handle further or you may damage the roll core
holder. If part A remains visible after turning the handle fully, rewind the handle, loosen the locking
screw, and reload the right side of the roll on the product.
15. Make sure that the left and right sides of the media roll are aligned and realign them, if necessary.
33
Page 34

16. Insert approximately 11.8 inches (30 cm) of media into the opening in the product, then lower the
media loading lever.
34
Page 35

17. Confirm that the left edge of the media lays over some portion of the black rectangle on the loading
guide label as shown.
Note: If the media does not lay over the rectangle on the label, reverse these steps to remove the
media and load it again. Do not reposition the roll core holders while your media is loaded.
35
Page 36

18. On the front of the product, grasp the media and raise the media loading lever.
19. Hold the center of the media with one hand and pull it straight forward and down until it is aligned
with the bottom edge of the label on the after heater.
Note: Do not pull media with both hands; the media may become skewed or move around.
36
Page 37

20. Lower the media loading lever to secure the media in place.
21. On the rear of the product, tap lightly on both ends of the media to check that the tension is even on
both sides. If necessary, raise the media loading lever and correct the media tension, then lower the
media loading lever.
37
Page 38

22. Grasp the tabs on the media edge guides on both sides and move them to the edges of the media.
Adjust the guides so the round holes are centered over the edges of the media as shown.
Caution: If your media is more than 0.02 inch (0.4 mm) thick, leave the media edge guides on the
sides of the product or they could damage the print head.
Note: Make sure to correctly position the media edge guides as shown here or your printouts may
contain banding, uneven tint, or stripes. Do not use the media edge guides if the sides of your
printouts are smudged or torn.
38
Page 39

23. Close the front cover.
24. Select your media settings on the control panel.
Parent topic: Media Handling
Related references
Media Handling Precautions
Related tasks
Viewing and Changing Media Settings
Viewing and Changing Media Settings
After you load media in your product, you can create settings for it. The media settings include the
options selected and stored for each media setting group or RIP setting you created.
1. Press the up or down arrow button to select a stored or empty media setting number for the loaded
media and press the OK button.
39
Page 40

2. Press the up or down arrow button to select the roll type you loaded and press the OK button.
If you turned on the Media Remaining setting, you see a prompt to enter the length of the currently
loaded media.
3. Press the up or down arrow button to select a roll length from 3 to 1968 feet (1 to 600 m) long and
press the OK button.
After a moment you see Ready on the LCD screen indicating that the printer is ready to print.
Parent topic: Media Handling
Related references
Media Setup Menu Settings
40
Page 41

Related tasks
Saving Sets of Media Settings
Saving Sets of Media Settings
You can store sets of media settings for each type of media you use. This lets you quickly select all the
necessary settings whenever you print on that media type.
Note: Make sure that you loaded the media type for which you are selecting settings.
1. Press the Menu button on the product control panel.
2. Press the OK button to select Media Setup.
3. Press the down arrow button to select Easy Media Setup and press the OK button.
4. Press the up or down arrow button to select a number for the set of media settings (from 1 to 30) and
press the OK button.
5. Press the up or down arrow button to display the characters you can use to name the media set.
When you see the desired character, press the right arrow button to select it and move to the next
character position. Repeat this step as necessary to complete the setting name. When you finish,
press the OK button.
Note: If you need to delete the previous character, press the left arrow button.
6. Press the up or down arrow button as necessary to select each available media setting and press
the OK button. If necessary, press the back button to return to the menu to select additional
settings.
Parent topic: Media Handling
Related tasks
Loading Media
41
Page 42

Printable Area and Media Size Checking
The left and right edges of media recognized by your product vary depending on the Media Size Check
setting.
• When the Media Size Check setting is turned on, your product automatically detects the left and right
edges of the media within 0.2 inches (5 mm), as long as the media edge guides are attached correctly.
1 0.2inches (5 mm)
• When the Media Size Check setting is turned off, your product uses the longest scale on the after
heater label shown as the standard position for the right edge of the media. The left edge of the media
is determined to be 64 inches (1626 mm) from the standard position for the right edge, no matter the
width of the loaded media. The printable area ranges for the media are described in the table here.
42
Page 43

Note: If you turn off the Media Size Check setting, printing may occur outside the edges of your
media, causing ink to stain the product. Make sure your print data width does not exceed the loaded
media width. When you load media to the left of the right side reference position, adjust the Print Start
Position setting on the product control panel to match the position where the media is loaded.
1 Bottom margin
You can configure this margin in the RIP software from 0.2 inch (5 mm) to 0.7 inch (17 mm); if
you set it below 0.2 inch (5 mm) or above 0.7 inch (17 mm), it is changed to 0.2 inch (5 mm) and
0.7 inch (17 mm) to maintain feeding accuracy.
2 Top margin1,
You can configure this margin in the RIP software from 0.2 inch (5 mm) and above; if you set it
below 0.2 inch (5 mm), it is changed to 0.2 inch (5 mm) to maintain feeding accuracy. The margin
differs based on how far you pulled the media during loading.
1
2
43
Page 44

3 Left margin3,
4
You select this margin as the Side Margin(Left) setting on the product control panel. The default
setting is 0.2 inch (5 mm), but you can select from 0.12 inch (3 mm) to 0.98 inch (25 mm).
4 Right margin3,
4
You select this margin as the total of the values for the Print Start Position (default setting is 0)
and Side Margin(Right) (default setting is 0.2 inch [5 mm]) settings on the product control panel.
You can select from 0.12 inch (3 mm) to 32.5 inches (825 mm).
5 Media width
11.8 to 64 inches (300 to 1626 mm); if Media Size Check is off, the product assumes this is
64 inches (1626 mm) regardless of the actual width
1
The configured margin and the actual print results may differ depending on the RIP software you use.
Contact the RIP manufacturer for more information.
2
When you set the Margin Between Pages setting to the No Margin option on the product control
panel, you can adjust the margin from –0.39 inch (–10 mm) to 0.39 inch (10 mm).
3
Depending on the RIP software, you may be able to use it to set these margins. Contact the RIP
manufacturer for more information.
4
When using the media edge guides, leave margins of at least 0.4 inch (10 mm) to avoid printing over
them. If the total of the print data width and left and right margins exceeds the printable area, a portion of
the print data will not print.
Parent topic: Media Handling
Related references
Printer Setup Menu Settings
Printing the Amount of Media Remaining
After you print, you can print the amount of media remaining on the leading edge of the remaining roll.
This lets you enter the number the next time you load the media for the most accurate accounting of the
media remaining on each roll.
Note: You must turn on the Media Remaining setting on the product control panel to calculate the
amount of media remaining.
1. Make sure your product is ready to print.
2. Press the media setup button.
44
Page 45

3. Press the down button to select Media Remaining and press the OK button.
4. Press the OK button to select Print Remaining Length.
5. Press the OK button to print the amount of media remaining.
Parent topic: Media Handling
Related references
Media Setup Menu Settings
Aligning the Print Head
If your printouts are grainy or blurry, you need to align the print head. The thickness of your print media
determines the alignment options you select. You can store separate alignment values for each type of
media you use for quick selection.
Before aligning the print head, make sure you have correctly loaded the media you plan to print on.
1. Press the Menu button.
2. Press the OK button to select Media Setup.
3. Press the down arrow button to select Customize Settings and press the OK button.
4. Press the up or down arrow button to select the number of the media settings you selected for the
currently loaded media. Then press the OK button.
5. Press the down arrow button to select Media Adjust and press the OK button.
6. Press the down arrow button to select Manual and press the OK button.
7. Press the down arrow button to select Head Alignment and press the OK button.
Your product prints an alignment test pattern and automatically feeds the media to viewing position.
Note: If you want to cut the media to better view the pattern, press the up arrow button to move the
media past the cutter groove. Be careful not to rewind curled media past the front cover.
45
Page 46

8. Examine the alignment test pattern to select the pattern number with the fewest gaps as shown.
9. Press the left or right arrow button to select the number of the best pattern and press the OK button.
Repeat this step for all the color patterns.
After you select the final color pattern number, the control panel returns to its ready status.
Parent topic: Media Handling
Related references
Media Setup Menu Settings
Media Feed Adjustment
If your printouts contain horizontal banding, uneven tint, or stripes, you need to adjust the feed of the
media. You do this by printing and examining a test pattern, and then selecting the feed adjustments you
need.
Adjust the feed using the same media type and print conditions you use for printing. For example, if you
are using the auto take-up reel, you should use it during feed adjustment. You may need to adjust the
feed again if you load media of a different width, change the feeding or take-up tension, or adjust the
suction.
Before adjusting the feed, make sure you have correctly loaded the media you plan to print on and
selected all the options you plan to use for printing.
46
Page 47

Note: You can also adjust the feed during printing without printing a test pattern.
Adjusting the Media Feed Automatically
Adjusting the Media Feed Manually
Adjusting the Media Feed During Printing
Parent topic: Media Handling
Adjusting the Media Feed Automatically
You can perform an automatic feed adjustment from the product control panel. Make sure the length of
the loaded media is at least 26 inches (670 mm).
1. Press the Menu button.
2. Press the OK button to select Media Setup.
3. Press the down arrow button to select Customize Settings and press the OK button.
4. Press the down arrow button to select Media Adjust and press the OK button.
5. Press the OK button to select Auto Feed Adjustment.
An adjustment pattern is printed and the product performs automatic adjustments. View the results
and determine if a manual adjustment is necessary.
6. When automatic adjustments are complete, a head alignment pattern is printed.
47
Page 48

7. Examine the alignment pattern to select the pattern number with the fewest gaps as shown.
8. Press the left or right arrow button to select the number of the best pattern and press the OK button.
Repeat this step for all the color patterns.
After you select the final color pattern number, the control panel returns to its ready status.
Parent topic: Media Feed Adjustment
Related references
Media Setup Menu Settings
Related tasks
Adjusting the Media Feed Manually
Adjusting the Media Feed Manually
You can perform a manual feed adjustment from the product control panel if you can still see banding
after performing an automatic feed adjustment.
1. Press the Menu button.
2. Press the OK button to select Media Setup.
3. Press the down arrow button to select Customize Settings and press the OK button.
48
Page 49

4. Press the down arrow button to select Media Adjust and press the OK button.
5. Press the down arrow button to select Manual and press the OK button.
6. Press the OK button to select Feed Adjustment.
7. Press the up or down arrow button to select an adjustment pattern and press the OK button.
• 500mm Pattern: We recommend starting with this pattern. Make sure the length of the loaded
media is at least 38 inches (970 mm).
• 250mm Pattern: Make sure the length of the loaded media is at least 28 inches (720 mm).
• 100mm Pattern: Make sure the length of the loaded media is at least 22 inches (570 mm).
• Standard: Make sure the length of the loaded media is at least 13 inches (330 mm).
Your product prints an adjustment pattern and automatically feeds the media to viewing position.
8. Do the following to adjust the media feed:
• If you selected 500mm Pattern (recommended), 250mm Pattern, or 100mm Pattern, measure
the distance between the + symbols in each test pattern as shown.
On the product control panel, enter the value for the distance between the + symbols and press
the OK button.
49
Page 50

• If you selected Standard, your product prints two groups of adjustment patterns (A and B).
On the product control panel, enter the values with the least amount of overlapping or gaps for
each group and press the OK button.
Parent topic: Media Feed Adjustment
Related references
Media Setup Menu Settings
Adjusting the Media Feed During Printing
You can adjust the feed and correct banding during printing without printing a test pattern.
1. During printing, press the media setup button.
The product control panel displays an adjustment value.
2. Press the up or down arrow button to adjust the feed depending on these banding results in your
printout:
• If black bands or dark stripes appear, press the up arrow button to increase the feed amount.
• If white bands or pale stripes appear, press the down arrow button to decrease the feed amount.
3. Check the results in your printout and do one of the following:
• If further adjustment is necessary, repeat the last step.
• If the print quality is good, press the OK button.
Parent topic: Media Feed Adjustment
Adjusting Heating and Drying During Printing
Follow the steps here to adjust the heating and drying settings during printing.
50
Page 51

Note: If the room temperature is too low and you send a print job with high ink density or a small number
of print passes, the print job may pause while the after heater warms up.
1. During printing, press the heat/dry menu button.
2. Press the OK button to select Heater Temperature.
3. Press the up or down arrow button to change the after heater temperature.
4. Press the OK button.
5. Press the back button until Ready appears on the LCD screen.
Parent topic: Media Handling
Related references
Media Setup Menu Settings
Cutting Media
When you finish printing, use a commercially available cutter to cut the media.
Warning: Be careful not to cut yourself when using cutters or other sharp blades. Also be careful
touching areas near the after heater since the after heater may be hot and you could be burned.
1. Press media setup button.
2. Press the OK button to select Feed to Cut Position.
51
Page 52

3. Make sure the trailing edge of the printout has fed beyond the cutter groove on the product, then
open the front cover.
Note: If you printed the amount of media remaining onto your media, press the up arrow button to
rewind the media as necessary to keep this information with the unprinted roll.
4. If you are using the auto take-up reel, move the Auto switch to the off position. Use the Manual
switch to take up the cut media, depending on the printable side of the media:
• Move the switch to the position for printable-side-out media.
52
Page 53

• Move the switch to the positionforprintable-side-inmedia.
53
Page 54

5. Use your cutting tool to cut the media along the cutter groove.
Parent topic: Media Handling
Using the Auto Take-up Reel
See these sections to use the auto take-up reel with your product.
About the Auto Take-up Reel
Attaching the Take-up Roll Core to the Auto Take-up Reel
Take Up with the Printable Side In
Take Up with the Printable Side Out
Removing Media from the Auto Take-up Reel
Parent topic: Media Handling
54
Page 55

About the Auto Take-up Reel
The auto take-up reel automatically rolls up printed media as you print.
You can use the auto take-up reel for media with the printable side in (on the left) or printable side out
(on the right).
It is best to do the following when using the auto take-up reel:
• Use media that is 36 inches (91.44 cm) or wider.
• Load media with the printable side in.
• Use a take-up roll core that is the same width as your media so the core does not bend or take up
media incorrectly.
Parent topic: Using the Auto Take-up Reel
Attaching the Take-up Roll Core to the Auto Take-up Reel
Be sure to attach a take-up roll core that is the same width as your media.
55
Page 56

1. Press and hold the down arrow button until the edge of the loaded media reaches the roll core
holder.
Note: Always use the down arrow button to feed loaded media or the media may twist during takeup.
56
Page 57

2. Loosen the roll core holder locking screws and adjust the roll core holders so they are wider than
your media. Then center the roll supports between the roll core holders.
Note: If the left roll core holder handle shaft is not visible, rotate the handle as shown here until it
stops or the roll core cannot take up media properly.
57
Page 58

3. Align the right roll core holder with the right edge of the media.
58
Page 59

4. Hold down the right roll core holder and tighten the locking screw so the roll core holder does not
move.
5. Insert the roll core onto the right roll core holder.
59
Page 60

6. Insert the left side of the roll core onto the left roll core holder.
7. Push the left roll core holder twice to securely insert it into the roll core.
8. Confirm that the roll core and the edges of the media are aligned. If they are misaligned, loosen the
right roll core holder locking screw and repeat these steps to attach the roll core again.
60
Page 61

9. Hold down the left roll core holder and tighten the locking screw so the roll core holder does not
move.
61
Page 62

10. Rotate the handle shown here until part A is hidden from view, then stop turning the handle.
Caution: Once part A is hidden, do not turn the handle further or you may damage the roll core
holder. If part A remains visible after turning the handle fully, rewind the handle, loosen the locking
screw, and reload the roll core on the auto take-up reel.
62
Page 63

11. Cut off about 9.8 inches (25 cm) from the corners of the end of the media on each side as shown to
prevent folding or catching before take up.
Parent topic: Using the Auto Take-up Reel
Take Up with the Printable Side In
After attaching the roll core on the auto take-up reel, follow these steps to take up media with the
printable side in.
63
Page 64

1. Guide your loaded media over the media guide bar and behind the roll core, then attach the media to
the roll core with tape as shown here.
Note: Make sure the media lays flat across the roll core without any gaps. If necessary, add more
tape or reattach the tape so the media is taken up correctly.
64
Page 65

2. Press and hold the down arrow button on the control panel to feed enough media for it to wrap once
around the roll core.
65
Page 66

3. Confirm that the Auto switch on the auto take-up reel is set to the off position, then push and hold
the Manual switch up to the positionto wind the media around the roll core.
66
Page 67

4. Move the Auto switch up to the position.
5. Make sure the media is taut and loads evenly on both sides.
Note: If the media is looser on one side than the other, the media cannot be taken up correctly.
Repeat these steps to reload the media on the auto take-up reel.
67
Page 68

6. Confirm that the tension is even by lightly tapping the media on both sides as shown here.
68
Page 69

7. Press and hold the down arrow button on the control panel until the edges of the media are taken up
and the media wraps once or twice around the roll core.
Parent topic: Using the Auto Take-up Reel
Take Up with the Printable Side Out
After attaching the roll core on the auto take-up reel, follow these steps to take up media with the
printable side out.
69
Page 70

1. Guide your loaded media over the media guide bar and the roll core, then attach the media to the roll
core with tape as shown here.
Note: Make sure the media lays flat across the roll core without any gaps. If necessary, add more
tape or reattach the tape so the media is taken up correctly.
70
Page 71

2. Press and hold the down arrow button on the control panel to feed enough media for it to wrap once
around the roll core.
71
Page 72

3. Confirm that the Auto switch is set to the off position, then push and hold the Manual switch down
to the position to wind the media around the roll core.
72
Page 73

4. Move the Auto switch down to the position.
5. Make sure the media is taut and loads evenly on both sides.
Note: If the media is looser on one side than the other, the media cannot be taken up correctly.
Repeat these steps to reload the media on the auto take-up reel.
73
Page 74

6. Confirm that the tension is even by lightly tapping the media on both sides as shown here.
74
Page 75

7. Press and hold the down arrow button on the control panel until the edges of the media are taken up
and the media wraps once or twice around the roll core.
Parent topic: Using the Auto Take-up Reel
Removing Media from the Auto Take-up Reel
After printing on media loaded on auto take-up reel, follow these steps to remove it.
Note: Make sure the media is cut before removing it from the auto take-up reel.
75
Page 76

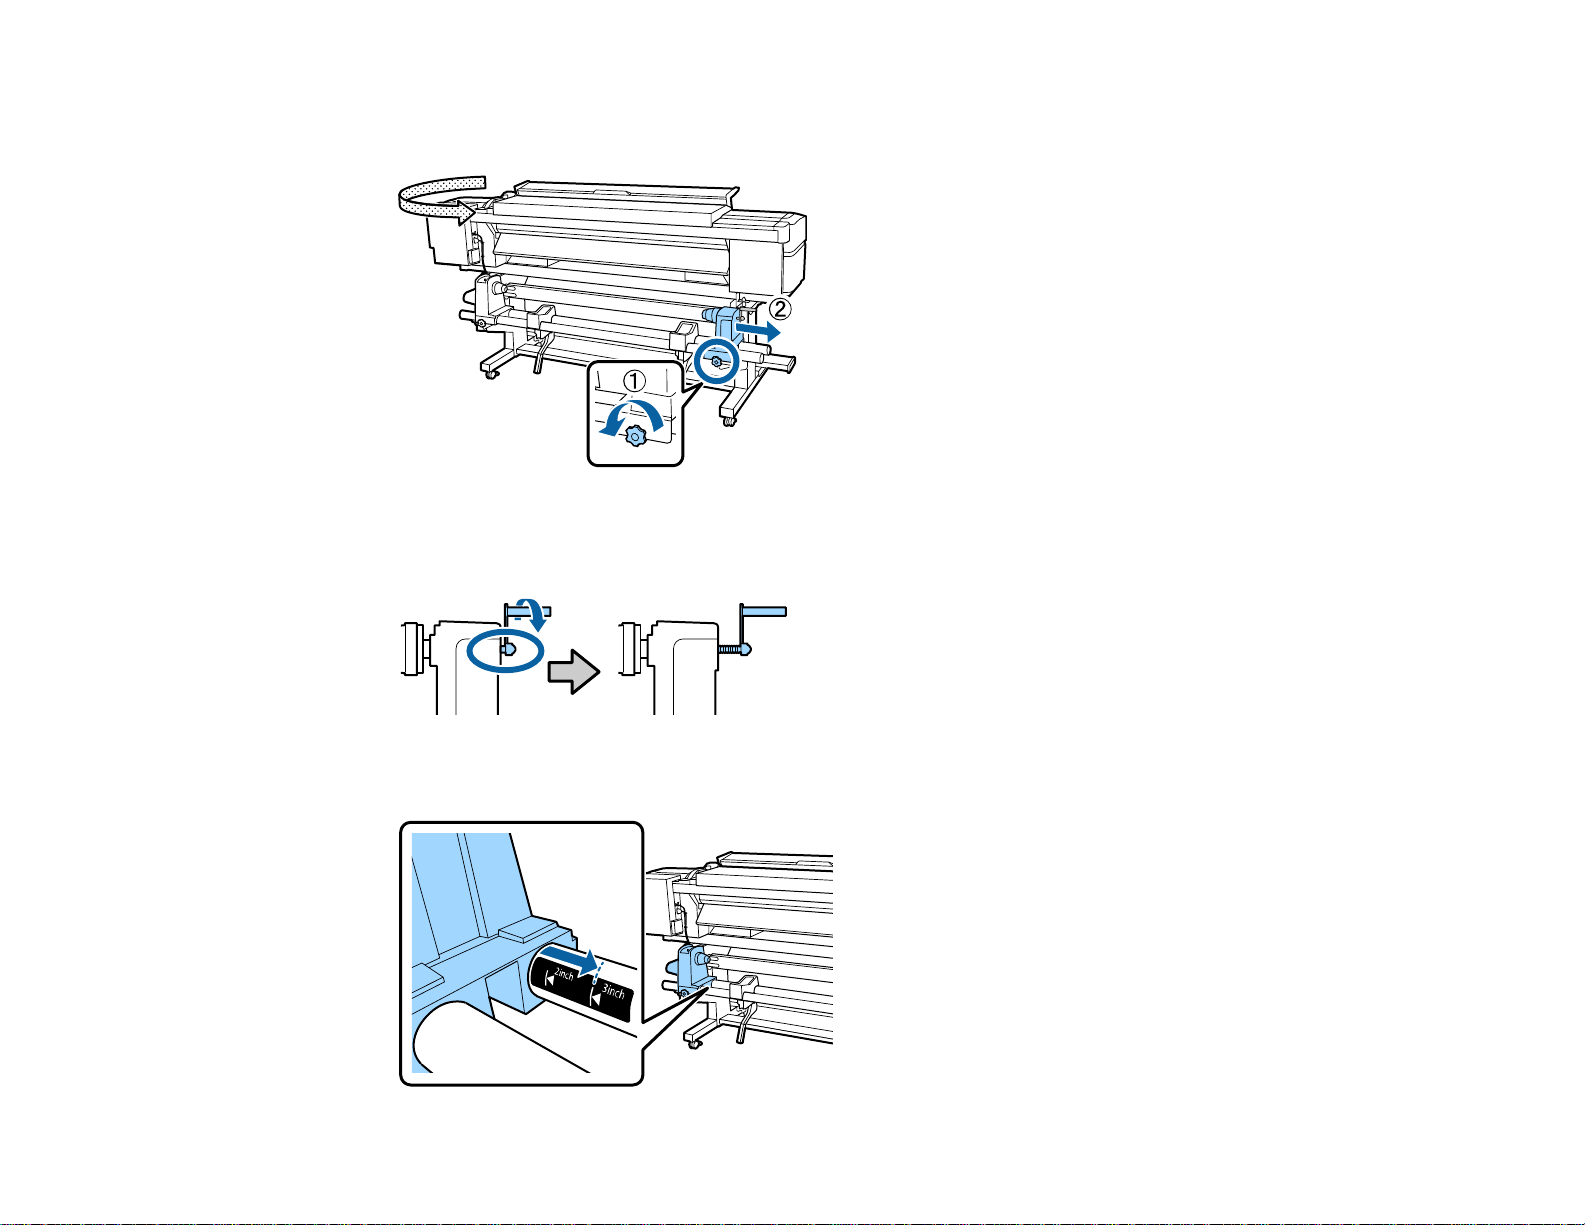
1. Rotate the handle of the left roll core holder.
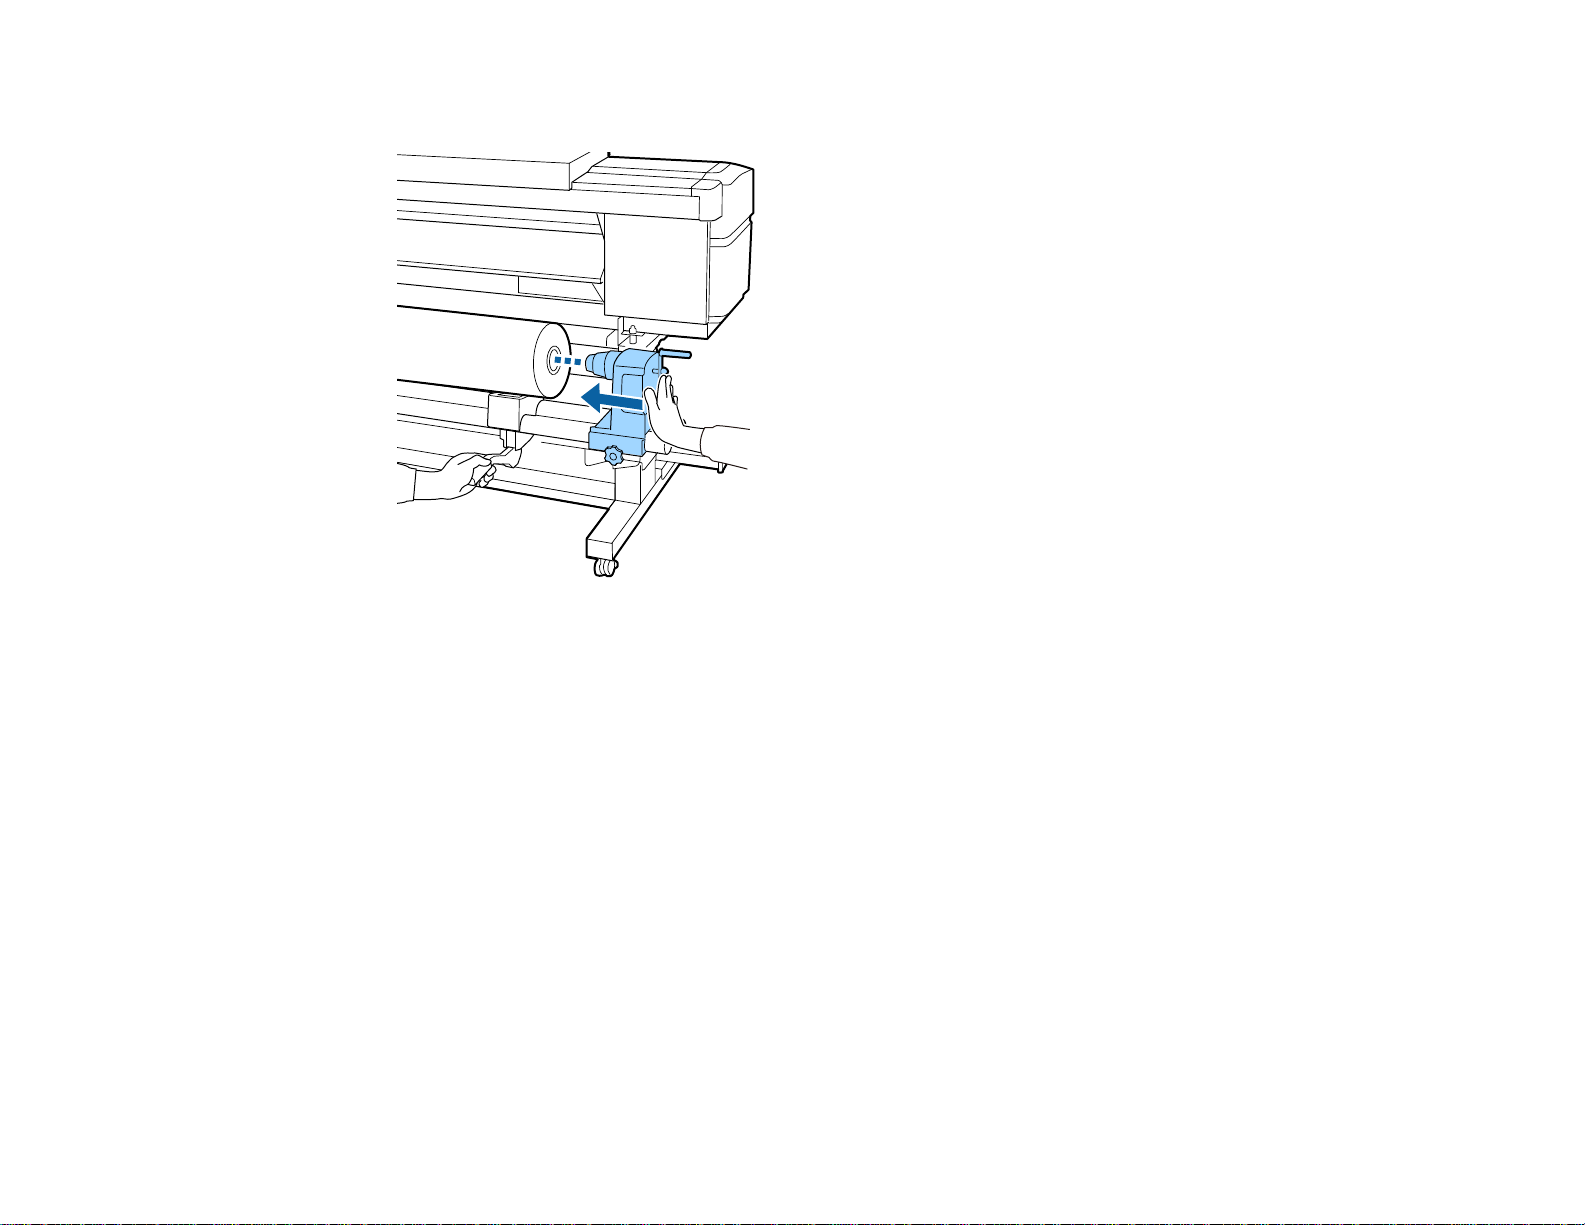
2. While supporting the left side of the media roll, loosen the left roll core holder locking screw and
remove the roll core holder from the roll.
76
Page 77

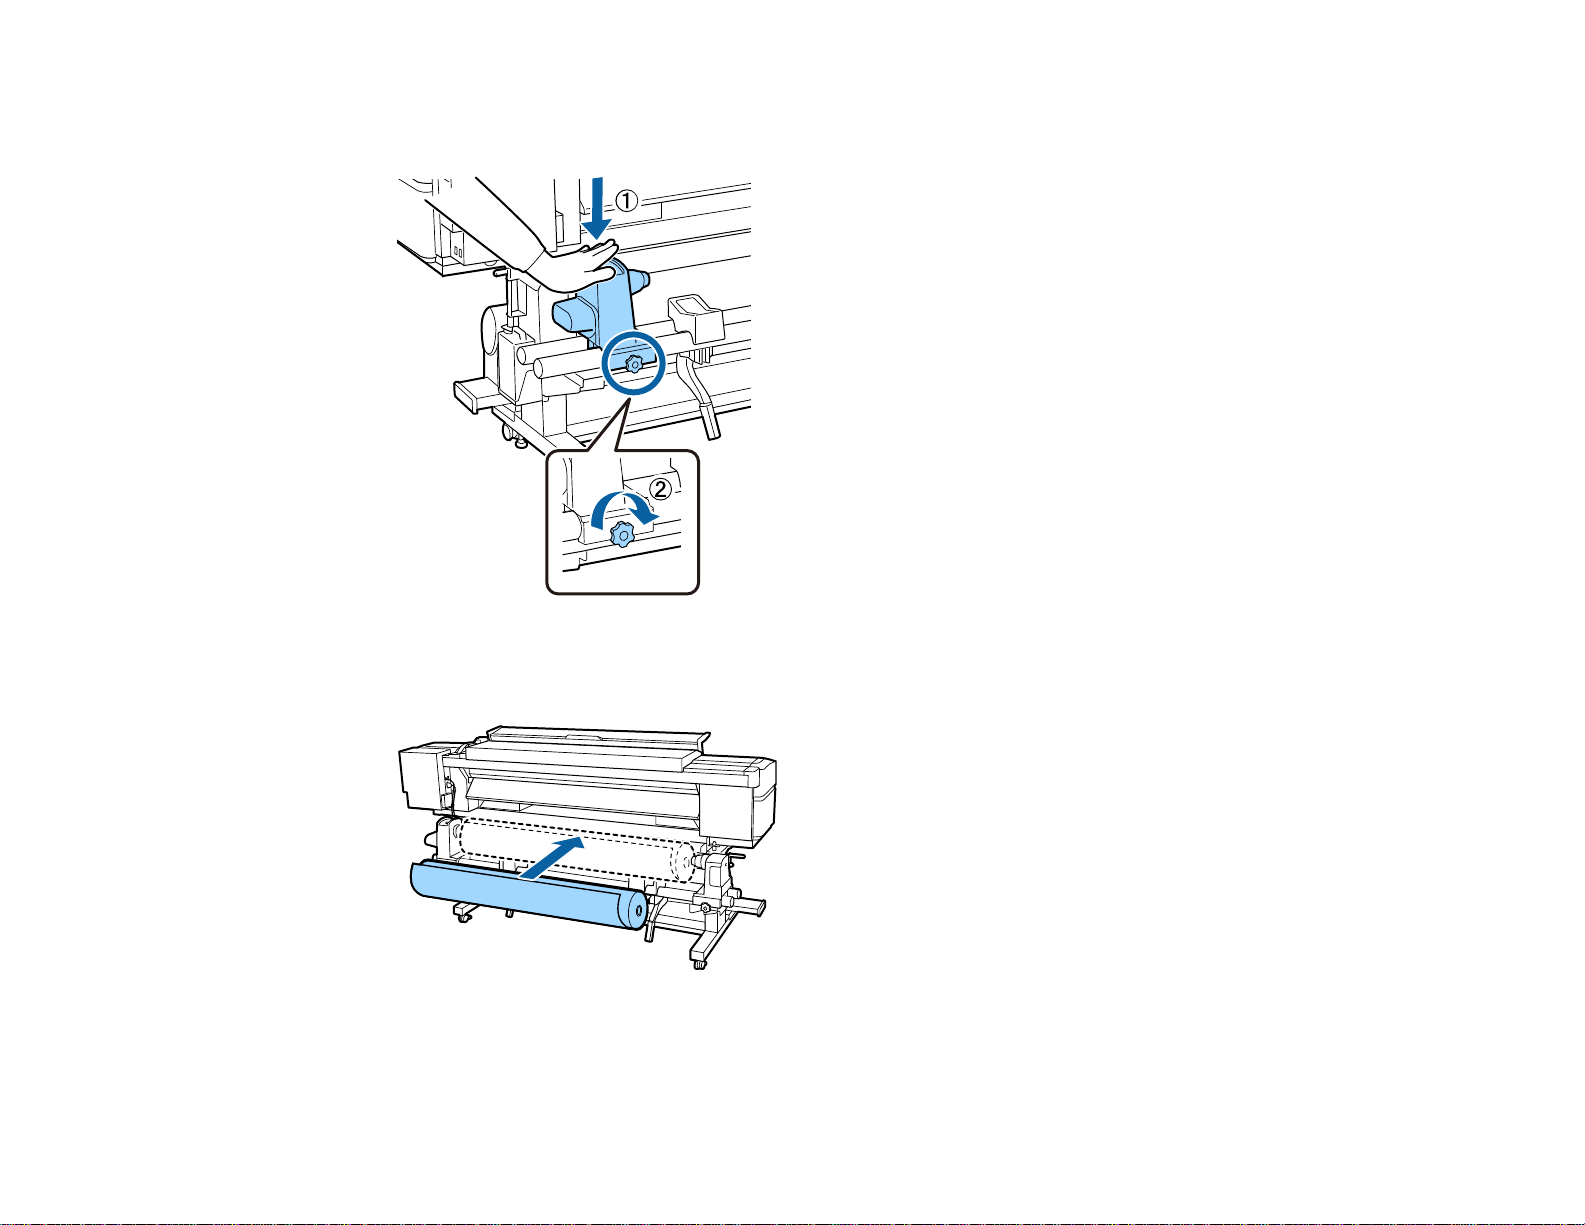
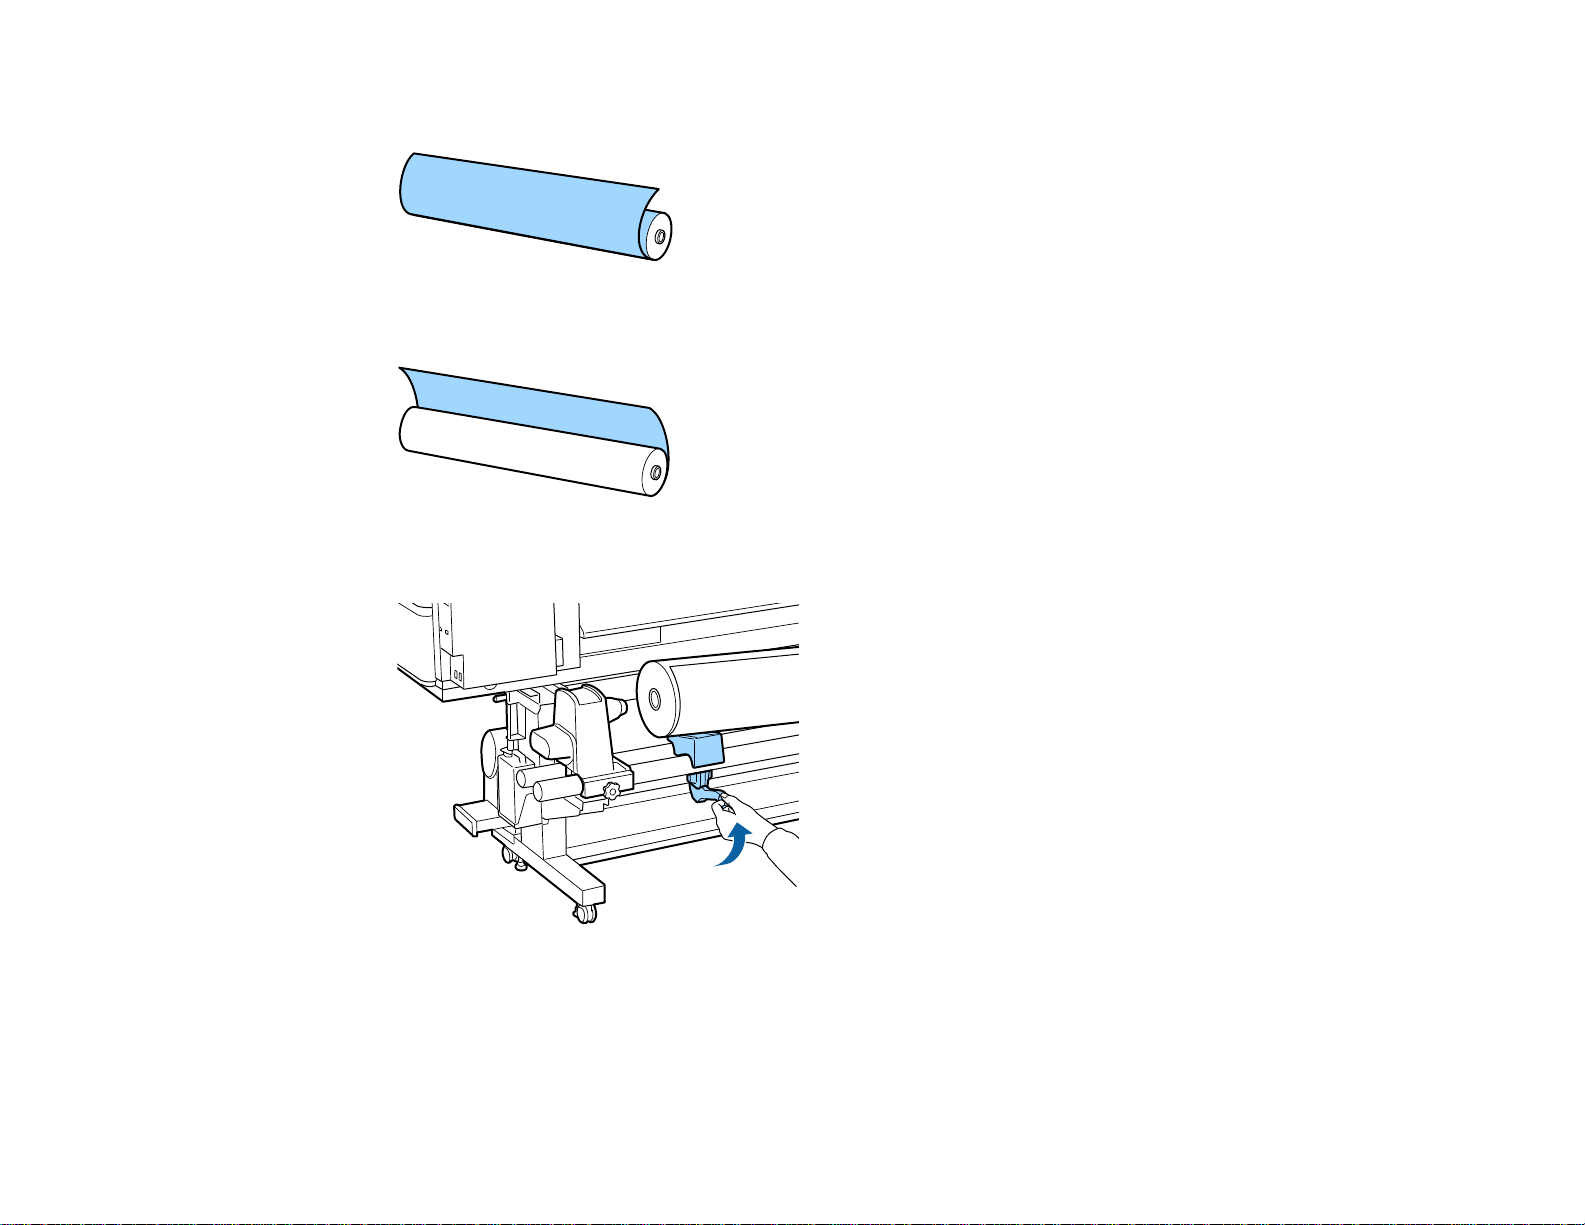
3. Lower the left side of the media roll onto the roll support.
4. While supporting the right side of the media roll, loosen the right roll core holder locking screw and
remove the roll core holder from the roll.
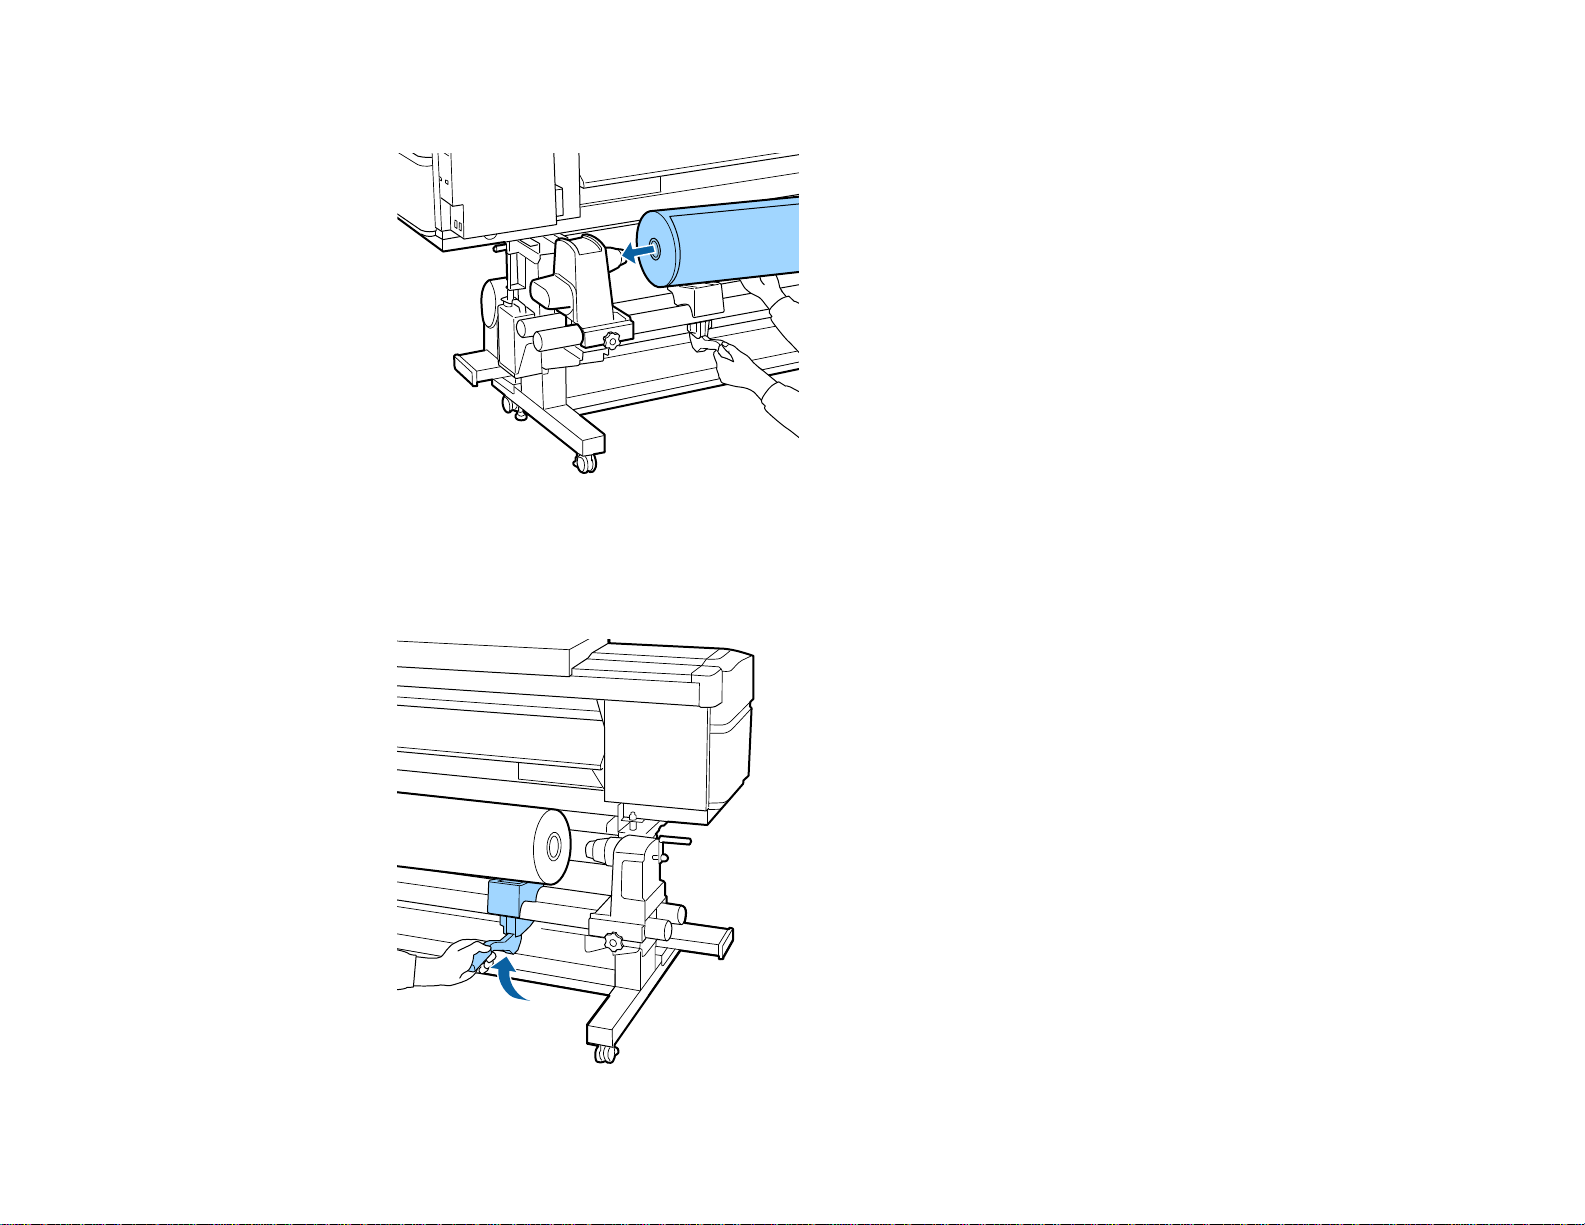
5. Lower the right side of the media roll onto the roll support.
77
Page 78

Parent topic: Using the Auto Take-up Reel
Related tasks
Cutting Media
78
Page 79

Using the Control Panel Menus
Follow the instructions in these sections to access the printer menu system and select settings.
Accessing the Printer's Menus
Media Setup Menu Settings
Printer Setup Menu Settings
Maintenance Menu Settings
Printer Status Menu Settings
Other Settings Menu Settings
Accessing the Printer's Menus
You can use the printer menus to adjust the settings that control how your product works.
1. Press the Menu button on the control panel.
You see the menus on the LCD screen.
2. Press the up or down arrow button to scroll through the menus.
Note: Press the back button to go back.
3. To change settings in the highlighted menu, press the OK button.
4. Press the up or down arrow button to move through the settings. Press the right or left arrow button
to position the cursor when entering data on the screen.
5. To select a setting, press the OK button.
6. When you finish changing settings on a menu, press the pause/cancel button to return to the
main screen.
Parent topic: Using the Control Panel Menus
Media Setup Menu Settings
Settings on the Media Setup menu let you customize various adjustments for up to 30 different media
types.
Caution: Follow the instructions in the topic links below the table to use these menu settings correctly.
79
Page 80

Setting Options Description
Feed to Cut Position — Sendstheendoftheprinttothecutting
groove.
Easy Media Setup 1 to 30 Store new media settings.
Screen Display Media Remaining Displays the length of the remaining roll
media in increments of 3.9 inches (0.1
m).
Print Length Displays the length per printed job in
increments of 39.4 inches (1 m).
Media Remaining Print Remaining Length Prints the amount of media remaining
on the current roll.
Length Enter the total roll length, from 3 to
1969 ft (1.0 to 600.0 m).
Remaining Alert Enter the length at which the printer will
alert you to the amount of media
remaining, from 3 to 50 ft (1 to 15 m).
Reset Print Length Manual Reset Resets the print length value to 0 when
you press the OK button.
Auto Reset Select Per Job to reset the print length
value to 0 for every new job.
If you select Off, you must manually
reset the value.
Customize Settings Current Settings Selects the current media setting to
customize (see the next table).
1 to 30 Selects a stored media setting to
customize (see the next table).
Select Media 1 to 30 Selects a stored media setting to use
for printing.
Customize Settings options
80
Page 81

Setting Options Description
Setting Name — Enter a name up to 22 characters long
for the group of media settings.
Media Type Thinnest Select for media 16 lb (60 g/m2) or less.
Thin Select for media 17 to 22 lb (61 to 80
g/m2).
Thick Select for media 23 to 32 lb (81 to 120
g/m2).
Thickest Select for media 33 lb (121 g/m2) or
more.
Adhesive Select when using any weight of
adhesive media.
Media Adjust Auto Feed Adjustment Select Print to perform an automatic
feed adjustment.
Manual Select Feed Adjustment and select a
pattern type (Standard, 100mm
Pattern, 250mm Pattern, or 500mm
Pattern).
Select Head Alignment to adjust only
the head alignment.
Advanced Settings — See the next table.
Restore Settings — Select Yes to return all settings for the
selected media to their default values.
Advanced Settings options
81
Page 82

Setting Options Description
Platen Gap 1.6 Select if print quality is unsatisfactory.
2.0 Select for most media; default setting.
2.5 Select only if printouts are scratched or
smudged. Choosing a larger gap than
necessary can cause ink stains inside
the product, reduce print quality, or
shorten product life.
Heating & Drying Heater Temperature Set from 86 to 131 °F (30 to 55 °C);
defaults to 122 °F (50 °C).
Drying Time Per Pass Set from 0 to 10 seconds. You can
maintain a constant drying time by
basing it on the media width.
Blank Area Feed Speeds up feeding of blank areas.
Select Quick, Standard, Slow, or
Slowest.
After Heater Feed Select an option to feed the end of the
printout to the after heater after printing
(if the media will be cut before the next
job starts).
Select Short, No Rewind or Long, No
Rewind to start the next print job
immediately after cutting the media.
82
Select Short, Rewind or Long, Rewind
to automatically rewind the media before
printing the next job. This setting is
suitable for continuous printing.
If you cut the media manually without
rewinding it, the next print job will not be
performed correctly.
Note: The Short option feeds the media
to the top third of the heater. The Long
option feeds the media to 2 inches (50
mm) below the bottom of the heater.
Page 83

Setting Options Description
Feeding Tension Lv1 to Lv8 Increase the value if creases appear in
media during printing.
Take-up Tension Auto Select for most media.
Manual Select a value from Lv1 to Lv9.
Decrease the value if creases appear in
media during printing or ink adheres to
the back of the take-up roll. Increase the
value if thick media cannot be wound
correctly.
Media Suction Lv0 to Lv10 Select a value to increase the gap
between the print head and thin or
flexible media. If print quality is reduced
or media does not feed correctly, you
may need to lower the value.
Head Movement Data Width Select to move the print heads within the
range of the print data's width.
Printer Full Width Select to move the print heads within the
range of the printer's maximum media
width.
Media Width Select to move the print heads within the
range of the width of the loaded media.
Multi-Strike Printing Off Disable the feature.
2 to 8 Select the number of times each line is
printed.
Feed Speed Limiter On Select if thin media wrinkles or tears
easily (print speed decreases).
Off Select for normal printing.
83
Page 84

Setting Options Description
Pressure Roller Load Low Select if there is wrinkling around the
pressure rollers or stains on the roller to
reduce pressure on the rollers.
Medium Selectfornormalprinting.
High Select if using media with a slippery
coating to increase pressure on the
rollers.
Remove Skew On Select to perform skew correction for
loaded media.
Off Select if media shows traces from the
rollers.
Periodic CL Cycle Auto Selecttolettheproductdeterminewhen
to perform a head cleaning based on the
selected media setting.
Manual Select to set the interval for head
cleaning. You can choose from Printing
Time or Media Usage.
Prevent Sticking On Selectonlyifthemediastickstothe
platen when the printer is turned on or
when printing starts.
Off Select for normal printing.
Reduce Print Streak Off Select for most print jobs.
Light If streaks appear in a printout, select
Medium
one of the options to make streaks less
evident.
Heavy
Parent topic: Using the Control Panel Menus
Related tasks
Cutting Media
Loading Media
Saving Sets of Media Settings
Adjusting the Media Feed Automatically
84
Page 85

Adjusting the Media Feed Manually
Adjusting Heating and Drying During Printing
Aligning the Print Head
Printer Setup Menu Settings
The Printer Setup menu lets you control margin settings, automatic cleaning cycles, and other aspects of
your product's operation.
Caution: Follow the instructions in the topic links below the table to use these menu settings correctly.
Setting Options Description
Margin Setting Side Margin(Right) Sets the width of the right or left margin
Side Margin(Left)
from 0.12 to 1.00 inch (3 to 25 mm).
Print Start Position 0.00 to 32.00 inches (0 to
800 mm)
Margin Between Pages Normal
No Margin
Skip Wrinkled Media On
Off
Sets an additional margin on the right
side of the media.
Sets a margin between pages.
Select On to avoid printing on wrinkled
media if it was left on the after heater.
85
Page 86

Setting Options Description
Media Check Media Size Check Automatically detects the edges of the
media. Select On unless the printer
displays Media Size Error when media
is loaded correctly. If you select Off,
the printer may print beyond the edges
of the media.
Changes to the settings are applied
after the media is reloaded.
Media End Check Automatically detects the end of the
media. Select On unless the printer
displays Media Out when media is
loaded correctly.
Media Skew Check Stops printing and displays an error
when skewed media is detected.
Select On to avoid jams caused by
skewed media.
Media End Option Continue
Stop Printing
Btw Pages Nozzle Check Off
Print Pattern (1 to 10
pages)
Lamp Setting Auto
Manual
Head Mode 2 Head Mode
Head1
Head2
86
Selects whether to continue an
unfinished print job after a media roll is
replaced.
Selects how often to print an automatic
nozzle check pattern between printed
pages.
Selects if the light inside the front cover
turns on automatically. If you select
Manual, press the internallight
button on the control panel to turn the
light on or off.
Select 2 Head Mode in most situations.
If there is a clogged nozzle in a single
print head that cannot be cleared after
several head cleanings, you can
continue printing by selecting one of
the unclogged heads.
Page 87

Setting Options Description
Sleep Mode 15 to 240 minutes Setsthenumberofminutesofinactivity
before the product enters sleep mode.
Press any button on the control panel
to resume operation.
Charge Setting Extend Charge Timing
Forced Charge
Cleaning During Standby When to Clean
Cleaning Level
Head Maint. Interval 20 to 400 m Sets when to perform head
Restore Settings Yes
No
Parent topic: Using the Control Panel Menus
Related references
Printable Area and Media Size Checking
Related tasks
Cleaning the Print Head
Checking for Clogged Print Head Nozzles
Adjusts the chip unit if there is a
discrepancy between the estimated ink
level indicator on the LCD screen and
the actual amount of remaining ink.
Sets the time (1 to 240 hours) to
perform head cleaning and the strength
level of cleaning when the product has
not been in use.
maintenance after the selected length
of media has been printed.
Returns all items in the Printer Setup
menu to their default settings.
Maintenance Menu Settings
The Maintenance menu lets you run nozzle checks, cleaning cycles, and other maintenance operations.
You can access the menu directly by pressing the maintenance button.
Caution: Follow the instructions in the topic links below the table to use these menu settings correctly.
87
Page 88

Setting Options Description
Nozzle Check Print At Right
Print At Center
Prints a nozzle check pattern in the
specified location on the media.
Print At Left
Cleaning Cleaning (Light)
Cleaning (Heavy)
Preventive Cleaning
Lets you clean all or selected nozzles,
based on the nozzle check pattern.
Select the light cleaning level first. If
nozzles are still clogged, select the
heavy cleaning level.
If you anticipate automatic or periodic
head cleaning will occur during a print
job, select Preventive Cleaning to
avoid the cleaning and continue the
print job.
Head Maintenance Auto Head Maintenance Select Execute if nozzles are still
clogged after head cleaning.
Regular Cleaning Select Move Head to position the print
heads for cleaning.
Replace Ink Bottle — Viewinstructionsonhowtoreplacethe
waste ink bottle on the LCD screen.
Head Cleaning Set — View information about the head
cleaning set on the LCD screen.
Other Maintenance Grease Carriage Rod SelectYesif a message to apply
carriage rod grease appears on the
LCD screen.
Parent topic: Using the Control Panel Menus
Related tasks
Checking for Clogged Print Head Nozzles
Cleaning the Print Head
Replacing the Waste Ink Bottle
Replacing the Head Cleaning Set
Applying Carriage Rod Grease
88
Page 89

Printer Status Menu Settings
The Printer Status menu displays the printer's firmware version and number of carriage passes.
Setting Description
Firmware Version Displays the printer's firmware version.
Carriage passes Displays the number of carriage passes.
Parent topic: Using the Control Panel Menus
Other Settings Menu Settings
The Other Settings menu includes network settings and other preferences you can customize.
Setting Options Description
Network Setup IPAddress Setting Determines whether IP addresses are
obtained automatically through DHCP
or manually. Select Panel to enter an
IP address, subnet mask, and default
gateway address.
Print Status Sheet Printsthe current network status and
settings.
Restore Settings Select Yes to restore all the Network
Setup settings to their defaults.
Preferences Date And Time Sets the printer's built-in clock. The
time and date are used in logs and
status sheets.
Language Selects the language used on the
control panel display.
Units Selects length or temperature units
displayed on the LCD screen or printed
test patterns.
Alert Sound Setting On
Off
89
Enables the alert sound when an error
occurs.
Page 90

Setting Options Description
Print Completion Sound On
Off
Alert Lamp Setting On
Off
Reset All Settings Yes
No
Parent topic: Using the Control Panel Menus
Enables the alert sound when a print
job is complete.
Enables the alert light when an error
occurs.
Resets all settings (except in the
Preferences menu) to their defaults.
90
Page 91

Maintenance
See the instructions in these sections to maintain your printer for optimum results.
Note: The SureColor F9470 is shown in most illustrations in this manual, but the instructions apply to
both models unless noted otherwise.
When to Maintain Your Product
Preparing for Maintenance
Stirring High Density Black Ink and Fluorescent Ink
Replacing the Ink and Chip Unit
Print Head Maintenance
Cleaning Around the Print Heads
Cleaning the Anti-drying Caps
Cleaning the Platen and Media Edge Guides
Cleaning the Heat Shield
Replacing the Waste Ink Bottle
Replacing the Head Cleaning Set
Replacing the Media Edge Guides
Applying Carriage Rod Grease
When to Maintain Your Product
See the guidelines here to determine when you perform maintenance operations on your product or
replace or refill consumables. If you need to perform an operation, use the links at the end of this topic.
Caution: To prevent sedimentation and incorrect colors in your printouts, stir the High Density Black ink
and fluorescent inks (if applicable) in the ink tank once a week.
Note: You can set up certain maintenance operations to run automatically using settings on your product
control panel.
Symptom Maintenance or consumable operation
A low ink warning appears on the LCD screen. Check if you need to replace an ink and chip unit
for the indicated color.
91
Page 92

Symptom Maintenance or consumable operation
A prepare and replacement message appears on
Replace the waste ink bottle.
the LCD screen.
A message on the LCD screen tells you to apply
Apply carriage rod grease to the carriage rods.
carriage rod grease.
You want to check the print quality for clogged
Run a nozzle check to print a check pattern.
nozzles.
A nozzle check pattern indicates clogged nozzles. Clean the print head.
Print quality has declined.
Printed media is faint, or contains horizontal
stripes or uneven colors.
Even after cleaning the print head several times,
print quality has declined.
Printed media is smudged.
Ink, paper particles, or lint from the media
accumulate on the platen or media edge guides.
Perform the following as necessary:
• Clean around the print heads.
• Clean the anti-drying caps.
Clean the platen and media edge guides as
necessary.
Ink adheres to the heat shield. Clean the heat shield.
The media edge guides are deformed or damaged. Replacethe media edge guides.
A message on the LCD screen tells you the head
Replace the head cleaning set.
cleaning set is nearing the end of its life.
Note: You may need to perform regular cleaning more frequently (such as once a week) depending on
the environment and media being used.
Parent topic: Maintenance
Related tasks
Replacing the Chip Unit and Refilling Ink
Replacing the Waste Ink Bottle
Applying Carriage Rod Grease
Checking for Clogged Print Head Nozzles
Cleaning the Print Head
Cleaning Around the Print Heads
92
Page 93

Cleaning the Anti-drying Caps
Cleaning the Platen and Media Edge Guides
Cleaning the Heat Shield
Replacing the Media Edge Guides
Replacing the Head Cleaning Set
Preparing for Maintenance
Before you perform any maintenance procedures, see these sections to prepare for maintenance.
Maintenance Supplies
Maintenance Precautions
Using Ink Cleaner
Moving the Print Head for Maintenance
Parent topic: Maintenance
Maintenance Supplies
Before performing any maintenance tasks or replacing ink, make sure you have the maintenance
supplies listed here.
Protective eyewear
Obtain commercially available eyewear to protect your eyes from ink and ink cleaner.
Mask
Obtain a commercially available mask to protect your mouth and nose from ink and ink cleaner.
Maintenance tools
Use the maintenance tools that came with your product for general cleaning.
Number Part Quantity
1 Cleaningwipes 100
2 Tweezers 1
93
Page 94

Maintenance Kit
Use the maintenance kit that came with your product for cleaning ink stains. The kit contains the
following items:
Number Part Quantity
1 Inkcleaner 1
2 Cup 1
3 Gloves 12
4 Cleaningstick 25
Metal tray
Use the tray that came with your product to hold cleaning tools and removed consumables.
Soft cloth
Obtain a commercially available static-free, lint-free soft cloth to clean inside the product.
Grease Kit
Use the grease kit that came with your product to apply grease to the carriage rods.
94
Page 95

Number Part Quantity
1 Gloves 16
2 Greasetool 1
3 Cleaningstick 8
4 PadA 16
5 PadB 16
6 Secondarycarriagerodgrease 2
Parent topic: Preparing for Maintenance
Related references
Consumables and Replacement Parts
Maintenance Precautions
Follow these precautions as you maintain your product:
• Remove loaded media from the product before performing any maintenance tasks.
• Touch a metal object to discharge any static electricity before performing any maintenance tasks.
• Never touch the belts, cables, circuit boards, or other parts not covered in the maintenance task steps
or you could adversely affect the print quality or damage your product.
• Use only the cleaning sticks included in the product maintenance kit to clean your product to avoid
damaging the print head.
• Do not reuse cleaning sticks.
• Do not touch the ends of the cleaning sticks to prevent oil from your hands from damaging the print
head.
• Do not use alcohol or water to clean the nozzle surface, caps, or wiper or you may damage your
product.
• Store ink packs, secondary carriage rod grease, and waste ink out of the reach of children.
• Wear protective eyewear, gloves, and a mask when performing maintenance tasks.
• Wash your hands after performing maintenance.
95
Page 96

Warning: If ink, waste ink, ink cleaner, or secondary carriage rod grease contact your skin, or get into
your eyes or mouth, immediately do the following:
• Thoroughly wash the substance from your skin with soapy water. If your skin becomes irritated or
discolored, contact a doctor.
• Immediately rinse the substance from your eyes with water to avoid bloodshot eyes or mild
inflammation. If you experience eye problems, contact a doctor.
• If a substance gets in your mouth, contact a doctor immediately.
• If you swallow a substance, do not induce vomiting and contact a doctor immediately. Inducing
vomiting may cause material to get in your windpipe and cause injury.
Caution: Used cleaning sticks, secondary carriage rod grease, and waste ink are classified as industrial
waste. Dispose of these items according to your local laws and regulations such as entrusting it to an
industrial waste disposal company. When handing over these items to the industrial waste disposal
company, make sure you include the Safety Data Sheet found on Epson's support website.
Parent topic: Preparing for Maintenance
Related references
Maintenance Supplies
Using Ink Cleaner
Use the ink cleaner and cup that came in the maintenance kit to clean only when instructed to.
Whenever you use the ink cleaner, follow the steps here.
Caution: Using ink cleaner on any other parts of your product could damage the product.
Be sure to do the following:
• Store ink cleaner at room temperature and out of direct sunlight.
• Use fresh ink cleaner with a fresh cleaning stick each time; do not reuse them.
• Dispose of used cleaning sticks and ink cleaner according to the used parts disposal guidelines; see
the link below.
1. Place the cup on a tray and pour approximately 0.3 ounce (10 ml) of ink cleaner into the cup.
2. Recap the ink cleaner bottle.
96
Page 97

3. Dip a fresh cleaning stick into the ink cleaner and let any excess cleaning solution drip into the cup.
Parent topic: Preparing for Maintenance
Related references
Maintenance Supplies
Moving the Print Head for Maintenance
Certain maintenance tasks require that you move the print head as described here before performing the
task.
Caution: Always move the print head as described here. Do not move the print head manually or you
may cause your product to malfunction.
1. When the product is turned on, press the maintenance button on the control panel.
You see the Maintenance menu.
2. Press the down arrow button to select Head Maintenance and press the OK button.
3. Press the down arrow button to select Regular Cleaning and press the OK button.
The print head moves into maintenance position.
4. Perform your maintenance task as necessary.
Note: After 10 minutes, an alarm sounds to warning you that the print head is still in the maintenance
position. You also see a notice on the LCD screen telling you to clean the print heads after
maintenance. After completing your maintenance task, press the OK button to clean the print heads.
The alarm sounds again at 10 minute intervals if the print heads are not in the home position.
97
Page 98

Parent topic: Preparing for Maintenance
Related references
Maintenance Menu Settings
Stirring High Density Black Ink and Fluorescent Ink
To prevent sedimentation and incorrect colors in your printed media, stir the High Density Black ink and
fluorescent inks (if applicable) in the ink tank once a week.
SureColor F9470
SureColor F9470H
98
Page 99

1. Open the ink inlet cover for the ink you want to stir.
99
Page 100

2. Grasp the loop at the top of the ink inlet cap and slowly remove the ink inlet cap.
100
 Loading...