

Page 1

Epson® SureColor®
F7170 Setup Guide
Page 2

2 |
Contents
Unpacking the Printer ...........................................................................................................................3
Assembling the Stand .............................................................................................................................6
Installing the Printer ..............................................................................................................................9
Installing the Media Feeding Unit .......................................................................................................16
Installing the Take-up Reel System ......................................................................................................19
Installing the Media Guide Bar ............................................................................................................22
Connecting to a power source ..............................................................................................................25
Setting the Language ............................................................................................................................26
Adjusting the Media System ................................................................................................................27
Loading Media ....................................................................................................................................29
Installing the Software .........................................................................................................................37
USB Installation ............................................................................................................................38
Network Installation .....................................................................................................................39
Page 3

Unpacking the Printer | 3
Read all of these instructions before using your printer. Also be sure to follow all warnings and instructions
marked on the printer and in the on-screen User’s Guide.
Unpacking the Printer
Before beginning assembly, make sure you have sufficient space to set up and use the printer. The
following illustration shows the minimum space required for using the printer:
Callout Distance
1 19.7 in. (500 mm)
2 3.9 in. (100 mm)
3 68.9 in. (1750 mm)
4 39.4 in. (1000 mm)
5 114.3 in. (2903 mm)
6 19.7 in. (500 mm)
7 39.4 in. (1000 mm)
8 142.5 in. (3620 mm)
Page 4
4 | Unpacking the Printer
When choosing a place for the printer, leave adequate room for easy access and ventilation. Avoid locations
subject to direct sunlight, excessive heat, humidity, or dust. Be sure the printer is placed on a flat, stable
location that can support 496 lb (225 kg).
Caution: Six people are required to unpack and install the printer.
You need an even larger floor space to assemble the printer and stand, so be sure to prepare a large, empty
area before unpacking them. Also make sure you save the boxes and packaging in case you need to ship the
printer later.
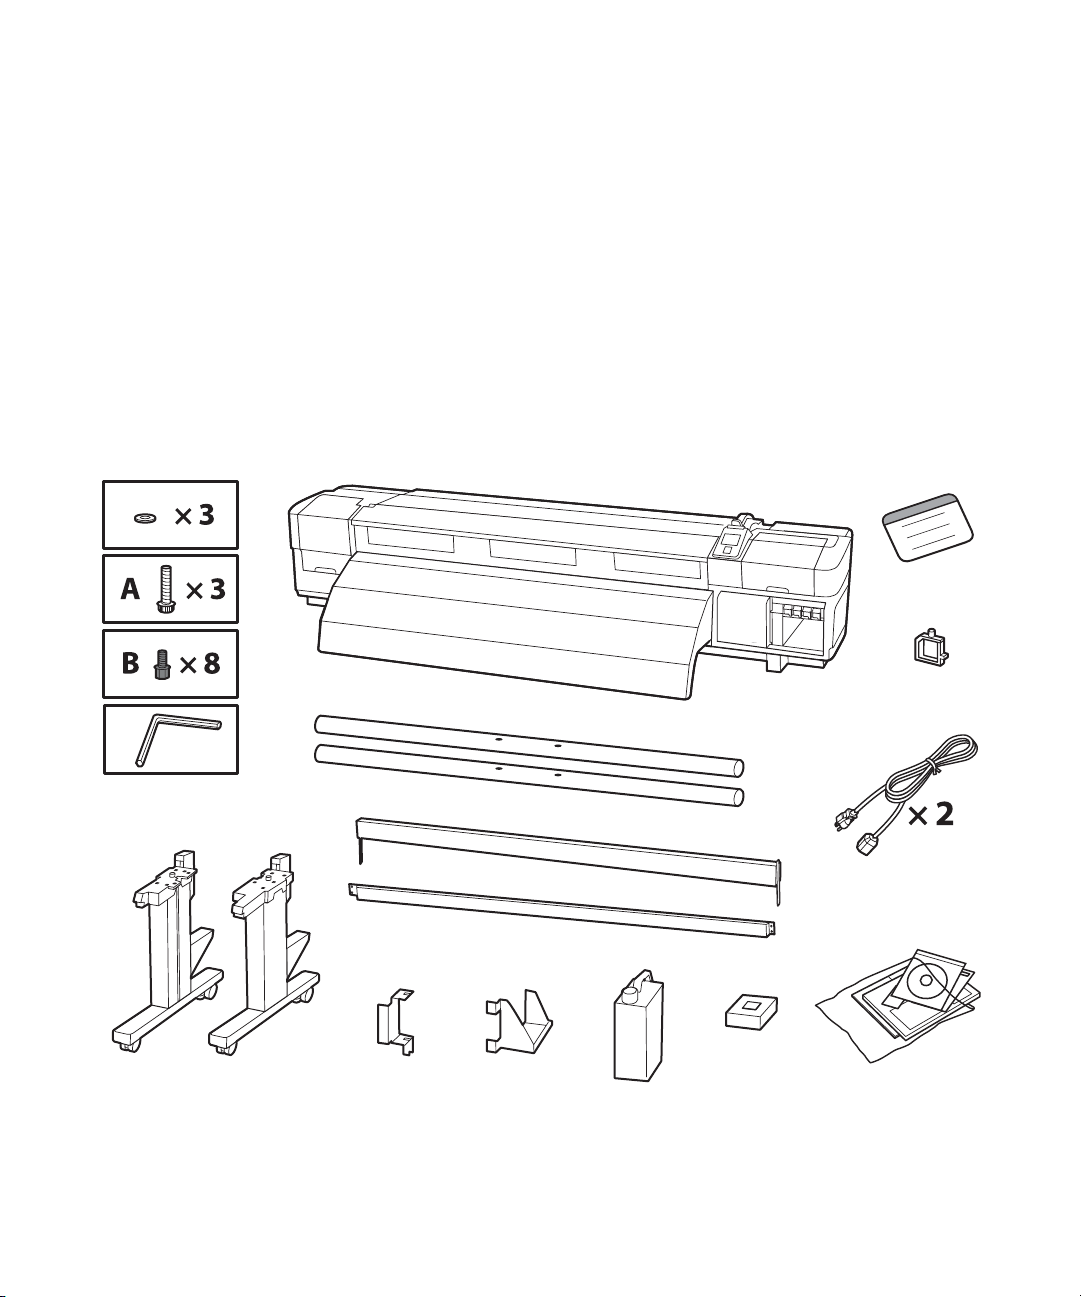
The following items are included with your printer:
Printer and Stand Assembly
Translated
caution label
a
Legs
Waste ink tube
bracket
Printer
Carry bars
Horizontal struts
Waste ink
tank bracket
Waste
ink tank
Ink splash
guard
Cable
support
Power cords
Software and
documentation
Page 5
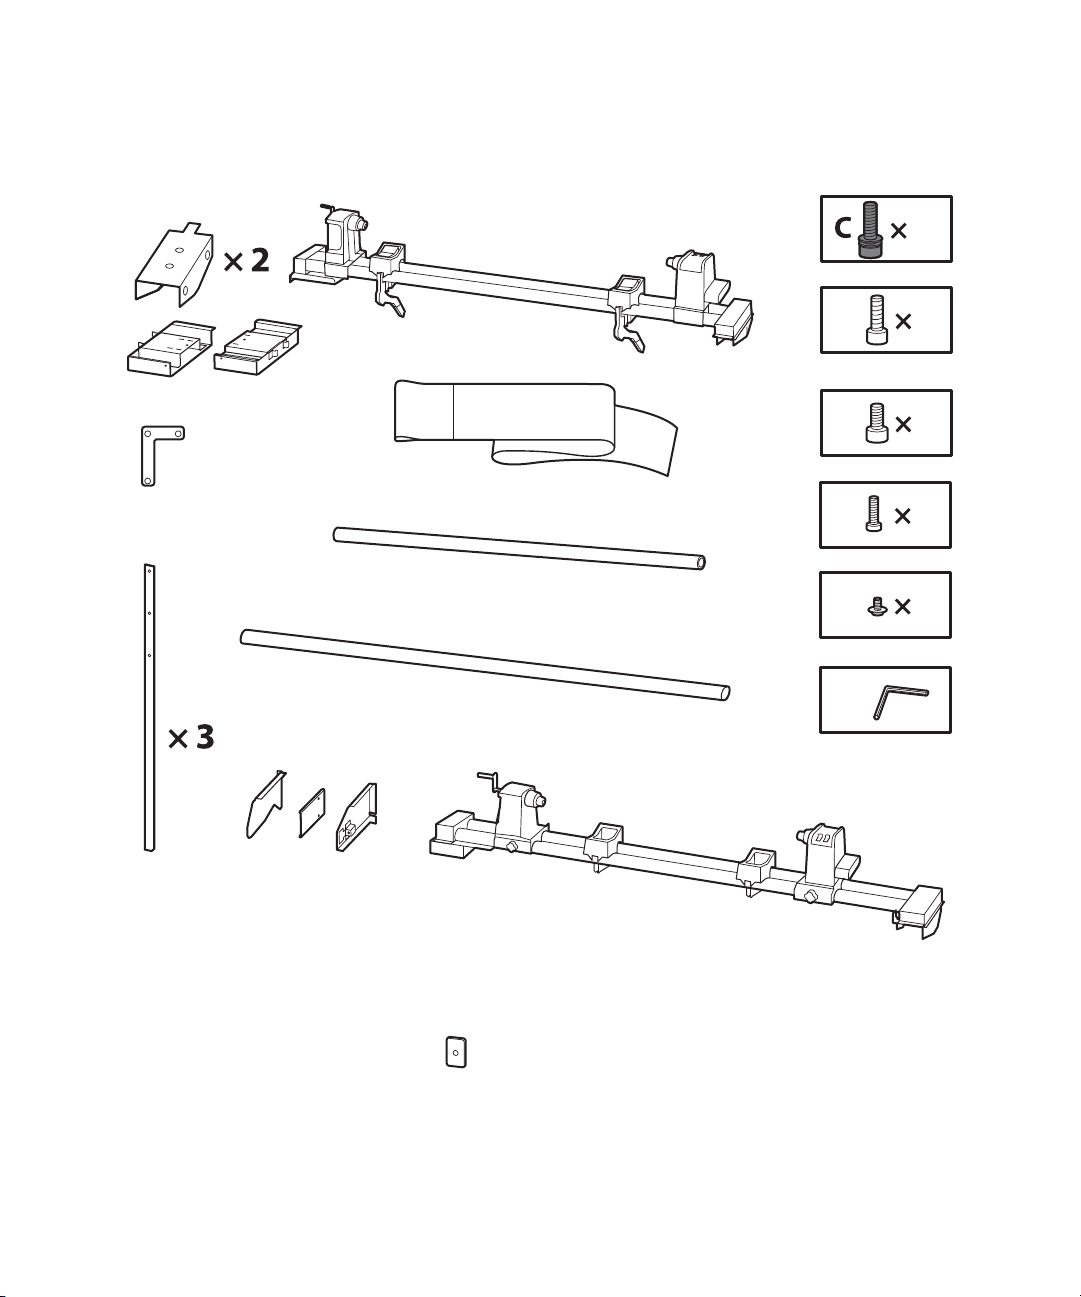
Media System Assembly
Unpacking the Printer | 5
26
Reel brackets
Bracket
alignment tool
Mounting
hardware
Media guide
mounting brackets
Take-up reel
Adjustment paper
Roll core
Media guide bar
Media feeding unit
2D
5 E
4F
2G
b
The item below can be found in the “Ink Supply System Cover 1” box.
Mounting hardware
Page 6
6 | Assembling the Stand
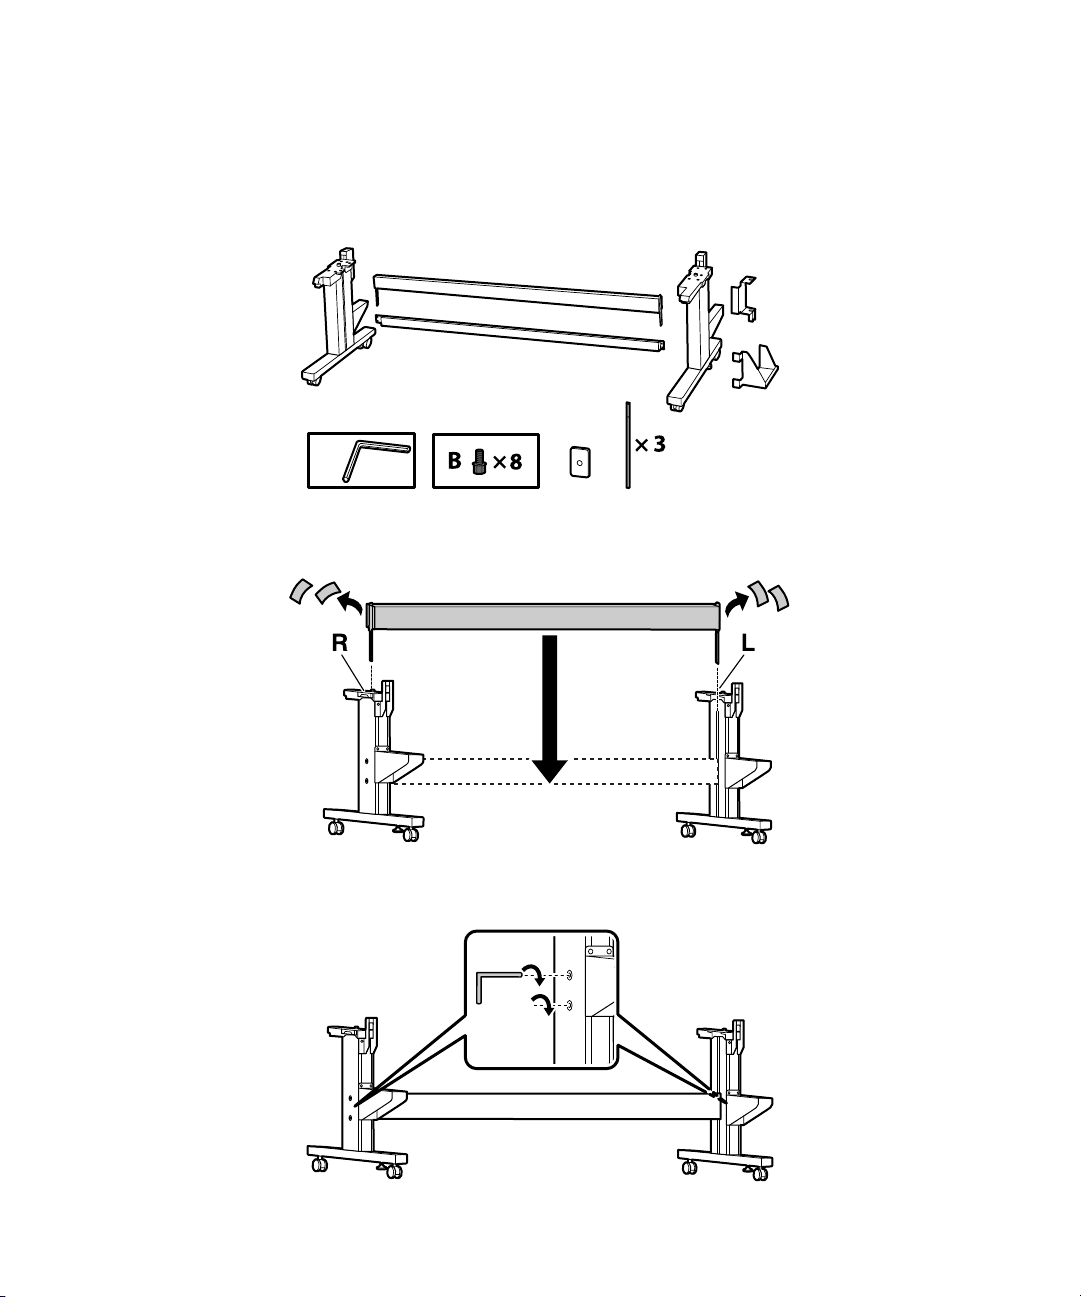
Assembling the Stand
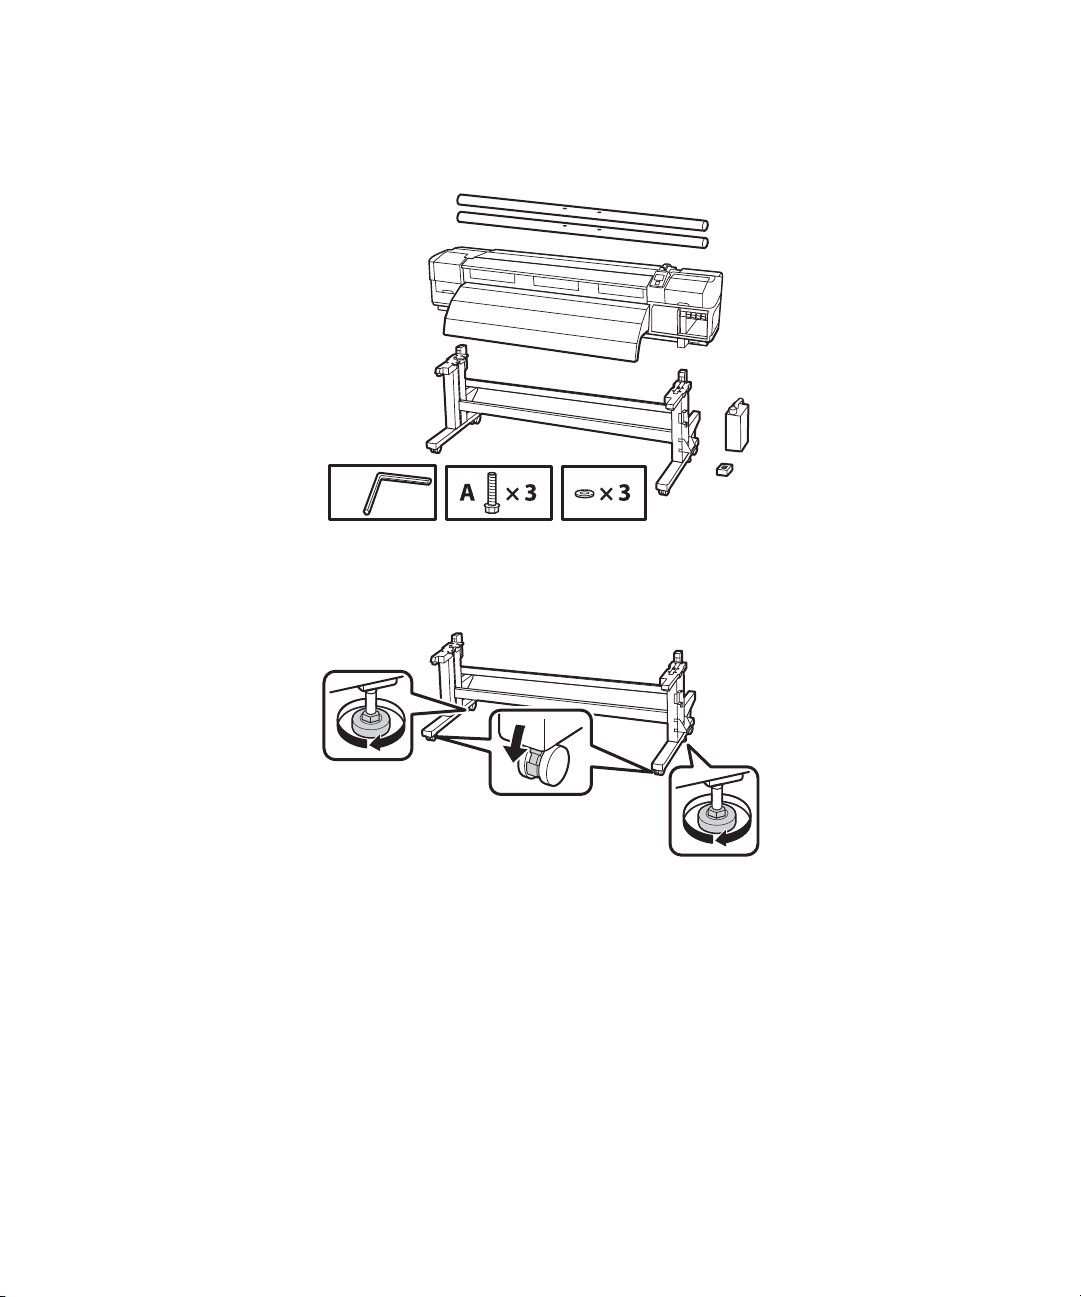
Make sure you have the following items before assembling the stand.
a
1. Remove the tape from the larger horizontal strut, then slide the strut into both of the legs.
Back of stand
2. Use the long end of the hex wrench to tighten the pre-placed screws on each of the legs.
Page 7
Assembling the Stand | 7
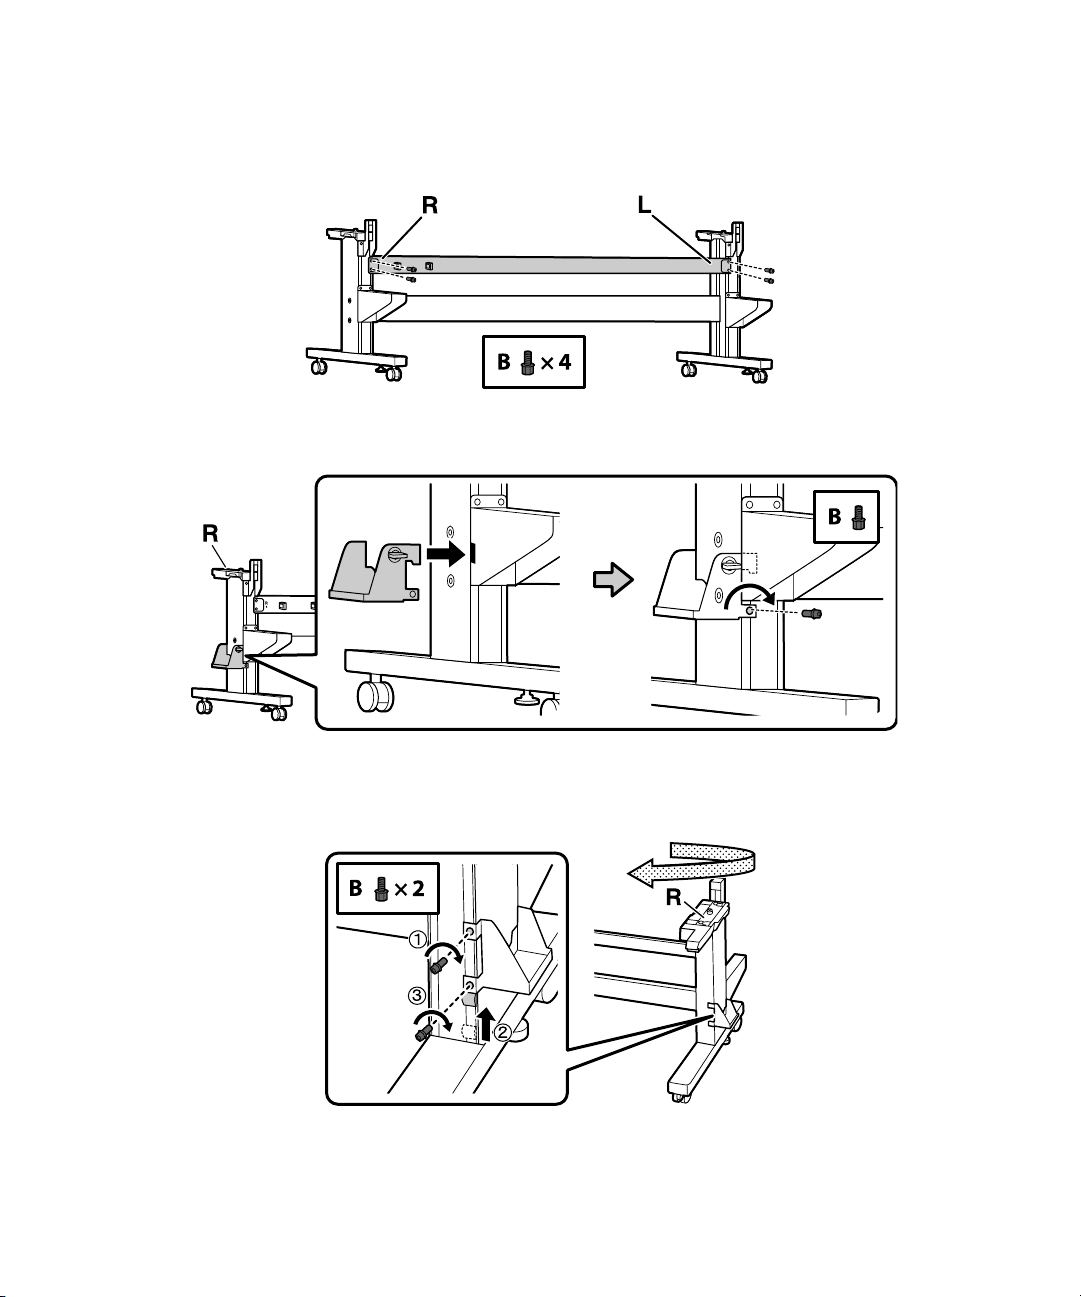
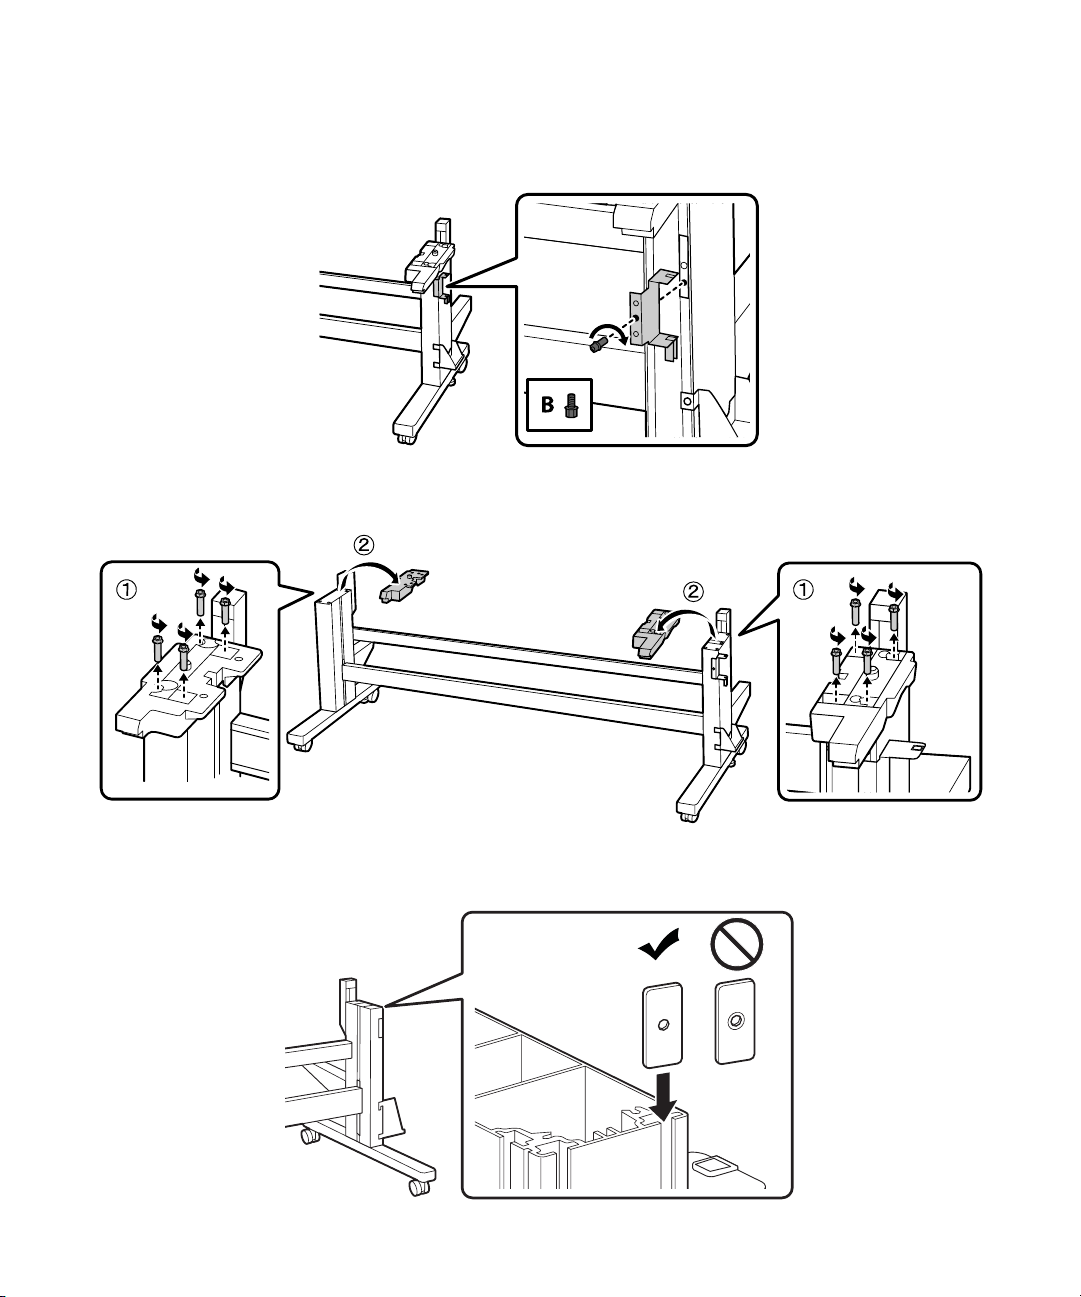
Attach the smaller horizontal strut by securing two B screws (four total) in the back of the legs.
3.
4. Attach the waste ink tank bracket and secure it with a B screw.
5. Attach one B screw to the other side of the bracket, move the slider into place, then attach another
Bscrew.
Page 8
8 | Assembling the Stand
6. Temporarily fasten the waste ink tube bracket using one B screw.
7. Remove the four screws from each leg, then remove the plastic pieces.
8. Slide the mounting piece into the groove, as shown.
Page 9
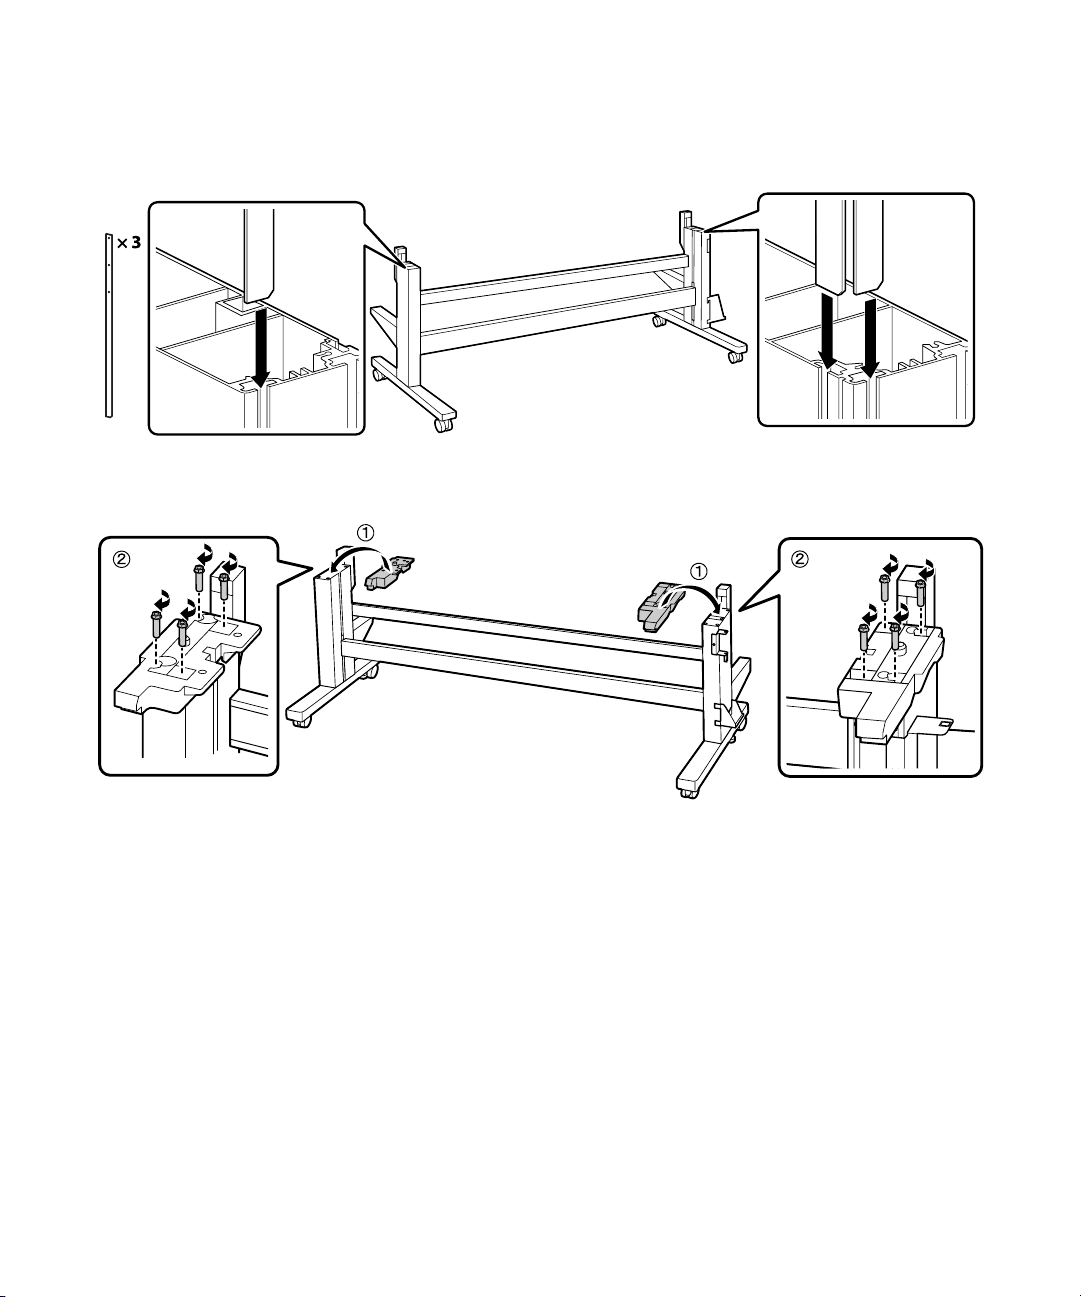
Slide the mounting pieces into the grooves, as shown.
9.
10. Replace the plastic pieces and tighten all eight screws.
Installing the Printer | 9
Installing the Printer
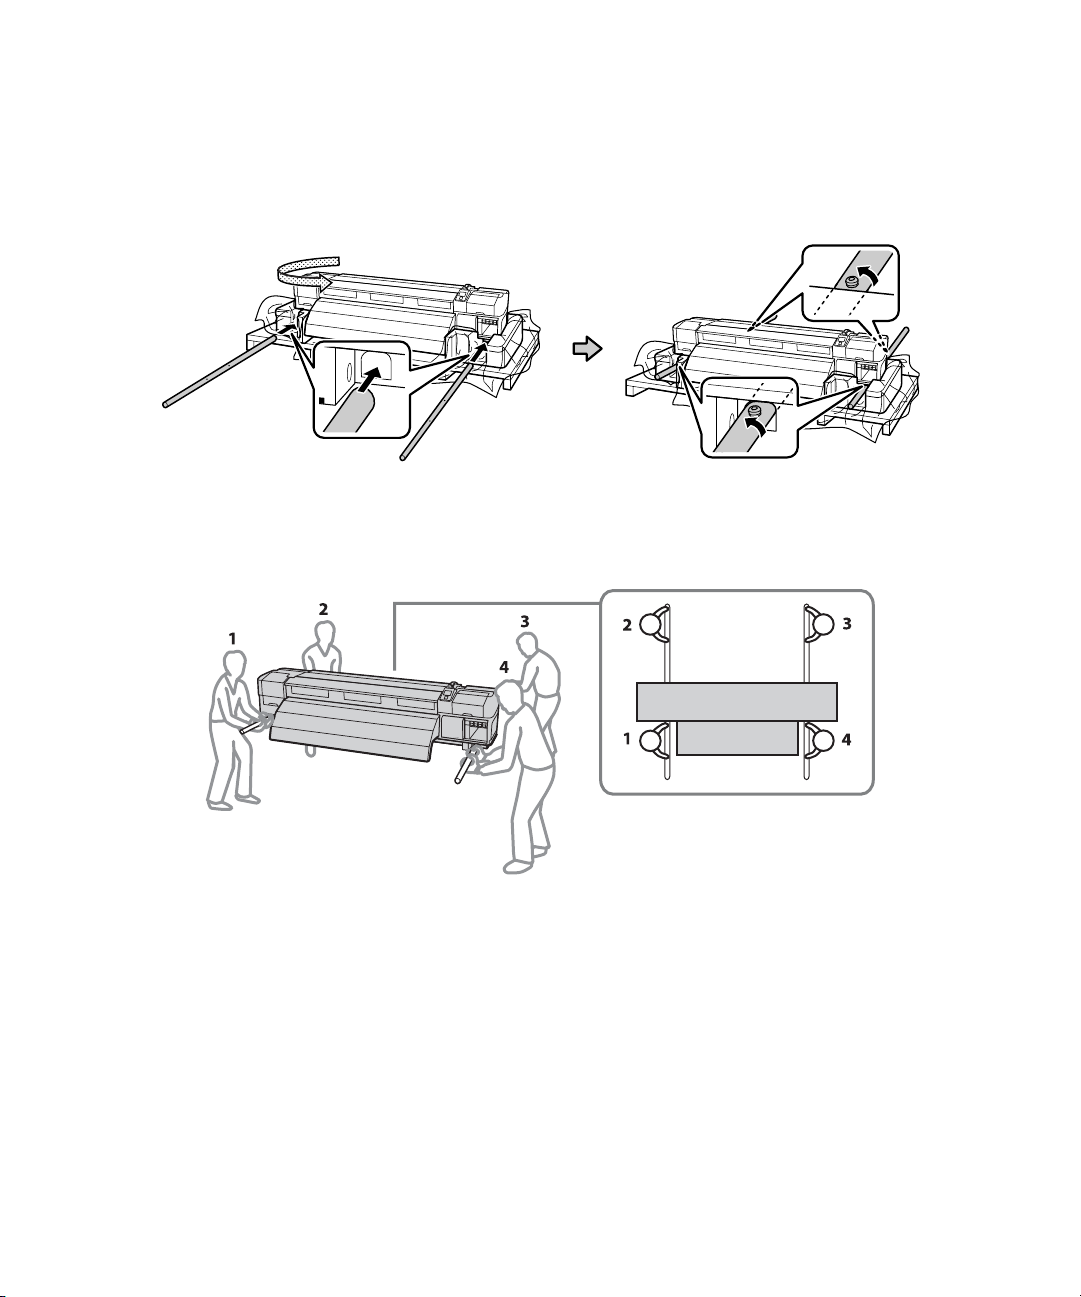
You need six people to install the printer; four people to carry it and two people to position it on the stand.
Use the carry bars to lift and move the printer.
Page 10
10 | Installing the Printer
Make sure you have the following items before installing the printer.
a
1. Lock the casters and fix the stand in place. To fix the stand, rotate the feet clockwise until they’re
firmly placed on the ground.
Page 11
Installing the Printer | 11
From the front of the printer, insert the carry bars into both sides of the printer with the locking bolts
2.
toward the ground. Once the carry bars are inserted, rotate them counterclockwise 180° to lock them
into place. This keeps the printer from sliding when lifted.
Caution: Before installing the printer, make sure the stand is fixed in place.
Lift the printer as shown.
3.
Caution: The printer is heavy. Use at least four people when lifting the printer.
Page 12
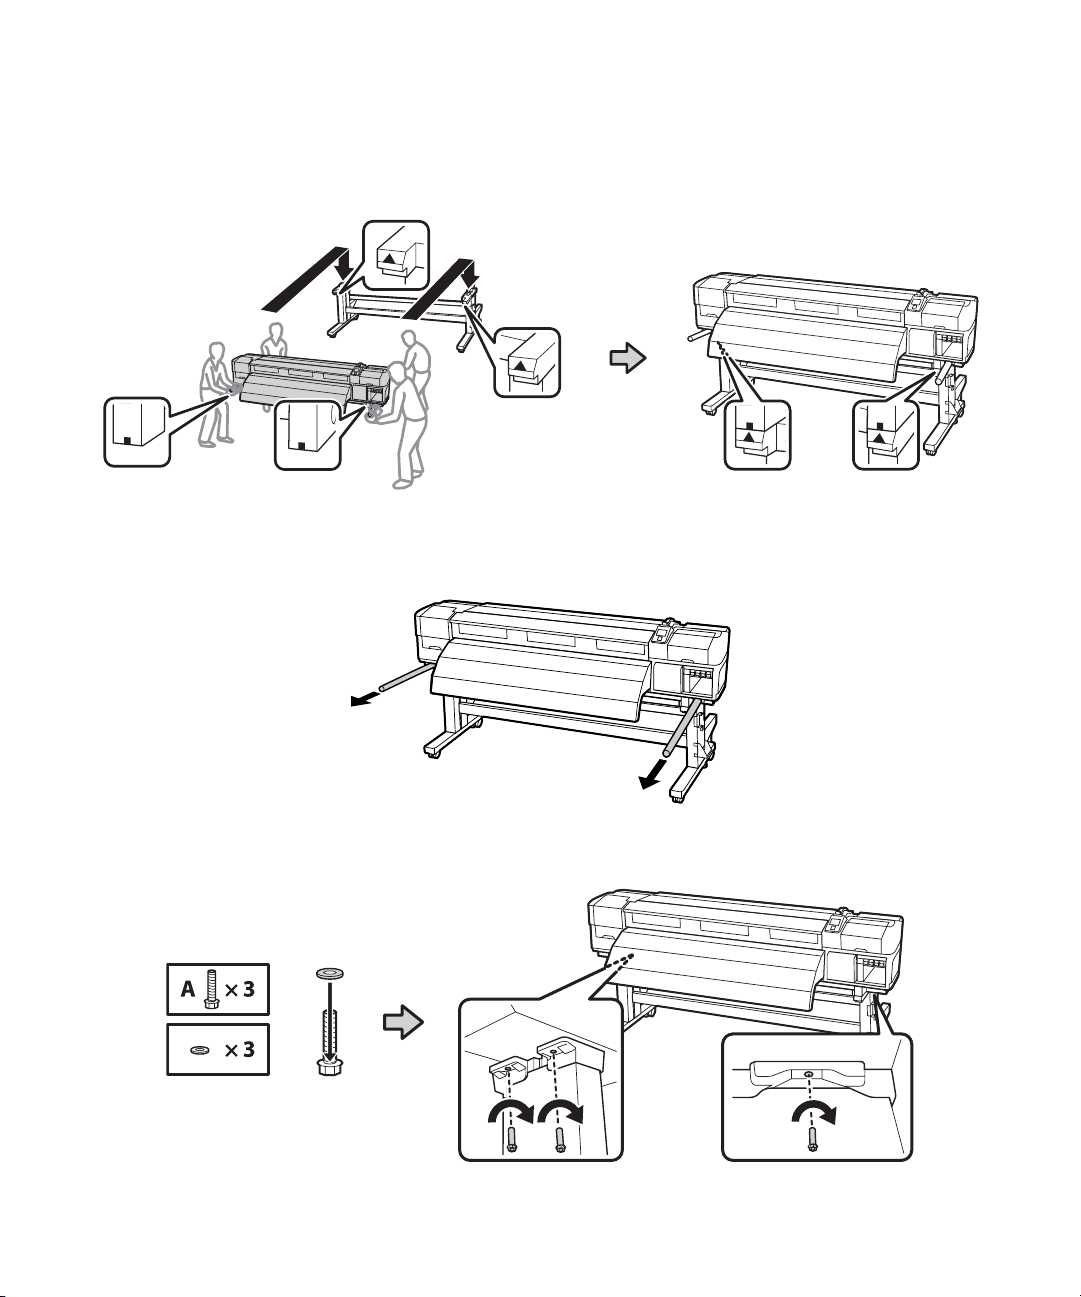
12 | Installing the Printer
4. Lift the printer onto the stand. Line up the marks on the bottom of the printer with the arrows on the
top of the stand’s legs before setting the printer down.
5. Rotate the carry bars clockwise 180° so the locking bolts face the ground. Remove the carry bars from
the printer.
6. Attach the printer to the stand using three A screws and washers.
Page 13
Open the front cover and remove the tape.
7.
8. Remove the media holding plates.
Installing the Printer | 13
9. Feed the long waste ink tube through the hole in the stand and secure it in place.
Page 14
14 | Installing the Printer
10. Open the clips.
11. Slide the waste ink tube into its bracket and close the clips. Gently pull up on the tube to tighten any
slack.
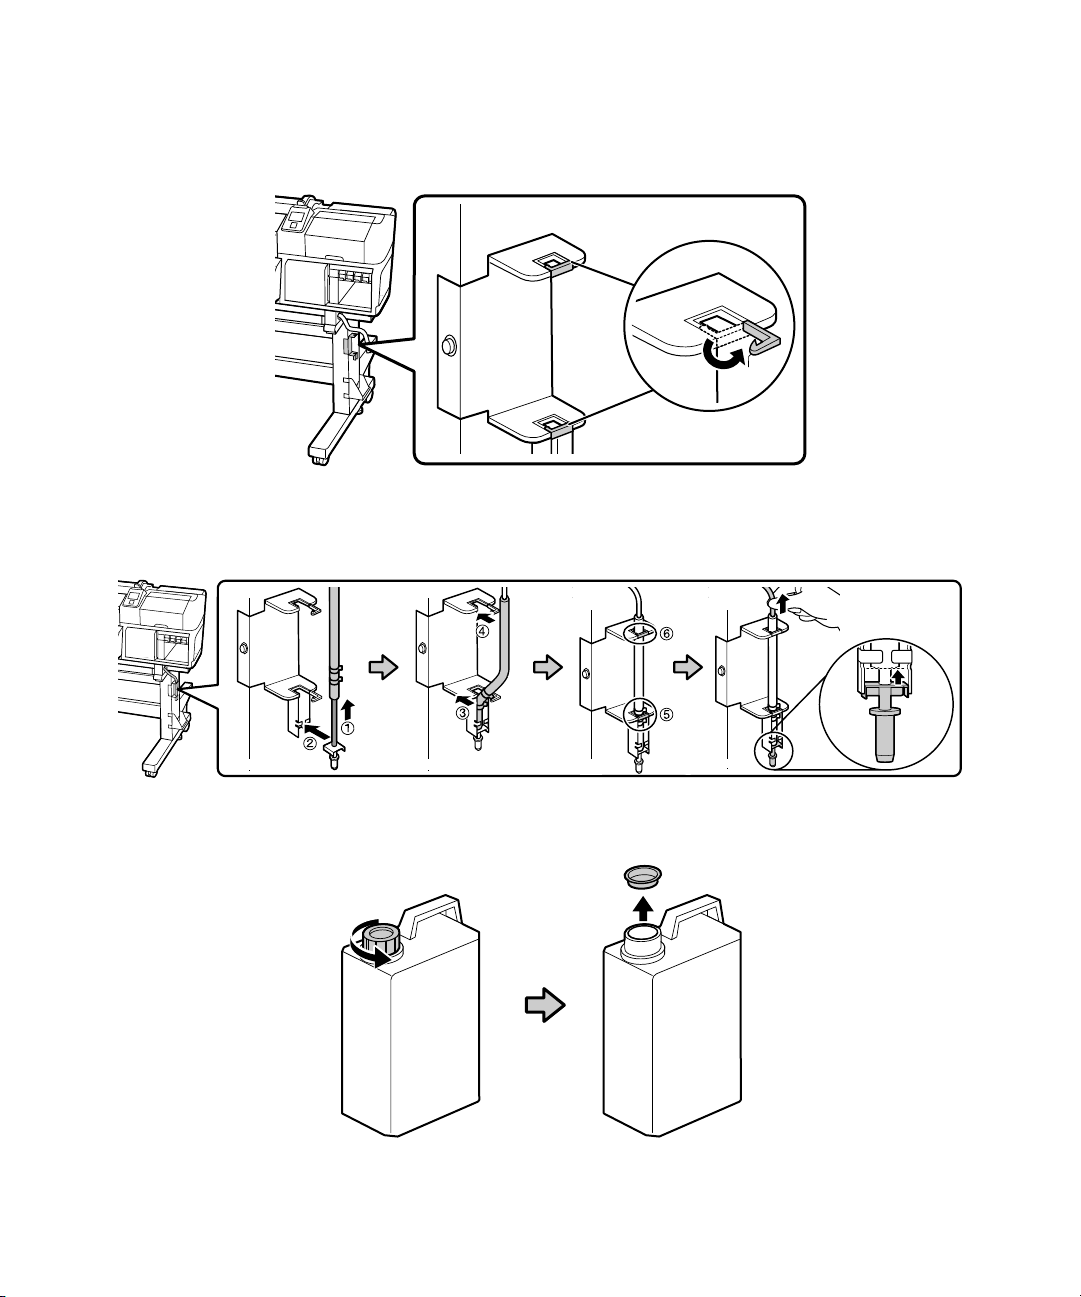
12. Remove the cap and inner seal from the waste ink tank.
Note: Keep the cap and inner seal for the waste ink tank. The tank must be sealed properly for disposal.
Page 15

Installing the Printer | 15
Slide the ink splash guard onto the waste ink tube.
13.
14. Install the waste ink tank into the bracket. Make sure the waste ink tube is inserted in the opening.
Push the ink splash guard down so that it covers the waste ink tank opening.
15. Place the caution label for your language over the English label, if necessary.
Page 16

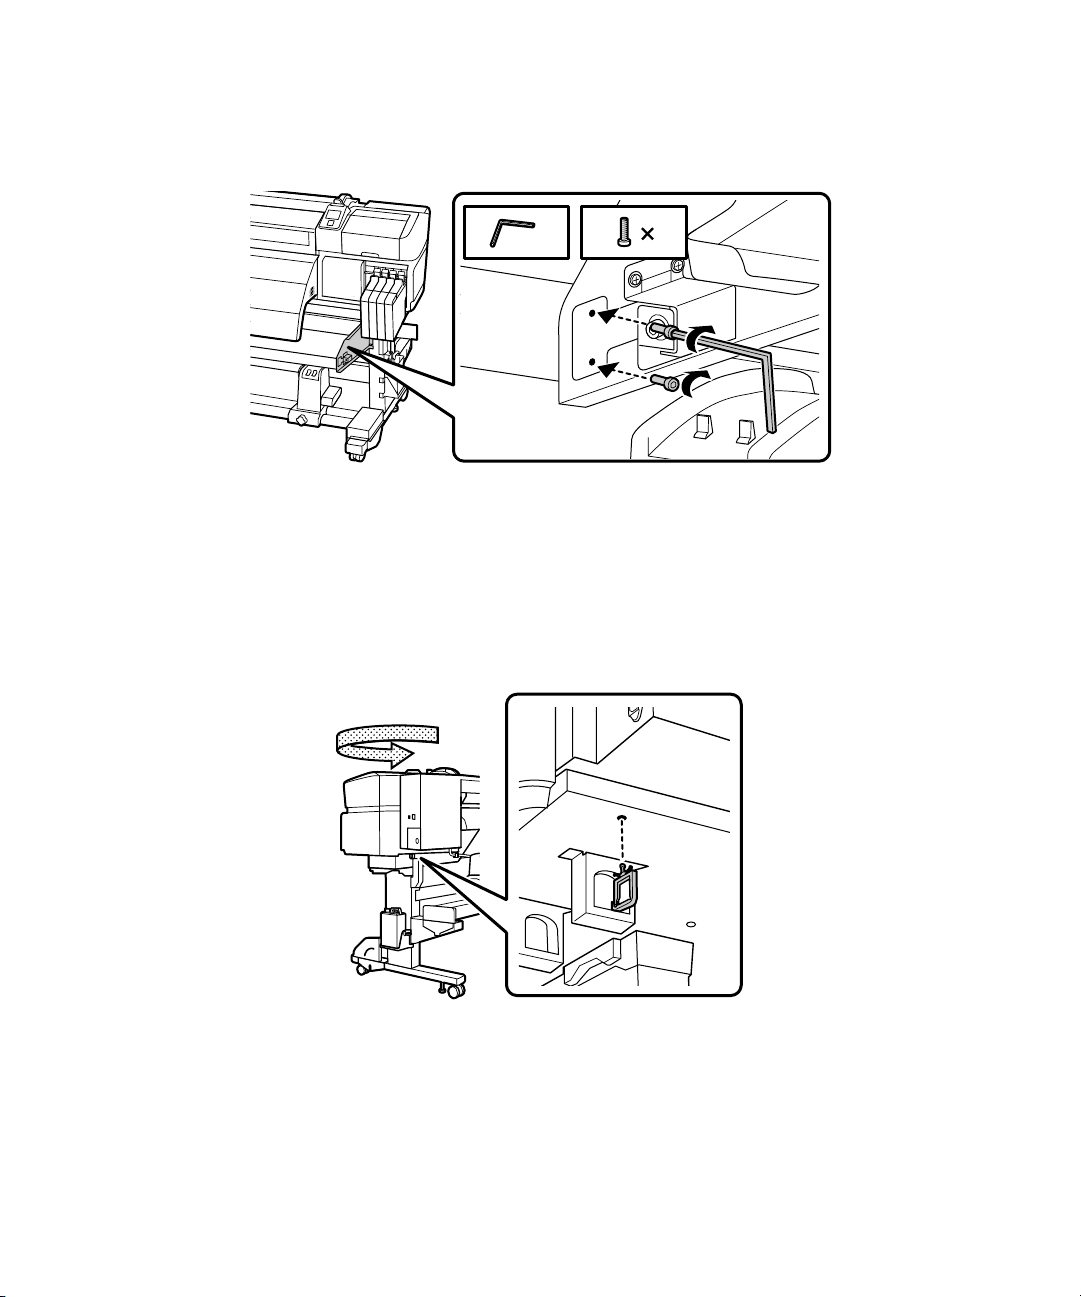
16 | Installing the Media Feeding Unit
Installing the Media Feeding Unit
You need the following parts to assemble and attach the media feeding unit:
13
a
Note: Make sure the bracket is oriented correctly when you attach it.
1.
Attach the brackets to the back side of the printer with two C screws on each side as shown.
Caution: The media feeding unit is heavy and requires two people to install. To avoid damaging the media
feeding unit, lift it by holding the two bars on the bottom as shown.
Page 17

Installing the Media Feeding Unit | 17
Lower the media feeding unit onto the brackets.
2.
3. Attach the media feeding unit to the stand using five C screws.
5
4. Attach the media feeding unit to the stand using four C screws.
Note: Leave the screws loose until the service engineer finishes adjusting the media system.
Page 18

18 | Installing the Media Feeding Unit
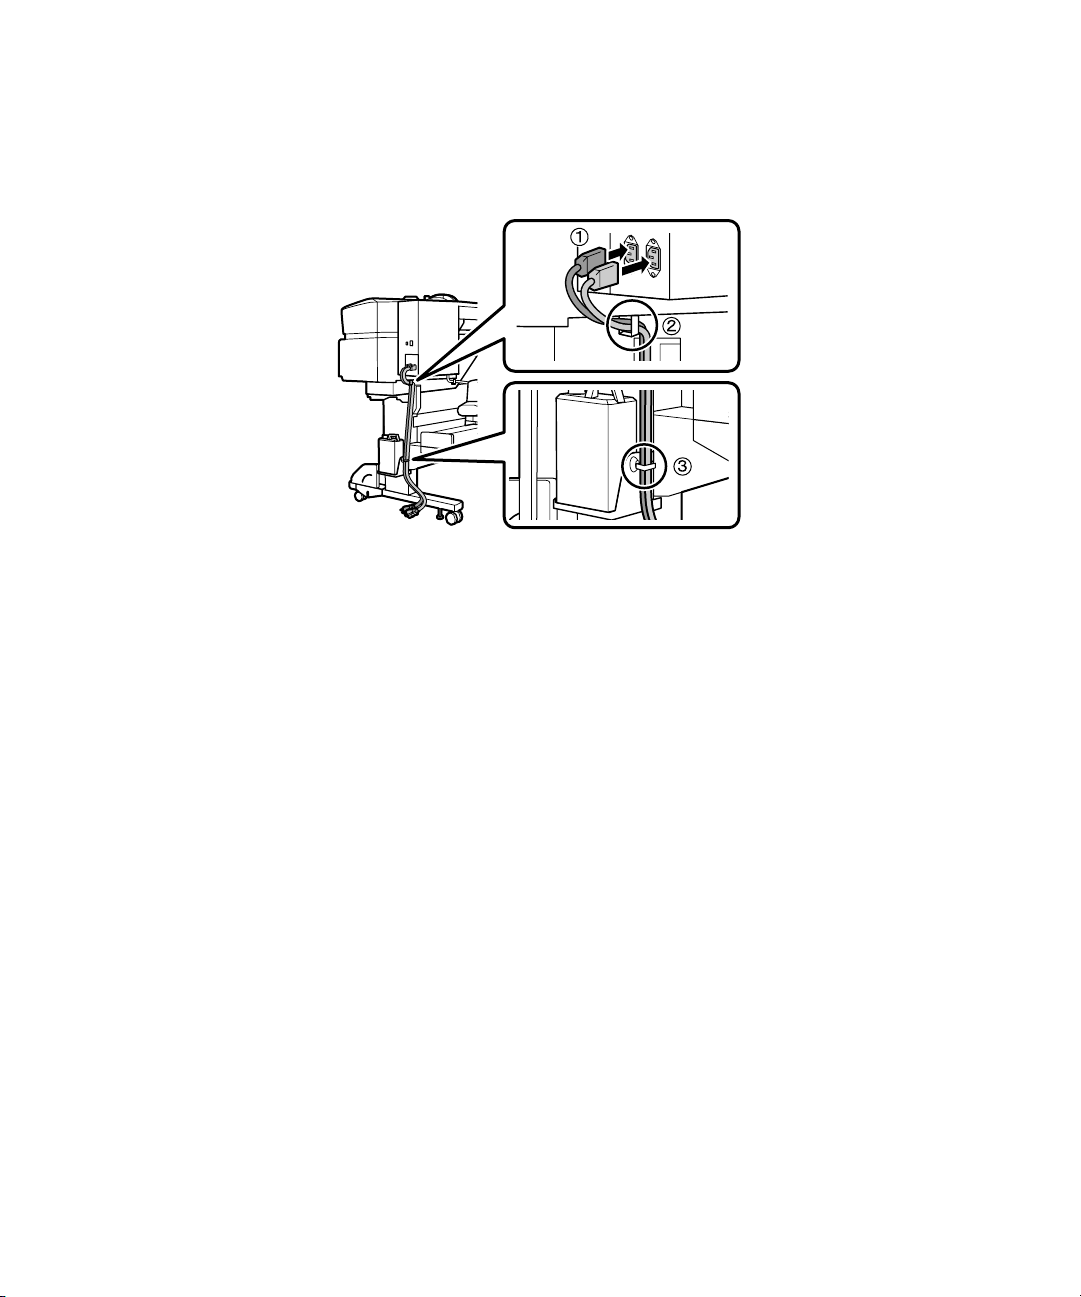
5. Run the communication cable through the cable supports.
6. Lift the port cover.
7. Plug in the communication cable and thread it through the cable supports.
Page 19

Installing the Take-up Reel System | 19
Make sure the communication cable is fully seated in the port and then close the port cover.
8.
Installing the Take-up Reel System
You need the following parts to assemble and attach the take-up reel system:
13
Note: Make sure the bracket is oriented correctly when you attach it.
1.
Attach the brackets to the front of the printer using two C screws on each side as shown.
a
Page 20

20 | Installing the Take-up Reel System
Caution: Use at least two people to lift the take-up reel. To avoid damaging the take-up reel, lift it by holding
the two bars on the bottom as shown.
Lower the take-up reel onto the brackets.
2.
3. Attach the take-up reel using five C screws as shown.
5
Page 21

Installing the Take-up Reel System | 21
Attach the take-up reel to the stand using four C screws.
4.
Note: Leave the screws loose until the service engineer finishes adjusting the media system.
5.
Connect the communication cable that is attached to the take-up reel system by running it through
the horizontal struts to the back of the printer. Place the communication cable in the cable supports
and plug it in, making sure to tighten the screws on the plug to secure it in place.
6. Contact a service engineer to attach the Epson Genuine Ink Supply System and adjust the printer. Do
not turn on the printer until the service engineer’s work is complete.
Page 22

22 | Installing the Media Guide Bar
Installing the Media Guide Bar
You need the following parts to assemble and attach the media feeding unit:
a
b
5 E
1. Place the mounting bracket over the screws, shift the plate to the right, and tighten the screws.
4F
a
Page 23

Attach two screws to the media guide mounting bracket.
2.
Installing the Media Guide Bar | 23
a
3. Attach a screw to the media guide mounting bracket.
a
2E
1 E
Page 24

24 | Installing the Media Guide Bar
4. Loosely attach two screws to the stand.
a
5. Place the bracket over the screws, shift the bracket to the left, then tighten the screws.
2E
a
6. Attach one side of the media guide bar using two screws.
b
2F
Page 25
Attach the other side of the media guide bar using two screws.
7.
Connecting to a Power Source | 25
b
8. Contact a service engineer to attach the Ink Supply System Cover 1 and adjust the printer. Do not
2F
turn on the printer until the service engineer’s work is complete.
Connecting to a Power Source
1. Attach the cable support to the bottom of the printer.
Page 26
26 | Setting the Language
2. Thread the power cords through the cable supports. Connect the power cord to the printer and use
the cable supports to restrain the cord.
3. Plug the printer into a properly grounded outlet. Note that two outlets are required, for a total of 20
amps. It is recommended that the outlets be powered by a dedicated 30-amp circuit.
Caution: Use only the type of power source indicated on the printer’s label.
Setting the Language
1. Turn on the printer, if necessary.
2. Press the Menu button.
3. Press d or u to select Preferences, and press OK.
4. Press d or u to select Language, and press OK.
5. Select your language, and press OK.
6. Press the y button until you return to the main menu.
Page 27

Loading Media
1. Press the P power button to turn on the printer.
2. Open the front cover and then raise the media loading lever.
Loading Media | 27
Page 28

28 | Loading Media
3. Loosen the screws on the roll holders and slide the roll holders towards the outside of the printer.
4. Align the left end of the media within the scale.
Page 29

Loading Media | 29
Using two or more people, move the media onto the roll holder, adjusting the roll holder as necessary.
5.
When the media is securely on the roll holder, tighten the screw.
6. Turn the roll holder handle counterclockwise until it can not be turned further.
Page 30

30 | Loading Media
7. Pull up the roll holder lever, slide the roll holder into the media roll.
8. Push the roll holder towards the center of the roll, twice, and tighten the roll holder screw.
Page 31

Loading Media | 31
Turn the roll holder handle clockwise until part A is hidden. When part A is hidden, do not turn the
9.
handle any further.
10. Pull the media into the printer. If the left end of the media is not partially covering the rectangular
area as shown in the figure on the right, return to step 4.
Page 32

32 | Loading Media
11. Lower the media loading lever.
12. Raise the media loading lever and then pull the media through the front of the printer.
13. Pull the media out as shown and ensure that the media is no slack on the left and right side of the roll.
Then lower the media loading lever.
Page 33

Loading Media | 33
Close the front cover.
14.
15. After loading the media, you will be prompted to choose setup and media options. Choose options as
necessary.
16. Press the u button to take in the media.
Page 34

34 | Loading Media
17. Open the front cover.
18. Attach the media holding plates while aligning their positions. The media holding plates should be
installed so that the sides of the media are visible through the three holes and the white line on the
media holding plates are visible through the windows.
Page 35

Installing the Software | 35
Close the front cover.
19.
Installing the Software
Insert the software CD that came with your printer into your computer and follow the on-screen
instructions.
You can use USB or Ethernet network connections.
• For USB connection, make sure your system has the appropriate port and that you have a standard,
shielded cable, 10 feet (3 m) or less.
Note: Do not connect the printer until a software installation screen prompts you to.
• To connect to a network hub, or directly to your computer’s network interface, you need a standard
RJ-45 (CAT-5 or higher) network cable.
Page 36

36 | USB Installation
USB Installation
1. Press the P power button to turn off the printer, then connect the USB cable to the printer and your
computer.
2. Insert the CD into your computer.
3. Follow the on-screen instructions to complete the installation.
Page 37

Network Installation
1. Press the P power button to turn on the printer, if necessary.
2. Connect the Ethernet cable to the printer and your networking device.
Network Installation | 37
3. Insert the CD into your computer.
Page 38

38 | Network Installation
4. Follow the on-screen instructions to complete the installation, keeping the following points in mind:
• Do not remove the checkmark from EpsonNet Configuration Utility and EPSON drivers and
utilities
in the software list.
• If you see a firewall or network message, make sure the publisher is SEIKO EPSON, and then
allow the connection.
EPSON and SureColor are registered trademarks, and EPSON Exceed Your Vision is a registered logomark of Seiko Epson
Corporation.
General Notice: Other product names used herein are for identification purposes only and may be trademarks of their respective
owners. Epson disclaims any and all rights in those marks.
This information is subject to change without notice.
© 2014 Epson America Inc., 2/14
CPD-40246
 Loading...