

Page 1

Update and Alignment Guide
Guide de mise à jour et d’alignement
Guía de actualizaciones y alineación
Guia de atualizações e alinhamento
Epson
®
SureColor® F7170
Page 2

2 |
Contents
Contents ...........................................................................................................................................2
Updates ............................................................................................................................................3
Parallel Adjustment ........................................................................................................................... 3
Adjusting the Media Feeding Unit ............................................................................................. 4
Adjusting the Take-up Reel ...................................................................................................... 17
Table des matières
Mises à jour .................................................................................................................................... 31
Ajustement parallèle ........................................................................................................................ 31
Ajustement de l’unité d’alimentation de papier ........................................................................32
Ajustement de la bobine réceptrice automatique ....................................................................... 45
Contenido
Actualizaciones ...............................................................................................................................61
Ajuste paralelo ................................................................................................................................ 61
Ajuste de la unidad de alimentación de papel ...........................................................................62
Ajuste del rodillo de recogida .................................................................................................... 75
Conteúdo
Atualizações ....................................................................................................................................89
Ajuste paralelo ................................................................................................................................ 89
Ajuste da unidade de alimentação de mídia ..............................................................................90
Ajuste do rolo de coleta ..........................................................................................................103
Page 3

Updates | 3
Your printer includes updated firmware, new troubleshooting recommendations, and a kit containing a
new alignment tool and adjustment guides.
This booklet describes the updates and tells you how to perform parallel adjustment using the new parts.
Updates
The new firmware and troubleshooting procedures include the following:
• The Feed Speed option for custom media is set to Auto by default. If you see strips of uneven color,
horizontal lines, or banding on printouts, try lowering the feed speed to
• The message displayed for ink and chip unit replacement is: Check Ink Levels.
Note that the use of a face mask is recommended when refilling ink or replacing the waste ink bottle.
• If media printed at high density is creased, set the Take-up Tension to Manual, and choose Lv1 or
Lv2.
If media skew is detected, try the following recommendations:
Lv1.
English
• Use the parallel adjustment procedure described in this booklet.
• Set the auto take-up unit to roll the media with the printed side in.
• Use media at least 36 inches (91.4 cm) wide.
• For thick media, set the software RIP to 3 passes or higher.
Parallel Adjustment
The parallel adjustment procedure ensures that media is fed straight into the printer and onto the auto
take-up reel. Use this procedure if you have problems with media feeding or take-up, or if the printer has
been moved.
Page 4
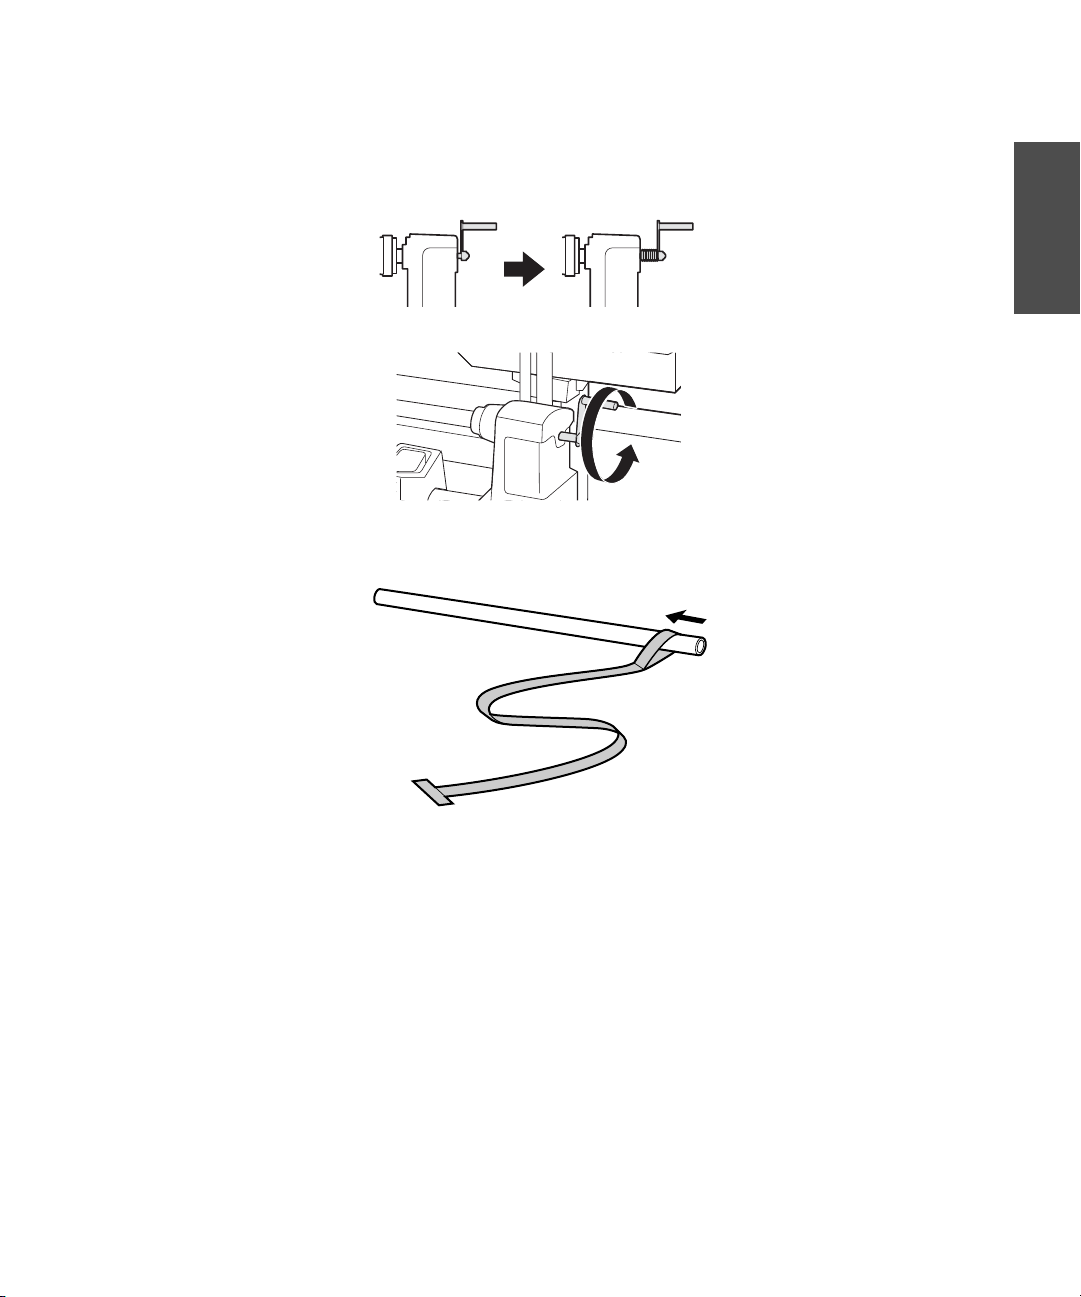
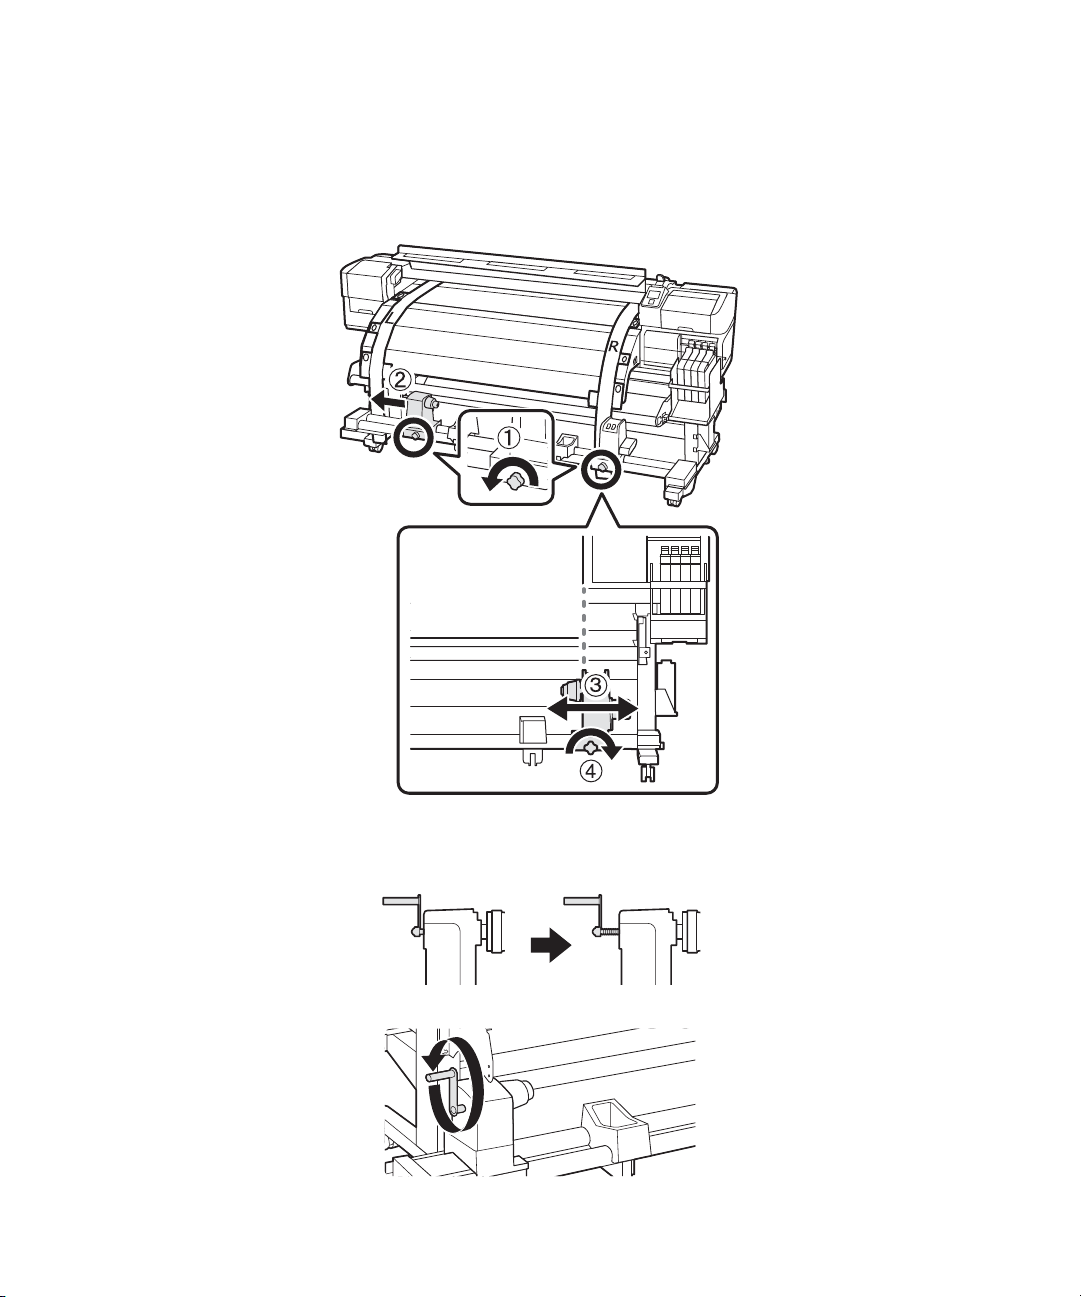
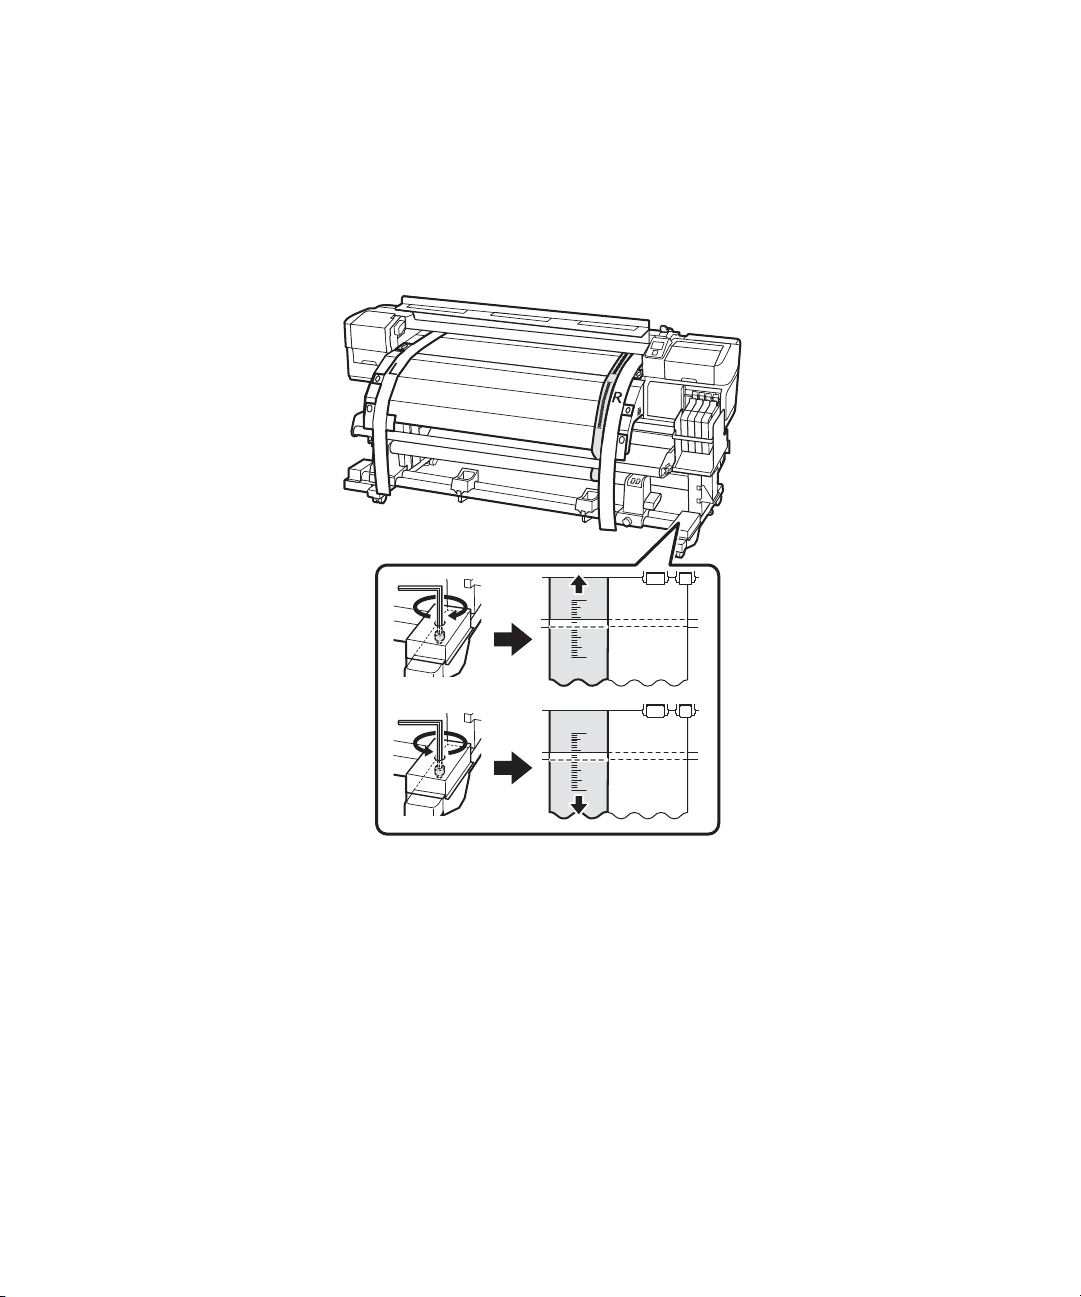
4 | Adjusting the Media Feeding Unit
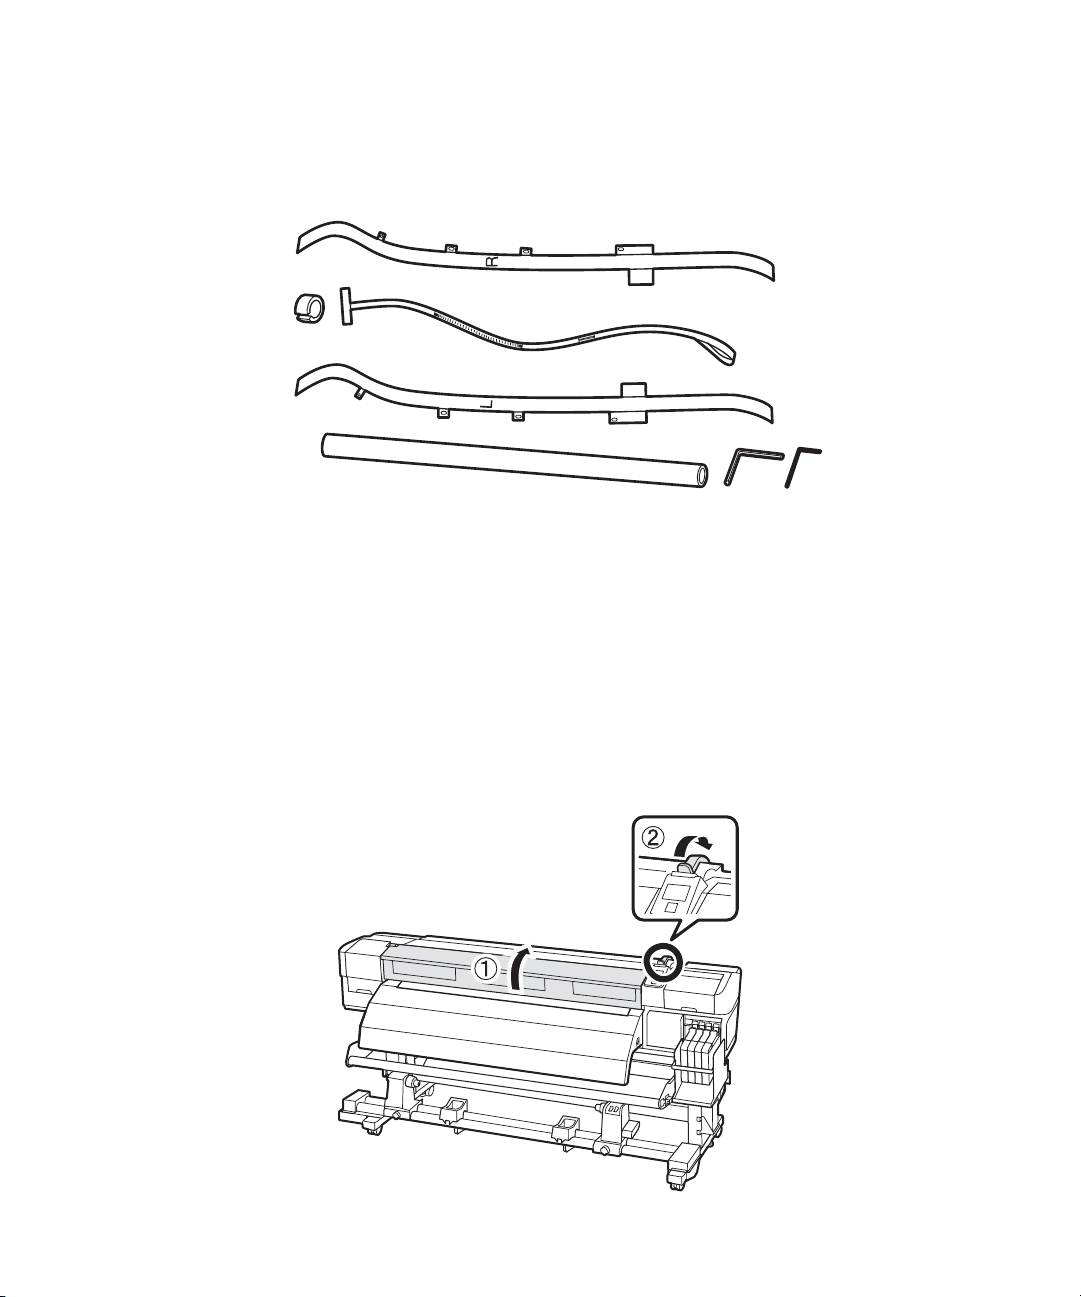
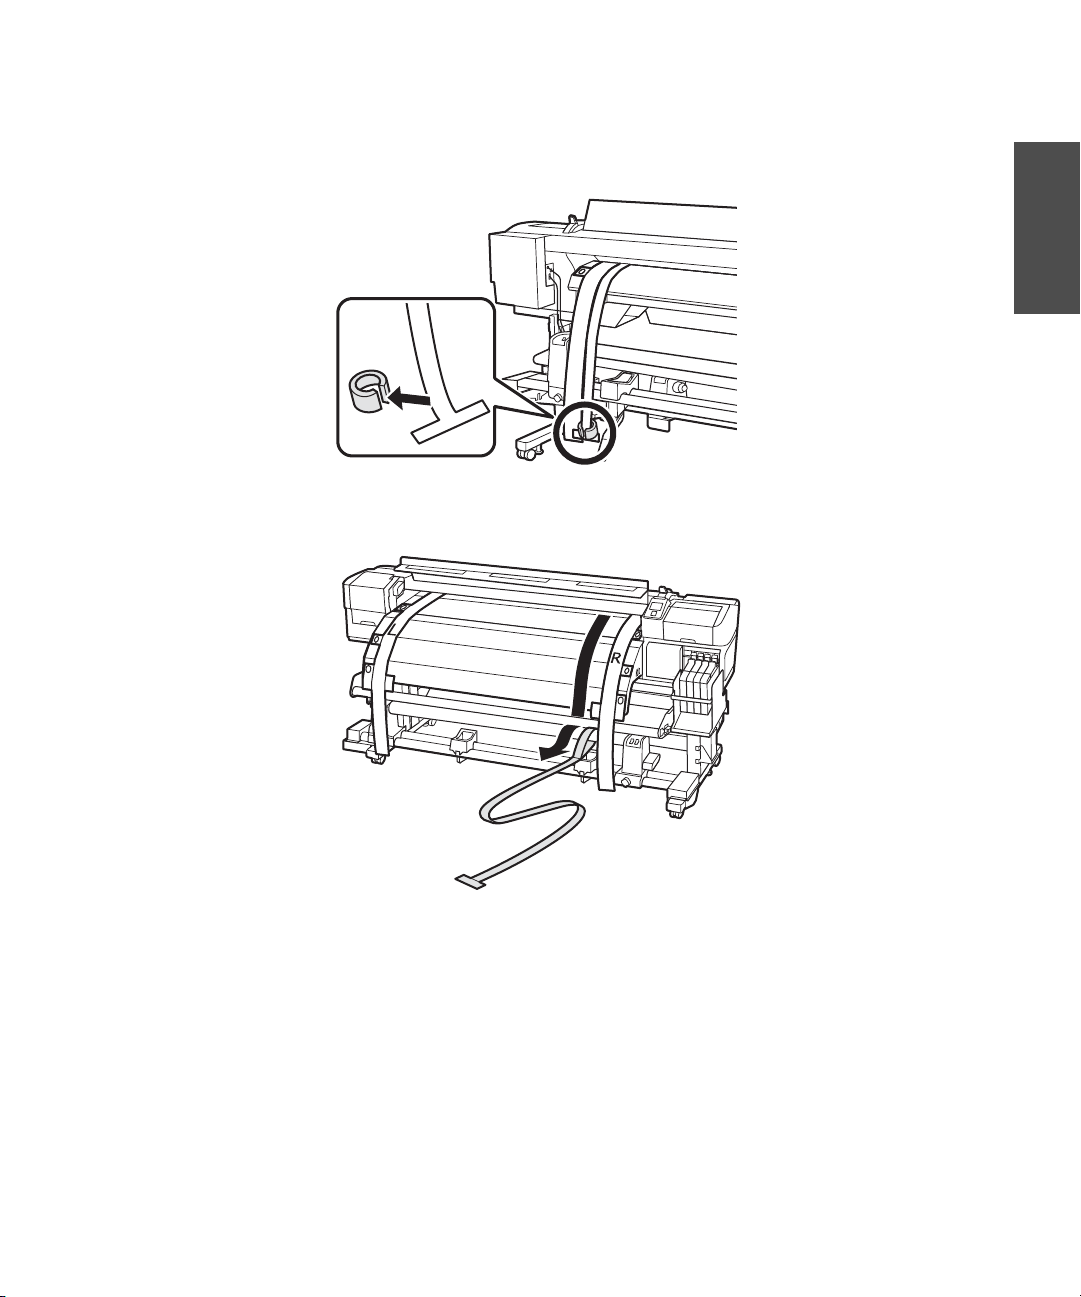
You can use the adjustment paper included with the printer, as described in the User’s Guide or the new
adjustment guides and alignment tool (shown below), as described in this booklet.
Right adjustment guide
Counterweight
Alignment tool
Left adjustment guide
Roll core
Hexagon wrenches
Before you begin the parallel adjustment procedure, make sure the printer is leveled and on a level surface.
Carefully unroll the adjustment guides.
Adjusting the Media Feeding Unit
Two people are required for parallel adjustment, one in front of the printer, and one in back. Make sure
the printer is off before you begin.
1. Open the front cover and push back the media loading lever.
Page 5
Adjusting the Media Feeding Unit | 5
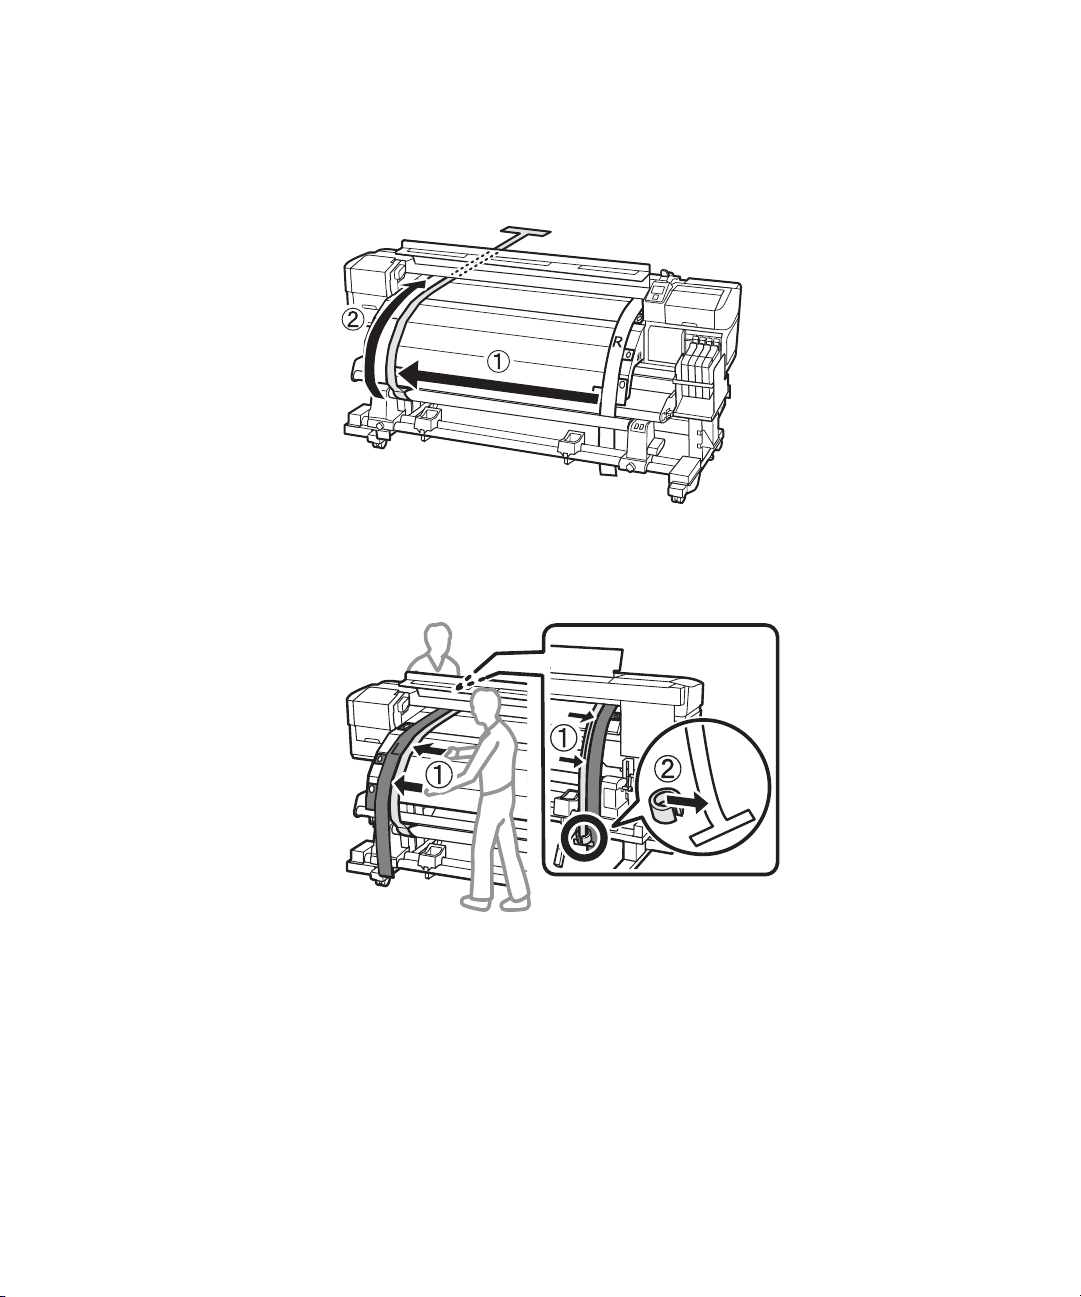
2. On the back of the printer, use the large hexagon wrench to loosen the four fixing screws as shown:
English
3. From the back of the printer, feed the left and right adjustment guides through the paper path.
Page 6
6 | Adjusting the Media Feeding Unit
4. Place the tabs over the screws at the back of the printer and remove the backing to secure the tabs.
Note: The adhesive does not damage the heating unit.
Page 7

Adjusting the Media Feeding Unit | 7
5. Place the tabs over the screws at the front of the printer and attach them as shown:
English
Page 8
8 | Adjusting the Media Feeding Unit
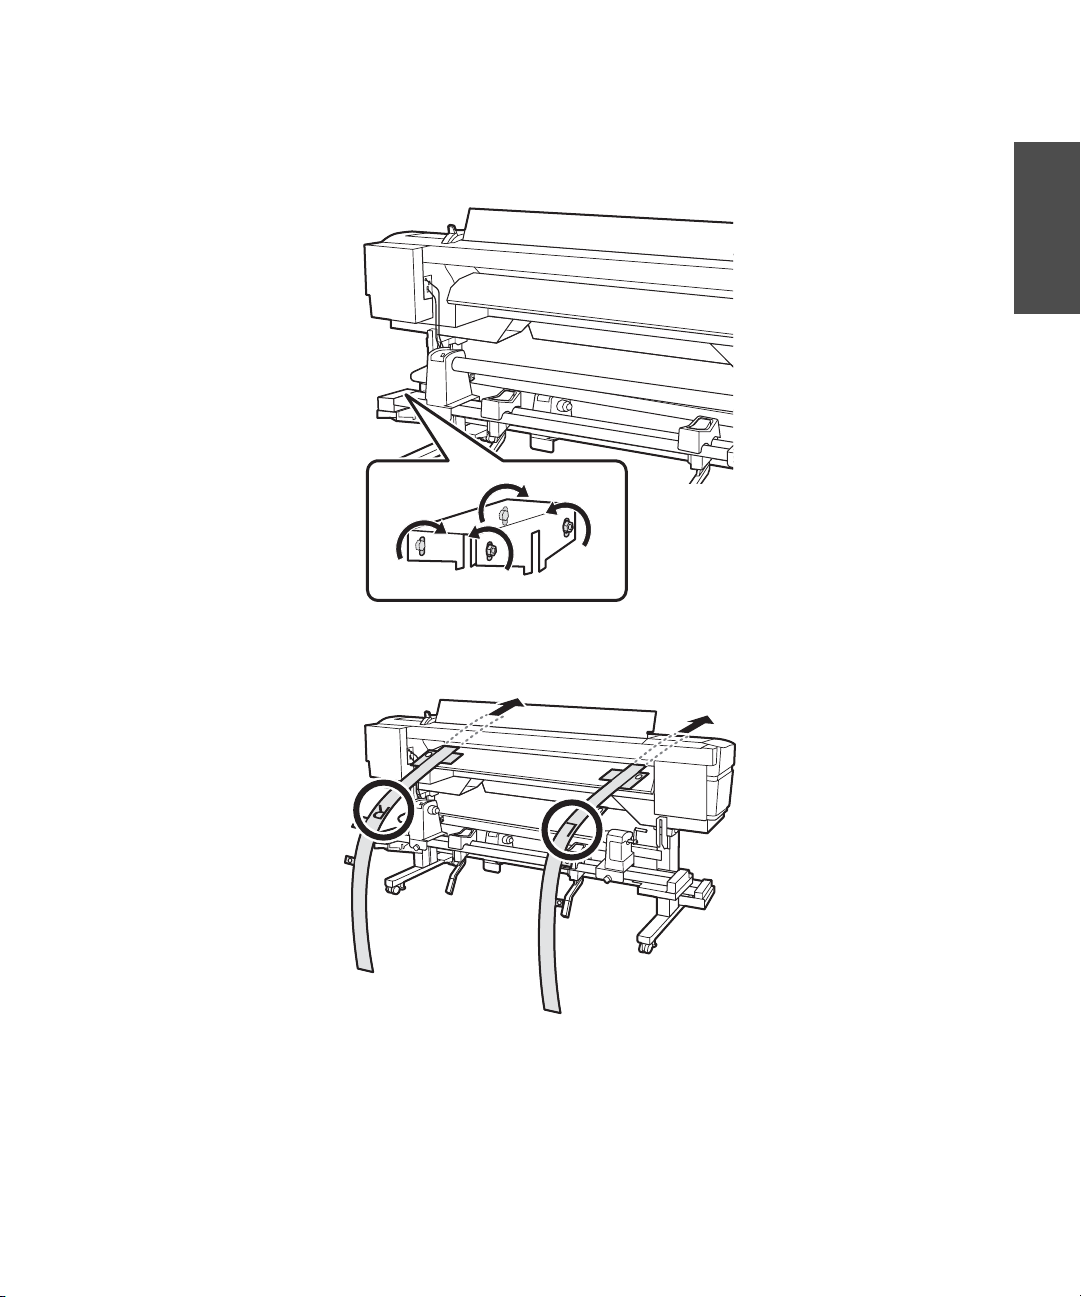
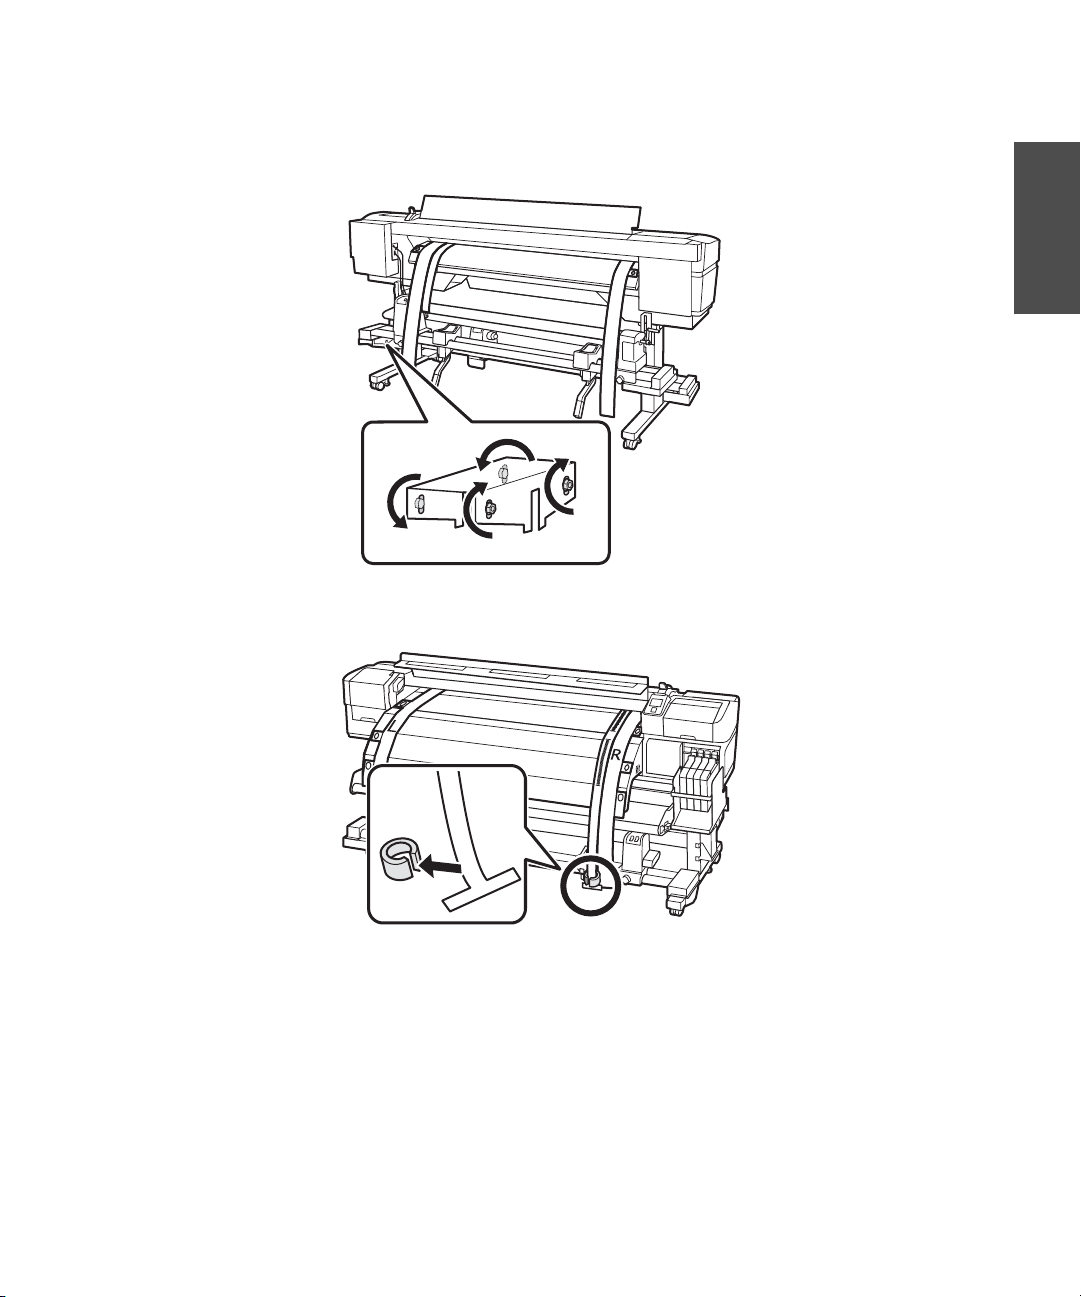
6. At the back of the printer, loosen the roll holder fixing screws and align the left side of the roll holder
with the left side of the printer as shown. Then tighten the roll holder fixing screw to secure it in place.
7. Adjust the right roll holder so that the distance between the two is wider than the roll core.
Page 9
Adjusting the Media Feeding Unit | 9
Note: If the roll holder handle shaft is pushed in, rotate the handle toward you (counterclockwise) until it
stops.
Slide the roll core into the loop at the end of the alignment tool.
8.
English
Page 10
10 | Adjusting the Media Feeding Unit
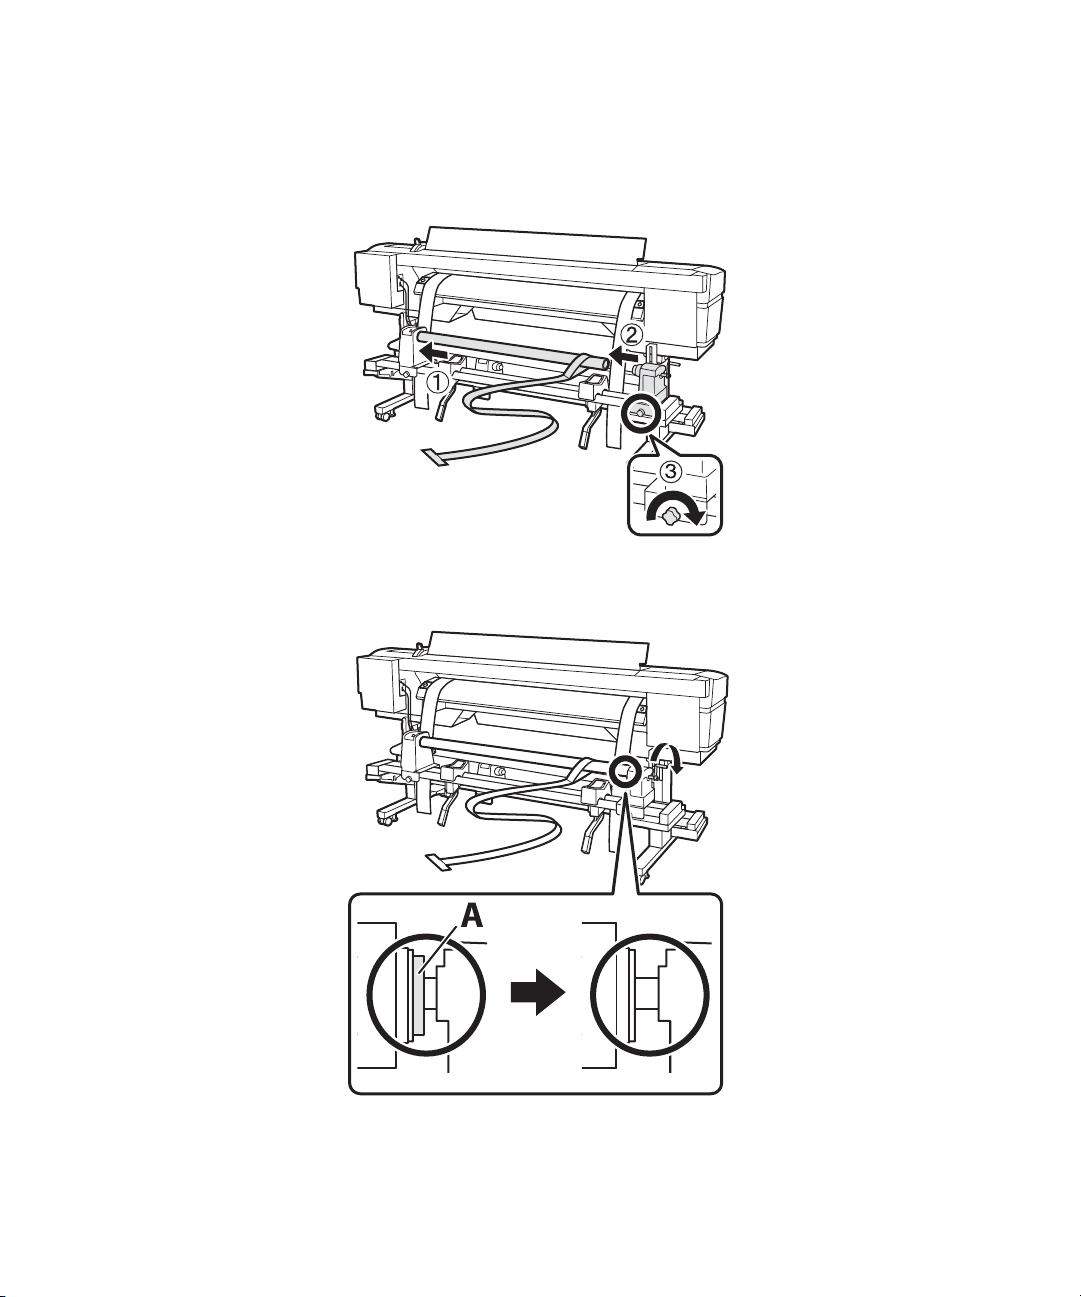
9. Insert the roll core with the alignment tool into the left roll holder. Then insert the right roll holder
into the roll core and tighten the roll holder fixing screw.
10. Rotate the handle until part A in the illustration below is fully inserted as shown:
Page 11
Adjusting the Media Feeding Unit | 11
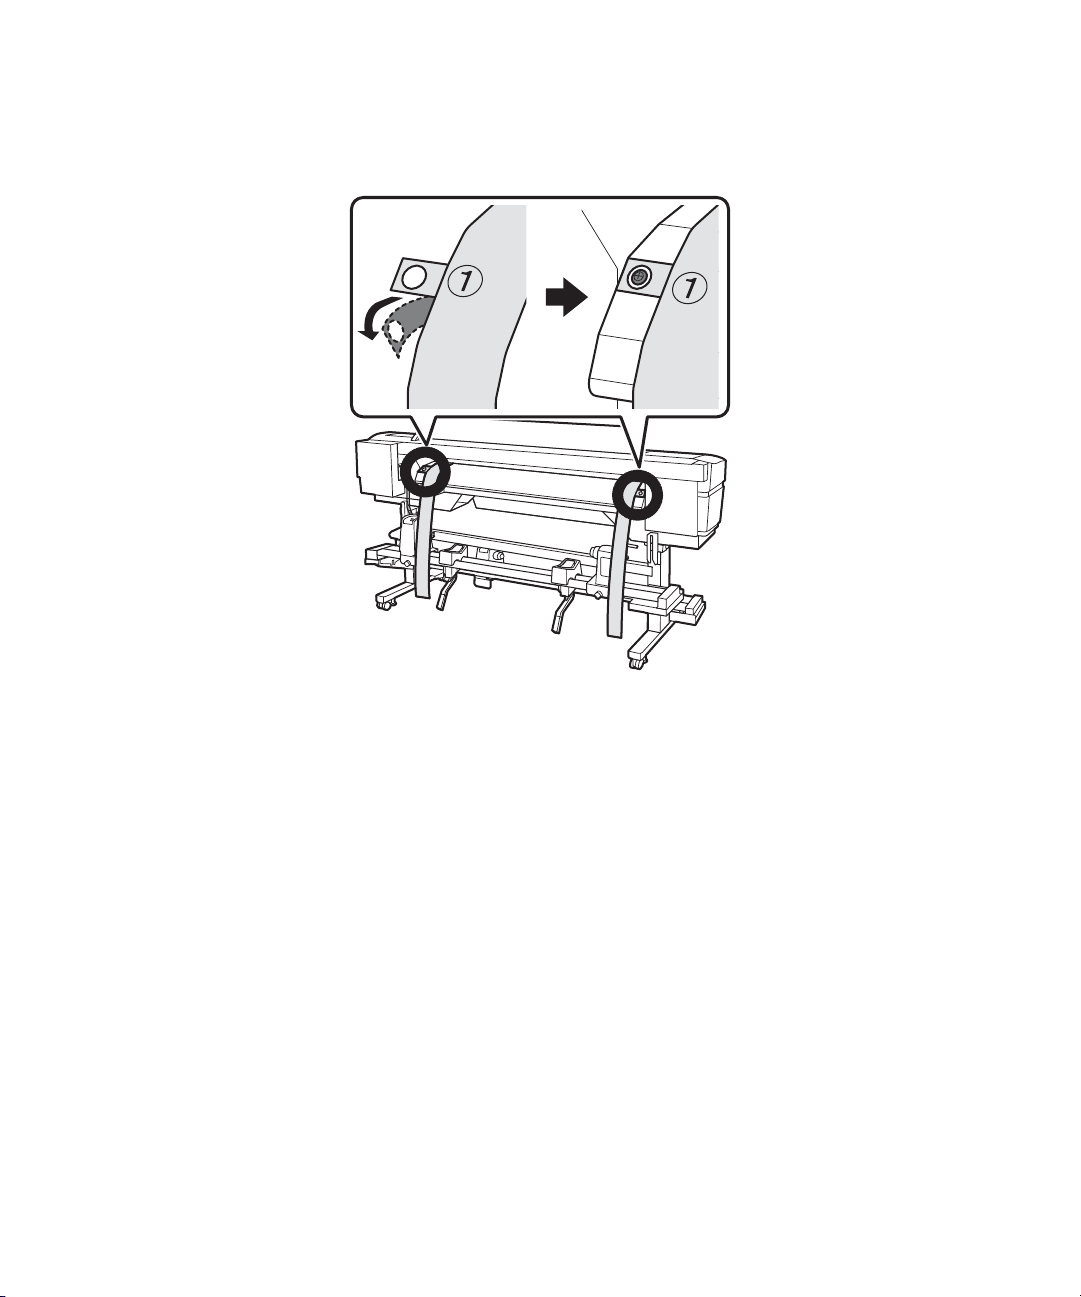
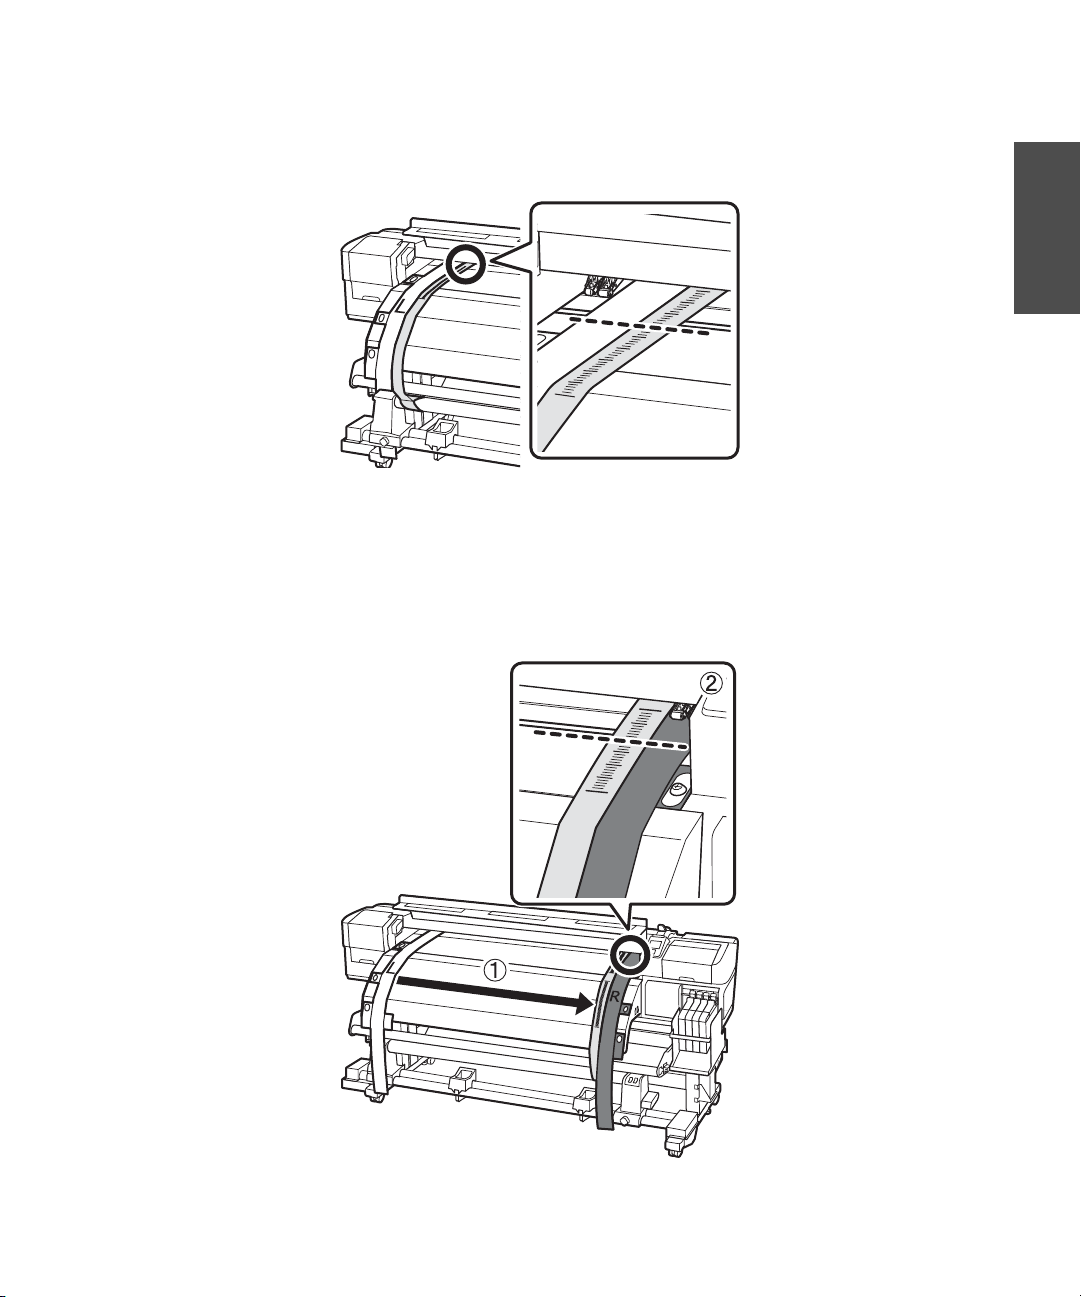
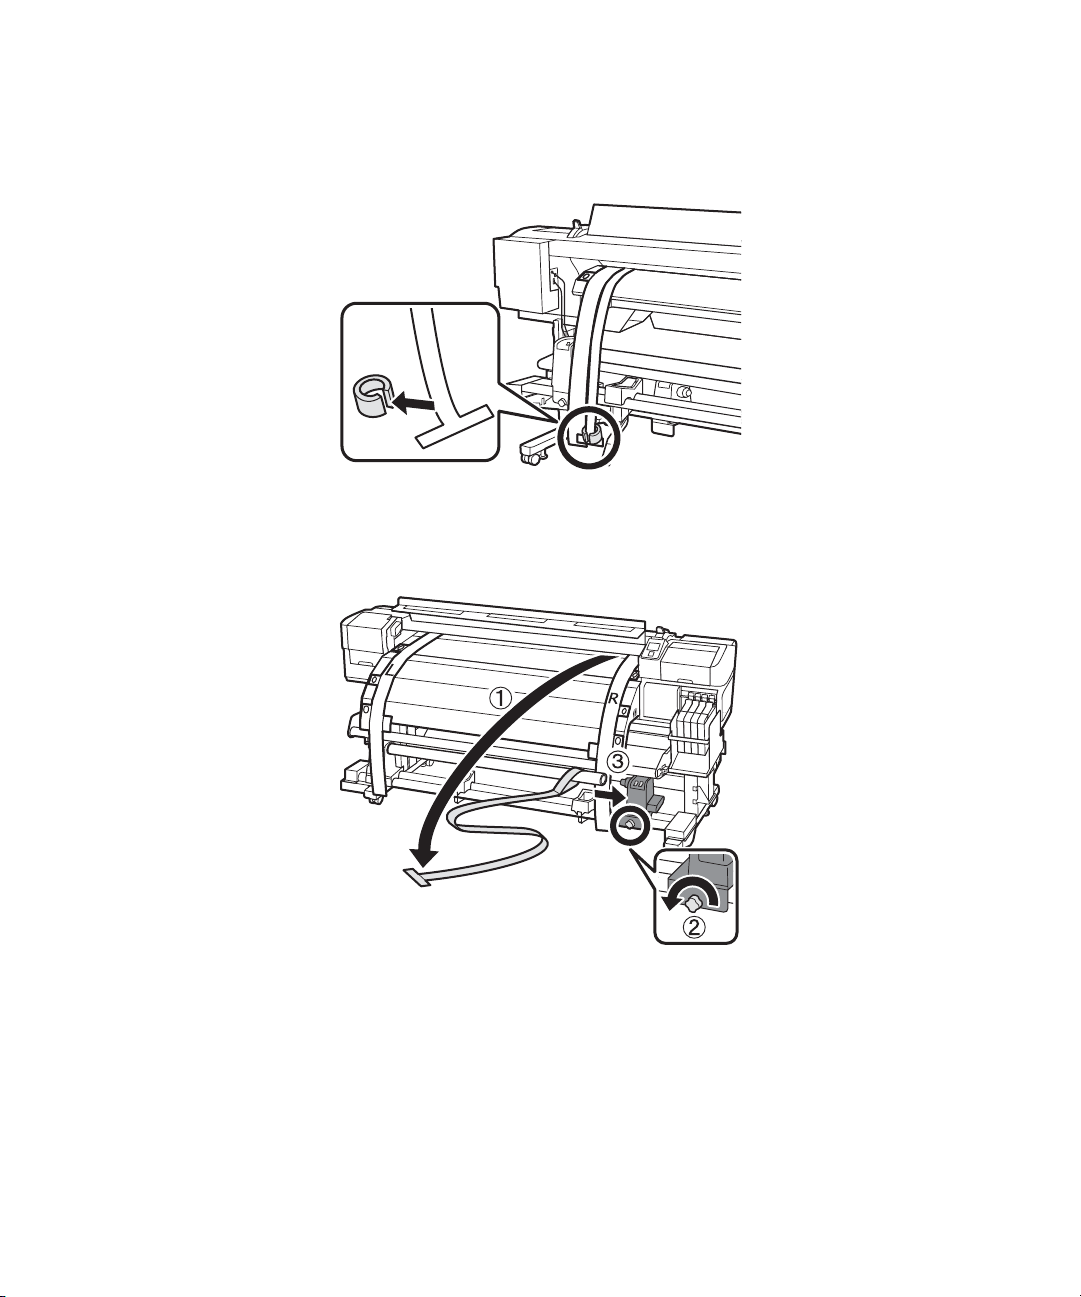
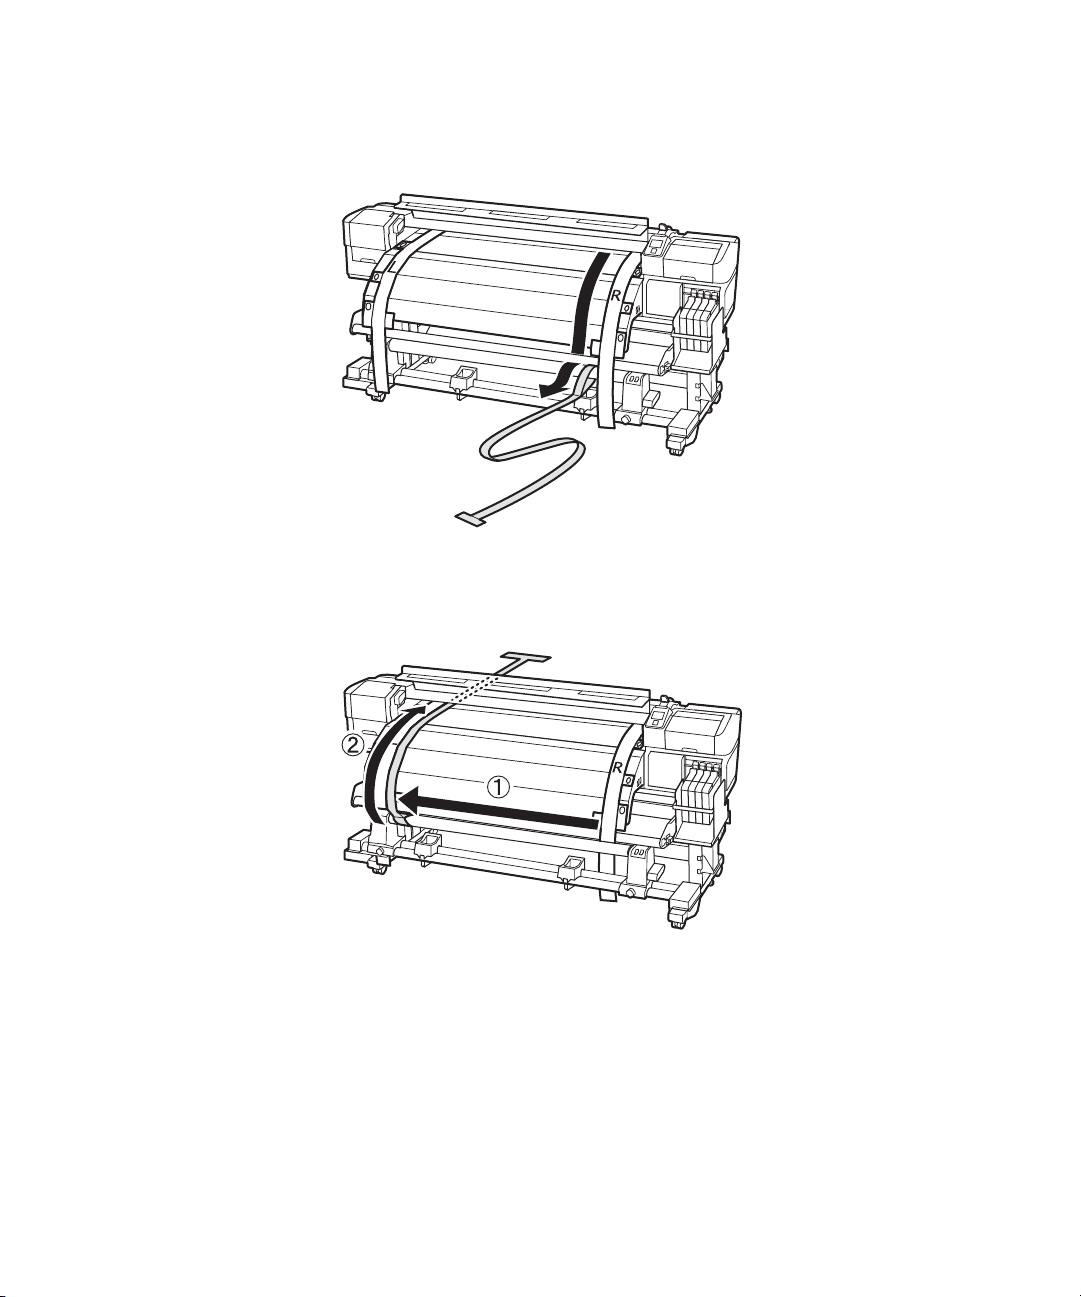
11. Feed the alignment tool into the printer.
12. Place the alignment tool next to the left adjustment guide and line them up at the front and back of
the printer.
English
Page 12
12 | Adjusting the Media Feeding Unit
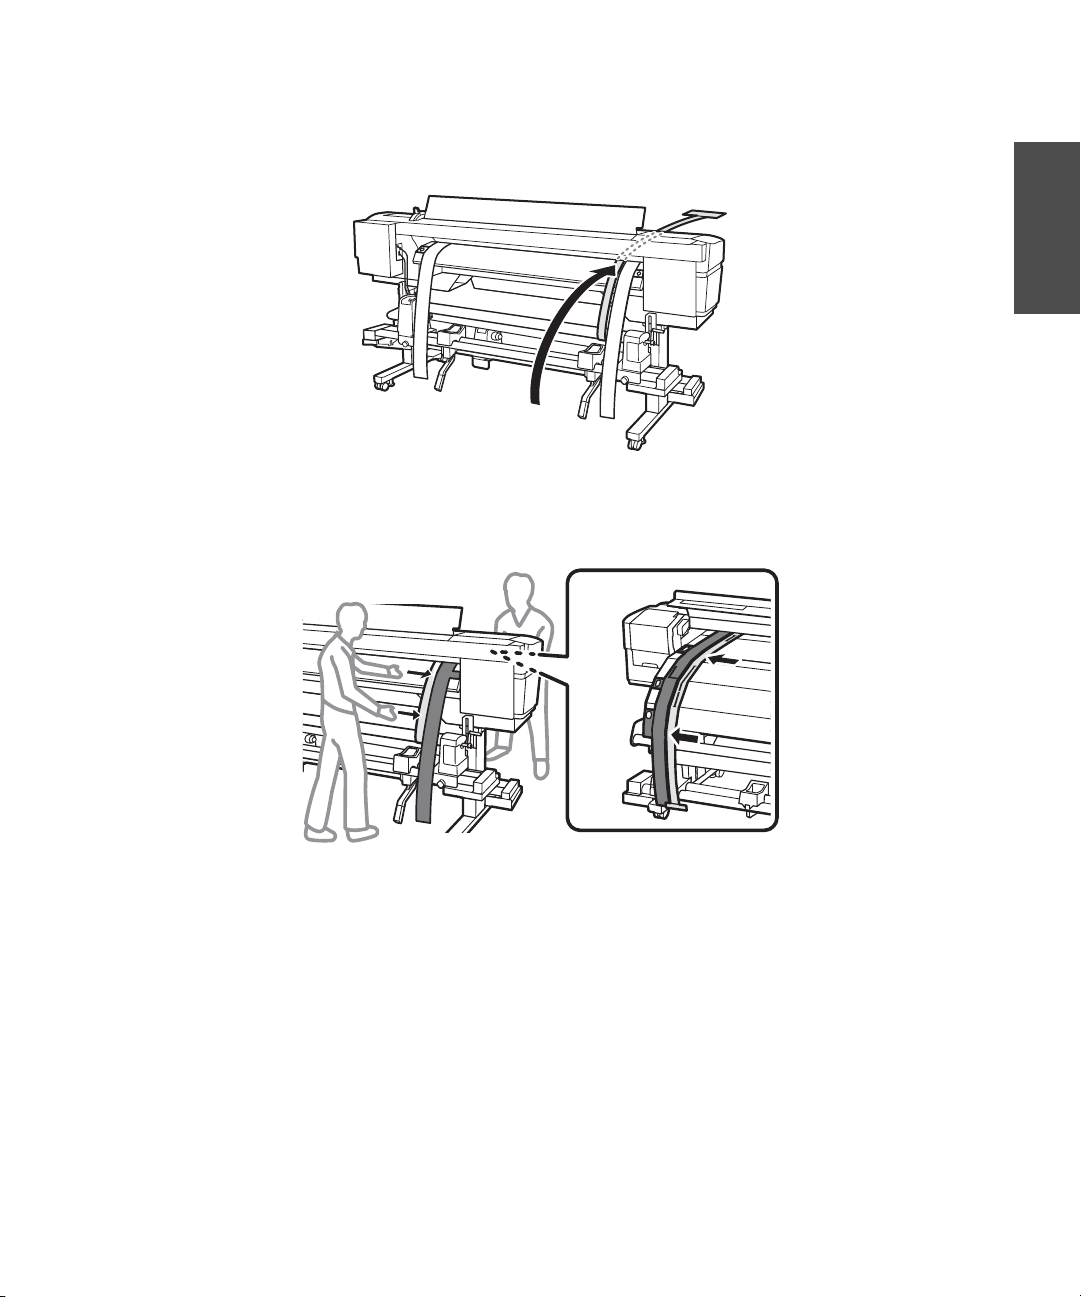
13. Attach the counterweight to the alignment tool to keep it stretched taut. Note the location where it
crosses the front of the white line on the platen.
Page 13

Adjusting the Media Feeding Unit | 13
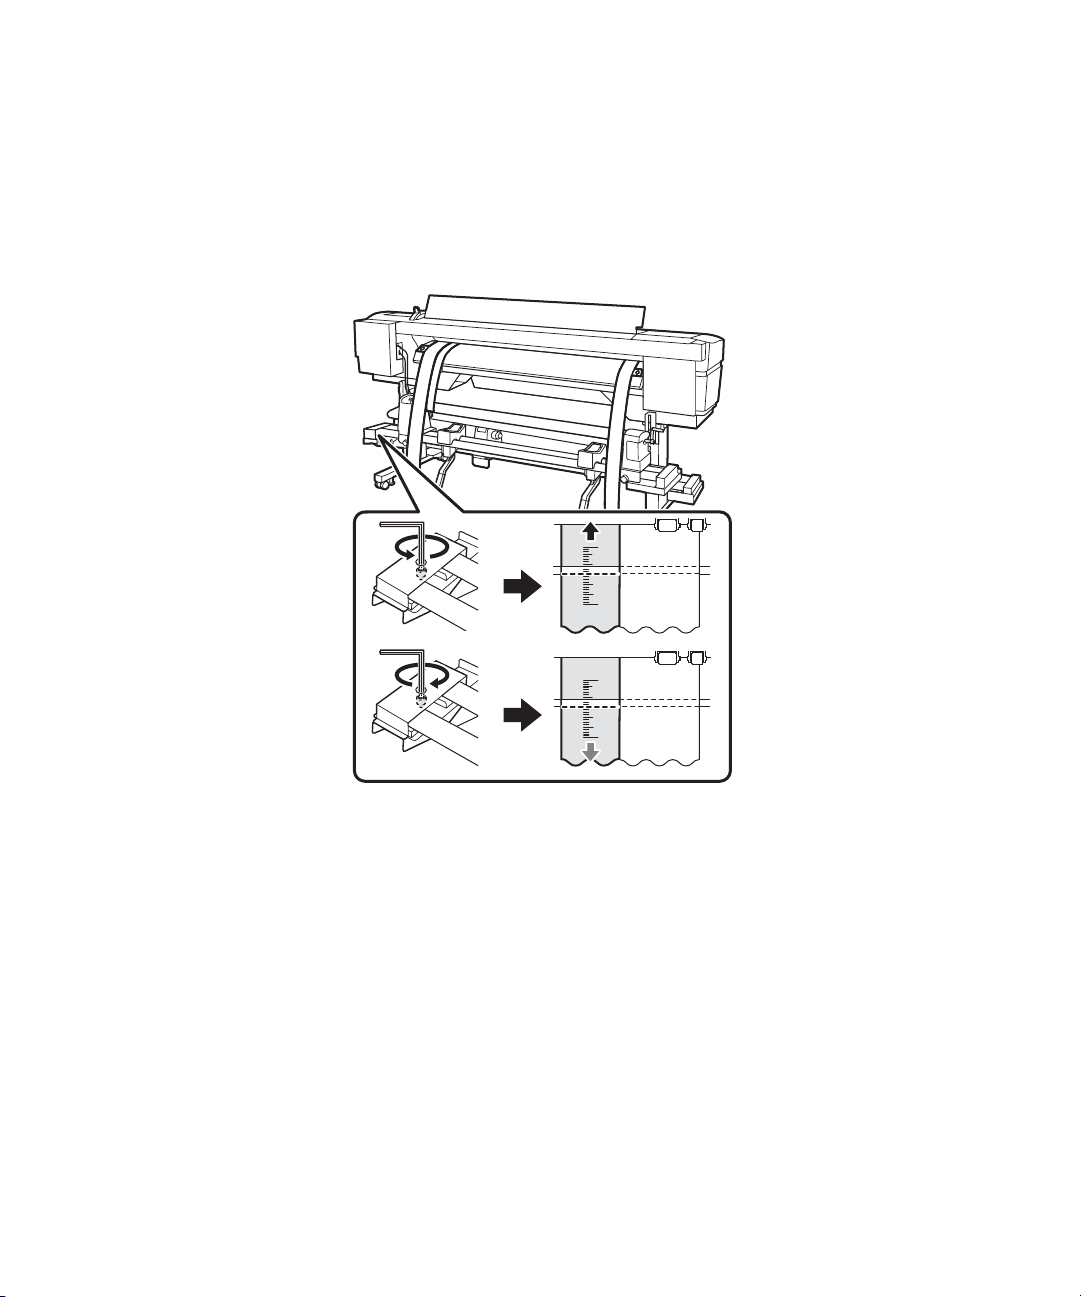
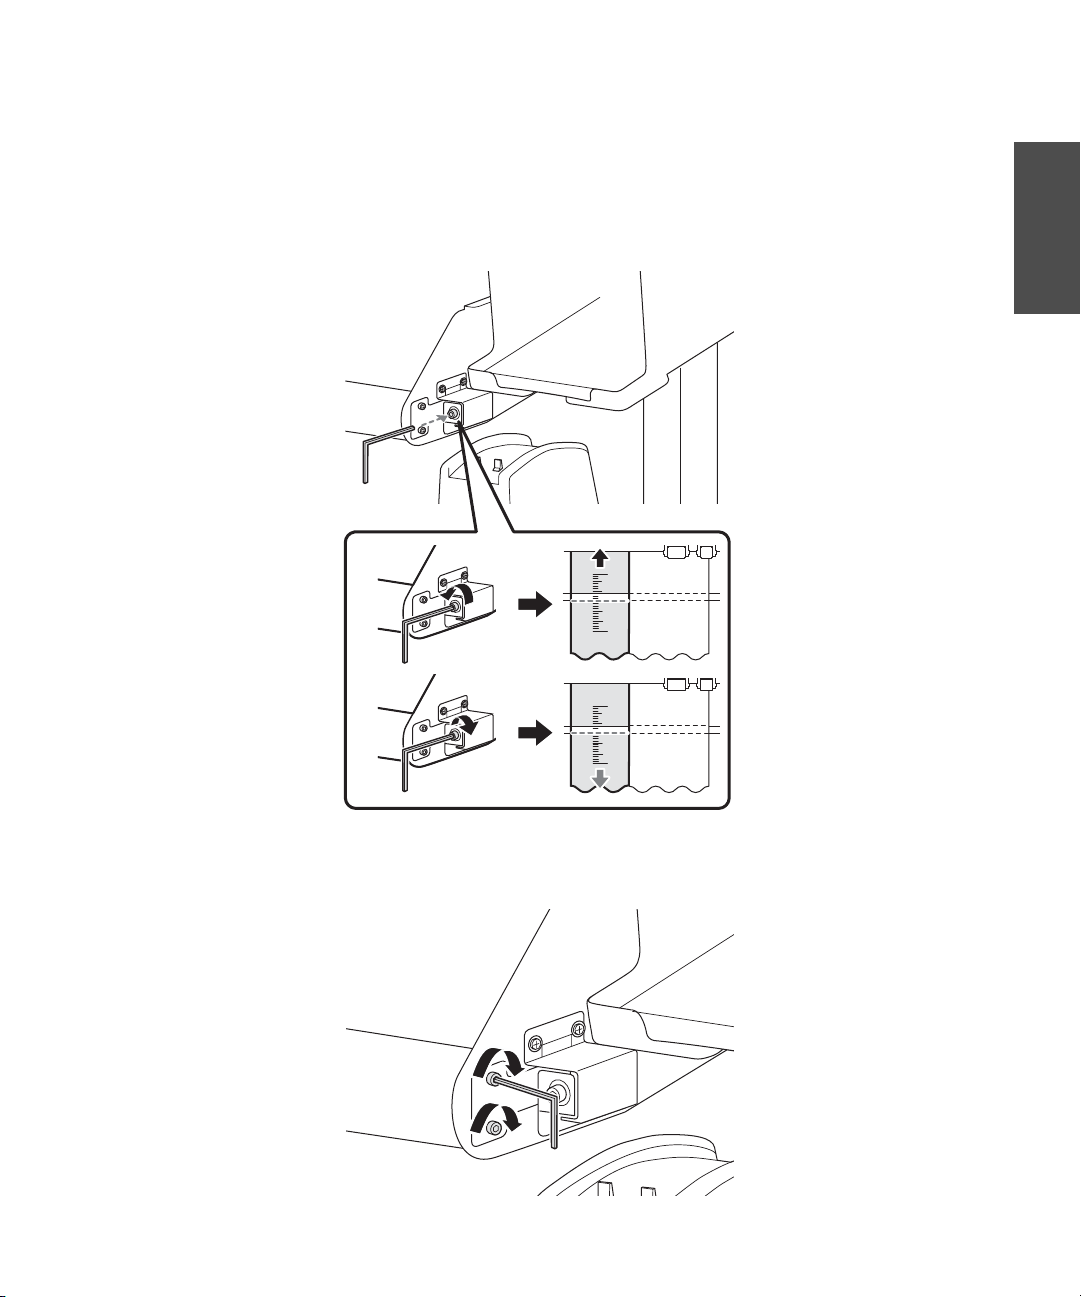
14. Lift up the alignment tool and slide it to the other side of the printer, next to the right adjustment
guide. Line up the alignment tool and the adjustment guide at the front and back of the printer.
Note the location where the alignment tool crosses the front of the white line on the platen. If the
location is different from the left side, go to step 15. If they are the same, go to step 16.
English
Page 14
14 | Adjusting the Media Feeding Unit
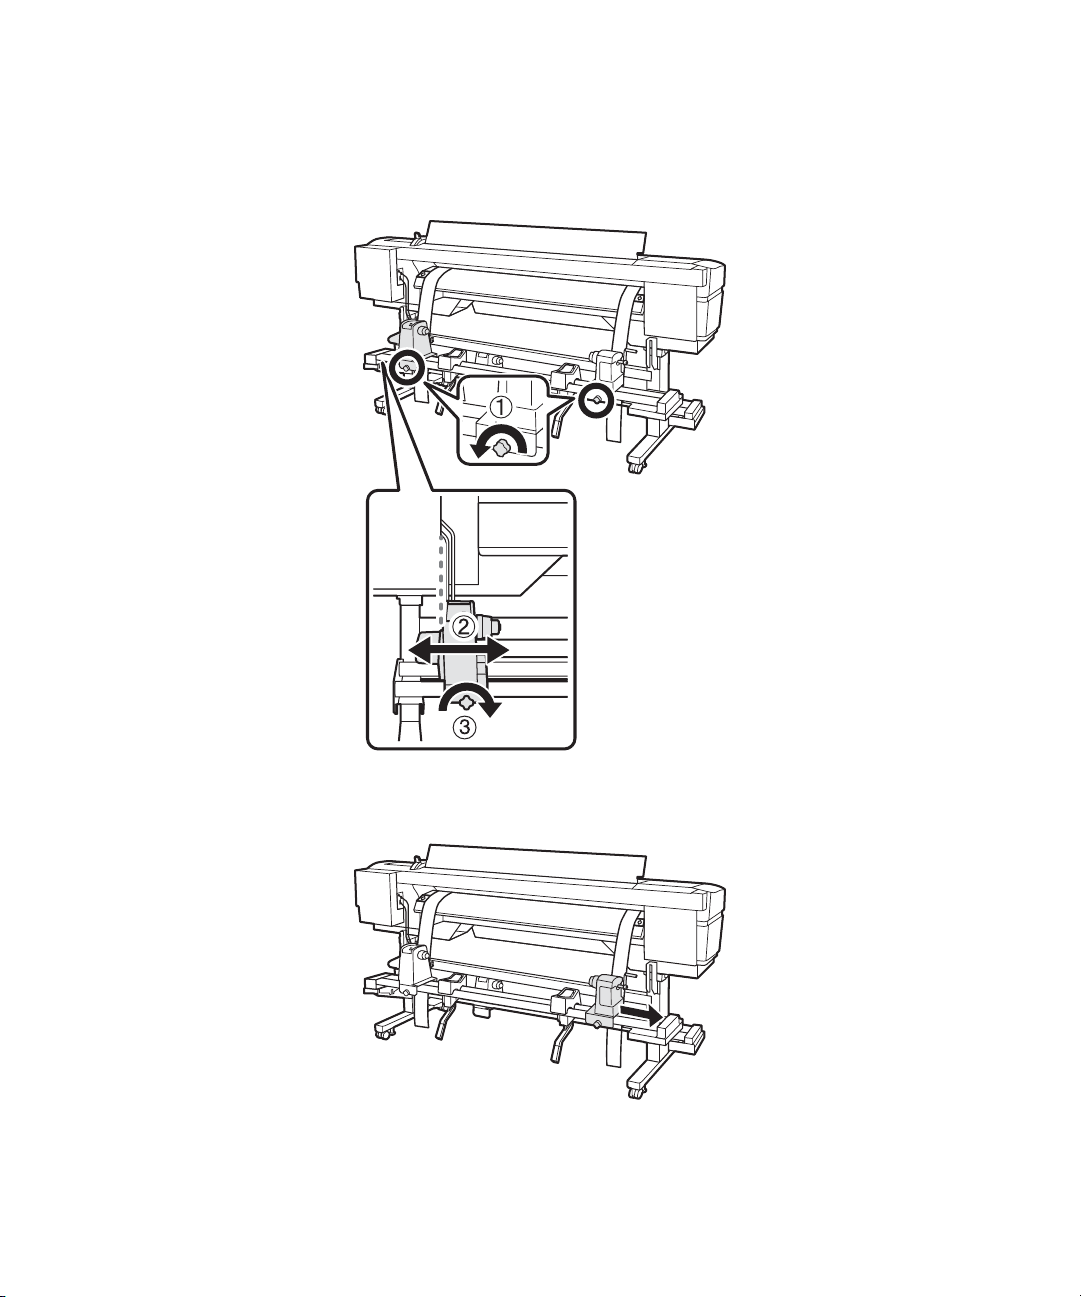
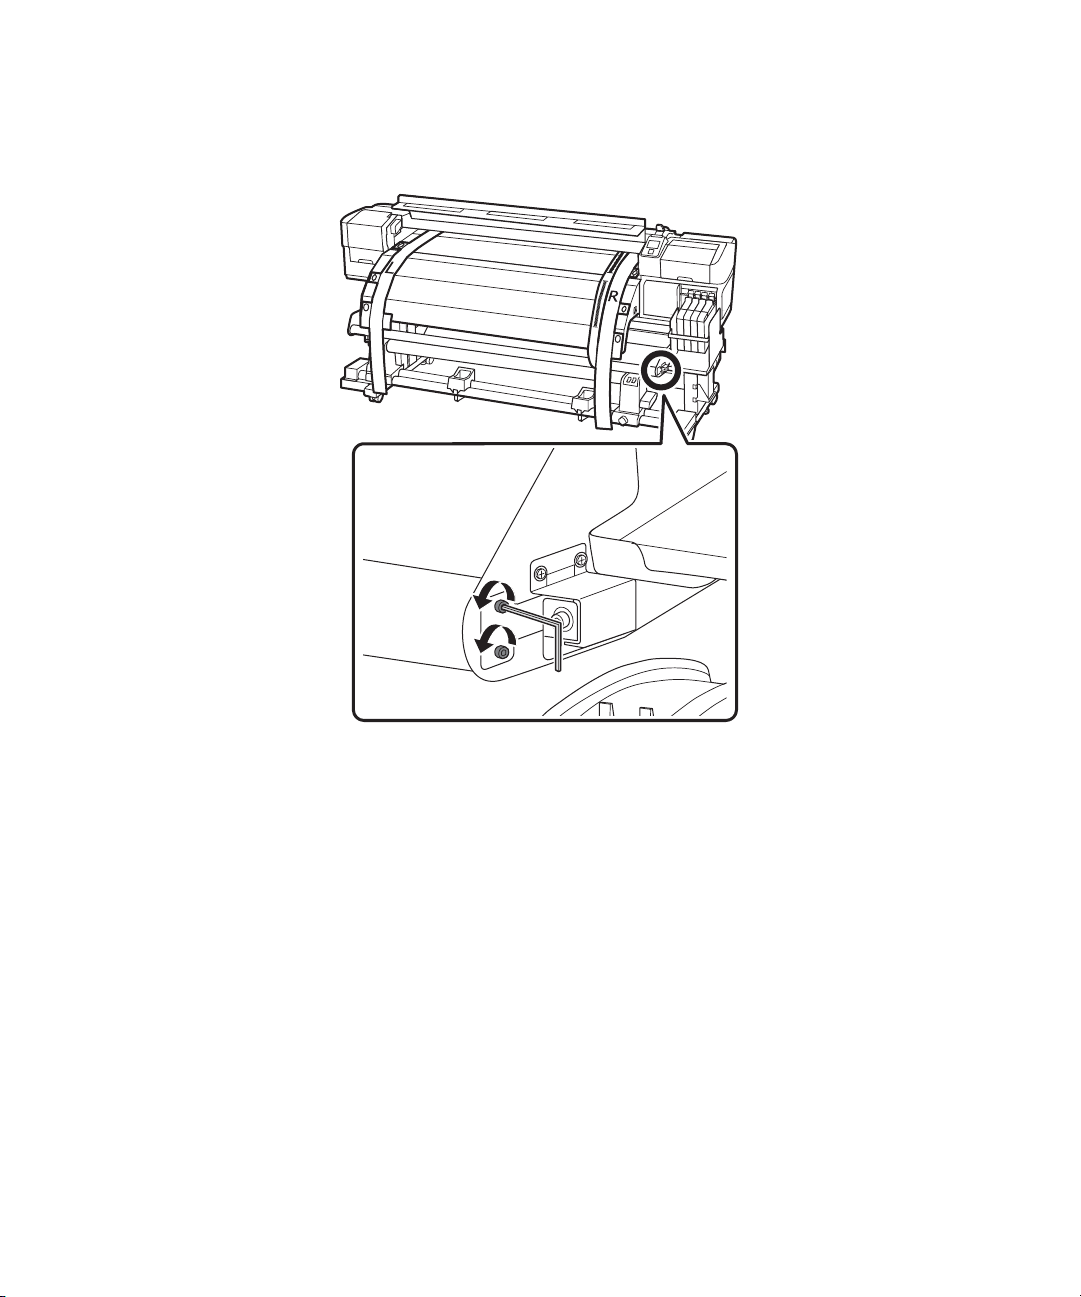
15. Make sure all four of the mounting screws are loose. To make adjustments, have a person at the back
of the printer turn the silver adjustment screw. Turn the screw counterclockwise to move the line
back, and turn it clockwise to move the line forward. The line will move approximately 1 mm with
each turn of the screw. Continue to turn the silver adjustment screw until the measurements are the
same.
Page 15
Adjusting the Media Feeding Unit | 15
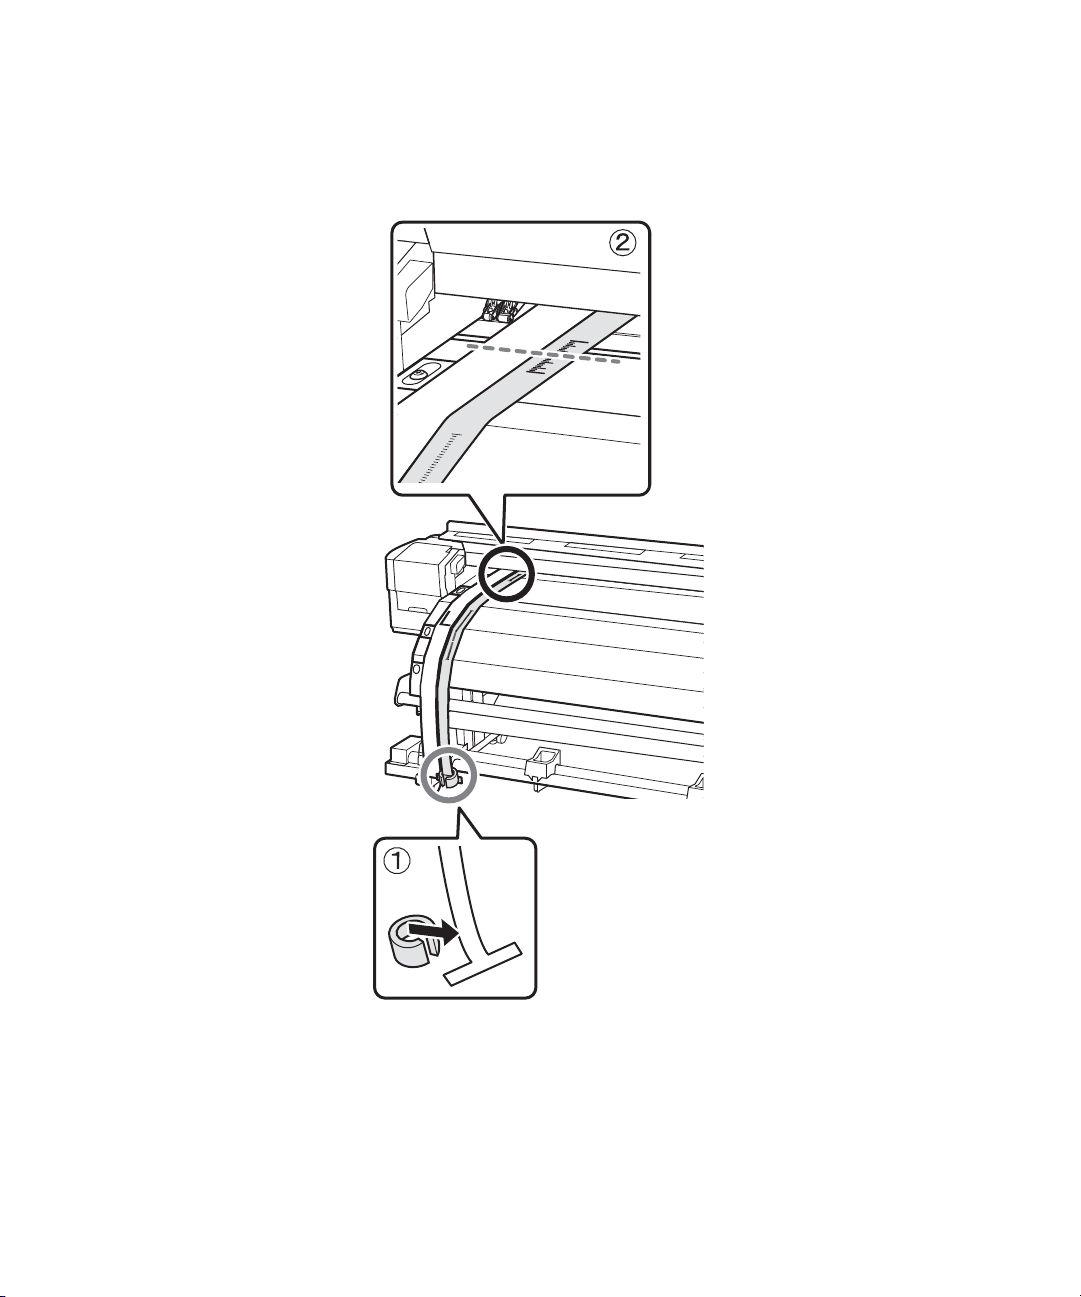
16. Use the large hexagon wrench to fully tighten all four of the mounting screws.
17. At the front of the printer, remove the counterweight from the alignment tool.
English
Page 16
16 | Adjusting the Media Feeding Unit
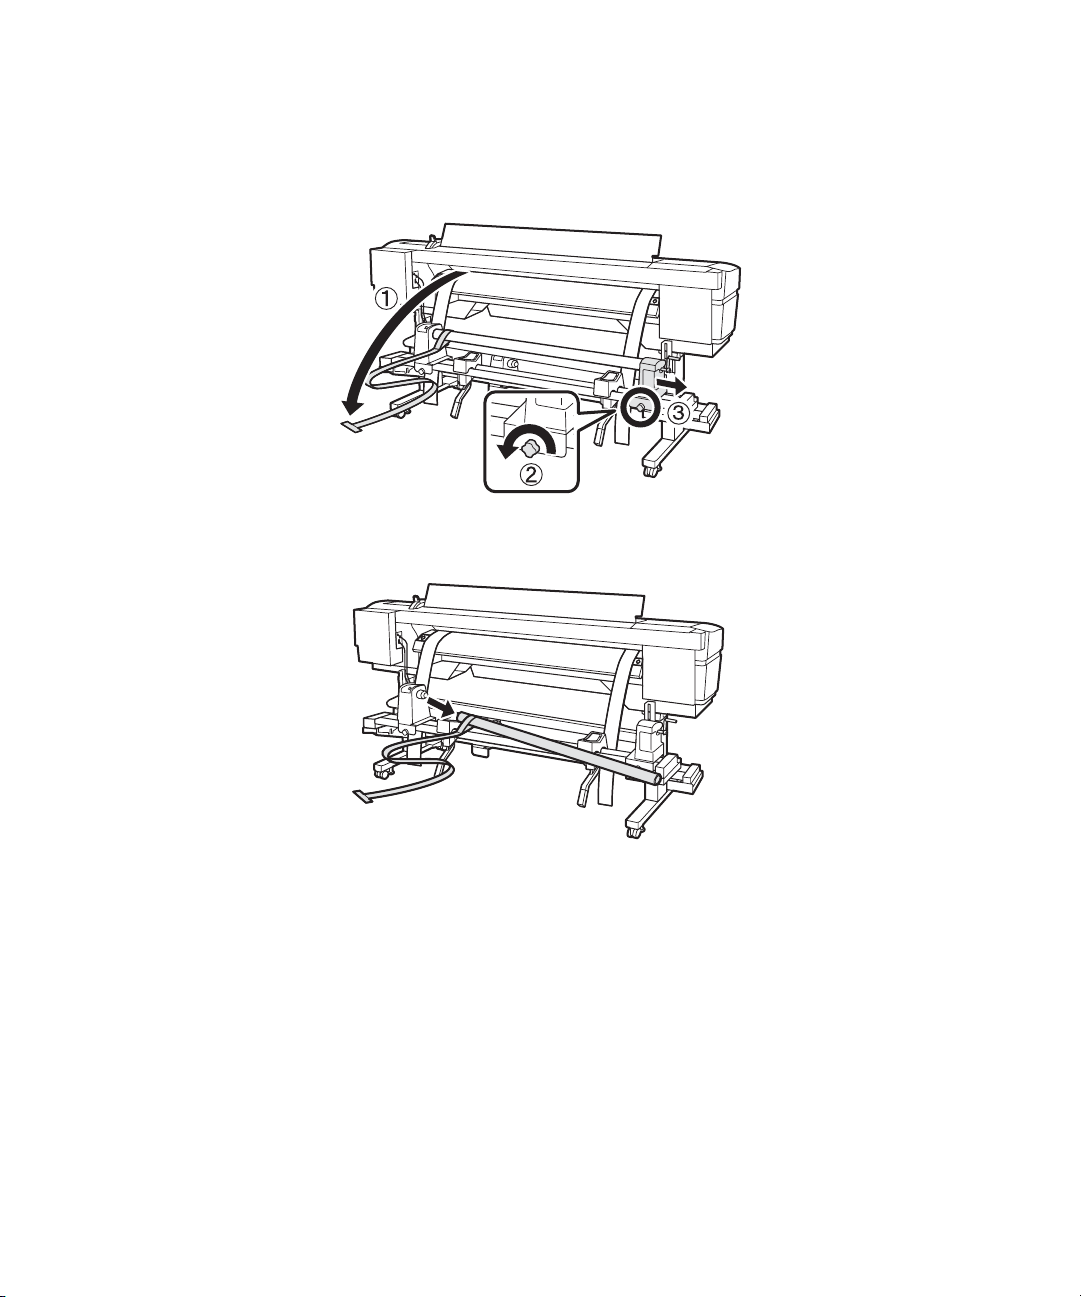
18. From the back of the printer, remove the alignment tool. Then loosen the right roll holder fixing
screw and slide out the right roll holder.
19. Remove the roll core and the alignment tool.
Page 17
Adjusting the Take-up Reel | 17
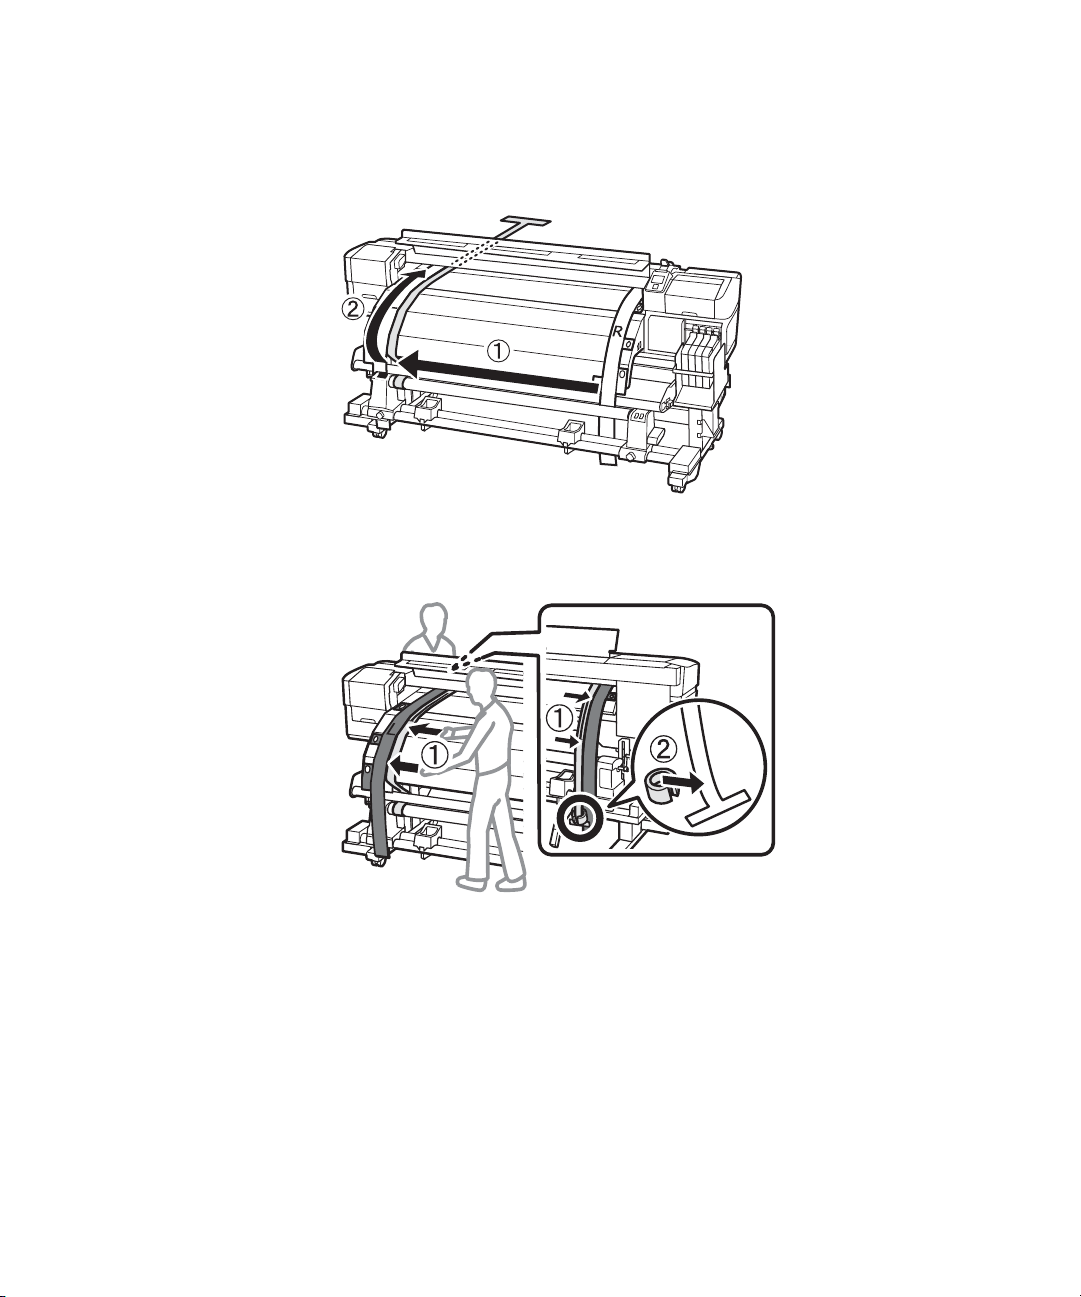
Adjusting the Take-up Reel
Once you have adjusted the media feeding unit, you need to perform a similar procedure on the take-up
reel unit. Two people are required, one in front of the printer and one in back.
1. Use the large hexagon wrench to loosen the four fixing screws on the front of the printer as shown:
English
Page 18
18 | Adjusting the Take-up Reel
2. Loosen the roll core holder locking screws and move the left roll core holder all the way to the left.
Align the inside edge of the right roll core holder with the outside edge of the after heater, then tighten
the right roll core holder locking screw.
Note: If the left roll core handle shaft is pushed in, rotate the handle until it stops.
Page 19
Adjusting the Take-up Reel | 19
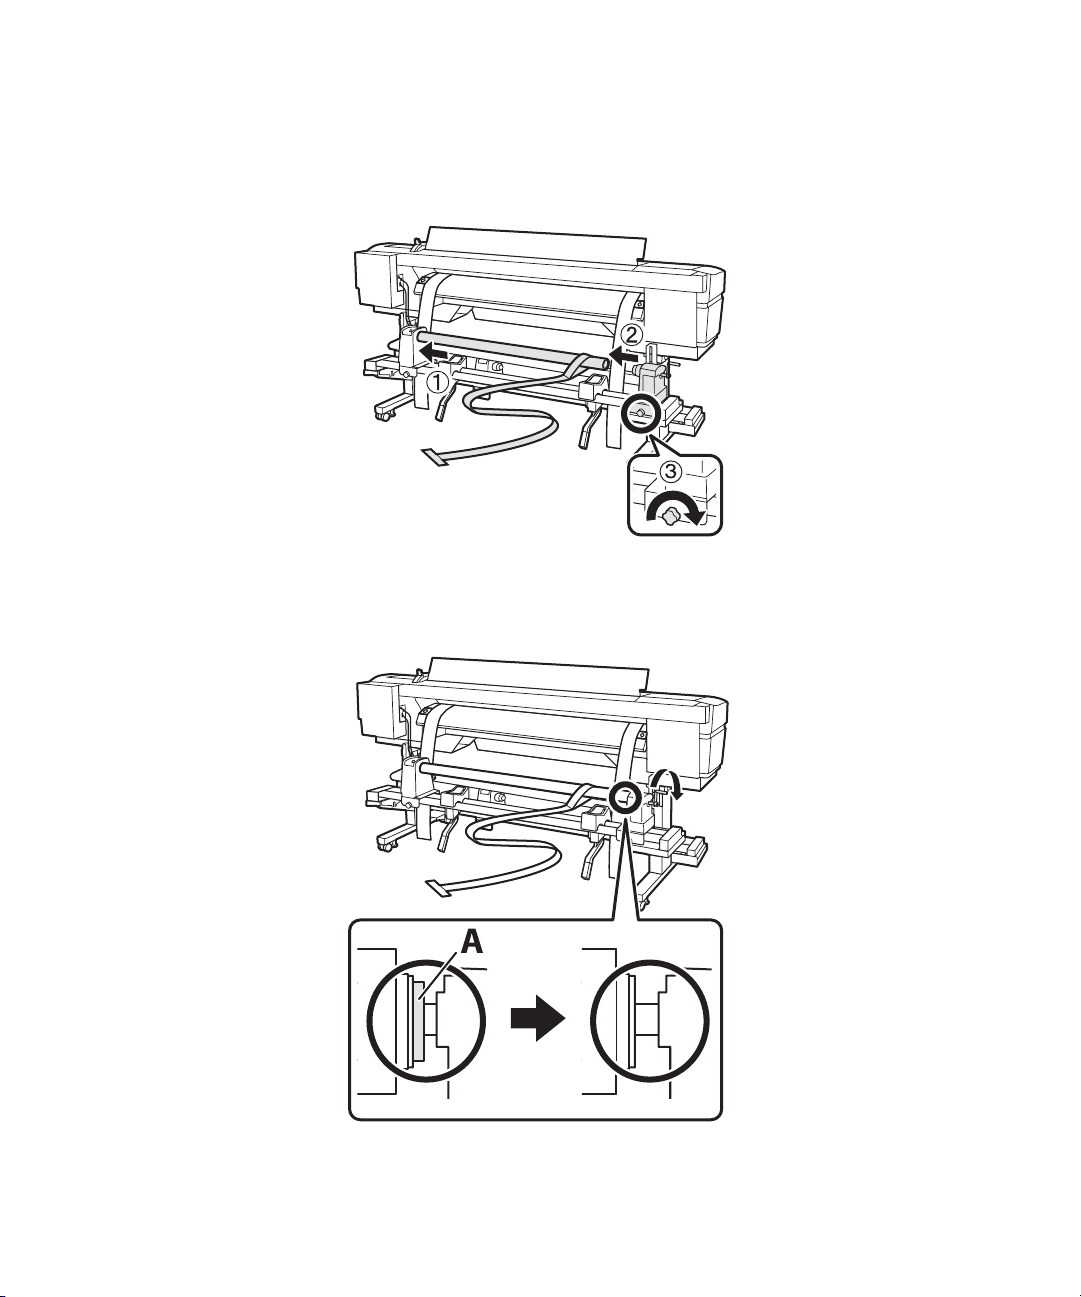
3. Insert the roll core with the alignment tool into the right roll holder. Then insert the left roll core
holder into the roll core and tighten the roll core holder locking screw.
4. Rotate the handle until part A in the illustration below is fully inserted as shown:
English
Page 20
20 | Adjusting the Take-up Reel
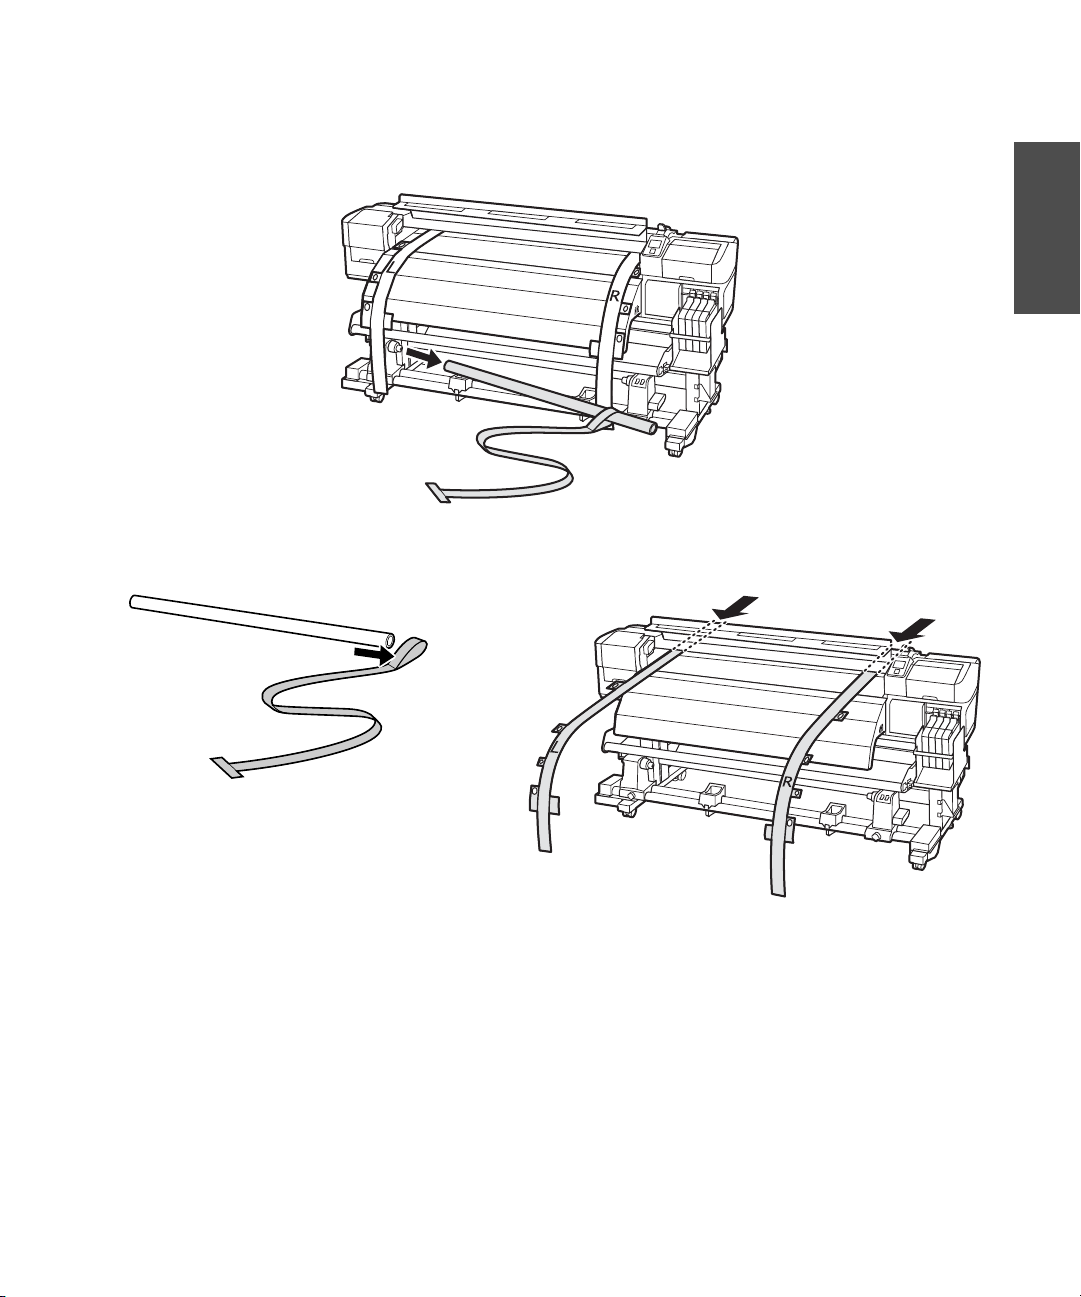
5. Move the alignment tool to the left side and feed it through the paper path between the media guide
bar and the after heater.
6. Place the alignment tool next to the left adjustment guide and line them up at the front and back of
the printer. Then attach the counterweight to the alignment tool.
Page 21

Adjusting the Take-up Reel | 21
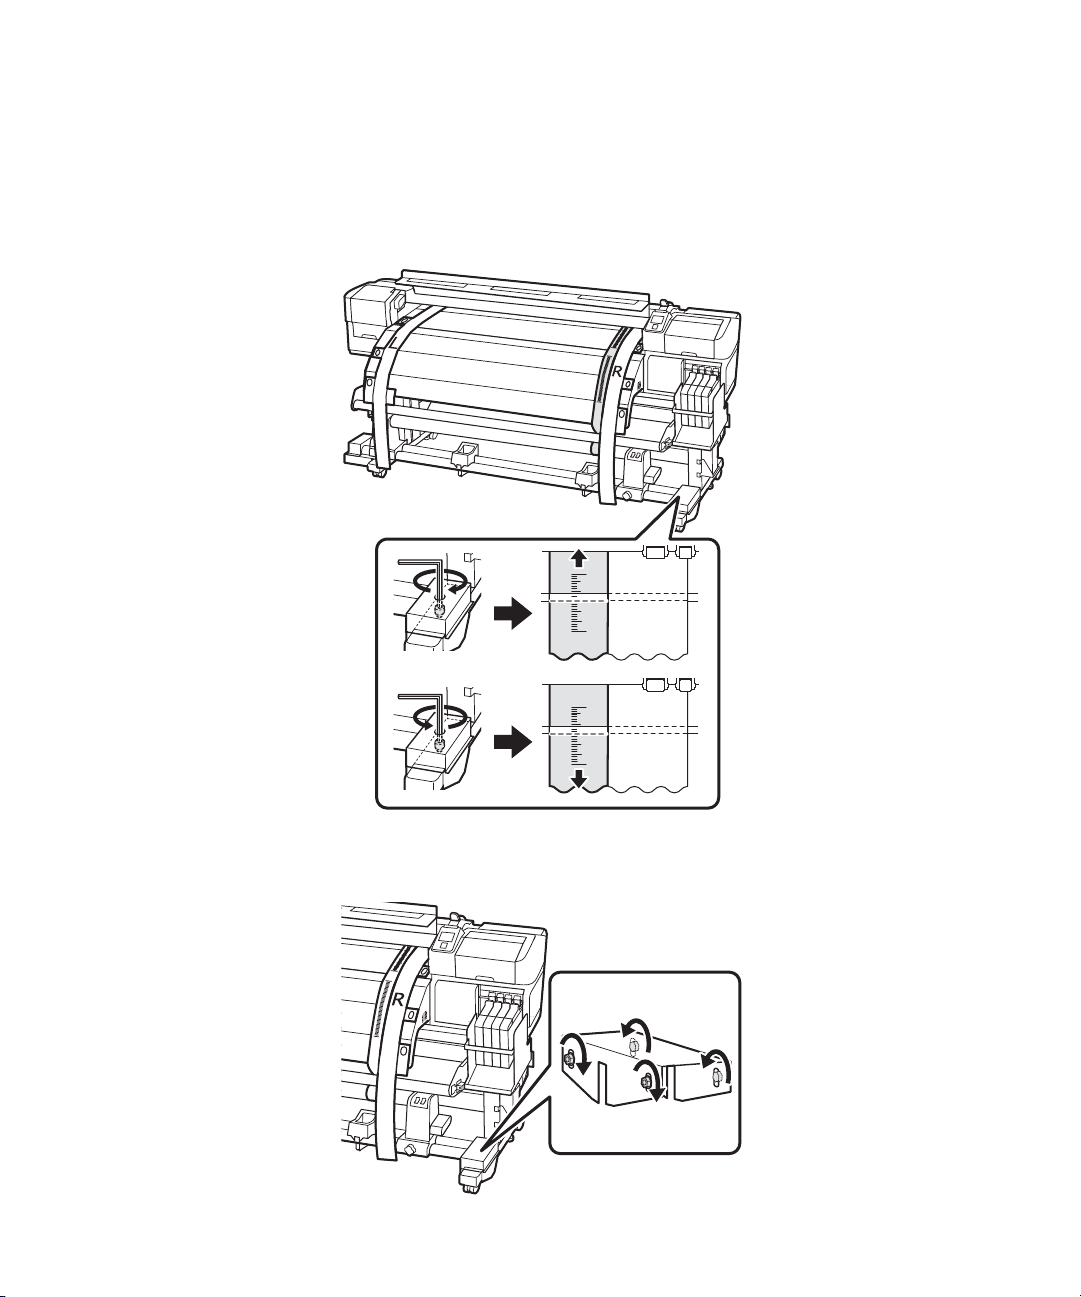
7. Note the location where the alignment tool crosses the front of the white line on the platen.
8. Lift up the alignment tool and slide it to the other side of the printer, next to the right adjustment
guide. Line up the alignment tool and the adjustment guide at the front and back of the printer.
Note the location where the alignment tool crosses the front of the white line on the platen. If the
location is different from the left side, go to step 9. If they are the same, go to step 10.
English
Page 22
22 | Adjusting the Take-up Reel
9. Make sure all four of the mounting screws are loose. To make adjustments, use the large hexagon
wrench to turn the adjustment screw counterclockwise to move the line back, and turn it clockwise to
move the line forward. The line will move approximately 1 mm with each turn of the screw. Continue
to turn the silver adjustment screw until the measurements are the same.
10. Fully tighten all four of the screws on the right bracket to secure it in place.
Page 23
11. At the back of the printer, remove the counterweight.
12. At the front of the printer, remove the alignment tool.
Adjusting the Take-up Reel | 23
English
Page 24
24 | Adjusting the Take-up Reel
13. Move the alignment tool to the left side and feed it through the paper path between the media guide
bar and the after heater.
14. Place the alignment tool next to the left adjustment guide and line them up at the front and back of
the printer. Then attach the counterweight to the alignment tool.
Page 25
Adjusting the Take-up Reel | 25
15. Note the location where the alignment tool crosses the front of the white line on the platen.
16. Lift up the alignment tool and slide it to the other side of the printer, next to the right adjustment
guide. Line up the alignment tool and the adjustment guide at the front and back of the printer.
Note the location where the alignment tool crosses the front of the white line on the platen. If the
location is different from the left side, go to step 17. If they are the same, go to step 20.
English
Page 26
26 | Adjusting the Take-up Reel
17. Use the small hexagon wrench to loosen the two screws.
Page 27
Adjusting the Take-up Reel | 27
18. Make adjustments using the large hexagon wrench while holding the media guide bar. Turn the
adjustment screw counterclockwise to move the line back, and turn it clockwise to move the line
forward. The line will move approximately 1 mm with each turn of the screw. Continue to turn the
adjustment screw until the measurements are the same.
English
19. Use the small hexagon wrench to tighten the two screws.
Page 28
28 | Adjusting the Take-up Reel
20. At the back of the printer, remove the counterweight.
21. At the front of the printer, remove the alignment tool. Then loosen the roll holder locking screw and
remove the right roll holder.
Page 29
Adjusting the Take-up Reel | 29
22. Remove the roll core and the alignment tool.
23. Remove the alignment tool from the roll core, then remove the adjustment guides from the printer.
English
Use a damp lint-free cloth to wipe off any dust and lint from the back of the adjustment guides. Roll up
the alignment tool and adjustment guides and store them so that they don’t become creased.
EPSON and SureColor are registered trademarks, and EPSON Exceed Your Vision is a registered logomark of Seiko Epson
Corporation.
General Notice: Other product names used herein are for identification purposes only and may be trademarks of their respective
owners. Epson disclaims any and all rights in those marks.
This information is subject to change without notice.
© 2014 Epson America, Inc., 6/14
Page 30

30 | Adjusting the Take-up Reel
Page 31

Mises à jour | 31
Votre imprimante inclut un micrologiciel mis à jour, de nouvelles recommandations de dépannage, ainsi
qu’un nouvel ensemble comprenant un outil d’alignement et des guides d’ajustement.
Ce livret décrit les mises à jour installées et vous indique comment effectuer un ajustement parallèle avec
les nouveaux outils.
Mises à jour
Voici une liste des nouveautés du micrologiciel et des nouvelles procédures de dépannage :
• L’option Vitesse d’alimentation pour les supports personnalisés est réglée à Auto par défaut. Si vous
remarquez des lignes de couleur inégale, des lignes horizontales ou des bandes sur vos tirages, essayez
de réduire la Vitesse d’alimentation à
Lv1.
• Le message qui s’affiche lorsqu’il est temps de remplacer une cartouche d’encre ou une puce est le
suivant :
Notez que nous recommandons l’utilisation d’un masque lorsque vous remplissez l’encre ou remplacez
la bouteille d’encre usagée.
Vérifier les niveaux d’encre.
• Si un support imprimé à haute densité se froisse durant l’impression, réglez la Tension d’alimentation
à
Manuel, et choisissez Lv1 ou Lv2.
Si l’imprimante détecte que le support est de biais, essayez les recommandations suivantes :
• Effectuez la procédure d’ajustement parallèle telle que décrite dans ce livret.
• Réglez la bobine réceptrice automatique de façon à ce qu’elle enroule le support avec le côté imprimé
vers l’intérieur.
• Utilisez un support d’au moins 36 po (91.4 cm) de large.
• Pour les supports épais, réglez le logiciel RIP à 3 passages ou plus.
Français
Ajustement parallèle
La procédure d’ajustement parallèle veille à ce que le support soit alimenté de façon droite dans
l’imprimante et sur la bobine réceptrice automatique. Suivez cette procédure si vous rencontrez des
problèmes lors de l’alimentation ou l’enroulement du support, ou après avoir déplacé l’imprimante.
Page 32

32 | Ajustement de l’unité d’alimentation de papier
Vous pouvez utiliser le papier d’ajustement inclus avec l’imprimante, tel que décrit dans le Guide de
l’utilisateur, ou vous pouvez utiliser les nouveaux guides d’ajustement et le nouvel outil d’alignement
(illustrés ci-dessous), tel que décrit dans ce livret.
Guide d’ajustement
de droite
Contrepoids
Outil d’alignement
Guide d’ajustement de gauche
Mandrin
Clés à 6 pans
Avant de commencer la procédure d’ajustement parallèle, assurez-vous que l’imprimante est de niveau et
est placée sur une surface plate. Déroulez délicatement les guides d’ajustement.
Ajustement de l’unité d’alimentation de papier
Deux personnes sont nécessaires pour effectuer l’ajustement parallèle : l’une à l’avant de l’imprimante, et
l’autre à l’arrière. Assurez-vous que l’imprimante est éteinte avant de commencer.
1. Ouvrez le capot avant et poussez le levier de chargement du support vers l’arrière.
Page 33

Ajustement de l’unité d’alimentation de papier | 33
2. À l’arrière de l’imprimante, utilisez la grande clé à six pans pour desserrer les quatre vis de fixation,
comme illustré :
Français
3. Depuis l’arrière de l’imprimante, alimentez les guides d’ajustement de droite et de gauche dans le
circuit papier.
Page 34

34 | Ajustement de l’unité d’alimentation de papier
4. Placez les languettes par-dessus les vis à l’arrière de l’imprimante et retirez la pellicule pour coller les
languettes.
Remarque : L’adhésif n’endommagera pas l’unité de chauffage.
Page 35

Ajustement de l’unité d’alimentation de papier | 35
5. Placez les languettes par-dessus les vis à l’avant de l’imprimante et fixez-les comme illustré :
Français
Page 36

36 | Ajustement de l’unité d’alimentation de papier
6. À l’arrière de l’imprimante, desserrez les vis de fixation du porte-rouleau et alignez le porte-rouleau de
gauche au côté gauche de l’imprimante, comme illustré. Puis, vissez la vis de fixation du porte-rouleau
de gauche afin de le fixer en place.
7. Ajustez le porte-rouleau de droite de manière à ce que la distance entre les deux côtés soit plus large
que le mandrin.
Page 37

Ajustement de l’unité d’alimentation de papier | 37
Remarque : Si la tige de la poignée du porte-rouleau n’est pas visible, tournez la poignée vers vous (dans le
sens contraire des aiguilles d’une montre) jusqu’à ce qu’elle s’arrête.
Faites glisser le mandrin dans la boucle à l’extrémité de l’outil d’alignement.
8.
Français
Page 38
38 | Ajustement de l’unité d’alimentation de papier
9. Insérez le mandrin avec l’outil d’alignement sur le porte-rouleau de gauche. Puis, insérez le
porte-rouleau de droite dans le mandrin et resserrez la vis de fixation.
10. Tournez la poignée jusqu’à ce que la pièce A de l’illustration ci-dessous soit complètement insérée,
comme illustré :
Page 39

Ajustement de l’unité d’alimentation de papier | 39
11. Alimentez l’outil d’alignement dans l’imprimante.
12. Placez l’outil d’alignement à côté du guide d’ajustement de gauche, puis alignez-les à l’avant et à
l’arrière de l’imprimante.
Français
Page 40

40 | Ajustement de l’unité d’alimentation de papier
13. Fixez le contrepoids sur l’outil d’alignement afin que ce dernier demeure bien étiré et tendu. Notez
l’endroit où il croise l’avant de la ligne blanche sur la platine.
Page 41

Ajustement de l’unité d’alimentation de papier | 41
14. Soulevez l’outil d’alignement et glissez-le vers l’autre côté de l’imprimante, à côté du guide
d’ajustement de droite. Alignez l’outil d’alignement au guide d’ajustement à l’avant et à l’arrière de
l’imprimante.
Notez l’endroit où l’outil d’alignement croise l’avant de la ligne blanche sur la platine. Si l’endroit est
différent de celui que vous avez noté pour le côté gauche, passez à l’étape 15. Si c’est le même, passez à
l’étape 16.
Français
Page 42

42 | Ajustement de l’unité d’alimentation de papier
15. Assurez-vous que les quatre vis de fixation sont bien desserrées. Pour effectuer des ajustements, la
personne à l’arrière de l’imprimante doit tourner la vis d’ajustement argentée. Tournez la vis dans le
sens contraire des aiguilles d’une montre pour déplacer la ligne vers l’arrière, ou dans le sens des
aiguilles d’une montre pour la déplacer vers l’avant. La ligne se déplacera d’environ 1 mm à chaque
tour de la vis. Continuez de tourner la vis d’ajustement argentée jusqu’à ce que les mesures soient les
mêmes.
Page 43

Ajustement de l’unité d’alimentation de papier | 43
16. Utilisez la grande clé à six pans pour bien serrer les quatre vis de fixation.
17. À l’avant de l’imprimante, retirez le contrepoids de l’outil d’alignement.
Français
Page 44

44 | Ajustement de l’unité d’alimentation de papier
18. À l’arrière de l’imprimante, retirez l’outil d’alignement. Puis, desserrez la vis de fixation du
porte-rouleau de droite et faites-le glisser sur le côté.
19. Retirez le mandrin avec l’outil d’alignement.
Page 45

Ajustement de la bobine réceptrice automatique | 45
Ajustement de la bobine réceptrice automatique
Une fois que vous avez ajusté l’unité d’alimentation de papier, vous devez effectuer une procédure similaire
pour la bobine réceptrice automatique. Deux personnes sont nécessaires pour effectuer l’ajustement : l’une
à l’avant de l’imprimante, et l’autre à l’arrière.
1. Utilisez la grande clé à six pans pour desserrer les quatre vis de fixation à l’avant de l’imprimante,
comme illustré :
Français
Page 46

46 | Ajustement de la bobine réceptrice automatique
2. Desserrez les vis de verrouillage des porte-mandrins et déplacez le porte-mandrin de gauche
complètement à gauche. Alignez le bord intérieur du porte-mandrin de droite avec le bord extérieur de
l’après-chauffage, puis resserrez la vis de verrouillage du porte-mandrin de droite.
Remarque : Si la tige de la poignée du porte-mandrin de gauche n’est pas visible, tournez la poignée jusqu’à
ce qu’elle s’arrête.
Page 47

Ajustement de la bobine réceptrice automatique | 47
3. Insérez le mandrin avec l’outil d’alignement sur le porte-mandrin de droite. Puis, insérez le
porte-mandrin de gauche dans le mandrin et resserrez la vis de verrouillage.
4. Tournez la poignée jusqu’à ce que la pièce A de l’illustration ci-dessous soit complètement insérée,
comme illustré :
Français
Page 48

48 | Ajustement de la bobine réceptrice automatique
5. Déplacez l’outil d’alignement vers la gauche et passez-le dans le circuit papier entre la barre du support
et l’après-chauffage.
6. Placez l’outil d’alignement à côté du guide d’ajustement de gauche, puis alignez-les à l’avant et à
l’arrière de l’imprimante. Fixez ensuite le contrepoids sur l’outil d’alignement.
Page 49

Ajustement de la bobine réceptrice automatique | 49
7. Notez l’endroit où l’outil d’alignement croise l’avant de la ligne blanche sur la platine.
8. Soulevez l’outil d’alignement et glissez-le vers l’autre côté de l’imprimante, à côté du guide
d’ajustement de droite. Alignez l’outil d’alignement au guide d’ajustement à l’avant et à l’arrière de
l’imprimante.
Notez l’endroit où l’outil d’alignement croise l’avant de la ligne blanche sur la platine. Si l’endroit est
différent de celui que vous avez noté pour le côté gauche, passez à l’étape 9. Si c’est le même, passez à
l’étape 10.
Français
Page 50

50 | Ajustement de la bobine réceptrice automatique
9. Assurez-vous que les quatre vis de fixation sont bien desserrées. Pour effectuer des ajustements, utilisez
la grande clé à six pans et tournez la vis d’ajustement dans le sens contraire des aiguilles d’une montre
pour déplacer la ligne vers l’arrière, ou dans le sens des aiguilles d’une montre pour déplacer la ligne
vers l’avant. La ligne se déplacera d’environ 1 mm à chaque tour de la vis. Continuez de tourner la vis
d’ajustement argentée jusqu’à ce que les mesures soient les mêmes.
Page 51

Ajustement de la bobine réceptrice automatique | 51
10. Resserrez complètement les quatre vis sur la pièce de soutien de droite pour la fixer en place.
11. À l’arrière de l’imprimante, retirez le contrepoids.
Français
Page 52

52 | Ajustement de la bobine réceptrice automatique
12. À l’avant de l’imprimante, retirez l’outil d’alignement.
13. Déplacez l’outil d’alignement vers la gauche et passez-le dans le circuit papier entre la barre du support
et l’après-chauffage.
Page 53

Ajustement de la bobine réceptrice automatique | 53
14. Placez l’outil d’alignement à côté du guide d’ajustement de gauche, puis alignez-les à l’avant et à
l’arrière de l’imprimante. Fixez ensuite le contrepoids sur l’outil d’alignement.
15. Notez l’endroit où l’outil d’alignement croise l’avant de la ligne blanche sur la platine.
Français
16. Soulevez l’outil d’alignement et glissez-le vers l’autre côté de l’imprimante, à côté du guide
d’ajustement de droite. Alignez l’outil d’alignement au guide d’ajustement à l’avant et à l’arrière de
l’imprimante.
Page 54

54 | Ajustement de la bobine réceptrice automatique
Notez l’endroit où l’outil d’alignement croise l’avant de la ligne blanche sur la platine. Si l’endroit est
différent de celui que vous avez noté pour le côté gauche, passez à l’étape 17. Si c’est le même, passez à
l’étape 20.
Page 55

Ajustement de la bobine réceptrice automatique | 55
17. Utilisez la petite clé à six pans pour desserrer les deux vis.
Français
Page 56

56 | Ajustement de la bobine réceptrice automatique
18. Effectuez des ajustements à l’aide de la grande clé à six pans tout en tenant la barre du support.
Tournez la vis d’ajustement dans le sens contraire des aiguilles d’une montre pour déplacer la ligne vers
l’arrière, ou dans le sens des aiguilles d’une montre pour la déplacer vers l’avant. La ligne se déplacera
d’environ 1 mm à chaque tour de la vis. Continuez de tourner la vis d’ajustement jusqu’à ce que les
mesures soient les mêmes.
Page 57

Ajustement de la bobine réceptrice automatique | 57
19. Utilisez la petite clé à six pans pour resserrer les deux vis.
20. À l’arrière de l’imprimante, retirez le contrepoids.
Français
Page 58

21. À l’avant de l’imprimante, retirez l’outil d’alignement. Puis, desserrez la vis de verrouillage du
porte-mandrin de droite et faites-le glisser sur le côté.
22. Retirez le mandrin avec l’outil d’alignement.
Page 59

Ajustement de la bobine réceptrice automatique | 59
23. Retirez l’outil d’alignement du mandrin, puis retirez les guides d’ajustement de l’imprimante.
Utilisez un chiffon non pelucheux humide pour essuyer la poussière et les peluches derrière les guides
d’ajustement. Enroulez l’outil d’alignement et les guides d’ajustement, et rangez-les dans un endroit où ils
ne se froisseront pas.
Français
EPSON et SureColor sont des marques déposées et EPSON Exceed Your Vision est un logotype déposé de Seiko Epson
Corporation.
Avis général : Les autres noms de produit utilisés dans le présent document sont donnés uniquement à titre d’identification et
peuvent être des marques de commerce de leurs propriétaires respectifs. Epson renonce à tous les droits associés à ces marques.
L’information contenue dans le présent document peut être modifiée sans préavis.
© 2014 Epson America, Inc., 6/14
Page 60

60 | Ajustement de la bobine réceptrice automatique
Page 61

Actualizaciones | 61
La impresora incluye firmware actualizado, nuevas recomendaciones para la solución de problemas y un kit
que contiene una nueva herramienta de alineación y nuevas guías de ajuste.
Este folleto describe las actualizaciones y le indica cómo realizar el ajuste paralelo con las nuevas piezas.
Actualizaciones
El firmware nuevo y los procedimientos de solución de problemas incluyen lo siguiente:
• La opción Velocidad Alimentación para papel personalizado está configurada en Automática de
manera predeterminada. Si ve rayas de color irregular, líneas horizontales o bandas en las impresiones,
reduzca la velocidad de alimentación a
• El mensaje que aparecerá para el reemplazo de tintas y unidades de chip es: Revisar Niveles Tinta.
Se recomienda el uso de una mascarilla al momento de rellenar la tinta o reemplazar el depósito de
tinta de desecho.
• Si el papel impreso a alta densidad tiene pliegues, configure el ajuste Tensión Recogida en Manual y
seleccione
Lv1 o Lv2.
Lv1.
Espàñol
Si se detecta que el papel está torcido, pruebe las siguientes recomendaciones:
• Utilice el procedimiento de ajuste paralelo descrito en este folleto.
• Ajuste la unidad de recogida automática para que cargue el papel con la cara imprimible hacia adentro.
• Utilice papel de al menos 36 pulg. (91,4 cm) de ancho.
• Para material grueso, configure el RIP del software a 3 o más pasadas.
Ajuste paralelo
El procedimiento de ajuste paralelo asegura que el papel se alimente de forma recta dentro de la impresora
y sobre el rodillo de recogida. Utilice este procedimiento si tiene problemas con la alimentación o el
enrollamiento de papel, o si la impresora ha sido movida.
Page 62

62 | Ajuste de la unidad de alimentación de papel
Puede usar el papel de ajuste que viene con la impresora, tal como se describe en el Manual del usuario o las
nuevas guías de ajuste y la herramienta de alineación (que se muestran a continuación), tal como se
describe en este folleto.
Guía de ajuste derecha
Contrapeso
Herramienta de alineación
Guía de ajuste izquierda
Portarrollos
Llaves hexagonales
Antes de empezar el procedimiento de ajuste paralelo, asegúrese de que la impresora esté nivelada y sobre
una superficie plana. Desenrolle cuidadosamente las guías de ajuste.
Ajuste de la unidad de alimentación de papel
Se requieren dos personas para realizar el ajuste paralelo, una que se ubique al frente de la impresora y la
otra en la parte posterior. Asegúrese de que la impresora esté apagada antes de comenzar.
1. Abra la tapa frontal y empuje hacia atrás la palanca de carga del papel.
Page 63

Ajuste de la unidad de alimentación de papel | 63
2. Utilice la llave hexagonal grande para aflojar los cuatro tornillos de fijación en la parte posterior de la
impresora, tal como se muestra a continuación:
Espàñol
3. Desde la parte posterior de la impresora, introduzca las guías de alineación izquierda y derecha en el
recorrido del papel.
Page 64

64 | Ajuste de la unidad de alimentación de papel
4. Coloque las lengüetas sobre los tornillos de la parte posterior de la impresora y retire el papel protector
para fijar las lengüetas.
Nota: El adhesivo no daña la unidad de calentamiento.
Page 65

Ajuste de la unidad de alimentación de papel | 65
5. Coloque las lengüetas sobre los tornillos de la parte delantera de la impresora y fíjelas como se muestra
a continuación:
Espàñol
Page 66

66 | Ajuste de la unidad de alimentación de papel
6. En la parte posterior de la impresora, afloje los seguros de los topes del rollo y alinee el lado izquierdo
del tope del rollo con el lado izquierdo de la impresora, tal como se muestra a continuación. Luego,
apriete el seguro del tope del rollo para fijarlo en su lugar.
7. Ajuste el tope derecho del rollo hasta que la distancia entre los dos sea más ancha que el portarrollos.
Page 67

Ajuste de la unidad de alimentación de papel | 67
Nota: Si empujó hacia el fondo el eje de la manivela del tope del rollo, gire la manivela hacia usted (hacia la
izquierda) hasta que se detenga.
Deslice el portarrollos en el acoplamiento del extremo de la herramienta de alineación.
8.
Espàñol
Page 68

68 | Ajuste de la unidad de alimentación de papel
9. Introduzca el portarrollos con la herramienta de alineación en el tope izquierdo del rollo. Luego,
introduzca el tope derecho del rollo en el portarrollos y apriete el seguro del tope del rollo.
10. Gire la manivela hasta que la pieza A de la ilustración quede insertada completamente, tal como se
muestra a continuación:
Page 69

Ajuste de la unidad de alimentación de papel | 69
11. Introduzca la herramienta de alineación dentro de la impresora.
12. Coloque la herramienta de alineación junto a la guía de ajuste izquierda y alinéelas en la parte frontal y
posterior de la impresora.
Espàñol
Page 70

70 | Ajuste de la unidad de alimentación de papel
13. Fije el contrapeso a la herramienta de alineación para mantenerla tensa. Fíjese dónde cruza la parte
frontal de la línea blanca de la platina.
Page 71

Ajuste de la unidad de alimentación de papel | 71
14. Levante la herramienta de alineación y deslícela hacia el otro lado de la impresora, junto a la guía de
ajuste derecha. Alinee la herramienta de alineación y la guía de ajuste en la parte frontal y posterior
de la impresora.
Fíjese en la ubicación donde la herramienta de alineación cruza la parte frontal de la línea blanca de
la platina. Si la ubicación es distinta de la del lado izquierdo, vaya al paso 15. Si es la misma, vaya al
paso 16.
Espàñol
Page 72

72 | Ajuste de la unidad de alimentación de papel
15. Asegúrese de que los cuatro tornillos de montaje están sueltos. Para realizar ajustes, pídale a la persona
en la parte posterior de la impresora que gire el tornillo de ajuste plateado. Gire el tornillo hacia la
izquierda para mover la línea hacia atrás y gírelo hacia la derecha para mover la línea hacia adelante.
La línea se moverá aproximadamente 1 mm con cada giro del tornillo. Siga girando el tornillo de
ajuste plateado hasta que las medidas sean las mismas.
Page 73

Ajuste de la unidad de alimentación de papel | 73
16. Utilice la llave hexagonal grande para apretar por completo los cuatro tornillos de montaje.
17. En la parte frontal de la impresora, retire el contrapeso de la herramienta de alineación.
Espàñol
Page 74

74 | Ajuste de la unidad de alimentación de papel
18. Retire la herramienta de alineación desde la parte posterior de la impresora. Luego, afloje el seguro del
tope derecho del rollo y deslice hacia afuera el tope derecho del rollo.
19. Retire el portarrollos y la herramienta de alineación.
Page 75

Ajuste del rodillo de recogida | 75
Ajuste del rodillo de recogida
Una vez que haya ajustado la unidad de alimentación de papel, necesita realizar un procedimiento similar
en la unidad del rodillo de recogida. Se requieren dos personas, una que se ubique al frente de la impresora
y la otra en la parte posterior.
1. Utilice la llave hexagonal grande para aflojar los cuatro tornillos de fijación en la parte frontal de la
impresora, tal como se muestra a continuación:
Espàñol
Page 76

76 | Ajuste del rodillo de recogida
2. Afloje los seguros de los topes del portarrollos y mueva el tope izquierdo del portarrollos
completamente hacia la izquierda. Alinee el borde interior del tope derecho del portarrollos con
el borde exterior del post-calentador, luego apriete el seguro del tope derecho del portarrollos.
Nota: Si empujó hacia el fondo el eje de la manivela izquierda del tope del portarrollos, gire la manivela hasta
que se detenga.
Page 77

Ajuste del rodillo de recogida | 77
3. Introduzca el portarrollos con la herramienta de alineación en el tope derecho del rollo. Luego,
introduzca el tope izquierdo del portarrollos en el portarrollos y apriete el seguro del tope del
portarrollos.
4. Gire la manivela hasta que la pieza A de la ilustración quede insertada completamente, tal como se
muestra a continuación:
Espàñol
Page 78

78 | Ajuste del rodillo de recogida
5. Mueva la herramienta de alineación hacia el lado izquierdo e introdúzcala en el recorrido del papel
entre la barra de guía del papel y el post-calentador.
6. Coloque la herramienta de alineación junto a la guía de ajuste izquierda y alinéelas en la parte frontal y
posterior de la impresora. Luego, fije el contrapeso a la herramienta de alineación.
Page 79

Ajuste del rodillo de recogida | 79
7. Fíjese dónde la herramienta de alineación cruza la parte frontal de la línea blanca de la platina.
8. Levante la herramienta de alineación y deslícela hacia el otro lado de la impresora, junto a la guía de
ajuste derecha. Alinee la herramienta de alineación y la guía de ajuste en la parte frontal y posterior
de la impresora.
Fíjese en la ubicación donde la herramienta de alineación cruza la parte frontal de la línea blanca de
la platina. Si la ubicación es distinta de la del lado izquierdo, vaya al paso 9. Si es la misma, vaya al
paso 10.
Espàñol
Page 80
80 | Ajuste del rodillo de recogida
9. Asegúrese de que los cuatro tornillos de montaje están sueltos. Para realizar ajustes, utilice la llave
hexagonal grande para girar el tornillo de ajuste hacia la izquierda para mover la línea hacia atrás
y gírelo hacia la derecha para mover la línea hacia adelante. La línea se moverá aproximadamente
1 mm con cada giro del tornillo. Siga girando el tornillo de ajuste plateado hasta que las medidas
sean las mismas.
Page 81

Ajuste del rodillo de recogida | 81
10. Apriete completamente los cuatro tornillos del soporte derecho para fijarlos en su lugar.
11. Retire el contrapeso en la parte posterior de la impresora.
Espàñol
Page 82
82 | Ajuste del rodillo de recogida
12. Retire la herramienta de alineación desde la parte frontal de la impresora.
13. Mueva la herramienta de alineación hacia el lado izquierdo e introdúzcala en el recorrido del papel
entre la barra de guía del papel y el post-calentador.
Page 83

Ajuste del rodillo de recogida | 83
14. Coloque la herramienta de alineación junto a la guía de ajuste izquierda y alinéelas en la parte frontal y
posterior de la impresora. Luego, fije el contrapeso a la herramienta de alineación.
15. Fíjese dónde la herramienta de alineación cruza la parte frontal de la línea blanca de la platina.
16. Levante la herramienta de alineación y deslícela hacia el otro lado de la impresora, junto a la guía de
ajuste derecha. Alinee la herramienta de alineación y la guía de ajuste en la parte frontal y posterior de
la impresora.
Espàñol
Page 84

84 | Ajuste del rodillo de recogida
Fíjese en la ubicación donde la herramienta de alineación cruza la parte frontal de la línea blanca
de la platina. Si la ubicación es distinta de la del lado izquierdo, vaya al paso 17. Si es la misma,
vaya al paso 20.
Page 85

Ajuste del rodillo de recogida | 85
17. Utilice la llave hexagonal pequeña para aflojar los dos tornillos.
Espàñol
Page 86

86 | Ajuste del rodillo de recogida
18. Para realizar ajustes, utilice la llave hexagonal grande mientras sujeta la barra de guía del papel. Gire
el tornillo de ajuste hacia la izquierda para mover la línea hacia atrás y gírelo hacia la derecha para
mover la línea hacia adelante. La línea se moverá aproximadamente 1 mm con cada giro del tornillo.
Siga girando el tornillo de ajuste hasta que las medidas sean las mismas.
19. Utilice la llave hexagonal pequeña para apretar los dos tornillos.
Page 87

Ajuste del rodillo de recogida | 87
20. Retire el contrapeso en la parte posterior de la impresora.
21. Retire la herramienta de alineación desde la parte frontal de la impresora. Luego, afloje el seguro del
tope del rollo y retire el tope derecho del rollo.
Espàñol
Page 88

88 | Ajuste del rodillo de recogida
22. Retire el portarrollos y la herramienta de alineación.
23. Retire la herramienta de alineación del portarrollos, luego retire las guías de ajuste de la impresora.
Utilice un paño seco que no deje pelusas para limpiar cualquier polvo y pelusa de la parte posterior de
las guías de ajuste. Enrolle la herramienta de alineación y las guías de ajuste y guárdelas de modo que no
se plieguen.
EPSON y SureColor son marcas registradas y EPSON Exceed Your Vision es un logotipo registrado de Seiko Epson Corporation.
Aviso general: El resto de los productos que se mencionan en esta publicación aparecen únicamente con fines de identificación y
pueden ser marcas comerciales de sus respectivos propietarios. Epson renuncia a cualquier derecho sobre dichas marcas.
La información contenida en la presente está sujeta a cambios sin previo aviso.
© 2014 Epson America, Inc., 6/14
Page 89

Atualizações | 89
Sua impressora inclui firmware atualizado, novas recomendações de resolução de problemas e um kit
contendo uma nova ferramenta de alinhamento e guias de ajuste.
Este livreto descreve as atualizações e mostra como realizar ajuste paralelo usando as novas peças.
Atualizações
O novo firmware e procedimentos de resolução de problemas incluem o seguinte:
• A opção Velocidade Alimentação para mídia personalizada é definida como Auto como padrão.
Se vir faixas de cores irregulares, linhas horizontais ou faixas nos impressos, tente diminuir a velocidade
de alimentação para
• A mensagem exibida para substituição de unidade de chip e tinta é: Verificar Níveis Tinta.
Note que uso de uma máscara é recomendado ao abastecer a tinta ou substituir o frasco de tinta
residual.
• Se mídia impressa em alta densidade estiver amassada, defina a Tensão de enrolamento para Manual,
e escolha
Lv1 ou Lv2.
Lv1.
Se for detectado inclinação de mídia, tente as seguintes recomendações:
• Use o procedimento de ajuste paralelo descrito neste livreto.
• Defina a unidade de coleta para enrolar a mídia com a face de impressão para dentro.
• Use mídia de pelo menos 36 pol. (91,4 cm) de largura.
• Para mídia espessa, ajuste o software RIP para 3 passes ou mais.
Ajuste paralelo
O procedimento de ajuste paralelo garante que a mídia seja alimentada reta na impressora e na bobina de
alimentação automática. Use este procedimento se tiver problemas com alimentação de mídia ou coleta, ou
se a impressora tiver sido movida.
Português
Page 90

90 | Ajuste da unidade de alimentação de mídia
Você pode usar o papel de ajuste incluído com a impressora, como descrito no Manual do usuário ou as
novas guias de ajuste e ferramenta de alinhamento (mostradas abaixo), como descrito neste livreto.
Guia de ajuste direito
Contrapeso
Ferramenta de alinhamento
Guia de ajuste esquerdo
Centro do rolo
Chaves sextavadas
Antes de começar o procedimento de ajuste paralelo, a impressora deve estar nivelada e em uma superfície
plana. Desenrole cuidadosamente as guias de ajuste.
Ajuste da unidade de alimentação de mídia
É necessário duas pessoas para fazer o ajuste paralelo, uma na frente da impressora e uma atrás.
A impressora deve estar desligada antes de começar.
1. Abra a tampa frontal e empurre a alavanca de carregamento de mídia.
Page 91

Ajuste da unidade de alimentação de mídia | 91
2. Atrás da impressora, use a chave grande para soltar os quatro parafusos de fixação como mostrado:
3. Atrás da impressora, passe as guias de ajuste esquerdo e direito pelo caminho do papel.
Português
Page 92

92 | Ajuste da unidade de alimentação de mídia
4. Coloque a aba sobre os parafusos atrás da impressora e remova a proteção para prender as abas.
Note: O adesivo não danifica a unidade de aquecimento.
Page 93

Ajuste da unidade de alimentação de mídia | 93
5. Coloque as abas sobre os parafusos na frente da impressora e prenda-as como mostrado:
Português
Page 94

94 | Ajuste da unidade de alimentação de mídia
6. Atrás da impressora, solte os parafusos de fixação do suporte de rolo e alinhe o lado esquerdo do
suporte de rolo com o lado esquerdo da impressora como mostrado. Depois aperte o parafuso de
fixação do suporte de rolo para prendê-lo no lugar.
7. Ajuste o suporte de rolo direito para que a distância entre os dois seja mais larga do que o centro
do rolo.
Page 95

Ajuste da unidade de alimentação de mídia | 95
Note: Se a ponta da manivela do suporte de rolo estiver para dentro, gire a manivela na sua direção (sentido
anti-horário) até ela parar.
Deslize o centro do rolo na alça na ponta da ferramenta de alinhamento.
8.
Português
Page 96

96 | Ajuste da unidade de alimentação de mídia
9. Insira o centro do rolo com a ferramenta de alinhamento no suporte de rolo esquerdo. Depois insira o
suporte de rolo direito no centro do rolo e aperte o parafuso de fixação de suporte de rolo.
10. Gire a manivela até a parte A na ilustração abaixo estar totalmente inserida como mostrado:
Page 97

Ajuste da unidade de alimentação de mídia | 97
11. Passe a ferramenta de alinhamento pela impressora.
12. Coloque a ferramenta de alinhamento perto da guia de ajuste esquerda e alinhe-a na frente e atrás da
impressora.
Português
Page 98

98 | Ajuste da unidade de alimentação de mídia
13. Fixe o contrapeso na ferramenta de alinhamento para mantê-la esticada. Repare no local onde ela cruza
a frente da linha branca na plataforma.
Page 99

Ajuste da unidade de alimentação de mídia | 99
14. Levante a ferramenta de alinhamento e deslize-a para o outro lado da impressora, perto da guia de
ajuste direita. Alinhe a ferramenta de alinhamento e a guia de ajuste na frente e atrás da impressora.
Repare no local onde a ferramenta de alinhamento cruza a frente da linha branca na plataforma.
Se o local for diferente do lado esquerdo, vá para o passo 15. Se forem iguais, vá para o passo 16.
Português
Page 100

100 | Ajuste da unidade de alimentação de mídia
15. Os quatro parafusos de montagem devem estar soltos. Para fazer ajustes, peça para alguém atrás da
impressora girar o parafuso de ajuste prateado. Gire o parafuso no sentido anti-horário para mover a
linha para trás e gire no sentido horário para mover a linha para a frente. A linha irá se mover
aproximadamente 1 mm a cada giro do parafuso. Continue girando o parafuso de ajuste prateado até
as medidas ficarem iguais.
 Loading...