

Page 1
Reference Guide
Color Image Scanner
Page 2

FCC Compliance Statement for United States Users
This equipment has been tested and found to comply with the limits for a Class B digital device, pursuant to
Part 15 of the FCC Rules. These limits are designed to provide reasonable protection against harmful
interference in a residential installation. This equipment generates, uses, and can radiate radio frequency
energy and, if not installed and used in accordance with the instructions, may cause harmful interference to
radio or television reception. However, there is no guarantee that interference will not occur in a particular
installation. If this equipment does cause interference to radio and television reception, which can be
determined by turning the equipment off and on, the user is encouraged to try to correct the interference by
one or more of the following measures.
◗ Reorient or relocate the receiving antenna
◗ Increase the separation between the equipment and receiver
◗ Connect the equipment into an outlet on a circuit different from that to which the receiver is connected
◗ Consult an experienced radio/TV technician for help.
WARNING
The connection of a non-shielded equipment interface cable to this equipment will invalidate the FCC
Certification of this device and may cause interference levels that exceed the limits established by the FCC for
this equipment. It is the responsibility of the user to obtain and use a shielded equipment interface cable with
this device. If this equipment has more than one interface connector, do not leave cables connected to
unused interfaces.
Changes or modifications not expressly approved by the manufacturer could void the user’s authority to
operate the equipment.
Page 2
Page 3

For Canadian Users
This digital apparatus does not exceed the Class B limits for radio noise emissions from digital apparatus as
set out in the radio interference regulations of the Canadian Department of Communications.
Le présent appareil numérique n’émet pas de bruits radioélectriques dépassant les limites applicables aux
appareils numériques de Classe B prescrites dans le règlement sur le brouillage radioélectrique édict‚ par le
Ministère des Communications du Canada.
A Note Concerning Responsible Use of Copyrighted Materials
Like photocopiers, scanners can be misused by improper scanning of copyrighted material. Although Section
107 of the U.S. Copyright Act of 1976 (Title 17, United States Code), the “fair use” doctrine, permits limited
copying in certain circumstances, those circumstances may not be as broad as some people assume. Unless
you have the advice of a knowledgeable attorney, be responsible and respectful by not scanning published
material without the permission of the copyright holder.
Page 3
Page 4

Copyright Notice
All rights reserved. No part of this publication may be reproduced, stored in a retrieval system, or transmitted
in any form or by any means, electronic, mechanical, photocopying, recording, or otherwise, without the prior
written permission of SEIKO EPSON CORPORATION. The information contained herein is designed only for
use with this EPSO N scanner. EPSON is not responsible for any use of this information as applied to other
scanners.
Neither SEIKO EPSON CORPORATION nor its aff iliates shall be liable to the purchaser of this product or
third parties for damages, losses, costs, or expenses incurred by purchaser or third parties as a result of:
accident, misuse, or abuse of this product or unauthorized modifications, repairs, or alterations to this product,
or (excluding the U.S.) failure to strictly comply with SEIKO EPSON CORPORATION’s operating and
maintenance instructions.
SEIKO EPSON CORPO RATIO N and its affiliates shall not be liable for any damages or problems arising from
the use of any options or any consumable products other than those designated as Original EPSON Products
or EPSON Approved Products by SEIKO EPSON CORPORATION.
EPSON is a registered trademark of SEIKO EPSON CORPORATION, and EPSON Expression is a registered
trademark of Epson America, Inc. EPSON SoundAdvice is a service mark and EPSON FaxAdvice is a
trademark of Epson America, Inc.
LaserSoft is a registered trademark and SilverFast is a trademark of LaserSoft Imaging GmbH, Germany.
General Notice: Other product names used herein are for identification purpose s only and may be
trademarks of their respective companies.
Copyright © 1998 by Epson America, Inc., Torrance, California, USA
EX8001298-00
12/98
Page 4
Page 5

Contents
Introduction
Optional Equipment 9
How to Use This Manual 10
Warnings, Cautions, and Notes 10
Important Safety Instructions 11
Where to Get Help 13
Under st an din g SC S I Connections
SCSI Chain 16
SCSI Cables 17
SCSI ID 17
SCSI Termination 18
Setting the SCSI ID Number 19
Changing the SCSI ID Number in Windows 98 21
16
8
Page 5
Page 6

Upgrading from Windows 95 to
Window s 98
Using Optional Equipment
Using the Transparency Unit 25
Unpacking the Transparency Unit 26
Removing the Shipping Screw 27
Installing the Transparency Unit 28
Scanning Oversized Transparencies and Film 32
Using the Film Guides 33
Scanning Normal Documents with the Transparency
Unit Installed 39
Using the Auto Document Feeder 40
Unpacking the Auto Document Feeder 41
Installing the Auto Document Feeder 42
Loading Paper in the Auto Document Feeder 46
Fixing Paper Jams in the Auto Document Feeder 49
22
24
Maintaining and Transporting
Your Scanner
Cleaning the Scanner 51
Replacing the Fluorescent Lamp 52
50
Page 6
Page 7

Transporting the Scanner 53
Transporting the Transparency Unit 55
Troubleshooting
Diagnosing Problems 57
Indicator Lights 58
Upgrading Your System 59
Problems and Solutions 60
Operation Problems 60
Scan Quality Problems 62
Image Matching Problems 66
Specifications
Glossary
Index
57
69
84
88
Page 7
Page 8

Introduction
The EPSON® Expression® 800 is a true 800-dpi full-color flatbed scanner
with an 8.5 × 11.7 inch (216 × 297 mm) sc anning area f or A4 or US
letter-size paper. It has the ability to scan in color or grayscale, making it
ideal for vir tu ally all uses, f rom s im ple drawin gs t o c om plex full-c olor
illustrations or photographs. I t achieves ex tr em ely high qu alit y in c olor by
reading a nd saving up t o 36 bits per pix el.
Your EPSON scanner offers the following features:
Full color sc anning of up to 68 billion colo rs or grayscale scanning in
◗
up to 4,096 sh ades of gray .
Maximum hardware res olution of 800 dpi (main scan) × 3200 dpi
◗
(subscan). You can adjust the output resolution to match the resolution
of your output device.
Maximum s of t w are resolution of 12800 × 12800 d pi w it h interpola ti on.
◗
Automatic Area Segmentation (AAS) lets you separate text from
◗
photographs on a pa ge so grayscale image s are c learer and t ex t
recognition is more accurate.
Text Enhancement T ec hnology (TET) enha nc es optical cha racter
◗
recognit ion (OCR) ac c uracy when scanning text on dark or color
backgrounds.
Two SCSI interface connectors.
◗
Software c ontrol of all s ca nner functi ons.
◗
Introduction Page 8
Page 9

Optional Equipment
The following optional items are available to expand the versatility of your
scanner. For detailed information on using these options, see Using
Optional Equipme nt .
Auto Document Feeder (B813162)
The auto document feeder allows you to scan up to 30 pages
automatically.
Transparency Unit (B813152)
The transparency unit is includ ed w it h the Profes s ional mode l of th e
EPSON Expression 800, and optional for the Executive and Artist models.
It allows you to scan transparencies, such as 35 mm slides and
negatives. It has a maximum reading area of 8.5 × 11.7 inches (216 × 297
mm), which allows yo u t o s c an a variety of t ransparen t media.
Introduction Page 9
Page 10

How to Use This Manual
Understanding SCSI Connections explains how to set your scanner up as
a SCSI device in a SCSI chain.
Upgrading from Windows 95 to Windows 98 tells you how to uninstall and
reinstall your scanner software when you upgrade from Windows 95 to
Windows 98.
Using Optional Equipment
optional transparency unit and auto document feeder.
Maintaining and Transporting Your Scanner gives tips on caring for your
scanner and preparing it for a move.
Troubleshooting
Specifications
equipment.
provides solutions to problems you may encounter.
provides technical details on your scanner and its optional
gives instructions for installing and using the
Warnings, Cautions, and Notes
Warnings must be followed carefully to avoid bodily injury.
Cautions must be observed to avoid loss of data or damage to your
equipment.
Notes contain important information about your scanner.
Introduction Page 10
Page 11

Important Safety Instructions
Read all of th es e instructions careful ly . Follow all warnings and
instructions marked on the scanner.
The scanner must be placed on a st urdy, level surf ace.
◗
Unplug the scanner before cleaning it. Clean it with a damp cloth only.
◗
Do not spill liquid on the scanner.
Do not place the scan ner near a radiator or hea t source.
◗
Do not block or cover the openings in the scanner’s cabinet . Do not
◗
insert objects through the slots.
Place your scanner close enough to the computer or workstation for
◗
the scanner cable to reach both ends. Make sure you can easily
unplug the power cord.
Use only th e t y pe of power so urce indicat ed on the sca nner’s labe l.
◗
Connec t al l equipmen t to properly gr ounded pow er outlets. Av oid
◗
using outlets on the sa me circui t as photo copiers or a ir contr ol syste ms
that regul arly s w it c h on and off.
Do not let th e power cord become damaged o r fra y ed.
◗
If you use an extension cord with the scanner, make sure the total
◗
ampere rat ing of the devices plugged int o th e ex t ension cord does not
exceed the cord’s ampere rating. Also, make sure the total ampere
rating of al l dev ic es plugge d into the wall out let does not ex c eed the
wall outle t’s ampere ra ti ng.
Do not attempt to service the scanner yourself.
◗
Introduction Page 11
Page 12

Unplug th e s c anner, lock the c arriage in plac e w it h the transp ortation
lock on the back of the scanner, an d bring it to qualified serv ic e
personnel under the fo llowing conditions:
If the powe r s upply is dam aged or malfunctioning
◗
If liquid has entered the scanner
◗
If the scanner has bee n dropped or t he cabinet damaged
◗
If the scanner does no t o perate normally or exhibits a distinc t
◗
change in performance.
Introduction Page 12
Page 13

Where to Get Hel
p
EPSON provides cu s to m er support t hrough the following services:
Electron ic su pport services
Servic e Access
World W ide Web From the In t ernet, you can reach EP SON’s Home Page at
http://www.epson.com.
EPSON Internet FTP
Site
EPSON Download
Servic e
EPSON For um on
CompuServe
Introduction Page 13
®
If you have In te rnet FTP capability, use your Web browser (or other
software for FTP dow nloading) to log onto
name
You can call the EPSON Download Service at
communications software to 8 data bits, 1 stop bit, no parity. Modem
speed can be up to 28.8 Kbps.
Members of CompuServe can type
reach the Epson America Forum. For a free introductory CompuServe
member sh ip, call (800) 848-8199 and ask for represent at iv e #529.
anonymous
and your e-m ail addres s as th e password .
GO EPSO N
ftp.epson.com
(800) 442-2007.
at the menu prompt to
with the user
Set your
Page 14

Automa te d t elephone s erv ic es
Service Access
EPSON SoundAdv ic e
SM
For pre-rec orded answers to comm only asked qu es t ions about EPSON
products 24 hours a day, seven days a week, call
(800) 922-8911.
EPSON F ax Advice™ Access EPSON’s te ch nic al informat ion library b y ca lling
(800) 922-8911
. You must provide a return fax num ber to use this
service.
EPSON R ef erral
Service
For the location of yo ur nearest Aut horized EP SON Rese ller or
Custom er C are Center, c all
(800) 92 2-8911.
Introduction Page 14
Page 15

EPSON als o provide s tec hnical support and in fo rm ation on the
installation, config uration, and operatio n of EPSON pro ducts. Dial
(310) 974 -1970 (U.S. ) or (905) 709-3839 (Cana da), 6 A.M. to 6 P. M .,
Pacific Time, Monday t hrough Frid ay .
If you need help using
software with an
EPSON product, see
the documentation for
that progr am f or
technical support
information.
Before yo u c all, please have the follo w ing informat ion ready:
Product name
◗
Product serial number
◗
Computer configuration
◗
Descript ion of the problem
◗
You can purchase opt ional equipment, manuals, and accessories from
EPSON Ac c essories at (8 00) 873-7766 (U.S. sales only). In C anada,
please ca ll (800) 873-7766 for de aler referral . For U.S. sales , yo u c an
also visit our website at www.epsonsupplies.com.
Introduction Page 15
Page 16
Understanding SCSI
Connections
Read the following sections to determine how to set up your SCSI
devices.
SCSI Chain
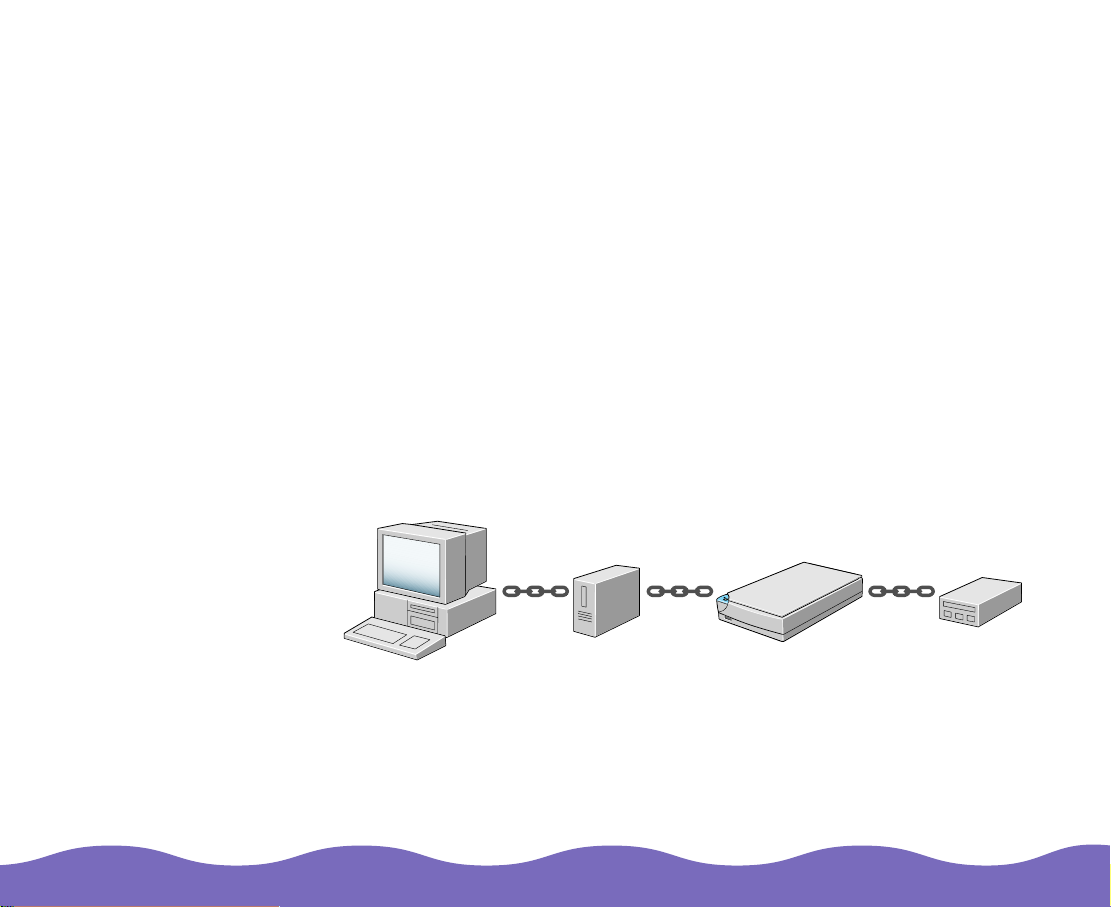
The SCSI inte rf ac e allows you to con nect up to seven de v ic es (su c h as a
scanner, hard disk, CD-ROM, and so on) to the computer. Only the first
SCSI device in the chain is connected to the computer; each of the other
devices is connected to another SCSI device.
Understanding SCSI Connectio ns Page 16
Page 17
Some SC SI ID
numbers may not
be available for
your system. See
SCSI ID Number
Settings f or details.
SCSI Cable s
The cable you use to attach the scanner to your computer must not
exceed 9.8 feet (3 meters).
If you are connecting multiple SCSI devices to your computer, you
may need to purchase several SCSI cables before setting up your
SCSI chain. Be sure th e SCSI cabl e c onnectors are suitable fo r y our
hardware, depend ing on the mak er of your SC SI device and SC SI
interface board.
To connect the scanner to another SCSI device, the length of cable must
not exceed 19.7 feet (6 meters); otherwise the system may not work
properly.
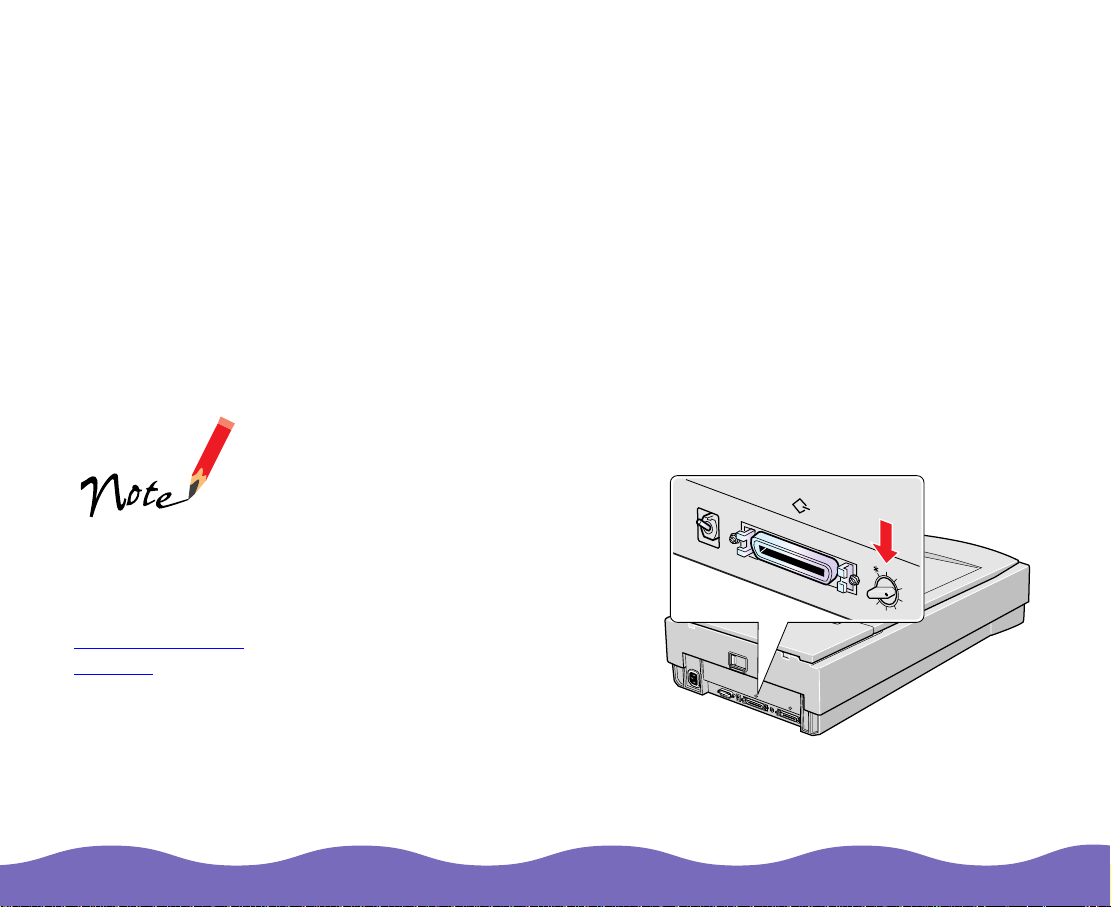
SCSI ID
Each device has a SCSI ID
number: the SCSI adapter in the
computer is usually num ber 7,
and each of th e other devic es
must have a different number
between 0 and 6. The EPSON
Expression 800 defaul t SCSI I D
number is 2.
You’ll find the SCSI ID rotary
switch at th e rear of the
scanner .
ON
OFF
1
2
7
6
4
5
UNLOCK
LOCK
OPTION
TERMINATOR
SW
ON
SCSI
OFF
ID
0
1
2
7
6
3
4
5
Understanding SCSI Connectio ns Page 17
Page 18

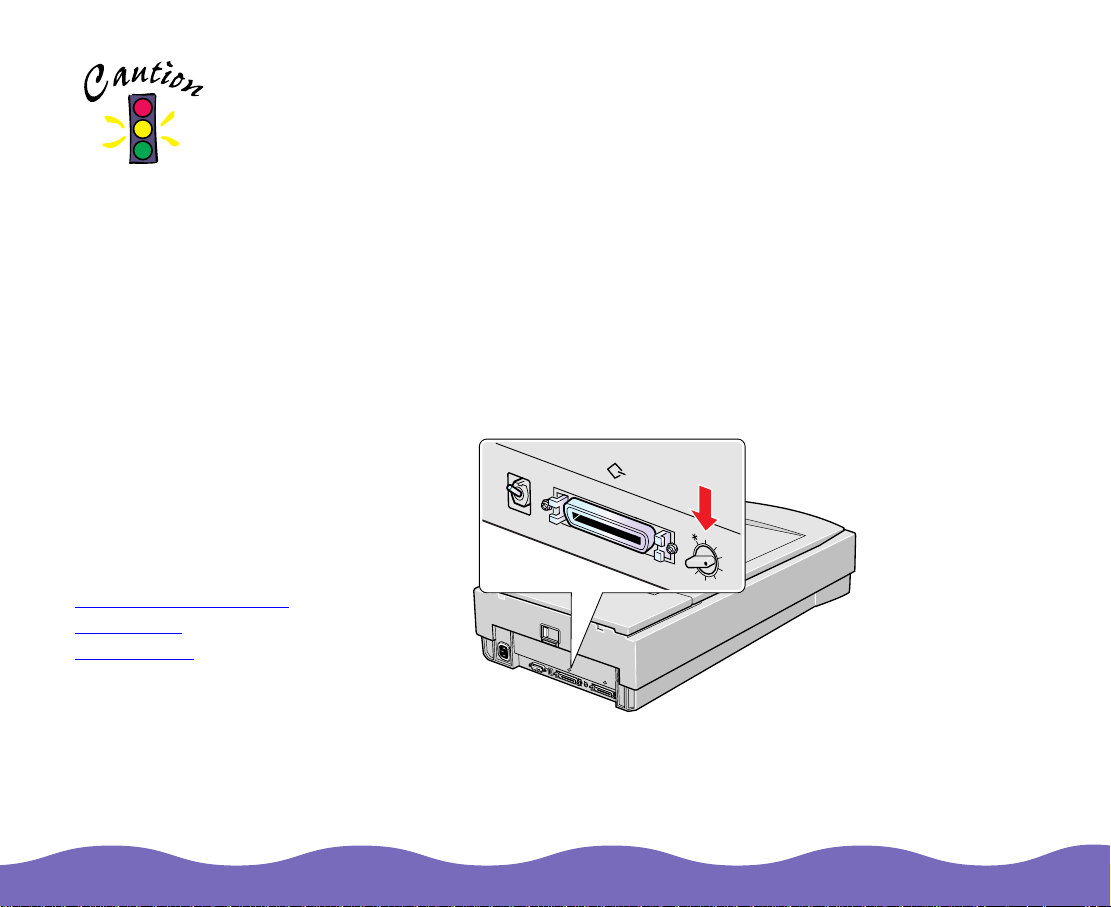
SCSI Termin ation
Remove the
terminator plug or turn
off the termination
switch for any devices
in the SCSI chain
other than th e f irs t
and last de v ic e.
The first device and the last device
in the chain (not including the
adapter) m ust be terminated,
either by a ter m inator plug or a
termination switch set to ON. No
other dev ic e in t he chain can
be termin at ed. The EPSON
Expression 800 has a te rm ination
swtich whic h is located at th e rear
of the scan ner. The def ault
position of the terminat ion switch
is ON. Do no t us e an external
terminator with the E PSON
Expression 800.
termination switch
ON
OFF
1
2
7
6
4
5
UNLOCK
LOCK
OPTION
TERMINATOR
SW
ON
SCSI
OFF
ID
0
1
2
7
6
3
4
5
Understanding SCSI Connectio ns Page 18
Page 19
Make sure the
scann er is tu rned off
before c hanging th e
SCSI ID number.
Do not set the SCSI
ID to an ID number
that is already
assigned to another
device. Otherwise the
computer, scanner,
and other devices will
not operate prope rly .
If you are us ing
Window s 98, see
Changing the SCSI ID
Numb er in
Window s 98 for more
inform at ion.
Setting the SCSI ID Number
The scanner’s default SCSI ID n um ber is 2. If you add the scan ner to a
system in w hic h one of your SCSI dev ic es already uses SCSI ID 2, you
can chan ge t he ID numb er t o an unused num ber using th e rot ary switch
at the rear o f the scanner. See the table on the next page for a guid e t o
SCSI ID nu m bers. Then fo llow t hese steps t o c hange the ID number:
Turn the sc anner off.
1
Use the rotary switch at the back of the sca nner to change the SCSI ID
2
number.
Turn the sc anner back on.
3
Restart your computer.
4
ON
OFF
1
2
7
6
4
5
UNLOCK
LOCK
OPTION
TERMINATOR
SW
ON
SCSI
OFF
ID
0
1
2
7
6
3
4
5
Understanding SCSI Connectio ns Page 19
Page 20

SCSI ID Number Settings
ID Availability
0 Not available for Mac intosh
Not recom m ended fo r W indows
®
; used for hard disk
®
; usually us ed f or hard disk
1 Not recom m ended; u s ually used fo r hard disk
2 Factory setting of the scanner; can be changed
3 Available for Windows
Not available if your M acintosh has a built-in CD -R OM
4 Available
5 Available
6 Available
7 Not available for Mac intosh; always used fo r th e M ac intosh itself
May not be availabl e fo r W indows; u su ally used for th e SC SI
board
* Not available; scan ner will not wo rk if se lec t ed (use only w hen
transporting the scanner)
Understanding SCSI Connectio ns Page 20
Page 21
Changing the SCSI ID Number in Windows 98
If you are using your scanner with Windows 98 and you want to change
the scanner’s SCSI ID number, fo llow t he steps be low .
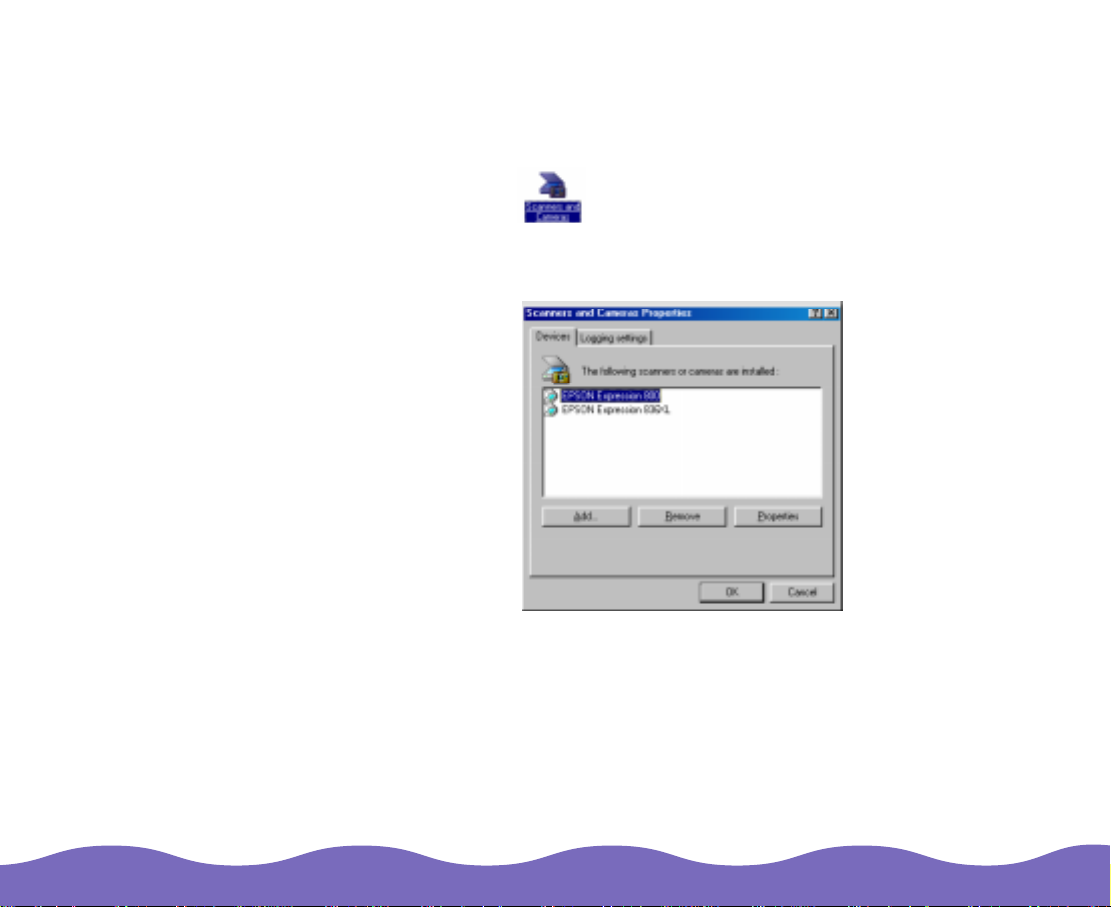
Double-c lic k th e
1
Panel.
Select your scanner in the installed devices list, then click
2
Click OK and clos e th e dialog box .
3
Shut dow n W indows 98 and turn off your PC and scanner.
4
Use the rotary switch at the back of the scanner to change the
5
scanner ’s SC SI ID number.
Turn on yo ur s c anner, and th en t urn on your P C .
6
Scanners and Cameras
icon in the Control
Remove
.
Follow the instructions on the screen.
7
Understanding SCSI Connectio ns Page 21
Page 22
Upgrading from
Windows 95 to Windows 98
If you installed th e scanne r softwa r e on a comput er wi th Windo ws 95 and
then upgraded to Windows 98, yo u m ust uninstall and re-ins t all the
scanner so ftw are. Follow th es e steps:
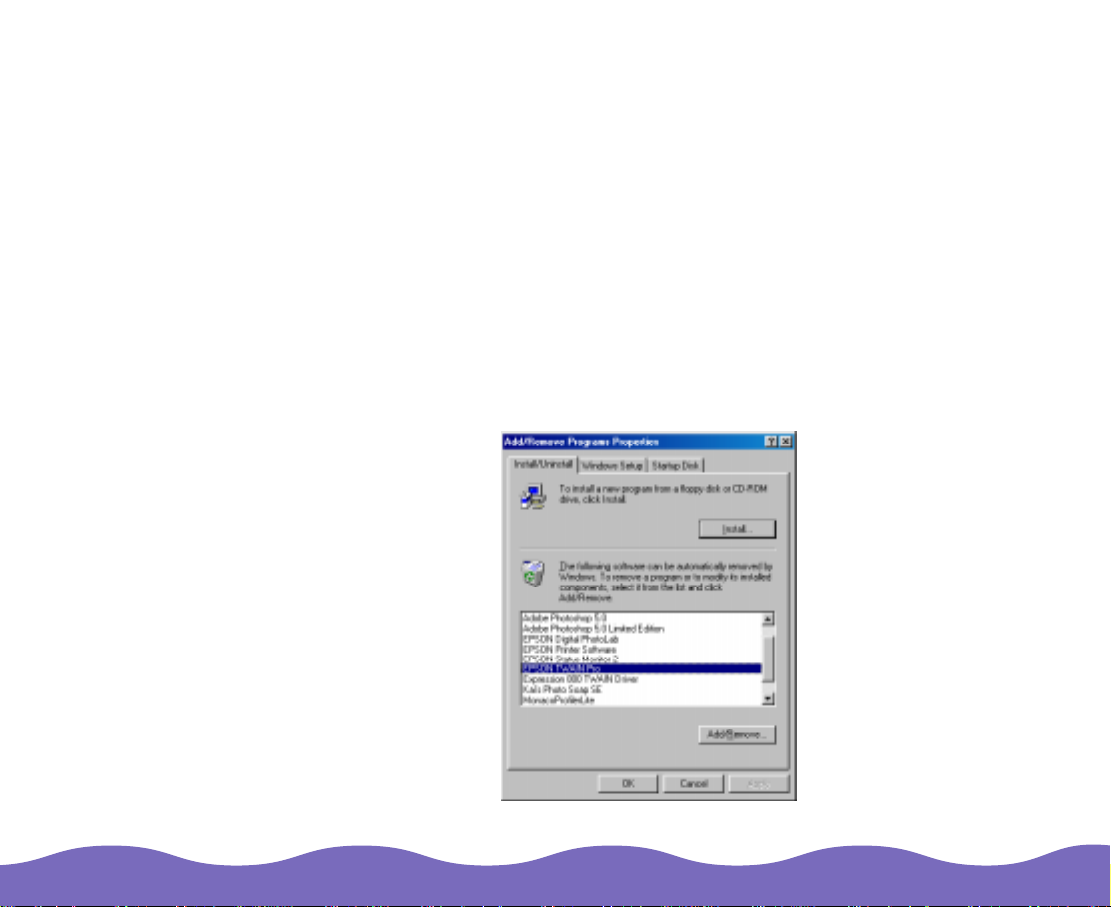
Click
1
2
Upgrading from Windows 95 to Windows 98 Page 22
Start, Settings
Double-click
and click
Add/Remove
Add/Remove Programs
, and then select
, then follow the instructions on th e s c reen.
Control Panel
. Select
EPSON TWAIN Pro
.
Page 23

When you ’v e f inished uni ns t alling EPSON TWAIN Pro, repeat s te p 2
3
to uninstall LaserSo f t
TWAIN Driver
To re-install the EPS ON s c anner software, follow th e instructions in
4
).
Setting Up and Using Your Scanner
®
SilverFast™ Lite (sele c t
.
Expression 800
Upgrading from Windows 95 to Windows 98 Page 23
Page 24

Using Optional Equipment
Follow the steps in these sections to install and use the scanner’s optional
equipment:
Using the Transparency Unit
◗
Using the Auto Document Feeder
◗
Using Optional Equipment Page 24
Page 25

The transparency
unit comes with the
Professional model
of the EPS ON
Expression 800
scanner . It’ s an
option for the
Executiv e and Artist
models of the
scanner.
Using the Transparency Unit
The optio nal transparency unit (part number B813152) lets you sc an f ull
color transparencie s , str ips of negatives or po si tives, and slide s . Yo u c an
also scan normal opa que documents with th e T PU installe d.
Follow the s t eps in these se c tio ns t o ins t all and use the TPU:
Unpacking the Transparency Unit
◗
Removing the Ship ping Screw
◗
Installing t he Transparency Un it
◗
Scanning Oversize d T ranspare nc ies and Film
◗
Using the F ilm Guides
◗
Scanning Normal Documents with the Transparency Unit Installed
◗
Using Optional Equipment Page 25
Page 26

You can store the
film guide s in th e
storage area built
into the TPU.
However, it is
recommended tha t
you do not store the
small 120/22 0-size
film guide in t he
storage area.
Unpacking the Transparency Unit
Make sure all these items are included in the box with the TPU. Contact
your EPSON deale r if a ny t hing is missing or damag ed.
reflective document mat
transparency unit
4 x 5-i nch film
installation
screws
guide
35 mm slide transparency guide
35 mm filmstrip guide
120/220-size (medium
format) film
guide
Using Optional Equipment Page 26
Page 27
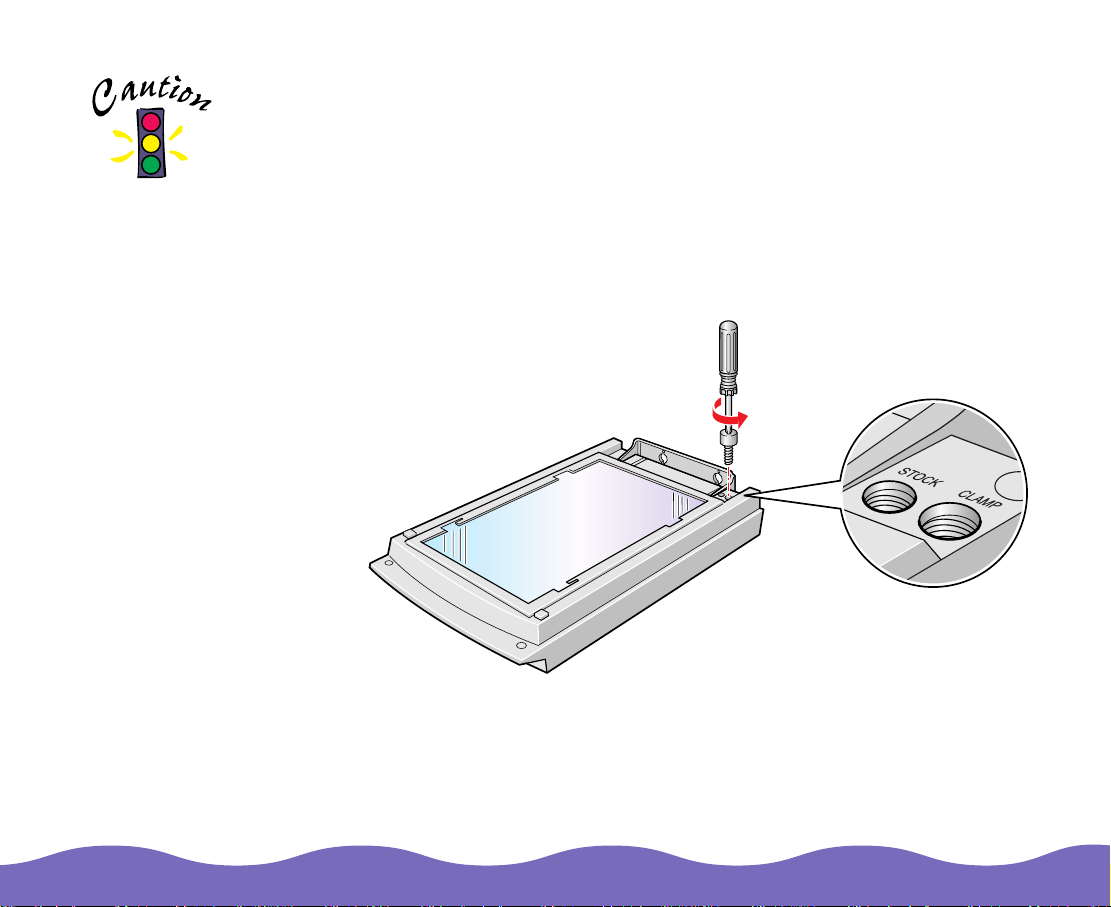
You may damage the
TPU if you try to use it
without removing the
screw from t he hole
labeled CLAMP.
Removing the Shipping Screw
To preven t dam age during shipping , a sh ipping screw is at t ac hed to the
TPU to secure its lamp assembly. You must remove this screw before
using the TP U .
Turn the TPU so the glass side faces up.
1
Use a Phill ips head (cross head) screw driver to rem ov e the shipping
2
screw from the hole la beled CLAMP, as shown below.
Install the screw in the storage hole labeled ST OCK.
3
Using Optional Equipment Page 27
Page 28
If you can’t insert the
shipping screw in the
hole labeled CLAMP
when you prepare
the scanner for
transportation, the
TPU’s lamp
assembly may not be
in its home position.
If this is the case,
slowly rais e t he front
of the TPU to allow
the lamp assembly to
slide to the home
position .
Before transporting the scanner, tu rn it off, r emove the TPU, and reinstall
the shipp ing screw in the outer shipping hole labeled CL AM P. The
transpor ta t ion lock at the back of the scanner mu st also be in the LOCK
position before you move the scanner (see
Scanner).
Setting Up and Using Your
Installing the Transparency Unit
Follow the s t eps below to ins t all t he TPU:
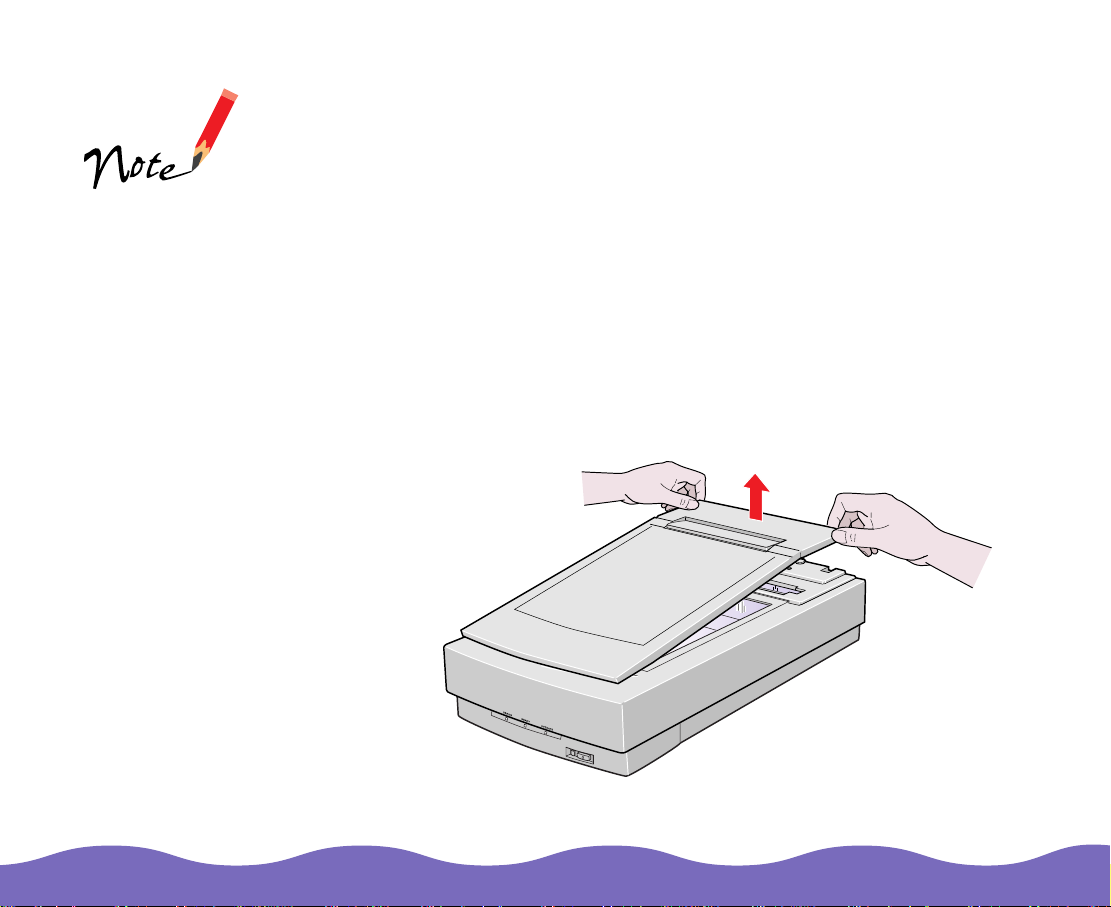
Make sure the scanner is turned off. Then unplug the power cable from
1
the scanner.
Remove the document cover by grasping the back of the document
2
cover as sh ow n and easi ng t he cover up.
Using Optional Equipment Page 28
Page 29

Position the sl o ts on the TPU’s mo unti ng bracket over th e heads of the
3
two mounting screws located at the back of the scanner. Slide the TPU
forward slightly unti l th e t w o holes in front of th es e s lots are aligned
with the screw holes at the back of the scanner.
align these holes
with the screw holes
on the scanner
screw holes on
scanner
position the slots on the
TPU’s mounting
bracket over the two
large screws at the
back of the scanner
Using Optional Equipment Page 29
Page 30
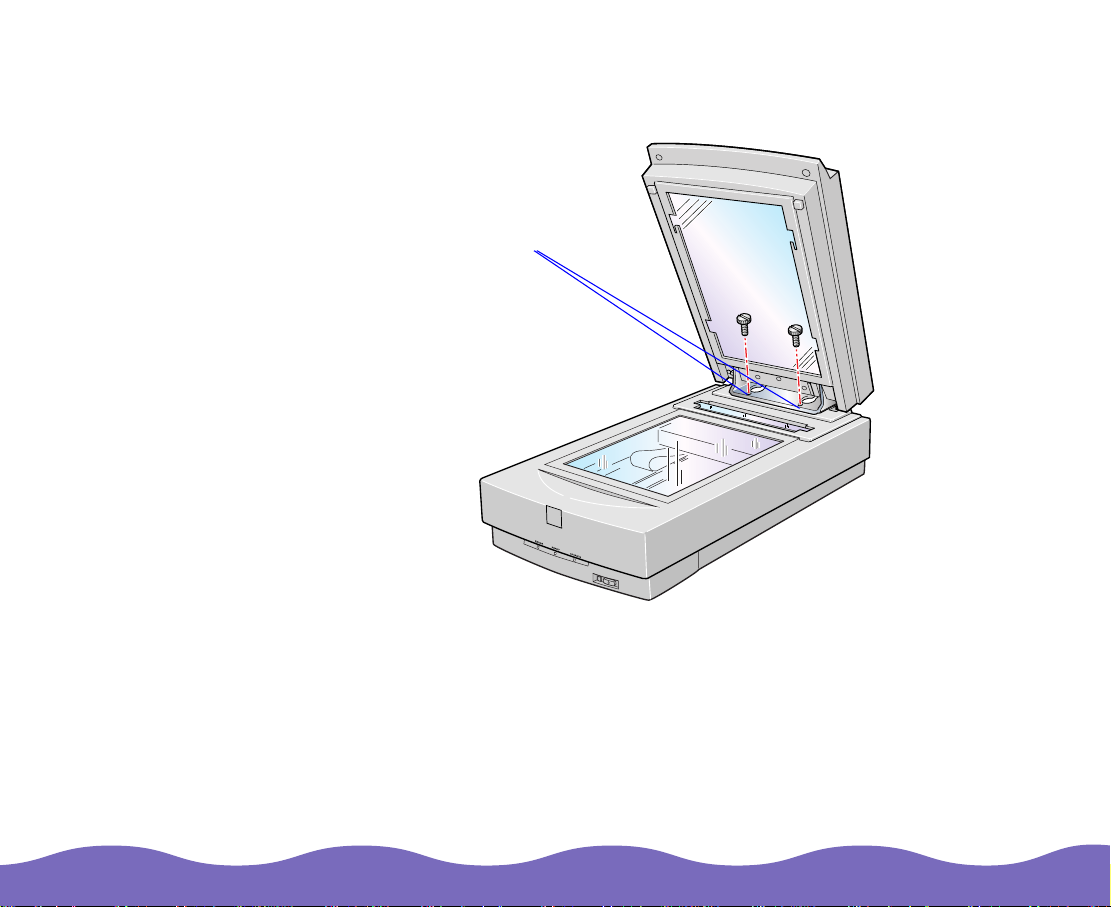
Insert the two installation screws that came with the TPU into the
4
screw holes, then tighten the screws with a c oin.
install the screws in
the screw holes
Gently clos e the TPU.
5
Using Optional Equipment Page 30
Page 31

Do not put heavy
objects on the TPU—
doing so may
damage the TPU.
Attach the TPU connector to the option connector at the back of the
6
scanner. To secure the TPU connector, tighten the attached screws.
OPTION
UNLOCK
LOCK
OPTION
TERMINATOR
SW
ON
SCSI
OFF
ID
0
1
2
7
6
3
4
5
Plug the scanner bac k in and turn it on.
7
Using Optional Equipment Page 31
Page 32
If you have th e Artist
or Professional
model and are using
LaserSoft SilverFast
4.0, you’ll f ind the
electronic manual for
that scan ner
software on the
LaserSoft SilverFast
CD-ROM.
Scanning Oversized Transparencies and Film
To scan a tra ns parency or film that is la rger than any of the film guides,
place the transparency or film face down on the document table. Position
the corne r of yo ur original against the a rrow in the upper right corner of
the document table, as shown below. The maximum size of your
transparency or film is 8.5 × 11.7 inches (216 × 297 mm).
Close the T PU and scan ac c ording to the instructions in your elec t ronic
EPSON TWAIN Pro User’s Guide
. (You’ll fin d both guide s in th e M anuals folder on your E PSON
Guide
Expression 800 Scanning Tools CD-ROM.)
position the original
against the upper
right corner of the
document table
or
LaserSof t Silv erFast Lite U s er’s
Using Optional Equipment Page 32
Page 33

Using the Film Guides
You can use the four film guides that came with the TPU to scan 35 mm
slides, strips of 35 mm negative or positive film , 120-size or 220-size
format film, and 4 × 5-inch (102×127 mm) film. Follow the steps in these
sections:
Loading 35 m m s lides
◗
Loading strips of 35 mm negative or positive film
◗
Loading m edium forma t size (120 or 220-size format) film
◗
Loading 4
◗
Using Optional Equipment Page 33
x 5-inc h film
Page 34

If you have the Artist
or Professional
model and are using
LaserSoft SilverFast
4.0, you’ll f ind the
electronic manual for
that scan ner
software on the
LaserSoft SilverFast
CD-ROM.
Loading 35 mm slides
Position the slide transparency guide on the document table, as shown
1
below. The upper and right edges of the guide shou ld be flush against
the ruled edges of the doc ument tab le.
you can line up two
columns of 35 mm
slides in the larger
section of the guide
Carefully position eac h slide inside the guid e, m ak ing sure that th e
2
glossy (smooth) sid e of the fi lm is facin g down and the emulsi on side is
facing up .
Close the T PU and scan th e s lides accor ding to your electronic
3
EPSON TWAIN Pro User’s Guide
. (You’ll fin d both these guides in the M anuals dire c to ry on y our
Guide
EPSON Ex pression 800 Scann ing Tools CD-ROM.)
or
LaserSof t Silv erFast Lite U s er’s
Using Optional Equipment Page 34
Page 35

If your film s t rip is
longer than the film
guide, it may affect
the quality of t he
scan.
Loading strips of 35 mm negative or positive film
Insert the film strips face down in the filmstrip guide.
1
Place the filmstrip guide on the document table. Make sure the glossy
2
(smooth) side of the film is facing down and the emulsion side is facing
up. Align the upper and right edges of the guide with the ruled edges of
the document table.
Using Optional Equipment Page 35
Page 36

Close the T PU and scan th e f ilm ac c ording to the instructions in your
3
electronic
EPSO N TWAIN Pro U s er’s Guide
Lite User’s Guide
.
or
LaserSoft SilverFast
If you have the Artist
or Professional model
and are using
LaserSoft SilverFast
4.0, you’ll f ind the
electron ic m anual for
that scanner software
on the Las erSoft
SilverFast CD-ROM.
Loading medium form at si ze (120 or 220-size format) film
Place the 120/220-siz e f ilm guide on th e s c anner’s document tab le,
1
fitting one c orner of the guide agains t th e upper right c orner of the
docume nt ta ble.
Using Optional Equipment Page 36
Page 37

If you have the Artist
or Professional
model and are using
LaserSoft SilverFast
4.0, you’ll f ind the
electronic manual for
that scann er
software on the
LaserSoft SilverFast
CD-ROM.
Place the film inside the guide, mak ing sure that th e area you want
2
to scan is ali gned with the open scan area in the gu ide. The glos s y
(smooth) s ide of the film sho uld be facing down and the em ulsion side
should be facing up.
Close the T PU and scan th e f ilm ac c ording to the instructions in your
3
electronic
Lite User’s Guide
EPSON Ex pression 800 Scann ing Tools CD-ROM.)
EPSO N TWAIN Pro U s er’s Guide
. (You’ll find both guides in the Manuals folder of your
or
LaserSoft SilverFast
Using Optional Equipment Page 37
Page 38

If you have the Artist
or Profes s ional
model and are using
LaserSoft SilverFast
4.0, you’ll f ind the
electronic manual for
that scanner
software on the
LaserSoft SilverFast
CD-ROM.
Loading 4 x 5-inch film
Place the 4 × 5-inch film guide on the document table.
1
Place the film inside the guide, aligning the area you want to scan with
2
the scan areas on the guide. Make sure the smooth (glossy) side of
your film is facing down and the emulsion side is facing up.
Close the TPU. Scan according to the instructions in your online
3
TWAIN Pro User’s Guide
Using Optional Equipment Page 38
or
LaserSoft SilverFast Lite User’s Guide
EPSON
.
Page 39

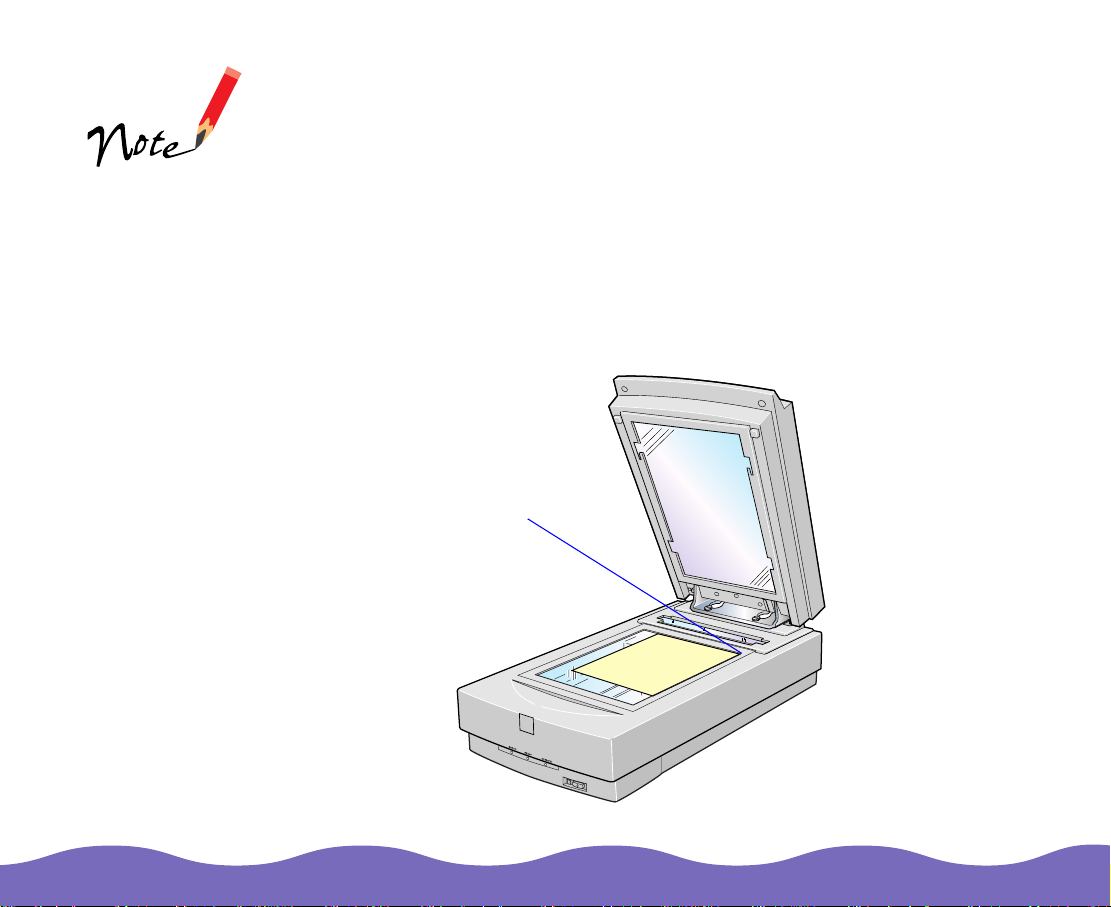
Scanning Normal Documents with the Transparency Unit Installed
To scan normal docum ents with th e T PU installe d, ins ert the refle c ti ve
docume nt m at inc luded with t he TPU as desc ribed below .
Open the TPU. If there’s a film guide on the document table, remove it.
1
Insert the tabs on t he ref lective docum ent mat into the slot s on the TPU
2
and slide the ma t do w n unt il th e tabs are secur e.
reflective document mat
tab
Place your document on the document table and close the TPU.
3
Using Optional Equipment Page 39
Page 40

If you have the Artist
or Professional
model and are using
LaserSoft SilverFast
4.0, you’ll f ind the
electronic manual for
that scan ner
software on the
LaserSoft SilverFast
CD-ROM.
Scan according to the instructions in your electronic
4
Pro User’ s G uide
both guides in the Man uals folder on your EPS ON Express ion 800
Scanning Tools CD-ROM). Set your Document Source to
(TWAIN Pro) or your Document Type to
To remove the reflec tive document mat, slid e it up until you ca n
disengage the tabs from the slots, then gently pull it out of the TPU.
or
LaserSoft SilverFast Lite User’s Guide
Reflective
EPSON TWAIN
(you’ll fin d
Flatbed
(SilverFast Lite).
Using the Auto Document Feeder
The auto document feeder (part number B813162) automatically loads
multiple- page docu m ents into your s c anner. It is particularly us ef ul for
OCR (optic al charact er recognition) scanning or for creat ing an imag e
databas e. F ollow the steps in these sect ions to install and use the ADF:
Unpacking the Auto Document Feeder
◗
Installing t he Auto Doc um ent Feeder
◗
Loading Paper in the Au t o D oc ument Fe eder
◗
Fixing Paper Jams in the Auto Document Feeder
◗
Using Optional Equipment Page 40
Page 41

Unpacking the Auto Document Feeder
Make sure that the following items are included in the ADF box. Contact
your EPSON deale r if a ny t hing is missing or damag ed.
installa tion
screws
auto document feeder
Using Optional Equipment Page 41
Page 42

To use the ADF, you
must ins ta ll EPSON
TWAIN Pro.
LaserSoft SilverFast
Lite does not support
the ADF.
Installing the Auto Document Feeder
Before ins t alling the ADF, be aware that:
The ADF is large, so clea r a w ide space around the sc anner befo re
◗
unpacki ng and installing it.
Don’t remove the protective foam block from the ADF’s mounting
◗
hardware until you’v e f inished inst alling it.
Follow the s t eps below to ins t all t he ADF on yo ur scanner:
Turn your scanner off and unplug t he c ables and pow er cord.
1
Remove the document cover by grasping the back of the document
2
cover as sh ow n and easi ng t he cover up.
Using Optional Equipment Page 42
Page 43

Do not remove the
protective foam
block until you’ve
finished tightening
the ADF’s installation
screws (see step 4.)
Position the ADF’s mounting slots over the two mounting screws
3
located a t the back of the s c anner. Slid e t he ADF forward slightly unt il
the two holes in front of these slots are aligned with the screw holes at
the back of th e s c anner.
line up these holes
with the screw holes
on the scanner
screw holes
on scanner
position the ADF’s
mounting slots over
the two large screws
on the scanner
Using Optional Equipment Page 43
Page 44

Insert the two installation screws that came with the ADF into the
4
screw holes, then tighten the screws with a c oin.
install the screws
in the screw holes
Remove the protective foam block from the ADF’s mounting hardware
5
foam block
and gently c los e the ADF.
Using Optional Equipment Page 44
Page 45

Attach the AD F ’s c onnector to th e s c anner’s option interfac e. Secure
6
the connection by tightening the connector screws.
OPTION
UNLOCK
LOCK
OPTION
TERMINATOR
SW
ON
SCSI
OFF
ID
0
1
2
7
6
3
4
5
Reattac h all t he scanner c ables and tur n on the scan ner.
7
Using Optional Equipment Page 45
Page 46

Loading Paper in the Auto Document Feeder
The ADF ca n hold up to 30 sheets of the f ollowing pap er sizes, bas ed on
a paper weight of 17 lb and a thickne s s of 0. 2 inc h (6.0 mm) o r les s :
Do not feed
photographic sheet s
or valuable original
artwork into the ADF;
misfeeding may result
in acciden ta l w rinkling
or damage to your
original.
Also, photo quality and
glossy paper are too
thick to feed into the
ADF successfully.
Checks: 3 × 5 inches (7 6 × 127 mm)
B5: 7.17 × 10.1 inches (182 × 257 mm)
A4: 8.27 × 11.69 inch es (210 × 297 mm)
Letter: 8.5 × 11 inches (215.9 × 279.4 mm)
Legal: 8.5 × 14 inches (215.9 × 355.6 mm)
Before loading the A D F , make sure th e document :
Has no wet ink on it.
◗
Has no hol es and is not ripped or wrinkled.
◗
Has no staples or other objects attached that may damage the feeder.
◗
Has no folds .
◗
Is not a multipart form.
◗
Is not bound.
◗
Is not print ed on photo qu ality or glossy paper.
◗
Has no carbon coating.
◗
Has no cut -out areas.
◗
Using Optional Equipment Page 46
Page 47

For checks, move th e
left edge gu ide
toward the center
until it stops, then
place your checks in
the tray. Move the
right edge guide flush
against the checks.
Follow the s t eps below to load paper in t he ADF:
Slide the edge guides all the way ou t.
1
Arrange your stack of originals face up, with the page you want to scan
2
first on the top. Insert the paper stack into the ADF until it meets
resistance. Make sure that the side you want to scan is facing up.
Using Optional Equipment Page 47
Page 48

When scanning
high-qu alit y c olor or
halftone documents,
it is be s t t o open
the ADF and scan
documents as
describe d in Loading
documents manually.
Don’t open the ADF
while scanning. Yo u’ll
get an option error
and poss ibly a paper
feeding error.
Slide the edge guides to th e edges of yo ur paper.
3
Follow the steps in your electronic
4
scan your document .
EPSON TWAIN Pro User’s Guide
to
Loading documents manually
You can load documents manually while the ADF is installed. Lift the ADF
and place t he document on the docum ent table. Then close th e AD F and
scan the doc ument as des c ribed in you r electronic
User’s Guide
800 Scanning Tools C D -R OM.)
(located in the Man uals folder on your EPSON Expres s s ion
EPSON TWAI N Pro
Using Optional Equipment Page 48
Page 49

Be caref ul not to pull
too hard on the paper.
It may tear, making it
more dif f ic ult to
remove.
Fixing Paper Jams in the Auto Document Feeder
If there is a pape r jam , open the ADF ’s co ve r to se e w here the pape r jam
occurred . Pull the jam-release lever forward and slowly pull t he jammed
paper out of t he f eeder mechanism.
pull forward on the
jam-release lever to
release the paper
After removing the jammed paper, close the ADF cover and reset the
scanner by tu rning it off and on again or pres s ing the
Using Optional Equipment Page 49
RESET
button.
Page 50

Maintaining and
Transporting Your Scanner
This chapter gives tips on caring for your scanner and preparing it for a
move. It includes the following sections:
◗ Cleaning the Scanner
◗ Replacing the Fluorescent Lamp
◗ Transporting the Scanner
◗ Transporting the Transparency Unit
Maintaining and Transporting Your Scanner Page 50
Page 51

Never o pen the
scanner case; doing
so will void your
warranty. If you
think rep airs or
adjustments are
necessary, consult
your EPSON
Customer Care
Center.
Cleaning the Scanner
To keep your scanner operatin g at it s b es t , you should cle an it
periodically. Before cleaning it, turn the scanner off and unplug the power
cable. Then clean the outside w ith m ild detergen t diluted in wat er.
If the glass of the document table gets dirty, clean it with a soft, dry,
lint-free cloth. If greas e or other har d-t o-remove m aterial ge ts on the
glass, rem ov e it with a sma ll am ount of glas s c leaner on a so ft lint-free
cloth. Wip e of f any remainin g m oisture with a dry lint-fre e c lot h.
Do not
◗
◗
◗
◗
◗
:
Scratch or damage the document ta ble glass
Use an abr as iv e cloth or brus h to clean th e s ca nner
Use alcohol, thinner, or c orrosive so lv ents
Spill liquid s on t he scanner or into the scanner mechanism or
electronic components
Spray lubricants inside the sca nner
Maintaining and Transporting You r Scanner Page 51
Page 52

p
Never o pen the
scanner case; doing
so will void your
warranty. If you
think rep airs or
adjustments are
necessary, consult
your EPSON
Customer Care
Center.
Replacing the Fluorescent Lam
The luminosity of the fluorescent lamp declines over time. If the lamp
breaks or becomes too dim to operate normally, the scanner stops
working and both the
the lamp assembly may need to be replaced. You must contact your local
EPSON C us t om er Care Center to have th e lam p replace d (s ee Where to
Get Help for details).
READY
and
ERROR
lights flash. If this happens,
Maintaining and Transporting You r Scanner Page 52
Page 53

Transporting the Scanner
If you need to transport the scanner or store it for an extended period, you
must secure the carriage befor ehand.
If the scanner is
inoper able, the
carriage may not
automatically return to
the home position. If it
doesn’t , sl ow ly raise
the front of the scanner
and hol d it up until the
carriage comes to rest
in the home position (at
the back of the
scann er). Then slid e
the transportation loc k
to the LOCK position.
Make sure the transportation lock is in the UNLOCK position.
1
Align the SCSI ID rotary switch with the asterisk (*).
2
If you’re us ing a transparency unit or auto docum ent feeder, remove it.
3
Replace th e s c anner cover. Position the two hinges o n t he c over over
4
the corresponding pins on the scanner, as s hown, then pus h down
gently.
Turn the sc anner on and wait until the carriage m ov es t o t he home
5
position (toward the back of the scanner). Then turn the scanner off.
Maintaining and Transporting You r Scanner Page 53
Page 54

Slide the tr ansportati on lock to the LOCK posit ion.
6
UNLOCK
LOCK
UNLOCK
LOCK
OPTION
TERMINATOR
SW
ON
SCSI
OFF
ID
0
1
2
7
6
3
4
5
Maintaining and Transporting You r Scanner Page 54
Page 55

Transporting the Transparency Unit
After you’v e removed t he transparency unit from the scanner, prep are it
for shippin g as follows:
Slowly rai s e th e f ront of the transparency unit to allow th e lamp
1
assembly to slide to the home position at the back of the unit. Wait until
the lamp assembly comes to rest.
let the lamp
assembly slide to
the home position
Maintaining and Transporting You r Scanner Page 55
Page 56

Reinstall the unit’s shipping screw in the hole marked CLAMP
2
.
Maintaining and Transporting You r Scanner Page 56
Page 57

Troubleshooting
This chapt er helps you s olve scann er problem s. I t in c ludes the foll ow ing
sections:
Diagnosing Problems
◗
Upgrading Your Sy stem
◗
Problems and Solutio ns
◗
Diagnosing Problems
Some problems can involve your software or computer, such as:
Incorrect setup of the SCSI interface
◗
Inappropriate selec t ion of the scanner funct ions
◗
Incorrect setup of your computer or software
◗
Incorrect operation of your scanner software
◗
If an error occurs, check the scanner’s indicator lights. See Indicator
Lights to determine what kind of error it is, and try the suggested
solutions. If that doesn’t solve the problem, see Problems and Solut ions.
See the documentation that came with your software, computer, and
printer for ot her possible s olutions.
Troubleshooting Page 57
Page 58

Indicator Lights
If an error occurs, the scanner stops operating. The
lights indi ca t e t he t y pe of error.
ERROR
light
On On Command
Flashing Off Interface
Flashi ng F las hing Fatal err or The problem co uld be:
READY
light
Error
type Solution
The scanner has received incorrect comm ands from yo ur
error
error
scanning software. Try r escanning the document. If the error still
occurs, try restarting the scanner.
The interface setup is wrong or the scanner is no t pr operly
connected to the computer. Ch ec k th e interface co nnection.
Then push the
The transportation lock is not in th e U N LOCK posit ion.
◗
The fluore s c ent lamp ma y n eed to be repl ac ed.
◗
The scanner is malfu nc t ioning
◗
Check that the transportation lock is unlocked, then push the
RESET
it off and on. If the problem persists or it occurs repeatedly,
consult your dealer.
RESET
button. I f the scanner s t ill doesn’t operate prop erly, turn
READY
button or turn the scan ner off and on.
and
ERROR
Off Off Option
error
Troubleshooting Page 58
There’s a problem with the TPU or ADF. Check that the option is
set up correctly, and that its cover is clos ed. If you have an ADF,
remove any jammed paper and make sure tthere’s paper loaded
in the feed er t ray .
Page 59

Upgrading Your System
To improve your image process ing speed a nd t he appearance of the
images on your monitor, you can add the following items to your system:
Additional memory.
◗
text files, so y ou may need more RAM in your com put er and a larger
hard disk .
Processor.
◗
speed; la rge files take longer to pro c es s th an small ones .
Video card.
◗
24-bit col or v ideo card.
High resolution monitor.
◗
the qualit y o f the image you see. Con si der a high reso lution monit or if
you do prec is e c olor work, b ut be s ure you have a compat ible video
card.
Compression software.
◗
make image files smaller for stor age or transm is s ion. Comp res s ion
software ca n c om press ima ges and rest ore them to their original s iz e,
but use of compression software may affect the quality of your scans.
You may want to increase your system’s processing
For accurate previews on your monitor, use a 16-bit or
Scanned images use much more memory than
The reso lut ion of your m onitor also af fe c t s
Many diffe rent progra m s are availabl e t o
Troubleshooting Page 59
Page 60

Problems and Solutio ns
Check the s e s ec t ions for the p roblem you’re having a nd f or possible
solution s:
Operation Problem s
◗
Scan Quality Problem s
◗
Image Mat c hing Problems
◗
Operation Problems
The OPERATE light does not come on.
Problem Solution
The scanner is not
getting po w er.
Make sure t he power cable is correc t ly plugged into th e s c anner and
the power out let. Make su re the outlet is o perational and is not
connected to a timer o r switch.
The READY light does not come on.
Problem Solution
The scanner is not
communicating with
your computer.
Troubleshooting Page 60
Make sure t he scanner is s ec urely connected to the correct com puter
interface and that the scanner is turned on.
Page 61

The scanner does not start scanning.
Problem Solution
The scanner is not
ready to scan.
Your softw are or
interface is not
operating properly.
Wait until th e R EADY ligh t is on.
If you’re running Win dows, make su re you selec te d t he SCSI inte rf ac e
port when yo u installed y our scanner s oftware. Also, make sure the
SCSI interf ace board on y our comput er is installe d properly. See
Setting Up and Using Your Scanner
Confirm th at t he t erminator and SCSI ID are set corr ec t ly . S ee
Understanding SC SI C onnections
If you have ot her expansion boards in y our comput er, m ake sure th at
they’re no t int erf ering with th e interrupt s et ti ng of the SCS I in te rf ac e
board for y our scanner. (See your com puter manual for details.)
The scanner software does not work properly.
Problem Solution
Your system doesn’t
meet your software
requirements, or the
software is set up
incorrectly.
Make sure y ou have correctly inst alled your software.
Make sure your computer system meets all the requirements specified
for your software.
Make sure your software supports this model of scanner.
Make sure the computer has enough memory for your software. If
you’re running othe r so f tware at the sa m e time, using RAM resi dent
programs, or have many device drivers, the c om puter may not have
enough memory lef t. (See your sof t w are and computer manuals for
details.)
for details.
for instruc t ions.
Troubleshooting Page 61
Page 62

Scan Quality Problems
The entire image is distorted or blurred.
Problem Solution
The document is not
placed correctly.
Make sure the document is placed flat on the document table.
You may h av e accident ally m oved the doc ument during scanning.
Check the position of the document and don’t move it while the scanner
is operati ng.
Be sure the s ca nner is not tilted or place d on an unstable surface .
Part of the image is distorted or blurred.
Problem Solution
Part of the document
may be wrinkled,
warped, or not in
contact with the
document table.
There may be IRQ
(interrupt request)
conflicts within your
system.
Be sure the document is uniformly flat and smooth.
Check your operating system manual and electronic help files for
instructions on how to resolve IRQ conflicts.
Troubleshooting Page 62
Page 63

The edges of the document are missing from the scanned output.
Problem Solution
The document is
position ed incorrect ly .
The docu m ent table has non-readable areas around the ed ges.
Reposition your document so that the image you want to scan is within
the readable area.
Color is patchy or distorted at the edges of the image.
Problem Solution
The document may be
letting in ext ernal light.
If the document is very thick or warped at the edges, the edges of the
image ma y be discolored. Cover the edges of th e document w it h
opaque p aper to block out s ide light.
If the document extends beyond the edge of the document table, part of
the document may not be in cont act with the table. Change the posi ti on
of the docum ent.
The image is faint or out of focus.
Problem Solution
The document is not
position ed c orrectly.
Your software settings
may be incorrect.
Check tha t th e document is p lac ed flush against the do c um ent table.
Adjust the brightness option in your software to a darker s et t ing. (In
EPSON T W AI N Pro, adjust th e
Gamma
setting.)
Troubleshooting Page 63
Page 64

The image is too dark.
Problem Solution
Your software settings
may be incorrect.
Adjust the brightness s et t ing in your sof tware. Also c heck the
brightnes s and contras t se ttings of you r m onitor.
Straight lines in the image are jagged.
Problem Solution
The document may be
placed at an angle on
the document table.
Scan resolution may be
set too low.
Align it so that the horizontal and vertical lines are carefully aligned with
the scales on the top and s ide of the doc um ent table.
Change the
Resolution
EPSON TWAIN Pro User’s Guide
for information on setting the resolution. (Both guides are located
Guide
in the Man uals folder on y our EPSON Ex pression 800 Scann ing Tools
CD-ROM.) If you have the Artist or Professional model and are using
LaserSof t Silv erFast 4.0, s ee the electr onic guide on yo ur LaserSo f t
SilverFast CD-ROM.
setting to a h igher value. See your ele c t ronic
or
A line of dots is always missing in the scanned image.
Problem Solution
Your scanner may be
causing the problem.
If this happ ens on both y our screen and printou t, th e s c anner’s sensor
may be malf unctioning. Consul t your dealer.
LaserSof t Silv erFast Lite U s er’s
Your printer may be
causing the problem.
Troubleshooting Page 64
If this happ ens in your printed image only, it may be caused by y our
printer. S ee y our printer ma nual for inst ruc t ions on solv ing the probl em .
Page 65

The image cannot be printed, the printout is garbled, or the printout is not an image.
Problem Solution
Your printer may be
causing the problem.
Your printer software
may be caus ing the
problem.
Check tha t th e printer is properly connected to the c omputer and is
correctly se t up. (See your pri nt er manual for instructions.)
Check tha t yo ur printer sof tware is prop erly installe d and configured.
(See your s of t w are manua l fo r details.)
Color stripes appear when scanning film.
Problem Solution
Your scan is being
distorted by an effect
known as Newton’s
Ring.
Try scanning the film upside down. Newton’s Ring is an optical
phenomenon that occurs when two very thin membranes such as
film surfaces or soap bubble sur fa c es m eet.
A line appears in the scanned image when you’re using the ADF unit.
Problem Solution
The narrow window
near the ADF’s
mounting bracket is
dirty.
Clean the window with a soft, dry, lint-free cloth.
Troubleshooting Page 65
Page 66

Image Matching Problems
The image does not look the same as the original.
Problem Solution
Your app lic at ion
software settings may
be incorrect.
Your app lic at ion
software m ay not be
set up correctly to
import your image.
Try differe nt im age settin gs in y our scanner software. (I f you’re using
EPSON TWAIN Pro, first try changing the
problem m ay be screen or printer calibration.)
Your app lic at ion may not hav e sufficient c olor matchin g and color
management features, or these components of your software may not
be correctly installed. (See your software manual for details.)
If you are importing a scanned-image file into your application software,
make sure the file format is one your software can read. Also check that
the image se t tin gs in your appl ic at ion are appropriate for t he type of
image yo u w ant to scan. (S ee your softw are manu al f or details.)
Printed colors are different from those in the original image.
Problem Solution
You’re experiencin g
normal color matching
problems.
If you’re using a TPU,
it may be let tin g in
external light.
Exact color matching is very difficult. Check your software and printer
manuals fo r inf ormation on color mat c hing and cali bration.
Make sure t he TPU is clos ed and that t he narrow window nea r th e
hinges is cov ered.
Destination
to see if your
Troubleshooting Page 66
Page 67

Colors on your monitor are different from those in the original image.
Problem Solution
You’re using EPSON
TWAIN P ro and didn’t
calibrate your screen to
the scanner.
Your scanner software
settings may be
incorrect.
Your system’s color
matching may be
affecting your results.
You’re experiencin g
normal color matching
problems.
If you’re using a TPU,
it may be let tin g in
external light.
Use the EPSON Screen Calibr at ion utility as des c ribed in
Setting Up
and Using Your Scann er.
Check the image settings in your scanner software, especially data
format (bit s /p ix el/color), g am m a correcti on, and color c orrection. Tr y a
different c om bination of th es e s et t ings. See yo ur electronic
TWAIN Pro User’s Guide
instructio ns . (You’ll find these guide s in t he M anuals folder on you r
EPSON Expression 800 Scanning Tools CD-ROM.) If you have the
Artist or Professional model and are using LaserSoft SilverFast 4.0, see
the electronic guide on y our LaserS of t Silv erFast CD -R OM.
Check the co lor matchin g and color managem ent c apabilities of y our
computer, display adapter , and softwa re. Some compute rs can chang e
the color p alette to adju s t colors on your s c reen. (See yo ur s oftware
and comp ut er manuals f or details.)
Exact color matching is very difficult. Check your software and
computer manuals f or informat ion on color mat c hing and ca libration.
Make sure t he TPU is clos ed and that t he narrow window nea r th e
hinges is cov ered.
or
LaserSof t Silv erFast Lite U s er’s Guide
EPSON
for
Troubleshooting Page 67
Page 68

The printed image is larger or smaller than the original size.
Problem Solution
You may have adjusted
the image si ze s et ti ngs
in your scanner
software.
Change the image size settings in your scanner software to resize the
scanned im age. Don’t u s e th e s iz e of the imag e on your monit or to
judge the printed size.
The colors of the preview for your negative film image look strange.
Problem Solution
The wrong Document
Source se t tin g is
selected in your
EPSON T W AI N Pro
software.
The film guide or slide
transpar ency guide
affects the exposure
of the scan ning area.
The TPU may be
letting in ext ernal light.
Make sure
setting.
The scanner software perceives the dark film guide frame as white ,
which alters the expo s ure of the scanning area and causes t he scan to
appear dar ke r. To see the co lors that will actually be scanned, selec t an
area by clicking and dragging the mouse over the preview, then click the
Make sure t he TPU is clos ed and that t he narrow window nea r th e
hinges is cov ered.
TPU for Neg. Film
zoom pre v iew button.
is selected as the Document Source
Troubleshooting Page 68
Page 69

Specificat ions ar e
subject to change
without notice.
Specification s
This chapter provides the technical specifications for your scanner and its
optional equipmen t in th es e sections:
Scanner Specifica ti ons
◗
Auto Document Fee der Specific at ions
◗
Transparency Unit Specifications
◗
Specifications Page 69
Page 70

Scanner Specifications
Scanning
Scanner t y pe Flatbed, c olor
Photoelec t ric
device
Effective pixels 6800 by 9360 pixels at 800 dpi, 100 %
Maximum
document size
Optical re s olution 800 dpi
Maximum
hardware
resolutio n
Maximum software
resolution
Zoom 50% to 200% in 1% inc rem ents
Command level ESC / I- B8
Speed (6 00 dpi,
draft mode)
Color sep aration RGB colo r fi lte rs on CCD
Color CCD line sensor
8.5 × 11.7 inch es (216 × 297 mm) US let t er or A4 size; re ading area c an
be specified from software
800 dpi (main scan)
3200 dpi (sub scan)
12800 × 12800 dpi w it h interpola t ion
Color: 7.5 m s / line
Monoch rom e (bi-leve l): Approx. 7.5 m s/line
Specifications Page 70
Page 71

Reading s equence Monochrome mode: One-pass s c anning
Color page sequen ce m ode: Three-pass scanning (R, G, B); not
supported by EPSON TWAIN Pro
Color byte sequence mode: One-pass scanning (R, G, B)
Color line s equence mode: One -pass scanning (R, G, B)
Pixel dept h 12 bits per pixel p er c olor input (o pt ic al density of 3. 3); 1 to 12 bits per
pixel per co lor output
Brightness 7 levels (In EPSON TWAIN Pro, Gamma correction controls brightness.)
Line art sett ings Fixed thres hold
TET (Tex t E nhancement Techno logy, enable/disable s electable)
Digital ha lftoning AAS (Auto Area Se gm entation, enable/disable select able)
3 halftoning modes (A, B, and C) and 4 dither patterns (A, B, C, and D) for
bi-level and quad-level data
Gamma correction 2 types for CRT display
3 types for printer
1 type for us er-defined
Color correction 1 type for CRT display
3 types for printer
1 type for us er-defined
Interface 2 SCSI-II (5 0-pin half pi tch connect ors )
Light sou rc e White cold c athode fluorescent lam p (Xenon)
Reliabilit y 100,000 cycles of c arriage movements (main unit)
Specifications Page 71
Page 72

Dimensions Width: 13 inches (332 mm)
Depth: 22.1 inches (562 m m )
Height: 5.3 inc hes (134 mm )
Weight Approxim ately 18.7 lb (8. 5 kg)
Supported
Documents
Reflective type Opaque documents with smooth surfaces
Transpa rency type Pos it iv e and negati ve fi lm (optional TPU required)
Electrical
Speci fi cations 100−120 V 220−240 V
Input volt age range 10 0 t o 240 VAC; universal aut oswitching
Rated frequency 50 to 60 Hz
Input frequency 49.5 to 60.5 Hz
Rated current 0 .8 A 0.4 A
Power consumption Approx. 40 W
Insulation resistance 10 mΩ at 500 VDC (between AC line and
chassis)
Check the label on the back of the scanner for voltage information
Specifications Page 72
Page 73

Environmen tal
Specifications Operation Storage
Safety Approvals
Temperature 41 to 95 °F
(5 to 35 °C)
Humidity 10% to 80%,
withou t condensa ti on
Opera ti ng c onditions Ordina ry of f ic e or home conditions
Extremely dusty c onditions s hould be avo ided
Operation under direct sunlight or near a strong
light sou rc e should be av oided
Model Safety Standards EMC
120 V UL 1950 with D3
CSA C2 2. 2 950 with D3
230 V EN 609 50 (VDE) EN 55022 (CISPR Pub 22)
FCC part 15 subpart B class B
(USA)
CSA C10 8. 8 c lass B (Cana da)
class B
AS/NZS 3548 class B
–13 to 140 °F
(–25 to 60 °C)
10% to 85%,
without condensation
Specifications Page 73
Page 74

CE Marking
Model Low Voltage Directive EMC Directive
230 V 7 3/ 23/EEC EN 6 0950 89/336/ EEC
EN 55022 Class B
EN61000-3-2
EN61000-3-3
EN 50082-1
IEC 801-2
IEC 801-3
IEC 801-4
Specifications Page 74
Page 75

SCSI Interface
Interface type ANSI Standard X3. 131-1994 (SCSI 2)
Functions BUS FREE phase
ARBITRATION phase
SELECTION/RESELECTION phase
COMMAND phase
(the Logical Unit Number is fixed at 0 and the Command Link Function
is not supported)
DATA phase
DATA IN phase
DATA OUT phase
STATUS phase
MESSAGE phase
MESSAGE IN phase
MESSAGE OUT phase
ATTENTION condition
RESET condition
Logic leve l TTL compatib le
Electrical s t andard ANSI Standard X3.131 -1994 (SC SI 2)
ID setting Can be set from 0 to 7 (factory setting is 2); asterisk (*) setting is only
used when transporting the scanner
Specifications Page 75
Page 76

Termina to r Internal term inator selec t able (enable/ disable)
Connec to r type Two 50-pin ha lf -pitch conn ec t ors
Connec to r pin
arrange m ent
25
1
50
26
Specifications Page 76
Page 77

SCSI pin
assignments
Pin No. Signal I/O Description
1-12, 14-25, 35-37,
GND — Ground
39, 40, 42
13 NC — Not used
26-33 DB0-DB7 I/O Data bus 0-7
34 DBP I/O Data bus parity
38 TERMPWR — Terminator power
41 ATN I Attention
43 BSY I/O Busy
44 ACK I Acknowledge
45 RST I Reset
46 MSG O Message
47 SEL I/O Select
48 C/D O Command/data
49 REQ O Request
50 I/O O Input/output
Specifications Page 77
Page 78

Initialization
Methods
The scanner can be initialized (returned to a fixed set of conditions) in the
following w ay s :
Type Method
Hardwa re initializat ion Whe n t he scanner is tu rned on.
When the scanner rec eiv es a SCSI Reset
signal from the SCSI in t erf ac e.
Software initializat ion When softw are sends the E SC @ (initialize the
scanner) command.
When the scanner re ceive s a S CSI Bus De vi ce
Message.
Specifications Page 78
Page 79

Auto Document Feeder Specifications
Basic Specifications
Feeder type
Document feeding Page s are c enter align ed, fed face up from the top of the stac k, and
Multiple siz es U navailable ; all document s in a s t ac k m us t be t he same size
Reliabilit y 10 0, 000 sheets or 5 y ears pape r fe eding life
Dimensions Width: 12. 2 inches (310 mm)
Weight 9.9 lb (4.5 kg)
Sheet through, face up loading, face down ejecting, roller friction
ejected face down
100,000 s heets or 5 yea rs paper ejec tin g lif e
30,000 hinge closings
Depth: 20.8 inches (528 mm)
Height: 3. 6 inches (92 m m )
Documents
Supported
Document size Letter, Legal, A4, B5, 3 × 6 inch (che ck-size)
Feeding C apacity 30 sh eets of 21 lb (8 0 g/ m
Ejecting Ca pacity 100 sheet s
Paper qu alit y H igh quality bond or thermal paper
2
) paper: A4, Letter or smaller
Compatible paper
types
Specifications Page 79
High qualit y paper, average qualit y paper, ink jet p aper (fine an d
super-fin e), bond pap er
Page 80

Incompatible paper
types
Tracing p aper, OHP fil m , o r label sheets
Coated paper (such as photo quality and glossy paper)
Pasted, c arbon, cata log, or specia lt y fib er paper (su ch as ric e paper)
Stapled, clipped, torn, curled, bent, or holed paper
Multipar t forms
Paper thic k ness 0.0028 to 0.0063 in c h (0. 07 to 0.16 m m )
2
Paper weight 13.9 to 34 lb (52.3 to 127.9 g/m
)
Electrical
Power su pply Supplied th rough the sc anner
24 ± 10% VDC
5 ± 10% VDC
Power
Approxim ately 22 W
consumpt ion
Insulation
resistanc e
10 mΩ or more at 50 0 VD C
(betwee n AC line and cha s s is )
Dielectric s tr ength 1000 VAC per minute
(betwee n AC line and cha s s is )
Resistance to
static elect ric noise
Case: Operated pro perly at 10 KV or less
Metal: Operated pro perly at 7 KV or less
Specifications Page 80
Page 81

Environmen tal
Specifications Operating Storage
Temperature 41 to 95 °F
(5 to 35 °C)
Humidity 20% to 85% without
condensation
Resistance to vibration 0.2 G / 5 to 55 Hz in all
directions
Drop te st height 24.2 inches (62 c m ) w hen packed
Opera ti ng c onditions Ordina ry of f ic e or home conditions
Extremely dusty c onditions s hould be avo ided
Operation under direct sunlight or near a strong
light sou rc e should be av oided (if pap er
thicknes s is ov er 110 g/m
conditions are 59 to 77 °F (15 to 25 °C), 40% to
70% RH)
Safety Approvals
Safety regulations UL1950
FCC
CE markings Directive 89/ 336 EEC, 92/31 EEC, 73/23 EEC
–4 to 140 °F
(–20 to 60 °C)
95% or less without
condensation
2 G / 5 to 55 Hz in all
directi ons
2
, operati ng
Specifications Page 81
Page 82

Transparency Unit Specifications
Basic Specifications
Type Fixed-do c um ent transp arency scanning unit
Light sou rc e White cold c athode fluorescent lam p (Xenon)
Color sep aration RGB colo r fi lte r s eparation
Supported
docume nt s
Maximum read
area
Film guides 35 mm filmstrip guide
Reliabilit y 10 0, 000 cycles (m ain unit)
Maximum
hardware
resolutio n
Dimensions Width: 12. 8 inches (324 mm)
Weight Approxim ately 11 lb (5 k g)
Positive and negative film; transparencies; reflective documents (with
reflective document mat installed)
8.5 × 11.7 inch es (216 × 297 mm)
35 mm slide transparency guide
4 × 5-inch film guide
120/220-s ize (medium format) f ilm guide
800 dpi (main scan)
3200 dpi (sub scan) w ith M ic ro Step Drive te c hnology
Depth: 21.3 inches (540 mm)
Height: 3. 6 inches (92 m m )
Specifications Page 82
Page 83

Electrical
Power su pply Supplied fr om t he scanner
24 VDC
5 VDC
Power
consumpt ion
Environmental
24 VDC: 0.6 A
5 VDC: 0.1 A
Specifications Operating Storage
Temperature 41 to 95 °F
(5 to 35 °C)
Humidity 10% to 80% without
condensation
Opera ti ng c onditions Ordina ry of f ic e or home conditions
Extremely dusty c onditions s hould be avo ided
Operation under direct sunlight or near a strong
light sou rc e should be av oided
–4 to 140 °F
(–20 to 60 °C)
10% to 85% without
condensation
Specifications Page 83
Page 84

Glossary
additive primary
colors
bit
bit/pixel
brightness
carriage
color correction
color separation
The color s o f re d, green and blue (RGB)—which giv e the perception of
white when fully added. These are the colors of the color system used
with monitors and scanners.
Short for bin ary digit. The sma lles t unit of data in com put er process ing. A
bit can represent two values: on and off, or 1 and 0.
The unit that indicate s th e number of bit s allocated fo r a pix el. The larger
the bit value, the more det ail a pixel can represen t.
A scanne r fu nc t ion to lighten or darken the out put image data.
A compon ent of the sca nner that con t ains the optical sensor and light
source for scanning.
A method of adjusting the c olor image da t a fo r a particular t y pe of device
so that the reproduction results ar e as c los e as possib le t o t he original
colors.
A process of converting full-color images into a limited number of primary
colors. Additive prim ary colors (re d, green, and blue) are use d by t he
scanner , a nd t he subtrac ti ve primary colo rs (c y an, magent a, and yellow)
plus black are used for printing pr es s se paration.
Glossary Page 84
Page 85

default
A set of valu es us ed when no ot her selectio ns have been ma de. These
are sometimes called factory defaults if the original values have not been
changed since the scanner has left the factory.
dithering
document
dpi
grayscale
halftoning
home position
interface
line sequence
A process in which software or an output device simulates continuous
tones with groups of dots.
The item, su c h as a s heet of paper or a book, th at is placed on the
docume nt ta ble for the scanner to rea d.
Dots per inch. A unit of measurement for resolution. The higher the value,
the higher t he resolution.
Images represented with vario us s hades of gray in addition to blac k and
white.
A method of us ing dot patte rns t o represen t an im age.
The position at the rear (nearest t he cover hinge position) of the scanner
where the carriag e rests be fore a scann ing operati on. Also, the positi on at
the rear of the TPU whe re t he TPU’s lamp assem bly rests before a
scannin g operation .
A piece of h ardware, a m et hod, or a stan dard used for c onnection
between or among com puter devic es .
A type of co lor s c anning tha t separates primary co lors line by line. T he
carriage m ak es only one pass.
monochrome
Black and w hit e im ages, or im ages repre s ent ed only by th e intensity of
luminosi ty.
Glossary Page 85
Page 86

OCR
Optical Character R ec ognition. T he technology that allo w s co m puters to
“read” text from physical objec ts. OCR requires a graphical representat ion
of text to inte rpret, which usually co m es f rom a scanned im age.
page sequence
pixel
port
resolution
scan
scanning area
SCSI
SCSI chai n
The type of co lor scanning in which th e entire image is scanne d once for
each sep arate color.
Short for picture element. Each image is composed of a number of pixels.
Pixels are als o c ounted in u nit s of dot s .
An interfa c e c hannel thro ugh which dat a is transmit t ed between devices.
Indication of how finely an image is resolved into pixels. Measured in dots
per inch (dpi), pixels p er inch (ppi), or s amples per inch (spi).
An operation performed by the sensor and the carriage of a scanner. The
image is di vi ded into pixels by s c anning.
The physical size of the image that can be scanned by the scanner.
Small Computer System Interface. A method used to connect your
computer to periphe rals such as s c anners, hard disk drive s , an d
CD-ROM drives.
A SCSI bu s a rrangemen t th at allows several devices to be c onnected
simultaneously in a line to a single c omputer. Som etimes called a daisy
chain.
SCSI ID
The numbers that all devices in a SCSI connection use to identify each
other. If the same ID number is used by two devices in the same SCSI
chain, the devices cannot oper at e properly.
Glossary Page 86
Page 87

subtractive primary
colors
The color s cy an, magent a, and yellow (C M Y)—which produce black
when mixed in certain amounts . In printing, black is often added to give
more defi nit ion as mixin g of ac t ual inks cann ot produce pu re black.
terminator
A device that stops elec t ronic signals , preventing them from proceedi ng
or returning to other dev ic es. Terminators are necessar y on either end o f
a SCSI chain to stop a signal from co nt inuously bouncing bet w een
devices.
Glossary Page 87
Page 88

Index
A
AC conne c to r, 72
ADF,
Auto docu m ent feeder, 40
Automa tic Area Segm entation, 8
Auto document feeder
see
description, 9
dimensio ns , 79
installing , 42 to 45
loading, 46 to 48
loading manually, 48
ordering , 15
paper jams, fixing, 49
part number, 9
specifications, 79 to 81
unpacking, 41
to 49
B
Blurred image, 62
C
Cable length, 17
Calibrati ng your scree n, 67
Cleaning t he scanner, 51
Color matching problems, 67
Color stripes, 65
Compression software, 59
D
Daisy chain, 16 to 17
Dimensions
auto document feeder, 79
scanner, 72
transparency unit, 82
Document position, 62 to 64
E
Electrical specifications
auto document feeder, 80
scanner, 72
transparency unit, 83
Environmental sp ec if ic ations
auto document feeder, 81
scanner, 73
transparency unit, 83
EPSON Accessories numbers, 15
EPSO N su pport inform at ion, 13 to 15
EPSON TWAIN Pro, 40, 67
Index Page 88
Page 89

ERROR light, 52
Errors, 58
, 58
F
Features, 8
Film holde rs
120-size or 220-size fo rm at film,
loading, 36
35 mm filmstrips, loading, 35 to 36
35 mm slides, loading, 34
4 × 5-inch film , loading, 38
illustration, 26
using, 33 to 38
Fluorescent lamp, replacing, 52
FTP site, EPSON, 13
to 37
H
Help, 13 to 15
Home position
scanner , 53
transpar ency unit, 55
I
Image
color stripes in image, 65
distorted or blurred, 62
faint or unfocused, 63
line of dots missing, 64
matching problems, 66to 68
too dark , 64
Initialization, scanner, 78
Interfac e
proble m s , 60
SCSI, 8, 75 to 77
to 61
L
Lamp, replacing, 52
LaserSoft SilverFast Lite, 40
Lights, 58
M
Maintenance, 51 to 52
Manual, how to use, 10
Matching problems, image, 66 to 68
Memor y , a dding, 59
Monitor, upgrading, 59
Index Page 89
Page 90

N
Negatives
scanning, 35
see als o
Newton’s Ring, 65
to 36
Film hold ers
O
OCR (Optical Character Recognition), 8, 40
OPERATE light, 60
Operation problems, 60 to 61
Optical character recognition (OCR), 8, 40
OPTION connector, 31, 45
Optional equipme nt , 24 to 49
auto docu m ent feeder, 40 to 49
list and part numbers, 9
ordering, 15
transpar ency unit, 25 to 40
Oversized film, scan ning, 32
Problems
blurred image, 62
diagnosing, 57 to 58
edges do not scan, 63
faint image, 63
image is to o dark, 64
image m at c hing, 66 to 68
image out of focus, 63
jagged lines in image, 64
missing dots in ima ge, 64
operation, 60 to 61
printer, 65
scan quality, 62to 65
scanne r does not scan, 60 to 61
Proces s or, upgrading, 59
Q
Quality problems, scan, 62 to 65
P
Paper jams, fixing, 49
Part numb ers, option al equipme nt , 9
Printer problems, 65
Index Page 90
RAM, adding, 59
READY light, 52, 58, 60
Reflective document mat, 39to 40
Resolution
maximum hardware, 70
maximum software, 70
output, 70
R
Page 91

S
Safety approvals
auto docu m ent feeder, 81
scanner , 73
Safety instructions, 11 to 12
Scanner
errors, 58
sensor, 64
Scanning
120-size or 220-size fo rm at film,
36
to 37
35 mm film, 35 to 36
35 mm slides, 34
4 × 5-inch film , 38
normal documents with TPU, 39 to 40
text, 8, 40
transpar encies and f ilm , 32 to 38
Screen ca libration utility, 67
Screws, transparency unit, 27 to 28
SCSI
cables, 17
connection, 16 to 21
ID number, 17 to 21
interface, 8, 75 to 77
termination, 18
SCSI-2, 17
Service, 13 to 15
SilverFa s t Li te , 40
Slides,
Software problems, 61
Software, uninstalling, 22 to 23
Film holde rs
see
, 64, 66 to 68
Specif ic at ions
auto document feeder, 79
scanner, 70 to 78
transparency unit, 82 to 83
Speed, 70
Suppor t ed docu me nts
auto document feeder, 79
scanner, 72
transparency unit, 82
System, upgrading, 59
to 81
to 80
T
Technical support numbers, 13 to 15
Text, scanning, 8, 40
Transp arency unit , 25 to 40
descrip t ion, 9
dimens ions, 82
installin g, 28 to 31
loading ov ersized film, 32
loading tr ans parencie s , 32
orderin g, 15
part num ber, 9
scanni ng normal do c um ents with,
39
to 40
shipping screws, removing, 27 to 28
specifications, 82 to 83
transporting, 55 to 56
unpacking, 26 to 28
using film holders, 33 to 38
Index Page 91
Page 92

Transporting
scanner, 53
transpar ency unit, 55 to 56
Troubleshooting, 57to 68
U
Uninstalling software, 22 to 23
Upgrading system, 59
Upgrading to Window s 98, 22 to 23
V
Video card, upgra ding, 59
W
Web site, EPSON, 13
Index Page 92
 Loading...