

Page 1

user manual
instrukcja obsługi
Dishwasher
Zmywarka
ESL63010
Page 2
2 electrolux
Electrolux. Thinking of you.
Share more of our thinking at www.electrolux.com
Contents
Safety information 2
Product description 3
Control panel 4
Use of the appliance 5
Setting the water softener 5
Use of dishwasher salt 6
Use of rinse aid 7
Loading cutlery and dishes 8
Use of detergent 10
Setting and starting a washing programme
Subject to change without notice
Washing programmes 12
Care and cleaning 12
What to do if… 14
Technical data 15
Installation 15
Water connection 16
Electrical connection 17
Environment concerns 17
11
Safety information
For your safety and correct operation of
the appliance, read this manual carefully
before installation and use. Always keep
these instructions with the appliance
even if you move or sell it. Users must
fully know the operation and safety features of the appliance.
Correct use
• The appliance is designed exclusively for
domestic use.
• Only use the appliance to clean household
utensils that are applicable for dishwashers.
• Do not put solvents in the appliance. Risk
of explosion.
• Put the knives and all items with sharp
points in the cutlery basket with their
points down. If not, put in a horizontal position in the upper basket.
• Use only branded products for dishwashers (detergent, salt, rinse aid).
• If you open the door while the appliance is
in operation, hot steam can escape. Risk
of skin burns.
•Do not remove dishes from the dishwasher
before the end of the washing programme.
• When the washing programme is completed, disconnect the mains plug from the
mains socket and close the water tap.
• Only an authorised service engineer can
repair this appliance. Use only original
spare parts.
• Do not do repairs yourself to prevent injury
and damage to the appliance. Always contact your local Service Force Centre.
General safety
• Persons (including children) with reduced
physical sensory, mental capabilities or
lack of experience and knowledge must
not use the appliance. They must have supervision or instruction for the operation of
the appliance by a person responsible for
their safety.
• Obey the safety instructions from the manufacturer of the dishwasher detergent to
prevent burns to eyes, mouth and throat.
• Do not drink the water from the dishwasher. Detergent residues can stay in your appliance.
• Always close the door when you do not
use the appliance to prevent injury and not
to stumble over the open door.
• Do not sit or stand on the open door.
Child safety
• Only adults can use this appliance. Children must get supervision to make sure
that they do not play with the appliance.
• Keep all the packaging away from children.
There is a risk of suffocation.
Page 3
electrolux 3
• Keep all detergents in a safe area. Do not
let children touch the detergents.
• Keep children away from the appliance
when the door is open.
Installation
• Make sure that the appliance is not damaged because of transport. Do not connect a damaged appliance. If necessary,
contact the supplier.
• Remove all packaging before first use.
• A qualified and competent person must do
the electrical installation.
• A qualified and competent person must do
the plumbing installation.
• Do not change the specifications or modify
this product. Risk of injury and damage to
the appliance.
Product description
• Do not use the appliance:
– if the mains cable or water hoses are
damaged,
– if the control panel, worktop or plinth
area are damaged, that you can get access to the inner side of the appliance.
Contact your local Service Force Centre.
• Do not drill into the sides of the appliance
to prevent damage to hydraulic and electrical components.
Warning! Carefully obey the
instructions for electrical and water
connections.
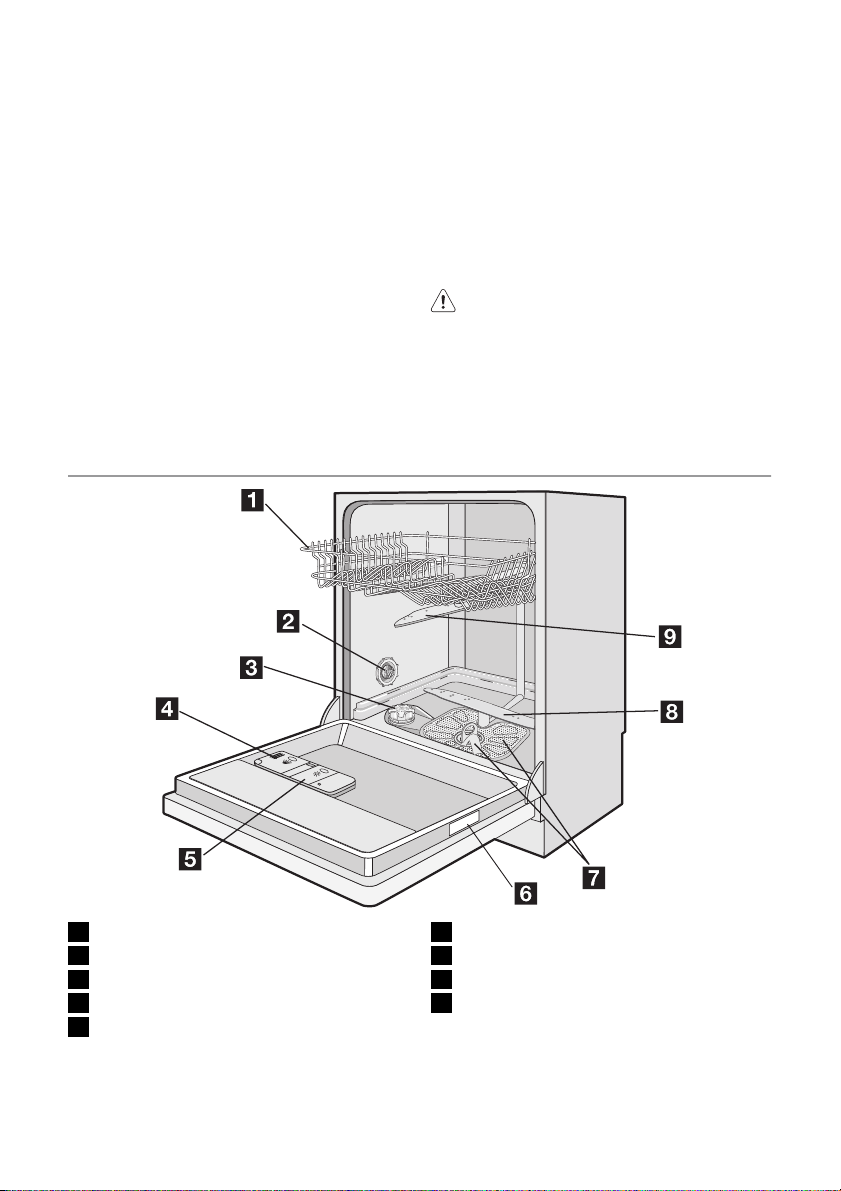
1 Upper basket
2 Water hardness dial
3 Salt container
4 Detergent dispenser
5 Rinse aid dispenser
6 Rating plate
7 Filters
8 Lower spray arm
9 Upper spray arm
Page 4
4 electrolux
Control panel
5 4
321
AB
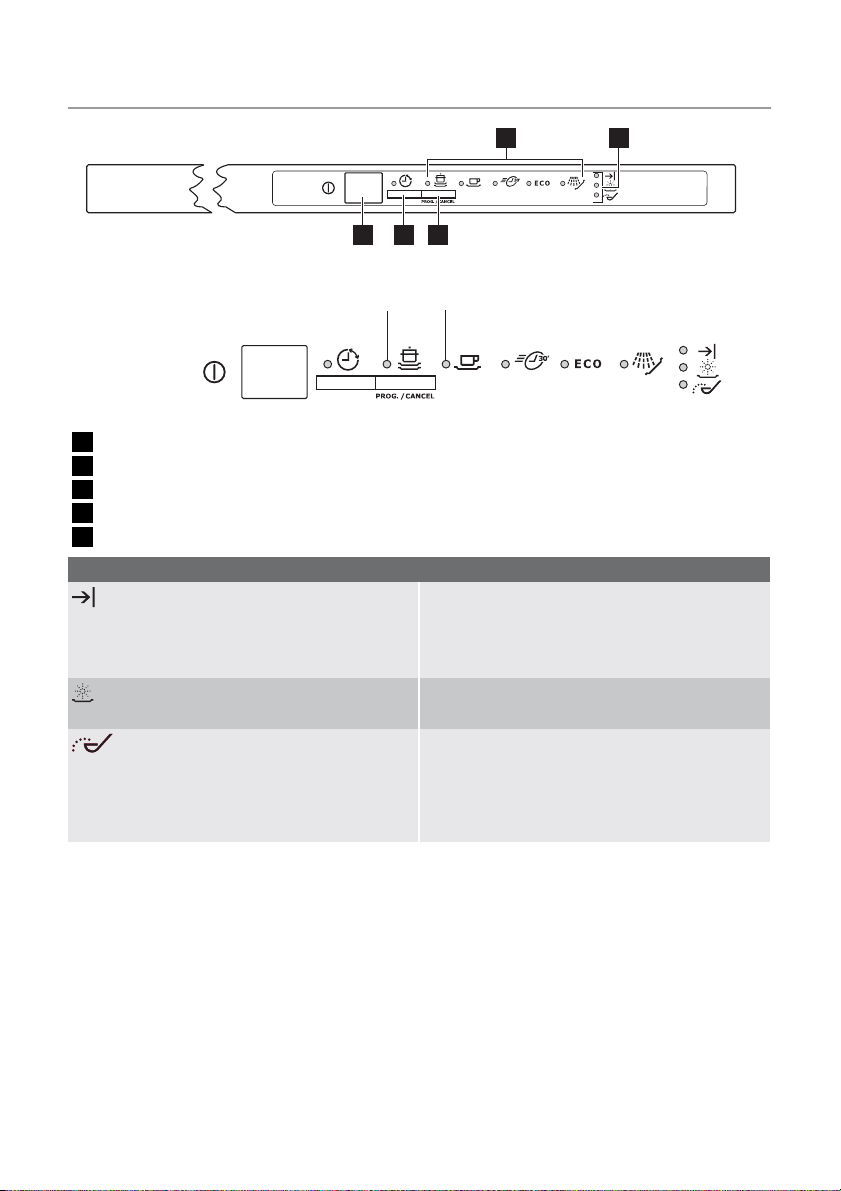
1 On/off button
2 Delay start button
3 Programme selection/cancel button / (PROG. / CANCEL)
4 Indicator lights
5 Programme indicator lights
Indicator lights
Comes on when the washing programme is completed. Auxiliary functions:
• Level of the water softener.
• Activation/deactivation the audible signals.
• An alarm if the appliance has a malfunction.
Comes on when it is necessary to fill the rinse aid
1)
1)
1) When the salt and/or rinse aid containers are empty, the related indicator lights do not come on while
a washing programme operates.
Programme selection/cancel button
Use the programme selection/cancel button
for these operations:
• To set the washing programme. Refer to
the chapter 'Setting and starting a washing
programme'.
• To set the water softener. Refer to the
chapter 'Setting the water softener'.
• To deactivate/activate the audible signals.
Refer to the section 'Audible signals'.
• To cancel a washing programme in pro-
gress. Refer to the chapter 'Setting and
starting a washing programme'.
container. Refer to 'Use of rinse aid'.
Comes on when it is necessary to fill the salt container. Refer to 'Use of dishwasher salt'.
After you fill the container, the salt indicator light
can continue to stay on for some hours. This does
not have an unwanted effect on the operation of
the appliance.
Delay start button
Use the delay start button to delay the start
of the washing programme with an interval of
3 hours. Refer to the chapter 'Setting and
starting a washing programme'.
Setting mode
The appliance is in setting mode when all the
programme indicator lights are off and the
end indicator light flashes.
The appliance must be in setting mode for
these operations:
– To set a washing programme.
Page 5

electrolux 5
– To set the water softener level.
– To deactivate/activate the audible signals.
If a programme indicator light is on, cancel
the programme to go back to the setting
mode. Refer to the chapter "Setting and
starting a washing programme".
Programme indicator lights A and B
Apart the selection of the corresponding
washing programme, these lights have an
auxiliary functions:
• The ad justment o f the water softener level.
• Deactivation/activation of the audible sig-
nals.
Audible signals
You can hear an audible signal:
• At the end of the washing programme.
• When the appliance has a malfunction.
The activation of the audible signals is set at
the factory.
Do these steps to deactivate the audible signals:
1. Switch on the appliance.
2. Make sure that the appliance is in setting
mode.
Use of the appliance
Refer to the following instructions for each
step of procedure:
1. Make a check if the water softener level
is correct for the water hardness in your
area. If necessary set the water softener.
2. Fill the salt container with dishwasher salt.
3. Fill the rinse aid dispenser with rinse aid.
4. Load cutlery and dishes into the dish-
washer.
3. Press and hold the programme selection/
cancel button until programme indicator
light A flashes and programme indicator
light B comes on.
4. Press the programme selection/cancel
button again.
– Programme indicator light A comes on.
– Programme indicator light B starts to
flash.
5. Wait until programme indicator light A
goes off.
– Programme indicator light B continues
to flash.
– The end indicator light comes on.
The audible signals are activated.
6. Press the programme selection/cancel
button again.
– The end indicator light goes off.
The audible signals are deactivated.
7. Switch off the appliance to save the operation.
Do these steps to activate the audible signals:
1. Do the above procedure until the end indicator light comes on.
5. Set the correct washing programme for
the type of load and soil.
6. Fill the detergent dispenser with the correct quantity of detergent.
7. Start the washing programme.
If you use detergent tablets, refer to the
chapter 'Use of detergent'.
Setting the water softener
The water softener removes minerals and
salts from the water supply. Minerals and
salts can have bad effect on the operation of
the appliance.
Water hardness is measured in equivalent
scales:
• German degrees (dH°).
Water hardness Water hardness setting
°dH °TH mmol/l Clarke manually electronically
51 - 70 91 - 125 9,1 - 12,5 64 - 88 2 10
43 - 50 76 - 90 7,6 - 9,0 53 - 63 2 9
• French degrees (°TH).
• mmol/l (millimol per litre - international unit
for the hardness of water).
•Clarke.
Adjust the water softener to the water hardness in your area. If necessary, contact your
local water authority.
Page 6

6 electrolux
Water hardness Water hardness setting
°dH °TH mmol/l Clarke manually electronically
37 - 42 65 - 75 6,5 - 7,5 46 - 52 2 8
29 - 36 51 - 64 5,1 - 6,4 36 - 45 2 7
23 - 28 40 - 50 4,0 - 5,0 28 - 35 2 6
19 - 22 33 - 39 3,3 - 3,9 23 - 27 2 5
15 - 18 26 - 32 2,6 - 3,2 18 - 22 1 4
11 - 14 19 - 25 1,9 - 2,5 13 - 17 1 3
4 - 10 7 - 18 0,7 - 1,8 5 - 12 1 2
< 4 < 7 < 0,7 < 5
1) No use of salt required.
You must set the water softener manually and electronically.
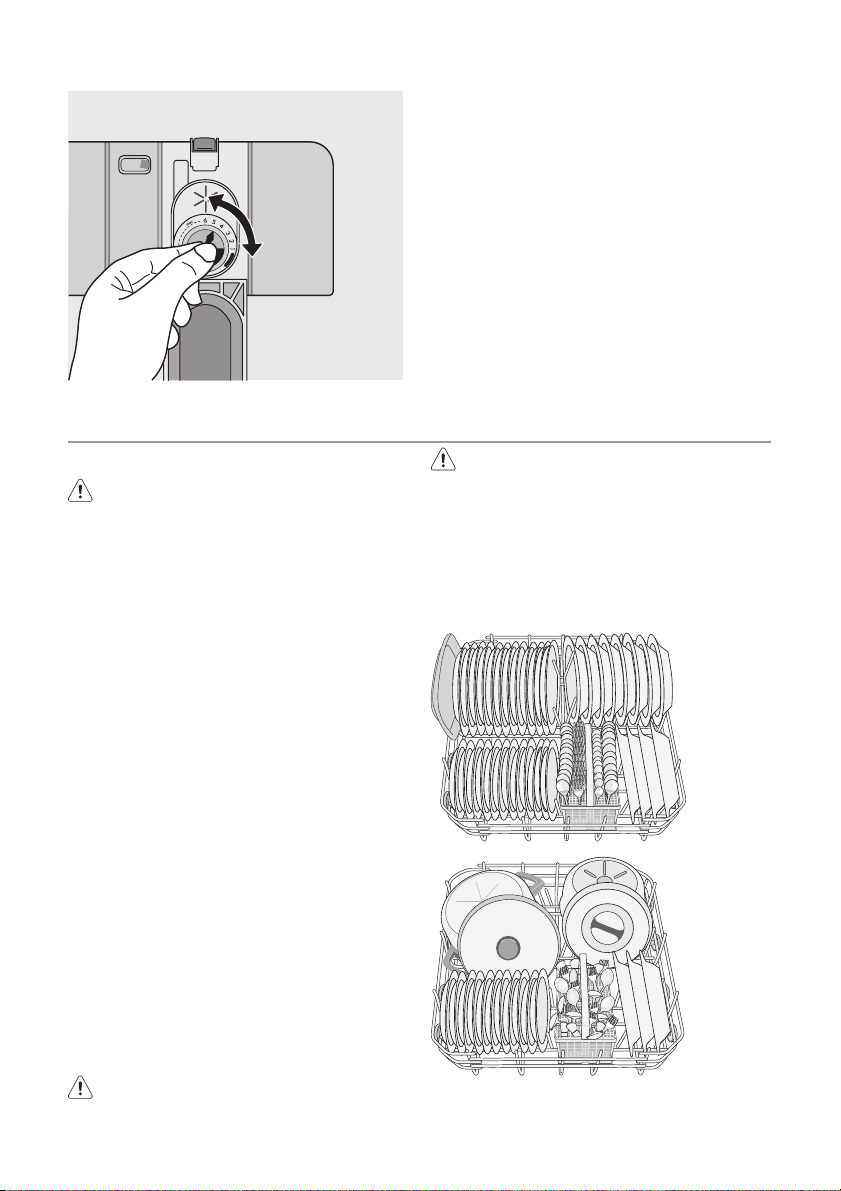
Manual adjustment
The appliance is set at the factory at position 2.
1. Open the door.
2. Remove the lower basket.
3. Turn the water hardness dial to position
1 or 2 (refer to the chart).
4. Install the lower basket.
3. Press and hold the programme selection/
cancel button.
4. Release the programme selection/cancel
button when programme indicator light A
starts to flash and programme indicator
light B comes on.
5. Wait until programme indicator light B
goes off.
– Programme indicator light A starts to
flash.
– The end indicator light starts to flash.
6. Press the programme selection/cancel
1)
1
button one time.
– Programme indicator light A starts to
flash.
– The setting function of the water soft-
ener is activated.
– The end indicator light flashes to show
the level of the water softener.
Example: 5 flashes, pause, 5 flashes,
pause, etc... = level 5.
5. Close the door.
Electronic adjustment
The water softener is set at the factory
at level 5.
7. Press the programme selection/cancel
button one time to increase the water
softener level by one step.
8. Press the on/off button to save the operation.
1. Switch on the appliance.
2. Make sure that the appliance is in setting
mode.
1)
1
Use of dishwasher salt
Caution! Only use dishwashers salt.
Types of salt that are not applicable for
dishwashers cause damage to the water
softener.
Caution! Grains of salt and salty water
on the bottom of the appliance can
cause corrosion. Fill the appliance with
salt before you start a washing
programme to prevent corrosion.
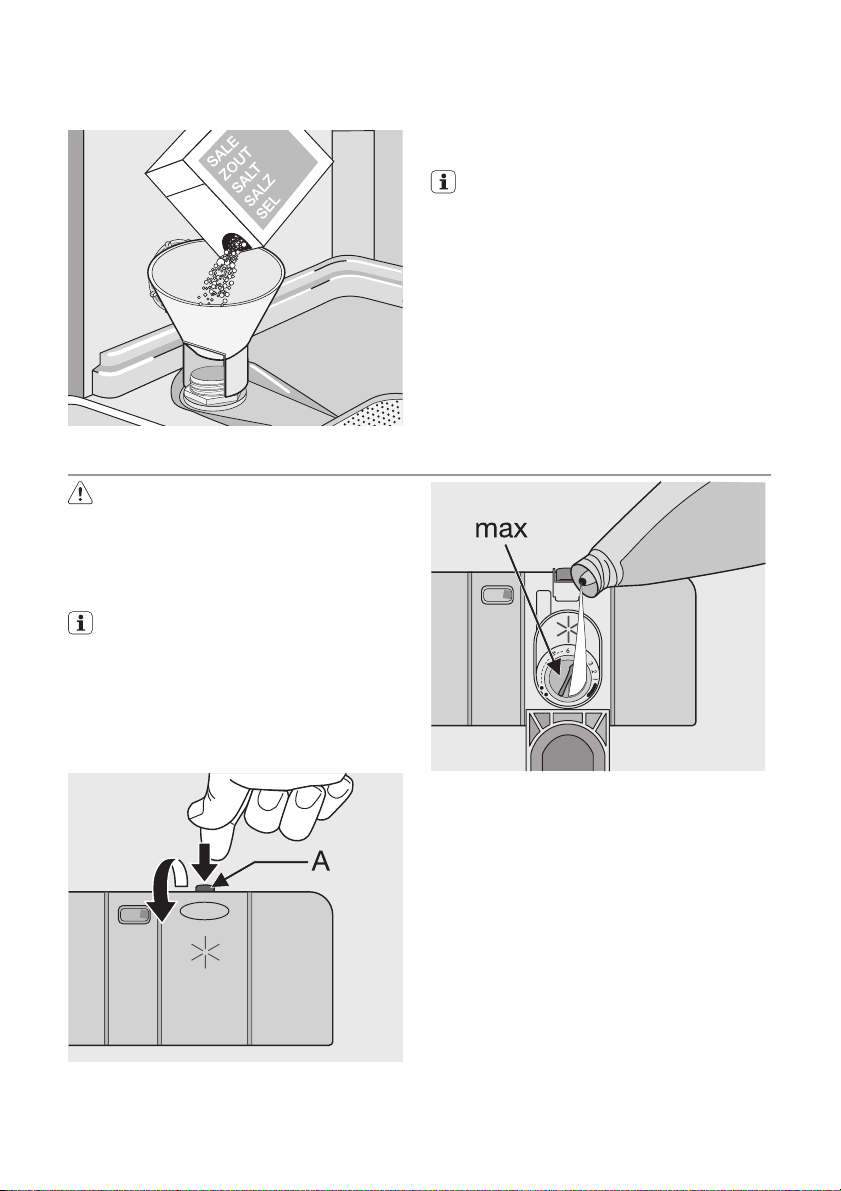
Do these steps to fill the salt container:
1. Turn the cap anticlockwise to open the
salt container.
2. Fill the salt container with 1 litre of water
(only the first operation).
Page 7
electrolux 7
3. Use the funnel to fill the salt container with
salt.
Use of rinse aid
Caution! Only use branded rinse aid for
dishwashers.
Do not fill the rinse aid dispenser with
other products (e.g. dishwasher cleaning agent, liquid detergent). This can
cause damage to the appliance.
Rinse aid makes it possible to dry the
dishes without streaks and stains.
Rinse aid is automatically added during
the last rinsing phase.
Do these steps to fill the rinse aid dispenser:
1. Press the release button (A) to open the
rinse aid dispenser.
4. Remove the salt around the opening of
the salt container.
5. Turn the cap clockwise to close the salt
container.
It is normal that water overflows from the
salt container when you fill it with salt.
When you set electronically the water softener to level 1, the salt indicator light does
not stay on.
3. Remove the spilled rinse aid with an absorbent cloth to prevent too much foam
during the subsequent washing programme.
4. Close the rinse aid dispenser.
Adjusting the rinse aid dosage
The rinse aid is set at the factory at position
4.
You can set the rinse aid dosage between
position 1 (lowest dosage) and position 6
(highest dosage).
2. Fill the rinse aid dispenser with rinse aid.
The mark 'max.' shows the maximum
level.
Page 8
8 electrolux
Loading cutlery and dishes
Helpful hints and tips
Caution! Only use the appliance for
household utensils that are applicable
for dishwashers.
Do not use the appliance to clean objects
that can absorb water (sponges, household
cloths, etc.).
• Before you load cutlery and dishes, do
these steps:
– Remove all food remainings and debris.
– Make burnt, remaining food in pans soft.
• While you load cutlery and dishes, do
these steps:
– Load hollow items (e.g. cups, glasses
and pans) with the opening down.
– Make sure that water does not collect in
the container or in a deep base.
– Make sure that cutlery and dishes do not
lie inside one another.
– Make sure that cutlery and dishes do not
cover other cutlery and dishes.
– Make sure that glasses do not touch
other glasses.
– Put small objects in the cutlery basket.
• Plastic items and pans with non-stick
coatings can keep water droplets. Plastic
items do not dry as well as porcelain and
steel items.
• Put light items in the upper basket. Make
sure that the items do not move.
Caution! Make sure that the spray arms
can move freely before you start a
washing programme.
1. Turn the rinse aid dial to increase or decrease the dosage.
– Increase the dosage if there are water
droplets or limescale on the dishes.
– Decrease the dosage if there are
streaks, whitish stains or bluish layers
on the dishes.
Warning! Always close the door after
you load or unload the appliance. An
open door can be dangerous.
Lower basket
Put saucepans, lids, plates, salad bowls and
cutlery in the lower basket. Arrange service
dishes and large lids around the edge of the
basket.
Page 9

electrolux 9
Cutlery basket
Warning! Do not put long-bladed knives
in a vertical position. Arrange long and
sharp cutlery horizontally in the upper
basket. Be careful with sharp items.
Put forks and spoons with the handles down.
Put knives with the handles up.
Mix spoons with other cutlery to prevent
them to bond together.
Use the cutlery grid. If the dimensions of the
cutlery prevent the use of the cutlery grid, you
can remove it.
Upper basket
The upper basket is for plates (maximum 24
cm in diameter), saucers, salad bowls, cups,
glasses, pots and lids. Arrange the items to
let water touch all surfaces.
Put glasses with long stems in the cup racks
with the stems up. For longer items, fold the
cup racks up.
Adjustment of the height of the upper
basket
If you put large plates in the lower basket, first
move the upper basket to the upper position.
Caution! Adjust the height before you
load the upper basket.
Maximum height of the dishes
upper bas-
ket
Upper position 20 cm 31 cm
Lower position 24 cm 27 cm
lower
basket
Do these steps to move the upper basket to
the upper position:
1. Move the front runner stops (A) out.
2. Pull the basket out.
Prevent to put plates in the first three
sectors in the front part of the basket.
Make sure the plates tilt forward.
3. Put the basket in the upper position.
4. Put back the front runner stops (A) in their
initial position.
Caution! If the basket is in the upper
position, do not put cups on the cup
racks.
Page 10

10 electrolux
Use of detergent
Only use detergents (powder, liquid or
tablet) that are applicable for dishwashers.
Follow the data on the packaging:
• Dosage recommended by the manufacturer.
• Storage recommendations.
Do not use more than the correct quantity of detergent to save an environment.
Do these steps to fill the detergent dispenser:
1. Open the lid of the detergent dispenser.
2. Fill the detergent dispenser (A) with detergent. The marking shows the dosage:
20 = approximately 20 g of detergent
30 = approximately 30 g of detergent.
3. If you use a washing programme with
prewash phase, put more detergent in
the prewash detergent compartment (B).
A
B
4. If you use detergent tablets, put the detergent tablet in the detergent dispenser
(A).
5. Close the lid of the detergent dispenser.
Press the lid until it locks into position.
Different brands of detergent dissolve in
different times. Some detergent tablets
do not have the best cleaning results
during short washing programmes. Use
long washing programmes when you
use detergent tablets to fully remove the
detergent.
Use of combi detergent tablets
These tablets contain agents such as detergent, rinse aid and dishwasher salt. Some
types of tablets can contain other agents
When you use tablets, that contain special
salt and rinse aid, it is not necessary to fill the
salt and rinse aid containers. In this condition
the rinse aid indicator light stays on when the
appliance is switched on.
1. Do a check if these tablets are applicable
for the local water hardness. Refer to the
instructions from the manufacturer.
2. Select the lowest setting for the water
hardness and rinse aid dosage.
Do these steps if the drying results are not
satisfactory
1. Fill the rinse aid dispenser with rinse aid.
2. Set the rinse aid dosage to position 2.
To use normal detergent again
1. Fill the salt container and rinse aid dispenser.
2. Adjust the water hardness setting to the
highest level.
Page 11

electrolux 11
3. Do a washing programme without
dishes.
4. Adjust the water softener to the water
hardness in your area.
5. Adjust the rinse aid dosage.
Setting and starting a washing programme
Set the washing programme with the
door ajar. The washing programme only
starts after you close the door. Until then
it is possible to modify the settings.
Do these steps to set and start a washing
programme:
1. Switch on the appliance.
2. Make sure that the appliance is in setting
mode.
3. Press the programme selection/cancel
button again and again to set the washing
programme. Refer to the chapter 'Washing programmes'.
– The programme indicator light comes
on.
4. Close the door.
– The washing programme starts auto-
matically.
When the washing programme operates, you cannot change the programme. Cancel the washing programme.
Warning! Only interrupt or cancel a
washing programme if necessary.
Caution! Open the door carefully. Hot
steam can come free.
Cancelling a washing programme
1. Press and hold the programme selection/
cancel button for approximately 3 seconds.
– The programme indicator light goes
off.
– The end indicator light starts to flash.
2. Release the programme selection/cancel
button to cancel the washing programme.
At this time you can do these steps:
1. Switch off the appliance.
2. Set a new washing programme.
Fill the detergent dispenser with detergent
before you set a new washing programme.
Interrupting a washing programme
Open the door.
• The programme stops.
Close the door.
• The programme continues from the point
of interruption.
Setting and starting a washing
programme with delay start
1. Press the on/off button.
2. Set a washing programme.
– The programme indicator light comes
on.
3. Press the delay start button.
– The delay start indicator light comes
on.
4. Close the door.
– The countdown of the delay start
starts.
– When the countdown is completed,
the washing programme starts automatically.
Do not open the door during the countdown to prevent interruption of the
countdown. When you close the door
again, the countdown continues from
the point of interruption.
Cancelling a delay start:
1. Open the door.
2. Press the delay start button.
– The delay start indicator light goes off.
3. Close the door.
– The programme starts immediately.
End of the washing programme
Switch off the appliance in these conditions:
• The appliance stops automatically.
• The audible signals for the end of the programme operate.
1. Open the door.
– The end indicator light comes on.
– The programme indicator light stays
on.
2. Press the on/off button.
Page 12

12 electrolux
3. For better drying results, keep the door
ajar for some minutes before you remove
the dishes.
Let the dishes cool down before you remove
them from the appliance. Hot dishes are
easily damaged.
Removing the load
• First remove items from the lower basket,
then from the upper basket.
• There can be water on the sides and door
of the appliance. Stainless steel becomes
cool more quickly than the dishes.
Washing programmes
Washing programmes
Programme
1)
2)
1) This is the perfect daily programme to clean a not fully load. Ideal for a family of 4 persons who only
want to load breakfast and dinner crockery and cutlery.
2) Test programme for test institutes. Please refer to separate leaflet supplied, for test data.
Degree of
soil
Heavy soil
Normal soil
Normal or
light soil
Normal soil
Any
Consumption values
Programme Programme duration
(in minutes)
85-95 1,8-2,0 22-25
105-115 1,5-1,7 23-25
30 0,9 9
130-140 1,0-1,2 14-16
12 0,1 5
The pressure and temperature of the
water, the variations of power supply
Type of
load
Crockery,
cutlery, pots
and pans
Crockery,
cutlery, pots
and pans
Crockery
and cutlery
Crockery
and cutlery
Partial load
(to be com-
pleted later
in the day)
Programme description
Prewash
Main wash up to 70°C
2 intermediate rinses
Final rinse
Drying
Prewash
Main wash up to 65°C
2 intermediate rinses
Final rinse
Drying
Main wash up to 60°C
Final rinse
Prewash
Main wash up to 50°C
1 intermediate rinse
Final rinse
Drying
1 cold rinse (to prevent food scraps to bond).
Detergent is not necessary with this programme.
Energy consumption
(in kWh)
Water consumption
(in litres)
and the quantity of dishes can change
these values.
Care and cleaning
Warning! Switch the appliance off
before you clean the filters.
Page 13

Cleaning the filters
Caution! Do not use the appliance
without the filters. Make sure that the
installation of the filters is correct.
Incorrect installation will cause
unsatisfactory washing results and
damage to the appliance.
If necessary, clean the filters. Dirty filters decrease the washing results.
The dishwasher has three filters:
1. coarse filter (A)
2. microfilter (B)
3. flat filter (C)
A
A
B
B
C
C
Do these steps to clean the filters:
1. Open the door.
2. Remove the lower basket.
3. To unlock the filter system, turn the han-
dle on the microfilter (B) approximately
1/4 anticlockwise.
electrolux 13
D
8. Clean the filters below running water.
9. Put the flat filter (C) in the bottom of the
appliance. Install the flat filter correctly
under the two guide (D).
10. Put the coarse filter (A) in the microfilter
(B) and push the filters together.
11. Put the filter system in position.
12. To lock the filter system, turn the handle
on the microfilter (B) clockwise until it
lock in position.
4. Remove the filter system.
5. Hold the coarse filter (A) by the handle
with the hole.
6. Remove the coarse filter (A) from the microfilter (B).
7. Remove the flat filter (C) from the bottom
of the appliance.
13. Install the lower basket.
14. Close the door.
Do not remove the spray arms.
If the holes in the spray arms become clogged, remove remaining parts of soil with a
cocktail stick.
External cleaning
Clean the external surfaces of the appliance
and control panel with a damp soft cloth.
Only use neutral detergents. Do not use
abrasive products, scouring pads or solvents
(acetone, trichloroethylene etc...).
Page 14

14 electrolux
Frost precautions
Caution! Do not install the appliance
where the temperature is below 0 °C.
The manufacturer is not responsible for
If not possible, empty the appliance and
close the door. Disconnect the water inlet
hose and remove water from the water inlet
hose.
damage because of frost.
What to do if…
The appliance does not start or stops during
operation.
If there is a fault, first try to find a solution to
the problem yourself. If you cannot find a solution to the problem yourself, contact the
Service Force Centre.
Fault code and malfunction Possible cause and solution
• continuous flash of the light of the
running programme
• intermittent audible signal
• 1 flash of the end indicator light
The appliance does not fill with water
.
• continuous flash of the light of the
running programme
• intermittent audible signal
• 2 flashes of the end indicator light
The appliance will not drain the water.
• continuous flash of the light of the
running programme
• intermittent audible signal
• 3 flashes of the end indicator light
Anti-flood device operates
The programme does not start • The appliance door is not closed.
• The water tap is blocked or furred with limescale.
Clean the water tap.
• The water tap is closed.
Open the water tap.
• The filter in the water inlet hose is blocked.
Clean the filter.
• The connection of the water inlet hose is not correct. The
hose can be kinked or squashed.
Make sure that the connection is correct.
• There is a blockage in the sink spigot.
Clean the sink spigot.
• The connection of the water drain hose is not correct. The
hose can be kinked or squashed.
Make sure that the connection is correct.
• Close the water tap and contact your local Service Force
Centre.
Close the door.
• Mains plug is not connected in.
Put in the mains.
• The fuse has blown out in the household fuse box.
Replace the fuse.
• Delay start is set.
Cancel the delay start to start the programme immediately.
After the check, switch on the appliance. The
programme continues from the point of interruption. If the malfunction shows again,
contact your Service Force Centre.
These data are necessary to help you quickly
and correctly:
•Model (Mod.)
Caution! Switch off the appliance
before you do the below suggested
corrective actions.
• Product number (PNC)
• Serial number (S.N.)
For these data, refer to the rating plate.
Write the necessary data here:
Model description : ..........
Product number : ..........
Serial number : ..........
Page 15

electrolux 15
The cleaning results are not satisfactory
The dishes are not clean • The selected washing programme is not applicable for the type of
Limescales particles on the
dishes
The dishes are wet and dull • No rinse aid has been used.
There are streaks, milky spots
or a bluish coating on glasses
and dishes
Dry water drop signs on
glasses and dishes
load and soil.
• The baskets are loaded incorrectly so that water cannot reach all
surfaces.
• Spray arms do not turn freely because of incorrect arrangement of
the load.
• The filters are dirty or not correctly installed.
• The quantity of detergent is too little or missing.
• The salt container is empty.
• The water softener is adjusted on a wrong level.
• The salt container cap is not closed correctly.
• The rinse aid dispenser is empty.
• Decrease the rinse aid dosage.
• Increase rinse aid dosage.
• The detergent can be the cause.
Technical data
Dimensions Width cm 59,6
Height cm 81,8-87,8
Depth cm 55,5
Electrical connection - Voltage Overall power - Fuse
Water supply pressure Minimum 0,5 bar (0,05 MPa)
Maximum 8 bar (0,8 MPa)
Capacity Place settings 12
Information on the electrical connection is given on the rating plate
on the inner edge of the dishwasher door.
Installation
Warning! Make sure that mains plug is
disconnected from the mains socket
during installation.
Important! Obey the instructions in the
enclosed template to:
• Build-in the appliance.
• Install the furniture panel.
• Connect to the water supply and drain.
Install the appliance under a counter (kitchen
worktop or sink).
If a repair is necessary, the appliance must
be easily accessible for the engineer.
Put the appliance adjacent to a water tap and
a drain.
For the venting of the dishwasher only water
fill, water drain and power supply cable openings are necessary.
The dishwasher has adjustable feet to allow
the adjustment of the height.
Make sure that the water inlet hose, the drain
hose and the supply cable are not kinked or
squashed, when you insert the machine.
Attaching the appliance to the adjacent
units
Make sure that the counter below which you
attach the appliance is a safe structure (adjacent kitchen units, cabinets, wall).
Adjusting the level of the appliance
Make sure that the appliance is level to close
and seal the door correctly. If the level of the
Page 16

16 electrolux
appliance is correct, the door does not catch
on the sides of the cabinet. If the door does
Water connection
Water inlet hose
Connected the appliance to a hot (max. 60°)
or cold water supply.
If the hot water comes from alternative sources of energy that are more environmentally
friendly (e.g. solar or photovoltaic panels and
aeolian), use a hot water supply to decrease
energy consumption.
Connect the inlet hose to a water tap with an
external thread of 3/4”.
Caution! Do not use connection hoses
from an old appliance.
The water pressure must be in the limits (refer
to 'Technical data'). Make sure that the local
water authority gives you the average mains
pressure in your area.
Make sure that there are no kinks in the water
inlet hose and that the water inlet hose is not
squashed or entangled.
Fit the locknut correctly to prevent water
leaks.
Caution! Do not connect the appliance
to new pipes or pipes that are not used
for a long time. Let the water run for
some minutes, then connect the inlet
hose.
Water drain hose
1. Connect the water drain hose to the sink
spigot and attach it under the work surface. This prevents that the waste water
from the sink goes back into the appliance.
2. Connect the water drain hose to a stand
pipe with vent-hole (minimum internal diameter 4 cm).
not close correctly, loosen or tighten the adjustable feet until the appliance is level.
Make sure that the drain hose is not bent or
squashed to prevent that the water drains
does not drain correctly.
Remove the sink plug when the appliance
drains the water to prevent that the water
goes back into the appliance.
A drain hose extension must not be longer
than 2 m. The internal diameter must not be
smaller than the diameter of the hose.
If you connect the water drain hose to a trap
spigot under the sink, remove the plastic
membrane (A). If you do not remove the
membrane, remaining food can cause a
blockage in the drain hose spigot
The appliance has a security feature to
prevent that dirty water goes back into
the appliance. If, the spigot of the sink
has a 'non-return valve', this valve can
cause the appliance to drain incorrectly.
Remove the non-return valve.
Caution! Make sure that the water
couplings are tight to prevent water
leakage.
max 85 cm
min 40 cm
max 400 cm
Page 17

Electrical connection
Warning! The manufacturer is not
responsible if you do not follow these
safety precautions.
Ground the appliance according to safety precautions.
Make sure that the rated voltage and
type of power on the rating plate agree
with the voltage and the power of the local power supply.
Always use a correctly installed shockproof socket.
Environment concerns
The symbol on the product or on its
packaging indicates that this product may
not be treated as household waste. Instead
it should be taken to the appropriate
collection point for the recycling of electrical
and electronic equipment. By ensuring this
product is disposed of correctly, you will help
prevent potential negative consequences for
the environment and human health, which
could otherwise be caused by inappropriate
waste handling of this product. For more
detailed information about recycling of this
product, please contact your local council,
your household waste disposal service or the
shop where you purchased the product.
The packaging materials are environmentally
friendly and can be recycled. The plastic
electrolux 17
Do not use multi-way plugs, connectors
and extension cables. There is a risk of
fire.
Do not replace the mains cable yourself.
Contact the Service Force Centre.
Make sure that the mains plug is accessible after installation.
Do not pull the mains cable to disconnect the appliance. Always pull the
mains plug.
components are identified by markings, e.g.
>PE<, >PS<, etc. Discard the packaging
materials in the applicable container at the
community waste disposal facilities.
Warning! To discard the appliance,
follow the procedure:
• Pull the mains plug out of the socket.
• Cut off the mains cable and mains
plug and discard them.
• Discard the door catch. This prevents
the children to close themselves inside the appliance and endanger their
lives.
Page 18

18 electrolux
Electrolux. Thinking of you.
Aby dowiedzieć się więcej o naszej filozofii, odwiedź naszą
stronę internetową www.electrolux.com
Spis treści
Informacje dotyczące bezpieczeństwa
Opis urządzenia 19
Panel sterowania 20
Eksploatacja urządzenia 21
Ustawianie zmiękczacza wody 21
Wsypywanie soli do zmywarki 23
Wlewanie płynu nabłyszczającego 23
Wkładanie sztućców i naczyń 24
Stosowanie detergentu 26
Może ulec zmianie bez powiadomienia
Wybór i uruchamianie programu zmywania
18
Programy zmywania 29
Konserwacja i czyszczenie 30
Co zrobić, gdy… 31
Dane techniczne 32
Instalacja 33
Podłączenie do sieci wodociągowej 33
Podłączenie do sieci elektrycznej 34
Ochrona środowiska 34
Informacje dotyczące bezpieczeństwa
Aby zapewnić bezpieczeństwo użytko-
wania i prawidłowe działanie urządzenia,
przed przystąpieniem do instalacji i obsługi należy dokładnie przeczytać niniejszą instrukcję. Instrukcję przechowywać
zawsze razem z urządzeniem, również w
razie jego przeniesienia lub odsprzedaży. Użytkownicy muszą w pełni poznać
działanie i funkcje ochronne urządzenia.
Prawidłowe użytkowanie
•Urządzenie jest przeznaczone wyłącznie
do użytku domowego.
•Urządzenie służy wyłącznie do czyszcze-
nia naczyń i sprzętów domowych nadają-
cych się do mycia w zmywarce.
•Nie używać rozpuszczalników w urządze-
niu. Zagrożenie wybuchem.
•Noże i wszystkie przedmioty z ostrymi
końcówkami umieszcza
sztućce, ostrym końcem skierowanym w
dół. Można też układać je w pozycji poziomej w koszu górnym.
•Używać wyłącznie markowych produktów
do zmywarek do naczyń (detergent, sól,
płyn nabłyszczający).
• Po otwarciu drzwi podczas pracy urzą-
dzenia może dojść do uwolnienia gorącej
pary. Ryzyko poparzenia skóry.
•Nie wyjmować naczyń ze zmywarki przed
zakończeniem programu mycia.
ć w koszyku na
•Po zakończeniu zmywania wyjąć wtyczkę
z gniazdka i zamknąć zawór dopływu wody.
•Urządzenie może być naprawiane wyłącz-
nie przez montera z autoryzowanego serwisu. Używać wyłącznie oryginalnych
części zamiennych.
• Nie wymieniać ich samodzielnie, aby uniknąć obrażeń i uszkodzenia urządzenia. Zawsze kontaktować si
zowanym serwisem.
Ogólne zasady bezpieczeństwa
•Urządzenie nie jest przeznaczone do użyt-
ku przez osoby (w tym dzieci) o ograniczonych zdolnościach fizycznych, sensorycznych czy umysłowych, a także nieposiadające doświadczenia ani odpowiedniej
wiedzy. Osoby te mogą obsługiwać urzą-
dzenie wyłącznie pod nadzorem i po uzyskaniu instrukcji od osoby odpowiedzialnej
za ich bezpieczeństwo.
•Przestrzegać instrukcji dotyczących bez-
pieczeństwa, dostarczonych przez producentów detergentów, aby uniknąć poparzeń oczu, ust i gardła.
•Nie pić wody ze zmywarki. W zmywarce
mogą być obecne pozostałości detergentów.
• Zawsze zamykać drzwi urządzenia, gdy
nie jest ono używane, aby uniknąć obrażeń
i nie potknąć się o otwarte drzwi.
ę z lokalnym autory-
27
Page 19

electrolux 19
•Nie siadać ani nie stawać na otwartych
drzwiach.
Bezpieczeństwo dzieci
•Urządzenie może być użytkowane wyłącz-
nie przez osoby dorosłe. Dzieci należy pilnować, aby mieć pewność, że nie bawią
się urządzeniem.
• Opakowanie przechowywać w miejscu
niedostępnym dla dzieci. Istnieje ryzyko
uduszenia.
• Wszystkie detergenty należy przechowywać w bezpiecznym miejscu. Nie dopuś-
cić do kontaktu dzieci z detergentami.
• Dzieci nie powinny znajdować się w pobliżu urządzenia, gdy jego drzwi są otwarte.
Instalacja
•Upewnić się, że urządzenie nie uległo usz-
kodzeniu w czasie transportu. Nie podłą-
czać uszkodzonego urządzenia. W razie
potrzeby skontaktować się z dostawcą.
• Przed pierwszym użyciem usunąć
kie materiały opakowaniowe.
wszyst-
Opis urządzenia
• Instalację elektryczną powierzyć wykwalifikowanemu i kompetentnemu specjaliś-
cie.
•Podłączenie wodociągowe i kanalizacyjne
powierzyć wykwalifikowanemu i kompetentnemu specjaliście.
• Nie zmieniać specyfikacji ani nie modyfikować produktu. Ryzyko odniesienia obrażeń i uszkodzenia urządzenia.
•Nie używać urządzenia:
–jeżeli przewód zasilający lub węże wod-
ne są uszkodzone,
–jeżeli panel sterowania, blat roboczy lub
cokół są uszkodzone w sposób dający
dostęp do wnętrza urządzenia.
Skontaktować się z lokalnym autoryzowanym serwisem.
• Nie wolno nawiercać ścian bocznych urzą-
dzenia, aby uniknąć uszkodzenia części
hydraulicznych lub elektrycznych.
Ostrzeżenie! Dokładnie przestrzegać
instrukcji dotyczących połączeń
elektryczności oraz wody.
1 Kosz górny
2 Pokrętło regulacji zmiękczania wody
3 Zbiornik soli
4 Dozownik detergentu
5 Dozownik płynu nabłyszczającego
6 Tabliczka znamionowa
7 Filtry
8 Dolne ramię spryskujące
Page 20

20 electrolux
9 Górne ramię spryskujące
Panel sterowania
5 4
321
AB
1 Przycisk Wł./Wył.
2 Przycisk opóźnienia rozpoczęcia programu
3 Przycisk wyboru/anulowania programu / (PROG. / CANCEL)
4 Kontrolki
5 Kontrolki programów
Kontrolki
Kontrolka zapala się po zakończeniu programu
zmywania. Funkcje dodatkowe:
•Poziom zmiękczania wody.
•Włączanie/wyłączanie sygnałów dźwiękowych.
• Alarm w razie nieprawidłowego działania urzą-
dzenia.
Kontrolka zapala się, gdy należy uzupełnić płyn
1)
1)
1) Kontrolka jest wyłączona podczas programu zmywania.
Przycisk wyboru/anulowania programu
Przycisk wyboru/anulowania programu służy
do wykonywania następujących czynności:
• Do ustawiania programu mycia. Zapoznać
się z rozdziałem "Ustawianie i uruchamianie programu".
•Do ustawiania zmiękczania wody. Zapo-
znać się z rozdziałem "Ustawianie zmiękczania wody".
nabłyszczający. Zapoznać się z rozdziałem "Używanie płynu nabłyszczającego".
Kontrolka zapala się, gdy należy uzupełnić sól.
Zapoznać się z rozdziałem "Używanie soli do zmywarek".
Kontrolka soli może się świecić przez kilka godzin,
ale nie ma to niepożądanego wpływu na działanie
urządzenia.
•Do włączania/wyłączania sygnałów dźwię-
kowych. Zapoznać się z rozdziałem "Sygnały dźwiękowe".
• Do anulowania włączonego programu. Zapoznać się z rozdziałem "Ustawianie i uruchamianie programu".
Przycisk opóźnienia rozpoczęcia
programu
Przycisk ten służy do opóźnienia rozpoczęcia
programu zmywania w odstępach co 3 go-
Page 21

electrolux 21
dziny. Zapoznać się z rozdziałem "Ustawianie i uruchamianie programu zmywania".
Tryb ustawiania
Urządzenie działa w trybie ustawiania, gdy
wszystkie lampki kontrolne programu są wyłączone i miga lampka wskazująca zakończenie.
Tryb ustawiania jest wymagany do wykonania następujących czynności:
– Do ustawiania programu zmywania.
– Do ustawiania poziomu zmiękczania wo-
dy.
–Do włączania/wyłączania sygnałów dźwię-
kowych.
Gdy świeci się lampka kontrolna programu,
aby powrócić do trybu ustawiania, należy
anulować program. Zapoznać się z rozdziałem "Ustawianie i uruchamianie programu
zmywania".
Lampki kontrolne programu A i B
Oprócz wyboru odpowiadających im programów mycia; lampki te pełnią dodatkowe
funkcje:
• Regulacja poziomu zmiękczania wody.
•Włączanie/wyłączanie sygnałów dźwięko-
wych.
Sygnały dźwiękowe
Sygna
ły dźwiękowe są słyszalne:
•Po zakończeniu programu zmywania.
•W razie wystąpienia usterki urządzenia.
Fabrycznie sygnały dźwiękowe są włączone.
Aby wyłączyć sygnały dźwiękowe, należy
wykonać poniższe czynności:
1. Włączyć urządzenie.
2. Upewnić się, że urządzenie jest w trybie
ustawiania.
3. Nacisnąć i przytrzymać przycisk wyboru/
anulowania programu, aż lampka A zacznie migać, a lampka B włączy się.
4. Ponownie nacisnąć przycisk wyboru/
anulowania programu.
– Lampka kontrolna A włączy się.
– Lampka kontrolna B zacznie migać.
5. Poczekać, aż lampka A zgaśnie.
– Lampka kontrolna B b
gać.
–Zaświeci się lampka kontrolna zakoń-
czenia programu.
Sygnały dźwiękowe są włączone.
6. Ponownie nacisnąć przycisk wyboru/
anulowania programu.
– Lampka kontrolna sygnalizująca za-
kończenie programu zgaśnie.
Sygnały dźwiękowe są wyłączone.
7. Wyłączyć urządzenie, aby zapisać usta-
wienie.
Aby włączyć sygnały dźwiękowe, należy wykonać poniższe czynności:
1. Wykonywać powyższą procedurę do
momentu, gdy lampka kontrolna sygnalizująca zakończenie włączy się.
ędzie nadal mi-
Eksploatacja urządzenia
Należy postępować zgodnie z poniższymi instrukcjami wykonując kolejne czynności:
1. Sprawdzić zgodność poziomu zmiękczania wody z twardością wody doprowadzonej do zmywarki. W razie potrzeby –
zmienić ustawienia zmiękczacza wody.
2. Napełnić zbiornik soli solą do zmywarek.
3. Napełnić dozownik płynu nabłyszczają-
cego.
4. Włożyć naczynia i sztućce do zmywarki.
Ustawianie zmiękczacza wody
Zmiękczacz wody usuwa minerały i sole z
doprowadzanej wody. Substancje mineralne
i sole mogą mieć negatywny wpływ na działanie urządzenia.
5. Ustawić program mycia odpowiedni do
rodzaju naczyń i stopnia zabrudzenia.
6. Napełnić dozownik odpowiednią ilością
detergentu.
7. Uruchomić program mycia.
W przypadku używania tabletek do zmywarek należy zapoznać się z rozdziałem
"Używanie detergentów".
Twardość wody jest mierzona w równoważ-
nych skalach:
• Stopnie niemieckie (dH°).
• Stopnie francuskie (°TH).
Page 22

22 electrolux
• mmol/l (milimol na litr – międzynarodowa
jednostka twardości wody).
trzeby skontaktować się z lokalnym zakła-
dem wodociągowym.
•Stopnie Clarka.
Ustawić zmiękczacz wody zgodnie z twardością wody z lokalnego ujęcia. W razie po-
Twardość wody Ustawienie zmiękczania wody
°dH °TH mmol/l Stopnie
51 - 70 91 - 125 9,1 - 12,5 64 - 88 2 10
43 - 50 76 - 90 7,6 - 9,0 53 - 63 2 9
37 - 42 65 - 75 6,5 - 7,5 46 - 52 2 8
29 - 36 51 - 64 5,1 - 6,4 36 - 45 2 7
23 - 28 40 - 50 4,0 - 5,0 28 - 35 2 6
19 - 22 33 - 39 3,3 - 3,9 23 - 27 2 5
15 - 18 26 - 32 2,6 - 3,2 18 - 22 1 4
11 - 14 19 - 25 1,9 - 2,5 13 - 17 1 3
4 - 10 7 - 18 0,7 - 1,8 5 - 12 1 2
< 4 < 7 < 0,7 < 5
1) Nie jest wymagane użycie soli.
Zmiękczacz wody należy regulować
Clarka
2. Upewnić się, że urządzenie jest trybie us-
ręcznie i elektronicznie.
Regulacja ręczna
Urządzenie zostało fabrycznie ustawio-
3. Nacisnąć i przytrzymać przycisk wyboru/
4. Zwolnić przycisk wyboru/anulowania
ne w położeniu 2.
1. Otworzyć drzwi.
2. Wyjąć dolny kosz.
5. Poczekać, aż lampka B zgaśnie.
3. Obrócić pokrętło regulacji twardości wo-
dy w położenie 1 lub 2 (patrz tabela).
4. Włożyć dolny kosz.
6. Nacisnąć jeden raz przycisk wyboru/anu-
ręczne elektroniczne
1)
1
tawiania.
anulowania programu.
programu, gdy lampka A zacznie migać,
a lampka B zapali się.
– Lampka kontrolna A zacznie migać.
– Lampka sygnalizująca zakończenie za-
cznie migać.
lowania programu.
– Lampka kontrolna A zacznie migać.
– Funkcja ustawiania zmiękczacza wody
jest włączona.
– Lampka sygnalizująca zakończenie za-
cznie migać, wskazując poziom zmiękczacza wody.
Przykład: 5 mignięć, przerwa, 5 mignięć, przerwa itd. = poziom 5.
5. Zamknąć drzwi.
Regulacja elektroniczna
Fabrycznym ustawieniem zmiękczacza
wody jest poziom 5.
7. Nacisnąć jeden raz przycisk wyboru/anulowania programu, aby zwiększyć poziom zmiękczacza wody o jeden.
8. Nacisn
ąć przycisk wł./wył., aby zapisać
ustawienie.
1. Włączyć urządzenie.
1)
1
Page 23

Wsypywanie soli do zmywarki
Uwaga! Używać wyłącznie soli do
zmywarek. Sól nieprzeznaczona do
zmywarek do naczyń powoduje
uszkodzenie zmiękczacza wody.
Uwaga! Grudki soli lub słona woda na
dnie urządzenia mogą spowodować
korozję. Aby zapobiec korozji, należy
uzupełniać sól w urządzeniu
bezpośrednio przed włączeniem
programu mycia.
Aby napełnić zbiornik soli, należy wykonać poniższe czynności:
1. Obrócić pokrywkę w kierunku przeciw-
nym do ruchu wskazówek zegara, aby
otworzyć zbiornik soli.
2. Wlać do zbiornika soli 1 litr wody (tylko za
pierwszym razem).
3. Do napełnienia zbiornika solą należy użyć
lejka.
electrolux 23
4. Usunąć sól rozsypaną wokół otworu
zbiornika soli.
5. Obrócić pokrywkę w kierunku zgodnym
z ruchem wskazówek zegara, aby zamknąć zbiornik soli.
Podczas napełniania zbiornika solą wypływa z niego woda – jest to normalne.
Po elektronicznym ustawieniu zmiękczania
wody na poziom 1 kontrolka soli będzie na
stałe wyłączona.
Wlewanie płynu nabłyszczającego
Uwaga! Należy używać wyłącznie
markowych płynów nabłyszczających
przeznaczonych do zmywarek do
naczyń.
Nie napełniać dozownika płynu nabły-
szczającego innymi produktami (np.
środkiem do czyszczenia zmywarek,
detergentem w płynie). Może to prowadzić do uszkodzenia urządzenia.
Płyn nabłyszczający umożliwia suszenie
naczyń bez smug lub plam.
Podczas ostatniej fazy płukania płyn nabłyszczający jest dodawany automatycznie.
Aby napełnić dozownik płynu nabłyszczają-
cego, wykonać poniższe czynności:
1. Nacisnąć klamkę (A), aby otworzyć dozownik płynu nabłyszczającego.
2. Napełnić dozownik płynu nabłyszczają-
cego. Oznaczenie "max."wskazuje maksymalny poziom.
Page 24

24 electrolux
3. Rozlany płyn nabłyszczający należy usunąć przy pomocy szmatki dobrze pochłaniającej wodę, aby zapobiec zbyt intensywnemu pienieniu podczas późniejsze-
go programu mycia.
4. Zamknąć dozownik płynu nabłyszczają-
cego.
Regulacja dozowania płynu
nabłyszczającego
Dozowanie płynu nabłyszczającego zostało
fabrycznie ustawione w pozycji 4.
Dozowanie płynu nabłyszczającego można
ustawić w zakresie od 1 (najmniejsze dozowanie) do 6 (największe dozowanie).
1. Obracając pokrętło regulacji twardości
wody zmniejszyć lub zwiększyć dozowanie.
–Jeśli na naczyniach widoczne są krople
wody lub osad kamienia, należy zwięk-
szyć dozowanie.
–Jeśli na naczyniach po myciu pozosta-
ją białe smugi, biały lub niebieskawy
nalot, należy zmniejszyć dozowanie.
Wkładanie sztućców i naczyń
Przydatne wskazówki i porady
Uwaga! Urządzenie służy wyłącznie do
czyszczenia naczyń i sprzętów
domowych przeznaczonych do mycia w
zmywarce.
Nie używać urządzenia do czyszczenia
przedmiotów pochłaniających wodę (gąbki,
odzież domowa itd.).
•Przed włożeniem naczyń i sztućców do
zmywarki, wykonać poniższe czynności:
–Usunąć wszelkie pozostałości jedzenia i
resztki.
–Namoczyć przypalone i wyschnięte
resztki jedzenia.
• Podczas wkładania naczyń i sztućców do
zmywarki należy przestrzegać poniższych
wskazówek:
–Wydrążone elementy (np. kubki, szklan-
ki i miski) układać otworami w dół.
–Upewnić się, że woda nie zbiera się w
pojemniku ani w zag
naczynia.
–Upewnić się, że żadne naczynia ani
sztućce nie znajdują się wewnątrz innych.
–Upewnić się, że naczynia i sztućce nie
zakrywają innych.
–Upewnić się, że szklanki nie stykają się
ze sobą.
–Małe elementy umieścić w koszyku na
sztućce.
• Elementy plastikowe i miski z powłoką zapobiegającą przywieraniu mogą zatrzymywać krople wody. Elementy plastikowe nie
wysychają tak szybko, jak elementy porcelanowe i stalowe.
• Lekkie elementy umieścić w koszu górnym. Upewnić się, że naczynia się nie
przemieszczają.
łębieniu podstawy
Page 25

Uwaga! Przed uruchomieniem
programu mycia upewnić się, że
ramiona natryskowe mogą się
swobodnie obracać.
Ostrzeżenie! Po załadowaniu lub
rozładowaniu urządzenia zawsze
zamykać drzwi. Otwarte drzwi mogą być
niebezpieczne.
Kosz dolny
Do dolnego kosza należy wkładać rondle,
pokrywki, talerze, salaterki i sztućce. Naczynia z serwisu i duże pokrywki układać przy
krawędziach kosza.
electrolux 25
Wymieszać łyżki z innymi sztućcami, aby nie
przylegały do siebie.
Używać kratki na sztućce. Jeżeli wymiary
sztućców uniemożliwiają korzystanie z kratki
na sztućce, można ją wyjąć.
Kosz górny
Górny kosz jest przeznaczony dla talerzy (o
maksymalnej średnicy 24 cm), salaterek,
kubków, szklanek, garnków i pokrywek. Naczynia rozmieszczać tak, aby woda miała dostęp do wszystkich powierzchni.
Kosz na sztućce
Ostrzeżenie! Noży z długimi ostrzami
nie należy umieszczać pionowo. Długie i
ostre sztućce należy układać poziomo w
koszu górnym. Należy zachować
ostrożność w czasie wkładania i
wyjmowania ostrych przedmiotów.
Widelce i łyżki należy wkładać uchwytami
skierowanymi w dół.
Noże wkładać uchwytami skierowanymi w
górę.
Talerzy nie należy wkładać w pierwszych
trzech sekcjach w przedniej części kosza. Należy sprawdzić, czy talerze są
pochylone do przodu.
Kieliszki na wysokich nóżkach układać nóż-
kami do góry na półkach na filiżanki. W przypadku dłuższych przedmiotów można złożyć
półki na filiżanki.
Page 26

26 electrolux
Regulacja wysokości górnego kosza
Aby włożyć większe talerze do dolnego kosza, należy najpierw przełożyć górny kosz do
górnego położenia.
Uwaga! Wysokość wyregulować przed
załadowaniem górnego kosza.
Maksymalna wysokość naczyń w
koszu gór-
nym
Położenie górne 20 cm 31 cm
koszu do-
lnym
Stosowanie detergentu
Używać wyłącznie detergentów (proszków, płynów lub tabletek) przeznaczonych do zmywarek do naczyń.
Przestrzegać informacji podanych na
opakowaniu:
• Dozowanie zalecane przez producenta.
• Zalecenia dotyczące przechowywania.
Aby chronić środowisko, nie używać
większej ilości detergentów niż to zalecane.
Aby napełnić dozownik detergentu, należy
wykonać poniższe czynności:
1. Otworzyć pokrywkę dozownika deter-
gentu.
Maksymalna wysokość naczyń w
Położenie dolne 24 cm 27 cm
Aby przełożyć górny kosz do położenia górnego, należy wykonać poniższe czynności:
1. Przekręcić na zewnątrz przednie ogra-
niczniki prowadnic (A).
2. Wysunąć kosz.
3. Umieścić kosz w górnym położeniu.
4. Przekręcić na pierwotne położenie
przednie ograniczniki prowadnic (A).
Uwaga! Jeżeli kosz znajduje się w
górnym położeniu, nie umieszczać
filiżanek na ich półkach.
2. Napełnić dozownik ( A) detergentem. Oz-
naczenie pokazuje dawki:
20 = około 20 g detergentu
30 = około 30 g detergentu.
3. Jeżeli wybrano program obejmujący mycie wstępne, wsypać dodatkową ilość
detergentu do przegródki mycia wstęp-
nego ( B).
Page 27

A
B
4. W przypadku korzystania z tabletek do
zmywarek, włożyć tabletkę do dozownika detergentu ( A).
5. Zamknąć pokrywkę dozownika detergentu. Docisnąć pokrywkę, aż zaskoczy.
Detergenty różnych producentów rozpuszczają się w różnym czasie. Niektóre
tabletki do zmywarek nie zapewniają odpowiednich wyników podczas krótkich
programów mycia. Przy używaniu table-
electrolux 27
tek do zmywarek zaleca się korzystanie
z długich programów mycia w celu cał-
kowitego usunięcia detergentu.
Korzystanie z tabletek do zmywarek
Tabletki takie zawierają w sobie detergent,
środek nabłyszczający i sól do zmywarek.
Niektóre typy tabletek mogą zawierać również inne środki
W przypadku stosowania tabletek zawierających specjalną sól oraz środek nabłyszczający nie ma potrzeby napełniania pojemnika
soli i płynu nabłyszczającego. W takim przypadku, lampka kontrolna płynu nabłyszcza-
jącego będzie świeciła się po włączeniu urzą-
dzenia.
1. Przed użyciem sprawdzić, czy dane tabletki są odpowiednie do stopnia twardoś-
ci wody doprowadzanej do zmywarki.
Zapoznać si
2. Wybrać najniższy poziom zmiękczania
wody i najmniejszą dawkę płynu nabły-
szczającego.
Jeżeli efekty suszenia nie są zadowalające,
wykonać poniższe czynności:
1. Napełnić odpowiedni dozownik płynem
nabłyszczającym.
2. Ustawić dozowanie płynu nabłyszczają-
cego w pozycji 2.
Aby ponownie użyć detergentu w proszku:
1. Uzupełnić zbiornik soli i dozownik płynu
nabłyszczającego.
2. Ustawić najwyższy poziom twardości
wody.
3. Uruchomić program mycia bez naczyń.
4. Ustawić zmiękczanie wody odpowiednio
do twardości wody doprowadzanej do
urządzenia.
5. Wyregulować dozowanie p
szczającego.
ę z instrukcjami producenta.
łynu nabły-
Wybór i uruchamianie programu zmywania
Ustawić program zmywania przy uchylonych drzwiach. Program zmywania
rozpoczyna się zaraz po zamknięciu
drzwi. Do tego momentu można zmodyfikować ustawienia.
Aby ustawić i uruchomić program zmywania,
należy wykonać poniższe czynności:
1. Włączyć urządzenie.
2. Upewnić się, że urządzenie jest w trybie
ustawiania.
3. Naciskać przycisk wyboru/anulowania
programu, aby ustawić program mycia.
Zapoznać się z rozdziałem "Programy
zmywania".
–Zaświeci się lampka kontrolna progra-
mu.
4. Zamknąć drzwi.
Page 28

28 electrolux
– Program mycia rozpocznie się auto-
matyczne.
Gdy program jest włączony, nie można
go zmienić. Należy anulować program
zmywania.
Ostrzeżenie! Program mycia
przerywać lub anulować tylko w razie
konieczności.
Uwaga! Ostrożnie otwierać drzwi. Może
dojść do uwolnienia gorącej pary.
Anulowanie programu zmywania
1. Nacisnąć i przytrzymać przycisk wyboru/
anulowania programu przez około 3 sekundy.
– Lampka kontrolna programu zgaśnie.
– Lampka kontrolna sygnalizująca za-
kończenie programu zacznie migać.
2. Zwolnić przycisk wyboru/anulowania
programu, aby anulować program mycia.
W tym momencie można wykonać następu-
jące czynności:
1. Wyłączyć urządzenie.
2. Ustawić nowy program zmywania.
Przed ustawieniem nowego programu zmywania należy napełnić dozownik detergentem.
Przerywanie programu mycia
Otworzyć drzwi.
• Program zostanie zatrzymany.
Zamknąć drzwi.
• Program zostanie wznowiony od momen-
tu, w którym został przerwany.
Ustawianie i uruchamianie programu z
opóźnionym rozpoczęciem
1. Nacisnąć przycisk Wł./Wył.
2. Ustawić program zmywania.
–Zaświeci się
kontrolka programu.
3. Wcisnąć przycisk opóźnienia uruchomienia.
–Zaświeci się kontrolka opóźnienia roz-
poczęcia programu.
4. Zamknąć drzwi.
–Rozpocznie się odliczanie czasu opó-
źnienia rozpoczęcia programu.
–Po zakończeniu odliczania następuje
automatyczne rozpoczęcie programu
zmywania.
Nie otwierać drzwi podczas odliczania,
ponieważ spowoduje to jego przerwanie. Po ponownym zamknięciu drzwi odliczanie jest kontynuowane od momentu
przerwania.
Anulowanie opóźnienia rozpoczęcia
programu:
1. Otworzyć drzwi.
2. Wcisnąć przycisk opóźnienia uruchomie-
nia.
– Lampka kontrolna opóźnienia urucho-
mienia zgaśnie.
3. Zamknąć drzwi.
– Program zostanie uruchomiony na-
tychmiast.
Zakończenie programu zmywania
Urządzenie można wyłączyć, gdy:
•Urządzenie zatrzyma się automatycznie.
• Wygenerowane zostały sygnały dźwięko-
we zakończenia programu.
1. Otworzyć drzwi.
–Zaświeci się lampka kontrolna sygnali-
zująca zakończenie programu.
– Lampka kontrolna programu pozostaje
włączona.
2. Nacisnąć przycisk Wł./Wył.
3. W celu osiągnięcia lepszych wyników su-
szenia, przed wyjęciem naczyń pozosta-
wić drzwi uchylone na kilka minut.
Przed wyjęciem naczyń ze zmywarki poczekać aż wystygną. Gorące naczynia łatwo ulegają uszkodzeniu.
Wyjmowanie naczyń
• W pierwszej kolejności wyjmować naczy-
nia z dolnego kosza, a następnie z górnego.
• Na bokach i na drzwiach urządzenia może
występować woda. Stal nierdzewna stygnie szybciej niż naczynia.
Page 29

electrolux 29
Programy zmywania
Programy zmywania
Stopień
Program
1)
2)
1) Jest to doskonały program do codziennego użytku przy niepełnym załadunku. Idealnie nadaje się dla
czteroosobowej rodziny, która zmywa tylko naczynia i sztućce po śniadaniu i obiedzie.
2) Program testowy dla ośrodków przeprowadzających testy. Dane z testów są przedstawione na
osobnej, dołączonej do urządzenia naklejce.
zabrudze-
nia
Bardzo za-
brudzone
Średnio
zabrudzo-
ne
Średnio lub
lekko za-
brudzone
Średnio
zabrudzo-
ne
Dowolny
Dane eksploatacyjne
Program Czas trwania (w mi-
85-95 1,8-2,0 22-25
105-115 1,5-1,7 23-25
30 0,9 9
130-140 1,0-1,2 14-16
12 0,1 5
Podane wartości mogą ulec zmianie w
zależności od ciśnienia i temperatury
nutach)
Rodzaj za-
ładunku
Naczynia
stołowe,
sztućce,
garnki i pa-
telnie
Naczynia
stołowe,
sztućce,
garnki i pa-
telnie
Naczynia
stołowe i
sztućce
Naczynia
stołowe i
sztućce
Niepełny za-
ładunek (do
uzupełnienia
w ciągu
dnia)
Opis programu
Mycie wstępne
Zmywanie zasadnicze w temperaturze do
70°C
2 płukania pośrednie
Płukanie końcowe
Suszenie
Mycie wstępne
Zmywanie zasadnicze w temperaturze do
65°C
2 płukania pośrednie
Płukanie końcowe
Suszenie
Zmywanie zasadnicze w temperaturze do
60°C
Płukanie końcowe
Mycie wstępne
Zmywanie zasadnicze w temperaturze do
50°C
1 płukanie pośrednie
Płukanie końcowe
Suszenie
1 płukanie zimną wodą (zapobiega zasychaniu resztek jedzenia).
W tym programie nie ma konieczności dodawania detergentu.
Zużycie energii (w
kWh)
Zużycie wody (w li-
trach)
wody, zmian w napięciu zasilania oraz
ilości naczyń.
Page 30

30 electrolux
Konserwacja i czyszczenie
Ostrzeżenie! Przed przystąpieniem do
czyszczenia należy wyłączyć
urządzenie.
Czyszczenie filtrów
Uwaga! Nie używać urządzenia bez
filtrów. Upewnić się, że filtry są
prawidłowo zainstalowane.
Nieprawidłowa instalacja filtrów
spowoduje niezadowalające wyniki
mycia oraz uszkodzenie urządzenia.
W razie konieczności wyczyść filtry. Brudne
filtry sprawiają, że wyniki mycia są gorsze.
Ta zmywarka ma trzy filtry:
1. filtr zgrubny (A)
2. mikrofiltr (B)
3. filtr płaski (C)
A
A
B
B
C
C
Aby wyczyścić filtry, należy wykonać poniż-
sze czynności:
1. Otworzyć drzwi.
2. Wyjąć dolny kosz.
3. Odblokować system filtrów, obracając w
tym celu rączkę umieszczoną na mikrofiltrze (B) o około 1/4 obrotu w kierunku
przeciwnym do ruchu wskazówek zegara.
5. Chwycić filtr zgrubny (A) za uchwyt z ot-
worem.
6. Wyjąć filtr zgrubny (A) z mikrofiltra (B).
7. Wyjąć filtr płaski (C) z dolnej części urzą-
dzenia.
D
8. Wyczyścić filtry pod bieżącą wodą.
9. Zamontować filtr płaski (C) w dolnej
części urządzenia. Zamocować filtr płaski pod dwoma zaczepami (D).
10. Włożyć filtr zgrubny (A) do mikrofiltra (B)
i ścisnąć je ze sobą.
11. Umieścić system filtrów na swoim miejscu.
12. Aby zablokować system filtrów, obrócić
rączkę na mikrofiltrze (B) w kierunku
zgodnym z ruchem wskazówek zegara,
aż do zablokowania.
4. Wyjąć system filtrów.
13. Włożyć dolny kosz.
14. Zamknąć drzwi.
Nie wyjmować ramion natryskowych.
Jeżeli otwory w ramionach spryskujących
ulegną zatkaniu, zabrudzenia należy usunąć
przy pomocy patyczka do koktajlu.
Page 31

electrolux 31
Czyszczenie zewnętrzne
Zewnętrzne powierzchnie urządzenia i panel
sterowania czyścić zwilżoną, miękką szmatką. Używać wyłącznie neutralnych środków
do czyszczenia. Nie używać materiałów
ściernych, myjek do szorowania ani rozpuszczalników (aceton, trichloroetylen itp.).
Środki ostrożności w przypadku mrozu
Uwaga! Nie instalować urządzenia w
miejscach, w których temperatura jest
Co zrobić, gdy…
Urządzenie nie uruchamia się lub zatrzymuje
się podczas pracy.
W razie wystąpienia problemów należy najpierw spróbować samodzielnie znaleźć rozwiązanie. Jeżeli nie można znaleźć rozwią-
zania, należy skontaktować się z autoryzowanym serwisem.
Kod błędu i nieprawidłowe dzia-
•Ciągłe miganie kontrolki trwające-
go programu
•Słyszalny przerywany sygnał
dźwiękowy
•1 mignięcie kontrolki sygnalizują-
cej zakończenie programu
Urządzenie nie napełnia się wodą
.
•Ciągłe miganie kontrolki trwające-
go programu
•Słyszalny przerywany sygnał
dźwiękowy
•2 mignięcia kontrolki sygnalizują-
cej zakończenie programu
Urządzenie nie odpompowuje wody.
•Ciągłe miganie kontrolki trwające-
go programu
•Słyszalny przerywany sygnał
dźwiękowy
•3 mignięcia kontrolki sygnalizują-
cej zakończenie programu
Włączyło się zabezpieczenie przed
zalaniem
łanie
• Zawór wody jest zablokowany lub zatkany osadem kamienia.
Wyczyścić zawór wody.
•Zamknięty zawór wody.
Odkręcić zawór wody.
• Zablokowany filtr w wężu doprowadzającym wodę.
Wyczyścić filtr.
•Nieprawidłowe połączenie węża doprowadzającego wodę.
Wąż może być zagięty lub przygnieciony.
Upewnić się, że połączenie jest prawidłowe.
•Zatkane rozgałęzienie syfonu zlewozmywaka.
Wyczyścić rozgałęzienie syfonu zlewozmywaka.
•Nieprawidłowe połączenie węża spustowego. Wąż może
być zagięty lub przygnieciony.
Upewnić się, że połączenie jest prawidłowe.
•Zamknąć dopływ wody i skontaktować się z lokalnym auto-
ryzowanym serwisem.
niższa niż 0°C. Producent nie ponosi
odpowiedzialności za uszkodzenia
wywołane przez mróz.
Jeśli nie ma innej możliwości, opróżnić urzą-
dzenie i zamknąć drzwi. Odłączyć wąż doprowadzający wodę i usunąć z niego wodę.
Uwaga! Wyłączyć urządzenie przed
przeprowadzeniem następujących
zalecanych działań korygujących.
Możliwa przyczyna i rozwiązanie
Page 32

32 electrolux
Kod błędu i nieprawidłowe dzia-
łanie
Program nie uruchamia się •Drzwi urządzenia nie są zamknięte.
Zamknąć drzwi.
• Wtyczka przewodu zasilającego nie jest włożona do gniazdka.
Włożyć wtyczkę do gniazdka.
• Przepalony bezpiecznik w domowej instalacji elektrycznej.
Wymienić bezpiecznik.
•Ustawiono opóźnienie rozpoczęcia programu.
Anulować opóźnienie rozpoczęcia programu, aby uruchomić program.
Po sprawdzeniu włączyć urządzenie. Program zostanie wznowiony od momentu, w
którym został przerwany. Jeżeli problem wystąpi ponownie, skontaktować się z lokalnym
autoryzowanym serwisem.
Poniższe dane są niezbędne dla serwisu, aby
pomoc była szybka i odpowiednia:
•Model (Mod.)
Możliwa przyczyna i rozwiązanie
• Numer seryjny (S.N.)
Informacje te znajdują się na tabliczce znamionowej.
W tym miejscu można zapisać wymagane
dane:
Nazwa modelu: ..........
Numer produktu: ..........
Numer seryjny: ..........
• Numer produktu (PNC)
Efekty mycia nie są zadowalające
Naczynia nie są czyste • Wybrano program mycia nieodpowiedni do rodzaju naczyń lub za-
Osad kamienia na naczyniach • Pusty zbiornik na sól.
Naczynia są mokre i matowe •Nie użyto płynu nabłyszczającego.
Smugi, mętne plamy lub niebieskawa powłoka na szklankach i naczyniach
Wyschnięte ślady kropel wody na szklankach i naczyniach
brudzenia.
•Kosze są załadowane nieprawidłowo, przez co woda nie dochodzi
do wszystkich powierzchni.
• Ramiona natryskowe nie obracają się swobodnie w wyniku nieprawidłowego rozmieszczenia naczyń.
• Zabrudzone lub nieprawidłowo zainstalowane filtry.
•Zbyt mała ilość lub brak detergentu.
• Nieprawidłowo Ustawiony poziom zmiękczania wody.
• Pokrywka zbiornika na sól nie jest prawidłowo dokręcona.
• Dozownik płynu nabłyszczającego jest pusty.
•Zmniejszyć dozowanie płynu nabłyszczającego.
•Zwiększyć dozowanie płynu nabłyszczającego.
• Przyczyną może być rodzaj użytego detergentu.
Dane techniczne
Wymiary Szerokość cm 59,6
Wysokość cm 81,8-87,8
Głębokość cm 55,5
Przyłącze elektryczne - Napięcie
- Moc całkowita - Bezpiecznik
Ciśnienie doprowadzanej wody Wartość minimalna 0,5 bara (0,05 MPa)
Wartość maksymalna 8 barów (0,8 MPa)
Informacje dotyczące podłączenia elektrycznego są podane na
tabliczce znamionowej umieszczonej na wewnętrznej krawędzi
drzwi zmywarki.
Page 33

electrolux 33
Pojemność Ilość standardowych nakryć 12
Instalacja
Ostrzeżenie! Upewnić się, że podczas
instalacji wtyczka przewodu
zasilającego jest wyjęta z gniazdka.
Ważne! Przestrzegać instrukcji zawartych
na dołączonym szablonie w celu:
• zmontowania urządzenia,
• instalacji panelu meblowego,
•podłączenia doprowadzenia i spustu wo-
dy.
Urządzenie zainstalować pod blatem (blatem
kuchennym lub zlewozmywakiem).
W razie konieczności dokonania naprawy,
urządzenie musi być łatwo dostępne dla serwisanta.
Ustawić urządzenie w pobliżu źródła i odpływu wody.
Dla wentylacji zmywarki wystarczą otwory na
wąż doprowadzający wodę, wąż spustowy i
przewód zasilający.
Zmywarka ma w regulowane nóżki, umożli-
wiające regulację wysokości.
Podczas ustawiania urządzenia upewnić się,
że wąż doprowadzający wod
wy i przewód zasilający nie są zagięte lub
przygniecione.
Mocowanie urządzenia do sąsiednich
szafek
Upewnić się, że blat, pod którym ma być zainstalowane urządzenie, jest stabilnie umocowany (sąsiadujące urządzenia kuchenne,
szafki, ściana).
Poziomowanie urządzenia
Należy zadbać o wypoziomowanie urządzenia, aby drzwi były szczelne i zamykały się
prawidłowo. Jeżeli urządzenie jest prawidłowo wypoziomowane, drzwi nie zahaczają o
boki obudowy. Jeżeli nie można prawidłowo
zamknąć drzwi, należy wkręcać lub wykrę-
cać regulowane nóżki, aż urządzenie zostanie wypoziomowane.
ę, wąż spusto-
Podłączenie do sieci wodociągowej
Wąż doprowadzający wodę
Podłączyć urządzenie do wody ciepłej
(maks. 60°) lub zimnej.
Jeżeli ciepła woda jest wytwarzana przy pomocy alternatywnych źródeł energii, które są
bardziej przyjazne środowisku (np. kolektory
słoneczne, ogniwa słoneczne lub elektrownie
wiatrowe), można użyć jej do zasilania urzą-
dzenia, aby zmniejszyć zużycie energii.
Podłączyć wąż doprowadzający wodę do
zaworu z zewnętrznym gwintem 3/4".
Uwaga! Nie używać węży
połączeniowych ze starych urządzeń.
Ciśnienie wody musi mieścić się w przedziale
określonym w "Danych technicznych".
Upewnić się, że lokalny zakład wodociągowy
zapewnia odpowiednie ciśnienie wody.
Upewnić się, że wąż doprowadzający wodę
nie jest zagięty, przygnieciony ani zaplątany.
Szczelnie dokręcić nakrętkę, aby zapobiec
wyciekom wody.
Uwaga! Nie podłączać urządzenia do
rur nowych lub nieużywanych przez
długi okres czasu. Otworzyć wodę na
kilka minut, a następnie podłączyć wąż
doprowadzający wodę.
Wąż spustu wody
1. Podłączyć wąż spustowy do syfonu kanalizacyjnego i zamocować go pod blatem. Zapobiegnie to cofaniu się brudnej
wody ze zlewozmywaka do urządzenia.
2. Podłączyć wąż spustowy do rury kanalizacyjnej z otworem odpowietrzającym (o
średnicy wewnętrznej min. 4 cm).
Page 34

34 electrolux
max 85 cm
min 40 cm
max 400 cm
Upewnić się, że wąż spustowy nie jest zagięty ani przygnieciony, ponieważ może to
utrudnić prawidłowe odprowadzanie wody.
W czasie odprowadzania wody, w otworze
odpływowym zlewu nie może być zatyczki,
ponieważ mogłoby to spowodować zassanie wody z powrotem do urządzenia.
Ewentualne przedłużenie węża spustowego
nie może być dłuższe niż 2 m. Średnica wewnętrzna nie może być mniejsza niż średnica
węża.
Usunąć plastikową membranę (A) przed
podłączeniem węża spustowego do syfonu
Podłączenie do sieci elektrycznej
Ostrzeżenie! Producent nie ponosi
odpowiedzialności za szkody
wynikające z nieprzestrzegania
wskazówek bezpieczeństwa.
Uziemić urządzenie zgodnie z przepisami bezpieczeństwa.
Upewnić się, że napięcie znamionowe i
moc podane na tabliczce znamionowej
są zgodne z napięciem i obciążalnością
lokalnej instalacji zasilającej.
Używać wyłącznie prawidłowo zainstalowanego gniazdka z uziemionym stykiem ochronnym.
pod zlewem. Jeżeli membrana nie zostanie
całkowicie usunięta, gromadzące się resztki
jedzenia mogą spowodować powstanie blokady w rozgałęzieniu syfonu.
Urządzenie ma zabezpieczenie uniemożliwiające powrót brudnej wody do
urządzenia. Jeżeli w odpływie zlewu zamontowano zawór zwrotny, może on
uniemożliwiać prawidłowe odprowadzanie wody z urządzenia. Zawór zwrotny
trzeba usunąć.
Uwaga! Aby zapobiec wyciekom wody,
po zainstalowaniu należy sprawdzić
szczelność połączeń hydraulicznych.
Nie używać rozgałęziaczy, łączników ani
przedłużaczy. Istnieje ryzyko pożaru.
Nie wymieniać samodzielnie przewodu
zasilającego. Skontaktować się z lokalnym autoryzowanym serwisem.
Należy zadbać o to, aby po zakończeniu
instalacji urządzenia wtyczka przewodu
zasilającego była łatwo dostępna.
Nie cią
gnąć za przewód zasilający w celu odłączenia urządzenia. Zawsze ciąg-
nąć za wtyczkę.
Ochrona środowiska
Symbol na produkcie lub na opakowaniu
oznacza, że tego produktu nie wolno
traktować tak, jak innych odpadów
domowych. Należy oddać go do właściwego
punktu skupu surowców wtórnych
zajmującego się złomowanym sprzętem
elektrycznym i elektronicznym. Właściwa
utylizacja i złomowanie pomaga w eliminacji
niekorzystnego wpływu złomowanych
produktów na środowisko naturalne oraz
zdrowie. Aby uzyskać szczegółowe dane
dotyczące możliwości recyklingu niniejszego
urządzenia, należy skontaktować się z
lokalnym urzędem miasta, służbami
oczyszczania miasta lub sklepem, w którym
produkt został zakupiony.
Użyte materiały opakowaniowe są przyjazne
dla środowiska i nadają się do przetworzenia.
Elementy plastikowe można zidentyfikować
na podstawie oznaczeń, np. >PE<, >PS< itd.
Opakowanie należy wyrzucić do wła
ściwego
Page 35

electrolux 35
pojemnika w instytucjach zajmujących się
utylizacją odpadów.
Ostrzeżenie! Aby poddać urządzenie
utylizacji, wykonać poniższe czynności:
•Wyjąć wtyczkę przewodu zasilające-
go z gniazdka.
•Odciąć i usunąć przewód zasilający z
wtyczką.
•Usunąć zatrzask drzwi. Zapobiega to
zatrzaśnięciu się dzieci wewnątrz
urządzenia i zagrożeniu ich życia.
Page 36

www.electrolux.com
www.electrolux.pl
156985642-00-092009
 Loading...