

Page 1

SEIKO EPSON
Setup procedure of Firewall
≪ ESET Smart Security ≫
Contents
Common procedure- - - - - - - - - - - - - - - - - - - - - - - - - - - - - - - - - - - - - - - - - - - 3
Connecting the projector to Windows XP using EMP NS Connection - - - - - - - - - 6
Connecting the projector to Windows XP using Quick Wireless Connection- - - - - 12
Common procedure- - - - - - - - - - - - - - - - - - - - - - - - - - - - - - - - - - - - - - - - - - - 15
Connecting the projector to Windows Vista using EMP NS Connection- - - - - - - - 18
Connecting the projector to Windows Vista using Quick Wireless Connection - - - 24
1
Page 2

SEIKO EPSON
Rev,No. Revision history Norts
Rev.A 2008.xx.xx New releases
Using This Manual:
This manual is for users who do not know much about how to add software for Epson projector to anti-
virus Software’s firewall exceptions list. Please be kindly noted that there are other methods to add the
software to firewall exception list other than the method described in this manual. Also, the description
about change in firewall setting in this manual is just an example setting to use the software (EMP NS
Connection and EPSON Quick Wireless Connection). This is not the security level Epson recommends
and assures. We would appreciate it if users could set up security level in accordance with their environment.
Copyright Notice:
All rights reserved. No part of this publication may be reproduced, stored in a retrieval system, or transmitted in any form or by any means, electronic, mechanical, photocopying, recording, or otherwise, without the prior written permission of SEIKO EPSON CORPORATION. No patent liability is assumed with
respect to the use of the information contained herein. Neither is any liability assumed for damages
resulting from the use of the information contained herein.
Neither SEIKO EPSON CORPORATION nor its affiliates shall be liable to the purchaser of this product
or third parties for damages, losses, costs, or expenses incurred by purchaser or third parties as a result
of: accident, misuse, or abuse of this product or unauthorized modifications, repairs, or alterations to this
product, or (excluding the U.S.) failure to strictly comply with SEIKO EPSON CORPORATION's operating and maintenance instructions.
SEIKO EPSON CORPORATION shall not be liable against any damages or problems arising from the
use of any options or any consumable products other than those designated as Original EPSON Products
or EPSON Approved Products by SEIKO EPSON CORPORATION.
EPSON is a registered trademark of SEIKO EPSON CORPORATION.
EasyMP is a trademark of SEIKO EPSON CORPORATION.
IBM is a registered trademark of International Business Machines Corporation.
Microsoft, Windows, Windows logo, Windows NT, and Windows Vista are registered trademarks or
trademarks of Microsoft Corporation in the United States of America.
ESET, logo of ESET, NOD32, ThreatSense, ThreatSense.Net are registered trademarks of ESET, spol. s
r. o.
General Notice:
Other product names used herein are also for identification purposes only and may be trademarks of their
respective owners.
EPSON disclaims any and all rights in those marks.
2
Page 3
SEIKO EPSON
WindowsXP
Common procedure
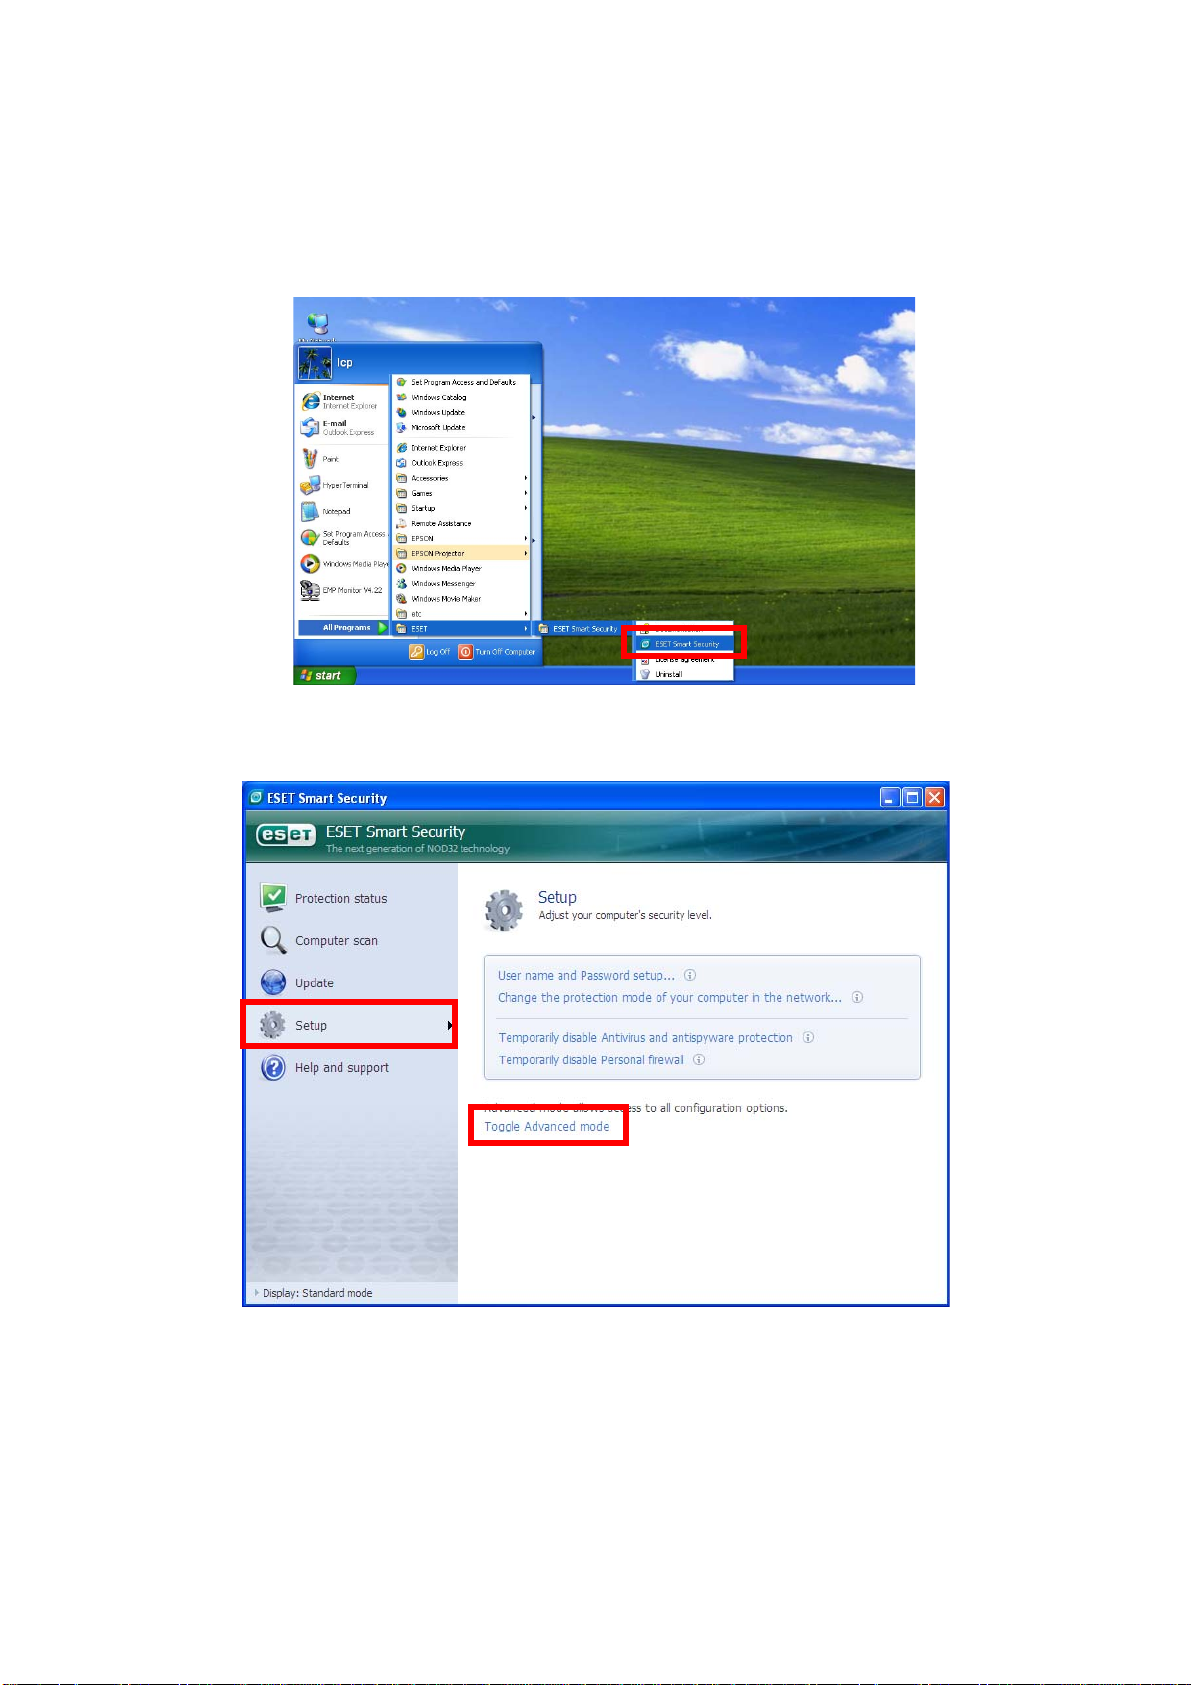
1. Start ESET Smart Security.
From Windows XP start button, click Start > All Programs > ESET > ESET Smart Security > ESET
Smart Security
2. Switch the main window to Advanced mode by clicking Setup > Toggle Advanced mode.
3
Page 4
SEIKO EPSON
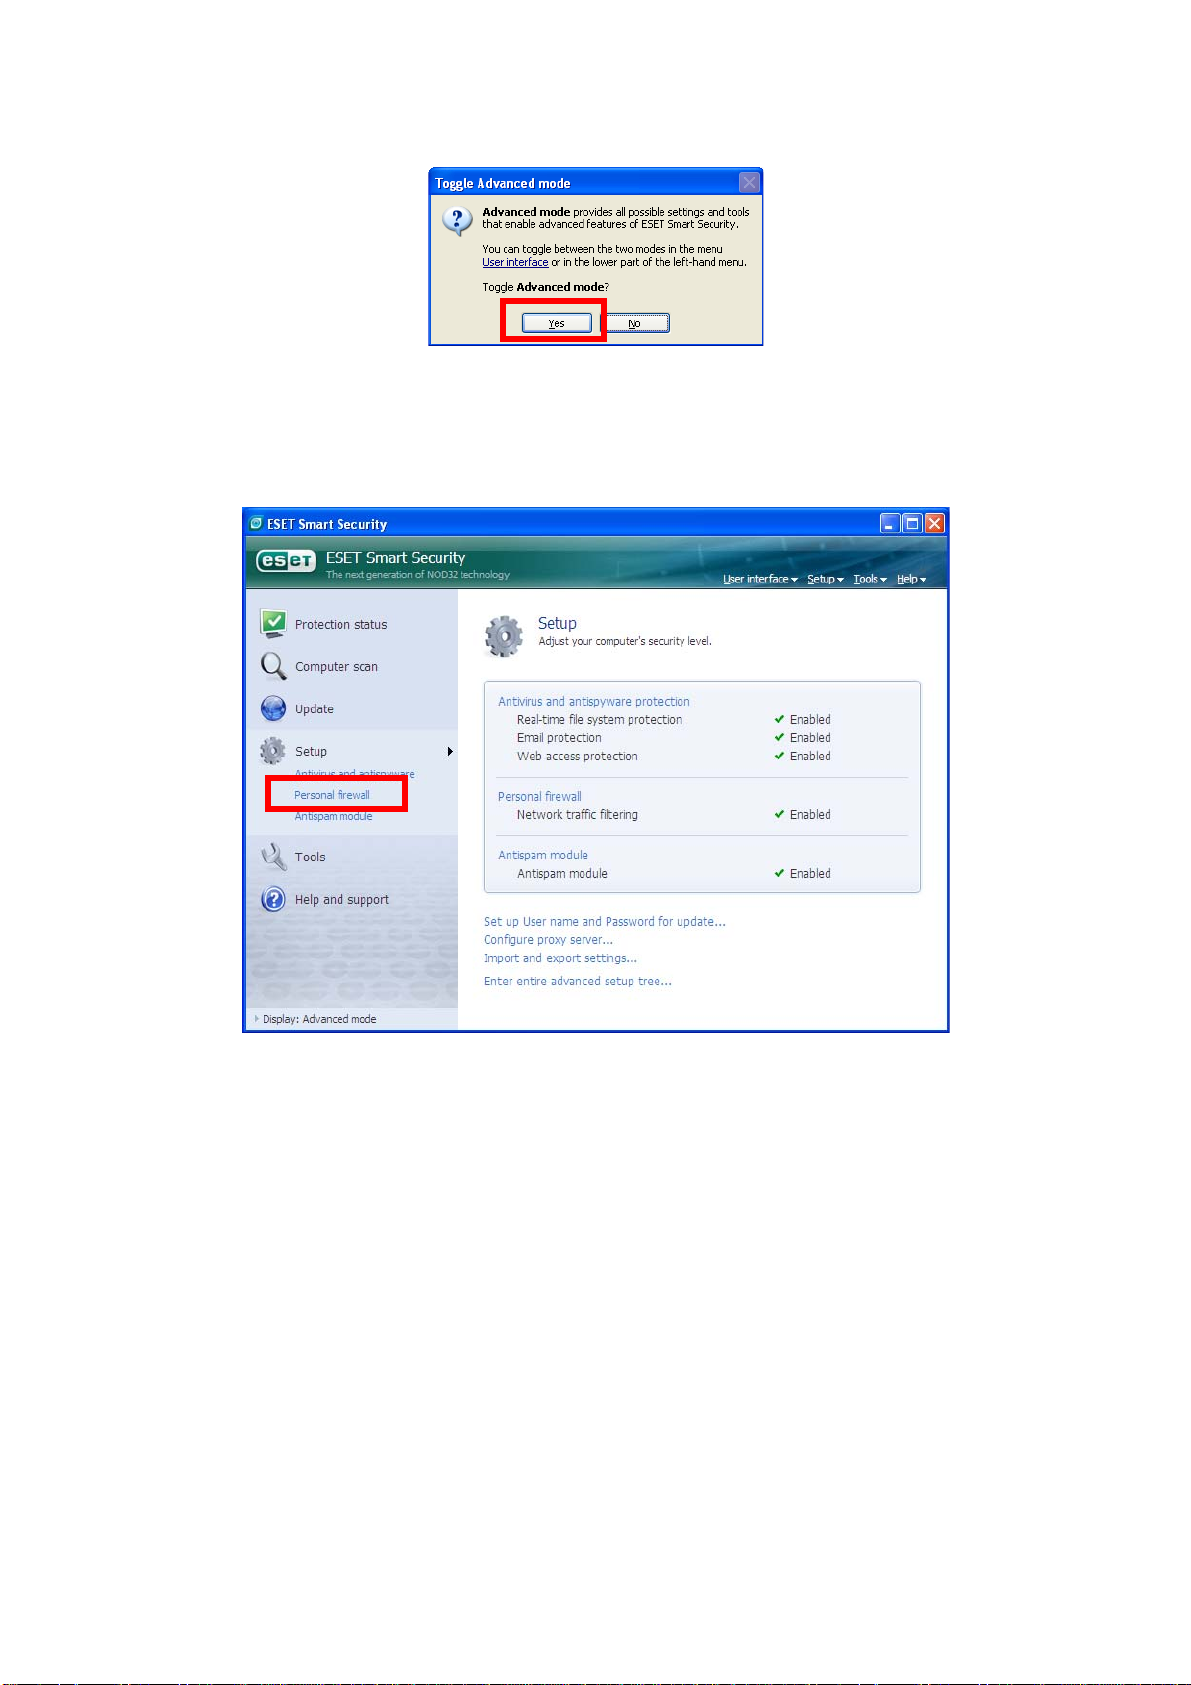
3. Confirmation window to change mode is displayed.
Click Yes to toggle to Advanced mode.
4. Set up Personal firewall by clicking Personal firewall in the Setup section on the center of the left side
of the window.
4
Page 5
SEIKO EPSON
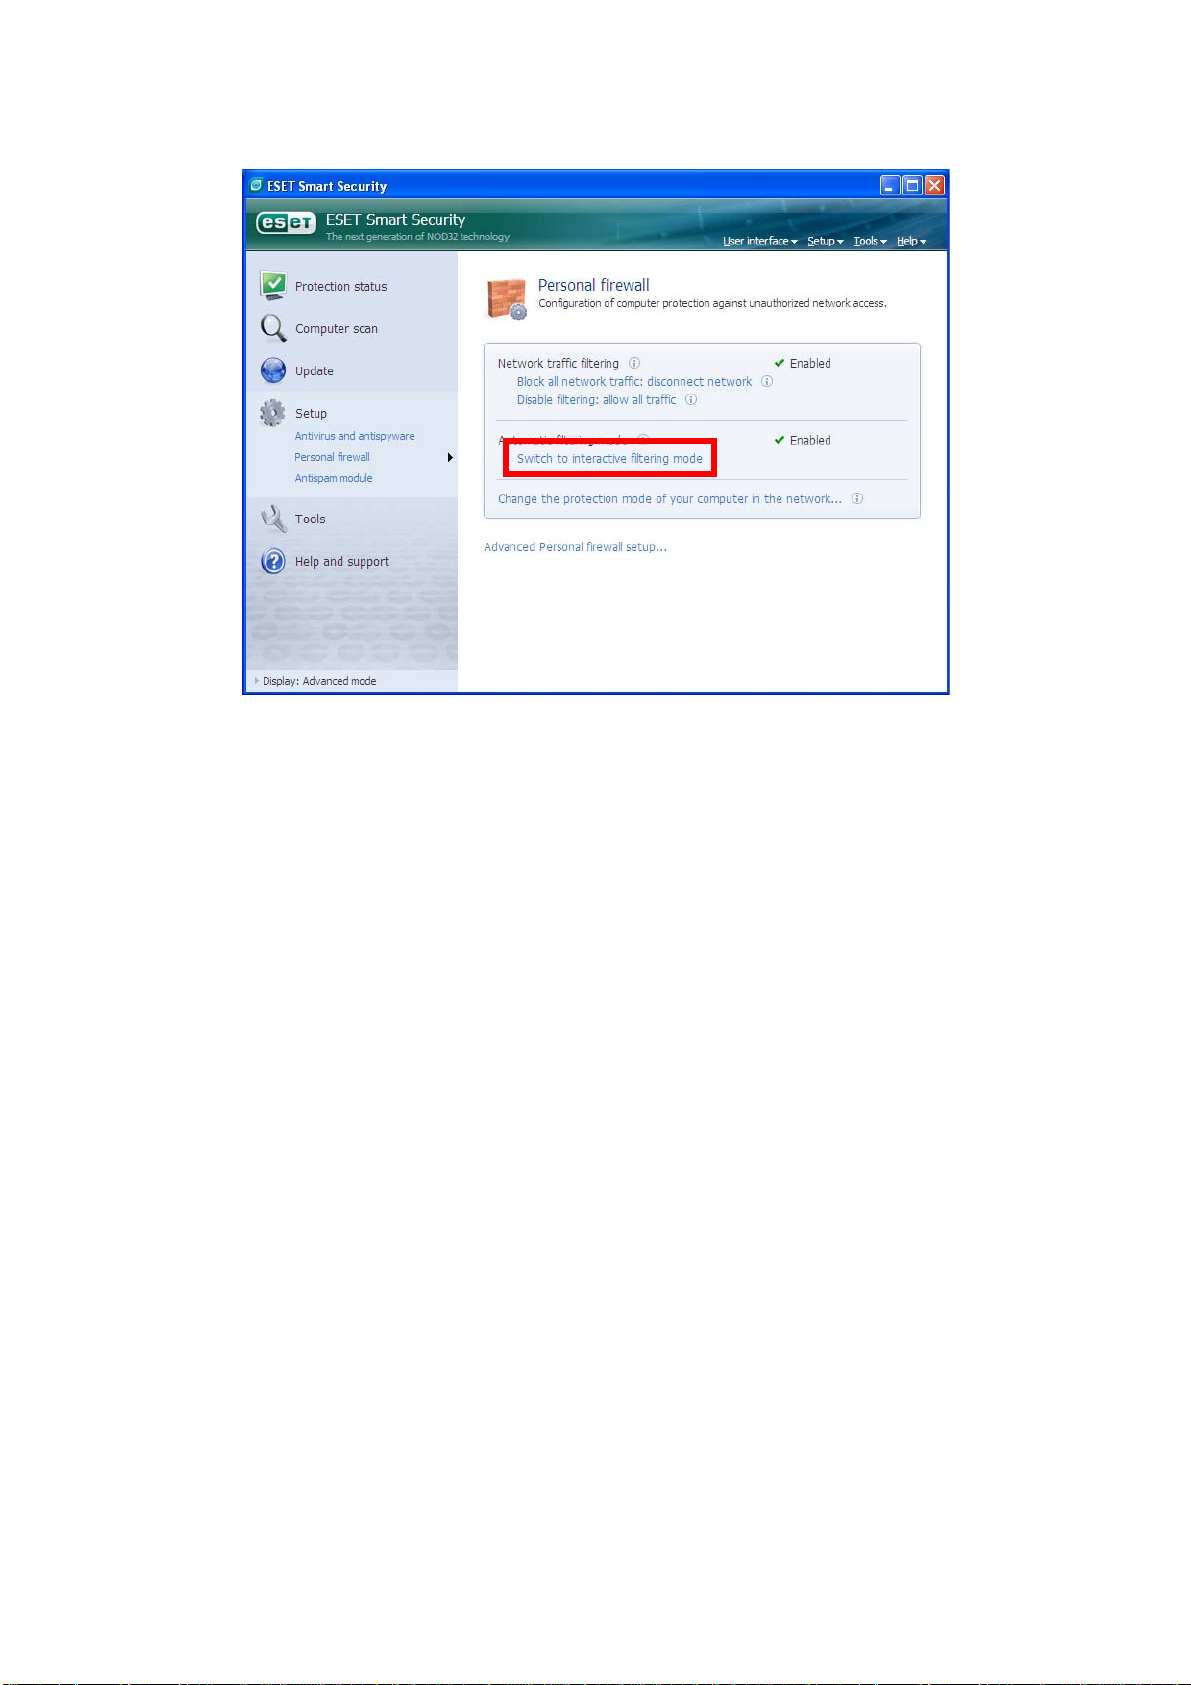
5. Switch from Automatic filtering mode to Interactive filtering mode by clicking Switch to Interactive
filtering mode.
5
Page 6

SEIKO EPSON
Connecting the projector to Windows XP using EMP NS Connection
1. Conduct the steps 1 - 5 that are common procedures for WindowsXP.
2. Set up advanced setting of Personal firewall by clicking Advanced Personal firewall setup at the bottom of the following window..
3.Set up Zone and rule editor by selecting Rules and zones and then clicking Setup button in Zone and
rule editor section.
6
Page 7
SEIKO EPSON
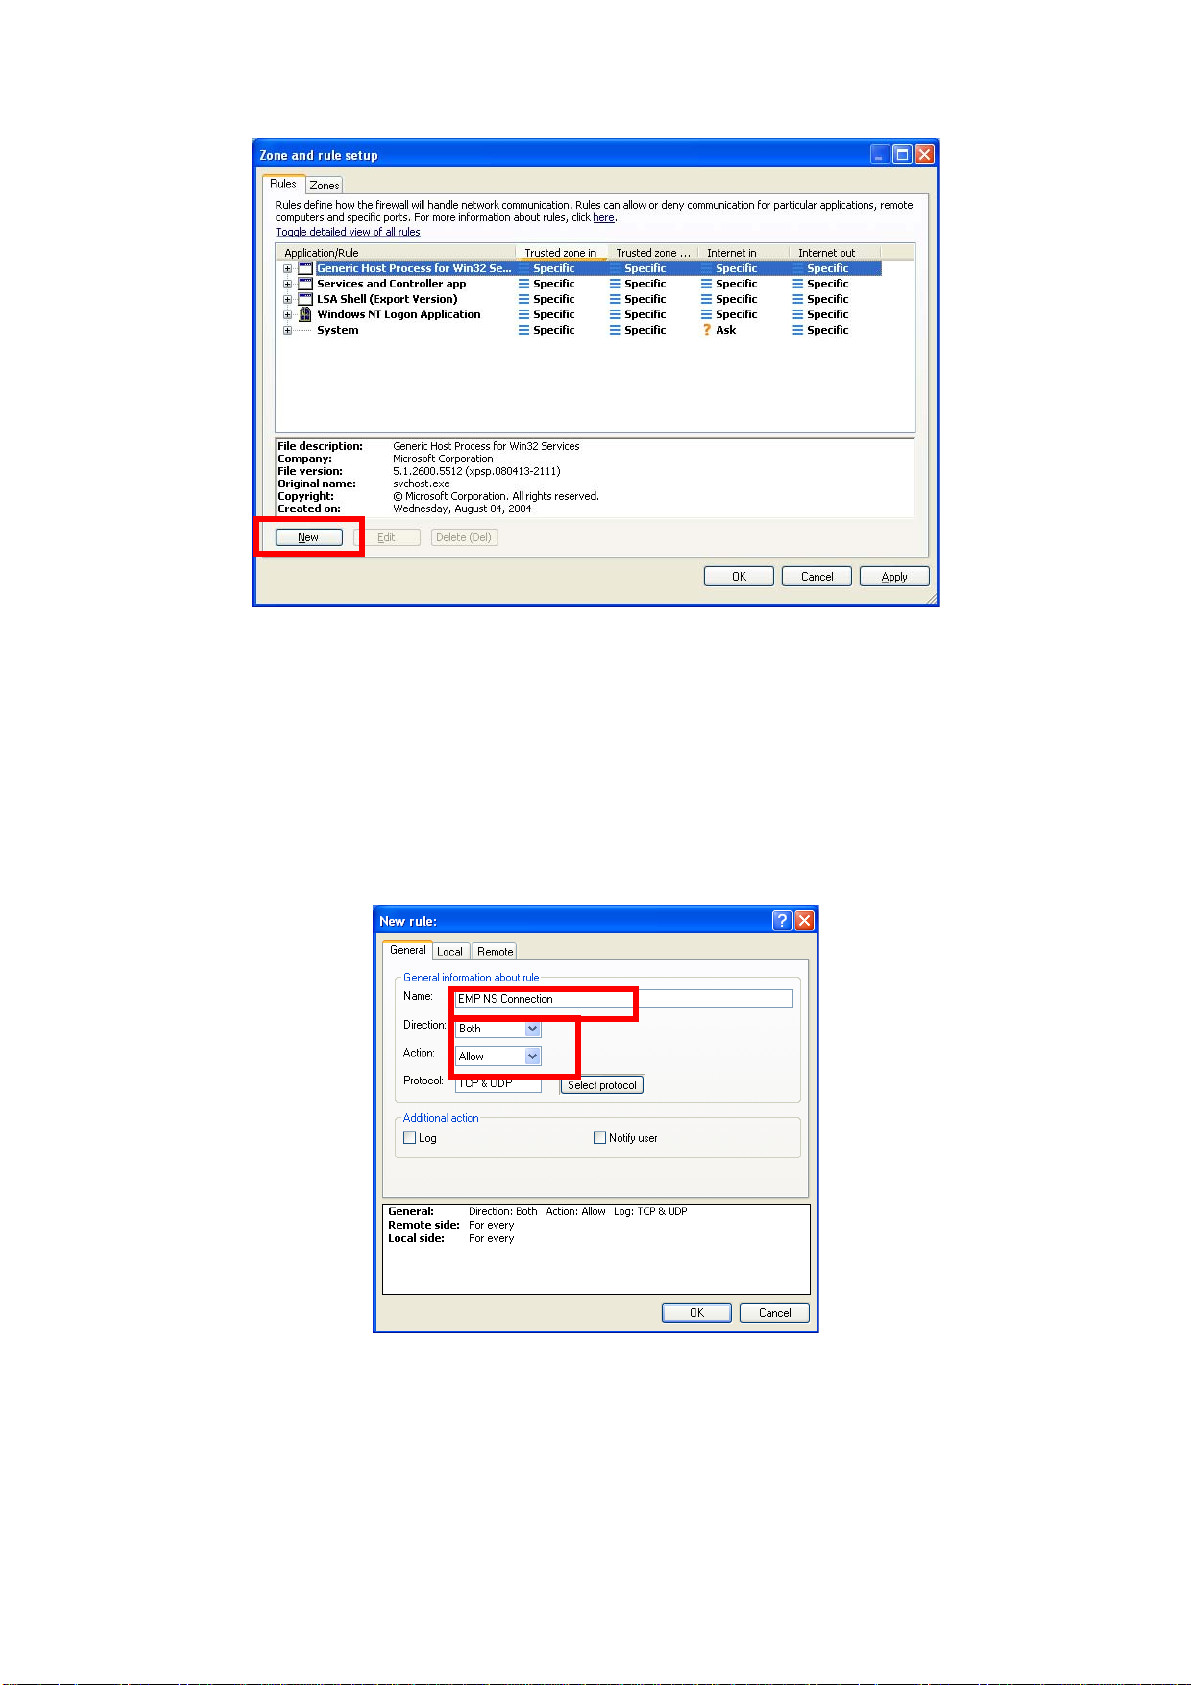
4. Zone and rule setup window is displayed. Under the Rules tab, add a new rule by clicking New button.
5. Create a rule for EMP NS Connection
- In the name box, enter an arbitrary rule name for the EMP NS connection.
- Set Direction to Both.
- Set Action to Allow.
- Keep the default in other setting items.
- Select Local tub.
7
Page 8
SEIKO EPSON
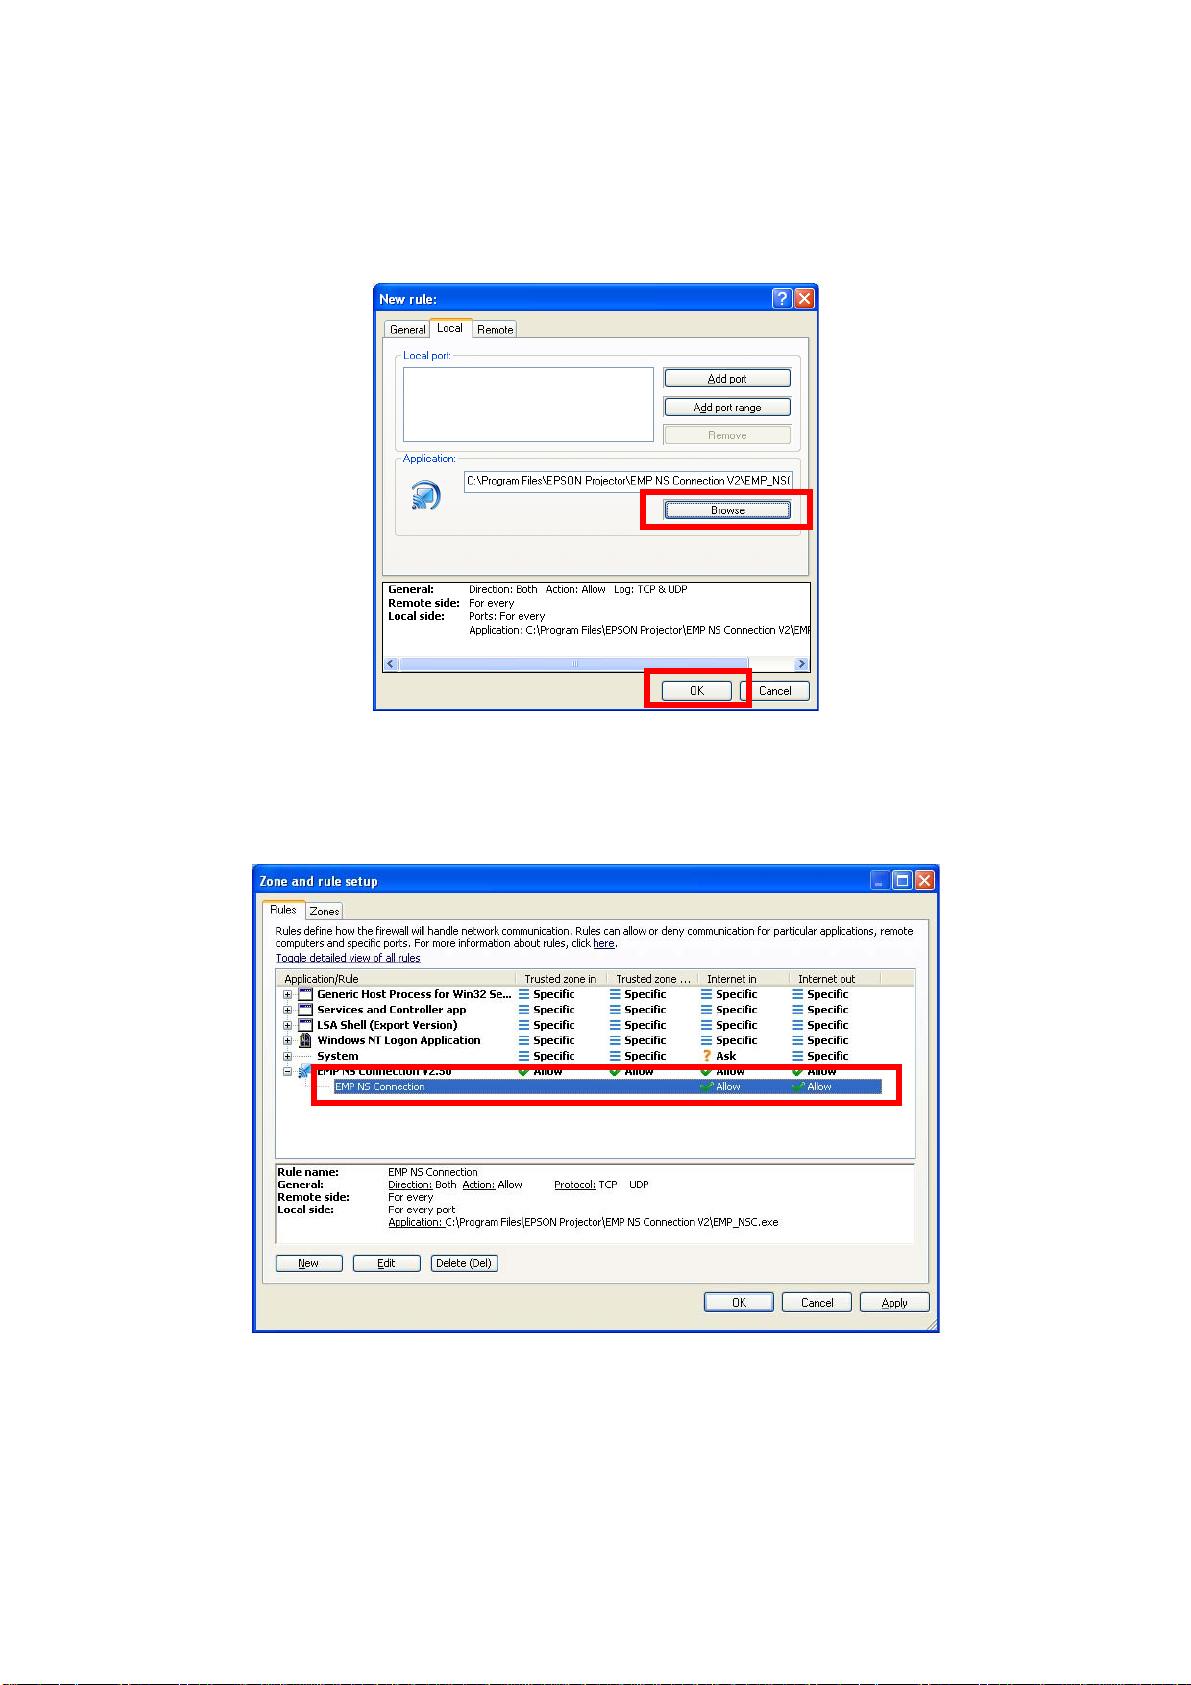
- Click Browse button in Application section. Then select executable file of EMP NS Connection.
(Location where EMP NS Connection's exe file is stored : C:\Program Files\EPSON Projector\EMP NS
Connection V2\EMP_NSC.exe)
*The above is default folder path when the EMP NS Connection was installed in PC.
- Keep the default in other setting items.
- Click OK button.
6. Confirm that the EMP NS Connection rule has been added on the Rules tab.
8
Page 9

SEIKO EPSON
7. Create a rule for movie sending mode(VLC). (For EMP-1825, EB-1725/1735W/G5150/G5350).
- Click the New button on the Rule tab in the Zone and rule setup window like the step 4.
Then the following screen is displayed.
- In the name box, enter an arbitrary rule name.
- Set Direction to IN.
- Set Action to Allow.
- Keep the default in other setting items.
- Select Local tab.
- Click Browse button in Application section. Then select executable file of VLC.
(Location where the VLC's exe file is stored : C:\Program Files\EPSON Projector\EMP NS Connection
V2\vlc086\vlc.exe)
*The above is default folder path when the EMP NS Connection was installed in PC.
- Keep the default in other setting items.
- Click OK button.
9
Page 10

SEIKO EPSON
8. Create a rule for movie sending mode(VLC). (For EMP-1705/1715/1815)
- Click the New button on the Rule tab in the Zone and rule setup window like the step 4.
Then the following screen is displayed.
- In the name box, enter an arbitrary rule name.
- Set Direction to IN.
- Set Action to Allow.
- Keep the default in other setting items.
- Select Local tab.
- Click Browse button in Application section. Then select executable file of VLC.
(Location where the VLC's exe file is stored : C:\Program Files\EPSON Projector\EMP NS Connection
V2\vlc084\vlc.exe)
*The above is default folder path when the EMP NS Connection was installed in PC.
- Keep the default in other setting items.
- Click OK button.
10
Page 11

SEIKO EPSON
9. Make sure that the movie sending mode(VLC) rule has been added in the Rules tab. (For EMP-1825,
EB-1725/1735W/G5150/G5350)
10. Make sure that the movie sending mode(VLC) rule has been added on the Rules tab. (For EMP-1705/
1715/1815)
11
Page 12

SEIKO EPSON
Connecting the projector to Windows XP using Quick Wireless Connection
1. Conduct the steps 1 - 5 that are common procedures for WindowsXP.
2. Set up advanced setting of Personal firewall by clicking Advanced Personal firewall setup at the bottom of the following window..
3.Set up Zone and rule editor by selecting Rules and zones and then clicking Setup button in Zone and
rule editor section.
12
Page 13

SEIKO EPSON
4. Zone and rule setup window is displayed. Under the Rules tab, add a new rule by clicking New button.
5. Create a rule for Quick Wireless Connection
- In the name box, enter an arbitrary rule name for the EMP NS connection.
- Set Direction to Both.
- Set Action to Allow.
- Keep the default in other setting items.
- Select Local tub.
13
Page 14

SEIKO EPSON
- Click Browse button in Application section. Then select executable file of Quick Wireless Connection.
(Location where Quick Wireless Connection's exe file is stored : C:\Program Files\EPSON Projec-
tor\Quick Wireless Connection V1.00\EMP_QW.exe)
*The above is default folder path when the Quick Wireless Connection was installed in PC.
- Keep the default in other setting items.
- Click OK button.
6. Confirm that the Quick Wireless Connection rule has been added on the Rules tab.
14
Page 15

SEIKO EPSON
WindowsVista
Common procedure
1. Start ESET Smart Security.
From Windows Vista start button, click Start > All Programs > ESET > ESET Smart Security > ESET
Smart Security.
2. Switch the main window to Advanced mode by clicking Setup > Toggle Advanced mode.
15
Page 16

SEIKO EPSON
3. Confirmation window to change mode is displayed.
Click Yes to toggle to Advanced mode.
4. Set up Personal firewall by clicking Personal firewall in the Setup section on the center of the left side
of the window.
16
Page 17

SEIKO EPSON
5. Switch from Automatic filtering mode to Interactive filtering mode by clicking Switch to Interactive
filtering mode.
17
Page 18

SEIKO EPSON
Connecting the projector to Windows Vista using EMP NS Connection
1. Conduct the steps 1 - 5 that are common procedures for Windows Vista.
2. Set up advanced setting of Personal firewall by clicking Advanced Personal firewall setup at the bottom of the following window..
3.Set up Zone and rule editor by selecting Rules and zones and then clicking Setup button in Zone and
rule editor section.
18
Page 19

SEIKO EPSON
4. Zone and rule setup window is displayed. Under the Rules tab, add a new rule by clicking New button.
5. Create a rule for EMP NS Connection.
- In the name box, enter an arbitrary rule name for the EMP NS connection.
- Set Direction to Both.
- Set Action to Allow.
- Keep the default in other setting items.
- Select Local tub.
19
Page 20

SEIKO EPSON
- Click Browse button in Application section. Then select executable file of EMP NS Connection.
(Location where EMP NS Connection's exe file is stored : C:\Program Files\EPSON Projector\EMP NS
Connection V2\EMP_NSC.exe)
*The above is default folder path when the EMP NS Connection was installed in PC.
- Keep the default in other setting items.
- Click OK button.
6. Confirm that the EMP NS Connection rule has been added on the Rules tab.
20
Page 21

SEIKO EPSON
7. Establish a rule to transfer movie (VLC) to EMP-1825 or EB-1725/1735W/G5150/G5350.
- Click the New button on the Rule tab in the Zone and rule setup window like the step 4.
Then the following screen is displayed.
- In the name box, enter an arbitrary rule name.
- Set Direction to IN.
- Set Action to Allow.
- Keep the default in other setting items.
- Select Local tab.
- Click Browse button in Application section. Then select executable file of VLC.
(Location where the VLC's exe file is stored : C:\Program Files\EPSON Projector\EMP NS Connection
V2\vlc086\vlc.exe)
*The above is default folder path when the EMP NS Connection was installed in PC.
- Keep the default in other setting items.
- Click OK button.
21
Page 22

SEIKO EPSON
8. Create a rule for movie sending mode(VLC). (For EMP-1705/1715/1815)
- Click the New button on the Rule tab in the Zone and rule setup window like the step 4.
Then the following screen is displayed.
- In the name box, enter an arbitrary rule name.
- Set Direction to IN.
- Set Action to Allow.
- Keep the default in other setting items.
- Select Local tab.
- Click Browse button in Application section. Then select executable file of VLC.
(Location where the VLC's exe file is stored : C:\Program Files\EPSON Projector\EMP NS Connection
V2\vlc084\vlc.exe)
*The above is default folder path when the EMP NS Connection was installed in PC.
- Keep the default in other setting items.
- Click OK button.
22
Page 23

SEIKO EPSON
9. Make sure that the movie sending mode(VLC) rule has been added on the Rules tab. (For EMP-1825,
EB-1725/1735W/G5150/G5350)
10. Make sure that the movie sending mode(VLC) rule has been added on the Rules tab. (For EMP-1705/
1715/1815)
23
Page 24

SEIKO EPSON
Connecting the projector to Windows Vista using Quick Wirel ess Connection
1. Conduct the steps 1 - 5 that are common procedures for WindowsVista.
2. Set up advanced setting of Personal firewall by clicking Advanced Personal firewall setup at the bottom of the following window.
3.Set up Zone and rule editor by selecting Rules and zones and then clicking Setup button in Zone and
rule editor section.
24
Page 25

SEIKO EPSON
4. Zone and rule setup window is displayed. Under the Rules tab, add a new rule by clicking New button.
5. Create a rule for Quick Wireless Connection
- In the name box, enter an arbitrary rule name for the EMP NS connection.
- Set Direction to Both.
- Set Action to Allow.
- Keep the default in other setting items.
- Select Local tub.
25
Page 26

SEIKO EPSON
- Click Browse button in Application section. Then select executable file of Quick Wireless Connection.
(Location where Quick Wireless Connection's exe file is stored : C:\Program Files\EPSON Projec-
tor\Quick Wireless Connection V1.00\EMP_QW.exe)
*The above is default folder path when the Quick Wireless Connection was installed in PC.
- Keep the default in other setting items.
- Click OK button.
6. Confirm that the Quick Wireless Connection rule has been added on the Rules tab.
26
 Loading...