

Page 1

DS-30000/DS-32000 User's Guide
Page 2

Page 3

Contents
DS-30000/DS-32000 User's Guide .............................................................................................................. 7
Scanner Basics............................................................................................................................................ 8
Scanner Parts ...................................................................................................................................... 8
Scanner Position (DS-32000)............................................................................................................. 12
Changing the Scanner Position (DS-32000).................................................................................. 14
Feed Selector Lever ........................................................................................................................... 17
Moving the Scanner ........................................................................................................................... 19
Using the Control Panel ..................................................................................................................... 20
Control Panel Buttons and Lights .................................................................................................. 21
Status Icon Information ............................................................................................................. 21
Changing LCD Screen Language.................................................................................................. 22
Adjusting Control Panel Sounds.................................................................................................... 23
Adjusting the Screen Brightness.................................................................................................... 24
Entering Characters on the LCD Screen ....................................................................................... 25
Setting a Password and Locking the Control Panel ....................................................................... 25
Rotating the Control Panel (DS-32000) ......................................................................................... 27
User Replaceable Epson Scanner Parts and Accessories................................................................. 28
Using Power Saving Settings ............................................................................................................. 29
Changing the Sleep Timer Settings ............................................................................................... 29
Changing the Power Off Settings .................................................................................................. 30
Loading Originals...................................................................................................................................... 32
Suggested Tray Positions .................................................................................................................. 32
Loading Originals in the Input Tray..................................................................................................... 36
Loading Thin Paper (DS-32000).................................................................................................... 45
Loading Long Paper ...................................................................................................................... 48
Loading Large Originals ................................................................................................................ 51
Loading Multiple Sizes of Originals in the Input Tray ..................................................................... 55
Original Document Specifications.................................................................................................. 58
Loading Plastic and Laminated Cards in the Input Tray ..................................................................... 64
Plastic and Laminated Card Specifications ................................................................................... 68
3
Page 4

Loading Special Originals................................................................................................................... 69
Loading Booklets........................................................................................................................... 75
Loading Passports......................................................................................................................... 79
Special Original Specifications ...................................................................................................... 83
Scanning .................................................................................................................................................... 85
Starting a Scan................................................................................................................................... 85
Starting a Scan Using the Product Control Panel .......................................................................... 85
Adding and Assigning Scan Jobs with Document Capture Pro - Windows ............................... 88
Adding and Assigning Scan Jobs with Document Capture - Mac.............................................. 90
Starting a Scan Using the Epson Scan 2 Icon ............................................................................... 91
Starting a Scan from a Scanning Program..................................................................................... 93
Scanning with Simple Scan in Document Capture Pro - Windows ..................................................... 94
Scanning with Document Capture Pro ............................................................................................... 96
Scanning with Document Capture - Mac ............................................................................................ 97
Scanning in Epson Scan 2 ............................................................................................................... 101
Additional Scanning Settings - Main Settings Tab ....................................................................... 105
Additional Scanning Settings - Advanced Settings Tab............................................................... 106
Scanning Settings for Special Documents................................................................................... 107
Image Format Options................................................................................................................. 108
Scan Resolution Guidelines ............................................................................................................. 109
Scanning Special Projects................................................................................................................ 110
Scanning Two Originals onto One Sheet (Stitching Images) - Windows ..................................... 110
Scanning Multi-Page Originals as Separate Files - Windows ...................................................... 113
Saving Scanned Documents as a Searchable PDF Using Epson Scan 2 ................................... 116
Saving a Scan as an Office Format File....................................................................................... 118
Scanning to a SharePoint Server or Cloud Service - Windows.................................................... 119
Scanning to a SharePoint Server or Cloud Service - Mac ........................................................... 121
Cleaning and Transporting Your Scanner............................................................................................. 123
Cleaning Your Scanner .................................................................................................................... 123
Cleaning Inside Your Scanner.......................................................................................................... 123
Checking the Scanner Roller Counter .............................................................................................. 133
Replacing the Scanner Rollers......................................................................................................... 134
Resetting the Scanner Roller Counter ......................................................................................... 139
4
Page 5

Transporting Your Scanner .............................................................................................................. 140
Solving Problems .................................................................................................................................... 143
Product Status Messages ................................................................................................................ 143
Solving Scanning Problems ............................................................................................................. 143
Scanner Does Not Turn On or Turns Off Unexpectedly............................................................... 144
Scanning Software Does Not Operate Correctly ......................................................................... 144
Cannot Start Epson Scan 2 ......................................................................................................... 145
Original Feeds Incorrectly in Scanner.......................................................................................... 145
Original Jams in Scanner............................................................................................................. 146
Scanning is Slow ......................................................................................................................... 148
Solving Scanned Image Quality Problems ....................................................................................... 148
Back of Original Image Appears in Scanned Image .................................................................... 149
Scanned Characters are Blurry ................................................................................................... 149
Characters are not Recognized During Conversion to Editable Text (OCR) ............................... 150
Ripple Patterns Appear in an Image ............................................................................................ 151
Spots or Lines Appear in All Scanned Images............................................................................. 151
Scanned Image is Cropped ......................................................................................................... 151
Resetting the Epson Scan 2 Settings .......................................................................................... 152
Uninstall Your Scanner Software...................................................................................................... 152
Uninstalling Scanner Software .................................................................................................... 152
Uninstalling Scanner Software - Mac........................................................................................... 153
Where to Get Help............................................................................................................................ 154
Technical Specifications ........................................................................................................................ 156
Windows System Requirements ...................................................................................................... 156
Mac System Requirements .............................................................................................................. 156
General Specifications ..................................................................................................................... 157
Dimension Specifications ................................................................................................................. 158
Electrical Specifications ................................................................................................................... 159
Environmental Specifications ........................................................................................................... 160
Safety and Approvals Specifications ................................................................................................ 160
Notices ..................................................................................................................................................... 162
Important Safety Instructions............................................................................................................ 162
Restrictions on Copying ................................................................................................................... 163
5
Page 6

Default Delay Times for Power Management for Epson Products .................................................... 164
Binding Arbitration and Class Waiver ............................................................................................... 164
Trademarks...................................................................................................................................... 167
Copyright Notice............................................................................................................................... 168
libTIFF Software Acknowledgment.............................................................................................. 168
A Note Concerning Responsible Use of Copyrighted Materials................................................... 169
Copyright Attribution.................................................................................................................... 169
6
Page 7

DS-30000/DS-32000 User's Guide
Welcome to the DS-30000/DS-32000 User's Guide.
For a printable PDF copy of this guide, click here.
7
Page 8
Scanner Basics
See these sections to learn about the basic features of your scanner.
Scanner Parts
Scanner Position (DS-32000)
Feed Selector Lever
Moving the Scanner
Using the Control Panel
User Replaceable Epson Scanner Parts and Accessories
Using Power Saving Settings
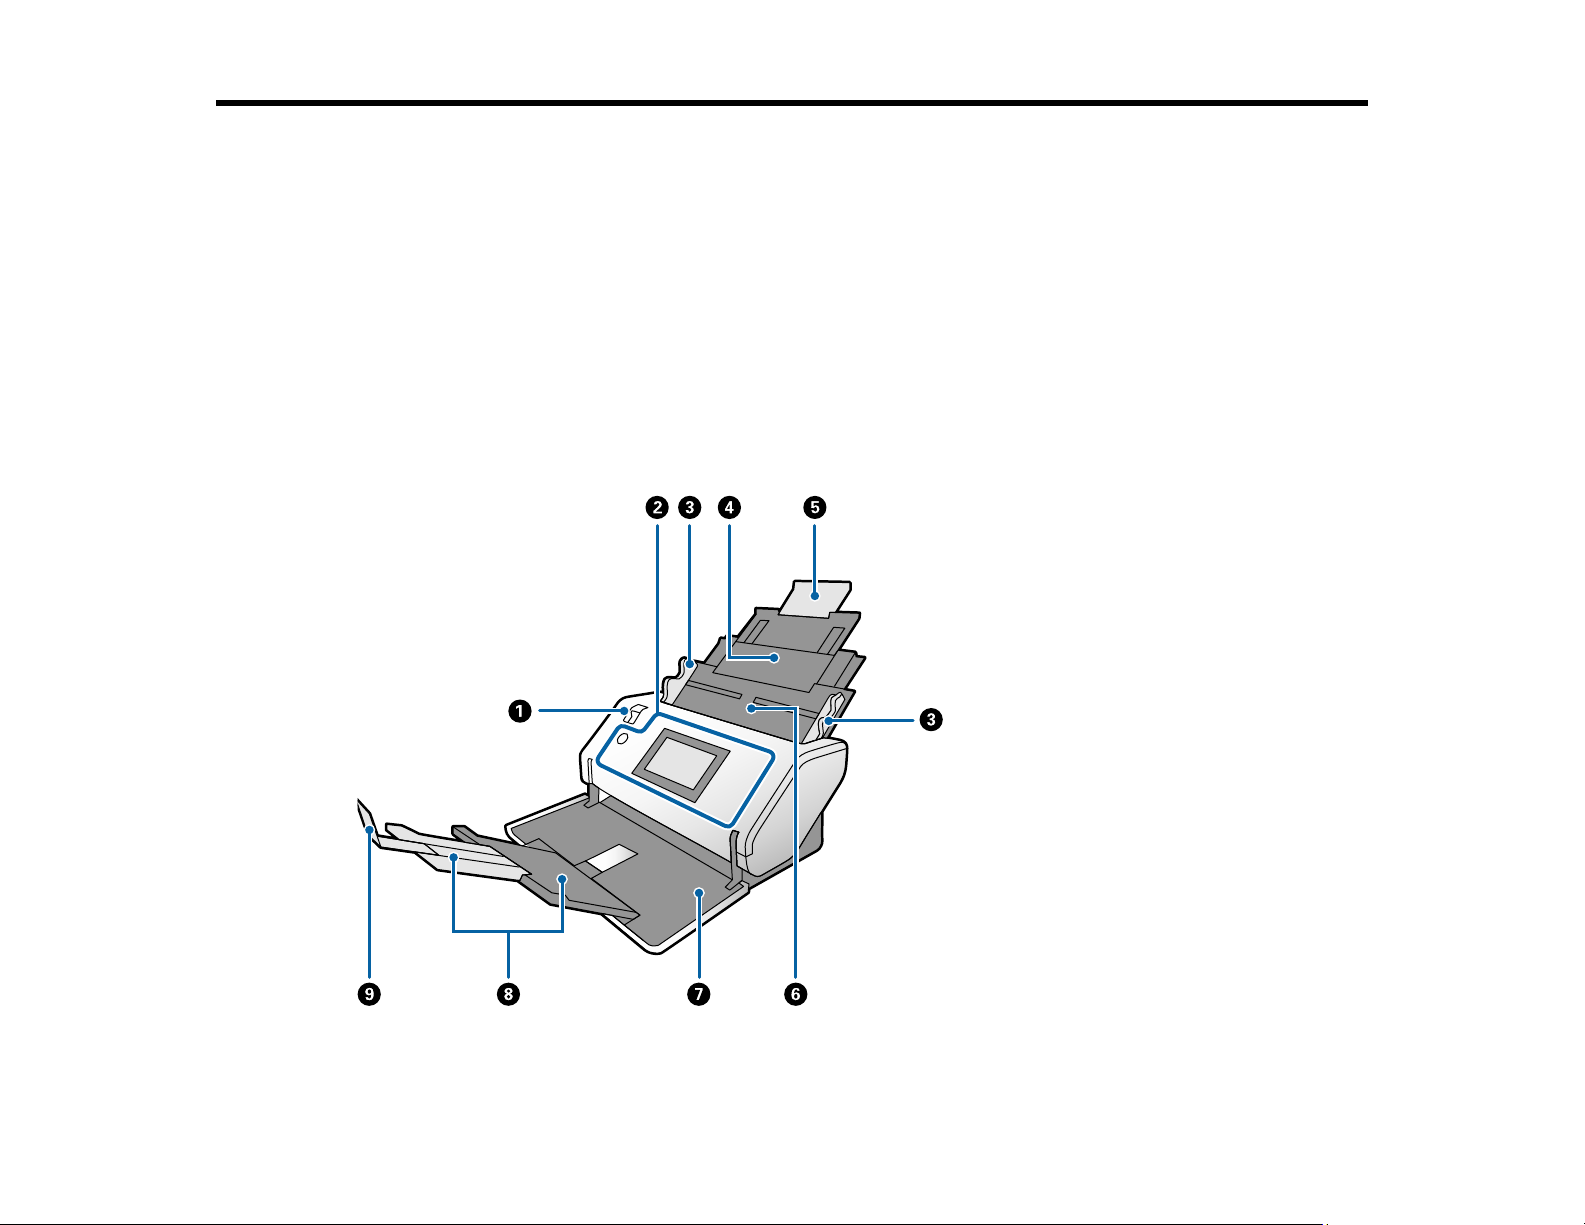
Scanner Parts
1 Feed selector lever
8
Page 9
2 Control panel
3 Edge guides
4 Input tray
5 Input tray extension
6 ADF (Automatic Document Feeder)
7 Output tray
8 Output tray extensions
9 Stopper
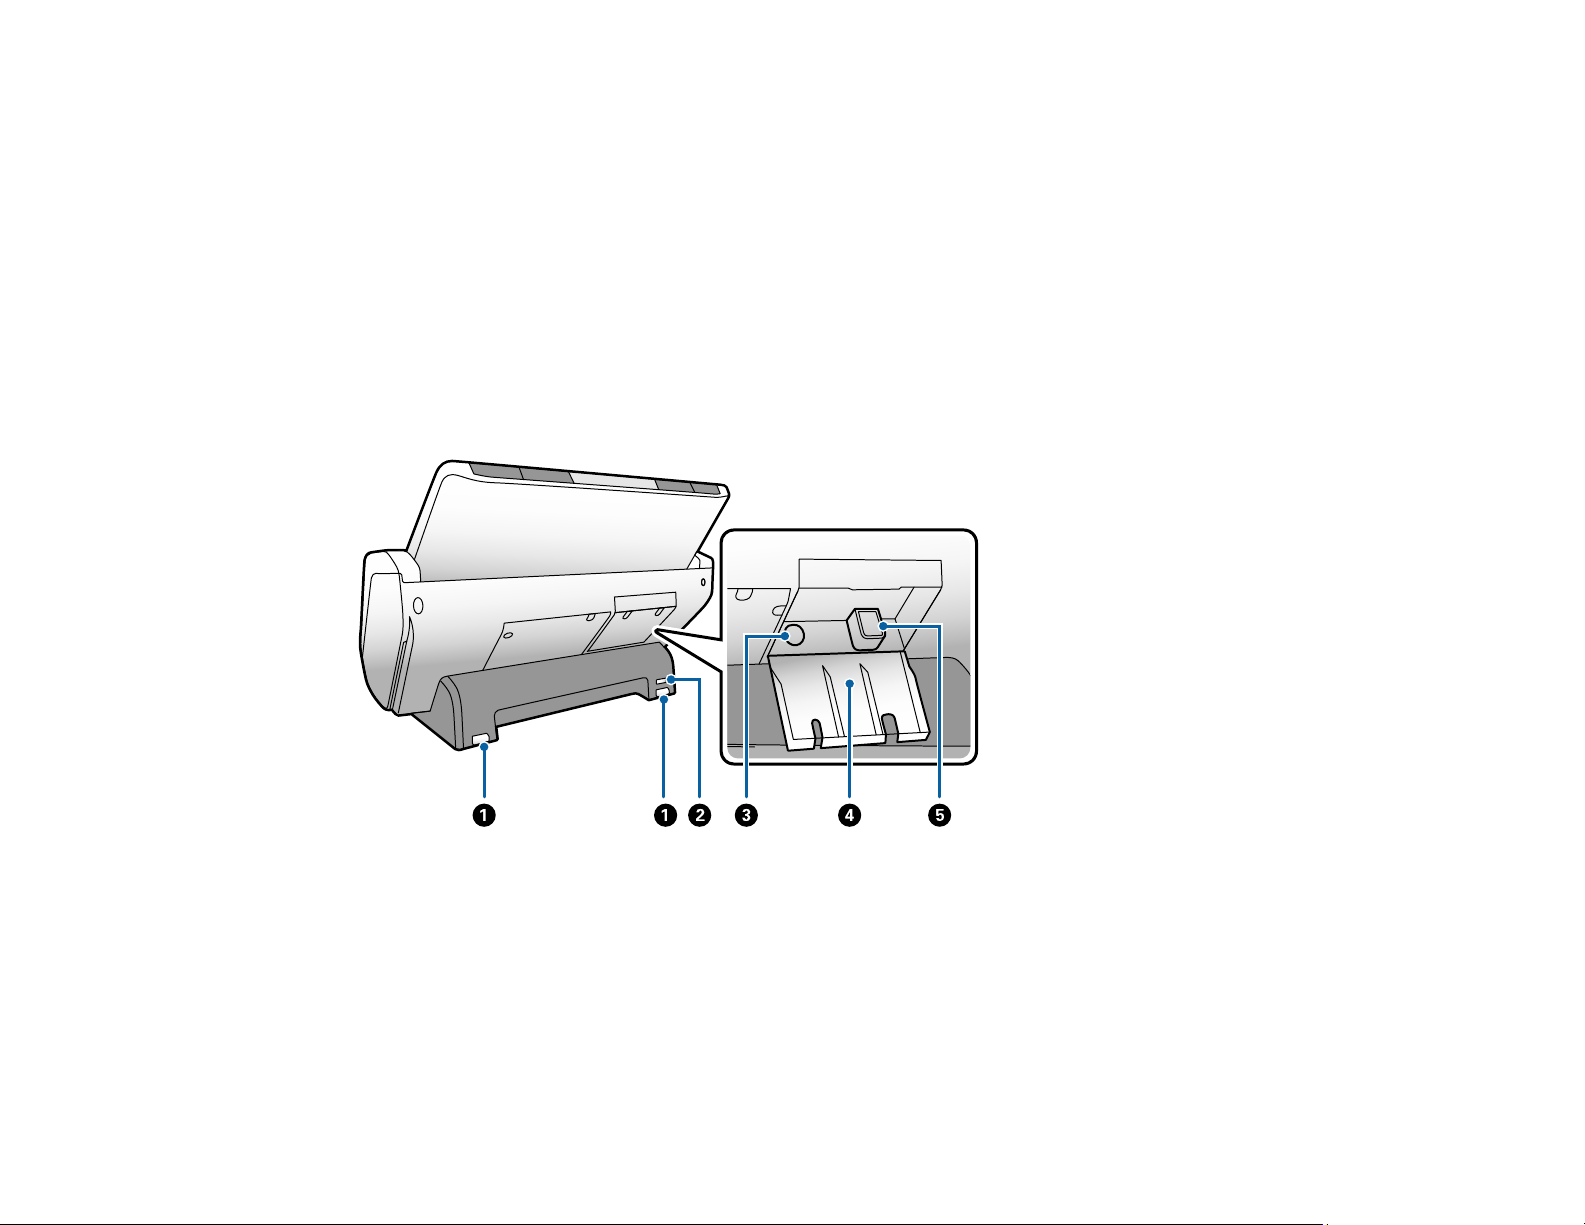
DS-30000
1 Rollers
2 Kensington security slot
3 Power inlet
4 Cable cover
5 USB port
9
Page 10
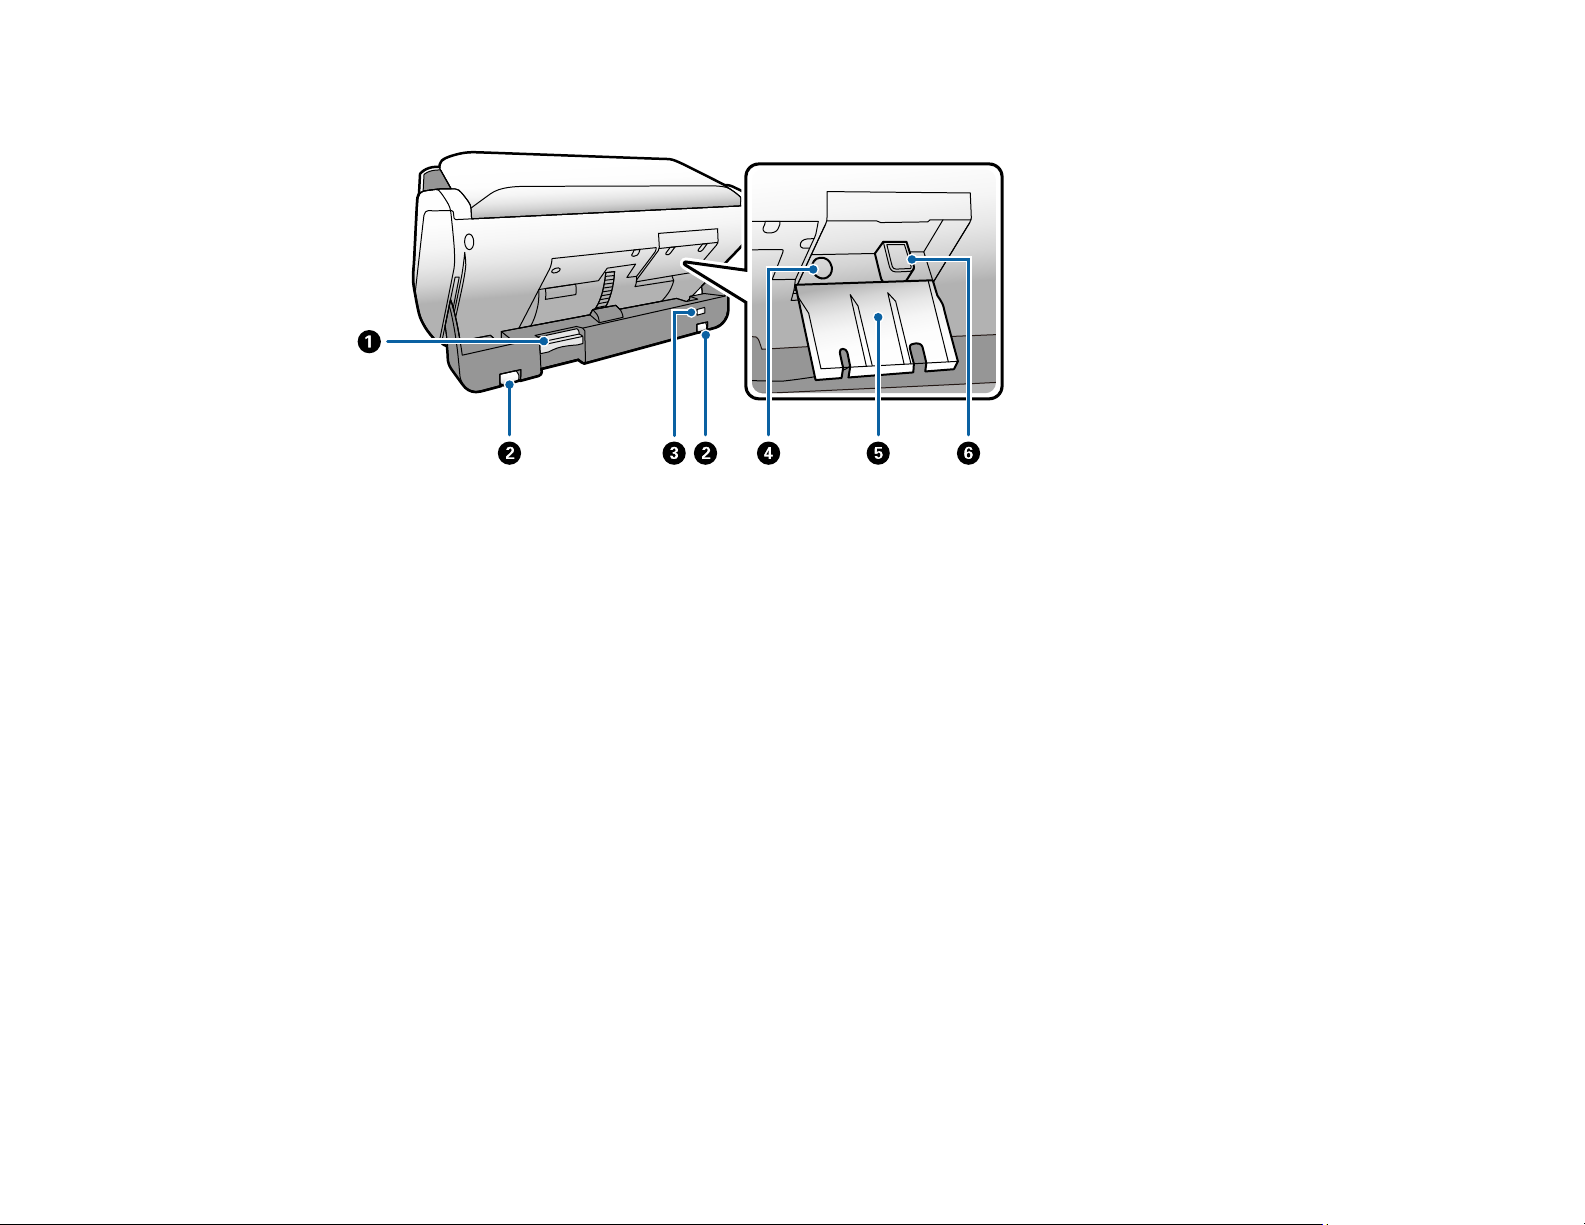
DS-32000
1 Position release lever
2 Rollers
3 Kensington security slot
4 Power inlet
5 Cable cover
6 USB port
10
Page 11

1 Scanner cover
2 Cover open lever
3 Separation rollers
4 Pickup rollers
5 Photo sensor (glass)
6 Anti-static brush
11
Page 12
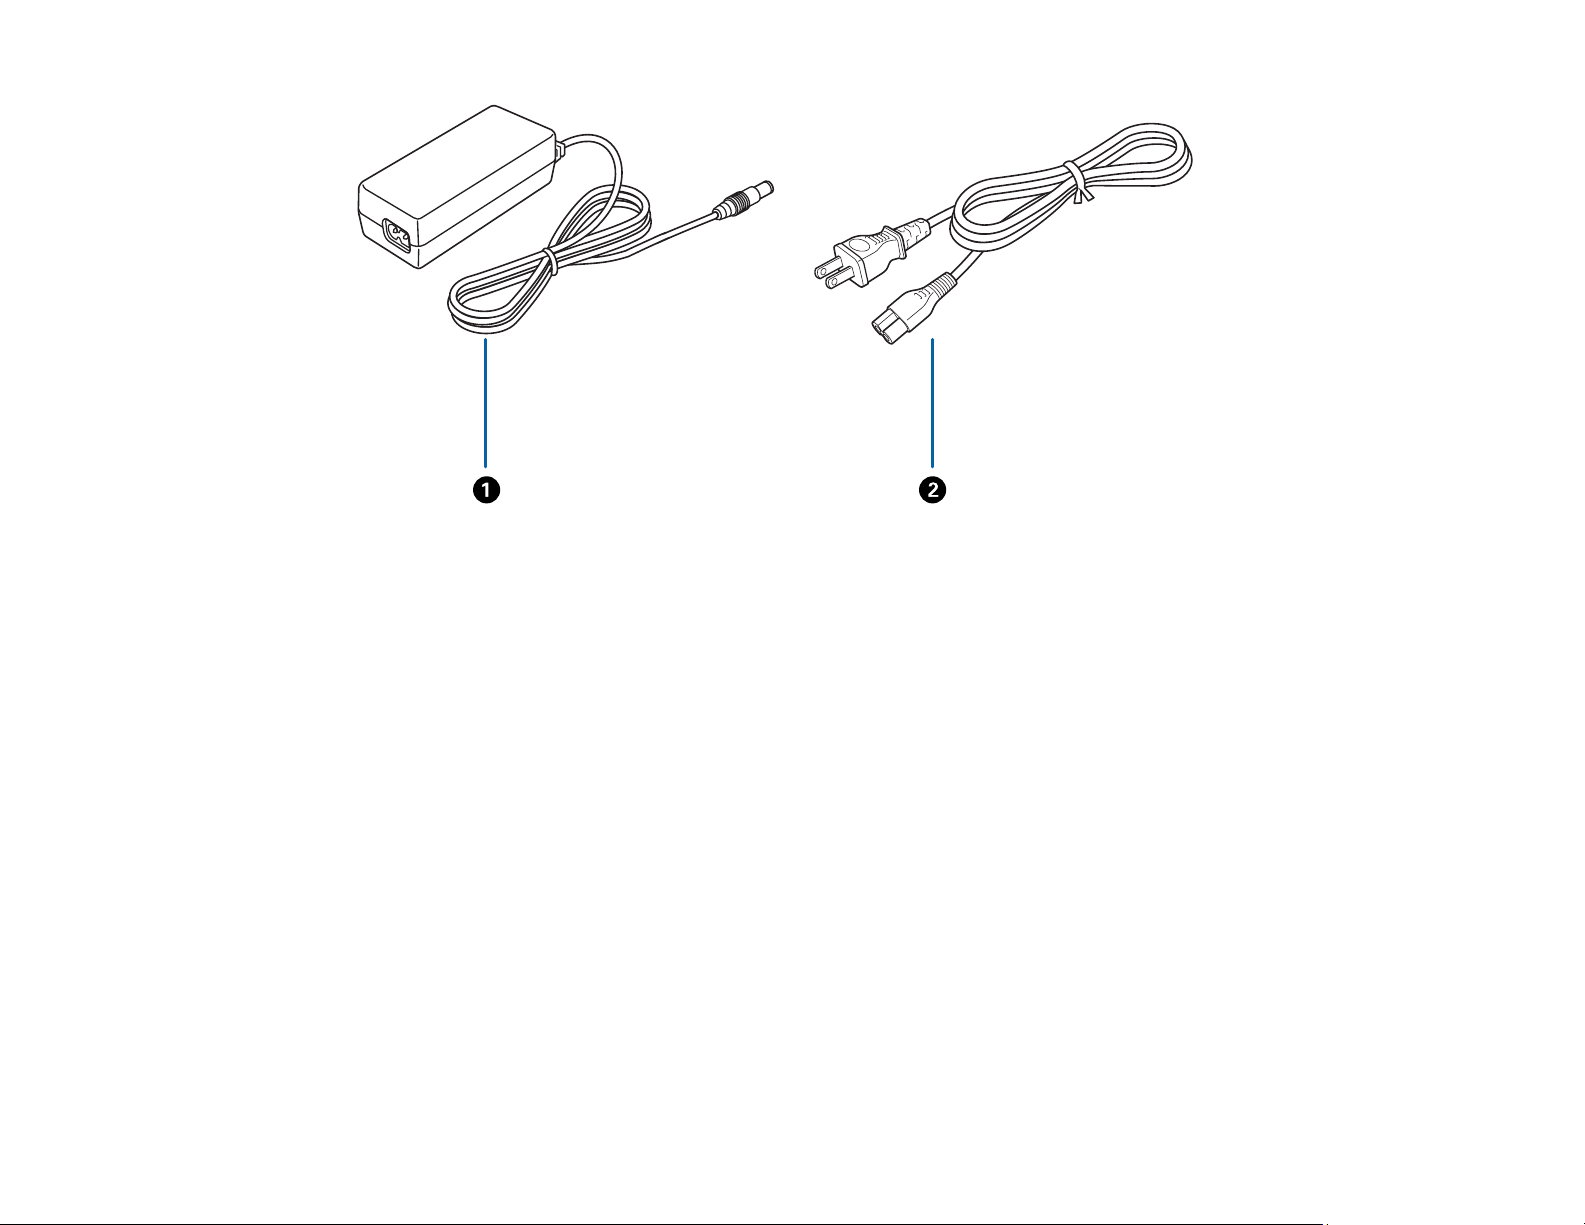
1 AC adapter
2 Power cord
Parent topic: Scanner Basics
Scanner Position (DS-32000)
The scanner has multiple scanning positions, depending on the amount and type of scanning you are
doing. You can place the scanner in Normal Mode to scan regular documents or Delicate Mode to either
scan fragile documents or use automatic scanning. The scanner can also be put in Storage Mode when
not in use.
Normal Mode
12
Page 13

When the scanner is in Normal Mode, you can scan a large amount of documents at high speed.
Delicate Mode
When the scanner is in Delicate Mode, the input tray capacity is reduced, and you can scan delicate or
fragile documents. Scanning in automatic mode is also possible in this position.
Storage Mode
13
Page 14

When the scanner is in Storage Mode, the output tray is locked into position and the scanner is as
compact as possible.
Changing the Scanner Position (DS-32000)
Parent topic: Scanner Basics
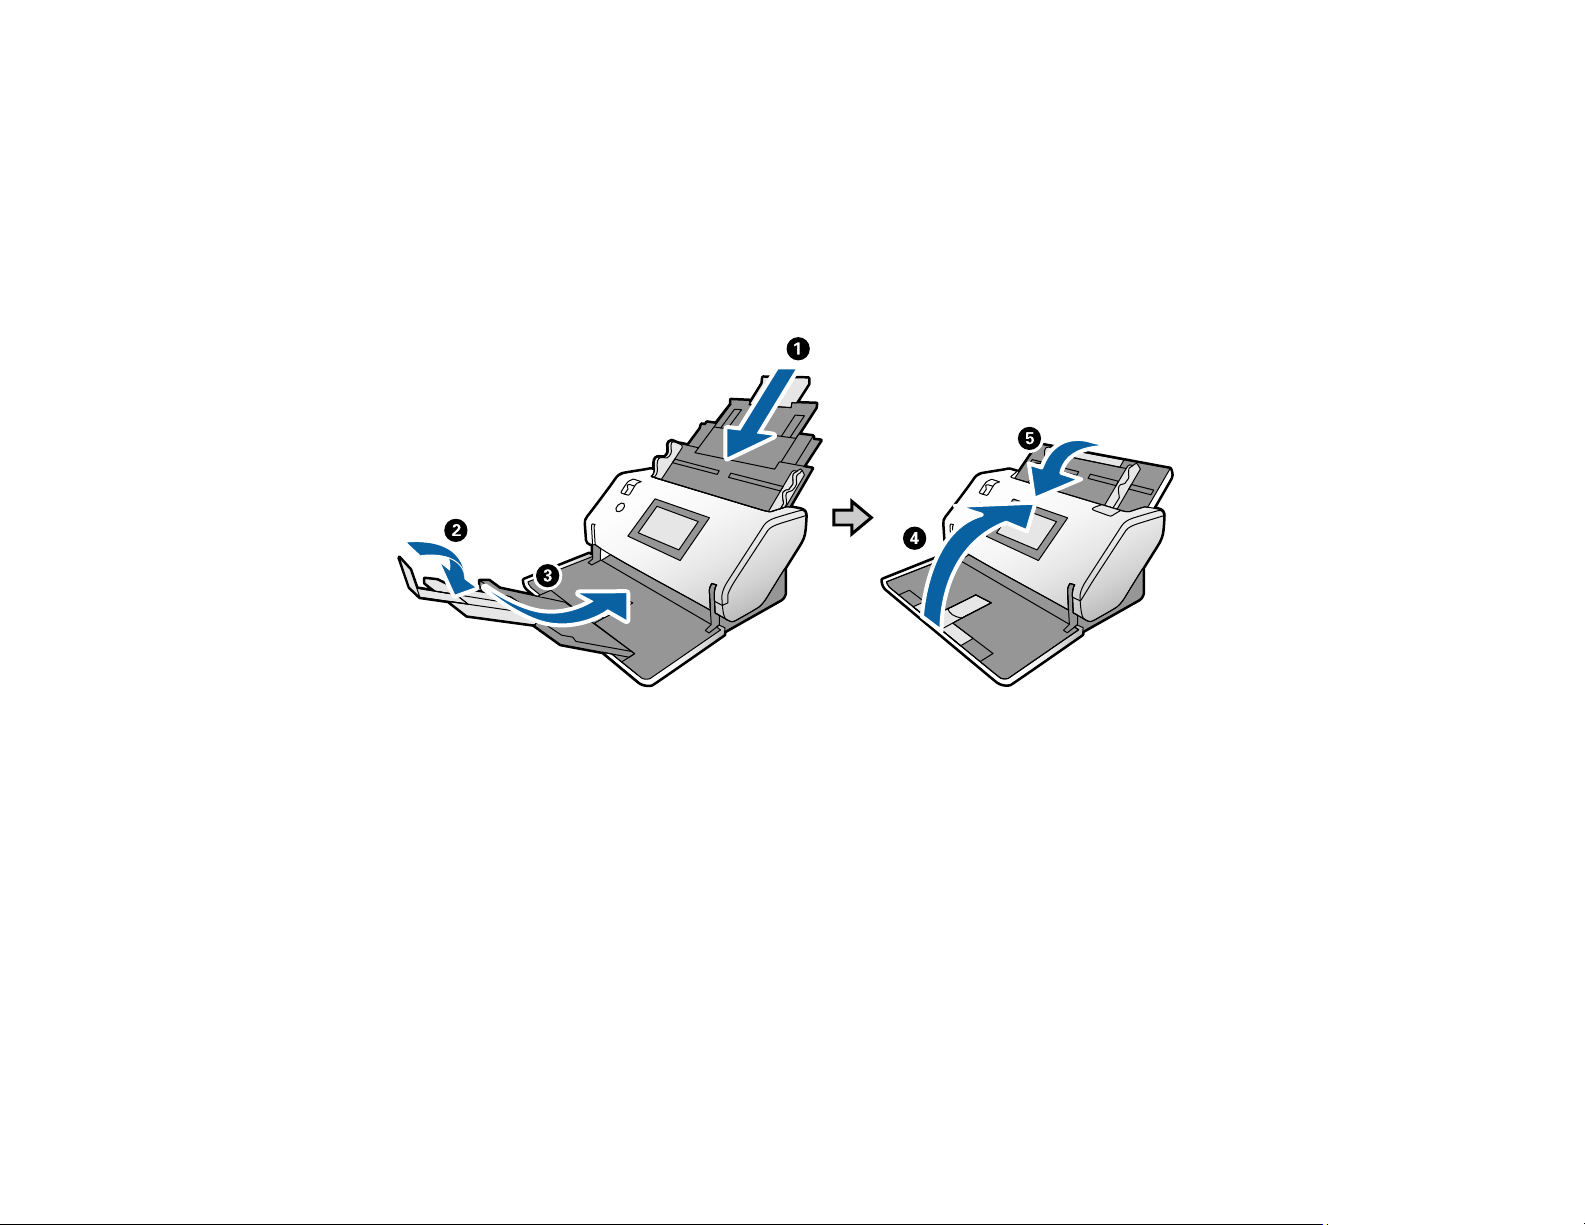
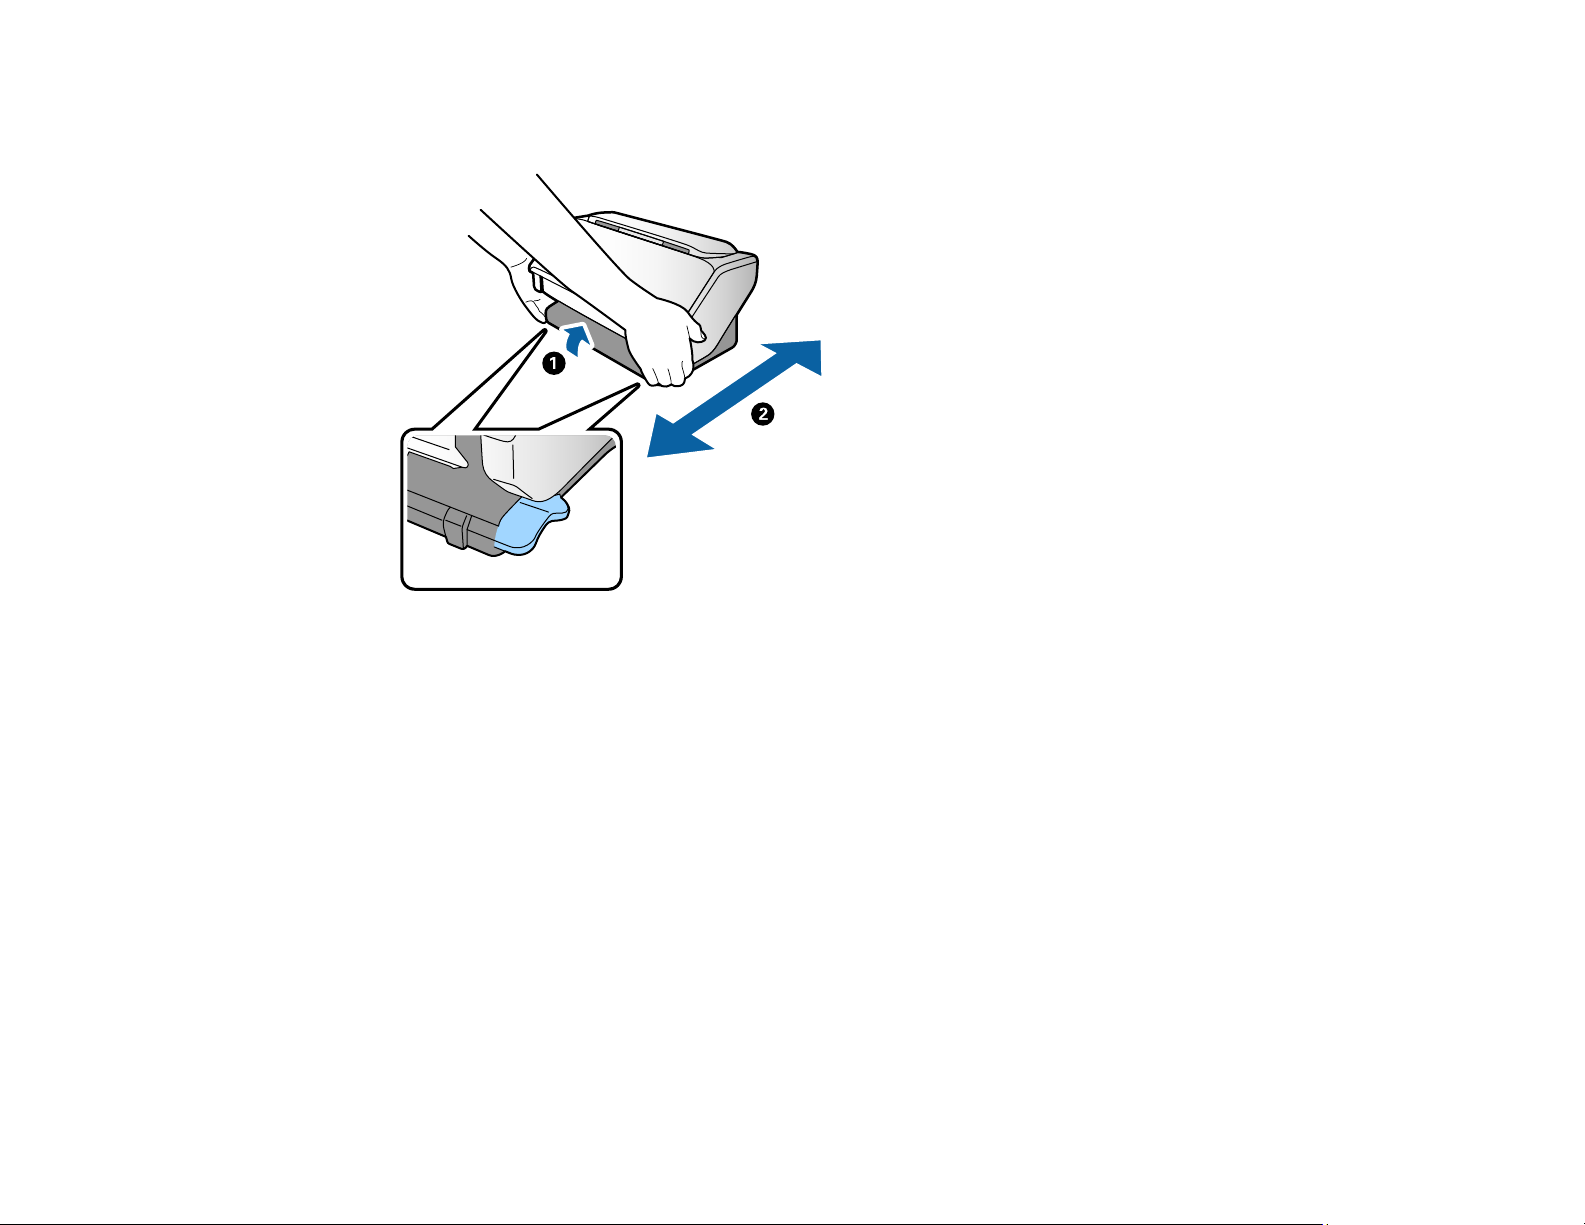
Changing the Scanner Position (DS-32000)
You can change the scanner position between Storage Mode, Normal Mode, and Delicate Mode
depending on what types of originals you want to scan.
1 Storage Mode
2 Normal Mode
3 Delicate Mode
Note: When the scanner is in Storage Mode, the power turns off and the output tray is locked in position.
14
Page 15
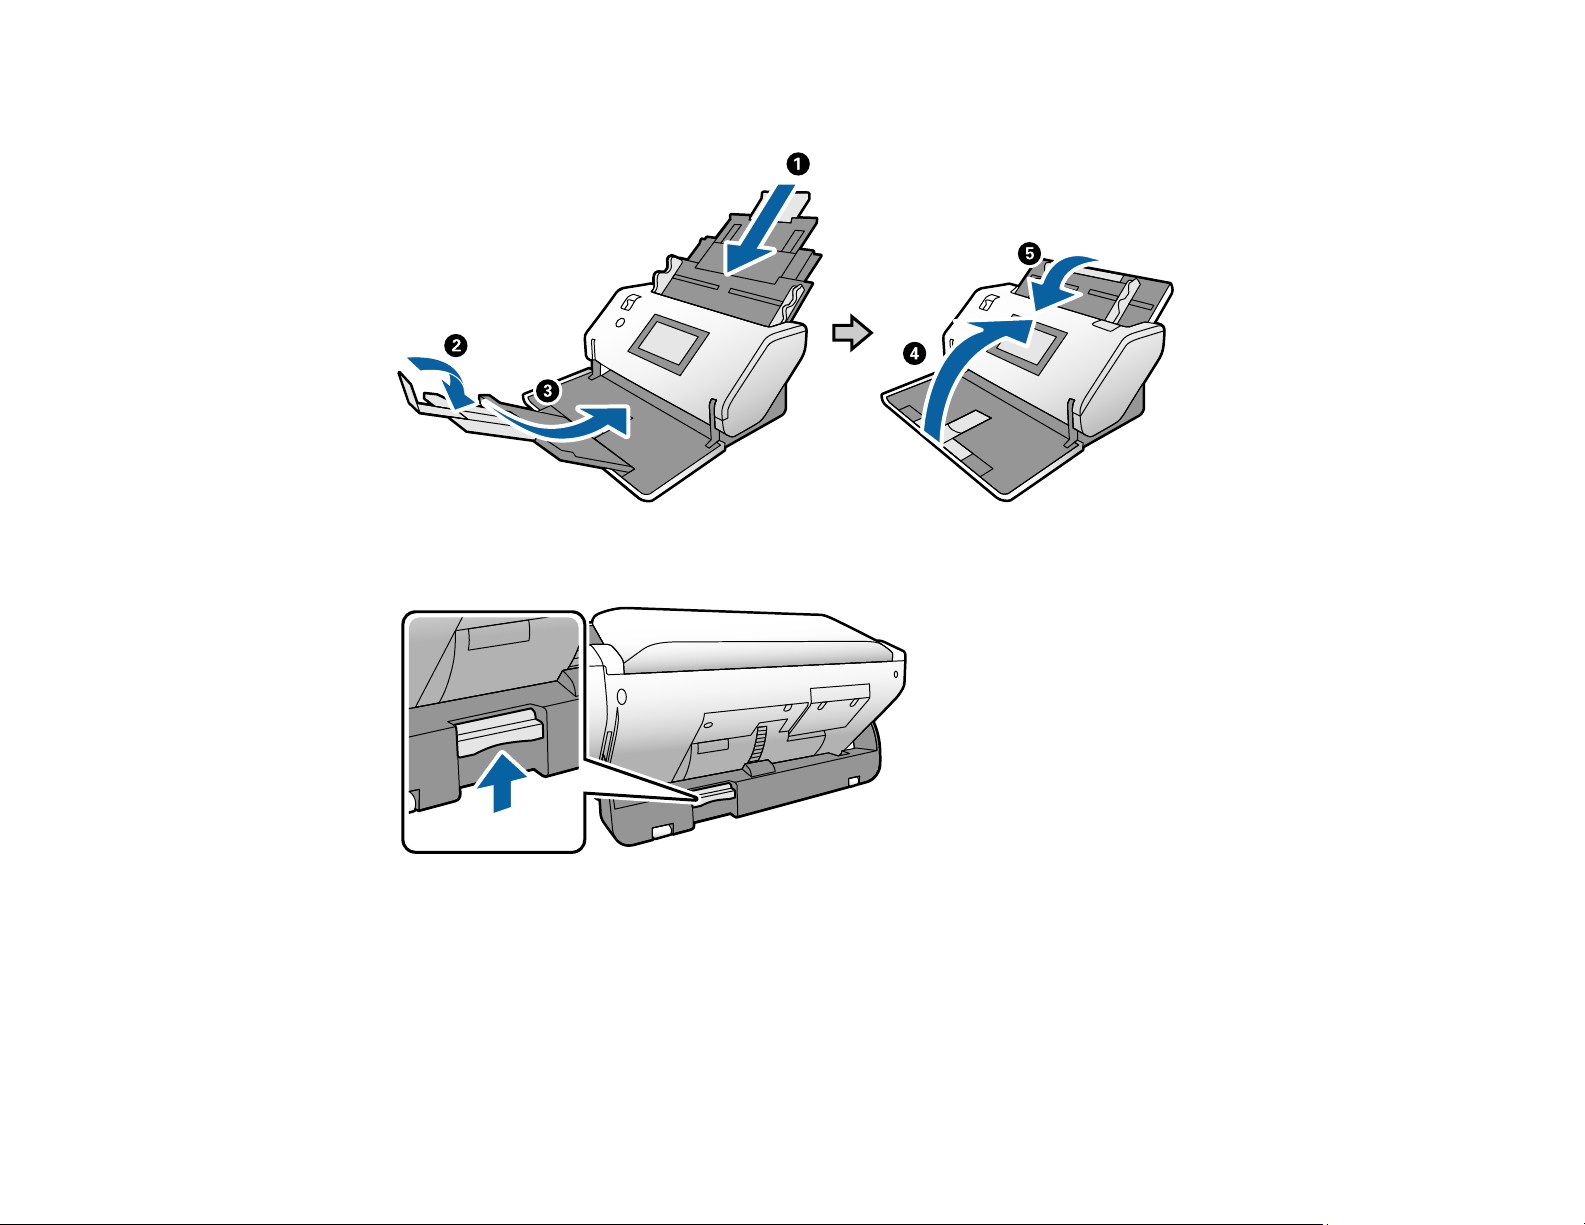
1. Close the input and output trays.
2. Lift the position selector lever on the back of the scanner.
15
Page 16
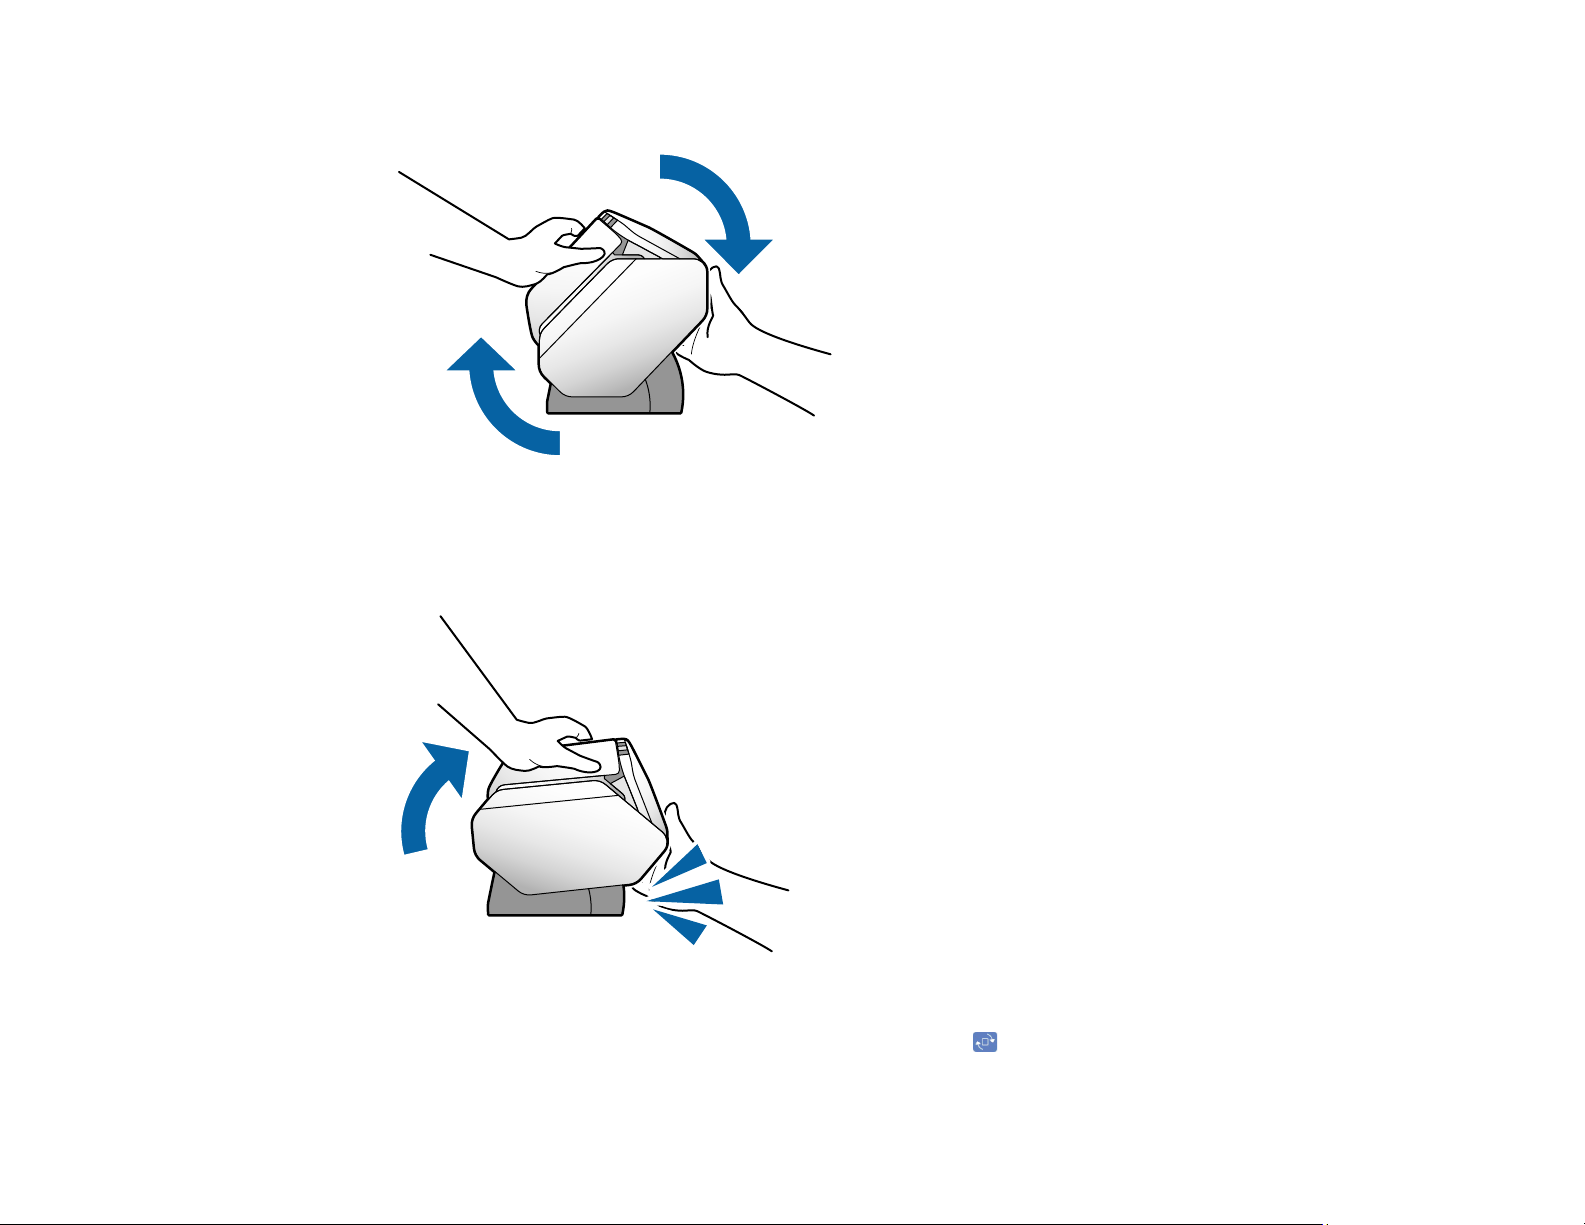
3. Rotate the scanner to the new position.
Note: Do not touch the antistatic brush underneath the output tray.
4. Release the lever and make sure the scanner locks into place.
5. Depending on the position of the feed selector lever, the LCD may prompt you to move the lever to
the correct position. In Delicate Mode, you can also use the icon to rotate the LCD screen.
Parent topic: Scanner Position (DS-32000)
16
Page 17

Related references
Feed Selector Lever
Related tasks
Rotating the Control Panel (DS-32000)
Feed Selector Lever
The feed selector lever adjusts the width of the scanner's document path to accommodate different types
of originals.
DS-30000
Normal Feed: Use this position when scanning plain paper, envelopes, plastic cards (without
embossing) and the carrier sheet.
Manual Feed: Use when feeding originals one at a time, or when scanning originals folded in half,
plastic cards with embossing, passport carrier sheets, or booklets.
Note: In the Manual Feed position, the double feed detection function is disabled.
17
Page 18
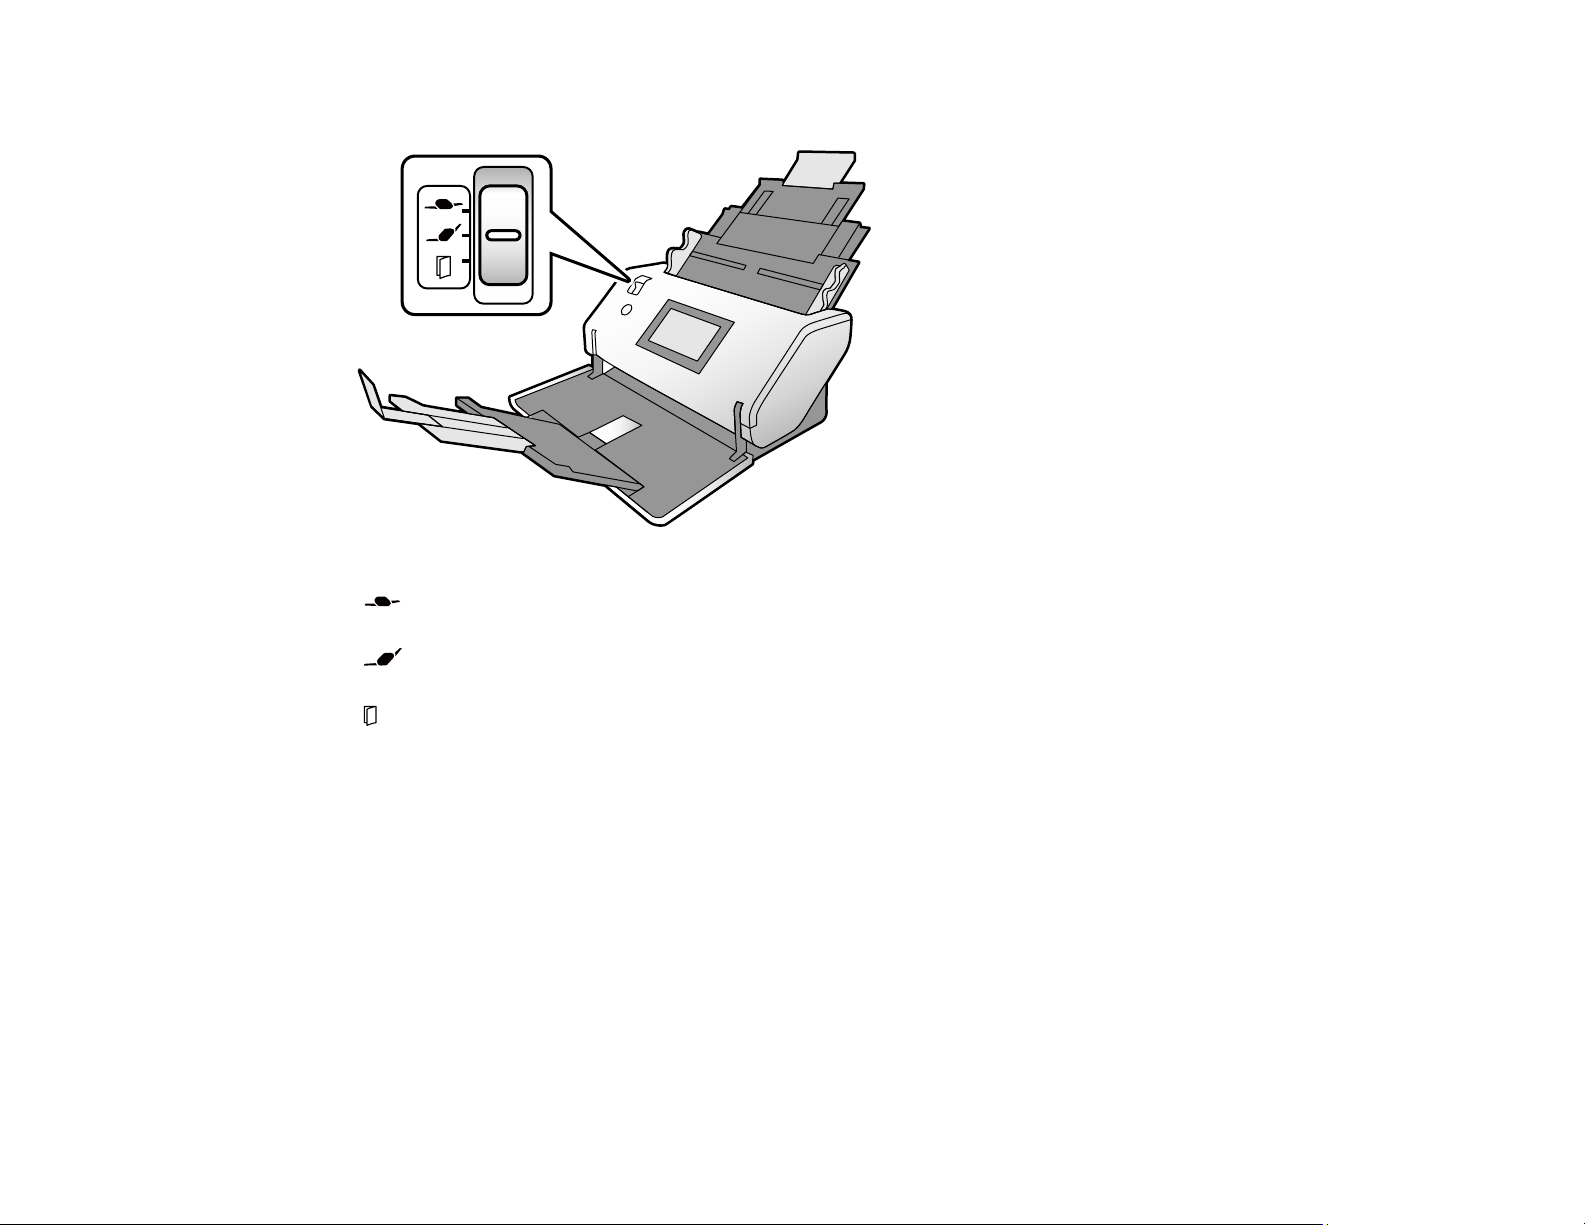
DS-32000
Delicate Feed: Use this position with the scanner in Delicate Mode to feed multiple delicate or
fragile items with less force.
Normal Feed: Use this position when scanning plain paper, envelopes, plastic cards (without
embossing) and the carrier sheet.
Manual Feed: Use when feeding originals one at a time, or when scanning special originals such
as originals folded in half, plastic cards with embossing, passport carrier sheets, or booklets.
When used with the scanner in Delicate Mode, you can use the carrier sheet to scan the special
originals listed above.
Note: In the Manual Feed position, the double feed detection function is disabled.
Parent topic: Scanner Basics
Related tasks
Changing the Scanner Position (DS-32000)
Loading Originals in the Input Tray
Loading Plastic and Laminated Cards in the Input Tray
Loading Special Originals
18
Page 19
Moving the Scanner
You can use the rollers underneath the scanner to easily move the scanner on a surface.
Note: When the scanner is in Storage Mode, the power turns off and the output tray is locked in position.
1. Turn off the scanner and remove all cables.
2. Close the input and output trays.
Note: Make sure you close the output tray securely
19
Page 20
3. Lift the scanner slightly from the front as shown below and roll it to the new location. Do not lift too far
or the rear of the scanner may scrape the surface.
Note: Do not touch the antistatic brush underneath the output tray.
Parent topic: Scanner Basics
Using the Control Panel
See these sections to learn about the control panel and select control panel settings.
Control Panel Buttons and Lights
Changing LCD Screen Language
Adjusting Control Panel Sounds
Adjusting the Screen Brightness
Entering Characters on the LCD Screen
Setting a Password and Locking the Control Panel
Rotating the Control Panel (DS-32000)
Parent topic: Scanner Basics
20
Page 21

Control Panel Buttons and Lights
1
The power button and the power light
2
The home button
3 The LCD screen
4
The help button
Status Icon Information
Parent topic: Using the Control Panel
Status Icon Information
Your product displays status icons on the LCD screen for certain product status conditions.
Note: Access to the grayed-out functions is restricted to authorized users. Contact your administrator for
more information.
Icons Description
Displays the Home screen.
Indicates whether the Double Feed Detection Skip (DFDS) function is enabled. Press the
icon to switch the setting on or off.
Indicates whether slow mode is enabled. Paper feeding speed is reduced during scanning.
Press the icon to switch the setting on or off.
21
Page 22

Icons Description
Indicates that the roller assembly kit needs to be replaced. Press the icon to display the
message.
(DS-32000) Rotates the screen when the scanner is in Delicate Mode. Press the icon to
display the Screen Orientation screen.
Displays additional information or instructions.
There is a problem with the indicated setting. Press the icon to resolve the problem.
Parent topic: Control Panel Buttons and Lights
Changing LCD Screen Language
You can change the language used on the LCD screen.
Note: This setting can be locked by an administrator. If you cannot access or change this setting,
contact your administrator for assistance.
1. Press the home button, if necessary.
2. Select Settings.
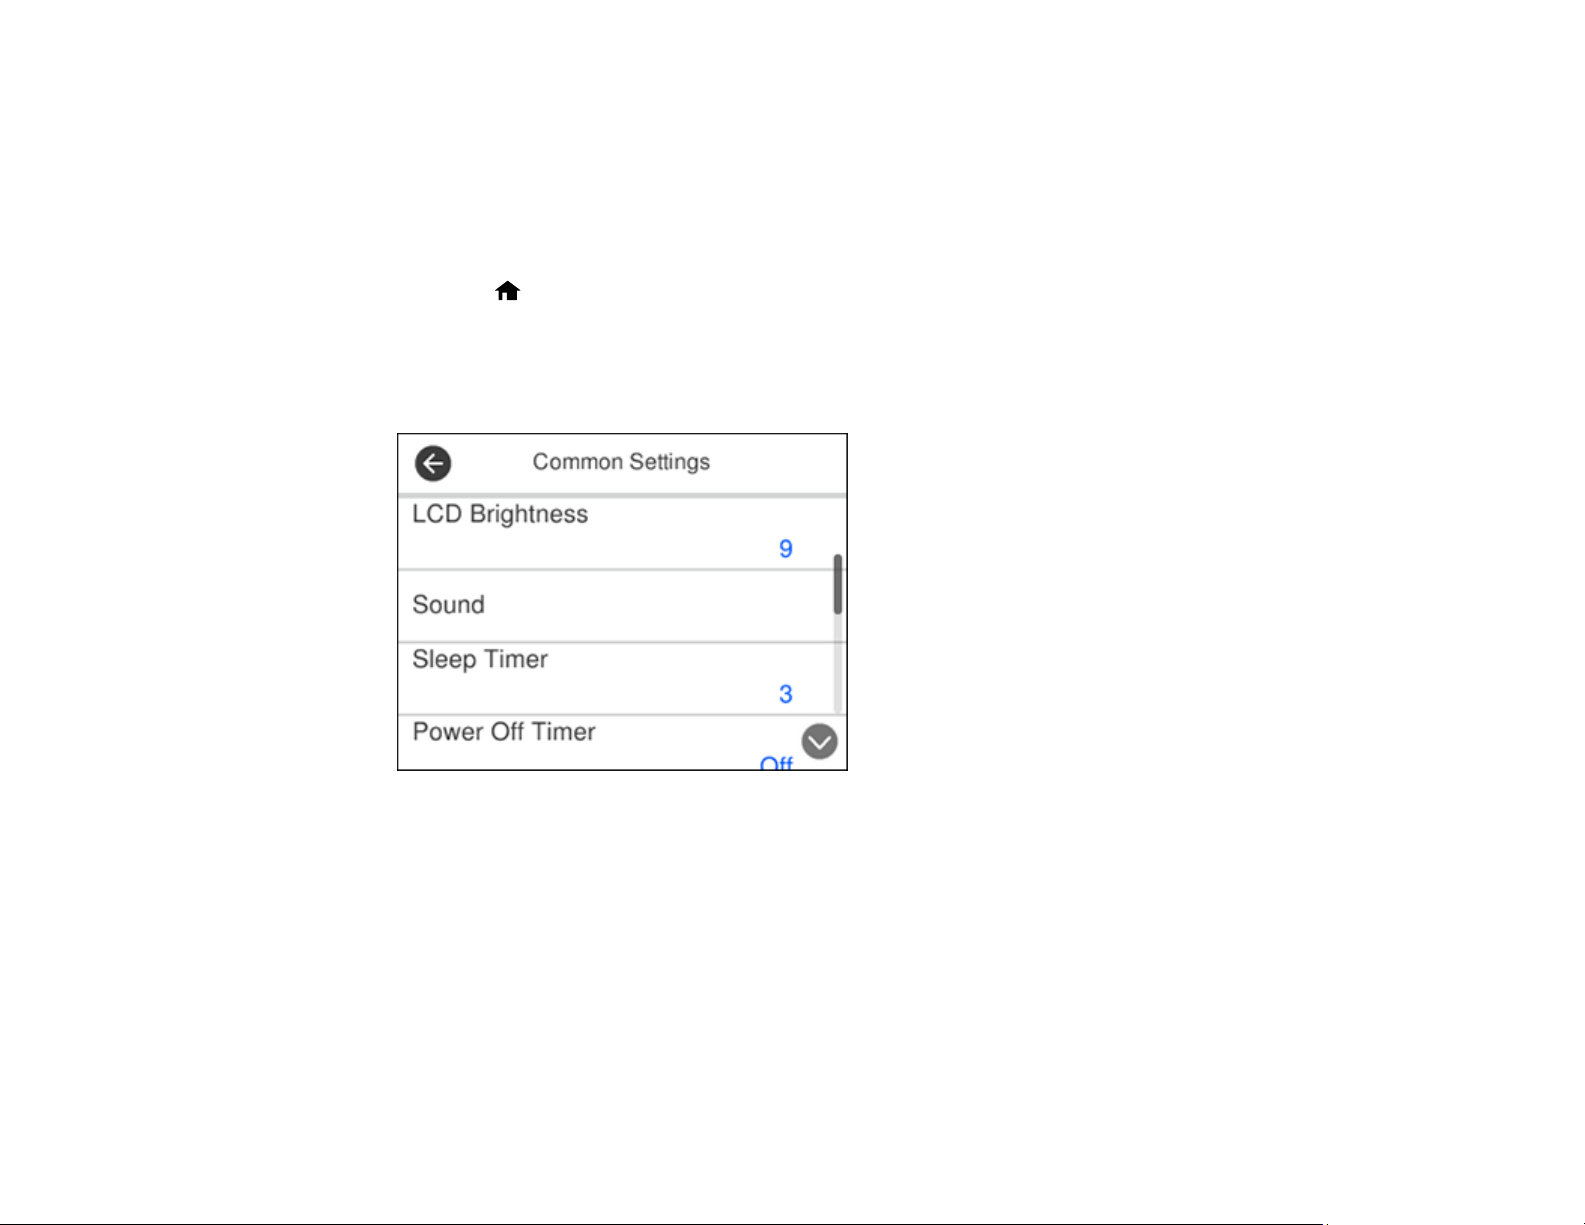
3. Select Common Settings.
You see a screen like this:
22
Page 23

4. Scroll down and select Language.
5. Select a language.
Parent topic: Using the Control Panel
Adjusting Control Panel Sounds
You can adjust the sound level heard when you press buttons on the control panel.
Note: This setting can be locked by an administrator. If you cannot access or change this setting,
contact your administrator for assistance.
1. Press the home button, if necessary.
2. Select Settings.
3. Select Common Settings.
You see a screen like this:
4. Select Sound.
5. Select Button Press.
6. Press the – or + icons to decrease or increase the sound.
7. Select OK to exit.
23
Page 24
Note: You can also adjust the sound level for the Error Notice function.
Parent topic: Using the Control Panel
Adjusting the Screen Brightness
You can adjust the brightness of the LCD screen.
1. Press the home button, if necessary.
2. Select Settings.
3. Select Common Settings.
You see a screen like this:
4. Select LCD Brightness.
5. Press the – or + icons to decrease or increase the brightness.
6. Select OK to exit.
Parent topic: Using the Control Panel
24
Page 25
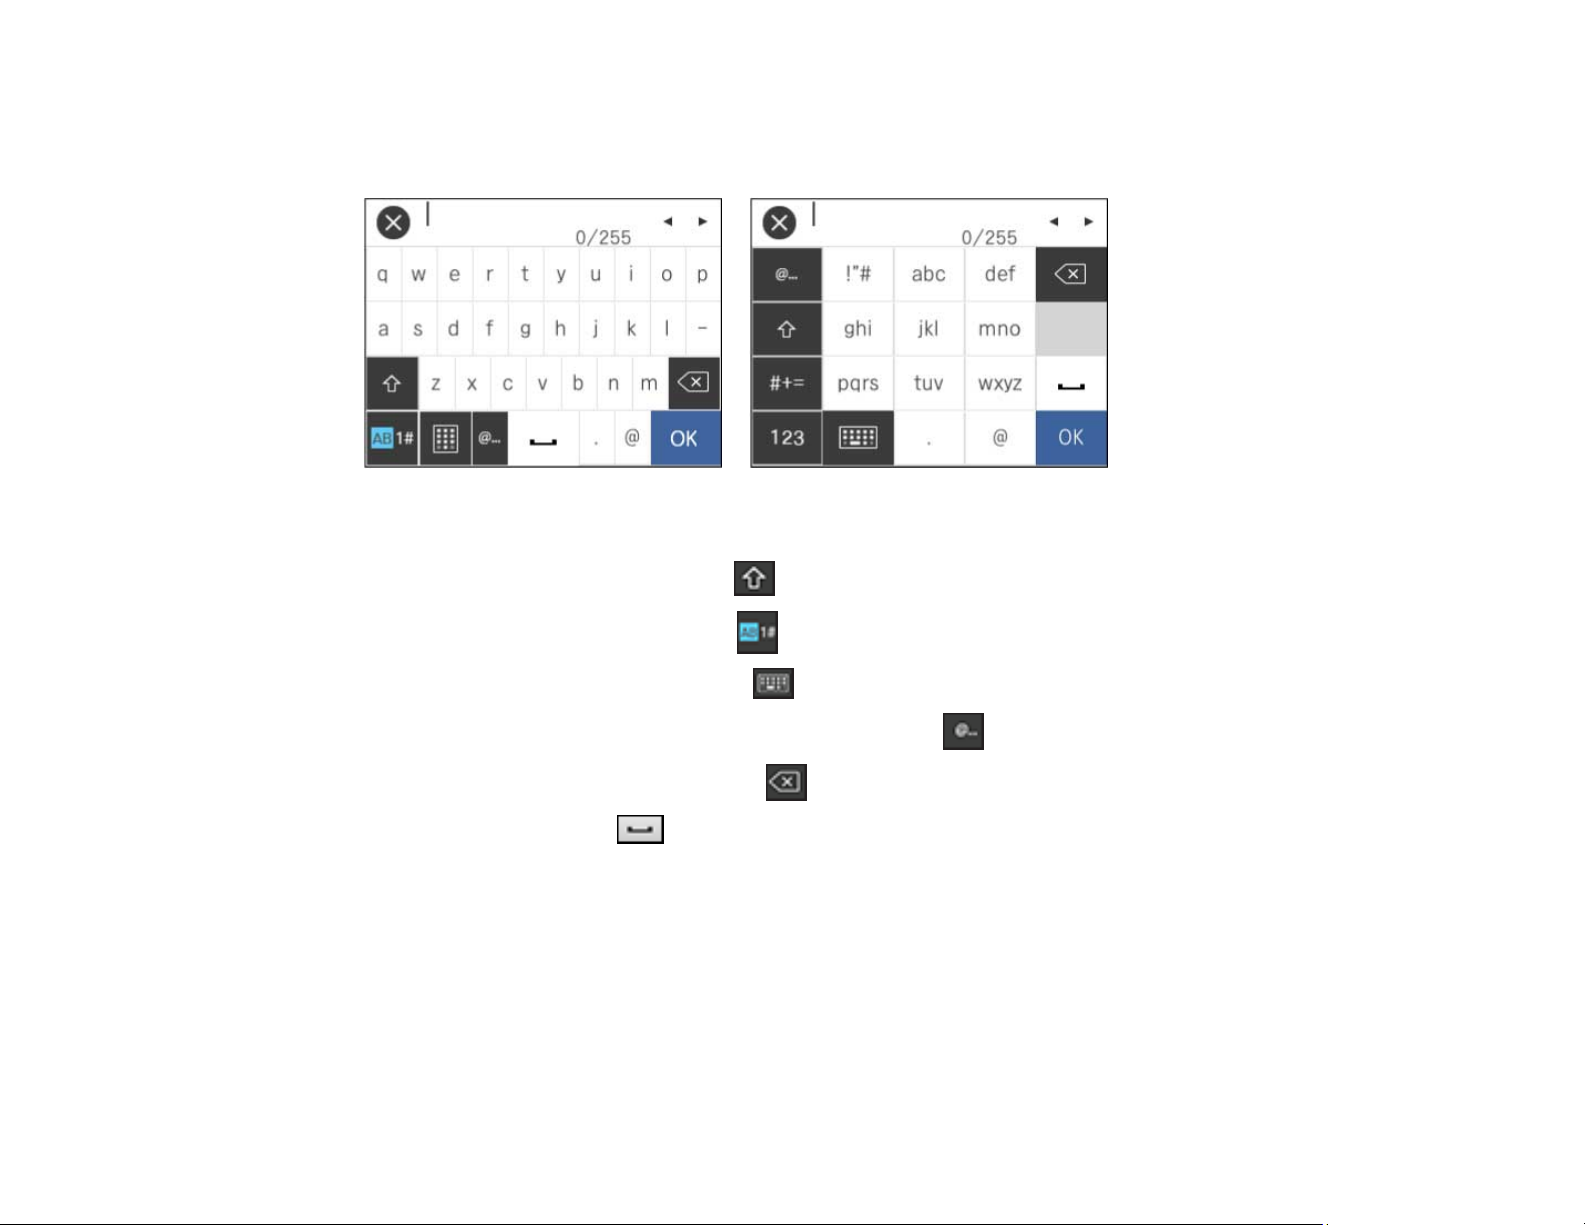
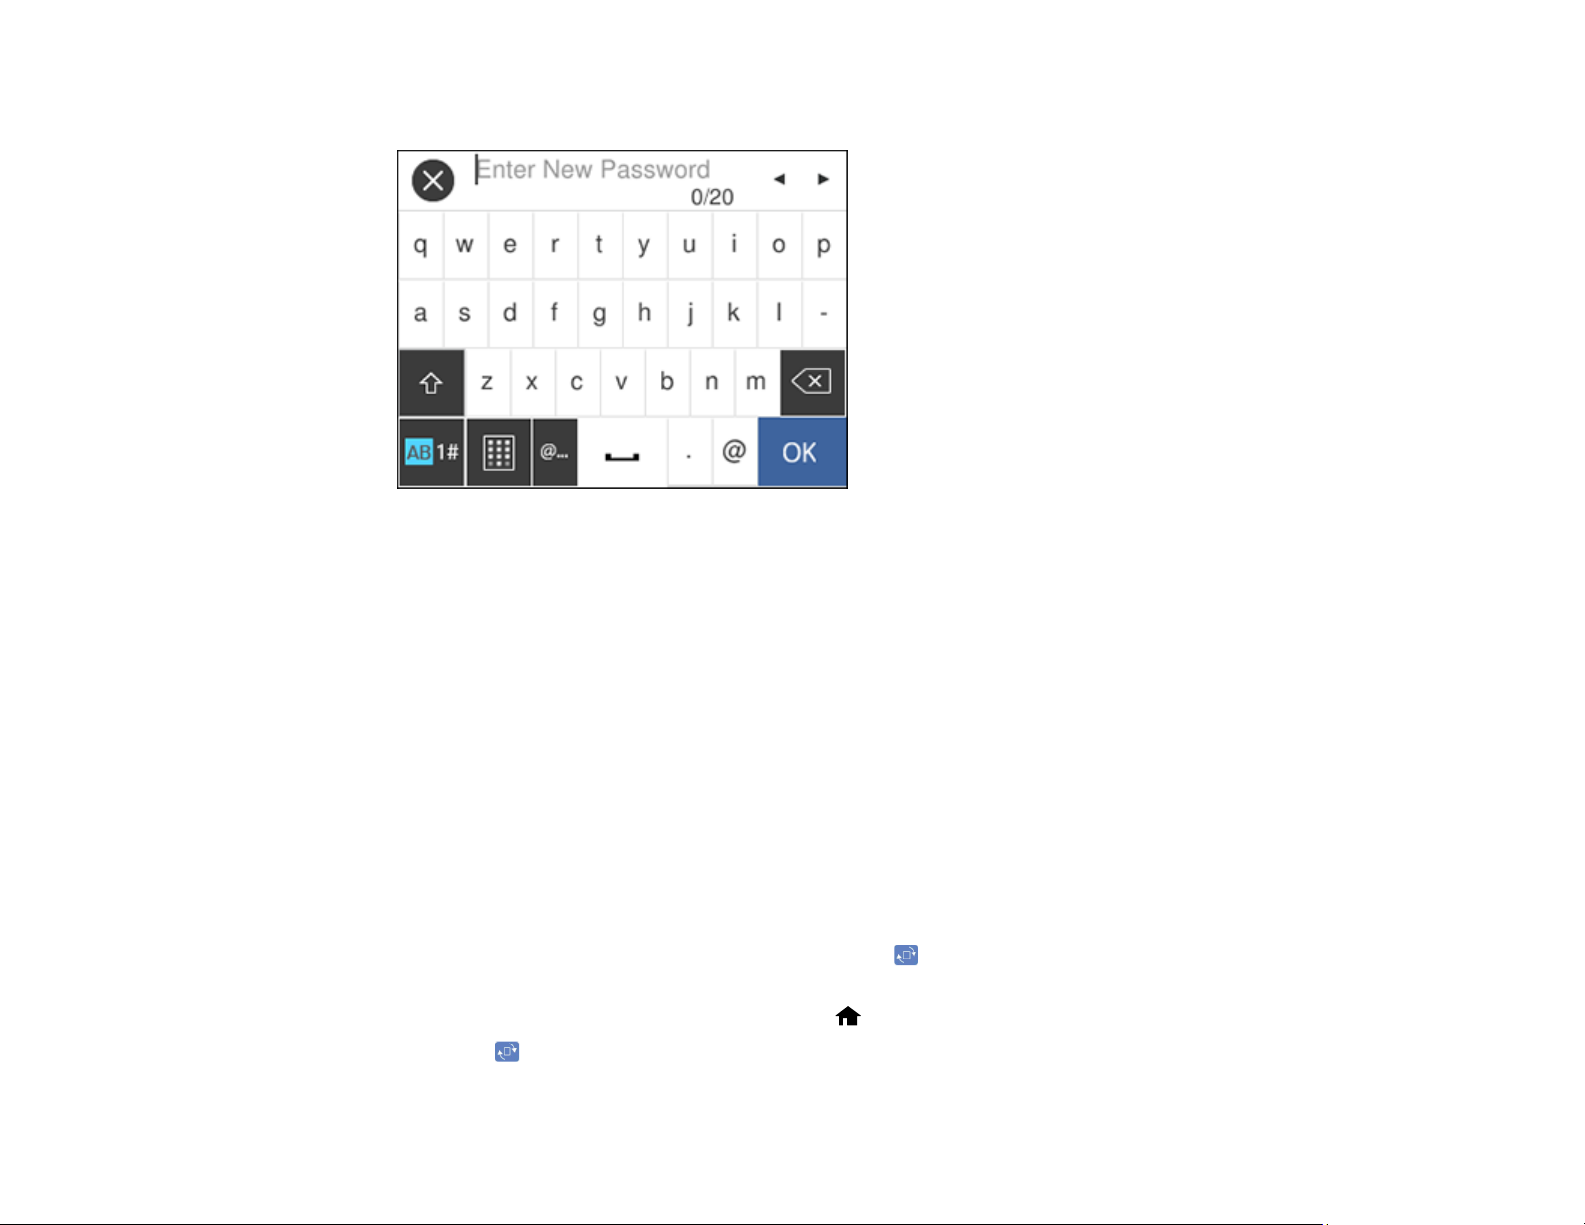
Entering Characters on the LCD Screen
Follow these guidelines to enter characters for passwords and other settings.
• To move the cursor, select the left or right arrows.
• To change the case of letters, select .
• To enter numbers or symbols, select .
• To change the keyboard layout, select .
• To enter a frequently used domain address or URL, select .
• To delete the previous character, select .
• To enter a space, select .
Parent topic: Using the Control Panel
Setting a Password and Locking the Control Panel
You can set an administrator password to lock the following settings and prevent them from being
changed:
• Scan settings
• System Administration settings
25
Page 26
1. Press the home button, if necessary.
2. Select Settings.
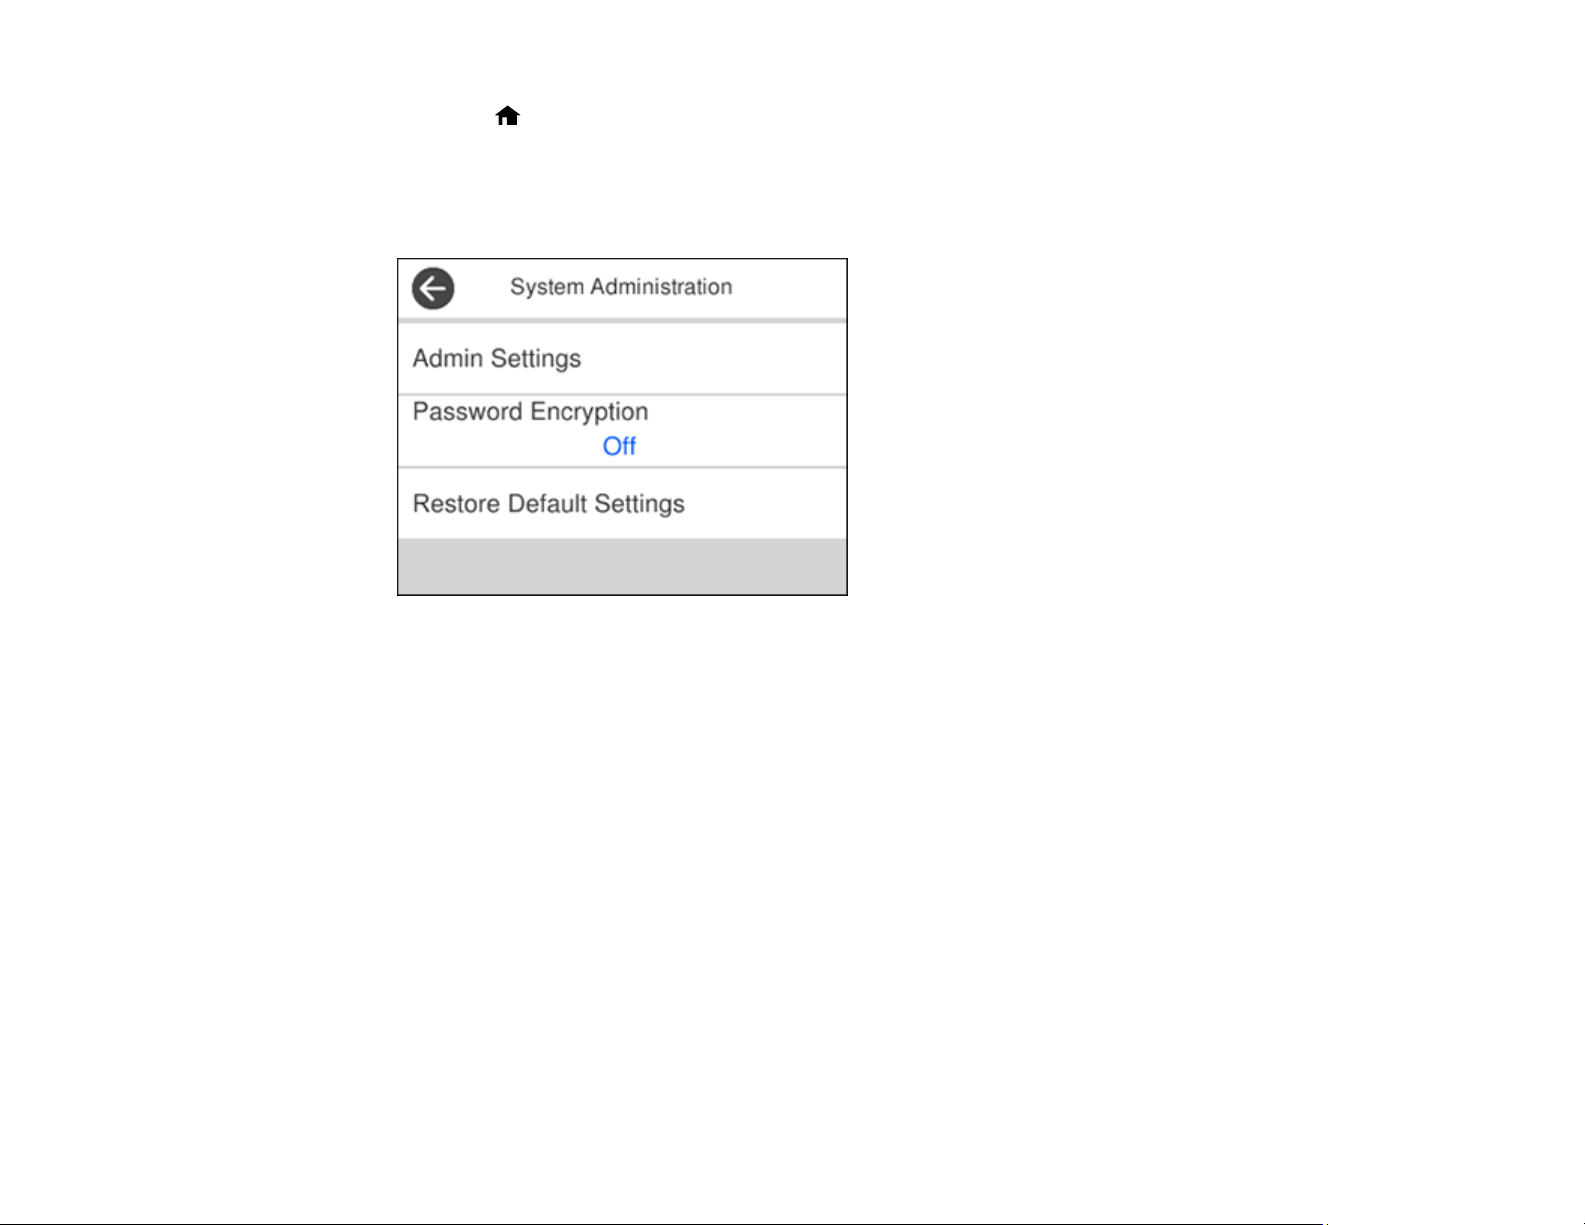
3. Scroll down and select System Administration.
You see a screen like this:
4. Select Admin Settings.
5. Select Admin Password.
6. Select Register.
26
Page 27
You see a screen like this:
7. Use the displayed keyboard to enter a password and select OK.
8. Enter your password again to confirm.
Note: Keep a copy of your password in a safe place.
9. Select OK.
10. Turn Lock Setting on.
When the control panel is locked, you must enter the password to access any of the locked settings.
Note: If you forget your password, contact Epson for assistance.
Parent topic: Using the Control Panel
Rotating the Control Panel (DS-32000)
When the scanner is in Delicate Mode, you can use the icon to rotate the LCD screen so the scanner
can be used in a sideways orientation.
1. With the scanner in Delicate Mode, press the home button, if necessary.
2. Press the icon.
27
Page 28

You see a screen like this:
3. Press the icon to rotate the screen.
4. Select OK to exit.
Parent topic: Using the Control Panel
Related tasks
Changing the Scanner Position (DS-32000)
User Replaceable Epson Scanner Parts and Accessories
You can purchase genuine Epson accessories at epson.com (U.S. sales), epson.ca (Canadian sales), or
epson.com.jm (Caribbean sales). You can also purchase accessories from an Epson authorized reseller.
To find the nearest one, call 800-GO-EPSON (800-463-7766) in the U.S. or 800-807-7766 in Canada.
Part Part number
Carrier sheet B12B819051
Cleaning kit B12B819291
Passport carrier sheet B12B819651
Replacement separation roller B12B819631
Replacement pickup roller B12B819611
28
Page 29

Parent topic: Scanner Basics
Using Power Saving Settings
Your scanner enters sleep mode automatically and turns off the LCD screen if it is not used for a period
of time. You can make the time period shorter to save energy and resources.
Changing the Sleep Timer Settings
Changing the Power Off Settings
Parent topic: Scanner Basics
Changing the Sleep Timer Settings
You can adjust the time period before your product enters sleep mode and turns off the LCD screen.
Note: This setting can be locked by an administrator. If you cannot access or change this setting,
contact your administrator for assistance.
1. Press the home button, if necessary.
2. Select Settings.
3. Select Common Settings.
You see a screen like this:
29
Page 30
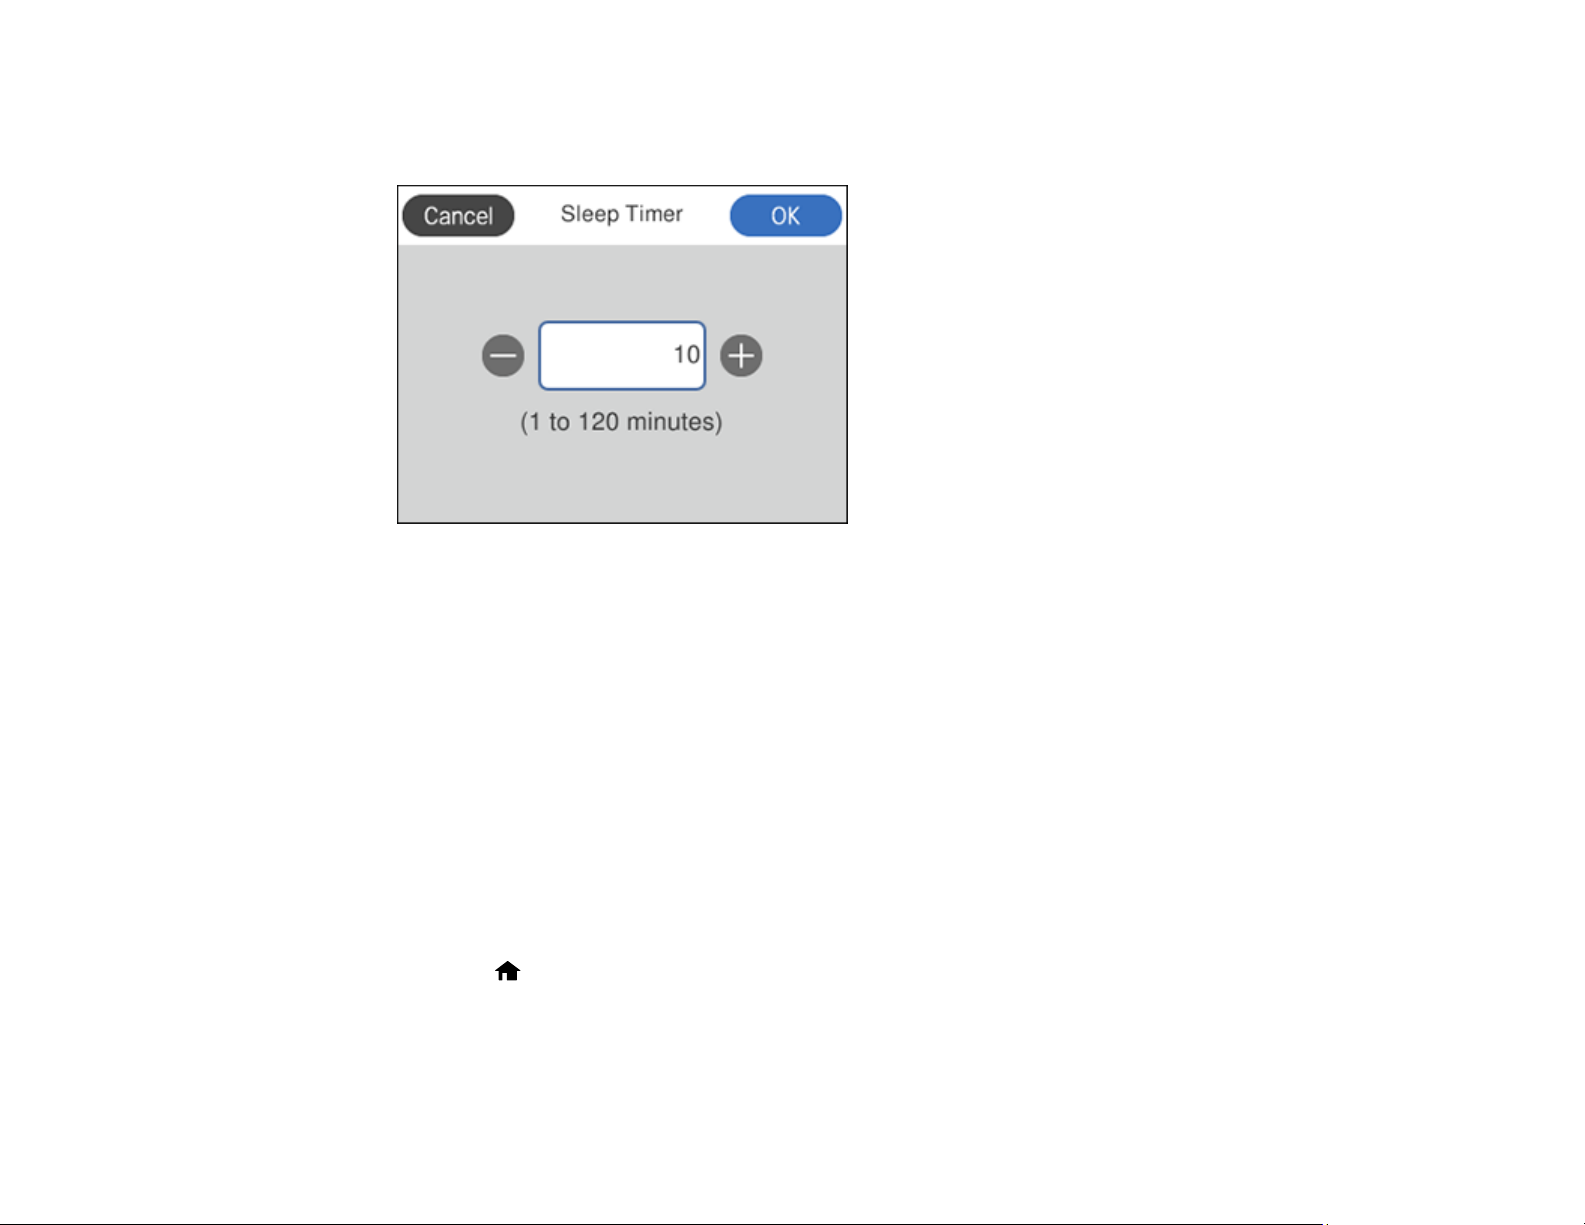
4. Select Sleep Timer.
You see a screen like this:
5. Do one of the following:
• Press the – or + icon to decrease or increase the number of minutes.
• Press the number of minutes on the LCD screen, select the number of minutes from the on-screen
keypad, and select OK.
6. Select OK.
Parent topic: Using Power Saving Settings
Changing the Power Off Settings
You can have the product turn off automatically if it is not used for a specified period of time.
Note: This setting can be locked by an administrator. If you cannot access or change this setting,
contact your administrator for assistance.
1. Press the home button, if necessary.
2. Select Settings.
3. Select Common Settings.
30
Page 31

You see a screen like this:
4. Select Power Off Settings.
5. To set the amount of time before the scanner turns off when it is inactive, select Power Off If
Inactive and select a value.
6. To turn the scanner off automatically if the USB connection is disconnected, set Power Off If
Disconnected to On.
7. Press the home button or select Close to exit.
Parent topic: Using Power Saving Settings
31
Page 32

Loading Originals
Follow the instructions here to load your originals into the scanner.
Suggested Tray Positions
Loading Originals in the Input Tray
Loading Plastic and Laminated Cards in the Input Tray
Loading Special Originals
Suggested Tray Positions
Based on the type and size of the scanned originals, extend the input and output trays to the suggested
position shown in the tables below. If the originals fall from the tray, raise the stopper. Depending on the
length of the originals, adjust the position of the stopper as necessary.
Normal Mode
Type of Original Tray Position
A3 (11.7 × 16.5 inches [297 × 420 mm]) with fold
lines
Legal (8.5 × 14 inches [216 × 356 mm]) to A3
(11.7 × 16.5 inches [297 × 420 mm])
32
Page 33

Type of Original Tray Position
Letter (8.5 × 11 inches [216 × 279 mm]) or A4
(8.3 × 11.7 inches [210 × 297 mm])
Letter (8.5 × 11 inches [216 × 279 mm]) or A4
(8.3 × 11.7 inches [210 × 297 mm]) (landscape
orientation)
Long paper
33
Page 34

Type of Original Tray Position
A3 (11.7 × 16.5 inches [297 × 420 mm]) (thin
paper)
A2 (16.5 × 23.4 inches [420 × 594 mm]) (folded)
Envelopes
A4 (8.3 × 11.7 inches [210 × 297 mm])-sized
carrier sheet
Thin paper
Thick paper
Booklets
Passports (in a passport carrier sheet)
Laminated cards
Vouchers and small originals
Delicate Mode (DS-32000)
34
Page 35

Type of Original Tray Position
A3 (11.7 × 16.5 inches [297 × 420 mm]) with fold
lines
Legal (8.5 × 14 inches [216 × 356 mm]) to A3
(11.7 × 16.5 inches [297 × 420 mm])
Letter (8.5 × 11 inches [216 × 279 mm]) or A4
(8.3 × 11.7 inches [210 × 297 mm])
Letter (8.5 × 11 inches [216 × 279 mm]) or A4
(8.3 × 11.7 inches [210 × 297 mm]) (landscape
orientation)
A3 (11.7 × 16.5 inches [297 × 420 mm]) (thin
paper)
A2 (16.5 × 23.4 inches [420 × 594 mm]) with fold
lines
Envelopes
A4 (8.3 × 11.7 inches [210 × 297 mm])-sized
carrier sheet
35
Page 36

Type of Original Tray Position
Thin paper
Thick paper
Booklets
Passports (in a passport carrier sheet)
Laminated cards
Vouchers and small originals
Parent topic: Loading Originals
Loading Originals in the Input Tray
You can load originals that meet the document specifications in the input tray.
Caution: Do not load photos, or valuable original documents or artwork, directly into the input tray. This
may wrinkle or damage the original. Load these originals using an optional carrier sheet.
The steps below describe loading originals of the same size. To load originals of multiple sizes at once,
see the link at the end of these steps.
1. Set the feed selector lever to (DS-30000) or (DS-32000).
2. Open the input tray and pull up its extension.
36
Page 37

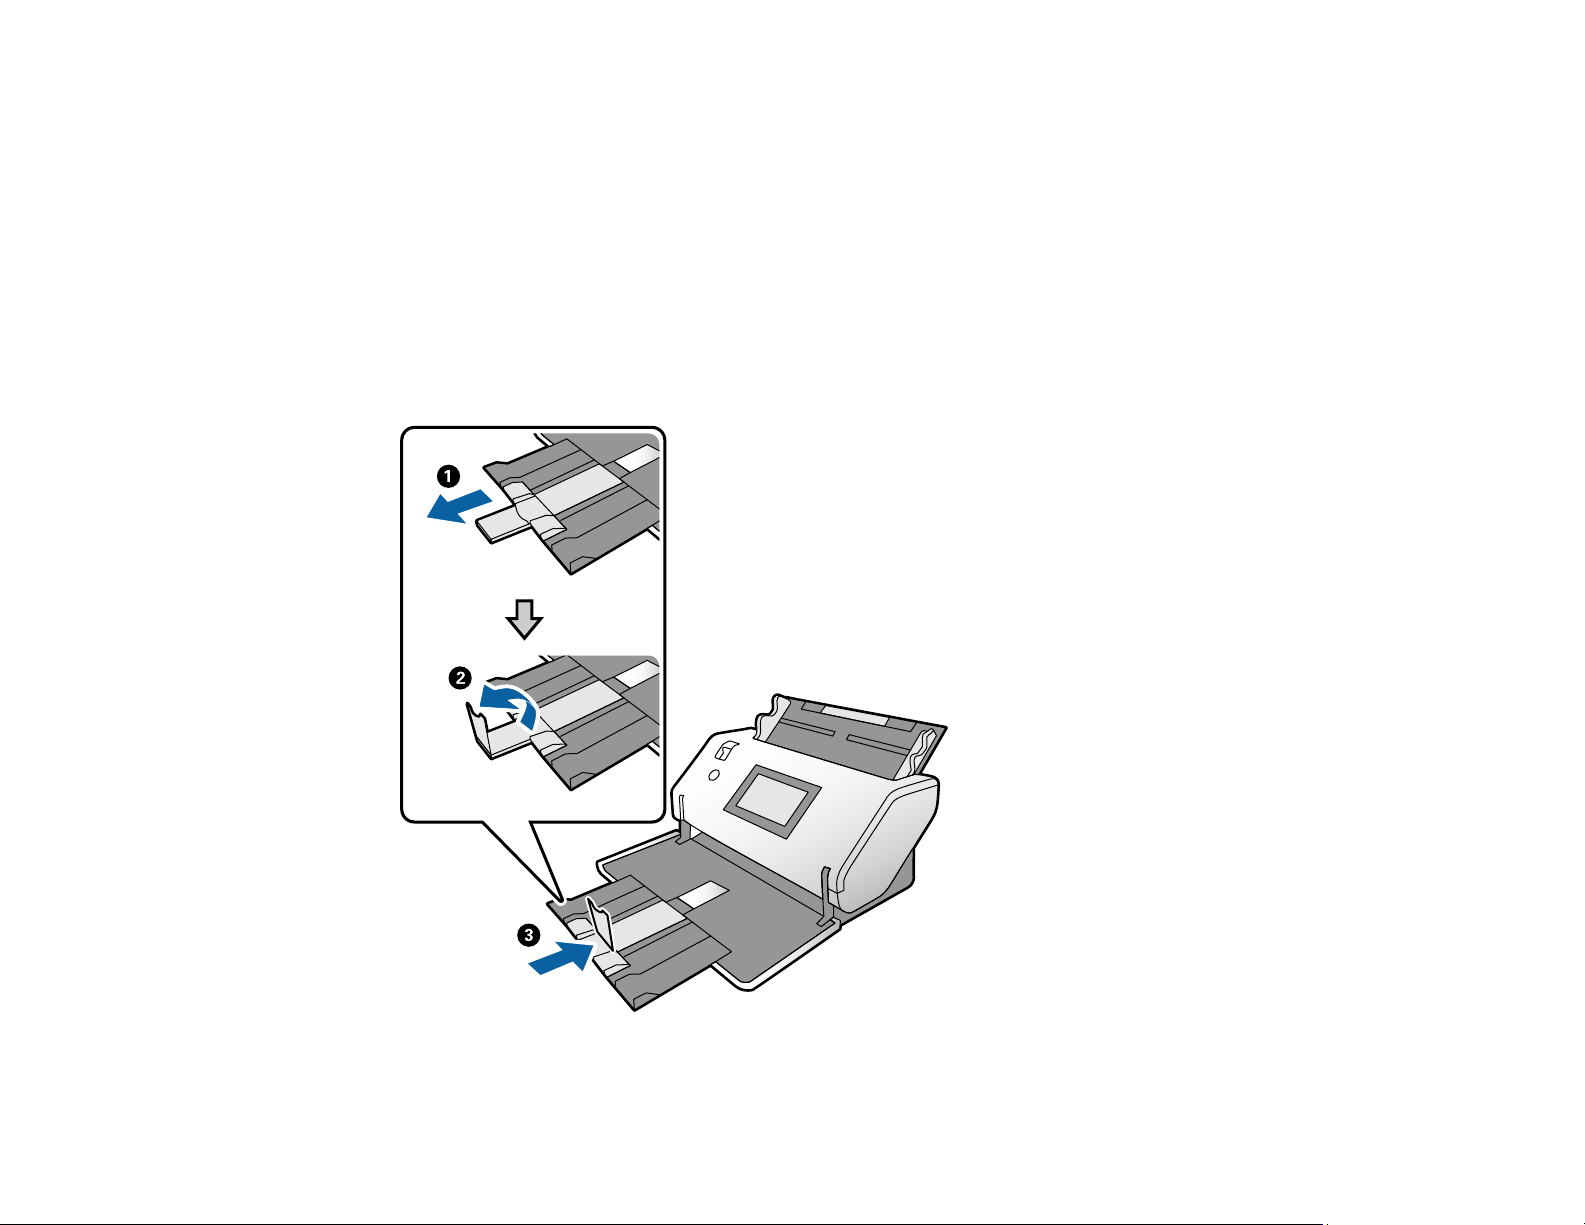
3. Pull out the output tray and its extension, and open the stopper.
Note: If you are loading an original that is 15.5 inches (393.8 mm) or longer, do not pull out the input
or output tray extensions and do not open the stopper.
37
Page 38

4. Slide the input tray edge guides all the way out.
5. If you are loading a multi-page original, fan your stack of originals.
Note: If you are loading an original that is 15.5 inches (393.8 mm) or longer, load only one sheet at a
time.
6. Stack the originals with the printed side facing down and slide the stack so the leading edge is at an
angle as shown.
38
Page 39

7. Load standard originals into the input tray printed side down and top edge first, and guide them in
until they meet resistance.
• If you are loading paper business cards, load up to 36 cards printed side down and short edge first
into the input tray horizontally, and slide them in until they meet resistance.
39
Page 40

40
Page 41

• If you are loading hole-punched originals, load them with the holes facing down or to the side as
shown. The holes must be within 1.2 inches (30 mm) of the edge of the originals.
• If you are loading A3 (11.7 × 16.5 inches [297 × 420 mm]) originals with fold lines, load them as
shown below.
41
Page 42

Originals folded in the middle:
42
Page 43

Originals with a binding fold:
43
Page 44

8. Slide the edge guides against the edges of the original.
Note: If you are scanning originals that are 15.5 inches (393.8 mm) or longer, support the original as
it enters into and ejects from the scanner as shown.
9. If necessary during scanning, adjust the position of the stopper on the output tray extension to fit the
ejected originals.
Note: If thicker paper does not eject properly or falls from the output tray, push in the output tray and
allow the originals to eject freely onto the surface below the scanner. If the scanned images are
affected by the originals ejecting below the scanner, try placing the scanner on the edge of a table
where the ejected originals can drop freely.
44
Page 45

If scanning thin or wrinkled paper causes paper jams, slow down the feeding speed by selecting the
icon or Settings > Scanner Settings > Slow > On on the LCD screen.
Loading Thin Paper (DS-32000)
Loading Long Paper
Loading Large Originals
Loading Multiple Sizes of Originals in the Input Tray
Original Document Specifications
Parent topic: Loading Originals
Related references
Suggested Tray Positions
Feed Selector Lever
Loading Thin Paper (DS-32000)
You can load thin originals with the scanner in Delicate Mode. Some items may require a carrier sheet.
Make sure the original meets the document specifications before loading it.
1. Place the scanner in Delicate Mode.
2. Set the feed selector lever to .
3. Open the input tray and pull up its extension.
4. Pull out the output tray and its extension to the length of the original, and open the stopper if
necessary.
45
Page 46

5. Slide the input tray edge guides all the way out.
6. If you are loading a multi-page original, fan your stack of originals.
Note: If you are loading an original that is 15.5 inches (393.8 mm) or longer, load only one sheet at a
time.
7. Stack the originals with the printed side facing down and slide the stack so the leading edge is at an
angle as shown.
46
Page 47

8. Load the originals into the input tray printed side down and top edge first, and guide them in until
they meet resistance.
9. Slide the edge guides against the edges of the original or carrier sheet.
47
Page 48

10. If necessary during scanning, adjust the position of the stopper on the output tray extension to fit the
ejected originals.
Parent topic: Loading Originals in the Input Tray
Related references
Feed Selector Lever
Related tasks
Changing the Scanner Position (DS-32000)
Loading Long Paper
You can load long paper up to 220 inches (5588 mm) long in the input tray. Some items may require a
carrier sheet. Make sure the original meets the specifications before loading it.
1. Check to make sure that the page separation lever is in the position shown here.
DS-30000
DS-32000
Note: To prevent paper jams, make sure to set the lever back to its original position when scanning
standard single- or multi-page originals.
2. Open the input tray.
48
Page 49
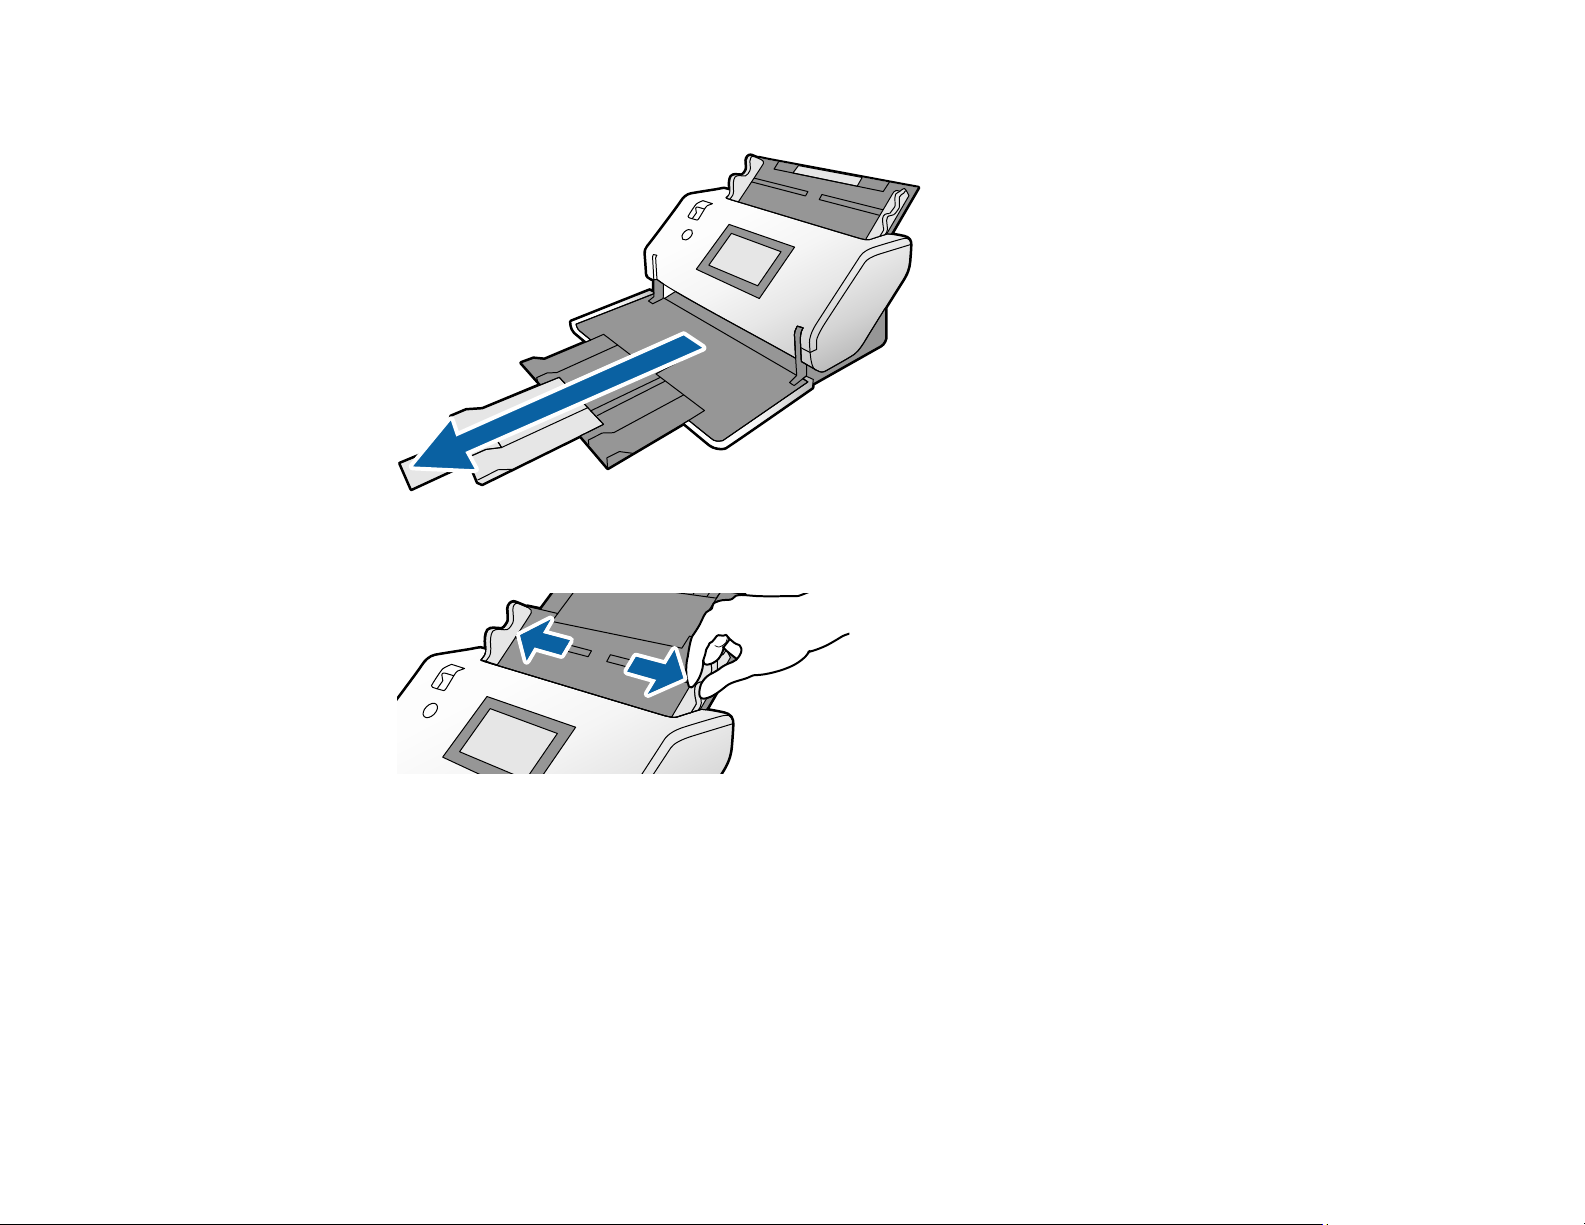
3. Pull out the output tray and its extension, but do not raise the stopper.
4. Slide the input tray edge guides all the way out.
49
Page 50

5. Load the original in the input tray as shown until it meets resistance.
6. Slide the edge guides against the edges of the original.
50
Page 51
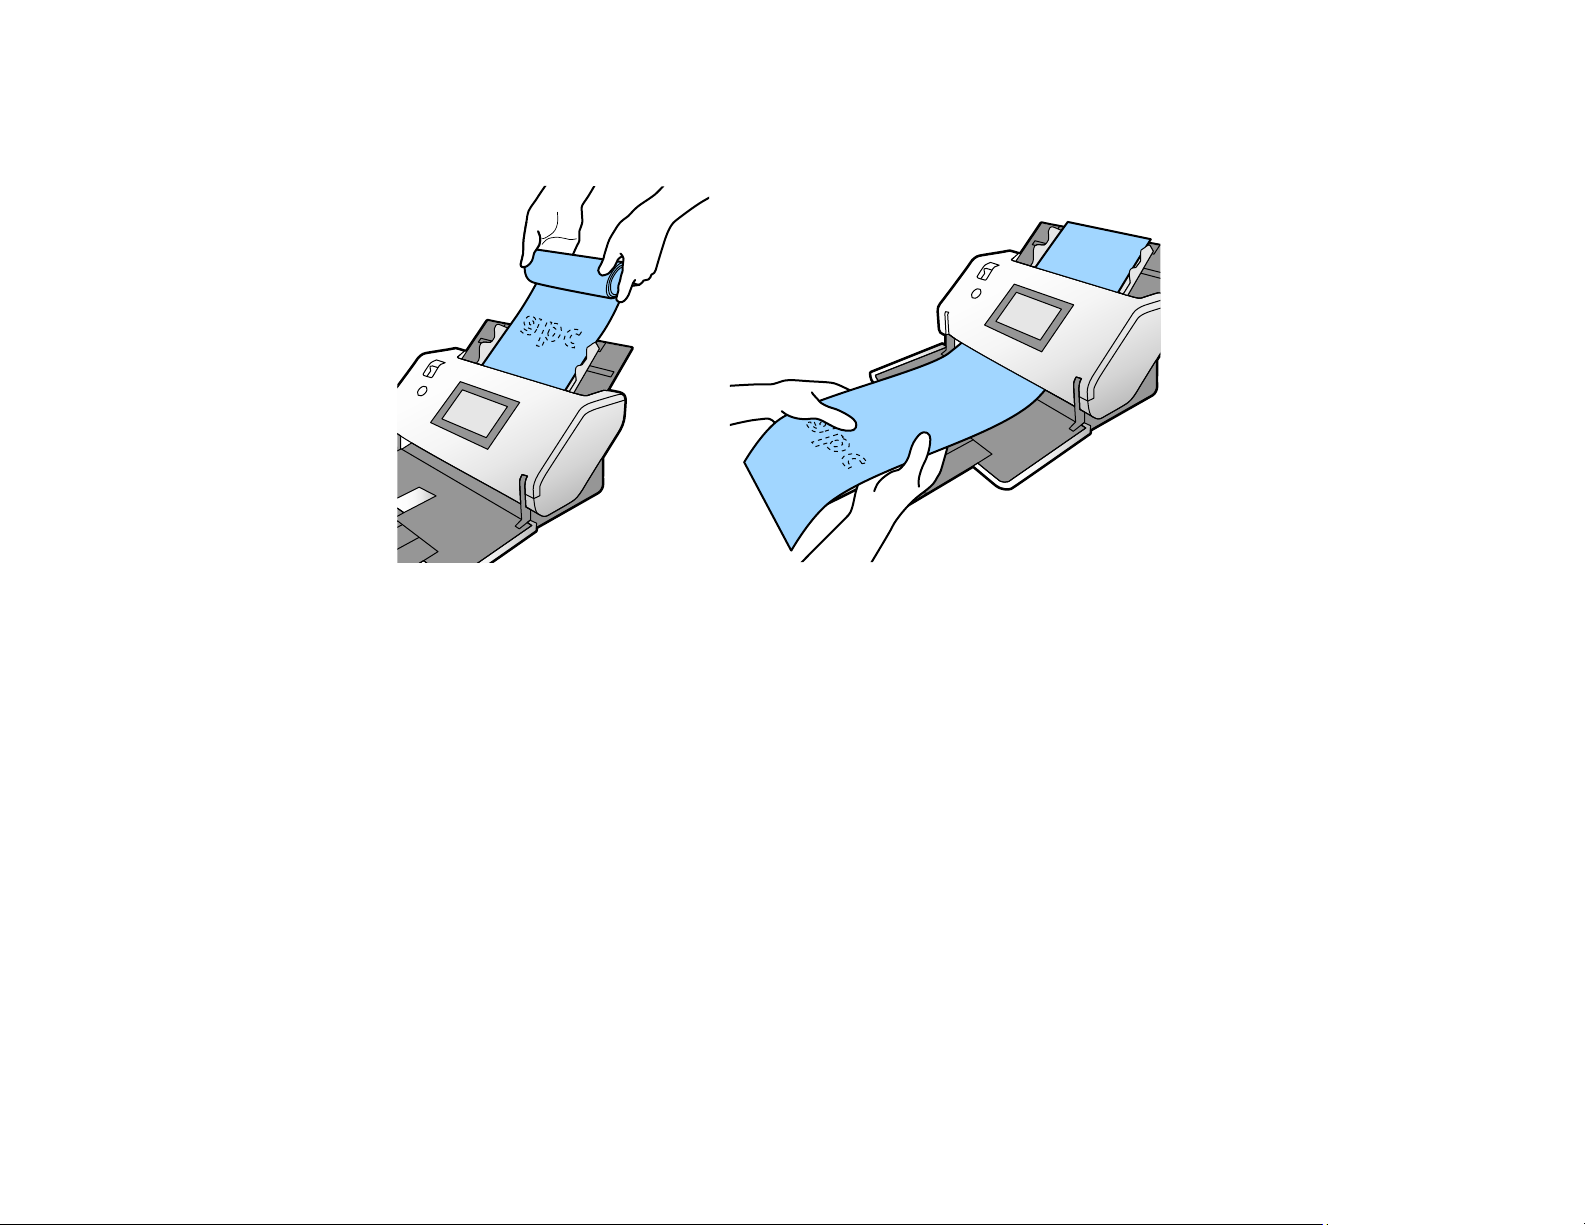
7. Support the paper at both ends with your hands to prevent it from falling off the ADF, getting
jammed, or dropping off the output tray.
Note: You can scan long paper in the following resolutions:
• Approximately 53 inches (1346 mm) or less: up to 600 dpi
• Approximately 215 inches (5461 mm) or less: up to 300 dpi
• Approximately 220 inches (5588 mm) or less: up to 200 dpi
Parent topic: Loading Originals in the Input Tray
Related references
Suggested Tray Positions
Feed Selector Lever
Original Document Specifications
Loading Large Originals
You can load large originals up to A2 (16.5 × 23.4 inches [420 × 594 mm]) size. Make sure the original
meets the specifications before loading it.
51
Page 52

Note: Originals larger than A3 (11.7 × 16.5 inches [297 × 420 mm]) must be folded in half. You can scan
both sides of the original and stitch the images together using Document Capture Pro or Epson Scan 2.
1. Check to make sure that the page separation lever is in the position shown here.
DS-30000
DS-32000
Note: To prevent paper jams, make sure to set the lever back to its original position when scanning
standard single- or multi-page originals.
Note: If you shift the scanner to Delicate Mode and use a carrier sheet, you can put the feed
selection lever in the position. (DS-32000)
2. Open the input tray and pull up its extension.
52
Page 53

3. Pull out the output tray and its extension, and open the stopper.
4. Slide the input tray edge guides all the way out.
5. Fold the original in half so that the side to be scanned is facing out.
53
Page 54

6. Load the folded original in the input tray with the second page facing up as shown.
7. Slide the edge guides against the edges of the original.
54
Page 55

Turn off the Detect Double Feed setting on the Main Settings tab in Epson Scan 2 when scanning
folded originals. To combine the scanned images, you will have to specify Double-Sided as the
Scanning Side setting and select Left & Right as the Stitch Images setting in Epson Scan 2.
Parent topic: Loading Originals in the Input Tray
Related references
Suggested Tray Positions
Feed Selector Lever
Original Document Specifications
Additional Scanning Settings - Main Settings Tab
Related tasks
Scanning Two Originals onto One Sheet (Stitching Images) - Windows
Loading Multiple Sizes of Originals in the Input Tray
You can load originals of different sizes, paper types, and thicknesses at one time in the input tray. Just
make sure they meet the original document specifications.
Caution: Do not load photos, or valuable original documents or artwork, directly into the input tray. This
may wrinkle or damage the original. Load these originals using an optional carrier sheet.
1. Open the input tray and pull up its extension.
55
Page 56

2. Pull out the output tray and its extension, and open the stopper.
Note: If you are loading originals that are 15.5 inches (393.8 mm) or longer, do not pull out the input
or output tray extensions and do not open the stopper.
56
Page 57

3. Slide the input tray edge guides all the way out.
4. Load the originals in the input tray in descending order of paper size with the widest at the back and
the narrowest at the front. Slide them in until they meet resistance. Make sure the printed sides are
facedown and the top edges are slightly angled in the input tray.
57
Page 58

5. Slide the edge guides against the edges of the widest original.
6. If necessary during scanning, adjust the position of the stopper on the output tray extension to fit the
ejected originals.
Note: If thicker paper does not eject properly or falls from the output tray, push in the output tray and
allow the originals to eject freely onto the surface below the scanner. If the scanned images are
affected by the originals ejecting below the scanner, try placing the scanner on the edge of a table
where the ejected originals can drop freely.
If scanning thin or wrinkled paper causes paper jams, slow down the feeding speed by selecting the
icon or Settings > Scanner Settings > Slow > On on the LCD screen.
Parent topic: Loading Originals in the Input Tray
Related references
Suggested Tray Positions
Feed Selector Lever
Original Document Specifications
Original Document Specifications
You can load original documents that meet these specifications in your scanner.
DS-30000/DS-32000 (Normal Mode)
Note: The following table lists the capacity when the scanner is in Normal Mode and the feed selector
position is in the (DS-30000) or (DS-32000) position. If the feed selector is in the position,
originals should be manually fed one at a time.
58
Page 59

Paper type Paper size Paper weight Loading capacity
Plain paper
Fine paper
Recycled paper
Letter (8.5 × 11 inches
[216 × 279 mm])
A4 (8.3 × 11.7 inches
[210 × 297 mm])
A5 (5.8 × 8.2 inches
[148 × 210 mm])
A6 (4.1 × 5.8 inches
[105 × 148 mm])
B5 (7.2 × 10.1 inches
[182 × 257 mm])
B6 (5 × 7.2 inches
[128 × 182 mm])
A8 (2.1 × 2.9 inches
[52 × 74 mm])
7 to 110 lb
(27 to 413 g/m²)
34 to 110 lb
(127 to 413 g/m²)
7 lb (27 g/m²): 120 sheets
21 lb (80 g/m²): 120
sheets
24 lb (90 g/m²): 100
sheets
28 lb (104 g/m²): 85
sheets
34 lb (127 g/m²): 63
sheets
42 lb (157 g/m²): 51
sheets
56 lb (209 g/m²): 39
sheets
68 lb (256 g/m²): 31
sheets
110 lb (413 g/m²): 19
sheets
Loading capacity may
vary depending on the
paper type.
Width: 2.0 to 8.5 inches (50.8
to 215.9 mm)
Height: 15.5 to 240 inches
(393.8 to 6096 mm)
59
13 to 35 lb
(50 to 130 g/m²)
1 sheet
Page 60

Paper type Paper size Paper weight Loading capacity
Plain paper
Fine paper
Recycled paper
Plain paper
Fine paper
Recycled paper
Legal (8.5 × 14 inches
[216 × 356 mm])
A3 (11.7 × 16.5 inches
[297 × 420 mm])
7 to 68 lb
(27 to 256 g/m²)
7 to 68 lb
(27 to 256 g/m²)
21 lb (80 g/m²): 80 sheets
24 lb (90 g/m²): 67 sheets
28 lb (104 g/m²): 57
sheets
34 lb (127 g/m²): 41
sheets
42 lb (157 g/m²): 34
sheets
56 lb (209 g/m²): 26
sheets
68 lb (256 g/m²): 21
sheets
Loading capacity may
vary depending on the
paper type.
7 lb (27 g/m²): 60 sheets
21 lb (80 g/m²): 60 sheets
24 lb (90 g/m²): 50 sheets
28 lb (104 g/m²): 43
sheets
60
34 lb (127 g/m²): 31
sheets
42 lb (157 g/m²): 25
sheets
56 lb (209 g/m²): 19
sheets
68 lb (256 g/m²): 15
sheets
Loading capacity may
vary depending on the
paper type.
Page 61

Paper type Paper size Paper weight Loading capacity
Long paper Width: 2 to 12 inches (50.8 to
304.8 mm)
13 lb (50 g/m²) to
35 lb (130 g/m²)
1 sheet (with feed
selector in the position)
Length: 17 to 220 inches
(431.8 to 5588 mm)
Paper business cards Business cards Up to 56 lb
36 cards loaded vertically
(210 g/m²)
DS-32000 (Delicate Mode)
Note: The following table lists the capacity when the feed selector position is in the position. If
the feed selector is in the position, originals should be manually fed one at a time.
Note: You can load originals of different sizes, paper types, and thicknesses up to this size: A3
(11.7 × 16.5 inches [297 × 420 mm]).
61
Page 62

Paper type Paper size Paper weight Loading capacity
Plain paper
Fine paper
Recycled paper
Plain paper
Fine paper
Recycled paper
Letter (8.5 × 11 inches
[216 × 279 mm])
A4 (8.3 × 11.7 inches
[210 × 297 mm])
A5 (5.8 × 8.2 inches
[148 × 210 mm])
A6 (4.1 × 5.8 inches
[105 × 148 mm])
B5 (7.2 × 10.1 inches
[182 × 257 mm])
B6 (5 × 7.2 inches
[128 × 182 mm])
A8 (2.1 × 2.9 inches
[52 × 74 mm])
Width: 2.0 to 8.5 inches (50.8
to 215.9 mm)
Height: 15.5 to 240 inches
(393.8 to 6096 mm)
Legal (8.5 × 14 inches
[216 × 356 mm])
A3 (11.7 × 16.5 inches
[297 × 420 mm])
7 to 110 lb
(27 to 413 g/m²)
34 to 110 lb
(127 to 413 g/m²)
13 to 35 lb
(50 to 130 g/m²)
7 to 68 lb
(27 to 256 g/m²)
7 lb (27 g/m²): 20 sheets
21 lb (80 g/m²): 20 sheets
24 lb (90 g/m²): 20 sheets
28 lb (104 g/m²): 20
sheets
34 lb (127 g/m²): 20
sheets
42 lb (157 g/m²): 10
sheets
56 lb (209 g/m²): 1 sheet
68 lb (256 g/m²): 1 sheet
Loading capacity may
vary depending on the
paper type.
1 sheet
21 lb (80 g/m²): 10 sheets
24 lb (90 g/m²): 10 sheets
28 lb (104 g/m²): 10
sheets
62
34 lb (127 g/m²): 10
sheets
42 lb (157 g/m²): 5 sheets
56 lb (209 g/m²): 1 sheet
68 lb (256 g/m²): 1 sheet
Loading capacity may
vary depending on the
paper type.
Page 63

Paper type Paper size Paper weight Loading capacity
Thin paper Up to Letter (8.5 × 11 inches
[216 × 279 mm]) or A4
5 lb (20 g/m²) to 7
lb (27 g/m²)
20 sheets
(8.3 × 11.7 inches
[210 × 297 mm])
Long paper Width: 2 to 12 inches (50.8 to
304.8 mm)
13 lb (50 g/m²) to
35 lb (130 g/m²)
1 sheet (with feed
selector in the position)
Length: 17 to 220 inches
(431.8 to 5588 mm)
Paper business cards Business cards Up to 56 lb
36 cards loaded vertically
(210 g/m²)
Warning: Do not load the following types of originals directly in the scanner, or they may be damaged or
may damage the scanner:
• Photos
• Originals that are bound (thicker than 0.08 inch (2 mm) when closed)
• Fabric or other non-paper originals
• Originals containing staples or paper clips
• Originals with glue attached
• Ripped originals
• Heavily wrinkled or curled originals
• Transparencies
• Originals with carbon paper backing
• Originals with wet ink
• Originals with attached sticky notes
You can scan A5-sized bound originals that are less than 0.08 inch (2 mm) when closed
You can scan ripped, wrinkled, or curled originals using a carrier sheet (not included).
Do not feed valuable photos, artwork, or important documents into the scanner directly. Misfeeding may
wrinkle or damage the original. When scanning these types of originals, use a carrier sheet (not
included).
63
Page 64

Caution: Be careful when loading the following types of originals, or they may be damaged or may not
scan successfully:
• Originals with uneven surfaces, such as embossed documents
• Curled or wrinkled originals
• Perforated originals
• Originals with labels or stickers
• Carbon-less paper
• Ripped, curled, or wrinkled originals
• Coated paper
Warning: Carbon-less paper contains chemical substances that may damage the rollers inside the
scanner. Make sure you clean the pickup roller and the separation rollers regularly. Scanning carbonless paper may reduce the service life of the rollers compared with scanning plain paper.
Note: When attempting to scan these types of originals, note the following:
• Slow down the feeding speed when scanning wrinkled originals, and smooth out the wrinkles if
possible
• Use the optional carrier sheet to scan originals that are delicate or wrinkled
• If originals are incorrectly detected as double feeds, set the DFDS Function to On on the control
panel, or select Off as the Detect Double Feed setting in Epson Scan 2
• Labels or stickers must be firmly adhered to the scanned original with no exposed glue
• Try to flatten curled originals as much as possible
Parent topic: Loading Originals in the Input Tray
Loading Plastic and Laminated Cards in the Input Tray
You can load plastic and laminated cards that meet the card specifications in the input tray.
Note: To increase the accuracy of auto size detection when scanning laminated cards, select the
Document Size > Settings > Scan laminated card setting in Epson Scan 2.
64
Page 65

1. Open the input tray, pull out the output tray, and open the stopper. Do not pull out the extensions.
2. Slide the input tray edge guides all the way out.
65
Page 66

3. Check to make sure that the page separation lever is in the position shown here.
DS-30000
DS-32000
Note: To prevent paper jams, make sure to set the lever back to its original position when scanning
standard single- or multi-page originals.
66
Page 67

4. Load plastic or laminated cards printed side down and short edge first into the input tray vertically,
and slide them in until they meet resistance.
Note: Do not load the cards horizontally.
5. Slide the edge guides against the edges of the card.
67
Page 68

6. Turn off the Detect Double Feed setting on the Main Settings tab in Epson Scan 2 when scanning
the cards.
Note: If you do not disable the Detect Double Feed setting and a double feed error occurs, remove
the plastic or laminated card from the input tray and reload it. Press the icon on the main screen
to disable the Detect Double Feed feature and scan again. You will need to disable Detect Double
Feed for each scan.
Plastic and Laminated Card Specifications
Parent topic: Loading Originals
Related references
Suggested Tray Positions
Feed Selector Lever
Plastic and Laminated Card Specifications
You can load original plastic and laminated cards that meet these specifications in your scanner. The
feed selector lever must be in the position to scan embossed plastic cards or laminated cards.
Paper type Paper size Paper thickness Loading capacity
Plastic cards,
embossed (ISO7810
ID-1 compliant)
Plastic cards, standard
(ISO7810 ID-1
compliant)
Laminated cards 4.7 × 5.9 inches (120
Note: Plastic cards with glossy surfaces may not scan properly.
Parent topic: Loading Plastic and Laminated Cards in the Input Tray
2.1 × 3.3 inches
(54 × 85.6 mm)
× 150 mm) or smaller
68
0.05 inch (1.24 mm)
maximum
0.03 inch (0.76 mm)
maximum
0.03 inch (0.8 mm)
maximum
1 card (vertical)
5 cards (vertical) (in
Normal Mode with the
feed selector in the
(DS-30000) or
(DS-32000) position)
1 card
Page 69

Loading Special Originals
You can load envelopes, passports, booklets, photos, or large, thick, or folded originals in the input tray.
Some items may require a carrier sheet. Make sure the original meets the specifications for special
originals before loading it.
1. Open the input tray and pull up its extension.
2. Pull out the output tray and its extension, and open the stopper.
Note: If you are loading an original that is 15.5 inches (393.8 mm) or longer, do not pull out the input
or output tray extensions and do not open the stopper.
69
Page 70

3. Slide the input tray edge guides all the way out.
4. Check to make sure that the page separation lever is in the position shown here.
DS-30000
DS-32000
Note: To prevent paper jams, make sure to set the lever back to its original position when scanning
standard single- or multi-page originals.
70
Page 71

5. Load an envelope vertically in the input tray with the printable side down and the flap facing as
shown. Slide in the envelope until it meets resistance.
Note: Do not load envelopes with adhesive on them. Envelopes that are not cut cleanly at the flap
edge may not scan correctly. Envelopes that have not been sealed can be loaded with the flap open
and facing up.
6. Do one of the following to load a photo, or folded or irregularly shaped originals:
• For a folded original, fold and load the original as shown.
71
Page 72

Caution: Do not load the original with the open side facing down.
• For a photo or an irregularly shaped original, load it in the center of a carrier sheet with the printed
side facing down. Make sure the illustration on the front edge of the carrier sheet is facing up.
72
Page 73

7. Load the original in the input tray as shown until it meets resistance.
Folded original
73
Page 74

Photo or irregularly shaped original
8. Slide the edge guides against the edges of the original or carrier sheet.
74
Page 75

9. Turn off the Detect Double Feed setting on the Main Settings tab in Epson Scan 2 when scanning
special originals.
10. If necessary during scanning, adjust the position of the stopper on the output tray extension to fit the
ejected originals.
Note: If thicker paper does not eject properly or falls from the output tray, push in the output tray and
allow the originals to eject freely onto the surface below the scanner. If the scanned images are
affected by the originals ejecting below the scanner, try placing the scanner on the edge of a table
where the ejected originals can drop freely.
When using a carrier sheet, do the following:
• Do not use a carrier sheet that is scratched or has been scanned more than 3,000 times.
• When a carrier sheet is detected and you select Auto Detect as the Document Size setting, the
Paper Skew setting will automatically be applied to the scanned document.
• Only use a carrier sheet designed for your scanner. The carrier sheet is automatically recognized by
detecting two small holes on the leading edge. Keep the holes clean and do not block them.
Loading Booklets
Loading Passports
Special Original Specifications
Parent topic: Loading Originals
Related references
Suggested Tray Positions
Feed Selector Lever
Loading Booklets
You can load small booklets into the scanner. Make sure the booklet meets the specifications before
loading it.
1. Open the input tray and pull up its extension.
75
Page 76

2. Pull out the output tray and its extension, and open the stopper.
3. Slide the input tray edge guides all the way out.
76
Page 77

4. Check to make sure that the page separation lever is in the position shown here.
DS-30000
DS-32000
Note: To prevent paper jams, make sure to set the lever back to its original position when scanning
standard single- or multi-page originals.
77
Page 78

5. Load the original in the input tray as shown until it meets resistance.
6. Slide the edge guides against the edges of the original or carrier sheet.
7. Turn off the Detect Double Feed setting on the Main Settings tab in Epson Scan 2 when scanning
booklets.
Parent topic: Loading Special Originals
78
Page 79
Related references
Suggested Tray Positions
Feed Selector Lever
Special Original Specifications
Loading Passports
You can load passports in the input tray using the passport carrier sheet. Make sure the original meets
the specifications before loading it.
1. Open the input tray and pull up its extension.
2. Pull out the output tray and its extension, and open the stopper.
79
Page 80

3. Slide the input tray edge guides all the way out.
4. Check to make sure that the page separation lever is in the position shown here.
DS-30000
DS-32000
Note: To prevent paper jams, make sure to set the lever back to its original position when scanning
standard single- or multi-page originals.
80
Page 81

5. Load the passport into the passport carrier sheet with the side to be scanned face down, and with
the thicker edge (the side with more pages) aligned with the leading edge of the carrier sheet.
81
Page 82

6. Load the original in the input tray as shown until it meets resistance.
7. Slide the edge guides against the edges of the original or carrier sheet.
82
Page 83

8. Select Passport as the Document Size and turn off the Detect Double Feed setting on the Main
Settings tab in Epson Scan 2 when scanning passports.
Note: Do not use a carrier sheet that is scratched or has been scanned more than 3,000 times.
Parent topic: Loading Special Originals
Related references
Suggested Tray Positions
Feed Selector Lever
Special Original Specifications
Special Original Specifications
You can load photos, envelopes, or large, thick, or folded originals that meet these specifications in your
scanner.
The following table lists the capacity when the scanner is in Normal Mode and the feed selector position
is in the (DS-30000) or (DS-32000) position. If the feed selector is in the position, originals
should be manually fed one at a time.
Caution: If the DS-32000 is in Delicate Mode when scanning these types of originals, the feed selector
lever must be in the position and originals should be manually fed one at a time.
Paper type Paper size Paper thickness Loading capacity
Large originals (plain
paper, fine paper, or
recycled paper)
(folded in half and
loaded in a carrier
sheet)
Photos
(load only in a carrier
sheet)
Up to this size: A3 (11.7 × 16.5
inches [297 × 420 mm])
Up to this size: A4 (8.3 × 11.7
inches [210 × 297 mm])
83
0.012 inch (0.3 mm)
maximum
(excluding the
thickness of the carrier
sheet)
0.012 inch (0.3 mm)
maximum
(excluding the
thickness of the carrier
sheet)
10 carrier sheets
10 carrier sheets
Page 84

Paper type Paper size Paper thickness Loading capacity
Envelopes 4.49 × 6.38 inches (114
× 162 mm)
4.33 × 8.66 inches (110
× 220 mm)
Passports
-- 0.2 inch (5 mm)
(load only in passport
carrier sheet)
Booklets Up to this size: A5 (5.8 × 8.2
inches [148 × 210 mm])
(A4 when two pages are
spread open)
Irregularly shaped
originals
Up to this size: A4 (8.3 × 11.7
inches [210 × 297 mm])
(load only in a carrier
sheet)
Parent topic: Loading Special Originals
0.015 inch (0.38 mm)
maximum
maximum
(total thickness of
closed passport)
.08 inch (2 mm)
maximum
(total thickness of
closed booklet)
0.012 inch (0.3 mm)
maximum
(excluding the
thickness of the carrier
sheet)
10 envelopes
1 passport
1 booklet
10 carrier sheets
84
Page 85

Scanning
You can scan your originals and save them as digital files.
Starting a Scan
Scanning with Simple Scan in Document Capture Pro - Windows
Scanning with Document Capture Pro
Scanning with Document Capture - Mac
Scanning in Epson Scan 2
Scan Resolution Guidelines
Scanning Special Projects
Starting a Scan
After placing your originals on your product for scanning, start scanning using one of these methods.
Note: You can also scan using Document Capture Pro (Windows) or Document Capture (Mac).
Starting a Scan Using the Product Control Panel
Starting a Scan Using the Epson Scan 2 Icon
Starting a Scan from a Scanning Program
Parent topic: Scanning
Related tasks
Scanning with Simple Scan in Document Capture Pro - Windows
Scanning with Document Capture Pro
Scanning with Document Capture - Mac
Starting a Scan Using the Product Control Panel
You can scan an original from the control panel using jobs created in Document Capture Pro or
Document Capture. Set the operation mode on the control panel before scanning.
1. Make sure you installed the product software and connected the product to your computer or
network.
Note: You may need to restart your computer after installing the product software to enable
scanning from the control panel.
85
Page 86

2. Place your original on the product for scanning.
3. Press the home button, if necessary.
4. Select Scan.
You see a list of available scanning jobs. Each job represents a pre-defined set of scan settings.
5. Select a job.
Note: If you don't see an appropriate job, you will have to edit an existing job or add a new job using
the Document Capture (Mac) or Document Capture Pro (Windows) application. See the link below.
You see a screen like this:
6. If you want to change the job settings for the current job, select the job name.
Any changes you make will only apply until you exit the Scan screen. If you select Scan again from
the main menu, the job is reloaded from the computer and your changes are lost. To permanently
modify a job, change the settings in Document Capture or Document Capture Pro.
Note: If you cannot modify the settings, open Document Capture (Mac) or Document Capture Pro
(Windows) and make sure the Disable job setting changes on control panel setting is not
selected in the Confirm/Test tab in the job settings.
86
Page 87

7. Select from the following options:
• To change the saved file type, select File Type and select a file type.
• To change the color type of the scanned image, select Image Type and select an option.
• To change the resolution, select Resolution and select an option from either Low (200 dpi),
Medium (300 dpi), or High (600 dpi).
• To change the size of the scanned original, select Original Size and select an option.
• To scan both sides of the original, select Source and select 2-Sided.
• To change the number of copies to print when a printer is selected as the destination, select
Copies and enter a number.
8. If you want to change the scanner settings for the current job, select Scanner Settings on the
control panel.
Note: If an administrator has locked the settings, you may need to enter the administrator password
to change certain scanner settings.
9. Select from the following options:
• To increase the force used to separate originals in Delicate Mode, enable Power Separation
Mode (DS-32000).
Caution: Do not use Power Separation Mode with thin originals, or you may damage them.
• To slow down the scanning speed, set the Slow setting to On.
• To stop scanning immediately when a double feed is detected, set the Double Feed Stop Timing
setting to Immediate. When set to After Eject, the double feed is scanned and ejected before
scanning ends.
• To skip double feed detection when scanning originals such as envelopes or plastic cards, set the
DFDS Function setting to On.
• To stop scanning immediately when a skewed original or feeding error is detected, enable the
Paper Protection setting. When set to higher levels, the setting reduces the amount of skew
required to trigger a stop. Select higher settings when scanning thin papers.
• To detect dirt on the scanner glass, enable the Detect Glass Dirt setting.
• To use the ultrasonic sensor to detect double feed errors, enable the Ultrasonic Double Feed
Detection setting. This setting may not work with envelopes, plastic cards, or originals with labels
or stickers.
87
Page 88

• To adjust the time before the rollers stop moving when in Automatic Feeding Mode, select Roller
Timeout and set a time.
10. Select the Start icon.
Adding and Assigning Scan Jobs with Document Capture Pro - Windows
Adding and Assigning Scan Jobs with Document Capture - Mac
Parent topic: Starting a Scan
Adding and Assigning Scan Jobs with Document Capture Pro - Windows
You can view, change, or add scan jobs for use when you scan using your product control panel. You do
this by accessing the scan jobs in the Document Capture Pro program.
Note: The settings may vary, depending on the software version you are using. See the help information
in Document Capture Pro for details.
1. Do one of the following to start Document Capture Pro:
• Windows 10: Click and select Epson Software > Document Capture Pro.
• Windows 8.x: Navigate to the Apps screen and select Document Capture Pro.
• Windows (other versions): Click or Start, and select All Programs or Programs. Select
Epson Software > Document Capture Pro.
You see the Document Capture Pro window.
2. Select the Job Scan tab on the left.
88
Page 89

You see a window like this:
3. Click the Job Settings button.
You see a window like this:
4. To add a scan job, click the New Job icon, enter a name for the new job, select settings as
necessary, and click OK.
You can now use the new scan job when you scan with Document Capture Pro.
89
Page 90

Note: See the help information in Document Capture Pro for details.
5. To assign a scan job to the product control panel, click the Button Assignment icon.
6. Select the jobs that you want to assign using any of the pull-down menus.
Note: The number of pull-down menus available may vary, depending on your product and any
connected options.
You see a screen like this:
7. Click OK, then click Back.
You can now use the added scan jobs when you scan from the product control panel.
Parent topic: Starting a Scan Using the Product Control Panel
Adding and Assigning Scan Jobs with Document Capture - Mac
You can view, change, or add available default scan settings when you scan using the Document
Capture Pro option on the product control panel. You do this by accessing the scan jobs in the Document
Capture program.
90
Page 91

1. Start Document Capture on a computer connected to the product.
2. Click the Manage Job icon from the toolbar at the top of the window.
You see a window showing the current scan job list.
3. To add a scan job, click the + icon, enter a name for the new job, select settings as necessary, and
click OK.
You can now use the new scan job when you scan with Document Capture.
Note: See the Help information in Document Capture for details.
4. To assign scan jobs to the selection list on the product control panel, click the icon at the
bottom of the window and click Event Settings.
5. Select the jobs that you want to assign using any of the pull-down menus.
You can now use the added scan jobs when you scan from the product control panel.
6. Click OK, then click OK again.
Parent topic: Starting a Scan Using the Product Control Panel
Starting a Scan Using the Epson Scan 2 Icon
You can start the Epson Scan 2 program to select scan settings, scan, and save the scanned image to a
file.
• Windows 10: Click and select EPSON > Epson Scan 2.
• Windows 8.x: Navigate to the Apps screen and select Epson Scan 2.
• Windows (other versions): Click or Start, and select All Programs or Programs. Select EPSON
> Epson Scan 2 > Epson Scan 2.
• Mac: Open the Applications folder, open the Epson Software folder, and select Epson Scan 2.
91
Page 92

You see an Epson Scan 2 window like this:
Parent topic: Starting a Scan
92
Page 93

Starting a Scan from a Scanning Program
You can start Epson Scan 2 from a TWAIN-compliant scanning program to select scan settings, scan,
and open the scanned image in the program.
1. Open your scanning program and select its scanning option. (See your scanning program help for
instructions.)
2. Select your product.
Note: In certain programs, you may need to select your product as the "source" first. If you see a
Select Source option, choose it and select your product. With Windows, do not select a WIA option
for your product; not all scan functions will be available.
93
Page 94

You see an Epson Scan 2 window like this:
Parent topic: Starting a Scan
Scanning with Simple Scan in Document Capture Pro - Windows
You can use the Simple Scan tab in Document Capture Pro to quickly select options and scan.
94
Page 95

Note: The settings may vary, depending on the software version you are using. See the help information
in Document Capture Pro for details.
1. Load your original in the product.
2. Do one of the following to start Document Capture Pro:
• Windows 10: Click and select Epson Software > Document Capture Pro.
• Windows 8.x: Navigate to the Apps screen and select Document Capture Pro.
• Windows (other versions): Click or Start, and select All Programs or Programs. Select
Epson Software > Document Capture Pro.
You see the Document Capture Pro window. (You may see a screen asking you to select your
scanner first; if you do, select your product.)
3. Click Select Scanner and select your scanner from the scanner list, if necessary.
4. Select the Simple Scan tab.
You see a window like this:
5. If you want to use a scan job, click the Job Scan tab.
Note: The default job is Scan to PDF. To create more jobs, click the Job Settings button.
95
Page 96

6. If you want to select specific scan settings for the scan, click the Scan Settings button, select any
displayed settings you want to use, and click OK. For additional settings, click the Detailed Settings
button on the Scan Settings screen.
Note: See the help information in Document Capture Pro for details.
7. Do one of the following:
• To scan the front side of an original, select SCAN single sided.
• To scan both sides of an original,select SCAN double sided.
Your product starts scanning and you see the Edit Scanned Results window.
8. View and edit the scanned pages as necessary and click Complete when you are finished.
Note: See the help information in Document Capture Pro for details.
9. Select a destination and any settings as necessary and click Complete.
Note: See the help information in Document Capture Pro for details.
Parent topic: Scanning
Scanning with Document Capture Pro
You can create scan jobs in Document Capture Pro and use them to quickly scan originals and save
them to various destinations.
Note: The settings may vary, depending on the software version you are using. See the help information
in Document Capture Pro for details.
1. Load your original in the product.
2. Do one of the following to start Document Capture Pro:
• Windows 10: Click and select Epson Software > Document Capture Pro.
• Windows 8.x: Navigate to the Apps screen and select Document Capture Pro.
• Windows (other versions): Click or Start, and select All Programs or Programs. Select
Epson Software > Document Capture Pro.
96
Page 97

You see the Document Capture Pro window. (You may see a screen asking you to select your
scanner first; if you do, select your product.)
3. Select the Job Scan tab.
You see a window like this:
4. Select one of the scan jobs (or click Job Settings to create a new scan job).
The scanner scans the loaded originals and saves them according to the job settings.
5. Depending on the job settings, you may be able to view and edit the pages before saving them. If so,
click Complete when finished.
The scanned images are saved according to the job settings.
Parent topic: Scanning
Scanning with Document Capture - Mac
When you scan with Document Capture, the program automatically saves your scanned file on your
computer in the folder you specify. You can select settings, preview, and change the scanned file
settings as necessary.
Note: The settings may vary, depending on the software version you are using. See the Help information
in Document Capture for details.
1. Load your original in the product.
97
Page 98

2. Open the Applications folder, open the Epson Software folder, and select Document Capture.
You see a window like this:
Note: You may need to select your scanner from the scanner list.
3. Click the Scan icon.
98
Page 99

You see a window like this:
Note: If you want to use a scan job that you created instead, select it from the Job list in the
Document Capture window, click the Start Job button, and skip the rest of these steps.
4. Select any displayed scan settings you want to use.
Note: See the Help information in Document Capture for details.
5. If you want to select detailed scan settings, close the Scan Settings window, open the Scan menu at
the top of the Mac desktop, and select Displays the EPSON Scan Setup Screen.
6. Click the Scan icon and select any detailed scan settings you want to use from the Epson Scan 2
window.
7. Click Scan.
99
Page 100

You see a preview of your scan in the Document Capture window.
Note: You may have to close the Epson Scan 2 window to view your scan in the Document Capture
window.
8. If you would like to scan additional originals and add them to the current captured images, click the +
icon, select Acquire from Scanner, and repeat the previous steps.
9. Check the scanned images and edit them as necessary.
10. Click one of the Destination icons to choose where to send your scanned files. (If you cannot see all
of the icons below, click the arrow next to the icons.)
11. Depending on the destination you chose, click OK or Send to complete the operation.
Parent topic: Scanning
100
 Loading...