

Page 1

User's Guide
Scanner Basics
Specications and Capacity for Originals
Placing Originals
Scanning
Maintenance
Solving Problems
NPD6160-01 EN
Page 2

Copyright
No part of this publication may be reproduced, stored in a retrieval system, or transmitted in any form or by any
means, electronic, mechanical, photocopying, recording, or otherwise, without the prior written permission of
Seiko Epson Corporation. No patent liability is assumed with respect to the use of the information contained
herein. Neither is any liability assumed for damages resulting from the use of the information herein.
information contained herein is designed only for use with this Epson product. Epson is not responsible for any
use of this information as applied to other products.
Neither Seiko Epson Corporation nor its aliates shall be liable to the purchaser of this product or third parties for
damages, losses, costs, or expenses incurred by the purchaser or third parties as a result of accident, misuse, or
abuse of this product or unauthorized modications, repairs, or alterations to this product, or (excluding the U.S.)
failure to strictly comply with Seiko Epson Corporation's operating and maintenance instructions.
Seiko Epson Corporation and its aliates shall not be liable for any damages or problems arising from the use of
any options or any consumable products other than those designated as Original Epson Products or Epson
Approved Products by Seiko Epson Corporation.
Seiko Epson Corporation shall not be held liable for any damage resulting from electromagnetic interference that
occurs from the use of any interface cables other than those designated as Epson Approved Products by Seiko
Epson Corporation.
© 2019 Seiko Epson Corporation
e
contents of this manual and the
e
specications
of this product are subject to change without notice.
Page 3

Trademarks
❏ EPSON, EPSON EXCEED YOUR VISION, EXCEED YOUR VISION and their logos are registered trademarks
or trademarks of Seiko Epson.
❏
Microso
Corporation.
❏ Apple, macOS, and OS X are registered trademarks of Apple, Inc.
❏ Adobe, Adobe Reader, and Acrobat are either registered trademarks or trademarks of Adobe Systems
Incorporated in the United States and/or other countries.
❏ Intel
❏ e SuperSpeed USB Trident Logo is a registered trademark of USB Implementers Forum, Inc.
❏ General Notice: Other product names used herein are for identication purposes only and may be trademarks
of their respective owners. Epson disclaims any and all rights in those marks.
, Windows®, Windows Server®, and Windows Vista® are registered trademarks of
®
is a registered trademark of Intel Corporation.
®
Microso
Page 4

Contents
Copyright
Trademarks
About This Manual
Introducing the Manuals.....................7
Marks and Symbols.........................7
Descriptions Used in this Manual...............7
Operating System References..................7
Important Instructions
Safety Instructions.........................10
Restrictions on Copying.....................11
Scanner Basics
Part Names and Functions...................13
Feed selector.............................15
Control Panel............................ 16
Buttons and Lights.......................16
Guide to the Screen......................16
Information on Applications..................19
Epson Scan 2...........................19
Document Capture Pro / Document Capture. . . .19
EPSON Soware Updater. . . . . . . . . . . . . . . . . . 20
Option Items and Consumables Information. . . . . .21
Carrier Sheet Codes......................21
Roller Codes...........................21
Cleaning Kit Codes......................22
Specications and Capacity for
Originals
Specications and Capacity for Originals being
Scanned................................ 24
Specications
Specications of Long Paper................27
Specications of Envelopes.................28
Specications
Specications
Specications of Booklets..................29
Specications for Passports.................29
Specications
Sheet.................................29
Types of Originals that Require Attention. . . . . . . . 30
of Standard Size Paper..........25
of Plastic Cards...............28
of Laminated Cards........... 28
for Originals Using the Carrier
Types of Originals that Must Not be Scanned. . . . . .31
Placing Originals
Combination of Input Tray and Output Tray. . . . . . 33
Placing Standard Size Originals................34
Placing A3 Size Originals with Fold Lines. . . . . . 37
Placing Long Paper........................ 41
Placing Large Size Originals..................43
Placing Envelopes......................... 46
Placing Plastic Cards.......................48
Placing Laminated Cards....................50
Placing a Booklet..........................53
Placing a Passport......................... 55
Placing Irregular Shaped Originals.............58
Placing Photographs....................... 60
Placing a Mixture of Originals at Dierent Sizes. . . .63
Scanning
Required Settings for Scanning................67
Creating a Job in Document Capture Pro
(Windows)............................ 67
Creating a Job in Document Capture (Mac OS). . 67
Enabling a Job to Run from the Control Panel
(Mac OS)..............................72
Scanning Using the Control Panel..............73
Scanning with Document Capture Pro (Windows). .75
Scanning with Document Capture (Mac OS). . . . . .76
Scanning with Epson Scan 2..................77
Required Settings for Special Originals. . . . . . . . 81
Scanning with Manual Feed in Automatic
Feeding Mode............................82
Menu Options on the Control Panel
Scan...................................86
Edit Job...............................86
Scanner Settings.........................86
Scanner Maintenance.......................88
Status.................................. 88
Settings.................................89
Device Information......................89
Scanner Settings.........................90
Common Settings....................... 91
Roller Replacement Alert Setting............ 92
4
Page 5

Regular Cleaning Alert Settings............. 92
System Administration....................93
Maintenance
Cleaning Outside the Scanner.................95
Cleaning Inside the Scanner..................95
Resetting the Number of Scans Aer Regular
Cleaning................................99
Replacing the Roller.......................100
Resetting the Number of Scans
the Rollers..............................105
Energy Saving........................... 105
Moving the Scanner.......................106
Moving the Scanner on the Desk............106
Transporting over a Long Distance..........107
Aer
Replacing
Solving Problems
Scanner Problems........................ 110
Checking Messages on the Control Panel. . . . . .110
e Scanner Does Not Turn On............ 110
e Scanner Turns O Unexpectedly.........110
Problems Starting Scanning.................110
Document Capture Pro (Windows) Is Not
Installed..............................110
Cannot Start Document Capture Pro
(Windows) or Document Capture (Mac OS). . . 111
Cannot Start Epson Scan 2................111
Paper Feeding Problems. . . . . . . . . . . . . . . . . . . . 112
Multiple Originals Are Fed................112
Removing Jammed Originals from the Scanner. 112
e Original Jams in the Scanner Frequently. . . 113
e Special Original Jams in the Scanner
Frequently............................114
Paper Protection Does not Work Correctly. . . . 114
e Originals Get Dirty..................114
Scanning Speed Slows Down when Scanning
Continuously..........................114
Scanning Takes a Long Time...............114
e Card Is Not Loaded..................115
Scanned Image Problems...................115
Straight Lines Appear when Scanning from
ADF................................ 115
Glass Dirt Alert and Sensor Dirt Alert Do
Not Disappear.........................116
Colors Are Uneven in the Scanned Image. . . . . 116
Expanding or Contracting the Scanned Image. . 116
Oset Appears in the Background of Images. . . 117
Scanned Image or Text is Blurred........... 117
Moiré Patterns (Web-Like Shadows) Appear. . . 118
e Edge of the Original is Not Scanned
when Automatically Detecting the Size of the
Original..............................118
Character is not Recognized Correctly........119
Carrier Sheet And Passport Carrier Sheet Are
Not Recognized Correctly.................119
Cannot Solve Problems in the Scanned Image. . 119
Uninstalling and Installing Applications. . . . . . . . 120
Uninstalling Your Applications.............120
Installing Your Applications...............122
Technical Specications
General Scanner Specications...............124
Dimensions and Weight Specications......... 125
Electrical Specications.................... 125
Scanner Electrical
AC Adapter Electrical
Environmental Specications................126
System Requirements......................126
Specications
Specications
............125
.........125
Standards and Approvals
Standards and Approvals for European Models. . . 129
Standards and Approvals for Australian Models. . .129
Where to Get Help
Technical Support Web Site..................131
Contacting Epson Support..................131
Before Contacting Epson................. 131
Help for Users in Europe..................131
Help for Users in Taiwan..................131
Help for Users in Australia................132
Help for Users in Singapore............... 132
Help for Users in ailand................133
Help for Users in Vietnam................ 133
Help for Users in Indonesia................134
Help for Users in Hong Kong.............. 135
Help for Users in Malaysia................ 136
Help for Users in India...................136
Help for Users in the Philippines............136
5
Page 6

About This Manual
Introducing the Manuals..............................................7
Marks and Symbols..................................................7
Descriptions Used in this Manual....................................... 7
Operating System References...........................................7
Page 7

About This Manual
>
Operating System References
Introducing the Manuals
latest versions of the following manuals are available from the Epson support website.
e
http://www.epson.eu/Support (Europe)
http://support.epson.net/ (outside Europe)
❏ Start Here (paper manual)
Provides you with information on setting up the product and installing the application.
❏ User's Guide (digital manual)
Provides instructions on using the product, maintenance, and solving problems.
As well as the manuals above, see the help included in the various Epson applications.
Marks and Symbols
Caution:
!
Instructions that must be followed carefully to avoid bodily injury.
Important:
c
Instructions that must be observed to avoid damage to your equipment.
Note:
Provides complementary and reference information.
Related Information
& Links to related sections.
Descriptions Used in this Manual
❏ Screenshots for the applications are from Windows 10 or macOS High Sierra. e content displayed on the
screens varies depending on the model and situation.
❏ Illustrations used in this manual are for reference only. Although they may dier slightly from the actual
product, the operating methods are the same.
Operating System References
Windows
In this manual, terms such as "Windows 10", "Windows 8.1", "Windows 8", "Windows 7", "Windows Vista",
"Windows XP", "Windows Server 2019", "Windows Server 2016", "Windows Server 2012 R2", "Windows Server
2012", "Windows Server 2008 R2", "Windows Server 2008", "Windows Server 2003 R2", and "Windows Server
2003" refer to the following operating systems. Additionally, "Windows" is used to refer to all versions and
7
Page 8

About This Manual
"Windows Server" is used to refer to "Windows Server 2016", "Windows Server 2012 R2", "Windows Server 2012",
"Windows Server 2008 R2", "Windows Server 2008", "Windows Server 2003 R2", and "Windows Server 2003".
>
Operating System References
❏ Microso
❏ Microso
❏
Microso
❏ Microso
❏ Microso
❏
Microso
❏ Microso
❏ Microso
❏
Microso
❏ Microso
❏ Microso
❏
Microso
❏ Microso
❏ Microso
❏
Microso
Mac OS
Windows® 10 operating system
®
Windows® 8.1 operating system
®
Windows® 8 operating system
®
Windows® 7 operating system
®
Windows Vista® operating system
®
Windows® XP operating system Service Pack 3
®
Windows® XP Professional x64 Edition operating system Service Pack 2
®
Windows Server® 2019 operating system
®
Windows Server® 2016 operating system
®
Windows Server® 2012 R2 operating system
®
Windows Server® 2012 operating system
®
Windows Server® 2008 R2 operating system
®
Windows Server® 2008 operating system
®
Windows Server® 2003 R2 operating system
®
Windows Server® 2003 operating system Service Pack 2
®
In this manual, "Mac OS" is used to refer to macOS Catalina,macOS Mojave, macOS High Sierra, macOS Sierra,
OS X El Capitan, OS X Yosemite, OS X Mavericks, OS X Mountain Lion, Mac OS X v10.7.x, and Mac OS X v10.6.8.
8
Page 9

Important Instructions
Safety Instructions................................................. 10
Restrictions on Copying............................................. 11
Page 10

Important Instructions
>
Safety Instructions
Safety Instructions
Read and follow these instructions to ensure safe use of this product and options. Make sure you keep this manual
for future reference. Also, be sure to follow all warnings and instructions marked on the product and options.
❏ Some of the symbols used on your product and options are to ensure safety and proper use of the product. Visit
the following Web site to learn the meaning of the symbols.
http://support.epson.net/symbols
❏ Place the product and options on a at, stable surface that extends beyond the base of the product and options
in all directions. If you place the product and options by the wall, leave more than 10 cm between the back of
the product and options and the wall.
❏ Place the product and options close enough to the computer for the interface cable to reach it easily. Do not
place or store the product and options or the AC adapter outdoors, near excessive dirt or dust, water, heat
sources, or in locations subject to shocks, vibrations, high temperature or humidity, direct sunlight, strong light
sources, or rapid changes in temperature or humidity.
❏ Do not use with wet hands.
❏ Place the product and options near an electrical outlet where the adapter can be easily unplugged.
❏ e AC adapter cord should be placed to avoid abrasions, cuts, fraying, crimping, and kinking. Do not place
objects on top of the cord and do not allow the AC adapter or the cord to be stepped on or run over. Be
particularly careful to keep the cord straight at the end.
❏ Use only the power cord supplied with the product and do not use the cord with any other equipment. Use of
other cords with this product or the use of the supplied power cord with other equipment may result in re or
electric shock.
❏ Use only the AC adapter that comes with your product. Using any other adapter could cause re, electrical
shock, or injury.
❏ e AC adapter is designed for use with the product with which it was included. Do not attempt to use it with
other electronic devices unless specied.
❏ Use only the type of power source indicated on the AC adapter’s label, and always supply power directly from a
standard domestic electrical outlet with the AC adapter that meets the relevant local safety standards.
❏ When connecting this product and options to a computer or other device with a cable, ensure the correct
orientation of the connectors. Each connector has only one correct orientation. Inserting a connector in the
wrong orientation may damage both devices connected by the cable.
❏ Avoid using outlets on the same circuit as photocopiers or air control systems that regularly switch on and o.
❏ If you use an extension cord with the product, make sure the total ampere rating of the devices plugged into the
extension cord does not exceed the cord’s ampere rating. Also, make sure the total ampere rating of all devices
plugged into the wall outlet does not exceed the wall outlet’s ampere rating.
❏ Never disassemble, modify, or attempt to repair the AC adapter, product, or product options by yourself except
as specically explained in the product’s guides.
❏ Do not insert objects into any opening as they may touch dangerous voltage points or short out parts. Beware of
electrical shock hazards.
❏ If damage occurs to the plug, replace the cord set or consult a qualied electrician. If there are fuses in the plug,
make sure you replace them with fuses of the correct size and rating.
❏ Unplug the product, options, and the AC adapter, and refer servicing to qualied service personnel under the
following conditions: e AC adapter or plug is damaged; liquid has entered the product, options, or the AC
adapter; the product or the AC adapter has been dropped or the case has been damaged; the product, options,
or the AC adapter does not operate normally or exhibits a distinct change in performance. (Do not adjust
controls that are not covered by the operating instructions.)
10
Page 11

Important Instructions
❏ Unplug the product and the AC adapter before cleaning. Clean with a damp cloth only. Do not use liquid or
aerosol cleaners except as
❏ If you are not going to use the product for a long period, be sure to unplug the AC adapter from the electrical
outlet.
❏ Aer replacing consumable parts, dispose of them correctly following the rules of your local authority. Do not
disassemble them.
❏ If the LCD screen is damaged, contact your dealer. If the liquid crystal solution gets on your hands, wash them
thoroughly with soap and water. If the liquid crystal solution gets into your eyes,
water. If discomfort or vision problems remain aer a thorough ushing, see a doctor immediately.
>
Restrictions on Copying
specically
explained in the product’s guides.
them immediately with
ush
Restrictions on Copying
Observe the following restrictions to ensure the responsible and legal use of your product.
Copying of the following items is prohibited by law:
❏ Bank bills, coins, government-issued marketable securities, government bond securities, and municipal
securities
❏ Unused postage stamps, pre-stamped postcards, and other ocial postal items bearing valid postage
❏ Government-issued revenue stamps, and securities issued according to legal procedure
Exercise caution when copying the following items:
❏ Private marketable securities (stock
tickets, etc.
❏ Passports, driver’s licenses, warrants of tness, road passes, food stamps, tickets, etc.
Note:
Copying these items may also be prohibited by law.
Responsible use of copyrighted materials:
Products can be misused by improperly copying copyrighted materials. Unless acting on the advice of a
knowledgeable attorney, be responsible and respectful by obtaining the permission of the copyright holder before
copying published material.
certicates,
negotiable notes, checks, etc.), monthly passes, concession
11
Page 12

Scanner Basics
Part Names and Functions............................................13
Feed selector. . . . . . . . . . . . . . . . . . . . . . . . . . . . . . . . . . . . . . . . . . . . . . . . . . . . . . 15
Control Panel.....................................................16
Information on Applications..........................................19
Option Items and Consumables Information..............................21
Page 13
Scanner Basics
>
Part Names and Functions
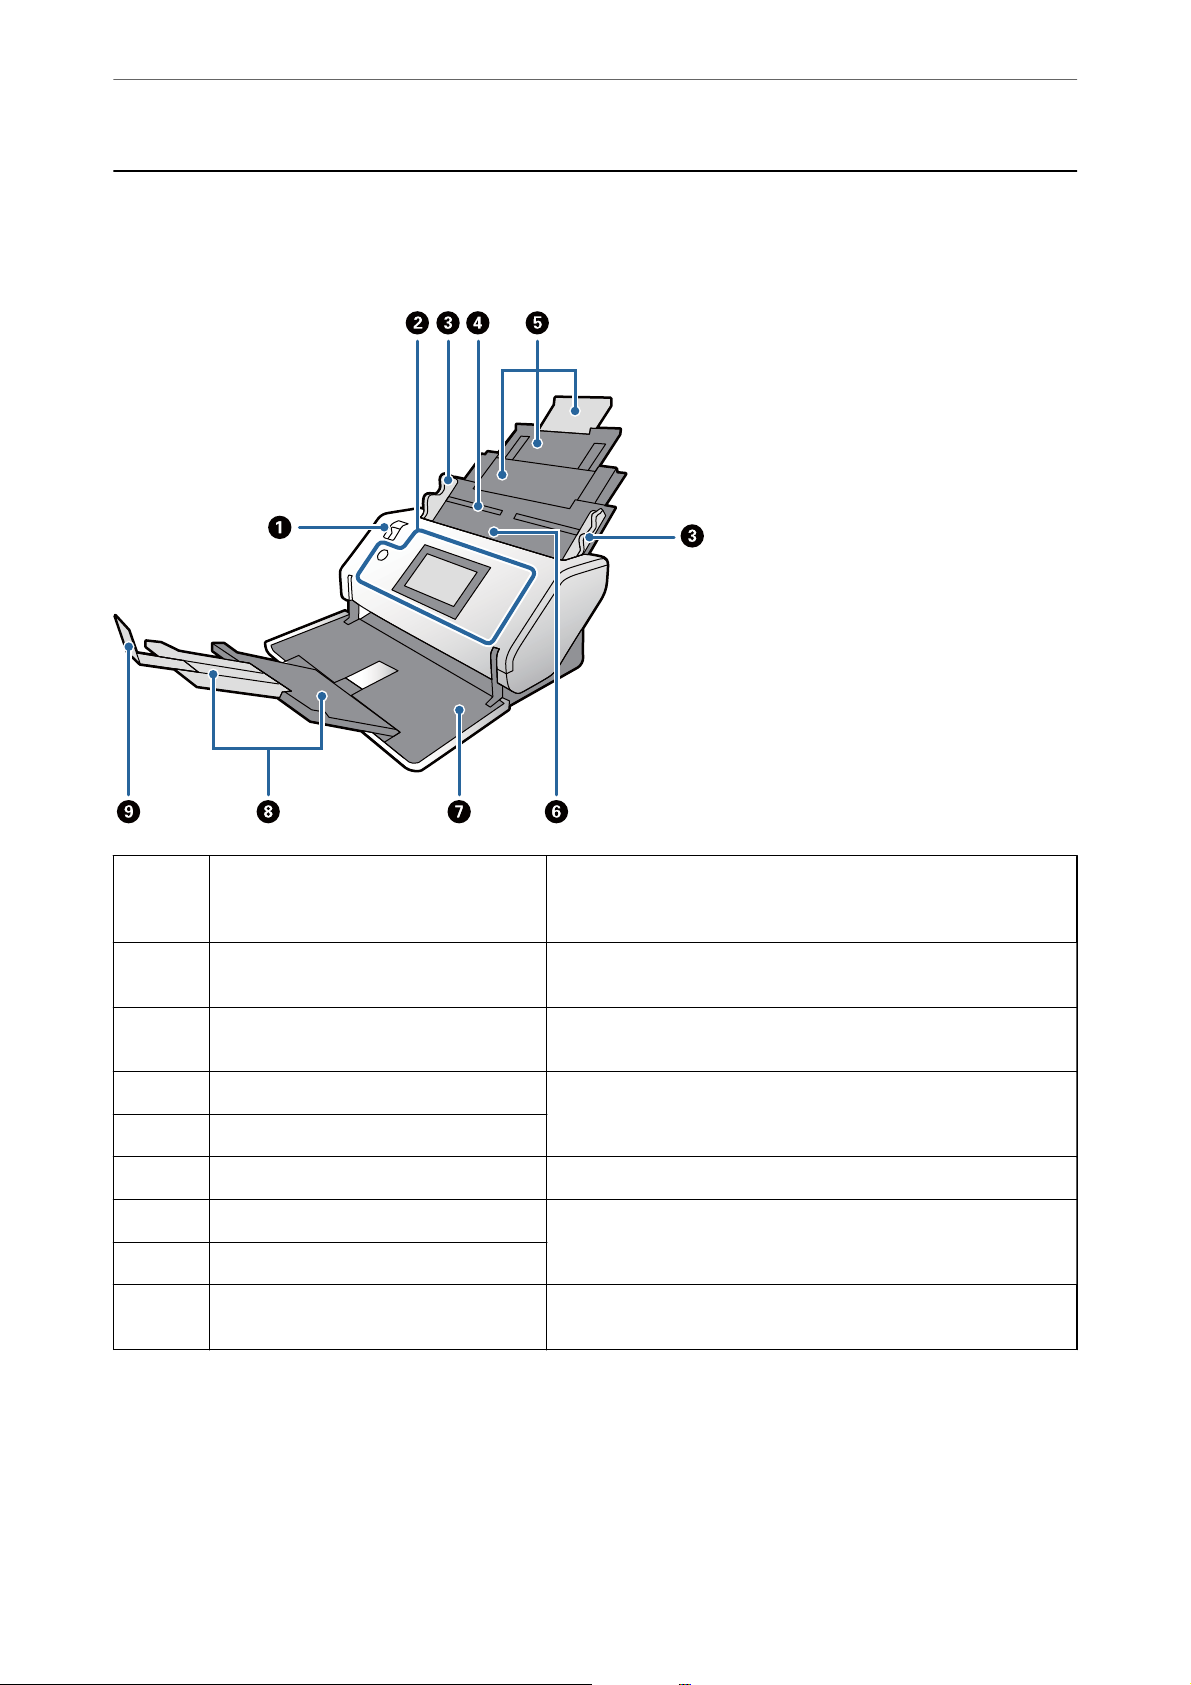
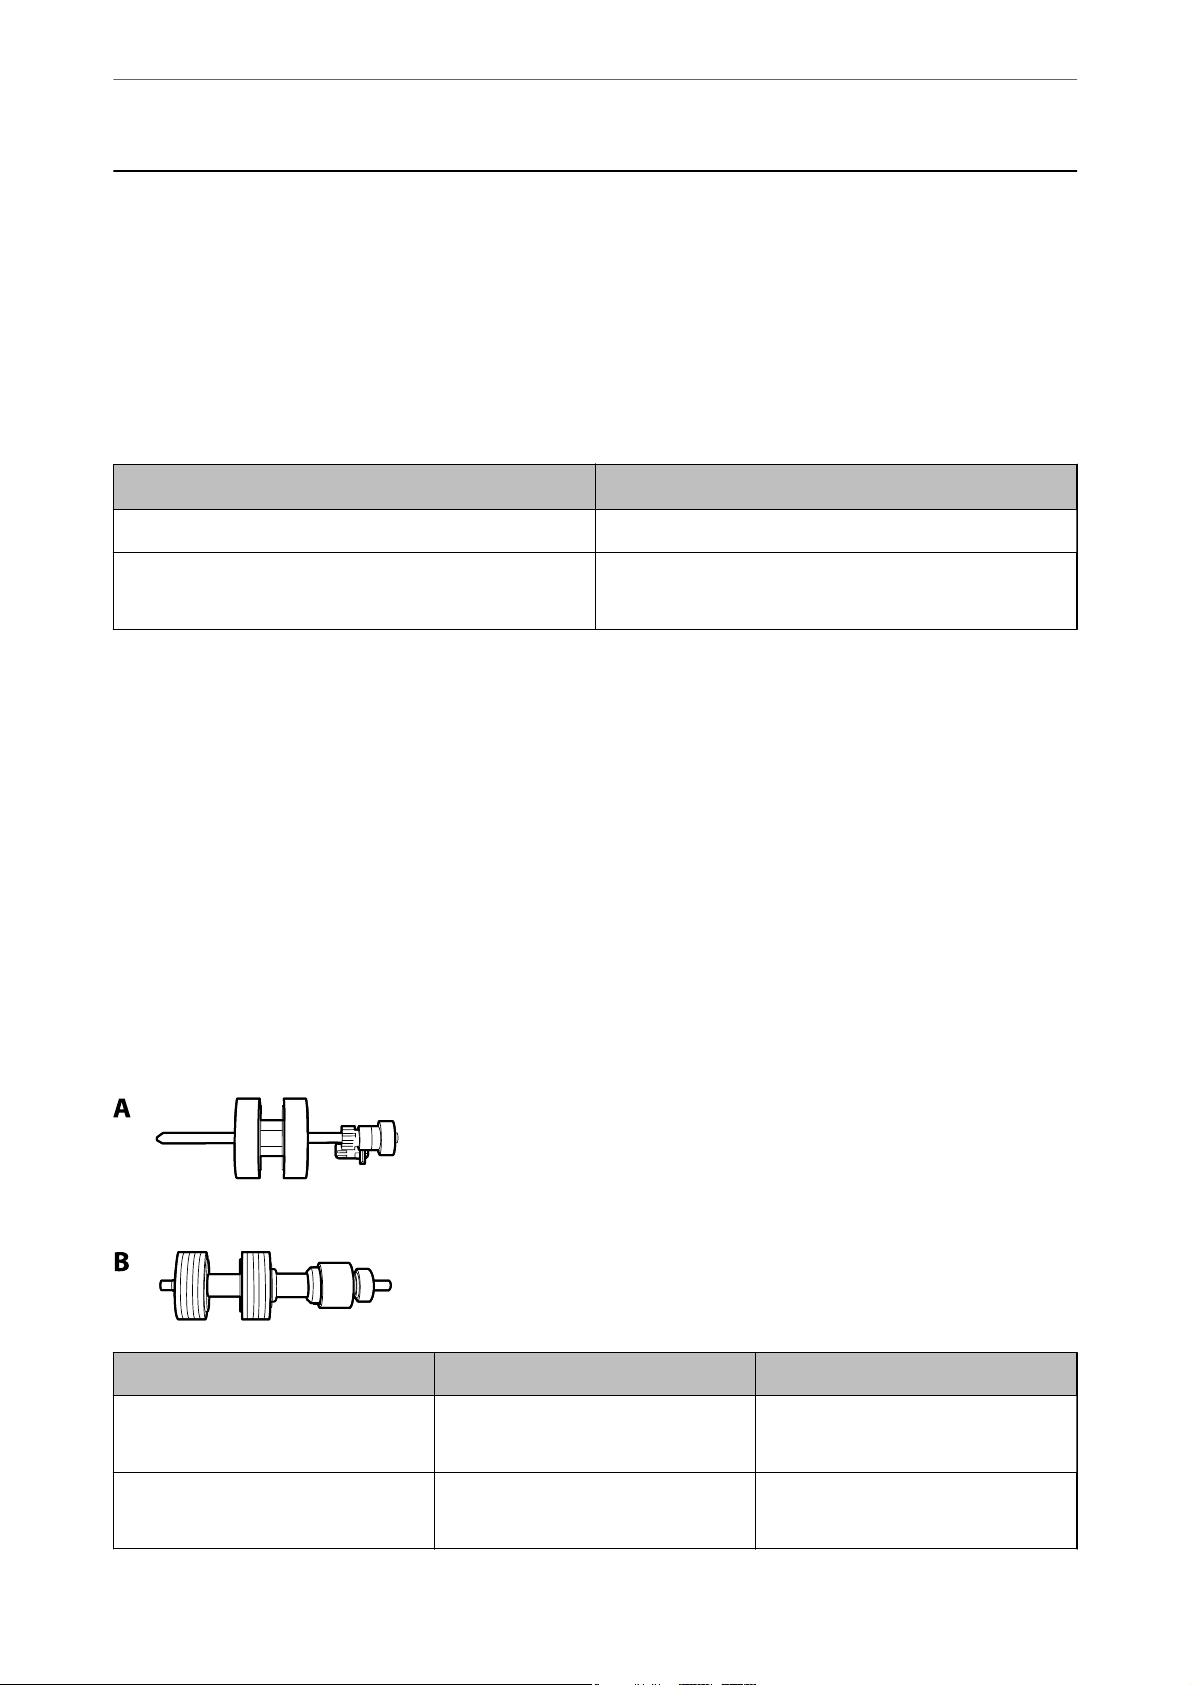
Part Names and Functions
Front
A
B
C
D
E
F
G
H
I
Feed selector The selector to change the feeding method of originals. Change
the position of the feed selector according to the type of originals
to be scanned.
Control Panel Indicates the scanner’s status and allows you to specify scanning
settings.
Edge guides Feeds originals straight into the scanner. While holding the tab,
slide the edge guides to t both ends of the originals.
Input tray Place to load originals. Pull out the input tray extension according
to the length of the originals.
Input tray extension
ADF (Automatic Document Feeder) Feeds loaded originals automatically.
Output tray Holds originals ejected from the scanner. Pull out the output tray
extension according to the length of the originals.
Output tray extension
Stopper Prevents ejected originals from falling o the tray extension. Adjust
the position of it according to the length of the originals.
13
Page 14
Scanner Basics
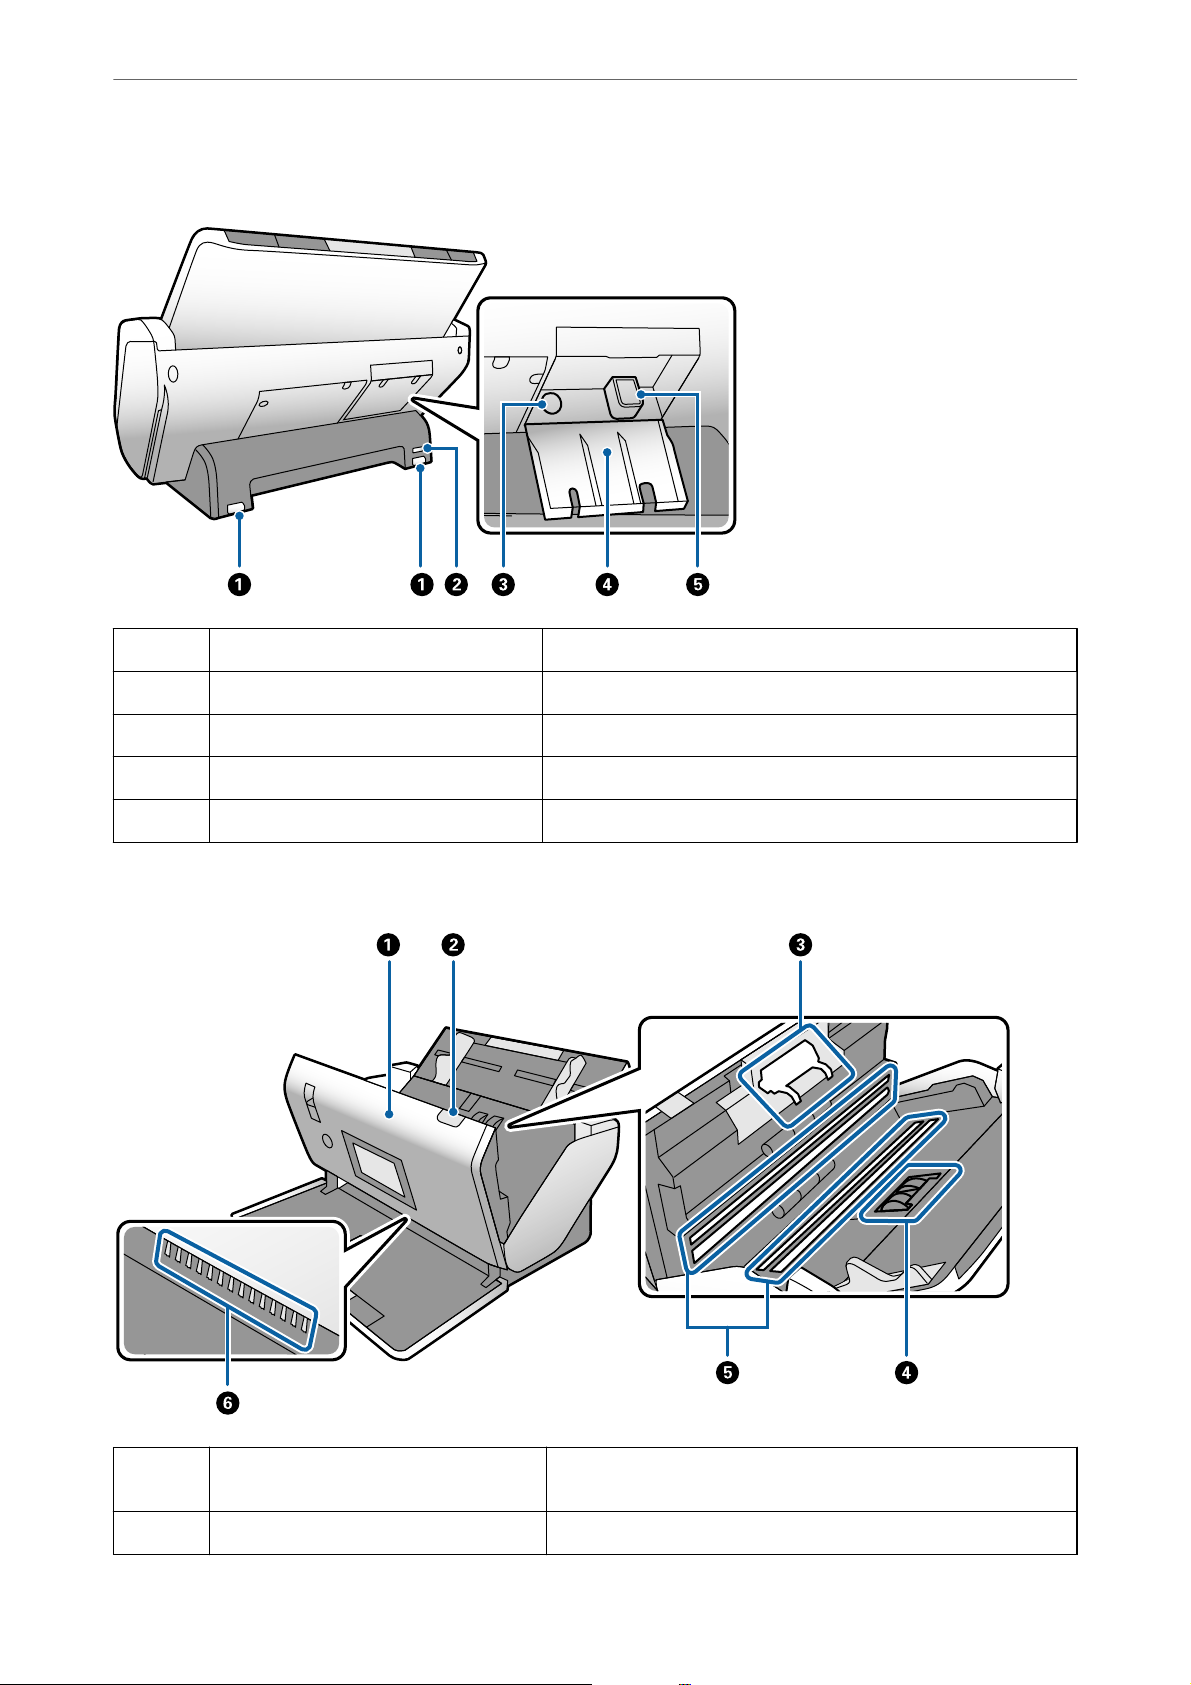
Back
>
Part Names and Functions
Inside
A
B
C
D
E
Caster Used to move the scanner on a at surface.
Security slot Inserts a security lock for theft prevention.
AC inlet Connects the AC adapter.
Cable cover The cover to protect connected portions of cables.
USB port Connects a USB cable.
A
B
Scanner cover Pull the lever and open the scanner cover when cleaning inside the
scanner and removing jammed paper.
Cover open lever Pull the lever and open the scanner cover.
14
Page 15
Scanner Basics
>
Feed selector
C
D
E
F
Separation Roller Feeds originals separately one by one. This needs to be replaced
when the number of scans exceeds the service life capacity.
Pickup Roller Feeds originals. This needs to be replaced when the number of
scans exceeds the service life capacity.
Photoelectric device (glass surface) This sensor reads originals. Be careful to keep it clean.
Antistatic brush Brush that eliminates static electricity from originals. Be careful not
to touch it. If the brush becomes bent, it cannot eliminate static
electricity, and this may cause the ejected originals to stick to each
other.
Related Information
& “Cleaning Inside the Scanner” on page 95
& “Replacing the Roller” on page 100
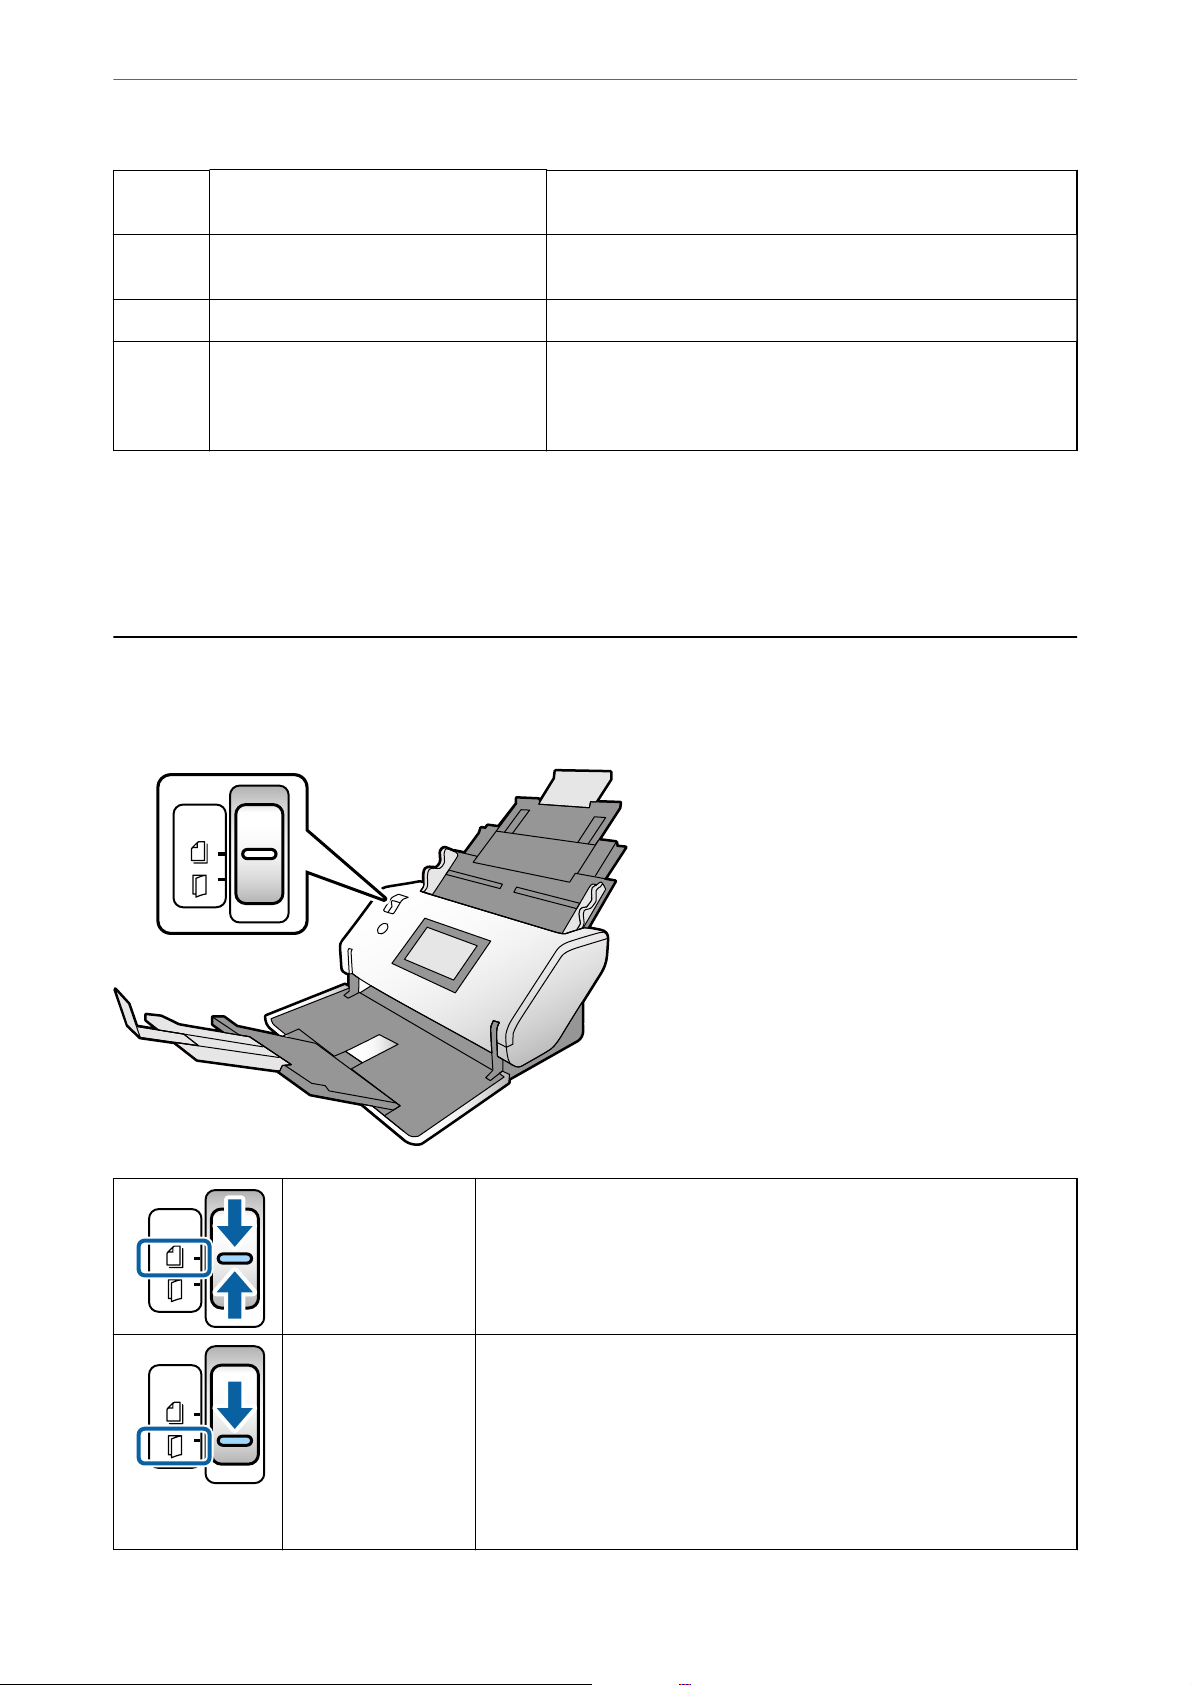
Feed selector
Changes the position of the feed selector according to the type of the originals to be scanned.
Normal Feed Normally set the selector to this position.
Plain papers, Envelopes, plastic cards (without embossing), and Carrier Sheet
can be fed.
Manual Feed Feeds the originals one by one by manual insertion.
Used to scan special originals such as an original folded in half, plastic card
(embossed card), passport carrier sheet, or booklet,
If multiple sheets of originals are loaded, a double feed (feeding multiple
sheets at a time) occurs.
Note:
In the Manual Feed, the double feed detection function is disabled.
15
Page 16
Scanner Basics
>
Control Panel>Guide to the Screen
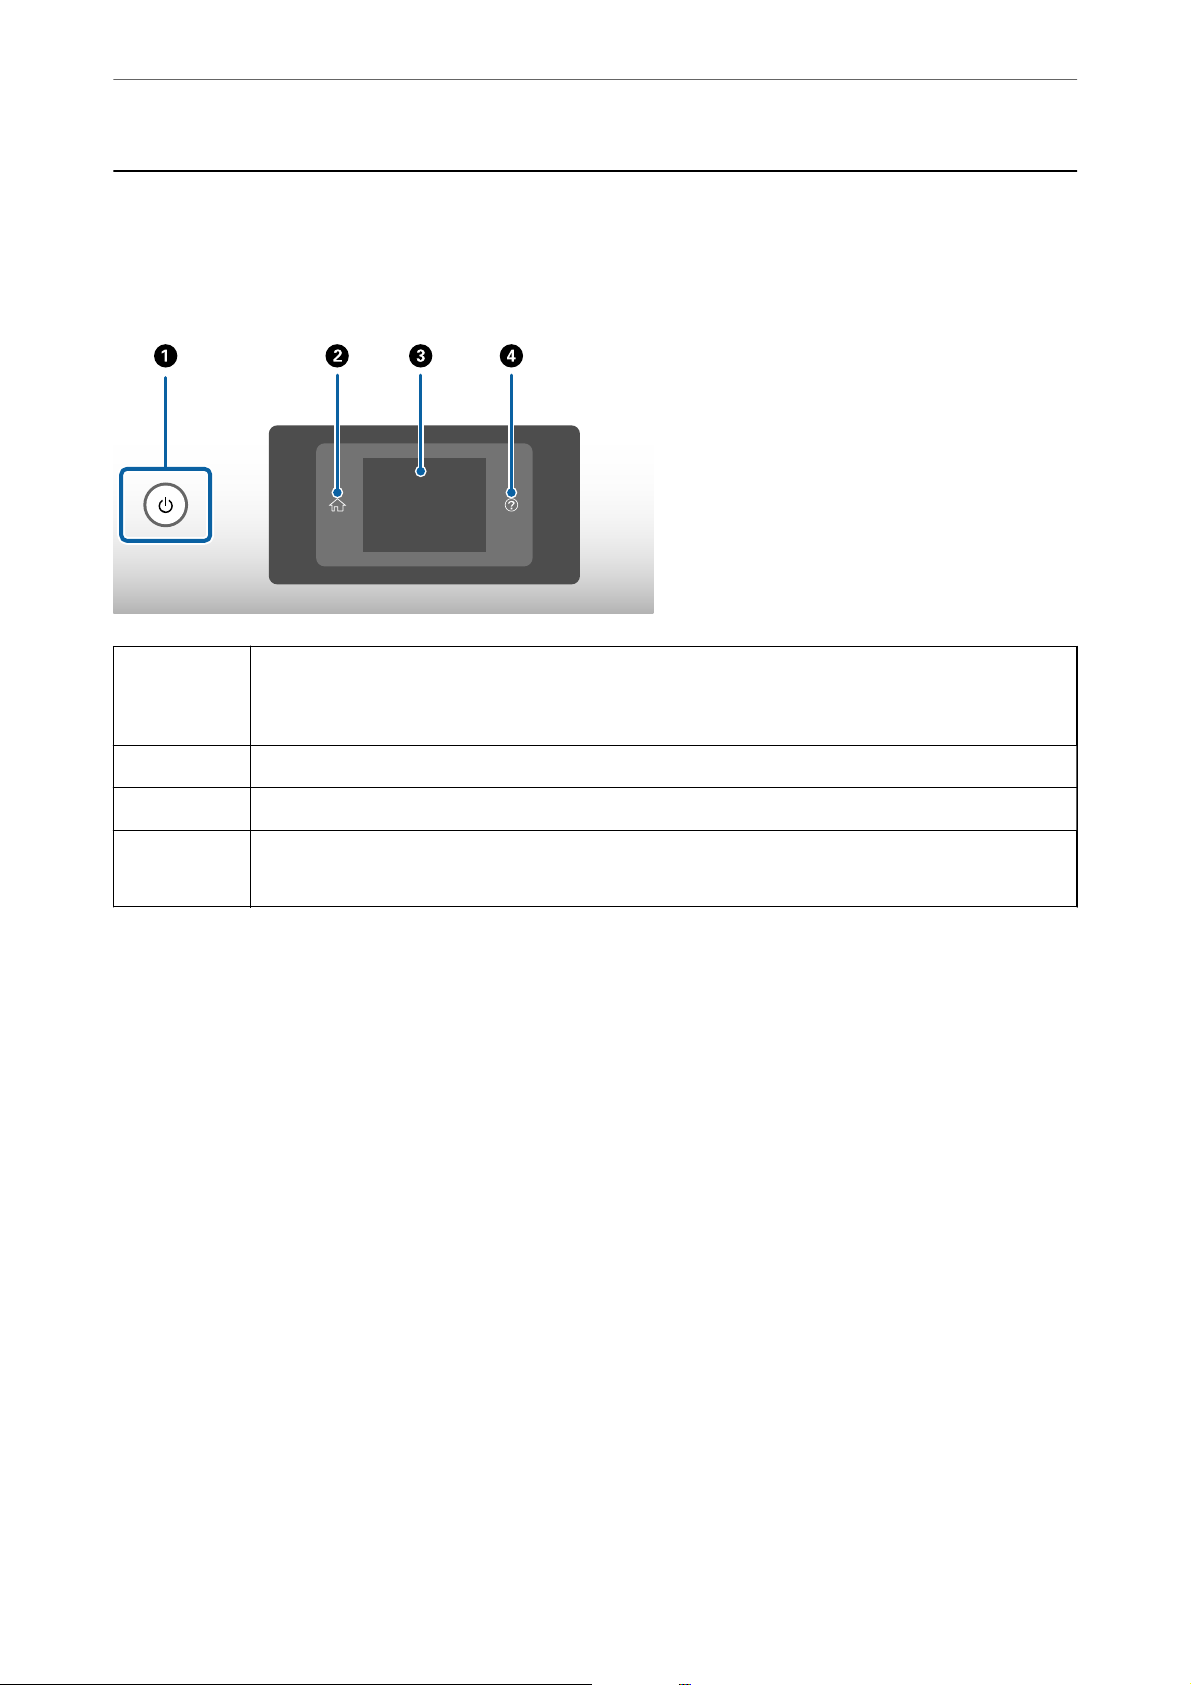
Control Panel
Buttons and Lights
A
B
C
D
Turns the scanner on or o.
Do not turn o the scanner while the light surrounding the button is ashing because the scanner is
operating or processing a job.
Used to display the home screen.
Displays menus and messages.
Used to display the help screen.
You can check how to solve problems and how to load originals.
Guide to the Screen
e screen on the scanner displays various items and messages.
16
Page 17

Scanner Basics
>
Control Panel>Guide to the Screen
Icons displayed in the LCD Screen
e following icons are displayed on the LCD screen depending on the scanner’s status.
A
B
C
D
E
This icon indicates that you are on the home screen.
Informs you when to replace the Pickup Roller and the Separation Roller.
A message is displayed on the screen when you tap the icon.
This icon indicates whether or not the DFDS Function is enabled.
If enabled, the function skips double feed detection only once and continues scanning. Enable this to
scan originals that are detected as double feeds, such as plastic cards and envelopes.
This icon indicates whether or not the Slow function is enabled.
If enabled, the function reduces the feeding speed. Enable this to scan originals that are likely to jam,
such as thin paper.
Function icons and names are displayed as menu icons.
Scan
Scanner
Maintenance
Settings
Opens the Scan menu.
You can scan originals using a job created in Document Capture Pro.
Opens the Scanner Maintenance menu.
Displays information on how to maintain the scanner.
Opens the Settings menu.
You can change the settings of the scanner.
F
Indicates that detailed information is available. indicates that caution is required.
Select the icon to display relevant information.
Touch Screen Operations
e touchscreen is compatible with the following operations.
17
Page 18
Scanner Basics
Ta p Press or select the items or the icons.
>
Control Panel>Guide to the Screen
Flick
Slide
Scroll the screen swiftly.
Hold and move the items around.
Viewing Guidance Animations
You can load various kinds of originals by viewing guidance animations on the control panel.
❏ Ta p
items that you want to see.
❏ Ta p How To at the bottom of the operation screen: Displays context-sensitive animations.
on the control panel: Displays the help screen. Tap How To to display animations, and then select the
18
Page 19

Scanner Basics
>
Information on Applications>Document Capture Pro / Document Capture
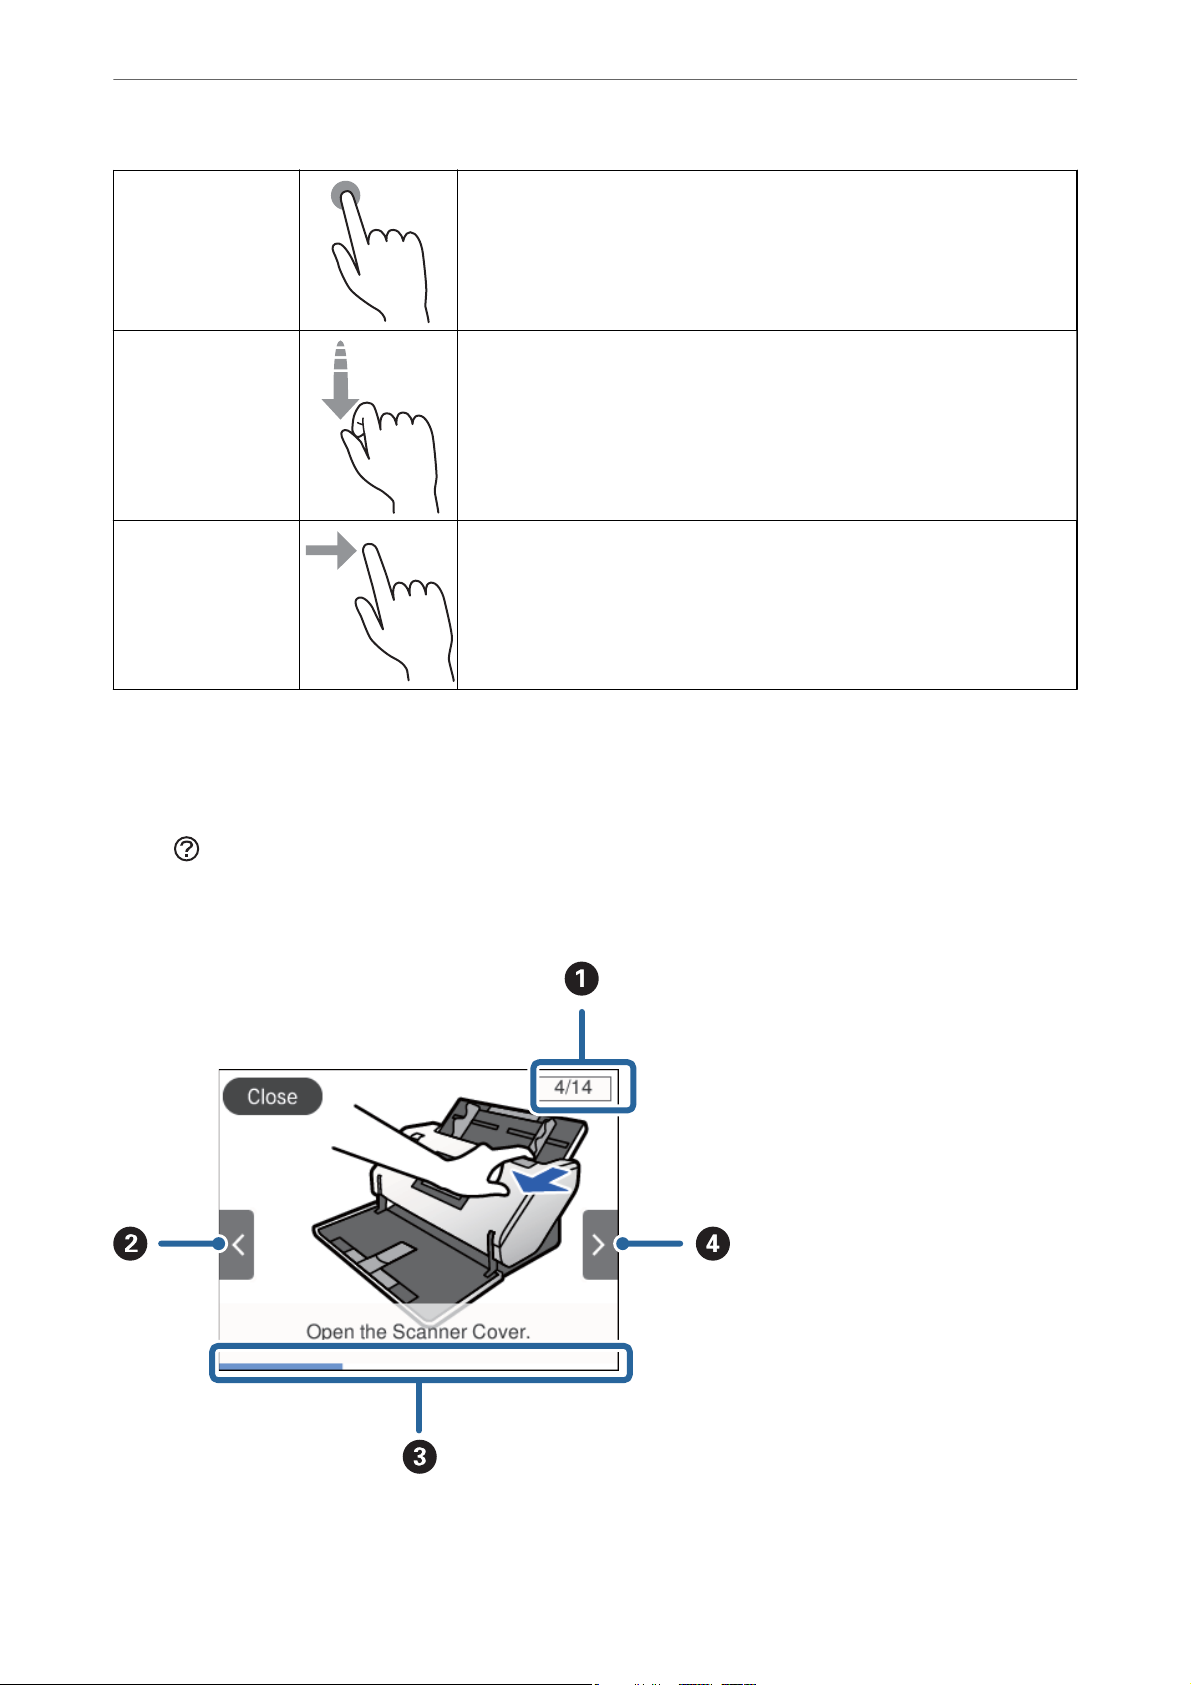
A
B
C
D
Indicates the total number of steps and the current step number.
The example above shows step 4 of 14 steps.
Back to the previous step.
Indicates your progress through the current step. The animation repeats from the begining of the step when the
progress bar reaches the end.
Moves to next step.
Information on Applications
section introduces the application products available for your scanner. e latest applications can be installed
is
from the Epson website.
Epson Scan 2
Epson Scan 2 is a driver for controlling your scanner, enabling a variety of scan settings. is also allows you to
start either as a standalone application or by using TWAIN-compliant application soware.
See the Epson Scan 2 help for details on using the application.
Document Capture Pro / Document Capture
Document Capture Pro is an application that allows you to easily digitize originals such as documents and forms.
You can save scanned images to a specied folder, send by email, and perform copying functions by linking to a
printer. You can also split documents by using separation information such as barcodes and automatically process
new les. is allows you to streamline the way electronic documents are handled, such as reading large
documents and making best use of network capabilities.
Document Capture Pro is for Windows only. For Mac OS, use Document Capture, and for Windows Server, use
Document Capture Pro Server.
See the Document Capture Pro help (Windows) or Document Capture (Mac OS) for details on using the
application.
If Document Capture Pro is not installed, install the latest soware from EPSON Soware Updater.
Note:
Document Capture Pro does not support Windows Vista/Windows XP.
Job:
When a scan, save, and send are performed in that order, these operations are known as a job.
By registering a series of operations in advance as a job, you can perform all of the operations by simply selecting
the job. By assigning a job to the scanner’s control panel, you can start a job from the control panel.
Separation Function:
You can automatically process complicated sorting or organizing by using a variety of detection methods such as
blank pages with/without barcodes which are inserted between the originals, or barcodes on the originals.
19
Page 20

Scanner Basics
You can also sort multiple scanned images as separate les and save each le in specic folders by using these
methods or by setting
Related Information
& “Installing the Latest Applications” on page 20
>
Information on Applications>EPSON Software Updater
specic
pages.
EPSON Software Updater
EPSON Soware Updater is an application that checks for new or updated applications on the internet and installs
them.
You can also update the scanner’s digital manual.
Note:
Windows Server operating systems are not supported.
Installing the Latest Applications
Make sure you use the latest version of the applications.
1.
Make sure that the scanner and the computer are connected, and the computer is connected to the internet.
2.
Start EPSON
❏ Windows 8.1/Windows 8
Enter the application name in the search charm, and then select the displayed icon.
❏ Except for Windows 8.1/Windows 8
Click the start button, and select All Programs or Programs > Epson Soware > EPSON Soware
Updater.
❏ Mac OS
Select Go > Applications > Epson Soware > EPSON Soware Updater.
Important:
Soware
Updater, and update the applications.
c
Do not turn o the computer or the scanner while updating.
Note:
If you cannot nd the application you want to update in the list, you cannot update using the EPSON Soware Updater.
Check for the latest versions of the applications on your local Epson website.
http://www.epson.com
20
Page 21
Scanner Basics
>
Option Items and Consumables Information>Roller Codes
Option Items and Consumables Information
Carrier Sheet Codes
Using a Carrier Sheet allows you to scan irregular shaped originals or photos that can be easily scratched. You can
scan an original larger than A4 size by folding it in half and inserting it into a Carrier Sheet. is is useful for
scanning multiple originals because up to 10 sheets of Carrier Sheet can be loaded on the scanner.
A Passport Carrier Sheet for a small booklet such as a passport is also available.
Part Name
Carrier Sheet B12B819051
Passport Carrier Sheet B12B819651
B12B819661 (for India)
* You can only use the Carrier Sheet with the code.
Codes
*
Related Information
& “Specications for Originals Using the Carrier Sheet” on page 29
& “Placing Large Size Originals” on page 43
& “Placing a Passport” on page 55
& “Placing Irregular Shaped Originals” on page 58
& “Placing Photographs” on page 60
Roller Codes
Parts (the Pickup Roller and Separation Roller) should be replaced when the number of scans exceeds the service
number. You can check the latest number of scans on the control panel.
Part name Codes Life cycle
A: Pickup Roller B12B819611
B12B819621 (India only)
B: Separation Roller B12B819631
B12B819641 (India only)
21
300,000
300,000
*
*
Page 22

Scanner Basics
* This number was reached by consecutively scanning using Epson test original papers, and is a guide to the replacement
cycle. The replacement cycle may vary depending on
or paper with a rough surface that may shorten the life cycle.
>
Option Items and Consumables Information>Cleaning Kit Codes
dierent
paper types, such as paper that generates a lot of paper dust
Related Information
& “Replacing the Roller” on page 100
& “Resetting the Number of Scans
Replacing the Rollers” on page 105
Aer
Cleaning Kit Codes
Use this when cleaning inside the scanner. is kit is composed of cleaning liquid and a cleaning cloth.
Part name Codes
Cleaning Kit B12B819291
Related Information
& “Cleaning Inside the Scanner” on page 95
22
Page 23

Specications and Capacity for
Originals
Specications
Types of Originals that Require Attention.................................30
Types of Originals that Must Not be Scanned..............................31
and Capacity for Originals being Scanned......................24
is section explains the specications and capacity for originals
e following types of originals may not be successfully scanned.
section lists the types of originals that must not be scanned
is
Page 24

Specications and Capacity for Originals
>
Specications and Capacity for Originals being Scanned
Specications and Capacity for Originals being
Scanned
is section explains the specications and capacity for originals
Related Information
& “Specications of Standard Size Paper” on page 25
& “Specications of Long Paper” on page 27
& “Specications of Envelopes” on page 28
& “Specications of Plastic Cards” on page 28
& “Specications of Laminated Cards” on page 28
& “Specications of Booklets” on page 29
& “Specications for Passports” on page 29
& “Specications for Originals Using the Carrier Sheet” on page 29
24
Page 25

Specications and Capacity for Originals
…
>
Specications and Capacity for Originals being Scanned
Specications of Standard Size Paper
Standard Size Thickness Paper Type
>
RA-3 304.8 x 431.8 mm
(12 x 17 in.)
Ledger 279.4 x 431.8 mm
(11 x 17 in.)
A3 297 x 420 mm
(11.7 x 16.5 in.)
B4 257 x 364 mm
(10.1 x 14.3 in.)
Legal 215.9 x 355.6 mm
(8.5 x 14 in.)
Letter 215.9 x 279.4 mm
(8.5 x 11 in.)
A4 210 x 297 mm
(8.3 x 11.7 in.)
B5 182 x 257 mm
(7.2 x 10.1 in.)
27 to 256 g/m Plain paper
Fine paper
Recycled paper
27 to 413 g/m
A5 148 x 210 mm
(5.8 x 8.3 in.)
B6 128 x 182 mm
(5.0 x 7.2 in.)
A6 105 x 148 mm
(4.1 x 5.8 in.)
*1
A8
Business Card
*1
52 x 74 mm
(2.1 x 2.9 in.)
55 x 89 mm
(2.1 x 3.4 in.)
127 to 413 g/m
210 g/m
*1 For A8 and business cards, the only available feeding direction is vertical. e minimum height is 69 mm (2.7
in.).
25
Page 26
Specications and Capacity for Originals
…
>
Specications and Capacity for Originals being Scanned
>
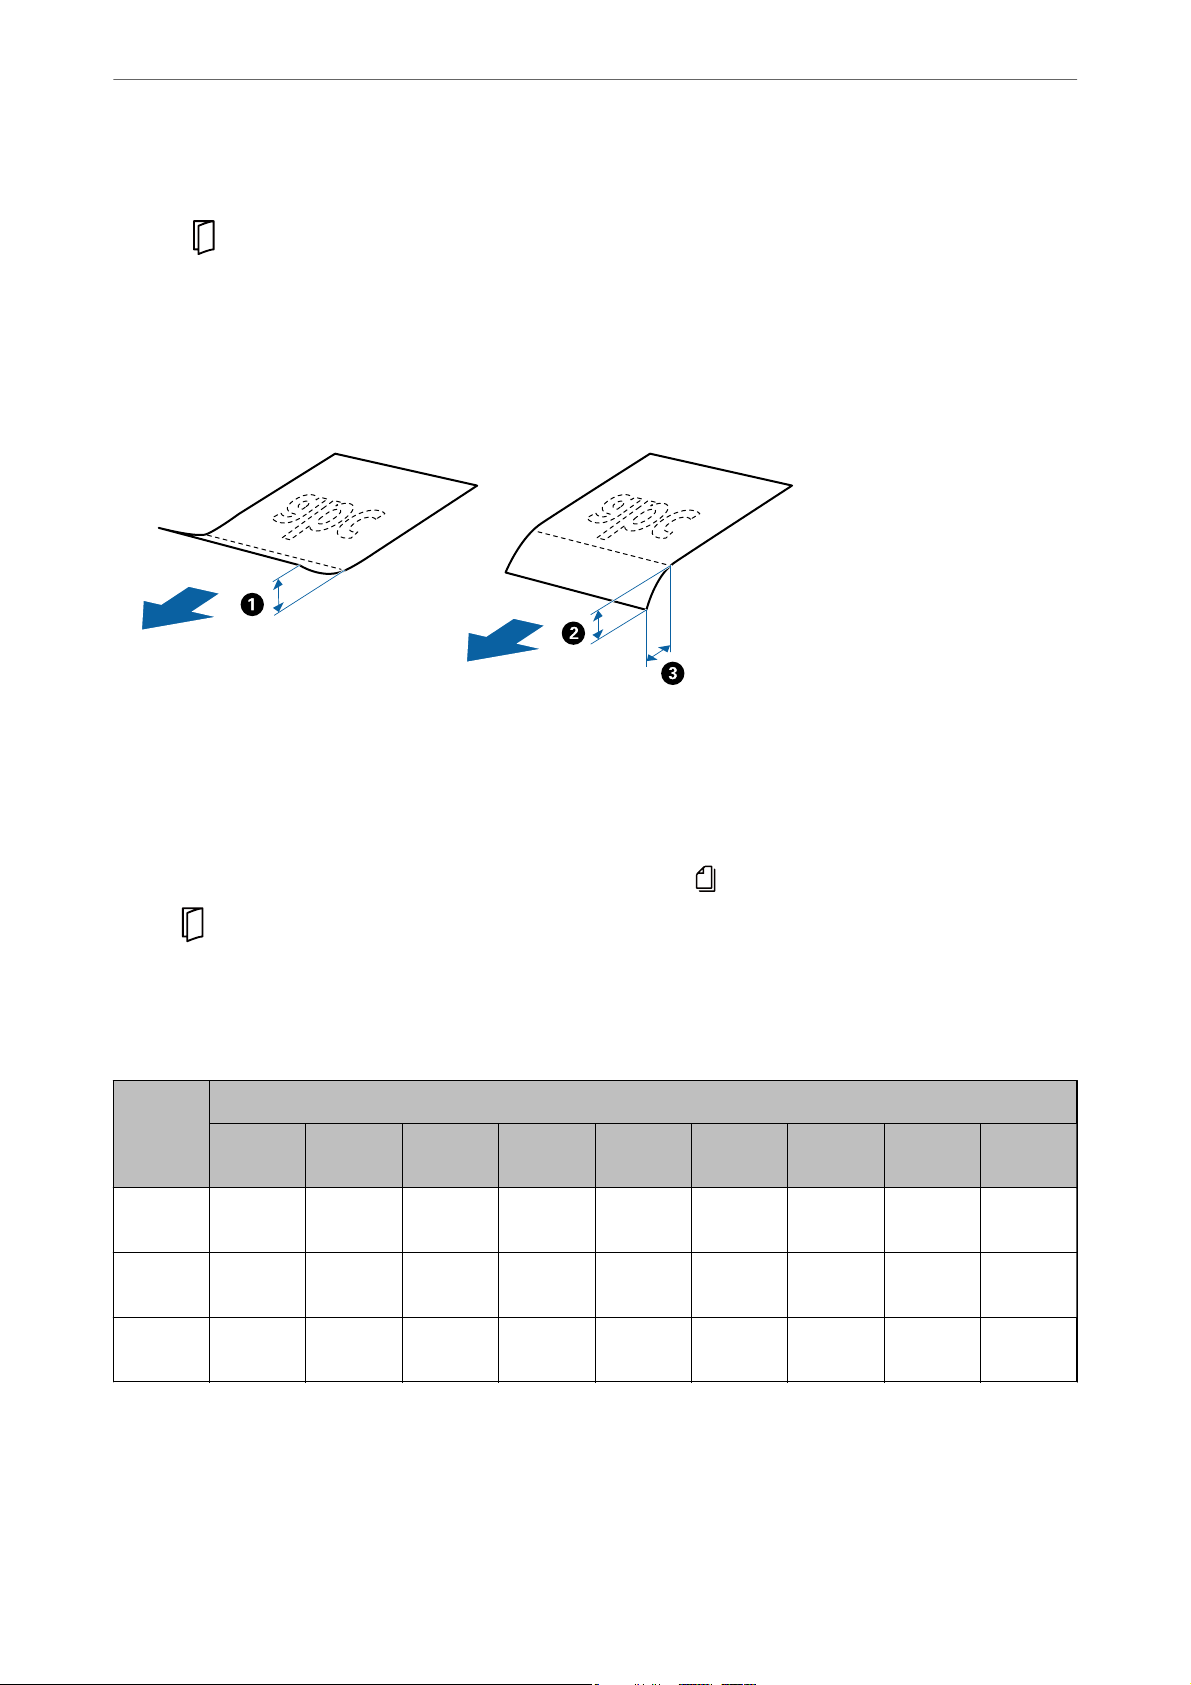
Note:
❏ e originals larger than A3 size (large originals, up to A2 size) can be set by folding in half. Scan such originals one by
one by
(Manual Feed).
❏ Keep all originals at at the leading edge.
❏ Make sure that curls on the leading edge of the originals are kept within the following range.
must be 3 mm or less.
A
When
than 10 times the size of
is equal to or less than C, B must be 1mm or less. When B is more than 1mm, C must be equal to or more
B
.
B
❏ Even when the original meets the specications, it may not be fed depending on the paper properties or quality.
Additionally, some originals may decrease the scan quality.
Guideline on the capacity for originals
Note:
❏ is refers to the number of originals when the paper feeding mode is in
With
(Manual Feed), you can only scan originals one by one.
(Normal Feed).
❏ e total thickness of the originals that can be set is 14 mm.
❏ Up to 36 business cards (210 g/m²) and up to 39 post cards (190 g/m²) can be set.
❏ * You can add originals up to the maximum capacity during scanning.
Paper
Size
A4
B4, LGL
A3
Paper Thickness
27 g/m 80 g/m 90 g/m 104
g/m
120
sheets
-80
60
sheets
120
sheets
sheets
60
sheets
100
sheets
67
sheets
50
sheets
85
sheets
57
sheets
43
sheets
127
g/m
63
sheets
41
sheets
31
sheets
157
g/m
51
sheets
34
sheets
25
sheets
209
g/m
39
sheets
26
sheets
19
sheets
256
g/m
31
sheets
21
sheets
15
sheets
413
g/m
19
sheets
-
-
26
Page 27
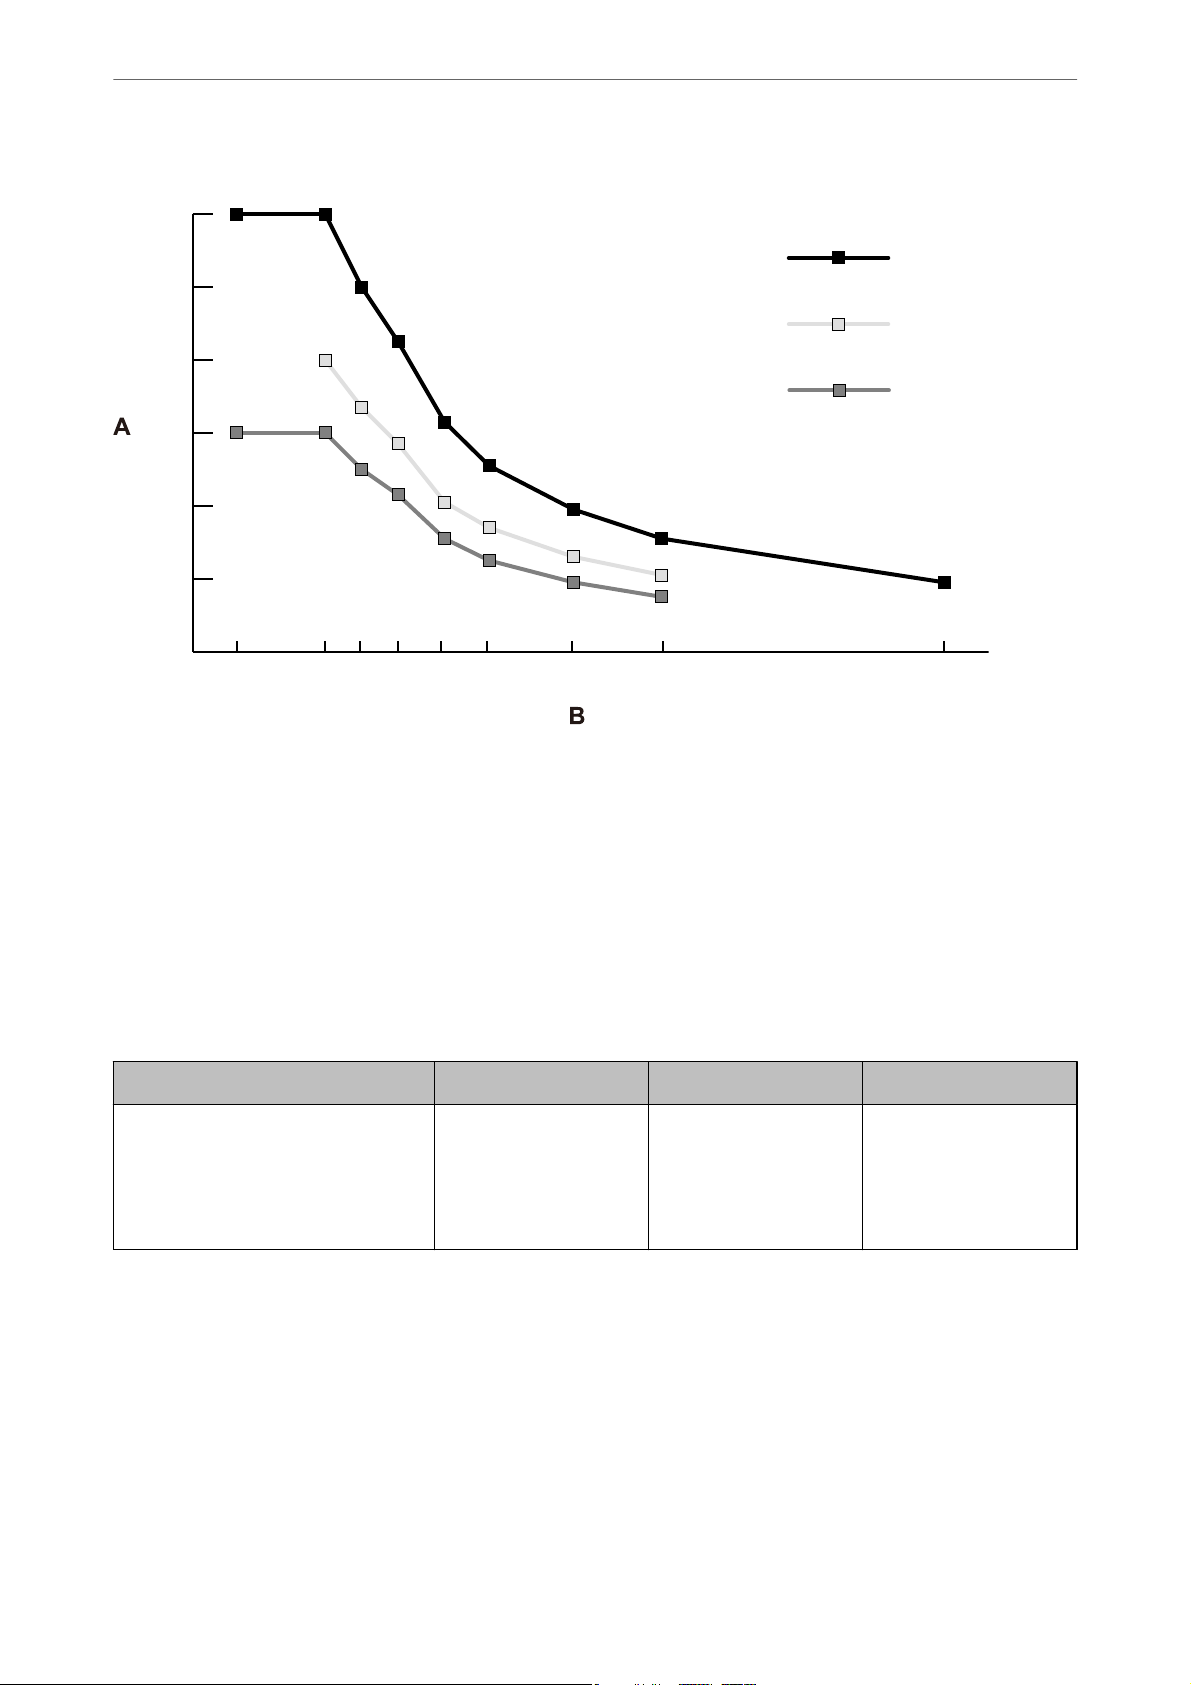
Specications and Capacity for Originals
…
120
100
80
60
40
20
>
Specications and Capacity for Originals being Scanned
A4
B4,LGL
A3
>
0
413256209157127104908027
A: Number of sheets
B: Paper thickness (g/m²)
Related Information
& “Placing Standard Size Originals” on page 34
& “Placing Large Size Originals” on page 43
Specications of Long Paper
Size Thickness Paper Type Loading Capacity
Width: 50.8 to 304.8 mm
(2.0 to 12.0 in.)
Length: 431.8 to 5588.0 mm
(17.0 to 220.0 in.)
50 to 130 g/m Plain paper
Fine paper
Recycled paper
1 sheet
Related Information
& “Placing Long Paper” on page 41
27
Page 28
Specications and Capacity for Originals
…
>
Specications and Capacity for Originals being Scanned
Specications of Envelopes
Standard Size Thickness Loading Capacity
>
C6 114 x 162 mm (4.49 x 6.38
in.)
(standard size)
DL 110 x 220 mm (4.33 x 8.66
in.)
(standard size)
* With Manual Feed ( ), you can only scan originals one by one.
Related Information
& “Placing Envelopes” on page 46
Specications of Plastic Cards
Size With
embossing
ISO7810 ID-1 Type
54.0 x 85.6 mm
(2.1 x 3.3 in.)
With embossing 1.24 mm (0.05 in.)
Without
embossing
Thickness Loading Capacity Loading
or less
1.1 mm (0.04 in.) or
less
0.38 mm (0.015 in.) or less
1 sheet Vertical (Portrait)
5 sheets
10 sheets
*
*
Direction
* With Manual Feed ( ), you can only scan originals one by one.
Related Information
& “Placing Plastic Cards” on page 48
Specications of Laminated Cards
Size Thickness Loading Capacity
120.0 x 150.0 mm (4.7 x 5.9 in.) or less 0.8 mm (0.03 in.) or less 1 sheet
Related Information
& “Placing Laminated Cards” on page 50
28
Page 29

Specications and Capacity for Originals
…
>
Specications and Capacity for Originals being Scanned
Specications of Booklets
Size Thickness Type Loading Capacity
>
Max. size: A5 size (A4 in a two-page
spread)
2 mm (0.08 in.)
(The total thickness of
the closed booklet)
Passbooks or similar
documents
Related Information
& “Placing a Booklet” on page 53
Specications for Passports
You can scan a passport by using a separately sold passport carrier sheet.
Thickness Loading Capacity
5 mm (0.20 in.) or less
(The total thickness of the closed passport placed in the passport carrier
sheet)
Related Information
& “Carrier Sheet Codes” on page 21
& “Placing a Passport” on page 55
One
One
Specications for Originals Using the Carrier Sheet
optional Carrier Sheet is a sheet designed to transport originals through the scanner. You can scan originals
e
that are important documents or photos which must not be damaged, thin paper, or irregular shaped originals
with this sheet.
29
Page 30

Specications and Capacity for Originals
Type of Original Size Thickness Loading Capacity of
>
Types of Originals that Require Attention
the Carrier Sheet
Originals that cannot be
loaded directly into the
scanner
*1 Fold in half to set.
*2 Originals that are wider than 215.9 mm (8.5 in.) need to be folded in half.
*3 To scan an original of about 297 mm long, securely insert the leading edge of the original into the full depth of the Carrier
Sheet . When you select Auto Detect as the Document Size setting in the application, the full length of the Carrier Sheet
may be scanned.
*1
A3
A4
*1
B4
Letter
*1
Legal
B5
A5
B6
A6
A8
Custom size:
❏ Width: up to 431.8 mm (17 in.)
*2
❏ Length: up to 297 mm (11.7 in.)
*3
0.3 mm (0.01 in.) or less
(excluding Carrier Sheet)
10 sheets
*4
*4 With Manual Feed (
), you can only scan originals one by one.
Related Information
& “Carrier Sheet Codes” on page 21
Types of Originals that Require Attention
e following types of originals may not be successfully scanned.
❏ Originals with an uneven surface such as letter head paper.
❏ Originals with wrinkles or fold lines
❏ Perforated originals
❏ Original with labels or stickers (including a glued small piece of paper)
❏ Carbonless paper
❏ Curled originals
❏ Coated paper
30
Page 31

Specications and Capacity for Originals
Important:
>
Types of Originals that Must Not be Scanned
c
Carbonless paper contains chemical substances that may damage the rollers inside the scanner. Check the following
points when scanning originals of carbonless paper.
❏ Clean the Pickup Roller and the Separation Roller regularly.
❏ Scanning carbonless paper may reduce the service life of the rollers compared with scanning plain paper.
Note:
❏ Wrinkled originals may be scanned better if you slow down the feeding speed during scanning or smooth out the wrinkles
before loading.
❏ To scan originals that are easily damaged or wrinkled, use the Carrier Sheet (sold separately).
❏ To scan originals that are incorrectly detected as double feeds, set the DFDS Function to On on the control panel before
you resume scanning, or select O in Detect Double Feed on the Main Settings tab in the Epson Scan 2 window. See
Document Capture Pro help on how to specify the settings of Epson Scan 2 from Document Capture Pro.
❏ Labels or stickers must be rmly stuck to the originals with no glue protruding.
❏ Try to atten the curled originals before scanning.
Types of Originals that Must Not be Scanned
is section lists the types of originals that must not be scanned
❏ Photos
❏ Bound originals* (thicker than 2 mm (0.08 in.) when closed)
❏ Non-paper original (such as clear les, fabric, and metal foil)
❏ Originals with staples or paper clips
❏ Originals with glue attached
❏ Ripped originals
❏ Heavily wrinkled or curled originals
❏ Originals such as OHP lm
❏ Originals with carbon paper on the back
❏ Originals with wet ink
❏ Originals with sticky notes attached
Note:
❏ *You can scan bound originals having a total thickness of 2 mm (0.08 in.) or less in A5 size (A4 in a two-page spread).
❏ Do not feed valuable photos, artwork, or important documents, which you do not want to damage or deface, into the
scanner directly. Misfeeding may wrinkle or damage the original. When scanning such originals, make sure to use the
Carrier Sheet (sold separately).
❏ Ripped, wrinkled, or curled originals can also be scanned if you use the Carrier Sheet (sold separately).
31
Page 32

Placing Originals
Combination of Input Tray and Output Tray.............................. 33
Placing Standard Size Originals........................................34
Placing Long Paper.................................................41
Placing Large Size Originals...........................................43
Placing Envelopes..................................................46
Placing Plastic Cards................................................48
Placing Laminated Cards.............................................50
Placing a Booklet.................................................. 53
Placing a Passport..................................................55
Placing Irregular Shaped Originals......................................58
Placing Photographs................................................60
Placing a Mixture of Originals at Dierent Sizes............................63
Page 33

Placing Originals
>
Combination of Input Tray and Output Tray
Combination of Input Tray and Output Tray
Extend the input tray and output tray according to the length of the originals.
See the following table for details.
Originals Positions
A3 original with fold lines
❏ Legal to A3
❏ A3 to RA3
Letter to A4 (Portrait)
Letter to A4 (Landscape)
Long paper
33
Page 34

Placing Originals
Originals Positions
❏ A3 thin paper
❏ A2 original with fold lines
❏ Envelope
❏ A4 carrier sheet
❏ Thin paper
❏ Thick paper
❏ Booklet
Passport
>
Placing Standard Size Originals
(Passport carrier sheet)
❏ Card (Laminated card)
❏ Vouchers and small originals
Note:
❏ Raise the stopper if the originals fall from the tray.
❏ Adjust the position of the stopper according to the length of the originals.
Placing Standard Size Originals
section explains how to place the originals when the paper feeding mode is in Normal Feed as an example.
is
1.
Set the feed selector to
(Normal Feed).
34
Page 35

Placing Originals
2.
Extend the input tray extension. Pull out the output tray extension to the length of the original. Raise the
>
Placing Standard Size Originals
stopper if necessary.
Note:
❏ To stack the original properly, pull out the output tray and output tray extension so that it is slightly longer than the
length of the original.
❏ For warped originals, do not pull up the output tray.
❏ If thick originals bump into the output tray and fall from it, store the output tray and do not use it. Let the ejected
originals stack directly onto the table where the scanner is placed.
❏ If scanned images are still aected by ejected originals hitting the table surface the scanner is placed on, move the
scanner to the edge of the table where the ejected originals can drop freely, and catch them directly.
3.
While holding the tab, slide the edge guides all the way out.
35
Page 36

Placing Originals
4.
Fan the originals.
Hold both ends of the originals and fan them a few times.
5.
Align the edges of the originals with the side to be scanned facing down and slide the leading edge into a
wedge shape.
>
Placing Standard Size Originals
6.
Load the originals with the side to be scanned facing down and the leading edge directed to the ADF.
Insert the originals into the ADF until they meet resistance.
36
Page 37

Placing Originals
7.
Adjust the edge guides to t the originals without any gap. Otherwise, the originals may be fed skewed.
Note:
❏ To scan originals with punch holes such as loose-leaf paper, load the originals with the holes on the le side, right
side, or bottom. ere must not be any holes within a 30 mm (1.2 in.) strip at the center of the originals. However,
there can be holes within 30 mm (1.2 in.) from the leading edge of the originals. Make sure that the edges of the
punch holes do not have burrs or curls.
>
Placing Standard Size Originals>Placing A3 Size Originals with Fold Lines
❏ If paper jams or double feeds frequently occur when scanning wrinkled paper, try to enable Slow to solve this
problem. To do this, on the control panel, tap Settings > Scanner Settings > Slow and set it to On to slow down the
feeding speed.
Placing A3 Size Originals with Fold Lines
1.
Set the feed selector to
(Normal Feed).
37
Page 38

Placing Originals
2.
Extend the input tray extension. Pull out the output tray extension to the length of the original. Raise the
>
Placing Standard Size Originals>Placing A3 Size Originals with Fold Lines
stopper if necessary.
Note:
❏ To stack the original properly, pull out the output tray and output tray extension so that it is slightly longer than the
length of the original.
❏ If thick originals bump into the output tray and fall from it, store the output tray and do not use it. Let the ejected
originals stack directly onto the table where the scanner is placed.
❏ If scanned images are still
scanner to the edge of the table where the ejected originals can drop freely, and catch them directly.
3.
While holding the tab, slide the edge guides all the way out.
4.
Follow the instructions below to load originals with a fold.
Note:
Depending on the folded state of the original, it may not be fed correctly. In this case, support both ends of the originals
with your hands.
by ejected originals hitting the table surface the scanner is placed on, move the
aected
38
Page 39

Placing Originals
❏ Originals creased in the middle
>
Placing Standard Size Originals>Placing A3 Size Originals with Fold Lines
39
Page 40

Placing Originals
❏ Originals with a bound fold
>
Placing Standard Size Originals>Placing A3 Size Originals with Fold Lines
Note:
Originals with a hard fold line may not be fed properly. Spread such originals in advance so that the height of the fold is
15 mm or less.
Insert the paper into the ADF until it meets resistance.
40
Page 41

Placing Originals
5.
Adjust the edge guides to t the originals without any gap. Otherwise, the originals may be fed skewed.
>
Placing Long Paper
Placing Long Paper
1.
Set the feed selector to
2.
Pull out the output tray extension to the length of the original.
(Manual Feed).
Caution:
!
Do not raise the stopper.
41
Page 42

Placing Originals
3.
While holding the tab, slide the edge guides all the way out.
4.
Load the original straight into the input tray with the side to be scanned facing down and its leading edge
directed to the ADF.
Insert the original into the ADF until it meets resistance.
>
Placing Long Paper
5.
Adjust the edge guides to t the original without any gap. Otherwise, the original may be fed skewed.
42
Page 43

Placing Originals
Note:
❏ You can scan various long paper in the following resolutions.
Approx. 1346 mm (53 in.) or less: up to 600 dpi
Approx. 5461 mm (215 in.) or less: up to 300 dpi
Approx. 5588 mm (220 in.) or less: up to 200 dpi
❏ You need to specify the size of the long paper original in Epson Scan 2. Open the Epson Scan 2 window.
You can specify the paper size of the long paper in the following three ways:
- If the paper length is 3,048 mm (120 in.) or less, you can select Auto Detect (Long Paper) to detect the size
automatically.
- If the paper length exceeds 3,048 mm (120 in.), select Customize and specify the length and the width.
- If the paper length is 5,461 mm (215 in.) or less, you can select Detect paper length to detect only the length
automatically. If the paper is longer than 5,461 mm (215 in.), specify both the length and the width of the paper.
See Document Capture Pro help on how to specify the settings of Epson Scan 2 from Document Capture Pro.
❏ Support the long paper at both ends with your hands to prevent it from falling o the ADF or being stacked and
jammed or dropped from the output tray.
>
Placing Large Size Originals
Placing Large Size Originals
Large size originals refer to originals of a size larger than A3 and equal to or smaller than A2.
1.
Set the feed selector to
(Manual Feed).
43
Page 44

Placing Originals
2.
Extend the input tray extension. Pull out the output tray extension to the length of the original. Raise the
stopper if necessary.
>
Placing Large Size Originals
3.
While holding the tab, slide the edge guides all the way out.
4.
Firmly fold the original in half so that the side to be scanned is facing out.
44
Page 45

Placing Originals
5.
Load the original in the input tray with the second page facing up and the leading edge directed to the ADF.
>
Placing Large Size Originals
Insert it into the ADF until it meets resistance.
6.
Adjust the edge guides to t the originals without any gap. Otherwise, the originals may be fed skewed.
Note:
❏ When using the Carrier Sheet, align the edge guides with the Carrier Sheet without any gap. Otherwise, the Carrier
Sheet cannot be recognized correctly.
❏ To scan both sizes of the original and combine the scanned images, specify the necessary settings in Epson Scan 2
window.
Open the Epson Scan 2 window. Select Double-Sided from Scanning Side, and select Le & Right from Stitch
Images. See the Epson Scan 2 help for details. See Document Capture Pro help on how to specify the settings of Epson
Scan 2 from Document Capture Pro.
❏ Select Large Originals from Scan Settings in Epson Scan 2.
45
Page 46

Placing Originals
>
Placing Envelopes
Placing Envelopes
Note:
❏ Select the appropriate rotation angle in the Rotate setting, or select Auto Rotation (or Auto) in the application for
scanning.
❏ To scan envelopes, specify the necessary settings in the Epson Scan 2 window.
Open the Epson Scan 2 window. Select the Main Settings tab > Detect Double Feed > O in this order. See the Epson
Scan 2 help for details.
When Detect Double Feed in the Epson Scan 2 window is enabled and a double feed error occurs, remove the envelope
from the ADF and reload it. On the control panel, set DFDS Function to On to disable Detect Double Feed for only the
next scan, and then scan again. DFDS Function disables Detect Double Feed for only one envelope. See Document
Capture Pro help on how to specify the settings of Epson Scan 2 from Document Capture Pro.
is section explains how to place the originals when the paper feeding mode is in Normal Feed as an example.
1.
Set the feed selector to
2.
Pull out the output tray extension and raise the stopper.
(Normal Feed).
3.
While holding the tab, slide the edge guides all the way out.
46
Page 47

Placing Originals
4.
Load the envelopes longitudinally with the side to be scanned facing down into the input tray. For envelopes
with an open end (ap portion) on the shorter side, load the envelope with the open end (ap side) placed at
the top.
Insert the envelope into the ADF until it meets resistance.
>
Placing Envelopes
Important:
c
Do not load envelopes with adhesives on them.
Note:
❏ Envelopes that are not cut cleanly at the ap edge when opened may not be scanned correctly.
❏ Envelopes that have not yet been sealed can be loaded with the ap open and facing up.
5.
Align the edge guides with the envelopes. Otherwise, the envelopes may be fed skewed.
47
Page 48

Placing Originals
>
Placing Plastic Cards
Placing Plastic Cards
1.
Set the feed selector as following:
❏ With embossing:
❏ Without embossing: (Normal Feed)
Note:
To scan plastic cards without embossing, specify the necessary settings in the Epson Scan 2 window.
On the Main Settings tab in Epson Scan 2, select Plastic Card in Document Size, or select O for Detect Double Feed.
See the Epson Scan 2 help for details.
(Manual Feed)
When Detect Double Feed in the Epson Scan 2 is enabled and a double feed error occurs, remove the card from the
ADF and reload it. Set DFDS Function on the control panel to On to disable Detect Double Feed for only the next
scan, and then scan again. DFDS Function disables Detect Double Feed for only one sheet.
48
Page 49

Placing Originals
2.
Pull out the output tray extension and raise the stopper.
>
Placing Plastic Cards
push back the output tray extension.
en,
3.
While holding the tab, slide the edge guides all the way out.
4.
Load the cards with the side to be scanned facing down and their leading edge directed to the ADF.
Insert the cards into the ADF until they meet resistance.
49
Page 50

Placing Originals
For embossed cards, load them with the emboss surface facing down.
>
Placing Laminated Cards
Important:
c
Do not load plastic cards laterally.
5.
Align the edge guides with the cards.
Placing Laminated Cards
1.
Set the feed selector to
(Manual Feed).
50
Page 51

Placing Originals
2.
Pull out the output tray extension and raise the stopper.
>
Placing Laminated Cards
push back the output tray extension.
en,
3.
While holding the tab, slide the edge guides all the way out.
51
Page 52

Placing Originals
4.
Load the cards with the side to be scanned facing down and their leading edge directed to the ADF.
Insert the cards into the ADF until they meet resistance.
>
Placing Laminated Cards
Important:
c
Do not load the cards laterally.
5.
Align the edge guides with the cards.
Note:
To scan laminated cards, specify the necessary settings in the Epson Scan 2 window. In the Scan Settings window, press
the Detailed Settings button to open the Epson Scan 2 window.
❏ To increase the accuracy of auto size detection, select the Main Settings tab > Document Size > Settings > Scan
laminated card. See the Epson Scan 2 help for details.
❏ In the Main Settings tab, select O in Detect Double Feed. See the Epson Scan 2 help for details.
When Detect Double Feed in the Epson Scan 2 window is enabled and a double feed error occurs, remove the card
from the ADF and reload it. On the control panel, set DFDS Function to On to disable Detect Double Feed for only
the next scan, and then scan again. DFDS Function disables Detect Double Feed for only one sheet.
❏ See Document Capture Pro help on how to specify the settings of Epson Scan 2 from Document Capture Pro.
52
Page 53

Placing Originals
>
Placing a Booklet
Placing a Booklet
1.
Set the feed selector to
2.
Pull out the output tray extension and raise the stopper. Push back the output tray extension so as to t the size
of the booklet.
Note:
To scan an A5 size booklet, make sure to pull out the output tray extension before scanning.
(Manual Feed).
3.
While holding the tab, slide the edge guides all the way out.
53
Page 54

Placing Originals
4.
Load the booklet into the input tray with the printed surface facing down, and the thicker side pointing down,
>
Placing a Booklet
as shown in the diagram.
Insert the booklet into the ADF until it meets resistance.
5.
Align the edge guides with the booklet.
Note:
To scan a booklet, specify the necessary settings in the Epson Scan 2 window.
Open the Epson Scan 2 window. In the Main Settings tab, select O for Detect Double Feed. See the Epson Scan 2 help
for details.
Select Booklet from Scan Settings in Epson Scan 2.
See Document Capture Pro help on how to specify the settings of Epson Scan 2 from Document Capture Pro.
54
Page 55

Placing Originals
>
Placing a Passport
Placing a Passport
1.
Set the feed selector to
2.
Extend the input tray extension. Pull out the output tray and output tray extension, and then raise the stopper.
(Manual Feed).
3.
While holding the tab, slide the edge guides all the way out.
55
Page 56

Placing Originals
4.
Load the passport with the thicker side aligned with the leading edge so that the side with the larger number of
pages is pointing towards the leading edge.
As shown in the diagram below, insert the passport into the Passport Carrier Sheet with the side to be scanned
facing down.
>
Placing a Passport
56
Page 57

Placing Originals
5.
Load it into the input tray with the side to be scanned facing down and the side having a larger number of
>
Placing a Passport
pages directed to the leading edge.
Insert the Passport Carrier Sheet into the ADF until it meets resistance.
6.
Adjust the edge guides to t the Passport Carrier Sheet without any gap.
Note:
To scan the Passport Carrier Sheet, specify the appropriate setting in the Epson Scan 2
Open the Epson Scan 2. On the Main Settings tab, select Single-Sided as the Scanning Side and Passport as the
Document Size. See the Epson Scan 2 help for details.
Select Passport from Scan Settings in Epson Scan 2.
See Document Capture Pro help on how to specify the settings of Epson Scan 2 from Document Capture Pro.
Do not use a Passport Carrier Sheet that is scratched or has been scanned more than 3,000 times.
57
Page 58

Placing Originals
>
Placing Irregular Shaped Originals
Placing Irregular Shaped Originals
1.
Set the feed selector to
2.
Extend the input tray extension. Pull out the output tray and output tray extension, and then raise the stopper.
(Normal Feed).
3.
While holding the tab, slide the edge guides all the way out.
4.
Make sure that the illustration at the edge of the Carrier Sheet is facing the front, and the original is facing the
back when you insert the original into the Carrier Sheet.
58
Page 59

Placing Originals
5.
Load the Carrier Sheet with its leading edge directed to the ADF.
Insert it into the ADF until it meets resistance.
>
Placing Irregular Shaped Originals
6.
Align the edge guides with the Carrier Sheet without any gap. Otherwise, the Carrier Sheet may be fed skewed.
59
Page 60

Placing Originals
Note:
❏ Do not use a Carrier Sheet that is scratched or has been scanned more than 3,000 times.
❏ If you cannot nd an appropriate size for the original you want to scan in the Document Size list, select Auto
Detect.
When using Epson Scan 2, you can also select Customize to create a custom document size.
❏ When scanning with a Carrier Sheet by selecting Auto Detect as the Document Size setting in Epson Scan 2, the
image is automatically scanned by applying Paper Skew in the Correct Document Skew setting.
❏ Only use a Carrier Sheet designed for your scanner. e Carrier Sheet is automatically recognized by the scanner by
detecting two small rectangular holes on the leading edge. Keep the holes clean and not covered.
>
Placing Photographs
Related Information
& “Carrier Sheet Codes” on page 21
Placing Photographs
1.
Set the feed selector to
(Normal Feed).
60
Page 61

Placing Originals
2.
Extend the input tray extension. Pull out the output tray and output tray extension, and then raise the stopper.
3.
While holding the tab, slide the edge guides all the way out.
>
Placing Photographs
4.
Make sure that the illustration at the edge of the Carrier Sheet is facing the front, and the original is facing the
back when you insert the original into the Carrier Sheet.
61
Page 62

Placing Originals
5.
Load the Carrier Sheet with its leading edge directed to the ADF.
Insert the sheet into the ADF until it meets resistance.
>
Placing Photographs
6.
Align the edge guides with the Carrier Sheet without any gap. Otherwise, the Carrier Sheet may be fed skewed.
62
Page 63

Placing Originals
Note:
❏ Do not use a Carrier Sheet that is scratched or has been scanned more than 3,000 times.
❏ If you cannot nd an appropriate size for the original you want to scan in the Document Size list, select Auto
Detect.
When using Epson Scan 2, you can also select Customize to create a custom document size.
❏ When scanning with a Carrier Sheet by selecting Auto Detect as the Document Size setting in Epson Scan 2, the
image is automatically scanned by applying Paper Skew in the Correct Document Skew setting.
❏ Do not leave photos inside the Carrier Sheet for a long time.
❏ Only use a Carrier Sheet designed for your scanner. e Carrier Sheet is automatically recognized by the scanner by
detecting two small rectangular holes on the leading edge. Keep the holes clean and not covered.
>
Placing a Mixture of Originals at Dierent Sizes
Related Information
& “Carrier Sheet Codes” on page 21
Placing a Mixture of Originals at Dierent Sizes
You can load mixed-sized originals at a time to scan. You can also load a mixture of paper types and thickness.
Important:
c
❏ When placing and scanning originals that are a mixture of dierent sizes, originals may be fed askew because
not all of the originals are supported by the edge guides.
❏ Originals may be jammed or fed askew if you set dierent types or very dierent sizes of originals, such as in the
following cases.
- in paper and thick paper
- A3 or A4 size paper and card size paper
- in paper and plastic cards
If originals are fed askew, check any problem in the scanned images.
Note:
❏ If originals are jammed or not fed correctly, try to enable Slow to solve this problem.
❏ Alternatively, you can scan originals of dierent paper sizes and types by loading them one by one using Automatic
Feeding Mode.
63
Page 64

Placing Originals
>
Placing a Mixture of Originals at Dierent Sizes
1.
Set the feed selector to
2.
Extend the input tray extension. Pull out the output tray and output tray extension, and then raise the stopper.
Note:
If any thick originals are contained, store the output tray and do not use it. Let the ejected originals to stack directly onto
the table where the scanner is placed.
(Normal Feed).
prevents the originals from bumping into the output tray and falling down.
is
3.
While holding the tab, slide the edge guides all the way out.
64
Page 65

Placing Originals
4.
Load the originals at the center of the input tray in descending order of paper size with the widest at the back
and the narrowest at the front.
Important:
>
Placing a Mixture of Originals at Dierent Sizes
c
Check the following points when setting dierent sizes of originals.
❏ Insert the originals into the ADF with their leading edges aligned securely until they meet resistance.
u
❏ Set the originals at the center of the input tray. Refer to the
❏ Set the originals straight.
If not, originals may be fed askew or jammed.
mark on the scanner as your guide.
Note:
Load the originals into the ADF with the side to be scanned facing down and the leading edges slightly displaced at an
angle.
5.
Align the edge guides with the widest original.
65
Page 66

Scanning
Required Settings for Scanning........................................ 67
Scanning Using the Control Panel......................................73
Scanning with Document Capture Pro (Windows)..........................75
Scanning with Document Capture (Mac OS)..............................76
Scanning with Epson Scan 2.......................................... 77
Scanning with Manual Feed in Automatic Feeding Mode..................... 82
Page 67

Scanning
>
Required Settings for Scanning>Creating a Job in Document Capture (Mac OS)
Required Settings for Scanning
From the control panel on the scanner, any job for scan created in Document Capture Pro or Document Capture
on the computer can be performed.
Job refers to a registration of a series of operations such as scan settings, save settings, and destination settings.
Registering a series of operations as a job eliminates the need of setting such operations for each scan.
To perform a job from the control panel, the settings below are required.
❏ 1. Create a job in Document Capture Pro or Document Capture.
❏ 2. Register the created job to be performed from the control panel.
See Document Capture Pro help on how to specify settings of Epson Scan 2 from Document Capture Pro
For information on Document Capture Pro or Document Capture, refer to the descriptions below.
Note:
Any created job can also be performed from the computer.
Creating a Job in Document Capture Pro (Windows)
See the following URL for the procedures to set a job in Document Capture Pro and register the job so that it can
be executed from the control panel.
https://support.epson.net/dcp/
Related Information
& “Scanning Using the Control Panel” on page 73
Creating a Job in Document Capture (Mac OS)
is section explains how to set a Job with Document Capture. See the Document Capture help for details.
67
Page 68

Scanning
1.
Start Document Capture.
>
Required Settings for Scanning>Creating a Job in Document Capture (Mac OS)
Select Go > Applications > Epson Soware > Document Capture.
Note:
Select the scanner you want to use from the scanners list.
2.
Click
.
e job list window is displayed.
Note:
ere is a preset job that saves scanned images in PDF format.
68
Page 69

Scanning
3.
Click the + icon.
>
Required Settings for Scanning>Creating a Job in Document Capture (Mac OS)
e job settings window is displayed.
4.
Enter a name for the job in Job Name.
69
Page 70

Scanning
5.
Specify scanning settings on the Scan tab.
>
Required Settings for Scanning>Creating a Job in Document Capture (Mac OS)
❏ Source: Select the source where the original is placed. When scanning 2-sided originals, select Double-
Sided.
❏ Document Size: Select the size of the original you placed.
❏ Image Type: Select the color type for saving the scanned image.
❏ Rotation: Select the rotation angle according to the original you want to scan.
❏ Resolution: Set the resolution.
Note:
You can also adjust the image using following items.
❏ Text Enhancement: You can make blurred letters in the original clear and sharp.
❏ Correct Document Skew: Select to correct the slant of the original.
❏ Skip Blank Page: Select to skip blank pages if any in the originals.
70
Page 71

Scanning
6.
Click Output, and then specify the save settings.
>
Required Settings for Scanning>Creating a Job in Document Capture (Mac OS)
❏ Save in: Select the save folder for the scanned image from the list.
❏ Example of File Name: Displays
❏
❏ Date: Adds the date to the le name.
❏ Time: Adds the time to the le name.
❏ Page Counter: Adds the number of pages to the le name.
❏ File Type: Select the le format for saving the scanned image from the list. Click Option to specify detailed
Character: Set a
Prex
settings for the le.
prex
name examples with the current settings.
le
for the name of the
le.
71
Page 72

Scanning
7.
Click Destination, and then select the Destination.
Setting items according to the destination are displayed. Specify the necessary settings. Click the ? (Help) icon
for details on each item.
>
Required Settings for Scanning>Enabling a Job to Run from the Control Panel (Mac OS)
Note:
❏ If you want to upload to a cloud service, you need to set up your account with the cloud service in advance.
❏ If you want to use Evernote as the destination, download the Evernote application from the Evernote Corporation
website and install it.
8.
Click OK to close the job settings window.
9.
Click OK to close the job list window.
e created job is saved.
Enabling a Job to Run from the Control Panel (Mac OS)
is section explains how to assign a job (action) to the scanner’s control panel in Document Capture. See the
Document Capture help for details.
72
Page 73

Scanning
1.
Start Document Capture.
Select Go > Applications > Epson Soware > Document Capture.
>
Scanning Using the Control Panel
Note:
Select the scanner you want to use from the scanners list displayed.
2.
Click the
e Job List window is displayed.
3.
Select Event Settings from the
4.
From the pull down menu, select the job you want to perform from the control panel on the scanner.
5.
Click OK to return to the Job List window.
job is assigned to the scanner control panel.
e
6.
Click OK to return to the main screen.
icon on the main window.
icon.
Scanning Using the Control Panel
You can scan originals from the control panel by using jobs created in Document Capture Pro/Document Capture.
Note:
❏ Before scanning, install Document Capture Pro/Document Capture on your computer and create the necessary job. ere
is a preset job that saves scanned images as PDFs.
❏ Before scanning, make sure that the scanner and the computer are connected properly.
❏ Before scanning, assign the job to the control panel by using Document Capture Pro/Document Capture.
1.
Place the original.
73
Page 74

Scanning
2.
Make sure that the feed selector on the scanner is set to the appropriate position.
❏
❏
3.
Select Scan from the home screen.
>
Scanning Using the Control Panel
: Standard size originals such as A4 paper
: Special originals such as folded documents and plastic cards
4.
Select a job in the Select Job window.
e selected job is displayed.
5.
To change the scan settings, tap Scanner Settings.
74
Page 75

Scanning
❏ If you set Disable job setting changes on control panel, you cannot change the settings.
❏ To scan originals that are detected as double feeds, such as plastic cards and envelopes, enable DFDS
❏ To scan originals that are likely to jam, such as thin paper, enable Slow to reduce the feeding speed.
>
Scanning with Document Capture Pro (Windows)
Function to skip double feed detection.
6.
Press the
Related Information
& “Placing Originals” on page 32
x
button to start scanning.
Scanning with Document Capture Pro (Windows)
Any job created in Document Capture Pro can also be performed from the computer.
1.
Start Document Capture Pro.
❏ Windows 10
Click the start button, and then select Epson
❏ Windows 8.1/Windows 8
Enter the application name in the search charm, and then select the displayed icon.
❏ Windows 7
Click the start button, and then select All Programs > Epson
Soware
> Document Capture Pro.
Soware
> Document Capture Pro.
75
Page 76

Scanning
Note:
Select the scanner you want to use from the scanners list displayed.
2.
Place the original.
3.
Make sure that the feed selector on the scanner is set to the appropriate position.
❏
❏
4.
Click the icon of the job you want to perform.
e
5.
Follow the instructions on each window.
e scanned image is saved according to the job settings.
Note:
For detailed information on how to use Document Capture Pro, refer to the following URL:
>
Scanning with Document Capture (Mac OS)
: Standard size originals such as A4 paper
: Special originals such as folded documents and plastic cards
selected job is performed.
https://support.epson.net/dcp/
Related Information
& “Creating a Job in Document Capture Pro (Windows)” on page 67
Scanning with Document Capture (Mac OS)
Any job created in Document Capture can also be performed from the computer.
1.
Start Document Capture.
Select Go > Applications > Epson Soware > Document Capture.
76
Page 77

Scanning
Note:
Select the scanner you want to use from the scanners list displayed.
2.
Place the original.
3.
Make sure that the feed selector on the scanner is set to the appropriate position.
❏
❏
>
Scanning with Epson Scan 2
: Standard size originals such as A4 paper
: Special originals such as folded documents and plastic cards
4.
Select the job from the list, and then click the
e selected job is performed.
icon.
5.
Follow the instructions on each window.
e scanned image is saved according to the job settings.
Note:
Without using a job, originals can be scanned and sent. Click and specify scanning settings, and then click Preview
Scan. en, click the destination icon for the scanned image.
Related Information
& “Creating a Job in Document Capture (Mac OS)” on page 67
Scanning with Epson Scan 2
You can scan the originals using image adjustment functions that are suitable for text documents.
1.
Place the original.
77
Page 78

Scanning
2.
Start Epson Scan 2.
❏ Windows 10/Windows Server 2016
❏ Windows 8.1/Windows 8/Windows Server 2012 R2/Windows Server 2012
❏ Windows 7/Windows Vista/Windows XP/Windows Server 2008 R2/Windows Server 2008/Windows Server
❏ Mac OS
3.
Specify the following settings on the Main Settings tab.
>
Scanning with Epson Scan 2
Click the start button, and then select EPSON > Epson Scan 2.
Enter the application name in the search charm, and then select the displayed icon.
2003 R2/Windows Server 2003
Click the start button, and then select All Programs or Programs > EPSON > Epson Scan 2 > Epson Scan
2.
Select Go > Applications > Epson Soware > Epson Scan 2.
❏ Scanning Side: Select the side of the original you want to scan. When scanning 2-sided originals, select
Double-Sided.
❏ Document Size: Select the size of the original you placed.
❏
/ (Original orientation) buttons: Select the set orientation of the original you placed.
Depending on the size of the original, this item may be set automatically and cannot be changed.
78
Page 79

Scanning
>
Scanning with Epson Scan 2
❏ Image Type: Select the color type for saving the scanned image.
❏ Resolution: Set the resolution.
Note:
❏ Document Source is set to the ADF automatically.
❏ On the Main Settings tab, you can specify the following settings:
❏ Stitch Images: Select to stitch the images on the front and back when scanning both sides of the
original.
❏ Rotate: Select to rotate the original clockwise and scan it.
❏ Correct Document Skew: Select to correct the slant of the original.
❏ Add or edit pages aer scanning: Select to add dierent originals or edit (rotate, move, and delete)
the scanned pages aer scanning.
❏ Skip Blank Pages: Select to skip blank pages if any in the originals.
❏ Detect Double Feed: Select to display a warning when multiple originals are fed at a time.
❏ Background Color: If text is blurry when scanning thin paper, set this to White. is may allow
clear or distinct scanning.If images on the back of the original for thin paper appear in the scanned
image, set this to Black. is may reduce oset in the background.
4.
Specify other scan settings if necessary.
❏ You can preview the front face of the rst original. Load only the rst original into the ADF, and press the
Preview button. e scanned original is ejected and the previewed image is displayed.
Load the ejected page again together with the rest of the originals.
❏ On the Advanced Settings tab, you can specify detailed image adjustment settings that are suitable for text
documents, such as the following:
❏ Remove Background: Removes the background of the originals.
❏ Text Enhancement: You can make blurred letters in the original clear and sharp.
❏ Auto Area Segmentation: You can make letters clear and images smooth when performing black and
white scanning for a document that contains images.
❏ Dropout: You can remove the color specied for the scanned image, and then save it in grayscale or
black and white. For example, you can remove the color of markers or characters written with a color
pen on a blank space.
❏ Color Enhance: You can enhance the color
specied
for the scanned image, and then save it in grayscale
or black and white. For example, you can clear any characters or ruled lines in a light color.
Note:
ese items may not be available depending on other settings you have made.
79
Page 80

Scanning
5.
Set the
>
Scanning with Epson Scan 2
saving settings.
le
❏ Image Format: Select the le format for saving the scanned image from the list.
You can specify detailed settings for each
format, select Options from the list.
❏ File Name: Conrm the displayed le name.
You c a n c h an ge settings f o r t h e
❏ Folder: Select the save folder for the scanned image from the list.
You can select another folder or create a new folder by selecting Select from the list.
6.
Make sure that the feed selector on the scanner is set to the appropriate position.
: Standard size originals such as A4 paper
❏
: Special originals such as folded documents and plastic cards
❏
7.
en click Scan.
Note:
❏ You can also start scanning by pressing the
❏ To scan originals that are likely to jam, such as thin paper, tap Settings > Slow in this order to reduce the feeding
speed.
name by selecting Settings from the list.
le
format except BITMAP and PNG.
le
x
button on the scanner’s control panel.
selecting the
Aer
le
80
Page 81

Scanning
>
Scanning with Epson Scan 2>Required Settings for Special Originals
e scanned image is saved to the folder you specied.
Related Information
& “Placing Originals” on page 32
Required Settings for Special Originals
To scan special originals, specify the necessary settings according to the originals in the Epson Scan 2 window.
You can also specify settings from Document Capture Pro. For detailed information, refer to the following URL:
https://support.epson.net/dcp/
Type of Original Required Settings
Envelopes
Plastic cards
Carrier Sheet
Passport
Large size originals
Thin paper
Select O in Detect Double Feed.
Select Plastic Card in the Document Size list, or select O in Detect Double Feed.
❏ If you select Auto Detect from the Document Size list, skewing of the original is automatically
corrected even if you select O in Correct Document Skew.
❏ If you select any other size than Auto Detect from the Document Size list, you can only use
Contents Skew when using Correct Document Skew.
Paper Skew is not applied even if this is selected. When you select Paper and Contents Skew,
only skewing of the contents is corrected.
Select Passport from the Document Size list. Also select Single-Sided in Scanning Side.
When you select any other option than Passport in Document Size, it cannot be scanned properly.
If the size of the original you want to scan is not listed in Document Size, select Customize to open
the Document Size Settings window. Next, create the size manually on the window.
If text is blurry when scanning thin paper, set this to White. This may allow clear or distinct
scanning.
Make the following settings when you cannot select White as the Background Color.
❏ Select anything except for Auto Detect or Passport as theDocument Size.
❏ Select anything except for Paper Skew as theCorrect Document Skew.
❏ If images on the back of the original for thin paper appear in the scanned image, set this to
Black. This may reduce
in the background.
oset
Long paper
Laminated cards
If the size is not listed on the
Customize to create a custom document size.
To scan transparent areas around the document, select Customize in the Document Size list to
open the Document Size Settings window. Next, select Scan laminated card in the displayed
window.
Document Size list, select Auto Detect (Long Paper) or select
Note:
Some originals cannot provide the appropriate
as expected. If transparent areas around
eect
the document cannot be scanned, select Customize from the Document Size list, and then
create the size manually.
81
Page 82

Scanning
>
Scanning with Manual Feed in Automatic Feeding Mode
Scanning with Manual Feed in Automatic Feeding
Mode
Automatic Feeding Mode enables you to scan originals by Manual Feed. In this mode, scanning starts
automatically when originals are loaded into the ADF. is is useful in the following situations:
❏ You want to check and scan originals one by one
❏ You want to scan dierent sizes of originals one by one
1.
Make sure that the feed selector on the scanner is set correctly before loading originals.
: Standard size originals such as A4 paper
❏
: Special originals such as folded documents and plastic cards
❏
2.
Start Epson Scan 2.
❏ Windows 10/Windows Server 2016
Click the start button, and then select EPSON > Epson Scan 2.
❏ Windows 8.1/Windows 8/Windows Server 2012 R2/Windows Server 2012
Enter the application name in the search charm, and then select the displayed icon.
❏ Windows 7/Windows Vista/Windows XP/Windows Server 2008 R2/Windows Server 2008/Windows Server
2003 R2/Windows Server 2003
Click the start button, and then select All Programs or Programs > EPSON > Epson Scan 2 > Epson Scan
2.
❏ Mac OS
Select Go > Applications > Epson Soware > Epson Scan 2.
Note:
You ca n also s tart Epson Scan 2 from Document Capture Pro. For detailed information on how to use Document
Capture Pro, refer to the following URL:
https://support.epson.net/dcp/
82
Page 83

Scanning
3.
On the Main Settings tab, select On in Automatic Feeding Mode.
>
Scanning with Manual Feed in Automatic Feeding Mode
Note:
You can specify timeout settings to exit Automatic Feeding Mode.
Select Settings in the Document Source list to open the Document Source Settings window. Set Automatic Feeding
Mode Timeout (minutes) on the displayed window.
4.
Specify other settings for scanning in the Epson Scan 2 main window.
5.
en click Scan.
Automatic Feeding Mode starts.
Automatic Feeding Mode window is displayed on your computer and the scanner.
e
83
Page 84

Scanning
6.
Adjust the edge guides, and then place the original in the ADF.
>
Scanning with Manual Feed in Automatic Feeding Mode
Scanning starts automatically.
7.
Aer scanning ends, place the next original in the ADF.
Repeat this procedure until you have scanned all originals.
Note:
If you want to scan originals that are detected as double feeds, such as plastic cards and envelopes, enable DFDS
Function to skip double feed detection.
To scan originals that are likely to jam, such as thin paper, enable Slow to slow down the feeding speed.
8.
Aer you have scanned all originals, exit Automatic Feeding Mode.
Select the Save and Finish on the scanner control panel, or click Finish on the Automatic Feeding Mode
window displayed on your computer.
e scanned image is saved to the folder you specied.
Related Information
& “Placing Originals” on page 32
84
Page 85

Menu Options on the Control Panel
Scan............................................................86
Scanner Maintenance...............................................88
Status...........................................................88
Settings......................................................... 89
Page 86

Menu Options on the Control Panel
>
Scan>Scanner Settings
Scan
You can start jobs on your computer that were created in Document Capture Pro (Windows)/Document Capture
(Mac OS).
Edit Job
Select a job in the Select Job window.
window. You can edit job settings.
Destination Name
Select the destination where you want to save the scanned image.
File Type
Select the le format for saving the scanned image from the list.
Image Type
Select the color type for saving the scanned image.
Resolution
Select the resolution to scan.
❏ High: Resolution is set to 600 dpi.
❏ Medium: Resolution is set to 300 dpi.
❏ Low: Resolution is set to 200 dpi.
Original Size
Select the size of the original you placed.
in the displayed window, tap the job name to display the Job Edit
en,
Source
Select the side of the original you want to scan.
❏ 2-Sided: Scans both sides of the original.
❏ 1-Sided: Scans only the front side of the original.
Copies
Set the number of copies when printing the scanned image using the printer.
Reset
You can clear all settings you have changed.
Scanner Settings
Select a job in the Select Job window. en, in the displayed window, tap Scanner Settings to display the Scanner
Settings window.
86
Page 87

Menu Options on the Control Panel
Slow
Slows down the feeding speed whenever scanning. Switching On and O also switches the icon
displayed at the top of the screen.
Enable this in the following situations:
❏ When originals are jammed frequently
❏ When loading thin originals
>
Scan>Scanner Settings
❏ When scanning
❏ If you feel that the scanner is noisy
dierent
types or sizes of originals at once
Double Feed Stop Timing
Set the operation when any double feed is detect.
❏ Immediate: Stops feeding immediately aer any double feed is detected.
❏ Aer Eject: Originals detected as double feed are scanned as is, and the subsequent feed of originals
is temporarily stopped.
If the scanned image has no problem, you can resume scanning as is.
DFDS Function
Skips double feed detection only once and continues scanning. Switching On and O also switches the
icon displayed at the top of the screen.
Enable this to scan originals that are detected as double feeds, such as plastic cards and envelopes.
Paper Protection
Reduces damage to the originals by stopping scanning immediately when the following status is
detected.
❏ A feeding error for the originals occurs
❏ Originals are fed askew
Select the detection level to enable this feature. See the table below for details on each level.
Level Examples of Protectable Paper Detection Sensitivity for Feeding
Skew
On-Low Plain paper Low
On-Medium Plain paper, Thin paper
On-High Thin paper (portrait), such as
application forms
Important:
High
c
❏
function does not always prevent damage of originals.
is
❏ Depending on the condition of the originals being fed, feeding errors cannot be detected.
87
Page 88

Menu Options on the Control Panel
Note:
Depending on the original, the condition of feeding, or the level you set, this feature may not work correctly.
❏ Select O to disable the feature when scanning plastic cards or thick paper.
❏ When misdetection occurs frequently, lower the level of this feature.
❏ Some originals may be misdetected as feeding errors, such as irregular shaped originals or originals scanned askew.
❏ When loading multiple originals, make sure to align the leading edge of the originals. Originals may be misdetected as
feeding errors if the edges of the originals are not aligned, even if they are scanned correctly.
❏ To scan the originals without skewing, adjust the edge guides to t the originals before scanning.
Detect Glass Dirt
Detects dirt on the glass surface inside the scanner. You can select the level of detection.
Depending on the dirt, this feature may not work correctly.
Ultrasonic Double Feed Detection
Sets to detect double feed using ultrasonic sensor. Use this when you cannot set double feed detection
from the external soware.
>
Status
For some originals such as envelopes, plastic cards, and originals with labels and stickers, this feature
may not work correctly.
Roller Timeout
Sets the time to automatically stop the rotation of the roller when Automatic Feeding
Mode(Continuous) is used.
Scanner Maintenance
Roller Cleaning
Displays how to clean the roller inside the scanner.
Pickup Roller Replacement/Separation Roller Replacement
Displays how to replace the Pickup Roller and Separation Roller. You can reset the number of scans
aer replacing the rollers.
Regular Cleaning
Displays how to perform regular cleaning for inside of the scanner. You can also reset the number of
scans aer performing regular cleaning.
Glass Cleaning
Displays how to clean the glass surface inside the scanner.
Status
is menu is only available when the icon is displayed on the home screen. Indicates the following status.
88
Page 89

Menu Options on the Control Panel
Pickup Roller Replacement/Separation Roller Replacement
Displays how to replace the Pickup Roller and Separation Roller. You can reset the number of scans
aer replacing the rollers.
Regular Cleaning
It is time to clean inside the scanner.
Detect Glass Dirt
Dirt has been detected on the glass surface inside the scanner. Clean inside the scanner.
>
Settings>Device Information
Settings
Device Information
Serial Number
Displays the serial number of the scanner.
Current Version
Displays the current rmware version.
Total Number of Scans
Displays the total number of scans.
Number of 1-Sided Scans
Displays the number of single-sided scans.
Number of 2-Sided Scans
Displays the number of double-sided scans.
Number of Scans of Carrier Sheet
Displays the number of scans using a Carrier Sheet.
Number of Passport Carrier Sheet
Displays the number of scans using a passport carrier sheet.
Number of Scans After Replacing Pickup Roller/Number of Scans After Replacing Separation Roller
Displays the number of scans
Reset the number of scans aer replacing the roller.
Number of Scans After Regular Cleaning
Displays the number of scans
Reset the number of scans aer performing regular cleaning.
replacing the Pickup Roller or Separation Roller.
aer
performing regular cleaning.
aer
89
Page 90

Menu Options on the Control Panel
Scanner Settings
Slow
Slows down the feeding speed whenever scanning. Switching On and O also switches the icon
displayed at the top of the screen.
Enable this in the following situations:
❏ When originals are jammed frequently
❏ When loading thin originals
❏ When scanning dierent types or sizes of originals at once
❏ If you feel that the scanner is noisy
Double Feed Stop Timing
Set the timing to stop operations when any double feed of originals is detected.
❏ Immediate: Stops immediately aer any double feed is detected.
>
Settings>Scanner Settings
❏ Aer Eject: Stops aer the originals being scanned are ejected.
DFDS Function
Skips double feed detection only once and continues scanning. Switching on and o also switches the
icon displayed at the top of the screen.
Enable this to scan originals that are detected as double feeds, such as plastic cards and envelopes.
Paper Protection
Reduces damage to the originals by stopping scanning immediately when the following status is
detected.
❏ A feeding error for the originals occurs
❏ Originals are fed askew
Select the detection level to enable this feature. See the table below for details on each level.
Level Examples of Protectable Paper Detection Sensitivity for Feeding
Skew
On-Low Plain paper Low
On-Medium Plain paper, Thin paper
On-High Thin paper (portrait), such as
application forms
Important:
High
c
❏ is function does not always prevent damage of originals.
❏ Depending on the condition of the originals being fed, feeding errors cannot be detected.
90
Page 91

Menu Options on the Control Panel
Note:
Depending on the original, the condition of feeding, or the level you set, this feature may not work correctly.
❏ Select O to disable the feature when scanning plastic cards or thick paper.
❏ When misdetection occurs frequently, lower the level of this feature.
❏ Some originals may be misdetected as feeding errors, such as irregular shaped originals or originals scanned askew.
❏ When loading multiple originals, make sure to align the leading edge of the originals. Originals may be misdetected as
feeding errors if the edges of the originals are not aligned, even if they are scanned correctly.
❏ To scan the originals without skewing, adjust the edge guides to t the originals before scanning.
>
Settings>Common Settings
Detect Glass Dirt
Detects dirt on the glass surface inside the scanner. You can select the level of detection.
Depending on the dirt, this feature may not work correctly.
Ultrasonic Double Feed Detection
Sets to detect double feed using ultrasonic sensor. Use this when you cannot set double feed detection
from the external soware.
For some originals such as envelopes, plastic cards, and originals with labels and stickers, this feature
may not work correctly.
Roller Timeout
Sets the time to automatically stop the rotation of the roller when Automatic Feeding
Mode(Continuous) is used.
Common Settings
LCD Brightness
Adjust the brightness of the LCD screen.
Sound
❏ Button Press: Set the volume for tapping sounds on the control panel.
❏ Error Notice: Set the volume for when an error occurs.
Note:
You can turn o the sounds of Button Press and Error Notice, but cannot turn o the sounds when turning the power on and
o.
Sleep Timer
Adjust the time period for entering sleep mode (energy saving mode) when the scanner has not performed any
operations. e LCD screen turns black when the set time has passed.
91
Page 92

Menu Options on the Control Panel
Related Information
& “Energy Saving” on page 105
>
Settings>Regular Cleaning Alert Settings
Power
Your product may have Power O If Disconnected feature depending on the location of purchase.
Power O If Inactive
Power O If Disconnected
Related Information
& “Energy Saving” on page 105
Settings
O
Turn the scanner o automatically when no operations have been performed for the specied time.
Set the time period before the scanner turns o.
Any increase will aect the product’s energy eciency. Consider the environment before making any
changes.
Turn the scanner o automatically when no connections via USB have been detected for 30 minutes.
is feature may not be available depending on your region.
Language
Select the country or region in which you are using your scanner.
Roller Replacement Alert Setting
Pickup Roller
Informs you when to replace the Pickup Roller.
Separation Roller
Informs you when to replace the Separation Roller.
Regular Cleaning Alert Settings
Warning Alert Setting
Noties you when to clean inside of the scanner.
Count Alert Setting
Changes the scanning number when the cleaning notication will be displayed.
92
Page 93

Menu Options on the Control Panel
System Administration
Admin Settings
Sets a password for an administrator or locks administrator settings.
Password Encryption
Encrypts the password for administrators.
Restore Default Settings
Restores all settings to their initial status when purchased.
>
Settings>System Administration
93
Page 94

Maintenance
Cleaning Outside the Scanner.........................................95
Cleaning Inside the Scanner.......................................... 95
Resetting the Number of Scans
Replacing the Roller............................................... 100
Resetting the Number of Scans Aer Replacing the Rollers...................105
Energy Saving....................................................105
Moving the Scanner............................................... 106
Regular Cleaning.......................99
Aer
Page 95

Maintenance
>
Cleaning Inside the Scanner
Cleaning Outside the Scanner
Wipe o any stains on the outer case with a dry cloth or a cloth dampened with mild detergent and water.
Important:
c
❏ Never use alcohol, thinner, or any corrosive solvent to clean the scanner. Deformation or discoloration may occur.
❏ Do not let water get inside the product. is could cause a malfunction to occur.
❏ Never open the scanner case.
1.
Press the
2.
Unplug the AC adapter from the scanner.
3.
Clean the outer case with a cloth dampened with mild detergent and water.
Wipe the touchscreen by using a so, dry cloth.
P
button to turn o the scanner.
Cleaning Inside the Scanner
Aer using the scanner for a while, paper and room dust on the roller or the glass part inside the scanner may
cause paper feed or scanned image quality problems. Clean the inside of the scanner every 10,000 scans. You can
check the latest number of scans on the control panel or in the Epson Scan 2 Utility.
If a surface is stained with a hard-to-remove material, use a genuine Epson cleaning kit to remove the stains. Use a
small amount of cleaner on the cleaning cloth to remove the stains.
Important:
c
❏ Never use alcohol, thinner, or any corrosive solvent to clean the scanner. Deformation or discoloration may occur.
❏ Never spray any liquid or lubricant on the scanner. Damage to equipment or circuits may cause abnormal
operations.
❏ Never open the scanner case.
1.
Press the
2.
Unplug the AC adapter from the scanner.
P
button to turn o the scanner.
95
Page 96

Maintenance
3.
Pull the lever and open the scanner cover.
4.
Wipe o any stains on the plastic roller and glass surface at the bottom inside of the scanner cover using a so
cloth or a genuine Epson cleaning kit.
>
Cleaning Inside the Scanner
Important:
c
❏ Do not place too much force on the glass surface.
❏ Do not use a brush or a hard tool. Any scratches on the glass may aect the scan quality.
❏ Do not spray cleaner directly onto the glass surface.
96
Page 97

Maintenance
5.
Wipe o any stains on the sensors with a cotton swab.
Important:
>
Cleaning Inside the Scanner
c
Do not use liquid such as a cleaner on a cotton swab.
6.
Open the cover, and then remove the Separation Roller.
See the steps for “Replacing the Roller” for more details.
7.
Wipe o any dust or dirt on the Separation Roller using a genuine Epson cleaning kit or a so, moist cloth.
97
Page 98

Maintenance
Important:
>
Cleaning Inside the Scanner
c
Use only a genuine Epson cleaning kit or a so, moist cloth to clean the roller. Using a dry cloth may damage
the surface of the roller.
8.
Open the cover, and then remove the Pickup Roller.
See “Replacing the Roller” for more details.
9.
Wipe o any dust or dirt on the Pickup Roller using a genuine Epson cleaning kit or a so, moist cloth.
Important:
c
Use only a genuine Epson cleaning kit or a so, moist cloth to clean the roller. Using a dry cloth may damage
the surface of the roller.
10.
Close the scanner cover.
11.
Plug in the AC adapter, and then turn on the scanner.
12.
Select Scanner Maintenance from the home screen.
98
Page 99

Maintenance
13.
On the Scanner Maintenance screen, select Roller Cleaning.
14.
Pull the lever to open the scanner cover.
e scanner enters roller cleaning mode.
15.
Slowly rotate the rollers at the bottom by tapping anywhere on the LCD. Wipe the surface of the rollers using a
genuine Epson cleaning kit or a
>
Resetting the Number of Scans After Regular Cleaning
cloth dampened with water. Repeat this until the rollers are clean.
so
Caution:
!
Be careful not to get your hands or hair caught in the mechanism when operating the roller. is could cause an
injury.
16.
Close the scanner cover.
e scanner exits roller cleaning mode.
Related Information
& “Cleaning Kit Codes” on page 22
& “Roller Codes” on page 21
Resetting the Number of Scans After Regular Cleaning
Reset the number of scans using the control panel
1.
Select Scanner Maintenance from the home screen.
regular cleaning.
aer
99
Page 100

Maintenance
2.
On the Scanner Maintenance screen, select Regular Cleaning.
3.
Ta p Reset the Number of Scans.
4.
Ta p Ye s .
Note:
You can also reset the number of scans by using the following method.
>
Replacing the Roller
Select Settings and then Device Information. Tap the
icon and tap Number of Scans Aer Regular Cleaning.
Replacing the Roller
e Pickup Roller and the Separation Roller need to be replaced when the number of scans exceeds the life cycle of
the rollers. When a replacement message is displayed on the control panel or your computer screen, follow the
steps below to replace it.
A: Separation Roller, B: Pickup Roller
1.
Press the
2.
Unplug the AC adapter from the scanner.
P
button to turn o the scanner.
100
 Loading...