

Page 1
Page 2
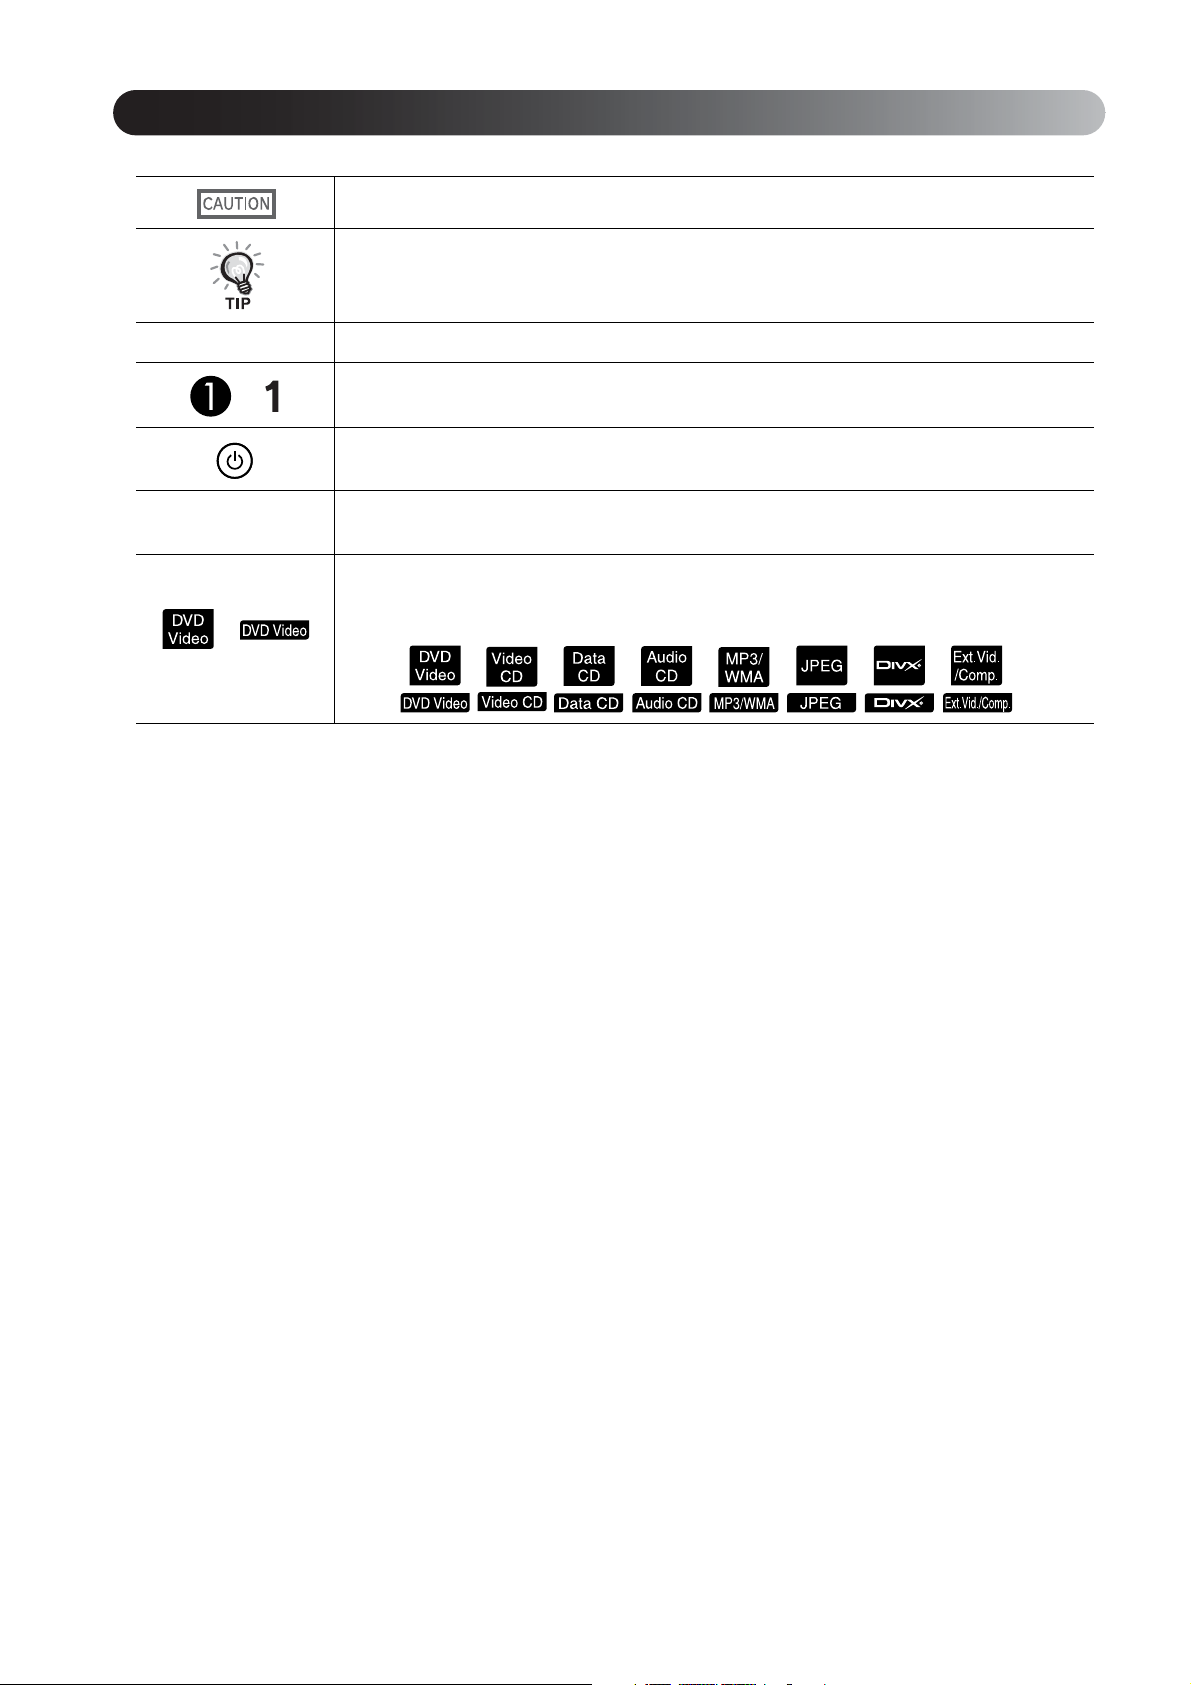
Notations used in this guide
Indicates content that may cause the unit damage or malfunction.
Indicates additional information and points that may be useful to know regarding a topic.
s Indicates a page where useful information regarding a topic can be found.
Indicates operating methods and the order of operations.
The procedure indicated should be carried out in order of the numbered steps.
Indicates remote control or main unit buttons.
“(Menu name)”
Indicates menu items and messages that are displayed on screen.
Example: “Brightness”
Depending on the type of disc, the functions and operations which can be performed may be
different.
These marks inform you of the type of disc being used.
Page 3

Contents
Contents..................................................................... 1
Safety Instructions..................................................... 2
Use and Storage......................................................... 8
Discs and USB Storage ............................................. 10
Parts Name and Functions......................................... 12
Preparing the Remote Control................................... 16
Quick Start
Installation................................................................. 18
Projection distance and screen size ............................................ 18
Connecting the power cable ....................................................... 18
Disc Playback............................................................ 19
Playing a disc and projecting ..................................................... 19
Adjusting the projection position and volume ........................... 20
Stopping playback ...................................................................... 22
Turning off the power ................................................................ 22
Basic Playback Operations........................................ 23
Pause........................................................................................... 23
Reverse search/forward search ................................................... 23
Skip............................................................................................. 24
Frame advance............................................................................ 24
Slow motion playback ................................................................ 24
Temporarily using the projector’s light as illumination (Break) 25
Color Mode ................................................................................ 25
Mute ........................................................................................... 25
Advanced Operations
Settings and Adjustments
Setup Menu Operation and Functions ....................... 50
Using the setup menu ................................................................. 50
Setup menu list ........................................................................... 51
Language code list ...................................................................... 53
“Digital Output” settings and output signals .............................. 54
Operations and functions on the Visual Setup menu. 55
Operations on the Visual Setup menu ........................................ 55
Visual Setup menu...................................................................... 56
Appendix
Troubleshooting......................................................... 58
Reading the indicators ................................................................ 58
When the indicators provide no help .......................................... 61
Maintenance .............................................................. 63
Cleaning...................................................................................... 63
Consumables replacement period ............................................... 64
Optional Accessories and Consumables ..................................... 64
How to replace consumables ...................................................... 65
Projection Distance and Screen Size ......................... 69
Compatible Resolution List....................................... 70
Compatible MPEG format list................................... 71
Specifications ............................................................ 72
Glossary..................................................................... 74
Index .......................................................................... 75
Inquiries..................................................................... 76
Quick Start
Advanced Operations
Becoming a playback expert ..................................... 26
Playback from a DVD menu ...................................................... 26
Playback a Video CD from the menu......................................... 27
JPEG, MP3/WMA and DivX® playback................................... 29
Playback by selecting the chapter or track number.................... 32
Repeat play and random play ..................................................... 32
Program play .............................................................................. 34
Zoom In ...................................................................................... 35
Changing the audio language ..................................................... 36
Changing the subtitles display.................................................... 36
Changing the angle..................................................................... 37
Carrying out operations from the playback information screen. 37
Setting the sleep timer ................................................................ 39
Changing the aspect ratio ........................................................... 40
Playback by attaching a peripheral device ................ 42
Connecting a USB storage device .............................................. 42
Connecting to another video device, a TV set, or a Computer .. 43
Projecting images from external video equipment or a computer 45
Audio Settings ........................................................... 47
Listening with headphones ......................................................... 47
Connecting to audio equipment with a digital coaxial audio input
port ............................................................................................. 48
Selecting the Surround Sound mode (Only via speaker) ........... 48
Selecting the digital sound effects .............................................. 49
Settings and
Adjustments
Appendix
1
Page 4
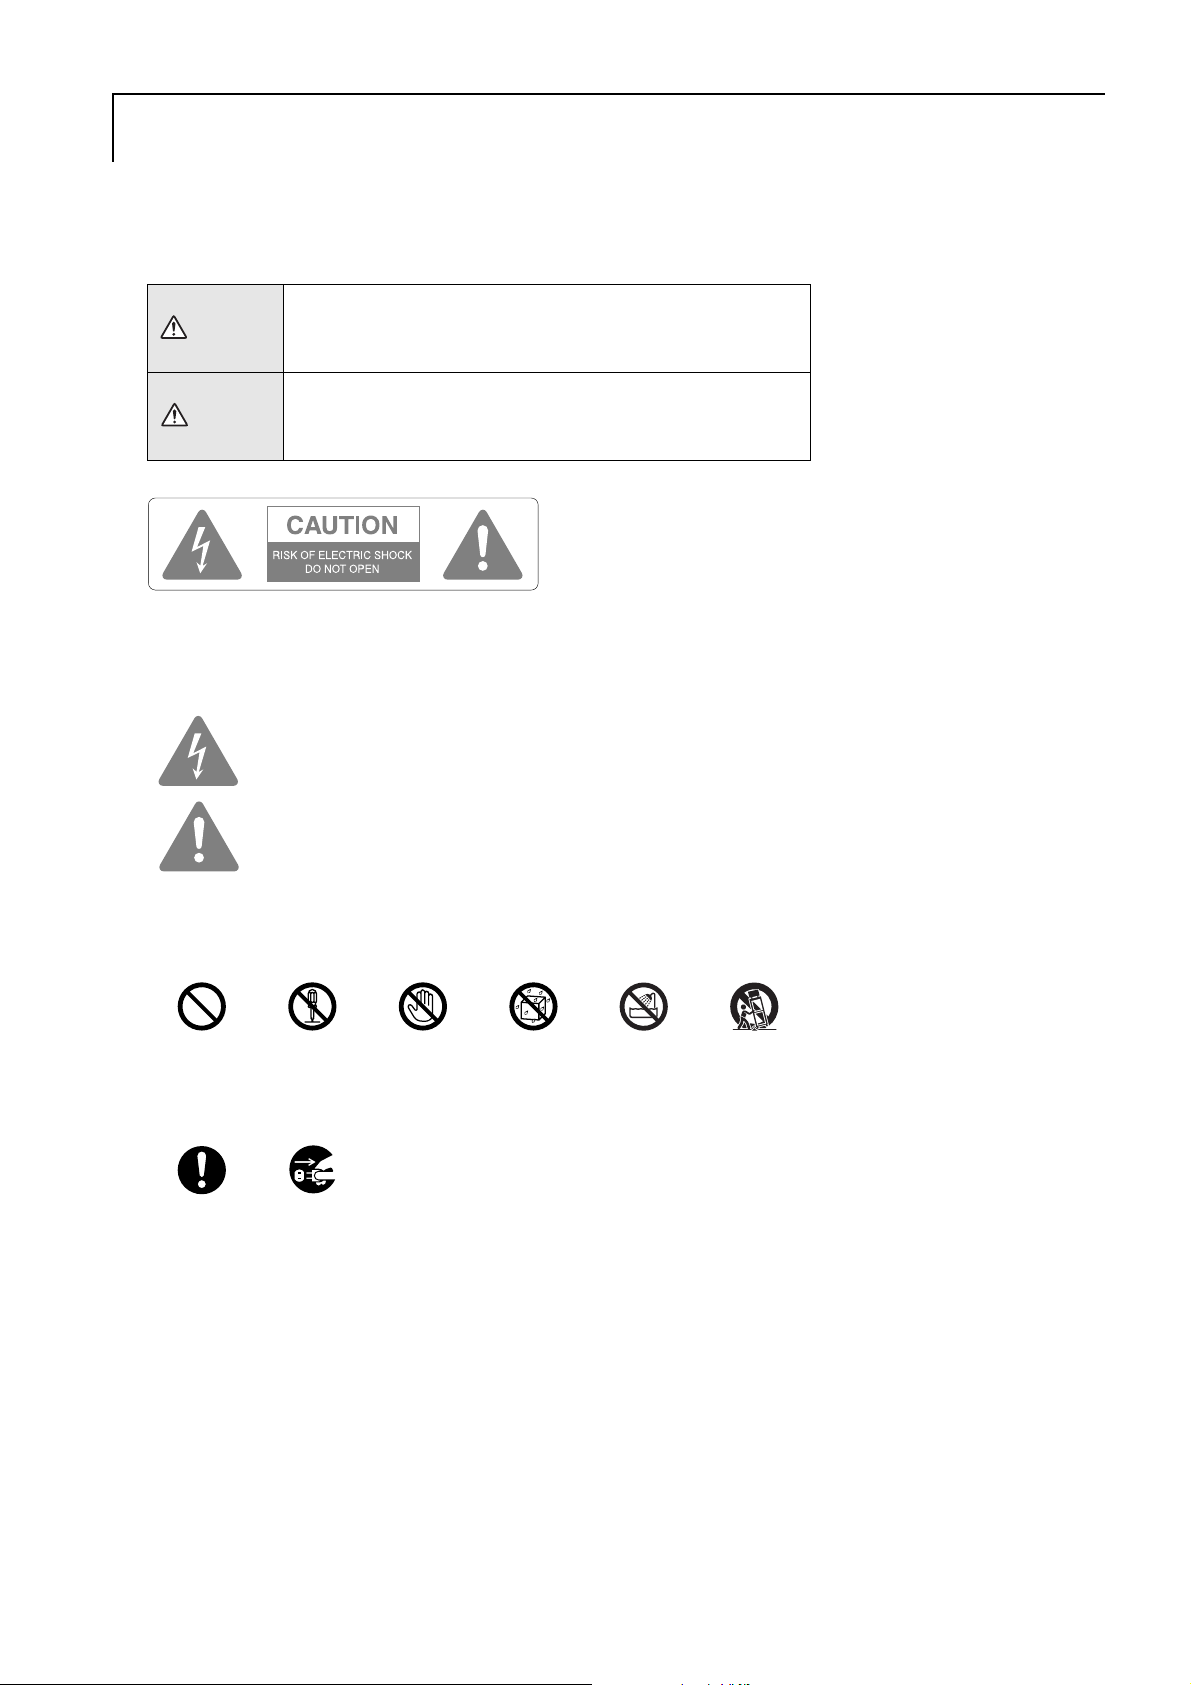
Safety Instructions
All safety and operating instructions should be read before using the unit. After you have read all instructions, save this
information for later reference.
The documentation and the unit use graphical symbols to show how to use the unit safely.
Please understand and respect these caution symbols in order to avoid injury to persons or property.
This symbol indicates information that, if ignored, could
Warning
Caution
Caution :
To reduce the risk of electric shock, do not remove cover (or back). No user-serviceable parts inside. Refer servicing to
qualified service personnel.
possibly result in personal injury or even death due to
incorrect handling.
This symbol indicates information that, if ignored, could
possibly result in personal injury or physical damage due
to incorrect handling.
This symbol is intended to alert the user to the presence of uninsulated “dangerous voltage” within the
product’s enclosure that may be of sufficient magnitude to constitute a risk of electric shock to persons.
This symbol is intended to alert the user to the presence of important operating and maintenance
(servicing) instructions in the literature accompanying the appliance.
Explanation of symbols
Symbols indicating an action that must not be done
Do not do Do not
disassemble
Symbols indicating an action that should be done
Instructions Disconnect
the plug from
the outlet
Do not
touch
Do not
wet
Do not use in
wet areas
Do not place
on an
unstable
surface
2
Page 5

Important safety instructions
Follow these safety instructions when setting up and using the projector :
• Read these instructions.
• Keep these instructions.
• Heed all warnings.
• Follow all instructions.
• Do not use this apparatus near water.
• Clean only with dry cloth.
• Do not block any ventilation openings. Install in accordance with the manufacturer’s instructions.
• Do not install near any heat sources such as radiators, heat registers, stoves, or other apparatus (including
amplifiers) that produce heat.
• Do not defeat the safety purpose of the polarized or grounding-type plug. A polarized plug has two blades with
one wider than the other. A grounding type plug has two blades and a third grounding prong. The wide blade or
the third grounding prong are provided for your safety. If the provided plug does not fit into your outlet, consult an
electrician for replacement of the obsolete outlet.
• Protect the power cord from being walked on or pinched particularly at plugs, convenience receptacles, and the
point where they exit from the apparatus.
• Only use attachments/accessories specified by the manufacturer.
• Use only with the cart stand, tripod, bracket, or table specified by the manufacturer, or sold with the apparatus.
When a cart is used, use caution when moving the cart/apparatus combination to avoid injury from tip-over.
• Unplug this apparatus during lightning storms or when unused for long periods of time.
• Refer all servicing to qualified service personnel. Servicing is required when the apparatus has been damaged
in any way, such as the power-supply cord or plug is damaged, liquid has been spilled or objects have fallen into
the apparatus, the apparatus has been exposed to rain or moisture, does not operate normally, or has been
dropped.
3
Page 6
Warning
To reduce the risk of fire or electric shock, do not expose this apparatus to rain or moisture.
Unplug the unit from the outlet and refer all repairs to qualified service personnel under the following
conditions:
• If smoke, unusual smells or unusual noises come from the unit.
• If liquid or foreign objects get inside the unit.
• If the unit has been dropped or the case has been damaged.
Continuing to use under these conditions may result in fire or electric shock.
Do not try to repair this unit yourself. Refer all repairs to qualified service personnel.
Place the unit near a outlet where the plug can be easily unplugged.
Never open any covers on the unit except as specifically explained in this guide. Never attempt to
disassemble or modify the unit. Refer all repairs to qualified service personnel.
Electrical voltages inside the unit can cause severe injury.
Do not expose the unit to water, rain, or extensive humidity.
Do not use in
wet areas
Disconnect
the plug from
the outlet
Do not
disassemble
Use only the type of power source indicated on the unit. Use of a power source other than the
specified may result in fire or electric shock. If you are not sure of the power available, consult your
dealer or local electricity company.
Check the specifications of the power cable. Using an inappropriate power cable could result in fire or
electric shock.
The power cable supplied with the unit is intended to comply with power supply requirements for the
country of purchase. If using within the country of purchase, do not use any power cable other than the one
supplied with the unit. If using the unit overseas, check the power supply voltage, outlet shape and
electrical rating of the unit that conform to the local standards, and purchase a proper power cable in the
country.
Take the following precautions when handling the plug.
Failure to comply with these precautions could result in fire or electric shock.
• Do not overload outlets, extension cables or multi-socket devices.
• Do not insert the plug into the outlet with dust present.
• Insert the plug firmly into the outlet.
• Do not handle the plug with wet hands.
• Do not pull the power cable when disconnecting the plug. Always be sure to hold the plug when
disconnecting it.
Do not use in
wet areas
Do not do
Instructions
Instructions
Do not use the power cable that is damaged. Fire or electric shock may result.
• Do not modify the power cable.
• Do not place heavy objects on top of the power cable.
• Do not bend, twist or pull the power cable excessively.
Do not do
• Keep the power cable away from hot electrical appliances.
If the power cable becomes damaged (such as the wires becoming exposed or broken), contact your dealer
for a replacement.
If there is an electrical storm, do not touch the plug, otherwise you may receive an electric shock.
Do not touch
4
Page 7
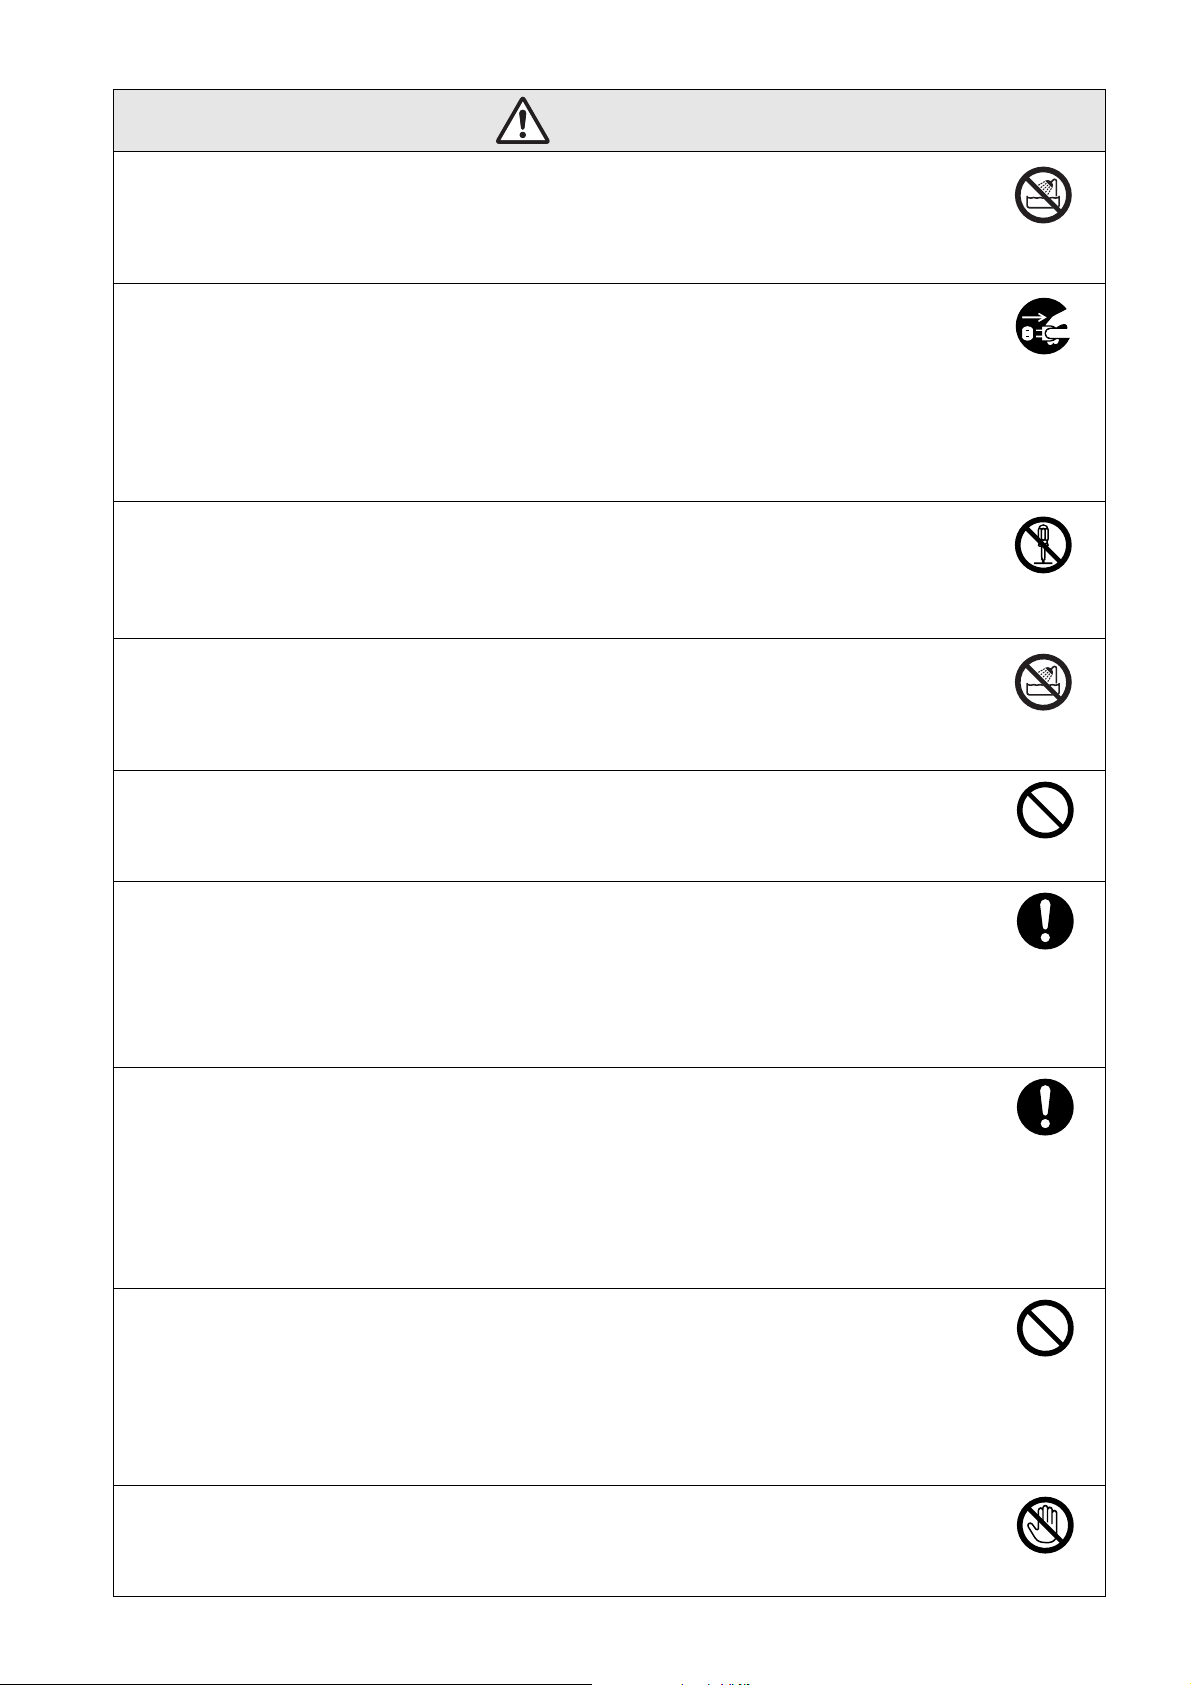
Warning
Do not place containers with liquids, water or chemicals on top of the unit.
If the containers spill and the contents get inside the unit, fire or electric shock may result.
Never look into the unit lens when the lamp is switched on as the bright light can damage your eyes.
Never push metallic or flammable objects or any other foreign materials through the air intake or air
exhaust vents, fire or electric shock may result.
A mercury lamp with high internal pressure is used as the unit’s light source. Be sure to observe the
instructions below.
If the following points are not observed, injury or poisoning may result.
• Do not damage the lamp or subject it to any impacts.
• The gases inside mercury lamps contain mercury vapor. If the lamp breaks, ventilate the room to prevent
the gases that are released from being inhaled or coming into contact with the eyes or mouth.
• Do not bring your face close to the unit while it is in use.
If the lamp breaks and gases or fragments of broken glass from the lamp are inhaled or get into the eyes or
mouth, or if any other ill effects are noticed, immediately seek medical advice.
Do not
wet
Do not do
Do not do
Instructions
Do not leave the unit or the remote control with batteries inside a vehicle with the windows closed, in
places where they will be exposed to direct sunlight, or in other places that may become extremely
hot.
Thermal deformation or technical malfunction may occur, which could result in fire.
Do not do
5
Page 8
Caution
Class 1 LASER Product
Do not open the top cover. There are no user serviceable parts inside the unit.
Do not use the unit in places where there are lots of humidity or dust, near cooking or heating
appliances, or in places where it may come into contact with smoke or steam.
Do not use or store this unit outdoors for an extended length of time.
Fire or electric shock may result.
Do not block the slots and opening in the unit case. They provide ventilation and prevent the unit from
overheating.
• Material or paper may get stuck against the air filter underneath the unit while it is in use. Remove
anything from underneath the unit that might get stuck against the air filter. If setting up the unit near a
wall, leave a space of at least 20 cm between the wall and the air exhaust vent.
• Ensure there is at least 10 cm between the air intake vent and any walls, and so on.
• Do not place the unit on a sofa, rug, or other soft surface, or in a closed-in cabinet unless proper
ventilation is provided.
Do not place the unit on an unstable cart, stand, or table.
The unit might fall down or tip over, and injury may result.
Do not
disassemble
Do not do
Do not do
Do not place
on an
unstable
surface
Do not stand on the unit or place heavy objects on it.
The unit might collapse or fall down, and injury may result.
Do not place anything that can become warped or damaged by heat near the air exhaust vents, or
bring your hands or face close to the vents while projection is in progress.
Because hot air comes out from the air exhaust vents, it may result in burns, warping or other accidents.
Never try to remove the lamp immediately after use because it will be extremely hot. Before removing
the lamp, turn off the power supply and wait the duration specified in this guide to allow the lamp to
cool completely.
The heat may cause burns or other injuries.
Do not place the source of a naked flame, such as a lit candle, on or near the unit.
Unplug the unit when it will not be used for extended periods.
The insulation may deteriorate, which may result in fire.
Do not do
Do not do
Do not do
Do not do
Disconnect
the plug from
the outlet
Be sure to check that the power is turned off, the plug is disconnected from the outlet and all cables
are disconnected before moving the unit.
Fire or electric shock may result.
Disconnect
the plug from
the outlet
6
Page 9

Caution
Unplug the unit from the outlet before cleaning.
This avoids electric shock during cleaning.
When cleaning the unit, do not use wet cloths or solvents such as alcohol, thinner or benzine.
Water infiltration or deterioration and breakage of the unit case could result in electric shock.
Incorrect battery usage may cause leakage of battery fluid and battery rupture, which could result in
fire, injury or corrosion of the unit. When replacing batteries, take the following precautions.
• Insert batteries so that the polarities (+ and -) are correct.
• Do not use batteries of different types or mix old and new batteries.
• Do not use any batteries other than those specified in this guide.
• If the batteries leak, wipe away battery fluid with a soft cloth. If fluid gets on your hands, wash them
immediately.
• Replace the batteries as soon as they run out.
• Remove the batteries if you will not be using the unit for a long period of time.
• Do not expose batteries to heat or flame and do not put them in water.
• Dispose of used batteries according to local regulations.
• Keep these batteries out of the reach of children. Batteries are choking hazards and are very dangerous if
swallowed.
Disconnect
the plug from
the outlet
Instructions
Instructions
Do not set the volume too high from the outset.
A loud sound may be produced suddenly that may cause damage to the speaker or your hearing. As a
precaution, lower the volume before you switch off this unit then raise it gradually after you switch it back
on.
When using headphones, do not turn the volume up too loudly.
You may adversely affect your hearing when listening at loud volumes over extended periods of time.
Follow the maintenance schedule for this unit. If the interior of the unit has not been cleaned for a long
time, dust may build up, which could cause fire or electric shock.
Replace your air filter periodically as needed.
Contact your dealer to clean the interior of the unit as needed.
Do not do
Do not do
Instructions
7
Page 10
Use and Storage
Take note of the following advice in order to prevent malfunction and damage.
range of that which is covered in your warranty
Notes on handling and storage
• Be sure to observe the operating temperatures
and storage temperatures given in this guide
when using and storing the projector.
• Do not set up the unit in places where it might
be subjected to vibration or shock.
• Do not install the unit close to television, radio or
video equipment that generates magnetic fields.
This may adversely affect the audio and images of
this unit, and may cause a malfunction. In the event
that such symptoms occur, move the unit further
away from any television, radio and video
equipment.
• Do not operate the projector under any of the
following conditions. If this is not observed,
problems with operation or accidents may result.
While the projector is
standing on its end
While the projector is placed
with the top facing up
terms.
• You can store the unit in an upright position
compactly on a shelf, etc., as it has storage feet
on its side. When storing the unit in an upright
position, place it on a stable surface with the
storage feet at the bottom. Be sure to place the
unit in the storage case supplied with the unit so
that no dust enters the air intake vent.
Condensation
If you move this unit from a cold place into a warm
room, or, if the room in which this unit is installed is
heated rapidly, condensation (moisture) may form
internally or on the lens surface. If condensation forms,
it may not only cause incorrect operation such as
weakening of the image, but also damage the disc and/
or parts. In order to prevent against condensation, setup
this unit in the room approximately one hour before it is
to be used. If by some chance condensation does form,
disconnect the power cable from the outlet, then wait
one to two hours before use.
While the projector is
placed with the bottom up
• Do not move this unit during playback.
This may damage the disc or cause malfunction.
• Avoid using or storing this unit in cigarette or
other smoke filled places, or in rooms containing
a large amount of dust.
This may cause degradation of the image quality.
• Do not touch the projection lens with your bare
hands.
If fingerprints or marks are left on the face of the
lens, the image will not be projected clearly. When
the unit is not in use, be sure to attach the lens cover.
• EPSON will not be held responsible for damage
arising from projector or lamp failure outside the
While the projector is
tilted to either side
Lamp
A mercury lamp with high internal pressure is used as
the unit’s light source.
The characteristics of the mercury lamp are:
• The intensity of the lamp decreases with use.
• When the lamp reaches the end of its life, it will no
longer light or may break with a loud noise.
• The life of the lamp may vary greatly depending on
the individual lamp characteristics and the operating
environment. You should always have a spare lamp
ready in case it is needed.
• Once the lamp replacement period has elapsed, the
possibility of lamp breakage incrcases. When the
lamp replacement message appears, replace the lamp
with a new one as soon as possible.
• This product includes a lamp component that contains
mercury (Hg). Please consult your local regulations
regarding disposal or recycling.
Do not dispose of it with normal waste.
8
Page 11

LCD panel
Transportation cautions
• The LCD panel is manufactured using extremely
high-precision technology.
However, black dots may appear on the panel, or
some red, blue or green dots may light up extremely
brightly at times. Furthermore, sometimes striped
color irregularities or brightness irregularities may
also appear. They are caused by the characteristics of
the LCD panel, and are not a sign of malfunction.
• Screen burn may remain in the projected image when
a high-contrast still image is projected for more than
15 minutes.
If screen burn has occured, you should project a
bright screen (if a computer is used: white screen,
video: as bright an animation as possible) until the
screen burn disappears. It takes approx. 30 to 60
minutes, depending on the extent of the screen burn.
If the screen burn does not disappear, contact your
dealer for advice. sp. 76
When moving this unit
• Close the lens cover.
• Eject the disc.
• Retract the unit feet if extended.
• Carry the unit by holding the handle as shown in
the following illustration.
• Many glass and precision parts are used within
this unit. In order to prevent impact during
transportation, re-use the box and protective
packaging you received at the time of purchase.
If you no longer have the original packing,
protect the outside of this unit with shock
absorbing material to protect it from impact,
place it inside a strong box and make sure it is
clearly labeled for the transportation of precision
equipment.
• Close the lens cover and pack the unit.
• If using a courier service for transportation,
inform them that this unit contains precision
equipment and should be handled accordingly.
* Your warranty does not cover any damages that may
occur to this product during transportation.
Copyrights
Reproduction of a disc for the purposes of broadcast,
projection in public, public musical performance, or
rental (regardless of compensation, remuneration, or
lack thereof) without the permission of the copyright
owner, is strictly prohibited.
9
Page 12
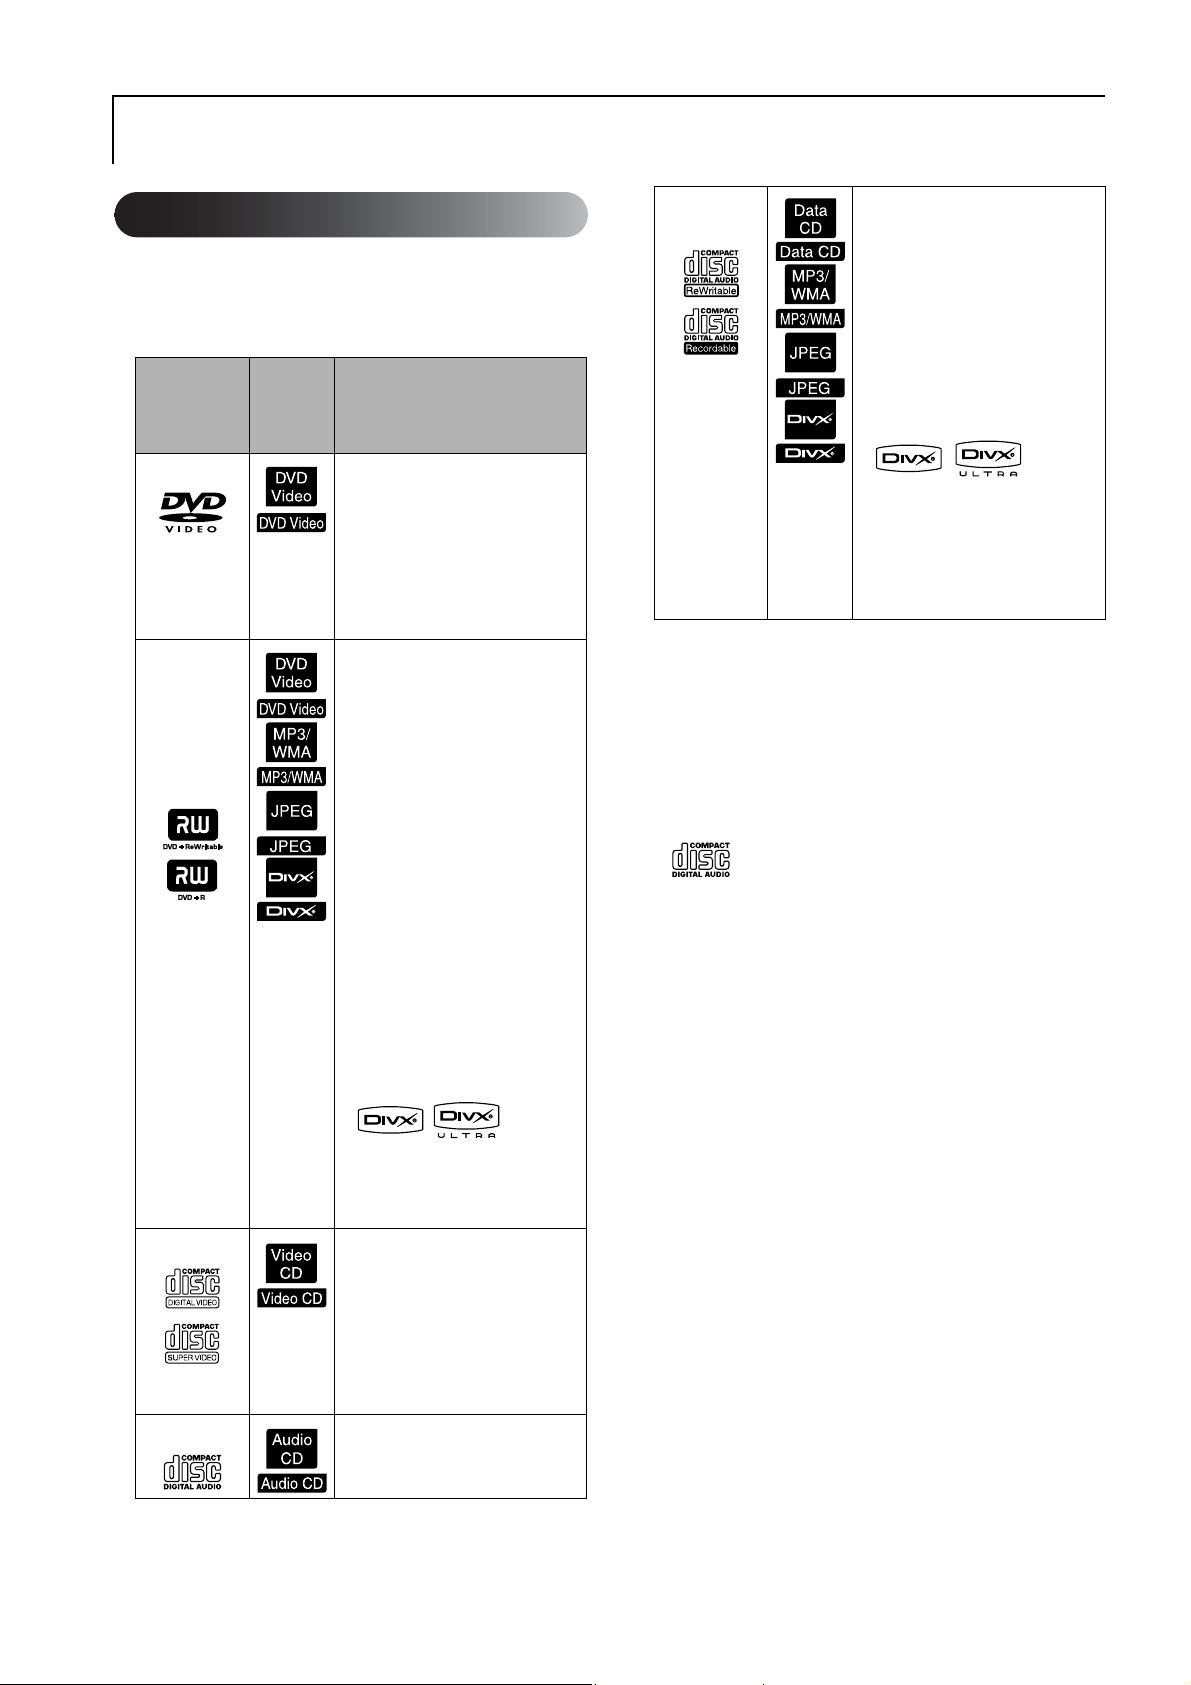
Discs and USB Storage
Discs
Readable disc types
The following discs can be played.
Symbols
Disc types
DVD video Commercially available software
DVD+RW
DVD+R
DVD+R DL
DVD-RW
DVD-R
DVD-R DL
Video CD Software containing images and
CD The software containing sound
used in
this
guide
Explanation
containing high-quality movies
and forms of visual images.
You cannot play DVD videos if
the disc region code does not
correspond to the region code
label on the side of this unit.
DVD discs described on the left,
recorded on another DVD
recorder.
• Can play a DVD disc
containing video format
images.
• Can play a DVD disc
containing VR format images.
• Can play a disc if it has been
“finalized” by the DVD
recorder that has recorded the
images.
• Can play the following files
recorded in the ISO 9660/UDF
format:
MP3/WMA/JPEG/MPEG1/2/
®
4/DivX
• Can play only the first session
although the unit supports
multiple sessions.
sound.
• Can play a Video CD (in
version 2.0) with PBC
(playback control).
• Can play a Super Video CD
(SVCD).
and voice.
3/4/5/6/DivX® Ultra
CD-R/RW
CD+R/RW
CDs created with a CD recorder
or a computer.
• Can play the following files
recorded in the ISO9660 level-
1 or -2/UDF format:
MP3/WMA/JPEG/Kodak
Picture CD/FujiColor CD/
MPEG1/2/4/
®
3/4/5/6/DivX® Ultra
DivX
• Supports the extended format
(Joliet).
• Supports multiple sessions.
• Can play a disc recorded by
packet writing.
• The performance and tonal quality of copy-
control CD discs that do not conform to the
compact disc (CD) standard cannot be
guaranteed with this unit. CDs that conform to
the CD standard will bear the following compact
disc logo mark. Check what is displayed on the
packaging of the audio disc.
• This unit conforms to the NTSC and PAL
television signal formats.
• In the case of DVD video, SVCD, and Video CD,
playback functions may be intentionally limited
by the software producers. As this unit plays
back the contents of a disc certain functions
may not work. Refer to the attached user
information of the disc being played.
• DVD-R/R DL/RW, DVD+R/R DL/RW, CD-R/RW,
and CD+R/RW discs may not be able to be
played if they are scratched, dirty, warped, or if
the recording status or recording conditions are
unsuitable. Also, it may take the unit some time
to read the disc data.
• CPRM (Content Protection for Recordable
Media)compatible DVD-R discs recorded in the
VR format cannot be played back on this unit.
• Only the audio of the following discs can be
played back.
- MIX-MODE CD - CD-G - CD-EXTRA
- CD TEXT
10
Page 13
Unreadable disc types
• The following discs cannot be played.
- DVD-ROM - CD-ROM - PHOTO CD
- DVD audio - SACD - DACD
- DVD-RAM
• This unit can play only one memory card even if
multiple cards are mounted on the card reader.
Mount only the card you wish to play.
Specifications of files that
• Round discs with a diameter other than 8 cm or
12 cm
• Irregularly shaped discs
Disc Handling
• Avoid touching the playback side with your bare
hands.
• Be sure to store discs in their cases when not in
use.
• Avoid storing your discs in places with high
humidity or in direct sunlight.
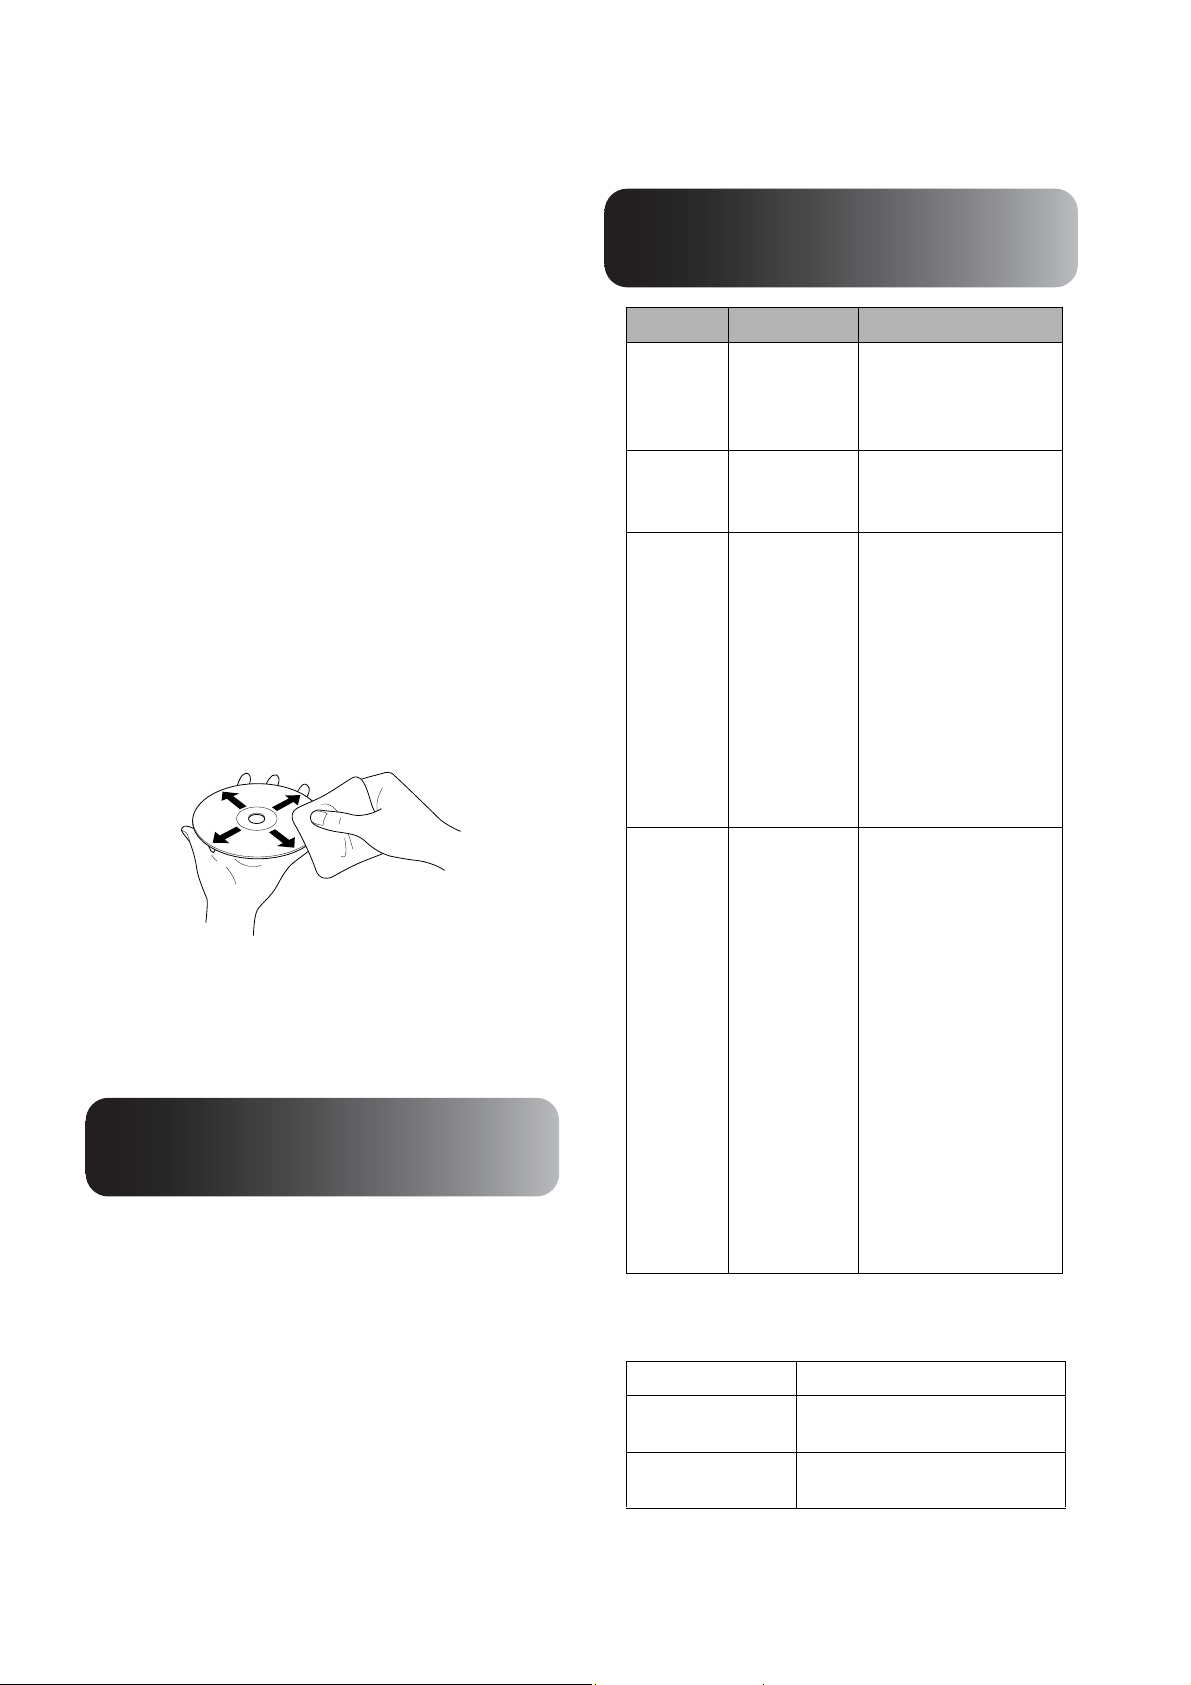
• If the playback surface of the disc is dirty with
dust or fingerprints, the image and audio quality
may deteriorate. When the playback surface is
dirty, gently wipe the disc clean with a soft dry
cloth, starting from the center of the disc then
moving outwards.
• Do not use cleaning products such as benzine,
or anti-static products designed for analog
records.
• Do not glue paper or attach stickers to a disc.
USB storage that can be
played
• You can attach and play the following USB 1.1
based storage devices to the unit:
- USB memory (only devices that are not equipped with
the security function)
- Multicard reader
- Digital camera (if USB mass storage class is supported)
• Use a multicard reader to connect an SD
memory card or other media to the unit.
• The FAT16 and FAT32 file systems are
supported.
• Some system files may not be supported. If the
media is not supported, format the media in the
Windows system before use.
can be played
File format
MP3 “.mp3” or
WMA “.wma” or
®
DivX
DivX®
Ultra
JPEG “.jpg” or “.JPG” Number of pixels: Up to
File extension
“.MP3”
“.WMA”
“.divx” or
“.DIVX”, “.avi”
or “.AVI”
*If double-byte character is used for a file name, it will
not be displayed correctly.
File size 4GB
Total number of
files*
Total number of
folders*
*This figure is unlimited if “MP3/JPEG Nav” from the
settings menu is set to “Without Menu”.
*
648 files (including folders) + 2
default folders
Up to 300 folders
Specifications
Bit rate: 16 to 320K bps
Sampling frequency: 11
kHz, 16 kHz, 22.05 kHz,
32 kHz, 44.1 kHz, 48 kHz
Bit rate: 64 to 192K bps
Sampling frequency: 44.1
kHz, 48 kHz
Up to 3M bps
Maximum number of
pixels: 720 x 576 pixels
Optimum frame rate: 30
fps
A file may not be in the
®
file format even if
DivX
it has an “.avi” or “.AVI”
file extension. In such a
case, the file cannot be
played.
3027 x 2048 pixels
No Motion JPEG is
supported.
JPEG data created by the
DCF (Design rule for
Camera File system)
standard based digital
camera is supported.
Pictures may not be
played back if the auto
rotate function of digital
still camera is used or if
data is processed, edited
or saved again using
computer image editing
software.
11
Page 14
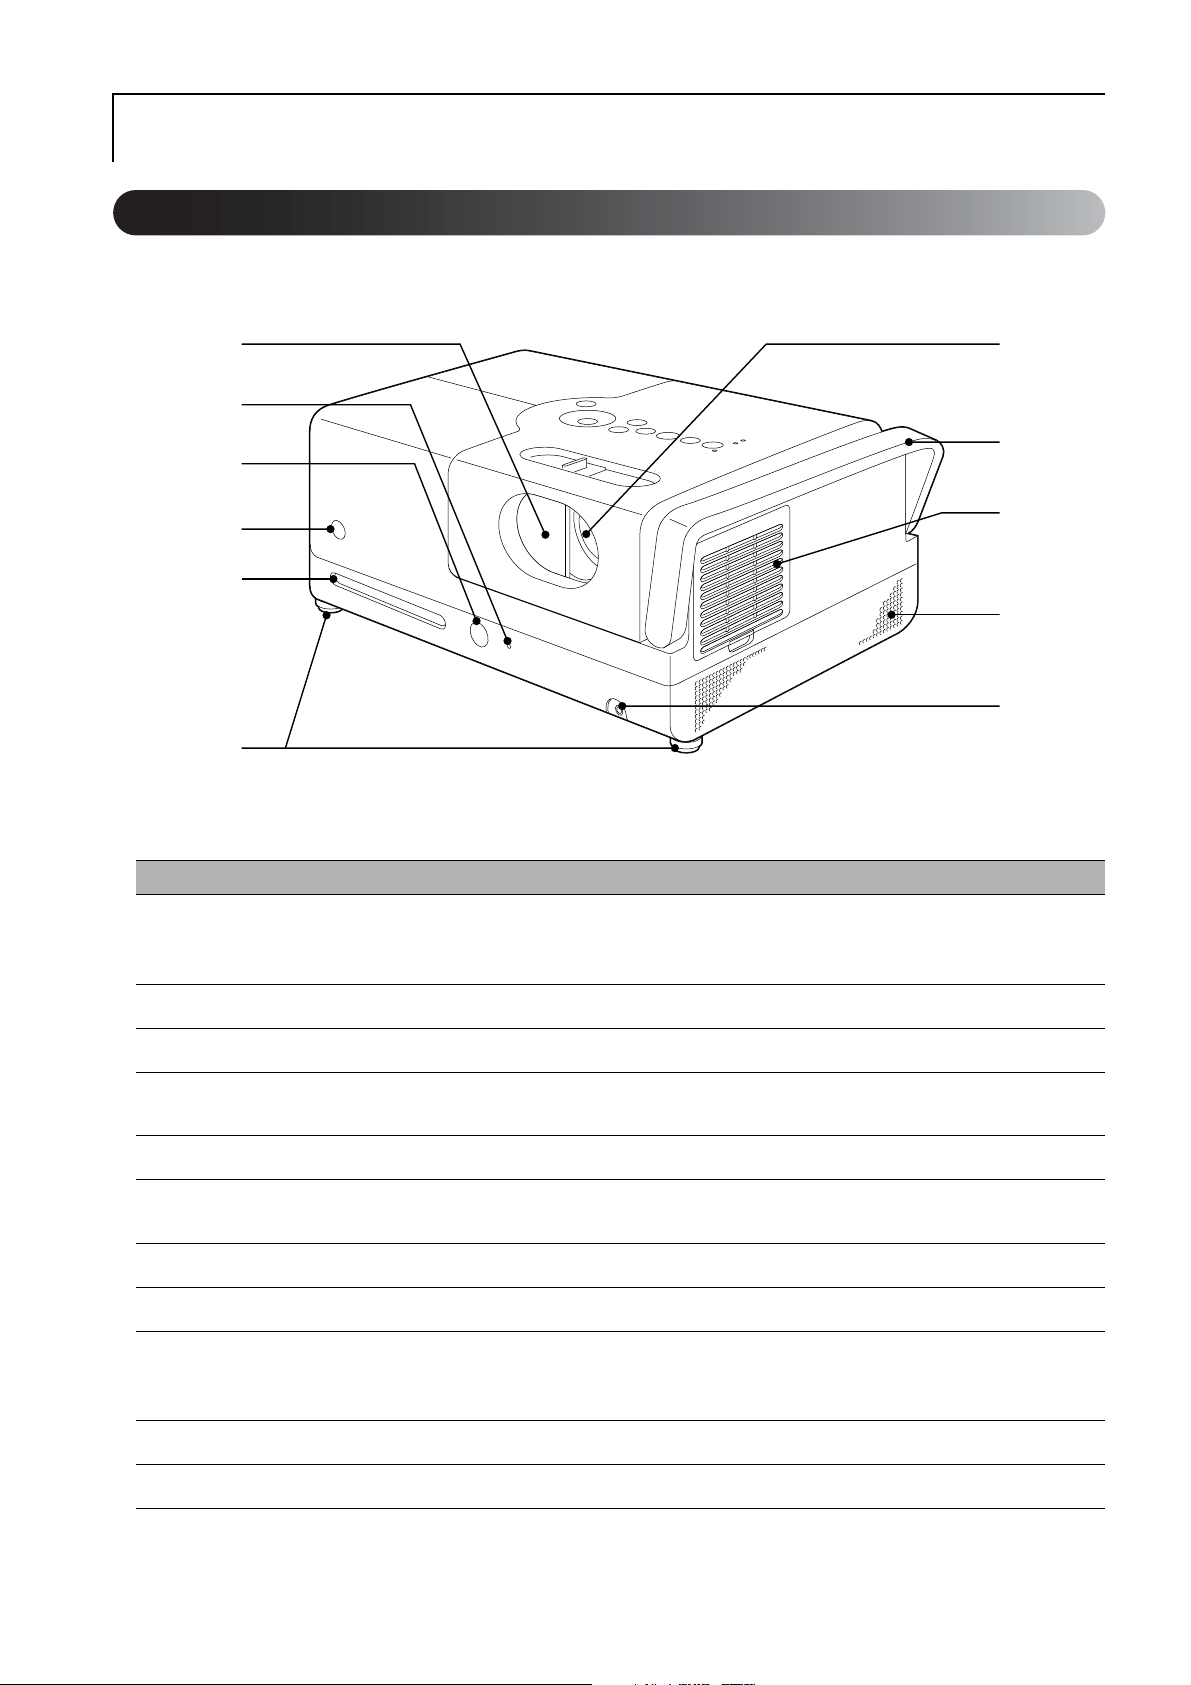
Parts Name and Functions
Front
A
B
C
D
E
F
Slide lens cover
A
K
J
I
H
G
Name Function
Close the lens cover to protect the lens when the unit is not in use.
You can stop the projection completely by closing the lens cover during projection. However, if
this state continues for 30 minutes, the unit lamp is turned off automatically. sp. 18
Disc indicator Lights up green when a disc is inserted into the disc slot. sp. 19
B
Eject button
C
Remote control light-
D
receiving area
Disc slot
E
Feet
F
Headphone jack Connects a headphone to the unit. sp. 47
G
Speakers Placed on the left and right; supports Dolby Virtual Speaker. sp. 48
H
Air intake vent
I
Handle Hold this handle when carrying the unit. sp. 9
J
Projection lens
K
Press this button to eject a disc from the disc slot.
Receives signals from the remote control.
Insert a disc you wish to play.
The feet on the side of the projection lens can be extended by turning them. Extending the feet to
the maximum extent tilts this unit by approximately 5 degrees. sp. 21
Take the cooling air into the unit. If dust collects on the air intake vent it can cause the internal
temperature of the unit to rise, and this can lead to operation problems and a shortening of the
service life of optical parts. Clean it periodically.
Projects an image.
sp. 19
sp. 22
sp. 16
sp. 63
12
Page 15
Rear
A
B
C
D
E
F
Name Function
L
K
J
I
H
G
Computer input port
A
Component input port Can be connected to the component (YCbCr or YPbPr) output port of a video device. sp. 44
B
Video input port
C
Audio input port
D
Power inlet port
E
Digital Coaxial Audio-Out
F
port
USB port
G
Security slot (j)
H
Remote control light-
I
receiving area
Speakers
J
Air exhaust vent
K
Can be connected to the RGB output port of a computer.
Can be connected to the ordinary image output port of a video device.
Can be connected to the audio output port of the connected video device or a computer.
sp. 43, 44
Connect the power cable. 18
Can be connected to an audio device with a digital coaxial audio input port. sp. 48
Connects a USB 1.1-based USB memory or a multicard reader to play the MP3/WMA, JPEG,
®
and other format storages. sp. 42
DivX
Supports Kensington’s micro saver security system. For details, access the Kensington website at
http://www.kensington.com/.
Receives signals from the remote control.
Placed on the left and right; supports Dolby Virtual Speaker.
The air outlet of the unit after cooling.
sp. 16
sp. 44
sp. 43
sp. 48
Caution
Do not block the exhaust vents, and do not touch the exhaust vent immediately after projecting, or
while projecting, since it becomes hot.
Storage feet
L
Used when placing the unit in an upright position. When storing the unit in an upright position,
place it on a stable surface with the storage feet at the bottom. Be sure to place the unit in the
storage case supplied with the unit so that no dust enters the air intake vent.
13
Page 16
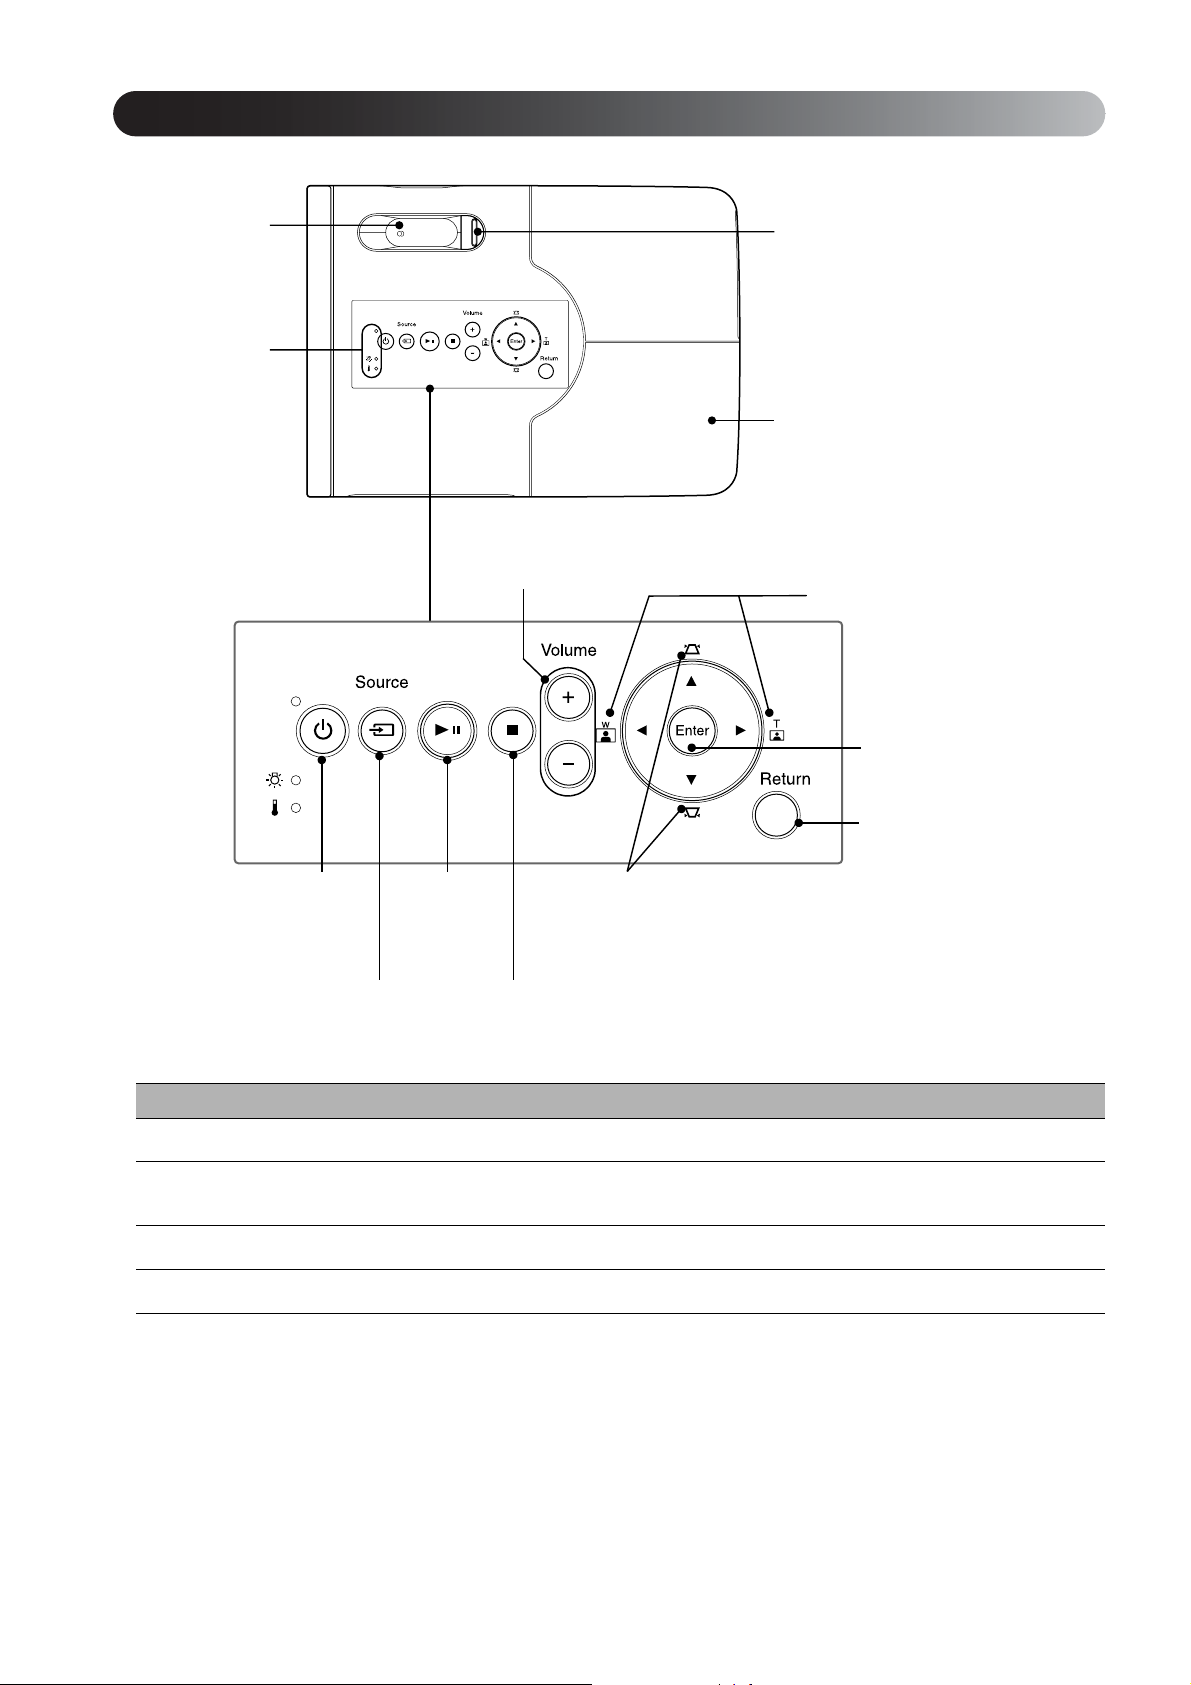
To p
A
B
D
C
vVolume adjustment buttons sp. 20
vZoom button sp. 20
vEnter button
sp. 29
vPower button
sp. 22
vSource button
sp. 45
Name Function
Focusing ring Move to the left or right for image focusing. sp. 20
A
Status indicator
B
Lamp cover
C
Lens cover knob
D
vPlay/Pause
button
sp. 23
vStop button
sp. 22
If a problem occurs in the unit, the status indicator blinks or lights up to indicate the problem.
sp. 58
When replacing the lamp, open this cover and replace the lamp.
Slide the holder to open or close the lens cover.
vw/v button
sp. 21
vReturn button
sp. 29
sp. 66
sp. 18
14
Page 17
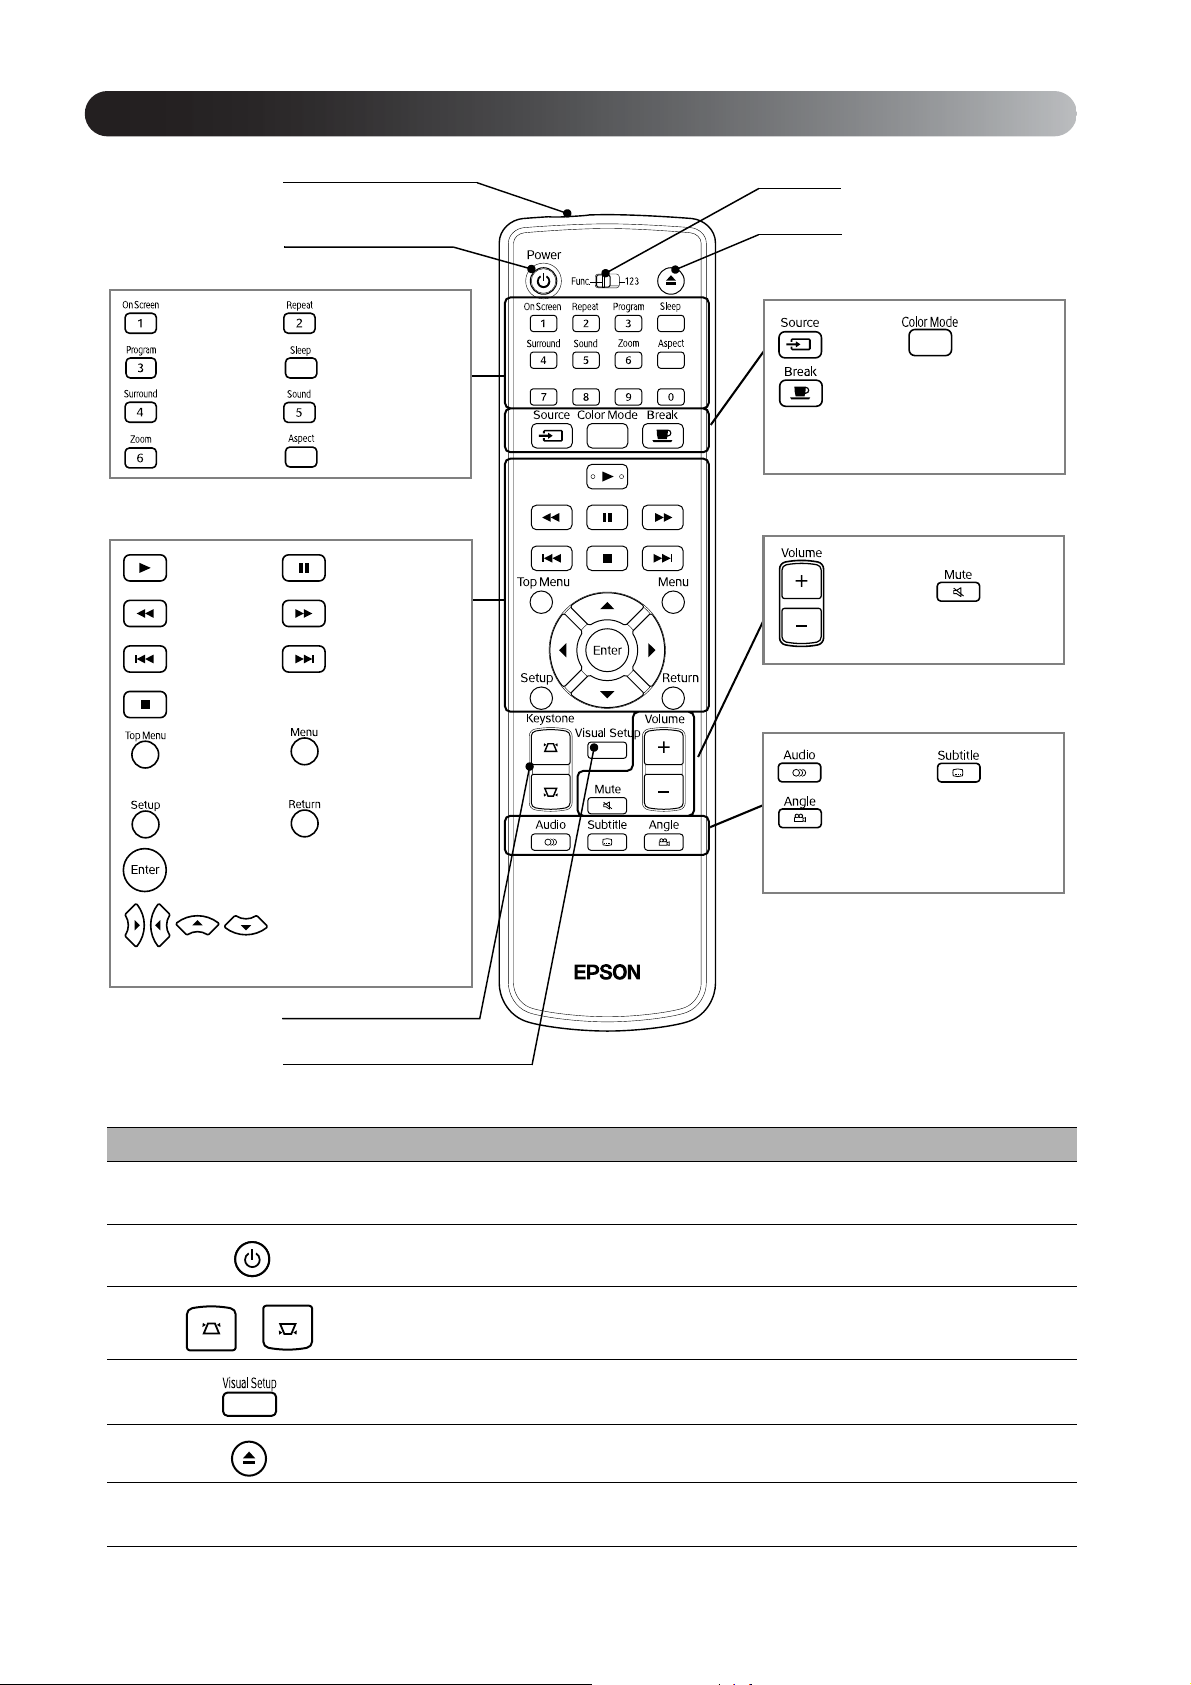
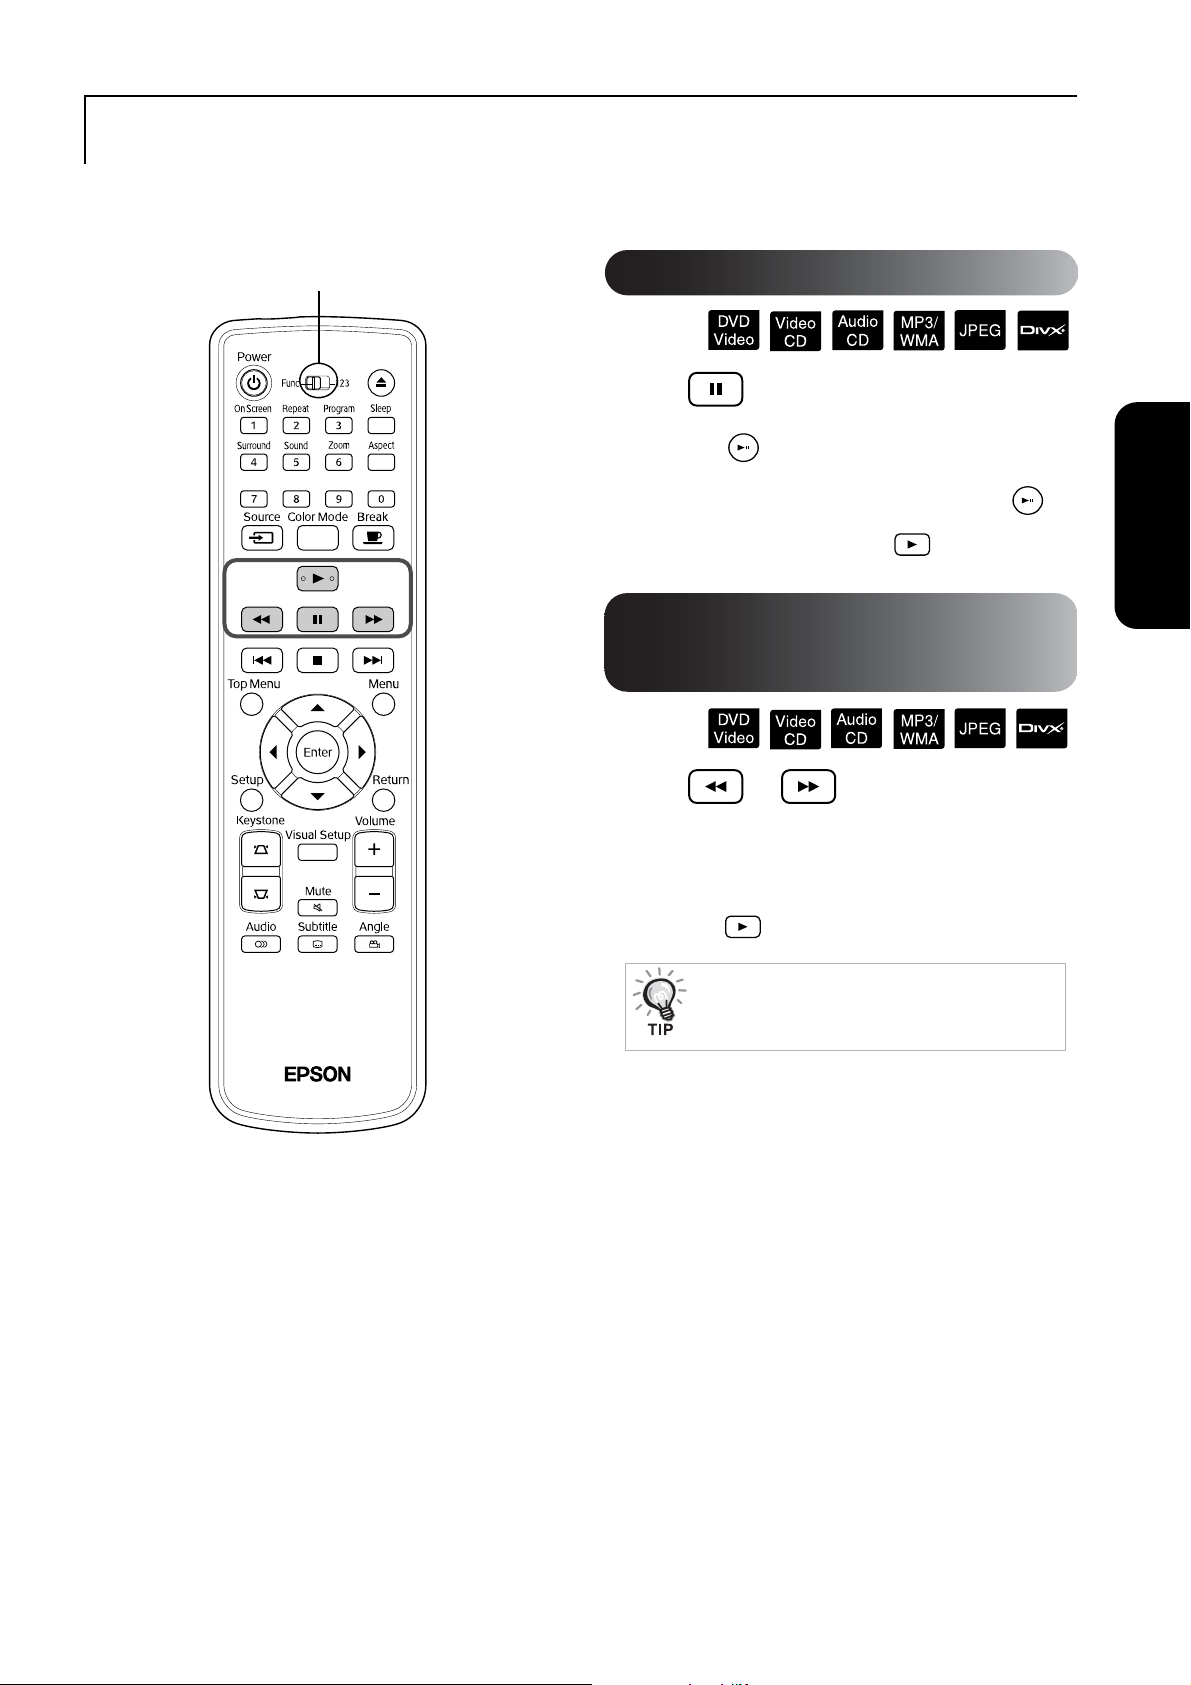
Remote Control
A
B
Handy functions
sp. 37 sp. 32
sp. 34 sp. 39
sp. 48 sp. 49
sp. 35 sp. 40
Buttons used during playback
sp. 22 sp. 23, 24
sp. 23, 24 sp. 23, 24
sp. 24 sp. 24
sp. 22
sp. 26 sp. 26, 28,
29, 30, 31
F
E
Advanced functions
sp. 45 sp. 25
sp. 25
Buttons used when adjusting audio
sp. 20 sp. 25
Buttons used when adjusting DVD
video
sp. 36 sp. 36
sp. 50 sp. 28
sp. 27, 28, 29, 30
sp. 26, 28, 29, 30
C
D
Name Function
Remote control light-
A
emitting area
B
C
D
sp. 37
Emits remote control signals.
Turns power supply to the unit on or off. sp. 22
Corrects keystone distortion of the screen image to square or rectangular. sp. 21
Displays or closes the projection adjustment and checkout menu. sp. 55
sp. 16
E
Function/numeric toggle
F
switch
Press this button to eject a disc from the disc slot. sp. 22
Switches between the functions and numerics you wish to use. Slide this switch to the Function
position to use any function. sp. 26
15
Page 18
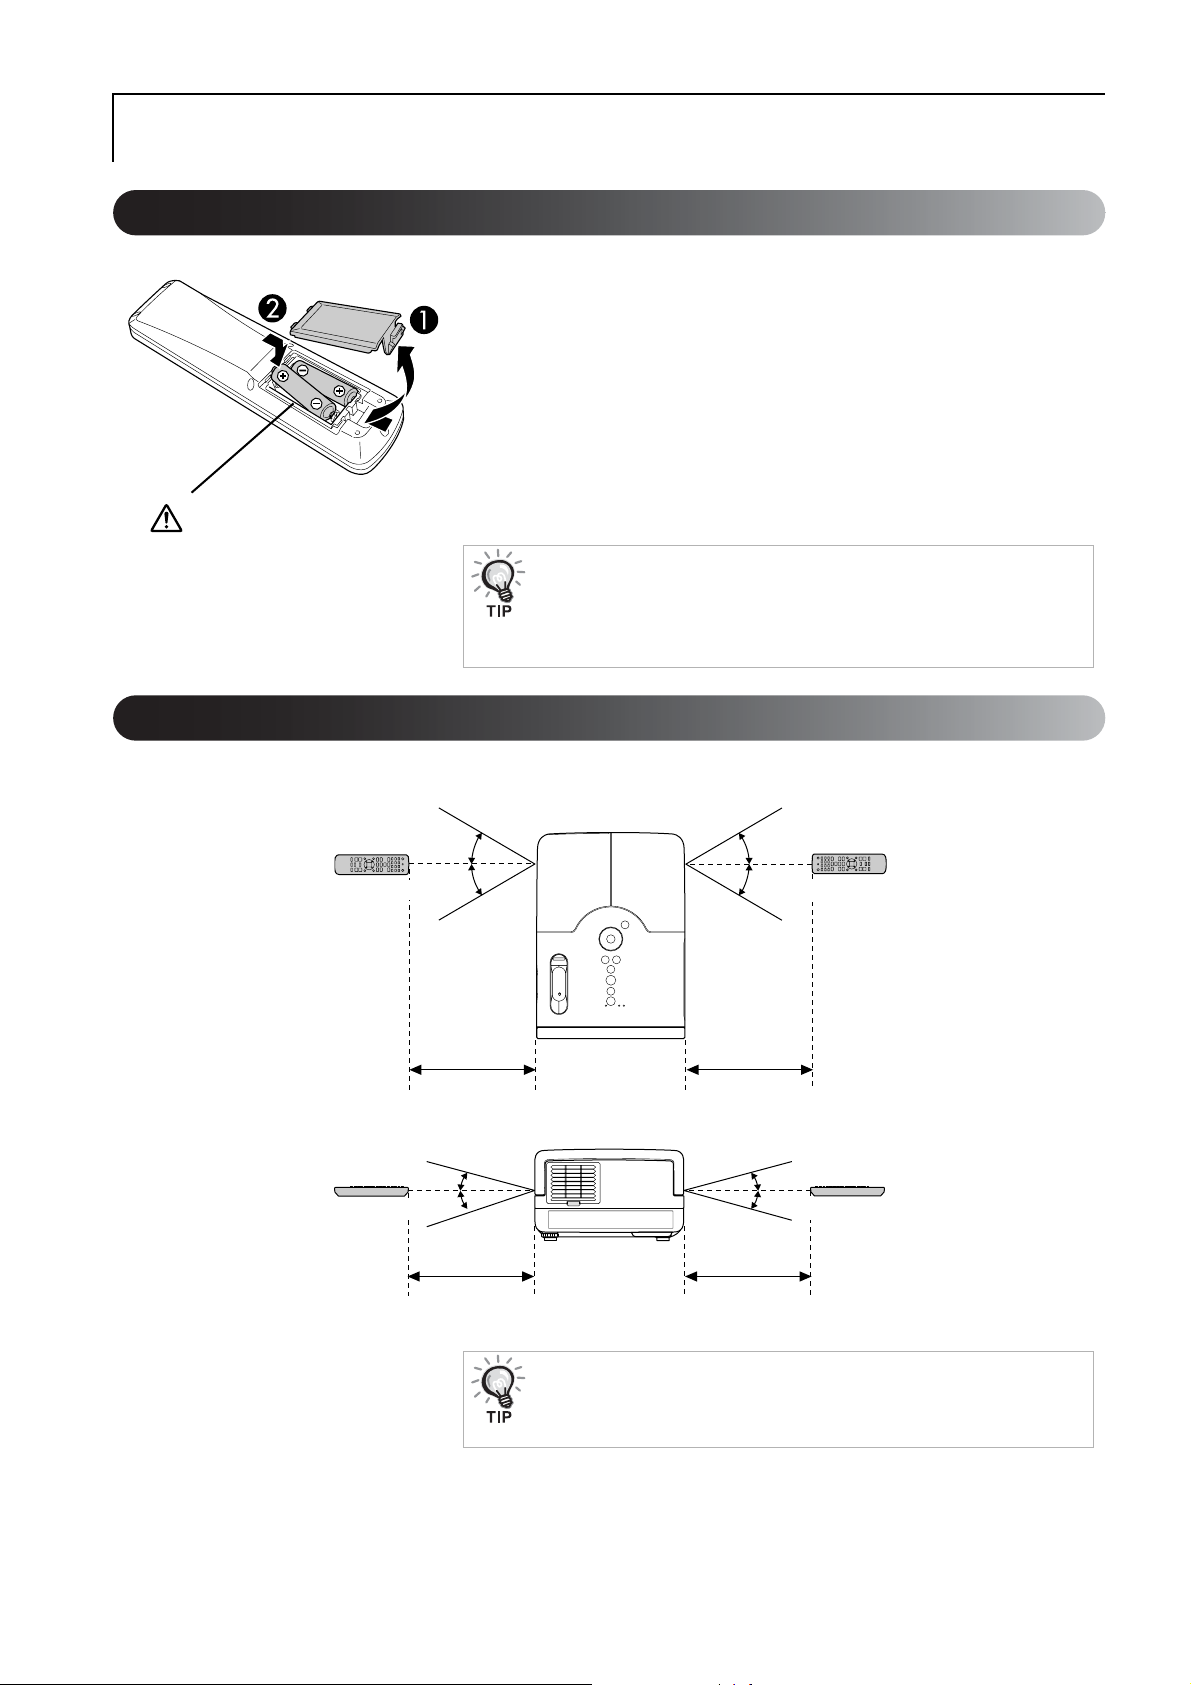
Preparing the Remote Control
Inserting the batteries
At the time of purchase, the batteries are not installed into the remote control.
Insert the batteries provided with this unit, before use.
Push in the catch on the rear of the remote control, then lift it
A
upwards.
Insert the batteries observing correct polarity.
B
Close the battery cover.
Caution
C
Check the positions of the (+) and (-)
marks inside the battery holder to
ensure the batteries are inserted the
correct way.
If delays in the responsiveness of the remote control occur, or if it does not
operate after it has been used for some time, it probably means that the
batteries are becoming flat and need to be replaced. Have two spare AA-
size alkaline (manganese) batteries ready to use when required.
Remote control usage range
Operable range (horizontal)
Approx. 30°
Approx. 30°
Operable range (vertical)
Approx. 30°
Approx. 30°
6 m6 m
16
Approx. 15° Approx. 15°
Approx. 15° Approx. 15°
6 m6 m
Avoid allowing direct sunlight or fluorescent light to fall on the remote
control light-receiving area of this unit. The signal from the remote control
may not be able to be received.
Page 19
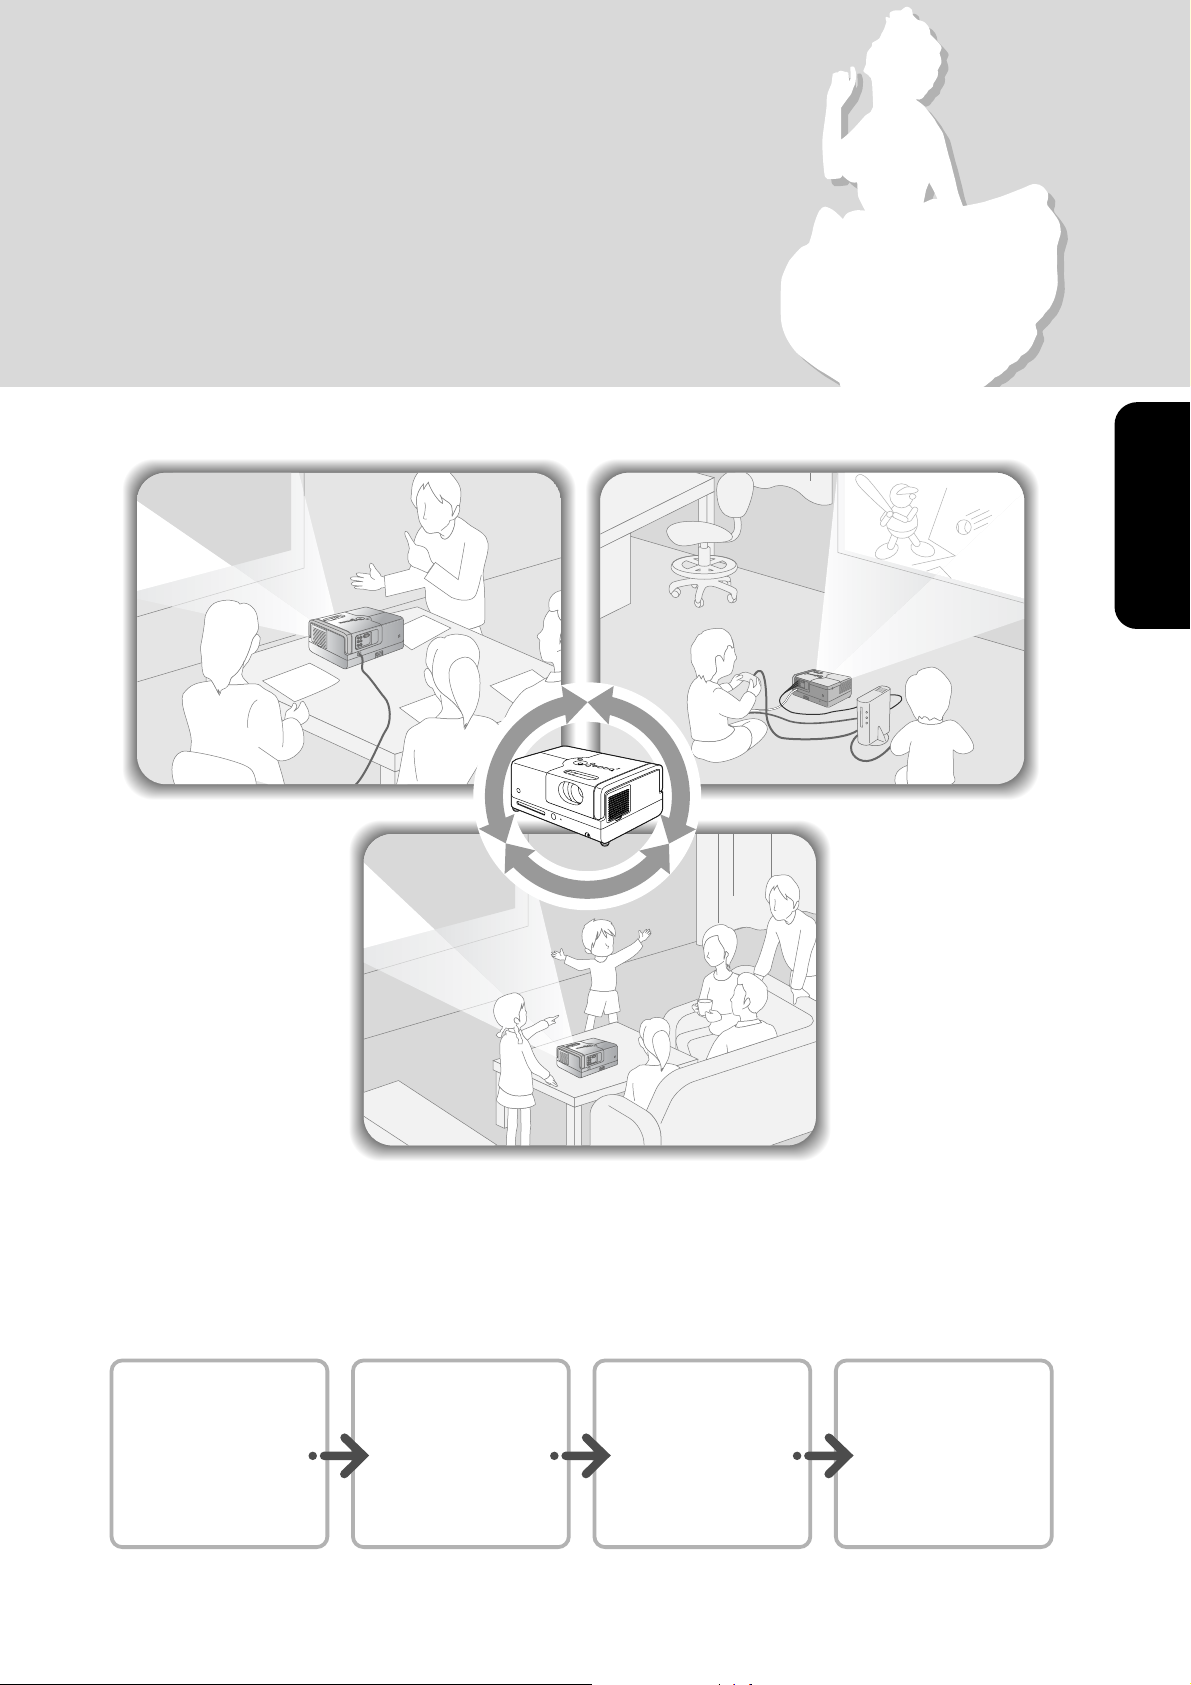
Quick Start
Quick Start
Playback procedure
No complicated connections are necessary. You do not even need to select the television type or change the input.
You can enjoy your DVDs on the big screen by following these four easy steps.
The standard speakers support Dolby Virtual Speaker, and you can enjoy real stereo surround sound using the left and
right speakers.
Position in front of
the screen.
sp. 18
Connect the power
cable.
sp. 18
Play a disc.
sp. 19
Adjust the
projection position,
size, and volume.
sp. 20
17
Page 20
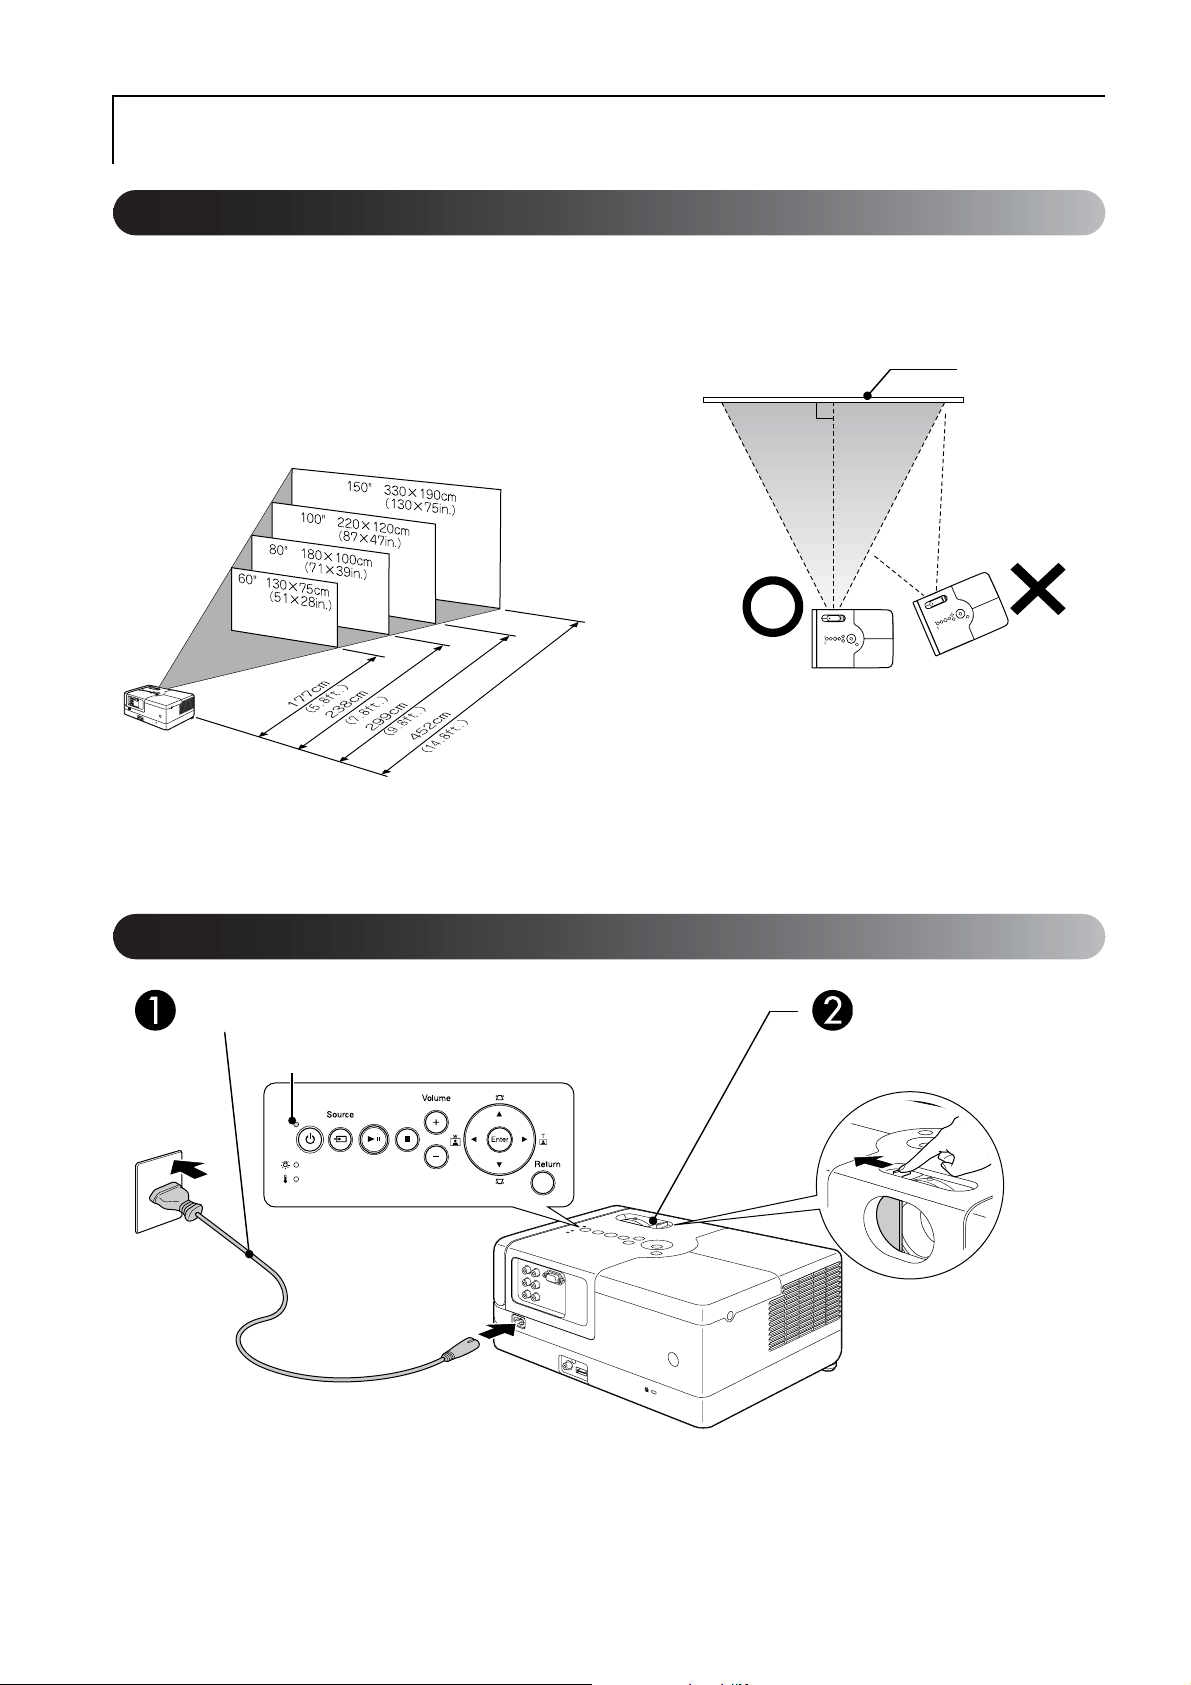
Installation
Projection distance and screen size
Place the unit in a position that will
A
enable the optimum size image to be
projected on the screen.
When you use a 16:9 ratio, 80” type widescreen,
for example, place the unit approximately 237 cm
away from the screen.
* Standard value
The further this unit is moved away from the
screen, the larger the projected image becomes.
Position this unit so that it is parallel to
B
the screen.
Screen
If this unit is not placed parallel to the screen, the
projected image is distorted in the shape of a
keystone.
For detailed projection distance values sp. 69
Connecting the power cable
Connect the power cable. Open the lens cover.
Lit orange
18
Page 21
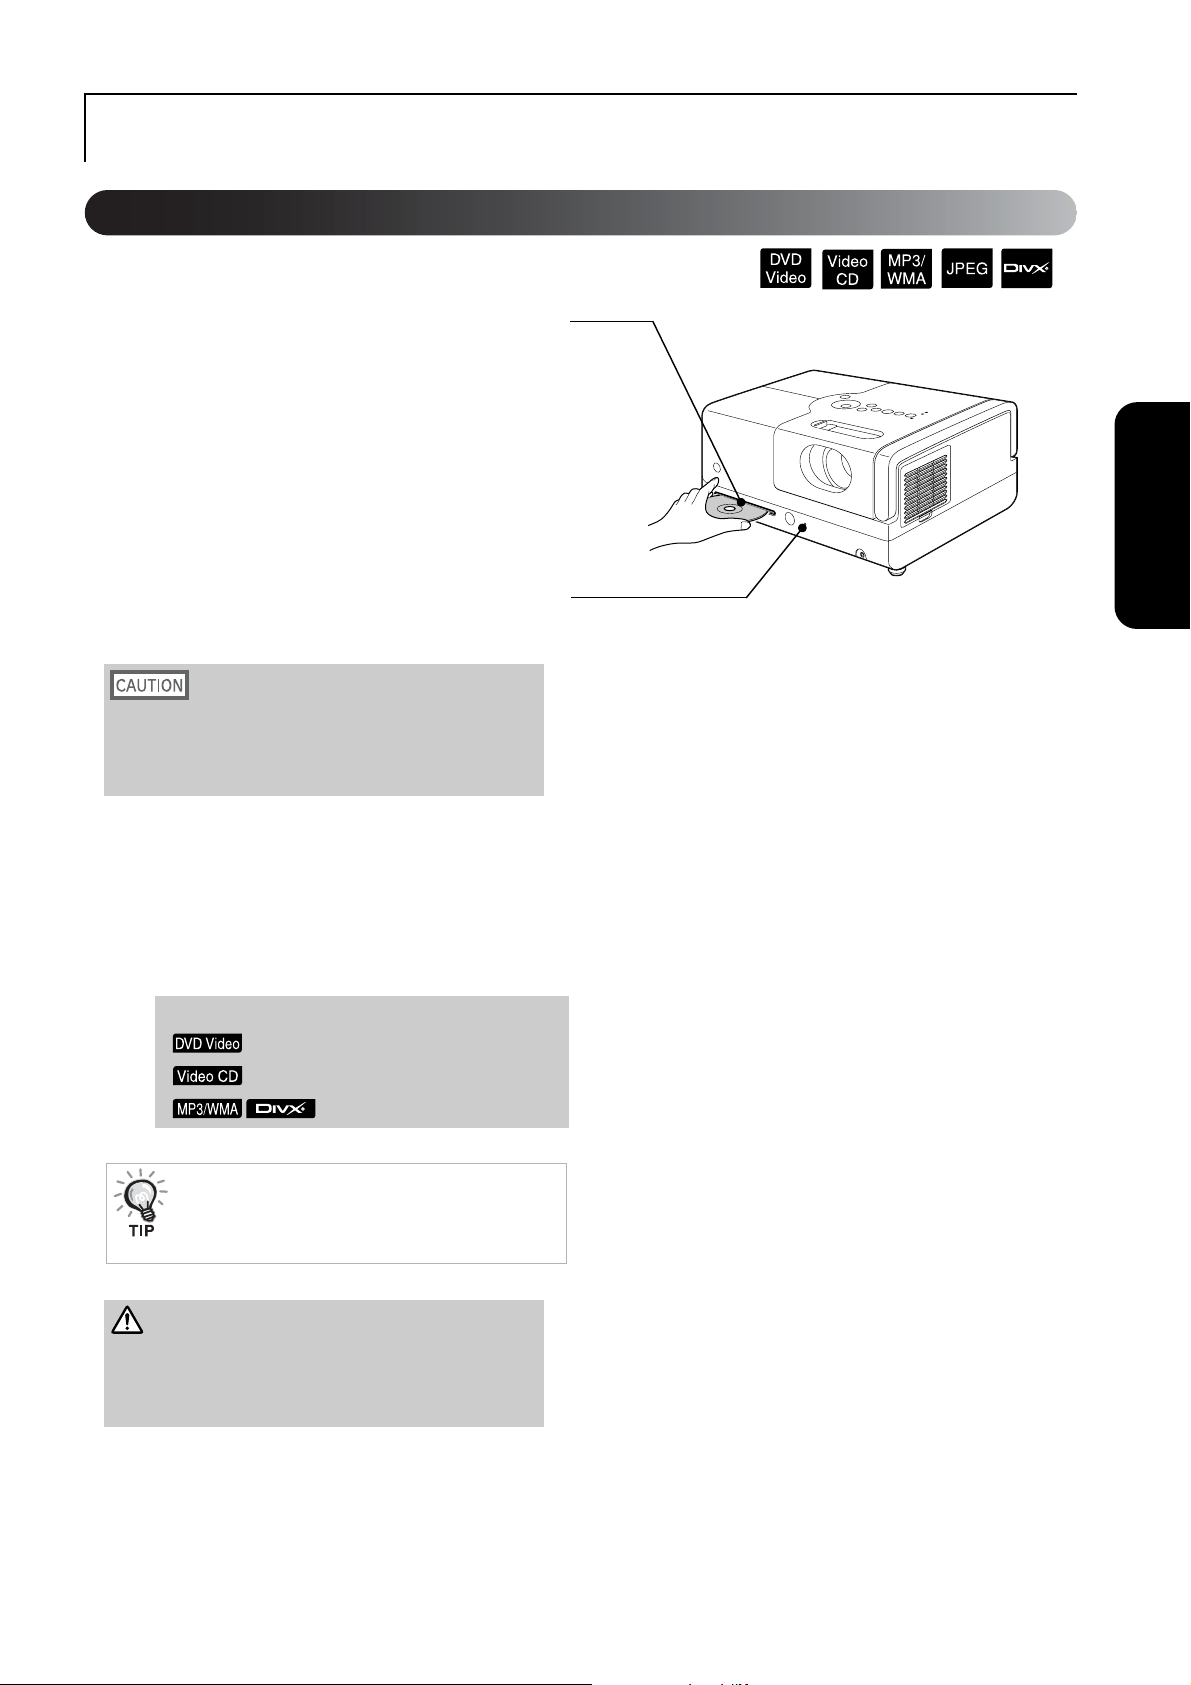
Disc Playback
Playing a disc and projecting
Insert the disc into its slot by facing the
A
disc label upward.
If you are using a dual-side disc, face the side you
wish to play downwards.
Insert an 8-cm disc into the disc slot center
position.
A short beep sounds and the power comes on.
Inserting the disc makes the Disc indicator light up
green.
Quick Start
Do not use discs with any CD/DVD label stickers stuck to
them, and do not use discs that have condensation on
them. This may cause malfunction or damage.
Start playback.
B
The projection lamp lights up automatically, and
projection begins. It takes approximately 30
seconds from when the lamp lights up until the
image is projected brightly.
When the Menu appears:
s
p. 26
sp. 27
sp. 29
When using this unit at high altitudes, that is 1500
m or more above sea level, set “High Altitude
Mode” to “On”.
sp. 56
Caution
Never look at the lens after you have turned the unit power
switch to On.
Close the lens cover before inserting or ejecting a disc.
19
Page 22
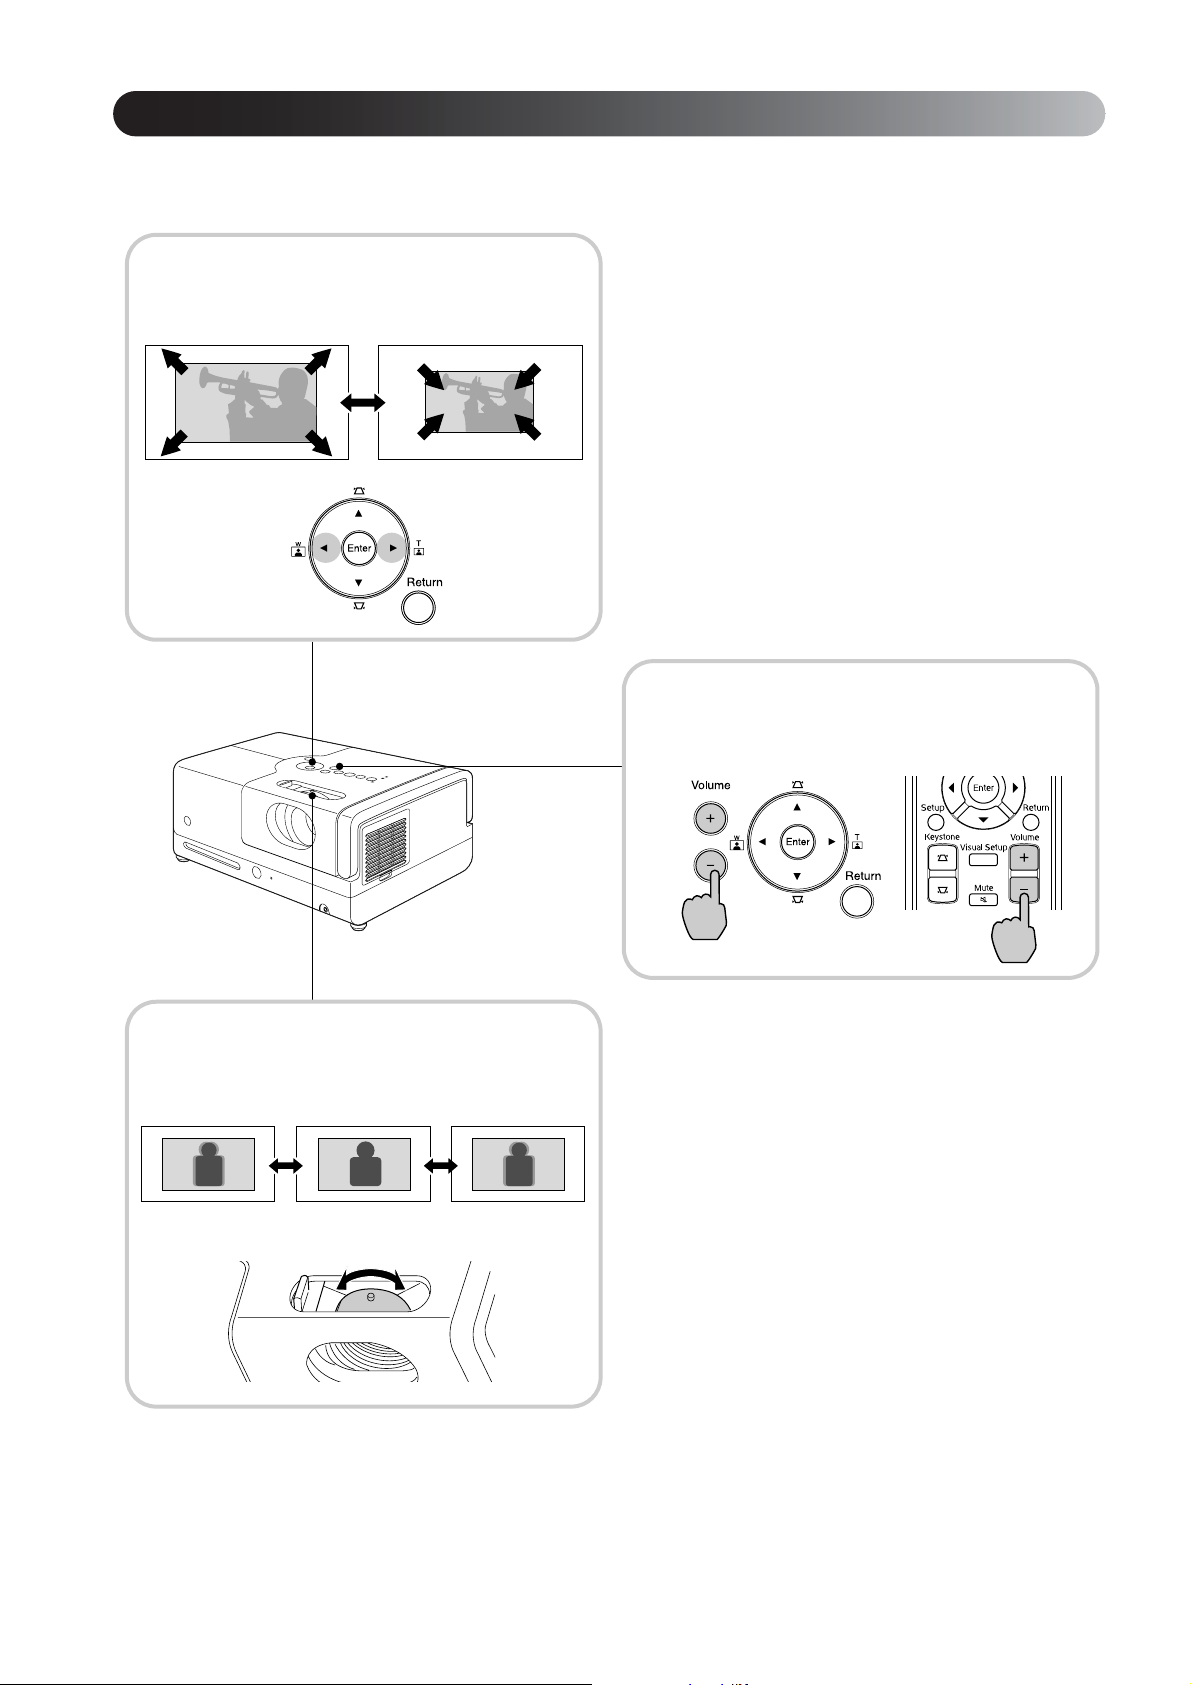
Adjusting the projection position and volume
Adjust the volume and image being projected.
Fine-tuning the projection size
(Zoom button)
To increase the size,
press the “W” side.
Focusing (Focus ring)
To decrease the
size, press the “T”
side.
Volume control (Volume)
Using the main unit Using the
remote control
20
Page 23
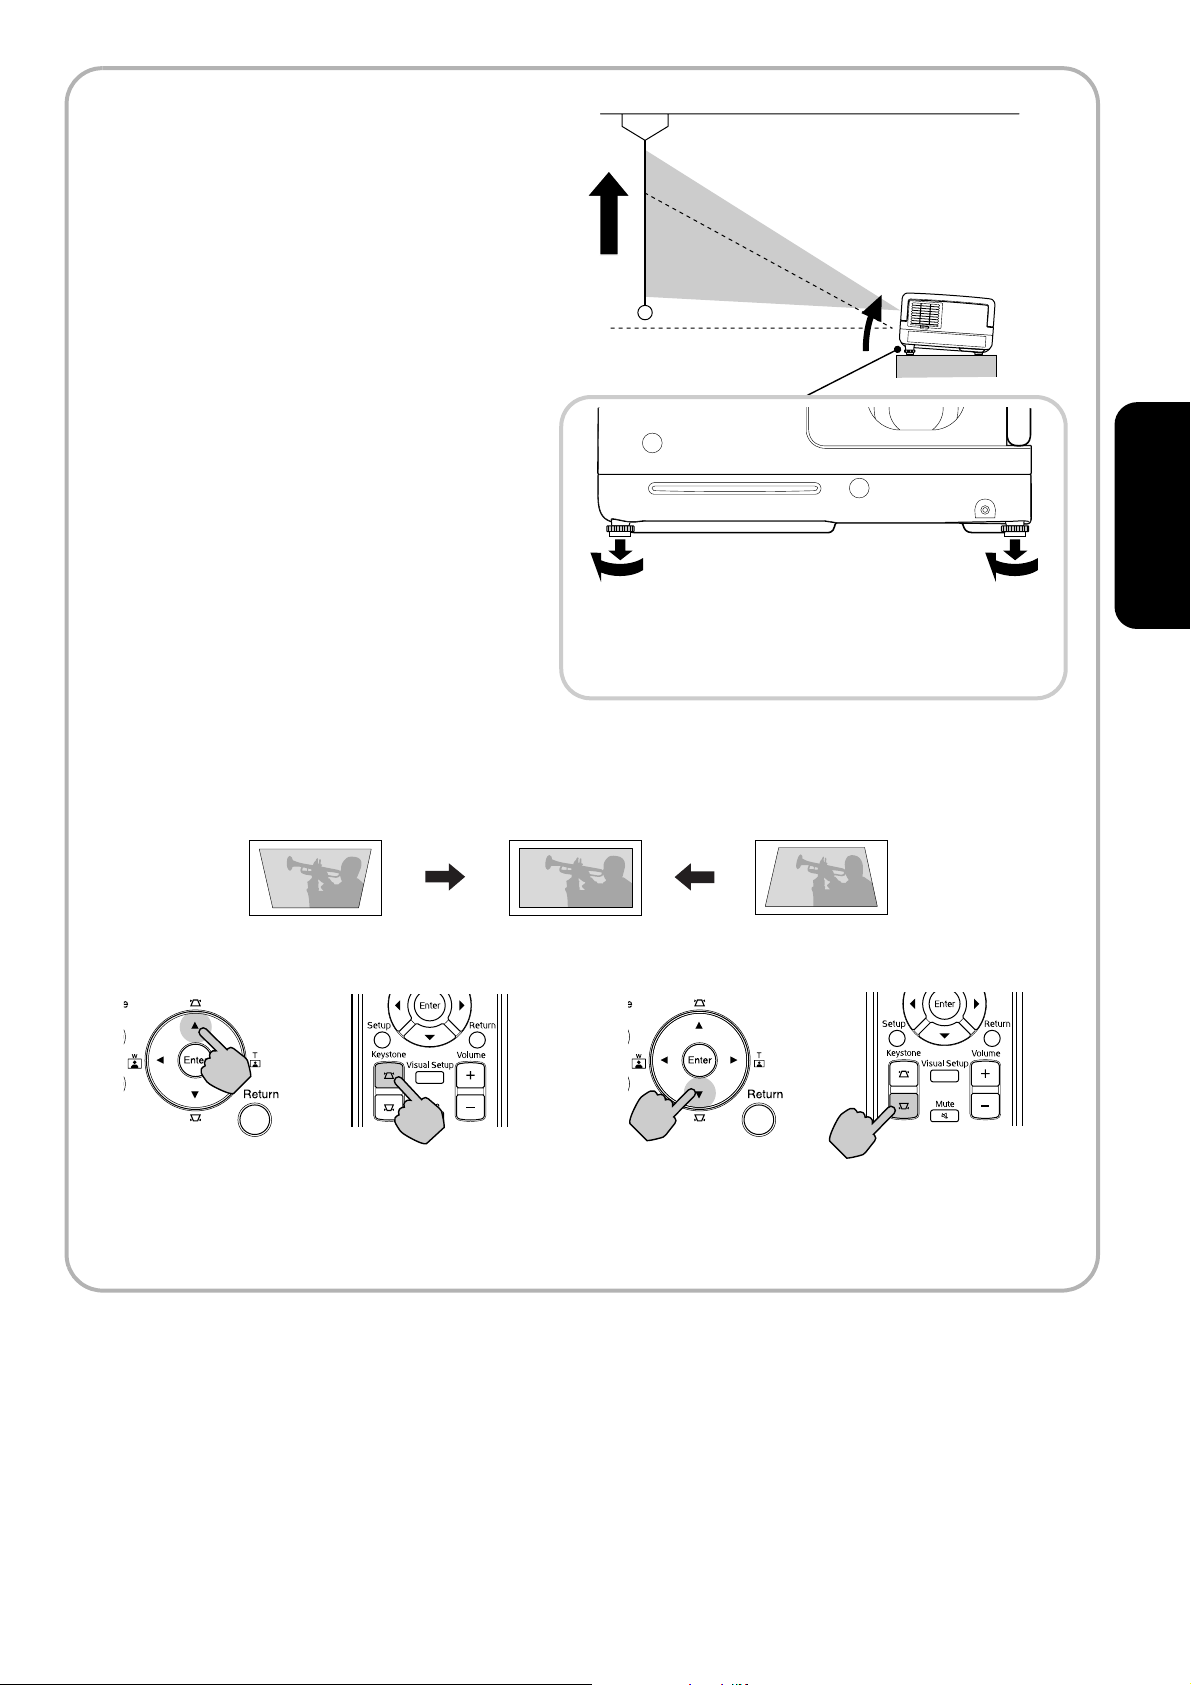
Correcting keystone
distortion of the image
(Keystone)
To raise the position of the projected image on
the screen, extend the front adjustable feet by
turning them.
Quick Start
Adjust the feet in such a way that the unit is level.
You can adjust the feet on the projection lens side
only.
If you extend the foot and tilt the unit, the image will have keystone distortion.
Reshape the keystone distortion as follows:
When the top of the image is wide When the bottom of the image is wide
Adjustment on
the main unit
If the unit is tilted by up to 15° degrees in an upward or downward orientation, you can correct the image shape.
However, it will be difficult to focus if the tilt angle is large.
Using the
remote control
Adjustment on
the main unit
Using the
remote control
21
Page 24
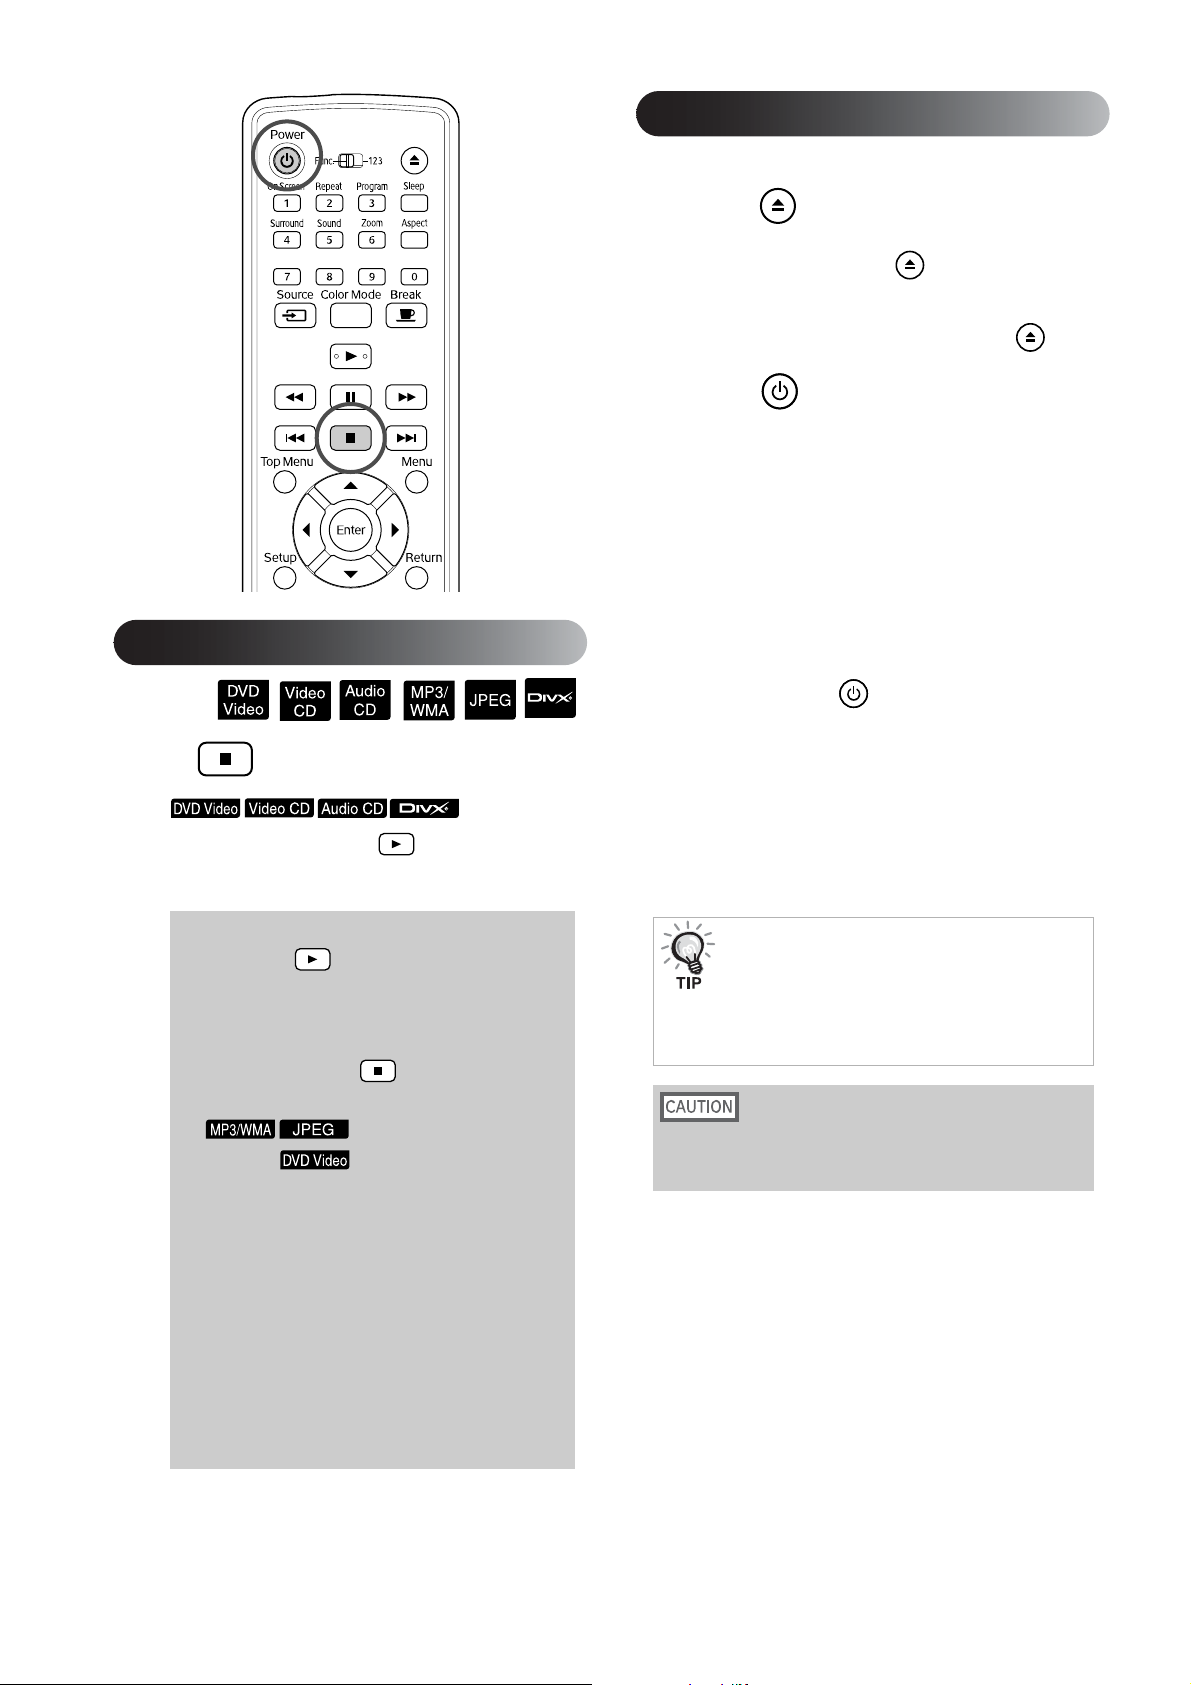
Stopping playback
Turning off the power
When you have played back a disc,
A
press to eject the disc from its slot.
• Once you have pressed , if you want to play
back the ejected disc again, you cannot push it
back into the disc slot manually. Press .
Press .
B
If the lamp was on, the lamp turns off
C
and the Power indicator on the main unit
flashes orange (during cool-down).
The confirmation buzzer beeps twice to
D
indicate that cool-down has completed.
Unplug the power cable from the
electrical outlet.
If you only press to turn off the power,
electricity continues to be consumed.
Press .
stopping, when you press , playback is
resumed from the interrupted scene (resume).
Notes on resume play
• If you press when “Loading” is displayed
on the screen, “Resume Play” is displayed and
the disc is played from the last stop position.
• Remember that the resume play function is
canceled if you press twice.
• You cannot resume playing a disc indicated as
on the File List and on VR
formatted .
• You can resume playing up to 10 discs that you
have recently played even if you replace the
discs.
• The position from where playback resumes may
be slightly different to where playback was
stopped.
• The audio language, subtitle language, and angle
settings are memorized along with the stopping
position.
• If you stop play when the disc menu is displayed,
the resume play may fail.
After
Close the lens cover.
E
Keep the lens cover in place when the unit is not
being used to protect the lens from dirt and
damage.
The Power indicator flashes orange to indicate
that the internal lamp cooling function (cool-
down) is taking place. The buttons on the remote
control and the main unit are disabled when
cool-down is taking place (approx. 5 seconds).
Do not unplug the power cable during cool-down. This
may reduce the lifespan of the lamp.
22
Page 25
Basic Playback Operations
From here on, operations are explained primarily using the buttons of the remote control. You can also use the buttons
with the same markings as those on the unit control panel to achieve the same effect.
Set the [Function] position before performing operations
Pause
Press during playback.
• Press on the operation panel. The play is
paused and restarted each time you press .
• To resume playback, press .
Reverse search/forward search
Press or during playback.
• There are five levels of reverse/forward search
speeds that change each time the buttons are
pressed.
Quick Start
• Press to return to normal playback.
Depending on the disc you use, the sound may
not be audible during forward/reverse search.
23
Page 26

Set the [Function] position before performing operations
Skip
Press or during playback or
when paused.
If you press once
during chapter/track playback, playback returns to
the start of the chapter or track being played. After
this, playback returns to the start of the previous
chapter/track each time you press . After this,
playback returns to the start of the previous chapter/
track each time you press .
• If you press / once when a
disc is being paused, the
previous chapter (file) or the next chapter
(file) is played.
Frame advance
Press during paused playback.
• A single frame is advanced each time you press
. This unit does not have a frame return
function.
• Press to return to normal playback.
Slow motion playback
Press at the point where you want
A
to begin slow motion playback in order to
pause the image.
Press .
B
• There are 4 levels of playback speed, selectable
24
each time is pressed.
• When playing a , slow motion review
can be performed by pressing . There are 4
levels of rewinding speed that change each time
is pressed.
• Press to return to normal playback.
•
No sound is output during slow motion playback.
Page 27

Temporarily using the projector’s light as illumination (Break)
While the color mode name is displayed,
B
press repeatedly until the desired
color mode appears.
After waiting a few seconds, the color mode
name disappears and the picture quality changes.
The break function is useful if, in the middle of a
movie, you want to get up or move around, get a drink,
or some food, and so on. By simply pressing the
button you can pause the disc being played until you
can get up to turn the lights on in the room.
Press during playback.
• The projection lamp remains lit, whilst the
projected image disappears. flashes in the
lower right portion of the screen.
• The screen darkens after about five minutes if
the unit is left in break mode without any
operations being made. Additionally, after
approximately 30 minutes have elapsed, power
to the unit automatically turns off.
• Press to return to the state before the break
button was pressed. If the power has switched
off, press to switch the power back on.
• Operations cannot be performed when the disc
menu is displayed.
• When you press any of the following buttons,
break mode is cancelled and the function of
the button you pressed is performed.
, , , ,
Color Mode
You can select a picture quality to correspond to the
brightness and other conditions of your room.
: Suitable for use in a
bright room with the
outside light shielded.
: Suitable for use in a
room with dim lighting
(Default setting).
: Suitable for use in a
pitch-dark room.
: Suitable for playing a
game with high speed
movement in a bright
room with the outside
light shielded.
• Game is selectable only when is turned
on.
Mute
Press during playback.
• Sound stops coming from the speakers and
headphones.
• Press to return to normal playback. The
former volume is also restored when power to
the unit is turned on again.
Quick Start
Press .
A
The currently selected color mode name is
displayed on the screen.
25
Page 28

Advanced Operations
Becoming a playback expert
Playback from a DVD menu
Some discs have the following kinds of original menus saved in
them.
• Root Menu: When multiple titles (image and audio) have been
recorded, this integrated disc information is displayed.
• Menu: Title-specific playback data (chapter, angle, audio, and subtitle
menus) is displayed.
Press or during playback.
1
Press and select the item you want to
2
see.
You can also select the title number or chapter number directly using the
numeric buttons.
When using the numeric buttons
With the function/numerics toggle switch in the [1 2 3] position, press the
following buttons.
Example)
5: 10: _
15: _ 20: _
Once you have finished entering numbers, return the function/numerics toggle
switch back to the [Function] position.
26
Page 29

Press .
3
• Certain discs may not contain a menu. If a menu is not recorded, these
operations cannot be executed.
• Depending on the disc, playback may begin automatically, even if
is not pressed.
Playback a Video CD from the menu
You can play a disc by selecting the desired chapter from any of the
following two menus.
• PBC (Playback control) function: If a Video CD with “PBC (playback
control) enabled” specified on the disc or jacket is inserted into the
disc slot, a menu screen is displayed. You can select the scene or
information you wish to see interactively from this menu.
• Preview function: You can select the desired track or scene and play
it back in the following three formats.
Track Digest: Plays the first three or four seconds of each track sequentially.
Six tracks are projected on a single screen page.
Disc Interval: The total disc time is divided by six, and the first three or four
seconds of each interval are played. Six images are projected on a
single screen page.
Track Interval: When a track is being played, it is divided by six and the first
three or four seconds of each interval are played. Six images are
projected on a single screen page.
Advanced Operations
PBC (playback control) playback
When playing a Video CD that contains PBC, the following
1
kind of menu is displayed.
Select the item you want to see using or the
2
numeric buttons.
The selected contents are played.
sp. 26
27
Page 30

To turn to the previous/next page of the menu screen
Press / when the menu screen is displayed.
To call the menu screen during playback
Each time is pressed, the menu goes back by one step. Press repeatedly
until the menu is displayed.
To call the PBC menu screen
When you display the playback information or the preview screen, the PBC mode is
canceled.
To call the PBC menu again during play, stop play by pressing twice. Then,
press .
If you select “Others” from the settings menu and set “PBC” to “Off”, the
disc is played directly without displaying the menu screen. PBC is “On”
by default. sp. 52
To play using the Preview function
If you press while a video CD is playing, the following
1
Preview menu is displayed.
• You can also use Track Digest and Disc Interval by pressing when
stopped.
Select an item by pressing , and press .
2
• If a disc contains six or more tracks, you can press to display
the next or previous page when you select Track Digest.
• You can return to the initial menu by selecting “Menu” and pressing
.
• You can close the Preview menu by selecting “Exit” and pressing .
28
Page 31

Select the track you want to see using ,
3
and press .
The selected track is played.
JPEG, MP3/WMA and DivX® playback
Set the [Function] position before
performing operations
Although the , or files stored in a disc and
a USB storage device are played back by selecting the desired
file from a File List, the function varies depending on the file, as
follows.
• If a in the folder is selected, the JPEG files stored in the
folder are played back starting from the selected file in Slideshow
sequence.
• files are automatically played back, starting from the first
file. If you want to play back another file, select a file from the File List
displayed.
If a Kodak Picture CD or FUJICOLOR CD is inserted into the disc slot,
Slideshow playback is automatically performed.
When you play back a disc containing , or
1
is displayed.
files, or a USB storage device, the following File List
Advanced Operations
Select a folder or file using .
2
• When the File List is displayed, you can go to the next or previous page
by using . When you are on the first page, the button is
ineffective and vice versa.
Press or to begin playback.
3
If is pressed while playing back , , Kodak Picture
CD or FUJICOLOR CD, the display returns to the File List.
29
Page 32

• If is displayed, you will return to the File List when you press
twice.
• When you select “Others” from the settings menu and set the “MP3/
JPEG Nav” to “Without Menu”, all MP3, WMA, JPEG and DivX
are listed. “With Menu” is set by default.
• MP3/WMA ID3 tag is supported. The album name, artist name, and
track name, if set, are displayed at the right of the File List (only
alphanumeric characters are supported).
sp. 52
Slideshow Playback Operation
• The image switching interval depends on the selected image size.
• The Slideshow ends after projection of all JPEG files in the folder.
• You can rotate an image by pressing .
• You can reverse the top and bottom of an image by pressing .
• You can reverse the right and left of an image by pressing .
• If you press during Slideshow playback, the Slideshow is
canceled and the thumbnail list is displayed.
®
files
• If you press during Slideshow playback, the File List is displayed.
If you select the desired JPEG file from the list and press , the
Slideshow will start.
• A progressive JPEG file takes a longer time to start when compared
with a baseline JPEG file.
• The JPEG files stored in a USB storage device are also played in the
Slideshow.
Operations from the thumbnail list
• If a disc contains 12 or more JPEG files, you can display the previous
or next page using .
30
• When you select the desired thumbnail and press , the Slideshow
restarts from the selected position.
• When you press , the File List is displayed. If you select the
desired JPEG file from the list and press , the Slideshow will start.
Page 33

When playing MP3/WMA audio
Once menu selection is complete and the audio begins, close the lens cover.
The projection lamp turns off and you can enjoy just the music being played.
Open the lens cover to turn the lamp back on.
Simultaneous MP3/WMA and JPEG playback
If a disc contains a mix of MP3/WMA and JPEG files, you can enjoy the
Slideshow with sounds.
When a disc containing both MP3/WMA and JPEG files is
inserted into the disc slot, the MP3/WMA files are automatically
played. If a JPEG file from the File List displayed is selected, the
Slideshow will start.
• The Slideshow ends after projection of all JPEG files in the folder.
• When you press during simultaneous file play, the Slideshow is
canceled and the file thumbnail list is displayed. When you select the
desired thumbnail from its list and press , the Slideshow restarts
from the selected position.
Advanced Operations
• You can return to the File List screen by pressing during
simultaneous file play. You can select the desired MP3/WMA file and
press . Then, when you select a JPEG file for Slideshow and press
, the selected items are played back simultaneously.
• If a USB storage device has both MP3/WMA and JPEG files, you can
also enjoy the Slideshow with sound.
Notes on playback
• Depending on the recording and the characteristics of the disc it is possible that
the disc may not be readable, or that disc reading may take some time.
• The time it takes to read a disc differs depending on the number of folders or files
recorded on the disc.
• The order of the File List displayed on the screen may differ from the order
displayed on the computer monitor.
• Files of a commercial MP3 disc may be played in the different order from those
recorded on the disc.
• It may take some time to play MP3 files containing still picture data. The time-
elapsed is not displayed until playback has commenced. Further, there are times
when an accurate elapsed time is not displayed, even once playback has
commenced.
• It is possible that data that has been processed, edited, or saved using computer
image editing software might not play.
• When playing back a Slideshow, JPEG files may be played in a different order
from that recorded on the disc, and you cannot change the order in which they are
played back.
31
Page 34

Playback by selecting the chapter or track number
During playback or when paused, select the chapter or track
number you wish to play by pressing the numeric buttons.
s “When using the numeric buttons” p. 26
• Can also be used when stopped.
• Depending on the disc, certain operations may not be possible.
Repeat play and random play
Set the [Function] position before
performing operations
Depending on the type of disc, you can loop playback within a range of titles,
chapters, or tracks, as in the table below.
Press during playback.
The repeat mode changes whenever you press and the repeat mode
name and icon are displayed on the screen.
• is not available when playing back using the PBC function.
Screen
display
Chapter
Title
Shuffle
Shuffle Repeat
Repeat Off
Function Contents
Chapter repeat Repeats the current chapter.
Title repeat Repeats the current title.
Random play Randomly plays titles and chapters.
Random repeat
Repeat Off Cancels repeat or random play.
Repeats random play. Tracks are played in a
different order when repeated.
32
Screen
display
Track
All
Shuffle
Shuffle Repeat
Repeat Off
Function Contents
Track repeat Repeats the current track.
Disc repeat Repeats entire tracks of the disc.
Random play Randomly plays all tracks of the disc.
Random repeat
Repeat Off Cancels repeat or random play.
Repeats random play. Tracks are played in a
different order when repeated.
Page 35

(If “Others” is selected from the settings menu and if “MP3/JPEG Nav” is
set to “With Menu”)
Screen
display
Repeat One
Repeat Folder
Shuffle
Repeat Off
Function Contents
File repeat Repeats the current file.
Folder repeat Repeats files in the current folder.
Random play Randomly plays files in the current folder.
Repeat Off Cancels repeat or random play.
(If “Others” is selected from the settings menu and if “MP3/JPEG Nav” is
set to “Without Menu”)
Screen
display
Repeat One
Repeat All
Shuffle
Repeat Off
Function Contents
File repeat Repeats the current file.
Disc repeat Repeats all files on the current disc.
Random play Randomly plays all files on the disc.
Repeat Off Cancels repeat or random play.
Canceling repeat play
Press repeatedly until “Repeat Off” is displayed on the screen.
Advanced Operations
• does not allow use of the “Title repeat” function with some
DVDs.
• You can also repeat the play from the playback information screen.
sp. 37
• The button is ineffective during program play.
33
Page 36

Program play
Set the [Function] position before
performing operations
You can set titles, chapters, and tracks to playback in your order of preference.
Press during play or when paused.
1
The program screen will appear for you to set a playback sequence.
Using the numeric keys, enter title and track/chapter
2
numbers sequentially.
s “When using the numeric buttons” p. 26
• Use to shift the cursor in respective directions.
• If the disc has 10 or more tracks/chapters, either press or select
“Next” on the screen and press to display the next page. To display
the previous page, either press or select “Previous” on the screen
and press .
• If you wish to delete a track or chapter you have entered, position the
pointer on it and press .
• To close the program screen, select “Exit” from the program screen and
press .
When you have set the playback sequence, select “Start”
3
from the screen and press .
• Playback starts in the set sequence.
• Once the set playback is fully complete, playback stops.
Canceling program play
• Press .
• Turn the power switch off.
Resuming normal playback
Stop play and press .
34
Page 37

Zoom In
• You can set the program play of up to 10 discs. Also, you can set up to
20 tracks or chapters of each disc. Your settings are held in memory even
when you have changed the discs. Insert the disc with the playback
sequence set in the disc slot, press , and select “Start” from the
program screen. Program play starts.
• Pressing during program play will not function.
• You may not use the program play for some types of discs.
Set the [Function] position before
performing operations
You can zoom (enlarge or compress) the projection image on the unit screen. If
the enlarged image exceeds the screen size, you can display it by panning.
Press during playback.
1
The magnification (or zoom rate) is displayed.
Select the desired magnification by pressing
2
repeatedly.
• You can only enlarge images. You cannot reduce them.
• After you have enlarged the image, press to pan.
• To return to the original size, press repeatedly until the Zoom
Rate disappears.
Advanced Operations
35
Page 38

Changing the audio language
When a disc has been recorded with multiple audio signals or languages, you
can switch to the available audio signal or language of your preference.
Press during playback.
1
The current audio settings are displayed on the screen.
Select the desired settings by pressing repeatedly.
2
• You can also switch from the playback information screen. sp. 37
• If a language code (for example 6978) is displayed sp. 53
Changing the subtitles display
You can choose whether or not to display subtitles for discs that have been
recorded with subtitles. If a disc has multiple language subtitles, you can
switch to the preferred language.
Press during playback.
1
The current subtitle settings are displayed on the screen.
Select the desired settings by pressing repeatedly.
2
• If the available subtitle is not found, the icon is displayed.
• You can also switch from the playback information screen.
• When using , you can switch between the embedded subtitle
and the subtitle file data. Both of them can be displayed with 45 single-
byte characters (27 double-byte characters) on 2 lines maximum. Any
excess characters are not displayed.
A subtitle file with any of the following extensions is valid:
“.srt”, “.smi”, “.sub”, “.ssa” and “.ass”;
The subtitle file name must be the same as the file name of the movie.
sp. 37
36
Page 39

Changing the angle
S
For discs that have been recorded with multiple camera angles, you can switch
from the main angle to a different camera angle of your preference, such as
from above, or from the right, during playback.
Press during playback.
1
The current angle is displayed on the screen.
Select the desired angle by pressing repeatedly.
2
You can also switch from the playback information screen. sp. 37
Advanced Operations
Carrying out operations from the playback information screen
et the [Function] position before
performing operations
You can check the current playback status and change your settings without
stopping the play.
Press during playback.
1
The projected image is reduced, and the following information screen is
displayed under it.
• When you are using a , the playback time is switched as
follows each time you press : “Single Remain” _ “Total
Elapsed” _ “Total Remain”_ “Single Elapsed.
• When you are using a , the playback time is
switched as follows each time you press : “Total Elapsed” _
“Total Remain” _ “-:--:--” (WMA does not support for Track Time)
37
Page 40

Pressing , position the pointer on the desired
2
item and press
.
• You can set the title/chapter/track number and time by using the
numeric keys, and set the play start time.sp. 26
• When the selected item appears, select the desired value using
and press .
• Press once and the playback information screen disappears.
• When you are using and “-:--:--” is displayed, you can set the
play start time of the track by using numeric keys.
• You cannot use this function when play is stopped.
Press .
3
Playback starts with the selected title/chapter/track or specified time
settings.
Contents on the playback information screen
Title
Chapter
Audio
Subtitle
Angle
TT time
Ch time
*
Repeat
Time Disp.
Track
Disc Time
Track Time
*
Repeat
Time Disp.
Specify a title number you wish to play by using the numeric keys.
Specify a chapter number you wish to play by using the numeric
keys.
Select the sound system and the language.
Select to display or not display subtitles and language.
You can switch the camera angle.
Set the play start time of a title using the numeric keys.
Set the play start time of a chapter using the numeric keys.
Select the repeat play mode.
Select how to display the play time at bottom right of the playback
information screen.
Specify a track number you wish to play using the numeric keys.
Set the play start time of a disc using the numeric keys.
Set the play start time of a track using the numeric keys.
Select the repeat play mode.
Select how to display the play time at bottom right of the playback
information screen.
38
*You cannot select random play or random repeat for the repeat setting on the
playback information screen. Set it up using . sp. 32
Page 41

Setting the sleep timer
Set the [Function] position before
performing operations
When the time you set on the sleep timer has passed, the unit power switch is
turned off automatically. You can prevent unnecessary power from being
consumed if you fall asleep while watching a movie.
If the sleep timer is set to “Sleep Off” and if play is stopped or finished and the
unit is not operated for approximately 30 minutes, the unit power switch is
turned off automatically.
Press .
• When you press , the current sleep timer setting is displayed.
When the sleep timer is displayed, select the desired setting using
.
: If the standby screen is projected and if
the unit is not operated for approximately
30 minutes, its power switch is turned off
automatically. If image signals are not
entered in mode and if the unit
is not operated for approximately 30
minutes, its power switch is turned off
automatically (default setting).
: After 10 minutes have elapsed, the power
switches off.
Advanced Operations
: After 150 minutes have elapsed, the power
switches off.
Setting the sleep timer
The “Sleep” message is displayed on the screen approximately 20 seconds before
automatic power off.
Changing the sleep timer
Press repeatedly and select the new time.
Checking the sleep timer setting
Once the sleep timer has been set, if you press once, the remaining time before
sleep is displayed on the screen.
• Sleep timer settings are not memorized. If the power is switched off, the
sleep timer is canceled.
• With discs that return to the menu once playback has completed, power
to the unit will not turn off even when the “Sleep Off” mode is set.
39
Page 42

Changing the aspect ratio
Set the [Function] position before
performing operations
The unit automatically recognizes the aspect suitable for the input signal, and
the image is projected in the appropriate aspect. If you want to change the
aspect yourself, or if the aspect is not correct, you can change it in the
following way.
Press .
• Each time you press the aspect ratio name is displayed on the
screen and the aspect ratio is changed.
• The aspect ratio for disc settings and image signals can be changed in
the following way.
When projecting by using the built-in DVD player
Screen Size Aspect
16:9 Fixed to full size (16:9)
4:3 Normal Full Zoom
Letterbox Normal Full Zoom
* Fixed to normal size when the Slideshow is executed.
40
Page 43

When projecting component video (SDTV), composite video images
Screen Size Aspect
4:3 Normal Full Zoom
Letterbox Normal Full Zoom
When projecting component video (HDTV) images
Screen Size Aspect
16:9 Fixed to full size (16:9)
Advanced Operations
When projecting computer images
Wide panel computer images are always projected at the normal (wide screen) setting.
If wide panel computer images are not projected in the correct aspect, press the button to change to an appropriate
aspect.
41
Page 44

Playback by attaching a peripheral device
Connecting a USB storage device
You can attach a USB memory or multicard reader that conform to the USB 1.1 to the unit and play the following format
files.
• MP3/WMA files
• JPEG files
®
• DivX
The file playback and your operations during play are the same as when you play files of a using the standard
DVD player.
files
• When you connect a USB storage device to the unit, the source is changed to the USB and playback starts
automatically when:
- a disc is being played or stopped on the standard DVD player.
- another video device, a TV set or a computer is connected to the unit and a disc is being played or stopped.
• If you use a USB hub, the unit will not operate normally. Connect the USB storage device directly to the unit.
• When power to the unit is turned on with only a USB storage connected (no disc inserted in the disc slot), the USB storage is not
recognized and “No Disc” is displayed. Even if you press , it does not playback. In such a case, remove the USB storage and
then reconnect.
• Do not remove the USB storage during a Slideshow. Stop the Slideshow by pressing , and remove the USB storage.
42
Page 45

Connecting to another video device, a TV set, or a Computer
PC
Video
Y
Cb/Pb
Cr/Pr
Audio
L
R
Compo
Aside from the built-in DVD player, this unit can project images by connecting to a computer or the following devices
with a video output port.
- Video recorder - Game machine - Video device with built-in TV tuner - Video camera and others
Video equipment signal format
The kind of video signal that can be output depends on the video equipment. The image quality differs depending on the video
signal format. Generally speaking, the order of quality of the image goes as follows.
1. Component video _ 2. Composite video
Check which signal system to use in the “Documentation” supplied with the video equipment that is being used. The composite
video may be called “Image output”.
If the equipment you are connecting has a unique connector shape, connect using the cable supplied with your
equipment, or an optional cable.
• Turn off connected equipment. Damage may result if you try to connect when the power is on.
• Close the lens cover before connecting a device to the unit. If fingerprints or marks are left on the face of the lens, the image will
not be projected clearly.
• Do not try to force a cable plug with a different shape the port. This may damage the unit or the equipment.
Connecting with a video cable
Yellow
White
Vid eo
L
Audio
R
Output
To Video output port
To Video input port (Yellow)
To Audio out port
Video/audio cable (commercially available)
Red
To Audio input port
Advanced Operations
43
Page 46

Connecting with a component video cable
PC
Video
Y
Cb/Pb
Cr/Pr
Audio
L
R
Component
PC
Video
Y
Cb/Pb
Cr/Pr
Audio
L
R
Component
To Audio input
port
White
Output
L
To Audio out port
Audio
R
For a D port output device, use a commercially available D port - component conversion cable.
Connecting with a computer
Red
RCA audio cable
(commercially available)
Component video cable
(commercially available)
To PC input port
To Audio input
port
White
Red
2RCA Stereo mini-pin
audio cable (commercially available)
To Audio out port
To display output port
Computer cable (commercially available)
(Mini D-Sub 15-pin Mini D-Sub 15-pin)
Use a cable marked “No resistance” when you use a commercially available 2RCA stereo mini-plug audio cable.
44
Page 47

Projecting images from external video equipment or a computer
Open the lens cover and press .
1
When you press , the following menu appears on the
2
screen.
The orange pointer points to the currently selected source. Select the
desired source by pressing , and press .
Turn the device power switch on, and press the [Play] or
3
[Playback] button on the video device.
If the lamp was off, it comes on automatically.
After a moment, the image is projected.
To return to the standard built-in DVD player
Make any of the following operations.
• Press .
• Insert a disc into the disc slot.
• Select “DVD/USB” by pressing .
• Press .
Advanced Operations
45
Page 48

When a computer image is not projected
You can switch the image signal destination from the computer by holding
down and pressing (the key is usually labeled or ).
s Computer “Documentation”
After switching, wait a few seconds for projection to start.
Examples of Switching Output
Epson Toshiba
NEC IBM/Lenovo
Panasonic Sony
SOTEC Dell
HP Fujitsu
Macintosh Set mirroring or display detection.
Depending on your OS, you can set them by pressing
.
Depending on the computer, each time the key to change the output is pressed,
the display status may also change as follows.
Computer only Screen only Both
46
Page 49

Audio Settings
Listening with headphones
Caution
• When listening with headphones, make sure the volume is not too high. You may damage your hearing when
listening to sounds at high volume over an extended period of time.
• Do not set the volume too high from the outset. A loud sound may be produced suddenly that may cause damage
to your headphones or your hearing. As a precaution, lower the volume before you switch off this unit then raise it
gradually after you switch it back on.
Connecting commercially available headphones.
Advanced Operations
To jack
Headphones
Once you have connected your headphones to the headphone jack, no sound will come from the speakers. Stereo mode
will be automatically selected. Sound mode selection is not possible when you are listening through the headphone.
When you disconnect the headphone from the headphone jack, the Sound mode will automatically toggle to the selected
Sound mode prior to the connection of headphone to headphone jack.
47
Page 50

Connecting to audio equipment with a digital coaxial audio input port
Digital Coaxial
Audio-Out
You can connect to AV amplifiers and so on or equipment capable of making digital recordings when they are equipped
with a coaxial digital audio input port. When connecting, use a commercially available coaxial digital cable.
Fully plug the audio cable connector into jack.
To a digital coaxial
AV amplifier
audio input port
Digital coaxial cable
(commercially available)
To Digital Coaxial Audio-Out port
The signal being output from the Digital Coaxial Audio-Out port is changed with the “Digital Output” setting in the
settings menu. For detailed output signal information sp. 54
Selecting the Surround Sound mode (Only via speaker)
Set the [Function] position before
performing operations
When you turn the Dolby Virtual Speaker function on, you can enjoy real
stereo sound although sound is usually provided through multiple speakers.
When using the Dolby Virtual Speaker function, setup the unit so that the unit
has to be placed in front of the viewer.
Press .
1
The current settings are displayed on the screen.
48
Page 51

Select the desired settings by pressing repeatedly.
2
When using the headphone the sound mode automatically changes to the
Stereo mode as the Dolby Virtual Speaker mode is not applicable on
headphone output. Sound mode will automatically toggle to the previous mode
when the headphone removed.
Selecting the digital sound effects
: Dolby Virtual Speaker mode
(default setting)
: Stereo mode
Set the [Function] position before
performing operations
You can select the sound effects appropriate to the musical genre of the current
disc.
Press .
1
The current settings are displayed on the screen.
Select the desired settings by pressing repeatedly.
2
The sound effects, which you can select according to the inserted disc or
the connected source, are switched as follows:
Concert _ Drama _ Action _ Sic-Fi (Science Fiction)
Other discs
Classic _ Jazz _ Rock _ Digital
Advanced Operations
Select “Concert” or “Classic” sound effects for flat sound output.
49
Page 52

Settings and Adjustments
Setup Menu Operation and Functions
The settings of this unit can be adjusted to suit the environment in which it is used.
Using the setup menu
Press during playback or when stopped.
1
The following setup menu is displayed.
Press and select the desired icon.
2
Language
setup
Audio setup
Others setup
50
Page 53

Press to select the item to be set, and then
3
press .
The settings are displayed on the right.
Select the setting you wish to change, and press .
4
To display other setting pages, select a desired icon by repeatedly
pressing .
After setup is complete, press to close the setup menu.
5
Setup menu list
Boldface is the default.
Language page
Setting Item Setting Contents
Disc Menu
Select the DVD video menu language.
Audio
Select the DVD video soundtrack language.
Subtitle
Select the DVD video subtitle language.
DivX Subtitle
Select a font type that supports the DivX
subtitle.
OSD Language
Select the menu language (for setup and visual
setup).
For “6978” and other language codes, see the “Language code
list”.sp. 53
These settings become available when settings have been recorded
on the disc itself. If they have not been recorded, the setting contents
become available. If the language selected is not recorded on the
disc, the default language for that disc is used.
Central Europe, Cyrillic, Greek, Standard, Hebrew
Select the “Standard” to display the standard list of Roman subtitle
fonts already installed on the unit.
English
·
·
·
·
Settings and
Adjustments
51
Page 54

Audio page
Setting Item Setting Contents
Digital Output
Select the kind of output signal according to
the equipment connected to the Digital
Coaxial Audio-Out port.
For detailed information sp. 54
Night Mode
Compensates for the variation in the way we
hear loud and quiet sounds when playing back
at low volume.
Only available for DVD videos that have been
recorded in Dolby Digital.
Turn the Dolby Digital mode “On” if the
volume of voices in the movie is low.
Others page
Setting Item Setting Contents
Screen Saver
Set whether or not to start the screen saver
function if play has stopped and a still image
is projected for approximately 15 minutes
without any unit operation.
PBC
Set to activate the PBC or cancel it during play
of .
®
DivX
VOD code
The registration codes required for video ondemand service are provided.
MP3/JPEG NAV
Display of hierarchical menu including
folders.
Default
Resets all settings to their initial states, except
for “Disc Lock” and “Password” from the
Settings menu and “Reset Lamp Hours” from
the Visual Setup menu.
Password
Set your password when you play a disc
protected with a “Disc Lock.”
Disc Lock
If you have locked a disc with the Disc Lock
function, you will need to enter your password
to play the disc. You can protect discs from
unauthorized play.
You can lock up to 40 discs.
All: Use when connected to a DTS/Dolby Digital Decoder,
or when connected to equipment with these functions.
PCM Only: Use when connected to equipment that is only
compliant with Linear PCM.
On: Reduce the loudness but increases volume of quieter sounds.
Off: Use this option to enjoy normal or powerful clear stereo
surround sound.
On: The Screen Saver function starts.
Off: The Screen Saver function does not start.
On: Starts to play with PBC active. When is played, its
menu screen appears.
Off: Starts to play with PBC inactive. The first and subsequent
tracks are played sequentially.
Press and check your registration code that is displayed.
After checking, press .
Using your registration code, you can purchase or rent videos
provided by DivX
vod).
Without Menu: Displays all , and files
With Menu: Displays the menu containing folders.
Press and press to start initialization.
Using the numeric keys of the remote control, enter your 6-digit
password in the “Old Password” column. When you enter a
password for the first time, enter “000000”.
Enter a new 6-digit password in the “New Password” column. Enter
the new 6-digit password again for confirmation in the “Confirm
PWD” column.
When you press , your new password is registered.
If you cannot remember your password, simply enter “000000” in
the “Old Password” column.
Lock: Locks playback of the currently inserted disc. You
Unlock: Allows playback of all discs.
®
video on-demand services (www.divx.com/
contained on a disc.
will need to enter the 6-digit password to play it.
52
Page 55

Language code list
Abkhazian 6566 Gaelic; Scottish Gaelic 7168 Magyar 7285 Sinhalese 8373
Afar 6565 Gallegan 7176 Malayalam 7776 Slovensky 8373
Afrikaans 6570 Georgian 7565 Maltese 7784 Slovenian 8376
Amharic 6577 Gikuyu; Kikuyu 7573 Manx 7186 Somali 8379
Arabic 6582 Guarani 7178 Maori 7773 Sotho; Southern 8384
Armenian 7289 Gujarati 7185 Marathi 7782 South Ndebele 7882
Assamese 6583 Hausa 7265 Marshallese 7772 Sundanese 8385
Avestan 6569 Herero 7290 Moldavian 7779 Suomi 7073
Aymara 6589 Hindi 7273 Mongolian 7778 Swahili 8387
Azerhaijani 6590 Hiri Motu 7279 Nauru 7865 Swati 8383
Bahasa Melayu 7783 Hrwatski 6779 Navaho; Navajo 7886 Svenska 8386
Bashkir 6665 Ido 7379 Ndebele, North 7868 Tagalog 8476
Belarusian 6669
Bengali 6678 Interlingue 7365 Ndonga 7871 Tajik 8471
Bihari 6672 Inuktitut 7385 Nederlands 7876 Tamil 8465
Bislama 6673 Inupiaq 7375 Nepali 7869 Tatar 8484
Bokmål, Norwegian 7866 Irish 7165 Norsk 7879 Telugu 8469
Bosanski 6683 Íslenska 7383 Northern Sami 8369 Thai 8472
Brezhoneg 6682 Italiano 7384 North Ndebele 7868 Tibetan 6679
Bulgarian 6671 Ivrit 7269 Norwegian Nynorsk; 7878 Tigrinya 8473
Burmese 7789 Japanese 7465 Occitan; Provencal 7967 Tonga (Tonga Island) 8479
Castellano, Enpañol 6983 Javanese 7486
Catalán 6765 Kalaallisut 7576 Oriya 7982 Tswana 8478
Chamorro 6772 Kannada 7578 Oromo 7977 Türkçe 8482
Chechen 6769 Kashmiri 7583 Ossetian; Ossetic 7983 Turkmen 8475
Chewa; Chichewa;
Nyanja
Chuang; Zhuang 9065 Khmer 7577 Persian 7065 Ukurainian 8575
Church Slavic; Slavonic 6785 Kinyarwanda 8287 Polski 8076 Urdu 8582
Chuvash 6786 Kirghiz 7589 Português 8084 Uzbek 8590
Corsican 6779 Komi 7586 Pushto 8083 Vietnamese 8673
Dansk 6865 Kuanyama; Kwanyama 7574 Quechua 8185 Walloon 8765
Deutsch 6869 Kurdish 7585 Raeto-Romance 8277 Welsh 6789
Dzongkha 6890 Lao 7679 Romanian 8279 Wolof 8779
English 6978 Latina 7665 Rundi 8278 Xhosa 8872
Esperanto 6979 Latvian 7686 Samoan 8377 Yiddish 8973
Estonian 6984 Letzeburgesch; 7666 Sango 8371 Yoruba 8979
Euskara 6985 limburgan; limburger 7673 Sanskrit 8365 Zulu 9085
Faroese 7079 Lithuanian 7684 Serbian 8382
Français 7082 Luxembourgish; 7666 Shona 8378
Frysk 7089 Macedonian 7775 Shqip 8381
Fijian 7074 Malagasy 7771 Sindhi 8368
7889 Kazakh 7575 Pali 8073 Twi 8487
9072 Kernewek 7587 Panjabi 8065 Uighur 8571
6783 Korean 7579 Russian 8285 Volapuk 8679
6976 Lingala 7678 Sardinian 8367
Interlingua
(International)
7365 Ndebele, South 7882 Tahitian 8489
Old Bulgarian; Old
Slavonic
6785 Tsonga 8483
Settings and
Adjustments
53
Page 56

“Digital Output” settings and output signals
Playback Disc
Linear PCM DVD video Linear PCM Stereo
DTS DVD video DTS bit stream 48 kHz, 16 bit linear PCM
Dolby digital DVD video Dolby digital bit stream 48 kHz, 16 bit stereo linear PCM
Audio CD, Video CD, SVCD 44.1 kHz, 16 bit stereo linear PCM/48 kHz, 16 bit linear PCM
DTS Audio CD DTS bit stream 44.1 kHz, 16 bit linear PCM
MP3/WMA disc 32/44.1/48 kHz, 16 bit linear PCM
Stream PCM
“Digital Output” Settings
54
Page 57

Operations and functions on the Visual Setup menu
You can adjust the brightness, contrast, and other values of the projected image.
Operations on the Visual Setup menu
Press during projection.
1
The following menu is displayed.
Press to select the item to be set, and then
2
press .
Press to select the item to be set, and then
3
press to adjust.
• When options are displayed, select a desired option and press to
enable it.
After setup is complete, press to close the menu.
4
Settings and
Adjustments
55
Page 58

Visual Setup menu
Image page
Setting Item Setting Contents
Brightness Adjusts the image brightness.
Contrast Adjusts the difference between light and shade in the images.
Color Saturation Adjusts the color saturation for the images. (This is not displayed
when a computer is connected.)
Tint Adjusts the image tint. (This is not displayed when the external
video or computer connected is not NTSC.)
Sharpness Adjusts the image sharpness.
Color Temp. Adjusts the entire image tint.
High: Makes the image bluish.
Low: Makes the image reddish.
Progressive
Converts the interlace signals into progressive
signals appropriate to the current picture.
Can only be set when one of the following five signals is input:
480i, 576i and 1080i in component video, or NTSC and PAL in
composite video.
Off: Suitable for fast action images.
Video: Suitable for ordinary video images.
Film/Auto: Uses 2-3 pull-down mode and converts 24/30-frame
movie film, CG and animation images into appropriate
progressive signals to produce natural image quality.
Option page
Setting Item Setting Contents
Video Signal
Sets the signal format of the video equipment
connected to the Video input port.
Child Lock
Use on the main unit to lock the poweron.
Ceiling Projection On: Projects images onto the ceiling using the optional Ceiling
High Altitude Mode
Set this mode when you use this unit at high
altitudes.
Zoom
Select W/T on the operation panel of the main
unit.
Only displayed when “Video” is selected as the source.
At the time of purchase, this is set to “Auto” so the video signal is
recognized automatically. If interference appears in the projected
images or no images appear when you select “Auto”, select the
appropriate signal manually.
On: Starts the Child Lock. To turn the power supply on, hold
down on the main unit for approximately 5 seconds or
hold down on the remote control.
Off: Cancels the Child Lock.
Reflector Kit.
Off: Deactivates the ceiling projection.
When using this unit at high altitudes, that is 1500 meters or more
above sea level, turn this mode “On”.
Adjusts the image size.
Wide: Enlarges the image.
Tele: Reduces the image.
56
Page 59

Info page
Item Contents
Information
Displays the
current status.
Reset Lamp
Hours
Lamp Hours: Total usage time of the lamp. 0H is displayed for 0 to 10 hours. Changes to units of
1 hour at 10 hours and above. The display turns yellow text when it is time to
change the lamp.
Source: Displays whether standard DVD player images are being projected, or images from
external video equipment or a computer are being projected.
Video Signal:This is displayed when “Video” is selected as the “Source”, and displays the format
of the video signal being input.
Resolution: The resolution is displayed if the “Source” is other than “Video”. The resolution of
image signals from a computer and the component video signals that are being input
are displayed.
Status: Displays any error information. You may be asked for this information when you
contact your service center.
After you have replaced the unit lamp, initialize the lamp hour settings. The accumulated lamp
operating time is cleared.
Settings and
Adjustments
57
Page 60

Appendix
Troubleshooting
Reading the indicators
You can check the status of this unit using the
indicators on the top panel.
Check each condition in the following table and follow
the steps to remedy the problem.
* If all indicators are not lit, the power cable is not
connected correctly or the unit is not powered.
When the or indicators flash orange
Red
Orange
Green
Orange
High Temperature
alarm
You can continue
projecting in this state.
Projection stops
automatically if
subsequent high
temperatures are
registered.
Lamp replacement notification
It is time to replace the lamp. Replace the lamp with a new one as soon as possible. Do not continue to
use the lamp in this state, otherwise it may explode. sp. 66
Check the 2 items listed.
• Move this unit away from
the wall at least 20 cm.
• Clean the air filter.
sp. 63
Warning
: lit : flashing : off
If there is no improvement when
you press and switch the
power on, discontinue use and
disconnect the power cable from
the electrical outlet. Contact your
local dealer or the nearest address
provided in the Inquiries.
sp. 76
58
Page 61

When lights on red
Error
: lit : flashing : off
Red
Red
Red
Red
Red
Red
Red
Red
Red
Internal failure
Wait for approximately 1 minute and 30 seconds.
Then, disconnect and reconnect the power cable.
If the indicator status does not change when
is pressed and the power turned on...
Fan related error/Sensor error
Disconnect the power cable from the electrical
If the error continues
outlet and contact your dealer.
Wait for approximately 1 minute and 30
seconds. Then, disconnect the power cable
from the electrical outlet and contact your local
dealer or the nearest address provided in the
Inquiries.
sp. 76
High temperature error
(overheating)
The lamp turns off automatically and
projection stops. Wait for approximately 5
minutes. When the Power indicator color
changes to orange, check for the 3 points
shown at right.
• Move this unit away
from the wall by at
least 20 cm.
• Clean the air filter.
sp. 63
• When using this unit
at high altitudes, that
is 1500 m or more
above sea level, set
“High Altitude Mode”
to “On”.
sp. 56
If the indicator status
does not change when
is pressed and the
power turned on...
Lamp error/Lamp failure/Lamp cuts out/Lamp cover open
Wait for approximately 1 minute and 30 seconds, and check for a blown lamp. sp. 66
Clean the air filter and the air intake vent.
Reinsert the lamp then turn on the main
The lamp is not broken
power switch on the main unit.
sp. 63
If the condition is not
fixed once the lamp is
re-inserted
The lamp is broken
When using this unit at high altitudes, that is 1500 m or more above sea level, set “High Altitude Mode”
to “On”.
sp. 56
Contact your dealer for further advice. sp. 76
Appendix
59
Page 62

When the or indicators are off
Normal
: lit : flashing : off
Orange
Green
Green
Orange
Green
Flashes orange three times
Standing-by
During
warming up
(Approx. 20
sec)
Projection in
Progress
Cooling down
(Approx. 5 sec)
Break
Child Lock
Shows that the unit is ready to be used.
In warm-up mode, pressing has no effect.
Do not unplug the power cable during warm-up. This may reduce the lifespan of the
lamp.
The operation of all remote control and main unit buttons is suspended during cooldown. Enters stand-by mode once cool-down has completed.
Do not unplug the power cable during cool-down. This may reduce the lifespan of
the lamp.
Press to return to normal playback.
Child Lock is set. sp. 56
60
Page 63

When the indicators provide no help
If this unit is not functioning normally, check the following notes before requesting repairs. However, if the unit fails to
improve, contact your dealer for advice.
At these times Check here
Power does not turn on
No images appear • Is the lens cover closed? sp. 18
Images are fuzzy or out of
focus
Images appear dark • Is the color mode appropriate to the usage environment? sp. 25
The remote control does not
work
There is no audio or it is too
low.
The audio distorts Is the volume too loud? sp. 20
The audio/subtitle language
cannot be changed
Subtitles do not appear • If there are no subtitles on the disc, they are not displayed. -
• Did you press ?
• Disconnect and reconnect the power cable. sp. 18
• Is the unit cooling down? sp. 60
• If the indicator goes on and off when you touch the power cable, turn
off the main power switch then disconnect and reconnect the power
cable. If the unit fails to improve, it is possible that the power cable
has been damaged. Stop using the unit, disconnect the power cable
from the electrical outlet, and contact your dealer.
• Is the Child Lock set? sp. 56
• Is the DVD video region number correct? sp. 10
• Press to switch to DVD.
• Is the lamp spent? sp. 58
• Has the focus been adjusted? sp. 20
• Is the unit at the correct distance? sp. 69
• Could there be condensation? sp. 8
• Is the lamp due for replacement? sp. 64
• Is the screensaver running? sp. 52
• Is the Function/Numerics toggle switch in the [1 2 3] (numerical
input) position?
• Depending on the disc, certain operations are prohibited. -
• Are the batteries dead, or have the batteries been inserted incorrectly? sp. 16
• Has the volume been adjusted to the minimum setting? sp. 20
• Is mute mode active? Press .
•
If multiple languages are not recorded on the disc, they cannot be
changed.
• Depending on the disc, there are some types that can only be changed
from the DVD menu.
• Is the subtitle language set to “OFF”? sp. 36
Reference
page
sp. 18
sp. 76
sp. 45
sp. 26
-
-
-
Appendix
61
Page 64

When using external video or computer mode
At these times Check here
No images appear • Is the power for the connected equipment turned on?
Switch on the power to the connected equipment, or start playback
depending on the playback method for the connected equipment.
“Signal not supported” is
displayed
“No signal.” is displayed • Are the cables connected correctly? sp. 43 - 44
• When external video equipment is connected
If projection is disabled even when the “Video Signal” is set to
“Auto” in the visual setup menu, set the signal format that is
appropriate to the device.
• When a computer is connected
Are the resolution and refresh rate modes for the image signal
compatible with the unit?
Use the computer’s documentation and so on to check and change the
resolution and the refresh rate for the image signal being output by
the computer.
• Is the power for the connected equipment turned on? Turn on the
power for the connected equipment. Press the playback button
according to the connected video equipment.
• Is a laptop computer or a computer with a built-in LCD screen
connected?
Change the image signal's output destination from the computer.
Reference
page
sp. 45
sp. 56
sp. 70
sp. 45
sp. 46
• Press to switch to DVD.
The signal is distorted • If an extension cable is used, electrical interference may affect the
signals. Connect amplification equipment and check.
• Is the computer’s image signal resolution mode compatible with the
unit?
Use the computer’s documentation and so on to check and change the
resolution for the image signal being output by the computer.
• Press the button on the remote control if interference or
flickering appear in the computer image being projected. “Running
Auto Setup···” is displayed and synchronization, tracking, and
position are automatically adjusted.
Image is truncated (large) or
small
Image colors are not right In the visual setup menu, set the “Video Signal” to the signal format
Moving images being
played back by the
computer become black
• The unit automatically recognizes the aspect ratio appropriate to
input signals and projects images. If the aspect ratio is not selected
correctly, press and select the aspect ratio appropriate to the
input signal.
• Press the button on the remote control if part of the computer
image being projected is missing. “Running Auto Setup···” is
displayed and synchronization, tracking, and position are
automatically adjusted.
appropriate to the device.
Change the computer’s image signal to external output only.
s Check the “Documentation” supplied with the computer for more
information, or inquire to the computer’s manufacturer.
sp. 45
-
sp. 70
-
sp. 40
-
sp. 56
-
62
Page 65

Maintenance
This section describes maintenance tasks such as cleaning the unit and replacing consumable parts.
Caution
Before starting the maintenance, unplug the power cable from the electrical outlet.
Cleaning
Cleaning the air filter and air
intake vent
When dust builds up on the air filter or the air intake
vent, or the message “The unit is overheating. Make sure
nothing is blocking the air vent, and clean or replace the
air filter.” is displayed, remove any dust from the air
filter and the air intake vent using a vacuum cleaner.
If dust collects on the air filter or the air intake vent it can
cause the internal temperature of the unit to rise, and this can
lead to operation problems and a shortening of the service
life of optical parts. It is recommended that you clean these
parts at least once every three months. Clean them more
often than this if the unit is used in particularly dusty
environments.
Cleaning the main unit
Clean the surface by wiping it gently with a soft cloth.
If the unit is particularly dirty, moisten a cloth with
water containing a small amount of neutral detergent,
firmly wring the cloth dry, wipe the unit softly with the
cloth to remove stains, and then wipe it again with a
soft, dry cloth.
Cleaning the projection lens
Use a commercially available cloth for cleaning glasses
to gently wipe the lens.
Do not use volatile substances such as wax, alcohol, or thinner
to clean the unit's surface. These can cause the unit to warp
and make the coating finish peel off.
Appendix
Do not rub the lens with harsh materials or subject the lens to
impact shock, as it is fragile.
63
Page 66

Consumables replacement period
Air filter replacement period
When the air filter gets dirty or is broken
Lamp replacement period
• The message “Replace the lamp” appears on the screen when projection starts.
• The projected image gets darker or starts to deteriorate.
• In order to maintain the initial brightness and image quality, the lamp replacement message is displayed after about
2900 hours of use has passed. The time at which this message is displayed will vary depending on the color mode
settings and the conditions under which this unit has been used.
• If you continue to use the lamp after this period, the possibility of the lamp breaking becomes greater. When the lamp
replacement message appears, replace the lamp with a new one as soon as possible, even if it is still working.
• Depending on the characteristics of the lamp and on the way it has been used, the lamp may become darker or stop
working before the lamp warning message appears. You should always have a spare lamp ready in case it is needed.
Optional Accessories and Consumables
The following optional accessories and consumables are available for purchase if required. This list of optional
accessories is applicable as of September, 2007. Details of accessories are subject to change without notice and
availability may vary depending on the country or area of purchase.
Consumables
Replacement lamp ELPLP44
(Lamp x1)
Use as a replacement for used lamps.
Air filter ELPAF14
(Air filter x1)
Use as a replacement for used air filters.
Optional accessories
50” portable screen ELPSC06
60” portable screen ELPSC07
80” portable screen ELPSC08
100” screen ELPSC10
A compact screen which can be carried easily.
(Aspect ratio 4:3)
HD-15 cable ELPKC02
(1.8 m - for mini D-Sub 15-pin/mini D-Sub 15-pin)
HD-15 cable ELPKC09
(3 m - for mini D-Sub 15-pin/mini D-Sub 15-pin)
HD-15 PC cable ELPKC10
(20 m - for mini D-Sub 15-pin/mini D-Sub 15-pin)
Use to connect the unit to a computer.
Component video cable ELPKC19
(3 m - for mini D-Sub 15-pin/RCA male x 3)
Use to connect a component video source.
64
Page 67

How to replace consumables
Replacing the air filter
Dispose of used air filters properly in accordance with your local
regulations.
Filter: Polypropylene
Frames: ABS resin
Turn the power switch off and when a short beep sounds,
1
unplug the power cable.
Remove the air filter cover.
2
Place your
finger in the
hollow and lift
upwards.
Take out the old air filter.
3
Install the new air filter.
4
Install the filter cover.
5
Appendix
65
Page 68

Replacing the lamp
Caution
The lamp is hot immediately after use. Once the power has been switched off,
allow approximately one hour to pass before replacing the lamp to allow it to cool
thoroughly.
Turn the power switch off, and when a short beep sounds,
1
unplug the power cable.
Loosen the screws of the lamp cover attachment using the
2
screwdriver that supplied with the replacement lamp. Slide
the lamp cover horizontally, and then lift it up to remove it.
Loosen the lamp attachment screws.
3
Take out the old lamp.
4
Install the new lamp.
5
66
Page 69

Tighten the lamp attachment screws firmly.
6
Install the lamp cover.
7
• Install the lamp and the lamp cover securely. For the safety of this unit, the lamp
will not turn on if the lamp or the lamp cover is not installed correctly.
• This product includes a lamp component that contains mercury (Hg). Please
consult your local regulations regarding disposal or recycling.
Do not dispose of it with normal waste.
Resetting the lamp operating time
After the lamp has been replaced, make sure you initialize the Lamp Hours
setting.
The unit has a built-in counter that keeps track of the lamp operating time and
the lamp replacement message is displayed based on this counter.
Connect the power cable, and press .
1
Press and when the menu appears, set the “Info” to
2
“Reset Lamp Hours”.
Appendix
67
Page 70

Select “Yes” and press to initialize the setting.
3
68
Page 71

Projection Distance and Screen Size
Refer to the following table and place the unit in a position which allows the best possible projection for the size of the
screen.
Units: cm (ft.)
Projection Distance
16:9 Screen Size
30” 66 x 37 (26 x 15) 85 - 116 (2.8 to 3.8)
40” 89 x 50 (35 x 20) 116 - 158 (3.8 to 5.2)
60” 130 x 75 (51 x 28) 177 - 240 (5.8 to 7.9)
80” 180 x 100 (71 x 39) 238 - 323 (7.8 to 10.6)
100” 220 x 120 (87 x 47) 299 - 405 (9.8 to 13.3)
120” 270 x 150 (106 x 59) 360 - 488 (11.8 to 16.0)
150” 330 x 190 (130 x 75) 452 - 611 (14.8 to 20.1)
4:3 Screen Size
30” 61 x 46 (24 x 18) 105 - 143 (3.4 to 4.7)
40” 81 x 61 (32 x 24) 143 - 194 (4.7 to 6.3)
60” 120 x 90 (47 x 35) 217 - 295 (7.1 to 9.6)
80” 160 x 120 (63 x 47) 292 - 396 (9.6 to 13.0)
100” 200 x 150 (79 x 59) 367 - 497 (12.0 to 16.3)
120” 240 x 180 (94 x 71) 442 - 598 (14.5 to 19.6)
150” 300 x 230 (118 x 91) 554 - 749 (18.2 to 24.5)
Minimum Maximum
(Zoom Adjustment Wide) - (Zoom Adjustment Tele)
Units: cm (ft.)
Projection Distance
Minimum Maximum
(Zoom Adjustment Wide) - (Zoom Adjustment Tele)
69
Appendix
Page 72

Compatible Resolution List
Composite video Units: Dots
Signal Resolution
TV (NTSC)
TV (PAL, SECAM)
* Letterbox signal
720 x 480
720 x 360
720 x 576
720 x 432
Normal Full Zoom
640 x 480
*
*
(4:3)
640 x 480
(4:3)
Aspect Mode
854 x 480
(16:9)
854 x 480
(16:9)
854 x 480
(16:9)
854 x 480
(16:9)
Component video Units: Dots
Signal Resolution
SDTV (480i, 60Hz)
SDTV (576i, 50Hz)
SDTV (480p)
SDTV (576p)
HDTV (720p) 16:9 1280 x 720
HDTV (1080i) 16:9 1920 x 1080
720 x 480
720 x 360
720 x 576
720 x 432
720 x 480
720 x 360
720 x 576
720 x 432
Normal Full Zoom
640 x 480
*
*
*
*
(4:3)
640 x 480
(4:3)
640 x 480
(4:3)
640 x 480
(4:3)
854 x 480
(16:9)
854 x 480
(16:9)
Aspect Mode
854 x 480
(16:9)
854 x 480
(16:9)
854 x 480
(16:9)
854 x 480
(16:9)
--
--
854 x 480
(16:9)
854 x 480
(16:9)
854 x 480
(16:9)
854 x 480
(16:9)
* Letterbox signal
Computer image Units: Dots
Signal Resolution
VGA60/72/75/85,
* 1
iMac
SVGA56/60/72/75/85,
* 1
iMac
XGA60/70/75/85,
* 1
iMac
MAC13” 640 x 480 640 x 480 854 x 480 854 x 480
MAC16” 832 x 624 640 x 480 854 x 480 854 x 480
MAC19” 1024 x 768 640 x 480 854 x 480 854 x 480
* 1 You cannot connect to models where the VGA output port is not installed.
* 2 Letterbox signals
Even when signals other than those mentioned above are input, it is likely that the image can be projected. However, not
all functions may be supported.
Small characters, and so on may not be visible.
640 x 480
640 x 360
800 x 600
800 x 450
1024 x 768
1024 x 576
* 2
* 2
* 2
Normal Full Zoom
640 x 480 854 x 480 854 x 480
640 x 480 854 x 480 854 x 480
640 x 480 854 x 480 854 x 480
Aspect Mode
70
Page 73

Compatible MPEG format list
Extension Video Codec Audio Codec Resolution
.AVI MPEG-1/MPEG-2/ MPEG-
4(Advanced Simple Profile)
.VID/.DIV/
.DIVX(Home Theater)/
.XVID
.MPE/ .MPG/ .MPEG MPEG-1/ MPEG-2 PCM/ADPCM/LPCM/
.DAT MPEG-1 MPEG I or II /layer II PAL: 25Hz 352 x 288/704 x 576
.VOB MPEG-2 PCM/ADPCM/LPCM/
The file format must meet the following requirements
• Resolution: up to 720 x 576
• GMC (global motion compensation) point: Up to one
• Bit rate: CD: 5.6 Mbps
DVD: 19Mbps
USB: 5.57 Mbps (However, this may be slower depending on the performance of the USB storage.)
MPEG-4(Advanced Simple
Profile)
PCM/ADPCM/MPEG/
MP3/WMA/AC3/DTS
PCM/ADPCM/MPEG/
MP3/WMA/AC3/DTS
MPEG/MP3/WMA/
AC3/DTS
MPEG/MP3/WMA/
AC3/DTS
PAL: 25 Hz 720 x 576 or less
NTSC: 30Hz 720 x 480 or less
PAL: 25 Hz 720 x 576 or less
NTSC: 30Hz 720 x 480 or less
PAL: 25 Hz 720 x 576 or less
NTSC: 30Hz 720 x 480 or less
NTSC: 30Hz 352 x 240/704 x 480
PAL: 25Hz 720 x 576
NTSC: 30Hz 720 x 480
71
Appendix
Page 74

Specifications
Product name EH-DM2
Dimensions 320W x 135H x 230D mm (Including projections)
Panel size 0.55” wide
Display method Polysilicon TFT active matrix
Resolution 409, 920 pixels (854W x 480H dots) x 3
Focus adjustment Manual
Zoom adjustment Digital type (Approx. 1:1.35)
Lamp (light
source)
Power supply 100 - 240VAC +/-10%, 50/60Hz, 2.5 to 1.1A
Power
consumption
Operating altitude Altitude: 0 m to 2286 m
Operating
temperature
Storage
temperature
Mass Approximately 3.8 kg
Connectors
Speakers Maximum input 8W, Rated impedance 12 Ω ohms
Audio output
UHE lamp, 140W, Model No.: ELPLP44
100 to 120VAC area Operating: 225 W
Standby: 5 W
220 to 240VAC area Operating: 225W
Standby: 5 W
+5 to +35ºC (No condensation)
-10 to +60ºC (No condensation)
Input Audio port 1 RCA pin jack
Video port 1 RCA pin jack
Component port 1 RCA pin jack
Computer port 1 Mini D-Sub 15-pin
USB port 1 Type A
Output Digital Coaxial Audio-Out
port
Headphone jack 1 3.5 mm mini-jack
Analog
audio
output
Digital
audio
output
1 speaker system:Practical, maximum output 8W + 8W (10% THD)
1 headphone system: 25 mW/32 Ω ohms
Dynamic range: 70 dB or more
Digital coaxial output
1 RCA pin jack
72
* The USB ports may not accept all USB-compatible devices.
Pixelworks DNXTM IC is installed in this unit.
Tilted angle
The unit may fail or may cause an accident if it is tilted more than 15 degrees.
Page 75

DECLARATION of CONFORMITY
According to 47CFR, Part 2 and 15
Class B Personal Computers and Peripherals; and/or
CPU Boards and Power Supplies used with Class B Personal Computers
We : Epson America, INC.
Located at : 3840 Kilroy Airport Way
MS:3-13
Long Beach, CA 90806
Tel : 562-290-5254
Declare under sole responsibility that the product identified herein, complies with 47CFR Part 2 and 15 of the
FCC rules as a Class B digital device. Each product marketed, is identical to the representative unit tested
and found to be compliant with the standards. Records maintained continue to reflect the equipment being
produced can be expected to be within the variation accepted, due to quantity production and testing on a
statistical basis as required by 47CFR 2.909. Operation is subject to the following two conditions :(1) this
device may not cause harmful interference, and (2) this device must accept any interference received,
including interference that may cause undesired operation.
Trade Name : Epson
Type of Product : Projector
Model : H302C
FCC Compliance Statement
For United States Users
This equipment has been tested and found to comply with the limits for a Class B digital device, pursuant to
Part 15 of the FCC Rules. These limits are designed to provide reasonable protection against harmful
interference in a residential installation. This equipment generates, uses, and can radiate radio frequency
energy and, if not installed and used in accordance with the instructions, may cause harmful interference to
radio or television reception. However, there is no guarantee that interference will not occur in a particular
installation. If this equipment does cause interference to radio and television reception, which can be
determined by turning the equipment off and on, the user is encouraged to try to correct the interference by
one or more of the following measures.
• Reorient or relocate the receiving antenna.
• Increase the separation between the equipment and receiver.
• Connect the equipment into an outlet on a circuit different from that to which the receiver is connected.
• Consult the dealer or an experienced radio/TV technician for help.
WARNING
The connection of a non-shielded equipment interface cable to this equipment will invalidate the FCC
Certification or Declaration of this device and may cause interference levels which exceed the limits
established by the FCC for this equipment. It is the responsibility of the user to obtain and use a shielded
equipment interface cable with this device. If this equipment has more than one interface connector, do not
leave cables connected to unused interfaces. Changes or modifications not expressly approved by the
manufacturer could void the user’s authority to operate the equipment.
Appendix
73
Page 76

Glossary
HDTV
An abbreviated form of “High-Definition Television system” to
be applied to a high-definition TV set that can satisfy the
following requirements:
-Vertical resolution 720p or 1080i or higher (where, “p” refers
to progressive scan, and “i” refers to interlace scan)
-16:9 screen aspect ratio
JPEG
A file format used for saving image files. Most photographs
taken with digital cameras are saved in the JPEG format.
MP3
The abbreviated form of “MPEG1 Audio Layer-3”, a standard
for audio compression. It enables the size of the data to be
greatly reduced, whilst maintaining a high sound quality.
NTSC
The abbreviated form of the “National Television Standards
Committee”, and given to one of the analog color television
wave transmission systems. This system is used in Japan, the
USA and Latin America.
PAL
The abbreviated form of “Phase Alternation by Line”, and
given to one of the analog color television wave transmission
systems. This system is used in China, Western Europe, with
the exception of France, and in other African and Asian
countries.
SDTV
An abbreviated form of “Standard Definition Television”, and
given to the standard TV broadcasting system that does not
satisfy the HDTV requirements.
SECAM
The abbreviated form of “SEquential Couleur A Memoire”,
and given to one of the analog color television wave
transmission systems. This system is used in France, Eastern
Europe, the former Soviet Union, the Middle East and some
African nations.
Aspect
The ratio between an image’s length and its height. HDTV
images have an aspect ratio of 16:9 and appear elongated. The
aspect ratio for standard images is 4:3. This unit can
automatically detect the aspect ratio of a disc when it is played
back.
Cool-down
A process to enable the lamp to cool down from the high
temperatures attained during projection. Cool-down is
automatically activated when you press to turn off the
power. Do not unplug the power cable during cool-down. If
cool-down is not performed correctly, the lamp or internal
structure of the main unit can overheat which may reduce the
lifespan of the lamp or cause damage to this unit. Cool-down is
complete once the main unit beeps twice.
Coaxial digital output
Converts the audio signal into a digital signal and enables it to
be transmitted along coaxial cable.
Playback control (PBC)
A method for playing back Video CDs. You can select the
screen or information you want to see from the menu screen
displayed.
Disc related terms
Title/Chapter/Track
One movie on a DVD is divided into units called titles, which
may contain any number of chapters.
DVD v ideo
Title 1 Title 2
Chapter 1 Chapter 2 Chapter 1
Chapter 2
74
WMA
The abbreviated form of “Windows Media Audio”, an audio
compression technology developed by the Microsoft
Corporation of America. You can encode WMA data using
Windows Media Player Ver.7, 7.1, Windows Media Player for
Windows XP, or the Windows Media Player 9 Series.
When encoding WMA files, please use applications that have
been certified by the Microsoft Corporation of America. If you
use an application that has not been certified, it is possible that
it may not operate correctly.
YCbCr
A transmission signal in the color bar signal waveform for the
current TV set (NTSC system). Expressed by Y (brightness
signal) CbCr (chromatin (color) signal).
YPbPr
A transmission signal in the color bar signal waveform for HiVision. Expressed by Y (brightness signal) PbPr (color
difference signal).
Video and Audio CDs are divided into units called tracks.
Video CD/Audio CD
Track 1 Track 2 Track 3 Track 4
Page 77

Index
A
Audio page ................................................................................ 52
Auto Setup ................................................................................ 62
B
Break ......................................................................................... 25
Brightness ................................................................................. 56
C
Chapter ...................................................................................... 74
Child lock .................................................................................. 56
Cleaning the air filter and air intake vent .................................. 63
Cleaning the main unit .............................................................. 63
Cleaning the projection lens ...................................................... 63
Color Mode ............................................................................... 25
Color Saturation ........................................................................ 56
Computer input port .................................................................. 44
Consumables ............................................................................. 64
Contrast ..................................................................................... 56
D
Digital Output ........................................................................... 52
Disc Lock .................................................................................. 52
DivX .......................................................................................... 29
DivX VOD ................................................................................ 52
Dolby Digital ............................................................................ 52
Dolby Virtual Speaker .............................................................. 48
F
Focus ring .................................................................................. 20
H
Headphones ............................................................................... 47
High Altitude Mode .................................................................. 56
O
Option page ...............................................................................56
Optional accessories ..................................................................64
OSD Language ..........................................................................51
Others page ................................................................................52
Overheating ...............................................................................59
P
Password ....................................................................................52
PBC (playback control) .............................................................27
Playback information screen .....................................................37
Progressive ................................................................................56
R
Remote Control .........................................................................15
Replacing the air filter ...............................................................65
Replacing the lamp ....................................................................66
Resetting the lamp operating time .............................................67
S
Sharpness ...................................................................................56
Source ........................................................................................57
Standing-by ................................................................................60
T
Tint ............................................................................................56
Title ............................................................................................74
Track ..........................................................................................74
TV tuner .....................................................................................43
U
USB .....................................................................................11, 42
V
I
Image page ................................................................................ 56
Indicators ................................................................................... 58
Info page ................................................................................... 57
Inserting the batteries ................................................................ 16
L
Lamp replacement period ......................................................... 64
Lamp-Hours .............................................................................. 57
Language page .......................................................................... 51
M
Menu ......................................................................................... 26
MP3 ........................................................................................... 29
MP3/JPEG NAV ....................................................................... 52
Mute .......................................................................................... 25
N
Night Mode ............................................................................... 52
Video input port .........................................................................43
Video Signal ..............................................................................56
Volume ......................................................................................20
W
WMA .........................................................................................29
Z
Zoom button ..............................................................................20
75
Page 78

Inquiries
< EUROPE, MIDDLE EAST & AFRICA >
This address list is current as of the 5th of April, 2007.
A more up-to-date contact address can be obtained from the corresponding website listed here. If you do not find what
you need on any of these pages, please visit the main Epson home page at www.epson.com.
ALBANIA :
INFOSOFT SYSTEM
Gjergji Center, Rr Murat Toptani
Tirana 04000 - Albania
Tel: 00 355 42 511 80/ 81/ 82/ 83
Fax: 00355 42 329 90
Web Address:
http://content.epson.it/about/int_services.htm
AUSTRIA :
EPSON DEUTSCHLAND
GmbH
Buropark Donau Inkustrasse 1-7 / Stg. 8 / 1.
OG
A-3400 Klosterneuburg
Tel: +43 (0) 2243 - 40 181 - 0
Fax: +43 (0) 2243 - 40 181 - 30
Web Address:
http://www.epson.at
BELGIUM :
EPSON DEUTSCHLAND GmbH
Branch office Belgium
Belgicastraat 4 - Keiberg
B-1930 Zaventem
Tel: +32 2/ 7 12 30 10
Fax: +32 2/ 7 12 30 20
Hotline: 070 350120
Web Address:
http://www.epson.be
BOSNIA AND HERZEGOVINA :
RECOS d.o.o.
Tvornicka 3 - 71000 Sarajevo
Tel: 00 387 33 767 330
Fax: 00 387 33 454 428
Web Address:
http://content.epson.it/about/int_services.htm
BULGARIA :
EPSON Service Center Bulgaria
c/o Reset Computers Ltd.
15-17 Tintiava Str.
1113 Sofia
Tel. : 00 359 2 911 22
Fax: 00 359 2 868 33 28
Email: reset@reset.bg
Web Address: http://www.reset.bg
CROATIA :
RECRO d.d.
Avenija V. Holjevca 40
10 000 Zagreb
Tel: 00385 1 3650774
Fax: 00385 1 3650798
Web Address:
http://content.epson.it/about/int_services.htm
CYPRUS :
TECH-U
75, Lemesou Avenue 2121 Cyprus
Tel: 00357 22 69 4000
Fax: 00357 22490240
Web Address:
http://content.epson.it/about/int_services.htm
CZECH REPUBLIC :
EPSON DEUTSCHLAND GmbH
Branch Office Czech Republic
Slavickova 1a 63800 Brno
E-mail: infoline@epson.cz
Web Address:
http://www.epson.cz
Hotline: 800 142 052
DENMARK :
EPSON Denmark
Generatorvej 8 C 2730 Herlev
Tel: 44508585
Fax: 44508586
Email: denmark@epson.co.uk
Web Address:
http://www.epson.dk
Hotline: 70279273
ESTONIA :
EPSON Service Center Estonia
c/o Kulbert Ltd.
Sirge 4, 10618
Tallinn
Tel: 00372 671 8160
Fax: 00372 671 8161
Web Address:
http://www.epson.ee
FINLAND :
Epson (UK) Ltd.
Rajatorpantie 41 C FI-01640 Vantaa
Web Address:
http://www.epson.fi
Hotline: 0201 552091
FRANCE & DOM-TOM TERRITORY :
EPSON France S.A.
150 rue Victor Hugo BP 320
92305 LEVALLOIS PERRET CEDEX
Web Address:
http://www.epson.fr
Hotline: 0821017017
GERMANY :
EPSON Deutschland GmbH
Otto-Hahn-Strasse 4 D-40670 Meerbusch
Tel: +49-(0)2159-538 0
Fax: +49-(0)2159-538 3000
Web Address:
http://www.epson.de
Hotline: 01805 2341 10
GREECE :
EPSON Italia s.p.a.
274 Kifisias Avenue –15232 Halandri Greece
Tel: +30 210 6244314
Fax: +30 210 68 28 615
Email:
epson@information-center.gr
Web Address:
http://content.epson.it/about/int_services.htm
HUNGARY :
Epson Deutschland GmbH
Magyarorszagi Fioktelep 1117 Budapest
Inforpark setany 1.
Hotline: 06 800 14 783
E-mail: infoline@epson.hu
Web Address:
http://www.epson.hu
IRELAND :
Epson (UK) Ltd.
Campus 100, Maylands Avenue
Hemel Hempstead Herts HP2 7TJ
U.K.Techn.
Web Address:
http://www.epson.ie
Hotline: 01 679 9015
ITALY :
EPSON Italia s.p.a.
Via M. Vi gan o de Vizz i, 93 /95
20092 Cinisello Balsamo (MI)
Tel: +39 06. 660321
Fax: +39 06. 6123622
Web Address:
http://www.epson.it
Hotline: 02 26830058
LATVIA :
EPSON Service Center Latvia
c/o ServiceNet LV
Jelgavas 36
1004 Riga
Tel.: 00 371 746 0399
Fax: 00 371 746 0299
Web Address:
http://www.epson.lv
LITHUANIA :
EPSON Service Center Lithuania
c/o ServiceNet
Gaiziunu 3
50128 Kaunas
Tel.: 00 370 37 400 160
Fax: 00 370 37 400 161
Web Address:
http://www.epson.lt
LUXEMBURG :
EPSON DEUTSCHLAND GmbH
Branch office Belgium
Belgicastraat 4-Keiberg
B-1930 Zaventem
Tel: +32 2/ 7 12 30 10
Fax: +32 2/ 7 12 30 20
Hotline: 0900 43010
Web Address:
http://www.epson.be
MACEDONIAN :
DIGIT COMPUTER ENGINEERING
3 Makedonska brigada b.b upravna
zgrada R. Konkar - 91000 Skopje Macedonia
Tel: 00389 2 2463896
Fax: 00389 2 2465294
Web Address:
http://content.epson.it/about/int_services.htm
NETHERLANDS :
EPSON DEUTSCHLAND GmbH
Branch office Netherland
J. Geesinkweg 501
NL-1096 AX AmsterdamDuivendrecht Netherlands
Tel: +31 20 592 65 55
Fax: +31 20 592 65 66
Hotline: 0900 5050808
Web Address:
http://www.epson.nl
NORWAY :
EPSON NORWAY
Lilleakerveien 4 oppgang 1A
N-0283 Oslo NORWAY
Hotline: 815 35 180
Web Address:
http://www.epson.no
76
Page 79

POLAND :
EPSON DEUTSCHLAND GmbH
Branch Office Poland
ul. Bokserska 66
02-690 Warszawa Poland
Hotline: (0) 801-646453
Web Address:
http://www.epson.pl
PORTUGAL :
EPSON Portugal
R. Gregorio Lopes, nº 1514 Restelo 1400-195
Lisboa
Tel: 213035400
Fax: 213035490
Hotline: 707 222 000
Web Address:
http://www.epson.pt
ROMANIA :
EPSON Service Center Romania
c/o MB Distribution 162, Barbu Vacarescu
Blvd., Sector 2
71422 Bucharest
Tel: 0040 21 231 7988 ext.103
Fax: 0040 21 230 0313
Web Address:
http://www.epson.ro
Russia :
EPSON CIS
ul. Schepkina, 42, bldg 2a Moscow
Tel. +7 (495) 737-37-88
Fax: +7 (495) 777-03-57
Hotline:(800) 200-37-88
Web Address:
http://www.epson.ru
http://www.support.epson.ru
SERBIA AND MONTENEGRO :
BS PROCESSOR d.o.o.
Hazdi Nikole Zivkovica 2
Beograd - 11000 - F.R. Jugoslavia
Tel: 00 381 11 328 44 88
Fax: 00 381 11 328 18 70
Web Address:
http://content.epson.it/about/int_services.htm
SLOVAKIA :
EPSON DEUTSCHLAND GmbH Branch
Office Czech Republic
Slavickova 1a
638 00 Brno
Hotline: 0850 111 429
(national costs)
Web Address:
http://www.epson.sk
SLOVENIA :
BIROTEHNA d.o.o.
Smartinska 106
1000 Ljubljana Slovenja
Tel: 00 386 1 5853 410
Fax: 00386 1 5400130
Web Address:
http://content.epson.it/about/int_services.htm
SPAIN :
EPSON Iberica, S.A.
Av. de Roma, 18-26
08290 Cerdanyola del valles
Barcelona
Tel: 93 582 15 00
Fax: 93 582 15 55
Hotline: 902 404142
Web Address:
http://www.epson.es
SWEDEN :
Epson Sweden
Box 329 192 30 Sollentuna Sweden
Tel: 0771-400134
Web Address:
http://www.epson.se
SWIZERLAND :
EPSON DEUTSCHLAND GmbH
Branch office Switzerland
Riedmuehlestrasse 8 CH-8305 Dietlikon
Tel: +41 (0) 43 255 70 20
Fax: +41 (0) 43 255 70 21
Hotline: 0848448820
Web Address:
http://www.epson.ch
TURKEY :
TECPRO
Sti. Telsizler mah. Zincirlidere cad.
No: 10 Kat 1/2 Kagithane 34410
Istanbul
Tel: 0090 212 2684000
Fax: 0090212 2684001
Web Address:
http://www.epson.com.tr
Info: bilgi@epsonerisim.com
Web Address:
http://www.epson.tr
UK :
Epson (UK) Ltd.
Campus 100, Maylands Avenue
Hemel Hempstead Herts HP2 7TJ
Tel: (01442) 261144
Fax: (01442) 227227
Hotline: 08704437766
Web Address:
http://www.epson.co.uk
AFRICA :
Contact your dealer
Web Address:
http://www.epson.co.uk/welcome/
welcome_africa.htm
or
http://www.epson.fr/bienvenu.htm
SOUTH AFRICA :
Epson South Africa
Grnd. Flr. Durham Hse, Block 6
Fourways Office Park
Cnr. Fourways Blvd. & Roos Str.
Fourways, Gauteng. South Africa.
Tel: +27 11 201 7741
/ 0860 337766
Fax: +27 11 465 1542
Email: support@epson.co.za
Web Address:
http://www.epson.co.za
MIDDLE EAST :
Epson (Middle East)
P.O. Box: 17383 Jebel Ali Free Zone Dubai
UAE(United Arab Emirates)
Tel: +971 4 88 72 1 72
Fax: +971 4 88 18 9 45
Email: supportme@epson.co.uk
Web Address:
http://www.epson.co.uk welcome/
welcome_africa.htm
< NORTH, CENTRAL AMERICA & CARIBBEANI ISLANDS >
CANADA :
Epson Canada, Ltd.
3771 Victoria Park Avenue
Scarborough, Ontario
CANA DA M1W 3Z5
Tel: 905-709-9475
or 905-709-3839
Web Address:
http://www.epson.com
MEXICO :
Epson Mexico, S.A. de C.V.
Boulevard Manuel Avila Camacho 389
Edificio 1 Conjunto Legaria
Col. Irrigacion, C.P. 11500
Mexico, DF
Tel: (52 55) 1323-2052
Web Address:
http://www.epson.com.mx
COSTA RICA :
Epson Costa Rica, S.A.
Dela Embajada Americana,
200 Sur y 300 Oeste
Apartado Postal 1361-1200 Pavas
San Jose, Costa Rica
Tel: (506) 210-9555
Web Address:
http://www.epson.co.cr
U. S. A. :
Epson America, Inc.
3840 Kilroy Airport Way
Long Beach, CA 90806
Tel: 562-276-4394
Web Address:
http://www.epson.com
77
Page 80

< SOUTH AMERICA >
ARGENTINA :
Epson Argentina S.A.
Avenida Belgrano 964/970 Capital Federal
1092, Buenos Aires, Argentina Tel: (54 11)
5167-0300
Web Address:
http://www.epson.com.ar
BRAZIL :
Epson Do Brasil Ltda.
Av. Tucunare, 720
Tambore Barueri,
Sao Paulo, SP 0646-0020, Brazil
Tel: (55 11) 4196-6100
Web Address:
http://www.epson.com.br
< ASIA & OCEANIA >
AUSTRALIA :
EPSON AUSTRALIA PTYLIMITED
3, Talavera Road, N.Ryde NSW 2113,
AUSTR ALIA
Tel: 1300 361 054
Web Address:
http://www.epson.com.au
CHINA :
EPSON (BEIJING) TECHNOLOGY
SERVICE CO.,LTD.
8F,A. The Chengjian Plaza NO.18
Beitaipingzhuang Rd.,Haidian District,Beijing,
China
Zip code: 100088
Tel: 010-82255566-606
Fax: 010-82255123
EPSON (BEIJING) TECHNOLOGY
SERVICE CO.,LTD.SHANGHAI
BRANCH PANYU ROAD SERVICE
CENTER
NO. 127 Panyu Road, Changning District,
Shanghai China
ZIP code: 200052
Tel: 021-62815522
Fax: 021-52580458
EPSON (BEIJING) TECHNOLOGY
SERVICE CO.,LTD.GUANGZHOU
BRANCH
ROOM 1405,1407 Baoli Plaza,NO.2 , 6th
Zhongshan
Road,Yuexiu District, Guangzhou
Zip code: 510180
Tel: 020-83266808
Fax: 020- 83266055
EPSON (BEIJING) TECHNOLOGY
SERVICE CO.,LTD.CHENDU BRANCH
ROOM2803B, A. Times Plaza, NO.2, Zongfu
Road, Chengdu
Zip code: 610016
Tel: 028-86727703/04/05
Fax: 028-86727702
CHILE :
Epson Chile S.A.
La Concepcion 322 Piso 3
Providencia, Santiago,Chile
Tel: (562) 484-3400
Web Address:
http://www.epson.com.cl
COLOMBIA :
Epson Colombia Ltda.
Diagonal 109, 15-49
Bogota, Colombia
Tel: (57 1) 523-5000
Web Address:
http://www.epson.com.co
HONGKONG :
EPSON Technical
Support Centre
(Information Centre)
Units 516-517, Trade Square,
681 Cheung Sha Wan Road,
Cheung Sha Wan, Kowloon,
HONG KONG
Tech. Hot Line: (852) 2827 8911
Fax: (852) 2827 4383
Web Address:
http://www.epson.com.hk
JAPAN :
SEIKO EPSON
CORPORATION
SHIMAUCHI PLANT
VI Customer Support Group:
4897 Shimauchi, Matsumoto-shi, Nagano-ken,
390-8640 JAPAN
Tel: 0263-48-5438
Fax: 0263-48-5680
Web Address:
http://www.epson.jp
KOREA :
EPSON KOREA CO., LTD.
11F Milim Tower, 825-22 Yeoksam-dong,
Gangnam-gu, Seoul,135-934 Korea
Tel : 82-2-558-4270
Fax: 82-2-558-4272
Web Address:
http://www.epson.co.kr
MALAYSIA :
EPSON TRADING
(MALAYSIA) SDN. BHD.
3rd Floor, East Tower, Wisma Consplant 1
No.2, Jalan SS 16/4,
47500 Subang Jaya,
Malaysia.
Tel: 03 56 288 288
Fax: 03 56 288 388
or 56 288 399
SINGAPORE :
EPSON SINGAPORE
PTE. LTD.
1 HarbourFront Place #03-02
HarbourFront Tower One
Singapore 098633.
Tel: 6586 3111
Fax: 6271 5088
PERU :
Epson Peru S.A.
Av. Del Parque Sur #400
San Isidro, Lima, 27, Peru
Tel: (51 1) 224-2336
Web Address:
http://www.epson.com.pe
VENEZUELA :
Epson Venezuela S.A.
Calle 4 con Calle 11-1
Edf. Epson -- La Urbina Sur Caracas, Venezuela
Tel: (58 212) 240-1111
Web Address:
http://www.epson.com.ve
TAIWAN :
EPSON Taiwan
Technology & Trading Ltd.
14F,No. 7, Song Ren Road,
Tai p e i , Taiwa n , ROC.
Tel: (02) 8786-6688
Fax: (02) 8786-6633
Web Address:
http://www.epson.com.tw
THAILAND:
EPSON (Thailand) Co.,Ltd.
24th Floor, Empire Tower,
195 South Sathorn Road, Yannawa, Sathorn,
Bangkok 10120, Thailand.
Tel: (02) 6700680 Ext. 310
Fax: (02) 6070669
Web Address:
http://www.epson.co.th
78
Page 81

All rights reserved. No part of this publication may be reproduced, stored in a retrieval system, or transmitted in any
form or by any means, electronic, mechanical, photocopying, recording, or otherwise, without the prior written
permission of Seiko Epson Corporation. No patent liability is assumed with respect to the use of the information
contained herein. Neither is any liability assumed for damages resulting from the use of the information contained
herein.
Neither Seiko Epson Corporation nor its affiliates shall be liable to the purchaser of this product or third parties for
damages, losses, costs, or expenses incurred by purchaser or third parties as a result of: accident, misuse, or abuse of this
product or unauthorized modifications, repairs, or alterations to this product, or (excluding the U.S.) failure to strictly
comply with Seiko Epson Corporation’s operating and maintenance instructions.
Seiko Epson Corporation shall not be liable against any damages or problems arising from the use of any options or any
consumable products other than those designated as Original Epson Products or Epson Approved Products by Seiko
Epson Corporation.
The contents of this guide may be changed or updated without further notice.
Illustrations and screens used in this publication may differ from actual illustrations and screens.
Trademarks
Windows Media and Windows logos are trademarks or registered trademarks of Microsoft Corporation in the United
States and other countries.
XGA is a trademark or a registered trademark of International Business Machine Corporation.
iMac is a registered trademark of Apple Inc.
Manufactured under license from Dolby Laboratories. “Dolby”, “Pro Logic”, and the double-D symbol are trademarks
of Dolby Laboratories.
Manufactured under license under U.S. Patent #’s: 5,451,942; 5,956,674; 5,974,380; 5,978,762; 6,487,535 & other U.S.
and worldwide patents issued & pending. DTS and DTS Digital Surround are registered trademarks and the DTS logos
and Symbol are trademarks of DTS, Inc. © 1996-2007 DTS, Inc. All Rights Reserved.
DivX, DivX Ultra Certified, and associated logos are trademarks of DivX, Inc. and are used under license.
Pixelworks and DNX are trademarks of Pixelworks Inc.
DVD Video logo is a trademark.
We respect other trademarks or registered trademarks of respective companies even if they are not specified.
©SEIKO EPSON CORPORATION 2008. All rights reserved.
 Loading...