

Page 1

™
Artisan 800 Series
Basics Guide
Page 2

Copyright Notice
All rights reserved. No part of this publication may be reproduced, stored in a retrieval
system, or transmitted in any form or by any means, electronic, mechanical,
photocopying, recording, or otherwise, without the prior written permission of Seiko
Epson Corporation. The information contained herein is designed only for use with this
Epson product. Epson is not responsible for any use of this information as applied to other
equipment.
Neither Seiko Epson Corporation nor its affiliates shall be liable to the purchaser of this
product or third parties for damages, losses, costs, or expenses incurred by purchaser or
third parties as a result of: accident, misuse, or abuse of this product or unauthorized
modifications, repairs, or alterations to this product, or (excluding the U.S.) failure to
strictly comply with Seiko Epson Corporation’s operating and maintenance instructions.
Seiko Epson Corporation shall not be liable for any damages or problems arising from the
use of any options or any consumable products other than those designated as Original
Epson Products or Epson Approved Products by Seiko Epson Corporation.
Responsible Use of Copyrighted Materials
Epson encourages each user to be responsible and respectful of the copyright laws when
using any Epson product. While some countries’ laws permit limited copying or reuse of
copyrighted material in certain circumstances, those circumstances may not be as broad as
some people assume. Contact your legal advisor for any questions regarding copyright law.
Trademarks
Epson is a registered trademark, Epson Exceed Your Vision is a registered logomark, and
Supplies Central is a service mark of Seiko Epson Corporation.
Artisan is a trademark and Epson Connection is a service mark of Epson America, Inc.
General Notice: Other product names used herein are for identification purposes only and
may be trademarks of their respective owners. Epson disclaims any and all rights in those
marks.
This information is subject to change without notice.
© 2008 Epson America, Inc. 6/08
2
Page 3

Contents
Using the Control Panel
Using the Touch Panel . . . . . . . . . . . . . . . . . . . . . . . . . . . . . . . . . . . . . . 5
Loading Paper
Using Special Papers . . . . . . . . . . . . . . . . . . . . . . . . . . . . . . . . . . . . . . . 10
. . . . . . . . . . . . . . . . . . . . . . . . . . . . . . . . . . . . . . . . . 7
Placing Originals for Copying, Scanning, or Faxing
Using the Scanner Glass . . . . . . . . . . . . . . . . . . . . . . . . . . . . . . . . . . . . 12
Using the Automatic Document Feeder . . . . . . . . . . . . . . . . . . . . . . . . . . 13
Copying a Document or Photo
Copying a Document . . . . . . . . . . . . . . . . . . . . . . . . . . . . . . . . . . . . . . 14
Restoring, Cropping, or Copying Photos . . . . . . . . . . . . . . . . . . . . . . . . . 15
Faxing a Document or Photo
Connecting to a Phone Line . . . . . . . . . . . . . . . . . . . . . . . . . . . . . . . . . 18
Setting Up Fax Features . . . . . . . . . . . . . . . . . . . . . . . . . . . . . . . . . . . . 19
Sending a Fax . . . . . . . . . . . . . . . . . . . . . . . . . . . . . . . . . . . . . . . . . . . 23
Receiving Faxes . . . . . . . . . . . . . . . . . . . . . . . . . . . . . . . . . . . . . . . . . . 25
. . . . . . . . . . . . . . . . . . . . . . . . . . . . . . . . 5
. . . . . . . 12
. . . . . . . . . . . . . . . . . . . . . . . . . 14
. . . . . . . . . . . . . . . . . . . . . . . . . . . 18
Printing From Your Camera’s Memory Card
Inserting Your Camera’s Memory Card . . . . . . . . . . . . . . . . . . . . . . . . . . 26
Inserting a USB Drive . . . . . . . . . . . . . . . . . . . . . . . . . . . . . . . . . . . . . . 28
Selecting and Printing Photos . . . . . . . . . . . . . . . . . . . . . . . . . . . . . . . . 29
Printing Layout Sheets . . . . . . . . . . . . . . . . . . . . . . . . . . . . . . . . . . . . . 31
Printing From a Camera . . . . . . . . . . . . . . . . . . . . . . . . . . . . . . . . . . . . 33
. . . . . . . . . . . . . 26
Contents
3
Page 4

Printing Special Projects
Printing Coloring Book Pages . . . . . . . . . . . . . . . . . . . . . . . . . . . . . . . . 35
Printing Lined Paper and Graph Paper . . . . . . . . . . . . . . . . . . . . . . . . . . 37
Printing Personalized Note Paper . . . . . . . . . . . . . . . . . . . . . . . . . . . . . . 37
Printing CDs and DVDs . . . . . . . . . . . . . . . . . . . . . . . . . . . . . . . . . . . . 39
. . . . . . . . . . . . . . . . . . . . . . . . . . . . . . . 35
Printing From Your Computer
Printing in Windows . . . . . . . . . . . . . . . . . . . . . . . . . . . . . . . . . . . . . . 43
Printing With a Macintosh . . . . . . . . . . . . . . . . . . . . . . . . . . . . . . . . . . 45
Selecting the Correct Paper Type . . . . . . . . . . . . . . . . . . . . . . . . . . . . . . 49
Two-sided Printing . . . . . . . . . . . . . . . . . . . . . . . . . . . . . . . . . . . . . . . . 50
Scanning a Document or Photo
Basic Scanning . . . . . . . . . . . . . . . . . . . . . . . . . . . . . . . . . . . . . . . . . . . 52
Scanning Multiple Pages . . . . . . . . . . . . . . . . . . . . . . . . . . . . . . . . . . . . 54
Maintaining Your All-in-One
Checking the Print Head Nozzles . . . . . . . . . . . . . . . . . . . . . . . . . . . . . . 55
Cleaning the Print Head . . . . . . . . . . . . . . . . . . . . . . . . . . . . . . . . . . . . 56
Checking the Ink Cartridge Status . . . . . . . . . . . . . . . . . . . . . . . . . . . . . 57
Purchasing Epson Ink Cartridges . . . . . . . . . . . . . . . . . . . . . . . . . . . . . . 58
Replacing Ink Cartridges . . . . . . . . . . . . . . . . . . . . . . . . . . . . . . . . . . . . 59
Solving Problems
Checking for Software Updates . . . . . . . . . . . . . . . . . . . . . . . . . . . . . . . 61
Problems and Solutions . . . . . . . . . . . . . . . . . . . . . . . . . . . . . . . . . . . . . 62
Where To Get Help . . . . . . . . . . . . . . . . . . . . . . . . . . . . . . . . . . . . . . . 65
. . . . . . . . . . . . . . . . . . . . . . . . . . . . . . . . . . . . . 61
. . . . . . . . . . . . . . . . . . . . . . . . . . 43
. . . . . . . . . . . . . . . . . . . . . . . . 52
. . . . . . . . . . . . . . . . . . . . . . . . . . . 55
Notices
Index
4
Contents
. . . . . . . . . . . . . . . . . . . . . . . . . . . . . . . . . . . . . . . . . . . . . . . 66
. . . . . . . . . . . . . . . . . . . . . . . . . . . . . . . . . . . . . . . . . . . . . . . . 74
Page 5
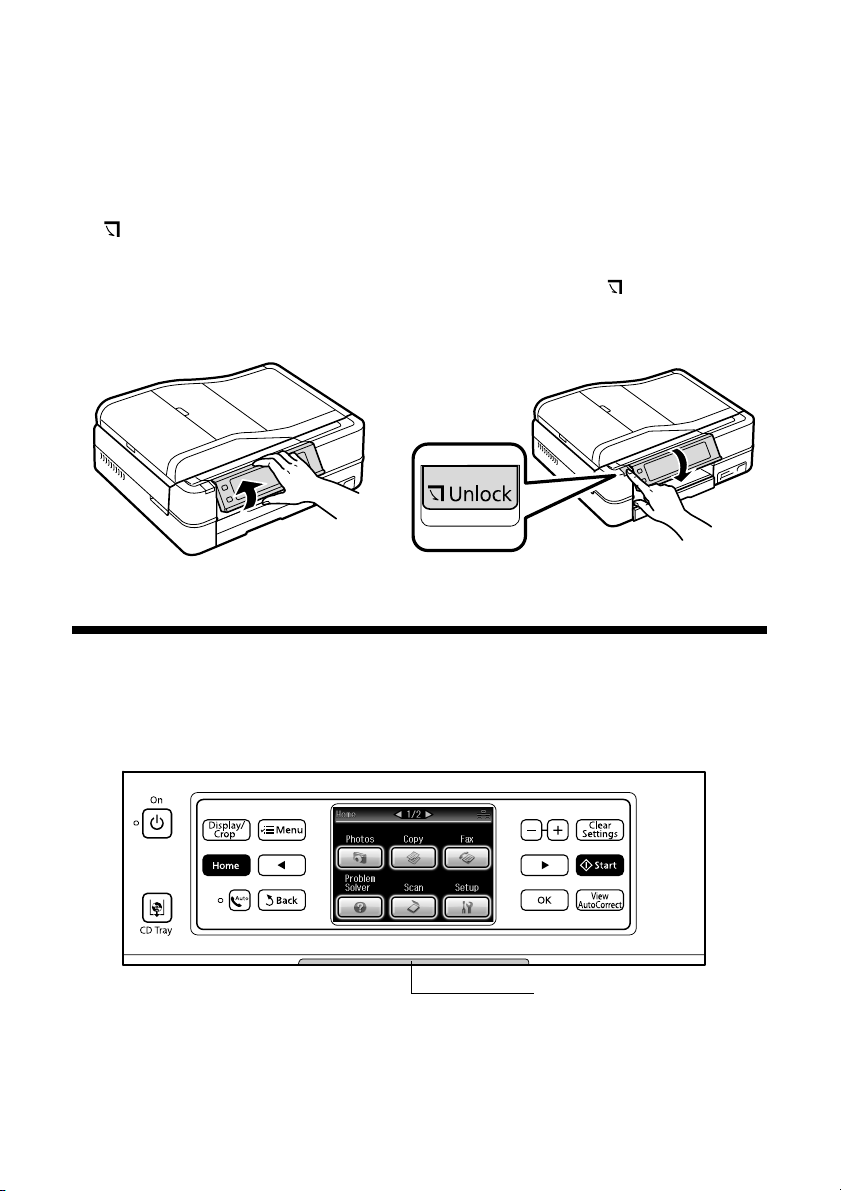
Using the Control Panel
The control panel is adjustable. To raise it, lift it as shown below. To lower it, press
the
Unlock
Caution:
To avoid damaging the Artisan 800 Series, make sure you press the Unlock button to
lower the control panel. Don’t try to push it down.
Using the Touch Panel
button.
The touch panel makes it easy to use all the creative features of your Artisan 800
Series.
Blue status light
Caution:
Press the touch panel gently with the tip of your finger; don’t press too hard or use
sharp objects.
Using the Control Panel
5
Page 6

The touch panel displays only the buttons that are available for the project you are
working on.
■
Whenever you see the l and r buttons, you can press them to view more
photos or access more options.
■
Whenever you see the x
Menu
button, you can press it to make special
settings.
■
Whenever you see the
Home
button, you can press it to return to the main
menu.
■
The touch panel retains the settings from the last time it was used. If you want
to start over, simply press
■
To save energy, the touch panel goes dark after 13 minutes of inactivity. Touch
Clear Settings
.
the screen to wake it up.
■
The blue status light at the bottom of the panel flashes when the Artisan 800
Series is printing or performing routine maintenance.
Note:
If the blue status light flashes rapidly, check the Artisan 800 Series for error
messages.
You may see the following icons on the screen:
Icon Meaning
The Artisan 800 Series is connected to a wired network
The Artisan 800 Series is connected to a wireless network
ADF A document is loaded in the automatic document feeder
The current photo is cropped
The Fix Red-Eye setting is on for the current photo or all photos
6
Using the Control Panel
Page 7
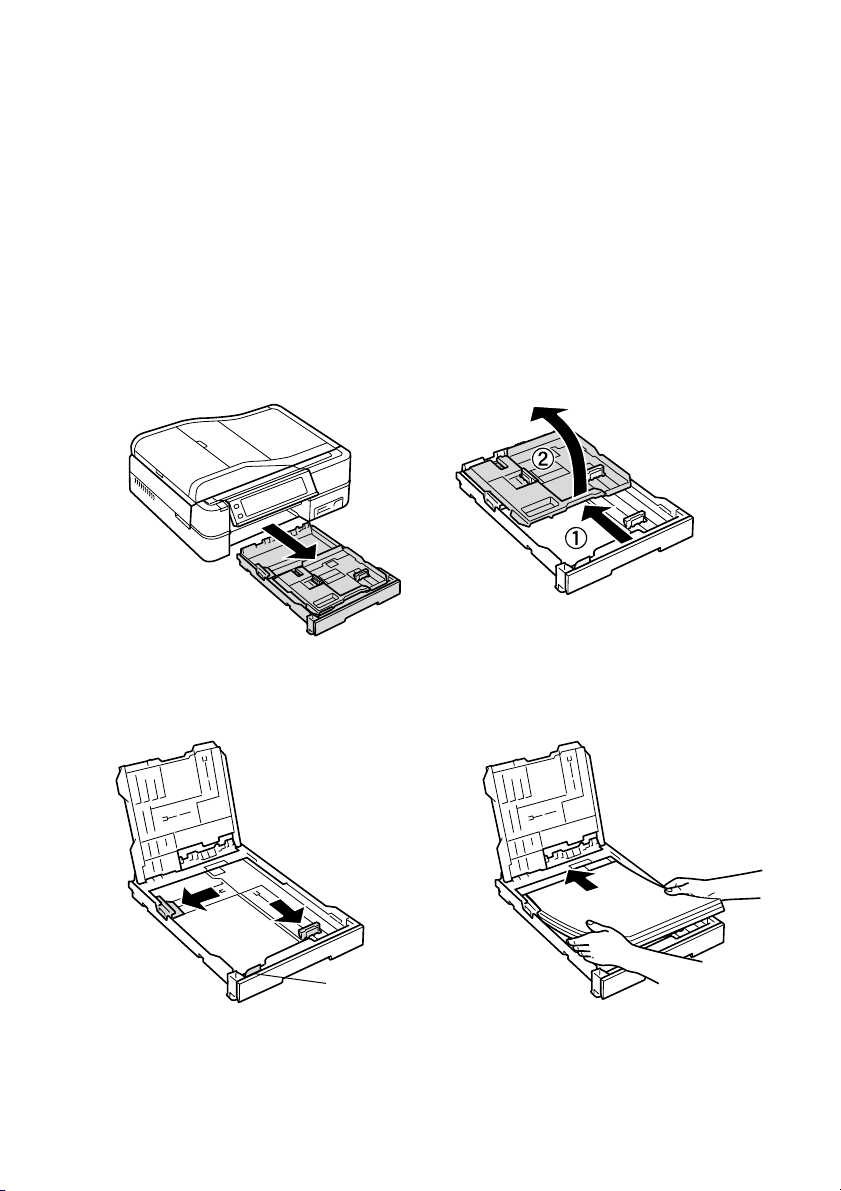
Loading Paper
Your Artisan 800 Series has two paper trays. The main tray is for letter-size, legalsize, A4, or 8
plain paper in the main tray. When extended, the tray can hold up to 50 legal-size
sheets.
×
10-inch paper. You can load up to 120 sheets of letter-size or A4
The photo tray is for 4
×
6 or 5 × 7-inch photo paper. You can load up to 20
sheets.
1. Pull out the paper cassette. Then slide back the photo tray and lift it up.
2. Squeeze the edge guides and slide them out. Then insert paper with the glossy
or printable side face-down.
For legal-size paper,
squeeze lever to extend tray
Note:
Load letterhead or pre-printed paper face-down, with the top edge at the back of
the paper cassette. To load legal-size paper, squeeze the lever and extend the tray.
Loading Paper
7
Page 8

3. Slide the left edge guide against the paper.
4. Adjust the front edge guide to your paper size.
Make sure the paper stack
fits under the edge guide
5. Lower the photo tray.
8
Loading Paper
Page 9

6. To load paper in the photo tray, squeeze the edge guides and slide them out.
Then insert photo paper with the glossy or printable side face-down.
7. Slide the left edge guide against the paper. Then adjust the front edge guide to
your paper size.
Note:
Make sure the paper fits under the edge guide.
8. Keep the cassette flat as you insert it.
Loading Paper
9
Page 10
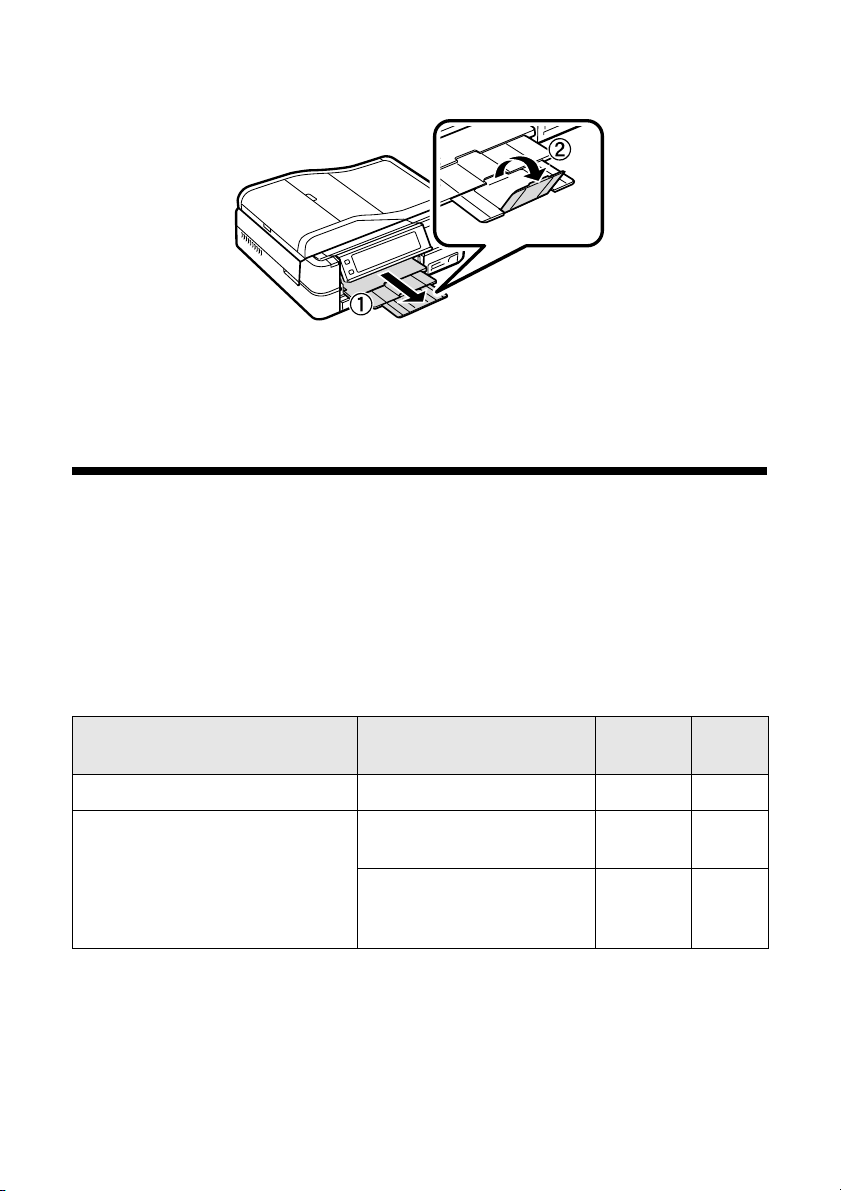
9. Extend the output tray and flip up the stopper.
For details on paper and instructions on loading envelopes and legal-size sheets,
see the on-screen Epson Information Center.
Using Special Papers
Epson offers a wide array of high quality papers, making it easy to maximize the
impact of your photos, presentations, and creative projects.
You can purchase genuine Epson ink and paper at Epson Supplies Central
www.epson.com/ink3 (U.S. sales) or www.epson.ca (Canadian sales). You can
also purchase supplies from an Epson authorized reseller. To find the nearest one,
call 800-GO-EPSON (800-463-7766).
SM
at
Part
Paper name Size
Epson Bright White Paper Letter (8.5 × 11 inches) S041586 500
Epson Photo Paper Glossy Borderless 4 × 6 inches S041809
Letter (8.5 × 11 inches) S041141
10
Loading Paper
number
S04203850100
S041649
S041271
Sheet
count
20
50
100
Page 11

Paper name Size
Part
number
Sheet
count
Epson Premium Photo Paper
Glossy
Epson Ultra Premium Photo
Paper Glossy
Epson Premium Photo Paper
Semi-gloss
Epson Presentation Paper Matte Letter (8.5 × 11 inches) S041062 100
Epson Ultra Premium Photo
Paper Luster
Epson Premium Presentation
Paper Matte
Borderless 4 × 6 inches S041808
S04172740100
Borderless 5 × 7 inches S041464 20
Borderless 8 × 10 inches S041465 20
Letter (8.5 × 11 inches) S042183
S0416672550
Borderless 4 × 6 inches S042181
S04217460100
Borderless 5 × 7 inches S041945 20
Borderless 8 × 10 inches S041946 20
Letter (8.5 × 11 inches) S042182
S0421752550
Borderless 4 × 6 inches S041982 40
Letter (8.5 × 11 inches) S041331 20
Legal (8.5 × 14 inches) S041067 100
Letter (8.5 × 11 inches) S041405 50
Borderless 8 × 10 inches S041467 50
Letter (8.5 × 11 inches) S041257
S04218050100
Epson Premium Presentation
Paper Matte Double-sided
Epson Ultra Premium
Presentation Paper Matte
Epson Photo Quality Self-
adhesive Sheets
Epson Iron-on Cool Peel Transfer
Paper
Letter (8.5 × 11 inches) S041568 50
Letter (8.5 × 11 inches) S041341 50
A4 (8.3 × 11.7 inches) S041106 10
Letter (8.5 × 11 inches) S041153 10
Using Special Papers
11
Page 12
Placing Originals for Copying, Scanning, or Faxing
Before you copy, scan, or fax, place your documents or photos on the scanner glass
(see below) or in the Automatic Document Feeder (see page 13).
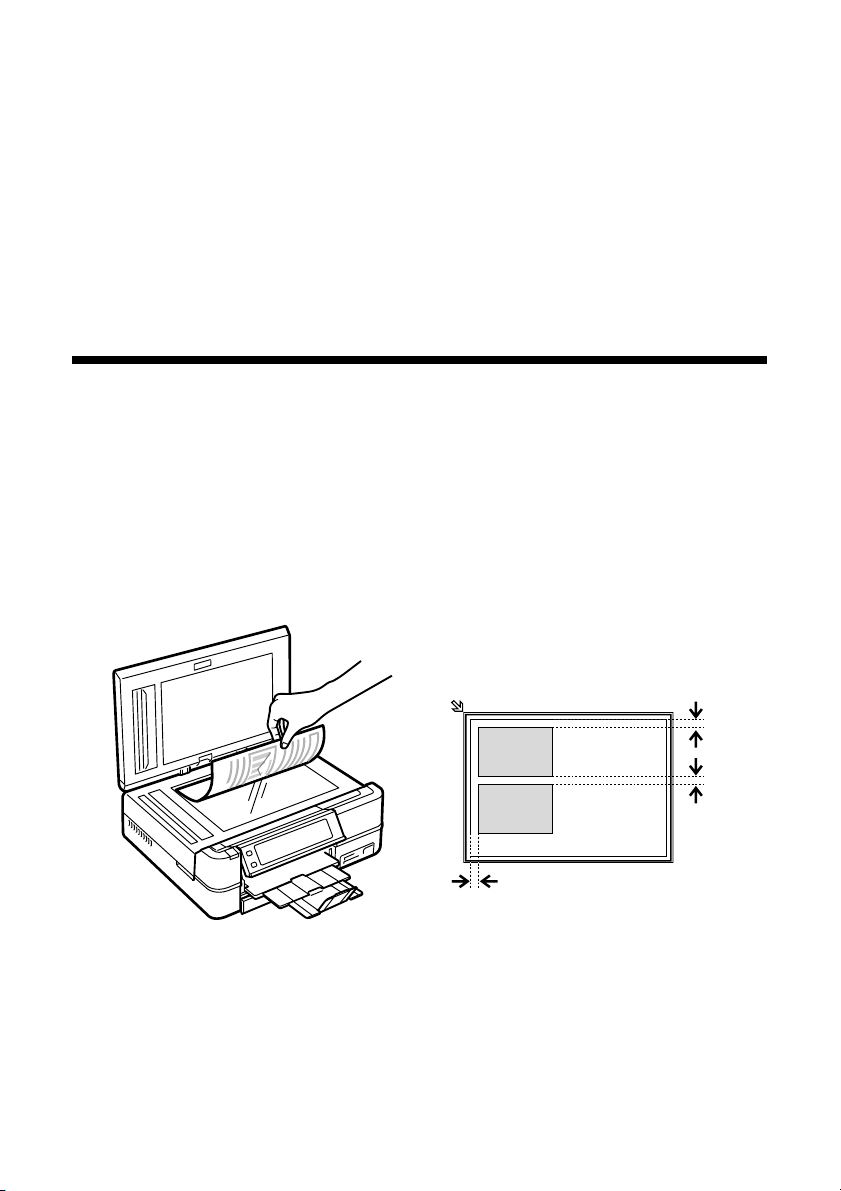
Using the Scanner Glass
You can place one or two photos or a document up to letter-size (or A4) on the
scanner glass to make color or black and white copies.
1. Open the document cover and place your original face-down on the scanner
glass, with the top against the back left corner.
If you’re scanning 3 × 5- or 4 × 6-inch photos, you can place up to two at a
time on the scanner glass. Place them at least 1/4 inch (5 mm) apart.
1/4 inch (5 mm)
2. Close the cover gently so you don’t move the original(s).
12
Placing Originals for Copying, Scanning, or Faxing
1/4 inch (5 mm)
Page 13

Using the Automatic Document Feeder
You can place up to 30 letter-size (or A4) sheets or 10 legal-size sheets in the
Automatic Document Feeder.
1. Open the Automatic Document Feeder paper support, and then move the
edge guide outward.
2. Fan the originals, then tap them on a flat surface to even the edges.
ADF
3. Insert the originals face-up, top edge first. The
screen.
icon appears on the
4. Slide the edge guide against the originals, but not too tightly.
Using the Automatic Document Feeder
13
Page 14
Copying a Document or Photo
Once you’ve placed your originals on the scanner or in the Automatic Document
Feeder (see pages 12 and 13), you can make color or black-and-white copies. See:
■
“Copying a Document” below
■
“Restoring, Cropping, or Copying Photos” on page 15
Copying a Document
1. Place your original(s) for copying (see page 12).
2. Load letter-size plain paper, Epson Bright White Paper, or Epson Presentation
Paper Matte.
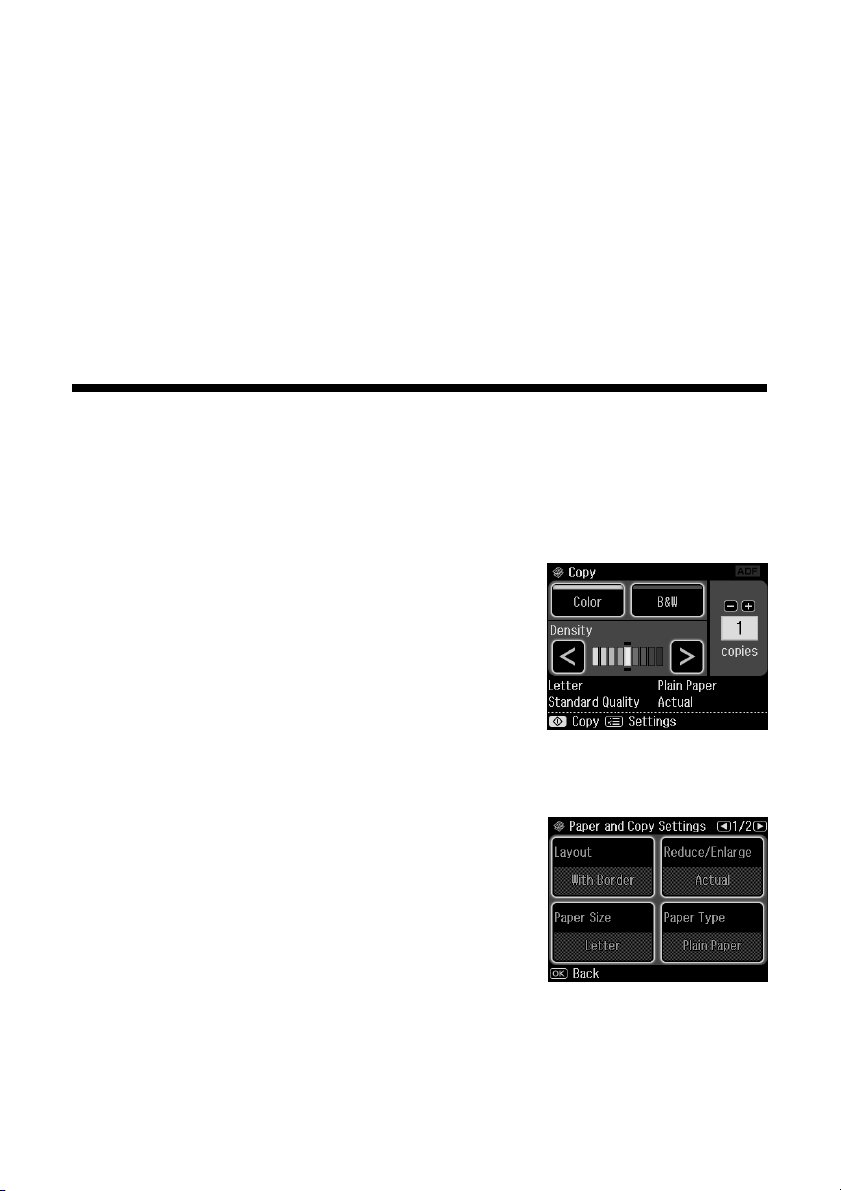
3. Press the
Copy
4. Press
want. Or press the number
Home
button, if necessary, and select
. You see this screen.
+
or – to select the number of copies you
1
to display the
numeric keyboard, then select the number and
press
OK
.
5. Select
Color
or
B&W
(black and white) copies.
6. Adjust the density (make the copies lighter or darker) if necessary.
7. To change copy settings, press x
Paper and Copy Settings
select
setting should be
Size
should be
■
To adjust the copy size, select
Enlarge
actual size),
Auto Fit Page
With Border
Letter
.
, then choose
Custom
Actual
(to select a percentage),
(to automatically size the image to fit your paper), or one
Menu
. The
and the
Reduce/
(to print at
and
Layout
Paper
of the specific sizes listed.
■
For the
Paper Type
setting, select
Plain Paper
. (If you loaded a type of
paper not listed in step 2, see the table on page 17.)
14
Copying a Document or Photo
Page 15
■
For the
Text & Image
■
To change the copy quality, select
Standard Quality
Document Type
setting, choose
Text
if your document contains photos or graphics.
, or
Best
Quality
.
, then choose
for plain documents or
Draft
,
For more information about copy settings, see your on-screen Epson
Information Center.
8. After you finish selecting your settings, press
9. Press x
Start
to begin copying. To cancel copying, press y
OK
.
Cancel
.
Restoring, Cropping, or Copying Photos
You can copy one or two photos onto 4×6-inch, 5×7-inch, 8×10-inch, or
letter-size photo paper for instant photo reprints. You can also restore colors in
faded photos, print with or without borders, convert photos to black and white,
and crop your photos.
1. Place one or two photos on the scanner glass. Place them at least 1/4 inch
(5 mm) apart.
2. Load 4 × 6-inch or 5 × 7-inch paper in the photo tray or 8 × 10-inch or lettersize Epson photo paper in the main tray. Load it printable side face-down.
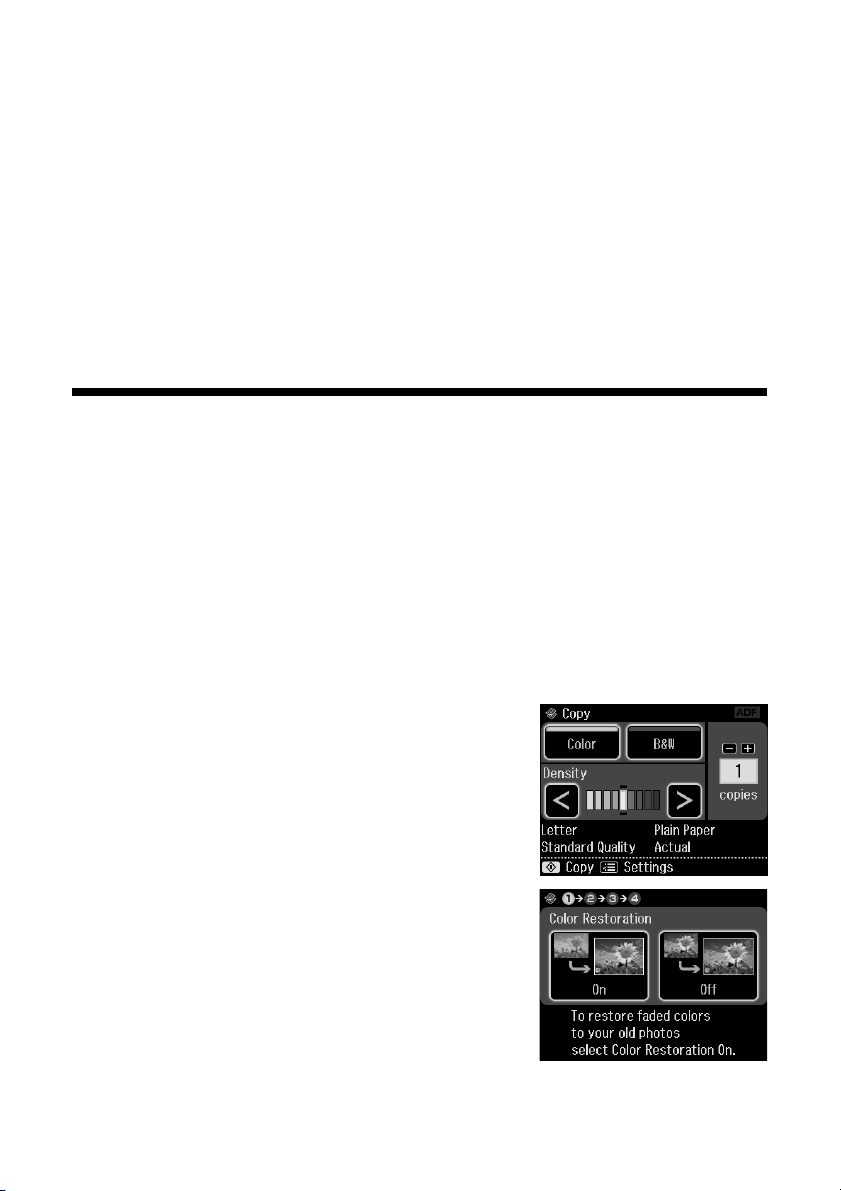
3. Press the
Copy
4. Press x
Photos
Home
button, if necessary, and select
. You see this screen.
Menu
, then select
.
Copy/Restore
5. To turn on
Color Restoration
in faded photos as you copy, select
photos are not faded, do not turn on
Restoration
.)
to restore colors
On
. (If your
Color
Restoring, Cropping, or Copying Photos
15
Page 16
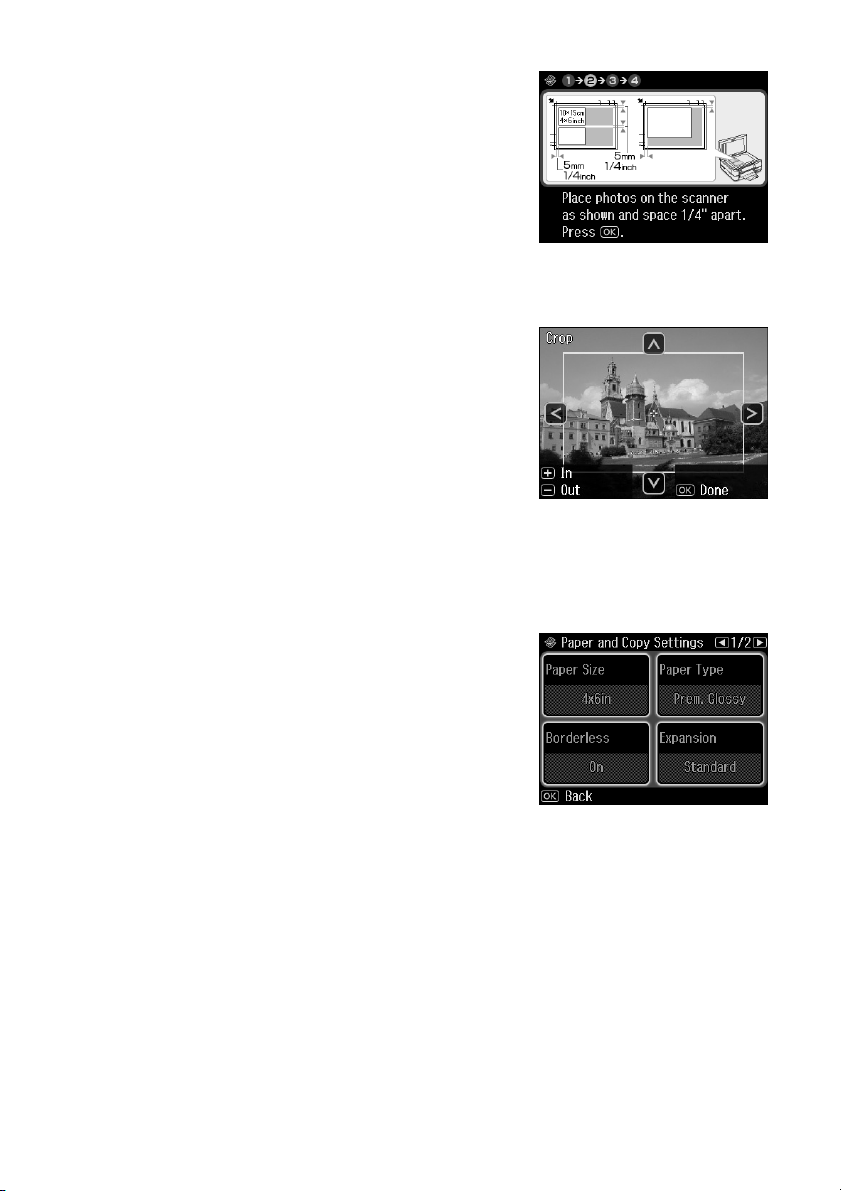
6. When you see this screen, press OK to prescan
your photos.
7. When you see a message asking you to select the
number of copies, press
OK
.
8. To print more than 1 copy, press
+
or – to select
the number (up to 99).
9. If you placed two photos on the scanner glass, press
one and select the number of copies.
10. If you want to crop one of your photos and
enlarge the resulting image area to fit onto your
paper, press
■
To resize the image area, press + or –.
■
To move the image area, use the arrow
Display/Crop
.
buttons.
■
To check the zoomed image, press OK.
When you finish cropping your photo, press
OK
11. Press
again to continue.
OK
.
12. To change any of the settings displayed on the
screen, press x
Copy Settings
■
To change the paper size, select
Menu
.
and select
Paper and
Paper Size
and choose the size of paper you loaded.
(
Paper Size
Type
options depend on the
setting you choose.)
Paper
l
or r to view the second
16
Copying a Document or Photo
Page 17
■
To change the paper type, select
Paper Type
and choose the setting for
the paper you loaded:
For this paper type Choose this setting
Epson Premium Photo Paper Glossy Prem. Glossy
Epson Premium Photo Paper Semi-gloss
Epson Ultra Premium Photo Paper Luster
Epson Ultra Premium Photo Paper Glossy Ultra Glossy
Epson Photo Paper Glossy Glossy
Epson Premium Presentation Paper Matte Matte*
Epson Ultra Premium Presentation Paper Matte
* Available only for standard copying (see page 14).
■
To change the print layout, select
Borderless
, then choose On to expand
the image all the way to the edge of the paper (slight cropping may occur)
Off
to leave a small margin around the image.
or
■
To adjust the amount of image expansion when printing borderless
photos, select
Minimum
Expansion
, then press OK if necessary. (Your printed photos may have
white borders if you use the
and choose
Minimum
Standard, Medium
setting.)
, or
■
If you want to create a black-and-white copy of a color photo, select
B&W
and choose
13. After you finish selecting your settings, press
14. When you’re ready to copy, press x
Note:
When you scan with your computer, you can use additional options to transform faded,
dusty, or badly exposed photos into ones with true-to-life color and sharpness. See the
on-screen Epson Information Center for details.
.
OK
.
Start
. To cancel copying, press y
Restoring, Cropping, or Copying Photos
Filter
Cancel
.
17
Page 18
Faxing a Document or Photo
Your Artisan 800 Series lets you send faxes by entering fax numbers or selecting
entries from a speed dial list. Using the Automatic Document Feeder, you can fax
up to 30 pages at a time.
See these sections:
■
“Connecting to a Phone Line” below
■
“Setting Up Fax Features” on page 19
■
“Sending a Fax” on page 23
■
“Receiving Faxes” on page 25
For more information on faxing and fax settings, see the on-screen Epson
Information Center.
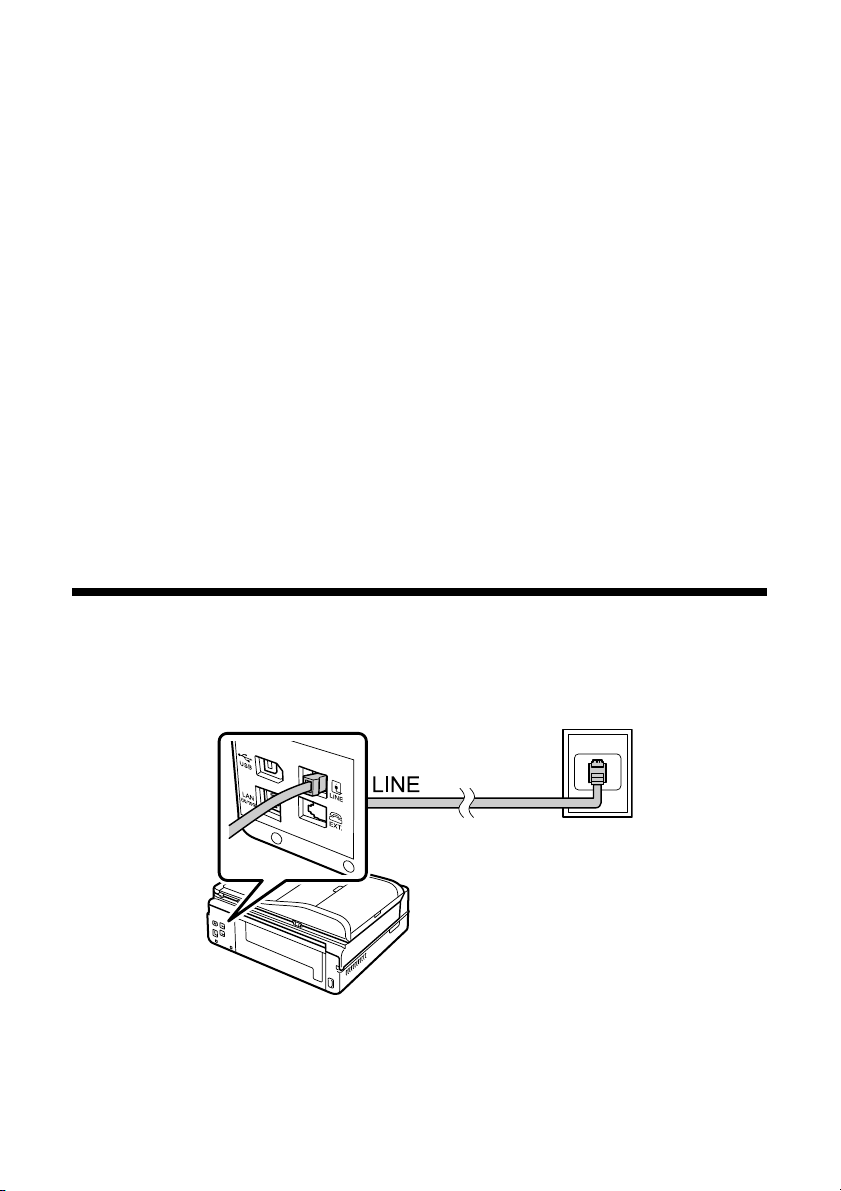
Connecting to a Phone Line
1. Connect the phone cable from the wall jack to the
the Artisan 800 Series.
Note:
If you’re connecting the Artisan 800 Series to a DSL phone line, you must plug a
DSL filter into the wall jack or you won’t be able to use the fax or telephone
equipment as described below. Contact your DSL provider for the necessary filter.
18
Faxing a Document or Photo
LINE
port on the back of
Page 19

2. To use a telephone or answering machine, you need a second phone cable.
Connect one end of the cable to the telephone or answering machine, and
EXT.
connect the other end to the
port on the back of the Artisan 800 Series.
When you receive a call, if the other party is a fax and you pick up the phone or
the answering machine answers, the Artisan 800 Series automatically begins
receiving the transmission. If the other party is a caller, the phone can be used as
normal or a message can be left on the answering machine.
Note:
Your phone or answering machine must be connected to the EXT. port (not to a wall
jack) for the Artisan 800 Series to detect incoming fax calls properly. It’s a good idea to
set the Artisan 800 Series to pick up calls after your answering machine; to adjust the
number of rings after which the Artisan 800 Series answers, press the Home button
and select Setup, select Fax Setting, select Communication, and select Rings to
Answer.
Setting Up Fax Features
Before sending or receiving faxes, you may want to create a fax header, select your
fax preferences, and set up a speed dial list of frequently used fax numbers.
■
“Entering Fax Header Information” on page 20
■
“Select Scan and Print Settings” on page 21
■
“Setting Up a Speed Dial List” on page 22
Note:
To change other settings or print fax reports, see the on-screen Epson Information
Center.
Setting Up Fax Features
19
Page 20
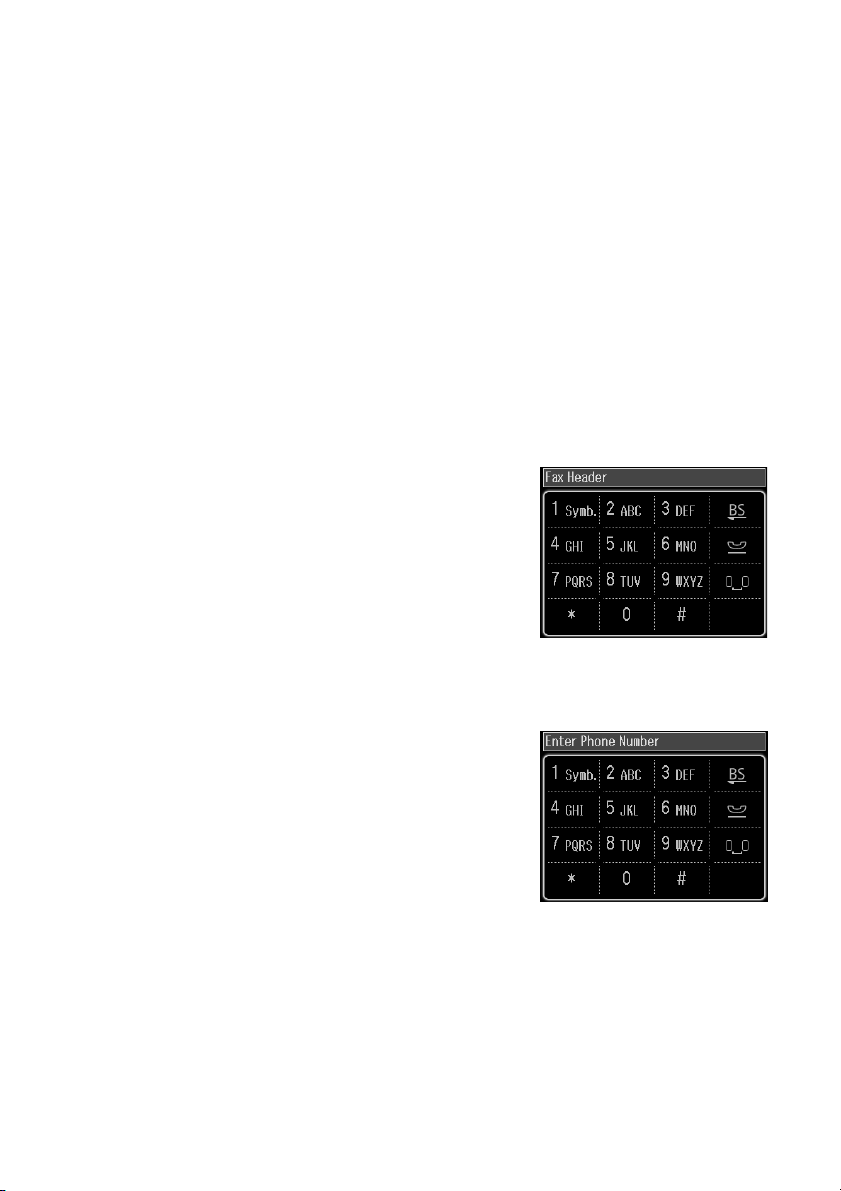
Entering Fax Header Information
You should enter fax header information before sending faxes so that recipients can
identify their source.
Note:
If you leave the Artisan 800 Series unplugged for a long period of time, the date and
time settings may not be retained. See the on-screen Epson Information Center for
instructions on setting the date and time.
Entering Your Sender Name
1. Press the
2. Press
3. Press
4. Select
Home
button, if necessary, and select
l
or r and select
l
or r and select
Fax Header
Fax Setting
Header
.
.
. You see the fax keypad.
5. Use the keypad to enter the header information
(see page 21). You can enter up to 40 characters
or digits for your name and other contact
information.
6. Press
OK
to return to the Header menu.
Entering Your Phone Number
1. Select
2. Use the keypad to enter your phone number, up
3. Press
Your Phone Number
from the Header
menu.
to 20 digits (see page 21). You don’t need to use
dashes. Use the # button to type the + symbol for
an international number.
OK
to return to the Header menu.
Setup
.
20
Faxing a Document or Photo
Page 21

Using the Keypad to Enter Numbers and Characters
■
To enter phone numbers, select them on the
keypad.
■
To enter text, use the keypad as you would on a
cell phone. Look for the button that has the
character on it you want to type. Then press the
button repeatedly until that character displays on
the screen.
■
Press 1
■
To move the cursor, add a pause or space, or delete a character:
Symb.
Button Function
l
or
r
to enter these characters: ! # % & ’ ( ) * + , – . / : ; = ? @ ~
Moves the cursor left or right.
Deletes a character (backspace).
Inserts a pause symbol (–).
Inserts a space.
Select Scan and Print Settings
Use these settings to adjust the image quality of incoming and outgoing faxes,
select the paper size loaded in your Artisan 800 Series, select the size at which faxes
are printed, and select when you want printed reports.
1. Press the
2. Press
3. Select
Home
button, if necessary, and select
l
or r and select
Scan & Print Setup
Fax Setting
Setup
.
.
.
4. Adjust any of the following settings:
Setting and options Description
Resolution
Standard, Fine, Photo
Contrast
–4 to +4
Paper Size
Letter (default), Legal, A4
Sets the scan resolution of outgoing faxes and
the print quality of received faxes.
Sets the contrast when sending and receiving
faxes.
Indicates the size of paper loaded in the Artisan
800 Series.
Setting Up Fax Features
21
Page 22
Setting and options Description
Auto Reduction
Off, On (default)
Last Transmission Report
Off, On Error (default),
On Send
Sets whether large incoming faxes are reduced
to fit on the selected Paper Size (On), or printed
at their original size on multiple sheets (Off).
Sets when reports are printed for transmitted
faxes. Select Off to turn off report printing, On
Error to print reports only when an error occurs,
or On Send to print reports for every fax you
send.
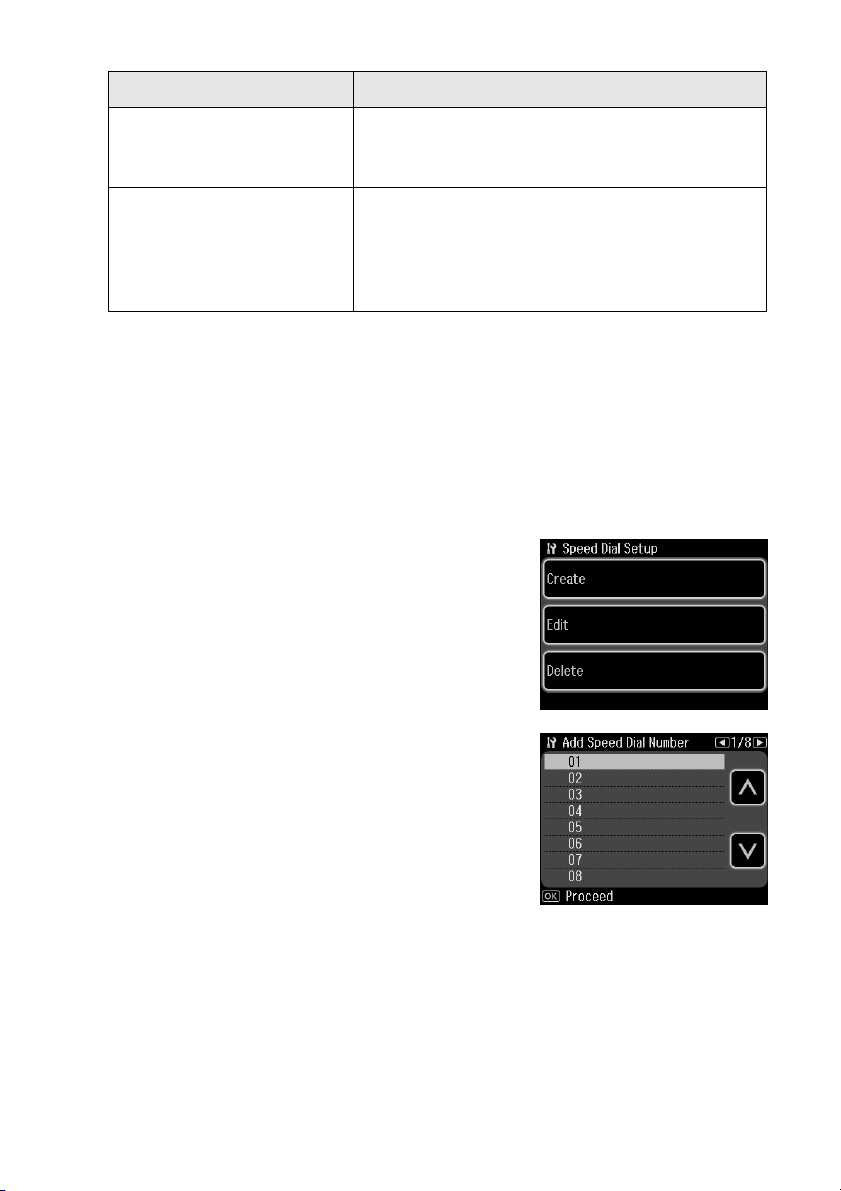
Setting Up a Speed Dial List
You can create a speed dial list of fax numbers so you can quickly select them for
faxing. You can also set up group dial lists to send the same fax message to multiple
recipients (see the on-screen Epson Information Center for details). The Artisan 800
Series lets you create up to 60 combined speed dial and group dial entries, add
names to identify the recipients, and print a list for easy reference (see page 23).
1. Press the
Setup
2. Press
3. Select
4. Select
Home
button, if necessary, and select
.
l
or r and select
Speed Dial Setup
Create
. You see the list of available entries.
Fax Setting
.
.
Note:
To edit or delete an entry from an existing list, select
Edit or Delete instead.
5. Use the arrows to select any available number for
OK
the entry you want to add, then press
.
6. Use the keypad to enter the phone number (see
OK
page 21), then press
.
7. Use the keypad to enter a name to identify the speed dial entry (see page 21),
then press
8. To add another speed dial entry, select
22
Faxing a Document or Photo
OK
. You return to the Speed Dial Setup menu.
Create
and repeat the steps above.
Page 23

Printing Your Speed Dial List
To print your speed dial or group dial list, follow these steps:
1. Press the
Fax
2. Press x
Report
3. Select
Home
.
Menu
, then press l or r and select
.
Speed Dial List
button, if necessary, and select
Fax
.
4. Make sure letter-size or A4 paper is loaded, then
press
x Start
to begin printing the list.
Sending a Fax
You can send a fax by manually entering a fax number (as described below),
redialing the previous fax number, or selecting an entry from your speed dial list.
1. Place your original(s) for faxing (see page 12).
2. Press the
3. Press , then use the numeric keypad to enter
the fax number (up to 64 digits). Then press
Note:
To dial the number using your telephone, by
redialing, or by selecting from your speed dial list,
see page 24.
Home
button, if necessary, and select
OK
Fax
.
.
4. Select
Color
or
B&W
.
Note:
If the recipient’s fax machine prints only in black and white, your fax is
automatically sent in black and white even if you select Color.
5. Press OK, if desired, to see a summary of your fax transmission settings.
6. Press
y
Cancel
x Start
.)
to begin scanning and faxing your document. (To cancel, press
If you are scanning with the Automatic Document Feeder, your document is
automatically scanned and faxed.
Sending a Fax
23
Page 24

If you placed your document on the scanner
glass, you see this screen after the first page is
scanned.
If you need to fax additional pages, place your
original on the scanner glass or in the Automatic
Yes
Document Feeder. Press
, then press OK to
continue. If you don’t need to fax another page,
press
No
.
Note:
If the fax number is busy, you see a redialing message and the Artisan 800 Series
redials after one minute. To redial immediately, press Redial.
Other Ways to Dial a Fax Number
In addition to manual transmission, here are some other ways you can enter a fax
number:
■
If you’ve connected a telephone to the Artisan
800 Series, you can dial the fax number from the
phone. When you see the screen at right, select
Send
.
Note:
Don’t hang up the phone until the Artisan 800 Series
begins transmitting the fax.
To select a speed dial or group dial entry, press
■
Select the name of the speed dial entry you want to use.
■
To redial the last fax number you used, press
displayed on the screen.
24
Faxing a Document or Photo
Speed Dial
Redial
or
. The last fax number is
Group Dial
.
Page 25

Receiving Faxes
Before receiving faxes, make sure you load plain paper and select the
Paper Size
setting that matches the size of paper you’ve loaded (see page 21). If the incoming
fax pages are larger than the paper size you loaded, the fax size is reduced to fit or
printed on multiple pages, depending on the
If you run out of paper during printing, you see the error message
Load more paper and press the
x Start
To receive faxes automatically, make sure you see a green light next to the
Answer
button on the screen. The light stays on when Auto Answer mode is
enabled. To change the answer mode, press the
Note:
To change the number of rings after which the Artisan 800 Series answers, press the
Home button, select Setup, select Fax Setting, select Communication, and select
Rings to Answer.
Auto Reduction
button to continue.
Auto Answer
setting you select.
Paper out
.
Auto
button.
Manually Receive a Fax
To receive a fax manually, press the
feature (and the light). Then follow these steps:
1. When your telephone rings, lift the phone off the
hook. You see this screen.
2. Select
Receive
and press the
Auto Answer
x Start
button to turn off this
button.
3. After all the pages are received, you see this screen
again. Replace the phone on the hook.
Receiving Faxes
25
Page 26

Printing From Your Camera’s Memory Card
The Artisan 800 Series lets you print photos from your digital camera’s memory
™
card, or by connecting your camera directly and using its DPOF
settings. You
can also print photos stored on a USB drive. See these sections:
■
“Inserting Your Camera’s Memory Card” below
■
“Inserting a USB Drive” on page 28
■
“Selecting and Printing Photos” on page 29
■
“Printing Layout Sheets” on page 31
■
“Printing From a Camera” on page 33
Inserting Your Camera’s Memory Card
1. Insert the card into the correct slot, as shown. Insert just one card at a time.
Upper slot: SDTM, SDHC
miniSDTM*, miniSDHC*
microSD*, microSDHC*
MultiMediaCard
MMCplus, MMCmobile*, MMCmicro*
Memory Stick
Memory Stick DuoTM*
Memory Stick MicroTM*
Memory Stick PRO
Memory Stick PRO DuoTM*
Memory Stick PRO-HG Duo*
MagicGate
MagicGate Memory Stick DuoTM*
xD-Picture Card
xD-Picture Card Types H and M
Lower slot: CompactFlash
Microdrive
TM
TM
TM
TM
TM
Memory Stick
TM
®
TM
* Adapter required
26
Printing From Your Camera’s Memory Card
Page 27

Make sure the image files on your card meet these requirements:
File format JPEG with the Exif version 2.21 standard
Image size 80 × 80 pixels to 9200 × 9200 pixels
Number of files Up to 9990 (If there are more than 999 photos on the
card, you can select a group of photos to display.)
2. After you insert the card, the memory card
Memory card access light
access light flashes, then stays on.
3. See page 29 to select and print your photos.
Removing Your Card
After you finish printing your photos, follow these steps to remove the card:
1. Make sure the memory card access light is not flashing.
Caution:
Do not remove the card or turn off the Artisan 800 Series while the memory card
access light is flashing, or you may lose data on the card.
2. If the Artisan 800 Series is connected to your computer, do one of the
following:
■
Windows: Click the or icon on the taskbar and select
remove USB Mass Storage Device
■
Macintosh: Drag the removable disk icon from your desktop into the
trash.
3. Pull the card straight out of its slot.
.
Safely
Inserting Your Camera’s Memory Card
27
Page 28

Inserting a USB Drive
You can print from an external storage device connected to the Artisan 800 Series,
such as a USB flash drive or CD burner.
Note:
Epson cannot guarantee the compatibility of any drives. You may not be able to print
photos from the storage device if they were saved to the device using a product other
than the Artisan 800 Series.
1. Remove any inserted memory card from the Artisan 800 Series.
2. Insert your USB flash drive or the USB cable for your external drive into the
USB connector on the front of your Artisan 800 Series.
3. Insert storage media (such as a CD) into your drive, if necessary.
4. If there are folders on your drive, select the folder you want and press
5. See the next section to select and print your photos.
Note:
Before removing your USB drive, make sure its access light is not flashing. Also see
step 2 in “Removing Your Card” on page 27.
28
Printing From Your Camera’s Memory Card
OK
.
Page 29

Selecting and Printing Photos
1. Load Epson photo paper. See page 10 for a list.
Home
2. Press the
Photos
.
button, if necessary, and select
3. Select
4. Press
View and Print Photos
l
or r to move through your photos and
and press OK.
display one you want to print.
Tip:
If View Auto Correct: Off appears on the screen, press the View Auto Correct
button to see how the image will look if Fix Photo is turned on (see page 30).
5. To print more than one copy, press + or – to select the number of copies you
want of that photo.
6. To crop the photo, press the
Display/Crop
button and see page 16 for
instructions.
Note:
In cropping mode, you can press x Menu to rotate the image.
7. Press l or r to view other photos, select the number of copies, and crop, if
desired.
8. When you’re done selecting photos, press
OK
.
You see the Print Preview screen.
9. Press x
Paper Size
Note:
Paper Size options depend on the Paper Type
setting you choose.
Menu
, select
Print Settings
, and select
. Choose the size of paper you loaded.
Selecting and Printing Photos
29
Page 30

10. Select
Paper Type
, then choose the correct setting for the type of paper you
loaded:
For this paper type Choose this setting
Epson Premium Photo Paper Glossy Prem. Glossy
Epson Premium Photo Paper Semi-gloss
Epson Ultra Premium Photo Paper Glossy Ultra Glossy
Epson Photo Paper Glossy Glossy
Plain paper Plain Paper
Epson Bright White Paper
Epson Presentation Paper Matte
Epson Premium Presentation Paper Matte Matte
Epson Ultra Premium Presentation Paper Matte
OK
11. When you’re done selecting settings, press
.
12. If desired, press x
Menu
and select
Photo Adjustments
to turn on red-eye
reduction or other photo-enhancing features. When you’re done selecting
settings, press
Note:
For the best quality printing, leave Fix Photo turned on. This automatically adjusts
brightness, contrast, and saturation to best effect.
Fix Photo uses a sophisticated face recognition technology to optimize photos that
include faces. For this to work, both eyes and the nose must be visible in the
subject’s face (without sunglasses). If your photo includes a face with an
intentional color cast, such as a bronze statue, you may want to turn off this setting
to retain the special color effects.
13. When you’re ready to print, press x
To cancel printing, press y
Note:
To switch the display screen from displaying one photo at a time to 9 photos at a
time, press the
OK
.
Display/Crop
Start
.
Cancel
.
button 3 times when viewing your photos.
30
Printing From Your Camera’s Memory Card
Page 31

Printing Layout Sheets
You can print the same photo or multiple photos on a single sheet of paper using
the Artisan 800 Series templates.
1. Press the
2. Press
3. Press
Note:
As indicated by the icons, some of the layouts let you place different photos on the
same sheet.
4. Select
Note:
Paper Size options depend on the Paper Type setting you choose.
5. Select
Home
button, if necessary, and select
l
or r and select
l
or r and select one of the layout settings shown on the screen.
Paper Size
Paper Type
Photo Layout Sheet
, then choose the size of paper you loaded.
, then choose the correct setting for the type of paper you
Photos
.
. You see this screen:
loaded (see the table on page 30).
6. When you’re done selecting settings, press
selected, you might see this screen:
OK
. Depending on the layout you
Printing Layout Sheets
31
Page 32

Select
Automatic layout
layout sheets for you, or select
to let the Artisan 800 Series place images in the
Place photos manually
to arrange the images
yourself.
OK
7. When you see this screen, press
.
8. Follow the instructions on the screen to add photos to the layout sheet.
Note:
If you don’t select enough photos to fill the layout you selected, you will see a
warning message, and the layout will have some blank spaces.
9. To print more than 1 copy of the sheet, press + or – to select the number
(up to 99).
Menu
10. Press x
to change any of the settings displayed on the screen. Select
one of the following options:
■
Print Settings
■
Photo Adjustments
to change the paper type and size, or other print settings
to turn on red-eye reduction or other features
When you’re done selecting settings, press
11. When you’re ready to print, press x
To cancel printing, press y
32
Printing From Your Camera’s Memory Card
Cancel
Start
.
OK
.
.
Page 33

Printing From a Camera
If you have a digital camera that supports PictBridge™ printing, you can connect it
to the Artisan 800 Series and print your photos directly from the camera. Check
your camera manual to see if it is compatible.
Your photos must be in JPEG format and sized from 80 × 80 to 9200 × 9200
pixels.
Note:
Epson cannot guarantee the compatibility of any cameras. Some combinations of paper
type, size, and layout may not be supported, depending on your camera and the Artisan
800 Series settings.
1. Remove any inserted memory card from the Artisan 800 Series.
2. Connect the USB cable that came with your camera to the USB
connector on the front of your Artisan 800 Series.
3. Turn on your camera. You see a connection message on the Artisan 800 Series
display screen.
4. Load Epson photo paper (see page 7).
Home
5. Press the
6. Press
l
or r and select
button, if necessary, and select
PictBridge Setup
Setup
.
. You see this screen:
Printing From a Camera
33
Page 34

7. Select the following settings (see the on-screen Epson Information Center for
details):
■
Print Settings
■
Photo Adjustments
to select the paper type and size, or other print settings
to turn on red-eye reduction or other features
When you’re done selecting settings, press
OK
.
8. Follow the instructions that came with your camera to select and print your
photos.
34
Printing From Your Camera’s Memory Card
Page 35

Printing Special Projects
You can use your Artisan 800 Series to make
coloring book pages for your kids, ruled paper
and graph paper for homework projects, and
even note paper personalized with your favorite
photos. You can also print custom designs
directly on ink jet-printable CDs and DVDs.
See these sections:
■
“Printing Coloring Book Pages” below
■
“Printing Lined Paper and Graph Paper” on page 37
■
“Printing Personalized Note Paper” on page 37
■
“Printing CDs and DVDs” on page 39
Printing Coloring Book Pages
Your Artisan 800 Series can turn any photo or drawing into a coloring book page.
1. Load letter- or A4-size plain paper, Epson Presentation Paper Matte, or Epson
Premium Presentation Paper Matte.
2. Press the
3. Press
Home
button, if necessary.
l
or r and select
Coloring Book
. You see this screen:
Printing Special Projects
35
Page 36

4. Open the document cover. Place a photo or drawing face-down on the glass,
in the back left corner, and press
OK
.
5. Select the type of photo or drawing you are using:
6. Select the paper size and type:
7. When you’re ready to print, press x
Cancel
y
36
Printing Special Projects
.
Start
. To cancel printing, press
Page 37

Printing Lined Paper and Graph Paper
You can have the Artisan 800 Series print lined paper or graph paper whenever you
need it.
1. Load plain letter- or A4-size paper.
2. Press the
3. Press
4. Press
option that matches your paper size.
5. When you see a message asking you to load paper, press
6. To print more than 1 sheet, press
7. When you’re ready to print, press x
y
Home
l
or r and select
l
or r and select
Cancel
.
button, if necessary.
Print Ruled Papers
Wide Rule, Thin Rule
+
. You see this screen:
, or
Grph Paper
or – to select the number (up to 99).
Start
. To cancel printing, press
OK
. Select an
.
Printing Personalized Note Paper
You can print lined or unlined note paper, personalized with a photo in the
background.
1. Load plain letter- or A4-size paper.
2. Insert a memory card (see page 26) or USB drive (see page 28).
3. Press the
4. Press
Home
button, if necessary.
l
or r and select
Print Ruled Papers
Printing Lined Paper and Graph Paper
.
37
Page 38

5. Press l or r and select one of the
for the size paper you loaded in the printer.
Note Pad
settings (with or without lines)
6. When you see this screen, press
OK
.
You see a preview of how your stationery will look with a photo in the
background.
7. To rotate the layout, press
Rotate
.
8. Press
l
or r to move through your photos and display the one you want to use
for your stationery.
9. Press
OK
.
10. When you see a message asking you to load paper, press
38
Printing Special Projects
OK
.
Page 39

11. To print more than 1 sheet, press
+
or – to select the number (up to 99).
12. When you’re ready to print, press x
Cancel
y
.
Start
. To cancel printing, press
Printing CDs and DVDs
You can use your Artisan 800 Series to print a design right onto ink jet-printable
CDs and DVDs. Follow these steps to transfer one or more photos from a
memory card or USB drive onto your CD/DVD.
Note:
You can also copy a CD/DVD design, print a jewel case insert, and create your own
designs using the Epson Print CD software that came with your Artisan 800 Series.
For more information, see the on-screen Epson Information Center.
1. To prevent errors, burn files, music, or video onto your CD/DVD before
printing on it.
2. Insert your memory card (see page 26) or USB drive (see page 28).
3. Press the
4. Press
Home
button, if necessary, and select
l
or r and select
Print on CD/DVD
Photos
.
. You see this screen:
5. Select
1-up, 4-up
, or
CD/DVD Variety
(10-up) to indicate the number of
photos in the layout.
6. Select
7. Press
Automatic layout
l
or r to move through your photos and display one you want to print.
Press the
+
button to select the number of copies you want of that photo. For
or
Place photos manually
, if necessary.
multiple photo layouts, repeat for each photo you want to include. You can
also press
Display/Crop
and crop your photos (see page 16 for instructions).
Printing CDs and DVDs
39
Page 40

8. Press OK when you’re done selecting photos. You see this screen:
9. If necessary, adjust the inner and outer diameter of your CD as shown on the
screen, then press
OK
.
10. If desired, select
Test Print on Letter/A4 paper
instructions to print a test on plain paper.
11. If your test is satisfactory, select
extends automatically and you see this screen:
40
Printing Special Projects
and follow the on-screen
Print on a CD/DVD
. The CD/DVD tray
Page 41

12. Raise the control panel all the way up.
13. Place your disc on the tray with the label side up. Gently press it in place
(it does not snap in).
Caution:
Do not try to pull the CD/DVD tray out; it extends automatically as far as possible.
14. Press the
Caution:
Do not turn the Artisan 800 Series off with a CD or DVD loaded in it. Always
remove the disc first.
15. Press x
■
■
When you’re done selecting settings, press
L CD Tray
Menu
Print Settings
Photo Adjustments
button to position the CD/DVD for printing.
to change any of these settings:
to change the print density or other print settings
to turn on red-eye reduction or other features
OK
.
Printing CDs and DVDs
41
Page 42

16. When you see this screen, press x
Start
to begin printing.
17. After your CD/DVD is printed, the tray extends from the Artisan 800 Series.
Remove your disc.
18. Press the
19. Press the
Note:
After printing, handle your CD/DVD carefully. You may need to wait up to 24 hours for
the ink to dry fully before inserting it in a drive. Keep printed discs away from moisture
and direct sunlight.
42
Printing Special Projects
L CD Tray
Unlock
button to put away the CD/DVD tray.
button to lower the control panel.
Page 43

Printing From Your Computer
This section describes the basic steps for printing a photo or document stored on
your Windows
®
or Macintosh® computer. For instructions on two-sided printing,
see page 50. For additional printing instructions, see the on-screen Epson
Information Center.
Before you start, make sure you’ve installed your printer software and connected
the Artisan 800 Series to your computer as described on the Start Here sheet.
Tip:
It’s a good idea to check for updates to your Artisan 800 Series software. See page 61
for instructions.
You can also create personalized photo greeting cards, calendars, and more using
®
the ArcSoft
Print Creations™ software included with your Artisan 800 Series. To
get started, double-click the Print Creations icon on your desktop.
Printing in Windows
1. Open a photo or document in an application.
2. Open the File menu and select
Print
. You see a window like this one:
Select EPSON Artisan 800
Series
Click here to open
your printer software
Printing From Your Computer
43
Page 44

3. Select
EPSON Artisan 800 Series
Properties
Note:
If you see a Setup, Printer, or Options button, click it. Then click Preferences or
Properties on the next screen.
button.
, then click the
Preferences
or
4. On the Main tab, select the basic print settings. Make sure you choose the
correct paper
Select the type of
document you’re
printing (choose
Photo or Best
Photo for photos)
Select your
paper Type
Select your
paper Size
Type
setting for the paper you are using (see page 49).
Click here for
borderless photos
Select your
document or photo
Orientation
Note:
For quick access to the most common settings, click the Shortcuts tab and select
one of the presets. You can create your own presets by clicking the Save Settings
button on the Advanced tab. For details, see your on-screen Epson Information
Center.
5. To improve the color, contrast, and sharpness of photos, select
6. To reduce or remove red-eye effects in photos, select
Fix Red-Eye
7. If you want to reduce or enlarge your printout, or print double-sided (see
page 50), click the
8. For more printing options, click the
Note:
For more information about print settings, click Help or see your on-screen Epson
Information Center.
Page Layout
tab and select settings as necessary.
Advanced
tab.
9. Click OK to save your settings.
44
Printing From Your Computer
Fix Photo
.
.
Page 45

OK
or
Print
10. Click
to start printing. This window appears and shows the
progress of your print job.
Check ink
cartridge status
Printing With a Macintosh
See the section below for your Mac OS® operating system.
Mac OS X 10.5
1. Open a photo or document in an application.
Cancel
printing
2. Open the
3. Select
4. Click
EPSON Artisan 800
d
to expand the Print window, if necessary.
File
menu and select
Print
.
as the
Printer
Select EPSON Artisan 800
setting.
Click to expand
Printing With a Macintosh
45
Page 46

5. Select the basic page setup options. For borderless photos, choose a
P
Paper Size
Note:
If the setting you want isn’t shown (for example, Scale), check for it in your
application before printing. Or check for it in the settings for your application at the
bottom of this window. (If you’re printing from Preview, you see the settings
shown below.)
setting with a
Borderless
option.
Copy and
page settings
Application
settings
6. Choose
Print Settings
from the pop-up menu, then select the following print
settings:
op-up menu
Select your Media Type
(see page 49)
Select Color or
Grayscale
Select higher quality or
faster printing (if available)
Select Automatic mode
7. Choose any other printing options you may need from the pop-up menu.
See the on-screen Epson Information Center for details.
Note:
To reduce or remove red-eye effects in photos, choose Extension Settings from
the pop-up menu and select Fix Red-Eye.
46
Printing From Your Computer
Page 47

Print
C
8. Click
.
9. To monitor your print job, click the icon in the dock. Select your print
job, then select an option to cancel, pause, or resume printing, if necessary.
ancel
printing
Pause or
resume
printing
Select the
print job
Mac OS X 10.3 and 10.4
1. Open a photo or document in an application.
2. Select
Page Setup
from the File menu. Select the following settings:
For borderless photos, choose a
Borderless
Select Artisan 800
Select your Paper Size
Select your document
or image orientation
option in the Paper Size list for
your paper size.
3. Click
OK
to close the Page Setup window.
Printing With a Macintosh
47
Page 48

4. Select
Print
from the File menu. You see a window like this one:
Select Artisan 800
Select Print Settings
5. Choose
Print Settings
from the pop-up menu, and select the following print
settings, as necessary:
Pop-up menu
Select your paper type
(see page 49)
Select Color or
Grayscale
Select higher quality or
faster printing (if available)
Select Automatic mode
Note:
In certain programs, you may need to select Advanced before you can select Print
Settings. For more information about printer settings, click the ? button.
6. Click the
Advanced
button to change additional settings.
Note:
?
For more information on advanced settings click
.
7. Choose any other printing options you may need from the pop-up menu.
See the on-screen Epson Information Center for details.
8. Click
48
Printing From Your Computer
Print
.
Page 49

9. To monitor your print job, click the icon in the dock (or click the Print
Center icon and double-click
Cancel
printing
Pause or
resume
printing
Select the
print job
Artisan 800
on the next screen).
Selecting the Correct Paper Type
Select the correct
Type
(see page 44) or
Media Type
(see page 46 or 48) setting
in your printer software. This tells the Artisan 800 Series what kind of paper you’re
using, so the ink coverage can be adjusted accordingly.
For this paper/media Select this setting
Plain paper
Epson Bright White Paper
Epson Ultra Premium Photo Paper Glossy Ultra Premium Photo Paper Glossy
Epson Premium Photo Paper Glossy Premium Photo Paper Glossy
Epson Photo Paper Glossy Photo Paper Glossy
Epson Presentation Paper Matte Presentation Paper Matte
Epson Premium Photo Paper Semi-gloss Premium Photo Paper Semi-gloss
Epson Ultra Premium Photo Paper Luster Ultra Premium Photo Paper Luster
Epson Premium Presentation Paper Matte
Epson Premium Presentation Paper Matte
Double-sided
Epson Ultra Premium Presentation Paper
Matte
Epson Photo Quality Self-adhesive Sheets
Epson Iron-on Cool Peel Transfer Paper
Envelopes Envelope
Plain Paper/Bright White Paper
Premium Presentation Paper Matte
Selecting the Correct Paper Type
49
Page 50

Two-sided Printing
If you have the optional auto duplexer, you can print on both sides of the page
automatically. To purchase the auto duplexer from Epson, see page 65.
With Windows, you can configure the printer software and perform two-sided
printing even if you don’t have the auto duplexer.
Note:
For detailed instructions on two-sided printing and installing or removing the auto
duplexer, see the on-screen Epson Information Center.
Windows
Follow the Windows printing instructions beginning on page 43, but complete
the additional steps below before you start printing.
1. Click the
2. Select
duplexer, or
Note:
When you use the Manual setting, the printer software will prompt you to reload
the printed pages as necessary.
Page Layout
Auto
as your
Manual
tab in the printer software.
Select Auto
or Manual
2-sided printing
setting if you’ve installed the auto
if you don’t have the auto duplexer.
50
Printing From Your Computer
Page 51

3. If you’re printing on plain paper and you notice that ink smears or bleeds
through the page, click
Adjust Print Density
to reduce the print density and
increase the ink drying time.
Mac OS X
Follow the Macintosh printing instructions beginning on page 45 (Mac OS X
10.5) or page 47 (Mac OS X 10.3 and 10.4), but complete the additional steps
below before you start printing.
1. Select
2. Select
Auto Duplex Printing Settings
Pop-up menu
Click here
Auto Duplex Printing
Note:
If you see a message indicating that the auto duplexer is not installed, open
EPSON Printer Utility3 (in the Applications folder on your hard drive), select
Artisan 800 Series, click OK, click the Printer and Option Information button,
and click OK again. Then close and reopen the print window.
.
from the pop-up menu.
3. If you’re printing on plain paper and you notice that ink smears or bleeds
through the page, you may need to reduce the print density and increase the
ink drying time.
Two-sided Printing
51
Page 52

Scanning a Document or Photo
You can use your Artisan 800 Series to scan original documents and photos and
save them as digital files on your computer.
You can also turn scanned documents into editable/searchable text using ABBYY
FineReader
For more information, see the on-screen Epson Information Center.
The Epson Scan software provides three scanning modes:
■
■
■
Note:
For detailed scanning instructions, see the on-screen Epson Information Center.
Basic Scanning
®
Sprint Plus (OCR software) included with your Artisan 800 Series.
Office Mode
Home Mode
Professional Mode
previews your image and scans text documents quickly.
previews your image and provides preset options for scanning.
previews your image and provides a full array of tools.
®
You can scan from any TWAIN-compliant application using Epson Scan. Or you
can start Epson Scan directly from your computer and save your image to a file.
1. Open the document cover and place your original face-down on the scanner
glass, in the back left corner, as shown on page 12.
2. Close the cover gently so you don’t move the original.
3. Do one of the following to start Epson Scan:
■
Windows:
Double-click the
■
Macintosh:
Double-click
■
If you are scanning from an application, start your application. Then
EPSON Scan
EPSON Scan
open the File menu, choose
icon on your desktop.
in the Applications folder.
Import
or
Acquire,
and select your Artisan
800 Series (if necessary).
52
Scanning a Document or Photo
Page 53

4. Epson Scan opens in Office Mode the first time you use it. (You can change
the scan mode using the Mode selector in the upper right corner.)
Click here to change
the scan mode
Note:
You cannot use Home mode to scan with the Automatic Document Feeder.
5. Click
Scan
scanned document.
6. Click
OK
Macintosh Finder.
and select the name, location, and format (such as PDF) for your
. The image is scanned and you see its icon in Windows Explorer or
Basic Scanning
53
Page 54

Scanning Multiple Pages
You can scan a multiple-page document and save it on your computer in PDF or
another format. With the Automatic Document Feeder, you can scan up to 30
letter-size pages at a time.
1. Place your document in the Automatic Document Feeder (see page 13).
2. Do one of the following to start Epson Scan:
■
Windows: Double-click the
■
Macintosh: Double-click
EPSON Scan
EPSON Scan
icon on your desktop.
in the Applications folder.
3. Select
4. Select the
5. Select
Office Mode
Image Type
Auto Detect
Document Feeder) as the
Source
6. Select the
Orientation
setting.
Size
of the originals and their
on the scanner.
7. Select the scanning
in the upper right.
.
or
ADF
(Automatic
Document
Resolution
based
Select Office Mode
on how you will use the scanned image:
■
E-mail, view on a computer screen, or post on the web: 96 to 150 dpi
■
Print or convert to editable text (OCR): 300 dpi
■
Fax: 200 dpi
8. Click the
Preview
button to scan and eject the first page. Place the page back
on top of the other pages and reload them in the feeder.
9. If desired, draw a marquee (or box) around the area you want to scan in the
Preview window. Adjust the image quality, if necessary.
10. Click
Scan
and select the name, location, and format (such as PDF) for your
scanned document. Then click
OK
. The document is scanned and you see its
icon(s) in Windows Explorer or Macintosh Finder.
Note:
Depending on the file format you select, Epson Scan may create one file containing
all of the pages in your document or create one file for each page of your
document. For more information, see the on-screen Epson Information Center.
54
Scanning a Document or Photo
Page 55

Maintaining Your All-in-One
Follow the steps here to check and clean the print head, and replace ink cartridges.
To align the print head, if necessary, see the on-screen Epson Information Center.
Checking the Print Head Nozzles
If your printouts are faint or have gaps in them, the print head nozzles may be
clogged. Follow these steps to check the print head nozzles:
1. Load letter-size plain paper in the paper tray.
2. Press the
Setup
3. Select
4. Press x
Home
button, if necessary, and select
.
Maintenance
Start
.
, then select
Nozzle Check
.
5. Check the nozzle check pattern that prints to see
if there are gaps in the lines:
Nozzles
are clean
Nozzles need
cleaning
6. If there are no gaps, the print head is clean. Select
If there are gaps or the pattern is faint, select
x
Start
to clean the print head.
Head Cleaning
Finish Nozzle Check
. Then press
.
Maintaining Your All-in-One
55
Page 56

Cleaning the Print Head
If print quality has declined and the nozzle check indicates clogged nozzles, you
can clean the print head. Print head cleaning uses ink, so clean it only if necessary.
Note:
You cannot clean the print head if an ink cartridge is expended, and may not be able to
clean it when a cartridge is low. You must replace the cartridge first (see page 59).
1. Load letter-size plain paper in the sheet feeder.
2. Press the
Setup
3. Select
Cleaning
4. Press x
Home
button, if necessary, and select
.
Maintenance
.
Start
.
, then select
Head
Cleaning takes about 2 minutes. When it’s finished, you see a message on the
display screen.
Caution:
Never turn off the printer during a cleaning cycle or you may damage it.
5. Select
Nozzle Check
. Then press x
Start
to run a nozzle check and confirm
that the print head is clean.
6. Select
Note:
If you don’t see any improvement after cleaning the print head four times, leave your
Artisan 800 Series turned on and wait at least six hours to let any dried ink soften. Then
try printing again. If you do not use your Artisan 800 Series often, it is a good idea to
print a few pages at least once a month to maintain good print quality.
Finish Nozzle Check
when you’re done.
56
Maintaining Your All-in-One
Page 57

Checking the Ink Cartridge Status
Your Artisan 800 Series will let you know when an ink cartridge is low or
expended by displaying a message on its display screen or your computer. You
cannot print or copy when an ink cartridge is expended even if the other cartridges
are not expended (but you can still scan, fax, and view photos). Replace any
expended cartridges before printing or copying.
To check ink cartridge status from the display screen anytime, follow these steps:
1. Press the
Setup
2. Select
Home
.
Ink Levels
button, if necessary, and select
. You see a screen like this:
A cartridge marked with is getting low on ink.
See page 59 to replace the cartridge, if necessary.
3. Press
OK
to exit.
A window may appear on your computer screen when you try to print when ink is
low. This window can optionally display ink offers and other updates retrieved
from an Epson website. On a Windows or Mac OS X 10.5 computer that is
connected to the Internet, you may see a screen asking if you want to receive these
Epson offers the first time you try to print when ink is low. Click
Decline
Note:
To disable checking for ink offers or updates from Epson, see the instructions in your
on-screen Epson Information Center.
.
Accept
or
Checking the Ink Cartridge Status
57
Page 58

Purchasing Epson Ink Cartridges
You can purchase genuine Epson ink and paper at Epson Supplies CentralSM at
www.epson.com/ink3 (U.S. sales) or www.epson.ca (Canadian sales). You can
also purchase supplies from an Epson authorized reseller. To find the nearest one,
call 800-GO-EPSON (800-463-7766).
Use the following list when you order or purchase new ink cartridges:
Part number
Ink color High Capacity Standard Capacity
Black 98 —
Magenta 98 99
Yellow 98 99
Cyan 98 99
Light magenta 98 99
Light cyan 98 99
Note:
High Capacity color ink cartridges are available online only.
We recommend that you use genuine Epson cartridges and do not refill them. The use
of other products may affect your print quality and could result in printer damage.
Yields vary considerably based on images printed, print settings, paper type, frequency
of use, and temperature. For print quality, a small amount of ink remains in the cartridge
after the “replace cartridge” indicator comes on. The printer ships with full cartridges
and part of the ink from the first cartridges is used for priming the printer.
For best printing results, use up a cartridge within six months of opening the package.
Store ink cartridges in a cool, dark place. If cartridges were exposed to cold
temperatures, allow them to warm up to room temperature for at least 3 hours before
using them.
58
Maintaining Your All-in-One
Page 59

Replacing Ink Cartridges
Make sure you have a new ink cartridge before you begin. You must install new
cartridges immediately after removing the old ones.
Caution:
Do not open ink cartridge packages until you are ready to install the ink. Cartridges are
vacuum packed to maintain reliability. Leave the expended cartridge(s) installed until
you have obtained a replacement, or the ink remaining in the print head nozzles may dry
out. If you remove a low or expended cartridge, you cannot reinstall and use it.
1. Turn on the Artisan 800 Series.
If a cartridge is low or expended, you see a
message on the display screen. Note which
cartridges need to be replaced and press
(You cannot print until you have replaced any
expended ink cartridges.)
If you’re replacing a cartridge before it’s
expended, follow the steps below.
2. Open the scanner.
Caution:
Make sure the Automatic Document Feeder is closed when you open the scanner.
OK
.
3. Squeeze the tab on the cartridge and lift it straight
up. Dispose of it carefully. Do not take the used
cartridge apart or try to refill it.
Warning:
If ink gets on your hands, wash them thoroughly with
soap and water. If ink gets into your eyes, flush them
immediately with water. Keep ink cartridges out of the reach of children.
Replacing Ink Cartridges
59
Page 60

4. Remove the cartridge from the package. Do not touch the green chip
on the side.
5. Remove the yellow tape from the bottom of the cartridge.
Caution:
Do not remove any other labels or seals, or ink will leak.
6. Insert the new cartridge into the holder and push it down until it clicks into
place.
7. Close the scanner.
Note:
If you see a warning message that the cartridge you just replaced is not installed,
open the scanner and press down the cartridge securely.
60
Maintaining Your All-in-One
Page 61

Solving Problems
Check the messages on the display screen to diagnose the cause of most problems.
Press the
see all the help topics.
You can also check the basic troubleshooting suggestions starting on page 62 or see
the on-screen Epson Information Center for more detailed help.
Checking for Software Updates
Periodically, it’s a good idea to check Epson’s support website
for free updates to your Artisan 800 Series software. Open your
on-screen Epson Information Center and select
Latest Software
epson.com/support (U.S.) or epson.ca (Canada).
Home
button, if necessary, and select
or visit Epson’s support website at
Problem Solver
Download the
. Press l or r to
With Windows, you can select
printer settings window. You can also click
Programs
Also select
, select
EPSON Scan
EPSON
Driver Update
, select
and click the
Artisan 800 Series
Scanner Driver Update
on the Maintenance tab in the
Start
or , select
, and click
Programs
Driver Update
for your product.
Solving Problems
or
All
.
61
Page 62

Problems and Solutions
Check the solutions below if you’re having trouble using your Artisan 800 Series.
Note:
If the screen is dark, press the touch panel to wake the printer from sleep mode.
Printing and Copying Problems
■
Make sure your paper is loaded printable side down (usually the whiter,
brighter, or glossy side). Don’t load paper above the edge guides.
■
Make sure the type of paper you loaded matches the paper size and paper type
settings on the control panel when copying (see page 14), when receiving faxes
(see page 25), or when printing with your printer software (see page 49).
■
Legal-size documents can be scanned, faxed, or copied using the Automatic
Document Feeder. If your copies are cropped, make sure you’ve loaded legalsize paper in the paper cassette (see page 7).
■
Make sure your original is positioned against the back left corner of the
scanner glass. If the edges are cropped, move your original away from the
edges slightly.
Document Feeding Problems
If documents don’t feed correctly in the Automatic Document Feeder, make sure
the corners of the paper are not bent, folded, or curled up. Do not load more than
30 letter-size or 10 legal-size sheets at a time. If documents have jammed:
1. Open the ADF cover and pull any paper out to the left.
Caution:
Do not try to remove the paper without opening the ADF cover first.
2. Lift open the ADF and check for any jammed paper underneath.
62
Solving Problems
Page 63

Paper Feeding Problems
If paper jams when printing, check the following:
1. Open the scanner and remove paper as shown, including any torn pieces.
Caution:
To prevent damage, avoid handling parts inside the printer.
2. Pull back on the tabs to remove the cover inside the Artisan 800 Series. Then
remove the paper as shown, including any torn pieces.
3. Reattach the cover and close the scanner.
4. You may also need to check other locations for jammed paper, such as the
back cover or auto duplexer (if installed), the paper cassette, and underneath
the printer. See the on-screen Epson Information Center for more information.
Problems and Solutions
63
Page 64

Faxing Problems
■
Make sure the recipient’s fax machine is turned on and working.
■
Make sure the
LINE
port on the Artisan 800 Series is connected to a telephone
wall jack. Verify that the telephone wall jack works by connecting a phone to
it.
■
If the line has static, press the
Fax Setting
, then select
Home
button and select
Communication
. Turn off the
Setup
V.34
. Select
and
ECM
(Error Correction Mode) settings.
■
If the Artisan 800 Series is connected to a DSL phone line, you must have a
DSL filter connected to the phone jack. Contact your DSL provider for the
necessary filter.
■
If fax calls are disconnected when you hang up, make sure a phone or
answering machine is connected to the
■
If an answering machine is connected, set the number of rings to answer for
EXT.
port.
receiving faxes to be greater than the number of rings for the answering
machine.
Print Quality Problems
■
For the best print quality, use Epson papers (see page 10) and genuine Epson
ink cartridges (see page 59).
■
If you notice light or dark bands across your printouts or they are too faint,
run a nozzle check (see page 55) to see if the print head needs cleaning.
■
If you notice jagged vertical lines, you may need to align the print head. See
the on-screen Epson Information Center for instructions.
■
The ink cartridges may be low on ink. Check your cartridge status (see
page 57) and replace cartridges, if necessary (see page 59).
■
If you’re copying, place the document flat against the scanner glass.
■
Clean the scanner glass with a soft, dry, lint-free cloth (paper towels are not
recommended), or use a small amount of glass cleaner on a soft cloth, if
necessary. Do not spray glass cleaner directly on the glass.
64
Solving Problems
Page 65

Where To Get Help
Epson Technical Support
Internet Support
Visit Epson’s support website at epson.com/support and select your product for
solutions to common problems. You can download drivers and documentation,
get FAQs and troubleshooting advice, or e-mail Epson with your questions.
Speak to a Support Representative
Before you call Epson for support, please have the following information ready:
■
Product name (Artisan 800 Series)
■
Product serial number (on the back of the Artisan 800 Series or under the
scanner unit)
■
Proof of purchase (such as a store receipt) and date of purchase
■
Computer configuration and description of the problem
Then call:
■
U.S.: (562) 276-4382, 6AM – 6PM, Pacific Time, Monday through Friday
■
Canada: (905) 709-3839, 6AM – 6PM, Pacific Time, Monday through Friday
Days and hours of support are subject to change without notice. Toll or long
distance charges may apply.
Purchase Supplies and Accessories
You can purchase genuine Epson ink, paper, and accessories at Epson Supplies
Central at www.epson.com/ink3 (U.S. sales) or www.epson.ca (Canadian sales).
You can also purchase supplies from an Epson authorized reseller. To find the
nearest one, call 800-GO-EPSON (800-463-7766).
Other Software Technical Support
ArcSoft Print Creations
www.arcsoft.com/support
ABBYY FineReader Sprint Plus
Phone: (510) 226-6717
www.abbyyusa.com
support@abbyyusa.com
Where To Get Help
65
Page 66

Notices
Important Safety Instructions
Before using your all-in-one, read and follow these safety instructions:
■
Be sure to follow all warnings and instructions marked on the product.
■
Use only the type of power source indicated on the product label.
■
Use only the power cord that comes with the product. Use of another cord may cause
fires or shock. Do not use the cord with any other equipment.
■
Place the product near a wall outlet where the plug can be easily unplugged.
■
If you won’t be using the product for a long period, unplug the power cord from the
electrical outlet.
■
Always turn off the product using the POn button, and wait until the POn light
stops flashing before unplugging the printer or cutting off power to the electrical
outlet.
■
Avoid plugging the product into an outlet on the same circuit as a photocopier or air
conditioning system that regularly switches on and off, or on an outlet controlled by a
wall switch or timer.
■
Do not let the power cord become damaged or frayed.
■
If you use an extension cord with the product, make sure the total ampere rating of
the devices plugged into the extension cord does not exceed the cord’s ampere rating.
Also, make sure the total ampere rating of all devices plugged into the wall outlet does
not exceed the wall outlet’s ampere rating.
■
Place the product on a flat, stable surface that extends beyond its base in all directions.
It will not operate properly if it is tilted or at an angle.
■
When storing or transporting the product, do not tilt it, stand it on its side, or turn it
upside down; otherwise ink may leak from the cartridges.
■
Avoid placing the product in locations that are subject to rapid changes in heat or
humidity, shocks or vibrations, or dust.
■
Leave enough room around the product for sufficient ventilation. Make sure the
product is at least 4 inches (10 cm) away from the wall.
■
Do not place the product near a radiator or heating vent or in direct sunlight.
■
Do not block or cover openings in the product case or insert objects through the slots.
66
Notices
Page 67

■
Do not use aerosol products that contain flammable gases inside or around the
printer. Doing so may cause fire.
■
Do not press too hard on the document table when placing the originals.
■
Do not open the scanner section while the product is in use.
■
Do not touch the flat white cable inside the product.
■
Do not spill liquid on the product.
■
Adjust only those controls that are covered by the operating instructions. Except as
specifically explained in your documentation, do not attempt to service the product
yourself.
■
Unplug the product and refer servicing to qualified service personnel under the
following conditions: if the power cord or plug is damaged; if liquid has entered the
product; if the product has been dropped or the case damaged; if the product does not
operate normally or exhibits a distinct change in performance.
■
The cords included with this product contain chemicals, including lead, known to the
State of California to cause birth defects or other reproductive harm. Wash hands
after handling. (This notice is provided in accordance with Proposition 65 in Cal. Health
& Safety Code § 25249.5 and following.)
LCD Screen Safety
■
Use only a dry, soft cloth to clean the LCD screen. Do not use liquid or chemical
cleansers.
■
If the LCD screen is damaged, contact Epson. If the liquid crystal solution gets on
your hands, wash them thoroughly with soap and water. If the liquid crystal solution
gets into your eyes, flush them immediately with water. If discomfort or vision
problems remain after a thorough flushing, see a doctor immediately.
Ink Cartridge Safety Instructions
■
Keep ink cartridges out of the reach of children and do not drink the ink.
■
Be careful when you handle used ink cartridges; there may be ink remaining around
the ink supply port. If ink gets on your skin, wash it off with soap and water. If it gets
in your eyes, flush them immediately with water. If you still have discomfort or vision
problems, see a doctor immediately.
■
Do not put your hand inside the product or touch any cartridges during printing.
■
Install a new ink cartridge immediately after removing an expended one. Leaving
cartridges uninstalled can dry out the print head and may prevent the product from
printing.
Important Safety Instructions
67
Page 68

■
If you remove an ink cartridge for later use, protect the ink supply area from dirt and
dust and store it in the same environment as the product. Note that there is a valve in
the ink supply port, making covers or plugs unnecessary, but care is needed to prevent
the ink from staining items that the cartridge touches. Do not touch the ink cartridge
ink supply port or surrounding area. Do not store the cartridge upside down.
Telephone Equipment Safety Instructions
When using telephone equipment, you should always follow basic safety precautions to
reduce the risk of fire, electric shock, and personal injury, including the following:
■
Do not use the Epson product near water.
■
Avoid using a telephone during an electrical storm. There may be a remote risk of
electric shock from lightning.
■
Do not use a telephone to report a gas leak in the vicinity of the leak.
Caution:
To reduce the risk of fire, use only a No. 26 AWG or larger telecommunication line cord.
Epson America, Inc., Limited Warranty
What Is Covered: Epson America, Inc. (“Epson”) warrants to the original retail purchaser
that the Epson printer covered by this limited warranty statement, if purchased and
operated only in the United States or Canada, will be free from defects in workmanship
and materials for the warranty period, as measured from the date of original purchase. The
“warranty period” means two years, if you registered your printer purchase with Epson
within 60 days of purchase, and one year otherwise. For residents of California or Quebec,
failure to submit the product registration form does not diminish your warranty rights.
For warranty service, you must provide proof of the date of original purchase.
This limited warranty statement also covers any Epson-branded duplexer purchased
separately for use with the printer. The warranty period for your duplexer is the same as
the period for your printer. In this limited warranty statement, the “product” means the
printer and the duplexer.
What Epson Will Do To Correct Problems: Should your Epson printer prove defective
during the warranty period, please call the Epson Connection
or (905) 709-3839 (Canada) for warranty repair instructions and return authorization. An
Epson service technician will provide telephone diagnostic service to determine whether
the printer requires service. If service is needed, Epson will, at its option, exchange or
repair the printer without charge for parts or labor. If Epson authorizes an exchange for the
defective unit, Epson will ship a replacement printer to you, freight prepaid, so long as you
use an address in Canada or the U.S. (excluding Puerto Rico and U.S. Possessions).
68
Notices
SM
at (562) 276-4382 (U.S.)
Page 69

Shipments to other locations will be made freight collect. You are responsible for securely
packaging the defective unit and returning it to Epson within five (5) working days of
receipt of the replacement. Epson requires a debit or a credit card number to secure the
cost of the replacement printer in the event that you fail to return the defective one. If
Epson authorizes repair instead of exchange, Epson will direct you to send your printer to
Epson or its authorized service center, where the printer will be repaired and sent back to
you. You are responsible for packing the printer and for all costs to and from the Epson
authorized service center. When warranty service involves the exchange of the printer or a
part, the item replaced becomes Epson property. The replacement printer or part may be
new or refurbished to the Epson standard of quality, and, at Epson’s option, may be
another model of like kind and quality. Exchange products and parts assume the
remaining warranty period of your original product covered by this limited warranty.
What This Warranty Does Not Cover: This warranty covers only normal use in the
United States and Canada. Using this product for continuous production or similar high
duty purposes is not considered normal use; damage, maintenance or service from such use
will not be covered under this warranty. This warranty is not transferable. This warranty
does not cover any color change or fading of prints or reimbursement of materials or
services required for reprinting. This warranty does not cover damage to the Epson
product caused by parts or supplies not manufactured, distributed or certified by Epson.
This warranty does not cover ribbons, ink cartridges or third party parts, components, or
peripheral devices added to the Epson product after its shipment from Epson, e.g., dealer
or user-added boards or components. Epson is not responsible for warranty service should
the Epson label or logo or the rating label or serial number be removed or should the
product fail to be properly maintained or fail to function properly as a result of misuse,
abuse, improper installation, neglect, improper shipping, damage caused by disasters such
as fire, flood, and lightning, improper electrical current, software problems, interaction
with non-Epson products, or service other than by an Epson Authorized Servicer. If a
claimed defect cannot be identified or reproduced, you will be held responsible for the
costs incurred.
THE WARRANTY AND REMEDY PROVIDED ABOVE ARE EXCLUSIVE AND IN
LIEU OF ALL OTHER EXPRESS OR IMPLIED WARRANTIES INCLUDING, BUT
NOT LIMITED TO, THE IMPLIED WARRANTIES OF MERCHANTABILITY,
NON-INFRINGEMENT OR FITNESS FOR A PARTICULAR PURPOSE. SOME
LAWS DO NOT ALLOW THE EXCLUSION OF IMPLIED WARRANTIES. IF
THESE LAWS APPLY, THEN ALL EXPRESS AND IMPLIED WARRANTIES ARE
LIMITED TO THE WARRANTY PERIOD IDENTIFIED ABOVE. UNLESS
STATED HEREIN, ANY STATEMENTS OR REPRESENTATIONS MADE BY ANY
OTHER PERSON OR FIRM ARE VOID. IN NO EVENT SHALL EPSON OR ITS
AFFILIATES BE LIABLE FOR ANY SPECIAL, INCIDENTAL OR
CONSEQUENTIAL DAMAGES RESULTING FROM THE USE OR INABILITY
TO USE THE EPSON PRODUCT, WHETHER RESULTING FROM BREACH OF
Epson America, Inc., Limited Warranty
69
Page 70

WARRANTY OR ANY OTHER LEGAL THEORY. IN NO EVENT SHALL EPSON
OR ITS AFFILIATES BE LIABLE FOR DAMAGES OF ANY KIND IN EXCESS OF
THE ORIGINAL RETAIL PURCHASE PRICE OF THE PRODUCT.
In Canada, warranties include both warranties and conditions.
Some jurisdictions do not allow limitations on how long an implied warranty lasts, and
some jurisdictions do not allow the exclusion or limitation of incidental or consequential
damages, so the above limitations and exclusions may not apply to you. This warranty
gives you specific legal rights and you may have other rights which vary from jurisdiction
to jurisdiction.
To find the Epson Authorized Reseller nearest you, visit our website at:
http://www.epson.com.
To find the Epson Customer Care Center nearest you, visit
http://www.epson.com/support.
You can also write to:
Epson America, Inc., P.O. Box 93012, Long Beach, CA 90809-3012
Declaration of Conformity
According to 47CFR, Part 2 and 15 for: Class B Personal Computers and Peripherals;
and/or CPU Boards and Power Supplies used with Class B Personal Computers:
We: Epson America, Inc.
Located at: MS 3-13
3840 Kilroy Airport Way
Long Beach, CA 90806
Telephone: (562) 290-5254
Declare under sole responsibility that the product identified herein, complies with 47CFR
Part 2 and 15 of the FCC rules as a Class B digital device. Each product marketed is
identical to the representative unit tested and found to be compliant with the standards.
Records maintained continue to reflect the equipment being produced can be expected to
be within the variation accepted, due to quantity production and testing on a statistical
basis as required by 47CFR §2.909. Operation is subject to the following two conditions:
(1) this device may not cause harmful interference, and (2) this device must accept any
interference received, including interference that may cause undesired operation.
Trade Name: Epson
Type of Product: Multifunction printer
Model: C381A
70
Notices
Page 71

FCC Compliance Statement
For United States Users
This equipment complies with Part 68 of the FCC rules and the requirements adopted by
the ACTA. On the back side is a label that contains, among other information, the FCC
registration number and the ringer equivalence number (REN) for this equipment. You
must, upon request, provide this information to your local telephone company. The
information associated with the services the equipment is to be connected are REN: 0.1B
Jack type: RJ-11C
The REN is useful to determine the quantity of devices that you may connect to your
telephone line and still have all of those devices ring when your telephone number is
called. In most, but not all areas, the sum of the RENs of all devices connected to one line
should not exceed five (5.0). To be certain of the number of devices that you may connect
to your line, you may want to contact your local telephone company to determine the
maximum REN for your calling area. For products approved after July 23, 2001, the REN
for this product is part of the product identifier that has the format US:
BKMFA01BC381A. The digits represented by 00 are the REN without a decimal point
(e.g., 00 is a REN of 0.0). For earlier products, the REN is separately shown on the label.
This equipment may not be used on coin service provided by the telephone company.
Connection to party lines is subject to state tariffs.
Should this equipment cause harm to the telephone network, the telephone company may
discontinue your service temporarily. If possible they will notify you in advance that
temporary discontinuance of service may be required. But if advanced notice isn’t
practical, the telephone company will notify you as soon as possible. You will be informed
of your right to file a complaint with the FCC. The telephone company may make
changes in its facilities, equipment, operations or procedures that could affect the proper
functioning of your equipment. If they do, you will be notified in advance to give you an
opportunity to maintain uninterrupted telephone service.
.
,
This product is not intended to be repaired. If you experience trouble with this
equipment, please contact:
Name: Epson America, Inc.
Address: 3840 Kilroy Airport Way, Long Beach, CA 90806 U.S.A.
Telephone: (562) 981-3840
The telephone company may ask that you disconnect this equipment from the network
until the problem has been corrected or until you are sure that the equipment is not
malfunctioning.
FCC Compliance Statement
71
Page 72

A plug and jack used to connect this equipment to the premises wiring and telephone
network must comply with the applicable FCC Part 68 rules and requirements adopted by
the ACTA. A compliant telephone cord and modular plug is provided with this product.
It is designed to be connected to a compatible modular jack that is also compliant. See
installation instructions for details.
The Telephone Consumer Protection Act of 1991 makes it unlawful for any person to use
a computer or other electronic device, including fax machines, to send any message unless
such message clearly contains in a margin at the top or bottom of each transmitted page or
on the first page of the transmission, the date and time it is sent and an identification of
the business or other entity, or other individual sending the message and the telephone
number of the sending machine or such business, other entity, or individual. In order to
program this information into your fax machine, follow the instructions in “Entering Fax
Header Information” on page 20.
According to the FCC’s electrical safety advisory, we recommend that you may install an
AC surge arrestor in the AC outlet to which this equipment is connected. Telephone
companies report that electrical surges, typically lightning transients, are very destructive
to customer terminal equipment connected to AC power sources and that this is a major
nationwide problem.
If your home has specially wired alarm equipment connected to the telephone line, ensure
the installation of this equipment Model C381A does not disable your alarm equipment.
If you have questions about what will disable alarm equipment, consult your telephone
company or a qualified installer.
This equipment has been tested and found to comply with the limits for a Class B digital
device, pursuant to Part 15 of the FCC Rules. These limits are designed to provide
reasonable protection against harmful interference in a residential installation. This
equipment generates, uses, and can radiate radio frequency energy and, if not installed and
used in accordance with the instructions, may cause harmful interference to radio or
television reception. However, there is no guarantee that interference will not occur in a
particular installation. If this equipment does cause interference to radio and television
reception, which can be determined by turning the equipment off and on, the user is
encouraged to try to correct the interference by one or more of the following measures:
72
■
Reorient or relocate the receiving antenna.
■
Increase the separation between the equipment and receiver.
■
Connect the equipment into an outlet on a circuit different from that to which the
receiver is connected.
■
Consult the dealer or an experienced radio/TV technician for help.
Notices
Page 73

WARNING
The connection of a non-shielded equipment interface cable to this equipment will
invalidate the FCC Certification of this device and may cause interference levels which
exceed the limits established by the FCC for this equipment. It is the responsibility of the
user to obtain and use a shielded equipment interface cable with this device. If this
equipment has more than one interface connector, do not leave cables connected to
unused interfaces. Changes or modifications not expressly approved by the manufacturer
could void the user’s authority to operate the equipment.
For Canadian Users
1. This product meets the applicable Industry Canada technical specifications.
Le présent matériel est conforme aux spécifications techniques applicables d’Industrie Canada.
2. The Ringer Equivalence Number is an indication of the maximum number of devices
allowed to be connected to a telephone interface. The termination on an interface may
consist of any combination of devices subject only to the requirement that the sum of the
RENs of all the devices does not exceed five.
L’indice d’équivalence de la sonnerie (IES) sert à indiquer le nombre maximal de terminaux
qui peuvent être raccordés à une interface téléphonique. La terminaison d’une interface peut
consister en une combinaison quelconque de dispositifs, à la seule condition que la somme
d’indices d’équivalence de la sonnerie de tous les dispositifs n’excède pas 5.
This Class B digital apparatus complies with Canadian ICES-003.
Cet appareil numérique de la classe B est conforme à la norme NMB-003 du Canada.
FCC Compliance Statement
73
Page 74

Index
A
ABBYY FineReader software, 52, 65
Accessories, purchasing, 65
ADF, see Automatic Document Feeder
Adjusting color in photos, 30
Aligning print head, 55
ArcSoft Print Creations software, 43, 65
Auto Answer button, 25
Auto Correction for photos, 29 to 30
Auto Reduction setting, faxing, 22
Automatic Document Feeder
capacity, 13, 62
placing documents in, 13
scanning, 54
B
Black-and-white copying, 14, 17
Borderless
copying, 17
printing, 46, 47
C
Cleaning
print head, 56
scanner glass, 64
Clear Settings button, 6
Color in photos
adjusting, 30
restoring, 15, 17
Coloring book pages, 35 to 36
Computer, printing from, 43 to 51
Contrast setting, faxing, 21
Control panel
raising and lowering, 5
using, 5 to 6
Copying
black-and-white, 14, 17
borderless photos, 17
density setting, 14
documents, 14 to 15
photos, 15 to 17
placing documents, 12
problems, 62
restoring color, 15
using the ADF, 13
Cropping a photo, 16
Calendar, personalized, 43
Camera
connecting, 33
printing from, 33 to 34
Capacity, see Loading capacity
CD/DVD
creating label, 39 to 42
density setting, 41
ink drying time, 42
jewel case insert, 39
placing on tray, 41
removing from tray, 42
74
Index
D
Date and time settings, 20
Density adjustment
CD/DVD label, 41
copying, 14
two-sided printing, 51
Dialing to send a fax, 24
Digital camera, see Camera
Displaying multiple photos, 30
Page 75

Documents
copying, 14 to 15
placing in ADF, 13
placing on scanner, 12
Double-sided printing, see Two-sided
printing
Drying time of ink
CD/DVD, 42
two-sided printing, 51
DSL filter, 18, 64
Duplexer
checking for paper jams, 63
printing with, 50 to 51
purchasing, 65
E
Envelopes
loading, 10
paper type setting, 49
Epson
help, 65
ink cartridges, 58
ink offers, 57
papers, 10 to 11
purchasing from, 65
warranty, 68 to 70
Epson Print CD software, 39
Epson Scan software, 52 to 54
Faxing (continued)
group dial, 22 to 23, 24
header, 20
international number, 20
keypad, 21, 23
paper size, 21
placing documents, 12, 23 to 24
printing reports, 19, 22
problems, 64
receiving a fax, 19, 25
redialing, 24
resolution, 21
rings to answer, 19, 25
scan and print settings, 21 to 22
sender name and phone number, 20
sending a fax, 23 to 24
settings, 19 to 23
speed dial, 22 to 23, 24
File format
memory card, 27, 33
scanning, 53, 54
FineReader software, 52, 65
Fix Photo setting, 30
G
Group dial
printing list, 23
setting up, 22
using, 24
F
Faded photos, restoring, 15, 17
Faxing
ADF, using, 13, 23 to 24
auto answer, 25
Auto Reduction setting, 22
connecting phone line, 18 to 19
contrast, 21
date and time settings, 20
dialing number, 24
entering phone number, 20 to 21, 23
feature setup, 19 to 23
H
Head cleaning, see Print head
Header, fax, 20
Help, 61, 65
Home button, 6
I
Icons on screen, 6
Index
75
Page 76

Ink cartridges
checking status, 57
offers from Epson, 57
part numbers, 58
purchasing, 58, 65
replacing, 59 to 60
safety, 67 to 68
storage, 58
Ink drying time, see Drying time of ink
Ink levels, 57
Inserting memory card, 26 to 27
Inserting USB drive, 28
J
Jam, paper, 62 to 63
Jewel case insert, printing, 39
JPEG file format, 27, 33
K
Keypad, using, 21, 23
L
Label, CD/DVD, 39 to 42
Layout sheets, printing, 31 to 32
LCD Screen, see Touch panel
Legal-size paper, loading, 10
Lined paper, printing, 37
Loading capacity
ADF, 13, 62
paper cassette, 7
Loading paper, 7 to 10
M
Macintosh
borderless printing, 46, 47
monitoring print job, 47, 49
OS X 10.3 and 10.4, 47 to 49, 51
OS X 10.5 (Leopard), 45 to 47, 51
printing, 45 to 49, 51
two-sided printing, 51
Maintenance
aligning print head, 55
checking ink cartridge status, 57
checking print head, 55
cleaning print head, 56
cleaning scanner glass, 64
replacing ink cartridges, 59 to 60
Media type setting, 49
Memory card
access light, 27
file format, 27, 33
inserting, 26 to 27
removing, 27
selecting photos and printing from, 29
to 30
slots, 26 to 27
types, 26
Menu button, 6
Modes for scanning, 52, 53
Monitoring print job, 45, 47, 49
N
Note paper, personalized, 37 to 39
Notebook paper, 37
Nozzle check pattern, 55
76
O
OCR (optical character recognition)
software, 52, 65
Index
Page 77

P
Paper
jams, 62 to 63
loading, 7 to 10
loading capacity, 7
purchasing, 10, 65
types, 10 to 11, 49
Paper Size setting, faxing, 21
Paper type setting, 49
Personalized note paper, 37 to 39
Phone line, connecting, 18 to 19
Phone number in fax header, 20
Photo greeting cards, 43
Photo paper
loading, 9
purchasing, 10
types, 10 to 11
Photos
adjusting color, 30
Auto Correction, 29 to 30
borderless, 17, 46, 47
copying, 15 to 17
cropping, 16
displaying multiple photos, 30
faded, 15, 17
file format, 27, 33
layout sheets, 31 to 32
placing on scanner, 12
red-eye reduction, 30, 44, 46
restoring color, 15, 17
selecting and printing, 29 to 34
templates, 31 to 32
PictBridge, 33
Print Creations software, 43, 65
Print head
alignment, 55
checking, 55
cleaning, 56
Print job, monitoring, 45, 47, 49
Print quality
maintaining, 55 to 56
problems, 64
Printer software updates, 61
Printing
calendar, 43
CD/DVD label, 39 to 42
coloring book pages, 35 to 36
duplexing, 50 to 51
fax report, 19, 22
from a camera, 33 to 34
from a computer, 43 to 51
jewel case insert, 39
layout sheets, 31 to 32
lined (ruled) paper, 37
Macintosh, 45 to 49, 51
personalized note paper, 37 to 39
photo greeting cards, 43
photos, 29 to 34
problems, 62, 64
shortcut settings, 44
special projects, 35 to 42, 43
two-sided pages, 50 to 51
Windows, 43 to 45, 50 to 51
Purchasing ink and paper, 10, 58
R
Receiving faxes, 19, 25
Red-eye reduction, 30, 44, 46
Redial, 24
Removing memory card, 27
Replacing ink cartridges, 59 to 60
Report, fax, 19, 22
Resolution setting
faxing, 21
scanning, 54
Restoring photos, 15, 17
Rings to Answer setting, 19, 25
Ruled paper, printing, 37
Index
77
Page 78

S
Safety instructions
general, 66 to 67
ink cartridge, 67 to 68
telephone equipment, 68
touch panel, 67
Scanner
Automatic Document Feeder, 13
cleaning, 64
document glass, 12
software updates, 61
Scanning
Epson Scan software, 52 to 54
file format, 53, 54
modes, 52, 53
multiple pages, 54
OCR software, 52, 65
placing documents, 12
resolution, 54
TWAIN-compliant application, 52
using the ADF, 13, 54
Screen, see Touch panel
Sender name in fax header, 20
Sending faxes, 23 to 24
Shortcut settings, 44
Sleep mode, 6, 62
Software
ABBYY FineReader, 52, 65
ArcSoft Print Creations, 43, 65
Epson Print CD, 39
Epson Scan, 52 to 54
OCR (optical character recognition),
52, 65
support, 65
updates, 61
Special projects
calendars, 43
CD/DVD labels, 39 to 42
coloring book pages, 35 to 36
graph paper, 37
layout sheets, photo, 31 to 32
lined (ruled) paper, 37
note paper, personalized, 37 to 39
photo greeting cards, 43
Speed dial
printing list, 23
setting up, 22
using, 24
Status light, 6
Storing ink cartridges, 58
Support
Epson, 65
software, 65
Symbols on screen, 6
T
Templates, photo, 31 to 32
Touch panel
icons, 6
raising and lowering, 5
safety, 67
sleep mode, 6, 62
using, 5 to 6
Troubleshooting
copying problems, 62
faxing problems, 64
paper problems, 62 to 63
print quality problems, 64
printing problems, 62
Two-sided printing
density setting, 51
ink drying time, 51
Macintosh, 51
Windows, 50 to 51
78
Index
Page 79

U
Unlock button, 5
USB drive, inserting, 28
V
View Auto Correct setting, 29
W
Warranty, 68 to 70
Windows
monitoring print job, 45
printing from, 43 to 45, 50 to 51
shortcut settings, 44
two-sided printing, 50 to 51
Index
79
Page 80

 Loading...