

Epson Artisan 700 Basic User Guide

Artisan 700 Series
™
Basics Guide

Copyright Notice
All rights reserved. No part of this publication may be reproduced, stored in a retrieval
system, or transmitted in any form or by any means, electronic, mechanical,
photocopying, recording, or otherwise, without the prior written permission of Seiko
Epson Corporation. The information contained herein is designed only for use with this
Epson product. Epson is not responsible for any use of this information as applied to other
equipment.
Neither Seiko Epson Corporation nor its affiliates shall be liable to the purchaser of this
product or third parties for damages, losses, costs, or expenses incurred by purchaser or
third parties as a result of: accident, misuse, or abuse of this product or unauthorized
modifications, repairs, or alterations to this product, or (excluding the U.S.) failure to
strictly comply with Seiko Epson Corporation’s operating and maintenance instructions.
Seiko Epson Corporation shall not be liable for any damages or problems arising from the
use of any options or any consumable products other than those designated as Original
Epson Products or Epson Approved Products by Seiko Epson Corporation.
Responsible Use of Copyrighted Materials
Epson encourages each user to be responsible and respectful of the copyright laws when
using any Epson product. While some countries’ laws permit limited copying or reuse of
copyrighted material in certain circumstances, those circumstances may not be as broad as
some people assume. Contact your legal advisor for any questions regarding copyright law.
Trademarks
Epson is a registered trademark, Epson Exceed Your Vision is a registered logomark, and
Supplies Central is a service mark of Seiko Epson Corporation.
Artisan is a trademark and Epson Connection is a service mark of Epson America, Inc.
General Notice: Other product names used herein are for identification purposes only and
may be trademarks of their respective owners. Epson disclaims any and all rights in those
marks.
This information is subject to change without notice.
© 2008 Epson America, Inc. 7/08
2

Contents
Using the Control Panel
Loading Paper
Using Special Papers . . . . . . . . . . . . . . . . . . . . . . . . . . . . . . . . . . . . . . . 10
. . . . . . . . . . . . . . . . . . . . . . . . . . . . . . . . . . . . . . . . . 7
Placing Originals for Copying or Scanning
Copying a Document or Photo
Copying a Document . . . . . . . . . . . . . . . . . . . . . . . . . . . . . . . . . . . . . . 13
Restoring, Cropping, or Copying Photos . . . . . . . . . . . . . . . . . . . . . . . . . 14
Printing From Your Camera’s Memory Card
Inserting Your Camera’s Memory Card . . . . . . . . . . . . . . . . . . . . . . . . . . 17
Inserting a USB Drive . . . . . . . . . . . . . . . . . . . . . . . . . . . . . . . . . . . . . . 19
Selecting and Printing Photos . . . . . . . . . . . . . . . . . . . . . . . . . . . . . . . . 20
Printing Layout Sheets . . . . . . . . . . . . . . . . . . . . . . . . . . . . . . . . . . . . . 22
Printing From a Camera . . . . . . . . . . . . . . . . . . . . . . . . . . . . . . . . . . . . 24
Printing Special Projects
Printing Lined Paper and Graph Paper . . . . . . . . . . . . . . . . . . . . . . . . . . 26
Printing Personal Notepaper . . . . . . . . . . . . . . . . . . . . . . . . . . . . . . . . . 27
Printing CDs and DVDs . . . . . . . . . . . . . . . . . . . . . . . . . . . . . . . . . . . . 28
. . . . . . . . . . . . . . . . . . . . . . . . . . . . . . . . 5
. . . . . . . . . . . . . . . 12
. . . . . . . . . . . . . . . . . . . . . . . . . 13
. . . . . . . . . . . . . 17
. . . . . . . . . . . . . . . . . . . . . . . . . . . . . . . 26
Printing From Your Computer
Printing in Windows . . . . . . . . . . . . . . . . . . . . . . . . . . . . . . . . . . . . . . 33
Printing With a Macintosh . . . . . . . . . . . . . . . . . . . . . . . . . . . . . . . . . . 35
Selecting the Correct Paper Type . . . . . . . . . . . . . . . . . . . . . . . . . . . . . . 39
Two-sided Printing . . . . . . . . . . . . . . . . . . . . . . . . . . . . . . . . . . . . . . . . 40
Scanning a Document or Photo
Basic Scanning . . . . . . . . . . . . . . . . . . . . . . . . . . . . . . . . . . . . . . . . . . . 43
. . . . . . . . . . . . . . . . . . . . . . . . . . 33
. . . . . . . . . . . . . . . . . . . . . . . . 43
3

Maintaining Your Artisan 700 Series
Checking the Print Head Nozzles . . . . . . . . . . . . . . . . . . . . . . . . . . . . . . 45
Cleaning the Print Head . . . . . . . . . . . . . . . . . . . . . . . . . . . . . . . . . . . . 46
Checking the Ink Cartridge Status . . . . . . . . . . . . . . . . . . . . . . . . . . . . . 47
Purchasing Epson Ink Cartridges . . . . . . . . . . . . . . . . . . . . . . . . . . . . . . 48
Replacing Ink Cartridges . . . . . . . . . . . . . . . . . . . . . . . . . . . . . . . . . . . . 49
. . . . . . . . . . . . . . . . . . . . 45
Solving Problems
Checking for Software Updates . . . . . . . . . . . . . . . . . . . . . . . . . . . . . . . 51
Problems and Solutions . . . . . . . . . . . . . . . . . . . . . . . . . . . . . . . . . . . . . 52
Where To Get Help . . . . . . . . . . . . . . . . . . . . . . . . . . . . . . . . . . . . . . . 54
Notices
Index
. . . . . . . . . . . . . . . . . . . . . . . . . . . . . . . . . . . . . . . . . . . . . . . 55
. . . . . . . . . . . . . . . . . . . . . . . . . . . . . . . . . . . . . . . . . . . . . . . . 61
. . . . . . . . . . . . . . . . . . . . . . . . . . . . . . . . . . . . . 51
4
Contents
Using the Control Panel
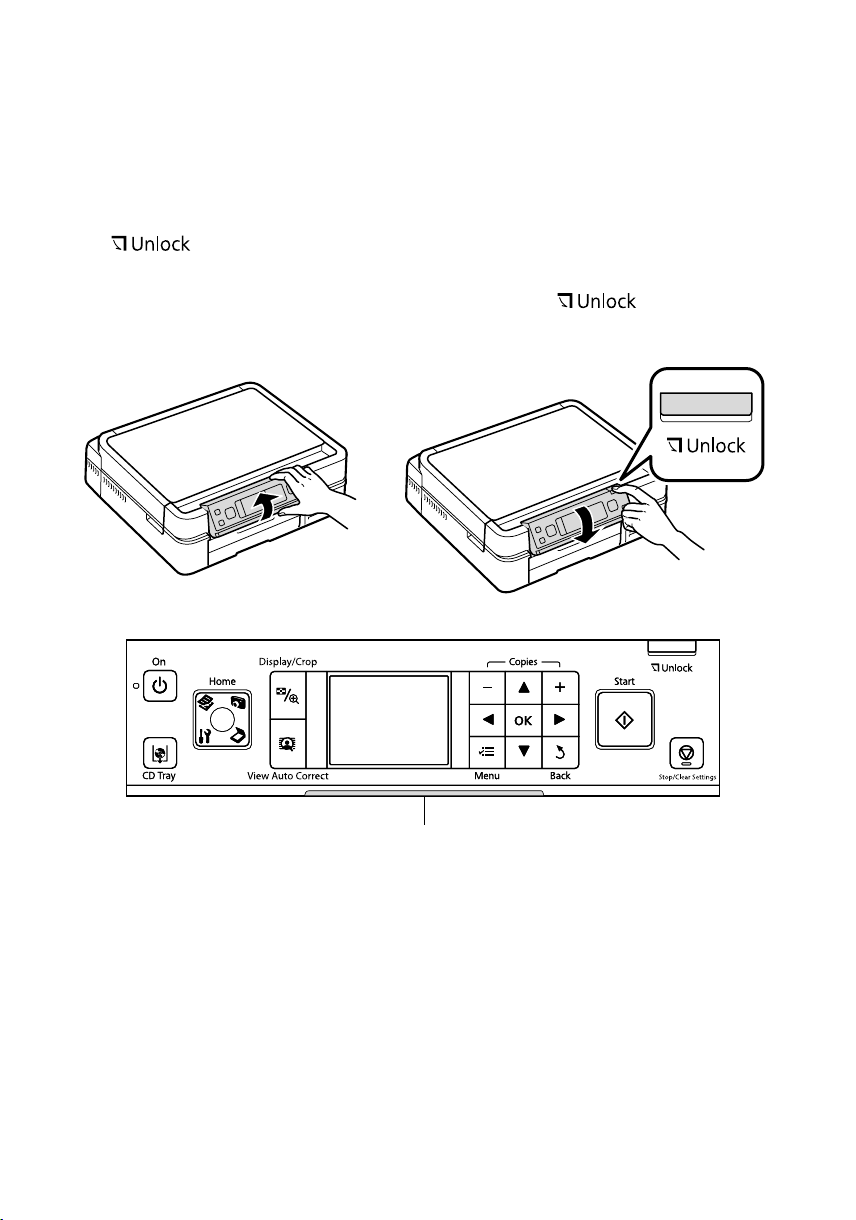
The control panel is adjustable. To raise it, lift it as shown below. To lower it, press
the button and push the control panel down.
Caution:
To avoid damaging the Artisan 700 Series, always press the
the control panel. Don’t try to push it down.
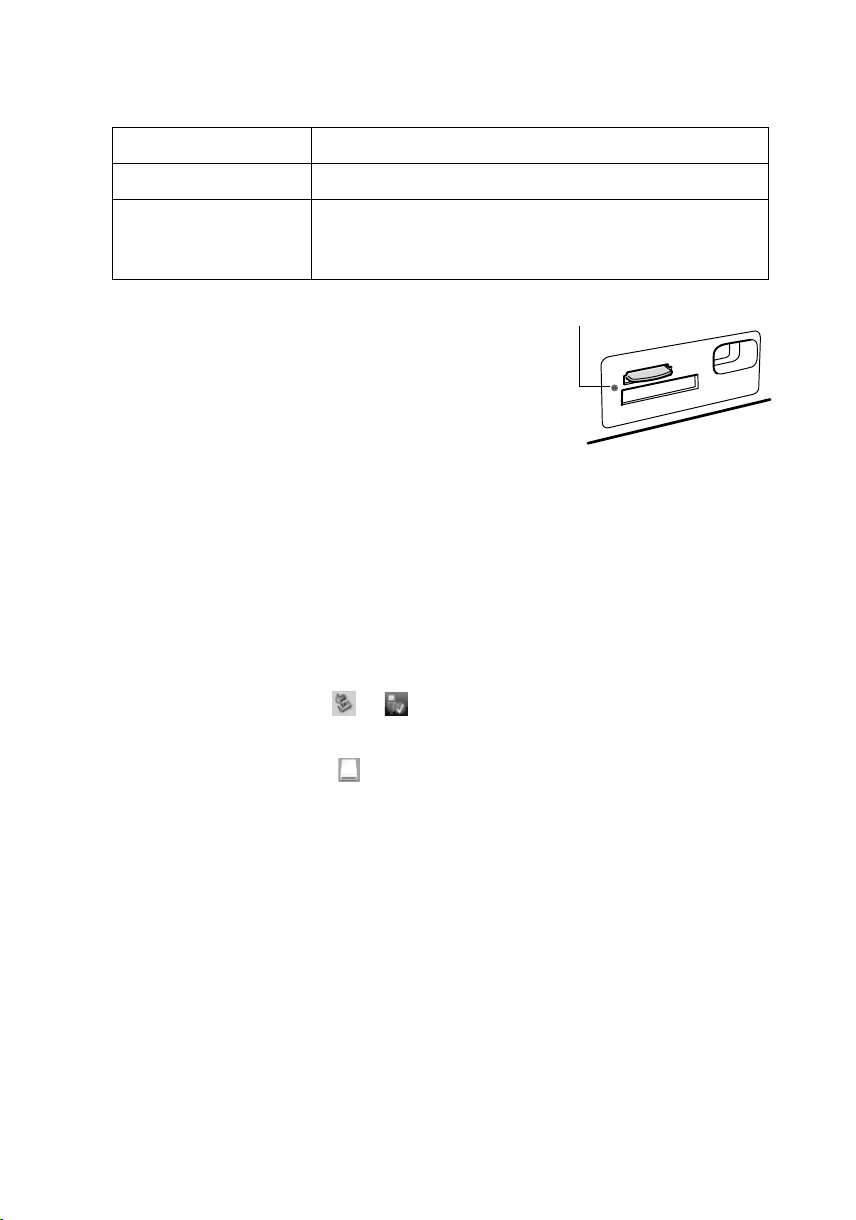
Display/Crop
button to lower
View Auto Correct
Blue status light
To save energy, the LCD screen goes dark after 13 minutes of inactivity. Press
■
any button (except the
■
To switch the display screen from displaying one photo at a time to 9 photos
at a time, press the
■
The blue status light at the bottom of the panel flashes when the Artisan 700
P On
button) to wake it up.
Display/Crop
button 3 times when viewing your photos.
Stop/Clear Settings
Series is operating or performing routine maintenance.
Note:
If the blue status light flashes rapidly, check the control panel for error messages.
Using the Control Panel
5

You may see the following icons on the screen:
Icon Meaning
The Artisan 700 Series is connected to a wired network
The Artisan 700 Series is connected to a wireless network
The current photo is cropped
The Fix Red-Eye setting is on for the current photo or all photos
6
Using the Control Panel

Loading Paper
Your Artisan 700 Series has two paper trays. The main tray is for letter-size, legalsize, A4, or 8
plain paper in the main tray. When extended, the tray can hold up to 50 legal-size
sheets.
The photo tray is for 4
×
6 and 20 sheets of 5 × 7-inch paper.
4
1. Pull out the paper cassette. Then slide back the photo tray and lift it up.
×
10 inch paper. You can load up to 120 sheets of letter-size or A4
×
6 or 5 × 7-inch paper. You can load up to 20 sheets of
2. Squeeze the edge guides and slide them out. Then insert paper with the glossy
or printable side face-down.
For legal-size paper, squeeze
lever to extend tray.
Note:
Load letterhead or pre-printed paper face-down, with the top edge facing the back
of the paper cassette. To load legal-size paper, squeeze the lever and extend the
tray.
Loading Paper
7
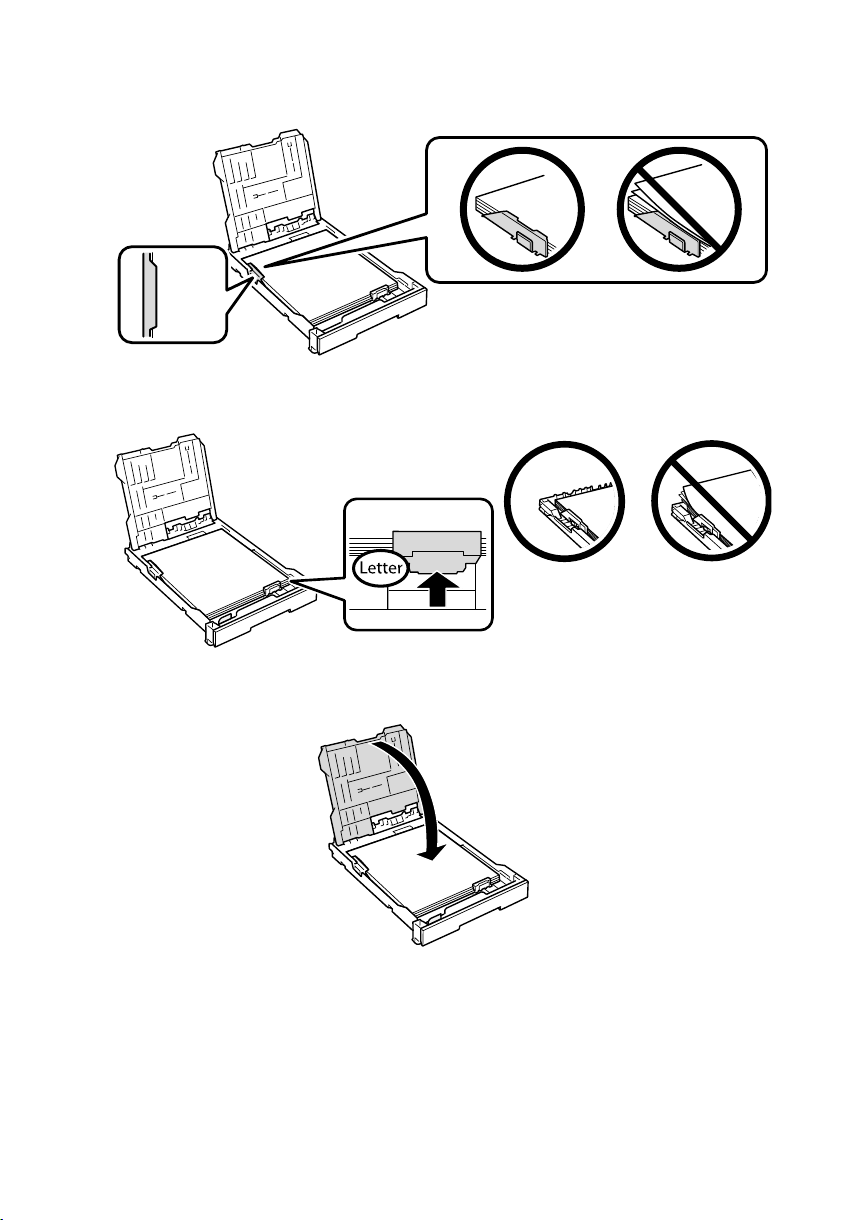
3. Slide the left edge guide against the paper.
4. Adjust the other edge guide to your paper size.
Make sure the paper stack
fits under the edge guide
5. Lower the photo tray.
8
Loading Paper
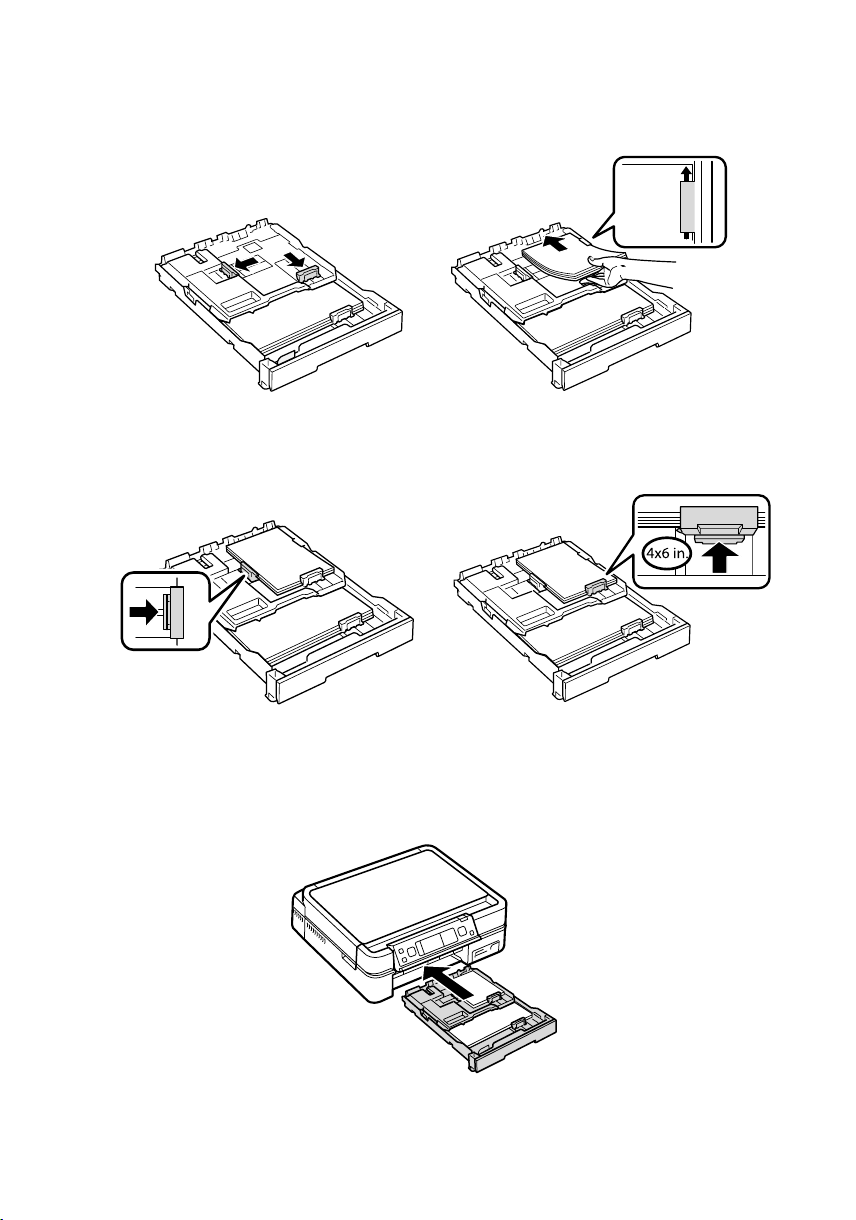
6. To load paper in the photo tray, squeeze the edge guides and slide them out.
Then insert photo paper with the glossy or printable side face-down.
7. Slide the left edge guide against the paper. Then adjust the other edge guide to
your paper size.
Note:
Make sure the paper fits under the edge guide.
8. Keep the cassette flat as you insert it.
Loading Paper
9

9. Extend the output tray and flip up the stopper.
For details on paper and instructions on loading envelopes and legal-size sheets,
see the on-screen Epson Information Center.
Using Special Papers
Epson offers a wide array of high quality papers, making it easy to maximize the
impact of your photos, presentations, and creative projects.
You can purchase genuine Epson ink and paper at Epson Supplies Central
www.epson.com/ink3 (U.S. sales) or www.epson.ca (Canadian sales). You can
also purchase supplies from an Epson authorized reseller. To find the nearest one,
call 800-GO-EPSON (800-463-7766).
SM
at
Part
Paper name Size
Epson Bright White Paper Letter (8.5 × 11 inches) S041586 500
Epson Photo Paper Glossy Borderless 4 × 6 inches S041809
Letter (8.5 × 11 inches) S041141
10
Loading Paper
number
S04203850100
S041649
S041271
Sheet
count
20
50
100
Paper name Size
Part
number
Sheet
count
Epson Premium Photo Paper
Glossy
Epson Ultra Premium Photo
Paper Glossy
Epson Premium Photo Paper
Semi-gloss
Epson Presentation Paper Matte Letter (8.5 × 11 inches) S041062 100
Epson Ultra Premium Photo
Paper Luster
Epson Premium Presentation
Paper Matte
Borderless 4 × 6 inches S041808
S04172740100
Borderless 5 × 7 inches S041464 20
Borderless 8 × 10 inches S041465 20
Letter (8.5 × 11 inches) S042183
S0416672550
Borderless 4 × 6 inches S042181
S04217460100
Borderless 5 × 7 inches S041945 20
Borderless 8 × 10 inches S041946 20
Letter (8.5 × 11 inches) S042182
S0421752550
Borderless 4 × 6 inches S041982 40
Letter (8.5 × 11 inches) S041331 20
Legal (8.5 × 14 inches) S041067 100
Letter (8.5 × 11 inches) S041405 50
Borderless 8 × 10 inches S041467 50
Letter (8.5 × 11 inches) S041257
S04218050100
Epson Premium Presentation
Paper Matte Double-sided
Epson Ultra Premium
Presentation Paper Matte
Epson Photo Quality Self-
adhesive Sheets
Epson Iron-on Cool Peel Transfer
Paper
Letter (8.5 × 11 inches) S041568 50
Letter (8.5 × 11 in.) S041341 50
A4 (8.3 × 11.7 inches) S041106 10
Letter (8.5 × 11 inches) S041153 10
Using Special Papers
11
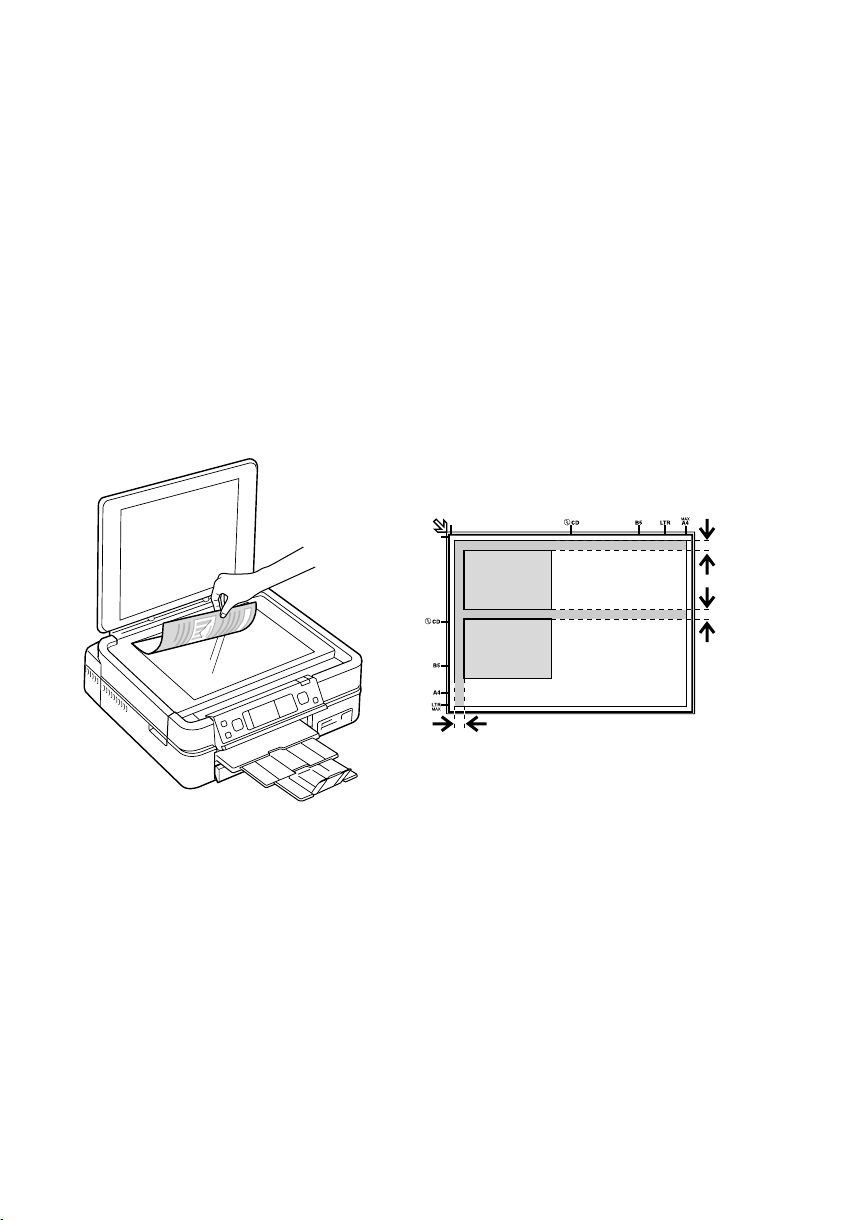
Placing Originals for Copying or Scanning
You can place one or two photos or a document up to letter-size (or A4) on the
scanner glass to make color or black and white copies.
1. Open the document cover and place your original face-down on the scanner
glass, with the top against the back left corner.
If you’re scanning 3 × 5- or 4 × 6-inch photos, you can place up to two at a
time on the scanner glass. Place them at least 1/4 inch (5 mm) apart.
1/4 inch (5 mm)
1/4 inch (5 mm)
Note:
If the edges of your document or photo are cut off, move the document or photo
1/4 inch (5 mm) away from the corner of the scanner glass.
2. Close the cover gently so you don’t move the original(s).
12
Placing Originals for Copying or Scanning
Copying a Document or Photo
Once you’ve placed your originals on the scanner glass, you can make color or
black and white copies. See:
■
“Copying a Document” below
■
“Restoring, Cropping, or Copying Photos” on page 14
Copying a Document
1. Place your original for copying (see page 12).
2. Load letter-size plain paper, Epson Bright White Paper, or Epson Presentation
Paper Matte.
3. Press the
4. Press
5. Press
Home
button until
OK
.
+
or – to select the number of copies you
Copy
want.
6. Press
u
or d to select
Color
or
B&W
white) copies.
7. Press
l
or r to adjust the density (make the copies lighter or darker) if
necessary.
8. To change copy settings, press x
OK
to select
Layout
Paper Size
■
To adjust the copy size, press d to select
Reduce/Enlarge
to choose
using
Paper and Copy Settings
setting should be
should be
With Border
Letter
, pressr, then pressu or d
+
or –),
Actual
(and select a percentage
Auto Fit Page
.
paper), or one of the specific sizes listed. Then press
is selected.
(black and
Menu
, then
. The
and the
(to automatically size the image to fit your
OK
.
Copying a Document or Photo
13

■
Pressd to scroll down to the
OK
Then press
■
For the
Text & Image
OK
.
■
To change the copy quality, select
choose
Draft, Standard Quality
.
Document Type
if your document contains photos or graphics. Then press
Paper Type
setting, choose
Quality
, or
Best
setting and select
Text
for plain documents or
Plain Paper
, pressr, then pressu or d to
. Then press OK.
For more information about copy settings, see your on-screen Epson
Information Center.
.
9. After you finish selecting your settings, press
Start
10. Press x
Settings
to begin copying. To cancel copying, press y
.
OK
.
Stop/Clear
Restoring, Cropping, or Copying Photos
You can copy one or two photos onto 4×6-inch, 5×7-inch, 8×10-inch, or
letter-size photo paper for instant photo reprints. You can also restore colors in
faded photos, print with or without borders, convert photos to black and white,
and crop your photos.
1. Place one or two photos on the scanner glass. Place them at least 1/4 inch
(5 mm) apart.
2. Load 4 × 6-inch or 5 × 7-inch paper in the photo tray or 8 × 10-inch or lettersize Epson photo paper in the main tray. Load it printable side down.
3. Press the
then press
4. Press x
Restore Photos
Home
button until
OK
. You see this screen.
Menu
, pressl or r to select
, then press
Copy
OK.
is selected,
Copy/
14
Copying a Document or Photo
5. To restore colors in faded photos as you copy,
press
d
to select On. (If your photos are not
faded, do not turn on
OK
to select
Off
.) Then press OK.
Color Restoration;
press
6. When you see this screen, press
OK
to prescan
your photos.
7. When you see a message asking you to select the
number of copies, press
OK
.
8. If you placed two photos on the scanner glass,
l
press
or r to view the second one and select
the number of copies.
+
9. To print more than 1 copy, press
or – to select the number (up to 99). If
you are copying 2 photos, do this for the other photo as well.
10. If you want to crop one of your photos and
enlarge the resulting image area to fit onto your
paper, press
■
To resize the image area, press + or –.
■
To move the image area, use the arrow
Display/Crop
.
buttons.
■
To check the zoomed image, press OK.
OK
When you finish cropping your photo, press
11. Press
OK
again to continue.
.
12. To change any of the settings displayed on the
screen, press x
Paper and Copy Settings
■
To change the paper size, select
Menu
and then OK to select
.
Paper Size
and choose the size of paper you loaded.
Press
OK
. (
Paper Type
the
Paper Size
options depend on
setting you choose.)
Restoring, Cropping, or Copying Photos
15

■
To change the paper type, select
Paper Type
, pressr, then pressuor
to choose the setting for the paper you loaded:
For this paper type Choose this setting
Epson Premium Photo Paper Glossy Prem. Glossy
Epson Premium Photo Paper Semi-gloss
Epson Ultra Premium Photo Paper Luster
Epson Ultra Premium Photo Paper Glossy Ultra Glossy
Epson Photo Paper Glossy Glossy
■
To change the print layout, select
to choose
On
to expand the image all the way to the edge of the paper
(slight cropping may occur) or
OK
image. Then press
■
To adjust the amount of image expansion when printing borderless
photos, select
Standard, Medium
Expansion,
.
pressr, then pressu or d to choose
, or
Minimum
photos may have white borders if you use the
Borderless
Off
to leave a small margin around the
, then pressr. Pressu or d
. Then press OK. (Your printed
Medium
or
Minimum
setting.)
■
To automatically adjust brightness, contrast, and saturation to best effect,
select
Fix Photo
, then press r. Pressu or d to choose On.
d
■
If you want to create a black-and-white copy of a color photo, select
Filter
, pressr, then pressu or d and choose
13. After you finish selecting your settings, press
14. When you’re ready to copy, press x
Clear Settings
Note:
When you scan with your computer, you can use additional options to transform faded,
dusty, or badly exposed photos into ones with true-to-life color and sharpness. See the
on-screen Epson Information Center for details.
16
Copying a Document or Photo
.
Start
. To cancel copying, press y
OK
B&W
. Then press OK.
.
Stop/
Printing From Your Camera’s Memory Card
The Artisan 700 Series lets you print photos from your digital camera’s memory
card, or by connecting your camera directly and using its DPOF
™
settings. You
can also print photos stored on a USB drive. See these sections:
■
“Inserting Your Camera’s Memory Card” below
■
“Inserting a USB Drive” on page 19
■
“Selecting and Printing Photos” on page 20
■
“Printing Layout Sheets” on page 22
■
“Printing From a Camera” on page 24
Inserting Your Camera’s Memory Card
1. Insert the card into the correct slot, as shown. Insert just one card at a time.
Upper slot: SDTM, SDHC
miniSDTM*, miniSDHC*
microSD*, microSDHC*
MultiMediaCard
MMCplus, MMCmobile, MMCmicro*
Memory Stick
Memory Stick DuoTM*
Memory Stick MicroTM*
Memory Stick PRO
Memory Stick PRO DuoTM*
Memory Stick PRO-HG Duo*
MagicGate
MagicGate Memory Stick Duo
xD-Picture Card
xD-Picture Card Types H, M, M+
Lower slot: CompactFlash
Microdrive
TM
TM
TM
TM
TM
Memory Stick
TM
®
TM
TM
*
* Adapter required
Printing From Your Camera’s Memory Card
17
Make sure the image files on your card meet these requirements:
File format JPEG with the Exif version 2.21 standard
Image size 80 × 80 pixels to 9200 × 9200 pixels
Number of files Up to 9990 (If there are more than 999 photos on the
card, you can select a group of photos to display.
See your on-screen Epson Information Center.)
2. After you insert the card, the memory card
Memory card access light
access light flashes, then stays on.
3. See page 20 to select and print your photos.
Removing Your Card
After you finish printing your photos, follow these steps to remove the card:
1. Make sure the memory card access light is not flashing.
Caution:
Do not remove the card or turn off the Artisan 700 Series while the memory card
access light is flashing; you may lose data on the card.
2. If the Artisan 700 Series is connected to your computer, do one of the
following before removing the memory card or turning it off:
■
Windows®:Click the or icon on the taskbar and select
remove USB Mass Storage Device
■
Macintosh®:Drag the removable disk icon from your desktop into the
trash.
3. Pull the card straight out of its slot.
.
Safely
18
Printing From Your Camera’s Memory Card
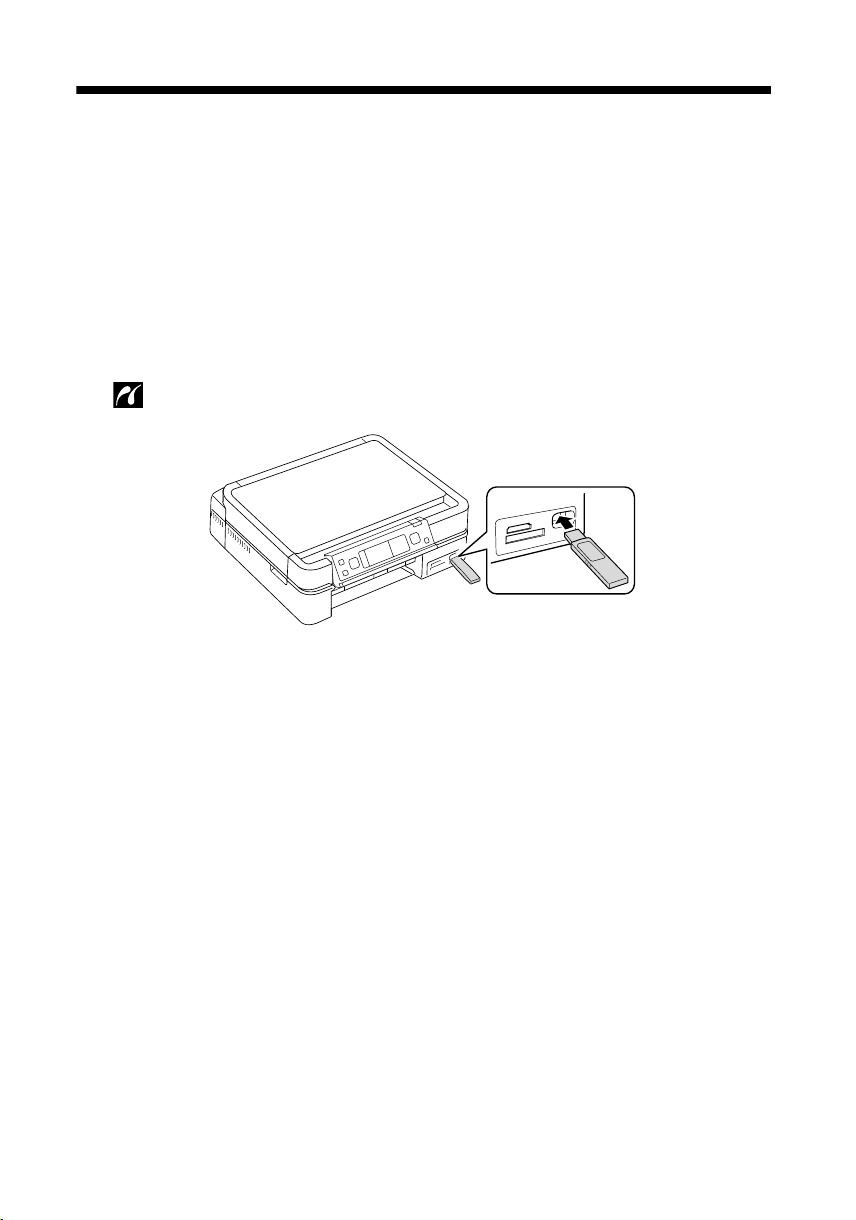
Inserting a USB Drive
You can print from an external storage device connected to the Artisan 700 Series,
such as a USB flash drive, external hard drive, or CD burner.
Note:
Epson cannot guarantee the compatibility of any drives. You may not be able to print
photos from the storage device if they were saved to the device using a product other
than the Artisan 700 Series.
1. Remove any inserted memory card from the Artisan 700 Series.
2. Insert your USB flash drive or the USB cable for your external drive into the
USB connector on the front of your Artisan 700 Series.
3. Insert storage media (such as a CD) into your drive, if necessary.
4. If there are folders on your storage media, select the folder you want and
press
OK
.
5. See the next section to select and print your photos.
Note:
Before removing your USB drive, make sure its access light is not flashing.
Inserting a USB Drive
19
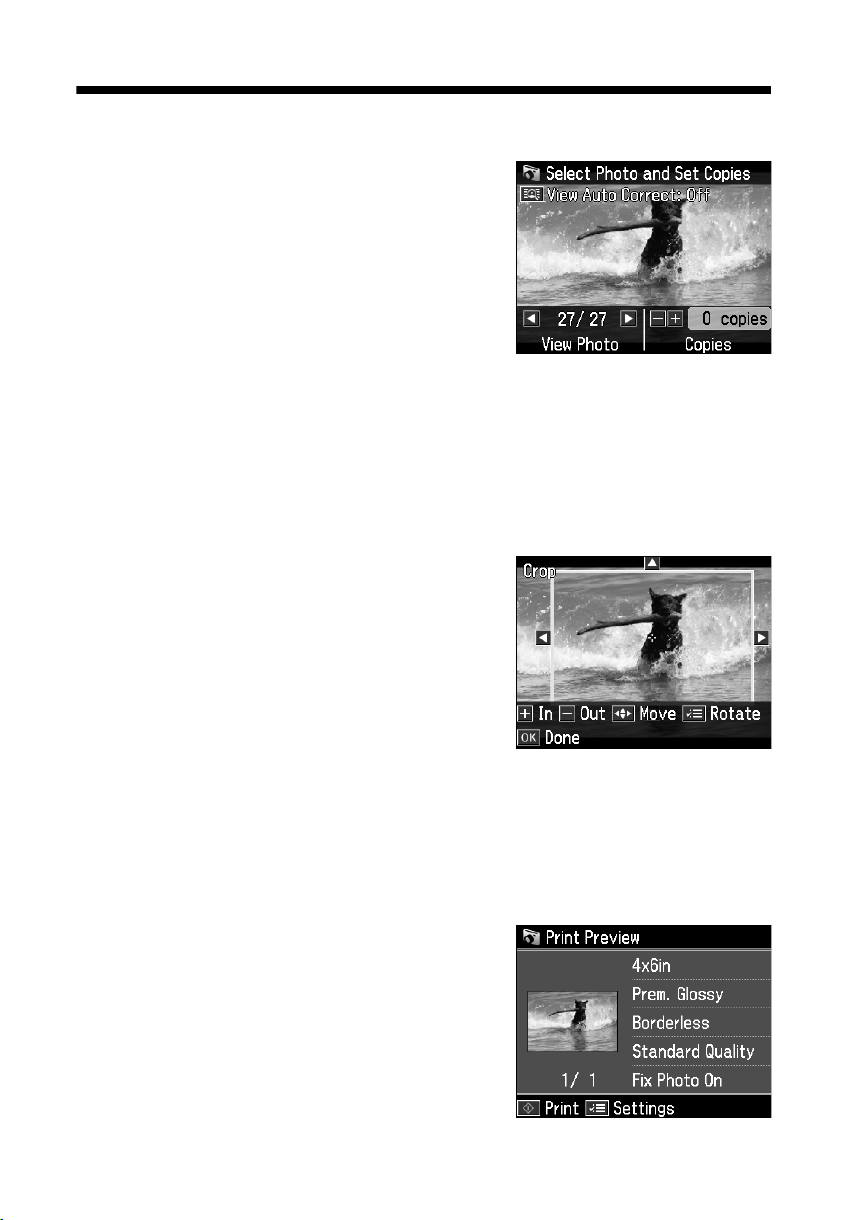
Selecting and Printing Photos
1. Load Epson photo paper. See page 10 for a
list.
2. Press the
selected, then press
3. Select
4. Press
Home
button until
OK.
View and Print Photos
l
or r to move through your photos
Photos
is
and press OK.
and display one you want to print.
Tip:
View Auto Correct: Off appears at the top of the display screen. Press View Auto
Correct to see how the image will look when Fix Photo is turned on (see page 21).
Press View Auto Correct again to return to the original view.
5. To print more than one copy, press + or – to select the number of copies you
want of that photo.
6. If you want to crop the photo and enlarge the
resulting image area to fit onto your paper,
Display/Crop
press
■
To resize the image area, press + or –.
■
To move the image area, use the arrow
.
buttons.
■
To rotate the image area, press x
■
To check the zoomed image, press OK.
Menu
.
When you finish cropping your photo, press
l
7. Press
or r to view other photos, select the number of copies, and crop, if
desired.
8. When you’re done selecting photos, press
OK
. You see the Print Preview screen:
20
Printing From Your Camera’s Memory Card
OK
.
 Loading...