

Page 1

User’s Guide
NPD3982-00 EN
Page 2

Copyright Notice
No part of this publication may be reproduced, stored in a retrieval system, or transmitted in any form or by any means, mechanical, photo copying, recording, or otherwise, without the prior written permission of Seiko Epson Corporation. No patent
liability is assumed with respect to the use of the information contained herein. Neither is any liability assumed for damages resulting from the use of the information
contained herein.
Neither Seiko Epson Corporation nor its affiliates shall be liable to the purchaser of
this product or third parties for damages, losses, costs, or expenses incurred by purchaser or third parties as a result of: accident, misuse, or abuse of this product or
unauthorized modifications, repairs, or alterations to this product, or (excluding the
U.S.) failure to strictly comply with Seiko Epson Corporation’s operating and maintenance instructions.
Seiko Epson Corporation and its affiliates shall not be liable against any damages or
problems arising from the use of any options or any consumable products other than
those designated as Original Epson Products or Epson Approved Products by Seiko
Epson Corporation.
Page 3

SOFTWARE LICENSE AGREEMENT
This package contains the following materials provided by Seiko Epson Corporation (Epson):
software included as part of the printing system, the digitally-encoded machine-readable outline
data encoded in the special format and in the encrypted form (“Font Programs”), other software
which runs on a computer system for use in conjunction with the Printing Software (“Host Software”), and related explanatory written materials (“Documentation”). The term “Software” shall
be used to describe Printing Software, Font Programs and/or Host Software and also include
any upgrades, modified versions, additions, and copies of the Software.
The Software is being licensed to you under the terms of this Agreement.
Epson grants to you a non-exclusive sublicense to use the Software and Documentation, provided that you agree to the following:
1. You may use the Printing Software and accompanying Font Programs for imaging to the
licensed output device(s), solely for your own internal business purposes.
2. In addition to the license for Font Programs set forth in Section 1 (“Printing Software”)
above, you may use Roman Font Programs to reproduce weights, styles, and versions of
letters, numerals, characters and symbols (“Typefaces”) on the display or monitor for your
own internal business purposes.
3. You may make one backup copy of the Host Software, provided your backup copy is not
installed or used on any computer. Notwithstanding the above restrictions, you may install
the Host Software on any number of computers solely for use with one or more printing systems running the Printing Software.
4. Y ou may assign its rights under this Agreement to an assignee of all of Licensee’s right and
interest to such Software and Documentation (“Assignee”) provided you transfer to
Assignee all copies of such Software and Documentation Assignee agrees to be bound by
all of the terms and conditions of this Agreement.
5. You agree not to modify, adapt or translate the Software and Documentation.
6. You agree that you will not attempt to alter, disassemble, decrypt, reverse engineer or
decompile the Software.
7. Title to and ownership of the Software and Documentation and any reproductions thereof
shall remain with Epson and its Licensor.
8. Trademarks shall be used in accordance with accepted trademark practice, including identification of the trademark owner’s name. Trademarks can only be used to identify printed
output produced by the Software. Such use of any trademark does not give you any rights
of ownership in that trademark.
9. Y ou may not rent, lease, sublicense, lend or transfer versions or copies of the Software that
the Licensee does not use, or Software contained on any unused media, except as part of
the permanent transfer of all Software and Documentation as described above.
10. In no event will Epson or its licensor be liable to you for any consequential, incidental INDIRECT, PUNITIVE or special damages, including any lost profits or lost saving, even if
Epson has been advised of the possibility of such damages, or for any claim by any third
party. Epson or its licensor disclaims all warranties with regard to the software, express or
implied, including, without limitation implied warranties of merchantability, fitness for a particular purpose, title and non-infringement of third party rights. Some states or jurisdictions
do not allow the exclusion or limitation of incidental, consequential or special damages, so
the above limitations may not apply to you.
Page 4

11. Notice to Government End Users: The Software is a “commercial item,” as that term is
defined at 48 C.F.R.2.101, consisting of “commercial computer software” and “commercial
computer software documentation,” as such terms are used in 48 C.F.R. 12.212. Consistent with 48 C.F.R. 12.212 and 48 C.F.R. 227.7202-1 through 227.7202-4, all U.S. Government End Users acquire the Software with only those rights set forth herein.
12. You agree that you will not export the Software in any form in violation of any applicable
laws and regulations regarding export control of any countries.
Page 5

Legal Restrictions on Copying
Certain types of documents must never be copied with the purpose or intent to pass
copies of such documents off as the originals.
The following is not a complete list, but is meant to be used as a guide to responsible
copying.
Financial Instruments
z Personal checks
z Traveler’s checks
z Money orders
z Certificates of deposit
z Bonds or other certificates of indebtedness
z Stock certificates
Legal Documents
z Food stamps
z Postage stamps (canceled or uncanceled)
z Checks or drafts drawn by government agencies
z Internal revenue stamps (canceled or uncanceled)
z Passports
z Immigration papers
z Motor vehicle licenses and titles
z House and property titles and deeds
General
z Identification cards, badges, or insignias
z Copyrighted works without permission of the copyright owner
In addition, it is prohibited under any circumstances
rencies, or works of art without permission of the copyright owner.
When in doubt about the nature of a document, consult with legal counsel.
to copy domestic or foreign cur-
" In order to prohibit the illegal reproduction of certain documents, such as
paper currency, this machine is equipped with a counterfeit prevention feature.
Due to the counterfeit prevention feature that this machine is equipped with,
images may be distorted.
Page 6

For EU member states only
This symbol means: Do not dispose of this product
together with your household waste!
Please contact the Local Authority for appropriate disposal instructions. In the case of a new device being
purchased, the used one can also be given to our dealer
for appropriate disposal. Recycling of this product will
help to conserve natural resources and prevent potential
negative consequences for the environment and human
health caused by inappropriate waste handling.
This product complies with RoHS (2002/95/EC) directive.
Page 7

Contents
1 Introduction ....................................................................................................... 1
Getting Acquainted with Your Machine 2
Space Requirements 2
Part Names 4
Front View 4
Rear View 6
Front View with Options 6
Software CD-ROM 7
Printer Drivers (PostScript Drivers) 7
Printer Drivers (PCL Drivers) 7
Printer Drivers (PPD Files) 7
Scanner Drivers 8
Documentation 8
System Requirements 10
2 Control Panel and Configuration Menu ........................................................ 11
About the Control Panel 12
Control Panel Indicators and Keys 12
Display Indications 14
Main Screen (Copy Mode) 14
Contents
i
Page 8

Main Screen (Scan Mode) 17
Print Screen 21
Checking the Machine Status and Settings 22
TONER REMAINING 22
REPORT/STATUS Menu 22
TOTAL PRINT 23
SUPPLY STATUS 23
TX RESULT 24
REPORT 24
Configuration Menu Overview 25
UTILITY Menu 25
MACHINE SETTING Menu 27
PAPER SETUP Menu 31
ADMIN. MANAGEMENT Menu 34
COPY SETTING Menu 48
ADDRESS REGISTER Menu 50
REPORTING Menu 51
SCAN SETTING Menu 51
DIRECT PRINT Menu 53
PS/PCL PRINT Menu 55
PROOF/PRINT MENU 55
PAPER MENU 57
QUALITY MENU 60
SYS DEFAULT MENU 80
MEMORY PRINT Menu 86
3 Media Handling ...............................................................................................89
Print Media 90
Specifications 90
Types 91
Plain Paper (Recycled Paper) 91
Thick Stock 92
Envelope 93
Label 94
Letterhead 95
Postcard 95
Transparency 96
Glossy Media 97
Guaranteed Imageable (Printable) Area 99
Imageable Area—Envelopes 99
Page Margins 99
Loading Media 100
How do I load media? 100
Tray 1 (Manual Feed Tray) 100
Loading Plain Paper 100
Other Media 102
Contentsii
Page 9

Loading Envelopes 103
Loading Label Sheets/Letterheads/Postcards/Thick Stock/Glossy Media
and Transparencies 105
Tray 2 107
Loading Plain Paper 107
Tray 3 (Optional Lower Feeder Unit) 110
Loading Plain Paper 110
About Duplex Printing 113
How do I autoduplex? 113
Output Tray 115
Media Storage 116
Original Media 117
Specifications 117
Documents that can be placed on the original glass 117
Documents that can be loaded into the ADF 117
Loading a Document to be Copied 119
Placing a document on the original glass 119
Loading a document into the ADF 120
4 Using the Printer Driver .............................................................. ... .............. 121
Selecting Printer Options/Defaults (for Windows) 122
Windows Vista/XP/Server 2003/2000 (PCL6, PS) 122
Uninstalling the Printer Driver (for Windows) 124
Windows Vista/XP/Server 2003/2000 (PCL6, PS) 124
Displaying Printer Driver Settings (for Windows) 125
Windows Vista 125
Windows XP/Server 2003 125
Windows 2000 125
Printer Driver Settings 126
Common Buttons 126
Advanced Tab (PostScript Printer Driver Only) 127
Basic Tab 127
Layout Tab 128
Cover Page Tab 128
Watermark/Overlay Tab 128
Quality Tab 129
Other Tab 130
Limitations on printer driver functions installed with Point and Print 130
5 Camera Direct ............................................................................................... 131
Camera Direct 132
Printing Directly from a Digital Camera 132
6 Memory Direct ...............................................................................................133
Memory Direct 134
Printing From a Connected USB Memory Device 134
Contents
iii
Page 10

7 Using the Copier ........................................................................................... 137
Making Basic Copies 138
Basic Copy Operation 138
Specifying the Copy Quality Setting 139
Selecting the Document Type 139
Specifying the Copy Density 140
Specifying the Zoom Ratio 140
Selecting a Preset Zoom Ratio 140
Specifying a Custom Zoom Ratio 140
Selecting the Media Tray 141
Making Advanced Copies 142
Setting 2in1/4in1 Copying 142
2in1/4in1 Copying From the ADF 142
2in1/4in1 Copying From the Original Glass 142
Setting a Copy Function 143
ID Card Copying 144
Repeat Copying 145
Poster Copying 146
Setting Duplex (Double-Sided) Copying 147
Duplex (Double-Sided) Copying From the ADF 147
Duplex (Double-Sided) Copying From the Original Glass 148
Duplex (Double-Sided) Document Copying 149
Setting Collated (Sort) Copying 149
Collated (Sort) Copying From the ADF 149
Collated (Sort) Copying From the Original Glass 149
8 Using the Scanner ........................................................................................ 151
Scanning From a Computer Application 152
Basic Scanning Operation 152
Windows TWAIN Driver Settings 153
Windows WIA Driver Settings 155
Macintosh TWAIN Driver Settings 156
Scanning With the Machine 158
Basic Scanning Operation 158
Specifying the Data Location 159
Saving Data on a USB Memory Device (Scan to USB Memory) 160
Specifying the Destination Address (Scan to E-mail/FTP/SMB) 161
Directly Entering the E-mail Address 161
Selecting From the Favorite List 162
Selecting an Address Destination 162
Selecting a Group Destination 163
Selecting From the Address Book 164
Searching the Address Book 164
Searching an LDAP Server 165
Specifying Multiple Destination Addresses 167
Editing a Specified Destination Address 167
Contentsiv
Page 11

Deleting a Specified Destination Address 168
Registering/Editing Addresses 168
Registering in the Favorite List 169
Deleting From the Favorite List 169
Registering Address Destinations (Direct Input) 170
Registering Address Destinations (LDAP Search) 171
Editing/Deleting Address Destinations 173
Registering Group Destinations 174
Editing/Deleting Group Destinations 175
Selecting the Data Format 176
Selecting the Scan Quality Setting 176
Selecting the Resolution 176
Selecting the Scan Mode 177
Selecting the Scan Density 177
Setting Duplex (Double-Sided) Scanning 177
Setting the Scan Size 178
Setting the Scan Color 178
Specifying the Subject 178
Deleting a Queued Transmission Job 178
9 Replacing Consumables ..............................................................................181
Replacing Consumables 182
About Toner Cartridges 182
Replacing a Toner Cartridge 184
Replacing an Imaging Unit 188
Replacing the Waste Toner Bottle 194
10 Maintenance .................................................................................................. 199
Maintaining the Machine 200
Cleaning the Machine 202
Exterior 202
Media Rollers 203
Cleaning the Media Feed Rollers (Manual Feed Tray) 203
Cleaning the Media Feed Rollers (Tray 2/3) 205
Cleaning the Media Transfer Rollers for Tray 3 206
Cleaning the Media Feed Rollers for the ADF 207
Cleaning the Media Feed Rollers for the Duplex 208
Laser Lens 209
11 Troubleshooting ........................................................................................... 211
Introduction 212
Printing a Configuration Page 213
Unlocking the Scanner 214
Preventing Media Misfeeds 215
Understanding the Media Path 216
Clearing Media Misfeeds 216
Contents
v
Page 12

Media Misfeed Messages and Clearing Procedures 217
Clearing a Media Misfeed from Tray 1 (Manual Feed Tray) and Transfer
Roller 218
Clearing a Media Misfeed in Tray 2 221
Clearing a Media Misfeed in Tray 3 224
Clearing a Media Misfeed from the ADF 227
Clearing a Media Misfeed from the Duplex 229
Clearing a Media Misfeed from the Fuser Unit 230
Clearing a Media Misfeed from the Switchback 234
Clearing a Media Misfeed from the Horizontal Transport Area 236
Solving Problems with Media Misfeeds 238
Solving Other Problems 241
Solving Problems with Printing Quality 248
Status, Error, and Service Messages 254
Status Messages 254
Error Messages 255
Service Messages 263
12 Installing Accessories .................................................................................. 265
Introduction 266
Antistatic Protection 267
Dual In-Line Memory Module (DIMM) 268
Installing a DIMM 268
Hard Disk Drive 271
Installing the Hard Disk drive 271
Tray 3 (Lower Feeder Unit) 275
Kit Contents 275
Installing Tray 3 276
A Appendix .......................................................................................................279
Technical Specifications 280
Entering Text 283
Key Operation 283
Entering Names 283
Entering E-mail Addresses 284
Changing Input Mode 284
Inputting Example 284
Correcting Text and Input Precautions 286
Our Concern for Environmental Protection 287
What is an ENERGY STAR product? 287
Contentsvi
Page 13

1Introduction
Page 14

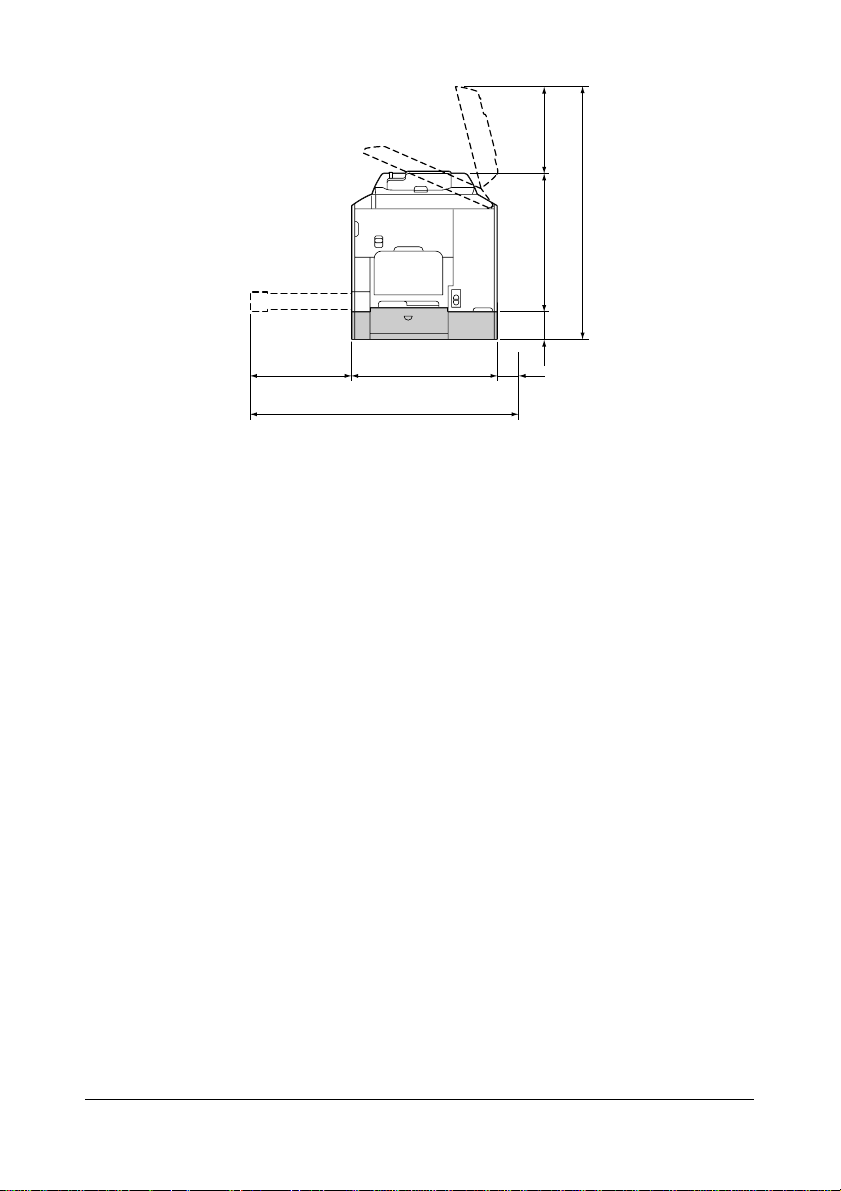
Getting Acquainted with Your Machine
Space Requirements
To ensure easy operation, consumable replacement and maintenance,
adhere to the recommended space requirements detailed below.
1355 mm (53.3")
100 mm
(3.9")
290 mm
(11.4")
539 mm (21.2")
Front View
326 mm
(12.8")
(13.0")
329 mm
100 mm
(3.9")
326 mm
(12.8")
907 mm (35.7")
578 mm (22.8")
590 mm (23.2")
100 mm
(3.9")
1016 mm (40.0")
Side View
Getting Acquainted with Your Machine2
Page 15
(13.0")
329 mm
578 mm (22.8")
1018 mm (40.1")
326 mm
(12.8")
590 mm (28.2")
1016 mm (40.0")
11 1 mm
(4.4")
100 mm
(3.9")
Side View with Options
" The option appears shaded in the above illustrations.
Getting Acquainted with Your Machine
3
Page 16
Part Names
The following drawings illustrate the parts of your machine referred to
throughout this guide, so please take some time to become familiar with
them.
Front View
1—Control panel
2—Automatic Document
Feeder (ADF)
2-a: ADF feed cover
2-b: Document guide
2-c: Document feed tray
2-d: Document output tray
2-e: Document stopper
" The ADF may appear
as “document cover” in
status and error messages.
" Lower the document
stopper when scanning
Legal-size paper with
the ADF.
3—Tray 1 (Manual feed tray)
4—Tray 2
5—Output tray
6—Extension tray
7—Scanner lock lever
8—Original glass
9—Original cover pad
10—Scanner unit
2-a
1
4 3
8
7
6
5
2-c
22-b
2-d
2-e
9
10
Getting Acquainted with Your Machine4
Page 17
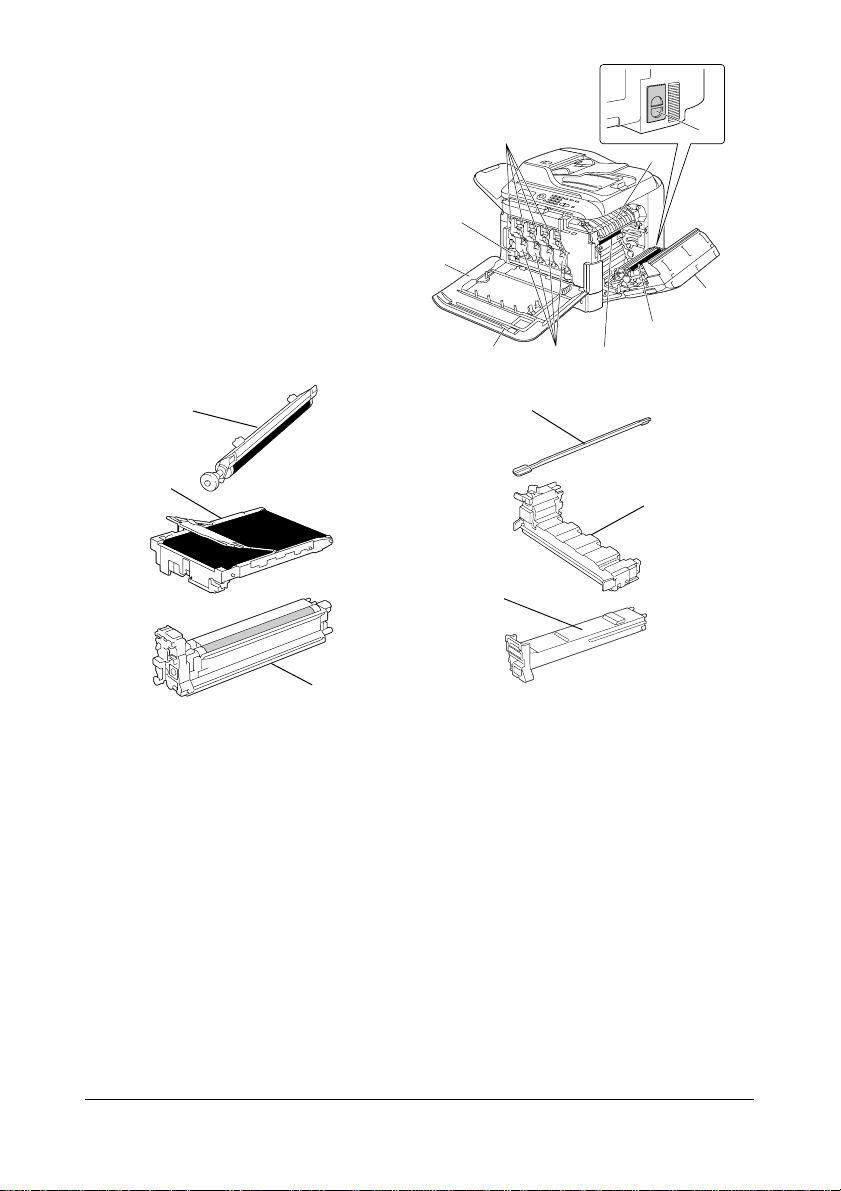
11—Fuser unit
12—Right door
13—Transfer roller
14—Transfer belt unit
15—Imaging unit(s)
16—Laser lens cleaning tool
17—Front cover
18—Waste toner bottle
19—Toner cartridge(s)
20—Ozone filter
19
18
17
16
14
15
20
11
12
13
14
13
16
18
19
P
U
S
H
Y
Y
15
Getting Acquainted with Your Machine
5
Page 18
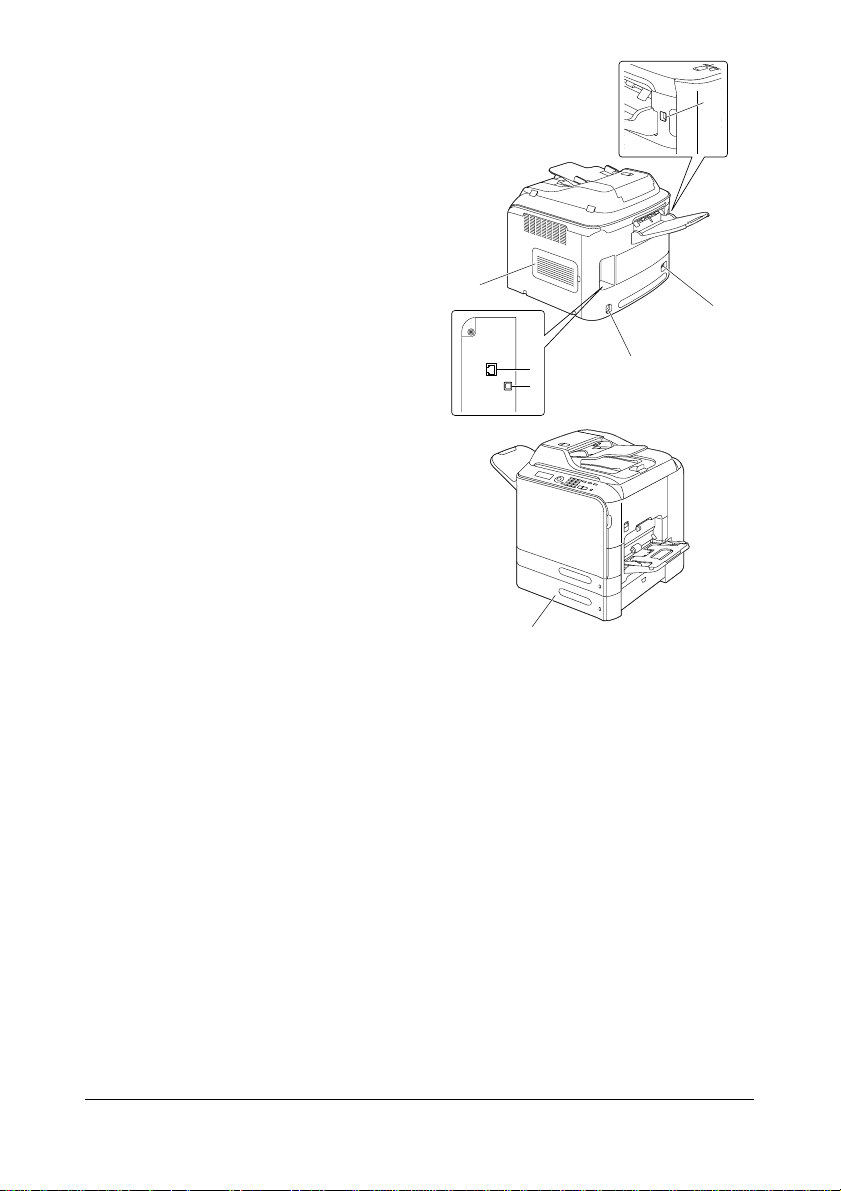
Rear View
1—Power switch
2—Power connection
3—10Base-T/100Base-TX/
1000Base-T Ethernet Inter-
face port
4—USB port
5—Rear cover
6—USB HOST port
Front View with Options
1—Lower feeder unit (Tray 3)
6
5
1
3
4
1
2
Getting Acquainted with Your Machine6
Page 19

Software CD-ROM
Printer Drivers (PostScript Drivers)
Drivers Use/Benefit
Windows Vista/XP/Server 2003/
2000
Windows Vista/XP/Server 2003 for
64bit
These drivers give you access to all of
the printer features, including finishing
and advanced layout. For details,
refer to “Displaying Printer Driver Settings (for Windows)” on page 125.
" A specific PPD file has been prepared for applications (such as Page
Maker and Corel Draw) that require that a PPD file be specified when
printing.
When specifying a PPD file while printing on Windows Vista, XP,
Server 2003 and 2000, use the specific PS file provided on the software CD-ROM.
Printer Drivers (PCL Drivers)
Drivers Use/Benefit
Windows Vista/XP/Server 2003/
2000
Windows Vista/XP/Server 2003 for
64bit
These drivers give you access to all of
the printer features, including finishing
and advanced layout. For details,
refer to “Displaying Printer Driver Settings (for Windows)” on page 125.
Printer Drivers (PPD Files)
Drivers Use/Benefit
Macintosh OS X (10.2.8, 10.3, 10.4,
10.5)
Red Hat Linux 9.0, SuSE Linux 8.2
These files are required in order to
use the printer driver for each operating system.
For details of the Macintosh and
Linux printer driver, refer to the Reference Guide on the software
CD-ROM.
Getting Acquainted with Your Machine
7
Page 20
Scanner Drivers
Drivers Use/Benefit
TWAIN Driver for Windows Vista/XP/
Server 2003/2000
TWAIN Driver for Macintosh OS X
10.2.8 or later
WIA Driver for Windows Vista/XP This driver enables you to set scanWIA Driver for Windows Vista/XP for
64bit
These drivers enable you to set scanning functions, such as the color setting and size adjustments.
For details, refer to “Windows TWAIN
Driver Settings” on page 153.
ning functions, such as the color setting and size adjustments.
For details, refer to “Windows WIA
Driver Settings” on page 155.
" For details of the Windows drivers, refer to the Setup Guide on the
software CD-ROM.
" For details of the Macintosh and Linux drivers, refer to the Reference
Guide on the software CD-ROM.
" Windows TWAIN driver does not correspond to 64-bit applications
though it corresponds to 32-bit applications on 64-bit OS.
Documentation
Documentation Use/Benefit
Setup Guide This manual provides installation
details that must be performed in
order to use this machine, such as
setting up the machine and installing
the drivers.
User's Guide (this manual) This manual provides details on gen-
eral daily operations, such as using
the drivers and control panel and
replacing consumables.
Getting Acquainted with Your Machine8
Page 21

Documentation Use/Benefit
Reference Guide This manual provides details on
installing the Macintosh and Linux
drivers and on specifying settings for
the network.
Safety Information Guide This guide provides details on operat-
ing conditions and precautions. Be
sure to read this information before
using the machine.
Getting Acquainted with Your Machine
9
Page 22

System Requirements
Personal computer
– Pentium II: 400MHz or higher
– PowerPC G3 or later (G4 or later is recommended)
– Macintosh equipped with an Intel processor
Operating System
– Microsoft Windows Vista Home Basic/Home Premium/Ultimate/Busi-
ness/Enterprise, Windows Vista Home Basic/Home Premium/ Ultimate/Business/Enterprise x64 Edition, Windows XP Home Edition/
Professional (Service Pack 2 or later), Windows XP Professional x64
Edition, Windows Server 2008 Standard/Enterprise, Windows Server
2008 Standard/Enterprise x64 Edition, Windows Server 2003, Windows Server 2003 x64 Edition, Windows 2000 (Service Pack 4 or
later)
– Mac OS X (10.2.8 or later; We recommend installing the latest patch)
– Red Hat Linux 9.0, SuSE Linux 8.2
Free hard disk space
256 MB or more
RAM
128 MB or more
CD drive
I/O interface
– 10Base-T/100Base-TX/1000Base-T (IEEE 802.3) Ethernet interface
port
– USB Revision 2.0 and USB Revision 1.1 compliant port
" The Ethernet cable and USB cable are not included with the machine.
" For details of the Macintosh and Linux drivers, refer to the Reference
Guide on the software CD-ROM.
Getting Acquainted with Your Machine10
Page 23

2Control Panel
and Configuration
Menu
Page 24
About the Control Panel
25 10
3
6
89431 7
11 12 13 14
Control Panel Indicators and Keys
No. Name Function
1 Message win-
dow
2 +/, keys Moves up and down through menus, options, or
3 */) keys Moves left and right through menus, options, or
4 Select key Press to select the setting that is currently displayed.
5 Error indicator Indicates an error condition.
6 Back key Clears the specified number of copies and entered
7 Keypad Enters desired number of copies. Enters mail
8 Addressbook
key
Displays settings, menus, and messages.
choices.
choices.
text.
Press to return to the previous screen.
Press to cancel the setting that is currently dis-
played.
addresses and names of recipients.
Displays the information registered in the favorite
list, address destinations and group destinations.
About the Control Panel12
Page 25

No. Name Function
9 Scan key/LED Enters Scan mode. (Scan to E-mail, Scan to FTP,
Scan to a shared folder on a computer, or Scan to
USB Memory)
Lights up in green to indicate that the machine is in
Scan mode.
For details on the Scanner functions, refer to chapter
6, “Using the Scanner”
10 Copy key/LED Enters Copy mode.
Lights up in green to indicate that the machine is in
Copy mode.
For details on the Copy functions, refer to chapter 5,
“Using the Copier”.
11 Start (B&W) key Starts monochrome copying or scanning.
12 Start indicator Lights up in blue when copying is possible.
Lights up in orange when copying is not possible, for
example, during warm-up or if an error has occurred.
13 Start (Color) key Starts color copying or scanning.
14 Stop/Reset key Returns the settin gs to their defaults and stops func-
tions.
To stop a job, press the * key before pressing the
Stop/Reset key.
About the Control Panel
13
Page 26
Display Indications
Main Screen (Copy Mode)
3 4
1
2
No. Indication Description
1 Copy settings Allows the current settings to be checked and the
various settings to be changed. For details, refer to
“Copy settings” on page 15.
2 S tatus Depending on the situation, the machine status or an
error message may appear.
3 Copy density Indicates the copy density.
AUTO appears when DENSITY is set to AUTO and
the
TEXT copy mode is selected.
4 Number of
copies
Indicates the number of copies.
About the Control Panel14
Page 27
Copy settings
1
2
3
Press +/,
4
5
6
Press +/,
7
8
9
Press +/,
10
11
No. Indication Description
1 Media tray Indicates the media tray that is selected. For details
2 Zoom ratio Indicates the zoom ratio that is specified. For details
3 Copy quality Indicates the copy quality that is selected. For details
About the Control Panel
on selecting the media tray, refer to “Selecting the
Media Tray” on page 141.
on specifying the zoom ratio, refer to “Specifying the
Zoom Ratio” on page 140.
on selecting the copy quality, refer to “Specifying the
Copy Quality Setting” on page 139.
15
Page 28

No. Indication Description
4 Collated (Sort)
copying
5 2in1/4in1 copy-
ing
6 Double-sided/
single-sided
copying
7 Copy function Indicates the copy function that is set. For details on
8
UTILITY
9
REPORT/STATUS
10
PS/PCL
PRINT
11
MEMORY
PRINT
Indicates whether or not collated (Sort) copying is
selected. For details on selecting collated (Sort)
copying, refer to “Setting Collated (Sort) Copying” on
page 149.
Indicates whether or not 2in1/4in1 copying is
selected. For details on selecting 2in1/4in1 copying,
refer to “Setting 2in1/4in1 Copying” on page 142.
Indicates whether double-sided copying or sin-
gle-sided copying is selected. For details on select-
ing double-sided/single-sided copying, refer to
“Setting Duplex (Double-Sided) Copying” on page
147.
setting a copy function, refer to “Setting a Copy
Function” on page 143.
Select this menu item to change the various
machine settings. For details, refer to “UTILITY
Menu” on page 25.
Select this menu item to view the total number of
pages printed by this machine as well as to print the
reports. For details, refer to “REPORT/STATUS
Menu” on page 22.
Select this menu item to print or delete jobs stored
on the machine's hard disk (optional) and to change
the settings related to PS/PCL printing. For details,
refer to “PS/PCL PRINT Menu” on page 55.
Select this menu item to perform memory direct
printing operations and to specify settings for these
operations. For details, refer to “MEMORY PRINT
Menu” on page 86.
" This menu item appears only if an optional
hard disk drive is installed.
About the Control Panel16
Page 29

Main Screen (Scan Mode)
3
1
2
No. Indication Description
1 Scan settings Allows the current settings to be checked and the
various settings to be changed. For details, refer to
“Scan settings” on page 18.
2 S tatus Depending on the situation, the machine status or an
error message may appear.
3 Available mem-
ory
Indicates the percentage of memory available for
scanning operations.
About the Control Panel
17
Page 30
Scan settings
1
2
3
Press +/,
4
5
6
Press +/,
7
8
9
Press +/,
10
No. Indication Description
1 Data format Indicates the data format that is selected. For details
on selecting the data format, refer to “Selecting the
Data Format” on page 176.
2 Scan quality Indicates the scan quality that is selected. For details
on selecting the scan quality, refer to “Selecting the
Scan Quality Setting” on page 176.
About the Control Panel18
Page 31

No. Indication Description
3 Scan data desti-
nation
Indicates the specified destination for the scan data.
For details on specifying the destination of the data,
refer to “Specifying the Data Location” on page 159
and “Specifying the Destination Address (Scan to
E-mail/FTP/SMB)” on page 161.
" If no destination has been specified, SCAN
TO
appears.
4 Single-sided/
double-sided
scanning
5 Scan size Indicates the scan size that is selected. For details
6 Scan color Indicates the scan color th at is selected. For details
7
SUBJECT
Indicates whether double-sided scanning or sin-
gle-sided scanning is selected. For details on select-
ing double-sided/single-sided scanning, refer to
“Setting Duplex (Double-Sided) Scanning” on page
177.
on selecting the scan size, refer to “Setting the Scan
Size” on page 178.
on selecting the scan color, refer to “Setting the Scan
Color” on page 178.
Select this menu item to specify the subject. For
details on specifying the subject, refer to “Specifying
the Subject” on page 178.
" This menu item does not appear if an FTP
address or SMB address was specified as the
destination.
8
CANCEL
RESERV.
Select this menu item to display the list of jobs
queued for transmission and to delete a job. For
details, refer to “Deleting a Queued Transmission
Job” on page 178.
About the Control Panel
" This menu item does not appear if an e-mail
address, FTP address or SMB address was
specified as the destination.
19
Page 32

No. Indication Description
9
UTILITY
Select this menu item to change the various
machine settings. For details, refer to “UTILITY
Menu” on page 25.
" This menu item does not appear if an e-mail
address, FTP address or SMB address was
specified as the destination.
10
REPORT/STATUS
Select this menu item to view the total number of
pages printed by this machine as well as to print the
reports. For details, refer to “REPORT/STATUS
Menu” on page 22.
" This menu item does not appear if an e-mail
address, FTP address or SMB address was
specified as the destination.
About the Control Panel20
Page 33

Print Screen
When a print job is received, PRINTER: Printing appears in the status
section of the main screen. To display the print screen (as shown below),
press the * key while
To cancel printing, press the Stop/Reset key when the print screen appears.
Press the Select key to select
No. Indication Description
1 Status Displays messages indicating operations such as
2 Media tray/
media size
PRINTER: Printing is displayed.
YES.
printing.
Indicates the media tray and media size that is
selected.
About the Control Panel
21
Page 34

Checking the Machine Status and Settings
TONER REMAINING
With the main screen displayed, press the * key to display the TONER
REMAINING screen. From this screen, a general estimate of the amount of
toner remaining in the toner cartridges can be viewed.
To return to the main screen, press the Back key.
" If the Select key is held down for at least 2 seconds while the screen
described above is displayed, the configuration page will be printed.
REPORT/STATUS Menu
To display the REPORT/STATUS screen, select REPORT/STATUS in the
main screen, and then press the Select key. From this menu, the total number of pages printed by this machine can be viewed. In addition, the reports
can be printed. The REPORT/STATUS menu is structured as shown below.
" To return to the previous screen, press the Back key . To display the
main screen, press the Stop/Reset key.
REPORT/STATUS TOTAL PRINT
SUPPLY STATUS
TX RESULT
REPORT
Checking the Machine Status and Settings22
Page 35

TOTAL PRINT
The total number of pages for each of the following can be checked.
TOTAL PRINT
MONO COPY
COLOR COPY
MONO PRINT
COLOR PRINT
TOTAL SCAN
This counter shows the total number of pages
printed.
This counter shows the total number of pages
copied in black-and-white.
This counter shows the total number of pages
copied in color.
This counter shows the total number of pages
printed in black-and-white.
This counter shows the total number of pages
printed in color.
This counter shows the total number of document pages that were scanned.
SUPPLY STATUS
The remaining amount of toner in the toner cartridges and the remaining service life of the imaging units can be displayed as a percentage.
C TONER
M TONER
Y TONER
K TONER
C I-UNIT
M I-UNIT
Y I-UNIT
K I-UNIT
Displays the remaining amount of toner in the
cyan (C) toner cartridge as a percentage.
Displays the remaining amount of toner in the
magenta (M) toner cartridge as a percentage.
Displays the remaining amount of toner in the
yellow (Y) toner cartridge as a percentage.
Displays the remaining amount of toner in the
black (K) toner cartridge as a percentage.
Displays the remaining service life of the cyan
(C) imaging unit as a percentage.
Displays the remaining service life of the
magenta (M) imaging unit as a percentage.
Displays the remaining service life of the yellow
(Y) imaging unit as a percentage.
Displays the remaining service life of the black
(K) imaging unit as a percentage.
Checking the Machine Status and Settings
23
Page 36

TX RESULT
The transmission history of Scan To E-mail, Scan To SMB, and Scan To FTP
can be displayed.
For details, refer to “Specifying the Destination Address (Scan to E-mail/FTP/
SMB)” on page 161.
REPORT
The machine settings, lists and reports related to scanning can be printed.
TX RESULT REPORT
FAVORITE LIST
ADDRESS LIST
GROUP LIST
UTILITY MAP
PS/PCL MENU MAP
CONFIGURATION PAGE
PS FONT LIST
PCL FONT LIST
DIRECTORY LIST
Prints the result of the latest scan.
Prints a list of the destinations registered in the
favorite list.
Prints a list of the address destinations.
Prints a list of the group destinations.
Prints the UTILITY menu and its settings.
Prints PS/PCL PRINT menu and its settings.
Prints a estimate of the percentage of toner
remaining and the settings, information and status of this machine.
Prints the PostScript font list.
Prints the PCL font list.
Prints the directory list of the hard disk.
Checking the Machine Status and Settings24
Page 37

Configuration Menu Overview
To display the settings menu for this machine, select UTILITY in the ma in
screen, and then press the Select key. From the UTILITY menu, settings for
the various machine functions can be changed.
In addition, Copy mode settings can be specified for PS/PCL printing and
memory direct printing. For details, refer to “PS/PCL PRINT Menu” on page
55 and “MEMORY PRINT Menu” on page 86.
UTILITY Menu
From this menu, various machine settings can be changed. The UTILITY
menu is structured as shown below.
" T o return to the previous screen in the UTILITY menu, press the Back
key. (If the Back key is pressed while settings are being specified,
those settings are not saved.)
" The ADMIN. MANAGEMENT menu is accessible only by the ad mi n i s-
trator. To display the settings for this menu, select ADMIN. MANAGE-
MENT
, use the keypad to type in the 6-digit administrator access code
(default: 000000), and then press the Select key.
UTILITY MACHINE SETTING
PAPER SETUP
ADMIN. MANAGEMENT
COPY SETTING
ADRESS REGISTER
REPORTING
Configuration Menu Overview
25
Page 38

SCAN SETTING
"
DIRECT PRINT
*
This menu item appears when ADMIN. MANAGEMENT/CAMERA
DIRECT
is set to ENABLE.
*
Configuration Menu Overview26
Page 39

MACHINE SETTING Menu
MACHINE SETTING AUTO PANEL RESET
PREHEAT MODE
ENERGY SAVE MODE
LCD CONTRAST
KEY SPEED TIME TO START
LANGUAGE
INTERVAL
LAMP OFF TIME
LAMP WARMUP TIME
TONER EMPTY
TONER NEAR EMPTY
I-UNIT NEAR EMPTY
Configuration Menu Overview
27
Page 40

AUTO CONTINUE
CALIBRATION
" Manufacturer’s default settings appear in bold.
AUTO PANEL RESET
PREHEAT MODE
ENERGY SAVE MODE
LCD CONTRAST
Setting
OFF / 30sec / 1min / 2min /
3min / 4min / 5min
Specify the length of time until all settings that
have not been programmed, such as the number of copies, are cleared and return to their
default settings when no operation is performed.
To set the machine to perform the auto panel
reset operation, select from 30sec, 1min, 2min,
3min, 4min or 5min for the length of time until
the auto panel reset operation is performed.
Setting
Enters Preheat mode (first stage of the energy
save mode) in order to conserve energy when
no operation is performed. Specify the length of
time in minutes until the machine enters Preheat mode.
Setting
Enters Energy Save mode in order to conserve
energy when no operation is performed. Specify
the length of time in minutes until the machine
enters Energy Save mode.
Setting (LIGHT) (DARK)
Specify the brightness of the message window.
1 to 120 min (Default: 1 min)
3 to 120 min (Default: 3 min)
Configuration Menu Overview28
Page 41

KEY
SPEED
TIME TO
START
INTERVAL
LANGUAGE
LAMP OFF TIME
Setting
0.1sec / 0.3sec / 0.5sec /
1.0sec / 1.5sec / 2.0sec /
2.5sec / 3.0sec
Specify the length of time until the cursor begins
to move continuously when a key is held down.
Setting
0.1sec / 0.3sec / 0.5sec /
1.0sec / 1.5sec / 2.0sec /
2.5sec / 3.0sec
Specify the length of time until the cursor continuously moves between settings or characters.
Setting
ENGLISH / FRENCH / GERMAN /
ITALIAN / SPANISH / PORTU-
GUESE
/ RUSSIAN / CZECH /
SLOVAK / HUNGARIAN / POLISH
/
JAPANESE
Select the language of the menus and messages that appear in the message window.
Setting
Select the length of time until the scanner unit
lamp goes off when no operation is performed.
If MODE1 is selected, the lamp goes off when
the machine enters Preheat mode.
MODE1 / MODE2
MODE2 is selected, the lamp goes off when
If
the machine enters Energy Save mode.
Configuration Menu Overview
29
Page 42

LAMP WARMUP TIME
TONER EMPTY
TONER NEAR EMPTY
I-UNIT NEAR EMPTY
AUTO CONTINUE
CALIBRATION
Setting
Specify the warm-up time for the lamp of the
scanner unit.
AUTO is selected, the length of time to
If
recover from Energy Save mode when the
machine is turned on is adjusted according to
the room temperature. Since the machine cannot be used until its condition is completely stabilized, select this setting, for example, if you
wish to scan at a high image quality from the
first page.
FIX is selected, the machine can be used
If
after lamp warm-up is finished. With a low room
temperature, the quality of the first page of a
copy or scanned image may not be as good as
if AUTO was selected.
Setting
Select whether or not printing and copying stop
when the toner has run out.
STOP is selected, printing and copying stop
If
when the toner runs out.
If BW CONTINUE is selected, monochrome
printing and monochrome copying can continue
when one or more color toners run out while
black toner still remains.
Setting
When the toner is nearly run out, a warning
message appears.
Setting
When the imaging unit is nearly run out, warning
message appears.
Setting
Select whether or not printing continues when a
size error occurs during printing.
Setting
Select whether or not to perform image stabili-
zation. If ON is selected, image stabilization is
started.
AUTO / FIX
STOP / BW CONTINUE
ON / OFF
ON / OFF
ON / OFF
ON / OFF
Configuration Menu Overview30
Page 43

PAPER SETUP Menu
PAPER SETUP TRAY1 PAPER
TRAY2 PAPER
Configuration Menu Overview
31
Page 44

" Manufacturer’s default settings appear in bold.
TRAY1 PAPER
Media type
PLAIN PAPER / THICK PAPER /
THICK PAPER2 / TRANSPARENCY /
LABELS / LETTERHEAD / GLOSSY /
GLOSSY2 / ENVELOPE / POSTCARD
Paper size
When a setting other than
or
POSTCARD is selected: A4 / A5 / B5
/
LEGAL / LETTER / G LETTER /
ENVELOPE
STATEMENT / EXECUTIVE / FOLIO /
G LEGAL / CUSTOM
When ENVELOPE is selected: COM10 /
C6 / DL / MONARCH / CHOU#3 / CUS-
TOM
When POSTCARD is selected:
J-POSTCARD 100x148 / D-POST-
CARD 148x200
Select the type and size of the media loaded into Tray
1. If CUSTOM is selected as the paper size, specify
settings for
The Setting range for LENGTH is 148 to 356 mm.
The default setting is 297 mm.
The Setting range for WIDTH is 92 to 216 mm.
LENGTH and WIDTH separately.
/ CUSTOM
The default setting is 210 mm.
When a media type is selected, a screen appears,
showing the available media sizes. The available
media sizes differ depending on the selected media
type.
" The setting for CUSTOM is displayed in
metric (mm) even if ADMIN. MANAGEMENT/
USER SETTING/PRESET ZOOM
INCH.
Configuration Menu Overview32
is set to
Page 45

TRAY2 PAPER
Paper size
Select the size of the media loaded into Tray 2. If
CUSTOM is selected as the paper size, specify settings
for
LENGTH and WIDTH separately.
The Setting range for LENGTH is 148 to 297 mm.
The default setting is 297 mm.
The Setting range for WIDTH is 92 to 216 mm.
The default setting is 210 mm.
Only plain paper can be loaded into Tray 2.
A4 / A5 / B5 / LETTER / G LETTER /
STATEMENT / EXECUTIVE / CUSTOM
" The setting for CUSTOM is displayed in
metric (mm) even if
USER SETTING/PRESET ZOOM
INCH.
ADMIN. MANAGEMENT/
is set to
Configuration Menu Overview
33
Page 46

ADMIN. MANAGEMENT Menu
" The ADMIN. MANAGEMENT menu is accessible only by the ad mi n i s-
trator. To display the settings for this menu, select
MENT
, use the keypad to type in the 6-digit administrator access code
(default: 000000), and then press the Select key.
ADMIN. MANAGE-
ADMIN. MANAGEMENT
ADMINISTRATOR
NO.
NETWORK SETTING
TCP/IP
IP ADDR. SET-
*1
TING
*1
DNS
*1
DHCP
*1
BOOTP
ARP/PING
*1
DNS AUTO SETTING
SPECIFY
*1
HTTP
*1
FTP
*1
SMB
Configuration Menu Overview34
Page 47

BONJOUR
*1
DYNAMIC DNS
*1
IPP
RAW PORT
SLP
SNMP
WSD PRINT
IPSEC
*1
*1
*1
*1
*1
*1
DISABLE/ENABLE
BIDIRECTIONAL
Configuration Menu Overview
IP ADDR.
*1
FILTER
*1
IPv6
ACCESS PER.
ACCESS REFUSE
DISABLE/ENABLE
AUTO SETTING
35
*2
Page 48

NETWARE
APPLETALK
SPEED/
DUPLEX
IEEE802.1X
E-MAIL SETTING SMTP
LINK LOCAL
GLOBAL
*2
ADDRESS
GATEWAY
*2
ADDRESS
*2
SENDER NAME
E-MAIL ADDRESS
DEFAULT SUBJECT
SMTP SERVER
ADDR.
SMTP PORT NO.
Configuration Menu Overview36
Page 49

SMTP TIMEOUT
TEXT INSERT
POP BEFORE SMTP DISABLE/ENABLE
POP3 SERVER
*3
ADDR.
SMTP AUTH. DISABLE/ENABLE
LDAP SETTING DISABLE/ENABLE
POP3 PORT NO.
POP3 TIMEOUT
POP3 ACCOUNT
POP3 PASSWORD
SMTP USER
*4
NAME
SMTP PASSWORD
*3
*3
*3
*3
*4
Configuration Menu Overview
LDAP SERVER
*5
ADDR.
37
Page 50

LDAP
PORT NO.
*5
SSL SETTING
SEARCH BASE
ATTRIBUTE
SEARCH
METHOD
LDAP
TIMEOUT
MAX.SEARCH
RESULTS
*5
*5
*5
*5
*5
*5
AUTHENTICATION
LDAP ACCOUNT
*5
*5
LDAP PASSWORD
DOMAIN NAME
*5
*5
CAMERA DIRECT
USER SETTING COUNTRY SETTING
Configuration Menu Overview38
Page 51

DATE&TIME
DATE FORMAT
PRESET ZOOM
SUPPLIES
REPLACE
*1
"
This menu item appears when ADMIN. MANAGEMENT/NET-
WORK SETTING/TCP/IP
*2
This menu item appears when ADMIN. MANAGEMENT/NETWORK
SETTING/IPv6/DISABLE/ENABLE
*3
This menu item appears when ADMIN. MANAGEMENT/E-MAIL
TRANSFER BELT
FUSER UNIT
TRANSFER ROLLER
is set to ENABLE.
SETTING/POP BEFORE SMTP/DISABLE/ENABLE
ENABLE.
*4
This menu item appears when ADMIN. MANAGEMENT/E-MAIL
SETTING/SMTP AUTH./DISABLE/ENABLE
*5
This menu item appears when ADMIN. MANAGEMENT/LDAP
SETTING/DISABLE/ENABLE
is set to ENABLE.
is set to ENABLE.
is set to
is set to ENABLE.
Configuration Menu Overview
39
Page 52

" Manufacturer’s default settings appear in bold.
ADMINISTRATOR NO.
NETWORK
TCP/IP
SETTING
IP ADDR. SETTING
DNS DNS
DHCP
BOOTP
ARP/PING
AUTO
SETTING
SPECIFY
Specify the new administrator access
code.
Setting
Select the setting for connecting to this
machine through a network.
Setting
Set the IP address of this printer on the
network.
If AUTO is selected, the IP address will
be assigned automatically.
SPECIFY is selected, manually spec-
If
ify settings for
NET MASK
Setting
Select whether or not the DNS server
address is automatically assigned by
the DHCP server.
Specify the DNS server address (up to
three addresses).
The default setting is “0.0.0.0”.
Setting
If there is a DHCP server on the network, specify whether the IP address
and other network information is automatically assigned by the DHCP server.
Setting
If there is a BOOTP server on the net-
work, specify whether the IP address
and other network information is automatically assigned by the BOOTP
server.
Setting
Select whether or not the ARP/PING
command is used when the IP address
is assigned.
DISABLE / ENABLE
AUTO / SPECIFY
IP ADDRESS, SUB-
and GATEWAY.
DISABLE / ENABLE
DISABLE / ENABLE
DISABLE / ENABLE
DISABLE / ENABLE
Configuration Menu Overview40
Page 53

HTTP
FTP
SMB
BONJOUR
DYNAMIC DNS
IPP
RAW
PORT
DISABLE/
ENABLE
BIDIRECTIONAL
SLP
SNMP
WSD PRINT
IPSEC
Setting
Select whether or not to enable HTTP.
Setting
Select whether or not to enable the FTP
server.
Setting
Select whether or not to enable SMB.
Setting
Select whether or not to enable Bonjour.
Setting
Select whether or not to enable
Dynamic DNS.
Setting
Select whether or not to enable IPP.
DISABLE / ENABLE
DISABLE / ENABLE
DISABLE / ENABLE
DISABLE / ENABLE
DISABLE / ENABLE
DISABLE / ENABLE
" If HTTP is set to DISABLE, IPP
cannot be set.
Setting
Select whether or not to enable the raw
port.
Setting
Select whether or not to enable raw port
bidirectional communication.
Setting
Select whether or not to enable SLP.
Setting
Select whether or not to enable SNMP.
Setting
Select whether or not to enable WSD
printing.
Setting
Select whether or not to enable IPsec.
DISABLE / ENABLE
DISABLE / ENABLE
DISABLE / ENABLE
DISABLE / ENABLE
DISABLE / ENABLE
DISABLE / ENABLE
Configuration Menu Overview
41
Page 54

IP
ADDR.
ACCESS
PER.
FILTER
ACCESS
REFUSE
IPv6 DIS-
ABLE/
ENABLE
AUTO
SETTING
LINK
LOCAL
GLOBAL
ADDRES
S
GATEWAY
ADDRES
S
NETWARE
APPLETALK
SPEED/DUPLEX
Setting
Specify access permissions for IP
address filtering.
Setting
Specify access blocking for IP address
filtering.
Setting
Select whether or not to enable IPv6.
Setting
Select whether or not to enable the IPv6
auto setting.
Displays the link-local address.
Displays the global address.
Displays the gateway address.
Setting
Select whether or not to enable Net-
Ware.
Setting
Select whether or not to enable Apple-
Talk.
Setting
DISABLE / ENABLE
DISABLE / ENABLE
DISABLE / ENABLE
YES/NO
DISABLE / ENABLE
DISABLE / ENABLE
AUTO / 10BASE-T
FULL
/ 10BASE-T
HALF
/ 100BASE-TX
FULL
/ 100BASE-TX
HALF
/ 1000BASE
FULL
Specifies the transmission speed for the
network and the transmission method
for bi-directional transmission.
Configuration Menu Overview42
Page 55

E-MAIL
SETTING
IEEE802.1X
SMTP
SENDER NAME
E-MAIL ADDRESS
DEFAULT SUBJECT
SMTP SERVER
ADDR.
SMTP PORT NO.
SMTP TIMEOUT
TEXT INSERT
Setting
Select whether or not to enable
IEEE802.1X.
Setting
Select whether to enable or disable
e-mail transmission operations for this
machine.
Specify the name of the E-mail sender
(up to 20 characters) used for network
scanning.
The default setting is “EPSON
AL-CX28”.
Specify the E-mail address (up to 64
characters) of the E-mail sender used
for network scanning.
Specify the subject (up to 20 characters)
of the E-mail message used for network
scanning.
The default setting is “from EPSON
AL-CX28”.
Specify the IP address or host name (up
to 64 characters) for the SMTP server.
The default setting is “0.0.0.0”.
Setting
Specify the port number communicating
with the SMTP server.
Setting
DISABLE / ENABLE
DISABLE / ENABLE
1 to 65535 (Default: 25)
30 to 300 sec (Default:
60 sec)
Select the amount of time (in seconds)
until the connection with the SMTP
server times out.
Setting
Select whether or not the specified text
is inserted into the E-mail message.
OFF / ON
Configuration Menu Overview
43
Page 56

POP
BEFORE
SMTP
SMTP
AUTH.
DISABLE/
ENABLE
POP3
SERVER
ADDR.
POP3
PORT
NO.
POP3
TIMEOUT
POP3
ACCOUNT
POP3
PASSWORD
DISABLE/
ENABLE
SMTP
USERNAME
SMTP
PASSWORD
Setting
Select whether or not to enable POP
Before SMTP.
ENABLE is selected, specify the time
If
(between 0 and 60 seconds). The
default setting is 1sec.
Specify the host name or IP address for
the POP3 server used for authentication
with POP Before SMTP.
The default setting is “0.0.0.0”.
Setting
Specify the port number used for communicating with the POP3 server.
Setting
DISABLE / ENABLE
1 to 65535 (Default: 110)
30 to 300 sec (Default:
30 sec)
Select the amount of time (in seconds)
until the connection with the POP3
server times out.
Specify the user name (up to 63 characters) used for authentication with POP3
server.
Specify the password (up to 15 characters) used for authentication with POP3
server.
Setting
Select whether or not to enable SMTP
authentication.
Specify the user name (up to 63 charac-
ters) used for SMTP authentication.
Specify the password (up to 15 characters) used for SMTP authentication.
DISABLE / ENABLE
Configuration Menu Overview44
Page 57

LDAP
SETTING
DISABLE/ENABLE
LDAP SERVER
ADDR.
LDAP PORT NO.
SSL SETTING
SEARCH BASE
ATTRIBUTE
SEARCH METHOD
LDAP TIMEOUT
MAX.SEARCH
RESULTS
AUTHENTICATION
LDAP ACCOUNT
Setting
Select whether or not to enable the
LDAP function.
Specify the address (up to 64 charac-
ters) of the LDAP server.
The default setting is “0.0.0.0”.
Setting
Specify the port number of the LDAP
server.
Setting
Select whether or not to enable SSL.
Specify the search starting point (up to
64 characters) in a hierarchical structure
arranged on the LDAP server.
The conditions for searches can be
specified as a name or e-mail address
(up to 32 characters).
The default setting is “cn”.
Setting
The specified characters can be
searched for at the beginning, within or
at the end.
Setting
DISABLE / ENABLE
1 to 65535 (Default: 389)
DISABLE / ENABLE
BEGIN / CONTAIN / END
5 to 300 sec (Default:
60 sec)
Specify the maximum wait time during a
search.
Setting
Specify the maximum number of desti-
nations displayed after a search.
Setting
5 to 100 (Default: 100)
ANONYMOUS / SIMPLE /
DIGEST-MD5 /
GSS-SPNEGO
Select the authentication method used
for logging on to the LDAP server.
Specify the account (up to 64 characters) used to connect to the LDAP
server.
Configuration Menu Overview
45
Page 58

LDAP PASSWORD
DOMAIN NAME
CAMERA DIRECT
USER
SETTING
COUNTRY SETTING
Specify the password (up to 32 characters) used to connect to the LDAP
server.
Specify the domain name (up to 64
characters) used to connect to the
LDAP server.
Setting
Setting
DISABLE / ENABLE
ARGENTINA / AUSTRA-
LIA
/ AUSTRIA / BEL-
GIUM
/ BRAZIL /
CANADA / CHINA /
CZECH / DENMARK /
EUROPE / FINLAND /
FRANCE / GERMANY /
GREECE / HONG KONG /
HUNGARY / IRELAND /
ISRAEL / ITALY /
JAPAN / KOREA /
MALAYSIA / MEXICO /
THE NETHERLANDS /
NEW ZEALAND / NORWAY
/
PHILIPPINES /
POLAND / PORTUGAL /
RUSSIA / SAUDI ARA-
BIA
/ SINGAPORE /
SLOVAKIA / SOUTH
AFRICA
DEN
/ SPAIN / SWE-
/ SWITZERLAND /
TAIWAN / TURKEY /
U.S.A / UNITED KING-
DOM
/ VIETNAM
Select the country where this machine
is installed.
Configuration Menu Overview46
Page 59

SUPPLIES
REPLACE
DATE&TIME
DATE FORMAT
PRESET ZOOM
TRANSFER BELT
FUSER UNIT
TRANSFER
ROLLER
Setting
TIME: 00:00-23:59
(Default:
00:00)
DATE: ’00/01/01-’99/12/31
(Default: ’
09/01/01)
ZONE:
GMT+12:00-GMT-12:00 (in
30-minute intervals)
(Default: GMT+00:00)
Use the keypad to specify the current
date, time and time zone.
Setting
MM/DD/YY / DD/MM/YY /
YY/MM/DD
Select the display format for reports and
lists.
Setting
Select the measurement units for the
preset zoom ratios.
Replace the counter when the transfer
belt unit is replaced with new one.
Replace the counter when the fuser unit
is replaced with new one.
Replace the counter when the transfer
roller is replaced with new one.
INCH / METRIC
Configuration Menu Overview
47
Page 60

COPY SETTING Menu
COPY SETTING PAPER PRIORITY
QUALITY PRIORITY
DENSITY PRIORITY
DENSITY LEVEL AUTO
OUTPUT PRIORITY
4IN1 COPY ORDER
MANUAL
DUPLEX COPY
" Manufacturer’s default settings appear in bold.
PAPER PRIORITY
Setting
Specify the paper tray that is normally used.
TRAY1 / TRAY2 / TRAY3
" If an optional lower feeder unit is not installed,
TRAY3 does not appear.
QUALITY PRIORITY
Setting
MIX , TEXT , PHOTO , FINE/MIX ,
FINE/TEXT , FINE/PHOTO
Select the type of document being copied.
MIX or FINE/MIX is selected, select either AUTO
If
ON
or AUTO OFF for the auto segmentation (The den-
sity is darkened for text.).
Configuration Menu Overview48
Page 61

DENSITY PRIORITY
DEN-
AUTO
SITY
LEVEL
MANUAL
OUTPUT PRIORITY
4IN1 COPY
ORDER
DUPLEX COPY
Setting
Select the density that is normally used.
Setting
Adjust the density of the background color.
Setting
Specify the default copy density.
Setting
Select whether or not to sort copies by sets.
Setting
Select the arrangement of scanned documents with
4in1 copying.
Setting
Select the default setting for duplex (double-sided)
copying.
OFF is selected, duplex (double-sided) copying is
If
not performed as a default.
If LONG EDGE is selected, duplex (double-sided)
copying is performed as a default, and the pages are
fed out with the binding along the long side.
SHORT EDGE is selected, duplex (double-sided)
If
copying is performed as a default, and the pages are
fed out with the binding along the short side.
AUTO / MANUAL
(LIGHT) (DARK)
(LIGHT) (DARK)
NON-SORT / SORT
SIDEWISE / DOWNWARD
OFF / LONG EDGE / SHORT EDGE
Configuration Menu Overview
49
Page 62

ADDRESS REGISTER Menu
ADDRESS REGISTER FAVORITE
ADDRESS
GROUP
FAVORITE
ADDRESS
GROUP
Register frequently used e-mail addresses in the
favorite list. Instead of being entered manually,
e-mail addresses can simply be recalled to ensure
that destination information is registered correctly.
A maximum of 20 destinations can be registered in
the favorite list.
Register frequently used e-mail addresses as
address destinations. Instead of being entered
manually, e-mail addresses can simply be recalled
to ensure that destination information is registered
correctly.
A maximum of 250 address destinations can be
registered.
For details, refer to and “Registering Address Destinations (Direct Input)” on page 170 and “Registering Address Destinations (LDAP Search)” on page
171.
Register frequently used broadcast destinations as
a group destination. Multiple destinations can be
recalled simply by selecting a registered group.
A maximum of 50 destinations can be registered
with one group destination.
A maximum of 9 group destinations can be registered.
For details, refer to “Registering Group Destinations” on page 174.
Configuration Menu Overview50
Page 63

REPORTING Menu
REPORTING TX RESULT REPORT
" Manufacturer's default settings appear in bold.
TX RESULT
REPORT
Setting
Select whether the report showing the result of a trans-
mission is printed automatically after the transmission
is finished.
ON: Prints the report after each transmission.
ON(ERROR): Prints the report after a transmission
only if an error occurred.
OFF: Does not print the report after each transmission,
even if an error has occurred.
The transmission result report is normally printed after
a broadcast transmission.
SCAN SETTING Menu
SCAN SETTING RESOLUTION
IMAGE FORMAT
CODING METHOD
ON / ON(ERROR) / OFF
FILE SIZE
QUALITY PRIORITY
DENSITY LEVEL
Configuration Menu Overview
51
Page 64

" Manufacturer’s default settings appear in bold.
RESOLUTION
IMAGE FORMAT
CODING METHOD
Setting
Select the default scanning resolution for scan to
E-mail operations.
150×150dpi / 300×300dpi /
600×600dpi
" When using the ADF to scan in color or
grayscale,
selected, even if the resolution was set to
600×600dpi.
Setting
Select the default format for saving files with scan to
E-mail operations.
300×300dpi is automatically
TIFF / PDF / JPEG
" PDF data can be opened in Adobe Acrobat
Reader.
" TIFF files of images that have been scanned
with the
opened with the Windows Picture and FAX
Viewer, which is included with Windows XP as a
standard component. These files can be opened
with image-processing applications such as
PhotoShop, Microsoft Offi ce Docu ment Imagin g
or ACDsee.
Setting
Select the default compression method for scan to
E-mail operations.
The compression ratio for these methods increases in
the following order:
Color or Gray setting cannot be
MH / MR / MMR
MH > MR > MMR.
" These settings are available only if BW Only
was selected for the color setting during the
e-mail transmission.
Configuration Menu Overview52
Page 65

FILE SIZE
Setting
Select whether or not to limit the size for scan data
sent as e-mail attachments.
SPLIT is selected, specify the maximum size
If
between
the maximum size allowed, the data is divided and
sent as multiple attached files.
NO SPLIT / SPLIT
1 and 10 Mb. If the data to be sent exceeds
" In order to receive multiple file attachments, an
e-mail application compatible with divided
transmissions is required.
QUALITY PRIORITY
DENSITY LEVEL
Setting
Select the scan data quality that is used as a default.
Setting
Select the scan data density that is used as a default.
MIX / TEXT / PHOTO
(LIGHT) (DARK)
DIRECT PRINT Menu
" This menu item appears when UTILITY/ADMIN. MANAGEMENT/
CAMERA DIRECT
DIRECT PRINT IMAGE QUALITY
is set to ENABLE.
PAPER SIZE TRAY1 PAPER
N-UP LAYOUT
" Manufacturer's default settings appear in bold.
IMAGE
QUALITY
Configuration Menu Overview
Setting
Select the image quality used with camera direct printing.
NORMAL / FINE
TRAY2 PAPER
53
Page 66

PAPER
SIZE
N-UP
LAYOUT
TRAY1
PAPER
Media
type
Paper
size
PLAIN PAPER / THICK PAPER /
THICK PAPER2 / LABELS / POST-
CARD
/ GLOSSY / GLOSSY2
When a setting other than POST-
CARD
is selected: LETTER / A4 /
A5 / STATEMENT / B5
When POSTCARD is selected: LET-
TER
/ A4 / A5 / STATEMENT / B5 /
J-POSTCARD 100×148
When GLOSSY or GLOSSY2 is
selected:
LETTER / A4 / A5 /
STATEMENT / B5 / PHOTO SIZE
4X6
/ PHOTO SIZE 10X15 / LTR
2UP SPL
/ A4 4UP SPL / A4 2UP
SPL
Select the media type and paper size when using
Tray 1 with camera direct printing.
When a media type is selected, a screen
appears, showing the available media sizes. The
available media sizes differ depending on the
selected media type.
TRAY2
PAPER
Setting
Select the number of images that will be printed on a single
page with camera direct printing.
Paper
size
Select the paper size when using Tray 2 with
camera direct printing.
Only plain paper can be loaded into Tray 2.
LETTER / A4
1 / 2 / 3 / 4 / 6 / 8
Configuration Menu Overview54
Page 67

PS/PCL PRINT Menu
To display the PS/PCL PRINT menu, select PS/PCL PRINT in the main
screen (Copy mode), and then press the Select key. From this menu, jobs
stored on the machine's hard disk (optional) can be printed or deleted, and
various PS/PCL printing settings can be changed.
The PS/PCL PRINT menu is structured as shown below.
" To return to the previous screen in the PS/PCL PRINT menu, press the Back
key. (If the Back key is pressed while settings are being specified, those
settings are not saved.)
*1
"
PS/PCL PRINT
*1
This menu item appears only if an optional hard disk drive is installed.
PROOF/PRINT MENU
PAPER MENU
QUALITY MENU
SYS DEFAULT MENU
PROOF/PRINT MENU
From this menu, jobs stored on the machine's hard disk (optional) can be
printed or deleted.
" This menu item appears only if an optional hard disk drive is installed.
PROOF/PRINT
MENU
PS/PCL PRINT Menu
(user name) (job name) PRINT
DELETE
55
Page 68

" If no jobs have been stored on the hard disk, the message NO STORED
JOB
appears when PROOF/PRINT MENU is selected.
PRINT
DELETE
Follow the procedure described below to print the
selected job.
1. If a password has been specified for the
selected job, type in the password, and then
press the Select key.
2. Specify the number of copies (1 to 9999),
and then press the Select key.
3. To print color copies, press the Start-Color
key. To print monochrome copies, press the
Start-B&W key.
Follow the procedure described below to delete the
selected job.
1. If a password has been specified for the
selected job, type in the password, and then
press the Select key.
2. Select
YES, and then press the Select key.
PS/PCL PRINT Menu56
Page 69

PAPER MENU
PAPER MENU ANY TRAY SET-
TING
TRAY CHAINING
TRAY MAPPING TRAY MAPPING MD.
TRAY1 PAPER TRAY1 ANY SIZE
TRAY1 ANY TYPE
TRAY2 PAPER TRAY2 ANY SIZE
TRAY2 ANY TYPE
TRAY3 PAPER
LOGICAL TRAY0
*1
TRAY3 ANY TYPE
DUPLEX
COPIES
COLLATE
PS/PCL PRINT Menu
•
•
•
•
LOGICAL TRAY9
*2
57
Page 70

*1
"
This menu item appears only if an optional lower feeder unit is installed.
*2
This menu item appears only if an optional hard disk drive is installed.
" Manufacturer's default settings appear in bold.
ANY TRAY
SETTING
TRAY1
PAPER
TRAY2
PAPER
TRAY3
PAPER
TRAY CHAINING
TRAY1
ANY
SIZE
TRAY1
ANY
TYPE
TRAY2
ANY
SIZE
TRAY2
ANY
TYPE
TRAY3
ANY
TYPE
Setting
Select whether or not the Any Paper
Size setting is selected for Tray 1.
Setting
Select whether or not the Any Media
Type setting is selected for Tray 1.
Setting
Select whether or not the Any Paper
Size setting is selected for Tray 2.
Setting
Select whether or not the Any Media
Type setting is selected for Tray 2.
Setting
Select whether or not the Any Media
Type setting is selected for Tray 3.
Setting
If ON is selected and the specified tray
runs out of paper during printing, a tray
loaded with paper of the same size is
automatically selected so printing can
continue.
OFF is selected and the specified tray
If
runs out of paper, printing stops.
ON / OFF
ON / OFF
ON / OFF
ON / OFF
ON / OFF
ON / OFF
PS/PCL PRINT Menu58
Page 71

TRAY
MAPPING
TRAY MAPPING
MD.
LOGICAL TRAY
0-9
Setting
Select whether or not the Tray Mapping
function is used.
Setting
ON / OFF
PHYSICAL TRAY1 /
PHYSICAL TRAY2 /
PHYSICAL TRAY3
Select the tray that is used for printing
when a print job is received from
another manufacturer's printer driver.
DUPLEX
COPIES
COLLATE
The default settings are
TRAY1
for LOGICAL TRAY1 and
PHYSICAL
PHYSICAL TRAY2 for other trays.
" PHYSICAL TRAY3 appears
only if an optional lower feeder
unit is installed.
Setting
If LONG EDGE is selected, the pages
will be printed on both sides of the
paper for long-edge binding.
SHORT EDGE is selected, the pages
If
will be printed on both sides of the
paper for short-edge binding.
The setting specified in the printer driver
will override this menu setting.
Setting
Specify the number of copies to be
printed.
The setting specified in the printer driver
will override this menu setting.
Setting
Select whether or not to enable collated
(sort) printing.
OFF / LONG EDGE /
SHORT EDGE
1 to 9999 (Default: 1)
ON / OFF
PS/PCL PRINT Menu
The setting specified in the printer driver
will override this menu setting.
59
Page 72

QUALITY MENU
QUALITY
MENU
COLOR MODE
BRIGHTNESS
HALFTONE IMAGE
EDGE
ENHANCEMENT
PRINTING
TEXT
PRINTING
GRFX.
PRINTING
IMAGE
PRINTING
TEXT
PRINTING
GRFX.
PRINTING
EDGE
STRENGTH
ECONOMY
PRINT
PCL SETTING CONTRAST
IMAGE
PRINTING
RGB SOURCE
PS/PCL PRINT Menu60
Page 73

RGB INTENT
RGB GRAY
TEXT
PRINTING
GRFX.
PRINTING
PS SETTING IMAGE
PRINTING
RGB SOURCE
RGB INTENT
RGB GRAY
RGB SOURCE
RGB INTENT
RGB GRAY
RGB SOURCE
RGB INTENT
PS/PCL PRINT Menu
TEXT
PRINTING
RGB GRAY
DESTINATION PROF
RGB SOURCE
61
Page 74
RGB INTENT
RGB GRAY
DESTINATION PROF
GRFX.
PRINTING
SIMULATION SIMULATION
CALIBRATION TONE CALI-
BRATION
RGB SOURCE
RGB INTENT
RGB GRAY
DESTINATION PROF
PROF
SIM. INTENT
CMYK GRAY
CMYK DENSITY
CYAN HIGHLIGHT
MIDDLE
PS/PCL PRINT Menu62
Page 75

SHADOW
MAGENTA HIGHLIGHT
MIDDLE
SHADOW
YELLOW HIGHLIGHT
MIDDLE
SHADOW
BLACK HIGHLIGHT
COLOR SEPARATION
PS/PCL PRINT Menu
MIDDLE
SHADOW
63
Page 76

" Manufacturer's default settings appear in bold.
COLOR
MODE
BRIGHT-
Setting
If COLOR is selected, the pages are printed in full color.
GRAYSCALE is selected, the pages are printed in black
If
and white.
Setting
NESS
The brightness of the printed image can be adjusted.
HALFTONE IMAGE
PRINTING
COLOR/GRAYSCALE
+15%/+10%/+5%/0%/-5%/-10%/
-15%
Setting
LINE ART/DETAIL/
SMOOTH
Select how halftones in images are
reproduced.
LINE ART is selected, halftones are
If
reproduced with high precision.
If DETAIL is selected, halftones are
reproduced with detail.
SMOOTH is selected, halftones are
If
reproduced with smoothness.
PS/PCL PRINT Menu64
Page 77

EDGE
ENHANCEMENT
TEXT
PRINTING
GRFX.
PRINTING
IMAGE
PRINTING
Setting
LINE ART/DETAIL/
SMOOTH
Select how halftones in text are
reproduced.
LINE ART is selected, halftones are
If
reproduced with high precision.
DETAIL is selected, halftones are
If
reproduced with detail.
If SMOOTH is selected, halftones are
reproduced with smoothness.
Setting
LINE ART/DETAIL/
SMOOTH
Select how halftones in graphics are
reproduced.
If LINE ART is selected, halftones are
reproduced with high precision.
DETAIL is selected, halftones are
If
reproduced with detail.
If SMOOTH is selected, halftones are
reproduced with smoothness.
Setting
Select whether image edges are
emphasized.
ON/OFF
PS/PCL PRINT Menu
If ON is selected, the edges are emphasized.
OFF is selected, the edges are not
If
emphasized.
" If ECONOMY PRINT is set to ON,
the edges cannot be emphasized.
65
Page 78

EDGE
STRENGTH
TEXT
PRINTING
GRFX.
PRINTING
Setting
Select whether text edges are
emphasized.
ON is selected, the edges are empha-
If
sized.
OFF is selected, the edges are not
If
emphasized.
Setting
Select whether graphic edges are
emphasized.
ON is selected, the edges are empha-
If
sized.
If OFF is selected, the edges are not
emphasized.
ON/OFF
ON/OFF
" If ECONOMY PRINT is set to ON,
the edges cannot be emphasized.
Setting
Select the desired amount that edges are emphasized.
If OFF is selected, the edges are not emphasized.
If LOW is selected, the edges are slightly emphasized.
OFF/LOW/MIDDLE/HIGH
If MIDDLE is selected, the edges are emphasized by an
average amount.
If HIGH is selected, the edges are highly emphasized.
" If OFF is selected, the edges are not emphasized,
even if an
to ON.
EDGE ENHANCEMENT menu item is set
PS/PCL PRINT Menu66
Page 79

ECONOMY
PRINT
PCL
SETTING
Setting
Select whether to print graphics with a reduced density by
reducing the amount of toner that is used.
ON is selected, the amount of toner used is reduced when
If
printing.
OFF is selected, the amount of toner used is not reduced
If
when printing.
ON/OFF
" If ON is selected, the edges are not emphasized, even
if IMAGE PRINTING and GRFX. PRINTING of
EDGE ENHANCEMENT menu item are set to ON.
the
CONTRAST
IMAGE
PRINTING
Setting
+15%/+10%/+5%/0%/
-5%/-10%/-15%
The contrast of the image can be
adjusted.
RGB
SOURCE
Setting
DEVICE COLOR/
sRGB
Specify the color space for
RGB image data.
DEVICE COLOR is
If
selected, no color space is
specified.
PS/PCL PRINT Menu
RGB
INTENT
RGB source profiles
downloaded with the
Web-based EpsonNet config
are available as RGB
SOURCE.
Setting
VIVID/
PHOTOGRAPHIC
Specify the characteristic
applied when converting RGB
image data to CMYK data.
VIVID is selected, a vivid
If
output is produced.
If PHOTOGRAPHIC is
selected, a brighter output is
produced.
67
Page 80

TEXT
PRINTING
RGB
GRAY
RGB
SOURCE
Setting
COMPOSITE
BLACK/BLACK
AND GRAY/
BLACK ONLY
Specify how black and grays
are reproduced in RGB image
data.
COMPOSITE BLACK is
If
selected, black is reproduced
using the CMYK colors.
If BLACK AND GRAY is
selected, black and gray are
reproduced using black only.
BLACK ONLY is selected,
If
black is reproduced using only
black.
Setting
DEVICE COLOR/
sRGB
Specify the color space for
RGB text data.
DEVICE COLOR is
If
selected, no color space is
specified.
RGB source profiles
downloaded with the
Web-based EpsonNet config
are available as RGB
SOURCE.
PS/PCL PRINT Menu68
Page 81

RGB
INTENT
RGB
GRAY
Setting
VIVID/
PHOTOGRAPHIC
Specify the characteristic
applied when converting RGB
text data to CMYK data.
VIVID is selected, a vivid
If
output is produced.
If PHOTOGRAPHIC is
selected, a brighter output is
produced.
Setting
COMPOSITE
BLACK/BLACK
AND GRAY/
BLACK ONLY
Specify how black and grays
are reproduced in RGB text
data.
COMPOSITE BLACK is
If
selected, black is reproduced
using the CMYK colors.
BLACK AND GRAY is
If
selected, black and gray are
reproduced using black only.
GRFX.
PRINTING
PS/PCL PRINT Menu
RGB
SOURCE
If BLACK ONLY is selected,
black is reproduced using only
black.
Setting
DEVICE COLOR/
sRGB
Specify the color space for
RGB graphics data.
DEVICE COLOR is
If
selected, no color space is
specified.
RGB source profiles
downloaded with the
Web-based EpsonNet config
are available as RGB
SOURCE.
69
Page 82

RGB
INTENT
RGB
GRAY
Setting
VIVID/
PHOTOGRAPHIC
Specify the characteristic
applied when converting RGB
graphics data to CMYK data.
VIVID is selected, a vivid
If
output is produced.
If PHOTOGRAPHIC is
selected, a brighter output is
produced.
Setting
COMPOSITE
BLACK/BLACK
AND GRAY/
BLACK ONLY
Specify how black and grays
are reproduced in RGB
graphics data.
COMPOSITE BLACK is
If
selected, black is reproduced
using the CMYK colors.
BLACK AND GRAY is
If
selected, black and gray are
reproduced using black only.
If BLACK ONLY is selected,
black is reproduced using only
black.
PS/PCL PRINT Menu70
Page 83

PS
SETTINGS
IMAGE
PRINTING
RGB
SOURCE
RGB
INTENT
Setting
DEVICE COLOR/
sRGB/
AppleRGB/
AdobeRGB1998/
ColorMatchRGB/
BlueAdjustRGB
Specify the color space for
RGB image data.
If DEVICE COLOR is
selected, no color space is
specified.
RGB source profiles
downloaded with the
Web-based EpsonNet config
are available as RGB
SOURCE.
Setting
VIVID/
PHOTOGRAPHIC/
RELATIVE
COLOR/
ABSOLUTE
COLOR
Specify the characteristic
applied when converting RGB
image data to CMYK data.
PS/PCL PRINT Menu
VIVID is selected, a vivid
If
output is produced.
If PHOTOGRAPHIC is
selected, a brighter output is
produced.
RELATIVE COLOR is
If
selected, relative color is
applied to the RGB source
profile.
ABSOLUTE COLOR is
If
selected, absolute color is
applied to the RGB source
profile.
71
Page 84

RGB
GRAY
DESTINATION
PROF
Setting
COMPOSITE
BLACK/BLACK
AND GRAY/
BLACK ONLY
Specify how black and grays
are reproduced in RGB image
data.
COMPOSITE BLACK is
If
selected, black is reproduced
using the CMYK colors.
If BLACK AND GRAY is
selected, black and gray are
reproduced using black only.
BLACK ONLY is selected,
If
black is reproduced using only
black.
Setting
Specify the destination profile.
If AUTO is selected, a
destination profile that the
machine automatically adapts
is selected based on a
combination of the specified
color matching, halftones and
other profiles.
Destination profiles
downloaded with the
Web-based EpsonNet config
are available as DESTINATION
PROF.
AUTO
PS/PCL PRINT Menu72
Page 85

TEXT
PRINTING
RGB
SOURCE
RGB
INTENT
Setting
DEVICE COLOR/
sRGB/
AppleRGB/
AdobeRGB1998/
ColorMatchRGB/
BlueAdjustRGB
Specify the color space for
RGB text data.
If DEVICE COLOR is
selected, no color space is
specified.
RGB source profiles
downloaded with the
Web-based EpsonNet config
are available as RGB
SOURCE.
Setting
VIVID/
PHOTOGRAPHIC/
RELATIVE
COLOR/
ABSOLUTE
COLOR
Specify the characteristic
applied when converting RGB
text data to CMYK data.
PS/PCL PRINT Menu
VIVID is selected, a vivid
If
output is produced.
If PHOTOGRAPHIC is
selected, a brighter output is
produced.
RELATIVE COLOR is
If
selected, relative color is
applied to the RGB source
profile.
ABSOLUTE COLOR is
If
selected, absolute color is
applied to the RGB source
profile.
73
Page 86

RGB
GRAY
DESTINATION
PROF
Setting
COMPOSITE
BLACK/BLACK
AND GRAY/
BLACK ONLY
Specify how black and grays
are reproduced in RGB text
data.
COMPOSITE BLACK is
If
selected, black is reproduced
using the CMYK colors.
If BLACK AND GRAY is
selected, black and gray are
reproduced using black only.
BLACK ONLY is selected,
If
black is reproduced using only
black.
Setting
Specify the destination profile.
If AUTO is selected, a
destination profile that the
machine automatically adapts
is selected based on a
combination of the specified
color matching, halftones and
other profiles.
Destination profiles
downloaded with the
Web-based EpsonNet config
are available as DESTINATION
PROF.
AUTO
PS/PCL PRINT Menu74
Page 87

GRFX.
PRINTING
RGB
SOURCE
RGB
INTENT
Setting
DEVICE COLOR/
sRGB/
AppleRGB/
AdobeRGB1998/
ColorMatchRGB/
BlueAdjustRGB
Specify the color space for
RGB graphics data.
If DEVICE COLOR is
selected, no color space is
specified.
RGB source profiles
downloaded with the
Web-based EpsonNet config
are available as RGB
SOURCE.
Setting
VIVID/
PHOTOGRAPHIC/
RELATIVE
COLOR/
ABSOLUTE
COLOR
Specify the characteristic
applied when converting RGB
graphics data to CMYK data.
PS/PCL PRINT Menu
VIVID is selected, a vivid
If
output is produced.
If PHOTOGRAPHIC is
selected, a brighter output is
produced.
RELATIVE COLOR is
If
selected, relative color is
applied to the RGB source
profile.
ABSOLUTE COLOR is
If
selected, absolute color is
applied to the RGB source
profile.
75
Page 88

RGB
GRAY
DESTINATION
PROF
Setting
COMPOSITE
BLACK/BLACK
AND GRAY/
BLACK ONLY
Specify how black and grays
are reproduced in RGB
graphics data.
COMPOSITE BLACK is
If
selected, black is reproduced
using the CMYK colors.
If BLACK AND GRAY is
selected, black and gray are
reproduced using black only.
BLACK ONLY is selected,
If
black is reproduced using only
black.
Setting
Specify the destination profile.
If AUTO is selected, a
destination profile that the
machine automatically adapts
is selected based on a
combination of the specified
color matching, halftones and
other profiles.
Destination profiles
downloaded with the
Web-based EpsonNet config
are available as DESTINATION
PROF.
AUTO
PS/PCL PRINT Menu76
Page 89

SIMULATION SIMU-
LATION
PROF
SIM.
INTENT
Setting
NONE/SWOP/
Euroscale/
CommercialPre
ss/TOYO/DIC
Specify the simulation profile.
If NONE is selected, no
simulation profile is specified.
Simulation profiles downloaded
with the Web-based EpsonNet
config are available as
SIMULATION PROF.
Setting
RELATIVE
COLOR/
ABSOLUTE
COLOR
Specify the characteristic of the
simulation profile.
RELATIVE COLOR is
If
selected, relative color is
applied to the simulation
profile.
ABSOLUTE COLOR is
If
selected, absolute color is
applied to the simulation
profile.
PS/PCL PRINT Menu
77
Page 90

CALIBRATION
TONE
CALIBRATION
CMYK
GRAY
Setting
COMPOSITE
BLACK/BLACK
AND GRAY/
BLACK ONLY
Specify how black and grays
are reproduced using the four
CMYK colors.
COMPOSITE BLACK is
If
selected, black is reproduced
using the CMYK colors.
If BLACK AND GRAY is
selected, black and gray are
reproduced using black only.
BLACK ONLY is selected,
If
black is reproduced using only
black.
Setting
If ON is selected, image adjustments are
applied.
If OFF is selected, image adjustments are
not applied.
ON/OFF
PS/PCL PRINT Menu78
Page 91

COLOR
SEPARATION
CMYK
DENSITY
CYAN/
MAGENTA/
YELLOW/
BLACK
HIGHLIGHT
MIDDLE
Setting
+3/+2/
+1/0/
-1/-2/
-3
The density of the
highlight color in
images can be
adjusted.
Setting
+3/+2/
+1/0/
-1/-2/
-3
The density of the
middle color in
images can be
adjusted.
SHADOW
Setting
+3/+2/
+1/0/
-1/-2/
-3
The density of the
shadow color in
images can be
adjusted.
Setting
If ON is selected, color separation are performed. The
contents of a color page is separated into the color pages
for yellow, magenta, cyan and black, and each is printed
with black gradations as individual pages. The printing order
is yellow, magenta, cyan, then black.
ON/OFF
OFF is selected, color separation is not performed. A
If
normal color separation is performed.
PS/PCL PRINT Menu
79
Page 92

SYS DEFAULT MENU
SYS DEFAULT
MENU
EMULATION DEF. EMULA-
TION
POSTSCRIPT WAIT TIME-
PCL CR/LF MAP-
OUT
PS ERROR
PAGE
PS PROTOCOL
PING
LINES PER
PAGE
FONT SOURCE FONT NUMBER
PITCH SIZE
(POINT
SIZE)
PAPER DEFAULT
PAPER
SYMBOL SET
PAPER SIZE
CUSTOM SIZE
PAPER TYPE
PS/PCL PRINT Menu80
Page 93

GRAYSCALE
PAGE
"
STARTUP
OPTIONS
HOLD JOB
*1
TIMEOUT
HDD FORMAT
*1
This menu item appears only if an optional hard disk drive is installed.
*1
DO STARTUP
PAGE
USER AREA
ONLY
ALL
PS/PCL PRINT Menu
81
Page 94

" Manufacturer's default settings appear in bold.
EMULATION
DEF.
EMULATION
POSTSCRIPT
Setting
Specify the machine emulation language.
AUTO is selected, the machine automatically
If
selects the machine emulation language from the
data stream.
WAIT
TIME
OUT
PS
ERROR
PAGE
PS
PROTOCOL
AUTO/POSTSCRIPT/PCL
Setting
Specify the time until an error is
determined to be a PostScript error.
0 is selected, no timeout is performed.
If
Setting
Select whether or not an error page is
printed when a Postscript error occurs.
Setting
Specify the protocol for data transmissions
with a PostScript data stream.
AUTO is selected, the machine
If
automatically selects an applicable
protocol from the data stream.
0 to 300 (Default: 0)
ON/OFF
AUTO/NORMAL/BINARY
PS/PCL PRINT Menu82
Page 95

PCL CR/LF
MAPPING
LINES
PER
PAGE
FONT
SOURCE
Setting
CR=CR LF=LF/CR=CRLF
LF=LF/CR=CR
LF=LFCR/CR=CRLF
LF=LFCR
Select the definitions of the CR/LF codes
in the PCL language.
Setting
Specify the number of lines per page in the
PCL language.
FONT
NUMBER
PITCH
SIZE
(POINT
SIZE)
5 to 128 (Default: 60)
Setting
0 to 102 (Default:
0)
Specify the default font in the
PCL language.
The font numbers that appear
correspond to the PCL font list.
For details on printing the font
list, refer to “REPORT” on page
24.
Setting
Specify the font size in the PCL
language.
0.44 to 99.99
(Default: 10.00)
(4.00 to 999.75
(Default:
12.00))
PS/PCL PRINT Menu
SYMBOL
SET
If the selected
is for a bitmap font,
SIZE
appears. If the selected
FONT NUMBER
PITCH
FONT NUMBER is for an
outline font,
appears.
Specify the symbol set used
with the PCL language.
The default setting is
POINT SIZE
PC8.
83
Page 96

PAPER DEFAULT
PAPER
PAPER
SIZE
CUSTOM
SIZE
Setting
LETTER/LEGAL/EXECUTIVE/A4/A5/A6/
B5(JIS)/B6(JIS)/GOVT
LETTER/STATEMENT/
FOLIO/SP FOLIO/UK
QUARTO/FOOLSCAP/GOVT
LEGAL/16K/PHOTO 4×6/
KAI 16/KAI 32/ENV C6/
ENV DL/ENV MONARCH/
ENV CHOU#3/ENV
CHOU#4/B5(ISO)/ENV
#10/JPOST 100x148/
JPOST-D 148x200/CUSTOM
Select the size of media that is normally
used.
" Depending on the setting selected
UTILITY / ADMIN.
for
MANAGEMENT / USER
SETTING / PRESET ZOOM,
PHOTO 4×6
PHOTO 10×15.
Specify the media size when PAPER
SIZE
is set to CUSTOM The Setting range
for
WIDTH is 3.63 to 8.50 inches (92
to
216 mm).
may change to
The default setting is 8.27 inches (210
mm).
The Setting range for
LENGTH is 5.83 to
14.00 inches (148 to 356 mm).
The default setting is 11.69 inches (297
mm).
PS/PCL PRINT Menu84
Page 97

GRAYSCALE
PAGE
STARTUP
OPTIONS
HOLD
JOB
TIME
OUT
HDD
FORMAT
PAPER
TYPE
Setting
PLAIN PAPER/
RECYCLED/THICK 1/
THICK 2/LABEL/
TRANSPARENCY/
ENVELOPE/POSTCARD/
LETTERHEAD/GLOSSY 1/
GLOSSY 2
Select the type of media that is normally
used.
Setting
Specify the operation to be performed for black-and-white
pages in a job specified for color printing.
If AUTO is selected, printing is automatically performed accord-
ing to the first page of the job.
GRAYSCALE PRINT is selected, black-and-white printing is
If
automatically performed depending on each page.
If COLOR PRINT is selected, color printing is performed, even
for a black-and-white page.
DO
STARTUP
AUTO/GRAYSCALE PRINT/COLOR PRINT
Setting
Select whether or not a startup page is printed when
the machine is turned on.
ON/OFF
PAGE
Setting
Specify the length of time until print jobs saved on the hard disk
are deleted. If DISABLE is selected, print jobs are not deleted
at a specific time.
USER
AREA
ONLY
ALL
DISABLE/1 hour/4 hours/1 day/1 week
Initialize the user area of the hard disk. When this
menu item is selected, the machine is automatically
restarted.
Initialize the hard disk. When this menu item is
selected, the machine is automatically restarted.
PS/PCL PRINT Menu
85
Page 98

MEMORY PRINT Menu
To display the MEMORY PRINT menu, select MEMORY PRINT in the main
screen (Copy mode), and then press the Select key. From this menu, memory direct printing operations can be performed, and various memory direct
printing settings can be specified.
The MEMORY PRINT menu is structured as shown below.
" This menu item appears only if an optional hard disk drive is installed. In
addition this menu item does not appear if public user access has not been
permitted through authentication settings. For details on the authentication
settings, refer to the Reference Guide on the software CD-ROM.
MEMORY PRINT
LIST OF FILES
TYPE OF FILES
" Manufacturer's default settings appear in bold
MEMORY PRINT Menu86
Page 99

.
LIST
OF
FILES
Select the file that you wish to output, and then press the Select
key.
If the file to be printed is in a folder, select the folder, and then
press the Select key.
PAPER
SELECT
Setting
Change the size of the paper.
LETTER/LEGAL/EXECUTIVE/A4/
A5/A6/B5(JIS)/B6(JIS)/GOVT
LETTER/STATEMENT/FOLIO/SP
FOLIO/UK QUARTO/FOOLSCAP/
GOVT LEGAL/16K/PHOTO 4×6/
KAI 16/KAI 32/ENV C6/ENV
DL/ENV MONARCH/ENV CHOU#3/
ENV CHOU#4/B5(ISO)/ENV #10/
JPOST 100×148/JPOST-D
148×200/CUSTOM
" Depending on the setting selected for
UTILITY / ADMIN. MANAGEMENT /
USER SETTING / PRESET ZOOM
PHOTO 4×6
10×15
may change to PHOTO
.
,
" This menu item does not appear if the
selected file is PDF file.
SIMPLEX/
DUPLEX
Setting
If 2-SIDE is selected, you can get duplex printing.
1-SIDE/2-SIDE
MEMORY PRINT Menu
If LONG EDGE is selected, the page will be printed
on both sides of the paper for long edge binding.
If SHORT EDGE is selected, the page will be
printed on both sides of the paper for short edge
binding.
OFF is selected, duplex printing is not performed.
If
87
Page 100

LIST
OF
FILES
TYPE
OF
FILES
COPY
QUANTITY
COPY
FINISHIN
G
Setting
Specify the number of copies to be printed (between
1 and 9999).
Setting
Select whether to collate the copies.
NON-SORT is selected, collated printing is not
If
performed.
If SORT is selected, collated printing is performed.
1 to 9999 (Default: 1)
NON-SORT/SORT
" This menu item appears only if the optional
hard disk drive is installed.
Setting
Select the type of files to be displayed.
PDF,JPEG,TIFF/PDF
MEMORY PRINT Menu88
 Loading...