

Page 1
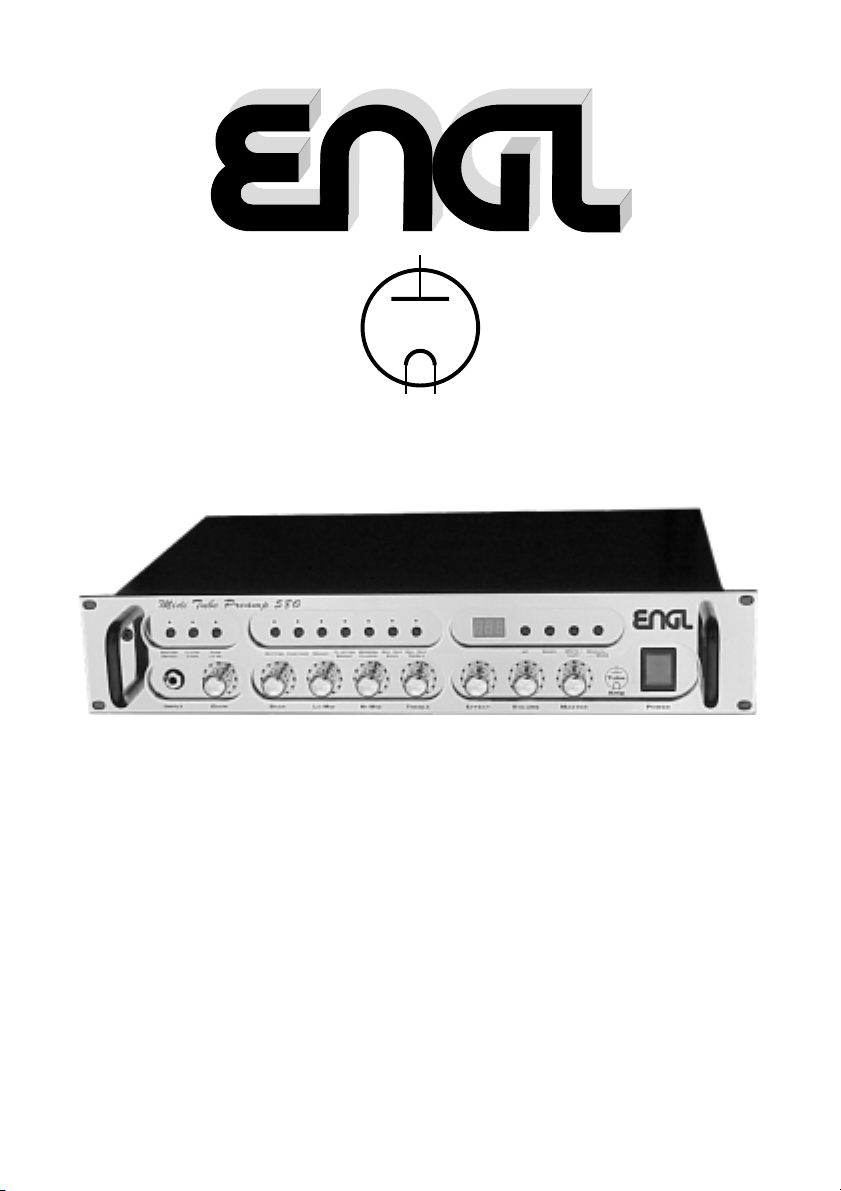
Tube
Amp
Midi Tube Preamp 580
Programmable
Guitar Tube Preamp
Operator´s Manual
Please, first read this manual carefully!
Page 2

Tube
Amp
Technology
2
Page 3

Table of Contents
Introduction
Features and Functionality at a Glance
Front Panel Features
Sound-Shaping Features: Knobs
Sound-Shaping Features: Buttons
Control Features
Combination Control Features
Page
4
4 - 5
6 - 7
8 - 10
10 - 12
13 - 15
Rear Panel Features
Preset and MIDI Channel Array
Factory Presets
Names and Descriptions
Step-by-step Illustrated Handling Guide
PC Software Remote Control Panel Features
Glossary
Troubleshooting
Handling and Care
Technical Data
Specifications in Detail
Tube Map
System Information
Wiring of Principal Connectors
Block Diagram
Quick reference on Control Features
The Making of... a Few Closing Words from the Amp Designer
Note Pad for User Presets
16 - 19
19 - 20
21 - 24
25 - 38
39 - 42
42 - 45
46 - 47
47
48
49
49
50
51
52
53
54 - 56
Supplementary information
CAUTION! Please read and heed the following:
You'll find an additional pamphlet accompanying this owner's
manual entitled "Instruction for the prevention of fire, electric shock
or injury of persons". Be sure to read it before you plug
the preamp in and switch it on!
Note: Technical specifications are subject to change without notice.
57 - 60
3
Page 4

Congratulations on your purchase of an MIDI Preamp E580!
Marrying tried-and-true all-tube technology to state-of-the-art microchip-powered
technology, this groundbreaking guitar preamp sets new standards with its sheer
audio brilliance—tone, authenticity and sonic variety is what this baby is all
about. Fully programmable control features and ten sound-shaping buttons put
an arsenal of voicing tools at your fingertips. Many of these features shape the
soundscape in ways we believe you have never heard before, and the virtually
infinite variety of options boggles the mind.
You'll soon discover that this preamp conjures up extremely sophisticated tones
that nonetheless sound earthy and authentic courtesy of its tube-driven
circuitry. To make this marriage of two disparate worlds work, the sound-shaping
features are controlled by a multiprocessor computer system equipped with three
microcontrollers that work hand in hand with advanced multitasking software.
What all this means to you:
1. utmost ease of use and remarkably intuitive handling
2. excellent sound-shaping options and greatest flexibility courtesy of its many
special features and programming possibilities
3. one preamp for every gig - live, studio and home-recording - featuring
an onboard programmable speaker simulation system
4. extremely wide range of sounds produced by custom-designed, programmable
filter systems in the individual tube stages
The different sound-shaping buttons actually shape the characteristic curve.
This technology can't be realized with conventional tube preamps, which is
why this preamp is literally one of a kind.
5. processor-controlled knobs and buttons allow stored sounds to be reproduced
with absolute precision any time, anywhere, under any operating conditions
6. You are now the proud owner of an ultra-advanced sound-generating machine
that will give you years of playing pleasure and value to boot.
Features and Functionality at a Glance
-> 256 presets. Directly selectable via MIDI and freely programmable, these
presets are grouped in two banks, A and B, and addressed via different
MIDI channels. This affords you the convenience of using one bank for
live gigs and the other for studio work.
-> 40 factory presets with preprogrammed audio examples that you can edit
and copy to MIDI presets as desired.
-> Manual mode in which the preamp operates just like a conventional preamp.
-> A shadow preset is assigned to each MIDI preset, serving much the same
purpose as the trash basket you may be familiar with on computers.
-> Non-programmable Master that may optionally be controlled in real time
via an external MIDI volume foot pedal.
-> The knobs are rotary encoders with an infinite control range. The advantage
of these knobs is that you can access a stored setting directly no matter what
the knob's actual position may be and adjust the setting in real time.
-> 11-segment circular LED chains. One of these surrounds each knob, indicate
its current setting. The LEDs flash when a MIDI preset's settings are changed.
The display also shows steps in increments while you are changing a setting.
4
Page 5

-> Tube-powered stereo effect loop; wet effect signal may be mixed with
the dry preamp signal from 0 -100% (that's parallel to serial).
This setting is programmable.
-> Passive 4-way tone controls. You can modify the voicing section's EQ
characteristics by means of the Contour button.
-> Stereo outs with level switch for routing signals to a stereo power amp.
-> Stereo line outputs. These are frequency-corrected (or, if you prefer,
compensated) and equipped with programmable filters offering different
loudspeaker and cabinet characteristics. The preamp comes with two
versions of these outs, stereo ¼” jacks for connecting recording gear,
and balanced XLR outs for feeding the preamp signal to mixing consoles.
-> MIDI IN, THRU, OUT ports let you integrate the preamp into a MIDI system.
-> RS232 interface for remote control via PC and downloading software updates.
-> Remote Control Panel software for PC gives you a bunch of nifty features
for controlling preamp remotely from a computer.
Selected quality components, excellent workmanship and strict quality control
ensure this preamp retains its value over the long run. Guidelines on care and
maintenance of tube amps are on page 47. Please be sure to read these before
operating your preamp. You'll also come across boxes shaded gray throughout
the manual. Sandwiched by descriptions of the preamp's various functions, they
offer contain handy tips on the aforementioned function. All critical information
pertaining to the operation of this preamp is preceded by "NOTE", "CAUTION",
"Read and heed” or some other eye-catching comment. We're calling your
attention to these remarks for reasons of safety or other compelling reasons, so
please give them due consideration
The ENGL team wishes you all the best—may you and your preamp enjoy an
harmonically rich future together!
Everyone at ENGL is convinced that this tube preamp's astonishing versatility and
unrivalled features are sure to delight you: Just plug in, play, store your favorite
settings, and enjoy the sound!
A few words of wisdom from the designer:
Though this preamp is relatively easy to handle and you're probably raring to give
it a go, I recommend you read the owner's manual thoroughly before you power
the preamp up. Particularly in handshake mode with a personal computer, there
are some very important things you need to know to avoid malfunctions. Don't be
daunted by the preamp's outward complexity. Yes, it is sophisticated, but it is very
easy to use once you get the hang of it. In this manual, I've described the features
and functions of the preamp in a hopefully enlightening variety of ways, in some
cases, with accompanying illustrations. These should explain everything you need
to know about your preamp and make handling a piece of cake.
Contents:
1. ENGL MIDI Tube Preamp 580;
2. 3,5" Disk with Software "Remote.exe" and "readme" files;
3. One connector cable 7 m in length (Sub D-9, male & female connector 1:1 );
4. This Operating Instructions;
5. A pamphlet entitled "Instruction for the prevention of fire, electric shock
or injury of persons"
5
Page 6

Front Panel Features
As you're reading these descriptions of the preamp's features, you'll gain a better
understanding of the topic at hand if you unfold of the diagrams of the front and
rear panels at the back of the manual and refer to them as we go!
1 INPUT
Plug your electric guitar into this ¼" jack.
If you choose to mount the amp in a 19" rack system, you can also route the
signal in via the Auxiliary jack (41) located on the rear panel of the preamp.
Input jack 1 on the front panel has priority, meaning that the signal patched into
the Auxiliary jack is cut off whenever a plug is inserted into the front panel jack.
Sound-shaping Features: Knobs (Rotary encoders)
A word about these knobs:
The Gain (2), Bass (3), Lo Mid (4), Hi Mid (5), Treble (6), Effect (7), and Volume
(8) knobs offer a control range comprising 21 steps. Like the status of the
sound-shaping buttons, the settings of these knobs may be programmed to MIDI
presets 1 to 128, bank A and bank B. The 11-segment LEDs surrounding every
knob indicate the given knob's current setting.
Odd-numbered steps are indicated by a single LED. Take, for example, step 5 or
the fifth increment on the scale. It is indicated by the third LED from the left. Even
steps are indicated by two neighboring LEDs. For example, the first and second
LEDs of the scale light up to indicate step 2, and so forth.
You can change every setting of any MIDI preset directly, meaning there's no
programming involved. Simply grab a knob and rotate. When you do this, that
change you have made activates MSF (memory status feature) and the given LED
will flash, telling you that this knob's setting in a MIDI or factory preset has been
edited. The circular and segmental LED chains always show the knobs' current
settings. In addition, steps are indicated in the display as decimal numbers as you
dial in a new setting. By giving you precise indications of any given value, this
feature lets you adjust knobs more swiftly and accurately, particularly when you're
in a hurry.
The Master knob is an exception to this rule. Its workings are described in detail in
section 9 below.
2 GAIN
This knob controls input sensitivity for all of the preamp's operating modes. For
Crunch, Soft Lead and Heavy Lead modes, it determines the amount of preamp
saturation. The AFC controls an internal filter that operates in parallel to the Gain
knob, automatically adapting and optimizing the frequency response of the
preamp to best match the setting you have selected.
A tip from the designer:
On account of its programmability, the preamp's Gain knob's response is different
than you would expect from gain controls found on conventional preamps. The
signal is not muted completely when you set it to step 1. For this reason, you can
dial in extremely low input levels for extremely high-level guitar signals. That puts
the low gain control range below step 5 (about the 9 o'clock position) to good
use, which is rarely the case on a conventional amp.
6
Page 7

CAUTION: Extremely high gain and volume settings in Lead mode can lead to
high-level feedback. Avoid those dreaded feedback squeals, they can damage
your hearing loss and speakers!
3 BASS
As its name would indicate, this is the passive 4-way voicing section's Bass knob. It
interacts with the other tone controls, and it is influenced by the Contour button's
setting.
4 LO MID
This knob of the passive 4-way voicing section shapes the low mids within a
frequency range of 300 Hz to 500 Hz.
The Lo Mid knob interacts with the other tone controls, and it is influenced by the
Contour button's setting.
5 HI MID
This knob of the passive 4-way voicing section shapes high mids above a frequency
of 1.5 kHz. The Hi Mid knob interacts with the other tone controls, and it is
influenced by the Contour button's setting.
6 TREBLE
This is the passive 4-way voicing section's treble knob. It interacts with the HI MID
control.
7 EFFECT
This knob determines the amount of wet or effect signal when a signal processor
is inserted in the effects loop. Its starts with a wet balance of 0%, sweeping
through the control range and finally arriving at step 21, which gives you a wet
balance of 100%. To prevent signal degradation and loss, a tube-driven passive
circuit mixes the wet and dry signals.
Note: Whenever the effects loop is not in use, be sure to set the Effect knob to
step 1!
8 VOLUME
This knob determines the basic level of the preamp. You can use it to balance
levels as you see fit by dialing in different or identical levels for different presets.
For this reason, Volume knob settings may be stored, which you can't do for
Master knob settings.
9 MASTER
This knob determines the overall output level. Bear in mind that this level will
depend on the Volume knob setting. Master knob settings can't be stored and, in
contrast to the Volume knob, its setting remains the same when you activate
other presets. The Master knob's control range comprises 11 steps, whereby each
step is indicated by a separate LED. You can control the Master level remotely via
an external MIDI volume pedal. For this purpose, be sure to set the Volume
parameter located in the setup to On (see Control Features).
10 POWER
This is the mains power button that switches the preamp on and off.
7
Page 8

Sound-shaping Features: Buttons
The sound-shaping buttons' statuses may be programmed to MIDI presets 1
through 128, bank A and bank B. An LED located above every sound-shaping
button indicates its current status.
11 PREAMP DEFEAT
This is a bypass that cuts the preamp out of the signal chain when you press the
button. In this case, the input signal is routed directly to the Send jack.
The LED located above the button illuminates to indicate the preamp is bypassed.
A tip from the designer:
This option comes in handy when you want to insert another preamp or an effect
processor into a serial loop along with the MIDI Preamp E580. If the other
preamp can also be bypassed, you can switch between the two preamps on the
fly or even run them both at the same time. If you want to connect a second
preamp, insert it into the stereo effects loop and set the Effect knob to step 21
when you want activate the second preamp. You could even daisy chain several
preamps or effect processors.
12 CLEAN LEAD
This button switches back and forth between Clean and Lead preamp operating
modes. The LED lights up to indicate Lead mode is active.
13 GAIN LO HI
Use this Gain control to set and activate different preamp saturation levels for the
two operating modes Clean and Lead. In Clean mode, your options are Clean or
Crunch, in Lead mode they are Soft or Heavy Lead. The LED lights up to indicate
Gain Hi is active.
A tip from the designer:
The gain ranges of the different operating modes overlap a tad, meaning that
you can dial in some dirt in Clean Gain Lo mode with high Gain settings similar to
what you get when you dial in low Gain settings in Clean Gain Hi mode. However,
the frequency response and dynamics of the two operating modes are different,
which adds even more interesting hues and textures to your tonal palette.
14 BOTTOM
This sound-shaping feature changes the preamp's bottom end frequency response
in all operating modes. You'll perceive a considerable boost in bass frequencies
when you activate it. The LED lights up to indicate the Bottom bass boost circuit is
active.
A tip from the designer:
When you're using a guitar equipped with bass-heavy pickups, you are
well-advised to switch this feature off to prevent it from muddying your tone,
particularly at higher Gain settings.
In fact, you should make a habit of deactivating this feature at higher Gain
settings (take that to mean anything over step 15), otherwise your distorted tone
will become far too sludgy.
8
Page 9

15 CONTOUR
This feature gives you another option for shaping predominantly mid-range
frequencies. When it is off, the Lo Mid knob affects the 500 Hz range, when it is
on, the knob affects the 300 Hz range. The LED lights up to indicate Contour is
active.
A tip from the designer:
The Contour knob shifts the entire frequency range of the voicing section so
that—by virtue of that handy storage option—you actually end up with two
separate sets of tone controls. Try activating Contour when you're going for
classic clean tone. Switch Contour off when you want something a little more
contemporary and direct—that modern in-your-face sound, if you will.
16 BRIGHT
This function boosts the upper frequencies in all operating modes. The LED lights
up to indicate Bright is active.
A tip from the designer:
For a crispy or glassy tone, set the Bright switch to the On position. This setting
brightens the sound of humbucking or any other muddy pickups.
17 CLEAN ULTRA BRIGHT
Though this option affects the Clean channel only, it boosts the upper end of
both clean (in Gain Lo mode that is) and crunch (Gain Hi) sounds. Though this is
indeed a treble boost, it affects frequencies that lie somewhat lower than the
highest frequencies in the spectrum. The LED lights up to indicate Ultra Bright
Clean is active.
A tip from the designer:
Activate this feature to conjure really glossy clean sounds. Great for doing the
country twang thing and spanking the funk plank, it also adds some top-end
shimmer to dark or muddy pickups. You'll find it easy to dial in loads of top-notch
tones in combination with the Contour and Modern/Classic sound-shaping
buttons.
18 MODERN/CLASSIC
This button switches between two fundamentally different voicings, modern and
Classic. The LED lights up to indicate Classic is active.
A tip from the designer:
The modern voicing is less dynamic, offering fewer mid-range frequencies. You'll
find that its voicing becomes far more prominent when you're running the
preamp at higher gain levels to evoke more distorted sounds.
Modern is your best bet for heavier sounds, Classic fits the bill for vintage styles.
For lead sounds you generally want tones that pack a punch powerful enough to
cut through the din. For this sonic scenario, I recommend you either activate
Contour for a Lead/modern configuration or stick with Classic.
19 RECORDING OUT BASS
This feature affects the filter system of the frequency-compensated Line Out only;
it will not affect the regular stereo outs when activated. When you switch this
option on, it boosts the bottom end of the Line Out filter. The LED lights up to
indicate the bass boost for the Line Out filter is on.
9
Page 10

20 RECORDING OUT TREBLE
This feature affects the filter system of the frequency-compensated Line Out only;
it will not affect the regular stereo outs when activated. When you switch this
option on, it boosts the top end of the Line Out filter. The LED lights up to
indicate the treble boost for the Line Out filter is on.
A tip from the designer:
With these two EQ parameters, you can opt for different filter settings to simulate
different types of speakers and cabinets. You should activate Rec Out Bass (19)
when you want to emulate a closed-back 4x12 cab. To avoid nasty overtones (at
least that how we feel about overly nasal honk) in the recording output in Lead
mode, I recommend you switch Rec Out Treble (20) off when you're running the
preamp in this operating mode. On the other hand, if you want really spiky clean
sounds, feel free to activate it and store it in the appropriate MIDI presets.
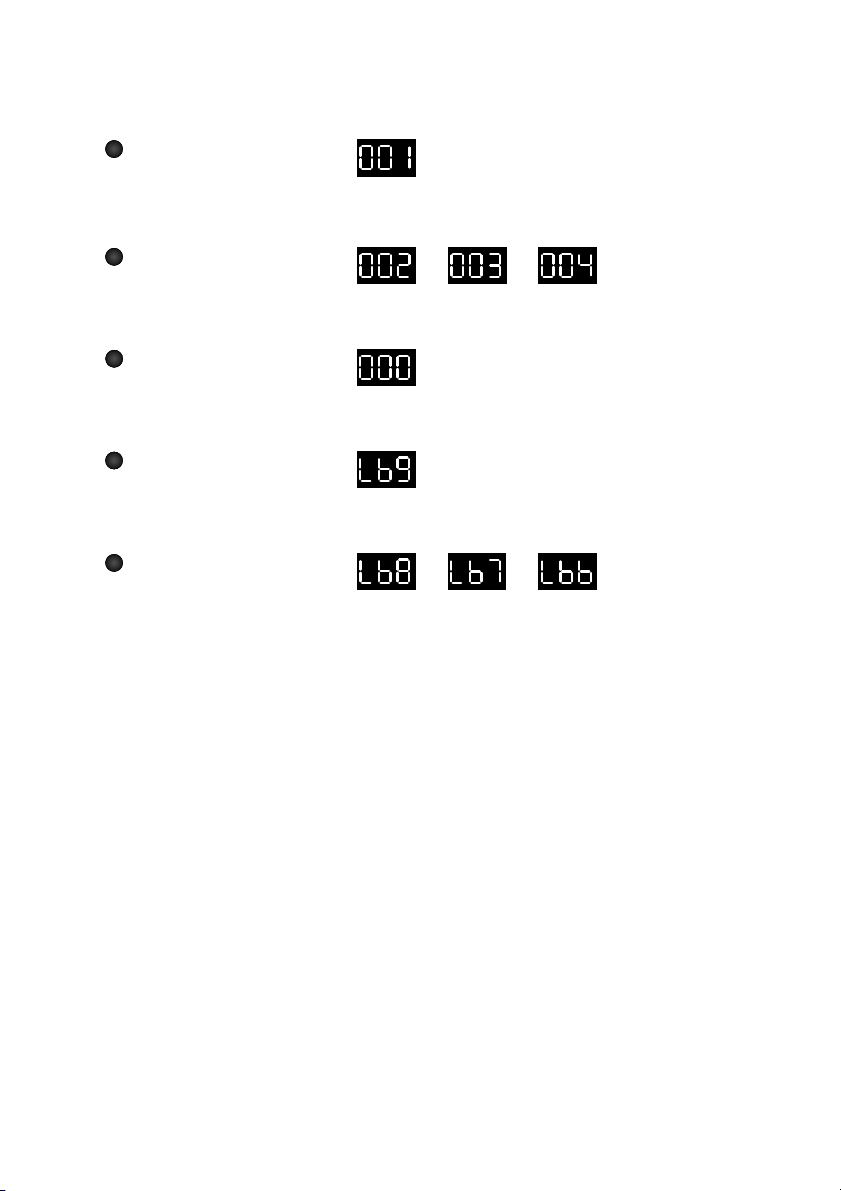
21 STATUS DISPLAY
These three seven-segment displays tell you which of the preamp's various
operating modes are currently active. After you power the preamp up, the ENGL
logo cycle through the display from right to left twice while the preamp carries
out an internal system check. Then the display will show 000, which indicates
Manual mode.
MIDI, factory and shadow presets are indicated by three digits, for example, MIDI
preset 1 appears in the display as "001". When you rotate a knob, the steps are
indicated by two digits, for example, step 3 on any knob appears in the display as
"03". The first zero falls by the wayside to make it easier for you to distinguish
between presets and settings in the display. To learn more about the various
display functions and statuses, consult pages 26 to 38, Handling MIDI and
Programming Functions.
Control Features
This category of features is comprised of administrative rather than sound-shaping
functions. Due to space constraints on the front panel, some functions are
activated by pressing two or three buttons simultaneously. However, this applies
primarily to the lesser used options; you'll find the most important functions are
accessible directly via a single button.
22 DOWN
This button is decremental, meaning that it activates the next lower preset
number every time you press it. If you're in a hurry or have a long way to go
between numbers, hold the button down to scroll more swiftly through the
presets. Note that the preamp won't switch to another sound until you release
the button. If you hold the button down for more than three seconds, the system
switches to Hi Speed Preset Select mode, meaning that it races through the
selection of presets.
In combination with other control buttons, you can activate a variety functions
that are described in detail on pages 13 to 15 in the section entitled "Combination
Control Features".
10
Page 11

23 UP
This button is incremental, meaning that it activates the next higher preset
number every time you press it. If you're in a hurry or have a long way to go
between numbers, hold the button down to scroll more swiftly through the
presets. Note that the preamp won't switch to another sound until you release
the button. If you hold the button down for more than three seconds, the system
switches to Hi Speed Preset Select mode, meaning that it races through the
selection of presets.
In combination with other control buttons, you can activate various functions that
are described in depth on pages 13 to 15 in the section entitled "Combination
Control Features".
24 MANUAL
This button sets the preamp to Manual operating mode, which is actually
something of a misnomer. More a status than an operating mode, Manual
describes the state of the preamp when no preset is active. Manual is the default,
it is activated once you power the preamp up and the system has finished running
its internal system check.
When you opt for this operating mode, you can't store settings, meaning that the
preamp handles like a conventional non-programmable preamp. The most recent
settings of all knobs and buttons are stored automatically when you switch the
preamp off. This means that whatever configuration you dialed in the last time
you used the preamp will be available by default when you switch it on again.
What's more, when you activate Manual mode you can press and hold the
Manual button for some three seconds to go from any MIDI or factory preset
immediately to the most recently activated preset (Preset Back Skip).
Manual mode is indicated in the display by 000. Note that this operating mode
can't be activated via MIDI.
You can activate special selection options in Manual mode, for example, MIDI
Channel Select mode; these are accessed in combination with other control
buttons as described on pages 13 to 15 in the section "Combination Control
Features".
A tip from the designer:
Switching from Manual mode to a MIDI preset via the Manual button (Preset
Back Skip) comes in handy when you want to compare two different sounds
without a lot of navigating fuss. Think of Manual mode as a blank canvas: Dial in
any sound you see fit and then store it to a MIDI preset. You'll find out how this is
done on page 32.
Manual is also useful when you want to go from a higher number MIDI preset
(say preset 69) to factory presets in a hurry. And if you accidentally activate
Manual, for instance when you're selecting a shadow preset, you can immediately
return to the given MIDI preset.
11
Page 12

25 WRITE/COPY
This option lets you save a MIDI preset's edited settings (in this context, "edit"
simply means changing settings). The system will select a Write operation
whenever you edit a MIDI preset. You'll know that this is the case because when
you rotate a knob or press a sound-shaping button, the corresponding LEDs flash.
A Write operation is executed exclusively for MIDI presets. Here's how you can
distinguish between Write and Copy: with the former you're actually
programming or writing a new MIDI preset, with the latter you´re making an
exact duplicate of an existing preset.
So the system will select Copy if you did not edit a MIDI preset. This means that
the given preset becomes the source, and its unedited contents are dumped to
another preset. The center decimal point in the display illuminates to indicate a
Copy operation is underway. If you activated Copy accidentally, you can cancel
that command by pressing the MANUAL button. The system will cancel Copy if
you don't activate a new preset within some 30 seconds.
The programming process—the Write command, that is—is not carried out as soon
as you press the button. First the preset number will begin flashing in the display
to indicate that the preamp is about to program this preset. The reason for this is
to prevent inadvertent programming. You can cancel the programming process at
any time during this phase.
The preset will only be programmed successfully if you press and hold the button
until the preset number in the display stops flashing, and the LEDs of the knobs
and sound-shaping features that you have edited stop flashing.
You'll have to go through the same routine to copy a preset once you select a
target preset.
In this case, the original contents of the MIDI preset are automatically dumped to
the corresponding shadow preset. The same thing applies when you overwrite a
target preset by means of the Copy option.
Copy is always activated for factory presets as well as in Manual mode whenever
you edit a setting.
You can protect every MIDI preset against unintentional overwriting by locking it.
Once you have locked a preset, it can't serve as the target of a Write or a Copy
operation. A locked preset can, however, serve as the source of a Copy operation.
A tip from the designer:
Descriptions of seemingly complicated functions like the one above can sometimes
be hard to follow. For this reason, this owner's manual includes some diagrams
that illustrate the diverse procedures step by step. Hopefully, these will make
easier to understand these processes. You'll find these hands-on explanations on
pages 25 to 38.
12
Page 13

Combination Control Features
This category comprises all control features that require two or three control
buttons to be pressed simultaneously. Try to make a habit of pressing these
buttons at precisely the same time, otherwise the function of whatever button
you press first will be activated.
MANUAL & DOWN: Activates preset bank A.
You can switch to bank A by pressing these two buttons at the same time.
Though this will work in Manual mode as well as when you have activated a MIDI
preset or a factory preset, it is actually designed for MIDI bank switching
purposes. We didn't disable this function for Manual mode and factory presets,
but it won't actually do anything because neither Manual mode nor factory
presets make a distinction between banks. You can switch banks until the cows
come home, the given memory slot will always remain the same.
Bank A is indicated in the display without the decimal point at left.
The MIDI channel setting always applies to the currently active bank. If the
decimal point between "c" and "h" (c h.) in MIDI Channel Select mode doesn't light
up, this tells you that the MIDI channel setting applies to bank A.
MANUAL & UP: Activates preset bank B.
You can switch to bank B by pressing these two buttons at the same time. This
will work in Manual mode as well as when you have activated a MIDI preset or a
factory preset. Please be aware that although you can do this for Manual mode
and factory presets, this option is meaningless because there is no subdivision of
banks. The memory slot will remain unchanged.
Bank B is indicated in the display with the left decimal point.
The MIDI channel setting always applies to the currently active bank. If the
decimal point between "c" and "h" (c.h.) in MIDI Channel Select mode lights up,
this tells you that the MIDI channel setting applies to bank B.
A tip from the designer:
In my book, 256 MIDI presets plus 256 shadow presets should satisfy the storage
requirements of even the most obsessive control freak. If you're one of those
people who can't imagine what all these memory slots could possibly be good for,
let me propose the following use for the second bank to you:
Courtesy of its tunable Line Out filter, the preamp is great for studio gigs and
hard disk recording. If you find yourself in either of these situations, it would be a
good idea to organize the presets you use for gigging in one of the two banks
and your studio presets in the other. It gets better: By defining suitable MIDI
channels on the MIDI footboard and the preamp itself, you can always switch to
the same preset number for the same part in every song for live and studio gigs,
yet still call up different settings that suit the given application. That makes it so
much easier to find the desired preset, and you don't have to memorize different
preset numbers for live and studio applications. This option pays off even if you
use it to store just a dozen different sounds programmed for live and studio gigs.
13
Page 14

MANUAL & WRITE in Manual mode: MIDI Channel Select mode.
Press these two buttons simultaneously while the preamp is in Manual mode to
activate MIDI Channel Select mode. This mode lets you determine the desired
MIDI channel for the currently active bank. The display shows ch. (short for
channel) briefly and then the MIDI channel, for example c01 or onl for OMNI. Off
tells you that the reception of MIDI data is deactivated for the respective bank.
Set the desired MIDI channel using the UP or DOWN buttons. If the display flashes
for one or several channels, this means that the given channel has already been
assigned to the other bank. If a bank is set to OMNI, all MIDI channels are locked
for the other bank. In this case, the other bank can only be set to Off.
After you have selected the desired MIDI channel, store it by pressing the Write
button.
Again, be sure to hold the Write button down until the display reads 000 to
indicate Manual mode and the display no longer flashes. Otherwise, the Write
operation will be canceled before the channel setting is stored.
Press the MANUAL button to quit MIDI Channel Select mode without storing a
channel.
If no other function is activated, the system will quit MIDI Channel Select mode
automatically after about 12 seconds.
DOWN & UP in Manual mode: Volume Controller Setup mode.
Press these two buttons simultaneously while the preamp is in Manual mode to
activate Volume Controller Setup mode. This mode lets you set up the preamp so
you can control the Master level remotely via a MIDI volume pedal. Once you
have pressed the two buttons simultaneously, the display will read Vol for about
two seconds. Then it will indicate the current status, which will be either On or
Off.
You can quit Volume Setup mode without changing its status by pressing the
Manual button (for example, if you just want to view the current status). Use the
UP or DOWN buttons to change the status from On to Off and vice versa. Press
the Write button to store the new setting. Again, be sure to hold the Write
button down until the display reads 000 to indicate Manual mode and the display
no longer flashes. Otherwise, the write operation will be canceled before the
setting is stored.
If no other function is activated, the system will quit Volume Controller Setup
mode automatically after about 12 seconds
MANUAL & WRITE while a preset is activated: Switching to a shadow preset.
Press these two buttons simultaneously while a MIDI preset is active for
approximately three seconds and the preamp will switch to the shadow preset of
that MIDI preset.
The shadow preset contains this MIDI preset's settings as they were before you
edited them or copied another configuration to this memory slot. You can quit
the shadow preset at any time by pressing the Manual button.
The contents of the shadow preset and the contents of the MIDI preset are
swapped when you press the Write button. This means that the old (overwritten)
setting is dumped back to the MIDI preset and the current (new) setting of the
MIDI preset is dumped to the shadow preset. Shadow and MIDI presets can only
be swapped if the given preset is not locked. Again, be sure to hold the Write
button down until the display indicates the MIDI preset number and the three
decimal points no longer flash. Otherwise, the write operation will be canceled.
14
Page 15

The preamp quits the shadow preset automatically after approximately 6 seconds,
and the system switches back to the MIDI preset. Note that you can't edit settings
using the sound-shaping features or knobs while a shadow preset is active.
DOWN & UP while a preset is activated: Locking and unlocking a MIDI preset
Press these two buttons simultaneously while a MIDI preset is active for
approximately three seconds to lock the preset. Locking a preset protects against
unintentional overwriting when you accidentally press the Write or Copy buttons.
The right decimal point appears in the display to indicate that this preset is locked.
Lo appears in the display, alternating with the preset number to indicate the
actual locking procedure is underway. Be sure to hold the two buttons down until
the number of the preset now longer flashes in the display.
The procedure for unlocking a preset is the same as the aforementioned locking
method. ULo appears in the display, indicating that the preset is being unlocked.
Once the MIDI preset is unlocked, the right decimal point disappears from the
display.
A tip from the designer:
This locking option will serve you well as soon as you start programming the
preamp. You can immediately lock MIDI presets to prevent you from selecting
them as targets for copy operations by mistake. The right decimal point appears
in the display indicating that this memory slot is already taken as soon as you dial
in a preset. And when you're using your preamp at live shows, neither friend nor
foe can tamper with your sounds, unless of course in the unlikely event that he or
she is familiar with the second operating level of your preamp.
DOWN & UP & WRITE in Manual mode: Unit Check mode is activated.
Press this combination of buttons simultaneously for approximately three seconds
to set the system to Unit Check mode. You should get a kick out this mode. It
steps through the control ranges of every knob on the preamp, letting you hear
every change from step 1 to step 21. Step 11 (the twelve o'clock or center
position) is the starting and ending position for each knob.
Once this function runs through every knob on the preamp, it moves on to the
sound-shaping functions, activating and deactivating them in the sequence in
which they are arrayed. This feature serves as an audio system check, and it lets
you audition the sounds produced by each step on every control range.
15
Page 16

Rear Panel Features
Please unfold and refer to the diagrams of the front and rear panels at the back
of the manual and refer to them as you read through the following explanations!
26 MAINS:
Connect a mains cord here.
CAUTION: Make sure you use an intact line cord with an grounded plug! Before
you power the preamp up, ensure the voltage value printed beside the mains
receptacle is the same as the current of the local power supply or wall outlet.
27 MAINS FUSE BOX:
Contains mains fuse (rear chamber) and a spare fuse (front chamber).
CAUTION: ALWAYS make sure replacement fuses are of the same type and have
the same ratings as the original fuse!
28 GROUND LIFT SWITCH
This switch severs the grounding circuit connecting the preamp's internal ground
to the wall receptacle's grounding. You can set the switch to GROUND floated
when you have connected a signal processor or power amp and you want to
prevent the two devices' ground circuits from creating a ground loop that
manifests itself in annoying humming.
CAUTION: If you're operating the preamp with a power amp or signal processor
that offers no direct connection between the internal ground and the outlet
ground, ensure this switch is set to the Ground position. Otherwise you may
encounter an irritating humming noise with a frequency of 50/60 Hz.
29 STEREO FREQUENCY CORRECTED LINE OUTPUT
This stereo ¼" jack serves as the output of the frequency-corrected line filter. It
delivers an unbalanced signal and it is equipped with a ground terminal. You can
patch the preamp signal routed through this jack to a recorder or a PC's audio
card via some type of adapter (depending on the type of inputs on the audio
card). Dial in the desired signal level via the Level knob (31).
30 OVEROAD
This LED illuminates to tell you the Line output is being overloaded. When it lights
up, back off the signal level using the Level knob.
31 LEVEL
This knob control the signal level of the frequency-corrected Line output. Use it to
adjust the preamp's Line output signal level to match the input gain of the mixing
desk's or recorder's input.
This knob lets you adjust levels from +3 dB to some -30 dB for very sensitive
inputs.
16
Page 17

32 & 33 LINE OUT BALANCED
These are the frequency-corrected (compensated) and balanced right and left
channel line outputs. Pin 2 and 3 of the XLR jack carry the signal, pin 1 = N.C. or
ground depending on the position of the Ground switch (34).
You can insert the signals routed through these outputs directly into a mixing
console or recording gear equipped with balanced inputs. The advantage of a
balanced circuit is that this type of connection will not create a ground loop,
provided of course it is wired correctly. Dial in the desired signal level for the two
balanced line outputs by adjusting the Level knob (31).
A tip from the designer:
The level of the line output is determined by the following factors: the input level
(Gain), the Volume knob as it is set in the given operating modes of the preamp,
and to a certain extent, the settings of the tone controls, as well as the position of
the Master knob.
Those are a lot of variables to be dealing with, so I recommend you first program
presets to taste, then dial in the best possible level for any signal processor you
may have connected, and finally adust the output level using the Level knob.
Certainly the best way to go about this is to call up the various presets and dial in
a setting for each that doesn't overload the output even at higher volume levels.
While you're at it, make sure that all of these levels are a reasonable match for
the input sensitivity of whatever recording device or mixing console you are using.
You can always fine-tune the level for each preset by means of the connected
device's input sensitivity or gain knob on.
34 LINE OUT GROUND
This switch assigns pin 1 of the XLR socket to ground (Ground to Pin 1). You'll find
this option comes in handy when you want to earth the circuit you have routed to
a mixing console or recording device.
35 LEVEL
This button determines the output level of the stereo output jacks. Press the
button to set a higher level (up to 10 dB) suitable for driving less sensitive power
amps. Do not press if you need a lower level (down to -10 dB) to feed the signal
to additional signal processors or extremely sensitive power amp inputs.
36 STEREO OUTPUT RIGHT
This unbalanced ¼" line out jack carries the preamp's right channel signal. You can
patch the signal routed to this jack to a power amp or a signal processor using a
shielded cord equipped with ¼" plugs.
37 STEREO OUTPUT LEFT
This unbalanced ¼" line out jack carries the preamp's left channel signal. You can
patch the signal routed to this jack to a power amp or a signal processor using a
shielded cord equipped with ¼" plugs.
38 FX LOOP RETURN: RIGHT
This is the right channel input for the FX loop. Connect this input to a signal
processor's right output/send jack using a shielded cable equipped with ¼" plugs.
17
Page 18

39 FX LOOP RETURN: LEFT
This is the left channel input for the FX loop. Connect this input to a signal
processor's left output/send jack using a shielded cable equipped with ¼" plugs.
40 FX LOOP SEND
This is the FX loop's output. Connect this output to the input of a signal processor,
or another preamp. ALC automatically adjusts the level of this output to the
different operating modes of the preamp. Use a short shielded cord equipped
with ¼" plugs to connect the preamp.
41 AUXILIARY INPUT
This is the preamp's ancillary input. The circuit is wired in series with the input
located on the front panel. Use it to connect the preamp to a 19" rack setup. The
front panel input has priority. In other words, when you insert a plug into the
front panel jack (1), the signal routed in via the Aux. Input is cut off.
42 P.C. REMOTE CONTROL
You can connect this D-Sub 9-pin port to a personal computer via the serial RS232
interface (Com port). The factory-included software features the Remote Control
Panel; it lets you do just that—control the preamp remotely from your PC.
CAUTION: Connect this port to the serial interface (Com port) of a compatible
personal computer running a Windows* operating system only!
NEVER connect the ENGL Custom Footswitch Z-5 or any other device to this port
because this could damage the preamp's computer system!
* Windows is a registered trademark of Microsoft Corporation.
Note: If you have a live connection between the preamp and a PC, make
absolutely sure you launch the Remote Control Panel on the PC before you switch
on the preamp. Otherwise the preamp may activate Software Download mode,
which could wreak havoc with the internal software of the preamp's main
processor!
43 MIDI OUT
This 5-pin DIN port (diode connector) will only send out MIDI data that the
preamp is programmed to handle. MIDI data is filtered by the internal computer
system, so to speak. For example, say bank A is assigned MIDI channel 01 and
bank B MIDI channel 12. In this case, only MIDI program change commands for
these channels are routed out via the MIDI OUT port. The same holds true for
MIDI volume controller commands.
44 MIDI THRU
Unlike MIDI OUT, this DIN port will forward all incoming MIDI data to any other
connected MIDI device.
18
Page 19

45 MIDI IN
This 5-pin DIN port is designed to accept data sent by a MIDI sender (for example,
the ENGL MIDI foot controller Z-12) or data sent from or routed through another
MIDI device.
Switch no. 46 lets you activate the preamp's power supply if you have an ENGL
MIDI foot controller connected to this port.
CAUTION: Before you connect any other MIDI footswitches or MIDI effect
devices, always make sure that switch no. 46 is set to the right to avoid damaging
any gear you have connected.
46 On-board Selector Switch for the MIDI IN Port
This switch activates a power supply for the ENGL MIDI foot controller. Power is
fed to the board via the MIDI circuit. When the switch is set to the left position
(ENGL MIDI Footcontroller), the preamp's power supply is routed to pin 1 and pin
2 of the MIDI IN port.
Whenever you use any other MIDI foot board, be sure to set the switch to the
right to avoid damaging it. If the foot board you are using is equipped to handle
phantom power, consult its operating manual to find out to how it is wired
(which pins carry its power supply) and what its voltage and current specifications
are.
If the voltage and current specifications and wiring match, you may set the switch
to the left to supply this foot board with power over the MIDI cord.
Read and heed: Be aware that any MIDI foot board you intend to supply with
power via this port may not draw or consume more than 200 milliamperes of
current. You must also find out if the MIDI foot board is able to handle 11 volts of
alternating current (AC)! If you are in any doubt, be sure to consult a specialist,
meaning an amp technician or electronics engineer who earns a living with a
screwdriver!
Preset and MIDI Channel Array
In this section, we'll take a look at the sequence in which you can dial up presets
using the UP and DOWN buttons on the face of the preamp or the software
Remote Control Panel on a PC.
Note that you can only call up the 128 presets of bank A and B via MIDI
commands. The following list points out the sequence of MIDI presets starting
with Manual 000.
You can only access and adjust MIDI channels on the actual preamp in MIDI
Channel Select mode, but not via the Remote Control Panel.
MIDI channels:
-> DOWN 015, etc.
-> DOWN 016: MIDI channel 16.
-> DOWN onI: OMNI mode, MIDI commands are received on
all MIDI channels.
off: all MIDI channels off, MIDI commands are
not received by any MIDI channel.
-> UP 01: MIDI channel 01.
-> UP 02: MIDI channel 02.
-> UP 03, etc.
19
Page 20

127 (A), etc.
<- DOWN
128 (A): MIDI preset 128 with the corresponding bank A shadow preset,
selectable via UP/DOWN buttons on the preamp, MIDI commands, and via
Remote Control Panel on a PC. WRITE and COPY (source & target) are possible.
<- DOWN
CA0-CA9: factory presets Clean 0 to 9,
selectable via UP/DOWN buttons on the preamp and
Remote Control Panel on a PC only. COPY (as target only).
<- DOWN
Cb0-Cb9: factory presets Crunch 0 to 9,
selectable via UP/DOWN buttons on the preamp and
Remote Control Panel on a PC only. COPY (as target only).
<- DOWN
LA0-LA9: factory presets Soft Lead 0 to 9,
selectable via UP/DOWN buttons on the preamp and
Remote Control Panel on a PC only. COPY (as target only).
<- DOWN
Lb0-Lb9: factory presets Heavy Lead 0 to 9,
selectable via UP/DOWN buttons on the preamp and
Remote Control Panel on a PC only. COPY (as target only).
<- DOWN
-> Manual 000: manual operating mode of the preamp and the default setting <-
selectable via MANUAL, UP and DOWN buttons on the preamp
and Remote Control Panel on a PC only. COPY (as target only).
-> UP
1 (A): MIDI preset 1 with the corresponding bank A shadow preset,
selectable via UP/DOWN buttons on the preamp, MIDI commands,
and via Remote Control Panel on a PC.
WRITE and COPY (source & target) are possible.
or if bank B is active,
1 (B): MIDI preset 1 with the corresponding bank B shadow preset,
selectable via UP/DOWN buttons on the preamp, MIDI commands,
and via Remote Control Panel on a PC.
WRITE and COPY (source & target) are possible.
-> UP
2 (A) or 2 (B), etc.
20
Page 21

Factory Presets
CA0-CA9: CLEAN
CA0: General Purpose Clean
Standard clean sound. Very versatile, it's great for those in-between
pickup positions, with plenty of sparkle for laying down clean tracks.
CA1: Rosewood Funk
Dials in righteous skank & spank that turns any guitar with
a rosewood fingerboard into a real funk plank.
CA2: Tele Twang
It's all in the name. Use the presence knob
of your power amp to spice the sound to taste.
CA3: Mahogany Rush
Adds a cool jazz flavor to guitars with mahogany bodies.
CA4: Mighty Wing
Beefs up the sound of neck position Strat pickups;
think "Little Wing" on steroids.
CA5: Swinging Sultans
Plenty of in-between pickup position cluck and pluck.
Add a hint of chorus and be Mark Knopfler.
CA6: Direct Out
Maybe some day someone will ask you to replicate a direct-to-desk
sound live. When that happens, you will be ready ...
CA7: Country + Western
You don't need to put the cow horns on the Cadillac to get a kick out
of this one. The Blues Brothers, for example, would have loved it ...
CA8: Clean Paul
Plug in Les Paul. Select middle position. Welcome to blues bliss.
Break out Kleenex. Wipe away tears of joy.
CA9: Texas Flood
Imagine what Stevie Ray would have sounded like over an ENGL amp.
Or better yet, play some tough Texas-style stuff and hear for yourself.
Cb0-Cb9: Crunch
Cb0: The Crunch
The ultimate crunch sound, warm with truckloads of harmonics and
attitude. This one gives you state-of-the-art class A grind.
Cb1: Humbucker Crunch
If you need to tame over-the-top humbucking pickups to get some slice
and sizzle, this where you'll get the bacon.
21
Page 22

Cb2: Turn The Page
Anyone for a taste of that other Jimmy?
Turn the page and let Zeppelin fly again.
Cb3: Angus Finest
Fiddle with the presence knob of your power amp, dial in that distinctive bite
and sparkle, and you'll find yourself on the Highway To Hell—figuratively
speaking of course.
Cb4: Jimi's Favourite
Nothing hazy about this one: Plug in the Seattle superman's trademark
guitar and take it to the stratosphere.
Cb5: Blues Crunch
`Nuff said, just plug and play........
Cb6: West Coast Crunch
Got a jones for a cranked non-master volume US class A combo?
Get your fix right here.
Cb7: Retro Seventies
Shovels full of grit and grind of the kind you expect non-master vintage amps
to deliver ... except that you don't need earplugs to enjoy this one.
Cb8: Stevie's Lead
If that Texas stang is your thang, this one's for you.
Cb9: Southern Crunch
Unlike Neil, even a southern man needs this one around ...
LA0-LA9: Soft Lead
LA0: Rush Hour
Here's a little something for the Canadian purveyor
of progressive rock in you.
LA1: California Vintage Wine
Hopped up class A combo sans master volume.
LA2: LA Saturated Tube
Add some chorus and delay for a trip back in time to the
taste-challenged´80s. Don't forget the parachute pants.
LA3: Fuzz Lead
Want that 1000 lb. mosquito buzz of a vintage fuzz?
Come and get it—aggressive distortion and presence galore.
LA4: Canadian Rock
Here's another north-of-the-border special for you. Use the in-between
pickup position to get that Canadian stadium pop sound. It's only love,
indeed, if this sort of thing yanks your chain.
22
Page 23

LA5: Ancient Tube Lead
Turn a non-master British stack up to 11 and stand back. Stand way back ...
LA6: Paranoid
The heavy metal mudslide that started an avalanche back in the early ´70s.
LA7: Tokyo Women
That would be Ritchie's fab tone for you. But don't take our word for it,
dress up in best black get up and hear for yourself.
LA8: Crazy Diamond
Pile on a healthy helping of echo and reverb to create a sound you can slice.
Shine on indeed ....
LA9: Violin
That lead tone near and dear to every Texas tone ranger's heart.
Breathtaking sustain and a refreshing gust of harmonics make it
easy sailing all the way to the cliffs of Dover.
Lb0-Lb9: Heavy Lead
Lb0: German Metal
Bone-crushing Teutonic tone for eurotrash metal made in Germany.
Tweak the presence knob of your power amp to elicit that evil tube punch.
Not for the faint of heart ...
Lb1: Modern Eddy
Latter day brown sound; just add a pinch of pitch and delay
to tap your way into the hearts and minds of your audience.
Lb2: Full Shred
Shred is not dead, it just nodded off. With this one, all pickers who thrive on
speed, accuracy and great tone will wake up to some hip hi-gain lead sounds.
Lb3: Classic Lead
Typical retro lead sounds of `70s vintage harking back
to the first amps equipped with master knobs.
Lb4: Moore Lead
Gary's notion of tone: Les Paul plus gobs of gain equals endless sustain.
Lb5: Angel's Rhythm
Straight-up, mids-heavy hi-gain rhythm. Great contemporary sound
for guitarists who like to stand out in a crowd. Creates a wall of sound
Phil Spector would have been proud of.
Lb6: Devil's Lead
The evil twin of preset Lb5. Modern hi-gain lead sound with a bulldog's bite
and balls to boot. Packs a mighty punch; great stuff if your band mates
won't back off the volume when it comes for you to strut your soloing stuff.
23
Page 24

Lb7: Ultra Sandman
In all humility, this one may set a new standard for ultramodern heavy metal
riffage. Punchy low midrange, tight bottom end and sparkling treble. Tweak
the presence knob and shape to taste. That should do it then ....
Lb8: The Healer
Searching for a singing Latin rock lead sound? Search no more. Particularly
owners of set-neck mahogany-body guitars will appreciate this one. Sustain
like there's no tomorrow, notes may actually hang around until the next day.
Lb9: Strat Lead
Plenty of punch to beef up every single coil-equipped guitar. Remarkable
dynamic range, much like a hard-working British amp cranked to the hilt.
Try an arpeggio or two and revel in the power and definition ...
The Making Of.......
Before we begin exploring the ENGL E 580 Preamp's world of sounds, allow us to
share a few comments with you:
1. The preset names are merely signposts, they are there to give you a general
idea of what each of these sonic configurations sound like. Our descriptions are
simply suggestions, it's up to you and your imagination to take it from there.
2. This E580 tube preamp was not designed to copy other maker's amps. With
our focus clearly on the rich heritage of ENGL tube tone tradition, we factored
in all the things we cherish about ENGL amps—both new and old. Building on
these versatile sounds, our goal was to make the most of state-of-the-art
technology to create a powerful tube tool for expressive guitarists who want
to go where no other player has gone before.
3. While we were programming the presets for the E580, we auditioned them
over an ENGL 100-watt power amp equipped with 6L6GC power tubes, and an
ENGL 4x12 vintage cabinet. Note that different gear (tube, amps, speakers and
cabinets) may of course elicit different sounds.
4. We used the usual complement of guitars (solid-body as well as hollow-body
guitars sporting single coil and humbucking pickups) to create the E580's
factory presets.
Finally, we would like to stress that it's all in your fingers and up to your powers of
invention. We designed the ENGL E580 MIDI TUBE PREAMP to fuel your creativity.
It may be a cliché, but in this case it's true—the only limit is your imagination. This
device has the power to take you where you have never gone before. Discover a
new realm of sound and perhaps a new approach to music.
Here's hoping you enjoy the trip,
Bernd Aufermann
24
Page 25

Step-by-step Illustrated Handling Guide
Explanations
Control features:
Take this to mean all the features used navigate and manage sounds rather than
shape them:
Specifically, that means the DOWN, UP, MANUAL and WRITE /COPY buttons as
well as diverse combinations thereof.
Some of these functions may also be executed via MIDI and the Remote Control
Panel, for example selecting MIDI presets.
Sound-shaping features:
This describes all features that influence the preamp's signal, for example
Clean/Lead, Contour, Rec. Out Treble, as well as all knobs such as Gain, Lo Mid,
Effect, and so forth.
Handling
<->: press one button or several buttons briefly.
<- : press and hold one button or several buttons simultaneously.
@ : shape sounds via knobs and buttons.
Display
=> : the display shows different data in sequence.
<=>: the display switches back and forth between two statuses.
Functions
1. Switching the device on. ...........................................................................
2. Selecting MIDI presets, factory presets and a MIDI preset. .....................
3. Selecting preset bank A and B. .................................................................
4. Saving settings to a MIDI preset. ..............................................................
5. Copying settings from one MIDI preset to another MIDI preset. ...........
6. Copying settings of a factory preset to a MIDI preset. ............................
7. Copying Manual settings to a MIDI preset. ..............................................
8. Locking a MIDI preset to protect it against inadvertent overwriting. ....
9. Unlocking a MIDI preset. ..........................................................................
10. Selecting a shadow preset. .......................................................................
11. Swaping the settings (data) of a shadow presets with ...........................
those of a MIDI preset.
12. Selecting MIDI channels. ...........................................................................
13. MIDI Volume Setup. ..................................................................................
14. Launching a preamp self-test. ...................................................................
described
at page:
26
27
28
29
30
31
32
33
33
34
35
36
37
38
25
Page 26

1. Switching the device on.
<->
P
OWER
=>
=> etc.
=>
After you power the preamp up, the ENGL logo cycles through display like a
banner. The preamp switches to Manual mode following the system test.
@
G
AIN
LO H
I
G
AIN
=>
The familiar sound-shaping features handle just like those on any
non-programmable device. As you're rotating a knob, you'll see the corresponding
steps indicated in the display. For example, here you can see step 11. About a
second after you release the knob, you'll see the number of the currently selected
preset reappear in the display.
The one exception is when you continue to rotate a knob past the respective
limits of the value range, i.e. step 1 and step 21 (step 11 on the Master knob). In
this case, the display will continue to read 01 or 21 (11 on the Master knob) until
you reactivate this knob or adjust another knob. This serves as a reminder that
this knob has arrived at the limits of its control range.
Note:
You can't store settings in Manual mode via Write. If you press WRITE/COPY while
the preamp is in Manual mode, the settings you have dialed serve the source and
the amp will always copy these to the MIDI preset you have selected as the
target.
More good-to-know stuff:
In Manual mode the most recent settings you made are stored automatically
when you switch the preamp off. The preamp returns to this status when you
switch it on again.
CAUTION:
Before you switch the preamp on, check to make sure the local mains voltage
matches the specification indicated on the model designation plate locate at the
right of the mains receptacle!
PCs and data circuits can behave unpredictably. To avoid potential malfunctions,
we recommend that you do not connect the preamp to a PC before you power it
up.
26
Page 27
2. Selecting MIDI presets, factory presets and
Manual mode.
<->
U
P
The preamp activates MIDI preset 1.
->
U
P
=>
=>
=> etc.
The preamp rapidly scrolls through MIDI presets in ascending order.
<->
M
ANUAL /
M
ODE
<->
This activates Manual mode.
<->
D
OWN
This activates factory preset Lb9.
->
D
OWN
=>
=>
=> etc.
The preamp rapidly scrolls through factory presets in descending order.
Note:
If you hold the UP or DOWN buttons down for more than three seconds, the
system automatically scrolls through presets much faster (that would be the Hi
Speed Preset Select option).
27
Page 28

3. Selecting preset bank A and B.
<->
&
UPM
M
ANUAL
ODE
<->
=>
Press the two buttons simultaneously to activate preset bank B.
This switching options also works when you have activated a preset. Here the
preamp switches from bank A to bank B in Manual mode. The decimal point at
the left appears in the display telling you that bank B is active.
<->
&
D
OWN
M
ANUAL
M
ODE
<->
=>
Press the two buttons simultaneously to activate preset bank A.
Here the preamp changes from bank B to bank A, MIDI preset 10.
The decimal point at the left disappears.
Note:
When you switch banks in Manual mode or while a factory preset is active, the
sound will not change. And for very good reason—we didn't make a distinction
between banks for Manual mode and the factory presets.
When you change banks while a MIDI preset is active, the preamp's features will
be configured to match the settings of the selected preset.
Note:
When you press two buttons simultaneously, make sure that you bear down on
them at precisely the same time, otherwise the preamp will carry out another
command that you don't want.
Examples:
In the first scenario depicted above, the preamp will switch to MIDI preset 1 if you
press UP before you press the MANUAL button.
Into the second example, the preamp switches to Manual mode if you hit the
MANUAL button before you press DOWN.
Supplementary information:
You can switch back and forth between bank A and bank B in both Manual mode
and for factory presets even though no distinction between banks is made for
these memory slots. The only distinguishing feature between these "nonexistent"
banks is the left decimal point that appears in the display.
Although at first glance this bank switching option would appear to be pointless,
it does have its advantages:
1.You can select the desired bank in Manual mode before you select the MIDI
channel.
2.You can predetermine the bank before you go from Manual mode to the MIDI
presetsby pressing the UP button.
Besides, the bank selection process (press the two MANUAL & UP or DOWN
buttons, depending on the desired bank) is more forgiving in Manual mode.
This means that you can accidentally press the MANUAL button just before you
press the UP or DOWN buttons without inadvertently activating another
function.
28
Page 29

4. Saving settings to a MIDI preset.
For purposes of this example, the preamp is in Manual mode.
<->
U
P
This activates MIDI preset 1, bank A.
@
G
AIN
L
O HI
G
AIN
=>
Adjust the preamp's sound-shaping features to taste, for example, select the
Heavy Lead channel, dial in step 14 on the Gain knob and so forth.
The LEDs for every knob and sound-shaping button that you adjusted will flash
(MSF is active) indicating that a Write operation will be carried out as soon as you
press the Write button.
->
W
RITE
/
OPY
C
<=>
=>
Hold the button down until the display stops flashing and preset 1 lights up
continuously. Whatever settings you dialed in are now stored in MIDI preset 1.
Note:
The Write operation can not be executed on a locked preset!
Note:
The original settings of this MIDI preset are automatically loaded to shadow
preset 1. You can load them back to the MIDI preset at any time.
Supplementary information:
To facilitate handling, we took a "shortcut" for the WRITE and COPY data storage
operations. When you program or copy a sound by pressing the "WRITE/COPY"
button, the display changes back and forth from the "Pro" (during a WRITE
operation ) or "Co." (in the case of a COPY operation) to the MIDI preset number
twice. During this phase, you can cancel the programming operation at any time
by simply releasing the button. The programming operation is launched
immediately after the second time the preset number appears in the display,
and it can't be cancelled or revoked. The operation is concluded as soon as the
preset number appears statically in the display, meaning that it no longer flashes.
Note that this phase takes a bit longer when you are storing MIDI channels and
MIDI volume settings, as well as when you are locking and unlocking presets.
This can't be helped - it is due to technical reasons and we do apologize
for any inconvenience.
29
Page 30

5. Copying settings from one MIDI preset
to another MIDI preset.
For purposes of this example, the preamp is in Manual mode.
->
U
P
=>
Select the desired preset as the source for the Copy operation.
In this example it is preset 15, bank A.
Read and heed:
If you want to copy MIDI preset 15 as is, don't change any of the settings after
you have dialed this preset up. If you do change settings, the preamp will write
these changes to this preset.
<->
W
RITE
/
OPY
C
=>
after
30 seconds
Press the button briefly. The Copy option is active for about 30 seconds.
The system will quit Copy mode automatically if you don't select a new preset
during this time.
The center decimal point in the display appears to indicate Copy has been
activated.
->
D
OWN
Select MIDI preset 10 as your target preset immediately after you activate Copy.
->
W
RITE
/
OPY
C
<=> =>
Hold the button down until the display stops flashing and preset 10 lights up
continuously. The settings of MIDI preset 15 were dumped to MIDI preset 10.
Note:
The original settings of this MIDI preset are automatically dumped to shadow
preset 10. You can load them back to the MIDI preset at any time.
Good-to-know stuff:
You can copy MIDI presets from one bank to another. To this end, you must
change to the other bank after you press the Copy button. You'll find an
explanation of how to go about changing banks in section 3 above.
Heads up:
You can't use a locked preset as the target of a copy operation!
Note:
You can press the MANUAL button at any time when you want to cancel the
operation and quit Copy mode.
30
Page 31

6. Copying settings from a factory preset
to a MIDI preset.
For purposes of this example, the preamp is in Manual mode.
->
D
OWN
=>
Select the desired factory preset as the source for the Copy operation. In this
example it is factory preset CA9.
You can change the sound-shaping settings of a factory preset before you copy it.
The preamp will always copy the last settings you dialed in for a factory preset
before you pressed the Copy button.
<->
W
RITE
/
OPY
C
=>
after approx.
30 seconds
Press the button briefly. The Copy option is active for about 30 seconds.
The system will quit Copy mode automatically if you don't select a new preset
during this time.
The center decimal point in the display appears to indicate Copy has been
activated.
->
U
P
Select MIDI preset 5, bank A as your target preset immediately after you activate
Copy.
->
W
RITE
/
OPY
C
<=> =>
Hold the button down until the display stops flashing and preset 5 lights up
continuously. The settings of factory preset CA9 were dumped to MIDI preset 5.
Note:
The original settings of this MIDI preset are automatically dumped to shadow
preset 5. You can load them back to the MIDI preset at any time.
Heads Up:
You can't use a locked preset as the target of a copy operation!
Reminder:
You can press the MANUAL button at any time when you want to cancel the
operation and quit Copy mode.
31
Page 32
7. Copying manual settings to a MIDI preset.
For purposes of this example, the preamp is set to MIDI preset 29, bank B.
<->
M
M
ANUAL
ODE
/
<->
=>
This activates the Manual settings as your source.
@
G
AIN
LO H
I
G
AIN
=>
after approx.
1 second
After you have selected Manual, you can change the any sound-shaping settings
as you see fit.
In this example, the Gain knob is set to step 17 and Hi Gain is activated.
<->
W
RITE
/
OPY
C
=>
after approx.
30 seconds
Press the button briefly. The Copy option is active for about 30 seconds.
The system will quit Copy mode automatically if you don't select a new preset
during this time.
The center decimal point in the display appears to indicate Copy has been
activated.
->
U
P
Select MIDI preset 11, bank B as your target preset immediately after you activate
Copy.
->
W
RITE
/
C
OPY
<=> =>
Hold the button down until the display stops flashing and preset 11 lights up
continuously. The settings of Manual were dumped to MIDI preset 11.
Note:
The original settings of this MIDI preset are automatically dumped to shadow
preset 11. You can load them back to the MIDI preset at any time.
Heads Up:
You can't use a locked preset as the target of a copy operation!
Reminder:
You can press the MANUAL button at any time when you want to cancel the
operation and quit Copy mode.
32
Page 33
8. Locking a MIDI preset to protect it against
inadvertent overwriting.
For purposes of this example, the preamp is set to MIDI preset 2, bank A.
->
&
U
D
OWN
P
<=>
=>
Press the two buttons simultaneously and hold them down until the display stops
flashing and preset 2 lights up continuously.
The decimal point on the right indicates the preset is locked.
Note:
You can neither store nor copy settings to a locked preset. What's more,
you can't swap the settings of a shadow preset and a MIDI preset.
Conversely, you can use a locked MIDI preset as the source for a Copy operation.
9. Unlocking a MIDI preset.
For purposes of this example, the preamp is set to MIDI preset 2, bank A
->
&
U
D
OWN
P
Press the two buttons simultaneously and hold them down until the display stops
flashing and preset 2 lights up continuously.
The decimal point on the right disappears, indicating the preset is unlocked.
Now you can store or copy settings to this preset.
<=>
=>
33
Page 34

10. Selecting a shadow preset.
For purposes of this example, the preamp is set to MIDI preset 11, bank A.
M
M
ANUAL
ODE
&
W
RITE
/
/
C
OPY
<->
->
<=>
=>
after approx.
5 seconds
Press the two buttons simultaneously and hold them down until the all three
decimal points start flashing. This indicates you have switched the preamp to
shadow preset 11, bank A.
After a period of some five seconds, the preamp automatically changes to
the MIDI preset.
You can press the MANUAL button to quit the shadow preset manually.
@
G
AIN
L
O HI
G
AIN
In the shadow presets, all sound-shaping features are locked. That means you
can't edit them.
Note that as you play the sound you are hearing is shaped by the settings of the
shadow preset. If any of the LEDs surrounding a knob flashes, this tells you that
the knob has different settings in the MIDI preset and shadow preset. If the
setting of a knob in a MIDI and shadow preset are identical, the LEDs surrounding
that knob light up but they do not flash.
Note:
In the shadow presets, the Master knob is also locked. For this reason, we
recommend that you set the Master knob to a low setting before you change to a
shadow preset. If you have dialed in a higher setting, roll it back.
This prevents you from unwittingly exposing your ears to extremely high levels,
for example, when a shadow preset's volume is set to a much higher level than
the MIDI preset's volume.
34
Page 35

11. Swaping the settings of a shadow preset with
those of a MIDI preset.
For purposes of this example, the preamp is set to MIDI preset 11, bank A.
M
M
ANUAL
ODE
&
W
RITE
/
/
C
OPY
<->
->
<=>
Press the two buttons simultaneously and hold them down until the all three
decimal points start flashing. This indicates you have switched the preamp to
shadow preset 11, bank A.
Now we'll dump the settings of the shadow preset back to MIDI preset 11.
@
G
AIN
L
O HI
G
AIN
In the shadow presets, all sound-shaping features are locked. That means you
can't edit them.
Note:
Note that as you play the sound you are hearing is shaped by the settings of the
shadow preset. If any of the LEDs surrounding a knob flashes, this tells you that
the knob has different settings in the MIDI preset and shadow preset (courtesy of
the MSF). If the setting of a knob in a MIDI and shadow preset are identical, the
LEDs surrounding that knob are illuminated but they do not flash.
->
W
RITE
/
C
OPY
<=>
=>
Hold the button down until the display stops flashing and MIDI preset 11 lights up
continuously.
Now the settings of the shadow preset have been dumped to the MIDI preset and
vice versa, the settings of the MIDI preset have been stored to the shadow preset.
This option lets you restore overwritten MIDI presets.
35
Page 36

12. Selecting MIDI channels.
Activate this selection routine while the preamp is in Manual mode.
Note:
You must select the bank to which you want to assign a MIDI channel before you
activate MIDI Channel Select mode.
<->
M
M
ANUAL
ODE
&
W
RITE
/
/
OPY
C
<->
=>
=>
after approx.
2 seconds
Press the two buttons simultaneously. The preamp switches to MIDI Channel
Select mode. After about two 2 seconds the display will indicate the assigned
MIDI channel. In this example it is channel 01.
<->
<->
D
OWN
=>
=>
Press the DOWN button twice. Normally you will scroll to the next lower MIDI
channel number every time you press the button, but in this case the display will
scroll from channel 01 to Off and then to OMNI mode.
->
W
RITE
/
OPY
C
<=>
=>
Now you can store the desired MIDI channel, which in this example is actually all
of them or OMNI. Press and hold the WRITE button until the display stops flashing
and Manual is indicated statically.
Otherwise, the programming procedure will be canceled.
Note:
To distinguish between the presets of the two banks when you want to access
both banks, these banks must be assigned to different MIDI channels. This means
that you can't assign the same MIDI channel to both banks. If you select a MIDI
channel that has already been assigned to the other bank, the display will let you
know that this is the case—this channel number will begin flashing.
If you set a bank to OMNI, you can't assign a channel to the other bank. Your
only option is to set MIDI channel reception to OFF.
Note:
You can activate MIDI Channel Select mode to simply check the given MIDI
channel assignment and press the MANUAL button to quit this mode without
storing a new MIDI channel.
The system quits this routine automatically after about 12 seconds.
36
Page 37

13. MIDI Volume Setup.
Activate this selection routine while the preamp is in Manual mode.
<->
&
D
OWN
U
P
=>
=>
after approx.
2 seconds
Press the two buttons simultaneously. The preamp switches to MIDI Channel
Select mode. After about two 2 seconds the display will indicate the current
status of the MIDI volume remote control option. In this example it is Off.
<->
U
P
Use the UP button to enable remote MIDI volume control so you can
control the preamp's Master volume via an external MIDI volume pedal.
->
W
RITE
/
OPY
C
<=>
=>
Now store the desired MIDI volume option, On or Off. In this example,
we'll go for On.
Press and hold the WRITE button until the display stops flashing and 000
appears in it indicating the amp is back in Manual mode. Otherwise, this
programming procedure will be canceled.
Note:
You can activate MIDI Volume Setup mode to check the status and press
the MANUAL button to quit this mode without storing a new setting.
The system quits this routine automatically after about 12 seconds.
37
Page 38

14. Launching a preamp self-test.
Activate this selection routine while the preamp is in Manual mode.
&
->
D
OWN
&
W
RITE
U
P
/
C
OPY
=>
Press and hold all three buttons simultaneously until the preamp switches
to Unit Check mode.
@
GAIN GAIN GAIN
=>
=> etc.
On its own, the system will set all knobs to step 11 or 12 o'clock position. It then
sweeps through the Gain control range automatically from step 1 to step 21.
Once it arrives at step 21, the system resets Gain to step 11.
The preamp goes through the same routine in turn for all knobs.
@
P
REAMP
D
EFEAT
P
REAMP
D
EFEAT
C
LEAN
L
EAD
Once all knobs are reset to the center (Step 11) or 12 o'clock position, the system
activates and deactivates all sound-shaping features in the sequence in which the
are ordered on the front panel.
Note:
In this operating mode, the system dials in settings without human intervention.
For this reason, we recommend that you set a connected power amp to a very
low volume to prevent levels from getting out of hand.
Supplementary information:
You can select a specific operating mode - say, Heavy Lead (sound-shaping
buttons 12 and 13 activated) - in order to run an automatic check of its
controls by selecting the desired operating mode before starting the UNC
function. Note that once this check routine has run through all knobs, all
sound-shaping functions are deactivated before the routine begins checking
the sound-shaping buttons.
During the UNC routine, all sound-shaping functions (that means all knobs
and buttons) are disabled.
38
Page 39

PC Software Remote Control Panel (RCP) Features
The preamp comes with software featuring a handy little utility we call the
Remote Control Panel (RCP). As its name would indicate, it lets you control the
features of the preamp remotely via a compatible personal computer. You'll need
Microsoft Windows* 95/98, NT or a higher operating system version to run this
software. Beyond that, your computer must have a serial port available (a Com
port or RS 232 interface).
Though we put our software through the paces on a number of different
computers and it ran flawlessly on each, we can't guarantee that this will be the
case with every brand and configuration of computer on the market.
Installation
Insert the included 3 ½" diskette into your computer's 3 ½" disk drive. Launch
Windows Explorer* and create a directory named "ENGL" or something similar on
your hard disk (that is disk drive C).
Copy the "Remote.exe" file from the diskette into this directory on the hard disk.
Launch the software via a double-click onto the file icon in Explorer or create a
link to the EXE file, drag or copy it onto the desktop, and launch it from there.
Read and heed: Be sure to bear the following rules in mind when you're
controlling the preamp remotely via PC:
1. Switch the preamp off before you connect it to the PC!
2. Once you've connected the PC to the preamp's D-Sub 9 port—it's labeled "P.C.
Remote Control"—be sure to launch the PC Remote Control software before
you switch the preamp on. Otherwise the preamp's main microcontroller will
activate Software Download mode. That would be bad because it could
damage or even delete this chip's software.
3. Use the enclosed D-Sub 9 cord on which connectors are wired the same as the
preamp port, i.e. the pin assignments are a perfect match.
Note: Many of the features and functions of the Remote Control Panel are
identical to those on the preamp, so we won't bore you with detailed
descriptions. To keep a long story as short as possible, we'll refer to the Remote
Control Panel by its acronym RCP in the following.
The buttons labeled Preamp Defeat, Clean Lead, Gain Lo Hi, Bottom, Contour,
Bright, Clean Ultra Bright, Modern Classic, Recording Out Bass and Recording Out
Treble are the virtual versions of the sound-shaping buttons of the same name on
the preamp. The status of these features is indicated by a red LED located above
every button.
A mouse click onto the buttons activates or deactivates its given function.
The faders Gain, Bass, Lo Mid, Hi Mid, Treble, Effect, Volume and Master are the
virtual versions of the sound-shaping knobs of the same name on the preamp.
* Microsoft Windows is a registered trademark of Microsoft Corporation.
39
Page 40

The current setting is indicated above the given fader in steps. You can drag the
fader to the desired value via mouse. Alternatively, you can click the button with
the little arrow on it up or down to adjust the value step-by-step in the given
direction.
Down, Up, Manual and Write/Copy buttons are the virtual versions of the buttons
of the same name on the preamp, except that here in the virtual world the
various multiple button combinations fall by the wayside.
Transmit
When you click this button, all settings you edited on the RCP are sent to the
preamp. After this command is executed, the settings of the RCP and the preamp
are identical.
Receive
When you click this button, all settings of all features on the preamp are sent to
the RCP. After this command is executed, the settings of the RCP and the preamp
are identical.
Bank
The Bank button changes banks on the preamp. The selected bank (A or B) is
indicated in the display of the RCP behind the preset number.
Shadow
The Shadow button changes from a MIDI preset to a shadow preset. The shadow
preset's status is indicated in the display of the RCP. If you switch to the Shadow
preset via this feature on RCP, the preamp will not switch back to the MIDI preset
automatically. You must quit the Shadow preset by pressing this button again.
Amp Lock, Unlock
This control feature lets you lock and unlock all knobs, sound-shaping features,
control features and the MIDI IN on the preamp. When you set the preamp to
Amp Lock, it can only be controlled via the RCP.
Realtime Lock, Unlock
This function determines whether changes to the faders and sound-shaping
buttons on the RCP are sent to the preamp immediately after you make them.
When you opt for Realtime Lock, you can edit settings to your heart's content on
the RCP and transmit them all at once to the preamp. Realtime Unlock, on the
other hand, sends every adjustment you make to a fader or sound-shaping button
to the preamp right away. Well, not quite right away, because there is a short
delay during data transfer for technical reasons.
The Menu Bar of the Remote Control Panel:
"File menu", Open
The Open option does just that, it opens files with the extension ENT to access
their settings.
The faders and other sound-shaping features on the RCP are set to the given
values after you open a file. You can click Transmit to send these settings to the
preamp.
40
Page 41

"File menu", Save
Save stores what we call "sound settings" (that term covers all settings and
statuses that shape the sound of the preamp) on the RCP in a file with the
extension "ENT".
You have to name each file before you can store it on hard disk or another
storage medium.
A tip from the designer:
This option of storing "sound settings" elsewhere isn't just a frill, it actually comes
in handy out there in the real world. Here's a case in point: Once you have
programmed your sounds to MIDI presets, a reasonable proposition would be to
create a backup of these presets on hard disk or CD.
You can use the Receive or Up and Down buttons to send the settings of the MIDI
presets from the preamp to the RCP, and then store the contents of every preset
under a unique name or the preset number (for example, preset1A.ENT). If you
take the time to do that, you can safeguard your sounds against disaster and
doom. For example, in the unlikely event that the onboard flash memory chip
crashes, you can restore your original settings by loading them back to the
preamp once a new flash memory chip has been installed. Here's another
potential application: You could send settings in a "sound setting" file over the
Internet to another guitarist who is also the proud owner of this preamp. Or you
could dump your sound files to floppy disk and carry them with you into the
sound studio for a recording gig (provided of course that the studio owner has
the same impeccable taste as yours and an ENGL E580 preamp at hand).
"File menu", Quit
This command closes the Remote Control Panel and quits the applications.
Remote control panel is ended and closed. The Com port is released so that it can
be put to some other use.
"Options" menu, RS 232 Com Ports
A click on this menu item opens a window called Preferences that lets you view
the currently selected Com port. You can select the desired Com port here. The
default is Com 1. If you select another Com port, you must confirm your selection
by clicking OK.
Click Cancel to close the window without changing the setting.
A tip from the designer:
You may have to configure the Com port depending on if and how your PC is
using Com port 1. Some systems use Com port 1 for the mouse or an analog
modem. If that is the case with your rig, you'll have to use Com port 2 to connect
your PC to the preamp and select this Com port on the Panel. Remote control via
RCP will only work if you have selected the right Com port.
"Options" menu, Serial Number
This menu item lets you check out the serial number of the preamp.
Although perhaps not the most thrilling feature you'll ever encounter, it will come
in handy if your preamp's flash memory chip develops a defect. In that case, the
service technician needs the serial number to make sure the main processor
adjusts the opto-controller ICs correctly. The information it needs to do this is
stored in each flash component of every preamp. The serial number is quite
significant for another reason. More on this later.
41
Page 42

STATUS DISPLAY in the Remote Control Panel
This alphanumeric display shows the various currently active statuses of the
preamp as well as some functions of the Panel.
Preset number: Preset 001-128
Manual: Manual 000
Factory preset: Factory CA 0-9, Factory CB 0-9, Factory LA 0-9, Factory LB 0-9
Shadow preset: Shadow 001-128
Bank A and B: "A" or "B" follows the preset number
MIDI preset locked: "L" follows the letter A or B, MIDI preset unlocked: "U"
The display also indicates when you select different control features or if you
change settings of Faders (e.g. Gain 15).
Glossary
AFC (Auto Frequency Correction):
This is a special filter circuit designed to provide automatic frequency
compensation. The Gain knob and different sound-shaping features are controlled
by a sophisticated matrix to adjust frequencies so that they best match the various
settings.
ALC (Auto Level Correction):
This feature adjusts the levels of the effect send jack to match the different levels
generated by the preamp's various operating modes without human intervention.
In other words, the circuit sets the best possible level for the send jack without
you having to tweak it.
Display:
There are three seven-segment displays on the preamp, each equipped with one
decimal point. The RCP features an alphanumeric display that is also able to show
all letters of the alphabet.
Rotary encoders:
In contrast to a regular potentiometer, this breed of knob can be rotated
360°—i.e. it has no limit of travel. Note that as you rotate these knobs you will feel
slight resistance as they travel past the various sensors. This is entirely normal and
no cause for concern.
On a programmable preamp, this type of component has a considerable
advantage over a conventional potentiometer: When you switch to another MIDI
preset, you're activating different settings. A rotary encoder is always set to the
currently valid value in real time. This quality makes it much easier for you to edit
knobs on the fly, in other words, change settings in a hurry.
Factory-Preset:
These are various factory settings that we programmed right into the
microcontroller. You can't edit these and store these changes directly.
You can, however, fiddle with the settings of a factory preset and then press the
Copy button to dump it to a MIDI preset. Or you can first copy the unedited
factory preset to a MIDI preset, tweak it to taste, and then store it with Write.
42
Page 43

Flash-Memory:
All data for the MIDI presets reside in a state-of-the-art serial flash memory chip.
This technology has the advantage that it stores information without requiring a
power source, which of course means it doesn't need a battery to do its thing.
The data required for the optoelectronic components' control algorithm as well as
the serial number of the preamp are also stored in the flash memory.
Hi Speed Preset Select mode:
Ultra-fast scrolling option for selecting presets via UP or DOWN when you're in a
hurry.
Manual:
More a status than an operating mode, Manual activates after you switch the
preamp on. 000 appears in the display telling you that the preamp is in Manual
mode.
In Manual mode, the preamp responds just like any conventional preamp that
isn't ready for MIDI.
You can't store settings in Manual mode. However, any settings that you dial in
while the preamp is in Manual mode can serve as a source, and you can copy this
configuration to a target MIDI preset.
MSF is disabled in Manual mode.
MIDI Channel Select Mode:
You can activate this routine to select MIDI channels Poly 01 to 16, OMNI or MIDI
Off for MIDI preset banks A and B.
MIDI-Volume:
This feature lets you control the preamp's Master knob via an external MIDI
volume pedal. The pedal must be connected to a suitable MIDI foot board (for
example, the ENGL Z-12-EXP) and it must be able to send MIDI data via MIDI
controller number 7. You must enable this option in MIDI Volume setup before
you can access and control the preamp's Master volume.
MIDI Volume Setup Mode:
You can activate this routine to switch the MIDI volume controller on (external
MIDI volume control is enabled) or off (external MIDI volume control is disabled).
Microcontroller:
A semiconductor chip by any other name. In this preamp, three microcontrollers
slave away for your tweaking pleasure, carrying out a mind-boggling amount of
arithmetic operations. Powered by custom-designed, extremely complicated
software, these chips control the different functions of the preamp and constantly
monitor the settings of the various components that are responsible for shaping
tube-driven signals.
43
Page 44

Multitasking:
Several software-driven processes run interleaved to ensure system commands are
executed at high-speed, which is a really complicated way of saying that
multitasking is doing two or more things at once. The reason why this preamp's
engine room is powered by multitasking-enabled processors is because its
sophisticated circuitry is so demanding. It takes considerable system performance
to satisfy the requirements of so many signal control and voicing options.
MSF (Memory Status Feature):
As its name would indicate, this feature is a status indicator built into the
segmental LEDs surrounding the knobs as well as the LEDs that indicate the status
of the sound-shaping buttons. The LEDs indicate the setting of the knob or an
enabled sound-shaping button by lighting up continuously. A flashing LED
indicates the setting of a knob or a sound-shaping button has been edited. When
a knob or button is adjusted on a MIDI or factory preset, the incremental steps on
the LED alway indicate the value of the new setting.
When you want to find out what the initial setting of a knob was, rotate it until
the LED or LEDs light up continuously. The same holds true for the sound-shaping
buttons: their LEDs must either illuminate or remain extinguished, depending on
the initial status of the given function.
For a shadow preset, the MSF indicates that a knob's setting differs from that of
its counterpart in the MIDI preset. The given LED will flash.
MSF doesn't work in Manual mode and no distinction is made between flashing
and continuous illuminated LED for the Master knob simply because the settings
of this knob can't be stored.
OMNI-Mode:
OMNI means "all", that is to say the preamp responds to every program change
command sent over the MIDI IN port, and changes over to the desired preset.
You can only set one bank to OMNI. If you do, you must go into the setup menu
and disable MIDI reception for the other bank (MIDI Channel Select mode: ch
off).
POLY channel:
Banks A and B of the preamp can be set to any of these poly channels, but you
can't set both banks to the same channel at the same time.
Let's look at a typical switching scenario: Say bank A is assigned to MIDI channel 1
and bank B to MIDI channel 3. When program change 110 is sent over channel 1,
this command activates MIDI preset 110, bank A on the preamp. The same
program change sent over channel 3 activates MIDI preset 110, bank B on the
preamp. The preamp will resolutely ignore a program change command sent on
channel 5.
Why use so many different MIDI channels? Because it comes in handy when
you've connected several MIDI devices in a MIDI loop and you want to address
and switch these MIDI devices individually.
Preset Back Skip:
In Manual mode, this feature jumps back to the most recently selected preset.
44
Page 45

Remote Control Panel (RCP):
This is a software interface that lets you control key functions and features of the
preamp remotely. It runs on Windows* PC operating systems. Before you can use
the Panel, you must connect the preamp to a serial interface of the PC (Com port)
and of course launch the software on your PC.
* Microsoft Windows is a registered trademark of Microsoft Corporation.
Shadow-Preset:
Every MIDI preset of banks A and B has a shadow preset of its own.
Every time you program a MIDI preset via Write or Copy, the system automatically
loads that MIDI preset's original setting to its shadow preset, deleting the
configuration that was previously stored in the shadow preset.
You can call up the shadow preset by pressing MANUAL & WRITE simultaneously
and then swap the contents of shadow preset with those of the MIDI preset by
pressing WRITE. This writes data back to the MIDI preset, restoring its old setting.
Segmental LED:
This term describes the 11 LEDs that are arrayed around every knob. In every
operating mode, these LEDs indicate the current setting of the knob. The MSF
(Memory Status Feature) causes the LED flash, indicating that a setting on a MIDI
or factory preset has been changed. This also tells you that a Write operation will
be carried out when you press the WRITE/COPY button and, when the LED stops
flashing, that the edited preset is stored. For shadow presets, LEDs will flash to
indicate that the settings of a MIDI preset and its shadow preset are not identical.
45
Page 46

Troubleshooting
The ENGL logo doesn't run through the display after you switch the preamp on.
--> Is the preamp connected to the mains power supply?
--> Is the preamp connected to the Com port of a PC and has the
Remote Control Software been launched? Try switching the preamp off,
starting the software on the PC and switching the preamp on again.
--> Is the preamp's mains fuse intact?.
The preamp fails to respond when you change settings.
--> Powerful static charges, strong radio signals or mains voltage spikes
can affect the preamp, setting it to an undefined status. The three onboard
microcontrollers operate in handshake mode, which is particularly susceptible
to outside influences. For example, powerful external interference could
interrupt the program routine of one of the three processors, throwing the
entire system out of whack. In that case, you have but one choice—a cold start.
Simply switch the preamp off and on again to reset it.
The display of the preamp reads hot.
--> That tells you the internal operating temperature of the preamp climbed to
over 50°C. This means that the optoelectronic components may no longer
function absolutely flawlessly. You may hear this because it can have a slight
but perceptible effect on the preamp's tone. Check if all the ventilation slots
on the side and rear panels of the preamp are free from obstruction and that
they allow for sufficient air circulation.
The preamp doesn't respond to your attempts to switch it via MIDI foot board.
--> Is the MIDI foot board connected to MIDI IN jack 45?
--> Is the MIDI cord you are using defective?
--> Is one of the two banks of the preamp set to the MIDI channel
on which the MIDI foot board is sending program change commands?
You could set one bank to OMNI reception to check if the preamp
is receiving data.
The preamp doesn't respond when you switch it via the Remote
Control Panel on the PC.
--> Is the interface cord you are using defective.
--> Are the interface cord connecting the preamp
and the PC wired so that it matches the two ports (perhaps you're
using the wrong cord).
--> Did you power the preamp up before you launched the remote control
software on? Switch the preamp off and on again.
--> Did you configure the right Com port on the RCP software. Check if the
entry in the "Options" menu is the same as the PC Com port that you are using.
If not, select the right port.
46
Page 47

A window appears on the RCP with the message Can not open Com Port.
--> Is the preamp switched on?
--> Is the preamp connected to the PC via a proper cord?
--> Did you configure the right Com port?
--> Is the Com port being used by some other device (for example, a mouse or
modem)?
No output signal.
--> Are all cords connected properly and are they functional?
--> Unplug any effect devices you may have connected and see if the preamp
works fine without these peripheral devices.
--> Is the connected power amp working properly?
--> Is the Master or Volume knob set to step 1? Both knobs should be set
to a value higher than step 1, otherwise the signal won't be sent to the
preamp's outs.
--> You may be looking at a faulty tube or another defect. In this case,
be sure to take the preamp to a qualified service center.
Handling and Care
Keep the preamp safe from mechanical knocks and shocks
(those tubes are fragile!).
Let the preamp cool down before you transport it
(10 minutes or so should do).
Tubes will take some 20 seconds to warm up after
you switch the power on.
Avoid storing the preamp in damp or dusty rooms,
they are hard on jacks, switches and rotary encoders.
Make sure air can circulate at the right side and at the rear panel
of the preamp to allow for adequate cooling.
Replace tubes with select replacement tubes only
(special selection criteria) to avoid microphonics,
undesirable noise and feedback.
47
Page 48

Technical Data
Input sensitivity
INPUT:
EFECT RETURN:
Output level
SEND, level range:
LINE OUT
Level Lo:
Level Hi:
FREQ.COR.LINE OUT:
Power consumption:
Fuses:
external
at 230V mains voltage:
at 120V mains voltage:
internal
at 230V mains voltage:
at 120V mains voltage:
Important note:
MIDI reception:
-20 dB, nominal, max. 0 dB
-20 dB nominal, max 0 dB
from -20 dB to -10 dB
from 20 dB to max. -10 dB;
from 0 dB to max. 20 dB;
variable from -35 dB to +3 dB;
0,23A max.
315 mAT
630 mAT
400 mAT
800 mAT
Replace with same type and rating only!
MIDI program change 0 - 127;
MIDI channel 1 - 16
MIDI controller 7 (main volume),
0-127 on 11 master steps interpolated;
Processors
Main-µC:
Slave-µC:
Tubes
V1:
V2, V3, V4:
consult Tube Map
to view tube array
Fan:
Dimensions:
Weight:
48
P89C51RD2 with internal 64K flash;
2 x AT89C2051 with internal 2 k flash;
ECC83 F.Q., input tube,
ECC83 selected;
DC12V - 1,4W - 60 mm diameter;
19" rack, 2 rack spaces, 340 mm overall depth,
approximately 300 mm chassis depth;
approximately 8 kg
Page 49

Tube and Optocoupler Array on the Main Board inside the Device
V1 V2 V3 V4
LD9 LD11 LD16
LD10
power
transformer
LD1 LD3 LD2 LD8 LD7 LD6 LD5 LD4
LD14 LD13 LD12 LD15
internal
mains fuse
air flow
System Information
fan
Temperature and ventilation provided by an internal fan:
A fan is installed in the preamp that runs at a low level, providing continuous
ventilation for the interior of the device while it is in operation. The preamp can't
do without this cooling system because the tubes, power transformer and voltage
regulators constantly generate and radiate heat.
If the internal temperature rises above approximately 40°C, the fan automatically
switches to a higher stage. If the internal temperature increases further in spite of
this measure and it exceeds approximately 50°C, hot will appear in the display
indicating that the preamp is running hot. It will still work, but at this
temperature the optoelectronic components can no longer be controlled with
absolute precision, which can have a slight but audible effect on the preamp's
tone. For this reason, it is essential that the vents on the right and rear panels of
the preamp remain unobstructed when you mount it into a 19"rack. In any case,
make sure that air can circulate freely around the preamp.
Optocouplers:
We poke and probe the optoelectronic components thoroughly before we install
them in amps. In fact, at ENGL they are subjected to rigorous testing and
selection routines developed specifically for this purpose.
In the unlikely event that one of these optoelectronic components develops some
kind of defect, your service center needs to know exactly which numbers are
printed on that component. This ensures that the microcontroller has the
information it needs to adjust their assigned functions to the required values.
Much like tubes, optoelectronic components are inserted into special sockets on
the board. Should it become necessary, these can be replaced without soldering
or removing the main board. The individual components are labeled LD1 to LD16,
providing the information service technicians needs to carry out service routines
should they ever become necessary.
49
Page 50

Pin Assignments
LINE OUT BALANCED (32) & (33), XLR male connector
Pin 1 - or ground,
depending on the
position of the switch
LINE OUT GROUND (34)
Pin 3:
signal -
Pin 2: signal +
MIDI IN (45), DIN connector
Pin 3 - N.C.
Pin 5 - MIDI wire
Pin 2 -
power supply
approx.11 volts AC *
Pin 1 - power supply
approx.11 volts AC *
Pin 4 - MIDI wire
* AC voltage is routed to pin 1 and 2 only when button
46 is set to ENGL MIDI Footcontroller.
P.C. REMOTE CONTROL, D-Sub 9 connector
Pin 3:
RXD
Pin 2:
TXD
Pin 7
RTS
Note:
Pin 7 is labeled "RTS". It is used to set the main microcontroller to ISP (in-system
programming) mode for a software download. The µ C runs an autopolling
routing immediately after the unit is powered up. For this reason, the preamp
may only be switched on after the Remote Control Panel has been launched on
the PC. This ensures that the correct logic level is sent to RTS pin 7. Special
software is required for a software update. More on this in the section on
updating.
50
Page 51

Block Diagram
INPUT (1)
AUXILLARY
INPUT (41)
FX LOOP
RETURN
LEFT (39)
FX LOOP
RETURN
RIGHT (38)
DEFEAT (11)
PREAMP
Left Effect
Control
Circuit
Effect
Control
Right Effect
Control
Circuit
Effect
Control
controls:
GAIN
(AFC)
BASS
LO MID
HI MID
TREBLE
(ALC)
programmable T ube
Preamp Circuit
switches:
CLEAN/LEAD
GAIN LO HI
BOTTOM
CONTOUR
BRIGHT
CL. ULTRA BRIGHT
MODERN/CLASSIC
Left Volume
Control
Circuit
Volume
Master
Right Volume
Control
Circuit
Volume
Master
Left Line Out
Boost amp
Right Line Out
Boost amp
PREAMP
DEFEAT (11)
SEND
(40)
LINE OUTPUT
LEFT (37)
LINE OUTPUT
RIGHT (36)
from: Gain
(2)
to: Master
(9)
from: DEFEAT
(11)
to: REC.OUT
TREBLE (20)
from: DOWN
(22)
to: WRITE/
COPY (25)
CONTROL
UNIT
MIDI
IN (45)
MIDI
THRU (44)
MIDI
OUT (43)
P.C. Remote
Control (42)
LINE
LEVEL
LINE
LEVEL
LEFT LINE
EQ. & BUFFER
switches:
REC.OUT
BASS
REC.OUT
TREBLE
RIGHT LINE
EQ. & BUFFER
switches:
REC.OUT
BASS
REC.OUT
TREBLE
Balance
Output
Converter
STEREO
FREQU.COR.
LINE OUT
(29)
F.C.LINE OUT
RIGHT BAL.
(32)
F.C.LINE OUT
LEFT BAL.
(33)
51
Page 52

Quick reference on Control Features:
In the following, when you see a term in capital letters, that means we're
referring to a button, i.e. MANUAL means the Manual button, and so forth.
Selecting presets
Changing banks
Selecting
shadow presets
Locking presets
Unlocking
presets
Activating
Manual
Preset back skip
Saving settings
Copying from:
MIDI preset
to MIDI preset
Factory preset
to MIDI preset
Manual
to MIDI preset
Setting
MIDI channels
Enabling/
disabling
MIDI volume
pedal
Preamp check
press UP once to go to the next higher preset,
press DOWN once to go to the next lower preset,
press and hold UP or DOWN to scroll swiftly through
presets without switching the preamp to each preset
as you go;
press DOWN in Manual mode to access factory presets
press MANUAL & UP simultaneously for bank B
press MANUAL and DOWN simultaneously for bank A
press MANUAL & WRITE simultaneously while a
MIDI preset is active for approximately three seconds
press and hold UP & DOWN simultaneously until the preset
number no longer flashes
press and hold UP & DOWN simultaneously until the preset
number no longer flashes
press MANUAL briefly
press and hold MANUAL until the display skips back
after you edit a MIDI preset, press and hold WRITE/COPY
until the preset number no longer flashes in the display
don't edit settings, press COPY, select target preset via UP
or DOWN, press and hold COPY until the preset number
no longer flashes in the display
press COPY, select target preset via UP or DOWN,
press and hold COPY until the preset number no longer
flashes in the display
press COPY, select target preset via UP or DOWN,
press and hold COPY until the preset number no longer
flashes in the display
select the desired Bank A or B,
press MANUAL & WRITE/COPY simultaneously while preamp is
in Manual mode,
press UP or DOWN to select the desired MIDI channel,
store via WRITE/COPY and hold the button down until Manual
000 reappears in the display
Press UP & DOWN simultaneously while preamp is in Manual
mode, select On via UP or DOWN via Off,
store via WRITE/COPY and hold the button
down until Manual 000 reappears in the display
Press and hold UP & DOWN & WRITE simultaneously
while preamp is in Manual mode until Unit Check mode
activates
52
Page 53

The Making of... a Few Closing Words from the Amp Designer
At ENGL, we have always pursued the goal of delivering the
greatest possible range of sounds and the highest quality tube tone
with missionary zeal. The ENGL MIDI Preamp 580 is the latest
product born of this philosophy. This project posed a very special
challenge to me, ENGL's resident amp designer. The idea was to
take all of the sounds I had implemented in earlier ENGL amps and
converge them in a single device. What's more, we sought to chart
entirely new sonic frontiers with this preamp. To make an already
daunting task even more challenging, we decided that all
sound-shaping features would be programmable. A tall order
indeed, but I had an ace in the hole—ENGL was the first to present
the special technology that powers programmable tube amps. An
astonished music world applauded ENGL's efforts way back in the
early '80s, so we had a great deal of experience to draw on.
When we brainstormed this preamp, we agreed that the focus had
to be on tone, tone, and more tone. With that in mind, I decided
the amp would have to do entirely without semiconductors in the
preamp stage, because this is the heart and soul of the preamp, the
section so critical to its tone. That sent us straight back to the
drawing board and the lab. Achieving all of these goals involved a
tremendous amount of research, and it demanded highest
performance from the computer system and software.
In a joint effort with a software specialist, we put in many, many
hours of hard work to make our ambitions reality.
The result literally speaks for itself. As the first benchtest ratings will
attest, this preamp hits the mark—it is a tone-generating monster.
And it looks the part too, so all the time, trouble and top-notch
materials we invested in its visuals paid off as well.
An amp this sophisticated requires some explanation. To make sure
you understand it and all its workings, I put a great deal of effort
into describing it down to the last detail in this manual.
Here's hoping you and your new ENGL MIDI Preamp 580 enjoy a
harmonious future,
Horst Langer,
ENGL amp designer
and the entire ENGL team
I would like to take this opportunity to extend my heartfelt
gratitude to everyone involved in this project—despite the many
challenges, it was a rewarding experience because you made it so.
53
Page 54

User Presets
Preset
001 A B
002 A B
003 A B
004 A B
005 A B
006 A B
007 A B
008 A B
009 A B
010 A B
Bank Preset-name application
011 A B
012 A B
013 A B
014 A B
015 A B
016 A B
cross out the
unused Bank!
54
Page 55

User Presets
Preset
Bank Preset-name application
55
Page 56

FRONT PANEL
11 12 13 14 15 16 17 18 19 20 21 22 23 24 25
Midi Tube Preamp 580
G
REAMP
LO H
L
EAD
D
EFEAT
G
I
NPUT
AIN
B
OTTOM
I
B
ASSLO MIDHI MID
CL.U
LTRA
B
RIGHT
C
ONTOUR
B
RIGHT
AIN
C
LEAN
P
R
EC. OUT
R
EC. OUT
M
ODERN
T
REBLE
B
ASS
C
LASSIC
E
T
REBLE
FFECT
1 2 3 4 5 6 7 8 9 10
REAR PANEL
42 43 4644 45
U
P
D
OWN
V
OLUMEMASTER
R
W
RITE
/
M
ANUAL
/
C
OPY
M
ODE
<->
Tube
Amp
P
OWER
P
ROGRAMMABLE
S
TEREO
T
UBE PREAMP
T
YPE
E580
Designed by: Horst Langer
MADE IN GERMANY
OOP
S
ETURN
L
EFT
R
A
UXILLARY
I
NPUT
END
REPLACE FUSE
ONLY WITH SAME
TYPE AND RATING !
P.C. R
CAUTION !
M
IDI
M
IDI
M
EMOTE
O
G
ROUND LIFT
SWITCH
UT
G
ROUND
F
LOATED
G
ROUND
C
ONTROL
IDI
MIDI
FOOTCONTROLLER
T
HRU
I
N
F
REQUENCY
C
ORRECTED
L
B
R
IGHT
ALANCED
INE OUTPUT
L
EFT
B
ALANCED
G
ROUND
S
TEREO OUTPUT
TO PIN 1
G
ROUND
<-
0 dB
L
IFTED
L
EVEL
L
INE
O
UT
-20/0 dB
G
ROUND
O
VERLOAD
L
EVEL
S
TEREO
RISK OF ELECTRIC SHOCK !
EQUIPMENT TO RAIN OR MOISTURE !
L
R
IGHT
DO NOT OPEN !
DO NOT EXPOSE THIS
EFT
!
FX L
R
R
ETURN
R
IGHT
26 27 28 29 30 31 32 33 34 35 36 37 38 39 40 41
Remote Control Panel
launched on a PC
interface
info
activities
serial
number
status
info
Page 57

Supplementary information for the ENGL MIDI Preamp 580's owner's manual
CAUTION: Be sure to read the following before you switch the preamp on
when it is connected to a personal computer and the Remote software:
Do not power up the preamp until after you have launched the Remote Control
Panel Panel (RCP) on the PC!!!
If the "ENGL" logo does not run through the display after you switch the preamp
on, immediately switch the preamp off again and check the serial interface (Com
port). It is possible that this port is being used by another device and cannot be
accessed by the Remote Control Panel.
In order to ensure that the PC accesses the desired Com port, proceed as follows:
1.After you start the RCP on the PC but before you switch on the preamp,
press the "Receive" button.
2.If the message: "Cannot open Com Port!! !!" appears, this tells you
that the Com port is being accessed by another device.
3.In this case, select another Com port in the RCP's "Option" menu by enabling
the menu item "RS-232 Com port" and confirming your selection via OK.
4.If the message "RS 232 Com-Port?? E580 connected??" appears
when you press the "Receive" button, this tells you that this Com port
is not otherwise engaged.
Switch the preamp on and observe the display. If the ENGL logo runs
through the display, press the "Receive" button on the RCP again
when the preamp activates Manual mode (000).
The manual setting on the preamp should be transmitted to the RCP.
5.If this is not the case and the messages "RS 232 Com-Port?? E580" connected??"
appear again, check whether the preamp is connected to the Com port
you selected on the RCP.
Notes to Item 2, GAIN (page 6):
The GAIN knob is linked with the ALC (Auto Level Correction; for more info
see page 42 of the owner's manual) function.
When you increase the amount of input gain, the signal level (the pre-send
volume level, that is) is adjusted automatically, meaning that it is rolled back.
Vice versa, when you reduce the amount of input gain, the signal level is boosted.
The effect is clearly audible, particularly when you're dealing with clean sounds.
Don't be alarmed, this is entirely normal.
Notes on connecting a signal processor to the effect loop:
The level of the send circuit ranges from -20 to -10 dB, depending on the given
gain setting. Note that this level is adjusted by the ALC function.
If you the preamp is being overdriven and high settings for "Hi Mid" and "Treble"
have been dialed in, peak levels may attain just over 0 decibels in "Modern"
operating mode.
57
Page 58

Supplementary information for the ENGL MIDI Preamp 580's owner's manual
Supplementary information on the Remote Control Panel, RCP
(starting page 39):
On the RCP, WRITE and COPY operations are carried out immediately after you
activate the WRITE/COPY button. "Pro" appears just once for a brief moment in
the display of the preamp to let you know that the given WRITE or COPY
operation is being carried out.
When you want to copy MIDI presets from one bank to another, after you
change banks on the RCP you must first select a new MIDI preset via UP or DOWN
before the preset can be copied. It is not necessary to do this when you are
carrying out the same operation on the actual preamp. On the amp you can copy
a preset to the same preset number of the other bank without further ado.
Comments on Realtime Lock (page 40):
When "Realtime Lock" is enabled, all control functions on the RCP (UP, DOWN,
MANUAL, BANK, SHADOW, WRITE/COPY) are disabled. If you want to transfer
and store settings to the selected MIDI preset via "Transmit", you must first press
the "Realtime Unlock" button.
A tip from the designer:
The option of storing settings on a PC in a file affords you greater convenience
and flexibility. You can, for example, even select shadow presets and store their
settings (that means old overwritten settings) elsewhere, for example, on the
hard disk of your PC.
Beyond that, you can take at advantage of this option to copy a shadow preset
to a MIDI preset (select the desired MIDI preset, open the stored file, "Transmit",
"WRITE/COPY"). Once you activate "Transmit", the WRITE operation is started
automatically and the setting is sent and stored in the selected MIDI preset.
MIDI-Implementation Chart
MIDI Receive: (MIDI IN)
MIDI program changes 0-127
MIDI channels 1-16
MIDI controller 7 main volume
The MASTER knob uses 11 steps made up
of the 128 main volume commands.
MIDI Transmit: (MIDI OUT)
MIDI program changes 0-127 to the selected channel of the active bank
MIDI volume commands 1-128
If a bank is set to OMNI and messages are sent in from an external device,
these messages are routed through via the same MIDI channel.
If a bank is set to OMNI and presets are changed internally - in other words,
on the preamp or RCP - these program change commands are always sent via
MIDI channel 1.
Controller 7 (main volume) commands are also sent in Manual mode as well as
to the factory presets.
58
Page 59

Tube
Amp
Technology
Gerätebau GmbH
Internet: http://www.engl-amps.com
Germany
Text, Design, Graphics, Photographies and Layout by
Horst Langer, Amp Designer
 Loading...