

Page 1

PIPEline
TM
PIPEline
User’s Guide
TM
Page 2
1 2
3
Page 3

English ....................................... 1
Français .................................... 25
Deutsch ..................................... 49
Page 4

English
Congratulations!
Your versatile E-MU PIPEline™ can be configured as a wireless transmitter
or a receiver. Because it is battery-powered, it can also be used as a
portable wireless device! Purchase additional units to enjoy wireless
networking of your audio equipment and musical instruments at home, in
the studio, or on stage. E-MU PIPEline™ supports transmitting up to three
different sources in the same space. While the E-MU PIPEline™ can be used
with an optional 5V DC power supply adapter, using E-MU PIPEline™ with
the internal battery gives greater freedom and movement, especially when
using as a headphone receiver or music instrument transmitter. Read on to
learn how to get started with your new E-MU PIPEline™!
Contents
About Your E-MU PIPEline™ ........................................................ 2
Broadcasting and Paired Modes .................................................. 3
Analog and Digital Modes ............................................................ 4
Setting Up Your E-MU PIPEline™ ................................................ 5
Using Your E-MU PIPEline™ ...................................................... 11
Troubleshooting Wireless Features .......................................... 13
General Specifications ............................................................... 16
Safety Information ...................................................................... 17
Regulatory Information .............................................................. 20
NOTE
The term “transmitter” used throughout this User’s Guide refers
to an E-MU PIPEline™ when it is configured as a transmitter.
Similarly, “receiver” is used when an E-MU PIPEline™ is
configured as a receiver.
Page 5
2 About Your E-MU PIPEline™
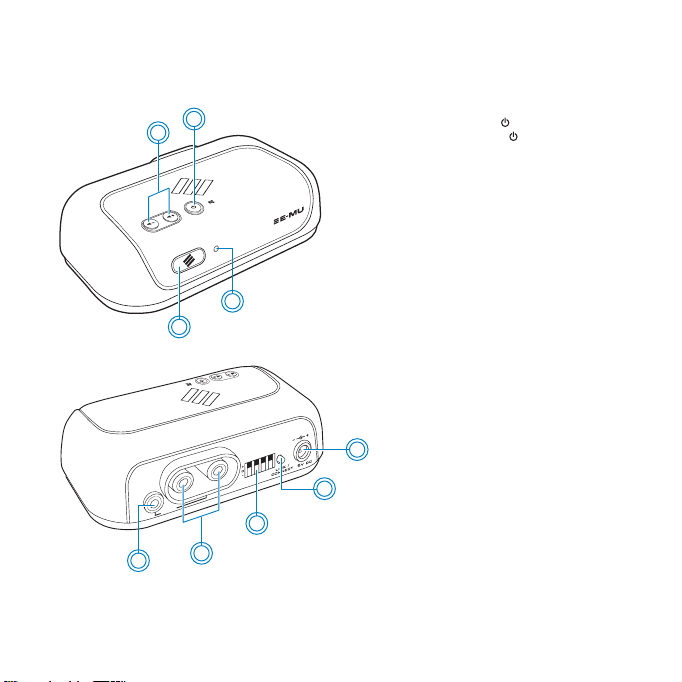
About Your E-MU PIPEline™
1
2
TM
PIPEline
1 Power/Mute button
Press and hold to turn on. When
turned on, press to mute or
unmute.
2 Volume buttons
See “Adjusting volume” on page 11.
3E-MU LED
4Power LED
See “Understanding the Power LED”
on page 12.
5 Flexi-Jack (1/8” Stereo
4
3
PIPEline
TM
D/A
R/T
B/P
DIGITAL OR ANALOG
FLEXI
KS
JAC
5
CH
7
6
9
8
Line Input/Output jack)
6Flexi-Jacks (RCA jacks)
Can be used to input or output either
analog or digital S/PDIF 48 kHz
signals. See “Analog and Digital
Modes” on page 4.
7 Mode DIP switches
See “Configure your E-MU
PIPEline™ units” on page 5.
8Link LED /
Connect button
See “Understanding the Link LED”
on page 12.
9 5V DC In jack
[5V, 1A (1000mA), Tip=Positive]
Page 6
Broadcasting and Paired Modes 3
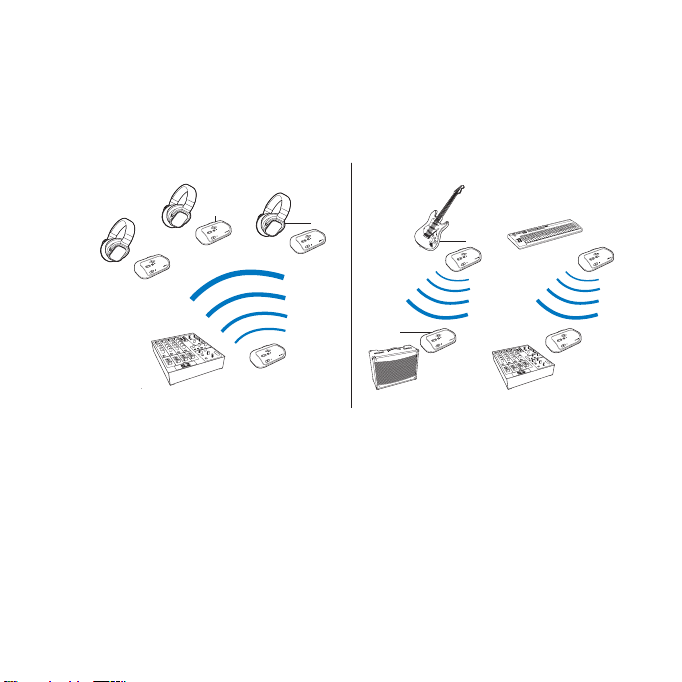
Broadcasting and Paired Modes
You need at least two E-MU PIPEline™ units to form a basic transmitterreceiver group. With more units, you can configure more complex multiple
wireless groups as shown below.
M
T
e
n
i
l
E
IP
P
M
T
e
n
i
l
E
P
I
P
M
T
e
n
i
l
E
P
I
P
M
T
e
in
l
E
P
I
P
M
T
e
n
i
l
E
P
I
P
M
T
e
n
i
l
E
P
I
P
Broadcasting
M
T
e
n
i
l
E
P
I
M
T
e
n
i
l
E
P
I
P
P
Paired
By setting the Mode DIP switches located at the back of the unit, you can
configure it as a transmitter or receiver, and also set it to be used in either
broadcasting or paired mode.
Broadcasting can be used with any number of paired E-MU PIPEline™
receivers. It is usually used in a “one transmitter-to-many receivers” group.
Paired means that one transmitter is linked solely to one dedicated
receiver.
Page 7

4 Analog and Digital Modes
Analog and Digital Modes
Your E-MU PIPEline™ can be configured to operate in either Analog or
Digital (S/PDIF 48 kHz) mode by setting the Mode DIP switches. Here are
some things to note when using digital mode:
• For a transmitter in digital mode, ensure that the E-MU PIPEline™ is receiving
a 48 kHz external S/PDIF digital stream. Similarly, for an E-MU PIPEline™
configured as a receiver in digital mode, ensure that the attached external
equipment is capable of receiving a coax S/PDIF 48 kHz digital stream.
• S/PDIF 48 kHz digital audio requires a specific 75-ohm coax digital RCA cable.
This cable can be connected to either one of the RCA jacks of the E-MU
PIPEline™.
• The E-MU PIPEline™ only supports the 48 kHz sample rate when in digital
mode.
• The E-MU PIPEline™ has no DTS or Dolby encoding or decoding capabilities,
but it does offer DTS pass-through.
• The E-MU PIPEline™ cannot input or output digital and analog signals
simultaneously. However, a transmitter-receiver pair can have different digital/
analog settings depending on their attached source or destination device.
Page 8
Setting Up Your E-MU PIPEline™ 5
Setting Up Your E-MU PIPEline™
You may find it easier to configure and pair your E-MU PIPEline™ units at
one location before placing each unit at its final location.
NOTE
Flexi-Jacks will be either inputs or outputs depending on the
E-MU PIPEline™ transmit/receive mode setting. They can also be
either digital or analog depending on the mode setting.
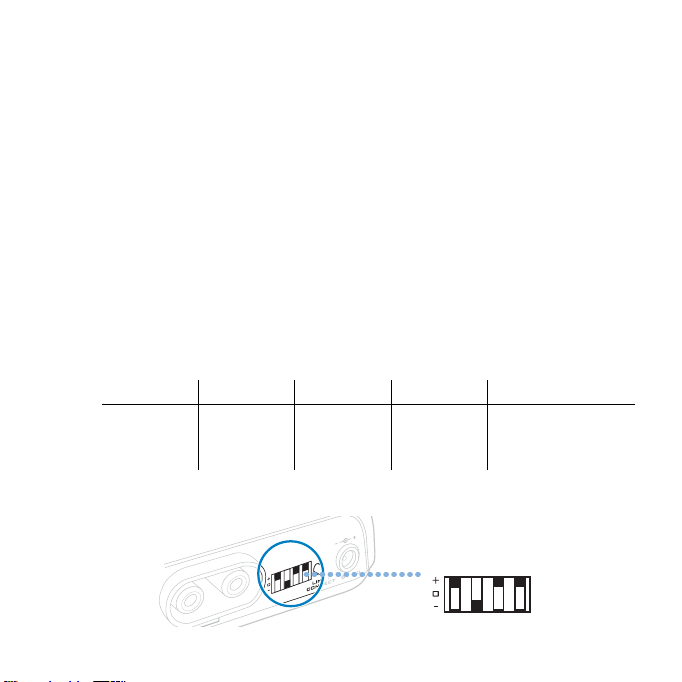
Step 1: Configure your E-MU PIPEline™ units
Set the Mode DIP switches for your transmitter and receiver(s). Refer to the
following table for the appropriate settings. This table can also be found on
the bottom of your E-MU PIPEline™ unit.
For a transmitter-receiver group, set the settings for DIP switches CH, B/P
and D/A. Then set switch R/T to configure the unit as a transmitter or
receiver. A group consists of at least one transmitter and one receiver.
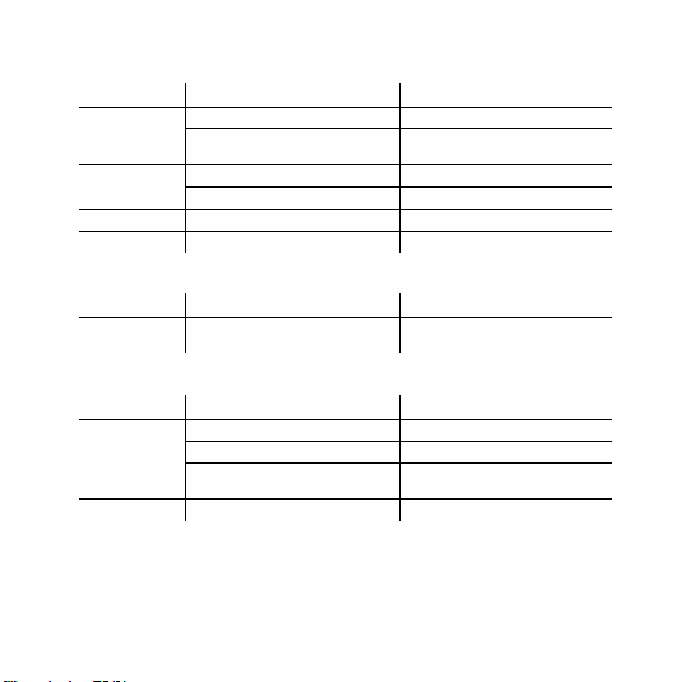
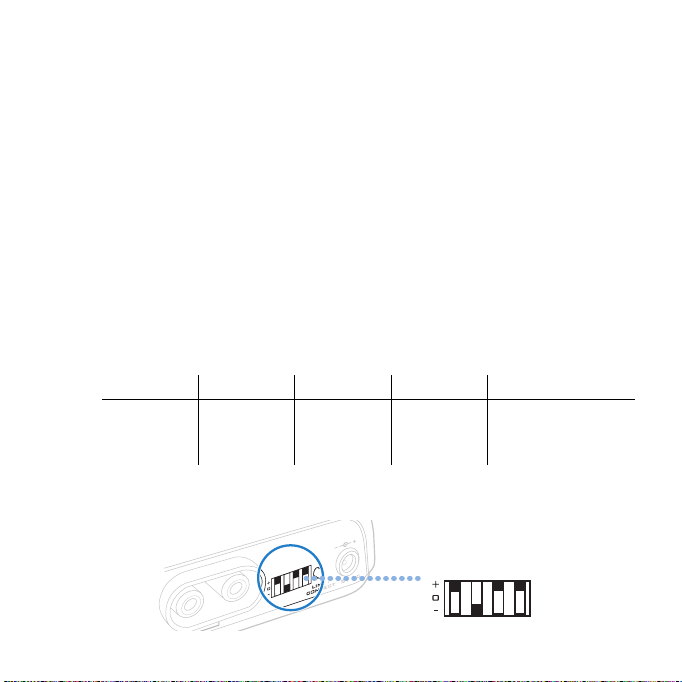
Position CH B/P R/T D/A
+ Ch 1 Paired Transmit Analog without limiter
0 Ch 2 - - Analog with limiter
- Ch 3 Broadcast Receive Digital
For example, a transmitter to be used for broadcasting, using RF Channel 1,
streaming analog audio from an analog source should be set as follows:
D/A
R/T
DIGITAL OR ANALOG
B/P
CH
CH
B/P
R/T
D/A
(S/PDIF 48 kHz)
Page 9
6 Connect your E-MU PIPEline™ units
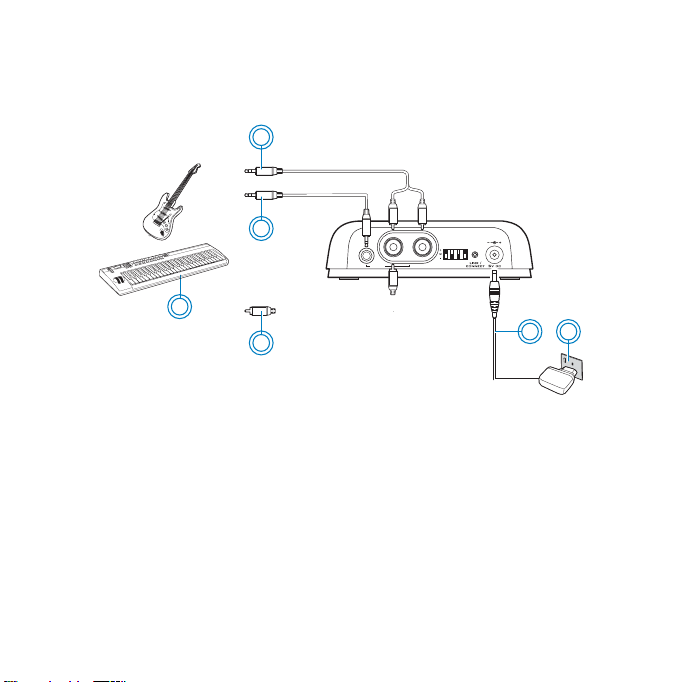
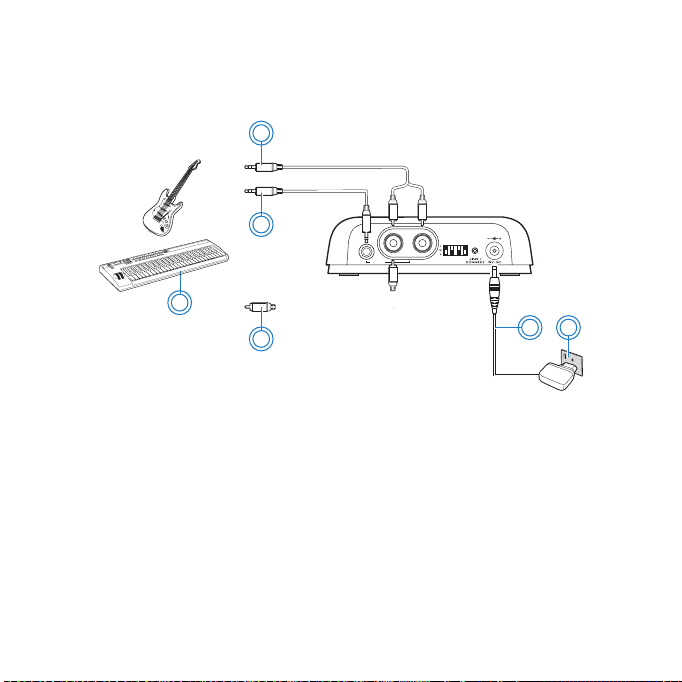
Step 2: Connect your E-MU PIPEline™ units
Connecting a unit as a Transmitter
1b
OR
1c
FIEXI
JACKS
1a
1d
1a Electric guitar with active preamp, synthesizer, mixer
or other audio input source
1b Stereo/Mono to RCA cable (Analog connection)
1c Stereo cable
1d RCA 75-ohm digital cable (S/PDIF 48 kHz connection)
2a Optional 5V power supply adapter
2b AC power outlet
CH
B/P
R/T
D/A
2a
2b
Page 10
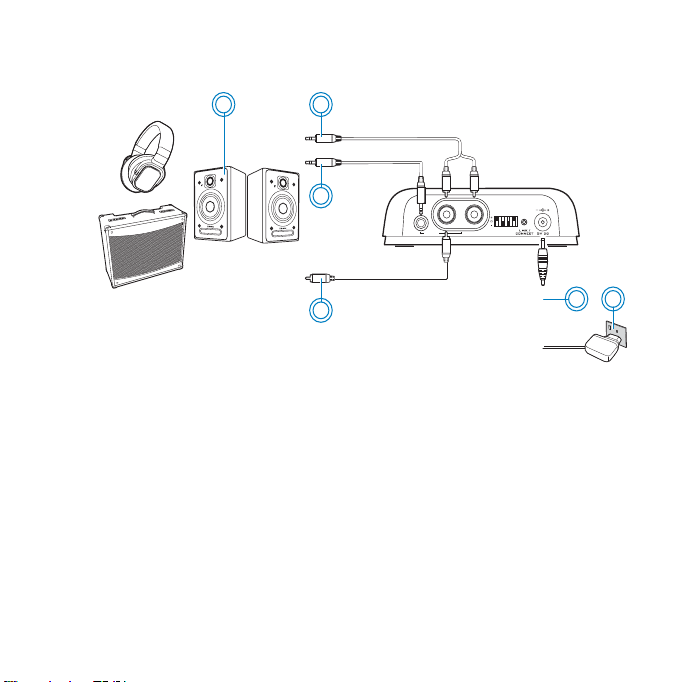
Connecting a unit as a Receiver
Connect your E-MU PIPEline™ units 7
1a
1b
OR
1c
FIEXI
JACKS
1d
1a Powered stereo or 2.1 speakers, headphones or line
level input amplifier
1b Stereo to RCA cable
1c Stereo cable
1d RCA 75-ohm digital cable (S/PDIF 48 kHz connection)
2a Optional 5V power supply adapter
2b AC power outlet
NOTE
When E-MU PIPEline™ is set as a receiver, you can engage a
limiter when in analog output mode to minimize the effects of
clipping. Set the D/A switch to the middle position as indicated in
the table found on page 5.
CH
B/P
R/T
D/A
2a
2b
Page 11
8 Turn on the receiver
5V DC
LINK /
CONNECT
5V DC
LINK /
CONNECT
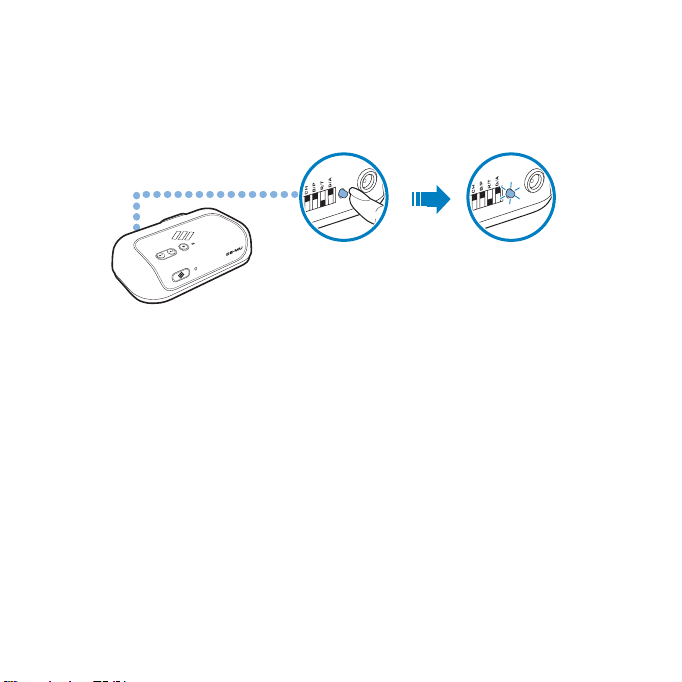
Step 3: Turn on the receiver
Press the Connect button at the back of the receiver.
For paired mode, the Link LED flashes as it searches for a transmitter to
pair with.
TM
PIPEline
Step 4: Turn on the transmitter
Next, press the Connect button of the transmitter.
For Broadcasting Mode
When pairing is successful, the receiver should be able to hear audio from
the output device connected to the receiver.
If you are broadcasting to more than one receiver, repeat Steps 3 and 4.
For Paired Mode
The Link LED of the receiver flashes and then lights up green when pairing
with the transmitter is successful.
Repeat Steps 1 to 4 to pair another dedicated transmitter-receiver group.
This group must use a different RF channel.
Page 12

Position your E-MU PIPEline™ units 9
Once your transmitter and receiver have been paired, they will be linked
automatically when turned on subsequently.
IMPORTANT
DO NOT press the Connect button repeatedly on your transmitter
or receiver before a pairing process is complete or else the units
may not be paired properly.
NOTE
• If your transmitter and receiver do not pair, simply reset them.
To reset the wireless connection, press and hold the receiver’s
Connect button for five seconds.
• For troubleshooting information, see “Troubleshooting Wireless
Features” on page 13.
Step 5: Position your E-MU PIPEline™ units
Place the receiver up to 15 meters (approximately 49 feet) away from the
transmitter. You may place the units in different rooms but avoid placing
them near large metal surfaces and objects, or objects emitting radio
frequencies, for example, a radio, cordless phone or other Wi-Fi
points.
NOTE
• Signal quality between the transmitter and receiver may be
affected by any object or structure (for example, multiple walls)
that is between the units. Experiment with different positions if
necessary.
• Once the battery is charged, the units can be moved around and
need not be placed near a power outlet. This is the case if it is
connected to portable equipment like headphones or
notebooks. However, movement will be restricted if the
attached equipment (like an amplifier) requires a power outlet.
®
access
Page 13
10 Play and stream music into the transmitter
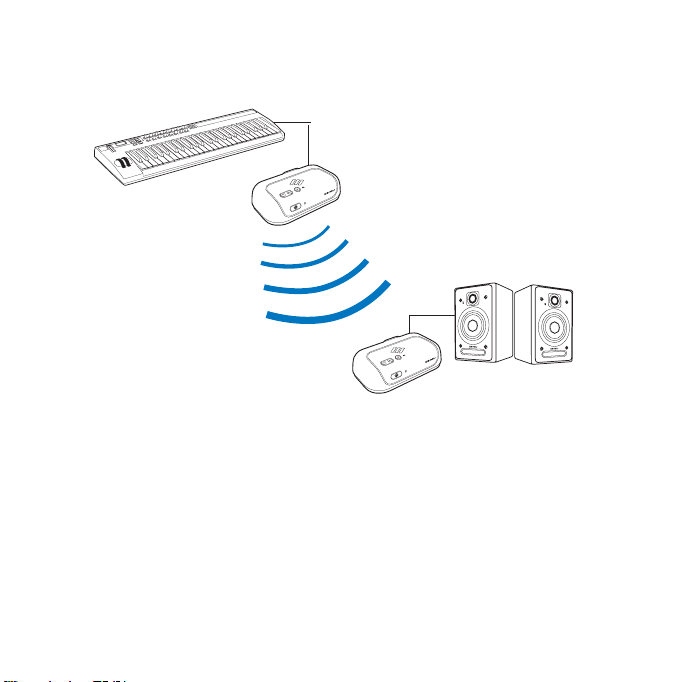
Step 6: Play and stream music into the transmitter
Play music into your transmitter and broadcast music to your receiver.
M
T
PIPEline
M
T
PIPEline
Page 14

Using Your E-MU PIPEline™ 11
Using Your E-MU PIPEline™
Adjusting volume
When E-MU PIPEline™ is configured as a transmitter, the volume buttons
on the transmitter function as attenuation buttons. To decrease the volume
of the audio being streamed to the receiver, press the “+” button to increase
attenuation and thus reducing the volume of the audio being streamed.
The volume buttons function as normal for E-MU PIPEline™ receivers.
Charging your E-MU PIPEline™
The E-MU PIPEline™ uses a 1200mAh Li-ion rechargeable battery. When
the battery power is low, the Power LED flashes red and white alternately.
When the battery is charging and the unit is not powered on, the Power LED
lights up red. When the battery is fully charged, the Power LED is not lit.
There is no “low-battery” indication when the external power supply
adapter is being used. A depleted battery takes up to three hours to become
fully charged. When fully charged, it can operate for approximately five to
eight hours without being connected to the power adapter.
Returning to factory default settings
To return E-MU PIPEline™ to factory default settings, press and hold the
Connect button on the rear of the unit for five seconds. The E-MU LED
flashes for two seconds before lighting up again.
Returning to factory default settings will do the following:
• Revert to the original volume setting,
• “Unpair” a receiver.
Page 15
12 Using Your E-MU PIPEline™
Understanding the Power LED
LED Behavior Status
White Stable Paired and ready for use
Continuous slow flashing Not detecting any signal or signal
Red Stable Charging
Continuous slow flashing Muted
Red-White Alternate flashing Battery low
Not lit - Fully charged
is weak
Understanding the E-MU LED
LED Behavior Status
Blue Two seconds of continuous rapid
flashing
Wireless reset
Understanding the Link LED
LED Behavior Status
Green Stable Paired and ready for use
Flashing* Pairing in progress
Rapid flashing One or more Mode DIP switches
Not lit – Connection lost
* Only applicable to Paired mode. For Broadcasting, LED will not flash.
are ambiguously positioned
Page 16

Troubleshooting Wireless Features 13
Troubleshooting Wireless Features
There is no sound from my receiver.
Check that:
• The signal source is working properly. If your transmitter is set to digital
mode, ensure that the source is set to stream 48 kHz S/PDIF.
• The transmitter is connected to the power outlet and turned on, or that it
is sufficiently charged (if you are not using an external power supply).
• The transmitter and receiver’s Mode DIP switches are configured
correctly:
• Both are set to the same RF channel.
• Both are set to the identical mode, either Broadcast of Paired mode.
• Transmitter is set to transmit, and receiver set to receive.
• See “Configure your E-MU PIPEline™ units” on page 5.
• The receiver is connected to the power outlet and turned on, or that it is
sufficiently charged (if you are not using a power outlet).
• The Link LEDs are green, and your units are paired. See “The Link LEDs
do not light up.” below.
• The receiver volume is not muted. Press the Power/Mute button.
• The receiver volume is turned up. Press the Volume Up button.
• The output system is turned on and working properly.
The Link LEDs do not light up.
This indicates that the signal from the transmitter is weak or the receiver
has lost its connection with the transmitter.
Try the following:
• Move your transmitter and receiver closer to each other.
Page 17

14 Troubleshooting Wireless Features
• Reposition your transmitter or receiver so that there are fewer objects
(for example, multiple walls or large metal structures) between them.
• Make sure your transmitter and receiver are not placed on metal
surfaces.
• Reset the wireless connection. Press and hold the receiver’s Connect
button for five seconds.
• Disconnect the transmitter and receiver from the power source. Then
reconnect them again and reset the wireless connection.
• Check that you have set the Mode DIP switches correctly for your
transceivers. See “Configure your E-MU PIPEline™ units” on page 5.
I need more battery-powered transmit time from my E-MU
Pipeline™ transmitter.
If your battery-powered E-MU PIPEline™ transmitter is running low on
power, simply swap it with your receiver (assuming it is plugged in) and
reverse the R/T DIP switch on each unit. The pairing should remain intact.
I have two transceivers which are configured as transmitters. My
receiver is receiving the incorrect transmission.
Check that you have set the same RF setting for both units in a transmitterreceiver pair. See “Configure your E-MU PIPEline™ units” on page 5.
Page 18

Troubleshooting Wireless Features 15
My receiver seems to be picking up extra noise, or there are
intermittent pauses.
The placement of your receiver as well as the signals from other wireless
routers or Bluetooth equipment may affect the quality of the transmission.
Try the following:
• Move your transmitter and receiver closer to each other. For best
performance, place your transmitter and receiver on the same floor.
• Place your transmitter or receiver away from other devices that transmit
wireless signals. The receiver may also pick up noise from nearby power
supply equipment.
• Reposition your transmitter or receiver so that there are fewer objects
(for example, multiple walls or large metal structures) between them.
Page 19

16 General Specifications
General Specifications
Audio Performance
• Signal-to-Noise Ratio (SNR): 96 dB (typical)
• Latency: 5.5 ms (Paired) / 10 ms (Broadcast)
Connectivity
• 3.5 mm (1/8") Stereo jack - Analog Line Input/Output depending on
mode
• RCA jacks - Analog or S/PDIF 48 kHz Input/Output depending on
mode
Rechargeable Battery
• Battery life: 5 to 8 hours (typical)
• Charge time: 3 hours (typical)
Power Adapter
• Supply Voltage: 5V +/- 5%
• Current: 1 A (1000 mA)
• Power: 5 W (Tip = Positive)
Radio Frequency (RF)
• Operating RF range: 2400 - 2483.5 MHz
• Number of RF channels: 3
• Number of simultaneously operating transmitters: 3
• RF transmitter power output: 16 dBm (typical)
Page 20

Safety Information 17
Safety Information
Refer to the following information to use your product safely, and to reduce the chance of
electric shock, short-circuiting, damage, fire, hearing impairment or other hazards.
Improper handling may void the warranty for your product. For more information, read the
warranty available with your product.
• Read these instructions.
• Keep these instructions.
• Heed all warnings.
• Follow all instructions.
• Do not use this apparatus near water.
• Clean only with dry cloth.
• Do not block any ventilation openings. Install the product in accordance with the
instructions.
• Do not install near heat sources such as radiators, heat registers, stoves, or
other apparatus (including amplifiers) that produce heat.
• Do not expose your product to temperatures outside the range of 0°C to 40°C
(32°F to 104°F).
• Do not pierce, crush or set fire to your product.
• Keep your product away from strong magnetic objects.
• Do not subject your product to excessive force or impact.
• Do not defeat the purpose of the polarized or grounding-type plug. A polarized
plug has two blades with one wider than the other. A grounding type plug has
two blades and a third grounding prong. The wide blade or the third prong are
provided for your safety. If the provided plug does not fit into your outlet,
consult an electrician for replacement of the obsolete outlet.
• Protect the power cord from being walked on or pinched particularly at plugs,
convenience receptacles, and the point where they exit from the apparatus.
• Only use attachments/accessories specified by the manufacturer.
• Use only with the cart, stand, tripod, bracket or table specified by the
manufacturer, or sold with the apparatus. When a cart is used, use caution
when moving the cart/apparatus combination to avoid injury from tip-over.
• Unplug this apparatus during lightning storms or when unused for long periods
of time.
• Do not dismantle or attempt to repair your product.
Refer all servicing to authorized and qualified service personnel. Servicing is
required when the apparatus has been damaged in any way, such as powersupply cord or plug is damaged, liquid has been spilled or objects have fallen
into the apparatus, the apparatus has been exposed to rain or moisture, does
not operate normally,or has been dropped.
Page 21

18 Safety Information
• WARNING: To reduce the risk of fire or electric shock, do not expose your
product to water or moisture. If your product is moisture-resistant, take care
not to immerse your product in water or expose it to rain.
Earphones
When a conductive apparatus, such as earphones, is used in close proximity
•
with a CRT television or CRT monitor, the latter may emit an electrostatic
discharge. The electrostatic discharge can be felt as a static shock. While this
static shock is usually harmless, it is good practice to avoid close contact with
CRT devices when using earphones.
• Do not listen to audio on your earbuds or headphones at high volume for
prolonged periods of time as hearing loss may result. For users in the United
States, go to www.hei.org for more information.
• Do not listen to your audio device at high volume when driving, cycling or
crossing the road, especially in heavy traffic, or in any other traffic condition
where such use will hinder safe travel on the roads. We recommend that
consumers be extremely cautious when using this device on the road.
Embedded Battery
• Do not attempt to remove the embedded battery.
The product must be disposed of according to local environmental regulations.
To replace the battery, return your product to your regional support office. For
product service information, go to www.emu.com.
For battery service, go to www.emu.com for the latest information.
CAUTION: Risk of explosion if battery is replaced by incorrect types.
Removable Battery
• The battery must be recycled or disposed of properly. Contact local agencies for
recycling and disposal information.
• Do not allow metal objects to touch the terminals of your battery.
• If there is leakage, an offensive odor, discoloration or deformation during
charging or use, remove the battery and do not use it again. Clean your hands
well before touching food or sensitive areas, for example, your eyes.
CAUTION: Risk of explosion if battery is replaced by incorrect types.
Wireless Device
• Switch off the device where it is prohibited, or when its use may cause danger
or interference such as inside an aircraft, hospitals, or near refuelling points.
Page 22
WEEE DIRECTIVE 2002/96/EQ
The use of the WEEE Symbol indicates that this product may not be
treated as household waste. By ensuring this product is disposed of
correctly, you will help protect the environment. For more detailed
information about the recycling of this product, please contact your
local authority, your household waste disposal service provider or the
shop where you purchased the product.
BATTERIES DIRECTIVE 2002/66/EQ
For Removable Battery
This product may contain one or more of the following removable
batteries:
Li-ion/polymer, button/coin cells, cylindrical cells. In this case, the
following applies:
The crossed-out wheeled bin symbol indicates that the battery in this
product should not be treated as unsorted municipal waste upon
reaching its end of life. Instead it should be taken to separate collection
and recycling schemes. Batteries containing heavy metal content will
have a two-letter symbol for the chemical under the crossed-out
wheeled bin symbol. 'Cd' stands for cadmium, 'Pb' for lead, and 'Hg' for
mercury. You can help the environment and avoid public health hazards
by recycling the battery at an authorized recycling facility or the place of
purchase. To find the nearest authorized recycle centre contact your
local authority. Instructions for removing the battery can be found in the
product user manual. The instructions should be followed carefully
before attempting to remove the battery.
For Integrated Battery
This product may contain a Lithium ion/polymer battery that should
only be removed by an authorized recycling centre. By recycling this
product at your local authorized recycling centre or the place of
purchase, the battery will be removed and recycled separately.
Safety Information 19
Page 23

20 Regulatory Information
Regulatory Information
Notice for the USA
FCC Part 15: This equipment has been tested and found to comply with the limits for a
Class B digital device, pursuant to Part 15 of the FCC Rules. These limits are designed
to provide reasonable protection against harmful interference in a residential
installation. This equipment generates, uses and can radiate radio frequency energy
and, if not installed and used in accordance with instructions, may cause harmful
interference to radio communications. However, there is no guarantee that
interference will not occur in a particular installation. If this equipment does cause
harmful interference to radio or television reception, which can be determined by
turning the equipment off and on, the user is encouraged to try to correct the
interference by one or more of the following measures:
• Reorient or relocate the receiving antenna.
• Increase the separation between the equipment and receiver.
• Connect the equipment into an outlet on a circuit different from that to which
the receiver is connected.
• Consult the dealer or an experienced radio/TV technician for help.
This device complies with part 15 of the FCC Rules. Operation is subject to the
following two conditions:
1 This device may not cause harmful interference, and
2 This device must accept any interference received, including interference that may
cause undesired operation.
CAUTION: To comply with the limits of the Class B digital device, pursuant to Part 15 of
the FCC Rules, this device must be installed with computer equipment certified to
comply with Class B limits.
All cables used to connect to the computer and peripherals must be shielded and
grounded. Operation with non-certified computers or non-shielded cables may results
in interference to radio or television reception.
MODIFICATION: Any changes or modifications not expressly approved by the grantee of
this device could void the user’s authority to operate the device.
WARNING: To satisfy FCC RF exposure requirements for mobile transmitting
devices, a separation distance of 20 cm or more should be maintained
between the antenna of this device and persons during device operation.
Page 24

Regulatory Information 21
To ensure compliance, operations at closer than this distance is not recommended.
The antenna used for this transmitter must not be co-located in conjunction with any
other antenna or transmitter.
California Proposition 65 Statement
WARNING: Handling this product may expose you to chemicals known to the State of
California to cause cancer and birth defects or other reproductive harm.
Wash hands after handling.
Explanatory Note: California Safe Drinking Water and Toxic Enforcement Act of 1986
(Proposition 65) requires special product labeling for products containing certain
chemicals known to the State of California to cause cancer, birth defects or other
reproductive harm. Creative has chosen to provide a warning based on its knowledge
about the presence of one or more listed chemicals without attempting to evaluate the
level of exposure. With Creative's products, the exposure may be below the Proposition
65 level of concern, or could even be zero. However, out of an abundance of caution,
Creative has elected to place the Proposition 65 warning on its products.
Déclaration de la Proposition 65 de la Californie
AVERTISSEMENT: La manipulation de ce produit peut vous exposer à des produits
chimiques qui sont reconnus par l'État de la Californie comme pouvant provoquer le
cancer, des anomalies congénitales ou d'autres effets nuisibles à la reproduction.
Veuillez vous laver les mains après l'avoir manipuler.
Note explicative: La Proposition 65 (California Safe Drinking Water and Toxic
Enforcement Act of 1986) de la Californie sur les matières dangereuses et l'eau
potable exige un étiquetage spécial pour les produits contenant certains produits
chimiques qui sont reconnus par l'État de la Californie comme pouvant provoquer le
cancer, des anomalies congénitales ou d'autres effets nuisibles à la reproduction.
Creative a choisi d'inclure une mise en garde s'appuyant sur sa connaissance de la
présence d'un ou de plusieurs de ces produits chimiques sans essayer d'en évaluer le
niveau d'exposition. Pour les produits de Creative, le niveau d'exposition peut être
inférieur au niveau critique établi par la Proposition 65 ou même être nul. Néanmoins,
par souci extrême de prudence, Creative a choisi de placer l'avertissement de la
Proposition 65 sur ses produits.
Page 25

22 Regulatory Information
Notice for Canada
This Class B digital apparatus complies with Canadian ICES-003.
Cet appareil numérique de la classe B est conforme à la norme NMB-003 du Canada.
Operation is subject to the following two conditions:
(1) This device may not cause harmful interference, and
(2) this device must accept any interference received, including interference that may
cause undesirable operation.
Son Fonctionnement est soumis aux deux conditions suivantes :
(1) Le matériel ne peut étre source D'interférences et
(2) Doit accepter toutes les interférences reques, Y compris celles pouvant provoquer
un fonctionnement indésirable.
CANADIAN CLASS B STATEMENT: This digital device does not exceed the Class B
limits for radio noise emissions from digital apparatus as set out in the interferencecausing equipment standard entitled “Digital Apparatus,” ICES-003 of the Department
of Communications.
Cet appareil numerique respecte les limites de bruits radioelectriques applicables aux
appareils numeriques de Class B prescrites dans la norme sur le materiel brouilleur.
“Appareils Numeriques,” NMB-003 edictee par le ministre des Communications.
MODIFICATION: Any changes or modifications not expressly approved by the grantee of
this device could void the user’s authority to operate the device.
Toute modification non approuvé explicitement par le fournisseur de licence de
l’appareil peut entraîner l’annulation du droit de l’utilisateur à utiliser l’appareil.
Page 26

Regulatory Information 23
European Compliance
This product conforms to the following:
EMC Directive 2004/108/EC.
Mains operated products for the European market comply with Low Voltage Directive
2006/95/EC.
Communication / RF wireless products for the European market comply with R&TTE
Directive 1999/5/EC.
CAUTION: To comply with the Europe CE requirement, this device must be installed
with CE certified computer equipment which meet with Class B limits.
All cables used to connect this device must be shielded, grounded and no longer than
3m in length. Operation with non-certified computers or incorrect cables may result in
interference to other devices or undesired effects to the product.
MODIFICATION: Any changes or modifications not expressly approved by Creative
Technology Limited or one of its affiliated companies could void the user’s warranty
and guarantee rights.
Information in this document is subject to change without notice and does not represent a commitment
on the part of E-MU Systems, Inc. No part of this manual may be reproduced or transmitted in any form or
by any means, electronic or mechanical, including photocopying and recording, for any purpose without
the written permission of E-MU Systems, Inc.
Copyright © 2009 E-MU Systems, Inc. All rights reserved. The E-MU and the E-MU logo, are trademarks
or registered trademarks of E-MU Systems, Inc. in the United States and/or other countries. Creative is a
trademark of Creative Technology Ltd. All other brand names are trademarks of their respective owners.
Version 1.0
March 2009
Page 27

Page 28

Français
Félicitations !
Votre E-MU PIPEline™ polyvalent peut être configuré comme un transmetteur ou
un récepteur sans fil. Alimenté par une batterie, il peut également être utilisé
comme un périphérique portable sans fil ! Achetez des unités supplémentaires
pour profiter d’un réseau sans fil pour votre équipement audio et vos
instruments de musique à la maison, au studio ou sur scène. E-MU PIPEline™
prend en charge la transmission de jusqu’à trois sources différentes dans le
même espace. Si E-MU PIPEline™ peut être utilisé comme un adapteur
d’alimentation CC 5 V facultatif, il donne également, avec la batterie interne, une
plus grande liberté de mouvement, en particulier avec un récepteur de casque
ou un transmetteur d’instrument de musique. Lisez ce manuel pour savoir
comment utiliser votre nouveau E-MU PIPEline™ !
Sommaire
À propos de votre E-MU PIPEline™ .................................................. 26
Modes Diffusion et Apparié ............................................................... 27
Modes Analogique et Numérique ...................................................... 28
Configuration de votre E-MU PIPEline™ ........................................... 29
Utilisation de votre E-MU PIPEline™ ................................................ 35
Dépannage des fonctions sans fil ..................................................... 37
Caractéristiques générales ............................................................... 40
Informations de sécurité ................................................................... 41
Informations réglementaires ............................................................ 44
REMARQUE
Le terme « transmetteur » utilisé dans le présent Guide de l’utilisateur
désigne E-MU PIPEline™ lorsqu’il est configuré comme un
transmetteur. De la même façon, « récepteur » est utilisé lorsque
E-MU PIPEline™ est configuré comme un récepteur.
Page 29

26 À propos de votre E-MU PIPEline™
À propos de votre E-MU PIPEline™
1
2
TM
PIPEline
4
3
PIPEline
T
M
G
D/A
LO
ANA
R
ITAL O
IG
D
I
X
E
L
F
CKS
A
J
5
6
R/T
B/P
CH
8
7
1 Bouton Alimentation/
Sourdine
Appuyez sur le bouton et maintenezle enfoncé pour l’allumer. Une fois
allumé, appuyez dessus pour
activer ou désactiver la sourdine.
2 Boutons de volume
Reportez-vous à la section “Réglage
du volume” page 35.
3Voyant E-MU
4 Voyant d’alimentation
Reportez-vous à la section
“Compréhension du voyant
d’alimentation” page 36.
5 Flexi-Jack (prise d’entrée/de
sortie ligne stéréo de 1/8 po)
6 Flexi-Jacks (prises RCA)
Peuvent être utilisées pour faire
entrer ou sortir des signaux S/PDIF
48 kHz analogiques ou numériques.
Reportez-vous à la section “Modes
Analogique et Numérique” page 28.
7 Boutons mode DIP
9
Reportez-vous à la section
“Configuration de vos unités E-MU
PIPEline™” page 29.
8 Voyant Relier /
bouton Connecter
Reportez-vous à la section
“Compréhension du voyant Relier”
page 36.
9 Prise d’entrée CC 5 V
[5 V, 1 A (1 000 mA), embout = positif]
Page 30

Modes Diffusion et Apparié 27
Modes Diffusion et Apparié
Vous avez besoin d’au moins deux unités E-MU PIPEline™ pour former un
groupe transmetteur-récepteur de base. Avec plus d’unités, vous pouvez
configurer de multiples groupes sans fil plus complexes, comme montré cidessous.
M
T
PIPEline
M
T
PIPEline
M
T
PIPEline
M
T
PIPEline
M
T
PIPEline
Diffusion
M
T
M
T
PIPEline
PIPEline
Apparié
M
T
PIPEline
En définissant les boutons mode DIP, situés à l’arrière de l’unité, vous pouvez
configurer cette dernière comme un transmetteur ou un récepteur, ainsi que
l’utiliser en mode diffusion ou apparié.
La diffusion peut être utilisée avec plusieurs récepteurs E-MU PIPEline™
appariés. Elle s’utilise généralement dans un groupe « un transmetteur pour
plusieurs récepteurs ».
Apparié signifie qu’un transmetteur est uniquement relié à un récepteur dédié.
Page 31

28 Modes Analogique et Numérique
Modes Analogique et Numérique
Votre E-MU PIPEline™ peut être configuré pour fonctionner en mode Analogique
ou Numérique (S/PDIF 48 kHz) en définissant les boutons mode DIP. Veuillez
noter les éléments suivants lorsque vous utilisez le mode numérique :
• Pour un transmetteur en mode numérique, assurez-vous que le E-MU PIPEline™
reçoit un flux numérique S/PDIF externe de 48 kHz. De la même façon, pour un E-MU
PIPEline™ configuré comme un récepteur en mode numérique, assurez-vous que
l’équipement externe qui y est relié peut recevoir un flux numérique S/PDIF coaxial
de 48 kHz.
• Un son numérique S/PDIF de 48 kHz nécessite un câble RCA numérique coaxial de 75
ohms spécifique. Ce câble peut être connecté à l’une des prises RCA du E-MU
PIPEline™.
• En mode numérique, le E-MU PIPEline™ prend seulement en charge le taux
d’échantillonnage de 48 kHz.
• Le E-MU PIPEline™ ne dispose pas de capacités d'encodage ou de décodage DTS ou
Dolby, mais il offre une passerelle DTS.
• Le E-MU PIPEline™ ne peut pas faire entrer ou sortir de signaux numériques ou
analogiques simultanément. Cependant, un appariement transmetteur-récepteur
peut avoir des paramètres numériques/analogiques différents en fonction du
périphérique de source ou de destination qui leur est rattaché.
Page 32
Configuration de votre E-MU PIPEline™ 29
Configuration de votre E-MU PIPEline™
Il vous sera peut-être plus facile de configurer et d’apparier vos unités E-MU
PIPEline™ à un endroit avant de placer chacune d’entre elles à leur
emplacement final.
REMARQUE
Etape 1: Configuration de vos unités E-MU PIPEline™
Définissez les boutons mode DIP pour votre (vos) transmetteur(s) et récepteur(s).
Consultez le tableau suivant pour connaître les réglages appropriés. Ce tableau
se trouve également au bas de votre unité E-MU PIPEline™.
Pour un groupe transmetteur-récepteur, définissez les paramètres des boutons
DIP à CH, B/P et D/A. Ensuite, définissez le bouton R/T pour configurer l’unité
comme un transmetteur ou un récepteur. Un groupe se compose d’au moins un
transmetteur et un récepteur.
Position CH B/P R/T D/A
+ Ch 1 Apparié Transmettre Analogique sans limitation
0 Ch 2 - - Analogique avec limitation
- Ch 3 Diffusion Recevoir Numérique
Par exemple, un transmetteur utilisé pour de la diffusion, se servant du canal 1
RF, diffusant un son analogique à partir d’une source analogique doit être défini
comme suit :
Les Flexi-jacks seront de type entrée ou sortie se lon le le réglage du mod e
transmettre/recevoir du E-MU PIPEline™. Elles peuvent également être
numériques ou analogiques en fonction du réglage du mode.
(S/PDIF 48 kHz)
G
O
L
A
N
A
R
O
L
A
IT
IG
D
D/A
R/T
B/P
CH
CH
B/P
R/T
D/A
Page 33

30 Connexion de vos unités E-MU PIPEline™
Etape 2: Connexion de vos unités E-MU PIPEline™
Connexion d’une unité comme un transmetteur
1b
OR
1c
FIEXI
JACKS
1a
1d
1a Guitare électrique avec un préamp. actif, un synthétiseur,
un mixeur ou une autre source d'entrée audio
1b Câble stéréo/mono à RCA (connexion analogique)
1c Câble stéréo
1d Câble RCA numérique de 75 ohms (connexion S/PDIF de
48 kHz)
2a Adaptateur d’alimentation 5 V facultatif
2b Prise de courant CA
CH
B/P
R/T
D/A
2a
2b
Page 34

Connexion de vos unités E-MU PIPEline™ 31
Connexion d’une unité comme un récepteur
1a
1b
OR
1c
FIEXI
JACKS
1d
1a Haut-parleurs stéréo ou 2.1 alimentés, casque ou amplificateur
d’entrée niveau ligne
CH
B/P
R/T
D/A
1b Câble stéréo à RCA
1c Câble stéréo
1d Câble RCA numérique de 75 ohms (connexion S/PDIF de 48 kHz)
2a Adaptateur d’alimentation 5 V facultatif
2b Prise de courant CA
REMARQUE Lorsque E-MU PIPEline™ est configuré comme un récepteur, vous
pouvez engager une limitation, en mode de sortie analogique, pour
minimiser les effets d'écrêtage. Mettez le bouton D/A au milieu, comme
indiqué dans le tableau de la page page 29.
2a
2b
Page 35

32 Allumez le récepteur
5V DC
LINK /
CONNECT
5V DC
LINK /
CONNECT
Etape 3: Allumez le récepteur
Appuyez sur le bouton Connecter situé à l’arrière du récepteur.
Pour le mode apparié, le voyant Relier clignote lors de sa recherche d’un
transmetteur à apparier.
M
T
PIPEline
Etape 4: Allumez le transmetteur
Puis, appuyez sur le bouton Connecter du transmetteur.
Pour le mode Diffusion
Une fois l’appariement réalisé, le récepteur doit pouvoir entendre le son émis du
périphérique de sortie qui lui est relié.
Si vous diffusez à partir de plusieurs récepteurs, répétez les étapes 3 et 4.
Pour le mode Apparié
Le voyant Relier du récepteur clignote, puis s’allume en vert lorsque
l’appariement avec le transmetteur est réussi.
Répétez les étapes 1 à 4 pour apparier un autre groupe transmetteur-récepteur
dédié. Ce groupe doit utiliser un canal RF différent.
Page 36

Positionnement de vos unités E-MU PIPEline™ 33
Une fois que votre transmetteur et votre récepteur ont été appariés, ils seront
automatiquement reliés à leur prochain allumage.
IMPORTANT
N’appuyez PAS sur le bouton Connecter de votre transmetteur ou
récepteur à plusieurs reprises avant de terminer le processus
d’appariement. Sinon, les unités ne seront pas correctement appariées.
REMARQUE
• Si votre transmetteur et votre récepteur ne s’apparient pas, il suffit
de les réinitialiser. Pour réinitialiser la connexion sans fil, appuyez
sur le bouton Connecter du récepteur et maintenez-le enfoncé
pendant cinq secondes.
• Pour obtenir des informations de dépannage, reportez-vous à la
section “Dépannage des fonctions sans fil” page 37.
Etape 5: Positionnement de vos unités E-MU PIPEline™
Placez le récepteur jusqu’à 15 mètres de votre transmetteur. Vous pouvez placer
les unités dans des pièces différentes, en évitant cependant qu’elles se trouvent
à proximité d’objets et de surfaces métalliques, ou d’objets émettant des
fréquences radio, par exemple une radio, un téléphone sans fil ou autres points
d’accès Wi-Fi®.
REMARQUE
• La qualité du signal entre le transmetteur et le récepteur peut être
affectée par la présence d’un objet ou d’une structure (plusieurs
murs, par exemple) entre les deux unités. Le cas échéant, essayez
différents emplacements.
• Une fois la batterie rechargée, les unités peuvent être déplacées et
ne doivent pas forcément être placées à proximité d’une prise de
courant, par exemple en cas de connexion à un équipement portable
comme des casques ou des ordinateurs portables. Cependant, la
capacité de mouvement sera restreinte si l’équipement rattaché
(comme un amplificateur) nécessite une prise de courant.
Page 37

34 Lisez et diffusez de la musique dans votre transmetteur
Etape 6: Lisez et diffusez de la musique dans votre
transmetteur
Lisez de la musique dans votre transmetteur et diffusez de la musique vers votre
récepteur.
M
T
e
n
i
l
E
P
I
P
M
T
e
n
i
l
E
P
I
P
Page 38

Utilisation de votre E-MU PIPEline™ 35
Utilisation de votre E-MU PIPEline™
Réglage du volume
Lorsque E-MU PIPEline™ est configuré comme un transmetteur, les boutons de
volume du transmetteur fonctionnent comme des boutons d’atténuation. Pour
diminuer le volume du son diffusé vers le récepteur, appuyez sur le bouton « + »
afin d’augmenter l’atténuation et donc réduire le volume du son diffusé.
Les boutons de volume fonctionnent normalement pour les récepteurs E-MU
PIPEline™.
Chargement de votre E-MU PIPEline™
Le E-MU PIPEline™ utilise une batterie rechargeable Li-ion de 1200 mAh.
Lorsque la batterie est faible, le voyant Alimentation clignote en rouge et blanc.
Lorsque la batterie est en cours de chargement et que l’unité n’est pas allumée,
le voyant Alimentation s'allume en rouge. Lorsque la batterie est entièrement
chargée, le voyant Alimentation n’est pas allumé.
Il n’y a aucune indication « faible batterie » lorsque l'adaptateur d'alimentation
externe est en cours d'utilisation. Une batterie déchargée met jusqu’à trois
heures pour se recharger. Lorsqu’elle est entièrement chargée, elle peut
fonctionner pendant environ cinq à huit heures sans être connectée à
l’adaptateur d’alimentation.
Retour aux paramètres d’origine par défaut
Pour retourner aux paramètres d’origine par défaut du E-MU PIPEline™,
appuyez sur le bouton Connecter situé à l’arrière de l’unité et maintenez-le
enfoncé pendant cinq secondes. Le voyant E-MU clignote pendant deux secondes
avant de s’allumer à nouveau.
Page 39

36 Utilisation de votre E-MU PIPEline™
Le retour aux paramètres d’origine par défaut aura les effets suivants :
• Réinitialiser le paramètre de volume d’origine,
• « Désapparier » un récepteur.
Compréhension du voyant d’alimentation
Voyant Comportement État
Blanc Fixe Apparié et prêt à l’emploi
Clignotement lent et continu Aucun signal détecté ou signal
Rouge Fixe En cours de chargement
Clignotement lent et continu Son coupé
Rouge-blanc Clignotement alterné Faible batterie
Éteint - Entièrement chargé
faible
Compréhension du voyant E-MU
Voyant Comportement État
Bleu Deux secondes de clignotement
continu et rapide
Réinitialisation sans fil
Compréhension du voyant Relier
Voyant Comportement État
Vert Fixe Apparié et prêt à l’emploi
Clignotement* Appariement en cours
Clignotement rapide Un ou plusieurs boutons mode DIP
Éteint – Connexion perdue
* Seulement applicable au mode Apparié. Pour la diffusion, le voyant ne clignotera pas.
sont positionnés de façon ambigüe
Page 40

Dépannage des fonctions sans fil 37
Dépannage des fonctions sans fil
Aucun son ne sort de mon récepteur.
Vérifiez que :
• La source du signal fonctionne correctement. Si votre transmetteur est défini
en mode numérique, assurez-vous que la source est configurée pour diffuser
un signal S/PDIF de 48 kHz.
• Le transmetteur est connecté à la prise de courant et qu’il est allumé, ou
qu’il est suffisamment chargé (si vous n’utilisez pas l’adaptateur
d’alimentation externe).
• Les boutons mode DIP du transmetteur et du récepteur sont correctement
configurés :
• Tous deux sont configurés sur le même canal RF.
• Tous deux sont configurés sur le même mode, Diffusion ou Apparié.
• Le transmetteur est configuré pour transmettre et le récepteur, pour recevoir.
• Reportez-vous à la section “Configuration de vos unités E-MU PIPEline™” page 29.
• Le récepteur est connecté à la prise de courant et qu’il est allumé, ou qu’il est
suffisamment chargé (si vous n’utilisez pas l’adaptateur d’alimentation
externe).
• Les voyants Relier sont verts et que les unités sont appariées. Reportez-vous
à la section “Les voyants Relier ne s’allument pas.” ci-dessous.
• Le volume du récepteur n'est pas en sourdine. Appuyez sur le bouton
Alimentation/Sourdine.
• Le volume du récepteur n'est pas allumé. Appuyez sur le bouton Plus de
volume.
• Le système de sortie est allumé et qu’il fonctionne correctement.
Les voyants Relier ne s’allument pas.
Ceci indique que le signal du transmetteur est faible ou que le récepteur a perdu
sa connexion avec le transmetteur.
Page 41

38 Dépannage des fonctions sans fil
Essayez ce qui suit :
• Rapprochez votre transmetteur et votre récepteur l’un de l’autre.
• Repositionnez votre transmetteur ou votre récepteur pour réduire le nombre
d’objets qui les séparent (par exemple, plusieurs murs ou de grandes
structures métalliques).
• Assurez-vous que votre transmetteur et votre récepteur ne se trouvent pas
sur des surfaces métalliques.
• Réinitialisez la connexion sans fil. Appuyez sur le bouton Connecter du
récepteur et maintenez-le enfoncé pendant cinq secondes.
• Déconnectez le transmetteur et le récepteur de la source d’alimentation.
Puis reconnectez-les et réinitialisez la connexion sans fil.
• Vérifiez que vous avez correctement défini les boutons mode DIP pour vos
transmetteurs et récepteurs. Reportez-vous à la section “Configuration de
vos unités E-MU PIPEline™” page 29.
J’ai besoin de plus de temps de transmission alimenté par batterie
pour mon transmetteur E-MU PIPEline™.
Si votre transmetteur E-MU PIPEline™ alimenté par batterie est faible, il vous
suffit de l’échanger par votre récepteur (s'il est branché) et d'inverser le bouton
DIP R/T sur chaque unité. L’appariement devrait rester intact.
J’ai deux transmetteurs-récepteurs configurés comme des
transmetteurs. Mon récepteur ne reçoit pas la bonne transmission.
Vérifiez que vous avez configuré le même paramètre RF pour les deux unités de
l’appariement transmetteur-récepteur. Voir “Configuration de vos unités E-MU
PIPEline™” page 29.
Page 42

Dépannage des fonctions sans fil 39
Mon récepteur semble capter du bruit ou il y a des pauses
intermittentes.
Le placement de votre récepteur, ainsi que les signaux d’autres routeurs ou
d’équipement Bluetooth sans fil peuvent affecter la qualité de la transmission.
Essayez ce qui suit :
• Rapprochez votre transmetteur et votre récepteur l’un de l’autre. Pour
obtenir des performances optimales, placez le transmetteur et le récepteur
X-Fi au même étage.
• Placez votre transmetteur ou votre récepteur à l’écart des périphériques
transmettant des signaux sans fil. Le récepteur peut également capter du
bruit d’un équipement d’alimentation alentour.
• Repositionnez votre transmetteur ou votre récepteur pour réduire le nombre
d’objets qui les séparent (par exemple, plusieurs murs ou de grandes
structures métalliques).
Page 43

40 Caractéristiques générales
Caractéristiques générales
Performances audio
• Rapport signal sur bruit (SNR) : 96 dB (standard)
• Latence : 5,5 ms (apparié) / 10 ms (diffusion)
Connectivité
• Prise stéréo 3,5 mm – entrée/sortie ligne analogique en fonction du mode
• Prises RCA – entrée/sortie analogique ou S/PDIF de 48 kHz en fonction du
mode
Batterie rechargeable
• Durée de vie de la batterie : 5 à 8 heures (standard)
• Temps de charge : 3 heures (standard)
Adaptateur d’alimentation
• Tension d’alimentation : 5 V +/- 5 %
• Courant : 1 A (1 000 mA)
• Puissance : 5 W (embout = positif)
Fréquence radio (RF)
• Portée RF de fonctionnement : 2 400 – 2 483,5 MHz
• Nombre de canaux RF : 3
• Nombre de transmetteurs fonctionnant simultanément : 3
• Sortie de puissance d’émission RF : 16 dBm (standard)
Page 44

Informations de sécurité 41
Informations de sécurité
Consultez les informations suivantes pour utiliser votre produit en toute sécurité et pour
réduire les risques de choc électrique, mise en court-circuit, dégât, incendie, perte auditive
ou tout autre danger. Toute mauvaise utilisation peut annuler la garantie de votre produit.
Pour plus d'informations, lisez la garantie fournie avec votre produit.
• Lisez ces instructions.
• Conservez ces instructions.
• Faites attention à ces avertissements.
• Suivez toutes les instructions.
• N’utilisez pas cet appareil en présence d'eau.
• Nettoyez-le uniquement avec un chiffon sec.
• N’obstruez aucun orifice de ventilation. Installez le produit en respectant les instructions.
• Ne l’installez pas à proximité de sources de chaleur comme les radiateurs, les fours
ou autres appareils (y compris les amplificateurs) qui produisent de la chaleur.
• N’exposez pas votre produit à des températures inférieures à 0 °C ou supérieures à 40 °C.
• Ne percez pas le produit, ne l'écrasez pas et veillez à ce qu’il ne prenne pas feu.
• Tenez votre produit éloigné d'objets fortement magnétiques.
• Ne soumettez pas le produit à une force ou à un impact excessif.
• Ne désactivez pas volontairement les prises polarisées ou de terre. Une prise
polarisée a deux lames, l’une étant plus large que l’autre. Une prise de terre a deux
lames, ainsi qu’une broche de terre. La large lame ou la broche sont fournies pour
votre sécurité. Si la prise fournie n'est pas appropriée, consultez un électricien pour
qu'il remplace l'ancienne prise.
• Protégez le cordon d’alimentation pour que personne ne marche dessus ou ne le
pince, en particulier au niveau des prises et de l'endroit où elles sortent de l'appareil.
• N’utilisez que les attaches/accessoires spécifiées par le fabricant.
• Utilisez uniquement avec les chariots, sellettes, trépieds, supports ou tables spécifiés
par le fabricant ou vendus avec l’appareil. Lorsque vous utilisez un chariot, faites
attention lorsque vous déplacez l’ensemble chariot/appareil pour éviter les blessures
causées par les chutes.
• Débranchez cet appareil pendant les orages ou si vous ne l’utilisez pas pendant
longtemps.
• N’essayez pas de démonter ou de réparer le produit.
Confiez toutes les réparations à du personnel autorisé et qualifié. Une réparation
est nécessaire lorsque l’appareil a été endommagé de quelque façon que ce soit,
comme lorsque le cordon d’alimentation ou la prise est endommagé(e), que du
liquide a été renversé ou que des objets sont tombés sur l’appareil, que l’appareil a
été exposé à de la pluie ou à de l’humidité, qu’il ne fonctionne pas normalement ou
qu’il est tombé par terre.
• ATTENTION: Pour réduire le risque d’incendie ou de choc électrique, n’exposez pas le
produit à de l’eau ou à de l’humidité. Si le produit résiste à l'humidité, veillez à ne pas
l’immerger dans de l'eau ou de ne pas l'exposer à la pluie.
Page 45

42 Informations de sécurité
Écouteurs
Lorsqu'un appareil conducteur, comme des écouteurs, est utilisé à proximité d'une
•
télévision ou d'un écran à tube cathodique, ce dernier peut émettre une décharge
électrostatique. Celle-ci peut faire l'effet d'une décharge statique. Même si une
décharge statique est généralement inoffensive, il est recommandé d'éviter de se
rapprocher des appareils à tube cathodique lors de l'utilisation d'écouteurs.
• Limitez la durée d’écoute de musique à volume élevé dans votre casque car cela peut
entraîner une perte auditive. Pour plus d'informations, pour les utilisateurs situés
aux États-Unis, visitez le site www.hei.org.
• N’utilisez pas votre périphérique audio à un volume élevé lorsque vous conduisez,
pédalez ou traversez la rue, surtout lorsque la circulation est dense, ou dans
n’importe quelle condition/situation où une telle utilisation entraverait la sûreté de la
circulation. Nous vous recommandons d'être extrêmement prudents lorsque vous
utilisez cet appareil sur la route.
Batterie intégrée
• N’essayez pas de retirer la batterie intégrée.
Le produit doit être mis au rebut conformément aux réglementations
environnementales. Pour remplacer la batterie, retournez le produit à votre bureau
d’assistance régional. Pour obtenir des informations sur l’entretien des produits,
visitez le site www.emu.com.
Pour la réparation des batteries, visitez le site www.emu.com pour obtenir les
dernières informations.
ATTENTION: Risque d’explosion en cas de remplacement par des batteries
inappropriées.
Batterie amovible
• La batterie doit être recyclée ou mise au rebut de façon appropriée. Contactez les agences
locales pour obtenir des informations relatives au recyclage et à la mise au rebut.
• Évitez que des objets métalliques n’entrent en contact avec les bornes de votre batterie.
• En cas de fuite, d’odeur désagréable, de décoloration ou de déformation lors du
chargement ou de l’utilisation, enlevez la batterie et cessez de l’utiliser. Lavez-vous
soigneusement les mains avant de toucher des aliments ou des zones sensibles,
comme les yeux, par exemple.
ATTENTION: Risque d’explosion en cas de remplacement par des batteries
inappropriées.
Périphérique sans fil
• Éteignez le périphérique là où il n’est pas autorisé ou lorsqu’il peut entraîner un
danger ou des interférences, comme à l’intérieur d’un avion, dans les hôpitaux ou à
proximité de stations de ravitaillement.
Page 46
DIRECTIVE WEEE 2002/96/EQ
L’utilisation du symbole WEEE indique que ce produit ne doit pas être traité
comme un déchet ménager. En vous assurant que ce produit est mis au rebut
convenablement, vous aidez à protéger l’environnement. Pour plus
d’informations sur le recyclage de ce produit, contactez les autorités locales,
le fournisseur de service d’élimination des déchets ménagers ou le magasin
où vous avez acheté le produit.
DIRECTIVE BATTERIES 2002/66/EQ
Pour les batteries amovibles
Ce produit peut contenir une ou plusieurs des batteries amovibles suivantes :
Li-ion/polymère, élément bouton, élement cylindrique. Dans ce cas, les
éléments suivants s’appliquent :
Le symbole de la poubelle ronde avec une croix indique que la batterie de ce
produit ne doit pas être traitée comme un déchet municipal non-trié à la fin
de sa vie. Elle doit plutôt être envoyée dans des programmes de collecte et de
recyclage séparés. Les batteries contenant des métaux lourds auront un
symbole à deux lettres, représentant le produit chimique, sous le symbole de
la poubelle ronde avec une croix. « Cd » désigne le cadmium, « Pb », le plomb
et « Hg », le mercure. Vous pouvez aider l’environnement et éviter les
dangers publics en recyclant la batterie dans une installation de recyclage
autorisée ou là où vous l’avez achetée. Pour trouver le centre de recyclage
autorisé le plus proche, contactez les autorités locales. Les instructions de
retrait de la batterie se trouvent dans le manuel de l'utilisateur du produit.
Ces instructions doivent être suivies de près avant d'essayer de retirer la
batterie.
Pour les batteries intégrées
Ce produit peut contenir une batterie lithim ion/polymère qui ne doit être
retirée que par un centre de recyclage autorisé. En recyclant ce produit dans
votre centre de recyclage local autorisé ou là où vous l’avez acheté, la
batterie sera retirée et recyclée séparément.
Informations de sécurité 43
Page 47

44 Informations réglementaires
Informations réglementaires
Avis pour les Etats-Unis
Réglementation FCC, section 15: Cet équipement a été testé et déclaré conforme aux limites
d'un appareil numérique de classe B, conformément à la section 15 de la réglementation
FCC. Ces limites permettent de définir une protection raisonnable contre les interférences
nuisibles dans le cas d'une installation permanente. Cet équipement génère, utilise et peut
émettre des ondes radio et, s'il n'est pas installé et utilisé conformément aux instructions,
peut provoquer des interférences nuisibles dans les communications radio. Cependant, il
n’est pas garanti qu'aucune interférence ne surviendra dans une installation donnée. Si cet
équipement provoque des interférences nuisibles dans la réception radio ou télé, ce que vous
pouvez déterminer en mettant l'équipement hors et sous tension, nous vous recommandons
d'essayer d’éliminer les interférences à l’aide d’une ou plusieurs des mesures suivantes :
• Réorientez ou déplacez l'antenne de réception.
• Augmentez la distance entre l'équipement et le récepteur.
• Connectez l'équipement à une prise située sur un circuit différent de celui auquel le
récepteur est connecté.
• Pour obtenir de l’aide, contactez votre distributeur ou un technicien radio/TV
expérimenté.
Cet appareil est conforme à la section 15 de la réglementation FCC. Le fonctionnement
dépend des deux conditions suivantes :
1 Cet appareil ne doit pas causer de mauvaises interférences et
2 cet appareil doit accepter toutes les interférences reçues, y compris les interférences
qui peuvent occasionner un fonctionnement indésirable.
ATTENTION: Pour être conforme aux limites des appareils numériques de classe B,
conformément à la section 15 de la réglementation FCC, cet appareil doit être installé avec un
équipement informatique certifié conforme aux limites de la classe B.
Tous les câbles utilisés pour connecter l'ordinateur et les périphériques doivent être blindés
et reliés à la terre. Si ces conditions ne sont pas respectées, des interférences peuvent
survenir dans la réception radio ou télé.
MODIFICATION: Tout changement ou toute modification non expressément approuvé par le
bénéficiaire de cet appareil peut provoquer l'annulation de l’autorité de l’utilisateur dans le
fonctionnement de cet appareil.
ATTENTION: Pour être conforme aux exigences de la réglementation FCC relative
aux radiofréquences en matière de périphériques de transmission mobiles, une
distance de 20 cm doit être observée entre l’antenne de ce périphérique et les
personnes lors de son fonctionnement.
Page 48

Informations réglementaires 45
Pour garantir la conformité, le fonctionnement de ce périphérique à une distance inférieure
n’est pas recommandé. L’antenne utilisée pour ce transmetteur ne doit pas être positionnée à
côté d’une autre antenne ou d’un autre transmetteur.
California Proposition 65 Statement
WARNING: Handling this product may expose you to chemicals known to the State of
California to cause cancer and birth defects or other reproductive harm.
Wash hands after handling.
Explanatory Note: California Safe Drinking Water and Toxic Enforcement Act of 1986
(Proposition 65) requires special product labeling for products containing certain chemicals
known to the State of California to cause cancer, birth defects or other reproductive harm.
Creative has chosen to provide a warning based on its knowledge about the presence of one
or more listed chemicals without attempting to evaluate the level of exposure. With Creative's
products, the exposure may be below the Proposition 65 level of concern, or could even be
zero. However, out of an abundance of caution, Creative has elected to place the Proposition
65 warning on its products.
Déclaration de la Proposition 65 de la Californie
AVERTISSEMENT: La manipulation de ce produit peut vous exposer à des produits chimiques
qui sont reconnus par l'État de la Californie comme pouvant provoquer le cancer, des
anomalies congénitales ou d'autres effets nuisibles à la reproduction.
Veuillez vous laver les mains après l'avoir manipuler.
Note explicative: La Proposition 65 (California Safe Drinking Water and Toxic Enforcement
Act of 1986) de la Californie sur les matières dangereuses et l'eau potable exige un étiquetage
spécial pour les produits contenant certains produits chimiques qui sont reconnus par l'État
de la Californie comme pouvant provoquer le cancer, des anomalies congénitales ou d'autres
effets nuisibles à la reproduction. Creative a choisi d'inclure une mise en garde s'appuyant
sur sa connaissance de la présence d'un ou de plusieurs de ces produits chimiques sans
essayer d'en évaluer le niveau d'exposition. Pour les produits de Creative, le niveau
d'exposition peut être inférieur au niveau critique établi par la Proposition 65 ou même être
nul. Néanmoins, par souci extrême de prudence, Creative a choisi de placer l'avertissement
de la Proposition 65 sur ses produits.
Page 49

46 Informations réglementaires
Notice for Canada
This Class B digital apparatus complies with Canadian ICES-003.
Cet appareil numérique de la classe B est conforme à la norme NMB-003 du Canada.
Operation is subject to the following two conditions:
(1) This device may not cause harmful interference, and
(2) this device must accept any interference received, including interference that may cause
undesirable operation.
Son Fonctionnement est soumis aux deux conditions suivantes :
(1) Le matériel ne peut étre source D'interférences et
(2) Doit accepter toutes les interférences reques, Y compris celles pouvant provoquer un
fonctionnement indésirable.
CANADIAN CLASS B STATEMENT: This digital device does not exceed the Class B limits for
radio noise emissions from digital apparatus as set out in the interference-causing
equipment standard entitled “Digital Apparatus,” ICES-003 of the Department of
Communications.
Cet appareil numerique respecte les limites de bruits radioelectriques applicables aux
appareils numeriques de Class B prescrites dans la norme sur le materiel brouilleur.
“Appareils Numeriques,” NMB-003 edictee par le ministre des Communications.
MODIFICATION: Any changes or modifications not expressly approved by the grantee of this
device could void the user’s authority to operate the device.
Toute modification non approuvé explicitement par le fournisseur de licence de l’appareil peut
entraîner l’annulation du droit de l’utilisateur à utiliser l’appareil.
Page 50

Informations réglementaires 47
Conformité européenne
Ce produit est conforme aux réglementations suivantes :
Directive EMC 2004/108/EC.
Les produits alimentés sur secteur destinés au marché européen sont conformes à la
Directive basse tension 2006/95/CE.
Les produits sans fil radiofréquences/de communication destinés au marché européen sont
conformes à la Directive R&TTE 1999/5/CE.
ATTENTION: Pour être conforme aux exigences de la directive CE, cet appareil doit être
installé avec un équipement informatique certifié CE et conforme aux limites de la classe B.
Tous les câbles utilisés pour connecter cet appareil doivent être blindés, reliés à la terre et ne
pas dépasser 3 m de long. Si ces conditions ne sont pas respectées, cela peut occasionner un
fonctionnement indésirable du produit ou des interférences dans d’autres périphériques.
MODIFICATION: Tout changement ou toute modification non expressément approuvé par
Creative Technology Limited ou l’une de ses sociétés affiliées peut provoquer l'annulation de
la garantie.
Les informations contenues dans ce document sont susceptibles d'être modifiées sans préavis et
n'engagent en rien la société E-MU Systems, Inc. Aucune partie de ce manuel ne peut être reproduite ou
transmise sous quelque forme ou par quelque moyen que ce soit, électronique ou mécanique, y compris
la photocopie et l'enregistrement, à quelque fin que ce soit sans l'accord écrit de E-MU Systems, Inc.
Copyright © 2009 E-MU Systems, Inc. Tous droits réservés. E-MU et le logo E-MU sont des marques
commerciales ou déposées de E-MU Systems, Inc aux États-Unis et/ou dans d'autres pays. Creative est
une marque commerciale de Creative Technology Ltd. Toutes les autres marques sont des marques
commerciales de leurs propriétaires respectifs.
Version 1.0
Mars 2009
Page 51

Page 52

Deutsch
Herzlichen Glückwunsch!
Ihr vielseitiger E-MU PIPEline™ lässt sich als Wireless-Transmitter oder als Receiver konfigurieren. Da das Gerät batteriebetrieben ist, lässt es sich auch als
tragbares Wireless-Geräte nutzen! Durch Hinzukaufen zusätzlicher Einheiten
können Sie Ihre Audiogeräte und Musikinstrumente zu Wireless-Netzen
zusammenschließen, die Sie zuhause im Studio oder auf der Bühne genießen
können. E-MU PIPEline™ unterstützt die Übertragung von bis zu drei
verschiedenen Quellen am gleichen Ort. Obwohl der E-MU PIPEline™ mit dem
optionalen 5 V-DC-Netzteil betrieben werden kann, bringt der Betrieb des
Gerätes mit der internen Batterie mehr Bewegungsfreiheit, besonders wenn der
E-MU PIPEline™ als Kopfhörerempfänger oder als Sender für ein
Musikinstrument genutzt wird. Lesen Sie weiter, um mehr über die Nutzung
Ihres neuen E-MU PIPEline™ zu erfahren!
Inhalt
Informationen über Ihren E-MU PIPEline™ ..................................... 50
Broadcasting und abgestimmte Modi .............................................. 51
Analoge und digitale Modi ................................................................ 52
Einrichten Ihres E-MU PIPEline™ .................................................... 53
Verwenden des E-MU PIPEline™ ..................................................... 59
Problembehebung: Wireless-Funktionen ....................................... 61
Allgemeine technische Daten .......................................................... 64
Sicherheitshinweise ......................................................................... 65
Ordnungsbestimmungen .................................................................. 68
HINWEIS Der Begriff „Transmitter“, der in diesem Benutzerhandbuch verwendet
wird, bezieht sich auf den E-MU PIPEline™, wenn dieser als Sender
konfiguriert ist. In ähnlicher Weise wird „Receiver“ verwendet, wenn
der E-MU PIPEline™ als Empfänger konfiguriert ist.
Page 53

50 Informationen über Ihren E-MU PIPEline™
Informationen über Ihren E-MU PIPEline™
1
2
TM
PIPEline
4
3
PIPEline
T
M
G
D/A
LO
ANA
R
ITAL O
IG
D
I
X
E
L
F
CKS
A
J
5
6
R/T
B/P
CH
8
7
1 Taste „Ein/Aus/Stumm“
Zum Einschalten gedrückt
halten. Drücken Sie im
eingeschalteten Zustand auf , um
die Stummschaltung zu aktivieren
oder zu deaktivieren.
2 Lautstärketasten
Siehe „Lautstärke regeln“ auf
Seite 59.
3E-MU LED
4 Netzanzeige-LED
Siehe „Zustände der NetzanzeigeLED und ihre Bedeutung“ auf
Seite 60.
5 Flexi-Jack (3,5 mm-Line-in/
out-Buchse für Stereo)
6 Flexi-Jacks (Cinch-Buchsen)
Dient der Ein- oder Ausgabe von
analogen Signalen oder digitalen S/
PDIF 48 kHz-Signalen. Siehe
„Analoge und digitale Modi“ auf
Seite 52.
7 Modus-DIP-Schalter
9
Siehe „Konfigurieren der E-MU
PIPEline™-Einheiten“ auf Seite 53.
8 Verbindungs-LED /
Connect-Taste
Siehe „Zustände der Anschluss-LED
und ihre Bedeutung“ auf Seite 60.
9 5 V DC In-Buchse
[5 V, 1 A (1000 mA), Spitze positiv]
Page 54

Broadcasting und abgestimmte Modi 51
Broadcasting und abgestimmte Modi
Mindestens zwei E-MU PIPEline™ Einheiten sind nötig, um eine einfache
Transmitter-Receiver-Gruppe aufzubauen. Mit einer größeren Anzahl von
Einheiten lassen sich komplexere Wireless-Gruppen konfigurieren, wie im
Folgenden gezeigt wird.
M
T
PIPEline
M
T
PIPEline
M
T
PIPEline
M
T
PIPEline
M
T
PIPEline
M
T
PIPEline
Broadcasting
M
T
M
T
PIPEline
PIPEline
Abgestimmt
Mithilfe der Modus-DIP-Schalter an der Geräterückseite lässt sich das Gerät als
Transmitter oder als Receiver konfigurieren und entweder für den BroadcastModus oder den abgestimmten Modus einrichten.
Broadcasting lässt sich mit einer beliebigen Anzahl von E-MU PIPEline™Receivern nutzen. Normalerweise wird dieser Modus in einer Gruppe mit einem
Transmitter und mehreren Receivern genutzt.
Abgestimmt bedeutet, dass ein Transmitter nur mit einem einzigen zugehörigen
Receiver verknüpft ist.
Page 55

52 Analoge und digitale Modi
Analoge und digitale Modi
Der E-MU PIPEline™ lässt sich mithilfe der Modus-DIP-Schalter entweder für
den analogen oder den digitalen (S/PDIF 48 kHZ-) Modus konfigurieren.
Folgende Dinge sollten Sie bei der Nutzung des digitalen Modus beachten:
• Achten Sie bei einem Transmitter im digitalen Modus darauf, dass der E-MU
PIPEline™ ein externes S/PDIF-Digitalsignal erhält. Achten Sie in ähnlicher Weise bei
einem E-MU PIPEline™, der als Receiver konfiguriert wurde darauf, dass die
angeschlossenen externen Geräte ein koaxiales Digitalsignal im Format S/PDIF 48 kHz
verarbeiten können.
• Für digitales Audio mit S/PDIF 48 kHz ist ein spezielles 75-Ohm-Digital-Koaxialkabel
mit Cinch-Anschlüssen erforderlich. Dieses Kabel kann an eine beliebige der beiden
Cinch-Buchsen des E-MU PIPEline™ angeschlossen werden.
• Der E-MU PIPEline™ unterstützt im digitalen Modus nur die Abtaste mit 48 kHz.
• Der E-MU PIPEline™ nimmt keine DTS- oder Dolby-Kodierung oder Dekodierung vor,
bietet aber DTS-Passthrough.
• Der E-MU PIPEline™ kann nicht gleichzeitig digitale und analoge Signale ein- oder
ausgeben. Ein Transmitter-Receiver-Paar kann aber je nach den angeschlossenen
Quell- und Zielgeräten unterschiedliche Digital/Analog-Einstellungen verwenden.
Page 56

Einrichten Ihres E-MU PIPEline™ 53
Einrichten Ihres E-MU PIPEline™
Es ist möglicherweise einfacher, das Konfigurieren und Abstimmen Ihrer E-MU
PIPEline™-Geräte an einem Ort durchzuführen, bevor die einzelnen Geräte an
ihren Bestimmungsort gebracht werden.
HINWEIS
Schritt 1: Konfigurieren der E-MU PIPEline™-Einheiten
Stellen Sie die Modus-DIP-Schalter für Ihre Transmitter und Receiver ein.
Geeignete Einstellungen finden Sie in der folgenden Tabelle. Diese Tabelle ist
auch auf der Unterseite Ihrer E-MU PIPEline™-Einheit abgedruckt.
Stellen Sie für eine Transmitter-Receiver-Gruppe die DIP-Schalter CH, B/P und
D/A in die richtige Position. Stellen Sie dann den Schalter R/T so ein, dass das
Gerät als Transmitter oder Receiver konfiguriert wird. Eine Gruppe besteht aus
mindestens einem Transmitter und einem Receiver.
Position CH B/P R/T D/A
+ Ch 1 Abgestimmt Senden Analog ohne Begrenzer
0 Ch 2 - - Analog mit Begrenzer
- Ch 3 Broadcast Empfangen Digital
Ein Transmitter, der für das Broadcasting mit RF-Kanal 1 verwendet werden soll
und analoges Audio von einer Analogquelle wiedergibt, sollte beispielsweise wie
folgt konfiguriert werden:
Flexi-Jacks sind entweder Eingänge oder Ausgänge, je nach
Einstellung des E-MU PIPEline™-Transmit/Receive-Modus. Je nach
Moduseinstellung funktionieren die Flexi-Jacks digital oder analog.
(S/PDIF 48 kHz)
G
O
L
A
N
A
R
O
L
A
IT
IG
D
D/A
R/T
B/P
CH
CH
B/P
R/T
D/A
Page 57
54 Anschließen der E-MU PIPEline™-Einheiten
Schritt 2: Anschließen der E-MU PIPEline™-Einheiten
Anschließen einer Einheit als Transmitter
1b
OR
1c
FIEXI
JACKS
1a
1d
1a E-Gitarre mit aktivem Vorverstärker, Synthesizer, Mixer oder
anderen Audio-Eingabequellen
1b Stereo/Mono-auf-Cinch-Kabel (analoge Verbindung)
1c Stereokabel
1d RCA 75-Ohm-Digitalkabel (S/PDIF-48 kHz-Verbindung)
2a Optionales 5 V-Netzteil
2b Netzsteckdose
CH
B/P
R/T
D/A
2a
2b
Page 58

Anschließen einer Einheit als Receiver
Anschließen der E-MU PIPEline™-Einheiten 55
1a
1b
OR
1c
FIEXI
JACKS
1d
1a Aktiver Stereo- oder 2.1-Lautsprecher, Kopfhörer oder
Verstärker mit Line-Level-Eingang
1b Stereo-auf-Cinch-Kabel
1c Stereokabel
1d RCA 75-Ohm-Digitalkabel (S/PDIF-48 kHz-Verbindung)
2a Optionales 5 V-Netzteil
2b Netzsteckdose
HINWEIS
Wenn E-MU PIPEline™ als Receiver eingestellt ist, lässt sich im
analogen Modus ein Begrenzer einsetzen, um Clipping-Effekte zu
mindern. Schieben Sie den Schalter D/A auf die mittlere Position, wie in
der Tabelle auf Seite 53 dargestellt.
CH
B/P
R/T
D/A
2a
2b
Page 59
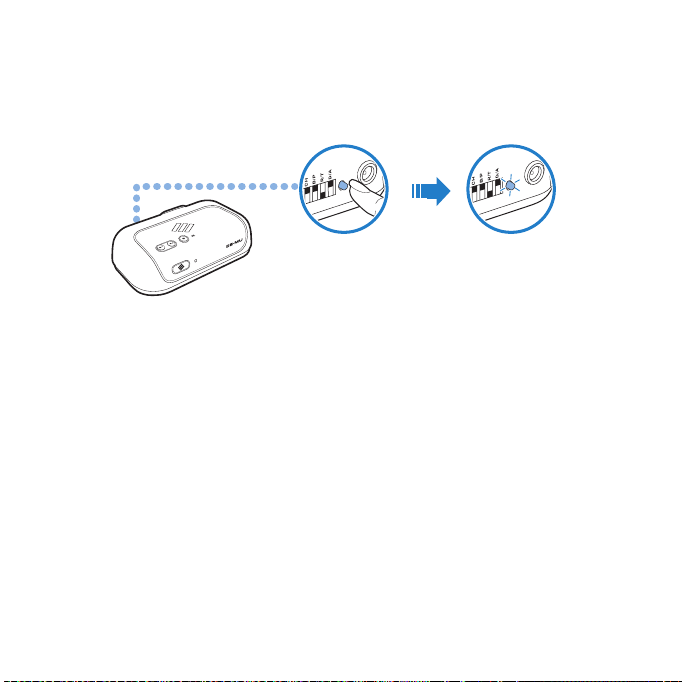
56 Schalten Sie den Receiver ein.
5V DC
LINK /
CONNECT
5V DC
LINK /
CONNECT
Schritt 3: Schalten Sie den Receiver ein.
Drücken Sie die Connect-Taste auf der Rückseite des Receivers.
Im abgestimmten Modus blinkt die Verbindungs-LED bei der Suche nach
Transmittern zur Abstimmung.
M
T
PIPEline
Schritt 4: Schalten Sie Ihren Transmitter ein
Drücken Sie als nächstes die Connect-Taste Ihres Transmitters.
Broadcasting-Modus
Nach erfolgreicher Abstimmung kann der Receiver die Audiosignale des mit dem
Receiver verbundenen Ausgabegerätes empfangen.
Falls Sie die Broadcast-Funktion mit mehr als einem Empfänger nutzen,
wiederholen Sie die Schritte 3 und 4.
Abgestimmter Modus
Die Verbindungs-LED des Receivers blinkt und leuchtet dann grün auf, wenn die
Abstimmung erfolgreich verlaufen ist.
Wiederholen Sie die Schritte 1 bis 4, um eine weitere zusammengehörige
Transmitter-Receiver-Gruppe abzustimmen. Diese Gruppe muss einen anderen
RF-Kanal verwenden.
Page 60

Aufstellen der E-MU PIPEline™-Einheiten 57
Nachdem Ihre Transmitter und der Receiver abgestimmt wurden, werden Sie
nach dem Einschalten automatisch miteinander verbunden.
WICHTIGER
HINWEIS
Drücken Sie auf Ihrem Transmitter oder Receiver die Verbindungstaste
NICHT mehrmals hintereinander, bevor der Abstimmungsvorgang
abgeschlossen ist, weil sonst möglicherweise keine korrekte
Abstimmung erfolgt.
HINWEIS
• Falls Ihr Transmitter und der Receiver sich nicht abstimmen lassen,
setzen Sie die Geräte einfach zurück. Um die Wireless-Verbindung
zurückzusetzen, halten Sie die Connect-Taste am Receiver für fünf
Sekunden gedrückt.
• Weitere Hinweise zur Problembehebung finden Sie unter
„Problembehebung: Wireless-Funktionen“ auf Seite 61.
Schritt 5: Aufstellen der E-MU PIPEline™-Einheiten
Stellen Sie den Receiver bis zu 15 Metern entfernt vom Transmitters auf. Die
beiden Geräte können in verschiedenen Räumen positioniert werden, sollten
jedoch nicht in der Nähe von großen metallenen Oberflächen und Objekten oder
Radiofrequenz-Geräten, wie beispielsweise Radios, schnurlosen Telefonen oder
anderen Wi-Fi®-Zugriffspunkten verwendet werden.
HINWEIS
• Die Qualität des Signals zwischen dem Transmitter und dem
Receiver kann durch dazwischen liegende Gegenstände und
Strukturen (z.B. mehrere Wände) beeinträchtigt werden.
Experimentieren Sie wenn nötig mit verschiedenen Positionen.
• Nachdem die Batterie aufgeladen ist, können die Geräte
transportiert werden, ohne eine Steckdose zu benötigen. Dies ist der
Fall, wenn tragbare Geräte wie Kopfhörer oder Notebooks
angeschlossen sind. Die Beweglichkeit ist jedoch eingeschränkt,
wenn die angeschlossenen Geräte (z. B. ein Verstärker) einen
Netzanschluss benötigen.
Page 61
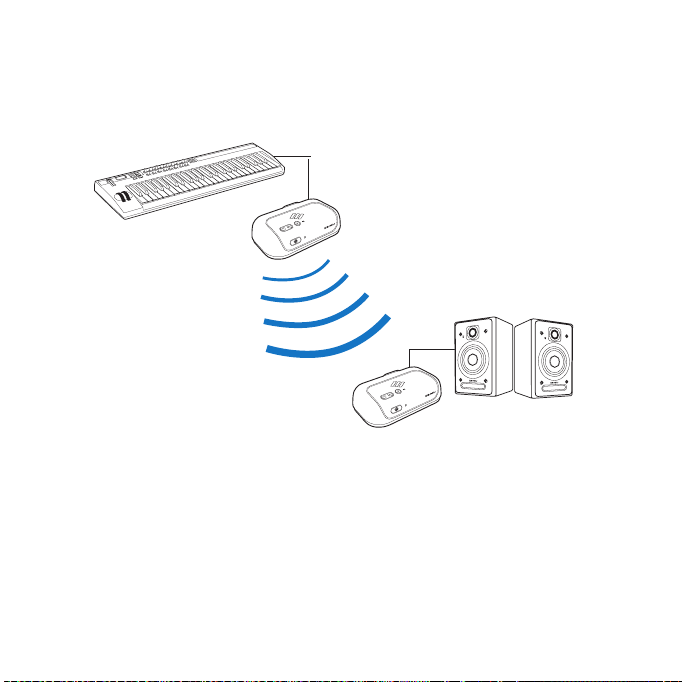
58 Wiedergabe und Streaming von Musik über den Transmitter
Schritt 6: Wiedergabe und Streaming von Musik über den
Transmitter
Spielen Sie Musik auf Ihrem Transmitter ab und übertragen Sie Musik auf Ihren
Receiver.
M
T
e
n
i
l
E
P
I
P
M
T
e
n
i
l
E
P
I
P
Page 62

Verwenden des E-MU PIPEline™ 59
Verwenden des E-MU PIPEline™
Lautstärke regeln
Wenn E-MU PIPEline™ als Transmitter konfiguriert ist, funktionieren die
Lautstärketasten des Transmitters als Abschwächer. Drücken Sie die Taste „+“,
um die Abschwächung zu erhöhen bzw. die Lautstärke des übertragenen
Audiosignals zu verringern.
Für E-MU PIPEline™-Receiver haben die Lautstärketasten Ihre gewohnte
Funktion.
Aufladen des E-MU PIPEline™
Der E-MU PIPEline™ verwendet einen wiederaufladbaren Lithium-Ionen-Akku
mit 1200 mAh. Wenn die Akkuleistung niedrig ist, blinkt die Netzanzeige-LED
abwechselnd rot und weiß. Beim Aufladen des Akkus und ausgeschaltetem
Gerät leuchtet die Power-LED rot. Sobald der Akku vollständig geladen ist,
leuchtet die Netzanzeige-LED nicht.
Die Anzeige des niedrigen Ladezustands entfällt bei Benutzung des externen
Netzteils. Im entladenen Zustand benötigt der Akku zur vollständigen Ladung bis
zu drei Stunden. Bei vollständiger Ladung reicht der Akku für etwa fünf bis acht
Stunden Betriebszeit ohne Netzanschluss.
Zurücksetzen auf die Werkeinstellungen
Um den E-MU PIPEline™ auf die Werkeinstellungen zurückzusetzen, halten
Sie die Connect-Taste an der Geräterückseite fünf Sekunden lang gedrückt.
Die E-MU-LED blinkt zwei Sekunden lang, bevor Sie wieder aufleuchtet.
Das Zurücksetzen auf die Werkeinstellungen bewirkt Folgendes:
• Die Originallautstärke wird wiederhergestellt.
• Die Abstimmung des Receivers wird aufgehoben.
Page 63

60 Verwenden des E-MU PIPEline™
Zustände der Netzanzeige-LED und ihre Bedeutung
LED Zustand Bedeutung
Weiß Dauerlicht Abgestimmt und betriebsbereit
Fortlaufendes langsames
Blinken
Rot Dauerlicht Wird aufgeladen
Fortlaufendes langsames
Blinken
Rot-Weiß Abwechselndes Blinken Niedriger Ladezustand
Leuchtet
nicht
- Vollständig geladen
Es wird kein Signal erkannt oder
Signal ist schwach
Stummgeschaltet
Zustände der E-MU LED und ihre Bedeutung
LED Zustand Bedeutung
Blau Zwei Sekunden lang schnelles
Blinken
Zurücksetzen von Wireless
Zustände der Anschluss-LED und ihre Bedeutung
LED Zustand Bedeutung
Grün Dauerlicht Abgestimmt und betriebsbereit
Blinklicht* Abstimmung wird vorgenommen
Schnelles Blinken Ein oder mehrere Mode-DIP-
Leuchtet
nicht
* Nur im abgestimmten Modus verfügbar. Beim Broadcasting blinkt die LED nicht.
– Verbindung verloren
Schalter sind nicht eindeutig
eingestellt
Page 64

Problembehebung: Wireless-Funktionen 61
Problembehebung: Wireless-Funktionen
Es erfolgt keine Audioausgabe auf dem Receiver.
Folgendes prüfen:
• Die Signalquelle arbeitet einwandfrei. Falls sich Ihr Transmitter im digitalen
Modus befindet, darauf achten, dass das Quellsignal auf 48 kHz S/PDIF
eingestellt ist.
• Der Transmitter ist an einen Netzanschluss angeschlossen und
eingeschaltet, oder der Ladezustand ist ausreichend (falls Sie nicht das
externe Netzteil verwenden).
• Die Modus-DIP-Schalter des Transmitters und des Receivers sind richtig
konfiguriert:
• Beide sind auf denselben RF-Kanal eingestellt.
• Beide sind auf denselben Modus eingestellt, entweder „Broadcast“ oder „Abgestimmt“.
• Der Transmitter ist auf „Senden“ eingestellt und der Receiver auf „Empfangen“.
• Siehe „Konfigurieren der E-MU PIPEline™-Einheiten“ auf Seite 53.
• Der Transmitter ist an einen Netzanschluss angeschlossen und
eingeschaltet, oder der Ladezustand ist ausreichend (falls Sie keinen
Netzanschluss verwenden).
• Die Verbindungs-LEDs sind grün und Ihre Einheiten sind abgestimmt. Siehe
„Die Verbindungs-LEDs leuchten nicht auf.” nachstehend.
• Der Receiver ist nicht stummgeschaltet. Drücken Sie die Taste „Ein/Aus/
Stumm“.
• Die Lautstärke des Receivers ist nicht auf Null. Drücken Sie die Taste
„Lautstärke plus“.
• Das Ausgabesystem ist eingeschaltet und arbeitet einwandfrei.
Die Verbindungs-LEDs leuchten nicht auf.
Dies bedeutet, dass das Signal vom Transmitter schwach ist oder dass der
Receiver die Verbindung zum Transmitter verloren hat.
Page 65

62 Problembehebung: Wireless-Funktionen
Versuchen Sie Folgendes:
• Verringern Sie die Distanz zwischen Ihrem Transmitter und Receiver.
• Platzieren Sie Ihren Transmitter oder Receiver so, dass sich zwischen beiden
Geräten weniger Gegenstände (beispielweise Wände oder große
Metallstrukturen) befinden.
• Stellen Sie Ihren Transmitter und Receiver nicht auf Metalloberflächen.
• Setzen Sie die Funkverbindung zurück Halten Sie Connect-Taste am Receiver
für fünf Sekunden gedrückt.
• Trennen Sie den Transmitter und Receiver vom Stromnetz. Schließen Sie sie
anschließend wieder an und setzen Sie die Funkverbindung zurück.
• Prüfen Sie, ob die Modus-DIP-Schalter für Ihre Transceiver richtig eingestellt
sind. Siehe „Konfigurieren der E-MU PIPEline™-Einheiten“ auf Seite 53.
Ich benötige von meinem E-MU Pipeline™-Transmitter mehr
Batteriebetriebszeit.
Wenn der Ladezustand Ihres batteriebetriebenen E-MU PIPEline™-Transmitters
abnimmt, kann das Gerät einfach mit dem Empfänger (falls Netzbetrieb)
getauscht werden, wobei die R/T-DIP-Schalter der beiden Geräte umgekehrt
werden müssen. Die Abstimmung sollte dabei intakt bleiben.
Ich habe zwei Transceiver, die als Transmitter konfiguriert sind. Mein
Receiver empfängt die falschen Signale.
Prüfen Sie, ob Sie für beide Geräte eines Transmitter-Receiver-Paares dieselben
RF-Einstellungen gewählt haben. Siehe „Konfigurieren der E-MU PIPEline™Einheiten“ auf Seite 53.
Page 66

Problembehebung: Wireless-Funktionen 63
Mein Receiver scheint Störungen aufzufangen oder es treten
vorübergehende Pausen auf.
Der Aufstellort Ihres Receiver und auch Signale anderer Wireless-Geräte wie
Router oder Bluetooth-Geräte können die Übertragungsqualität beeinflussen.
Versuchen Sie Folgendes:
• Verringern Sie die Distanz zwischen Ihrem Transmitter und Receiver. Für
beste Leistungen sollten sich Transmitter und Receiver auf der gleichen
Etage befinden.
• Stellen Sie Ihren Transmitter oder Receiver in größerer Distanz zu Ihren
anderen Funkgeräten auf. Der Receiver kann auch Signalrauschen in der
Nähe befindlicher Stromversorgungen auffangen.
• Platzieren Sie Ihren Transmitter oder Receiver so, dass sich zwischen beiden
Geräten weniger Gegenstände (beispielweise Wände oder große
Metallstrukturen) befinden.
Page 67

64 Allgemeine technische Daten
Allgemeine technische Daten
Audioleistung
• Rauschabstand (SNR): 96 dB (typisch)
• Latenz: 5.5 ms (abgestimmt) / 10 ms (Broadcast)
Anschlüsse
• 3,5 mm-Stereobuchse - analoger Audio-Ein/Ausgang je nach Modus
• Cinch-Buchsen - analoger oder S/PDIF-48 kHz-Ein/Ausgang je nach
Modus
Aufladbarer Akku
• Batteriebetriebsdauer: 5 bis 8 Stunden (typisch)
• Ladezeit: 3 Stunden (typisch)
Netzteil
• Versorgungsspannung: 5 V +/- 5%
• Strom: 1 A (1000 mA)
• Leistung: 5 W (Spitze positiv)
Hochfrequenzdaten (HF)
• Hochfrequenz-Betriebsbereich: 2400 - 2483,5 MHz
• Anzahl HF-Kanäle: 3
• Anzahl gleichzeitig betriebener Transmitter: 3
• Ausgangsleistung des HF-Senders: 16 dBm (typisch)
Page 68

Sicherheitshinweise 65
Sicherheitshinweise
Lesen Sie die folgenden Hinweise, um Ihr Produkt sicher anzuwenden und die Risiken von
elektrischen Schlägen, Kurzschlüssen, Beschädigungen, Bränden, Gehörschäden oder
anderen Gefahren zu reduzieren. Unsachgemäße Handhabung kann zum Erlöschen der
Gewährleistung Ihres Produktes führen. Weitere Informationen sind in der Ihrem Produkt
beigefügten Garantieerklärung enthalten.
• Diese Anleitungs lesen.
• Anleitung aufbewahren.
• Warnhinweise berücksichtigen.
• Alle Anleitungen befolgen.
• Das Gerät nicht in nasser Umgebung benutzen.
• Nur mit einem trockenen Tuch reinigen.
• Lüftungsöffnungen nicht blockieren. Das Produkt gemäß Anleitung installieren.
• Nicht in der Nähe starker Wärmequellen wie Heizkörpern, Heizplatten, Öfen oder
anderen wärmeerzeugenden Geräten (einschließlich Verstärker) installieren.
• Setzen Sie das Produkt nicht Temperaturen unter 0°C oder über 40°C aus.
• Das Produkt darf nicht durchbohrt, zerdrückt oder in Brand gesteckt werden.
• Bewahren Sie das Produkt oder die Batterie nicht in der Nähe stark magnetischer
Gegenstände auf.
• Setzen Sie das Produkt keiner übermäßigen Kraft- oder Aufpralleinwirkung aus.
• Den Erdschutzleiter nutzen. Ein gepolter Stecker hat zwei Kontakte, von denen einer
verbreitert ist. Ein geerdeter Stecker hat zwei Kontakte und einen Erdleiter. Der
verbreiterte Kontakt bzw. der Erdleiter dienen zu Ihrer Sicherheit. Falls der
mitgelieferte Stecker nicht in Ihre Netzsteckdose passt, lassen Sie die veraltete
Netzsteckdose von einem Elektriker ersetzen.
• Laufen Sie nicht über das Netzkabel und achten Sie darauf, dass es nicht verknickt,
besonders im Bereich des Steckers, der Steckdosen und am Auslasspunkt aus dem
Gerät.
• Verwenden Sie nur die vom Hersteller empfohlenen Zubehörteile.
• Verwenden Sie das Gerät nur mit vom Hersteller empfohlenen oder mit dem Gerät
verkauften Rollschränken, Ständern, Befestigungsklammern oder Tischen. Bei der
Verwendung eines Rollschranks ist beim Schieben der Einheit Rollschrank/Gerät
darauf zu achten, dass diese nicht kippt und dadurch Verletzungen verursacht.
• Trennen Sie das Gerät während eines Gewitters oder bei längerer Nichtbenutzung
vom Netz.
• Nehmen Sie das Produkt nicht auseinander, und versuchen Sie nicht, es zu reparieren.
Lassen Sie alle Reparatur- und Kundendienstarbeiten von autorisierten Händlern
durchführen. Das Gerät muss zur Reparatur, sobald es in irgendeiner Weise
beschädigt ist, das Netzkabel oder der Stecker beschädigt sind, Flüssigkeiten oder
Gegenstände in das Gerät gefallen sind, das Gerät Regen oder Feuchtigkeit
ausgesetzt wurde, es nicht ordnungsgemäß funktioniert oder gestürzt ist.
Page 69

66 Sicherheitshinweise
• WARNUNG: Um einen Elektroschock zu vermeiden, das Produkt nicht Wasser oder
Feuchtigkeit aussetzen. Auch wenn Ihr Produkt feuchtigkeitsbeständig ist, darf es
nicht in Wasser getaucht oder Regen ausgesetzt werden.
Kopfhörer
Ein in der Nähe von Röhrenbildschirmen befindliches leitendes Gerät (z. B. Ohrhörer)
•
kann elektrostatische Ladung aussenden. Diese Entladung kann wie ein
elektrostatischer Schlag empfunden werden. Obgleich dieser elektrostatische Schlag
normalerweise harmlos ist, sollten Sie nicht in die Nähe von Kathodenstrahlgeräten
gehen, wenn Sie Ohrhörer verwenden.
• Hören Sie auf Ihren Kopfhörern nicht für längere Zeit laute Musik, da dies zu
Hörschäden führen kann. Englischsprachige Benutzer finden weitere Informationen
unter www.hei.org.
• Verwenden Sie Ihr Audiogerät nicht mit hoher Lautstärke, wenn Sie Auto fahren,
Radfahren oder die Straße überqueren, besonders bei hohem Verkehrsaufkommen oder
in Situationen, wo durch dessen Verwendung die Sicherheit auf der Straße nicht mehr
gewährleistet ist. Es wird empfohlen, dieses Gerät unterwegs vorsichtig zu benutzen.
Eingebettete Batterie
• Versuchen Sie nicht, die eingebettete Batterie zu entfernen.
Das Produkt muss entsprechend den geltenden Umweltgesetzen des jeweiligen
Landes entsorgt werden. Wenn Sie die Batterie ersetzen möchten, wenden Sie sich mit
dem Produkt an Ihre regionale Support-Niederlassung. Service-Informationen zum
Produkt finden Sie unter www.emu.com.
Aktuelle Hinweise zum Batterie-Service finden Sie unter www.emu.com.
ACHTUNG: Explosionsgefahr beim Ersetzen des Akkus durch falschen Ersatztyp.
Austauschbare Batterie
• Die Batterien müssen recycelt oder ordnungsgemäß entsorgt werden. Informationen
zum Recycling sowie zur Entsorgung erhalten Sie von den zuständigen Behörden vor Ort.
• Die Kontakte von Batterien/Akkus dürfen nicht mit metallischen Gegenständen in
Berührung kommen.
• Wenn die Batterie ausläuft, einen unangenehmen Geruch verbreitet oder während des
Ladevorgangs oder Gebrauchs ihre Farbe oder Form verändert hat, entfernen und
entsorgen Sie sie umgehend. Waschen Sie danach gründlich Ihre Hände, bevor Sie
Lebensmittel oder empfindliche Körperstellen wie beispielsweise Ihre Augen berühren.
ACHTUNG: Explosionsgefahr beim Ersetzen des Akkus durch falschen Ersatztyp.
Wireless-Gerät
• Schalten Sie das Gerät an Orten aus, an denen die Benutzung zu Gefahren oder
Störungen führen kann, beispielsweise in Flugzeugen, Krankenhäusern oder in der
Nähe von Tankstellen.
Page 70

WEEE-DIREKTIVE 2002/96/EQ
Die Verwendung des WEEE-Symbols gibt an, dass dieses Produkt nicht als
Haushaltsmüll betrachtet werden kann. Durch die korrekte Entsorgung
dieses Produktes tragen Sie zum Schutz der Umwelt bei. Weitere
Informationen zum Recycling dieses Produktes erhalten Sie bei den
zuständigen lokalen Stellen, bei den Abfallwirtschaftsbetrieben oder dort, wo
Sie Ihr Produkt erworben haben.
BATTERIE-DIREKTIVE 2002/66/EQ
Austauschbare Batterie
Dieses Produkt enthält möglicherweise eine oder mehrere der folgenden
austauschbaren Batterien:
Lithium-Ionen/Polymer/Knopfzellen/Zylinderzellen. In diesem Fall gilt
folgende Regelung:
Das durchgestrichene Symbol eines Abfallbehälters bedeutet, dass die
Batterie in diesem Produkt nach Überschreiten der Lebensdauer nicht im
Hausmüll entsorgt werden darf. Statt dessen sollte die Batterie separat
gemäß den Recycling-Regeln entsorgt werden. Batterien, die Schwermetalle
enthalten, sind unterhalb des durchgestrichenen Symbols eines
Abfallbehälters mit zwei Kennbuchstaben für die Chemikalie
gekennzeichnet. „Cd“ steht für Cadmium, „Pb“ für Blei und „Hg“ für
Quecksilber. Sie können die Umwelt unterstützen und öffentliche
Gesundheitsrisiken vermeiden, indem Sie die Batterie an einer dafür
vorgesehenen Einrichtung oder am Ort des Einkaufs dem Recycling
zuführen. Bei Ihrer lokalen Abfallentsorgungsstelle erfahren Sie den Ort des
Ihnen am nächsten gelegenen Recyclinghofs. Eine Anleitung zum Entfernen
der Batterie finden Sie im Benutzerhandbuch des Produkts. Befolgen Sie
diese Anleitung beim Entfernen der Batterie sorgfältig.
Eingebaute Batterie
Dieses Produkt enthält möglicherweise eine Lithium-Ionen/PolymerBatterie, die nur von autorisierten Recycling-Stellen entfernt werden darf.
Durch das Recycling des Produkts durch eine lokale Recyclingstelle oder am
Ort des Einkaufs wird die Batterie entfernt und separat entsorgt.
Sicherheitshinweise 67
Page 71

68 Ordnungsbestimmungen
Ordnungsbestimmungen
Europäische Richtlinien
Dieses Produkt entspricht Folgendem:
EMV-Richtlinie 2004/108/EQ.
Netzbetriebene Produkte für den europäischen Markt entsprechen der
Niederspannungsrichtlinie 2006/95/EC.
Kommunikationsprodukte bzw. RF Wireless-Produkte für den europäischen Markt
entsprechen der R&TTE-Direktive 1999/5/EC.
ACHTUNG: Um der europäischen CE-Spezifikation zu entsprechen, muss dieses Gerät mit CE-
zertifizierter Computerausstattung installiert werden, die die Anforderungen der Klasse B erfüllt.
Alle Kabel für den Anschluss dieses Geräts müssen abgeschirmt, geerdet und dürfen nicht
länger als 3 m sein. Der Betrieb mit nicht zugelassenen Computern oder fehlerhaften Kabeln
kann zu Störungen bei anderen Geräten oder unerwünschten Effekten beim Produkt führen.
MODIFIKATION: Jegliche Änderung, die nicht ausdrücklich von Creative Technology Limited
oder eine der Tochtergesellschaften von Creative genehmigt wurde, kann dazu führen, dass
die Garantierechte des Benutzers keine Geltung mehr haben.
Die in diesem Dokument enthaltenen Informationen können ohne vorherige Ankündigung geändert
werden und stellen keine Verpflichtung seitens E-MU Systems, Inc. dar. Kein Teil dieses Handbuchs darf
ohne schriftliche Genehmigung von E-MU Systems, Inc. in jeglicher Form oder auf jegliche Art und Weise
und zu jeglichem Zweck vervielfältigt oder übertragen werden, weder elektronisch, noch mechanisch
(einschließlich durch Fotokopie oder Aufzeichnung).
Copyright © 2009, E-MU Systems, Inc. Alle Rechte vorbehalten. E-MU und das E-MU-Logo sind
Trademarks oder eingetragene Marken von E-MU Systems, Inc. in den USA und/oder anderen Ländern.
Creative ist ein Trademark von Creative Technology Ltd. All anderen Marken sind Trademarks der
jeweiligen Eigner.
Version 1.0
März 2009
Page 72

NOTES
69
Page 73

70
NOTES
 Loading...