

Page 1

XL-7 / MP-7
Operation Manual
Addendum
Software Version 1.17
Many cool and useful features have been added since the initial software
release. This addendum describes these features.
New Features & Changes
•
Page 3 - New Song/Pattern Display
currently playing pattern as well as the next one in the queue.
•
Page 4 - Note Range Option
now specify a note range when performing Song or Pattern
editing functions.
•
Page 4 - Scale/Shift Note Duration
lets you scale (multiply by a value) or shift (add a value to) the
note durations in any selected tracks.
•
Page 5 - Scale/Shift Note Velocity
lets you scale (multiply by a value) or shift (add a value to) the
note velocities in any selected tracks.
•
Page 6 - Extend Sequence Data To
this new feature allows you to extend an existing pattern by
looping the existing data.
•
Page 7 - The Asterisk *
or song name whenever you have made a change to the item.
•
Page 8 - Cut/Copy Track Section
be cut or copied to the clipboard when editing a track.
•
Page 9 - Song Channel Assign
feature lets you assign the realtime song data to the internal
“B” channels or the MIDI Out port A or B. MIDI data can be
routed to the internal MIDI channels, external MIDI ports, or
both.
•
Page 10 - Paste Track Section
clipboard will be pasted when editing a track
•
Page 11 - Note & Event List Editor
pitch wheel. mono pressure, poly pressure and program
change MIDI messages in the pattern or song can now be
visually edited, inserted or deleted.
•
Page 15 - Revert to Saved
- An asterisk now appears in the preset, pattern,
for Sequence Editing functions - You can
- You can now specify at which bar the
- An revert function for pattern & song edits.
- The display now shows you the
- This filter for songs and patterns
- This filter for songs and patterns
- Located in the Pattern Edit menu,
- You can now specify a bar range to
- Located in the Song Edit menu, this
- Notes, continuous controller,
E-MU PN FI11886 Rev. C
MP-7 / XL-7 Manual Addendum
1
Page 2

2
•
•
•
•
•
•
•
•
•
•
•
•
•
•
•
XL-7 / MP-7 Operation Manual Addendum
Page 16 - New Song Event Source Option - There is now a “song & pat-
terns” option in the song edit menu, “Event Source” screen.
When selected, the selected events from the song as well as
the patterns will be used.
Page 16 - Song/Pattern Edit Lockout - You now must be in the proper
mode to enter the Song or Pattern Edit menus.
Page 16 - MIDI Song Position Pointer, Start, Continue, Stop com-
mands are now received.
Page 16 - MIDI Panic Button - Kills all sounding notes internally and
over MIDI.
Page 16 - New Song Mode Realtime Record screen - The new screen
adds Quantize, Metronome and Count-In fields to Song mode
realtime record.
Page 17 - Aftertouch Curves - Located in the Controllers menu, this
feature allows you select one of four different response curves
to tailor the aftertouch response to your playing style.
Page 18 - Local Control On/Off - This Controllers menu function facil-
itates use of the keypads with an external sequencer.
Page 18 - Footswitch Enhancement - The two footswitch jacks can
now perform many new functions such as: punching in and
out, start/stop sequencer. tap tempo, inc/dec channel, inc/dec
sequence.
Page 19 - MIDI In Channels - This is a data switch which allows incom-
ing MIDI data to control either the A or B MIDI channels.
Page 20 - Rechannelize MIDI In - This new feature will automatically
rechannelize MIDI data when recording in order to simplify
the recording process.
Page 20 - Keyboard Transpose - This Controllers menu feature allows
you to transpose the keyboard in semitone increments.
Manual Corrections
Page 20 - Corrected instructions for: Recording Realtime Controller
Notes & Tips
Page 21 - Tips
Page 22 - Event Timing Explanation
Other Changes
Song Length - Songs can now contain up to 999 bars.
E-MU Systems
Data into a Pattern
Page 3

XL-7 / MP-7 Operation Manual Addendum
New Pattern Play
Pressing Play in Pattern mode causes the selected pattern to
continuously play and loop. The display changes as shown.
T
01 STOP Ln:08 Bar:01 .1
0
CurPat: 002
The Track Mute buttons can be used to select specific tracks for playback.
The track mute settings are saved when the pattern is saved and restored
when the pattern is run.
Pressing the Stop button stops the pattern immediately. Pressing
Stop again rewinds the pattern to the beginning (RTZ).
Pressing the Stop button a third time reloads the initial setup
information for the Pattern (or Song).
NextPat: 0020
To select another pattern while one is already playing : Turn the data
entry control in Pattern Mode/View. The lower line of the display changes
to show the name and number of the pattern you have selected. The
Home/Enter LED will be flashing.
T
01 STOP Ln:08 Bar:01 .1
0
015
Press Enter to jump to the new pattern when the current pattern ends. The
lower line of the display now shows the current and next pattern numbers.
T
CurPat: 002
To start a new pattern immediately, press Stop , select the new pattern
and press Play . To select a pattern while playing, press Enter , press Stop ,
then Play .
Club Luv
01 STOP Ln:08 Bar:01 .1
0
NextPat: 0220
XL-7 / MP-7 Manual Addendum 3
Page 4

4
XL-7 / MP-7 Operation Manual Addendum
Note Range Option
Scale/Shift
Duration
OO
Tip: To set all notes to a
OO
particular value, set Scale to 0%,
(this zeros the value) then set
Shift to the desired duration.
You can now specify a note range when performing the following Song or
Pattern editing functions: Scale/Shift Duration, Thin Events, Transpose and
Scale/Shift Velocity. This gives you much more control over which notes
are edited. See the “Set/Shift Duration” function below for a detailed
description.
This filter allows you to either scale (multiply by a value) or shift (add a
value to) the note durations in the selected tracks. The Scale function is
performed before the Shift value is added.
Scale - Multiplies all note durations by a percentage from 0% to 125%.
Scaling by 100% would leave all note durations untouched.
Scaling by 50% would cut all note durations in half.
Shift - Adds or subtracts a specific note duration in quarter notes and
ticks to note-on events in the selected tracks.
To Scale or Shift Note Duration:
1.
Select the pattern you wish to edit.
2.
Select the Track(s) you wish to Scale or Shift using the Track Enable/
Mute buttons.
3.
Press the Pattern Edit button.
4.
Scroll to the Scale/Shift Note Duration screen shown below using the
data entry control.
SCALE/SHIFT NOTE DURATION
Scale: 87% Shift: +00.000
E-MU Systems
Quarter Notes Ticks
5.
Select the amount of note duration scaling or shift (offset) . The
Home/Enter LED will be flashing once the cursor is moved to the lower
line of the display.
6.
Press Enter. The screen shown below appears to remind you to select
the tracks you want to filter. Select a key range for filtering. The default
setting is all keys.
SELECT TRACKS
Key Range: C-2 to:G8
Low Key High Key
7.
Press Enter to scale/shift the note durations. Press any other menu
button to Cancel the operation.
Page 5

XL-7 / MP-7 Operation Manual Addendum
Scale/Shift Velocity
OO
Tip: To set all notes to a
OO
particular velocity value, set
Scale to 0%, then set Shift to the
desired velocity.
This filter allows you to either scale (multiply by a value) or shift (add a
value to) the velocity values of notes in a pattern. The Scale function is
performed before the Shift value is added.
Scale - Multiplies all note-on velocities by a percentage from 0% to
125%. Scaling by 100% would leave all velocity values
untouched. Scaling by 50% would cut all velocity values in half.
Shift - Adds or subtracts a specific velocity value (-127 to +127) to
every note-on event in the pattern.
To Scale or Shift Velocity:
1.
Select the pattern you wish to edit.
2.
Select the Track(s) you wish to Scale or Shift using the Track Enable/
Mute buttons.
3.
Press the Pattern Edit button.
4.
Scroll to the Scale/Shift Velocity screen shown below using the data
entry control.
SCALE/SHIFT VELOCITY
Scale: 87% Shift: +0
5.
Select the a mount of velocity scaling or shift . The Home/Enter LED
will be flashing once the cursor is moved to the lower line of the
display.
6.
Press Enter. The screen shown below appears to remind you to select
the tracks you want to velocity scale or shift. Select a key range. The
default setting is all keys.
SELECT TRACKS
Key Range: C-2 to:G8
7.
Press
Enter
to change velocity in the selected tracks. Press any other
button to
Cancel
the operation.
XL-7 / MP-7 Manual Addendum 5
Page 6

XL-7 / MP-7 Operation Manual Addendum
Extend Sequence
Data To
This feature lets you change the length of any selected tracks after
recording a pattern. If you are lengthening a pattern, the pattern is looped
to fill in the empty space. If you set the length shorter than the existing
pattern, the pattern will be truncated.
You can set the pattern length before you extend so that only those
bars will be copied. The copied data will be merged with the data in the
subsequent bars of the pattern.
To Extend the 1st Bar over 4 Bars
1. Set Pattern
Length to 1-bar
Bar 1 Bar 2 Bar 3 Bar 4
2. Extend Sequence
Data to 4-bars
Bar 1 Bar 2 Bar 3 Bar 4
To Extend the Length of Selected Tracks:
1.
Select the pattern
2.
Press the
3.
Scroll to the
Pattern Edit
you wish to extend.
button from pattern mode.
Pattern Length
screen and set the length to the measures
you wish to extend. For example, if you want to copy the first measure,
set the length to 1.
4.
Scroll to
Extend Sequence Data using the Data Entry Control.
6
E-MU Systems
EXTEND SEQUENCE DATA TO
bar: 8
5. Move the cursor to the lower line of the display and select the new
pattern length.
6. Select the Track(s) that you want to extend using the Track Enable/
Mute buttons.
7. Press Enter. The following screen appears.
--- PERFORM OPERATION? ---
Enter = Yes Other = Cancel
8. Press Enter again to extend the pattern or any other key to cancel the
operation.
Page 7

The Asterisk The Asterisk
These parameters are
stored for each track
used in a pattern or
each channel used in
a song.
When a pattern (or song) has been edited and needs to be saved an asterisk
(*) appears in the display. The Save/Copy LED will also be flashing as a
reminder to save your work. The asterisk and your edits remain in the
single edit buffer even if you change patterns. Edits are only erased by
saving the pattern, editing another pattern, invoking the “Revert To Saved”
feature, or turning the unit off. Saving saves the current pattern and NOT
the edit buffer.
Asterisk
Appears
Pressing Rec
List Edit
(press enter)
Executing
an Edit
function
No
Asterisk
Changing:
tempo,
meter,
length,
name, chan.
asssign, etc.
The following information is stored in non-volatile Flash memory, which is
recalled just before the pattern is played.
XL-7 / MP-7 Operation Manual Addendum
T
01 STOP Ln: 08 Bar: 01 . 1
0
000
Start of IT
Indicates that the Pattern
needs to be saved.
*
OO
OO
Use the “Revert to
Saved Pattern” feature to
remove the asterisk and
discard your pattern edits.
Important: Pattern and Song Setup information is saved as it was set at the
moment you saved the pattern or song.
• Pattern (Song) Name & Number
• Track Events (patterns only)
• Initial Tempo & Meter
• Master FX setup
• Track (Chan) to MIDI Channel mapping....
• Track Mutes (patterns only) ..........................
• Bank/Program changes ................................
• Volume & Pan settings.................................
• Mix Output setup.........................................
• Arp Status (off, on, preset, master) ..............
XL-7 / MP-7 Manual Addendum 7
Page 8
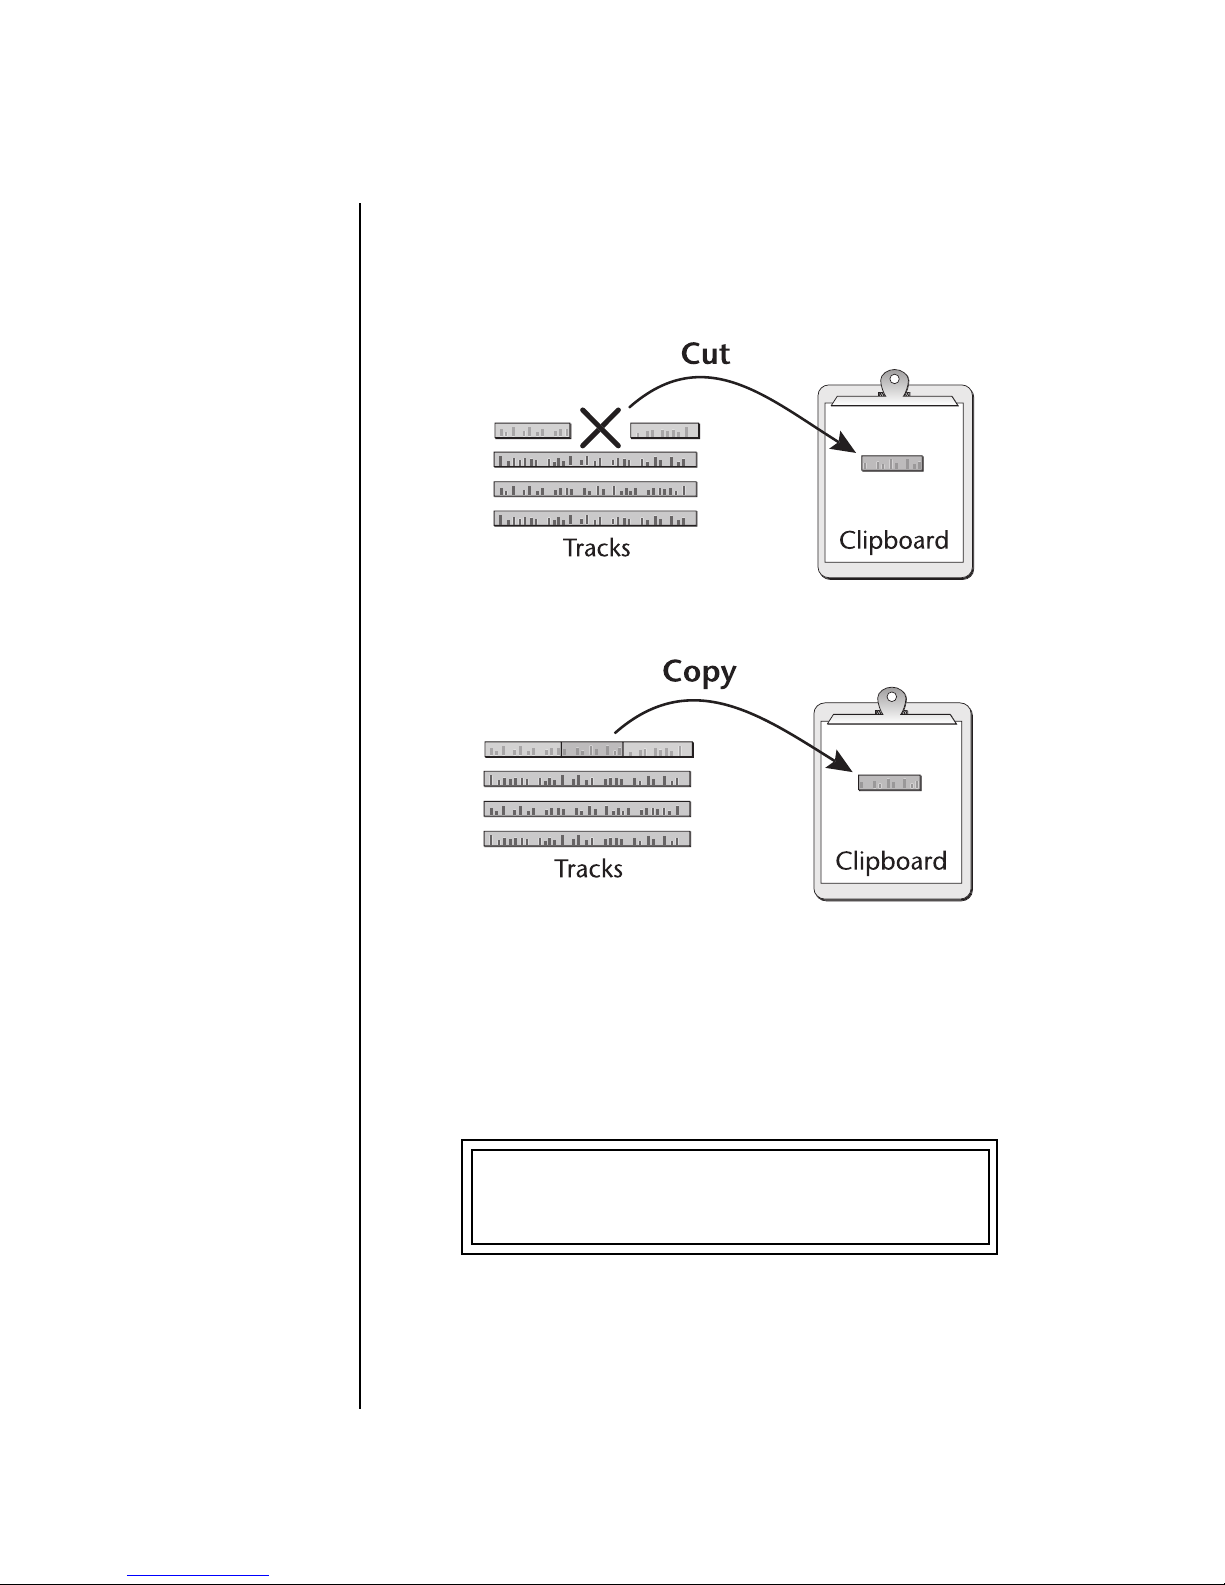
XL-7 / MP-7 Operation Manual Addendum
Cut/Copy Track
Section
You can now specify a bar range to be cut or copied to the clipboard when
editing a track. This function cuts or copies a section of a track from the
pattern or song and places it on the clipboard, where it will be held until it
is replaced with another cut or copy operation, or the power is turned off.
The cut section is placed on the clipboard leaving a blank
space in the track where the data was cut out.
OO
OO
Tracks can be freely cut,
copied or pasted between songs
and patterns.
8 E-MU Systems
The copied section is placed on the clipboard leaving
the track untouched.
To Cut or Copy a Section of a Track:
1. Select the pattern you wish to edit.
2. Press the Pattern Edit button.
3. Scroll to the Cut (Copy) Track to Clipboard screen using the data
entry control.
CUT TRACK TO CLIPBOARD
Track: 1 Bar:04 Len:07
4. Select the track to be cut or copied. The Home/Enter LED will be
flashing once the cursor is moved to the lower line of the display.
5. Select the Start Bar and the Length (in bars) to be cut or copied.
6. Press Enter to cut (copy) the track. Press any other menu button to
Cancel the operation.
Page 9

XL-7 / MP-7 Operation Manual Addendum
Song Channel
Assign
You can now assign your realtime song data to channels 1B-16B or to MIDI
Out port A or B. The song track can be routed to: internal MIDI channels
(either A or B), the external MIDI ports, both, or none. Multi A is routed to
MIDI port A and Multi B is routed to MIDI port B, if “ext” or “both” is
selected as a destination. Selecting “None” disables playback.
SONG CHANNEL ASSIGN
Channel: MultiA Dest:both
To Assign the Song Track to the A or B channels:
1. Press the Song Edit button.
2. Scroll to the Song Channel Assign screen shown above using the Data
Entry control.
3. Select MultiA if you want the song track to go to channels 1A-16A or
MIDI port A. Select MultiB if you want the song track to go to channels
1B-16B or MIDI port B.
4. Select the desired destination for the track (internal channels, external
MIDI channels, both, or none).
5. Press the Song Edit button again to exit the module.
Song
Tra ck
Song
Tra ck
Song
Tra ck
Song
Tra ck
A or B Destination
A
Channels
B
Channels
B
Channels
B
Channels
both
none
Internal
Internal
Internal
Internal
Channels 1A-16A
used internally
MIDI Port A used
Channels 1B-16B
used internally
MIDI Port B used
Song disabled
XL-7 / MP-7 Manual Addendum 9
Page 10

XL-7 / MP-7 Operation Manual Addendum
Paste Clipboard to
Track
OO
OO
Tracks can be freely cut,
copied or pasted between songs
and patterns.
Once a track (or a section of a track) has been cut or copied to the
“clipboard”, it can be pasted into another track or pattern. The Paste
operation Merges the clipboard data with the data on the destination track.
It adds the new information to the existing data with the start of the data
in the clipboard placed at the selected bar position.
Because of the data merging feature, the Paste operation can be used to
“bounce down” multiple tracks to a single multichannel track. See below.
Specified
Bar
Tracks
To Paste the Clipboard into a Track:
1. Press the Pattern Edit button.
2. Cut or Copy data to the clipboard.
3. Scroll to the Paste Clipboard to Track screen shown below using the
data entry control.
Paste
Clipboard
You will not hear the
results of the Paste operation
until the sequence cycles
around. (Hint: Press RTZ)
10 E-MU Systems
PASTE CLIPBOARD TO TRACK
Track: 1 At Bar:06
4. Select the track where you want the clipboard data to be pasted. The
Home/Enter LED will be flashing once the cursor is moved to the lower
line of the display.
5. Select the bar where the clipboard contents will be pasted.
6. Press Enter to paste the data. Press any other menu button to Cancel
the operation.
To Bounce Tracks:
1. Copy the first track you wish to bounce.
2. Paste the track to the desired destination track.
3. Repeat steps 1 & 2 for the other tracks you wish to bounce down.
4. Press the Pattern Edit button and scroll to the Channel Assign screen.
5. Set the Track containing all your bounced tracks to MultiA.
(or MultiB if the original tracks were recorded using the “B” channels.)
Page 11

XL-7 / MP-7 Operation Manual Addendum
Note List Editor Individual MIDI notes in the pattern can be edited, inserted or deleted from
this screen. Place the cursor underneath the “Event Scroll Field” shown
below and turn the data entry control to navigate through events.
• Hold the Enter button and turn the data entry control to scroll through
events when the cursor is on any other field
Event Scroll Field
Track Number
T
(scroll though events)
01 NOTE <-> 002.03.008
Time Location
C01 C#1 v:100 dur:00.083
MIDI
Channel
• Erase button - - - - - Erases the currently selected note.
• Repeat button - - - - Duplicates the currently selected note, allowing you
Note: You cannot have two events with the exact same time and data in
a pattern. Any duplicate events will be automatically deleted as soon as
you increment the event or exit the screen.
To Edit a MIDI Note:
1. Select the pattern you wish to edit.
2. Press the Pattern Edit button.
3. Scroll to the Note List Editor screen shown below using the data entry
control.
4. Press the Enter button as prompted by the display to begin editing.
5. Select the Track that you want to edit using the Track/Channel select
button near the LCD.
T
01 NOTE <-> 002.03.008
MIDI
Note
to edit and create a new note.
1) Press Repeat.
2) Change the time, channel, or MIDI note.
Note
Velocity
Note
Duration
OO
OO
You can edit notes and
note velocity by playing the
keyboard.
C01 C#1 v:100 dur:00.083
6. Press the right Cursor button to move the cursor underneath the Event
Scroll field (<->).
7. Turn the data entry control to scroll through the event list and locate
the event you want to edit.
8. Move the cursor to the data field you want to edit and make changes
using the data entry control.
9. Press the Pattern Edit button to exit the Pattern Edit module.
XL-7 / MP-7 Manual Addendum 11
Page 12

XL-7 / MP-7 Operation Manual Addendum
Event List Editor Continuous controller, pitch wheel. mono pressure, poly pressure and
program change MIDI messages can be edited, inserted or deleted using this
menu. Place the cursor underneath the “Event Scroll Field” shown
below and turn the data entry control to navigate through events.
The event list editor also allows you access to the Conductor Track which sets
the tempo and meter for the pattern.
Hold the Enter button and turn the data entry control to scroll through
events when the cursor is on any other field.
• Erase button - - - - - Erases the currently selected event.
• Repeat button - - - - Duplicates the currently selected event, allowing
you to edit and create a new event.
1) Press Repeat.
2) Change the time, channel, or MIDI event type.
• Note: You cannot have two events with the exact same time and data in
a pattern. Duplicate events will be deleted as soon as you increment the
event or exit the screen.
Continuous Controller Edit
Continuous controller numbers 1-95 can be edited. Continuous controllers
and Channel Pressure messages may range in value from 0-127.
Continuous Controller Screen
Event Scroll Field
Track Number
T
C01 controller #1
MIDI
Channel
(scroll though events)
01 EVENT <-> 002.03.008
v:52
Event
Type
Controller
No. Field
Time Location
Event
Value
Pitch Strip Edit
Touch Strip messages are bidirectional and may range in value from -8192
to +8191.
Pitch Strip Screen
T
01 EVENT <-> 002.03.004
12 E-MU Systems
C01 pitch strip: -49
Bidirectional Pitch Value
Page 13

XL-7 / MP-7 Operation Manual Addendum
Poly Pressure Edit
Polyphonic pressure messages are assigned on a per note basis and have
range of 0-127. XL-7 and MP-7 can generate polyphonic pressure messages,
but cannot receive them.
Poly Pressure Screen
T
01 EVENT <-> 002.03.004
__
__
In order to send program
changes to external devices, the
Track must be assigned to an
“external” channel.
C01 polypress:
C1 62
MIDI
Note
Poly Pressure
Value
Program Change Edit
Program change numbers from 0-127, and on any bank number, can be
inserted, deleted or edited in this screen. If you do not select bank numbers
(off), the program change will be sent to the currently selected bank.
Program Change Screen
T
01 EVENT <-> 003.02.026
C01 prog: 10
Program
Change
Number
To Edit a MIDI Event:
1. Select the pattern you wish to edit.
2. Press the Pattern Edit button.
3. Scroll to the Event List Editor screen shown below using the data entry
control.
4. Press the Enter button as prompted by the display to begin editing.
5. Select the Track that you want to edit using the Track/Channel select
button near the LCD.
m:off l:off
Bank
Number MSB
cc:0
Number LSB
cc:32
Bank
T
01 EVENT <-> 002.03.008
C01 controller #1
v:52
XL-7 / MP-7 Manual Addendum 13
Page 14

XL-7 / MP-7 Operation Manual Addendum
6. Press the right Cursor button to move the cursor underneath the Event
Scroll Field (<->).
7. Turn the data entry control to scroll through the event list and locate
the event you want to edit.
8. Move the cursor to the data field you want to edit and make changes
using the data entry control.
9. Press the Pattern Edit button to exit the Pattern Edit module.
The Conductor Track (track 0)
The conductor track allows you to insert tempo and meter changes
anywhere in the pattern. Select the track below track 1 and the first screen
shown below will appear.
Conductor Track Screen
T
CT EVENT <-> 003.01.000
C01 tempo: 138 bpm
T
CT EVENT <-> 003.01.000
C01 meter: 04/4
To Insert a Tempo Change into the Conductor Track:
1. Select the pattern you wish to edit.
2. Press the Pattern Edit button.
3. Press the (-) Track/Channel button until “CT” appears in the track
field.
4. Press the Enter button as prompted by the display to begin editing.
5. Move the cursor to the lower line of the display and select tempo.
T
CT EVENT <-> 002.03.008
Time LocationTrack field
tempo: 120 bpm
6. Move the cursor under the bpm field and set the tempo.
7. Set the Time Location where you want the tempo change to occur.
14 E-MU Systems
Tempo/Meter field
BPM field
Page 15

To Insert a new Event:
1) Press the Repeat button.
2) Modify the Time & Tempo.
XL-7 / MP-7 Operation Manual Addendum
8. If you want to add another tempo change, press the Repeat button on
the front panel.
9. Change the Time Location and Tempo.
10. Press the Pattern Edit button to exit the Pattern Edit module.
To Remove or edit a Tempo Change from the Conductor Track:
1. Select the pattern you wish to edit.
2. Press the Pattern Edit button.
3. Press the (-) Track/Channel button until “CT” appears in the track
field.
4. Press the Enter button as prompted by the display to begin editing.
5. Press the right Cursor button twice to move the cursor underneath the
Event Scroll field (<->).
6. Turn the data entry control to scroll through the event list and locate
the tempo change you want to edit.
Event Scroll Field
(scroll though events)
Revert to Saved
Pattern
__
__
Caution: Never “Revert
to Saved” while the sequencer is
in record mode or the computer
may crash.
T
CT EVENT <-> 002.03.008
tempo: 120 bpm
7. Press the front panel Erase button to erase the tempo event.
8. Simply change the Tempo or Location fields to modify the tempo or
time of the event.
9. Press the Pattern Edit button to exit the Pattern Edit module.
To Insert or Edit Meter Changes:
Meter changes are inserted and edited exactly like tempo changes.
This screen allows you to discard any edits made to the pattern and restore
the last saved version. This is not the same as an “Undo” function since
Revert permanently discards any edits you have made since saving. This
function removes the asterisk in the display that appears after you’ve edited
the pattern.
REVERT TO SAVED PATTERN
0000 A2DJ
XL-7 / MP-7 Manual Addendum 15
Page 16

XL-7 / MP-7 Operation Manual Addendum
Song & Pattern
Event Source
Song / Pattern Edit
Lockout
MIDI Control
Commands
A new “song & pattern” option has been added to the Song “Event Source”
screen. The song track is much more flexible because of this feature, since
both song and pattern events can be used on playback. (For example, you
might want to use the song track for volume mixing.) This option allows
presets to be correctly selected when using channels 1B-16B for song
events.
You must now be in the Song mode to enter the Song Edit menu. Likewise,
you must be in Pattern mode to enter the Pattern Edit menu. Formerly you
could edit songs while in pattern mode and vice-versa which could
sometimes be confusing.
• If the Song Edit or Pattern Edit buttons doesn’t work, change the Mode
using the buttons underneath the LCD.
MIDI Song Position Pointer, Start, Continue, Stop commands are now
received by XL-7 and MP-7.
• Start, Continue & Stop commands are always received.
• Song Position Pointer commands are received only when synced to
MIDI clock.
• Stop - Stops from any transport state.
• Start/Continue - Only starts from the “stopped” transport state, and not
from any “pause-record” modes.
MIDI Panic Button • Pressing the MIDI and Home/Enter buttons simultaneously sends a
MIDI “All Notes Off” and “All Sound Off” for all 32 MIDI channels. This
immediately kills all sounding notes internally and over MIDI.
New Song Mode
When you press Record once in Song mode, the following screen appears:
Realtime Record
Screen
:150 - - - REC - - - Bar: 001 . 1
Quan: off Met: off CntIn: 0
Auto-
Correct
This screen is very similar to the pattern mode realtime record screen. You
set the Quantization and Count-In for the Song Track just like for a Pattern
track. See page 57 in the operation manual. You can now also turn the
Metronome on or off in Song mode.
16 E-MU Systems
Metronome
on/off/rec
Count-in
Bars
Page 17

XL-7 / MP-7 Operation Manual Addendum
Aftertouch Curves You can now select one of four different response curves to tailor the after-
touch response to your playing style. You can also turn aftertouch off in
this menu.
Because poly aftertouch generates mountains of MIDI data, it defaults to
the off position. It’s probably best to leave poly aftertouch off unless you
are specifically using it, as it can clog the MIDI cable. XL-7 and MP-7 do not
use poly aftertouch, even though it can be transmitted out over MIDI.
Aftertouch is also called
“Pressure” in the Preset Edit,
Cords menu.
AFTERTOUCH CURVES
channel: 1 poly: off
To Change the Aftertouch Curve:
1. Press the Controllers button.
2. Scroll to the Aftertouch Curves screen using the Data Entry Control.
3. Move the cursor to the channel field and select curve 1-4 or off.
4. Press the Controllers button again to leave the menu.
Curve 1
Result Pressure
Played Pressure
Curve 3
Result Pressure
Played Pressure
Curve 2
Linear
Result Pressure
Played Pressure
Curve 4
Result Pressure
Played Pressure
XL-7 / MP-7 Manual Addendum 17
Page 18

XL-7 / MP-7 Operation Manual Addendum
Local Control On/Off Local Control is used to disconnect the keypad and controllers (knobs,
touchstrip, footswitches) from the sound generating section. Even though
disconnected from the internal synthesizer, the keypad and controllers are
still transmitted over MIDI. Local Control is normally turned Off when
recording into an external MIDI sequencer (set sequencer to Echo Thru).
Played data and recorded data are merged in the computer sequencer and
then sent back to the module. This feature can also be used if you want to
control another MIDI sound generator from the rubber keypads without
playing internal sounds.
LOCAL CONTROL ON/OFF
on
Footswitch Jack
Function
18 E-MU Systems
Turning Local Control Off allows you to use the Echo Thru feature on your sequencer
while sequencing. In conjunction with Echo Thru, Local Control Off allows you to record
into the external sequencer and hear the correct sounds whether you are recording or
playing back the sequence.
The two footswitch jacks on the rear panel can be programmed to perform
a variety of functions. The footswitch jacks are designed to accept
momentary footswitches which connect the tip and ring. The unit senses
either normally-on or normally-off switches on power-up.
Each footswitch can be independently programmed. The following
functions can be controlled via the footswitches.
FOOTSWITCH JACK FUNCTION
1: MIDI FtSw 2: Tap Tempo
Page 19

XL-7 / MP-7 Operation Manual Addendum
• MIDI Footswitch In this mode the footswitch is routed to the Patch-
Cord in the Preset Edit, Cords menu. It is also transmitted out on the Footswitch Controller number as
programmed in the Controllers menu.
• Play/Stop Pressing the footswitch once activates the Play
button on the front panel. Pressing the footswitch
again activates the front panel Stop button.
• Play Pressing the footswitch activates the Play button on
the front panel. This works well in combination
with the following function.
• Stop/RTZ Pressing the footswitch activates the front panel
Stop button. Pressing the footswitch again invokes
the Return-to-Zero function.
• Punch I/O When the sequencer is playing, the footswitch will
activate the Record button in order to punch-in to
record mode. Pressing the footswitch again will
punch-out of record.
When the sequencer is stopped, repeatedly pressing
the footswitch cycles through the three record
modes: realtime, grid & step record.
• Tap Tempo Pressing the footswitch activates the front panel Tap
button, allowing you to tap in the current tempo
with your foot.
• Channel + Pressing the footswitch increments the MIDI
channel number.
• Channel - Pressing the footswitch decrements the MIDI
channel number.
• Sequence + Pressing the footswitch increments the current
pattern or song number. The next pattern will begin
playing when the current pattern ends.
• Sequence - Pressing the footswitch decrements the current
pattern or song number. The next pattern will begin
playing when the current pattern ends.
MIDI In Channels This menu allows MIDI data received at the MIDI input port to control
either the internal “A” or “B” channels. With this switch set to “B”, you
could play an external MIDI keyboard on channels 1B-16B while channels
1A-16A remain dedicated to the internal sequencer.
MIDI IN CHANNELS
0 to 16: A
XL-7 / MP-7 Manual Addendum 19
Page 20

XL-7 / MP-7 Operation Manual Addendum
Rechannelize
MIDI In
__
__
Rechannelize MIDI In
must be turned OFF in order to
properly record multichannel
MIDI data from an external
source.
This menu allows data on incoming MIDI data channels to be converted to
the Basic channel. This allows an external MIDI keyboard to be used as an
input device for sequence recording and auditioning without having to
change the keyboard’s transmit channel. When on, you’re ready to begin
recording on another channel by simply changing tracks. Or, to record
another channel on a multitrack, just change the channel.
• Off . . . . . . . . . . Disables the feature.
• Always . . . . . . . MIDI data is always converted to the Basic Channel.
• On Record . . . .MIDI data is only converted to the Basic Channel when
the sequencer is in record mode.
Rechannelize MIDI IN
To Track Chan: on record
Keyboard Transpose This option allows you to offset the transposition of the rubber keypads in
semitone intervals. This is allows you to easily play in different keys with
the one octave keypad and lets you access different groups of instruments
in a drum map. The transpose range is ±36 semitones.
Recording Realtime
Controller Data into
a Pattern
__
__
Too much controller
information can clog the
sequencer causing sluggish
performance and sloppy timing.
Use the “Thin Events” function
to reduce the amount of
controller data in the pattern.
KEYBOARD TRANSPOSE
+00 semitones
The instructions in the Revision-A operation manual are incorrect because
they leave out the all important steps of setting the track to “Multichannel”
(steps 6-9 below). Follow these instructions instead.
To Record Realtime Controller Data
You can mix and embellish your patterns by recording continuous
controllers along with note data.
1. Start by recording and saving a pattern.
Recording Quick Edits
The Quick Edit knobs are only active on the Basic Channel (the channel
currently displayed in the Preset View screen).
2. Select Quick Edit mode by pressing the Controller Function Select
button.
3. Select the channel with the preset you wish to Quick Edit.
4. Practice your knob movements before recording by Playing the
pattern and twisting the knobs.
5. When you’re ready to record, press Records while the sequencer is
playing (to punch-in), then perform the knob movements.
20 E-MU Systems
Page 21

Use the “Erase cc#
Events” function to erase
controller data from the pattern.
XL-7 / MP-7 Operation Manual Addendum
Record Multitrack Volume and Pan Information
You can record Volume and Pan information for all 16 channels simultaneously by using Volume Knob mode. You’ll be recording multichannel
volume or pan data onto a track. The default channel assignment will
rechannelize this data to a single channel. You must change this.
6. Select a track for the Realtime Controller data.
7. Press the Pattern Edit button and scroll to the “Channel Assign” page.
8. Set the track to MultiA. Now the track will record multichannel data.
9. Press the Pattern Edit button to exit the menu.
Automating the Volume of each Channel
10. Select Volume knob mode by repeatedly pressing the Controller
Function Select button.
11. Select Mix View mode if you wish to view the volume settings.
12. Press the Stop button twice to make sure the pattern starts at the
beginning.
13. Press the Record button in Pattern mode to get ready to realtime
record. The Play button LED will be flashing.
14. Press the Play button to begin recording. The controller knobs now
adjust the volumes of all 16 channels.
15. Press Stop when you’re finished recording.
Real-time Panning
16. Select Pan Knob mode by pressing the Controller Function Select
button.
17. Select Mix View mode by pressing the Mix button (if it’s not already
selected).
18. Turn the data entry control clockwise to select Ch Pan view.
19. Press the Stop button twice to make sure the pattern starts at the
beginning.
20. Press the Record button in Pattern mode to get ready to record. The
Play button LED will be flashing.
21. Press the Play button to begin recording. The controller knobs now
adjust the pan positions of all 16 tracks.
22. Press Stop when you’re finished recording.
Notes & Tips The following are a couple of hidden tricks you might find useful.
• Press and hold Play, then press Record while a pattern is playing to
jump right into Grid Record mode.
• Selecting the next pattern while playing does NOT change the tempo.
This allows you to perform live pattern changes in one tempo. For a pattern to play its own tempo, either press stop 3 times (loading the initial
setup data), or select the pattern while stopped.
XL-7 / MP-7 Manual Addendum 21
Page 22

XL-7 / MP-7 Operation Manual Addendum
Event Timing The following information is intended for advanced users. If you are just
getting started you can skip this section for now.
Songs and patterns both contain pre-sequence setup information that is
loaded just before a song or sequence plays. This pre-sequence information
is not reloaded when a pattern loops. Reloading this setup information
each time a pattern looped would cause data clogging and possible timing
errors in the sequence.
• The first two ticks (0 & 1) are reserved for pre-sequence setup informa-
tion. Tick 0 is reserved for the internal pre-sequence setup information.
Tick 1 is used to place your own pre-sequence setup information so
that it won’t loop and cause timing errors.
• Events (controller data, program changes, sysex, etc.) are played before
Notes, even if they are located on the same numbered Tick. This is done
so that volume changes and other programming information will be in
place when the notes turn on.
Events
tick 0
tick 1
Notes
Pattern/Song Setup Info
Reserved for User Events
Pre-Sequence
Setup Info
tick 0
tick 1
tick 2
Loop
tick 2
tick 3
tick 3
This chart shows how notes and other MIDI events are recorded at the beginning of
a pattern or song.
Notes are played after other MIDI events. Ticks 0 and 1 are reserved for pre-sequence
setup information which does not loop. Beginning at tick 2 of the pattern or song,
information is recorded normally (events first, then notes).
Track Priority
The sequencer handles lower numbered tracks first. Therefore, you should
put your most timing-critical data on low numbered tracks. Normally this
will not be important since the sequencer timing is so good, but if you
create very dense sequences, this information might be useful.
22 E-MU Systems
E-MU World Headquarters
E-MU / ENSONIQ
P.O. Box 660015
Scotts Valley, CA USA
95067-0015
Telephone: 831-438-1921
Fax: 831-438-8612
Internet: www.emu.com
Europe, Africa, Middle East
E-MU / ENSONIQ
Suite 6, Adam Ferguson House
Eskmills Industrial Park
Musselburgh, East Lothian
Scotland, EH21 7PQ
Tel: +44 (0) 131-653-6556
Fax: +44 (0) 131-665-0473
 Loading...