

Page 1

Operation Manual
Page 2

Operation Manual
© 1996 E-mu Systems, Inc.
All Rights Reserved
• FI524 Rev. A
E-mu World Headquarters
E-mu Systems, Inc. U.S.A.
P.O. Box 660015
Scotts Valley, CA USA
95067–0015
Telephone: 408-438-1921
Fax: 408-438-8612
Europe, Africa, Middle East
E-mu Systems, Ltd.
Suite 6, Adam Ferguson House
Eskmills Industrial Park
Musselburgh, East Lothian
Scotland, EH21 7PQ
Telephone: +44 (0) 131-653-6556
Fax: +44 (0) 131-665-0473
Important Notice:
In order to obtain warranty service on your Launchpad unit, the serial
number sticker must be intact and you must have a sales receipt or other
proof of purchase. If there is no serial number sticker on Launchpad,
please contact E-mu Systems at once.
This product is covered under one or more of the following U.S. patents:
4,404,529; 4,506,579; 4,699,038; 4,987,600; 5,013,105; 5,072,645; 5,111,727;
5,144,676; 5,170,367; 5,248,845; 5,303,309; 5,317,104; 5,342,990; 5,430,244
and foreign patents and/or pending patents. Launchpad is a registered trademark
of E-mu Systems, Inc.
PRINTED AND MADE IN THE USA
Page 3

INTRO/CONNECTIONS
Introduction 4
Connections 5
BASIC OPERATION
Realtime Controllers/Foot Pedal 7
Drum Pads 8
Pitch Wheel/Mod. Slider 9
Thumby Button/Footswitch 10
Triggers/Transport Mode 10
Inc/Dec Buttons 12
Transpose Knobs/MIDI Channel Select 13
Song Select/Preset Select/Bank Select 14
MIDI Clock Select 15
Save Button 16
APPLICATIONS
Using Launchpad with Orbit 17
Interfacing With Your Other gear 20
MIDI SPECIFICATIONS
Launchpad SysEx Format 22
Page 4

Introduction
Launchpad is a hot new performance MIDI controller designed
to merge perfectly with your existing gear. Launchpad has all
the extra controls you need and the ability to control multiple
pieces of your MIDI gear while taking up less than a foot of
space.
Launchpad’s logical control surface is a musical instrument unto
itself, making it easy to turn your ideas into reality.
Launchpad’s key features are listed below.
• Fast, intuitive user interface
• Compact and durable metal package
• One octave, velocity sensitive drum pad keyboard
• +5 octave, -4 octave transposition range
• 12 semitone fine tuning range
• 5 real-time, programmable sliders
• Pitch knob, thumby button, footswitch and expression pedal
input
• 6 latched trigger buttons with independent MIDI channels
• MIDI machine control
• Sends MIDI clock
• Sends preset, bank and song command changes
• MIDI merging
• Setup can be saved or restored via MIDI SysEx
All parameters are stored in nonvolatile memory and can be
transmitted or received as SysEx parameters.
4 Connections
Page 5
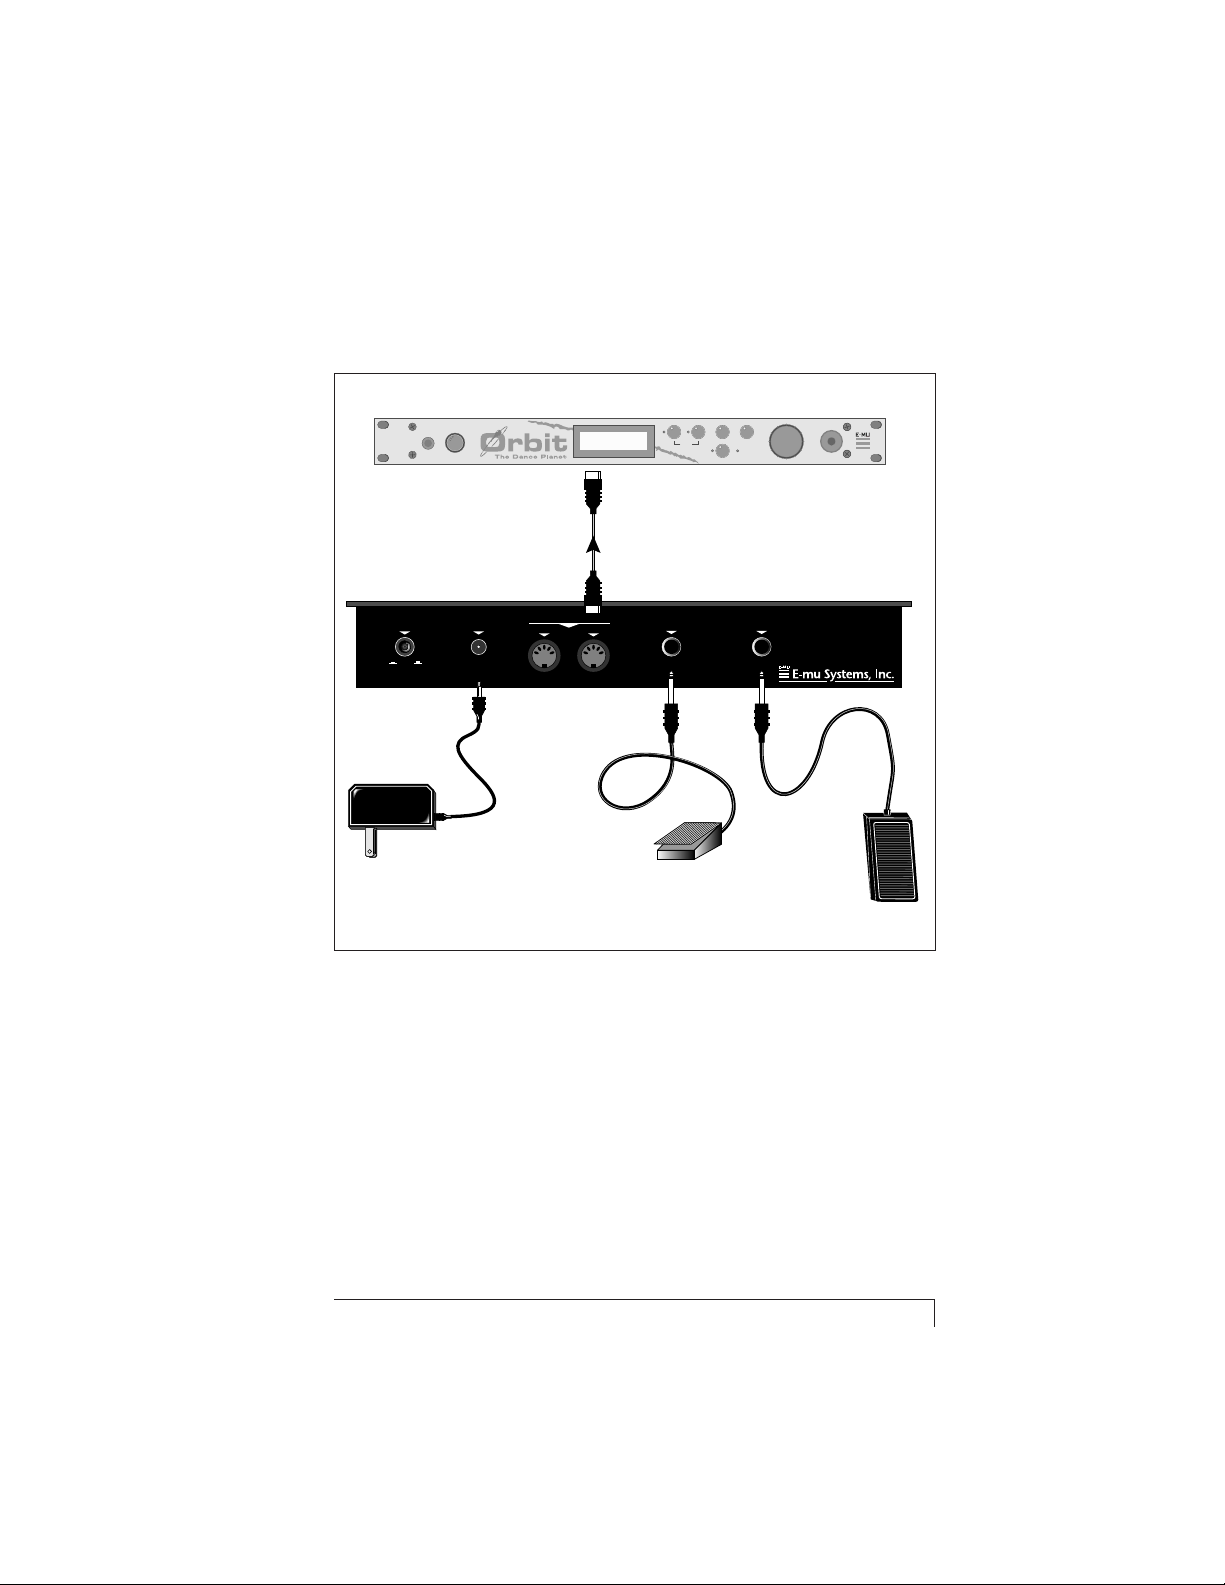
Connections
MIDI Sound Generator
VOLUME
PHONES
Launchpad
POWER 9 VAC IN
I/O 1 AMP
9 VAC
Adapter
MIDI Out
MIDI
IN
C01 VOL127 PAN=P
195 vox:Jaxvox
MIDI In
OUT
<>
EDITMASTER
CURSOR
HOME/ENTER
BEATS
FOOT SWITCH FOOT PEDAL
MIDI
Foot Switch
POWER
DATA
Control
Pedal
Power Input
Connects to the 9VAC wall adapter and supplies power to the
module.
Power Switch
Turns Launchpad On and Off.
MIDI Out
Connect the MIDI Out to the MIDI In port of a MIDI sound
generator such as a MIDI keyboard or sound module. The MIDI
Output can also be used for transferring Launchpad’s memory
contents to a computer or sequencer for backup.
LAUNCH • PAD Performance Controller 5
Page 6
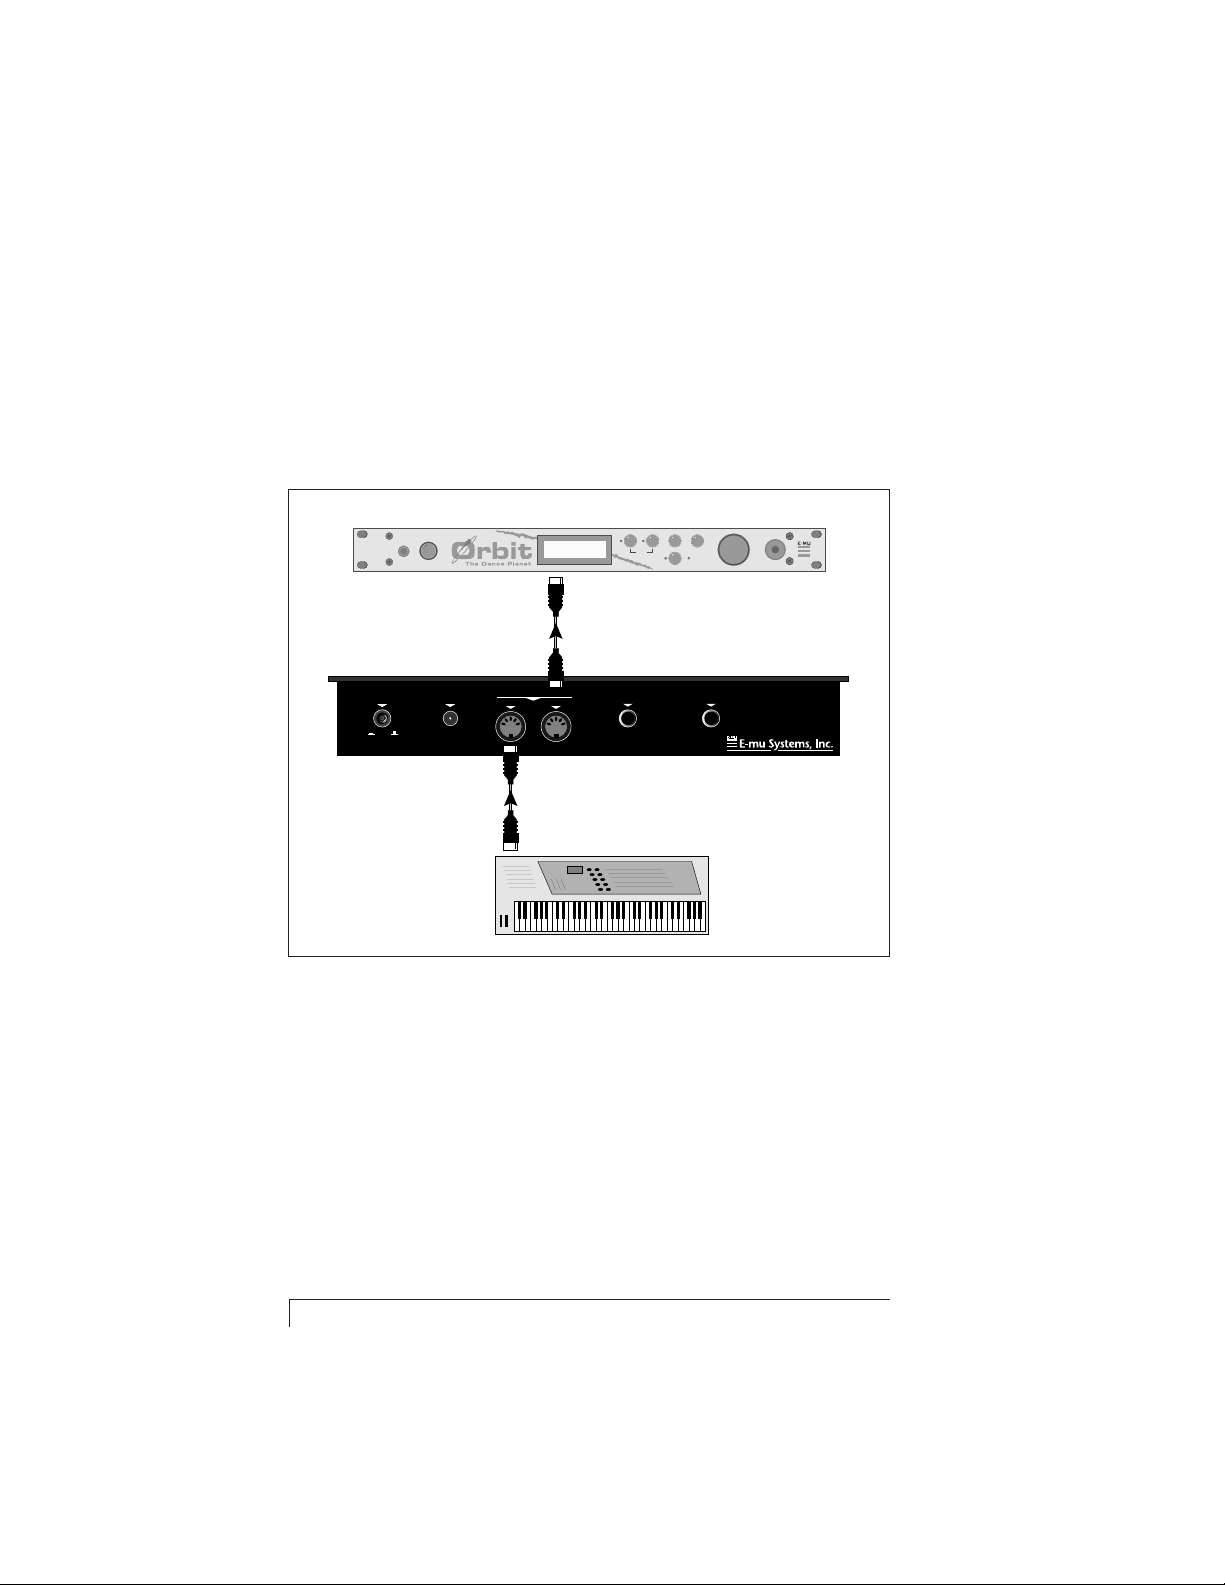
MIDI In
Launchpad merges the MIDI data it generates with the data
received at the MIDI In port. This is a handy feature when you
want to connect two controllers to the same MIDI sound
module or keyboard. The MIDI In port can also be connected to
a computer or sequencer to restore Launchpad’s memory
contents that have been backed up.
MIDI Sound Generator
VOLUME
PHONES
C01 VOL127 PAN=P
195 vox:Jaxvox
MIDI
In
BEATS
EDITMASTER
<>
CURSOR
HOME/ENTER
MIDI
POWER
DATA
Data from MIDI Keyboard and
Launchpad is “Merged” together.
FOOT SWITCH FOOT PEDAL
OUT
MIDI Controller
(MIDI Keyboard, Sequencer, etc.)
POWER 9 VAC IN
I/O 1 AMP
MIDI
Out
MIDI
IN
Out
MIDI
MIDI
In
Footswitch Input
Launchpad accepts a momentary-type footswitch (either normally open or normally closed). The footswitch can be programmed to any MIDI continuous controller number.
Foot Pedal Input
A control foot pedal can be used as a realtime performance
control in the same manner as the front panel sliders. The pedal
can be programmed to any MIDI continuous controller number.
The foot pedal can be either a voltage (which outputs a DC
voltage from 0-9 volts) or a resistance type. (See page 21 for
wiring diagrams for the two pedal types.)
6 Connections
Page 7
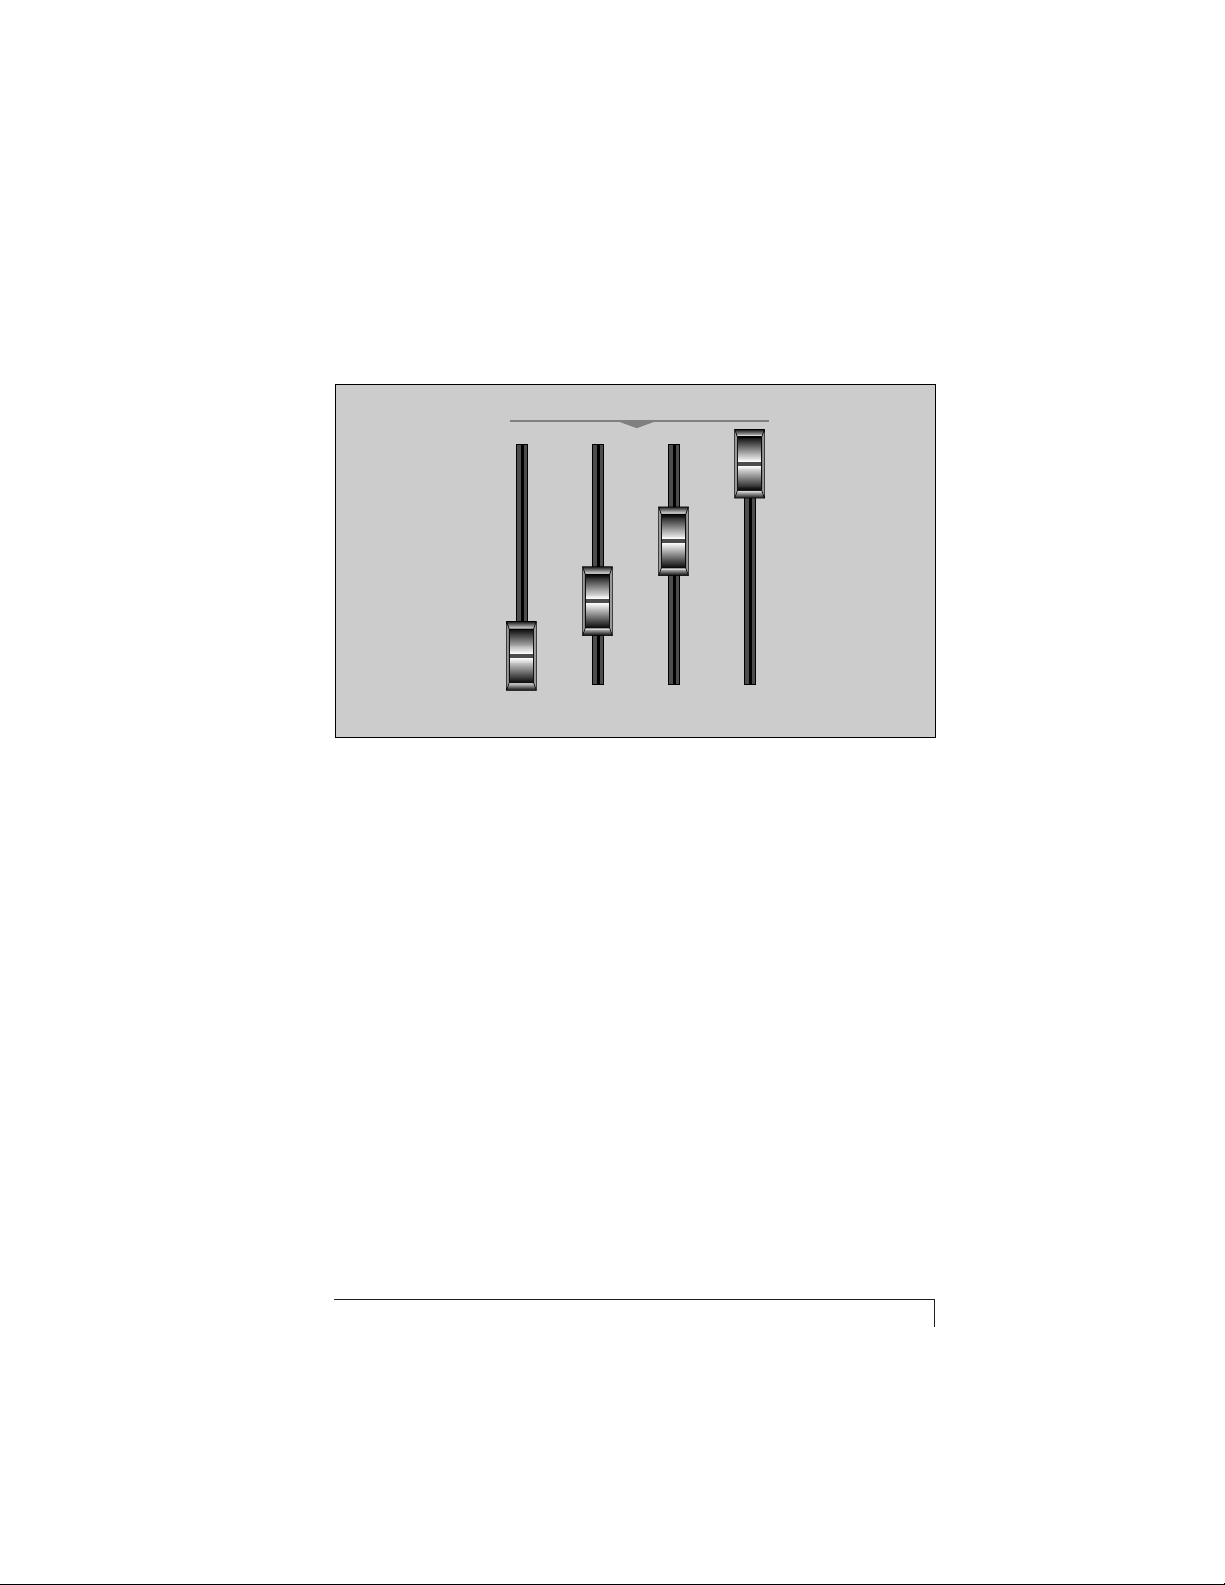
Main Controls
CONTROLLERS
A
BCD
Realtime Controllers/Foot Pedal
Realtime MIDI controller messages are sent out on the MIDI
channel currently selected by the MIDI channel selector switch
whenever a slider (or the foot pedal) is moved. Each of the four
sliders and footpedal input can be programmed for any MIDI
controller channel from 0-127. Controller value is 0 at the
bottom and 127 at the top of the slider’s travel.
m To Assign the Realtime Controllers
1. Press Select Control. The Select Control LED will be
flashing.
2. Move the desired slider or pedal. The Enter MIDI Controller/Note LED and the Enter Number LED will be
flashing.
3. Enter the MIDI Controller number from the Drum Pads.
The Enter MIDI Controller/Note LED and the Enter Number LED will continue to flash. The Save LED will now also
be flashing.
4. Press the Save button to save the assignment.
✗ To Abort the Operation at any point, press the Select
Control button again.
LAUNCH • PAD Performance Controller 7
Page 8

13 6810
11 12975420
Drum Pads
Drum Pads
Pressing a drum pad sends a MIDI Note-On message with
detected velocity on the currently selected MIDI channel. A
MIDI Note-Off message is sent as soon as the pad is released.
If the Transpose knobs are set to C and Off (straight up position), the Drum Pads send the following note numbers:
Drum Pad 0 note 60 (Middle C)
Drum Pad 1 note 61
Drum Pad 2 note 62
Drum Pad 3 note 63
Drum Pad 4 note 64
Drum Pad 5 note 65
Drum Pad 6 note 66
Drum Pad 7 note 67
Drum Pad 8 note 68
Drum Pad 9 note 69
Drum Pad 10 note 70
Drum Pad 11 note 71
Drum Pad 12 note 72
Entering Data Using the Drum Pads
The Drum Pads are also used to enter the values for Bank,
Preset, Song, Note, MIDI Clock Rate, and MIDI Controller
Numbers.
Note: A number can be entered with as many digits as desired
(1, 2, or 3). If more than 3 digits are entered, only the last 3 are
used for the value. For example, if the pads 2, 3, 5, 4, 6 are
pressed, the value accepted is 5, 4, 6 (which is illegal in any
case). A single digit can be entered followed by the Save button.
You do not have to enter all three digits (as in 0, 0, 2).
8 Controls
Page 9

PITCH
MODULATION
THUMBY BUTTON
Pitch Wheel
This spring-loaded control varies the pitch. Pitch change messages are sent out on the MIDI channel currently selected with
the rotary MIDI channel select switch. The amount of pitch
bend is controlled by the receiving device.
Modulation Slider
Realtime MIDI controller messages are sent out on the MIDI
channel currently selected by the MIDI channel selector switch
whenever the slider is moved. The slider can be programmed for
any MIDI controller channel from 0-127. Controller value is 0 at
the bottom and 127 at the top of the slider’s travel.
m To Assign the Modulation Slider
1. Press Select Control. The Select Control LED will be
flashing.
2. Move the Mod. Slider. The Enter MIDI Controller/Note
LED and the Enter Number LED will be flashing.
3. Enter the MIDI Controller number from the Drum Pads.
The Enter MIDI Controller/Note LED and the Enter Number LED will continue to flash. The Save LED will now also
be flashing.
4. Press the Save button to save the assignment.
✗ To Abort the Operation at any point, press the Select
Control button again.
LAUNCH • PAD Performance Controller 9
Page 10

Thumby Button/Footswitch
The thumby button and the footswitch (if connected) generate
controller values of 127 when pressed and a value of 0 when
released. Their function is determined by the receiving device.
The switches transmit on the currently selected MIDI channel
and can be assigned to any MIDI controller number.
m To Assign the Thumby Button or Footswitch
1. Press Select Control. The Select Control LED will be
flashing.
2. Press the Thumby Button. The Enter MIDI Controller/
Note LED and the Enter Number LED will be flashing.
3. Enter the MIDI Controller number from the Drum Pads.
The Enter MIDI Controller/Note LED and the Enter Number LED will continue to flash. The Save LED will now also
be flashing.
4. Press the Save button to save the assignment.
✗ To Abort the Operation at any point, press the Select
Control button again.
Triggers/Transport Mode Button
This switch is used to change the
function of the Trigger/Transport
control buttons. The LEDs next to
the button indicate the current
mode.
• When the Transport LED is lit, the
buttons are used to generate MMC
(MIDI Machine Control) and
Sequencer Control commands.
•␣ When the Triggers LED is lit, the trigger buttons send Note-
On/Note-Off commands on the specific MIDI channel that has
been programmed for that button. Each Trigger button can
transmit on a different MIDI channel and are latched in the
Note-On/Note-Off state, indicated by the LED next to each
button.
• You can switch between the two modes without disturbing the
functions of either the Triggers or Transport controls.
MODE
TRIGGERS
TRANSPORT
10 Controls
Page 11

TRIGGERS/TRANSPORT
RTZ
STOPFFWDREW
PLAY
REC
Triggers/Transport Controls
The Trigger buttons can be assigned to any play key on any
MIDI channel. They are quite useful when you want a note to
be continuously held for a background effect. Pressing a trigger
button causes the assigned Note-On message to be sent out on
the assigned MIDI Channel. Pressing the trigger button again
causes a corresponding Note-Off message to be sent. The Trigger
buttons are latched and an LED indicator next to the switch
illuminates to indicate the Note-On condition.
In Transport Mode, the six buttons transmit both MMC com-
mands and System Common Sequencer Control commands.
MMC commands - can be used to operate the transport
controls of digital audio recorders.
Sequencer Control commands - can be used to operate the
transport controls of MIDI sequencers.
The Play button sends a Sequencer Song Start command along
with the MMC Start command.
The Stop button sends a Sequencer Song Stop command along
with the MMC Stop command.
IMPORTANT:␣ MIDI Clock must be set to something other than
zero for Song Start and Song Stop to be transmitted. Song Start
is always issued on multiple presses, and no support of Song
Continue is provided.
m To Assign the Trigger Buttons
1. Press Select Control. The Select Control LED will be
flashing.
2. Press the desired Trigger Button. The Enter MIDI Controller/Note LED, the Enter MIDI Channel LED and the Enter
Number LED will all be flashing.
LAUNCH • PAD Performance Controller 11
Page 12

3. Enter the MIDI Controller number from the Drum Pads.
The Enter MIDI Controller/Note LED, the Enter MIDI
Channel LED and the Enter Number LED will continue to
flash.
4. Enter the MIDI Channel number by selecting it on the
rotary MIDI channel switch. The Enter MIDI Controller/
Note LED, the Enter MIDI Channel LED and the Enter
Number LED will continue to flash. The Save LED will now
also be flashing.
5. Press the Save button to save the assignment.
✗ To Abort the Operation at any point, press the Select
Control button again
Inc/Dec Buttons
These buttons are used to increment or decrement the last valid
song, bank, or preset number. The Inc/Dec buttons are enabled
whenever the Enter Number LED is flashing after having
pressed either of the SONG, BANK, or PRESET performance
select buttons. Each time the Inc or Dec button is pressed, the
appropriate song, bank or preset change messages are sent out
on the currently selected MIDI channel.
If the entry is aborted (by pressing buttons other than Save,
Drum Pads, Inc, or Dec buttons), then no song, bank, or preset
change messages are sent.
NOTE: It is NOT necessary to press the Save button when using
the Inc or Dec buttons in order to send a song, bank, or preset
change message. Each time the Inc or Dec buttons are pressed,
the last valid song, bank, or preset number that was sent is
incremented or decremented.
m To Increment a Preset on MIDI Channel 3:
1. Move MIDI Selector Switch to MIDI channel 3.
2. Press the Preset button under the Performance Select
heading.
3. Press the Inc button to increment the current preset by 1.
4. Press the Inc button again to increment the current preset
again.
12 Controls
Page 13

TRANSPOSE
INC
DEC
A#
A
G#
C
C#
B
D#
-2OCT
-3OCT
-4OCT
D
E
F#
F
G
OFF
-OCT
+OCT
MIDI CHANNEL
1
16
10
2
8
9
15
14
13
12
11
+2OCT
+3OCT
+4OCT
+5OCT
3
4
5
6
7
Transpose Knobs
The two Transpose rotary switches define the notes sent by the
Drum Pads. The first control varies the Drum Pad interval by up
to ±12 semitones. If the same sound is placed across the entire
keyboard of your MIDI keyboard (sound source), this control
will have the effect of changing the key of the drum pads. If
your MIDI sound source is programmed with different sounds
on each key, this control will shift the assignment of sounds on
each Drum Pad. The second control changes the Drum Pad
octave up from 1-5 octaves or down from 1-4 octaves.
MIDI Channel Select Switch
A 16-position rotary switch is used to specify the MIDI Channels for sending MIDI messages. The messages from the Sliders,
Pitch Wheel, Pedal, Footswitch, Thumby Button, and Drum
Pads are sent out on the MIDI channel currently selected with
this switch. (The messages from the Trigger buttons are sent out
on their own assigned MIDI channels.)
LAUNCH • PAD Performance Controller 13
Page 14

PERFORMANCE SELECT
SONG BANK PRESETMIDI CLOCK
Performance Select Buttons
Bank Select Button
Bank Select allows you to select MIDI Preset Banks on the
currently selected MIDI channel. MIDI presets are grouped into
banks of 128 presets. Note: E-mu uses the MMA standard
regarding Bank Select. Some manufacturers (such as Roland) use
their own standard and are not supported.
m To Change a MIDI Preset Bank:
1. Select the MIDI Channel of the Bank you wish to change
using the MIDI Channel knob.
2. Press the Bank button. The Enter Number LED will flash.
3. Enter the desired Bank number using the Drum Pads. You
can also use the Inc/Dec buttons to select a new Bank. The
Save LED will be flashing.
4. Press the Save button. The Save LED will stop flashing.
5. Press the Inc button to increment the current preset again.
When the Save button is pressed, the Bank Change message is
sent out on the selected MIDI channel along with the current
preset value.
Song Select Button
MIDI Song Select can be used in conjunction with Launchpad’s
Transport Controls to select, play and stop sequences from a
MIDI sequencer. When used with the E-mu Orbit sound module, Song Select will select the current beat when in Beats mode.
m To Select a New Song:
1. Press the Song button. The Enter Number LED will flash.
14 Controls
Page 15

2. Enter the desired Song number from 0-127 using the
Drum Pads. You can also use the Inc/Dec buttons to
instantly select a new Song. The Save LED will be flashing.
3. Press the Save button. The Save LED will stop flashing
and the selected Song number will be transmitted.
✗ To Abort the Operation at any point, press the Song Select
button again
Preset Select Button
This control allows you to select presets (programs) on the
currently selected MIDI channel. Preset numbers can be selected
by entering the exact number (using the Drum Pads) or by using
the Inc/Dec buttons.
When using the Inc/Dec buttons to change presets, Launchpad
stays in the Preset Select mode until you change it by pressing
Save or one of the other Performance Select controls. This frees
up the Drum Pads for performance while the Inc/Dec buttons
control preset changes.
m To Select a New Preset:
1. Press the Preset button. The Enter Number LED will flash.
2. Enter the desired Preset number from 0-127 using the
Drum Pads. You can also use the Inc/Dec buttons to
instantly select a new Preset. The Save LED will be flashing.
3. Press the Save button. The Save LED will stop flashing
and the selected Preset number will be transmitted. You
don’t have to press Save if you used the inc/dec buttons.
✗ To Abort the Operation at any point, press the Preset Select
button again
MIDI Clock Rate
Launchpad can control the tempo of other devices using MIDI
Clock. The MIDI Clk button specifies the rate of the clock.
m To Select a MIDI Clock Rate:
1. Press the MIDI Clock button. The Enter Number LED will
flash.
LAUNCH • PAD Performance Controller 15
Page 16

2. Enter the desired Clock Rate from 30-255 bpm using the
Drum Pads. The Save LED will be flashing.
3. Press the Save button. The Save LED will stop flashing
and Launchpad will immediately begin transmitting MIDI
Clock at the selected rate.
4. To stop transmitting MIDI Clock, enter a MIDI Clock Rate
of 0.
✗ To Abort the Operation at any point, press the MIDI Clock
button again
Select Control Button
When this button is pressed, its associated LED begins to flash
reminding you to select one of the controls for assignment of a
MIDI Controller or Note number. The controls are selected by
pressing or moving them as follows:
Triggers Press the desired trigger button.
Sliders Move the desired slider.
Thumby Press the button.
Pedal Move the pedal.
Footswitch Step on the switch.
If the LED is already flashing when the button is pressed, the
LED stops flashing. This aborts the operation.
When a control is selected, the Enter Number the associated
LED flashes to direct the attention of the user to the drum pads
for numeric entry operations). If a MIDI channel number is
required (as in the case of the trigger buttons), the Enter MIDI
Channel LED will also be flashing. The Save LED will begin
flashing when all the necessary data has been entered
Press the Save button to complete the entry process. All LEDs
will be extinguished.
Save Button
The LED associated with this button begins to flash as soon as
the user has entered valid data for a particular operation. In
order for the data entry to be complete, you must press the Save
button.
16 Controls
Page 17

• If you want to abort the operation, any other button except
for the Save Button, Drum Pads, or the Inc/Dec buttons may be
pressed.
Other Functions
Changing the Transpose Parameter on Orbit
Orbit can be remotely transposed using this hidden function.
m To Transpose Orbit
1. Press and Hold the Thumby Button
2. Use the Inc/Dec buttons to increment or decrement
transpose. The last transpose setting is remembered until
Launchpad is powered down.
Restoring the Factory Default Settings
If the Save button is pressed and held down while pressing
Drum Pad 0, the factory defaults for all parameters are restored.
The following factory defaults are assigned:
Slider A .............. Controller 1
Slider B .............. Controller 2
Slider C ..............Controller 3
Slider D .............. Controller 4
Mod Slider .........Controller 1
Trigger 1 ............ Note number 60 (middle C)
Trigger 2 ............ Note number 61
Trigger 3 ............ Note number 62
Trigger 4 ............ Note number 63
Trigger 5 ............ Note number 64
Trigger 6 ............ Note number 65
Thumby ............. Controller 65
Pedal ..................Controller 7
Footswitch ......... Controller 64
LAUNCH • PAD Performance Controller 17
Page 18

Initiating a MIDI SysEx Data Dump
All parameters are stored in nonvolatile memory and can be
transmitted or received as SysEx parameters. This procedure
transmits all parameters settings from the MIDI Out port to a
computer or sequencer.
m To Initiate a SysEx Data Dump
1. Connect MIDI Out of Launchpad to MIDI In on the
receiving device.
2. Press the Select Control and Save buttons simultaneously. All current device settings are transmitted out the
MIDI output as SysEx data.
Receiving a MIDI SysEx Data Dump
This procedure transmits all parameters settings from the MIDI
Out port to a computer or sequencer.
m To Initiate a SysEx Data Dump
1. Connect MIDI In of Launchpad to MIDI Out on the
sending device.
2. Send the previously recorded SysEx packet of information
to Launchpad using your sequencer or computer.
Launchpad’s memory contents will be replaced with the
new values.
MIDI Merging
Merge is always active and merges the MIDI data coming into
the MIDI In with the data generated by the device itself to the
MIDI Out jack.
18 Controls
Page 19

Applications
Using Launchpad with the Orbit Sound Module
Orbit - the dance planet, is E-mu’s hot new sound module.
Many of Launchpad’s performance features were specifically
designed to add intuitive and responsive control to Orbit’s
fantastic sound generating capabilities.
Some of these tips are specific to Orbit, but most can be used
with other MIDI sound modules as well.
Set up the MIDI Channels
One of the most powerful features of Orbit is that it can play on
all 16 MIDI channels. Launchpad has a handy MIDI channel
selector to direct the Drum Pads and Realtime Controllers. By
setting up Orbit in this way, you can switch presets by simply
selecting a new MIDI channel on Launchpad.
1. Choose 15 of your favorite Orbit presets and assign them
to different MIDI channels. (Select the MIDI channel on the
main screen of Orbit, press Enter, then select the desired preset.)
MIDI channel 16 is used by “Beats Mode” so don’t assign
anything to this channel.
Set up the Transport Controls
In order to remote control Beats Mode on Orbit, MIDI clock has
to be running. So let’s set the MIDI clock rate to say, 120 beats
per minute.
1. Press MIDI Clock. The Enter Number LED will be flashing.
2. Enter 1-2-0 using the Drum Pads. The Save LED will now
also be flashing
3. Press Save to enter the Tempo. MIDI Clock is now en-
abled and set to 120 bpm.
LAUNCH • PAD Performance Controller 19
Page 20

Place Orbit in Beats Mode
Orbit has to be in Beats Mode before it will accept Sequencer
Start and Stop commands.
1. Press and hold both the Master and Presets buttons at
the same time to place Orbit into Beats mode.
2. Press the Mode button on Launchpad so that the Trans-
port LED is lit.
3. Press the Play button on Orbit to start Beats Mode. The
Stop button will stop Beats Mode.
• As the beats are playing, notice that you can play the Drum
Pads and select transpositions and MIDI channels without
affecting the beats.
Change the Beat
1. Press the Song button.
2. Press the Increment button to increment the song by
one. The new beat will begin as soon as the one playing
has finished.
• You can also use the Drum Pads to enter a specific beat
number after pressing the Song button. Press Save to enter
the number and start the new beat.
Change the Preset
You can change presets on the fly using the performance select
controls.
1. Select the MIDI channel using the rotary knob.
2. Press the Preset button.
3. Press the Increment button to increment the preset by
one. The new preset will instantly be selected.
• You can also use the Drum Pads to enter a specific preset
number after pressing the Song button. Press Save to enter
the number and select the new preset.
20 Applications
Page 21

Foot Pedal Wiring Diagrams
Launchpad accepts either a Voltage or Resistance type of control
Foot Pedal. The two types of pedals are shown below.
• A Voltage Pedal outputs 0-9 volts when the pedal is depressed. Usually these pedals consist of a 9 volt battery
connected to a potentiometer.
Voltage Pedal
Wiring
Mono Plug
0-9 Volts
• A Resistance Pedal uses a stereo plug and is wired as shown
in the diagram below.
Resistance Pedal
Wiring
Pedal
Ring
Tip
Gnd
LAUNCH • PAD Performance Controller 21
Stereo Plug
Page 22

LaunchPad SysEx Format
• Press Select Control and Save to dump the contents of memory.
F0 system exclusive status byte
18 E-mu ID byte
0D product id byte
00 device id byte
01 send/receive byte (00=data request, 01=dump follows)
01 slider A continuous controller number
02 slider B continuous controller number
03 slider C continuous controller number
04 slider D continuous controller number
01 small modulation slider continuous controller number
07 foot pedal continuous controller number
40 footswitch continuous controller number
3C trigger 1 note number
3D trigger 2 note number
3E trigger 3 note number
3F trigger 4 note number
40 trigger 5 note number
41 trigger 6 note number
01 trigger 1 channel
01 trigger 2 channel
01 trigger 3 channel
01 trigger 4 channel
01 trigger 5 channel
01 trigger 6 channel
42 thumby button continuous controller number
F7 EOX
Notes:
1. If you send in an illegal value, it ignores just that one parameter and sends the rest of the string properly.
2. The entire string must be sent to a Launchpad except when
requesting a dump. If you send less than the full 26 bytes,
the message will be ignored.
22 Applications
 Loading...