

Page 1
Reference Manual
E-MU Systems 1
Page 2

Reference Manual
© 2006 E-MU Systems
All Rights Reserved
Ver si on 3.0
E-MU World Headquarters
E-MU Systems
1500 Green Hills Road
Scotts Valley, CA 95066
USA
Asia Pacific, Africa, Middle East
Creative Technology Ltd
31 International Business Park
Creative Resource, Singapore 609921
SINGAPORE
2 Emulator X3 Reference Manual
Europe
Creative Labs (Ireland) Ltd
Ballycoolin Business Park
Blanchardstown, Dublin 15
IRELAND
Japan
Creative Media K. K.
Kanda Eight Bldg., 3F
4-6-7 Soto-Kanda
Chiyoda-ku, Tokyo 101-0021
JAPAN
Page 3

Table of Contents
1 - Introduction & Installation ......................................... 15
Introduction .........................................................................................................................15
Emulator X3 Features .................................................................................................... ..15
Streaming ................ ....................................... ........................................ .......................15
Sampling ....................... .............................................. ................................................ ..15
Synthesizer .................. ..................... ..................... ..................... .................... ...............16
Before you Begin… ...........................................................................................................16
Notes, Tips and Warnings ................................................................................. ..........16
Tutorial List .. .....................................................................................................................16
What’s New in X2 ............................................................................................................17
New in X3 .........................................................................................................................17
Minimum System Requirements........................................................................................18
Software Installation............................................................................................................18
Programs installed: ................................................................ ......................................18
Running the Application for the First Time........................... ............................................19
Setting up your Audio..........................................................................................................20
Setting up the Preferences ...................................................................................................21
Audio Preferences ........................... .................................................................................22
Streaming ................ ....................................... ........................................ .......................22
Audio Setup ..................................................................................................................23
MIDI ................. ........................................ ...................................... ...................................26
MIDI Inputs .................. ............................................ .. ............................................ ......26
MIDI Response ................................ .............................................. ...............................27
Controllers .............. ....................... ......................... ......................... ......................... ........28
Appearance Settings in Windows ................................. ..............................................29
Other Settings ............... ........................................................................................ ........29
2 - Emulator Architecture ................................................ 31
Organization of the Emulator X Modules ....................... .. ................................................31
A Modular System................................................................................................................32
Bank ..................................................................................................................................32
Saving ............................................................................................................................32
Undo/Redo ................... ................................................ .............................................. ..32
Multisetup ............... ........................... ........................... ........................... .....................34
Preset .............................................................................................................................34
Voice .................... ............................... ............................... ................................ ............34
Sample ..................... .... ...... ...... ..... ...... .... ...... .... ....... .... ...... ...... ..... ...... .... ...... ..... ...... ... ...35
Flexible Architecture ........................................................................................................35
Preset Diagram .......................................... .......................................................................36
Voices ................................................................................................................................36
Multisample Voices ......................................................................................................37
The Sample .......................................................................................................................38
TwistaLoop™ ................................................................................................................39
E-MU Systems 3
Page 4

3 - Getting Started .......................................................... 41
Exploring the Tree...................................................................................................... ..........41
Multisetup Page....................................................................................................................42
Changing Presets (from Single View) ............................ ................................................43
Multi Channel View ...................... ...................................................................................44
Changing Presets (from the Multichannel view) ....................... ...................................45
Adjusting the Controllers ................................................................................................45
Create Your Own Custom Bank .........................................................................................47
Load a New Bank .................................................................................................................49
Opening a Preset....................................................................................... ...........................49
Examine a Voice.......................................... .........................................................................52
Wipe the Slate ...............................................................................................................53
Examine the Samples........................................................................................................... 54
Using DSP ................................................................... ......................................................55
Experiment! ..................................................................................................................57
Save and Save As ..............................................................................................................57
Emulator X Bank Structure ...................................... ........................................................57
Building a Preset from the Ground Up................. .............................................................58
Emulator X Advanced Applications Guide .......... ......................................................65
The Librarian ................................ ........................................................................................66
4 - Multisetup / Preset Globals ........................................ 69
The Multisetup.............. ........................................... ............................................ .................69
Changing Presets (from Single View) ............................ ................................................70
Multi Channel View ...................... ...................................................................................71
The Current MIDI Channel ..................................... ....................................................72
MIDI Channel ............................... .............................................. .................................72
Preset Assignment ......................................... .............................................. .................72
Channel Volume ...... .. .......................................................................................... ........72
Channel Pan ................... .............................................. .............................................. ..72
Output Assignment ......................................................................................................72
Output View Button .....................................................................................................73
Aux FX View Buttons ....................................................................................................73
Aux Send On/Off .........................................................................................................73
Preset FX Enables .........................................................................................................73
Select Effect ...................................................................................................................73
TwistaLoop Override ...................................................................................................73
Global Controls... .................................................................................................................74
Master Volume Control & VU Meter ........................................................... ...............74
Tempo Control .............................................................................. ...............................74
Master Tune ..................................................................................................................74
Master Transpose .........................................................................................................74
Limiter ................. ....................................... ........................................ ...........................74
Aux Outputs ..................................................................................................................75
Using the Emulator Sessions in PatchMix DSP .........................................................75
Filter Override .............. ............................................ .. ............................................ ......77
MIDI Controllers & Scribble Strips ............. ...............................................................77
Pre-roll RAM Used .......................................................................................................77
CPU Meter ....................................................................................................................77
Number of Samples Playing .......................................................................................77
Current Channel ..........................................................................................................77
Working with Multisetups...................................................................................................78
Saving FX & Multisetups ..............................................................................................78
VSTi Multisetups ........... ............................................................................................ ....78
4 Emulator X3 Reference Manual
Page 5

Preset Globals................................................................. .. ............................................ ........80
Transpose & Volume ........................................................................................................81
Initial Controllers A-P .....................................................................................................81
Capture MIDI Controllers ...................... .. .......................................................................82
TwistaLoop Lock To Tempo ............................................................................................82
Initial Tempo ....................................................................................................................82
Tuning Tables ...................................................................................................................83
Key CC Window ...............................................................................................................85
Preset Modulators ....................................... .............................................. .......................85
Channel Lag 1 & 2 Rate .............. .. ...............................................................................85
Poly Key Timer ..................................................................... ........................................86
Channel Ramp ............................................................... ..............................................86
Preset PatchCords ........................... .. .............................................. .............................87
Templates ................ .................... ..................... ................... ..................... .................... .....87
5 - Voices & Sample Zones ............................................... 89
Voices and Zones Pages.......................................................................................................90
Mix/Tune ..................... ............... .............. ............. .............. ............... ............... ........... .90
Key Win ................................... ............................................ ..........................................90
Vel Win ................................................. .........................................................................90
RT Win ....................... ....................................................................................................90
CC Win 1-5 ..................... ..............................................................................................90
Region ...........................................................................................................................90
Details ...........................................................................................................................90
Voice Selection ....................... .............................................. ................................................ 91
Manipulating Voices ........................................................................................................91
Working With Multiple Voices .......................................................................................91
Samples & Multisamples . ................................................ .............................................. ..92
Groups ..............................................................................................................................93
Sorting Voices and Zones ................................................................................................93
The Keyboard Display .....................................................................................................94
Overview Section.............. .. .......................................................................................... ........95
Sample Controls ...............................................................................................................95
Sample ..................... .... ...... ...... ..... ...... .... ...... .... ....... .... ...... ...... ..... ...... .... ...... ..... ...... ... ... 95
Original Key ....................................... ...........................................................................95
Group ............................................................................................................................95
Direction .......................................................................................................................95
Mix Tune Controls ...........................................................................................................96
Mute ..............................................................................................................................96
Solo ........................ ...... .... ...... ..... ...... .... ...... .... ....... ...... .... ...... ..... ...... .... ...... ....... .... .. ......96
Volume .................. ......................... ......................... ......................... ....................... ......96
Pan ......................... .................. ................. ................... ................... ................ ...............96
Fine Tune ......................................................................................................................96
Coarse Tune ............................... ................................................................................... 96
Transpose .................. ............................... ............................... ................................ ......96
Key Win, Velocity Win, RT Win, and CC Win Controls ......... ......................................96
Direction ................. ............................................. .............................................. ...............97
Adding Samples and Voices................................................................................................97
Mix/Tune Page......................................................................................................................99
Key Window Page .................. .............................................. ................................................99
Using Values to Define Key Window Parameters ......................................................102
Velocity Window Page...................................................................................................... 103
Using Values to Define Velocity Window Parameters ............................................... 104
Realtime Window Page......................................... .. ..........................................................105
E-MU Systems 5
Page 6

Using Values to Define Realtime Window Parameters ............................................. 107
Continuous Controller Window Pages.............................. .. ........................................... 108
Keyboard CC Window......................................................................................................109
Cycle Groups ............................................................................................................. 111
Using Values to Define CC Window Paramet er s ...... ................................................. 114
Region Page ............................ .............................................. ............................................. 115
Creating or Editing a Region .................................................................................... 116
Region View Controls ................................................................ ... ................................ 116
Sample Zoom and Scroll Controls ................ ................................................... .......116
Sensitivity ................ ........................... ........................... ........................... .................. 116
Snap Settings and Markers ....................................................................................... 117
Region Xplode .................................................................... ........................................... 117
More About Regions .................................................................................................118
Details Page ................ ........................................... ............................................................119
Voice & Sample Zone Utilities ............................... ................................................. .. .......120
Open Voices ........................................................ .............................................. .........120
Open Sample ............................. ............................................. ................................... 120
New Voice ............... .. .................................................................................................120
Delete Voices .......................... ................................................................................... 120
Duplicate Voices ............................................................................................... .........120
Combine Voices ...................................................................................... ..................120
Expand Voice ............................................................................................................. 121
New Sample Zone ..................................................................................................... 121
Delete Sample Zones ................................................................................................121
Duplicate Sample Zones ........ ................................................ ................................... 121
Sort Voices ................................................................................................................. 12 1
Sort Zones ....................... ...........................................................................................121
New Group ................................................................................................................ 121
Select Group .............................................................................................................. 121
Clear All Solos and Mutes ........................................................................................121
Edit Menu Utilities - Cut, Copy & Paste....................................................................... ...122
Links................................................................................................................................... 123
Link Utilities ............................................................................. ..................................... 124
Subsuming Links .................................................... .......................................................124
Mix/Tune Window ........................................................................................................ 125
Key Window .................................................................................................................. 125
Velocity Window ................................... ................................................ ........................ 125
CC Window ................................................................................................................... 126
6 - Voice Processing ...................................................... 127
Simplified Emulator X Signal Path.................................................................................. 127
Overview of the Voice Processing Window............. .................................................. .....128
Templates ................ .................... ..................... ................... ..................... .................... .. 128
Oscillator............................................................................................................................ 129
Pitch Bend Range ..........................................................................................................129
TwistaLoop Controls .................................................................................................... 129
Speed ....................... .............................................. .............................................. .......129
Loop (% or number) ................................................................................................129
Start At Loop .............................................................................................................. 129
Tuning Controls ............................................................................................................129
Transpose .................. ............................... ............................... ................................ ...129
Coarse Tuning ................................. .......................................................................... 129
Fine Tuning .............................................. .................................................................. 130
Fixed Pitch Mode .......................................................................................................130
6 Emulator X3 Reference Manual
Page 7

Chorus Amount ................. .......................................................................................... . 130
Tips for Using Chorus .......................................................... ..................................... 130
Glide Rate & Curve ....................................................................................................... 131
Key Controls ..................................................................................................................131
Delay ..........................................................................................................................131
Sample Offset ............................................................................................................ 131
Sample Start Offset ...................................................................................................131
Amplifier, Filter & Auxiliary Envelopes...........................................................................132
Adjusting the Envelopes ........................................................................................... 132
Envelope Mode: Repeat ............................................................................................ 133
Envelope Mode: Complete .......................................................................................134
Time-based and BPM Envelopes .................................................................................134
BPM Envelopes .......................................................................................................... 134
BPM Tempo Chart ....................................................................................................135
LFOs & Lags ................................................................................................... ................ 136
Frequency .................... ...... ...... ..... ...... ...... .... ....... ...... .... ...... ....... .... ...... ...... .... ....... ..... 13 6
Delay ..........................................................................................................................136
Shape ....................... ............................... ............................. ................................ .......136
Variation .................................................................................................................... 136
Sync ............................................................................................................................137
BPM ............................................................................................................................137
LFO Tricks & Tips: ........................................................ ............................................. 138
Lag Processors 1 & 2 .... ................................................ .................................................138
Extra Summing Amps ...............................................................................................138
Function Generators ........ .............................................. .............................................. . 139
Function Display and Grid ....................................................................................... 139
Function Generator Main Controls ................................ .. ....................................... 141
Modulation Destinations .................................. .. .....................................................143
Function Generator Ideas ........................................ .................................................143
Filter Controls ............................................................................................................... 145
Filter Descriptions .........................................................................................................145
Programmable Morphing Filters .................................................................................149
Morph Designer .............................................................................. .. ........................ 149
Dual EQ Morph .........................................................................................................151
Dual EQ Morph + Expression ..................................................................................152
2EQ + Lowpass Morph ................................... ..........................................................153
Peak/Shelf Morph ..................................... .............................................. .................. 153
Amplifier Controls............................................................................................................ 154
Volume ................. ................... ................... ................. ................... .................. .............. 154
Panning ....................... ............................... ............................... ................................ ..... 154
Amp Envelope Dynamic Range ................. ................................................ ..................154
Response ................. ............................................. .............................................. ............154
FX Wet/Dry .................................................................................................................... 154
Voice Effect Sends ............................. ............................................. ................................... 155
Modulation Cords. ............................................................................................................ 156
Pitch Amount Chart .................................................................................................. 158
Modulation Source Polarity ......................................................................................... 160
Summing Nodes ........... .............................................. .. ............................................. 161
PatchCord Lore .................. ....................................................................................... 161
Sample Loop Modulation ........................................................................................ 161
Assign Groups ...............................................................................................................164
Output Assign Groups .............................................................................................. 164
Poly Key Assign Groups ....... ................................................ ..................................... 165
Keyboard Modes ..................................... .............................................. .. ...................... 166
Latch Mode ....................................................................................................................167
E-MU Systems 7
Page 8

7 - Editing a Sample ...................................................... 169
Sample Editor Window .................................................................................................... 169
Exporting & Importing Samples............................................. ......................................... 171
Exporting a Tempo Map..................... ................................................ .............................. 171
Tips for Exporting Tempo Maps .................................................................................. 172
Importing a Tempo Track to a Sequencer .................................................................. 173
Display Menu Items.......................................................................................................... 174
Zoom In (Page Up) ................................................................................................... 174
Zoom Out (Page Down) ................................................................................... .......174
Zoom In (Ctrl +Page Up) ......................................................................................... 174
Zoom Out (Ctrl +Page Down) .................................................................................174
Zoom To Selection (F10) .........................................................................................174
Zoom To All (F11) ........................................................................ .. .......................... 174
Zoom To Sample (F12) ............................................................................................ 174
Display Time in Samples ......................................................................................... 174
Display Time in Seconds .........................................................................................174
Display Time in Bar:Beats ........................................................................................174
Display Level in Percent .......................................................................................... 174
Display Level in Decimal .........................................................................................174
Display Level in dB .................................................................................................. 174
Show Note Markers ......................................................... ......................................... 175
Show Loop Markers .................................................................................................175
Show Zero Crossing Threshold ........................................................... .................... 175
Vertical Units ............................................................................................................. 175
Horizontal Units ....................................................................................................... 176
Transport/Loop Controls................................................................................................. 177
Play (from Cursor) .................................................................................................... 177
Play from Start ......................................... .................................................................. 177
Stop ............................................................................................................................177
Loop Play ...................................................................................................................177
Go to Sample Start ..... .. ............................................................................................. 177
Go to Sample End ............................................................ ......................................... 177
Go to Loop Start ........................................................................................................ 177
Go to Loop End ......................................................................................................... 177
Move Start to Previous Zero ......................... ................................................ ............177
Move Start to Next Zero ... ................................................ ......................................... 178
Move End to Previous Zero ..................................................................................... . 178
Move End to Previous/Next Zero ......................................................................... ...178
Autocorrelate Loop .......................................................................................................178
Cut, Copy, Paste & Delete ...................................................................... .......................... 179
Undo and Redo ......................................................................................................... 179
Typical Applications ................... ................................................ .............................. 179
Cut Section .......................................................... ............................................ ..............180
Copy Section .............. .......................................................................................... .........180
Paste Section ..................................................................................................................181
Sample Edit Tools .............................................................................................................185
MIDI Audition ....................................... ........................................................................ 185
Truncate .........................................................................................................................186
Fade ................................................................................................................................186
Normalize ............... ............................................. .............................................. ............187
Adjust Gain ....................................................................................................................187
DC Filter ......................................................................................................................... 188
Reverse ...........................................................................................................................189
Swap L-R Channels .............. ......................................................................................... 189
8 Emulator X3 Reference Manual
Page 9

Bit Reduction ................ ........................................................................................ .........190
Time Compression ........................................................................................................ 190
Pitch Shift .................... ...................................................................................................192
Transform Multiply ..................................................................................... ..................193
Convert to Mono or Stereo ................................................................................. .. .......194
Sample Rate Convert .................................................................................................... 195
Xtractor ................. ....... ...... .... ...... ..... ...... .... ...... ....... .... ...... .... ...... ..... ...... .... ...... ....... .. ..... 196
Vocal or Instrument Isolation/Elimination ............................................................ 198
A Visual Mix Analysis ........................................................................................... .....200
Batch Processing.... .............................................. .............................................. ................ 202
Looping and Loop Processing ......................................................................................... 203
Crossfade Looping .................................................................................................... 204
Truncate after Loop ................................................................................................... 204
Loop Compression ................................................................................................... 204
Loop Settings ................................................................................................................. 205
Loop Button ...............................................................................................................205
Loop in Release Button ............................................................................................. 205
Loop Select .................................................................................................................205
Lock Button ...............................................................................................................205
Select Loop ..................................................................................................................... 205
Select All ............................................. ............................................................................ 205
No Snap .........................................................................................................................205
Snap To Marker ................ .............................................. .. ............................................. 205
Snap To Zero-Crossings ...... .............................................. ........................................... 206
Background: Zero Crossing Threshold ....................................................................... 206
Delete Unused Samples ............................................. ...................................................206
How to Loop a Sample ................................................................................................. 207
Zero Crossing ............................. ................................................................................... 208
8 - TwistaLoop .............................................................. 209
Introduction ...................................................................................................................... 209
Analyzing Beats In the Sample Edit Window.............................................................. ...209
Running Beat Analysis .................................................................................................. 209
Tempo Range (BPM) .................................. ..............................................................210
Tempo Variation ....................... ................................................................................ 210
Beats per Bar .............................................................................................................. 210
Meter .......................................................................................................................... 211
Create note markers .......................... .............................................. .. ........................ 211
Create beat markers .............................. .................................................................... 211
Viewing Your Analyzed Sample ...................................................................................211
Markers ...................................................................................................................... 212
The Triplet Button ........................................................ ............................................. 212
Sensitivity ................ ........................... ........................... ........................... .................. 212
Fine-Tuning Your Analyzed Sample ............................................................................ 213
Shifting the Beats .......................................................................................................213
Beat Parameters .............. .............................................. ............................................. 213
Bar Numbering Changes .......................................................................................... 214
Beats Per Bar Changes .............................................................................................. 214
Tempo Granularity Changes ............................. .......................................................214
Creating Loops from Your Analyzed Sample ............................................................. 215
Tips for Making Selections for Loops ...................................................................... 216
Using Loops....................................................................................................................... 217
Playing Back Loops ....................................................................................................... 217
Loop Speed and Tempo ............................................................................................... 219
E-MU Systems 9
Page 10

Changing Loops Using a Continuous Controller ......................................................219
Loop Select (Continuous) ........................................................................................ 220
Loop Select (Jump) ................................................................................................... 221
Other Ways to Change Loops ................ .. .................................................................... 222
Synchronizing Loops .................................................................................................... 222
Multisample Voices and Looping ................................................................................223
The Speed Knob ................................................................................................................ 224
Changing a Loop’s Speed .............................................................................................224
Nudging the Tempo ...................................................................................................... 224
Using Regions of Analyzed Samples............................................... ................................ 226
Using the RT Win With Regions .................................................................................. 227
Troubleshooting................................................................................................................ 228
Beat Analysis Doesn’t Find the Right Beats ............................................................ 228
Looping Doesn’t Occur ............................................................................................ 228
Loops Don’t Synchronize to Tempo ....................................................................... 229
9 - Effects ..................................................................... 231
Overview............................................................................................................................ 231
Programming Effects.........................................................................................................232
Adding an Aux Effect in the Multisetup ............... .. .................................................. ...232
Adding an Effect to a Preset .........................................................................................233
Block Diagram of the Effects Routing ..................................................................... 234
Block Diagram of the Effects Screens ...................................................................... 235
Effects Overhead ....................................................................................................... 236
Typical Effects Usage ...... .............................................. .. ........................................... 236
ASIO Outputs ............................................................................................................ 236
Main Output Window .................................. .. .............................................. .................... 237
Main Output Window ....................................... .......................................................237
Proteus X Composer FX Template............................ ................................................ .......23 8
Key Points ...................................................................................................................... 238
Voice .................... ............................... ............................... ................................ ......... 238
Preset .......................................................................................................................... 238
Multisetup ............... ........................... ........................... ........................... .................. 238
Controlling the Preset Effect Amount from the Voice ........ ................... ................. ... 239
Aux FX Screen.................................................................................................................... 240
Aux Effects ..................................................................................................................240
Aux FX Send Amounts ........................ .......................................................................... 240
Preset FX Screen.................................................................................................................241
Preset Effects ..............................................................................................................2 4 1
Preset FX Modulation Parameters ...............................................................................242
Creating and Deleting Templates ................................................................................ 242
Effects Listing.....................................................................................................................243
Effects Descriptions........................................................................................................... 243
Background: Reverb ............................ ...................................................................... 243
Reverb ............................................................................................................................244
Early Reflections Reverb ............................................................................................... 244
Reverb Lite (mono) ........... ................................................ ........................................... 245
Chorus ..................... ...... .... ...... ....... .... ...... .... ...... ....... .... ...... .... ....... ...... .... ...... .... ....... ..... 246
Background: Chorus ................................................................................................. 246
Chorus / Delay .......................................... .............................................. ...................... 247
Compressor ................................................................................................................... 248
Basic Controls ............................................................................................................248
Delay .............................................................................................................................. 250
Background: Delay ............................................. ................................................ .......250
10 Emulator X3 Reference Manual
Page 11

Discrete stereo ...................................................................... ..................................... 250
Ping Pong, stereo ............ .......................................................................................... . 251
Ping Pong, mono L->R ....... .. .............................................. .. ..................................... 251
Delay (BPM) .................................................................................................................. 253
Early Reflections ............................................................................................................ 254
1-Band Para EQ ....................................... .. .............................................. ...................... 254
4-Band EQ .......................... ...........................................................................................255
Flanger ..................... ...... .... ...... ....... .... ...... .... ...... ....... .... ...... .... ....... ...... .... ...... .... ....... .....256
Flanger (BPM) ............................................................................................................... 257
Growl .............................................................................................................................258
Limiter ................ .................................. ............................... .................................. ......... 259
Phaser ................... .......................... ......................... ....................... ......................... ....... 260
Pitch Shifter (mono) ..................................................................................................... 261
Ring Modulator ............................................................................................................. 262
SP12-ulator ..................... .......................................... ....................................... .............. 263
Tremulator BPM ............................................................................................................ 264
Tube ...................... ........... ............ ............. .......... ............. ............ ........... ............ ............ 266
Twin .................... ............. .......... ............. ............ ........... ............ ............. .......... .............. 267
10 - Controls ................................................................. 269
The Toolbars......................................................................................................................269
Viewing and Hiding the Toolbars ...............................................................................270
Drag & Drop...................................................................................................................... 270
Floating Keyboard.......................... ................................................................................... 270
Changing Settings ........................ .............................................. ....................................... 271
Entering Numeric Values ....................................................... ....................................... 271
Adjusting Ranges & Fades.......... ....................................................................................... 272
Selecting Voices using your MIDI Keyboard .............................................................. 273
Adjusting Envelopes........................................................... ...............................................274
BPM Mode & Tempo ................................................................................................ 274
Cut, Copy & Paste ............................... .............................................. .. .............................. 274
View Menu............... ............................................ ............................................ ..................275
List Display View ........................................................................................................... 276
Creating a Text List of Presets and Samples ............................................ .................... 276
Tree View ........................................................................................................................ 277
Tree Navigation using the Keyboard .............................. ............................................. 277
Cursor Keys ...................................... .. ........................................................................ 277
Find Items .................................................................................................... ..............278
Tree Navigation Using the Toolbar ...................................... .. ..................................... 278
Refresh (F5) .................... ...............................................................................................278
Context Sensitive Menus .................................... ..........................................................278
All Sound Off (Ctrl + Pause) ............................ ................................................ ............278
Templates...........................................................................................................................279
Creating and Recalling Templates ......................................................... ...................... 279
Organizing Templates .................................................................................................. 280
E-MU Systems 11
Page 12

11 - From Sample to Preset ........................................... 281
Acquire (Sampling)...........................................................................................................281
Input Controls ............................................................................. .............................. 281
Recording Audio (Sampling) .......................................................................................282
Record Audio Controls ......................................................................... .................... 283
Gating the Samples .................................................... ...................................................284
Gating Display ................................................................................... ........................ 284
Gate/Chop Controls ............................... .............................................. .. .................. 284
Region List Display ............................... .................................................................... 285
Region List Controls ................................................................... .............................. 286
Saving your Samples .....................................................................................................288
Save to Sampler Controls .........................................................................................289
SynthSwipe™.....................................................................................................................290
Tips for Saving SynthSwipe Recordings .................................................................. 293
Resampling........................................................................................................................ 293
Importing Other Sample Formats ...................................................................................294
Set Original Keys ...................................................... .............................................. .......295
Original Key Algorithms .................................... .. .....................................................295
Sample Options ............................................................................................................296
Build Preset Options ............................................................................... ...................... 297
12 - Synthesizer Basics .................................................. 299
Emulator X Advanced Applications Guide .......... .. ................................................. 299
Editing Presets ................................................................................................................ ... 299
Modulation........................................................................................................................299
Modulation Sources ......................................................................................................300
Keyboard Key .............. .......................................................................................... .....300
Key Velocity .......................................................................... ..................................... 300
Release Velocity .........................................................................................................300
Gate ............................................................................................................................300
Key Glide .............................................. ...................................................................... 300
Pitch and Mod Wheels ............................................................................................. 300
Keyboard Pressure (mono aftertouch) ................................................................... 300
Pedal ...................... ......................... ....................... ......................... ......................... ... 300
Miscellaneous Controllers A-P ................................................................................301
Low Frequency Oscillators (2 per voice) ...... ... .................................................... .. . 301
Envelope Generators (3 per voice) .......................................................................... 301
Function Generators (3 per voice) .......................................................................... 301
Noise & Random Generators ......... .......................................................................... 301
T-switch and Footswitches .............................................................................. .........3 01
Modulation Cords ................................................................................................ ......... 301
Envelope Generators.........................................................................................................302
Retriggering ................. ............... ................ ................. ............... ................ ................ 30 2
Complete Mode .........................................................................................................3 02
Low Frequency Oscillators (LFOs)...................................................................... ............303
Random Sources ...............................................................................................................304
Clock Modulation............................................................................................................. 304
Syncing an LFO to the Clock .................................................................................... 304
Function Generators..................................................................................... .. .................. 305
Modulation Destinations ........................... ...................................................................... 306
Modulation Processors............................................................ ......................................... 307
Modulation Processor Examples ................................................................................. 308
Dynamic Filters ...................... ...........................................................................................309
12 Emulator X3 Reference Manual
Page 13

What is a Filter? ........ .......................................................................................... .......310
Parametric Filters ...................................................... .............................................. ...312
The Z-Plane Filter .......................................................................................................... 313
MIDI Channels & Real-time Controls............................................................................. 314
Assigning MIDI Controller Knobs............................ .......................................................316
MIDI Program Change Commands......................................... ....................................... 317
MIDI Bank Select Commands ................... ................................................ .. ................317
Background: Bank Select Commands ..... .................................................... ............317
MIDI Modes..................................................... ............................................ ...................... 317
13 - Appendix ............................................................... 319
Translator Emulator X Converter ....................................................................................319
Supported File Types .................................................................................................... 319
Emulator X VSTi........................................ .. .............................................. ........................ 320
Launching the VSTi Application .................. ................................................................ 320
1 - Setting up Cubase LE4 ...................... ................................................ ...................... 320
2- Recording a MIDI Track using Emulator X3 ..........................................................322
On Your Own ................................................................................................................325
Multisetup is Saved in the Recording Application ..................................................... 325
Checklist for Launching Emulator X VSTi ......................... ......................................... 326
Cubase LE ..................................................................................................................326
If you’re using PatchMix DSP... ............................................................................... 326
Keyboard Shortcuts................................. .......................................................................... 327
Drag & Drop...................................................................................................................... 328
Toolbar Functions...................... .. ..................................................................................... 331
MIDI Key Number to Note Chart.................................................................................... 332
Frequency Range of Common Instruments...................................................................333
MIDI Implementation Chart .... ................................................ ....................................... 334
Received Channel Commands ............ ................................................ .................... 339
Special Notes: ............................................................................ ................................ 339
Optimizing Your Computer for Emulator X..................................................................340
SCSI and IDE Drive Tips and Considerations ................................ ............................ 340
Index ............................................................................ 341
E-MU Systems 13
Page 14

14 Emulator X3 Reference Manual
Page 15

1 - Introduction & Installation
Introduction
Congratulations on your purchase of the Emulator X3 Streaming Sampling Synthesizer—the most powerful and complete software instrument in the world, built on
E-MU’s 35 years of synthesis experience. The Emulator X3 features the Xstream™
streaming sound engine with up to 192kHz sampling, and playback, an arsenal of
automated sampling/beat analysis/editing tools and almost unlimited sound manipulation.
Emulator X3 Features
Streaming
1 - Introduction & Installation
Introduction
• Xstream™ 24-bit/192 kHz Streaming Engine, featuring E-MU’s patented pitch
interpolation and precision 32-bit floating point processing for unmatched
sound quality.
• 32-bit and native 64-bit applications included (32-bit: Windows XP and Vista;
64-bit: Windows x64 and Vista)
• Optimized for Multi-core and Multi-Threaded processors to intelligently balance
the processing load across all available resources for exceptional performance.
• Standalone (64 MIDI channels) or VSTi (16 MIDI channels per instantiation)
operation.
Sampling
ASAP™ Automated Sampling and Placement
• Sample, Chop and Place
• Load, Chop and Place
• SynthSwipe™ automated hardware and software instrument sampling
Integrated Sample Editor
• Auto-Correlation Looping
• Crossfade Looping
• Comprehensive DSP Tools including Transform Multiply
• External Editor Link
Beat/Loop Tools
• Beat Analysis and Markup
• TwistaLoop™ non-destructive audio manipulator
• Xplode™ beat slicer with MIDI and Tempo Map Export
E-MU Systems 15
Page 16
1 - Introduction & Installation
Introduction
Synthesizer
• Advanced Modular Synthesis and FX Engine (from your initial sample’s tempo
through Emulator X3’s entire synthesis and FX architecture, all time-based
parameters syncable to BPM clock).
• Over 50 types of Z-Plane™ Morphing Filters (2nd order to 12th order),
including the Morph Filter Designer
• Multi-Function Generators/Arpeggiators (can be programmed to modulate
pitch, filters, volume, retrigger samples, or LFOs, change tempo or tr igger
other events)
• Virtual PatchCord Modulation Matrix (over 100 modules)
• Integrated Modulation FX engine (23 core effects), including SP12ulator,
Tremulator, Reverbs, Delays and many more
• Comprehensive sound format support, including EOS, EIII, GigaSampler, MP3,
REX2, .AIFF, SoundFont 2.1, .WAV and more.
Before you Begin…
You should have a good working knowledge of your computer’s operating system. For
example, you should know how to use the mouse, standard menus and commands.
You should also know how to cut, copy, paste, open and close files.
Notes, Tips and Warnings
Items of special interest are presented in this docume nt as notes, tips and warnings.
Notes
Warnings are especially important, since they help you avoid activities that can
provide additional information related to the topic being discussed. Often,
notes describe the interaction between the topic and some other aspect of the system.
Tips describe applications for the topic under discussion.
cause damage to your files, your computer or yourself.
Tutorial List
Although this document is primarily intended as a reference manual, it does contain
quite a few step-by-step tutorials that you may find helpful. A few are list ed below.
Tutorial Page Tutorial Page
Adding an Aux Effect 232
Adding an Effect to a Preset 233 Creating Sequencer Tempo Tracks 173
Building a Preset from Scratch 58 Layering Presets 124
Change Loops with a Controller 220 Looping 207
Conserving Polyphony 165 Morph Designer 150
Function Generator 140
Tip: Please refer to
the “Index” for a
complete list of all
Emulator X tutorials.
Control FX Parameters via MIDI 242 Sampling 282
Create a Custom Bank 47 Program Change Commands 317
Creating ADSR Envelopes 133 Setting up your Controller Knobs 28
Crossfade between two Loops 227 SynthSwipe 290
Examine a voice or sample 52 VSTi 320
16 Emulator X3 Reference Manual
Page 17

What’s New in X2
• Support for 64 MIDI channels (page 70)
• Three 64-stage Function Generators per voice (page 139
• Morph Designer allows you to design custom morphing filters (page 149
• TwistaLoop loop analysis and manipulation tools (page 209
• User interface changes
• New Region Page (page 115)
• New Detail Page with Voices and Zones info (page 119
• Improved Keyboard Display (page 99)
• Floating Keyboard (page 270
• Tabs in Voice Editor (page 89
• Envelope Mode Settings (page 132)
• Sample Display/Overview (page 169
• Sample Root Note shown with Red Bar (page 99
)
)
)
)
• Key CC Window Controls (page 108)
• Cycle Groups in CC Window provide more natural sound by cycling through
different samples on repeated key presses. (page 111
• Poly Key Groups allow you to limit polyphony per key (page 164
• New modulation sources for patch cords: (page 156
• Function Generator (+,~,<,)
• Function Generator (gate, trigger)
• New modulation destinations for patch cords: (page 159)
• Function Generator Rates/Retrigger/Length/Direction
•Key Timer Rate
•Lag Rates 1 & 2
• Loop Select: Continuous/Jump
• Sample Retrigger (+, -)
• TwistaLoop Oscillator Speed
• New Effects
•Compressor (page 248)
•Limiter (page 259
•Tremulator BPM (page 264
•Flanger BPM (page 257
)
)
)
• New Tuning Tables: al-Farabi 12, 22-Tone, 24-Tone, 36-Tone (page 83)
• More templates (XML based)
• Capture MIDI Controllers to preset initial settings (page 82
• Voices and Zones can be sorted according to different criteria (page 121
• New Preference Settings: Select edited preset for multisetup, Expand tree items
when selected, Knob tracking (page 29
)
• New MIDI Setting: Preset Tempo Channel (page 27
• More Undo Levels and greater control over undo behavior (page 30
• Effects Overhead dialog box (page 236
)
)
)
)
)
)
)
)
)
)
1 - Introduction & Installation
Introduction
)
)
New in X3
• Xstream™ 24-bit/129kHz Streaming Engine—32-bit and native 64-bit applications
optimized for Multi-core and Multi-threaded processors. Vista compatible.
• Xplode Region can now create companion MIDI files (page 117
• Export Tempo Map from Beat Analyzed samples (page 171
• Xtractor tool selectively processes audio based on stereo position (page 196
• Librarian improvements - Faster operation with large libraries (page 66
E-MU Systems 17
)
)
)
)
Page 18

1 - Introduction & Installation
Minimum System Requirements
Minimum System Requirements
To use Emulator X you will need at least:
• Pentium IV 1.5 GHz or equivalent CPU (2.4 GHz or faster recommended)
• CD-ROM Drive
• 512 MB RAM (2 GB DDR or greater recommended)
• Windows XP, Windows x64, Windows Vista, or Windows Vista x64
• Onboard Sound or Audio Interface
Software Installation
Programs installed:
• Emulator X3 Streaming Sampling Synthesizer application
• Emulator X VSTi
• Emulator X Factory Sound Banks
1. Insert the CD labeled “Emulator X3 - Software/Manual/Sounds Installation CD”
into your CD-ROM drive.
If Windows AutoPlay mode is enabled for your CD-ROM drive, the CD starts
running automatically. If not, navigate to the CD and double-click on Setup.exe.
2. Follow the instructions on the screen.
3. You will be asked to choose the Destination Folder for the program. The default
location is: “Program Files\Creative Professional\Emulator X.”
4. You will be asked to choose the Destination Folder for the VST plugins. The default
location is: “Program File\Steinberg\VstPlugins”
5. The program will be installed. Click Finish to complete the installation (when
prompted) then remove the Emulator X application disk from the CD drive.
6. The included CDs contain the following Emulator X sound banks:
• X Producer.........E-MU General MIDI, Hip Hop Producer, Proteus X Composer,
Saint Thomas Strings
• Studio Grand..... A stunning 1.4 GB grand piano bank
• Beat Shop 1.......ATC, Buju, Head Nod, Homage, IDA, Modern Kit, Rock Kit,
Seattle, Studio Kit
• Xperience...........Breakdown, Filters and Functions, Guitar Wah Bazaar, Jam
Session, Jazz Drummer, Transform Tool Kit, Transformed,
Twista Mania
• Xtreme Lead-1...The complete set of presents and samples from the Prote us
Xtreme Lead-1 sound module
7. Follow the onscreen instructions to install the banks on your hard disk. The
Factory Sound Banks are installed inside “Program Files\Creative Professional\Emulator X\Production Sound Banks” by default.
8. You may install the sound bank disks now or at a later time.
No Hardware
Requirement: As of
software version 3.0
Emulator X3 no longer
requires that a piece of
E-MU hardware be
connected to your
computer system.
18 Emulator X3 Reference Manual
Page 19
Running the Application for the First Time
Running the Application for the First Time
1. Launch the Emulator X program by double clicking the Emulator X icon on the
desktop or by selecting the Emulator X item from the Start menu.
2. You will be asked to activate your copy of the softwar e by ent er ing the serial
number included with your master CD-ROM.
1 - Introduction & Installation
3. Activation can be verified via the internet or by email. If your computer is
connected to the internet, activation will be automatic.
4. If you are NOT connected to the internet, you can register via email using another
computer (such as a friend’s house, or public library). Click the “Activate by email
via another computer” button. The following dialog box appears.
5. Contact E-MU by email at: emu.support@customercare.creative.com. Be sure to
include your Serial Number (from your Activation Card) and the Request Code in
the email message. You will receive a return email with your author izati o n code.
6. When you receive the response code enter it in the box above and click “Activate”.
7. Continue on to “Setting Up Your Audio” on the following page.
E-MU Systems 19
Page 20
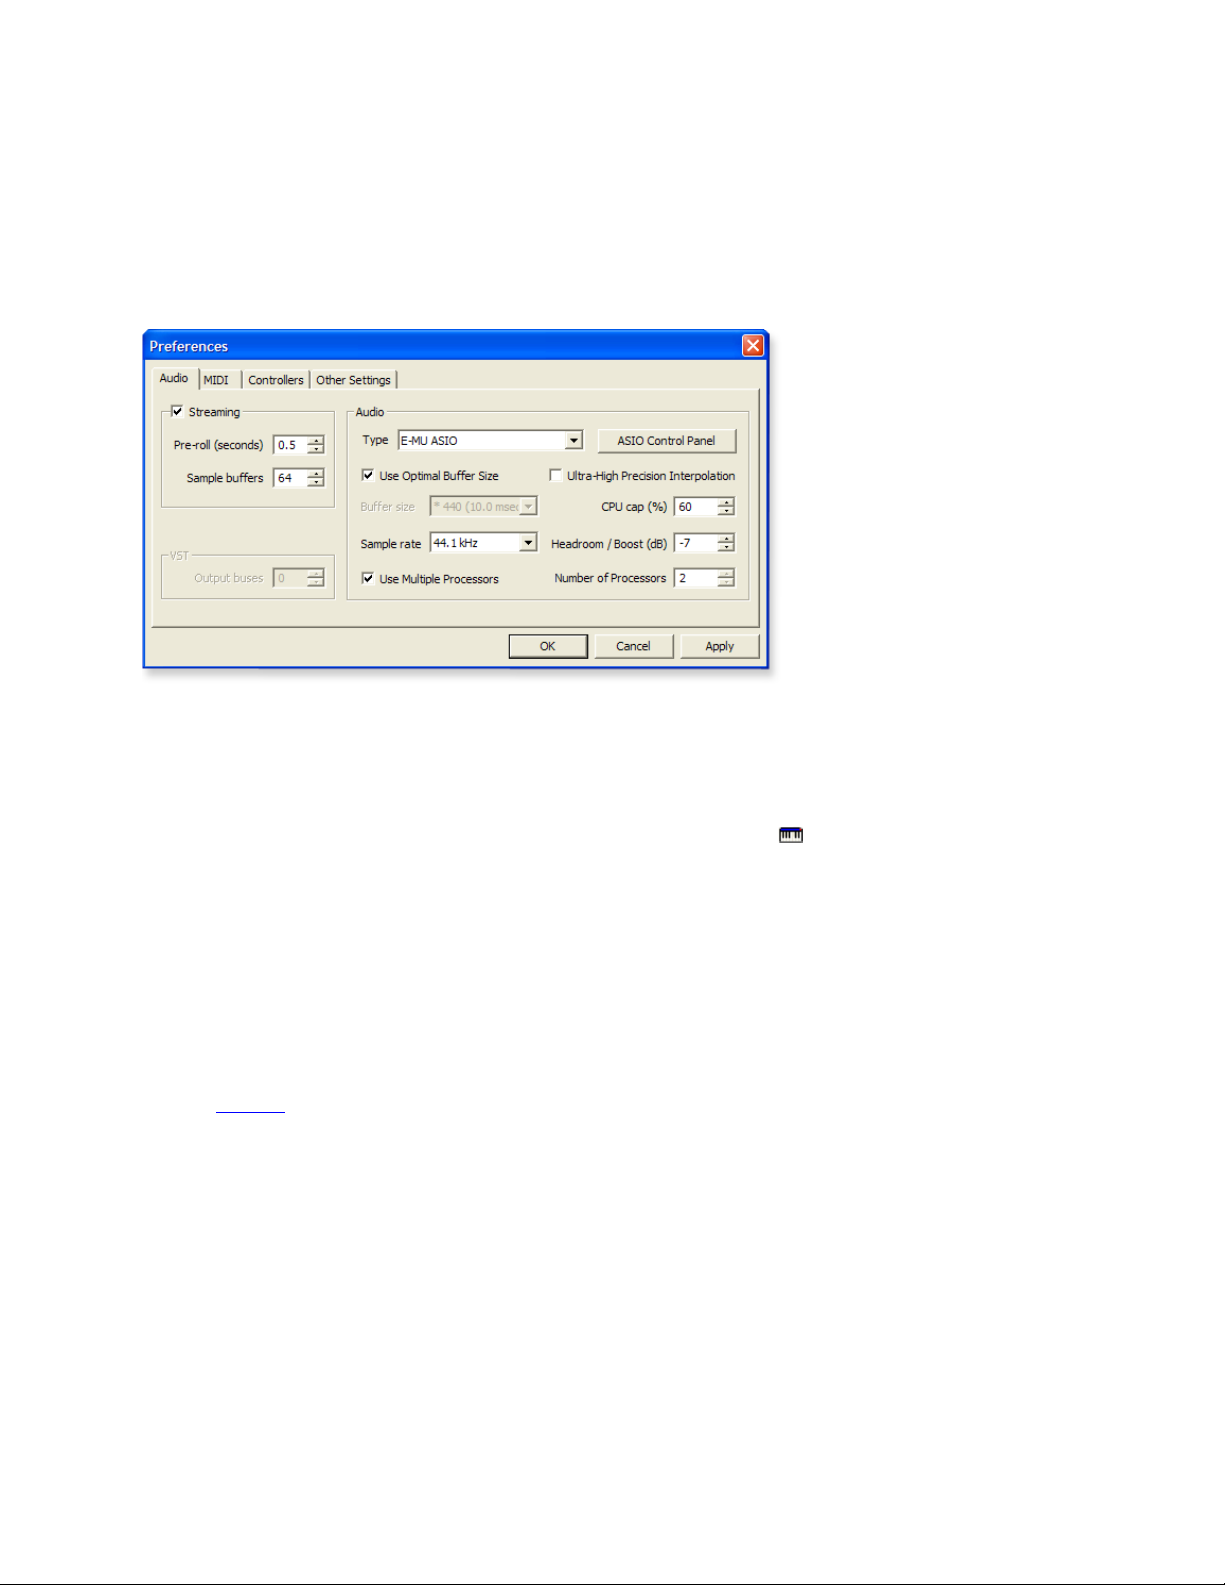
1 - Introduction & Installation
Setting up your Audio
Setting up your Audio
Before you can start making music, you have to establish a connection between
Emulator X and your audio output hardware. This is done by selecting a software driver
that makes this connection between hardware and software.
1. In the Options menu of Emulator X, select Preferences. The following screen
appears.
2. In the Audio section of the menu, select E-MU ASIO if using an E-MU Digital
Audio System. Select ASIO E-MU USB|0202, ASIO USB|0404 or ASIO E-MU
Tracker Pre|USB if using an E-MU USB interface. If you’re using another brand of
audio interface, select the appropriate driver.
3. You can verify that the Emulator X is producing audio by clicking on the icon
in the toolbar. This calls up the Floating Keyboard. Play the floating keyboard
with your mouse and you should be hearing sound and seeing activity on the
Emulator X main mix meters.
4. After running Emulator X, you may want to adjust the Audio Preferences for
optimum performance on your computer system.
5. If for some reason you want to use hardware that doesn’t support ASIO, select the
DirectSound driver. For Emulator X to communicate with your sound card, you
need to have Microsoft DirectSound installed on your computer and there must be
a DirectSound driver installed for your audio hardware.
Please go to page 22
for complete explanations of the Audio Preferences.
20 Emulator X3 Reference Manual
Page 21
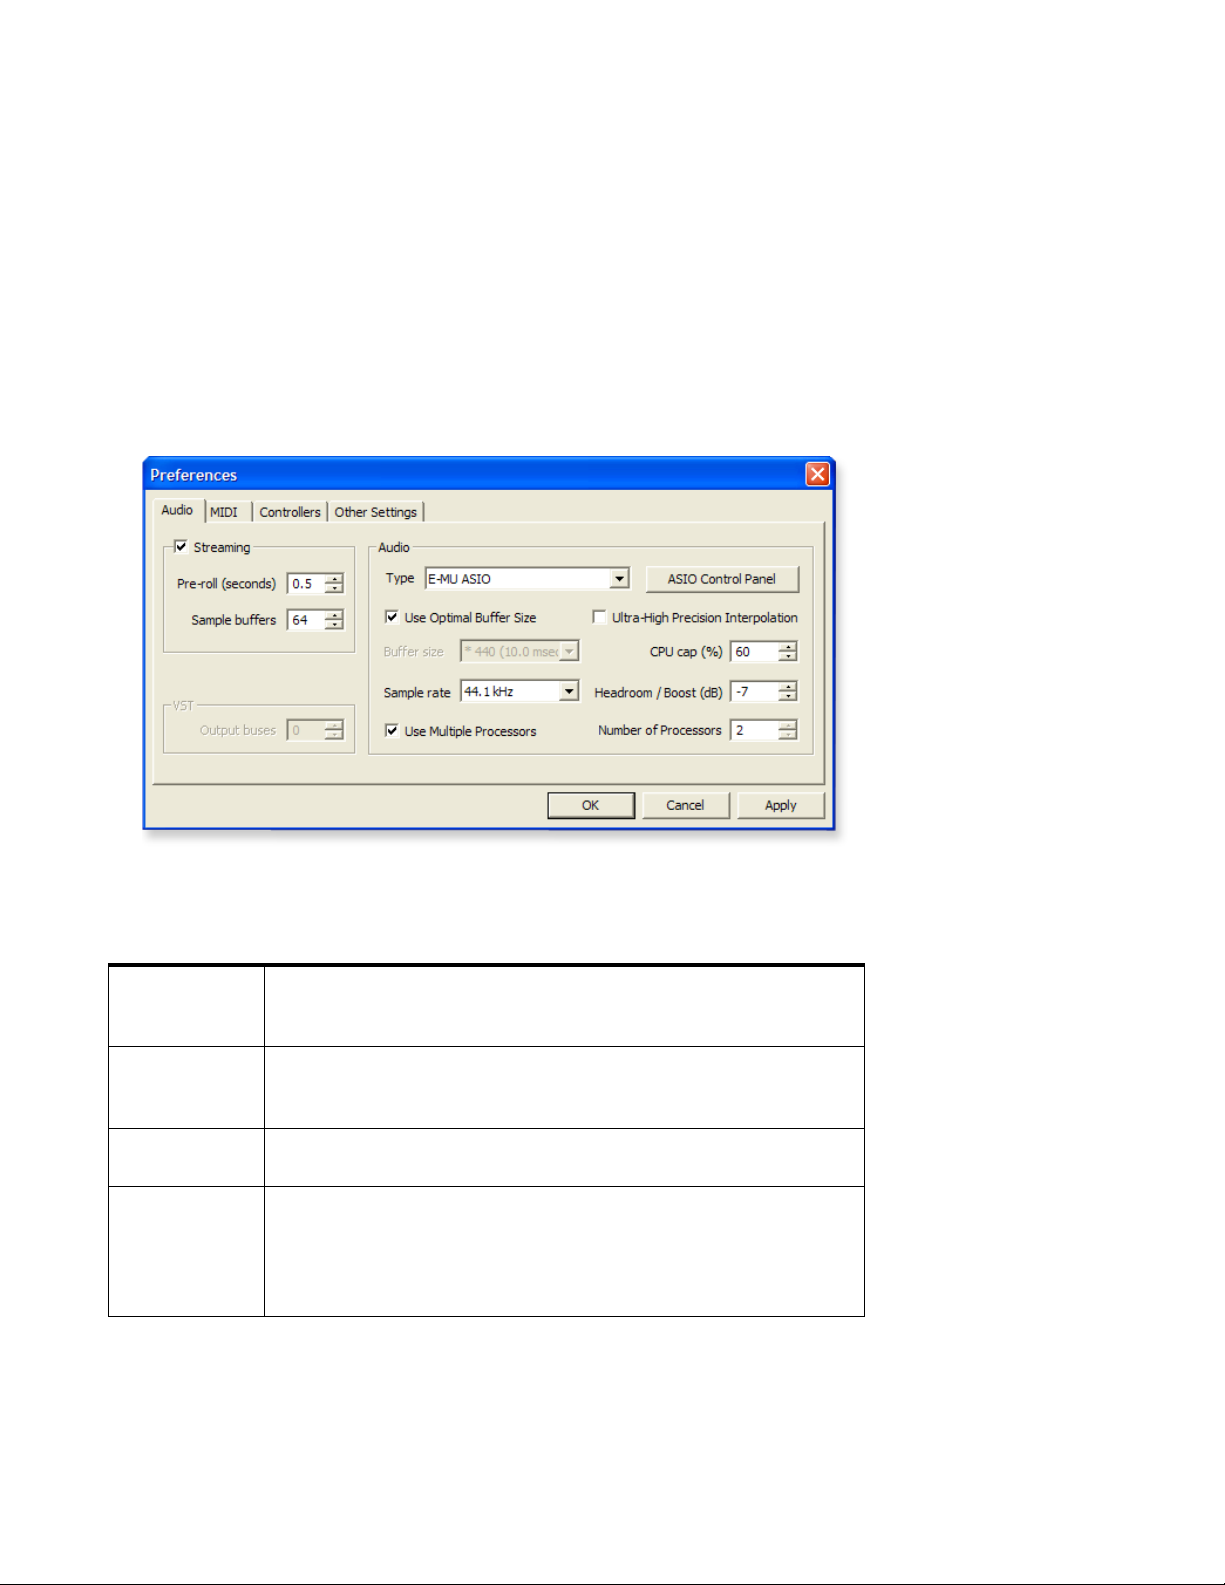
Setting up the Preferences
The preferences dialog box contains a variety of important controls used to configure
Emulator X for your audio hardware and to customize the controls to suit the way you
work.
To get the best possible performance from your computer, you’ll need to spend a little
time adjusting the Audio Preferences such as Pre-roll, Sample Buffers, CPU Cap and
ASIO Buffer latency. These parameters interact with each other and you may have to
experiment to find the settings that work best on your unique computer system.
To Access the Preferences Dialog Box
1. In the Options menu, select Preferences. The following screen appears.
1 - Introduction & Installation
Setting up the Preferences
2. The preferences dialog box is divided into four main groups. Click on the tab
heading to select one of the four sets of controls.
Disk Streaming Controls, Sample Rate, Audio Hardware Setup &
Audio
MIDI
Controllers
Other
Pitch Shift Algorithm Selection, Multiple Processor Support, ASIO
Control Panel.
MIDI Input Channels 1-64, IntelliEdit, and Receive/Ignore Program
Changes, Internal/External Tempo Source select, Velocity Curve,
Volume Curve, Volume Sensitivity, Preset Tempo Channel.
This section allows you to set up the MIDI Continuous Controllers
you want the Emulator X to receive.
This group contains several miscellaneous controls: Load last bank at
startup, Select preset on active channel when editing in multimode,
Clear clip indicators after 10 seconds, Expand tree items when
selected, Knob tracking, Recording Directory, External Audio Editor,
Undo settings.
E-MU Systems 21
Page 22
1 - Introduction & Installation
Setting up the Preferences
Audio Preferences
Streaming
When you load an Emulator X bank (with Streaming on), you are not actually loading
the sample files themselves into your computer’s RAM. Only the prese t in formation
and the first few seconds of each sample are loaded. The rest of the sample data is taken
directly from the hard disk when needed.
This streaming technique makes fast loading times possible even when using huge
banks that would clog a RAM-based sampler. Multi-layer, minute-long, stereo samples
on each key are no problem for Emulator X. Sample streaming technology is not new.
It was originally developed in the 1980’s for hard disk audio recorders so that fast
punch-ins and punch-outs could be achieved.
You have the option to enable or disable streaming audio. If streaming is turned off,
Emulator X loads (or attempts to load) the entire bank into RAM.
If streaming is so great, why would you ever want to turn it off? Well, if you’re using
your computer as an audio workstation, performing multiple simultaneous functions,
sooner or later, you’ll exceed your computer’s CPU, memory or disk access resources.
Sample streaming makes very heavy demands on your hard disk. If you’re recording
other audio tracks, using multiple software plug-ins and playing Emulator X with a lot
of voices, you may run into a disk access bottleneck. By disabling streaming and
loading the bank into your unneeded RAM, your hard disk can be reserved for more
critical operations.
Pre-roll (seconds)
This important control allows you to set ho w many seconds of each sample should be
loaded into RAM when the bank is loaded. This setting greatly influences the performance of Emulator X when streaming is on. The setting you choose depends on: the
number of samples you want to use and the amount of RAM you want to dedicate to
Emulator X.
The smaller the pre-roll, the more disk access will be required for sustained sounds.
Frequent disk access may overtax your computer system, depending on its speed and
the number of other disk dependent applications you have running. Large pre-roll
times improve polyphony and performance at the expense of system RAM and slower
bank loading. If you set the pre-roll high enough, the entire bank will be loaded into
RAM and no disk streaming will occur.
Tip: If you get an
error message when
trying to open a file, the
file may be too large to fit
into RAM. Turn streaming
on.
Tip: Decrease Pre-roll
time for fast load times
when auditioning sounds
and creating new banks.
Increase pre-roll time
when you’re playing
many notes or dense
sequences.
22 Emulator X3 Reference Manual
Page 23

Sample Buffers
This control allocates the amount of RAM that will be set aside for Emulator X (in other
words, the number of the largest complete samples in the bank th at can be kept in the
RAM cache). As samples are played, they are streamed from the hard disk into RAM. If
you play those samples again and they are already in RAM, they don’t have to be
reloaded. This control sets the size of the RAM cache that will be kept and lowers disk
access at the expense of RAM.
Optimize the Performance and Polyphony of your System
The polyphony of the Emulator X is dependent on a variety of factors including:
• The Pre-roll setting (if str eam ing is enabled)
• The Sample Buffers setting (if streaming is enabled)
• The CPU Cap setting — the amount of CPU resources available to the Emulator X
• The bit depth of your samples —16 or 24 bits (24 bits = fewer voices)
• The sample rate of the audio hardware — 44.1kHz, 48kHz, 96kHz .
Lower sample rates use fewer CPU resources.
• Ultra-High Precision Interpolation and the use of high-order filters can reduce
polyphony.
1 - Introduction & Installation
Setting up the Preferences
Tip: Adding RAM is a
relatively cheap and easy
way to improve EX3
performance. With more
RAM available, you can
turn up the Pre-roll and
Sample Buffers to reduce
disk access.
• The speed of your computer — CPU speed, number of CPUs, speed and size of
RAM, as well as hard disk access time
Cost of Filters on Voice Count
No Filter
2nd Order
No additional CPU load.
Additional CPU load comparable to playing another 1/2 sample.
4th Order Additional CPU load comparable to playing another 3/4 sample.
6th Order Additional CPU load is comparable to playing 1 more sample.
(maximum polyphony is divided by 2)
12th Order Additional CPU load comparable to playing 2 more samples.
(maximum polyphony is divided by 3)
Synthesizer parameters also use CPU resources. When creating presets, feel free to use
modulation cords as needed, but don’t leave cords half connected if you aren’t using
them, since these patch settings waste CPU cycle s. Turn off both the source and
destination of unused cords.
Audio Setup
These controls let you set audio quality parameters related to Emulator X and your
sound card.
Type
You have a choice to use either Direct Sound or ASIO audio drivers. If you have
another high quality sound card installed in your system, it will be shown in this field.
ASIO (Audio Stream Input/Output) is a cross-platform, multi-cha nnel audio transfer
protocol. ASIO is fast and supports 16-bit and 24-bit data width. Select E-MU ASIO if
using an E-MU Digital Audio System. Select ASIO E-MU USB|0202, ASIO USB|0404
or ASIO E-MU Tracker Pre|USB if using an E-MU USB interface. If you’re using
another brand of audio interface, select the appropriate driver.
E-MU Systems 23
Page 24

1 - Introduction & Installation
Setting up the Preferences
Selecting Direct Sound uses the audio output device specified in the control panel of
your computer. In general, using Direct Sound is NOT RECOMMENDED because of
low transfer rate and high latency issues.
Buffer Size
This control sets the number of sample periods between updates of the synthesizer
parameters. The buffer size can be adjusted according to the speed of your computer’s
CPU. A faster CPU can handle a lower buffer size.
An asterisk (*) next to a buffer size in the drop-down menu indicates the optimal
buffer size for your ASIO Buffer Latency settings.
Use Optimal Buffer Size
When this box is checked, the Emulator X will choose the best buffer size based on the
ASIO Buffer Latency setting (located in the ASIO control panel). You should normally
leave this feature enabled for best audio performance. In certain rare cases you may
want to manually set the buffer length to improve MIDI or synth performance.
Sample Rate
This control sets the output sample rate of the Emulator X, and will always match the
sample rate of your sound card. The default setting is 44.1kHz.
CPU Cap
This control sets the maximum percentage of CPU resources that can be used by
Emulator X and consequently the maximum number of samples that can be played at
the same time. (Depending on the design of each preset, playing a single note on
Emulator X may cause multiple samples to play simultaneously.) The maximum
setting is 80% CPU usage. If you hear notes being “stolen” in your seque nce or as you
play the keyboard, or if the disk meter readout at the bottom of the window frequently
goes into the red, increase the value of this control. If you have other applications
running, you may want to reduce the setting of this control to free up more CPU for
them.
Headroom/Boost
Headroom is the amount of dynamic range remaining before clipping occurs.
The amount of headroom is adjustable from 12 dB to -30 dB in 1 dB increments. A
headroom setting of 12dB provides the hottest output leve l, (and the highest signal to
noise ratio) but may produce “clipping” if too many notes are played at once. The
default headroom setting is -7 dB, which maintains an excell ent signal to noise ratio
while keeping a reasonable amount of headroom in reserve. If you hear the signal
clipping or breaking up, make the headroom value more negative. In practice, you can
think of this control as adjusting the control range of the Master Volume control.
Ultra-High Precision Interpolation
This button allows you to select between E-MU’s ultra-high precision pitch shifting
algorithm or a lower quality pitch shifting scheme which uses fewer CPU resources.
If you are using presets with a sample placed on every key, as is the case on many
banks, you can switch high precision off to free up CPU with no penalty in audio
quality. No pitch shifting is occurring anyway. High quality pitch interpolation is only
needed when you are playing presets which have a few samples mapped across the
entire keyboard. In this case, Emulator X shifts the pitch of the available samples to fill
in the keyboard.
Warning: Sounds
with long release times
will exhibit “voice
stealing” more than short
percussive sounds.
24 Emulator X3 Reference Manual
Page 25
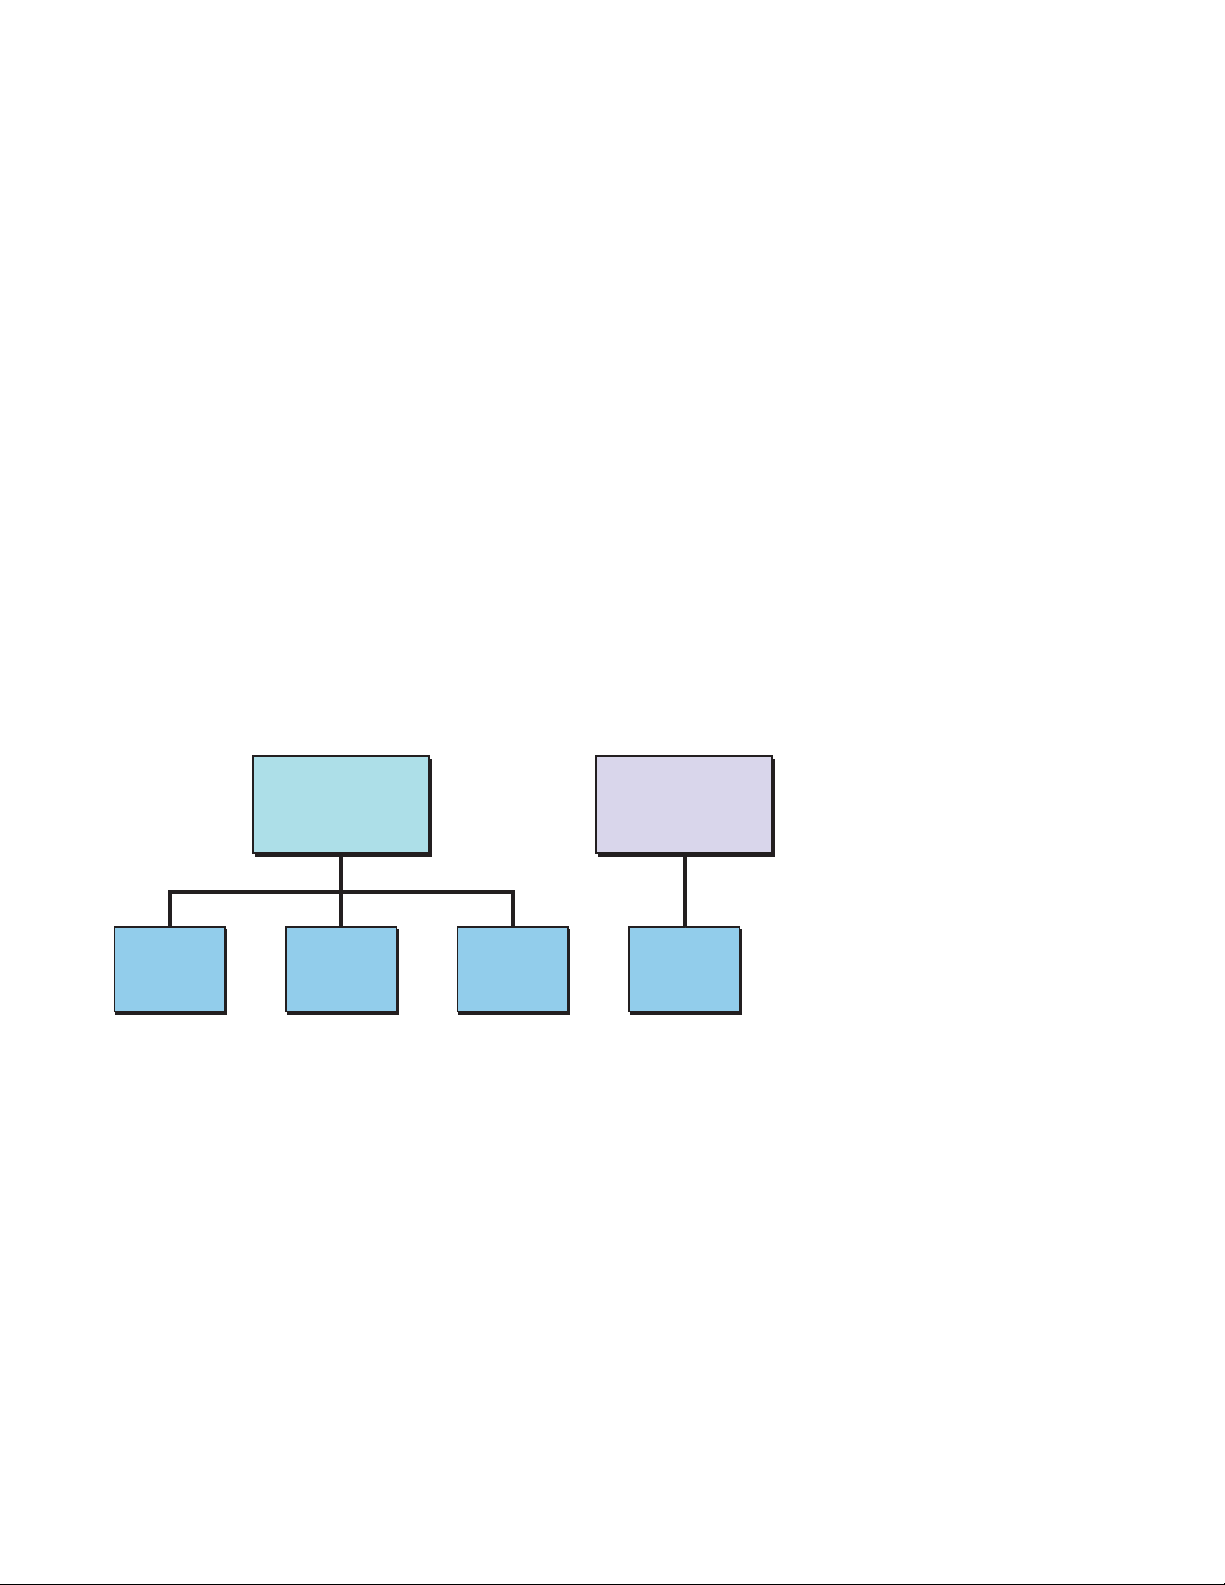
ASIO Control Panel
This button brings up the E-MU ASIO control panel which allows you to set the ASIO
buffer latency in milliseconds. This important setting determines how fast notes will
sound after you play them. If this time is too long, (>10mS) the keyboard response will
feel slow and sluggish. If set too fast, however, you will hear the sound break up and
crackle when you play too many notes. Experiment to find the setting that gives the
best performance on your computer.
Use Multiple Processors
This option allows the processing load of the Emulator X to be divided among several
CPUs or multi core processors. You can also set the Number of Processors (up to 4) to
utilize the latest quad-core processors for significant performance gains. You can even
use the 2 processor option if you have a hyper-threaded CPU since it can run 2 simulataneous threads.
If your computer is also serving as your DAW, recording audio tracks and running VST
plug-ins, simply assigning all your available processors to the Emulator X may not
always be the best approach. Since your computer is running many other processes
besides the Emulator X, you want to balance the workload between your available
cores for most efficient results.
For example, if you have a screaming fast quad-core system you might assign the
Emulator X to use 3 of the 4 available CPUs for a significant performance gain without
crowding out your DAW. On the other hand, if you have a computer dedicated to the
Emulator X you might want to give it all the available CPUs.
1 - Introduction & Installation
Setting up the Preferences
Tip: To find out how
many logical processors
your computer supports
check the “Performance”
tab in the Windows Task
Manager (Ctrl-Alt-Delete
or “Processors” in the
Device Manager.
Emulator
X2
DAW
Software
CPUCPUCPUCPU
When running multiple audio software applications, it’s usually best to balance the workload
between the available CPU cores.
Balancing the workload between the available CPUs is the key to maximizing the
performance of your system. If you have a multi core machine and Multiple Processor
mode is OFF, you can probably turn up the CPU Cap (try 80%) for a performance gain,
since the multiple CPUs are sharing the overall task load.
VST Output Buses
This control is only active in the Emulator X VSTi application. This setting allows you to
add additional VST buses (stereo pairs). Emulator X channel outputs can be assigned to
VST buses in the Multisetup, Output field. These outputs are sent to the VST Mixer in
your recording application. You must restart the VSTi for the change s to take effect.
E-MU Systems 25
Page 26
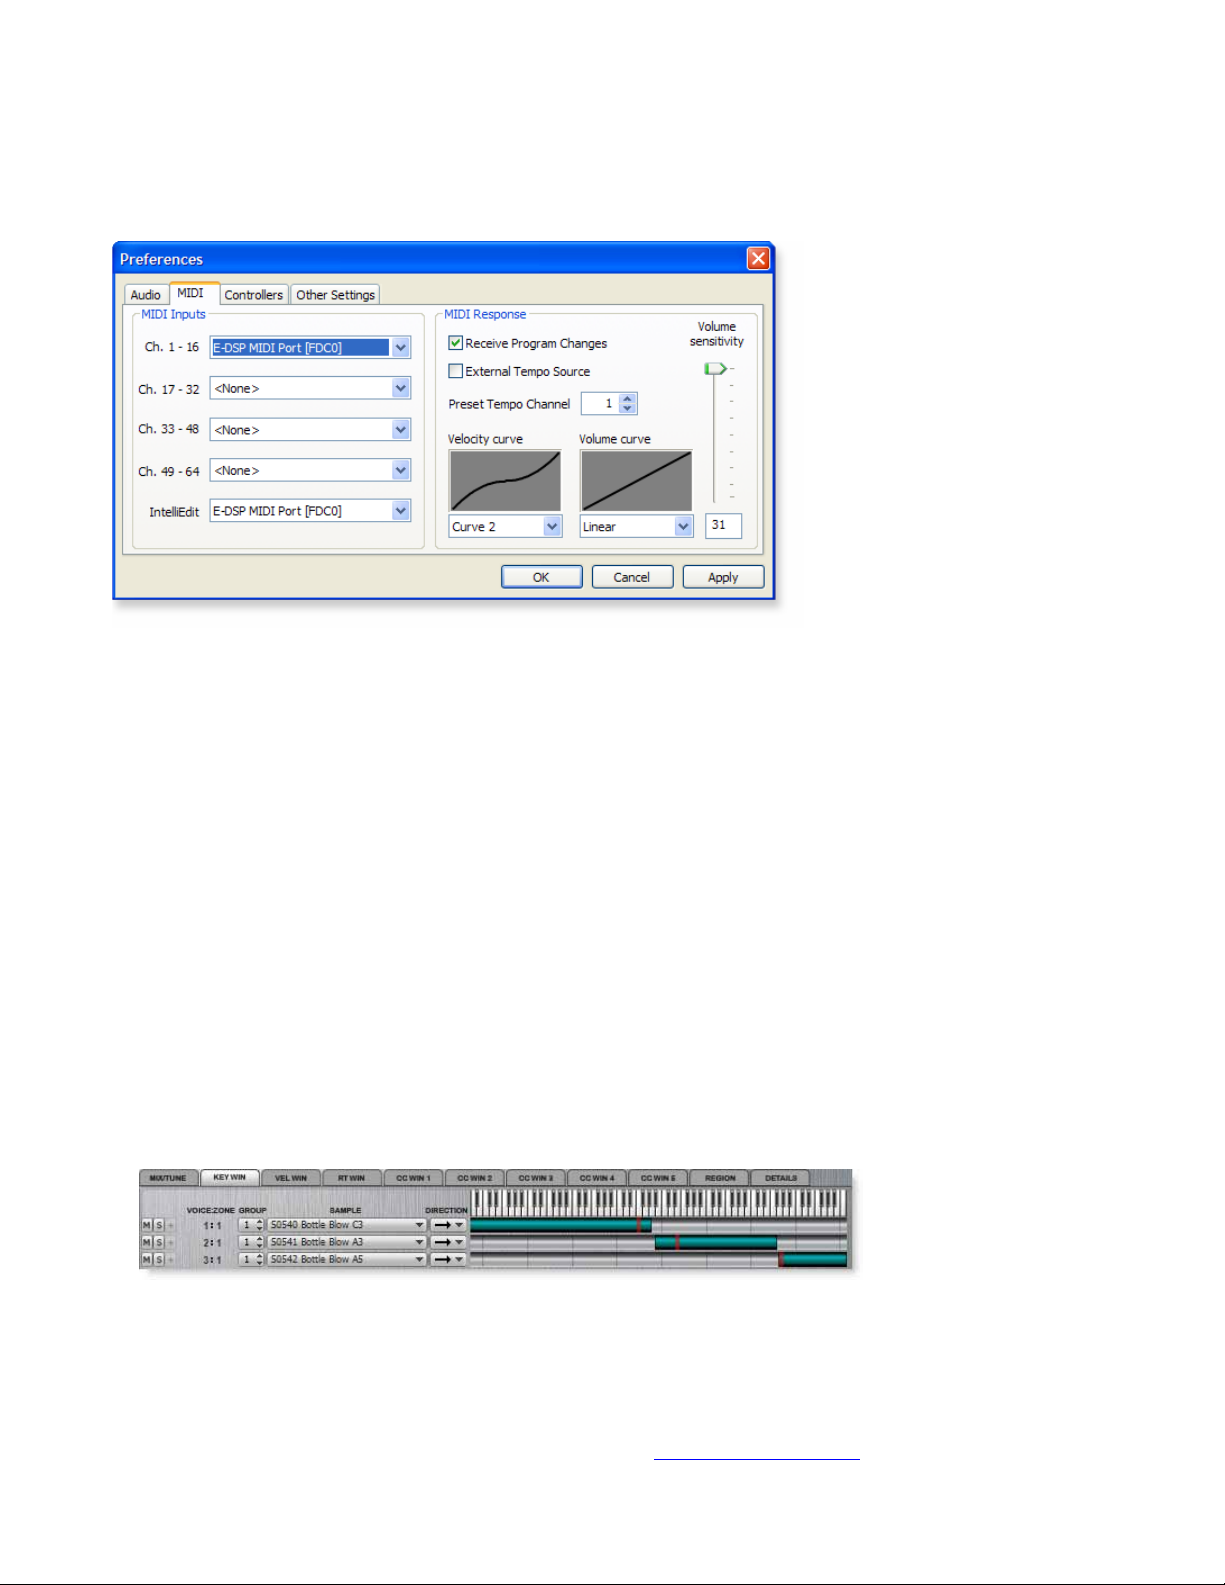
1 - Introduction & Installation
Setting up the Preferences
MIDI
This group of preferences allows you to set up the MIDI inputs, adjust the master MIDI
volume and velocity curves and turn the “IntelliEdit” feature on or off.
MIDI Inputs
Channels 1-16, 17-32, 33-48, 49-64
Emulator X can respond to 64 MIDI channels. Since there can be only 16 MIDI
channels per MIDI cable (or input), four inputs are provided. Set the MIDI inputs to
match up to four outputs from your MIDI interface or sequencer. If you don’t need 64
channels you can turn any input off.
IntelliEdit
This control allows you to set the MIDI device for IntelliEdit. Selecting “None” disables
the feature.
When editing sample key ranges or editing voices it is convenient to select the key
position by simply playing your MIDI keyboard. IntelliEdit lets you selectively edit key
ranges using the keyboard when you need to, but blocks keyboard editing when you
may not want it, such as when your keyboard is playing in the background.
To Use IntelliEdit:
1. Make sure IntelliEdit is set to the same MIDI port your keyboar d is using.
2. In one of the Voices and Sample Zones screens such as “Key Window”, position
the cursor inside one of the Key Range fields (Low or High).
3. Press and hold, Ctrl+Alt on your computer keyboard.
4. Play your MIDI keyboard. The key range will be edited.
5. In the Voice Edit window, holding Ctrl+Alt lets you select voices for editing. If
more than one voice is assigned to the key, the voices will cycle around with
repeated pressing of the same key.
6. To select multiple voices, you must use the Group feature. See
26 Emulator X3 Reference Manual
Groups on page 93.
Page 27

Receive Program Changes
This check box selects whether or not MIDI Program Change messages from your MIDI
controller or sequencer will be received or ignored by Emulator X. Place an X in the
check box to receive program changes.
External Tempo Source
This check box selects between internal tempo clock or MIDI clock as the tempo
source. Emulator X uses a global master tempo for Tempo-based Envelopes, Tempobased LFOs, clock modulation and TwistaLoop. When this check box is selected, MIDI
clock will be used for the global tempo and the tempo control in the Multisetup
window will be disabled.
Preset Tempo Channel
The tempo of Emulator X can be specified in the preset so that selecting a preset on a
specific MIDI channel changes the tempo. See
Initial Tempo on page 82. This option
selects the MIDI channel whose preset will be used for Tempo Control. This allows the
proper tempo to be set when a Tempo-based or Twistaloop preset is selected.
For example, suppose you have this field set to channel 1 and the preset on MIDI
channel 1 has its Tempo Control set to 122.22 BPM. When the bank is loaded, the
Tempo will be set to 122.22 BPM. If you change the preset on channel 1, the tempo will
change to follow the “Set Global Tempo” setting in the new preset.
If the preset on the Preset Tempo channel has its Tempo Control set to “Off”, (or if this
option is set to “Off”) no tempo change occurs when the preset is selected.
1 - Introduction & Installation
Setting up the Preferences
Important!
If External Tempo Source
is set to external, the
tempo control in the
Voice Processing window
will be “greyed-out” and
non-functional.
MIDI Response
These controls allow you to customize the MIDI response of Emulator X to match your
MIDI Controller or other instruments.
Vel oc ity Curve
Incoming velocity values can be scaled by one of 24 curves to better adapt to your
playing style or MIDI controller. Selecting “linear” leaves incoming velocity data
unaltered. The shape of the selected curve is displayed in the window. Select the curve
that works best for you.
Vol um e Curve
This is an adjustment to help match MIDI controller #7 volume response to other
manufacturers’ equipment. Three curves are provided: Linear, Inverse Square or
Logarithmic. The action of this control is displayed in the window.
Volume Sensitivity
This control allows you to modify the response curve for MIDI continuous controller
#7 (Volume). This allows you to match Emulator X's response to other manufacturers’
equipment. Low numbers compress the volume control range, raising the volume level
at lower controller #7 values.
E-MU Systems 27
Page 28
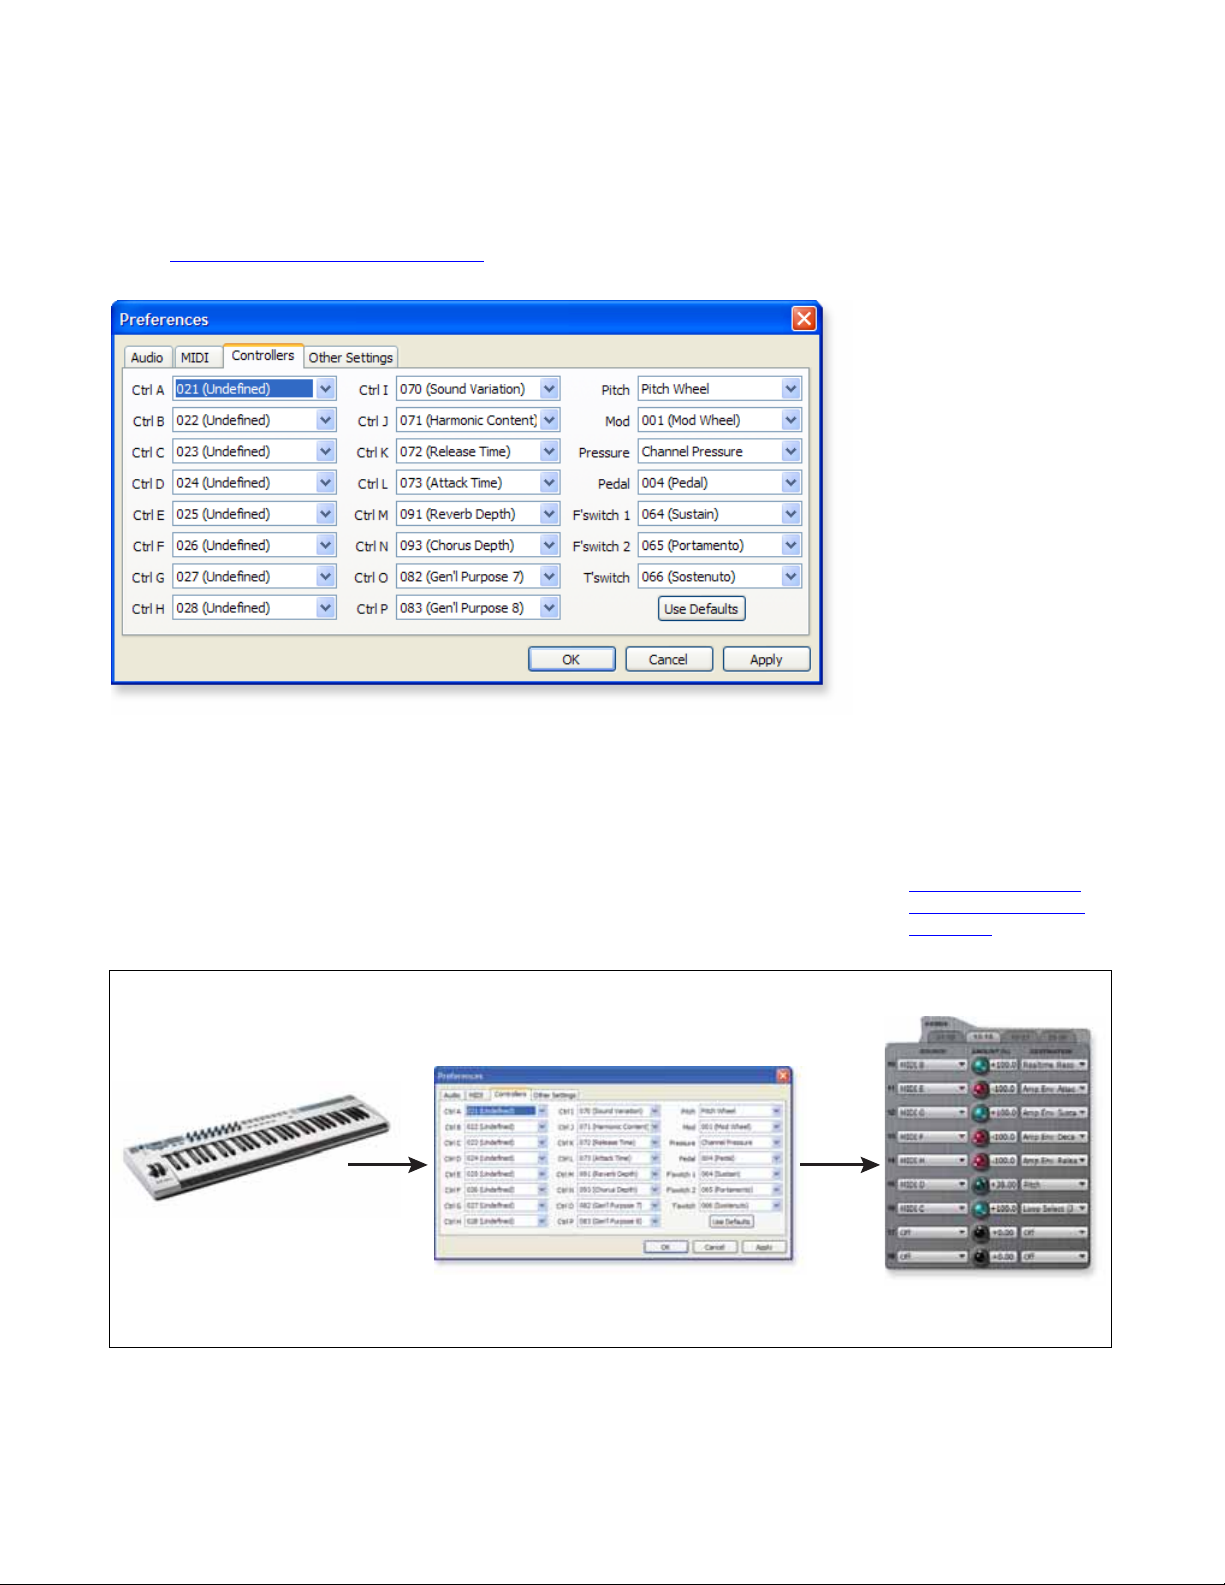
1 - Introduction & Installation
Setting up the Preferences
Controllers
This is where you set up which MIDI Continuous Controllers Emulator X will receive.
Match these controls to the MIDI continuous controller numbers that your keyboard
or sequencer transmits. What the controllers actually do is programmable in each
preset. See
Modulation Cords on page 156.
As you can see, MIDI Continuous Controller numbers are assigned to letters (A-P) or
labels (Pitch, Mod, Pressure, Pedal, etc.) in this scree n. When programming a preset,
these letter or name labels can be assigned to control various parameters such as filter
frequency or attack time.
The name labels such as pitch and mod wheels are so commonly used that they have
their own assigned name, but these can also be freely assigned in any way you choose.
If you’re just getting started, it’s probably best to use the default settings. Press the
“Use Default” button to restore the default settings shown above.
Controller Knob Assignment
Preferences
(Options, Preferences Controllers)
MIDI Keyboard
Controller
Knob data
1. Select the CC
numbers you
wish to receive.
Continuous controller numbers
are assigned Letters (A-P)
& Labels (mod wheel, etc.)
For more information
on MIDI Controllers...
MIDI Channels &
See
Real-time Controls on
page 314.
Voice Processing Cords
2. Assign the controller
letters to Synth
destinations.
The Controllers screen determines which CC numbers (knob controller data) the Emulator X will receive. What the knobs actually
do to change the sound can be programmed differently for each preset (Voice Processing).
28 Emulator X3 Reference Manual
Page 29

Appearance Settings in Windows
Adjust the “Performance Options” in Windows to make the Preference buttons much
easier to read and increase smoothness when dragging windows around the screen.
To Improve the Appearance Settings:
1. Open the Windows Control Panel. (Start, Settings, Control Panel)
2. Select System.
3. Select the Advanced Settings tab.
4. Under Visual Effects, select Adjust for Best Performance.
5. Click OK.
Other Settings
1 - Introduction & Installation
Setting up the Preferences
Startup
• Load last bank - This feature automatically loads the las t bank you had loade d
whenever you start the Emulator X application.
Interface
• Select preset on active channel when editing in Multimode - When checked,
selecting a preset for editing in the Tree selects that preset on the active channel
in the multisetup. This is what you want if you’re editing a preset and playing a
MIDI keyboard.
If you’re playing back a multi-timbral se quence and want to make a quick edit to
a preset, you might want this feature Off so as not to alter your multisetup.
• Clear clip indicators after 10 seconds - This feature automatically clears the
main output meter clip indicators. If this function is set to Off, the clip indicators
will stay on until you manually click on them.
• Expand tree items when selected - If this option is checked, selecting presets
from the Tree will automatically open the selected preset for editing. When
unchecked, selecting presets from the Tree will select the preset for playing, but
not open it for editing.
• Knob Tracking - This control allows the rotary knobs to be manipulated with
either Rotary, Horizontal, or Vertical motion. The setting affects all rotary
controls.
E-MU Systems 29
Page 30

1 - Introduction & Installation
Setting up the Preferences
Paths
• Recording and temp file directory - This option allows you to choose the
location where new samples will be stored when sampling.
• External audio editor - This option allows you to set the location of an external
audio editor. The External Audio Editor is selected from the Sample Edit menu
or the toolbar. When the External Editor is selected, the current sample
opens in the editing application you have selected. When y ou Save the edited
sample in the external editing application, it is automatically transferred back to
the Emulator X. You even have the option to Undo the external edit.
Undo
•History size - The maximum number of stored undo steps.
• Clear history when saving - Clears all undo history when you save a bank. If
you have this box unchecked, you can undo even when you save and re-open a
bank.
• Clear now - Clears the undo history immediately.
30 Emulator X3 Reference Manual
Page 31

Organization of the Emulator X Modules
2 - Emulator Architecture
This chapter contains important background information about the organization of
the various modules of Emulator X. Although this chapter doesn’t contain any handson tutorials, this information is vital to your understanding of this ultra powerful
instrument. Read This!
2 - Emulator Architecture
SAMPLING
INTEGRATED
SAMPLE
EDITOR
LOAD
& BROWSE
LIBRARIES
VOICES
& ZONES
S
SE
L
VZ
ASAP
Load
Sample
SynthSwipe
LOOPING
TOOLS
Auto-Correlate
Crossfades
Multiple Loops
Translator Tools
Librarian
Audition from Disk
Xplode
128 Layers
Crossfades
CC Windows
Key Switching
RT Windows
Cycle (flex)
Region Editor
Groups
FILE-BASED
DSP
Xtractor
Pitch Change
Reverse, etc.
Organization of
the Emulator X
Modules
BEAT
ANALYSIS
Sample Markup
PatchCords
Envelopes
VOICE
PROCESSING
PRESET
GLOBALS
MULTISETUP
VP
PG
MS
LFOs
Function Gens
Morph Filters
Tuning/Amp
Templates
FX Sends
Preset FX
Tuning Tables
Controller Setup
64 Chan Mixer
Aux FX
TwistaLoop
Tempo
OUTPUT
E-MU Systems 31
Page 32

2 - Emulator Architecture
A Modular System
A Modular System
You can think of Emulator X as a collection of sound organizing modules, all
contained within the current bank. The following is a brief description of the five main
elements of Emulator X’s hierarchy starting from the largest element, the Bank.
Bank
Before you can play Emulator X, you load a Bank of presets. The bank contains all the
sounds you wish to use in a particular sequence or performance. If you need additional
sounds, they can be added by simply dragging and dropping them into the bank from
the system or library. Unneeded sounds can likewise be removed from the bank. When
loading a bank, Emulator X only loads a small portion of the digital samples so bank
load time is greatly reduced.
Saving
A bank’s data is retained only for as long you have the program open. Saving the bank
to disk permanently stores the bank so you can access it next time you use the program.
IF YOU DO NOT SAVE A BANK, ANY CHANGES YOU HAVE MADE WILL BE LOST
WHEN YOU OPEN A NEW BANK, OR CLOSE EMULATOR X!
Do not wait until the end of a session to save. Save your work periodically in case of
power failure or some other unforeseen circumstance that might exit the program.
Hard disks and computers are not infallible. All hard disk banks should be backed up
periodically to another hard disk or other media. Should you improve the preset or
sample later, you can always replace the original with the revised version. And if
something goes wrong, the original will still be available to save you the ordeal of
starting from scratch.
When you choose Save, (as opposed to Save As) only the edited presets, voices and
samples will be written, saving time and memory.
When you choose Save As from the File menu, the entire bank—presets, voices and
samples—are re-written to the hard disk as new files. This method, although somewhat
wasteful of memory, ensures that all your samples remain bound with your bank.
When you save, you might be prompted with a dialog box telling you have unused
samples. Choosing to delete the unused samples removes them from your hard drive,
saving space and memory. This dialog occurs any time you have samples in your
sample pool that are not assigned to any voices.
Undo/Redo
Almost every action you do with Emulator X can be undone. You can undo up to 500
actions and this number is selectable under Prefer ence s in the Options menu. See page 30
Select Undo or Redo from the Edit menu or press Ctrl+Z (Undo) or Ctrl+Y (Redo) from
the keyboard.
Whenever you have
done enough work that
you would hate to lose it,
BACK IT UP!
Use Save As… and
rename the bank file to
avoid losing valuable
data.
.
32 Emulator X3 Reference Manual
Page 33

Emulator X Bank
2 - Emulator Architecture
A Modular System
MultiSetup
Preset
MIDI
Ch 1
Preset
MIDI
Ch 2
Key Map
Voice
MIDI
Ch 3
Preset
MIDI
Ch 4
Preset
Preset
Key Map Key Map
Multisample
Voice
MIDI
Ch 32
Preset
Voice
Voice
MIDI
Ch 64
Preset
Velocity or
Realtime
Crossfade,
CC X-Switch
Voices
Samples
Multi-Sample Voice
(Multisample)
Multi
Filter Amp
Single Sample
Voice
S01
S01
Sample Filter Amp
Sample01Sample02Sample03Sample04Sample05Sample
S03
S02
Velocity Crossfade
S05
S04 S06
Positional
Crossfade
06
E-MU Systems 33
Page 34

2 - Emulator Architecture
A Modular System
Multisetup
A Multisetup is like a map which assigns a preset, volume, pan position and output
routing to each of the 64 MIDI channels. Aux FX and effect bypass controls are also
included in a Multisetup. Multisetups can be saved and recalled for use with a
particular song or sequence so that all the MIDI channels play the proper preset.
Preset
A Preset is one complete keyboard setup controlled by one MIDI channel. Presets are
composed of multiple voices. The assignment of voices to keyboard keys is completely
flexible.
Voice
A Voice is one complete sound, containing one or more samples with keyboard and
velocity mappings and all programmable synthesizer parameters. Voices can be
assigned to a single note on the keyboard, or transposed to cover a wider keyboard
range.
A Preset is the same
as a MIDI Program.
34 Emulator X3 Reference Manual
Page 35

Sample
A Sample is an individual digital recording with a name, sample rate and looping
information.
2 - Emulator Architecture
A Modular System
Flexible Architecture
Emulator X allows you great flexibility in the way you construct presets. Consider this
— you can assign multiple samples to the keyboard inside a voice or assign s ingle
sample voices to the keyboard.
Unless you specify otherwise, only one sample is assigned per voice. In this case you
would assign voices (and the single sample each one contains) to the keyboard and
create presets. On the other hand, you may want to create multisample voices before
you start designing presets and treat the voice as your finished sound. In this case, the
Preset can crossfade, layer or switch between multiple complex voices.
E-MU Systems 35
Page 36

2 - Emulator Architecture
A Modular System
Preset Diagram
The diagram below illustrates the concepts of a preset and voice.
Preset
Voi ce
Sample
A complete keyboard layout with unlimited voices.
A complete synth sound containing a single sample or a Multisample.
An individual digital recording with loop information.
Preset
KYBD Range KYBD Range KYBD Range
Voice
Group #
Sample
Loop info.
Sample Rate
Voice
Morph
Filter
Voice
Voice
Amp
Velocity
or Realtime
Crossfade,
CC X-switch
L
R
Key #
Velocity
Gate
Pitch
Retrigger
LFO
Chorus
(x2)
Loop
Glide
Start Offset
Envelope
Gen
Frequency Q
(x3)
Controls
- 36 Cords -
MIDI
Pan
Vol
Function
Gen
(x3)
Other
Voices
A voice is a complete sound that can be assigned to a range of the keyboard. A sample
is the part of a voice that generates the actual sound. You can think of a voice as a
complete instrument consisting of one or more samples, which can then be used as a
building block in constructing more complicated presets.
A voice consists of one or more samples, a dynamic filter, a dynamic amplifier, three
6-stage envelope generators, three 64-stage function generators, two multi-wave
LFOs and up to 36 modulation routings called “Cords” to connect everything
together.
36 Emulator X3 Reference Manual
Page 37

When you record a sample into the Emulator X, a new voice is typically created for each
new sample. In this case, each sample will have its own complete set of synthesizer
parameters.
Multisample Voices
In another scenario, you might record several samples of an instrument (such as a
piano), then place them into the same voice in order to share the same set of synthesizer parameters. If a voice contains more than one sample, this multiple sample obj ect
is called a “Multisample.” A diagram of a multisample voice is shown below.
Multisample Voice
Each Sample:
Orig. Key
Tun e
Volume
Pan
Key Range/Fades
Velo Range/Fades
S27
Velocity Crossfade
S28
S29
S30 S32
S31
Positional
Crossfade
2 - Emulator Architecture
A Modular System
A voice can contain a
single sample or multiple
samples, whichever you
prefer.
Sample 28 Sample 30Sample 27
Loops, Samp Rate Loops, Samp Rate Loops, Samp Rate
Multisample voices are designed to arrange groups of samples into one manageable entity.
The window below shows an opened multisample. The key range of the multisample
can be used to limit the keyboard range of the samples contained within it. A multisampled
voice is treated just like a single sample voice.
Normally these samples would be placed side by side on the keyboard as in the
diagram above. You assign the sample to a range by setting the original key, (which is
usually the original pitch of the sample) a high key and a low key. The number of
samples needed for a realistic emulation varies with the instrument, but in ge ne ral ,
“more is better.”
E-MU Systems 37
Page 38

2 - Emulator Architecture
A Modular System
When a sample is taken, it can be automatically placed into a voice with one sample.
You could also manually place the voice (and its sample) on the keyboard if you wish.
If more than one voice is assigned to the same range, then pressing a key in that range
plays all the voices assigned to that range. Voices assigned to the keyboard can be crossfaded by their position on the keyboard, or the key stroke velocity. Voices can also be
switched or faded depending on the value of a realtime controller such as a
modulation wheel, an LFO or an envelope generator.
The Sample
Loading in any sound, in mono or stereo, creates a sample, the raw material with which
the Emulator X works.
The term sample commonly means two different things:
• A digital recording of a complete sound, or
• Each snapshot of the sound that makes up the complete sample.
In this manual, we’ll assume sample means the complete recorded sound unless
indicated otherwise.
You can modify a raw sample in several ways. A sample can be transposed up or down
in pitch to cover a particular range of the keyboard making it unnecessary to record a
sample for every key. Sample editing might consist of Looping a sample (allowing even
short samples to play indefinitely), Truncating (cutting off unneeded parts of a sample),
or any of a number of digital processes that actually change the raw sample data.
The Original Key assignment determines the pitch at which the sample will be
played back. Therefore it’s important to map your samples to the proper original key.
HighOrigLow HighOrigLow
Original
Low
Key
Key
High
Key
S02 Piano D3 S03 Piano D5S01 Piano A0
Sample Sample Sample
You can also name samples. It’s usually a good idea to include the original pitch in the
name so that you can place it on the keyboard later at the proper pitch.
You can have any number of samples in a bank. The number of possible samples is
only limited by the size of your computer’s hard disk.
38 Emulator X3 Reference Manual
Page 39

TwistaLoop™
TwistaLoop is a tool that automatically analyzes a sample by dissecting it into its
rhythmic components, making it easy to select multiple loop points and regions. TwistaLoop offers total control over tempo, using real-time audio time expansion/
compression.
You can play back analyzed samples at a custom speed, or in time with Emulator X’s
clock (or an external clock source).
Once you create loops from an analyzed sample, you can use them in a variety of ways:
• Change the playback speed of any loop.
• Choose which loops are repeated when played back.
• Set up a continuous controller to change in real time which loop plays.
• Sync your loops to Emulator X’s master tempo, or to an external tempo source,
such as a VST host.
• Play different beats or bars from the same sample.
2 - Emulator Architecture
A Modular System
E-MU Systems 39
Page 40

2 - Emulator Architecture
A Modular System
40 Emulator X3 Reference Manual
Page 41

3 - Getting Started
Exploring the Tree
In this section you’ll learn how to navigate around Emulator X using the Tree. Don’t
worry if you don’t know what everything does just yet. Everything will be explained
later on.
1. With the Emulator X application running, a bank is loaded by selecting Open from
the File menu. Click on the Presets Folder in the Tree and a screen, similar to the
one shown below, appears.
Toolba rs
Sampler
Bank
3 - Getting Started
Exploring the Tree
Presets
Folder
Open
Preset
Presets
Samples
Folder
Multisetup
Folder
The
Tre e
Sampler/System/Library Tabs
List View
The Tree is the section shown on the left of the screen. There are three tabs at the
bottom of the Tree labeled Sampler, System and Library.
Sampler
Allows you to see the contents of the current Emulator X bank.
This tab gives you access to your entire computer system: PC, hard disks,
System
CD-ROM drives, network, etc. Presets, Samples and Multisetups can be
browsed, then Merged into the current Bank. Load Emulator 4
banks from this tab.
E4/E3 CDs use a
proprietary format and
can only be read using
SCSI/ATAPI drives. They
cannot be read using
firewire and USB drives.
The Library shows you all Emulator X and related files, wherever they
Library
may be located on hard disks, CD-ROM or network. Presets, Samples and
Multisetups can be browsed in the Library, then Merged into the current
Bank.
E-MU Systems 41
Page 42

3 - Getting Started
Multisetup Page
Multisetup Page
The Multisetup is the top level of the Emulator hierarchy and is the place where you
choose and assign presets to each of the MIDI channels.
A multisetup assigns a preset, volume, pan position and output routing to each of the
64 MIDI channels. Multisetups can be saved and recalled for use with a particular song
or sequence so that all the MIDI channels play the proper preset.
Click on the Emulator X icon to display the Multisetup page.
There are five views of the Multisetup page. The Multisetup View buttons
change the current view. The Single channel view is shown below.
• Single..................... Displays the pre se t f o r the currently selected MIDI channel.
• Channels 1-16....... Displays the preset, volume and pan for MIDI channels 1-16.
• Channels 17-32.... Displays the preset, volume and pan for MIDI channels 17-32.
• Channels 33-48.... Displays the preset, volume and pan for MIDI channels 33-48.
• Channels 49-64.... Displays the preset, volume and pan for MIDI channels 49-64.
Note: When
sequencing, you can also
include program changes
in the sequence rather
than using a Multisetup.
This is often best, since
the program changes will
then be part of the song.
See page 69
for a complete description of the Multisetup scree n .
Single Channel View
Click
Here
MIDI
Controllers
Multisetup View
Tab s
MIDI
Mode
Select
Aux FX
Display
Tab s
Master
Volume
Preroll
RAM Used
42 Emulator X3 Reference Manual
CPU & Disk
Usage Meters
Samples
Playing
Current
Channel
Page 43

Changing Presets (from Single View)
Single View is the default view when you first run Emulator X. This view is convenient
for performing live or when you’re only playing one preset at a time. All the main
parameters for the selected MIDI channel are displayed in Single View and a convenient Category mode allows you to quickly select presets in a certain category. A closeup of the current channel settings is shown below.
Single View Close-up
3 - Getting Started
Multisetup Page
Note that Single View
only changes the display
and does not affect the
currently selected MIDI
mode (i.e. Omni, Poly or
Multi).
Select All or Select
by Category
Preset
Inc/Dec
Select/View
Preset
Number
Preset
Name
Channel
Volume
Main Output
Select
To Select Presets by Number
Select
Category
FXA/FXB
Enables
Select/View
MIDI Channel
Aux Output
Enable
MIDI Channel
Inc/Dec
Bank/
Program
Display
Selected
Category
Channel
Pan
1. Click on the Preset Increment/Decrement buttons to move up or down the presets
by number.
2. Highlight the Preset Number field and type in the desired preset number.
The Bank/Program
Display shows the Bank
and Program number
you would use to select
the preset from a
sequencer.
To Select Presets by Category
1. Click on the Select Category button.
The pop-up dialog box at right
appears.
2. Select the desired preset category, then
press OK.
3. Choose Select By Category from the
Single view screen above.
4. Use the Increment or Decrement
buttons to select presets. Note that
only presets of the selected category are
selected.
E-MU Systems 43
Page 44

3 - Getting Started
Multisetup Page
Changing the Current MIDI Channel
The Current MIDI Channel is simply the MIDI channel you are currently working
with. To change the current MIDI channel, simply increment or decrement the
channel number using the buttons, or click on the channel number and type in the
desired number.
To Find the Selected Preset in the Tree
In a huge bank like the Proteus X Composer, you can jump immediately to the
preset by double-clicking in the Preset Name Display. The Tree expands to that
preset, and the view switches to the Preset Globals view.
Multi Channel View
Press the Multisetup View 1-16 tab to view channels 1-16.
This page view is particularly useful when sequencing as you can see 16 MIDI channels
at once. Note that the Output Display button is now active. Tabs 17-32, 33-48, 49-64
are identical to this page and allow you to access these additional MIDI channels. See
also “
4 - Multisetup / Preset Globals” on page 69.
Multi Channel View
Click
Here
Current
Channel
MIDI
Controllers
MIDI
Activity
Preset
Select
Multisetup
View
Tab s
Channel
Volume
Channel
Pan
MIDI
Mode
Select
Output
Display
Button
Aux FX
Display
Tab s
Main
Output
Routing
Aux Send
Enables
Preset FX
Enables
Master
Tempo
Master
Volume
Preset Tune
& Transpose
Aux
Output
Select
Definable
Labels
44 Emulator X3 Reference Manual
Preroll
RAM Used
CPU & Disk
Use Meters
No. of
Samples
Playing
Current
Channel
TwistaLoop
Override
Filter
Override
Limiter
Page 45

Changing Presets (from the Multichannel view)
Play your MIDI keyboard and note that one of the MIDI activity LEDs comes on. This is
the channel on which your MIDI keyboard is transmitting. If you don’t see MIDI
activity, check your MIDI connection and make sure MIDI is set up properly in the
Preferences menu. See page 28
To Audition and Select Presets
1. Click once on the Preset Select button on the channel used by your MIDI
keyboard. The complete list of all presets in the bank appears.
2. Click once on a preset to audition it. Play your keyboard to hear it.
3. Try out a few more presets. When you find one you like, double-click on it to select
it and return to the Multisetup screen.
4. Change the current channel by clicking on the number to the left of the preset. The
number you selected turns red.
5. Play the floating keyboard (Select Keyboard from the View menu). Notice that the
MIDI Activity LED of the current preset now plays along with whatever sound is
selected for that channel. (Your MIDI keyboard still plays on the channel to which
it is set.)
6. Change the channel on your MIDI keyboard then play it. Emulator X now plays the
preset on that channel.
.
3 - Getting Started
Multisetup Page
Selecting Presets from the Tree
1. When you click on a preset in the tree, you have just selected it for the current MIDI
channel. This action also calls the Preset Global page.
2. To go back to the Multisetup page click the back arrow or click on the Emulator X
icon at the top of the tree.
Changing the Current MIDI Channel
1. The Current MIDI Channel is simply the MIDI channel you are currently working
with.
2. To change the current MIDI channel, click on the channel numbe r in th e M u lt i-
setup page. The selected channel number turns red. Note also that the channel
number at the bottom of the window changes to reflect the current channel.
Adjusting the Controllers
Each preset has a set of 16 continuous controllers (CC’s) which are used to adjust and
control the sound as you play. Your MIDI keyboard may have several knobs or sliders
that are transmitted over MIDI. These can be used to control Emulator X if you match
the CC numbers your MIDI keyboard transmits to the same CC numbers on
Emulator X. These global settings are located under Options, Preferences, Controllers.
See page 28
To Modify the Sound using the Controllers
1. Play your MIDI keyboard as you adjust the controller knobs on the screen. Notice
that the sound changes. If the sound doesn’t change, make sure the current preset
(red number) is the same one that your keyboard is playing.
2. If you have controller knobs on your MIDI keyboard and have set up the
Controllers (Options, Preferences, Controllers) to match your keyboard, you can
use these knobs to modify the sound. Notice that the screen knob follows the
movement of the hardware knob.
and page 314 for additional information about MIDI controllers.
Selecting “None” in
the Preset field, disables
the MIDI Channel.
E-MU Systems 45
Page 46

3 - Getting Started
Multisetup Page
3. Try changing the filt er type. Click on the selector to the right of the filter name and
select one of the 55 different filter types.
4. Adjust the Tone and Presence controls while playing the keyboard to hear your
changes.
5. Change the Volume and Pan controls for the MIDI channel you are using. These
settings can be adjusted remotely using MIDI controller #7 (volume) and
controller #10 (pan).
6. If you want to save the changes, you must set the Initial Controller Amounts in the
Preset Globals page to match the settings you made in the Multisetup page, then
save the bank.
46 Emulator X3 Reference Manual
Page 47

Create Your Own Custom Bank
It’s easy to create your own custom sound banks by simply “dragging and dropping”
the presets or samples you want onto the Emulator X icon in the tree.
To Create a New Custom Bank
Locate the Presets on your Computer
1. Select New from the File menu. This creates a new empty bank. (You can also
merge presets or samples into an existing bank if you wish.)
2. Select the System Tab. The Desktop icon will appear in the tree .
3. Locate the presets you wish to include in your new bank. These will be located in
the “Creative Professional” folder located in “Program Files”.
Click to
Open
3 - Getting Started
Create Your Own Custom Bank
The included CD-
ROMs contain several
other great banks of
sounds. Run the installer
application on the library
CDs to install these banks
on your hard disk.
Click to
Open
System Tab
Audition the Presets
4. After you have located the Presets folder, click on the Emulator X icon in the Tree
to view the Multisetup page.
5. Find a preset in the Tree and Right-click over it. A pop-up menu appears with two
options, A
6. Select Audition (or press “A” on your computer keyboard). Notice that the preset
name is now flashing in the Multisetup screen.
7. Play your MIDI keyboard to audition the preset from the hard disk.
8. Right-click again and select Stop Audition (or press “S” on your computer
keyboard). The preset name stops flashing in the Multisetup screen.
9. Continue auditioning until you find a preset you like.
udition and Merge.
Tip: You ca n al so
audition samples or
presets from the library.
Presets that reside in
.E4B or .EXB disk files can
be auditioned from disk.
E-MU Systems 47
Page 48

3 - Getting Started
Create Your Own Custom Bank
Merge the Preset
10. When yo u have found a preset you want to include, Right-click over it in the Tree
and select M
erge from the menu (or press “M” on your computer keyboard). The
preset is added to the current bank.
Another Method of Merging Presets
11. Simply click (left mouse button) and drag the preset over the Emulator X icon at
the top of the tree. The cursor changes to a plus sign as you pass over the icon.
Release the mouse button and a pop-up progress bar will inform you that the
preset is being loaded.
12. If you change your mind and don’t want to merge the preset afte r all, choose Undo
from the Edit menu to un-merge the preset.
Continue to Create the Bank
13. Continue to add presets to your new bank.
14. Save the bank when you are satisfied.
Alternate Method using the Librarian to find Presets
1. Select the Library Tab instead of the System Tab in step 3 above.
2. If you haven’t done so already, Update the Library.
3. Choose presets from the Library, then drag and drop them on top of the Emulator
X icon at the top of the tree.
48 Emulator X3 Reference Manual
Page 49

Load a New Bank
Load up a new bank in preparation for the next few examples. Load the Proteus X
Composer bank located in your Emulator X folder.
1. Select Open from the File menu, then locate Prot eus X Composer and click Open.
Opening a Preset
A preset is a complete keyboard setup for one MIDI Channel. Think of a preset as one
complete sound, which usually contains multiple voices and samples.
1. Click on the Preset Folder in the Tree to show all the presets in the bank.
Show Details
Click
Here
To Show All
Sort Buttons
3 - Getting Started
Load a New Bank
Note: Emulator 4
banks are accessed and
loaded from the System
Tab, rather than from the
File menu.
Double-click
to open the
Folder.
Click on a
preset icon to
go to Preset
Global.
2. Click the Show Deta il s button. The details of the presets are now shown. The sort
buttons allow you to sort the presets by name. ID number, bank/program number,
or category. Click on the button again to sort in reverse order.
3. Clicking on the plus sign (+) next to the Preset folder or double-clicking on the
folder itself opens the folder and displays the bank’s presets in the tree.
4. Clicking on the plus sign (+) next to one of the preset icons displays the sub-
modules of the preset: Voices & Presets, Links, Voice Processing.
E-MU Systems 49
Page 50

3 - Getting Started
Opening a Preset
Submodule Function
Voices & Zones Assign voices and multisamples to the keyboard, which can be
switched or crossfaded by key position, velocity or controller setting.
Links Multiple presets can be layered, switched or crossfaded across the
keyboard,
Voice Processing Synthesizer voice parameters including filters, LFOs, envelopes,
function generators and cords.
5. Open the preset “And Voice” by clicking on the plus (+) sign next to the folder.
6. Next, click on the Voices & Zones icon. The Key Window appears. The blue bars
show that the two multisamples in this preset are mapped across the entire
keyboard.
7. Click on the Mix/Tune tab at the top of the window.
Please refer to
chapter “2 - Emulator
Architecture” on page 31
for complete
explanations of the submodules.
8. There are two multisampled voices in this preset. Adjust the volume slider for each
of the voices as you play. Now try playing with the pan position and transpose.
Before you leave this window, turn up the volume controls on both voices.
Exploring the Key and Velocity Windows
1. Click the Key W in tab again.
2. Click and drag the ends of the blue bars so they look something like the screen
shown above. The settings don’t have to be exact.
3. Play the keyboard from the lowest key to the highest. Voice 1 plays at the low end
of the keyboard and voice 2 plays on the high keys.
4. To return both voices to their original pos itions, select Edit, Undo from the
toolbar. Select Undo again until both voices are assigned to the entire keyboard.
Velocity Switching and Crossfading
5. Click on the Ve l W in tab. The following window appears:
Step 8. Alt-Click here.
50 Emulator X3 Reference Manual
Page 51

6. This page controls the voices using key velocity or how hard the keys are played. Set
the bars something like the screen above.
7. Play the keyboard anywhere, but begin playing softly and gradually play harder.
Notice that the choir (voice 2) plays with lower key velocity and switches to piano
(voice 1) when you play hard. You’ve just created a velocity cross-switch.
8. Alt-click the end point of the bar in voice 1 and drag it to the left. The color
intensity of the bar fades. The fade in color is analogous to volume. the darker the
color, the louder the volume for a certain velocity.
9. Drag the fade points of the two voices so the y look something like the window
shown below.
10. Play the keyboard anywhere, but begin playing softly and gradually play harder.
Notice that the choir plays with lower key velocity and fades into piano as you play
harder. You’ve just created a velocity crossfade.
3 - Getting Started
Opening a Preset
Add a Voice
1. Select Preset, New V o ice from the toolbar. A new, empty voice appears below voice
two.
2. The label area of the new voice is blank. Click on the selection box to the right of
the empty label area to bring up the entire list of samples in the bank.
3. Select sample 0350 SectionStringC3 by double-clicking on it. You’ve just assigned
a sample to the voice you created.
4. Play the keyboard and now you have orchestral strings as well.
Delete the Voice
1. Select the voice you just created by clicking once on the sample name or number
to the left of the name. The number turns red.
2. Select Preset, Delete Voice from the toolbar. The voice has now been deleted.
E-MU Systems 51
Page 52

3 - Getting Started
Examine a Voice
Examine a Voice
Each voice has its own synthesizer section (called Voice Processing) to process the raw
samples. You can process each voice separately or select all voices to be processed in
the same way.
1. Go to the Tree and click on preset P0015 Dana-him. Play the keyboard. You
should be able to hear the preset.
2. Open the preset by clicking on the plus sign(+), then click on the V oice Processing
icon. The Voice Processing page shown below appears.
Step 3.
Select All
3. Near the top of the screen near the keyboard you’ll see the Group Selector. Set this
to All, to select all voices in the preset.
4. Feel free to explore the synthesizer section. The filter section is probably a good
place to begin. Change the filter type, then adjust the frequency and Q controls as
Step 5
Set to LFO 1 ~
Step 6
Set to Filter Frequency
See Groups on
page 93
information on how to
select groups of voices.
for detailed
you play the keyboard. Note that the filter response display changes as you change
the filter settings.
Cords
One reason synthesizers are able to generate such complex sounds is because most, if
not all, of their processes can be placed under automatic control. Here’s an example.
5. Tired of turning the filter frequency by hand? Let’s program one of the LFOs to do
it. Choose Cord #8 and set the left selection box to LFO 1 ~.
6. You’ve just connected one end of a Cord. Like all cords, you’ve got to connect both
ends for it to do anything. Connect the other end of the cord to Filter Frequency.
52 Emulator X3 Reference Manual
Page 53

7. Each Cord has its own attenuator which controls “how much” sign al goes through
the cord. Turn the knob in the center of the cord all the way to the right (+100%).
8. Now set the filter frequency knob about 1/3 of the way up and play a note on the
keyboard. You should hear the filter being turned up and down automatically.
9. Change filter types and adjust the filter frequency if you don’t hear the filter being
modulated.
10. Adjust the Frequency of LFO 1.
11. Change the Shape of LFO 1. (You’ll have to re-key to hear the new waveform.)
Modulating Cords
In Emulator X even the Cords themselves can be controlled by other modulation
sources or controls. Let’s use your keyboard’s mod wheel to control the amount of LFO
to filter modulation.
12. Cord 0 already has the Mod Wheel assigned as an input. Set the output of Cord 0 to
go to Cord 8 Amount.
13. Turn up the amount of Cord 0 to 100%.
14. Set the amo unt of Cord 8 to 0% (off). (You’re going to turn it up with the mod wheel.)
15. Now play a note and move the Mod Wheel of your keyboard up. (Most keyboards
have two wheels or controllers. One bends pitch and the other is the modulation wheel.)
3 - Getting Started
Examine a Voice
Tip: Any control can
be set to its default value
by pressing Alt + left
mouse click over the
control.
Experiment
16. Try setting the output of Cor d 11 to Pitch. Now try changing the LFO Shape. Now
it’s much easier to hear the different LFO wave shapes.
Wipe the Slate
The preset might be a little messed up after your experiments. It’s good to know that as
long as you don’t Save the bank, none of the original data is destroyed. If you want to
get back to the original preset, simply load the bank again.
You can also Undo any changes you made by repeatedly clicking the back arrow
button (=).
E-MU Systems 53
Page 54

3 - Getting Started
Examine the Samples
Examine the Samples
Samples are the digital recordings which are the basis of an Emulator X sound. As
you’ve seen, samples can be layered and switched or treated by the Voice Processing
functions to create entirely new sounds, but the actual samples can also be modified
and sculpted.
A single preset may use over a hundred samples and a bank may contain thousands of
individual samples. Let’s take a look.
1. Click on the plus sign (+) next to the Samples folder to open the folder and
display the samples in the bank. (If the Preset folder is already open, you can click
on the minus sign (-) next to the folder to close it and clean up the tree.)
2. Click on any sample to display its waveform.
Vertical Zoom
Horizontal Zoom
Zoom All
3. The transport controls are located in the toolbar. If you don’t see them, right-click
an empty area in the toolbar and select Sample Transport. Click the Play button
to listen to the sample.
4. Press the Stop button to stop playing.
5. Click on the larger magnifying glass of the Horizontal Zoom buttons. The time-
base of the waveform is magnified allowing you to see more detail. Continue
clicking and eventually you’ll reach maximum magnification. The individual
sample measurements are shown here as dots. If the sample rate is 44.1 kHz, there
will be 44,100 of these dots per second of sound.
6. Click repeatedly on the smaller magnifying glass and the horizontal magnification
decreases.
7. Click the Zoom All button, and the vie w zooms to show the entire sample.
8. The Vertical Zoom buttons allow you to zoom in or out on the vertical axis. None
of the zoom buttons change the wave in any way. They’re just display contro ls.
54 Emulator X3 Reference Manual
Page 55

Using DSP
There are a number of DSP or digital signal processing functions that you can perform
on the raw samples. Samples can be spliced together, merged, time-stretched, reversed
and on and on.
Time Compression/Expansion
1. Select sample Riff Trip Gb. Press Play on the transport controls to check it out.
2. Suppose you wante d to change the tempo to fit into your song. The time
compression/expansion DSP tool can do this for you. Select Time Compress from
the DSP toolbar. The following dialog box appears.
3 - Getting Started
Examine the Samples
3. Change the ratio. Ratios below 100% compress or shorten the time. Ratios above
100% expand or lengthen the time. Note that the tempo and length fields change
to show the new length and tempo.
4. Press OK to change the time scaling. Pre ss Play again and note the change in tempo
of the sample.
Loop Play
5. Turn on Loop Play on the Transport toolbar. Now the sample will continue to
loop until you press Stop.
Reverse
6. Select Reverse from the toolbar. The sample is immediately reversed.
7. Press Play and hear the sample played backwards.
Copy and Paste
8. Select the entire sample by pressing the Select All button on the DSP toolbar.
9. Choose Copy from the Edit menu. The sample is placed on the clipboard.
10. C lick anywher e on the wave for m display to deselect the sample, then position the
cursor at the very end of the sample by pressing the Go To End button in the
transport section of the toolbar. The flashing cursor line is now positioned at the
end of the sample.
Note: The original
tempo shown may not
reflect the actual tempo
of the sample. You have
to set this value manually
in order to have the new
tempo accurately
calculated.
E-MU Systems 55
Page 56

3 - Getting Started
Examine the Samples
11. Choose Paste from the Edit menu. The following dialog box appears.
12. Insert mode is already selected and it’s the mode we want. The clipboard contents
will be inserted at the cursor location, extending the length of the sample. Press
OK.
13. Now position the mouse pointer at the very end of the sample. Press the shift key
down and click the left mouse button. The section of wave you just pasted is
selected.
Step 13.
Position
pointer here.
56 Emulator X3 Reference Manual
Page 57

Pitch Shift
14. Select Pitch Shift from the DSP toolbar. The following dialog box appears.
15. Set the Tuning interval. 100 cents equals one semitone. Try a setting of 700 cents or
a perfect fifth.
16. Select Constant Time. This setting changes the pitch but will leave the rhythm
constant. Don’t change the algorithm. See page 192
the pitch change options.
17. Press OK to change the pitch.
18. Click on the Loop Start button in the Transport Controls to set the cursor to the
beginning of the sample and press Play.
for more information about
3 - Getting Started
Examine the Samples
Experiment!
Please feel free to try out all the other DSP processes such as Transform Multiplication.
Be sure to read the Editing a Sample chapter (page 169
) to learn all about these
powerful tools, but you should actually try them out as you read.
Remember that nothing is made permanent until you save the bank, so experime nt
as much as you like without fear.
Samples can also be exported as WAVE or AIFF files using the Export function in the
Sample Edit menu. This allows you to use other sound processors in your computer. Externally processed samples can be re-imported using the Import option in the File menu.
Save and Save As
When you choose “Save As” from the file menu, the entire bank—presets, voices and
samples—are re-written to the hard disk. This method , alt h ough somewhat wasteful of
memory, ensures that all your samples remain bound with your bank.
Be sure to rename your bank when using Sav e As… to save an edited bank, otherwise
you may overwrite data you wanted to keep. When you choose Save, (instead of Save As)
only the edited presets, voices and samples will be written, saving time and memory.
When you save, you might be prompted with a dialog box telling you have unused
samples. Choosing to delete the unused samples removes them from your hard drive,
saving space and memory. This dialog occurs any time you have samples in your
sample pool that are not assigned to any voices.
All the DSP tools are
calculated in 32-bit
precision math.
Emulator X Bank Structure
Banks are comprised of two distinct entities which need to be kept in the same folder
on your computer hard disk. The Sample Pool contains the raw sample data used. The
Bank file contains all the voice, preset and multisample data that makes up the
Emulator X bank.
E-MU Systems 57
Page 58

3 - Getting Started
Building a Preset from the Ground Up
Building a Preset from the Ground Up
In this tutorial we’ll start with an empty bank and create a comp le te preset using some
of the samples in your library. Along the way you’ll learn:
• How to locate samples from your library and load them into the bank
• How to place samples on the keyboard
• How to stretch samples across the keyboard
• How to apply various types of audio processing to the samples
Locate Samples and Load them into the Bank
1. Make sure you have either the Proteus Composer or Proteus X Composer bank on
your hard disk.
2. Let’s start with a clean slate. Select New from the File menu.
3. The easiest way to find samples is using the Library feature. Click the Library Tab at
the bottom of the Tree.
4. Select Vocal as the Category, then type “aah” in the ‘Filter by Name’ box. Click
Search.
Important: If the
Librarian doesn’t find the
samples, select Update
Library from the File
menu. (You need to have
Proteus X Composer bank
in your System.)
Library Tab
5. Clicking on the Samples Folder in the Tree displays the expanded list in the main
window.
6. The window should look something like the one shown above, although you may
have more samples shown, depending on the size of your sample library.
7. Locate the follo wing samples: Aahs A2, Aahs C3, Aahs C4, Aahs D#2, Aahs D#3,
Aahs D#4, Aahs F#3, Aahs F6.
8. Select the samples listed above and while holding the mouse button, drag and drop
them on top of the Emulator X icon above the Tree.
58 Emulator X3 Reference Manual
Tip: Select multiple
continuous samples by
pressing on the Shift key
while selecting items.
Select multiple noncontinuous samples by
pressing the Ctrl key
while selecting items.
Page 59

Building a Preset from the Ground Up
Drag and Drop
9. Click the Sampler Tab at the bottom of the Tree, then double-click the Samples
Folder to open it. You’ll notice that the samples have now been added to the Bank.
10. Click on one of the Sample icons in the Tree. The Sample Editor appears with
one of your Aah waves displayed.
Loop Start
Marker
3 - Getting Started
Loop End
Marker
11. The sample is of a fixed length. So that the sample will play for as long as you hold
a keyboard key, the sample is looped. Notice (but don’t change) the Start and End
Loop Markers.
12. Loo p ing is a subjec t f or another tutorial. At this point, let’s move on to the next
step in building a Preset, and place the samples on the keyboard.
Time to Save?
13. It’s time to save whenever you have done enough work that you’d HATE to lose it.
Now would probably be a good time.
14. Select Save As... from the File menu, choose a location where you can find it again
(the desktop?), and press Save. Don’t you feel better?
E-MU Systems 59
Page 60

3 - Getting Started
Building a Preset from the Ground Up
Placing the Samples on the Keyboard
1. Click on the Presets Folder in the Tree, then select New Preset (Ctrl+W) from the
Presets menu. A new preset appears in the Tree.
2. Select Voices and Zones in the new preset. The Voices and Zones page appears.
3. Select Aahs A2 from the list in the Tree, then drag and drop it anywhere in the Key
Win area as shown below.
4. A new voice named Aahs A2 appears in the window. A green bar appears across the
entire keyboard range indicating that the sample is transposed across the entire
keyboard. The red bar shows the original key. Because the original pitch of the
sample (A2) is included in the name, Emulator X is smart enough to place the
original pitch on the proper key.
• Important: If the original key of a sample
is on the wrong key, the sample will be
out of tune. The original key selection
field is always visible regardless of which
tab is selected.
Original Key Selection
5. Play the keyboard. Since the sample is transposed over the entire keyboard range you can play it polyphonically at any pitch.
But as you play in the upper part of the keyboard, notice that the sound doesn’t
sound so natural anymore. This is a result of the sample transposition. To
overcome this problem we add more samples.
6. This time, let’s use a different method of assigning samples. This method is useful if
the original pitch is NOT included in the sample name. Select Aahs D#2 from the
list in the Tree, then drag and drop it over the D#2 key on the keyboard at the
bottom of the window.
Drag and Drop
7. A new voice named Aahs D#2 appears in the window on note D#2.
8. Continue placing the rest of the samples. Practice using both methods.
9. Select the Key Win tab. This window graphically displays the current sample to
keyboard mapping. Depending on the way you placed your samples, the display
might look something like this. The red bars show the original keys.
Empty Voice
Original Keys
60 Emulator X3 Reference Manual
Page 61

Building a Preset from the Ground Up
10. N otice that the top voice has no sample. This empty voice was created when you
created the Preset. We won’t need this voice and can get rid of it. Select the empty
voice by clicking on it. It becomes highlighted in red. Press the Delete key on your
keyboard to delete it.
11. Also notice that the original keys of our voices are all over the place. Let’s rearrange
the voices by the position of the original keys. From the Preset menu, select Sort
Voices, By Original Key.
12. Now the voices should be arranged like the screen below.
3 - Getting Started
13. Next, we need to give each sample its own keyboard range. Click on the original
key of Aahs D#2 and drag it all the way to the left.
Key Range
Controls
Click & Drag
Inc/dec
buttons
14. You can also adjust the key range using the key range controls in the lower right
corner of the window. Click the inc/dec buttons and note that the graphic display
follows. The Key Range display shows the currently selected voice. The Key Range
Controls allow you to select multiple voices and change them all to a single value if
so desired.
15. Adjust the range of all your voices until the display looks like the one below. Make
sure that none of the voices overlap each other and that all the keys are covered.
E-MU Systems 61
Page 62

3 - Getting Started
Building a Preset from the Ground Up
16. Play the keyboard. The choir sounds much more realistic, especially in the middle
range.
Time to Save?
17. It’s time to save again. This time just select Save (Ctrl+S) from the file menu.
Apply Voice Processing
Now that we have our samples arranged, we can continue to refine our preset using the
filters and amplifier.
1. Select the Voice Processing page by clicking the Voice Processing icon in the Tree.
The Voice Processing page appears.
2. In the Emulator X, each voice is a complete synthe-
sizer with its own set of parameters. In most cases,
you’ll want to treat the voices as a single synthesizer.
Select All voices from the Group box above the
keyboard in lower part of the window.
• Important! Selecting the proper voices to modify
is a fundamental operation and it’s easy to get confus e d . I f the synthesizer
controls don’t seem to be working correctly, check to make sure you have the
correct voices selected.
Amp
Envelope
Select All
Attack 1 Knob Release 1 Knob
62 Emulator X3 Reference Manual
Page 63

Building a Preset from the Ground Up
Amplifier Envelope
3. Our choir sounds pretty good, but the sound turns on abruptly like an organ. Let’s
increase the Attack Time a little so that the voices swell up when we press the keys.
The Amplifier has its own dedicated Envelope Generator and it’s already selected.
Set the Attack 1 knob to about .5 seconds.
4. Much better! Let’s increase the Release Time so that the sound dies away slowly
when the keys are released. Set the Release 1 Time to about 1 second. Heavenly!
Clear the Cords
5. Before we begin, take a look at the Cords section for
a second. Cords are the virtual wires that connect
everything together in the Emulator X. A bunch of
Cords are already connected to their default connections. We don’t want or need these Cords, so let’s
get rid of them.
6. Right-click anywhere inside the Cords section. A
pop-up selection box appears. Select All Off to clear
all the Cords. Poof!
Phaser Phun
7. Now let’s add a filter effect. Select Phaser 1 from
the Filter Type menu. This filter simulates a traditional phase shifter by creating two deep notches
in the frequency spectrum. Leave the Frequency
and Resonance settings at 0.0 for now.
8. Let’s add a bit of movement to the filter by
connecting an LFO to the Filter Frequency. An LFO
or Low Frequency Oscillator is simply an oscillator that repeats slowly. The LFOs have a range of
.08 Hz (12.5 seconds per cycle) to 18 cycles per
second.
3 - Getting Started
9. Click on the fields to select source and
destination for the cord. Set-up Cord 1 as
shown at right with LFO 1+ as the source,
Filter Frequency as the destination, and
an amount of around +40.00.
10. A block diagram of the connection you
just made is shown below.
Filter
Phaser 1
Freq.
Q
Cord
40
LFO
11. Play the keyboard and you’ll hear the phaser filter sweeping the two notches across
the frequency spectrum.
E-MU Systems 63
Page 64

3 - Getting Started
Building a Preset from the Ground Up
12. Let’s tweak the LFO a bit. Select the LFO/LAGS page by clicking on the LFO/Lags
tab. Next, set the Frequency to about 0.9 Hz and change the Shape to Sine.
Frequency
Shape
13. If you have trouble adjusting with the knob, try typing the value into the numeric
field. One the numeric field “has the focus” you can use the up/down keys on your
computer keyboard to increment or decrement values.
14. N o w the effect is a lot more subtle. Increase the Filter Frequency to about 25 to
“zero-in” on the main group of frequency components. Feel free to tune the filter
to your own taste. You can also adjust the Cord Amount along with the Filter
Frequency to get the effect you want.
15. The Resonance control (Res) adds resonant peaks and deepens the notches in the
filter. Try it out.
16. Explore a little on your own. Go ahead and try out different LFO wave shapes, or
different filter types. (Be careful. Some of the filters have extremely high gain at certain
frequencies and they may distort with the harmonically-dense voice samples.)
LFO/Lags
Load an Entire Preset
Now we’re going right back to where we started, but instead of loading individual
samples, let’s load a complete Preset.
1. Select the Library Tab in the Tree.
2. Select Keyboard 1 as the “Filter Category” and type in piano in the “Filter by
Name” box. Click the Search button.
3. Double-click on the Presets folder in the Tree to open it. You should see several
piano presets there.
4. Select one of the piano presets then drag and drop it over the Emulator X icon
above the filter selections.
5. Switch back to the Sampler Tab beneath the Tree and see your piano preset in the
bank.
6. Select the piano preset and play the keyboard. That was easy!
7. Save the bank.
64 Emulator X3 Reference Manual
Page 65

To Audition and Merge Samples
Samples can also be auditioned and merged.
Locate the Samples Folder
1. Locate the Samples folder, just below the Presets folder.
2. Click on the Emulator X icon in the Tree to view the Multisetup page.
Audition
3 - Getting Started
Building a Preset from the Ground Up
3. Select a Sample from the Tree and press the Space Bar on your computer
keyboard. The sample is auditioned from the hard disk.
4. Press the Space Bar again to Stop auditioning.
5. You can also audition samples by Right-clicking over the sample and selecting
A
udition. Right-click and select Stop Audition to silence audition.
Merge the Samples
6. Right-click over the sample in the Tree and select Merge from the menu (or press
“M” on your computer keyboard). The sample is added to the current bank.
7. You can also drag and drop a sample over the Emulator X icon to merge it into the
bank. These “free” samples will have to be assigne d to voices in a preset before they
can be played.
8. If you change your mind and don’t want to merge the sample after all, choose
Undo from the Edit menu (or press Ctrl+Z) to un-mer ge the sample.
Signing Off
We’ve covered a lot in this lesson. Now you know how to create a preset from samples
and how to create a custom bank from the presets in the library. This is a very ‘deep’
instrument, so don’t expect to learn it all in one day. Explore a little at a time and most
of all don’t forget the music, because that’s what its all about. Have fun!
Emulator X Advanced Applications Guide
The Emulator X Advanced Applications Guide contains 43 more in-depth tutorials. The
Advanced Application Guide begins with the fundamentals and walks you through
nearly every facet of this amazing instrument. You can find this pdf document on your
Emulator X3 CD or online at: www.emu.com
. Check it out!
Samples that reside in
.E4B or .EXB disk files can
be auditioned from disk.
Vista Users: To
Audition samples, you
may need to download
and install the Vista
Codec Package 4.5.4.
E-MU Systems 65
Page 66

3 - Getting Started
The Librarian
The Librarian
As your sample library grows so does the problem of managing all your banks, presets
and samples. As you’ve probably already discovered, a single bank can contain literally
thousands of individual samples.
The Library is accessed by clicking the Library tab at the bottom of the Tree. To use the
librarian, you first “Update” from the File menu. This creates a searchable database of
all your samples, presets, banks and audio files which can be quickly searched. Audio
files can be either WAVE or AIFF.
You can select which drives you wish to add to the catalog or manually “Add
Locations” to narrow down the selection range to speed the update process. The Add
Location button also allows you to specify network drives to catalog. Only the selected
targets are overwritten with new data when the update process is performed.
Unselected targets remain as they were. The “Clear Library” button erases the entire
library so you can start from scratch.
Using the Librarian
Catalog your Disks
1. Select Update Library... from the File menu. A popup dialog box appears asking
you to select the disks you wish to catalog.
Cool Tip: Categorize
multiple Presets:
1. Click the Sampler Tab
in the Tree.
2. Click the Presets folder.
3. Select multiple presets.
4. Right-click and choose
category.
5. Select category.
Update
Clear Library
Add Location
Updates the Library with the selected items, leaving non-checked
targets intact.
Erases Library database.
Allows you to manually select targets to speed update time or select network
drives to catalog.
2. Select any disk drives that contains the banks, presets and samples that were
included when you installed the Emulator X application. Using the Add Location
button, you can select network drives to add to the Library catalog. The Add
Location button also allows you to select specific folders or locations for
cataloging.
3. Click the Update button to begin cataloging. The display will read: “Updating”.
This process may take a minute or two depending on how many files need to be
cataloged.
66 Emulator X3 Reference Manual
Page 67

Find your Files
4. Select the Library tab at the bottom of the Tree and press Enter on your computer
keyboard. All Emulator X Banks, Presets, or Samples can now be accessed here.
(This can take a few seconds, especially with very large banks.)
5. Click on the Presets folder to view all the presets
on your hard disks.
6. Selecting an item in the Category field returns any
Banks, Presets or Samples in the selected category.
7. Type a search string in the Filter by Name field,
then press the Search button to search the library.
The 'Filter by Name' field is a subset of the
Category search. Select <Any> in the Category
field to search the entire library.
8. Browse through the Bank, Preset, and Sample
folders to find the sounds you want.
9. Right-click on a Preset or Sam ple to Audition the
Preset or Sample from disk. You must play the
keyboard while Auditioning to hear presets.
Load your Files
10. To add a file to the bank, Left-click and Drag the
desired object in the Library over the Emulator X
icon at the top of the tree and release the mouse
button. The file is added to the bank.
11. Or… Select the object you want from the Library
and Right-click. Then select Merge to merge the
object into the current bank.
3 - Getting Started
The Librarian
E-MU Systems 67
Page 68

3 - Getting Started
The Librarian
68 Emulator X3 Reference Manual
Page 69

4 - Multisetup / Preset Globals
The Multisetup
The Multisetup is the top level of the Emulator hierarchy and is the place where you
choose and assign presets to each of the MIDI channels. All the control settings in this
window are saved when you save the Multisetup.
A multisetup assigns a preset, volume, pan position and output routing to each of the
64 MIDI channels. Multisetups can be saved and recalled for use with a particular song
or sequence so that all the MIDI channels play the proper preset.
To Select the Current Multisetup:
1. Click on the Emulator X icon at the top of the Tree. The current multisetup appears.
2. The Single Mode view is shown below. This view is convenient for performing live
or when you’re only playing one preset at a time.
4 - Multisetup / Preset Globals
The Multisetup
The MIDI Controller
settings and Filter
Override are not stored
with the Multisetup.
These settings are stored
with each Preset.
Single Channel View
Preset
Select
Click
Here
Channel
Pan
Channel
Volume
FXA, FXB,
Aux Output
Enables
Main
Output
Select
Single View
Tab
Select All or
by Category
Select
Category
Channel
Select
MIDI
Mode
Select
Bank &
Preset
Display
Aux FX
Display
Tabs
Select
Effect
Effect
Bypass
Preset
Category
Display
Master
Tempo
Master
Volume
Master Tune
Tran spos e
MIDI
Controllers
Pre-roll
RAM Used
E-MU Systems 69
CPU & Disk
Usage Meters
Samples
Playing
Current
Channel
TwistaLoop
Override
Filter
Override
Aux
Output
Select
Limiter
Page 70

4 - Multisetup / Preset Globals
The Multisetup
There are five views of the Multisetup page. The Multisetup View buttons change the
current view. The Single channel view is shown below.
• Single................... .. Displays the pres et for the currently selected MIDI channel.
• Channels 1-16....... Displays the preset, volume and p an for MI DI channel s 1-16.
• Channels 17-32.... Displays the preset, volume and pan for MIDI channels 17-32.
• Channels 33-48.... Displays the preset, volume and pan for MIDI channels 33-48.
• Channels 49-64.... Displays the preset, volume and pan for MIDI channels 49-64.
Changing Presets (from Single View)
Single View is the default view when you first run Emulator X. This view is convenie nt
for performing live or when you’re only playing one preset at a time. All the main
parameters for the selected MIDI channel are displayed in Single View and a convenient Category mode allows you to quickly select presets in a certain category. A closeup of the current channel settings is shown below.
Single View Close-up
Note that Single View
only changes the display
and does not affect the
currently selected MIDI
mode (i.e. Omni, Poly or
Multi).
Select All or Select
by Category
Preset
Inc/Dec
Select/View
Preset
Number
Preset
Name
Channel
Volume
Main Output
Select
To Select Presets by Number
Select
Category
FXA/FXB
Enables
Select/View
MIDI Channel
Aux Output
MIDI Channel
Inc/Dec
Bank/
Program
Display
Selected
Category
Channel
Pan
Enable
1. Click on the Preset Increment/Decrement buttons to move up or down the presets
by number.
2. Highlight the Preset Number field and type in the desired preset number.
The Bank/Program
Display shows the Bank
and Program number
you would use to select
the preset from a
sequencer.
Tip: You can al so
select a preset by
dragging and dropping it
from the tree into the
single view screen.
70 Emulator X3 Reference Manual
Page 71

To Select Presets by Category
1. Click on the Select Category button. The popup dialog box at right appears.
2. Select the desired preset category, then press OK.
3. Choose Select By Category from the Single view
screen above.
4. Use the Increment or Decrement buttons to
select presets. Note that only presets of the
selected category are selected.
Changing the Current MIDI Channel
The Current MIDI Channel is simply the MIDI channel you are currently working
with. To change the current MIDI channel, simply increment or decrement the
channel number using the buttons, or click on the channel number and type in
the desired number.
Multi Channel View
Press the 1-1 6 Multis etup View button to view 16 channels at once. This mode is useful
for sequencing or when playing multiple MIDI channels.
4 - Multisetup / Preset Globals
The Multisetup
Multi Channel View
MIDI
Activity
Click
Here
Current
Channel
MIDI
Controllers
Preset
Select
Multisetup
View
Tabs
Channel
Vol ume
Channel
Pan
MIDI
Mode
Select
Output
Display
Tab
Aux FX
Display
Tabs
Main
Output
Routing
Aux Send
Enables
Preset FX
Enables
Master
Tempo
Master
Volume
Master Tune
& Transpose
Aux
Output
Select
Definable
Labels
E-MU Systems 71
Preroll
RAM Used
CPU & Disk
Use Meters
No. Samples
Playing
Current
Channel
TwistaLoop
Override
Filter
Override
Limiter
Page 72

4 - Multisetup / Preset Globals
The Multisetup
The Current MIDI Channel
Change the current channel by clicking anywhere on the desired horizontal channel
strip. The red indicator displays the currently selected channel number. The MIDI
Controllers change to show the settings of the currently selected MIDI channel.
To Select a Preset:
1. Click on the Preset Select button for the desired MIDI channel. The Select Preset
dialog box appears.
2. Click on the presets in the list to audition them. Presets can be viewed by large icon,
small icon, by list, or by detailed list. Presets can also be sorted by name, ID, bank/
program number, or category when in Detail View mode.
3. To choose a preset, select it and press OK, or double-click on the preset in the li st.
To Select a Preset from the Tree:
1. Set the Current Channel by clicking anywhere on a horizontal channel strip in the
Multisetup window.The channel number turns red, indicating that this is the
current channel.
2. Choose the preset you want in the tree and Right-Click on its preset icon.
3. Choose Select on Current Channel. The preset is now selected for that channel.
4. You can also select a preset for the current channel by simply clicking the preset’s
keyboard icon from the tree.
MIDI Channel
Each channel only responds to MIDI data on its particular channel. Use the floating
keyboard (select Keyboard from the View menu) to audition presets on the currently
selected channel. Select the current channel by clicking anywhere on the desired
channel strip. The red indicator displays the currently selected channel number.
Preset Assignment
Assign presets to MIDI channels by clicking on the triangle selector button to the
right of the preset field. A pop-up dialog box appears with the list of presets in the
bank. Select a preset, then click OK to select.
Channel Volume
This control sets the relative volume of the MIDI channel. This is equivalent to MIDI
controller #7 (channel volume) and changes made over MIDI will be shown here.
Channel Pan
This control sets the stereo position of the MIDI channel. This is equivalent to MI DI
controller #10 (channel pan) and changes made over MIDI will be shown here.
Output Assignment
This control selects the Main Output assignment for the MIDI
channel. 100% of the stereo output signal is sent to the selected
output bus.
The number of outputs available in this field depends on the number of stereo
channels your sound card provides. Add ASIO input strips in PatchMix DSP to increase
the number of available outputs. Output destinations will be labeled according to the
PatchMix DSP input strip scribble strip name. The EX session templates in PatchMix
DSP are designed to be used with Emulator X.
Important: The act of
creating PatchMix DSP
ASIO mixer strips makes
them available for Emulator
X. If they are not created in
PatchMix DSP, you won’t
see them in the Output
Assignment field.
72 Emulator X3 Reference Manual
Page 73

Output View Button
This button allows you to view the Aux Send On/Off, Main Output Routing, and Preset
FXA/FXB Bypass buttons when not in Single Mode. (The button is disabled in Single
mode.)
You may want to bypass the Preset Effects on certain channels in order to free up CPU
power or to hear the presets dry.
Aux FX View Buttons
The buttons above the TV display select which of the three possible Aux Effect is
currently displayed. Note: The Output View button is disabled in Single mode.
Aux Send On/Off
These buttons enable (blue) or disable (grey) the inputs to the Aux Sends for each
MIDI channel. When a factory FX template (such as Proteus X Composer) is used, these
buttons serve to enable/disable the Aux FX for each channel. The Main Output is
unaffected by these buttons.
These buttons disable the Aux Sends whether the Aux FX are being used or not. Please
refer to the diagram on page 234
path.
Output View
Button
to see the exact location of this switch in the signal
Aux Effect View Buttons
4 - Multisetup / Preset Globals
The Multisetup
The Output View
button is only available
when any of the
multimode views are
selected. In Single mode
you can only control the
current channel.
Aux Send
Preset FX
Enable Buttons
Main Output
Routing
On/Off
Preset FX Enables
These two rows of buttons marked FXA and FXB, enable or disable the preset effects for
each MIDI channel. These work differently than the Aux Send On/Off buttons in that
they bypass the effects instead of turning them on or off. These buttons are useful to
bypass any preset effects which may have been programmed in the preset.
Please refer to Chapter
“9 - Effects” on page 231 for detailed information about the
output and effects routing.
Select Effect
Click on the Effect Select icon at the top right corner of the Effects TV screen. A list
of available effects drops down. See “
Adding an Aux Effect in the Multisetup” on
page 232 for complete details on how to add aux effects.
TwistaLoop Override
This three-way switch determines if the beat looping features
are locked to Master Tempo. The three modes are as follows:
• On: Beats on the channel are locked to the Global
Master Tempo. This control overrides the “Sync
To Master Clock” setting in the preset.
• Off: Beats on the channel are NOT locked to the Global Master Tempo. This
control overrides the “Sync To Master Clock” setting in the preset.
• Not Set: The “Sync To Master Clock” button in the Preset Globals page deter-
mines whether or not the Beats are locked to the Global Master Tempo.
E-MU Systems 73
Page 74

4 - Multisetup / Preset Globals
Global Controls
Global Controls
Master Volume Control & VU Meter
This is the master volume control for Emulator X. This slider controls the output
volume of all MIDI channels.The range of this control can be adjusted using the
Headroom/Boost control in the preferences dialog box. See page 24.
The Master volume control responds to the Universal Real Time System Exclusive message for
Master Volume. If your MIDI controller (e.g. an E-MU Xboard) sends such messages (such as
from a master volume slider), the master volume in Emulator X changes accordingly.
The VU meter indicates the overall output level of the Emulator X Main Outputs. It serves
as a handy indicator to show clipping or to troubleshoot audio output p roblems.
Temp o Con tro l
This control and associated display sets the master tempo when Emulator X is chosen
as the tempo source. Emulator X contains a global master clock which is used for
Tempo-based Envelopes, Tempo-based LFOs, and clock modulation.
External Tempo Source” in the MIDI Preferences dialog must be Off fo r this control
to operate.
When “External Tempo Source” in the preferences dialog box is On, and an external
MIDI device or appl icati on is generating MIDI clock, the Emulator X tempo will lock to
the MIDI clock tempo.
Master Tune
Master Tune adjusts the overall tuning of all presets so you can tune Emulator X to
other instruments. The master tuning range is ±1 semitone in one cent steps (1/100th
of a semitone). A master tune setting of 0¢ indicates that Emulator X is precisely tuned
to concert pitch (A=440 Hz).
Master Transpose
The master transpose parameter transposes the key of all presets in sem it one inte r vals.
The transpose range is ±12 semi tones (1 octave).
Limiter
When playing Emulator X you may sometimes hear digital clipping. This clipping
occurs in the digital hardware and is not caused by Emulator X, which uses high
resolution floating point processing and has tremendous internal headroom.
To avoid the clipping, you could always lower the volume controls, but there’s a better
way. The Limiter monitors the signal ahead of the output stage and automatically turns
down the volume before clipping can occur.
74 Emulator X3 Reference Manual
Page 75

To Use the Limiter
1. Press the Enable button, illuminating the but ton.
2. Set the Release knob to about 30% to start. Release controls how fast the limiter
turns the volume back up after reducing it to avoid the clipping peaks.
3. Increase the r el eas e t im e if you hear obvious volume changes (pumping). Reduce
the release time for percussive playing.
Aux Outputs
These three output assignments assign the Aux Routings selected in the Voices or
Presets to pairs of ASIO channels or to DirectSound. Every Voice (page36
) has three
effects sends with programmable amounts as well as a wet/dry mix to the Preset FX
section. The three effect sends from all voices and Presets are summed into the three
Aux Outputs where they are assigned to an ASIO pair. The Aux ASIO streams can be
routed to the PatchMix DSP mixer or to other software devices running on your
computer.
Emulator X Aux Bus Routing
4 - Multisetup / Preset Globals
Global Controls
See Chapter
9 - Effects” on page 231
“
for complete descriptions
of the effects routing.
Using the Emulator Sessions in PatchMix DSP
The E-MU Digital Audio System contains special Sessions that can be used with the
Emulator X factory banks. These Sessions connect the Aux Outputs to PatchMix DSP
mixer input strips containing PatchMix DSP hardware effects.
If a factory bank has the Aux Outputs set as shown in the diagram above, it is designed
to use the PatchMix hardware effects. If all the Aux Outputs are set to EX Main it most
likely uses the built-in software effects. You can easily add PatchMix DSP hardware
effects to a bank that uses Emulator X software effects by simply switching an Aux bus
to a PatchMix strip with effects.
See “
Block Diagram of the Effects Routing” on page 234.
ASIO 1/2
ASIO 3/4
ASIO 5/6
ASIO 7/8
E-MU Systems 75
Page 76

4 - Multisetup / Preset Globals
Global Controls
IMPORTANT
The act of creating PatchMix DSP ASIO mixer strips makes them available for
Emulator X or any other application. You must create the ASIO mixer strips
before Emulator X or any other application will see them.
To Open the Emulator Sessions in PatchMix DSP
1. Open PatchMix DSP by clicking on the icon and select New Session.
2. Select Emulator X Studio.
3. Select Percussion EQ for use with the percussion banks on Disk 3. Select Emulator
X Studio for all other banks.
4. The PatchMix DSP screen below shows the Main and Aux Output connections from
Emulator X.
Emulator X Studio Session
Main
Output
Aux 1 Aux 2 Aux 3
The routing options in the Emulator X Aux Output section take their names from the
PatchMix DSP scribble strips. To route an Aux Send to a hardware effect, simply
change the Aux Output routing to a PatchMix strip containing effects.
76 Emulator X3 Reference Manual
Page 77

Filter Override
The filter type of the first voice in the preset (on the currently selected channel) is
shown in this display. If you change the filter type in this field, ALL the voices in the
preset will change to the filter type you select. When the display reads, - Not Set - the
filters programmed in each voice will be used. The filters may be set differen tly for each
voice.
4 - Multisetup / Preset Globals
Global Controls
MIDI Realtime Controllers & Scribble Strips
Pre-roll RAM CPU Meter Number of Samples Current Channel
Filter Override
MIDI Controllers & Scribble Strips
Sixteen realtime MIDI Controllers are available to control the preset on the currently
selected channel. These controllers are connected to MIDI sources as assigned in the
Preferences dialog box (page 28
The scribble strip names and the initial settings of the controller knobs are user
programmable in the Preset Globals window. See page 80
) and changes made over MIDI will be reflected here.
.
Pre-roll RAM Used
This display shows how much of your computer’s RAM is being used by pre-roll sound
data. The amount of Pre-roll RAM can be adjusted in the preferences dialog box. When
Sample Streaming is disabled this number shows the total RAM usage. See page 21
.
CPU Meter
This display shows how much of your computer CPU power is being used by
Emulator X. If the meter turns red, this indicates that there is not enough CPU
bandwidth to properly process the audio in a timely manner, which may result in
audible glitches or delayed notes.
Number of Samples Playing
This display shows you how many samples are currently being played. The maximum
number of samples that can be played depends on a variety of factors such as: HD
speed, RAM memory speed and CPU speed. See “
information about performance.
Audio Setup” on page 23 for more
Current Channel
This displays the currently selected MIDI channel. Change the current channel by
clicking anywhere on the desired channel strip.
E-MU Systems 77
Page 78

4 - Multisetup / Preset Globals
Working with Multisetups
Working with Multisetups
A Multisetup is a “snapshot” of the current Emulator X settings. Multisetups store the
preset, volume, pan position, and output bus routings for 64 MIDI channels along with
the Global Tempo and the three Aux Send destinations.
Saving FX & Multisetups
It is important to realize what data is stored in a multisetup when saving banks. In
addition to Volume, Pan, and Preset choices for each channel, the Initial Controllers,
FX Aux 1, Aux 2, and Aux 3 are stored with the multisetup. The send level for each
preset to each Aux bus is stored in the preset data. Remember to save the bank
whenever you have made changes that you want to keep.
VSTi Multisetups
A multisetup for your VSTi is stored in your Cubase project and will be loaded when
the project is opened. This multisetup overrides whatever default multisetup may have
been saved if the bank was opened in standalone mode. If you wish to store extra
multisetups you may do by using the Multisetup menu on the toolbar.
To Store the Current Multisetup
1. Set up all the multisetup parameters the way you want them.
2. Select Store from the Multisetup window on the toolbar.
3. Choose a name and number for the multisetup. Changing the number allows you
to place the Multisetup anywhere you want in the list.
4. Press OK to store the Multisetup.
5. Save the Bank, otherw is e nothing will be saved.
To Restore a Multisetup
1. Open the multisetup folder in the Tree. Any multis etups contained in t he bank will
be listed below the folder.
2. Left-click on the desired multisetup icon in the tree and drag it over the Emulator
X icon above the tree. This multisetup will be restored.
3. Alternate Method - Right-click over the Multisetup icon in the Tree and choose
Load.
To Export the Multisetup as a New Bank
This feature lets you save only the presets and samples you need as a new bank.
1. Set up all the multisetup parameters the way you want them.
2. Select Export from the Multisetup window on the toolbar. The popup “Save As”
dialog box appears prompting you for the save location.
3. Choose the location for your new bank and click Save to save the bank, or click
Cancel to cancel the operation.
To Rename a Multisetup
1. Open the multisetup folder in the Tree. Any multisetups contained in the bank will
be listed below the folder.
2. Right-click on the desired multisetup icon in the tree, then select Rename from the
pop-up menu.
3. Type in a new name for the multisetup.
78 Emulator X3 Reference Manual
Page 79

To Delete a Multisetup
1. Open the multisetup folder in the Tree. Any multis etups contained in t he bank will
be listed below the folder.
2. Right-click on the desired multisetup icon in the tree, then select Delete from the
pop-up menu.
3. The Multisetup will be deleted.
To Duplicate a Multisetup
1. Open the multisetup folder in the Tree. Any multis etups contained in t he bank will
be listed below the folder.
2. Right-click on the desired multisetup icon in the tree, then select Duplicate from
the pop-up menu.
3. The Multisetup will be duplicated renamed “Copy of…XX” and placed in the first
empty Multisetup location.
To Rearrange the Order of Multisetups
1. Click once on the multisetup folder in the tree. The list of multisetups appears.
2. Select Details View from the view options in the toolbar and change the ID
number.
3. If you try to save a Multisetup with a number that is already used, a popup dialog
box will appear asking you if you want to use the next available ID number or enter
a new ID.
4 - Multisetup / Preset Globals
Working with Multisetups
E-MU Systems 79
Page 80

4 - Multisetup / Preset Globals
Preset Globals
Preset Globals
The Preset Globals allow you to edit presets and their key maps. Samples can be
arranged into single-sample or multi-sample voices with synthesizer processing
applied. Then these complete voices can then be arranged anywhere on the keyboard.
The Preset Editor contains three sections. The first section, Voices & Zones, is used for
arranging voices and samples on the keyboard and editing global preset parameters.
The Links section makes it easy to build new presets by combining other finished
presets. Multiple presets can be crossfaded or cross-switched according to key position,
key velocity, or by the position of MIDI continuous controllers.
The third section, Voice Processing, is used to perform more detailed editing of voices
such as envelope shaping of amplitude and filters as well as modulation parameters.
This is the synthesizer section of Emulator X containing E-MU’s legendary Z-plane
filters and powerful matrix modulation.
To Edit a Preset:
1. Select the Sampler tab from the Tree. The
contents of the current Emulator X bank
appears in the Tree.
2. Double-click on the Preset folder from the
tree (or click once on the (+) symbol). The preset
folder expands to display the presets
contained within.
3. Click on one of the Preset icons in the Presets
folder to view the Preset Globals window.
4. Double-click on the desired preset icon from
the tree (or click once on the (+) symbol). The
preset icon expands to display the subsections:
Voices and Zones, Links, and Voice
Processing levels.
5. Select the desired section: Voices & Zones,
Links, or Voice Processing by clicking on the
associated icon.
To Select a Preset from the Tree:
1. Set the Current Channel to the one you’re
using by clicking on the channel number in
the Multisetup screen.
2. Choose the preset you want in the tree and
Right-Click on its preset icon.
3. Choose Select on Current Channel. The
preset is now selected for that channel.
80 Emulator X3 Reference Manual
Page 81

These parameters affect the entire preset and are saved with t he bank.
4 - Multisetup / Preset Globals
Preset Globals
You can quickly access
the Preset Globals
window by clicking the
button in the toolbar.
Transpose & Volume
Transpose works by shifting the keyboard position. The actual samples are not retuned.
In other words, if you have the same sound on each key, such as a piano, the piano will
change key when you transpose. On the other hand, if you have a different drum
assigned to each key, changing transpose will shift the position of the drum s on the
keyboard.
The volume control allows you to adjust the volume for the entire preset. This control
is variable from -96 dB (off) to +10 dB.
Initial Controllers A-P
These set the initial value of MIDI controllers A-P for the preset. As soo n as a M ID I
controller is moved, it jumps immediately from this initial setting to the new setting of
the control. The controllers A-P are assigned to MIDI continuous controller numbers in
the Preferences dialog box.
Controllers A-P can be adjusted via MIDI or by turning the controller knob in the
Multisetup.
The Label fields to the left of the initial controller knobs are user definable. These labels
or “Scribble Strips” also appear in the Multisetup screen to show the function of the
realtime controller knobs.
See “
MIDI Channels & Real-time Controls” on page 314 for additional information
about Controllers A-P.
Changing the initial
controller settings is an
easy way to customize a
preset. Simply change the
knobs and save the bank.
E-MU Systems 81
Page 82

4 - Multisetup / Preset Globals
Preset Globals
Capture MIDI Controllers
You can capture the state of all your MIDI input device’s MIDI controllers, and place
the settings in the Initial Controllers section of the Preset. Essentially, this allows you to
capture the Multisetup’s MIDI controller state, and store it in the preset.
To Capture MIDI Controllers
1. Make any desired changes to any MIDI controllers on your MIDI input device, or
in the Multisetup window.
2. Go to the Preset Globals window for the preset you want to apply your current
MIDI state.
3. From the Preset menu, select Capture MIDI Controllers.
4. Notice that the initial controllers now reflect the state of your MIDI controllers. To
keep these settings, you can save the Preset.
TwistaLoop Lock To Tempo
This control locks all analyzed beats in the preset to the global
master tempo. When this function is on, all beats in the preset will
lock to the master tempo unless “TwistaLoop Override” (page 73
is turned off.
This button works in combination with “TwistaLoop Override.”
When TwistaLoop Override is “Not Set,” this button determines
whether beats sync to the master tempo for the pres e t.
When TwistaLoop Override is set to On or Off for the MIDI channel, this button has no
effect. These two controls allow you to set the state of “Sync to Master Clock” by MIDI
channel (TwistaLoop Override) or by Preset (this button).
)
Initial Tempo
This feature allows the master tempo to be programmed from
presets that use tempo-based envelopes, LFOs or TwistaLoop.
The Initial Tempo works in combination with the “Preset Tempo
Channel” option in the Preferences menu, which allows one
specific MIDI channel to control the master tempo. See
Tempo Channel on page 27.
When the Initial Tempo is set to a tempo on the defined Preset
Tempo Channel, the master tempo will follow this tempo setting when the preset is
selected.
To Set the Master Tempo from a Preset:
1. Turn Preset Tempo Channel on a nd set it to the desired MIDI control channel.
(Options, Preferences, MIDI) “External Tempo Source” must be turned off.
2. Set the Initi a l Tempo (Preset Globals) to the desired tempo.
3. Turn on TwistaLoop - Lock To Tempo (Preset Globals) if you are using Twist-
aLoop.
4. Select the preset on the assigned preset tempo channel.
Preset
82 Emulator X3 Reference Manual
Page 83

Tuning Tables
In addition to the standard equally divided octave tuning, Emulator X contains twelve
factory programmed tuning tables. The Keyboard Tuning parameter selects which
tuning is used by the current preset.
The factory keyboard tuning tables are described in the following table.
Tuning Tables Description
Equal Temperament
Just C
Just C2
Just C-minor
Just C3
Vallotti and Young
19-Tone
Gamelan
Werkmeister
Kirnberger
Scarlatti
Repeating Octave
al-Farabi 12
22-Tone
24-Tone
36-Tone
Standard Western tuning
12 equally spaced notes per octave.
Just intonation. Based on small interval ratios. Sweet
and pure, non-beating intervals.
Allows you to play the following chords in the key of
C: C, E, F, G, A, B, C#m, D#m, Em, F#m, G#m, Am, Bm
Allows you to play the following chords in the key of
C: C, E, F, G, A, B, Em, Am, Bm, C#m, D#m, G#m
Allows you to play the following chords in the key of
C: C, D, F, Bb, C#m, Dm, Em, F#m, G#m, Am
Valotti & Young non-equal temperament. Similar to 12
tone equal temperament. Each key has a different
character for a given scale.
19 tone equal temperament. 19 notes per octave.
Difficult to play, but works well with a sequencer.
5 tone Slendro and 7 tone Pelog. (Javanese.) Pelog are
white keys, Slendro are black keys. Exotic tunings of
Gamelan flavor.
A “well” temperament developed in the 17th century.
Although you can play in all keys, each key sounds
slightly different.
Another well temperament developed by Johann
Philipp Kirnberger where no pitch is more than 12
cents off from equal temperament.
A variant of Meantone tuning which was used from
the 15th to 18th centuries.
Middle C octave is repeated up and down the
keyboard. Link with a preset in equal temperament to
form unusual inversions up and down the keyboard.
A twelve-note reduction of an Arabic/Middle Eastern
tuning system. The following scales are useful:
Diatonic: C Eb G G# A A# B c
Zalzal: C Eb Gb G# A A# B c
Persian: C Eb F G# A A# B c
22 tone equal temperament. Good for minor
harmonies.
24 tone equal temperament. These notes are quarter
steps apart.
26 tone equal temperament. Difficult to play, but even
better for minor harmonies.
4 - Multisetup / Preset Globals
Preset Globals
E-MU Systems 83
Page 84

4 - Multisetup / Preset Globals
Preset Globals
The Just C Tuning Tables
Well Tempered and Just were standard keyboard tunings up
until the 20th-century when the current “equal tempered”
scale became prevalent. In an equal tempered scale, the
octave is equally divided into 12 parts. In Just or Well
Tempered scales, the 12 notes are separately tuned to
produce pure chords. However, in Just tunings you are
limited to playing certain chords and if you play the wrong
chord it may sound sour!
Tuning tables can be changed as you play using a program
change (create several presets with the same sound and
different tuning tables) or using a continuous controller
(link 2 presets and crossfade between them using a
controller).
The Just C2, Just C min, Just C3 Tuning Tables
Fully explaining the mysteries of just intonation is beyond the scope of this manual,
but the subject is covered exhaustively in Hermann Helmho ltz’s On the Sensations of
Tone, available at most libraries and bookstores.
The four just intonation tables are called Just C2, Just C3, and Just C Minor. Try playing
in the key of C/Cm using each table. You’ll quickly discover both the wonders and the
frustrations of just intonation! In Just C, for example, you’ll find that the chords C, Em,
F, G, and Am sound beautiful. If you hold one of these chords, you’ll hear no
“beating”. After playing for a few minutes, switch back to Equal Temperament for a
rude awakening!
At this point you might wonder why anyone would use Equal Temperament to begin
with. For the answer to that question, play a D, Dmi, or Bb chord! The intervallic ratios
that make the C & G chords sound so pure make the D chord sound horribly out of
tune. That's why we had to include Just C3. In this tuning, D, Dmi and Bb sound in
tune, but the G chord will sound wrong.
Each of the 4 tables allows you to play a different group of common chords in just
intonation. Sadly, there is no single 12 note tuning that will allow all of the common
chords to be in tune, and of course that's why they invented the equal temperament
tuning system that we use today.
Just C
Play these chords: C, E, F, G, A, Cm, C#m, Em, F#m,
Gm, Am
Just C2
Play these chords:
C, E, F, G, A, B, C#m, D#m, Em, G#m, Am, Bm
Just C minor
Play these chords: C, D
Just C3
Play these chords: C, D, F, B
b
, D, Eb, G, Ab, Cm, Em, Fm, Gm
b
, C#m, Dm, Em, F#m, G#m, Am
Equal Temperament Tunings
For each of the equal temperament tunings except 19-tone, middle C (i.e., MIDI note
60) is middle C as it would be in a standard 12-note tuning. The keyboard is then
scaled up and down from middle C (C2). For example, using the 22-tone scale, one
octave above middle C is 22 keys up the keyboard (A#3).
84 Emulator X3 Reference Manual
Page 85

Key CC Window
These controls work in conjunction with the “Keyboard - CC Window” function in the
Voices and Zones. See “
Pressing the “Key CC Win” button and setting a Keyboard Range fields marks off a
section of the keyboard to be used as control keys for the CC Window or a PatchCord
source in the Voice Processing section. These keys will no longer trigger sounds.
Instead, they are now used for selecting different voices in the CC Windows, or as a
modulation source in the Cords. (See page 222.
Continuous Controller Window Pages” on page 108.
)
Preset Modulators
The Preset Modulators are special class of modulation sources in that they originate at
the Preset Level, but their output is used in the V oice PatchCords. There are three types of
preset modulation sources.
Preset Modulator Typical Uses
Channel Lags 1 & 2 “Leslie” speaker effects. Switch slowly increases/decreases LFO
speed.
Poly Ramp (Timer) Controlling key-up layer volume based on the time a key is held.
Channel Ramp Ramps on First Note only. “Hammond” style organ percussion.
4 - Multisetup / Preset Globals
Preset Globals
Channel Lag 1 & 2 Rate
Like the Layer Lag processors (described on page 138) the Channel Lag slows down
rapid changes in the input signal. The output “lags” behind the input at a preprogrammed rate.
Unlike the layer level lag processors, the Channel Lags 1 & 2 take effect as soon as the
preset is selected. In contrast, the Voice level lag processors begin acting only after a
keyboard key has been depressed. The Channel Lag also has a Lag Amount input which
controls the lag time. Positive lag amounts increase the lag time. A MIDI controller
(front panel knob) is commonly used to control lag amount.
The Channel Lags could be used to slowly increase or decrease the speed of an LFO
which in turn controls some other effect, perhaps left/right panning, pitch, or the filter.
When a MIDI footswitch is used as the input, the lag acts to slow down the inst antaneous change of the switch. The slowly changing output value can then be routed using
a patchcord to smoothly crossfade between voices or gradually change the speed of an
LFO.
Channel
Lag
ex. footswitch
Lag Amount
(+ value = longer)
E-MU Systems 85
Page 86

4 - Multisetup / Preset Globals
Preset Globals
Poly Key Timer
This processor starts a timer which begins counting down whenever a key is pressed,
and stops and outputs its value when the key is released. The value of this timer can be
used on any voices after the key release. The Poly Key Timer is a special modulation
source controlled by the key and not the voice.
The Poly Key Timer is commonly used on grand piano presets to reduce the pedal
damper volume the longer the keys are held.
Release layer
voice becomes
softer the
longer the key
Release
Layer
Voice
Amp
is held.
Poly Release
Trigger
Amp Vol
Poly Key
Timer
Preset Global
Note-On - Poly Key Timer begins counting down.
Note-Off - Poly Key Timer stops counting and outputs value.
Channel Ramp
This processor generates a single negative going slope whenever the first key is
depressed on the MIDI channel. This preset level processor was originally designed to
simulate the percussion key click on Hammond organs, but you may find other uses.
Channel Ramp
time
decrease
1st Note
Played
The Channel Ramp instantly resets when all notes have been released and the next first
key on the MIDI channel is pressed. The value of the ramp rate set s the increment. Large
values produce fast ramps and small values produce slow ramps.
To use the Channel Ramp as a first-note decay envelope, patch the Channel Ramp out
to Amp Volume and set the Amp Envelope for a fast attack and 100% sustain and short
release.
86 Emulator X3 Reference Manual
Page 87

Preset PatchCords
Preset PatchCords give you real-time control of the Preset Modulators. There are 16
Preset PatchCords per preset with a source, a destination and an amount control. The
amount can be set from -100 to +100.
Modulation Sources Modulation Destinations
Off Off
Pitch Wheel Channel Lag 1 In
Mod Wheel (Modulation Wheel) Channel Lag 1 Amount
Pressure (Channel Pressure) Channel Lag 2 In
Pedal Channel Lag 2 Amount
MIDI Volume (Controller 7) Channel Ramp Rate
MIDI Pan (Controller 10) Post-FX Main Send
Expression (Controller 11) Post-FX Aux 1 Send
MIDI A-P Post-FX Aux 2 Send
Footswitch 1 Post-FX Aux 3 Send
Flip-Flop Footswitch 1 (F’switch 1 FF) FX A Mod 1
Footswitch 2 FX A Mod 2
Flip-Flop Footswitch 2 (F’switch 2 FF) FX A Mod 3
Thumbswitch FX A Mod 4
Flip-Flop Thumbswitch (T’switch FF) FX B Mod 1
DC Offset FX B Mod 2
Channel Lag 1 & 2 FX B Mod 3
Channel Ramp FX B Mod 4
4 - Multisetup / Preset Globals
Preset Globals
Templates
For each different module in the Preset Globals window, you can save a library of your
favorite settings. These Templates make it easy to create your own customized voices
and presets. Templates are saved as an XML file within the Emulator X application
directory so they’re always available for use. For more information on templates,
See
Templates on page 279.
E-MU Systems 87
Page 88

4 - Multisetup / Preset Globals
Preset Globals
88 Emulator X3 Reference Manual
Page 89

5 - Voices & Sample Zones
Each preset contains voices. A voice houses a sample, or multiple samples, and can
cover an individual key, or a range of keys.
The Voices and Zones window allows you full control over the parameters for each
voice, including levels, tuning, keyboard range, crossfading, looping, region, and more.
The Voices and Zones window is divided into tabs, each with its own set of controls.
Certain controls, such as Volume and Pan appear in each window.
To access the Voices and Zones window, expand a preset in the tree, and click Voices
and Zones.
5 - Voices & Sample Zones
Selected
Voice/Zone
xpand/Collapse
Multisample
Mute/Solo
Voice or
Zone
Selected
Voice(s)
Overview
Section
Page Selection Tabs Voice Multisample Voice Sample Zone
MIDI Controller RangeKey Range for
Selected Voice(s)
E-MU Systems 89
Page 90

5 - Voices & Sample Zones
Voices and Zones Pages
Voices and Zones Pages
The Voices and Zones Window is separated into tabbed pages:
Mix/Tune
Adjust volume, pan, transpose, coarse tuning, and fine tuning for each voice . For mo r e
information, see “
Mix/Tune Page” on page 99.
Key Win
Edit keyboard range assignments and place voices and multisamples wherever you
want. For more informations, see “
Key Window Page” on page 99.
Vel Win
Control the volume of a voice by key velocity. Crossfade or cross-switch between voices
by key velocity. For more information, see “
Velocity Window Page” on page 103.
RT Win
Control the volume of a voice using a real-time controller such as a modulation wheel,
a pedal, an LFO or an envelope generator. For more information, see “
Window Page” on page 105.
Realtime
CC Win 1-5
Switch CC windows using specified keys on your MIDI controller. For more information, see “
Continuous Controller Window Pages” on page 108.
Region
Define which part of a sample plays. For more information, see “Region Page” on
page 115.
You c an q ui ckl y ac cess
the Voices and Zones
window for the current
preset by clicking the
button in the toolbar.
Details
An overview of each voice that allows you to view and change Sample, Direction, Mix/
Tune, and Key Window information using numeric values. For more information, see
“
Details Page” on page 119.
90 Emulator X3 Reference Manual
Page 91

Voice Selection
In each tabbed page, voices can be selected by clicking any part of th e voice strip.
Selection is shown by a red box around the voice strip.
1. Select the first voice in the “Voices & Zones” screen.
2. Hold the Shift key to select contiguous voices. Hold the Control key to select or
deselect non-contiguous voices. Press Control-A to select all voices.
Manipulating Voices
Under each tabbed page, there are various controls that allow you to change a voice’s
Group, Sample, Direction, Volume, Pan, etc. Some controls, such as Group or
Direction, are selected from a drop-down menu. Others, such as Volume and Pan, are
controlled by a slider or wheel.
Most pages also contain parameters that can be adjusted
using graphical sliders.
You edit a slider’s range or position by clicking the slider, and dragging your mouse left
or right. Create a fade by holding the Alt key in conjunction with clicking and dragging
your mouse. See the example below:
5 - Voices & Sample Zones
Voice Selection
Click & Drag the
End to Resize
Click & Drag the
Middle to Move
Click & Drag Fade Point
to Adjust Fade
Alt-Click & Drag the
End to set Fade
• To set the high and low ranges, click and drag the end points of the graphic display
• To move the whole range without resizing it, click and drag the middle of the range.
• To create a fade, hold Alt, and click and drag the end points. Once you create a fade
point, you can click and drag the fade point to re-position it.
Working With Multiple Voices
If you select more than one voice, you can edit parameters for all selected voices simultaneously. To select more than one voice, hold the Ctrl key while clicking the voices
with your mouse. To select contiguous voices, hold the Shift key while clicking.
It’s important to understand how changing parameters in the various tabbed pages
differs from changing parameters in the Overview section that occupies the bottom
half of the screen:
• In the tabbed pages, such as the Mix/Tune page, parameter changes w ork in a
relative manner. This means if you select multiple voices and decrease the
Volume of a voice by 10 dB, you decrease all voices’ volumes by 10 dB.
• However, if you select multiple voices and change the volume knob in the
Overview section, you change all selected voices’ absolute volumes.
E-MU Systems 91
Page 92

5 - Voices & Sample Zones
Voice Selection
Note about multiple voice editing: If you open several voices for editing that have
different voice parameter settings, the parameters in th e dif f er e nt voice s will remain as
they were until you change them. That is, if you have three voices selected and you
change the filter cutoff, all three voices will jump to the new cutoff setting, but all the
other parameters will remain as they were.
Samples & Multisamples
The samples contained in the voice are displayed and can be edited. If the voice
contains more than one sample, the word “Multisample” is displayed in the sam p le
field. All the samples in a multisample share the same set of synthesizer parameters.
However, the volume, fine tune and pan parameters can be adjusted separately for
each sample in a multisample.
To View & Edit the Samples in a Multisample
1. Click the + symbol to display the individual samples and key ranges which
comprise the multisample.
2. Click the - symbol to coll apse the multisample.
Expand/Collapse Multisample
Multisample Key Range Individual Sample Key Ranges
Multisamples allow you to place multiple samples under the same set of synthesizer voice
parameters.
The multisample key range sets the overall key range limit for the samples in the multisample. In the diagram above, the top sample won’t be played, because its key range is
outside the limit of the Multisample key range.
92 Emulator X3 Reference Manual
Page 93

Groups
Voices can be categorized into Groups as a way to organize and select similar voices,
say a layer of piano voices and a layer of string voices, into unified entities.
You can create a temporary group if you want to edit several voices. Grouping the
voices and then selecting the group is faster and more dependable than manually
selecting each voice when editing.
To Place a Voice into a Group
1. Tag each voice you want to be in the group with the same group number. This can
be done in the “Voices and Zones” window or from the “Voice Processing”
window.
2. Whenever you select that group number in the Voice Processing window, all voices
with that group number will be selected. You can define up to 99 groups, but a
voice can only be in one group at a time.
To Make a New Group from the Currently Selected Voices
1. Select the voices you want to be in the new Group from the “Voices & Zones” page.
2. Select New Group from the Preset menu. A new group will be created using the
lowest available group number.
5 - Voices & Sample Zones
Voice Selection
To Select All Voices for Editing
• From the Voices & Sample Zones window, press Control-A.
• From the Voice Processing window, select All in the Group box.
To Select a Group of Voices for Editing
• Method #1: Simply select the desired group number from the Voice
Processing page. Once you have selected a group, you will be editing all
the voices in this group.
• Method #2: Select any voice in the group, then select Select Group “N”
from the Preset menu. All the voices in the group will be selected.
Sorting Voices and Zones
You can sort Voices, and Zones using the following criteria:
• Sample Number
• Sample Name
•Low Key
•High Key
•Original Key
• Volume
•Pan
• Group (voices only)
To Sort Voices or Zones
1. Right click any Voice or Zone number.
2. Select Sor t Voices or Sort Zones, and choose how you want to sort them.
E-MU Systems 93
Page 94
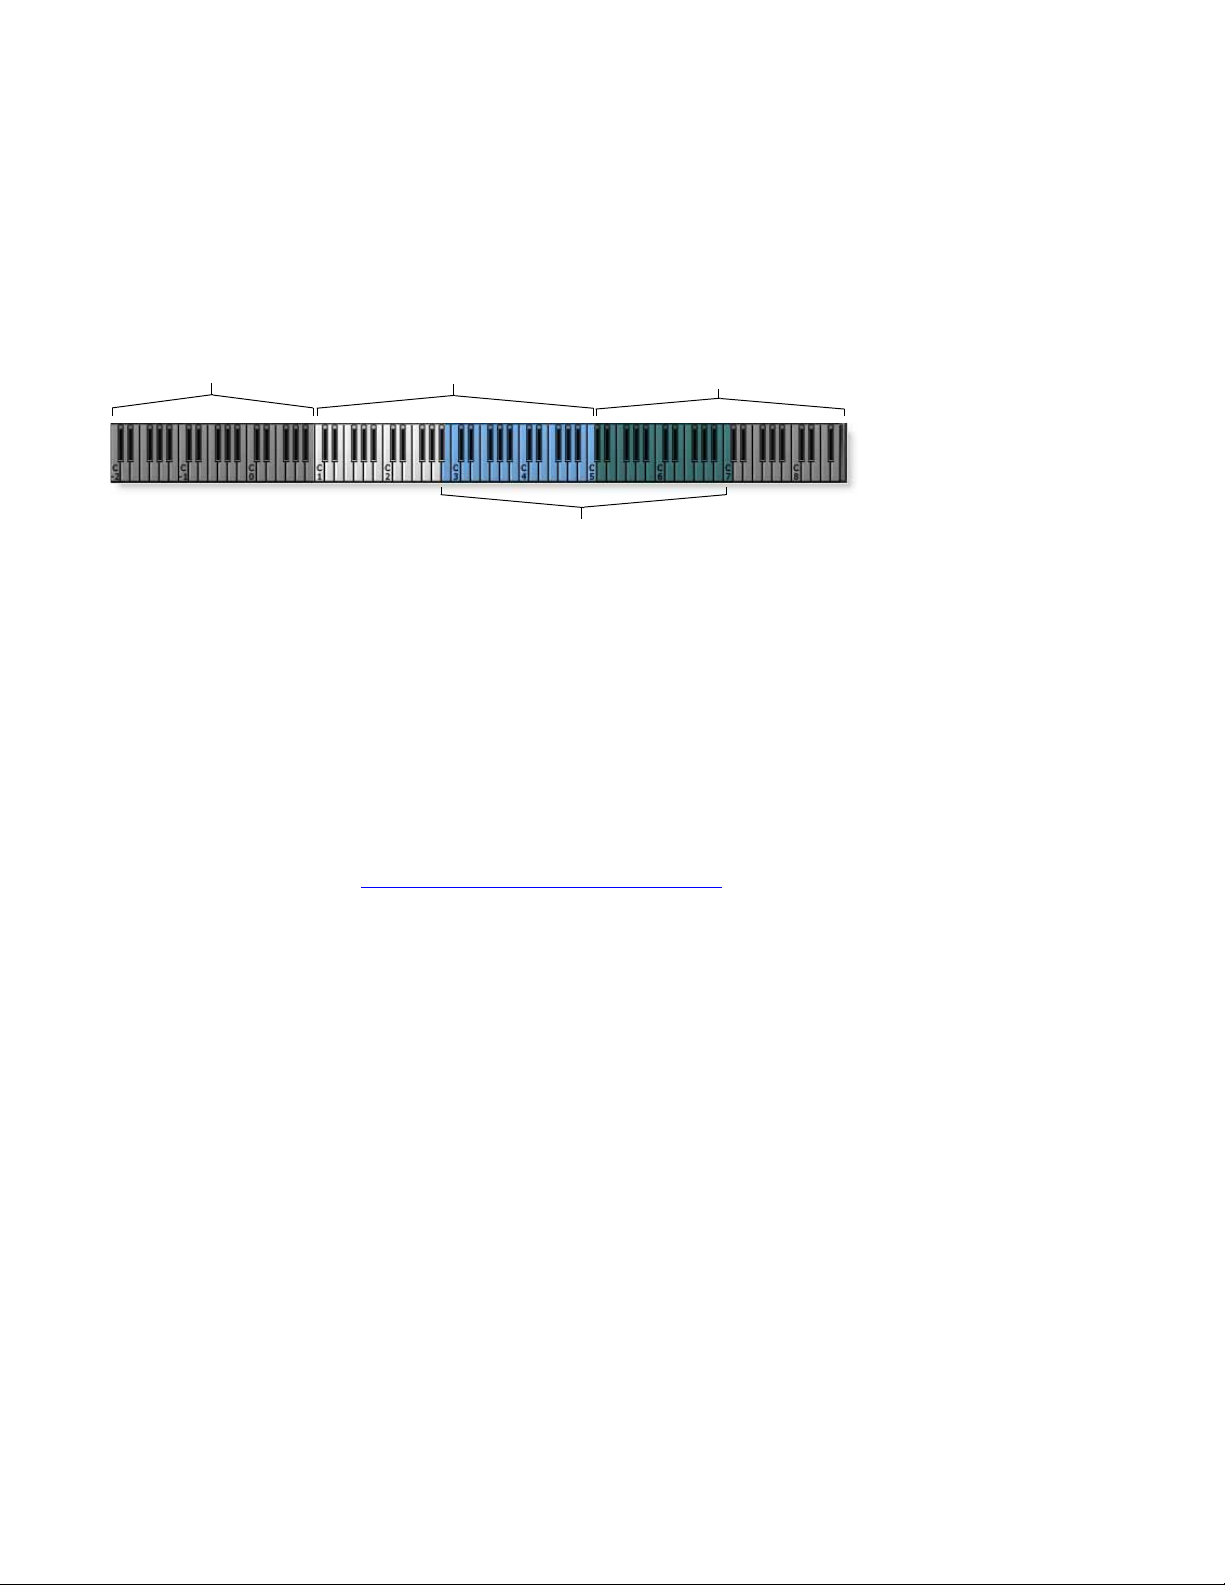
5 - Voices & Sample Zones
Voice Selection
The Keyboard Display
The keyboard display on the bottom of the screen gives you a visual representation of
the Key Win range for the currently selected voice(s), and the Note range of your MIDI
controller.
Notes that fall within the currently selected voices’ key range appear in color.
You can also mask out notes that don’t fall within a range of keys that match your
MIDI controller. Masked keys display in darker colors.
MIDI Controller Range (Light)Mask (Dark) Mask (Dark)
Key Win Range for
Selected Voice(s) (Color)
To Choose What type of MIDI Controller to Display
• Right-click the keyboard and select the type of controller you are using. Choices
are Full MIDI (no mask), Piano (88 keys), Three Octave, XBoard 61, XBoard 49,
and XBoard 25.
The keyboard display is also useful for identifying notes and creating a new voice with
a specific Original Key value Key Win range:
• When you hover your mouse over the keyboard, the name of the key is
displayed.
• You can create new voices by dragging samples onto the keyboard in the Voices
and Zones screen. See “
Adding Samples and Voices” on page 97 for more infor-
mation.
The Keyboard also
appears in the Voice
Processing screen.
94 Emulator X3 Reference Manual
Page 95

Overview Section
The bottom portion of the page contains an overview that displays and allows you to
control parameters for the selected voice(s).
These controls are available regardless of which tabbed page you select (except the
Region page), and work per voice. When you modify a setting here, the corresponding
setting changes in the Voice Processing window.
Note that the selected voices are indicated in the upper-left corner of the Overview.
Changes to these controls only affect the indicated voice(s). If you select multiple
voices and change a parameter in the Overview section, that parameter changes for all
selected voices.
When you select multiple voices, it’s important to understand how changing parameters in the Overview differs from changing parameters in the various tabbed pages. In
the Overview section, all changes are absolute values. This means if you select multiple
voices and change the Volume knob to a value of 10, you change all selected voices to a
volume of 10. However, if you select multiple voices and move the volume slider in the
Mix/Tune page, you change all selected voices’ relative volumes.
5 - Voices & Sample Zones
Overview Section
Tip: To set a control
to its default setting, hold
Alt while clicking the
control, or right-click the
control, and select
Default.
Selected Voice(s)
Sample Info
Mix/Tune Info
CC Win Info
Key, Realtime, and Velocity Window parameters
Sample Controls
Sample
The sample assigned to the selected voice or zone. If you select mu lt iple voices, this
window appears blank.
Muting and Soloing
voices does not save
polyphony! Muted voices
still play; they are simply
silenced.
Original Key
Sets the Original key of the selected voice or zone.
Group
Changes the group of the selected voice or zone.
Direction
Selects whether the sample plays forward, backward, forward loop, backward loop, or
one-shot.
E-MU Systems 95
Page 96

5 - Voices & Sample Zones
Overview Section
Mix Tune Controls
These are the same controls found in the Mix/Tune page.
Mute
Mutes the selected voice(s) or zone(s).
Solo
Mutes all voices but the selected voice(s) or zone(s).
Volume
Controls the volume for the selected voice(s) or zone(s). This control is also located in
the Voice Processing window.
Pan
Controls the Pan for the selected voice(s) or zone(s). This control is also loca ted i n the
Voice Processing window.
Fine Tune
Fine tunes the pitch of the selected voice(s) or zone(s) by cents. This control is also
located in the Voice Processing window.
Coarse Tune
Tunes the pitch of the selected voice(s) by semi tones. This control is also located in the
Voice Processing window. This control is NOT available for individual zones of multisample voices.
Tran spos e
Transposes the pitch of the selected voice(s) by semi tones. This control is also located
in the Voice Processing window. This control is NOT available for individual zones of
multisample voices.
Key Win, Velocity Win, RT Win, and CC Win Controls
Tip: To qui ckly
remove all solos and
mutes, select Clear All
Solos and Mutes from
the Preset menu.
See page 129 to
understand the
difference between
transpose and coarse
tune. You can also set the
group number from this
page.
Rather than using the graphical representation found in each corresponding tabbed
page, you can change the Key Win, Velocity Win, Realtime Win, and CC Win values
from any page (except the Region page). Remember, any changes you make only affect
the selected voice(s).
96 Emulator X3 Reference Manual
Page 97

Direction
For each voice (or zone in the case of a multisample voice), you can choose direction
settings. The Direction drop-down menu allows you to choose one of the following:
5 - Voices & Sample Zones
Adding Samples and Voices
Forward
The region plays from beginning to end while the note is
held.
Backward
The region plays in reverse from end to beginning while
the note is held.
Forward Loop
The region loops forwards from beginning to end as long
as the note is held.
Backward Loop
The region loops backwards from end to beginning as
long as the note is held.
One-Shot
The region plays from beginning to end when a note on
signal is received. If you release the note before the
sample completes, the region still finishes playback.
Note: You may have to adjust the Amp Envelope settings
in order to hear the sample. See “Envelope Complete”
mode on page 126
.
Adding Samples and Voices
You can create new voices and add samples to them from any of the tabbed pages in
the Voices and Zones window.
To Add a New Voice
There are several ways to add a new voice from the Voices and Zones window:
•Press Ctrl+W on your keyboard.
•From the Preset menu, select New Voice.
• Right-click an empty area and select New Voice.
To Cha nge a Zo ne’s Sample
•From the Sample column, click the Selector Button next to the appropriate voice or zone. Select a sample from the Select Sample dialog box.
• Drag a Sample from the Tree to the zone’s strip.
To Add an Additional Sample to a Voice
This either adds to, or creates a Multisample voice. From the Voices and Zones
window:
• Drag and Drop a sample from the Samples tree (or from your Library) on
the left into a voice in the Voices and Zones window.
• Explore your computer for an audio file (Wave, AIFF, MP3, REX 2). Drag and
drop the file into a voice in the Voices and Zones window. This imports the
sample and adds it to the voice.
E-MU Systems 97
Page 98

5 - Voices & Sample Zones
Adding Samples and Voices
To Add a Voice and a Sample Simultaneously
There are several ways to add a voice and a sample in the Voices and Zones window:
• Drag and Drop a sample from the Samples tree (or from your Library) on
the left into the empty area just beneath the list of voices.
This creates a new voice containing the sample you selected. The new
voice’s original key will be the sample’s original key (or C3 if this information
is unavailable). The voice’s key range will be C-2 to G8.
• Explore your computer for an audio file (Wave, AIFF, MP3, REX 2). Drag and
drop the file into any area in the Voices and Zones window.
This creates a new voice containing the audio file you selected. The new
voice’s original key will be the audio file’s original key (or C3 if this information is unavailable). The voice’s key range will be C-2 to G8.
• Drag and Drop a sample from the Samples tree, from your Library, or from
your desktop onto a note on the keyboard at the bottom of the screen.
This creates a new voice containing the sample you selected. The new
voice’s original key will be whichever note you dropped the sample onto.
The voice’s high and low keys will also be whichever note you dropped the
sample onto.
98 Emulator X3 Reference Manual
Page 99

Mix/Tune Page
5 - Voices & Sample Zones
Mix/Tune Page
Sample Name
Mute/Solo Direction
Selector
Button
Vol ume PanGroup
Transpose, Coarse Tune, Fine Tune
Volume, pan, direction, transpose, coarse tuning, and fine tuning can be adjusted
separately for each voice. The Mix/Tune window allows you to see these settings for
each voice at the same time, giving you an overview of your preset’s direction, volume,
pan, tuning, and transpose settings for each voice. All of these controls are available in
the other tabbed windows, but in this window, you can see the volume and pan for
each channel.
Additionally, from this screen, you can easily select multiple voices and change their
volumes with one adjustment. Select the voices whose Volume or Pan you want to
change, and hold Shift while dragging the volume right or left.
See page 129 to
understand the
difference between
transpose and coarse
tune. You can also set the
group number from this
page.
Key Window Page
Group
When a sample is recorded, it is automatically placed in a voice and assigned a
keyboard range specified in the “Auto-Placement” parameters in the “Acquire” or
Import Samples” options in the File menu. The Key Range Window allows you to edit
these assignments and place the voices and samples wherever you want.
A voice containing only one sample takes the name of the sample. If a voice contains
more than one sample, it is called a “Multisample” and the samples it contains are
listed below it. The screen above shows two single sample voices. Voice 1 plays on the
lower half of the keyboard and voice 2 plays on the upper half.
Sample Name
Selector
Button
DirectionMute/Solo
Original Key Graphic Display
of Voice Position
The Original Key determines the pitch of the sample. The original key need not be
located between the high and low key ranges. Samples normally have the original key
E-MU Systems 99
Page 100

5 - Voices & Sample Zones
Key Window Page
as part of the sample name. Imported samples with embedded original key information can be auto-mapped to the correct location. See page 295
.
The key position is edited by placing the cursor over the desired parameter and then
playing the MIDI keyboard or adjusting the value using the keyboard. You can also
simply drag the blue bar to the desired position with the mouse.
Voices and samples can be crossfaded according to key position by adjusting the low
and high fade parameters. The fade is adjusted in “number of keys” and is graphically
represented by a gradual decrease in the color intensity of the bars.
To Manipulate the Bars:
• To Set the Length of the Bar: Left-click and drag from either endpoint.
• To Move the Entire Bar: Left-click and drag from somewhere in the middle of
the bar.
• To Create a Fade: Left-click and drag inward while holding the Alt key.
B2
The voice will gradually fade-out in volume below B2 as you play down the keyboard.
To Switch Voices According to Position
Assigning voices (samples or multisamples) adjacent to each other is the simplest and
most common application of the Key Window. The voices in the screen below are each
assigned a one octave range.
Another way of visualizing this assignment is shown below.
VOICE 1 VOICE 2 VOICE 3
VOICE 4
Samples can be
arranged in a
multisample voice in
exactly the same way that
voices are arranged on
the keyboard. They can
be arranged side by side
on the keyboard or
stacked on top of each
other to create layered
sounds, all within a single
voice.
100 Emulator X3 Reference Manual
 Loading...