

Page 1

E-mu Systems Emulator
Operating Instructions
(Preliminary)
By Marco Alpert and Dave Rossum
Version 3.6 © 1981, 1982 E-mu Systems, Inc.
Restored by The Emulator Archive 1999
www.emulatorarchive.com
Based on the Manual Shipped with Emulator Serial #440
Page 2

Emulator – Operating Instructions Preliminary
CONTENTS
1 Introduction 2
2 Functional Overview 2
3 Software 3
4 Diskette Use and Storage 4
5 Sound Storage and Recall 6
6 Release Foot Switch 9
7 Doubling Mode 9
8 Special Sound Modes 10
9 Backwards Mode 11
10 Outputs 12
11 Keyboard Channel Allocation 12
12 Channel Disable 13
13 Vibrato and Pitch Bend 14
14 Sustain Loop, Truncation and Filter 15
15 Master Tune 17
16 Sound Input 18
17 Multi-Sample Recording 21
18 User’s Multi-Sample 22
19 Sequencer 27
20 User’s Diskette Formatting 32
21 In Case of Difficulty 33
22 Warranty 34
Change of Address Notice 35
Instant Emulator Simplified 36
© E-mu Systems, Inc. 1981,1982 Restored by The Emulator Archive 1999 Page 1
Page 3
Emulator – Operating Instructions Preliminary
1 INTRODUCTION
This is the preliminary operating manual for the E-mu Systems Emulator digital
polyphonic keyboard instrument. Its purpose is to provide a concise description
of the functions and user controls of the instrument along with some
suggestions as to how to get the highest level of performance from the
machine. We are currently at work on a more complete user’s manual, which
will be sent to you upon its completion.
2 FUNCTIONAL OVERVIEW
The Emulator is a computer based digital instrument that allows you to record
any sound of up to two seconds in length and then to play that sound at any
pitch over a two-octave range, with four or eight voice polyphonic capability. Its
four octave split keyboard allows the simultaneous control of two independent
sounds, while a unique sustain loop function allows any sound to be sustained
indefinitely. Its integral mini-floppy disk drive is used for the storage and recall
of a potentially unlimited sound library. Additionally, performance oriented
effects wheels allow the real-time control of both pitch bend and vibrato depth.
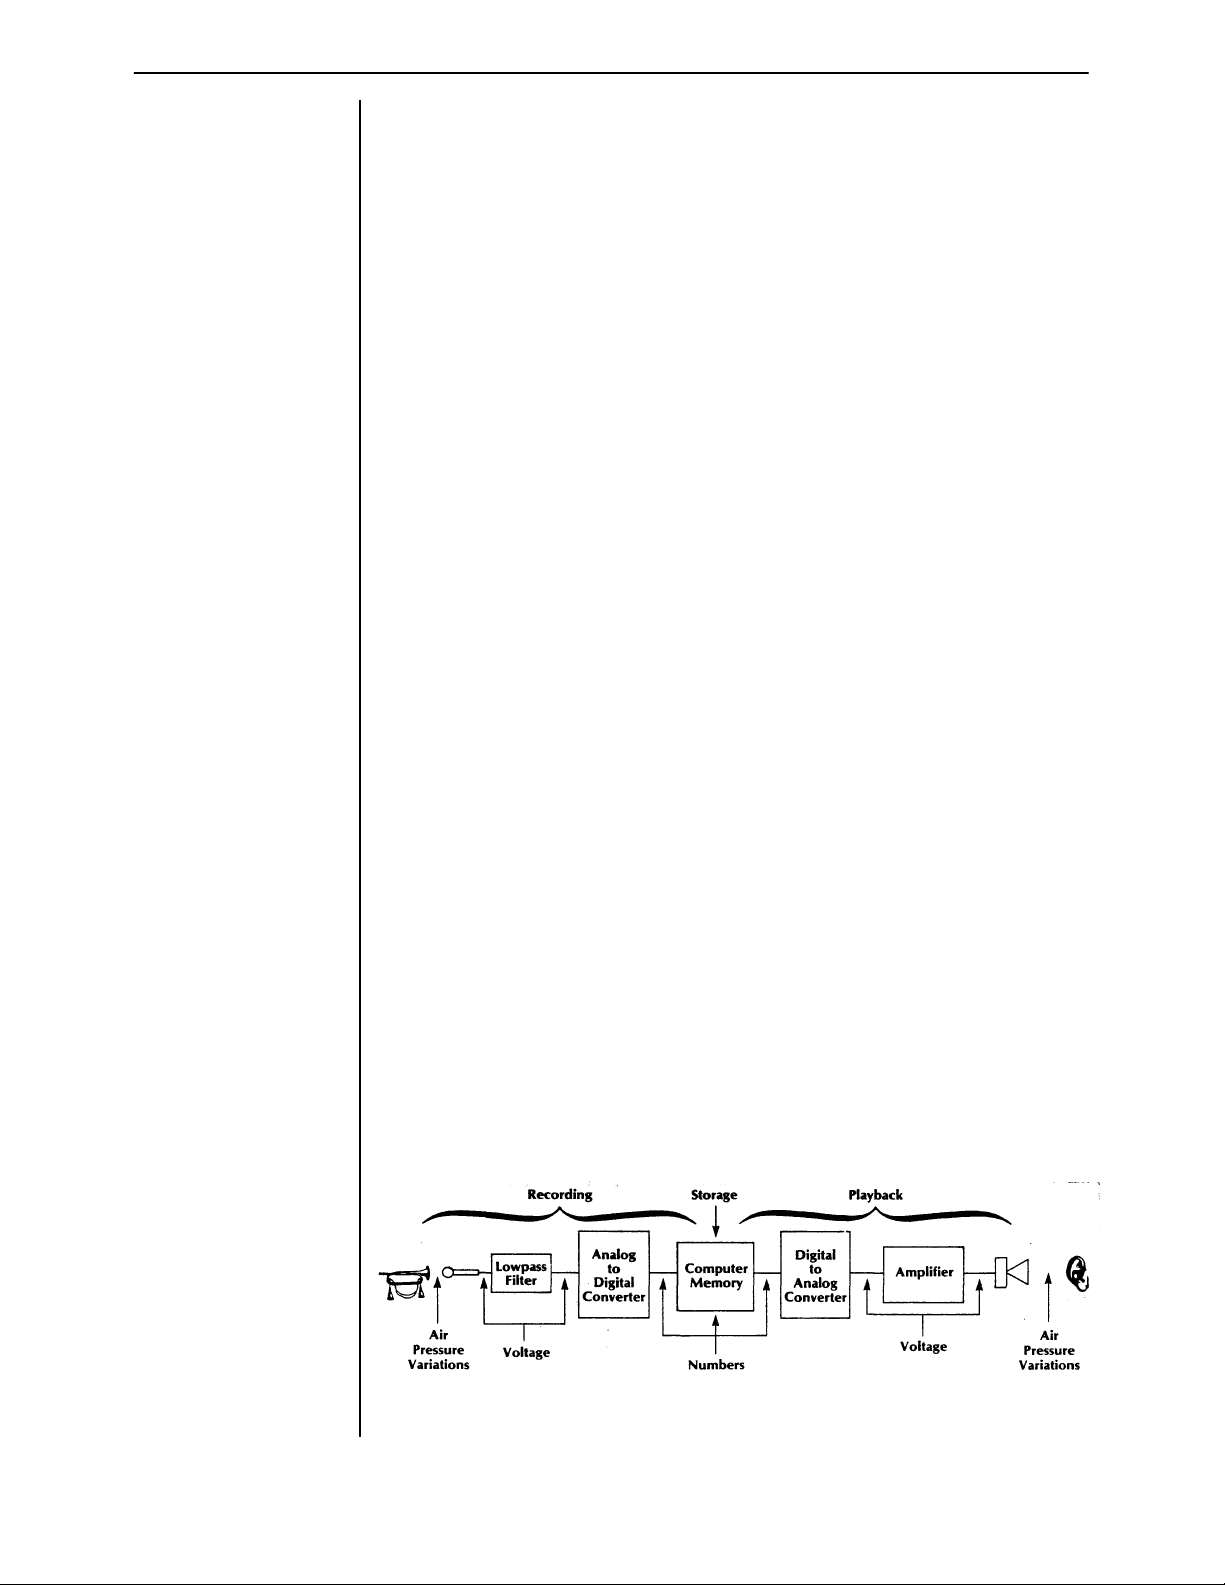
To understand how the Emulator works, refer to the simplified flowchart in
figure 1. During the recording process, sound is input from a microphone or line
level source. In either case the signal is presented to the Emulator as an analog
voltage, which is filtered, and then processed by an analog to digital converter
(ADC). The ADC samples the incoming signal approximately 30,000 times a
second and, for each sample, stores a number in the computer’s memory that
corresponds to the level of the analog voltage. Once in memory, the numbers
representing the sampled sound can have various operations performed on
them, including truncating the recording and defining a loop portion of the
sound which will be repeated as long as a key is held down. The information in
memory (including the truncation and loop definition) can be stored on a floppy
diskette for reloading at any later time.
Once a sound is recorded in memory it can be played back by pressing a key
on the keyboard. When a key is pressed the computer outputs the numbers
stored in memory to a digital to analog converter (DAC), which decodes them
back into the analog voltage originally recorded. Which key is pressed controls
the speed at which the numbers are output. Output speeds faster than the
original sampling rate result in higher pitches while slower speeds result in
lower pitches. The output rate is also affected, in various ways, by the master
tune controls, the vibrato controls, and the pitch bend wheel. When the output
voltage is applied to an amplifier and speaker, the result is the recreation of the
originally recorded sound at pitches corresponding to the keys pressed
.
Figure 1: Emulator Functional Overview
© E-mu Systems, Inc. 1981,1982 Restored by The Emulator Archive 1999 Page 2
Page 4

Emulator – Operating Instructions Preliminary
3 SOFTWARE
Overview
Your Emulator is basically a special purpose digital computer and, like all
computers, requires “software” in order to function. Software (as opposed to
“hardware” - the actual physical parts of which the Emulator is made) consists of
instructions to the computer telling it what to do (i.e. programs) and data for those
programs to work with (in the case of the Emulator, digital representations of
recorded sounds). Both types of Emulator software are stored on floppy
diskettes.
Of the ten diskettes supplied with your Emulator, eight contain pre-programmed
sounds and are shipped “write protected” (see section IV). The remaining two
have been left blank for you to record sounds of your own. You can, of course,
record over any of the other eight that you don’t wish to save. Additional diskettes
can be purchased from your E-mu Systems dealer.
In addition to sound storage, each diskette also contains the Emulator’s complete
operating program. This program is automatically loaded into the Emulator each
time it is turned on. Consequently, as new and improved software is developed
we can update your Emulator simply by sending you a diskette containing the
new program. Using the Software Replicate function (see Section 5) this new
software can be copied onto all your existing diskettes without disturbing any
sounds recorded on them. For this reason it is important that you always keep us
apprised of your current address so that we can notify you of any future software
updates. All Emulator owners who return their warranty card will be placed on a
permanent mailing list. If you should move, please send us one of the Change Of
Address Notices, included at the back of this manual.
Software Update
Both the blank and pre-recorded diskettes are shipped with the most recent
version of Emulator operating software. When you get a new diskette, check the
software version number on the diskette label. If it is numerically higher than the
number on the rest of your diskettes, it contains a more recent software version.
Use the software replication procedure described in Section 5 to copy this
software onto your other diskettes. Be sure to change the number on the labels
to reflect this.
When a software update corrects a newly found error in current software, you will
be sent a free diskette containing the new program. When an update adds a new
operating feature, you can purchase the software for the cost of a blank diskette,
or, if you send us one of your diskettes, we will copy the new software onto it and
return it at no charge.
We are currently in the process of recording a wide range of additional
instrumental sounds. Some of these sounds will be available for purchase and
others will be included among those sent free with each new Emulator. These
latter sounds will be available to current owners on the same basis described
above for software updates, i.e. for the cost of a blank diskette, or free if you
send us a diskette to copy it onto.
NOTE:
Unless you’ve
purchased the
optional User’s
Formatting program,
all Emulator
diskettes must be
purchased from
E-mu Systems, or
your Emulator
dealer.
Other diskettes will
NOT work.
© E-mu Systems, Inc. 1981,1982 Restored by The Emulator Archive 1999 Page 3
Page 5

Emulator – Operating Instructions Preliminary
4 DISKETTE USE AND STORAGE
Overview
The data representing recorded sounds are stored on mini-diskettes. To insure
reliable storage and recall it is necessary to observe the following precautions:
1. When not in use, always store diskettes in their boxes.
2. When using your Emulator, place the diskettes, in their white
envelopes, in the storage compartment on top of the instrument.
The only time a diskette should be out of its envelope is when it is
actually in the disk drive.
3. The diskette itself consists of a black jacket enclosing a thin disk of
plastic on which the magnetic medium is deposited. NEVER touch
the plastic disk where it is exposed through the jacket.
4. Never fold or bend a diskette.
5. Keep diskettes away from strong magnetic fields such as
telephones or tape head demagnetizers.
6. When writing on diskette labels, use only felt tip pen. A ballpoint
pen or pencil may damage the disk.
7. Diskettes should not be exposed to temperatures lower than 50
degrees F or higher than 125 degrees F.
8 As much as possible, keep diskettes away from dirt, dust and
smoke. Never lay them down without their protective envelope. If
someone holds a gun to your head and forces you to lay an
unprotected diskette down on a less than sterile surface, keep in
mind the fact that the data is recorded on the side of the diskette
opposite the side with the label, so lay it label side down.
Diskette Loading
The Emulator’s disk drive is located behind the slot to the left of the control
panel. To insert a diskette, first open the square plastic door at the center of the
drive by grasping its bottom edge and pulling out and up. Insert the diskette
(label side up) with the edge with the label facing you. Insert it into the open
drive until it stops. It should be completely inside the drive. The diskette should
slip in easily.
If you encounter any resistance, withdraw the disk and try again. If it still
doesn’t go in easily, inspect the diskette for damage and check to be sure there
isn’t already a diskette in the drive.
Once the diskette is in the drive, close the plastic door. To remove the diskette,
simply open the door and pull it out.
© E-mu Systems, Inc. 1981,1982 Restored by The Emulator Archive 1999 Page 4
Page 6

Emulator – Operating Instructions Preliminary
Write Protecting Diskettes
Near the lower right hand corner of the diskette label you will find a rectangular
cutout. This is the “write protect” slot. When this slot is exposed the Emulator can
write data onto the disk To “write protect” the disk peel one of the silver selfadhesive tabs from its backing sheet and press it around the edge of the diskette
so it completely covers both sides of the slot. When this tab is in place the
Emulator cannot write onto the disk. It is a good idea to keep all your sound disks
write protected.
Backing Up Diskettes
It is also a good idea to keep backup disks of any sounds that would be difficult
to replace. A backup disk is only used to load a sound into the Emulator for the
purpose of rewriting it onto a working disk. The working disk is employed for
everyday use. Should anything happen to the working disk the backup is always
available to generate a replacement
New Diskette Initialization
Each of your Emulator diskettes must be initialized for use in your particular
machine. The diskettes shipped with your instrument have already been
initialized at the factory.
When you buy new diskettes, either blank or with pre-recorded sounds, you must
initialize them before use. To do this, turn your Emulator off and then turn it back
on again (unless, of course, it’s already off, in which case merely turning it on will
be sufficient). Place a diskette to be initialized, with NO write protect tab, into the
drive and wait for the Emulator to finish loading. That diskette is now initialized. If
you have more new diskettes, place each one in the drive (also with no write
protect tab) and execute the software replication procedure as described in
Section 5. The diskettes are now ready for use.
With proper handling, diskettes should last almost indefinitely. During testing we
loaded sounds into an Emulator 56,000 times in succession from a single
diskette with no noticeable diskette wear. In cases where data files have been
lost, it has almost always been as the result of improper diskette handling. The
slightest scratch to the surface of a diskette is enough to render it useless.
© E-mu Systems, Inc. 1981,1982 Restored by The Emulator Archive 1999 Page 5
Page 7

Emulator – Operating Instructions Preliminary
5 SOUND STORAGE AND RECALL
Controls
The sound storage section consists of the disk drive and the following four
controls:
1 GET LOWER
With a sound diskette in the disk drive, pressing the GET LOWER button
causes the Emulator to load the Lower sound from the diskette into
memory for control by the lower two octaves of the keyboard This
process takes approximately seven seconds, during which time the GET
LOWER LED will flash. At the end of this time the LED will go out to
signify a successful load. If a problem is encountered during the load
procedure the Emulator will turn off the disk drive and light the GET
LOWER LED. Possible problems include:
There is no diskette in the drive
The diskette has been improperly inserted into the drive
There is damage to the diskette resulting in data errors
In the latter case, data up to the point of the error will have been loaded
into memory, so attempting to play the lower keyboard after an
unsuccessful load may bring unpredictable results. (On the other hand, if
the sound you were attempting to load was a very short one and the data
error happened after the truncation point (see Section 14) the sound
may, in fact, be usable despite the error.)
Whenever the LED is lit as the result of an unsuccessful load, it will
remain lit until a sound is successfully loaded into that half of’ the
keyboard If an improperly loaded sound is Swapped (see below) to the
opposite side of the keyboard the lit LED indication will also move to the
other Get button. For example, if you successfully load a sound into the
Upper keyboard section and then attempt to load a sound into the Lower
section from what turns out to be a damaged disk, you will end up with a
good sound in the Upper section, a garbled sound in the Lower section,
and a steadily lit GET LOWER LED. If you then hit the SWAP button, the
two sounds will be exchanged, the GET LOWER LED will go out and the
GET UPPER LED will light to indicate that the Upper section now
contains an improperly loaded sound.
Both halves of the keyboard remain active during the load procedure.
The results of playing on the half of the keyboard into which the load is
happening, depends to a great extent on the relative lengths of the
incoming and outgoing sounds. If they are both short sounds, it may be
possible to play the new sound after only a second or two of the load
cycle. However, if they are both fairly long or the outgoing sound is
substantially longer than the incoming one, playing a key during load will
result in a sound consisting of the first portion of the new sound followed
by the end of the old one. This, of course, does not in any way affect the
loading process, so feel free to experiment.
2 GET UPPER
This button functions exactly as GET LOWER except that it loads the
Upper Sound from a diskette into memory for control by the upper two
octaves of the keyboard.
© E-mu Systems, Inc. 1981,1982 Restored by The Emulator Archive 1999 Page 6
Page 8

Emulator – Operating Instructions Preliminary
3 SAVE
With an unprotected diskette in the drive, pressing this button causes the
Emulator to store both sounds presently in memory along with the
sequences in bins #1 and #2 (see Section 19) onto the diskette. The
sound currently controlled by the lower half of the keyboard is stored as
the Lower Sound and, appropriately enough, the sound controlled by the
upper half is stored as the Upper Sound. This process takes
approximately 20 seconds, during which time the SAVE LED will blink. At
the end of this time the LED will go out to indicate a successful save. If a
problem is encountered during the Save process the disk drive will be
turned off and the SAVE LED will light.
If, when the SAVE button is pressed, the LED comes on immediately and
does not blink, the possible problems include:
There is no diskette in the drive
The diskette is improperly inserted in the drive
The diskette in the drive is write protected
If’ the LED blinks for a while and then comes on steadily, the Emulator
has been unable to successfully transfer the data to the diskette. This
almost always indicates a damaged diskette. In either case the data in
the Emulator’s memory is still intact. To make another attempt to save,
turn off the SAVE LED by hitting any key on the keyboard correct the
problem and press SAVE again. The keyboard and all other front panel
controls are inactive during the Save process
4 SWAP
Pressing the SWAP button causes control of the two sounds currently in
memory to be exchanged between the two halves of the keyboard; i.e.
the sound controlled by the lower half of the key board moves to the
upper half and vice versa. This process takes about five seconds, during
which time the SWAP LED remains lit. Both halves of’ the keyboard and
all panel controls remain active during the Swap process.
Power On Procedure
When the Emulator is first turned on, the disk drive motor will turn on and the disk
drive LED, and all the panel LED’s will light. Insert a sound diskette into the drive.
The panel LED’s that had lit will go out and the Emulator will automatically load
both the Lower and Upper sounds into memory. Neither the keyboard nor the
panel controls will become active until both sounds have been loaded.
It should be noted that the software (i.e. the computer program) that makes the
Emulator work is not stored in the machine but on each diskette. It is
automatically loaded into the Emulator during the power on procedure. If the
diskette that you use in this procedure is a faulty one, the Emulator may refuse to
work and give the appearance of being broken. In this case, turn the Emulator
off, turn it back on again, and try the procedure with a different diskette.
If you do not insert a diskette into the disk drive within about five seconds of
turning on the Emulator, or if the diskette is improperly inserted, the SAMPLE,
OVERLOAD, and SWAP LED’s will go out. This indicates a “Disk Not Ready”
error. Either insert a diskette or remove and reinsert an improperly inserted
diskette The Emulator should now load normally. If the Emulator encounters
other problems in the process of initial loading, other combinations of LED’s will
go out. If you cannot get your Emulator to successfully execute the power on
procedure, carefully note which LED’s go out and when. Call your nearest
service center or E-mu Systems with this information.
NOTE:
E-mu Systems no
longer formally
support the
Emulator.
© E-mu Systems, Inc. 1981,1982 Restored by The Emulator Archive 1999 Page 7
Page 9

Emulator – Operating Instructions Preliminary
Software Replication
The Software Replicate feature allows you to copy updated or special function
software onto previously formatted diskettes without disturbing any sounds
stored on them.
To update diskettes, start by powering up the Emulator with the diskette
containing the new software. Next remove that diskette and insert a diskette to
be updated (be sure it’s not write protected). Press the ‘B’ button followed by
the ‘8’ button (see Section 20 for details of using the sequencer buttons as
special function keys). The disk drive LED will come on and the software will be
written onto the diskette. If a problem is encountered in the write process, the
SAVE button LED will come on. This can indicate any of the problems
described above in the Save section, but it is usually the result of forgetting to
remove the write protection on the diskette that you are attempting to update.
Multi Button Commands
The Emulator will remember up to three presses of the GET, SWAP and GET
SEQUENCE buttons and execute them in sequence. It is not necessary, for
example, when getting both upper and lower sounds from a disk, to wait until
the GET LOWER cycle is finished before pressing the GET UPPER button.
Simply press the GET LOWER button followed immediately by the GET
UPPER button.
Another example is GET LOWER, SWAP, GET LOWER. This sequence would
put the same sound on both halves of the keyboard. The SAVE function can
not be part of a multi-button command.
Sound Reorganization
Using the GET and SWAP functions, it is easy to combine sounds from
different disks onto a single disk. Imagine that you need a diskette with a lower
sound of cellos and an upper sound of flutes. Your cello sound is currently the
lower sound on your diskette #1 and the flute sound is the lower sound on
diskette #2. Simply place diskette #2 in the drive and load the flute sound into
the lower section. Hit SWAP to move it to the upper section. Remove diskette
#2 and insert #1. Load the cellos into the lower section. Now place a blank
diskette in the drive and hit SAVE.
Voila!
© E-mu Systems, Inc. 1981,1982 Restored by The Emulator Archive 1999 Page 8
Page 10

Emulator – Operating Instructions Preliminary
6 RELEASE FOOT SWITCH
All Emulator sounds supplied by E-mu Systems are supplied in “short release”
mode. (Exceptions are sound effects and percussion sounds, which are preset in
natural release mode (see Section 7). Sounds recorded into the instrument using
the Input section are also initially in short release mode. In this mode, releasing a
key always results in the immediate termination of the sound, regardless of
whether or not the recorded sample has come to its end. Alternatively, a sound
may be put into “natural release” mode. In natural release mode, pressing a key
always results in the complete sample being played, regardless of when the key
is released. A sound may be put into natural release mode through use of the
special sound mode function (see Section 7) or by use of the release foot switch.
To use the supplied foot switch to control the release mode, insert its phone plug
into the Foot Switch jack on the Emulator’s rear panel. The foot switch can be
assigned to affect the sounds on either or both halves of the keyboard.
To assign the foot switch to the lower keyboard section only, press the ‘A’ button
followed by the ‘6’ button in the Sequencer section. (See section 20 for the
details of using the sequencer buttons as special function keys).
To assign it to the upper section only press ‘A 7’. To assign it to both sections
press ‘A 8’. If you don’t want it to affect either section, don’t step on it.
Depressing the foot switch causes the sounds in affected keyboard sections to
operate in natural release mode for as long as the switch is held down. Releasing
the switch causes all sounds whose keys are not currently pressed to
immediately terminate. The footswitch never affects sounds that have been put
into natural release mode through the use of the special sound mode procedure
described in Section 7.
7 DOUBLING MODE
Doubling mode allows you to play notes on the lower keyboard section and have
those notes automatically doubled by the sound on the upper keyboard section.
When playing in doubling mode, each key that you press uses up two of your
available channels so you have only half the polyphonic capability that you
usually have.
To use doubling mode, plug a foot switch into the Access. Switch jack on the rear
of the Emulator. Pressing the foot switch puts you in doubling mode. Once in
doubling mode you will remain in doubling mode until you press the switch again.
It is not necessary to keep your foot on the switch.
© E-mu Systems, Inc. 1981,1982 Restored by The Emulator Archive 1999 Page 9
Page 11

Emulator – Operating Instructions Preliminary
8 SPECIAL SOUND MODES
Overview
Each sound in the Emulator carries with it an identification of its sound type.
Sounds supplied by E-mu Systems on diskette are supplied in “normal” mode
(sound type 1). Sounds recorded into the instrument using the Input section are
also initially in normal mode. The current software has 4 modes:
sound type 1 – normal
sound type 2 – solo mode
sound type 3 – non-transposition mode
sound type 4 – natural release mode
Solo Mode (Sound Type 2)
Sounds in solo mode play on only one channel (i.e. monophonically). If a
second key is pressed before the previous one is released, the pitch changes
to that of the more recent key without any re-attack occurring. If a second key is
pressed while a previous note is decaying, the decay is terminated and a new
attack is begun. This latter effect works well with sounds having a percussive
attack, but less well with sounds that begin gradually.
Non-transposition Mode (Sound Type 3)
In non-transposition mode all keys within the keyboard section play the sound
at its recorded pitch. The vibrato and pitch wheels function normally.
Natural Release Mode (Sound Type 4)
Normally, when you release a pressed key, its sound will stop immediately,
whether or not the recorded sample has reached its end. In natural release
mode the complete sample will always be played, regardless of when the key is
released. This is equivalent to playing a normal sound with the release
footswitch always depressed. This mode is particularly useful for sound effects
and percussion sounds when you want to be able to trigger the entire sound
with just a quick press of a key. The release foot switch never affects a sound
in natural release mode.
Setting Sound Type
To set the type of the lower sound, use the special function buttons as
described in Section XVI.
A 1 sets sound type 1 (normal)
A 2 sets sound type 2 (solo)
A 3 sets sound type 3 (non-transposition)
A 4 sets sound type 4 (natural release)
It should be noted that sound type 4 functions somewhat differently from the
other types. Unlike types 1, 2, or 3, when you press the ‘A 4’ for sound type 4, it
toggles the sound in or out of natural release mode, depending on the sound’s
current state. If the sound is currently in short release mode it will be changed
to natural release mode, and vice versa. No other characteristics of the sound
are changed. If the sound is currently in another special sound mode, it remains
in that mode. It is therefore possible for a sound to be simultaneously in both
natural release mode, and either solo or non-transposition mode. This is not
true of the other sound types. A sound cannot be in both solo and nontransposition modes at the same time.
© E-mu Systems, Inc. 1981,1982 Restored by The Emulator Archive 1999 Page 10
Page 12

Emulator – Operating Instructions Preliminary
To set the type of the upper sound you must first Swap sounds, wait for the swap
to complete, set the lower sound type as described above, and then finally
reswap the sounds. Once the type of a sound has been set, that sound will
continue to play in the mode selected and can be stored and recalled from disk
while retaining the mode. The sound can be changed to a different mode
whenever desired.
9 BACKWARDS MODE
Overview
Backwards mode allows you to play any Emulator sound in reverse (i.e. as if it
had been recorded on tape and then played backwards). To put the lower sound
into backwards mode, press special function code ‘B 3’. Pressing ‘B 3’ again will
return the sound to normal mode. To place the upper sound into backwards
mode you must first swap it to the lower keyboard section, press ‘B 3’, and then
re-swap it. When you press ‘B 3’, it takes about one second to complete the
reversing process.
Truncation
In addition to being able to play sounds backwards, this mode also gives you the
ability to truncate the beginnings of samples. This is useful for fixing samples
which for some reason triggered early during recording, resulting in a delay at the
start of the sound (see Section 10). To do this, press ‘B 3’ to reverse the sound,
use the truncation function to shorten what is now the end of the sound, and then
press ‘B 3’ to reverse it back to normal.
Weird Stuff
Since backwards mode only reverses the un-truncated part of the sound and
leaves any currently truncated portion unaffected, it is possible to create a
sample that consists partially of forward sound and partially of backward sound.
One way to do this is to record a sample, truncate part of it, reverse it, and then
un-truncate it. When you press a key you will hear the originally un-truncated part
of the sound backwards followed by the part that had been truncated played
forwards. Subsequent truncating, reversing, and un-truncating will give you a
wide variety of bizarre results.
The Backwards Talking Game
Although it probably has limited practical usefulness, we’ve been having an awful
lot of fun with the following:
Record a word or short phrase into your Emulator. Reverse it and listen carefully
to the resulting sound. Try to speak this backwards version. This will take a bit of
practice since reversing speech results in some vocal sounds that are difficult to
reproduce. When you think you’ve got it, record this backward version into the
Emulator. Now reverse it and listen to the result. You’ll probably find that you’ve
invented an entirely new foreign accent.
© E-mu Systems, Inc. 1981,1982 Restored by The Emulator Archive 1999 Page 11
Page 13

Emulator – Operating Instructions Preliminary
10 OUTPUTS
The Emulator has two sets of three outputs. One set uses ¼ inch phone jacks
and the other uses Cannon connectors. The two sets are otherwise identical.
The three outputs are Lower, Upper and Mix.
The Mix output contains an even mix of all channels of the instrument. The Mix
Level knob in the Output section of the front panel controls the sound level of
the Emulator.
The Lower and Upper outputs are full level. In an eight voice Emulator the
Lower output contains channels one through five and the Upper contains six
through eight. In a four voice, Lower is one through three and Upper is channel
four. All outputs are line level.
11 KEYBOARD CHANNEL ALLOCATION
Fixed Allocation
There are two modes of allocating the available channels between the two
keyboard sections. When the Dynamic Allocation pushbutton LED is not lit the
Emulator is in Fixed Allocation mode. In Fixed Allocation mode, particular
channels are permanently assigned to each half of the keyboard as follows:
Lower Section Upper Section
Channels Channels
Eight Voice
Four Voice
1 – 5 6 – 8
1 – 3 4
Table 1: Channel Allocation
If these numbers seem vaguely familiar it may be because they are the same
as the output channel allocations described in Section 10. Consequently, when
in Fixed Allocation mode, the Lower Sound will always be present at the Lower
Output and the Upper Sound at the Upper Output. Channels are assigned on a
last key pressed priority basis. Therefore, if you are holding down five keys on
the lower keyboard section of an eight voice Emulator in Fixed Allocation mode
and then press a sixth key, it will steal the channel of one of the five previously
pressed keys.
Dynamic Allocation
When the Dynamic Allocation LED is lit the Emulator is in Dynamic Allocation
mode. In this mode all of the channels are available to be used in any
combination between the two halves of the keyboard. One could, for example
play eight notes on the lower half of the keyboard followed by eight on the
upper half and then, while holding seven on the upper, play an eighth on the
lower. As you play, available channels will continuously be reassigned to either
half of the keyboard as needed. Because of this, sounds will often jump back
and forth between the Upper and Lower outputs. This effect can sometimes be
very useful, particularly when dealing with sound effects. If however, you find
this unacceptable in a particular application you can either use the Mix output
or return to the Fixed Allocation mode.
© E-mu Systems, Inc. 1981,1982 Restored by The Emulator Archive 1999 Page 12
Page 14

Emulator – Operating Instructions Preliminary
12 CHANNEL DISABLE
Overview
The channel disable feature allows you to “turn off” specific channels of your
Emulator. This feature is primarily intended to allow you to continue using your
Emulator when one or more channels malfunctions and, for some reason, you
are unable to get it repaired immediately.
A malfunctioning channel will generally manifest itself in one of two ways. Either
it will be completely dead (i.e., no output) or its output will be noisy or contain
“garbage”. If you occasionally hit a key and nothing happens, you are probably
dealing with a dead channel. An occasional note that is garbled or noticeably
noisier than normal is also an indication of a faulty channel.
Identification
The first step in dealing with a bad channel is to identify exactly which channel is
at fault. To do this, load Into the Emulator a long sound with no loop (the electric
grand piano is a good choice). Make sure the Emulator is in Fixed Allocation
mode. In an eight voice Emulator, channels 1 - 5 will be on the lower keyboard
section and channels 6 - 8 will be on the upper section.
To check the lower channels, play five notes on the lower keyboard section,
release them, and wait ten seconds after they have stopped sounding. Now
carefully press and hold a single key. Listen to the resulting sound. It is being
played through channel 5. While continuing to hold this key (even though it. is no
longer sounding), press and hold a second key. This is channel 4. Now, while
continuing to hold these first two keys, press and hold a third. This is channel 3.
Continue in this way to press a fourth key for channel 2 and a fifth for channel 1.
Repeat the process on the upper keyboard section to hear, in order, channels 8,
7, and 6. Use the same technique on a four voice Emulator. The lower channels
are 3, 2, and 1, and the upper section has only channel 4.
Checking and Repeating
If, in the above test, you press a key and get no output, or noisy or garbled
output, you will know that that channel is bad. If this happens, do not press any
more keys. Release all the keys currently held down, wait ten seconds, and then
repeat the test to make sure that you get the same results. If you don’t, you have
either made an error in the test or the problem is not in a specific channel.
Assuming that the results match, you should disable the faulty channel using the
procedure described below. Since there may be more than one bad channel, you
should now repeat the test, keeping in mind that the disabled channel will be
skipped over. If, for example, you were testing the lower keyboard section of an
eight voice Emulator and found channel 3 to be bad, after disabling it the first key
you pressed would be channel 5, the second would be channel 4, the third would
be channel 2, and the fourth would be channel 1. (Since you’ve disabled one
channel, there are now only four channels available on the lower section.)
Repeat the above procedure until all the faulty channels have been identified and
disabled.
Disabling
To disable a channel, press and hold the SAMPLE button and, while continuing
to hold it, press the GET UPPER button. Release both buttons in either order.
Choose the channel to be disabled by pressing the key on the keyboard that
corresponds to that channel (see the table below). Repeat the entire procedure
for each channel that you want to disable. If, when executing this procedure, you
press the key of a currently disabled channel, that channel will be re-enabled. Be
sure to keep track of which channels you have disabled.
© E-mu Systems, Inc. 1981,1982 Restored by The Emulator Archive 1999 Page 13
Page 15

Emulator – Operating Instructions Preliminary
Once a channel has been disabled there is no easy way to tell exactly which
channel it was. If you get confused, turn off your Emulator, turn it back on, and
start over.
1
Key
CC#DD#EFF#G
Channel
Table 2: Channel Selection Keys
1 2 3 4 5 6 7 8
13 VIBRATO AND PITCH BEND
Vibrato and pitch bend are governed by the following controls:
LOWER ENABLE
When this button is pressed, vibrato will be applied to the sound currently
controlled by the lower half of’ the keyboard. The button’s LED will light
to indicate this condition. Pressing the button again will turn it off.
UPPER ENABLE
As above, but for the sound controlled by the upper half of the keyboard.
VIBRATO RATE
This knob controls the speed of the vibrato.
VIBRATO DEPTH
This wheel controls the depth of the modulation applied to sounds that
have vibrato enabled. With the wheel rotated to its backstop no
modulation is allowed. As you rotate the wheel forward the modulation
will become progressively deeper.
VIBRATO DEPTH FOOR PEDAL
Plugging the supplied foot pedal into the Vibrato Depth jack on the
Emulator’s rear panel disables the Mod Depth wheel and allows you to
control the vibrato depth with the pedal. Pressing down the toe end of the
pedal increases the modulation depth, while pressing the heel end
decreases it.
PITCH BEND
This wheel allows you to vary the pitch of any sound played by
approximately a major second in either direction. Rotating the wheel
forward results in raising the pitch while rotating it back results in
lowering it. A center detent is provided to facilitate return to the proper
pitch. If you are not planning to use the wheel for expressive purposes, it
can be employed as a keyboard offset control.
1
These are the lowest eight keys on the lower keyboard section.
© E-mu Systems, Inc. 1981,1982 Restored by The Emulator Archive 1999 Page 14
Page 16

Emulator – Operating Instructions Preliminary
14 SUSTAIN LOOP, TRUNCATION AND FILTER
Controls
The Sustain/Filter Section consists of the following controls:
SET LOWER
When this button is pressed the two Sustain Section slide pots are
activated for setting parameters of the sound currently controlled by the
lower section of the keyboard. The button’s LED will light to indicate this
condition. When the button is pressed again, the two sliders will be
deactivated and the current settings will be locked into the sound.
SET UPPER
As above, but for the sound controlled by the upper section of the
keyboard. It is not possible to set parameters of both halves of the
keyboard simultaneously. For example if you press SET UPPER, make
some adjustments, and then press SET LOWER, SET UPPER will
automatically be deactivated, locking in the current setting, the SET
UPPER LED will go off, and you will be ready to set the Lower Sustain
parameters.
TRUNCATE/FILTER
This button controls the function of the two Sustain Section slide pots.
When its LED is not lit, the sliders will govern the setting of the sustain
loop of a sound whose SET button LED is lit. When the Truncate/Filter
LED is lit, the upper slider will set the truncation point of a sound while
the lower slider will set the output filter cutoff frequency for that sound.
START POINT/TRUNCATE SLIDER
When the sustain section is in the Start Point/Loop mode
(Truncate/Filter LED not lit), this slider adjusts the point in the sound
where the sustain loop begins. When in the Truncate/Filter mode, this
slider adjusts the truncation point of the sound, that is, the end point of
the sound. When no Sustain section LED’s are lit, this slider controls the
speed of the sequencer playback.
LOOP LENGTH/FILTER SLIDER
When in the Start Point/Loop mode, this slider adjusts the size or
duration of the sustain loop. When in the Truncate/Filter mode, the slider
controls the cutoff point of the output filter.
Sustaining Sounds
When a sound has been input into the Emulator, it begins as an unsustained
sound. Pressing a key activates the sound which will be played back exactly as it
was recorded. Holding the key down has no effect on the sound. The Sustain
Section controls allow you to tailor the sound to your application, and determine
what will happen as you hold the key.
Truncating Sounds
Truncating a sound cuts of the end of a recorded sample, shortening it to a
length determined by the TRUNCATE slider. When sampling, the Emulator
always records a full two seconds. If, for example, you record a ½ second sound,
each time you press a key you will hear your sound followed by 1½ seconds of
room tone or other background noise. By using the Truncate function you can
eliminate this unwanted portion of’ the recording. Truncating a sound also
increases the resolution of the loop controls. In the above example if you do not
truncate your ½ second sound, many of the possible loop start points will fall in
the 1½ seconds of silence. When you truncate the recording all of the start points
will lie within the sound.
© E-mu Systems, Inc. 1981,1982 Restored by The Emulator Archive 1999 Page 15
Page 17

Emulator – Operating Instructions Preliminary
To truncate a sound, press the TRUNCATE/FILTER button, then the appropriate
SET button. Slide the truncate control slowly from right to left, stopping to press a
key at various points. Keep sliding until you can hear the decay of the sound
being clipped off, and then back off to the right until the decay is just complete.
Truncating a sound does not destroy the data from the end of the sound. At any
time you can re-extend the sound to its full length.
Sustain Loop
When the user adds a sustain loop, the Emulator can continue making sound as
long as a key is depressed. To accomplish this, the instrument divides the sound
into three sections:
Attack
Sustain Loop
Decay.
When a key is depressed, the attack portion is first played. Then the sustain loop
sounds. If the key is still depressed at the end of the loop, the sustain loop is
repeated until the key is released. Finally the decay portion is played after the
key has been released.
Sustain Effects
You can use this feature for several different effects. For many purposes you will
select a sustain loop that consists of a single waveform of the sustain portion of
the instrumental sound recorded. For other sounds, a long loop of up to a second
or so of sound may be repeated. For still other effects the entire sound including
some un-truncated silence at the end may be looped.
Use the sliders in the Start Point/Loop mode to adjust the location in the sound of
the sustain loop. With the Truncate/Filter LED off, press one of the sustain SET
buttons. The START POINT slider will now adjust the point in the sound where
the attack portion ends and the sustain loop begins. The leftmost settings will
begin the loop right at the start of the sound. As you slide the control right, the
loops will begin later and later in the sound, until at the rightmost setting the
entire sound up to the truncate point will be the attack portion, and there will be
no sustain loop or decay (unsustained sound).
The LOOP LENGTH slider will adjust the size of the sustain loop. For the
leftmost settings, the loop will be very short, and will be perceived as highpitched waveforms. As the slider is moved slowly to the right, the waveforms will
drop in pitch and at some point a waveform will be found that matches the pitch
of the attack and decay portions of the sound. (If you can not seem to find a loop
that matches the pitch of the remainder of the sound, try re adjusting the start
point slightly and try again.) As the LOOP LENGTH slider is moved further to the
right, the sustain loop will progressively include more of the sound until at its
extreme right setting it includes the entire sound to the truncate point.
Each time the sliders are moved, a new set of attack, sustain loop, and decay
parameters are computed. However, these parameters only affect newly
depressed keys, so a single key cannot be held while the sliders are adjusted.
You must release and press a key each time you move the sliders.
© E-mu Systems, Inc. 1981,1982 Restored by The Emulator Archive 1999 Page 16
Page 18

Emulator – Operating Instructions Preliminary
Sustain Loops
Different types of sustain loops work well with different sounds and keyboard
techniques. For most playing styles, short sounds with single waveform loops
work best. A single waveform loop will sound natural only if the sound has a
natural sustain portion in it, such as a held vowel in speech or a bowing without
vibrato or tremolo on a string.
Sounds with natural modulation, such as a flute with breath noise, a violin with
vibrato, or a voice with tremolo will sound “dead” as single waveform loops are
entered. For these sounds, longer loops must be used.
New Timbres
The Sustain controls can be used to create new timbres as well. Many sounds,
particularly short percussive ones, are never heard with natural sustains. By
placing sustain loops in appropriate locations, a wide range of’ completely new
sounds can be created.
Quantization Distortion
Because of the digital nature of the Emulator, a peculiar type of distortion, called
quantization distortion, occurs as the instrument records a sound. For most
sounds, the effect is inaudible, but for certain pure sounds it can be heard as a
“crackling” or buzzing in the sound. The sounds on which this occurs are low
frequency pitched sounds with little harmonic content. The Emulator provides a
tracking output filter to remove this distortion from these sounds.
While in the TRUNCATE/FILTER mode, slide the FILTER control to the right.
When a note is played, the higher harmonics will be filtered away. The left most
setting of the control provides no filtering. Adjust the filter control for the best
tradeoff between distortion and sound quality.
The FILTER, TRUNCATE, and SUSTAIN LOOP parameters are all saved on the
diskette when the sound is saved. If you retrieve a sound from the diskette, you
can readjust its parameters at any time, and Save it again if desired. The sustain
controls provide a tremendous variety in the sounds available from your
Emulator. Practice and experimentation are the only ways to learn their
capabilities.
15 MASTER TUNE
The Master Tune section consists of LOWER TUNE and UPPER TUNE knobs.
Each knob can vary the pitch of its respective keyboard section by approximately
one semitone. The primary purpose of these controls is to bring into tune two
instruments that have been sampled at slightly different pitches. In addition,
however, loading the identical sound into both halves of the keyboard and then
using the master can create an interesting effect tune controls to detune them
slightly. Playing the same notes on both halves of the keyboard results in a rich
“ensemble” sound. This is particularly pronounced if you are using the Upper and
Lower outputs in stereo.
© E-mu Systems, Inc. 1981,1982 Restored by The Emulator Archive 1999 Page 17
Page 19

Emulator – Operating Instructions Preliminary
Note:
The sound will not
be audible through
the Emulator during
the level setting and
recording process.
16 SOUND INPUT (SAMPLING)
Sampling Controls
The Input section consists of two inputs on the back of the Emulator (one ¼ inch
phone jack and one Cannon connector) and the following controls:
GAIN SWITCH
This three position switch selects the amount of’ gain applicable to the
signal to be sampled. The correct setting is usually found through
experimentation, but as a rough guide, line level signals typically require
the 0dB setting while microphones and other low level sources require
the 40dB position.
ATTENUATION
This control is used in combination with the overload light to set the
Emulator’s recording level
OVERLOAD LED
This LED lights during the process of level setting to indicate a signal
level that would result in clipping during the recording process. It will also
light at the end of a sound recording if such clipping occurred.
SAMPLE
This button initiates the level setting procedure, sets the automatic
threshold, and initiates the recording process as described below.
Sound Recording Procedure
In order to record a sound into the Emulator, first connect your sound source to
whichever of the two inputs has a matching connector.
1 Set the Recording Level
To set the recording level, press the SAMPLE button once. Its LED will
blink rapidly to indicate that it is in level setting mode. Now fool around
with, the gain switch and the attenuator while making the sound you wish
to record until the sound causes the overload LED to light. Back off on
the attenuator to just below the lowest point at which the overload LED
still lights. The recording level is now set.
2 Set the Sample Threshold
To set the automatic threshold level, press the SAMPLE button while it is
blinking and hold it down for a few seconds. While you are holding it
down the Emulator is sampling whatever signal is at the input. The
loudest thing it hears during the time you hold it down becomes the
recording threshold level.
3 Sample the Sound
When you release the SAMPLE button the LED will remain on to indicate
that the recording process is “armed”. As soon as the Emulator detects a
signal at the input that is above the previously set threshold level it will
begin the recording process. The SAMPLE button LED will blink slowly
during the two seconds of recording and then go out. Once the LED goes
out there will be a pause of approximately one second while the
Emulator checks the recorded sound for an overload. If an overload
occurred the overload LED will light.
© E-mu Systems, Inc. 1981,1982 Restored by The Emulator Archive 1999 Page 18
Page 20

Emulator – Operating Instructions Preliminary
4 Playing to Check the Sample
The newly recorded sound will now be playable on the lower section of
the keyboard. (Sounds always record into the lower keyboard section.)
Playing middle C of the keyboard section will play the sound at its
original pitch and it will be transposed up and down from that point.
Illustration
To illustrate the above procedure, consider the following example:
Imagine that you wish to record your voice into the Emulator in a relatively noisy
environment. Connect a microphone and press the SAMPLE button to enter level
set mode. With the SAMPLE button LED flashing, sing the note you wish to
record while setting the gain switch and attenuator as described above. Now
press and hold the SAMPLE button. The Emulator will sample the ambient noise
level in your environment and set its level as the threshold level. When you
release the button, thus arming the instrument, the Emulator will ignore the
ambient noise and wait for something louder (like your sung note) to trigger it.
Forced Sampling
Sometimes, in a noisy environment, you may find that the beginning of your
recorded sound has been cut of f. This happens when the sound you wish to
record starts at a level lower than the previously set threshold level. To overcome
this problem you can force the recording to trigger by pressing the SAMPLE
button while the instrument is armed. This causes the recording to start
immediately, regardless of the threshold level. The idea here is to hit the button
at the same instant that you start the sound. It usually takes a few tries to get it
right.
Eliminating Sample Start Delays
Conversely, you may occasionally, after recording a sample, find that when you
press a key there is a short delay before the sound starts. (This will be more
noticeable at the lower end of the keyboard range.) This will happen when some
spurious sound causes sampling to be triggered slightly before the start of the
sound that you want to record. There are two possible solutions to this problem.
First, you can use backwards mode to truncate the delay from the beginning of
the sample. This, however, wastes some recording time and if you are recording
a long sound or using multisampling you will probably need every last
millisecond.
The other option is to artificially raise the recording threshold level slightly so that
any spurious sounds will be ignored. To do this, make some low level noise into
the microphone while you are holding the SAMPLE button to set the threshold
level. The loudness of this noise will depend on the level of any spurious sound
in your recording environment. With a little practice you will be able to judge this
level very accurately.
Saving Sounds
Recording a sound into the lower keyboard section naturally eliminates the sound
that was previously there. If’ you enter the level set mode and only then
remember that you haven’t yet saved that great sound currently in the lower
keyboard section, it is still possible to change your mind. By pressing any of the
three buttons in the Sustain section you will abort the recording process and
leave the current lower sound intact. This will only work while in the level set
mode. If you don’t remember until you get to threshold set, you’ve blown it.
© E-mu Systems, Inc. 1981,1982 Restored by The Emulator Archive 1999 Page 19
Page 21

Emulator – Operating Instructions Preliminary
Helpful Hints on Sampling
Ensuring Sounds are of a High Quality
Recording a sound in the Emulator is no different from recording a sound on
tape. Acoustic environment, microphone choice and placement, and any other
factor that effects studio recording equally effects the Emulator. The Emulator’s
sound can never be better that the quality of your recording.
Extreme care should always be taken in setting the recording level. In order to
get the maximum signal to noise ratio it is necessary to set the highest possible
level short of overload. For this reason you should make a great effort to insure
that the signal you record is at the same level as the signal you used to set the
recording level. When a sound is recorded live it is of ten difficult for the musician
to play a note at exactly to same loudness every time. If the note you record is at
all lower in level than the note you used for level set, you are throwing away
valuable signal to noise performance. One way to insure consistency is to record
the sound to be sampled onto tape and feed it to the Emulator from the tape
recorder. That way you can be certain that every time you roll the tape the signal
will be at exactly the same level.
Pitch Shifting Implications
As you try recording various sounds you will soon discover that some sounds are
less suitable to the Emulator’s pitch shifting technique than others. This is
generally true of musical sounds with very pronounced resonances. Saxophone
and male voice are both prime examples. As their pitch is shifted, so are their
resonant frequencies. Once they have been shifted more than a few notes from
their originally recorded pitch, they lose their identifying characteristics. To
overcome this problem we have introduced specially recorded diskettes, which
use a special multi-sample technique. Since the disk contains many samples
across the playable range, no single sample will ever be shifted more than a few
semitones in either direction, thereby preserving the proper resonant
frequencies.
Extreme Dynamic Range
Some sounds pose particular problems because of their extreme dynamic range.
This is particularly true of percussive sounds. In order to keep a very percussive
attack from overloading, it is often necessary to attenuate the sound to the point
where any subsequent component of the sound is at a very low level. This results
in an excessively noisy recording. There are two basic approaches to this
problem. One is to use a compressor to reduce the overall dynamic range of the
sound. The other is to set the level for the “sustain” portion of the sound and to
simply let the attack overload. In many cases the attack is so short that clipping is
inaudible. Your ears should always be the final judge in this matter. If you can’t
hear any clipping you have a successful recording, regardless of what the
overload light says.
Four Octave Sounds
Since the Emulator’s keyboard is always split, it is not possible to shift a single
sample over the entire four-octave range. However, for sounds that are usable
over a four octave range, one needs only to record one note into the lower
keyboard section and then another note from the same instrument, two octaves
higher, into the upper section. This is particularly useful for keyboard and
synthesizer sounds. One should keep in mind, though, that while shifting the
pitch of an instrument beyond the actual range of that instrument will probably
give interesting results, it is unlikely to sound much like the original instrument.
Most of all, use your imagination and don’t be afraid to experiment. The Emulator
can be a very powerful tool for the creative artist. If enough people take
advantage of its capabilities, we are going to make one hell of a lot of money.
© E-mu Systems, Inc. 1981,1982 Restored by The Emulator Archive 1999 Page 20
Page 22

Emulator – Operating Instructions Preliminary
17 MULTISAMPLE RECORDING
Overview
In normal sampling mode your Emulator requires one sound sample for each
two-octave section of the keyboard. As previously mentioned, this technique
does not work too well with sounds having pronounced stationary resonances.
As you shift the pitch of these sounds the resonant frequencies also move, there
by destroying the identifying characteristics of the sound. With voice, for
example, as you play up and down the keyboard the effect is not that of a person
singing different notes, but of bigger and smaller people. Very low notes sound
like a record running too slow, while high notes sound like the Chipmunks. To
overcome this problem we have developed the technique of multi-sample
recording.
With multi-sample recording, each two-octave section of the keyboard is further
divided into two, three, four, or six subsections (depending on the requirements
of the particular sound(s) being recorded). A separate sample is recorded for
each of these subsections. Consequently, no single sample is ever shifted
beyond the range in which it sounds natural, thus preserving the proper resonant
frequencies across the entire keyboard range. In addition, by recording a
different sound into each subsection it is possible, for example, to have up to
twelve entirely different percussion sounds or sound effects available on the
keyboard at one time.
Pre-recorded Multi-samples
All Emulator operating software from version 0303 onwards is capable of playing
pre-recorded multi-sample sounds. E-mu Systems supplied multi-sample sounds
can be identified as such by the “M” suffix on the diskette label (e.g. O3-O111O1M).
These sounds are loaded and stored in exactly the same way as normally
sampled sounds. Each two-octave group of multi-samples is treated as if it were
a single sound. Pressing GET UPPER or GET LOWER loads the appropriate
group of samples into the Emulator. Individual subsections cannot be recalled
from the diskette separately.
Multi-sample Modification
Normal Emulator software does not allow modification of pre-recorded multisample sounds. Do not attempt to change the loop, filter, or truncation settings of
such sounds. To do so requires the User’s Multi-sample software described in
Section 18.
© E-mu Systems, Inc. 1981,1982 Restored by The Emulator Archive 1999 Page 21
Page 23

Emulator – Operating Instructions Preliminary
18 USER’S MULTISAMPLE (OPTIONAL)
Overview
User’s Multi-sample is a special program that allows you to record sounds
using the multi-sample technique and to modify pre-recorded multi-sample
sounds. The program is supplied on a standard diskette and must be initialized
in the manner of any new diskette (see Section IV).
Backup
You should immediately make a backup copy in case the original is ever
damaged. DO NOT copy this software onto your sound diskettes. This software
is intended for recording and modifying only and lacks many of the features of
regular Emulator operating soft ware.
Loading
To load the User’s Multi-sample program into your Emulator, perform the
power—on procedure as described in Section V using the User’s Multi-sample
diskette. Remove the User’s Multi-sample diskette from the drive. The program
is now ready for use.
Multi-sample Recording
In multi-sample recording, each two-octave keyboard section can be further
split into two, three, four, or six subsections. A separate sample is recorded into
each subsection. The available modes are listed below:
Mode Samples
Single
Double
per Two
Octaves
2
1 2 octaves 2 seconds B1
2 1 octave 1 second B2
Size of
Subsection
Average
Time per
Sample
Triple
Quad
Hex
3 2/3 octave
2/3 second B3
4 ½ octave
½ second B4
6 1/3 octave 1/3 second B6
Table 3: Multi-sampling Modes
Note that the times per sample are averages. It is not necessary to make each
sample the same length, as long as the total of each two-octave keyboard
section does not exceed two seconds. You could, for example, use quad multisample to create a keyboard section consisting of one 1 second recording, one
½ second recording, and two ¼ second recordings.
Selection
Code
2
Single Multi-sample (huh?) is identical to regular single sampling with the
addition of the availability of the programmable tuning function described below.
You should use this mode to correct the intonation of instruments over which
you have no tuning control, e.g., an out of tune piano. Be sure to keep track of
which sounds you record with single multi-sample to avoid confusing them with
normal single sampled sounds.
© E-mu Systems, Inc. 1981,1982 Restored by The Emulator Archive 1999 Page 22
Page 24

Emulator – Operating Instructions Preliminary
Truncating to Free Memory
Each time you make a multi-sample recording, the Emulator will use all the
currently available memory. Truncating that recording will free up the now unused memory for use in the next multi-sample section. This will continue until you
have made all your recordings or until you run out of memory, whichever comes
first.
Individual Settings
Each multi-sample section can have its own individual loop and filter settings
and, since it is often difficult for a musician to play many different notes in perfect
tune, each section can be individually tuned to match the other sections. This
tuning (unlike the Master Tune controls) becomes part of the sound and is stored
with it on the diskette when the sound is saved. The loop and filter settings and
the tuning of any sample may be changed at any time, but, because it controls
the allocation of available memory, truncation must be the first thing done after
each sound is recorded and may not be subsequently changed.
Deciding on Multi-sampling Mode
In deciding which multi-sample mode to use you will be making a compromise
between accuracy of reproduction and length of recording. Sounds with
substantial decay times and sounds that need long loops will require double or
triple mode. Many keyboard sounds actually work better in single sample mode.
Most acoustic keyboards don’t suffer much from pitch shifting and the two
second sample length is necessary to capture the characteristic decays.
Sounds with short final decays (like woodwinds, brass, and some sound effects
and percussion sounds) can use the quad and hex modes. Because of the short
sample times, short sustain loops are a necessity in these modes. In the case of
multiple sound effects and percussion sounds, the number and length of the
sounds to be recorded will define the mode to be used.
Occasionally you will find that a sound will require both long sampling time and
many samples. For these cases, there is a way to double the average time per
sample for each multi-sample mode if you are willing to limit yourself to only two
octaves of range on the keyboard at one time. To do this, choose the appropriate
multi-sample mode and record the lower octave of the selected instrument range
into the TOP octave of the lower keyboard section. Use the entire two seconds of
memory for this one octave. (The lower octave of the keyboard section will then
have nothing recorded into it). Hit SWAP.
Now record the upper octave of the selected instrument range into the LOWER
octave of what is now the lower keyboard section, again using all two seconds of
memory. Hit SWAP again. You will now have your instrument on the middle two
octaves of the keyboard with nothing in the top and bottom octaves. Using this
technique gives you four seconds of recording for the two octave range as
opposed to the usual two seconds, but at the cost of two octaves of range.
In recording musical instruments, you should not automatically assume that the
more samples the better. Many sounds that are not quite acceptable with single
sample, work very well in double or triple mode. There is no point in using more
than the minimum number of samples necessary. Remember that the more
samples you use, the more loops you will have to find and the harder it becomes
to match all the samples across the keyboard range. Recording good multisample sounds is an exacting process and the more samples you use, the more
difficult and tedious it becomes.
© E-mu Systems, Inc. 1981,1982 Restored by The Emulator Archive 1999 Page 23
Page 25

Emulator – Operating Instructions Preliminary
NOTE:
If the SAMPLE button
does not blink, it is an
indication that the
memory contains
some non-multisample compatible
data.
If this happens it will
be because you forgot
to enter a selection
code or you are
attempting to modify a
normal single sample
sound. Correct the
error and press
SAMPLE again.
Recording Procedure
If you are going to make a new set of multi-sample recordings into the lower
keyboard section (like normal samples, multi-samples are always made into the
lower half of the keyboard), start by choosing the multi-sample mode you want to
use. To do this, use the special function buttons to enter the appropriate
selection code as listed in Table #1, i.e. ‘B2’ for double multi-sample, ‘B3’ for
triple multi-sample, etc. Entering the code also erases the entire two seconds of
memory and makes it available for your new recordings.
If you are going to replace one or more sections of an existing set of multisample recordings, DO NOT enter a selection code. The Emulator knows which
mode was originally used to make a recording and each individual section will be
automatically erased as you record each new sound.
The following table lists the subsection sizes and locations for each of the multisample modes along with the notes within these sections at which the originally
recorded pitches will appear:
Mode Subsection
Ranges
Single C - B’ C’
Double C - B
C’ - B’
Triple C - G
G# - D#’
E’ - B’
Quad C - F,
F# - B,
C’ - F’
F#' - B'
Hex C - D#
E - G
G# - B
C’ - D#’
E’- G’
G#’ - B’
Table 4: Multi-sampling Note Assignments
Multi-Sampling Recording
To initiate the recording process, press the SAMPLE button. The SAMPLE LED
will blink rapidly to indicate multi-sample mode.
Now choose the subsection you wish to record into by pressing the key in that
particular section of the keyboard at which the recorded pitch will appear (as
listed in Table #2). For example, if you are using quad multi-sample and want to
record into the lowest half octave subsection you would press the lowest D#. If
you wanted to record into the next higher subsection you would press A.
If you press an inappropriate key (any key other than the ones listed for the mode
you are using) the SAMPLE LED will remain lit steadily while the key is pressed
and then return to blinking when it is released to indicate that the Emulator is still
waiting for a correct key to be pressed.
Notes at Which Recorded
Pitches Appear
G
G’
E
C
G#’
D#
A
D#’
A’
D
F#
A#
D’
F#'
A#’
© E-mu Systems, Inc. 1981,1982 Restored by The Emulator Archive 1999 Page 24
Page 26

Emulator – Operating Instructions Preliminary
Aborting Sampling
If you wish to abort the recording process before you’ve actually chosen a
section, press the lowest C on the keyboard. Once you press a key to choose a
section, any existing data in that section is erased and you are committed to
making a recording. If, when you press a key to choose a section, there is no
memory available for recording (because you failed to truncate the immediately
proceeding recording) the OVERLOAD LED will light and the SAMPLE LED will
go out. If this happens, you will have to replace one or more of the previously
recorded sounds with shorter samples in order to make some memory available.
Assuming memory is available, when you choose a section to record into, the
blinking of the SAMPLE LED will slow to indicate level set mode, exactly as in
single sample recording. At this point simply record your sound as you normally
would, i.e. set the level, press and hold the SAMPLE button to set the recording
threshold, release the button and record. Although the LED will blink for two full
seconds, just as in normal sampling, the actual recording time will depend on the
length of previous recordings.
Truncation
Each multi-sample sound must be truncated immediately after sampling. After
any multi-sample recording, the Emulator automatically goes into truncation
mode. All three Sustain section LED’s will light to indicate this state. Set the
truncation as you normally would, using the Truncation slider and making certain
that you are playing a key in the section into which you just recorded. Set the
truncation point as close as you can to the end of your sound, as this will
maximize the amount of memory available for any sub sequent samples. When
you are sure you have the truncation point where you want it, press the
Truncate/Filter button to exit truncation mode and lock in your setting. Remember
that this is the only chance you have to truncate the recording. Once the setting
is locked in it can’t be changed. The Filter slider is inoperative in multi-sample
truncation mode.
Loop and Filter Setting
Once your Emulator is out of truncation mode, the loop and filter sliders work
exactly as they do with normal samples. To set a loop, press SET UPPER or
SET LOWER, depending upon which keyboard section contains the multi-sample
subsection whose loop you wish to set. Press a key in the appropriate subsection.
The loop sliders will now affect the sample in that section. Keep in mind the fact
that the sliders will always affect the subsection, which contains the most recently
pressed key. If you are setting the loop in one section and inadvertently press a
key in another section, the sliders will stop affecting the first section and start
affecting the second section. This can be very disconcerting, particularly if’ you
had previously spent considerable time setting the loop in the second section and
had not yet saved it on diskette.
Consequently, you should be very careful when setting loops to only press keys
in the section you are setting. There is a natural tendency, when making loop
settings, to want to compare them to nearby samples. If you do this with the loop
controls active you will find that you are accidentally changing loop settings all
over the keyboard (we know this from painful experience). It is advisable to try to
get into the habit of making a loop setting, deactivating the sliders, comparing the
loop to adjacent samples, and then reactivating the sliders to make any further
changes.
NOTE:
Remember that for
each multi-sample
mode the recorded
pitches appear at the
keys listed in Table
4.
These are the notes
that should be
recorded to obtain a
continuous scale
from section to
section.
In triple mode, for
example, you would
record an E for the
lowest section, a C
for the middle
section, and a G# for
the highest section.
© E-mu Systems, Inc. 1981,1982 Restored by The Emulator Archive 1999 Page 25
Page 27

Emulator – Operating Instructions Preliminary
Filter Settings
Each individual sample can also have its own filter setting. This can be useful not
only to eliminate quantization error distortion, but also to help match an
instrument’s timbre from subsection to subsection.
To make a filter setting, press the TRUNCATE/FILTER button, then the appropriate SET button, and then a key in the subsection to be set. Use the FILTER
slider in the normal way. The above precautions about playing keys while making
settings also apply to the filter.
Tuning
The tuning function allows you to correct the intonation of samples that are
slightly out of tune. When the TRUNCATE/FILTER LED is lit, the upper slider will
control individual section tuning. Press the appropriate SET button and then a
key in the section to be tuned. If you are tuning to an external reference,
repeatedly play the desired note while moving the upper slider until the proper
pitch is reached.
If you are tuning one section to another, use the following procedure (the section
affected by the tune slider is controlled by the last key pressed, exactly as
described above for the loop and filter settings). With the sliders deactivated, play
and hold the note that will be serving as reference pitch. While continuing to hold
it, activate the tuning control and then play the appropriate note in the section to
be tuned. Repeatedly play this note while moving the upper slider until the note is
in tune with the reference. Release both notes and deactivate the controls. Repeat this procedure until all the sections are in tune.
When recording multi-sample sounds, it is not necessary to use the same mode
on both halves of the keyboard. You could, for instance, select quad multisample, record four samples, hit SWAP, and then hit B3 to change to triple mode
for the next set of samples. Both the quad and triple samples can be saved on
the same diskette.
When you are working on a set of multi-samples, you should save the partially
completed section to a diskette each time you record and truncate a sound and
each time you set a loop and filter. In this way, should you accidentally destroy a
previously completed sample while working on a subsequent one, you can
always get it back by reloading it from the diskette.
When a set of multi-samples has been completed, it should be saved to diskette
as an upper or lower sound as desired. It should be saved on a diskette
containing normal operating software, NOT the User’s Multi-sample diskette.
Modifying Pre-recorded Sounds
To modify pre-recorded sounds, load the User’s Multi-sample program as
previously described and then load the desired sounds. Individual multi-sample
sections can be replaced using the recording procedure described above
(remember, don’t clear the memory or you will erase all the sections). Loop and
filter settings and tuning can be changed for any section. Truncation settings
can’t. When you have made all the changes that you wish to, resave the sounds
to a diskette containing normal software.
Finished Recording
When you have finished recording and/or modifying multi-sample sounds, turn off
your Emulator. If you wish to continue playing, repeat the power on procedure
using a diskette containing standard operating software.
© E-mu Systems, Inc. 1981,1982 Restored by The Emulator Archive 1999 Page 26
Page 28

Emulator – Operating Instructions Preliminary
19 SEQUENCER
Overview
The Sequencer section is located to the right of the Mod and Depth wheels and
contains eight buttons. Two of these, the “A” and “B” buttons are used for special
functions, as discussed later in this section. The remaining six buttons control the
sequencer.
Simple Storing and Recalling
The Sequencer allows you to store the notes you play on the keyboard and then
recall them. You can store the notes in either of two sequence bins:
Seq. # 1
Seq. # 2
To store a sequence press the STORE button, followed by the bin number, e.g.
SEQ # 1. The STORE and SEQ # 1 LED’s will light and the sequencer will be
ready to begin memorizing notes.
The sequence will actually begin with the first note you play on the keyboard. It
will memorize both the notes and their rhythm, and continue memorizing until you
press STOP. You can then recall the sequence you stored by pressing RECALL
followed by the sequence number, e.g. SEQ # 1. The notes will be recalled in the
sequence and rhythm that you played them.
Looping
At the end of the sequence (at the point that you pressed STOP during the store
process) the sequence will loop back to the beginning and play again. You’ll
notice that when it loops, the first note falls exactly at the point you pressed
STOP. If you hit STOP on the proper beat when you store the sequence it will
loop in correct rhythm when it is recalled.
Silence at the Start of a Recording
It is also possible to begin a sequence with a period of silence. To do this, press
a key on the keyboard and, while continuing to hold it, press STORE and SEQ
# 1 (or 2). Now release the key. The sequence will start recording at the instant
you release it and you can then begin playing when the appropriate amount of
time has passed.
Stopping a Sequence
To stop a recalling sequence, press the STOP button. Its LED will light and the
sequence will stop the next time it reaches its end. If’ you press the STOP button
again before the sequence reaches its end the sequence will stop immediately.
Playing Sequences in Succession
You can store sequences in both bin # 1 and bin # 2, and play them back in
succession. To recall sequence # 2, press RECALL SEQ # 2. While it is recalling,
press RECALL SEQ # 1. When sequence # 2 ends, sequence # 1 will
immediately start. You can then press STOP to stop at the end of # 1, or you
could even press RECALL SEQ # 2 to go back to recalling # 2 at the end of # 1.
Alternatively, if you press RECALL SEQ # 1, STOP, RECALL SEQ # 2, when you
press the SEQ # 2 key sequence # 1 will stop immediately and sequence # 2 will
start at that point.
© E-mu Systems, Inc. 1981,1982 Restored by The Emulator Archive 1999 Page 27
Page 29

Emulator – Operating Instructions Preliminary
Altering, Saving and Recalling
Altering the Tempo
You can alter the tempo of the recalling sequence using the START POINT/
TRUNCATE slider when the SUSTAIN section buttons are all off. Sliding the
slider to the left will slow the recall down, sliding it to the right will speed it up.
When you are storing, you should leave the slider in the middle in most cases.
This will enable you to either increase or decrease the recalling tempo. If you
should wish to drastically increase the tempo during recall, you would store with
the slider at the extreme left, and recall with it at the extreme right.
Storing Sequences to Diskette
The Emulator sequencer allows you to save your sequences on diskette for more
permanent storage. Whenever you press the SAVE button the sequences in bins
# 1 and # 2 are automatically stored on the diskette along with the sounds
currently in the Emulator.
Each diskette will hold one set of two sequences. You should remember that the
SAVE process always writes both the sounds and sequences onto the diskette.
If, for example, a diskette contains both sounds and a set of sequences and you
GET the sounds, modify them, and then hit SAVE, the new sounds will be stored
onto the diskette but the sequences on the diskette will be erased and replaced
with whatever happened to be in the sequencer at the time you hit SAVE.
If you wish to change the sounds on a diskette but leave the sequences intact,
before hitting SAVE hit GET SEQUENCE. This loads the stored sequences into
the Emulator’s sequencer so that when you then hit SAVE they will be restored
back onto the diskette. The same precaution applies to the reverse situation, i.e.
when you want to change a stored sequence but leave the sounds on the
diskette intact. In this case hit GET UPPER and GET LOWER after changing the
sequence but before hitting SAVE.
Recalling Sequences from Diskette
To reload sequences from a diskette into the sequencer, press GET
SEQUENCE. If the sequencer is running, it will stop, and the new sequences will
be loaded from the disk. If a disk error occurs (for example there is no disk in the
drive) the GET SEQUENCE light will remain lit when the disk turns off, and the
sequence bins will be left empty. GET SEQUENCE, like GET LOWER, GET
UPPER, and SWAP can be part of a multi-button command (see Section V). Up
to three depressions of these buttons will be remembered and executed in
sequence. If you press a fourth button the Emulator will stop playing until it
completes the first operation that you requested.
When you SAVE a sequence, the setting of the tempo slider is also saved. This
setting is restored when you GET SEQUENCE. You can set a particular recall
tempo and be sure the tempo is correct when you GET SEQUENCE during
performance. To change this tempo with the TRUNCATE slider, you must first
move the slider to the position that corresponds to the preset tempo. Only then
will the slider affect the playback speed in the normal way. (This prevents an
inadvertent bump of the slider from causing a drastic and unexpected change in
tempo.)
© E-mu Systems, Inc. 1981,1982 Restored by The Emulator Archive 1999 Page 28
Page 30

Emulator – Operating Instructions Preliminary
The ‘Extra’ Sequence
When you store a sequence into a bin, and there was already a sequence in the
bin, the old sequence is transferred to a special sequence bin called the ‘extra’
sequence. This can be particularly useful when you inadvertently store over a
sequence you wanted to keep or when you make an error during sequence
overdubbing (see below).
To recall the sequence in the extra bin, press RECALL then RECALL again.
Recalling the extra sequence is just like recalling either of the other two
sequences - it will loop, stop, and succeed the others by pressing the appropriate
buttons as above.
Exchanging the Extra Sequence
Often you will want to exchange the ‘extra’ sequence with one of the other two
sequences to allow you to SAVE it on disk (the ‘extra’ sequence is not saved on
the disk). To do this, press STORE, then RECALL, then the sequence number
you wish to exchange with the extra sequence (i.e. SEQ # 1 or SEQ # 2).
A sequence in the ‘extra’ bin remains intact when additional sequences are
recalled from a diskette. Consequently it is possible to get a set of sequences
from a diskette, swap one of them to the ‘extra’ bin, and then get another set
from another diskette, thereby ending up with three independent sequences
available simultaneously.
Sequencer Footswitch
The Accessory Footswitch (the one that usually controls doubling mode) can also
be used to start and stop the sequencer. Pressing special function code ‘B1’
enables the footswitch for sequencer control. Pressing ‘B1’ again returns it to
normal doubling mode control.
When the footswitch is enabled for sequencer control it will function exactly like
the STOP button. This is very useful, when recording a sequence, for stopping
the sequencer precisely on the right beat without having to make a mad lunge for
the STOP button. When pressing the footswitch during recall, the STOP button
LED will light exactly as if the button itself had been pressed.
Additionally, the footswitch will start initial sequence recall. For example, if you
press RECALL SEQ # 1 with the footswitch enabled, the RECALL LED will light
and the SEQ # 1 LED will BLINK to indicate that the Emulator is waiting for the
footswitch to be pressed to start the sequence. When you then press the
footswitch the SEQ # 1 LED will light steadily, the sequence will start and the
footswitch will return to acting as the STOP button. (The STOP button itself will
always remain active, regardless of whether or not the footswitch is enabled.)
This is particularly useful when overdubbing as it allows you to get your hands to
the keyboard, ready to start, before initiating play back with the footswitch.
It is possible to start a sequence with the footswitch and then also control
doubling mode. Press ‘B1’ to enable the footswitch. Press RECALL SEQ # 1 and
then ‘B1’ again. The SEQ # 1 LED will continue blinking. When you press the
footswitch the sequence will start and the footswitch will revert back to controlling
doubling mode. (It will not, of course, then act as the STOP button.) Pressing ‘B1’
does not affect the doubling mode state; it can be left enabled or disabled as you
wish.
© E-mu Systems, Inc. 1981,1982 Restored by The Emulator Archive 1999 Page 29
Page 31

Emulator – Operating Instructions Preliminary
Sequencer Errors
The Emulator Sequencer has a total memory of almost 900 notes for bins # 1
and # 2 combined (the ‘extra’ sequence has its own separate memory). If while
storing you exceed the memory capacity, the store will stop immediately and the
STOP light will remain lit. You can extinguish the STOP light by pressing STOP.
If you try to exchange the ‘extra’ sequence with one of the bins, and the result
would exceed the 900 note total for the two bins, the exchange will not take place
and instead the STOP light will remain lit as above.
Storing During Performance
The Emulator Sequencer has a special mode that is particularly useful while
using the sequencer during performance. If RECALL is pressed twice in
succession during STORE, the STORE is immediately stopped and the
sequence that was storing begins recalling instantly. To use this feature, press
STORE #1, then RECALL (to be ready), and then play a brief keyboard line. On
the downbeat, press RECALL a second time. The line will be repeated
continuously in rhythm!
Overdubbing
Your Emulator Sequencer can both store and recall sequences at the same time.
This is particularly useful for overdubbing tracks of sequence using techniques
similar to those used with multi-track tape.
To overdub a second pass onto a sequence stored in SEQ # 1 press STORE
SEQ # 1 and then RECALL SEQ # 1. The previously stored sequence will begin
recalling at the instant that you press SEQ # 1 after RECALL and you can play
your second pass along with the recalling sequence. Pressing the STOP button
will cause both the store and recall to stop the next time the recalling sequence
reaches its end. Pressing STOP a second time will cause both to stop
immediately. The overdubbed sequence is now stored in bin #1, and can be
recalled by pressing RECALL SEQ # 1. The sequence as it existed prior to the
current over dub is now stored in the ‘extra’ bin, so if you made a mistake during
the over dub, simply exchange the ‘extra’ sequence with Sequence # 1 and try
again.
You can overdub sounds as many times as you like, limited only by the number
of simultaneously sounding notes on the Emulator and the sequencer memory
900 note limit.
You can also recall bin # 2 while storing in bin # 1, or chain both # 1 and # 2
together just as in normal recall mode. You cannot, however; recall the ‘extra’
sequence while storing.
© E-mu Systems, Inc. 1981,1982 Restored by The Emulator Archive 1999 Page 30
Page 32

Emulator – Operating Instructions Preliminary
Complicated Stuff
Once you get used to all of the above features of the sequencer, there are a few
additional features that you may find useful. These are involved with STORE
during RECALL in more complicated situations.
Adding Notes to the Beginning
You can add some notes to the beginning of an existing sequence; say in bin # 1.
To do this, press STORE SEQ # 1, then RECALL, and play the notes you wish to
add. When it’s time for the existing sequence to begin, press SEQ # 1. Press
STOP to end the storage at the end of the existing recalling sequence.
You can add some notes to the end of an existing sequence too. Press
STORE # 1 RECALL # 1 just like you would to overdub a track. Then press
RECALL STOP. When the end of the recalling sequence comes around, recall
will stop but you will continue in store mode. Play the notes you wish to add and
press STOP on the downbeat to end the now extended sequence.
Truncate an Existing Sequence
You can also truncate an existing sequence. To do so, press STORE # 1, then
RECALL # 1 to recall and save the sequence. Press STOP twice. On the second
press both the RECALL and STORE will end to truncate the sequence. You
could have instead pressed RECALL STOP STOP to immediately end recall but
continue store mode to replace the old ending with a new one.
The Sequencer and Other Emulator Functions
Certain functions of the Emulator will not work properly with the sequencer
running, so they turn it off as soon as they are pressed. These are SAMPLE,
SAVE, and GET SEQUENCE.
Special Functions with the Sequencer
Because of the new ‘A’ and ‘B’ prefix buttons, we’ve been able to move the
special sound modes and special functions to the sequencer buttons for easier
access. To activate any of these modes, press the prefix button (‘A’ or ‘B’) which
will light the LED on that button, followed by the numbered button (the number is
the small one at the upper right of the button) corresponding to the function you
wish to perform. For example, to set the lower sound to SOLO Mode, press ‘A’ ‘2’
(‘2’ is also labeled GET SEQUENCE).
Buttons Command
A 1 Set Lower sound to normal mode
A 2 Set Lower sound to solo mode
A 3 Set Lower sound to non-transposition mode
A4 Toggle Lower sound natural release mode
A 5 Cancel ‘A’ prefix
A 6 Release pedal affects the Lower sound only
A 7 Release pedal affects the Upper sound only
A 8 Release pedal affects both sounds
B 1 Toggle sequencer footswitch
B 2 Cancel ‘B’ prefix
B 3 Toggle backwards mode
B 4 - 7 Cancel ‘B’ prefix
B 8 Replicate Software
Table 5: Sequencer Button Alternate Commands
Use the CANCEL PREFIX commands if you inadvertently press the A or B
pushbutton.
© E-mu Systems, Inc. 1981,1982 Restored by The Emulator Archive 1999 Page 31
Page 33

Emulator – Operating Instructions Preliminary
20 USER DISKETTE FORMATTING SOFTWARE
(OPTIONAL)
Overview
The optional User Diskette Formatting Software allows you to purchase diskettes
at your local computer store and use them in your Emulator. To do this, the
program ‘formats’ the diskette, that is, it puts information on the diskette that the
Emulator needs in order to read from and write to the diskette.
Use Only Quality Diskettes
E-mu has determined that only the finest quality diskettes are of adequate
reliability for use in the Emulator. Use ONLY DYSAN or MAXELL brand
diskettes. Don’t accept another brand because a salesman tells you they are ‘the
same thing’ or ‘just as good.’ The Emulator requires diskettes that are ‘Certified
for Double Density’ usage. Do not use ‘Single Density’ diskettes.
NEVER use both sides of a ‘Single Sided’ diskette. While the disk drive in the
Emulator is not specified for use with ‘Double Sided’ diskettes, tests at E-mu
Systems have concluded that you may use both sides of certified ‘Double Sided’
diskettes with little risk of data loss.
For maximum safety, however, use ‘Single Sided’ diskettes. In conclusion,
purchase only MAXELL or DYSAN Double Density Soft Sectored diskettes. The
Dysan part number is 104/1D (801187). The Maxell part number is MD1.
Initializing the Program
The USER FORMAT program, like any software received from E-mu Systems,
may need to be initialized to your instrument before use. If the program has not
been initialized, when you attempt to load it, the disk drive will stop and the SAVE
light will come on. In this case, simply remove the write protect sticker from the
diskette and try again. Once you have initialized the diskette, you may write
protect it again.
Formatting Diskettes
To format diskettes that have been purchased from a source other than E-mu
Systems, begin with your Emulator turned off. Turn on the instrument and insert
the USER FORMAT diskette. The instrument will read for a short time from the
disk, and then turn the disk drive off. Remove the USER FORMAT diskette.
The instrument is now ready to format your diskettes. Note that it will not load or
play sounds - it is only useful for formatting diskettes in this state. To format a
diskette, insert the diskette to be formatted into the drive and press SAVE. The
disk drive will format the diskette. Remove the formatted diskette from the drive.
It will have software already on it, and will be initialized to your instrument. It will
not have any sounds or sequences stored on it.
You can format as many diskettes as you like using this procedure. If you choose
to use double sided diskettes, you will have to format both sides of the diskette.
When you are done formatting diskettes, turn off the instrument’s power. You can
then power the instrument up using and normal diskette (including the ones you
have formatted) to play music with your Emulator.
If, when you press SAVE, nothing happens but the SAVE light comes on, it
means that the diskette is write protected. Simply remove the tab if you really
want to format the diskette.
© E-mu Systems, Inc. 1981,1982 Restored by The Emulator Archive 1999 Page 32
Page 34

Emulator – Operating Instructions Preliminary
Making Additional Copies of the Program
There are two other functions the USER FORMAT can perform. The first is to
copy itself to another diskette, enabling you to back up the USER FORMAT
program itself. To accomplish this, load the USER FORMAT program as above.
Place a formatted diskette into the drive, and press DYNAMIC. The diskette will
be written with the USER FORMAT program. Label it accordingly!
If you attempt to copy the USER FORMAT program onto a write protected
diskette, the disk drive won’t turn on and the DYNAMIC light will come on. If there
is an error during the write, the DYNAMIC light will come on and stay on.
Updating the Software Written to Formatted Diskettes
The USER FORMAT program can also update the software it writes onto the
diskette while it is formatting the diskette. You need not use this function,
because you can always rewrite the software onto a formatted diskette using the
‘Software Replicate’ function in any Emulator software. If, however, you would
like to eliminate that step, you can load new software into the USER FORMAT
program. Place a diskette containing the software you wish to read into the
USER FORMAT program in the drive, and press GET LOWER. The Emulator will
read the software from the diskette into the USER FORMAT program in memory.
This software will be duplicated onto any diskettes formatted after this time.
Of course, if you turn off the instrument after loading new software the software
will be forgotten. However, if you copy the USER FORMAT program back to its
diskette after reading new software, you will permanently save the USER
FORMAT program with the new software
If the instrument is unable to read the software from the diskette because of a
bad diskette, the GET LOWER light will stay on after the read. In this case, try
another copy of the software. If you attempt to load software from a diskette that
has not yet been initialized to your instrument, the GET UPPER light will come
on. Start over after initializing the diskette that has the software on it.
The USER FORMAT software may seem a bit confusing at first, but it is actually
very simple in practice If you like, phone E-mu Systems during your first attempt
at formatting to receive additional instructions
21 IN CASE OF DIFFICULTY
If you have problems with your Emulator, contact the dealer from whom you
purchased it and describe to him what it is or isn’t doing. In many cases he will
be able to solve the problem on the spot. If he is unable to, he will direct you to
call the nearest E-mu Service Center or the factory. Be prepared to describe the
problem in detail. The clearer the picture we have of your Emulator’s behavior,
the more likely we are to be able to figure out what’s wrong. If it is necessary to
return the instrument for service you will be given a return authorization number
and the address to which it should be sent. Under no circumstances should you
return your Emulator to us without getting prior authorization.
NOTE:
E-mu Systems no
longer formally
support the
Emulator.
© E-mu Systems, Inc. 1981,1982 Restored by The Emulator Archive 1999 Page 33
Page 35

Emulator – Operating Instructions Preliminary
22 WARRANTY
© E-mu Systems, Inc. 1981,1982 Restored by The Emulator Archive 1999 Page 34
Page 36

Emulator – Operating Instructions Preliminary
Change of Address Notice
Name Date___________
Old Address________________________________________
City
New Address________________________________________
City
State Zip
State Zip
Change of Address Notice
Name
Old Address________________________________________
City
New Address________________________________________
State Zip
Date___________
City
State Zip
Change of Address Notice
Name
Old Address________________________________________
City
New Address________________________________________
City
© E-mu Systems, Inc. 1981,1982 Restored by The Emulator Archive 1999 Page 35
State Zip
State Zip
Date__________
Page 37

Emulator – Operating Instructions Preliminary
Instant Emulator Simplified
Set Up and Operating Instructions
Since you are probably more interested in playing your new Emulator thon in reading a
long boring owner’s manual, we have compiled the following instructions to help you
make noise fast. We suggest that you set up your Emulator, confirm that it is working
correctly, and try out the enclosed prerecorded sounds. When you get tired of that, read
the owner’s manual. Although the Emulator is extremely simple to use, getting the
maximum level of performance from it requires a thorough understanding of its various
functions.
Set Up
1. Carefully unpack your Emulator. In addition to the instrument itself you
should have an AC line cord, a box of ten diskettes, a foot pedal, two foot
switches, on owner’s manual, and a warranty registration card.
2. Check the AC line voltage switch on the rear of the Emulator to make sure
that it is set to the correct voltage for your country. Be sure the power switch
is in the “OFF” position. Attach the AC line cord and plug it into an AC outlet.
3. Connect a patch cord from the “MIX” output on the rear of your Emulator to
your amplifier (use either the phone or cannon output). The volume of this
output can be controlled by the Mix Level knob on the Emulator’s front
panel.
4. Turn the Emulator on. The disk drive motor (which is behind the slot at the
left end of the control panel) should begin to run, and all the panel LED’s
should come on. After about five seconds the Overload, Sample, and Swap
LED’s should go out. If this happens, your Emulator is working correctly (so
far).
Playing Prerecorded Sounds
WARNING: If you are not familiar with the use and handling of floppy diskettes, read Section 5 of
1. Select a diskette containing prerecorded sounds. Open the disk drive door
and insert the diskette (label side up) with the edge with the label facing you.
Close the door. All of the panel LED’s will go off and the Emulator will
automatically load both the Lower and Upper sounds. The Get Lower and
Get Upper LED’s will blink during loading. When both sounds have finished
loading you can, play on the keyboard.
2. Press the Dynamic Allocation button. (See the owner’s manual for an
explanation of this function.)
3. Use the Master Tune controls to adjust the tuning of the Lower and Upper
keyboard sections.
4. To apply vibrato to a keyboard section, press the appropriate Enable button,
move the Mod Depth wheel forward and adjust the vibrato speed with the
Rate knob. Plugging in the vibrato foot pedal will disable the Mod wheel and
allow you to use the pedal to control vibrato depth.
the owner’s manual before proceeding.
© E-mu Systems, Inc. 1981,1982 Restored by The Emulator Archive 1999 Page 36
Page 38

Emulator – Operating Instructions Preliminary
5. Plug in the Release Foot Switch. Normally a sound stops when you release
its key. When you hold down the Release Foot Switch, pressing a key
always results in the entire sound being played, regardless of when you
release the key. Experiment with the piano.
6. Press the Swap button to move the Lower sound to the upper keyboard
section and vice versa.
7. To load another prerecorded sound, place the desired diskette in the drive
and press the Get Lower and/or Get Upper buttons. You can play on the
keyboard while the sounds are loading.
Sound Recording
Reading the owner’s manual is a definite requirement for recording your own
high quality sounds. The following instructions will, however, allow you to gain
some familiarity with the basic technique.
1. Plug a microphone into either of the inputs on the rear of the Emulator.
2. Set the Gain switch to the 40dB position.
3. Press the Sample button. Its LED will blink rapidly.
4. Set the recording level: Adjust the Attenuation knob until the Overload LED
lights when you make the sound that you wish to record. Now back off on
the attenuator to just below the lowest setting at which the LED still lights.
5. Press the Sample button again and hold it for a few seconds (don’t make
any noise during this time). Release the button. The LED should remain on.
(See the owner’s manual for on explanation of this step.)
6. Make the sound you wish to record. The sound will trigger the Emulator into
recording (the Sample LED will blink slowly). You hove two seconds of
recording time. At the end of that time the Sample LED will go out. If there
was an overload during recording, the Overload LED will come on.
7. Play the sound on the lower half of the keyboard. (Sounds always record into the
lower keyboard section.)
8. To save your sound onto diskette, place a diskette with no write protect label into
the disk drive and press the Save button. The Save LED will blink for about 20
seconds and then go out to indicate a successful save.
9. If you have any problems, refer to section 16 of the owner’s manual for a complete
description of the sampling process.
Have fun !
E-mu Systems
© E-mu Systems, Inc. 1981,1982 Restored by The Emulator Archive 1999 Page 37
 Loading...