

Page 1

EMAX II
OPERATIONS MANUAL
Copyright E-mu Systems Inc.
Page 2

Emax II operation manual
Emax II
16-Bit Digital Sound System
Operation Manual
© 1989 E-mu Systems, Inc.
All Rights Reserved
For future reference, copy the
Serial Number from your Emax II here.
Written by
Craig Anderton
Editing and additional
illustrations by
Riley Smith
Cover by Dan Borba
■ FI368 Rev. E
E-mu Systems, Inc.
1600 Green Hills Road
Scotts Valley, CA 95066
(831) 438-1921
Important Notice: In order to to obtain warranty service on
your Emax II, the serial number sticker must be intact and you
must have a sales receipt or other proof of purchase. If there is
no serial number sticker on your unit, please contact E-mu
Systems at once.
This product is covered by one or more of the following
U.S. patents: 3,969,682; 3,986,423; 4,404,529; 4,506,579;
4,699,038; and foreign patents and/or pending patents.
Emax II is a registered trademark of E-mu Systems, Inc.
Page 3

Emax II operation manual
Page 4
Emax II operation manual
Precautions
WARNING: READ THIS FIRST
IMPORTANT SAFETY INSTRUCTIONS
Changing the voltage selector may require the use of a different line cord or attachment plug, or
both. To reduce the risk of fire or electric shock, refer servicing to qualified service personnel. To
reduce risk of fire or electric shock do not expose this product to rain or moisture.
GROUNDING INSTRUCTIONS
This product must be grounded. If it should malfunction or break down, grounding provides a
path of least resistance for electric current, reducing the risk of electric shock. This product is
equipped with a cord having an equipment-grounding conductor and a grounding plug. The plug
must be plugged into an appropriate outlet properly installed and grounded in accordance with
all local codes and ordinances.
DANGER
Improper connection of equipment grounding conductor can result in the risk of electric shock.
Check with a qualified electrician or service personnel if you are in doubt as to whether the product
is properly grounded. Do not modify the plug provided with this product — if it will not fit the
outlet, have a proper outlet installed by a qualified technician.
CAUTION
If the 2201-06 Emax II is rack mounted, a standard 19 inch open frame rack must be used. make
sure ventilation openings on the rear of the 2201-06, Emax II are not blocked.
USER-MAINTENANCE INSTRUCTIONS
1. The Emax II should be kept clean and dust free. Periodically wipe the unit with a clean, lint free
cloth. Do not use solvents or cleaners.
2. There are no user lubrication or adjustment requirements.
3. Refer all other servicing to qualified service personnel.
INSTRUCTIONS PERTAINING TO A RISK OF FIRE,
ELECTRIC SHOCK, OR INJURY TO PERSONS
WARNING; When using electric products, basic precautions should always be
followed, including the following:
1. Read all instructions before using the Emax II.
2. To reduce the risk of injury, close supervision is necessary when the Emax II is used near
children.
3. Do not use the Emax II near water — for example near a bathtub, washbowl, kitchen sink, in a
wet basement, on a wet bar, or near or in a swimming pool.
4. The Emax II should be situated so that its location or position does not interfere with its proper
ventilation.
5. The Emax II should be located away from heat sources such as radiators, heat registers,
fireplaces, stoves, or ovens.
6. The Emax II should only be connected to a power supply of the type described in the operating
instructions and as marked on the product.
■
This symbol is intended
to alert the user to the presence of important operating
and maintenance (servicing) instructions in the literature accompanying the
appliance.
■
This symbol is intended to
alert the user to the presence of uninsulated dangerous voltage within the
product's enclosure that
may be of sufficient magnitude to constitute a risk of
electric shock to persons.
Page 5
Emax II operation manualPrecautions
7. This product, in combination with an amplifier and headphones and speakers, may be capable
of producing sound levels that could cause permanant hearing loss. Do not operate for a long
period of time at a high volume level or at a level that is uncomfortable. If you experience any
hearing loss or ringing in the ears, consult an audiologist.
8. This Emax II may be equipped with a polarized line plug (one blade wider that the other). This
is a safety feature. If you are unable to insert this plug into the outlet, do not defeat the safety
purpose of the plug. Contact an electrician to replace your obsolete outlet.
9. The power supply cord of the Emax II should be unplugged from the outlet when left unused
for a long period of time.
10. Care should be taken so that objects do not fall and liquids are not spilled into the enclosure
of the Emax II through openings.
11. The product should be serviced by qualified service personnel when:
A. The power supply cord has been damaged; or
B. Objects have fallen, or liquid has been spilled into the product; or
C. The product has been exposed to rain; or
D. The product does not appear to operate normally or exhibits a marked change in
performance; or
E. The product has been dropped or the enclosure damaged.
12.All servicing should be referred to qualified service personnel.
SAVE THESE INSTRUCTIONS
CAUTION
RISK OF ELECTRIC SHOCK
DO NOT OPEN
CAUTION: TO REDUCE THE RISK OF ELECTRIC SHOCK
DO NOT REMOVE COVER OR BACK
NO USER SERVICEABLE PARTS INSIDE
REFER SERVICING TO QUALIFIED SERVICE PERSONNEL
RADIO and TELEVISION INTERFERENCE
The equipment described in this manual generates and uses radio-frequency energy. If it is not
installed and used properly-- that is, in strict accordance with our instructions - it may cause
interference with radio and television reception.
This equipment has been tested and complies with the limits for a Class A computing device in
accordance with the specifications in Subpart J of Part 15 of the FCC rules. These rules are designed
to provide reasonable protection against such interference in a residential installation. However,
there is no guarantee that the interference will not occur in a particular installation, especially if
a "rabbit ear" television antenna is used.
If the Emax II does cause interference to radio or television reception, you can try to correct the
interference by using one or more of the following measures:
■ Turn the television or radio antenna until the interference stops.
■ Move the Emax II to one side or the other of the television or radio.
■ Move the Emax II farther away from the television or radio.
■ Plug the Emax II into an outlet on a different circuit than the television or radio.
■ Consider installing a rooftop antenna with a coaxial lead-in between the antenna and
television set.
Page 6

Emax II operation manual
INTRODUCTION 1
EMAX II BASICS 9
Sampling Basics ................................................................................................................... 11
The Bank ............................................................................................................................... 12
Samples & Voices................................................................................................................. 12
Making a Preset.................................................................................................................... 13
The Current Preset ............................................................................................................... 13
The Current Voice................................................................................................................ 13
More About Voices .............................................................................................................. 14
Other Definitions ................................................................................................................. 16
GUIDED TOURS 19
Guided Tour No. 1 - Meet the Emax II ............................................................................. 21
Guided Tour No. 2 - Specifying the Current Voice ........................................................ 25
Guided Tour No. 3 - Dynamic Processing of a Voice ..................................................... 27
Guided Tour No. 4 - Realtime Control Programming ................................................... 31
Guided Tour No. 5 - Basic Sampling ................................................................................ 33
Guided Tour No. 6 - Digitally Processing Samples ........................................................ 35
Guided Tour No. 7 - Managing the Bank......................................................................... 38
Guided Tour No. 8 - The Sequencer ................................................................................. 38
Guided Tour No. 9 - Make Your Own .............................................................................. 39
i
CONTENTS
GENERAL INSTRUCTIONS 41
Selecting the Current Preset ............................................................................................... 43
Exiting a Function ................................................................................................................ 43
Keyboard Numbering Protocol ......................................................................................... 44
Disk Handling ...................................................................................................................... 44
FUNCTION BUTTONS 47
Transpose .............................................................................................................................. 49
Select Drive ........................................................................................................................... 50
Load Bank ............................................................................................................................. 50
Enter Data ............................................................................................................................. 51
MASTER 53
1. Master Tune ...................................................................................................................... 55
2. Memory Remaining......................................................................................................... 55
3. Velocity Curve ................................................................................................................. 56
4. Erase All ............................................................................................................................ 56
Page 7

ii
CONTENTS
Emax II operation manual
MASTER (continued)
5. Format Disk ...................................................................................................................... 57
6. Erase HD Bank ................................................................................................................. 59
7. Bird Run ............................................................................................................................ 60
8. Backup/Restore ............................................................................................................... 60
0. Define Custom ................................................................................................... 61
1. Copy HD to HD ................................................................................................. 61
2. New Banks Only................................................................................................ 62
3. Selected Banks ................................................................................................... 62
4. Custom Backup ................................................................................................. 63
5. Continue Backup ............................................................................................... 63
6. Backup to Floppy .............................................................................................. 63
7. New Banks to Floppy ....................................................................................... 64
8. Selected to Floppy ............................................................................................. 64
9. Floppy Restore ................................................................................................... 64
9. Special................................................................................................................................ 65
1. Copy Software ................................................................................................... 65
2. MIDI Master ....................................................................................................... 66
3. Recalibrate .......................................................................................................... 67
4. Audition Note .................................................................................................... 67
5. MIDI Analyzer ................................................................................................... 68
6. SCSI Boot ID ....................................................................................................... 68
7. Install Disk.......................................................................................................... 69
Software Revision.................................................................................................. 69
SAMPLE 71
1. VU Mode/Gain ................................................................................................................ 73
2. Place Sample ..................................................................................................................... 73
3. Sample Rate ...................................................................................................................... 74
4. Sample Length ................................................................................................................. 75
5. Threshold .......................................................................................................................... 76
6. Arm Sampling .................................................................................................................. 76
7. Force Sampling ................................................................................................................ 77
8. Stop Sampling .................................................................................................................. 77
0. Change Sample ................................................................................................................ 77
DIGITAL PROCESSING 79
0. Change Voice.................................................................................................................... 81
1. Truncate ............................................................................................................................ 82
2. Loop ................................................................................................................................... 84
3.Release Loop...................................................................................................................... 88
4. Loop Mode........................................................................................................................ 91
5. Taper .................................................................................................................................. 92
6. Splice.................................................................................................................................. 93
7. Combine ............................................................................................................................ 95
Page 8

Emax II operation manual
CONTENTS
DIGITAL PROCESSING (continued)
8. Crossfade Loop ................................................................................................................ 96
9. Digital Effects ................................................................................................................... 98
1. Gain/Attenuation ............................................................................................. 98
2. Reverse Sound ................................................................................................... 99
3. Change Sample Rate ......................................................................................... 99
4. Change Pitch .................................................................................................... 100
5. Transform Multiplication ............................................................................... 101
6. Spectrum Synthesizer ..................................................................................... 103
PRESET MANAGEMENT 105
1. Load Preset ..................................................................................................................... 107
2. Save Compressed ........................................................................................................... 108
3. Create Preset ................................................................................................................... 109
4. Erase Preset ..................................................................................................................... 109
5. Copy Preset ..................................................................................................................... 110
6. Rename Preset ................................................................................................................ 110
7. Preset Size ....................................................................................................................... 111
8. Save All 16 Bit ................................................................................................................ 112
iii
PRESET DEFINITION 113
1. Copy Voice...................................................................................................................... 115
2. Edit Assignment ............................................................................................................ 118
3. Erase Voice...................................................................................................................... 120
4. Stereo Voice .................................................................................................................... 121
5. Crossfade ........................................................................................................................ 123
6. Arpeggiator .................................................................................................................... 126
7. MIDI................................................................................................................................. 133
8. Pitch Bend Range ........................................................................................................... 138
9. Realtime Controls .......................................................................................................... 138
0. Stack Presets ................................................................................................................... 144
DYNAMIC PROCESSING 147
00. Change Voice................................................................................................................ 149
11. Attenuation/Tuning/Delay....................................................................................... 151
12. VCA AHDSR ................................................................................................................ 151
13. Filter Setup.................................................................................................................... 155
14. Filter AHDSR ............................................................................................................... 156
15. LFO Setup ..................................................................................................................... 157
16. LFO To ........................................................................................................................... 158
17. Velocity To A ................................................................................................................ 159
18. Velocity To B ................................................................................................................ 160
19. Panning ......................................................................................................................... 161
20. Chorus ........................................................................................................................... 162
Page 9

iv
Emax II operation manual
CONTENTS
DYNAMIC PROCESSING (continued)
21. Keyboard Mode ........................................................................................................... 163
22. Control Enable ............................................................................................................. 164
SEQUENCER 165
Play ...................................................................................................................................... 167
Record.................................................................................................................................. 167
Stop ...................................................................................................................................... 167
Select Sequence .................................................................................................................. 168
Sequencer Manage
1. Tempo .............................................................................................................................. 168
2. Clock Source ................................................................................................................... 169
3. Load Sequence ............................................................................................................... 169
4. Erase Sequence ............................................................................................................... 171
5. Copy Sequence ............................................................................................................... 173
6. Rename Sequence .......................................................................................................... 173
Sequencer Setup
1. Track Status .................................................................................................................... 174
2. Track Preset .................................................................................................................... 174
3. Auto Extend.................................................................................................................... 175
4. Erase Track ..................................................................................................................... 176
5. Bounce Track .................................................................................................................. 176
6. Supermode ...................................................................................................................... 177
ADVANCED APPLICATIONS 181
The Art of Sampling 183
Part 1: Taking the Best Possible Sample ......................................................................... 183
Session #1: Sampling from Tape ..................................................................................... 186
Session #2: Sampling Acoustic Instruments .................................................................. 187
Session #3: Sound Effects ................................................................................................. 190
Part 2: Manipulating the Sample ..................................................................................... 192
Part 3: Multi-Sampling ...................................................................................................... 195
Fix It in the Mix 197
Multi-Timbral Operation 201
Multi-Timbral Banks 203
Spectrum Synthesis 205
Overview............................................................................................................................. 205
Spectrums ........................................................................................................................... 206
Time Slice ............................................................................................................................ 207
Creating Sounds................................................................................................................. 208
Page 10

Emax II operation manual
CONTENTS
Spectrum Synthesis (continued)
Interpolation ....................................................................................................................... 209
1. Frequency Spectrum ..................................................................................................... 210
2. Time Slice ........................................................................................................................ 211
3. Amplitude Contour ....................................................................................................... 213
4. Pitch Contour ................................................................................................................. 214
5. Pitch/Ratios .................................................................................................................... 216
6. Interpolate ....................................................................................................................... 216
7. Load Parameters ............................................................................................................ 217
8. Save Parameters ............................................................................................................. 217
9. Erase Parameters............................................................................................................ 218
0. Synthesize! ...................................................................................................................... 218
Approaching Spectrum Synthesis ................................................................................... 219
Spectrum Synthesis Experiments .................................................................................... 219
v
Digital Sound Transfer 221
MIDI Supplement 223
APPENDIX 229
Velocity Charts ................................................................................................................... 230
Emax II Memory Expansion.............................................................................................. 235
Technical Specifications .................................................................................................... 236
MIDI Implementation Chart ............................................................................................ 237
Note-to-Frequency Conversion Chart ............................................................................ 238
Index ..................................................................................................................................... 239
Warranty .............................................................................................................................. 243
Page 11

Emax II operation manual
Page 12

Emax II operation manual
Introduction
INTRODUCTION
WHAT'S AN EMAX II? 2
INSTANT GRATIFICATION 3
CONNECTION INSTRUCTIONS 5
CONNECTION DIAGRAM 6
1
Page 13

2
Emax II Features
Emax II operation manual
INTRODUCTION
WHAT’S AN EMAX II?
Emax II is a responsive, low cost, surprisingly easy-to-use musical instrument with
staggering creative possibilities. It’s also a composer’s personal orchestra, a recording
studio’s chance to have hundreds of acoustic and electronic instruments “on call” at any
one time, a university’s research tool...but most of all, it provides the means for some
truly special musical experiences. To give you a better idea of its capabilities, here are
just a few of Emax II’s highlights:
In addition to synthesizing sounds, Emax II digitally records (“samples”) real-world
sounds into its memory with 16-bit, CD quality in either mono or stereo (optional). If you
want Emax to sound like a piano, sample a piano; if you want it to sound like a barking
dog, sample a dog. Pre-sampled sounds can also be loaded into Emax II’s memory from
disks. Emax II also contains Spectrum Synthesis, a powerful additive synthesizer.
These sounds may then be modified with Emax II’s synthesizer processors and/or stateof-the-art digital processors. The synthesizer-type processors include:
● Dynamic digital lowpass filters (VCF) with AHDSR envelope generators
● Digital amplifiers (VCA) with AHDSR envelope generators
● LFOs with adjustable rate, delay, and speed variation
● Two programmable wheels for real-time control over pitch, filter cutoff, AHDSR
attack rate, level, LFO modulation index, etc.
● Two programmable footswitches for real-time control over sustain, release,
sustenuto, “patch” change, and sequencer start/stop
● Velocity sensitive keyboard, where keyboard dynamics can control any or
all of the following: VCA level, VCA attack, VCF cutoff, VCF attack, and VCF Q.
The keyboard can play up to sixteen notes simultaneously; however, Emax II can chorus
its voices or play in stereo with no loss of polyphony! Note that like standard analog
synthesizers, there is a complete set of modifiers for each note. Therefore, when we refer
to the “filter”, "LFO" or “VCA," we are really talking about sixteen filters, LFOs and
VCAs.
Digital processing techniques include:
● Truncation (shortening the beginning and/or the end of the sample)
● Looping the sample (or any portion thereof)
● “Crossfade” looping for smooth, clean loops
● Digitally combining (mixing) two samples
● Sound reversal, as well as sample rate conversion and pitch conversion
● Transform Multiplication™, a powerful new DSP effect
● Splicing two or more samples together (imagine a piano that turns into a voice, that
turns into a seagull...)
● Advanced split capabilities and the ability to layer four presets on a single key
● Easy doubling, plus velocity-controlled crossfading and switching between
samples
● Individual tuning and attenuation for each sample
● Ultra-flexible, programmable arpeggiation
● 16 track “scratchpad” sequencer
Page 14

Emax II operation manual
Sounds can be stored on Emax II’s built-in hard disk drive, on an external hard disk
drive, or on commonly available double-sided, double-density (DSDD) 3.5 inch floppy
diskettes (as used with many personal computers). Thanks to sophisticated disk
management techniques, it’s easy to save, organize, retrieve, rename and catalog various
sounds. Perhaps best of all, Emax II is fully compatable with Emax I disks, allowing
access to the huge Emax I library already in existence.
For outside world interfacing, the built-in sequencer can sync up to a 24, 48, or 96 pulsesper-quarter note clock or MIDI sync; there’s also a complete complement of MIDI
functions.
Despite all this flexibility Emax II is nonetheless not that hard to learn...as you will see
during the course of this manual.
Instant Gratification
3
SEND IN YOUR WARRANTY CARD NOW!
It is vital that you send in your warranty card so that we can notify you of enhancements,
new features, and software bugs (nobody’s perfect) and cures. Don’t miss out: Send it
in now!
INSTANT GRATIFICATION!
If you just can’t wait another second before hearing the Emax II, we understand. Follow
the directions below EXACTLY as given and get ready to hear some great sounds.
(Incidentally, in case you make a mistake or run into problems, don’t worry. This process
is described in greater detail later.)
1. With the Emax II unplugged, patch the rear panel Right & Left, or Right Mono jack to
the input of a high quality amplification system. You can also plug stereo headphones
directly into the headphone jack.
2. Check that the rear panel voltage selector is set for the correct voltage in your part of
the world.
3. Plug the Emax II line cord into an AC outlet.
4. Check that no disk is currently in the drive. If so, or if the disk drive contains cardboard
packing materials, push in on the disk eject button towards the bottom of the drive,
remove the disks or packing materials, and put them in a safe place.
5. Turn on power; Emax II will do a drive check for a few seconds, then the display will
say “Please Insert Disk” if you do not have a hard disk or “Checking SCSI 1, then Booting
from SCSI 1” if you do have a built-in hard disk.
If you don’t have a hard disk, insert one of the diskettes that came with your Emax II into
the disk drive. The Emax II will begin loading software from the disk you have placed
in the drive.
Page 15

4
Instant Gratification
SELECT DRIVE
6. Press the button labeled DRIVE SELECT on the front panel of Emax II. Use the data
slider to select "SCSI 0: Floppy", if you want to load a floppy disk; or "SCSI 1 Conner",
if you have a built-in hard disk drive. Then, press ENTER.
LOAD FROM FLOPPY DISK
7a. Press the LOAD BANK button, then simply insert a floppy disk and press ENTER.
LOAD FROM HARD DISK
7b. Press the LOAD BANK button, then select one of the sound banks using the data
slider. When you find one that strikes your fancy, press ENTER.
8. Raise the volume slider to the up position.
Emax II operation manual
9. The display will show the name of the Current Preset (we’ll talk more about the
Current Preset concept later). Turn up the volume control and start playing the
keyboard. All right!! The display will show you the ID number (P followed by two digits)
and name of the sound you are playing. These sounds are called presets, for reasons
which will become clear later.
10. Use the telephone-type numeric keypad underneath the display to call up different
presets. Press a two-digit number; start with 01 and play the keyboard for awhile, then
press 02 and play, 03, 04, etc. At some point you will run out of factory presets, and the
display will say “Empty Preset.”
If you want, vary the control wheels towards the left hand side of the keyboard. They
may not be active with some presets, as they perform different functions with different
presets.
To load another floppy disk, press LOAD BANK, and the display will say:
Load All Presets
And Sequences
Insert another floppy disk, then press ENTER. Emax II will begin loading the new bank.
Note: Some Emax II banks require two or more floppy diskettes. In this case, simply
insert the diskettes in sequential order (1, 2, 3...).
To try out presets from other factory hard disk banks, locate the LOAD BANK button
(in the group of four buttons to the right of the numeric keypad) and press it. Use the data
slider to scroll through the available hard disk banks. When you find a bank that
interests you, press the flashing ENTER button right below it. The disk drive will start
making noises, and a few seconds later you will have loaded another bunch of sounds
into the Emax II.
Page 16
Emax II operation manual
Connections
CONNECTION INSTRUCTIONS
CONNECTION TO A MIXER
■ STEREO: Emax II has provisions for a variety of output connection schemes. The most
common hookup will probably be for stereo operation. Once you have heard the Emax
II in stereo, you will never be satisfied with mono again. Connect the left and right audio
out phone jacks to the inputs of your mixer or stereo preamp. Emax II will also drive
stereo headphones, which can be plugged directly into the headphone output. For
maximum dynamic range, keep the front panel volume control turned up full.
■ MONO: If a monophonic amplifier is used, simply connect the right/mono output to
the input of the amplifier. Guitar amps are not recommended because they are generally
noisy and low fidelity. The output level of the Emax II is somewhere between instrument
and line level. Care should be taken when connecting to an instument amplifier so that
the delicate nerve cells in your ears are not damaged.
■ SUBMIX OUTPUTS: There may be times when different equalization or reverb
settings are desired on the various instruments that have been sampled. Emax II has
eight polyphonic outputs that can be used when individual processing on specific
instruments is desired. Any combination of voices can be programmed to appear at any
channel output. Voices are assigned to output channels using the Edit Assignment
function in the Preset Definition module or in the Keyboard Mode function of the
Dynamic Processing module. Each of the Sub A, Sub B, and Sub C outputs on Emax II
are stereo jacks. The tip of each jack (accessed when a standard phone plug is inserted)
connects to the right or left output of the group. If a stereo plug is inserted, the Ring of
the stereo plug serves as a signal return, which sums into the Main outputs.
5
Therefore, the Sub A, B, C jacks can serve as effect sends and returns in order to further
process selected voices and then return them to the main mix.
The submix send/return jacks can be used to process selected voices and return them to
the main mix instead of using the effects bus on your mixing board. In a pinch, the effects
returns could also be used to sum additional instruments into the main outputs of the
Emax II.
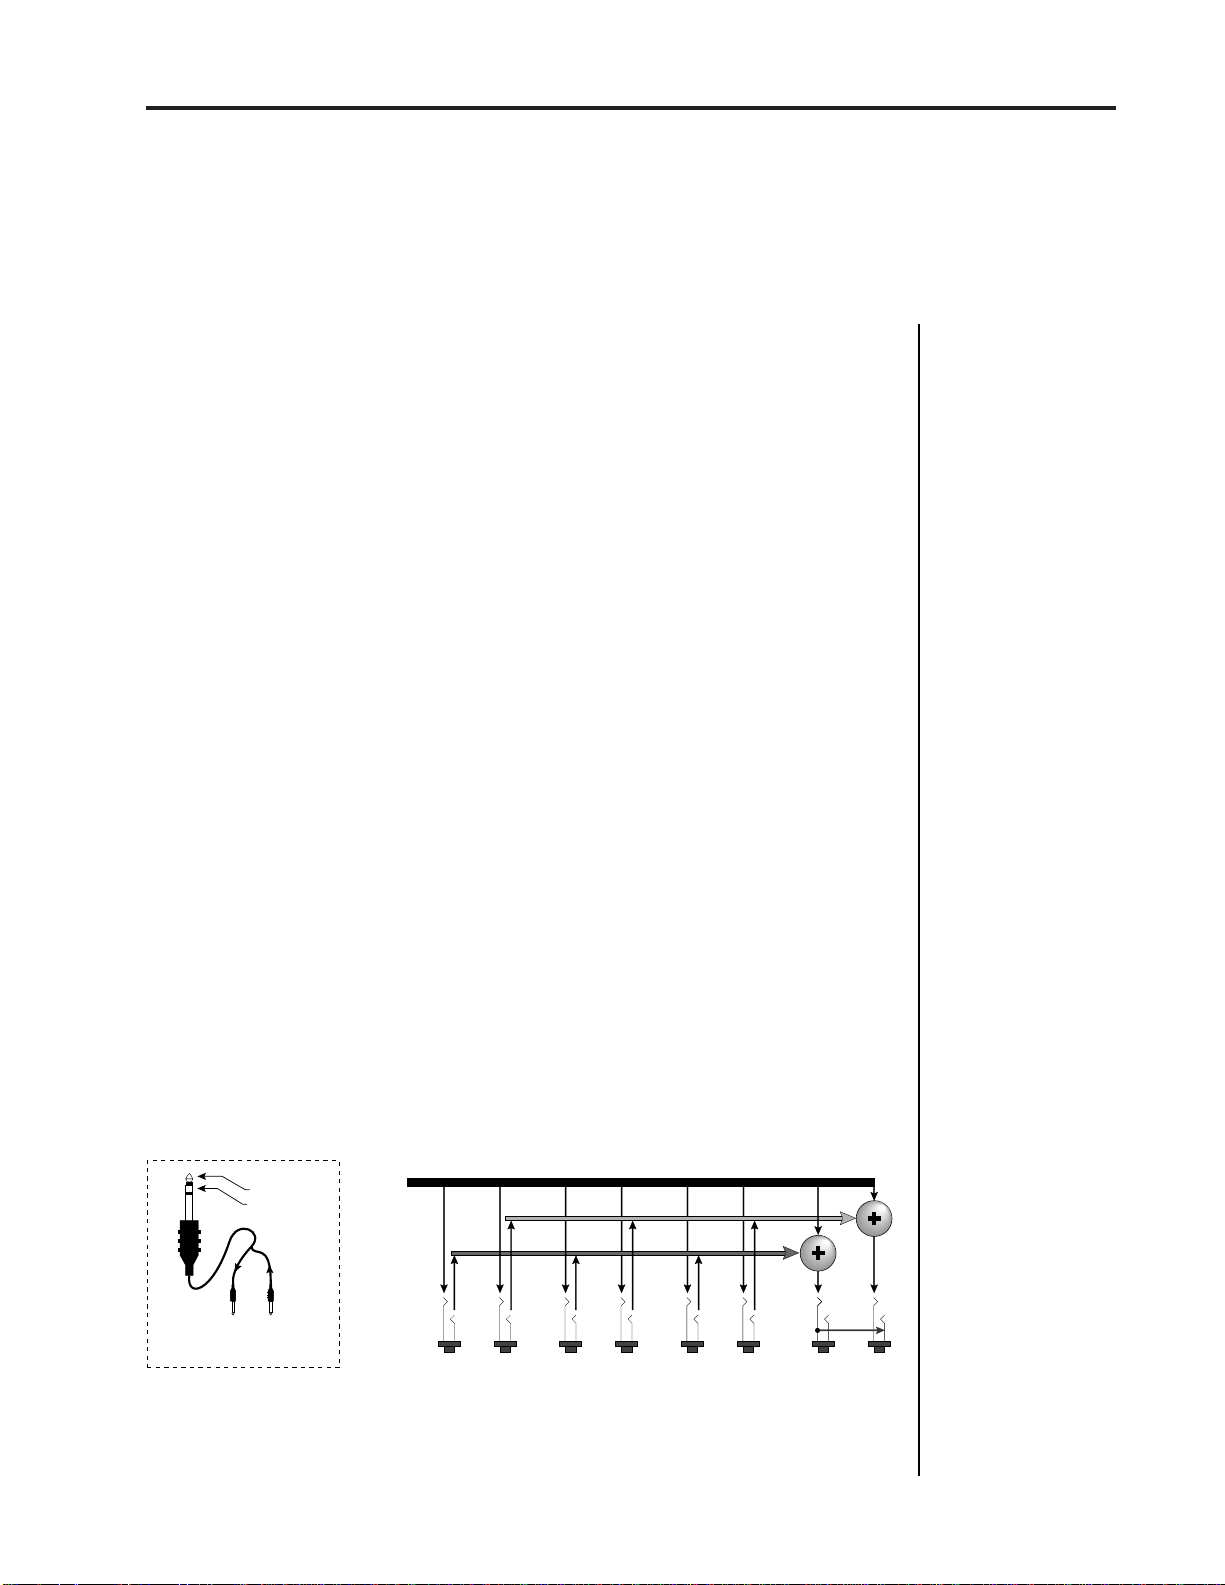
Sub Output
Return
(To Main Output)
Tip Ring
To Effect From Effect
SEND/RETURN CABLES
This diagram shows the
type of cable used to access the Emax II submix
sends and returns.
Emax II Output Section
L Bus
R Bus
Tip
Tip
Tip
Ring
RL
Ring
SUB A
Tip
Ring
RL RL RL
SUB B SUB C MAIN
Ring
Tip
Tip
Ring
Ring
This diagram shows how the stereo jacks are used to
function as effect sends and returns.
Tip Tip
Ring
Page 17
6
Connection Diagram
CONNECTION DIAGRAM
Sub C
Sub B
Sub A
Main Outs
Mono Mix
Headphones
Sample In
Footswitch 1
Footswitch 2
Footpedal
RS422
MIDI In
MIDI Out/Thru
Emax II operation manual
MIDI Keyboard
Clock In
Clock Out
On
Off
110/220
Power Switch
Power
Send/Return
Effect Device
Mixer
Amp
&
Speakers
Tip
Left Channel
Ring
Right Channel
Microphones
or
Line Out
of Mixer
SCSI
L
R
Hard Disk
Computer
To
Main Outs
Male RCA plug
to
Male Phone plug
Home
Stereo
This diagram shows how various pieces of equipment can be interfaced with the Emax II.
The connections to the Emax II rack are identical.
Page 18

Emax II operation manual
Connections
7
SAMPLE IN CONNECTION
The Sample In jack can accept any signal level from microphone level to line level. The
gain is adjusted with the data slider while in VU/gain mode in the sample module. The
level can be read in the liquid crystal display while in this mode.
If your Emax II contains the stereo sampling option, use a stereo plug in the Sample In
jack to sample in stereo. The Tip of the stereo plug corresponds to the Left channel and
the Ring of the plug corresponds to the Right channel.
MIDI CONNECTION
Emax II provides a MIDI In and a MIDI Out/Thru port.
■ The MIDI In port on the Emax II is connected to the MIDI Out port of an external MIDI
controller which could be a keyboard, a sequencer, MIDI drum kit or whatever. Note that
the Emax II can only respond to information that your controller transmits. Therefore,
if your MIDI keyboard does not have velocity and pressure sensitivity, Emax II will not
respond to velocity and pressure.
■ MIDI Out can be connected to another MIDI instrument or sequencer. In MIDI Thru
mode, MIDI Out will re-transmit any MIDI information that appears at the MIDI In port.
In MIDI Out mode, only information from the Emax II’s keyboard, sequencer or realtime
controls will be transmitted, except when overflow mode is selected. Overflow mode
allows a second Emax II to be connected to the MIDI Out to allow 32 channel operation.
Use cords that have been designed specifically for MIDI. While regular 5 pin DIN
cords may work, they are not shielded correctly for MIDI use and may cause ground
loops between equipment.
▼
High level signals
should not be present at
the sample input jack
when entering the
sample module because the Emax II autocalibrates the sample
inputs during this time.
FOOTSWITCH AND PEDAL CONNECTION
■ Two control footswitch jacks are provided for performance control of sequencer,
arpeggiator, sustain, release, X-switch, and preset advance. The footswitches need not
be connected for the unit to operate but they offer exciting control possibilities. The
footswitches should be of the momentary contact type, but can be either normally-open
or normally-closed.
■ The control pedal is used as a realtime control in the same manner as the wheels. It can
be programmably routed to a destination by using the realtime control section of the
preset definition module. The pedal can either be a voltage type, (which outputs a DC
voltage from 0-9 volts at the tip of the jack) or a resistance type (which varies a 10K ohm
resistance from the tip to ground of the jack). Both the footswitches and the pedal are
available from your dealer.
CLOCK IN CONNECTION
The Clock In jack allows a non-MIDI external device such as a drum machine or
sequencer to control the tempo of the sequencer or arpeggiator. Emax II can receive input
clock rates of 24, 48, or 96 pulses-per-quarter note. The pulses should be at least 1
millisecond wide and have a level of 1 to 5 volts.
Page 19

8
■
Warning: All SCSI
devices connected to
the SCSI bus must be
turned on , or Emax II will
not boot.
Connections
Emax II operation manual
CLOCK OUT CONNECTION
The Clock Out jack allows the Emax II to be the master clock and drive non-MIDI
sequencers and drum machines at a rate of 24 pulses-per-quarter note. This is a 5 volt
pulse which is about 6 milliseconds wide.
SCSI CONNECTION
The 25-pin connector on the rear of your Emax II is a SCSI port (pronounced scuzzy),
which stands for Small Computer Systems Interface. SCSI is an ultra high-speed parallel
port, normally used to connect external hard disk drives. Up to 7 external devices can
be connected the the SCSI port. Each device on the SCSI bus must have its own unique
ID number so that Emax II can distinguish it from the other devices. If you have an
internal hard disk, it will be assigned ID #1. The floppy drive is assigned ID #0. If there
are two devices on the SCSI bus with the same ID number, a SCSI error will result.
Consult the operation manual of your external storage device for information on
changing the ID number.
● Always use quality SCSI cables which are as short as practical (total length <12 ft).
● Tighten the thumbscrews on the jacks to ensure good electrical connection.
● Power up external SCSI devices before the Emax II.
● All SCSI devices on the bus must be turned on.
RS-422 CONNECTION
The RS-422 connector is a high-speed serial communication port which allows data to be
transferred to and from an external computer at a high rate (500K baud). The connection
cable to the external computer will generally be supplied with a software package (such
as Sound Designer by Digidesign) and will not usually be available from your music
dealer.
110V/220 V SELECTOR
The 110V/220V selector allows the Emax II to be used in either 110 volt or 220 volt
environments at either 50 Hz or 60 Hz. In the USA ,110 volts is the standard. To change
the voltage setting, first UNPLUG the unit; then use a flat blade screwdriver to change
the setting.
the unit.
WARNING:
Operating Emax II at the wrong setting may seriously damage
AC POWER CONNECTION and FUSE
The AC power connector is how the Emax II gets power (obviously). The fuse receptacle
is not as obvious. It is located directly over the power receptacle. Before changing or
checking a fuse, UNPLUG the power cord. To remove the fuse holder, squeeze the two
tabs located on either side of the fuse holder together. The fuse holder will now pop out
with it’s two fuses. The Emax II uses (2) 1 amp, 250 volt fast-blo mini-fuses. The Emax
II should not normally blow fuses. If a fuse that has been replaced blows again, do not
attempt another replacement. Have the unit serviced!
Page 20

Emax II operation manual
9
EMAX II BASICS
SAMPLING BASICS 11
THE BANK 12
SAMPLES & VOICES 12
MAKING A PRESET 13
THE CURRENT PRESET 13
THE CURRENT VOICE 13
MORE ABOUT VOICES 14
OTHER DEFINITIONS 15
THE BIG RE-CAP 17
Page 21

10
Emax II operation manual
Page 22
Emax II operation manual
Sampling Basics
EMAX II BASICS
HOW EMAX II ORGANIZES SOUND
READ THIS SECTION CAREFULLY OR THE REST OF THE MANUAL WILL NOT
MAKE SENSE!!
Throughout this manual we will use the terms and concepts described and defined
below. Read through this section carefully, even if you don’t retain it all, and refer to this
section periodically as you read the manual until you know the meaning of all the
following definitions.
SAMPLING BASICS
The Emax II is conceptually like a tape recorder in that it records sound. However, the
recording process is very different since Emax II records into its computer memory.
11
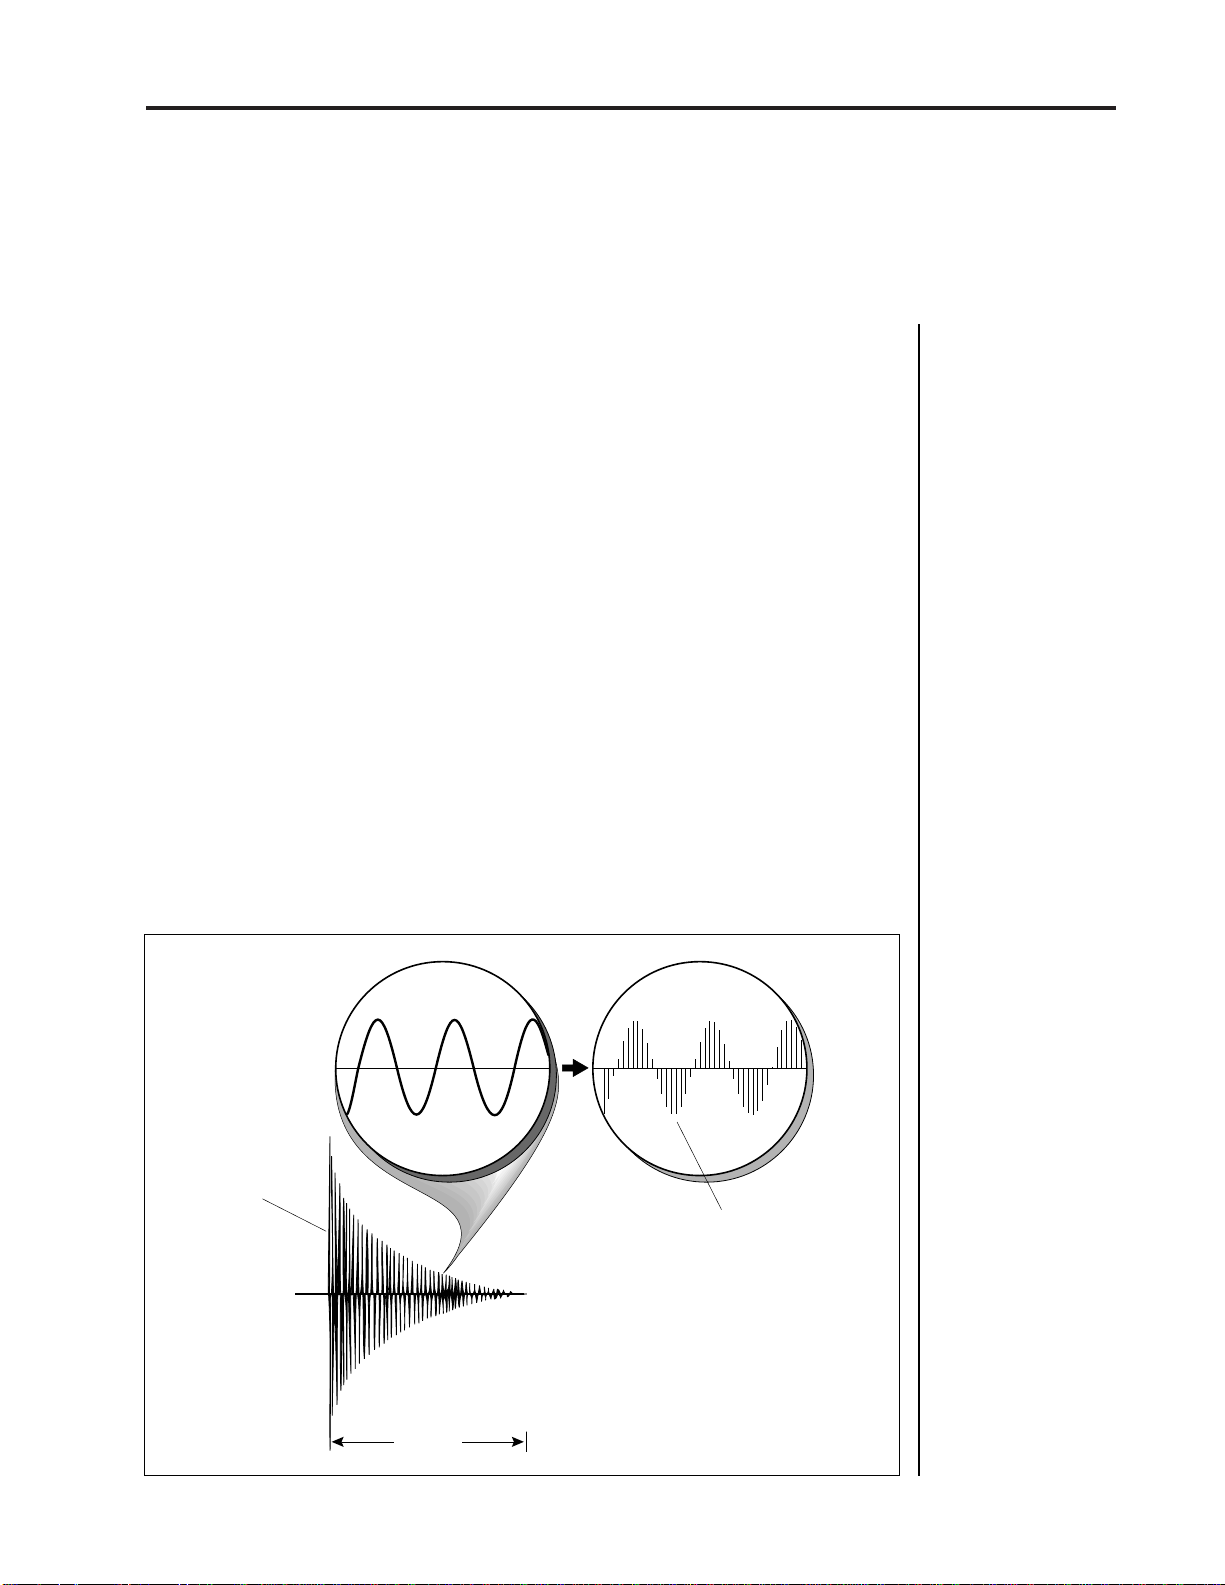
Computers can accept information only in the form of numbers, so first Emax II converts
audio signals into numbers. It does this by examining (sampling) the incoming signal
level at a maximum rate of 39,000 times a second, and sequentially records these different
levels in computer memory. The diagram below shows a one-second percussive sound
being sampled. The magnified view shows how the samples define the instantaneous
level of the signal. Once stored in Emax II’s memory bank, these samples may be played
back (in the proper sequence, of course) to reconstruct the original signal. If a two-second
sound was being sampled, it would require 2 X 39,000 or 78,000 samples at the highest
sampling rate. Shorter sounds require fewer samples. Note: The sampling rate can be
altered for reasons which we will get into later.
Percussive Voice
Each vertical line
represents a sample.
Each sample takes
a "snapshot" of the
instantaneous signal level.
1 second
Page 23
12
The Bank
EMAX II BASICS
Just like tape, a sound can be manipulated once it has been recorded. Playing back the
samples in the reverse order from which they were stored plays the sound backwards.
Playing back the samples at a faster rate than the rate at which they were stored raises
pitch; playing back at a slower rate lowers pitch (like a tape recorder’s variable speed
control).
THE BANK
The bank contains all of Emax II’s memory, which includes preset, voice, sample and
sequence data. Consider the bank as the central storehouse for all of Emax II’s data.
Although the memory is volatile, meaning that the data disappears when you turn off
power or load a new bank, the bank data can be saved permanently on disk to keep a
record of your work. Since we now have a place to store information temporarily (the
bank), and two ways to store information permanently (saving to disk), let’s take a look
at the different kinds of information being stored.
Emax II operation manual
THE BANK
Preset 00
All Preset Definition Parameters
Velo, Xfade, MIDI, Arpeggiator, etc.
Keyboard Assignment
Primary
Voice 01
All Dynamic
Parameters
Sample
File
Truncation
Loops
Sound Data
Primary
Voice 02
All Dynamic
Parameters
Sample
File
Truncation
Loops
Sound Data
Primary
Voice 03
All Dynamic
Parameters
Sample
File
Truncation
Loops
Sound Data
Primary
Voice 04
All Dynamic
Parameters
Sample
File
Truncation
Loops
Sound Data
All Preset Definition Parameters
Velo, Xfade, MIDI, Arpeggiator, etc.
Primary
Voice 01
All Dynamic
Parameters
An Emax II bank is all the data currently loaded into its memory.
Each preset has its own set of voices which may share sample data with other voices.
Preset 01
Keyboard Assignment
Secondary
Voice 01
All Dynamic
Parameters
Sample
File
Truncation
Loops
Sound Data
Primary
Voice 02
All Dynamic
Parameters
Sample
File
Truncation
Loops
Sound Data
Pri
Sec
Secondary
Voice 02
All Dynamic
Parameters
Sample
File
Truncation
Loops
Sound Data
SAMPLES and VOICES
Sampling a sound (drum sound, oboe, zither, hamster sneeze or whatever) using the
instrument’s “Recording Studio” capabilities creates a Sample, the “raw material” with
which the instrument works. The total available sampling time can be divided up any
way you like—one long sample, lots of short samples, a few medium samples, or any
combination thereof. Note that a “sample” is a digital recording of a complete sound, or
each “snapshot” of the sound that makes up the recording.
Page 24

Emax II operation manual
You may process this raw sample via filtering, truncation and so on to create a Voice.
Individual voices can be saved to disk and loaded from disk as part of a Preset. The preset
can store up to two voices per key, each identified by a two-digit voice number and the
voice’s original pitch.
Making a Preset
MAKING A “PRESET”
A voice can be assigned to a single note on the keyboard, or transposed polyphonically
to cover a wider range of the keyboard. The process of assigning, and optionally
transposing, voices to specific ranges of the keyboard is called Making a Preset. (Note:
It is often necessary to use multiple voices to make up a preset, since wide-range
transposition alters the voice’s timbre. Therefore, using multiple samples and transposing each over a small range usually gives the most realistic sound). Individual presets,
including their voices and samples, can be loaded from disk. Making a preset is a threestep process:
13
EMAX II BASICS
1. Create the preset and give it a number and name. The bank can hold up to 100 presets.
2. Assign voices to different ranges of the keyboard (for example, with five voices you
could assign each voice to cover one octave of the keyboard). Note that the same sample
can be assigned to more than one range of the keyboard in a given preset. Also, that
sample can be assigned to more than one preset.
3. Choose from a number of options that further define the preset, such as assigning
voices to partially or fully overlap other voices (thus producing doubling effects),
assigning dynamic control to individual voices in a preset, erasing presets you don’t like,
cataloguing presets, adding arpeggiation, setting up MIDI parameters, etc.
THE CURRENT PRESET
When you load a sound disk, a preset will be ready to play and the display will show the
preset number. This is the Current Preset. If you select another preset, or create a preset,
it will become the current preset.
THE CURRENT VOICE
Voices contained in a preset can be sent to the Dynamic and Digital Processing modules
for further alteration. However, since a preset typically contains several voices, we need
to specify which voice, or voices, we want to process. This is called Selecting the Current
Voice, another three-step process.
1. Call up a preset that contains the voice(s) to be processed.
2. Select the range of the keyboard to be processed. This will automatically select the
voice, or voices, that fall within the specified range (a group of voices being processed
simultaneously is still referred to as the “current voice”).
Page 25

14
More About Voices
EMAX II BASICS
■
On an Emax II with the
Stereo Sampling option,
the Left channel will correspond to the Primary
Voice and the Right
channel will correspond
to the Secondary Voice.
Emax II operation manual
3. You may send the current voice through the Dynamic and Digital Processing
modules, whereupon they return back to the bank in their modified form.
MORE ABOUT VOICES: THE PRIMARY AND SECONDARY VOICE
An Emax II key can contain up to two “channels.” These two channels contain the
Primary and Secondary voices. For example, the primary voice might be a guitar note,
and the secondary voice a detuned version of the same guitar note. When they are
played together, you hear chorusing. Also, a preset contains information about how the
keyboard dynamics affect the primary and secondary voices. For example, the primary
voice could be that of a drum hit played softly, and the secondary of a drum hit played
loudly. You could then set up the keyboard so that playing the keyboard softly plays the
primary voice, and playing the keyboard more forcefully plays the secondary voice.
MODULE
A Module controls a particular section of the Emax II. There are six main modules (see
the labels to the right of the 12 main pushbuttons) and a sequencer module that has six
sub-modules (see the labels to the left of the 12 main pushbuttons).
FUNCTION
Each module contains individual numbered Functions. Example: function 2 in the
MASTER module checks the amount of memory remaining.
ACTIVATING A MODULE
To work with a module, you must first activate it. Press the button associated with the
desired module. The display will then show the Module Identifier.
THE MODULE IDENTIFIER
When you activate a module, the display identifies which module you have activated,
and how many functions are available.
There are two ways to select a function within the module. Those just getting started can
move the data slider until the display shows the desired function, then press ENTER. As
you work with the Emax II, though, you will start to memorize the function numbers and
will probably find it faster to simply key in the appropriate function number using the
numeric keypad.
Example: if the manual says to “activate MASTER 2,” you would first press the
MASTER main pushbutton. Then, either key in 2 using the numeric keypad, or move
the slider until the display shows function 2 and press ENTER.
Note: If a module is already active, and you are finished with one function, you do not
need to re-activate the module—just key in the new function number.
Page 26

Emax II operation manual
Disk Drives
FLOPPY DISK DRIVE
The floppy disk drive (mounted on the left-front of the unit), allows you to transfer
sounds and sequences in and out of the Emax II and allows you to “back-up” your
precious work permanently.
HARD DISK DRIVE
Why hard disks? There are two big advantages to using a hard disk over floppy disks.
■ Greater storage. The hard disk can hold many banks; the floppy, half a bank or less.
■ Faster access time. A 1 Megabyte bank can be saved from the Emax II to the hard disk
in 12 seconds (as opposed to 2 minutes for saving to floppy), or loaded from the hard disk
to the Emax in 6 seconds (as opposed to 50 seconds from a floppy). In most cases, you
can treat the hard disk like a super-floppy; transferring data to and from the Emax II is
straightforward.
15
EMAX II BASICS
SCSI
SCSI (pronounced skuzzy) stands for Small Computer System Interface. SCSI is an
industry standard hardware and software specification that allows high-speed data
transfers between different pieces of equipment. SCSI devices can include hard disks,
tape drives, optical disks and other types of digital equipment. Why use SCSI? SCSI is
FAST! SCSI is a parallel interface which transmits 8-bits of information at a time at high
speed. MIDI in comparison, is a serial interface which can only transmit 1-bit at a time.
■ Each device on the SCSI bus has its own ID number so that it can distinguish its data
from data meant for another device. Each SCSI device must have its own unique ID
number. Most SCSI devices have hardware defined ID numbers. This means that there
is a little switch somewhere on the device to change the ID number.
■ Keep SCSI cable lengths as short as possible. Data errors may occur with long cables.
VELOCITY-SENSITIVE KEYBOARD
A velocity-sensitive keyboard measures how long it takes for a key to go from the key
up to key down position, and uses this data to control dynamics. If it takes a long time
for the key to reach the key down position, it is assumed you are playing that key less
forcefully (minimum dynamics). If the key goes to the key down position almost
instantaneously, it is assumed that you are playing the key more forcefully (maximum
dynamics). In this manual, we will refer to playing the keyboard “harder” or “softer,”
even though technically speaking the keyboard is reacting to speed of key position
change, not force.
PRESSURE-SENSITIVE KEYBOARD
A pressure-sensitive (also called aftertouch) keyboard responds to pressure applied to
a key after it is down. This pressure data is typically used to control vibrato amount,
pitch-bending, and so on after the key is down. Emax II can respond to pressure when
an external keyboard with pressure sensitivity is controlling the Emax II via MIDI.
Page 27

16
Other Definitions
EMAX II BASICS
OTHER DEFINITIONS
The Disk Archives
So far, we’ve loaded a bunch of voices into the bank, created some presets containing
those voices, and done some voice processing. However, remember that the bank only
retains this information for as long as the Emax II is plugged in and turned on. Of course,
we don’t expect you to leave the thing on all the time, which brings us to the subject of
saving data on disks.
Commanding the central computer to “Save All 16-bit” (PRESET MANAGEMENT 8)
shuttles all the bank data (voices, presets, and sequences) to disk. This disk permanently
(well, at least as long as the disk lasts) stores data so that even after turning off the Emax
II, the disk will contain a record of your work.
■ Emax II also allows you to save your work in an Emax I format. This process uses a
data compression process to squeeze more data onto a disk. A 1 megabyte Emax II bank,
when compressed, may be stored on a single floppy disk. In many cases the compressed
data will be audibly indistinguishable from the 16-bit version.
Emax II operation manual
■
The Emax II will not
boot up unless all
devices on the SCSI
bus are turned on.
IF YOU DO NOT DO A “SAVE ALL”, ALL BANK DATA WILL BE LOST WHEN YOU
TURN OFF EMAX II.
Do not wait until the end of a session to save—save your work (PRESET MANAGEMENT 8) periodically in case of power failure or some other unforeseen circumstance
which might erase the bank’s memory.
Since the disk (hard disk or floppy) contains a record of the bank data, loading the disk
back into the bank transfers all the voice, preset, and sequencer data into the bank (this
will replace the existing bank data, if any). Therefore, you can work a bank of sounds out
at leisure, and save the results of your work on disk; when you go to a gig, simply load
all your hard work from disk into the Emax II in a few seconds.
The Keyboard
The LFO, VCA, VCF and AHDSR analog signal processors are tied to keyboard
dynamics (for example, playing harder can alter the loudness, attack time, filter cutoff,
etc.), as are some preset assignment characteristics (i.e. playing louder assigns a different
voice to a particular key).
Booting
Booting Emax II is not a repair technique; rather, it is a computer term that means
“having the computer read software necessary for its operation from the disk” (It’s easy
to see why this was shortened to “booting”). Emax II automatically “boots” itself when
you turn it on. Once booted, the instrument is ready to go.
Default
A default setting is what we’ve judged to be a useful initial setting, and remains in effect
until you change it. For example, the arpeggiator defaults to off when a new preset is
created. Had it defaulted to the on position, new presets would all be arpeggiated!
Page 28

Emax II operation manual
The Big Re-Cap
Cursor
The cursor is a small line that shows up in the display, and flashes when it wants data
from you about the number or letter under which it is located. Entering a new value will
over-write the old one, whereupon the cursor moves on to the next number or letter (if
applicable). Note: If the Emax II is expecting a two or three-digit number, in most cases
you must enter all the required digits even if some of these are zeroes (called “leading
zeroes”). For example, if Emax is expecting a two-digit number and you want to enter
8, you would enter 08. If it is expecting a single-digit number, entering 8 would be
sufficient.
Data Slider & Increment/Decrement
On virtually all Emax II menus where the data slider selects options, the Increment (ON/
YES) and Decrement (OFF/NO) switches duplicate the slider function.
17
EMAX II BASICS
Saving
We can’t emphasize this enough. Whenever you have done enough work on a preset,
voice, sample or sequence that you would hate to lose it, save it. Hard disks are not
infallible. All hard disk banks should be backed-up on floppy disk. Should you improve
the preset, voice, sample or sequence later, you can always replace the original with the
revised version — and if something goes wrong, the original will still be available to save
you the hassle of starting from scratch.
THE BIG RE-CAP
One more time: A Sample is a raw sound, that upon being recorded into the Bank
immediately becomes a Voice.
To create a new Preset, make sure you have all the voices required for the preset in the
bank, number and name a preset, then assign combinations of voices from the bank to
specific sections of the keyboard. By specifying one or more of these voices as the Current
Voice, the current voice may then be processed by Emax II’s dynamic and digital signal
processors.
Since loading in a disk fills the bank with voices and presets, you can group these voices
into new presets, process the voices or alter the existing presets.
THE REWARD
If you’ve assimilated this information, the rest of the manual should be fairly easy to
understand. If not, re-read the previous information again. If it still doesn’t make
sense, plunge right into the Guided Tours - as you actually work with the Emax II, all
of the above definitions will make sense as you relate theory to practice.
Page 29

18
Emax II operation manual
Page 30

Emax II operation manual
19
GUIDED TOURS
Guided Tour No. 1 21
Meet the Emax II
Guided Tour No. 2 25
Specifying the "Current Voice"
Guided Tour No. 3 27
Dynamic Processing of a Voice
Guided Tour No. 4 31
Realtime Control Programming
Guided Tour No. 5 33
Basic Sampling
Guided Tour No. 6 35
Digitally Processing Samples
Guided Tour No. 7 38
Managing the Bank
Guided Tour No. 8 38
The Sequencer
Guided Tour No. 9 39
Make Your Own
Page 31

20
Emax II operation manual
Page 32

Emax II operation manual
Guided Tour #1
GUIDED TOURS
GUIDED TOUR #1:
MEET THE EMAX II
Welcome to the Guided Tours! If you have just met Emax II for the first time, follow these
tours until you complete the Guided Tours section. This will get you “up and running”
on the Emax II in the fastest possible time. Also, you’ll learn some tricks in this section
that will come in handy as you play some more with the Emax II.
This tour covers how to...
● Get ready for the tours
● Load a bank from the hard disk
● Select different presets within the bank
● Load a floppy disk
● Tune the Emax II to other instruments
● Transpose the keyboard
21
...and also discusses Emax II’s “modular” design philosophy.
HOW TO USE THE GUIDED TOURS
Please follow all steps exactly as given. For example, if we ask you to load the Arco
Strings disk, even if you would really rather hear something else load in the strings—
several sections of the tour will refer to specific sounds on that disk.
Occasionally during a tour you will be told to refer to something like PRESET
DEFINITION 4, SAMPLE 2, or some other name. This means that you will find more
information in the specified section of the manual’s reference section. For example,
PRESET DEFINITION 4 indicates that the information is in the preset definition chapter
under section 4; SAMPLE 2 indicates that the information is in the sample chapter under
section 2.
GETTING READY FOR THE GUIDED TOURS
Have you sent in your warranty card yet? Listen, we’re not kidding! Send it in!!
Okay. Now you can proceed.
Set up the Emax II as described in the Introduction under Instant Gratification. After
completing step 5, return to this section.
LOADING FLOPPY DISKS
So far, so good...now it’s time to move on.
1. Press the button labeled DRIVE SELECT and use the data slider to select, SCSI 0:
Floppy.
Page 33

22
Guided Tour #1
GUIDED TOURS
2. Select the Arco Strings disk (4 M Emax IIs- Piano & Strings) , and insert it in the drive.
3. Press the button labeled LOAD BANK. The display will say:
4. Press ENTER to load the floppy disk. Remember that loading in a new bank will erase
the currently loaded bank, so always think twice before pressing Enter to load the bank.
5. Play the sounds from the newly-loaded disk, then move on to the next section.
Emax II operation manual
Load All Presets
and Sequences
LOADING A BANK FROM THE HARD DISK
If you are using an external hard disk, make sure that it is correctly connected
(Connection Instructions) and formatted (MASTER 5) for the Emax II.
1. Press the button labeled DRIVE SELECT and use the data slider to locate the hard
disk. Hard disk drives may use SCSI ID numbers 1-7.
2. Press the LOAD BANK button; the display says: Load Bank, and shows the name and
number of the current bank. Use the data slider to scroll through the available hard disk
banks. Stop when you find the bank labeled Arco Strings (4 M Emax IIs- Piano & Strings),
then press ENTER.
■ An alternate method of loading a hard disk bank is to press LOAD BANK, then simply
type in the number of the bank using the numeric keypad.
The display will show the current preset number and name (the cursor will flash
underneath the first digit). Start playing the keyboard and adjust the Volume slider for
a comfortable listening level.
SELECTING DIFFERENT PRESETS
1. The bank you just loaded contains several presets. To call up a new current preset, use
the keypad underneath the display. Note that “leading zeroes” must be entered for
preset numbers (i.e. type 0 and 0, not just 0, to call up preset 00). Now type 0 then 0 on
the keypad; these will replace the numbers indicated by the flashing cursor.
2. The display says P00. Play the keyboard... hey, check out those sounds!
3. Now call up more presets (refer to GENERAL INSTRUCTIONS 1, “Selecting the
Current Preset,”). If you enter a number for which there is no preset, the display will list
the entered preset number and say “Empty Preset”; try again.
Page 34

Emax II operation manual
Guided Tour #1
GUIDED TOURS
4. To scroll through the presets available in the bank, move the data slider. The various
preset names will scroll on the lower display line. When this line shows the desired
preset, press ENTER to make that the current preset. This is an alternative preset
selection method.
5. Increment or decrement the current preset (as displayed in the top line) with the
CURSOR buttons. This method is useful for live performance—arrange your presets in
the desired order, and step through them as needed.
When you’re ready to check out some more sounds, proceed.
THE EMAX II “MODULAR” SYSTEM
The left side of the Emax II front panel includes the volume, data slider, ON/YES and
OFF/NO (Increment and Decrement) buttons, the Liquid Crystal Display, two cursor
control buttons, and a numeric keypad. Once you select a module and function, this area
is where you will specify parameters.
23
The modules start towards the right of the keypad. Each module will be discussed in
detail later on; the following is intended mostly as background information. Each
module affects a certain area of Emax II’s operation.
■ Function Buttons These are the buttons that get you going. Load Bank and Enter load
disk data into the Emax II, Drive Select selects which disk drive will be used, and
Transpose, as you probably suspect, transposes the keyboard.
■ Sequencer This module is a 16-track solid state control data recorder. While
optimized for downloading MIDI data from other sequencers, it has some very useful
features such as Mono operation when driven via MIDI, ability to re-assign presets, track
bounce, and so on. It consists of the Sequencer Setup module (which sets up a sequence
for recording) and the Sequencer Manage module (which lets you load, erase, copy, and
do other sequence “housekeeping”). All sequencer functions are controlled by the lefthand column of buttons.
■ Master This module contains functions that affect the overall keyboard or bank
(memory remaining, keyboard velocity curve, master tune, erase all and format disk).
This also contains the Special commands, which are explained in the Reference section.
■ Sample This “recording studio” module records sounds from the outside world into
the bank. Features include adjustable preamp gain, variable threshold setting, and
adjustable sample rate and length.
■ Digital Processing With this powerful module, you may edit a voice’s length, loop
(i.e. infinitely sustain) any portion of the voice (with several different looping options),
have Emax II automatically find the best loop points (“Autoloop”), splice two different
voices together, mix two voices, amplify or attentuate the voice, and more.
Page 35

24
Guided Tour #1
GUIDED TOURS
■ Preset Management This module handles the preset “housekeeping”—load presets
from disk, save presets to disk, create, copy, rename, or erase presets, and check on how
much memory space a preset uses up.
■ Preset Definition This module lets you change parameters within a given preset. Set
up the arpeggiator or MIDI options, assign the pitch bend and modulation wheels to
control various parameters in real time, copy or erase voices, edit the voice assignment,
choose Stereo Voice mode (more on this later), and set some keyboard parameters
(dynamics and crossfade between overlapping voices).
■ Dynamic Processing This module sets parameters that should be familiar to those
who have worked with analog synthesizers. Set the dynamics by adjusting the VCA
envelope, control timbre using the VCF (filter) and its associated AHDSR envelope
generator, modulate the signal with the LFO, tie the keyboard velocity to various
parameters, set the tuning, attenuation, and delay for each voice, and more.
Emax II operation manual
■
Any time you make a
mistake, get confused,
or get lost in the module, simply de-activate
the module. Then, reactivate and try again.
Remember—if you want to save modified voices or presets, save the altered bank to
disk. Otherwise, any changes will be lost as soon as power to the Emax II is interrupted.
ACTIVATING A MODULE, SELECTING FUNCTIONS,
DE-ACTIVATING A MODULE
Here’s important background information on how to access the various module
functions. As the tours progress, we’ll relate this information to practical examples.
■ Activating Each module has an associated switch. Most of these are found in the
right-most series of blue buttons, however, the Sequencer Setup and Sequencer Manage
module buttons are found in the green column of Sequencer-related buttons. Pushing
the associated switch “activates” the module, as indicated by an LED next to the switch
lighting up. Upon activation, the display’s top line will show the Module Identifier (such
as “Master,” “Preset Management,” etc.). In some cases, upon activation the display will
ask you to specify the current voice (as described in the next Guided Tour). Once the
module is active, it’s time to start...
■ Selecting functions Each module includes a printed list of functions on the front
panel; these functions are available when the module is active. Selecting a module
function requires keying in its associated number with the keypad. We will shortly give
an example of how this all works.
■ De-activating When you’re finished with the module, either press its button again
to de-activate, or simply activate a new module.
Page 36

Emax II operation manual
Guided Tour #2
GUIDED TOURS
TUNING THE EMAX II TO OTHER INSTRUMENTS
Refer to MASTER 1. This function demonstrates how Emax II uses the data slider to
adjust a parameter (in this case, overall tuning).
TRANSPOSING THE KEYBOARD
Refer to FUNCTION, TRANSPOSE and follow the instructions.
GUIDED TOUR #2:
SPECIFYING THE “CURRENT VOICE”
25
BACKGROUND
Emax II has two modules dedicated exclusively to processing voices within a preset:
DIGITAL PROCESSING and DYNAMIC PROCESSING. Each voice stored in a bank can
be processed independently (or groups of voices may be processed simultaneously if
desired). Therefore, we need a way to specify the Current Voice, which is the individual
voice (or collection of individual voices) to be processed.
The concept of the Current Voice is important. To process one voice out of a preset,
assign the current voice to be that one voice, and process it. To process more than one
voice at a time, specify a group of voices to be the current voice and process all voices
simultaneously.
This section covers how to identify which keyboard keys belong to which voice, and how
to specify which voices or voices make up the current voice. For a short form version of
this tour, see DYNAMIC PROCESSING 00 and DIGITAL PROCESSING 0.
Begin this tour by loading Arco Strings (Piano & Strings) into the bank. Also, read the
section FUNCTION, ENTER DATA as the ENTER button will be used frequently during
this and most subsequent tours.
IDENTIFYING WHICH KEYBOARD KEYS BELONG TO WHICH VOICE
1. Once the Arco Strings (Piano & Strings) bank is loaded, the display should show 00
as the current preset. Select preset #10 - Demo Strings, then activate the Dynamic
Processing module. Its LED will light after a second. If a current voice has not been
previously selected (it shouldn’t have if you just loaded in the disk), the display will say:
Lo:A-1
Select Lo Voice
Page 37

26
5 Octave Keyboard Range
01
02 03 04 05 06 07 08 09 10 11 12
C2 C3 C4 C5 C6C1 E2
A-1 C7
F#1
B1 E2 A2 D3 G3 C4 F4 A#4 D#5 G#5 C#6
Guided Tour #2
GUIDED TOURS
If this is the case, move on to step 2. If a current voice has been previously assigned, the
display’s top line will give the module identifier. If this is the case, before proceeding to
step 2 initiate the CHANGE CURRENT VOICE function by keying in 00.
Note: that if the preset contains primary and secondary voices, the display will ask
whether you want to process the primary, secondary, or both voices (GENERAL
INSTRUCTIONS 2). With this preset, however, there are only primary voices. Emax II
is a smart little critter, so it won’t ask you to select between primary and secondary voices
unless both types of voices are present.
2. Play the keyboard, starting at the lowest note. The upper display line will show the
note you’re playing, while the lower display line will show the voice number and its
original pitch (in this case, 01 and F#0). The original pitch is the pitch of the sample itself.
See GENERAL INSTRUCTIONS 3 for details on the keyboard numbering protocol.
Emax II operation manual
■
The data slider may
also be used to quickly
find all the voices assigned to the keyboard.
Lo:A-1
Pri:01 Orig:F#0
This lower display line remains as is until you play the first A. From this, we can
conclude that voice 01’s original pitch is F#0, and that it was transposed to cover the
range from A-1 to G#0.
If there were both primary and secondary voices present, the display might look
something like this:
Lo:A-1
P:01 F#0 S:05 F0
Play ascending keys, one at a time, over the full range of the keyboard. The display will
give the voice number and the original pitch. Take a minute or two and note where the
various voices begin and end, and which voices are at which locations on the keyboard.
They should be as follows, with the original keys indicated by the numbered arrows:
Arco Strings Bank
Preset #10 Demo Strings
Voice #'s
Original Keys
Page 38

Emax II operation manual
Guided Tour #3
GUIDED TOURS
SPECIFYING THE DYNAMIC PROCESSING MODULE CURRENT
VOICE
Now that we know how many voices there are in the preset, and the range covered by
each voice, let’s specify a range of voices to be altered by the Dynamic Processing
module, starting with the lowest voice. This will become the lowest part of the current
voice.
1. Press a key in the lowest voice of the range you want to process. For this exercise, press
E2. When the upper display line confirms your choice, press ENTER. Since E2 is located
within voice 03, that voice becomes the lowest voice of the current voice. Note that you
could have pressed any key within voice 03 to specify that voice.
2. The display now shows the highest note of the voice in which E2 resides. Don’t press
ENTER yet—but if you did, this highest note would set the upper limit of the current
voice. Instead, let’s make the current voice cover a somewhat wider range. Press C4 (the
display will show this as the new high note) and press ENTER. As with selecting the
lowest voice, selecting any key within the highest voice makes that voice the upper range
of the current voice. Thus, the current voice now extends from V03 to V07, and covers
the range from D2 to D4.
27
3. You will now see the module identifier, which means you’re ready to start modifying
the sounds in the bank with the Dynamic Processing module, the subject of the next tour.
4. The assigned current voice will remain as is until you either change the current voice
assignment, change presets, or load another bank. If you switch between modules, the
current voice remains as assigned (unless you select the Digital Processing module,
which will be a subject of a later tour).
5. Before proceeding, look over DYNAMIC PROCESSING 00 to help reinforce what
you’ve learned. Now that you know what a current voice is and how to specify it, we’ve
reached the end of this tour (although you may need to come back from time to time to
refresh your memory). In the next tour, we’ll see how to modify voices with the Dynamic
Processing section.
GUIDED TOUR #3:
DYNAMIC PROCESSING OF A VOICE
BACKGROUND
The Dynamic Processing module consists of several sound processing functions. Let’s
start with the Filter and VCA sections, as they are among the most important.
Make sure you have loaded in the Arco Strings (Piano & Strings) bank and selected
the current voice as specified in Guided Tour #2 before proceeding. The display
should show the Dynamic Processing module identifier. If not, repeat Guided Tour
#2.
Page 39

28
Guided Tour #3
GUIDED TOURS
WORKING WITH THE FILTER
You could activate the Filter Setup function directly by keying in 13. However, let’s
investigate another way to select the Filter function. Move the data slider to catalog the
various Dynamic Processing functions. When the display shows function 13, Filter
Setup, press ENTER.
CHANGING FILTER CUTOFF FREQUENCY
1. Refer to DYNAMIC PROCESSING 13. The display should look like the one in Step 1
of DYNAMIC PROCESSING 13.
2. Play with the cursor buttons (the left and right arrow buttons directly below the
display). Note how you can move the cursor under the various parameters to be
adjusted. For now, move the cursor under Fc.
Emax II operation manual
3. Vary the data slider. Note how the numbers under Fc change. Lower numbers mean
a lower filter cutoff frequency (less high frequencies). Higher numbers mean a higher
filter cutoff frequency (more high frequencies). Observe how only the notes within the
current voice are affected by the slider setting.
Note: You must re-trigger a note to hear any changes. Holding down a note and playing
the slider will not change the sound; you must play a note after changing the slider to
hear the results of changing the slider. This is true when making any changes to the
sound, not just while you’re in the Filter function or the Dynamic Processing module.
By the way, now might be a good time to mention that although we are changing the
sounds in the bank, the sounds on the disk remain unchanged. This is because we
haven’t saved the bank to disk. Thus, you can fool around with the bank sounds as much
as you want without having to worry about altering the original sounds on the disk.
CHANGING FILTER Q
1. Move the cursor under Q on the display. Vary the slider to change the sharpness of
the sound; higher numbers give a sharper sound. Again, this affects only the range of
notes covered by the current voice. Leave the Q at about 90 and proceed.
2. Move the cursor back to Fc and vary the data slider. Note how this produces a sort
of wa-wa effect (remember, you have to re-trigger the key to hear the results of changing
the Q).
3. Now set Fc and Q to about 50. The range of notes covered by the current voice should
sound muted.
CHANGING THE FILTER CUTOFF ENVELOPE
1. Let’s investigate the effects of envelope control over the filtered sound. Move the
cursor under Env and use the slider to set a value of +40. This allows the envelope to
control the filter cutoff frequency. (See DYNAMIC PROCESSING 14.)
Page 40

Emax II operation manual
Guided Tour #3
GUIDED TOURS
2. Now we need to change over to DYNAMIC PROCESSING 14. Press ENTER to exit
from the current function (see GENERAL INSTRUCTIONS 3), and the display will show
the module identifier.
3. Key in 14 to select the filter envelope parameters.
4. Move the cursor under A and vary the slider. With larger values, it will take more
attack time for the filter frequency to go from lowest to highest cutoff frequency. Refer
to DYNAMIC PROCESSING 14 , vary the various envelope parameters, and observe the
effect these changes have on the sound.
5. Now let’s check out inverted envelopes. Set the envelope parameters as follows:
29
F: A H D S R
01 01 07 01 01
... and play and hold a chord. This is a non-inverting envelope in the sense that the
envelope increases the filter cutoff frequency above the initial cutoff. To select an
inverting envelope, where the cutoff decreases below the initial cutoff, exit Function 14
by pressing ENTER (this puts you back at the module identifier), then key in 13.
6. We’re back at the familiar Filter Setup screen. Move the cursor under Env and select
-40 to invert the envelope. Note that the envelope effect is not all that noticeable when
you play a chord. This is because the envelope forces the cutoff frequency in a negative
direction, and since the cutoff frequency is already fairly low, it can’t go that much lower.
7. Now move the cursor under Fc and increase the cutoff frequency to around 90 or 100.
The effect will be far more noticeable since there will be more range available for the
negative-going envelope excursion.
8. If you feel like experimenting, play with the Trk control to affect the way the filter
frequency tracks the keyboard pitch (see DYNAMIC PROCESSING 13).
9. Before proceeding with the Tour, set Fc=100, Q=00, Env=+00, and Trk=1.00. Set the
envelope to A=01, H=01, D=01, S=32, and R=05 ( DYNAMIC PROCESSING 14). After
entering these values, press ENTER to return to the module identifier.
FUN WITH VCAS
1. In preparation for the following experiments, let’s change the current voice to include
the entire keyboard. Enter 00, then press Enter twice. You have now selected the entire
keyboard.
Page 41

30
Guided Tour #3
GUIDED TOURS
■
Pressing the Enter
button twice in succession will also select all
voices.
Emax II operation manual
2. Now key in 12 to select the VCA function. Referring to DYNAMIC PROCESSING 12,
move the cursor under the various envelope parameters and see how different settings
affect the sound.
3. Before moving on, make sure you have a sound that is fairly sustained with little or
no envelope attack time.
OTHER DYNAMIC PROCESSING OPTIONS
1. Key in 11, refer to DYNAMIC PROCESSING 11, and note how the controls affect the
sound.
2. Let’s add some LFO effects. Key in 16 and position the cursor under each display
option. Vary the data slider and observe how this affects the sound. Note that adding
LFO to Fc might not sound all that noticeable; if you want a more obvious effect, bounce
back to function 13 and set Fc to about 50 and Q to about 50. This should make the LFO’s
effect more noticeable.
3. If the LFO settings aren’t to your liking, then key in 15 to change the LFO rate, delay
and variation (as explained in DYNAMIC PROCESSING 15).
UNDERSTANDING VELOCITY
1. By now you might have a pretty messy sound due to all those exercises. Let’s start with
a clean slate. Press function button LOAD BANK and then ENTER to re-load the disk.
Select preset 10 as the current preset. Press the DYNAMIC PROCESSING button.
2. Let’s make the entire keyboard the current voice. Press the DYNAMIC PROCESSING
button again, which selects the entire keyboard.
3. Key in 17, and read over DYNAMIC PROCESSING 17. The velocity to level setting
should be 06; move the slider to select different values, and note the effects. Emax II plays
softer as you play softer. In other words, Emax II equates harder play with the nominal
volume setting and goes down from there as you play softer.
4. Move the cursor under the other available parameters and vary the slider. Notice that
the filter cutoff frequency lowers as you play softer . The amount of downward change
is dependent on the value in the display.
Filter Q is affected differently than level or filter cutoff. It raises from the initial setting
as you play harder Also, note that velocity can be set to affect Q inversely—in other
words, if the filter is set to a high Q setting, playing harder on the keyboard will lower
the Q.
5. After you’ve had enough of function 17, key in 18. Here the velocity affects the VCA
and filter envelope attacks, as well as panning. Refer to DYNAMIC PROCESSING 18 as
Page 42

Emax II operation manual
Guided Tour #4
GUIDED TOURS
you experiment with different settings. Remember that the velocity-to-envelope attack
setting interacts with the initial envelope attack settings; if you don’t take our word for
it, then by all means call up the envelope attack parameters for the filter and VCA and
see how different values interact with different velocity values.
MORE DYNAMIC PROCESSING...
Read over DYNAMIC PROCESSING sections 19, 20, and 21. If any of these interest you,
use the knowledge you’ve gained in this tour to try out these functions on various
presets.
31
GUIDED TOUR #4:
REALTIME CONTROL PROGRAMMING
BACKGROUND
Ever wanted to add vibrato to a grand piano? Or bend its pitch? The Realtime Control
module can do this, and lots more. Begin this Tour by re-loading Arco Strings (Piano &
Strings), then select Preset 10 (Demo Strings).
PITCH-BENDING
First, let’s check out pitch-bending. Play middle C and rotate the pitch bend wheel.
Hmm...no pitch bend. Now play A5, and there will be pitch bend. Check further, and
you’ll see that pitch- bending affects only the range from A#3 to C7. This is because pitch
bend can be enabled for any voice or voices within a preset. In this case, pitch bend was
only enabled for the voices that span from A#3 to C7 (voices 07-12).
Let’s have pitch bend affect the entire keyboard. Key in DYNAMIC PROCESSING 22
and select the entire keyboard as the current voice (surely you know how to do this by
now, so we’ll spare you the details). Move the cursor, and you’ll see a list of modulation
destinations. Pitch will be set to ON. Press YES, and like magic, you can now pitch bend
the entire current voice.
The important point of all this is that if modulation does not seem to affect a voice, make
sure that modulation is enabled. Now read DYNAMIC PROCESSING 22 for more informa-
tion. Want to change the pitch bend range? De-activate the Dynamic Processing module,
activate Preset Definition, and refer to PRESET DEFINITION 8.
CHANGING MODULATION WHEEL DESTINATIONS
Note: Emax II offers two vibrato options: Pre-programmed (which adds a constant,
selectable amount of vibrato), and realtime (where the player adds in vibrato by using
one of the wheels).
Page 43

32
Guided Tour #4
GUIDED TOURS
Each Emax II wheel can be assigned to a particular destination. For example, if the left
wheel is assigned to pitch, then rotating the wheel bends pitch. If assigned to the filter,
rotating the wheel varies the cutoff frequency.
Let’s set up for the next part of the tour. Choose Preset 01 as the current preset if it is not
already. Activate DYNAMIC PROCESSING, assign the entire keyboard as the current
voice if necessary, then key in 22. Press the cursor buttons and press YES for all the
enable options. This will make it easier to hear the results of the next series of
experiments.
Now activate PRESET DEFINITION and key in 9. To make “live” playing as simple as
possible, the display works somewhat differently for this module. The display shows
eight pairs of numbers:
Emax II operation manual
1:1 2:4 3:0 4:0
5:0 6:0 7:3 8:6
The first number of each pair stands for one of the eight possible control sources (the left-
hand column of functions printed on the top panel under Preset Definition 9), namely:
1: Left wheel (center detent, spring return type)
2: Right wheel (continuously variable type)
3: Pressure (from external MIDI controller)
4: Control voltage pedal (plugs into rear panel PEDAL jack; also
accepts any 0 to +10V control voltage source)
5: MIDI control A (can be assigned to any MIDI controller #)
6: MIDI control B (can be assigned to any MIDI controller #)
7: Footswitch 1 (plugs into rear panel FOOT SWITCH 1 jack)
8: Footswitch 2 (plugs into rear panel FOOT SWITCH 2 jack)
The second number of the pair represents a control destination (the right-hand column
of functions printed in the module) which you assign to a control source.
Each of the destinations printed in the upper right-hand column (0-9) can be controlled
by control source 1, 2, 3, or 4, or via data sent over MIDI. For more information on MIDI,
see PRESET DEFINITION 7 (“MIDI Setup”) and the Advanced Applications section of
this manual.
Each of the destinations printed in the lower right-hand column (0-6) can be controlled
by sources 7 and 8.
You’ll be happy to know that real time control settings are memorized for each
individual preset. Thus, if desired each preset can react to the real time controls and
MIDI controllers in different ways.
Page 44

Emax II operation manual
Guided Tour #5
GUIDED TOURS
SELECTING A CONTROL SOURCE and CONTROL DESTINATION
1. With Arco Strings, preset 10 as the current preset, and PRESET DEFINITION 9
activated, select the left wheel as a control source by keying in 1. The cursor will flash
underneath the number to the right of the chosen control source number, thus indicating
that Emax II is ready for you to key in the control source’s destination.
2. The left wheel should be assigned to 1 (pitch). Vary the wheel and check that the
keyboard pitch is indeed affected. If sections of the keyboard are not affected, check that
pitch control is enabled (DYNAMIC PROCESSING 22). Now press 2; this assigns the left
wheel to Filter cutoff. Rotating the wheel towards you should produce a more muted
sound. Key in 13, and the left wheel will affect overall volume. If you feel adventurous,
check out the other control destinations. Note that if you select a destination that is
already specified for one of the other control sources, the old assignment will be de-
selected and that control source will be turned off (0).
33
3. Think about it for a bit...the left wheel can control a destination, the right wheel can
control a different one (as can the pedal), and there are MIDI control possibilities too.
These assignments can be different for each preset, and particular controller destinations
can be disabled for different presets and voices. We’re talking versatility here, so if you
feel like taking out the next couple of hours and checking out all the possibilities, be our
guest! Note: When assigning the footpedal, make sure it’s plugged in to prevent
unpredictable results.
4. Oh yes, and there are footswitches too. But before experimenting with the footswitches
(sources 7 and 8), we need to understand the difference between looped and unlooped
sounds. Looping is described more fully in DIGITAL PROCESSING 2 and DIGITAL
PROCESSING 3, but basically, a “sustain looped” sound is one where a portion of the
sound is put into an “infinite repeat” loop for as long as you hold down the key. This is
similar to the infinite repeat function on digital delay lines. Looping allows for sustaining a normally non-sustaining sound for as long as you like. An unlooped sound is not
artificially sustained, and therefore lasts its normal length.
Keeping this in mind, refer to PRESET DEFINITION 9, Destinations 0-6. Assign various
functions to the footswitches; note that some sounds lend themselves to the sustain
function better than other sounds, so feel free to experiment.
GUIDED TOUR #5:
BASIC SAMPLING
BACKGROUND
Sampling does not just involve sticking a microphone in front of something—sampling
is an art. So, we’ve included information on the art of sampling in the Advanced
Applications section of this manual. Meanwhile, this Guided Tour gives you the basics,
and also lays the groundwork for the guided tour of the Digital Processing module.
Page 45

34
Guided Tour #5
GUIDED TOURS
SETUP
1. Plug a microphone into the rear panel Sample Input jack (an instrument can also be
used, but a mic is easier to work with for now).
2. Erase the bank memory (MASTER 4). This gives us maximum sampling time.
3. Set the level (SAMPLE 1). The default keyboard placement will work for now, but if
you want to change it, see SAMPLE 2. Also set the sampling rate (SAMPLE 3). This
should be at 39 kHz; might as well leave it there for now. Check the available sampling
time (SAMPLE 4), which should be at least 13.4 seconds.
4. Set the threshold (SAMPLE 5), arm the sampling process (SAMPLE 6), and you’re
ready to sample! Speak into the mic; as soon as the level exceeds the threshold, the
display will say “sampling.” Feel free to talk away for 13.4 seconds, but if you lose
patience, press 8 to stop sampling.
Emax II operation manual
5. Play the keyboard in the assigned range (lower keyboard, C1-B1) to hear the results
of your sampling.
6. Now experiment with more sampling: Try setting a particular sample length
(SAMPLE 4), using forced sampling instead of threshold-sensitive sampling (SAMPLE
7), assigning the sampled sound to other portions of the keyboard (SAMPLE 2), and
also, practice terminating the sampling process (SAMPLE 8). As long as you do not de-
activate the module, new samples will replace previous samples on the keyboard.
7. To save the sample as part of a preset, de-activate the sample module. Since memory
was cleared prior to sampling, Emax II created a preset (00) called “Untitled,” and this
is the preset that holds your new sample. Had you sampled into a bank with existing
presets, the sample would have been stored with the current preset. If you wanted to
sample into a new preset, you would have first had to create a preset (PRESET
MANAGEMENT 3) in which the sample could reside.
8. Let’s try another sample. Activate SAMPLE 2 to change the current voice. Notice that
Emax II, a very polite instrument, doesn’t overwrite the existing sample without your
express permission; thus, the new sample is automatically assigned to the next higher
octave. This assignment can always be modified with SAMPLE 2. Also note that if
you’re ever in a position where you’re going to overwrite an existing sample, Emax II
will notify you via the display.
9. Remember, this Guided Tour is intended simply as an overview to give you a “feel”
for the sampling process. Good sampling requires skill and patience; practice!!
Page 46

Emax II operation manual
Guided Tour #6
GUIDED TOURS
GUIDED TOUR #6:
DIGITALLY PROCESSING SAMPLES
BACKGROUND and SETUP
Digital processing allows for radically altering voices stored in the bank. In this Guided
Tour, we’ll learn — among other topics — how to truncate, loop, reverse, splice, and
combine samples. First, though, we need to take a couple of samples with which we can
practice.
1. Clear the bank of memory (MASTER 4).
2. Follow the directions in Guided Tour #5 and make a sample of yourself speaking.
However, select a 4 second sample length (SAMPLE 4). After setting the threshold and
such, arm sampling and start jabbering.
35
3. De-activate the sample module, then re-activate and take another 4 second sample.
You will not have to do any setup — just hit SAMPLE 6 and talk away. You now have
two samples suitable for experimentation.
CHOOSING THE CURRENT VOICE
Activate DIGITAL PROCESSING. You will be asked to select a voice, so press a key
within the range of the voice that you want to work on and press ENTER.
TRUNCATING A VOICE
1. Choose DIGITAL PROCESSING 1 to truncate the ends from voices.
2. Vary the data slider as you play a key in the range assigned to the current voice. Notice
the start of the voice will disappear. Use this technique to get rid of silence at the start of
a voice or for effects.
3. Move the cursor using the arrow keys to the End display. Use the data slider to truncate
any undesired part off the end of the sample.
4. When you get tired of truncating, press ENTER. When Emax II asks if you want to
“Make Truncation Permanent?”, enter NO so that the full sample is available for
subsequent experiments in this tour.
5. If desired, change the current voice (DIGITAL PROCESSING 0) and experiment with
truncating the other sample you took. Again, when asked if you want to “Make
Truncation Permanent?”, press NO.
LOOPING A VOICE
1. If you haven’t yet done so, activate the DIGITAL PROCESSING module and assign
the current voice. Select function 4 and turn the loop mode ON.
Page 47

36
Guided Tour #6
GUIDED TOURS
2. Refer to DIGITAL PROCESSING 2 to graphically see how looping affects a sample.
If you play and hold a key in the current voice, it will play indefinitely since the loop
function is on.
3. Now try modifying the loop. Activate DIGITAL PROCESSING 2 and adjust the Start
and Length values. Note that if the length equals the full length of the sample, you will
not be able to set a new start point. Reduce the length, and you should be able to adjust
the start point. For practice, try looping individual words or sentence fragments.
Please remember that looping is a very complex process which requires a great deal of
practice for proficiency. The only way to fully understand looping is to experiment with
a variety of signals. The purpose of this Guided Tour is to acquaint you with the concept
of looping, but there is much more to the subject than simply fooling around with
looping words from a spoken sample. For more information, refer to the Advanced
Applications section of this manual.
Emax II operation manual
SPLICING VOICES
Splicing marks an end point in one sample and a start point in a second sample; the first
sample end and second sample start are then joined together. See DIGITAL PROCESS-
ING 6 to graphically see how this process works, then follow the instructions given to
splice two samples together. (Make sure any loops are turned off in the samples for best
results.)
COMBINING VOICES
Combining mixes two samples together digitally into a single sample whose length
equals that of the longer sample. Assuming you still have two samples on the keyboard,
follow the instructions in DIGITAL PROCESSING 7 and combine them. If not, first clear
the bank memory and record two samples as instructed at the beginning of this section.
FURTHER INVESTIGATIONS
The Digital Processing module is very powerful, but this is one case where spending
some time experimenting with the various options works much better than just reading
about them. Fool around with Taper (DIGITAL PROCESSING 5), Crossfade Looping
(DIGITAL PROCESSING 8 ), and Digital Effects (DIGITAL PROCESSING 9). The more
you work with these functions, the more sense they will make, and the more easily you
can get Emax II to do your bidding.
A PRACTICE SAMPLING SESSION
1. Plug a microphone into the rear panel sample input jack.
2. Erase all memory ( Use MASTER 4). This erases the bank, not the disk.
Page 48

Emax II operation manual
Guided Tour #6
GUIDED TOURS
3. Set the level (SAMPLE 1). Sing "ahhhh" into the microphone (This is an easy sound
to loop). The VU level should not quite reach the top of its range. Adjust the gain (use
the data slider) until a good level is attained.
4. Set the threshold (SAMPLE 5). This should be set about 5 or 6 bars from the left. When
the input sound exceeds this level, recording will start.
5. OK, now get ready to sing "ahhhhh" and press (SAMPLE 6) to arm the sampling
process.
6. Now sing "ahhhhh". When you are out of breath, press (SAMPLE 8) to stop sampling.
7. Play the keyboard in the assigned range (lower keyboard, C1-B1) to hear the results.
37
8. Now we can truncate the silence from the beginning and end of the sound. Press
(DIGITAL PROCESSING), the display will say: Select a Voice. Play a key in your sample
range (C1-B1) and press ENTER. Now press 1 to select truncation.
9. Adjust the start and end points by moving the slider to remove any silence or
unwanted portion of the sound (You must play the keyboard after you move the data
slider in order to hear the results of the slider change). Press ENTER then NO to exit
truncation.
10. Now we are ready to loop the sound. Press 2 to select looping. To loop, first move the
data slider to make the loop length about 10,000 to 14,000 samples long. Next move the
start point into the sustained portion of the ahhh sound so that the ticking sound
becomes softer. When you get a fairly good loop press ENTER. The display says:
Autoloop Y/N. Press YES. You now should have a fairly good loop. If not, adjust the
start point and again press autoloop. It takes practice, but you’ll get it. That’s it! Feel free
to play around with other processors such as chorus and LFO.
11. In summary; these are the steps you will go through every time you have a sampling
session (of course you will develop your own order and style of doing it).
■ Take the sample
■ Truncate the sample
■ Loop the sample (if desired)
■ Assign the voice to a keyboard position
■ Continue to refine and make presets
TIME TO SAVE?
Maybe you haven’t created any masterpieces during these experiments...but maybe you
have. If you want to save a preset to disk, take your blank formatted disk prepared in the
last Guided Tour and Save All 16 bit (PRESET MANAGEMENT 8). Moral of the story:
Always have a blank formatted disk around (or an empty hard disk bank) just in case you
come up with something you want to save.
Page 49

38
Guided Tours 7 & 8
GUIDED TOURS
GUIDED TOUR #7:
MANAGING THE BANK
BACKGROUND AND SETUP
The following functions don’t necessarily do glamorous things, but they are very useful.
This Guided Tour acquaints you with these utilities.
Begin by loading the Arco Strings (Piano/Strings) bank.
ERASING A PRESET
Refer to PRESET MANAGEMENT 4 and erase Preset 01. Don’t worry, this is just gone
from the bank, not the disk. And we can get it back anyway by...
Emax II operation manual
LOADING A PRESET
See PRESET MANAGEMENT 1 and load Preset 01. Now it’s back in the bank again.
OTHER BANK MANAGEMENT FUNCTIONS
The other functions—copy, rename, create, and preset size— are pretty much self-
explanatory. Refer to PRESET MANAGEMENT 5, 6, 3, and 7 respectively. Try these
various functions to get a feel for how they work. PRESET MANAGEMENT 8 lets you
save the bank to disk.
GUIDED TOUR #8:
THE SEQUENCER
The Emax II sequencer is a “scratchpad” for musical ideas, and is not intended to be a
sophisticated do-all whiz-bang. However, you can create sequences on a fancy computer and, using Supermode, download these sequences via MIDI into the sequencer
(SEQUENCER SETUP 6).
For now, we’ll check out how the sequencer works as a scratchpad, so load the Arco
Strings bank, activate SEQUENCER MANAGE, and let’s go.
1. Key in 1 to set the tempo. While you’re at it, activate SEQUENCER MANAGE 2 and
make sure that the Emax II clock is on Internal. The other Sequencer Manage options—
Load, Erase, Copy, and Rename—are described under SEQUENCER MANAGE 3
through 6.
2. Now press SELECT. Enter sequence numbers 01, 02, 03 etc. from the keypad, until you
find one that says, "Empty Seq". This is the sequence into which we will record.
Page 50

Emax II operation manual
Guided Tour #9
GUIDED TOURS
3. Press RECORD, then PLAY. Start playing the keyboard immediately when you press
play. When you’ve played enough, press STOP.
4. To play back the sequence, press PLAY. Varying the data slider will change the tempo.
The display will show this is an untitled sequence; practice renaming it with SE-
QUENCER MANAGE 6.
5. To stop the sequence at its end, press STOP once. To stop it immediately, press STOP
twice.
6. Now dig into the sequencer portion of the manual and check out all the various
functions if you so desire. Bouncing tracks is fun, as is overdubbing.. and Supermode...
in fact, sequencers in general are a lot of fun.
39
GUIDED TOUR #9:
MAKE YOUR OWN
These Guided Tours cover only the basics; to cover every possibility of how to use the
instrument would drown you in words. It’s better that you just start playing! The best
way to learn Emax II is to dive right in. Remember, you can experiment as much as you
want on stuff in the bank; you have to actually save the bank to disk in order to alter the
contents of the disk, and in case you’re nervous, you can even write-protect the disk.
Try to spend some time not playing with, but rather practicing with, the instrument.
After you’re a little more familiar with Emax II, read through the Reference Section and
delve deeply into a particular function or module. Emax II is like an audio construction
set, where sounds can be captured, held, processed, mutated, spliced, sped up, slowed
down...and lots more, so take advantage of what it is has to offer.
The more you practice with the Emax II, the more you’ll be able to put your personal
stamp on the music you play. And when you do play, you’ll know the instrument
well enough so that you are free to concentrate on the music.
Page 51

40
Emax II operation manual
Page 52

Emax II operation manual
41
GENERAL INSTRUCTIONS
SELECTING THE CURRENT PRESET 43
EXITING A FUNCTION 43
KEYBOARD NUMBERING PROTOCOL 44
DISK HANDLING 44
Page 53

42
Emax II operation manual
Page 54

Emax II operation manual
Selecting Presets
43
GENERAL INSTRUCTIONS
GENERAL INSTRUCTIONS 1
SELECTING THE
CURRENT PRESET
This Function chooses one of the available bank presets.
1. With no modules active, the display will show the current preset name and number.
The blinking cursor will appear under the preset number’s first digit.
2. There are four ways to change the current preset:
■ Enter a two-digit number with the keypad. If you enter a number for which there is
no preset, the lower display line will show the illegal preset number and say Empty
Preset. Try again.
■ Move the data slider or the increment buttons. The top display line will continue to
show the current preset, but the lower line will scroll through the available presets as you
move the data slider. When the lower line shows the preset that you want as the current
preset, press ENTER.
■ Increment or decrement the current preset (as displayed in the top line) with the
CURSOR buttons. This method is useful for live performance—arrange your presets in
the desired order, and step through them as needed.
■ Use a footswitch to advance through the presets.
3. To see the current preset number at any time, de-activate any active modules and look
at the display.
GENERAL INSTRUCTIONS 2 EXITING A FUNCTION
After modifying a current voice or preset by adjusting any of its parameters,
you have three options on how to proceed.
1. If the Enter LED is lit steadily, pressing ENTER will return you to the module
identifier.
2. De-activate the module (Emax II returns to current preset).
3. Activate another function within the module or activate another module.
Remember:
when the power goes off. To permanently save modified individual voices and complete
banks, save to disk.
A modified voice or preset is saved in the bank, which loses its memory
Page 55

44
KYBD Numbering
GENERAL INSTRUCTIONS
GENERAL INSTRUCTIONS 3 KEYBOARD
Several functions reference particular keyboard keys. Emax II numbers the
keyboard keys as follows.
For a 5 octave keyboard, the left-most (lowest) C is C1. The next highest note is C#1, then
D1, D#1, E1, etc. through to B1. After B1, the next higher C is C2. Notes proceed upwards
from C2 (C#2, D2, D#2, E2, etc.) until the next higher C, which is C3 (middle C). Notes
count upwards in a similar fashion until reaching the very highest C, which is C6.
In summary:
Emax II operation manual
NUMBERING
PROTOCOL
The lowest octave spans the range C1 - B1.
The next octave higher spans the range of C2 - B2.
The next octave higher spans the range of C3 - B3.
The next octave higher spans the range of C4 - B4.
The next octave higher spans the range of C5 - B5.
The very highest note is C6.
Note: Emax II is able to accommodate an 88-note keyboard over MIDI, from keys A-1 to
C7.
GENERAL INSTRUCTIONS 4 DISK HANDLING
Disks represent the sum total of your experience with Emax II, and should be
handled with care.
Common courtesy for floppy disks
Disks should never be:
● Bent or sat on
● Exposed to strong magnetic fields (TVs, speakers, etc.)
● Subjected to temperature extremes
● Left out in the sun
● Used for coasters or frisbees.
Disks should always be:
● Kept away from dust, dirt, and smoke
● Treated carefully and gently.
Page 56

Emax II operation manual
Disk Handling
GENERAL INSTRUCTIONS
DISK TYPE
Emax II requires double-sided, double-density (DSDD) 3.5-inch microfloppy disks. In
some cases the less expensive single-density or single-sided disks will work with the
Emax II, but we do not recommend using these except for non-critical applications.
FLOPPY DISK DRIVE
The floppy disk drive on your Emax II is used for transporting sounds in and out of the
Emax II and also for BACKING UP your valuable sound collection. Floppy disk drives
should be considered fragile and should not be subjected to mechanical shocks or
temperature extremes. The mechanism will occasionally make “clunking” sounds; these
are normal.
45
HARD DISK DRIVE
The hard disk drive built-in to your Emax II is the drive that you will want to use most
often. In fact, you will be spoiled and will never again want to use a floppy disk after
using the hard disk. If the hard disk ever develops an error, you will be very happy that
you have made a backup. Hard disk drives should be considered extremely fragile (ie.
do not drop your Emax II on a hard surface). If you treat your Emax II gently and with
due consideration you should get years of faithful service from the hard disk. Hard disks
are great!
LABELING DISKS
Write on an adhesive label which you then attach to the disk. Always label your disks
so that you don’t confuse blank and recorded disks.
WRITE-PROTECTING DISKS
Write-protecting a disk turns off the disk drive’s ability to record on to the disk, thus
preventing accidental erasure. To write-protect a disk, open the write-protect “switch”
in the corner of the disk. To write-enable the disk, close the “switch” so that there is no
visible hole in the disk case.
If you try to write on a disk that is write-protected,the Emax II display will say “Disk is
Write Protected”.
INSERTING A DISK INTO THE DRIVE
Referring to the diagram on the following page, insert the disk into the drive label-side
up, with the metal disk protector flap going in first. Gently push the disk in as far as it
will go, until you hear a solid click that indicates the disk is seated in the drive.
Page 57

46
Disk Handling
GENERAL INSTRUCTIONS
FLOPPY DISK DRIVE
Emax II operation manual
disk slot
disk eject button
3.5" Micro-Disk
Write-Protect
Slide-Switch
label
Open to PROTECT
Slide
Close to UNPROTECT
Page 58

Emax II operation manual
47
FUNCTION BUTTONS
TRANSPOSE 49
SELECT DRIVE 50
LOAD BANK 50
ENTER DATA 51
Page 59

48
Emax II operation manual
Page 60

Emax II operation manual
Transpose
FUNCTION BUTTONS
FUNCTION TRANSPOSE
This function transposes the keyboard in half-step intervals ± one octave.
Applications: Use one key’s fingerings in a different key. Modulate to a different key
without having to use different fingerings.
1. Press and hold TRANSPOSE ; its LED will flash. The display says:
Transpose
Play a Key
49
If the keyboard has already been transposed, the TRANSPOSE LED will be steadily lit.
If you press and hold TRANSPOSE , not only will its LED flash, but the display will
show the amount of transposition referenced to C2 (see GENERAL INSTRUCTIONS 6),
the second C from the left-hand side of the keyboard. For example, if the Emax II is one
whole-step sharp, the display says:
Transpose +D
Play a Key
2. To Transpose: Continue to press TRANSPOSE and press a key between C1 and C3.
The display shows which keyboard key you have selected for the transposition ratio
(compared to C2).
3. To Retain the Transposition: Release TRANSPOSE (its LED stays lit to remind you
that the Emax II is transposed).
4. To Cancel the Transposition: Press and hold TRANSPOSE, press C2, then release
TRANSPOSE (its LED should now be off).
Note: Transpose transposes the key number rather than the voice assignment.This
means that selecting the current voice and any other use of the keyboard will show the
transposed key number. In short, you should turn off transpose before selecting or
modifying any voices. The note sent over MIDI is post-transposition. Notes from the
sequencer or MIDI are also transposed.
Application: Use transpose to easily reach “hidden” voices that lie beyond the ends of
the physical keyboard.
Page 61

50
Drive Select
FUNCTION BUTTONS
FUNCTION DRIVE SELECT
This function selects which storage device will be used when loading or saving. The
Emax II, in addition to its floppy disk drive, may have an internal hard disk or up to
seven external SCSI devices (hard disks, etc.) may be attached to the SCSI port located
on the back panel. Drive Select, selects which storage device will be used.
1. Press DRIVE SELECT. The display says:
Use the data slider to scroll through the SCSI numbers (0-7). If you have a formatted hard
disk connected, the display will show the name of the hard drive and the amount of
memory remaining.
Emax II operation manual
SCSI 0: Floppy
Simply select the desired drive and press ENTER to select a particular drive.
FUNCTION LOAD BANK
A disk stores presets, voices, and sequences. Load Bank loads all data on the disk
into the Emax II.
When the machine is first turned on, a sound bank is not automatically loaded. Any time
you want a bank of new sounds, you must use Load Bank to transfer disk data into the
Emax II.
1. Insert the disk to be loaded into the drive (if applicable).
2. Press LOAD BANK. The display says:
Hard Disk Floppy Disk
Load Bank Load All Presets
XX Bank Name And Sequences
...where “XX” is the bank number and “Name of Bank” is the name of the bank.
Note: The “Name of Bank” is simply the current preset at the time that the bank was
saved. The ENTER light will flash.
Page 62

Emax II operation manual
Enter Data
FUNCTION BUTTONS
3. Use the data slider or the increment/decrement buttons to select the bank to be loaded,
then press ENTER. In the case of a floppy disk , simply press ENTER. The display now
says:
Loading Bank...
XX Name of Bank
After several seconds, the disk will be loaded and the display will show the current
preset. If there is a problem with a floppy disk, the ENTER light will flash and the display
will say...
51
Read Error
Press ENTER to give it another try. Otherwise, try a different disk.
4. To choose a different preset, enter its number with the keypad (see GENERAL
INSTRUCTIONS 1, “Selecting the Current Preset”).
5. To choose which current preset will be active when you load a bank, select the desired
preset just before saving the bank to disk (see PRESET MANAGEMENT 2 , “Save All”).
The Emax II will default to that preset whenever you load the bank.
FUNCTION ENTER DATA
ENTER is something that Emax II, rather than you, activates. Just as you can activate a
module to tell Emax II something you want to do, Emax can activate this module to tell
you something it wants you to do.
Sometimes the display will ask you for data (i.e., such as keying in a number to indicate
a parameter you want to change). A flashing ENTER LED means that either data is
needed to be entered, or another step is involved in completing a function. Under these
conditions, Emax II is in a “holding pattern” where you must enter the desired data, or
de-activate the module, before Emax II can move on to other functions (however, you can
still play the keyboard).
After keying in the data, press ENTER to send the data into Emax II’s computer. If the
ENTER LED is lit steadily, pressing ENTER is optional. Usually this exits you from the
function, and returns you to the module identifier so that you can go directly to another
function within the module.
Page 63

52
Emax II operation manual
Page 64

Emax II operation manual
53
MASTER
1. MASTER TUNE 55
2. MEMORY REMAINING 55
3. VELOCITY CURVE 56
4. ERASE ALL 56
5. FORMAT DISK 57
6. ERASE HD BANK 59
7. BIRD RUN 60
8. BACKUP/RESTORE 60
0. Define Custom 61
1. Copy HD to HD 61
2. New Banks Only 62
3. Selected Banks 62
4. Custom Backup 63
5. Continue Backup 63
6. Backup to Floppy 63
7. New Banks to Floppy 64
8. Selected to Floppy 64
9. Floppy Restore 64
9. SPECIAL 65
1. Copy Software 65
2. MIDI Master 66
3. Recalibrate 67
4. Audition Note 67
5. MIDI Analyzer 68
6. SCSI Boot ID 68
7. Headroom 69
8. Install Disk 69
Software Revision 69
Page 65

54
Emax II operation manual
Page 66

Emax II operation manual
Master Tune
MASTER 1 MASTER TUNE
MASTER TUNE lets you tune the Emax II to other instruments.
1. Activate MASTER 1. The display says:
Tuning YXX Cents
Use Data Slider
... where XX is a two-digit number and Y indicates plus or minus.
2. Vary the data slider to change tuning. The display indicates, in cents, the amount sharp
(+) or flat (-) compared to the normal keyboard pitch (+45 cents to -48 cents).
55
MASTER
Note: The tunings of individual voices can also be varied (see DYNAMIC PROCESSING
11).
3. Press ENTER to return to the module identifier, or de-activate the module to return
to Select Preset.
MASTER 2 MEMORY REMAINING
How close are you to filling up the Emax II memory with samples and presets? This
command puts a dipstick in the memory to find out.
1. Activate MASTER 2. With an empty memory bank, the display says:
Sample: 524288
Preset: 028144
The sample memory shows the number of remaining 16-bit samples and preset memory
shows the amount of remaining preset memory in 8-bit bytes.
2. Press ENTER to return to the module identifier, or de-activate the module to return
to Select Preset.
Page 67

56
Velocity Curve
MASTER
Emax II operation manual
MASTER 3 VELOCITY CURVE
Emax II provides 14 different velocity curves (See Appendix) to provide different
types of dynamics in response to your playing.
The Velocity Curves do not affect incoming MIDI data and therefore this function
has no purpose on a rack mount Emax II.
1. Activate MASTER 3. The display says:
Velocity CurveXX
[01-14] / Slider
... where XX will be a number from 01 to 14. Use the data slider or the numeric keypad
to select the desired velocity curve.
2. As you play a key, the lower line will display the MIDI velocity value (with 127 being
the highest possible value). This helps you see how each velocity curve reacts to the
dynamics of your playing.
3. Press ENTER to return to the module identifier, or de-activate the module to return
to Select Preset.
Note: The velocity curve is stored as part of the preset.
MASTER 4 ERASE ALL MEMORY
This procedure clears out Emax II’s entire RAM memory— Presets, Voices,
Samples and Sequences.
Application: Provides maximum amount of memory for sampling.
1. Activate MASTER 4. The display says:
Erase All Memory
Are You Sure?Y/N
2. Press YES to erase, NO to exit without erasing.
Page 68

Emax II operation manual
Format Disk
MASTER 5 FORMAT DISK
FLOPPY DISK
Before a floppy diskette can record (store) any data, it first must be told how to
record this data (called
procedure on
systems (such as home computers) since these will not be formatted correctly for
the Emax II.
Formatting a disk that already contains data will “bulk erase” any data on the disk
being formatted. Always check that disks are either blank, or contain nothing you
want to save, before formatting. A disk need only be formatted once unless you
want to use the “bulk erase” aspect of formatting.
Use 3.5" double-sided, double-density (DSDD) disks. Avoid bargain disks.
any
new disk, or on “recycled” disks previously used with other
formatting
the disk). Run the following formatting
57
MASTER
HARD DISK
Just as a floppy disk must be formatted in order to receive Emax II data, so must
the hard disk. Formatting, which erases any existing hard disk data, occurs for one
of two reasons:
▼ The hard disk has never been used previously and must be prepared for
operation.
▼ The hard disk has developed one or more “Disk Read Errors” making one or
more banks unavailable.
Formatting will re-initialize the hard disk and erase any existing banks. Hard disk
crashes are not frequent occurrences, which may lull you into a false sense of
security. However, Murphy’s Law dictates that a crash will occur when you have
sampled fantastic, unique new sounds that aren’t backed up, so
tain floppy disk backups of any banks stored on the hard disk.
On either a hard disk or floppy disk, formatting not only formats the disk, but also
writes Emax II’s operating system (the software that tells the system how to
operate). Emax II writes the software that the machine was initially booted up with
onto the disk to be formatted. Note: Emax II will not boot from a removable media
hard disk.
1. Activate MASTER 5. (If you do not have a hard disk, make sure you have a formatted
disk already in the drive.) The display says:
ALWAYS
main-
■
If a new hard disk
does not seem to be
working correctly, it may
not have been formatted for the Emax II.
Format Erases
Memory! OK?
Page 69

58
Format Disk
MASTER
Emax II operation manual
If you don’t want to lose what you have in the bank, save it to disk first (see PRESET
MANAGEMENT 2). Otherwise, press YES.
2. If you booted from a floppy disk, Emax II will ask you to insert the source software
disk. Check that a formatted Emax II disk with the latest software is in the drive. If not,
insert one. To prevent any embarrassing errors, write-protect the disk (GENERAL
INSTRUCTIONS 4). Press ENTER. There will be a short wait while Emax II loads the
formatting software.
If you booted from a hard disk, Emax II will simply load the software into its memory
from the hard disk. In either case, the display will say:
Format Disk
Select a Drive
FORMAT FLOPPY - Select SCSI 0 in order to format a floppy disk, then press ENTER.
FORMAT HARD DISK - If you want to format a hard disk, select the correct SCSI ID
number of the hard disk and press ENTER. When formatting a hard disk, disconnect any
other HDs if possible, to avoid accidently formatting the wrong hard disk. Formatting
a hard disk takes 15-20 minutes, so take a break.
If you are formatting a floppy, the display says:
Pls Insert Disk
To Be Formatted
4. Remove the source disk and insert the disk to be formatted, then press ENTER.
The display will say:
Formatting
Formatting a floppy takes about a minute and a half.
Page 70

Emax II operation manual
After formatting is complete, the display asks:
Erase HD Bank
Format Another
Disk? Y/N
To format another disk, remove the newly formatted disk from the drive, insert the next
disk to be formatted in the drive, then press YES. Otherwise, press NO, whereupon the
display returns to the module identifier.
59
MASTER
MASTER 6 ERASE HD BANK
This function lets you erase an entire bank from a hard disk in order to make room
for other sounds.
1. Activate MASTER 6. The display says:
Erase Disk Bank
BXX Name of Bank
...where “XX” is the bank number and “Name of Bank” is the name of the bank.
Note: The “Name of Bank” is simply the current preset at the time that the bank was
saved.
2. Select the hard disk bank that you wish to erase and press ENTER.
The display says:
Erases HD Data
Are You Sure?Y/N
3. Press YES to erase the bank or NO to return to the module identifier.
Page 71

60
MASTER
Bird Run
Emax II operation manual
MASTER 7 BIRD RUN
This function aligns Emax II’s internal stabilizers and prevents excessive gyrocosmic relativation.
1. Activate MASTER 7.
2. Carefully observe the display for any signs of destabilization (eg. gravitational warps,
apparent speeding up or slowing down of time, objects in mirrors appearing closer than
they really are). If Emax II returns to the module identifier after a few seconds, all is well.
Note: Occasionally a small emu will get trapped within the Emax II and run across the
screen during the stabilization scan process. This does not affect Emax II’s normal
functions.
MASTER 8 BACKUP/RESTORE
This module allows you to backup either a portion or the entire contents of the
hard disk on 3.5" micro-floppy diskettes. These functions make backup so easy
that you will have no excuse for not backing up all your hard disk banks!
Remember, If you would hate to lose it, BACK IT UP.
Note: Please read through all of the Backup/Restore procedures and try them out as
well. These very flexible routines are designed to fit almost any style of backup you may
have.
1. Activate MASTER 8. The display says:
Backup/Restore
[0-9] / Slider]
Select the desired function using the data slider or keypad.
0) Define Custom
1) Copy HD To HD
2) New Banks Only
3) Selected Banks
4) Custom Backup
5) ContinueBackup
6) BackuptoFloppy
7) NewBanksToFlpy
8) SelectedTo Flpy
9) Floppy Restore
Page 72

Emax II operation manual
■
0 Define Custom
This function tells the Emax II to save the previous backup function as your custom
backup. When you have chosen your preferred backup scheme, simply execute it once,
then use this function and it will be permanantly saved. The next time you want to
backup, use the Custom Backup function and the procedure will be performed automatically. See also Custom Backup.
■
1 Copy HD To HD
This function allows the backup of an entire hard disk to another hard disk. The display
shows:
Backup/Restore
61
MASTER
Backup SCSI X
Needs YYMB
... where X is the currently selected SCSI drive and YY is the amount of HD memory (on
the destination drive) needed to back it up.
Press ENTER to continue and the display says:
SCSI X to SCSI _
Use the numeric keypad to enter the destination drive ID number, then press ENTER.
The display will show the amount of memory avaialable on the destination drive in
megabytes, and percentage of memory remaining.
The display now asks:
SCSI X to SCSI Y
Interactive? Y/N
If you select YES (Interactive), you will be asked to confirm the copying of each bank.
If you select NO, the backup will be performed on all banks without user intervention.
Page 73

62
Backup/Restore
MASTER
Emax II operation manual
The display will now ask for the Destination Mode.
Your choices are:
AddToEmpty Banks
CopyToSameNumber
Erase, Then Copy
If Interactive Mode has been chosen, the display will ask your permission before
copying each bank. Use the YES and NO buttons to acknowledge.
■
2 New Banks Only
This function works exactly like Copy HD to HD except that the only banks eligible to be
copied are those that have been changed or added to since a previous backup.
Installs backup banks in the lowest
empty banks on the destination drive
and no data is lost.
Overwrites any existing bank with the
same number.
Erases all data on the destination drive and
provides an exact copy of the source disk.
■
3 Selected Banks
This mode allows you to select a range of banks to be copied. The copy mode can either
be interactive or automatic. After the standard backup prompts are complete, the
display will say:
Select Low Bank
BXX Name of Bank
... where XX is the bank number and “Name of Bank” is the name of the bank.
Use the data slider to select the lowest bank to be backed up, then press ENTER.
Page 74

Emax II operation manual
The display now says:
Backup/Restore
Select High Bank
BXX Name of Bank
Select the highest bank to be backed up, then press ENTER. The backup process will
continue.
■
4 Custom Backup
Custom Backup allows you to use a custom backup procedure that you defined using
function O-Define Custom. When you Define Custom, the Emax II simply saves the
previously used backup function as your custom backup. If you backup regularly,
Custom Backup will be your main routine and will save you many keystrokes. As an
example, this is what the screen would show for an automatic backup of selected banks
7-10 from SCSI 1 to SCSI 4.
63
MASTER
Backup=07-10Auto
SCSI1->Same# OK?
■
5 Continue Backup
This function is used when backing up to a removable media device or to a series of disks
from a larger disk. If the destination HD become filled and cannot receive the entire
backup, Emax II remembers which banks have not been backed up and allows you to
change the removable media or switch SCSI ID numbers. The Continue Backup function
allows you to continue backing up from where you left off. If a previous backup (which
left any of the banks unsaved) has not been performed, the error message, “Cannot
Continue Backup”, will be displayed.
■
6 Backup to Floppy
This mode is used if you want to backup the entire contents of a HD to floppy disk.
The display shows:
Backup SCSI X
Need YY Floppys
... where X is the cuurently selected HD, and YY is the number of floppy disks needed.
Page 75

64
Backup/Restore
MASTER
Emax II operation manual
After the source drive is selected, you will be prompted as to the number of disks needed
for each bank. Press YES to backup a particular bank, or NO to skip to the next bank.
Save to NN disks
BXX Name of Bank
... where NN is the number of floppy disks required, XX is the bank number, and “Name
of Bank” is the name of the bank.
If YES is selected, the display says:
Takes NN disks
Insert disk 1
Continue to feed Emax II floppy disks as directed until the backup process is complete.
This will take awhile.
■
7 New Banks to Floppy
This function is identical to a normal backup to floppy, except that only banks that have
been changed or added to since the last backup are eligible to be backed up.
■
8 Selected to Floppy
This function allows you to choose a range of banks to be backed up. You select the
starting and ending bank numbers of the banks you want backed up.
■
9 Floppy Restore
This function is simply an automated load and save bank function, which could be used
to restore the HD in the event of a hard disk failure. Insert a backup disk, then press
ENTER. The disk will be loaded and you will be asked to which bank it should be saved.
Choose the destination, and press ENTER. This process is repeated infinitely.
Page 76

Emax II operation manual
Copy Software
MASTER 9 SPECIAL
This module holds some seldom-used, but extremely useful, functions.
1. Activate MASTER 9. The display says:
Special
[1-8] / Slider
2. Select the desired special function using the data slider or keypad.
65
MASTER
1 Copy Software
2 MIDI Master
3 Recalibrate
4 Audition Note
5 MIDI Analyzer
6 SCSI Boot ID
7 Headroom
8 Install Disk
■
1 Copy Software
The Emax II operating system deals with such tasks as disk transfers, memory management, and so on. Occasionally E-mu enhances the operating system. Each version of the
operating system is numbered, as indicated when you move the data slider all the way
to the top while in Special. As newer versions are introduced, use this function to copy
the new software on to disks containing the old software. Everything else on the old
disk—samples, presets, sequences, and so on — remain unchanged.
1. Upon selecting Copy Software, the display says:
Copy Sftw - Will
Erase Memory OK?
If it’s not okay to erase memory, press NO and copy the bank contents to disk.
Otherwise, press YES.
Page 77

66
MIDI Master
MASTER
Emax II operation manual
The display now says:
Copy Sftwre from
SCSI X:DriveName
... where X is the SCSI ID number and “DriveName” is the name of the drive.
Use the data slider to select the SCSI drive that you wish to copy from.
2. Insert the Source disk (the one with the new software) in the drive if you are copying
from floppy.
3. Press ENTER to select the source drive. This clears the bank and loads the operating
system software into the Emax II. The display will say “Just A Moment... “.
4. After the software has been loaded, the display says:
Copy Sftwre to
SCSI X:DriveName
... where X is the SCSI ID number and “DriveName” is the name of the drive.
Use the data slider to select the SCSI drive that you wish to copy to.
Insert the destination floppy disk (if applicable) and press ENTER to initiate the transfer.
After copying the software to a floppy, you have the option of copying the software onto
another disk (insert the disk then press YES) or exit back to the module identifier (press
NO).
■
2 MIDI Master
This contains three functions. Channel (Chan) allows you to set the MIDI channel of the
Emax II and ignore the programmable channels in each preset. Overflow (Ovfl) is used
to turn overflow mode on or off. Overflow mode transmits notes over MIDI only when
the Emax II runs out of channels. HD Load allows you to load a hard disk bank via a
MIDI program change. HD load is set to a preset that is used to tell the Emax II that the
next preset change command will change the hard disk bank number. If an invalid bank
number is sent, the Emax II will return to normal preset mode.
Note: Be careful when using the HD load function to prevent the accidental loading of
seemingly random HD banks.
Page 78

Emax II operation manual
Recalibrate
Chnl Ovfl HDBank
off off off
■
3 Recalibrate
With this function you can select minimum and maximum values for the left wheel, right
wheel, foot pedal, data slider, and volume slider. You can also select a center value for
the left wheel as well as the footswitch polarities and LCD contrast. Select the controller
to be re-calibrated with the data slider. The Emax II controls should be recalibrated
periodically in order to compensate for normal wear and tear on the controls themselves
or if the controls ever behave strangely.
67
MASTER
With the exception of the left wheel, LCD contrast and the footswitches, you will first set
the minimum value and press ENTER, then the maximum value and press ENTER. For
the left wheel, you can also set the center value. After making your choices, the display
will ask if you want to save results. If so, press YES; otherwise, press NO. The wheels
and sliders should be calibrated so that the “Post” setting ranges from 0-255.
The recalibrate footswitch function allows the Emax II to use either of two types of
footswitches (normally open or normally closed). If your footswitch seems to work
backwards, try changing the setting of the footswitch select from Footswitch
On=Closed to Footswitch On=Open.
The LCD contrast control allows you to adjust the LCD viewing angle for easy reading.
On the rack mount Emax II, the LCD angle is ajusted from the front panel and not from
the recalibrate menu.
■
4 Audition Note
This function is included for use on the Emax II rack at times when a MIDI keyboard is
not connected. This function allows you to play the Emax II without a keyboard. Select
Special 5 and the display says:
Audition Note:C3
(0-9) / Slider
Moving the slider will select which note is played and buttons 0-9 play the sound.
Page 79

68
MIDI Analyzer
MASTER
Emax II operation manual
■
5 MIDI Analyzer
The MIDI Analyzer is a useful function designed to help you solve MIDI interconnection
problems.
Select Special 6 and the display says:
MIDI Data: In
Use Data Slider
Moving the data slider changes the analyzer from analyzing MIDI IN to analyzing MIDI
OUT. Press ENTER to select.
The display now says:
Waiting for
MIDI Data
When MIDI data is received (or sent), the data will be displayed. The analyzer
recognizes most MIDI messages, but does not display System Exclusive or Active
Sensing messages.
■
6 SCSI Boot ID
This function allows you to select which SCSI drive (0=floppy, 1-7=HD) Emax II will
scan on initial power up for its operating software. Note: Emax II will always boot from
floppy if a formatted floppy disk resides in the drive on power up.
The display says:
Preferred Boot
Drive: SCSI X
... where “X” is the preferred SCSI ID number.
Use the data slider to select the preferred boot drive, then press ENTER.
Note: You MUST press ENTER in order to store this setting in the Emax II.
Page 80

Emax II operation manual
■
7 Headroom
Headroom is the amount of dynamic range remaining before clipping will occur. The
amount of headroom on the Emax II is adjustable from 0 dB to 15 dB in 1 dB increments
with the front panel volume control set to maximum. A headroom setting of 0 dB, for
example, will provide the hottest output level, (and the highest S/N ratio) but may cause
"clipping" if too many notes are played at once. The default headroom setting is 6 dB,
which is a good compromise between a good signal to noise ratio and having a bit of
remaining headroom. If you hear clipping from the Emax II, raise the amount of
headroom. The headroom setting is retained when power is switched off.
■
8 Install Disk
The Install Disk utility allows you install new features (memory expansion, etc.) into the
Emax II as they become available. Detailed instructions concerning this function will be
supplied with the update kits.
Install Disk
69
MASTER
■
Software Revision
This shows the operating system version number in the display.
Page 81

70
Emax II operation manual
Page 82

Emax II operation manual
71
SAMPLE
1. VU MODE/GAIN 73
2. PLACE SAMPLE 74
3. SAMPLE RATE 74
4. SAMPLE LENGTH 75
5. THRESHOLD 76
6. ARM SAMPLING 76
7. FORCE SAMPLING 77
8. STOP SAMPLING 77
0. CHANGE SAMPLE 77
Page 83

72
Emax II operation manual
Page 84

Emax II operation manual
VU Mode/Gain
SAMPLE 1 VU MODE/GAIN
This function sets the proper level for sounds being recorded into the Emax II.
1. First, insert the source to be sampled into the rear panel sample input jack. Select the
preset in which you want the sample to appear. Next, activate SAMPLE 1.
If the preset already contains a sample in the default range in which a new sample would
be recorded (C1 low note, G1 original note, B1 high note), the Emax II will look for the
first available empty keyboard space to place the sample. If the Emax II can’t find an
empty keyboard space, it chooses the standard default and goes to the place sample
screen (see SAMPLE 2). After this is taken care of, the display shows:
Pri 01 G2 -10dB Stereo G2 -10dB
||||||||||||||||| |
| | | | | | | | | | | | | | | | | | | | | | | | | | | | | | | | | | | | | |
| | | | | | | | | | | | | | | | | | | | | | | | | | | | | | | | | | | |
Mono Sampling Stereo Sampling
Left - Primary
Right- Secondary
73
SAMPLE
▼
High level signals
should not be present at
the sample input jack
when entering the
sample module because the Emax II autocalibrates the sample
inputs during this time.
There may or may not be some moving vertical bars in the display’s lower line.
2. The data slider sets the sampling section gain from -10 to +40 dB in 2 dB steps. Play the
sound to be sampled and observe the moving bar display; louder signals will kick the
bars further over to the right. The signal can be monitored through the main outputs. The
Emax II VU meter is a “peak hold” type which briefly “holds” the highest level attained.
The signal levels on the VU meter should be set as follows for optimum results:
■ Emax II with Mono Sampling capabilities only : The signal level should be set so the
peak does not exceed the level shown in the Mono Sampling diagram above.
■ Emax II with Stereo Sampling option: The signal level should be set so that the peak
bar comes close to the extreme right side without actually reaching it. This is the
optimum recording level for either mono or stereo samples.
3. If the meter bar hits the extreme right hand side, the headroom of the Emax II has been
exceeded. Adjust the data slider, and possibly the output control of the device being
sampled (if present), so that peaks are below this overload point.
■
Please refer to "The
Art of Sampling" in the
Advanced Applications
section of this manual
for more information.
Page 85

74
Place Sample
SAMPLE
Emax II operation manual
SAMPLE 2 PLACE SAMPLE
Emax II defaults to placing the sampled sound on G1, transposed down to C1 and
up to B1. However, this can be changed before sampling.
1. Activate SAMPLE 2. The display shows:
Spl Orig Lo Hi
XXX YY YY YY
...where XXX indicates primary, secondary or stereo voice, and YY are keyboard notes.
2. Use the cursor buttons to select the parameter to be changed:
Spl = Use the data slider to select primary, secondary or stereo voice. Move the cursor
to the next parameter to be changed or press ENTER to return to the module identifier.
The status of this control can only be changed before a sample is taken.
Orig = Specifies the original key at which the sample will appear. Change this with the
data slider, or play the desired keyboard key. Move the cursor to the next parameter to
be changed or press ENTER to return to the module identifier.
Lo = Chooses the sample’s low transposition point. Change this with the data slider, or
play the desired keyboard key. Move the cursor to the next parameter to be changed or
press ENTER to return to the module identifier.
Hi = Chooses the sample’s high transposition point. Change this with the data slider, or
play the desired keyboard key.
Note: If the display says “Illegal Asngment”, you are either trying to place the low note
higher than the high note or the high note lower than the low note.
If you want to change a previously selected parameter, move the cursor; otherwise,
press ENTER to return to the module identifier.
SAMPLE 3 SAMPLE RATE
The Emax II has an adjustable sample rate. Lower sample rates use up less
memory, but increase distortion and reduce high frequency response. Higher
sample rates give better fidelity but use up more memory.
1. Activate SAMPLE 3. The display shows:
SampleRate 39kHz
Page 86

Emax II operation manual
2. Use the data slider to choose from six different sample rates between 20kHz (mediumquality DDL sound) to 39 kHz (almost the same rate used with Compact Disks).
Press ENTER to return to the module identifier.
Sample Length
SAMPLE 4 SAMPLE LENGTH
Once sampling is initiated, the Emax II will normally sample until it runs out of
memory or is stopped (see SAMPLE 8, the “Stop Sampling” function). However,
this function lets you program a particular sample time after which Emax II will stop
sampling.
75
SAMPLE
1. Activate SAMPLE 4. The display says:
Length XX.X secs
(YY.Y Available)
...where XX.X is the time in seconds and YY.Y is the maximum time available.
Maximum time will depend on your sample rate; The chart below shows sample rates
versus time (this chart assumes that all of the Emax II’s sample and sequence memory
is empty).
SAMPLE TIME (seconds)
RATES
1 M 2 M 3 M 4 M 5 M 6 M 7 M 8 M
20.000kHz 26.1 52,5 78.6 104.9 131.1 157.3 183.5 209.7
22.050kHz 23.7 47.6 71.3 95.1 118.9 142.7 166.4 190.2
27.778kHz * 18.9 37.7 56.6 75.5 94.4 113.2 132.1 151
31.250kHz * 16.8 33.5 50.3 67.1 83.9 100.7 117.4 134.2
39.0625kHz 13.4 26.9 40.3 53.7 67.1 80.5 94 107.4
Note: The Sample Rates shown in Bold, have a maximum continuous sampling time
equal to that of the 39kHz rate. Emax II samples at the 39kHz rate, then performs
automatic sample rate conversion on the sample and frees up the additional memory for
subsequent sampling.
The additional rates of 10kHz, 15.625kHz, 41.667kHz, and 44.1kHz are available in the
Sample Rate Conversion function of the Digital Processing module.
Page 87

76
Arm Sampling
SAMPLE
Emax II operation manual
2. Use the data slider to change the sample length (the increment length depends on the
available memory). When the display shows the desired sample length, press ENTER.
The sample length will remain as set until changed.
SAMPLE 5 THRESHOLD
There are two ways to initiate sampling: Threshold-sensitive sampling and forced
sampling (SAMPLE 7). With threshold-sensitive sampling, once sampling is
“Armed” sampling begins whenever the signal to be sampled exceeds the
programmable threshold level. This function sets the threshold level.
■
When sampling in
Stereo, sampling
will begin whenever
either the left or right
channel exceeds
the threshold.
1. Activate SAMPLE 5. Once you move the data slider, the display will show a single bar
on the top line that indicates the threshold level; the lower line will show the level of the
signal to be sampled.
2. Set the desired threshold level with the data slider. Generally, you will set threshold
just above the residual noise of the sound to be sampled. Therefore, any noise will not
initiate sampling, but a signal that exceeds the threshold will.
Hint: Set the lowest possible threshold. If the beginning of a sound is cut off, the
threshold is too high. If there’s a delay before the beginning of a sound, the threshold is
too low and was probably triggered by some noise prior to the actual signal.
Note: Once sampling has begun, the Emax II will continue sampling even if the signal
falls below the threshold level. To stop sampling, refer to SAMPLE 8 or set a specific
sample length (SAMPLE 4).
SAMPLE 6 ARM SAMPLING
Upon initiating this function, Emax II will begin sampling as soon as the sound to
be sampled exceeds the threshold set with SAMPLE 5, or when sampling is forced
(see SAMPLE 7).
1. Activate SAMPLE 6. The display’s top line says “Sample Armed”, while the bottom
line shows the moving-bar VU meter (see SAMPLE 1).
2. As soon as the sound to be sampled exceeds the threshold, the display will say
“Sampling.” After reaching the end of the sample length (if set with SAMPLE 4), being
stopped manually (SAMPLE 8), or when the Emax II runs out of memory, the display
will return to the module identifier.
Page 88

Emax II operation manual
3. Play the keyboard in the sample range. If you are not satisfied with the sample, repeat
steps 1-2 before de-activating the module. Otherwise, de-activate the module. Deactivating the module, then re-entering it, will automatically advance the default sample range
to the next available space.
Change Current Sample
SAMPLE 7 FORCE SAMPLING
Force sampling lets you initiate sampling manually as an alternative to thresholdsensitive sampling. This is useful for situations where the signal to be sampled is
more or less continuous (continuous signals greatly complicate the thresholdsetting process described in SAMPLE 5).
77
SAMPLE
1. With the module active and levels properly set, as soon as you are ready to sample key
in 7. Sampling will begin immediately, and the display will say “Sampling.”
2. After reaching the end of the sample length (if set with SAMPLE 4), being stopped
manually (SAMPLE 8), or when the Emax II runs out of memory, the display will return
to the module identifier.
3. If you are satisfied with the sample, de-activate the module.
SAMPLE 8 STOP SAMPLING
End sampling at any time by keying in 8. After sampling, the display will return to
the module identifier.
SAMPLE 0 CHANGE CURRENT SAMPLE
If you take consecutive samples without exiting the sample module, each sample
will overwrite the previous sample. However, you can specify a new sample into
which a sample will go—even without exiting the sample module—by keying in 0.
Emax II will default to the next empty sample number.
The display says:
New Sample
Pri XX YY
... where XX is the voice number and YY is the keyboard placement of the sample.
Page 89

78
Emax II operation manual
Page 90

Emax II operation manual
79
DIGITAL PROCESSING
0. CHANGE VOICE 81
1. TRUNCATE 82
2. LOOP 84
3. RELEASE LOOP 88
4. LOOP MODE 91
5. TAPER 92
6. SPLICE 93
7. COMBINE 95
8. CROSSFADE LOOP 96
9. DIGITAL EFFECTS 98
1. Gain/Attenuation 98
2. Reverse Sound 99
3. Change Sample Rate 99
4. Change Pitch 100
5. Transform Multiplication 101
6. Spectrum Synthesizer 103
Page 91

80
Emax II operation manual
Page 92

Emax II operation manual
Change Current Voice
DIGITAL PROCESSING
DIGITAL PROCESSING 0 CHANGE CURRENT VOICE
This function changes the current voice selection.
1. Activate DIGITAL PROCESSING 0. The display says:
Process Pri or
Sec Voice: XXX
...where XXX is either Pri or Sec. Use the data slider to select whether you will edit the
Primary or Secondary voice, then press ENTER. If there are only Primary or Secondary
voices, Emax II will automatically go to step 2.
81
2. The display now says:
Key: XX YY KHZ
Select a Voice
...where XX defaults to the lowest note of the lowest voice (whether Pri or Sec), and YY
is the sample rate. Press a key in the range of the voice that you want to edit, or to quickly
select the voice, use the data slider or increment buttons. While selecting the voice, the
lower display line will show the voice number and its original pitch. After selecting the
voice to be processed, press ENTER.
3. If the sample to be processed is used in other presets, processing the sample will
process the sample in those other presets. Therefore, the display asks:
Used Elsewhere
CopyItFirst? Y/N
Press NO, and any processing will affect other presets containing that sample. To avoid
affecting other presets containing the sample, press YES to copy the sample—the
current preset will contain the new copy in place of the original sample. Either response
returns the Emax II to the module identifier. If there is “not enough memory” to
duplicate the sample, the display will tell you.
If it is important to copy the sample, erase an unneeded voice (to gain memory space)
(PRESET DEFINITION 3 ) and try again. Note that if a sample is used in other presets,
Page 93

82
Truncate
DIGITAL PROCESSING
processing it will process the sample in those other presets. Therefore, upon selecting the
voice, you will be asked if you want to copy the sample.
Note that if two voices in the same preset use a single sample, then you will not be asked
to copy first, and any changes will affect both voices in the preset.
3. While you remain in the Digital Processing module, all voices other than the current
voice will be muted as you play the keyboard. The specified current voice will remain
as is until you either change the voice assignment ( DIGITAL PROCESSING 0 ), change
presets, or load another bank. The current voice will need to be re-specified if you switch
between modules.
Emax II operation manual
■
Make a copy of the
preset if you wish to
save your original
sample un-edited.
■
Each side of a Stereo Voice must be
truncated separately!
Truncate the primary
voice, then write
down the truncation
points and truncate
the secondary voice
so that it exactly
matches the primary.
This will preserve the
stereo image.
DIGITAL PROCESSING 1 TRUNCATE
(Set SampleStart/End)
Truncation shortens a voice’s length by trimming off parts of the beginning and/
or end.
Applications: Cut off unneeded portions of a voice to conserve memory. Change
instrument characteristics (i.e. remove the attack from a plucked string note). Cut off
long decay (i.e., simulate noise-gated reverb effect on drums). Use to isolate a particular
section of a sample.
1. Activate DIGITAL PROCESSING 1.
2. Use the arrow keys to move the cursor under either the Start or End point. The display
will show these as:
Tr:Start End
XXXXXXX XXXXXXX
3. The seven digits under Start indicate, in number of sample points, how much is being
cut off the start of the voice. The seven digits under End indicate, in number of sample
points, how much is being cut off the end of the voice. Select the parameter to be adjusted
with the cursor buttons. Adjust the coarse value with the data slider and fine value with
the increment and decrement keys, or enter a seven-digit number. The minimum voice
size is 34 samples.
Example: Adjusting these sliders so that the bottom line indicates Trun Start 0039000
cuts one second off the beginning of the sample at the highest sample rate.
Page 94

Emax II operation manual
Percussive
Sound
Envelope
DIGITAL PROCESSING
Start = 39,000
1234
Time in Seconds
Truncate
83
Adjusting the Truncation Start to 0039000, cuts one second off the beginning of the sample at
the highest sample rate.
4. After setting the desired truncation points, press ENTER. The display asks:
Make Truncation
Permanent? Y/N
To permanently erase the truncated sections, press YES. To retain the truncated
information in memory (so that you can truncate the sample again later in a different
way), press NO. Note that if you exit the Digital Processing module or change the current
voice (DIGITAL PROCESSING 0), this temporary truncation will be lost.
5. If you invoke this function to try and truncate a sample that has already been
truncated, but for which the truncation has not been made permanent, the display will
first ask:
Make Truncation
Permanent? Y/N
Page 95

84
Looping
DIGITAL PROCESSING
If you press NO, the Emax II enters the truncation function. YES permanently truncates
the voice, the voice will be truncated at the previously selected truncation point(s), and
the Emax II will return to the module identifier.
Note: As you change the truncation points of a looped sample (see DIGITAL PROCESS-
ING 2), the loop(s) may disappear and reappear depending on the exact location of the
truncation points. If the sample is permanently truncated while the loop is inaudible,
then the loop will be lost. The minimum size of a voice is 79 samples.
DIGITAL PROCESSING 2 SET LOOP START
Emax II operation manual
and LOOP LENGTH POINTS
■
Each side of a Stereo
Voice must be looped
separately! Loop the
primary voice, then
write down the loop
points and loop the secondary voice so that it
exactly matches the
primary. This will save
time. Alternately, you
may wish to have different loop points on each
side.
“Looping” lets you mark off a section (called a loop) of a voice with a Start Point
and Loop Length. When you press a key, the voice plays normally until it reaches
the end of the loop. It then jumps back to the Start point and re-plays through the
loop. Upon reaching the loop end, it again re-plays the loop. This looping process
continues for as long as the key is pressed.
Note: DIGITAL PROCESSING 4 controls three aspects of looping: loop on/off,
forwards/backwards, and loop in release. Refer to this section for specifics.
Note also that the Emax II offers two loops, each of which can loop a different
portion of the signal. The Sustain Loop is operative when the key is down, and the
Release Loop is operative in the release phase, when the key is up.
Applications: Looping provides “infinite sustain” effects, extends short samples, and if
the loop time is rhythmically related to a composition, produces interesting rhythmic
effects.
1. Activate DIGITAL PROCESSING 2. The display shows:
Lp:Start Length
XXXXXXX XXXXXXX
The seven digits under Start indicate, in number of sample points, the Start of the Loop
in relation to the beginning of the voice. A higher number moves the Start point closer
to the end of the sample. Example: At a 39K sample rate, if the Start point reads 0039000,
the Start point is located one second into the sample. The seven digits under Length
indicate the Loop Length in number of sample points. A higher number increases the
loop Length. The minimum start point is 3 samples and the shortest possible loop length
on the Emax II is 32 samples.
Page 96

Emax II operation manual
Percussive
Sound
Envelope
Loop Start = 39,000
Loop Length = 39,000
Looping
DIGITAL PROCESSING
85
1234
Time in Seconds
Example: If L reads L0039000, the loop is one second long at the highest sample rate.
Select the parameter to adjust with the cursor buttons. Adjust the coarse value with the
data slider and fine value with the increment and decrement keys, or enter a six-digit
number. Loops have a minimum start point of 3 samples, and a minimum length of 32
samples.
First, the note
plays to the end
of the loop...
etc.
then replays
the marked loop
for as long as the
key is held down.
Start
1234
Loop
Length
Key Depression Key Release
1234
56
Page 97

86
Looping
DIGITAL PROCESSING
2. Remember—L sets the Length, not the end point, of the loop.When S moves, the loop
end point (as determined by the loop Length) moves in tandem with S.
After finding a good loop, press ENTER.
Hint: If the Loop Length is at maximum (as occurs when you first call up a voice for
looping), you cannot set a new S point since that would force the loop to “run out of
sample”. Shorten the Length before moving the S point.
Emax II operation manual
S2
As S1 moves to S2
the loop length follows
S1
along to create a
new end point.
L2
L1
1234
Time in Seconds
Moving the loop's Start Point adjusts the End Point of the loop as well.
ABOUT AUTOLOOPING
Looping performs an electronic “splice” which sometimes produces annoying glitches.
Here’s why.
Refer to the diagram on the following page, which shows the waveform where a sample
is to be looped. As the signal loops, note the discontinuity at the “splice point.” This can
produce an annoying ticking or popping sound.
Fortunately, the Emax II can help find the optimum splice point for you. Set loop points
as best you can, then press YES to invoke Autoloop. The computer will look for nearby
points that can be spliced together with minimum discontinuity. The display will
update to reflect the computer-chosen Start and Loop points.
How well does Autolooping work? Incredibly well, once you get the hang of it (getting
the most out of this function does require practice). Autoloop can save you much time
when doing looped samples, and is remarkably effective with short, sustained samples.
Page 98

Emax II operation manual
Start
Length
Autolooping
DIGITAL PROCESSING
87
Manually-set
Loop Points
3. The display now asks if you want to Autoloop...
Autoloop? Y/N
Loop 1 Loop 2
Press YES to autoloop, NO if you have a good loop and want to continue.
Page 99

88
Release Loop
DIGITAL PROCESSING
Note: Sometimes the Emax II will choose the correct splice point from a technical
standpoint, not a musical one. Therefore, if you find a good splice point, write down the
S and L numbers before invoking Autoloop. Should Autoloop produce an inferior splice
point, you can regain your original settings.
4. If desired, repeat steps 2 to 4 until the best possible loop results.
Note: Sometimes it will be impossible for you or the computer to find a perfect splice
point. When you first try looping, you will probably think this is a common occurrence.
However, you’ll generally find that Autoloop, combined with practice and experimentation, can usually produce very smooth loops.
5. After establishing the desired loop points, press ENTER. The display asks:
Emax II operation manual
■
If a Release Loop is
not defined, then it will
default to the Sustain
Loop settings.
Truncate After
Loop? Y/N
Press YES to discard all voice data after the loop end point (this conserves memory).
However, if you might want to use the same sample later with a different loop point,
press NO to keep the entire sample intact, or save the preset containing the original
sample to disk.
DIGITAL PROCESSING 3 SET RELEASE,
LOOP START and
LENGTH POINTS
For an explanation of Looping and Autolooping, see DIGITAL PROCESSING 2
above. This function is the same, but affects the Release Loop (operational when
the key is released) rather than the Sustain Loop (operational when the key is
down).
1. Activate DIGITAL PROCESSING 3. The display asks:
Same As Sustain
Loop? Y/N
Page 100

Emax II operation manual
Release Loop
DIGITAL PROCESSING
Press YES if you want to copy the Sustain Loop parameters to the Release Loop and then
return to the module identifier, or NO if you want to set different parameters for the
Sustain and Release Loops.
2. If you pressed NO, the display shows:
Lp:Start Length
XXXXXXX XXXXXXX
The seven digits under Start indicate, in number of sample points, the Start of the Loop
in relation to the beginning of the voice. A higher number moves the Start point closer
to the end of the sample. The seven digits under Length indicate the Loop Length in
number of sample points. A higher number increases the loop Length. Select the
parameter to adjust with the cursor buttons. Adjust the coarse value with the data slider
and fine value with the increment and decrement keys, or enter a six-digit number.
89
Sustain
Loop
Start
Sustain
Loop
Length
This loop plays for as
This loop plays
for as long as the
envelope is in the
sustain phase.
Release
Loop
Length
Release
Loop Start
long as the release phase
of the envelope lasts.
As the release fades out,
the looped sound will fade
out as well.
The Release Loop begins as soon as the key is released and continues until the sound fades
out.
3. Remember—L sets the Length, not the end point, of the loop. When S moves, the loop
end point (as determined by the loop Length) moves in tandem with S.
After finding a good loop, press ENTER.
 Loading...