

Page 1

11
Contents
Contents
Safety Instructions
Grounding Instructions ........................................2
Radio and Television Interference ........................4
Wichtige Sicherheitsvorschriften .........................5
Instructions de Sécurité Importantes ...................7
Interférences Radio et Télévision .......................... 9
About this Manual
Important Upgrade Information ........................ 10
........................................... 10
Introduction ...............................................
Available Options ............................................... 13
Main Controls
Connections
Disk Drive Options ............................................. 24
About Sampling .................................................. 278
Instant Gratification!
Loading a Bank from Hard Disk or CD-ROM ..... 29
Loading a Bank from Floppy Disk ...................... 29
Selecting Presets .................................................. 30
Saving .................................................................. 31
A Practice Sampling Session ............................... 32
Exploring the Preset ............................................ 36
Which Voices are Assigned to the Keyboard? .... 37
Creating a Link ................................................... 38
Arpeggiator ......................................................... 39
Keyboard Modes ................................................. 42
.................................................. 14
...................................................... 18
....................................... 28
Specifications
Sound RAM Memory Expansion
Warranty
Warranty Card .................................................... 54
.................................................... 45
................... 46
............................................................ 51
E5000 - Getting Started 1
Page 2

Safety Instructions
Important Safety Instructions
2
Important Safety
Instructions
These instructions pertain to E5000 Ultra. Use in countries other than the
U.S.A. may require the use of a different line cord or attachment plug, or
both. To reduce the risk of fire or electric shock, refer all servicing to
qualified service personnel. Do not expose this product to rain or moisture.
There are no user serviceable parts or adjustments inside the unit.
Grounding Instructions
This product must be grounded. If it should malfunction or break down,
grounding provides a path of least resistance for electric current, reducing
the risk of electric shock. This product is equipped with a cord having an
equipment-grounding conductor and a grounding plug. The plug must be
plugged into an appropriate outlet properly installed and grounded in
accordance with all local codes and ordinances.
Danger!
Improper connection of the equipment’s grounding conductor can result in
the risk of electric shock. Check with a qualified electrician or service
personnel if you are in doubt as to whether the product is properly
grounded. Do not modify the plug provided with this product. If it will not
fit the outlet, have a proper outlet installed by a qualified technician.
Caution!
If your E5000 Ultra is rack mounted, you must use a standard 19-inch open
frame rack. Screw-on rack mount ears are provided for this purpose.
User Maintenance Instructions
1.
The E5000 Ultra should be kept clean and dust free. Periodically wipe
the unit with a clean, lint free cloth. Do not use solvents or cleaners.
2.
There are no user lubrication or adjustment requirements.
E-MU Systems
Caution -.
reduce the risk of electric shock, do not perform any servicing other than that
contained in these operating instructions unless you are qualified to do so. Refer
all servicing to qualified service personnel.
These servicing instructions are for use by qualified personnel only. To
Page 3
This symbol is intended to
alert you to the presence of
important operating and
maintenance (servicing)
instructions in the literature
accompanying the unit.
This symbol is intended to
alert you to the presence of
uninsulated dangerous
voltage within the product’s
enclosure that may be of
sufficient magnitude to
constitute a risk of electric
shock to persons.
Safety Instructions
Important Safety Instructions
INSTRUCTIONS PERTAINING TO A RISK OF FIRE,
ELECTRIC SHOCK, OR INJURY TO PERSONS.
READ THESE INSTRUCTIONS: When using electric products, basic precau-
tions should always be adhered to, including the following:
Read all instructions before using E5000 Ultra .
1.
To reduce the risk of injury, close supervision is necessary when using
2.
the E5000 Ultra near children.
Do not use E5000 Ultra near water — for example near a bathtub,
3.
washbowl, kitchen sink, in a wet basement, on a wet bar, or near or in a
swimming pool. Do not expose the unit to drips or splashes.
E5000 Ultra should be situated so that its location or position does not
4.
interfere with its proper ventilation.
E5000 Ultra should be located away from heat sources such as radiators,
5.
heat registers, fireplaces, stoves, or ovens.
E5000 Ultra should be connected only to a power supply of the type
6.
described in the operating instructions and marked on the product.
Care should be taken so that objects do not fall and liquids are not
7.
spilled into the enclosure of the E5000 Ultra through openings.
This E5000 Ultra may be equipped with a polarized line plug (one blade
8.
wider that the other). This is a safety feature. If you are unable to insert
this plug into the outlet, do not defeat the safety purpose of the plug.
Contact an electrician to replace your obsolete outlet.
Protect the power cord from being walked on or pinched, particularly at
9.
plugs, convenience receptacles, and the point where they exit from the
unit.
Unplug E5000 Ultra from the power outlet during lightning storms or
10.
when left unused for a long period of time.
This product, in combination with an amplifier and headphones and
11.
speakers, may be capable of producing sound levels that could cause
permanent hearing loss. Do not operate for a long period of time at a
high volume level or at a level that is uncomfortable. If you experience
any hearing loss or ringing in the ears, consult an audiologist.
Only use attachments and accessories specified by E-mu Systems.
12.
E5000 Ultra should be serviced by qualified service personnel when:
13.
A. The power supply cord has been damaged; or
B. Objects have fallen, or liquid has been spilled into the unit; or
C. The unit has been exposed to rain; or
D. The unit has been dropped or the enclosure damaged; or
E. The unit does not operate normally or exhibits a marked change in
performance.
All servicing should be referred to qualified service personnel.
14.
Save These Instructions
E5000 - Getting Started 3
Page 4

Safety Instructions
Important Safety Instructions
4
•
•
•
•
•
Radio and Television Interference
The equipment described in this manual generates and uses radiofrequency energy. If it is not installed and used properly —that is, in strict
accordance with our instructions— it may cause interference with radio
and television reception.
This equipment has been tested and complies with the limits for a Class B
computing device in accordance with the specifications in Subpart J of Part
15 of the FCC rules. These rules are designed to provide reasonable
protection against such interference in a residential installation. However,
there is no guarantee that the interference will not occur in a particular
installation, especially if a “rabbit ear” TV antenna is used.
If the E5000 Ultra does cause interference to radio or television reception,
you can try to correct the interference by using one or more of the
following measures:
Turn the television or radio antenna until the interference stops.
Move the E5000 Ultra to one side or the other of the television or radio.
Move the E5000 Ultra farther away from the television or radio.
Plug the E5000 Ultra into an outlet on a different circuit than the televi-
sion or radio.
Consider installing a rooftop antenna with a coaxial lead-in between the
antenna and television set.
E-MU Systems
Page 5

Safety Instructions
Warnings - German
Warnings - German
Wichtige Sicherheitsvorschriften
In Ländern ausserhalb den U.S.A. können andere Kabel oder Stecker
notwendig werden. Zur Verminderung des Risikos von Feuer oder eines
elektrischen Schlages übergebe man den Service an qualifizierte Fachleute.
Das Gerät niemals Regen oder Nässe aussetzen.
Erdungsinstruktionen
Das Gerät muss geerdet sein. Bei einem Defekt oder Ausfall bietet Erdung
dem elektrischen Strom den Weg des geringsten Widerstandes und
reduziert das Risiko eines Schlages. Dieses Gerät ist mit einem geerdeten
Kabel und Stecker ausgerüstet. Der Stecker muss in eine passende,
einwandfrei montierte und geerdete Steckdose in Übereinstimmung mit
den örtlichen Vorschriften eingeführt werden.
Gefahr
Unvorschriftsgemässer Anschluss des Gerätes kann zum Risiko eines
elektrischen Schlages führen. Im Zweifelsfalle über die ordnungsgemässe
Erdung soll ein qualifizierter Elektriker oder eine Serviecestelle beigezogen
werden. Ändern Sie den mitgelieferten Stecker nicht. Sollte er nicht in die
Steckdose passen, soll die einwandfreie Installation durch einen qualifizierten Techniker erfolgen.
Vorsicht
Wird der Ultra in einem Rackgestell montiert, muss ein offener 19Zollrahmen verwendet werden.
Unterhaltsinstruktionen für anwender
1.
Ultra soll sauber und staubfrei gehalten werden. Das Gerät mit einem
sauberen und säurefreien Tuch periodisch abreiben. Keine Lösungsoder Reinigungsmittel anwenden.
2.
Schmieren und Justieren sind nicht notwendig.
3.
Bei weiteren Servicefragen wende man sich an eine qualifizierte Servicestelle.
Vorsicht
Diese Gebrauchsanweisungen sind nur für qualifizierte Techniker
beabsichtigt. Um die Gefahr eines elektrischen Schlages zu vermeiden,
sollen Sie keine Arbeit unternehmen, die nicht in diesen Instruktionen
vorgeschrieben ist. Wenden Sie Sich bei weiteren Servicefragen an eine
qualifizierte Servicestelle.
E5000 - Getting Started 5
Page 6

Safety Instructions
Warnings - German
Dieses Symbol weist den
Anwender auf wichtige
Gebrauchs- und ServiceVorschriften in den beiliegenden Drucksachen.
Dieses Symbol verweist auf
nicht-isolierte Stromspannungen im Geräte-Innern,
welche zu einem
elektrischen Schlag führen
könnten.
6
INSTRUKTIONEN BETR. FEUERRISIKO,
ELEKTROSCHOCK ODER VERLETZUNG VON PERSONEN
WARNUNG; Beim Einsatz elektrischer Geräte sollten folgende
Vorsichtsmassregeln stets beachtet werden:
1.
Lesen Sie vor dem Einschalten des Ultra alle Instruktionen.
2.
Zur Vermeidung von Verletzungsrisiken müssen Kinder bei eingeschaltetem Ultra sorgfältig überwacht werden.
3.
Ultra nicht in der Nähe von Wasser in Betrieb nehmen -- z.B. in der
Nähe von Badewannen, Waschschüsseln, auf nassen Gestellen oder am
Swimmingpool.
4.
Ultra stets so aufstellen, dass seine Belüftung nicht beeinträchtigt wird.
5.
Ultra nicht in der Nähe von Hitze aufstellen, wie Heizkörper, offenem
Feuer, Öfen oder von Backöfen.
6.
Ultra ausschliesslich mit einem Netzgerät gemäss Bedienungsanleitung
und Gerätemarkierung verwenden.
7.
Dieses Gerät kann bei Verwendung von Kopfhörern und Verstärkern
hohe Lautpegel erzeugen, welche zu bleibenden Gehörschäden führen.
Arbeiten Sie nicht während längerer Zeit mit voller Lautstärke oder
hohem Lautpegel. Stellen Sie Gehörverlust oder Ohrenläuten fest,
wenden Sie sich an einen Ohrenartz.
8.
Ultra kann mit einem polarisierten Kabelstecker (mit ungleichen
Stiften) ausgerüstet sein. Das geschieht für Ihre Sicherheit. Können Sie
den Stecker nicht in die Steckdose einführen, ändern Sie nicht den
Stecker ab, sondern wenden Sie sich an einen Elektriker.
9.
Das Netzkabel des Ultra bei längerem Nichtgebrauch aus der Steckdose
ziehen.
10.
Vermeiden Sie sorgfältig das Eindringen von Gegenständen oder
Flüssigkeiten durch die Gehäuseöffnungen.
11.
Das Gerät soll durch qualifizierte Serviceleute gewartet werden, falls:
A. das Netzkabel beschädigt wurde, oder
B. Gegenstände oder Flüssigkeit in das Gerät gelangten,
C. das Gerät Regen ausgesetzt war, oder
D. das Gerät nicht normal oder einwandfrei arbeitet, oder
E. das Gerät stürzte oder sein Gehäuse beschädigt wurde.
12.
Servicearbeiten sollten nur qualifizierten Fachleuten anvertraut werden.
VORSICHT
Unvorschriftsgemässer einbau der Batterie kann zum Risiko einer Explosion
führen. Ersetzen Sie die Batterie nur mit der gleichen oder einer von E-mu
empfohlene Sorte. Werfen Sie die alten Batterien weg, wie es der Hersteller
anweist.
E-MU Systems
DIESE INSTRUKTIONEN AUFBEWAHREN
Page 7

Safety Instructions
Warnings - French
Warnings - French
Instructions de Sécurité Importantes
Une utilisation dans des pays autres que les U.S.A. peut nécessiter l’usage
d’un cordon d’alimentation différent. Afin de réduire les risques d’incendie
ou d’électrocution, référez-vous à un personnel de service qualifié, et
n’exposez pas cet appareil à la pluie ou à l’humidité.
Instructions de Mise à la Terre
Cet appareil doit être relié à la terre. Dans le cas d’une malfonction
éventuelle, la terre fournit un passage de moindre résistance pour le courant
électrique, réduisant ainsi les risques d’électrocution. L’Ultra est équipé
d’un cordon muni d’un conducteur et d’une fiche devant être branchée
dans une prise appropriée et reliée à la terre en conformité avec les normes
locales.
Danger
Une connexion incorrecte peut résulter en des risques d’électrocution.
Vérifiez avec un technicien qualifié si vous avez des doutes quant à la
connexion. Ne modifiez pas vous-même le cordon d’alimentation livré avec
cet appareil; s’il ne rentre pas dans la prise, faites-en installer un autre par
un technicien qualifié.
Attention
Si l’Ultra est installé dans un rack, utilisez un rack standard ouvert de
48.25cm.
Instructions de Maintenance
1. L’Ultra doit être maintenu propre et sans poussière. Nettoyez-le
périodiquement à l’aide d’un chiffon propre et non-pelucheux.
N’utilisez pas de solvants, ou d’autres produits de nettoyage.
2. Aucune lubrification et aucun réglage ne sont nécessaires de votre part.
3. Pour tout autre service, référez-vous à un personnel qualifié.
Instructions Concernant les Risques d’Incendie, d’Electrocution, ou de Blessures Corporelles.
ATTENTION: Lorsque vous utilisez des appareils électriques,
certaines précautions élémentaires doivent toujours être prises,
incluant les suivantes:
E5000 - Getting Started 7
Page 8

Safety Instructions
Warnings - French
Ces instructions de dépanage sont destinées uniquement aux personnes
qualifiées. Afin d’éviter les risques d’électrocution, n’effectuez que les opérations décrites dans ce manuel, à moins que vous ne soyez qualifiê pour cela.
Faites effectuer toute r’eparation par une personne qualifié.
1. Lisez bien toutes les instructions avant d’utiliser l’Ultra .
2. Afin de réduire les risques de blessures, une attention particulière est
nécessaire en la présence d’enfants en bas âge.
3. N’utilisez pas l’Ultra dans ou près d’endroits humides - par exemple
près d’une baignoire, d’un lavabo, dans les toilettes, dans une cave
humide, sur un bar fréquenté, en présence d’un bull-dog en rut, ou
dans une piscine pleine. Protégez cet appareil de tout liquide,
éclaboussure ou fuite.
4. L’Ultra doit être placé de façon à ce que sa position n’interfére pas avec
sa propre ventilation.
5. L’Ultra doit être placé loin de sources de chaleur telles que des radia-
teurs, cheminées, fours, ou groupies en chaleur.
6. L’Ultra doit uniquement être connecté à une alimentation du type
décrit dans les instructions d’opération et tel qu’indiqué sur l’appareil.
7. Une attention particulière doit être observée quant aux objets pouvant
tomber et aux liquides pouvant être versés sur et à l’intérieur de l’Ultra .
8. L’Ultra peut être équipé d’une fiche secteur polarisée (avec une broche
plus large que l’autre). C’est une mesure de sécurité. Si vous ne pouvez
pas brancher cette fiche dans une prise, ne neutralisez pas cette sécurité.
Contactez plutôt un électricien pour remplacer la prise obsolète.
9. Evitez de marcher sur le cordon d’alimentation ou de le coincer, parti-
culiêrement prês des prises de courant, des boitiers ‘electriques dt du
point de sortie de l’appareil.
10. Le cordon d’alimentation de l’Ultra doit être débranché lorsque ce
dernier n’est pas utilisé pendant une longue période.
11. Cet appareil, combiné avec un amplificateur, des haut-parleurs, et/ou
un casque, est capable de générer des niveaux sonores pouvant
occasionner une perte de l’ouïe permanente. Ne travaillez pas trop
longtemps à un volume trop élevé ou même inconfortable. Si vous
observez une perte de l’audition ou un bourdonnement dans les
oreilles, consultez un O.R.L.
12. N’utilisez que les accessoires sp’ecifi’es par E-mu Systems.
13. Cet appareil doit être examiné par un personnel qualifié lorsque:
A. Le cordon d’alimentation a été endommagé, ou
B. Des objets sont tombés, ou du liquide a été versé sur/à l’intérieur
de l’appareil, ou
C. L’Ultra a été exposé à la pluie, ou
D. L’Ultra est tombé, ou
E. L’Ultra ne fonctionne pas normalement, ou affiche un
changement radical de performance.
14. Tout service doit être effectué par un personnel qualifié.
8 E-MU Systems
Page 9
Ce symbole vous alerte de la
présence d’instructions
importantes d’opération et
de maintenance dans la
notice accompagnant
Ce symbole vous alerte de
la présence d’un voltage
non-isolé dangereux à
l’intérieur de l’appareil,
pouvant être d’une
magnitude suffisante pour
constituer un risque
d’électrocution.
Safety Instructions
Warnings - French
Attention
Danger d’explosion si la etterie n’est pas correctement remplacée. Pour
remplacer la batterie, utilisez une batterie de meme type, ou d’un type
‘equivalent recommand’e par E-mu. Suivez les instructions du faricant pour
vous d’earrasser de la etterie usée.
SAUVEGARDEZ CES INSTRUCTIONS
Interférences Radio et Télévision
L’appareil décrit dans cette notice génére et utilise une énergie de
fréquence-radio. S’il n’est pas installé et utilisé correctement - c’est à dire en
suivant strictement nos instructions - il peut occasionner des interférences
avec la réception d’une radio ou d’une télévision.
Cet appareil a été testé et est conforme aux normes de Classe A en accord
avec les spécifications du paragraphe J de la section 15 des lois FCC. Ces lois
sont désignées pour fournir une protection raisonnable contre de telles
interférences dans une installation résidentielle. Toutefois, il n’est pas
garanti qu’aucune interférence n’apparaisse dans des installations particulières, et plus spécialement lorsqu’une antenne de télévision en «oreilles de
lapin» est utilisée.
Si l’Ultra occasionne des interférences , vous pouvez essayer de les corriger
en utilisant une ou plusieurs des mesures suivantes:
• Tournez l’antenne de la télé ou de la radio jusqu’à ce que les interférences disparaissent.
• Déplacez l’Ultra d’un côté ou de l’autre de la télé ou de la radio.
• Eloignez l’Ultra de la télé ou de la radio.
• Branchez l’Ultra sur une prise différente que la télé ou la radio.
• Installez une antenne sur le toit munie d’une connexion coaxiale entre
elle et le poste de télévision.
E5000 - Getting Started 9
Page 10

About this Manual
Important Upgrade Information
About this Manual
This is the “Getting Started” manual for the E5000 Ultra synthesizer. It is
not intended to be a complete reference. Its purpose is to give you a few
basics to get you playing in the shortest amount of time. The complete EOS
software manual, provided in PDF format on the supplied CD-ROM,
contains everything you’ll need to know about your E5000.
Note: This manual just scratches the surface of this powerful and complex
instrument. You’ll need to read the EOS software manual in order to really
know your way around the E5000.
If you are unfamiliar with samplers and synthesizers in general, you may
need more information than provided in either of these two manuals. We
suggest that you read some of the many books and magazines on the
subject of music synthesis. This will help you to get the most out of this
extremely powerful instrument.
Your E5000 is a special purpose sound computer and like all computers, can
be thought of as having two main components:
1. The physical machine with the buttons, keys, gadgets, that generates
sound.
This “Getting Started” manual describes the electrical connections and
physical hardware of the E-mu E5000 Digital Sampler/Synthesizer.
2. The EOS software that tells the hardware what to do. The Ultra Series
software is called EOS (for Emulator Operating System) and is used on
several E-MU products including the Emulator IV, e-64, e-6400, E4K,
E4X, all the Ultra series, and now E5000 Ultra.
The EOS software manual, included on the included CD-ROM, contains
detailed operating instructions for the software.
Important Upgrade Information
The Ultra Series samplers are software-based devices. The features and
functions of the Ultra Series may be enhanced and upgraded periodically.
Please take a moment now to read the Emu warranty and to fill out and
send in your warranty registration card. We NEED your mailing address in
order to keep you advised of upgrades and manual revisions.
10 E-MU Systems
Page 11

Introduction
Introduction
Thank you for purchasing the E5000 Ultra. The E5000 Ultra provides
almost all the features and expandability of the other Ultra series samplers
at a greatly reduced price. This is an Ultra powerful instrument with the
impeccable audio quality that has made E-MU famous. You are going to
love this machine. We strive to exceed your expectations!
State of the Art Software
E5000’s powerful EOS (Emulator Operating System) incorporates a graphic
user interface to make operating and programming your sampler easy and
intuitive. Advanced digital signal processing features like: auto-truncation,
auto-normalization and crossfade looping make sampling a breeze!
EOS utilizes “Digital Modular Synthesis”, which gives you the ultimate
flexibility to connect any of 56 modulations sources to 53 destination using
24 virtual patchcords. Modulation sources include three multi-stage
envelope generators and two multi-wave LFOs per channel, as well as full
MIDI modulation control over virtually every parameter. The digital
patchbay also contains a set of arithmetic modifiers which allow you to
create complex synthesis models. Check out the EOS Operation Manual on
the CD-ROM that came with your unit for detailed information on all of
the EOS features and how to get the most from your new E-MU product!
State of the Art Hardware
The Ultra Series’ digital hardware implements 64 “analog-sounding”
Z-plane filters. Twenty one different filter types are implemented.
• 12, 24, or 36 dB/octave lowpass filters with resonance
• 2nd & 4th order highpass filters with resonance
• 2nd & 4th order bandpass filters with resonance
• Contrary bandpass filter
• Three types of swept EQ filters
• Three phasers and one flanger with resonance
• Six powerful morphing filters
The E5000 features a powerful new 32-bit RISC processor, for blazing fast
MIDI response, quicker editing, and improved SCSI and SMDI transfers.
E5000 - Getting Started 11
Page 12

Introduction
The modular design of E5000 lets you add hardware features as you need
without paying for features you don't. For starters, the E5000 contains an
incredible 64 channels of polyphony (32 stereo).
The E5000 Ultra sampler is 16 part multi-timbral, for complex sequencing
and sound effects creation, and can be remote controlled by an external
computer using SMDI. The optional 2nd MIDI port will allow E5000 to
receive 32 MIDI channels instead of the normal sixteen channels.
Built-in Digital Effects
A high quality internal effects processor adds reverb and chorus effects
while keeping the sound in the digital domain. 76 different effects are
implemented and there are several controllable parameters for each effect.
Sounds with effects applied can easily be resampled and then saved as an
entirely new sound with ambience and effects included.
Sound Libraries
All the Ultra Series samplers have full access to the huge library of sounds
available from E-mu and many other sources. It is fully compatible with the
legendary Ultra, E-IV, e-64, EIII, EIIIX and ESI libraries, and can transparently read Emax II, Akai S1000/S1100/S3000 and Roland S-760 banks
without awkward conversion routines.
Sounds and Sampling
The E5000 comes standard with 16 Megabytes of sample RAM. Sampling is
a standard feature with selectable sample rates of 22.05 kHz, 24 kHz,
44.1 kHz, and 48 kHz. The D/A converters and the stereo Sigma-Delta A/D
converter are 20-bit linear. Sampling can be performed in either mono or
true stereo. Sample RAM can be expanded up to 128 MB using standard
SIMM modules. With fully expanded memory, the E5000 Ultra provides
over 24 minutes of sampling time! An internal expansion socket allows you
to install up to 32 MB of sample ROM, which is instantly ready to use.
Resampling: E5000 Ultra can resample its own output in the digital
domain for layering and the creation of new and exciting effects.
Transposition: The E5000 Ultra is based on the latest G-chip and H-chip
digital hardware. The G-chip allows smooth sample transposition over a 10octave range while the H-chips retain the warm, musical character of
traditional analog filters.
Your E5000 Ultra sampler is an extremely powerful and reliable tenth
generation instrument. We at Emu sincerely hope it will help you realize
and further your musical aspirations.
12 E-MU Systems
Page 13

Introduction
Available Hardware Options…
• Eight Channel Output Expander adds eight additional polyphonic
output channels for a total of 12.
• The “DWAM” option adds an AES/EBU Digital Interface in order to
transfer stereo digital audio between the E5000 and digital recorders,
mixers, etc. An ASCII keyboard interface is also included with this
option. The keyboard can control all Ultra Series front panel operations
including naming and browsing.
• 32 MIDI Channel Expander option adds another MIDI In, Out and Thru
port to allow 32 MIDI channel capability.
• ADAT I/O option adds 16 digital outputs and 8 digital inputs using the
Alesis ADAT™ optical digital format.
• Internal Hard Disk option lets you add an internal hard disk to Ultra
Series for convenient storage and retrieval of sounds.
• Several Flash/ROM options add a 8, 16, or 32 Megabyte ROM or a Flash
ROM SIMM. ROM SIMMs add permanent onboard sound banks. The
Flash option allows you to create your own custom sample bank.
E5000 - Getting Started 13
Page 14
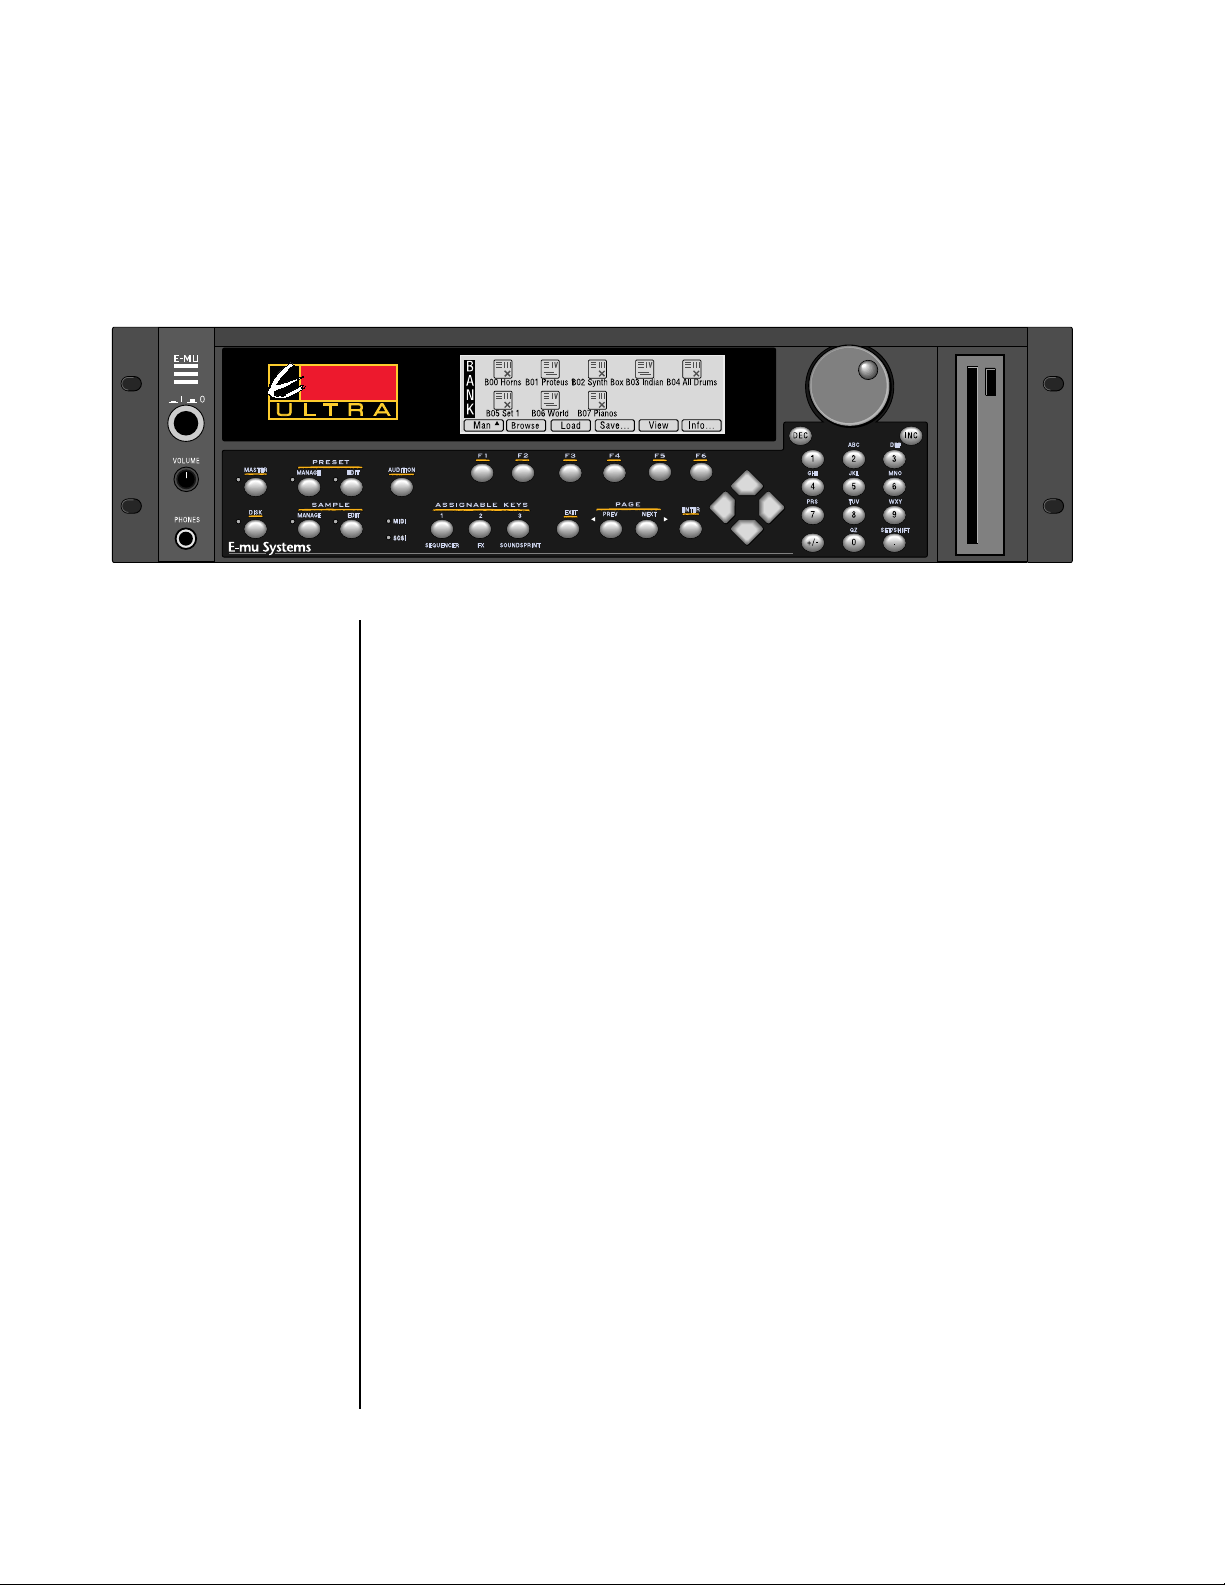
Main Controls
Volume Control
Main Controls
5000
Volume Control
This is the master volume control for all outputs, including digital I/O and
the headphone output. The master volume is a digital control. For
maximum dynamic range, set this control at or near maximum level.
Stereo Headphone Output
The stereo headphone output is taken from the stereo main outputs. This is
a high quality headphone amplifier with an output level compatible with
professional grade headphones.
Module Select Keys
The functions of your E5000 Ultra are grouped into six modules. The
Sample Manage and Sample Edit modules deal with operations at the
sample level. The Preset Manage and Preset Edit modules deal with operations at the preset level. The Master module contains functions that affect
the entire machine. Any function that has to do with the disk, such as
loading, saving and the like is accessed through the Disk module.
MIDI & SCSI Indicator LEDs
The LEDs illuminate to show activity on the SCSI bus and incoming MIDI
data.
Audition Key
The audition key allows you to play notes directly from the front panel
without having a MIDI keyboard connected. Select the note you want to
play from the “Tune” submenu in the Master module. If you have an
external hard disk connected to the E5000, the Audition key lets you play
samples directly from the hard disk before loading them when browsing
samples (Disk, Sample Browser).
14 E-MU Systems
Page 15

Main Controls
Assignable Keys
Assignable Keys
These are user-assigned keys which can cause a jump to any screen. To link
an assignable key to the current screen:
1. Press and hold one of the assignable keys.
2. After two seconds, a pop up window appears informing you that the
assignable key has been programmed for the current screen.
For additional information, see Assignable Keys in chapter three of the EOS
software manual.
Function Keys
The lower line of the display usually contains a row of up to six “soft key”
buttons. These soft-key buttons indicate the function of the function keys
directly below them.
Exit Button
The Exit button backs out of a module one menu at a time each time the
button is pressed. Use the Exit button anytime you do not want to execute
a particular function. In the Sample Manage module, the Exit button also
terminates the sampling process.
Page Select Keys (Previous & Next)
The previous and next Page Keys are used to move back and forth between
pages when multiple pages of options exist. Each button has an associated
LED arrow which illuminates when there is more information on the
previous or next page. Arrows in the top corners of the display also indicate
there are more available pages. Use the Page Select keys in the preset
selection screen to select the previous or next preset.
Enter Key
Use the Enter button to confirm a particular operation. You can use Enter in
place of an affirmative function key response such as “OK” or “Go”.
Pressing the Enter key from the Disk Browser advances the selection from:
Drives -> Folders -> Banks -> Presets -> Samples -> Sequences.
(The Exit key reverses the progression.)
Cursor Keys
The left, right, up, and down Cursor Keys are primarily used to move the
cursor around in the display. The Cursor is a reversed-out section in the
display which indicates the currently selected parameter. You can use the
left and right Cursor Keys in the preset selection screen to select the
previous or next preset.
E5000 - Getting Started 15
Page 16

Main Controls
Data Entry Control
Data Entry Control
The Data Entry Control is a stepped, variable control used to change
parameter values. The control increments or decrements the current value
one unit each click. This control incorporates acceleration (values advance
faster if the control is quickly turned).
Inc/Dec Keys
The Increment and Decrement keys are used to duplicate the function of
the data entry control when a finer degree of control is required. In the
preset selection screen the inc/dec keys select the previous or next preset.
Numeric Keys
Use the Numeric Keys to quickly select a particular preset or to enter data in
precise amounts.
Entering Data - The Numeric Keys can be used anytime the data to be
entered is a number, such as selecting samples and presets when you know
the exact number. You could simply enter the number without the leading
zero as in “10”, In this case, after entering the number, you will be asked to
confirm the value by pressing “Go”. The +/- key can be used to indicate if
the value is positive or negative. The numeric keys can also be used for
naming as some of the keys are labeled “telephone-style” with 3 characters
above the key.
Number Lock Feature
The Lock Key is used to select presets using just one or two key presses
instead of three. Pressing the Lock key repeatedly cycles through the three
lock modes - Lock Off, Lock 1 digit and Lock 2 digits. Locked digits are
shown in reverse video (white letters on black background) as shown below.
When you lock digits, you are limiting the size of the group so that fewer
key presses are required for preset selection.
Set/Shift Key
The Set/Shift key is used for several functions.
• When Set/Shift is held, the Assignable Keys assume the functions which
are labelled beneath them, taking you instantly to the Sequencer, FX or
Soundsprint screens.
• It can also be used to set a “Bookmark” in SoundSprint mode.
To Set a Bookmark: Press and hold the Set key while in SoundSprint
mode, then press one of the numeric keys. The current preset will be
stored under that numeric key and can be selected by pressing the
numeric key while in SoundSprint mode.
• To Save All Bookmarks to Flash RAM: (retained even after the power
has been turned off) Press and hold the Set/Shift key and press the +/key.
• Last and also least, the Set/Shift key functions as a decimal point key.
16 E-MU Systems
Page 17

Main Controls
Floppy Disk Drive
Floppy Disk Drive
The Floppy Disk Drive is used primarily to update software, but can also be
used to store and transfer sound banks in a pinch. Due to the low capacity
of floppy disks, they are not practical for backing up sound data. However,
floppy disks are very useful for storing MIDI sequence files and one floppy
disk can store many sequences.
The E5000 can also save samples as .WAV or AIFF files to the floppy disk.
Floppy disks are a convenient medium for transferring sound files between
the E5000 and your personal computer.
E5000 - Getting Started 17
Page 18
Connections
SCSI Port
Connections
18 E-MU Systems
In order for you to hear sounds from the unit, you need to connect it to
audio equipment. This could be headphones, a computer with speakers, or
a stereo.
This section provides descriptions of the ports and connectors on the back
of the unit and describes how to use them.
SCSI Port
SCSI is a high-speed parallel interface which is normally used to interface
with an external mass storage device such as a hard disk or CD-ROM. The
50-pin SCSI port can also be used to link the E5000 with an external
computer for extremely fast file transfers. Ultra Series synthesizers contain
advanced SCSI links to facilitate multiple “master” devices on the SCSI bus,
such as multiple Ultra Series units or a computer and an the Ultra.
For more information on SCSI installation, see the EOS Software Manual.
Also refer to the manual that accompanies your external SCSI device.
Page 19

OO
OO
You can add an
additional MIDI In, Out, and
Thru port as a option to provide
32 MIDI channel operation.
Connections
Option Ports
Option Ports
The option ports let you add additional hardware options such as the Eight
Channel Output expander - which adds eight analog output channels, or
the ADAT Interface which allows you to send sixteen eight channels and
receive eight channels of digital data to and from another digital device
using the Alesis ADAT® Optical digital interface.
MIDI Connection
E5000 Ultra provides a MIDI In, MIDI Out, and a MIDI Thru port.
• Connect Ultra’s MIDI In port to the MIDI Out port of your external
MIDI controller; this could be a keyboard, a sequencer, MIDI drum kit or
whatever.
Note: E5000 Ultra can only respond to information that your controller
transmits. (i.e. If your MIDI keyboard does not have velocity and pressure sensitivity, Ultra will not respond to velocity and pressure.)
• Connect E5000 Ultra’s MIDI Out to another MIDI instrument or computer. The MIDI Out ports transmit preset change information or filtered
performance data to a sequencer or other instruments, or can be used to
transfer MIDI sample dump information (sample data).
• MIDI Thru simply re-transmits any information received at the MIDI In
port.
OO
OO
Use a stereo plug if you
want the sample inputs to be
balanced (tip +, ring -).
The MIDI In and Out ports can also be used for communication with a
computer running Editor/Librarian applications.
Digital Interface/ASCII Keyboard Option Port
The optional digital interface allows E5000 Ultra to transfer digital audio
back and forth to other digital devices equipped with AES/EBU digital I/O.
Digital transfer keeps the signal in the digital domain which is desirable in
order to keep the signal to noise ratio as high as possible and avoid
distortion caused by D/A and A/D conversion.
The AES digital input lets you sample in stereo directly from a DAT recorder
or other digital device. The digital output reflects the data at the stereo
outputs of Ultra. See the Sample Manage module and Output Format
(located under Output in the Master menu of the EOS Software manual) for
more information.
Sample Inputs
The two electronically balanced sample input jacks accept any signal level
from microphone to line level. Input impedance is 10KΩ.
The gain of the sample input preamplifiers is set using the ADC Gain
parameter in the “New” screen which is located in the Sample Manage
module. Whenever the Sample Manage module is enabled, the sample
inputs are normally routed to the main outputs for monitoring. (Sample
Monitor can be turned On or Off in the Sample Manage, New screen.)
E5000 - Getting Started 19
Page 20

Connections
Word Clock In/Out (optional)
Word Clock In/Out (optional)
The optional word clock provides a means of synchronizing multiple digital
audio devices so that data can be transferred digitally. All digital devices in
a system should run off the same master clock. Devices can be connected in
daisy chain fashion (word clock out connected to the next unit’s word
clock in) in a small system, but a digital studio will normally use a master
word clock generator or “House Sync” with a distribution system so that
every device receives a phase-coherent and jitter-free word clock.
Word Clock In: Receives word clock (sample clock) from another digital
device such as a digital video deck, digital recorder or digital mixer.
Word Clock Out: Sends word clock (sample clock) to another digital
recorder. Word clock is always output, whether it is generated by the
internal crystal or passed through from the word clock input.
75Ω On/Off: Termination for the word clock input can be switched on or
off. Like SCSI, the LAST device in a serial word clock chain should have
termination turned On.
Digital Mixer
ADAT Optical
or AES Digital
5000
5000
Word Clock Termination ON
The last device in a Word Clock chain should have Termination ON.
Digital
Device 1
IN
OUT
IN
Digital
Device 3
Word ClockWord Clock
House Sync
Generator
Digital
Device 2
Digital
Device 4
20 E-MU Systems
A master word clock generator is preferable for larger digital setups.
Page 21

ADAT
Connections
Main Outputs
REWIND FAST FWD STOP PLAY RECORD
EJECT
In
Optical
Interface
Word
Clock
(optional)
E5000 Ultra
5000
This diagram shows how to connect an E5000 to an Alesis ADAT™
using the optional ADAT interface card. The Word Clock connection
is option, but provides a slightly more stable clock source.
Out
Main Outputs
E5000 Ultra has provisions for a variety of output connection schemes. The
most common hookup is using the main stereo outputs. The electronically
balanced main outputs are available at 1/4" stereo phone jacks. Output
impedance is 600 ohms.
Balanced Output Wiring
+
Balanced
-
Tip
Ring
E5000 - Getting Started 21
Page 22

Connections
Submix Outputs
Submix Outputs
In addition to the main stereo outputs, there is another pair of balanced
submix outputs which can be used when you want individual processing
on specific instruments. You can program any combination of MIDI
channels or Voices to appear at this submix output pair. MIDI channels can
be assigned to the submix pair in the Multimode screen. Voices can be
assigned to output channels in the Amplifier screen of the Preset Edit
menu. The submix outputs are stereo jacks (TRS). When a standard mono
jack is inserted, the jack serves as an unbalanced output. Output impedance
is 600 ohms.
Note: Two other submix output pairs (Sub2 & Sub3) are shown in the
Multimode and Amplifier screens. These are not used in the E5000 and any
signals routed to Sub2 or Sub3 will be automatically re-routed to the main
outputs.
Nominal Output Levels
Unbalanced - - 0 dBV (1V RMS)
Balanced - - - - +6 dBV (2V RMS)
AC Power Connection
E5000 Ultra may be used in environments ranging from 100 volts to 240
volts at either 50 Hz or 60 Hz. You do not need to change voltage settings.
Ultra automatically switches itself for the
proper line voltage.
22 E-MU Systems
Page 23

Connections
ASCII Keyboard Interface
ASCII Keyboard Interface
The Digital Interface/ASCII Keyboard option lets you connect a standard
IBM PC style ASCII keyboard to the synth. The ASCII keyboard allows all
front panel controls to be accessed and is a real time saver when naming
samples, presets, banks and sequences. The keyboard must be connected
before power is applied in order for the E5000 to recognize it.
Ultra Function ASCII Keyboard
Exit Esc
Ten Key Pad Ten Key Pad
Cursor Keys Cursor Keys, Ten Key Pad
Page Keys Ten Key Pad 3, 9
Numeric Selection [Num Lock, Ten Key Pad]
Inc/Dec +/F1-F6
Preset Edit [Alt, A], [Alt, F], [Ctrl, E]
Sample Manage [Alt, S]
Sample Edit Alt, D], [Ctrl, G]
Preset Manage [Alt, P]
Master [Alt, M]
Multimode [Alt, Z]
Disk [Ctrl, D]
Load Bank [Ctrl, L], [Alt, ] ]
Save Bank [Ctrl, S], [Alt, [ ]
Search Dialog [Ctrl, F] in Browser
Rename Dialog [Ctrl, R] in Browser
Audition Preset [Ctrl, A] Preset related modules
Audition Sample [Ctrl, A] Sample related modules
[F1-F6]
E5000 - Getting Started 23
Page 24

Connections
Disk Drive Options
Disk Drive Options
Internal Drives
A disk drive is a memory storage device that stores banks of sound and
preset data. Ultra can be fitted with an internal hard disk or can be
connected to an external hard disk drive via SCSI. The floppy drive on the
Ultra is used mainly to update the operating system software. (The operating
system of a computer consists of the instructions that tell the computer what to
do.) The floppy drive is also handy for transferring sequences to and from a
computer-based sequencer. Because of the large bank size of Ultra (4-128
MB) the floppy disk is impractical for backing up sound data, although it
can be used to save or transfer small sound banks in a pinch. Other types of
disk drives, as described below, can connect to your E5000 to provide
efficient sound storage.
Floppy Disk Drive (Drive 8): The floppy disk drive accommodates 3.5",
double-sided, high-density (1.4 MB) floppy disks. Primarily, the floppy drive
is a convenient way to update the operating system software. As new
enhancements are developed, the new software is distributed on floppy
disks. This software can be copied into Flash RAM and made a permanent
part of your E5000.
OO
OO
IDE Drives: Ultra Series
Emulators can use an internal
IDE hard disk. IDE drives have
several advantages such as low
cost, high capacity, low noise
and they don’t use up a precious
SCSI ID number.
• Order IDE installation kit
number 6303. This kit includes
everything necessary except the
IDE drive.
v To Update Ultra’s EOS Software
1. Turn off power to the unit.
2. Insert the floppy disk into the drive with the label side towards the
center of the unit.
3. Turn on power to the unit.
4. Press Enter to update the software or Exit to cancel.
5. Wait for E5000 Ultra to update its firmware. When the software
update has finished, the display will inform you.
Internal Hard Disk Drive: A hard disk provides the advantages of much
higher memory capacity and far faster access time. However, an internal
hard disk cannot be removed and its data must be backed up to another
medium for safekeeping.
External Drives
E5000 contains a SCSI (Small Computer Systems Interface) connector on
the rear panel. This interface is commonly used in the computer industry,
so many devices made to work with computers—particularly mass storage
devices—will also work with Ultra. Here are some of the types of mass
storage devices that can plug into the SCSI connectors.
24 E-MU Systems
Page 25

Connections
Disk Drive Options
Hard Disk Drive: A hard disk provides the advantages of much higher
memory capacity and far faster access time. Transferring data to and from
E5000 is quite straightforward. However, you cannot remove a hard disk
and replace it with another one—the disk is a permanent part of the drive.
There are three main cautions involved with hard disks:
1. Hard disks are sensitive to extreme mechanical shocks. If your hard disk
falls off a keyboard stand, chances are the hard disk will be damaged.
2. Make sure power is not interrupted when you write data to the hard
disk.
3. Hard disks have reached a very high level of reliability. However, they
can fail from time to time (as can any part of a computer), so any data
should be backed up periodically on some other medium.
Removable-media Hard Disk Drives: These are similar to normal hard
disk drives except that the disk itself can be removed and replaced with
another disk. Disk densities can range from 44 Mbytes to well over 1
Gigabyte per platter. Removable-media hard disk drives allow you to build a
sound library of unlimited size and are quite handy for transferring sounds
between machines. They’re also perfect for backups.
OO
OO
If the hard disk is
already formatted with another
file system, you can use the
“Format” function instead of the
time consuming “LL Format”.
See Disk Utilities.
CD-ROM Drive: A CD-ROM is a playback-only (data cannot be written to
it) mass storage memory device whose capacity is approximately 660
Megabytes. Quality CD-ROM libraries are available from several companies
(E-MU, InVision, Northstar, Q-Up Arts). These can be loaded into the bank
as easily as you would load from a hard disk.
Magneto-Optical Drive: Basically a read/writable CD, these high speed,
high density storage devices are great for storing large amounts of sound
data. Typically a magneto-optical drive can hold upwards of 300 Mb per
side and the removable cartridges can be used over and over. Disk access
time is comparable to a normal hard disk.
v To Connect the E5000 to an Unformatted Hard Disk
1. Position the SCSI device and the E5000 in a stable location. Hard disk
drives are particularly susceptible to shock and vibration. Make sure
that you position your hard disk where it won’t get bumped or moved
while in use.
2. Important: Make sure that all power to the E5000 and the SCSI device
is turned OFF.
3. Connect the SCSI device to your E5000 using a quality SCSI cable.
Make sure that the connectors are firmly mated and that the wire
“keepers” are locked in place. There are two type of SCSI cables in
common use: the 50-pin Centronics type and the 25-pin DB connector
type. The E5000 uses the 50-pin Centronics type connector. If your
drive the DB-25 connector, you can connect them using an adapter
cable.
E5000 - Getting Started 25
Page 26

Connections
Disk Drive Options
OO
OO
The ID numbers of all
connected drives are shown in
the Disk Browser.
4. Set the SCSI ID of your external SCSI device to any number other than
6. (6 is the default ID of the E5000). Consult the operation manual of
your SCSI device for this procedure.
5. Turn on the external SCSI device and the E5000.
6. Make sure your hard disk really is unformatted since formatting a hard
disk erases all data on it. Press the Disk button. If the display does not
show the external hard disk icon, try mounting the drives (Utilities, in
the Disk Browser). Also check that the SCSI ID is not set to 6 (E5000's
default). If the disk icon still doesn't appear, the drive is probably unformatted.
7. Format the hard disk - While in the Disk Browser, press the Utils soft
key. A new line of options will appear.
8. Select Format. The display will warn that formatting erases everything
on the hard disk. Press OK to continue.
9. The E5000 will format the hard disk drive. Formatting takes a few
minutes. The time will vary depending of the capacity of the disk.
10. After formatting, the hard disk will appear in the disk browser and is
now ready to accept data. Use the left/right cursor keys or the data
entry control to select the newly formatted hard drive. Use the Info…
function key to get information about the new drive.
OO
OO
If the hard disk is already
formatted with another file
system, you can use the Install
File System function instead of
formatting the disk. See Disk
Utilities.
v To Connect the E5000 to a Formatted SCSI Device
E5000 will recognize and load from SCSI devices formatted for Ultra,
E-Synth, E-IV, e6400, E4X, E4K, EIIIX, Emax II, EIII, ESI-32, ESI-4000,
Roland S700™ and Akai S1000/S1100/S3000™.
1. Position the SCSI device and the E5000 in a stable location.
2. Important: Make sure that all power to the E5000 and the SCSI device
is turned OFF before you connect or disconnect the SCSI cable.
3. Connect the SCSI device to your E5000 using a quality SCSI cable.
Make sure that the connectors are firmly mated and that the wire
“keepers” are locked in place. The E5000 uses a 50-pin Centronics type
connector.
4. Set the SCSI ID of your external SCSI device to any number other than
6. (6 is the default ID of E5000, although this number is user selectable.
Master, Misc). Consult the operation manual of your SCSI device for
this procedure.
5. Turn on the external SCSI device and the E5000.
6. The SCSI device will appear as a new icon in the disk browser screen.
26 E-MU Systems
Page 27
About Sampling
Percussive
Sample
Connections
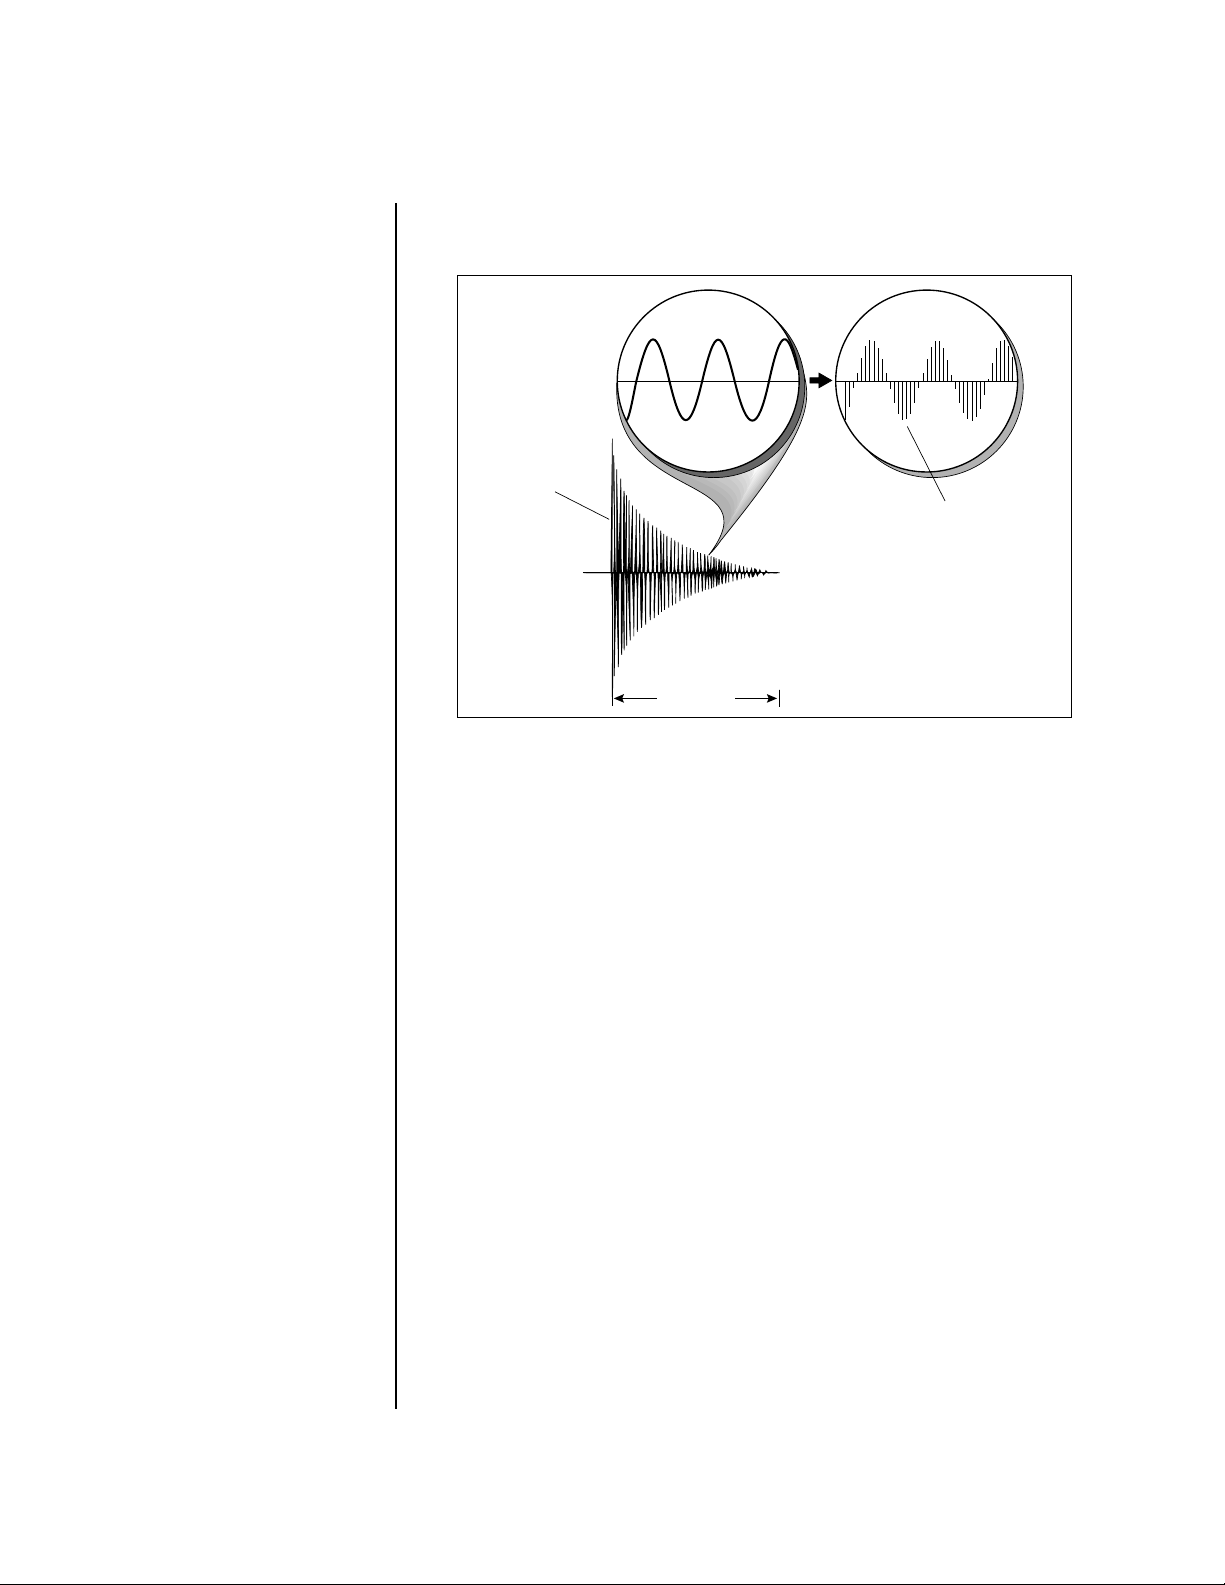
About Sampling
Each vertical line
represents a sample.
Each sample takes
a "snapshot" of the
instantaneous signal level.
1 second
Conceptually, sampling is like a tape recorder. However, the recording
process is different since the E5000 records into its computer memory
digitally. Samples can be loaded via removable-media hard disk, magnetooptical disk or CD-ROM using the SCSI interface. They can be sampled
through the analog inputs or the AES/EBU digital interface, or even
through the MIDI interface using MIDI Sample Dump or SMDI.
Computers can accept information only in the form of numbers, so the
E5000 works with audio signals coded into binary numbers. Sampling
works by examining (sampling) the incoming signal level at a very high
rate (44,100 times a second for compact disc rate), and sequentially
recording these different levels in memory. Once stored, these samples may
be played back (in the proper sequence, of course) to reconstruct the
original signal. For instance, if a two-second sound were being sampled at
44.1 kHz, it would require 2 x 44,100 or 88,200 samples to be recorded.
Once a sound has been recorded, it can be manipulated. Playing back the
samples in reverse order from which they were stored plays the sound
backwards. Playing back the samples at a faster rate than the rate at which
they were stored raises the pitch. Playing back at a slower rate lowers the
pitch, much like a tape recorder’s variable speed control.
Advanced onboard sample editing processors such as Time Compression/
Expansion, Doppler and Beat Munging allow you to manipulate the sound
in both time and audio space. Other processors provide standard studio
functions such as parametric equalization, compression and exciter. Far
more radical transformations are possible using our exclusive Transform
Multiplication and Beat Munging processes. Sounds can also be manipulated in real-time by filtering or by modulating amplitude and pitch.
E5000 - Getting Started 27
Page 28

Instant Gratification
Power Up!
Instant Gratification
This section is designed to get you playing sounds in the shortest amount
of time and provides only a partial explanation of disk operations. For more
complete instructions, see Disk in the EOS Software Manual.
Power Up!
• Turn on the Emulator and wait for the following screen to appear.
If you had the ROM bank added, you could select presets immediately
using the Data Entry Control, INC/DEC buttons, Left/Right cursor buttons
or the numeric keypad to change presets. Without the ROM bank installed,
you must load a bank into the unit. See the next page for instructions.
Before you Begin…
v Do you have a Hard Disk or CD-ROM drive connected to
the external SCSI port?
You NEED one. Sample and preset data must be loaded into the E5000’s
internal RAM before it can make sound. A hard disk drive is also necessary
in order to SAVE your valuable work.
A hard disk drive and a CD-ROM drive are the keys to building a sample
library. Once you have these two important necessities, you’ll have access
to a universe of sounds. The beauty of a sampling-synthesizer is that it can
never become obsolete. You can have ANY sound simply by sampling it or
loading a new bank of presets. The entry fee is a CD-ROM and HD drive.
• If you don’t have a hard disk or CD-ROM drive yet, you can still start
exploring your E5000. See “Loading from Floppy Disk” on page 29 or
“A Practice Sampling Session” on page 32.
28 E-MU Systems
Page 29
OO
OO
The SCSI ID number of
the drive precedes the Drive
Name. In the screen at right, the
Quantum FIREBALL is on SCSI ID
#1. The Floppy drive is always
Drive 8.
Instant Gratification
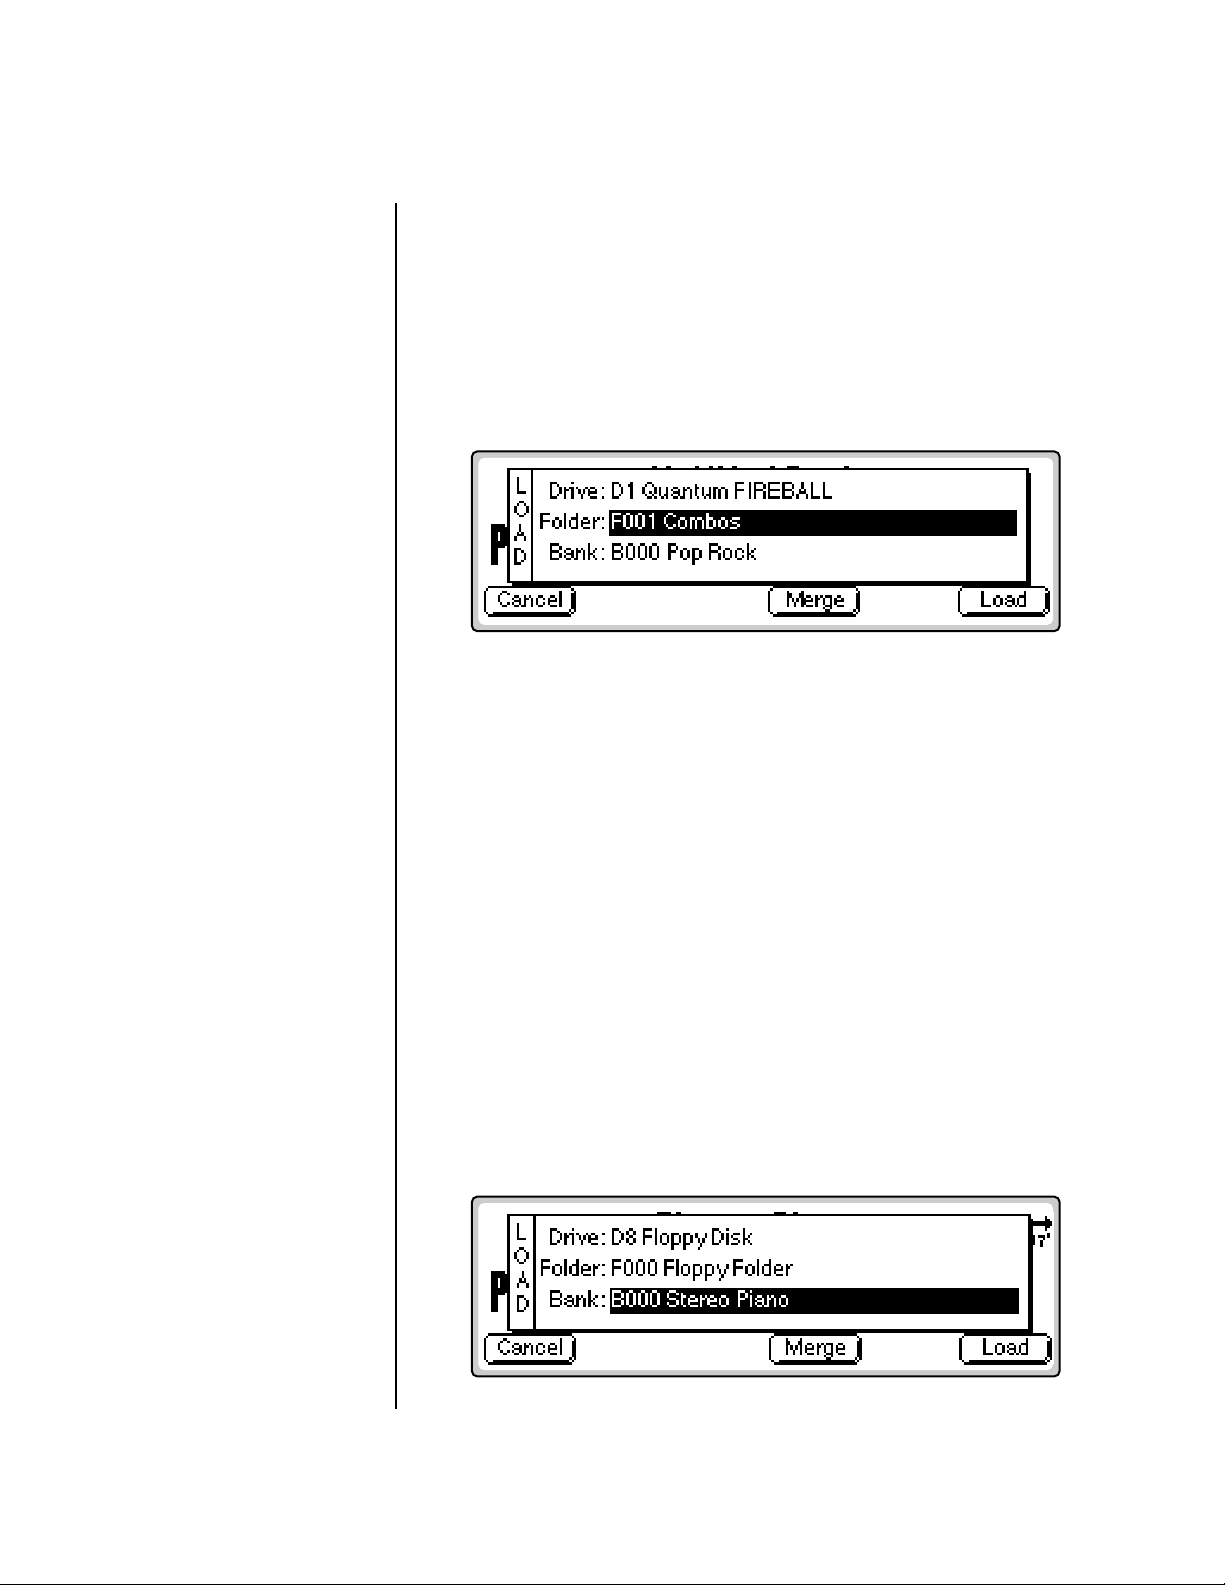
Loading a Bank from Hard Disk or CD-ROM
Loading a Bank from Hard Disk or CD-ROM
Loading a bank of sounds makes an entire collection of different presets
immediately available.(Of course you have to have a hard disk or CD-ROM
connected before you can load a bank. See page 25 for information on
connecting a hard disk.)
v To Load a Bank from the Hard Disk or CD-ROM:
1. Press the Load function key (F4) from the main screen shown above.
The following screen appears. Select the desired Drive.
The display shows the hard disk drive information, the folders contained
on the drive, and the individual banks contained in the displayed folder.
2. Select the Folder containing the desired bank. Using the Arrow cursor
buttons, move the cursor to the Folder field and select the Combos
folder.
3. Select the Bank. Move the cursor down to the Bank field and choose
the General MIDI bank using the Data Entry Control, the INC/DEC
buttons or the numeric keypad.
4. Press OK to load the bank. The bank is loaded and the first preset in the
bank appears.
Loading from Floppy Disk
If you don’t have a hard disk or CD-ROM drive yet, you can load the stereo
piano contained on one of the floppy disks that came with your E5000.
Storing sounds on floppy disk is NOT recommend due to their small size.
v To Load a Bank from the Floppy Disk:
1. Insert the Stereo Piano floppy disk with the label toward the display.
Press the Load function key (F4) from the main screen. If you don’t
have a hard disk connected, the following screen appears.
E5000 - Getting Started 29
Page 30
Instant Gratification
Selecting Presets
2. Select the Drive. (If you have a hard disk or CD-ROM connected
otherwise skip this step.) Using the Arrow cursor buttons, move the
cursor to the Drive field and select, “D8 Floppy Disk”.
3. Select the Folder containing the desired bank. Using the Arrow cursor
buttons, move the cursor to the Folder field and select the F000 Floppy
folder. (Since the Piano floppy only has one folder, skip this step.)
4. Select the Bank. Move the cursor down to the Bank field and choose
the Stereo Piano bank using the Data Entry Control, the INC/DEC
buttons or the numeric keypad. (If you’re loading the Piano you can
skip this step too since the Piano floppy only has one Bank.)
5. Press OK to load the bank. The bank is loaded and the first preset in the
bank appears.
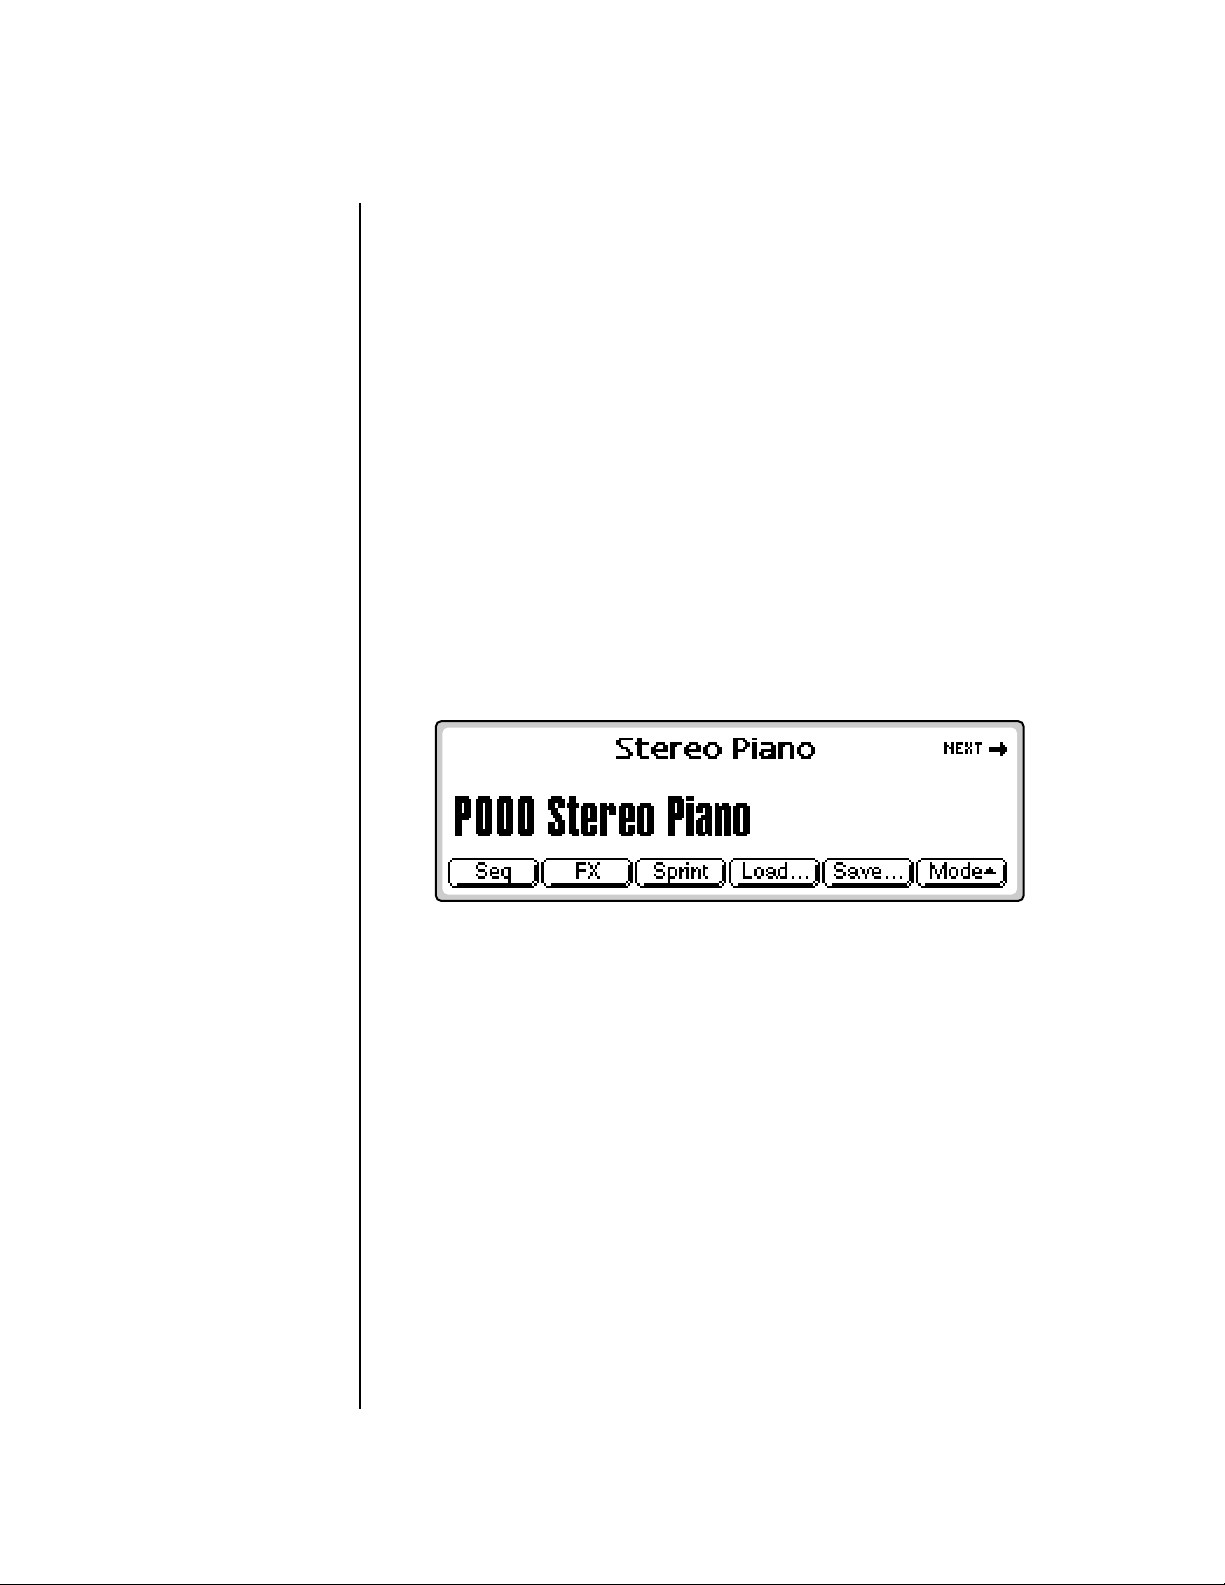
Selecting Presets
The currently selected preset is displayed on the main screen showing the
preset number (as it appears in the currently loaded Bank) and its name.
EOS provides several methods for selecting presets.
30 E-MU Systems
v To Select a Preset:
• Use the Data Entry Control to quickly scroll through the presets.
• Use the Left and Right cursor buttons or the INC and DEC buttons to
scroll through them one at a time.
• The Page buttons to scroll through them ten at a time.
• The numeric keypad to punch in the preset number and then press the
“Go” button to confirm the selection.
When using the numeric keypad to select presets, you select a preset by
entering a 1, 2 or 3 digit number. If fewer than three digits are entered, you
must press the Enter or Go button after selecting the number. For example,
you could select preset number 3 in any one of three ways:
1. Type “3.” A window pops up asking you to confirm the preset number.
Press the “Enter” button or “Go” button.
2. Type “03.” A window pops up asking you to confirm the preset number.
Press the “Enter” button or “Go” button.
Page 31
Instant Gratification
3. Type “003.” (You do not need to press the “Enter” button or “Go”
button when entering all three digits of the preset number. Because
there are only three possible digits, EOS knows that you’re done.)
Saving
OO
OO
The more sound RAM
you have in the unit, the larger
the bank size can be and the
more presets you can have in
the bank at once.
OO
OO
Save to an Empty Bank
location if you have edited
presets and want to save the old
bank as well as the edited bank.
Presets are contained in the bank you loaded earlier so they are instantly
accessible when selected, unlike SoundSprint presets, which take a second
or two to load from the hard disk.
The next and previous presets are displayed in the upper corners of the
screen. The next preset is displayed in the upper right hand corner, the
previous preset is shown in the upper left hand corner.
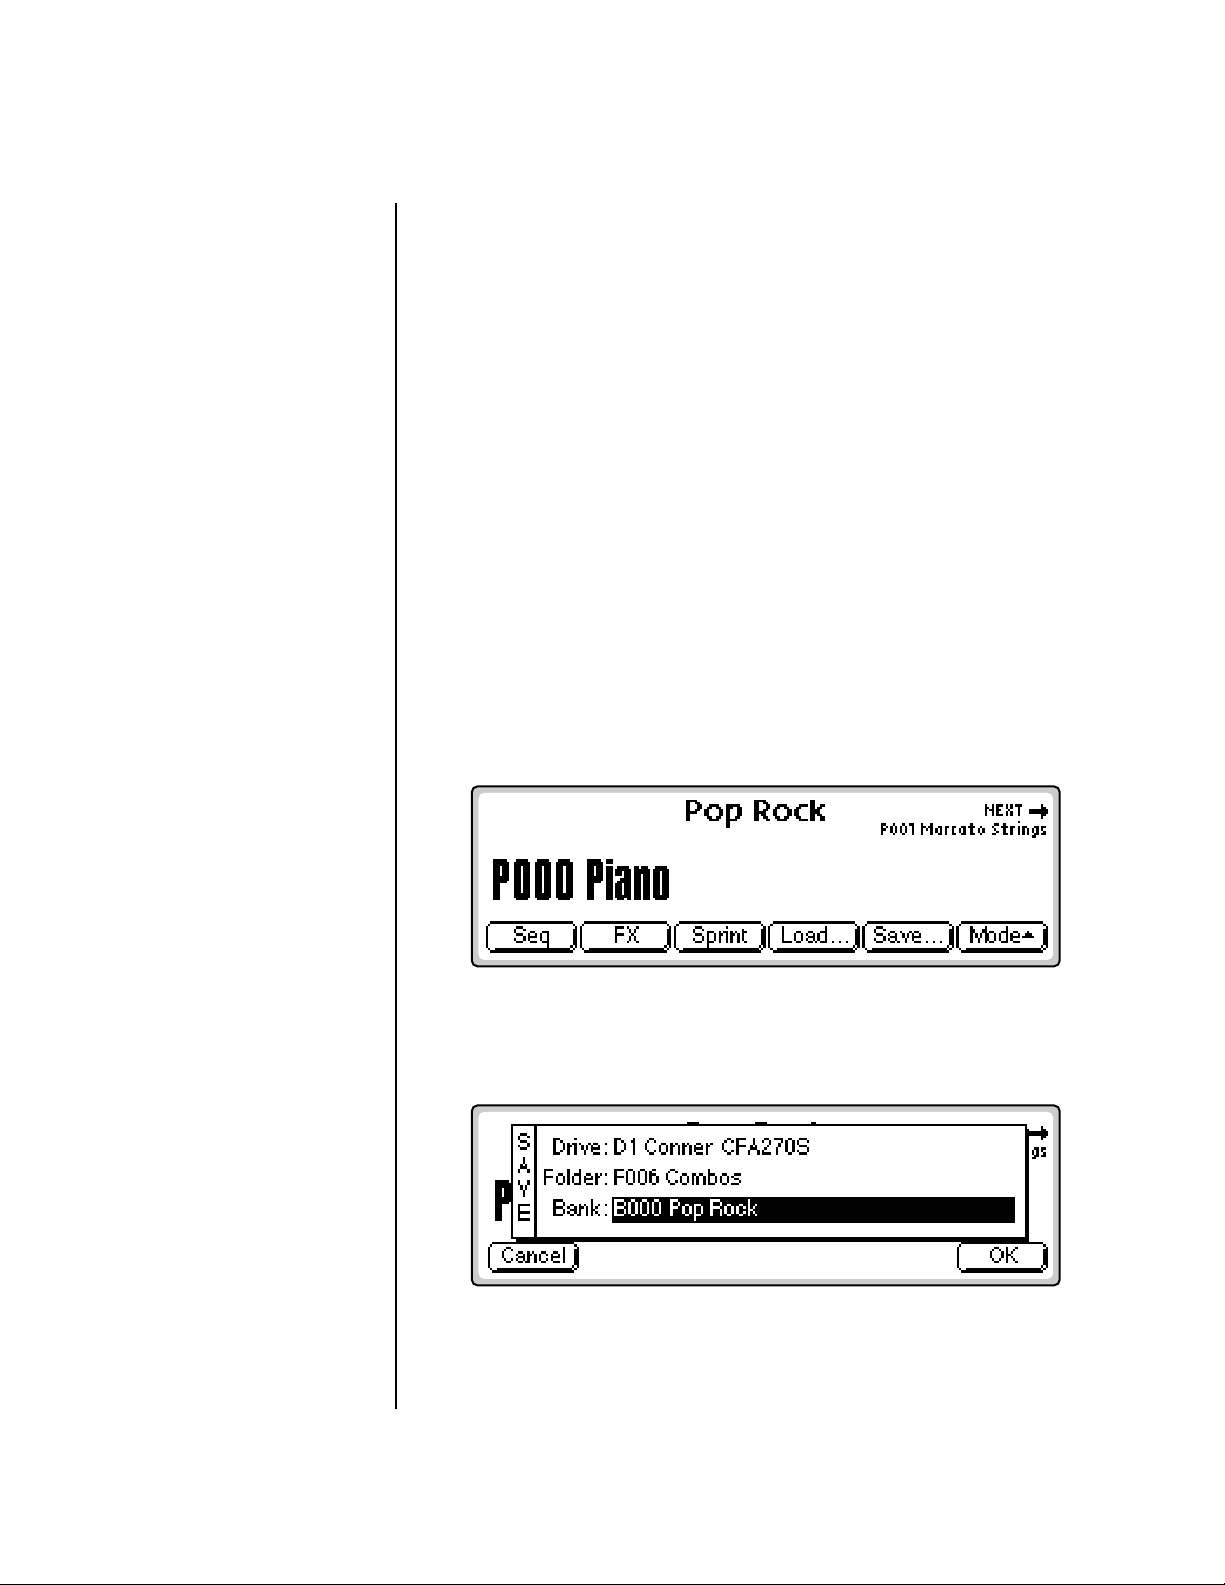
Saving
When presets are loaded into the bank, you are free to edit any parameter
in any preset. When you have everything the way you want it, SAVE the
entire bank to the hard disk. Since nothing is made permanent until you
Save it, you can play around with the presets to your heart’s content
without worrying about ruining something.
When you get something you want to keep, then it's time to Save. If you
don't save the bank, all changes will be lost as soon as you switch off
power or load another bank.
v To Save a Bank:
1. From the Main screen shown above, press the button directly under
“Save…” on the screen (F5). The following screen appears.
2. Select the Bank location. The bank field defaults to the bank currently
loaded. Press OK to overwrite the bank or select an empty bank if you
want to save the bank as a new bank.
E5000 - Getting Started 31
Page 32

Instant Gratification
A Practice Sampling Session
OO
OO
To save a single preset to
a bank see “Export Preset” in
the Preset Manage module.
You can also save the bank to another folder or disk drive (if
connected). Use the up/down cursor buttons to advance the cursor to
the Folder or Drive field, then select the new destination.
3. Remember that Saving is permanent, so think twice before pressing OK.
Press OK to Save the bank or Cancel to abort the operation and return
to the main screen.
A Practice Sampling Session
Sampling lets you play ANY SOUND! In this session, you will sample your
own voice. Although there is much more to the art of sampling than just
sampling your voice, this lesson will give you a good start.
In preparation for this sampling session, please read over Chapter 5, Sample
Management in the EOS software manual.
v Connections…
1. Connect a microphone to the left sample input jack on the rear panel
of your EOS instrument. If you don't have a microphone you can use
another signal source such as a CD player. Connect a CD player to both
the left and right sample inputs or just the left input if you want to
sample in mono.
v Erase the Bank
This step “cleans the slate” for your experiments.
2. Press the Master button to enter the Master module.
3. Press the Bank function key (F2).
4. Press Erase (F1). A popup dialog box appears asking you if you want to
erase Preset, Samples and Sequences.
5. Don't worry, be happy! Press OK (F6).
v Sample Setup
6. Press the Sample Manage button.
7. Press the New function key (F3). The following screen appears.
32 E-MU Systems
Page 33

Instant Gratification
A Practice Sampling Session
8. If you are sampling in mono, select the Left channel only. The
Threshold sample trigger only reads the Left channel.
9. Set the Source to analog 44.1 kHz or analog 22.05 kHz. To select the
48kHz (or 24kHz) sampling rate, you must change the “Default Clock”
located in the MASTER menu under “In/Out” to 48kHz.
10. Set Length to 2 seconds.
11. Move the cursor to ADC Gain.
12. Sing “Ahhh” into the microphone. (This is an easy sound to loop.) You
should see the VU meter moving.
13. Still singing “Ahhh”, adjust the ADC Gain using the Data Entry
Control or INC/DEC buttons so that the peak bar of the VU meter
comes close to the extreme right side without actually reaching it.
14. Set the Threshold to -54 dB. When the input sound exceeds this level,
sampling will start.
Truncation trims the
silence off the beginning and
end of the sample.
Normalize boosts the signal to
its optimum level.
v Sampling!
15. Press the Arm function key (F5). This arms the sampling process.
16. Sing Ahhhh! The display says “Sampling”.
17. When you are out of breath, press Stop (F1), Exit or Enter to stop
sampling. The following screen appears.
18. The screen shown above gives you the option to Dispose, Keep or place
the sample you just took. It also contains the Automatic Sampling
parameters. Set the Automatic Truncate, Normalize and Loop
parameters as shown above (both, relative, off).
19. Press the Place function key (F6).
E5000 - Getting Started 33
Page 34

Instant Gratification
A Practice Sampling Session
OO
OO
Tip: If you name the
current preset BEFORE taking the
sample, EOS will automatically
name the sample for you. If you
happen to be sampling another
synthesizer and have MIDI
connected, EOS will even add
the original key to the sample
name!
20. Popup dialog boxes will inform you that the sample is being Truncated
and Normalized. Play the keyboard. Your voice will play up and down
the entire keyboard. You will probably notice that the original key
sounds the most natural.
Congratulations! You've just taken your first sample.
v Name the Sample
Name everything! It saves valuable time when you're trying to find a
certain Sample or Preset you created earlier.
21. Press the Exit button to go to the main Sample Manage screen.
22. Press the Name function key (F2). The following screen appears.
The Attack portion of the
sound is the large part of the
waveform. The attack contains
changing harmonics and is
difficult to loop. Move the loop
start and end points into a
portion of the wave where the
level looks steady.
23. Change letters using the Data Entry Control, INC/DEC buttons or
numeric keypad. Move the cursor using the left/right cursor buttons.
The up cursor adds a space. The down cursor button deletes a space.
24. Press OK (F6) when you're finished naming your sample.
v Looping
Looping has gained a reputation for being something of a black art. In
actuality, it's really not that difficult to loop most sounds, especially with all
the looping tools provided by EOS. Let's go ahead and loop the sample you
just created.
25. Press the Sample Edit button.
26. Press the Tools1 key (F3). Another row of function keys appears.
27. Press Loop (F1). The following screen appears.
34 E-MU Systems
28. Turn the “fixSize” parameter Off by pressing the F2 key so there is no
check mark in the box.
Page 35

Instant Gratification
A Practice Sampling Session
29. Move the cursor down to the third line and adjust the Loop Size so
that it is about half a second or less. As you do so, you'll see the dotted
line marked “E” move toward the left.
30. Play a key. You'll hear your voice being looped… badly.
31. Move the cursor back up to the Start field. Play a key as you adjust the
Loop Start using the Data Entry Control. As you move the start point
out of the “attack” portion of the sound, you’ll notice the loop
improve. Find a location where the loop sounds best. Don't worry if it's
not that great.
32. Press the AutoC function key (F5 Autocorrelate). This advanced control
examines the waveform for similarities and adjusts the loop points for
you.
33. Play a key. Did the loop improve? If the volume wavers excessively, try
reducing the loop start. Autocorrelate again.
34. Continue adjusting the loop size and start times. Autocorrelate the
sample after each adjustment until you get a good loop. It takes a little
practice, but you'll get it.
35. Press OK when you've found a good loop. The Loop Parameters screen
appears. This screen contains three other looping tools. Press OK to
continue.
36. Read about the other looping tools in Chapter 5, Sample Edit of the
EOS software manual and, by all means, feel free to try them out. The
best way to learn about looping is to experiment with a wide variety of
signals.
• Practice sampling and looping using the Audio CD that came with your
E5000. Looping drum beats and grooves is usually much easier than
looping instruments.
• Be sure to try out ‘“Beat Munging” on your samples from the Audio CD.
• Learn how to set the keyboard ranges of samples and do a whole bunch
more by reading “Voices-Key Window” in the EOS software manual.
v Steps in Sampling
These are the basic steps you will go through every time you have a
sampling session.
• Take the sample
• Truncate the sample
• Loop the sample (if desired)
• Assign the sample to a keyboard position
• Continue to refine and make presets
Of course, you will probably develop your own order and style of sampling
techniques. It’s not hard, it just takes a little practice.
E5000 - Getting Started 35
Page 36

Instant Gratification
Exploring the Preset
OO
OO
Use the EXIT button to
back out of the Preset Edit
module if you get lost.
Exploring the Preset
The Preset Edit module is where everything comes together into a complete
keyboard setup. It's a huge module and can be initially confusing. The first
thing you need to know is that there are two main levels to the Preset Edit
module.
Preset Definition is used for arranging voices and samples on the
keyboard, editing global preset parameters and linking presets, as well as
setting effects and initial controller values.
Dynamic Processing is the lower level which is used to perform more
detailed editing of voices such as envelope shaping of the amplifier and
filter as well as the modulation parameters. This is the “synthesizer” section
of EOS.
Preset Edit Key
Preset Definition Level
Voices
Vol/Pan/Tune
Key Ranges
Velocity Ranges
Realtime Ranges
Edit Soft Key
Exit Key
Global
Preset Setup
Preset Effects
Init. Controller
Links
Vol/Pan/Tune
Key Ranges
Velocity Ranges
Dynamic Processing Level
Tuning
Voice Tuning
Voice Modifiers
Voice Setup
Amp/Filter
Amplifier
Amp. Envelope
Filter Setup
Filter Envelope
LFO/Aux
LFO-1
LFO-2
Aux. Envelope
Cords
Cords 00-05
Cords 06-11
Cords 12-17
Cords 18-23
The Preset Definition layer contains three main pages.
Global Editor. Preset Transpose, Volume and Preset Effects.
Links. Create stacked preset layers or splits.
Voice Editor. Allows you place voices and samples on the keyboard and
crossfade or switch between them according to key position, velocity range
and realtime controls. Also contains voice tuning, volume and pan
controls.
36 E-MU Systems
The Dynamic Processing parameters are accessed by pressing the Edit
button while in one of the Preset Edit, Voice screen parameters.
Page 37

Instant Gratification
Which Voices are Assigned to the Keyboard?
Which Voices are Assigned to the Keyboard?
Good question. You'll often want to know how samples and voices are
assigned in existing presets or you may want to build your own presets.
1. Select a preset to examine.
2. Press the Preset Edit button. The following screen appears.
In this preset, Voice 1 is a multisample. The samples contained in the
multisample are listed below it. The volume, pan position, coarse and
fine tuning, transpose and original keys can be adjusted from this
screen.
3. Press the Next Page button. The arrow next to it is illuminated,
indicating that there is another page of information. The Key Window
appears.
The keyboard assignments of the multisample and the samples it
contains are shown graphically.
Press the Down cursor button repeatedly to view the keyboard
assignment of the other voices.
4. Press the Next Page button to go to the Velocity Window. The velocity
window allows you to switch or fade samples and voices according to
key velocity.
See “Voices - Velocity Window” in the EOS software manual for detailed
information about the Velocity Window.
5. Press the Next Page button again to go to the Realtime Window. The
realtime window allows you to switch or fade samples and voices
according to a realtime control such as a modulation wheel or an LFO.
See “Voices - Realtime Window” in the EOS Software manual for
detailed information about the Realtime Window.
E5000 - Getting Started 37
Page 38

Instant Gratification
Creating a Link
Creating a Link
Linking presets is a quick and easy way to create huge stacked presets, split
keyboard presets and create new sounds.
1. Press the Links function key (F4). The preset link page appears. The
screen should appear as below with “No Links in Preset”. If not, choose
another preset and return to Preset Links.
2. Press the Utils function key (F1). Another row of function keys appears.
3. Press New… (F1). The following screen appears.
38 E-MU Systems
4. Move the cursor to the preset field and select a preset using the Data
Entry Control, INC/DEC buttons, or the numeric keypad.
5. Play the keyboard. Both presets will be heard.
Add another link if you want. Also, be sure to check out all the other link
options. See “PRESET EDIT - Links”, in the EOS software manual for more
information.
Page 39

OO
OO
The arpeggiated notes
can be recorded into the
sequencer and are transmitted
on the MIDI Out port.
OO
OO
The arpeggiator
continues playing on the current
MIDI channel if you switch to
Multi mode.
Instant Gratification
Arpeggiator
Arpeggiator
An arpeggiator moves a pattern of notes sequentially over a range of the
keyboard. EOS provides a performance-oriented arpeggiator which is
powerful, yet quick and easy to use. It has several features including tap
tempo, octave extension, note value divisor and control over how the
extensions are played (up, down, or up and down or random). The arpeggiator plays on the Basic Channel and remembers the order of played notes.
v To Access the Arpeggiator:
1. From the main preset selection screen, press the Mode function key
(F6). A new set of function keys appears.
2. Press the Arp function key (F5). The arpeggiator will be enabled and the
function keys now control the arpeggiator functions.
Arp Off
Octave Extension. The extension control shifts the arpeggio up the
specified number of octaves each time the pattern is repeated. For example,
suppose you played C2 with an Octave Extension value of 2. The arpeggiator advances the pattern 2 octaves in the direction specified. The
extension can be set from 0-3 octaves.
Octave
Extend
Direction Note
Division
Tempo Go
Back
v To Set the Octave Extension:
• Press the Octave Extension button (F2) to toggle between values.
2-oct Extension, Direction Up
Back
123 456 789
Played
Extend 1
Extend 2
E5000 - Getting Started 39
Page 40

Instant Gratification
Arpeggiator
Arpeggiator
Direction
Up
Down
Up/Down
Random
Direction. The Direction parameter determines the direction or pattern of
the arpeggiated notes. The held notes can be played forward, backward in
an alternating forward/backward order or randomly. This setting also
affects the order of the octave extensions.
v To Set the Arpeggiator Direction:
• Press the Direction button (F3) repeatedly until the desired direction is
displayed on the screen. See the illustration at left for a description of
the direction display.
Division. The speed of the arpeggiator is determined by both the tempo
and the tempo divisor. The following divisors are available: 1/2 note, 1/2
note triplet, 1/4 note, 1/4 note triplet, 1/8 note, 1/8 note triplet, 1/16 note,
1/16th note triplet, 1/32 note, 1/32 note triplet. The division is particularly
useful if you are synced to an external MIDI clock.
Triplets. Access the arpeggiator from Multimode and turn Triplets On.
Triplets will remain on even if you switch back to Omni or Poly modes.
Tempo. The Tempo parameter, used with the Division parameter, deter-
mines the speed of the arpeggiator. There are two ways of defining the
arpeggiator tempo; by entering it numerically or by using the Tap Tempo
feature.
40 E-MU Systems
v To Enter the Tempo Numerically:
1. Press the Tempo function key (F5) to access the Arpeggiator Tempo
screen.
2. Place the cursor over the tempo field and enter the desired tempo
using the Data Entry Control, INC/DEC buttons or the Numeric
Keypad.
3. Press Done (F1) or OK (F6) to return to the main Arpeggiator menu
from the Tempo submenu. If you changed the status of the Sync
function, it will be saved to EEPROM.
v To use the Tap Tempo function:
1. Press the Tempo function key (F5) to access the Arpeggiator Tempo
screen.
Page 41

Instant Gratification
Arpeggiator
2. Tap the F4 button at the desired tempo at least four times to define a
new tempo. After the first four taps, the tempo updates the average
tempo with each subsequent tap.
3. Press Done (F1) or OK (F6) to return to the main Arpeggiator menu
from the Tempo submenu. If you changed the status of the Sync
function, it will be saved to EEPROM.
You can control the
arpeggiator using an external
MIDI Clock by setting the
sequencer to an external clock
(Sequencer, Global, Setup).
OO
OO
The arpeggiated notes
can be recorded into the
sequencer and are transmitted
on the MIDI Out port.
ReSync! Resets the Arpeggiator clock at the exact moment the Resync
button is pressed. This lets you synchronize with another beat as you play,
even if the two clocks are not locked together.
Key Sync/Free Run. The Sync parameter defines when a note is played in
relation to when the key is pressed. When set to Key Sync, the note sounds
the instant a key is pressed. When set to Free Run, the note will not sound
until the next arpeggiator clock cycle. The new Sync value is saved to the
internal EEPROM.
The arpeggiator and sequencer use the SAME CLOCK and tempo. Changes
in either menu will affect both functions.
v To Arpeggiate:
1. Press the Mode function key (F6) from the preset selection screen.
A new row of function keys appears.
2. Press the Arp function key (F5). The arpeggiator is enabled and the
function keys now control the arpeggiator functions.
3. Play a chord. The notes you are holding should now be arpeggiating.
Change the note division or go to the tempo submenu to change the
speed. Explore all the arpeggiator controls. Have fun!
4. Press ArpOff (F1) to turn off the Arpeggiator.
Note: You can leave the Arpeggiator menu with the Arpeggiator on.
Simply return to the Arp menu to turn it off again.
5. Press Run to start and Stop to stop arpeggiating. Press Done, OK, Exit
or Enter to leave the Arpeggiator.
From Multi mode, the Arpeggiator window appears as shown below. The
functions are identical.
E5000 - Getting Started 41
Page 42
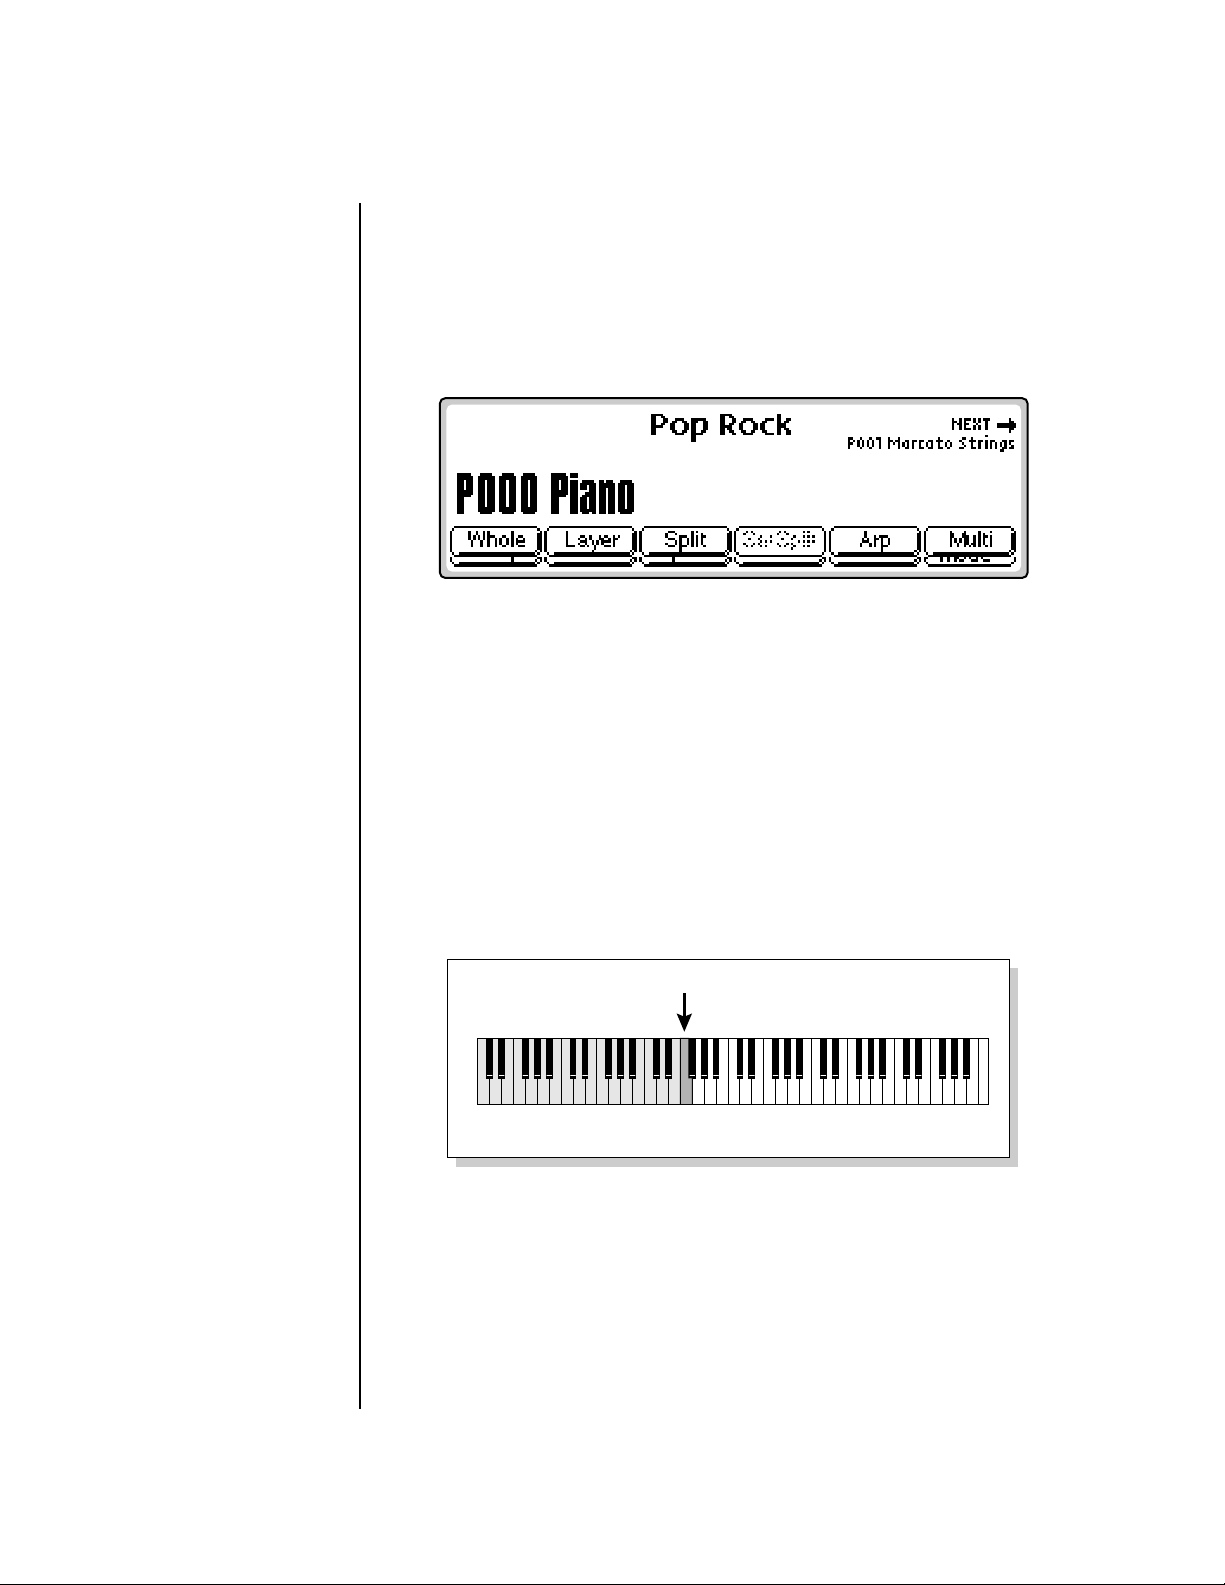
Instant Gratification
Keyboard Modes
Keyboard Modes
The keyboard modes are receiver functions, processing MIDI and are
designed as easy-to-use performance features.
v To Access the Keyboard Modes:
1. Press the Mode function key (F6). A new set of function keys appears.
Whole
Normal mode where the keyboard is not split or layered. This button puts
EOS in Omni or Poly Mode.
OO
OO
On a split keyboard, the
Arpeggiator will play on the
preset that was selected when
the arpeggiator was turned on
Layer
This mode places both presets across the entire keyboard at once. Selection
and Transpose operate exactly the same as in Split mode. See Split.
Split
The preset assigned to the MIDI Basic channel is placed on the lower half of
the keyboard and the preset assigned to the Basic channel + 1 is placed on
the upper split (for details about the Basic Channel and how to set it, see
“Basic Channel” in the EOS Software Manual).
Split Point
Basic Channel Basic Channel + 1
Rock Bass 1 Piano
v To Set the Keyboard Split Point:
1. Press the Mode button (F6) from the main preset screen. The Keyboard
submenu appears.
2. Press the SetSplit function key (F4). The display asks you to play a key.
3. Play a key on the keyboard you want to be the first key of the upper
preset.
42 E-MU Systems
Page 43
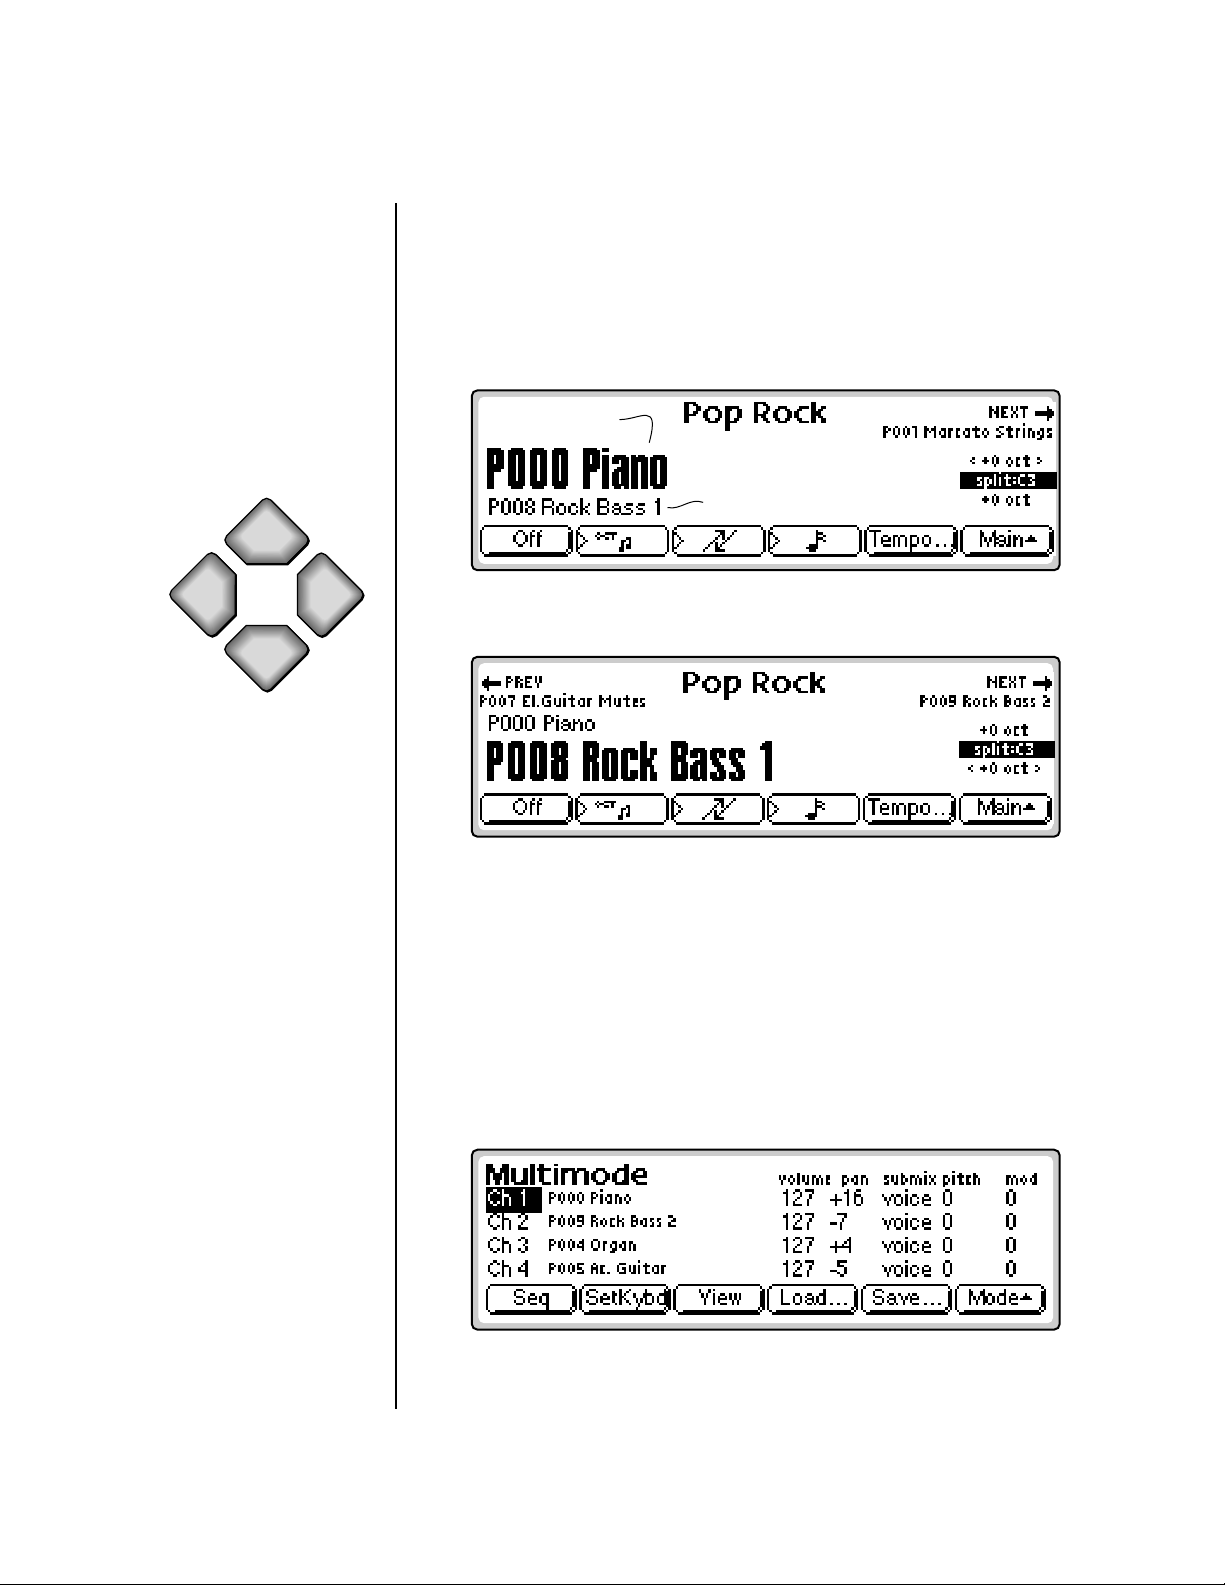
Select
Upper
Instant Gratification
Keyboard Modes
v To Change and Transpose Presets in Split Mode:
When in Split mode, the display appears as shown below, with both split
presets shown (upper is always on top). The currently selected preset is
ALWAYS shown in large bold type.
1. Use the Data Entry Control or INC/DEC buttons to change the Preset
shown in Bold.
Upper Preset
Lower Preset
Xpose
Down
Pan ADDS to the pan
setting made in the voice and is
not an absolute pan setting.
Xpose
Up
Select
Lower
2. Use the left and right cursor buttons to transpose the selected Preset up
or down.
The Upper Preset is ALWAYS on top of the lower preset in the display.
Multi
Multimode allows the Emulator to respond to multiple MIDI channels at
once allowing you to play multiple MIDI channels simultaneously. For
detailed information and instructions on operating in Multimode, see
Multimode in the EOS Software Manual.
v Selecting Multi Mode:
• Press the Mode function key (F6) to turn on Multimode and display
the Multi mode screen. See the following illustration.
E5000 - Getting Started 43
Page 44

Instant Gratification
There’s Always More
The optional MIDI
channel expander card allows
32 channel operation on older
EOS machines having a single
MIDI input port.
OO
OO
Omni mode plays only
the currently selected preset
from any MIDI channel.
v To Change Channel Settings in Multimode:
1. Press the View function key to select MIDI Mix view. The MIDI Mix
screen displays and defines the preset, volume, pan settings and output
assignments for up to 32 MIDI channels.
This is useful for fine tuning multi-timbral sequences. This screen also
lets you override the output channel programmed in the voice. Any
volume, pan and preset changes made over MIDI are reflected in this
display.
• Volume = MIDI continuous controller channel #7
• Pan = MIDI continuous controller channel #10
2. Select the desired MIDI channel using the up/down cursor buttons.
3. Select preset, volume, pan or the output assignment using the left/right
cursor buttons. Change the parameter values using the Data Entry
Control, the INC/DEC buttons, or the numeric keypad.
v To Return to Omni or Poly Mode:
1. Press the Arrow function key (F6).
2. Press the Mode function key (F6).
3. Press the Whole function key (F1).
There’s Always More
There’s LOTS more, all contained in the EOS software manual. Use it as a
reference manual, looking up subjects as you need to know them. Most
important of all is that you actually TRY OUT the various functions.Once
you actually perform a function, you’ll remember how it’s done.
44 E-MU Systems
Page 45

Specifications
Specifications
Number of Voices: 64
Sound Memory: 16 MB standard, expandable to 128 MB
Output Sample Rate: 44.1 kHz, 48 kHz
Main Outputs: 2 balanced 1/4” stereo jacks, TRS
Submix Outputs: 2 balanced 1/4" stereo jacks, (expandable to 10
outputs)
Output Level: 0 dBV nominal unbalanced, +6 dBV balanced
Output Impedance: 600Ω
Analog Inputs: 2 balanced 1/4" jacks, TRS
Input Impedance: 10KΩ
Input Gain Scaling: -16 to +30 dB
Data Encoding: Input: 16-bit, ∑∆, 128x oversampling
Output: 20-bits
Digital I/O: AES/EBU, XLR connectors, (optional)
ASCII Keyboard: ASCII keyboard connector (optional)
MIDI: In, Out, Thru (optional 32 MIDI channels)
SCSI: 50-pin connector, active termination
Sample Rates: Analog: 48, 44.1, 24, 22.05 kHz;
Digital: 48, 44.1, 32 kHz.
Pitch Shift Range: +4/-6 octaves, constant sample rate technology
Frequency Response: 20 Hz to 20 kHz, +1/-1 dB
Dynamic Range: >100 dB
Signal/Quiescent
Noise:
THD: 0.02% (1 kHz sine wave, A-weighting)
Stereo Phase: Phase Coherent ±1° at 1 kHz
Weight: 17.75 pounds (8 kg)
Dimensions: W - 17.125" (43.5 cm)
>95 dB
H - 5.25" (13.3 cm)
L - 13.25" (33.6 cm)
Power: 100-240 VAC, 50/60 Hz, auto-select, < 50 watts
E5000 - Getting Started 45
Page 46
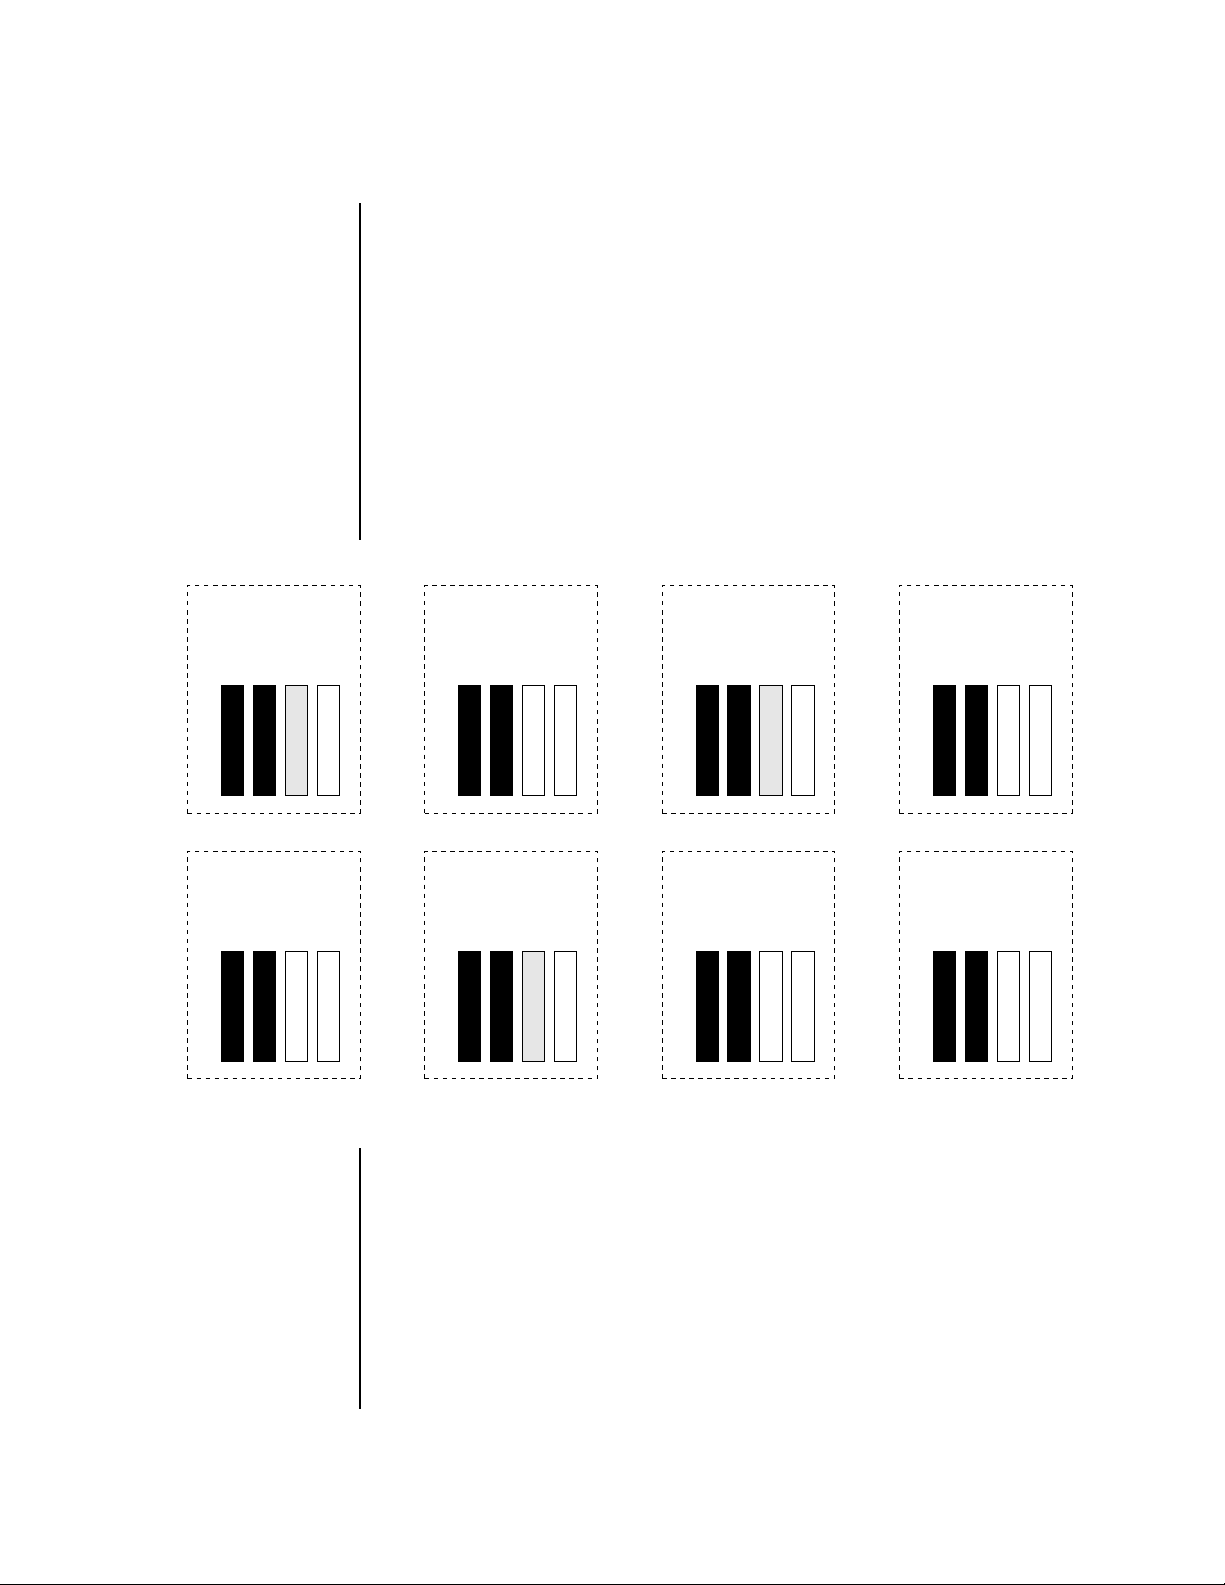
Sound RAM Memory Expansion
Sound RAM Memory Expansion
__
__
Caution: No more than
64 MB of sample RAM can be
used together with Sound ROM.
More memory CAN be installed
however, and a special function
(Master, Setup, Misc) can be
used to temporarily disable the
Sound ROM when more than 64
MB is needed.
4 MB
ROM 0
ROM 1
Sound ROM
Left Side
RAM A
RAM B
Sound ROM
Empty
4 MB
Ultra's sample RAM is user-expandable and consists of either one or two
SIMM RAM memory modules. There are also four sockets are for E-MU
Sound modules. Do not plug RAM SIMMs into the sockets marked ROM!
The requirements for the RAM SIMM modules are as follows:
• 72-pin SIMM (4 MB 16 MB or 64MB)
• 8 or 9 bits (Mac or IBM)
• 70 nS or faster
The following diagram shows the allowable combinations of SIMMs. The
standard E5000 comes with (1) 16 MB SIMM installed. When only one
SIMM is installed, use the RAM B socket.
8 MB
ROM 1
Sound ROM
Left Side
ROM 0
RAM A
RAM B
Sound ROM
4 MB
4 MB
16 MB
ROM 1
Sound ROM
Left Side
ROM 0
RAM A
RAM B
Sound ROM
16 MB
Empty
18 MB
ROM 1
Sound ROM
Left Side
ROM 0
RAM A
RAM B
Sound ROM
16 MB
4 MB
Fig. 1
32 MB
ROM 1
Sound ROM
Left Side
ROM 0
RAM A
RAM B
Sound ROM
16 MB
16 MB
64 MB
ROM 1
Sound ROM
Left Side
ROM 0
RAM A
RAM B
Sound ROM
64 MB
Empty
72 MB
ROM 1
Sound ROM
Left Side
ROM 0
RAM A
RAM B
Sound ROM
64 MB
16 MB
128 MB
ROM 0
ROM 1
Sound ROM
Sound ROM
Left Side
RAM A
RAM B
64 MB
64 MB
If the SIMMs are of different size, the smaller SIMM will be divided in half.
That is, you will get only half of the memory of the smaller SIMM. You
MUST install the larger SIMM in the RAM A socket. (Otherwise the larger
SIMM will be divided in half.)
BEFORE YOU BEGIN, determine the proper locations of the SIMMs you
plan to install.
46 E-MU Systems
Page 47

Sound RAM Memory Expansion
Installing Memory
Before you begin, find a clean, well lit work place.
UNPLUG THE AC POWER CORD BEFORE WORKING ON E5000
Ground Work
Installing memory requires that you periodically “Ground” yourself, by
touching a grounded object such as a water pipe or a grounded piece of
equipment. Grounding yourself prevents the static charge in your body
from damaging the sensitive memory chips. When you are asked to
“Ground” yourself, simply reach over and touch the metal on the water
faucet. Do not walk across the room or across a rug, as this will defeat the
purpose of grounding.
v Remove the Cover
1. To gain access to the interior of the E5000, the top panel must first be
removed. The top panel is attached to the main chassis by means of (7)
Phillips head screws There are three screws along the top back of the
unit and two in the recesses on both sides.
2. When the screws are removed, lift the metal top FROM THE REAR and
lift off. Set the top cover aside in a safe place and put the screws into a
cup so they will not get lost. The switching power supply is covered by
a metal box. Do not remove this metal cover!
v Remove the Old Memory SIMMs (if necessary)
With the front of the E5000 facing you, the memory SIMMs are located
near the left front of the main board. To remove a SIMM:
3. Ground yourself by touching a grounded object.
4. On each end of the SIMM socket there is a silver or plastic tab. Use a
screwdriver or a ball point pen to squeeze the tabs toward the outside of
the socket while gently pushing the SIMM toward the right side of the
unit. The old SIMM should “hinge” to the right and can now be
removed.
v Install the New Memory SIMMs
5. Ground yourself by touching a grounded object, then remove the
memory SIMM modules from the static protected packaging. Install the
SIMM closest to the LEFT side first.
E5000 - Getting Started 47
Page 48

Sound RAM Memory Expansion
6. Gently set the SIMM deep into the SIMM socket at a 45º angle with the
notch toward the back of the unit as shown in figure 2. Without forcing
the insertion, let the board rest in the socket as deep as it will go. The
chips mounted on the board should face the rear of the unit. See the
following diagrams.
Power Supply
Fig. 2
Front of Unit
PIN 1
(notch)
ROM 1
ROM 0
RAM A
RAM B
Rear of Unit
Use these two
sockets ONLY!
48 E-MU Systems
Page 49

Sound RAM Memory Expansion
7. While applying a slight downward pressure on the top of the SIMM to
keep it from popping out of the socket, tilt the SIMM board into a
vertical position as shown in figure 3. You should hear an audible click.
Make sure both sides of the silver tabs have latched.
ROM 1
ROM 0
Fig. 3
RAM A
RAM B
v Reassemble the Unit
8. Tilt the rear of the top cover up a little and slide the front of the top
panel under the front panel lip. Lower the rear of the top panel into
place.
9. Replace the seven screws. The screws are all identical.
v Test It
At this point, the installation is almost finished. Plug in the power cord and
turn on power to the E5000. If the display shows the new memory size
during boot up, everything is probably OK. It's always a good idea to test
the memory anyway. If the unit comes up without showing the proper
memory size, you may have installed the SIMMs incorrectly.
10. Activate the Master module.
11. Select Utilities.
12. Select Tests. A pop up window appears asking you to enter the
Diagnostics Password. Ah, you've got us now. We'll have to reveal the
secret password. Enter the secret password: 1-3-5-8, then press OK.
Another row of soft keys appears.
13. Press the RAM soft key to begin testing memory. The display may warn
you that the test destroys any data currently residing in RAM. Don't
worry, this test does NOT affect your hard disk data. Press OK to
continue.
E5000 - Getting Started 49
Page 50

Sound RAM Memory Expansion
14. CPU memory will be tested first (cRAM). After four cycles, the sound
__
__
A Word of Warning…
Now that you know how to get
into the hidden diagnostics, DO
NOT run the Automatic or Hard
Disk tests which could erase
your hard disk!
15. Press EXIT to abort the test. Any errors will be displayed. If the memory
Problems?
Disconnect power, open the unit, and try re-seating the SIMMs. Make sure
that the RAM SIMMs are installed in the sockets labelled RAM, not ROM. If
all else fails, return the E5000 to its original configuration and call E-MU/
ENSONIQ Customer Service at (831) 438-1921. Telephone support hours
are 8:00-5:00 PST, Monday through Friday.
memory (gRAM) will be tested. Allow this test to run through at least
four complete cycles or longer if you want. (This time will vary with the
amount of RAM installed.)
tests bad, you may have incorrectly installed the SIMMs.
50 E-MU Systems
Page 51

Warranty
Warranty
Please read this warranty, as it gives you specific legal rights.
Length of Warranty
This warranty covers all defects in materials and workmanship:
• Two years from the date of purchase, from E-MU/ENSONIQ, by an
authorized dealer for all floorstock units.
• One year from the date of purchase by the original customer, from an
authorized dealer, provided that the Warranty Registration Card is filled
out and returned to E-MU/ENSONIQ within 14 days from the date of
purchase. E-MU/ENSONIQ’s Service Department or one of
E-MU/ENSONIQ’s authorized service centers will ask for a copy of a customers sales receipt to facilitate warranty service.
E-MU/ENSONIQ does not cover:
• Damages due to improper or inadequate maintenance, accident, abuse,
misuse, alteration, unauthorized repairs, tampering, or failure to follow
normal operating procedures as outlined in the owner's manual.
• Deterioration or damage of the cabinet.
• Damages occurring during any shipment of the E5000 for any reason.
• An E5000 that has in any way been modified by anyone other than
E-MU/ENSONIQ.
Limitation of Implied Warranties
No warranty is expressed or implied. E-MU-ENSONIQ specifically disclaims
the implied warranties of merchantibility and fitness for a particular
purpose.
Exclusion of Certain Damages
EMU/ENSONIQ's liability for an E5000 found defective is limited to repair
or replacement of the unit at E-MU/ENSONIQ's option. In no event shall
E-MU/ENSONIQ be liable for damages based on inconvenience, whether
incidental or consequential, loss of use of the unit, loss of time, interrupted
operation or commercial loss, or any other consequential damages.
Some states do not allow limitation of the duration of implied warranties or
the exclusion or limitation of incidental or consequential damages, so the
above limitations and exclusions may not apply.
How To Obtain Warranty Service
All E-MU/ENSONIQ products are manufactured with the highest standards
of quality. If you find that your instrument does require service, it may be
done by any authorized E-MU/ENSONIQ service center. If you are unable to
locate a service center in your area, please contact E-MU/ENSONIQ Service
E5000 - Getting Started 51
Page 52

Warranty
Department at (831) 438-1921. They will either refer you to an authorized
service center or ask that you return your E5000 to the factory. When
returning an E5000 to the factory, you will be issued a Return Merchandise
Authorization number (RMA). Please label all cartons, shipping documents
and correspondence with this number.
E-MU/ENSONIQ suggests you carefully and securely pack your E5000 for
return to the factory. (Do not send the power cord or operation manual.)
Mark the outside of the shipping carton clearly with your RMA number.
and send to:
E-MU/ENSONIQ
1600 Green Hills Road
Scotts Valley, California 95066.
You must pre-pay shipping charges to E-MU/ENSONIQ. E-MU/ENSONIQ
will pay return shipping fees. You will be responsible for any damage or loss
sustained during shipment in any direction.
52 E-MU Systems
 Loading...