

Page 1

Contents
Introduction 1
Introduction.......................................................................... 3
About EOS
Graphic User Interface ..................................................................... 4
Sequencer and Data Filer ................................................................. 4
Sound Libraries ............................................................................... 4
Sound Storage ................................................................................4
Advanced DSP ................................................................................. 4
Built-in Digital Effects ......................................................................5
More Digital Processing Features ..................................................... 5
......................................................................................... 4
Instant Gratification.............................................................. 6
Power Up!
Loading a Bank from the Hard Disk
Loading SoundSprints
Selecting Presets
Lock Button ..................................................................................... 9
Saving
Arpeggiator
Keyboard Modes
.......................................................................................... 6
................................................ 7
...................................................................... 7
................................................................................ 8
............................................................................................... 10
...................................................................................... 11
............................................................................. 14
1 - The Basics 17
Definitions........................................................................... 19
How Sounds are Organized
The Sample ................................................................................... 20
Voices ............................................................................................21
The Preset ..................................................................................... 22
SoundSprint .................................................................................. 23
Preset Diagram .............................................................................. 23
Bookmarks .................................................................................... 25
The Bank ....................................................................................... 26
Folders .......................................................................................... 26
The Internal Drive ..........................................................................27
External Drives .............................................................................. 28
Sample Memory & Preset Memory
Sound ROM & Sound RAM ........................................................... 29
Five Types of Memory ................................................................... 29
Flash Sound RAM .......................................................................... 30
Sample Numbers ...........................................................................31
Using Preset Flash Memory ........................................................... 31
Using Sound Flash Memory ........................................................... 32
........................................................... 19
............................................... 29
Page 2

Contents
Modules
More Definitions
Saving ...........................................................................................36
Default ..........................................................................................36
Icons .............................................................................................36
The Cursor ....................................................................................37
Data Entry Control & Increment/Decrement Buttons .....................37
Selecting .......................................................................................37
The Big Re-Cap
Using The Browser
Guided Tours
Banks, Sequences, Presets & Samples ............................................41
Loading a Bank Automatically ........................................................42
Loading a Sequence from a Different Bank ....................................43
Loading Standard MIDI Files ..........................................................44
Saving Banks .................................................................................44
Finding Banks, Presets, Samples & Sequences ................................45
Naming Banks ...............................................................................46
Erasing Banks .................................................................................46
Assignable Keys .............................................................................46
Recording a Sequence ...................................................................47
Arpeggiator Sequencing! ...............................................................50
A Practice Sampling Session ...........................................................53
Exploring the Preset .......................................................................57
Which Voices are Assigned to the Keyboard? .................................58
Creating a Link ..............................................................................59
...........................................................................................34
..............................................................................36
................................................................................37
..........................................................................38
...................................................................................41
ii E-MU Systems
2 - Master Menu 61
Overview ............................................................................. 63
Memory Statistics
Master Utilities.................................................................... 65
Assignable Keys
Channel Volume
Tones
................................................................................................67
Recalibration
Test Access
About…
.......................................................................................69
............................................................................................70
Bank..................................................................................... 71
Erase Bank
Name Bank
Auto Bank Load
Flash Utilities
Using Sound Flash Memory ...........................................................75
........................................................................................71
............................................................................64
...............................................................................66
..............................................................................67
....................................................................................68
......................................................................................72
...............................................................................72
....................................................................................73
Page 3

Contents
Setup ................................................................................... 78
Tune
Input/Output
Miscellaneous
Undo/Redo Enable
SCSI/Disk
Import Options
.................................................................................................. 79
Tuning Offset ................................................................................ 79
Transpose ...................................................................................... 79
Audition Key .................................................................................80
................................................................................... 80
Headroom ..................................................................................... 80
Output Boost ................................................................................ 82
Output Format .............................................................................. 82
ADAT Output Dither ......................................................................83
Default Clock ................................................................................84
Word Clock In ...............................................................................85
WC Phase In/Out ..........................................................................85
.................................................................................. 86
Contrast ........................................................................................ 86
Wrap Field Selection ...................................................................... 86
Screen Saver .................................................................................. 87
Disable Sound ROM ......................................................................87
Zero Crossing Threshold ............................................................... 88
.......................................................................... 89
.......................................................................................... 90
SCSI ID .......................................................................................... 90
SCSI Termination On/Off ............................................................... 91
Avoid Host on ID ........................................................................... 91
Disk Button Goes To: ..................................................................... 92
................................................................................ 93
Memory Configuration .................................................................. 95
Master Effects ..................................................................... 96
Use Master Effects Settings in MultiMode ...................................... 97
Master Effects A ............................................................................. 97
Master Effects B ............................................................................. 98
Effects Setup
Effects Control ............................................................................... 99
.................................................................................... 98
Sequence Manage ............................................................ 101
MIDI .................................................................................. 102
MIDI Mode
Basic Channel .............................................................................. 103
MIDI Mode ................................................................................. 103
MIDI Device ID ............................................................................ 104
Local Control ...............................................................................105
Multimode - MIDI Mix ................................................................ 106
.................................................................................... 103
MIDI Controllers ............................................................... 108
About MIDI Controllers ............................................................... 108
MIDI Preferences
Velocity Curve ............................................................................. 110
........................................................................... 110
EOS 4.0 Software Manual iii
Page 4

Contents
Controller #7 Sensitivity ...............................................................110
Controller #7 Curve .....................................................................111
Global Pedal Override ..................................................................111
Receive Program Change On/Off .................................................112
Send Program Change On/Off ....................................................112
Magic Load Preset .......................................................................113
3 - Effects 115
Effects................................................................................ 117
Dual Effects Processor
The Effects Sends
Effect B Into Effect A ....................................................................120
Three-way Effects Control ............................................................121
Effects Programmed in the Preset ................................................122
Master Effects ..............................................................................122
Using Master Effects Settings in Multimode .................................123
Using the Effects Channel Settings in Multimode .........................124
Effects Bypass ..............................................................................125
Effect Descriptions
A EFFECT TYPES ...........................................................................126
B EFFECT TYPES ...........................................................................126
Reverb .........................................................................................127
Chorus ........................................................................................128
Doubling .....................................................................................128
Slapback ......................................................................................128
Stereo Flanger .............................................................................128
Delay ...........................................................................................129
Stereo Delay ................................................................................129
Panning Delay .............................................................................129
Dual Tap ......................................................................................129
Vibrato ........................................................................................129
Distortion ....................................................................................129
...................................................................117
...........................................................................118
.........................................................................126
iv E-MU Systems
4 - Sequencer 131
Sequence Manage............................................................. 133
Recording MIDI SysEx ..................................................................136
Standard MIDI files ......................................................................136
Name Sequence ..........................................................................137
Export .........................................................................................138
Transport Controls............................................................ 139
Sequencer Utilities ............................................................ 140
Erase ............................................................................................140
Copy Sequence ...........................................................................141
Sequencer Memory .....................................................................141
Jukebox .......................................................................................142
Sequence Edit ..............................................................................142
Page 5

Contents
Sequence Edit ................................................................... 143
The Sequence Edit Screen
Track Mode ................................................................................. 144
Track Numbers ............................................................................ 144
Counter Display .......................................................................... 144
Tempo Display ............................................................................ 144
Track ‘ Preset ............................................................................... 144
MIDI Channel Modes .................................................................. 145
Volume - Pan - Submix ................................................................ 145
The Initial Track State Screen ....................................................... 145
Initial Tempo ...............................................................................146
Cut/Copy .................................................................................... 146
............................................................ 144
Editing: Cut, Copy & Paste ............................................... 147
Cut/Copy/Erase
Note Erase ................................................................................... 148
Paste ........................................................................................... 150
Track Delete ................................................................................ 152
Track Copy .................................................................................. 152
UNDO! (REDO!) ..........................................................................153
......................................................................... 147
Tools.................................................................................. 154
Quantize
Transpose
Sequence Velocity
Channelize
Channel Extract
........................................................................................ 154
....................................................................................... 156
......................................................................... 157
..................................................................................... 158
............................................................................. 159
Setup ................................................................................. 160
Metronome
Sequence Clock
Sequence Input
Sequence Record
Sequence Loop
Transport
Received MMC Commands ......................................................... 168
Locate
.................................................................................... 161
............................................................................. 162
............................................................................. 164
........................................................................... 165
.............................................................................. 166
........................................................................................ 167
............................................................................................. 169
5 - Sample Manage 171
Overview ........................................................................... 173
Sample Utilities
Erase Sample ............................................................................... 174
Copy Sample ............................................................................... 175
Sample Dump ............................................................................. 175
Defragment Memory .................................................................. 177
.............................................................................. 174
EOS 4.0 Software Manual v
Page 6

Contents
Name Sample
New Sample
Threshold ....................................................................................179
Input Channels ............................................................................179
Sampling Source & Rate ..............................................................179
Dither ..........................................................................................180
ADC Gain ....................................................................................181
Sample Length ............................................................................182
Arm Sample Trigger .....................................................................182
Force Sample Trigger ...................................................................183
Keyboard Sample Trigger .............................................................183
Monitor On/Off ...........................................................................184
Automatic Parameters
Automatic Digital Signal Processing Operations ...........................184
Auto-Placement Parameters .........................................................186
Place Sample
Export Sample
Get Info
................................................................................178
...................................................................................178
...................................................................184
..................................................................................188
...............................................................................189
..........................................................................................190
6 - Sample Edit 191
Sample Edit ....................................................................... 193
Background: The Scrub Wheel
Background: Using Cut, Copy, Paste and Undo
Background: About Looping
How Looping Works ....................................................................196
Auto Correlation ..........................................................................196
Creating Attack & Decay Characteristics for the Looped Portion ..197
Loop Compression ......................................................................198
Crossfade Looping .......................................................................198
Zero Crossing ..............................................................................198
.....................................................194
.........................195
........................................................196
Utilities .............................................................................. 199
Cut Section .................................................................................199
Copy Section ...............................................................................201
Paste Section ...............................................................................202
Truncation ...................................................................................204
Taper ...........................................................................................205
Tools 1 ............................................................................... 207
Loop
Loop Type
Digital Tuning
Sample Rate Convert
Sample Calculator
...............................................................................................207
......................................................................................210
................................................................................211
....................................................................212
.........................................................................213
vi E-MU Systems
Page 7

Contents
Tools 2............................................................................... 214
DC Filter
Swap Left & Right
Stereo <-> Mono
Reverse Section
Sample Integrity
......................................................................................... 214
......................................................................... 215
........................................................................... 216
.............................................................................. 216
............................................................................ 217
Tools 3............................................................................... 218
Gain Change
Compressor ................................................................................... 221
Using the Digital Compressor ...................................................... 224
Limiter ........................................................................................ 224
Musical Compression (e.g. Guitar) ..............................................224
Noise Reduction .......................................................................... 224
Parametric Equalizer ..................................................................... 225
FIR (Phase Linear Filter) ................................................................. 227
Aphex Aural Exciter .......................................................................229
.............................................................................. 218
Tools 4............................................................................... 230
Transform Multiplication .............................................................. 231
Doppler .......................................................................................... 232
Time Compression ........................................................................234
Pitch Change ................................................................................. 235
Bit Converter .................................................................................236
Beat Munger ..................................................................................237
Beat Munger Controls ................................................................. 238
Undo.................................................................................. 240
7 - Preset Manage 243
Preset Manage .................................................................. 245
Utilities ...........................................................................................246
Erase Preset .................................................................................246
Dump Preset ............................................................................... 246
Name Preset .................................................................................. 247
New Preset ..................................................................................... 247
Copy Preset .................................................................................... 248
Export Preset ................................................................................. 249
Get Info .......................................................................................... 250
EOS 4.0 Software Manual vii
Page 8

Contents
8 - Preset Edit 251
Synthesizer Basics ............................................................. 253
Editing Presets ...............................................................................253
Modulation ....................................................................................254
Modulation Sources .....................................................................255
Modulation Cords .......................................................................256
Envelope Generators .....................................................................257
Low Frequency Oscillators (LFOs) ................................................258
Random Sources ............................................................................259
Clock Modulation ..........................................................................260
Modulation Destinations ..............................................................262
Modulation Processors ..................................................................263
Modulation Processors .................................................................264
Dynamic Filters.................................................................. 269
Dynamic Filters ..............................................................................269
What is a Filter? ...........................................................................270
Parametric Filters .........................................................................273
The Z-Plane Filter .........................................................................273
Selecting Voices, Samples & Groups ................................ 275
Selecting from the Preset Editor Windows ..................................275
Selecting All Voices ........................................................................276
Selecting Voices from the Dynamic Processing Level ....................276
Selecting Voices from the Voice Select Screen ..............................276
Groups............................................................................... 277
Preset Editor...................................................................... 278
PRESET EDIT - Global ........................................................ 281
Global Editor ..................................................................................281
Edit All .........................................................................................281
Preset Effects A.................................................................. 282
Effects Programmed in the Preset ................................................283
Effect ...........................................................................................284
Decay Time .................................................................................285
HF Damping ................................................................................285
FX Amounts .................................................................................285
FX B Through FX A ......................................................................286
Preset Effects B.................................................................. 287
Effect B ...........................................................................................287
Feedback Amount .......................................................................288
LFO Rate ......................................................................................289
Delay Time ..................................................................................289
FX Amounts .................................................................................290
Preset Edit - Links.............................................................. 291
viii E-MU Systems
Page 9

Contents
Main Controls ................................................................................ 291
Link Type ........................................................................................ 292
Link Volume ................................................................................... 292
Link Pan .......................................................................................... 293
Link Transpose ...............................................................................293
Link Fine Tuning ............................................................................294
Link Utilities ...................................................................... 295
New Link ........................................................................................ 295
Copy Link ....................................................................................... 296
Delete Link ..................................................................................... 296
Subsume Link ................................................................................ 297
Links - Key Window........................................................... 298
Key Window Controls .................................................................. 298
Keyboard & Velocity Ranges ........................................................ 299
Links - Velocity Window ................................................... 300
Velocity Window Controls ............................................................ 300
Velocity Range ............................................................................... 301
Links - MIDI Filters ............................................................ 302
MIDI Filter Window Controls ....................................................... 302
Preset Edit - Voices ........................................................... 304
Voices - Main Controls .................................................................. 304
Voice Utilities ................................................................................. 305
New Voice ................................................................................... 305
Copy Voice .................................................................................. 305
Delete Voice ................................................................................ 306
Split Voice ................................................................................... 306
Solo Voice ...................................................................................307
Sample Zone ..................................................................... 308
New Sample Zone ........................................................................ 308
Get Multisample ............................................................................ 309
Delete Sample Zone ..................................................................... 309
Combine ........................................................................................ 310
Expand... ........................................................................................ 311
Voices - Key Window ........................................................ 312
Key Window Controls ................................................................... 312
Keyboard Ranges .......................................................................... 313
Voices -Velocity Window .................................................. 316
Velocity Window Controls ............................................................ 316
Velocity Range ............................................................................... 317
EOS 4.0 Software Manual ix
Page 10

Contents
Voices - Realtime Window ................................................ 319
Realtime Window Controls ...........................................................319
Preset Edit - Dynamic Processing Level ............................ 322
Utilities .............................................................................. 325
Voice Select ....................................................................................326
Function Keys ..............................................................................326
The Isolate Key: ...........................................................................328
Copy Voice(s) .................................................................................328
Delete Voice(s) ...............................................................................330
Automatic Voice Selection ............................................................331
Set ...................................................................................................331
Solo Voice .......................................................................................331
Voice Tuning,
Modifiers & Setup ............................................................. 332
Key Transpose ................................................................................333
Coarse Tuning ................................................................................333
Fine Tuning ....................................................................................334
Non-transpose Mode ....................................................................334
Chorus Amount .............................................................................335
Delay ...............................................................................................336
Start Offset .....................................................................................336
Glide Rate & Curve .......................................................................337
x E-MU Systems
Solo Modes ....................................................................................338
Latch Mode ....................................................................................339
Assign Group .................................................................................340
Amplifier/Filter.................................................................. 341
Amplifier Parameters .....................................................................341
Amplifier Envelope ........................................................................342
Filter Parameters ............................................................................343
FILTER TYPES ...............................................................................343
Filter Envelope ...............................................................................347
LFO/Auxiliary Envelope..................................................... 348
Lag Processors ...............................................................................349
Auxiliary Envelope .........................................................................350
Cords ................................................................................. 351
Sample Retrigger ...........................................................................353
Page 11

Contents
9 - Disk Menu 355
Disk Menu ......................................................................... 357
Disk Browser .................................................................................. 357
Disk.................................................................................... 361
Disk Utilities ................................................................................... 361
Mount Drives .................................................................................362
Copy System .................................................................................. 362
Format Disk .................................................................................... 363
Low Level Format .......................................................................... 364
Backup ........................................................................................... 364
Load Bank ...................................................................................... 366
Save Bank .......................................................................................367
View… ............................................................................................ 367
Info, Lock Drive, & Sleep ..............................................................368
Lock ............................................................................................368
Sleep ........................................................................................... 368
Folder ................................................................................ 369
Folder Utilities ................................................................................369
New ................................................................................................ 369
Delete ............................................................................................. 370
Rename .......................................................................................... 370
Find… ............................................................................................. 370
View ................................................................................................ 371
Info… ............................................................................................. 371
Bank................................................................................... 372
Bank Utilities ..................................................................................372
Delete ............................................................................................. 372
Name ............................................................................................. 373
Find… ............................................................................................. 373
Load Bank ...................................................................................... 374
Save Bank .......................................................................................374
View ................................................................................................ 375
Info… ............................................................................................. 375
Preset ................................................................................ 376
Preset Utilities ................................................................................ 376
Soundsprint™ ................................................................................ 376
Bookmarks .................................................................................. 378
EOS 4.0 Software Manual xi
Page 12

Contents
Find…
Load Preset
View
Info…
.............................................................................................379
.....................................................................................380
................................................................................................380
..............................................................................................380
Sample............................................................................... 381
Sample Utilities
Find... ..........................................................................................381
View
................................................................................................382
Load Sample
Load .WAV & AIFF Files
Audition
Info…
..........................................................................................383
..............................................................................................383
..............................................................................381
..................................................................................382
.................................................................383
Sequence........................................................................... 384
Sequence Utility
Find…
View
.............................................................................................385
................................................................................................385
Load Sequence
Info…
..............................................................................................386
.............................................................................384
..............................................................................385
10 - Appendix 387
SCSI ................................................................................... 389
Why Use SCSI?
The SCSI Bus
ID Numbers .................................................................................389
Types of SCSI Cables
Terminating SCSI Cables ..............................................................390
SCSI Problems
Sample Transfers Via SMDI
Using Multiple Samplers on the SCSI Bus
...............................................................................389
..................................................................................389
.....................................................................390
................................................................................391
...........................................................392
...................................393
Menu Maps ....................................................................... 394
Menu Maps
Menu Maps
Menu Maps
....................................................................................394
....................................................................................395
....................................................................................396
MIDI................................................................................... 397
MIDI Implementation Chart
........................................................397
Notes: ................................................................................ 398
Index 399
xii E-MU Systems
Page 13

Introduction
Page 14

Introduction
E-MU Systems
2
Page 15

Introduction
This is the operation manual for E-mu Operating System (EOS). EOS is the
operating system in several E-mu products, including: E-IV, e-64, E4K,
E-6400, E4X, E-Synth and the E4 Ultra series. The same EOS software is
loaded into each of these machines. For the sake of simplicity, we refer to
all these products as “the Emulator” when we talk about them in this
manual (unless, of course, there is an issue involving a particular product,
then we will be specific).
Your Emulator is a special purpose sound computer and like all computers,
can be thought of as having two main components:
1.
The physical machine with the buttons, keys, gadgets, that generates
sound and;
2.
The EOS software that tells the hardware what to do.
This manual describes how to use EOS to get the most from your Emulator.
The various functions of EOS are organized in this manual by their module.
Screen displays and step-by-step instructions are described for all aspects of
use and operation. Notes in the margin highlight important points or give
useful operational tips which might not be readily apparent.
If you are unfamiliar with samplers and synthesizers in general, you may
need more information than this manual provides. We suggest that you
read some of the many books and magazines on the subject of music
synthesis. This will help you to get the most out of this extremely powerful
instrument.
Important Upgrade Information
The features and functions of EOS are enhanced and upgraded periodically.
Please take a moment now to read the E-mu Systems warranty and fill out
and send in your warranty registration card. We NEED your mailing address
in order to keep you informed about upgrades and manual revisions.
EOS 4.0 Software Manual 3
Page 16

Introduction
About EOS
About EOS
Graphic User Interface
EOS uses icons, graphics and dialog boxes extensively to make
programming as easy and as intuitive as possible. Similar functions are
logically grouped into menus and navigation controls such as the Cursor
and Page buttons make it easy to select the desired field.
Sequencer and Data Filer
The onboard 48-track sequencer is a full function music production center.
It contains a host of powerful features such as high resolution cut and paste
editing, quantization, data filters, and external sync capability. It is also
capable of reading and playing back standard MIDI files (format 0 & 1)
direct from a DOS floppy disk and saving them to the internal hard disk
drive. Music sequences are stored within banks or as separate objects.
Sound Libraries
The Emulator family has access to the huge library of sounds available from
E-mu and other sources. EOS is fully compatible with the E-IV, e-64, EIII,
EIIIX, ESI-32, E4K, E-6400, E4X, E-Synth and Ultra sound libraries, and can
transparently read Emax II, Roland S-700 and Akai S1000/S1100/S3000
banks via SCSI HD or CD–ROM without awkward conversion routines.
Sound Storage
EOS lets you arrange up to 1000 samples per bank in up to 1000 presets.
E-mu's exclusive SoundSprint™ function automatically loads presets from
the hard disk as you browse through them. You can continue to play while
the new preset is loading in the background. The Sound ROM option
(standard on E-Synth) gives you 16 MB of great samples with hundreds of
user programmable presets which are always on-line and ready to go.
Advanced DSP
EOS’s advanced digital signal processing (DSP) features make sampling a
breeze. Samples can be truncated, normalized and placed on the keyboard
automatically as the sample is taken. Advanced tools such as Auto Correlation, Loop Compression and Crossfade Looping allow even the most
difficult sounds to be looped easily.
You can digitally splice and mix samples with other samples. Control
samples dynamically from the keyboard using velocity and positional crossfading and switching functions. Advanced digital processing features such
as Sample Rate Conversion, Compression, Parametric Equalization and
Digital Tuning let you shape raw samples quickly and with greater precision
than computer based systems. Samples are easily transferred between the
Emulator and an external computer via SCSI.
4
E-MU Systems
Page 17

Introduction
About EOS
Additional digital processing functions include:
Time Compression and Expansion : Shortens or lengthens the sample
time without changing the pitch.
Pitch Change : Changes the pitch of a sample without altering the
time.
Transform Multiplication : Creates weird and wonderful new timbres.
Aphex Aural Exciter :
Dopplerization : Moves samples forward and backwards in space as well
as from side to side.
FIR Filters : Non-realtime digital filters with “Ultra” high Q values and
phase-linear filter response.
Bit Converter : Removes unwanted bit resolution from your samples.
Beat Munging : Analyzes drum loops and phrases and allows you to
change tempo, time signature, swing and individual beats in real-time.
™
Adds brilliance and sheen to your samples.
Built-in Digital Effects
A high quality internal effects processor adds reverb and chorus effects
while keeping the sound in the digital domain. 76 different effects are
currently implemented with several controllable parameters for each effect.
A sound with effects applied can be resampled and saved as an entirely new
sound, with ambience and effects included.
More Digital Processing Features
The digital hardware implements up to 128 “analog-sounding” Z-plane
filters with many different filter types.
12, 24, or 36 dB/octave Low-pass filters with resonance
2nd & 4th order High-pass filters with resonance
2nd & 4th order Band-pass filters with resonance
Contrary Band-pass filter
Three types of swept EQ filters
Three Phasers and one Flanger with resonance
Six powerful Morphing filters
Modulation sources include three multi-stage envelope generators and two
multi-wave LFOs per channel with full MIDI modulation control over
virtually every parameter. The digital patchbay, containing a set of arithmetic modifiers, let you create complex synthesis models.
EOS Emulators have 32 part multi-timbral capability, allowing complex
sequencing and sound effects creation. Emulators can be operated by
remote control using an external computer. A MIDI expander card is
available for older units which increases the number of MIDI channels from
16 to 32.
•
•
•
•
•
•
•
•
•
•
•
•
•
•
•
EOS 4.0 Software Manual 5
Page 18
Introduction
Power Up!
Instant Gratification
This section is designed to get you playing sounds in the shortest amount
of time and provides only a partial explanation of disk operations. For more
complete instructions, see “Disk Menu” on page 355.
Power Up!
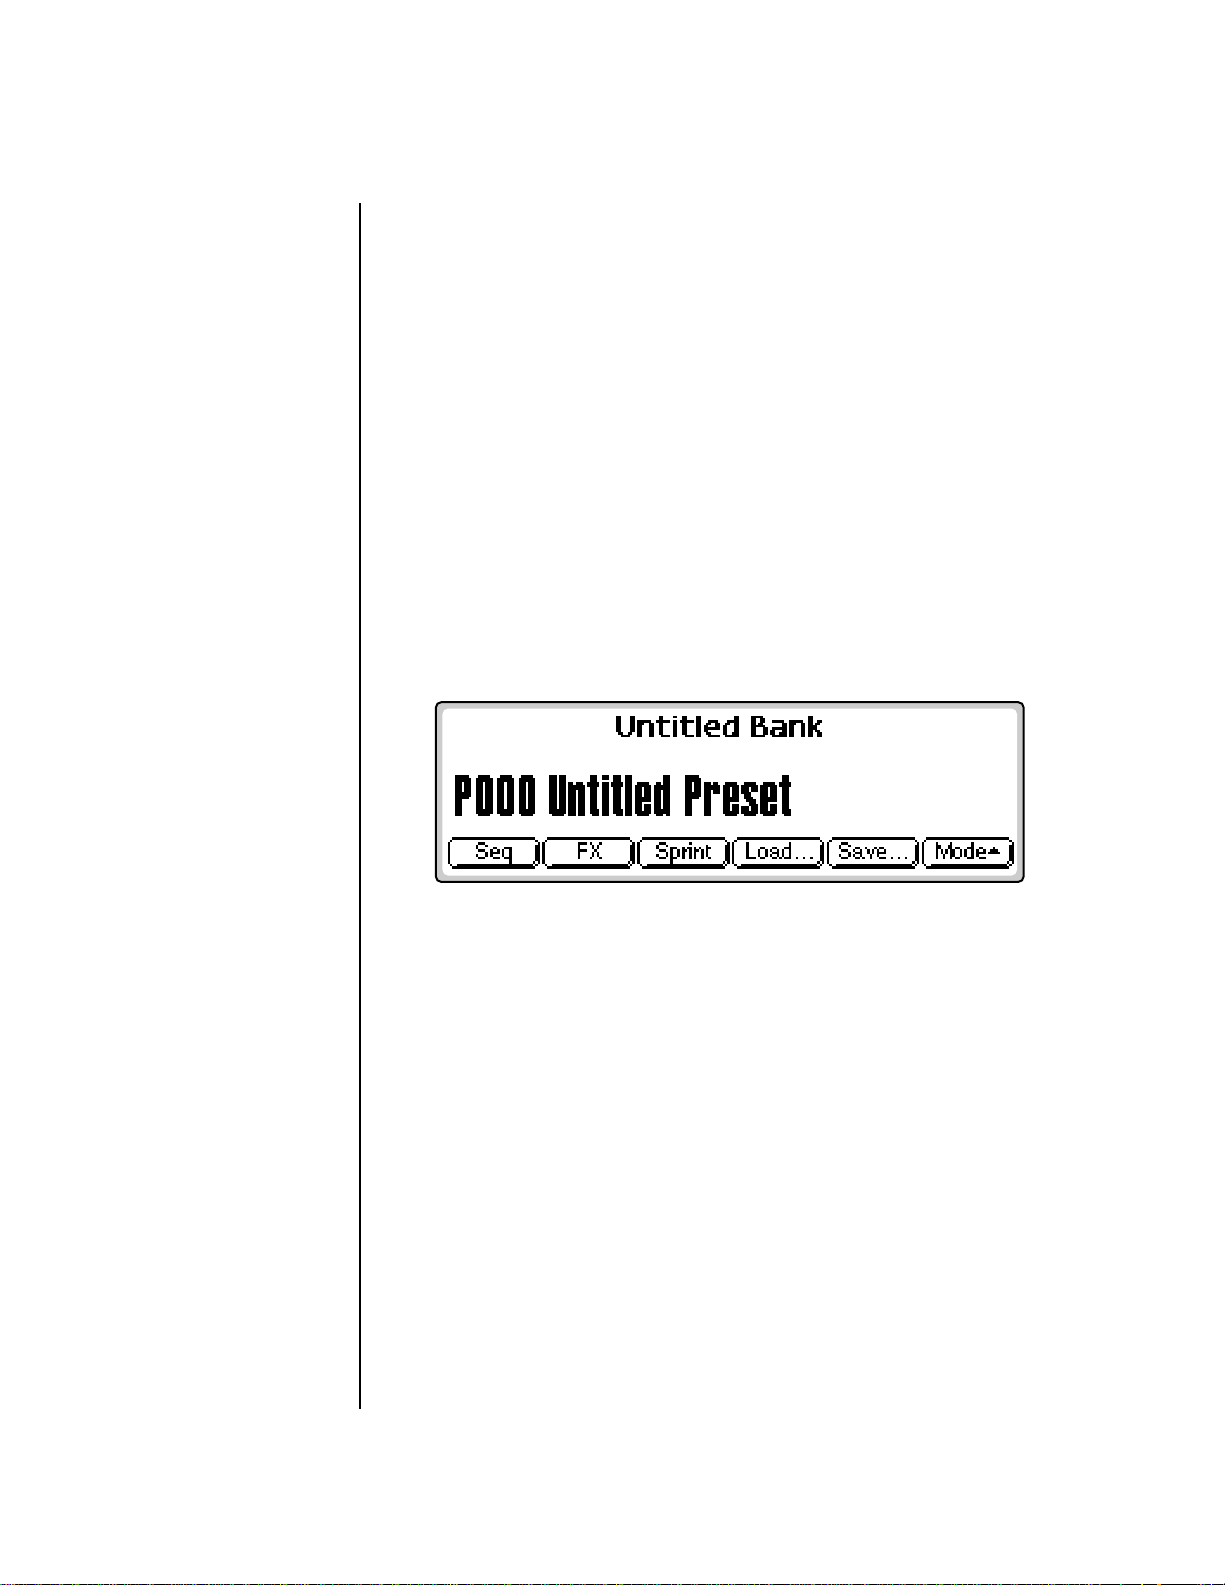
Turn on the Emulator and wait for the following screen to appear.
E-MU Systems
If you have an E-Synth or an Emulator with the ROM bank added, you can
select presets immediately. Use the Data Entry Control, INC/DEC buttons,
Left/Right cursor buttons or the numeric keypad to change presets. That's
it! If you have an Emulator without the ROM bank installed, you must load
a bank into the unit. Go to the next section for instructions.
6
•
Page 19
Introduction
Loading a Bank from the Hard Disk
Loading a Bank from the Hard Disk
Loading a bank of sounds makes an entire collection of different presets
immediately available.
To Load a Bank from the Hard Disk:
v
1.
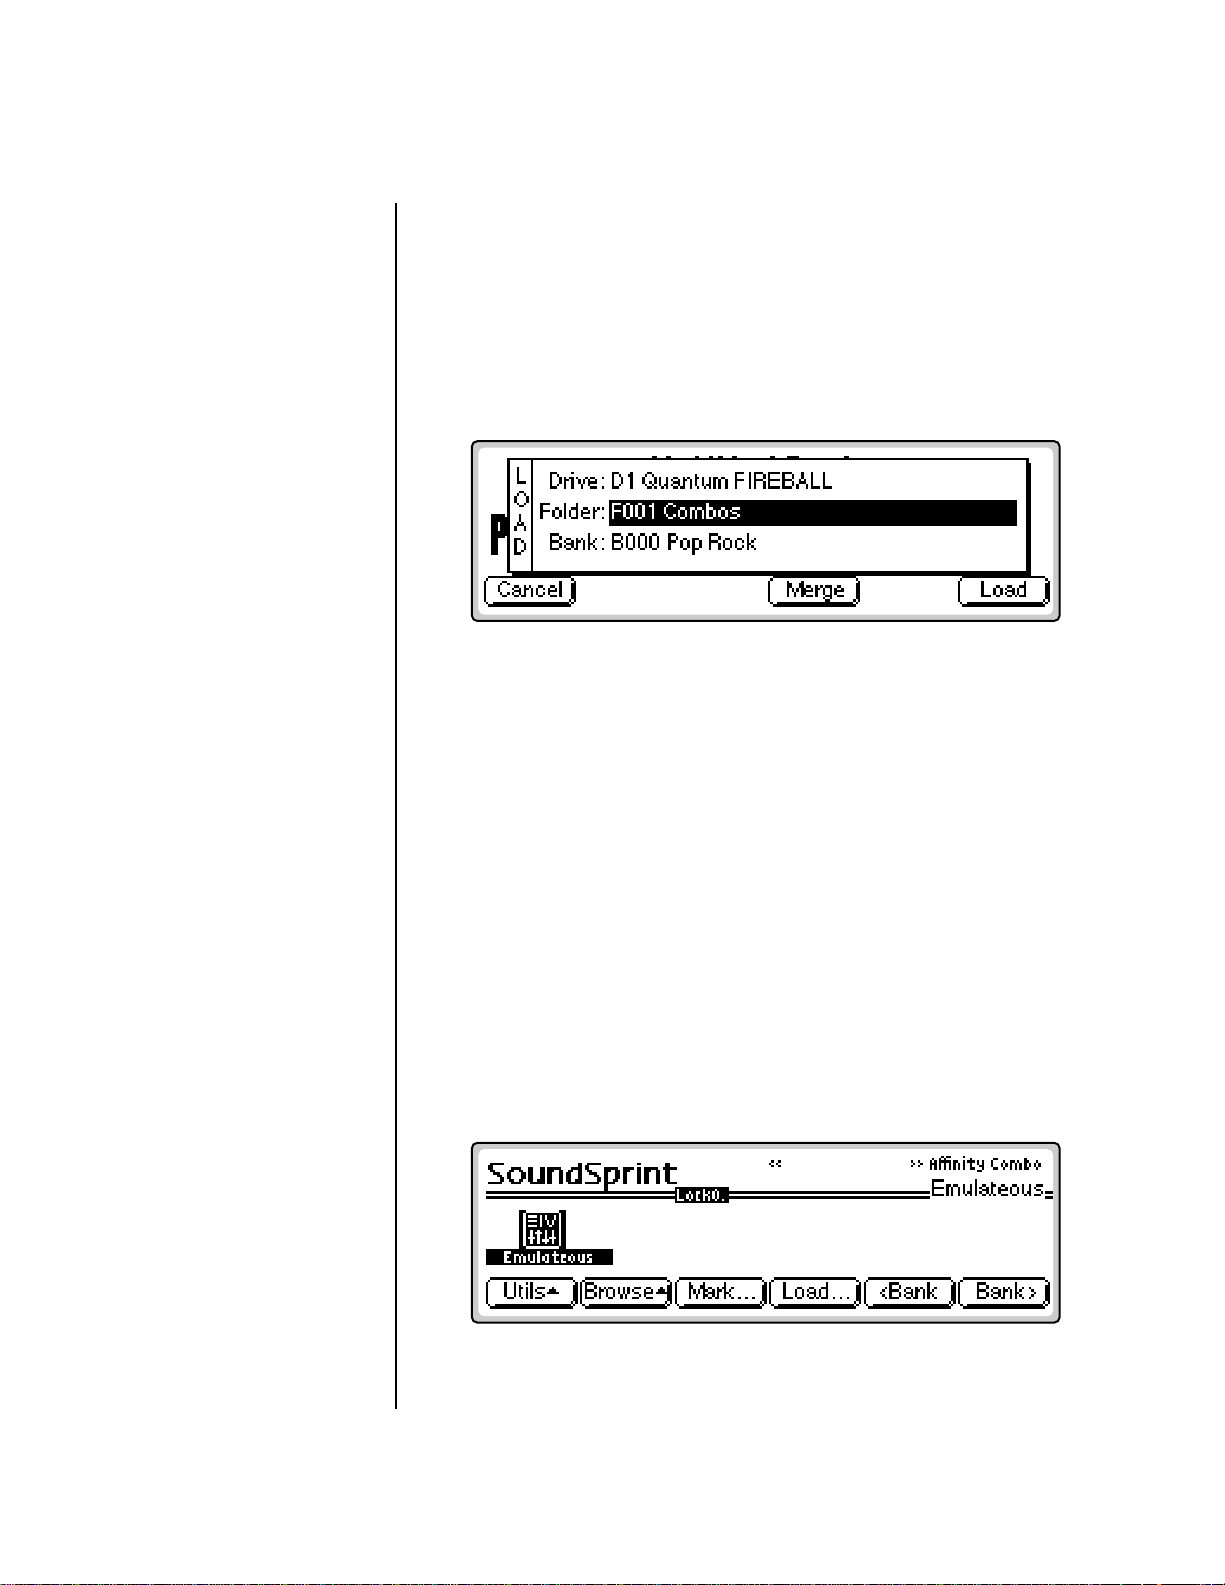
Press the Load function key (F4) from the main screen shown above.
The following screen appears.
The display shows the hard disk drive information, the folders contained
on the drive, and the individual banks contained in the displayed folder.
OO
The Disk button can be
OO
set to call up either SoundSprint
mode or the Last screen you
used in the Disk Browser. This
preference is located under
Master, Setup, SCSI.
2.
Select the Folder containing the desired bank. Using the Arrow cursor
buttons, move the cursor to the Folder field and select the Combos
folder.
3.
Select the Bank . Move the cursor down to the Bank field and choose
the General MIDI bank using the Data Entry Control, the INC/DEC
buttons or the numeric keypad.
4.
Press OK to load the bank. The bank is loaded and the first preset in the
bank appears.
Loading SoundSprints
SoundSprint is a proprietary method of loading presets from a hard disk. As
a preset is selected in SoundSprint, it is immediately loaded into the bank.
If you have an EOS machine with a hard disk, try it out. See “SoundSprint”
on page 23 for more information.
EOS 4.0 Software Manual 7
Page 20

Introduction
Selecting Presets
Turn Sprint Off before
continuing.
v
To Load SoundSprints:
1.
From the main screen, press the Sprint function key (F2). The screen
shown above appears.
Select a preset . Use the bank function keys (F5 & F6), the left/right
cursor buttons, the previous/next buttons or the Data Entry Control to
select new presets. The previous and next presets in the folder are
shown in the upper right of the SoundSprint display window.
As you explore the SoundSprint presets be sure to try out the controllers
such as sliders and wheels. EOS machines containing a hard disk have a
special folder of Sprint presets.
To Turn Off SoundSprint Mode:
v
1. Press the Utils function key (F1).
2. Press the SprntOff function key (F5).
OO
OO
Press Assignable Key 3
(default setting) to jump
between the RAM and ROM
preset locations if you have an
E-Synth.
Selecting Presets
The currently selected preset is displayed on the main screen showing the
preset number (as it appears in the currently loaded Bank) and its name.
EOS provides several methods for selecting presets.
v To Select a Preset:
• Use the Data Entry Control to quickly scroll through the presets.
• Use the Left and Right cursor buttons or the INC and DEC buttons to
scroll through them one at a time.
• The Page buttons to scroll through them ten at a time.
• The numeric keypad to punch in the preset number and then press the
“Go” button to confirm the selection.
When using the numeric keypad to select presets, you select a preset by
entering a 1, 2 or 3 digit number. If fewer than three digits are entered, you
must press the Enter or Go button after selecting the number. For example,
you could select preset number 3 in any one of three ways:
E-MU Systems
1. Type “3.” A window pops up asking you to confirm the preset number.
Press the “Enter” button or “Go” button.
8
Page 21
OO
OO
The more sound RAM
you have in the unit, the larger
the bank size can be and the
more presets you can have in
the bank at once.
Introduction
Selecting Presets
2. Type “03.” A window pops up asking you to confirm the preset number.
Press the “Enter” button or “Go” button.
3. Type “003.” (You do not need to press the “Enter” button or “Go”
button when entering all three digits of the preset number. Because
there are only three possible digits, EOS knows that you’re done.)
Presets are contained in the bank you loaded earlier so they are instantly
accessible when selected, unlike SoundSprint presets, which take a second
or two to load from the hard disk.
The next and previous presets are displayed in the upper corners of the
screen. The next preset is displayed in the upper right hand corner, the
previous preset is shown in the upper left hand corner.
Lock 1
2-Key Preset Selection
Lock 2
1-Key Preset Selection
Lock Button
The +/- button has an alternate function as a digit “Lock” button. When
used as a lock, it sets the number of digits that you must enter to change a
preset using the numeric keypad. Locking 1 digit (Lock 1 mode) requires
you to enter the remaining two digits, but gives you a selection of 100
presets. Locking 2 digits requires only a single button press, but reduces the
selection range to 10 presets. Press the Lock button repeatedly from the
preset selection screen to rotate through the modes.
After entering the first digit in Lock 1 mode (meaning you need to enter 2
digits to select the preset by number), a popup window appears listing the
ten presets in that rank. Use the Page buttons to select the next or previous
ten presets. Use the cursor buttons to select a preset in that rank.
• The Lock button can be used to set the current rank of ten Bookmarks
in SoundSprint mode. Press and Hold the Lock button and select a
number to change the rank.
If you are in the Lock 1 mode and you only enter one digit, a message pops
up asking you to confirm the preset number. You must press the Enter or
Go button to confirm the selection.
For example, to select preset number 3, type “3.” A window pops up asking
you to confirm the preset number. Press the “Enter” button or “Go” button.
EOS 4.0 Software Manual 9
Page 22
Introduction
Saving
OO
OO
Save to an Empty Bank if
you have edited presets and
want to save the old bank as
well as the edited bank.
Saving
When presets are loaded into the bank, you are free to edit any parameter
in any preset. When you have everything the way you want it, SAVE the
entire bank to the hard disk. Since nothing is made permanent until you
Save it, you can play around with the presets to your heart’s content
without worrying about ruining something.
When you get something you want to keep, then it's time to Save. If you
don't save the bank, all changes will be lost as soon as you switch off
power or load another bank.
OO
OO
To save a single preset to
a bank see “Export Preset” in
the Preset Manage module.
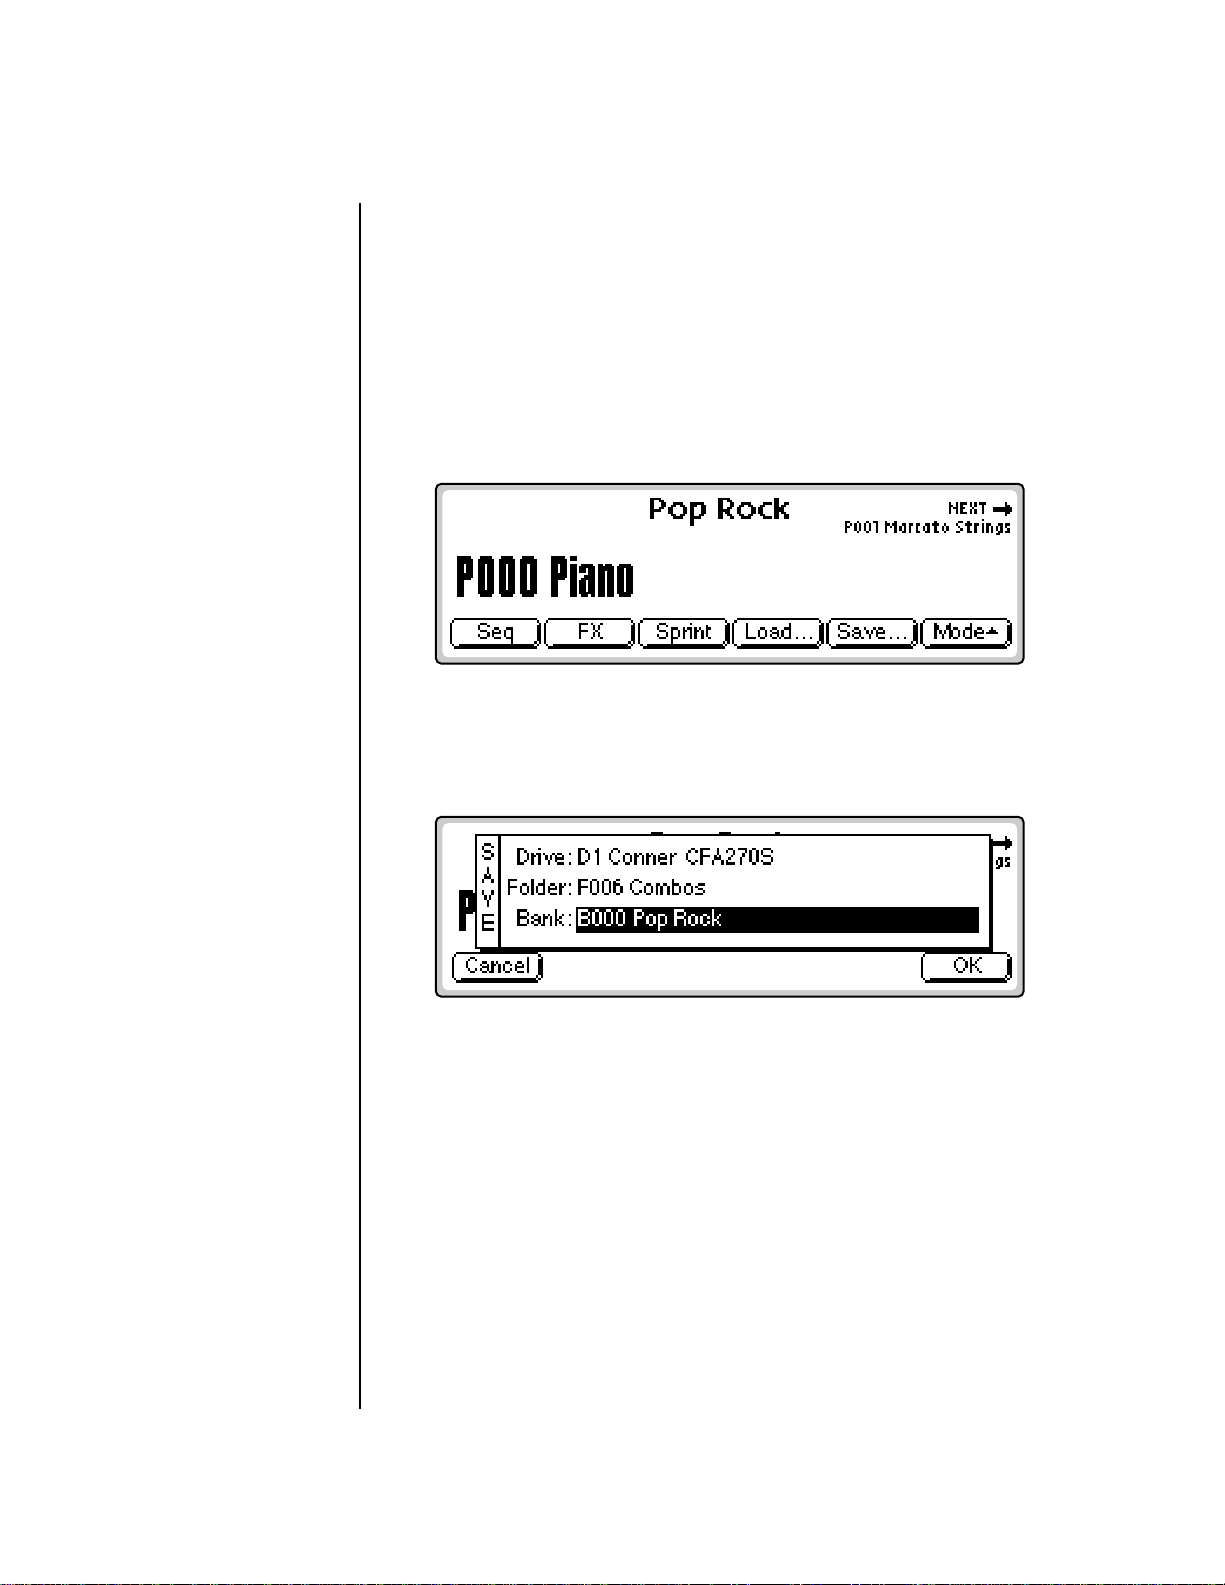
v To Save a Bank:
1. From the Main screen shown above, press the button directly under
“Save…” on the screen (F5). The following screen appears.
2. Select the Bank location. The bank field defaults to the bank currently
loaded. Press OK to overwrite the bank or select an empty bank if you
want to save the bank as a new bank.
You can also save the bank to another folder or disk drive (if
connected). Use the up/down cursor buttons to advance the cursor to
the Folder or Drive field, then select the new destination.
3. Remember that Saving is permanent, so think twice before pressing OK.
Press OK to Save the bank or Cancel to abort the operation and return
to the main screen.
10 E-MU Systems
Page 23
OO
OO
The arpeggiated notes
can be recorded into the
sequencer and are transmitted
on the MIDI Out port.
OO
OO
The arpeggiator
continues playing on the current
MIDI channel if you switch to
Multi mode.
Introduction
Arpeggiator
Arpeggiator
An arpeggiator moves a pattern of notes sequentially over a range of the
keyboard. EOS provides a performance-oriented arpeggiator which is
powerful, yet quick and easy to use. It has several features including tap
tempo, octave extension, note value divisor and control over how the
extensions are played (up, down, or up and down or random). The arpeggiator plays on the Basic Channel and remembers the order of played notes.
v To Access the Arpeggiator:
1. From the main preset selection screen, press the Mode function key
(F6). A new set of function keys appears.
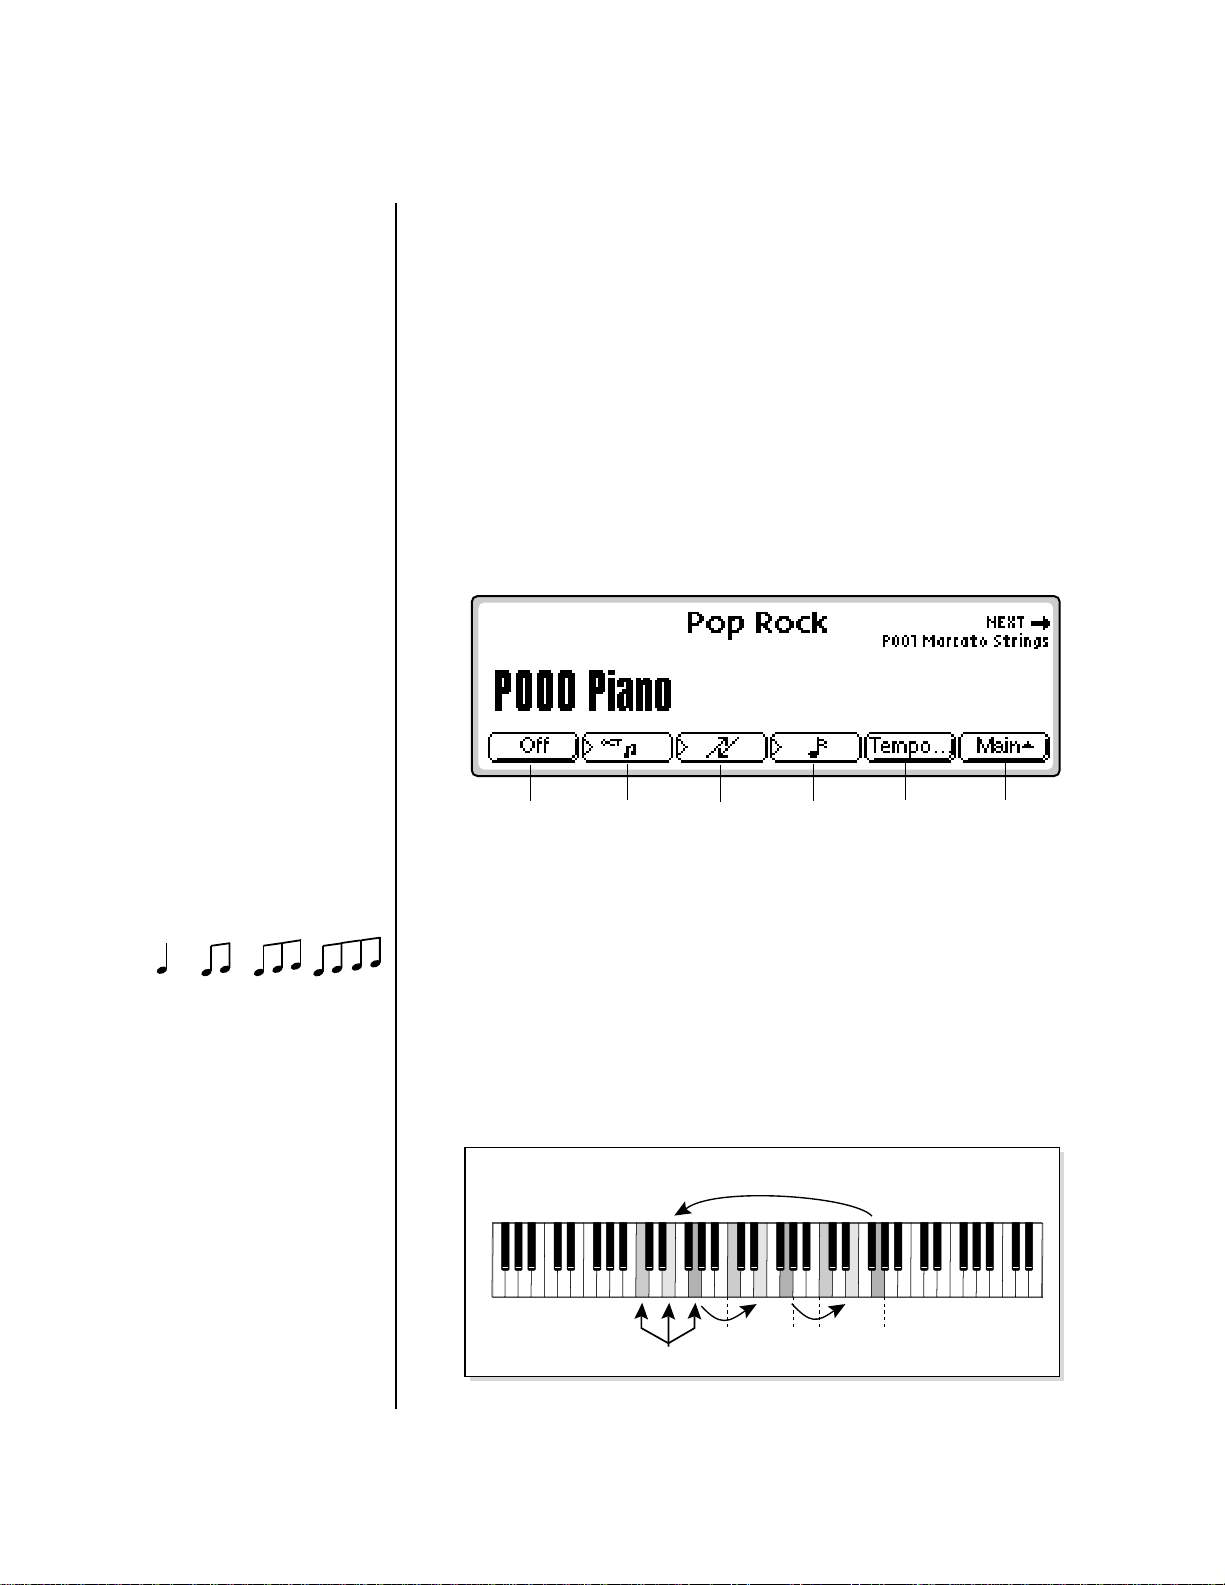
2. Press the Arp function key (F5). The arpeggiator will be enabled and the
function keys now control the arpeggiator functions.
None 1 Oct 2 Oct 3 Oct
Arp Off
Octave Extension. The extension control shifts the arpeggio up the
specified number of octaves each time the pattern is repeated. For example,
suppose you played C2 with an Octave Extension value of 2. The arpeggiator advances the pattern 2 octaves in the direction specified. The
extension can be set from 0-3 octaves.
Octave
Extend
Direction Note
Division
Tempo Go
Back
v To Set the Octave Extension:
• Press the Octave Extension button (F2) to toggle between values.
2-oct Extension, Direction Up
Back
123 456 789
Played
Extend 1
Extend 2
EOS 4.0 Software Manual 11
Page 24
Introduction
Arpeggiator
Arpeggiator
Direction
Direction. The Direction parameter determines the direction or pattern of
the arpeggiated notes. The held notes can be played forward, backward in
an alternating forward/backward order or randomly. This setting also
affects the order of the octave extensions.
Up
Down
Up/Down
Random
v To Set the Arpeggiator Direction:
• Press the Direction button (F3) repeatedly until the desired direction is
displayed on the screen. See the illustration at left for a description of
the direction display.
Division. The speed of the arpeggiator is determined by both the tempo
and the tempo divisor. The following divisors are available: 1/2 note, 1/2
note triplet, 1/4 note, 1/4 note triplet, 1/8 note, 1/8 note triplet, 1/16 note,
1/16th note triplet, 1/32 note, 1/32 note triplet. The division is particularly
useful if you are synced to an external MIDI clock.
Triplets. Access the arpeggiator from Multimode and turn Triplets On.
Triplets will remain on even if you switch back to Omni or Poly modes.
Tempo. The Tempo parameter, used with the Division parameter, deter-
mines the speed of the arpeggiator. There are two ways of defining the
arpeggiator tempo; by entering it numerically or by using the Tap Tempo
feature.
12 E-MU Systems
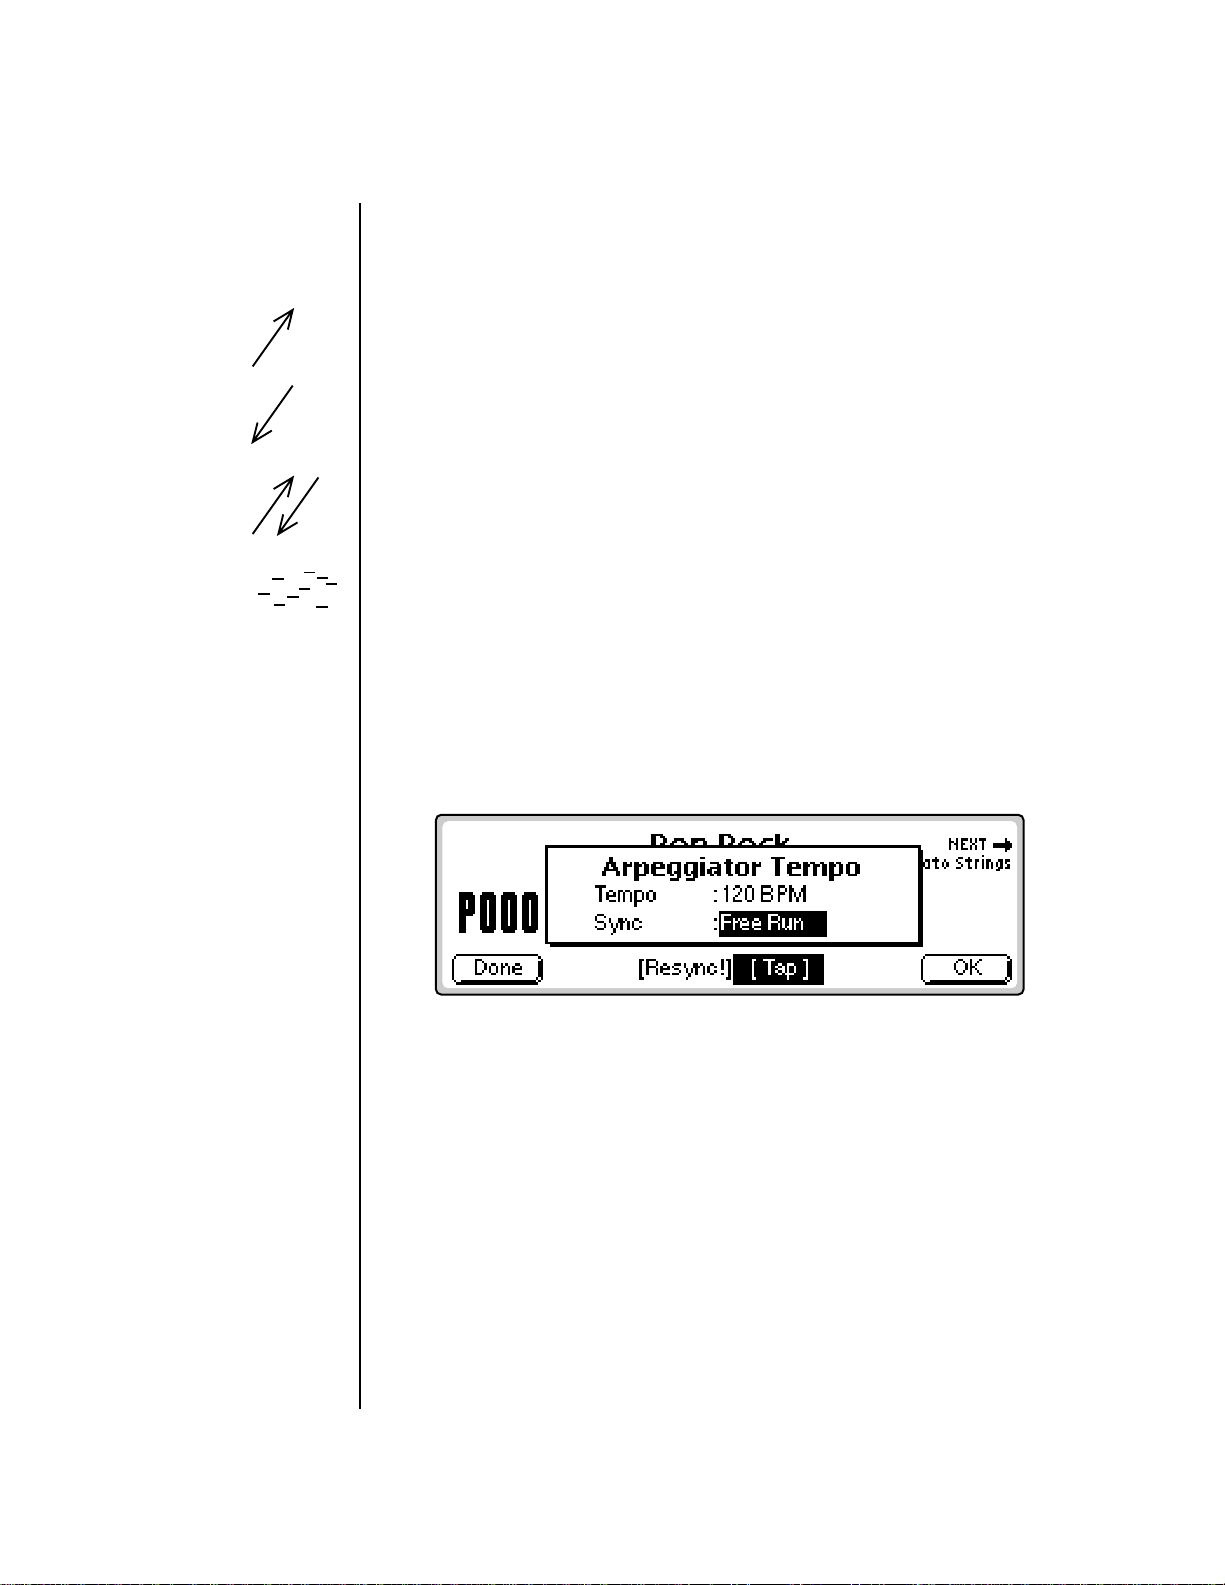
v To Enter the Tempo Numerically:
1. Press the Tempo function key (F5) to access the Arpeggiator Tempo
screen.
2. Place the cursor over the tempo field and enter the desired tempo
using the Data Entry Control, INC/DEC buttons or the Numeric
Keypad.
3. Press Done (F1) or OK (F6) to return to the main Arpeggiator menu
from the Tempo submenu. If you changed the status of the Sync
function, it will be saved to EEPROM.
Page 25

You can control the
arpeggiator using an external
MIDI Clock by setting the
sequencer to an external clock
(Sequencer, Global, Setup).
Introduction
Arpeggiator
v To use the Tap Tempo function:
1. Press the Tempo function key (F5) to access the Arpeggiator Tempo
screen.
2. Tap the F4 button at the desired tempo at least four times to define a
new tempo. After the first four taps, the tempo updates the average
tempo with each subsequent tap.
3. Press Done (F1) or OK (F6) to return to the main Arpeggiator menu
from the Tempo submenu. If you changed the status of the Sync
function, it will be saved to EEPROM.
ReSync! Resets the Arpeggiator clock at the exact moment the Resync
button is pressed. This lets you synchronize with another beat as you play,
even if the two clocks are not locked together.
Key Sync/Free Run. The Sync parameter defines when a note is played in
relation to when the key is pressed. When set to Key Sync, the note sounds
the instant a key is pressed. When set to Free Run, the note will not sound
until the next arpeggiator clock cycle. The new Sync value is saved to the
internal EEPROM.
OO
OO
The arpeggiated notes
can be recorded into the
sequencer and are transmitted
on the MIDI Out port.
The arpeggiator and sequencer use the SAME CLOCK and tempo. Changes
in either menu will affect both functions.
v To Arpeggiate:
1. Press the Mode function key (F6) from the preset selection screen.
A new row of function keys appears.
2. Press the Arp function key (F5). The arpeggiator is enabled and the
function keys now control the arpeggiator functions.
3. Play a chord. The notes you are holding should now be arpeggiating.
Change the note division or go to the tempo submenu to change the
speed. Explore all the arpeggiator controls. Have fun!
4. Press ArpOff (F1) to turn off the Arpeggiator.
Note: You can leave the Arpeggiator menu with the Arpeggiator on.
Simply return to the Arp menu to turn it off again.
5. Press Run to start and Stop to stop arpeggiating. Press Done, OK, Exit
or Enter to leave the Arpeggiator.
EOS 4.0 Software Manual 13
Page 26
Introduction
Keyboard Modes
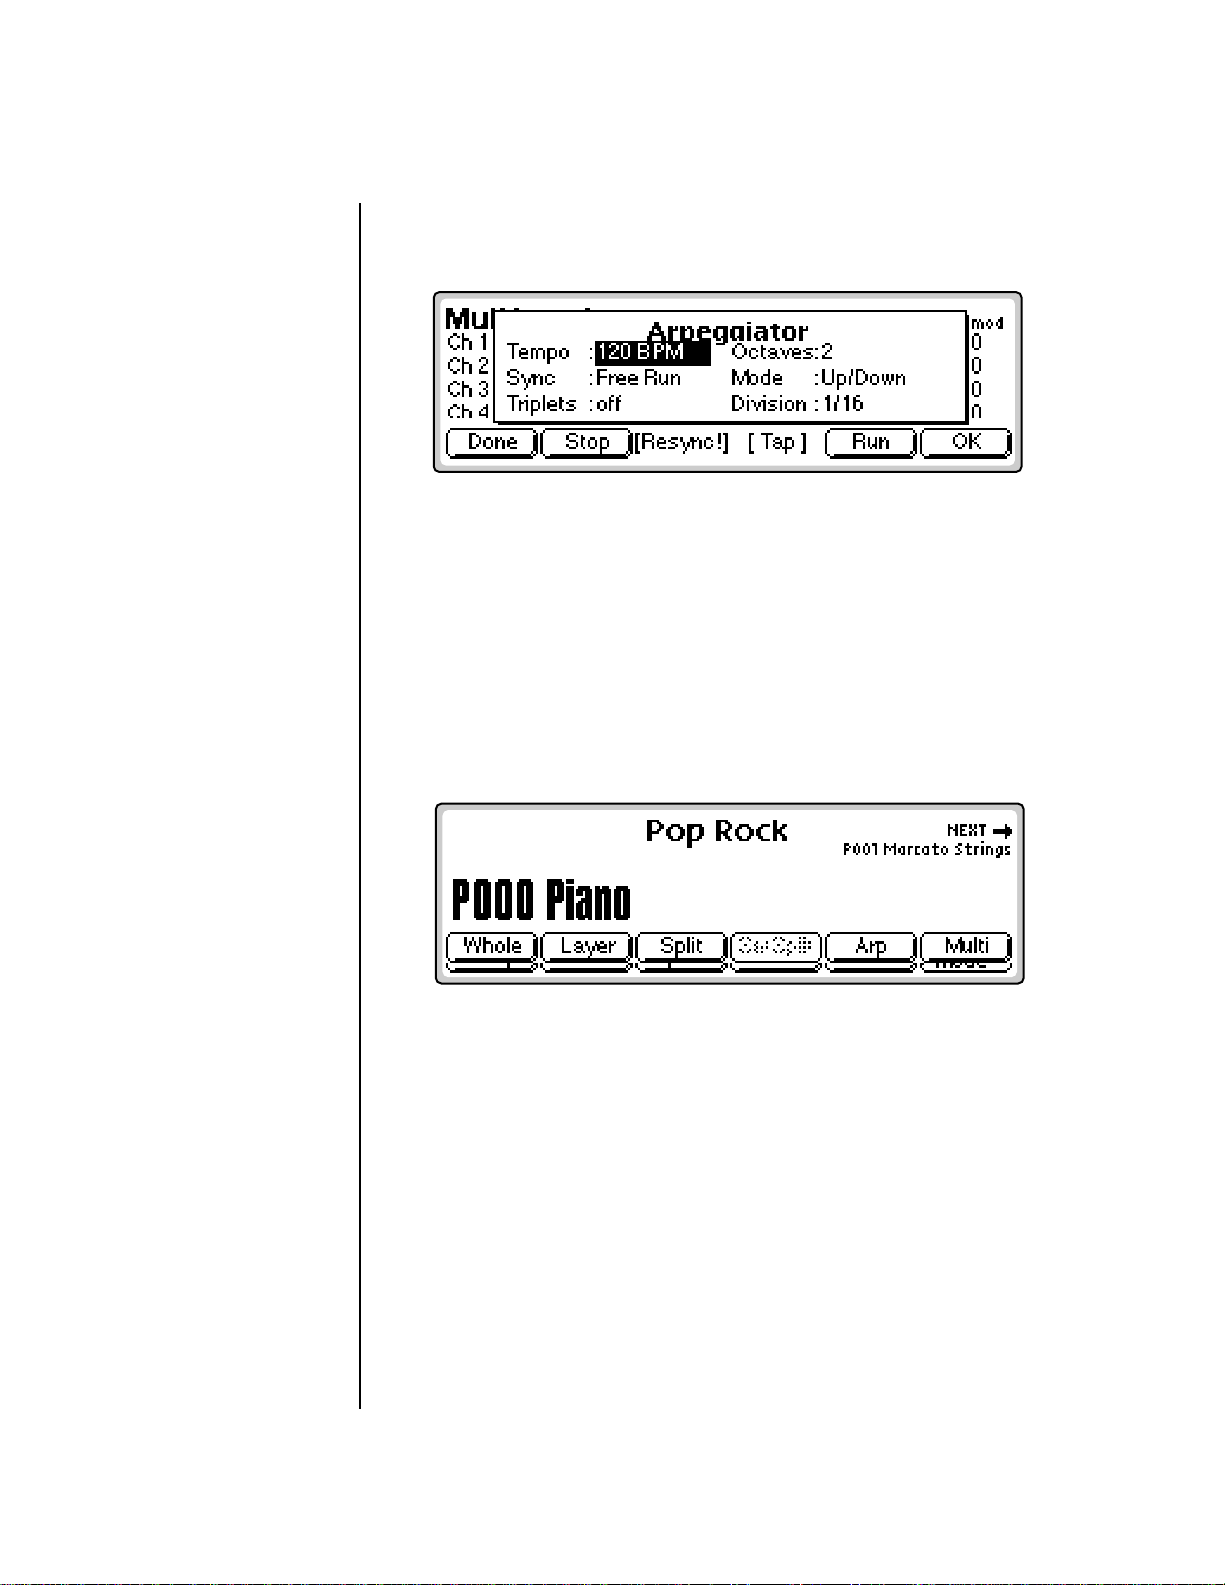
From Multi mode, the Arpeggiator window appears as shown below. The
functions are identical.
Keyboard Modes
The keyboard modes are receiver functions, processing MIDI (or keyboard
action on an E4K or E-Synth Keyboard) and are designed as easy to use
performance features.
OO
OO
On a split keyboard, the
Arpeggiator will play on the
preset that was selected when
the arpeggiator was turned on.
v To Access the Keyboard Modes:
1. Press the Mode function key (F6). A new set of function keys appears.
Whole
Normal mode where the keyboard is not split or layered. This button puts
EOS in Omni or Poly Mode.
Layer
This mode places both presets across the entire keyboard at once. Selection
and Transpose operate exactly the same as in Split mode. See Split.
Split
The preset assigned to the MIDI Basic channel is placed on the lower half of
the keyboard and the preset assigned to the Basic channel + 1 is placed on
the upper split (for details about the Basic Channel and how to set it, see
“Basic Channel” on page 103).
14 E-MU Systems
Page 27
Introduction
Keyboard Modes
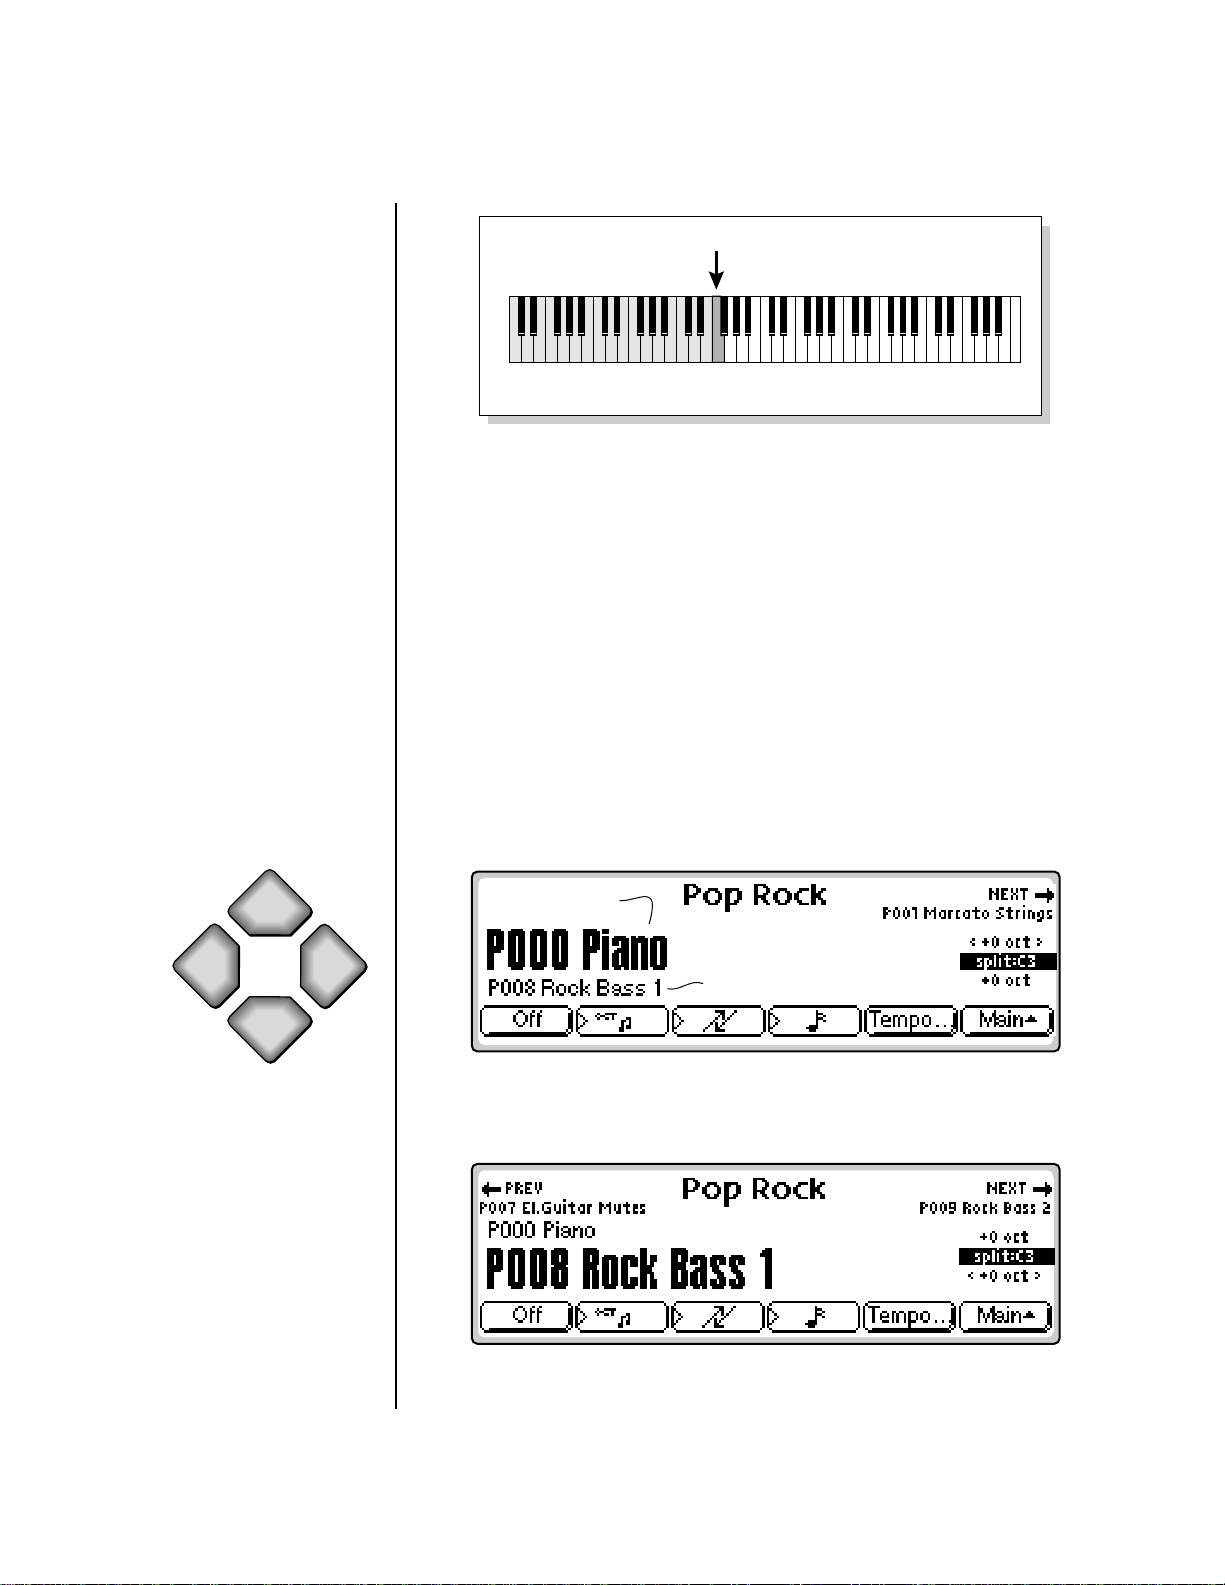
Split Point
Basic Channel Basic Channel + 1
Rock Bass 1 Piano
v To Set the Keyboard Split Point:
1. Press the Mode button (F6) from the main preset screen. The Keyboard
submenu appears.
2. Press the SetSplit function key (F4). The display asks you to play a key.
3. Play a key on the keyboard you want to be the first key of the upper
preset.
Xpose
Down
Select
Upper
Select
Lower
Xpose
Up
v To Change and Transpose Presets in Split Mode:
When in Split mode, the display appears as shown below, with both split
presets shown (upper is always on top). The currently selected preset is
ALWAYS shown in large bold type.
1. Use the Data Entry Control or INC/DEC buttons to change the Preset
shown in Bold.
Upper Preset
Lower Preset
2. Use the left and right cursor buttons to transpose the selected Preset up
or down.
The Upper Preset is ALWAYS on top of the lower preset in the display.
EOS 4.0 Software Manual 15
Page 28
Introduction
Keyboard Modes
Pan ADDS to the pan
setting made in the voice and is
not an absolute pan setting.
The optional MIDI
channel expander card allows
32 channel operation on older
EOS machines having a single
MIDI input port. This option is
standard on E4X, E4XT Ultra
and E-Synth Ultra.
Multi
Multimode allows the Emulator to respond to multiple MIDI channels at
once allowing you to play multiple MIDI channels simultaneously. For
detailed information and instructions on operating in Multimode, see
Multimode on page 106.
v Selecting Multi Mode:
• Press the Mode function key (F6) to turn on Multimode and display
the Multi mode screen. See the following illustration.
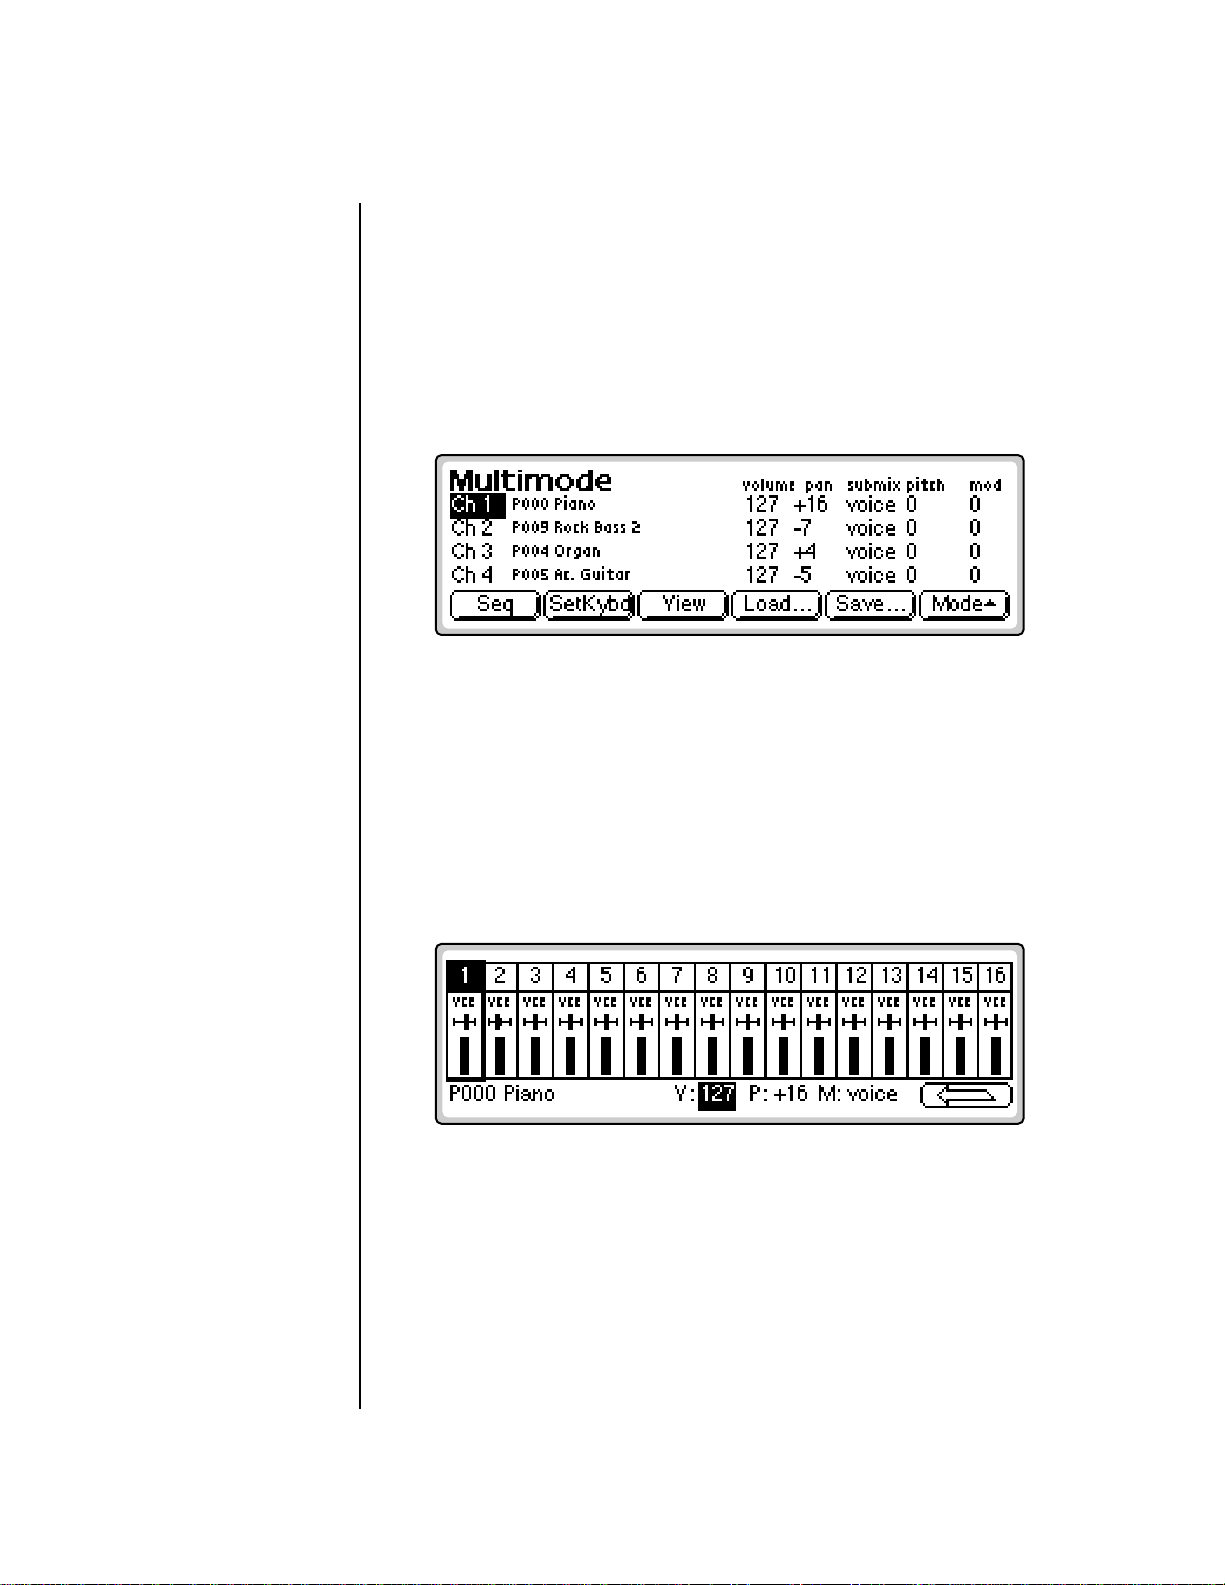
v To Change Channel Settings in Multimode:
1. Press the View function key to select MIDI Mix view. The MIDI Mix
screen displays and defines the preset, volume, pan settings and output
assignments for up to 32 MIDI channels.
This is useful for fine tuning multi-timbral sequences. This screen also
lets you override the output channel programmed in the voice. Any
volume, pan and preset changes made over MIDI are reflected in this
display.
• Volume = MIDI continuous controller channel #7
• Pan = MIDI continuous controller channel #10
OO
OO
Omni mode plays only
the currently selected preset
from any MIDI channel.
16 E-MU Systems
2. Select the desired MIDI channel using the up/down cursor buttons.
3. Select preset, volume, pan or the output assignment using the left/right
cursor buttons. Change the parameter values using the Data Entry
Control, the INC/DEC buttons, or the numeric keypad.
v To Return to Omni or Poly Mode:
1. Press the Arrow function key (F6).
2. Press the Mode function key (F6).
3. Press the Whole function key (F1).
Page 29

The Basics
1
Page 30

1 - The Basics
18 E-MU Systems
Page 31

1 - The Basics
Definitions
How Sounds are Organized
It is important to understand how sounds are organized in order to make
best use of the instrument in the shortest possible time. Many terms will be
introduced now that show up later in the manual.
You can think of the Emulator as a collection of sound organizing modules,
all contained within the currently loaded bank. Let’s take a closer look at
what makes up this information, and how it is transferred from one section
of the instrument to another. The Disk is the largest element in the
hierarchy; the Sequence is the smallest element. The following gives a brief
description of the EOS hierarchy.
Disk Drive. Floppy Disk, Hard Disks, CD-ROM Drives, Optical Drives, ROM
Chips, etc.
Folder. Used to group and organize collections of Banks.
Bank. All samples, voices, and presets - Everything that resides in RAM
(memory).
Preset. One complete keyboard setup containing one or more voices.
Voice. One complete sound which contains one or more samples with
keyboard and velocity settings and all programmable synthesizer parameters.
Sample. An individual digital recording with a name, sample rate and
looping information.
Sequence. A sequence of key depressions, controller movements, program
changes or system exclusive MIDI data. Up to 50 sequences can be stored
with each bank, but sequences can also be exported as Standard MIDI Files
or as Emulator sequences. They can even be saved to Flash RAM.
To explain the hierarchy, we’ll begin with individual elements, then work
our way through the system.
EOS 4.0 Software Manual 19
Page 32

1 - The Basics
The Sample
The total amount of
available sampling time can be
divided up any way you like—
one long sample, lots of short
samples, a few medium
samples, or any combination
thereof.
The Sample
Loading in any sound, in mono or stereo, creates a sample, the raw material
with which the Emulator works.
The term sample commonly means two different things:
1. A digital recording of a complete sound, or
2. Each snapshot of the sound that makes up the complete sample.
In this manual, we’ll assume sample means the complete recorded sound
unless indicated otherwise.
You can modify a raw sample in several ways. A sample can be transposed
up or down in pitch to cover a particular range of the keyboard making it
unnecessary to record a sample for every key. Sample editing might consist
of Looping a sample (allowing even short samples to play indefinitely),
Truncating (cutting off unneeded parts of a sample, thus saving memory),
or any of a number of digital processes that actually change the raw sample
data.
HighOrigLow HighOrigLow
Original
Low
Key
Key
High
Key
S02 Piano D3 S03 Piano D5S01 Piano A0
Sample Sample Sample
You can name samples also. It is usually a good idea to include the original
pitch in the name so that you can place it on the keyboard later at the
proper pitch. A bank can hold up to 1000 samples.
20 E-MU Systems
Page 33

OO
OO
A voice can contain a
single sample or multiple
samples, whichever you prefer.
1 - The Basics
Voices
Voices
A voice is a complete sound that can be assigned to a range of the keyboard.
A sample is the sound-generating portion of a voice. You can think of a
voice as a complete instrument consisting of one or more samples, which
can then be used as a building block in constructing more complicated
presets. A voice consists of one or more samples, a dynamic filter, a
dynamic amplifier, up to three 6-stage envelope generators, up to two
multi-wave LFOs and up to 24 modulation routings called “Cords” to
connect everything together.
In one typical scenario, you might record several samples of an instrument
(such as a piano), then place them into the same voice. Normally these
samples would be placed side by side on the keyboard as in the following
diagram. You assign the sample to a range by setting the original key,
(which is usually the original pitch of the sample) a high key and a low key.
The number of samples needed for a realistic emulation varies with the
instrument, but in general, “more is better.”
When a sample is taken, it can be automatically placed into a voice with
one sample. You can also place the voice (and its sample) on the keyboard.
Voice
Each Sample:
Orig. Key
Tune
Volume
Pan
Key Range/Fades
Velo Range/Fades
Sample 01
Loop, Info,
Sample Rate
If more than one voice is assigned to the same range, then pressing a key in
that range plays all the voices assigned to that range. Voices assigned to the
keyboard can be crossfaded by their position on the keyboard, or the key
stroke velocity. Voices can also be switched or faded depending on the
value of a realtime controller such as a modulation wheel, an LFO or an
envelope generator.
S01
S10
S02
Velocity Crossfade
Sample 02
Loop, Info,
Sample Rate
S03 S05
S04
Positional
Crossfade
Sample 03
Loop, Info,
Sample Rate
EOS 4.0 Software Manual 21
Page 34

1 - The Basics
The Preset
The Preset
A voice can be assigned to a single note on the keyboard, or transposed
polyphonically to cover a wider keyboard range. A preset is one entire
keyboard setup consisting of one or more voices. The process of assigning,
and optionally transposing, samples to specific ranges of the keyboard is
called making a preset. Making a preset is a three-step process:
1. Create the preset and give it a number and name.
2. Place voices in different keyboard ranges. For example, with six voices
you could assign each voice to cover one octave of a six octave
keyboard. A voice can be assigned more than once within a given
preset, and assigned to more than one preset. Each preset can have up
to 256 voices.
3. Choose from a number of available options that further define the
preset. Some examples are: assigning samples to partially or fully
overlap other samples, thus producing doubling effects, or assigning
dynamic control to individual voices in a preset. Overlapping voices
can be crossfaded using any modulation source. You can modify voice
parameters and set up MIDI and dynamic processing parameters.
EOS allows you great flexibility in the way you construct presets. Consider
this — you can assign multiple samples to the keyboard inside the voice or
assign single sample voices to the keyboard. Unless you specify otherwise,
only one sample is assigned per voice. In this case you would assign voices
(and the single sample each one contains) to the keyboard and create
presets. On the other hand, you may want to create finished voices before
you start designing presets and treat the voice as your finished sound. In
this case, the preset can be used to crossfade, layer or switch multiple
complex voices.
22 E-MU Systems
Page 35

1 - The Basics
SoundSprint
SoundSprint
SoundSprint is a special mode used to load presets quickly and automatically within a folder as you browse through them. Presets are loaded in the
background while the keyboard remains active with the last preset. Loading
time varies with the size of the preset, but most presets load in one to three
seconds.
Presets loaded via SoundSprint are placed at the top of the bank memory
and are assigned preset numbers 990-999.
You can load up to ten SoundSprint presets in RAM and these can be
selected instantly. Once you load more than 10, the oldest Sprint preset is
erased. SoundSprint will not overwrite a preset that has been loaded in the
conventional manner and a “Memory Full” message will be displayed. See
“Soundsprint™” on page 376 for additional information.
Presets are erased to
P
e
r
n
e
o
d
a
o
L
a
t
a
s
e
m
i
T
e
make room for new ones
t
Preset
991
992 993 994 999
Bank
Hard Disk
Hard Disk
Preset Diagram
SOUNDSPRINT
Load All
Preset
Preset
Preset
LOAD BANK
Bank
Preset
Preset
PresetPreset
PresetPreset
EOS 4.0 Software Manual 23
Page 36

1 - The Basics
Preset Diagram
Preset
KYBD Range KYBD Range KYBD Range
Group #
Key #
Velocity
Gate
Samples
Pitch
Glide
Chorus
Retrigger
LFOs
Loop
Start Offset
Envelope
Gen.
Voice
Voice
Morph
Filter
Frequency Q
Envelope
- 24 Cords -
Gen.
Voice
Voice
Amp
Pan
Vol
Envelope
Gen.
Velocity
or Realtime
Crossfade
L
R
Other
24 E-MU Systems
Sample 01
Loop, Info,
Sample Rate
S01
Velocity Crossfade
Sample 02
Loop, Info,
Sample Rate
Samples
S10
S03 S05
S02
S04
Positional
Crossfade
Sample 03
Loop, Info,
Sample Rate
Page 37

OO
OO
Up to 100 Bookmarks
can be saved to nonvolatile
Flash RAM.
1 - The Basics
Bookmarks
Bookmarks
When in SoundSprint mode, you can attach Bookmarks to your favorite
presets so that they can be selected instantly with a single or double key
press. You can store up to 100 bookmarks and save them to nonvolatile
Flash RAM.
v To Set a Bookmark:
1. Select a preset. From the SoundSprint Browser, use the left/right cursor
buttons to select the preset you want to bookmark.
2. Press the Mark… function key (F3). The screen shown above appears.
3. Select a bookmark location using the Data Entry Control or INC/DEC
buttons.
4. After selecting a location, press the Set function key (F4) to set the
bookmark. Press the Set/Save function key (F3) if you want to save the
bookmarks to nonvolatile memory.
The numeric keypad selects a bookmark from the rank of 10 you last
selected with the Lock engaged.
5. Press the Go function key (F6) to go to the currently selected preset.
Press Cancel (F1) to cancel the operation.
v Alternate Method to Set a Bookmark: (Using the Set button)
1. The first digit must be Locked for this trick to work. Press the ± key so
that Lock0 appears in the display.
2. From the SoundSprint Browser, select the preset you want to bookmark
using the left/right cursor buttons.
3. Press and hold the Set button located to the right side of the numeric
buttons. While holding the Set button, press one of the numeric
buttons. A pop up dialog box will inform you that the bookmark is set.
v To Select a Bookmark:
• From the SoundSprint Browser, press the numeric button(s) corre-
sponding to the bookmark you want to select. For example, if you want
to select the preset at bookmark number 9, press 9 on the numeric
buttons. The preset is selected.
EOS 4.0 Software Manual 25
Page 38

1 - The Basics
The Bank
Indicates first digit is locked at 0
v To Lock the first digit of the two digit Bookmark Number:
• Press and hold the Lock button (located to the left of the numeric but-
tons) while pressing one of the numeric buttons to lock the most
significant digit.
• Press the Lock button by itself to turn Lock mode On or Off. The lock
indicator on the display is shown in the previous illustration.
With Lock Off, two digits must be entered to select a bookmark. For
example, to select bookmark 9, you would press 0, then 9.
With the most significant digit locked, only one button press is
required to select a bookmark.
A bank can hold up to
1000 presets.
BANK
00
100 Banks per Folder
BANK
01
BANK
BANK
v To Select another Rank of 10 Bookmarks:
• Press and hold the Lock button and press one of the numeric buttons.
The display informs you of which rank of 10 bookmarks is now
selected.
The Bank
The bank contains samples, voices, presets and sequences. Everything that
is loaded into the Emulator is part of the bank. Although the memory is
volatile, meaning that the data disappears when you turn off power, all
bank data can be saved permanently to a hard disk drive or other media.
The number of samples that can be loaded into a bank at once is dependent
on the amount of sample RAM you have installed in your Emulator.
Folders
Just like on a computer, folders help keep banks organized. A folder can
02
98
BANK
03
BANK
99
contain up to 100 banks (0-99). You can use folders to organize your sound
banks by including all the banks used for a particular project in a folder.
The number of folders in a disk depends on the size of the disk. As an
example, a one gigabyte hard disk can hold up to 96 folders.
26 E-MU Systems
Page 39

1 - The Basics
The Internal Drive
The Internal Drive
A disk drive is a memory storage device that stores banks of data. The
floppy drive is used mainly to update the operating system software. (The
operating system consists of the instructions that tell the Emulator what to
do.) Other types of disk drives, as described below, can connect to the
Emulator to provide efficient sound storage.
Floppy Disk Drive: The floppy disk drive requires 3.5", double-sided,
high-density (1.4 MB) floppy disks. As new enhancements are developed,
the new software is distributed on floppy disks. The floppy drive is used to
update the operating system software. This software can be copied into
Flash RAM and made a permanent part of the Emulator itself.
It is also ideal for transferring sequences to and from a computer-based
sequencer. With large bank sizes of 4-128 MB, the floppy disk becomes
impractical for backing up sound data, although it can be used to save or
transfer small sound banks in a pinch.
EOS accepts 2 kinds of floppy formats. DOS formatted disks allow multiple
files per disk and are compatible with PC and Macintosh computers. EOS
formatted disks allow one bank to be spread over multiple disks.
Check the E-mu web site
at: www.emu.com for the latest
software updates & downloads.
Note: The Emulator can format floppies in EOS format only. DOS floppies
must be formatted on a PC or Mac computer or purchased preformatted.
EOS cannot read Macintosh floppies, but fortunately the Mac can read and
format DOS floppy disks.
To Update the EOS Software:
Since the EOS operating system is stored in Flash ROM, it can be easily
updated to add features or to fix bugs. The following procedure explains
how.
1. Turn off power.
2. Insert the floppy disk into the drive.
3. Turn on power.
4. Press Enter to update or Exit to cancel.
5. Wait for the Emulator to update its firmware.
6. Re-initialize EEPROM. (This should be done after a software update to
“clean the slate”. It resets the Master menu preferences and other bits.)
a. Press Master
b. Press Utils
c. Press Tests
d. Enter the Secret Password: 1-3-5-8, then press OK.
e. Press More
f. Press InitEE The display reads, “Initialize EE?”
g. Press OK. The display reads, “Saving System”
f. Press Master to exit diagnostics mode.
7. Recalibrate the Emulator controls. See “Recalibration” on page 68.
EOS 4.0 Software Manual 27
Page 40

1 - The Basics
External Drives
OO
OO
Use the “Mount Drives”
utility whenever an external
SCSI device does not appear in
the display.
Internal Hard Disk Drive: A hard disk provides the advantages of much
higher memory capacity and far faster access time than floppy disks.
However, the hard disk cannot be removed and its data must be backed up
to another medium for safekeeping.
IDE Drives: The Ultra series Emulators can make use of an internal IDE
hard disk. An IDE drive has several advantages including: low cost, high
capacity, low noise and it doesn’t use up a precious SCSI ID number. Order
IDE installation kit #6303. This includes everything needed except the IDE drive.
External Drives
Emulators are equipped with SCSI (Small Computer Systems Interface)
connector(s) on the rear panel. This interface is commonly used in the
computer industry, so many devices made to work with computers—particularly mass storage devices—will also work with Emulators. Here are some
of the types of mass storage devices that can be connected to the Emulator
using the SCSI connectors.
Hard Disk Drive: A hard disk provides the advantages of high memory
capacity and fast access time. Transferring data is quite straightforward.
However, you cannot remove a hard disk and replace it with another one—
the disk is a permanent part of the drive. There are some important
cautions involved with hard disks:
1. Hard disks are sensitive to extreme mechanical shocks. If your hard disk
falls off a keyboard stand, chances are the hard disk will be damaged.
2. Hard disks have reached a very high level of reliability. However, they
can fail from time to time (as can any part of a computer), so any data
should be backed up periodically on some other medium.
Removable-media Hard Disk Drives: These are similar to standard hard
disk drives except that the disk itself can be removed and replaced with
another disk (similar to floppy disks). Disk densities can range from 44MB
to well over 1 Gigabyte (GB) per platter. Removable-media hard disk drives
make it easy for you to build a sound library of unlimited size and are quite
handy for transferring sounds between machines. They’re also perfect for
backups because you can remove the media and keep it in a safe place.
CD-ROM Drive: A CD-ROM is a playback-only mass storage memory
device whose capacity is approximately 660MB. Quality CD-ROM libraries
are available from several companies (E-mu Systems, InVision, Northstar,
Q-Up Arts and many others). These can be loaded into the bank just like a
hard disk.
Magneto-Optical Drive: These high speed, high density storage devices
are ideal for storing large amounts of sound data. Typically a magnetooptical drive can hold upwards of 300 MB per side and the removable
cartridges can be used over and over. Disk access time is comparable to a
normal hard disk. Although you can read and write to these drives, they are
generally slower than most hard disks.
28 E-MU Systems
Page 41

OO
OO
The Memory
Configuration control (Master,
Setup, Memory), allows you to
balance the allocation of Preset
Memory between the Sequencer
and Presets.
Contact your E-mu
dealer if you wish to upgrade
your CPU RAM.
1 - The Basics
Sound ROM & Sound RAM
Sample Memory & Preset Memory
EOS presets use two separate memory locations — Preset Memory and
Sample Memory. Preset memory (also called CPU memory) is used to hold
both preset parameter information and sequences. (The ratio between
presets & sequences is user adjustable — see sidebar tip.) The amount of
Preset Memory determines the number of presets and sequences you can
have in your Emulator.
Preset memory on the e-64, E-IV, E4K, and E-6400 is about half a megabyte.
The E4X, and E-Synth come standard with 2.6 MB of usable preset memory.
Ultra models have about 4 MB of preset memory. Sample memory contains
the actual sample data and can vary from 4 MB to 128 MB. Because presets
use far less memory than do samples, less preset memory is needed.
Audio Out
Sound
Generation
Preset Flash can also be
used to store presets for HD
based sound banks. However,
this can be confusing since the
proper samples may not be
loaded into Sample RAM when
the preset is selected.
Hard Disk
Sound
Data
Sample Memory
Sample
Sample
Sample
Sample
Sample Sample
Control Data
Preset
Control
Control Data
Preset Memory
Preset
Preset
Preset
Preset
PresetPreset
Sound ROM & Sound RAM
Sound ROM is a standard feature on E-Synth and one of the available
hardware upgrades for other EOS instruments. Although the samples
themselves are in ROM and cannot be changed or modified, the Presets
with all their keyboard mapping and synthesizer parameters can be
changed because they are stored in non-volatile Preset Flash RAM. Flash
RAM contain 256 to 1000 presets depending on the amount of Flash RAM
you have installed. Flash presets are located immediately after RAM preset
999 (I000 - IXXX) in the preset numbering scheme.
Five Types of Memory
The Emulator uses up to five different memory types. It CAN be confusing.
• Sample RAM - 4-128 MB. Contains samples loaded from the hard disk.
• Sample ROM - Permanent ROM samples. Optional on all but E-Synth.
• Preset RAM - 1-8 MB of dynamic RAM. Used by CPU, and also contains
presets and sequences loaded from the hard disk.
• CPU Flash - Normally used to store presets for ROM or S-Flash banks.
• Sound Flash - Optional flash SOUND memory to store your own banks.
EOS 4.0 Software Manual 29
Page 42

1 - The Basics
Flash Sound RAM
Tip #1: Storing RAM based
presets in flash can be useful to
store preset “templates” that do
not have samples associated
with them. Bear in mind that
unless you have Sound ROM or
Sound Flash installed, the presets
may NOT point to the correct
samples.
Audio Out
Sound Data
Sound
Generation
Control Data
Preset
Control
Tip #2: Flash presets can also be
used when you’re working on a
RAM based preset which uses a
lot of sample memory. Normally
you would Save the bank, but
this can take quite some time
with a really large bank.
If you’re only modifying the
preset parameters, you can Copy
the preset to Flash and save
time. Later you can Copy the
preset back to RAM then Save
the bank normally.
Tip #3: Flash memory is also
handy to store your favorite
sequences. Copy the sequence to
a Flash (z) sequence location.
Sample ROM
Sample
Sample Sample
Sample
Sample
Preset FLASH
Preset
PresetPreset
Preset
Preset
Sample
Preset
Sample RAM
Sample
Sample
Sample
Sample
Sample
Presets 000-999Presets I000-IXXX
Preset RAM
Preset
Preset
PresetPreset
Control Data
Sample
Preset
Preset
Sample ROM and Preset Flash are both retained when power is disconnected.
Sample RAM and Preset RAM are not retained with power disconnected and
must be re-loaded from the hard disk.
Normally, preset data stored in Flash RAM uses the samples stored in ROM.
However, you can also create RAM presets (saved and loaded from disk)
which use the permanent ROM samples.
Presets stored in Flash RAM can point to RAM based samples also. This
mode of operation can be CONFUSING however, because there is no
guarantee that the correct samples will be in RAM when the flash preset is
selected.
30 E-MU Systems
Copy Presets to and from a floppy or hard disk using special Flash memory
utilities which are located under Master, Bank, Flash. See “Flash Utilities”
on page 73 for details.
Flash Sound RAM
Flash Sound RAM is yet another upgrade that adds either 8 MB or 16 MB of
non-volatile Sample storage. Unlike the Sound ROM option, both samples
and presets are stored in Flash RAM.
You can save entire banks to Flash RAM just like ordinary Sound RAM, but
unlike ordinary RAM, Flash RAM retains its memory when the power is
turned off. Flash RAM lets you create a custom ROM bank that is reliable
and always available. If both Sound ROM and Flash Sound RAM options are
installed, the 256 available presets are shared between them.
Page 43

1 - The Basics
Sample Numbers
Audio Out
Sound
Flash Sound RAM
Generation
SAMPLE RAM
Presets 000 - 999
FLASH RAM
8 or 16 MB4-128 MB
Presets I000 -
I 255
I 999
depending
on installed
Flash RAM
Sample Numbers
The Emulator contains two internal SIMM sockets for use by Sound ROM
and Flash Sound RAM. These special sockets are designated X and Y. If you
have either Sound ROM or Sound Flash RAM installed, you'll notice that
the samples stored in these locations have the prefix X or Y before the
sample number. (Press Preset Edit to see the sample assignments) Similarly
samples stored in main sample RAM use the designator “S” before the
sample number, as in “S003”.
Using Preset Flash Memory
The Preset Flash memory comes pre-loaded with 256 Presets. If you need to
reload the factory presets, use the following instructions.
v To Upload the Factory Presets into Flash:
1. Power up the machine and wait for it to finish booting.
2. Press the Master button.
3. Press the Setup function key (F3).
4. Press the Memory function key (F6).
5. Set the Memory Configuration. To load the 8 MB FLASH Presets you’ll
need at least 85K of Preset Memory. To load the “Big RAM” Presets
you’ll need at least 507K of Preset Memory.
6. Press the Save function key (F6).
7. Press the Master button again to exit the Master module.
8. Insert the floppy disk containing the factory presets into the drive
with the label side towards the center of the unit.
9. Press the Load function key (F4). The pop-up Load window appears.
10. Set the Drive to “Floppy” using the cursor buttons and Data Entry
Control.
EOS 4.0 Software Manual 31
Page 44

1 - The Basics
Using Sound Flash Memory
11. Press the Load function key (F6).
12. When the bank has finished loading, press the Master button.
13. Press the Bank function key (F2).
14. Press the Flash function key (F6).
15. Press the RAM➔F function key (F3). A warning screen appears advising
you that you are about to overwrite Flash RAM.
16. Press OK (F6) to write the bank to Flash RAM.
Using Sound Flash Memory
Sound Flash Memory is a similar to a hard disk containing one bank. A
bank is assembled in Sample RAM, then Saved to Flash Memory. Individual
presets can be saved to Flash Memory using the Copy function in the Preset
Manage module.
v To Save a Bank to Flash Memory:
1. Erase the Bank
• Press the Master button.
• Press the Bank function key (F2).
• Press the Erase function key (F1).
2. Load the Bank you want to Save to Flash
• From the main screen, press Load.
• Select the Drive, Folder and Bank you want to Save to Flash,
then press Load. The bank will load into RAM.
3. Save the Sounds to Flash.
• Press Save.
• Select Flash Memory as the drive you wish to Save to, then press
OK (F6). The Samples will be stored in Flash Sound RAM.
4. Mount the Drive.
• Press Disk.
• Press Utils (F1).
• Press Mount (F1).
5. Erase the Bank…again
• Press Master.
• Press Bank (F2).
• Press Erase (F1).
32 E-MU Systems
Page 45

1 - The Basics
Using Sound Flash Memory
6. Erase Preset 000
This operation deletes the empty preset in the P000 location of the bank so
it won’t get merged into your Flash Bank. Unfortunately, you must have at
least one preset in the bank, so before deleting P000 we’ll create a new
empty preset at location 999.
• Press Preset Manage.
• Press New…
• Select destination preset P999 Empty Preset.
• Press OK, twice.
• Select P000 Untitled Preset.
• Press Utils (F1).
• Press Erase Preset (F1). Press OK (F6).
7. Merge the Presets. Merging the presets into the bank will point to the
correct locations in the Flash Sound Memory bank. The Emulator sees
that the samples are in Flash Sound Memory and changes the sample
numbers so they point to Flash.
• From the main screen, press the Arrow button, then Load.
• Select the Drive, Folder and Bank you want to Save to Flash,
then press Merge.
8. Save the Presets. Now that the sample numbers point to the samples in
Flash Sound Memory, write the presets into CPU Flash memory using
the Flash utilities.
• Press Master.
• Press Bank (F2).
• Press Flash (F6).
• Press RAM->F (F3). A warning screen appears.
• Press OK (F6). The presets are written into CPU Flash memory.
v To Copy Flash RAM Presets to Disk:
1. Power up the machine and wait for it to finish booting.
2. Press the Master button.
3. Press the Bank function key (F2).
4. Press the Flash function key (F6).
5. Press the F➔RAM function key (F4). A warning screen appears advising
you that you are about to overwrite RAM.
6. Press OK (F6) to write to RAM.
7. Press the Master button to return to the main screen.
8. Insert the floppy disk into the drive if you wish to copy to floppy disk.
9. Press the Save function key (F5). The pop-up Save window appears.
EOS 4.0 Software Manual 33
Page 46

1 - The Basics
Using Sound Flash Memory
__
__
Heed this warning if you
have ROM or Flash presets
already stored in preset Flash.
Sound ROM and Flash Sound
Memory share the same preset
locations.
10. Press OK to continue.
11. Select the destination Drive, Folder and Bank for the flash presets.
12. When the parameters are properly set, press OK (F6). A warning screen
appears warning you that you are about to overwrite a bank.
13. Press OK (F6) to save the bank to Disk or Cancel (F1) to cancel the
operation.
v To Copy Flash Sounds to Disk:
It might be a good idea to back-up the factory samples before you overwrite
the Flash Bank with your own sounds.
1. Power up the machine and wait for it to finish booting.
2. From the main screen, press the Arrow function key.
3. Press the Load function key.
4. Wait for the bank to finish loading, then press the Arrow function key.
5. Press the Save function key.
6. Select the destination.
Modules
A module controls a particular set of functions. There are six main modules
in EOS: Master, Disk, Preset Manage, Preset Edit, Sample Manage and
Sample Edit. There is also a Sequencer submodule located under Master.
Activating a Module: To work with a module, you must first activate it.
Press the button associated with the desired module.
Function Key Menus: Menus are selected using the function keys along
the bottom of the display. Pop-up menus may also be used when a field
being edited has a small number of choices.
Page Selection: Each module contains several pages which contain
controls for additional functions.
34 E-MU Systems
In a graphical display, the different fields can be selected in the following
ways:
Page 47

1 - The Basics
Using Sound Flash Memory
• By pressing the cursor buttons (up, down, left, right).
• By turning the Data Entry Control.
• By assigning an assignable key to jump directly to the screen you want
to edit.
Pressing the module button or the Exit button cancels any operation.
The Module buttons are located on the left side of the control panel. Each
module affects a specific area of the Emulator's operation.
Disk: This module controls everything to do with the disk drives where
sounds are stored. You can browse through the disks, examine their
contents and audition sounds directly from a hard disk before loading. If
you are looking for a specific sound, you can use the “Find” function to
quickly locate it. See “Disk Menu” on page 357.
Master: This module contains functions that affect the entire machine,
such as master tuning, headroom, master FX, output sample rate, LCD
contrast, and much more. “Master Utilities” on page 65.
Sample Manage: This “recording studio” module records sounds from
the outside world into the bank. Features include adjustable preamp gain,
variable threshold setting, and adjustable sample rate and length. “Sample
Utilities” on page 174.
Sample Edit: With this powerful module, you can edit a sample's length,
loop (i.e. infinitely sustain) any portion of the sample and automatically
find the best loop points using Auto Correlate. You can splice two different
samples together, mix samples, or perform a variety of advanced digital
signal processes on the sample. “Sample Edit” on page 193.
Preset Manage: This module handles the preset “housekeeping”,
allowing you to create new presets, copy them to any location, rename
them or erase them. “Preset Manage” on page 245.
Preset Edit: This module lets you alter the synthesizer voice parameters,
such as shaping the amplitude and filter dynamics or adjusting the
keyboard dynamic response. Voices can be placed on the keyboard, moved
around or shaped in just about any possible way. “Editing Presets” on
page 253.
Sequencer: This module accesses the 48-track sequencer which is located
inside the Master module. The Sequencer can be quickly accessed by
holding the Set/Shift button (decimal point) and pressing Assignable Key 1.
“Sequence Manage” on page 133.
Effects: This module controls the realtime FX processors. It is located in
the Master and also the Preset modules, but can be quickly accessed by
EOS 4.0 Software Manual 35
Page 48

1 - The Basics
Saving
holding the Set/Shift button (decimal point) and pressing Assignable Key 2.
“Effects” on page 117.
SoundSprint: This function automatically loads presets as you browse
through them. SoundSprint can be quickly accessed by holding the Set/
Shift button (decimal point) and pressing Assignable Key 3. “SoundSprint”
on page 23.
More Definitions
Saving
The RAM bank retains data only for as long as the Emulator is plugged in
and turned on. Of course, we don’t expect you to leave the thing on all the
time, which brings us to the subject of saving data.
Pressing the SAVE function key from the Disk module or Main Screen
shuttles all the bank data (samples, voices, presets and sequences) to the
drive of your choice. A hard disk permanently stores data so that even after
turning off the Emulator, the disk stores a record of your work.
This is the icon for
the floppy disk drive
IF YOU DO NOT SAVE A BANK, ALL BANK DATA WILL BE LOST WHEN
YOU TURN OFF THE MACHINE!
Do not wait until the end of a session to save. Save your work periodically
in case of power failure or some other unforeseen circumstance that might
erase the bank’s memory. Hard disks are not infallible. All hard disk banks
should be backed up periodically to another hard disk or other media.
Should you improve the preset or sample later, you can always replace the
original with the revised version. And if something goes wrong, the original
will still be available to save you the ordeal of starting from scratch.
Whenever you have done enough work that you would hate to lose it,
BACK IT UP!
Default
A default setting is what we’ve judged to be a useful initial setting, and
remains in effect until you change it. For example, if you create a new
preset, the transpose setting defaults to “0.” Had the default value been
“+12,” all new presets would be transposed up an octave until you change
the value.
Icons
An icon is a little picture of an object such as a floppy disk, a hard disk,
folders, banks, presets or samples. In the disk browser screens, icons are
used as an easy way to identify and select the appropriate object. When an
icon is selected, the image will reverse (black to white & vice-versa).
36 E-MU Systems
Page 49

1 - The Basics
The Cursor
The Cursor
The cursor is a highlighted area on the display. It shows you the number or
letter that will be altered if you enter data. Entering a new value overwrites
the number or letter above the cursor, whereupon the cursor moves on to
the next number or letter (if applicable). If the Emulator is expecting a two
or three-digit number, in most cases you must enter all the required digits
even if some of these are zeroes (called leading zeroes). For example, if the
Emulator is expecting a three-digit number and you want to enter 8, you
would enter 008. If it is expecting a single-digit number, entering 8 would
be sufficient.
Data Entry Control & Increment/Decrement Buttons
In virtually all instances where the Data Entry Control selects options, the
increment (Inc/Yes) and decrement (Dec/No) buttons duplicate the Data
Entry Control. Press Inc/Yes to increase a value, or Dec/No to decrease by
one value at a time.
Selecting
When the instructions say to select an option, you can use whatever
method is most comfortable for you: the Data Entry Control, the
increment/decrement buttons, the numeric keypad (if applicable) and,
when naming, the keyboard keys. Some functions do not implement all
these options. (You can’t go wrong by trying, though. If a function doesn’t
respond to the numeric keypad, for instance, then pressing the keypad will
have no effect.) Use the Data Entry Control or the INC/DEC buttons
instead.
The Big Re-Cap
• A sample is a raw sound that is loaded into the bank.
• A voice is a complete sound, consisting of one or more samples,
processed through the dynamic signal processors, that is mapped onto
the keyboard.
• To create a new preset, make sure you have all the samples required for
the preset, then assign combinations of voices from the bank to specific
sections of the keyboard.
• After arranging a bank, it can be saved to one or more drives or to Flash
Memory.
• Since loading from a hard disk fills the bank with samples, voices and
presets, you can group these voices and samples into new presets, process the samples contained in particular voices, or alter existing presets.
• Presets loaded via SoundSprint are always placed in preset locations
990-999.
• Up to 50 sequences can be saved with the bank. An additional 50
sequences can be saved into Flash (if you have it). Flash sequences are
designated by a “z” in front of the sequence number. Exported or
Standard MIDI File sequences appear in the Bank browser.
EOS 4.0 Software Manual 37
Page 50

1 - The Basics
Selecting
Using The Browser
OO
OO
The Info… button gives
information about the selected
object.
The type of View you choose (list
or icon) is remembered for each
level.
Selected Object
Identifier
Functions
Function
Keys
The Disk Browser makes it easy to navigate through the different levels of
the disk drives. Take the time to familiarize yourself with this section
because the Browser is an integral part of the system. A brief recap of the
disk hierarchy is as follows:
• Disk Drive - Floppy disk drives, hard disk drives (internal and external),
CD-ROM drives, optical drives, etc.
• Folder - Used to group and organize collections of banks.
• Bank - A group of presets which can be loaded into memory.
• Preset - A complete sound: samples, voices and all programmable
options.
• Sample - An individual digital recording with looping information.
• Sequence - A recording of keyboard key depressions (with velocity and
pressure) and any other performance controllers (pitch and mod
wheels, real time control sliders, thumb button, footpedal, foot switch
and program changes). Sequences can be stored along with the bank or
can be exported as separate entities which appear as icons in the bank
browser.
Icons
Activates
Submenu
38 E-MU Systems
v To Browse the Disk:
1. Press the Disk button. The LED illuminates and a screen similar to the
one shown below appears.
Page 51

1 - The Basics
Selecting
2. Press the View function key (F3). The display now changes to a list
format. Press the View button again to return to the icon display.
3. Press the Info… function key (F6). A pop-up window appears with
information about the hard disk drive. The other functions on this page
such as “Drive Sleep” and “Drive Lock/Unlock” are covered in chapter 9
- Disk Menu.
4. Press the OK function key to return.
5. Press the function key under Browse (F2). A second row of function
keys appears.
If another page of
choices exists, the Right Page
arrow LED will be illuminated.
6. Press the function key under Folders (F2). The folders on the hard disk
are displayed.
7. Select a folder. Use the cursor buttons, INC/DEC buttons or the Data
Entry Control to select the active object.
8. Press the function key under Browse. Press the function key under
Banks to examine the banks in the selected folder.
EOS 4.0 Software Manual 39
Page 52

1 - The Basics
Selecting
Sequences saved as
Standard MIDI Files also appear
as banks in the Bank browser.
9. Choose a Bank.
10. Press the function key under Browse again.
11. Press the function key under Presets and the Preset screen shown below
appears.
12. Choose one of the Presets, then press the function key under Browse
yet again.
13. Press the function key under Samples to examine the samples used in
the selected bank.
14. Press the Info… function key (F6). a pop-up window appears with
information about the sample. Press OK to return to the previous view.
40 E-MU Systems
Page 53

OO
OO
The Enter button can be
used to step forward through
the Folder, Bank, Preset and
Sample browsers.
Use the Exit button to back out
of the pages.
1 - The Basics
Banks, Sequences, Presets & Samples
15. Press the Exit button to “back out” of the pages. Press the Exit button
once from the sample browser to return to the preset browser. Press Exit
again to put you in the folder browser. Press it once more and you're in
the disk browser. Press Exit one more time and you're out of the disk
module altogether and back in the preset selection screen.
16. Press the function key under Browse.
17. Press the function key under Seqs to examine or load the sequences
resident in the selected bank. If no sequences exist, a pop-up window
will inform you of this fact.
Guided Tours
These Guided Tours will help get you up and running in no time.
Banks, Sequences, Presets & Samples
The Bank is a set of up to 1000 presets which can be loaded into and saved
to disk from internal memory (RAM). When you save to disk, that
collection of presets, samples and sequences is a bank. Banks can be
constructed as large as the memory in your Emulator will allow (usually
128 MB). A preset is one complete keyboard setup containing voices and
samples arranged on the keyboard together with all programmable
synthesizer parameters. A sample is the most basic sound element of EOS
and consists of the digitized sound together with truncation and looping
parameters.
Banks, Presets and Samples can be loaded into RAM, renamed, saved to
disk, and deleted using the Utilities menu of the individual modules.
The following sections describe how to Load, Save, Find, Name and Erase
Banks, Presets and Samples. Also included in this section is how to change
the way the display looks, how to load Standard MIDI Files and using the
Assignable Keys.
A bank can be loaded directly from the Disk Browser or from the Main
Screen. Presets and samples are loaded from the Preset Browser and Sample
Browser respectively. Detailed instructions on how to access each of these
browsers is located in the previous section titled “Using the Browser.” For
simplicity’s sake, we’ll assume you are starting from the desired browser in
the following instructions.
EOS 4.0 Software Manual 41
Page 54

1 - The Basics
Loading a Bank Automatically
v To Load Banks, Sequences, Samples, and Presets:
1. From the Browser, press the Load function key (F4). One of the load
screens will appear. (If the bank is empty and you are loading a bank,
the bank will load without delay.)
2. Choose the item you want to load using the Data Entry Control, INC/
DEC buttons, cursor buttons or the numeric keypad.
3. Press OK to load the item or Cancel to cancel the operation.
If you are loading a bank and there is a bank already loaded, the Merge
button appears. Merge combines the new bank with the bank previously
loaded.
v To Merge Banks:
4. Press the Merge function key to combine the two banks of presets or
press OK to overwrite the current bank. The display will warn you if
there isn't enough memory to hold both banks.
Note: EIII presets are translated into EOS presets as they are loaded.
EOS voices are much larger than EIII voices. By contrast, EOS
sample zones within voices are tiny. At import/load time, EOS tries
to collapse adjacent EIII voices into EOS voice+sample zones if it
can (Envs, LFOs, etc. must be the same), otherwise, it creates voices.
Therefore, EIII presets that use lots of differing voices really balloon
in EOS. Simpler presets (Instrument-based presets which have the
same settings for all samples) may collapse into a single voice.
42 E-MU Systems
Loading a Bank Automatically
This function automatically loads the selected bank whenever the unit is
first powered up.
v To Set the Auto Load Bank:
1. Press the Master button. The LED illuminates and the Memory
Statistics screen appears.
2. Press the Bank function key (F2). A second row of function keys
appears.
Page 55

1 - The Basics
Loading a Sequence from a Different Bank
3. Press the Auto… function key (F3). The pop-up dialog box shown above
appears.
4. Select the bank to be automatically loaded on power up. Banks can be
selected using the numeric keypad, Data Entry Control, INC/DEC
buttons and cursor buttons.
5. Press Save to confirm your choice or Cancel to cancel the operation.
Loading a Sequence from a Different Bank
An individual sequence can be loaded from another bank using the
sequence browser. Simply load in the desired sequences, then save the bank
to disk. Sequences can be either Emulator sequences or Standard MIDI Files.
v To Load a Sequence from Another Bank:
1. Select the Drive and Bank containing the sequence you wish to load
using the cursor buttons, INC/DEC buttons or the Data Entry Control
from the Disk Browser.
2. Select the Sequence you wish to load from the Sequence Browser.
3. Press the Load function key (F4). A pop-up window prompts you to
select the destination sequence.
4. Choose a location for the sequence using the Data Entry Control, the
INC/DEC buttons or the numeric keypad. You may overwrite an
existing sequence or choose an empty sequence as the destination.
There are 50 possible sequence locations (and 50 Flash locations).
5. Press OK to load the selected sequence or Cancel to cancel the
operation.
• If you are loading an imported sequence from the bank browser, press
Merge to combine it with the bank of presets in memory.
EOS 4.0 Software Manual 43
Page 56

1 - The Basics
Loading Standard MIDI Files
Important Information
for Loading Standard MIDI Files
* Use PC DOS formatted, highdensity diskettes to load from
floppy. Disks can be formatted
on either the Mac or PC.
* To be readable by EOS, the file
MUST have 0-8 characters, then
a period, then “MID”.
Loading Standard MIDI Files
The Emulator can load and play Standard MIDI File sequences (type 0 or 1).
Sequence files should conform to PC DOS format using a DOS formatted
disk and using the following format for the file name: 12345678.MID (up to
eight characters followed by “.MID”). It is important to note that Standard
MIDI Files appear as Banks, NOT as sequences in the sequence browser.
v To Load a Standard MIDI File from Floppy Disk:
1. Insert a DOS formatted floppy disk containing the Standard MIDI
Files.
2. From the Disk Browser, select the floppy drive.
3. Press Browse.
4. Select Banks. The MIDI sequences appears as banks.
5. Press the Load function key (F4). A pop up dialog box appears warning
you that loading will destroy the resident bank.
6. Press the Merge button (F4). The selected sequence will be merged into
the current bank, and will be placed in the first empty sequence
location.
7. Press OK to load the selected sequence or Cancel to cancel the
operation.
44 E-MU Systems
Saving Banks
A bank can be saved to disk from the bank browser.
v To Save a Bank:
1. From the Browser, press the Save function key (F5). The following
screen appears:
Page 57

1 - The Basics
Finding Banks, Presets, Samples & Sequences
2. Choose a location for the bank using the Data Entry Control, the INC/
DEC buttons, cursor buttons or the numeric keypad.
3. Press OK to load the bank or Cancel to cancel the operation. If you
pressed “OK” the bank will be saved and the main preset selection
screen appears. If you are about to overwrite an existing bank, the
display will warn you.
• If the bank contains SoundSprint presets (presets in locations 990-999),
the display will ask you if you want to save the SoundSprint presets
along with the bank.
Finding Banks, Presets, Samples & Sequences
This utility searches your disk library for a particular pattern of letters and
numbers (a search string). If it finds the string anywhere in the name, the
bank will be selected. Use the Find utility again to find additional matching
items.
v To Find a Bank:
1. From the Bank Browser, press the Utilities function key (F1).
2. Press the Find function key (F6). A screen similar to the following
appears.
3. Select the type of item (folder, bank, preset, sample or sequence) you
want to search for. If you have an idea of where the item is located, you
can narrow the search by inputting additional data about the drive,
folder or bank. Selecting “All” tells EOS to search everything.
4. Press the String function key (F4), and enter the search string. Letters
can be selected using the numeric pad, Data Entry Control, INC/DEC
buttons and cursor buttons, or using an ASCII keyboard.
5. Press the Search function key (F6) to search for the item or the Cancel
function key (F1) to cancel the operation.
EOS 4.0 Software Manual 45
Page 58

1 - The Basics
Naming Banks
Naming Banks
Use this utility to rename a bank.
v To Name a Bank:
1. From the Bank Browser, select the bank you wish to rename using the
cursor buttons, INC/DEC buttons or the Data Entry Control.
2. Press the Utilities function key (F1).
3. Press the Name function key (F4). A pop-up window appears prompting
you to name the bank.
4. Change the name of the bank. Select letters using the numeric pad,
Data Entry Control, INC/DEC buttons, cursor buttons, or using an
ASCII keyboard.
5. Press the OK function key (F6) to confirm the new name or the Cancel
function key (F1) to cancel the operation.
Erasing Banks
This utility allows you to erase an entire bank.
OO
OO
The Assignable Keys have
secondary functions which are
accessed by holding down the
decimal point button and
pressing the Assignable Key.
v To Erase a Bank:
1. From the Bank Browser, select the bank you wish to delete using the
cursor buttons, INC/DEC buttons or the Data Entry Control.
2. Press the Utilities function key (F1).
3. Press the Delete function key (F3). A pop-up window appears asking
you if you want to delete the bank.
4. Press the OK function key (F6) to delete the bank or the Cancel
function key (F1) to cancel the operation.
Assignable Keys
You can program six assignable keys on the front panel to jump to almost
any screen in EOS. This handy feature saves you from having to page
through multiple menus to find the screen you want to edit. The assignable
keys can be programmed from the assignable keys screen in the Master
Utilities submodule or, directly from any screen in which you are working.
v To Program an Assignable Key from the Master Menu:
1. Press the Master button. The LED illuminates and the Memory
Statistics screen appears.
2. Press the Utilities function key (F1). A second row of function keys
appears.
3. Press the AsnKy function key (F1). The following screen appears.
46 E-MU Systems
Page 59

1 - The Basics
Recording a Sequence
4. Select a screen. Use the Data Entry Control or the INC/DEC buttons to
change the screen associated with each assignable key.
5. Press Save to store the assignable keys settings and return to the
Memory Statistics screen. Press Cancel to cancel the operation and
return to the Memory Statistics screen.
v To Program an Assignable Key from the Current Screen:
This method allows you to link an assignable key to the screen you are
currently viewing.
Note: if a key is
assigned to RAM/ROM, it can’t
be programmed from the
current screen
• Press and hold one of the assignable keys from any screen. After two
seconds a pop up window appears, informing you that the assignable
key has been programmed for the current screen.
Recording a Sequence
The easiest way to learn about sequencing is simply to record one. A multitimbral sequence contains more than one sound. In this guided tour of the
sequencer, you'll learn how to set up the metronome, the input quantize
function and lay down multitimbral tracks. These instructions apply to
both a rack and keyboard EOS synthesizers.If you’re using a Rack Emulator.
make sure your MIDI keyboard is connected. If you have two MIDI In ports,
use Port A.
v Load a Bank of Sounds
For your initial investigations, choose a bank which contains all types of
instruments, including drums. The Combos Bank might be a good choice.
1. From the main screen press the Load function key (F4).
2. Select the desired Folder and Bank.
3. Press the Load function key (F6).
4. The display informs you that you are about to overwrite the current
bank. Press OK (F6) to load the bank.
v Select Multimode
5. From the main screen press the Mode function key (F6).
6. Select Multi (F6). The following screen should appear.
EOS 4.0 Software Manual 47
Page 60

1 - The Basics
Recording a Sequence
• There are two different Multimode screen views. If you get the other
screen, press the F6 function key, then press View (F3).
v Enter the Sequencer Submodule
7. Hold the Decimal Point button and press Assignable Key 1. The
Sequence Manage screen appears.
8. Press the Edit function key (F5). The Edit screen appears.
v Set up the Metronome
The Metronome is important if you want to use the Quantize functions. If
you don't want quantization and just want to enter a few tracks, skip to
step 20.
9. Press the Setup button (F3). A second row of function keys appears.
10. Press the Metro button (F1). The following screen appears.
11. Set the Metronome parameters as shown.
12. The lower left field allows you to select a preset to be used for the
Metronome. Select a preset containing a click or short percussion
sound.
13. Move the cursor to the MIDI Note/Ch field.
14. Select the metronome sound using the Data Entry Control, INC/DEC
buttons or the keyboard. The metronome sound is played as you scroll
through the note numbers.
15. Press the Exit button to leave the Metronome screen.
48 E-MU Systems
Page 61

1 - The Basics
Recording a Sequence
v Turn Quantization On
Input Quantization is really handy for laying down a drum track for your
sequence.
16. Press the Setup function key (F3) again. A second row of function keys
appears.
17. Press the Input function key (F3). The following screen appears.
18. Turn Quantize Input On (Select Yes). Set Swing to 50%. Set the
Amount for quarter notes or eighth notes for starters.
19. Press the Exit button to lock in your selections and return to the Edit
screen.
v Setup Track 1 for Recording
OK! You're almost ready to start recording.
20. Set the Track Mode to Record. Move the cursor to the Track Mode
location as shown above. Set this field to R (Record) using the
Increment button or Data Entry Control.
21. Move the cursor right to the Channel field. Set the channel to @1
using the Inc/Dec buttons or Data Entry Control. The @1 function
records on MIDI channel 1 exclusively.
22. Select a preset. Move the cursor left to the Preset field. Play the
keyboard and select the preset you want to play on your first track.
Select a drum preset if you're laying down a drum track.
EOS 4.0 Software Manual 49
Page 62

1 - The Basics
Arpeggiator Sequencing!
v Record Track 1
23. Press the Menu/Transport function key (F6). The Transport control
buttons appear on the lower line of the display.
24. Get ready to record! Press the Record function key (F4).
25. Press the Play function key (F3) to begin recording. You should be
hearing the metronome.
26. Start playing. If you make a serious mistake in your playing and want
to try again, press Abort (F5). Then press Record, then Play to begin
again.
27. Press the Stop function key (F2) to end recording. Press RTZ (F1) to
rewind to the beginning of the sequence. Press Play (F3) to play back
your creation.
• Note that the Track Status field for Track 1 now reads P for playback.
The track can also be set to M to Mute the track if you don't want to
hear it.
v Record Another Track
28. Set Track 2 to Record. Move the cursor to the record field of track 2
and set the track to R (record).
29. Move the cursor to the channel field of track 2 and set the channel to
@2. This will force all information onto MIDI channel 2.
30. Move the cursor back to the preset field on track 2 and select a preset.
31. You’re ready to record track 2. Follow the instructions for recording on
track 1 and GO!
50 E-MU Systems
Arpeggiator Sequencing!
One of the many things you can do with EOS is combine the Arpeggiator
and the Sequencer. This is a great idea stimulator and tons of fun.
v Load a Bank of Sounds (E-Synth - jump to step 5)
1. From the main screen press the Load function key (F4).
2. Select the desired Folder and Bank.
3. Press the Load function key (F6).
4. The display informs you that you are about to overwrite the current
bank. Press OK (F6) to load the bank.
v Select Multimode
5. From the main screen press the Mode function key (F6).
6. Select Multi (F6). The following screen appears.
Page 63

There are two different
Multimode screen views. If you
get the other screen, press the
key (F6), then press View (F3).
1 - The Basics
Arpeggiator Sequencing!
v Set Keyboard to Channel 1
7. If you are using an E-Synth keyboard or an E4K, select channel 1 and
press SetBCh (Set Basic Channel). If you are using an external MIDI
keyboard, set it to transmit on channel 1.
v Select a Preset
8. Move the cursor to the preset field and select a preset. Turn on the
Arpeggiator.
9. Press the Mode function key (F6).
10. Select Arp (F5). The Multimode Arpeggiator screen appears.
11. The Arpeggiator will be on. While playing the keyboard select a Preset
using the Data Entry Control, INC/DEC buttons or the numeric keypad.
E-Synth Keyboard and
E4K have dedicated Sequencer
buttons.
12. Adjust the Arpeggiator controls until you have a nice groove going.
v Enter the Sequencer Submodule
13. Press the Seq function key (F1) from the main preset screen. The
Sequence Manage screen appears.
14. Press the Edit function key (F5). The Edit screen appears.
EOS 4.0 Software Manual 51
Page 64

1 - The Basics
Arpeggiator Sequencing!
OO
OO
Since you've already
selected a preset for MIDI
channel 1 in Multimode, the
preset will automatically come
up when you set @1 as the
channel number.
v Setup Track 1 for Recording
Almost ready to start recording…
15. Set the Track Mode to Record. Move the cursor to the Track Mode
location as shown above. Set this field to R (Record) using the
Increment button or Data Entry Control.
16. Move the cursor right to the Channel field. Set the channel to @1 using
the Inc/Dec buttons or Data Entry Control. The @1 function records on
MIDI channel 1 exclusively.
17. Play the keyboard. You should be hearing the arpeggiator playing the
preset you selected.
v Record Track 1
18. Press the Menu/Transport function key (F6). The Transport control
keys appear on the lower line of the display.
19. Get ready to record! Press Record (F4), then Play (F3) to begin
recording.
20. Start playing.
21. Press Stop (F2) to end recording. Press RTZ (F1) to rewind to the
beginning of the sequence. Press Play (F3) to play back your creation.
v Turn the Arpeggiator Off
22. Note that the arpeggiated sequence is being arpeggiated again! Press the
Stop function key (F2), then press the Exit button to return to the
Multimode screen.
23. Press the Mode function key (F6).
24. Select Arp (F5). The Multimode Arpeggiator screen appears.
25. Press Stop (F2) to stop the arpeggiator.
26. Press OK (F6) or Done (F1) to return to the Multimode screen.
v Back to the Sequencer…
27. Hold the Decimal Point button and press Assignable Key 1. The
Sequence Manage screen appears.
28. Press the Menu/Transport function key (F6). The Transport control
keys appear on the lower line of the display.
29. Press Play (F3) to play the sequence. Yeah!
v Record More Tracks?
30. Repeat steps 15-21 changing the MIDI channel for each subsequent
track.
52 E-MU Systems
Page 65

1 - The Basics
A Practice Sampling Session
You can also record additional tracks using the arpeggiator. To do this you
must match the MIDI channel generated by the keyboard to the MIDI
channel of the track you wish to record. Use Set Kybd on E-Synth or E4K. If
you are using an external MIDI keyboard, change the MIDI channel output
from the keyboard to the same channel you are recording on the track.
A Practice Sampling Session
Sampling lets you play ANY SOUND! In this session, you will sample your
own voice. Although there is much more to the art of sampling than just
sampling your voice, this lesson will give you a good start.
In preparation for this sampling session, please read over Chapter 5, Sample
Management.
v Connections…
1. Connect a microphone to the left sample input jack on the rear panel
of your EOS instrument. If you don't have a microphone you can use
another signal source such as a CD player. Connect a CD player to both
the left and right sample inputs or just the left input if you want to
sample in mono.
v Erase the Bank
This step “cleans the slate” for your experiments.
2. Press the Master button to enter the Master module.
3. Press the Bank function key (F2).
4. Press Erase (F1). A popup dialog box appears asking you if you want to
erase Preset, Samples and Sequences.
5. Don't worry, be happy! Press OK (F6).
v Sample Setup
6. Press the Sample Manage button.
7. Press the New function key (F3). The following screen appears.
8. If you are sampling in mono, select the Left channel only. The
Threshold sample trigger only reads the Left channel.
EOS 4.0 Software Manual 53
Page 66

1 - The Basics
A Practice Sampling Session
Ultra Users: To select
the 48kHz (or 24kHz) sampling
rate, you must change the
“Default Clock” located in the
MASTER menu under “In/Out”
to 48kHz.
9. Set the Source to analog 48 kHz or analog 44.1 kHz.
10. Set Length to 2 seconds.
11. Move the cursor to ADC Gain.
12. Sing “Ahhh” into the microphone. (This is an easy sound to loop.) You
should see the VU meter moving.
13. Still singing “Ahhh”, adjust the ADC Gain using the Data Entry
Control or INC/DEC buttons so that the peak bar of the VU meter
comes close to the extreme right side without actually reaching it.
14. Set the Threshold to -54 dB. When the input sound exceeds this level,
sampling will start.
Truncation trims the
silence off the beginning and
end of the sample.
Normalize boosts the signal to
its optimum level.
v Sampling!
15. Press the Arm function key (F5). This arms the sampling process.
16. Sing Ahhhh! The display says “Sampling”.
17. When you are out of breath, press Stop (F1), Exit or Enter to stop
sampling. In any case, EOS will stop sampling after 2 seconds. The
following screen appears.
18. The screen shown above gives you the option to Dispose, Keep or place
the sample you just took. It also contains the Automatic Sampling
parameters. Set the Automatic Truncate, Normalize and Loop
parameters as shown above (both, relative, off).
19. Press the Place function key (F6).
20. Popup dialog boxes will inform you that the sample is being Truncated
and Normalized. Play the keyboard. Your voice will play up and down
54 E-MU Systems
Page 67

OO
OO
Tip: If you name the
current preset BEFORE taking the
sample, EOS will automatically
name the sample for you. If you
happen to be sampling another
synthesizer and have MIDI
connected, EOS will even add
the original key to the sample
name!
1 - The Basics
A Practice Sampling Session
the entire keyboard. You will probably notice that the original key
sounds the most natural.
Congratulations! You've just taken your first sample. If you haven't already
done so, check out Chapter 5, Sample Management to learn all about the
various sampling options.
v Name the Sample
Name everything! It saves valuable time when you're trying to find a
certain Sample or Preset you created earlier.
21. Press the Exit button to go to the main Sample Manage screen.
22. Press the Name function key (F2). The following screen appears.
The Attack portion of the
sound is the large part of the
waveform. The attack contains
changing harmonics and is
difficult to loop. Move the loop
start and end points into a
portion of the wave where the
level looks steady.
23. Change letters using the Data Entry Control, INC/DEC buttons or
numeric keypad. Move the cursor using the left/right cursor buttons.
The up cursor adds a space. The down cursor button deletes a space.
24. Press OK (F6) when you're finished naming your sample.
v Looping
Looping has gained a reputation for being something of a black art. In
actuality, it's really not that difficult to loop most sounds, especially with all
the looping tools provided by EOS. Let's go ahead and loop the sample you
just created.
25. Press the Sample Edit button.
26. Press the Tools1 key (F3). Another row of function keys appears.
27. Press Loop (F1). The following screen appears.
EOS 4.0 Software Manual 55
Page 68

1 - The Basics
A Practice Sampling Session
28. Turn the “fixSize” parameter Off by pressing the F2 key so there is no
check mark in the box.
29. Move the cursor down to the third line and adjust the Loop Size so
that it is about half a second or less. As you do so, you'll see the dotted
line marked “E” move toward the left.
30. Play a key. You'll hear your voice being looped… badly.
31. Move the cursor back up to the Start field. Play a key as you adjust the
Loop Start using the Data Entry Control. As you move the start point
out of the “attack” portion of the sound, you’ll notice the loop
improve. Find a location where the loop sounds best. Don't worry if it's
not that great.
32. Press the AutoC function key (F5 Autocorrelate). This advanced control
examines the waveform for similarities and adjusts the loop points for
you.
33. Play a key. Did the loop improve? If the volume wavers excessively, try
reducing the loop start. Autocorrelate again.
34. Continue adjusting the loop size and start times. Autocorrelate the
sample after each adjustment until you get a good loop. It takes a little
practice, but you'll get it.
35. Press OK when you've found a good loop. The Loop Parameters screen
appears. This screen contains three other looping tools. Press OK to
continue.
• Read about the other looping tools in Chapter 5, Sample Edit and, by
all means, feel free to try them out. The best way to learn about looping
is to experiment with a wide variety of signals.
56 E-MU Systems
Page 69

OO
OO
Use the EXIT button to
back out of the Preset Edit
module if you get lost.
1 - The Basics
Exploring the Preset
Exploring the Preset
The Preset Edit module is where everything comes together into a complete
keyboard setup. It's a huge module and can be initially confusing. The first
thing you need to know is that there are two main levels to the Preset Edit
module.
Preset Definition is used for arranging voices and samples on the
keyboard, editing global preset parameters and linking presets, as well as
setting effects and initial controller values.
Dynamic Processing is the lower level which is used to perform more
detailed editing of voices such as envelope shaping of the amplifier and
filter as well as the modulation parameters. This is the “synthesizer” section
of EOS.
Preset Edit Key
Preset Definition Level
Global
Preset Setup
Preset Effects
Init. Controller
Exit Key
Links
Vol/Pan/Tune
Key Ranges
Velocity Ranges
Voices
Vol/Pan/Tune
Key Ranges
Velocity Ranges
Realtime Ranges
Edit Soft Key
Dynamic Processing Level
Tuning
Voice Tuning
Voice Modifiers
Voice Setup
Amp/Filter
Amplifier
Amp. Envelope
Filter Setup
Filter Envelope
LFO/Aux
LFO-1
LFO-2
Aux. Envelope
Cords
Cords 00-05
Cords 06-11
Cords 12-17
Cords 18-23
The Preset Definition layer contains three main pages.
Global Editor. Preset Transpose, Volume and Preset Effects.
Links. Create stacked preset layers or splits.
Voice Editor. Allows you place voices and samples on the keyboard and
crossfade or switch between them according to key position, velocity range
and realtime controls. Also contains voice tuning, volume and pan
controls.
The Dynamic Processing parameters are accessed by pressing the Edit
button while in one of the Preset Edit, Voice screen parameters.
EOS 4.0 Software Manual 57
Page 70

1 - The Basics
Which Voices are Assigned to the Keyboard?
Which Voices are Assigned to the Keyboard?
Good question. You'll often want to know how samples and voices are
assigned in existing presets or you may want to build your own presets.
1. Select a preset to examine.
2. Press the Preset Edit button. The following screen appears.
In this preset, Voice 1 is a multisample. The samples contained in the
multisample are listed below it. The volume, pan position, coarse and
fine tuning, transpose and original keys can be adjusted from this
screen.
3. Press the Next Page button. The arrow next to it is illuminated,
indicating that there is another page of information. The Key Window
appears.
58 E-MU Systems
The keyboard assignments of the multisample and the samples it
contains are shown graphically.
Press the Down cursor button repeatedly to view the keyboard
assignment of the other voices.
4. Press the Next Page button to go to the Velocity Window. The velocity
window allows you to switch or fade samples and voices according to
key velocity.
See “Velocity Window Controls” on page 300 for detailed information
about the Velocity Window.
5. Press the Next Page button again to go to the Realtime Window. The
realtime window allows you to switch or fade samples and voices
according to a realtime control such as a modulation wheel or an LFO.
See “Realtime Window Controls” on page 319 for detailed information
about the Realtime Window.
Page 71

1 - The Basics
Creating a Link
Creating a Link
Linking presets is a quick and easy way to create huge stacked presets, split
keyboard presets and create new sounds.
1. Press the Links function key (F4). The preset link page appears. The
screen should appear as below with “No Links in Preset”. If not, choose
another preset and return to Preset Links.
2. Press the Utils function key (F1). Another row of function keys appears.
3. Press New… (F1). The following screen appears.
4. Move the cursor to the preset field and select a preset using the Data
Entry Control, INC/DEC buttons, or the numeric keypad.
5. Play the keyboard. Both presets will be heard.
Add another link if you want. Also, be sure to check out all the other link
options. See “Preset Edit - Links” on page 291.
EOS 4.0 Software Manual 59
Page 72

1 - The Basics
60 E-MU Systems
Page 73

2
Master Menu
2 - Master Menu
EOS 4.0 Software Manual 61
Page 74

2 - Master Menu
62 E-MU Systems
Page 75

Overview
The Master Module commands affect the Emulator on a global basis (all
presets). Master operations affect overall tuning, LCD contrast and Master
Effects to name a few. All of the settings defined in the Master Menu (with
the exception of a few of the Sequencer settings) are saved into Flash RAM
when you exit the module, meaning the settings are stored even when you
turn off the unit.
This chapter describes the global settings, features and commands you can
carry out using the Master Menu. The sections in this chapter are organized
by submenu as they appear in the Master Menu.
The Master Menu contains six main submenus:
Utilities. Controls for the assignable keys, test tones and volume control
recalibration. Also contains the channel status indicator, credits and
software version display.
Bank. Allows you to name or erase the bank and set a bank to be auto-
loaded on power-up. If you have Flash RAM or Flash ROM installed, the
Bank submenu contains the Flash Utilities also.
Setup. Contains six submenus: Tune, Input/Output, Miscellaneous, SCSI,
Import and Memory Configuration.
FX. Contains the digital effect processor functions.
Sequence Manage. Contains a 48-track sequencer.
MIDI. Contains global MIDI controls, velocity curve and other
miscellaneous MIDI functions.
EOS 4.0 Software Manual 63
Page 76

2 - Master Menu
Memory Statistics
The E-6400, e-64, E4K
and EIV contain about half a
Mbyte of usable Preset Memory.
The E4X and E-Synth contain
about 2.6 Mbytes of usable
Preset Memory. Ultra series
machines contain about 4 MB of
usable preset memory.
Contact your E-mu dealer for
upgrade information.
Memory Statistics
The main screen shows the internal memory status. There are three kinds of
memory — Resident Memory, Preset Memory & Sample Memory.
The Resident memory display shows the amount of preset memory
available for the optional (except on E-Synth) ROM or Flash RAM banks.
Preset memory (also called CPU memory) is used to hold both preset
parameter information and sequences. (The ratio between presets &
sequences is user adjustable.) Sample memory, which contains the actual
sample data, can vary from 4 megabytes to 128 megabytes.
Presets and sequences require far less memory than do samples, so less
preset memory is needed. You are not likely to run out of preset memory,
even when creating huge banks.
64 E-MU Systems
v To View the Memory Statistics:
• Press the Master button on the Emulator. The Master Menu main
screen appears showing the Memory Statistics.
Page 77

2 - Master Menu
Memory Statistics
Master Utilities
The Master Utilities menu contains several functions:
Assignable Keys (AsnKy). Allows you to program the three Assignable
Keys on the front panel of the Emulator.
Channel Volume (ChVol). Displays a bar graph showing the current
volume of all channels.
Reference Tones (Tones...). Generates accurate tones used to trouble-
shoot your audio system without having to load a bank.
Recalibration (Recal...). Recalibrate the front panel volume control,
rotary encoder, and for the E4K and E-Synth Keyboard, the control wheels
and pedal input.
Test Access (Tests). Provides access to the Service Center diagnostic
routines.
About (About...). Displays the current software version, the current
hardware configuration, and credits.
EOS 4.0 Software Manual 65
Page 78

2 - Master Menu
Assignable Keys
Assignable Keys
You can program the Assignable Keys on the front panel to call up almost
any screen. This saves you from having to page through multiple menus to
find the screen you want to edit.
Simply press an assignable key to call up its assigned location. Press and
hold the Set/Shift (decimal point) key while pressing an Assignable Key to
access three additional menu locations.
The assignable keys can be programmed from the assignable keys screen in
the Master module or directly from any screen in which you are working.
v To Program the Assignable Keys from the Master Menu:
1. Press the Master button. The LED illuminates and the Memory
Statistics screen appears.
2. Press the Utilities function key (F1). A second row of function keys
appears.
3. Press the AsnKy function key (F1). The following screen appears.
OO
OO
The Assignable Keys
have secondary functions which
are accessed by holding down
the decimal point button and
pressing the Assignable Key.
66 E-MU Systems
4. Select the desired screen. Use the Data Entry Control or the INC/DEC
buttons to change the screen associated with each assignable key.
5. Press the Save function key (F6) to store the assignable keys settings
and return to the Memory Statistics screen or press Cancel to cancel the
operation and return to the Memory Statistics screen.
v To Program an Assignable Key from the Current Screen:
This method allows you to link an assignable key to the screen you are
currently viewing.
• Press and hold one of the Assignable keys from any screen.
After two seconds a pop up window appears, informing you that the
assignable key has been programmed for the current screen.
Page 79

2 - Master Menu
Channel Volume
Channel Volume
This function calls up a bar graph display showing the number of channels
each sound uses and the volume of all voice channels. This channel status
display is a useful indicator of your channel usage. Channels become
available for reassignment when their output volume falls below a certain
level.
Tones
This function generates accurate reference tones which can be used to
troubleshoot your audio system without loading a bank or can be used to
test each audio output. The following frequencies can be selected: 50Hz,
100Hz, 200Hz, 261.60Hz, 440Hz, 444Hz, 500Hz, 1kHz, 2kHz, 5kHz, 10kHz,
15kHz, and 19kHz. Sine, Triangle, Square or Sawtooth waveforms can be
selected. The master volume control has no effect on the volume of Tones.
v To Enable the Reference Tone:
1. Press the Master button. The LED illuminates and the Memory
Statistics screen appears.
2. Press the Utilities function key (F1). A second row of function keys
appears.
3. Press the Tones… function key (F3). The following screen appears and
the defined tone plays continuously through the selected outputs.
4. Adjust the frequency, waveform, gain and output submix channel
using the Data Entry Control or INC/DEC buttons.
5. Press the Save function key (F6) to accept the changes. Press Cancel to
return to the Memory Statistics screen.
EOS 4.0 Software Manual 67
Page 80

2 - Master Menu
Recalibration
__
__
ALWAYS recalibrate the
Pitch and Modulation wheels of
the E4K after installing new
software or initializing the
EEPROM.
Recalibration
This utility recalibrates the front panel volume control, Data Entry Control
and, for the E4K, the control wheels. We recommend you recalibrate the
controls periodically to adjust them for normal wear and tear or if the
controls ever behave strangely.
You can press Cancel at any time during recalibration to skip that particular
control and move on to the next.
v To Recalibrate
1. Press the Master button. The LED illuminates and the Memory
Statistics screen appears.
2. Press the Utilities function key (F1). A second row of function keys
appears.
3. Press the Recal… function key (F4). The following screen appears.
4. Adjust the volume slider to the minimum and maximum positions.
5. Press OK. The display will say, “Saving System” and the following
recalibration screen appears.
6. Move the encoder one revolution.
7. Press OK. Again, the display says, “Saving System.”
If you have an E4K or E-Synth Keyboard, continue on with steps 8
though 10. These screens only appear if you have an E4K or E-Synth
Keyboard.
68 E-MU Systems
Page 81

2 - Master Menu
Test Access
8. Move the pitch wheel as directed.
9. Press OK. The display will say, “Saving System” and the last recali-
bration screen appears.
The footpedal must be
plugged in at boot time for EOS
to recognize it.
10. Move the mod wheel as directed, then press OK.
11. Move the foot pedal as directed, then press OK.
Test Access
This menu item provides access to the Service Center diagnostic routines.
Some of the diagnostic routines have the potential to destroy the data on
your hard disk. It is for this reason that the diagnostics are protected from
casual use by a secret password. If you read carefully through this manual,
maybe you’ll find it.
EOS 4.0 Software Manual 69
Page 82

2 - Master Menu
About…
About…
The About screen displays the current software version and hardware
configuration in the unit. It also credits the instrument designers and
displays the E-mu Systems phone number to call for ordering additional
sounds.
v To Get Info About Your Instrument:
1. Press the Master button. The LED illuminates and the Memory
Statistics screen appears.
2. Press the Utilities function key (F1). A second row of function keys
appears.
3. Press the About… function key (F6). A pop-up dialog box lists the
resident software version and a second row of function keys appears.
4. Press Config to show the hardware configuration.
5. Press Sounds to find out how to order sounds.
6. Press Credits to list the creators of your instrument.
7. Press Exit to return to the Memory Statistics screen.
70 E-MU Systems
Page 83

2 - Master Menu
Erase Bank
Bank
The Bank submenu contains functions which allow you to name and erase
the bank and automatically load a bank on power up. Flash Utilities are also
accessed from this sub-menu if you have the Sound ROM or Flash Sound
RAM upgrades installed.
Erase Bank
Erasing a bank erases ALL the memory in RAM including all samples, voices
presets and sequences. Erasing the bank does not erase anything stored on
your hard disk, only the contents of RAM.
v To Erase the Bank:
1. Press the Master button. The LED illuminates and the Memory
Statistics screen appears.
2. Press the Bank function key (F2). A second row of function keys
appears.
3. Press the Erase function key (F1). A pop-up dialog box appears asking
you if you want to erase all presets and samples.
4. Press OK to erase the bank or Cancel to cancel the operation.
EOS 4.0 Software Manual 71
Page 84

2 - Master Menu
Name Bank
Name Bank
This utility allows you to name the current bank.
v To Name the Bank:
1. Press the Master button. The LED illuminates and the Memory
Statistics screen appears.
2. Press the Bank function key (F2). A row of function keys appears.
3. Press the Name… function key (F2). A pop-up dialog box appears
asking you to enter the new bank name.
4. Name the bank. Letters can be selected using the numeric keypad,
Data Entry Control, INC/DEC buttons and cursor buttons, or using an
ASCII keyboard.
5. Press OK to name the bank or Cancel to cancel the operation.
Auto Bank Load
This function automatically loads the selected bank whenever the unit is
first powered up.
v To Set the Auto Load Bank:
1. Press the Master button. The LED illuminates and the Memory
Statistics screen appears.
2. Press the Bank function key (F2). A second row of function keys
appears.
3. Press the Auto function key (F3). The pop-up dialog box appears similar
to the following illustration.
4. Select the bank to be automatically loaded on power up. Banks can be
selected using the numeric keypad, Data Entry Control, INC/DEC
buttons and cursor buttons.
5. Press the Save function key (F6) to confirm your choice or Cancel to
cancel the operation.
72 E-MU Systems
Page 85

2 - Master Menu
Flash Utilities
Flash Utilities
These special utilities are exclusively for use with Flash RAM. If you don't
have Flash ROM or RAM installed in your Emulator, these options will not
be available.
Preset RAM is used as the intermediary storage area when copying between
Flash and disk. To copy presets from a floppy into Flash RAM, you first load
them onto the bank, then use the Copy RAM➔Flash utility to copy them
into Flash RAM.
• Clear Flash - Erases all resident presets and sequences.
• Compact Flash - Defragments Flash RAM. As presets are erased and
modified, the memory can become fragmented. This utility re-orders
the memory in the most efficient way.
• Copy RAM to Flash - Copies RAM presets into Flash RAM.
• Copy Flash to RAM - Copies Flash presets to Preset RAM.
v To Access the Flash Utilities:
1. Press the Master button. The LED illuminates and the Memory
Statistics screen appears.
2. Press the Bank function key (F2). A second row of function keys
appears.
3. Press the Flash function key (F6). Another row of function keys appears.
4. Select the desired Flash utility using function keys F1-F4. You will
asked to confirm the selected operation.
5. Press OK (F6) to confirm your choice or Cancel (F1) to cancel the
operation.
v To Copy Presets from Floppy to Flash:
1. Insert the Disk containing the presets into the floppy disk drive.
2. Press the Load function key (F4) on the main screen. The Load Preset
screen appears.
3. Move the cursor up to the Drive Select field.
4. Select the Floppy drive using the Data Entry Control or INC/DEC
buttons.
5. Press LoadAll (F6). The presets are loaded into RAM.
6. Press the Master button. The LED illuminates and the Memory
Statistics screen appears.
7. Press the Bank function key (F2). A second row of function keys
appears.
8. Press the Flash function key (F6). Another row of function keys appears.
EOS 4.0 Software Manual 73
Page 86

2 - Master Menu
Flash Utilities
Ultra units may contain
up to 1000 flash presets.
9. Press RAM➔Flash (F3). The following screen appears.
10. Press OK (F6) to confirm your choice or Cancel (F1) to cancel the
operation.
Saving presets to floppy disk is just as easy. Copy the presets into RAM, then
save to floppy.
Disk Disk
Load from Disk
Preset RAM
Copy RAM ->Flash
Flash RAM
The Bank is used as an intermediary storage space when copying between
the disk and Flash Memory. Data is copied into RAM first, then to disk or
Flash.
Preset RAM
Flash RAM
Save to Disk
Copy Flash ->RAM
74 E-MU Systems
Page 87

2 - Master Menu
Flash Utilities
Using Sound Flash Memory
Sound Flash Memory is a similar to a hard disk containing one bank. A
bank is assembled in Sample RAM, then Saved to Flash Memory. Individual
presets cannot be saved to Flash Memory. The process of saving a bank to
Flash is outlined below. Follow these instructions carefully.
v To Save a Bank to Flash Memory:
Erase the Bank
1. Press Master.
2. Press Bank (F2).
3. Press Erase (F1).
Load the Bank you Wish to Save to Flash
4. From the main screen, press the Arrow key, then Load.
5. Select the Drive, Folder and Bank you wish to Save, then press Load.
The bank will load into RAM.
Save the Sounds to Flash
6. Press the Arrow key, then Save.
7. Select Flash Memory as the drive you wish to Save to, then press OK
(F6). The Samples will be stored in Flash Sound RAM.
Mount the Drive
8. Press Disk.
9. Press Utils (F1).
10. Press Mount (F1).
Erase the Bank…again
11. Press Master.
12. Press Bank (F2).
13. Press Erase (F1).
Erase Preset 000
This operation deletes the empty preset in the P000 location of the bank so
it won’t get merged into your Flash Bank. Unfortunately, you must have at
least one preset in the bank, so before deleting P000 we’ll create a new
empty preset at location 999.
14. Press Preset Manage.
15. Press New…
16. Select destination preset P999 Empty Preset.
EOS 4.0 Software Manual 75
Page 88

2 - Master Menu
Flash Utilities
17. Press OK, twice.
18. Select P000 Untitled Preset.
19. Press Utils (F1).
20. Press Erase Preset (F1). Press OK (F6).
Merge the Presets
This operation merges the presets into the bank so that they will point to
the correct locations in the Flash Sound Memory bank. The Emulator sees
that the samples are in Flash Sound Memory and changes the sample
numbers so they point to Flash.
21. From the main screen, press the Arrow key, then Load.
22. Select the Drive, Folder and Bank you wish to Save to Flash, then press
Merge.
Save the Presets
Now that the sample numbers point to the samples in Flash Sound
Memory, the presets can be written into CPU Flash memory using the Flash
utilities.
23. Press Master.
24. Press Bank (F2).
25. Press Flash (F6).
26. Press RAM ->F (F3). A warning screen appears.
27. Press OK (F6). The presets will be written into CPU Flash memory.
v To Copy Flash RAM Presets to Disk:
Power up the machine and wait for it to finish booting.
1. Press Master.
2. Press Bank (F2).
3. Press Flash (F6).
4. Press F->RAM (F4). A warning screen appears advising you that you are
about to overwrite RAM.
5. Press OK (F6) to write to RAM.
6. Press Master to return to the main screen
7. Insert the floppy disk into the drive if you wish to copy to floppy disk.
8. Press Save (F5). The popup Save window appears.
9. Select the destination Drive, Folder and Bank for the flash presets.
10. When the parameters are properly set, press OK (F6). A warning screen
appears warning you that you are about to overwrite a bank.
11. Press OK (F6) to save the bank to Disk or Cancel (F1) to cancel the
operation.
76 E-MU Systems
Page 89

2 - Master Menu
Flash Utilities
v To Copy Flash Sounds to Disk:
It might be a good idea to back-up the factory samples before you overwrite
the Flash Bank with your own sounds.
1. Power up the machine and wait for it to finish booting.
2. From the main screen, press the Arrow key, then Load.
3. Wait for the bank to finish loading, then press the Arrow key, then
Save.
4. Select the destination Drive, Folder and Bank for the flash presets.
5. When the parameters are properly set, press OK (F6).
EOS 4.0 Software Manual 77
Page 90

2 - Master Menu
Flash Utilities
Setup
The Setup menu contains six additional submenus.
Tune. Contains three functions: tuning offset, transposition and audition
key.
Input/Output. Contains several functions related to the audio and S/PDIF
output levels.
Miscellaneous. Contains several miscellaneous functions.
SCSI/Disk. Contains several options relating to SCSI and SMDI. Also
contains an option for routing the disk button.
Import Options. Contains preferences and controls for importing samples
and presets from Akai™ or Roland™ samplers.
Memory Configuration. Allows you to control the amount of RAM
allocated between the sequencer and presets.
78 E-MU Systems
Page 91

2 - Master Menu
Tune
This submenu contains three functions related to master tuning: Tuning
Offset, Transposition, and Audition Key.
Tuning Offset
Tuning Offset adjusts the overall tuning so that you can tune to other
instruments. The range of tuning offset is ±100 cents or 1 semitone in
approximately 1.5 cent increments.
v To Change the Tuning Offset:
1. Press the Master button. The LED illuminates and the Memory
Statistics screen appears.
2. Press the Setup function key (F3). A second row of function keys
appears.
3. Press the Tune function key (F1). The following screen appears.
Tune
__
__
Turn off transposition
before selecting or modifying
any presets to avoid confusion.
Transpose transposes the key
number rather than the sample
assignment. Selecting the zone
and any other use of the
keyboard will show the
transposed key number.
4. Adjust the tuning offset. If it is not already there, move the cursor to
the tuning offset field using the cursor buttons or by pressing the F1
function key. Adjust the offset value using the Data Entry Control, or
INC/DEC buttons.
5. Press the Exit button twice to return to the Memory Statistics screen.
Transpose
Transpose allows you to play in a different key without changing your
fingering. This feature transposes the Emulator in half-step intervals and
the transposition range is ±1 octave. Transpose also lets you play beyond
the range of the physical keyboard.
v To Change the Transposition:
1. Press the Master button. The LED illuminates and the Memory
Statistics screen appears.
2. Press the Setup function key (F3). A second row of function keys
appears.
3. Press the Tune function key (F1). The Tuning screen appears.
4. Adjust the transposition. Move the cursor to the transposition amount
using the cursor buttons or by pressing the F2 function key. Adjust the
transposition value using the Data Entry Control, or INC/DEC buttons.
5. Press the Exit button twice to return to the Memory Statistics screen.
EOS 4.0 Software Manual 79
Page 92

2 - Master Menu
Input/Output
The raw sample (at the
original pitch) will be played if
you audition from any samplerelated screen (Sample Manage,
Sample Edit, Disk Sample
Browser).
Audition Key
This parameter lets you set the key that will be played when the front panel
Audition Key is pressed, or the ASCII keyboard controlled audition
command (Control, A) is applied.
v To Change the Audition Key:
1. Press the Master button. The LED illuminates and the Memory
Statistics screen appears.
2. Press the Setup function key (F3). A second row of function keys
appears.
3. Press the Tune function key (F1). The Tuning screen appears.
4. Move the cursor to the Audition Key field using the cursor buttons or
by pressing the F3 button.
5. Select the Audition Key using the Data Entry Control, INC/DEC
buttons or the keyboard.
6. Press the Exit button twice to return to the Memory Statistics screen.
Suggested
Settings
Polyphonic Music
Boost = 0
Headroom = 3
Single Sample Digital
Transfer
Boost = +12
Headroom = 6 to 8
Input/Output
The Input/Output submenu contains functions dealing with the audio and
digital outputs.
Headroom
Headroom is the amount of dynamic range remaining before clipping
occurs. Think of a tall person (the signal) in a small room. Raising the
ceiling increases the headroom or the amount of space between the top of
the person's head and the ceiling.
The headroom adjustment, the master volume control, AES Boost and the
zone level all control the output level of the digital audio output. These
controls can be adjusted when transferring digital audio to optimize the
signal level.
A sampling musical instrument, unlike a CD player, must play multiple
channels at once and each additional channel increases the headroom
requirement by 3 dB.
80 E-MU Systems
Page 93

OO
OO
The headroom
adjustment also controls the
level of the digital audio output.
2 - Master Menu
Input/Output
The amount of headroom is adjustable from 0 dB to 15 dB in 1 dB increments (with the front panel volume control set to maximum). A headroom
setting of 0 dB for example, provides the hottest output level, (and the
highest signal to noise ratio) but may produce “clipping” if too many notes
are played at once. The default headroom setting is +3 dB, which maintains
an excellent signal to noise ratio while keeping a reasonable amount of
headroom in reserve. If you hear the signal clipping or breaking up,
increase the amount of headroom. The headroom adjustment also controls
the level of the S/PDIF digital output. Press Exit after setting the headroom
to store the setting in FLASH RAM.
v To Change the Headroom:
1. Press the Master button. The LED illuminates and the Memory
Statistics screen appears.
2. Press the Setup function key (F3). A second row of function keys
appears.
3. Press the Output function key (F2). The Output menu appears.
4. Advance the cursor to the Headroom field. Adjust the amount of
remaining headroom using the Data Entry Control, or INC/DEC
buttons.
5. Press the Exit button to return to the Setup screen. Press the Exit
button again to return to the Memory Statistics screen.
x1
-+
20
7
10
3
1
5
0
1
3
4
VU
x2
-+
20
7
10
3
1
5
0
1
3
4
VU
x4
-+
20
7
10
3
1
5
0
1
3
4
VU
x8
-+
20
7
10
3
1
5
0
1
3
4
VU
The more channels are played, the more headroom is required.
Increasing the headroom lets you play more channels without clipping.
EOS 4.0 Software Manual 81
Page 94

2 - Master Menu
Input/Output
Output Boost
Output Boost is similar to the headroom control and digitally raises the
output level by up to +12 dB. This option provides the best signal-to-noise
ratio when only one or two channels are being played at a time. However,
playing back too many channels with Output Boost turned on may cause
the output signal to clip. This control affects both the analog and digital
outputs.
v To Change the Output Boost:
1. Press the Master button. The LED illuminates and the Memory
Statistics screen appears.
2. Press the Setup function key (F3). A second row of function keys
appears.
3. Press the Output function key (F2). The output menu appears.
4. Set the output boost to +0 dB or +12 dB using the Data Entry Control,
or INC/DEC buttons.
5. Press the Exit button twice to return to the Memory Statistics screen.
Output Format
The digital audio output (optional on the e-6400) is used for interfacing
with other digital or analog audio equipment using either the AES/EBU
(professional) or S/PDIF (consumer) formats. The digital audio interface
carries two channels of audio information which mirror the audio at the
main outputs. The analog and digital outputs are always active. This
function optimizes the output for whatever format is being used. Set the
Output Format to the digital format you are currently using: S/PDIF or AES
pro.
v To Change the Output Format:
1. Press the Master button. The LED illuminates and the Memory
Statistics screen appears.
2. Press the Setup function key (F3). A second row of function keys
appears.
82 E-MU Systems
Page 95

OO
OO
Always use high-quality,
low-capacitance cable for the
AES/EBU interface to insure data
integrity.
2 - Master Menu
Input/Output
3. Press the In/Out function key (F2). The output menu appears.
4. Set the output format to S/PDIF, AES pro or Analog using the Data
Entry Control, or INC/DEC buttons.
5. Press the Exit button twice to return to the Memory Statistics screen.
XLR
AES to S/PDIF
Plug
OO
OO
When to Dither?
Add Dither - When sending
ADAT data to a 16 bit device
which doesn’t dither at the
input.
Don’t Add Dither - When
sending ADAT data to a 20-24
bit device.
Adapter Cable
N.C.
1 2
3
-
+
Shield
Center Pin
RCA
To
S/PDIF
Device
ADAT Output Dither
Dither is a technique used in digital systems to improve audio performance
by adding noise to the least significant data bits. In general, dither is used
whenever a digital number is converted to a smaller number (for instance
when converting 20 bits to 16 bits).
As an example, suppose you were transferring ADAT optical data from the
Ultra to an older ADAT recorder. The ADAT output is 20 bits wide while the
older ADAT only receives data 16 bits wide. In this case you would turn
Dither On because the receiving device has fewer bits. If you were sending
data to a new ADAT which receives 20 bit data, you would turn Dither Off.
v To Turn ADAT Output Dither On or Off:
1. Press the Master button. The LED illuminates and the Memory
Statistics screen appears.
2. Press the Setup function key (F3). Another row of function keys
appears.
3. Press the In/Out function key (F2). The Input/Output screen appears.
4. Move the cursor to the ADAT Output Dither field using the cursor
buttons or by pressing the F4 key.
5. Turn Dither on or Off using the Data Entry Control, or INC/DEC
buttons.
6. Press the Exit button twice to return to the Memory Statistics screen.
EOS 4.0 Software Manual 83
Page 96

2 - Master Menu
Input/Output
Default Clock
Use the Default Clock to change the Emulator’s output sample rate (clock
rate) to either 44.1 kHz or 48 kHz. This function sets the output rate of the
entire machine (analog as well as digital outputs). Digital audio recorders
automatically record at the clock rate of the source, so set this control at 48
kHz to record into a DAT recorder.
Ultra Series. This function is tied to analog sampling on the Ultra series
Emulators. There are four analog sample rates (22.05 kHz, 24 kHz, 44.1 kHz,
48 kHz), but depending on this setting only two are selectable at a time.
Default clock = 44.1 kHz (22.05 kHz & 44.1 kHz)
Default clock = 48 kHz (24 kHz & 48 kHz)
Change the default clock rate if the analog sample rate you want is not
available in the Sample Manage module
v To Change the Default Clock Rate:
1. Press the Master button. The LED illuminates and the Memory
Statistics screen appears.
2. Press the Setup function key (F3). Another row of function keys
appears.
3. Press the In/Out function key (F2). The Input/Output screen appears.
4. Move the cursor to the Default clock field using the cursor buttons or
by pressing the F4 key.
5. Set the Default clock rate using the Data Entry Control, or INC/DEC
buttons.
6. Press the Exit button twice to return to the Memory Statistics screen.
84 E-MU Systems
Page 97

Note: If an external
word clock is not physically
connected, EOS defaults to its
internal clock (even though the
display is set to an external
source).
2 - Master Menu
Input/Output
Word Clock In
This Ultra function selects the Word Clock source. The Word Clock is the
master time-base reference for the Emulator audio engine. Normally Word
Clock In will be set to Internal to use the internal crystal-based reference.
When transferring digital data, the different pieces of gear need to be
synchronized to the same master clock. The BNC connector on the rear
panel (optional on some models) allows the Emulator to synchronize with an
external clock source (a house sync generator or word clock out from another
piece of digital gear).
• Internal .Uses the Emulator’s ultra-stable crystal reference oscillator.
• BNC........ Uses the word clock received at the rear panel BNC Word
Clock In connector.
• AES ........ Uses the word clock provided by the rear panel AES digital
input connector.
• ADAT .....Uses the Word Clock embedded in the ADAT optical data.
v To Set the Word Clock Source:
1. Press the Master button. The LED illuminates and the Memory
Statistics screen appears.
2. Press the Setup function key (F3). Another row of function keys
appears.
3. Press the In/Out function key (F2). The Input/Output screen appears.
4. Change the Word Clock In status. Move the cursor to Word Clock In
using the cursor buttons or by pressing the F6 function key. Choose the
Word Clock source using the Data Entry Control, or INC/DEC buttons.
5. Press the Exit button to return to the Memory Statistics screen.
WC Phase In/Out
This Ultra function allows you to adjust the phase relationship between
input and output sample clocking in order to compensate for clock phase
delays in other equipment or when word clock is daisy-chained. On EOS
machines, a setting of 0.00 degrees means that the word clock in phase is
exactly equal to the word clock out. If you are having trouble synchronizing to other equipment, try adjusting the appropriate word clock phase
control to remedy the problem.
WC Phase In. Adjusts the phase relationship between the input clock
(BNC, AES, or ADAT) and the digital output embedded data clock.
WC Phase Out. Adjusts the phase relationship between the input clock
(BNC, AES, or ADAT) and the Emulator Word Clock output.
EOS 4.0 Software Manual 85
Page 98

2 - Master Menu
Miscellaneous
Miscellaneous
The Misc submenu, as the name suggests, contains master miscellaneous
functions such as setting the LCD contrast, screen saver, and global
preferences.
Contrast
This function changes the contrast of the front panel LCD so that it may be
read easily from different angles. The contrast is adjustable from +7 to -8.
Adjust the contrast for the most comfortable viewing.
v To Change the Contrast:
1. Press the Master button. The LED illuminates and the Memory
Statistics screen appears.
2. Press the Setup function key (F3). A second row of function keys
appears.
3. Press the Misc function key (F3). The Miscellaneous menu appears.
4. Move the cursor to the Contrast field using the cursor buttons or by
pressing the F1 function key.
5. Adjust the Contrast using the Data Entry Control, or INC/DEC buttons.
6. Press the Exit button twice to return to the Memory Statistics screen.
Wrap Field Selection
When wrap field selection is enabled, moving the cursor past the last
selection in a window makes it automatically jump back up to the first
selection. With wrap field selection Off, the cursor will NOT move past the
last selection in a window. You have to use the up or left cursor button to
go back.
v To Turn Wrap Field Selection On or Off:
1. Press the Master button. The LED illuminates and the Memory
Statistics screen appears.
2. Press the Setup function key (F3). A second row of function keys
appears.
3. Press the Misc function key (F3). The Miscellaneous menu appears.
4. Move the cursor to Wrap Field Selection using the cursor buttons or by
pressing the F2 key.
86 E-MU Systems
Page 99

2 - Master Menu
Miscellaneous
5. Turn Wrap Field Selection On or Off using the Data Entry Control or
INC/DEC buttons.
6. Press the Exit button twice to return to the Memory Statistics screen.
Screen Saver
After a period of inactivity, the LCD backlight dims in order to prolong the
life of the LCD. This parameter sets the period of time from 10 to 60
minutes (in increments of 10 minutes) before the screen dims, or “Never”
so that the backlight always stays on. This option is not available on e64 or
EIV units.
v To Turn the Screen Saver On or Off:
1. Press the Master button. The LED illuminates and the Memory
Statistics screen appears.
2. Press the Setup function key (F3). A second row of function keys
appears.
3. Press the Misc function key (F3). The miscellaneous menu appears.
4. Move the cursor to Screen Saver using the cursor buttons.
5. Set the screen saver time using the Data Entry Control, or INC/DEC
buttons.
6. Press the Exit button to return to Memory Statistics.
You only need to disable
the Sound ROM access if you
have Sound ROM and want to
use more than 64 MB of Sample
memory.
Disable Sound ROM
Sample memory is user-expandable up to 64 megabytes with standard
SIMM modules (up to 128 MB if ROM access is disabled). To use more than
64 MB of Sample Memory with the Sound ROM upgrade installed, you
must turn off the Sound ROM. This screen is only accessible if you have Sound
ROM SIMMs installed.
v To Disable the Sound ROM:
1. Press the Master button. The LED illuminates and the Memory
Statistics screen appears.
2. Press the Setup function key (F3). A second row of function keys
appears.
3. Press the Misc function key (F3). The Miscellaneous menu appears.
4. Move the cursor to Disable Sound ROM using the cursor buttons or by
pressing the F4 function key.
5. Select Yes to disable the Sound ROM using the Data Entry Control, or
INC/DEC buttons.
6. Press the Exit button twice to return to the Memory Statistics screen.
7. Reboot the system.
EOS 4.0 Software Manual 87
Page 100

2 - Master Menu
Miscellaneous
Zero Crossing Threshold
Background
The term “zero crossing” refers to the point at which the positive slope of a
waveform passes through zero. In many sample editing applications, such
as splicing and looping, it is useful to locate zero crossings in order to make
glitch-free joins and loops. On some signals, however, a simple zero
crossing may not be effective because the signal contains excessive noise or
low-level, high-frequency harmonics. In these cases, every few samples may
cross through zero. By setting a zero crossing threshold, we can ignore lowlevel zero crossings and wait for the signal to reach a certain level before
choosing the next zero-crossing. Zero crossing threshold sets a level that a
signal must exceed before the next zero crossing with a positive slope is
selected. The defined zero crossing threshold is used in the Auto-Truncate
function or whenever you manually select a zero crossing using the cursor
buttons.
The following diagram illustrates zero crossing in action. The small x marks
the initial position.
Zero X Threshold
(Set at -30 dB)
Ignored
-30dB
-96dB
Selected
Slope of
Wave
+-
-30dB
-96dB
Selected
Slope of
Wave
+-
Ignored
To move forward through the sound to the next zero crossing, press the
right cursor button, as shown in the previous diagram. EOS finds the first
zero crossing on the positive slope after the signal has crossed the
threshold.
88 E-MU Systems
To move backward through the sound to the next zero crossing, press the
left cursor button. EOS finds the first zero crossing on the positive slope
after the signal has crossed the designated threshold.
 Loading...