

Page 1
Liebert® IntelliSlot™ Unity Card
User Manual–Web, SNMP, Modbus, BACnet, YDN23
Page 2

Page 3

TABLE OF CONTENTS
IMPORTANT SAFETY INSTRUCTIONS . . . . . . . . . . . . . . . . . . . . . . . . . . . . . . . . . . . . . . . . . . . . . . . . 1
1.0 INTRODUCTION . . . . . . . . . . . . . . . . . . . . . . . . . . . . . . . . . . . . . . . . . . . . . . . . . . . . . . . . . .2
1.1 Protocols . . . . . . . . . . . . . . . . . . . . . . . . . . . . . . . . . . . . . . . . . . . . . . . . . . . . . . . . . . . . . . . . . . . 2
1.2 Compatibility With Other Emerson Products and Communication Protocols . . . . . . . . . . . . 3
2.0 INSTALLATION . . . . . . . . . . . . . . . . . . . . . . . . . . . . . . . . . . . . . . . . . . . . . . . . . . . . . . . . . .5
2.1 Installing the Liebert IntelliSlot Unity Card . . . . . . . . . . . . . . . . . . . . . . . . . . . . . . . . . . . . . . 5
2.1.1 Assigning the Card’s IP Address . . . . . . . . . . . . . . . . . . . . . . . . . . . . . . . . . . . . . . . . . . . . . . . . . 5
2.1.2 Connect an Ethernet Cable . . . . . . . . . . . . . . . . . . . . . . . . . . . . . . . . . . . . . . . . . . . . . . . . . . . . . 6
2.1.3 Connect an RS-485 Serial Cable . . . . . . . . . . . . . . . . . . . . . . . . . . . . . . . . . . . . . . . . . . . . . . . . . 7
2.2 Change User Names and Passwords Immediately. . . . . . . . . . . . . . . . . . . . . . . . . . . . . . . . . . 7
2.3 Configure the Card. . . . . . . . . . . . . . . . . . . . . . . . . . . . . . . . . . . . . . . . . . . . . . . . . . . . . . . . . . . 8
2.4 Installing Multiple Liebert IntelliSlot Unity Cards in a System . . . . . . . . . . . . . . . . . . . . . . 9
3.0 ENABLE COMMUNICATION PROTOCOLS. . . . . . . . . . . . . . . . . . . . . . . . . . . . . . . . . . . . . . . 10
3.1 Enable Protocols . . . . . . . . . . . . . . . . . . . . . . . . . . . . . . . . . . . . . . . . . . . . . . . . . . . . . . . . . . . . 10
3.1.1 Enable Modbus Protocol. . . . . . . . . . . . . . . . . . . . . . . . . . . . . . . . . . . . . . . . . . . . . . . . . . . . . . . 11
3.1.2 Enable BACnet Protocol. . . . . . . . . . . . . . . . . . . . . . . . . . . . . . . . . . . . . . . . . . . . . . . . . . . . . . . 13
3.1.3 Enable SNMP . . . . . . . . . . . . . . . . . . . . . . . . . . . . . . . . . . . . . . . . . . . . . . . . . . . . . . . . . . . . . . . 16
4.0 LIEBERT INTELLISLOT UNITY CARD WEB PAGE LAYOUT . . . . . . . . . . . . . . . . . . . . . . . . . .21
4.1 Web Page Sections . . . . . . . . . . . . . . . . . . . . . . . . . . . . . . . . . . . . . . . . . . . . . . . . . . . . . . . . . . 21
4.2 Help Text. . . . . . . . . . . . . . . . . . . . . . . . . . . . . . . . . . . . . . . . . . . . . . . . . . . . . . . . . . . . . . . . . . 23
4.3 Managed Equipment Tab Menus . . . . . . . . . . . . . . . . . . . . . . . . . . . . . . . . . . . . . . . . . . . . . . 24
4.4 Unity Tab Menus . . . . . . . . . . . . . . . . . . . . . . . . . . . . . . . . . . . . . . . . . . . . . . . . . . . . . . . . . . . 25
5.0 EDIT THE LIEBERT INTELLISLOT UNITY CARD CONFIGURATION . . . . . . . . . . . . . . . . . . . . . 26
5.1 Web Page Unity Tab Folders . . . . . . . . . . . . . . . . . . . . . . . . . . . . . . . . . . . . . . . . . . . . . . . . . . 27
5.1.1 Unity Tab-Active Events Folder . . . . . . . . . . . . . . . . . . . . . . . . . . . . . . . . . . . . . . . . . . . . . . . . 27
5.2 Unity Tab-Downloads Folder. . . . . . . . . . . . . . . . . . . . . . . . . . . . . . . . . . . . . . . . . . . . . . . . . . 27
5.3 Unity Tab-Configuration Folder . . . . . . . . . . . . . . . . . . . . . . . . . . . . . . . . . . . . . . . . . . . . . . . 27
5.3.1 Configuration Folder—System . . . . . . . . . . . . . . . . . . . . . . . . . . . . . . . . . . . . . . . . . . . . . . . . . 28
5.3.2 Configuration Folder—User Settings . . . . . . . . . . . . . . . . . . . . . . . . . . . . . . . . . . . . . . . . . . . . 28
5.3.3 Configuration Folder—Network Settings . . . . . . . . . . . . . . . . . . . . . . . . . . . . . . . . . . . . . . . . . 29
5.3.4 Configuration Folder—Web Server Settings . . . . . . . . . . . . . . . . . . . . . . . . . . . . . . . . . . . . . . 30
5.3.5 Configuration Folder—LIFE
5.3.6 Configuration Folder—Emerson Protocol . . . . . . . . . . . . . . . . . . . . . . . . . . . . . . . . . . . . . . . . . 31
5.4 Configuration Folder—Messaging Settings . . . . . . . . . . . . . . . . . . . . . . . . . . . . . . . . . . . . . . 31
5.4.1 Email Settings . . . . . . . . . . . . . . . . . . . . . . . . . . . . . . . . . . . . . . . . . . . . . . . . . . . . . . . . . . . . . . 31
5.4.2 SMS Settings . . . . . . . . . . . . . . . . . . . . . . . . . . . . . . . . . . . . . . . . . . . . . . . . . . . . . . . . . . . . . . . 32
5.4.3 Messaging Test . . . . . . . . . . . . . . . . . . . . . . . . . . . . . . . . . . . . . . . . . . . . . . . . . . . . . . . . . . . . . . 33
5.5 Unity Tab—Protocols . . . . . . . . . . . . . . . . . . . . . . . . . . . . . . . . . . . . . . . . . . . . . . . . . . . . . . . . 34
5.6 Protocols Folder—BACnet Folder . . . . . . . . . . . . . . . . . . . . . . . . . . . . . . . . . . . . . . . . . . . . . . 34
5.6.1 Protocols Folder—BACnet IP Folder . . . . . . . . . . . . . . . . . . . . . . . . . . . . . . . . . . . . . . . . . . . . . 35
5.6.2 Protocols Folder—BACnet MSTP Folder . . . . . . . . . . . . . . . . . . . . . . . . . . . . . . . . . . . . . . . . . 35
5.7 Protocols Folder—Modbus . . . . . . . . . . . . . . . . . . . . . . . . . . . . . . . . . . . . . . . . . . . . . . . . . . . . 35
5.7.1 Modbus TCP . . . . . . . . . . . . . . . . . . . . . . . . . . . . . . . . . . . . . . . . . . . . . . . . . . . . . . . . . . . . . . . . 36
5.7.2 Modbus RTU . . . . . . . . . . . . . . . . . . . . . . . . . . . . . . . . . . . . . . . . . . . . . . . . . . . . . . . . . . . . . . . . 36
™
. . . . . . . . . . . . . . . . . . . . . . . . . . . . . . . . . . . . . . . . . . . . . . . . . . 31
1
Page 4

5.8 Protocols Folder—SNMP Subfolder . . . . . . . . . . . . . . . . . . . . . . . . . . . . . . . . . . . . . . . . . . . . 37
5.8.1 SNMPv3 User Settings . . . . . . . . . . . . . . . . . . . . . . . . . . . . . . . . . . . . . . . . . . . . . . . . . . . . . . . 38
5.8.2 Edit the SNMPv3 Table . . . . . . . . . . . . . . . . . . . . . . . . . . . . . . . . . . . . . . . . . . . . . . . . . . . . . . . 39
5.8.3 SNMPv1 Trap Settings . . . . . . . . . . . . . . . . . . . . . . . . . . . . . . . . . . . . . . . . . . . . . . . . . . . . . . . 40
5.8.4 SNMPv1/v2c Access Settings . . . . . . . . . . . . . . . . . . . . . . . . . . . . . . . . . . . . . . . . . . . . . . . . . . . 41
5.9 Protocols Folder—YDN23 Protocol . . . . . . . . . . . . . . . . . . . . . . . . . . . . . . . . . . . . . . . . . . . . . 42
5.10 Configuration—Unity Tab-Status Folder . . . . . . . . . . . . . . . . . . . . . . . . . . . . . . . . . . . . . . . . 42
5.11 Configuration—Unity Tab-Support Folder. . . . . . . . . . . . . . . . . . . . . . . . . . . . . . . . . . . . . . . 43
5.11.1 Unity Tab-Support Folder—Active Networking . . . . . . . . . . . . . . . . . . . . . . . . . . . . . . . . . . . . 44
5.11.2 Unity Tab-Support Folder—Firmware Update . . . . . . . . . . . . . . . . . . . . . . . . . . . . . . . . . . . . 45
6.0 FIRMWARE UPDATES . . . . . . . . . . . . . . . . . . . . . . . . . . . . . . . . . . . . . . . . . . . . . . . . . . . .46
6.1 Updating the Liebert IntelliSlot Unity Card’s Firmware . . . . . . . . . . . . . . . . . . . . . . . . . . . 46
6.2 Revert to Alternate Firmware . . . . . . . . . . . . . . . . . . . . . . . . . . . . . . . . . . . . . . . . . . . . . . . . . 48
APPENDIX A-CONFIGURATION FOLDER—LIFE™ SUBFOLDER. . . . . . . . . . . . . . . . . . . . . . . . . A49
FIGURES
Figure 1 Liebert IntelliSlot Unity-DP card features . . . . . . . . . . . . . . . . . . . . . . . . . . . . . . . . . . . . . . . . . . . . 2
Figure 2 Command prompt access . . . . . . . . . . . . . . . . . . . . . . . . . . . . . . . . . . . . . . . . . . . . . . . . . . . . . . . . . . 6
Figure 3 Change administrator and general user names and passwords . . . . . . . . . . . . . . . . . . . . . . . . . . . 8
Figure 4 Enabling the communication protocol—IPv4 or IPv6 . . . . . . . . . . . . . . . . . . . . . . . . . . . . . . . . . . . . 9
Figure 5 Enable protocols; enable commands . . . . . . . . . . . . . . . . . . . . . . . . . . . . . . . . . . . . . . . . . . . . . . . . 11
Figure 6 Modbus TCP-Trusted IP List . . . . . . . . . . . . . . . . . . . . . . . . . . . . . . . . . . . . . . . . . . . . . . . . . . . . . . 12
Figure 7 Modbus-RS-485 . . . . . . . . . . . . . . . . . . . . . . . . . . . . . . . . . . . . . . . . . . . . . . . . . . . . . . . . . . . . . . . . . 13
Figure 8 BACnet protocol settings . . . . . . . . . . . . . . . . . . . . . . . . . . . . . . . . . . . . . . . . . . . . . . . . . . . . . . . . . 14
Figure 9 BACnet IP settings . . . . . . . . . . . . . . . . . . . . . . . . . . . . . . . . . . . . . . . . . . . . . . . . . . . . . . . . . . . . . . 15
Figure 10 BACnet MSTP settings. . . . . . . . . . . . . . . . . . . . . . . . . . . . . . . . . . . . . . . . . . . . . . . . . . . . . . . . . . . 16
Figure 11 SNMP settings . . . . . . . . . . . . . . . . . . . . . . . . . . . . . . . . . . . . . . . . . . . . . . . . . . . . . . . . . . . . . . . . . 17
Figure 12 SNMPv3 user settings . . . . . . . . . . . . . . . . . . . . . . . . . . . . . . . . . . . . . . . . . . . . . . . . . . . . . . . . . . . 18
Figure 13 SNMPv1 trap settings . . . . . . . . . . . . . . . . . . . . . . . . . . . . . . . . . . . . . . . . . . . . . . . . . . . . . . . . . . . 19
Figure 14 SNMPv1/v2c access settings. . . . . . . . . . . . . . . . . . . . . . . . . . . . . . . . . . . . . . . . . . . . . . . . . . . . . . . 20
Figure 15 Web page sections, UPS example. . . . . . . . . . . . . . . . . . . . . . . . . . . . . . . . . . . . . . . . . . . . . . . . . . . 22
Figure 16 Web page sections, Thermal Management unit example . . . . . . . . . . . . . . . . . . . . . . . . . . . . . . . . 22
Figure 17 Help text on mouse-over . . . . . . . . . . . . . . . . . . . . . . . . . . . . . . . . . . . . . . . . . . . . . . . . . . . . . . . . . . 23
Figure 18 Managed Equipment Tab examples, Liebert APS
Figure 19 Editing configuration settings . . . . . . . . . . . . . . . . . . . . . . . . . . . . . . . . . . . . . . . . . . . . . . . . . . . . . 26
Figure 20 Configuration folder, System subfolder . . . . . . . . . . . . . . . . . . . . . . . . . . . . . . . . . . . . . . . . . . . . . . 28
Figure 21 Configuration folder, System subfolder, Time Service Settings. . . . . . . . . . . . . . . . . . . . . . . . . . . 28
Figure 22 IPv4/IPv6 settings. . . . . . . . . . . . . . . . . . . . . . . . . . . . . . . . . . . . . . . . . . . . . . . . . . . . . . . . . . . . . . . 29
Figure 23 Edit the SNMPv3 table. . . . . . . . . . . . . . . . . . . . . . . . . . . . . . . . . . . . . . . . . . . . . . . . . . . . . . . . . . . 39
Figure 24 Ethernet port. . . . . . . . . . . . . . . . . . . . . . . . . . . . . . . . . . . . . . . . . . . . . . . . . . . . . . . . . . . . . . . . . . . 46
Figure 25 Firmware update screen . . . . . . . . . . . . . . . . . . . . . . . . . . . . . . . . . . . . . . . . . . . . . . . . . . . . . . . . . . 47
™
and Liebert CRV™. . . . . . . . . . . . . . . . . . . . 24
TABLES
Table 1 Compatibility with Liebert equipment . . . . . . . . . . . . . . . . . . . . . . . . . . . . . . . . . . . . . . . . . . . . . . . 3
Table 2 Liebert IntelliSlot card communication protocols . . . . . . . . . . . . . . . . . . . . . . . . . . . . . . . . . . . . . . . 3
Table 3 Help text and icons . . . . . . . . . . . . . . . . . . . . . . . . . . . . . . . . . . . . . . . . . . . . . . . . . . . . . . . . . . . . . . 23
Table 4 Unity Tab menus. . . . . . . . . . . . . . . . . . . . . . . . . . . . . . . . . . . . . . . . . . . . . . . . . . . . . . . . . . . . . . . . 25
2
Page 5

IMPORTANT SAFETY INSTRUCTIONS
!
!
SAVE THESE INSTRUCTIONS
WARNING
Risk of improper installation. Can cause equipment damage, injury or death.
Only a qualified service professional should install these products. Emerson recommends
having an Emerson Network Power
in large UPS’s. Contact Liebert Services at 1-800-LIEBERT (1-800-543-2378).
WARNING
Risk of electric shock. Can cause equipment damage, injury or death.
Service and maintenance work must be performed only by properly trained and qualified
personnel and in accordance with applicable regulations and manufacturers’ specifications.
Opening or removing the covers to any equipment may expose personnel to lethal voltages
within the unit even when it is apparently not operating and the input wiring is disconnected
from the electrical source.
Check the circuits with a voltmeter before beginning installation.
Important Safety Instructions
®
Liebert Services representative perform the installation
1Liebert
®
IntelliSlot™ Unity™ Card
Page 6
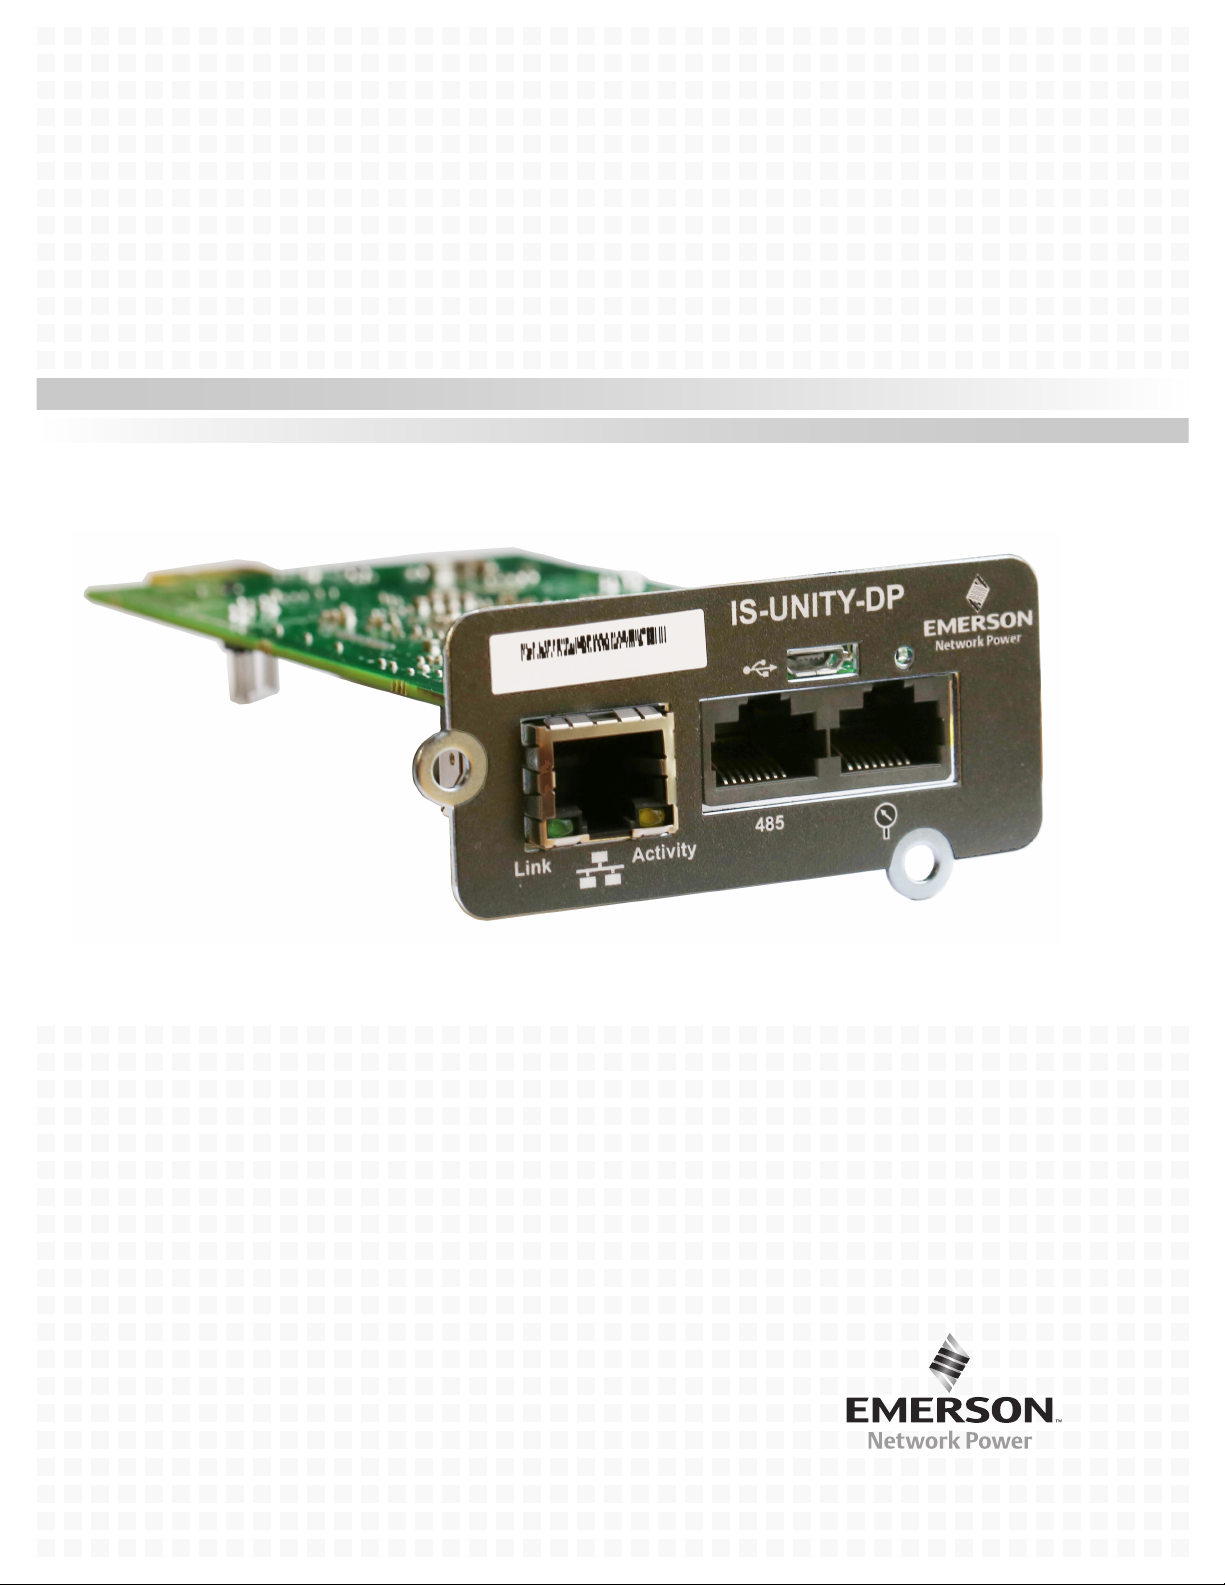
1.0 INTRODUCTION
Liebert Sensor Network
(future release)
RJ-45-Ethernet—HTTP; Modbus TCP;
BACnet IP; SNMPv1, v2c, v3;
Emerson Protocol
Reset
Button
(Reboot or
reset to
factory
defaults)
BACnet MSTP
Modbus RTU
YDN23
Micro-USB AB
(future release)
This Liebert IntelliSlot Unity platform delivers enhanced communication and control of AC Power,
Power Distribution and Thermal Management products. The platform communicates with Emerson
Network Power
™
Web
and Liebert Nform®.
The platform includes the Liebert IntelliSlot Unity-DP
Each card employs the Emerson Protocol to monitor and manage a wide range of operating
parameters, alarms and notifications about the power, distribution and Thermal Management
equipment. The cards also communicate with Building Management Systems and Network
Management Systems.
Figure 1 Liebert IntelliSlot Unity-DP card features
®
software tools and services, including Trellis®, LIFE™ Technology, Liebert SiteScan
™
and Liebert IntelliSlot Unity LIFE™ cards.
IS-UNITY-DP
Introduction
1.1 Protocols
Each card supports the Emerson Protocol, Remote Service Delivery Protocol and HTTP Web by
default.
The Liebert IntelliSlot Unity-DP supports selecting two third-party protocols; the Liebert IntelliSlot
Unity LIFE card supports the default protocols only (Emerson Protocol, Remote Service Delivery
Protocol and HTTP Web).
Available protocols are
• BACnet IP—BACnet over Internet Protocol
• BACnet MSTP—BACnet Master-Slave/Token-Passing (MSTP) communications protocol over a
RS-485 serial network (also known as BACnet MSTP RS-485)
• Modbus RTU—Modbus Remote Terminal Unit (RTU) communication protocol over a RS-485
serial network (also known as Modbus RTU RS-485)
• Modbus TCP—Modbus Transmission Control Protocol over Internet Protocol (also known as
Modbus TCP/IP)
•SNMP
• YDN23 - YD-T-1363 specification protocol (also known as YD/T 1363)
Link
Activity
485
Liebert® IntelliSlot™ Unity™ Card 2
Page 7

Introduction
1.2 Compatibility With Other Emerson Products and Communication Protocols
The Liebert IntelliSlot Unity platform includes:
Table 1 Compatibility with Liebert equipment
Liebert IntelliSlot Card
™
, Liebert APS™, Liebert CRV™, Liebert CW
™
, Liebert Deluxe System/3™, Liebert DS™, Liebert DSE™, Liebert eXL
™
, Liebert PCW™/PDX™, Liebert PeX™ *, Liebert XDC™, Liebert XDP™,
™
Liebert IS-UNITY-DP
Liebert IS-UNITY-LIFE
Liebert APM
Liebert DCP
Liebert HPC™ Liebert HPC-S/M/R/W/Generic™, Liebert HPM™, Liebert NXC™, Liebert NXL™ *,
Liebert NXR
Liebert XDP-Cray
The Liebert IntelliSlot Unity-DP platform supports the following protocols:
Table 2 Liebert IntelliSlot card communication protocols
Communication Protocols Available
Remote
Liebert IntelliSlot
Card (Part #)
Liebert IS-UNITY-DP
(IS-UNITY-DP)
Liebert IS-UNITY-LIFE
(IS-UNITY-LIFE)
* YDN23 applicable only to Liebert PeX and Liebert NXL.
HTTP
HTTPS
Emerson
Protocol
✔✔ ✔✔✔✔ ✔ ✔ ✔
✔✔ ✔
Service
Delivery
Protocol Email SMS
—— — — — —
Compatible with:
SNMP
v1,v2c, v3
™,
Liebert Challenger 3000™
BACnet IP
BACnet MSTP
Modbus TCP
Modbus RTU YDN23 *
™
The Liebert IntelliSlot Unity platform supports both 10Mbit and 100Mbit communication speeds and
either half or full duplex.
Password Protection
Control and configuration capabilities are protected by an administrator’s username and password
combination. Optionally, status information can be password-protected. The default user name for the
administrator is Liebert and the default password is also Liebert.
The user name and password can be changed with the Web interface. See 2.2 - Change User Names
and Passwords Immediately for details.
SNMP Support
The Liebert IntelliSlot Unity card enables SNMP management of Liebert equipment. To integrate the
card into a SNMP implementation, import or compile the Liebert Global Products MIB on the
network management station (NMS).
The Liebert Global Products MIB is available at Liebert’s Web site (www.liebert.com); it supports
both Windows
®
(192436P1) and Unix (192435P1) file formats.
Web Support
The Liebert IntelliSlot Unity card delivers Web management and control to Liebert equipment over
HTTP and HTTPS. All authorized users on your network will be able to view status information.
Modbus TCP and Modbus RTU Support
The Liebert IntelliSlot Unity card supports Modbus TCP and Modbus RTU for the full range of
information available from the managed device. The Modbus protocol mapping document, SL-28170,
is available at Liebert’s Web site: www.liebert.com
BACnet IP and BACnet MSTP Support
The Liebert IntelliSlot Unity card supports BACnet IP and BACnet MSTP for the full range of
information available from the managed device. The BACnet protocol mapping document, SL-28170,
is available at Liebert’s Web site: (www.liebert.com). This document includes the BACnet Protocol
Implementation Conformance Statement (PICS) document as a guide to implementing the BACnet
protocol.
3Liebert
®
IntelliSlot™ Unity™ Card
Page 8

YDN23 Support
Introduction
The Liebert IntelliSlot Unity card supports YD/T-1363 specification for the full range of information
available from managed Liebert NXL
™
or Liebert PeX™ units.
Trellis™ Support
The Liebert IntelliSlot Unity-DP card communicates a rich set of Emerson Protocol information to the
Trellis DCIM platform.
Trellis can manage and control Liebert equipment using SNMP, Modbus or the Emerson Protocol.
This allows monitoring all Liebert equipment using Liebert IntelliSlot Web, Liebert IntelliSlot 485,
Liebert IntelliSlot IPBML, Liebert IntelliSlot Web ADPT or Liebert IntelliSlot Unity platform
communication interfaces.
Liebert Nform
Utilizing the Emerson Protocol or SNMP and Web technologies built into each Liebert IntelliSlot
Unity card, Liebert Nform will centrally manage alarm notifications to provide an easy interface to
access critical equipment information.
A downloadable version is available online at: nform.liebert.com
Liebert MultiLink
The Liebert IntelliSlot Unity card integrates with Liebert’s MultiLink software to provide
unattended, graceful operating system shutdown of PCs, servers and workstations. The card can be
monitored by Liebert MultiLink over the network, eliminating the need for serial cables.
For more information on Liebert MultiLink and a downloadable version of Liebert MultiLink
software, visit multilink.liebert.com
®
Support
®
Support
Liebert® IntelliSlot™ Unity™ Card 4
Page 9
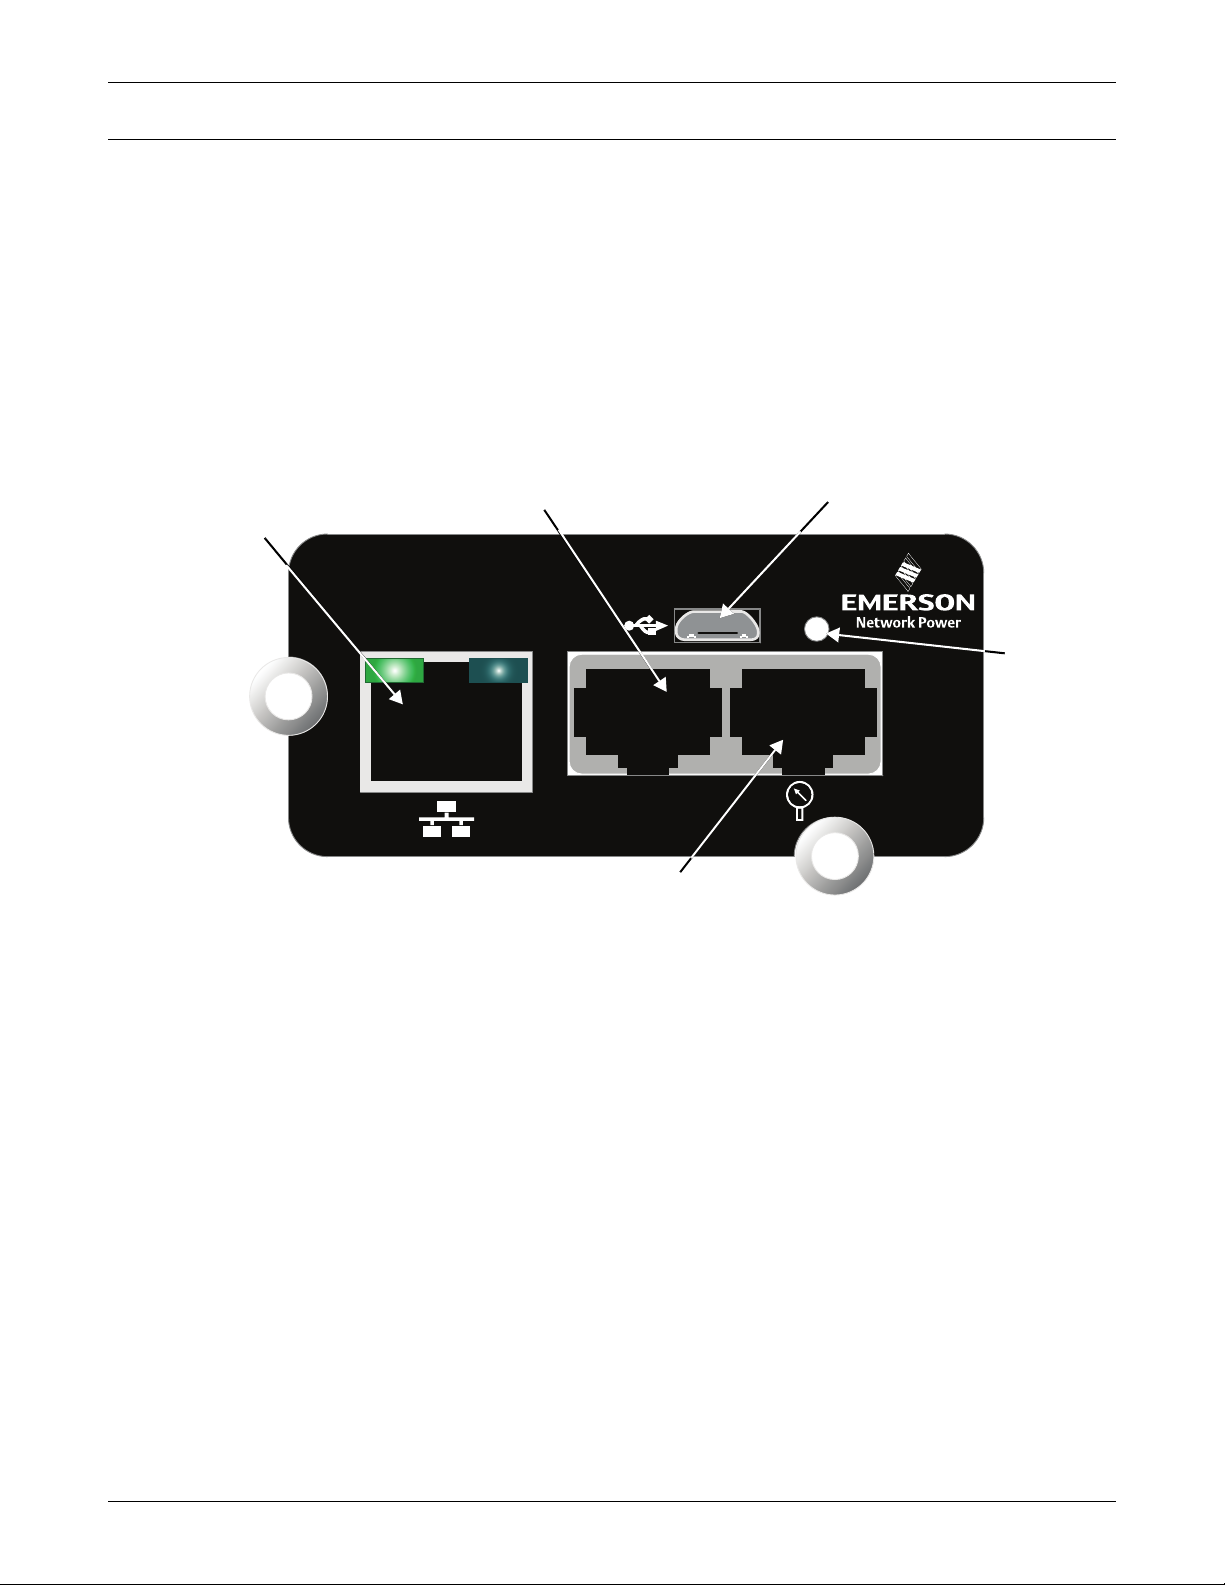
2.0 INSTALLATION
!
Activity
Link
485
IS-UNITY-DP
WARNING
Risk of improper installation. Can cause equipment damage, injury and death.
Only a properly trained and qualified service professional should install these products.
Emerson recommends having an Emerson Network Power
perform the installation in large UPS’s. Contact Liebert Services at 1-800-LIEBERT
(1-800-543-2378).
NOTICE
Risk of duplicate node ID’s if two or more Liebert IntelliSlot cards are installed. Can cause
network conflicts.
An internal networking conflict may occur within a device when multiple communication
cards with duplicate Node IDs are installed in the device.
Each Liebert IntelliSlot card must have a unique node ID. This will not be a problem if only
one card is installed on your system. Duplicate node ID’s are easily averted with the
procedure detailed in 2.4 - Installing Multiple Liebert IntelliSlot Unity Cards in a
System.
2.1 Installing the Liebert IntelliSlot Unity Card
The Liebert IntelliSlot Unity card may be installed at the factory or field-installed. To perform a
field-installation:
1. Find the Liebert IntelliSlot bay on your Liebert equipment—It may have a plastic cover.
2. Insert the card into the Liebert IntelliSlot bay.
Installation
®
Liebert Services representative
NOTE
The card will only fit one way in the Liebert IntelliSlot bay because the circuit board is not
centered on the faceplate. The slot in the Liebert IntelliSlot bay also is not centered.
3. Secure the card with the screws supplied with the cover plate.
4. Connect an Ethernet cable to the card’s Ethernet RJ-45 port for IP communication interfaces.
5. Connect a serial cable to the card’s 485 RJ-45 port for RS-485 communication interfaces (see
2.1.3 - Connect an RS-485 Serial Cable.
2.1.1 Assigning the Card’s IP Address
DHCP
The Liebert IntelliSlot Unity card is factory-configured for DHCP. If you require a Static or BootP
network configuration, be sure to change the Boot Mode as described in Static IP on page 6.
Connect an RJ-45 cable to the card and it will receive an IP address from the DHCP server. Contact
the DHCP administrator to obtain the IP address using the Liebert IntelliSlot Unity card’s MAC
address. The MAC address is printed on the card’s faceplate.
If the DHCP administrator is not available or there is no way of
determining the IP address assigned by the DHCP server, use a
computer with a direct Ethernet connection to the Liebert
IntelliSlot Unity card, and the Autoconfiguration IPv4 Address
convention described in 2.1.2 - Connect an Ethernet Cable to
access the card’s Web page and configure the card. To see the card’s
last DHCP-assigned IP address, click on the Unity Tab, then on
the left side menu select Support > Active Networking. The
table of information will show the last IP address assigned by the
DHCP server. The card may retain that IP address when it
reconnects to the DHCP network because most DHCP systems
reuse the same IP address for the same device.
5Liebert
®
IntelliSlot™ Unity™ Card
Page 10
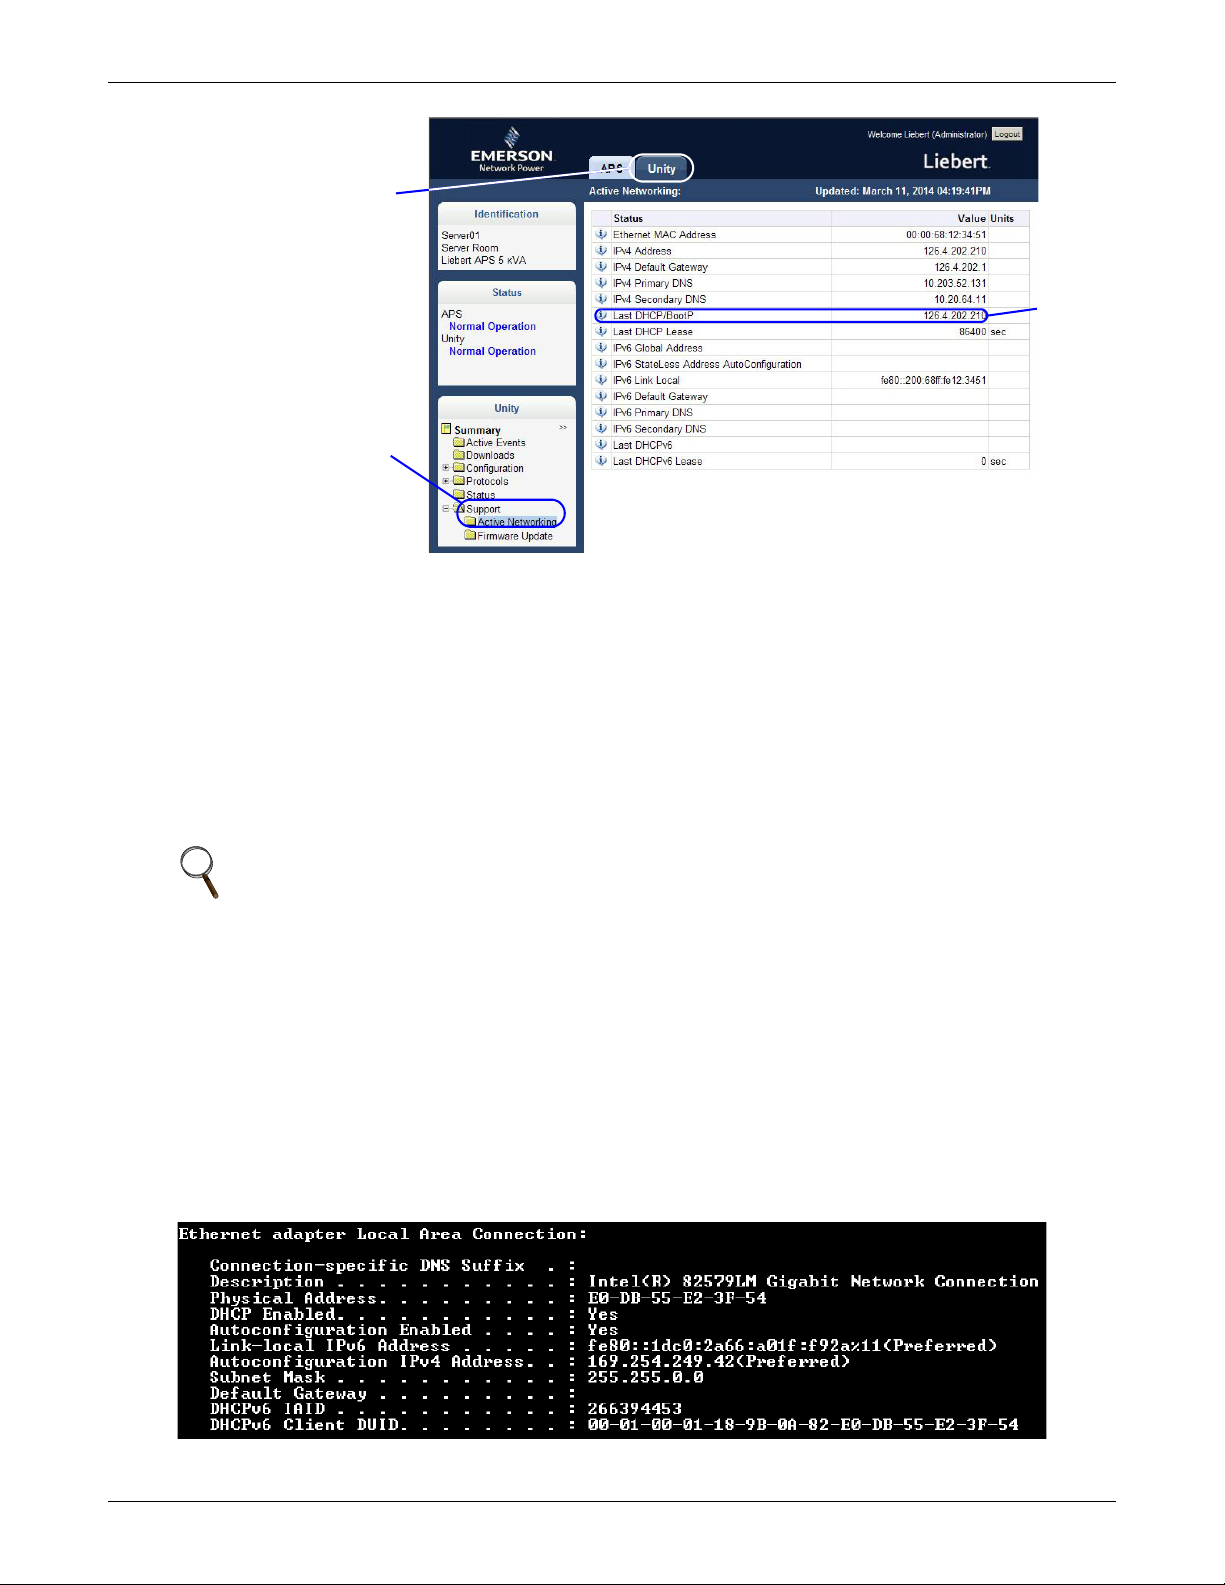
Installation
Last
DHCP
Address
Support>Active Networking
Unity Tab
Static IP
To assign a static IP address, use the Ethernet connection to configure the card. Proceed to 2.1.2 Connect an Ethernet Cable and 2.2 - Change User Names and Passwords Immediately.
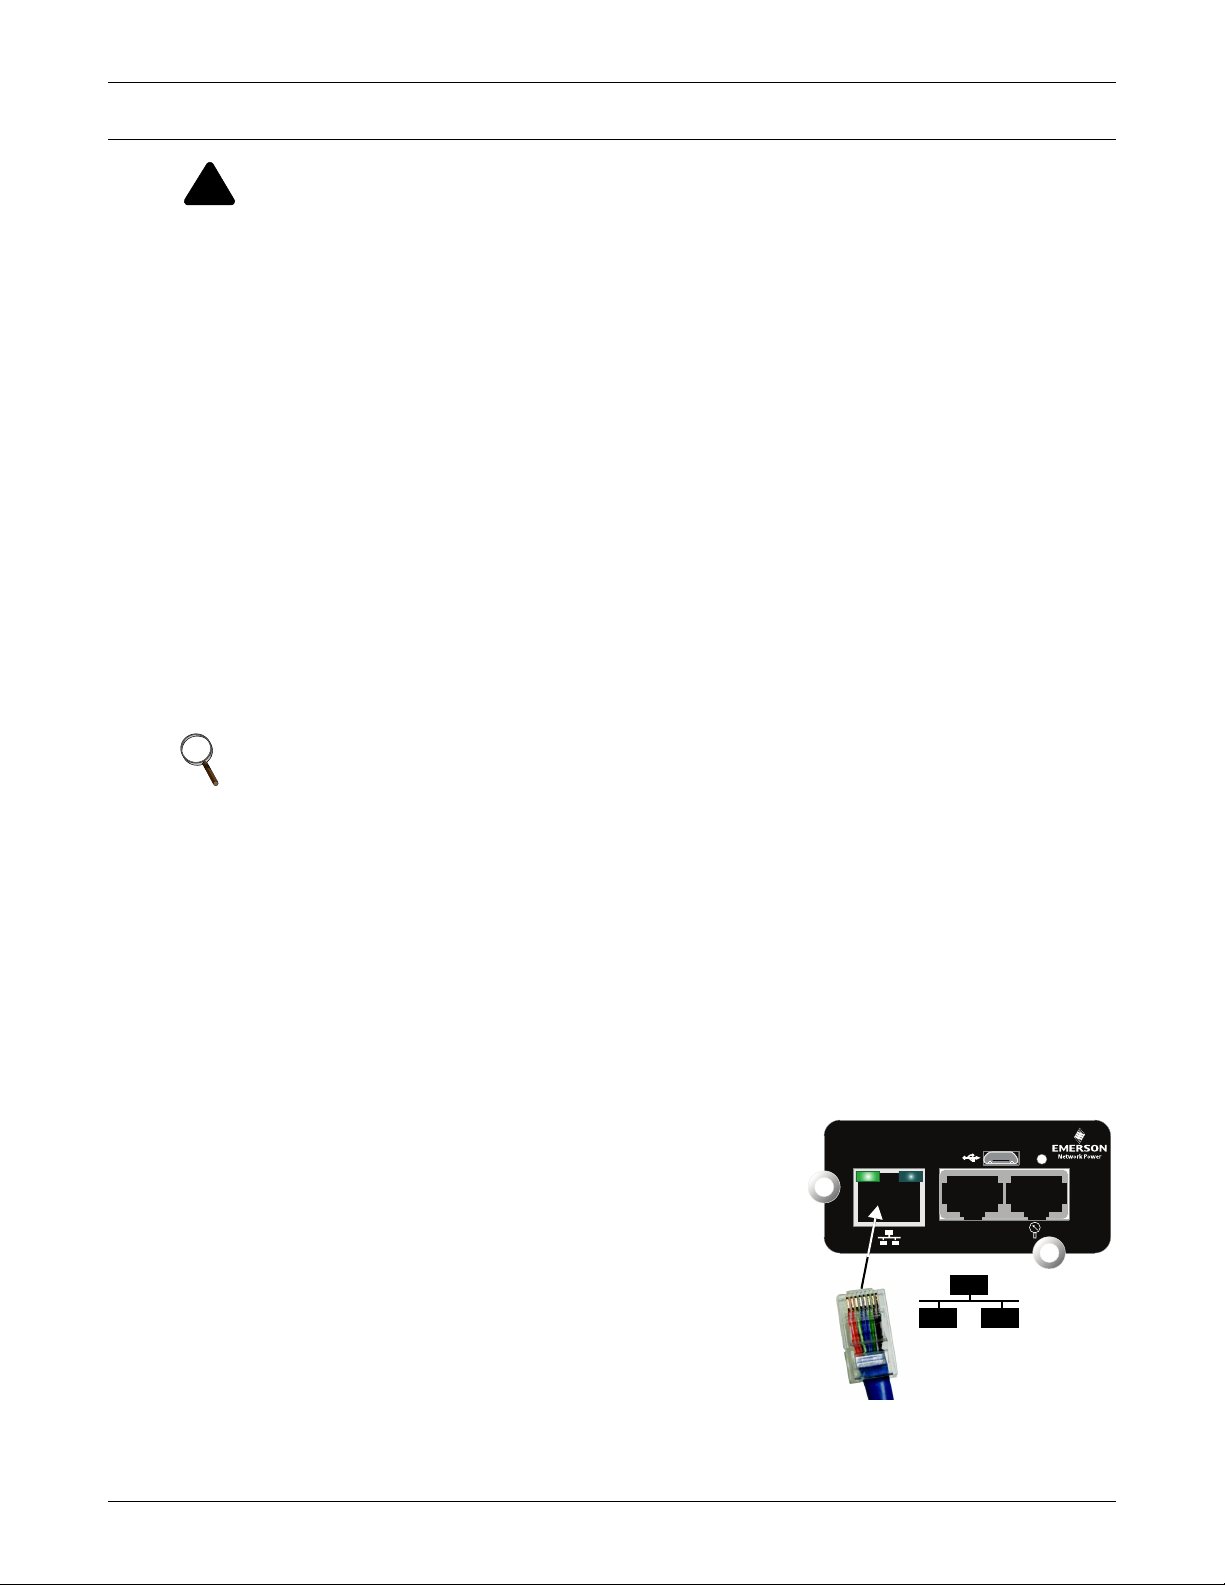
2.1.2 Connect an Ethernet Cable
1. Connect a computer running a Microsoft Windows operating system (Microsoft Windows® XP with
SP2 [64-bit] or SP3 [32-bit] or later) to the card by plugging a network cable into the RJ-45 port on
the computer and the Liebert IntelliSlot Unity card.
2. Autoconfiguration, which is normally enabled on computers running Microsoft Windows
operating systems, will automatically negotiate the communication settings. This takes about one
minute.
NOTE
If the computer does not automatically connect, verify that autoconfiguration is enabled by:
Open the Command Prompt window from the computer’s Start menu.
Enter ipconfig/all to verify that Autoconfiguration is enabled on the computer and that an
Autoconfiguration IPv4 Address has been assigned: Enabled = Yes (see Figure 2). An
Autoconfiguration IPv4 Address begins with 169.254.)
3. If the Ethernet adapter being used to attach to the card does not show an Autoconfiguration IPv4
Address, open a new Command Prompt and type ipconfig/renew and press Enter. This forces the
computer to acquire an Autoconfiguration IPv4 Address.
4. When the computer has an Autoconfiguration IPv4 Address, open a browser window on the
computer and type 169.254.24.7 (the card’s default Autoconfiguration IPv4 Address) in the URL
address field. The card’s Web page will appear.
Figure 2 Command prompt access
Liebert® IntelliSlot™ Unity™ Card 6
Page 11
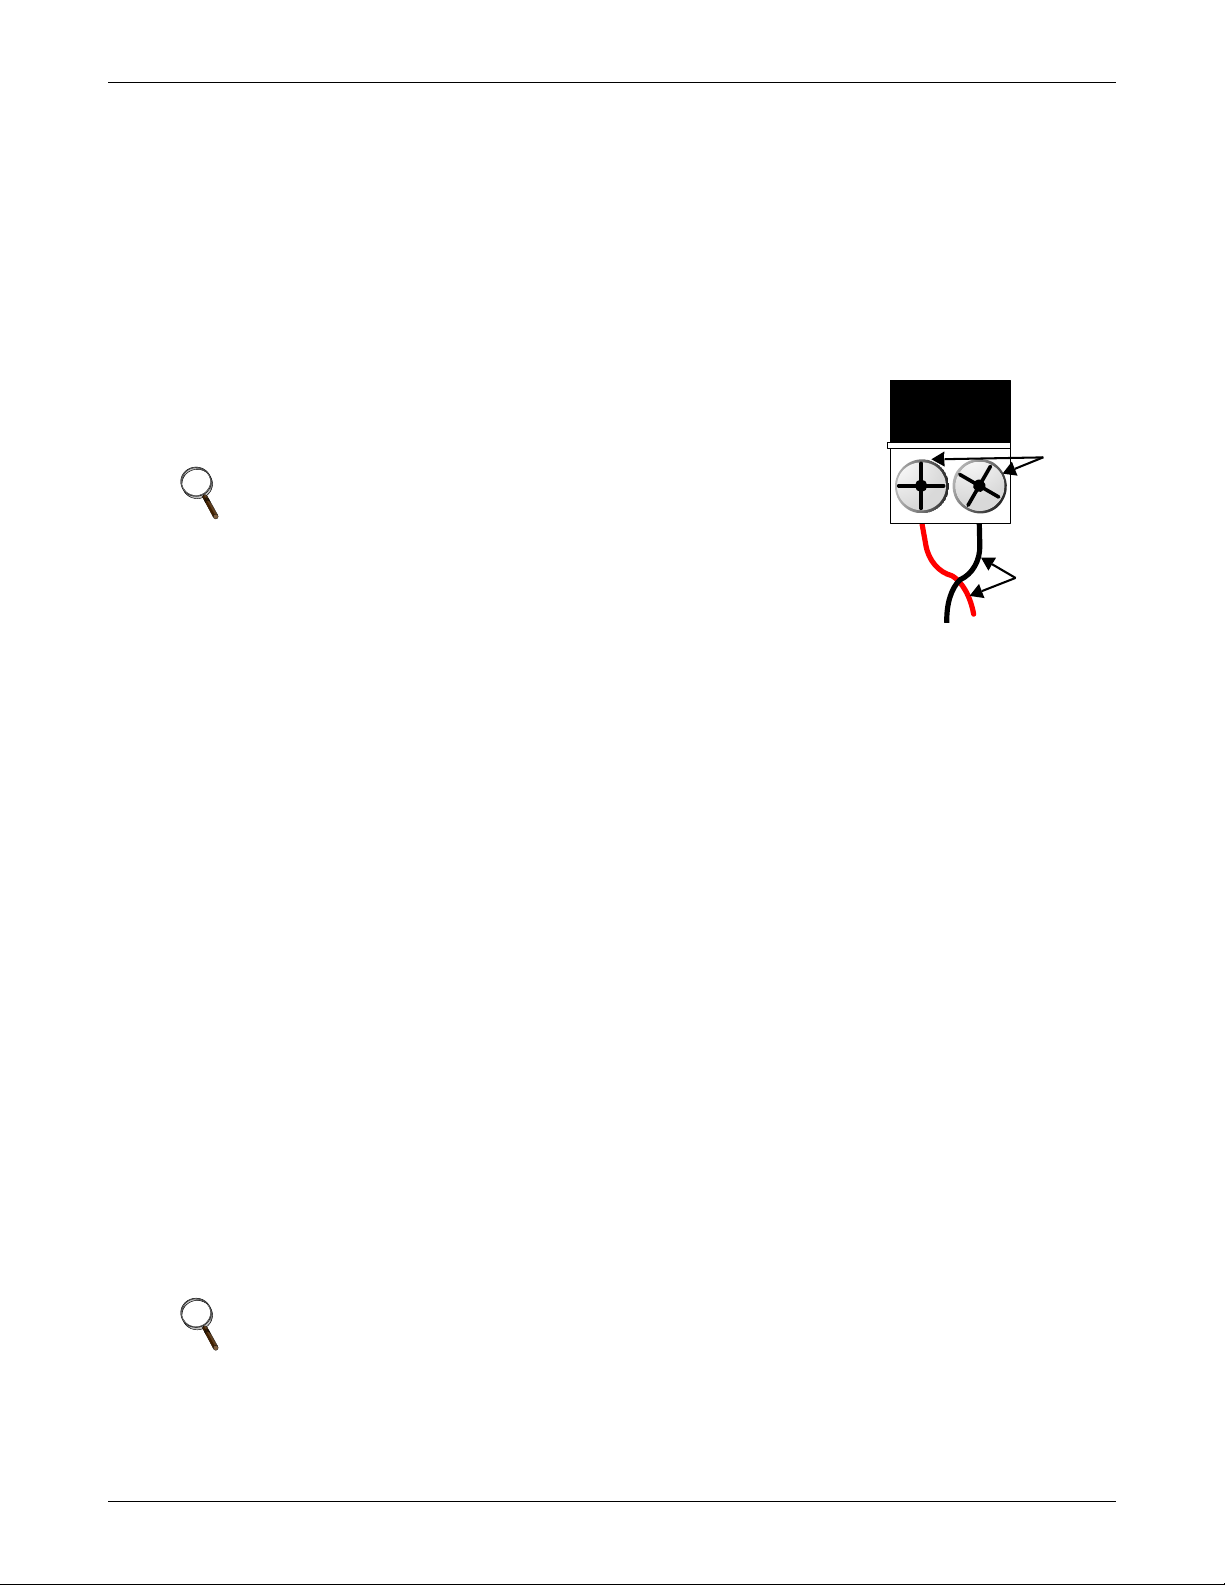
2.1.3 Connect an RS-485 Serial Cable
485
+-
Wires
Screws
For Building Management Systems using serial network connections, an RS-485 serial cable
connection will be used.
Liebert IntelliSlot Unity cards come with an Adapter RJ-45-2POS Terminal Block. The adapter has
two screw terminals to attach the ends of a RS-485 cable for communicating to a building
management system.
1. Find the serial cable from the building management system. If it already has an RJ-45 connector
on the end, determine whether it uses the same pinout as the Liebert IntelliSlot Unity card’s
connector. If the pinout is the same as the Liebert IntelliSlot Unity card connector’s pinout, skip
to Step 6.
2. Strip the ends of the positive (typically red) and negative (typically
black) leads on the RS-485 cable so that enough bare wire is exposed for
connection, about 1/4" (6mm).
NOTE
No bare wire should be exposed when the connection is completed.
3. Position the adapter so the side with the positive and negative marks is
face up. The small markings are on the same side as the screw heads,
as shown at right.
4. Loosen the screw to the positive terminal and insert the red wire far
enough to insert the bare wires into the terminal block under the screw, then tighten the screw.
Be careful not to break the wires.
5. Repeat Step 3 with the negative terminal and the black wire.
6. Plug the cable into the 485 RJ-45 port on the Liebert IntelliSlot Unity card.
Installation
2.2 Change User Names and Passwords Immediately
Emerson recommends changing the administrative user name and password immediately to
safeguard protected configuration and control areas of the Liebert IntelliSlot Unity card.
The user name and password are set at the factory; each is Liebert (case-sensitive). All printable
characters are valid except \ : ’ < > ~ ? " #
A general user name and password are also set at the factory: User and User (case-sensitive). This
may be left at the factory default or changed. The general user has access only to non-protected
configuration and control areas of the Liebert IntelliSlot Unity card.
To change the default user names:
1. Select the Unity Tab > Configuration > User Settings.
2. Click the Edit button and enter the factory-set user name (Liebert) and password (Liebert).
3. Click OK.
4. Enter a new administrator user name and password.
5. Re-enter the administrator password to confirm it.
Optional General User Name Change
6. Enter a new general user name and password.
7. Re-enter the general user’s password to confirm it.
8. Click the Save button to confirm the changes or click Cancel to discard them.
NOTE
Record the new user names and passwords and save them in a secure place where they can be
found if forgotten.
7Liebert
®
IntelliSlot™ Unity™ Card
Page 12
Figure 3 Change administrator and general user names and passwords
Administrator User
Name and Password
General User Name
and Password
2.3 Configure the Card
The Liebert IntelliSlot Unity card requires minor configuration, such as choosing the IP/Web
communication interface, serial RS-485 communication interface, or both. The default for IP/Web
communication is IPv4, but this can be changed to IPv6 for greater security; contact your network
administrator to determine whether it is compatible with your network. To choose the communication
interface refer to Figure 4:
Installation
1. Select Unity Tab > Configuration > Network Settings.
2. Enable the protocol, either IPv4 or IPv6, that will be used to communicate with the Liebert
IntelliSlot Unity card and with the Liebert equipment.
a. Click on either IPv4 Settings or IPv6 Settings.
b. Click the Edit button.
c. When prompted with a login display, enter the user name and password (the defaults are
Liebert and Liebert).
d. Put a check mark (✔) in the enabled box.
e. Insert the desired or assigned IP address along with the rest of the required networking
information; contact your system administrator if necessary.
3. Click on Save to confirm the changes or click on Cancel to discard them. The changes will take
effect after the card is restarted.
Liebert® IntelliSlot™ Unity™ Card 8
Page 13
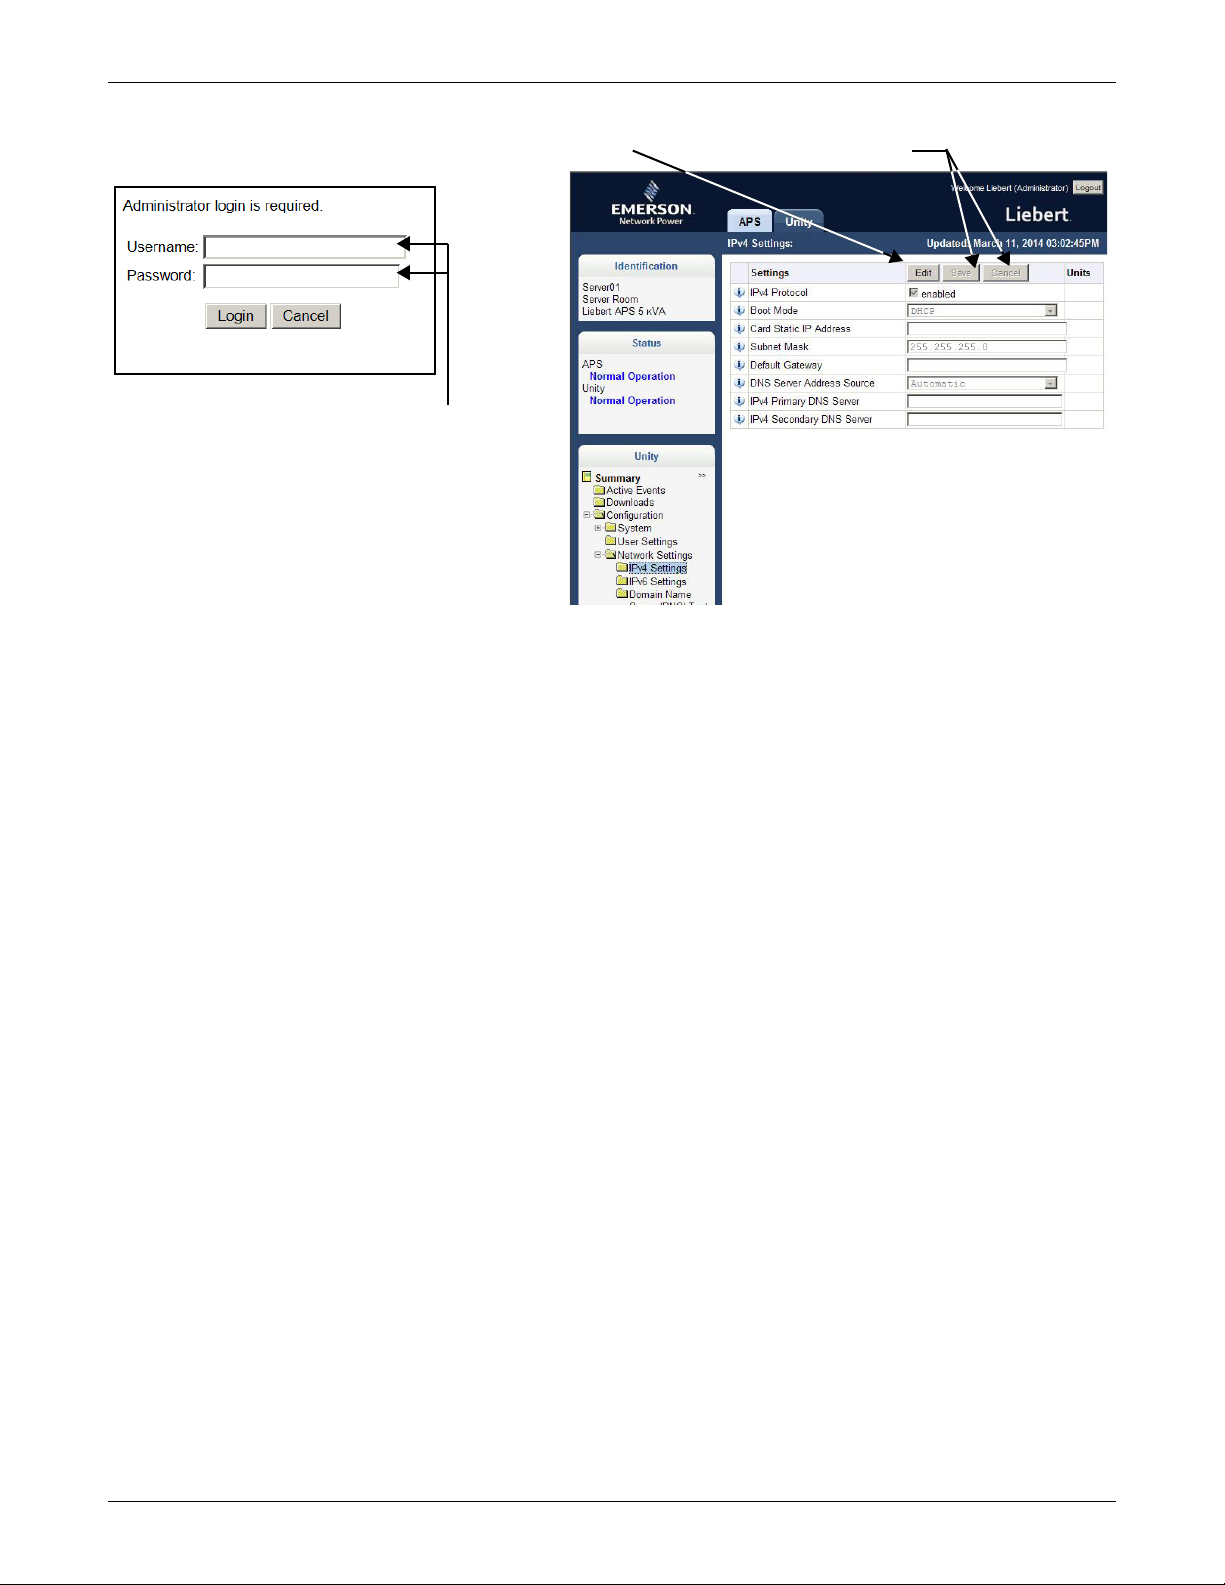
Figure 4 Enabling the communication protocol—IPv4 or IPv6
IPv4
Settings
Shown
Edit Dialog Box
Enter the Administrator Name and Password;
defaults are Liebert and Liebert
These should have been changed; see
2.2 - Change User Names and Passwords
Immediately
Edit Button
Save and Cancel Buttons
2.4 Installing Multiple Liebert IntelliSlot Unity Cards in a System
More than one Liebert IntelliSlot card may be installed in a system, but circular routes and duplicate
node ID’s must be avoided during installation. The instructions below apply if the second card to be
installed is a Liebert IntelliSlot Unity card. If the second card is not a Liebert IntelliSlot Unity card,
follow instructions in the user manual for that card.
Before beginning installation of a second Liebert IntelliSlot card, verify that the first card functions
properly.
If the first card is a Liebert IntelliSlot card, but not a Liebert IntelliSlot Unity card, and if both cards
connect to the same Ethernet network, then you should disable the router function on the first card.
This will avoid circular routes. Follow instructions in the user manual for the first card.
If the first and second cards are both Liebert IntelliSlot Unity cards, steps must be taken to avoid
duplicate Emerson Protocol MSTP node ID’s. By default, the two cards would use the same node ID,
and one or both cards would report a duplicate node error and fail to communicate with the system.
The default node ID for a Liebert IntelliSlot Unity card is 0, so the second card should use 1 or 2
preferably, or 127 if necessary. Contact your system administrator about the proper node ID for the
second card, then perform the steps below.
1. Open a Web browser and navigate to the second Liebert IntelliSlot Unity card.
2. Click on Unity Tab > Configuration > Emerson Protocol > MSTP.
3. Click on Edit and enter a password and username, if required.
4. Enter the new node ID.
5. Click Save to confirm the changes or click Cancel to discard them.
6. Restart the card as follows.
a. Select the Unity Tab > Support.
b. Click on Enable.
c. Click on Restart.
Installation
9Liebert
®
IntelliSlot™ Unity™ Card
Page 14

3.0 ENABLE COMMUNICATION PROTOCOLS
The Liebert IntelliSlot Unity card will communicate with equipment and third-party systems over
these protocols:
• BACnet IP
• BACnet MSTP
• Modbus TCP
• Modbus RTU
•SNMP
•YDN23
NOTE
Only two of the protocols may be enabled on one card.
• Only one version of BACnet may be selected, either BACnet IP or BACnet MSTP
• Only one version of Modbus may be selected, either Modbus TCP or Modbus RTU
• Only one of the protocols can use the 485 port; choosing two 485 protocols will cause
conflicts.
NOTE
Some Building Management Systems can be configured to send continuous updates for device
setpoints, usually setting the same value. The BMS should be configured to send, on a
sustained average, no more than two writes per second to the device. This will allow the device
to catch up after a burst of updates when required while allowing other communication with
the device to proceed.
Enable Communication Protocols
3.1 Enable Protocols
Protocols may be enabled after a card has been installed and configured. After a protocol is enabled, it
must be configured, which requires opening that protocol’s folder (Unity>Protocols> (desired
protocol).
To enable two communication protocols:
1. Select Unity Tab > Protocols.
2. Click on Edit and enter the administrator user name and password.
3. Put a check mark (✔) in the desired protocols—Only two may be enabled; only one of the two can
use the 485 port.
4. Click Save to confirm the changes or click on Cancel to discard them.
5. Configure the protocols selected. For details, refer to 5.0 - Edit the Liebert IntelliSlot Unity
Card Configuration.
6. Restart the card (refer to 5.11 - Configuration—Unity Tab-Support Folder.
a. Select Unity Tab > Support.
b. Enable the commands.
c. Click on Restart.
Liebert® IntelliSlot™ Unity™ Card 10
Page 15
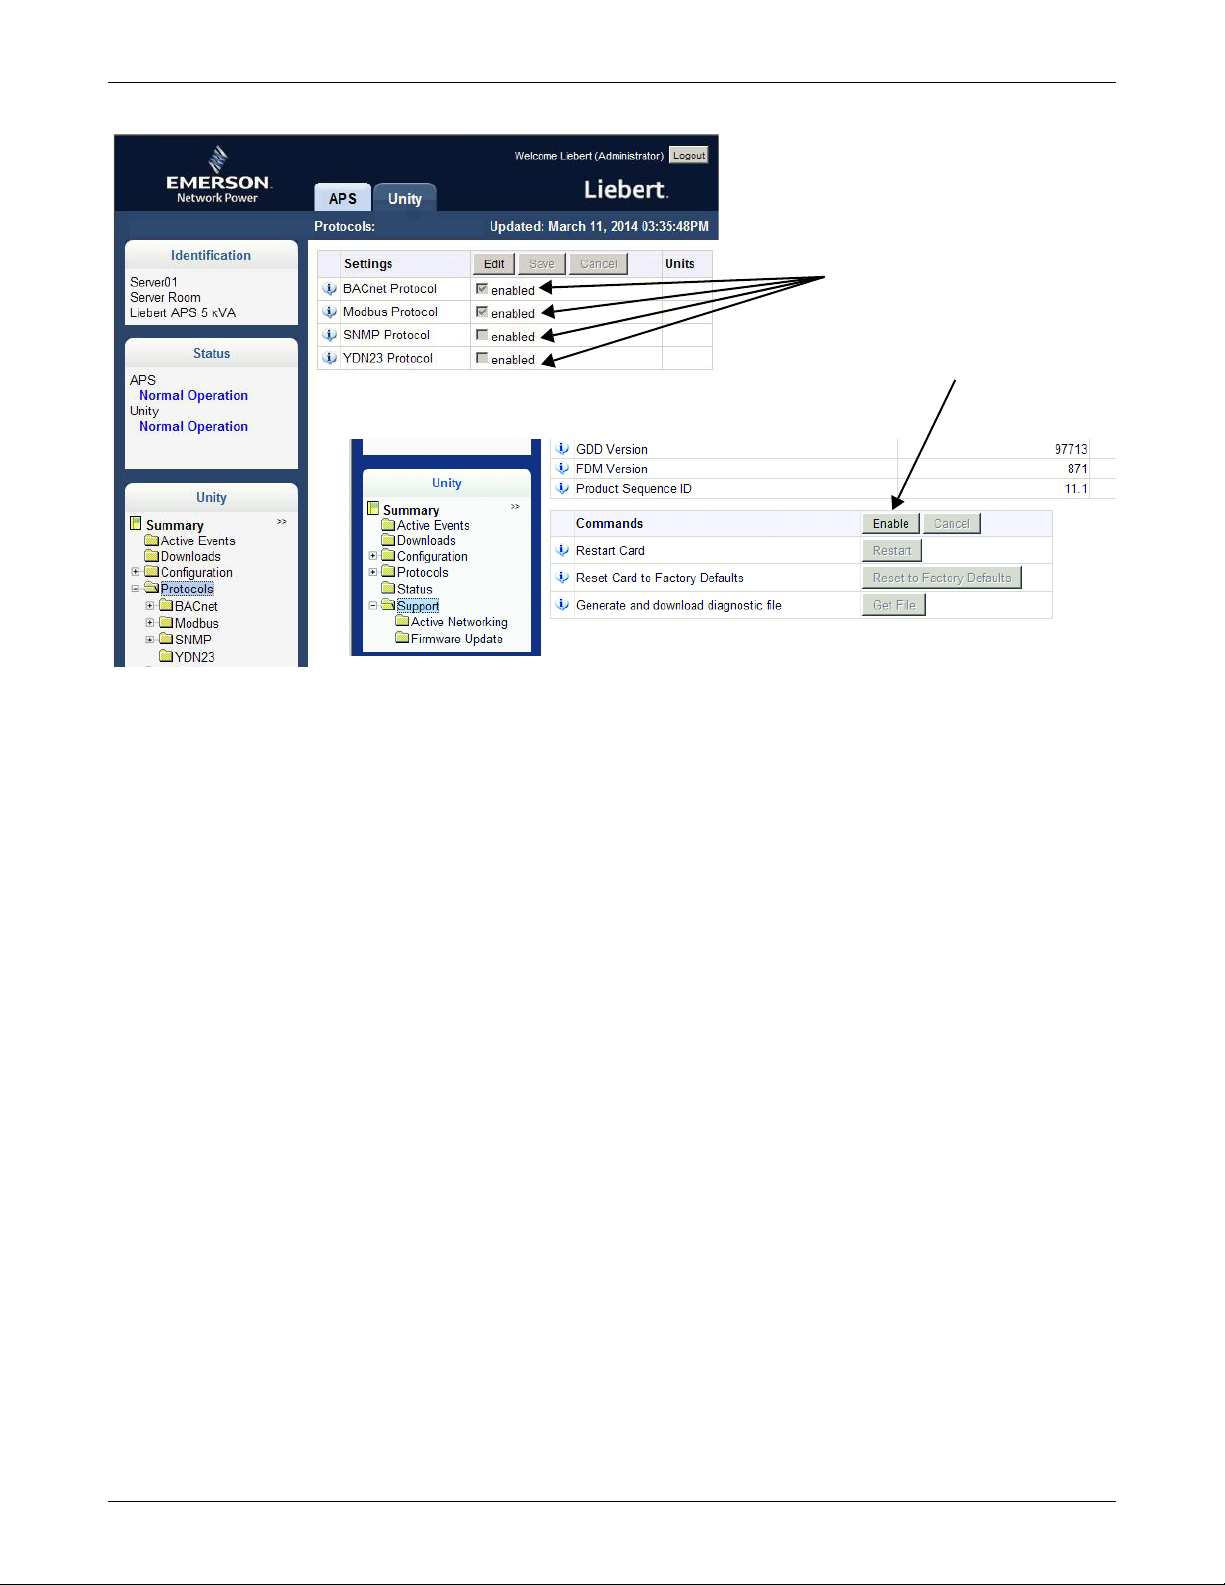
Figure 5 Enable protocols; enable commands
Enable
Protocols
Enable Commands
(Support folder)
Enable Communication Protocols
3.1.1 Enable Modbus Protocol
Protocols may be enabled after a card has been installed and configured. To enable Modbus protocol:
1. Select Unity Tab > Protocols > Modbus.
2. Click on Edit and enter a User name and password.
3. Select the access level (Read Only or Read/Write).
4. Select the Modbus interface, (Modbus TCP or Modbus RTU).
5. Click Save to confirm the changes or click on Cancel to discard the changes.
6. Configure the Modbus interface chosen; refer to Configure Modbus TCP or Configure
Modbus RTU. For additional details, see 5.7 - Protocols Folder—Modbus.
Configure Modbus TCP
1. Select the Unity Tab > Protocols > Modbus TCP.
2. Click on Edit and enter a User name and password if required.
3. Set the Limit Network Access Type by choosing from the drop-down list (Open/Same
Subnet/Trusted IP List). Refer to 5.7 - Protocols Folder—Modbus for additional details.
4. Enter the port to be used by the Modbus Server to listen for and respond to Modbus protocol
requests based on limit Network Access Type setting.
5. Enter the Maximum Client Connection Count.
6. Click Save to confirm the changes or click on Cancel to discard them.
7. Restart the card to confirm the changes.
a. Select Unity Tab > Support.
b. Enable the commands.
c. Click on Restart.
11 Liebert® IntelliSlot™ Unity™ Card
Page 16
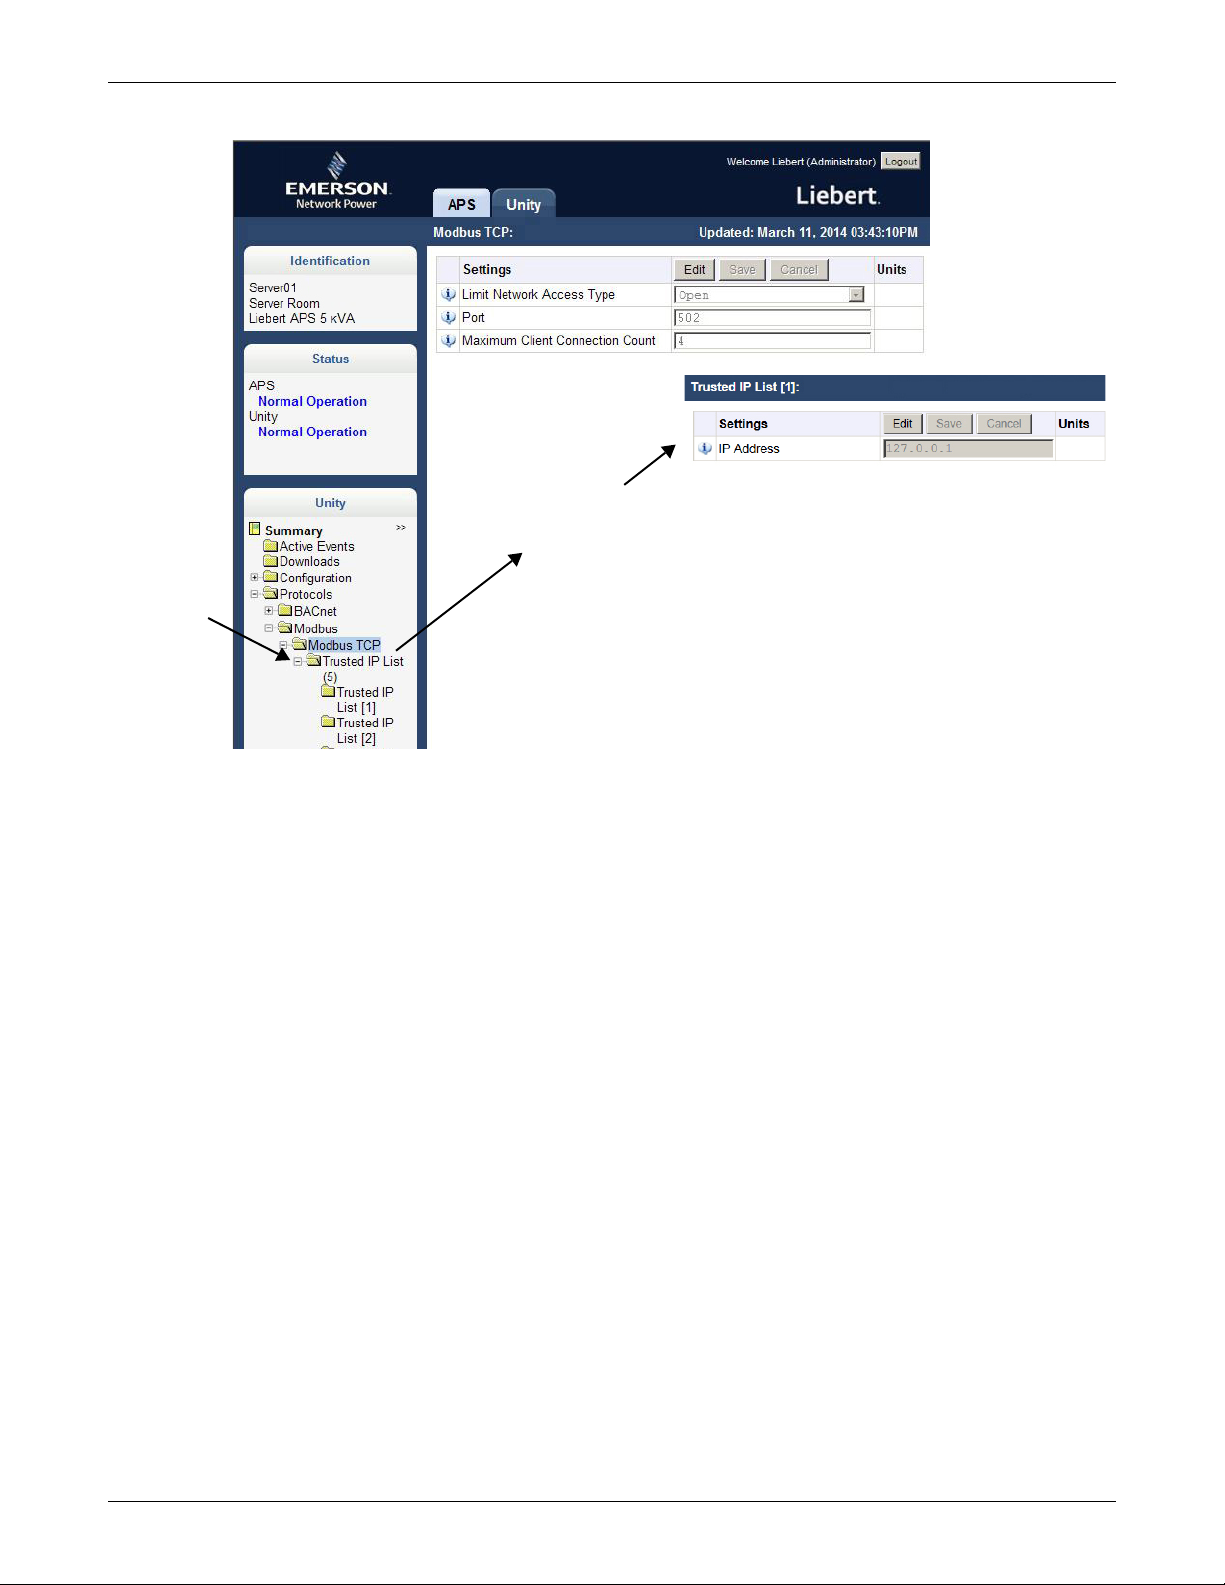
Figure 6 Modbus TCP-Trusted IP List
... brings up a screen
where this information
may be entered.
Clicking on
one of the
five Trusted
IP List
folders ...
Enable Communication Protocols
Configure Modbus RTU
1. Select the Unity Tab > Protocols > Modbus RTU.
2. Click on Edit and enter a user name and password if required.
3. Set the Node ID and the Baud Rate.
The Node ID defaults to 1, but must have a value from 1 to 255 that is unique among devices
connected through the RS-485 interface.
The default baud rate is 9600; 19200 and 38400 also available.
Contact your system administrator if you are uncertain about the settings.
4. Click Save to confirm the changes or click on Cancel to discard them.
5. Restart the card to confirm the changes.
a. Select Unity Tab > Support.
b. Enable the commands.
c. Click on Restart.
Liebert® IntelliSlot™ Unity™ Card 12
Page 17
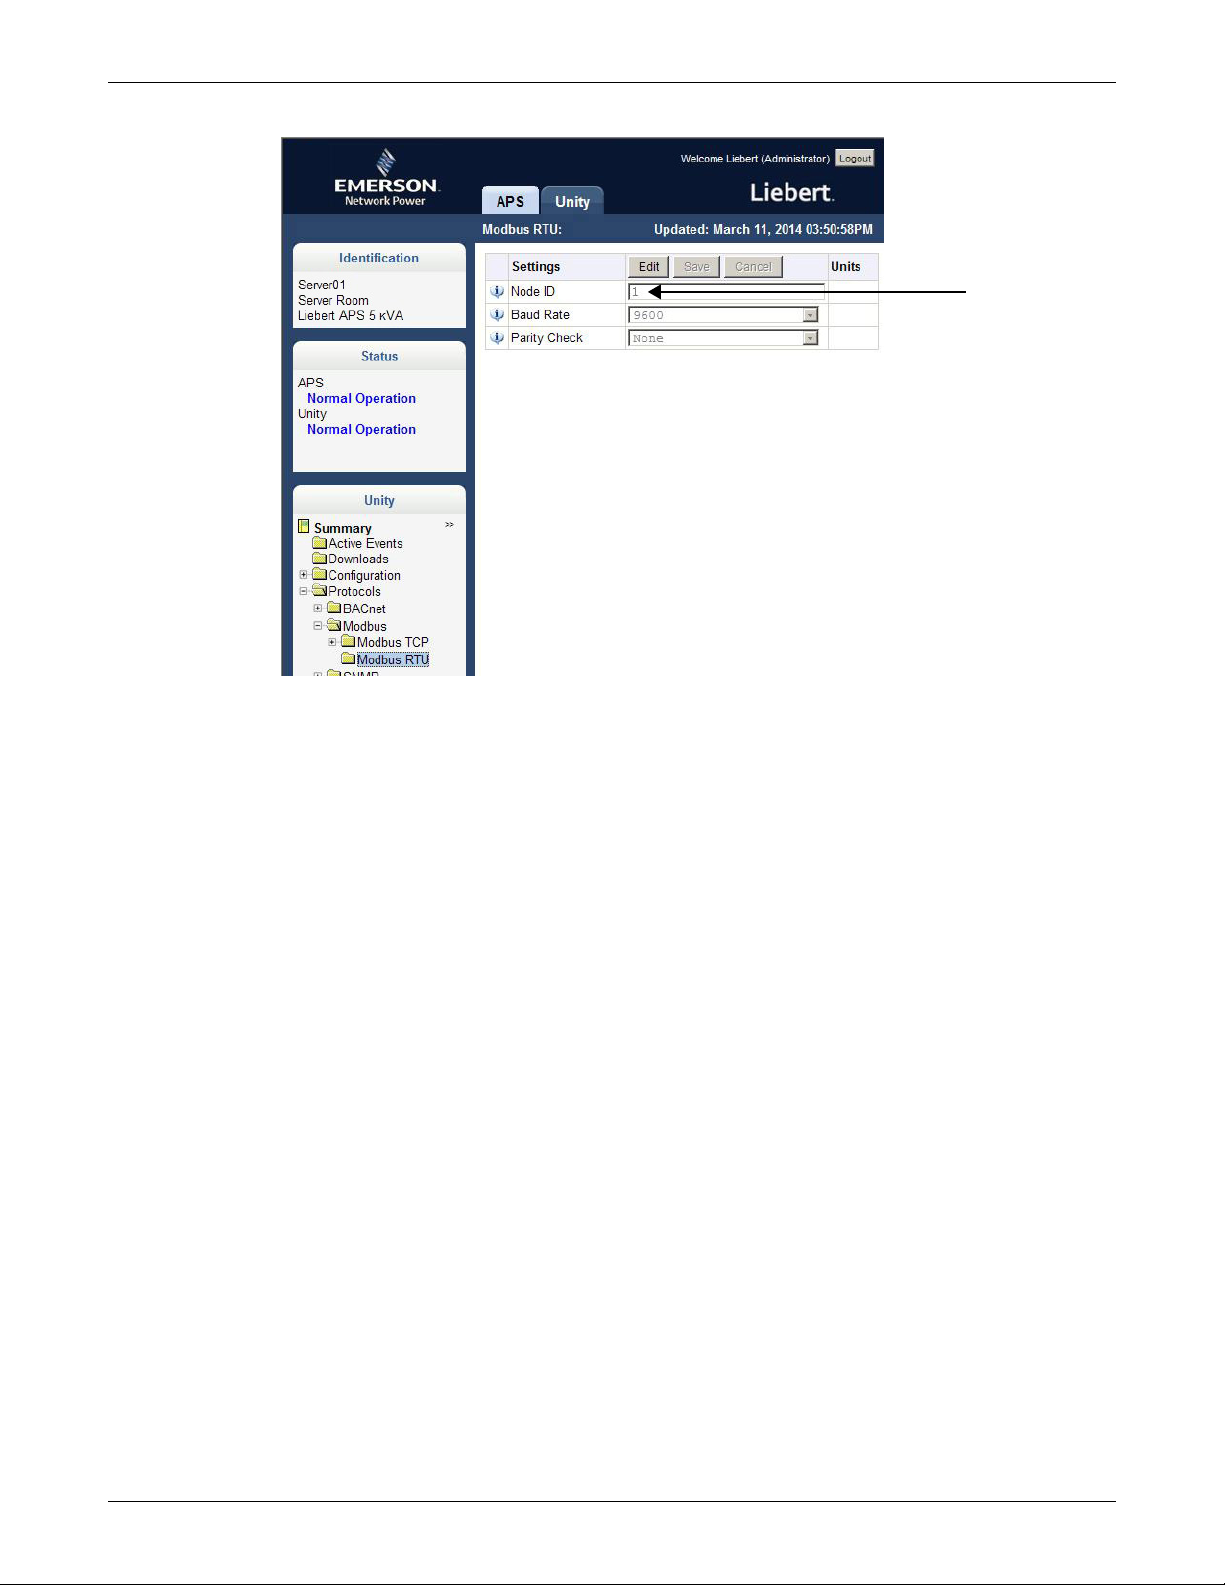
Figure 7 Modbus-RS-485
Node ID must
be unique on
the RS-485 bus
this card is
connected to.
Enable Communication Protocols
3.1.2 Enable BACnet Protocol
Contact your system administrator or building management system administrator if you are
uncertain about the settings.
1. Select Unity Tab > Protocols > BACnet.
2. Click on Edit and enter a user name and password if required.
3. Enter the Managed Device Write Access level (Read Only or Read/Write). This determines a
user’s ability to change settings in the Liebert IntelliSlot Unity card.
4. Choose the BACnet interface, either BACnet IP or BACnet MSTP
5. Set the Device Object Instance Number.
6. Set the Device Object Name.
7. Set the APDU Timeout.
8. Set the APDU Retries.
9. Click Save to confirm the changes or click on Cancel to discard them.
10. Configure the BACnet interface chosen; refer to Configure BACnet IP Protocol or Configure
BACnet MSTP Protocol. For additional details, see 5.6 - Protocols Folder—BACnet Folder.
13 Liebert® IntelliSlot™ Unity™ Card
Page 18

Figure 8 BACnet protocol settings
Enable Communication Protocols
Configure BACnet IP Protocol
Contact your system administrator if you are uncertain about the settings.
1. Select Unity Tab > Protocols > BACnet IP.
2. Click on Edit and enter a User name and password if required.
3. Set the BACnetIP/Port Number
4. If the Liebert IntelliSlot Unity card is on a different subnet, a possibility when the monitored
units are part of a Liebert SiteScan network or other third-party monitoring service:
a. Choose whether to enable Register as Foreign Device.
b. Enter the IP address of the BBMD (BACnet Broadcast Management Device).
c. Enter a time in seconds for Foreign Device Time-to-Live.
5. Click Save to confirm the changes or click on Cancel to discard them.
6. Restart the card to activate the changes.
a. Select the Unity Tab > Support.
b. Enable the commands.
c. Click on Restart.
Liebert® IntelliSlot™ Unity™ Card 14
Page 19

Figure 9 BACnet IP settings
Enable Communication Protocols
Configure BACnet MSTP Protocol
Contact your system administrator if you are uncertain about the settings.
1. Select Unity Tab > Protocols > BACnet MSTP.
2. Click on Edit and enter a user name and password if required.
3. Set the BACnet MSTP Node ID. The ID default is 1.
4. Set the BACnet MSTP Data Rate.
5. Set the BACnet MSTP Max Master Address.
6. Set the BACnet MSTP Max Info Frames. The default is 8.
7. Click Save to confirm the changes or click on Cancel to discard them.
8. Restart the card to activate the changes.
a. Select Unity Tab > Support.
b. Enable the commands.
c. Click on Restart.
15 Liebert® IntelliSlot™ Unity™ Card
Page 20

Figure 10 BACnet MSTP settings
Enable Communication Protocols
3.1.3 Enable SNMP
SNMPv1/v2c and SNMPv3 are enabled by default. The protocols may be configured or their default
values may be accepted. Authentication Traps are not enabled by default. The default Heartbeat Trap
interval is 24 hours; this can be disabled or the interval may be changed.
1. Select the Unity Tab > Protocols > SNMP.
2. Click on Edit and enter a User name and password if required.
3. To enable Authentication Traps, put a check mark (✔) in the box.
4. To change the Heartbeat Trap Interval, choose a time from the drop-down list or choose Disabled
to prevent any heartbeat traps from being sent.
The interval times offered are 5 minutes, 30 minutes, or 1, 4, 8, 12 or 24 hours.
5. Choose whether to disable the traps or to set the interval to one of the periods on the menu.
6. Click Save to confirm the changes or click on Cancel to discard them.
7. Restart the card to activate the changes.
a. Select the Unity Tab > Support.
b. Enable the commands.
c. Click on Restart.
Liebert® IntelliSlot™ Unity™ Card 16
Page 21

Figure 11 SNMP settings
Enable Communication Protocols
Configure SNMP Settings
SNMPv3 Users or SNMPv1/v2c Trap and Access settings must be made before SNMP access or
notifications can occur. The Liebert IntelliSlot Unity card permits up to 20 SNMPv3 Users, up to 20
SNMPv1 Trap targets, and up to 20 SNMPv1/v2c Access addresses.
The required changes vary according to the type of SNMP protocol used. For SNMPv1, trap settings
must be made. SNMPv2c must have Access Settings made. SMPv3 users must have settings
configured. SNMPv1 trap settings are separate from the access settings for SNMPv1/v2c.
Configure SNMPv3 Settings
The settings must be made for each user who will receive notifications.
1. Select Unity Tab > Protocols > SNMP > SNMPv3 Users Setting (20) > SNMPv3 Users Setting (1).
2. Click on Edit and enter a User name and password if required.
3. Enter the information and set the permissions appropriate to the user. Refer to Figure 12 for the
information required.
4. Click Save to confirm the changes or click on Cancel to discard them.
5. Repeat Steps 1 through 4 for any additional users.
6. Restart the card to activate the changes.
a. Select the Unity Tab > Support.
b. Enable the commands.
c. Click on Restart.
17 Liebert® IntelliSlot™ Unity™ Card
Page 22

Figure 12 SNMPv3 user settings
Settings are
required for
each user
Enable Communication Protocols
Configure SNMPv1 Trap Settings
1. Select Unity Tab > Protocols > SNMP > SNMPv1 Trap Settings (20).
2. Click on Edit and enter a User name and password if required.
3. Enter the information and set the permissions appropriate to the user. Refer to Figure 13 for the
information required.
4. Click Save to confirm the changes or click on Cancel to discard them.
5. Repeat Steps 1 through 4 for any additional users.
6. Restart the card to confirm the changes.
a. Select the Unity Tab > Support.
b. Enable the commands.
c. Click on Restart.
Liebert® IntelliSlot™ Unity™ Card 18
Page 23

Figure 13 SNMPv1 trap settings
Settings required
for each address
that will receive
SNMP notifications.
Enable Communication Protocols
19 Liebert® IntelliSlot™ Unity™ Card
Page 24

Configure SNMPv1/v2c Access Settings
Selecting the SNMPv1v2cAccess
Settings folder will bring up the
settings that may be changed.
1. Select Unity Tab > Protocols > SNMP > SNMPv1/v2c Access Settings (20) > SNMPv1/v2c Access
Settings (1).
2. Click on Edit and enter a User name and password if required.
3. Enter the information and set the permissions appropriate to the user. Refer to Figure 13 for the
information required.
4. Click Save to confirm the changes or click on Cancel to discard them.
5. Restart the card to confirm the changes—The card must be restarted before another user’s
settings may be changed.
a. Select the Unity Tab > Support.
b. Enable the commands.
c. Click on Restart.
Figure 14 SNMPv1/v2c access settings
Enable Communication Protocols
Liebert® IntelliSlot™ Unity™ Card 20
Page 25

Liebert IntelliSlot Unity Card Web Page Layout
4.0 LIEBERT INTELLISLOT UNITY CARD WEB PAGE LAYOUT
Default settings in the Liebert IntelliSlot Unity card permit using it immediately after installation to
monitor the equipment the card is installed in. The Web interface permits customizing the
information to ease monitoring the equipment and troubleshooting problems. Users can name the
equipment, enter a location, set up e-mail and text alerts and change equipment settings.
NOTE
The Edit button will be grayed-out if the settings on a menu cannot be changed.
4.1 Web Page Sections
Each Web page displayed by the Liebert IntelliSlot Unity card has these main areas (see Figure 15):
• Identification
• Status
• Tab Menus
•Detail
Identification
Displays the System Name, System Location and System Description
Status
Displays the status of the monitored equipment and of the Liebert IntelliSlot Unity card.
Tab Menus
The Liebert IntelliSlot Unity card has two tabs: the Managed Equipment tab, which will display the
name of the monitored equipment, and the Unity Tab. The tab selected determines the Tab Menu
shown.
• Managed Equipment Tab—Information pertaining to the equipment being monitored and
controlled. Refer to 4.3 - Managed Equipment Tab Menus for details. The tab label refers to
the type of Liebert unit the card is installed in. Figure 15 shows a Managed Equipment Tab
labeled “APM,” meaning the card is installed in a Liebert APM UPS. Figure 16 a Web page
example for a Liebert IntelliSlot Unity card installed in a Liebert CRV.
• Unity Tab—Information about the Liebert IntelliSlot Unity card, such as the overall event
status of the equipment and communication interface, logs of third-party information,
communication settings, third-party protocol settings and system status. Refer to 4.4 - Unity Tab
Menus for details.
Detail
Displays detailed information about the device based on the menu selection made in the Tab Menu
area. Edits to the device and its configuration are made in this section.
21 Liebert® IntelliSlot™ Unity™ Card
Page 26

Liebert IntelliSlot Unity Card Web Page Layout
Identification
Status
Tab Menu
(changes
according to
monitored
equipment)
Unity Tab
Managed Equipment Tab
Card in a Liebert APM
Information on
Opening Screen
depends on type of
unit being monitored
Identification
Status
Tab Menu
(changes
according to
monitored
equipment)
Unity Tab
Information on
Opening Screen
depends on type of
unit being monitored
Managed Equipment Tab
Card in a Liebert CRV
Figure 15 Web page sections, UPS example
Figure 16 Web page sections, Thermal Management unit example
Liebert® IntelliSlot™ Unity™ Card 22
Page 27

4.2 Help Text
i
x
!
!
i
Hovering a mouse
pointer over the icon
reveals information
about that entry.
Help text about the
System Input RMS L1-N
entry on the Managed
Equipment Tab, System
Status Menu.
Each Web page shown by the Liebert IntelliSlot Unity-DP card has informational text that is revealed
by hovering a mouse pointer over the icon to the left of the Status, Events or Settings row, as shown
below. The Web page may display any of six icons beside the Status, Events or Setting entry:
Table 3 Help text and icons
Icon Description
Liebert IntelliSlot Unity Card Web Page Layout
a check mark (
an i on a blue button (Event Information)
an x on a red button (Event Alarm)
an exclamation point (!) on a yellow shield (Event Warning)
an exclamation point (!) on a red button (Event Critical)
an i in a word balloon (Tool Tip).
Figure 17 Help text on mouse-over
✔) on a green button (Event Normal)
23 Liebert® IntelliSlot™ Unity™ Card
Page 28

4.3 Managed Equipment Tab Menus
Equipment tab will display
Status or Events for the
applicable equipment only.
Equipment tab will display
Status, Events or Settings
for the applicable
equipment only.
Menus on the Managed Equipment tab list only data that is relevant to the equipment being
monitored. For example, menus shown by a Liebert IntelliSlot Unity card installed in a UPS differ
from menus shown by a card installed in Thermal Management equipment. Information on those
menus will also differ depending on the equipment the card is installed in.
Liebert IntelliSlot Unity Card Web Page Layout
Figure 18 Managed Equipment Tab examples, Liebert APS
™
and Liebert CRV
™
Liebert® IntelliSlot™ Unity™ Card 24
Page 29

4.4 Unity Tab Menus
The Unity Tab shows the overall event status of the equipment and communication interface. It
contains logs of third party information, communications settings, third party protocol settings and
system status information as detailed below.
Table 4 Unity Tab menus
Unity Tab Menus Description See Details:
Active Events Displays the current event activity page 27
Downloads
Configuration
Protocols
Status
™
LIFE
device identity changed-LIFE™ needs to
Duplicate Emerson Protocol MSTP Node ID
Duplicate BACnet MSTP Node ID
Support
Reset Card to Factory Defaults
Generate and download diagnostic file
Agent (or Unity Card) Logs
Event Logs
Data Logs
Other files
System
User Settings
Network Settings
Web Server Settings
LIFE
Emerson Protocol
Messaging Settings
Modbus
BACnet
SNMP
YDN23
System Status
System Restart Required
be reconfigured
RS-485 Port Conflict
Agent time and Date
Agent Model
Agent App Firmware Version
Agent App Firmware Label
Agent Boot Firmware Version
Agent Boot Firmware Label
Agent Serial Number
Agent Manufacture Date
Agent Hardware Version
GDD Version
FDM Version
Product Sequence ID
Restart Card
(see Note below)
Firmware Update
Active Networking
Liebert IntelliSlot Unity Card Web Page Layout
Downloading files to text-accessible, commadelimited or tab-delimited files ease
troubleshooting.
Displays information about the system setup,
access, network connections, Emerson
Protocol settings and whether e-mail and
SMS messaging are enabled
Lists information and settings related to
available third-party protocols employed to
monitor equipment.
Shows the overall condition of the system
and whether a restart is needed to activate
configuration changes; restart is performed
only from the Support Folder
Shows information needed for maintenance
or troubleshooting and shortcuts to reboot
the card, reset the Liebert IntelliSlot Unity
card to its factory defaults and to update the
card’s firmware.
page 27
page 27
page 34
page 42
page 43
(Firmware
Update also
on page 46)
NOTE
The card may be reset to factory defaults manually by briefly pressing the reset button five
times within 10 seconds.
Do not hold the reset button too long: Pressing the reset button and holding it for 5 seconds will
restart the card without resetting it to factory defaults.
To perform either function, insert a straightened paper clip into the small hole on the front of
the card (see Figure 1 for the Reset Button’s location).
25 Liebert® IntelliSlot™ Unity™ Card
Page 30

Edit the Liebert IntelliSlot Unity Card Configuration
Select Unity Tab
Tab Menu
containing the
setting to be
changed
Edit
Button
Enter Password
Dialog Box
(from clicking
on Edit)
5.0 EDIT THE LIEBERT INTELLISLOT UNITY CARD CONFIGURATION
The Web-based interface can be used to change settings for the Liebert IntelliSlot Unity card and for
the monitored equipment. The following steps apply to making changes in all sections of the Liebert
IntelliSlot Unity card.
To edit the configuration:
1. Open a Web browser and enter the card’s IP address.
2. Click on the Unity Tab.
3. Select the menu in the Tab Menu area that contains the configuration setting to be changed.
4. Click the Edit button near the top of the Web page (see Figure 19).
5. Enter the administrator name and password for the Liebert IntelliSlot Unity card in the dialog
box that opens (the default settings are Liebert and Liebert).
6. Click OK.
7. Change the settings.
8. Click on Save to apply the changes or click Cancel to discard them.
Figure 19 Editing configuration settings
Liebert® IntelliSlot™ Unity™ Card 26
Page 31

5.1 Web Page Unity Tab Folders
The Unity Tab contains information about the overall event status of the
equipment and communication interface. It presents logs of third-party
information, communication settings, third-party protocol settings and
system status information.
The Unity Tab folders are shown at right.
5.1.1 Unity Tab-Active Events Folder
The Unity Tab’s Active Events folder contains no configurable settings.
The folder displays events affecting the Liebert IntelliSlot Unity card.
5.2 Unity Tab-Downloads Folder
The Unity Tab’s Downloads folder contains no configurable settings. The folder displays links to
download logs of third-party protocols that are enabled on the Liebert IntelliSlot Unity card. The logs
help in configuring and troubleshooting communication between the Network Management or
Building Management Systems being used to monitor the managed equipment.
Edit the Liebert IntelliSlot Unity Card Configuration
5.3 Unity Tab-Configuration Folder
The Configuration folder’s top level displays the System Model Name of the
Liebert IntelliSlot Unity card. This name is factory-set and cannot be changed
(the Edit button is grayed out). The Configuration folder contains seven
subfolders:
•System
•User Settings
•Network Settings
• Web Server Settings
•LIFE
• Emerson Protocol
• Messaging Settings
™
27 Liebert® IntelliSlot™ Unity™ Card
Page 32

5.3.1 Configuration Folder—System
Enter the information in the dialog boxes and choose
temperature display, either Celsius or Fahrenheit
The System subfolder displays general information about the monitored and managed equipment and
the display of some data. Refer to Figure 20. The data displayed is set by the user and can assist in
troubleshooting. To alter the information displayed, click on the Edit button, enter the administrator
name and password and make changes. Click Save to save the changes; click Cancel to discard the
changes.
Figure 20 Configuration folder, System subfolder
Time Service Settings
The System Subfolder contains one folder: Time Service Settings. Each setting offers either a menu of
choices or an enable/disable check box. Users can set these parameters
Edit the Liebert IntelliSlot Unity Card Configuration
Figure 21 Configuration folder, System subfolder,
• External Time Source—The external source to be used for time synchronization.
• NTP Time Server—Network Time Server (NTP) URL or IP address
• NTP Time Sync Rate—The rate at which time will be synchronized with the Network Time
Protocol server, if NTP is the external time source.
• Time Zone—Time zone where the device is located.
• Enable Auto-Sync to Managed Device—Enable automatic writing time to the managed device.
• Managed Device Auto-Sync Rate—Rate at which time will be written to the managed device, if an
external time source has been selected.
5.3.2 Configuration Folder—User Settings
The User Settings subfolder displays the administrator’s and general user’s name and password.
Each can be changed. The default user name and password for the administrator are Liebert and
Liebert. The defaults for the general user are User and User. To change either, click on Edit, enter the
default username and password and enter the new information. Click on Save to accept the changes
or click Cancel to discard the changes.
Time Service Settings
Liebert® IntelliSlot™ Unity™ Card 28
Page 33

5.3.3 Configuration Folder—Network Settings
IPv4 Settings IPv6 Settings
The top level of the Network Settings subfolder displays:
• Speed Duplex
• Domain Name Suffix List
The Speed Duplex item selects the speed and duplex configuration of the card’s Ethernet port. It is set
to Auto by default. If it requires changing, contact the system administrator for the proper settings.
The Domain Name Suffix List is a listing of domain name suffixes for resolution of hostnames. If it
requires changing, contact the system administrator for the proper setting.
The Network Settings subfolder contains three subfolders related to communication:
Edit the Liebert IntelliSlot Unity Card Configuration
IPv4/IPv6 Settings
The IPv4 and IPv6 settings determine which Internet Protocol will be used for communication over
the network connected to the Ethernet port. IPv4 and IPv6 networks will run in parallel (dual-stack
network), but the protocols are different. See your network administrator to determine which protocol
should be enabled and to determine the correct settings.
Figure 22 IPv4/IPv6 settings
IPv4 Settings
• IPv4 Protocol—Enables IPv4 in the card
• Boot Mode—Mode the card boots into to be a network ready device (Static, DHCP, BootP)
• Card IP Address—Network address for the interface
• Subnet Mask—Network mask for the interface which divides a network into manageable
segments
• Default Gateway—IP address of the gateway for network traffic destined for other networks or
subnets
• DNS Server Address Source—Source of DNS server identification (None, Automatic, Configured)
• IPv4 Primary DNS Server
• IPv4 Secondary DNS Server
29 Liebert® IntelliSlot™ Unity™ Card
Page 34

Edit the Liebert IntelliSlot Unity Card Configuration
IPv6 Settings
• IPv6 Protocol—Enables IPv6 in the card.
• Boot Mode—Mode the card boots into to be a network ready device (Static, Auto)
• Card IP Address—Network address for the interface.
• Prefix Length—Prefix length for the address that divides a network into manageable segments.
• Default Gateway—IP address of the gateway for network traffic destined for other networks or
subnets.
• DNS Server Address Source—Source of DNS server identification (None, Automatic, Configured)
• IPv6 Primary DNS Server
• IPv6 Secondary DNS Server
Domain Name Server (DNS) Test
The Domain Name Server Test checks key points of a Domain Name Server (DNS) setup for a given
domain.
Domain Name Server (DNS) Test Settings
• Last Query Response—Response from a domain name server (DNS) to the last query
Example: gxtwebdemo.liebert.com resolved to 126.4.203.234
• Type of Query—Type of DNS query. (Hostname, IP Address)
• Query Value—Value for the domain name server (DNS) to resolve. Example:
gxtwebdemo.liebert.com
5.3.4 Configuration Folder—Web Server Settings
The Web Server Settings permits making some security settings, such as HTTP or HTTPS, and
password enabling.
Web Server Settings
• Web Server Protocol—Select the operation mode of the Web Server (HTTP, HTTPS)
• HTTP Port—Standard web port not encrypted. Required if HTTP is enabled as Web Server
Protocol.
• HTTPS Port—Standard secure Web port; all communication is encrypted. Required if HTTPS is
enabled as Web Server Protocol.
• Password Protect Site—When enabled, a login session is required before any device information is
displayed to the user. User level credentials will allow only viewing of device information.
Administrator level credentials are required to make any changes.
• Session Idle Timeout—The interval the software will wait before logging off a user unless there is
user activity (Default is 5 min.)
Liebert® IntelliSlot™ Unity™ Card 30
Page 35

Edit the Liebert IntelliSlot Unity Card Configuration
5.3.5 Configuration Folder—LIFE
The LIFE subfolder contains settings that affect use of the Emerson® LIFE Technology, a remote
monitoring and diagnostic service for Emerson Network Power units. The LIFE settings are for use
by trained Emerson Network Power personnel only and require no user changes. For information
about the LIFE settings, refer to Appendix A - Configuration Folder—LIFE
™
5.3.6 Configuration Folder—Emerson Protocol
Emerson Protocol contains four subfolders: Managed Device, MSTP, Ethernet and Internal.
NOTE
With the exception of changing the node ID when multiple cards are used, the settings in the
Emerson Protocol subfolders should not be modified unless directed by an Emerson
representative.
5.4 Configuration Folder—Messaging Settings
The Messaging Settings subfolder permits enabling e-mail and text messaging about events. The
subfolder also contains a test to determine whether the notifications are sent. Settings for the two
notification methods permit specifying who gets the notifications, the format and other details.
™
Subfolder.
• Email—May be enabled to send e-mail messages about events
• SMS—May be enabled to send text messages about events
5.4.1 Email Settings
Selections in Email Settings determine how the card sends e-mails about events.
31 Liebert® IntelliSlot™ Unity™ Card
Page 36

Edit the Liebert IntelliSlot Unity Card Configuration
Email Settings
• Email From Address—Sender’s email address. In most cases this will be the email address of the
person to whom replies should be sent. Example Support@company.com
• Email To Address—Email address of the recipient. Multiple email addresses should be separated
by a semicolon. The maximum length for an email address is 64 characters.
• Email Subject Type—Subject of the email. This value will default to the event description. The
subject line can be customized.
• Custom Subject Text—The subject of the email can be changed
• SMTP Server Address—Fully qualified domain name or IP address of the server used for relaying
email messages. The maximum length for this entry is 32 characters. If using a server name, a
DNS server must be configured under Network Settings.
• SMTP Server Port—SMTP server port. Note: Typically the default of 25 should be used.
• Include IP Address in Message—If checked, the IP Address of the agent card will be included in
outgoing messages.
• Include Event Description in Message—If checked, SNMP event description will be included in
outgoing messages.
• Include Name in Message—If checked, the agent card Name will be included in outgoing
messages.
• Include Contact in Message—If checked, the agent card Contact will be included in outgoing
messages.
• Include Location in Message—If checked the agent card Location will be included in outgoing
messages.
• Include Description in Message—If checked, the agent card Description will be included in
outgoing messages.
• Include Web Link in Message—If checked, a Web link to the agent card and Web Server listening
port number will be included in outgoing messages.
• Enable Event Consolidation—If checked, multiple events will be sent per outgoing message.
• Consolidation Time Limit—If Event Consolidation is enabled, a message will be sent when
'Consolidation Time Limit' seconds has passed since the first buffered event was received.
• Consolidation Event Limit—If Event Consolidation is enabled, a message will be sent when the
number of buffered events reaches the ‘Consolidation Event Limit.’
5.4.2 SMS Settings
Selections in SMS Settings determine how the card sends text messages about events.
Liebert® IntelliSlot™ Unity™ Card 32
Page 37

Edit the Liebert IntelliSlot Unity Card Configuration
SMS Settings
• SMS From Address—Sender’s SMS address. In most cases this will be the SMS address of the
person to whom replies should be sent. For example: Support@company.com
• SMS To Address—SMS address of the recipient. Multiple SMS addresses should be separated by
a semicolon Note: The maximum length for an SMS address entry is 64 characters.
• SMS Subject Type—Subject of the message, either Default or Custom.
• Custom Subject Text—The subject of the message; can be customized by the customer
• SMTP Server Address—Fully qualified domain name or IP address of the server used for relaying
SMS messages. The maximum length for this entry is 32 characters. Note 2: If using a server
name, a DNS server must be configured under IP Settings.
• SMTP Server Port—SMTP server port. Note: Typically the default of 25 should be used.
• Include IP Address in Message—If checked the IP Address of the agent card will be included in
outgoing messages.
• Include Event Description in Message—If checked SNMP event description will be included in
outgoing messages.
• Include Name in Message—If checked the agent card Name will be included in outgoing
messages.
• Include Contact in Message—If checked the agent card Contact will be included in outgoing
messages.
• Include Location in Message—If checked the agent card Location will be included in outgoing
messages.
• Include Description in Message—If checked the agent card Description will be included in
outgoing messages.
• Include Web Link in Message—If checked a Web link to the agent card and Web Server listening
port number will be included in outgoing messages.
• Enable Event Consolidation—If checked multiple events will be sent per outgoing message.
• Consolidation Time Limit—If Event Consolidation is enabled, a message will be sent when
'Consolidation Time Limit' seconds has passed since the first buffered event was received.
• Consolidation Event Limit—If Event Consolidation is enabled, a message will be sent when the
number of buffered events reaches the ‘Consolidation Event Limit.’
5.4.3 Messaging Test
Selections here permit testing the setup for e-mail and SMS messages. If the test fails, incorrect
settings should be changed to ensure that the Liebert IntelliSlot Unity card sends proper notifications
if an event should occur.
Messaging Test Settings
• Messaging Test Results—The messaging test results field.
• Send Test Message—The messaging test control used to send test email or SMS messages.
33 Liebert® IntelliSlot™ Unity™ Card
Page 38

5.5 Unity Tab—Protocols
The Protocols folder displays the types of protocols that may be enabled for a Liebert IntelliSlot Unity
card. Not all protocols are available at the same time. Some protocols may not be available for some
types of managed devices (see 1.2 - Compatibility With Other Emerson Products and
Communication Protocols). The Liebert IntelliSlot Unity card allows selecting two third-party
protocols.
The folders contained by the Protocols folder are:
•BACnet
• BACnet IP
• BACnet MSTP
•Modbus
• Modbus TCP
• Modbus RTU
•SNMP
• SNMPv3 User Settings (20)
• SNMPv1 Trap Settings (20)
• SNMPv1/v2c Access Settings (20)
• YDN23
Edit the Liebert IntelliSlot Unity Card Configuration
Settings in each permit configuring the protocols available on the Liebert IntelliSlot Unity card.
5.6 Protocols Folder—BACnet Folder
BACnet Settings
• Managed Device Write Access—Enable or Disable the BACnet server to write to the managed
device.
• BACnet Interface—BACnet server interface: BACnet IP or BACnet MSTP.
• Device Object Instance Number—The instance number (0-4194302) of the BACnet server's device
object.
• Device Object Name—The name of the BACnet server's device object.
• APDU Timeout—The timeout in milliseconds between APDU retries (1-65535).
• APDU Retries—The number of times to retransmit an APDU after the initial attempt (0-8).
Liebert® IntelliSlot™ Unity™ Card 34
Page 39

5.6.1 Protocols Folder—BACnet IP Folder
Edit the Liebert IntelliSlot Unity Card Configuration
BACnet IP
• BACnet IP Port Number—The port for the BACnet server's UDP/IP connection.
• Register as Foreign Device—Enable or Disable registration as a foreign device.
• IP Address of BBMD—IP Address of the BACnet Broadcast Management Device (BBMD) to be
accessed for Foreign Device Registration
• Foreign Device Time-to Live—Time to remain in the BBMD Foreign Device table after
registration.
Settings
5.6.2 Protocols Folder—BACnet MSTP Folder
BACnet MSTP Settings
• Node ID—The BACnet server’s MS/TP node ID (MAC).
• Data Rate—The BACnet MSTP communication rate (bits per second).
• Max Master Address—The maximum node ID (MAC) in use on the MS/TP network.
• Max Info Frames—Maximum number of information frames this node may send before it must
pass the token.
5.7 Protocols Folder—Modbus
Modbus Settings
• Managed Device Write Access—Enable or Disable the Modbus server to write to the managed
device
• Modbus Interface—Select the Modbus interface, either Modbus TCP or Modbus RTU
35 Liebert® IntelliSlot™ Unity™ Card
Page 40

5.7.1 Modbus TCP
The Modbus TCP permits connection to the card by:
• any client (Open) permits communication by any IP address
• clients on the same subnet as the Liebert IntelliSlot Unity card
• clients with specific IP addresses (Trusted IP Lists); only five addresses are permitted
Modbus TCP Settings
• Limit Network Access Type
• IP Access List (Open, Same Subnet, Trusted IP List)
• Port—The TCP port used by the Modbus Server to listen for and respond to Modbus protocol
requests based on Limit Network Access Type setting.
• Maximum Client Connection Count
Edit the Liebert IntelliSlot Unity Card Configuration
5.7.2 Modbus RTU
Modbus RTU Settings
• Node ID—Modbus Server ID for the interface; obtain from network administrator.
• Baud Rate—Communication rate (9600, 19200, 38400)
• Parity Check—The communication parity check (None, Even, Odd)
Liebert® IntelliSlot™ Unity™ Card 36
Page 41

5.8 Protocols Folder—SNMP Subfolder
Folders and settings in this folder permit configuring the card for various types of SNMP
communication, including access, traps and other user settings.
SNMP Settings
• SNMPv3 Engine ID—The SNMPv3 engine ID; assigned automatically
• SNMP v1/v2c Enable—Enable or Disable SNMP v1/v2c
• SNMP v3 Enable—Enable or Disable SNMPv3
• Authentication Traps—An Authentication Trap is sent if an SNMP host tries to access the card
via SNMP, but either the host address is not in the SNMP Access Settings or it is using the wrong
Community String.
• Heartbeat Trap Interval—Enable or Disable and set interval 5 minutes, 30 minutes, 1 hour, 4
hours, 8 hours, 12 hours and 24 hours
• RFC-1628 MIB—Enable or Disable support for retrieval of data from the RFC-1628 MIB objects.
Required for proper operation of Liebert MultiLink
• RFC-1628 MIB Traps—Enable or Disable support for sending RFC-1628 traps. Required for
proper operation of Liebert MultiLink and applies only to managed UPS equipment
• Liebert Global Products (LGP) MIB—Enable or Disable support for getting and setting data using
the Liebert Global Products MIB.
• LGP MIB Traps—Enable or Disable support for Liebert Global Products MIB traps. LGP traps
will not be sent unless LGP MIB is enabled.
• LGP MIB System Notify Trap—Enable or Disable support for the LGP System Notification trap.
This is a single trap sent each time an alarm or warning is added or removed from the conditions
table. It provides a text description of the event in a varbind of the trap message. LGP System
Notify Traps will not be generated unless the LGP MIB is enabled.
Edit the Liebert IntelliSlot Unity Card Configuration
®
and applies only to managed UPS equipment
37 Liebert® IntelliSlot™ Unity™ Card
Page 42

5.8.1 SNMPv3 User Settings
Click on a SNMPv3User
Settings folder or a link
to get this settings page.
The Liebert IntelliSlot-Unity card supports up to 20 SNMPv3 users. The top level page has a table
with settings for all 20. The page displays a link to edit the table columns displayed for each SNMPv3
user. The same settings may be accessed by clicking on a folder for a user, such as SNMPv3 User
Settings [1].
The Web page below shows the settings that can be changed for a SNMPv3 user. To display the
settings, click on any of the SNMPv3 Users Setting links. After making any changes, click Save to
make the changes effective; click Cancel to discard the changes.
Edit the Liebert IntelliSlot Unity Card Configuration
SNMPv3 User Settings
• SNMPv3 User Enable—Select to enable read, write or sending notifications with the user's
credentials.
• SNMPv3 Username—The User name the authentication and privacy settings apply to. This
string can be composed of printable characters except colon, tab, double quote, and question mark.
• SNMPv3 Access Type—Read Only, Read/Write or Traps only
• SNMPv3 Authentication—Cryptographic algorithm used for authentication: None, MD5 or
SHA-1
• SNMPv3 Authentication Secret—Pass phrase or password used for SNMPv3 Get request. This
string can be composed of printable characters with the exception of colon, tab, double quote, and
question mark. Note: The entry must be 8 or more characters but not more than 64.
• SNMPv3 Privacy—Cryptographic algorithm used for encryption: None or DES.
• SNMPv3 Privacy Secret—Pass phrase or password used for SNMPv3 Get request. This string can
be composed of printable characters with the exception of colon, tab, double quote, and question
mark. Note: The entry must be 8 or more characters but not more than 64.
• SNMPv3 Trap Target Addresses—Network hosts that will receive SNMPv3 traps, identified with
either a network name or IP address. Multiple addresses must be separated by commas. The field
has a maximum length of 125 characters
• SNMPv3 Trap Port—Port used by the target host for receiving SNMPv3 traps; default is 162.
Liebert® IntelliSlot™ Unity™ Card 38
Page 43

5.8.2 Edit the SNMPv3 Table
Click on this link to change the
information shown in the table
Checking all choices will display
the information below on the
SNMPv3 User Settings [20] page
The information in the table for
one user may be viewed by
clicking on a SNMPv3 User
Settings folder or a SNMPv3 User
Settings link, as shown at right.
The table on the SNMPv3 User Settings [20] page may be altered to provide more or less information.
To do so, click on the command above the table (Click here to edit columns displayed in this table).
Put a check mark (✔) in the boxes beside the desired information (see Figure 23). The choices permit
showing the same information in this screen that is displayed by clicking on a SNMPv3 User Settings
folder or a SNMPv3 User Settings link.
Figure 23 Edit the SNMPv3 table
Edit the Liebert IntelliSlot Unity Card Configuration
39 Liebert® IntelliSlot™ Unity™ Card
Page 44

5.8.3 SNMPv1 Trap Settings
Click on a SNMPv1 Trap
Settings folder or a link to
get this settings page.
Click on this link to change
the information shown in the
table on this page to the
information shown below.
This page contains settings for network hosts that will receive SNMPv1 traps. Up to 20 trap
recipients can be enabled and configured. Like the SNMPv3 pages, the setting for each target may be
reached by clicking on the links in the Detail portion of the page or by clicking on the folders for the
trap targets. Also, data shown in the table may be changed by clicking on the link above the table.
Edit the Liebert IntelliSlot Unity Card Configuration
SNMPv1 Trap Settings
• SNMP Trap Target Addresses—Configure network hosts that will receive alert notifications (i.e.,
SNMP Traps). The host can be identified as either an IP address or the host’s network name.
• SNMP Trap Port—Port used by the target host for receiving notifications; default is 162.
• SNMP Trap Community String—String identifying a 'secret' known only by those hosts that want
to be notified of device status changes.
Liebert® IntelliSlot™ Unity™ Card 40
Page 45

5.8.4 SNMPv1/v2c Access Settings
Click on a SNMPv1v2c
Access Settings folder or a
link to get this settings page.
Click on this link to change
the information shown in the
table on this page to the
information shown below.
This page contains settings for network hosts that can access data using SNMPv1/v2c. Up to 20
access hosts can be enabled and configured. Like the SNMPv3 pages, the setting for each host may be
reached by clicking on the links in the data portion of the page or by clicking on the folders for the
access hosts. Also, data shown in the table may be changed by clicking on the link above the table.
Edit the Liebert IntelliSlot Unity Card Configuration
SNMPv1/v2c Access Settings
• SNMP Access IP Address—Configure network hosts interested in device information access. The
host can be identified as either an IP address or the host’s network name
• SNMP Access Type—SNMPv1/v2C access type: Read Only or Read/Write
• SNMP Access Community String—SNMP Community String
41 Liebert® IntelliSlot™ Unity™ Card
Page 46

5.9 Protocols Folder—YDN23 Protocol
The YDN23 protocol supported is based on the YD-T-1363 specification using an RS-485 network
connection.
Edit the Liebert IntelliSlot Unity Card Configuration
YDN23 Protocol
• Managed Device Write Access—Enable or Disable the YDN23 server to write to the managed
device.
• Device Address—YDN23 device address
• Baud Rate—The communications rate in bps.
5.10 Configuration—Unity Tab-Status Folder
The Status folder contains no configurable items. It displays the System Status of the Liebert
IntelliSlot Unity card and a list of events that affect the card’s status. A green check mark (✔)
indicates the status is Normal, as shown in the Status column
Liebert® IntelliSlot™ Unity™ Card 42
Page 47

5.11 Configuration—Unity Tab-Support Folder
The Support folder permits restarting the Liebert IntelliSlot Unity card, resetting the card to its
factory defaults and updating the card’s firmware. Agent refers to the Liebert IntelliSlot Unity card.
The folder also displays information about the card for help in troubleshooting, such as the card’s
firmware version, label, MAC address and related information.
Edit the Liebert IntelliSlot Unity Card Configuration
Support Folder Settings
• Agent Date and Time—Date and time setting for the card.
• Agent Model—The card’s model (Unity Platform)
• Agent App Firmware Version—The card’s firmware version (2.0 or higher)
• Agent App Firmware Label—The card’s firmware label
• Agent Boot Firmware Version—The card’s Boot firmware version
• Agent Boot Firmware Label—The card’s boot firmware label
• Agent Serial Number—The card’s serial number
• Agent Manufacture Date—The card’s manufacture date
• Agent Hardware Version—The card’s hardware version
• GDD Version—The card’s GDD version, current when the card’s firmware was installed; the GDD
is a proprietary reference document for device data.
• FDM Version—The card’s FDM version; the FDM is a data model document that defines data
supported by devices that use the Emerson Protocol.
• Product Sequence ID—The card’s product sequence identifier
Commands - Enable/Cancel
• Restart Card—Restart card and implement configuration changes
• Reset Card to Factory Defaults—Reset the card’s configuration to its factory defaults
• Generate and download diagnostic file—Generate a file containing diagnostic information and
download it with a Web browser.
43 Liebert® IntelliSlot™ Unity™ Card
Page 48

5.11.1 Unity Tab-Support Folder—Active Networking
Status of the currently active IP network settings for the Liebert IntelliSlot Unity card along with
some previous values for troubleshooting IP communication issues.
Edit the Liebert IntelliSlot Unity Card Configuration
Active Networking
• Ethernet MAC Address—Ethernet MAC Address for the Liebert IntelliSlot card
• IPv4 Address—Presently used IPv4 network address
• IPv4 Default Gateway—Presently used IPv4 network address of the gateway for network traffic
destined for other networks or subnets
• IPv4 Primary DNS—Presently used IPv4 Primary DNS
• IPv4 Secondary DNS—Presently used IPv4 Secondary DNS
• Last DHCP/BootP—Last known IPv4 address assigned by DHCP
• Last DHCP Lease—Lease time of last known DHCP address
• IPv6 Global Address—Shows if DHCPv6 or Static address is presently being used
• IPv6 StateLess Address AutoConfiguration—IPv6 SLAAC is assigned automatically from Router
Advertisement, if “A” flag is
• set, combining Prefix with EUI-64 MAC
• IPv6 Link Local—Presently used IPv6 Link Local Address
• IPv6 Default Gateway—Presently used IPv6 network address of the gateway for network traffic
destined for other networks or subnets
• IPv6 Primary DNS—IPv6 Primary DNS
• IPv6 Secondary DNS
• IPv6 Secondary DNS
• Last DHCPv6—Last known IPv6 address assigned by DHCPv6
• Last DHCPv6 Lease—Lease time of last known DHCPv6 address
Liebert® IntelliSlot™ Unity™ Card 44
Page 49

5.11.2 Unity Tab-Support Folder—Firmware Update
The Firmware Update folder supports updating the firmware of the Liebert IntelliSlot Unity card or
reverting to an alternate firmware version and configuration (if the current firmware is not the initial
load).
Edit the Liebert IntelliSlot Unity Card Configuration
Firmware Update
• Current Firmware Version—The version of the firmware running on the card
• Current Firmware Label—The label of the firmware running on the card
• Current Firmware Date—The build date of the firmware running on the card
• Alternate Firmware Version—The version of the firmware in the alternate area
• Alternate Firmware Label—The label of the firmware in the alternate area
• Alternate Firmware Date—The build date of the firmware in the alternate area
Commands
• Run Alternate Firmware—Return the card's firmware to a version in the alternate area (the
version in use before the most recent firmware update).
• Firmware Update—Update the card’s firmware to a new version
45 Liebert® IntelliSlot™ Unity™ Card
Page 50

6.0 FIRMWARE UPDATES
Activity
Link
485
IS-UNITY-DP
Liebert IntelliSlot
Card Ethernet Port
The Liebert IntelliSlot Unity card has two areas in flash memory for the firmware and the
configuration. One area is currently operating on the card. The other area is the previous firmware on
the card and is considered an alternate. For information on the alternate firmware, see 6.2 - Revert
to Alternate Firmware.
6.1 Updating the Liebert IntelliSlot Unity Card’s Firmware
To update the Liebert IntelliSlot Unity card’s firmware:
1. Download onto your computer the latest Liebert IntelliSlot Unity card firmware update from the
Liebert software download Web site at www.liebert.com
2. If the card’s DHCP or Static-IP address is known, type the IP address in the Web browser address
window.
3. If the card does not have a known IP address and it is configured for DHCP, connect the card to a
computer with an Ethernet cable and open a Web browser. The card has an Ethernet RJ-45
connector on the front (see Figure 24). The card and computer will automatically negotiate
communications, which will take about one minute (for details on autoconfiguration, see 2.1.2 -
Connect an Ethernet Cable). When communication is established, open a Web browser and
enter the address 169.254.24.7, the card’s default Autoconfiguration IPv4 Address. The card’s
Web page will appear.
Firmware Updates
Figure 24 Ethernet port
4. Select the Unity Tab at the top of the screen, then the Support folder from the Unity folders on
the left of the screen and then the Firmware Update folder.
5. Select the Enable button.
6. Enter the administrator user name and password selected previously (see 2.2 - Change User
Names and Passwords Immediately) in the security dialog box that appears.
7. Click on the Web button and the firmware update screen will appear.
8. Browse to the firmware file to update, select it and click the Update Firmware button.
NOTE
Do not navigate away from the Firmware Update screen and do not close the browser once the
update begins. Either action will interrupt the download.
Liebert® IntelliSlot™ Unity™ Card 46
Page 51

Figure 25 Firmware update screen
Support
Folder
Firmware
Update
Web button becomes
active when enabled and
administrator’s user name
and password are entered
Enable
Button
User name and
password must be
entered to update
firmware
Firmware Updates
47 Liebert® IntelliSlot™ Unity™ Card
Page 52

6.2 Revert to Alternate Firmware
The Liebert IntelliSlot Unity card has two areas in flash memory for the firmware and the
configuration. One area is currently operating on the card. The other area is considered an alternate.
When a card’s firmware is updated, the previous firmware and configuration are moved to the
alternate area. The Liebert IntelliSlot Unity card allows returning to the firmware version and
configuration that are kept in the alternate area.
NOTE
Reverting to an alternate firmware version will not be possible if the currently operating
firmware is the initial version loaded on the Liebert IntelliSlot Unity card. If the initially
loaded firmware is still running on the card, the Alternate Version fields will be blank, and it
will not be possible to revert to an alternate version.
1. Select the Unity Tab at the top of the screen.
2. Select the Support folder, then select the Update Firmware folder.
3. Select the Enable button.
4. Enter the user name and password in the security dialog box that appears; use the administrator
user name and password from the user settings.
5. Click on the Run Alternate button and a confirmation dialog box will appear.
6. Click the OK button on the confirmation dialog box.
Firmware Updates
NOTE
The card will reboot. After the reboot, the card will be running the previous version of the
firmware and configuration, which had been stored in flash memory. The previous firmware
and configuration will have been moved to the alternate area.
Liebert® IntelliSlot™ Unity™ Card 48
Page 53

APPENDIX A-CONFIGURATION FOLDER—LIFE™ SUBFOLDER
The LIFE subfolder contains settings that affect use of the Emerson® LIFE Technology, a remote
monitoring and diagnostic service for Emerson units. The LIFE settings are for use by trained
Emerson Network Power personnel only and require no user changes.
Status Description
Connection Media The LIFE Technology connection media
Enable Date and Time The date and time that LIFE Technology support was enabled.
Settings Description
LIFE Technology Enable or disable the LIFE Technology
System Serial Number System serial number, obtained from the unit automatically
Site Equipment Tag Number Site equipment tag number
Site Identifier Site identifier, entered by the Service Technician
Answer Incoming Call Enable answering of LIFE Watch Station incoming calls
Next Call Date and Time Date and Time of next call to make to the LIFE Watch Station server
Call Interval Days Days between routine calls to LIFE Watch Station
Call Interval Hours Number of hours between LIFE Watch Station routine calls
Call Interval Minutes
Call Trials Number The number of attempts to retry a call after it fails before rescheduling the call.
Number of minutes between routine LIFE Watch Station calls. This value is used in
conjunction with val_life_callInterval_hours.
Firmware Updates
UPS State SMS Messaging Configuration
Settings Description
Primary Mains Restored SMS Send SMS when Primary Mains are restored
Primary Mains Restored SMS Value Value sent via SMS when Primary Mains are restored
Primary Mains Failure SMS Send SMS when Primary Mains fail
Primary Mains Failure SMS Value Value sent via SMS when Primary Mains fail
Bypass Mains Fail SMS Send SMS when Bypass Mains fail
Bypass Mains Failure SMS Value Value sent via SMS when Bypass Mains fail
Load On Bypass SMS LIFE Load on Bypass SMS Enable
Load On Bypass SMS Delay
The amount of time to delay sending an SMS after a Load is on Bypass if
the condition still exists.
Gate Settings
Status Description
HTTP Transport Result HTTP Transport Result contains the result of the last HTTP transaction.
HTTP Transport Error Value HTTP Transport Error value from the last HTTP transaction
HTTP Transport Reply Time HTTP transport reply time
Connection Result IP connection result
Bridge State IP Bridge state machine state
Error Count Gate connection error count
Settings Description
Proxy Enable Enable Gate proxy
Proxy Authentication Enable Gate proxy authentication
Proxy IP Address Gate proxy IP address
Proxy IP Port Number Gate proxy IP port number
Proxy User Name Gate proxy user name
Proxy User Password Gate proxy user password
LIFE Gate IP Address LIFE Gate IP address
LIFE Gate IP Port Number LIFE Gate Port Number
49 Liebert® IntelliSlot™ Unity™ Card
Page 54

Firmware Updates
Advanced
Status Description
Device State Whether the device is connected or unconnected
The connection status of the Remote Service Delivery application system
Connection Status
Call Type The type of call currently in progress with the LIFE
Scheduled Call Delay Time The delay time before the next call to the LIFE Watch Station server.
Heartbeat Status Device status as determined by heartbeat traps
Date and Time (UTC) of Last
Call
Commands Description
Make Manual Call Sends all currently collected events
Reset Scheduled Call Delay
Time
Reset Activity and Data Resets all LIFE in-progress activity and deletes all LIFE data
Settings Description
Service Mode Enable or Disable LIFE service Mode
interface. This is the interface by which Remote Service Delivery services
communicates with the Unity system software.
The date and time (in UTC) of the LIFE Watch Station that was retrieved when
the last successful call was made. YY-MM-DD HH:MM:SS
Forces a rescheduled call to be done immediately
™
Watch Station server.
Liebert® IntelliSlot™ Unity™ Card 50
Page 55

Page 56

While every precaution has been taken to ensure the accuracy
and completeness of this literature, Liebert Corporation assumes no
responsibility and disclaims all liability for damages resulting from use of
this information or for any errors or omissions.
© 2013 Liebert Corporation
All rights reserved throughout the world. Specifications subject to change
without notice.
® Lieber t is a registered t rademark of Lieber t Corporation.
All names referred to are trademarks
or registered trademarks of their respective owners.
Technical Support / Service
Web Site
www.liebert.com
Monitoring
liebert.monitoring@emerson.com
800-222-5877
Outside North America: +00800 1155 4499
Single-Phase UPS & Server Cabinets
liebert.upstech@emerson.com
800-222-5877
Outside North America: +00800 1155 4499
Three-Phase UPS & Power Systems
800-543-2378
Outside North America: 614-841-6598
Environmental Systems
800-543-2778
Outside the United States: 614-888-0246
Locations
United States
1050 Dearborn Drive
P.O. Box 29186
Columbus, OH 43229
Europe
Via Leonardo Da Vinci 8
Zona Industriale Tognana
35028 Piove Di Sacco (PD) Italy
+39 049 9719 111
Fax: +39 049 5841 257
Asia
29/F, The Orient Square Building
F. Ortigas Jr. Road, Ortigas Center
Pasig City 1605
Philippines
+63 2 687 6615
Fax: +63 2 730 9572
SL-52645_REV3_11-14
Emerson Network Power
Division: Liebert
Web: www.emerson.com
www.EmersonNetworkPower.com
 Loading...