

Page 1
Precision Cooling
For Business-Critical Continuity™
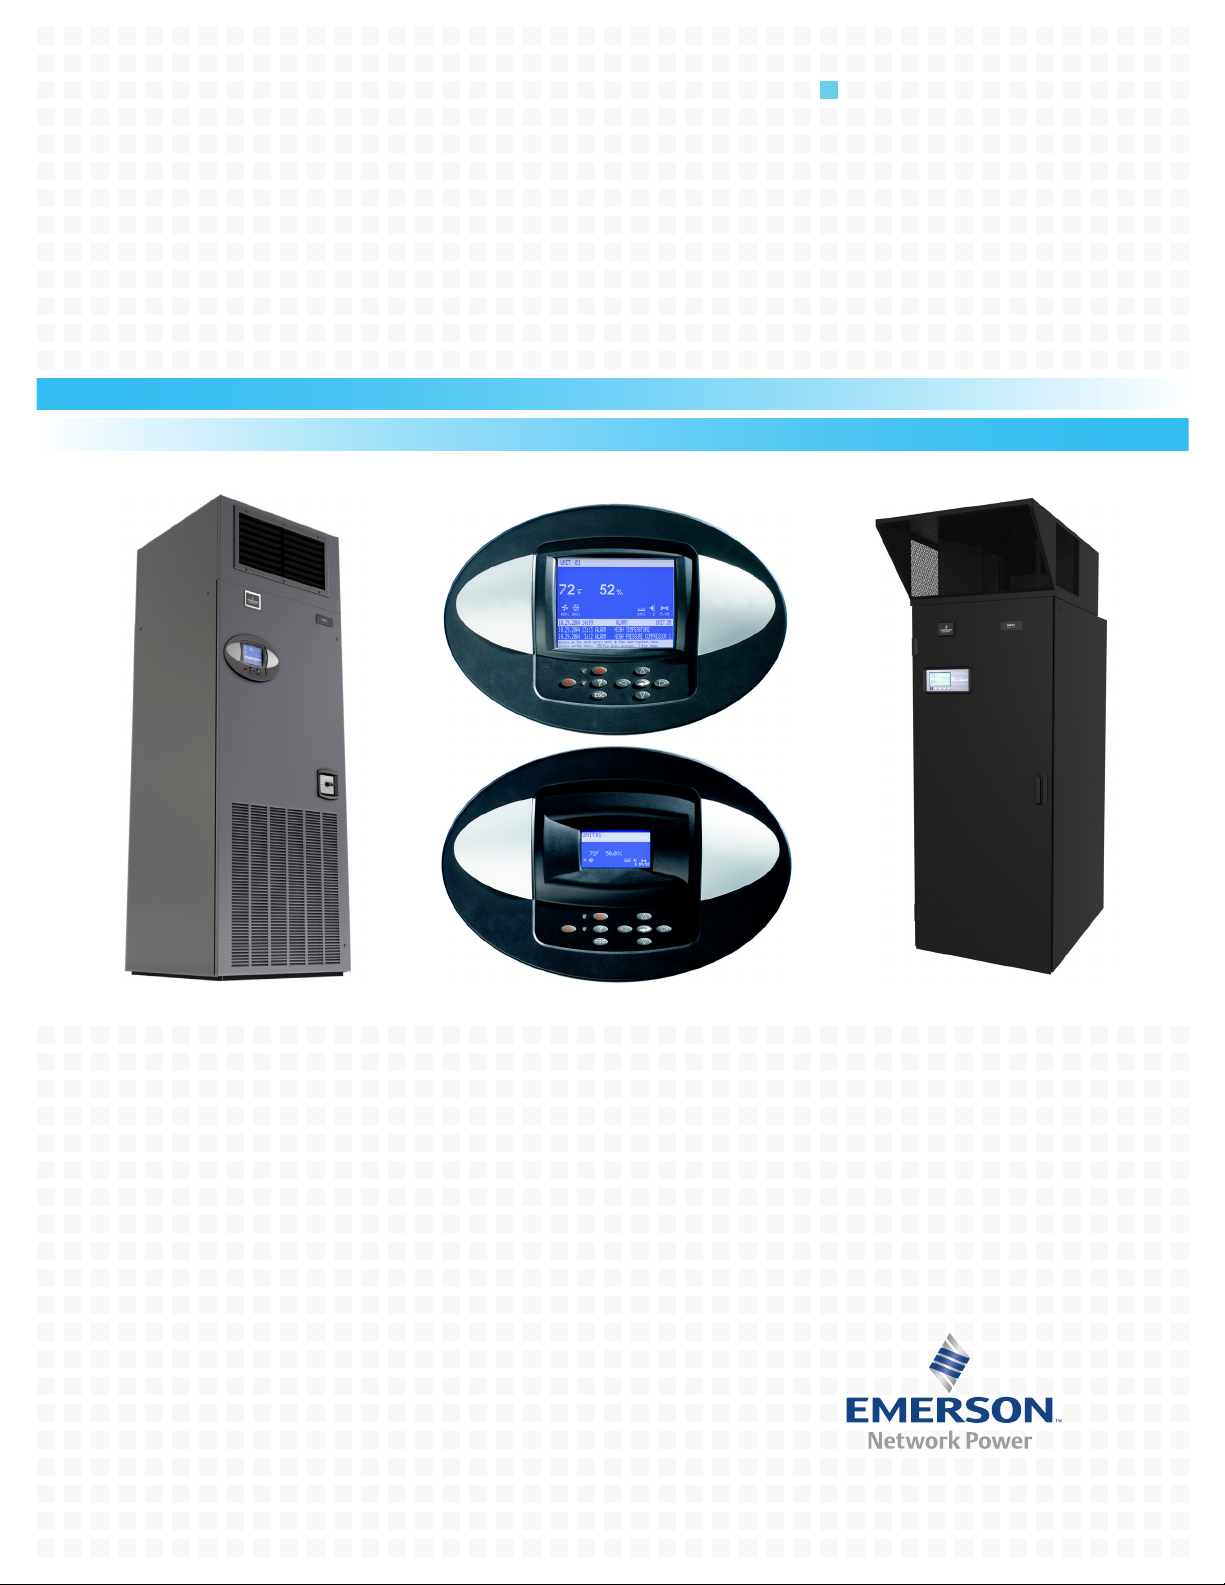
Liebert® Challenger™ 3000/Liebert Challenger ITR™
with Liebert iCOM
Operation & Maintenance Manual - 50 & 60Hz
®
Control
Page 2

Page 3

TABLE OF CONTENTS
IMPORTANT SAFETY INSTRUCTIONS . . . . . . . . . . . . . . . . . . . . . . . . . . . . . . . . . . . . . . . . . . . . . . . . 1
SAVE THESE INSTRUCTIONS . . . . . . . . . . . . . . . . . . . . . . . . . . . . . . . . . . . . . . . . . . . . . . . . .1
1.0 INTRODUCTION . . . . . . . . . . . . . . . . . . . . . . . . . . . . . . . . . . . . . . . . . . . . . . . . . . . . . . . . . .3
1.1 System Descriptions . . . . . . . . . . . . . . . . . . . . . . . . . . . . . . . . . . . . . . . . . . . . . . . . . . . . . . . . . . 3
1.1.1 Compressorized Systems . . . . . . . . . . . . . . . . . . . . . . . . . . . . . . . . . . . . . . . . . . . . . . . . . . . . . . . 3
1.1.2 GLYCOOL
1.1.3 Chilled Water Systems . . . . . . . . . . . . . . . . . . . . . . . . . . . . . . . . . . . . . . . . . . . . . . . . . . . . . . . . . 3
™
(Chilled Glycol Cooling) Systems. . . . . . . . . . . . . . . . . . . . . . . . . . . . . . . . . . . . . . 3
2.0 STARTUP . . . . . . . . . . . . . . . . . . . . . . . . . . . . . . . . . . . . . . . . . . . . . . . . . . . . . . . . . . . . . .4
2.1 Startup Procedure . . . . . . . . . . . . . . . . . . . . . . . . . . . . . . . . . . . . . . . . . . . . . . . . . . . . . . . . . . . 4
3.0 OPERATION WITH ICOM CONTROL . . . . . . . . . . . . . . . . . . . . . . . . . . . . . . . . . . . . . . . . . . .6
3.1 Features . . . . . . . . . . . . . . . . . . . . . . . . . . . . . . . . . . . . . . . . . . . . . . . . . . . . . . . . . . . . . . . . . . . 6
4.0 LIEBERT ICOM DISPLAY COMPONENTS AND FUNCTIONS . . . . . . . . . . . . . . . . . . . . . . . . . . . 7
4.1 Navigating Through the Liebert iCOM Display. . . . . . . . . . . . . . . . . . . . . . . . . . . . . . . . . . . . 9
4.1.1 Control Interface—Three Main Menus . . . . . . . . . . . . . . . . . . . . . . . . . . . . . . . . . . . . . . . . . . . 10
4.1.2 Accessing Menus and Settings. . . . . . . . . . . . . . . . . . . . . . . . . . . . . . . . . . . . . . . . . . . . . . . . . . 11
4.1.3 Entering the Password . . . . . . . . . . . . . . . . . . . . . . . . . . . . . . . . . . . . . . . . . . . . . . . . . . . . . . . . 11
4.1.4 Accessing Submenus . . . . . . . . . . . . . . . . . . . . . . . . . . . . . . . . . . . . . . . . . . . . . . . . . . . . . . . . . 12
4.2 Changing Operational Settings . . . . . . . . . . . . . . . . . . . . . . . . . . . . . . . . . . . . . . . . . . . . . . . . 14
4.3 Changing Liebert iCOM’s Display Settings . . . . . . . . . . . . . . . . . . . . . . . . . . . . . . . . . . . . . . 15
4.4 Graphical Data Record. . . . . . . . . . . . . . . . . . . . . . . . . . . . . . . . . . . . . . . . . . . . . . . . . . . . . . . 16
4.5 Liebert iCOM Service Menu Icons and Legend . . . . . . . . . . . . . . . . . . . . . . . . . . . . . . . . . . . 16
4.6 Wiring for Unit-to-Unit Communications—U2U . . . . . . . . . . . . . . . . . . . . . . . . . . . . . . . . . . 17
4.6.1 Liebert iCOM U2U Ethernet Network . . . . . . . . . . . . . . . . . . . . . . . . . . . . . . . . . . . . . . . . . . . 17
4.6.2 Wiring a Liebert iCOM U2U Network . . . . . . . . . . . . . . . . . . . . . . . . . . . . . . . . . . . . . . . . . . . 17
4.7 Entering Network Setup Information . . . . . . . . . . . . . . . . . . . . . . . . . . . . . . . . . . . . . . . . . . . 25
4.8 Viewing Multiple Units with a Networked Large Display. . . . . . . . . . . . . . . . . . . . . . . . . . . 26
5.0 OPERATION . . . . . . . . . . . . . . . . . . . . . . . . . . . . . . . . . . . . . . . . . . . . . . . . . . . . . . . . . . .27
5.1 Single Unit Functions . . . . . . . . . . . . . . . . . . . . . . . . . . . . . . . . . . . . . . . . . . . . . . . . . . . . . . . 27
5.1.1 Unit/Fan Control . . . . . . . . . . . . . . . . . . . . . . . . . . . . . . . . . . . . . . . . . . . . . . . . . . . . . . . . . . . . 27
5.1.2 General Compressor Requirements. . . . . . . . . . . . . . . . . . . . . . . . . . . . . . . . . . . . . . . . . . . . . . 28
5.1.3 Compressor Timing . . . . . . . . . . . . . . . . . . . . . . . . . . . . . . . . . . . . . . . . . . . . . . . . . . . . . . . . . . 29
5.2 Control Types . . . . . . . . . . . . . . . . . . . . . . . . . . . . . . . . . . . . . . . . . . . . . . . . . . . . . . . . . . . . . . 30
5.2.1 Proportional Control. . . . . . . . . . . . . . . . . . . . . . . . . . . . . . . . . . . . . . . . . . . . . . . . . . . . . . . . . . 30
5.2.2 PI Control . . . . . . . . . . . . . . . . . . . . . . . . . . . . . . . . . . . . . . . . . . . . . . . . . . . . . . . . . . . . . . . . . . 30
5.2.3 Intelligent Control (Chilled Water Only) . . . . . . . . . . . . . . . . . . . . . . . . . . . . . . . . . . . . . . . . . 31
6.0 ALARM DESCRIPTIONS . . . . . . . . . . . . . . . . . . . . . . . . . . . . . . . . . . . . . . . . . . . . . . . . . . .32
i
Page 4

6.1 Standard Alarms . . . . . . . . . . . . . . . . . . . . . . . . . . . . . . . . . . . . . . . . . . . . . . . . . . . . . . . . . . . 32
6.1.1 Change Filter . . . . . . . . . . . . . . . . . . . . . . . . . . . . . . . . . . . . . . . . . . . . . . . . . . . . . . . . . . . . . . . 32
6.1.2 Compressor Overload . . . . . . . . . . . . . . . . . . . . . . . . . . . . . . . . . . . . . . . . . . . . . . . . . . . . . . . . . 32
6.1.3 High Head Pressure . . . . . . . . . . . . . . . . . . . . . . . . . . . . . . . . . . . . . . . . . . . . . . . . . . . . . . . . . . 33
6.1.4 High Humidity . . . . . . . . . . . . . . . . . . . . . . . . . . . . . . . . . . . . . . . . . . . . . . . . . . . . . . . . . . . . . . 33
6.1.5 High Humidity and Low Humidity (Simultaneously) . . . . . . . . . . . . . . . . . . . . . . . . . . . . . . . 33
6.1.6 High Temperature . . . . . . . . . . . . . . . . . . . . . . . . . . . . . . . . . . . . . . . . . . . . . . . . . . . . . . . . . . . 33
6.1.7 High Temperature and Low Temperature (Simultaneously) . . . . . . . . . . . . . . . . . . . . . . . . . 33
6.1.8 Humidifier Problem . . . . . . . . . . . . . . . . . . . . . . . . . . . . . . . . . . . . . . . . . . . . . . . . . . . . . . . . . . 33
6.1.9 Loss of Air Flow . . . . . . . . . . . . . . . . . . . . . . . . . . . . . . . . . . . . . . . . . . . . . . . . . . . . . . . . . . . . . 34
6.1.10 Loss of Power . . . . . . . . . . . . . . . . . . . . . . . . . . . . . . . . . . . . . . . . . . . . . . . . . . . . . . . . . . . . . . . 34
6.1.11 Low Humidity . . . . . . . . . . . . . . . . . . . . . . . . . . . . . . . . . . . . . . . . . . . . . . . . . . . . . . . . . . . . . . . 34
6.1.12 Low Suction Pressure. . . . . . . . . . . . . . . . . . . . . . . . . . . . . . . . . . . . . . . . . . . . . . . . . . . . . . . . . 34
6.1.13 Low Temperature . . . . . . . . . . . . . . . . . . . . . . . . . . . . . . . . . . . . . . . . . . . . . . . . . . . . . . . . . . . . 34
6.1.14 Main Fan Overload. . . . . . . . . . . . . . . . . . . . . . . . . . . . . . . . . . . . . . . . . . . . . . . . . . . . . . . . . . . 34
6.1.15 Short Cycle . . . . . . . . . . . . . . . . . . . . . . . . . . . . . . . . . . . . . . . . . . . . . . . . . . . . . . . . . . . . . . . . . 34
6.2 Optional Alarms . . . . . . . . . . . . . . . . . . . . . . . . . . . . . . . . . . . . . . . . . . . . . . . . . . . . . . . . . . . . 35
6.2.1 Loss of Water Flow . . . . . . . . . . . . . . . . . . . . . . . . . . . . . . . . . . . . . . . . . . . . . . . . . . . . . . . . . . . 35
6.2.2 Smoke Detected . . . . . . . . . . . . . . . . . . . . . . . . . . . . . . . . . . . . . . . . . . . . . . . . . . . . . . . . . . . . . 35
6.2.3 Standby GC Pump On . . . . . . . . . . . . . . . . . . . . . . . . . . . . . . . . . . . . . . . . . . . . . . . . . . . . . . . . 35
6.2.4 Standby Unit On. . . . . . . . . . . . . . . . . . . . . . . . . . . . . . . . . . . . . . . . . . . . . . . . . . . . . . . . . . . . . 35
6.2.5 Water Under Floor . . . . . . . . . . . . . . . . . . . . . . . . . . . . . . . . . . . . . . . . . . . . . . . . . . . . . . . . . . . 35
6.3 Set Alarms—User Menus. . . . . . . . . . . . . . . . . . . . . . . . . . . . . . . . . . . . . . . . . . . . . . . . . . . . . 35
7.0 COMPONENT OPERATION AND MAINTENANCE . . . . . . . . . . . . . . . . . . . . . . . . . . . . . . . . . .36
7.1 System Testing . . . . . . . . . . . . . . . . . . . . . . . . . . . . . . . . . . . . . . . . . . . . . . . . . . . . . . . . . . . . . 36
7.1.1 Environmental Control Functions . . . . . . . . . . . . . . . . . . . . . . . . . . . . . . . . . . . . . . . . . . . . . . . 36
7.2 Filters . . . . . . . . . . . . . . . . . . . . . . . . . . . . . . . . . . . . . . . . . . . . . . . . . . . . . . . . . . . . . . . . . . . . 39
7.3 Blower Package . . . . . . . . . . . . . . . . . . . . . . . . . . . . . . . . . . . . . . . . . . . . . . . . . . . . . . . . . . . . 39
7.3.1 Fan Impellers and Bearings. . . . . . . . . . . . . . . . . . . . . . . . . . . . . . . . . . . . . . . . . . . . . . . . . . . . 39
7.3.2 Belt . . . . . . . . . . . . . . . . . . . . . . . . . . . . . . . . . . . . . . . . . . . . . . . . . . . . . . . . . . . . . . . . . . . . . . . 39
7.3.3 Air Distribution . . . . . . . . . . . . . . . . . . . . . . . . . . . . . . . . . . . . . . . . . . . . . . . . . . . . . . . . . . . . . 40
7.4 Refrigeration System . . . . . . . . . . . . . . . . . . . . . . . . . . . . . . . . . . . . . . . . . . . . . . . . . . . . . . . . 40
7.4.1 Suction Pressure. . . . . . . . . . . . . . . . . . . . . . . . . . . . . . . . . . . . . . . . . . . . . . . . . . . . . . . . . . . . . 40
7.4.2 Discharge Pressure. . . . . . . . . . . . . . . . . . . . . . . . . . . . . . . . . . . . . . . . . . . . . . . . . . . . . . . . . . . 41
7.4.3 Superheat . . . . . . . . . . . . . . . . . . . . . . . . . . . . . . . . . . . . . . . . . . . . . . . . . . . . . . . . . . . . . . . . . . 41
7.4.4 Thermostatic Expansion Valve . . . . . . . . . . . . . . . . . . . . . . . . . . . . . . . . . . . . . . . . . . . . . . . . . 41
7.4.5 Hot Gas Bypass Valve—Not Available on Digital Scroll Units . . . . . . . . . . . . . . . . . . . . . . . . 42
7.4.6 Air Cooled Condenser . . . . . . . . . . . . . . . . . . . . . . . . . . . . . . . . . . . . . . . . . . . . . . . . . . . . . . . . . 42
7.4.7 Water/Glycol Cooled Condensers . . . . . . . . . . . . . . . . . . . . . . . . . . . . . . . . . . . . . . . . . . . . . . . . 43
7.4.8 Motorized Ball Valve—Digital Scroll Compressor . . . . . . . . . . . . . . . . . . . . . . . . . . . . . . . . . . 44
7.4.9 Regulating Valve—Scroll Compressor . . . . . . . . . . . . . . . . . . . . . . . . . . . . . . . . . . . . . . . . . . . 44
7.4.10 Drycooler Settings . . . . . . . . . . . . . . . . . . . . . . . . . . . . . . . . . . . . . . . . . . . . . . . . . . . . . . . . . . . 46
7.4.11 Compressor Oil . . . . . . . . . . . . . . . . . . . . . . . . . . . . . . . . . . . . . . . . . . . . . . . . . . . . . . . . . . . . . . 47
7.5 Compressor Replacement. . . . . . . . . . . . . . . . . . . . . . . . . . . . . . . . . . . . . . . . . . . . . . . . . . . . . 47
7.5.1 Compressor Functional Check . . . . . . . . . . . . . . . . . . . . . . . . . . . . . . . . . . . . . . . . . . . . . . . . . . 47
7.5.2 Standard Scroll Compressor Replacement . . . . . . . . . . . . . . . . . . . . . . . . . . . . . . . . . . . . . . . . 48
7.5.3 Digital Scroll Compressor Replacement Procedure . . . . . . . . . . . . . . . . . . . . . . . . . . . . . . . . . 49
ii
Page 5

7.6 Facility Fluid and Piping Maintenance for Water and Glycol Systems . . . . . . . . . . . . . . . . 49
7.7 Humidifier. . . . . . . . . . . . . . . . . . . . . . . . . . . . . . . . . . . . . . . . . . . . . . . . . . . . . . . . . . . . . . . . . 50
7.7.1 Infrared Humidifier . . . . . . . . . . . . . . . . . . . . . . . . . . . . . . . . . . . . . . . . . . . . . . . . . . . . . . . . . . 50
7.7.2 Steam Generating Humidifier . . . . . . . . . . . . . . . . . . . . . . . . . . . . . . . . . . . . . . . . . . . . . . . . . . 52
8.0 TROUBLESHOOTING . . . . . . . . . . . . . . . . . . . . . . . . . . . . . . . . . . . . . . . . . . . . . . . . . . . . .56
9.0 MONTHLY MAINTENANCE INSPECTION CHECKLIST . . . . . . . . . . . . . . . . . . . . . . . . . . . . . . .62
10.0 SEMIANNUAL MAINTENANCE INSPECTION CHECKLIST . . . . . . . . . . . . . . . . . . . . . . . . . . . .63
FIGURES
Figure 1 Liebert iCOM components . . . . . . . . . . . . . . . . . . . . . . . . . . . . . . . . . . . . . . . . . . . . . . . . . . . . . . . . . 6
Figure 2 Liebert iCOM display components . . . . . . . . . . . . . . . . . . . . . . . . . . . . . . . . . . . . . . . . . . . . . . . . . . . 7
Figure 3 Liebert iCOM default screen symbols . . . . . . . . . . . . . . . . . . . . . . . . . . . . . . . . . . . . . . . . . . . . . . . . 9
Figure 4 Liebert iCOM default home screen—Graphical view . . . . . . . . . . . . . . . . . . . . . . . . . . . . . . . . . . . . 9
Figure 5 Liebert iCOM default home screen—Simple view . . . . . . . . . . . . . . . . . . . . . . . . . . . . . . . . . . . . . 10
Figure 6 Entering the password . . . . . . . . . . . . . . . . . . . . . . . . . . . . . . . . . . . . . . . . . . . . . . . . . . . . . . . . . . . 11
Figure 7 Menu tree—Large and small displays, stand-alone or networked. . . . . . . . . . . . . . . . . . . . . . . . . 13
Figure 8 Liebert iCOM User Menu icons . . . . . . . . . . . . . . . . . . . . . . . . . . . . . . . . . . . . . . . . . . . . . . . . . . . . 14
Figure 9 Display setup screen . . . . . . . . . . . . . . . . . . . . . . . . . . . . . . . . . . . . . . . . . . . . . . . . . . . . . . . . . . . . . 15
Figure 10 Temperature graph . . . . . . . . . . . . . . . . . . . . . . . . . . . . . . . . . . . . . . . . . . . . . . . . . . . . . . . . . . . . . . 16
Figure 11 Liebert iCOM Service Menu icons . . . . . . . . . . . . . . . . . . . . . . . . . . . . . . . . . . . . . . . . . . . . . . . . . . 16
Figure 12 U2U network setup diagram . . . . . . . . . . . . . . . . . . . . . . . . . . . . . . . . . . . . . . . . . . . . . . . . . . . . . . 19
Figure 13 Liebert iCOM wiring—Unit as shipped . . . . . . . . . . . . . . . . . . . . . . . . . . . . . . . . . . . . . . . . . . . . . . 21
Figure 14 Wiring a small display for U2U network operation . . . . . . . . . . . . . . . . . . . . . . . . . . . . . . . . . . . . 22
Figure 15 Wiring a large display for U2U network operation. . . . . . . . . . . . . . . . . . . . . . . . . . . . . . . . . . . . . 23
Figure 16 Liebert iCOM input-output control board . . . . . . . . . . . . . . . . . . . . . . . . . . . . . . . . . . . . . . . . . . . . 24
Figure 17 Control board U2U network setup screen . . . . . . . . . . . . . . . . . . . . . . . . . . . . . . . . . . . . . . . . . . . . 25
Figure 18 Liebert iCOM display U2U network setup screen . . . . . . . . . . . . . . . . . . . . . . . . . . . . . . . . . . . . . 25
Figure 19 Menu tree—Large display, networked. . . . . . . . . . . . . . . . . . . . . . . . . . . . . . . . . . . . . . . . . . . . . . . 26
Figure 20 Start-stop priority switches . . . . . . . . . . . . . . . . . . . . . . . . . . . . . . . . . . . . . . . . . . . . . . . . . . . . . . . 27
Figure 21 Liebert leak detection units . . . . . . . . . . . . . . . . . . . . . . . . . . . . . . . . . . . . . . . . . . . . . . . . . . . . . . . 37
Figure 22 Recommended liquid sensor locations . . . . . . . . . . . . . . . . . . . . . . . . . . . . . . . . . . . . . . . . . . . . . . . 38
Figure 23 Outdoor fan/condenser configuration. . . . . . . . . . . . . . . . . . . . . . . . . . . . . . . . . . . . . . . . . . . . . . . . 43
Figure 24 Johnson Controls valve adjustment. . . . . . . . . . . . . . . . . . . . . . . . . . . . . . . . . . . . . . . . . . . . . . . . . 45
Figure 25 Metrex valve adjustment . . . . . . . . . . . . . . . . . . . . . . . . . . . . . . . . . . . . . . . . . . . . . . . . . . . . . . . . . 45
Figure 26 Infrared humidifier lamps . . . . . . . . . . . . . . . . . . . . . . . . . . . . . . . . . . . . . . . . . . . . . . . . . . . . . . . . 51
Figure 27 Steam generating humidifier . . . . . . . . . . . . . . . . . . . . . . . . . . . . . . . . . . . . . . . . . . . . . . . . . . . . . . 52
iii
Page 6

TABLES
Table 1 Keyboard icons and functions. . . . . . . . . . . . . . . . . . . . . . . . . . . . . . . . . . . . . . . . . . . . . . . . . . . . . . . 8
Table 2 Sample Liebert iCOM network configurations . . . . . . . . . . . . . . . . . . . . . . . . . . . . . . . . . . . . . . . . 17
Table 3 Set alarms—User Menus . . . . . . . . . . . . . . . . . . . . . . . . . . . . . . . . . . . . . . . . . . . . . . . . . . . . . . . . . 35
Table 4 Zone leak detection kit installation scenarios . . . . . . . . . . . . . . . . . . . . . . . . . . . . . . . . . . . . . . . . . 38
Table 5 Recommended free area ft
of 550 and 600 fpm (2.8 and 3.1 m/s) . . . . . . . . . . . . . . . . . . . . . . . . . . . . . . . . . . . . . . . . . . . . . . . . 40
Table 6 Suction pressures - R407c. . . . . . . . . . . . . . . . . . . . . . . . . . . . . . . . . . . . . . . . . . . . . . . . . . . . . . . . . 40
Table 7 Discharge pressures . . . . . . . . . . . . . . . . . . . . . . . . . . . . . . . . . . . . . . . . . . . . . . . . . . . . . . . . . . . . . 41
Table 8 Water/glycol system conditions requiring optional settings for aquastats . . . . . . . . . . . . . . . . . . 46
Table 9 Aquastat settings—two-fan through four-fan drycoolers . . . . . . . . . . . . . . . . . . . . . . . . . . . . . . . . 46
Table 10 Compressor oil types . . . . . . . . . . . . . . . . . . . . . . . . . . . . . . . . . . . . . . . . . . . . . . . . . . . . . . . . . . . . . 47
Table 11 Humidifier canister part numbers . . . . . . . . . . . . . . . . . . . . . . . . . . . . . . . . . . . . . . . . . . . . . . . . . . 54
Table 12 Blower troubleshooting . . . . . . . . . . . . . . . . . . . . . . . . . . . . . . . . . . . . . . . . . . . . . . . . . . . . . . . . . . . 56
Table 13 Chilled water troubleshooting . . . . . . . . . . . . . . . . . . . . . . . . . . . . . . . . . . . . . . . . . . . . . . . . . . . . . 56
Table 14 Compressor and refrigeration system troubleshooting. . . . . . . . . . . . . . . . . . . . . . . . . . . . . . . . . . 57
Table 15 Dehumidification troubleshooting . . . . . . . . . . . . . . . . . . . . . . . . . . . . . . . . . . . . . . . . . . . . . . . . . . 59
Table 16 Glycol pump troubleshooting . . . . . . . . . . . . . . . . . . . . . . . . . . . . . . . . . . . . . . . . . . . . . . . . . . . . . . 59
Table 17 Infrared humidifier troubleshooting . . . . . . . . . . . . . . . . . . . . . . . . . . . . . . . . . . . . . . . . . . . . . . . . 59
Table 18 Steam generating humidifier troubleshooting . . . . . . . . . . . . . . . . . . . . . . . . . . . . . . . . . . . . . . . . 60
Table 19 Reheat troubleshooting . . . . . . . . . . . . . . . . . . . . . . . . . . . . . . . . . . . . . . . . . . . . . . . . . . . . . . . . . . . 61
2
(m2) for grilles or perforated panels at output velocities
iv
Page 7
IMPORTANT SAFETY INSTRUCTIONS
!
!
!
SAVE THESE INSTRUCTIONS
This manual contains important safety instructions that should be followed during the installation
and maintenance of the Liebert Challenger 3000/Liebert Challenger ITR with Liebert iCOM. Read
this manual thoroughly before attempting to install or operate this unit.
Only qualified personnel should move, install or service this equipment.
Adhere to all warnings, cautions and installation, operating and safety instructions on the unit and in
this manual. Follow all operating and user instructions.
WARNING
Risk of electric shock. Can cause injury or death.
Disconnect local and remote power supplies before working within.
Before proceeding with installation, read all instructions, verify that all the parts are included
and check the nameplate to be sure the voltage matches available utility power.
The Liebert iCOM microprocessor does not isolate power from the unit, even in the “Unit Off”
mode. Some internal components require and receive power even during the “Unit Off” mode
of Liebert iCOM control.
The factory-supplied optional disconnect switch is inside the unit. The line side of this switch
contains live high-voltage.
The only way to ensure that there is NO voltage inside the unit is to install and open a remote
disconnect switch. Refer to unit electrical schematic.
Follow all local codes.
WARNING
Risk of explosive discharge from high-pressure refrigerant. Can cause injury or death.
This unit contains fluids and gases under high pressure. Relieve pressure before working with
piping.
WARNING
Risk of refrigerant system rupture or explosion from overpressurization. Can cause
equipment damage, injury or death.
If a pressure-relief device is not provided with the condenser unit, the system installer must
provide and install a discharge pressure-relief valve rated for a maximum of 500 psig (34bar)
in the high side refrigerant circuit. Do not install a shutoff valve between the compressor and
the field installed relief valve.
One or more additional pressure-relief valves are required downstream of any and all
field-installed isolation valves. Do not isolate any refrigerant circuits from overpressurization
protection.
For systems requiring EU CE compliance (50Hz), the pressure-relief valve must be CE
certified to the EU Pressure Equipment Directive by an EU “Notified Body.”
NOTE
A pressure-relief valve is provided with Liebert Lee-Temp
provided on Liebert Fan Speed Control condensers. The Liebert indoor cooling unit has a
factory-installed high pressure safety switch in the high side refrigerant circuit.
™
condensers. A fusible plug is
1
Page 8

!
WARNING
!
Risk of high-speed moving parts. Can cause injury or death.
Disconnect all local and remote electric power supplies before working in the unit.
Do not operate upflow units without installing a plenum, ductwork or guard over the blower
opening(s) on the top of the unit cabinet.
Ductwork must be connected to the blower(s), or a plenum must be installed on the blower
deck for protection from rotating blower wheel(s) on upflow units.
CAUTION
Risk of contact with hot surfaces. Can cause injury.
The compressors, refrigerant discharge lines, humidifiers and reheats are extremely hot
during unit operation. Allow sufficient time for them to cool before working within the unit
cabinet. Use extreme caution and wear protective gloves and arm protection when working on
or near hot compressors, discharge lines, humidifiers and reheats.
NOTICE
Risk of leaking water. Can cause equipment and building damage.
This unit requires a water drain connection. It may also require an external water supply to
operate.
Improper installation, application and service practice can result in water leaking from the
unit. Water leaks can cause severe property damage and loss of critical data center
equipment.
Do not locate unit directly above any equipment that could sustain water damage.
Emerson recommends installing leak detection equipment for unit and supply lines.
2
Page 9

1.0 INTRODUCTION
1.1 System Descriptions
The Liebert Challenger 3000™ and Liebert Challenger ITR™ Precision Cooling systems are available
in several configurations.
1.1.1 Compressorized Systems
NOTE
Compressorized systems may be a self-contained system, with the compressor in the Liebert
Challenger 3000/Liebert Challenger ITR unit, or a split system, with the compressor in a
separate condensing unit.
These systems may be air, water, or glycol cooled, depending on the heat rejection method selected.
Cooling—One stage standard; variable capacity with digital scroll, optional.
Heating—Two stages of electric reheat standard; SCR controlled electric reheat, hot water reheat,
hot gas reheat on water and glycol cooled systems optional.
Humidification—Infrared standard; steam generating optional.
Dehumidification—Hot gas bypass locked out standard
Introduction
1.1.2 GLYCOOL™ (Chilled Glycol Cooling) Systems
GLYCOOL systems have all of the features of a compressorized water or glycol system, plus a second
cooling coil that is connected into the water circuit. When fluid temperature is sufficiently low (below
room temperature), cooling is provided by circulating the fluid through the second cooling coil (flow is
controlled by a motorized valve.) This is then the primary cooling source, and it greatly reduces the
compressor operation.
Cooling—Modulated cooling valve opens proportionally to match room needs (primary), one or two
stages of mechanical refrigeration (secondary)
Heating—Two stages of electric reheat standard; hot water reheat optional
Humidification—Infrared standard; steam generating optional
Dehumidification—Hot gas bypass locked out standard
1.1.3 Chilled Water Systems
These systems utilize a central chiller and control cooling by modulating a control valve in the chilled
water line.
Cooling—Proportional in response to room needs
Heating—Two stages of electric reheat standard; hot water reheat optional
Humidification—Infrared standard; steam generating optional
Dehumidification—Chilled water valve opens proportionally in response to room needs
3
Page 10

Startup
!
2.0 STARTUP
Before beginning startup, make certain that unit was installed according to the instructions in the
installation manual, SL-11962. Verify that the fan shipping bolt has been removed, the check valve
has been installed (on air cooled units), and that the scroll compressor is rotating in the proper direction. All exterior panels must be in place with the front panel open.
Locate the startup form supplied with your unit documents. Complete the form during startup and
mail it to Liebert when startup is completed. Contact your Liebert supplier if you have any questions
or problems during unit installation, startup or operation.
WARNING
Risk of electric shock. Can cause injury or death.
Potentially lethal voltages exist within this equipment during operation. Observe all cautions
and warnings on unit and in this manual.
The Liebert iCOM microprocessor does not isolate power from the unit, even in the “Unit Off”
mode. The only way to ensure that there is NO voltage inside the unit is to install and open a
remote disconnect switch. Refer to unit electrical schematic.
2.1 Startup Procedure
___ 1. Disconnect all power to the environmental control unit.
___ 2. Tighten all electrical wiring connections that may have loosened during shipping (on electric panel
and at all major components, such as compressor, reheats, humidifier and motor).Retighten according
to values listed on component by component manufacturer.
___ 3. Remove all line voltage fuses except the main fan fuses at the far right of the electric panel and the
Control Voltage fuses at the far left of the electric panel. For units supplied with circuit breakers,
open the circuit breakers instead of removing fuses.
___ 4. Turn on power and check line voltage on main unit disconnect switch. Line voltage must be within
10% of nameplate voltage.
___ 5. Turn On main unit disconnect switch and check secondary voltage at transformer T1. Voltage at T1
must be 24 VAC ±2.5 VAC (check at TB1-1 and TB1-8). T1 voltage must not exceed 28 VAC. Change
primary tap if necessary.
___ 6. Push the On button. Blower will start.
___ 7. If you do not want your unit to operate at factory default settings, set temperature and humidity
setpoints, alarms, and other control functions. Refer to 3.0 - Operation with iCOM Control or 5.0 -
Operation.
___ 8. Stop the unit by depressing the On/Off button on the front display. Turn Off main unit disconnect and
main breaker.
___ 9. Replace all fuses (or reset circuit breakers) that were removed in Step 3.
___ 10. Restore power to unit; turn On the main unit disconnect switch.
___ 11. Push the On button—putting the unit into operation.
___ 12. Check the current draw on all line voltage components and match with serial tag.
___ 13. Verify that the scroll compressor is rotating in the proper direction.
NOTICE
Risk of improper scroll compressor installation. Could cause poor performance and
compressor damage.
Three-phase power must be connected to the unit line voltage terminals in the proper
sequence so that the scroll compressor rotates in the proper direction. Rotation in the wrong
direction will result in poor performance and compressor damage. Use a phase sequence and
motor rotation sensor to ensure that the three-phase power is correctly connected and that the
compressor is rotating properly.
4
Page 11

14. Check for unusual noises and vibration.
15. Check all refrigerant and fluid lines for leaks.
16. Test all functions of your unit for proper operation.
17. Close high voltage dead front cover and latch.
18. Close front accent panel and latch.
Return completed startup form to:
Liebert Corporation
Warranty Registration
1050 Dearborn Drive
P.O. Box 29186
Columbus, OH 43229
Startup
5
Page 12

3.0 OPERATION WITH ICOM CONTROL
Wall Mount Large Display
Unit Panel Mount
Small Display and Bezel
Unit Panel Mount Large Display
and Bezel
Liebert iCOM Input/Output Board
Liebert vNSA Network Switch
The Liebert iCOM™ control offers the highest capabilities in unit control, communication and moni-
toring of Liebert mission-critical cooling units.
Liebert iCOM may be used to combine multiple cooling units into a team that operates as a single
entity, enhancing the already-high performance and efficiency of Liebert’s units.
3.1 Features
Large and Small Displays
The Liebert iCOM control is available with either a large or small liquid crystal display.
•The Liebert iCOM with small display has a 128 x 64 dot matrix screen that shows text and
icons. This display is capable of controlling only the unit it is directly connected to.
•The Liebert iCOM with large display has a 320 x 240 dot matrix screen that shows text and
icons of 32 connected units (see Figure 4). This display can be used to control a single cooling unit
or any cooling unit within a connected group over a network.
Liebert iCOM’s menu-driven display is used for all programming functions. The Status menu shows
the temperature of the return or supply air and the and humidity of the return air.
Figure 1 Liebert iCOM components
Operation with iCOM Control
6
Page 13
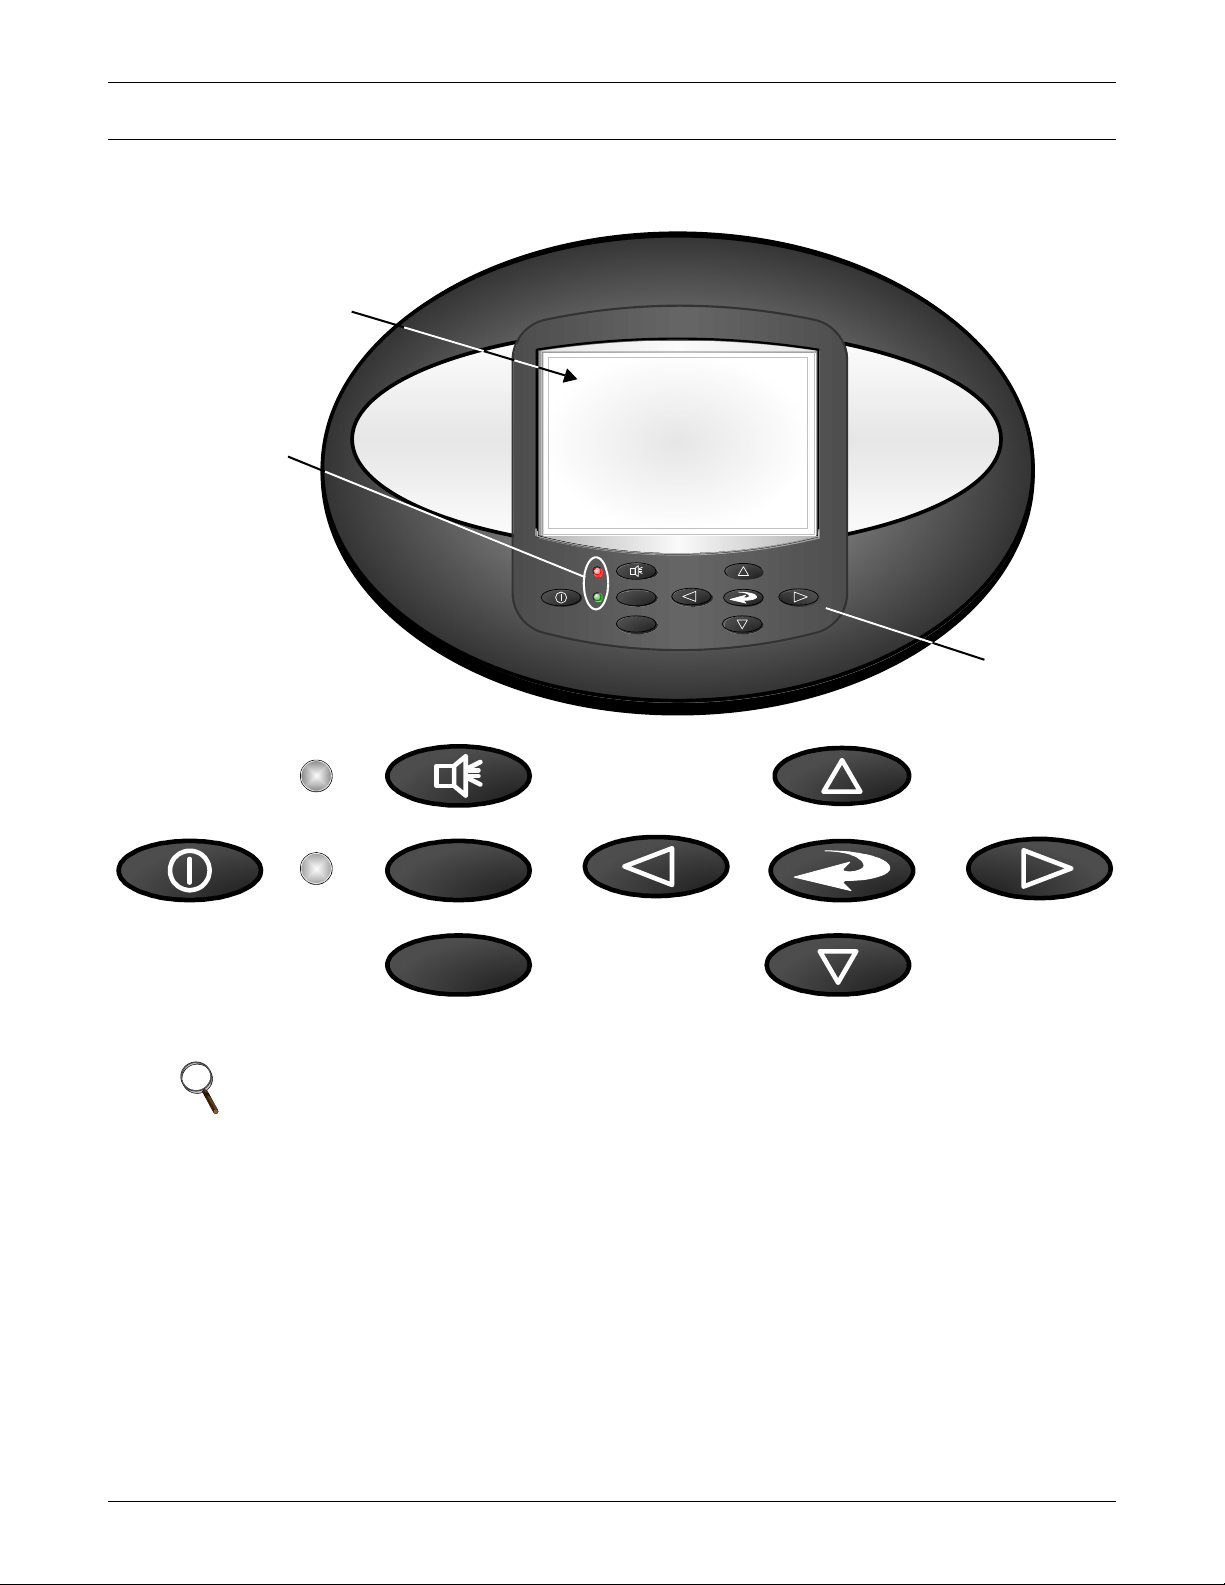
Liebert iCOM Display Components and Functions
ESC
?
Liquid Crystal Display
Keypad
Large Liebert iCOM Display
shown - Keypad and LEDs are
identical on all displays.
LED Status Indicators
(top LED is red or
flashing red; bottom
LED is green or amber)
ESC
?
On/Off Key
Escape Key Down Arrow Key
Up Arrow Key
Left Arrow Key Right Arrow KeyEnter Key
Alarm Key
Help Key
4.0 LIEBERT ICOM DISPLAY COMPONENTS AND FUNCTIONS
The small and the large display have a common key layout, as shown in Figure 2.
Figure 2 Liebert iCOM display components
NOTE
The Help key may be pressed at any time for a brief explanation of what is being viewed.
7
Page 14
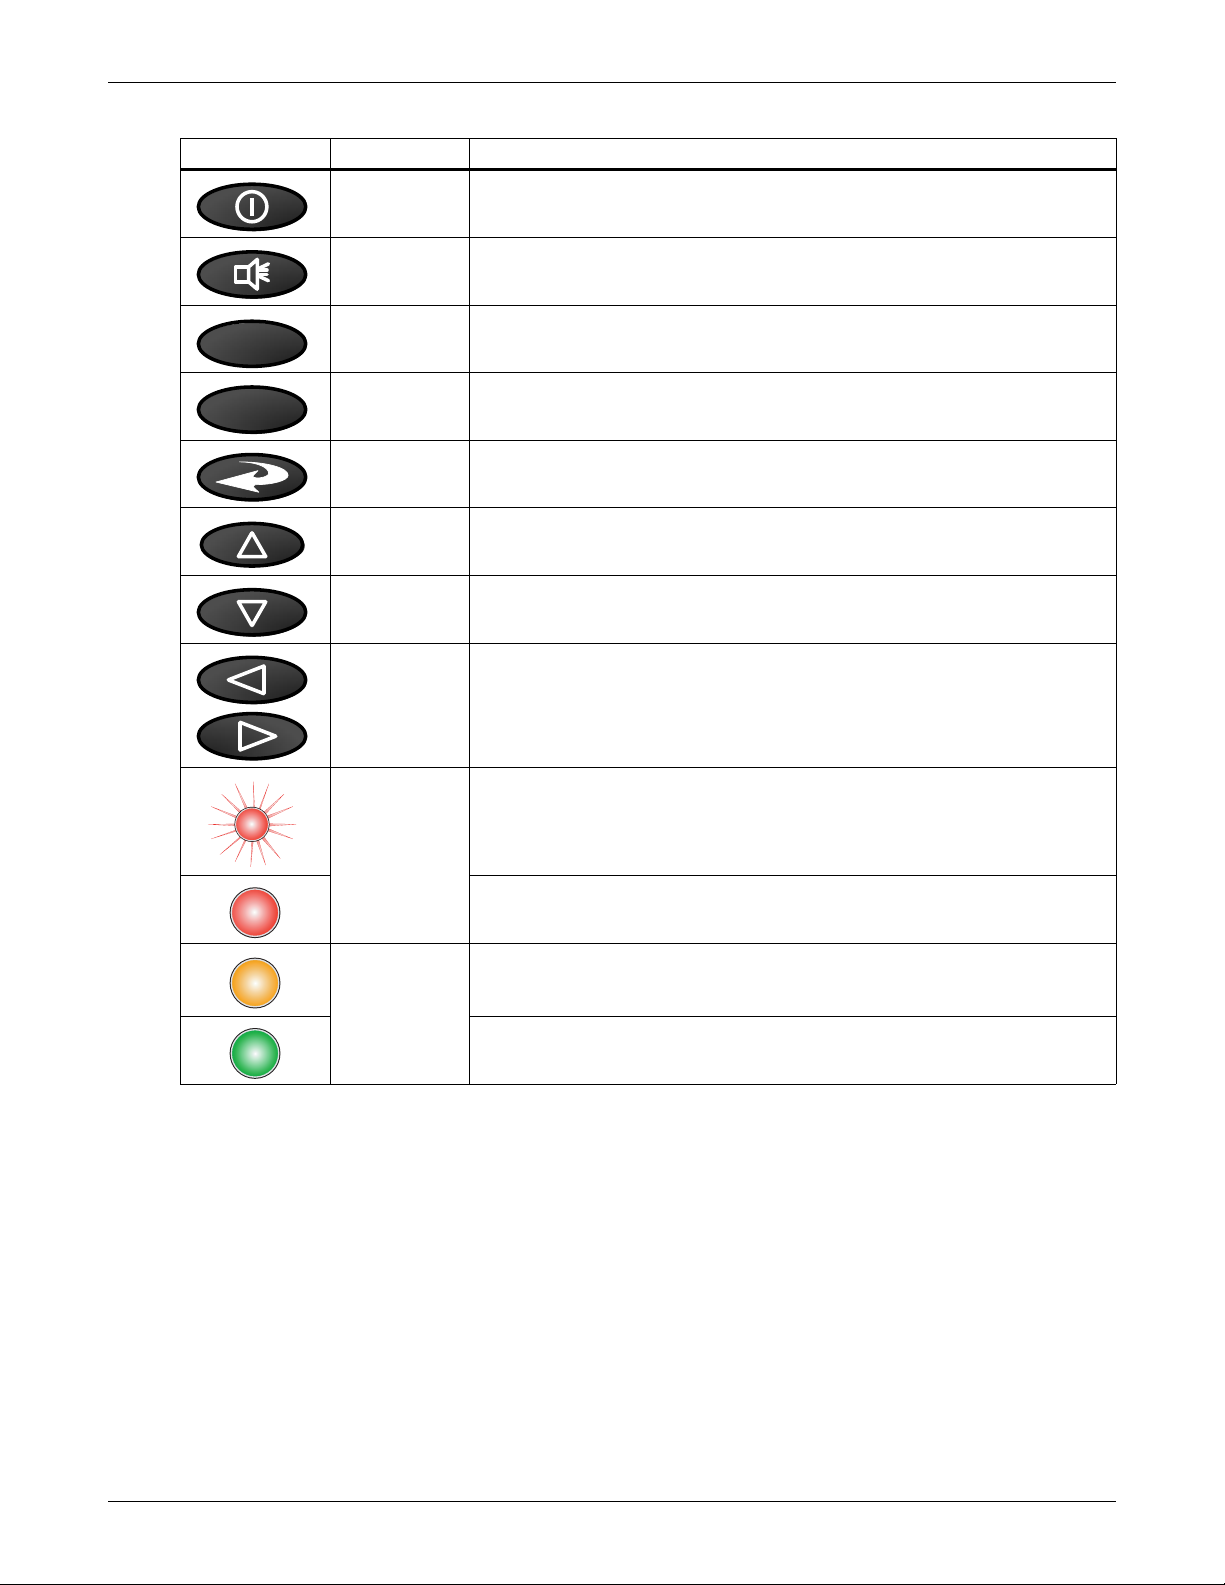
Table 1 Keyboard icons and functions
?
ESC
Icon
Key Name Function
On/Off Key Controls the operational state of the cooling unit.
Alarm Key Silences an alarm.
Help Key Accesses integrated help menus.
ESCape Key Returns to the previous display view.
Enter Key Confirms all selections and selects icons or text.
Liebert iCOM Display Components and Functions
Increase Key
(Up Arrow)
Decrease Key
(Down Arrow)
Left and Right
Arrow Keys
Upper LED
Lower LED
Moves upward in a menu or increases the value of a selected parameter.
Moves downward in a menu or reduces the value of a selected parameter.
Navigates through text and sections of the display.
Blinking Red—Active, unacknowledged alarm exists
Solid Red—Active, acknowledged alarm exists
Amber—Power is available to the unit, unit is NOT operating
Green—Power is available to the unit, unit is operating
8
Page 15
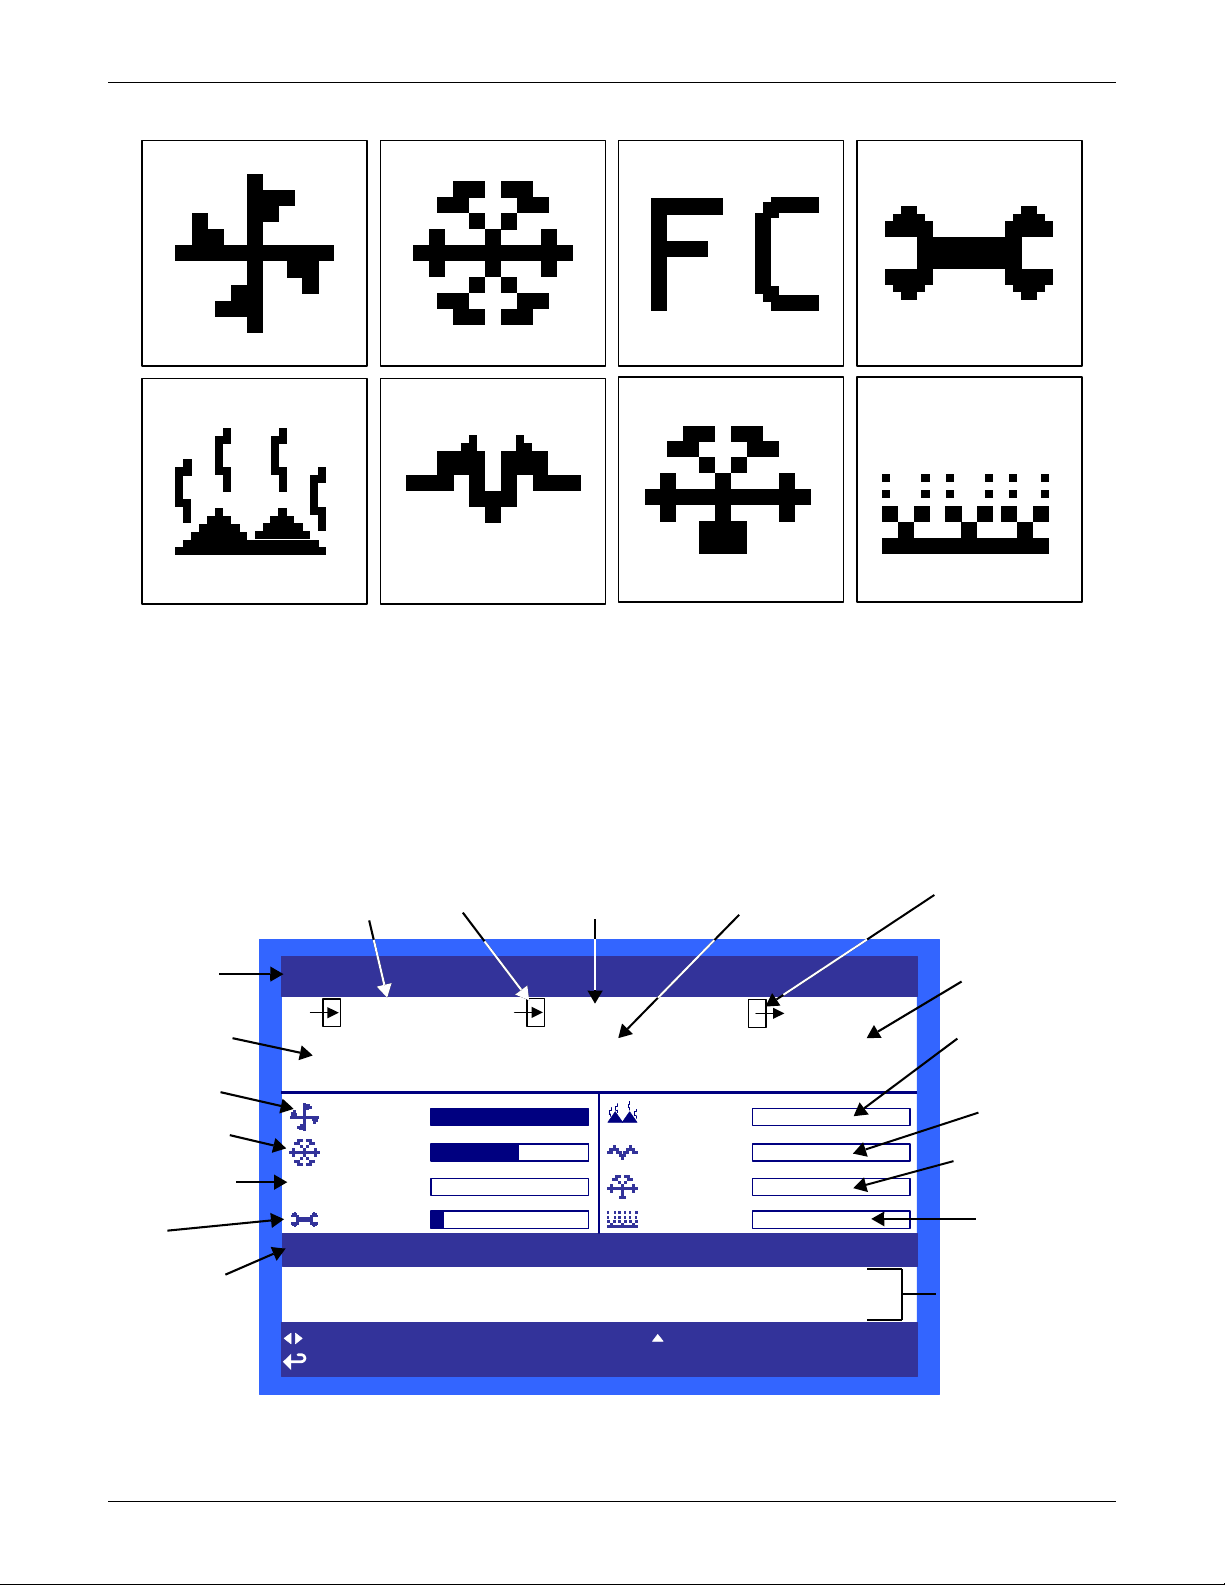
Figure 3 Liebert iCOM default screen symbols
fan
cooling
maintenance
hot water
electric heat
dehumidification humidification
freecooling
7/29 /2009 08 :28 (01 ) MSG UNIT ON
7/29 /2009 08 :27 (01 ) MSG POWER ON
UNIT 1
7/29 /2009 09 :18:07
50
72.0°F 50%
51.6
°F
%
SET
ACT
UNIT ON
for next / prev unit for s ystem vi ew
for menu for previous screen ? for help
ESC
73.6
°F
100%
60%
FC
0%
03/2010
0%
0%
0%
0%
System or
Unit # view
Temperature
Sensor Reading
Evaporator
Fan Speed
Percent
Cooling
Free-Cooling
Percentage
Next
Maintenance
Date and
Time
Temperature
Setpoint
Return Air
Humidity
Setpoint
Humidity Sensor
Reading
Supply Air (requires
optional supply air
sensor)
Supply
Air Temperature
Percent
Electric
Heating
Percent
Dehumidifying
System
(or Unit)
On/Off
Most recent Message (MSG), Alarm
(ALM) or Warning
(WRN) with Date,
Time, Unit and
Description)
Percent
Hot Water
Heating
Liebert iCOM Display Components and Functions
4.1 Navigating Through the Liebert iCOM Display
Liebert iCOM displays icons and text for monitoring and controlling your Liebert cooling unit. The
number of icons and amount of text shown depends on the display size.
The Liebert iCOM offers two different types of views: graphical and simple. The graphical view is the
default; to set the simple view refer to 4.3 - Changing Liebert iCOM’s Display Settings. The Liebert iCOM’s home screen is shown in Figure 4 (graphical view) and in Figure 5 (simple view).
Figure 4 Liebert iCOM default home screen—Graphical view
9
Page 16

Figure 5 Liebert iCOM default home screen—Simple view
9/29 /2010 08 :28 (01 ) MSG UNIT ON
9/29 /2010 08 :27 (01 ) MSG POWER ON
UNIT 1
9/29 /2010 09 :18:07
50
72.0°F
74.1
°F
50%
51.6
°F
%
SET
ACT
72%100%
UNIT ON
for next / prev unit for s ystem vi ew
for menu for previous screen ? for help
ESC
52.0°F
03/2011
System or
Unit # view
Temperature
Sensor Reading
Evaporator
Fan Speed
Percent
Cooling
Next
Maintenance
Date and
Time
Return Air
Tem per atu re
Setpoint
Return Air
Humidity
Setpoint
Humidity Sensor
Reading
Supply Air Setpoint
Supply
Air Temperature
System (or Unit)
On/Off
Most Recent
Alarms
(Date, Time, Unit,
Description)
Liebert iCOM Display Components and Functions
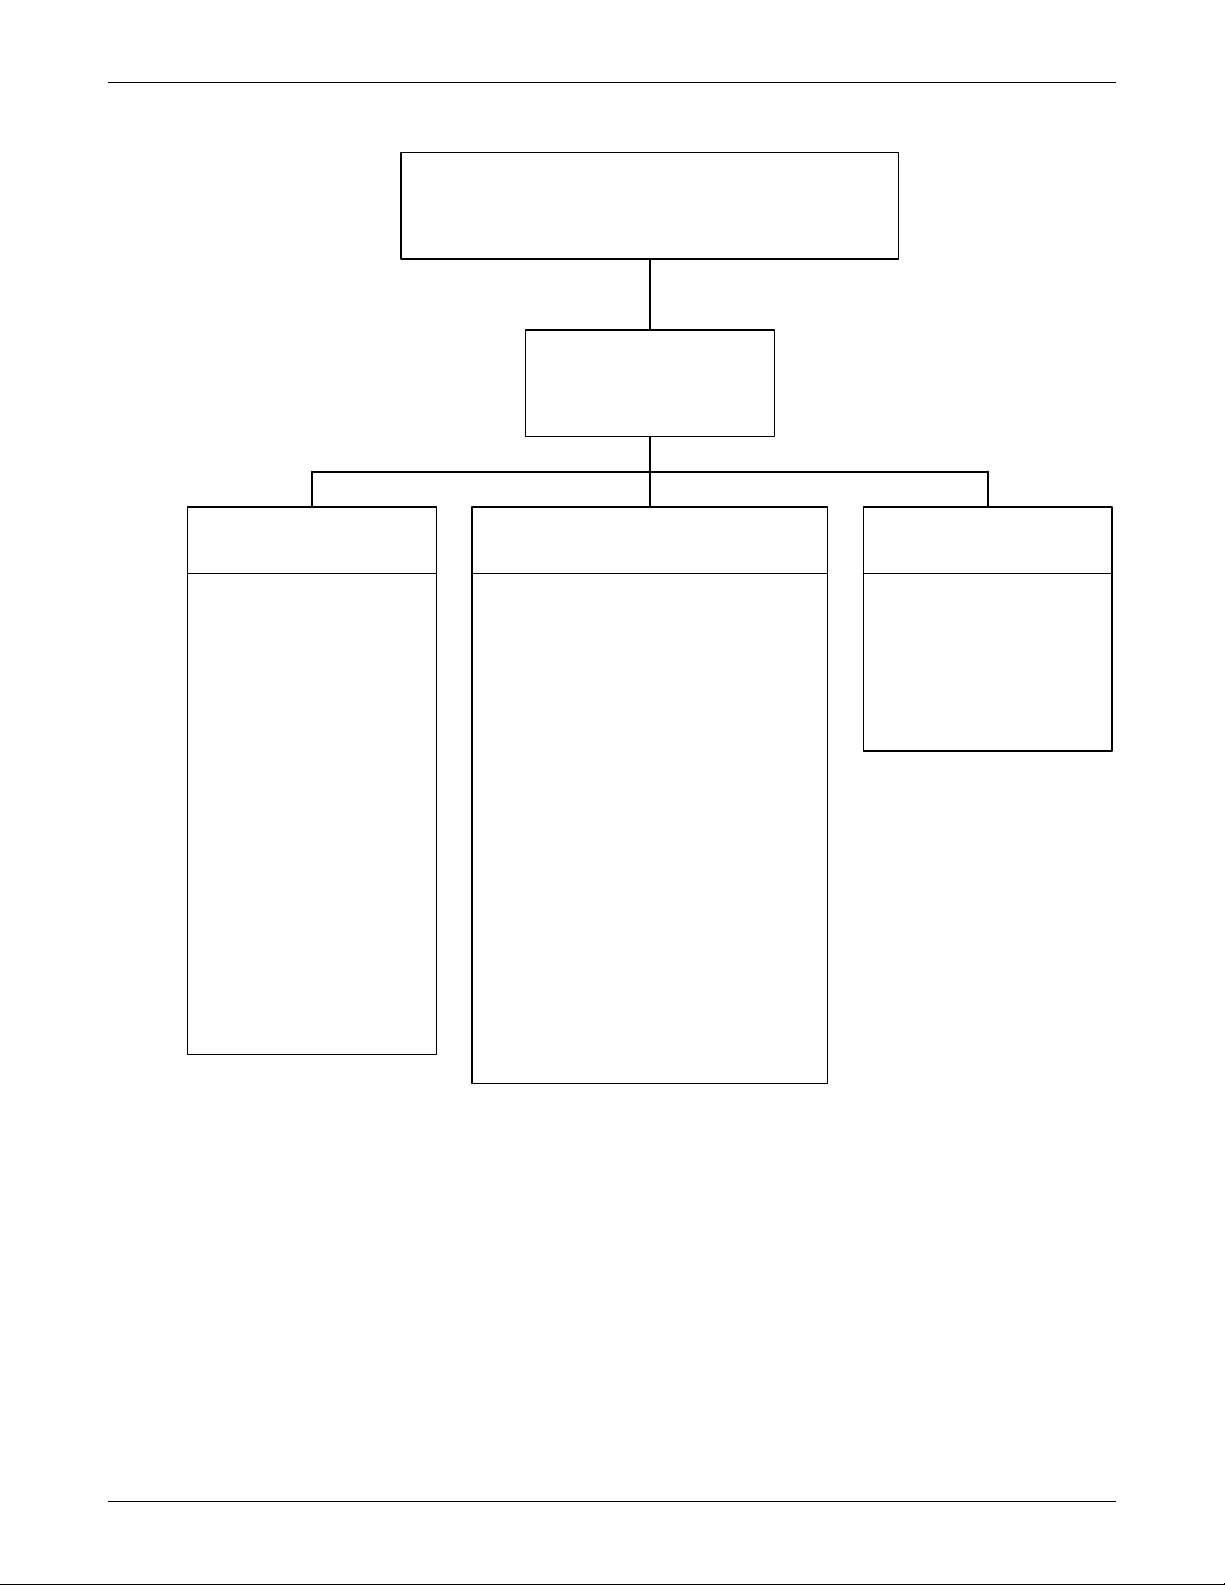
4.1.1 Control Interface—Three Main Menus
The Liebert iCOM control has three main menus: User, Service and Advanced.
The User menu contains the most frequently used features, settings and status information. The Service menu contains settings and features used to set up unit communications and for unit maintenance. The Advanced menu contains settings used to set up the unit at the factory.
NOTE
The Liebert iCOM’s Advanced menu is for factory use only or in consultation with the factory
service department.
NOTE
Menu settings may be viewed without a password, but changing settings requires a password.
If a password is required, the Liebert iCOM shows a prompt to enter the password. The
password for the User menu is 1490. The password for Service menu is 5010. For details on
When the buttons on the Liebert iCOM control have not been pressed for a short period, the display
backlight turns Off. Pressing any key will turn the backlight On (wake up the screen) and display the
Status menu of the last cooling unit viewed. The Status menu will show the cooling unit’s operational
mode(s), return air temperature and humidity readings, temperature and humidity setpoints and any
active alarm conditions.
If the cooling unit has a large display and is not on a network, or if the unit has a small display,
whether it is networked or stand-alone, the Status menu will display only that cooling unit’s information. Any large display that is connected to a network can be used to view any cooling unit on the network or show an average view of the entire system of cooling units.
entering a password, see 4.1.3 - Entering the Password
10
Page 17
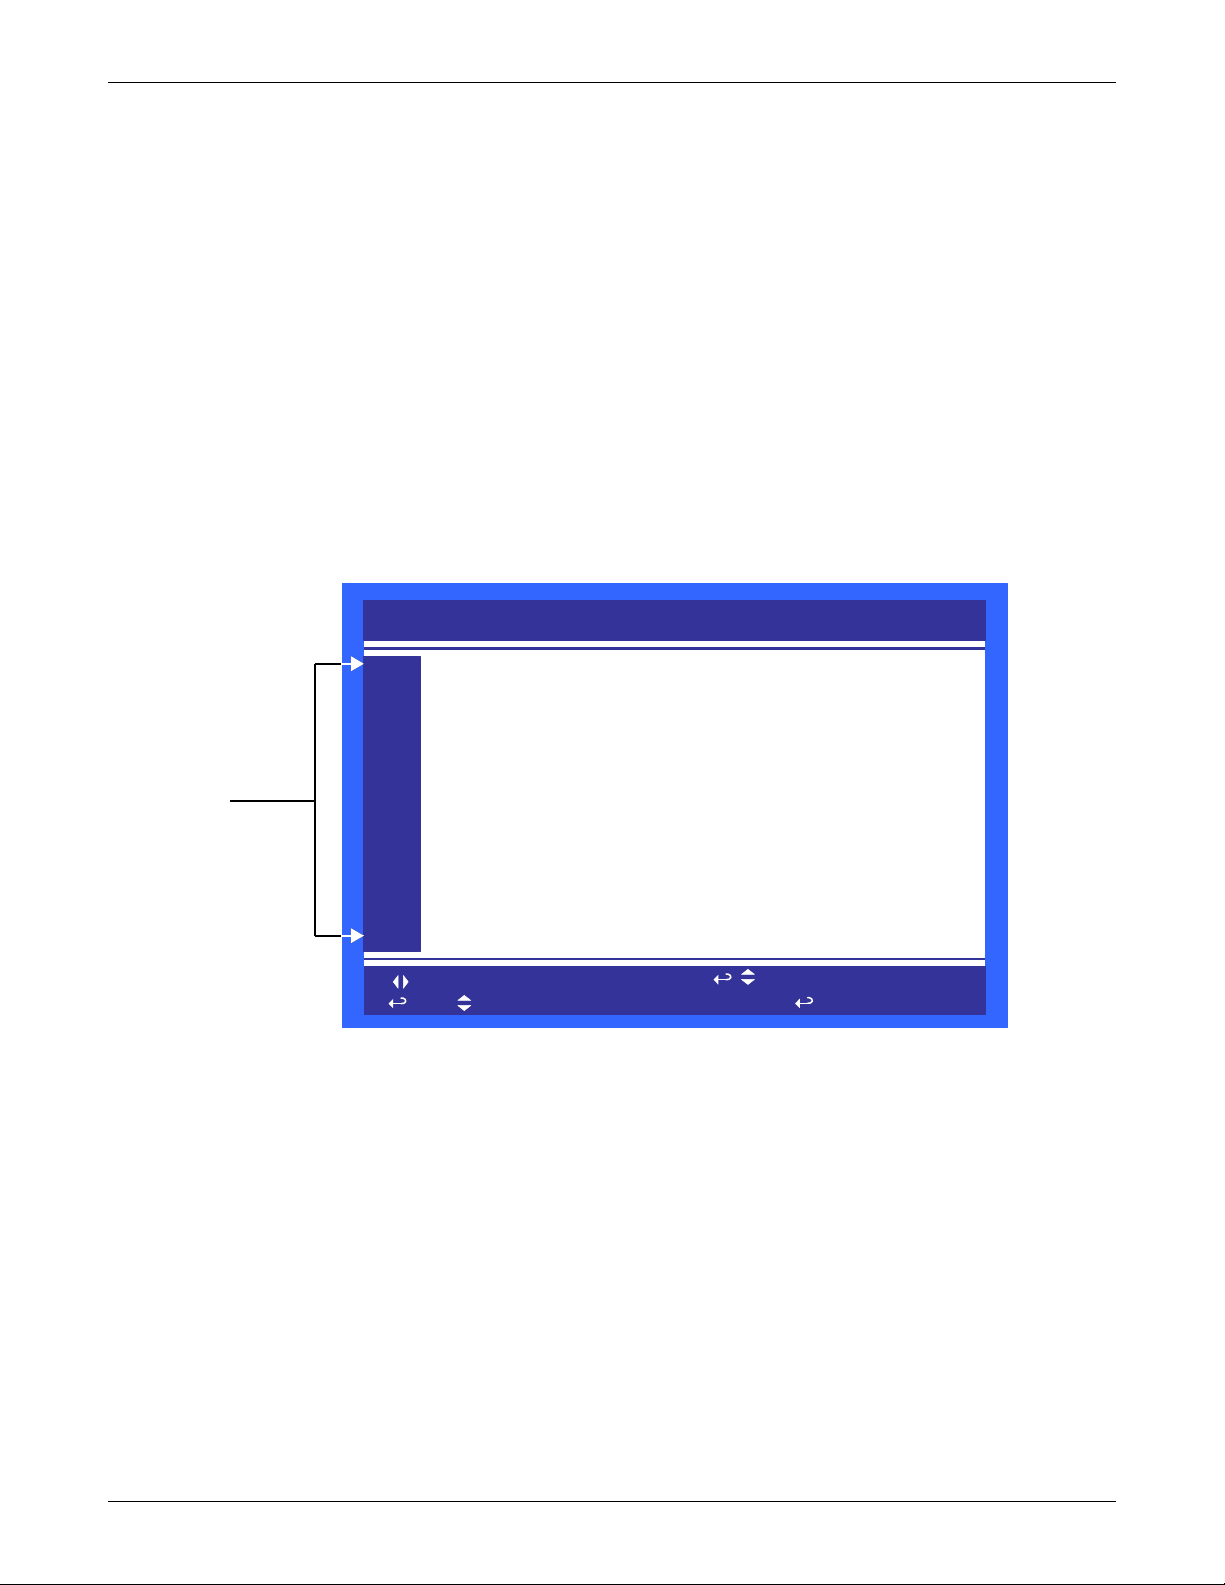
4.1.2 Accessing Menus and Settings
SETPOINTS
for next /prev unit to sel ect parameter
then to change parameter to confirm
UNIT 01
PASSWORD (Actual Level 3)
Temperature Setpoint
Humidity Setpoint
Humidity Control Type
Supply Sensor
Supply Setpoint
Backup Temperature Setpoint
U101
U102
U103
U104
U105
U106
U107
U108
U109
U110
U111
????
72°F
50.0%
Relative
Disabled
°F
73°F
Password command line—highlight
by pressing Enter
After highlighting the Password command line, press
Enter again to highlight the first digit. Use the Up and
Down arrow keys to change the first digit. Move to the
next digit in the Password with the right arrow.
Password is
factory-set
at 1490
Viewing Data
No password is required to view data or settings.
To view data:
1. From the home screen, press the Enter key to view the User Menu (see Figure 8).
2. Press Enter again to highlight the first icon.
3. Use the keyboard’s arrow keys to move to the icon for the data you wish to view.
4. Once that icon is highlighted, press Enter again to open that menu.
• If a password is required, see 4.1.3 - Entering the Password.
• If a menu has more than one screen, the Liebert iCOM display will have text at the top similar to this: (page 1 of 2).
5. Press Enter to select the first line of data.
6. Use the Up and Down arrow keys to scroll to the desired data point.
7. Press ESC to move back to higher level menus.
4.1.3 Entering the Password
Most settings in the Liebert iCOM are protected by a factory-set password, 1490. To enter the password:
1. From the home screen, press the Enter key to view the User Menu (see Figure 8).
2. Press Enter again to highlight the first icon.
3. Use the keyboard’s arrow keys to move to the icon for the data you wish to change.
4. Once that icon is highlighted, press Enter again to open that menu.
5. Press Enter to highlight the Password line.
6. With the Password line highlighted, press Enter to highlight the first digit in the password
7. Enter the password, 1490.
Use the Up and Down arrow keys to select a numeral for the first digit of the password.
Move to the next digit of the password with the Right arrow key.
Select the numerals for all four digits with the same process.
8. After all four digits of the password have been entered, press the Enter key.
Liebert iCOM Display Components and Functions
NOTE
Do not press the ESC key or the Liebert iCOM will move to the previous screen and the
password must be re-entered before changes may be made.
Figure 6 Entering the password
11
Page 18

4.1.4 Accessing Submenus
To access the User, Service or Advanced menu, press the Enter or down arrow key while viewing the
Status menu of the unit you wish to access. The User menu will be displayed first. To view the Service
or Advanced menus, press the right arrow key.
Accessing Submenus on Small Displays
While viewing the menu you wish to access (User, Service or Advanced), use the up and down arrow
keys to scroll through the icons page-by-page. To scroll through the icons one-by-one, press the enter
key and then use the up and down arrow keys. With the desired icon highlighted, press the enter key
to enter that submenu. Once in a Submenu, a list of parameters is displayed.
Press the enter key and use the up and down arrow keys to scroll through the parameters one-by-one.
Pressing the ESC key will go back a level. Figure 7 shows the Liebert iCOM control menus for a
small display.
Accessing Submenus on Large Displays
While viewing the menu you wish to access (User, Service or Advanced), press the enter key to highlight the first icon. Use the arrow keys to navigate through the icons. With the desired icon highlighted, press the enter key to enter that submenu. Once in a Submenu, a list of parameters will be
displayed.
The up and down arrow keys may be used to scroll through the parameters page-by-page if the submenu has multiple pages. To scroll item-by-item, press the Enter key and then use the up and down
arrow keys. Using the right or left arrow keys on large displays attached to a network will change the
unit being viewed. Pressing the ESC key will go back a level. Figures 7 and 19 show the Liebert
iCOM control menus for a stand-alone large display and for a networked large display, respectively.
Liebert iCOM Display Components and Functions
NOTE
Settings are readable without a password, but changing settings requires a password.
12
Page 19
Liebert iCOM Display Components and Functions
Status Menu – System View
(Large Display Only)
Status Menu
Unit 1 View
User Menu
Unit 1
Password
Setpoints
Spare Part List
(Large Display Only)
Event Log
Graphics
View Network
(Large Display Only)
Set Alarms
Sensor Data
Active Alarms
Display Setup
Total Run Hours
Sleep Mode
(Large Display Only)
Service Contact Info
Service Menu
Unit 1
Password
Setpoints
Unit Diary
(Large Display Only)
Maintenance/Wellness Settings
(Maintenance on Large
Display Only)
Diagnostics / Service Mode
(Service Mode on Large
Display Only)
Set Alarms
Sensor Calibration/Setup
(Setup on Large Display Only)
System/Network Setup
(System on Large Display Only)
Options Setup
Service Contact Info
Advanced Menu
Unit 1
Password
Factory Settings
Compressor Info
(Large Display Only)
Access Passwords
Unit 1 will be displayed
in the top left corner of
the screen on the large
display only.
Figure 7 Menu tree—Large and small displays, stand-alone or networked
13
Page 20
4.2 Changing Operational Settings
°C / °F
% RH
SET
EVENT
LOG
SET
ALARMS
!
ACTIVE
ALARMS
1 2
39
6
SET
1234h
1 2
39
6
Changes to the Liebert Challenger 3000/Liebert Challenger ITR’s operation settings in the Set
Alarms and Setpoints menus require a password.
1. From the home screen, press the Enter key to view the User Menu (see Figure 8).
2. Press Enter again to highlight the first icon.
3. Use the keyboard’s arrow keys to move to the icon for the data you wish to change.
4. Once that icon is highlighted, press Enter again to open that menu.
• If a password is required, see 4.1.3 - Entering the Password.
5. After entering the password, use the Up and Down arrow keys to scroll to and highlight the
operational setting to be changed.
6. Press Enter to highlight the values for that setting.
7. Use the Up and Down arrow keys to change the value.
8. Press Enter to accept the change. (The value will no longer be highlighted.)
9. Press ESC to deselect the operational setting. (The setting will no longer be highlighted.)
10. Press ESC again to move to previous screens.
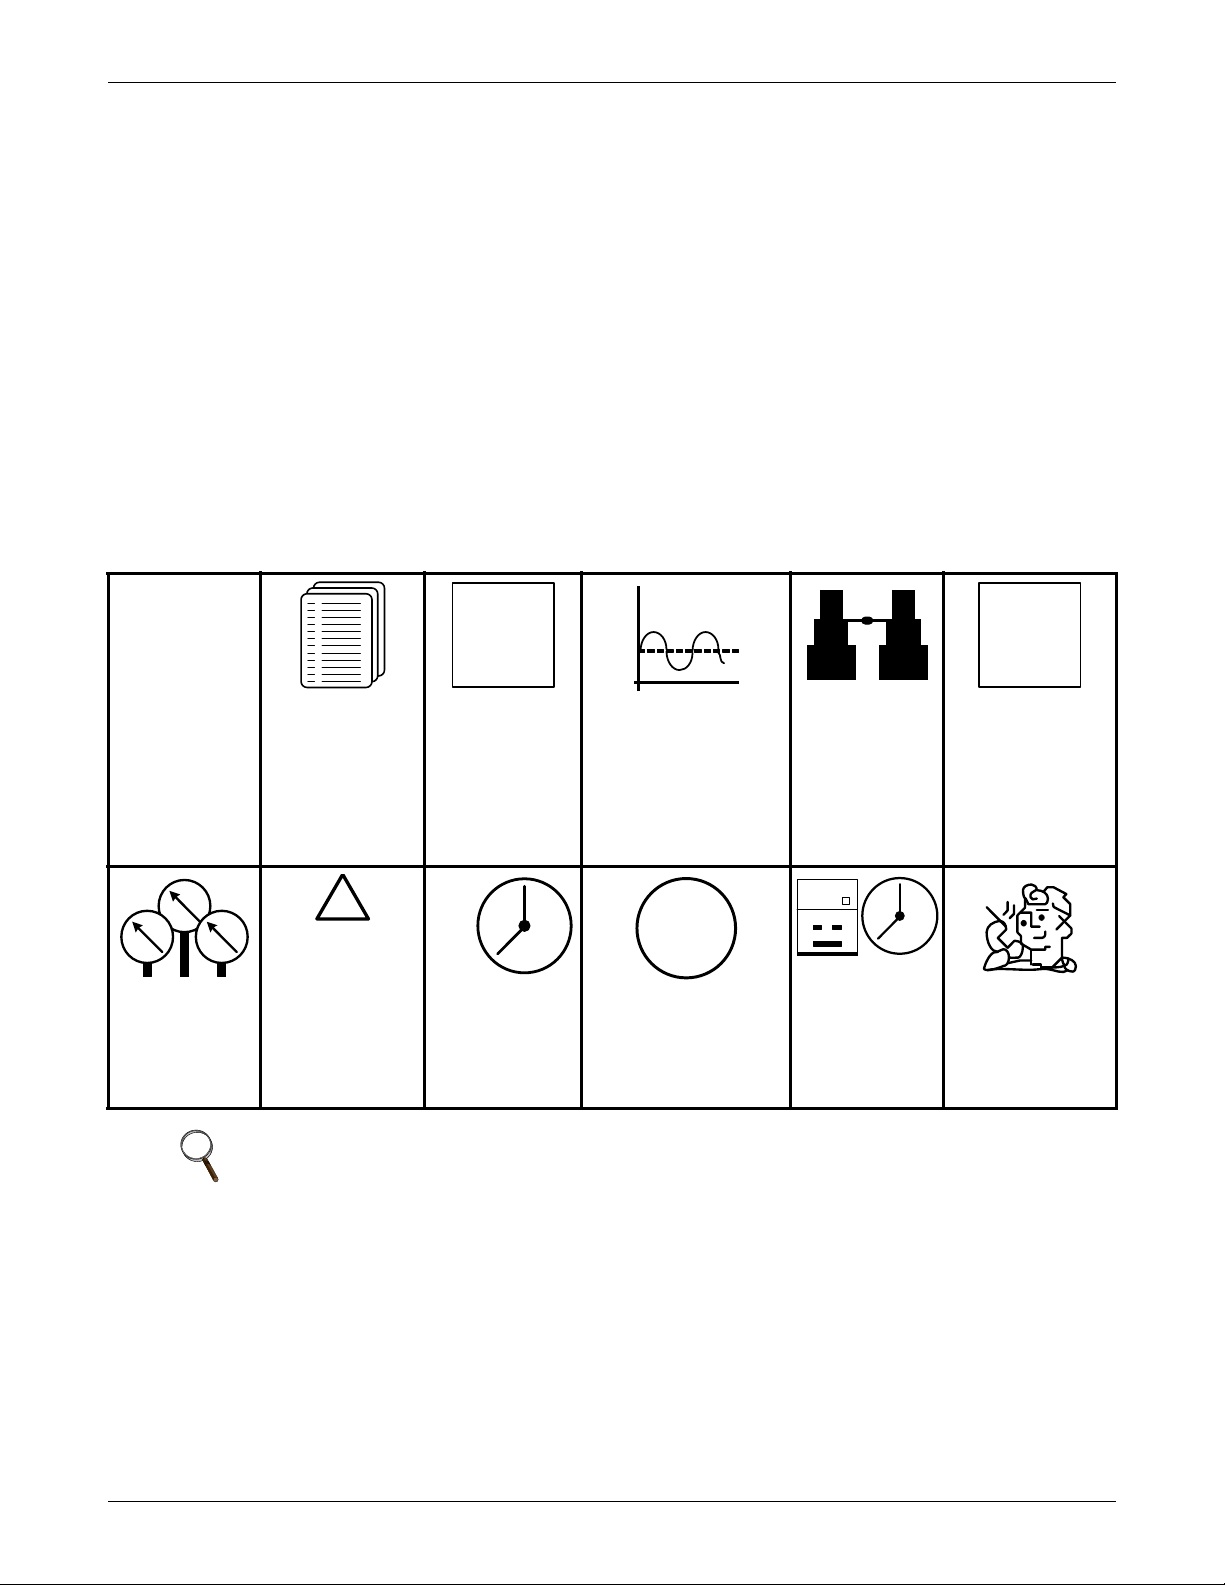
Figure 8 Liebert iCOM User Menu icons
Liebert iCOM Display Components and Functions
Setpoints
View and change
operational
setpoints
Sensor Data
Shows readings
of sensors; View
Only
Spare Parts List
Contains spare
parts available on
site; Large Display
Only
Active Alarms
Lists all current
alarms; View Only
Event Log
Lists last 400
events and
alarms
View Only
Display Setup
Change settings
for display:
language and
time
Graphic Data Record
Displays average room
air temperature and
supply refrigerant
temperature graphs;
Data is View Only;
Display scale is
adjustable
Total Run Hours
Records the run time of
all components and
allows setting of limits on
run time; View Only
View Network
Shows status of
all connected
units; View Only;
Large Display
Only
Sleep Mode
Used to set
operating period,
including startup
and shutdown;
Large Display
Only
Set Alarms
Allows user to
change settings for
alarms
Service
Contacts
Contains key
contact information
for service
NOTE
Menu shows icons only; text is explanatory and does not appear on the Liebert iCOM display.
14
Page 21
4.3 Changing Liebert iCOM’s Display Settings
DISPLAY SETUP
to change parameter
to confirm
to select parameter
for next/previous unit
then
Language
Date
Time
Temperature Indication
Display Contrast
Buzzer Frequency
Backlite Off after
Screen
Display Shows
Display Colors
Date Format
SYSTEM
U401
U402
U403
U404
U405
U406
U407
U408
U409
U410
U411
ENGLISH (US)
7/7/2008
09:24 :17
°C
50
Off/ 50
5 min
XDP
ACT+SET
Normal
mm/dd/yyyy
Highlight the
setting to be
changed by
pressing Enter.
No password is required to change the way Liebert iCOM displays data. The Display Setup controls
how the unit shows data, such as temperature, date and time.
To change the display settings:
1. From the home screen, press the Enter key to view the User Menu (see Figure 8).
2. Press Enter again to highlight the first icon.
3. Use the keyboard’s arrow keys to move to the Display Setup icon.
4. Once that icon is highlighted, press Enter again to open that menu.
5. Press the Enter key to select the first setting.
Either change that setting or navigate to another setting with the Up and Down arrow keys.
6. Once the desired setting is highlighted, press the Enter key to access that parameter’s display
setting options.
7. Use the Up and Down arrow keys to make changes.
8. Press the Enter key to accept the changes.
9. Press the ESC key twice to return to Liebert iCOM’s user menu.
Figure 9 Display setup screen
Liebert iCOM Display Components and Functions
15
Page 22

4.4 Graphical Data Record
UNIT 1
+11
RETURN AIR TEMPERATURE
73°F
-11
18ht:24h 12h 6h 09:21
+25
RETURN AIR HUMIDI TY
50%
-25
18ht:24h 12h 6h 09:21
GRAPHS (system average )
°C / °F
% RH
SET
WELLNESS
SERVICE
SET
ALARMS
+ / -
NETWORK
SET
UP
The Graphical Data Record charts the average temperature from the return air temperature sensor
(see Figure 10). The temperature scales can be changed to expand or compress the data. The time
scale also can be altered to any of several selectable values. Changing the time scale eliminates all
previous graphical data and the unit will begin recording new data.
Figure 10 Temperature graph
Liebert iCOM Display Components and Functions
4.5 Liebert iCOM Service Menu Icons and Legend
Figure 11 Liebert iCOM Service Menu icons
Setpoints
View and change
operational
setpoints
Sensor
Calibration/Setup
Setup and calibrate
sensors for site
NOTE
Menu shows icons only; text is explanatory and does not appear on the Liebert iCOM display.
Unit Diary
Shows all program
changes and
maintenance
performed,
Network
Setup or alter
network setting.
Maintenance/
Wellness
Settings
Shows all mainte-
nance records, cal-
culates next
maintenance date
Options Setup
Enter specific
settings for various
options
Diagnostics/
Service Mode
Enter Diagnostics/
Service Mode for
troubleshooting
and repair; Large
Display Only
Set Alarms
Change settings for
alarms
Service Contacts
Contains key
contact information
for service
16
Page 23

4.6 Wiring for Unit-to-Unit Communications—U2U
The Liebert Challenger 3000/Liebert Challenger ITR with Liebert iCOM comes from the factory wired
for stand-alone operation. Multiple units can be set up in a network for efficiency, ease of operation
and easier control.
NOTE
U2U connections can be set up to link these units: Liebert Challenger 3000, Liebert Challenger
ITR, Liebert DS and Liebert CW. Each unit must be equipped with a Liebert iCOM.
4.6.1 Liebert iCOM U2U Ethernet Network
The Liebert iCOM U2U network must be isolated from other network traffic. The network switch(es)
that connect Liebert iCOM controls need to be dedicated to supporting only Liebert iCOM communication. The U2U network cannot be connected to the building or IT network. If network communication is ever lost (failed network switch, etc.), all Liebert iCOM-controlled cooling units will continue to
operate as independent units.
The Liebert iCOM control can support up to 64 nodes on one network. An input/output board, large
display and large wall-mount display are each considered one node. No more than 32 nodes may be
input/output boards (32 cooling units). A small display is not considered a node. Small displays connect directly to input/output boards that do not have large displays attached to them. The following
table illustrates how a network can be configured.
Table 2 Sample Liebert iCOM network configurations
Sample
Configuration
12020 NoNA
22021Yes 3
33030Yes 3
42110Yes 3
58441Yes13
6323200 Yes 64
7322755 Yes 64
8 32 0 32 32 Yes 64
Input/Output
Boards
Large
Displays
Small
Displays
Wall Mount
Large Displays
Liebert iCOM Display Components and Functions
Private Switch
Required
Ports Required
on Switch
Network communication can be configured during system startup by a Liebert-trained technician. For
technical issues contact:
Liebert Technical Service
1050 Dearborn Drive
Columbus, Ohio 43235
Telephone: 1-800-LIEBSRV (1-800-543-2778)
E-Mail: technicalservice@emersonnetworkpower.com
4.6.2 Wiring a Liebert iCOM U2U Network
Small Displays
Two cooling units, each with a small display: To network two cooling units, each with a small
display, connect a crossover CAT5 cable between the P64 connectors on each cooling unit’s Liebert
iCOM input/output board. A network switch is not needed, because the small display connects
directly to the Liebert iCOM.
Three or more units with small displays: To network three or more cooling units, each equipped
with a small display, connect a straight-through CAT5 Ethernet cable from the P64 connector on each
cooling unit’s Liebert iCOM input/output board to a common network switch (see Figure 13).
17
Page 24

Liebert iCOM Display Components and Functions
Large Displays
A network switch is required to enable Ethernet communication on one or more cooling units with
large displays. Each cooling unit with a large display requires two straight-through Ethernet cables
from a network switch. One cable connects to port P64 on the Liebert iCOM input/output board and
the other straight-through cable connects to the female-female coupler provided with the unit. Connect the red crossover cable, which is provided with the cooling unit, between the coupler and the P64
port on the back of the large display (see Figure 15).
NOTE
Only cooling units with large displays are supplied with a female-female coupler inside the
unit from the factory.
Wall-Mount Large Display
Only large displays can be used for remotely monitoring and controlling cooling units connected on
the same network. Each wall-mount large display requires 120V input power; Liebert provides an AC
adapter wall plug. A straight-through Ethernet cable must be connected between the network switch
and the P64 port on the back of the display. This will enable control and monitoring capabilities to
any cooling unit connected to the network.
Combining Large and Small Displays on a U2U Network
Setting up a network of cooling units equipped with large and small displays requires a network
switch. The controls are to be connected to the switch as described above.
To connect multiple units in a U2U network, the Network IP address, U2U Group Number and the
U2U Address must be changed. The Network IP and the U2U Address must be unique on the network.
18
Page 25

Figure 12 U2U network setup diagram
Network
Switch
Liebert Challenger
with Small Liebert
iCOM Display
Liebert Challenger
with Small Liebert
iCOM Display
Liebert Challenger
with Large Liebert
iCOM Display
Display Service/Network
Liebert iCom Display Menu
IP Address: 192.168.001.001
U2U A d dre ss:1
Group #: 1
---------------------------------------
Display Service/Network
Liebert Challenger
Control Board Menu
IP Address: 192.168.001.002
U2U Address: 2
Group #: 1
Display Service/Network
Liebert Challenger
Control Board Menu
IP Address: 192.168.001.003
U2U Address: 3
Group #: 1
Display Service/Network
Liebert Challenger
Control Board Menu
IP Address: 192.168.001.003
U2U Address: 4
Group #: 1
Liebert iCOM Display Components and Functions
19
Page 26

Liebert iCOM Display Components and Functions
Notes on Wiring for a U2U Network—Refer to Figures 13 and 15
1. See unit electrical schematic.
2. Cable ‘A’ and ‘B’ are provided with each unit. One only is used as follows:
• Liebert IntelliSlot based communications - Cable ‘A’ is preconnected to P65 on I/O board and
P65 on the Liebert IntelliSlot power supply
• Non-Liebert IntelliSlot-based communications—Cable ‘B’ is pre-connected to Terminals 77 &
78 but must be exchanged with Cable ‘A’ at P65 on the I/O board.
3. A Liebert IntelliSlot option bay is provided for a maximum of two optional Liebert IntelliSlot
Web-LBDS or Liebert IntelliSlot 485-LBDS cards.
4. When a large display is used, both cables (P64A and P66) are required.
5. On units with the standard small display, Cable ‘C’ is provided for unit to unit (U2U) networking.
Cable ‘C’ is pre-connected to P64A on the I/O board. The customer connection point is in the fieldwiring area near the Liebert IntelliSlots.
6. On units with the optional large display, Cable ‘C,’ Cable ‘D,’ and a crossover coupler are provided
for unit-to-unit (U2U) networking. To enable U2U networking, unplug the red cable from P64A
near the I/O board and connect to one side of the crossover coupler. Connect Cable ‘C’ to P64A as
shown. The customer connection point for Cable ‘C’ is located in the field wiring area, near the
Liebert IntelliSlot bays. Connect Cable 'D' to the other side of the crossover coupler as shown. The
customer connection point for Cable 'D' is also in the field wiring area, near the Liebert IntelliSlot
bays. This connects the I/O board and the display to the private U2U network.
7. When the optional remote T/H sensors are supplied, the customer connection point is in the field
wiring area, near the Liebert IntelliSlot bays. The cable supplied with the remote T/H sensors is
marked unit end and sensor end. Match the six-pole plug on the unit end of the cable with the six-
pole connector in the unit. Secure the fork terminal on the cable shield to the metal plate adjacent
to the six-pole connector.
20
Page 27

Figure 13 Liebert iCOM wiring—Unit as shipped
Liebert IntelliSlot
Power Supply
Liebert
IntelliSlot 1
Liebert
IntelliSlot 2
P64A Connection
Located Near
I/O Board
Cable 'A'
Cable†‘D’
Cable 'C'
Ribbon
Cables
Cable 'B'
Liebert iCOM
Microprocess or and I/O Board
Not
Used
See Note 2
See table for
plug assignments
24VAC Nominal
T6 Isolation
Transformer
T1 Unit Control
Transformer
Control Fuse Board
Internal T/H Sensor
See Notes
5 & 6
Standard Small
Graphics D is play
(Rear View)
Red Crossover
Ethernet Cable
CAN
Cable
See
Note 4
Crossover
Coupler
See Note 6
RemoteT/H Sensor (Optional)
Customer
Connection
Point
See Note 7
Optional Large
Graphics Display
(Rear View)
See Note 4
See Note 3
CAN
Cable
194273
Liebert iCOM Display Components and Functions
21
Page 28

Figure 14 Wiring a small display for U2U network operation
Standard Small
Graphics Display
(Rear View)
Liebert iCOM
I/O Board
Straight-Through
Ethernet Cable
To / From Other
Networked Units
CAN
Cable
U2U Networking Switch
(Field-Supplied)
Not
Used
Cable 'C'
P64A Connection
Located Near
I/O Board
194273
Liebert iCOM Display Components and Functions
22
Page 29

Figure 15 Wiring a large display for U2U network operation
Crossover
Coupler
(See Note 6)
Red Crossover
Ethernet Cable
Liebert iCOM
I/O Board
Straight-Through
Ethernet Cables
CAN
Cable
See Note 4
Optional Large
Graphics Display
(Rear View)
To / F r o m O t h er
Networked Units
U2U Networking Switch
(Field-Supplied)
Not
Used
Customer Connection Point
See Note 6
Cable 'D'
Cable 'C'
P64A Connection
Located Near
I/O Board
194273
Liebert iCOM Display Components and Functions
23
Page 30

Figure 16 Liebert iCOM input-output control board
P65 P64
(RJ-45 Jack)
P66
P63P61
P67
Liebert iCOM Display Components and Functions
24
Page 31

4.7 Entering Network Setup Information
SYSTEM/NETWORK SETUP (page 2 of 2)
Attention: any changes done on these parameters
must be followed by a 'Save+R eboot ' command
SYSTEM
PASSWORD (Actual Level 3)
Monitoring Protocol
IP Address
Netmask
Gateway
MAC
U2U Protocol
U2U Address
U2U Group
Bootloader Variables
Static RAM
S834
S835
S836
S837
S838
S839
S840
S841
S842
S843
S844
????
Velocity
126.001 .060 .212
255.255 .255 .192
126.001 .060 .213
00:00 :68:19:02:03
GBP
1
15
OK No
OK No
SYSTEM/NETWORK SETUP (page 2 of 2)
Attention: any changes done on these parameters
must be followed by a 'Save+R eboot ' command
SYSTEM
PASSWORD (Actual Level 3)
IP Address
Netmask
Gateway
MAC
U2U Protocol
U2U Address
U2U Group
Bootloader Variables
S812
S813
S814
S815
S816
S817
S818
S819
S820
S821
S822
????
126.001.060 .212
255.255.255 .192
126.001.060 .212
00:00 :68:19:21:23
GBP
33
15
OK No
Setting up a U2U network requires setting a unique IP addresses for each unit, choosing a U2U
address and designating the U2U group. Refer to Figure 17 for the setup screen for the control board
(installed inside the Liebert Challenger 3000/Liebert Challenger ITR) and Figure 18 for the setup
screen for the Liebert iCOM on the front of the Liebert Challenger 3000/Liebert Challenger ITR.
Figure 17 Control board U2U network setup screen
Liebert iCOM Display Components and Functions
Figure 18 Liebert iCOM display U2U network setup screen
25
Page 32

Liebert iCOM Display Components and Functions
Status Menu – System View
(Networked Large Display Only )
Status Menu
Unit 1 View
Status Menu
Unit 2, 3, 4...
User Menu
Unit #
Password
Setpoints
Spare Part List
Event Log
Graphics
View Network
Set Alarms
Sensor Data
Active Alarms
Display Setup
Total Run Hours
Sleep Mode
Service Contact Info
Service Menu
Unit #
Password
Setpoints
Unit Diary
Standby Settings/Lead-Lag
Maintenance/Wellness Settings
Diagnostics / Service Mode
Set Alarms
Sensor Calibration/Setup
System/Network Setup
Options Setup
Service Contact Info
Advanced Menu
Unit #
Password
Factory Settings
Compressor Info
Access Passwords
Unit # or System will be
displayed in the top left
corner of the screen .
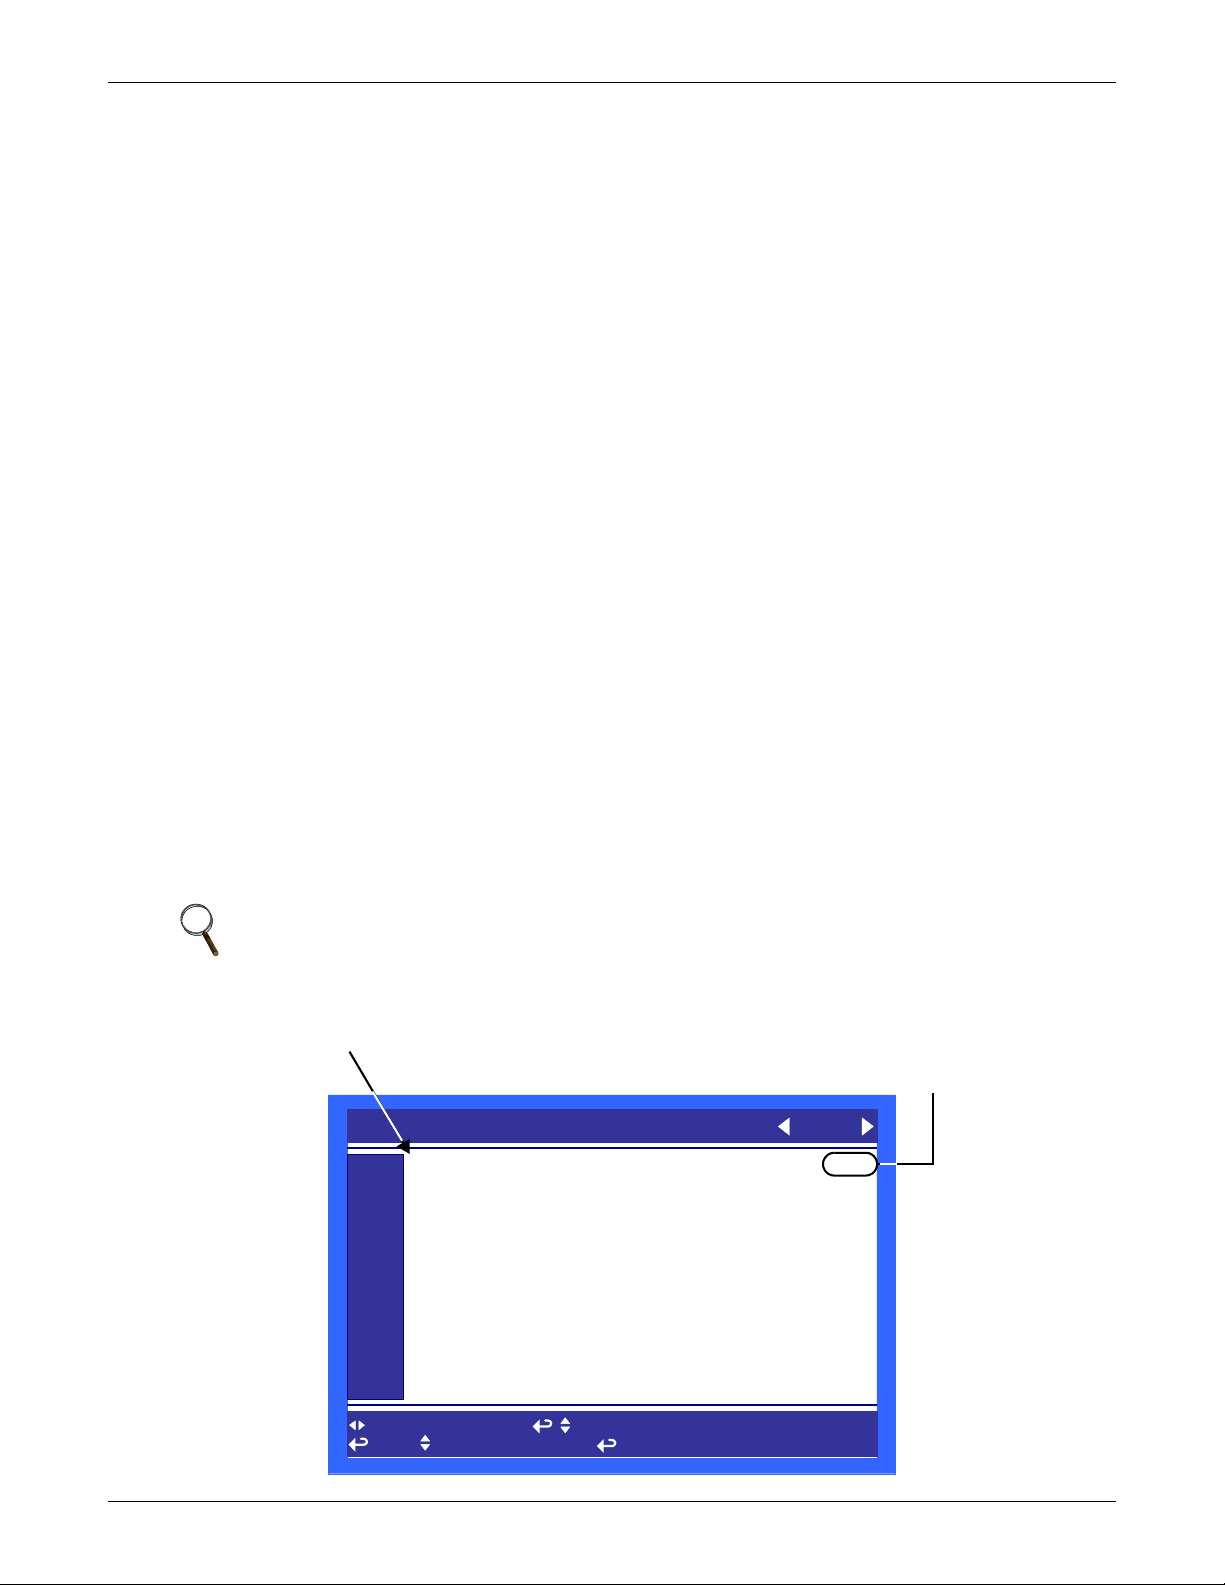
4.8 Viewing Multiple Units with a Networked Large Display
When you first wake up the control, press the ESC key to return to the System view Status menu.
This view shows an average of all the units on the network and any alarms present. To view a specific
unit on the network, press either the enter key or down arrow key. When you do this, you will see the
word System in the top left of the screen change to a unit number. Using the left and right arrow keys
you can toggle through the various units on the network. To go back to the System view, or back one
level from any menu in the control, press the ESC key.
Figure 19 Menu tree—Large display, networked
26
Page 33

5.0 OPERATION
Remote On / Off
Display On / Off
The Liebert iCOM display for your Liebert cooling unit features an easy-to-use, menu-driven liquid
crystal display (LCD). All unit settings and parameters can be viewed and adjusted through three
menus: User, Service and Advanced. All active alarms are displayed on the LCD and annunciated.
The control is shipped from the factory with default selections for all necessary settings. Adjustments
can be made if the defaults do not meet your requirements.
References to menu items in this manual are followed by the main menu and the submenu where they
can be found.
For example:
• Temperature Setpoint (User Menu, Setpoints) - The Temperature Setpoint parameter is
located in the User menu under the Setpoints submenu.
• High Return Humidity (Service Menu, Set Alarms) - The High Return Humidity alarm is
located in the Service menu under the Set Alarms submenu.
5.1 Single Unit Functions
5.1.1 Unit/Fan Control
Start - Stop
Operation
Unit On means the fan output is activated. The unit can be switched On and Off from two inputs:
• Remote On/Off input
• Display button
Pressing the On/Off key on a small display will control only the cooling unit it is connected to regardless, of whether the cooling unit is a stand-alone unit or part of a network.
Pressing the On/Off key on a large display of a stand-alone cooling unit will control only that unit.
The effect of pressing the On/Off key on a large display connected to a network depends on the view:
System or Unit.
• In System view, pressing the On/Off key shows a warning asking for confirmation to shut down
the entire system.
• In Unit view, pressing the On/Off key affects only the unit being viewed, without a confirmation
request.
Each time a unit is powered On or Off, an event is added to the Event Log in the User menu.
NOTE
Customer switches: remote On/Off (if used) and display On/Off switches are in series. A
cooling unit will start only if both switches are On; if one of these switches is Off, the unit will
stop. Safety devices within the unit are also in series and will shut the unit down if required.
Figure 20 Start-stop priority switches
NOTE
If Remote On/Off is not used, a jumper is inserted to bypass the switch.
Unit auto restart will begin once the control has booted.
27
Page 34

Operation
!
WARNING
Risk of electric shock. Can cause injury or death.
The Liebert iCOM microprocessor does not isolate power from the unit, even in the “Unit Off”
mode. Some internal components require and receive power even during the “Unit Off” mode
of Liebert iCOM control.
The only way to ensure that there is NO voltage inside the unit is to install and open a remote
disconnect switch. Refer to unit electrical schematic.
Autorestart
When there is a loss of power to the cooling unit and power comes back, the unit will return to its previous operating status—On if it was On before the power failed, Off if it was Off.
When power returns, the autorestart time—time-selectable: Single Unit Auto Restart (Service Menu,
Options Setup)—controls the start of the unit. The autorestart time runs in a loop, starting the next
unit each time when elapsed. With units in a U2U network, the autorestart will begin with Unit #1.
Loss of Power Alarm
A Loss of Power Alarm is activated when power is restored after an interruption. If acknowledged, the
alarm resets automatically after 30 minutes. This alarm can be set to different event types (Message,
Alarm or Warning) and can be disabled under menu item Loss of Power (Service Menu, Set Alarms).
NOTE
Loss of power alarm will be activated only on units that had the fan on before power was lost.
Fan Alarm / Fan Protection Settings
The fan operation is protected by two devices: motor protection (optional) and a differential pressure
switch. The differential pressure switch ensures that the blower(s) are moving air and the motor protection monitors for main fan overload. If either protection device triggers, an alarm will be
announced by a buzzer, alarm relay and event to monitoring after an adjustable time-delay (Main
Fan Overload and Loss Of Airflow in Service Menu, Set Alarms).
The time delay at the unit start is always five seconds shorter than the control delay (to avoid short
component starting when the fan is not working). During operation, the fan delay is fixed to
15 seconds.
There are two selection possibilities for both, Loss Of Airflow and Main Fan Overload:
• Shutdown—stops the unit (intended for DX models).
• Disable—stops the humidifier, electrical heaters and dehumidification; allows cooling and
free-cooling only (intended for chilled water models / external cooling).
NOTE
When the Main Fan Overload alarm is active, the Loss of Airflow alarm is masked out. If a loss
of airflow occurs, the compressor, heaters and humidifier will all turn Off until airflow is
restored.
5.1.2 General Compressor Requirements
Low-Pressure Time Delay
When the compressor starts, the low-pressure input is ignored for a selected period of time based on
the setting of the Low Pressure Alarm Delay (Service Menu, Options Setup). This permits the pumps
to begin operating normally without nuisance alarms at startup.
NOTE
Low-pressure condition could be read through contacts or through pressure transducers with
threshold setting.
28
Page 35

Operation
Pump Down—Air Cooled with Condenser Only Units
NOTE
Pump down activation is determined by the type of unit; these units do not have a pump-down
function: Glycol, GLYCOOL and remote condensing units.
The Pump Down operation is performed to protect the compressor oil from being diluted with liquid
refrigerant, which helps ensure that the compressor is properly lubricated for the next startup. The
Pump Down operation operates in the following manner:
Pump down is always performed loaded (for digital scroll: control solenoid valve disabled).
Digital Scroll Only: When pump down has finished successfully, pump down will be continued for
another half-second with the control solenoid valve energized.
High Pressure Alarm
When the compressor is initially activated, the system will be monitored for a high pressure situation.
When a high pressure situation is detected during the first 10 minutes of operation, the unit will
attempt to correct the problem several times without notification. This alarm will automatically reset
when the pressure drops to an acceptable operating range. If the unit is unsuccessful in correcting the
problem, an alarm will occur and the affected compressor will be locked Off. If high head pressure
alarm trips three times in a rolling 12 hour period, the affected compressor will be locked Off.
Once the compressor is locked Off, it will not come back On until main power is reset, or until the
HP Alarm Counters (Service Menu, Diagnostics) are reset to 0.
NOTE
If the unit is equipped with manual reset high head pressure switches, or if the auto reset high
head pressure switches don’t reset, the compressor will not be turned back On, but there will be
a 30-second delay from when the high head pressure situation occurs and when the alarm is
annunciated.
Digital Scroll High Temperature
A protective maximum operating compressor temperature limit is imposed on units with digital scroll
compressor(s) with thermistor. Once the digital scroll temperature reaches the maximum temperature threshold, the compressor will be locked out for at least 30 minutes and an alarm will be annunciated. If after 30 minutes the temperature has cooled to a safe operating temperature, the
compressor will resume operation.
The HT 1 Alarm Counter (Service Menu, Diagnostics) records the number of high-temperature
alarms. Once these counters reach five occurrences in a rolling four-hour period, the compressor will
be locked out. The alarm can be reset once the temperature returns to a safe level by:
1. Setting the counter back to 0 from the display and pressing the alarm reset button.
2. Shutting Off power to the control board by turning the cooling unit's main power disconnect
switch Off and On.
5.1.3 Compressor Timing
To help maximize the life of your compressor(s), there is a start-to-next start delay for each single
compressor.
A Minimum On time and a Minimum Off time may be selected in the Advanced menu (minimum
three minutes for single phase compressors). Consult the factory on how to modify the Minimum On
and Off time settings.
29
Page 36

Evaluate the start operation of the unit (with pump down).
Approximate room load (in % full load)
Time between peaks x peak amplitude x 4
1. Close LLSV
2. Wait for LPS to make or ignore for WSK time
If LPS is made before WSK has expired, allow the compressor to continue running, if not then
stop compressor and alarm low pressure alarm.
3. Once LPS makes start compressor.
4. Verify the alarm phrase for the WSK and the low pressure switch.
5.2 Control Types
5.2.1 Proportional Control
This is a standard control method that maintains the room at a temperature proportional to the load.
The temperature maintained increases as the room load increases. At full load the room would be controlled at a temperature equal to the temperature setpoint plus the temperature sensitivity.
5.2.2 PI Control
The PI control combines two individual terms to determine the control output for a given set of conditions. Note that PI control is used only for temperature. If PI control is selected, humidity will continue to use proportional control.
The proportional (P term) is determined by the difference between the current temperature and the
control setpoint. This term is expressed in % cooling (heating) desired for each degree above (below)
the setpoint. It is adjustable from 0% to 100% per degree. The purpose of this term is to adjust the
control output for any deviation between the current temperature and the control setpoint.
Operation
The integral (I term) is determined by two things: the difference between the temperature and control
setpoint and the amount of time this difference has existed. This term is expressed in % cooling (heating) desired for each minute and degree above (below) the setpoint. It is adjustable from 0% to 100%
per degree-minute. The purpose of this term is to force the control to maintain the temperature
around the setpoint by slowly but continuously adding (subtracting) a small amount of cooling (heating) to the total control output until the temperature is at the setpoint.
A suggested tuning procedure is as follows:
1. Initially adjust the integral setting to 0%.
2. Starting with 20%, adjust the proportional setting in small increments (10% steps) until the
control sustains a constant hunting action (the temperature swings are approximately the same
amplitude from one peak to the next).
3. Note the time in minutes between peaks of adjacent temperature swings and the amplitude of the
temperature swing (degrees above the setpoint).
4. Adjust the proportional control setting to about 1/2 the value obtained in Step 2.
5. Adjust the integral setting to a value calculated by the following equation:
NOTE
If this calculation results in a value of less than 1%, then set the integral to 1%.
The tuning procedure above is only an approximation for an initial set of adjustments and are based
on the “average” room characteristics. Your particular settings may need to be further adjusted for
optimum PI control performance. Some suggestions for additional tuning are as follows:
• If cooling output overshoot is occurring on load changes, decrease the proportional setting.
• If system hunting occurs with constant room load, decrease the integral setting.
• If the control responds too slowly, resulting in large temperature excursions on a load change,
increase the proportional setting.
• If a constant temperature deviation exists between the temperature and setpoint, increase the
integral setting.
30
Page 37

5.2.3 Intelligent Control (Chilled Water Only)
The intelligent control operates from a set of general rules that define how the control output should
be adjusted for different system conditions. The rules are designed to duplicate the actions that an
experienced human operator would take if manually controlling the system.
Just as an operator might take several things into consideration before making a temperature control
decision, the intelligent control can be programmed to do likewise. For example, not only is the current temperature used in making temperature control decisions, but also conditions such as:
• How fast is the temperature changing?
• What direction is the temperature changing?
• What is the cooling output now?
• What was the cooling output in the past?
• How long ago was the cooling output changed?
• and other factors.
Any number of rules can be used in an intelligent control to define the controls operation under various operating conditions. Hence, several advantages are gained from this type of control over a more
standard control approach that uses a fixed mathematical equation to define the operation of the control for all conditions (such as a proportional or PI control). You can expect intelligent control to be
more efficient and precise for most applications, but system performance based on room conditions is
not as predictable as standard approaches that use a fixed equation.
Operation
31
Page 38

6.0 ALARM DESCRIPTIONS
The Liebert iCOM will audibly and visually annunciate all enabled alarms. Alarms are wired from
Terminal 24 through a normally open contact to locations 50, 51, 55 and 56, respectively, for alarms 1
through 4.
The alarms can be delayed from 0 to 255 seconds.
The alarms can be designated as WARNING, URGENT, or DISABLED. Alarms designated as
WARNINGS are annunciated after the Time Delay, but do not energize the Common Alarm Relay. If
designated as URGENT, they are annunciated after the Time Delay as a WARNING alarm and then
re-annunciated after a user programmable period from 0 minutes to 999 hours as an URGENT alarm.
When annunciated as an URGENT alarm, the Common Alarm Relay is activated.
When a new alarm occurs, it is displayed on the screen and the audible alarm is activated. If the Liebert Challenger 3000/Liebert Challenger ITR with iCOM is communicating with a Liebert site monitoring product, the alarm is also transmitted. The display will also show a message to “PRESS
ENTER KEY TO SILENCE” the alarm. After the alarm is silenced, the display will return to the Normal Status Display.
The alarms can also be silenced through communications with a Liebert site monitoring unit. Most
alarms will reset automatically when the alarm condition is no longer present and only after it has
been acknowledged by being “Silenced.” The exceptions are:
• The three software alarms: Loss of Power, Low Suction Pressure, and Short Cycle, which reset
automatically 90 minutes after being “Silenced” or acknowledged.
• Some alarms, such as overloads and high pressure switches, may require a manual reset depending on your model.
Alarm Descriptions
An alarms history is retained in nonvolatile memory.
6.1 Standard Alarms
6.1.1 Change Filter
Periodically, the return air filters in the environmental units must be changed. The Change Filter
alarm notifies the user that filter replacement is necessary. A differential air pressure switch closes
when the pressure drop across the filters becomes excessive. The switch is adjustable using the procedure on the switch label.
6.1.2 Compressor Overload
An optional tri-block overload device can be used for the compressor. Compressor overload may be
manual or automatic reset, depending on your model. Overload is located at the electric connection
box on the compressor.
32
Page 39

6.1.3 High Head Pressure
Compressor high head is monitored with a pressure switch. One SPDT pressure switch is used for the
compressor in the unit. If head pressure exceeds 360 PSIG, the switch opens the compressor contactor
and sends an input signal to the control. On a self-contained system, the head pressure switch located
at the compressor requires a manual reset and the alarm condition to be acknowledged on the front
display panel. On a split system, the high head pressure condition is acknowledged by pressing the
alarm silence button that will clear the alarm if the high head pressure condition no longer exists. On
a split system, if the compressor is Off for 1 hour, the control goes into a special “cold start mode.” In
the cold start mode on a call for cooling or dehumidification, the Liquid Line Solenoid Valve (LLSV) is
energized. If the high pressure switch does NOT trip within 10 seconds, the control returns to normal
operation of monitoring the high head pressure switch for three occurrences in a 12-hour period. It is
a rolling timer; after the third high head alarm occurs and is acknowledged by the user, it will lock Off
the compressor. If while in the cold start mode, the high head pressure switch DOES trip within 10
seconds of the activation of the LLSV, the control does not annunciate the alarm. The control will turn
Off the LLSV and delay 10 seconds. The control will permit this occurrence two more times or a total
of three times. If on the fourth try the high head pressure switch trips within 10 seconds, the control
will annunciate the alarm, turn Off the LLSV, wait for the user to acknowledge the alarm and hold
the compressor Off for three minutes, which is the normal short cycle control. On the third occurrence, the control will lock the compressor Off until the control power is reset.
On air cooled systems, check for power shut Off to the condenser, condenser fans not working, defective head pressure control valves, closed service valves, dirty condenser coils, and crimped lines. Also,
make sure that when the compressor contactor is energized, the side switch on the contactor closes to
energize the control circuit on the air cooled condenser.
On water/glycol/GLYCOOL systems, check water regulating valves. Verify water/glycol flow (are
pumps operating and service valves open?). Is water tower or drycooler operating? Is the coolant temperature entering the condenser at or below design conditions? Is relay R5 operating during cooling to
turn On the drycooler?
Alarm Descriptions
6.1.4 High Humidity
The return air humidity has increased to the High Humidity Alarm setpoint. Is the unit setup for
dehumidification (check DIP switch)? Check for proper setpoints. Does the room have a vapor barrier
to seal it from outdoor humidity? Are doors or windows open to outside air? Run diagnostics to make
sure the cooling system is working properly (the cooling system dehumidifies).
6.1.5 High Humidity and Low Humidity (Simultaneously)
If these two alarms are displayed at the same time, the humidity input signal is lost. Dashes will be
displayed for the humidity reading. The control system will deactivate humidification and dehumidification. Check for a disconnected cable or a failed sensor.
6.1.6 High Temperature
If the return air temperature has increased to the High Temperature Alarm setpoint, check for proper
setpoints. Is the room load more than the unit can handle (is the unit capacity too small)? Run diagnostics to make sure all cooling components are operating (compressor and/or valves).
6.1.7 High Temperature and Low Temperature (Simultaneously)
If these two alarms are displayed at the same time, the temperature input signal is lost (or the
humidity is out of sensor range: 15 to 85% RH). Dashes will be displayed for the temperature reading.
The control system will initiate 100% cooling. Check for a disconnected cable or a failed sensor.
6.1.8 Humidifier Problem Infrared Humidifiers
This alarm is activated by the high-water float switch in the humidifier pan assembly. The highwater float switch is normally closed and opens upon alarm condition. Check for drain clog and, if
present, clean drain. Check for float switch stuck high; replace the switch as necessary. Check for
proper operation of the humidifier water makeup valve.
Steam Generating (Canister) Humidifiers
This alarm is activated by a signal from the humidifier control indicating that the canister needs to be
replaced.
33
Page 40

6.1.9 Loss of Air Flow
A differential air pressure switch is used to indicate loss of air flow in Liebert Challenger 3000/Liebert Challenger ITR units.
Check for blockage of unit air outlet or inlet. Check blower motor fuses and overload reset. Check for
broken belts. Make sure blower wheels are tight to shaft. Run diagnostics to see if the fan contactor is
working properly.
6.1.10 Loss of Power
If the unit has lost power, or the disconnect switch was turned Off before the unit On switch was
pressed (to turn the unit Off), this local alarm will occur when power is restored to the unit. A Liebert
remote monitoring unit (optional) will immediately indicate loss of power.
6.1.11 Low Humidity
If the return air humidity has decreased to the Low Humidity Alarm setpoint, check to make sure
that the unit is setup for humidification (check DIP switch). Check for proper setpoints. Does the
room have a vapor barrier to seal it from outdoor humidity? Are doors or windows open to outside air?
Run diagnostics to make sure the humidifier system is working properly.
6.1.12 Low Suction Pressure
A pressure switch monitors the suction pressure at the compressor inlet to monitor whether pressure
has dropped below a factory preset point while the compressor is in cooling operation. When pressure
drops below a factory preset point, the switch opens. After the positive start kit time delay, and the
switch stays open for five minutes, the alarm is activated. The alarm stays active for 90 minutes.
Alarm Descriptions
Look for conditions that would cause loss of refrigerant. Check for piping problems such as leaks or
crimped lines. Check for inoperative components such as liquid line solenoid valve, low pressure
switch, expansion valve, and head pressure control valve. Check for closed service valves in the liquid
line or at the condenser or receiver.
6.1.13 Low Temperature
If the return air temperature has decreased to the Low Temperature Alarm setpoint, check for proper
setpoints. Run diagnostics to make sure all heating components are operating (contactors and
reheats). Are reheats drawing the proper current? (See nameplate for amp rating.)
6.1.14 Main Fan Overload
An optional tri-block overload is required for this alarm, and may or may not replace internal motor
overload, depending on your model. The overload device is located next to the main fan contactor in
the line voltage section. The alarm is activated when the overload is tripped.
6.1.15 Short Cycle
On compressorized systems, if the compressor has exceeded 10 cooling starts in one hour or if the
compressor has cycled five times in 10 minutes on the low pressure switch during non-cooling, the
Short Cycle alarm will occur. This can be caused by low refrigerant level (but not low enough to activate Low Suction Pressure alarm) or room cooling load is small compared to capacity of the unit.
Check for leaks, crimped lines, and defective components. If room load is low, increase sensitivity to
reduce cycling (proportional control). On GLYCOOL units, dirty filters can cause the coil freeze stats
to cycle the compressor.
34
Page 41

6.2 Optional Alarms
6.2.1 Loss of Water Flow
Available only with 3-way valves and occurs when no water flow is detected in the chilled water or
condenser water supply line. An optional flow switch is required for this alarm. Check for service
valves closed, pumps not working, etc.
6.2.2 Smoke Detected
Smoke is detected in the return air by an optional Liebert Smoke Detector. Check for source of smoke
or fire, and follow appropriate emergency procedures.
6.2.3 Standby GC Pump On
The primary pump has failed, and the standby pump is activated (glycol cooled and GLYCOOL units
only).
Check for problems with the primary pump (fuses blown, motor burnout, service valve shut, stuck
check valve, impeller damage, etc.).
6.2.4 Standby Unit On
The primary environmental control system has had an alarm condition, and the standby system is
activated.
6.2.5 Water Under Floor
Water is detected by an optional Liebert Water Detection System. Check under the raised floor for
water or other leaks.
Alarm Descriptions
NOTE
The alarms are specified by the customer at the time of order. All alarms will report to a
Liebert remote monitoring unit. Additional devices and wiring may be required at the factory
for some of the alarms.
6.3 Set Alarms—User Menus
Table 3 Set alarms—User Menus
Range
Large Display
U201 PASSWORD - - - - - -
U202
U203
U204
U205
U206
U207
U208
U209
U210
U211
Return Sensor
Alarms
High Return
Temperature
Low Return
Temperature
High Return
Humidity
Low Return
Humidity
Sensor A
Alarms
High-Temperature
Sensor A
Low Temperature
Sensor A
High Humidity
Sensor A
Low Humidity
Sensor A
Small
Display Alarm Description
RTN SNSR
HI TEMP
LO TEMP
HI HUM
HI HUM
SENSOR A
HI TEMPA
LO TEMPA
HI HUM A
LO HUM A
Std. Sensor
Alarms Enable
Std. Sensor High
Temperature Alarm
Std. Sensor Low-
Temperature Alarm
Std. Sensor High-
Humidity Alarm
Std. Sensor Low
-Humidity Alarm
Sensor A
Alarms Enable
Sensor A
High-Temperature Alarm
Sensor A Low-
Temperature Alarm
Sensor A
High-Humidity Alarm
Sensor A
Low-Humidity Alarm
Large
Display
0 = Disabled
1 = Enabled
34-210 °F
(1-99°C)
34-210 °F
(1-99°C)
1-99% 1-99% 1 60%
1-99% 1-99% 1 40%
0 = Disabled
1 = Enabled
34-210 °F
(1-99°C)
34-210 °F
(1-99°C)
1-99% 1-99% 1 70%
1-99% 1-99% 1 30%
Range
Small
Display Res. Std.
0 = No,
1 = Yes
34-210 °F
1-99°C
34-210 °F
(1-99°C)
0 = No,
1 = Yes
34-210 °F
(1-99°C)
34-210 °F
(1-99°C)
- Enabled
1
1
- Disabled
1
1
80°F
27°C
65°F
18°C
90°F
32°C
55°F
13°C
35
Page 42

7.0 COMPONENT OPERATION AND MAINTENANCE
!
7.1 System Testing
7.1.1 Environmental Control Functions
The performance of all control circuits can be tested by actuating each of the main functions. This is
done by temporarily changing the setpoints.
Cooling
To test the cooling function, set the setpoint for a temperature of 10°F (5°C) below room temperature.
A call for cooling should be seen and the equipment should begin to cool. A high temperature alarm
may come On. Disregard it. Return setpoint to the desired temperature.
Heating
Reheat may be tested by setting the setpoint for 10°F (5°C) above room temperature. A call for heating should be seen and the heating coils should begin to heat. Disregard the temperature alarm and
return the setpoint to the desired temperature.
Humidification
To check humidification, set the humidity setpoint for an RH 10% above the room humidity reading.
For infrared humidifiers, the infrared element should come On. Steam generating humidifiers should
click immediately as it energizes. After a short delay, the canister will fill with water. The water will
heat and steam will be produced. Return the humidity setpoint to the desired humidity.
Component Operation and Maintenance
Dehumidification
Dehumidification can be checked by setting the humidity setpoint for an RH 10% below room relative
humidity. The compressor should come On. Return humidity setpoint to the desired humidity.
Electric Panel
The electric panel should be inspected for any loose electrical connections.
WARNING
Risk of electric shock. Can cause injury or death.
The Liebert iCOM microprocessor does not isolate power from the unit, even in the “Unit Off”
mode. Some internal components require and receive power even during the “Unit Off” mode
of Liebert iCOM control.
The only way to ensure that there is NO voltage inside the unit is to install and open a remote
disconnect switch. Refer to unit electrical schematic.
Be sure that all power has been disconnected from the unit before attempting to tighten any
fittings or connections.
36
Page 43

Component Operation and Maintenance
!
Liebert Liqui-tect Point
Leak Detection Sensor
LT460 Zone Leak Detection Kit
Control Transformer and Fuses
The control system is divided into four separate circuits. The control voltage circuits are individually
protected by fuses located on the transformer/fuse board. If any of the fuses are blown, first eliminate
shorts, then use spare fuses supplied with unit. Use only type and size of fuse specified for your unit.
The small isolation transformer on the board supplies 24 volts to the main control board. The transformer is internally protected. If the internal protector opens, the transformer/fuse board must be
replaced. Also check the control voltage fuse on the main control board before replacing the transformer/fuse board.
Fan Safety Switch
The Fan Safety Switch is located in the low voltage compartment and consists of a diaphragm switch
and interconnecting tubing to the blower scroll. The Fan Safety switch is wired directly to the control
circuit to activate the alarm system if the airflow is interrupted
High-Temp Sensor
The optional high-temp sensor is a bimetal-operated sensing device with a normally closed switch.
This device will shut down the entire unit when the inlet air temperature exceeds a preset point. It is
connected between Terminals 1 and 2 at Plug P39.
Smoke Detector
The optional smoke detector power supply is located on the base of the upflow units, and at the top of
downflow units. It is constantly sampling return air through a tube. No adjustments are required.
Water Detection Sensor
WARNING
Risk of fire or explosion. Can cause injury or death.
Do not use near flammable liquids or for flammable liquid detection.
The optional water detection devices available are a point leak detection sensor and a zone leak detection kit.
Figure 21 Liebert leak detection units
The point leak detection sensor provides leak detection at a critical point. A simple two-wire connection signals the alarms at a Liebert environmental unit or at a monitoring panel. Run wires to the
Liebert unit and connect them to terminals 24 and 51, 55 or 56. Use NEC Class 2, 24V wiring. The
sensor contains a solid state switch that closes when water is detected by the twin sensor probes. The
sensor is hermetically sealed in all thread PVC nipple and is to be mounted where water problems
may occur. The sensor should be located 6-8 feet (2-2.5m) from the environmental control unit in a
wet trap or near a floor drain. It should not be mounted directly under the unit.
37
Page 44

Figure 22 Recommended liquid sensor locations
Liebert Unit
Recommended Liebert
Liqui-tect location
Floor drain
2-ft clearance
in front
2-ft clearance
in front
6-ft clearance
in front
6-ft clearance
in front
The zone leak detection kit provides leak detection for a defined zone. This kit is ideal for perimeter
sensing or serpentine coverage of small areas. A simple, two-wire connection signals the alarms at a
Liebert environmental unit or at a monitoring panel. Run wires to the Liebert unit and connect them
to terminals 24 and 51, 55 or 56. The sensor utilizes Liebert's LT500Y leak detection cable. The kit is
offered with five different lengths of cable sized specifically for the type of Liebert Environmental unit
(see matrix below). Refer to matrix below for the recommended location of leak detection cable.
Table 4 Zone leak detection kit installation scenarios
Upflow Unit
Detection
around
entire unit
Scenarios
Upflow Unit
Detection on sides
and
in front of unit
Component Operation and Maintenance
Downflow Unit
Detection
around
entire unit
Downflow Unit
Detection on sides
and
in front of unit
Distance From Unit, feet (m)
In back 2 (0.6) No cable behind 1 (0.3) No cable behind
On sides 2 (0.6) 2 (0.6) 1 (0.3) 1 (0.3)
In front 2 (0.6) 2 (0.6) 6 (1.8) 6 (1.8)
Unit (footprint-in.) Part Number
Liebert Challenger 3000
and Liebert Challenger ITR
LT460-Z30 LT460-Z20 LT460-Z30 LT460-Z25
(32.5 x 32.5)
Remote Shutdown
A connection point is provided for customer supplied remote shutdown devices. This terminal strip is
located at the top of upflow units, and at the base of downflow units. Terminals 37 and 38 on the terminal strip are jumpered when no remote shutdown device is installed.
38
Page 45

7.2 Filters
Filters are usually the most neglected item in an environmental control system. To maintain efficient
operation, they should be checked monthly and changed as required. Because replacement intervals
vary with environmental condition and filter type, each unit is equipped with a filter clog switch. This
warns of restricted airflow through the filter compartment by activating the Change Filter alarm.
Turn power Off before replacing filters.
Liebert Challenger 3000 Liebert and Challenger ITR filters are 28-1/2" by 29-1/2", either 2" or 4"
thick, plus an optional 2" thick pre-filter. The filter is replaced from the front of the unit. On upflow
units, the filter is vertical, in front of the lower compartment. Pull the filter out toward you to remove
it. On downflow units, the filter is horizontal, above the electrical panel. Slide the filter out toward
you to remove it.
After replacing the filter(s), test the operation of the filter clog switch. Turn the adjusting screw counter clockwise to trip the switch — this will energize the Change Filter alarm. To adjust the switch proceed as follows: With the fan running, set the switch to energize the light with clean filters. The unit
panels must all be in place and closed to accurately find this point. Then turn the adjusting knob one
turn clockwise, or to the desired filter change point.
7.3 Blower Package
Periodic checks of the blower package include: belt, motor mounts, fan bearings, and impellers.
7.3.1 Fan Impellers and Bearings
Component Operation and Maintenance
Fan impellers should be periodically inspected and any debris removed. Check to see if they are
tightly mounted on the fan shaft. Rotate the impellers and make sure they do not rub against the fan
housing.
Bearings used on the units are permanently sealed and self-lubricating. They should be inspected for
signs of wear when the belt is adjusted. Shake the pulley and look for movement in the fan shaft. If
any excessive movement is noticed, bearings should be replaced. However, the cause of the wear must
be determined and corrected before returning the unit to operation.
7.3.2 Belt
The drive belt should be checked monthly for signs of wear and proper tension. Pressing in on belts
midway between the sheave and pulley should produce from 1/2" to 1" (12 to 25 mm) of movement.
Belts that are too tight can cause excessive bearing wear.
Belt tension can be adjusted by raising or lowering the fan motor base. Loosen nut above motor
mounting plate to remove belt. Turn nut below motor mounting plate to adjust belt tension. If belt
appears cracked or worn, it should be replaced with a matched belt (identically sized). With proper
care, a belt should last several years.
NOTICE
Risk of improper adjustment. Can cause equipment damage.
After adjusting or changing the belt, check to ensure that the motor base nuts are tightened.
The bottom adjustment nut should be finger tight. The top locking nut should be tightened
with a wrench.
39
Page 46

7.3.3 Air Distribution
All unit models are designed for constant volume air delivery. Therefore any unusual restrictions
within the air circuit must be avoided. For downflow models operating on a raised floor, refer to the
following table for recommended free area for proper air flow.
Table 5 Recommended free area ft
550 and 600 fpm (2.8 and 3.1 m/s)
Model
60 Hz Units
3 Ton 3.3 (0.31) 3.0 (0.28)
5 Ton 5.1 (0.41) 4.7 (0.44)
50 Hz Units
3 Ton 3.3 (0.31) 3.0 (0.28)
5 Ton 4.7 (0.44) 4.3 (0.40)
550 FPM
(2.8 m/s)
Component Operation and Maintenance
2
(m2) for grilles or perforated panels at output velocities of
600 FPM
(3.1 m/s)
Grilles used in raised floors vary in size, the largest being 18" x 6" (46 cm x 15 cm). This type of grille
has approximately 56 in
2
and have a nominal free area of approximately 108 to 144 in
NOTICE
Risk of airflow restriction. Can cause inefficient operation and equipment overheating.
In raised-floor use, all under-floor restrictions, such as clusters of cables or piping, must be
avoided because they may form barriers to airflow. Whenever possible, cables and pipes
should be run parallel to the airflow. Never stack cables or piping.
7.4 Refrigeration System
Each month, the components of the refrigeration system should be inspected for proper function and
signs of wear. Since, in most cases, evidence of malfunction is present prior to component failure, periodic inspections can be a major factor in the prevention of most system failures.
Refrigerant lines must be properly supported and not allowed to vibrate against ceilings, floors or the
unit frame. Inspect all refrigerant lines every six months for signs of wear and proper support. Also
inspect capillary and equalizer lines from the expansion valve and support as necessary.
Each liquid line has a sight glass that indicates liquid refrigerant flow and the presence of moisture.
Bubbles in the sight glass indicate a shortage of refrigerant or a restriction in the liquid line. The
moisture indicator changes from green to yellow when moisture is present in the system.
7.4.1 Suction Pressure
(361 cm2) of free area. Perforated Panels are usually 2' x 2' (61 cm x 61 cm)
2
(697 to 929 cm2).
Suction pressure will vary with load conditions. The low pressure switch will shut the compressor
down if suction pressure falls below the cut-out setting. High suction pressure reduces the ability of
the refrigerant to cool compressor components and can result in compressor damage. Minimum (pressure switch cut-out setting) and maximum (design operating) suction pressures are in Table 6.
Table 6 Suction pressures - R407c
Minimum
System
Air w/FSC
(Fan Speed Control)
Air w/Lee-Temp Control
(Floodback head
pressure control)
Water Cooled 20 (137) 95 (654)
Glycol Cooled 20 (137) 95 (654)
PSIG (kPa)
15 (103) 95 (654)
20 (137) 95 (654)
Maximum
PSIG (kPa)
40
Page 47

7.4.2 Discharge Pressure
Discharge Pressure can be increased or decreased by load conditions or condenser efficiency. The high
pressure switch will shut the compressor down at its cut-out setting. Refer to Table 7, below.
Table 7 Discharge pressures
System Design
Air Cooled 260 (1795)
Water/Glycol Cooled 65-75°F (18-24°C) fluid 210 (1450)
Maximum 330 (2275)
High Pressure Cut-Out 360 (2482)
7.4.3 Superheat
Superheat can be adjusted by the Thermostatic Expansion Value (TEV). To determine superheat:
1. Measure the temperature of the suction line at the point the TEV bulb is clamped.
2. Obtain the gauge pressure at the compressor suction valve.
3. Add the estimated pressure drop between bulb location and suction valve.
4. Convert the sum of the two pressures to the equivalent temperature.
5. Subtract this temperature from the actual suction line temperature. The difference is superheat.
Component Operation and Maintenance
Discharge Pressure
PSIG (kPa)
85°F (29°C) fluid 225 (1550)
115°F (46°C) fluid 295 (2035)
7.4.4 Thermostatic Expansion Valve
Operation
The thermostatic expansion valve performs one function. It keeps the evaporator supplied with
enough refrigerant to satisfy load conditions. It does not effect compressor operation.
Proper valve operation can be determined by measuring superheat. If too little refrigerant is being fed
to the evaporator, the superheat will be high; if too much refrigerant is being supplied, the superheat
will be low. The correct superheat setting is between 10 and 15°F (5.6 and 8.3°C).
Adjustment
To adjust the superheat setting:
1. Remove the valve cap at the bottom of the valve.
2. Turn the adjusting stem counterclockwise to lower the superheat.
3. Turn the adjusting stem clockwise to increase the superheat.
NOTE
Make no more than one turn of the stem at a time. As long as 30 minutes may be required
for the new balance to take place.
41
Page 48

Component Operation and Maintenance
7.4.5 Hot Gas Bypass Valve—Not Available on Digital Scroll Units
Operation—Self-Contained Units
The hot gas bypass is inserted between the compressor discharge line and the leaving side of the
expansion valve through the side outlet distributor. The system, with normal operation when the
evaporator is under full load, will maintain enough pressure on the leaving side of the hot gas valve to
keep the valve port closed.
If the load on the evaporator decreases, the evaporator will get colder. When the coil is too cold, the
internal pressure in the evaporator drops and allows the hot gas bypass valve to open. Hot gas then
mixes with the liquid coolant on the discharge side of the expansion valve raising the temperature
and pressure in the evaporator. The net result is a reduction in the cooling capacity of the unit to
match the load.
To aid in lubricating the compressor, the hot gas bypass solenoid is delayed for 30 seconds on the initial call for cooling and de-energized for 30 seconds during every 60 minutes of continuous operation.
NOTE
These procedures are not applicable to condensing units. For condensing unit information,
refer to Liebert’s condensing unit manual, SL-10059, available at the Liebert Web site,
www.liebert.com
Adjustment
Upon deciding what evaporator temperature is desired, the following procedure should be used to
adjust the hot gas bypass valve:
1. Install the suction and discharge pressure gauge.
2. Adjust the temperature setpoint to call for cooling so that the refrigeration compressor will run.
3. Remove the TOP adjusting nut from the valve.
4. Insert an Allen wrench in the brass hole at top of the valve in adjusting port, and turn
CLOCKWISE if a higher evaporator temperature is required.
5. After obtaining the suction pressure required, reinstall the cap tightly making sure there are no
leaks.
6. Let the evaporator operate for approximately 10 to 15 minutes to make sure the suction pressure
is within the desired range.
7. There will be a fluctuation of approximately 3 to 6 PSIG (21 to 41 kPa) on the evaporator due to
the differential on the hot gas bypass.
8. Return the temperature setpoint to desired number.
7.4.6 Air Cooled Condenser
Restricted airflow through the condenser coil will reduce the operating efficiency of the unit and can
result in high compressor head pressure and loss of cooling.
Clean the condenser coil of all debris that will inhibit air flow. This can be done with compressed air
or commercial coil cleaner. Check for bent or damaged coil fins and repair as necessary. In winter, do
not permit snow to accumulate around the sides or underneath the condenser.
Check all refrigerant lines and capillaries for vibration isolation. Support as necessary. Visually
inspect all refrigerant lines for signs of oil leaks.
42
Page 49

Checking Refrigerant Charge (Lee–Temp/Flood Back Head Pressure Control)
Secure each leg to condenser
frame at all points shown using
hardware provided.
Liquid line
* B
Hot gas line
Electric service
supplied by others
FAN SPEED CONDENSER
Lee-Temp heater pad
connection box
*B - Inverted traps are to be field-supplied and installed (typical). When installing traps, provide clearance for swing end of access door. Traps are to extend above base of coil by a
minimum of 7-1/2" (190 mm).
Liquid line
Electric
service
supplied by
others
Hot gas line
* B
LEE-TEMP CONDENSER
The system refrigerant level must be checked periodically. To do so:
1. Adjust temperature setpoint in the unit so that the compressor will run continuously.
2. The refrigerant level is visible through two sight glasses on the receiver and will vary with
ambient temperature.
a. 40°F (4.4°C) and lower — Midway on the bottom sight glass.
b. 40 to 60°F (4.4 to 15.6°C) — Bottom sight glass should be clear with liquid.
c. 60°F (15.6°C) and above — Midway on the top sight glass.
3. Return temperature setpoint to desired number.
Figure 23 Outdoor fan/condenser configuration
Component Operation and Maintenance
7.4.7 Water/Glycol Cooled Condensers
Coaxial Condenser
Each water- or glycol-cooled module has a coaxial condenser that consists of a steel outside tube and a
copper inside tube.
Coaxial condensers do not normally require maintenance or replacement if the water supply is clean.
If your system operates at high head pressure with reduced capacity, and all other causes have been
eliminated, the coaxial condenser may be obstructed and needs to be replaced.
43
Page 50

7.4.8 Motorized Ball Valve—Digital Scroll Compressor
On water-cooled and glycol-cooled digital scroll units, the discharge pressure is controlled by a motorized ball valve. During unloaded operation, the pressure changes during each digital cycle could
result in excessive repositions with a pressure operated water regulating valve. The control algorithm
for the motorized ball valve uses an intelligent sampling rate and adjustable pressure thresholds to
reduce valve repositions. The valve assembly consists of the brass valve, linkage and actuator.
Control
The valve actuator operates on 24VAC power and is controlled by a 2-10VDC proportional control signal. The valve full open to full close time is 60 seconds. At 2VDC the valve is closed; at 10VDC the
valve is fully open. There is a 20-second delay to position the motorized ball valve before starting the
compressor.
Control Method
The control utilizes an upper and lower pressure threshold with a 35 PSI (241 kPa) deadband to
reduce valve movement. If the liquid pressure is between the upper and lower threshold the valve
remains at the current position. If the liquid pressure exceeds the upper threshold the valve opens,
and if the pressure falls below the lower threshold the valve closes. There are multiple adjustment bands to
ease discharge pressure back into control range.
Adjustment
Both pressure thresholds can be shifted simultaneously over a 50 PSI (345 kPa) range (the 35 PSI
[241 kPa] differential remains constant). The ball valve setpoint offset parameter in the Service menu
can be adjusted from 0 to 50 PSI (345 kPa) to raise or lower the control band similar to the pressure
adjustment on a water regulating valve. Units are factory set at a 30 PSI (207 kPa) setpoint offset (30
PSI [207 kPa] above minimum). This results in a 220 PSIA (1517 kPa) lower threshold and a 255
PSIA (1758 kPa) upper threshold pressure.
Component Operation and Maintenance
Startup
The setpoint offset is adjusted to the minimum value during startup, then transitions to the set value
once the compressor reaches normal operating pressures. Additionally changes in fluid temperature
could cause pressure changes that do not result in valve movement within the dead band on drycoolers. Fan cycling stats should be set to prevent continuous fluid temperature swings greater than 10
o
(5.6
C) (see 7.4.10 - Drycooler Settings).
Location
The motorized ball valves are located in the condenser fluid return line. The three-way valve is piped
in a mixing arrangement with the common port at the valve outlet.
Manual Control
The valve can be manually set by disconnecting AC power, depressing the manual override button on
the valve actuator, and adjusting the valve position with the handle. You also have the option to control the motorized ball valves through the Service menu using manual mode to override the normal
control.
7.4.9 Regulating Valve—Scroll Compressor
The water regulating valve automatically regulates the amount of fluid necessary to remove the heat
from the refrigeration system, permitting more fluid to flow when load conditions are high and less
fluid to flow when load conditions are low. The valve consists of a brass body, balance spring, valve
seat, valve disc holders, capillary tube to discharge pressure, and adjusting screw.
Standard Valve - 150 psig (1034 kPa) system for 3 & 5 ton units (Johnson Controls Valve) High Pressure Valve - 350 psig (2413 kPa) system for 5 ton units (Johnson Controls Valve)
o
F
Adjustment—The valve may be adjusted with a standard refrigeration service valve wrench or
screw driver. Refer to Table 7 for recommended refrigerant pressures.
To lower the head pressure setting, turn the square adjusting screw clockwise until the high pressure
gauge indicates the desired setting.
44
Page 51

To raise the head pressure setting, turn the adjusting screw counterclockwise until the desired set-
Range
Spring
Valve
Spring
Guide
Top
Retainer
Range Adjustment Screw
Insert screwdrivers under
the valve spring guide.
Adjusting Collar Nut
ting is obtained.
Figure 24 Johnson Controls valve adjustment
Component Operation and Maintenance
Manual Flushing—The valve may be flushed by inserting a screwdriver or similar tool under the
two sides of the main spring and lifting. This action will open the valve seat and flush any dirt particles from the seat. If this fails, it will be necessary to disassemble the valve and clean the seat.
High Pressure Valve - 350 PSIG System (2413 kPa) for 3 Ton Units (Metrex Valve)
Adjustment—The valve may be adjusted using a 1/8" diameter rod. Turn adjusting collar nut counterclockwise to raise head pressure. Turn it clockwise to lower head pressure. Rotation directions are
as viewed from top of valve spring housing.
Figure 25 Metrex valve adjustment
45
Page 52

Manual Flushing—The valve may be flushed by rotating the socket head screw clockwise. This
screw must be in the OUT position (counterclockwise) for normal valve operation.
Valve Disassembly
1. Shut off the water supply by using isolating valves.
2. Relieve the tension on the main spring by turning the adjusting screw (or collar) as far as it will
go (provide a container to catch water below the valve).
3. Remove four screws extending through the main spring housing.
4. Remove the center assembly screws for access to all internal parts.
5. Clean the seat if possible. If the seat is pitted or damaged, replace the valve rubber disc and valve
seat.
6. After valve is reassembled check for leaks.
7. Readjust head pressure control.
Testing Function of Valve—When the refrigeration system has been Off for approximately 10 to 15
minutes, the water flow should stop.
If the water continues to flow, the valve is either improperly adjusted (with head pressure too low) or
the pressure sensing capillary is not connected properly to the condenser.
7.4.10 Drycooler Settings
Applications with the Optional Stat Setting require field piping to be insulated to prevent condensation. Table 8 shows acceptable applications where stats must be adjusted to Optional Setting.
Aquastats must be field-adjusted to Optional Setting for:
• GLYCOOL/Dual Cool applications
• Single Drycooler loops with motor ball valve flow controls (motor ball valves are used on all Liebert Challenger 3000 and ITR units with digital compressors).
Table 8 Water/glycol system conditions requiring optional settings for aquastats
Cooling Type Glycool Glycol
Flow Control MBV WRV MBV WRV
Drycoolers in Loop 1 Multiple 1 Multiple 1 Multiple 1 Multiple
Stat Setting
Insulate Field Piping Yes Yes Yes Yes Yes No No No
1. See Table 9.
2. MBV=motor ball valve; WRV=water regulating valve
1
Component Operation and Maintenance
Optional Optional Optional Optional Optional Factory Factory Factory
Table 9 Aquastat settings—two-fan through four-fan drycoolers
Dial Setting (Stat Open Temp) Set for Mid Differential 8°F (4.4°C) Rise to Close
Factory Setting
Aquastat # Fans
AQ1 F1 65°F (18.3°C) 35°F (1.7°C)
AQ2 F2 & F3 75°F (23.9°C) 45°F (7.2°C)
AQ3 F4 70°F (21.1°C) 40°F (4.4°C)
(Glycol) (see Notes 1 and 2)
NOTE
1. All drycoolers are shipped at Factory Setting.
2. Factory Setting is used for all glycol applications, except single drycooler loops with motor
ball valve controls.
3. Stats must be field-adjusted to Optional Setting for GLYCOOL/Dual Cool applications
and all single drycooler loops using motor ball valve flow controls.
46
Optional Setting
(GLYCOOL) (see Note 3)
Page 53

7.4.11 Compressor Oil
NOTICE
Risk of improper compressor lubrication. Can cause compressor and refrigerant system
damage.
Failure to use oil types, viscosities and quantities recommended by the compressor
manufacturer may reduce compressor life and void the compressor warranty. See oil types
specified in Table 10.
• Do NOT mix polyol ester (POE) and mineral-based oils.
• Do NOT mix oils of different viscosities.
Consult Emerson or the compressor manufacturer if you have questions.
Table 10 Compressor oil types
Compressor Type R-407c
Copeland Scroll
and Digital Scroll
1. Use Copeland POE Oil ULTRA 22CC, Mobil EAL Arctic 22CC or other Copeland-approved oils.
7.5 Compressor Replacement
Replacement compressors are available through your local Emerson office. Compressors are shipped
in reusable packaging. If unit is under warranty, complete and include Liebert Service Credit Application (LSCA) with the compressor that is being returned. The original compressor should be
returned in the same packaging.
POE Oil - ISO 22
Viscosity
Component Operation and Maintenance
1
Before Replacing or Returning a Compressor
Be certain that the compressor is actually defective. At a minimum, recheck a compressor returned
from the field in the shop or depot for Hipot, winding resistance and ability to start before returning
it. More than one-third of compressors returned for warranty analysis are determined to have nothing
wrong. They were misdiagnosed in the field as being defective. Replacing working compressors unnecessarily costs everyone.
7.5.1 Compressor Functional Check
The following diagnostic procedure should be used to evaluate whether the compressor is working
properly.
1. Proper voltage to the unit should be verified.
2. The normal checks of motor winding continuity and short to ground should be made to determine
if the inherent overload motor protector has opened or if an internal motor short or ground fault
has developed. If the protector has opened, the compressor must be allowed to cool sufficiently to
allow it to reset.
3. Proper indoor and outdoor blower/fan operation should be verified. Condenser glycol flow should
be verified.
4. With service gauges connected to suction and discharge pressure fittings, turn On the compressor.
If suction pressure falls below normal levels, either the system charge is low on or there is a flow
blockage in the system.
5. If suction pressure does not drop and discharge pressure does not rise to normal levels, reverse
any two of the compressor power leads and reapply power to make sure compressor was not wired
to run in reverse direction. If pressures still do not move to normal values, system is properly
charged and solenoid valves function, the compressor is faulty. Reconnect the compressor leads as
originally configured and use normal diagnostic procedures to check operation of the reversing
valve.
6. To test if the compressor is pumping properly, the compressor current draw must be compared to
published compressor performance curves using the operating pressures and voltage of the
system. If the measured average current deviates more than ±15% from published values, a faulty
compressor may be indicated. A current imbalance exceeding 15% of the average on the three
phases should be investigated further.
47
Page 54

7.5.2 Standard Scroll Compressor Replacement
!
!
Infrequently a fault in the motor insulation may result in a motor burn, but burnouts rarely occur in
a properly installed system. Of those that do, most are the effects of mechanical or lubrication failures, resulting in the burnout as a secondary consequence.
If problems that can cause compressor failures are detected and corrected early, a large percentage
can be prevented. Periodic maintenance inspections by alert service personnel on the lookout for
abnormal operation can be a major factor in reducing maintenance costs. It is easier and far less
costly to take the steps necessary to ensure proper system operation than it is to allow a compressor
to fail and require replacement.
When troubleshooting a compressor, check all electrical components for proper operation.
1. Check all fuses and circuit breakers.
2. Check Hi-Lo Pressure switch operation.
3. If a compressor failure has occurred, determine whether it is an electrical or mechanical failure.
Mechanical Failure
A mechanical compressor failure will be not be indicated by a burned odor. The motor will attempt to
run. If you have determined that a mechanical failure has occurred, the compressor must be replaced.
If a burnout occurs, correct the problem that caused the burnout and clean the system. It is important
to note that successive burnouts of the same system are usually caused by improper cleaning.
Electrical Failure
An electrical failure will be indicated by a distinct pungent odor. If a severe burnout has occurred, the
oil will be black and acidic.
In the event that there is an electrical failure and a complete burnout of the refrigeration compressor
motor, the proper procedures must be performed in order to clean the system to remove any acids that
would cause a future failure.
Component Operation and Maintenance
For clean-out warnings and procedures, see Copeland Application Engineering Bulletin 24-1105
“Principles of Cleaning Refrigeration Systems” or Carlyle Service Guide, Literature # 020-611.
WARNING
Risk of explosive discharge from high-pressure refrigerant. Can cause injury or death.
This unit contains fluids and gases under high pressure. Relieve pressure before working with
piping. Do not loosen any refrigeration or electrical connections before relieving pressure.
CAUTION
Risk of contact with hot substances or surfaces. Can cause injury.
Avoid touching or contacting the gas and oils with exposed skin. Severe burns will result. Use
long rubber gloves in handling contaminated parts. Use extreme caution and wear protective
gloves and arm protection when working on or near hot compressors, discharge lines,
humidifiers and reheats.
NOTE
Release of refrigerant to the atmosphere is harmful to the environment and is unlawful.
Refrigerant must be recycled or discarded in accordance with federal, state, and local
regulations.
NOTICE
Damage to a replacement compressor caused by improper system cleaning constitutes abuse
under the terms of the warranty, and the warranty will be void.
NOTICE
Risk of improper scroll compressor installation. Could cause poor performance and
compressor damage.
48
Page 55

Three-phase power must be connected to the unit line voltage terminals in the proper
sequence so that the scroll compressor rotates in the proper direction. Rotation in the wrong
direction will result in poor performance and compressor damage.
Record compressor motor connections when removing a failed compressor. Wire the
replacement compressor motor the same way to maintain proper rotation direction.
7.5.3 Digital Scroll Compressor Replacement Procedure
1. Disconnect power and follow all warnings at front of this manual.
2. Attach suction and discharge gauges to access fittings.
3. Front-seat service valves to isolate the compressor. Reclaim charge from compressor.
4. Remove marked pressure transducer and discharge pressure switch. Disconnect all electrical
connections.
5. Detach service valves from compressor.
6. Remove failed compressor.
7. If required, follow compressor manufacturer’s suggested clean-out procedures.
8. Install replacement compressor and make all connections. Replace gaskets or seals on service
valves. Replace unloading solenoid.
9. Evacuate and charge as detailed in the user manual, SL-11962.
NOTICE
Risk of improper component reinstallation. Can cause equipment damage.
Identify and mark location of suction pressure transducer and discharge pressure switch.
These devices look similar and they must be reinstalled in their original location.
Component Operation and Maintenance
Digital Compressor Unloading Solenoid(s)—Models 040, 042, 047, 049, 061 and 072
When replacing a digital scroll compressor, digital solenoid valve and coil must be replaced. Compressor and valve kit are shipped separately. Valve kit must be field-brazed to top of compressor in proper
orientation and supported with original factory bracket.
7.6 Facility Fluid and Piping Maintenance for Water and Glycol Systems
Facility water and glycol quality remain a requirement throughout the life of the piping system. Fluid
and piping system maintenance schedules must be established and performed. A local fluid maintenance program must be established that will evaluate fluid chemistry and apply necessary treatment.
A periodic leak inspection of facility and unit fluid piping is recommended.
Glycol Solution Maintenance
It is difficult to establish a specific schedule of inhibitor maintenance since the rate of inhibitor depletion depends upon local water conditions. Analysis of water samples at time of installation and every
six months should help to establish a pattern of depletion. A visual inspection of the solution and filter residue is often helpful in judging whether or not active corrosion is occurring.
The complexity of water caused problems and their correction makes it important to obtain the advice
of a water treatment specialist and follow a regularly scheduled maintenance program. It is important to note that improper use of water treatment chemicals can cause problems more serious than
using none.
Proper inhibitor maintenance must be performed in order to prevent corrosion of the glycol system.
Consult glycol manufacturer for testing and maintenance of inhibitors. Do not mix products from different manufacturers. For further details, refer to filling instructions in the installation manual, Liebert part number SL-11925, available at the Liebert Web site, www.liebert.com
49
Page 56

7.7 Humidifier
!
7.7.1 Infrared Humidifier
During normal humidifier operation, deposits of mineral solids will collect in the humidifier pan. This
should be cleaned out periodically to ensure efficient operation. Each water supply has different characteristics, so the time interval between cleanings must be determined locally. A monthly check (and
cleaning if necessary) is recommended.
Removing the Pan
To remove humidifier pan, first open disconnect switch and open front panel. Allow time for pan and
water to cool. Unlatch front retainer clip (or remove screw from bracket on some units). Pull pan forward. Remove stand pipe to allow pan to drain. Disconnect drain line. Pull pan forward to remove it.
WARNING
Risk of electric shock and contact with hot liquids. Can cause injury or death.
The Liebert iCOM microprocessor does not isolate power from the unit, even in the “Unit Off”
mode. Some internal components require and receive power even during the “Unit Off” mode
of Liebert iCOM control.
The only way to ensure that there is NO voltage inside the unit is to install and open a remote
disconnect switch. Refer to unit electrical schematic.
Before removing pan, be sure power is disconnected from the unit and water in the humidifier
pan is no hotter than lukewarm.
Component Operation and Maintenance
Cleaning the Pan
An autoflush system can greatly increase the time between cleanings but does not eliminate the need
for periodic checks and maintenance.
Scale on the side and bottom can be loosened with a stiff brush. Flush with water and replace pan in
humidifier.
50
Page 57

Changing Humidifier Lamps
Humidifier Lamps
1. Open disconnect switch.
2. Open front panel.
3. Remove screws securing line voltage compartment cover, then remove the cover.
4. In line voltage compartment, disconnect one end of the purple jumpers, then locate the burned out
bulb with a continuity meter.
5. Remove humidifier pan. Refer to Removing the Pan on page 50.
6. Remove lamp brackets (2) under lamps.
Figure 26 Infrared humidifier lamps
7. Loosen two screws securing bulb wires to junction block.
8. Pull bulb straight down.
9. Replace bulb. Wrap wires once loosely around bulb. This will support the bulb and also allow for
thermal expansion. Make sure lamp wires are secure in the junction block.
Component Operation and Maintenance
NOTICE
Risk of oily deposits. Can shorten component life.
Do not touch the quartz lamps with your bare hands. Oily deposits such as fingerprints will
severely shorten bulb life. Use clean cotton gloves at all times.
10. Reverse Steps 1 through 6 to reassemble.
Autoflush Infrared Humidifier Cleaning System
NOTICE
Risk of improper water pressure. Can cause improper component operation.
To operate properly, the Autoflush Humidifier requires a water source that can deliver at
least 1 gpm (0.063 l/s) with a minimum pressure of 20 psig (138 kPa).
The autoflush system will periodically flush the humidifier pan with water to prevent the buildup of
water minerals due to saturation. Because water conditions vary, the amount of water flushing
through the system may be programmed to match local needs.
Water amounts between 110% and 500% of the amount needed for humidification may be selected.
Operation of the flushing system is then automatic and no further adjustments need to be made.
Autoflush Operation
The operation of the autoflush is divided into four steps, beginning with a call for humidification.
1. If the humidifier has not been activated for over 30 hours, the autoflush will flow water into the
pan for about 30 seconds. This will provide a minimum amount of water in the pan and prevent
heat damage to the humidifier pan. Humidifier lamps are Off.
2. If the humidifier has been activated within the last 30 hours, Step 1 is bypassed. The autoflush
will flow water into the pan for about 4 minutes. The humidifier lamps are On and the humidifier
is operational during this period. When the pan is filled (the fill cycle has timed out), the water
make-up valve is closed.
3. The water make-up valve remains Off and the humidifier lamps are On for a maximum of
9-1/2 minutes.
4. After the 9-1/2 minute delay, the autoflush adds water to the pan to replenish the water used in
humidification and flush the pan of mineral solids. This amount of water is adjustable from 110%
to 500% in increments of 10%. At the end of this cycle, the make-up valve is closed. Steps 3 and 4
repeat as long as humidification is required.
51
Page 58

Autoflush Controls
Use the LCD display, menu, and keys on the front control panel to program the autoflush controls.
7.7.2 Steam Generating Humidifier
Steam generating humidifiers are designed to operate in voltage ranges from 200 to 575 volts and
generate 11 pounds (5 kg) of steam per hour. These humidifiers operate efficiently over a wide range
of water quality conditions and automatically adjust to changes in the conductivity of water. The
humidifiers drain and refill to maintain an amperage setpoint and alert the operator when the
humidifier canister needs to be replaced. The humidifier is in the lower section of upflow units; it is in
the middle section of downflow units.
Figure 27 Steam generating humidifier
Component Operation and Maintenance
52
Page 59

Component Operation and Maintenance
Operation
1. During startup, when the humidity control calls for humidification, the fill valve opens and allows
water to enter the canister. When the water level reaches the electrodes, current flows and the
water begins to warm. The canister fills until the amperage reaches the setpoint and the fill valve
closes. As the water warms, its conductivity increases and the current flow, in turn, rises. If the
amperage reaches 115% of the normal operating amperage, the drain valve opens and flushes
some of the water out of the canister. This reduces electrode contact with the water and lowers
the current flow to the amperage setpoint. Boiling soon commences, and the canister operates
normally.
2. If the conductivity of the water is low, the canister fills and the water level reaches the canister
full electrode before the amperage setpoint is reached. The humidifier stops filling to prevent
overflow. Boiling should commence in time. As water is boiled off, the mineral concentration in
the canister increases and current flow also increases. The canister eventually reaches full output
and goes to normal operation. No drain is permitted until then.
3. When full output is reached the circuit board starts a time cycle which is factory set at 60 seconds.
During this repeating time cycle, the fill valve will open periodically to replenish the water being
boiled off and maintain a “steady state” output at the set point. The amperage variance will
depend on the conductivity of the water.
4. After a period of time, the mineral concentration in the canister becomes too high. When this
occurs, the water boils too quickly. As the water quickly boils off and less of the electrode is
exposed, the current flow decreases. When the current crosses the low threshold point (factory set
at 90%) before the end of the time cycle, the drain valve opens, draining the mineral laden water
out and replacing it with fresh water. This lowers the mineral concentration and returns the
canister to “steady state” operation and prolongs canister life. The frequency of drains depends on
water conductivity.
5. Over a period of time, the electrode surface will become coated with a layer of insulating material,
which causes a drop in current flow. As this happens, the water level in the canister will slowly
rise exposing new electrode surface to the water to maintain normal output. Eventually, the
steady state water level will reach the canister full electrode and indicate so by activating the
canister full alarm. At this point, all of electrode surface has been used up and the canister should
be replaced.
6. After the entire electrode surface has been coated, the output will slowly begin to fall off. This
usually occurs in the last several hours of electrode life and should allow enough time to schedule
maintenance. During these last hours, the mineral concentration can increase. If the mineral
concentration is too high, arcing can occur. If the electrodes start to arc, turn Off the humidifier
immediately and replace the canister with the identical part.
Controls
The humidifier RUN/DRAIN switch is located at the upper right of the humidifier assembly. This
switch should be in the RUN position when the humidifier is in normal operation, and in the DRAIN
position when a manual drain sequence is required. The electronic control board for the humidifier is
located on the right side of the humidifier assembly. When the main unit is energized, power is available to the humidifier circuits.
53
Page 60

Component Operation and Maintenance
!
!
Replacing the Canister
Over a period of operation, the humidifier electrodes become coated with mineral solids. This coating
insulates the electrodes and decreases the current flow. To maintain humidifier capacity, the water
level slowly rises to expose fresh electrode. Eventually, the entire electrode becomes coated and the
water level reaches the top. At this point, the canister full alarm is activated and the output begins to
fall. When this happens, it is necessary to replace the full canister.
To replace the canister:
1. Turn the humidifier Off by lowering the humidity setpoint below the ambient humidity level.
Record the original setpoint.
2. Place the RUN/DRAIN switch in the DRAIN position to drain the water from the canister.
3. Return the RUN/DRAIN switch to the RUN position after the canister has drained.
WARNING
Risk of electric shock. Can cause injury or death.
To avoid a shock hazard, all power to the unit must be disconnected before proceeding with
the canister replacement procedure.
4. Turn Off the power at the main unit.
5. Remove the cover from the humidifier cabinet.
CAUTION
Risk of contact with hot surfaces. Can cause injury.
The canister and steam hose may be hot. Allow sufficient time for them to cool before working
within the unit cabinet. Use extreme caution and wear protective gloves and arm protection
when working on or near the canister or steam hose.
6. Locate the power wires to the steam canister. They are connected to the canister with 1/4" quick
connects. Make note of the wiring configuration before removing any wires. Refer to the schematic
on the unit. Slide the rubber boot back to expose the connections. Remove the three power wires
and the two canister full wires. Do not loosen the screws that secure the electrodes.
7. Loosen the steam outlet hose clamp and slide the steam hose away from the canister top fitting.
8. The canister is now ready to be removed. Pull the canister straight up and out of the cabinet
toward you.
9. Replace the canister with the part indicated in Table 11.
Table 11 Humidifier canister part numbers
Part
Number Voltage
136798P1 200-460* 11 (5)
136798P2 380-575 11 (5)
* Can operate on 575V unit with transformer
10. Replace the canister by reversing the above procedure. Make special note of the following:
NOTE
When replacing the canister:
1. Make sure the two “O” rings are lubricated and properly seated on the bottom neck.
2. Always check the fill and drain solenoids for proper operation.
NOTE
When replacing the wiring, connect the red wire from Terminal #1 on the interface to the red
top terminal on the canister. It is in the middle of a group of three terminals. The black wire
from Terminal #2 on the interface connects to the power terminal farthest from the red
terminal/wire. The power wire to this terminal is routed through the current sensing coil.
Capacity
lb/hr (kg/hr)
54
Page 61

Component Operation and Maintenance
!
Circuit Board Adjustments
WARNING
Risk of electric shock. Can cause injury or death.
The Liebert iCOM microprocessor does not isolate power from the unit, even in the “Unit Off”
mode. The only way to ensure that there is NO voltage inside the unit is to install and open a
remote disconnect switch. Refer to unit electrical schematic.
Only properly trained and qualified personnel should perform adjustment of the circuit board.
Hazardous voltages are present in the equipment throughout the procedure. Disconnect all
power from the unit before working within the cabinet.
Humidifier operation is governed by the humidifier control board. This board is located on the right
side of the humidifier compartment. There are three potentiometers mounted on the board. These
pots can be used to adjust for extreme water conductivity conditions and capacity.
The “%” pot controls the amperage at which the drain will energize. The pot is clearly marked in percentages. This adjustment is factory set at 90%, which indicates that the unit will drain when the
amperage falls off to 90% of the capacity setpoint. Raising the value increases the frequency of drain
cycles. Lowering the value decreases the frequency of drain cycles. The frequency should be increased
for highly conductive water and decreased for less conductive water. If adjustment is necessary, and a
change of three to four percent in either direction does not permit normal operation of the unit, consult your Liebert supplier.
The pot marked “SEC” controls the duration of the drain cycle. The pot is clearly marked in seconds.
This adjustment is factory set at 60 seconds and should not be readjusted without consulting your
Liebert supplier.
The pot marked “CAP ADJ” is factory set at 100%. The maximum capacity is determined by a fixed
resistor (R4) which is factory selected based on unit voltage.
Drain Tempering Feature
All units are equipped with a drain tempering feature which mixes cold fill water with hot drain
water to protect drain piping. This feature can lower drain water temperature to as low as 140°F
(60°C), depending on water pressure. To deactivate this feature, remove the diode from socket CR18
on the circuit board (lower left, above LED).
55
Page 62

8.0 TROUBLESHOOTING
!
!
Use this section to assist in troubleshooting your unit. Also refer to 6.0 - Alarm Descriptions. Suggestions are grouped by product function for convenience.
WARNING
Risk of electric shock. Can cause injury or death.
The Liebert iCOM microprocessor does not isolate power from the unit, even in the “Unit Off”
mode. Some internal components require and receive power even during the “Unit Off” mode
of Liebert iCOM control.
The only way to ensure that there is NO voltage inside the unit is to install and open a remote
disconnect switch. Refer to unit electrical schematic.
Only properly trained and qualified personnel should service these units. Lethal voltage is
present in some circuits. Use caution when troubleshooting with power On. Disconnect and
lock out power before replacing components.
WARNING
Risk of explosive discharge from high-pressure refrigerant. Can cause injury or death.
This unit contains fluids and gases under high pressure. Relieve pressure before working with
piping.
Troubleshooting
NOTICE
Risk of improper control connection. Can cause equipment damage.
When using jumpers for troubleshooting, always remove jumpers when maintenance is
complete. Jumpers left connected could override controls and cause equipment damage.
Table 12 Blower troubleshooting
Symptom Possible Cause Check or Remedy
No main power Check L1, L2 and L3 for rated voltage.
Blown fuse or tripped circuit breaker (CB) Check fuses or CBs to main fan.
Blower will not
start
Table 13 Chilled water troubleshooting
Symptom Possible Cause Check or Remedy
Chilled water or hot
water/steam valve
not opening
Modulating Motors
Actuator Motors No 24 VAC power to motor
Overloads tripped Push reset button on main fan overload. Check amp draw.
No output voltage from transformer
Control fuse blown or circuit breaker tripped
Motor operates but valve
won’t open
No 24 VAC power to motor Check linkage for adjustment and be sure that it is tight on the valve.
No signal from control
Motor not working
Check linkage for adjustment and be sure that it is tight on the valve.
Check DC voltage on printed circuit board in motor. Terminal No. 1 is
grounded and No. 3 is positive. DC voltage should vary from 0.8 to
2.0 VDC or above as temperature control is varied below room
temperature on cooling valve or above room temperature on heating
valve.
Remove wires on Terminal No. 1 and No. 3 from the motor (do not
short). With 24 VAC power from TR to TR jumper terminal 1 and 2 on
motor to drive open. Remove jumper to drive closed, if motor fails to
work, replace it.
Check for 24 VAC between P22-3 and P22-5 (open), or P22-1 and
P22-5 (closed).
Check for 24 VAC between P24-2 and P24-1. If no
voltage, check primary voltage.
Check for 24 VAC between P4-4 and E1. If no voltage,
check for short. Replace fuse or reset circuit breaker.
56
Page 63

Table 14 Compressor and refrigeration system troubleshooting
Symptom Possible Cause Check or Remedy
Power Off
Compressor will not start
Compressor will not operate,
contactor not pulling in
Compressor will not operate,
contact not pulling in
Compressor contactor pulled in but
compressor will not operate
Compressor runs for three minutes
then stops; contactor drops out.
High discharge pressure
Low discharge pressure
Low suction pressure
Current overload open
Loose electrical connections Tighten connections
Compressor motor burned out
No call for cooling Check monitor status.
Solenoid valve not energizing
Low pressure switch not making contact
High pressure switch open
Blown fuse or tripped CB
Low pressure switch not closing
Liquid line solenoid valve not opening Check magnetic field to see if energized.
Dirty condenser or drycooler fins Clean coil.
Condenser equipment not operating Check operation.
High refrigerant charge Check refrigerant charge.
Hot gas bypass valve adjusted
improperly
Water regulating valve adjusted
improperly
Excessive fluid flow through condenser Adjust fluid regulating valve
Suction service valve partially closed Open the valve.
Faulty head pressure control valve or
condenser fan speed control
Compressor rotation in reverse direction
Insufficient refrigerant in system
Dirty air filters Change filters.
Plugged filter-drier Replace filter.
Improper superheat adjustment
Defective expansion valve sensing
element
Poor air distribution
Low condensing pressure Check head pressure control device.
Slipping belts Inspect and adjust
Troubleshooting
Check main switch, fuses or CBs and
wiring
Re-set units with overload option
manually. Allow compressor to cool for
internal overloads to reset.
Check and replace compressor if
defective.
Hold screwdriver over solenoid and check
for magnetic field. This indicates solenoid
is energized.
Check gas pressure - manually energize
low pressure switch.
Reset switch. Refer to other refrigeration
troubleshooting suggestions.
Check for line voltage after fuses or CBs,
and after contactors.
Check for low gas pressure. Compressor
is running on Positive Start Kit (air cooled
systems only)
Adjust properly.
Adjust properly.
Replace if defective.
Check for proper power phase wiring to
unit and to compressor motor.
Check for leaks, repair, and add
refrigerant for air cooled. Evacuate and
recharge for water/glycol unit.
Reset expansion valve for 10-15
(6-8°C)
Replace element
Check duct work for closed dampers.
Check for under-floor restrictions at or
near the unit.
°F
57
Page 64

Table 14 Compressor and refrigeration system troubleshooting (continued)
Symptom Possible Cause Check or Remedy
Defective or improperly set expansion
valve
Flooding
Low compressor capacity or
inability to pull down system
Compressor noisy Loose compressor or piping support Tighten clamps.
Pipe rattle Loose pipe connections Check pipe connections
Compressor running hot Compression ratio too high
Compressor cycles intermittently
Compressor cycles continually
Compressor motor protectors
tripping or cycling
Compressor cycles on locked rotor
Motor burnout
Evaporator fan motor or belt
Low condensing pressure Check head pressure control device
Slipping belts Inspect and adjust
Compressor rotation in reverse
direction.
Leaking liquid line solenoid valve or dirt
in valve
Low-pressure switch erratic in operation
Insufficient refrigerant in system
Suction service valve closed Open valve.
Insufficient fluid flowing through
condenser or clogged condenser, or
dirty air cooled condenser coils
Discharge service valve not fully open Open valve
Faulty low pressure switch Repair or replace.
Dirt or restriction in tubing to pressure
stat
Defective liquid line solenoid valve
Plugged filter-drier Replace filter.
High discharge pressure
Defective overload relay Replace.
High suction temperature
Loose power or control circuit wiring
connection
Defective motor
Low line voltage
Compressor motor defective Check for motor winding short or ground.
Single phasing
Check control panel for welded
contactor contacts or welded overload
contacts
Increase superheat or replace valve
Correct problem or replace fan motor and/
or belts.
Check for proper power phase wiring to
unit and to compressor motor.
Replace valve if clean; clean out valve if
dirty.
Check setting of high and low pressure
switches. Check condenser -- is it
plugged? Check that all evaporator and
condenser fans are operating properly.
Check tubing to switch to see if clogged or
crimped. Check for proper switch
operation.
Check for leaks, fix, and add refrigerant on
air cooled unit. Evacuate and recharge
water/glycol unit.
Adjust fluid regulating valve to condenser.
Flush the condenser.
Check and clean tubing.
Check valve and solenoid operator;
replace if necessary.
Check for loss of condenser water or
blocked condenser fan or coil.
Reduce suction temperature by expansion
valve adjustment or provide
desuperheating.
Check all power and control circuit
connections.
Check for motor ground or short. Replace
compressor, if either condition is found.
Check line voltage and determine location
of voltage drop.
Check voltage across all 3 legs at
contactor. Correct source problem.
Replace defective components
Troubleshooting
58
Page 65

Troubleshooting
Table 15 Dehumidification troubleshooting
Symptom Possible Cause Check or Remedy
Control not calling for
dehumidification
Compressor contactor not pulling in See 7.5.1 - Compressor Functional
No dehumidification
Compressor won't run; fuse blown or
CB tripped
Check monitor status.
Check and Table 14.
See 7.5.1 - Compressor Functional
Check and Table 14. Check fuses or CBs
and contacts. Check line voltage
Table 16 Glycol pump troubleshooting
Symptom Possible Cause Check or Remedy
Suddenly stops pumping Clogged strainer or impeller Clean out debris.
Suddenly slow pumping Clogged impeller, diffuser, or line Clean out debris and use strainer.
Excessive leakage around the pump
shaft while operating
Performance poor
Noisy operation
Worn seal or packing Replace seal or packing.
Worn impeller or seal Replace with new impeller or seal.
Suction lift too high Relocate pump closer to supply.
Motor not up to speed; low voltage
Worn bearings Replace pump
Worn motor bearings Replace pump
Low discharge head
Debris lodged in impeller Remove cover and clean out.
Cavitating pumps Adjust system pressures.
Larger lead wires may be required. Check
for proper line voltage (±10%).
Throttle discharge-improve suction
conditions.
Table 17 Infrared humidifier troubleshooting
Symptom Possible Cause Check or Remedy
Humidifier pan not filling
Control not calling for humidity Check monitor status
No humidification
Humidity contact not pulling in
Humidifier bulb burned out
Check water supply.
Check fill valve operation
Check drain stand pipe adjustment
Check for clogged waterline
Check visually. If contact is made, check
line voltage after contactor and fuses or
CBs.
Check for open humidifier safety stat.
Jumper between terminals P35-6 and
P35-15. If contactor pulls in, replace
safety. Remove jumper.
Replace bulb. Loosen lead on old bulb.
Trim excess lead length on new bulb to
avoid shorts.
59
Page 66

Table 18 Steam generating humidifier troubleshooting
Symptom Possible Cause Check or Remedy
False canister full indication Foaming
Main 24 VAC fuse or circuit
breaker trips
Main fuses blow
approximately 15 seconds
after unit is activated
Main fuses blow when
drain valve is activated.
Unit On, humidifier will not
operate
Contactor pulled in, but no
water enters canister
Water enters canister, but
canister full circuit activates
at a low water level
Canister fills but overflows
Shorts or loose connections Check the wiring connections of the 24 VAC circuit.
Faulty circuit board Replace the circuit board.
Faulty solenoid Check for magnetic field at coil.
Conductivity too high
Mineral deposits obstruct
drain valve
Faulty solenoid Check for magnetic field at coil.
Faulty circuit board Replace circuit board.
Humidifier not receiving power
No water available to unit Check external shutoff valves.
Clogged fill line strainer Clean or replace fill line strainer.
Wiring breaks or loose
connections
Faulty circuit board Replace circuit board.
Foaming Check drain valve and water supply.
Canister interface connections
incorrect
Full isolation has broken down
Drain assembly not operating
freely
Faulty circuit board Replace circuit board
Canister full circuit does not
activate
Troubleshooting
Check drain valve to ensure that it drains freely. Check and
replace if defective.
Check water supply. If commercially softened, reconnect to
raw water supply. If connected to hot water reconnect to
cold water.
Check amp draw of humidifier on startup. If it exceeds rated
amps, increase setting of the % pot on the circuit board
Check drain valve for obstructions and clean if necessary.
Verify that RUN/DRAIN switch is in the RUN position.
Check fuses or CBs and replace or reset if necessary.
Make sure molex connector is securely plugged into circuit
board and that no wires are loose.
Check for faulty wiring and loose connections.
Check connection on component plate in humidifier cabinet.
Terminal #1 on the square block interface device must be
connected to L2 of the power terminal block. L2 must also
be connected to the electrode closest to the steam outlet
port.
Verify that the red wire from Terminal #2 on the interface
connects to the red top terminal on the canister. This is the
one farthest from the steam outlet port and is the high water
sensor probe.
Remove red canister full wire from canister. If normal
operation resumes, canister must be replaced. Remove the
wire from Terminal #3 on the interface. If normal operation
resumes, canister full interface must be replaced.
Check and replace coil or valve if necessary.
Check wiring of canister full interface. Replace circuit board.
60
Page 67

Table 18 Steam generating humidifier troubleshooting (continued)
Symptom Possible Cause Check or Remedy
Verify that drain valve operates freely when activated. Clean
valve and replace coil or valve if defective. Flush canister
several times and replace if arcing persists.
If water is commercially softened, reconnect humidifier to
raw water supply, drain canister, and restart If connected to
hot supply, reconnect to cold water.
Increase drain rate by adjusting % pot on circuit board
above the preset 70% to roughly 80%.
Analyze iron content of water. If it exceeds 0.1 mg./l, install
a filter to remove iron from water supply.
Drain canister and add one Alka-Seltzer tablet to canister.
Refill. Turn the % pot to roughly 60%. Restart humidifier. If
amperage rises rapidly, it may be necessary to dilute the
water to prevent blown fuses. If it rises too slowly, add
another Alka-Seltzer tablet.
If humidifier returns to canister full condition, verity that the
fill solenoid closes tightly.
Excessive arcing in the
canister
On cold startup, canister
fills, high water alarm
activates and humidifier
fails to reach full amperage
On cold startup, canister
fills, high water alarm
activates and humidifier
fails to reach full amperage
Drain valve clogged or
defective
Improper water supply
Insufficient drain rate
Excessive iron content in
water
Conductivity of water too low
Fill solenoid not closing tightly
Table 19 Reheat troubleshooting
Symptom Possible Cause Check or Remedy
Reheat will not operate;
contactor not pulling in
Reheat not operating;
contactor pulling in
Control not calling for heat Check monitor status.
Reheat safety stat open
Heater burned out Turn Off power and check heater continuity with Ohm meter.
Jumper between terminals P34-1 and P34-2. If reheat operates,
safety is open. Remove jumper. Replace safety.
Troubleshooting
NOTE:
Reheat element sheaths and fins are manufactured with stainless steel. Regular inspections
are necessary to ensure proper cleanliness of the reheating element. Should inspection reveal
corrosion particles on the reheating element or adjoining surfaces (including ducts and
plenums), appropriate cleaning should be performed. Periodic reheating element replacement
may be required to meet specific application requirements.
61
Page 68

Monthly Maintenance Inspection Checklist
9.0 MONTHLY MAINTENANCE INSPECTION CHECKLIST
Date:_______________________________________ Prepared by:_________________________________
Model #:_____________________________________ Serial #:____________________________________
Filters
___ 1. Restricted air flow
___ 2. Check filter switch
___ 3. Wipe section clean
Blower Section
___ 1. Impellers free of debris and move freely
___ 2. Check belt tension and condition
___ 3. Bearings in good condition
Compressor
___ 1. Check oil leaks
___ 2. Check for leaks
Air Cooled Condenser (if applicable)
___ 1. Condenser coil clean
___ 2. Motor mounts tight
___ 3. Bearings in good condition
___ 4. Refrigerant lines properly supported
Reheat
___ 1. Check reheat element operation
___ 2. Inspect elements for cleanliness
Steam Generating Humidifier
___ 1. Check canister for deposits
___ 2. Check condition of steam hoses
___ 3. Check water make-up valve for leaks
Infrared Humidifier
___ 1. Check pan drain for clogs
___ 2. Check humidifier lamps
___ 3. Check pan for mineral deposits
Refrigeration Cycle/Section
___ 1. Check refrigerant lines
___ 2. Check for moisture (sight glass)
___ 3. Check suction pressure
___ 4. Check head pressure
___ 5. Check discharge pressure
___ 6. Check hot gas bypass valve
___ 7. Check thermostatic exp. valve
Air Distribution Section
___ 1. Restriction in grille free area
Refrigerant Charge
___ 1. Check refrigerant level
NOTES
Signature
Make photocopies of this form for your records
62
Page 69

Semiannual Maintenance Inspection Checklist
10.0 SEMIANNUAL MAINTENANCE INSPECTION CHECKLIST
Date:________________________________________ Prepared by:_________________________________
Model #:_____________________________________ Serial #:_____________________________________
Filters
___ 1. Restricted air flow
___ 2. Check filter switch
___ 3. Wipe section clean
Blower Section
___ 1. Impellers free of debris and move freely
___ 2. Check belt tension and condition
___ 3. Bearings in good condition
___ 4. Inspect & tighten electrical connections
Compressor
___ 1. Check oil leaks
___ 2. Check for leaks
___ 3. Inspect & tighten electrical connections
Air Cooled Condenser (if applicable)
___ 1. Condenser coil clean
___ 2. Motor mounts tight
___ 3. Bearings in good condition
___ 4. Refrigerant lines properly supported
___ 5. Inspect & tighten electrical connections
Water/Glycol Condenser (if applicable)
___ 1. Copper tube clean
___ 2. Water regulating valves function
___ 3. Glycol solution
___ 4. Check for water/glycol leaks
Glycol Pump
___ 1. Glycol leaks
___ 2. Pump operation
___ 3. Inspect & tighten electrical connections
Steam Generating Humidifier
___ 1. Check canister for deposits
___ 2. Check condition of steam hoses
___ 3. Check water make-up valve for leaks
___ 4. Inspect & tighten electrical connections
Infrared Humidifier
___ 1. Check pan drain for clogs
___ 2. Check humidifier lamps
___ 3. Check pan for mineral deposits
___ 4. Inspect & tighten electrical connections
Refrigeration Cycle/Section
___ 1. Check refrigerant lines
___ 2. Check for moisture (sight glass)
___ 3. Check suction pressure
___ 4. Check head pressure
___ 5. Check discharge pressure
___ 6. Check hot gas bypass valve
___ 7. Check thermostatic exp. valve
Air Distribution Section
___ 1. Restriction in grille free area
Refrigerant Charge
___ 1. Check refrigerant level
Electrical Panel
___ 1. Check fuses
___ 2. Inspect & tighten electrical connections
___ 3. Check operation sequence
___ 4. Check contactor operation
Reheat
___ 1. Check reheat element operation
___ 2. Inspect elements for cleanliness
___ 3. Inspect & tighten electrical connections
Notes
Signature
Make photocopies of this form for your records
63
Page 70

Semiannual Maintenance Inspection Checklist
64
Page 71

Page 72

Ensuring The High Availability
Of Mission-Critical Data And Applications.
Emerson Network Power, the global leader in enabling business-critical
continuity, ensures network resiliency and adaptability through
a family of technologies—including Liebert power and cooling
technologies—that protect and support business-critical systems.
Liebert solutions employ an adaptive architecture that responds
to changes in criticality, density and capacity. Enterprises benefit
from greater IT system availability, operational flexibility and
reduced capital equipment and operating costs.
While every precaution has been taken to ensure the accuracy
and completeness of this literature, Liebert Corporation assumes no
responsibility and disclaims all liability for damages resulting from use of
this information or for any errors or omissions.
© 2009 Liebert Corporation
All rights reserved throughout the world. Specifications subject to change
without notice.
® Liebert is a registered trademark of Liebert Corporation.
All names referred to are trademarks
or registered trademarks of their respective owners.
SL-11963 _REV0_08-09
Technical Support / Service
Web Site
www.liebert.com
Monitoring
liebert.monitoring@emerson.com
800-222-5877
Outside North America: +00800 1155 4499
Single-Phase UPS & Server Cabinets
liebert.upstech@emerson.com
800-222-5877
Outside North America: +00800 1155 4499
Three-Phase UPS & Power Systems
800-543-2378
Outside North America: 614-841-6598
Environmental Systems
800-543-2778
Outside the United States: 614-888-0246
Locations
United States
1050 Dearborn Drive
P.O. Box 29186
Columbus, OH 43229
Europe
Via Leonardo Da Vinci 8
Zona Industriale Tognana
35028 Piove Di Sacco (PD) Italy
+39 049 9719 111
Fax: +39 049 5841 257
Asia
29/F, The Orient Square Building
F. Ortigas Jr. Road, Ortigas Center
Pasig City 1605
Philippines
+63 2 687 6615
Fax: +63 2 730 9572
Emerson Network Power.
The global leader in enabling Business-Critical Continuity.
AC Power
Connectivity
DC Power
Business-Critical Continuity, Emerson Network Power and the Emerson Network Power logo are trademarks and service marks of Emerson Electric Co.
©2009 Emerson Electric Co.
Embedded Computing
Embedded Power Power Switching & Controls
Monitoring
Outside Plant
Precision Cooling
EmersonNetworkPower.com
Racks & Integrated Cabinets
Services
Surge Protection
 Loading...