

Page 1

2600 / 2800
Instruction Manual
Manuel d’instructions
Bedienungsanleitung
Page 2

IMPORTANT SAFETY INSTRUCTIONS
Your Elna 2600/2800 series sewing machine is designed and constructed for HOUSEHOLD use only.
Read all instructions before using this machine.
DANGER -
1. Your sewing machine should never be left unattended plugged in. Always unplug the machine from the
electric outlet immediately after using and before cleaning.
2. Always unplug before replacing light bulb. Replace bulb with same type rated 15 Watts.
3. Do not place or store machine where it can fall or be pulled into a tub or sink. Do not reach for the machine
if it has fallen into water. Unplug immediately.
WARNING -
1. Do not allow machine to be used as a toy. Supervision is necessary when this machine is
used by or near children.
2. Use this sewing machine only for ist intended use as described in this manual. Only use attachments
recommended by the manufacturer as described in this manal.
3. Never operate this machine if it has a damaged cord or plug, is not working properly, has been
dropped or damaged or dropped into water. Return the machine to the nearest authorized dealer or
service center for examination, repair, electrical or maechanical adjustment.
4. The machine is equipped with a special connection cord which, if damaged, must be replaced
by an identical cord. This can be obtained from your dealer.
5. Never operate the sewing machine with any air opening blocked. Keep ventilation openings of the
sewing machine and foot control free from the accumulation of lint, dust and fibers.
6. Never drop or insert any object into any opening.
7. Do not use outdorrs.
8. Do not operate where aerosol (spray) products are being used or where oxygen is being
administered.
9. To disconnect, turn machine off and remove plug from outlet.
10. Do not unplug by pulling on cord. To unplug, grasp the plug, not the cord.
11. Keep fingers away from all moving parts especiallythe needle.
12. Always use the proper needle plate. The wrong plate can cause the needle to break.
13. Do not use bent needles.
14. Do not pull or push fabric while stitching. It may deflect the needle causing it to break.
15. Switch this sewing machine off when making any adjustment in the needle area, such as
threading the needle, changing needle, threading bobbin, changing presser foot, etc.
16. Always unplug this sewing machine from the electrical outlet when removing covers,
lubricating or making any other servicing adjustments mentioned in the instruction manual.
To reduce the risk of electric shock:
To reduce the risk of burns, fire, electrical shock, or injury:
SAVE THESE INSTRUCTIONS
USA only
Your machine comes equipped with a polarized plug (one prong wider than the other). A
polarized plug reduces the risk of electrical shock. This plug is intended to fit into a polarized
outlet. If the plug does not fit fully into the outlet, reverse the plug. If it still does not fit, contact a
qualified electrician to install the proper outlet. Do not modify the plug in any way.
Use only foot control YC-482J or TJC-150 (UL, CSA).
2
Page 3

CONSIGNES DE SÉCURITÉ IMPO
RTANTES
, notamment les
D
ANGER
aut toujours débrancher cette machine à
A
VE
R
TISSEMENT
tous autres réglages mentionnés dans le ma
n
uel de la machine à coudr
e.
CONSE
R
VEZ CETTE N
O
TICE
Pour utiliser un appareil électrique, il faut toujours respecter les consignes de sécurité fondamentales
consignes suivantes : Avant d’utiliser cet appareil, lisez toutes ces instructions.
: Pour réduire les risques d’électrocution.
1. Il ne faut jamais laisser un appareil sans surveillance lorsqu’il est branché. Il f
coudre de la prise électrique murale, après son utilisation ou avant de la nettoyer.
2. Il faut toujours débrancher la machine avant de remplacer une ampoule électrique. Remplacez l’ampoule par une
ampoule du même type de 15W.
: Afin de réduire les risques de brûlures, incendie, électrocution ou blessures corporelles:
1. Il ne faut pas se servir de la machine comme d’un jouet. Il faut faire très attention lorsque cette machine à coudre est
utilisée par des enfants ou à proximité de ceux-ci.
2. Utilisez cette machine uniquement pour les utilisations prévues, telles qu’elles sont décrites dans le manuel de la
machine à coudre.
Utilisez uniquement les accessoires recommandés par le fabricant tels qu’ils sont indiqué dans le manuel de la
machine à coudre.
3. Il ne faut jamais faire fonctionner la machine à coudre si le câble ou la prise est endommagé (e), si elle ne fonctionne
pas correctement, si on l’a laissé tomber, si elle est endommagée ou si elle est tombée dans l’eau.
Retournez la machine à coudre au magasin ou au centre de réparation Janome le plus proche, afin de la faire
examiner, réparer ou d’effectuer des réglages électriques ou mécaniques.
4. Il ne faut jamais faire fonctionner cette machine si les orifices d’aération sont colmatés. Tenir les orifices d’aération
de cette machine à coudre et le curseur d’escamotage du pied-de-biche exempts de toute accumu lation de peluches,
poussières et de morceaux de chiffon.
5. Il ne faut jamais laisser tomber ou introduire d’objet dans les orifices.
6. Il ne faut pas l’utiliser en plein air.
7. Il ne faut pas la faire fonctionner si des produits en aérosol (vaporisateur) sont utilisés où s’il y a une installation
d’oxygène.
8. Pour la débrancher, tourner le commutateur à la position Arrêt (“0”), puis retirez la prise de la douille.
9. Ne débranchez pas la machine en tirant sur le câble. Pour la débrancher, saisissez la prise, et non pas le câble
électrique.
10. Tenez les doigts à l’écart de toutes les pièces mobiles. Il faut faire particulièrement attention dans la zone proche de
l’aiguille de la machine à coudre.
11. Il faut toujours utiliser la plaque d’aiguille correcte. Si la plaque d’aiguille ne convient pas, l’aiguille risqué de se briser.
12. N’utilisez pas d’aiguilles courbées.
13. Ne tirez ni ne poussez pas le tissu pendant les piqûres. Cela risque de faire dévier l’aiguille et provoquer sa cassure.
14. Avant de faire des réglages dans la zone de l’aiguille tels qu’enfiler l’aiguille, changer l’aiguille, enfiler la canette ou
changer le pied-de-biche, etc., mettez le commutateur de la machine à coudre sur Arrêt (“0”).
15. Débranchez toujours la machine à coudre de la douille électrique avant de retirer les capots, de la graisser ou de faire
3
Page 4

WICHTIGE SICHERHEITSHINWEISE
eisungen einzuhalten,
Ziehen
er
ks Prüfung,
nehmen,
schmieren oder andere in diesem Hand
b
uch aufgefüh
r
te Einstellungen
vor
nehmen.
BE
W
AHREN SIE DIESE ANWEISUNGEN
A
UF
Bei der Benutzung eines elektrischen Geräts sind immer grundlegende Sicherheitsanw
einschließlich Folgendes:
Lesen Sie alle Anweisungen, bevor Sie diese Maschine in Gebrauch nehmen.
GEFAHR
1. Lassen Sie die Maschine niemals unbeaufsichtigt, wenn sie an das Stromnetz angeschlossen ist.
Sie unmittelbar nach dem Gebrauch und vor der Durchführung von Reinigungen immer den Netzsteck
dieser Nähmaschine ab.
2. Ziehen Sie immer den Netzstecker ab, bevor die Glühbirne ausgewechselt wird. Ersetzen Sie die Birne
mit einer Birne der gleichen Nennleistung (15W).
WARNUNG
1. Benutzen Sie diese Maschine nicht als Spielzeug. Beim Gebrauch dieser Maschine durch oder in der
Nähe von Kindern ist besondere Aufmerksamkeit erforderlich.
2. Benutzen Sie diese Maschine nur für ihren vorgesehenen Zweck gemäß der Beschreibungen in diesem
Handbuch.
Benutzen Sie nur Zubehör, das vom Hersteller empfohlen wird, wie in diesem Handbuch beschrieben.
3. Nehmen Sie diese Nähmaschine niemals in Betrieb, wenn ihr Netzstecker oder Stromkabel schadhaft
sind, wenn sie nicht vorschriftsmäßig funktioniert, wenn sie fallen gelassen oder beschädigt wurde oder
in Wasser gefallen ist.
Bringen Sie diese Nähmaschine zu Ihrem nächsten Janome Händler und Kundendienst zwec
Reparatur, elektrischer oder mechanischer Einstellung.
4. Nehmen Sie das Gerät niemals in Betrieb, wenn eine Luftöffnung blockiert ist. Sorgen Sie dafür, dass
sich in den Luftöffnungen dieser Maschine und der Fußsteuerung keine Fusel, Staub und Stoffreste
ansammeln.
5. Sorgen Sie dafür, dass keine Gegenstände in die Öffnungen gelangen.
6. Benutzen Sie die Maschine nicht im Freien.
7. Benutzen Sie diese Maschine nicht, wenn Aerosole (Sprays) verwendet oder Sauerstoff zugeführt wird.
8. Stellen Sie beim Abschalten der Maschine alle Schalter auf AUS (“ 0 ”) und ziehen Sie dann den
Netzstecker ab.
9. Ziehen Sie den Netzstecker nicht ab, indem Sie am Kabel ziehen. Halten Sie den Stecker fest, nicht das
Kabel.
10. Halten Sie Ihre Finger von allen beweglichen Teilen fern. Gehen Sie im Bereich der Nähnadel mit
besonderer Vorsicht vor.
11. Benutzen Sie immer die richtige Nadelplatte. Die falsche Platte kann dazu führen, dass die Nadel
abbricht.
12. Benutzen Sie keine verbogenen Nadeln.
13. Schieben oder ziehen Sie das Nähgut nicht beim Nähen, da so die Nadel verbogen werden und
abbrechen kann.
14. Stellen Sie diese Nähmaschine auf AUS (“ 0 ”), bevor Sie Justierungen im Bereich der Nadel vor
wie zum Beispiel Einfädeln der Nadel, Auswechseln der Nadel, Einfädeln der Spule oder Auswechseln
des Nähfußes, etc.
15. Ziehen Sie immer den Netzstecker dieser Maschine ab, bevor Sie Abdeckungen entfernen, die Maschine
– Vermeidung eines Stromschlags:
– Vermeidung von Verbrennungen, Brand, Stromschlag oder Personenschäden:
4
Page 5

TABLE
OF
CONTENTS
SECTION
1.
KNOW
YOUR
MACHINE
Variable needle posi
SECTION
4.
UTILITY
STITCHES
Names of Parts ................................................................ 8
Standard Accessories.................................................... 10
Accessory storage ......................................................... 10
Extension Table ............................................................. 12
Free-arm sewing............................................................ 12
SECTION 2. GETTING READY TO SEW
Connecting the Power Supply ....................................... 14
Controlling the Sewing Speed ....................................... 14
Reverse Stitch Lever ..................................................... 16
Foot Pressure Dial ......................................................... 16
Dropping the Feed Dog ................................................. 16
Raising and Lowering the Presser Foot ........................ 18
Changing the Presser Foot............................................ 18
Removing and Attaching the Foot Holder...................... 18
Changing Needles ......................................................... 20
Needle and Fabric Chart................................................ 20
Winding the Bobbin........................................................ 24
Setting the spool ............................................................ 24
Removing the bobbin..................................................... 24
Winding the bobbin ........................................................ 26
Inserting the bobbin ....................................................... 28
Threading the Machine .................................................. 30
Needle threader ............................................................. 32
Drawing up the Bobbin Thread ...................................... 34
Selecting the Stitch Pattern ........................................... 36
Pattern selector dial ....................................................... 36
Stitch Length Dial........................................................... 36
Adjusting stretch stitch balance ..................................... 38
Stitch Width Dial............................................................. 38
tion ................................................ 38
Balancing Needle Thread Tension ................................ 40
SETION 3. BASIC SEWING
Straight Stitch Sewing.................................................... 42
Changing the sewing direction....................................... 42
Finishing sewing ............................................................ 42
Seam guides on the needle plate .................................. 44
Turning a square corner ................................................ 44
Basic Zigzag................................................................... 46
Overcasting.................................................................... 46
Super Stretch Stitch .......................................................48
3-Step Zigzag Stitch....................................................... 48
Triple Seam.................................................................... 50
Rickrack or Triple Zig-zag .............................................. 50
Button Sewing................................................................ 52
Automatic Buttonhole (Model 2800) .............................. 54
Adjusting the buttonhole stitch density .......................... 58
4-step Buttonhole (Model 2600) .................................... 60
Adjusting the buttonhole stitch density .......................... 60
Corded Buttonhole (Model 2800)................................... 62
Corded Buttonhole (Model 2600)................................... 64
Manual Buttonhole (Model 2800)................................... 66
Zipper Application .....................................................68-72
Blind Hemming............................................................... 74
SECTION 5. DECORATIVE STITCHES
Decorative Satin Stitches............................................... 76
Decorative Stretch Stitches............................................ 76
Smocking ....................................................................... 78
Quilting (Model 2800)..................................................... 80
Pin Tucking .................................................................... 82
Shell Tucking.................................................................. 82
Fagoting .........................................................................84
Patchwork ...................................................................... 84
Appliqué .........................................................................86
SECTION 6. CARE AND MAINTENANCE
Cleaning the Hook Race and Feed Dogs ...................... 88
Replacing the Bobbin Holder ......................................... 90
Replacing the Light Bulb ................................................90
Troubleshooting ............................................................. 92
OPTIONAL ACCESSORIES ...........................95
RECYCLING REGULATIONS ........................95
NOTE : Information found in this instruction manual is
current at the time of printing. Elna reserves the right to
change and update specifications and information as
needed.
5
Page 6

T
ABLE DES M
A
TIÈRE
S
SECTION 1.
CONNAISSEZ
VO
TRE M
A
CHINE
SECTION 5.
POINTS DÉCOR
A
TIFS
Dénomination des composants ....................................... 9
Accessoires standard .................................................... 11
Rangement des accessoires ......................................... 11
Table d’extension........................................................... 13
Couture avec le bras libre.............................................. 13
SECTION 2. SE PRÉPARER À COUDRE
Raccordement de la machine au secteur ........................ 5
Contrôle de la vitesse de couture .................................... 5
Levier de point arrière.................................................... 17
Sélecteur de pression du pied-de-biche ........................ 17
Abaissement des griffes d’entraînement ....................... 17
Relevage et abaissement du pied-de-biche .................. 19
Changement de pied-de-biche ...................................... 19
Enlever et fixer la bride semelle..................................... 19
Changement d’aiguille ................................................... 19
Tableau des fils et des aiguilles..................................... 22
Remplissage de la canette ............................................ 25
Réglage de la bobine de fil ............................................ 25
Porte-bobine supplémentaire......................................... 25
Retrait de la canette....................................................... 25
Remplissage de la canette ............................................ 27
Introduction de la canette .............................................. 29
Enfilage de la machine .................................................. 31
Enfile-aiguille.................................................................. 33
Remonter le fil de la canette .......................................... 35
Sélection du motif de point ............................................ 37
Sélecteur de motif.......................................................... 37
Sélecteur de longueur de point...................................... 37
Réglage fin des points stretch ....................................... 39
Sélecteur de largeur de point......................................... 39
Position variable de l’aiguille.......................................... 39
Équilibrage de la tension du fil d’aiguille........................ 41
SECTION 3. COUTURE STANDARD
Couture à point droit ..................................................... 43
Pour modifier le sens de la couture .............................. 43
Pour terminer la couture ................................................ 43
Guides de couture de la plaque à aiguilles.................... 45
Tourner un angle vif....................................................... 45
SECTION 4. POINTS ULITAIRES
Point zigzag de base ..................................................... 47
Surfilage......................................................................... 47
Point Super stretch ........................................................ 49
Zigzag spécial................................................................ 49
Couture triple ................................................................. 51
Point stretch décoratif .................................................... 51
Couture de boutons ....................................................... 53
Boutonnière automatique (2800 uniquement) ............... 55
Pour ajuster la densité des points de boutonnière ........ 59
Boutonnière en 4-phases (2600 uniquement) ............... 61
Boutonnière cordonnet (2800 uniquement) ................... 63
Boutonnière cordonnet (2600 uniquement) ................... 65
Boutonnière manuelle (2800 uniquement) .................... 67
Pose de fermeture à glissière .................................. 93+73
Ourlet invisible ............................................................... 75
Point d’épine décoratif.................................................... 77
Points stretch décoratifs................................................. 77
Smocks...........................................................................79
Guide de ouatinage (2800 uniquement) ........................81
Nervures.........................................................................83
Point à coquilles ............................................................. 83
Faux-jour ........................................................................ 85
Patchwork ......................................................................85
Application au point bourdon ......................................... 87
SECTION 6. SOINS ET ENTRETIEN
Nettoyage du logement de crochet et des griffes
d’entraînement ...............................................................91
Remettre la capsule .......................................................91
Remplacement de l’ampoule ......................................... 91
Dépistage des pannes ...................................................93
RECYCLAGE.................................................95
ACCESSOIRES .............................................95
REMARQUES: Les informations contenues dans ce
manuel d’instruction sont valides à la date d’impression.
Nous nous réservons le droit de modifier des
caractéristiques et d’effectuer des mises à jour si
nécessaires.
6
Page 7

INHA
L
TSVERZEICHNIS
TEIL
1.
IHRE
MASCHINE
Variable Nadelstellung
Einstellen der Oberfadenspannung
...............................
41
TEIL
5.
ZIERSTICHE
Augenblick des Druckens.Wir behalten uns des Recht vor,
TEIL 3.
EINFA
CHES NÄHEN
TEIL
4.
PRAKTISCHE
STICHE
Teilebezeichnungen......................................................... 9
Serienmäßiges Zubehör ................................................ 11
Zubehörfach................................................................... 11
Anschiebetisch............................................................... 13
Freiarmnähen................................................................. 13
TEIL 2. VORBEREITUNGEN FÜR DAS NÄHEN
Anschluss an den Netzstrom ......................................... 15
Regulieren der Nähgeschwindigkeit .............................. 15
Rückwärtstaste .............................................................. 17
Fußdruckregler............................................................... 17
Herabsenken des Transporteurs ................................... 17
Heben und Senken des Nähfußes................................. 19
Auswechseln des Nähfußes .......................................... 19
Abnehmen und Anbringen des Fußhalters.................... 19
Auswechseln der Nadeln ............................................... 21
Faden- und Nadeltabelle ............................................... 23
Spulen............................................................................ 25
Einsetzen der Garnrolle ................................................. 25
Zuätzlicher Garnrollenhalter .......................................... 25
Entnahme der Spule ...................................................... 25
Spulen............................................................................ 27
Einsetzen der Spule....................................................... 29
Einfädeln der Maschine ................................................. 31
Nadeleinfädler................................................................ 33
Heraufholen des Unterfadens........................................ 35
Wahl des Stichmusters .................................................. 37
Musterauswahlregler ..................................................... 37
Stichlängenregler ........................................................... 37
Feine Einstellungen der Stretchstitche .......................... 39
Stichbreitenregler........................................................... 39
................................................... 39
Dekorative Federstiche ..................................................77
Dekorative Stretchstiche ................................................77
Smoken ..........................................................................79
Wattierungsführer ( nur für Mod. 2800)..........................81
Biesen ............................................................................83
Nähen eines Muschelsaums ..........................................83
Hohlsaum .......................................................................85
Patchwork.......................................................................85
Applizieren mit dem Kordonstich....................................87
TEIL 6. PFLEGE UND WARTUNG
Reinigen von Greifer und Transporteuren .....................89
Wiedereinstzen des Spulengehäuses............................91
Auswechseln der Glühbirne ...........................................91
Problemlösungen ...........................................................94
ZUBEHÖR ..................................................... 95
RECYCLINGS-VORSCHRIFTEN.................. 95
Hinweis : Alle informationen in diesem Handbuch gelten im
Beschreibungen und Informationen bei Bedarf zu ändern oder
zu aktualisieren.
Geradstichnähen ............................................................43
Änderung der Nährichtung .............................................43
Fertigstellen der Naht .....................................................43
Nahtführungslinien auf der Stichplatte ...........................45
Ändern der Nährichtung um 90°.....................................45
Zick-Zack-Stich ...............................................................47
Abdeckungsnähte...........................................................47
Superstretch Stich ..........................................................49
3-Stufen Zick-Zack-Stich ................................................49
Dreifachnaht ...................................................................51
Dekorativer Stretchstich .................................................51
Annähen von Knöpfen ....................................................53
Automatische Knopflöcher (nur für Mod. 2800)..............55
Einstellen der Knopflochstichdichte................................59
Knopflochnähen in 4-Schritten .......................................61
Mit Bündchen verstärkte Knopflöcher
(nur für Mod. 2800) .........................................................63
Mit Bündchen verstärkte Knopflöcher
(nur für Mod. 2800) .........................................................65
Manuelles Knopfloch (nur für Mod. 2800 ) .....................67
Reißverschlüsse ...................................................... 69+73
Blindsaum .......................................................................75
7
Page 8
SECTION
1.
KNOW
YOUR
MACHINE
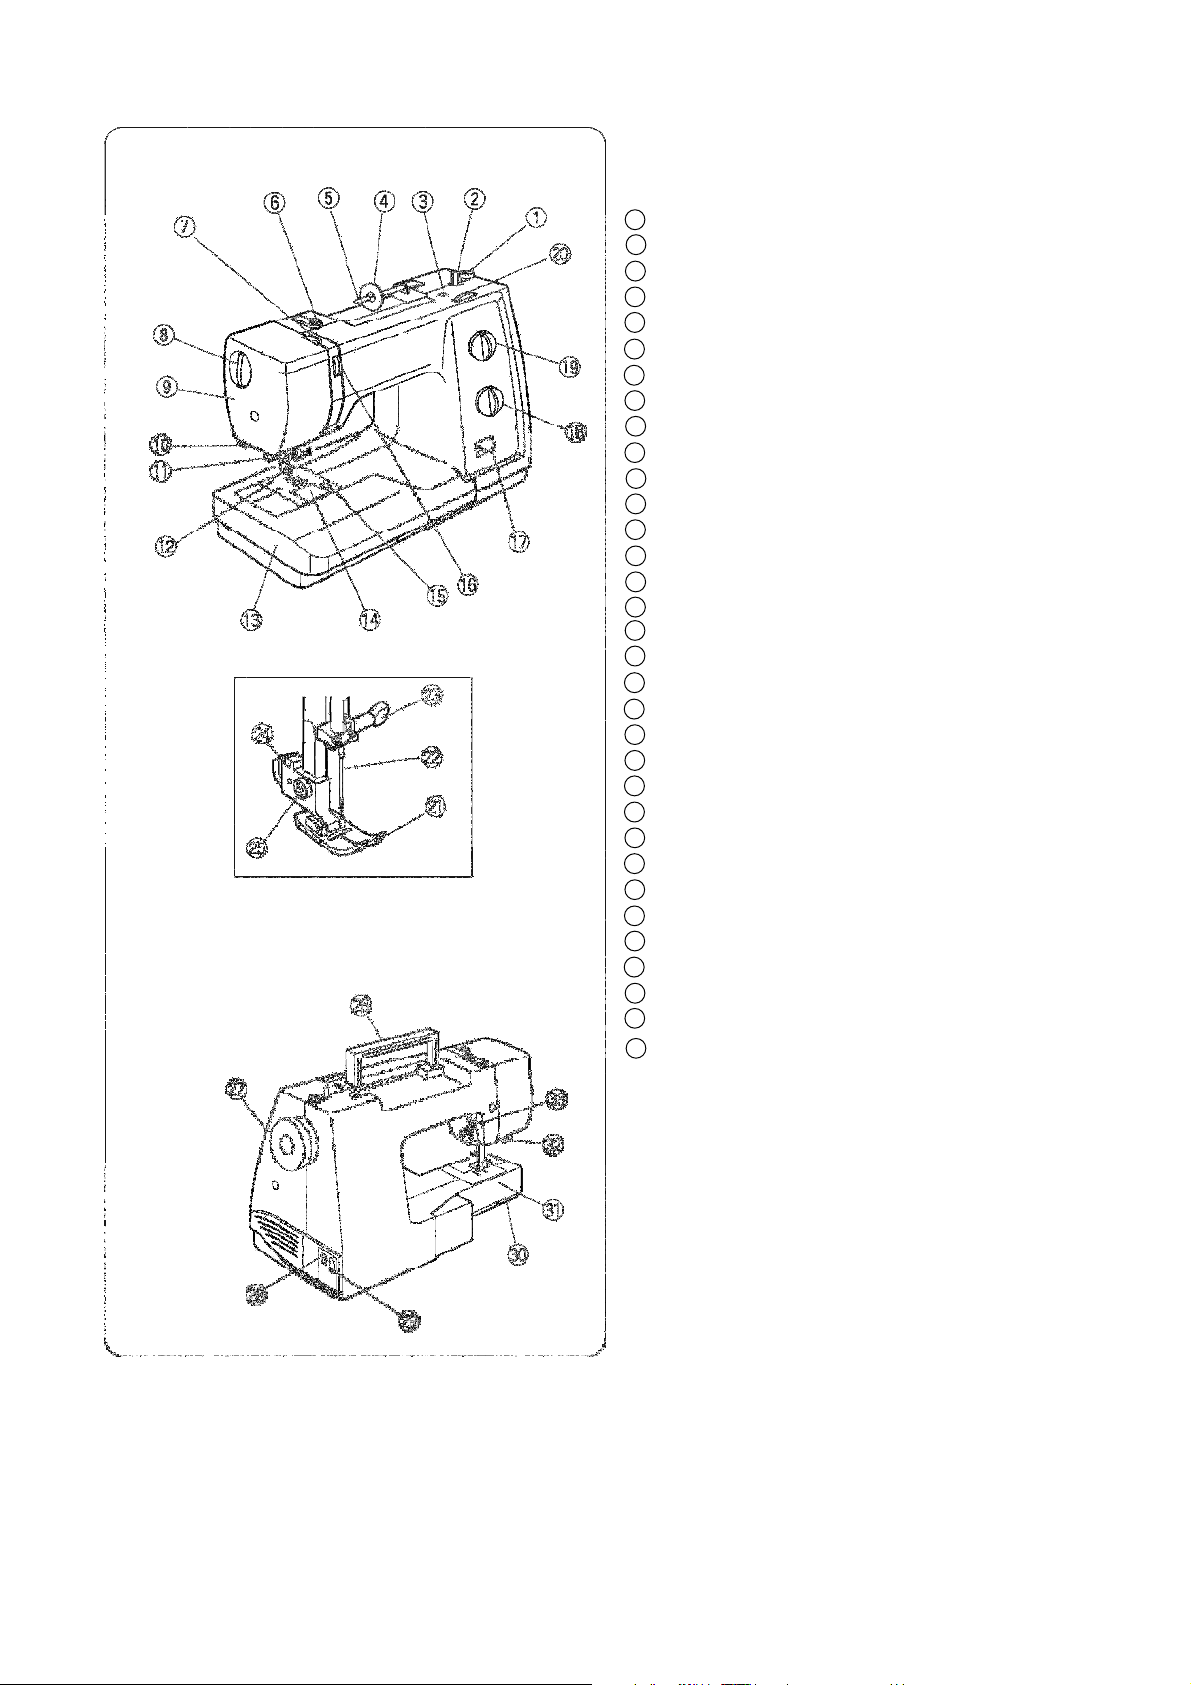
N ames of Parts
1
Bobbin winder stopper
2
Bobbin winder spindle
3
Hole for additional spool pin
4
Spool holder
5
Spool pin
6
Bobbin winder thread guide
7
Thread take-up lever
8
Foot pressure dial
9
Face plate
10
Thread cutter
11
Needle threader (Model 2800 only)
12
Needle plate
13
Extension table (Accessory storage)
14
Hook cover plate
15
Hook cover plate release button
16
Thread tension dial
17
Reverse stitch lever
18
Stitch length dial
19
Pattern selector dial
20
Stitch width dial
21
Presser foot
22
Needle
23
Needle clamp screw
24
Shank
25
Setscrew
26
Carrying handle
27
Flywheel
28
Power switch
29
Machine socket
30
Drop feed lever
31
Free-arm
32
Buttonhole lever (Model 2800 only)
33
Presser foot lever
8
Page 9

SECTION 1.
CONNAISSEZ
VO
TRE M
A
CHINE
TEIL
1.
IHRE
MASCHINE
Dénomination des composants
Te
ilebe
zeichnungen
1
angement d’accessoires)
Butée du dévidoir
2
Broche du dévidoir
3 Trou pour porte-bobine supplémentaire
4
Disque fixe-bobine
5
Porte-bobine
6
Guide-fil du dévidoir
7
Levier releveur de fil
8
Sélecteur de pression du pied-de-biche
9
Plaque frontale
10
Coupe-fil
11
Enfile aiguille ( 2800 uniquement)
12
Plaque à aiguilles
13
Table d’extension (boîte de r
14
Couvercle de crochet
15
Bouton d’ouverture du couvercle de crochet
16
Sélecteur de tension du fil
17
Levier de point arrière
18
Sélecteur de longueur de point
19
Sélecteur de motif
20
Sélecteur de largeur de point
21
Pied-de-biche
22
Aiguille
23
Vis de pince-aiguille
24
Bride semelle
25
Vis de blocage
26
Poignée de transport
27
Volant
28
Interrupteur de mise sous tension
29
Prise de courant de la machine
30
Levier d’escamotage des griffes d’entraînement
31
Bras libre
32
Levier de boutonnière ( 2800 uniquement)
33
Levier du pied à coudre
1
Spuleranschlag
2
Spuler
3
Anbringung für zweiten Garnrollenhalter
4
Fadenabziehscheibe
5
Garnrollenhalter
6
Spulerfadenführung
7
Fadenhebel
8
Fußdruckregler
9
Kopfabdeckung
10
Fadenabschneider
11
Nadeleinfädler (nur für Mod.2800)
12
Stichplatte
13
Anschiebetisch (Zubehörfach)
14
Greiferplatte
15
Auslöseknopf für Greiferabdeckung
16
Fadenspannungsregler
17
Rückwärtstaste
18
Stichlängenregler
19
Musterauswahlregler
20
Stichbreitenregler
21
Nähfuß
22
Nadel
23
Nadelklemmschraube
24
Fußhalter
25
Befestigungsschraube
26
Tragegriff
27
Handrad
28
Netzschalter
29
Maschinensteckdose
30
Schieber zum Versenken des Transporteurs
31
Freiarm
32
Knopflochhebel (nur für Mod.2800)
33
Nähfußhebel
9
Page 10
Standar
d Accessories
Accessory storage
The standard accessories can be stored in the accessory
Draw out the storage box from the table as shown.
1
Overedge foot C (Model 2800 only)
2
Zipper foot E
3
Blind hemming foot G
4
Satin stitch foot F
5
Automatic buttonhole foot R (Model 2800 only)
6
Sliding buttonhole foot J (Model 2600 only)
7
Needles
8
Bobbins
9
Screwdriver
10
Lint brush
11
Seam ripper (buttonhole opener)
12
Quilting guide (Model 2800 only)
13
Spool holder (large)
14
Spool holder (small)
15
Additional spool pin
16
Felt cushion
storage box under the extension table.
1
Accessory storage box
10
Page 11

Accessoires
standa
r
d
Serienmäßiges Zubehör
Rangement des accessoires
angés dans la
Zubehörfa
c
h
sch
wie dargestellt he
1
Pied Overlock C (2800 uniquement)
2
Pied à semelle étroite E
3
Pied ourlet invisible G
4
Pied point bourdon F
5
Pied de boutonnière automatique R (2800 uniquement)
6
Pied boutonnière en 4 – phases ( 2600 uniquement)
7
Aiguilles
8
Canettes
9
Tournevis
10
Brosse anti-peluche
11
Découd -vite (ouvre-boutonnière)
12
Guide de outinage
13
Disque fixe-bobine (grand modèle)
14
Disque fixe-bobine (petit modèle)
15
Porte-bobine supplémentaire
16
Coussinet de feutre
1
Overlock Fuss C (nur für Mod.2800)
2
Reißverschlussfuß E
3
Blindstichfuß G
4
Satinstich Fuss F
5
Automatik-Knopflochfuss R (nur für Mod.2800)
6
Sohle für 4-Stufen Knopflöcher (nur für Mod.2600)
7
Nadeln
8
Spulen
9
Schraubendreher
10
Reinigungspinsel
11
Nahttrenner (Knopflochtrenner)
12
Kantenlineal
13
Fadenabziehscheibe (groß)
14
Fadenabziehscheibe (klein)
15
Zusätzlicher Garnrollenhalter
16
Filzpolster
Les accessoires standard peuvent être r
boîte de rangement d’accessoires sous la table
d’extension.
Tirez la boîte de rangement se trouvant sous la table
comme illustré.
1
Boîte de rangement des accessoires
11
Das Standardzubehör kann im Zubehörfach unter dem
Anschiebetisch untergebracht werden.
Ziehen Sie das Zubehörfach unter dem Anschiebeti
raus.
1
Zubehörfach
Page 12
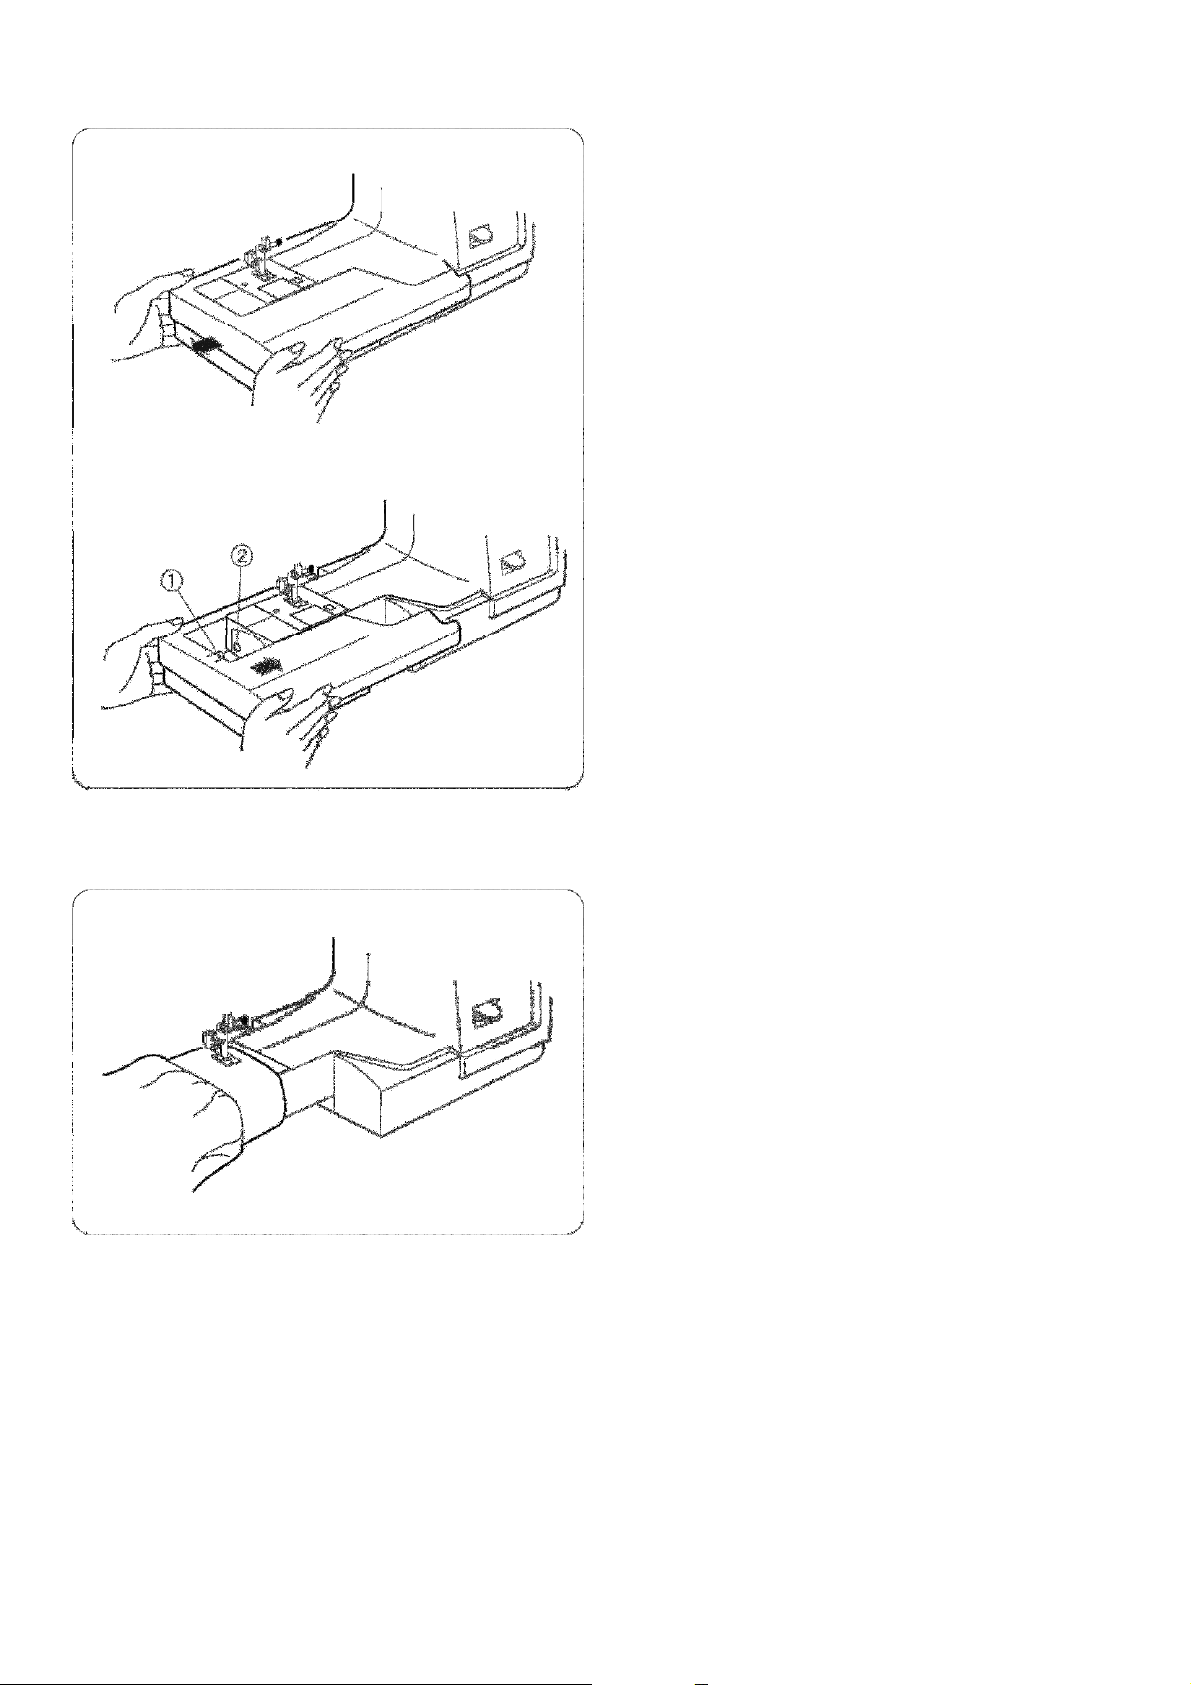
Extensio
n Table
To
detach:
Pull the extension table to the
left.
To
attach:
to
Free A
rm
sewing
waistbands,
or
Insert the pin into the hole and push the extension table
snap it in place.
1
Pin
2
Hole
Free arm sewing is used for stitching sleeves,
pant legs or any other tubular garment.
It is also useful for darning socks or mending knees
elbows.
12
Page 13

Tab
le d’
e
xtension
Ans
c
hiebetisch
Retrait:
Tirez la table d’extension vers la gauche.
Abnehmen:
Installation:
Anbrin
g
en:
Couture
a
vec le bras libre
Freiarmnähen
Anschiebetisch nach links ziehen.
Insérez la broche
d’extension jusqu’à ce qu’elle s’encastre avec un
claquement.
1
Broche
2
Trou
Le bras libre permet de coudre les manches,
les ceintures, les jambes de pantalons et autres
vêtements cylindriques.
Il est également idéal pour repriser les chaussettes, les
genoux de pantalons et les coudes de chemises.
dans
le trou et poussez la table
Führen Sie den Stift in die Öffnung und schieben Sie den
Anschiebetisch ein, bis er einrastet.
1
Stift
2
Öffnung
Freiarmnähen eignet sich zum Nähen von Ärmeln,
Bünden, Hosenbeinen oder anderen röhrenförmigen
Teilen.
Es ist außerdem nützlich zum Stopfen von Socken oder
Knien und Ellbogen.
13
Page 14
SEC
TION
2.
GETTING
READY
TO
SEW
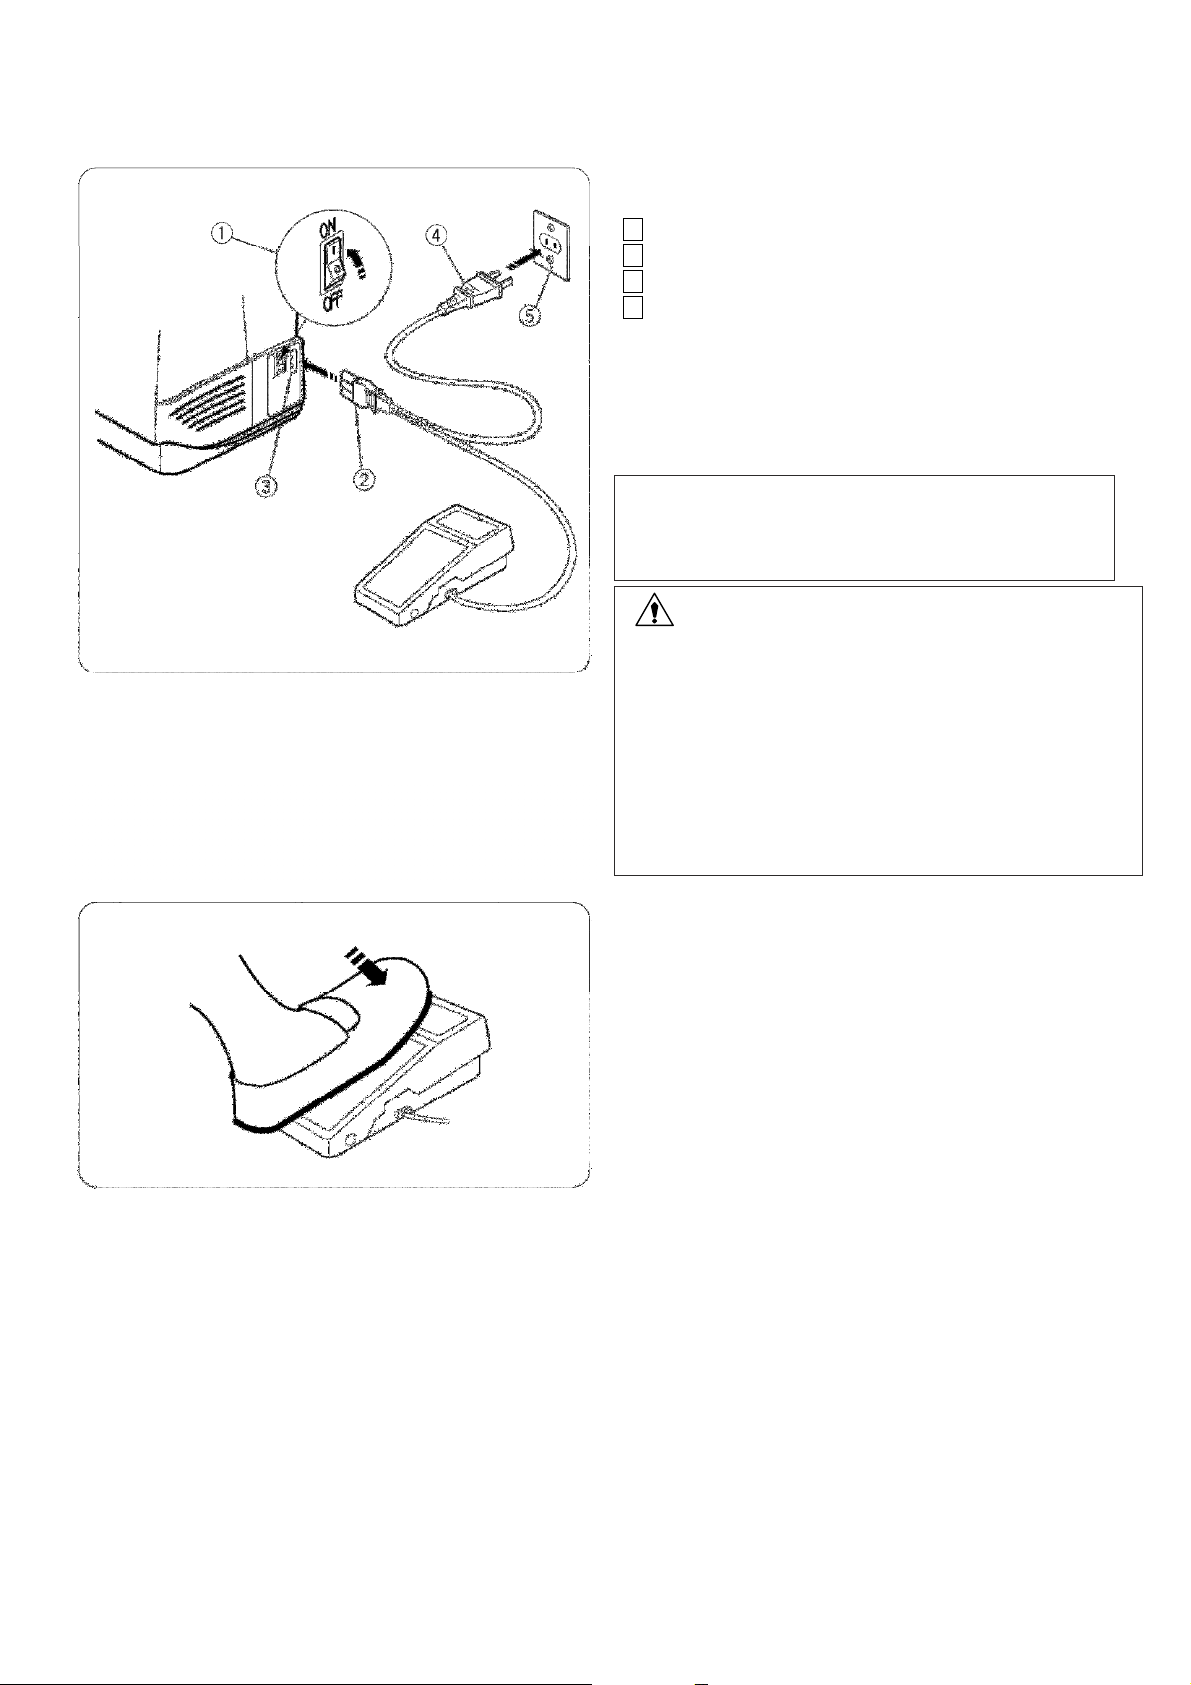
Connectin
g the
Powe
r Supply
WARNING:
Controllin
g the
Sewin
g Speed
Foot
control
Operatin
g Instructions:
1
Turn the power switch off.
2
Insert the machine plug into the machine socket.
3
Insert the power supply plug into the wall outlet.
4
Turn the power switch on.
1
Power switch
2
Machine plug
3
Machine socket
4
Power supply plug
5
Wall outlet
NOTE:
Before connecting to the power supply, make sure the
voltage shown on the machine conforms to your
electrical power.
While in operation, always keep your eyes on the sewing
area, and do not touch any moving parts such as the
thread take-up lever, flywheel or needle.
Always turn off the power switch and unplug from the
power supply:
- when leaving the machine unattended.
- when attaching or removing parts.
- when cleaning the machine.
Do not place anything on the foot control, otherwise the
machine will run intermittently.
Sewing speed can be varied by the foot control.
The harder you depress the foot control, the faster the
machine runs.
The symbol "O" of a switch indicates the "off" position.
For an appliance with a polarized plug (one blade wider than the other):
To reduce the risk of electrical shock, this plug is intended to fit in a polarized outlet only one way.
If it does not fit fully in the outlet, reverse the plug. If it still does not fit, contact a qualified electrician to install the
proper outlet. Do not modify the plug in any way.
The foot controller Model YC-482J or TJC-150 is used with the sewing machine Models 2600 and 2800 (USA market
only).
14
Page 15
TEIL 2.
VORBEREITUNGEN
FÜR DAS
ad oder die Nadel.
schneller läuft die Maschin
e.
SECTION 2.
SE PRÉ
P
ARER À COUDRE
ier la vitesse de
Plus
v
ous appu
y
ez sur la pédal
e
, plus la machine
v
a vite.
Instructions d’utilisation
Bedie
n
ungshinweise:
Raccordement de la machine au secteur
1
Mettez l’interrupteur d’alimentation en position d’arrêt.
2
Introduisez la fiche de la machine dans la prise de la
machine.
3
Introduisez la fiche d’alimentation dans la prise
murale.
4
Mettez l’interrupteur d’alimentation en position de
marche.
1
Interrupteur de mise sous tension
2
Fiche de la machine
3
Prise de courant de la machine
4
Fiche d’alimentation
5
Prise de courant murale
REMARQUE:
Avant le branchement, assurez-vous que le voltage
indiqué sur la machine correspond au type de courant
du secteur.
AVERTISSEMENT :
Pendant le fonctionnement de la machine, maintenez
toujours votre attention sur la zone de couture, et ne
touchez aucun élément en mouvement tel que le
levier releveur de fil, le volant ou l’aiguille.
Coupez toujours l’interrupteur d’alimentation et
débranchez la machine :
- lorsque vous laissez la machine sans surveillance,
- lorsque vous installez ou démontez des éléments,
- lorsque vous nettoyez la machine.
Ne placez rien sur la pédale, sinon la machine risque
de tourner par intermittence.
Contrôle de la vitesse de couture
Pédale
La pression exercée sur la pédale fait var
couture.
NÄHEN
Anschluss an den Netzstrom
1
Schalten Sie den Netzschalter aus.
2
Stecken Sie den Maschinenstecker in die
Maschinensteckdose.
3
Stecken Sie den Netzstecker in die Wandsteckdose.
4
Schalten Sie den Netzschalter ein.
1
Netzschalter
2
Maschinenstecker
3
Maschinensteckdose
4
Netzstecker
5
Wandsteckdose
HINWEIS:
Bitte achten Sie vor Einstecken des Kabels darauf,
dass die auf der Maschine gezeigte Spannung mit der
Ihres Netzanschlusses übereinstimmt.
WARNHINWEIS:
Wenden Sie beim Nähen Ihren Blick nicht vom
Nähbereich ab und berühren Sie keine beweglichen
Teile wie den Fadenhebel, das Handr
Schalten Sie den Netzschalter immer auf AUS und
ziehen Sie den Stecker ab:
- wenn Sie die Maschine unbeaufsichtigt lassen,
- wenn Sie Teile befestigen oder entfernen,
- wenn Sie die Maschine reinigen.
Bitte stellen Sie keine Gegenstände auf den
Fußanlasser, da die Maschine sonst unbeabsichtigt
startet.
Regulieren der Nähgeschwindigkeit
Fußanlasser
Die Nähgeschwindigkeit kann mit dem Fußanlasser
geändert werden.
Je stärker man auf den Fußanlasser drückt, um so
Le symbole “O” du commutateur indique la position Arrêt.
15
Auf einem Schalter bedeutet das Symbol “O” die “AUS”Stellung des Schalters.
Page 16
Revers
e Stitc
h Lever
reverse.
Foo
t Pressur
e Dial
pressure.
regular
wor
w
Droppin
g the
Feed
Dog
e
Push the reverse stitch lever down to sew in
The machine will sew in reverse while the lever is
pushed.
Turn the foot pressure dial to adjust the foot
The foot pressure dial should be set at “3” for
sewing.
Reduce the pressure to “2” for appliqué, cutwork, draw
k and basting.
1
Setting mark
16
The drop feed lever is located underneath the free-arm
bed on the backside of the machine.
To drop the feed dog, push the lever in the direction of
the arrow, as illustrated.
To raise the feed dog, push the lever in the direction of
the arrow, as illustrated, and turn the handwheel toward
you.
The feed dog must be up for regular sewing.
1
Drop feed lever
2
Raised position
3
Lowered position
Page 17

Levier de point arrière
Abaisser le levier de point arr
ière pour coudre en marche
Rückwä
r
tstaste
tstaste
Sélecteur de pression du pied
-de-bic
he
tre réglé
Fußdru
c
kregler
V
Abaissement des grif
f
es d’entraînement
, comme illustré, puis
er en position
Herabsenken des
Transpo
r
teurs
bildung).
arrière.
La machine coud en marche arrière lorsque le levier est
abaissé.
Zum Rückwärtsnähen drücken Sie die Rückwär
herunter.
Die Maschine näht rückwärts, solange die
Rückwärtstaste gedrückt wird.
Tournez le sélecteur de pression pour régler la pression
du pied-de-biche.
Le sélecteur de pression du pied-de-biche doit ê
sur “3” pour une couture normale.
Réduisez la pression à “2” pour les appliqués, les
découpages, les motifs dessinés et le faufilage.
1
Repère de réglage
Le levier d’escamotage des griffes d’entraînement est
situé sous le bâti du bras libre sur la face arrière de la
machine.
Pour abaisser les griffes d’entraînement, positionnez le
levier dans la direction de la flèche, comme illustré.
Pour relever les griffes d’entraînement, positionnez le
levier dans la direction de la flèche
tournez le volant vers vous.
Les griffes d’entraînement doivent se trouv
relevée pour une couture normale.
1
Levier d’escamotage des griffes d’entraînement
2
Position relevée
3
Position abaissée
Drehen Sie den Fußdruckregler, um den Fußdruck
einzustellen.
Der Fußdruckregler sollte beim normalen Nähen auf “3”
stehen.
erringern Sie den Druck auf “2” für Applikationen,
Durchbruchstickerei, Hohlsaumarbeit und Heftarbeiten.
1
Einstellmarke
Der Schieber zum Versenken des Transporteurs befindet
sich unter dem Freiarm an der Rückseite der Maschine.
Senken Sie den Transporteur herab, indem Sie den
Schieber in Richtung des Pfeils bewegen (siehe Ab
Stellen Sie den Transporteur hoch, indem Sie den
Schieber in Richtung des Pfeils bewegen (siehe
Abbildung) und das Handrad auf sich zu drehen.
Der Transporteur muss beim normalen Nähen in der
angehobenen Position sein.
1
Schieber zum Versenken des Transporteurs
2
Angehobene Stellung
3
Gesenkte Stellung
17
Page 18
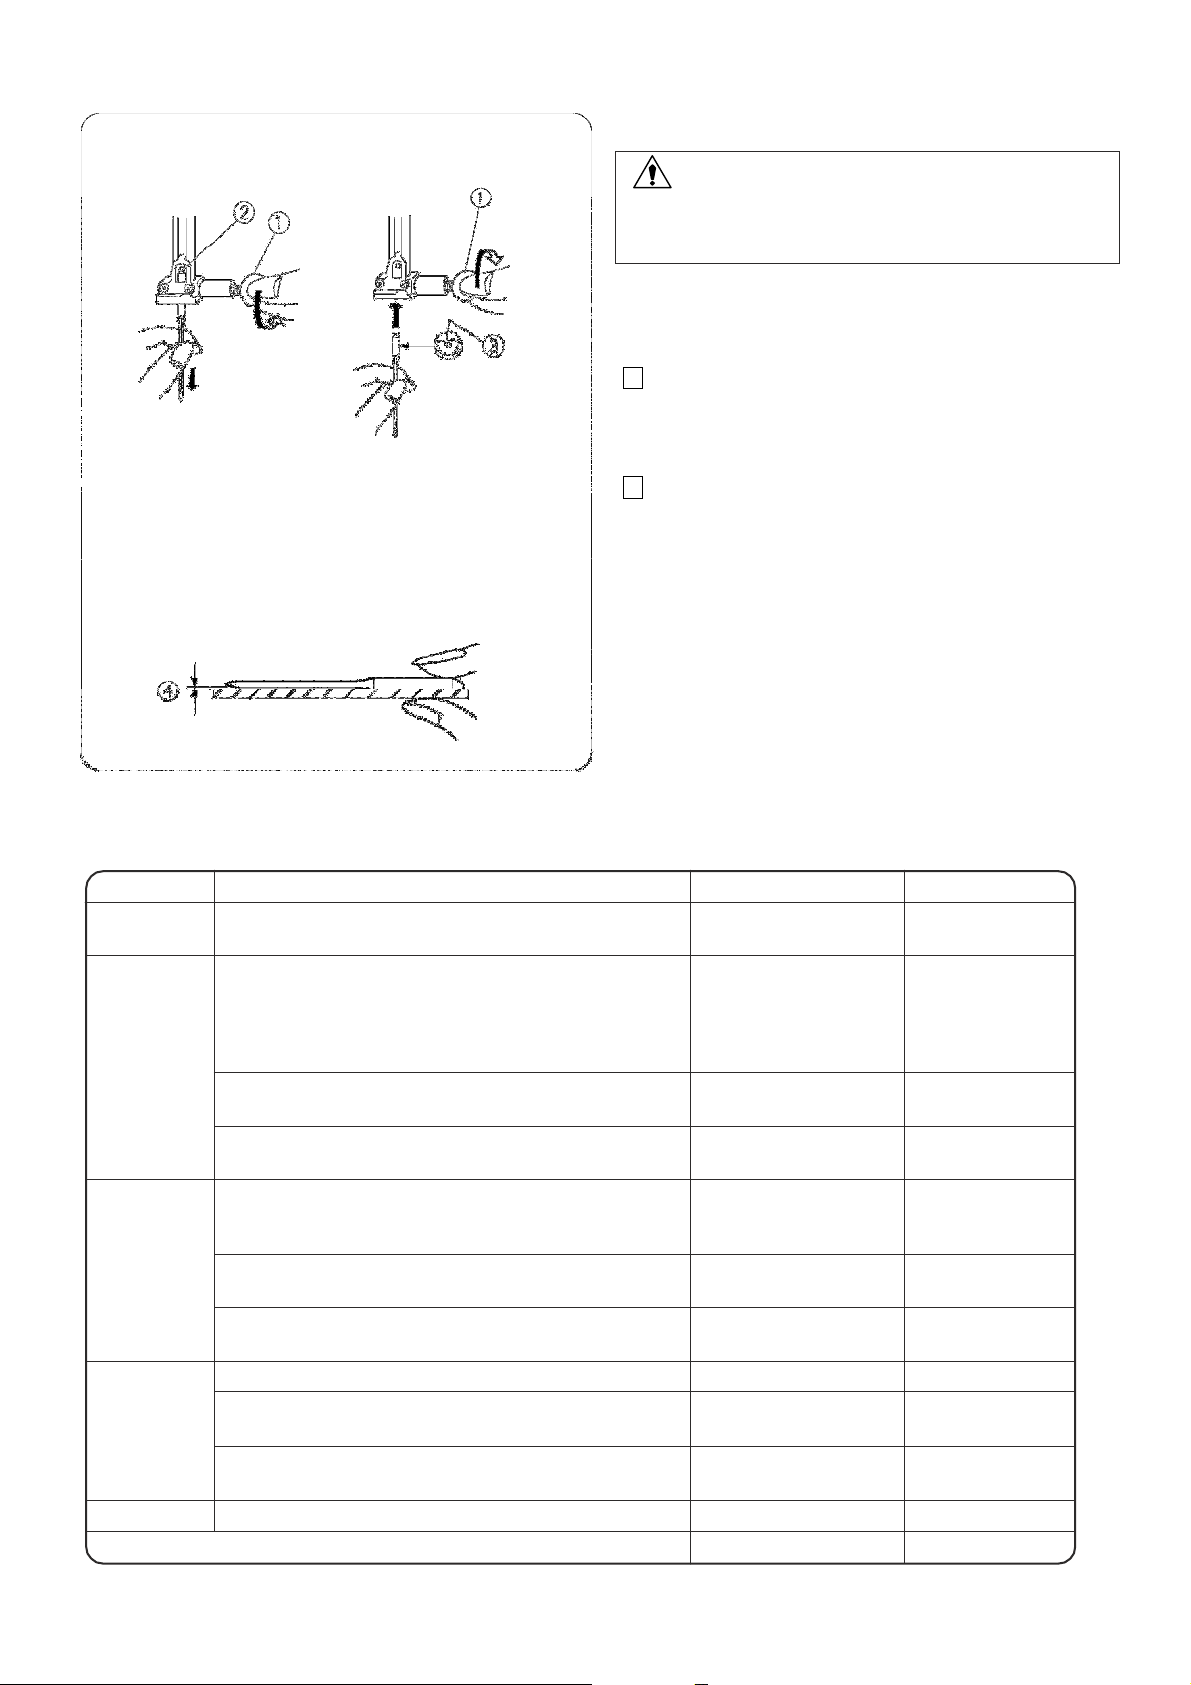
Raisin
g and
Lowerin
g the
Presse
r Foot
The
presse
r foot
lifter
raise
s and
lower
s the
presse
r
foot.
Changin
g the
Presse
r Foot
To
remove:
the
foot,
To
attach:
Removin
g and
Attachin
g the
Shank
or
To
remove:
with
To
attach:
You can raise the foot about 1/4" (0.6 cm) higher than
the normal up position for easy removal of the presser
foot, or to help you place heavy fabric under the foot.
1
Lowered position
2
Normal up position
3
Extra up position
Raise the needle to its highest position by turning
handwheel counterclockwise. Raise the presser
and press the lever on the back of the foot holder.
1
Lever
CAUTION:
Turn OFF the power switch before changing the foot.
Always use the proper foot for the selected pattern.
The wrong foot can cause the needle to break.
Do not push the lever down to prevent it from being
broken.
Place the desired presser foot, so that the pin on the foot
lies just under the groove on the foot holder. Lower the
presser foot lifter to lock the foot in place.
2
Groove
3
Pin
WARNING:
Turn OFF the power switch before detaching
attaching the shank.
Remove the setscrew by turning it counterclockwise
a screwdriver and remove the shank.
Match the hole in the shank with the threaded hole
In the presser bar. Fit the setscrew into the hole. Tighten
the screw by turning it clockwise with a screwdriver.
1
Setscrew
2
Shank
3
Hole
4
Threaded hole
18
Page 19
Lever et abaisser le pied
-de-biche
Heben und Senken des Nähfußes
Le levier du pied à coudre pe
r
met de rel
ever et d
’abaisser
le pied-de-biche.
V
acilement le
De
r Nähfußhebel hebt und senkt den Nähfuß.
3
Zusätzlich angehobene Stellung
Chan
g
ement de pied
-de-bic
he
Auswec
hseln des Nähfußes
Retrait :
nant
Entf
ernen Sie den Fußhalter wie
f
olgt:
ingen Sie die Nadel in ihre höchste Stellung, indem Sie
A
TTENTION :
ure de la
V
ORSICH
T
:
, um den Fuß in
Enlever et fixer la bride semelle
Abnehmen und Anbrin
g
en des Fußhalte
r
s
AVER
TISSEMEN
T
:
upteur d’alimentation en position d’ARRÊT
W
ARNHINWEIS:
Retrait:
erse des aiguilles d’une montre et
Entfernen Sie den Fußhalter wie
f
olgt:
, indem Sie diese
Installation:
Placez la vis
4
Trou fileté
Anbrin
g
en:
windeloch
4
Ge
windeloch
ous pouvez le relever à environ 0.6 cm au-dessus de la
position relevée normale pour pouvoir retirer f
pied-de-biche, ou pour vous aider à placer une étoffe
épaisse sous le pied.
1
Position abaissée
2
Position relevée normale
3
Position très relevée
Sie können den Fuß etwa 0,6 cm über die normale
gehobene Stellung heben, damit der Nähfuß leichter
entfernt werden kann, oder wenn Sie dicken Stoff unter
den Fuß legen wollen.
1
Gesenkte Stellung
2
Normale angehobene Stellung
Relevez l’aiguille à sa position la plus haute en tour
le volant en sens contraire des aiguilles d’une montre.
Relevez le pied-de-biche, et appuyez sur le levier à
l’arrière de la bride semelle.
1
Levier
Mettez l’interrupteur d’alimentation en position
d’ARRÊT avant de changer le pied.
Utilisez toujours le pied approprié pour le motif
sélectionné.
Un mauvais pied peut casser l’aiguille.
Ne pas pousser le levier vers le bas pour éviter de le
casser.
Installation:
Placez le pied-de-biche désiré de façon à ce que la
charnière du pied se trouve juste sous l’échancr
bride semelle. Abaissez le releveur de pied pour
verrouiller le pied en position.
2
Échancrure
3
Charnière
Br
das Handrad gegen den Uhrzeigersinn drehen. Stellen
Sie den Nähfuß hoch und drücken Sie den Hebel an der
Rückseite des Fußhalters.
1
Hebel
Schalten Sie den Netzschalter aus, bevor Sie den Fuß
auswechseln.
Verwenden Sie stets den richtigen Fuß für das
Gewählte Muster.
Beim Einsatz des falschen Fußes kann die Nadel
brechen.
Drücken den Hebel nicht nach unten – dies kann ihn
beschädigen.
Anbringen:
Positionieren Sie den gewünschten Nähfuß so, dass sich
der Stift am Fuß direkt unter der Rille des Fußhalters
befindet. Senken Sie den Nähfußhebel ab
dieser Stellung zu sichern.
2
Rille
3
Stift
Mettez l’interr
avant de retirer ou d’installer la bride semelle.
À l’aide d’un tournevis, enlevez la vis de blocage en
tournant en sens inv
retirez la bride semelle.
Faites correspondre le trou pratiqué dans le porte-pied
avec le trou fileté de l’axe du pied-de-biche.
de blocage dans le trou. Serrez la vis avec un tournevis
en tournant dans le sens des aiguilles d’une montre.
1
Vis de blocage
2
Bride semelle
3
Trou
19
Schalten Sie den Netzschalter vor Lösen oder
Befestigen des Fußhalters aus.
Entfernen Sie die Befestigungsschraube
mit einem Schraubendreher gegen den Uhrzeigersinn
drehen. Nehmen Sie den Fußhalter ab.
Richten Sie das Loch im Fußhalter auf das Ge
in der Stoffdrückerstange aus Führen Sie die
Befestigungsschraube durch das Loch. Ziehen Sie die
Schraube an, indem Sie diese mit einem
Schraubendreher im Uhrzeigersinn drehen.
1
Befestigungsschraube
2
Fußhalter
3
Öffnung
Page 20
C
hangin
g Needles
and
before
Turn off the
powe
r switch.
the
To
chec
k needl
e straightness
, place the flat
side of the
should
Needle
and Fabric
Char
t
WEIGHT
ery Light
F
ABRIC
ool Crepe, Peau de
TYPE of NEEDLE
ipped Needle
ipped Needle
NEEDLE SIZE
Mediu
m
Leathe
r
, Suede
, Burlap, Quilted Fabrics
W
edge Point
Leather Needle
1
1 (75)
14 (90)
Double Knits, (synthetic and natural) St
retch
Ball Point
Leather Needle
14 (90)
14 (90)
Heavy
Denim, Sailcloth,
Ticking
,
Denim Needle
16 (100)
16 (100)
V
ery Heavy
Leathe
r
, Suede
Canvas, Duck, Upholstery Fabrics
W
edge Point
opstitching Needle
16 (100)
16 (100)
CAUTION:
Always make sure to turn the power switch off
disconnect the machine from power supply
changing the needle.
Raise the needle by turning the handwheel and lower
presser foot.
1
Loosen the needle clamp screw by turning it
counterclockwise.
Remove the needle from the clamp.
1
Needle clamp screw
2
Insert a new needle into the needle clamp with the
flat side of the needle to the rear.
When inserting the needle into the needle clamp,
push it up against the stopper pin and tighten the
needle clamp screw firmly.
2
Stopper pin
3
Flat side
needle onto something flat (a needle plate, glass etc.)
The gap between the needle and the flat surface
be consistent.
Never use a blunt needle.
4
Gap
V
Light
Chiffon, Georgette, Fine Lace, Organdy
Net, Tulle
Batiste, Voile, Lawn, Pure Silk, Crepe de Chine,
Sheer Crepe, Chambray, Handkerchief Linen,
Gingham, Challis, Percale, W
Soie, Taffeta, Satin, Silk Surah, Satin-backed
Crepe, Qiana
Single Knits, Jersey, Swimwear, and Tricot
Flannel, Velour, Velvet, Muslin, Velveteen,
Poplin, Corduroy, Broadcloth, Linen, Chintz,
Gabardine, Felt, Terry
Velour, Stretch Terry, Sweater Knits
Leather, Vinyl, Suede
Double Faced Wool, Heavy Coating, Fake Fur
Drapery Fabrics
Topstitching for Special Finishes
Universal
Ball Point
Blue T
Universal
Blue T
Ball Point
Universal
Wedge Point
Universal
Leather Needle
Universal
T
9 (65)
9 (65)
11 (75)
11 (75)
12 (80)
11 (75)
11 (75)
18 (110)
14 (90)
20
Page 21

A
TTENTION:
V
eillez à toujours mettre la machine hors tension et à
Chan
g
ement d’aiguille
Auswechseln der Nadeln
V
ORSICH
T
:
etzschalter aus
Levez l’aiguille en tou
r
nant le
v
olant
v
ers vous et
Drehen Sie das Hand
r
ad, um die Nadel an
zuheben, und
Desserrez la vis du pince
-
aiguille en la tou
r
nant dans
Lösen Sie die Nadelklemmsch
r
aube, indem Sie diese
Introduisez une nou
v
elle aiguille dans le pince
-
aiguill
e,
Setzen Sie eine neue
Nadel
in
die Nadel
klemme
ein.
ist, indem Sie die flache Seite der Nadel auf eine flache
débrancher le cordon d’alimentation de la prise secteur
avant de changer l’aiguille.
Schalten Sie die Maschine immer am N
und ziehen Sie den Stecker ab, bevor Sie die Nadel
auswechseln.
abaissez le pied-de-biche.
Mettez l’interrupteur d’alimentation en position d’arrêt.
1
le sens contraire des aiguilles d’une montre.
Déposez l’aiguille du pince-aiguille.
1
Vis de pince-aiguille
2
avec le côté plat orienté vers l’arrière.
Au moment d’insérer l’aiguille dans le pince-aiguille,
poussez-la au maximum vers le haut, contre l’axe de
butée, puis serrez fermement la vis du pince-aiguille.
2
Axe de butée
3
Côté plat
Pour vérifier si une aiguille est droite, placez le côté
plat de l’aiguille sur une surface plane (plaque à
aiguille, miroir etc.).
L’écartement entre l’aiguille et la surface plane doit
être le même partout.
N’utilisez jamais une aiguille émoussée.
4
Écartement
senken Sie den Nähfuß.
Schalten Sie den Netzschalter aus.
1
gegen den Uhrzeigersinn drehen.
Nehmen Sie die Nadel aus der Klemme.
1
Nadelklemmschraube
2
Dabei muss die flache Seite der Nadel nach hinten
zeigen.
Achten Sie beim Einsetzen der Nadel in die
Nadelklemme darauf, dass sie gegen den
Anschlagstift geschoben wird. Ziehen Sie die
Klemmschraube fest an.
2
Anschlagstift
3
Flache Seite
Sie können prüfen, ob die Nadel gerade ausgerichtet
Fläche drücken (eine Stichplatte, Glas, etc.). Der
Abstand zwischen der Nadel und der flachen Stelle
sollte durchgehend gleich sein.
Benutzen Sie niemals stumpfe Nadeln.
4
Abstand
21
Page 22

Tableau des fils et des aiguilles
ÉPAISSEUR
TISSU
,
,
TYPE D’AIGUILLE
erselle
T
AILLE
DE L’AIGUILLE
Tricots simple
s
, jersey
, vêtements de bain et tissu
tricot
Aiguille à tête
b
leue
P
ointe bille
11 (75)
11 (75)
Moyennement
épais
Cuir, suédine
Aiguil
le Cuir
ointe palette
11 (75)
14 (90)
14 (90)
Cuir, vinyle, suédine
Aiguille Cuir
P
ointe palette
14 (90)
Épais
épais
Jean, toile à
v
oiles, co
util pour lite
rie
,
Aiguille spéciale jean
ointe palette
16 (100)
16 (100)
16 (100)
18 (110)
16 (100)
Surpiqûres pour finitions spéciales
Aiguille
spéciale
sur
piqûres
14 (90)
Très fin
Fin
Très
Chiffon, georgette, dentelle fine, organdi, tulle
Baptiste, voile, linon, soie naturelle, crêpe de Chine
crêpe fin, chambray, cambrai, vichy, challis, percale
crêpe de laine, peau de soie, taffetas, satin, surah,
crêpe doublé de satin, qiana
Flanelle, velours, mousseline, veloutine, popeline,
velours côtelé, popeline fine, lin, chintz, gabardine,
feutre, tissu éponge, toile, tissus piqués
Tricots doubles (synthétiques et naturels), velours
extensible, tissu éponge extensible, vestes extensibles
Laine double, recouvrement épais, fausse fourrure
draperies
Cuir, suédine
Toile, coutil, tissus d’ameublement
Pointe bille univ
Aiguille à tête bleue
Universelle
P
Universelle
Pointe bille
Universelle
Aiguille Cuir P
Universelle
9 (65)
9 (65)
11 (75)
11 (75)
12 (80)
22
Page 23

F
aden
-
und Nadeltabelle
GEWICHT
STOFF
aschentuchleinen,
Atla
NADELA
R
T
e
e
NADELGRÖSSE
Lede
r,
Wildleder
Lede
r
nadel (
K
eilspit
z
e)
11 (75)
Medio
Flanella,
Velour
s
, Samt, Musselin,
Velvetine, Popelin
e,
Stretch
v
elour
s
, Stretch
-Frottier
ware
, Sch
w
eißwollstof
f
e
Universale
14 (90)
14 (90)
Lede
r, Vin
yl, Wildleder
Lede
r
nadel
(Keilspit
z
e)
14 (90)
P
esante
Denim, Segeltuch, Drell
elzimitation,
Denimnadel
e)
Top-
Stitch
-
Nadel
16 (100)
Sehr leicht
Leicht
Chiffon, Georgette, Spitzengewebe, Organdy, Tüll
Batist, Voile, Linon, reine Seide, Crèpe de Chine,
durchscheinender Crèpe, Chambray, T
Gingham, Challis, Perkal, Wollkrepp, reinseidene
sware, Taft, Baumwollsatin, Surahseide, mit
Baumwollsatin verstärkter Crèpe, Qiana
Einfache Maschenware, Jersey, Badebekleidung und
Trikot
Universal-Kugelspitze
Nadel mit blauer Spitz
(Universal)
Nadel mit blauer Spitz
(Keilspitze)
9 (65)
9 (65)
11 (75)
11 (75)
12 (80)
11 (75)
11 (75)
Molto pesante
Kord, Wolltuch, Leinen, Chintz, Gabardine, Filz,
Frottierware, Bauernleinen, Steppstoffe
Doppelte Maxchenware (synthetisch und natur),
Doppelseitige Wolle, schweres Manteltuch, P
Tuchware
Leder, Wildleder
Sackleinen, Duck, Polsterstoffe
Übersteppen für Sonderfinishes
Kugelspitze
Universal
Ledernadel (Keilspitz
Universal
16 (100)
16 (100)
18 (110)
16 (100)
14 (90)
23
Page 24
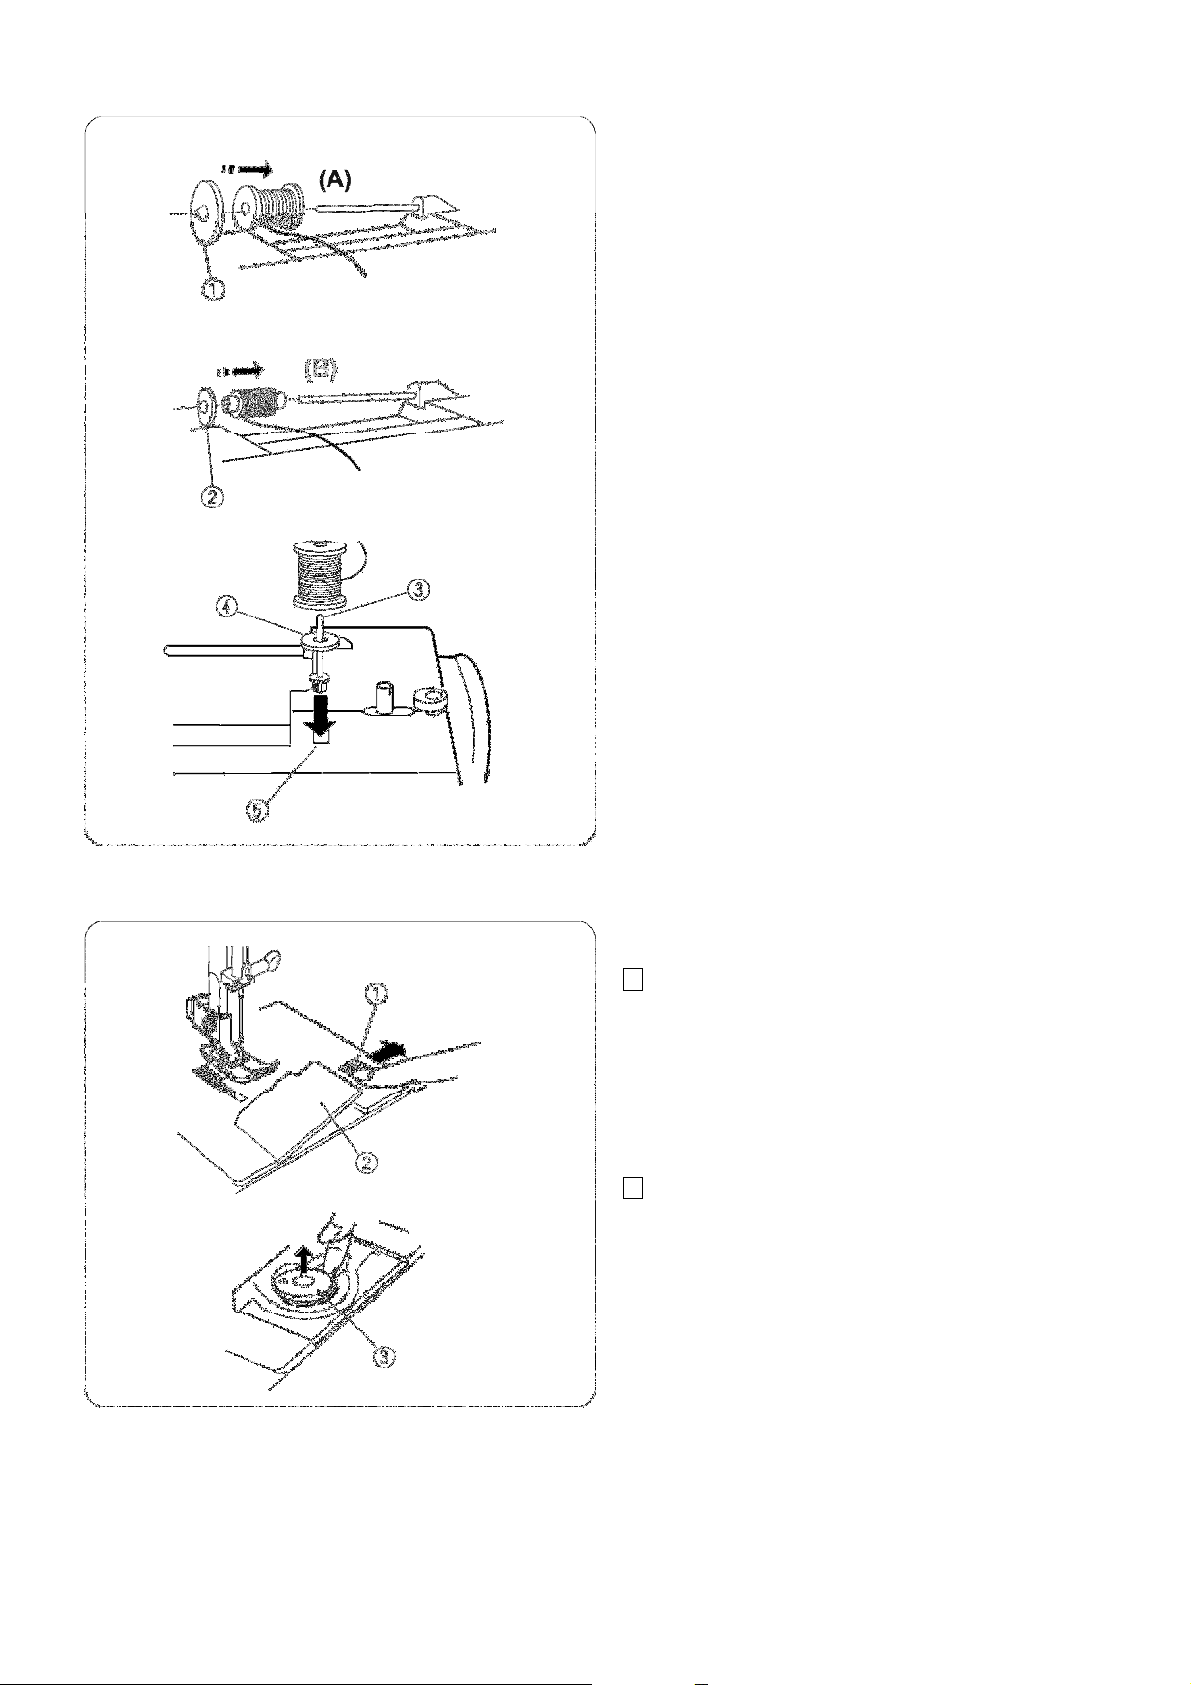
Windin
g the
Bobbin
Settin
g the
spool
Place a spool of thread on the spool pin with the thread
A
: Pres
s the
large
spoo
l holde
r firmly
agains
t the spool
Additiona
l spoo
l pin
without
5
Removin
g the
bobbin
Lift out the
bobbin.
coming off the spool as illustrated.
of thread.
1
Large spool holder
B: For a small spool, use the small spool holder.
2
Small spool holder
The additional spool pin is for bobbin winding
unthreading the machine.
Insert the additional spool pin into the hole.
Place the felt cushion and a spool on the pin.
3
Additional spool pin
4
Felt cushion
Spool pin hole
1
Push the hook cover plate release button to
the right and remove the cover plate.
1
Hook cover plate release button
2
Hook cover plate
2
3
Bobbin
24
Page 25

Rempliss
age de la canette
Spulen
Régl
age de la bobine de fil
Placez une bobine de fil sur le porte-bobine, av
ec le fil
Einset
z
en der Garn
r
olle
,
w
A
: Appu
y
ez fermement le disque fi
xe-
bobine g
r
and
A:
Drück
en Sie
die große
F
adenabziehscheibe
f
est
B
: P
our une petite bobin
e
, utilisez le disque fi
xe-
bobine
B:
Benutzen Sie bei einer kleinen Ga
r
nrolle die kleine
Porte-
bobine supplémentaire
met de remplir une
5
Trou du po
rte-
bobine
Zusätzli
c
her Garn
r
ollenhalter
eignet sich zum Spulen
in das Loch
5
Anbringung für zusätzlichen Ga
r
nrollenhalter
Retrait de la canette
Entnahme der Spule
P
oussez le bouton d’ou
ver
ture du cou
v
ercle de
ercle de
Schieben Sie den
A
uslöseknopf für Grei
fer
abde
c
kung
Soulev
ez la canette pour la so
rtir.
Nehmen Sie die Spule he
raus.
positionné comme illustré.
Stecken Sie eine Garnrolle auf den Garnrollenhalter
obei der Faden wie dargestellt abläuft.
modèle contre la bobine de fil.
1
Disque fixe-bobine grand modèle
petit modèle.
2
Disque fixe-bobine petit modèle
Le porte-bobine supplémentaire per
canette sans désenfiler la machine.
Insérez le porte-bobine supplémentaire dans le trou.
Placez le feutre et une bobine sur l’axe.
3
Porte-bobine supplémentaire
4
Feutre pour porte-bobine
gegen die Garnrolle.
1
Große Fadenabziehscheibe
Fadenabziehscheibe.
2
Kleine Fadenabziehscheibe
Der zusätzlicher Garnrollenhalter
ohne Ausfädeln der Maschine.
Setzen Sie den zusätzlichen Garnrollenhalter
Stecken Sie Filz und eine Garnrolle auf den
Garnrollenhalter.
3
Zusätzlicher Garnrollenhalter
4
Garnrollenfilz
1
crochet vers la droite, puis retirez le couv
crochet.
1
Bouton d’ouverture du couvercle de crochet
2
Couvercle de crochet
2
3
Canette
2
nach rechts und entfernen Sie Greiferplatte.
1
Auslöseknopf für Greiferabdeckung
2
Greiferabdeckung
2
3
Spule
25
Page 26

Windin
g the
bobbin
1
Pull out the
flywheel
to disengag
e the
clutch.
Draw the threa
d from the spool
. Guid
e the
thread
Threa
d throug
h the
hole in the
bobbi
n from the inside
With the free end of the threa
d held in your
hand,
Depres
s the
foot
contro
l again
. Whe
n the
bobbi
n is
as
Push in the
flywheel
to engag
e the
clutch.
1
flywheel
2
around the bobbin winder thread guide.
2
Bobbin winder thread guide
3
to the outside.
Put the bobbin on the bobbin winder spindle with the
free end of the thread coming out at the top.
3
Bobbin winder spindle
4
Push the bobbin to the right.
NOTE:
Do not move the bobbin winder spindle while the
machine is running.
26
5
depress the foot control. Stop the machine when the
bobbin has been wound a few layers, and cut the
thread close to the bobbin.
6
fully wound, it will stop automatically.
Return the bobbin winder to its original position by
moving the spindle to the left, and cut the thread
7
Page 27
Remplissa
g
e de la canette
Spulen
1
Tirez le
v
olant
v
ers l’
e
xtérieur pour dégager
Ziehen Sie das Hand
r
ad he
raus
, um die
Kupplung
Tirez le fil de la bobin
e.
Guidez le fil autour du guide
-
fil
Ziehen Sie
F
aden
v
on der Ga
r
nrolle. Führen Sie den
F
aites passer le fil par l’o
r
ifice de la canett
e
, en
3
Fädeln Sie den
F
aden
v
on innen nach außen durch
Repoussez la canette
v
ers la droit
e.
Drück
en Sie die Spule nach recht
s.
REMAR
Q
UE:
Ne touchez pas à la broche du dévidoir pendant le
HINWEIS:
En tenant l’
e
xtrémité libre du fil dans la main, appu
yez
, puis coupez
T
reten Sie auf den Fußanlasse
r
, während Sie das lose
aden direkt an
Appu
y
ez à nou
v
eau sur la p
édale. Quand la canette
T
reten Sie e
r
neut auf den Fußanlasse
r. Wenn die
egen und
P
oussez le
v
olant
v
ers l’inté
r
ieur pour engager
Drück
en Sie das Handrad wieder ein, um die
l’embrayage.
1
Volant
1
auszulösen.
1
Handrad
2
du dévidoir.
2
Guide-fil du dévidoir
3
l’enfilant de l’intérieur vers l’extérieur.
Placez la canette sur la broche du dévidoir de façon à
ce que l’extrémité libre du fil dépasse vers le haut.
Broche du dévidoir
4
fonctionnement de la machine.
5
sur la pédale. Arrêtez la machine après avoir enroulé
plusieurs épaisseurs de fil sur la canette
le fil tout près de la canette.
2
Faden um die Spulerfadenführung.
2
Spulerfadenführung
3
das Loch an der Spule ein.
Stecken Sie die Spule auf den Spuler, so dass das
lose Garnende nach oben herausragt.
3
Spuler
4
Der Spuler darf nicht bewegt werden, wenn die
Maschine läuft.
5
Garnende mit der Hand festhalten. Halten Sie die
Maschine an, wenn die Spule einige Lagen Garn
aufgespult hat, und schneiden Sie den F
der Spule ab.
6
est complètement enroulée, elle s’arrête
automatiquement.
Pour remettre le dévidoir à sa position initiale,
déplacez la broche vers la gauche et coupez le fil
comme illustré.
7
l’embrayage.
27
6
Spule voll ist, hält die Maschine automatisch an.
Bringen Sie den Spuler in die Ausgangsposition
zurück, indem Sie die Spindel nach links bew
den Faden wie dargestellt abschneiden.
7
Kupplung einzurasten.
Page 28
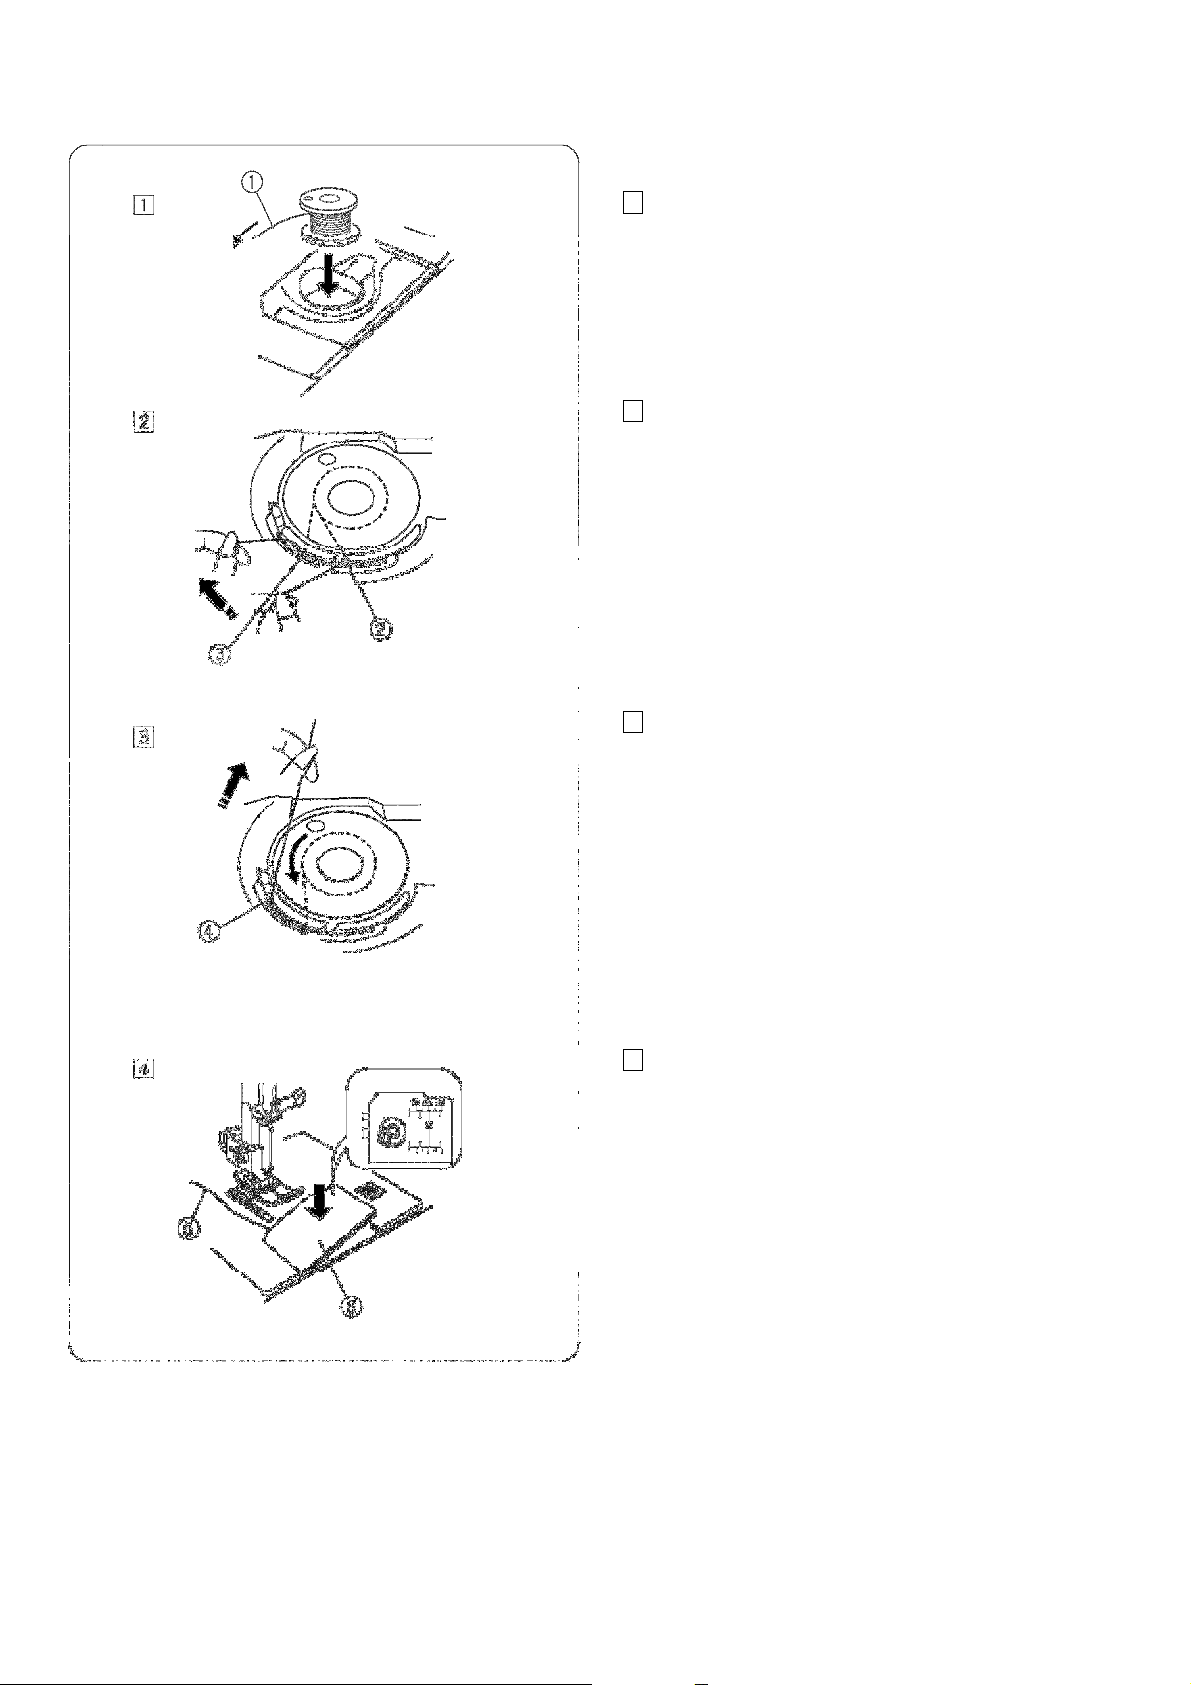
Insertin
g the
bobbin
Guid
e the
threa
d into the front
notch on the
front
side
Continu
e to
draw the threa
d lightl
y until the thread
Pull out abou
t 4” (10 cm) of thread
. Attac
h the
bobbin
1
Place the bobbin in the bobbin case with the thread
running off as illustrated.
1
Thread
2
of the bobbin case. Draw the thread to the left,
sliding it between the tension spring blades.
2
Front notch
3
Tension spring blade
3
slips into the side notch.
4
Side notch
28
4
cover plate. Refer to the chart on the bobbin cover
plate for proper threading.
5
Thread
6
Hook cover plate
Page 29

Introduction de la canette
1
Placez la canette dans la capsule en laissant le
Einset
z
en der Spule
1
Faden
Guidez le fil dans l’encoche frontal
e
, du côté
av
ant de
Führen Sie den
F
aden durch die
v
ordere
K
erbe an der
Conti
n
uez à tirer le fil
avec précaution jusqu’à ce qu’il
Ziehen Sie den
F
aden leicht weite
r
, bis er in der
Tirez e
n
viron 10 cm de fil.
Installez le cou
v
ercle de
Ziehen Sie den
F
aden ca.
10 cm he
raus. Br
ingen Sie
fil se dérouler comme illustré.
1
Fil
1
Legen Sie die Spule in das Spulengehäuse ein,
wobei das Garn wie dargestellt abläuft.
2
la capsule. Tirez le fil vers la gauche, en le faisant
glisser entre les lames de tension.
2
Encoche frontale
3
Lame de tension
3
s’engage dans l’encoche latérale.
4
Encoche latérale
2
Vorderseite des Spulengehäuse. Ziehen Sie den Faden
nach links und schieben Sie ihn zwischen die
Spannungsfedern.
2
Vordere Kerben
3
Spannungsfeder
3
Seitenkerbe liegt.
4
Seitenkerbe
4
crochet. Référez-vous au schéma d’enfilage se
trouvant sur le couvercle de crochet.
5
Fil
6
Couvercle de crochet
29
4
die Greiferabdeckung an. Überprüfen Sie das
Einfädeln - siehe Einfädeltabelle auf der
Greiferabdeckung.
5
Faden
6
Greiferabdeckung
Page 30
z
Threadin
g the
Machine
by
WARNING:
needle.
Draw the threa
d from the spoo
l and
pass it unde
r the
Draw the threa
d up
aroun
d the
botto
m of the thread
Firml
y draw the threa
d from
right to left
over
the
lever
Draw the threa
d down
along the left
channe
l and
slip
Pass the threa
d throug
h the
needl
e eye
from the front
To set the needle thread:
Raise the thread take-up lever to the highest position
turning the handwheel.
Raise the presser foot.
Turn OFF the power switch before threading the
1
thread guide. Then draw it down along the right
channel.
1
Thread guide
2
Right channel
2
guide plate.
Pull the thread up along the left channel
3
Thread guide plate
4
Left channel
3
thread take-up lever and down into the take-up
eye.
5
Thread take-up lever
4
the thread behind the needle bar thread guide from
the left.
6
Needle bar thread guide
5
or use the needle threader (refer to the next page).
30
Page 31

Enfil
age de la machine
Einfädeln der Mas
c
hine
P
our régler le fil d’aiguille:
Relevez le levier releveur de fil à son point le plus éle
vé
Oberfaden einfädeln:
ads
Tirez le fil de la bobine et
f
aites
-
le passer sous le
ers
Ziehen Sie
F
aden
v
on der Ga
r
nrolle und führen Sie
Tirez le fil autour de la pa
r
tie infé
r
ieure
de la plaque de
Führen Sie den
F
aden nach oben um die Unterseite
Tirez
fer
mement le fil de la droite
v
ers la gauche par
-
Ziehen Sie den
F
aden
f
est von rechts nach links über
Tirez le fil
v
ers le bas le long du conduit gauche et
Ziehen Sie den
F
aden nach unten um den lin
ken
on rechts hinter
Enfilez le fil dans le chas de l’aiguille depuis l’
avant.
Führen Sie den
F
aden
v
on vorne durch das Nadelöh
r.
en tournant le volant.
Relevez le pied-de-biche.
Bringen Sie den Fadenhebel durch Drehen des Handr
in seine höchste Stellung.
Heben Sie den Nähfuß an.
1
guide-fil. Ensuite, longez le conduit droit avec le fil v
le bas.
1
Guide-fil
2
Conduit droit
2
guide-fil.
Tirez le fil vers le haut le long du conduit gauche.
3
Plaque de guide-fil
4
Conduit gauche
3
dessus le levier releveur de fil et vers le bas dans le
chas du levier releveur.
5
Levier releveur de fil
1
ihn unter die Fadenführung. Ziehen Sie den Faden
dann durch den rechten Kanal nach unten
1
Fadenführung
2
Rechter Kanal
2
der Fadenführungsplatte.
Ziehen Sie den Faden durch den linken Kanal nach
oben
3
Fadenführungsplatte
4
Linker Kanal
3
den Fadenhebel und nach unten durch sein Öhr.
5
Fadenhebel
4
faites-le coulisser derrière le guide-fil de la barre
d’aiguille depuis la gauche.
6
Guide-fil de la barre d’aiguille
5
31
4
Kanal und schieben Sie den Faden v
die Nadelstangen-Fadenführung.
6
Nadelstangen-Fadenführung
5
Page 32

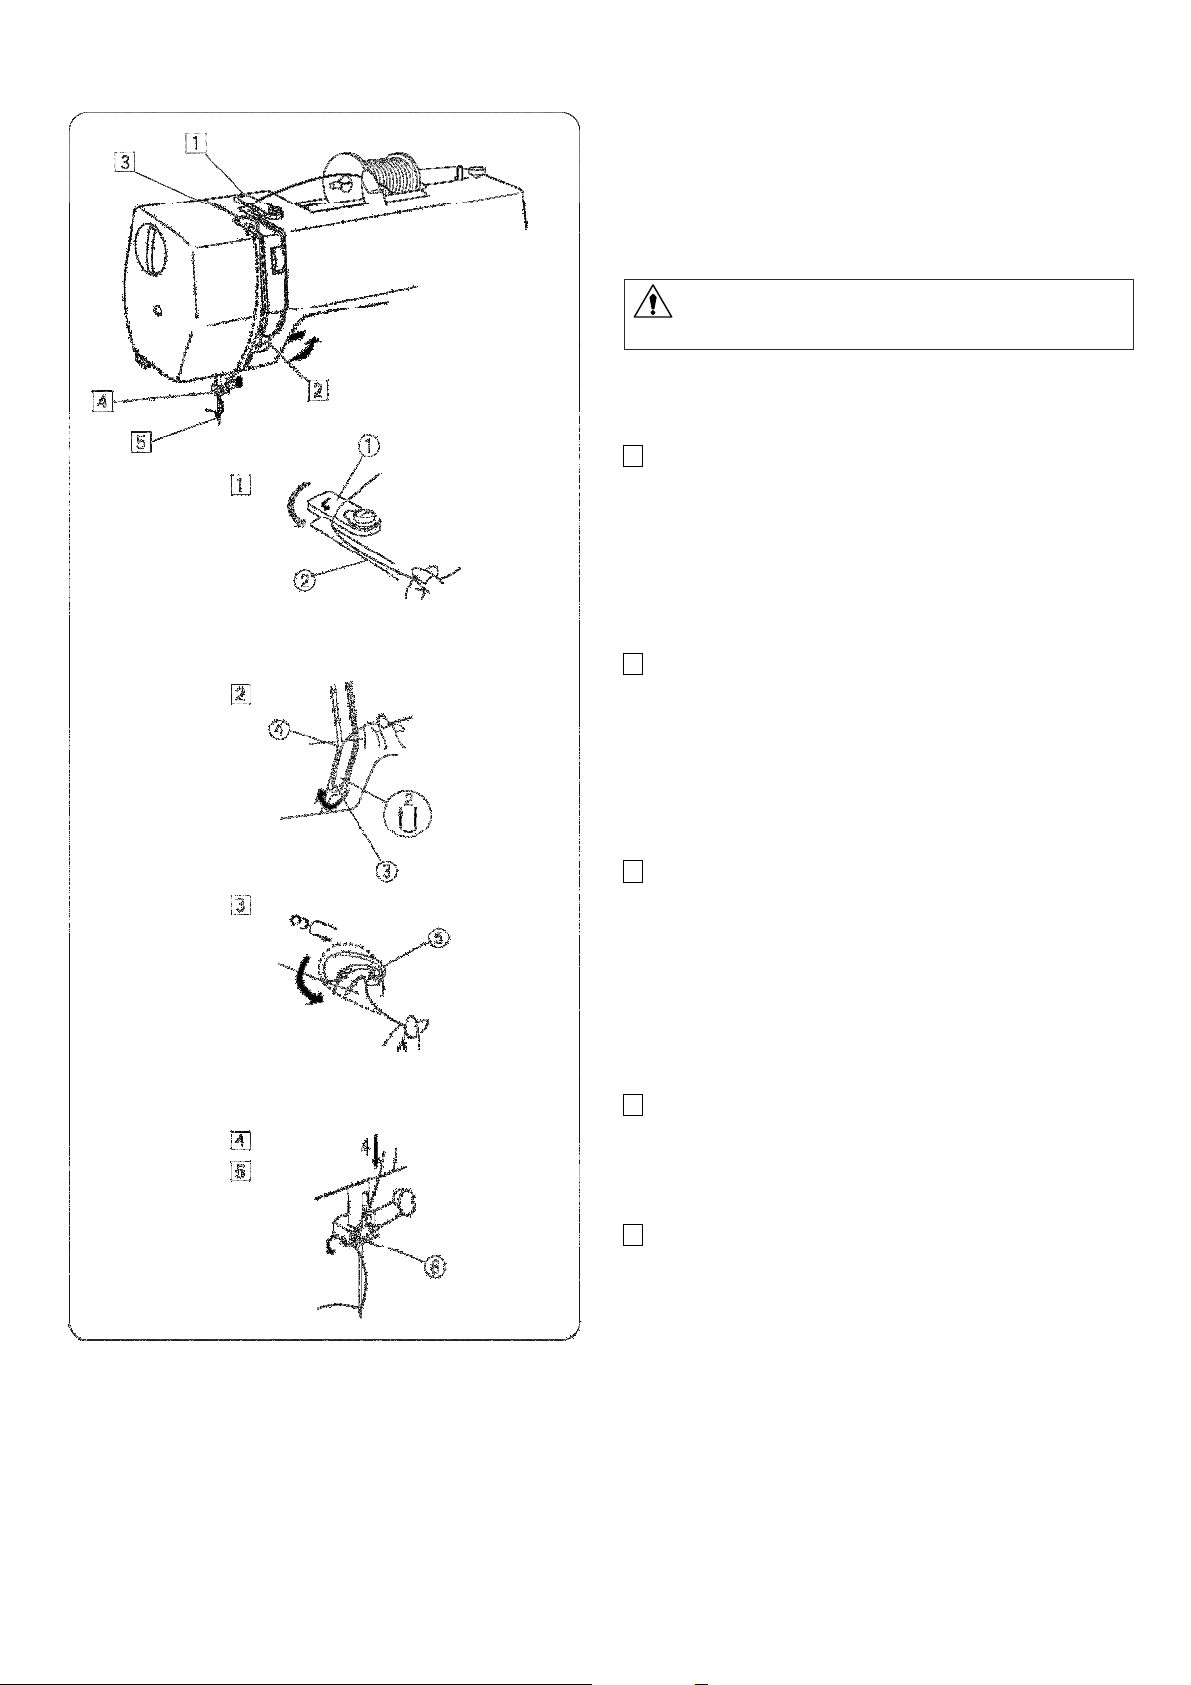
Needl
e threader
Raise the needl
e to its highes
t positio
n and
lowe
r the
as
Draw the threa
d from the left
aroun
d the
guide
and
Releas
e the
lever
slowl
y while
holdin
g the
threa
d end
Pull out the end of the
threa
d throug
h the
needl
e eye.
1
presser foot. Push down the needle threader lever
far as it will go.
1
Threader lever
2
under the hook.
2
Guide
3
Hook
3
with your hand. A loop of the thread is pulled up
through the needle eye.
4
32
Page 33

Enfile
-
aiguille
Nadeleinfädler
1
Lev
ez l’aiguille à sa position la plus él
e
vée et abaissez
Drehen Sie das Handrad, um die Nadel in ihre höchste
Tirez le fil depuis la gauche aut
our du guide et sous le
Ziehen Sie den
F
aden
v
on links um die
F
adenfüh
r
ung
Relâchez lentement le bouto
n d’enfilage tout en
Une boucle se
Lassen Sie den Nadeleinfädler langsam lo
s
, während
F
aites passer l’
e
xtrémité du fil par le chas de l’aiguill
e.
Ziehen Sie das
F
adenende durch das Nadelöh
r.
le pied-de-biche. Appuyez à fond sur le bouton
d’enfilage de l’aiguille.
Le crochet sort de l’aiguille par l’arrière.
1
Bouton d’enfilage
1
Position anzuheben, und senken Sie den Nähfuß.
Drücken Sie den Nadeleinfädler ganz nach unten.
Der Einfädelhaken schiebt sich von hinten durch das
Nadelöhr.
1
Nadeleinfädlerknopf
2
crochet.
2
Guide
3
Crochet
3
maintenant l’extrémité du fil d’une main.
forme au travers du chas de l’aiguille.
4
2
und unter den Haken durch.
2
Führung
3
Haken
3
Sie das Fadenende mit der Hand festhalten. Ziehen
Sie dann eine Schlinge des Fadens durch das
Nadelöhr.
4
33
Page 34

Drawin
g up the Bobbi
n Thread
Raise the presse
r foot and hold the needl
e thread
Turn the flywhee
l slowl
y towar
d you one complete
needle
Pull 4” (10 cm) of
both
thread
s back and unde
r the
1
lightly with your left hand.
1
Needle thread
2
turn. Bring the bobbin thread up by pulling the
thread as illustrated.
1
Needle thread
2
Bobbin thread
3
presser foot.
34
Page 35

Remonter le fil de la canette
Heraufholen des Unterfadens
1
Relev
ez le pied
-de-
biche et maintenez légèrement le
Heben Sie den Nähfuß an und halten Sie den
Tour
nez lentement le
v
olant
v
ers vous d’un tour
ant sur
Drehen Sie das Handrad um eine
v
ollständige
ingen Sie den
Tirez 10 cm des deux fils et
f
aites les passer der
r
ière
Ziehen Sie 10 cm
F
adenlänge
v
on be
iden Fäden nach
fil d’aiguille entre les doigts de votre main gauche.
1
Fil d’aiguille
1
Oberfaden leicht in der linken Hand.
1
Oberfaden
2
complet. Faites remonter le fil de canette en tir
le fil d’aiguille comme illustré.
1
Fil d’aiguille
2
Fil de canette
3
sous le pied-de-biche.
2
Umdrehung langsam auf sich zu. Br
Unterfaden durch Anziehen des Oberfadens wie
dargestellt herauf.
1
Oberfaden
2
Unterfaden
3
hinten und unter den Nähfuß.
35
Page 36

Selectin
g a Stitc
h
Raise the needl
e to its highes
t position.
Stitch
selecto
r dial
To
selec
t a stitch,
turn the stitch
selecto
r dial
until the
CAUTION:
To
selec
t the
stretc
h stitches (12-22 in model 2800 or
Stitc
h Leng
th
Dial
setting mark points to the stitch.
1
Stitch selector dial
2
Setting mark
Do not turn the stitch selector dial while the needle is in
the fabric; the needle may bend or break.
10-18 in model 2600), set the stitch length dial at S.S.
Turn the stitch length dial until the setting mark points
to the stitch length number.
The higher the number, the longer the stitch.
The “ ” mark shows the adjustment range for
sewing the buttonhole.
3
Setting mark
4
Stitch length dial
36
Page 37

V
ORSICH
T
:
efindet, da die
A
TTENTION :
nez pas le sélecteur de motif alors que l’aiguille
nez le sélecteur de longueur de point pour régler le
uméro de longueur de point désirée jusqu’au repère de
Sélection du motif de point
W
ahl des Sti
chm
uste
rs
Relev
ez l’aiguille à sa position la plus haut
e. Br
ingen Sie die Nadel in ihre höchste Stellung.
Sélecteur de motif
Tournez le sélecteur de motif de f
açon à ce que le repère
Musterau
s
wahlregler
2
de réglage se trouve en face du symbole du motif de
point désiré.
1
Sélecteur de motif
2
Repère de réglage
Drehen Sie den Musterauswahlregler und stellen Sie das
Symbol des gewünschten Musters auf die Einstellmarke.
1
Musterauswahlregler
Einstellmarke
Ne tour
est piquée dans le tissu, sinon l’aiguille risque de se
tordre ou de casser.
Pour sélectionner les motifs de points élastiques, réglez
le sélecteur de longueur de point sur S.S.
- 12-22 pour la 2800
- 10-18 pour la 2600
Sélecteur de longueur de point
Tour
n
réglage.
Plus le chiffre est élevé, plus long est le point.
Le repère “ ” indique la plage de réglage pour
coudre la boutonnière.
3
Repère de réglage
4
Sélecteur de longueur de point
Drehen Sie die Musterauswahlscheibe niemals,
während sich die Nadel noch im Stoff b
Nadel sonst möglicherweise verbogen wird oder
abbrechen könnte.
Zur Auswahl der Stretchstichmuster stellen Sie die
Stichlängenregler auf S.S.
- 12-22 nur für Mod.2800
- 10-18 nur für Mod.2600
Stichlängenregler
Drehen Sie den Stichlängenregler, um an der
Einstellmarke die gewünschte Stichlänge einzustellen.
Je höher die Zahl, desto länger der Stich.
Die Markierung “ ” zeigt den Einstellbereich beim
Nähen eines Knopflochs.
3
Einstellmarke
4
Stichlängenregler
37
Page 38

Fine Tuning Stretch Stitches
To
selec
t the
stretch stitches, set the
stitch
length
dial at S.S.
If the stretc
h stitches are
uneve
n when you sew
stitch
If the stitches are
draw
n out,
correc
t them by settin
g the
If the stitches are
compressed
, correc
t them by setting
Stitc
h Widt
h Dial
CAUTION:
Do not set the stitch width less than 5 when using foot C;
Variabl
e needl
e position
between the center (5) and left (0) with thw stitch width
on a particular fabric, correct them by turning the
length dial.
dial to the “–” side.
the dial to the “+” side.
Turn the stitch width dial until stitch width number is
Aligned with setting mark.
The higher the number, the wider the stitch
1
Stitch width dial
2
Setting mark
Do not turn the stitch width dial while the needle is in the
fabric, otherwise the needle may bend or break.
the needle may hit the foot causing the needle to bend
tor break.
The needle drop position of the straight stitch (1, 12 on
model 2800 and 1, 10 on model 2600) can be moved
dial.
38
Page 39

Réglage fin des points stretch
Feine Einstellun
gen der Stretschstiche
Si les motifs de points élastiques sont inégaux lorsque
W
enn die Stretchstich
m
uster beim Nähen auf einem
Stoff ungleichmäßig sind, kann dies mit dem
Si les motifs sont étiré
s
, modifiez
-
les en réglant le
les en réglant le
W
enn die Stich
m
uster zu ausgedehnt sind,
korr
igieren
,
Sélecteur de la
rgeur de point
Stichbreitenregler
Tour
nez le sélecteur de largeur de point pour régler le
uméro de largeur de point désirée jusqu’au repère de
2
Drehen Sie den Stichbreitenregle
r
, um an der
wünschte Stichbreite einzustellen.
2
A
TTENTION:
nez pas le sélecteur de largeur de point alors
ée dans le tissu, sinon l’aiguille
V
ORS
ICHT:
, während
brechen
P
osition
v
ariable de l’aiguille
Variable Nadelstellung
La position d’abaissement de l’aiguille des points droits
peut être déplacée entre le centre (5) et la gauche (0) à
Die Nadelsenkposition der Ge
radstiche kann durch
V
vous cousez sur un tissu particulier, modifiez-les en
tournant le sélecteur de longueur de point.
sélecteur du coté du “–”.
Si les motifs sont compressés, modifiezsélecteur du côté du “+”.
n
réglage.
Plus le chiffre est élevé, plus large est le point.
1
Sélecteur de largeur de point
Repère de réglage
bestimmten
Stichlängen-Ausgleich reguliert werden.
Sie dies, indem Sie die Stellscheibe auf die Seite “–”
drehen.
Wenn die Stichmuster zu dicht sind, korrigieren Sie dies
indem Sie die Stellscheibe auf die Seite “+” drehen.
Einstellmarke die ge
Je höher die Zahl, desto breiter der Stich.
1
Stichbreitenregler
Einstellmarke
Ne tour
que l’aiguille est piqu
risque de se tordre ou de casser.
l’aide du sélecteur de largeur de point.
Drehen Sie den Stichbreitenregler niemals
sich die Nadel noch im Stoff befindet, da die Nadel
sonst möglicherweise verbogen wird oder ab
könnte.
erschieben des Stichbreitenregler zwischen der Mitte
(5) und links (0) bewegt werden.
39
Page 40

Balancin
g Needl
e Threa
d Tension
the
dial.
two
For an ideal
zigza
g stitch
, the
bobbi
n threa
d does
not
(bottom
Needl
e threa
d tensio
n is too tight:
a
Needl
e threa
d tensio
n is too loose:
wron
a
The thread tension should be adjusted depending on
sewing materials, layers of fabric and sewing method.
To adjust the thread tension, turn the thread tension
1
Thread tension dial
Balanced tension:
The ideal straight stitch has threads locked between
layers of fabric, as illustrated.
show on the right side (top side) of the fabric, and the
needle thread shows slightly on the wrong side
side) of the fabric.
2
Needle thread (Top thread)
3
Bobbin thread (Bottom thread)
4
Right side (Top side) of fabric
5
Wrong side (Bottom side) of fabric
The bobbin thread (bottom thread) will appear on the
right side (top side) of the fabric.
Loosen the needle thread tension by moving the dial to
lower number.
The needle thread (top thread) will form loops on the
g side (bottom side) of the fabric.
Tighten the needle thread tension by moving the dial to
higher number.
40
Page 41

Équilibr
age de la tension du fil d'aiguille
Einstellen der Oberfadenspan
n
ung
Il faut régler la tension du fil d’aiguille en
f
onction des
tissus à coudre
, du nombre d’épaisseurs de tissu et de la
aits lorsque les fils se bouclent
ieure (l’endroit) du tissu,
5
Face infé
r
ieure (e
nvers) du tissu
Die Span
n
ung sollte je nach den genähten Stof
f
en,
5
Linke (untere) Stof
fseite
La tension du fil de l’aiguille est t
r
op éle
vée:
ace
uez la tension du fil de l’aiguille en réglant le
Zu starke Oberfadenspan
n
ung:
La tension du fil de l’aiguille est insuffisante:
a des boucles sur la
Oberfadenspan
n
ung ist zu lo
c
ker:
méthode de couture utilisée.
Pour régler la tension du fil, tournez le sélecteur de
tension.
1
Sélecteur de tension
Tension équilibrée :
Les points droits sont parf
entre les deux épaisseurs du tissu, comme illustré.
Pour un point zigzag parfait, le fil de la canette ne doit
pas être visible sur la face supér
et le fil de l’aiguille doit légèrement ressortir sur la face
inférieure (l’envers) du tissu.
2
Fil d’aiguille (fil supérieur)
3
Fil de canette (fil inférieur)
4
Face supérieure (endroit) du tissu
Stofflagen und der Nähart eingestellt werden.
Zur Einstellung der Fadenspannung drehen Sie den
Fadenspannungsregler.
1
Fadenspannungsregler
Ausgeglichene Fadenspannung:
Beim idealen Geradstich werden die Fäden zwischen
zwei Stofflagen wie dargestellt miteinander verschlungen.
Beim idealen Zick-Zack-Stich ist der Unterfaden nicht auf
der rechten (oberen) Stoffseite zu sehen, und der
Oberfaden erscheint nur etwas auf der linken (unteren)
Stoffseite.
2
Oberfaden
3
Unterfaden
4
Rechte (obere) Stoffseite
Le fil de la canette (fil inférieur) ressort sur la f
supérieure (l’endroit) du tissu.
Dimin
sélecteur sur un numéro inférieur.
Le fil de l’aiguille (fil supérieur) former
face inférieure (l'envers) du tissu.
Augmentez la tension du fil d’aiguille en réglant le
sélecteur sur un numéro supérieur.
Der Unterfaden erscheint auf der rechten (oberen)
Stoffseite.
Lösen Sie die Oberfadenspannung durch Drehen des
Reglers auf eine niedrigere Zahl.
Der Oberfaden wirft Schlingen auf der linken (unteren)
Stoffseite.
Erhöhen Sie die Oberfadenspannung durch Drehen des
Reglers auf eine höhere Zahl.
41
Page 42

SECTION
3.
BASIC
SEWING
3
Stitch
length
: 1.5 – 4
Startin
g to
sew
toward
NOTES:
Changin
g the
sewin
g direction
continue
Finishin
g sewing
in
g
the
thread
s to the back.
the
Straight Stitch Sewing
Machine setting:
1
Stitch pattern: 1
2
Stitch width: 0 or 5
4
Thread tension: 2 – 6
5
Presser foot: Zigzag foot A
Raise the presser foot and place the fabric under the
foot.
Lower the needle into the fabric.
Lower the presser foot and smooth the threads
the back. Depress the foot control.
To fasten the beginning of the seam, first sew several
stitches in reverse then sew forward.
Stop the machine and turn the handwheel toward you to
bring the needle down into the fabric.
Raise the presser foot.
Pivot the fabric around the needle to change sewing
direction as desired. Lower the presser foot and
sewing in the new direction.
Press the reverse stitch lever and sew several stitches
reverse at the end of the seam.
Raise the presser foot and remove the fabric, drawin
Draw the threads up and into the thread cutter.
The threads are cut the proper length for starting
next seam.
1
Thread cutter
42
Page 43

So beginnen Sie zu nähen
SECTION 3.
COUTURE S
TAND
ARD
TEIL 3.
EIN
FACHES NÄHEN
Couture à point d
r
oit
Geradsti
c
hnähen
Régl
age de la ma
c
hine :
5
Pied-de-biche:
A
Maschineneinstellung:
5
Nähfuß:
A
P
our commencer à coudre
biche et placez le tissu sous le pied.
.
t, cousez tout d’abord
P
our modifier le sens de la couture
changer
-
Änderung der Nähri
c
htung
Halten Sie die Maschine an und drehen Sie das Handrad
P
our terminer la couture
ière et cousez plusieurs
Fertigstellen der Naht
Relev
ez le pied
-de-
biche et retirez le tissu en ti
r
ant les fils
Heben Sie den Nähfuß an und nehmen Sie den Stoff
Tirez les fils
v
ers le haut et amenez
-
les dans le coupe
-
fil.
Les fils sont coupés à la bonne longueur pour entamer la
Ziehen Sie die Fäden nach oben und in den
ichtigen Länge abgeschnitten,
1
Point: 1
2
Largeur de point: 0 ou 5
3
Longueur de point: 1.5 – 4
4
Tension du fil: 2 – 6
1
Stich: 1
2
Stichbreite: 0 oder 5
3
Stichlänge: 1.5 – 4
4
Fadenspannung: 2 – 6
Relevez le pied-deAbaissez l’aiguille dans le tissu.
Abaissez le pied-de-biche et lissez les fils vers l’arrière
Appuyez sur la pédale.
REMARQUES:
Pour arrêter la couture de dépar
plusieurs points en arrière puis cousez en marche
avant.
Arrêtez la machine et tournez le volant vers vous de
façon à abaisser l’aiguille dans le tissu.
Relevez le pied-de-biche.
Faites pivoter le tissu autour de l’aiguille afin de
le sens de couture selon le besoin. Abaissez le pied-de
biche et continuez de piquer dans le nouveau sens.
Abaissez le levier de point arr
points en arrière à la fin de la couture.
Heben Sie den Nähfuß und legen Sie den Stoff unter den
Fuß.
Senken Sie die Nadel in den Stoff.
Senken Sie den Nähfuß und streichen Sie die Fäden
nach hinten. Treten Sie auf den Fußanlasser.
HINWEISE:
Zum Vernähen des Nahtanfangs nähen Sie zuerst
mehrere Rückwärtsstiche und dann Vorwärtsstiche.
auf sich zu, um die Nadel in den Stoff zu senken.
Heben Sie den Nähfuß an.
Drehen Sie den Stoff um die Nadel, um die Nährichtung
nach Bedarf zu ändern. Senken Sie den Nähfuß und
nähen Sie in der neuen Richtung weiter.
Drücken Sie den Rückwärtstaste und nähen Sie mehrere
Rückwärtsstiche am Nahtende.
vers l’arrière.
couture suivante.
1
Coupe-fil
43
heraus. Ziehen Sie die Fäden nach hinten.
Fadenabschneider.
Die Fäden werden in der r
um die nächste Naht zu beginnen.
1
Fadenabschneider
Page 44

Seam
guide
s on the needl
e plate
measure
center
Spacing (cm)
1.5 2.0 1.3 1.6 1.9
Turnin
g a squar
e corner
cm)
Whe
n the
fabric
edge
facin
g you
lines up with the cornering
needle
new
The seam guides on the needle plate help you to
seam allowance.
The numbers indicate the distance between the
needle position and the seam guide.
1
Seam guides
Number 15 20 4/8 5/8 6/8
Spacing (inch) (5/8) (3/4) 1/2 5/8 3/4
The cornering guide helps you maintain a 5/8” (1.6
seam allowance when sewing a corner.
guide as illustrated, stop stitching and lower the
into the fabric by turning the handwheel toward you.
Raise the presser foot and pivot the fabric so the edge of
the fabric will align with the 5/8” (1.6 cm) seam guide.
Lower the presser foot and start stitching in the
direction.
2
Cornering guide
44
Page 45

Guides de couture de la plaque à aig
uilles
Les guides de couture tracés sur la plaque à aiguille v
ous
Nahtführungslinien
auf der Sti
c
hplatte
en Ihnen
T
ourner un angle vif
ous cousez en angle
biche et commencez à piquer dans le
Ändern der Nähri
c
htung um 90
°
and wie dargestellt mit
ungslinien
facilitent la tâche pour mesurer les rentrés de couture.
Le nombre indique la distance entre l’aiguille en position
centrale et le guide de couture.
1
Guides de couture
Die Nahtführungslinien auf der Stichplatte helf
dabei, die Nahtzugabe zu messen.
Die Zahlen geben den Abstand zwischen mittlerer
Nadelposition und Nahtführungslinien an.
1
Nahtführungslinien
Numéro 15 20 4/8 5/8 6/8
Distance (cm) 1.5 2.0 1.3 1.6 1.9
Distance (pouce) (5/8) (3/4) 1/2 5/8 3/4
Le guide de couture des coins vous aide à conserver un
rentré de couture de 1,6 cm lorsque v
droit.
Lorsque le bord du tissu devant vous s’aligne sur le guide
de couture des coins comme illustré, arrêtez de piquer et
abaissez l’aiguille dans le tissu en tournant le volant vers
vous.
Relevez le pied-de-biche et faites pivoter le tissu de façon
à aligner le bord du tissu sur le guide de couture de
1,6 cm.
Abaissez le pied-denouveau sens.
2
Guide de couture des coins
Nummer 15 20 4/8 5/8 6/8
Abstand (cm) 1.5 2.0 1.3 1.6 1.9
Abstand (Zoll) (5/8) (3/4) 1/2 5/8 3/4
Die Eckennähführung hilft Ihnen, beim Nähen einer Ecke
einen Saumabstand von 1,6 cm einzuhalten.
Wenn der Ihnen zugewandte Stoffr
der Eckennähführung abschließt, halten Sie mit dem
Nähen an und senken die Nadel in den Stoff, indem Sie
das Handrad auf sich zu drehen.
Stellen Sie den Nähfuß hoch und drehen Sie den Stoff
so, dass der Stoffrand mit dem 1,6 cm Nahtführ
abschließt.
Senken Sie den Nähfuß und nähen Sie in der neuen
Richtung weiter.
2
Eckennähführung
45
Page 46

SECTION
4.
UTILITY
STITCHES
Basi
c Zigzag
Simpl
e zigza
g stitchin
g is
widel
y used for overcasting,
NOTE:
and
Overcasting
3
Stitch
length
: 1 – 2
A
(Mode
l 2600)
Mode
l 2800:
and
CAUTION:
Mode
l 2600:
the
Machine setting
1
Stitch: 2
2
Stitch width: 1 – 5
3
Stitch length: 0.5 – 3
4
Thread tension: 2 – 5
5
Presser foot: A
sewing on buttons etc.
Adjust the stitch length to suit your sewing needs.
Use a stabilizer for stretch fabrics such as tricot
knits to prevent puckering.
Machine setting
1
Stitch pattern: 2
2
Stitch width: 5
4
Thread tension: 3 – 7
5
Presser foot: C (Model 2800)
Overcasting is used to prevent fabrics from raveling at
raw edges. It can be used to finish a hem edge.
Place the edge of the fabric next to the guide of foot
sew while guiding the fabric edge along the guide.
6
Guide
Do not set the stitch width less than 5 when using foot
C ; the needle may hit the foot causing the needle to
bend or break.
Sew while guiding the fabric so the needle drops off
fabric edge on the right.
46
Page 47

SECTION 4.
POINTS ULI
T
AIRES
TEIL
4.
PRAKTISCHE
STICHE
P
oint z
igzag de base
Zick-Zack-
Stich
Régla
g
e de la ma
c
hine
1
5
Pied-de-biche:
A
Maschineneinstellung
5
Nähfuß:
A
Le point zigzag simple est utilisé fréquemment pour le
Utilisez un tissu stabilisant pour les tissus élastiques
Der ein
f
ache Zi
ck-Zack-
Stich wird häufig beim
V
und
Surfil
age
Abdecken
Modèle 2800
Le point zigzag large est utilisé sur le rentré de couture
Modell 2800
utzt, um
A
TTENTION
pied de point surjet C est utilisé, la largeur
V
ORSICHT
Breite auf 5,0 oder breiter einstellen,
ähte am
Modèle 2600
Modell 2600
Point: 2
2
Largeur de point: 1 – 5
3
Longueur de point: 0.5 – 3
4
Tension du fil: 2 – 5
1
Stich: 2
2
Stichbreite: 1 – 5
3
Stichlänge: 0.5 – 3
4
Fadenspannung: 2 – 5
surfilage, pour coudre des boutons etc.
Régler la longueur de point qui correspond à vos
besoins.
REMARQUE:
tels que les tissus tricotés et tricots pour éviter les
fronces.
Réglage de la machine
1
Point: 2
2
Largeur de point: 5
3
Longueur de point: 1 – 2
4
Tension du fil: 3 – 7
5
Pied-de-biche: C (2800 uniquement)
Pied-de-biche : A (2600 uniquement)
ersäubern, Annähen von Knöpfen usw. verwendet.
Stellen Sie die Stichlänge auf Ihren Bedarf ein.
HINWEIS:
Verwenden Sie bei feinen Stoffen, wie z.B. TrikotStretchstoffen ein Vlies, um zu vermeiden, dass der
Stoff Falten wirft.
Maschineneinstellung
1
Stich: 2
2
Stichbreite: 5
3
Stichlänge: 1 – 2
4
Fadenspannung: 3 – 7
5
Nähfuss C (nur für Mod.2800)
Nähfuss A (nur für Mod.2600)
pour éviter que le tissu ne s’effiloche sur les bords.
Positionnnez le bord du tissu à côté du guide du pied,
puis commencez à coudre.
6
Guide
Lorsque le
du point zigzag doit être de 5,0 ou plus, afin
d’empêcher l’aiguille de heurter les câbles du point.
Coudre le point zigzag sur le bord du tissu. Lorsque
l’aiguille pique à droite, elle ne pique pas dans le tissu.
47
Der Zick-Zack-Stich wird auf der Nahtzugabe ben
ein Ausfransen der Schnittkanten zu verhindern.
Legen Sie die Stoffkante neben den Bahnführer des
Fußes und nähen Sie.
6
Führung
Bei der Verwendung des Kantennähfußes C müssen
Sie die Zick-Zackum zu verhindern, dass die Nadel gegen die Dr
Fuß stößt.
Nähen Sie ein Zickzackstich am äusseren Ende eines
Stoffes. Wenn die Nadel rechts einsticht, sticht Sie nicht
in den Stoff.
Page 48

q
17/15
w
e
Super Stretch Stitch
2
Stitch
width
: 5
A
(Mode
l 2600)
Mode
l 2800:
It
and
CAUTION:
the
foot
Mode
l 2600:
allowance.
3-Step Zigzag
This
stitch is used to finish a raw edge on synthetic
s and
Machine setting
1
Stitch: 17 (Model 2800)
15 (Model 2600)
3
Stitch length: S.S.
4
Thread tension: 3 – 7
5
Presser foot: C (Model 2800)
This stitch is ideal for finishing edges of stretch fabrics.
seams and finishes the fabric edges simultaneously.
Place the edge of the fabric next to the guide of foot
sew while guiding the fabric edge along the guide.
6
Guide
Do not set the stitch width less than 5 when using
overedge foot C, otherwise the needle may hit the
causing the needle to bend or break.
Place the fabric to leave a 5/8" (1.6 cm)
Trim the extra allowance after sewing.
Machine setting
1
Stitch: 3
2
Stitch width: 3 – 5
3
Stitch length: 0.5 – 1.5
4
Thread tension: 3 – 6
5
Presser foot: A
48
other fabrics that tend to pucker.
Place the fabric to leave a 5/8" (1.6 cm) allowance.
Trim the extra allowance after sewing.
It is also used for mending tears.
Page 49

Point Super stretch
Réglage de la machine
Superstretch Stich
Ce point peut être utilisé pour coudre et en même temps
ositionnez le bord du tissu à côté du guide du pied, puis
Dieser Stich eignet sich für das gleich
z
eitige Nähen
von
enn die Nähte nicht geöffnet
A
TTENTION
Lorsque le pied de point surjet C est utilisé, la largeur
V
ORSICHT
Breite auf 5,0 oder breiter einstellen,
n, dass die Nadel gegen die Drähte am
Zigzag spécial
5
Pied-de-biche:
A
3-Stufen Zick
-
Zack
-
Stich
5
Nähfuß:
A
Ce point se
r
t à finir le bord b
r
ut de tissus synthétiques et
Dieser Stich wird zum Bearbeiten einer Schnittkante
v
on
alten
w
Modèle 2600
Modell 2600
1
Point: 17 (2800 uniquement)
Point : 15 (2600 uniquement)
2
Largeur de point: 5
3
Longueur de point: S.S.
4
Tension du fil: 3 – 7
5
Pied-de-biche: C (2800 uniquement)
Pied-de-biche: A (2600 uniquement)
Maschineneinstellung
1
Stich: 17 (nur für Mod. 2800)
Stich: 15 (nur für Mod. 2600)
2
Stichbreite: 5
3
Stichlänge: S.S.
4
Fadenspannung: 3 – 7
5
Nähfuß: C (nur für Mod. 2800)
Nähfuß: A (nur für Mod. 2600)
surfiler les bords d’un tissu.
Utilisez ce point lorque vous n’avez pas besoin d’ouvrir
deux épaisseurs à plat.
P
commencez à coudre.
6
Guide
du point zigzag doit être de 5,0 ou plus, afin
d’empêcher l’aiguille de heurter les câbles du point.
Placez les tissus bord à bord sous le pied-de-biche.
Coupez si nécessaire la réserve de couture.
Réglage de la machine
1
Point: 3
2
Largeur de point: 3 – 5
3
Longueur de point: 0.5 – 1.5
4
Tension du fil: 3 – 6
Säumen und Umstechen von Stoffkanten.
Benutzen Sie diesen Stich, w
und flach gedrückt werden müssen.
Legen Sie die Stoffkante neben den Bahnführer des
Fußes und nähen Sie.
6
Führung
Bei der Verwendung des Kantennähfußes C müssen
Sie die Zick-Zackum zu verhinder
Fuß stößt.
Stoffkanten zusammen unter den Nähfuss legen.
Eventuell überstehende Nahtzugabe-zurückschneiden.
Maschineneinstellung
1
Stichmuster: 3
2
Stichbreite: 3 – 5
3
Stichlänge: 0.5 – 1.5
4
Fadenspannung: 3 – 6
d’autres tissus extensibles qui ont tendance à froncer.
Placez le tissu afin de former un rentré de 1,6 cm.
Coupez le tissu dépassant du rentré après la couture.
Ce point est également utile pour raccommoder les
déchirures.
49
Synthetik- und anderen Stoffen benutzt, die leicht F
erfen. Legen Sie den Stoff so, dass eine Nahtzugabe
von 1,6cm übersteht. Schneiden Sie die zusätzliche
Nahtzugabe nach dem Nähen ab.
Der Stich wird außerdem zum Stopfen und zum
Ausbessern von Rissen verwendet.
Page 50

Triple Seam
2
Stitch
width
: 0 or 5
5
Carefull
y guide the fabric
while
sewin
g as the fabric
Rickrack or
Triple Zigzag
2
Stitch
width
: 2 – 5
5
Sew on stretch fabrics in any area that you might use a
This stitch is used as a dec
orative topstitch as well.
Machine setting
1
Stitch pattern: 12 (Model 2800)
10 (Model 2600)
3
Stitch length: S.S.
4
Thread tension: 2 – 5
Presser foot: Zigzag foot A
The triple seam is sewn with two stitches forward and
one stitch backward, forming a seam that does not rip
easily.
Use it to reinforce areas such as crotch and armhole
seams.
Also use it when constructing items such as backpacks
for extra strength.
moves back and forth.
Machine setting
1
Stitch: 13 (Model 2800)
11 (Model 2600)
3
Stitch length: S.S.
4
Thread tension: 2 – 5
Presser foot: A
zigzag stitch.
50
Page 51

Couture triple
Dreifachnaht
Régla
g
e de la ma
c
hine
1
Maschineneinstellung
Ce motif est composé de deux points en
avant et d’un
Guidez soigneusement le tissu pendant la couture car il a
Dieser Stich wird mit z
wei Vorwä
r
tsstichen und einem
Point stretch decoratif
Dekorati
ver Stretchstich
Utilisez ce point sur les tissus élastiques là où
v
ous
Ce point est également utilisé comme un point de piqûre
V
erwenden Sie diesen Stich auf Stretchstof
f
en, in allen
Stich nähen würden.
Point: 12 (2800 uniquement)
Point: 10 (2600 uniquement)
2
Largeur de point: 0 ou 5
3
Longueur de point: S.S.
4
Tension du fil: 2 – 5
5
Pied-de-biche: A
1
Stich: 12 (nur für Mod. 2800)
Stich: 10 (nur für Mod. 2600)
2
Stichbreite: 0 oder 5
3
Stichlänge: S.S.
4
Fadenspannung: 2 – 5
5
Nähfuß: A
point en arrière, formant ainsi une couture qui ne se
déchire pas facilement.
Il peut servir à renforcer des zones telles que les
entrejambes et les emmanchures.
Il peut également être utilisé dans les travaux de
réalisation de sacs à dos, pour renforcer leur solidité.
tendance à glisser d’un côté ou de l’autre.
Réglage de la machine
1
Point: 13 (2800 uniquement)
Point: 11 (2600 uniquement)
2
Largeur de point: 2 – 5
3
Longueur de point: S.S.
4
Tension du fil: 2 – 5
5
Pied-de-biche: A
Rückwärtsstich genäht, um eine reißfeste Naht zu
erhalten.
Benutzen Sie ihn, um Bereiche wie Schritt- und
Ärmellochnähte zu verstärken.
Er ist auch beim Nähen von Teilen wie Rucksäcke
angebracht, da er zusätzliche Stärke verleiht.
Während sich der Stoff beim Nähen rückwärts und
vorwärts bewegt, ist dieser vorsichtig zu führen.
Maschineneinstellung
1
Stich: 13 (nur für Mod. 2800)
Stich: 11 (nur für Mod. 2600)
2
Stichbreite: 2 – 5
3
Stichlänge: S.S.
4
Fadenspannung: 2 – 5
5
Nähfuß: A
utiliseriez un point zigzag.
décoratif.
51
Bereichen, wo Sie einen Zick-ZackDieser Stich eignet sich auch für eine dekorative
Decknaht.
Page 52

Butto
n Sewing
6
Feed
dog:
Lowered
A pin can be
place
d on the foot to form a
shank.
NOTE:
Machine setting
1
Stitch: 2
2
Stitch width: Adjust as necessary
3
Stitch length: Any
4
Thread tension: 3 – 7
5
Presser foot: F
Adjust the stitch width to match it with the span of the
holes in the button. Turn the flywheel to check if the
needle enters into each hole in the button.
Lower the foot to hold the button in place.
The holes in the button should align with the slot of the
foot.
Make sure to check if the needle enters into both holes
in the button.
1
Pin
Sew about 10 stitches.
Raise the presser foot and remove the fabric. Cut the
needle and bobbin threads leaving 8” (20 cm) tails.
Bring the needle thread between the button and fabric
through the holes in the button.
Pull the needle thread to pick bobbin thread up to the
right side of the fabric.
Wind the threads to from a shank and tie them together.
2
Needle thread
3
Bobbin thread
Raise the feed dog after sewing.
52
Page 53

Couture des boutons
Annähen
v
on Knöp
fen
Régla
g
e de la ma
c
hine
6
Griff
es d’ent
r
aînement:
Abaissées
Maschineneinste
llung
6
Stoffschieber:
Gesenkte Stellung
Ajustez la largeur de point afin qu’elle
corresponde
à
olant pour
ifier que l'aiguille pique dans chaque trou du bouton.
ad,
V
ous pou
v
ez placer une épingle sous le pied
-de-
biche
Vé
Relev
ez le pied
-de-
biche et retirez le tissu.
Coupez les fils
Stellen
Sie den Nähfuß
hoch
und entfernen Sie den Stoff.
REMAR
Q
UE:
ois la couture
HINWEIS:
Stellen Sie nach dem Nähen den Stoffschieber hoch.
1
Point: 2
2
Largeur de point: Ajustez selon le besoin
3
Longueur de point: Tous
4
Tension du fil: 3 – 7
5
Pied-de-biche: F
1
Stich: 2
2
Stichbreite: Nehmen Sie entsprechende
Einstellungen vor.
3
Stichlänge: Beliebig
4
Fadenspannung: 3 – 7
5
Nähfuß: F
l'écart entre les trous du bouton. Tournez le v
vér
Abaissez le pied-de-biche pour maintenir le bouton en
place.
Les trous du bouton doivent s’aligner sur la rainure du
pied-de-biche.
pour servir de tige.
rifiez que l’aiguille pique bien dans les deux trous du
bouton.
1
Épingle
Cousez environ 10 points.
de l’aiguille et de la canette en laissant dépasser 20 cm
de fil.
Placez le fil d’aiguille entre le bouton et le tissu à travers
les trous du bouton.
Tirez le fil d’aiguille pour faire remonter le fil de canette
sur l'endroit du tissu.
Enroulez les fils autour du bouton pour former une tige et
nouez-les.
2
Fil d’aiguille
3
Fil de canette
Anpassen Sie die Stichbreite, so dass sie dem Abstand
der Löcher im Knopf entspricht. Drehen Sie das Handr
um zu prüfen, dass die Nadel in jedes Loch des Knopfes
einsticht. Senken Sie den Fuß ab, um den Knopf in
dieser Stellung festzuhalten.
Die Löcher des Knopfes sollten mit dem Schlitz auf dem
Nähfuß ausgerichtet sein.
Eine auf den Fuß gelegte Stecknadel kann einen Stiel
bilden.
Prüfen Sie, dass die Nadel in beide Löcher des Knopfes
einsticht.
1
Stift
Nähen Sie etwa 10 Stiche.
Schneiden Sie Ober- und Unterfaden auf eine Länge von
20 cm ab.
Bringen Sie den Oberfaden zwischen Knopf und Stoff
durch die Löcher im Knopf.
Ziehen Sie am Oberfaden, um den Unterfaden zur
rechten Stoffseite zu bringen.
Wickeln Sie die Fäden, um einen Fadenstiel zu bilden
und verknoten Sie diese.
2
Oberfaden
3
Unterfaden
Relevez la griffe d'entraînement une f
terminée.
53
Page 54

Automati
c Buttonhol
e (Mode
l 2800)
5
Presse
r foot: R
NOTES:
1"
Turn the handwhee
l towar
d you to raise the needl
e to
its
Pull to open the butto
n holde
r to the back
(A
)
, and
NOTE:
Machine setting
1
Stitch pattern:
2
Stitch width: 4 – 5
3
Stitch length: 0.5 – 1
4
Thread tension: 1 – 5
The size of buttonhole is automatically determined by
placing the button in the automatic buttonhole foot.
The button holder of the foot takes a button size up to
(2.5 cm) in diameter.
Make a test buttonhole on a sample duplicating the
fabric, interfacing and seams of the actual garment to
check the settings.
Use interfacing on stretch fabrics.
highest position.
1
Place the automatic buttonhole foot with the pin lies
just under the groove on the foot holder. Lower
the foot lifter to snap the foot in place.
1
Groove
2
Pin
2
place the button in it. Push back (B) the button
holder against the button to hold it tight.
3
Button holder
Thick buttons - If the button does not fit through the test
buttonhole, lengthen the buttonhole by pulling the
buttonhol by pulling open the button holder to create a
small gap.
4
Small gap
54
Page 55

A
utomatis
c
he Knopflö
c
her
Die Größe des Knopfloches wird automatisch bestimmt,
eil, um
Boutonnière automatique
automatiquement en plaçant le bouton sur le pied de
er l’aiguille à la
ad auf sich zu, um die Nadel in die
Placez le pied de boutonnière
automatique de
f
açon à
Platzieren Sie den automatischen Knopflochfuß mit
, um
Tirez le po
rte-
bouton
v
ers l’ar
r
ière
(A)
afin de l’ouv
rir
bouton
Ziehen Sie den Knopfhalter nach hinten
(A)
, um ihn
REMAR
Q
UE:
d’essai.
tonnière d’essai,
HINWEIS:
enn
Réglage de la machine
1
Point:
2
Largeur de point: 4 – 5
3
Longueur de point: 0.5 – 1
4
Tension du fil: 1 – 5
5
Pied-de-biche: R
REMARQUES :
La dimension de la boutonnière est déterminée
boutonnière automatique.
Le porte-bouton du pied accepte les boutons allant
jusqu’à 2,5 cm de diamètre.
Faites un essai de boutonnière sur un échantillon
identique au tissu, à la doublure et à l’ourlet du
vêtement pour vérifier les réglages.
Utilisez un entoilage sur les tissus extensibles.
Tournez le volant vers vous pour relev
position la plus haute.
1
ce que la charnière se trouve juste sous l’échancrure
de la bride semelle. Abaissez le levier du pied pour
verrouiller le pied en position.
1
Échancrure
2
Charnière
Maschineneinstellung
1
Stich:
2
Stichbreite: 4 – 5
3
Stichlänge: 0.5 – 1
4
Fadenspannung: 1 – 5
5
Nähfuß: R
HINWEISE:
indem der Knopf in den automatischen Knopflochfuß
gelegt wird.
Der Knopfhalter am Fuß nimmt Knöpfe bis zu 2,5 cm
Durchmesser auf.
Nähen Sie ein Probeknopfloch auf einem Stoffrest,
verwenden Sie dabei denselben Stoff, das selbe Vlies
und dieselben Nähte wie auf dem zu nähenden T
die Einstellungen zu prüfen.
Bei Stretchstoffen ist ein Vlies zu verwenden.
Drehen Sie das Handr
höchste Stellung zu bringen.
1
dem Stift so, dass er gerade unter der Rille des
Fußhalters liegt. Senken Sie den Nähfußhebel ab
den Fuß in dieser Stellung einrasten zu lassen.
1
Rille
2
Stift
2
et placez-y le bouton. Repoussez (B) le portecontre le bouton pour le maintenir solidement en
place.
3
Porte-bouton
Pour des boutons épais, faites une boutonnière
Si le bouton est trop large pour la bou
allongez la boutonnière en tirant le porte-bouton
quelque peu vers l’arrière.
4
Tirez à peine
2
zu öffnen, und legen Sie den Knopf in den Halter.
Drücken Sie den Knopfhalter ein wenig gegen den
Knopf zurück (B) , um ihn festzuhalten.
3
Knopfhalter
Für dicke Knöpfe nähen Sie ein Probeknopfloch. W
der Knopf nicht durch das Probeknopfloch passt,
können Sie das Knopfloch verlängern, indem Sie den
Knopfhalter ein wenig zurückziehen.
4
Ziehen Sie den Knopfhalter ein wenig zurück
55
Page 56

Pull the buttonhol
e lever
down as far as it
will
go.
Raise the foot and pass the needl
e threa
d t
hrough
bobbin
Sew
slowl
y and
stop the machin
e when a
buttonhole
first,
Raise the foot and remov
e the
fabric.
4"
3
4
Buttonhole lever
4
the opening in the foot. Draw both needle and
threads to the left.
Insert the fabric under the foot and lower the needle
into the fabric at the starting point.
Lower the foot.
5
Needle thread
6
Bobbin thread
7
Opening
8
Starting point
NOTE:
Make sure there is no gap between the slider and front
stopper. If there is a gap, the length of the right and left
rows of the buttonhole will differ.
9
Slider
Front stopper
11
Difference
12
There should be no gap.
56
5
is completed.
The machine sews the front bartack and left row
then the back bartack and right row.
6
Cut both needle and bobbin threads leaving about
(10 cm) thread ends.
Draw the needle thread to wrong side of fabric by
pulling the bobbin thread.
Then, knot the threads.
Insert a pin inside the bartack. Then cut the opening
with seam ripper.
Take care not to cut the stitches.
Page 57

Abaissez à
f
ond le l
e
vier de boutonnièr
e.
Ziehen Sie den Knopflochhebel so
w
eit wie möglich
Soulev
ez le pied
-de-
biche et
f
aites passer le fil
Tirez le fil de l'aiguille
8
Stellen Sie den Nähfuß hoch und führen Sie den
8
REMAR
Q
UE:
Vérifiez qu’il n’y ait pas d'espace entre le coulisseau et
angées
auche de la boutonnière seront de longueur
HINWEIS:
, dass zwischen dem Schieber und
Sollte
9
Coulisseau
9
Schieber
Cousez lentement et arrêtez la machine dès que
v
ous
Nähen Sie langsam und halten Sie die Maschine an,
e Raupe und danach den
Relev
ez le pied et retirez le tissu.
Coupez les fils d’aiguille et de canette en laissant une
Coupez
Heben Sie den Fuß an und ent
fer
nen Sie den Stof
f.
aden auf die
.
3
4
Levier de boutonnière
4
d’aiguille par l’ouverture du pied.
et le fil de canette vers la gauche.
Placez le tissu sous le pied, puis abaissez l’aiguille
dans le tissu au point de départ.
Abaissez le pied.
5
Fil d’aiguille
6
Fil de canette
7
Ouverture
Point de départ
3
nach unten.
4
Knopflochhebel
4
Oberfaden durch das Loch im Fuß. Ziehen Sie den
Unter- und den Oberfaden nach links.
Legen Sie den Stoff unter den Fuß und senken Sie die
Nadel am Ausgangspunkt in den Stoff.
Stellen Sie den Fuß herab.
5
Oberfaden
6
Unterfaden
7
Öffnung
Ausgangspunkt
la butée avant. En effet, s’il y a un espace, les r
droite et g
différente.
Butée avant
11
Différence
12
Il ne peut y avoir d’espace.
5
avez terminé la boutonnière.
La machine coud tout d’abord le bord avant et la
rangée gauche, puis le bord arrière et la rangée droite.
6
longueur d’environ 10 cm.
Tirez le fil d’aiguille du côté envers du tissu en tirant
sur le fil de canette.
Nouez ensuite les fils.
Insérez une épingle dans la couture du bord.
la fente à l’aide du découd-vite.
Prenez garde à ne pas couper les fils de couture.
Sorgen Sie dafür
dem vorderen Anschlag keine Lücke besteht.
eine Lücke bestehen, fallen die rechten und linken
Knopflochreihen unterschiedlich aus.
Vorderer Anschlag
11
Unterschied
12
Hier darf kein Abstand sein.
5
wenn das Knopfloch fertig genäht ist.
Die Maschine näht zuerst den vorderen
Knopflochriegel und die link
hinteren Knopflochriegel und die rechte Raupe.
6
Schneiden Sie Ober- und Unterfaden auf eine Länge
von ca. 10 cm ab.
Ziehen Sie am Unterfaden, um den Oberf
linke Stoffseite durchzuziehen.
Verknoten Sie dann die Fäden.
Stecken Sie eine Stecknadel in den Knopflochriegel.
Schneiden Sie die Öffnung mit einem Nahttrenner auf
Vorsicht - schneiden Sie dabei nicht in die Naht.
57
Page 58

To sew anothe
r buttonhole
, turn the stitch
selecto
r to
Adjustin
g the
buttonhol
e stitch
density
Turn the stitch
lengt
h dial
withi
n the
rang
e of “ ”
Whe
n buttonhol
e sewin
g is
finished
, push
the
“RESET”, then back to “ ” again.
Move fabric and sew another buttonhole.
7
buttonhole lever up as far as it will go.
to adjust the buttonhole stitch density.
1
Stitch length dial
58
Page 59

P
our coudre
une autre boutonnièr
e
, placez le cadran de
W
enn Sie ein
w
eiteres Knopfloch nähen möchten, drehen
und
Tour
nez le sélecteur de longueur de point à l’inté
r
ieur de
Die Knopflochstichdichte kann durch Einstellen der
w
Positionnez le tissu et appu
y
ez sur la pédale de
Drück
en Sie jetzt ein
f
ach auf den Fußanlasser und es
wird ein identisches Knopfloch genäht.
Lorsque la boutonnière es
t terminé
e
, relevez à
f
ond le
Nachdem das Knopfloch genäht ist, schieben Sie den
P
our ajuster la densité des points de boutonnière:
Einstellen der Knopflo
c
hstichdichte
sélection de motif sur “RESET”, puis à nouveau
sur “ ”, comme illustré.
commande pour coudre une boutonnière identique.
7
levier de boutonnière.
Sie die Stichprogrammauswahlscheibe auf “RESET”
dann wie abgebildet wieder auf “ ”.
7
Knopflochhebel so weit wie möglich nach oben.
la plage “ ” pour régler la densité du point de
boutonnière.
1
Sélecteur de longueur de point
Stichlänge-Stellscheibe zwischen “ ” angepasst
erden.
1
Stichlängenregler
59
Page 60

4-Step
Buttonhol
e (Mode
l 2600)
Buttonhol
e foot B
Set the pattern selector dial at “
”.
Draw both of needle and bobbin thread to the left.
w
NOTE:
The scale on the slider is engraved in centimeters.
Sew forward until you reach the front marking of your
Raise the needle to its highest position.
”. Sew 5 stitches,
then stop sewing. Set the stitch length dial to "0" and
Raise the needle and presser foot. Remove the fabric
Adjusting the buttonhole stitch density:
t the
Machine setting
1
Stitch:
2
Stitch width: 4 – 5
3
Stitch length: 0.5 – 1
4
Thread tension: 1 – 5
5
Presser foot: Sliding buttonhole J or
1
Carefully mark buttonhole length on fabric.
Place the fabric under the foot with the buttonhole
marking running toward you.
Move the slider toward you so that the top mark
on the slider meets the start mark q.
1
Start mark
2
Top mark
3
Needle thread
4
Bobbin thread
2
buttonhole. Stop sewing at a left stitch.
3
Raise the needle to its highest position.
Set the pattern selector dial at “ ”. Sew 5 stitches,
then stop sewing at a right stitch.
4
Set the pattern selector dial at “ ”. Sew until the
needle reach the back marking of the buttonhole.
5
Raise the needle to its highest position.
Set the pattern selector dial at “
the pattern selector dial at straight sewing.
Sew a few locking stitches.
6
from the machine and cut the sewing thread. Insert a
pin inside the bartack.
Then cut the opening with a seam ripper.
Take care not to cut the stitches.
5
Pin
6
Seam ripper
60
Set the stitch length dial between “ ” to adjus
buttonhole stitch density.
Page 61

Boutonnière en 4 phases (Modèle 2600)
Réglage de la machine
us le pied, en situant la marque de
Knopflochnähen in 4 Schritten
(Modell 2600)
”. Nähen
Stich an.
jusqu’à ce que l’aiguille atteigne le repère arrière de la
b
outonnière.
Bringen Sie die Nadel in ihre höchste Stellung.
”. Nähen
vous. Réglez le sélecteur de
longueur de point sur “0” et le sélecteur de motif
Bringen Sie die Nadel in ihre höchste Stellung.
”. Nähen
biche. Retirez le tissu
Insérez une
Heben Sie Nadel und Nähfuß an. Nehmen Sie den
Pour
ajuster la densité des points de boutonnière:
Einstellen der Knopflochstichdichte:
Die Knopflochstichdichte kann durch Einstellen der
” justiert
werden.
1
Point:
2
Largeur de point: 4 – 5
3
Longueur de point: 0.5 – 1
4
Tension du fil: 1 – 5
5
Pied-de-biche:
1
Réglez le sélecteur de motif sur “ ”.
Les repères situés sur le coulisseau sont gravés en
centimètres.
2
Cousez vers l’avant jusqu’à ce que vous atteignez le
Marquez soigneusement la longueur de la
boutonnière sur le tissu.
Disposez le tissu so
la boutonnière vers vous.
Tirez le fil de l’aiguille et le fil de canette vers la
gauche.
Déplacez le coulisseau vers vous de façon à ce que le
repère supérieur w corresponde au repère de
départ q.
1
Repère de départ
2
Repère supérieur
3
Fil d’aiguille
4
Fil de canette
REMARQUE:
repère avant de votre boutonnière. Arrêtez la couture
par un point de gauche.
3
Relevez l’aiguille à sa position la plus haute.
Réglez le sélecteur de motif sur “ ”. Cousez 5
points, puis arrêtez la couture par un point de droite.
Maschineneinstellung
1
Stich:
2
Stichbreite: 4 – 5
3
Stichlänge: 0.5 – 1
4
Fadenspannung: 1 – 5
5
Nähfuß:
1
Stellen Sie den Musterauswahlregler auf “ ”.
Markieren Sie die Knopflochlänge vorsichtig auf dem
Stoff.
Legen Sie den Stoff unter den Fuß, wobei die
Knopflochmarkierung auf Sie zu läuft.
Ziehen Sie Unter- und Oberfaden nach links.
Bewegen Sie den Schieber auf sich zu, so dass die
obere Markierung w auf dem Schieber über der
Startmarkierung q liegt.
1
Startmarkierung
2
Obere Markierung
3
Oberfaden
4
Unterfaden
HINWEIS:
Die Skala auf dem Schieber ist in Zentimeter eingeteilt.
2
Nähen Sie vorwärts, bis Sie die vordere Markierung
Ihres Knopflochs erreichen. Halten Sie an einem
linken Stich an.
3
Bringen Sie die Nadel in ihre höchste Stellung.
Stellen Sie den Musterauswahlregler auf “
Sie 5 Stiche und halten Sie dann an einem rechten
4
Relevez l’aiguille à sa position la plus haute.
Réglez le sélecteur de motif sur “ ”. Cousez
5
Relevez l’aiguille à sa position la plus haute.
Réglez le sélecteur de motif sur “ ”. Cousez 5
points, puis arrêtez-
pour la couture au point droit.
Cousez quelques points d’arrêt.
6
Soulevez l’aiguille et le pied-de-
de la machine et coupez le fil de couture.
épingle dans la couture du bord.
Coupez la fente à l’aide du découd-vite.
Prenez garde à ne pas couper les fils de couture.
5
Fil d’aiguille
6
Fil de canette
Réglez le sélecteur de longueur de point entre “ ”
pour déterminer la densité du point de boutonnière.
4
Stellen Sie den Musterauswahlregler auf “
Sie, bis die Nadel die hintere Markierung des
Knopflochs erreicht.
5
Stellen Sie den Musterauswahlregler auf “
Sie 5 Stiche und halten Sie dann an. Stellen Sie die
Stichlängenregler auf “0” und den Musterwahlregler
auf Geradstich.
Nähen Sie einige Vernähstiche.
6
Stoff aus der Maschine und schneiden Sie den
Nähfaden ab. Stecken Sie eine Stecknadel in den
Knopflochriegel.
Schneiden Sie die Öffnung mit einem Nahttrenner
auf.
Vorsicht - schneiden Sie dabei nicht in die Naht.
5
Oberfaden
6
Unterfaden
Stichlängen-Stellscheibe zwischen “
61
Page 62

Corde
d Buttonhol
e (Mode
l 2800)
5
Presse
r foot: R
With the buttonhol
e foot
raised
, hook the filler
cord on
the
Draw
both
needl
e and
bobbi
n threa
d to the left.
point
automatic
Pull the left end of the filler
cord to tighte
n it and cut
Machine setting
1
Stitch:
2
Stitch width: 4 – 5
3
Stitch length: 0.5 – 1
4
Thread tension: 1 – 5
1
the spur at the back of the foot.
Bring the ends toward you under the foot, clearing
front end.
Hook the filler cord into the forks on the front of the
foot to hold them tight.
1
Spur
2
Forks
2
Lower the needle into the fabric at the starting
and lower the foot.
Depress the foot control gently and sew the
buttonhole over the cord.
The sewing sequence is the same as the
buttonhole.
3
Needle thread
4
Bobbin thread
5
Starting point
3
the excess tails.
To cut the buttonhole opening, refer to the
instructions on page 25.
62
Page 63

Régla
g
e de la ma
c
hine
Boutonnière co
r
donnet (2800 uniquement)
Mit Bünden verstärkte Knopflöcher (nur für Mod. 2800)
Maschineneinstellung
5
Nähfuß:
R
Le pied de boutonnière étant rel
e
vé, accrochez le
ant sur la
,
la page 53.
Stellen Sie den Knopflochfuß hoch und ha
k
en Sie den
adenenden unter dem Fuß auf sich
finden Si
e auf Seite 53.
1
Point:
2
Largeur de point: 4 – 5
3
Longueur de point: 0.5 – 1
4
Tension du fil: 1 – 5
5
Pied-de-biche: R
1
Stich:
2
Stichbreite: 4 – 5
3
Stichlänge: 0.5 – 1
4
Fadenspannung: 1 – 5
1
cordonnet de remplissage sur l’ergot se trouv
partie arrière du pied.
Placez les extrémités vers vous, sous le pied-de-biche
en dégageant la partie avant.
Accrochez le cordonnet de remplissage dans la
fourchette à l’avant du pied pour la maintenir.
1
Ergot
2
Fourchette
2
Tirez le fil de l'aiguille et le fil de canette vers la
gauche.
Piquez l'aiguille dans le tissu au point de départ, puis
abaissez le pied.
Appuyez délicatement sur la pédale, et cousez la
boutonnière sur le cordonnet.
La méthode de couture est la même que pour la
boutonnière automatique.
3
Fil d’aiguille
4
Fil de canette
5
Point de départ
3
Tirez sur l’extrémité gauche du cordonnet pour le
tendre et coupez le cordon en trop.
Pour couper l’ouverture de boutonnière, référez-vous à
1
Einlauffaden auf die Führung an der Rückseite des
Fußes.
Ziehen Sie beide F
zu, so dass sie unter dem vorderen Fußende
herausragen.
Haken Sie den Einlauffaden in die Gabeln an der
Vorderseite des Fußes ein, um die Fadenende
festzuhalten.
1
Führung
2
Gabeln
2
Ziehen Sie den Unter- und den Oberfaden nach links.
Senken Sie die Nadel am Ausgangspunkt und dann
den Nähfuß.
Treten Sie leicht auf den Fußanlasser und nähen Sie
das Knopfloch über den Einlauffaden.
Die Nähfolge entspricht der für das automatische
Knopfloch.
3
Oberfaden
4
Unterfaden
5
Ausgangspunkt
3
Ziehen Sie am linken Ende des Einlauffadens, um
diesen zu spannen, und schneiden Sie die
überschüssige Fadenlänge ab.
Anleitungen zum Aufschneiden der Knopflochöffnung
63
Page 64

Corde
d Buttonhol
e (Mode
l 2600)
With the buttonhol
e foot
raised
, hook the filler
cord on
the
Draw both of needle and bobbin thread to the left.
1
6
Bobbin thread
Lowe
r the
needl
e into the fabric at the
startin
g point
Pull the left end of the filler
cord to tighte
n it and cut
Machine setting
1
Stitch:
2
Stitch width: 4 – 5
3
Stitch length: 0.5 – 1
4
Thread tension: 1 – 5
5
Presser foot: J
1
the spur at the back of the foot.
Bring the ends toward you under the foot, clearing
front end.
Hook the filler cord into the forks on the front of the
foot to hold them tight.
1
Spur
2
Forks
2
Move the slider toward you so that the top mark
on the slider meets the start mark 2.
3
Start mark
4
Top mark
5
Needle thread
and lower the foot.
Depress the foot control gently and sew the
buttonhole over the cord.
The sewing sequence is the same as the 4-step
buttonhole.
3
the excess tails.
To cut the buttonhole opening, refer to the
instructions on page 27.
64
Page 65

Boutonnière cordonnet (Modèle 2600)
Knopflöcher mit Einlauffaden
(Model 2600)
Le pied de boutonnière étant relevé, accrochez le
cordonnet de remplissage sur l’ergot se trouvant sur la
2
Stellen Sie den Knopflochfuß hoch und haken Sie den
Ziehen Sie beide Fadenenden unter dem Fuß auf sich
2
Gabeln
Tirez le fil de l’aiguille et le fil de canette vers la
Déplacez le coulisseau vers vous de façon à ce que le
boutonnière en 4 phases.
Ziehen Sie Unter
-
und Oberfaden nach links.
Die Nähfolge entspricht der für das 4
-
Schritte
-
Knopfloch.
Tirez sur l’extrémité gauche du cordonnet pour le
vous
Ziehen Sie am link
en Ende des Einlauffadens, um
Réglage de la machine
1
Point:
2
Largeur de point: 4 – 5
3
Longueur de point: 0.5 – 1
4
Tension du fil: 1 – 5
5
Pied-de-biche: J
Maschineneinstellung
1
Stichmuster:
2
Stichbreite: 4 – 5
3
Stichlänge: 0.5 – 1
4
Fadenspannung: 1 – 5
5
Nähfuß: J
1
partie arrière du pied.
Placez les extrémités vers vous, sous le pied-debiche, en dégageant la partie avant.
Accrochez le cordonnet de remplissage dans la
fourchette à l’avant du pied pour la maintenir.
1
Ergot
Fourchette
2
gauche.
repère supérieur 1 corresponde au repère de
départ 2 .
3
Repère de départ
4
Repère supérieur
5
Fil d’aiguille
6
Fil de canette
Piquez l’aiguille dans le tissu au point de départ, puis
abaissez le pied.
Appuyez délicatement sur la pédale, et cousez la
boutonnière sur le cordonnet.
La méthode de couture est la même que pour la
1
Einlauffaden auf die Führung an der Rückseite des
Fußes.
zu, so dass sie unter dem vorderen Fußende
herausragen.
Haken Sie den Einlauffaden in die Gabeln an der
Vorderseite des Fußes ein, um die Fadenende
festzuhalten.
1
Führung
2
Bewegen Sie den Schieber auf sich zu, so dass die
obere Markierung 1 auf dem Schieber über der
Startmarkierung 2 liegt.
3
Startmarkierung
4
Obere Markierung
5
Oberfaden
6
Unterfaden
Senken Sie die Nadel am Ausgangspunkt und dann den
Nähfuß.
Treten Sie leicht auf den Fußanlasser und nähen Sie das
Knopfloch über den Einlauffaden.
3
tendre et coupez le cordon en trop.
Pour couper l’ouverture de boutonnière, référezà la page 61.
65
3
diesen zu spannen, und schneiden Sie die
überschüssige Fadenlänge ab.
Anleitungen zum Aufschneiden der Knopflochöffnung
finden Sie auf Seite 61.
Page 66

Manua
l Buttonhol
e (Mode
l 2800)
5
Presse
r foot:
For or optional
B
If the diamete
r of the butto
n is
more
than 1" (2.5
cm), a
point,
Sew the front
bartac
k and
left row to the desired
Click the buttonhol
e lever
towar
d you.
Sew the back
bartac
k and
right
row, and then
stop
the
Whe
n buttonhol
e sewin
g is
finished
, push
the
Machine setting
1
Stitch:
2
Stitch width: 4 – 5
3
Stitch length: 0.5 – 1
4
Thread tension: 1 – 5
buttonhole must be made manually as follows:
1
Pull the buttonhole lever down as far as it will go.
Draw needle and bobbin threads to the left.
Lower the needle into the fabric at the starting
and lower the foot.
1
Needle thread
2
Bobbin thread
3
Starting point
2
length then stop the machine.
3
4
machine at the starting point.
5
buttonhole lever up as far as it will go.
66
Page 67

Maschineneinstellung
Boutonnière ma
n
uelle (2800 uniquement)
Manuelles Knopflo
c
h (nur
für mod. 2800)
Régla
g
e de la ma
c
hine
1
Si le diamètre du bouton est supé
r
ieur à 2,5 cm, la
W
enn der Durchmesser des Knop
f
es größer a
ls 2,5 cm
Abaissez à
f
ond le l
e
vier de boutonnièr
e.
t, puis
Ziehen Sie den Knopflochhebel so
w
eit wie möglich
.
Cousez le bord
avant et la
r
angée de gauche à la
Nähen Sie den
v
orderen Knopfloch
r
iegel und die lin
ke
Enclenchez le l
e
vier de boutonnière
v
ers vous.
Stellen Sie den Knopflochhebel auf sich zu, bis er
Redémarrez la machine pour coudre le bord ar
r
ière et
Starten Sie die Maschine neu, um den hinteren
nähen.
Lorsque la boutonnière est te
r
minée
, relevez à
f
ond le
Nachdem das Knopf
loch genäht ist, schieben Sie den
Point:
2
Largeur de point: 4 – 5
3
Longueur de point: 0.5 – 1
4
Tension du fil: 1 – 5
5
Pied-de-biche: F ou pied de boutonnière B
(option)
1
Stich:
2
Stichbreite: 4 – 5
3
Stichlänge: 0.5 – 1
4
Fadenspannung: 1 – 5
5
Nähfuß: F oder………………………. B
(optional)
boutonnière devra être faites à la main comme suit :
1
Tirez le fil de l’aiguille et le fil de canette vers la
gauche.
Piquez l’aiguille dans le tissu au point de dépar
abaissez le pied.
1
Fil d’aiguille
2
Fil de canette
3
Point de départ
2
longueur voulue, puis arrêtez la machine.
ist, muss das Knopfloch wie folgt manuell genäht werden:
1
nach unten.
Ziehen Sie den Unter- und den Oberfaden nach links
Senken Sie die Nadel am Ausgangspunkt und dann
den Nähfuß.
1
Oberfaden
2
Unterfaden
3
Ausgangspunkt
2
Raupe auf die gewünschte Knopflochlänge und halten
Sie die Maschine dann an.
3
4
la rangée de droite, puis arrêtez la machine au point
de départ.
5
levier de boutonnière.
67
3
einrastet.
4
Knopflochriegel und die rechte Raupe zu
Halten Sie die Maschine am Ausgangspunkt an.
5
Knopflochhebel so weit wie möglich nach oben.
Page 68

Zippe
r Application
3
Stitch
length
: 1.5 – 4
Attachin
g the
zippe
r foot
A
: To sew the
left
side of the
zipper
, attac
h zippe
r foot
foot
Fabri
c preparation
the
9
Botto
m stop
position
Place the right
(top)
sides of the
fabric
together
. Sew
leaving
Machine setting
1
Stitch: 1
2
Stitch width: 5 (center needle poston)
4
Thread tension: 3 – 6
5
Presser foot: E
with the right side pin.
B: To sew the right side of zipper, attach the zipper
with the left side pin.
1
Groove
2
Pin
1
Add 3/8” (1 cm) to the zipper length. This is
overall opening size.
1
Right side of the fabric
2
3/8” (1 cm)
3
Opening size
4
Zipper length
5
Slider
6
Zipper teeth
7
Zipper tape
8
Wrong side of the fabric
2
a bottom seam up to the bottom stop position
a 5/8” (2 cm) allowance. Sew a few stitches in
reverse to lock.
Increase the stitch length to “4”, set needle thread
tension to “1”, and baste the entire length of the
fabric.
5/8” (2 cm)
11
Basting
12
13
Reverse stitch
13
Bottom stop position
14
Bottom seam
68
Page 69

P
ose de
f
ermeture à glissière
Reißve
rsc
hlüsse
Régla
g
e de la ma
c
hine
5
Pied-de-b
iche:
E
Maschineneinstellung
5
Nähfuß:
E
Installation du pied
à semelle ét
r
oite Anbrin
g
en des Reißve
rsc
hlussfußes
A
: P
our coudre le côté gauche de la
fer
meture à glissièr
e
,
A
: Bringen Sie den Reiß
v
erschlussfuß mit dem Stift auf
erschlussfuß mit dem Stift auf
2
Préparation du tissu
Vorbereitung des Stoffes
Ajoutez 1 cm à la taille de la
fer
meture à glissièr
e.
Cette longueur correspond à la longueur totale de
9
Extrémité de l'ou
ver
ture
Die Öff
n
ung muss insgesamt 1 cm größer als die
9
Ende der Öff
n
ung
Mettez le tissu endroit contre endroit.
Faites une
ieure de 2 cm depuis le bord droit jusqu’à
Couture infé
r
ieure
Legen Sie die rechten (oberen) Stoffseiten
on
Untere Naht
1
Point: 1
2
Largeur de point: 5
3
Longueur de point: 1.5 – 4
4
Tension du fil: 3 – 6
1
Stich: 1
2
Stichbreite: 5
3
Stichlänge: 1.5 – 4
4
Fadenspannung: 3 – 6
installez le pied à semelle étroite avec la broche à
droite.
B: Pour coudre le côté droit de la fermeture à glissière,
installez le pied à semelle étroite avec la broche à
gauche.
1
Échancrure
2
Charnière
1
l’ouverture.
1
Endroit du tissu
2
1 cm
3
Taille de l’ouverture
4
Taille de la fermeture à glissière
5
Coulisseau
6
Dents de la fermeture à glissière
7
Ruban de la fermeture à glissière
8
Envers du tissu
der rechten Seite an, um die linke Seite des
Reißverschlusses zu nähen.
B: Bringen Sie den Reißv
der linken Seite an, um die rechte Seite des
Reißverschlusses zu nähen.
1
Rille
Stift
1
Größe des Reißverschlusses sein. Dies ist die
Gesamtgröße der Öffnung
1
Rechte Stoffseite
2
1 cm
3
Öffnungsgröße
4
Reißverschlussgröße
5
Schieber
6
Reißverschlusszähne
7
Reißverschlussstoff
8
Linke Stoffseite
2
couture infér
la position d’arrêt du bas de la fermeture à glissière.
Arrêtez la couture en cousant quelques points en
arrière.
Augmentez la longueur de point à “4”, réglez la
tension du fil d’aiguille sur “1” et faufilez sur toute la
longueur du tissu.
2 cm
11
Faufilage
12
Point arrière
13
Extrémité de l'ouverture
14
69
2
gegeneinander. Nähen Sie eine untere Naht 2 cm v
der rechten Kante bis zum unteren
Reißverschlussanschlag. Nähen Sie einige
Rückwärtsstiche, um die Naht zu vernähen.
Stellen Sie die Stichlänge auf “4”, die
Oberfadenspannung auf “1” und heften Sie die
gesamte Stofflänge.
2 cm
11
Heften
12
Rückwärtsstich
13
Ende der Öffnung
14
Page 70

To
sew
back
8
Basting
Place
zippe
r teeth
next to margi
n edge and baste
the
Stop the machin
e 2” (5 cm)
befor
e reachin
g the
foot,
Remov
e fabric and close
zipper
. Take the upper
1
Attach zipper foot with the right side pin.
Fold back the upper layer seam allowance. Fold
the lower layer seam allowance to leave a 1/8"
(0.4 cm) margin of fabric.
1
Lower layer
2
End of the opening
3
Zipper teeth
4
1/8” (0.4 cm) margin
5
Upper layer
6
Opening size
7
Folded edge
2
zipper tape to the lower fabric layer.
Return thread tension and stitch length to original
settings.
Sew a seam the entire length of zipper tape.
3
slider, with needle in the fabric and raise the
then unzip to clear a path for stitching.
9
Slider
2” (5 cm)
4
fabric layer and lay it flat over the zipper.
Baste the zipper tape to the upper fabric layer.
11
9
Basting
12
9
Zipper tape
70
Page 71

P
our coudre
Nähen
Installez le pied à semelle étroite
avec la broche à
.
ieur en
8
Faufilage
Bringen Sie den Reiß
v
erschlussfuß mit dem Sti
ft auf
on 0,4 cm
8
Heften
Placez les dents de la
fer
meture près du bord de la
lissez la tension du fil et la longueur de
uban de
Legen Sie die Reiß
v
erschlusszähne neben die
erschlussstoff an
erschlussfuß mit der Stoffkante
Arrêtez la machine à 5 cm
avant d'atteindre le
5 cm
Halten Sie ca.
5 cm
v
or dem Schieber an, ohne die
Fuß
erschluss einige Zentimeter
en.
Enlevez le
tissu
et fermez la fer
meture
à
glissièr
e.
là à
Entfernen Sie den Stoff und schließen Sie den
Sie die obere Stofflage flach
1
droite.
Repliez le rentré de couture de l’épaisseur supérieure
Repliez le rentré de couture de l'épaisseur infér
laissant une marge de tissu de 0,4 cm.
1
Épaisseur inférieure
2
Extrémité de l'ouverture
3
Dents de la fermeture à glissière
4
Marge de 0,4 cm
5
Épaisseur supérieure
6
Taille de l’ouverture
7
Bord plié
2
marge et faufilez le ruban de la fermeture sur
l’épaisseur de tissu inférieure.
Alignez le pied à semelle étroite sur le bord de la
marge. Rétab
point à leur position initiale.
Faites une couture sur toute la longueur du r
la fermeture à glissière.
1
der rechten Seite an.
Falten Sie die obere Nahtzugabe um. Falten Sie die
untere Nahtzugabe um, so dass ein Rand v
besteht.
1
Untere Stofflage
2
Ende der Öffnung
3
Reißverschlusszähne
4
0,4 cm breiter Rand
5
Obere Stofflage
6
Öffnungsgröße
7
Gefaltete Kante
2
Stoffkante und heften Sie den Reißv
die untere Stofflage.
Richten Sie den Reißv
aus. Stellen Sie Fadenspannung und Stichlänge
wieder auf die ursprünglichen Einstellungen zurück.
Nähen Sie eine Naht an der gesamten Länge des
Reißverschlussstoffs entlang.
3
coulisseau ; piquez l’aiguille dans le tissu et soulevez
le pied-de-biche, puis ouvrez la fermeture à glissière
de quelques centimètres afin d’aménager un passage
pour coudre.
9
Coulisseau
4
Prenez l’épaisseur de tissu supérieure et posezplat sur la fermeture à glissière.
Faufilez le ruban de la fermeture à glissière sur
l'épaisseur de tissu supérieure.
11
9
Faufilage
12
9
Ruban de la fermeture à glissière
3
Nadel aus dem Stoff zu ziehen. Heben Sie den
an, öffnen Sie den Reißv
weit, um ausreichend Platz zum Nähen zu schaff
9
Schieber
5 cm
4
Reißverschluss. Legen
über den Reißverschluss.
Heften Sie den Reißverschlussstoff an die obere
Stofflage.
11
9
Heften
12
9
Reißverschlussstoff
71
Page 72

Raise the foot and detac
h it. Re-
attac
h it
with
the
basting
Unzip a few inche
s to
clear a
path for stitching.
to
5
left side pin.
Starting just below zipper bottom stop, sew across
fabric to about 3/8" (1 cm) distance from the
basting line.
Turn fabric 90 degrees and sew a seam the entire
length of the zipper tape. Before reaching the slider,
stop the machine with needle in fabric and raise the
foot. Use seam ripper to open a few inches of
stitch.
13
9
Unstitch basting
14
9
3/8" (1 cm)
6
At the end of seam, sew a few stitches in reverse
lock. Once both sides of zipper are sewn, use the
seam ripper to open the basting stitch.
72
Page 73

5
Soulev
ez et relâchez le pied
-de-
biche, et réinstallez le
.
ez le
Heben Sie den Fuß an, lösen Sie ihn und b
r
ingen Sie
Ouvrez la
fer
meture à
glissière de quelques
.
Öffnen Sie den Reiß
v
erschluss einige Z
entimeter
w
eit,
pied avec la charnière gauche.
En débutant juste sous l’arrêt du bas de la fermeture,
piquez le tissu à environ 1 cm de distance de la ligne
de faufilage.
Faites pivoter le tissu à 90 degrés et piquez sur la
longueur restante du ruban de la fermeture à glissière
Avant de parvenir au coulisseau, arrêtez la machine
en laissant l’aiguille piquée dans le tissu et soulev
pied. Utilisez le découd-vite pour ouvrir les points de
faufilage sur quelques centimètres.
13
9
Décousez le faufilage
14
9
1 cm
5
ihn wieder mit dem Stift auf der linken Seite an.
Nähen Sie den Stoff etwa 1 cm von der Heftlinie
entfernt. Beginnen Sie dabei knapp unterhalb des
unteren Reißverschlussanschlags.
Drehen Sie den Stoff um 90° und nähen Sie eine Naht
an der verbleibenden Länge des
Reißverschlussstoffes entlang. Halten Sie die
Maschine an, bevor Sie den Schieber erreichen,
während sich die Nadel im Stoff befindet, und stellen
Sie den Nähfuß hoch. Öffnen Sie einige cm der
Heftnaht mit dem Nahttrenner.
13
9
Aufgetrennte Heftlinie.
14
9
1 cm
6
centimètres afin d’aménager un passage pour coudre
Une fois la couture terminée, faites quelques points
arrière pour arrêter la couture.
Une fois que les deux côtés de la fermeture sont
cousus, retirez le faufilage à l’aide du découd-vite.
6
um ausreichend Platz zum Nähen zu schaffen.
Nähen Sie einige Rückwärtsstiche am Nahtende, um
die Naht zu vernähen.
Nachdem beide Reißverschlussseiten genäht sind,
trennen Sie die Heftnaht mit dem Nahttrenner auf.
73
Page 74

Blin
d Hemming
5
Presse
r foot: G
On
heav
y weigh
t fabric
s that
ravel
, the raw edge
or
(0.5 cm) allowance.
4
Place the fabric so that the needl
e just
pierce
s the
extreme
Turn the screw to align the guide on the
foot
with
the
Open and press the fabric
after
sewin
g is
finished.
Machine setting
1
Stitch: 4 or 5
2
Stitch width: 2 – 3
3
Stitch length: 2 – 3
4
Thread tension: 1 – 4
1
should be overcast first.
Fold the hem under the fabric as illustrated for fine
medium fabrics.
Fold a hem with the wrong side up forming a 1/8”
1
Wrong side of the fabric
2
1/8” (0.5 cm)
3
Heavy weight fabric
Fine and medium weight fabric
2
folded edge when the needle comes over the
left side.
Lower the presser foot.
3
folded edge so that the needle just pierces the fold.
If the needle pierces too far left, move the guide
slightly to the left.
If the needle misses the fold, move the guide slightly
to the right.
Sew slowly while guiding the folded edge along the
guide.
5
Screw
6
Guide
7
Folded edge
4
8
Right side of the fabric
NOTE:
If the needle drops too far left, the stitches will be
apparent on the right side of the fabric.
74
Page 75

Drehen Sie die Sch
r
aube, um
die Füh
r
ung am Fuß auf
ade
egen Sie
Stiche auf der rechten Stoffseite sichtba
r.
Tour
nez la vis pour aligner le guide du pied
-de-
biche
, déplacez légèrement
é le long
resso
r
tiront à l'endroit du tissu.
Ourlet i
n
visible
Blindsaum
Régla
g
e de la ma
c
hine
1
5
Pied-de-biche:
G
Maschineneinstellung
5
Nähfuß
: G
Sur les tissus épais qui s’effilochent, il
f
aut tout
ers du tissu étant sur le dessus afin
4
Bei sch
w
eren, ausf
r
ansenden Stof
f
en ist die
eine und
en Seite nach oben
4
Placez le tissu afin que l’aiguille perce juste le bord
.
Legen Sie den Stoff s
o
, dass die Nadel ge
r
ade die
enn die Nadel ganz
Point: 4 ou 5
2
Largeur de point: 2 – 3
3
Longueur de point: 2 – 3
4
Tension du fil: 1 – 4
1
Stich: 4 oder 5
2
Stichbreite: 2 – 3
3
Stichlänge: 2 – 3
4
Fadenspannung: 1 – 4
1
d’abord surfiler le bord brut.
Pour les tissus fins ou moyens, pliez l’ourlet sous le
tissu comme illustré.
Pliez l’ourlet, l’env
de former un rentré de 0,5 cm.
1
Envers du tissu
2
0,5 cm
3
Tissus épais
Tissus fins et moyennement épais
2
plié lorsqu’elle parvient sur le côté gauche extrême
Abaissez le pied presseur.
3
sur le bord plié afin que l'aiguille perce juste le pli.
Si l’aiguille perce trop à gauche
le guide vers la gauche.
Si l’aiguille ne parvient pas à percer le pli, déplacez
légèrement le guide vers la droite.
Cousez doucement tout en guidant le bord pli
du guide.
5
Vis
6
Guide
7
Bord plié
4
Une fois la couture terminée, ouvrez le tissu et
repassez-le.
8
Endroit du tissu
REMARQUE:
Si l'aiguille perce le tissu trop à gauche, les points
1
Schnittkante zuerst zu versäubern.
Falten Sie den Saum unter den Stoff, wie für f
mittelschwere Stoffe dargestellt.
Legen Sie einen Saum mit der link
mit einer Zugabe von 0,5 cm um.
1
Linke Stoffseite
2
0,5 cm
3
Schwere Stoffe
Feine oder mittelschwere Stoffe
2
gefaltete Stoffkante durchsticht, w
zur linken Seite geführt wird.
Senken Sie den Nähfuß.
3
die Stoffkante auszurichten, so dass die Nadel ger
die gefaltete Stoffkante durchsticht
Wenn die Nadel zu weit nach links einsticht, bewegen
Sie die Führung leicht nach links.
Wenn die Nadel die Faltenkante verfehlt, bew
die Führung leicht nach rechts.
Nähen Sie langsam, während Sie die gefaltete Kante
an der Führung entlang führen.
5
Schraube
6
Führung
7
Gefaltete Kante
4
Falten Sie den Stoff nach dem Nähen auf und bügeln
Sie ihn.
8
Rechte Stoffseite
HINWEIS:
Wenn die Nadel zu weit nach links einsticht, sind die
75
Page 76

SECTION
5.
DECORATIVE
STITCHES
Decorativ
e Sati
n Stitches
5
Presse
r foot: F
Determin
e the
appropriat
e stitch
densit
y by
test
sewing.
wit
Decorativ
e Stretc
h Stitches
Machin
e setting
5
Decorativ
e stretc
h stitches
are used for addin
g a
fabric
Machine setting
1
Stitch: 8 – 11 (Model 2800)
9 (Model 2600)
2
Stitch width: 3 – 5
3
Stitch length: 0.5 – 1
4
Thread tension: 1 – 4
For a delicate fabric such as chiffon, use a single layer
h a tear-away backing, if necessary. Reduce the
needle thread tension slightly to achieve the better
result.
1
Stitch pattern: 12 – 22 (Model 2800)
10 – 18 (Model 2600)
2
Stitch width: 3 – 5
3
Stitch length: S.S.
4
Thread tension: 1 – 4
Presser foot: A or F
creative and personalized touch to items.
Carefully guide the fabric while sewing as the
moves back and forth.
76
Page 77

SECTION 5.
POINTS DÉCOR
A
TIFS
TEIL
5.
ZIERSTICHE
P
oint d’épine décoratif
Dekorativer Fede
r
stich
Régla
g
e de la ma
c
hine
1
5
Pied-de-biche:
F
Maschinenei
nstellung
Déte
r
minez la densité de point approp
r
iée en
f
aisant un
Bestimmen Sie die beste Stichdichte durch eine
adenspannung leicht, um ein
P
oints stret
c
h décoratifs
Dek
orative Stret
c
hstiche
Régla
g
e de la ma
c
hine
Maschineneinstellung
Les motifs
e
xtensi
b
les déco
r
atifs sont utilisés pour ajouter
Guidez soigneusement le tissu pendant la couture car il a
Mit de
kor
ativen Stre
tchstichen
ver
leihen Sie Ihren
ts und
Point: 8 – 11 (2800 uniquement)
Point: 9 (2600 uniquement)
2
Largeur de point: 3 – 5
3
Longueur de point: 0.5 – 1
4
Tension du fil: 1 – 4
1
Stich: 8 – 11 (nur für Mod. 2800)
Stich: 9 (nur für Mod. 2600)
2
Stichbreite: 3 – 5
3
Stichlänge: 0.5 – 1
4
Fadenspannung: 1 – 4
5
Nähfuß: F
essai de couture.
Pour un motif délicat sur des tissus tels que les mousselines, utilisez une seule épaisseur de tissu avec un
entoilage détachable si nécessaire.
Diminuez légèrement la tension du fil d’aiguille pour
obtenir de meilleurs résultats.
1
Point: 12 – 22 (2800 uniquement)
Point: 10 – 18 (2600 uniquement)
2
Largeur de point: 3 – 5
3
Longueur de point: S.S.
4
Tension du fil: 1 – 4
5
Pied-de-biche: A ou F
Nähprobe.
Benutzen Sie für empfindliche Stoffe wie Chiffon bei
Bedarf ein rückenverstärkendes, abziehbares Vlies.
Reduzieren Sie die Oberf
besseres Resultat zu erzielen.
1
Stich: 12 – 22 (nur für Mod. 2800)
Stich: 10 – 18 (nur für Mod. 2600)
2
Stichbreite: 3 – 5
3
Stichlänge: S.S.
4
Fadenspannung: 1 – 4
5
Nähfuß: A oder F
une touche créative et personnalisée aux ouvrages.
tendance à glisser d’un côté ou de l’autre.
77
Nähteilen einen kreativen, individuellen Touch.
Während sich der Stoff beim Nähen rückwär
vorwärts bewegt, ist dieser vorsichtig zu führen.
Page 78

Smocking
5
Presse
r foot: F
Step
1:
than
Step
2:
pull
Sew
rows of the
smockin
g stitch
betwee
n the
gathering
Machine setting
1
Stitch: 14 (Model 2800)
12 (Model 2600)
2
Stitch width: 3 – 5
3
Stitch length: S.S.
4
Thread tension: 1 – 4
Choose a soft and lightweight fabric such as batiste,
gingham or challis. Cut the fabric three times wider
the finished width.
Increase the stitch length to “4” and loosen thread
tension to “1”. Sew rows of straight stitches 3/8" (1 cm)
apart across the area to be smocked.
1
3/8” (1 cm)
Knot the threads along one end. From the other end,
the bobbin threads to distribute gathers evenly and
secure the threads.
Return the thread tension to the original setting.
stitches.
Remove the gathering stitches after finished.
78
Page 79

Smo
cksSmoken
Régla
g
e de la
machine
1
Maschineneinstellung
Étape 1:
uez la
Schritt 1:
atist,
ung
Étape 2:
xtrémité
Schritt 2:
V
Ziehen Sie
Réta
b
lissez la tension du fil à sa position initial
e.
k entre les points
Stellen Sie die
F
adenspan
n
ung wieder auf die
.
Point: 14 (2800 uniquement)
Point: 12 (2800 uniquement)
2
Largeur de point: 3 – 5
3
Longueur de point: S.S.
4
Tension du fil: 1 – 4
5
Pied-de-biche: A
1
Stich: 14 (nur für Mod. 2800)
Stich: 12 (nur für Mod. 2600)
2
Stichbreite: 3 – 5
3
Stichlänge: S.S.
4
Fadenspannung: 1 – 4
5
Nähfuß: A
Choisissez un tissu doux et léger, comme la batiste, le
vichy ou le challis. Coupez trois fois plus de tissu que la
largeur de l’ouvrage.
Augmentez la longueur de point jusqu’à “4” et dimin
tension du fil à “1”. Cousez des rangées de points droits
à 1 cm les unes des autres à l'endroit où vous voulez
faire les smocks.
1
1 cm
Ligaturez les fils à une extrémité. Depuis l'autre e
du tissu, tirez les fils de la canette pour répartir les
fronces de façon homogène et arrêtez les fils.
Cousez des rangées de points de smoc
de fronçage.
Une fois terminé, retirez les points de fronçage.
Wählen Sie dazu einen weichen, leichten Stoff wie B
Gingham oder Challis aus. Schneiden Sie den Stoff auf
die dreifache vorgegebene Breite zu.
Stellen Sie die Stichlänge auf “4” und die Fadenspann
auf “1” ein. Nähen Sie gerade Nähte mit 1 cm Abstand
auf den zu smokenden Bereich.
1
1 cm
erknoten Sie die Fäden entlang einem Ende.
vom anderen Ende die Unterfäden, um die Kräuselung
gleichmäßig zu verteilen, und sichern Sie die Fäden.
ursprüngliche Einstellung zurück.
Nähen Sie Zierstichmusterreihen zwischen den
gekräuselten Stichen.
Entfernen Sie die gekräuselten Stiche am Ende
79
Page 80

Quiltin
g (Mode
l 2800
only)
6
Quiltin
g guide
(Mode
l 2800
only)
The
quiltin
g guide
will
help
keep the seam
spacing
the
Sew,
tracin
g the
previou
s row of stitchin
g with
the
Machine setting
1
Stitch: 1
2
Stitch width: 0 or 5
3
Stitch length: 1.5 – 4
4
Thread tension: 3 – 6
5
Presser foot: A
constant.
Insert the quilting guide into the opening and set
quilting guide at the desired seam spacing.
1
Quilting guide
2
Opening for the quilting guide
quilting guide.
3
Seam spacing
80
Page 81

Guide de ouatin
age (2800 uniquement)
Réglage de la machine
6
Guide de ouatinage (2800 uniquement)
Wattierungsführer (nur für Mod. 2800)
6
Kantenlineal (nur für Mod. 2800)
Le guide de ouatinage pe
r
met de conse
rver l’éca
r
t entre
Das Kantenlineal sorgt dafü
r
, dass die Nähte einen
Insérez le guide de ouatinage dans l’ou
ver
ture et réglez
-
2
Stecken Sie das Kantenlineal in die Öff
n
ung und stellen
wünschten Nahtabstand
Cousez à l’aide du guide de ouatinage en sui
v
ant la
F
olgen Sie beim Nähen der
v
orherigen Stichreihe
mit
1
Point: 1
2
Largeur de point: 0 ou 5
3
Longueur de point: 1.5 – 4
4
Tension du fil: 3 – 6
5
Pied-de-biche: A
Maschineneinstellung
1
Stich: 1
2
Stichbreite: 0 oder 5
3
Stichlänge: 1.5 – 4
4
Fadenspannung: 3 – 6
5
Nähfuß: A
les coutures constant.
le sur l’écart souhaité entre les coutures.
1
Guide de ouatinage
Ouverture pour le guide de ouatinage
rangée de points précédente.
3
Écart entre les coutures
gleichmäßigen Abstand erhalten.
Sie das Kantenlineal auf den ge
ein.
1
Kantenlineal
2
Öffnung für Kantenlineal
dem Kantenlineal.
3
Nahtabstand
81
Page 82

1
Pint
ucking
5
Fold a
fabric
wron
g side
together
. Lowe
r the
needl
e int
o
3
Shel
l Tuck
5
Presse
r foot: F
Use a
lightweigh
t fabric
(tricot
, for
example).
to
jus
NOTE:
Machine setting
1
Stitch: 1
2
Stitch width: 0 or 5
3
Stitch length: 1.5 – 3
4
Thread tension: 2 – 6
Presser foot: G
the fabric 0.1 – 0.2 cm inside the folded edge.
Lower the foot and turn the screw to align the guide on
the foot with the folded edge.
Sew slowly while guiding the folded edge along the
guide.
Open the fabric and iron press the tucks.
1
Screw
2
Guide
Folded edge
Machine setting
1
Stitch pattern: 6
2
Stitch width: 5
3
Stitch length: 2 – 3
4
Thread tension: 6 – 8
Fold and stitch on the bias.
When the needle swings to the right, allow the needle
t clear the folded edge of the fabric.
Increase the needle thread tension to form
exaggerated results.
82
Page 83

Benutzen Sie einen Stoff (wie z.
B. Trik
ot).
,
Utilisez un tissu léger (du t
r
icot, par
exemple).
Nervures
Réglage de la machine
5
Pied-de-biche:
G
Biesen
5
Nähfuß
: G
Pliez le tissu e
nvers contre e
nvers et piquez l’aiguille
nez la vis pour aligner le
Cousez doucement tout en guidant le bord plié le long du
3
Bord plié
Legen Sie den Stoff auf der lin
k
en Seite zusammen und
altete Kante an
3
Gef
altete Kante
P
oint à coquilles
5
Pied-de-biche:
F
Nähen eines Mus
c
helsaums
5
Nähfuß:
F
1
Point: 1
2
Largeur de point: 0 ou 5
3
Longueur de point: 1.5 – 3
4
Tension du fil: 2 – 6
Maschineneinstellung
1
Stich: 1
2
Stichbreite: 0 oder 5
3
Stichlänge: 1.5 – 3
4
Fadenspannung: 2 – 6
dans le tissu à 0,1 ou 0,2 cm à l’intérieur du bord plié.
Abaissez le pied-de-biche et tour
guide du pied avec le bord plié.
guide.
Ouvrez le tissu et repassez les nervures.
1
Vis
2
Guide
Réglage de la machine
1
Point: 6
2
Largeur de point: 5
3
Longueur de point: 2 – 3
4
Tension du fil: 6 – 8
senken Sie die Nadel 0,1 - 0,2 cm in die gefaltete
Stoffkante.
Senken Sie den Fuß und drehen Sie die Schraube, um
die Führung am Fuß auf die Stoffkante auszurichten.
Nähen Sie langsam, während Sie die gef
der Führung entlang führen.
Falten Sie den Stoff auseinander und bügeln Sie die
Biesen.
1
Schraube
2
Führung
Maschineneinstellung
1
Stich: 6
2
Stichbreite: 5
3
Stichlänge: 2 – 3
4
Fadenspannung: 6 – 8
Pliez le tissu et piquez dans le biais.
Lorsque l’aiguille oscille vers la droite, laissez-la toucher
à peine le bord plié du tissu.
REMARQUE:
Augmentez la tension du fil d’aiguille.
83
Falten Sie den Stoff diagonal und nähen Sie.
Wenn die Nadel nach rechts schwingt, achten Sie darauf
dass die Nadel gerade über die gefaltete Kante
hinausgeht.
HINWEIS:
Erhöhen Sie die Oberfadenspannung für
hervorstehende Muscheln.
Page 84

Fagoting
5
Use
this
stitch to join two piece
s of
fabric to creat
e an
press.
Sew
slowly
, guidin
g the
fabric so the
needl
e catche
s the
Patchwork
5
Presse
r foot: F
with the straight stitch.
Machine setting
1
Stitch: 7
2
Stitch width: 3 – 5
3
Stitch length: 1 – 3
4
Thread tension: 1 – 4
Presser foot: F
open work appearance, and to add design interest.
Fold under each fabric edge 1/2" (1.3 cm) and
Baste the two edges to a piece of wash-away
stabilizer.
1
Wash-away stabilizer
folded edge on each side.
Remove stabilizer after sewing is finished.
Machine setting
1
Stitch: 3
2
Stitch width: 5
3
Stitch length: 1 – 3
4
Thread tension: 1 – 4
Place right sides of two fabrics together. Sew a seam
Press seam allowance open.
Reset machine for patchwork stitch.
Place fabrics under the foot so that the seam line
matches the center of the foot.
Lower the foot and sew over the seam line.
84
Page 85

Faux
-
jour
Fa
gotte
c
hnik
Régla
g
e de la ma
c
hine
1
5
Pied-de-biche:
F
Maschineneinstellung
5
Nähfuß
: F
Utilisez ce point pour joindre deux morceaux de tissu afin
Benutzen Sie diesen Stich, um z
w
ei Stoffstü
cke
Vlie
Patchw
orkPatchwork
Régla
g
e d
e la ma
c
hine
5
Pied-de-biche:
F
Maschineneinstellung
5
Nähfuß:
F
Placez les deux épaisseurs de tissu, endroit contre
biche et cousez le motif le long de la
Legen Sie z
w
ei Stofflagen mit der
rechten Seite
Legen Sie den Stoff unter den Fuß, so dass die Nahtlinie
Point: 7
2
Largeur de point: 3 – 5
3
Longueur de point: 1 – 3
4
Tension du fil: 1 – 4
1
Stich: 7
2
Stichbreite: 3 – 5
3
Stichlänge: 1 – 3
4
Fadenspannung: 1 – 4
de créer une apparence d’ouverture dans l’ouvrage et
donner de l’intérêt au dessin.
Pliez sur 1,3 cm sous chaque rebord de tissu et
repassez.
Épinglez les deux bords sur du papier ou un entoilage
détachable à 0,3 cm l’un de l’autre.
1
Papier ou entoilage
Cousez lentement en guidant le tissu afin que l’aiguille
pique le bord replié, de chaque côté.
Une fois la couture terminée, détachez l’entoilage.
1
Point: 3
2
Largeur de point: 5
3
Longueur de point: 1 – 3
4
Tension du fil: 1 – 4
aneinander zu nähen und der Näharbeit so eine offene
Erscheinung und zusätzliche Effekte zu verleihen.
Legen Sie alle Stoffränder mit einer Zugabe von 1,3 cm
um und bügeln Sie diese.
Heften Sie die beiden Kanten mit einem Abstand von
0,3 cm an ein Stück Papier oder ein rückenverstärkendes
s.
1
Papier oder stabilisator
Nähen Sie langsam und führen Sie den Stoff so, dass die
Nadel auf jeder Seite in die umgelegte Kante sticht.
Reißen Sie das Hilfsmaterial nach dem Nähen ab.
1
Stich: 3
2
Stichbreite: 5
3
Stichlänge: 1 – 3
4
Fadenspannung: 1 – 4
endroit.
Cousez le long des bords en faisant des points droits.
Mettez les épaisseurs de tissu à plat et pliez chaque
rentré de couture.
Mettez le tissu sous le pied-de-biche afin que la ligne de
couture corresponde au centre de la largeur du pied.
Abaissez le pied-deligne de couture.
85
zusammen.
Nähen Sie mit Geradstich an den Kanten entlang.
Legen Sie den Stoff flach auseinander und falten Sie die
Nahtzugaben um.
an der Mitte der Fußbreite ausgerichtet ist.
Senken Sie den Fuß und nähen Sie das Muster an der
Nahtlinie entlang.
Page 86

NOTE:
q w
Sat
in Stitch Appliqué
6
Foot
pressure
: “2”
Bast
e appliqu
é piece
s on the fabric
, or
fuse the appliqué
Turnin
g a curve or corner:
on
NOTE:
Machine setting
1
Stitch: 2
2
Stitch width: 3 – 5
3
Stitch length: 0.5 – 1
4
Thread tension: 1 – 4
5
Presser foot: F
Apply stabilizer to the fabric for the stitch to form
correctly.
pieces on with fusible webbing.
Stitch around the appliqué, making sure the needle
swing off to the right side of the appliqué outside edge.
Stop the machine and lower the needle into the fabric
the outside edge of the appliqué.
Raise presser foot, pivot the fabric, lower foot and sew.
Return the foot pressure dial to “3” after finishing.
86
Page 87

REMAR
Q
UE:
F
aufilez les pièces appliquées sur le tissu ou the
r
mofixez
Heften Sie Applikationsteile auf den Stof
f
, oder bügeln
sschwingen sauber innen
en Sie die Nadel am
Application au point de bourdon
Applizieren mit dem Kordonstich
Régla
g
e de la ma
c
hine
6
Pressio
n du pied:
2
Maschineneinstellung
6
Fußd
ruck: 2
HINWEIS:
1
Point: 2
2
Largeur de point: 3 – 5
3
Longueur de point: 0.5 – 1
4
Tension du fil: 1 – 4
5
Pied-de-biche: F
1
Stich: 2
2
Stichbreite: 3 – 5
3
Stichlänge: 0.5 – 1
4
Fadenspannung: 1 – 4
5
Nähfuß: F
Entoilez le tissu pour que le point se forme
correctement.
vos pièces à l’aide d’une matière thermocollante à
repasser.
Piquez autour de l’appliqué en vous assurant que
l’aiguille, lorsqu’elle oscille vers la droite, pénètre le long
du bord extérieur de l’appliqué.
Tourner un coin:
Arrêtez la machine et piquez l’aiguille dans le tissu sur
l’extrémité extérieure de l’appliqué.
Relevez le pied et faites pivoter le tissu pour le mettre
dans l’autre sens.
REMARQUE:
Ramener le sélecteur de pression du pied à la position
“3” après avoir terminé la couture.
Den Stoff verstärken, um eine schöne Stichbildung zu
erhalten.
Sie diese mit einem Stoffkleber auf.
Nähen Sie die Applikation auf und achten Sie darauf,
dass die Nadel beim rechten Au
und außen einsticht.
Ändern der Nährichtung:
Halten Sie die Maschine an und senk
äußeren Applikationsrand in den Stoff.
Heben Sie den Nähfuß an und drehen Sie den Stoff in
die gewünschte Richtung.
HINWEIS:
Stellen Sie den Fußdruckregler nach Abschluss des
Nähvorgangs auf “3” zurück.
87
Page 88

SECTION
6.
CARE
AND
MAINTENANCE
WARNING:
before
NOTE:
than
wha
Clea
n the
outsid
e of the machin
e with a
soft
cloth
and
Cleanin
g the
Hoo
k Rac
e and
Feed
Dogs
screw
Lift up the
bobbi
n holde
r and
remov
e it.
Brus
h out
dust and lint.
Wipe the bobbi
n holde
r with a
Clea
n the
feed
dogs and hook
race
with the lint
Wipe the hook
race
with a
soft, dry cloth.
NOT
E:
Turn the power switch off and unplug the machine
cleaning.
Do not dismantle the machine in any way other
t is explained in this section.
mild soap.
1
Remove the presser foot and needle. Remove
on the needle plate with the screwdriver.
Remove the needle plate and take out the bobbin.
1
Screw
2
2
Bobbin case
3
soft, dry cloth.
4
brush.
3
Lint brush
4
Feed dogs
5
5
Hook race
You may also use a vacuum cleaner.
88
Page 89

W
ARNHINWEIS:
, wie
w
AVER
TISSEMENT
Retirez la vis de la
SECTION
6.
SOINS
ET
ENTRETIEN
TEIL 6.
PFLEGE UND
WARTUNG
Relev
ez la capsule et déposez
-
là.
Heben Sie den Spulen
k
orb und ent
fer
nen Sie ihn.
Brossez la poussière et les peluche
s.
Essu
y
ez la
Pinseln Sie Staub und Fusseln he
raus.
Wischen Sie
Nettoy
ez les
griffes d’ent
r
aînement
et le logement de
Reinigen Sie die
Tr
anspo
r
teure und die Grei
f
erbahn
Essu
y
ez le logement de crochet à l’aide d’un chif
fon
Wischen Sie das Grei
f
erbahn mit einem
w
eichen,
REMAR
Q
UE:
V
HINWEIS:
Coupez l'alimentation et débranchez la machine avant
de procéder à son nettoyage.
REMARQUE:
Ne démontez pas la machine en outrepassant les
instructions de cette section.
Nettoyez l’extérieur de la machine avec un chiffon et un
savon doux.
Nettoyage du logement de crochet et des griffes
d’entraînement
1
Retirez le pied-de-biche et l’aiguille.
plaque à aiguille à l’aide du tournevis.
Retirez la plaque à aiguille et sortez la canette.
1
Vis
2
2
Capsule
Schalten Sie die Maschine am Netzschalter aus und
ziehen Sie den Stecker ab, bevor Sie die Maschine
reinigen.
HINWEIS:
Bauen Sie die Maschine nur so weit auseinander
es in diesem Abschnitt beschrieben wird.
Reinigen Sie das Gehäuse der Maschine mit einem
eichen Tuch und milder Seifenlauge.
Reinigen von Greifer und Transporteuren
1
Entfernen Sie den Nähfuß und die Nadel. Entfernen
Sie die Schraube auf der Stichplatte mit dem
Schraubendreher.
Entfernen Sie die Stichplatte und nehmen Sie die
Spule heraus.
1
Schraube
2
2
Spulenkorb
3
capsule à l’aide d’un chiffon doux et sec.
4
crochet avec une brosse anti-peluche.
3
Brosse anti-peluche
4
Griffes d’entraînement
5
doux et sec.
5
Logement de crochet
ous pouvez également utiliser un aspirateur.
3
den Greiver mit einem weichen, trockenen Tuch ab.
4
mit einem Reinigungspinsel.
3
Reinigungspinsel
4
Transporteure
5
trockenen Tuch ab.
5
Greifer
Sie können dazu auch einen Staubsauger verwenden.
89
Page 90

Replacin
g the
Bobbi
n Holder
Make
sure the knob of the
bobbi
n holde
r fits
next to
Replac
e the
bobbin.
pins
screw
Clea
n the
machi
n with a
soft
cloth
. Do not use
chemical
Replacin
g the
Ligh
t Bulb
WARNING:
it.
Remov
e the cap and
screw
. Remov
e the
face
plate.
it.
1
Insert the bobbin holder into the hook race.
2
the stopper on the race.
1
Knob
2
Stopper
3
Attach the needle plate, inserting the two guide
into the holes in the needle plate. Tighten the
firmly with the screwdriver.
3
Guide holes
4
Screw
solvent.
Store the machine in cool and dry place.
Do not store the machine in an area of high humidity,
near a radiator or in direct sunlight.
When replacing the bulb, switch off and unplug the
machine.
Wait for the light bulb to cool down before touching
1
Cap
2
Screw
3
Face plate
Push and turn the bulb counterclockwise to remove
Push and turn the bulb clockwise to replace it.
4
Light bulb
90
Page 91

Remettre la capsule
Widerreinstzen des Spul
engehäuses
Insérez la capsule dans le logement de crochet.
Setzen Sie den Spulen
k
orb in die Grei
f
erbahn.
Assurez
-vous que le bouton de la capsule est bien
Achten Sie da
rauf
, dass sich der Knopf des
Remplacez la canett
e.
.
Anbringen der Stichplatt
e.
ungen der Stichplatte
Remplacement de l’ampoule
Auswechseln der Glühbirne
AVER
TISSEMEN
T
:
anchez
nez l’ampoule dans le sens des aiguilles
4
W
ARNHINWEIS:
4
Glühbi
rne
1
2
placé près de la butée dans le logement de crochet.
1
Bouton
2
Butée
3
Installez la plaque à aiguille en insérant les deux
broches de guidage dans les trous de la plaque à
aiguille. Resserrez fermement la vis avec un tournevis
3
Œillets de passage
4
Vis
1
1
Spulenkorbes neben dem Anschlag an der
Greiferbahn befindet.
1
Knopf
2
Anschlag
3
Bringen Sie die Stichplatte wieder an, führen Sie die
beiden Führungsstifte in die Öffn
ein. Ziehen Sie die Schraube mit dem
Schraubendreher fest an.
3
Führungsöffnungen
4
Schraube
Avant de remplacer l’ampoule, éteignez et débr
la machine.
Attendez que l’ampoule refroidisse avant de la toucher.
Déposez le capuchon et la vis. Déposez la plaque
frontale.
1
Capuchon
2
Vis
3
Plaque frontale
Poussez et tournez l’ampoule dans le sens inverse des
aiguilles d’une montre pour la retirer.
Poussez et tour
d’une montre pour la mettre en place.
Ampoule
91
Beim Auswechseln der Glühbirne schalten Sie die
Maschine am Netzschalter aus und ziehen Sie den
Stecker aus der Steckdose.
Warten Sie, bis sich die Glühbirne abgekühlt hat, bevor
Sie diese berühren.
Entfernen Sie Abdeckung und Schraube. Entfernen Sie
die Abdeckplatte.
1
Kappe
2
Schraube
3
Kopfabdeckung
Drücken Sie die Birne ein und drehen Sie diese gegen
den Uhrzeigersinn, um sie zu entfernen.
Drücken Sie die Birne ein und drehen Sie diese im
Uhrzeigersinn, um sie auszuwechseln.
Page 92

T
roubleshooting
The needle thread
The machine does not
1. The needle thread is not threaded properl
y.
set properly under the presser
Page 12
bin.
Noisy
operation
1.
The feed dog is packed
with lint.
Page
41
Layer
slippage
1.
The foot pressure
is
not adjusted
properl
y.
Page
6
Condition Cause
Reference
breaks.
The bobbin thread
breaks.
The needle breaks.
The needle thread
loops.
Skipped stitches
Seam puckering
The cloth is not fed
smoothly.
work.
Patterns are distorted.
The buttonhole is not
sewn well.
2. The needle thread tension is too tight.
3. The needle is bent or blunt.
4. The needle is incorrectly inserted.
5. The needle thread and the bobbin thread are not
drawn to the rear and
foot when starting sewing.
6. The fabric is not drawn to the rear when sewing is
finished.
7. The thread is too heavy or too fine for the needle.
1. The bobbin thread is not threaded properly in the
bobbin holder.
2. Lint has collected in the bobbin holder.
3. The bobbin is damaged and does not turn smoothly.
4. The thread is wound loosely on the bobbin.
1. Needle is incorrectly inserted.
2. The needle is bent or blunt.
3. The needle clamp screw is loose.
4. A proper foot is not used.
5. The fabric is not drawn to the rear when sewing is
finished.
6. The needle is too fine for the fabric being sewn.
1. The needle thread tension is too loose.
2. The needle size is not suitable for the thread.
1. The needle is incorrectly inserted.
2. The needle is bent or blunt.
3. The needle and/or thread are not suitable for the
fabric being sewn.
4. A blue tip needle is not used for sewing stretch, very
fine fabrics and synthetics.
5. The needle thread is not threaded properly.
6. A poor quality needle is used.
1. The needle thread tension is too tight.
2. The needle thread is not threaded properly.
3. The needle is too heavy for the fabric being sewn.
4. The stitch length is too long for the fabric.
* Use a stabilizer for very fine fabrics.
1. The feed dog is packed with lint.
2. The stitches are too fine.
3. The feed dog was not raised after being lowered.
4. The foot pressure is not adjusted properly.
1. The machine is not plugged in.
2. Thread is caught in the hook race.
3. The handwheel is pulled for bobbin winding.
1. The stretch stitch is not balanced.
1. The stitch density is not suitable for the fabric being
sewn.
2. Interfacing is not being used with stretch fabrics.
Page 17
Page 8
Page 8
Page 18
Page 18
Page 8
Page 11
Page 41
Replace the bobbin
Re-wind the bob
Page 8
Page 8
Page 8
Use proper foot.
Page 18
Page 8
Page 17
Page 8
Page 8
Page 8
Page 8
Page 8
Page 12
Replace the needle
Page 17
Page 12
Page 8
Make stitch shorter
Page 41
Make stitch longer
Page 6
Page 6
Page 5
Page 41
Page 10
Page 16
Pages 26, 27
Page 24
92
2. Lint has collected in the bobbin holder.
Page 41
Page 93

Dépistage des pannes
Le fil d’aiguille casse.
fonctionne pas.
1. Le fil d’aiguille n’est pas bien enfilé.
P
age 27
Les motifs sont déformés.
1. Le point n’est pas équilibré.
Page 33
La boutonnière est mal
1. La densité du point ne convient pas au tissu cousu.
P
age 49
Fon
ctionnement
1. Les griffes d’entraînement sont remplies de peluches.
Page 69
Anomalie Cause Références
Le fil de canette casse.
L’aiguille casse.
Le fil d’aiguille forme
des boucles.
Points sautés.
Les piqûres froncent.
Le tissu n’avance pas
régulièrement.
La machine ne
2. Le fil d’aiguille est trop tendu.
3. L’aiguille est déformée ou émoussée.
4. L’aiguille est mal positionnée.
5. Le fil de l’aiguille et le fil de la canette ne sont pas tirés vers
l’arrière et correctement placés sous le pied-de-biche au
début de la piqûre.
6. Le tissu n’est pas tiré vers l’arrière après la couture.
7. Le fil est trop épais ou trop fin pour l’aiguille.
1.
Le
fil de la canette est mal enfilé dans le support de canette.
2.
Il y a
une accumulation de peluches dans le support de canette.
3.
La
canette est endommagée et ne tourne pas correctement.
4.
Le
fil est mal enroulé sur la canette.
1. L’aiguille est mal positionnée.
2. L’aiguille est déformée ou émoussée.
3. La vis du pince-aiguille est desserrée.
4. Vous n’utilisez pas le pied approprié.
5. Le tissu n’est pas tiré vers l’arrière après la couture.
6. L’aiguille est trop fine pour le tissu utilisé.
1. Le fil de l’aiguille n’est pas assez tendu.
2. La taille de l’aiguille ne convient pas au fil.
1. L’aiguille est mal positionnée.
2. L’aiguille est déformée ou émoussée.
3. L’aiguille et/ou le fil ne conviennent pas au tissu utilisé.
4. Vous n’utilisez pas d’aiguille à pointe bleue pour coudre des
tissus extensibles, très fins ou synthétiques.
5. Le fil d’aiguille n’est pas bien enfilé.
6. L’aiguille utilisée est de mauvaise qualité.
1. Le fil d’aiguille est trop tendu.
2. Le fil d’aiguille n’est pas bien enfilé.
3. L’aiguille est trop lourde pour le tissu utilisé.
4. Le point est trop long pour le tissu.
* Utilisez un tissu stabilisant pour les tissus très fins.
1. Les griffes d’entraînement sont remplies de peluches.
2. Les points sont trop fins.
3. Les griffes d’entraînements n’ont pas été relevées après
avoir été abaissées.
4. La pression du pied n’est pas réglée correctement.
1. La machine n’est pas branchée.
2. Le fil est coincé dans le boîtier du crochet.
3. Le volant est tiré vers l’extérieur pour le remplissage de
canette.
Page 35
Page 17
Page 17
Page 37
Page 37
Page 18
Page 25
Page 69
Remplacez la canette.
Enroulez de nouveau la canette.
Page 17
Page 17
Page 17
Utilisez le pied approprié.
Page 37
Page 17
Page 35
Page 18
Page 17
Page 17
Page 19
Page 17
Page 27
Remplacez l’aiguille.
Page 35
Page 25
Page 18
Raccourcissez le point.
Page 69
Allongez le point
Page 13
Page 13
Page 11
Page 69
Page 23
cousue.
bruyant.
Glissement des
couches.
2. Un entoilage n’est pas utilisé avec les tissus extensibles.
2. Il y a
1. La pression du pied n’est pas réglée correctement.
93
une accumulation de peluches dans le support de canette.
Page 41
Page 69
Page 13
Page 94

Problemlösun
g
en
Problem
Oberfade
n reißt.
1. Ober
f
aden nicht
r
ich
tig eingefädelt.
uss des Nähens nicht nach
P
age 27
Nadel bri
cht
1. Nadel
f
alsch eingesetzt.
nach
P
age 17
Oberfaden wirft
1. Ober
f
adenspannung
zu locker.
P
age 35
.
Muster sind verzer
r
t
ht gut
1. Der Stich
ist nicht
ausgeglichen.
P
age 33
Maschine laut
1. Transpo
r
teur voller Fusseln.
2. Fusseln im
F
adenabziehscheib
e.
P
age 69
Stofflagen
1. Der Nähfußd
ruc
k ist nicht
r
ichtig eingestellt.
P
age 13
Ursache Seite
Unterfaden reißt
2. Oberfadenspannung zu stark.
3. Nadel verbogen oder stumpf.
4. Nadel falsch eingesetzt.
5. Ober- und Unterfaden bei Nähbeginn nicht zur
Rückseite des Nähfußes gezogen und nicht richtig
unter Nähfuß gelegt.
6. Stoff wurde nach Abschl
hinten gezogen.
7. Faden zu dick oder dünn für die Nadel.
1. Unterfaden falsch in eingefädelt gefädelt.
2. Fusseln im Greifer.
3. Spule beschädigt und läuft nicht reibungslos.
4. Faden ist locker um die Spule gewickelt.
2. Nadel verbogen oder stumpf.
3. Nadelklemmschraube lose.
4. Der falsche Fuß wird verwendet.
5. Stoff wurde nach Abschluss des Nähens nicht
hinten gezogen.
6. Nadel zu fein für den genähten Stoff.
Page 35
Page 17
Page 17
Page 37
Page 37
Page 19
Page 25
Page 69
Ersetzen Sie die Spule.
Spulen Sie das Garn neu.
Page 17
Page 17
Benutzen Sie den richtigen
Fuß.
Page 37
Page 17
Schlingen
Ausgelassene Stiche
Naht kräuselt sich
Stoff wird nicht
einwandfrei
transportiert
Maschine näht nicht
2. Nadelgröße eignet sich nicht für den Faden.
1. Nadel falsch eingesetzt.
2. Nadel verbogen oder stumpf.
3. Nadel bzw. Faden nicht für den genähten Stoff geeignet.
4. Zum Nähen von Stretchstoffen, sehr feinem Stoff und
Synthetik wurde keine Nadel mit blauer Spitze benutzt.
5. Oberfaden nicht richtig eingefädelt.
6. Schlechte Nadelqualität benutzt.
1. Oberfadenspannung zu stark.
2. Oberfaden nicht richtig eingefädelt.
3. Nadel zu stark für den genähten Stoff.
4. Stichlänge zu lang für den Stoff.
* Benutzen Sie bei sehr feinen Stoffen eine Einlage.
1. Transporteur voller Fusseln.
2. Stiche zu fein.
3. Transporteur wurde nach dem Senken nicht
angehoben.
4. Der Nähfußdruck ist nicht richtig eingestellt.
1. Maschine nicht an Steckdose angeschlossen.
2. Faden hat sich verfangen.
3. Das Handrad wurde beim Spulen herausgezogen.
Page 19
Page 17
Page 17
Page 19
Page 17
Page 27
Ersetzen Sie die Nadel.
Page 35
Page 25
Page 19
Verkürzen Sie den Stich.
Page 69
Verlängern Sie den Stich
Page 13
Page 13
Page 11
Page 69
Page 23
Knopfloch nic
genäht.
verschieben sich
94
1. Stichdichte nicht für den genähten Stoff geeignet.
2. Bei Stretchstoffen wird keine Einlage verwendet.
Page 49
Page 41
Page 69
Page 95

OPTIONAL ACCESORIES
Many standard accessories are provided with your machine but your unique creations may
require something more. Therefore, Elna offerts a vast array of optional accessories. Please
contact your authorized Elna dealer or service center to leam more about all the possibilities
OR visit us at our website : www.elna.com
ACCESSOIRES
Votre machine est fournie avec de nombreux accessoires. Et si vous voulez donner libre cours
à votre créativité, Elna vous propose toute une gamme d’accessoires en option. Découvrez-les
chez votre concessionnaire Elna ou sur notre site Internet : www.elna.com
ZUBEHÖR
Viele Standard-Zubehörteile werden zusammen mit Ihrer Maschine geliefert, aber Ihre
einzigartigen Kreationen machen vielleicht ein paar mehr erforderlich. Aus diesem Grunde
bietet Elna eine grosse Menge von wahlweisem Zubehör an. Bitte setzen Sie sich mit Ihrem
zugelassenen Elna-Händler oder Kundendienstzentrum in Verbindung, um mehr über alle
Möglichkeiten zu erfahren ODER besuchen Sie uns auf unserer Website: www.elna.com
RECYCLING
The following information is published to be in accordance with directive 2002/96/EC
of the European Parliament.
This equipment is marked with the below recycling symbol. It means that at the end of the life of
this machine you must dispose of it separately at an appropriate collection point and not place it
in the normal domestic unsorted waste system. This will benefit the environment for all.
Les informations suivantes sont publiées conformément à la directive 2002/96/EC
du parlement européen.
La machine comporte le symbole de recyclage ci-dessous vous signalent que l’objet, une fois
décidé de le mettre au rebut – ne doit pas être jeté parmi les ordures ménagères, mais déposé
dans un lieu de ramassage respectueux de l’environnement.
Die folgende Information wird in Übereinstimmung mit der Richtlinie 2002/96/EC
des Europäischen Parlaments bekannt gegeben.
Diese Ausstattung ist mit dem untenstehenden Recycling-Symbol versehen. Es bedeutet, dass
die Maschine am Endeder Lebensdauer gesondert an einer geeigneten Sammelstelle
abgegeben werden muss und nicht in das normale unsortierte Hausabfallsystem gegeben
95
Page 96

96
Page 97

97
Page 98

06.06 – English-French-German – 395750-80
www.elna.com
98
 Loading...