

Page 1
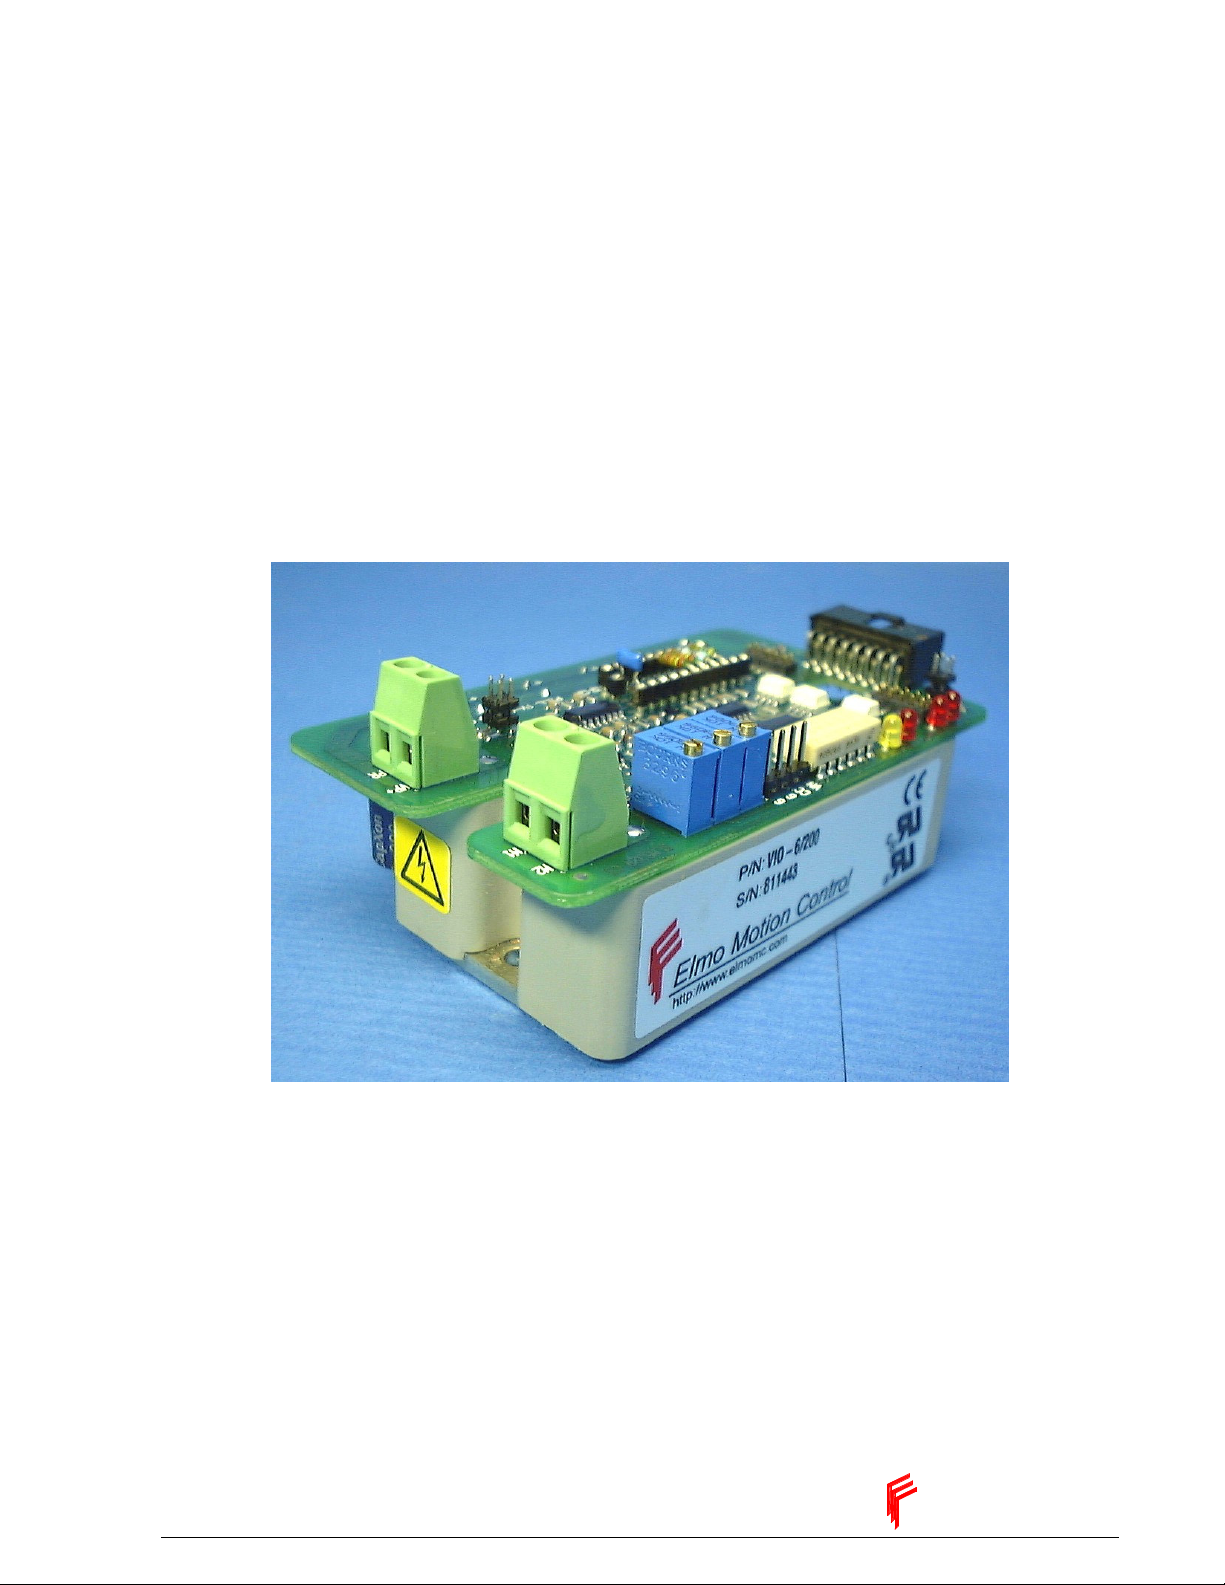
VIO-VELOCITY
OPERATING MANUAL
Rev 5/00
Elmo Motion Control
Page 2

Page 3

VIO-Velocity - Operating Manual Rev 09/09. Elmo Motion Control
TABLE OF CONTENTS
Safety Information ...........................................................................................................................1
Introduction ......................................................................................................................................3
Servo Amplifier Description............................................................................................................5
2.1 STANDARD FEATURES .......................................................................................................................5
2.2 FAULT PROTECTION ...........................................................................................................................5
2.3 TYPE DESIGNATION ...........................................................................................................................6
2.4 TERMINAL DESCRIPTION....................................................................................................................6
2.4.1 Power connections......................................................................................................................6
2.4.2 Control connections....................................................................................................................6
2.5 DIP SWITCHES ...................................................................................................................................8
2.6 TEST POINTS ......................................................................................................................................9
2.7 ADJUSTABLE COMPONENTS...............................................................................................................9
Operation of the Servo Control.....................................................................................................13
3.1 COMMAND .......................................................................................................................................13
3.2 CFM.................................................................................................................................................13
3.3 CURRENT GAIN CONTROL (CGC)....................................................................................................14
3.4 EXTERNAL CURRENT LIMIT - CONTINUOUS (ECLC).......................................................................14
3.4.1 ECLC external voltage .............................................................................................................14
3.4.2 Continuous current limit resistor .............................................................................................14
3.5 EXTERNAL CURRENT LIMIT - PEAK (ECLP)....................................................................................14
3.5.1 ECLP external voltage..............................................................................................................15
3.5.2 Peak current limit resistor........................................................................................................15
3.6 LATCH MODE ...................................................................................................................................15
3.7 ENABLE ............................................................................................................................................15
3.8 LIMIT SWITCHES...............................................................................................................................16
3.8.1 FLS ...........................................................................................................................................16
3.8.2 RLS ...........................................................................................................................................16
3.9 VELOCITY MODE .............................................................................................................................16
3.9.1 Tachometer feedback................................................................................................................17
3.9.2 Armature Feedback ..................................................................................................................17
3.9.3 I*R Compensation ....................................................................................................................17
3.10 RESPONSE ADJUSTMENT (VELOCITY MODE ONLY) ....................................................................18
3.11 CURRENT MODE ...........................................................................................................................20
Mounting and wiring instructions ................................................................................................21
4.1 HEAT SINK MOUNTING ....................................................................................................................21
4.2 WIRING.............................................................................................................................................21
4.3 DC POWER SUPPLY...........................................................................................................................22
Status Indicators.............................................................................................................................23
Technical Specifications.................................................................................................................25
Dimensional Drawing.....................................................................................................................27
Accessories ......................................................................................................................................29
8.1 INTERFACE & EVALUATIONS BOARDS ............................................................................................29
Service Centers and Warranty......................................................................................................31
Page I
Page 4

Elmo Motion Control Rev 09/09 VIO-Velocity - Operating Manual
9.1 WARRANTY PERFORMANCE ............................................................................................................ 31
List of Figures
FIGURE 1: TYPE DESIGNATION..................................................................................................................6
FIGURE 2: COMPONENT LAYOUT ...........................................................................................................11
FIGURE 3: TYPICAL VELOCITY RESPONSE WAVEFORMS ................................................................19
FIGURE 4: MOTOR WIRING .......................................................................................................................21
FIGURE 5: DIMENSIONAL DRAWING......................................................................................................27
FIGURE 6: SIB-SSA.......................................................................................................................................29
List of Tables
TABLE 1: POWER CONNECTIONS ..............................................................................................................6
TABLE 2: CONTROL CONNECTIONS .........................................................................................................7
TABLE 3: DIP SWITCH SETTINGS...............................................................................................................8
TABLE 4: TEST POINTS.................................................................................................................................9
TABLE 5: POTENTIOMETERS......................................................................................................................9
TABLE 6: REMOVABLE COMPONENTS ..................................................................................................10
TABLE 7: CFM EFFECTS.............................................................................................................................13
TABLE 8: MINIMUM INDUCTANCE VALUES ........................................................................................14
TABLE 9: RECOMENDED CAPACITANCE...............................................................................................22
TABLE 10: DIAGNOSTIC LED’S ................................................................................................................23
TABLE 11: RATING SPECIFICATION........................................................................................................25
TABLE 12: ELECTRICAL SPECIFICATION ..............................................................................................25
TABLE 13: ENVIRONMENTAL SPECIFICATION ....................................................................................26
TABLE 14: MECHANICAL SPECIFICATION ............................................................................................26
Page II
Page 5

VIO-Velocity - Operating Manual Rev 09/09. Elmo Motion Control
Safety Information
Read this page carefully before installation and use of the instrument, and follow all instructions in
this for safe installation of this product.
INTRODUCTION
The following clauses contain information, cautions and warnings that must be followed to ensure
safe operation and to retain the instrument in a safe condition.
This product is intended for incorporation into a machine or end product. The end product must
comply with all safety aspects of the relevant requirements of the European Safety of Machinery
Directive 89/392/EEC as amended, and with those of the most recent versions of standards
EN60204-1 and EN292-2 at least.
Only qualified personnel shall carry out installation, adjustment, maintenance and repair of the
instrument.
WARNINGS
Any removal from the structure or removal of parts, except those to which access is permitted, is
likely to expose live parts and accessible terminals, which can be dangerous to life. Only a
qualified person who is aware of the hazard involved shall perform any adjustment, maintenance or
repair, of the opened instrument under voltage.
The instrument shall be disconnected from all voltage sources before it is opened (for service).
Any interruption of the protective earth conductors inside the instrument is likely to make
the instrument dangerous.
Components, which are important for the safety of the instrument, may only be renewed by
components obtained through the Elmo service organization.
Before switching on, ensure that the instrument has been installed in accordance with the
Installation Instructions.
Maximum AC & DC supplies must be according to the types described in the operating manual.
The VIO-Velocity conforms to the following industry safety standards:
Power Conversion Equipment Recognized UL508c.
Insulation Coordination Including Clearance
and Creepage Distances Of Electrical
Equipment
Dielectric Voltage Withstand (Between the
base plate to any other part of the product).
Safety of Information Technology
Equipment, Including Electrical Business
Equipment
Low Voltage Directive, 73/23/EEC. In compliance with EN60204-1.
Page 1
In compliance with UL840.
In compliance with UL1557
Conditions 12.3- 12.5, 3000VAC or
4300 VDC.
In compliance with UL1950.
Page 6

Page 7

VIO-Velocity - Operating Manual Rev 09/09. Elmo Motion Control
Introduction
This manual is intended for the use of the design engineer who is implementing the VIO-Velocity
servo amplifier into a machine. It covers the various aspects of the implementation process from
basic understanding of the product concept and features, through a detailed explanation of the user
accessible functions, down to mounting guidelines and requirements from peripheral devices.
Chapter 2, “Servo Amplifier Description”, includes a description of the various features of the VIO-
Velocity, a list of all the pins and their functions and a block diagram of the product.
Chapter 3, “Operation of the Servo Control”, describes all the user accessible functions and gives
the design engineer the guideline as for how to design the peripheral circuits.
Chapter 4, “Mounting and Wiring Instructions”, covers the requirements from peripheral equipment
like motors, cables, and the power supply in order to achieve successful operation of
the VIO-Velocity.
Chapter 5, “Status Indications” summarizes all the indication outputs that are available to the user
in order to determine the amplifier status.
Page 3
Page 8

Page 9

VIO-Velocity - Operating Manual Rev 09/09. Elmo Motion Control
Servo Amplifier Description
The VIO-Velocity extends the VIO line by adding a velocity loop daughter board. This series of miniature
servo amplifiers for DC brush motors incorporate custom mixed analog/digital ICs and hybridized power
stage.
The product meets UL508c and the suitable CE regulations.
The power stage is implemented on a single ceramic substrate. This design enables very high thermal
conductivity, high current carrying capacity, better EMC and good mechanical strength. The control section
is implemented by dedicated custom ICs that contribute to higher and improved performance.
2.1 Standard Features
Operation in current mode or velocity mode
Armature feedback with I*R compensation,
Tachometer feedback
Internal DC to DC converter allows for operation from a single supply
Zero dead band
Excellent linearity
Motor current monitor
Current gain change for low inductance motors
Current feedback multiplier for low current motors
External continuous and peak current limits adjustments
Latch mode for the protective features
Forward and Reverse limit switches
Socketed components for adjusting:
• Continuous current limit
• Peak current limit
• Command scaling
• Tachometer scaling
• Velocity loop tuning
Full array of diagnostic LED’s
Additional capacitance on the DC bus
DIP switches for selecting functions such as CGC, CFM, Latch mode, Directional limits, and
Enable
An encoder feedback option card can be installed on the basic velocity board when required.
2.2 Fault Protection
• Short between the outputs or between each output and the Power Return.
• Over temperature
• Under/over voltage
Page 5
Page 10
Elmo Motion Control Rev 09/09 VIO-Velocity - Operating Manual
Maximum voltage
Velocity version
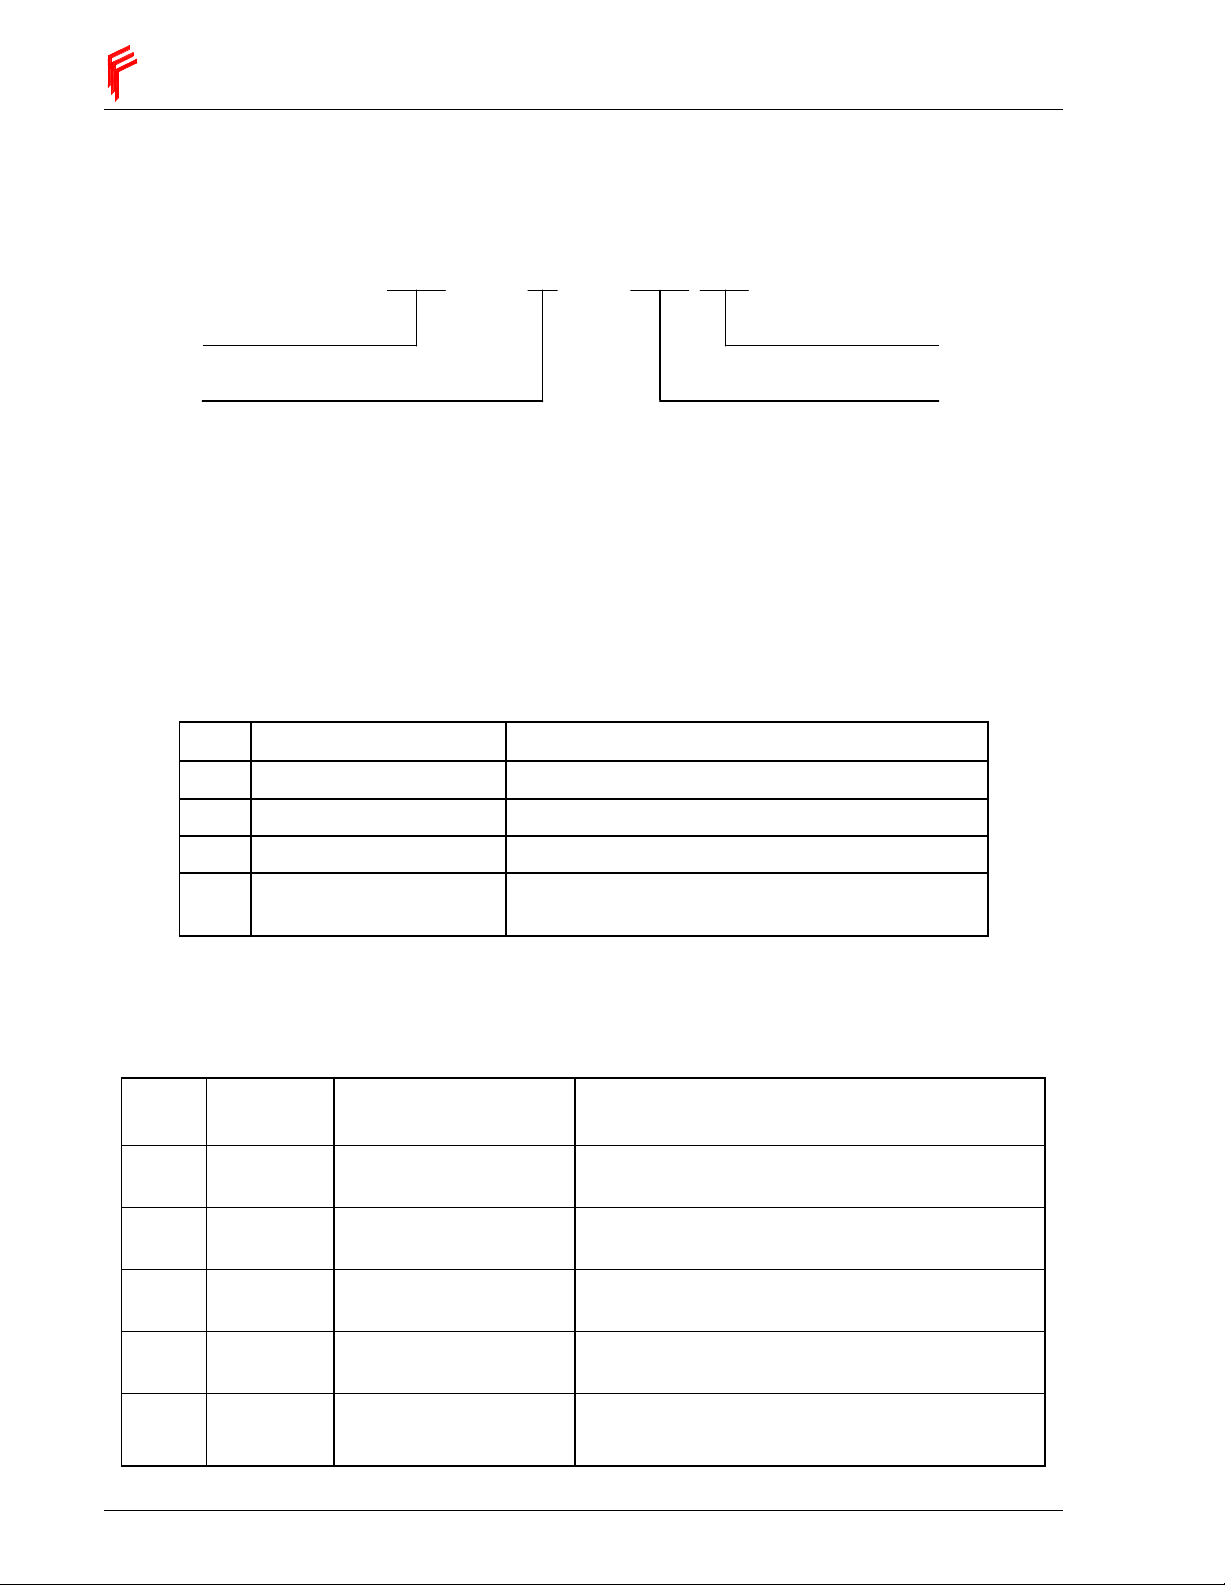
2.3 Type Designation
VIO
15
55
////
V
VIO amplifier
Rated current
Figure 1: Type Designation
2.4 Terminal Description
2.4.1 Power connections.
Pin Function Remarks
VP+ Positive power Input Voltage determined by VIO model
PR Power input Return
M1 Motor power output 1
M2 Motor power output 2
This output will be positive when pin CREF (+) is
positive relatively to pin CREF (-).
Table 1: Power Connections
2.4.2 Control connections.
Pin # Short form Function Remarks
1 TAC+ Tach positive input.
2
TAC- Tach negative input.
Positive input of a differential amplifier with two
adjustable resistors R1 and R2.
Negative input of a differential amplifier.
Specification as for pin 1.
3 REF-
4 REF+ Command positive input
5 ECLC
Page 6
Command negative
input
External current limit –
continuous
Negative input of a differential amplifier.
Specification as for pin 4.
Positive input of a differential amplifier with two
adjustable resistors R5 and R6.
External voltage reduces the Ic limit.
For more details see "current limit paragraph".
Page 11
VIO-Velocity - Operating Manual Rev 09/09. Elmo Motion Control
Pin # Short form Function Remarks
6 ECLP
External current limit –
peak
External voltage reduces the Ip limit.
For more details see "current limit paragraph".
7 ECLRET Current limits return Return for the current limit signals.
8 FLS Forward limit switch
9 RLS Reverse limit switch
Positive input of the opto isolated forward limit
switch
Positive input of the opto isolated reverse limit
switch
10 LSRET "FLS", "RLS" – Return Return for limit switch signals.
Analog output with a scale of ± 5V for ± Ip.
11 CM Current monitor
Output resistance: 11Kohm
12 CMRET Current monitor return Return for the current monitor (CM) signal.
13 EN+ Enable (+) Positive input of the opto isolated enable input
14 EN- Enable (-) Negative input of the opto isolated enable input
“Amplifier OK” indication output pin.
When the amplifier is at normal operating
conditions this output is in “active Low “ state.
When a failure occurs this output is changed to
15 AOK Amplifier OK
“open” state.
Opt isolated, open collector NPN type. Max.
Voltage = 30V.
16 AOKRET Amplifier OK return
Table 2: Control Connections
Max. Current = 8 ma.
“On” voltage: V
OUT (On)
< 0.8V
Status Outputs Common for AOK.
Isolated from the circuit common.
Page 7
Page 12

Elmo Motion Control Rev 09/09 VIO-Velocity - Operating Manual
2.5 DIP Switches
Switch Function ON OFF
S1
S2 CFM
S3 CGC
Armature
Feedback signal.
Armature Feedback is
connected.
Changing S2 to ON
position multiplies the
current feedback
signal by 2.
Changing S3 to ON
position reduces the
proportional gain (P)
of the current loop by
70%.
Armature Feedback is
disconnected.
CFM – OFF
CGC – OFF
S4 LM Latch mode. Non-Latch mode.
S5 "FLS" and "RLS"
S6 EN+
Directional inhibits
are bypassed
Amplifier is Enabled
when S6 is in the ON
position and EN-
(pin 14) is connected
to ECLRET (pin 7)
Directional inhibits are
active.
" Amplifier Disable ".
Table 3: DIP Switch Settings
Page 8
Page 13

VIO-Velocity - Operating Manual Rev 09/09. Elmo Motion Control
2.6 Test Points
Test point
VM Velocity Feedback signal
CC Current Command to the VIO
G GND Ground
G
GND Ground
Function Description
2.7 Adjustable Components.
Potentiometer Function Description
P1 Velocity Feedback gain.
P2 Offset trimmer.
±4V
±3.75V = nominal Ip of the VIO
Table 4: Test Points
Adjust for 4V on VM at max
velocity.
With command at 0V adjust to
cancel drift.
P3
Compensation, AC gain
compensation of velocity loop.
Table 5: Potentiometers
Adjust CW until a buzz is heard
then CCW until quiet again.
Page 9
Page 14

Elmo Motion Control Rev 09/09 VIO-Velocity - Operating Manual
Component Stock Value Function
R1 Not installed Tachometer feedback resistor. (See 3.4 below)
R2 Not installed Tachometer feedback resistor. (See 3.4 below)
R3 Not installed Tachometer feedback resistor. (See 3.4 below)
R4 Not installed I x R compensation resistor. (See 3.9.2 below)
R5
R6
R7
R8
R9 Not installed Continuous current limit resistor. (See 3.4.2 below).
R10 Not installed Peak current limit resistor. (See 3.5.2 below)
C1
24.3KΩ
24.3KΩ
30Ω
475KΩ
0.022µf
Input scaling resistor. (See 3.1 below)
Input scaling resistor. (See 3.1 below)
DC gain adjustable resistor of the error amplifier.
(See 3.9 below).
AC gain adjustable resistor of the error amplifier.
(See 3.10 below).
Adjustable capacitor for the AC gain of the error amplifier.
(See 3.10 below)
Table 6: Removable Components
Page 10
Page 15

VIO-Velocity - Operating Manual Rev 09/09. Elmo Motion Control
Test
Points
Figure 2: Component Layout
Page 11
Page 16

Page 17

VIO-Velocity - Operating Manual Rev 09/09. Elmo Motion Control
===
=
Operation of the Servo Control
3.1 Command
The user can change the default scale of the differential input (±10.0V) by calculating and inserting R5 &
R6 into the designated solderless terminals. The value of theses resistors is given by:
KohmsVRR MAXIN
)(*5.265
The factory default values of R5 and R6 are 25Kohms. This value is for ±10V command input.
Care must be taken not to apply input voltage above the maximum input voltage as this will cause the input
op amp to operate beyond its limits and in extreme cases may even damage the op amp. The maximium
voltage is calculated by:
8.0*)(5)( KohmsRV MAXIN
3.2 CFM
The amplifier is equipped with Current Feedback Multiplier (CFM). By switching S2 to the ON position the
signal of the current feedback is multiplied by 2 and consequently the following changes occur:
• Current gains are divided by 2.
• Current monitor is multiplied by 2.
• Current limits are divided by 2.
This function should be activated whenever the rated current AND the peak current of the motor are less
than 50% of the amplifier rated continuous and peak limits respectively.
Cont.
Current limit
With no CFM Ic Ip Ip/4 5/Ip
With CFM Ic/2 Ip/2 Ip/8 10/Ip
Peak Current
limit
Current
Gain (A/V)
Current
monitor
(V/A)
Table 7: CFM effects
The default (S2 Off) is normal current feedback.
Page 13
Page 18
Elmo Motion Control Rev 09/09 VIO-Velocity - Operating Manual
75.3
V
3.3 Current Gain Control (CGC)
The amplifier is equipped with Current Gain Control (CGC) for improved performance of low induction
motors. By switching S3 to the ON position the gain of the current loop is reduced, thus enabling the use of
low inductance motors without the insertion of an additional inductor. The default (S3 OFF) is high gain.
Switching S3 to the ON position reduces the proportional gain (P) of the current loop by approx. 70%. In
the following table, minimum inductance values can be calculated.
25/50 L
15/55 L
10/100 L
15/100 L
6/200 L
15/200 L
Minimum inductance for High Gain Minimum inductance for Low Gain
Load (millihenry)
Load (millihenry)
Load (millihenry)
Load (millihenry)
Load (millihenry)
Load (millihenry)
> 2.4*10
> 4*10
> 9*10 -3 * V
> 6*10 -3 * V
> 16.5*10 -3 *V
> 6.6*10 -3 *V
-3
-3
* V
* V
supply (Volt)
supply (Volt)
supply (Volt)
supply (Volt)
supply (Volt)
supply (Volt)
L
L
L
L
L
L
Load (millihenry)
Load (millihenry)
Load (millihenry)
Load (millihenry)
Load (millihenry)
Load (millihenry)
> 0.9*10 -3 * V
> 1.6*10 -3 * V
> 2.2*10 -3 * V
> 1.5*10 -3 * V
> 4*10 -3 * V
supply (Volt)
> 1.6*10 -3 * V
supply (Volt)
supply (Volt)
supply (Volt)
supply (Volt)
supply (Volt)
Table 8: Minimum inductance values
3.4 External Current Limit - Continuous (ECLC)
The amplifiers' continuous current limit can be reduced by an external voltage or by a fixed resistor R9. .
For most applications using a fixed resistor will be the preferred method.
3.4.1 ECLC external voltage
An external positive voltage (0 to 3.75V) to terminal ECLC in reference to terminal ECLRET will control
continuous current limit from zero to Ic (nom).
V
ECLC
)( nomI
newI C
C =
)(*
Remarks:
The voltage will be internally clamped to 3.75V whenever the external V
will be higher
ECLC
than 3.75V.
The external voltage source must be capable to source/ sink at least ±0.2 ma.
The max absolute V
ECLC
is 12V.
3.4.2 Continuous current limit resistor
The user can change the continuous current limit by calculating and inserting R9. The value is given by:
)(
KohmR
*4.37)(9 −=
nomIc
Remarks:
• 0 < R9 < 36.4K (1/8 Watt)
• If R9 is larger than 36.4K the current limit will be internally clamped to the nominal value.
newIc
• I
is the nominal continuous current limit of the amplifier.
C (nom)
1
)(
3.5 External Current Limit - Peak (ECLP)
The amplifiers' peak current limit can be reduced by an external voltage or by a fixed resistor R10. . For
most applications using a fixed resistor will be the preferred method.
Page 14
Page 19

VIO-Velocity - Operating Manual Rev 09/09. Elmo Motion Control
75.3
V
3.5.1 ECLP external voltage
An external positive voltage (0 to 3.75V) to terminal ECLP in reference to terminal ECLRET will control
peak current limit from zero to Ip (nom).
V
ECLP
)( nomI
newI P
P =
Remarks:
The voltage will be internally clamped to 3.75V whenever the external V
than 3.75V.
The external voltage source must be capable to source/ sink at least ±0.2 ma.
The max absolute V
ECLP
is 12V.
)(*
will be higher
ECLP
3.5.2 Peak current limit resistor
The user can change the continuous current limit by calculating and inserting R10. The value is given by:
)(
KohmR
*4.37)(10 −=
nomIp
Remarks:
• 0 < R10 < 36.4K (1/8 Watt)
• If R10 is larger than 36.4K the current limit will be internally clamped to the nominal
value.
newIp
• I
is the nominal peak current limit of the amplifier.
P (nom)
1
)(
3.6 Latch Mode
By setting S4 to the ON position, whenever one of the following failures: Short, and Over Temperature
occur the amplifier will be latched in Disable mode.
Disabling the amplifier (removing the power from the Enable pins J4/13 and J4/14) resets the latch. If the
amplifier is enabled by S6, switch S6 off then back on.
3.7 Enable
Pins J4/13 and J4/14 are the inputs of an opto-coupler. The opto-coupler must be energized to enable the
operation of the amplifier. If the Enable input is kept High before powering the amplifier, the amplifier
power output will be active immediately upon power on.
To enable the operation of the amplifier the opto must be “on”. This can be done in two ways:
1. Apply voltage between this J4 pin 13(+) and J4 pin 14 (-).
Minimum “ON” voltage: 5V, current consumption 1.2 ma.
Maximum “ON” voltage: 15V, current consumption 5 ma.
When operating in this mode Dipswitch 6 must be in the OFF position.
2. Set Dip switch 6 to the ON position and connect "EN-" (pin 14) to ECLRET (pin 7).
Page 15
Page 20

Elmo Motion Control Rev 09/09 VIO-Velocity - Operating Manual
7
R
3.8 Limit switches
When one direction of rotation is disabled, the reference input is clamped to 0V in this direction. Please be
aware that the unit can still drift due to offset. If an absolute stop is critical to the application the controller
of the machine should also handle the switch.
3.8.1 FLS
To enable the operation of the amplifier in the forward direction the FLS opto must be “on”. This can be
done by either of two methods:
1. Applying voltage between this J4 pin 8(+) and J4 pin 10 (-).
Minimum “ON” voltage: 5V, current consumption 1.6 ma.
Maximum “ON” voltage: 15V, current consumption 5.6 ma.
When using with this mode Dipswitch 5 must be in OFF position.
2. Changing Dipswitch 5 to ON position.
3.8.2 RLS
To enable the operation of the amplifier in the reverse direction the RLS opto must be “on”. This can be
done by either of two methods:
1. Applying voltage between this J4 pin 9(+) and J4 pin 10 (-).
Minimum “ON” voltage: 5V, current consumption 1.6 ma.
Maximum “ON” voltage: 15V, current consumption 5.6 ma.
When using with this mode Dipswitch 5 must be in OFF position.
2. Changing Dipswitch 5 to ON position.
Note: Changing dipswitch 5 to the ON position bypasses both directional limit switches
3.9 Velocity Mode
In the velocity mode, op amps U1/2 are employed as a high gain error amplifier. The
amplifier sums velocity command and the velocity feedback signal, and provides the
necessary servo compensation and gain adjustments, resulting in stable, optimum servo
operation.
This op amp is configured with two feedback paths:
One, in the form of a resistive T network, controls the DC gain of this amplifier. The
equivalent value of a T network is given by:
10
Rf
10
Ω=
Resistor R7 is mounted in solderless terminals so it can be changed easily whenever the
DC gain of the error amplifier is to be changed. The AC gain is controlled by C1, R8 and
P3. Maximum AC gain is obtained with P3 set fully CCW. Setting P3 fully CW removes
AC gain and no lag in response occurs. R8 and C1 are mounted in soldering terminals and
can be easily replaced in cases when P3 range is not enough to get optimum response.
Page 16
Page 21

VIO-Velocity - Operating Manual Rev 09/09. Elmo Motion Control
===
=
3.9.1 Tachometer feedback
When using Tachometer feedback the user must select the scale for the differential input by calculating and
inserting R1 & R2 into the designated solderless terminals. The value of theses resistors is given by:
*5.221
VTM = maximum Tachometer voltage at the differential Input.
Care must be taken not to apply input voltage above the maximum input voltage as this will cause the input
op amp to operate beyond its limits and in extreme cases may even damage the op amp. The maximium
voltage is calculated by:
8.0*)(1)( KohmsRV MAXIN
Note: 1) * When using Tachometer feedback R3 must be Inserted (R3 value is 0 to 100 ohm).
* Dipswitch 1 must be in OFF position.
2) When using Armature feedback R3 must be removed.
KohmsVRR TM
3.9.2 Armature Feedback
An internal differential amplifier with fixed gain is used for armature feedback. The gain of this circuit is
set for the maximum voltage of the VIO. If the adjustment range of the potentiometer P1 does not provide
enough gain, the armature signal can be externally connected like a tachometer. When this is done,
calculate R1&2 using the DC bus voltage for VTM. This should only be required when the bus voltage is
near the minimum operating voltage of the VIO.
To activate Armature feedback change S1 to the ON position and remove resistor R3.
3.9.3 I*R Compensation
In order to improve the speed stability in various load conditions, I*R compensation is required.
This is achieved by inserting R4. The value of R4 can be achieved empirically.
The following procedure should be performed to determine R4 empirically:
a) Connect a decade resistor box in the terminals of R4 - start with 3Mohm
b) Run the motor at 2/3 of nominal speed.
c) Apply nominal load.
d) Decrease resistance value until motor speed reaches the no load speed.
e) Install R4 as close as possible to the decade box value. R4 should be between 500K and
3Mohms.
Note: A high compensation may result in unstable operation of the amplifier.
Page 17
Page 22

Elmo Motion Control Rev 09/09 VIO-Velocity - Operating Manual
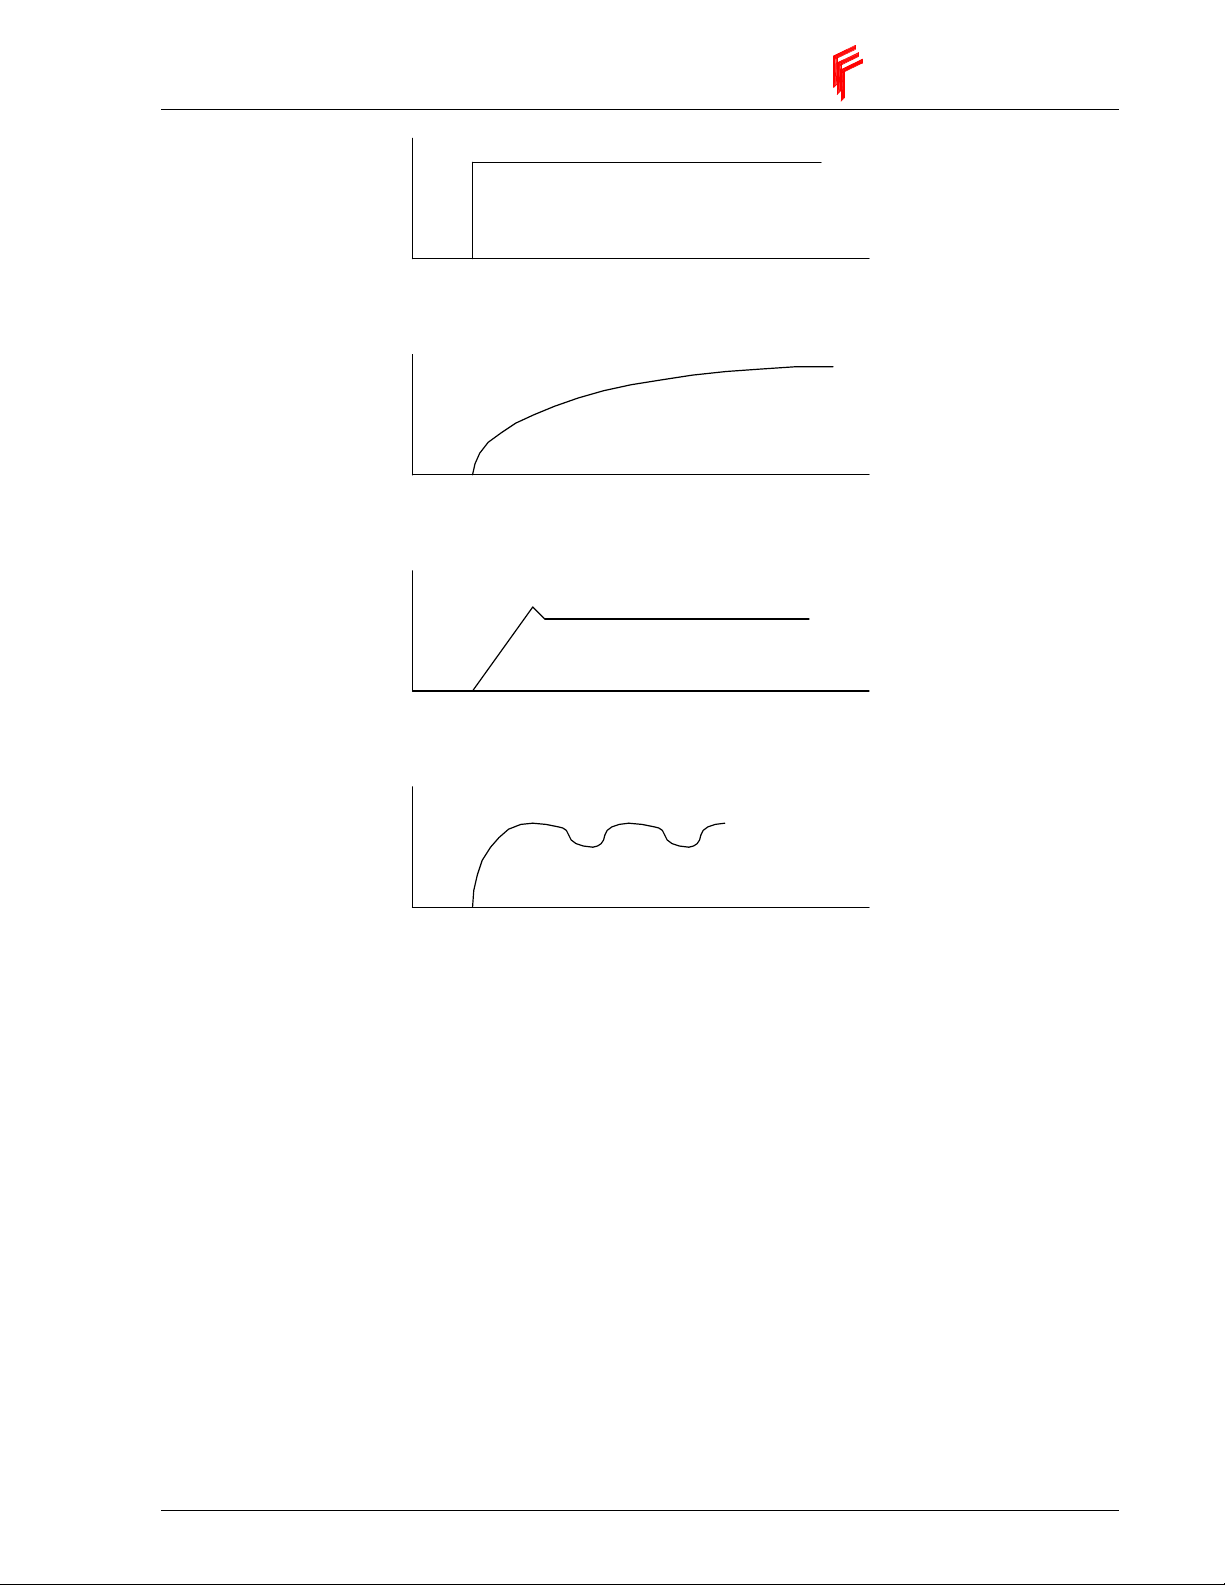
3.10 Response Adjustment (Velocity Mode Only)
In most applications optimum response is achieved by adjusting the compensation (COMP)
trimmer. Adjustment procedure is as follows:
- Provide the amplifier with a low frequency, bi-directional square wave velocity command (A 0.5Hz,
±2V waveform is often employed).
- Apply power to the amplifier, and while monitoring the tachometer signal, gradually adjust the
COMP trimmer from the CCW toward the CW position. Optimum response (critically-damped)
should be achieved at some position before reaching full CW on P3. Fig 8.1 illustrates the types
of waveforms observed for various setting of P3.
In some applications, especially those where the load inertia is much smaller or larger than
normally encountered, the standard compensation components values of 0.022µF for C1 and
475Kohm for R8 may not allow an optimum setting of the COMP trimmer P3. In fact, the velocity
loop may be unstable for any setting of P3.
In these cases different values for C1 and R8 must be chosen. The following procedure can be used
to select these values:
a) - Replace C1 with a short jumper wire.
b) - Replace R8 with a decade resistance box. Initially set the box resistance at 20Kohm.
c) - Set P3, the COMP trimmer to approximately midrange.
d) - Input a 0.5Hz, 2V bi-directional square wave velocity command signal to the amplifier.
e) - Apply power, and while monitoring the tachometer signal, gradually increase the value of
the box resistance until optimum response as depicted in Fig 8.1 is achieved.
f) - Substitute the closest standard value discrete resistor for R8 and remove the decade
resistance box.
g) Remove the shorting jumper, install C1, and again check the response using the square wave
test signal. If near optimum results are obtained, trim the response using the COMP trimmer
P3 for the optimum.
h) - If the previous step does not yield satisfactory results, if unacceptable overshooting has been
noted, substitute a larger value than 0.022µµµµF; or, if the response is over damped substitute a
smaller value than 0.022µµµµF. Repetition of this procedure should yield an optimum choice for
C1.
Page 18
Page 23
VIO-Velocity - Operating Manual Rev 09/09. Elmo Motion Control
Underdamped: P3 too far CCW
Reference input signal
Overdamped: P3 too far CW
Critically damped: P3 optimum
Figure 3: Typical velocity response waveforms
Page 19
Page 24

Elmo Motion Control Rev 09/09 VIO-Velocity - Operating Manual
3.11 Current Mode
In order to operate the servo amplifier as a current amplifier, the velocity loop should be disabled. This is
done by converting the error amplifier into a low gain DC amplifier that has a flat response beyond the
desired current bandwidth. To run the VIO-V in current mode:
Set S1 to OFF
Remove R3 (in solderless terminals)
Remove R4 (in solderless terminals)
Remove R7 (in solderless terminals)
Remove C1 (in solderless terminals)
When operating in current mode the user adjustments are command scaling, CFM, CGC, and offset.
Page 20
Page 25
VIO-Velocity - Operating Manual Rev 09/09. Elmo Motion Control
A
Vp+
Mounting and wiring instructions
4.1 Heat Sink Mounting
The VIO series dissipates its heat by natural convection for loads up to 500W. For higher output loads the
amplifier should be mounted on an additional heat sink or cooled by fan. Care should be taken that the
motor leads are as short as possible. The capacitance of long shielded motor leads can cause the amplifier
to generate a significant amount of heat. There are two 4.5mm holes in the base plate for mounting to an
additional heat sink (see Figure 5).
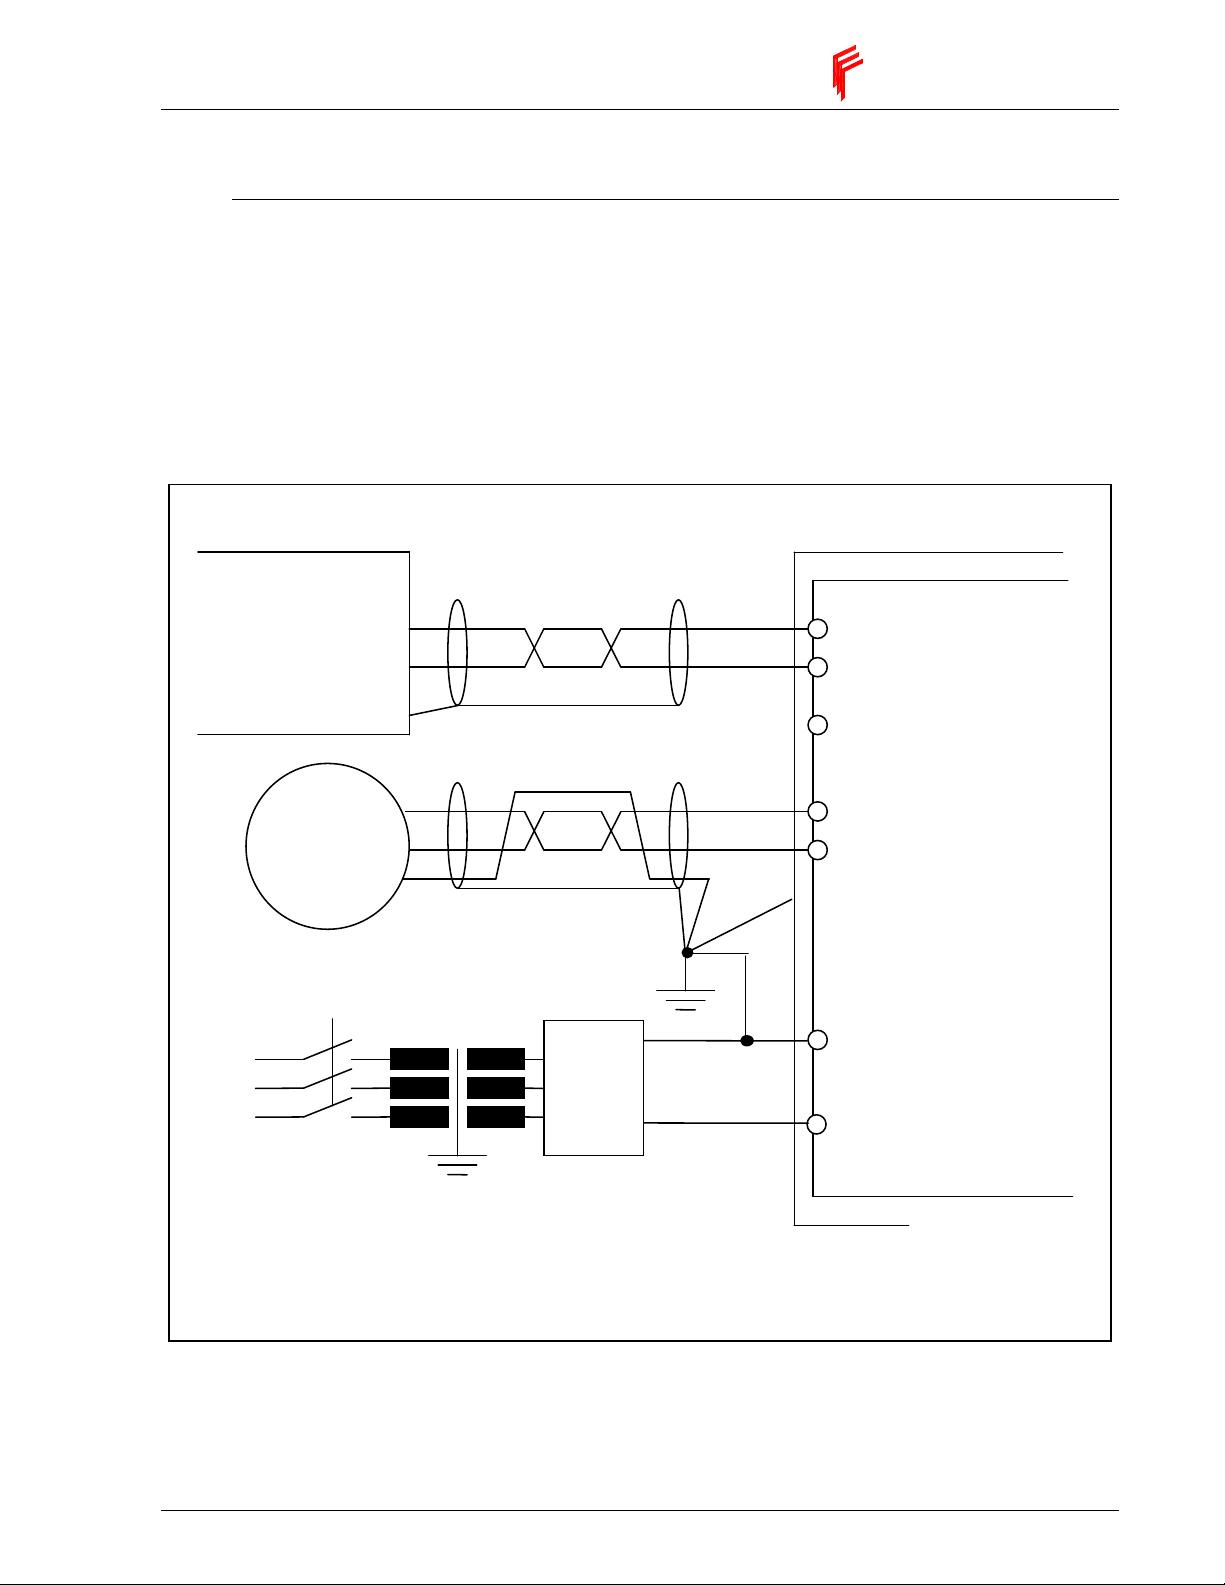
4.2 Wiring
Motion Controller
Controller's common
Motor
Chassis
Isolating transformer
See remark below
Power wires twisted and shielded
B
(-)
(+)
Power
Supply
REF+
REF-
CMRET
M1
M2
VIO-V
PR,
Power Return (-)
Heatsink
Figure 4: Motor wiring
Page 21
Page 26

Elmo Motion Control Rev 09/09 VIO-Velocity - Operating Manual
Guidelines for connecting a non isolated amplifier with an isolating power transformer
Ground:
DC power common
Motor chassis
Amplifier's heat sink
4.3 DC power supply
DC power supply can be at any voltage in the range defined within the technical specifications. The supply
source must comply with the safety aspects of the relevant requirements in accordance with the most recent
version of the standard EN60950 or equivalent Low Voltage Directive Standard, all according to the
applicable over voltage Category. If the power source to the power supply is the AC line (through a
transformer), safety margins have to be considered to avoid activating the under/over voltage protection due
to line variations and/or voltage drop under load.
In addition to the above, the transformer must comply with the safety aspects of the relevant requirements
in accordance with the most recent version of the standard EN60742 (Isolating and Safety Isolating
Transformers). The nominal DC bus voltage should be in the following range:
1.2VDC
VDC
VDC
Recommended minimum power supply capacitance for single phase connection:
- Minimum DC bus
min
- Maximum DC bus
max
< VDC < 0.9VDC
min
max
Type of amplifier VIO-
25/50V
Recommended
5600µF 5600µF 3300µF 5600µF 1500µF 5600µF
VIO-
15/55V
VIO-
10/100V
VIO-
15/100V
VIO-
6/200V
VIO-
15/200V
capacitance
Table 9: Recomended Capacitance
The transformer power should be calculated to have the capability to deliver power to the amplifier
(including peak power), without significant voltage drops.
The power supply should be located as close as possible to the amplifier. Maximum distance is 30cm (1
foot).
While driving high inertia loads, the power supply must be equipped with a shunt regulator, otherwise, the
amplifier will be disabled whenever the capacitors are charged above the maximum voltage.
Page 22
Page 27

VIO-Velocity - Operating Manual Rev 09/09. Elmo Motion Control
Status Indicators
LD1
Latch
Function
Amplifier
OK (AOK)
External
disable
Current limit No ON OFF OFF ON
Short Yes OFF ON OFF ON
Over
temperature
Internal
supplies
protection
Under
voltage
Over voltage No OFF OFF ON OFF
Power Up
Reset
option
N/A ON OFF OFF OFF
No ON ON OFF ON
Yes OFF OFF ON ON
No OFF ON ON OFF
No OFF ON OFF OFF
No OFF OFF OFF OFF
AOK
Yellow
LD2
SO1
Red
LD3
SO2
Red
LD4
SO3
Red
Table 10: Diagnostic LED’s
Note:
Latch mode OFF: The LED indications are present only while the fault is active.
Latch mode ON: The LED's indications (temperature and short) are reset when the enable
signal is removed from the enable input.
Multiple Faults: Only the reading of the first fault is reliable. Additional faults add to the
status and the indication will be meaningless
Page 23
Page 28

Page 29

VIO-Velocity - Operating Manual Rev 09/09. Elmo Motion Control
Technical Specifications
Table 11: Rating specification
Type DC Supply
Min-Max (V)
*
*
*
Current limits
Cont/Peak (A)
VIO-25/50V 10-49 25/50
VIO-15/55V 10-56 15/30
VIO-10/100V 20-96 10/20
VIO-15/100V 20-96 15/30
VIO-6/200V 40-196 6/12
VIO-15/200V 40-196 15/30
Table 12: Electrical specification
Parameter Value
DC output voltage >93% of DC input voltage
Switching frequency on the load
Current loop response 3kHz minimum
Current step response
Efficiency at rated current 97%
Peak current duration (full rated peak current)
Continuous current limit tolerance -1% +5%
Peak current limit tolerance -1% +5%
Current gain linearity
Current gain accuracy
Current monitor accuracy
32kHz (±5%)
<150µs
2.7seconds ±15%
Better than ±1% of rated continuous current
Better than ±5% for 0.05Ic<Imotor>Ip
Better than ±5% for 0.05Ic<Imotor>Ip
*
*
*
These are the absolute minimum-maximum DC supply voltages under any condition.
Page 25
Page 30

Elmo Motion Control Rev 09/09 VIO-Velocity - Operating Manual
Table 13: Environmental specification
Parameter Value
Operating ambient temperature
Max. Case temperature
Storage temperature
Operating humidity 90% non condensing
Max. Operating altitude 2000m (6,500 feet)
Storage humidity 98% non condensing
Protective coating Applied to all the circuits
0-60°C (32-140°F)
87°C (-2°C/+7°C) (188.6°F (-3.6°F/+12.6°F))
-40 - +100°C (-40 - +212°F)
Table 14: Mechanical specification
Parameter Value
Size 105x60.5x42 mm (4.1”x2.4”x1.7”)
Weight 0.25 Kg (8oz)
Power connector
Power connector wire capacity 0.14-1.5 mm2 (26-14AWG)
Signal connector Molex, 90709-1601
Phoenix Contact MKDS1,5-5,08
Page 26
Page 31

VIO-Velocity - Operating Manual Rev 09/09. Elmo Motion Control
Dimensional Drawing
Figure 5: Dimensional Drawing
Page 27
Page 32

Page 33
VIO-Velocity - Operating Manual Rev 09/09. Elmo Motion Control
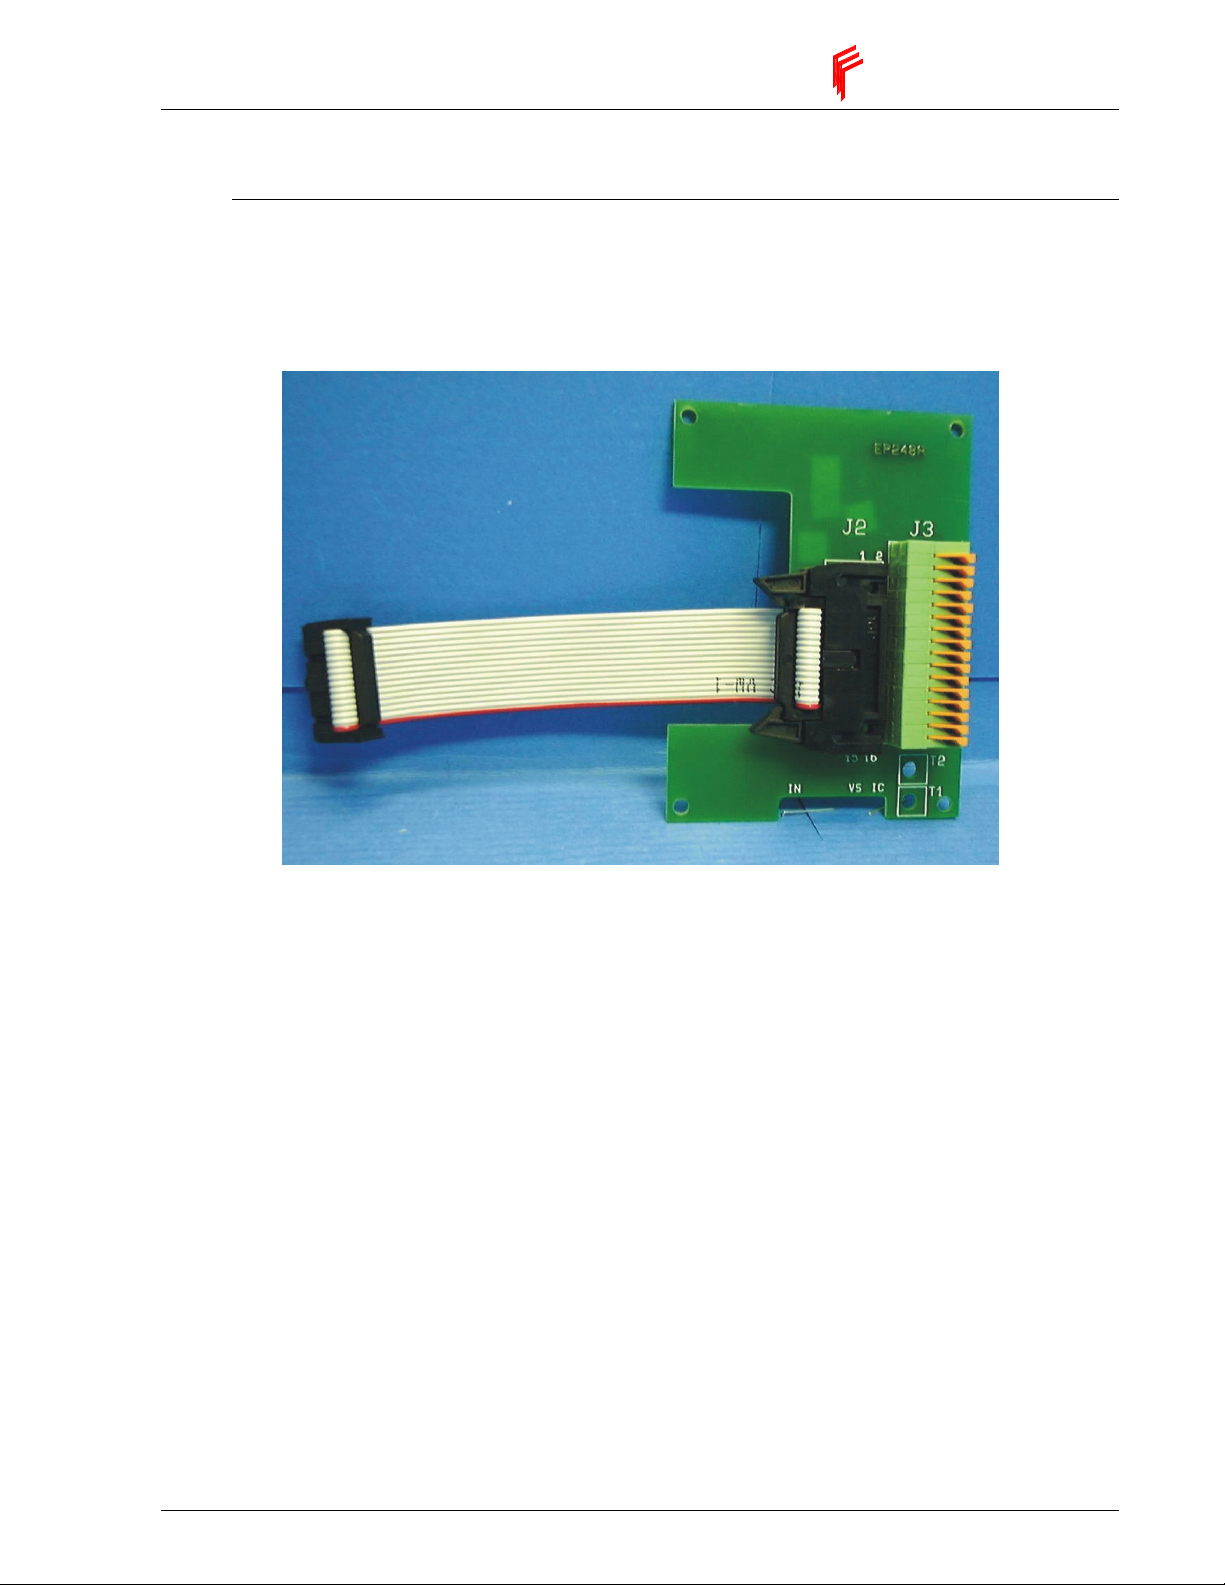
Accessories
8.1 Interface & Evaluations Boards
Elmo offers an interface connection board, the SIB-SSA, to simplify the connection of the VIO-Velocity for
prototyping and evaluation. The SIB-SSA connects with a ribbon cable to signal connector J4 and provides
those signals to the user on a convenient terminal strip.
Figure 6: SIB-SSA
Page 29
Page 34

Page 35

VIO-Velocity - Operating Manual Rev 09/09. Elmo Motion Control
Service Centers and Warranty
ISRAEL
Elmo Motion Control LTD
64 Gisin ST.
Petah-Tikva 49103
Tel: (03)922-0864
Fax: (03)922-6949
EUROPE
Switzerland
Elmo Motion Control
7 Stanserstrasse
CH-6362 Stansstad
Tel: +41 41 6100775
Fax: +41 41 6100778
Germany
Elmo Motion Control GmbH
Steinbeisstrasse 41
D-78056 Villingen-Schwenningen
Tel: +49 7720 857760
Fax: +49 7720 857770
U.S.A
Elmo Motion Control Inc.
900H River Street
Windsor, CT 06095-1330
Tel: (860) 683-0095
Fax: (864) 683-0336
9.1 Warranty performance
The warranty performance covers only Elmo’s products and only the elimination of problems that are due
to manufacturing defects resulting in impaired function, deficient workmanship or defective material.
Specifically excluded from warranty is the elimination of problems that are caused by abuse, damage,
neglect, overloading, wrong operation, unauthorized manipulations etc.
The following maximum warranty period applies:
12 months from the time of operational startup but not later than 18 months from shipment by the
manufacturing plant.
Damage claims, including consequential damages, which exceed the warranty obligation will be rejected in
all cases.
If any term or condition in this warranty performance shall be at variance or inconsistent with any provision
or condition (whether special or general) contained or referred to in the Terms and Conditions of Sales set
out at the back of Elmo's Standard Acknowledge Form, than the later shall prevail and be effective.
Page 31
 Loading...