

Page 1
СИНТЕЗАТОР MS-6140
РУКОВОДСТВО ПОЛЬЗОВАТЕЛЯ
Page 2

МЕРЫ ПРЕДОСТОРОЖНОСТИ
ПОЛНОСТЬЮ ПРОЧТИТЕ ДАННОЕ РУКОВОДСТВО И
СОХРАНИТЕ ЕГО ДЛЯ ПОСЛЕДУЮЩЕГО ИСПОЛЬЗОВАНИЯ!
Пожалуйста, следуйте указания данного руководства - это поможет Вам
избежать появления неполадок в работе синтезатора и подключенного
к нему оборудования.
• Никогда не разбирайте данный прибор, и не производите ни каких
изменению внутри него. При появлении любых неполадок в работе
синтезатора немедленно отключите его и свяжитесь с сервисным
центром.
• Установите данный инструмент в сухом месте, вдали от источников
водяных брызг. Не ставьте рядом с ним сосуды, содержащие
жидкость.
• В случае искрения шнура питания, сбоев в звучании, появления
неприятного запаха или дыма, немедленно отключите синтезатор и
свяжитесь с сервисным центром.
• Используйте только соответствующий по техническим характеристикам сетевой адаптер.
• Отключайте прибор от электросети перед тем, как чистить его. Не
прикасайтесь к нему влажными руками.
• Не допускайте загрязнения разъемов для подключения внешних
устройств.
• Не оставляйте шнур питания сетевого адаптера рядом с горячими
поверхностями. Не пережимайте его, не позволяйте ему свисать с
края стола и не оставляйте его посреди прохода.
• Отключайте прибор от сети, держась за штепсель.
• Не включайте синтезатор в розетку, к которой подключены другие
приборы - это может привести к возгоранию.
• После каждого использования отключайте прибор от электросети и
не включайте его во время грозы.
• Перед подключением внешнего оборудования отключите его и
синтезатор от сети. Установите минимальный уровень громкости.
• Для протирания инструмента используйте сухую мягкую тряпочку.
Запрещается использовать спиртосодержащие моющие средства. Не
ставьте на синтезатор предметы из пластмассы, содержащей этан.
• Не сидите, и не ставьте тяжелые предметы на прибор. Не
применяйте силу при использовании панели управления или игре на
инструменте.
• Не подносите ухо близко к динамику - это может повредить слух.
2
Page 3

СОДЕРЖАНИЕ
1. Описание прибора ........................................................................... 4
2. Предварительная подготовка .......................................................... 5
3. Основные функции прибора ........................................................... 6
4. Авто-ритм ........................................................................................ 8
5. Аккорды .......................................................................................... 10
6. Управление эффектами .................................................................. 12
7. Запись/Воспроизведение ................................................................ 13
8. Программа ...................................................................................... 13
9. Обучающая функция ....................................................................... 14
Пожалуйста, полностью прочитайте данное руководство, чтобы в полной мере использовать все функции данного инструмента.
• 61 клавиша
• 100 тембров, 100 ритмов
• 12 демо-песен
• Режимы: “Один палец”/ “Все пальцы” / “Синхронно” / “Вставка”
• Запись / Воспроизведение
• Функции: “Одна кнопка” / “Обучающая” / “Сустейн” / “Вибрато”
• Ударные инструменты: 8 на панели управления + клавиши
синтезатора
• Информационный дисплей
• Аудио выход (левый и правый каналы) / Разъем для подключения
наушников
3
Page 4
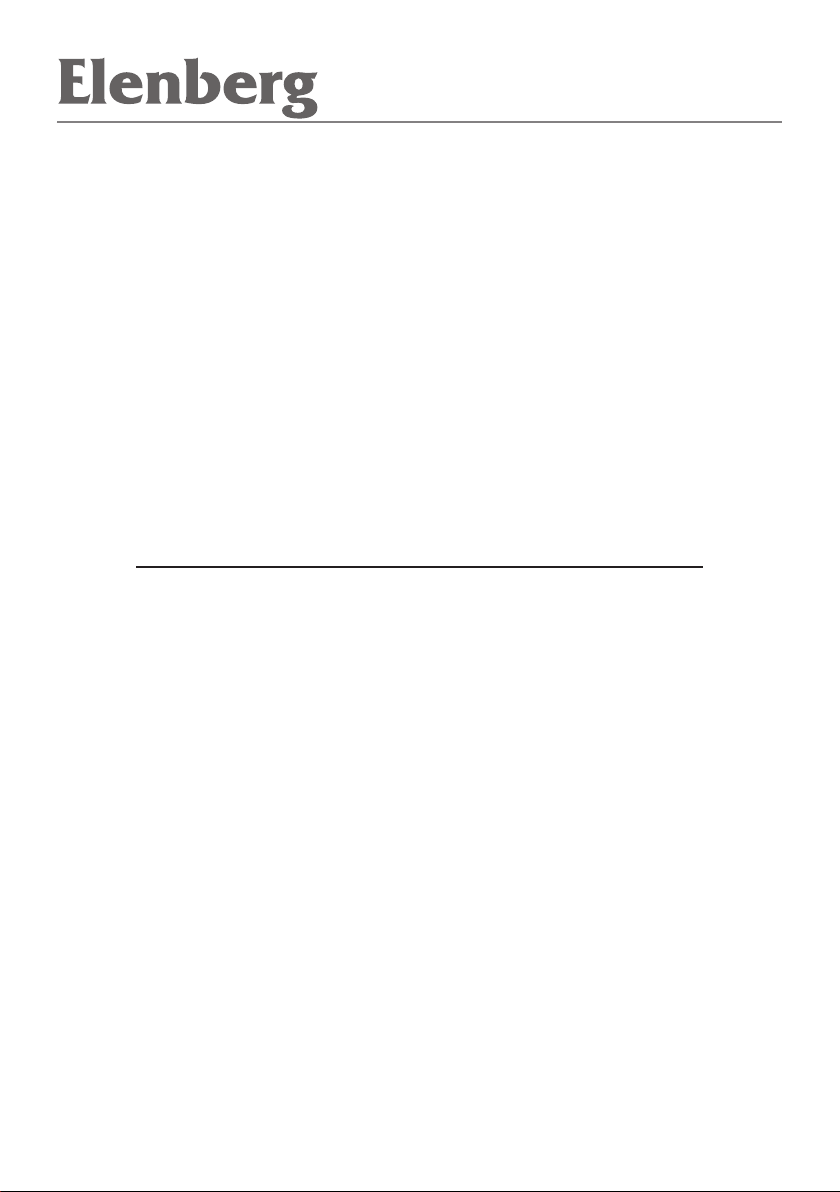
ОПИСАНИЕ ПРИБОРА
1. Динамики
2. Кнопка Вкл./Выкл.
3. Громкость (
уровень громкости
4. Аккомпанемент
(
Уровень громкости
аккомпанемента
5. Темп
6. Переместить
7. “Один палец”
8. “Сустейн”
9. “Вибрато”
10. Запись
11. Воспроизведение
ЗАДНЯЯ ПАНЕЛЬ СИНТЕЗАТОРА:
33. Разъем для сетевого адаптера
34. Разъем для наушников
35. Аудио выход
36. Вход для микрофона
Общий
)
12. Программа
13. Прослушать
14. Дисплей
)
15. Ударные инстр.
на клавишах
16. Демо 1
17. Демонстрировать
все
18. “Одна кнопка”
19. Обучение
20. Кнопки с цифрами
21. Ритм
22. Тембр
23. Метроном
24. Аккорды отключены
25. Бас
26. “Все пальцы”
27. Панель ударных
инструментов
28. Вступление/
Завершение
29. Вставка
30. Синхронно
31. Старт/Стоп
32. Часть Автоаккордов
4
Page 5
ПРЕДВАРИТЕЛЬНАЯ ПОДГОТОВКА
Использование сетевого адаптера
Используйте только адаптер, входящий в комплект поставки прибора,
который переводит напряжение электросети 220 В в 12 В/350 мА.
Контакт с положительным зарядом находится в середине штекера.
Сначала подключите адаптер к синтезатору, а затем к электросети.
(Убедитесь, что напряжение в электросети совпадает с рабочим
напряжением адаптера).
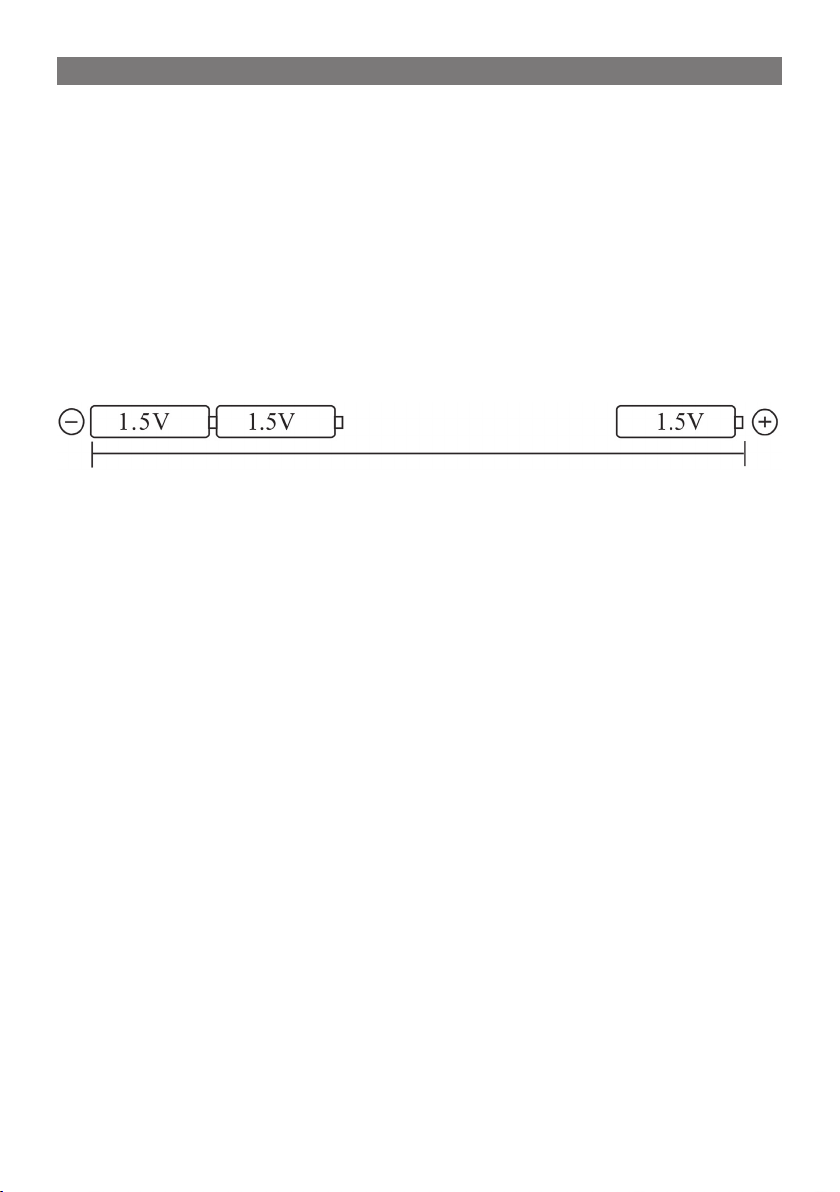
Установка батарей (не прилагаются)
Откройте отсек для батарей, находящийся в нижней части прибора
и вставьте в него 6 батарей по 1.5В, размера “D” (или подобных).
Батареи необходимо вставлять в соответствии с маркировкой (+) и
(-), нанесенной на стенки отсека для батарей.
ЗАМЕЧАНИЕ: Когда заряд батарей подходит к концу, звучание
синтезатора становится не стабильным, а дисплей тускнеет. В этом
случае необходимо заменить батареи.
Не используйте одновременно старые и новые батареи. Не исполь-
зуйте батареи разных типов. Если Вы не собираетесь использовать
синтезатор в течение длительного времени, выньте из него батареи.
Подключение внешних устройств
Данный инструмент имеет встроенную систему динамиков. Но Вы
можете подключить к нему внешнее аудио оборудование. Для этого
отключите питание синтезатора и подключаемого устройства, и
соедините их с помощью аудио кабеля через выход (R-OUT-L) на
синтезаторе и вход (LINE-IN или AUX) на этом устройстве.
Наушники/Микрофон (не прилагаются)
1) При подключении наушников прекращается подача звука на
динамики.
2) Подключите микрофон к соответствующему разъему, и Вы сможете
петь под музыку.
5
Page 6
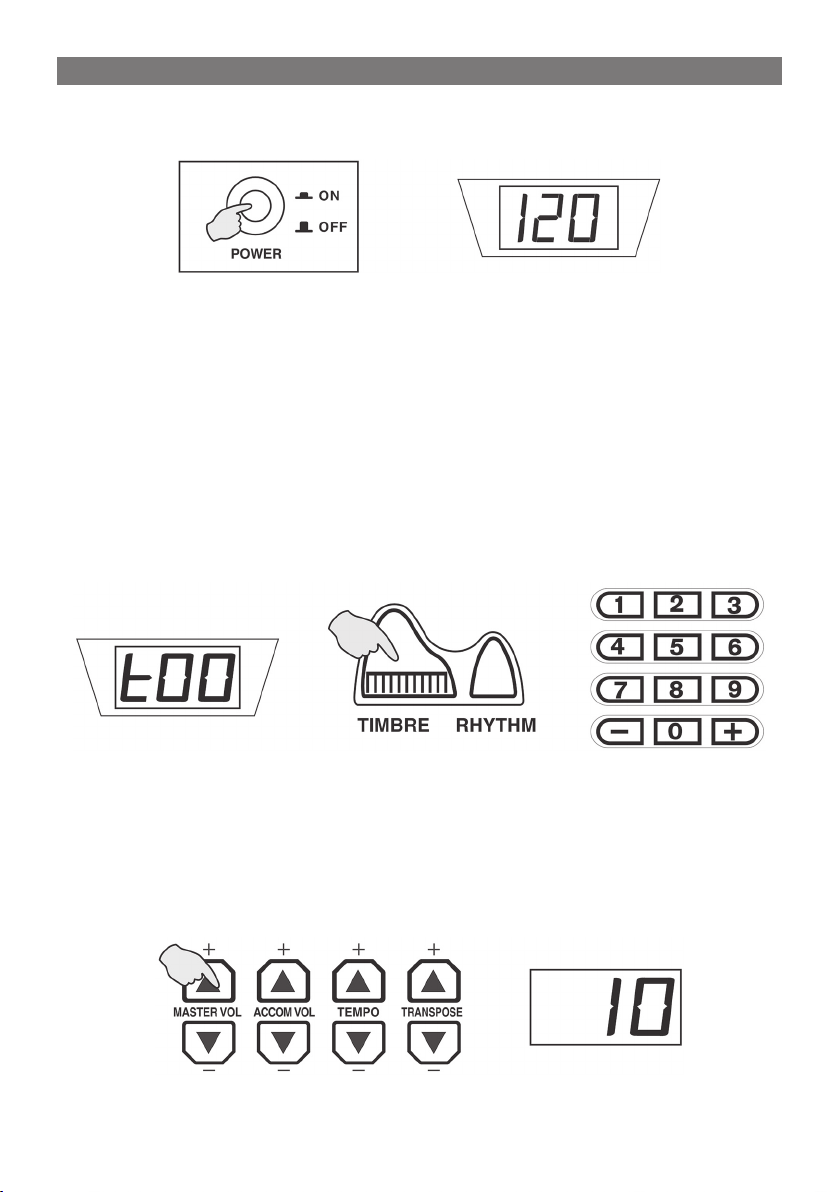
ОСНОВНЫЕ ФУНКЦИИ ПРИБОРА
Нажмите кнопку ВКЛ./ВЫКЛ. [POWER], синтезатор включится, а на экране
отобразится следующее:
Выбор тембра
Всего доступно 100 тембров, заложенных в этот синтезатор, Вы
можете выбрать любой от “t00” до “t99”.
1) При включении инструмента активным является тембр “t00” фортепиано. Чтобы установить другой тембр используйте кнопки
с цифрами.
Пример: Чтобы выбрать 32 тембр, последовательно нажмите “3” и
“2”. На экране появится надпись “t32”. Теперь инструмент настроен
на данный тембр.
2) Для выбора нужного тембра Вы также можете использовать кнопки
[+] и [-]. Чтобы активировать режим выбора тембра, нажмите
кнопку ТЕМБР [TIMBRE].
Настройка уровня громкости (Общего)
Всего доступно 16 уровней громкости от “00” до “ 15”. По умолчанию
установлен уровень громкости “10”. Чтобы увеличить громкость
используйте кнопку ГРОМКОСТЬ+ [MASTER VOL +], а чтобы уменьшить,
кнопку ГРОМКОСТЬ- [MASTER VOL -]. Если Вы нажмете эти две кнопки
одновременно, установится 10 уровень громкости. Общий уровень
громкости контролирует уровень громкости аккомпанемента.
6
Page 7

Демо-песни
Вашему вниманию доступно 12 демо-песен. При запуске демо-песни
на экране высвечивается соответствующий номер.
1) Нажмите кнопку ДЕМОНСТРИРОВАТЬ ВСЕ [Demo All], чтобы
прослушать все демо-песни. Чтобы выбрать для прослушивания
одну демо-песню, используйте кнопку ДЕМО 1 [Demo One],
начнется повторяющееся воспроизведение текущей песни.
2) Чтобы прослушать следующую демопесню, нажмите кнопку ДЕМОНСТРИРОВАТЬ ВСЕ или ДЕМО 1, чтобы прервать
текущую песню. После этого нажмите
любую клавишу, чтобы прослушать
следующую демо-песню.
Список демо-песен:
01 Grassland paean 02 Courser gallop de-
fend the frontiers
04 Embroider gold
plaque
07 Childhood 08 Merry Christmas 09 Jingle bells
10 For Elise 11 Clap Your Hands 12 Music Box dancer
05 Noisy New Year 06 Turkish march
03 Beijing opera
Ударные инструменты
Всего доступно 8 ударных инструментов расположенных на панели
управления и 61 на клавишах синтезатора.
Нажимая на кнопки ударных инструментов, расположенные на панели
управления, Вы услышите соответствующий им звук.
Чтобы использовать ударные инструменты, которым соответствуют
клавиши синтезатора, нажмите кнопку [Keyboard Percussion]. Теперь
каждая клавиша будет отвечать за отдельный ударный инструмент,
а на экране появится надпись “PEr”. Чтобы выйти их этого режима,
снова нажмите кнопку [Keyboard Percussion].
7
Page 8
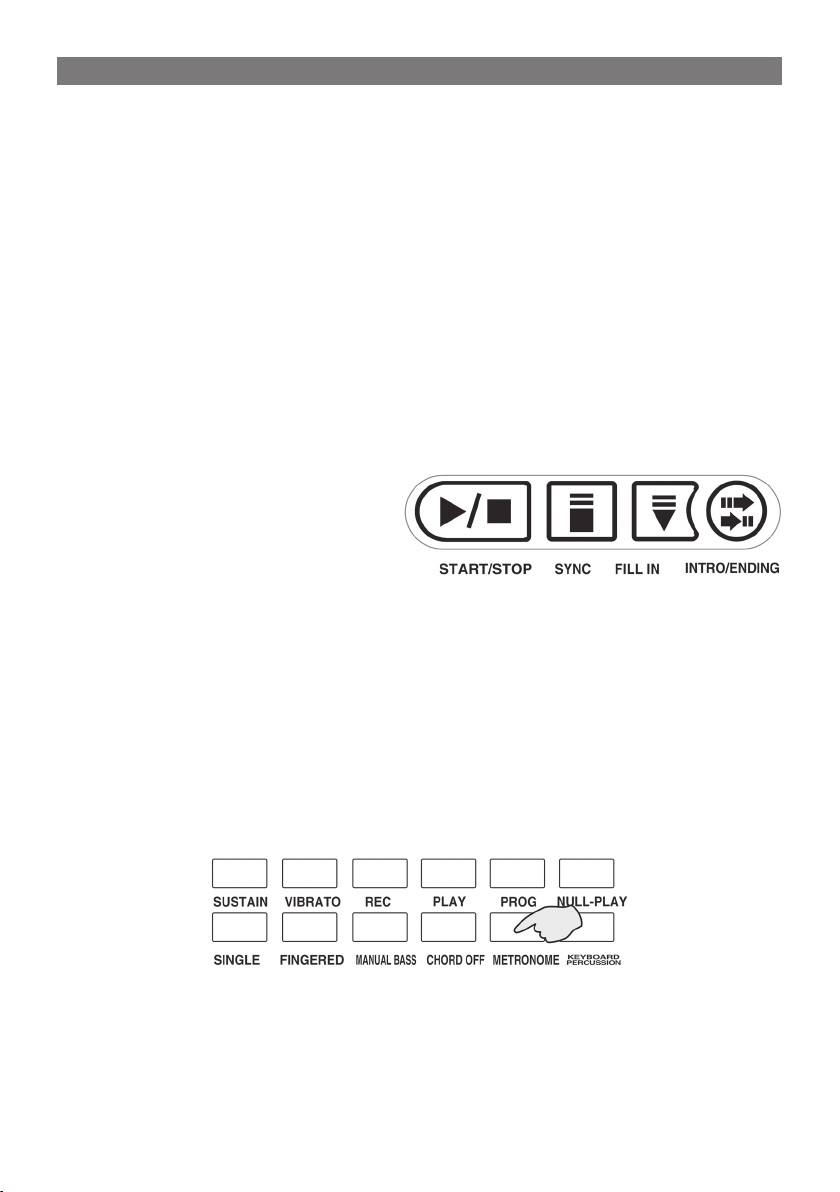
РИТМИЧНЫЙ АККОМПАНЕМЕНТ
Выбор ритма
В данном синтезаторе заложено 100 различных ритмов. Чтобы
выбрать один из них, сначала нажмите кнопу РИТМ [RHYTHM]. При
этом загорится соответствующий индикатор. Для выбора Вы можете
использовать кнопки “+/-” или кнопки с цифрами. (Способ выбора
ритма совпадает со способом выбора тембра)
Управление ритмом
1. Запуск ритма
Существует 3 способа запуска ритма.
• Нажмите кнопку СТАР [START/STOP] для немедленного запуска.
• Нажмите кнопку СИНХРОННО [SYNC], затем нажмите одну из 19
клавиш в левой части клавиатуры. Начнется воспроизведение
выбранного Вами аккомпанемента.
• Нажмите кнопку ВСТУПЛЕНИЕ [Intro/Eding], чтобы сначала
прозвучала прелюдия, а затем аккомпанемент.
2. Вставка
Нажмите кнопку ВСТАВКА [FILL
In] во время воспроизведения
аккомпанемента. В него будет
вставлен звуковой отрывок,
после чего воспроизведение аккомпанемента продолжится.
3. Остановка аккомпанемента
• Нажмите кнопку СТОП [ START/STOP ].
• Нажмите кнопку ЗАВЕРШЕНИЕ [Intro/Ending] прозвучит
завершающий такт и воспроизведение остановится.
Автоматический метроном
В синтезаторе заложено 8 типов метронома: 1/8, 2/8...8/8. Нажмите
кнопку МЕТРОНОМ [Metronome] один раз, активируется метроном на
1/8. Повторное нажатие этой кнопки остановит его; Нажмите кнопку
МЕТРОНОМ второй раз, активируется метроном на 2/8. Повторяйте
описанные действия, чтобы установить нужный Вам метроном.
8
Page 9
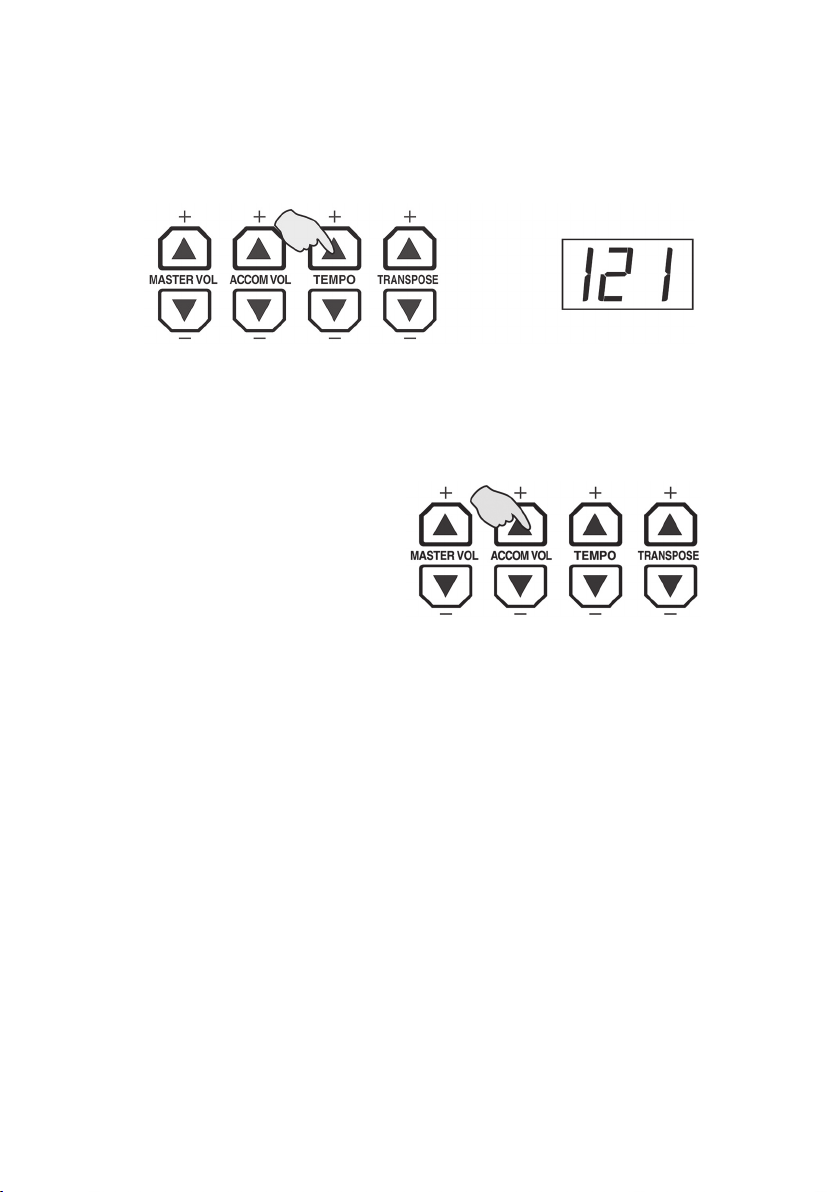
Установка темпа
По умолчанию установлен темп 120 уд./мин. Вы можете установить
темп в пределах от 60 уд./мин. до 240 уд./мин., всего 46 градаций.
Чтобы изменить текущий тем используйте кнопки ТЕМП +/- [Tempo+/-]. Если нажать обе кнопки ТЕМП одновременно, темп будет
равен 120 уд./мин.
Громкость аккомпанемента
По умолчанию установлен уровень громкости аккомпанемента
“A13”. Вы можете установить любое значение в пределах от “A00” до
“A15”. Для этого используйте кнопки АККОМПАНЕМЕНТ +/- [ACCOM
VOL+/-]. Громкость звучания аккомпанемента зависима от основной
громкости.
9
Page 10

АККОРДЫ
Для Вашего удобства предусмотрены несколько режимов создания
аккорда: “Один палец (Авто-бас)”/”Все пальцы” и “Бас”.
Режим “Один палец”
Нажмите кнопку “ОДИН” [SINGLE], на экране появится надпись “C-1”
- это значить, что активирован режим “Один палец” (Авто-бас). Чтобы
создавать аккорды с помощью этого режима используйте 19 клавиш
в левой части клавиатуры.
Чтобы отключить этот режим нажмите кнопку АККОРДЫ ОТКЛЮЧЕНЫ
[CHORD OFF].
МЕТОД “ОДИН ПАЛЕЦ”:
1) Мажор: нажмите базовую клавишу аккорда.
2) Минор: одновременно нажмите базовую клавишу аккорда и черную клавишу слева.
3) Септаккорд: одновременно нажмите базовую клавишу аккорда и
белую клавишу слева.
4) Малый септаккорд: одновременно нажмите базовую клавишу
аккорда, черную и белую клавишу слева.
РАСПОЛОЖЕНИЕ ПАЛЬЦЕВ НА КЛАВИАТУРЕ
10
Page 11

Режим “Все пальцы”
Нажмите кнопку “ВСЕ ПАЛЬЦЫ” [FINGERED], на экране появится
надпись [C-2] - это значить, что активирован режим “Все пальцы”
Чтобы создавать аккорды с помощью этого режима используйте 19
клавиш в левой части клавиатуры.
Чтобы отключить этот режим нажмите кнопку АККОРДЫ ОТКЛЮЧЕНЫ
[CHORD OFF].
РАСПОЛОЖЕНИЕ ПАЛЬЦЕВ НА КЛАВИАТУРЕ (Аккорд “C”)
В этой таблице представлены модуляции аккорда “До-мажор”
Бас
Нажмите кнопку БАС [Manual Bass], включится режим “Бас”. При этом
19-ти клавишам в левой части раскладки присваиваются тембры
заложенных в синтезаторе басов. Остальные клавиши будут настроены на тембр предварительно выбранного инструмента.
Чтобы отключить этот режим нажмите кнопку АККОРДЫ ОТКЛЮЧЕНЫ
[CHORD OFF].
11
Page 12

УПРАВЛЕНИЕ ЭФФЕКТАМИ
Перемещение
Нажмите кнопку ПЕРЕМЕСТИТЬ +/- [Transpose +/-], чтобы сместить
раскладку клавиатуры. Значение
смещения будет отображено на экране.
Диапазон перемещения от ”-12” до
“12”. Одновременное нажатие кнопок
“+” и “-” восстановит изначальную
раскладку клавиатуры “00”.
Функция “Сустейн” (Послезвучие)
Нажмите кнопку “СУСТЕЙН” [SUSTAIN], на экране появится надпись
“S-1”. Синтезатор начнет работать с функцией “Сустейн”.
Повторное нажатие кнопки - отключит эту функцию, а не экране
появится надпись “S-0”.
Функция “Вибрато”
Нажмите кнопку “ВИБРАТО” [VIBRATO], на экране появится надпись
“on”. Синтезатор начнет работать с функцией “Вибрато”.
Повторное нажатие кнопки - отключает эту функцию, а не экране
появится надпись “OFF”.
12
Page 13

ЗАПИСЬ/ВОСПРОИЗВЕДЕНИЕ
Нажмите кнопку ЗАПИСЬ [REC], на экране
появится надпись “rEC”. Теперь синтезатор начнет
записывать последовательности нот (максимум
63). Снова нажмите эту кнопку, чтобы занести
последовательность нот в память. На экране
появится надпись “ICH” и синтезатор выйдет из
режима записи.
Нажмите кнопку ВОСПРОИЗВЕДЕНИЕ [Playback],
чтобы прослушать записанную мелодию.
ПРОГРАММА
Программирование
Нажмите кнопку ПРОГРАММА [PROG], на экране появится надпись
“Prg”. Теперь Вы можете использовать 8 кнопок с ударными
инструментами, расположенных на панели управления. Чтобы
запомнить последовательность ударных инструментов (максимум
32), снова нажмите кнопку ПРОГРАММА [PROG].
Прослушивание программы
Нажмите кнопку ПРОСЛУШАТЬ [Null Play]. На экране появится надпись
“PLy” и начнется циклическое воспроизведение запрограммированного ритма. Чтобы прервать прослушивание нажмите кнопку
ПРОСЛУШАТЬ [Null Play] или СТАРТ/СТОП [Start/Stop].
13
Page 14

ОБУЧАЮЩАЯ ФУНКЦИЯ
Функция “Одна кнопка”
Нажмите “ОДНА КНОПКА” [One Key], на экране появится номер
текущей демо-песни. Если нажать какую-нибудь клавишу - начнется
воспроизведение данной песни. Кнопкой
ДЕМО1 Вы можете выбрать демо-песню и
прослушать ее, нажав кнопку “ОДНА КНОПКА”
[One Key].
Обучающая функция
Нажмите кнопку ОБУЧЕНИЕ [GUIDE], а затем любую клавишу, чтобы
начать воспроизведение демо-песни. Во время работы этой функции
Вы можете играть на клавиатуре синтезатора, на это время демопесня будет приостановлена. Если Вы перестанете играть, то через 5
секунд воспроизведение демо-песни продолжится.
СРОК СЛУЖБЫ
По истечении срока службы товара, необходимо обратиться в
сервисный центр за консультацией по дальнейшей эксплуатации
товара. В противном случае дальнейшая эксплуатация может повлечь
невозможность нормального использования товара.
Срок службы данного изделия - 3 года с момента продажи
Изготовитель “ЭЛЕНБЕРГ ЛИМИТЕД”, Великобритания
Адрес: 35 Бромптон Роад, Кнайтсбридж Лондон СВ3 ИДЕ
Сделано в Китае. ”ЭЛЕНБЕРГ ЭЛЕКТРИК КОМПАНИ ЛТД”
А08 Р2-Б4 билдинг, Кеджинан 2 Роад, С энд Т Индастри Парк,
14
Шензень, Гуандонг Провинс, Китай.
Page 15

Данная сехема имеет информационный характер и может быть изменена, в целях улечшения качества
продукта, без предварительного предупреждения.
(ПРИЛОЖЕНИЕ) МОНТАЖНАЯ СХЕМА
15
Page 16

DIGITAL ELECTRONIC KEYBOARD
MS-6140
USER MANUAL
Page 17

PRECAUTIONS
READ THE FOLLOWING PRECAUTIONS CAREFULLY BEFORE YOU BEGIN.
KEEP THIS PRECAUTIONS SECURELY FOR FUTURE REFERENCE!
Please obey the announcements, before you use the organ, it can help you
avoid hurting yourselves or others, and avoid damaging the electronic or
gan or other exterior equipments.
Announcements as follows, but not only be limited by this.
• Neither take the liberty to dismantle this piano, nor make any changes
inside it. In case of any anomalous functioning, stop using immediately
and contact us for repairs by our qualified maintenance personnel.
• Place this piano away from rain drops, water, or damp. Avoid putting a
container that holds water on the piano in case the water spills inside the
piano.
• In the event of a fray in the pin wire of the AC power adaptor, a sounding
failure, an alien odour, or smoke, immediately switch the piano off and
unplug it, then ask for our qualified maintenance personnel.
• Use the required power adaptor. Using a wrong adaptor will bring about
damage or excessive heat to the piano.
• Unplug the piano before cleaning it and avoid using wet hands to plug
or unplug it.
• Check the plug at regular intervals and remove dirt from it.
• Do not let the wire of the AC power adaptor near heat like radiator, etc.
Avoid excessively bending the wire, putting heavy objects on it, leaving
it in the middle of the aisle, or avoid entanglement around the wire with
other things.
• Remember to cup the plug in your hand to pull it out instead of dragging
the wire.
• Do not plug this piano into a multiple socket because it might result in
a deteriorated tone as well as a socket overheating.
• Unplug the piano while leaving it unused or during a lightning storm.
• Switch both the piano and other equipment off before connecting them
to each other. Turn the volume to the minimum before switch on or off
the equipment.
• Use a dry and soft cloth to clean the piano. Using liquid like paint, organic solvent, or chemical steep is strictly forbidden. Besides, putting
ethane plastic materials on the piano may also cause the fading of the
colour of the panel or of the keyboard.
• Never sit or put heavy objects on the piano. Never use strength to excess
when operating the panel and plugging or unplugging.
• Do not close to the ear! Misuse may cause damage to hearing.
-
17
Page 18

CONTENT
1. Panel Control And Outer Pore ........................................................... 19
2. Preparation for Performance ............................................................. 20
3. Basic Method of Performance ........................................................... 21
4. Auto-Rhythms .................................................................................. 23
5. Auto-Bass Chord .............................................................................. 25
6. Effect Control ................................................................................... 27
7. Record, Playback Function ................................................................ 28
8. Program ........................................................................................... 28
9. Teaching Function ............................................................................ 29
Please read this manual carefully before performance, which will help you
take advantage of it’s functions.
• 61 Keys
• 100 Timbres / 100 Rhythms
• 12 Demonstration Songs
• Single Finger / Fingered / Sync / Fill in
• Record / Playback
• One-Key / Guide/Sustain / Vibrato
• 8 Panel Percussions / Keyboard Percussions
• LED Display
• Speaker output(L/R) / Headphone Jack
18
Page 19

PANEL CONTROL AND OUTER PORT
1. Speaker
2. Power Switch
3. Master Volume
4. Accom Volume
5. Tempo
6. Transpose
7. Single
8. Sustain
9. Vibrato
10. Record
11. Playback
12. Program
FACE-PANEL CONTROL:
13. Null Play
14. LED Display
15. Keyboard Percus
sions
16. Demo One
17. Demo All
18. One Key
19. Guide
20. Number Buttons
21. Rhythm
22. Timbre
23. Metronome
33. DC 12V JACK
34. HEADPHONE JACK
35. AUDIO OUT L/R JACK
36. MIC JACK
24. Chord Off
25. Manual Bass
-
26. Fingered
27. Panel Percussions
28. Intro/Ending
29. Fill in
30. Sync
31. Start/Stop
32. Auto-chord Keyboard
19
Page 20

PREPARATION FOR PERFORMANCE
Using AC/DC Power Supply Adapter
In case of using AC/DC power supply adapter, the unit should be con-
nected to an adapter specially provided by the manufacturer, of to a
power supply of steady voltage (output voltage is 12V and output current over 350 mA). Be sure of the center terminal of the plug is the positive pole. Please put one side of power supply adapter into the power
supply socket and the other side into the city-electricity network.(Please
attend that the input voltage should be the same as the city-electricity
voltage).
Installation of Batteries (not included)
Open the battery compartment cover on the underside of the electronic
keyboard, install 6 pieces of 1.5V D size batteries (Type D, SUM-1 R20
or Equivalent), according to the schematic positive (+) and negative (-)
pole on the cell to install the batteries, then replace the cover.
NOTES: When the voltage drop to a certain range because of the lack of the
batteries electricity, the electronic organ cannot perform naturally because of some unwonted instance, for example, he electronic organ will
be cacoepy or the display will be dinginess. And now you should replace
he batteries in time.
Don’t use the new and old or different type batteries together. If you
do not perform for a long time, please take out of the batteries so as to
avoid damaging the instruments because of the leak of the battery liquid.
To Connect Amplifier Or Acoustics
There is an inner loudhailer system in this electronic organ, And you
also can connect it with the other amplifier or loudhailer. Please shut
off the electronic organ and the outer equipments, and then insert one
end of the stereo frequency cable into the jack (LINE IN or AUX IN) of the
outer equipments, and the other end into the jack (OUT L/R) of the rear
panel.
Headphone/Microphone (not included)
1) When you are practicing or performing, you can insert the stereo
headphone into the headphone jack which is on the flank-panel, In
order to avoid affecting others. And now the inner loudhailer will be
cut off automatically
2) Insert the plug of the microphone into the microphone jack of the
keyboard and you can enjoy playing and singing.
20
Page 21

BASIC METHOD OF PERFORMANCE
Press [POWER] button and the digital display will shows this moment, the
system is in the standby state.
Selection of Timbres
There are 100 timbre options saved in this unit, you can choose from
“tOO” to “t99” freely.
1) When you turn on the unit, the stored timbre “tOO” is piano, you can
choose the timbres that you need by pressing the number buttons.
For example, when you select “32” timbres, press the number “3”
first, and then press the number “2” ,the digital will display “ t32”, and
now you can perform the timbre “32” which you have selected.
2) Press the button [+] or [-] ,you also can choose the timbre that you
need. If the number buttons are controlled by the rhythm, you should
press the timbres button to change into the timbre status.
Master Volume Adjustment
There are 16 levels of the master volume from “00” to “ 15” and the de-
fault volume is “10” .Press “MASTER VOL MAX” button the master volume
is increasing and press “ MASTER VOL MIN” button the master volume
is decreasing. If you press the two buttons together, the master volume
will revert back to 10. The Master volume also control the accompaniment volume.
21
Page 22

Demonstration Songs
There are 12 pieces of demonstration songs saved in the electronic or-
gan. When the demo song starts, the related numbers will be shown on
the LCD window.
1) Press the [Demo All] button, the system will play the Demo Songs
successively and press the [Demo One] button, the system will play
the present songs repeatedly.
2) In the state of [Demo All] or [Demo One] , if
you want to change for other songs, you can
press the [Demo All] or [Demo One] button first to make it stop, and then press one
of the button again, the organ will play the
next Demo Songs.
12 pieces of demonstration songs:
01 Grassland paean 02 Courser gallop de-
fend the frontiers
04 Embroider gold
plaque
07 Childhood 08 Merry Christmas 09 Jingle bells
10 For Elise 11 Clap Your Hands 12 Music Box dancer
05 Noisy New Year 06 Turkish march
03 Beijing opera
Percussions
There are 8 Panel percussions and 61 Keyboard percussions.
Press panel percussions and the related percussion will sound. The per-
formance effect can be enhanced if the percussion added according to
the real time requirement.
Press the [Keyboard Percussion] button, the screen shows [PEr] ,the
keyboard becomes the percussion keyboard transitorily. And now any
one of the keystroke corresponds to a type of percussions, and
press the [ Keyboard Percussion] button once more, you can exit the
keyboard percussions, and the keyboard turns to normal.
22
Page 23

RHYTHMIC ACCOMPANIMENT
Rhythm Selection
The electronic keyboard provides 100 Rhythms. Before selecting, press
[RHYTHM] button first, its indicator lights up, then use the “ + “ button,
the “-” button or the number buttons “00” - “99” on the digital panel to
select the Rhythms.(The selecting way is the same as that of timbre)
Rhythm control
1. Start Rhythm
There are 3 ways to start the rhythm.
• Press [START/STOP] button to start the rhythm immediately.
• Press [SYNC] button, then press any note of the 19 keys from left on
the keyboard. The accompaniment will begin with your performance.
• Press [Intro/Eding] button to start the accompaniment immediately from the intro part. The
electric keyboard will play a
prelude, and then enter auto
accompaniment.
2. Fill in
Press [FILL In] button when you play, the keyboard will play a short piece
of intermezzo automatically and then continues the original accompaniment.
3. Stop the accompaniment
• Press [ START/STOP ] button to stop the accompaniment.
• Press [Intro/Ending] button then the ending being. When the ending
is finished, the accompaniment is also over with it.
Auto-metronome
There are 8 types of metronomes in this system, they are 1/8 beat, 2/8
beat...8/8 beat. In the normal state, press the [Metronome] button for
the first time, the organ will play 1/8 beat, press again, it will stop; Press
for the second time, the organ will play 2/8 beat, press again, it will
stop; do as this, it will play 3/8 beat...8/8 beat.
23
Page 24

Tempo control
The scheduled time rate is 120 beat/min, and you can adjust from 60
beat/min. To 240 beat/min, there are 46 levels in all. Press the rate
[Tempo+] or [Tempo-] button. You can quicken or slower the rate of the
rhythms. Press the [ Tempo+ ] or [ Tempo-] button synchronously, the
rate will turn to 120 beat/min.
Accompaniment Volume Setting
The accompaniment volume is preset as “A13” levels and you can ad-
just it from “AOO” to “A15” Press [ACCOM VOL+] button to increase the
accompaniment volume and press [ACCOM VOL-] to decrease the accompaniment volume. And the accompaniment volume is control by the
master volume.
24
Page 25

AUTO-BASS CHORD
The electronic keyboard has many different chord performance of such as
“Single finger Auto Bass Chord”/”Fingered Bass Chord” and “Manual Bass”.
Single-finger chord
Press the [SINGLE] button with the [C-1] appearing on the screen, which
means that the single-finger auto-bass chord is on and 19 note keys
on the left keyboard are turn to chord keyboard. In accordance with the
Single Finger. Fingering to play on the chord keyboard, the single finger
chord can be performed.
Press the [CHORD OFF] button , the screen shows [OFF], the single-fin-
ger chord stops.
SINGLE-FINGER AUTO-BASS CHORD METHOD:
1) Major: press the basic voice key.
2) Minor: press the basic key and any black key on its left side synchronously.
3) Seventh: press the basic key and any white key on its left side synchronously.
4) Minor seventh: press the basic keys and one white key, and one black
key on its left side synchronously.
SINGLE-FINGER CHORD FINGERING
25
Page 26

Fingered Chord
Press the [FINGERED] button with the [C-2] appearing on the screen,
which means that the fingered auto-bass chord is on and 19 note keys
on the left keyboard are turn to chord keyboard. In accordance with the
Fingered chord fingering to play on the chord keyboard, the fingered
chord can be performed.
Press the [CHORD OFF] button, the screen shows [OFF], the fingered
chord stops.
The following table is Tune “C”, the others may be deduced analogy like
this.
FINGERED CHORD FINGERING (Tune C)
Manual Bass
Press the [Manual Bass] button, the manual bass function is on, the 19
keys on the left side of the keyboard turn to the bass keyboard and keep
the intrinsic timbre, now you can select the timbres on the right keyboard.
Press [Chord Off] button, the manual bass function and the bass key-
board will be off, the timbre of the keyboard is the latest selection.
26
Page 27

EFFECT CONTROL
Transpose
Press “Transpose” [+] or [-] button to process the keyboard by trans-
posing and the current data is displaying
on LED window. The range of transpose
may be adjust from”-12” to “12” . Press
the [+] / [-] button at the same time, the
keyboard will return to normal with the
preset value “00”.
Sustain Function
Press [SUSTAIN] button with the digital screen displays “S-1” , and the
sustain function in on, now perform keyboard will emerge the sustain
effect.
Press the button again, the screen displays “S-0” ,the function is off.
Vibrato Function
Press [VIBRATO] button with the digital screen displays “on”, and the
vibrato function in on, now perform keyboard will emerge the vibrato
effect.
Press the button again, the screen displays “OFF” ,the function is off.
27
Page 28

RECORD AND PLAYBACK
Press the [REC] button with the digital screen displays
“rEC”, now the performer can play freely as the likes
and the played note will be recorded. Press the [REC]
button again or record 63 pieces of notes, the digital
screen displays “ICH” , and the system quit the record function.
Press the [Playback] button, the digital screen displays
“PLY”, and the system will play the melody which be
recorded just now.
PROGRAM
Programming
Press the [PROG] button ,the screen shows “Prg”, now you can press any
of 8 pieces of percussion button to edit a group of rhythms as you like.
Press the button [PROG] again or record 32 pieces of percussions, the
system will quit the function.
Null Play
Press the [Null Play] button with the screen displays shows “PLy”, the
self-edited rhythm will be played in circle. Press the [Null Play] button
gain or [Start/Stop] to stop playing.
28
Page 29

INTELLIGENT TEACHING FUNCTION
One-key Function
Press the [One Key] button, the digital screen displays the number of
demo songs at the moment. By pressing any one of the keyboards, the
main melody of the song will be performed.
After selecting demo songs by pressing the
[DEMO] button, press the button [One Key] to
select the relative demo song.
Teaching Function
Press the button [GUIDE], and then press any one of the keys, the melody
will be performed. If you play the keyboard at this time, the main melody
will be shielded. The main melody will be regained if you do not play
after 5 seconds.
SERVICE LIFE
Address to service center for consultation, when the service life of prod
uct has expired. Otherwise the further operation can entail impossibility of
normal use of the product.
-
Service life of the given product - 3 years from the moment of sale
29
Page 30

This circuit diagram is only for your reference. Forgive us not to give an urgent announcement if any data of
circuit element is timely charged.
(APPENDIX) THE CIRCUIT DIAGRAM OF ELECTRONIC KEYBOARD
30
 Loading...