

Page 1

СИНТЕЗАТОР MS-5420
РУКОВОДСТВО ПОЛЬЗОВАТЕЛЯ
Page 2

МЕРЫ ПРЕДОСТОРОЖНОСТИ
ПЕРЕД ИСПОЛЬЗОВАНИЕМ ПОЛНОСТЬЮ ПРОЧТИТЕ ИНСТРУКЦИЮ.
СОХРАНИТЕ ЭТУ ИНСТРУКЦИЮ ДЛЯ ПОСЛЕДУЮЩЕГО ИСПОЛЬЗОВАНИЯ!
Данное руководство поможет Вам избежать травм и сохранить
работоспособность прибора и оборудования, которое можно подключить
к нему.
• Не разбирайте и не модифицируйте данный прибор. При первых
признаках неисправности прекратите использование синтезатора и
свяжитесь с сервисным центром.
• Не допускайте попадания воды на данный прибор. Не ставьте на него
сосуды с водой или другой жидкостью.
• В случае появления постороннего запаха, дыма, повреждения шнура
питания, немедленно отключите прибор и обратитесь в сервисный
центр.
• Используйте прилагаемый к синтезатору адаптер. Использование
прочих адаптеров может привести к пожару или поломке прибора.
• Отключайте прибор от электросети перед тем, как чистить его. Не
беритесь за прибор влажными руками.
• Регулярно проверяйте штепсель и разъемы прибора.
• Не позволяйте шнуру питания прикасаться к горячим поверхностям.
Не ставьте ничего на шнур питания, не допускайте его перегибов и
наматывания на окружающие предметы. Не оставляйте шнур питания
посреди прохода.
• Держитесь за штепсель, когда подключаете прибор к сети или
отключаете его.
• Не подключайте прибор к тройнику, т.к. это может привести к его
перегреву.
• Отключайте синтезатор от электросети, если не собираетесь в
ближайшее время использовать его и во время грозы.
• Перед подключением к прибору внешнего устройства отключите их.
Перед включением синтезатора установите звук на минимум.
• Храните синтезатор в безопасном месте.
• Протирайте прибор сухой мягкой тряпочкой. Не используйте
спиртосодержащие чистящие вещества. Не ставьте на синтезатор
предметы, состоящие из пластмасс содержащих этан.
• Не сидите, и не ставьте тяжелые предметы на синтезатор. Не
применяйте силу при использовании прибора и при включении и
отключении.
• Не играйте на синтезаторе при высоком уровне громкости в течение
длительного времени - это может негативно сказаться на слухе.
2
Page 3

СОДЕРЖАНИЕ
I. ОПИСАНИЕ ПРИБОРА ........................................................................ 4
II. ПОДГОТОВКА К РАБОТЕ .................................................................... 4
1. УСТАНОВКА БАТАРЕЙ ................................................................... 4
2. ПОДКЛЮЧЕНИЕ К ЭЛЕКТРОСЕТИ ................................................... 5
3. ПОДКЛЮЧЕНИЕ МИКРОФОНА И КОЛОНОК .................................... 5
III. ИСПОЛЬЗОВАНИЕ ПРИБОРА .............................................................. 5
1. ПРОСЛУШИВАНИЕ ДЕМО-ПЕСЕН .................................................. 5
2. ВЫБОР ТЕМБРА .............................................................................. 5
3. РИТМИЧНЫЙ АККОМПАНЕМЕНТ ................................................... 6
4. АККОРД ......................................................................................... 7
5. УДАРНЫЕ ИНСТРУМЕНТЫ И ПРОГРАММИРОВАНИЕ ....................... 8
6. ЗАПИСЬ И ВОСПРОИЗВЕДЕНИЕ ..................................................... 8
7. ФУНКЦИЯ ОБУЧЕНИЯ .................................................................... 9
3
Page 4
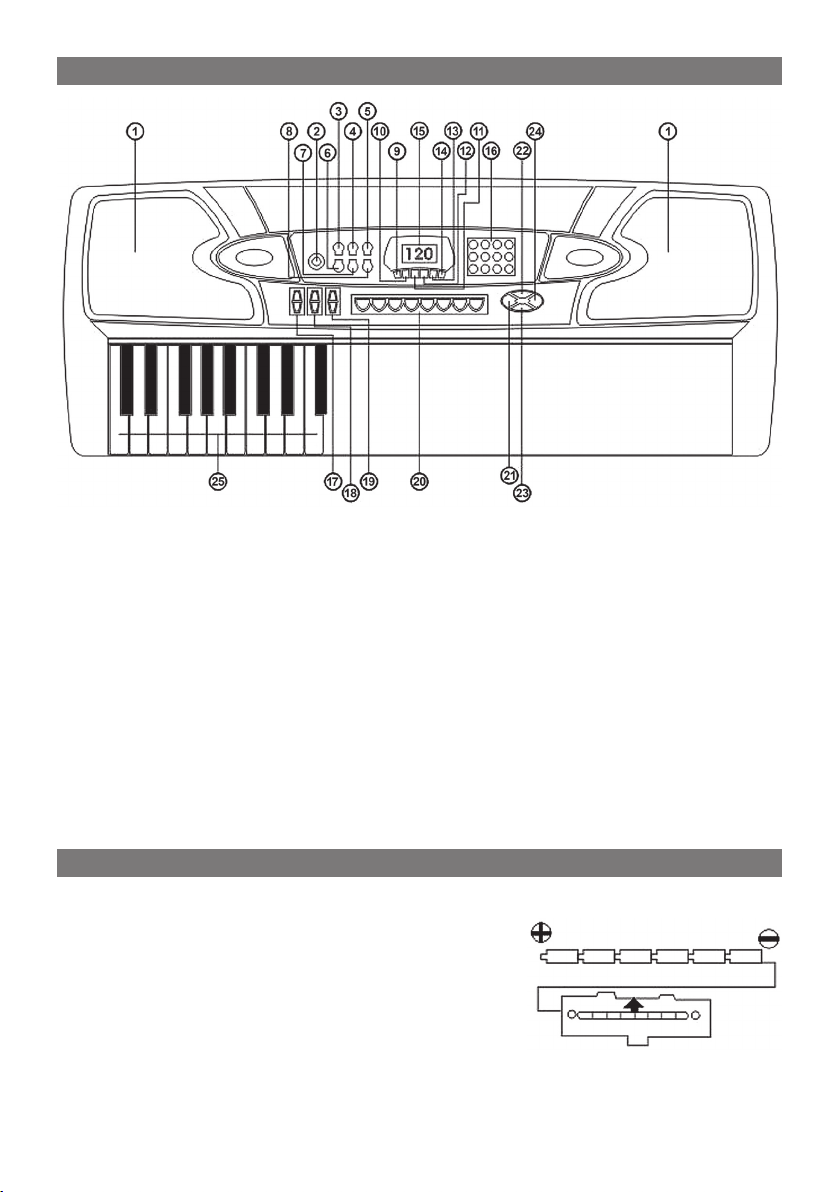
I. ОПИСАНИЕ ПРИБОРА
1. ДИНАМИК
2. ПИТАНИЕ ВКЛ./ВЫКЛ.
3. БЫСТРЫЙ ВЫЗОВ (ONE KEY)
4. ОБУЧЕНИЕ (GUIDE)
5. ДЕМО-ПЕСНИ (DEMO)
6. ПРОГРАММА (PROG)
7. ЗАПИСЬ (REC)
8. ВОСПРОИЗВЕДЕНИЕ (PLAY BACK)
9. СТАРТ/СТОП (START/STOP)
10. СИНХРОНИЗАЦИЯ (SYNC)
11. ВСТАВКА (INSERT)
12. АККОРД 1-Й КЛАВИШЕЙ (SINGLE)
13. АККОРДЫ (FINGERED)
14. ОТКЛЮЧЕНИЕ АККОРДОВ
(CHORD OFF)
15. ЭКРАН
16. КНОПКИ С ЦИФРАМИ
17. ОСНОВНАЯ ГРОМКОСТЬ
18. ГРОМКОСТЬ АККОМПАНЕМЕНТА
19. ТЕМП (TEMPO)
20. УДАРНЫЕ ИНСТРУМЕНТЫ
21. ТЕМБР (TIMBRE)
22. ВИБРАТО (VIBRATO)
23. СУСТЕЙН (SUSTAIN)
24. РИТМ (RHYTHM)
25. КЛАВИШИ АККОМПАНЕМЕНТА
II. ПОДГОТОВКА К РАБОТЕ
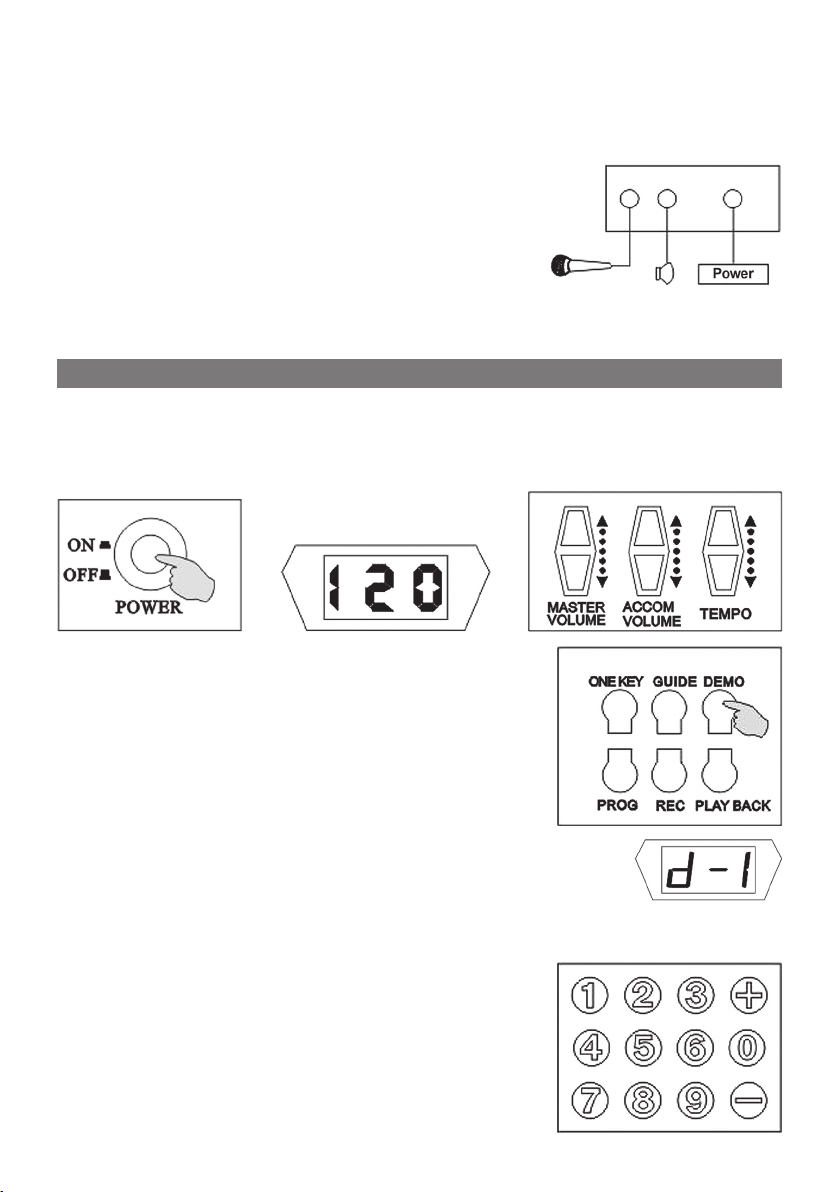
1. Установка батарей
Прибор работает от 6 батарей размера
“D”. Откройте отсек для батарей. По
одной вставьте батарейки в соответствии
с маркировкой “+” и “-”.
ЗАМЕЧАНИЕ: Если заряд батарей подойдет
к концу, звук синтезатора станет не
стабильным. Если это произошло, замените все шесть батарей.
Рекомендуется вынимать батареи, если Вы не собираетесь в ближайшее время использовать прибор.
4
Page 5
2. Подключение к электросети
Подключите стандартный выпрямитель к разъему, расположенному
на задней панели синтезатора. Убедитесь, что подаваемое выпрямителем напряжение соответствует напряжению, указанному на разъеме для подключения.
отключите прибор от сети.
После использования,
3. Подключение микрофона и колонок
1) На задней панели прибора имеется
специальный разъем для подключения
микрофона (не прилагается).
2) Через разъем, расположенный на задней панели прибора, можно
подключить колонки - это улучшит звучание музыки.
III. ИСПОЛЬЗОВАНИЕ ПРИБОРА
Нажмите кнопку ПИТАНИЕ ВКЛ./ВЫКЛ., загорится экран, и синтезатор
перейдет в режим ожидания. Затем, кнопками
уровень громкости (MASTER). По умолчанию установлен 10 уровень
громкости; всего их 15.
▲/▼, установите основной
1. Прослушивание Демо-песен
Нажмите [DEMO], на экране появится надпись
“d-1”. Это означает, что будет воспроизведена
1-я демо-песня. Если Вы хотите выбрать
другую песню, нажмите кнопку [DEMO]
два раза. Первое нажатие остановит
воспроизведение текущей песни, а второе,
переключит синтезатор на вторую демопесню и т.д. Всего имеется 8 демо-песен. Кроме
этого, выбирать песни можно кнопками регулировки
темпа ▲/▼.
2. Выбор тембра
Всего имеется 100 настроек тембра, Вы можете выбрать любую от
“tOO“ до “t99”.
1) При включении синтезатора тембр настроен на “t00“ - пианино. Чтобы изменить
тембр используйте кнопки с цифрами.
Чтобы набрать “08”, нужно нажать “0”,
затем “8”, на экране появится надпись
“t08”. Теперь на синтезаторе используется
5
Page 6
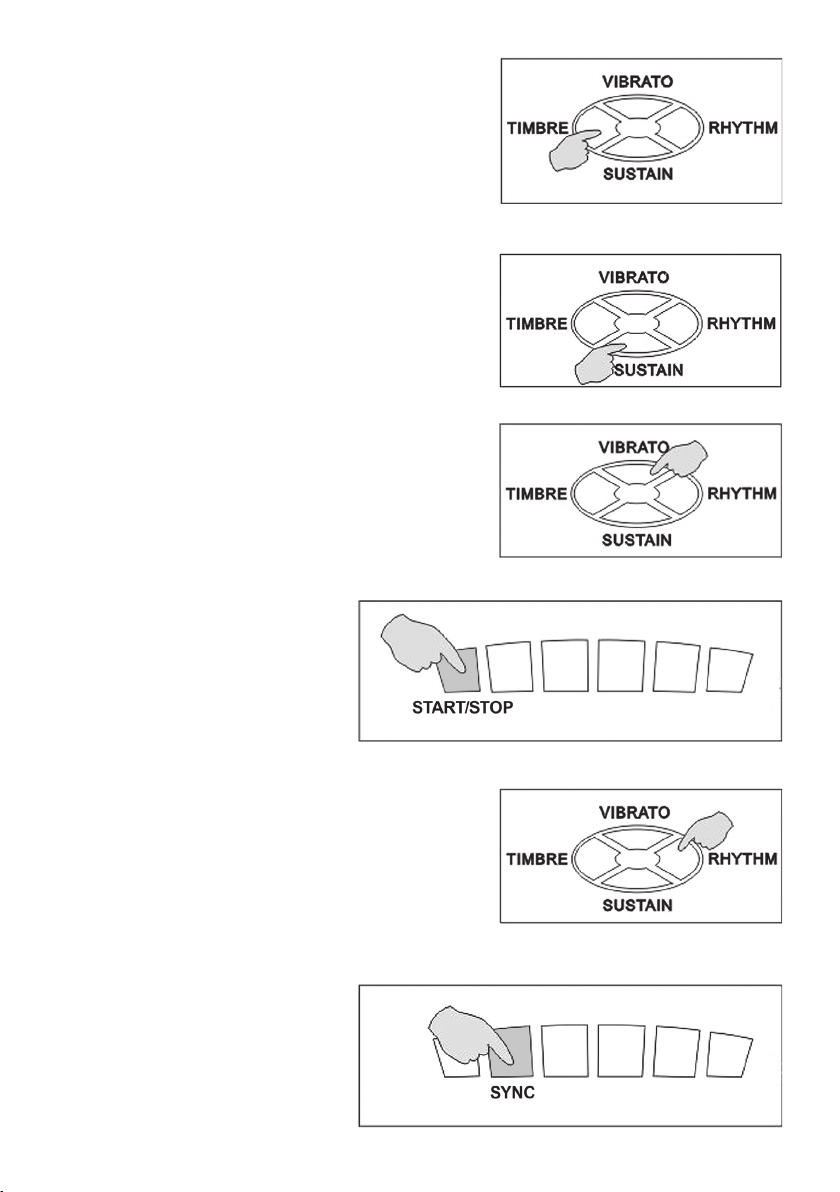
“08” тембр.
2) Вы также можете изменить тембр,
нажимая кнопки “+” и “-”. Если кнопки с цифрами в данный момент отвечают за другую функцию, нажмите
кнопку [TIMBRE], чтобы настроить
тембр.
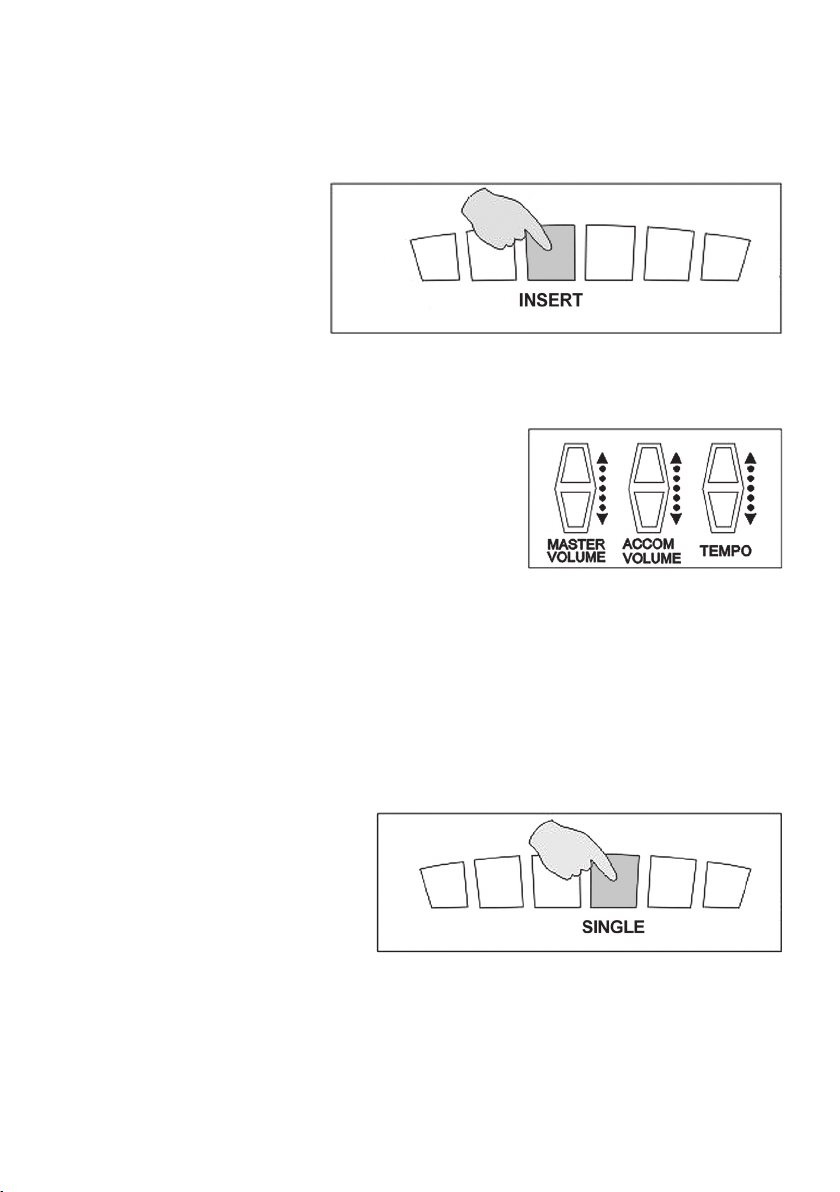
3) Функция “Сустейн” (Послезвучие)
Нажмите [SUSTAIN], на экране
появится надпись “S-1” - это
значить, что функция включена.
Чтобы отключить эту функцию, снова
нажмите кнопку [SUSTAIN], на экране
появится “S-0”.
4) Функция “Вибрато”
Нажмите кнопку [VIBRATO], чтобы
включить эту функцию, на экране
появится надпись “on” (Вкл.). Снова
нажмите эту кнопку, чтобы отключить
функцию “Вибрато”. На экране
появится надпись “OFF” (Выкл.).
3. Ритмичный аккомпанемент
В данном синтезаторе
заложено более 100
вариантов аккомпанемента.
1)
Нажмите [START/
STOP], сразу начнет
воспроизводиться один
из аккомпанементов
номер текущего аккомпанемента.
Для выбора используется тот же
способ, что и для выбора тембра.
2) Функция синхронизации:
Если Вы самостоятельно задали ритм
и хотите синхронизировать с ним
аккомпанемент, нажмите [SYNC].
На экране синтезатора начнет мигать точка, в соответствии с
установленным ритмом.
Теперь нажмите
одну из 19 клавиш
слева. Синтезатор
подстроит выбранный
аккомпанемент под
. Нажмите [RHYTHM] и на экране появится
6
Page 7
текущий ритм.
3) Вставка
Нажмите кнопку [INSERT], если ритм не задан, будет воспроизве-
ден проигрыш, а за ним последует соответствующий ритм. Если
нажать эту кнопку при воспроизведении ритма, в него будет вставлен проигрыш, а
за ним последует
соответствующий ему
ритм.
4) Настройка темпа
метронома
Изначально темп
метронома установлен на 120 уд./мин., Вы можете изменить
данный тем, используя кнопки ▲/▼. Если одновременно нажать
кнопки ▲ и ▼, метроном вернется к начальным настройкам
темпа 120 уд./мин. Темп метронома
варьируется в переделах от 60 уд./мин.
до 240 уд./мин., всего 46 уровней.
5)
Настройка громкости аккомпанемента
Используя кнопки ▲ и ▼, Вы можете
изменить уровень громкости аккомпанемента. Верхний уровень [A15],
нижний уровень [A00]. Уровень громкости аккомпанемента зависит
от общего уровня громкости.
4. Аккорд
1) Метод “Oдного пальца”
При активном режиме “Ритм”, нажмите кнопку [SINGLE], на экране
появится надпись “C-1”. Используйте аккомпанементную область
клавиатуры для этого метода.
Описание метода:
a) Большое трио: нажмите базовую клавишу.
b) Малое трио: одно-
временно нажмите
базовую клавишу и
черную слева.
c) Большой септаккорд:
одновременно нажмите базовую
клавишу и белую слева.
d) Малый септаккорд: нажмите базовую, белую и черную клавиши
вместе.
2) “Несколько пальцев”
При активном режиме “Ритм”, нажмите кнопку [FINGERED], на
экране появится надпись “C-2”, и Вы сможете составлять аккорды,
используя несколько клавиш в области аккомпанемента.
7
Page 8

Пример для ключа С,
существуют следующие
варианты: C, C7, CM,
CM7, CDIM, CSUS4, C9,
CM9.
3) Ручной аккорд
Если не активирован режим “Ритм” и не выбраны методы
“Одного пальца” и “Нескольких пальцев”, то каждой кнопке
ак к о м пане м е н тной
области клавиатуры
соответствует свой
аккорд.
4) Отключить аккорды
Нажмите [CHORD OFF],
чтобы отключить все
методы генерации аккорда. Теперь клавиатурой
синтезатора можно пользоваться, как обычной
клавиатурой фортепиано.
5. Ударные инструменты и программирование
1) Ударные инструменты
На данном синтезаторе заложены 8 ударных инструментов, кнопки
активации этих инструментов расположены на передней панели.
2) Программирование
Нажмите кнопку [PROG], на экране появит-
ся надпись “Prg”, теперь Вы можете задать
нужный ритм, используя кнопки ударных
инструментов.
Нажмите [PROG] снова, чтобы записать 32
позиции ударных инструментов и выйти
из программирования. Нажмите [PLAYBACK], чтобы прослушать созданный ритм,
при этом можно пользоваться аккомпанементом.
Используйте кнопку [START/STOP], чтобы остановить или продолжить воспроизведение.
6. Запись и воспроизведение
Нажмите кнопку [REC], на экране появится
надпись “rEC”. При этом начнется запись всех
нажимаемых белых и черных клавиш. Можно
запомнить 72 позиции. Для этого нажмите
кнопку [RECORD] снова, на экране появится
8
Page 9

надпись “1CH” и система выйдет из функции записи. Нажмите кнопку
[PLAYBACK] для воспроизведения записанного отрывка. На экране
появится надпись [PLY].
7. Функция обучения
1) Функция “One-key”
Нажмите кнопку [ONE KEY] на экране
появится номер текущей демо-песни.
Нажмите любую клавишу, чтобы начать
воспроизведение. После выбора демопесни кнопкой [DEMO] нажмите кнопку
[ONE KEY] чтобы выбрать другую песню.
2) Обучение
Сначала нажмите кнопку [GUIDE], затем
нажмите любой из ключей, начнется
воспроизведение мелодии. Если Вы играете на инструменте, мелодия прервется и
возобновится после окончания игры на
инструменте.
9
Page 10

Данная сехема имеет информационный характер и может быть изменена, в целях улечшения качества
продукта, без предварительного предупреждения.
МОНТАЖНАЯ СХЕМА
10
Page 11

По истечении срока службы товара, необходимо обратиться в
сервисный центр за консультацией по дальнейшей эксплуатации
товара. В противном случае дальнейшая эксплуатация может повлечь
невозможность нормального использования товара.
Срок службы данного изделия - 3 года с момента продажи
Изготовитель “ЭЛЕНБЕРГ ЛИМИТЕД”, Великобритания
Адрес: 35 Бромптон Роад, Кнайтсбридж Лондон СВ3 ИДЕ
Сделано в Китае. ”ЭЛЕНБЕРГ ЭЛЕКТРИК КОМПАНИ ЛТД”
А08 Р2-Б4 билдинг, Кеджинан 2 Роад, С энд Т Индастри Парк,
11
Шензень, Гуандонг Провинс, Китай.
Page 12

DIGITAL ELECTRONIC KEYBOARD
MS-5420
USER MANUAL
Page 13

PRECAUTIONS
READ THE FOLLOWING PRECAUTIONS CAREFULLY BEFORE YOU BEGIN.
KEEP THIS PRECAUTIONS SECURELY FOR FUTURE REFERENCE!
Please obey the announcements, before you use the organ, it can help you
avoid hurting yourselves or others, and avoid damaging the electronic or
gan or other exterior equipments.
Announcements as follows, but not only be limited by this.
• Neither take the liberty to dismantle this piano, nor make any changes
inside it Incase of any anomalous functioning, stop using immediately
and contact us for repairs by Our qualified maintenance personnel.
• Place this piano away from rain drops, water, or damp. Avoid putting a
container that holds water on the piano in case die water spills inside the
piano.
• In the event of a fray in the pin wire of the AC power adaptor, a sounding
failure, an alien odour, or smoke, immediately switch the piano off and
unplug it, then ask for our qualified maintenance personnel.
• Use the required power adaptor. Using a wrong adaptor will bring about
damage or excessive heat to the piano.
• Unplug the piano before cleaning it and avoid using wet hands to plug
or unplug it
• Check the plug at regular intervals and remove dirt from it.
• Do not let the wire of the AC power adaptor near heat like radiator, etc.
Avoid excessively bending the wire, putting heavy objects on it, leaving
it in the middle of the aisle, or avoid entanglement around the wire with
other things.
• Remember to cup the plug in your hand to pull it out instead of dragging
the wire.
• Do not plug this piano into a multiple socket because it might result in
a deteriorated tone as well as a socket overheating.
• Unplug the piano while leaving it unused or during a lightning storm.
• Switch both the piano and other equipment off before connecting them
to each other. Turn the volume to the minimum before switch on or off
the equipment.
• Never put the piano on an insecure place in case.
• Use a dry and soft cloth to clean the piano. Using liquid like paint, organic solvent, or chemical steep is strictly forbidden. Besides, putting
ethane plastic materials on the piano may also cause the fading of the
colour of the panel or of the keyboard
• Never sit or put heavy objects on the piano. Never use strength to excess
when operating the panel and plugging or unplugging.
• Never play the piano long to the maximum volume, which might cause a
permanent hearing disorder.
-
13
Page 14

CONTENTS
I. NAME AND DISTRIBUTION OF FUNCTION KEYS .................................. 15
II. PREPARATION FOR PERFORMANCE .................................................... 15
1. INSTALLATION OF BATTERIES ....................................................... 15
2. EXTERNAL POWER ........................................................................ 16
3. MICROPHONE / EXTERNAL SPEAKER ............................................. 16
III. BASIC METHOD OF PERFORMANCE ................................................... 16
1. PERFORMANCE OF DEMO SONGS .................................................. 16
2. SELECTION OF TIMBRE ................................................................. 16
3. RHYTHMIC ACCOMPANIMENT ...................................................... 17
4. CHORD ........................................................................................ 18
5. PERCUSSION PERFORMING AND PROGRAMMING ........................... 19
6. RECORD AND PLAYBACK .............................................................. 19
7. TEACHING FUNCTION .................................................................. 20
14
Page 15

I. NAME AND DISTRIBUTION OF FUNCTION KEYS
1. SPEAKER
2. POWER SWITCH KEY
3. ONE KEY
4. GUIDE
5. DEMO
6. PROGRAM
7. RECORD
8. PLAY BACK
9. START/STOP
10. SYNC TIMBRE
11. INSERT VIBRATO
12. SINGLE SUSTAIN
13. FINGERED
14. CHORD OFF
15. DIGITAL DISPLAY
16. NUMBER BUTTONS
17. MASTER VOLUME
18. ACCOM VOLUME
19. TEMPO
20. PERCUSSION KEYS
21. TIMBRE
22. VIBRATO
23. SUSTAIN
24. RHYTHM
25. ACCOMPANY KEYBOARD AREA
II. PREPARATION FOR PERFORMANCE
1. Installation Of Batteries
This unit uses 6 pieces of “D” size batter-
ies. Open the battery compartment cover on
the keyboard. According to the positive and
negative polarity on the cell, insert the batteries one by one, then replace the cover.
NOTES: If the battery voltage drops too low,
the sound of the keyboard will become deteriorated or distorted. When
this happens, install a complete set of six new batteries. It is recommended to remove the batteries when the keyboard is not in use.
15
Page 16

2. External Power
Insert the plug of the standard converter into on the rear panel of the
keyboard Pay attention to the voltage which must be as same as the
rated voltage and the pole of plug.
When you do not play the keyboard, be sure to
disconnect the plug from the power outlet
3. Microphone/External Speaker
1) Insert the plug of the microphone (not in-
cluded) into the microphone jack of the
keyboard and you can enjoy playing and singing.
2) Insert the plug of an external speaker into the speaker jack and th
playing effect will be enhanced.
III. BASIC METHOD OF PERFORMANCE
Press power switch key, the digital screen lights, and the system is in the
standby state. Then press the [MASTER VOLUME] button [
adjust the volume, When you turn on the keyboard, the tacit volume choice
is Level 10, there are fifteen levels in all.
▲] or [▼] , you can
1. Performance of Demo Songs
Press [DEMO] button, the digital screen dis-
plays “d-1”, the first demonstration song will
be played repeatedly. If you want to choose another song, press the [DEMO] button to stop the
broadcasting. Press the button again, the next
one will be played, and the screen will display
“d-2“, and the third one, the screen displays “d3“, like this, there are eight pieces of songs for choosing. The rate of the songs can be adjusted by [▲] or [▼]
of tempo button.
2. Selection of Timbres
There are 100 timbres options saved in this unit, you can choose from
“tOO“ to “t99” freely.
1) When you turn on the unit, the stored timbre
“ tOO “ is piano, you can choose the timbre
that you need by pressing the number keys.
For example, when you select “08” timbres,
press the number “0” first, and then press
the number “8”, the digital will display “t08”,
16
Page 17

and now you can perform the timbre
“08” which you have selected.
2) Press the button [ + ] or [ — ] , you also
can choose the timbre that you need. If
the number keys are controlled by the
rhythm, you should press the timbre
key to choose the timbre.
3) Sustain Function
Press [SUSTAIN] button, the digital
screen will display “S-l”, and the sustain function is on, the performance
keyboard will emerge the sustain effect. Press the button again, the screen
will display “S-0”, the function is off.
4) Vibrato Function
Switch on [VIBRATO] button, the digi-
tal screen will display “on”, and the vibrato function is on, the performance
keyboard will emerge the vibrato effect. Press it again, the screen displays
“OFF”, the function will be off.
3. Rhythmic Accompaniment
There are 100 rhythm op-
tions saved in the organ,
from “rOO” to “r99* for you
to choose.
1) Press [START/STOP]
button, the rhythm accompaniment starts
immediately. Press button [RHYTHM], the digital screen displays the
current number, and press the number keys to control the change of the
rhythms, and now you can choose the
rhythm that you need at your option
(The same method as the timbre selection).
2) Synchronism Function:
In the state of not starting the automatic rhythm, press the button
[SYNC], the first round
point in the digital
screen will start flashing for each beat for the
preparatory state.
And now press any key
of the accompany key-
17
Page 18

board area (1-19 from the left), the automatic accompaniment will
start immediately.
3) Inserted Function
Press button [INSERT], if it is no rhythm, the unit will play a period of
intermezzo first, and then turn to the homologous normal rhythm.
If the rhythm is on,
the unit will insert a
period of intermezzo into the pristine
rhythm, and then
turn to the homologous normal rhythm.
4) Adjustment of Metronome Tempo
The metronome tempo is preset to 120 beats/minute, press the speed
button [▲] or [▼], you can quicken or retard the metronome tempo.
If press [▲] and [▼] at the same time, the
tempo will return to 120 beats/minute.
Metronome tempo can be adjusted from
60 beats/minute to 240 beats/minute,
there are 46 levels in all.
5) Adjustment of Accompany Volume
Press button [▲] or [▼], they can increase
or decrease the accompany volume, the highest volume is [A15] ,the
lowest volume is [A00] . And the accompany volume is controlled by
the master volume.
4. Chord
1) Single-finger Chord
In the state of rhythm, press button [SINGLE] , and the digital screen
will display “C-1” , you can perform the single-finger chord by different finger-playing methods in accompany keyboard area.
Single-finger Chord Method:
a) Big trio: press the ba-
sic voice key.
b) Small trio: press the
basic key and a black
key on its left side simultaneously.
c) Genus hepta: press the
basic key and a white key on its left side simultaneously.
d) Small hepta: press the basic key, a black key and a white key si-
multaneously.
2) Fingered
In the state of rhythm, press [FINGERED] button, the digital screen will
display “C-2” , and you can perform the multi-finger chord by different finger-playing methods in accompany keyboard area.
18
Page 19

Make key C for the ex-
ample, the method of
the multi-fingered includes C, C7, CM, CM7,
CDIM, CSUS4, C9, CM9.
3) Manual Chord
If it is no rhythm and press the single-finger of multi-fingered key,
the timbres of the accompany keyboard area are the homologous
chord, and now you can
perform the manual
chord freely.
4) Chord Off
Press [CHORD OFF] but-
ton, the single-finger or
Finger chord stop, the
button of accompany keyboard area does not control
the chord change of the rhythm, you can perform on
the whole keyboard.
5. Percussion Performing and programming
1) Percussion Performing
There are eight kinds of front-panel percussion buttons, press on of
them, you can get an appropriate percussion sound.
2) Programming
Press the button [PROG] , the digital screen
will display “Prg” ,now you can press the button of percussion to edit a group of rhythms
as you like.
Press the button [PROG] again or record 32
pieces of percussions, the system will quit
this function. Press the button [PLAYBACK],
the self-edited percussion rhythm will be
played in circle, and the rhythm chord can be selected to accompany. Press the button [PLAYBACK]
again or [START/STOP] to stop playing.
6. Record and Playback
Press [REC] button, the digital tube will display
“rEC” ,and press any one of the white or black
buttons and panel percussion will be stored.
Press the button [RECORD] again or record 72
pieces of pitches, the digital screen will display
19
Page 20

“1CH”, and the system quit the record function. Press the button [PLAYBACK] , the digital screen display [PLY], and broadcast the pitch which is
recorded.
7. Teaching Function
1) One-key Function
Press button [ONE KEY] , the digital screen
will display the number of demo songs at
the moment. By pressing any one of the buttons, the main melody of the song will be
performed. After selecting demo songs by
pressing the [DEMO] button, press the button [ONE KEY] to select the relative demo
song.
2) Teaching Function
Press the button [GUIDE] , and then press
any one of the keys, the melody will be performed. If you play the instrument at this
time, the main melody will be shielded. The
main melody will be regained if you do not
play the instrument. You can also select
demo songs by pressing the button [DEMO].
20
Page 21

This circuit diagram is only for your reference. Forgive us not to give an urgent announcement if any data of
circuit element is timely charged.
THE CIRCUIT DIAGRAM OF ELECTRONIC KEYBOARD
21
Page 22

Address to service center for consultation, when the service life of product has expired. Otherwise the further operation can entail impossibility of
normal use of the product.
Service life of the given product - 3 years from the moment of sale
22
 Loading...