

Page 1
СИНТЕЗАТОР MS -4920
РУКОВОДСТВО ПОЛЬЗОВАТЕЛЯ
Page 2

ВВЕДЕНИЕ
• 49 ключей фортепиано
• 10 тембров/10 ритмов/6 ударных инструментов
• Режимы “Один палец”, “Комбинация клавиш”, функция “Авто-бас”
• Аккорд/Вибрато/Сустейн(Послезвучие)/Вставка/Бас
•
Программирование ритма/Запись/Воспроизведение/Авто-отключение
• 8 демо-песен
• 25-уровня темпа/8-уровней громкости
• Масштабная интеграция/Логическая управляющая матрица
• Аудио выход/вход для микрофона
• Питание от электросети через выпрямитель
СПЕЦИФИКАЦИЯ
Размеры: 662mm X 228mm X 67mm
Вес: 1.42 Kg
Клавиши: 49 шт
Аккорды:
Диапазон: F2-F6
Ритмы: 10
Тембры: 10
Выходная мозность: ≥ 3 Вт X 2
Питание от сети: выпрямитель на 9 В
“Один палец”, “Игра перебором”, “Авто-бас”
2
Page 3

СОДЕРЖАНИЕ
I. ОПИСАНИЕ ПРИБОРА ........................................................................ 4
II. ПОДГОТОВКА ПРИБОРА К ИСПОЛЬЗОВАНИЮ ................................... 4
1. Установка батарей ............................................................................ 4
2. Подключение к электросети ............................................................. 4
3. Подключение микрофона и колонок ................................................ 5
III. ЭКСПЛУАТАЦИЯ ................................................................................ 5
1. Мелодия и ударные .......................................................................... 6
2. Демо-песни ...................................................................................... 5
3. Установка тембра .............................................................................. 5
4. Запись/Воспроизведение .................................................................. 6
5. Автоматический ритм, программирование ритма ............................ 6
6. Аккорды и функция “Авто-бас” ........................................................ 6
7. Темп .................................................................................................. 6
IV. МЕРЫ ПРЕДОСТОРОЖНОСТИ ............................................................. 7
3
Page 4
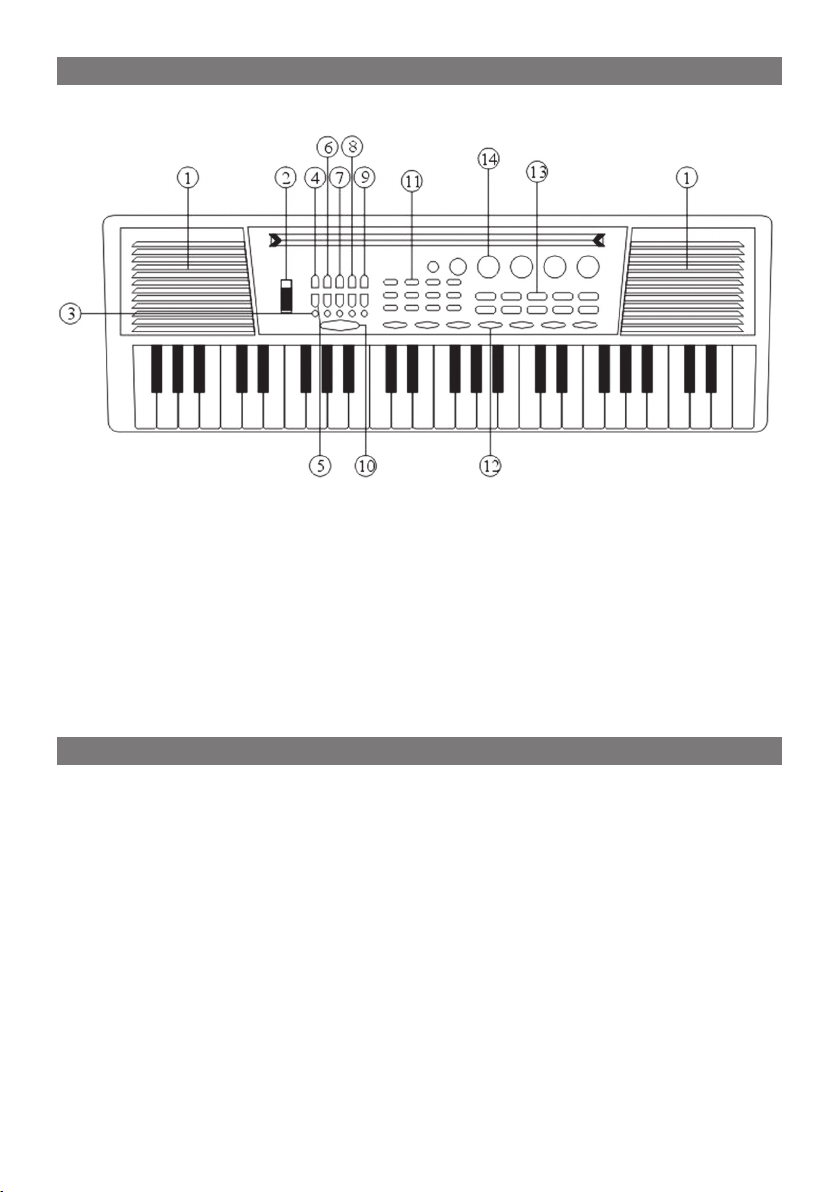
I. ОПИСАНИЕ ПРИБОРА
1. Динамики
2. Питание Вкл./Выкл.
3. Индикатор режима ожидания
4. Переустановить
5. Стоп
6. Регулятор темпа
7. Запись/Воспроизведение
8.
Программирование
ритма
9. Демо-песни
10. Громкость
11. Тембр
12. Аккорды
13. Ритм
14. Ударные инструменты
II. ПОДГОТОВКА ПРИБОРА К ИСПОЛЬЗОВАНИЮ
1. Установка батарей
Прибор работает от 6 батарей размера “5”. Откройте отсек для
батарей. По одной вставьте батарейки в соответствии с маркировкой
“+” и “-”.
ЗАМЕЧАНИЕ: Если заряд батарей подойдет к концу, звук синтезатора
станет не стабильным. Если это произошло, замените все шесть
батарей. Рекомендуется вынимать батареи, если Вы не собираетесь в
ближайшее время использовать прибор.
2. Подключение к электросети
Подключите стандартный выпрямитель на 9В к разъему, располо-
женному на задней панели синтезатора. Убедитесь, что подаваемое
выпрямителем напряжение соответствует напряжению, указанному на
разъеме для подключения.
от сети
.
После использования, отключите прибор
4
Page 5
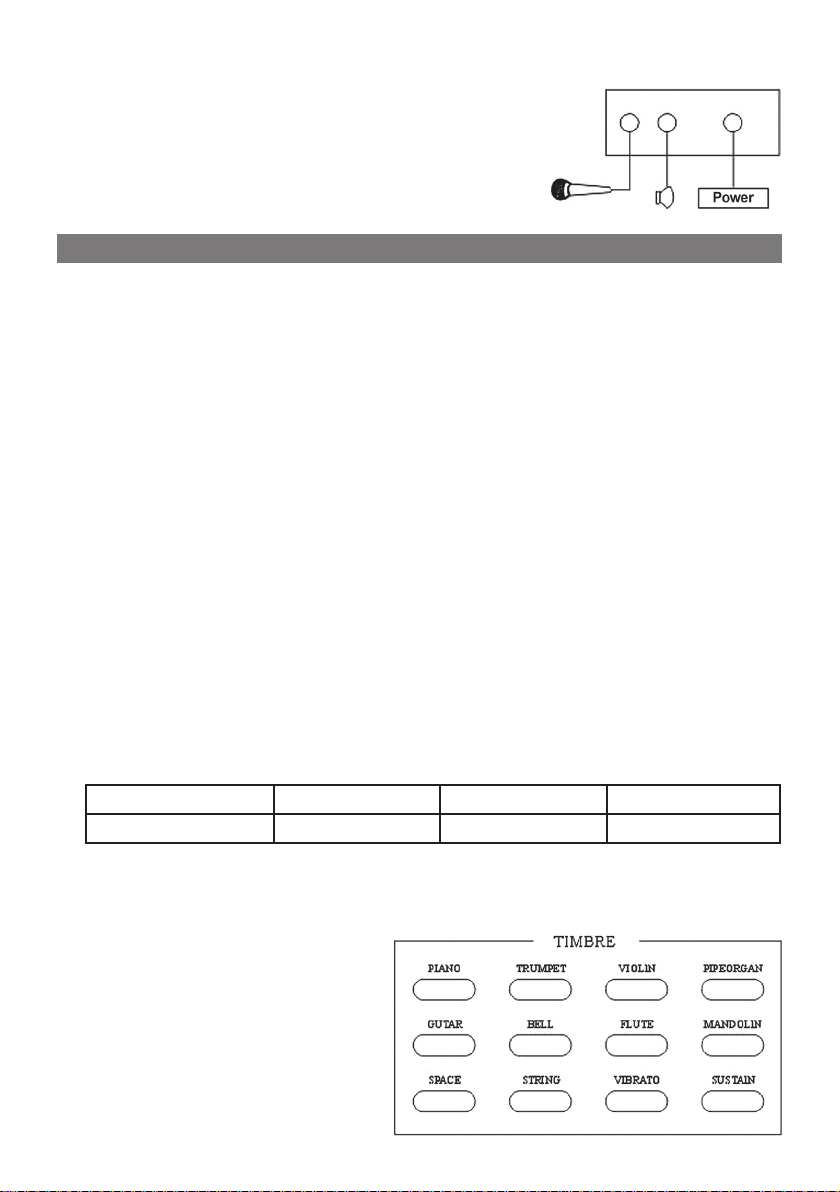
3. Подключение микрофона и колонок (не прилагаются)
1) На задней панели прибора имеется
специальный разъем для подключения
микрофона .
2) Через разъем, расположенный на задней
панели прибора, можно подключить
колонки - это улучшит звучание музыки.
III. ЭКСПЛУАТАЦИЯ
1. Мелодия и ударные
1) Переключите кнопку ПИТАНИЕ в положение “Вкл” (ON).
Отрегулируйте уровень громкости. Если не использовать
инструмент в течение 3-х минут, он подаст напоминающий сигнал
и перейдет в режим ожидания.
2) Регулировка громкости: Громкость мелодии и ударных инструментов регулируется кнопкой ГРОМКОСТЬ +/- (Vol+/Vol-).
Нажмите посередине кнопки ГРОМКОСТЬ, чтобы установить изначальный уровень громкости.
3) Touch “PERCUSSION” buttons and you can play all kinds of percussion
sounds.
2. Демо-песни
1) Нажмите кнопку DEMO 1, замигает красный индикатор и начнется
последовательное воспроизведение демо-песен. Нажмите эту
кнопку снова, чтобы остановить воспроизведение.
2) Чтобы запустить повторяющееся воспроизведение одной демопесни нажмите кнопку DEMO 2.
3) Во время воспроизведения демо-песни можно нажать кнопку
ТЕМБР (TIMBRE), чтобы изменить ее тембр или кнопку ТЕМП (TEMPO), чтобы изменить темп (25 ступеней).
СПИСОК ДЕМО-ПЕСЕН
1. American Patrol 3. Besame Mucho 5. Little Brown Jug
2. Fly me to the Moon
4. Captown Races 6. Songs of Spring 8. Nocturne
7. Music Box Dancer
3. Установка тембра
1) После включения синтезатора, он настроен на тембр фортепиано.
Чтобы установить другой тембр, нажмите соответствующую кнопку, находящуюся в разделе
“TIMBRE”.
2) Вы можете добавить
эффекты “Вибрато” и
“Сустейн” [Послезвучие]
(VIBRATO, SUSTAIN) к
выбранному тембру, чтобы
изменить его звучание.
5
Page 6
4. Запись/Воспроизведение
1) Чтобы войти в режим записи, нажмите кнопку ЗАПИСЬ (RECORD),
при этом загорится индикатор. После этого все нажимаемые
клавиши будут запоминаться (максимальное количество нот - 42).
Если память заполнена, индикатор погаснет.
2) Нажмите кнопку ВОСПРОИЗВЕДЕНИЕ (PLAY), чтобы прослушать
записанные ноты. При этом загорится индикатор и начнется
воспроизведение. Индикатор погаснет, когда закончится воспроизведение. Для повторного прослушивания, снова нажмите
эту кнопку. Чтобы создать новую запись повторите предыдущие
шаги.
5. Автоматический ритм, программирование ритма
1) При нажатии кнопки ПРОГРАММА (PROG) загорится соответствующий индикатор. После синтезатор готов запомнить
последовательность ударных инструментов. Максимальная
последовательность - 32 ударных инструмента. Если память
заполнена, индикатор погаснет. Нажмите кнопку NULL-PLAY для
повторяющегося воспроизведения записанного ритма. Чтобы
составить другую программу снова нажмите кнопку ПРОГРАММА.
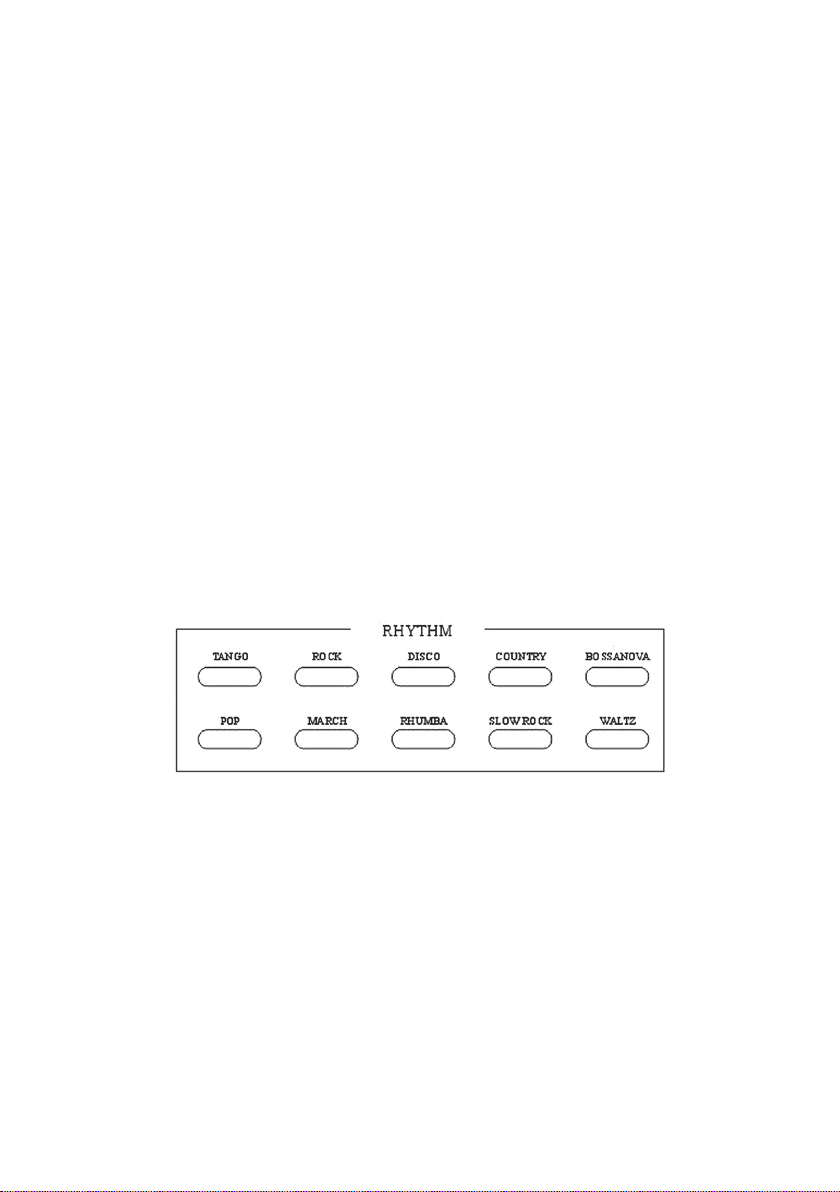
2) Нажмите одну из кнопок в разделе РИТМ (RHYTHM), включится
подсветка этой кнопки и начнется воспроизведение соответствующего ритма. Чтобы сменить ритм нажмите другую кнопку в этом
разделе. Чтобы выйти их этого режима нажмите кнопку СТОП.
3) Если синтезатор перестал реагировать на Ваши действия, нажмите
кнопку ПЕРЕУСТАНОВИТЬ (RESET).
6. Аккорды и функция “Авто-бас”
1) Существуют два способа создания аккордов: “Один палец” (SINGLE) и “Комбинация клавиш” (FINGER). Кнопки соответствующих
режимов находятся в разделе “АККОРД” (CHORD). При нажатии
на эти кнопки загорается индикатор. Выбрав режим создания
аккордов, используйте для их создания клавиши с 1 по 19. Чтобы
отменить любой из этих режимов, нажмите кнопку NORMAL.
2) Выберите режим “Один палец” или “Комбинация клавиш” и нажмите
кнопку SYNC. Индикатор начнет мигать в такт с предварительно
запущенным ритмом. После этого, нажимая клавиши с 1 по 19, Вы
будете получать синхронизированные с ритмом аккорды. Также
активируется режим “Авто-бас”.
6
Page 7

3) Звучание и тембр аккордов можно изменить, используя кнопки
АККОРД (CHORD) или БАС (BASS). Используйте кнопку ВСТАВКА
(FILL-IN), чтобы вставить в ритм специальный звук.
7. Темп
Всего доступно 25 градаций темпа. Нажатие кнопки БЫСТРЕЕ
(FAST) или МЕДЛЕННЕЕ (SLOW) увеличивает или уменьшает темп
соответственно. Одновременное нажатие этих кнопок возвращает
темп к изначальному значению.
IV. МЕРЫ ПРЕДОСТОРОЖНОСТИ
1. Перед подключением синтезатора к внешнему устройству, отключите питание синтезатора, и устройства к которому производится
подключение.
2. Не оставляйте прибор в пыльном или влажном помещении. Синтезатор
должен находится вдали от источников тепла. Не оставляйте прибор
под прямыми солнечными лучами на долгое время.
3. Рядом с клавиатурой не должно находится веществ, содержащих
щелочь или кислоту - это может привести к окислению контактов.
4. После каждого использования отключайте прибор от электросети.
5. Вынимайте батареи, если не собираетесь использовать прибор в
течении длительного периода времени.
6. Поддерживайте чистоту клавиатуры, регулярно протирая ее сухой
мягкой тряпочкой.
7
Page 8

Данная сехема имеет информационный характер и может быть изменена, в целях улечшения качества
продукта, без предварительного предупреждения.
МОНТАЖНАЯ СХЕМА
8
Page 9

По истечении срока службы товара, необходимо обратиться в
сервисный центр за консультацией по дальнейшей эксплуатации
товара. В противном случае дальнейшая эксплуатация может повлечь
невозможность нормального использования товара.
Срок службы данного изделия - 3 года с момента продажи
ТОВАР НЕ ПОДЛЕЖИТ
ОБЯЗАТЕЛЬНОЙ СЕРТИФИКАЦИИ
А08 Р2-Б4 билдинг, Кеджинан 2 Роад, С энд Т Индастри Парк,
Изготовитель “ЭЛЕНБЕРГ ЛИМИТЕД”, Великобритания
Адрес: 35 Бромптон Роад, Кнайтсбридж Лондон СВ3 ИДЕ
Сделано в Китае. ”ЭЛЕНБЕРГ ЭЛЕКТРИК КОМПАНИ ЛТД”
9
Шензень, Гуандонг Провинс, Китай.
Page 10

DIGITAL ELECTRONIC KEYBOARD
MS -4920
РУКОВОДСТВО ПОЛЬЗОВАТЕЛЯ
Page 11

INTRODUCTION
• 49 Style-Piano Keys
• 10 Timbres/10 Rhythms/6 Percussions
• Single Finger & Fingered Chords/Auto-bass chord function
• Chord/Vibrato/Sustain/Fill-in/Bass
• Rhythm Programming/Record/Playback/Auto-alarm
• 8 Demonstration Songs
• 25-Level Tempo Control/8-Grade Volume Adjustable
• Large Scale Integration/Matrix Controlling Logical Circuit
• Speaker Out/Microphone
• External AC Power
SPECIFICATION
Dimension: 662mm X 228mm X 67mm
Weight: 1.42 Kg
Keyboard: 49 Style Piano Keys
Chord: Single Finger & Fingered Chords & Auto-bass chord function
Tone Area: F2-F6
Rhythm: 10
Timbre: 10
Output Power: ≥3WX2
Rated Voltage: DC 9V
11
Page 12

СОДЕРЖАНИЕ
I. Name And Distribution of Function Keys ........................................... 13
II. Preparation For Performance ............................................................ 13
1. Installation of Batteries .................................................................... 13
2. External DC Power ........................................................................... 13
3. Microphone / Loudspeaker Output .................................................. 14
III. Basic Method Of Performance ........................................................... 14
1. Melody and Percussion ..................................................................... 15
2. Demonstration Songs ....................................................................... 14
3. Selection of Timbres ........................................................................ 14
4. Record / Playback ............................................................................ 15
5. Auto-rhythm and Rhythm Programming .......................................... 15
6. Chord and Auto-bass chord functioon ........................................... 15
7. Tempo ............................................................................................ 15
IV. Precaution ....................................................................................... 16
12
Page 13

I. NAME AND DISTRIBUTION OF FUNCTION KEYS
1. Speakers
2. Power Switch
3. Stand-by Indicator
4. Reset
5. Stop
6. Tempo Speed
Control
7. Record / Playback
Button
8. Rhythm Programming
9. Demonstration
Songs
10. Volume
11. Timbre Selection
12. Chord Buttons
13. Rhythm Button
14. Percussions
II. PREPARATION FOR PERFORMANCE
1. Installation Of Batteries
This unit uses 6 pieces of “5” size batteries. Open the battery compart-
ment cover on the underside of the keyboard. According to the schematic positive and negative pole on the cell, push the batteries one by
one, a then replace the cover.
NOTES: If the battery voltage drops too low, the sound of the keyboard
will become deteriorated or distorted. When this happens, install a complete set of six new batteries. Better take out of the batteries if you do
not play the keyboard for a long time so as to avoid damaging to the
instrument.
2. External DC Power
Insert the plug of the standard DC converter (9V) into on the rear panel
of it and it can be used. Pay attention to the voltage which must be as
same as the rated voltage and the pole of plug.
13
Page 14

When you do not play the keyboard, be sure to take off the plug from the
power outlet.
3. Microphone/External Speaker (not included)
1) Insert the plug of the microphone into the
microphone jack of the keyboard and you
can enjoy self-playing and self-singing.
2) Insert the plug of external speaker into the
speaker jack and the playing effect will be
enhanced.
III. BASIC METHOD OF PERFORMANCE
1. Melody and Percussion
1) Turn on the power Switch to “ON” position and the green indicator
light. Set “VOLUME” button to an appropriate level then you can play.
When the instrument not to be played for three minutes, the instrument gives out alarm signal to remind you of timing off the instrument.
2) Volume control: The volume of the melody and percussion output
can be adjusted by pressing the “Volm+” or “Volum-” key. Press the
middle level of the button and the volume is in the original status.
3) Touch “PERCUSSION” buttons and you can play all kinds of percussion
sounds.
2. Demonstration Songs
1) Press “DEMO 1 “button, and the red light flashes with the demonstration songs performed one by one. Press “DEMO 1” button again and
the music would be stopped.
2) If you would like to keep a song on cycling-performance, press “DEMO
2” button to choose the songs.
3) When the songs playing, press the timbre keys can change the timbre
of the song, press the “TEMPO” button and you can have 25 grades of
tempo control.
DEMONSTRATION SONGS
1. American Patrol 3. Besame Mucho 5. Little Brown Jug
2. Fly me to the Moon
4. Captown Races 6. Songs of Spring 8. Nocturne
7. Music Box Dancer
3. Selection of Timbres
1) When you turn on the power supply, the electronic organ works as piano timbre.
While playing, once you
press one of the correlating buttons for “TIMBRE”,
the timbre will be changed.
(Fig.3)
14
Page 15

2) In accordance with your desire, you can change the voice by pressing
key for “VIBRATO” or key for “SUSTAIN” in the selection of timbres to
exchange the performance effect.
4. Record and Playback
1) The system will enter the recording mode after the “RECORD” button
is pressed with the LED lit. The notes of the pressed keys will all be
recorded in the memory (the maximum number of the notes recordable is 42). Once the memory is full, the LED is off.
2) Pressing the “PLAY” button play the stored notes once. After the
“PLAY” button is pressed, the LED will be lit and the stored notes will
start to play. Once the playing notes are completed, the LED will become dark. If you would like to listen to it again, just press the “PLAY”
button again. If you want to have a new recording, please repeat the
above steps.
5. Rhythm Programming and Auto-Rhythms
1) After the rhythm programming button (PROG) is pressed, the LED (refer to the application circuit) will be lit, pressed button of percussion
as desired will be stored in the RAM. The maximum numbers of the
percussion tones to be store are 32. Once the contents of the RAM are
full, the LED becomes dark. Press “NULL-PLAY” button repeat playing
the previously stored percussion tones. When you expect to re-program, just press “PROG” button again.
2) Press one of the rhythm buttons and the red correlating light flashes with the rhythm automatically performed. If you want to change
the rhythm, just press the other as desired. Press “STOP” button, the
rhythm will be stopped. (Fig.4)
3) Please press “RESET” key when the function of the instrument is con
fusion because of wrong operation.
6. Chord and Auto-bass-chord (Fig.6)
1) To play a chord, press the “SINGLE” or “FINGER” button in the “CHORD”
buttons and the chord indicator will be lit You can choose “SINGER” or
“FINGER” for performance and key 1-19 at this time are accompanying keys. To cancel the function, press the “NORMAL” button and the
LED is off.
2) Press “SINGER” or “FINGER” in the “CHORD” button, and then press
“SYNC” button with the chord indication LED lit to synchronize the
chord to the rhythm that was previously selected by rhythm buttons.
15
-
Page 16

Finally press a key of 1-19 to start playing a chord. The system at this
time will enter the auto-bass-chord.
3) When the chord is playing, the “CHORD” or “BASS” may be pressed to
change not only the playing chord but also the chord timbre. Press
the “FILL-IN” button to add a fill-in sound to the playing rhythm. To
disable this function, press the “NORMAL” button with the LED off.
7. Tempo
There are totally 25 speeds to be selected. Pressing the “FAST” key in-
crease the speed while pressing the “SLOW” key reduces it until the maximum or minimum speed is reached. If “FAST” and “SLOW” button are
pressed at the same time, the tempo will be in the original status.
IV. PRECAUTIONS
1. When the unit is connected to other appliances, assure yourself the both
cut off electric in advance.
2. The unit should not be at wet or dusty places, and avoids in the sun for
a long time, and must be far from heat.
3. Any of acid or alkaline matters should be kept away from the electronic keyboard to avoid contact faults by circuit oxidation. Don’t play the
electronic keyboard in a strong corrosive environment to avoid the same
the above.
4. After using the unit must be cut off electricity, and the plug of the converter pulled out.
5. When the unit doesn’t be used for a period, the batteries should be removed for avoid damaging to the parts because battery leakage.
Keep the unit clear. Wipe it frequently with dry and soft rag.
16
Page 17

This circuit diagram is only for your reference. Forgive us not to give an urgent announcement if any data of
circuit element is timely charged.
THE CIRCUIT DIAGRAM OF ELECTRONIC KEYBOARD
17
Page 18

Address to service center for consultation, when the service life of product has expired. Otherwise the further operation can entail impossibility of
normal use of the product.
Service life of the given product - 3 years from the moment of sale
18
 Loading...