

Electrolux ZVE 4110FL, ZVE 4120FL Operating Instructions Manual
Please read these operating instructions before operating your vacuum cleaner.
Operating Instructions
ZVE 4110FL, ZVE 4120FL

IMPORTANT SAFETY INSTRUCTIONS
1.
IMPORTANT SAFETY INSTRUCTIONS
READ ALL INSTRUCTIONS
BEFORE USING (THIS APPLIANCE)
When using an electrical appliance basic
precautions should always be followed, including
the following. Before connecting the cleaner to
an electrical supply outlet, ensure that the voltage
marked on the rating plate (on the underside of
the cleaner) is correct for your electrical supply.
If it does not comply, do not use the cleaner prior
to contacting the manufacturer.
WARNING – To reduce the risk of re, electric
shock, or injury:
1.
Do not leave vacuum cleaner when
plugged in. Unplug from outlet when
not in use and before servicing.
2. To reduce the risk of electric shock, do not
use outdoors or on wet surfaces.
3. This appliance is not intended for use by
persons (including children) with reduced
physical, sensory or mental capabilities, or
lack of experience and knowledge, unless they
have been given supervision or instruction
concerning use of the appliance by a person
responsible for their safety. Children should
be supervised to ensure that they do not play
with the appliance.
4.
Use only as described in this manual. Use only
manufactures recommended attachments.
5.
Do not use with damaged cord or plug. If
vacuum cleaner is not working as it should,
has been dropped, damaged, left outdoors,
or dropped in water, take it to a service centre
before using.
6.
Do not pull or carry on cord or use as a handle.
Do not close door on cord, or pull around
sharp edges or corners. Do not run vacuum
cleaner over cord. Keep cord away from
heated surfaces.
7.
Do not unplug by pulling on the cord.
To unplug, grasp the plug, not the cord.
8.
Do not handle the plug or vacuum cleaner
with wet hands.
9.
Keep hair, loose clothing, ngers and all parts
of body away from openings and moving parts.
10.
Turn all controls o before unplugging.
11. Do not use to pick up ammable or
combustible liquids, such as gasoline,
or use in areas where they may be present.
12.
Do not pick up anything that is burning
or smoking, such as cigarettes, matches,
or hot ashes.
13.
Do not use without dust bag and/or lter
in place.
14.
Do not use extension cords or outlets with
inadequate current carrying capacity.
15.
We recommend you do not use your vacuum
on carpet cleaning foams, sharp or heavy
building materials or plaster dust. They could
damage or clog the dustbag and cause failures
to other key parts in your vacuum cleaner and
render your warranty invalid.
16.
Store your cleaner indoors in a cool, dry area.
17. Unplug electrical appliances before
vacuuming them.
18.
Please remove the plug from the socket outlet
before cleaning or maintaining this appliance.
19.
If the power cord is damaged, it must be
replaced by the manufacturer, its service
agent or similarly qualied person in order
to avoid a hazard.
SERVICE & REPAIR
It is dangerous to alter the specications or modify
the product in any way. Under no circumstances
should you attempt to repair the cleaner yourself.
NB! To avoid injury and prevent damage to the
vacuum cleaner a defective cord must only be
replaced by an authorised service provider
approved by the manufacturer to avoid a hazard.
The vacuum cleaner should be serviced by an
authorised service provider and only genuine Volta
spare parts should be used.
Double Insulation
Your vacuum cleaner is double insulated. This
means that all external parts are electrically
insulated from the mains. This is done by placing
insulation barriers between the electrical and
mechanical components, making it unnecessary for
the cleaner to be earthed.
WARNING: On collection of proprietary carpet
conditioning powder, it is recommended that the
dust container is emptied and the cartridge lter
is cleaned after each use. Some of the preparations
contain substances which if left in the vacuum
cleaner for extended periods, could cause damage.
Many air fresheners, household deodorants, sprays
and polishes contain highly inammable gas
propellants, because of this it is particularly
important that these products are used strictly
in accordance with the relevant manufacturers
instructions, it is essential that none of the above
products are sprayed directly into the vacuum
cleaner or any of the lters, hose assembly or
dust chamber.
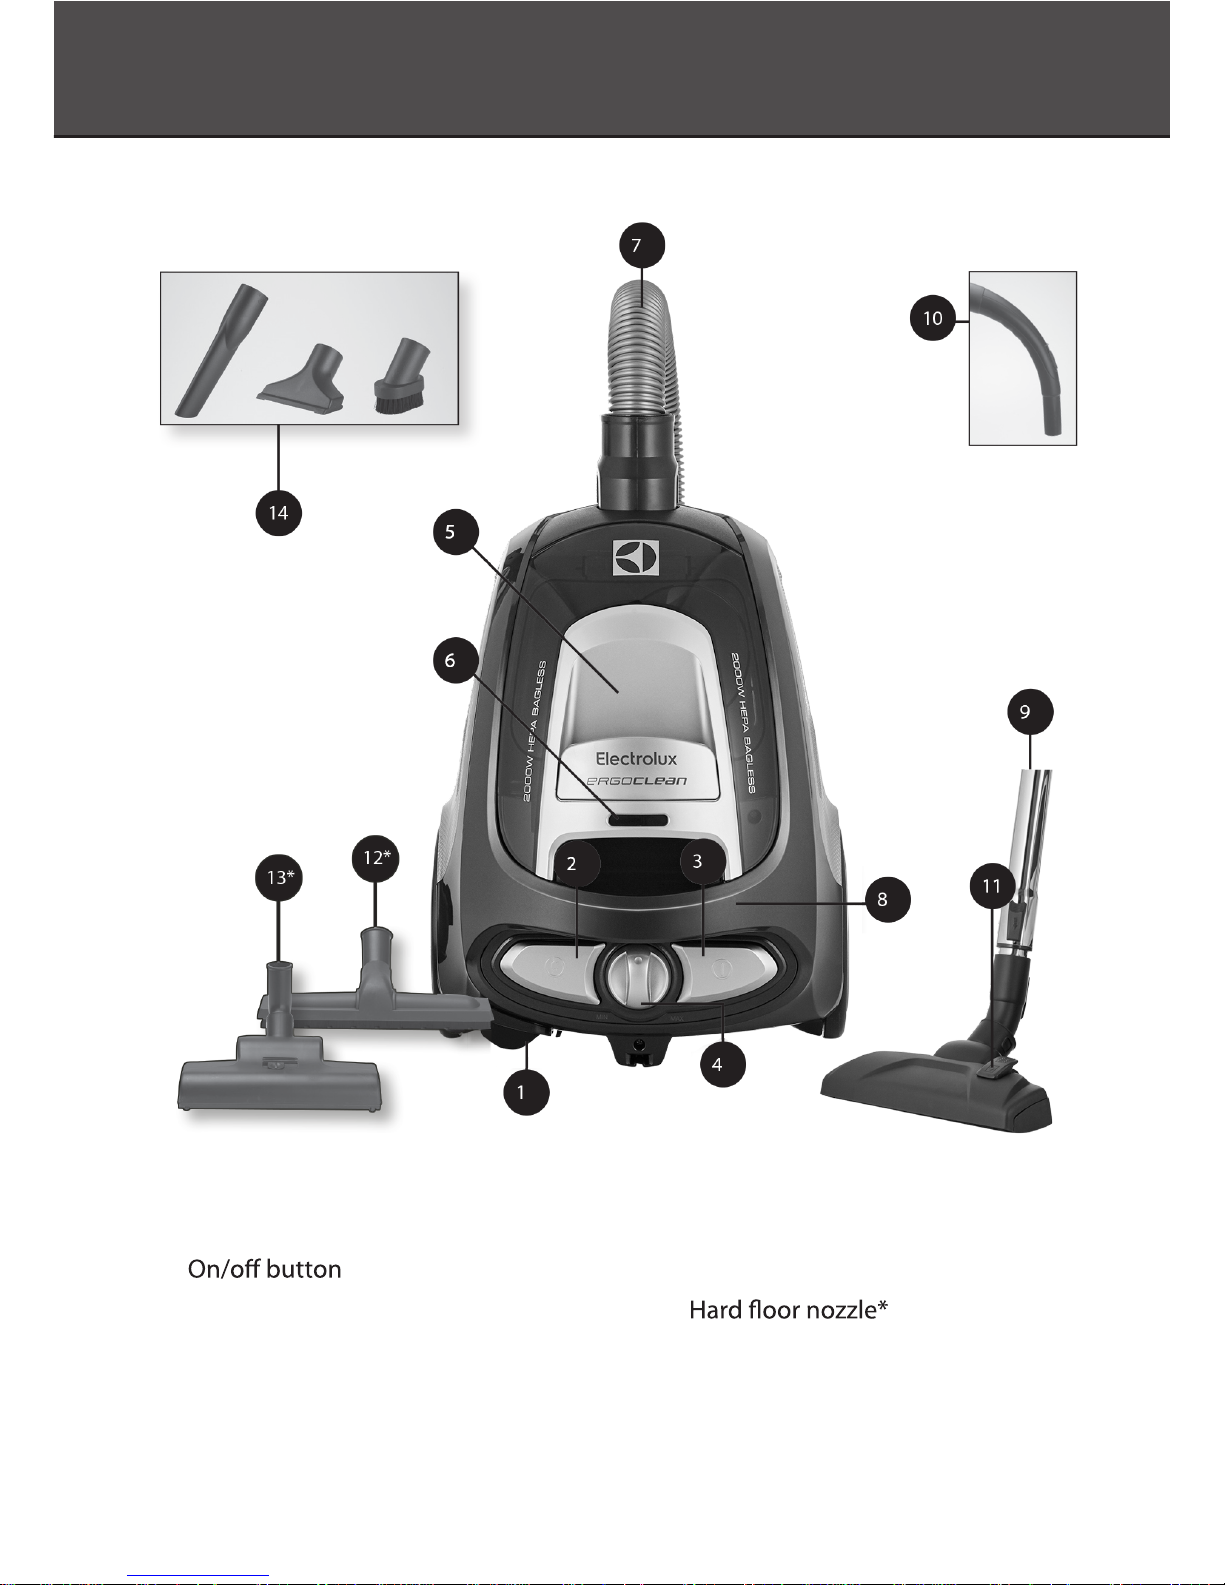
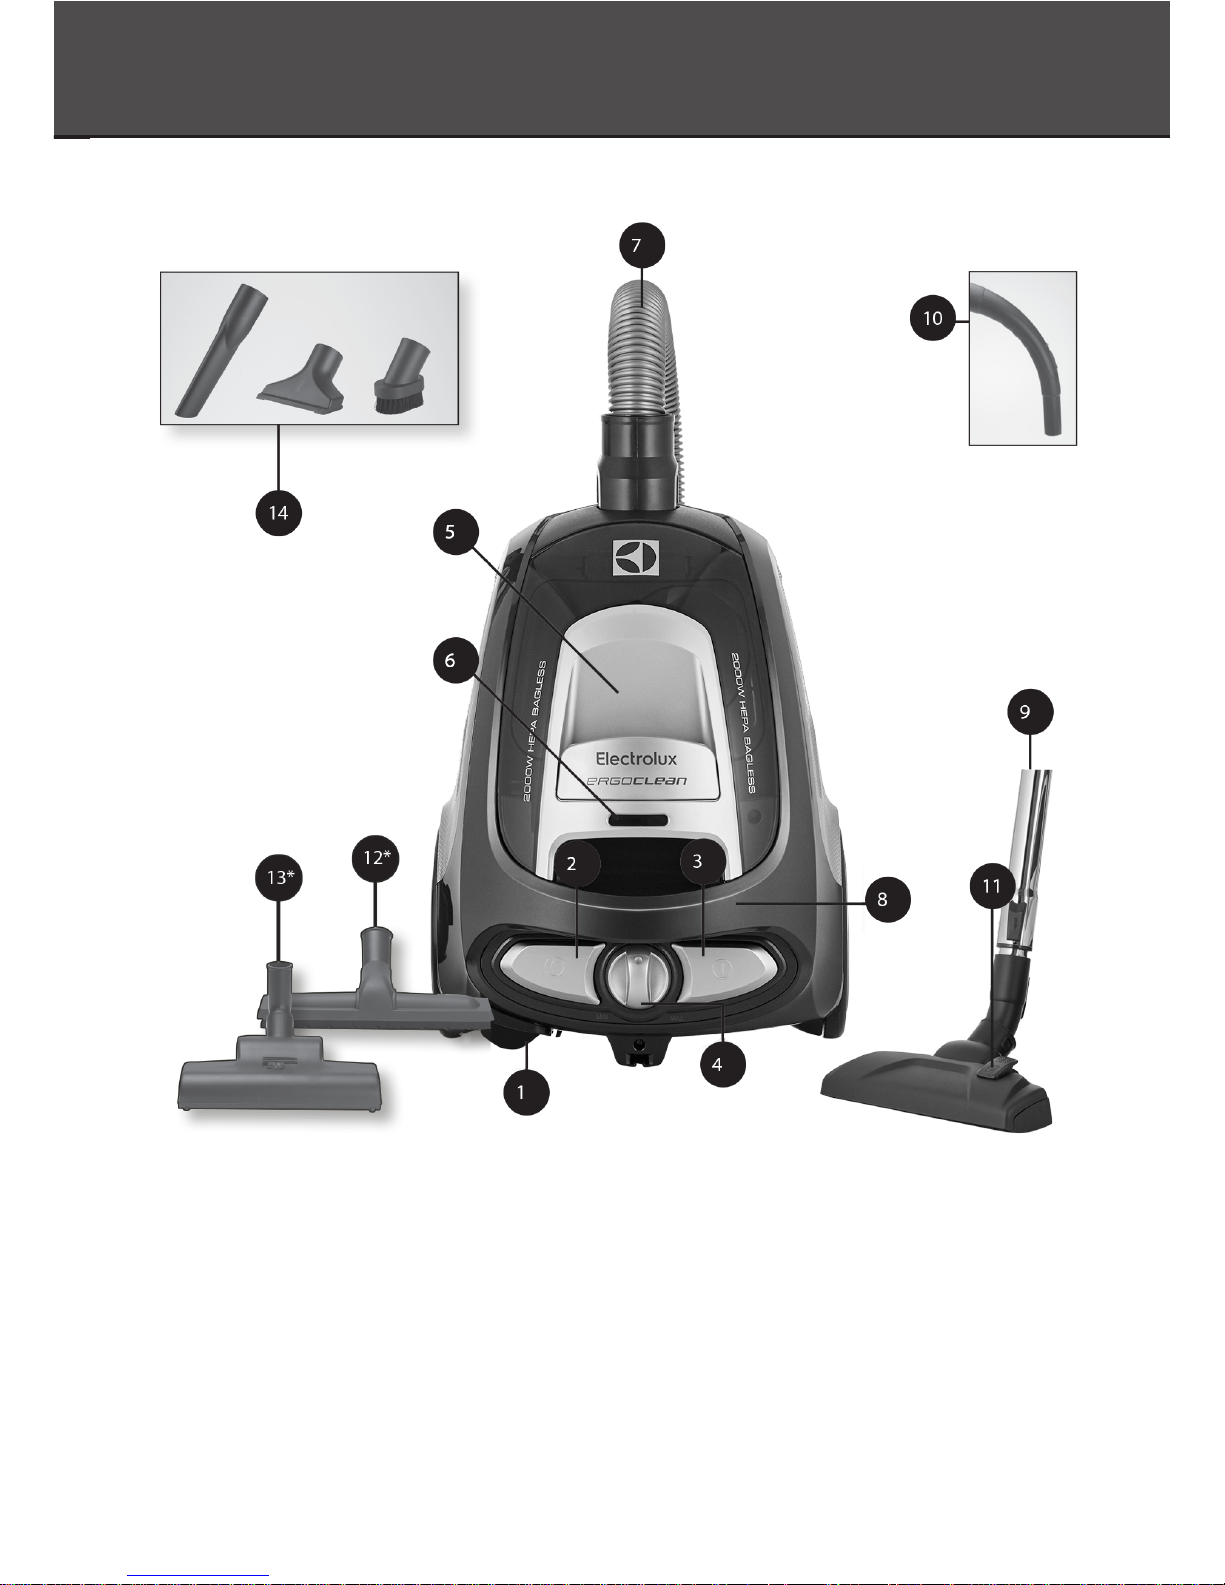
PARTS IDENTIFICATION
2.
1. Power cable
2. Cable rewind button
3.
4. Variable Suction control
5. Dust container
6. Filter indicator
7. Hose assembly
8. Carry handle
9. Telescopic tube
10. Hose handle with slide valve
11.
Dust Pro Nozzle
12.
13. Turbo pet hair nozzle*
14.
Upholstery nozzle, Crevice nozzle
and Dusting brush
*Certain models only
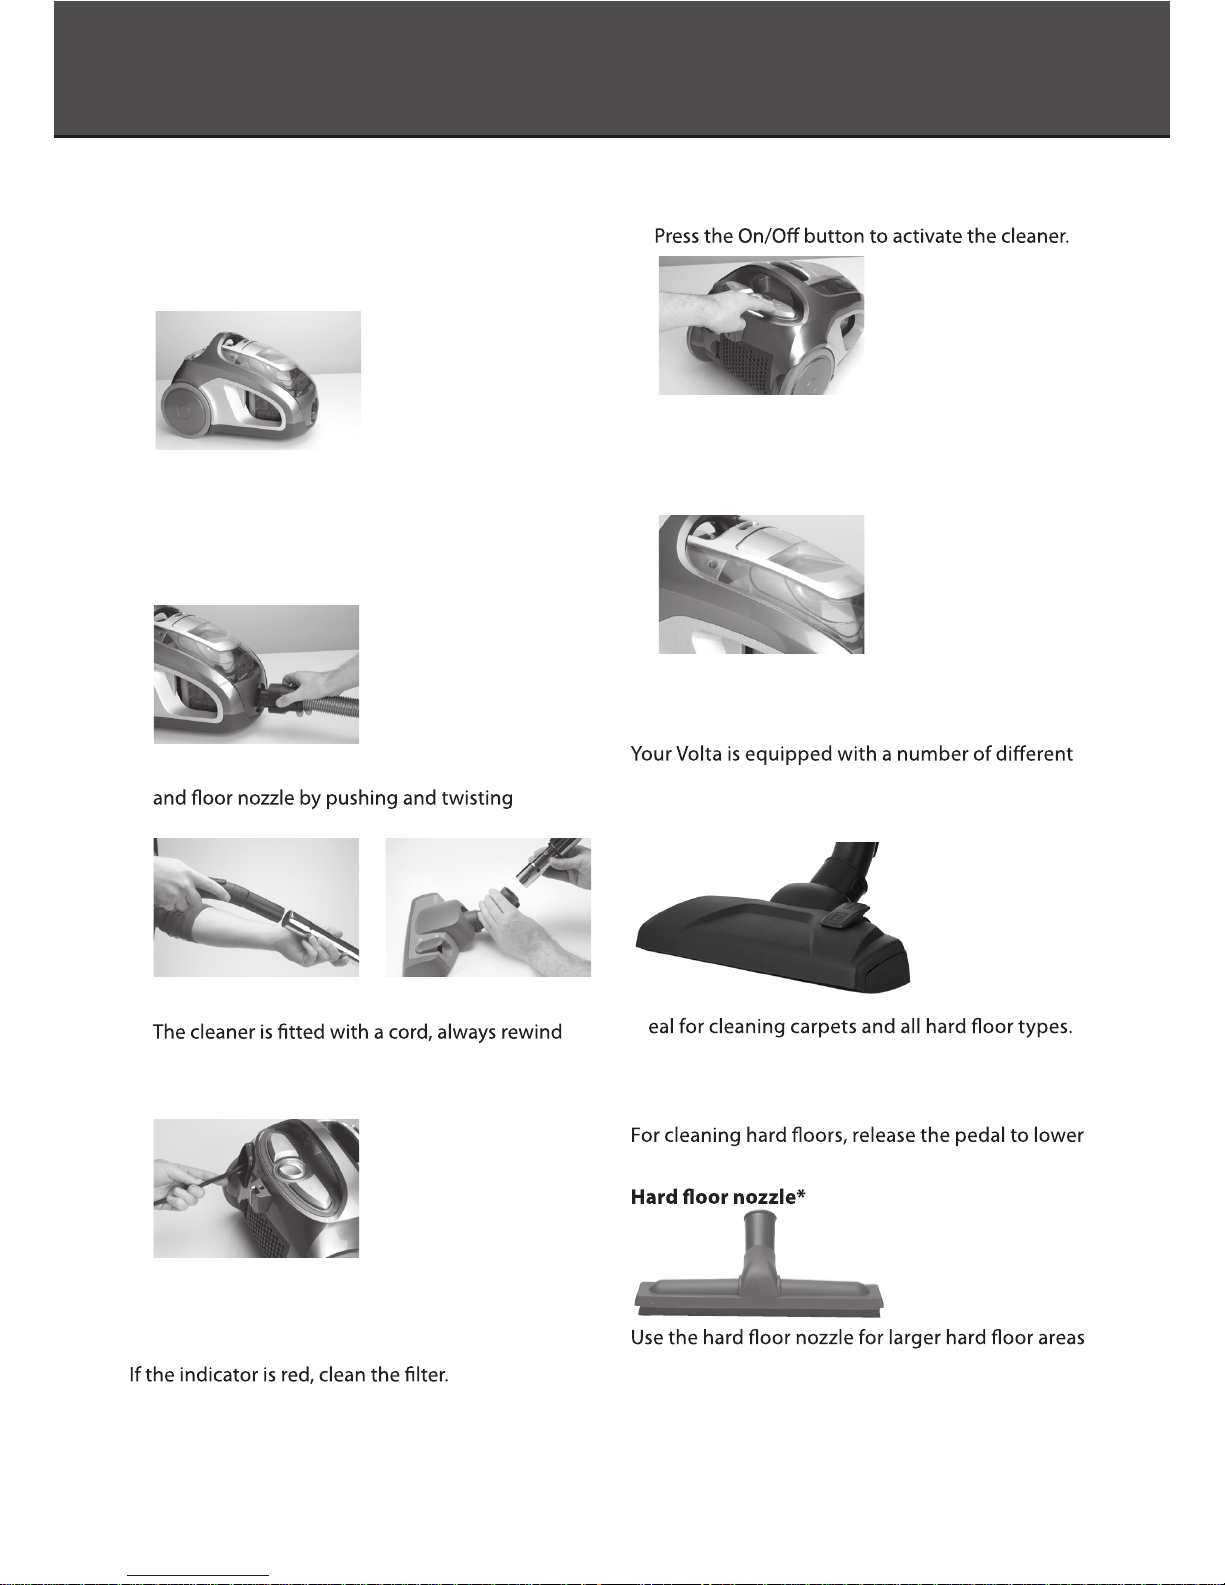
ASSEMBLING THE VACUUM CLEANER
3.
GETTING STARTED,
ASSEMBLING ERGOCLEAN
1. Check the dust container is in place.
2. To connect the hose into the suction inlet
push it until it clicks.
To disconnect the hose form the suction inlet,
push the button at the end of the hose and
pull away from the cleaner.
3. Attach the telescopic tube to the hose handle
together. Twist and pull apart to dismantle.
4. Extend the cable and connect to mains power.
and ensure the cord is not twisted before use.
(Press foot pedal to rewind. Note: Please hold the
plug to prevent it striking you or the machine).
Filter indicator: before commencing cleaning,
plug the cleaner in and turn it on (without the
hose attached to the cleaner).
If the indicator is clear, attach the hose and all other
necessary attachments and commence cleaning.
➚
5.
6. By moving the variable power control,
the suction power can be adjusted.
Suction can also be regulated on the hose
handle by opening/closing the slide valve.
GETTING THE BEST CLEANING RESULTS
nozzles and accessories. Read below to learn more.
Dust Pro Nozzle
Id
For cleaning carpets, the brush strip should be in
the retracted position. To retract the brush strip,
press the pedal on the top of the nozzle.
the brush strip for soft cleaning.
to ensure gentle, scratch free cleaning.
➚
*Certain models only
Important maintenance tips
Your Volta is designed to provide ecient cleaning
performance. Be sure to follow the below simple
steps to ensure you get the best performance
possible for years to come.
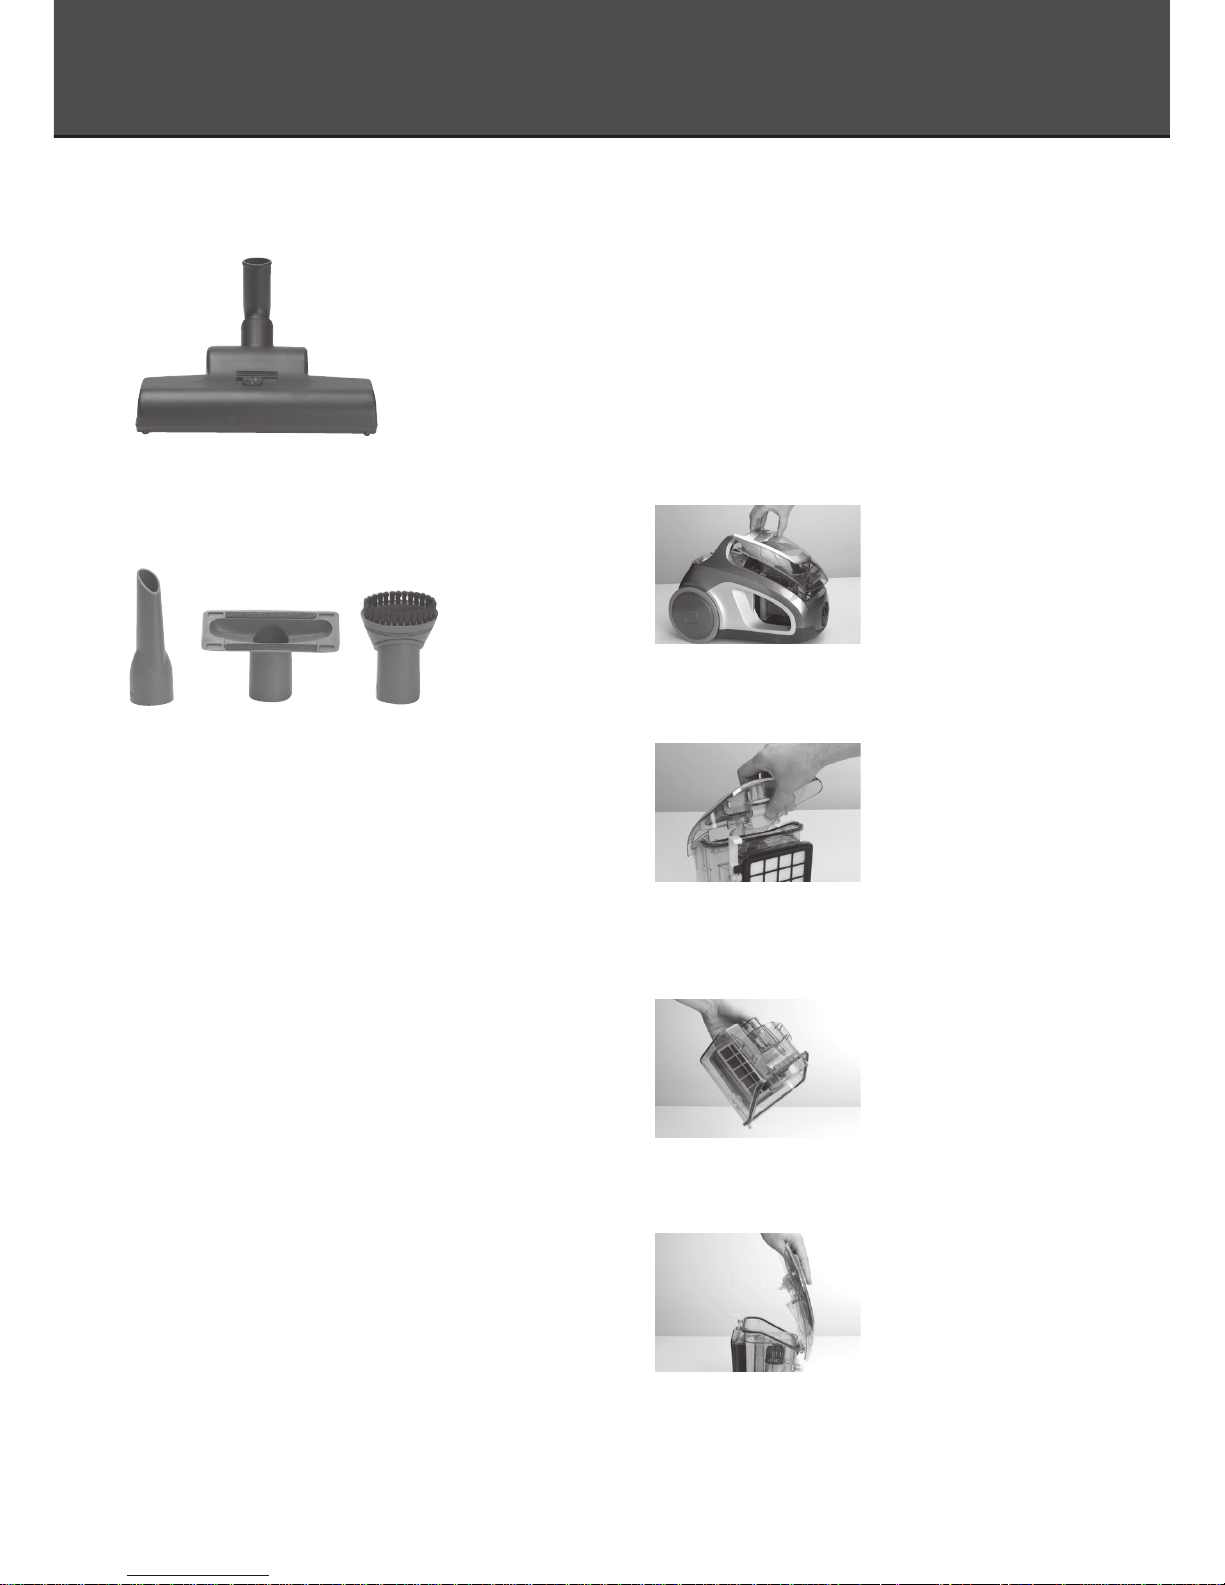
EMPTYING THE DUST CONTAINER
Always operate the cleaner with the dust container
properly installed.
1. Lift the dust container from the cleaner body.
2. Open the dust container by pressing on the
button marked ’push’ and lifting the lid away from
the container.
3. Empty the content of the dust container into
a dust bin. Note that some councils require this
content to be emptied into a plastic bag that is
sealed when collected.
4. Hook the hinges on the front of the lid in place
and lower the lid down upon the dust container
until it clicks into place.
5. Replace the dust container by dropping back
into the cleaner body until it clicks into place.
Note that the dust container will not t if the
HEPA lter is not tted correctly.
Turbo Nozzle*
The turbo nozzle features an air-driven brush roll,
which makes it ideal for ecient carpet cleaning,
particularly for removing pet hair.
Small accessories:
XL Crevice Nozzle
For ultimate accessibility into corners, between
furnitures and tight places .
Upholstery nozzle
Ideal for loose fabrics, curtains and upholstery,
this nozzle is ideal for cleaning fabrics.
Dusting brush
For cleaning of hard surfaces such as table tops,
benches and shelves.
INSTRUCTIONS FOR USE / MAINTENANCE
4.
*Certain models only
REPLACING & CLEANING
THE MICRO-EXHAUST FILTER
The micro-exhaust lter should be inspected
twice a year, and cleaned when visibly dirty,
or replaced if damaged.
1. To remove the micro-exhaust lter,
remove the exhaust grill, and lift the
lter frame out of the cleaner.
2. Like the HEPA lter, the micro-exhaust
lter can be rinsed under tap water.
Be sure to let it dry completely before use.
If the lter is damaged discard it and replace
with a new one.
MAINTENANCE
5.
REPLACING & CLEANING
THE MAIN HEPA FILTER
The HEPA lter should be inspected every
two months, and cleaned when visibly dirty,
or replaced if damaged. This will help ensure
the best possible performance from your Volta.
1. Remove the dust container from the vacuum
cleaner and pull on the tab to remove the lter.
Note there is a sponge protection lter in front
of the HEPA lter, pull this lter away from the
HEPA lter frame.
2. Cover the HEPA lter with a sheet of paper
with the frame facing up and tap it against
a hard surface. This will help to dislodge
excessive dust and dirt from the lter.
3. If necessary, the HEPA lter can be rinsed under
a tap using lukewarm water. Always rinse the
lter with the frame facing down and never
use cleaning chemicals. Never scrub or brush
the lter. Rinse the sponge protection lter
under tap water.
4. Air-dry both the HEPA and sponge protection
lters for 24 hours, away from direct sunlight
before reusing it. If the lter appears damaged
it is recommended to replace with a new lter.
MAINTENANCE / TROUBLE SHOOTING
6.
WARNING: On collection of proprietary carpet
conditioning powders, plaster/concrete dust, it is
recommended that the dust container is emptied
and the cartridge lter is cleaned after every use.
Some of the preparations contain substances which
while left in the vacuum cleaner for extended
periods could create damage.
Many air fresheners, household deodorants,
sprays and polishes contain highly inammable
gas propellants. Because of this it is particularly
important that these products are used strictly
in accordance with the relevant manufacturers
instructions. It is essential that none of the above
products are sprayed directly into the vacuum
cleaner or any of the lters, hose assembly or
dust chamber.
TROUBLE SHOOTING AND
CUSTOMER INFORMATION
You can perform your own troubleshooting
at home based on the checklist given below.
However, if the problem persists, please contact
Electrolux on 1300 365 305 (AUS)
or 0508 730 730 (NZ)
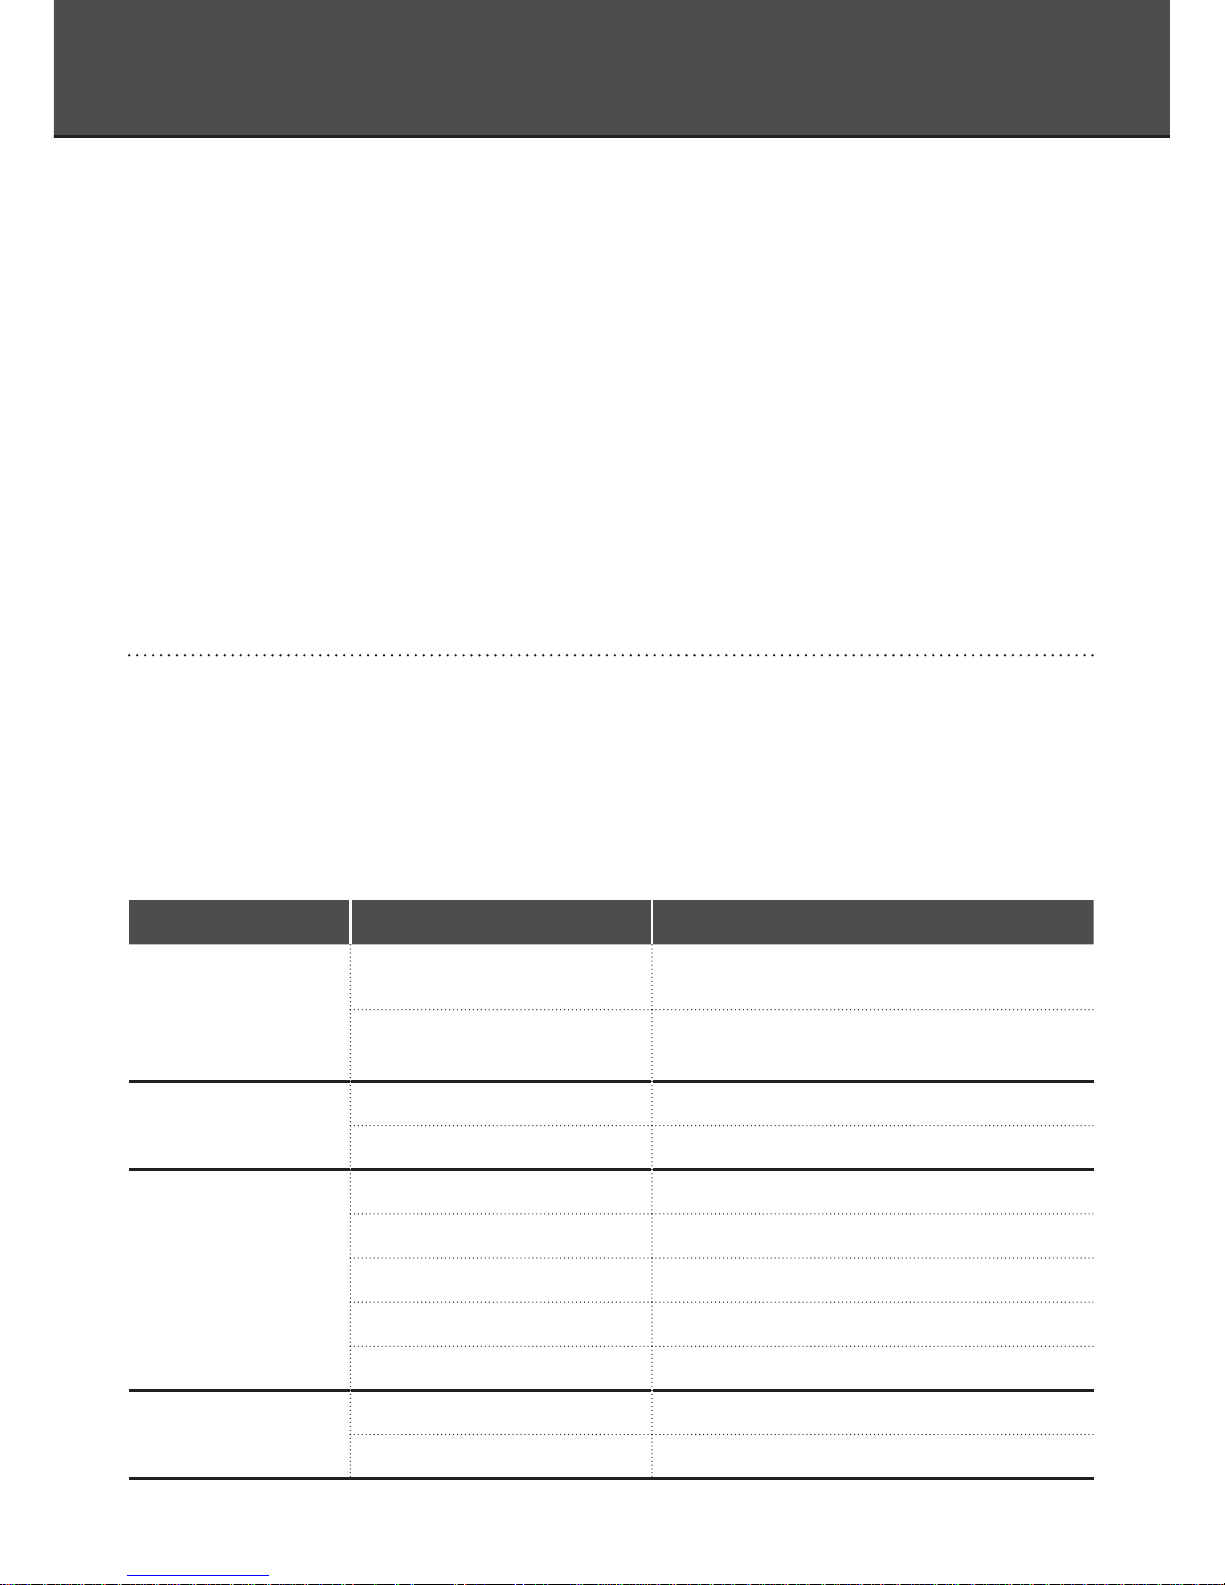
PROBLEM POSSIBLE CAUSES CORRECTIONS
Vacuum cleaner does
not start.
Plug is not properly connected
to the socket.
Check the plug connection or try another socket.
Thermal protector activated due
to high temperature.
Press the On/O button and wait 20-30 minutes
for the motor to cool down.
Filter indicator light
stays on.
Dust container is full. Empty the dust container.
Filters are clogged. Clean or replace lters.
Reduction of suction
capacity.
Suction hose is blocked. Clean the hose.
Nozzle is blocked. Clean the nozzle.
Dust container is full. Empty the dust container.
Filters are clogged. Clean or replace lters.
Hose is damaged or broken. Change the hose.
Over-heating. Dust container is full. Empty the dust container.
Filters are clogged. Clean or replace lters.

重要的安全提示
7.
重要的安全提示
请在使用本产品前仔细阅读所有使用说明。
使用本电器时应始终遵循的基本注意事项如下所
示。将吸尘器连接到电源插座之前,请确保标牌
(位于吸尘器下方)上标注的电压值与您所提供的
电压值相匹配。如果不匹配,请勿使用吸尘器,请先
联系制造商。
警告 – 以下措施可有效降低火灾、电击或人身伤
害事故的风险:
1. 无人看管时请务必断开吸尘器的电源。吸尘器
处于未使用状态以及维修前请务必从插座拔出
插头。
2. 为 降 低 发 生 电 击 的 风 险 ,请 勿 在 户 外 或 潮 湿
表面上使用本产品。
3. 身体、感官或心智存在缺陷、经验不足并对本
产品缺乏了解的人士(包括儿童)请勿使用本
产品,除非身边有人提供监督指导并能对其安
全负责。成人应对儿童全程监督,确保其不会将
吸尘器当做玩具玩耍。
4. 请仅按照本手册中所述方法使用本产品。
请仅使用制造商推荐的配件。
5. 电源线或插头损坏时请勿使用。如果吸尘器不
能正常工作,掉落在地、出现损坏、遗留在户外
或落入水中,请将其送至服务中心维修。
6. 请勿使用电线拉拽或拖动吸尘器,请勿将电线
当做手柄使用。请勿用门夹住电线,在靠近尖锐
锋利器物边缘或角落时应格外小心。运行吸尘
器时请勿碾压电缆。请确保电线远离热源。
7. 请勿拉拽电线以拔出插头。拔出插头时应先握
住插头再拔出,而不是用电线拉出。
8. 请勿用湿手触摸插头或吸尘器。
9. 请确保毛发、宽松衣物、手指及人身体的任何部
位均远离开口和活动的部件。
10. 拔出插头前请先关闭所有控制开关。
11. 请勿使用本品清理易燃物或易燃液体
(如汽油),请勿在可能出现此类物品的地方
使用本品。
12. 请勿使用本品清理任何正在燃烧或冒烟的
物体,如烟头、火柴或热灰烬。
13. 集尘袋和/或滤网未安装就位时请勿使用
本产品。
14. 请勿使用与产品电流负荷不匹配的延长线
或插座。
15. 我们不建议使用吸尘器清理以下物体:地毯上
的泡沫;锋利器物;笨重的建筑材料;石膏灰
尘。此类操作将导致吸尘器的其他关键部件出
现故障,由此造成的损坏不在保修范围内。
16. 请在凉爽、干燥的室内存储吸尘器。
17. 用吸尘器清理电器前请先断开电器电源。
18. 清洁或维修本品前请先从插座中拔出插头。
19. 如果电源线损坏,必须由制造商、服务代理商或
此 类 授 权 人 员 进 行 更 换 ,以 防 造 成 危 险 。
维修和改型
以任何方式改变本产品的规格或修改产品都是一项
危险操作。在任何情况下均绝不允许自行尝试维修
吸尘器。
特别注意1 ! 为避免人身伤害,并防止对吸尘器造
成损坏,只有制造商核准的经授权服务商才能更换
问题电线,以防造成危险。吸尘器的维修应由经授权
的服务商进行,并仅允许使用原厂配件。
双重绝缘
您 的 吸 尘 器 为 双 重 绝 缘 特 性 ,亦 即 该 产 品 的 所 有 外
部件与电源均处于绝缘状态。这归功于电气与机器
组件间设有绝缘障壁,从而使吸尘器完全不必接地
了。
警告: 采集私人地毯空调粉尘时,建议在使用前应
先彻底清空集尘器,并于每次使用完后清理筒式滤
网。由于某些物质长期驻留在吸尘器中可能会对吸
尘器造成危害,例如许多空气芳香剂、日用除臭剂、
喷雾剂和抛光剂都含有易燃气体推进剂,因此在使
用此类产品时务必要严格遵守相应的制造商说明。
请谨记上述所有产品都不能直接吸入吸尘器或滤
网、软管接头或集尘室中。
部件标识
8.
1. 电源线
2. 卷线按钮
3. 开/关按钮
4. 吸力调节控制
5. 集尘器
6. 滤网指示灯
7. 软管接头
8. 移动手柄
9. 伸缩管
10. 带滑动阀的软管手柄
11.
12. 硬地板管口*
13. 风动宠物毛发管口*
14. 室内装饰品管口,缝隙管口和
去尘刷
*仅适用部分型号
特效除塵吸扒
组装吸尘器
9.
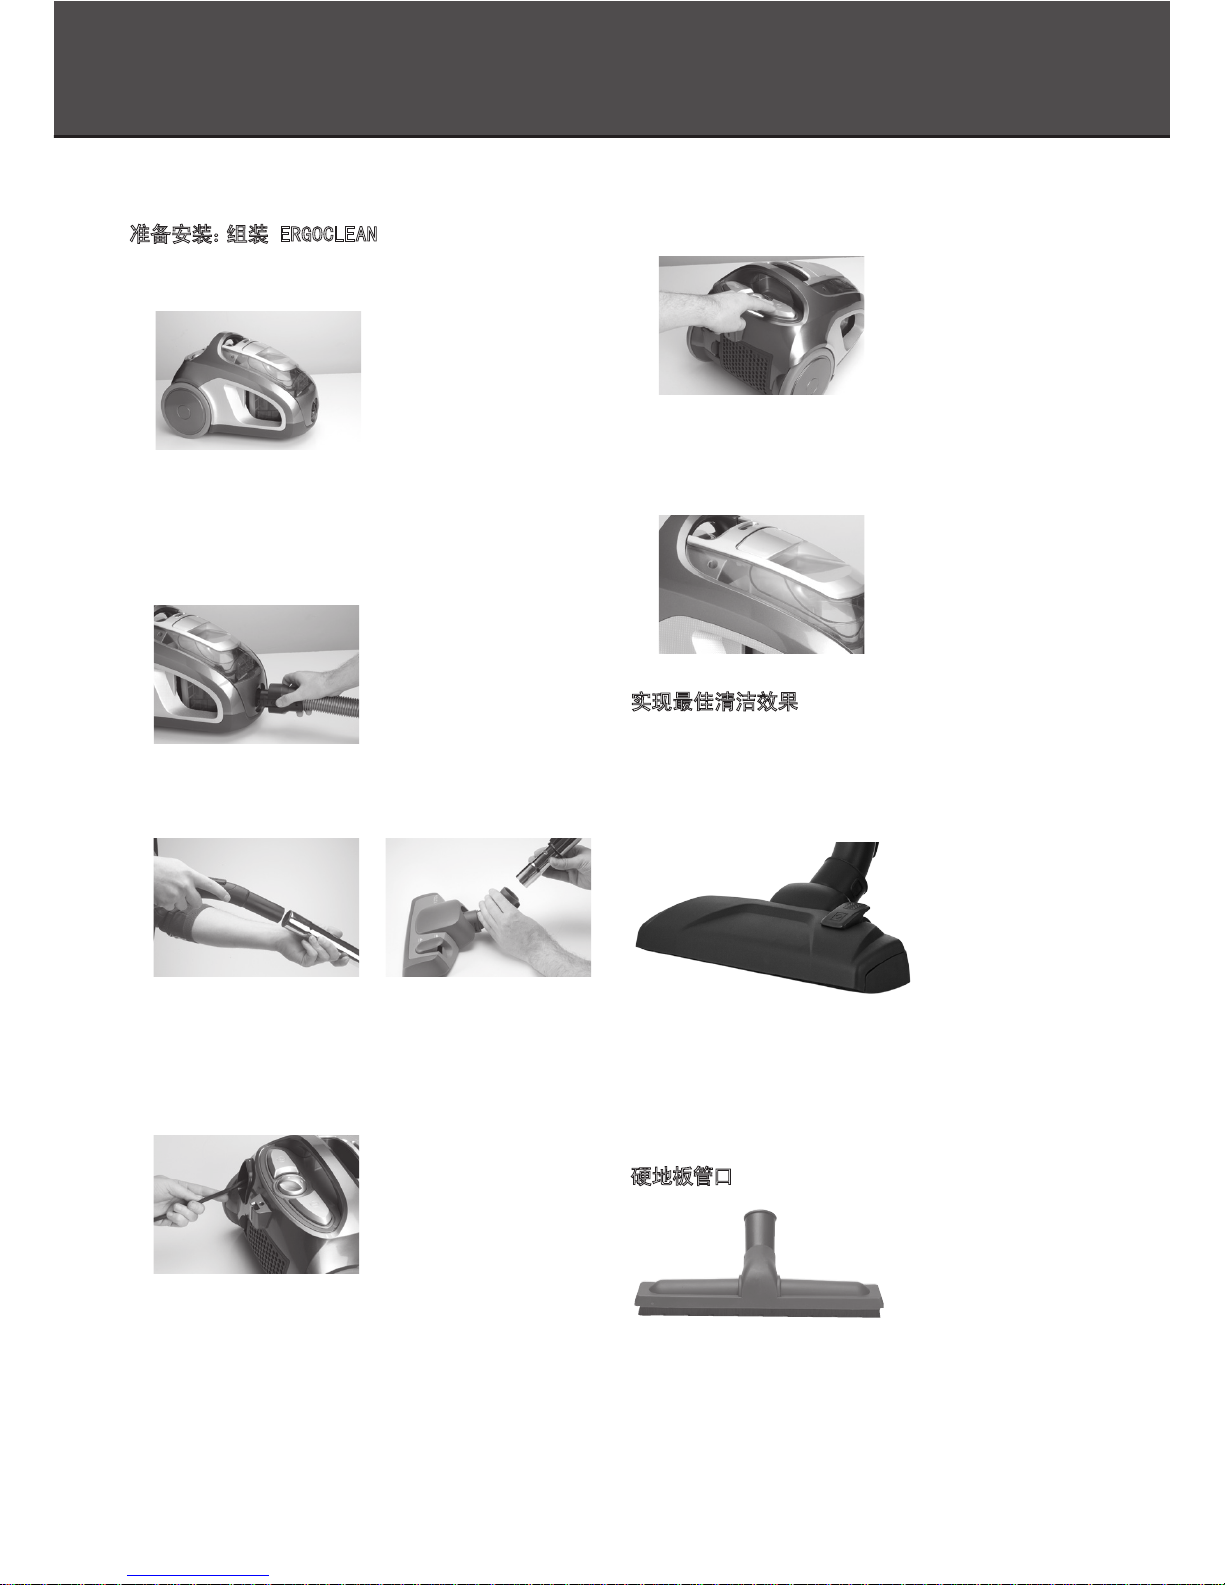
准备安装:组装 ERGOCLEAN
1. 检查集尘器是否已安装就位。
2. 将软管推入到吸尘口直至咔哒一声即表示
连接到位。
若要从吸尘口中拔出软管,请按下软管末端的
按钮,并将软管抽离吸尘器。
3. 推挤并扭转伸缩管与软管手柄和地板管口就可
将其连接在一起。扭转并拉开三者即可将其分
离开来。
4. 延展电缆并将其连接到主电源。吸尘器附带一
根卷曲的延展电缆,应始终记得卷进收好,并确
保电线在使用前未扭曲。(按下脚踏开关即可
收好电线。注:请握住插头以防不慎伤到自己或
损坏机器)。
滤网指示灯:在开始吸尘前,请先接通吸尘器电
源,并开启机器(软管未连接到吸尘器)。
指示灯如变成红色,请清洁滤网。
指示灯如变成透明,可连接软管和其他所有附
件,并准备开始吸尘。
➚
5. 按下开/关按钮开启吸尘器。
6. 通过调节可变功率控件,即可调节吸力大小。
还可通过打开/关闭滑动阀来使用软管手柄对吸
力进行控制。
实现最佳清洁效果
本吸尘器配备有多种不同用途的管口和配件。请阅
读以下内容了解更多信息。
清洁地毯及所有硬地板类型的理想之选。
清洁地毯时刷条应处于收回状态。要收回刷条,请按
下管口顶部的开关。
清洁硬地板时请松开开关以放低刷条进行软清洁。
硬地板管口*
使用硬地板管口对较大型的硬地板区域进行清洁,
实现温和的无擦伤刮痕清洁。
➚
*仅适用部分型号
Dust Pro Nozzle
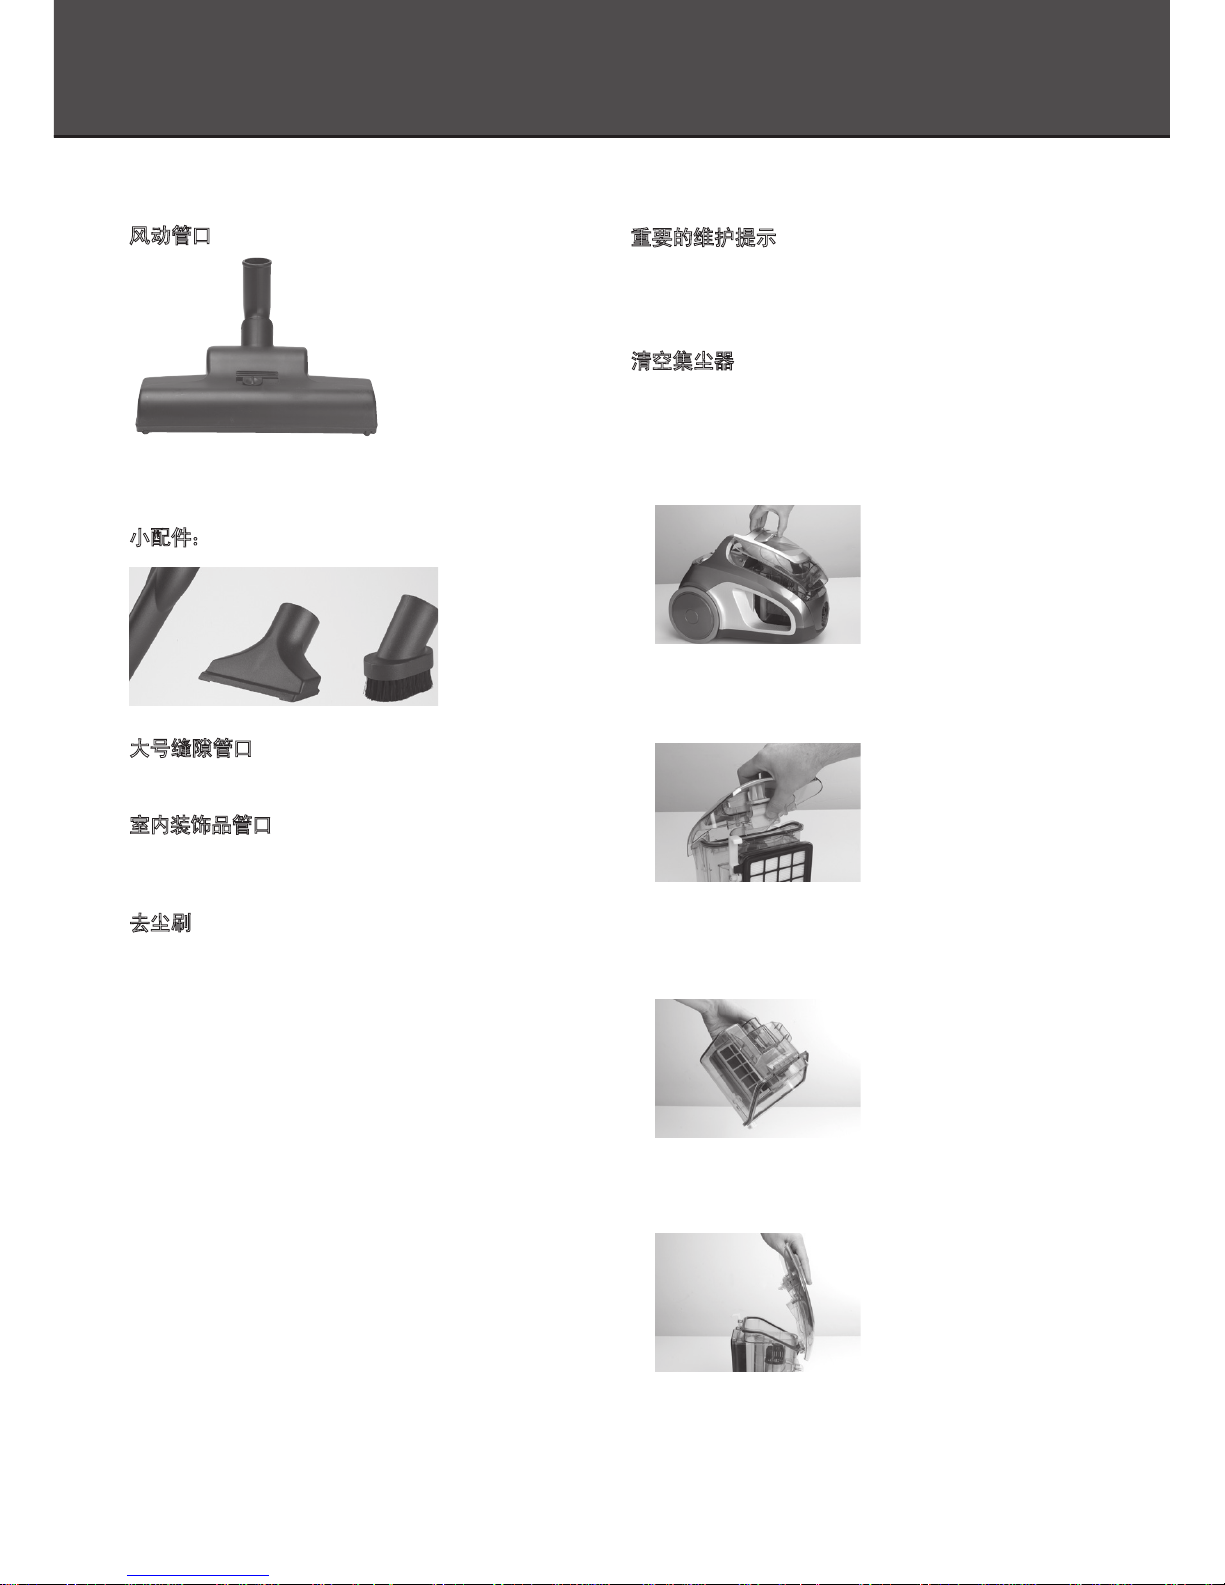
重要的维护提示
本吸尘器旨在提供高效的清洁服务。请确保遵循以
下简单步骤进行操作以确保产品可提供长久的最佳
性能。
清空集尘器
请确保始终在集尘器妥善安装就位的情况下运行
吸尘器。
1. 将集尘器从吸尘器机体中抬离出来。
2. 按下标记有“pu s h”的按钮来打开集尘器,
将盖子抬离吸尘器。
3. 清理集尘器中的东西将其丢弃到垃圾箱。请注
意部分地区要求将这些东西清理到密封塑料袋
中进行收集。
4. 勾住盖子前面的铰链,将盖子向下放到集尘器
上直至咔哒一声安装就位。
5. 放回吸尘器机体直至其咔哒一声安装就位即表
示集尘器更换完毕。请注意,如果高效微粒空气
过滤器与机体不匹配,那么集尘器也不适用。
风动管口*
风动管口的突出特性为风动刷辊,该特性是实现地
毯高效清洁的理想之选,尤其适于清理宠物的发。
小配件:
大号缝隙管口
最佳使用环境为家具及狭小空间的清洁。
室内装饰品管口
针对蓬松纤维织物、帏帘和室内装饰品而言,
该管口是清洁此类物品的理想之选。
去尘刷
用于清洁硬质表面,如桌面,凳子和书架。
使用说明 / 维护
10.
*仅适用部分型号
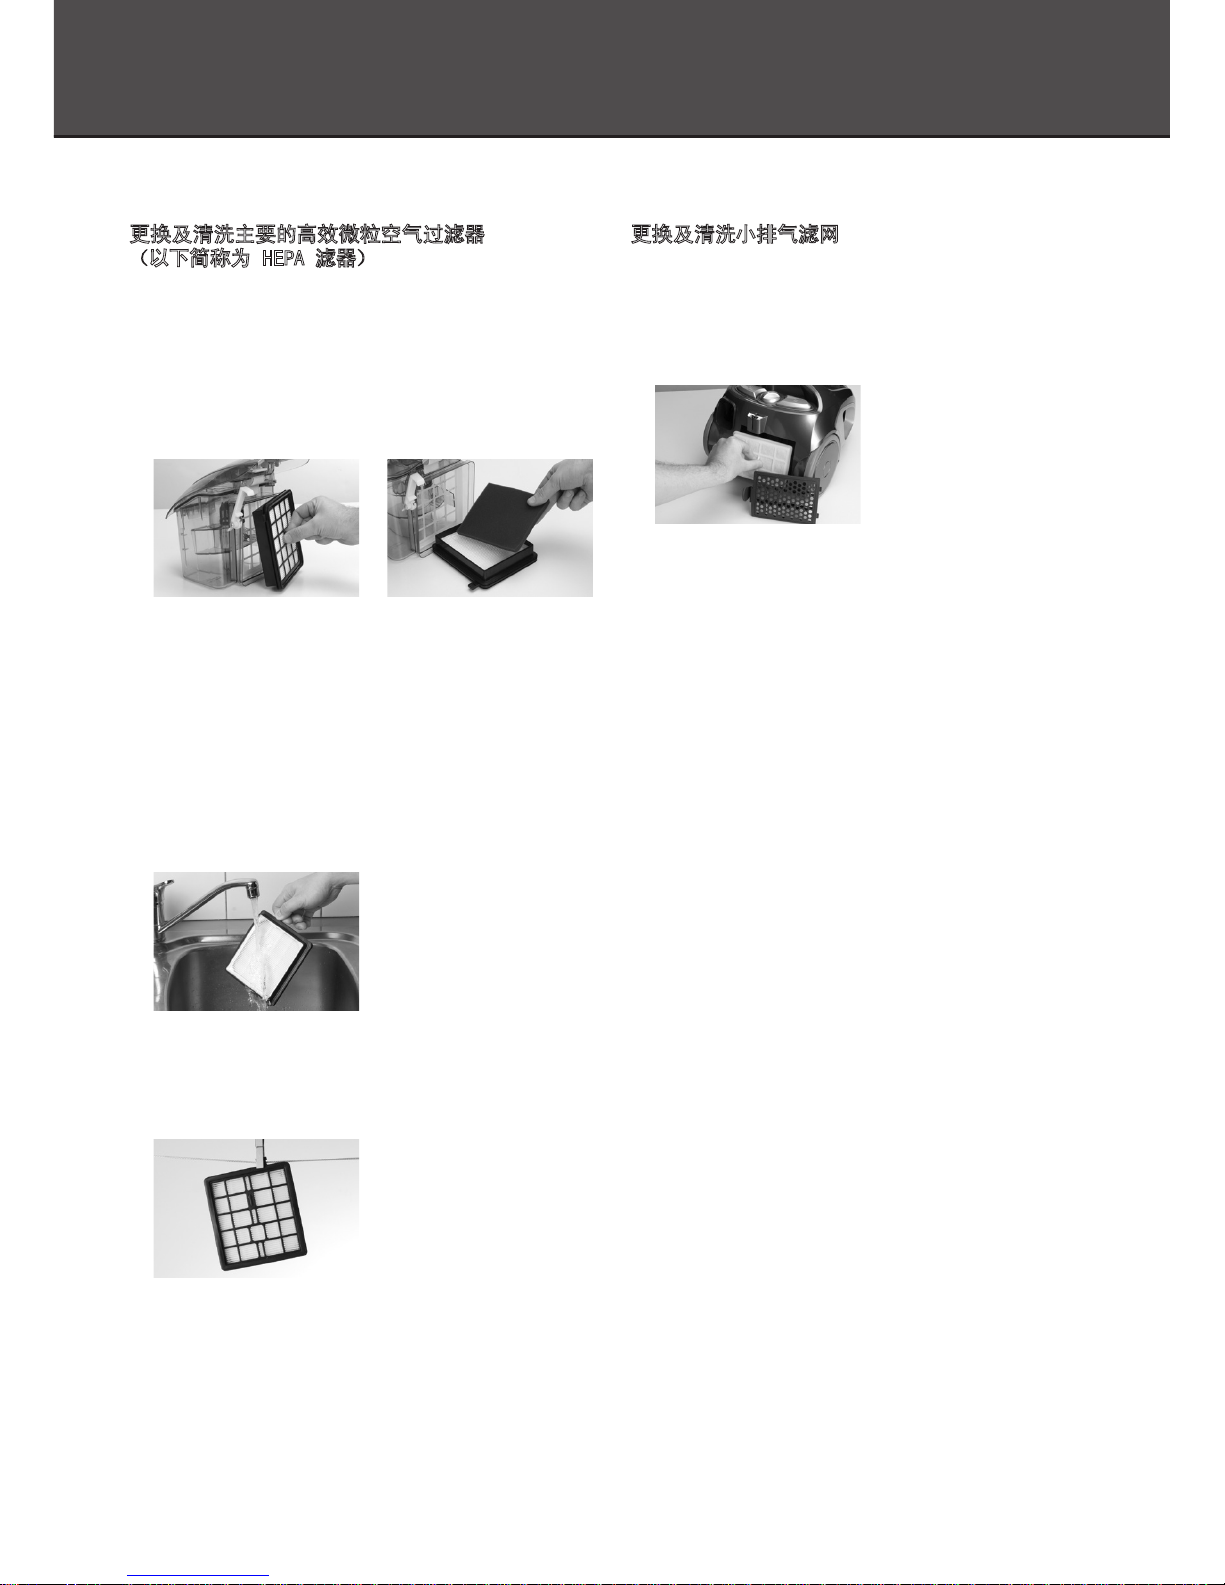
更换及清洗小排气滤网
小排气滤网应每年检查两次,并在出现明显的污渍
时进行清洗,出现损坏时需要进行更换。
1. 要卸下小排气滤网,请先卸下排气格栅,将滤框
抬离吸尘器。
2. 和 HEPA 类似,小排气滤网也可在自来水龙头下
进行清洗。请确保在使用前已将其完全晾干。
如果滤网出现损坏,请将其丢弃,更换一个新的
滤网。
维修
11.
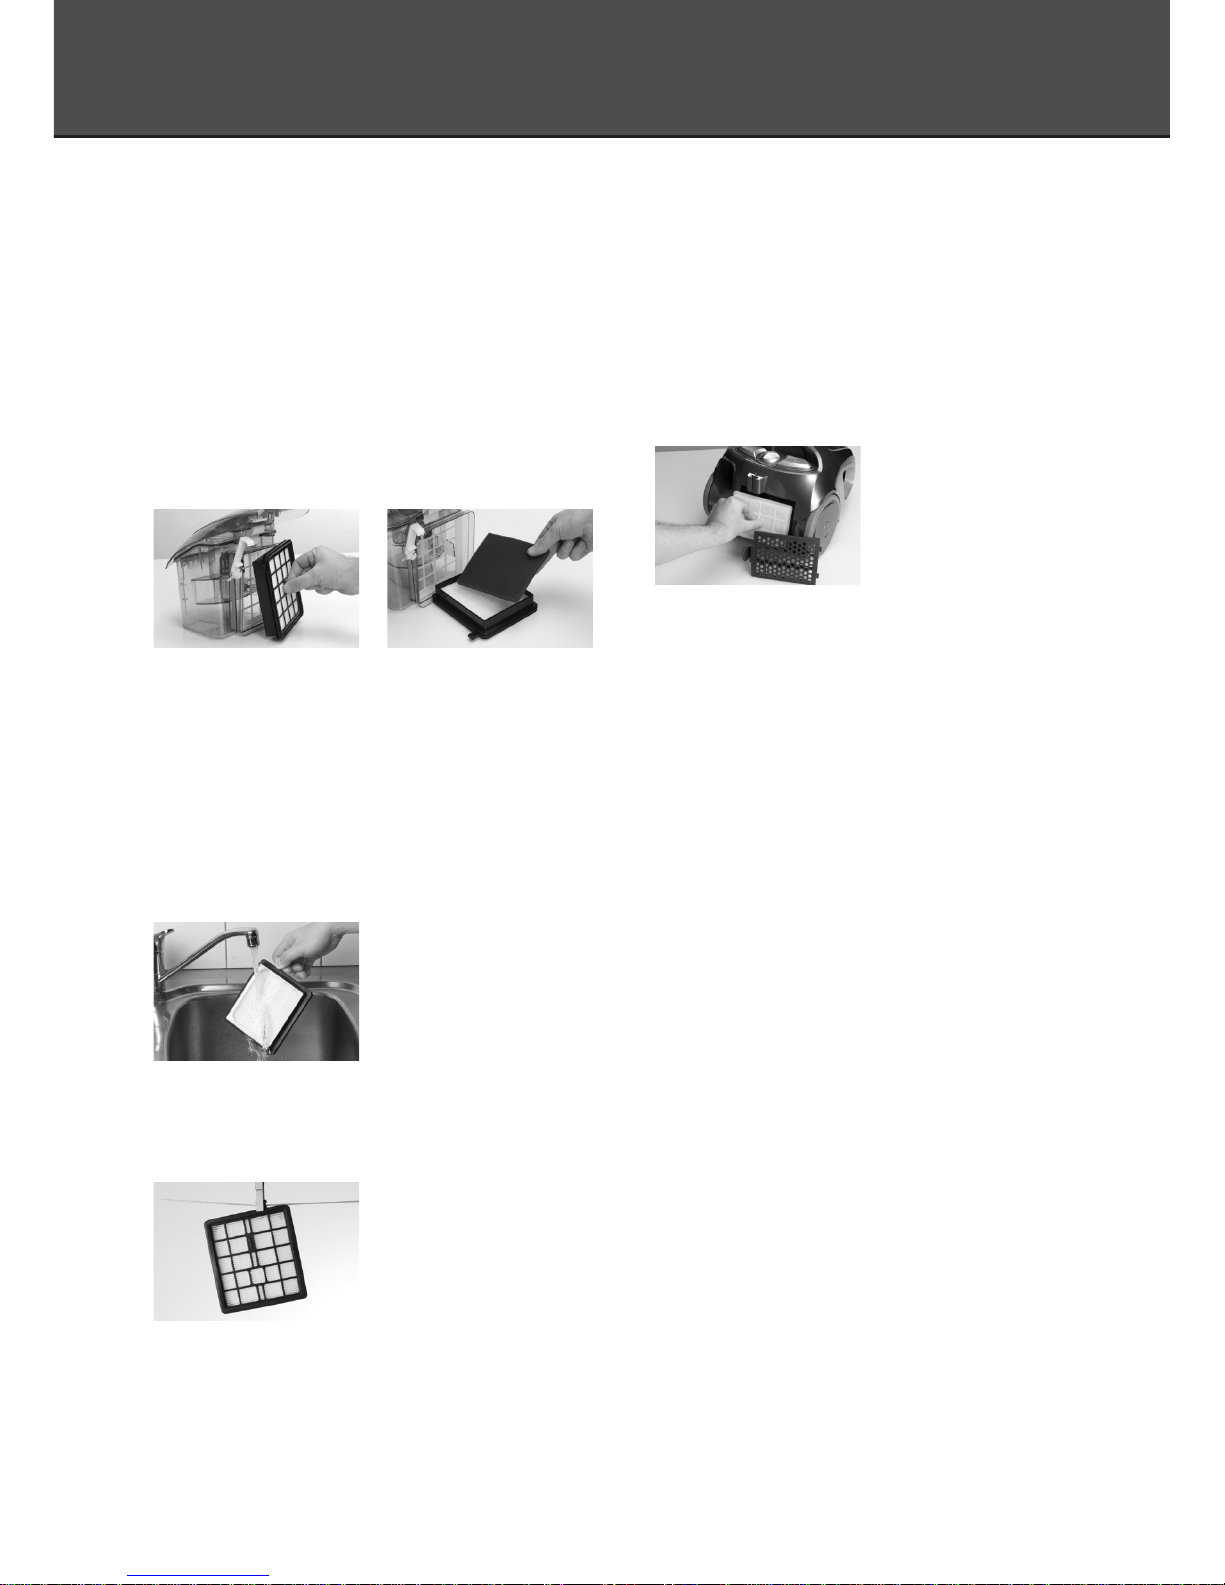
更换及清洗主要的高效微粒空气过滤器
(以下简称为 HEPA 滤器)
HEPA 滤器应每隔两月检查一次,并在出现明显污渍
时进行清洗,出现损坏需要进行更换。这有助于吸尘
器提供最佳的性能。
1. 从吸尘器中取出集尘器,拉动卡口以卸下滤网。
请注意在 HEPA滤器的前端有一个海绵保护滤
网,拉动该滤网以脱离 HEPA 滤框。
2. 滤框向上时HEPA 滤器上附有一层纸,用以敲
击硬 质表面。这有助于防止滤器落上极 厚灰尘
和污渍。
3. 如果需要,还可在水龙头下使用冷水对 HEPA
滤器进行冲洗。在冲洗过程中请确保滤网的滤
框始终向下,请勿使用任何化学物质进行冲洗。
请勿用力擦拭或刷洗滤网。使用水龙头的流动
水冲洗海绵保护滤网。
4. 将 HEPA 和海绵保护滤网二者晾置 24 小时以
完 全 晾 干 ,重 新 使 用 前 请 勿 阳 光 直 射 。如 果 滤 网
出现损坏,建议您更换一个新的滤网。
 Loading...