

Page 1
EWT 2852EWW
EWT 2853EWW
EN Washing Machine User Manual 2
FR Lave-linge Notice d'utilisation 21
RU Стиральная машина Инструкция по эксплуатации 42
Page 2

www.electrolux.com2
CONTENTS
1. SAFETY INFORMATION....................................................................................3
2. SAFETY INSTRUCTIONS..................................................................................4
3. PRODUCT DESCRIPTION................................................................................ 6
4. CONTROL PANEL............................................................................................. 6
5. PROGRAMME CHART...................................................................................... 7
6. CONSUMPTION VALUES..................................................................................9
7. OPTIONS..........................................................................................................10
8. SETTINGS........................................................................................................10
9. BEFORE FIRST USE....................................................................................... 11
10. DAILY USE..................................................................................................... 11
11. HINTS AND TIPS........................................................................................... 14
12. CARE AND CLEANING..................................................................................15
13. TROUBLESHOOTING....................................................................................17
14. TECHNICAL DATA.........................................................................................20
15. PROBLEM WITH MAINS SUPPLY ............................................................... 20
WE’RE THINKING OF YOU
Thank you for purchasing an Electrolux appliance. You’ve chosen a product that
brings with it decades of professional experience and innovation. Ingenious and
stylish, it has been designed with you in mind. So whenever you use it, you can
be safe in the knowledge that you’ll get great results every time.
Welcome to Electrolux.
Visit our website for:
Get usage advice, brochures, trouble shooter, service information:
www.electrolux.com/webselfservice
Register your product for better service:
www.registerelectrolux.com
Buy Accessories, Consumables and Original spare parts for your appliance:
www.electrolux.com/shop
CUSTOMER CARE AND SERVICE
Always use original spare parts.
When contacting our Authorised Service Centre, ensure that you have the
following data available: Model, PNC, Serial Number.
The information can be found on the rating plate.
Warning / Caution-Safety information
General information and tips
Environmental information
Subject to change without notice.
Page 3

1. SAFETY INFORMATION
Before the installation and use of the appliance, carefully
read the supplied instructions. The manufacturer is not
responsible for any injuries or damages that are the
result of incorrect installation or usage. Always keep the
instructions in a safe and accessible location for future
reference.
1.1 Children and vulnerable people safety
• This appliance can be used by children aged from 8
years and above and persons with reduced physical,
sensory or mental capabilities or lack of experience
and knowledge if they have been given supervision or
instruction concerning the use of the appliance in a
safe way and understand the hazards involved.
• Do not let children play with the appliance.
• Children aged 3 years and under must be kept away
from this appliance when it is in operation at all times.
• Keep all packaging away from children and dispose of
it appropriately.
• Keep detergents away from children.
• Keep children and pets away from the appliance when
the door is open.
• Children shall not carry out cleaning and user
maintenance of the appliance without supervision.
ENGLISH 3
1.2 General Safety
• Do not change the specification of this appliance.
• Do not exceed the maximum load of 5,5 kg (refer to
the "Programme chart" chapter).
• The operating water pressure at the water entry point
from the outlet connection must be between 0.5 bar
(0.05 MPa) and 8 bar (0.8 MPa).
• The ventilation opening in the base (if applicable) must
not be covered by a carpet, mat, or any floor covering.
Page 4

www.electrolux.com4
• The appliance must be connected to the water mains
using the new supplied hose sets, or other new hose
sets supplied by the Authorised Service Centre.
• Old hose sets must not be reused.
• If the mains power supply cable is damaged, it must
be replaced by the manufacturer, its Authorised
Service Centre or similarly qualified persons to avoid
an electrical hazard.
• Before any maintenance operation, deactivate the
appliance and disconnect the mains plug from the
socket.
• Do not use high pressure water sprays and/or steam
to clean the appliance.
• Clean the appliance with a moist cloth. Use only
neutral detergents. Do not use abrasive products,
abrasive cleaning pads, solvents or metal objects.
2. SAFETY INSTRUCTIONS
2.1 Installation
• Remove all the packaging and the
transit bolts.
• Keep the transit bolts in a safe place.
If the appliance is to be moved in
future they must be reattached to lock
the drum to prevent internal damage.
• Always take care when moving the
appliance as it is heavy. Always use
safety gloves and enclosed footwear.
• Do not install or use a damaged
appliance.
• Follow the installation instruction
supplied with the appliance.
• Do not install or use the appliance
where the temperature can be less
than 0°C or where it is exposed to the
weather.
• The floor area where the appliance is
to be installed must be flat, stable,
heat resistant and clean.
• Make sure that there is air circulation
between the appliance and the floor.
• Adjust the feet to have the necessary
space between the appliance and the
flooring.
• Do not install the appliance where the
appliance lid cannot be fully opened.
• Do not put a container to collect
possible water leakage under the
appliance. Contact the Authorised
Service Centre to ensure which
accessories can be used.
2.2 Electrical connection
• The appliance must be earthed.
• Always use a correctly installed
shockproof socket.
• Make sure that the parameters on the
rating plate are compatible with the
electrical ratings of the mains power
supply.
• Do not use multi-plug adapters and
extension cables.
• Make sure not to cause damage to
the mains plug and to the mains
cable. Should the mains cable need to
be replaced, this must be carried out
by our Authorised Service Centre.
• Connect the mains plug to the mains
socket only at the end of the
installation. Make sure that there is
access to the mains plug after the
installation.
• Do not touch the mains cable or the
mains plug with wet hands.
Page 5

• Do not pull the mains cable to
disconnect the appliance. Always pull
the mains plug.
• This appliance complies with the
E.E.C. Directives.
2.3 Water connection
• Do not cause damage to the water
hoses.
• Before connection to new pipes, pipes
not used for a long time, where repair
work has been carried out or new
devices fitted (water meters, etc.), let
the water flow until it is clean and
clear.
• Ensure that there are no visible water
leaks during and after the first use of
the appliance.
2.4 Use
WARNING!
Risk of injury, electrical
shock, fire, burns or damage
to the appliance.
• This appliance is for household use
only.
• Follow the safety instructions on the
detergent packaging.
• Do not put flammable products or
items that are wet with flammable
products in, near or on the appliance.
ENGLISH 5
• Make sure that all metal objects are
removed from the laundry.
• Do not wash fabrics which are heavily
soiled with oil, grease or other greasy
substances. It can damage rubber
parts of the washing machine.
Prewash such fabrics by hand before
loading them into the washing
machine.
2.5 Service
• To repair the appliance contact an
Authorised Service Centre.
• Use original spare parts only.
2.6 Disposal
WARNING!
Risk of injury or suffocation.
• Disconnect the appliance from the
mains electrical and water supplies.
• Cut off the mains electrical cable
close to the appliance and dispose of
it.
• Remove the door catch to prevent
children or pets from becoming
trapped in the drum.
• Dispose of the appliance in
accordance with local requirements
for the disposal of Waste Electrical
and Electronic Equipment (WEEE).
Page 6
2
3
1
5
4
6
7
800 600 400
1 2 3
8
6
5
7
4
9
www.electrolux.com6
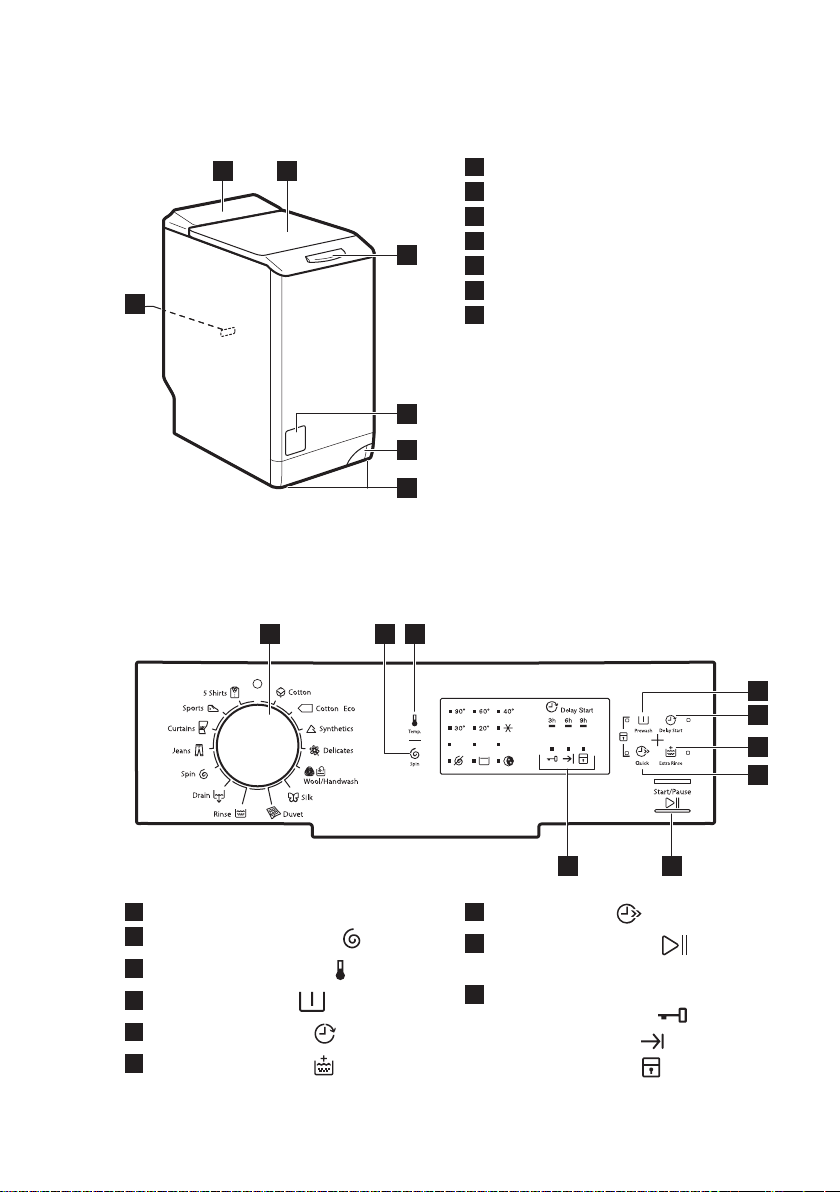
3. PRODUCT DESCRIPTION
3.1 Appliance overview
4. CONTROL PANEL
4.1 Control panel description
Control panel
1
Lid
2
Lid handle
3
Drain pump filter
4
Lever to move the appliance
5
Feet for levelling the appliance
6
Rating plate
7
Programme knob
1
2
Spin reduction touchpad (Spin)
3
Temperature touchpad (Temp.)
4
Prewash touchpad (Prewash)
5
Delay start touchpad (Delay Start)
6
Extra rinse touchpad (Extra
Rinse)
7
Quick touchpad (Quick)
8
Start/Pause touchpad (Start/
Pause)
Programme status indicators:
9
Door locked indicator
End cycle indicator
Child lock indicator
Page 7
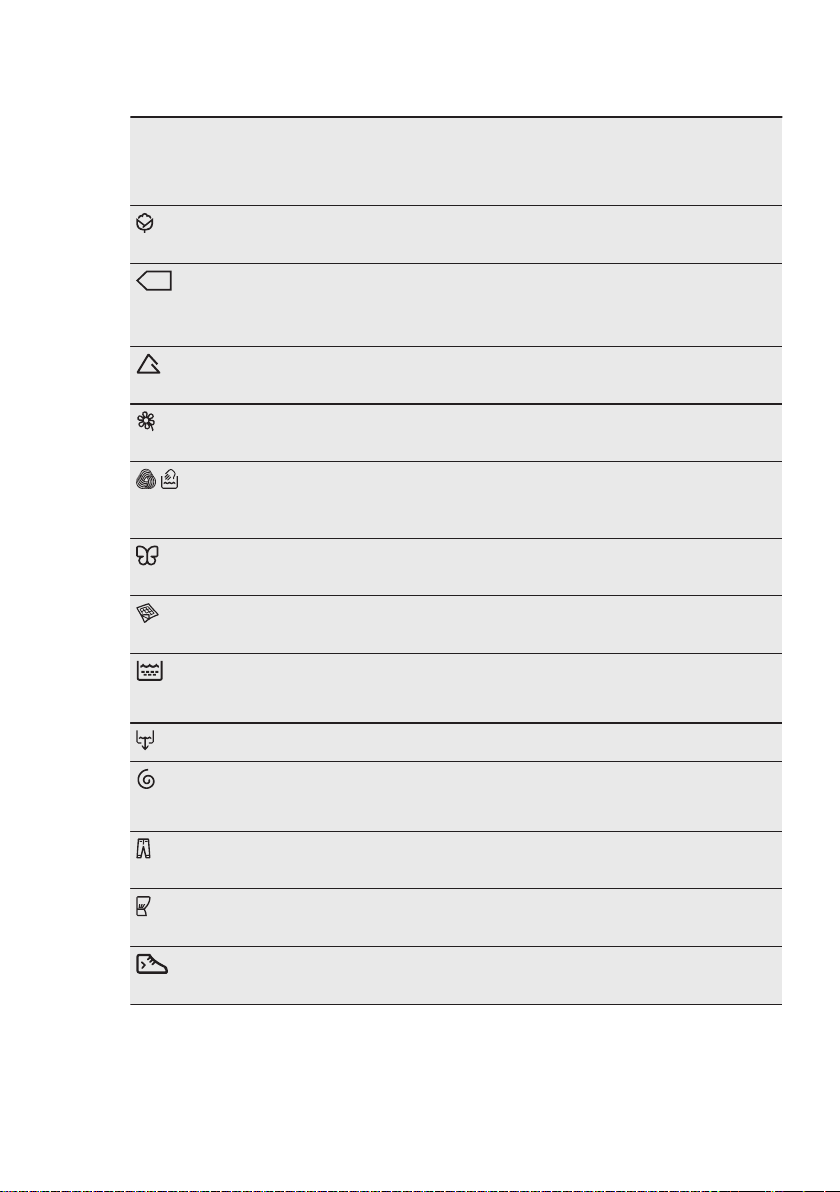
5. PROGRAMME CHART
ENGLISH 7
Programme
Temperature
range
Cotton
90° - Cold
Cotton
1)
Eco
60° - 40°
Synthetics
60° - Cold
Delicates
40° - Cold
Wool/
Handwash
40° - Cold
Silk
30°
Duvet
60° - 30°
Rinse
Drain
Spin
Jeans
60° - Cold
Curtains
40° - Cold
Sports
30°
Maximum
load
Maximum
spin speed
5,5 kg
800 rpm
5,5 kg
800 rpm
2,5 kg
800 rpm
2,5 kg
800 rpm
1 kg
800 rpm
1 kg
800 rpm
2 kg
800 rpm
5,5 kg
800 rpm
5,5 kg To drain the water in the drum. All fabrics.
5,5 kg
800 rpm
3 kg
800 rpm
2 kg
800 rpm
2 kg
800 rpm
Programme description
(Type of load and soil level)
White cotton and coloured cotton. Normal soil
and light soil.
White cotton and fast-coloured cotton. Normal
soil. The energy consumption decreases and the
time of the washing programme is extended.
Synthetic items or mixed fabric items. Normal
soil.
Delicate fabrics such as acrylics, viscose,
polyester items. Normal soil.
Machine washable wool, hand washable wool
and delicate fabrics with «hand washing» care
2)
symbol.
Special programme for silk and mixed synthet‐
ic items.
Special programme for one synthetic blanket,
duvet, bedspread and so on.
To rinse and spin the laundry. All fabrics, except
woollens and very delicate fabrics. Reduce the
spin speed accordingly to the type of laundry.
To spin the laundry and to drain the water in the
drum. All fabrics, except woollens and deli‐
cate fabrics.
Items in denim and jersey. Also for dark col‐
oured items.
Special programme for curtains. The prewash
phase is activated automatically.
Synthetic and delicate items. Light soil items or
items to refresh.
3)
Page 8
www.electrolux.com8
Programme
Temperature
range
Maximum
load
Maximum
Programme description
(Type of load and soil level)
spin speed
5 Shirts
30°
1)
Standard programmes for the Energy Label consumption values. According to regu‐
lation 1061/2010, these programmes are respectively the «Standard 60°C cotton pro‐
gramme» and the «Standard 40°C cotton programme». They are the most efficient pro‐
grammes in terms of combined energy and water consumption for washing normally soiled
cotton laundry.
The water temperature of the washing phase may differ from the temperature
declared for the selected programme.
2)
During this cycle the drum rotates slowly to ensure a gentle wash. It can seem that the
drum doesn't rotate or doesn't rotate properly, but this is normal for this programme.
3)
Do not use any detergent for prewash phase to rinse only with water.
1,5 kg
800 rpm
Synthetic and mixed fabric items. Light soil
items and items to freshen up. For 5 - 6 shirts.
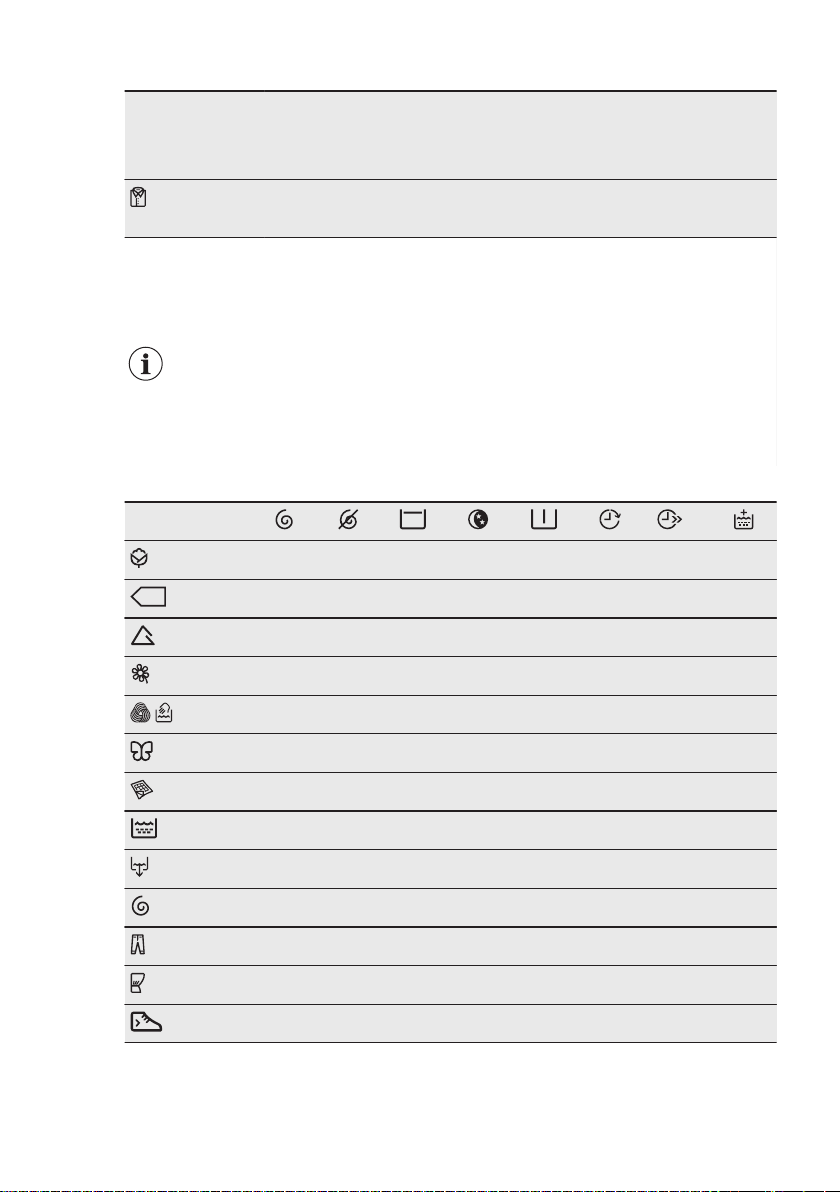
Programme options compatibility
Programme
1)
■ ■ ■ ■ ■ ■ ■ ■
■ ■ ■ ■ ■ ■ ■
■ ■ ■ ■ ■ ■ ■ ■
■ ■ ■ ■ ■ ■ ■ ■
■ ■ ■ ■ ■
■ ■ ■
■ ■
■ ■ ■ ■ ■
■
■ ■
■ ■ ■ ■ ■ ■ ■
■ ■ ■ ■ ■ ■
■ ■ ■
Page 9
ENGLISH 9
Programme
■ ■ ■
1)
When you set the Quick option, we recommend that you decrease the quantity of the
laundry. It is possible to keep the full load but the washing results can be unsatisfactory.
Recommended load: cotton: 2,75 kg, synthetics and delicates: 1,5 kg.
5.1 Woolmark Apparel Care Blue
The wool wash cycle of this machine has
been approved by The Woolmark
6. CONSUMPTION VALUES
The data in this table are approximate. Different variables can affect the
data: the quantity and type of laundry, the water and ambient tempera‐
ture.
1)
Company for the washing of wool
garments labelled as «hand wash»
provided that the garments are washed
according to the instructions issued by
the manufacturer of this washing
machine. Follow the garment care label
for drying and other laundry instructions.
M1145
In UK, Eire, Hong Kong and India the
Woolmark symbol is a certification
trademark.
Programmes Load
Cottons 60°C 5,5 1,15 58 140
Cotton Energy Saving Pro‐
gramme 60°C
Cottons 40°C 5,5 0,70 58 120
Synthetics 40°C 2,5 0,55 45 103
Delicates 40°C 2,5 0,55 45 80
Wool/Handwash 30°C 1 0,35 50 70
1)
«Cotton Energy Saving programme » at 60°C with a load of 5,5 kg is the reference pro‐
gramme for the data entered in the energy label, in compliance with EU Commission Direc‐
tive 95/12/EC and measured according to EN 60456/2005.
1)
(kg)
Energy
con‐
sumption
(kWh)
5,5 0,95 48 189
Water con‐
sumption
(litre)
Approximate pro‐
gramme duration
(minutes)
Page 10

www.electrolux.com10
The information given in the chart above is compliant with the EU Commission regu‐
lation 1015/2010 implementing directive 2009/125/EC
7. OPTIONS
Off Mode (W) Left On Mode (W)
0,48 0,48
7.1 Temp.
Set this option to change the default
temperature.
Indicator
The indicator of the set temperature
comes on.
7.2 Prewash
With this option you can add a prewash
phase to a washing programme.
Use this option for heavy soil.
When you set this option the programme
duration increases.
The related indicator comes on.
7.3 Delay Start
With this option you can delay the start of
a programme by 9, 6 or 3 hours.
8. SETTINGS
8.1 Child Lock
With this option you can prevent that the
children play with the control panel.
• To activate/deactivate this option,
press
until the indicator comes on/goes
off.
You can activate this option:
• After you press : the options and
the programme knob are locked.
• Before you press
cannot start.
= cold water.
and at the same time
: the appliance
The indicator of the option and the
indicator of the set value are on.
7.4 Extra Rinse
With this option you can add some rinses
to a washing programme.
Use this option for persons allergic to
detergents and in areas where the water
is soft.
The related indicator comes on.
7.5 Quick
With this option you can decrease the
programme duration.
Use this option for items with light soil or
items to refresh.
The related indicator comes on.
8.2 Acoustic signals
The acoustic signals operate when:
• The programme is completed.
• The appliance has a malfunction.
To deactivate/activate the acoustic
signals, press
time for 6 seconds.
If you deactivate the
acoustic signals, they
continue operate when the
appliance has a malfunction.
and at the same
Page 11
9. BEFORE FIRST USE
A
ENGLISH 11
1. Put a small quantity of detergent in
the compartment for washing phase.
2. Set and start a programme for cotton
at the highest temperature without
laundry.
10. DAILY USE
WARNING!
Refer to Safety chapters.
10.1 Loading the laundry
1. Open the appliance lid.
2. Push the button A.
The drum opens automatically.
3. Put the laundry in the drum, one item
at a time.
4. Shake the items before you put them
in the appliance.
Make sure not to put too much laundry in
the drum.
5. Close the drum and the lid.
This removes all possible dirt from the
drum and the tub.
CAUTION!
Before you close the lid of
your appliance, make sure
that you close the drum
correctly.
10.2 Using detergent and additives
1. Measure out the detergent and the
fabric conditioner.
2. Put the detergent and the fabric
conditioner into the compartments.
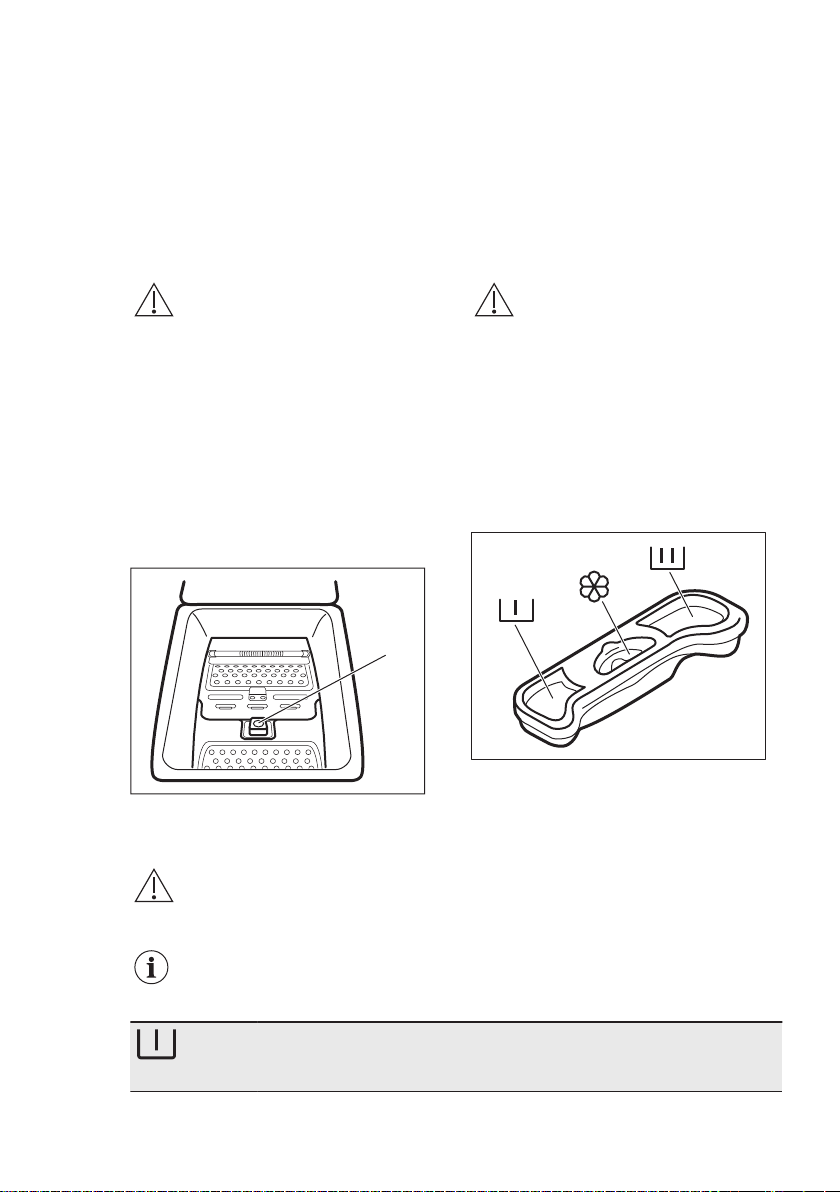
10.3 Detergent compartments
CAUTION!
Use only specified detergents for washing machine.
Always obey the instructions that you find on the packaging of the
detergent products.
Detergent compartment for prewash phase.
When you set a programme with a stain, add detergent (powder or
liquid).
Page 12
www.electrolux.com12
Detergent compartment for washing phase.
Compartment for liquid additives (fabric conditioner, starch).
The mark M is the maximum level for the quantity liquid additives.
10.4 Setting a programme
1. Turn the programme knob and set
the programme:
• The indicator of the
2. If necessary, change the temperature
and the spin speed or add available
options. When you activate an
option, the indicator of the set option
comes on.
If you set something
incorrect, the indicator
flashes red.
flashes.
10.5 Starting a programme without the delay start
Press the .
• The indicator of the stops to
flash and stays on.
• The programme starts, the lid
locks, the indicator
• The drain pump can operate for a
short time at the beginning of the
washing cycle.
is on.
10.6 Starting a programme with the delay start
1. Press to set the delay you want to
set.
The indicator of the set delay is on. The
indicator is on.
2. Press
• The appliance starts the
• When the countdown is
:
countdown.
completed, the programme starts
automatically.
You can cancel or change
the set of the delay start
before you press the .
To cancel the delay start :
a. Press to set the appliance to
pause
b. Press until the indicator of the
set delay goes off.
Press again to start the
programme immediately.
10.7 Interrupting a programme and changing the options
You can change only some options
before they operate.
1. Press .
The indicator flashes.
2. Change the options.
3. Press again.
The programme continues.
10.8 Cancelling a running programme
1. Turn the programme knob to position
to cancel the programme and to
deactivate the appliance.
2. Turn the programme knob again to
activate the appliance. Now, you can
set a new washing programme.
Before starting the new
programme the appliance
could drain the water. In this
case, make sure that the
detergent is still in the
detergent compartment, if
not fill the detergent again.
10.9 Opening the lid
While a programme or the delay start
operates, the appliance lid is locked. The
indicator is on.
Page 13
CAUTION!
If the temperature and level
of the water in the drum are
too high, you cannot open
the lid.
Open the lid during the first 10
minutes of the cycle and when the
delay start operates:
1. Press the to pause the appliance.
2. Wait until the lid lock indicator
goes off.
3. You can open the lid.
4. Close the lid and press the again.
The programme (or the delay start)
continues.
Open the lid when the programme
operates:
1. Turn the programme knob to position
to deactivate the appliance.
2. Wait for some minutes and then open
the appliance lid.
3. Close the lid and set the programme
again.
ENGLISH 13
• The drum turns regularly to prevent
the creases in the laundry.
• The lid lock indicator is on. The
indicator flashes. The lid stays
locked.
• You must drain the water to open the
lid.
To drain the water:
1. If necessary, decrease the spin
speed. If you set , the appliance
only drains.
2. Press
water and spins.
3. When the programme is completed
and the lid lock indicator goes
off, you can open the lid.
4. Turn the programme knob to position
. The appliance drains the
to deactivate the appliance.
The appliance drains and
spins automatically after
approximately 18 hours
(except for Wool
programme).
10.10 At the end of the programme
• The appliance stops automatically.
• The acoustic signal operates (if it is
activated).
• The indicator of the button goes
off.
• The lid lock indicator goes off.
• The indicator is on.
• You can open the lid.
• Remove the laundry from the
appliance. Make sure that the drum is
empty.
• Close the water tap.
• Turn the programme knob to position
to deactivate the appliance.
• Keep the lid ajar, to prevent the
mildew and odours.
The washing programme is
completed, but there is water in the
drum:
10.11 Stand-by
Some minutes after the end of the
washing programme, if you do not
deactivate the appliance, the energy
saving status activates.
The energy saving status decreases the
energy consumption when the appliance
is on the stand by.
• All indicators go off.
• The indicator of the flashes
slowly .
• Press one of the options to deactivate
the energy saving status.
If you set a programme or an
option that ends with water
in the drum, the energy
saving status function
doesn't activate to remind
you to drain the water.
Page 14

www.electrolux.com14
11. HINTS AND TIPS
11.1 The laundry load
• Divide the laundry in: white, coloured,
synthetics, delicates and wool.
• Obey the washing instructions that
are on the laundry care labels.
• Do not wash white and coloured items
together.
• Some coloured items can discolour
with the first wash. We recommend
that you wash them separately for the
first times.
• Button up pillowcases, close zippers,
hooks and poppers. Tie up belts.
• Empty the pockets and unfold the
items.
• Turn multilayered fabrics, wool and
items with painted illustrations inside
out.
• Remove hard stains with a special
detergent.
• Wash and pre-treat heavy soil stains
before putting items in drum
• Be careful with the curtains. Remove
the hooks and put the curtains in a
washing bag or pillowcase.
• Do not wash laundry without hems or
with cuts. Use a washing bag to wash
small and/or delicate items (e.g.
underwired bras, belts, tights, etc. ).
• A very small load can cause balance
problems with the spin phase. If this
occurs, adjust manually the items in
the tub and start the spin phase
again.
11.2 Stubborn stains
For some stains, water and detergent is
not sufficient.
We recommend that you pre-treat these
stains before you put the items in the
appliance.
Special stain removers are available.
Use the special stain remover that is
applicable to the type of stain and fabric.
11.3 Detergents and additives
• Only use detergents and additives
specially made for washing machines:
– powder detergents for all types of
fabric,
– powder detergents for delicate
fabrics (40 °C max) and woollens,
– liquid detergents, preferably for
low temperature wash
programmes (60 °C max) for all
types of fabric, or special for
woollens only.
• Do not mix different types of
detergents.
• To help the environment, do not use
more than the correct quantity of
detergent.
• Obey the instructions that you find on
the on packaging of these products.
• Use the correct products for the type
and colour of the fabric, the
programme temperature and the level
of soil.
• If your appliance does not have the
detergent dispenser with the flap
device, add the liquid detergents with
a dosing ball (supplied by the
detergent's manufacturer).
11.4 Ecological hints
• Always start a washing programme
with the maximum load of laundry
allowed.
• If necessary, use a stain remover
when you set a programme with a low
temperature.
• To use the correct quantity of
detergent, check the water hardness
of your domestic system. Refer to
"Water hardness".
11.5 Water hardness
If the water hardness in your area is high
or moderate, we recommend that you
use a water softener for washing
machines. In areas where the water
hardness is soft it is not necessary to use
a water softener.
To know the water hardness in your
area, contact your local water authority.
Use the correct quantity of the water
softener. Obey the instructions that you
find on the packaging of the product.
Page 15
12. CARE AND CLEANING
ENGLISH 15
WARNING!
Refer to Safety chapters.
12.1 External cleaning
Clean the appliance with soap and warm
water only. Fully dry all the surfaces.
CAUTION!
Do not use alcohol, solvents
or chemical products.
12.2 Descaling
If the water hardness in your area is high
or moderate, we recommend that you
use a water descaling product for
washing machines.
Regularly examine the drum to prevent
limescale and rust particles.
To remove rust particles use only special
products for washing machines. Do this
separately from the laundry wash.
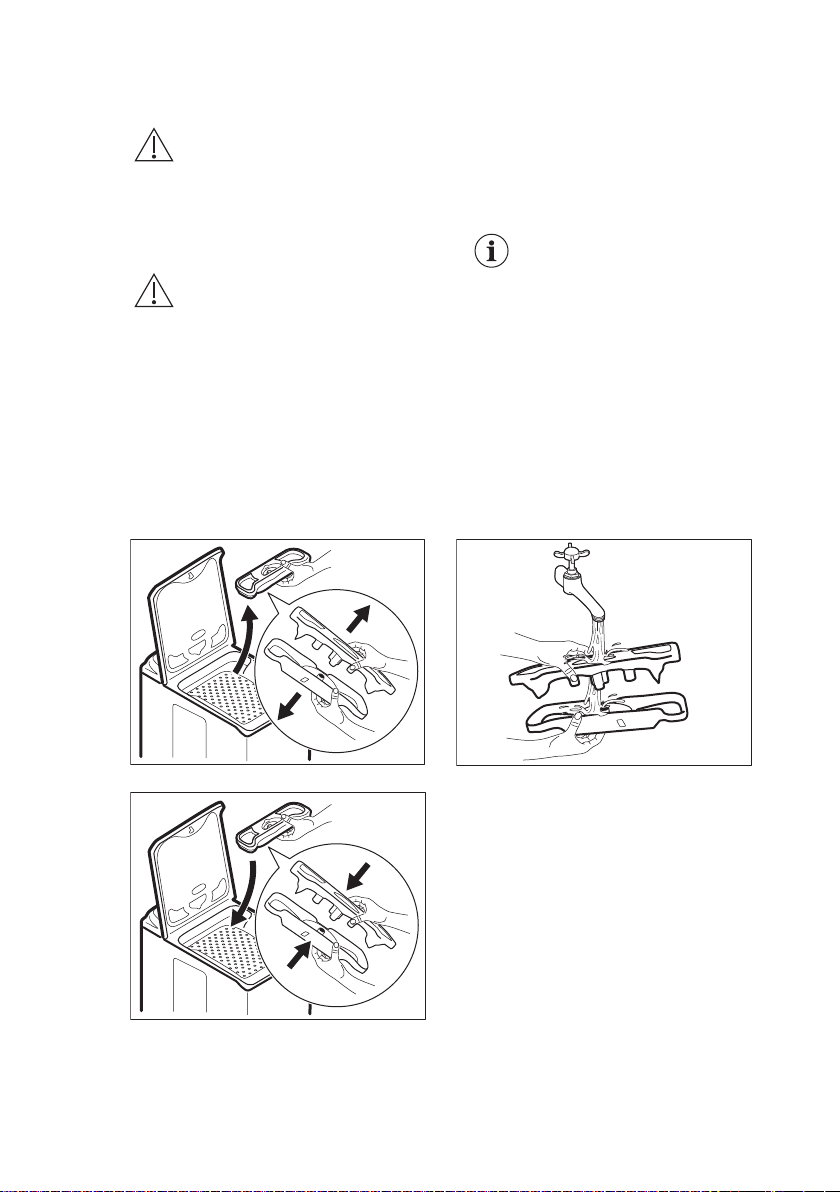
12.3 Maintenance wash
With the low temperature programmes it
is possible that some detergent stays in
the drum. Perform a maintenance wash
regularly. To do this:
• Remove all laundry from the drum.
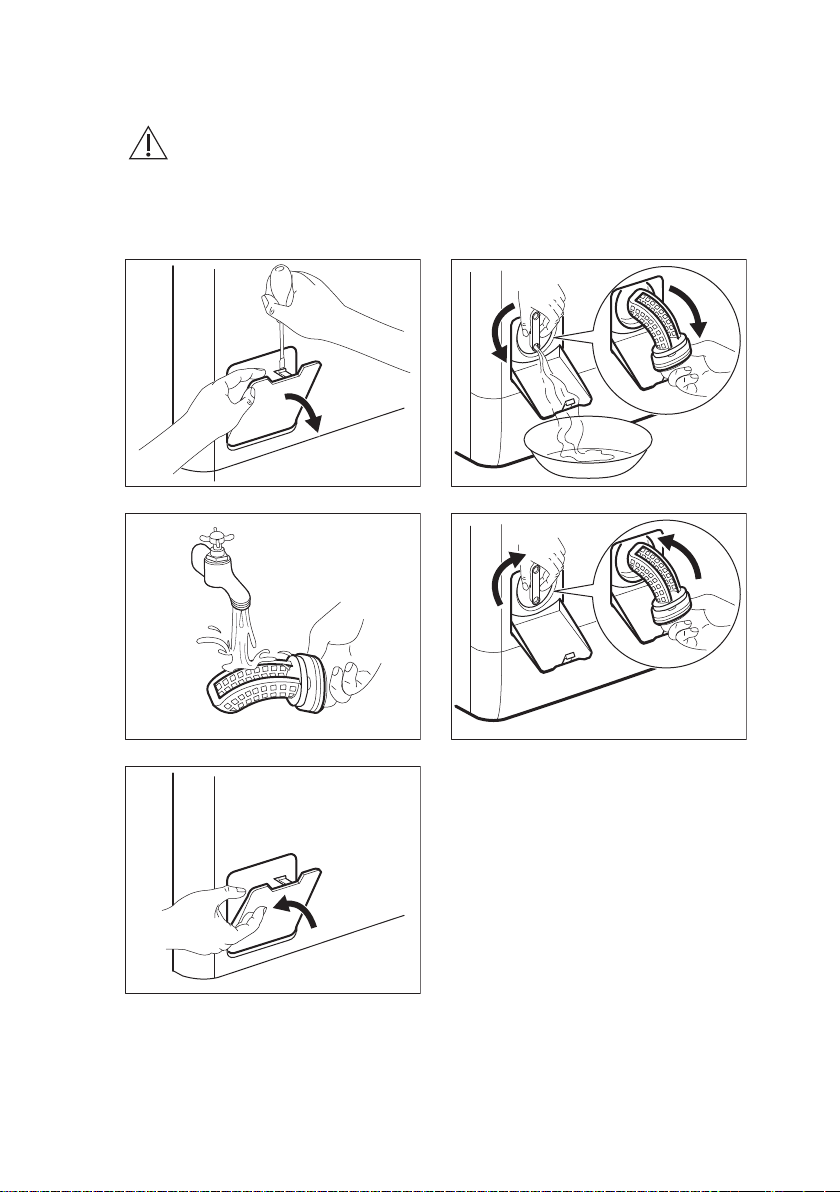
12.4 Cleaning the detergent dispenser
1. 2.
Always obey the instructions
that you find on the
packaging of the product.
3.
Page 16
www.electrolux.com16
12.5 Cleaning the drain filter
WARNING!
Do not clean the drain filter if
the water in the appliance is
hot.
1. 2.
3. 4.
5.
Page 17
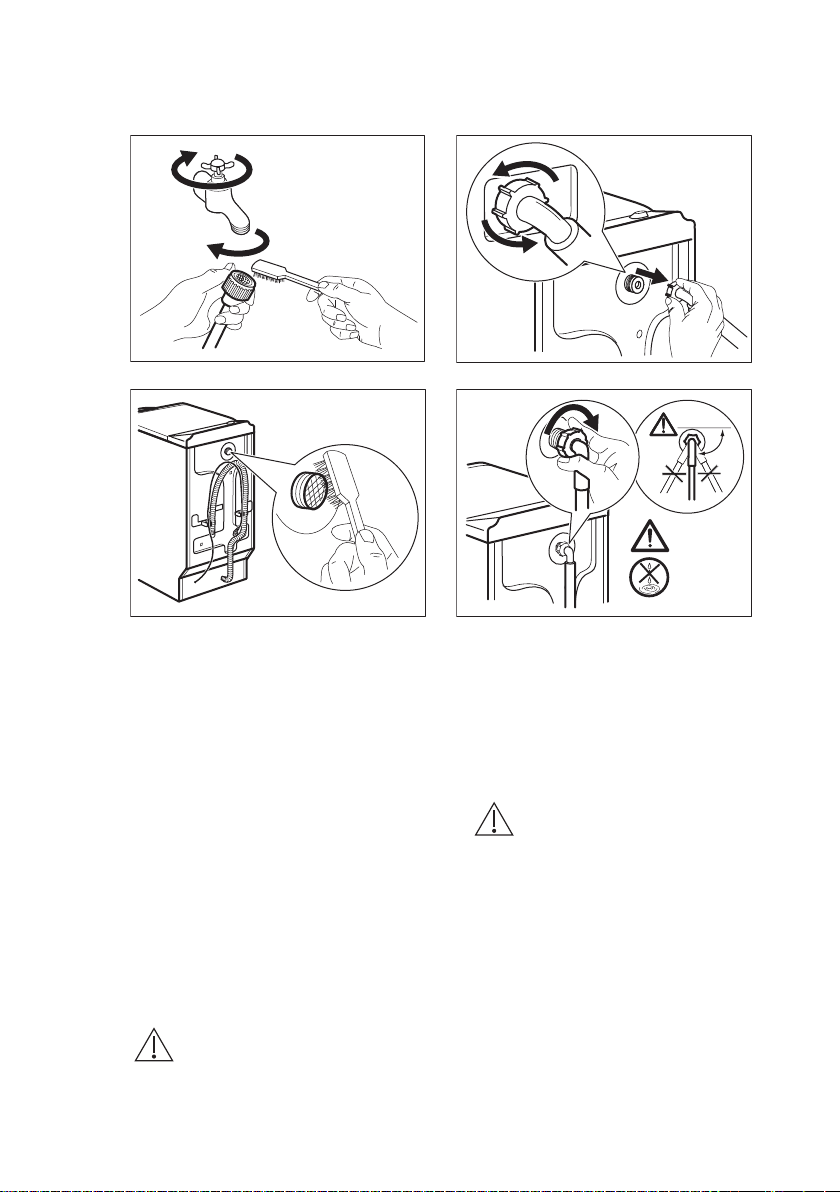
12.6 Cleaning the inlet hose and the valve filter
1
2
3
90˚
ENGLISH 17
1.
3. 4.
12.7 Emergency drain
Because of a malfunction, the appliance
cannot drain the water.
If this occurs, do steps (1) through (5) of
'Cleaning the drain filter'. If necessary,
clean the pump.
12.8 Frost precautions
If the appliance is installed in an area
where the temperature can be less than
0° C, remove the remaining water from
the inlet hose and the drain pump.
1. Disconnect the mains plug from the
mains socket.
2.
2. Close the water tap.
3. Put the two ends of the inlet hose in
a container and let the water flow out
of the hose.
4. Empty the drain pump. Refer to the
emergency drain procedure.
5. When the drain pump is empty,
install the inlet hose again.
WARNING!
Make sure that the
temperature is higher than 0
°C before you use the
appliance again.
The manufacturer is not
responsible for damages
caused by low temperatures.
13. TROUBLESHOOTING
WARNING!
Refer to Safety chapters.
13.1 Introduction
The start of the appliance does not occur
or it stops during operation.
Page 18
www.electrolux.com18
First try to find a solution to the problem
(refer to the table). If not, contact the
Authorised Service Centre.
With some problems, the acoustic
signals operate. The red indicator
flashes and one of the indicators comes
on, to show an alarm code:
- The appliance does not fill with
•
water properly.
• - The appliance does not drain the
water.
• - The appliance lid or drum doors
are open or not closed correctly.
Please check both!
13.2 Possible failures
Problem Possible solution
• Make sure that the mains plug is connected to the
mains socket.
• Make sure that the appliance lid and drum doors are
The programme does
not start.
The appliance does not
fill with water properly.
The appliance does not
fill with water and drain
immediately.
closed properly.
• Make sure that there is not a damaged fuse in the fuse
box.
• Make sure that the Start/Pause has been pressed.
• If the delay start is set, cancel the setting or wait for the
end of countdown.
• Deactivate the Child Lock function if it is on.
• Make sure that the water tap is open.
• Make sure that the pressure of the water supply is not
too low. For this information, contact your local water
authority.
• Make sure that the water tap is not clogged.
• Make sure that the filters of the inlet hoses and the fil‐
ters of the valves are not clogged. Refer to “Care and
cleaning”.
• Make sure that the inlet hose has no kinks or bends.
• Make sure that the connection of the water inlet hose is
correct.
• Make sure that the drain hose is in the correct position.
The hose may be too low. Refer to 'Installation instruc‐
tion'.
• The indicator of button Start/Pause
flashes in red 11 times and 1 (or 2 or
3) time(s) in yellow: the mains supply
is unstable. Wait until the mains
supply is stable and the appliance
automatically starts operating.
WARNING!
Deactivate the appliance
before you do the checks.
Page 19

Problem Possible solution
• Make sure that the sink spigot is not clogged.
• Make sure that the drain hose has no kinks or bends.
• Make sure that the connection of the drain hose is cor‐
rect.
• Set the drain option if you set a programme without
The appliance does not
drain the water.
drain phase.
• Set the drain option if you set an option which ends with
water in the drum.
• Make sure that the drain filter is not clogged. Clean the
filter, if necessary. Refer to 'Care and cleaning'.
• If problem remains please contact the Authorised Serv‐
ice Centre.
• Set the spin option.
• Set the drain option if you set an option which ends with
The spin phase does
not operate or the
washing cycle lasts lon‐
ger than usually.
water in the drum.
• Make sure that the drain filter is not clogged. Clean the
filter, if necessary. Refer to 'Care and cleaning'.
• Adjust manually the items in the tub and start the spin
phase again. This problem may be caused by balance
problems.
• Make sure that the couplings of the water hoses are
tight and there is not water leakages.
There is water on the
floor.
• Make sure that the water inlet hose and the drain hose
have no damages.
• Make sure you use the correct detergent and the correct
quantity of it.
You cannot open the
appliance lid.
• Make sure that the washing programme is finished.
• Set the drain or the spin option if there is water in the
tub.
• Make sure the levelling of the appliance is correct. Refer
to 'Installation instruction'.
The appliance makes
an unusual noise.
• Make sure that the packaging and/or the transit bolts
are removed. Refer to 'Installation instruction'.
• Add more laundry in the drum. The load may be too
small.
• Increase the detergent quantity or use a different deter‐
gent.
The washing results are
not satisfactory.
• Use special products to remove the stubborn stains be‐
fore you wash the laundry.
• Make sure that you set the correct temperature.
• Decrease the laundry load.
You cannot set an op‐
tion.
• Make sure that you press only the wanted touch but‐
ton(s).
ENGLISH 19
After the check, activate the appliance. The programme continues from the point of
interruption.
If the problem occurs again, contact the Authorised Service Centre.
Page 20
www.electrolux.com20
If the appliance shows other alarm codes
(the indicator of button flashes in
red). Deactivate and activate the
14. TECHNICAL DATA
appliance. If the problem continues,
contact the Authorised Service Centre.
Dimension Width/ Height/ Depth/
Electrical connection Voltage
Level of protection against ingress of solid parti‐
cles and moisture ensured by the protective cov‐
er, except where the low voltage equipment has
no protection against moisture
Water supply pressure Minimum
Water supply
Maximum Load Cotton 5,5 kg
Energy Efficiency Class A+
Spin Speed Maximum 800 rpm
1)
Connect the water inlet hose to a water tap with a 3/4'' thread.
1)
Total depth
Overall power
Fuse
Frequency
Maximum
400 mm/ 890 mm/ 600 mm/ 600
mm
230 V
2200 W
10 A
50 Hz
IPX4
0,5 bar (0,05 MPa)
8 bar (0,8 MPa)
Cold water
15. PROBLEM WITH MAINS SUPPLY
A momentary or a long interruption of
power supply stops the washing machine
operating, especially when the load on
electrical network exceeds the maximum
nominal load, 2000 watts. This can
decrease the voltage supply below the
acceptable values, 185 volts.
When these interruptions occurs, most of
the time, it is only necessary to wait until
the normal voltage supply is restored.
To avoid these interruptions,
we suggest:
• To let the washing
machine operating during
times when electrical
network is not overload
(e.g. during night).
• To ensure that other
appliances aren't already
operating.
16. ENVIRONMENTAL CONCERNS
Recycle the materials with the symbol
. Put the packaging in applicable
containers to recycle it. Help protect the
environment and human health and to
recycle waste of electrical and electronic
appliances. Do not dispose appliances
marked with the symbol with the
household waste. Return the product to
your local recycling facility or contact
your municipal office.
Page 21

FRANÇAIS 21
TABLE DES MATIÈRES
1. INFORMATIONS DE SÉCURITÉ..................................................................... 22
2. CONSIGNES DE SÉCURITÉ........................................................................... 23
3. DESCRIPTION DE L'APPAREIL......................................................................25
4. BANDEAU DE COMMANDE............................................................................ 25
5. TABLEAU DES PROGRAMMES......................................................................26
6. VALEURS DE CONSOMMATION....................................................................28
7. OPTIONS..........................................................................................................29
8. RÉGLAGES......................................................................................................30
9. AVANT LA PREMIÈRE UTILISATION............................................................. 30
10. UTILISATION QUOTIDIENNE........................................................................30
11. CONSEILS......................................................................................................33
12. ENTRETIEN ET NETTOYAGE.......................................................................34
13. EN CAS D'ANOMALIE DE FONCTIONNEMENT...........................................38
14. CARACTÉRISTIQUES TECHNIQUES...........................................................40
15. PROBLÈME LIÉ À L'ALIMENTATION ÉLECTRIQUE ...................................40
NOUS PENSONS À VOUS
Merci d'avoir choisi ce produit Electrolux. Avec ce produit, vous bénéficiez de
dizaines d'années d'expérience professionnelle et d'innovation. Ingénieux et
élégant, il a été conçu sur mesure pour vous. Grâce à cet appareil, vous savez
que chaque utilisation vous apportera satisfaction.
Bienvenue chez Electrolux.
Visitez notre site Internet pour :
Obtenir des conseils d'utilisation, des brochures, de l'aide, des informations :
www.electrolux.com/webselfservice
Enregistrez votre produit pour obtenir un meilleur service :
www.registerelectrolux.com
Acheter des accessoires, consommables et pièces de rechange d'origine pour
votre appareil :
www.electrolux.com/shop
SERVICE APRÈS-VENTE
Utilisez toujours des pièces d'origine.
Avant de contacter le service après-vente, assurez-vous de disposer des
informations suivantes : Modèle, PNC, numéro de série.
Vous trouverez ces informations sur la plaque signalétique.
Avertissement/Consignes de sécurité
Informations générales et conseils
Informations en matière de protection de l'environnement
Sous réserve de modifications.
Page 22

www.electrolux.com22
1. INFORMATIONS DE SÉCURITÉ
Avant d'installer et d'utiliser cet appareil, lisez
soigneusement les instructions fournies. Le fabricant ne
pourra être tenu pour responsable des blessures et
dégâts résultant d'une mauvaise installation ou
utilisation. Conservez toujours les instructions dans un
lieu sûr et accessible pour vous y référer ultérieurement.
1.1 Sécurité des enfants et des personnes vulnérables
• Cet appareil peut être utilisé par des enfants âgés
d'au moins 8 ans et par des personnes ayant des
capacités physiques, sensorielles ou mentales
réduites ou dénuées d’expérience ou de
connaissance, s'ils (si elles) sont correctement
surveillé(e)s ou si des instructions relatives à
l'utilisation de l'appareil en toute sécurité leur ont été
données et si les risques encourus ont été
appréhendés.
• Ne laissez pas les enfants jouer avec l'appareil.
• Les enfants de moins de 3 ans doivent être tenus
éloignés de l'appareil en permanence lorsqu'il est en
fonctionnement.
• Ne laissez pas les emballages à la portée des enfants
et jetez-les convenablement.
• Ne laissez pas les détergents à la portée des enfants.
• Tenez les enfants et les animaux éloignés de
l'appareil lorsque la porte est ouverte.
• Le nettoyage et l'entretien par l'usager ne doivent pas
être effectués par des enfants sans surveillance.
1.2 Sécurité générale
• Ne modifiez pas les caractéristiques de cet appareil.
• Respectez la charge maximale de 5,5 kg (reportez-
vous au chapitre « Tableau des programmes »).
Page 23

FRANÇAIS 23
• La pression de l'eau en service au niveau du point
d'entrée en provenance de l'arrivée d'eau doit être
comprise entre 0,5 bar (0,05 MPa) et 8 bar (0,8 MPa).
• Les orifices d'aération situés à la base (si présents) ne
doivent pas être obstrués par de la moquette, un tapis,
ou tout type de revêtement de sol.
• L'appareil doit être raccordé à l'arrivée d'eau à l'aide
des tuyaux neufs fournis, ou d'autres tuyaux neufs
fournis par le service après-vente agréé.
• N'utilisez pas de tuyaux provenant d'anciens
appareils.
• Si le câble d'alimentation est endommagé, il doit être
remplacé par le fabricant, un service de maintenance
agréé ou un technicien qualifié afin d'éviter tout
danger lié à l'électricité.
• Avant toute opération d'entretien, éteignez l'appareil et
débranchez la fiche de la prise secteur.
• Ne pulvérisez pas d'eau ni de vapeur à haute pression
pour nettoyer l'appareil.
• Nettoyez l'appareil avec un chiffon humide. Utilisez
uniquement des produits de lavage neutres. N'utilisez
pas de produits abrasifs, de tampons à récurer, de
solvants ni d'objets métalliques.
2. CONSIGNES DE SÉCURITÉ
2.1 Installation
• Retirez l'intégralité de l'emballage et
les boulons de transport.
• Conservez les boulons de transport
en lieu sûr. Si l'appareil doit être de
nouveau déplacé, les boulons doivent
être réutilisés pour maintenir le
tambour en place et éviter tout dégât
interne.
• Soyez toujours vigilants lorsque vous
déplacez l'appareil car il est lourd.
Utilisez toujours des gants de sécurité
et des chaussures fermées.
• N'installez pas et ne branchez pas un
appareil endommagé.
• Suivez scrupuleusement les
instructions d'installation fournies
avec l'appareil.
• N'installez pas l'appareil ou ne
l'utilisez pas dans un endroit où la
température ambiante est inférieure à
0 °C ou dans un endroit exposé aux
intempéries.
• L'appareil doit être installé sur un sol
plat, stable, résistant à la chaleur et
propre.
• Assurez-vous que de l'air circule entre
l'appareil et le sol.
• Réglez les pieds pour laisser un
espace suffisant entre l'appareil et le
sol.
Page 24

www.electrolux.com24
• N'installez pas l'appareil dans un
endroit où il ne pourrait pas être
complètement ouvert.
• Ne placez aucun récipient sous
l'appareil pour récupérer tout éventuel
écoulement. Contactez le service
après-vente agréé pour connaître les
accessoires disponibles.
2.2 Branchement électrique
• L'appareil doit être relié à la terre.
• Utilisez toujours une prise de courant
de sécurité correctement installée.
• Vérifiez que les paramètres figurant
sur la plaque signalétique
correspondent aux données
électriques de votre réseau.
• N'utilisez pas d'adaptateurs
multiprises ni de rallonges.
• Veillez à ne pas endommager la fiche
secteur ni le câble d'alimentation. Le
remplacement du cordon
d'alimentation de l'appareil doit être
effectué par notre service après-vente
agréé.
• Ne branchez la fiche d'alimentation à
la prise de courant qu'à la fin de
l'installation. Assurez-vous que la
prise de courant est accessible une
fois l'appareil installé.
• Ne touchez jamais le câble
d'alimentation ni la fiche avec des
mains mouillées.
• Ne tirez jamais sur le câble
d'alimentation pour débrancher
l'appareil. Tirez toujours sur la fiche.
• Cet appareil est conforme aux
directives CEE.
2.3 Raccordement à l'arrivée
d'eau
• Veillez à ne pas endommager les
tuyaux de circulation d'eau.
• Avant d'installer des tuyaux neufs,
des tuyaux n'ayant pas servi depuis
longtemps, lorsqu'une réparation a
été effectuée ou qu'un nouveau
dispositif a été installé (compteurs
d'eau, etc.), laissez l'eau s'écouler
jusqu'à ce qu'elle soit parfaitement
propre et claire.
• Pendant et après la première
utilisation de l'appareil, vérifiez
qu'aucune fuite n'est visible.
2.4 Utilisation
AVERTISSEMENT!
Risque de blessure, de choc
électrique, d'incendie, de
brûlures ou de dommage
matériel à l'appareil.
• Cet appareil est exclusivement
destiné à une utilisation domestique.
• Suivez les consignes de sécurité
figurant sur l'emballage du produit de
lavage.
• Ne placez pas de produits
inflammables ou d'éléments imbibés
de produits inflammables à l'intérieur
ou à proximité de l'appareil, ni sur
celui-ci.
• Veillez à retirer tout objet métallique
du linge.
• Ne lavez pas les textiles très tachés
par de l'huile, de la graisse ou une
autre substance grasse. Cela pourrait
endommager les pièces en
caoutchouc du lave-linge. Prélavez de
tels articles à la main avant de les
introduire dans le lave-linge.
2.5 Maintenance
• Pour réparer l'appareil, contactez un
service après-vente agréé.
• Utilisez exclusivement des pièces
d'origine.
2.6 Mise au rebut
AVERTISSEMENT!
Risque de blessure ou
d'asphyxie.
• Débranchez l'appareil de
l'alimentation électrique et de l'arrivée
d'eau.
• Coupez le câble d'alimentation au ras
de l'appareil et mettez-le au rebut.
• Retirez le dispositif de verrouillage du
hublot pour empêcher les enfants et
les animaux de s'enfermer dans le
tambour.
• Jetez l'appareil en vous conformant
aux exigences locales relatives à la
mise au rebut des Déchets
d'équipements électriques et
électroniques (DEEE).
Page 25

3. DESCRIPTION DE L'APPAREIL
2
3
1
5
4
6
7
800 600 400
1 2 3
8
6
5
7
4
9
3.1 Vue d'ensemble de l'appareil
1
2
3
4
5
6
7
4. BANDEAU DE COMMANDE
4.1 Description du bandeau de commande
FRANÇAIS 25
Bandeau de commande
Couvercle
Poignée du couvercle
Filtre de la pompe de vidange
Levier de déplacement du lave-linge
Pieds pour la mise de niveau de
l'appareil
Plaque signalétique
Sélecteur de programme
1
Touche de réduction de la vitesse
2
d'essorage (Spin)
3
Touche Température (Temp.)
4
Touche Prélavage (Prewash)
5
Touche Départ différé (Delay
Start)
6
Touche Rinçage plus (Extra
Rinse)
7
Touche Rapide (Quick)
8
Touche Départ/Pause (Start/
Pause)
Voyants d'état du programme :
9
Voyant Hublot verrouillé
Voyant Fin de cycle
Page 26

www.electrolux.com26
Voyant Sécurité enfants
5. TABLEAU DES PROGRAMMES
Programme
Plage de tem‐
pératures
Coton
90° - Froid
Coton
1)
Eco
60° - 40°
Synthétiques
60° - Froid
Délicats
40° - Froid
Laine/
Lavage à la
main
40° - Froid
Soie
30°
Couette
60° - 30°
Rinçage
Vidange
Essorage
Jeans
60° - Froid
Rideaux
40° - Froid
Charge maxi‐
male
Vitesse d'es‐
sorage maxi‐
male
5,5 kg
800 tr/min
5,5 kg
800 tr/min
2,5 kg
800 tr/min
2,5 kg
800 tr/min
1 kg
800 tr/min
1 kg
800 tr/min
2 kg
800 tr/min
5,5 kg
800 tr/min
5,5 kg Pour vidanger l'eau du tambour. Tous textiles.
5,5 kg
800 tr/min
3 kg
800 tr/min
2 kg
800 tr/min
Description du programme
(Type de charge et degré de salissure)
Coton blanc et couleurs. Normalement sale ou
légèrement sale.
Coton blanc et couleurs grand teint. Normale‐
ment sale. La consommation d'énergie diminue
et la durée du programme de lavage est prolon‐
gée.
Articles en textiles synthétiques ou mixtes.
Normalement sale.
Articles en textiles délicats tels que l'acryli‐
que, la viscose ou le polyester. Normalement
sale.
Lainages lavables en machine, laine lavable à
la main et textiles délicats portant le symbole
« lavable à la main ».
Programme spécial pour les articles en soie et
en textiles synthétiques mixtes.
Programme spécial pour une couverture, une
couette, un couvre-lit, etc. en textile synthéti‐
que.
Pour rincer et essorer le linge. Tous textiles, ex‐
cepté la laine et les tissus très délicats. Réduisez
la vitesse d'essorage en fonction du type de lin‐
ge.
Pour essorer le linge et vidanger l'eau du tam‐
bour. Tous textiles, excepté la laine et les tis‐
sus délicats.
Articles en jean ou en jersey. Également pour
les articles de couleurs foncées.
Programme spécial pour les rideaux. La phase
de prélavage est automatiquement activée.
2)
3)
Page 27

FRANÇAIS 27
Programme
Plage de tem‐
pératures
Charge maxi‐
male
Vitesse d'es‐
Description du programme
(Type de charge et degré de salissure)
sorage maxi‐
male
Sports
30°
5 Chemises
30°
1)
Programmes standard pour les valeurs de consommation de l'étiquette énergéti‐
que.Conformément à la norme 1061/2010, ces programmes sont respectivement le « pro‐
gramme standard à 60 °C pour le coton » et le « programme standard à 40 °C pour le co‐
ton ». Ce sont les programmes les plus économes en termes de consommation d'eau et
d'électricité pour laver du linge en coton normalement sale.
La température de l'eau de la phase de lavage peut différer de la température
indiquée pour le programme sélectionné.
2)
Durant ce cycle, le tambour tourne lentement pour garantir un lavage en douceur. Le
tambour peut donner l'impression de ne pas tourner, ou de ne pas tourner correctement,
mais son fonctionnement est normal pour ce programme.
3)
N'utilisez aucun détergent pour la phase de prélavage si vous souhaitez uniquement rin‐
cer à l'eau.
2 kg
800 tr/min
1,5 kg
800 tr/min
Articles en textiles synthétiques et délicats.
Légèrement sale ou articles à rafraîchir.
Articles en textiles synthétiques ou mixtes.
Légèrement sales ou articles à rafraîchir. Pour 5
ou 6 chemises.
Compatibilité des options avec les programmes
Programme
1)
■ ■ ■ ■ ■ ■ ■ ■
■ ■ ■ ■ ■ ■ ■
■ ■ ■ ■ ■ ■ ■ ■
■ ■ ■ ■ ■ ■ ■ ■
■ ■ ■ ■ ■
■ ■ ■
■ ■
■ ■ ■ ■ ■
■
■ ■
■ ■ ■ ■ ■ ■ ■
Page 28

www.electrolux.com28
Programme
■ ■ ■ ■ ■ ■
■ ■ ■
■ ■ ■
1)
Lorsque vous sélectionnez l'option Quick, nous vous recommandons de réduire la charge
de linge. Il est possible de charger entièrement le lave-linge, mais les résultats du lavage
seront alors moins bons. Charge conseillée : coton : 2,75 kg, textiles synthétiques et déli‐
cats : 1,5 kg.
5.1 Woolmark Apparel Care Bleu
Le cycle Laine de cet appareil a été
approuvé par la société Woolmark pour
le lavage des vêtements en laine portant
une étiquette « lavage à la main », sous
réserve que les vêtements soient lavés
conformément aux instructions
mentionnées par le fabricant de ce lavelinge. Respectez les instructions de
séchage figurant sur l'étiquette des
vêtements et toutes les autres
instructions concernant le linge. M1145
Au Royaume-Uni, en Irlande, à Hong
Kong ainsi qu'en Inde, le symbole
Woolmark est une marque de
certification.
6. VALEURS DE CONSOMMATION
1)
Les données de ce tableau sont approximatives. Les données peuvent
varier pour différentes raisons : la quantité et le type de linge, la tempé‐
rature ambiante ou de l'eau.
Programmes Char‐
Coton 60 °C 5,5 1,15 58 140
Programme Coton Éco à
1)
60 °C
Coton 40 °C 5,5 0,70 58 120
Synthétiques 40 °C 2,5 0,55 45 103
Textiles délicats 40 °C 2,5 0,55 45 80
ge (kg)
Consom‐
mation
énergéti‐
que
(kWh)
5,5 0,95 48 189
Consom‐
mation
d'eau (li‐
tres)
Durée approximati‐
ve du programme
(minutes)
Page 29

FRANÇAIS 29
Programmes Char‐
Laine/Lavage à la main
30 °C
1)
Le « programme coton éco » à 60 °C avec une charge de 5,5 kg est le programme de
référence pour les données de l'étiquette énergétique, conformément aux normes
CEE 95/12 de la commission européenne et mesuré conformément à la norme
EN 60456/2005.
Les informations fournies dans le tableau ci-dessus sont conformes à la directive
d'application 1015/2010 de la réglementation 2009/125/CE de la commission euro‐
péenne.
7. OPTIONS
7.1 Temp.
Sélectionnez cette option pour modifier
la température par défaut.
Voyant
Le voyant de la température réglée
s'allume.
7.2 Prewash
Cette option vous permet d'ajouter une
phase de prélavage à un programme de
lavage.
Utilisez cette option pour le linge très
sale.
Lorsque vous réglez cette option, la
durée du programme est allongée.
Le voyant correspondant s'allume.
ge (kg)
Mode « Éteint » (W) Mode « Veille » (W)
0,48 0,48
Consom‐
mation
énergéti‐
que
(kWh)
1 0,35 50 70
Consom‐
mation
d'eau (li‐
tres)
L'indicateur de cette option et l'indicateur
de la valeur réglée s'allument.
Durée approximati‐
ve du programme
(minutes)
7.4 Extra Rinse
= eau froide.
Cette option vous permet d'ajouter des
rinçages à un programme de lavage.
Utilisez cette option pour les personnes
allergiques aux produits de lavage et
dans les régions où l'eau est douce.
Le voyant correspondant s'allume.
7.5 Quick
Cette option vous permet de diminuer la
durée d'un programme.
Utilisez cette option pour le linge
légèrement sale ou à rafraîchir.
Le voyant correspondant s'allume.
7.3 Delay Start
Avec cette option, vous pouvez différer le
départ d'un programme de 9, 6 ou
3 heures.
Page 30

A
www.electrolux.com30
8. RÉGLAGES
8.1 Sécurité enfants
Avec cette option, vous pouvez
empêcher les enfants de jouer avec le
bandeau de commande.
• Pour activer/désactiver cette option,
appuyez simultanément sur les
touches
voyant s'allume/s'éteigne.
Vous pouvez activer cette option :
• Après avoir appuyé sur : les
options et le sélecteur de programme
sont verrouillés.
• Avant d'appuyer sur
peut pas démarrer.
et jusqu'à ce que le
: l'appareil ne
8.2 Signaux sonores
Les signaux sonores retentissent
lorsque :
• Le programme est terminé.
• L'appareil présente une anomalie de
fonctionnement.
Pour désactiver/activer les signaux
sonores, appuyez simultanément sur les
touches
Si vous désactivez les
signaux sonores, ils
continueront à retentir si
l'appareil présente une
anomalie.
9. AVANT LA PREMIÈRE UTILISATION
1. Versez une petite quantité de
détergent dans le compartiment de la
phase de lavage.
2. Sélectionnez et faites démarrer, à
vide, un programme pour le coton à
la température la plus élevée
possible.
Cela élimine toute salissure éventuelle
du tambour et de la cuve.
10. UTILISATION QUOTIDIENNE
AVERTISSEMENT!
Reportez-vous aux chapitres
concernant la sécurité.
et pendant 6 secondes.
10.1 Chargement du linge
1. Ouvrez le couvercle de l'appareil.
2. Appuyez sur la touche A.
Le tambour s'ouvre automatiquement.
3. Mettez le linge dans le tambour, un
article à la fois.
4. Dépliez-les le plus possible avant de
les placer dans l'appareil.
Assurez-vous de ne pas surcharger le
tambour.
5. Refermez le tambour et le couvercle.
ATTENTION!
Avant de fermer le couvercle
de votre appareil, vérifiez
que le tambour est
correctement fermé.
10.2 Utilisation de lessive et d'additifs
1. Dosez le produit de lavage et
l'assouplissant.
Page 31

2. Mettez le produit de lavage et
l'assouplissant dans les
compartiments.
10.3 Compartiments à lessive
ATTENTION!
Utilisez uniquement les lessives recommandées pour le lave-linge.
Respectez toujours les instructions figurant sur l'emballage des lessives.
Compartiment à lessive pour la phase de prélavage.
Lorsque vous sélectionnez un programme avec une phase de déta‐
chage, ajoutez du détergent (en poudre ou liquide).
Compartiment à lessive pour la phase de lavage.
FRANÇAIS 31
Compartiment réservé aux additifs liquides (assouplissant, amidon).
Le repère M indique le niveau maximal pour les additifs liquides.
10.4 Réglage d'un programme
1. Tournez le sélecteur pour régler le
programme :
• Le voyant de la touche
clignote.
2. Si nécessaire, modifiez la
température et la vitesse d'essorage
ou ajoutez des options compatibles.
Lorsque vous activez une option, le
voyant correspondant s'allume.
Si vous effectuez un
mauvais réglage, le voyant
clignote en rouge.
10.5 Démarrage d'un programme sans départ différé
Appuyez sur .
• Le voyant cesse de clignoter
et reste allumé.
• Le programme démarre, le
couvercle est verrouillé et le
voyant est allumé.
• La pompe de vidange peut
momentanément se mettre en
route au début du cycle de
lavage.
10.6 Départ d'un programme avec départ différé
1. Appuyez sur la touche pour régler
le délai souhaité.
Le voyant du départ différé sélectionné
est allumé. Le voyant est allumé.
2. Appuyez sur :
Page 32

www.electrolux.com32
• L'appareil commence le
décompte.
• Lorsque le décompte est terminé,
le programme démarre
automatiquement.
Vous pouvez à tout moment
modifier ou annuler le départ
différé, avant d'appuyer sur
la touche .
Avant de lancer le nouveau
programme, l'appareil peut
vidanger l'eau. Dans ce cas,
assurez-vous qu'il y a
toujours du détergent dans
le compartiment de produit
de lavage ; si ce n'est pas le
cas, versez à nouveau du
détergent.
Pour annuler le départ différé :
a. Appuyez sur pour mettre
l'appareil en pause.
b. Appuyez sur la touche
ce que le voyant du départ différé
sélectionné s'éteigne.
Appuyez de nouveau sur
pour démarrer le programme
immédiatement.
jusqu'à
10.7 Interruption d'un programme et modification des options
Vous ne pouvez modifier que quelques
options avant qu'elles ne soient actives.
1. Appuyez sur la touche .
Le voyant clignote.
2. Modifiez les options.
3. Appuyez de nouveau sur .
Le programme se poursuit.
10.8 Annulation d'un programme en cours
1. Tournez le sélecteur de programme
sur pour annuler le programme et
éteindre l'appareil.
2. Tournez de nouveau le sélecteur
pour mettre en fonctionnement
l'appareil. Maintenant, vous pouvez
sélectionner un nouveau programme
de lavage.
10.9 Ouverture du couvercle
Durant le fonctionnement d'un
programme ou du départ différé, le
couvercle de l'appareil est verrouillé. Le
voyant
Ouvrez le couvercle durant les
10 premières minutes du cycle et
pendant le départ différé :
1. Appuyez sur pour mettre
2. Attendez que le voyant de
3. Vous pouvez ouvrir le couvercle.
4. Fermez le couvercle et appuyez à
Ouvrez le couvercle lorsque le
programme est en cours :
1. Tournez le sélecteur de programme
2. Attendez quelques minutes avant
3. Fermez le couvercle et sélectionnez
est allumé.
ATTENTION!
Si la température et le
niveau de l'eau dans le
tambour sont trop élevés,
vous ne pouvez pas ouvrir le
couvercle.
l'appareil en pause.
verrouillage du couvercle
s'éteigne.
nouveau sur
le départ différé) se poursuit.
sur
pour éteindre l'appareil.
d'ouvrir le couvercle.
à nouveau un programme.
. Le programme (ou
10.10 À la fin du programme
• L'appareil s'arrête automatiquement.
• Le signal sonore retentit (s'il est
activé).
• Le voyant de la touche s'éteint.
Page 33

• Le voyant de verrouillage du
couvercle s'éteint.
• Le voyant est allumé.
• Vous pouvez ouvrir le couvercle.
• Sortez le linge de l'appareil. Vérifiez
que le tambour est vide.
• Fermez le robinet d'eau.
• Tournez le sélecteur de programme
pour éteindre l'appareil.
sur
• Laissez le couvercle entrouvert pour
éviter la formation de moisissures et
l'apparition de mauvaises odeurs.
Le programme de lavage est terminé,
mais il y a de l'eau dans le tambour :
• Le tambour tourne régulièrement pour
éviter que le linge ne se froisse.
• Le voyant de verrouillage du
couvercle est allumé. Le voyant
clignote. Le couvercle reste
verrouillé.
• Vous devez vidanger l'eau pour
pouvoir ouvrir le couvercle.
Pour vidanger l'eau :
1. Si besoin est, diminuez la vitesse
d'essorage. Si vous sélectionnez
l'appareil effectue uniquement la
vidange.
2. Appuyez sur la touche . L'appareil
effectue la vidange et l'essorage.
3. Une fois le programme terminé et le
symbole de verrouillage du couvercle
FRANÇAIS 33
éteint, vous pouvez ouvrir le
couvercle.
4. Tournez le sélecteur de programme
sur pour éteindre l'appareil.
L'appareil effectue
automatiquement la vidange
et l'essorage au bout
d'environ 18 heures (sauf
pour le programme Laine).
10.11 Veille
Quelques minutes après la fin du
programme de lavage, si vous n'avez
pas éteint l'appareil, la fonction
d'économie d'énergie se déclenche.
La fonction d'économie d'énergie réduit
la consommation d'énergie lorsque
l'appareil est en veille.
• Tous les voyants s'éteignent.
• L'indicateur
• Appuyez sur l'une des touches
d'option pour désactiver la fonction
d'économie d'énergie.
,
Si vous sélectionnez un
programme ou une option se
terminant avec de l'eau dans
le tambour, la fonction
d'économie d'énergie n'est
pas activée pour vous
rappeler qu'il faut vidanger
l'eau.
clignote lentement.
11. CONSEILS
11.1 Chargement du linge
• Répartissez le linge entre articles :
blancs, de couleurs, synthétiques,
délicats et en laine.
• Respectez les instructions de lavage
qui figurent sur les étiquettes des
vêtements.
• Ne lavez pas les articles blancs et de
couleur ensemble.
• Certains articles de couleurs peuvent
déteindre lors des premiers lavages. Il
est recommandé de les laver
séparément les premières fois.
• Boutonnez les taies d'oreiller, fermez
les fermetures à glissière et à
pression et les crochets. Attachez les
ceintures.
• Videz les poches des vêtements et
dépliez-les.
• Retournez les tissus multi-couches,
en laine et les articles portant des
illustrations imprimées vers l'intérieur.
• Lavez les taches incrustées avec un
produit spécial.
• Lavez et pré-traitez les taches très
sales avant d'introduire les articles
dans le tambour
• Traitez les rideaux avec précautions.
Retirez les crochets et placez les
rideaux dans un sac de lavage ou une
taie d'oreiller.
Page 34

www.electrolux.com34
• Ne lavez pas d'articles sans ourlet ou
déchirés. Utilisez un sac de lavage
pour les articles très petits et/ou
délicats (par exemple les soutiensgorge à armatures, les ceintures, les
bas, etc.).
• Une très petite charge peut provoquer
des problèmes d'équilibre pendant la
phase d'essorage. Si cela se produit,
répartissez manuellement les articles
dans la cuve et lancez à nouveau la
phase d'essorage.
11.2 Taches tenaces
Pour certaines taches, l'eau et les
produits de lavage ne suffisent pas.
Il est recommandé de pré-traiter ces
taches avant de mettre les articles dans
l'appareil.
Des détachants spéciaux sont
disponibles. Utilisez le détachant spécial
adapté au type de tache et de textile.
11.3 Produits de lavage et
additifs
• Utilisez uniquement des produits de
lavage et des additifs spécialement
conçus pour les lave-linge :
– lessives en poudre pour tous les
types de textiles,
– lessives en poudre pour les
textiles délicats (40 °C max.) et
les lainages,
– lessives liquides, de préférence
pour les programmes de lavage à
basse température (60 °C max.)
pour tous les types de textiles, ou
lessives spéciales pour les
lainages uniquement.
• Ne mélangez pas différents types de
produits de lavage.
• Afin de préserver l'environnement,
n'utilisez que la quantité nécessaire
de produit de lavage.
• Respectez les instructions qui se
trouvent sur les emballages de ces
produits.
• Utilisez des produits adaptés au type
et à la couleur du textile, à la
température du programme et au
niveau de salissure.
• Si votre appareil ne dispose pas d'un
distributeur de produit de lavage avec
volet, ajoutez les produits de lavage
liquides à l'aide d'une boule doseuse
(fournie par le fabriquant du produit
de lavage).
11.4 Conseils écologiques
• Commencez toujours un programme
de lavage avec une charge de linge
maximale.
• Si nécessaire, utilisez un détachant
quand vous réglez un programme à
basse température.
• Pour utiliser la bonne quantité de
produit de lavage, vérifiez la dureté de
l'eau de votre système domestique.
Reportez-vous au chapitre « Dureté
de l'eau ».
11.5 Dureté de l'eau
Si, dans votre région, la dureté de l'eau
est élevée ou modérée, il est
recommandé d'utiliser un adoucisseur
d'eau pour lave-linge. Dans les régions
où l'eau est douce, il n'est pas
nécessaire d'utiliser un adoucisseur
d'eau.
Pour connaître la dureté de l'eau dans
votre région, contactez votre compagnie
des eaux.
Utilisez la bonne quantité d'adoucisseur
d'eau. Respectez les instructions qui se
trouvent sur les emballages du produit.
12. ENTRETIEN ET NETTOYAGE
AVERTISSEMENT!
Reportez-vous aux chapitres
concernant la sécurité.
12.1 Nettoyage extérieur
Nettoyez l'appareil uniquement à l'eau
savonneuse chaude. Séchez
complètement toutes les surfaces.
Page 35

ATTENTION!
N'utilisez pas d'alcool, de
solvants ni de produits
chimiques.
spéciaux pour lave-linge. Procédez
séparément d'un lavage de linge.
Respectez toujours les
instructions figurant sur
l'emballage du produit.
12.2 Détartrage
Si, dans votre région, la dureté de l'eau
est élevée ou modérée, il est
recommandé d'utiliser un produit de
détartrage de l'eau pour lave-linge.
Examinez régulièrement le tambour pour
éviter le dépôt de particules de calcaire
et de rouille.
Pour éliminer les particules de rouille,
utilisez uniquement des produits
12.3 Lavage d'entretien
Avec les programmes à basse
température, il est possible que certains
produits de lavage restent dans le
tambour. Effectuez régulièrement un
lavage d'entretien. Pour ce faire :
• Retirez le linge du tambour.
12.4 Nettoyage du distributeur de produit de lavage
1. 2.
FRANÇAIS 35
3.
12.5 Nettoyage du filtre de vidange
AVERTISSEMENT!
Ne nettoyez pas le filtre de
vidange si l'eau dans
l'appareil est chaude.
Page 36

www.electrolux.com36
1. 2.
3. 4.
5.
Page 37

1
2
3
90˚
FRANÇAIS 37
12.6 Nettoyage du tuyau d'arrivée d'eau et du filtre de la soupape
1.
3. 4.
12.7 Vidange d'urgence
En raison d'une anomalie de
fonctionnement, l'appareil ne peut pas
vidanger l'eau.
Si cela se produit, procédez aux étapes
(1) à (5) du chapitre « Nettoyage du filtre
de vidange ». Si nécessaire, nettoyez la
pompe.
12.8 Précautions contre le gel
Si l'appareil est installé dans un local où
la température peut être négative,
évacuez toute l'eau restant dans le tuyau
d'alimentation et la pompe de vidange.
1. Débranchez la fiche d'alimentation
de la prise secteur.
2. Fermez le robinet d'eau.
2.
3. Placez les deux extrémités du tuyau
d'alimentation dans un récipient et
laissez l'eau s'écouler du tuyau.
4. Videz la pompe de vidange.
Reportez-vous à la procédure de
vidange d'urgence.
5. Une fois que la pompe de vidange
est vide, réinstallez le tuyau
d'alimentation.
AVERTISSEMENT!
Assurez-vous que la
température est supérieure à
0 °C avant d'utiliser à
nouveau l'appareil.
Le fabricant ne pourra être
tenu pour responsable en
cas de dommages dus aux
basses températures.
Page 38

www.electrolux.com38
13. EN CAS D'ANOMALIE DE FONCTIONNEMENT
AVERTISSEMENT!
Reportez-vous aux chapitres
concernant la sécurité.
13.1 Introduction
L'appareil ne démarre pas ou s'arrête en
cours de programme.
Dans un premier temps, essayez de
trouver une solution au problème
(reportez-vous au tableau). Si vous n'y
parvenez pas, contactez le service
après-vente agréé.
Les signaux sonores retentissent lorsque
certains problèmes se produisent. Le
voyant rouge
autres voyants s'allume, pour indiquer un
code d'alarme :
clignote et l'un des
13.2 Pannes possibles
Problème Solution possible
• Assurez-vous que la fiche du câble d'alimentation est
bien insérée dans la prise de courant.
• Assurez-vous que le couvercle et les portes du tambour
de l'appareil sont correctement fermés.
Le programme ne dé‐
marre pas.
L'appareil ne se remplit
pas d'eau correcte‐
ment.
• Assurez-vous qu'aucun fusible n'est grillé dans la boîte
à fusibles.
• Assurez-vous que la touche Départ/Pause est enfon‐
cée.
• Si vous avez sélectionné un départ différé, annulez-le
ou attendez la fin du décompte.
• Désactivez la sécurité enfants si elle a été préalable‐
ment activée.
• Assurez-vous que le robinet d'eau est ouvert.
• Assurez-vous que la pression de l'arrivée d'eau n'est
pas trop basse. Pour obtenir cette information, contac‐
tez votre compagnie des eaux.
• Assurez-vous que le robinet d'eau n'est pas obstrué.
• Assurez-vous que les filtres des tuyaux d'arrivée d'eau
et les filtres des vannes ne sont pas obstrués. Reportezvous au chapitre « Entretien et nettoyage ».
• Assurez-vous que le tuyau d'arrivée d'eau n'est pas tor‐
du ni plié.
• Vérifiez que le raccordement du tuyau d'arrivée d'eau
est correct.
• - L'appareil ne se remplit pas d'eau
correctement.
• - L'appareil ne se vidange pas.
- Les portes du tambour ou le
•
hublot de l'appareil sont ouverts ou ne
sont pas fermés correctement.
Vérifiez les deux !
• Le voyant de la touche Start/Pause
clignote 11 fois en rouge et 1 (ou 2 ou
3) fois en jaune : l'alimentation
électrique est instable. Attendez que
l'alimentation électrique redevienne
stable et l'appareil redémarrera
automatiquement.
AVERTISSEMENT!
Éteignez l'appareil avant de
procéder aux vérifications.
Page 39

Problème Solution possible
L'appareil ne se remplit
pas d'eau et se vidange
immédiatement.
• Vérifiez que la position du tuyau de vidange est correc‐
te. Le tuyau est peut-être trop bas. Reportez-vous au
chapitre « Instructions d'installation ».
• Assurez-vous que le siphon de l'évier n'est pas obstrué.
• Assurez-vous que le tuyau de vidange n'est pas tordu ni
plié.
• Vérifiez que le raccordement du tuyau de vidange est
correct.
• Sélectionnez l'option de vidange si vous avez choisi un
L'appareil ne vidange
pas l'eau.
programme sans phase de vidange.
• Sélectionnez l'option de vidange si vous avez choisi une
option se terminant avec de l'eau dans le tambour.
• Assurez-vous que le filtre de vidange n'est pas obstrué.
Nettoyez le filtre si nécessaire. Reportez-vous au chapi‐
tre « Entretien et nettoyage ».
• Si le problème persiste, contactez le service après-ven‐
te agréé.
• Sélectionnez l'option d'essorage.
• Sélectionnez l'option de vidange si vous avez choisi une
La phase d'essorage
n'a pas lieu ou le cycle
de lavage dure plus
longtemps que d'habitu‐
de.
option se terminant avec de l'eau dans le tambour.
• Assurez-vous que le filtre de vidange n'est pas obstrué.
Nettoyez le filtre si nécessaire. Reportez-vous au chapi‐
tre « Entretien et nettoyage ».
• Répartissez manuellement les vêtements dans la cuve
et lancez à nouveau la phase d'essorage. Ce problème
peut résulter de problèmes d'équilibrage.
• Assurez-vous que les raccords des tuyaux d'eau sont
bien serrés et qu'il n'y a aucune fuite d'eau.
Il y a de l'eau sur le sol.
• Assurez-vous que le tuyau d'arrivée d'eau et le tuyau de
vidange ne sont pas endommagés.
• Assurez-vous d'utiliser une lessive adaptée en quantité
correcte.
Impossible d'ouvrir le
couvercle de l'appareil.
• Assurez-vous que le programme de lavage est terminé.
• Sélectionnez l'option de vidange ou d'essorage s'il y a
de l'eau dans la cuve.
• Vérifiez que l'appareil est de niveau. Reportez-vous au
chapitre « Instructions d'installation ».
L'appareil fait un bruit
inhabituel.
• Vérifiez que l'emballage et/ou les boulons de transport
ont été retirés. Reportez-vous au chapitre « Instructions
d'installation ».
• Ajoutez plus de linge dans le tambour. La charge est
peut-être trop légère.
FRANÇAIS 39
Page 40

www.electrolux.com40
Problème Solution possible
• Augmentez la quantité de produit de lavage ou utilisez-
Les résultats de lavage
ne sont pas satisfai‐
sants.
Impossible de régler
une option.
Après avoir effectué ces contrôles, mettez l'appareil en marche. Le programme reprend là
où il s'était interrompu.
Si le problème persiste, contactez le service après-vente agréé.
en un autre.
• Utilisez des produits spéciaux pour enlever les taches
tenaces avant de laver le linge.
• Veillez à sélectionner la bonne température.
• Réduisez la charge de linge.
• Assurez-vous d'avoir appuyé sur la/les bonne(s) tou‐
che(s).
Si d'autres codes d'alarme s'affichent sur
l'appareil, (le voyant de la touche
clignote en rouge). Éteignez puis
rallumez l'appareil. Si le problème
persiste, contactez le service aprèsvente agréé.
14. CARACTÉRISTIQUES TECHNIQUES
Dimensions Largeur / Hauteur / Pro‐
Branchement électri‐
que
Niveau de protection contre l'infiltration de parti‐
cules solides et d'humidité assuré par le couver‐
cle de protection, excepté là où l'équipement
basse tension ne dispose d'aucune protection
contre l'humidité
Pression de l'arrivée
d'eau
Arrivée d'eau
Charge maximale Coton 5,5 kg
Classe d'efficacité énergétique A+
Vitesse d'essorage Maximale 800 tr/min
1)
Raccordez le tuyau d'arrivée d'eau à un robinet fileté 3/4'' .
1)
fondeur / Profondeur to‐
tale
Tension
Puissance totale
Fusible
Fréquence
Minimale
Maximale
400 mm/ 890 mm/ 600 mm/ 600
mm
230 V
2 200 W
10 A
50 Hz
IPX4
0,5 bar (0,05 MPa)
8 bar (0,8 MPa)
Eau froide
15. PROBLÈME LIÉ À L'ALIMENTATION ÉLECTRIQUE
Une interruption momentanée ou
prolongée de l'alimentation électrique
arrête le fonctionnement du lave-linge,
en particulier lorsque la charge sur le
réseau électrique dépasse la charge
nominale maximale de 2 000 watts. Ceci
Page 41

peut faire baisser la tension
d'alimentation en dessous des valeurs
acceptables, à 185 volts.
La plupart du temps, lorsque ces
interruptions se produisent, vous n'avez
qu'à attendre que la tension de
l'alimentation soit restaurée.
Pour éviter ces interruptions,
nous vous suggérons :
• de faire fonctionner le
• de vous assurer que
16. EN MATIÈRE DE PROTECTION DE
L'ENVIRONNEMENT
FRANÇAIS 41
lave-linge aux moments
où le réseau électrique
n'est pas surchargé (par
ex. la nuit).
d'autres appareils ne sont
pas déjà en cours de
fonctionnement.
Recyclez les matériaux portant le
symbole . Déposez les emballages
dans les conteneurs prévus à cet effet.
Contribuez à la protection de
l'environnement et à votre sécurité,
recyclez vos produits électriques et
électroniques. Ne jetez pas les appareils
portant le symbole avec les ordures
ménagères. Emmenez un tel produit
dans votre centre local de recyclage ou
contactez vos services municipaux.
Page 42

www.electrolux.com42
СОДЕРЖАНИЕ
1. СВЕДЕНИЯ ПО ТЕХНИКЕ БЕЗОПАСНОСТИ...............................................44
2. УКАЗАНИЯ ПО БЕЗОПАСНОСТИ................................................................. 46
3. ОПИСАНИЕ ИЗДЕЛИЯ...................................................................................48
4. ПАНЕЛЬ УПРАВЛЕНИЯ................................................................................. 48
5. ТАБЛИЦА ПРОГРАММ................................................................................... 49
6. ПОКАЗАТЕЛИ ПОТРЕБЛЕНИЯ..................................................................... 51
7. РЕЖИМЫ.........................................................................................................52
8. ПАРАМЕТРЫ...................................................................................................53
9. ПЕРЕД ПЕРВЫМ ИСПОЛЬЗОВАНИЕМ........................................................53
10. ЕЖЕДНЕВНОЕ ИСПОЛЬЗОВАНИЕ............................................................ 53
11. ПОЛЕЗНЫЕ СОВЕТЫ...................................................................................57
12. УХОД И ОЧИСТКА........................................................................................ 58
13. ПОИСК И УСТРАНЕНИЕ НЕИСПРАВНОСТЕЙ..........................................61
14. ТЕХНИЧЕСКИЕ ДАННЫЕ............................................................................ 64
15. НЕИСПРАВНОСТЬ ЭЛЕКТРОСЕТИ .......................................................... 64
МЫ ДУМАЕМ О ВАС
Благодарим вас за приобретение прибора Electrolux. Вы выбрали изделие,
за которым стоят десятилетия профессионального опыта и инноваций.
Уникальное и стильное, оно создавалось с заботой о вас. Поэтому когда бы
вы ни воспользовались им, вы можете быть уверены: результаты всегда
будут превосходными.
Добро пожаловать в Electrolux!
На нашем веб-сайте вы сможете:
Найти рекомендации по использованию изделий, руководства по
эксплуатации, мастер устранения неисправностей, информацию о
техническом обслуживании:
www.electrolux.com/webselfservice
Зарегистрировать свое изделие для улучшения обслуживания:
www.registerelectrolux.com
Приобрести дополнительные принадлежности, расходные материалы и
фирменные запасные части для своего прибора:
www.electrolux.com/shop
ПОДДЕРЖКА ПОТРЕБИТЕЛЕЙ И СЕРВИСНОЕ
ОБСЛУЖИВАНИЕ
Мы рекомендуем использовать оригинальные запчасти.
При обращении в сервис-центр следует иметь под рукой следующую
информацию: модель, код изделия (PNC), серийный номер.
Данная информация находится на табличке с техническими данными.
Внимание / Важные сведения по технике безопасности.
Общая информация и рекомендации
Информация по охране окружающей среды
Page 43

Право на изменения сохраняется.
РУССКИЙ 43
Page 44

www.electrolux.com44
1. СВЕДЕНИЯ ПО ТЕХНИКЕ БЕЗОПАСНОСТИ
Перед установкой и эксплуатацией прибора
внимательно ознакомьтесь с приложенным
руководством. Производитель не несет
ответственности за какие-либо травмы или ущерб,
возникший вследствие неправильной установки или
эксплуатации. Всегда храните данное руководство
под рукой в надежном месте для последующего
использования.
1.1 Безопасность детей и лиц с ограниченными возможностями
• Данный прибор может эксплуатироваться детьми,
если их возраст превышает 8 лет, и лицами с
ограниченными физическими, сенсорными или
умственными способностями и с недостаточным
опытом или знаниями только при условии
нахождения под присмотром лица, отвечающего за
их безопасность, или после получения
соответствующих инструкций, позволяющих им
безопасно эксплуатировать электроприбор и
дающих им представление об опасности,
сопряженной с его эксплуатацией.
• Не позволяйте детям играть с прибором.
• Детям младше 3 лет категорически запрещается
находиться рядом с прибором во время его
работы.
• Храните все упаковочные материалы вне
досягаемости детей и утилизируйте материалы
надлежащим образом.
• Храните моющие средства вне досягаемости
детей.
• Не подпускайте детей и домашних животных к
прибору, когда его дверца открыта.
• Очистка и доступное пользователю техническое
обслуживание прибора не должно производиться
детьми без присмотра.
Page 45

РУССКИЙ 45
1.2 Общие правила техники безопасности
• Не вносите изменения в параметры данного
прибора.
• Не превышайте максимально допустимую загрузку
в 5,5 кг (см. Главу «Таблица программ»).
• Рабочее давление воды в точке ее поступления из
водопроводной сети должно находиться в
пределах 0,5 бар (0,05 МПа) и 8 бар (0,8 МПа).
• Вентиляционное отверстие в днище (если
предусмотрено конструкцией) не должно
перекрываться ковровым покрытием, ковриком,
подставкой или любым иным напольным
покрытием.
• При подключении прибора к водопроводу должны
использоваться новые поставляемые с ним
комплекты шлангов или другие новые комплекты
шлангов, поставленные авторизованным
сервисным центром.
• Использовать старые комплекты шлангов нельзя.
• В случае повреждения кабеля электропитания во
избежание поражения электрическим током он
должен быть заменен изготовителем,
авторизованным сервисным центром или
специалистом с аналогичной квалификацией.
• Перед выполнением любых операций по чистке и
уходу выключите прибор и извлеките вилку
сетевого шнура из розетки.
• Не используйте для чистки прибора
водоразбрызгиватели высокого давления или пар.
• Протрите прибор влажной тряпкой. Используйте
только нейтральные моющие средства. Не
используйте абразивные средства, абразивные
губки, растворители или металлические предметы.
Page 46

www.electrolux.com46
2. УКАЗАНИЯ ПО БЕЗОПАСНОСТИ
2.1 Установка
• Удалите всю упаковку и вывинтите
транспортировочные болты.
• Сохраните транспортировочные
болты в надежном месте. Если в
будущем прибор понадобится
перевезти на другое место, их
следует установить на место,
чтобы заблокировать барабан во
избежание внутренних
повреждений прибора.
• Никогда не забывайте о мерах
предосторожности при его
перемещении: прибор имеет
большой вес. Всегда используйте
защитные перчатки и закрытую
обувь.
• Не устанавливайте и не
подключайте прибор, имеющий
повреждения.
• Следуйте приложенным к прибору
инструкциям по его установке.
• Не устанавливайте и не
эксплуатируйте прибор в
помещениях, где температура
может упасть ниже 0°C или там, где
он может оказаться под действием
атмосферных условий.
• Пол на месте установки прибора
должен быть ровным, прочным,
чистым и не бояться нагрева.
• Убедитесь, что между днищем
прибора и полом имеется
достаточная вентиляция.
• Для обеспечения необходимого
пространства между прибором и
напольным покрытием
отрегулируйте высоту ножек
прибора.
• Не устанавливайте прибор там, где
его крышку будет невозможно
полностью открыть.
• Не помещайте под прибор
контейнер для сбора воды на
случай возможной ее протечки.
Чтобы узнать, какие
дополнительные принадлежности
могут использоваться с Вашим
прибором, обратитесь в
авторизованный сервисный центр.
2.2 Подключение к электросети
• Прибор должен быть заземлен.
• Включайте прибор только в
установленную надлежащим
образом электророзетку с
защитным контактом.
• Убедитесь, что параметры,
указанные на табличке с
техническими данными,
соответствуют характеристикам
электросети.
• Не используйте тройники и
удлинители.
• Позаботьтесь о том, чтобы не
повредить вилку и сетевой кабель.
В случае необходимости замены
сетевого шнура она должна быть
выполнена нашим авторизованным
сервисным центром.
• Вставляйте вилку сетевого кабеля в
розетку только по окончании
установки прибора. Убедитесь, что
после установки прибора к вилке
электропитания имеется свободный
доступ.
• Не беритесь за кабель
электропитания или за его вилку
мокрыми руками.
• Для отключения прибора от
электросети не тяните за кабель
электропитания. Всегда беритесь
за саму вилку.
• Данный прибор соответствует
директивам E.E.C.
2.3 Подключение к
водопроводу
• Не повреждайте шланги для воды.
• Перед подключением к новым или
давно не использовавшимся
трубам, а также в случае, если
производились ремонтные работы
или устанавливались новые
устройства (счетчики воды и т.д.)
дайте воде стечь, пока она не
станет прозрачной и чистой.
• В ходе и по окончании первого
использования прибора убедитесь
в отсутствии видимых утечек воды.
Page 47

2.4 Эксплуатация
ВНИМАНИЕ!
Существует риск травмы,
поражения электрическим
током, пожара, получения
ожогов или повреждения
прибора.
• Данный прибор предназначен
только для бытового применения.
• Следуйте правилам по
безопасному обращению,
приведенным на упаковке моющего
средства.
• Не помещайте на прибор, рядом с
ним или внутрь него
легковоспламеняющиеся вещества
или изделия, пропитанные
легковоспламеняющимися
веществами.
• Удостоверьтесь, что из белья
извлечены все металлические
предметы.
• Не стирайте вещи, сильно
загрязненные маслом, жиром или
другими веществами,
содержащими жиры. Это может
привести к повреждению резиновых
деталей стиральной машины.
Перед загрузкой таких изделий в
стиральную машину необходимо
РУССКИЙ 47
произвести их предварительную
стирку вручную.
2.5 Сервис
• Для ремонта прибора обратитесь в
авторизованный сервисный центр.
• Применяйте только оригинальные
запасные части.
2.6 Утилизация
ВНИМАНИЕ!
Существует опасность
травмы или удушья.
• Отключите прибор от электросети и
водопроводной сети.
• Обрежьте кабель электропитания
как можно ближе к прибору и
утилизируйте его.
• Удалите защелку дверцы, чтобы
дети или домашние животные не
оказались заблокированными в
барабане.
• Утилизируйте прибор в
соответствии с местными
требованиями к утилизации
отработанного электрического и
электронного оборудования
(WEEE).
Page 48

2
3
1
5
4
6
7
800 600 400
1 2 3
8
6
5
7
4
9
www.electrolux.com48
3. ОПИСАНИЕ ИЗДЕЛИЯ
3.1 Обзор прибора
4. ПАНЕЛЬ УПРАВЛЕНИЯ
4.1 Описание панели управления
Панель управления
1
Крышка
2
Рукоятка крышки
3
Фильтр сливного насоса
4
Рукоятка для перемещения
5
прибора
Ножки для выравнивания прибора
6
Табличка с техническими данными
7
Селектор программ
1
Сенсорное поле снижения
2
скорости отжима (Spin)
3
Сенсорное поле температуры
(Temp.)
Сенсорное поле предварительной
4
стирки (Prewash)
5
Сенсорное поле отсрочки пуска
(Delay Start)
Сенсорное поле дополнительного
6
полоскания (Extra Rinse)
Сенсорное поле быстрой стирки
7
(Quick)
8
Сенсорное поле «Пуск/Пауза»
(Start/Pause)
Индикаторы состояния программ:
9
Индикатор блокировки дверцы
Индикатор завершения цикла
Page 49

Индикатор функции «Защита от
детей»
5. ТАБЛИЦА ПРОГРАММ
РУССКИЙ 49
Программа
Диапазон тем‐
ператур
Хлопок
90° – Стирка в
холодной воде
Хлопок
Эконом
60° - 40°
60° – Стирка в
холодной воде
ткани
40° – Стирка в
холодной воде
Ручная стирка
40° – Стирка в
холодной воде
30°
60° - 30°
1)
Синтетика
Деликатные
Шерсть/
Шелк
Одеяло
Полоскание
Слив
Отжим
Максималь‐
ная загрузка
Максималь‐
ная скорость
отжима
5,5 кг
800 об/мин
5,5 кг
800 об/мин
2,5 кг
800 об/мин
2,5 кг
800 об/мин
1 кг
800 об/мин
1 кг
800 об/мин
2 кг
800 об/мин
5,5 кг
800 об/мин
5,5 кг Слив воды из барабана. Все ткани.
5,5 кг
800 об/мин
Описание программы
(Тип загрузки и степень загрязненности)
Белый и цветной хлопок. Обычная и легкая
загрязненность.
Белый и нелиняющий цветной хлопок.
Обычная загрязненность. Энергопотребление
при этом уменьшается, а продолжительность
программы стирки увеличивается.
Изделия из синтетических или смесовых
тканей. Обычная загрязненность.
Деликатные ткани, например, из акрила,
вискозы и полиэстера. Обычная загрязнен‐
ность.
Шерстяные изделия, пригодные для ма‐
шинной стирки, шерстяные изделия, под‐
лежащие ручной стирке, а также изделия
из тканей, требующие бережного обраще‐
ния и имеющие на этикетке символ «Ручная
стирка».
Особая программа для шелковых и смесо‐
вых синтетических тканей.
Специальная программа для стирки одного
одеяла из синтетики, стеганого или пухо‐
вого одеяла, покрывала и т.д.
Полоскание и отжим белья. Все ткани за ис‐
ключением шерсти и вещей, требующих бе‐
режного обращения. Уменьшите скорость от‐
жима сообразно типу ткани.
Отжим белья и слива воды из барабана. Все
ткани за исключением шерсти и вещей,
требующих бережного обращения.
2)
Page 50

www.electrolux.com50
Программа
Диапазон тем‐
ператур
Максималь‐
ная загрузка
Максималь‐
Описание программы
(Тип загрузки и степень загрязненности)
ная скорость
отжима
Джинсы
60° – Стирка в
3 кг
800 об/мин
Джинсовые и вязаные изделия. Также изде‐
лия темных цветов.
холодной воде
Шторы
40° – Стирка в
2 кг
800 об/мин
Особая программа для штор. Этап предвари‐
тельной стирки включается автоматически.
3)
холодной воде
Спортивное
30°
2 кг
800 об/мин
Синтетические изделия и вещи, требую‐
щие бережного обращения. Вещи с незначи‐
тельной степенью загрязненности и вещи, ко‐
торые требуется освежить.
5 рубашек
30°
1,5 кг
800 об/мин
Изделия из синтетических и смесовых тка‐
ней. Легкая загрязненность и стирка изделий,
которые требуется только освежить. Для 5-6
рубашек.
1)
Стандартные программы для оценки класса энергопотребления.В соответ‐
ствии с евродирективой 1061/2010 данные программы являются эквивалентными про‐
граммам «Стандартная Хлопок 60°C» и «Стандартная Хлопок 40°C». Это наиболее
энергоэффективные программы для стирки этого типа белья нормальной степени за‐
грязненности из хлопка в части экономии как электроэнергии, так и потребления воды.
Температура воды на этапе стирки может отличаться от температуры, за‐
явленной для выбранной программы.
2)
В ходе этого цикла барабан медленно вращается, обеспечивая щадящую стирку.
Может показаться, что барабан не вращается или вращается ненадлежащим образ‐
ом, но для данной программы такое поведение является нормальным.
3)
Для того, чтобы просто прополоскать вещи, не добавляйте моющие средства на
этапе предварительной стирки.
Совместимость программных режимов
Программа
1)
■ ■ ■ ■ ■ ■ ■ ■
■ ■ ■ ■ ■ ■ ■
■ ■ ■ ■ ■ ■ ■ ■
■ ■ ■ ■ ■ ■ ■ ■
■ ■ ■ ■ ■
■ ■ ■
Page 51

РУССКИЙ 51
Программа
■ ■
■ ■ ■ ■ ■
■
■ ■
■ ■ ■ ■ ■ ■ ■
■ ■ ■ ■ ■ ■
■ ■ ■
■ ■ ■
1)
При выборе опции Quick рекомендуется уменьшить загрузку белья. Полная загруз‐
ка прибора возможна, однако качество стирки при этом может оказаться неудовлетво‐
рительным. Рекомендуемая загрузка: хлопок: 2,75 кг, синтетика и вещи, требующие
бережного обращения: 1,5 кг.
5.1 Woolmark Apparel Care Синий
Компания Вулмарк (Woolmark)
одобрила применение используемой в
данной машине программы стирки
шерстяных изделий с этикеткой
«ручная стирка» при условии
выполнения стирки в соответствии с
указаниями производителя данной
стиральной машины. Следуйте
указаниям по сушке изделия,
приведенным на его этикетке, а также
другим инструкциям по уходу за
бельем. M1145
Символ Woolmark является
сертификационным товарным знаком
в Великобритании, Ирландии,
Гонконге и Индии.
1)
6. ПОКАЗАТЕЛИ ПОТРЕБЛЕНИЯ
Приведенные в таблице данные являются ориентировочными. Они
могут меняться в зависимости от различных факторов,таких как ко‐
личество и тип белья, температура воды и окружающая температу‐
ра.
Page 52

www.electrolux.com52
Программы За‐
Хлопок 60°C 5,5 1,15 58 140
Энергосберегающая про‐
грамма для хлопка
1)
60°C
Хлопок 40°C 5,5 0,70 58 120
Синтетика 40°C 2,5 0,55 45 103
Деликатные ткани 40°C 2,5 0,55 45 80
Шерсть/Ручная стирка
30°C
1)
«Энергосберегающая программа для хлопка» при 60°C и загрузке 5,5 кг является
эталонной программой для расчета данных, указанных на табличке энергопотребле‐
ния в соответствии со стандартом EU 95/12/EC. Измерения выполняются в соответ‐
ствии с нормативом EN 60456/2005.
В отключенном состоянии (Вт)
0,48 0,48
Информация, приведенная в таблице выше, соответствует требованиям поста‐
новления комиссии ЕС 1015/2010 о введении в действие директивы
2009/125/EC
грузка
(кг)
Потре‐
бление
элек‐
троэнер‐
гии
(кВт·ч)
5,5 0,95 48 189
1 0,35 50 70
Потребле‐
ние воды
(в литрах)
При оставлении во включенном со‐
Приблизительная
продолжитель‐
ность программы
(в минутах)
стоянии (Вт)
7. РЕЖИМЫ
7.1 Temp.
Используйте эту функцию для
изменения температуры по
умолчанию.
Индикатор
При этом загорится индикатор
заданной температуры.
7.2 Prewash
С помощью этой функции можно
добавить в программу стирки фазу
предварительной стирки.
Рекомендуется использовать данную
функцию для стирки
сильнозагрязненного белья.
При использовании этой функции
продолжительность программы
увеличивается.
Загорится соответствующий
индикатор.
= холодная вода.
7.3 Delay Start
С помощью этой функции можно
отсрочить запуск программы на 9, 6
или 3 часа.
При этом светятся индикаторы
функции и заданного значения.
Page 53

РУССКИЙ 53
7.4 Extra Rinse
С помощью этой функции можно
добавить в программу стирки фазу
дополнительного полоскания.
Используйте данную функцию в
случае аллергии на средства для
стирки или, если вода в вашем
регионе отличается мягкостью.
Загорится соответствующий
индикатор.
8. ПАРАМЕТРЫ
8.1 Защита от детей
С помощью этой функции можно
заблокировать панель управления от
детей.
• Чтобы включить/выключить эту
функцию, одновременно нажмите и
удерживайте
пока не загорится/отключится
индикатор .
Можно включить эту функцию:
• После нажатия : селектор
программ и функций блокируются.
• До нажатия кнопки : в этом
случае прибор будет нельзя
запустить.
и до тех пор,
7.5 Quick
С помощью этой функции можно
уменьшить продолжительность
программы.
Используйте эту функцию для стирки
легко загрязненных вещей или для
того, чтобы освежить чистые вещи.
Загорится соответствующий
индикатор.
8.2 Звуковая сигнализация
Звуковые сигналы подаются в
следующих случаях:
• Работа программы завершена.
• В случае неисправности прибора.
Чтобы включить/отключить
звуковые сигналы, нажимайте
одновременно в течение 6 секунд.
При обнаружении
неисправности звуковые
сигналы будут подаваться
даже в случае их
отключения.
и
9. ПЕРЕД ПЕРВЫМ ИСПОЛЬЗОВАНИЕМ
1. Поместите небольшое количество
моющего средства в отсек для
этапа стирки.
2. Не загружая в прибор одежды,
выберите и запустите программу
для стирки изделий из хлопка на
максимальной температуре.
Эта процедура удалит из барабана и
бака любые загрязнения.
10. ЕЖЕДНЕВНОЕ ИСПОЛЬЗОВАНИЕ
ВНИМАНИЕ!
См. Главы, содержащие
Сведения по технике
безопасности.
10.1 Загрузка белья
1. Откройте крышку прибора.
2. Нажмите на кнопку A.
Автоматически откроется барабан.
3. Поместите белье в барабан по
одной вещи за раз.
4. Перед загрузкой встряхните
каждое загружаемое изделие.
Не превышайте норму загрузки при
укладке белья в барабан.
5. Закройте барабан и крышку.
Page 54

A
www.electrolux.com54
2. Поместите в отделения моющее
ПРЕДУПРЕЖДЕНИЕ
Перед тем, как закрыть
крышку прибора,
убедитесь, что барабан
закрыт как следует.
10.2 Добавление средства для стирки и добавок
1. Отмерьте количество средства для
стирки и кондиционера для ткани.
10.3 Отделения дозатора моющих средств
ПРЕДУПРЕЖДЕНИЕ
Используйте только средства для стирки в стиральных машинах.
средство и кондиционер для
белья.
Всегда следуйте инструкциям, приведенным на упаковке средств для
стирки.
Отсек средства для стирки, используемого на этапе предвари‐
тельной стирки.
При выборе программы с удалением пятен добавьте моющее
средство (порошковое или жидкое).
Отсек средства для стирки, используемого на этапе стирки.
Отделение для жидких добавок (кондиционера для тканей,
средства для подкрахмаливания).
Отметка M указывает на максимальный уровень жидких доба‐
вок.
10.4 Выбор программы
1. Выберите программу, повернув
селектор программ:
• Индикатор
замигает.
2. В случае необходимости измените
температуру и скорость отжима
или включите доступные функции.
При включении функции
загорается ее индикатор.
Page 55

РУССКИЙ 55
При ошибочной установке
на дисплее замигает
красным цветом .
10.5 Запуск программы без отсрочки пуска
Нажмите на .
• Индикатор
перестав мигать.
• Произойдет запуск программы,
крышка заблокируется и
загорится индикатор .
• В начале цикла стирки на
короткое время может
включиться сливной насос.
загорится,
10.6 Запуск программы с отсрочкой пуска
1. Нажатием на добейтесь
отображения на дисплее
необходимой отсрочки.
При этом загорится индикатор
заданного значения отсрочки. При
этом горит индикатор
2. Нажмите на :
• Прибор начнет обратный отсчет
времени.
• После завершения обратного
отсчета произойдет
автоматический запуск
программы.
Можно отменить или
изменить значение
отсрочки до нажатия на
.
Для отмены отсрочки пуска:
a. Нажмите , чтобы перевести
прибор в режим паузы.
b. Многократными нажатиями на
кнопку добейтесь, чтобы
индикатор отсрочки погас.
Вновь нажмите
немедленного запуска
программы.
.
для
10.7 Прерывание программы и изменение выбранных функций
Ряд функций можно изменить до того,
как они будут запущены.
1. Нажмите на
Замигает индикатор.
2. Внесите изменения в функции.
3. Вновь нажмите .
Выполнение программы будет
продолжено.
.
10.8 Отмена выполняющейся программы
1. Поверните селектор программ в
положение , чтобы отменить
программу и выключить прибор.
2. Вновь включите прибор поворотом
селектора программ. Теперь
можно выбрать новую программу
стирки.
Перед запуском новой
программы прибор может
произвести слив воды. В
этом случае убедитесь,
что средство для стирки
все еще находится в
дозаторе моющих средств;
в противном случае
добавьте средство для
стирки.
10.9 Открывание крышки
Во время выполнения программы или
отсчета времени при отсрочке пуска
крышка прибора остается
заблокированной. При этом светится
индикатор .
ПРЕДУПРЕЖДЕНИЕ
Если температура или
уровень воды в барабане
слишком высоки, крышку
нельзя будет открыть.
Откройте крышку в течение первых
10 минут цикла. В случае, если
задана отсрочка пуска:
Page 56

www.electrolux.com56
1. Нажмите на , чтобы перевести
прибор в режим паузы.
2. Дождитесь отключения индикатора
блокировки крышки .
3. Крышку можно открыть.
4. Закройте крышку и снова нажмите
на кнопку . Выполнение
программы или (отсчета времени
отсрочки пуска) продолжится.
Открывание крышки при
выполнении программы:
1. Выключите прибор, повернув
селектор программ в положение
.
2. Подождите несколько минут, а
затем откройте крышку прибора.
3. Закройте крышку и снова задайте
программу.
10.10 По окончании программы
• Прибор автоматически завершит
работу.
• Будет выдан звуковой сигнал (если
он включен).
• Индикатор кнопки
• Индикатор блокировки крышки
гаснет.
• При этом горит индикатор .
• Крышку можно открыть.
• Выньте белье из прибора.
Убедитесь, что барабан пуст.
• Закройте водопроводный вентиль.
• Выключите прибор, повернув
селектор программ в положение .
• Оставьте крышку приоткрытой для
предотвращения образования
плесени и неприятных запахов.
Программа стирки завершена, но в
барабане осталась вода.
• Барабан регулярно совершает
вращения для предотвращения
образования складок на белье;
• Включен индикатор блокировки
крышки . Мигает индикатор .
Крышка остается заблокированной.
гаснет.
• Чтобы открыть крышку, необходимо
слить воду.
Для слива воды:
1. При необходимости понизьте
скорость отжима. При установке
прибор выполнит только слив.
2. Нажмите на . Прибор
произведет слив воды и отжим.
3. По окончании программы
индикатор блокировки крышки
погаснет и дверцу можно будет
открыть.
4. Выключите прибор, повернув
селектор программ в положение
.
Прибор автоматически
произведет слив воды и
отжим приблизительно
через 18 часов (за
исключением программ
стирки шерстяных
изделий).
10.11 Режим ожидания
Если через несколько минут по
окончании программы стирки прибор
не будет выключен, он перейдет в
режим сохранения энергии.
Режим сохранения энергии уменьшает
энергопотребление, пока прибор
находится в режиме ожидания.
• Все индикаторы при этом гаснут.
• Индикатор медленно мигает.
• Для выключения режима
сохранения энергии нажмите на
одну из кнопок выбора режимов.
В случае выбора
программы или режима,
при окончании которых в
баке остается вода,
функция экономии
электроэнергии не
включается, чтобы
напомнить о
необходимости слива
воды.
Page 57

11. ПОЛЕЗНЫЕ СОВЕТЫ
РУССКИЙ 57
11.1 Загрузка белья
• Разделите белье на: белое белье,
цветное белье, синтетику,
деликатное белье и изделия из
шерсти.
• Следуйте инструкциям,
приведенным на ярлыках вещей с
информацией по уходу за ними.
• Не стирайте одновременно белое и
цветное белье.
• Некоторые цветные вещи могут
обесцвечиваться при первой
стирке. Рекомендуется стирать их
отдельно при первой стирке.
• Застегните наволочки, закройте
молнии, зацепите крючки,
защелкните кнопки. Завяжите
ремешки.
• Выньте из карманов все их
содержимое и расправьте вещи.
• Выверните многослойные изделия,
изделия из шерсти и вещи с
аппликациями.
• Удалите стойкие пятна
специальным моющим средством.
• Перед загрузкой вещей в барабан
выстирайте и предварительно
обработайте сильно загрязненные
места
• Соблюдайте осторожность при
обращении с занавесками. Удалите
крючки или поместите занавески в
мешок для стирки или наволочку.
• Не стирайте белье с
необработанными краями или с
разрезами. Помещайте небольшие
вещи и деликатные вещи
(например, бюстгальтеры с
косточками, ремни, колготки и т.д.)
в мешок для стирки.
• При крайне малой загрузке на
этапе отжима может иметь место
дисбаланс. В этом случае вручную
распределите вещи в барабане и
снова запустите этап отжима.
11.2 Стойкие пятна
Вода и средство для стирки могут не
справиться с некоторыми пятнами.
Такие загрязнения рекомендуется
обработать заранее до загрузки
одежды в прибор.
В продаже имеются
специализированные средства для
выведения пятен. Используйте
пятновыводители, подходящие к
конкретному типу пятен и ткани.
11.3 Средства для стирки и добавки
• Используйте только средства для
стирки и добавки, предназначенные
специально для стиральных машин:
– стиральные порошки для всех
типов тканей;
– стиральные порошки для
изделий из деликатных тканей
(макс. температура 40°C) и
шерсти;
– жидкие моющие средства,
предпочтительные для
низкотемпературных программ
стирки (макс. температура
60°C) для всех типов тканей или
специально предназначенные
для стирки только шерстяных
изделий.
• Не смешивайте разные средства
для стирки.
• В целях сохранения окружающей
среды не используйте средства для
стирки в количествах,
превышающих необходимые.
• Следуйте инструкциям,
приведенным на упаковке данных
средств.
• Выбирайте средства, подходящие
для типа и цвета конкретной ткани,
температуры программы стирки и
уровня загрязненности.
• Если в приборе отсутствует
дозатор средства для стирки с
заслонкой, добавляйте жидкие
средства для стирки при помощи
дозирующего шарика
(поставляемого производителем
средства для стирки).
Page 58

www.electrolux.com58
11.4 Рекомендации по
экологичному использованию
• Всегда запускайте программу
стирки при максимально
допустимой загрузке белья.
• При необходимости используйте
пятновыводитель и выбирайте
программу с более низкой
температурой стирки.
• Для того, чтобы правильно выбрать
нужное количество средства для
стирки, узнайте, какова жесткость
воды в Вашей водопроводной сети.
См. Главу «Жесткость воды».
11.5 Жесткость воды
Если вода в Вашем регионе имеет
высокую или среднюю жесткость,
12. УХОД И ОЧИСТКА
рекомендуется использовать
предназначенные для стиральных
машин смягчители для воды. В
регионах, где вода имеет низкую
жесткость, использование смягчителя
для воды не требуется.
Чтобы узнать уровень жесткости воды
в Вашем регионе обратитесь местную
службу контроля водоснабжения.
Используйте нужное количество
смягчителя воды. Следуйте
инструкциям, приведенным на
упаковке данных средств.
ВНИМАНИЕ!
См. Главы, содержащие
Сведения по технике
безопасности.
12.1 Очистка наружных
поверхностей
Для очистки прибора используйте
только теплую воду с мылом. Насухо
вытрите все поверхности.
ПРЕДУПРЕЖДЕНИЕ
Не используйте составы на
основе спирта,
растворителей или
химических веществ.
12.2 Удаление накипи
Если вода в Вашем регионе имеет
высокую или среднюю жесткость,
рекомендуется использовать
предназначенные для стиральных
машин средства для удаления накипи.
Регулярно проверяйте состояние
барабана, во избежание образования
накипи и частичек ржавчины.
Для удаления частиц ржавчины
используйте только специальные
средства для стиральных машин.
Данную операцию следует
производить отдельно от стирки
белья.
Всегда следуйте
инструкциям, приведенным
на упаковке данных
средств.
12.3 Профилактическая стирка
При использовании программ стирки
при низкой температуре в барабане
могут задерживаться остатки средства
для стирки. Регулярно производите
«профилактическую стирку». Для этот
проделайте следующее:
• Выньте все белье из барабана.
Page 59

12.4 Очистка дозатора моющего средства
1. 2.
3.
РУССКИЙ 59
12.5 Чистка фильтра сливного насоса
ВНИМАНИЕ!
Не производите очистку
сливного фильтра, если в
приборе находится
горячая вода.
1. 2.
Page 60

1
2
3
www.electrolux.com60
3. 4.
5.
12.6 Очистка наливного шланга и фильтра клапана
1.
2.
Page 61

3. 4.
90˚
РУССКИЙ 61
12.7 Экстренный слив
В результате неисправности прибор
может быть не в состоянии произвести
слив воды.
В этом случае выполните действия с
(1) по (5), описанные в Главе «Очистка
сливного фильтра». При
необходимости очистите насос.
12.8 Меры против замерзания
Если прибор установлен в месте, где
температура может опускаться ниже
0°C, удалите из наливного шланга и
сливного насоса оставшуюся там
воду.
1. Выньте вилку сетевого кабеля из
розетки.
2. Закройте водопроводный вентиль.
3. Поместите оба конца наливного
шланга в контейнер и дайте воде
вытечь из шланга.
4. Слейте воду из сливного насоса.
См. операции, выполняемые для
экстренного слива воды.
5. После слива воды из сливного
насоса подключите наливной
шланг.
ВНИМАНИЕ!
Перед тем, как вновь
использовать прибор,
убедитесь, что
температура превышает
0°C.
Производитель не несет
ответственности за ущерб,
вызванный воздействием
низких температур.
13. ПОИСК И УСТРАНЕНИЕ НЕИСПРАВНОСТЕЙ
ВНИМАНИЕ!
См. Главы, содержащие
Сведения по технике
безопасности.
13.1 Введение
Прибор не запускается или
останавливается во время работы.
Сначала попытайтесь найти решение
проблемы (см. Таблицу). Если
решение не найдено, обратитесь в
авторизованный сервисный центр.
В случае определенных
неисправностей выдаются звуковые
сигналы. Мигает красный индикатор
, а также загорается один из
индикаторов, обозначая код
неисправности:
• - В прибор не поступает как
следует вода.
- Прибор не сливает воду.
•
• - Крышка прибора или
барабана открыта или не закрыта
как следует. Просьба проверить
обе крышки!
• Индикатор кнопки Start/Pause
мигает 11 раз красным цветом и 1
(или 2 или 3) раз(а) желтым: работа
электросети нестабильна.
Page 62

www.electrolux.com62
Дождитесь стабилизации
электросети, и прибор
автоматически приступит к работе.
13.2 Возможные неисправности
Неисправность Возможное решение
• Убедитесь, что вилка сетевого шнура вставлена в
розетку электропитания.
• Убедитесь, что крышка прибора и дверца барабана
как следует закрыты.
Программа не запу‐
скается.
В прибор не поступает
как следует вода.
Прибор не набирает
воду и тут же произво‐
дит ее слив.
• Убедитесь, что предохранитель на электрощите не
поврежден.
• Убедитесь, что кнопка «Пуск/Пауза» была нажата.
• Если задана функция «Отсрочка пуска», отмените
отсрочку или дождитесь окончания обратного отсче‐
та.
• Отключите функцию «Защита от детей», если она
включена.
• Убедитесь, что водопроводный кран открыт.
• Убедитесь, что давление в водопроводной сети не
понижено. Для получения сведений об этом обрат‐
итесь в местную службу водоснабжения.
• Убедитесь, что водопроводный кран не засорен.
• Убедитесь, что фильтры наливного шланга и фильт‐
ры клапанов не засорены. См. Главу «Уход и очист‐
ка».
• Убедитесь, что наливной шланг не перекручен и не
передавлен.
• Убедитесь, что наливной шланг подключен правиль‐
но.
• Удостоверьтесь, что сливной шланг находится в
нужном положении. Возможно, шланг расположен
слишком низко. См. Главу «Инструкции по установ‐
ке».
ВНИМАНИЕ!
Перед выполнением
проверок выключите
прибор.
Page 63

Неисправность Возможное решение
• Убедитесь, что сливная труба не засорена.
• Убедитесь, что сливной шланг не перекручен и не
передавлен.
• Убедитесь, что сливной шланг подключен правиль‐
но.
• Если была выбрана программа без использования
Прибор не сливает во‐
ду.
слива, выберите функцию слива.
• Если использовалась функция, в результате работы
которой по окончании которой в барабане остается
вода, воспользуйтесь программой «Слив».
• Убедитесь, что сливной фильтр не засорен. При не‐
обходимости очистите фильтр. См. Главу «Уход и
очистка».
• Если проблема осталась, обратитесь в авторизован‐
ный сервисный центр.
• Задайте функцию отжима.
• Если использовалась функция, в результате работы
которой по окончании которой в барабане остается
Отжим не использует‐
ся или цикл стирки
длится дольше, чем
обычно.
вода, воспользуйтесь программой «Слив».
• Убедитесь, что сливной фильтр не засорен. При не‐
обходимости очистите фильтр. См. Главу «Уход и
очистка».
• Распределите вещи в барабане вручную и снова за‐
пустите этап отжима. Эта проблема может быть вы‐
звана разбалансировкой.
• Убедитесь, что соединения шлангов герметичны, а
утечки воды отсутствуют.
Вода на полу.
• Убедитесь, что наливной шланг и сливной шланги не
повреждены.
• Убедитесь, что используется подходящее моющее
средство в необходимом количестве.
Невозможно открыть
крышку прибора.
• Убедитесь, что программа стирки завершена.
• Если в камере осталась вода, выберите функцию
слива или отжима.
• Убедитесь, что прибор как следует выровнен. См.
Главу «Инструкции по установке».
Прибор издает не‐
обычный шум.
• Убедитесь, что упаковка и/или транспортировочные
болты удалены. См. Главу «Инструкции по установ‐
ке».
• Добавьте в барабан еще белья. Возможно, нагрузка
недостаточна велика.
• Увеличьте количество моющего средства или ис‐
пользуйте другое моющее средство.
Результаты стирки не‐
удовлетворительны.
• Перед стиркой используйте специальные средства
для удаления стойких пятен.
• Убедитесь в правильности выбранной температуры.
• Уменьшите объем загрузки.
РУССКИЙ 63
Page 64

www.electrolux.com64
Неисправность Возможное решение
Не удается выбрать
какую-либо опцию.
После проверки включите прибор. Выполнение программы продолжится с того
момента, на котором она была прервана.
Если неисправность появится снова, обратитесь в авторизованный сервисный центр.
• Убедитесь, что Вы нажимаете только на требуемую
сенсорную кнопку/кнопки.
Прибор выдает другие коды ошибок
(мигает красный индикатор кнопки
). Выключите и включите прибор. В
14. ТЕХНИЧЕСКИЕ ДАННЫЕ
Размеры Ширина/Высота/Глуби‐
Подключение к элек‐
тросети
Защита от проникновения твердых частиц и
влаги обеспечивается защитной крышкой. Ис‐
ключения: низковольтное оборудование не
имеет защиты от влаги.
Давление в водопро‐
водной сети
Подключение воды
Максимальная за‐
грузка
Класс энергопотребления A+
Скорость отжима Максимум 800 об/мин
1)
Присоедините наливной шланг к водопроводному крану с резьбой 3/4'' .
на/Общая глубина
Напряжение
Общая мощность
Предохранитель
Частота
Минимум
Максимум
1)
Хлопок 5,5 кг
случае повторного возникновения
неисправности обратитесь в
авторизованный сервисный центр.
400 мм/ 890 мм/ 600 мм/ 600 мм
230 В
2200 Вт
10 А
50 Гц
IPX4
0,5 бар (0,05 МПа)
8 бар (0,8 МПа)
Холодная вода
15. НЕИСПРАВНОСТЬ ЭЛЕКТРОСЕТИ
В случае кратковременного или
долговременного перебоя подачи
электроэнергии стиральная машина
прекращает работу, особенно в
случае, если нагрузка на электросеть
превышает максимальную
номинальную величину в 2000 ватт.
Это может привести к уменьшению
напряжения ниже приемлемой
величины в 185 вольт.
В большинстве случаев при подобных
перебоях электропитания достаточно
просто дождаться восстановления
нормального напряжения электросети.
Page 65

Во избежание данных
перебоев рекомендуется:
• Использовать
стиральную машину в
периоды, когда
электросеть не
перегружена (например,
ночью).
• Позаботиться о том,
чтобы при этом не были
запущены другие
приборы.
16. ОХРАНА ОКРУЖАЮЩЕЙ СРЕДЫ
РУССКИЙ 65
Материалы с символом следует
сдавать на переработку. Положите
упаковку в соответствующие
контейнеры для сбора вторичного
сырья. Принимая участие в
переработке старого электробытового
оборудования, Вы помогаете
защитить окружающую среду и
здоровье человека. Не выбрасывайте
вместе с бытовыми отходами бытовую
технику, помеченную символом .
Доставьте изделие на местное
предприятие по переработке
вторичного сырья или обратитесь в
свое муниципальное управление.
*
Page 66

www.electrolux.com66
Page 67

РУССКИЙ 67
Page 68

www.electrolux.com/shop
192958781-A-062017
 Loading...