

Electrolux EMS20202 User Manual
USER MANUAL
EMS20202

EMS20202
í===========================================
English
3
Before using your microwave oven 4
Technical data
4
Safety instructions
5
– Utensil safety
5
– Testing suitability of Cookware
5
– Food safety
6
– Installation
8
– Oven utensils and accessories guide
9
– Unpacking
9
How to operate your microwave oven
10
– Name and fun ct ion of parts
10
– Control panel
11
– Setting the Clock
12
– Child Sa fe ty Lock
12
– To Stop the Oven
12
– Switching the beeper off
13
– Quick Start
13
– Microwave Power setting Guide
13
– Microwave cooking
14
– Automatic Defrost
15
– Automatic Reheat
16
– Snack Function
17
Recommendations for Manu al Defrost
18
– Auto Reheat Programmes Chart
19
– Auto Defrost Programmes Chart
20
– Snack Fu nc tion Programmes Chart
21
Microwave Hints
22
Care and cleaning
23
– Cleaning the accessories (turntable and support)
23
– Cleaning the interior
23
– Cleaning the exterior
23
Guarantee Conditions
24
Contents
EMS20202
í===========================================
English
4
Thank you for having chosen a Electrolux product. We are convi nced that you will find your new microwave oven
very useful and that it will be of great help to you. As with all new kitchen appliance s, it will take som e time to
learn all the new functions and features, but with time, this oven will become indisp e nsable to you.
Read through the instruction ma nual carefully. In order that you can get the best from your new Electrolux
Microwave Oven, the following instructio ns have been prepared. Please make sure you read them car efully.
It is important that this instruction book is reta ined with the appliance for futu re reference. Sh o uld the appliance
be sold or transferred to another owner, or if you move house and leave the applian ce, always ensure that the
book is supplied with the appliance or that the new owner can be acquainted with the functioning of the
appliance and the relevant warnings.
Please ensure you have read the whole instruction book before using the appliance and that you follow the
recommendations given.
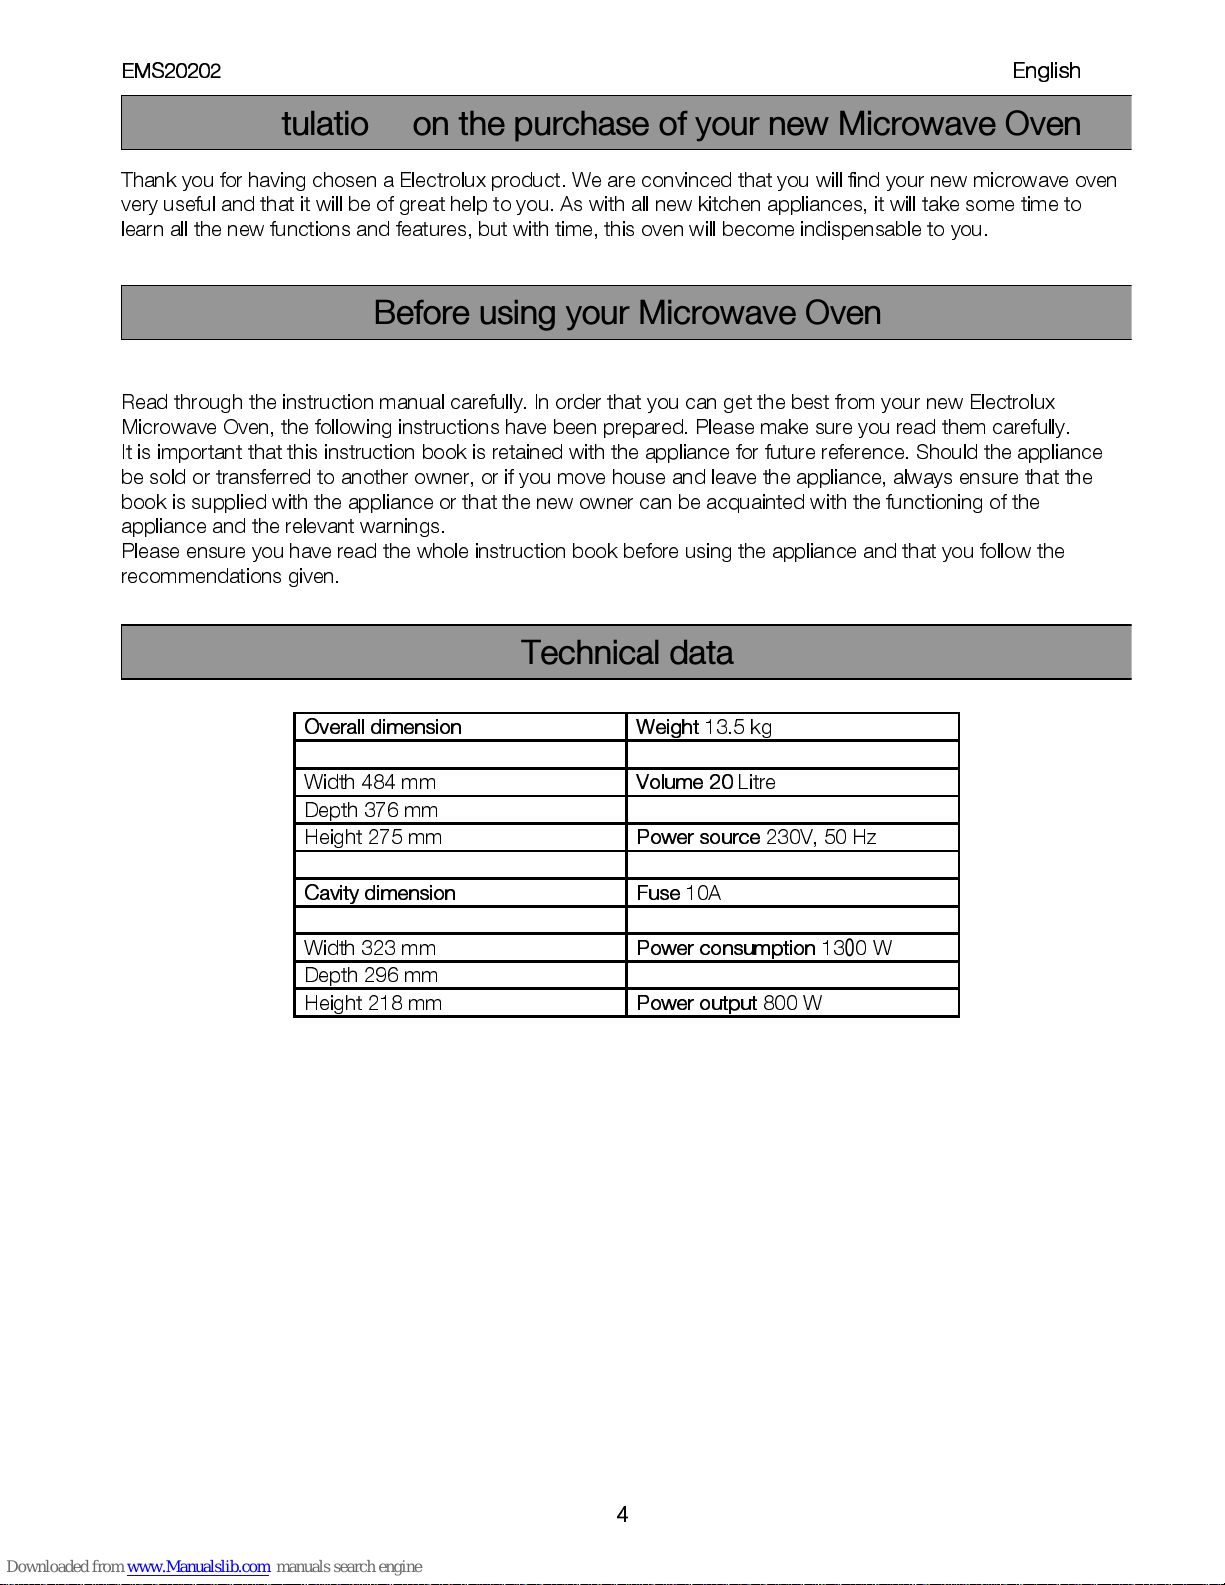
Overall dimension Weight
13.5 kg
Width 484 mm
Volu me 20
Litre
Depth 376 mm
Height 275 mm
Powe r source
230V, 50 Hz
Cavity dimension Fuse
10A
Width 323 mm
Power co n sumption
1350 W
Depth 296 mm
Height 218 mm
Power o ut p ut
800 W
Congratulations on the purchase of your new Microwave Oven
Before using your Microwave Oven
Technical data
0
EMS20202
í===========================================
English
5
READ CAREFULL Y AND K EEP F OR FUT URE REFEREN CE
•
The built-in safety interlock switches prevent the
microwave oven from operating when the door is
open.
•
Do not tamper with th em, or attempt to operate the
oven with the door open as open door opera tion
can result in exposure to microwave energy.
•
Do not allow food sp ills o r c leaner residue to
accumulate on door sealing surfaces. See the
Cleaning and Care section for cleaning instructions.
•
It is particularly important that the oven door closes
properly and that there is no damage to the: (1)
door (warped), (2) hinges and latches (broken or
insecure), (3) door seals and sealing surface.
m
WARNING
: If the door, hinges/latches
or door seals are damaged, the microwave
must not be operated until it has been repaired
by a authorized service person.
m
WARNING
: It is hazardous for anyone
excep t factory tr ai n e d se r vi ce perso n nel to
service or make adjustments to this oven.
Contact your nearest authorised service agent
if service should be required.
•
Do not remove the outer case, door or control
panel at any time. Doing so may cause exposure to
extremely high voltage.
•
Install or locate this oven only in accord ance with
‘installation instructions’ found in this manual.
•
Use the appliance for its intended use as described
in this manual. Do not use corrosive chemicals in
this appliance. This type of oven is specifically
designed to heat, cook, or defrost food. It is not
designed for industrial or laboratory use neither for
commercial u se as this will invalidate the guaran te e.
•
Do not operate the oven empty. If food or water is
not present to absorb the microwave energy , the
magne tron t u be can be damag e d.
•
Do not store this appliance o u tdoors. Do not use
this product near water.
•
Do not attempt to dry clothing or new spapers in
the mic r o w a ve oven. Thes e items can ignite.
•
Do not use the ca vity for storage purposes. Do not
leave paper products, cooking utensils, or food in
the cavity when not in use.
•
The temperature of acc essible surfaces may be
high when the app liance i s operating.
m
WARNING
: If smoke is observed, switch
off or unplug the appliance and keep the door
closed in order to stifle any flames. Never use
water.
m
WARNING
: Only allow c hildren o r infirm
persons to use the mi crow ave, without
supervision, when adeq uate in structions h a ve
been given so that the child or infirm person is
able to use the microwave in a safe way and
understand the hazards of improper use.
Utensil safe ty
•
Only use utensils that are suitable for use in a
microwave oven.
•
Most glass, glass ceramic and heat-resistant glass-
ware utensils are excellent for use in t he micro-
wave ove n . A lthough microw a ve energy will not
heat most glass and ceram ic items, these utensils
can become hot as heat transfers from the food to
the container. The use of oven gloves to remove
dish es is re c ommended.
Testing suitability of c ookw are
•
Utensils should be checked to ensure they are
suitable for use in Microwave Ovens.
•
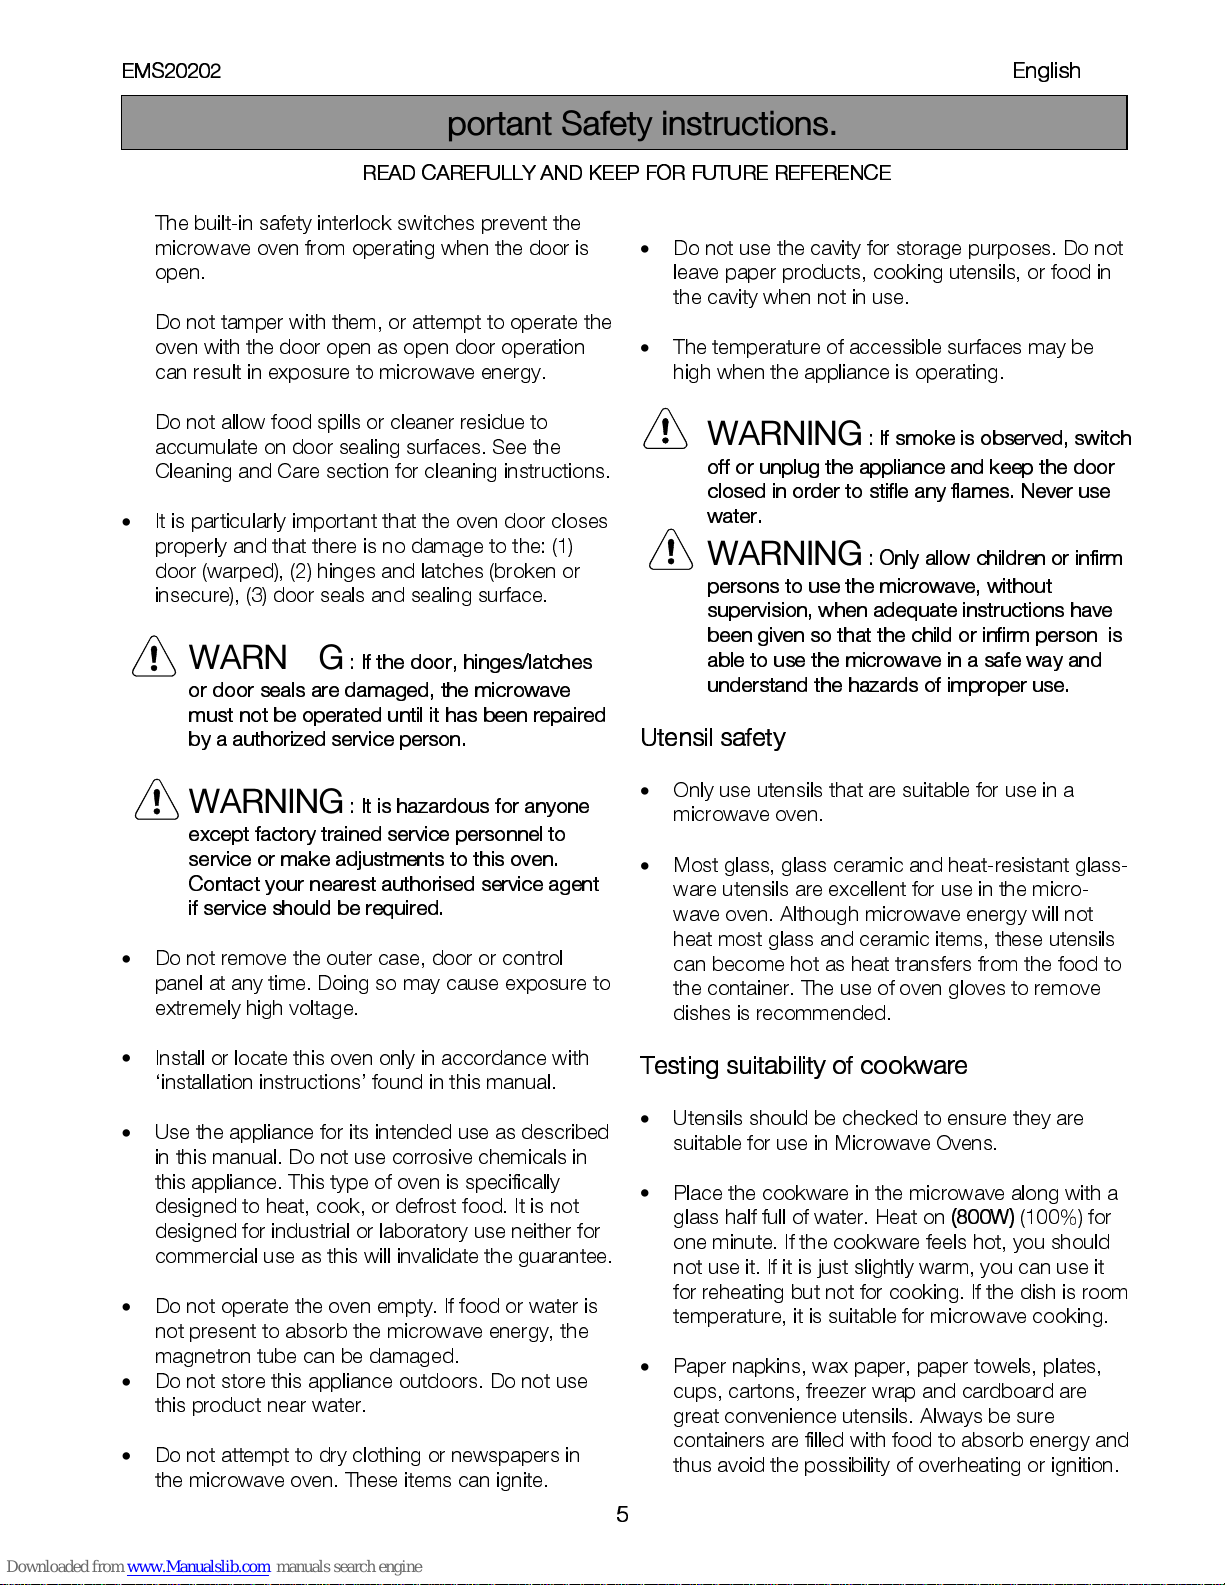
Place the cookware in the microwave along with a
glass half full of water. Heat on
(800W)
(100%) for
one minute. If the cookware feels hot, you should
not use it. If it is just slightly warm, you can use it
for reheating but not for cooking. If the dish is room
temperature, it is suitable for microwave cooking.
•
Paper napkins, wax paper, paper towels, plates,
cups, cartons, freezer wrap and cardboard are
great convenience utensils. Always be sure
containers are filled with food to absorb energy and
thus avoid the po ssibility of overheating or ignition.
Important Safety instructions.
EMS2020
2
í===========================================
English
6
•
Many plastic dishes, cups, freezer co ntainers and
plastic wraps may be used in the microwave oven.
Follow manufacturer’s instructions when using
plastics in the oven. Avoid using plastic utensils
with foods that have high fat or sugar content since
these foods reach high temper atures and could
melt some plastics.
•
Do not leave oven unattended, and look at it from
time to time when heating or cooking food in
plastic, paper or other combustible containers.
•
Metal utensils and utensils with me tallic trim should
not be used in the microwave oven, unless
specifically recommended for m icrowave use.
•
Containers with restricted openings, such as
bottles, should not be used for microwave cooking.
•
Use caution when removing a lid or cover from a
dish to avoid steam burns.
Foil containe rs
Shallow foil containers may safely be used to reheat
foods in your microwave ov e n providing the follow ing
rules are observed:
1. Foil containers should not be more than 3 cms (1
1/4”) deep.
2. Foil lids must n o t b e used.
3. The foil containers must be at least two-thirds full
of food. Empty containers must never be used.
4. Foil co ntainers should be used si n g ly in the
microwave oven and should not be allowed to
touch the sides. If your oven has a metal turntable
or cooking rack, the foil container should be
placed on an upturned oven-proof plate.
5. Foil co ntainers should never be re-used in the
microwave oven.
6. If the microwave oven has been in use for 15
minutes or more, allow it to cool before using it
again.
7. The container and turntable may become hot
during use, take great care when removing either
from the oven. It is advisable to use an ove n cloth
or glove when doing so.
8. Remember when using an aluminium foil
container that the reheating or cook ing ti mes may
be longer than you are us ed to, always ensure that
the food is piping hot before serving.
Food safety
•
Do not heat food in a can in the microwave oven.
Always remove the food to a suitable container.
•
Deep fat frying shou ld not be done in the
microwave oven, because the fat temperature
cannot be controlled, hazard ous situations can
result.
•
Popcorn may be prepared in the microwave oven,
but only in special packag es or utensils d esigned
specifically for this purpose. This cooking op eration
should never be unattend ed.
•
Pierce foods with non-porous skins or membra nes
to prevent steam build-up and bursting. Apples,
potatoes, chicken livers, and egg yolks are
examples of items that should be p ierced.
•
The contents of feeding bottles and baby food jars
are to be stirred or shaken and the te m p erature is
to be checked before consumption, in order to
avoi d burns.
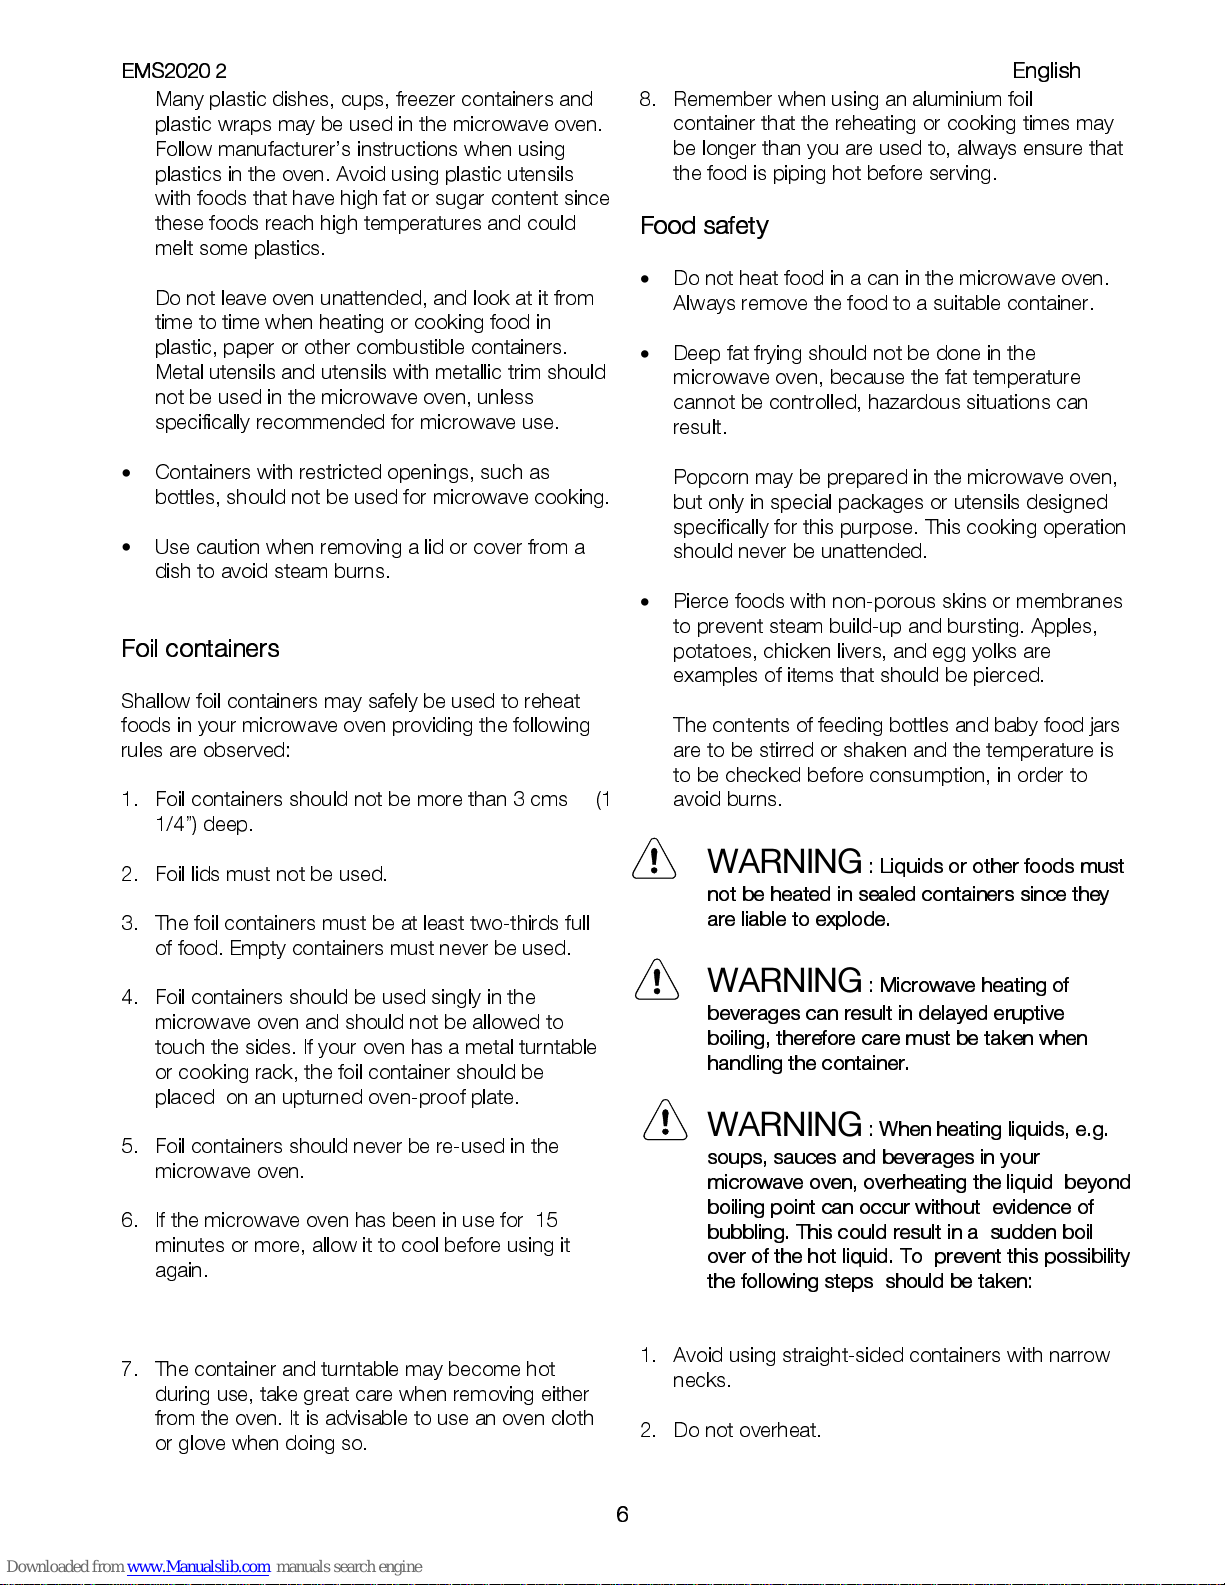
m
WARNING
: Liquids or other foods must
not be heated in sealed containers since they
are liable to explode.
m
WARNING
: Microwave heating of
beverages can result in delayed eruptive
boiling, therefore ca re mu st be ta ke n w hen
handling the container.
m
WARNING
: When heating liquids, e.g.
soups, sauces and beverages in your
microwa
ve oven, overheating the liquid beyond
boiling point can oc cur withou t evid en ce of
bubbling. This could resul t in a sud den boil
over of the hot liquid. To prevent th is possibility
the following steps should b e ta ken:
1. Avoid using straight-sided containers with narrow
necks.
2. Do not overheat.

EMS20202
í===========================================
English
7
3. Stir the liquid before placing the container in the
oven and again halfway through the heating time.
4. After heating, allow to stand in the oven for a short
time, stirring again before carefully removing the
container.
m
WARNING
: Some products such as
whole eggs and sealed containers – for
example, closed glass ja rs – may explode and
should not b e he ated in this ov en.
Occasionally, poached eggs may explode
during cooking. Always pierce the yolk, then
cover and allow the standing time of one
minute before removing cover.
&
It is quite normal for steam to be emitted
around the door, or for misting to occur on the
door, or even for water droplets to appear
below the door during the cooking cycle. This is
merely condensation from the heat of the food
and does not affect the safety of your oven. The
door is not intended to seal
the oven cavity completely.
•
Do not force the turntable to rotate by hand. This
may cause m alfunctioning.
•
Arcing in the oven during microwave operation
usually occu rs from use of metalli c utensils.
Continuous arcing, however, can damage the unit.
Stop the progr amme and check the utens il.
•
Care should be taken not to obstruct any air vents
located on the top, rear, side and bottom of the
oven.
m WARNING
: Do not use this oven for
commercial purposes.This oven is made for
domes ti c use only .

EMS20202
í===========================================
English
8
1. Remove any promotion label from the door.
2. The oven should be installed on a fla t, level
surface. The surface must be strong enough to
safely bear the weight (13.5 kg) of the oven, and
the contents. To avoid the possibility of causing
vibration or noise the oven must be in a stable
position.
3. Keep the oven away from heat and water.
Exposure to heat and w ater can lower oven
efficiency and lead to malfunctioning, so be sure to
install the oven away from heat and water sources.
4. Do not block air vents on the top and the sides of
the cabinet and also do not place any articles on
the top of the oven. If air vents are blocked during
operation, the oven may overheat, and this may
lead to malfunctioning. Hot air escapes from the
vents, so be sure not to obstruct it or let curtains
come between the oven and the rear wall.
5. Place the oven as far away from radios and TV’s
as possible. This oven does con form to EEC
requirements of radio interference suppression, but
some interference may occur if it is placed too
close to a radio or TV, so keep them as far apart
as possible.
6. If positioned in a corner, leave a gap of at least
10 cm from the walls and 10 cm above the
microwave.
IMPORTANT!
The oven can be placed almost
anywhere in the kitchen. Make sure the oven is
placed on a flat, level surface and that vents as
well as the surface underneath the oven are not
blocked (for sufficient ventilation).
Connecting to the mains
The oven is delivered with the power cord and a plug
for 230V, 50Hz, earthed socket outlet.
Earth protection minimises the risks should a short
circuit occur. Check to ensure the voltage of the oven
matches the supply.
N.B. If the oven is connected to the socket via an
extension cord, make sure the cord is earthed.
m
This appliance must not be used on a non-
earth protected power supply. Contact an
electrician if you are uncertain regarding
electrical connection of the oven or provision of
earth protection of the
supply.
m
This appliance must be earthed. If this
appliance is fitted with a non-rewireable plug
for which your socket is unsuitable, it must be
replaced by the manufacturer, its service agent
or similarly qualified persons in order to avoid a
hazard.
m
If the supply cord is damaged, it must be
replaced by the manufacturer, its service agent
or similarly qualified persons in order to avoid a
hazard.
Installation.
EMS20202
í===========================================
English
9
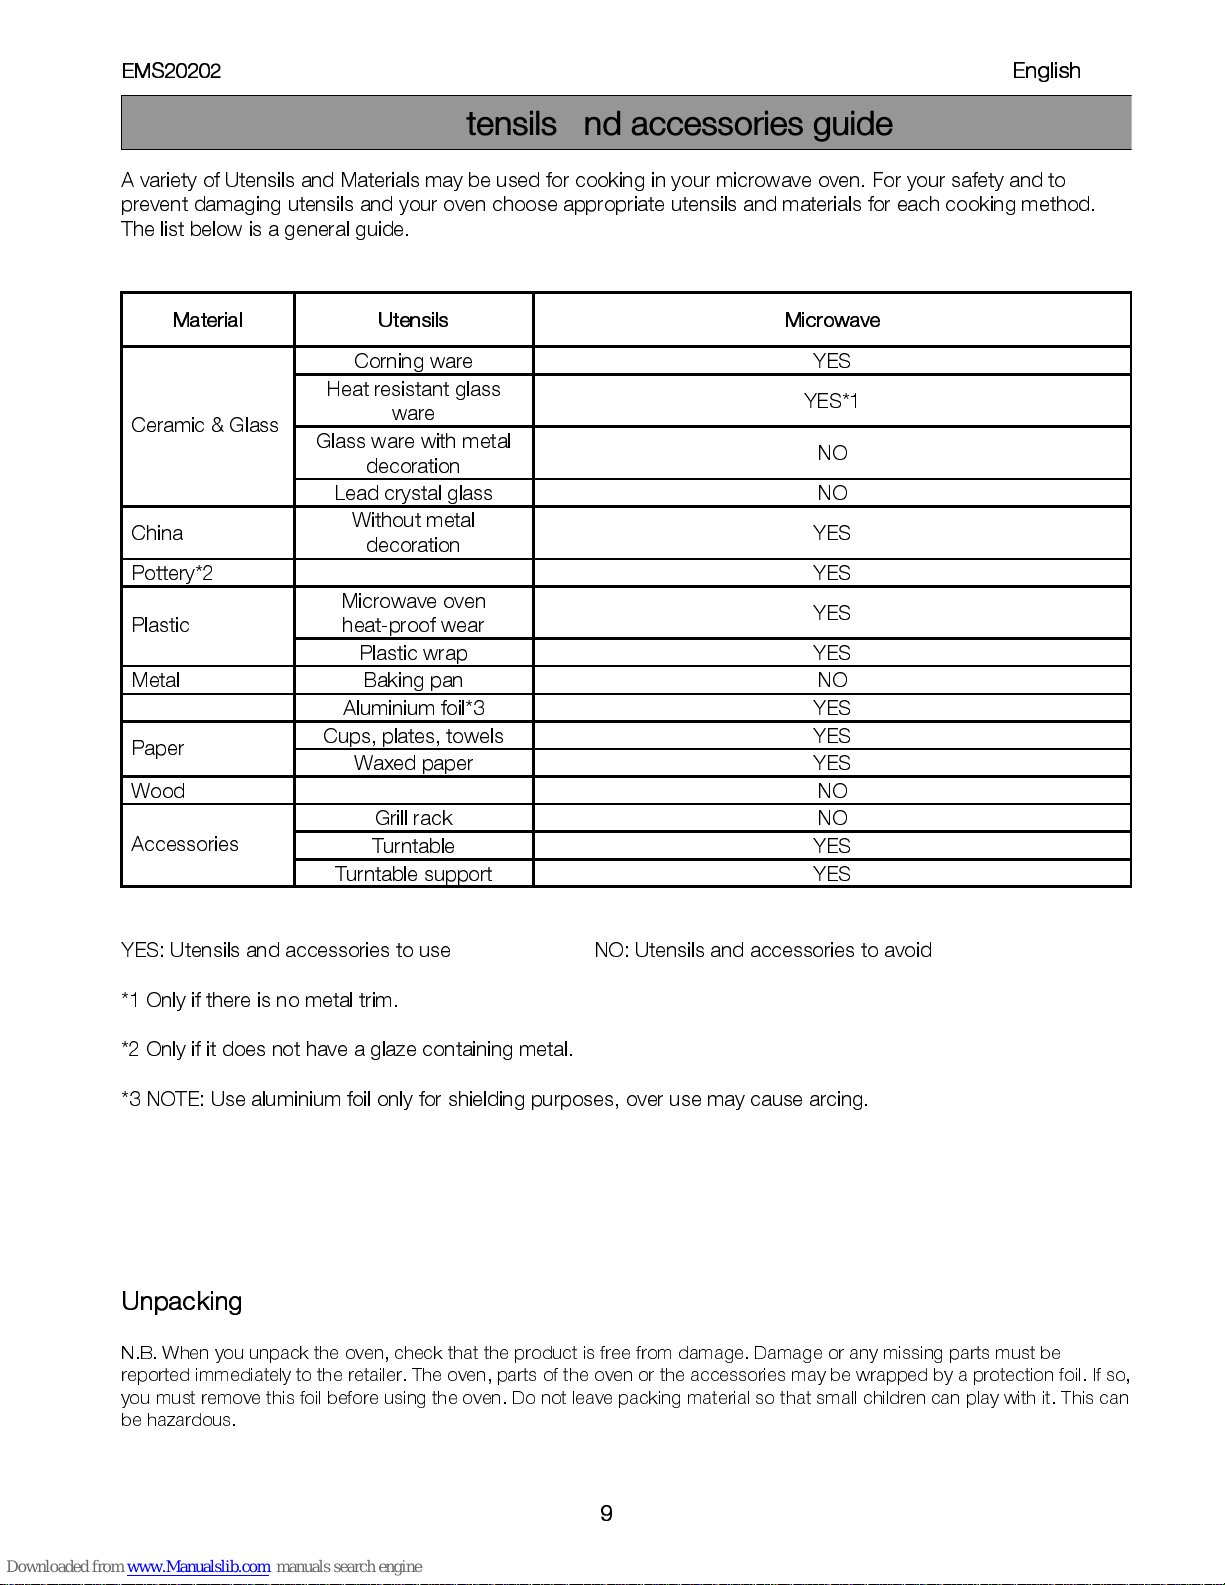
A variety of Utensils and Materials may be used for cooking in your microwave oven. For your safety and to
prevent damaging utensils and your oven choose appropriate utensils and materials for each cooking method.
The list below is a general guide.
Material Utensils Microwave
Corning ware
YES
Heat resistant glass
ware
YES*1
Glass ware with metal
decoration
NO
Ceramic & Glass
Lead crystal glass
NO
China
Without metal
decoration
YES
Pottery*2
YES
Microwave oven
heat-proof wear
YES
Plastic
Plastic wrap
YES
Metal
Baking pan
NO
Aluminium fo il*3
YES
Cups, plates, towels
YES
Paper
Waxed paper
YES
Wood
NO
Grill rack
NO
Turntable
YES
Accessories
Turntable support
YES
YES: Utensils and accessories to use NO: Utensils and accessories to avoid
*1 Only if there is no metal trim.
*2 Only if it does not have a glaze containing metal.
*3 NOTE: Use aluminium foil only for shielding purposes, over use may cause arc ing.
Unpacking
N.B. When you unpac k the oven, check that the product is free from damage. Damage or any m issing parts must be
reported immediately to the retailer. The oven, parts of the oven
or the accessories may be wrapped by a protection foil. If so,
you must remove this foil before using the oven. Do not leave packing material so that small children can play with it. This can
be hazardous.
Oven utensils and accessories guide
EMS20202
í===========================================
English
10
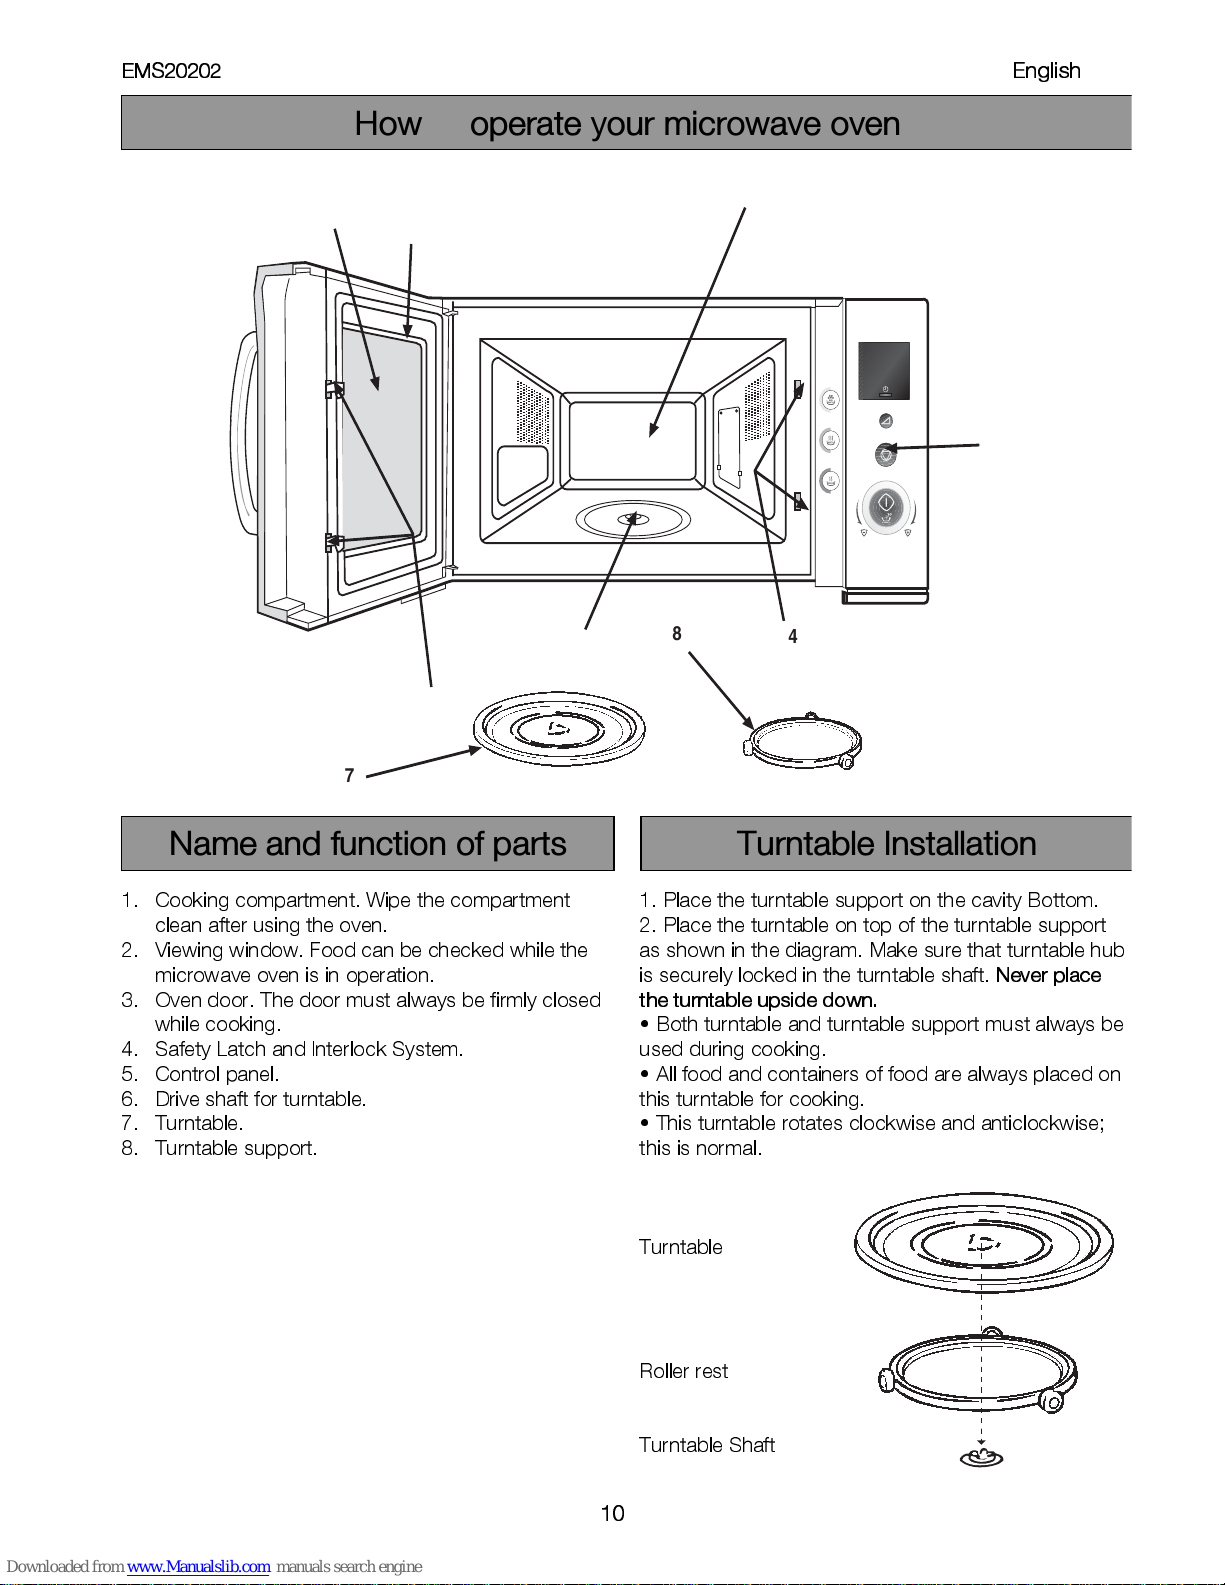
1. Cooking compartment. Wipe the compartment
clean after using the oven .
2. Viewing window. Food can be c hecked while the
micr o w ave oven is in operatio n .
3. Oven door. The door must always be firmly closed
while cooking.
4. Safety Latch and Interlock System.
5. Control panel.
6. Drive shaft for turntable.
7. Turntable.
8. Turntable support.
1. Place the turntable support on the cavity Bottom.
2. Place the turntable on top of th e turntable support
as shown in the diagram. M ake sure that turntable hub
is securely locked in the turntable shaft.
Never place
the turntable upside down.
• Both turntable and turntable supp ort must always be
used during cooking.
• All food and containers of food are always placed on
this turntable for cooking.
• This turntable rotates clockwise and anticlockwise;
this is normal.
Turntable
Roller rest
Turntable Shaft
1
2
3
5
4
6
7
8
4
How to operate your microwave oven
Name and function of parts Turntable Installation
EMS20202
í===========================================
English
11
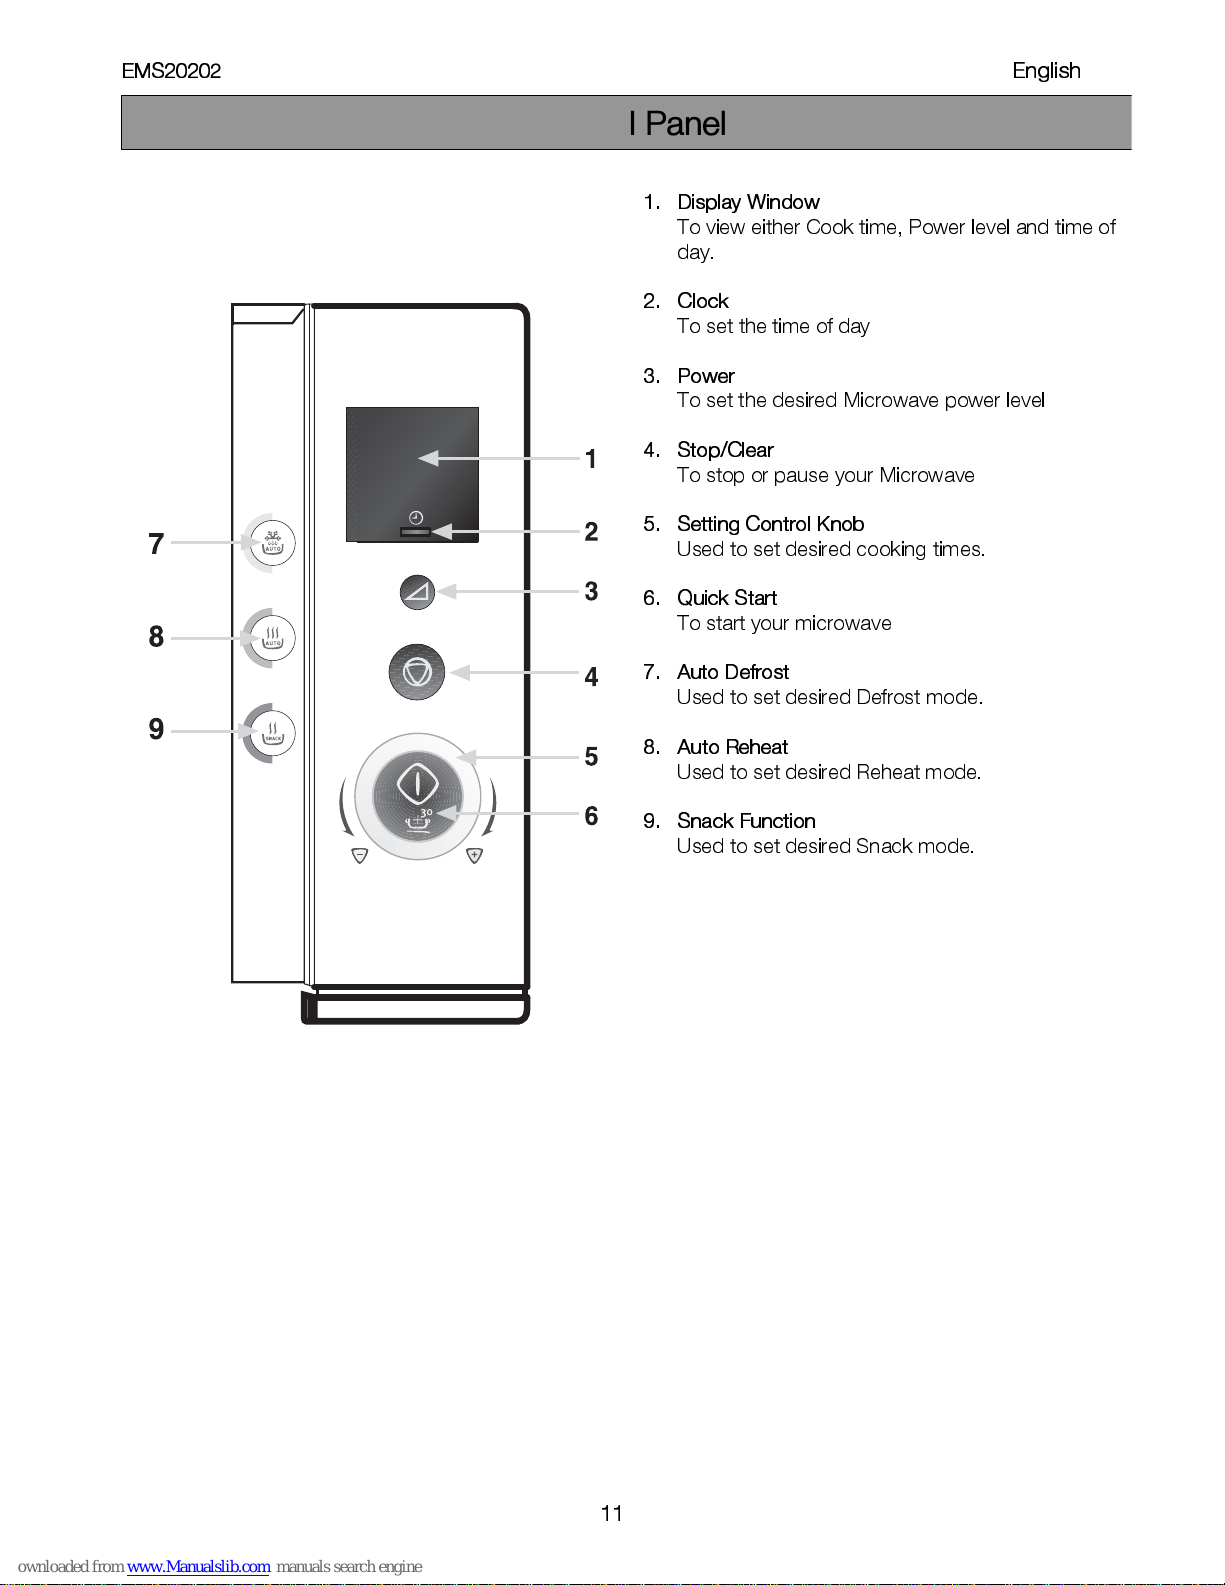
1. Display Window
To view either Cook time, Power leve l and time of
day.
2. Clock
To set the time of day
3. Power
To set the desired Microwave power level
4. Stop/Clear
To stop or pause your Microwave
5. Setting Control Knob
Used to set desired cooking times.
6. Quick Start
To start your microwave
7. Auto Defrost
Used to set desired Defrost mode.
8. Auto Reheat
Used to set desired Reheat mode.
9. Snack Function
Used to set desired Snack m o de.
Control Panel
EMS20202
í===========================================
English
12
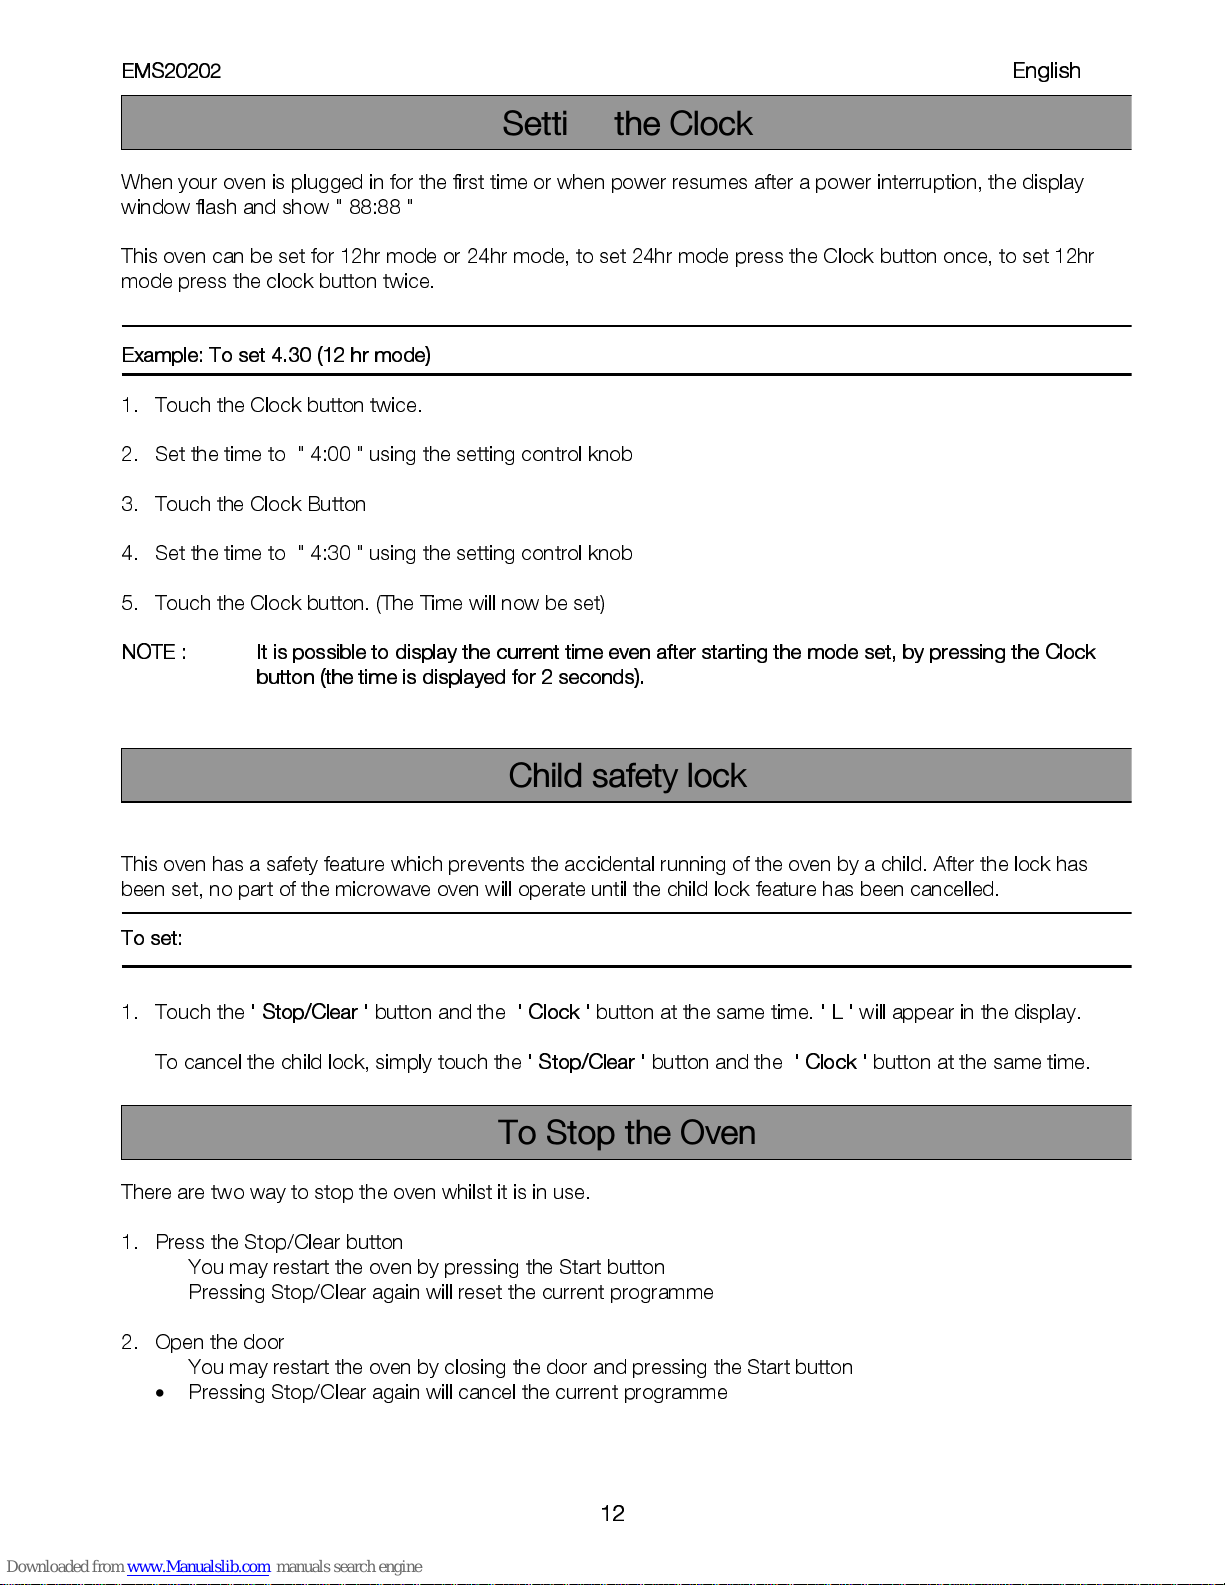
When your oven is plugged in for the first time or when power resumes after a power interruption, the display
window flash and show " 88:88 "
This oven can be set for 12hr mode or 24hr mode, to set 24hr mode press the Clock button once, to set 12hr
mode press the clock button twice.
Example: To set 4.30 (12 hr mode)
1. Touch the C lock button twice.
2. Set the time to " 4:00 " using the setting control knob
3. Touch the C lock Button
4. Set the time to " 4:30 " using the setting control knob
5. Touch the C lock button. (The Time will now be set)
NOTE : It is possible to display the current time even after starting the mode set, by pressing the Clock
button (the time is displayed for 2 seconds).
This oven has a safety feature which prevents the accide ntal running of the oven by a child. A fter the lock has
been set, no p a rt o f th e microwave oven will operate until the child lock feature has be e n cancelled.
To set:
1. Touch the
' Stop/Clear '
button and the
' Clock '
button at the same time.
' L '
will appear in th e display.
To cancel the child lock, simply touch t he
' Stop/ C le a r '
button and the
' Clock '
button at the same time.
There are two way to stop the oven whilst it is in use.
1. Press the Stop/Clear button
•
You may restart the oven by pressing the Start button
•
Pressing Stop/Clear again will reset the current programme
2. Open the door
•
You may restart the oven by closing the door and pressing the Start button
•
Pressing Stop/Clear again will cancel the current programme
Setting the Clock
Child safety lock
To Stop the Oven
EMS20202
í===========================================
English
13
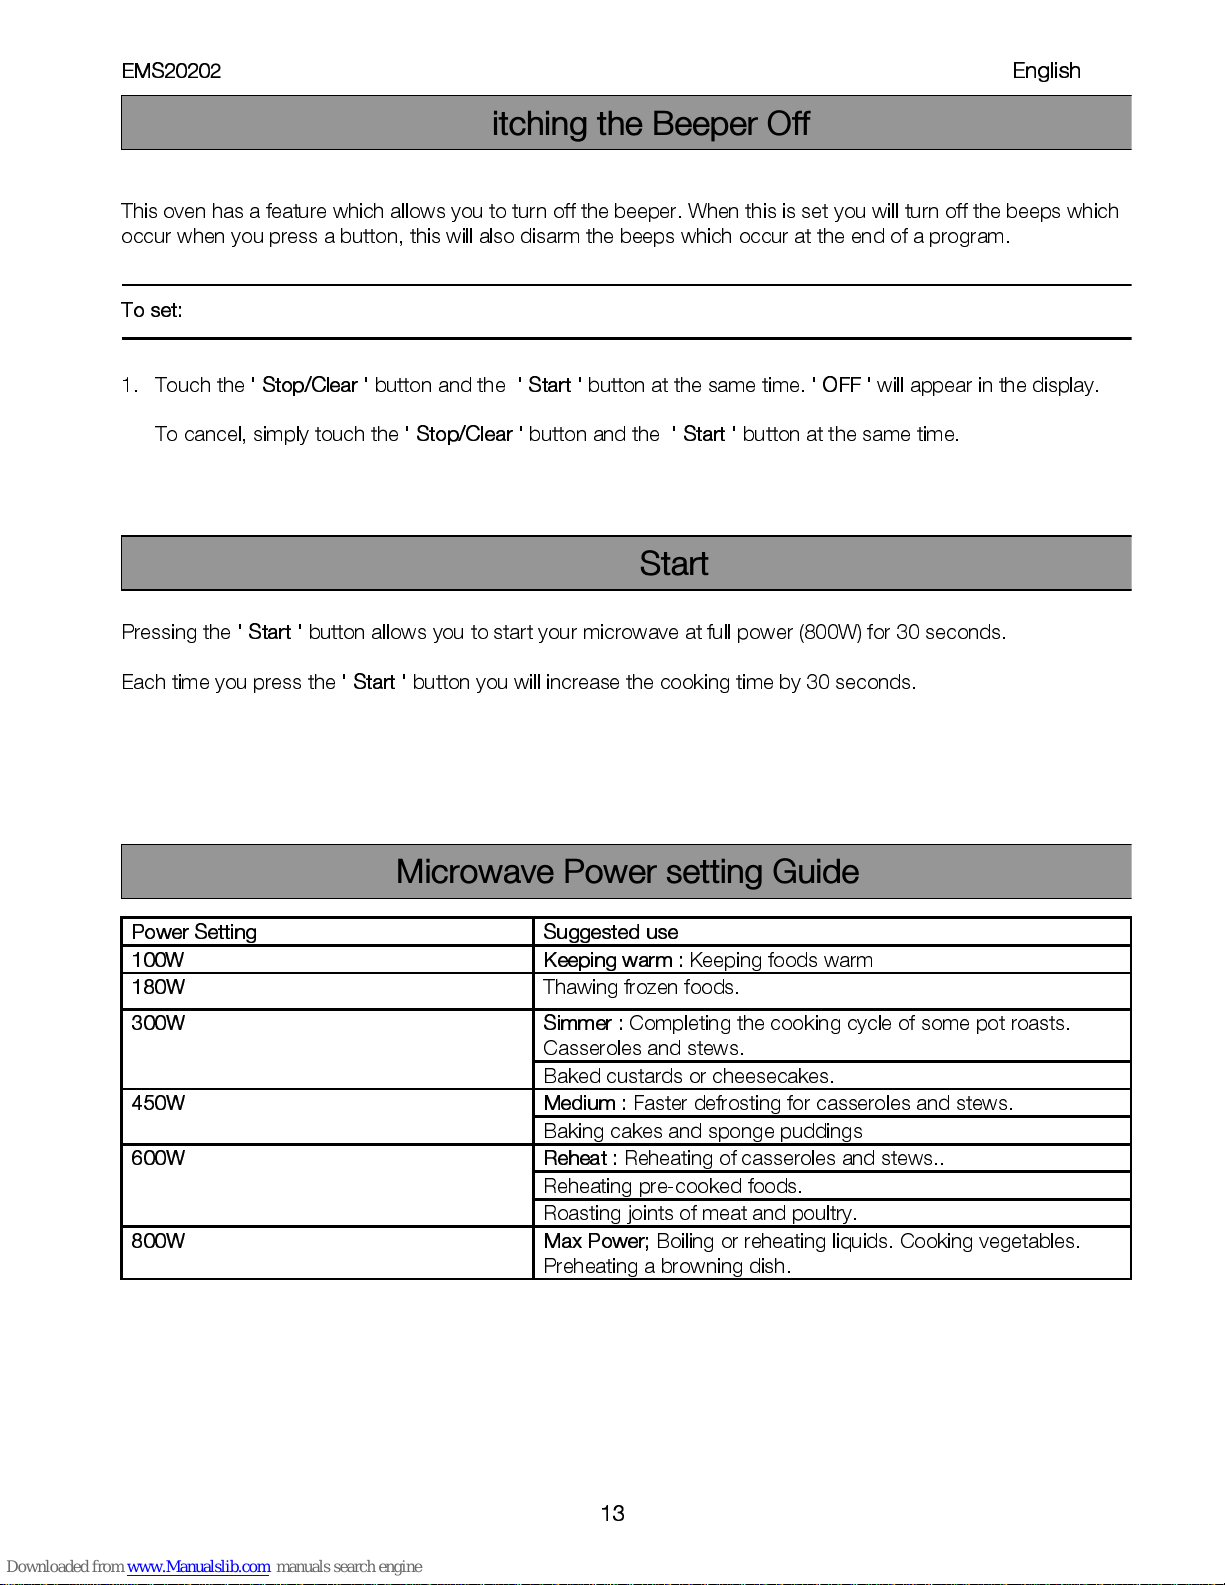
This oven has a feature which allo ws you to turn off the b eeper. When this is se t yo u will turn off the beeps which
occur when you press a button, this will also disarm the beeps which occur at the end of a pr ogra m.
To set:
1. Touch the
' Stop/Clear '
button and the
' Start '
button at the same time.
' OFF '
will appea r in the display.
To cancel, simply touch the
' Stop/Clear '
button and the
' Start '
button at the same time.
Pressing the
' Start '
button allows you to start your microwave at full power (800W) for 30 seconds.
Each time yo u press the
' Start '
button you will increase the cooking time by 30 seconds.
Power Setting Suggested use
100W Keeping warm :
Keeping foods warm
180W
Thawing frozen foods.
Simmer :
Completing the cooking cycle of some pot roasts.
Casseroles and stews.
300W
Baked custards or cheesecakes.
Medium :
Faster defrosting for casseroles and stews.
450W
Baking cakes and sponge puddings
Reheat :
Reheating of casseroles and stews..
Reheating pre-cooked food s.
600W
Roasting joints of meat and poultry.
800W Max Power;
Boiling or reh e a ting liquids. Cooking vegetables.
Preheating a browning dish.
Quick Start
Switching the Beeper Off
Microwave Power setting Guide

EMS20202
í===========================================
English
14
1. Open the door, place the food on the turntable.
Close the door.
2. Press the ' Power ' butto n until the desired power
level is reache d .
3. Set the desired time by turning the setting control
knob.
4. Press Start
(The oven begins cooking.)
To turn off the oven during cooking, simply touch the
Stop/Clear button.
Note: After use, be sure to press the Stop/Clear button
Twice as this will ensure that you h a ve reset the
microwave.
Example: To cook at 450W for 15 minutes
1. Touch the Power button 3 times ( '
450 '
should now be showing in the display window).
2. Turn the setting control knob
(
' 15:00 '
should now be showing in the display window).
3. Press start. The Oven will now start cooking.
Microwave Cooking

EMS20202
í===========================================
English
15
1. Open the door, place the food on the turntable.
2. Press the ' Auto Defrost ' button until the desired
programme is reached.
3. Turn the setting control knob until the required
quantity is reached.
4. Close the door.
5. Press Start (The oven b egins defrosting.)
NOTE : For details See Table Below.
To turn off the oven during cooking, simply touch the
Stop/Clear button.
NOTE : After use, be sure to press the Stop/C lea r
button Twice as this will ensure tha t you h ave re set the
microwave.
NOTE : During Autom ati c D efrost th e oven will auto m atically se lect the req uired m icrowa v e pow er and
defrosting time. The oven will stop and/or beep part way through defrosting to allow food to be
stirred or turned. Press Start to resume defrosting.
Selection Chart for Auto Cook functions :-
Auto Programme Press Button Portion Size Remarks
Meat
Once
200 - 2000g
The Oven will stop pa rt w ay throu gh defrosting to
allow food to be stirred or turned. Press Start to
resume defros ting.
Poultry
Twice
200 - 2000g
The Oven will stop pa rt w ay throu gh defrosting to
allow food to be stirred or turned. Press Start to
resume defros ting.
Fish
Three Times
200 - 2000g
The Oven will stop pa rt w ay throu gh defrosting to
allow food to be stirred or turned. Press Start to
resume defros ting.
125 - 1000g
for 125g Turn a f ter 10 beeps. a t 30 se conds
for 250g Turn a f ter 10 beeps. a t 60 s econds
for 375g Turn after 10 beeps. at 90 seconds
for 500g Turn after 10 beeps. at 120 seconds
for 625g Turn after 10 beeps. at 150 seconds
for 750g Turn after 10 beeps. at 180 seconds
for 875g Turn after 10 beeps. at 210 seconds
Bread / Cake
Four Times
for 1000g Turn after 10 beeps. at 240 seconds
Note : During Defrost Bread / Cake, the oven will only stop when 10 beeps are heard i f the door is
opened. Stir or turn the food, close the door and press start to resume defrosting.
Example: To automatically defrost 500g of Fish.
1. Open the door.
2. Touch the Auto defrost button 3 times
3. Turn the setting control knob until 500 is showing in the display window.
4. Close the door then press start. The O v en will now start defrostin g .
See Auto Defrost Programme Chart for further details.
As an alternative to Automatic Defrosting you can defrost manually by selecting 180W microwave power. To
speed up the defrosting of dense foods over 450g (1lb), the oven may be started on 800W (100% ) power for
1 - 3 minutes, then reduced to (180W) until defrosting is complete.
Automatic Defrost
EMS20202
í===========================================
English
16
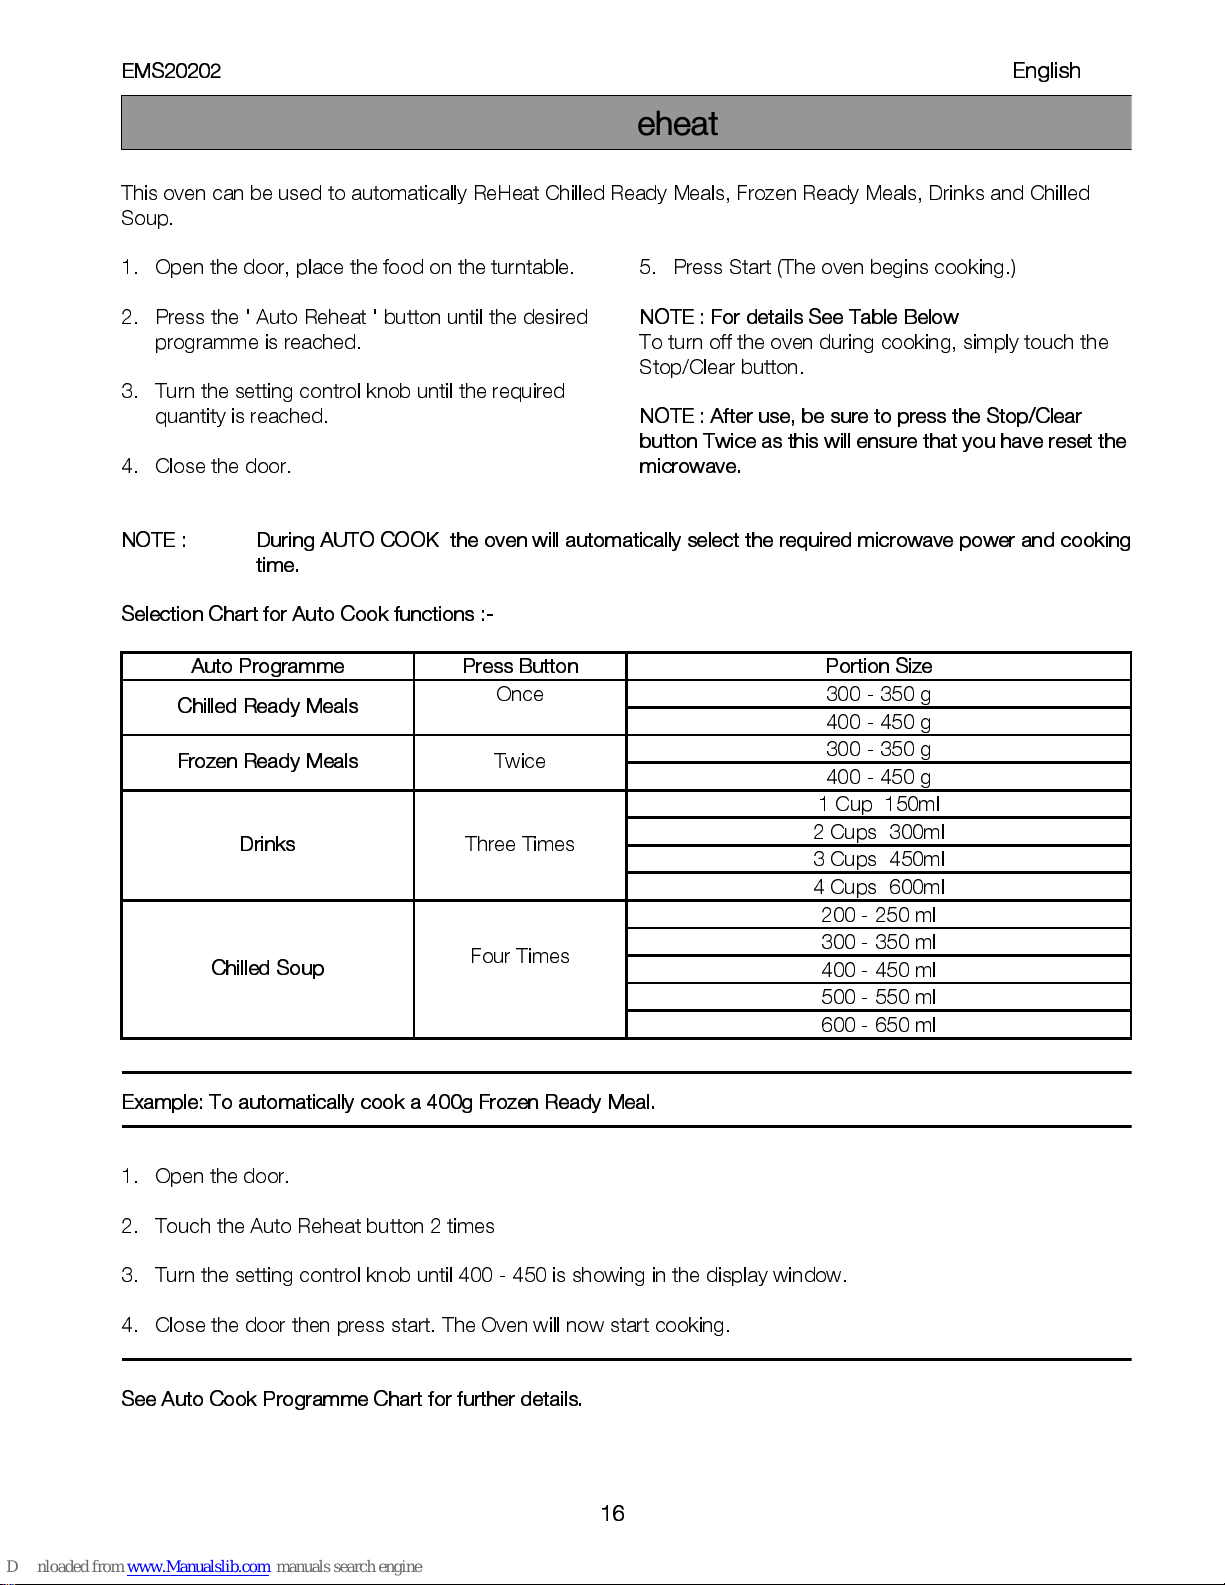
This oven can be used to auto m atically ReHeat Chilled Ready Meals, Frozen Ready Meals, Drinks and Chilled
Soup.
1. Open the door, place the food on the turntable.
2. Press the ' Auto Re heat ' button until the desired
programme is reached.
3. Turn the setting control knob until the required
quantity is reached.
4. Close the door.
5. Press Start (The oven begins cooking.)
NOTE : For details See Table Below
To turn off the oven during cooking, simply touch the
Stop/Clear button.
NOTE : After use, be sure to press the Stop/C lea r
button Twice as this will ensure tha t you h ave re set the
microwave.
NOTE : During AUTO COOK th e o ven w ill autom ati cally s elect the req uired m icrow av e powe r and c ooki ng
time.
Selection Chart for Auto Cook functions :-
Auto Programme Press Button Portion Size
300 - 350 g
Chilled Ready Mea ls
Once
400 - 450 g
300 - 350 g
Frozen Ready Meals
Twice
400 - 450 g
1 Cup 150ml
2 Cups 300ml
3 Cups 450ml
Drinks
Three Times
4 Cups 600ml
200 - 250 ml
300 - 350 ml
400 - 450 ml
500 - 550 ml
Chilled Soup
Four Times
600 - 650 ml
Example: To automatically cook a 400g Froze n Ready Meal.
1. Open the door.
2. Touch the Auto Reheat button 2 times
3. Turn the setting control knob until 400 - 450 is showing in the display window.
4. Close the door then press start. The O v en will now start cooking.
See Auto Cook Programme Cha rt for further details.
Auto Reheat
EMS2020
2
í===========================================
English
17
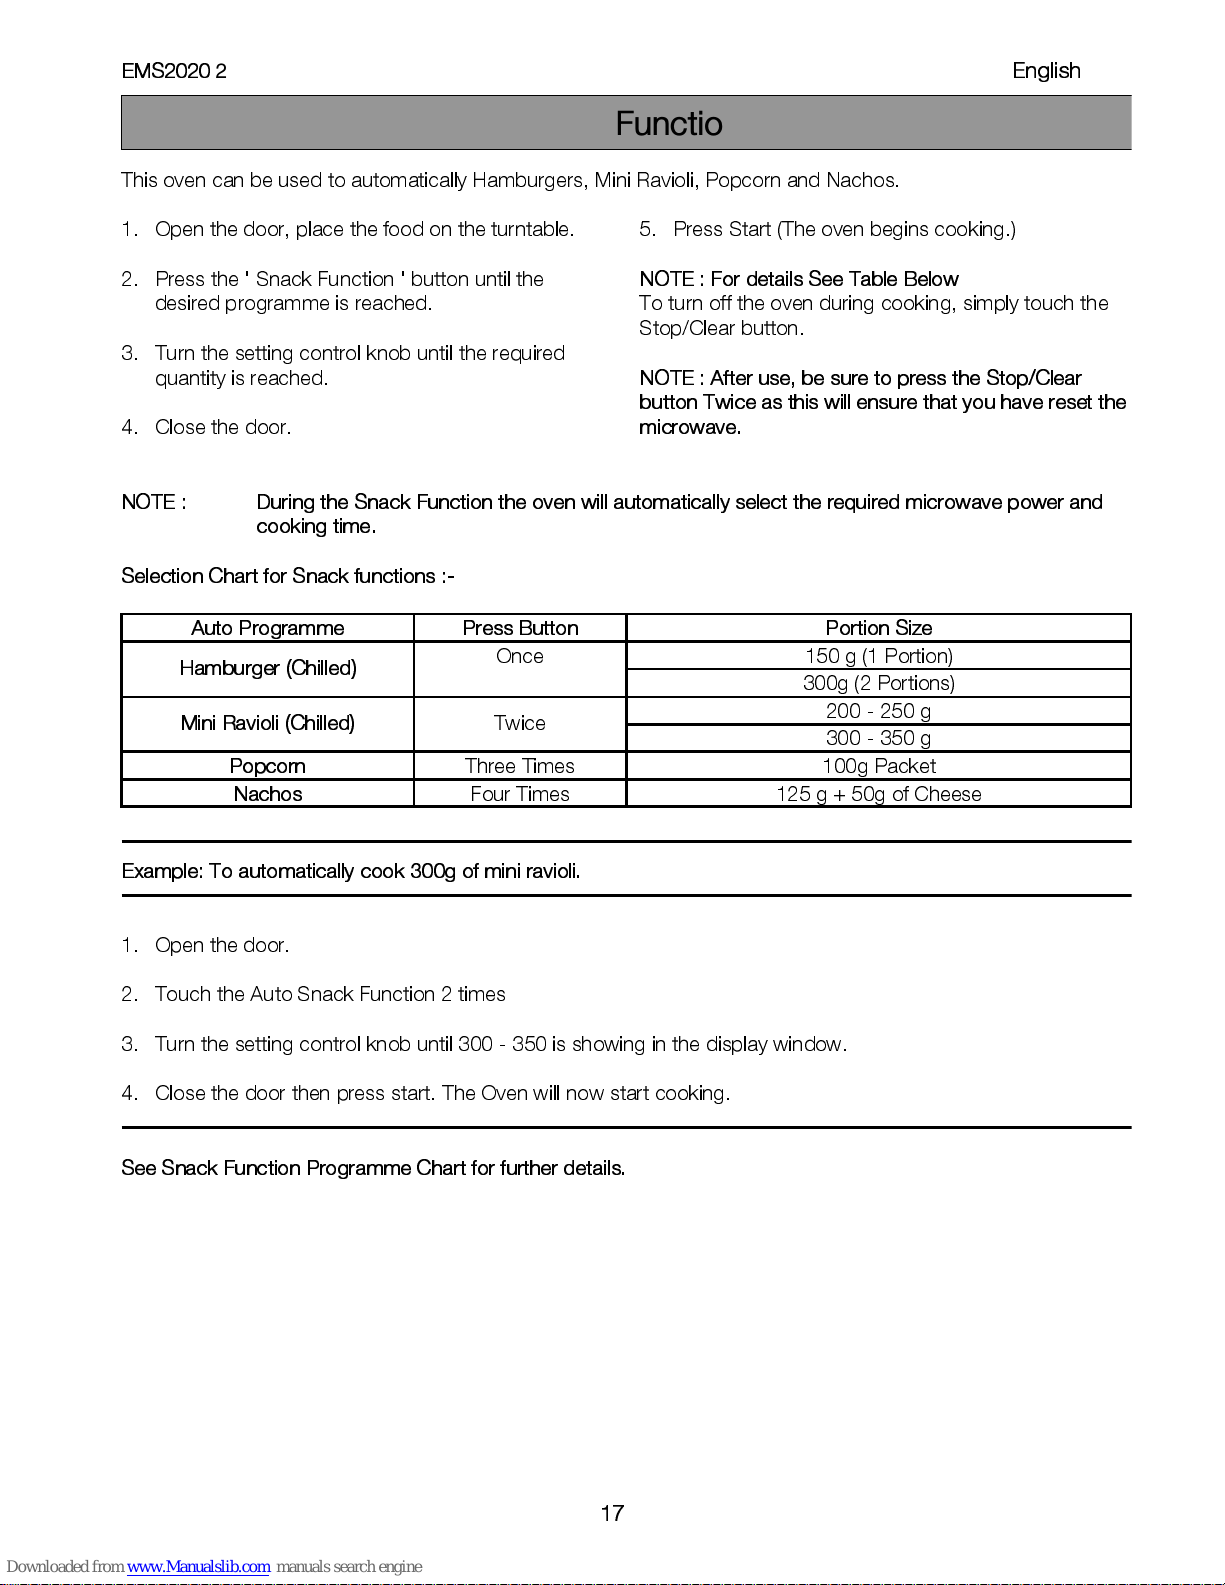
This oven can be used to automatically Hamburgers, Mini Ravioli, Popcorn and Nachos.
1. Open the door, place the food on the turntable.
2. Press the ' Snack Function ' button until the
desired programme is reached.
3. Turn the setting control knob until the required
quantity is reached.
4. Close the door.
5. Press Start (The oven begins cooking.)
NOTE : For details See Table Below
To turn off the oven during cooking, simply touch the
Stop/Clear button.
NOTE : After use, be sure to press the Stop/C lea r
button Twice as this will ensure tha t you h ave re set the
microwave.
NOTE : During the Snack Fun ction the oven will auto matically select th e required microwave power and
cooking time.
Selection Chart for Snack functions :-
Auto Programme Press Button Portion Size
150 g (1 Portion)
Hamburger (Chilled)
Once
300g (2 Portions)
200 - 250 g
Mini Ravioli (Chill ed )
Twice
300 - 350 g
Popcorn
Three Times 100g Packet
Nachos
Four Times 125 g + 50g of Cheese
Example: To automatically cook 300g of mini ravioli.
1. Open the door.
2. Touch the Auto Snack Function 2 times
3. Turn the setting control knob until 300 - 350 is showing in the display window.
4. Close the door then press start. The O v en will now start cooking.
See Snack Function Programm e Ch art for further details.
Snack Function
EMS20202
í===========================================
English
18
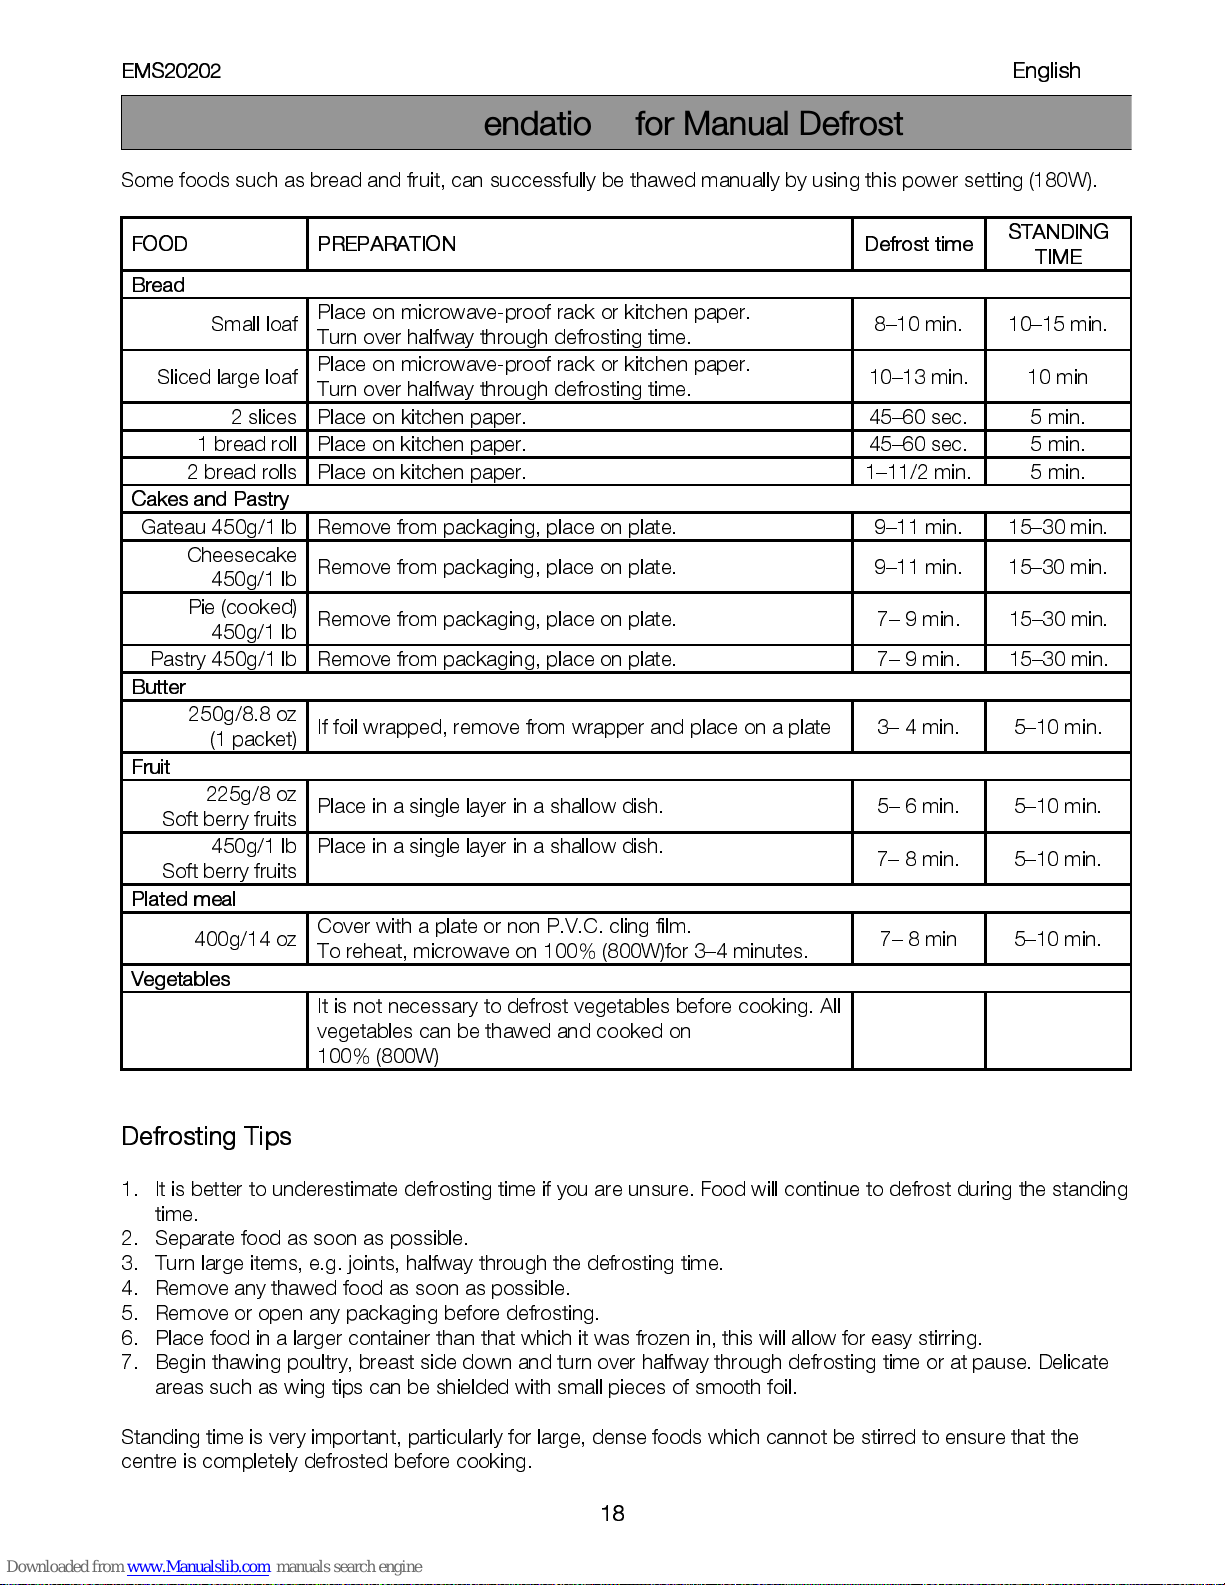
Some foods such as bread and fruit, can successfully be thawed manually by using this power setting (180W).
FOOD PREPARATION Defrost time
STANDING
TIME
Bread
Small loaf
Place on microwave-proof rack or kitchen paper.
Turn over halfway through defrosting time.
8–10 min. 10–15 min.
Sliced larg e lo a f
Place on microwave-proof rack or kitchen paper.
Turn over halfway through defrosting time.
10–13 min. 10 min
2 slices Place on kitchen paper. 45–60 sec. 5 min.
1 bread roll Place on kitchen paper. 45–60 sec. 5 min.
2 bread rolls Place on kitchen paper. 1–11/2 min. 5 mi n.
Cakes and Pastry
Gateau 450g/1 lb Remove from packaging, place on plate. 9–11 min. 15–30 min.
Cheesecak e
450g/1 lb
Remove from packaging, place on plate. 9–11 min. 15–30 min.
Pie (cooked)
450g/1 lb
Remove from packaging, place on plate. 7– 9 min. 15–30 min.
Pastry 450g/1 lb Remove from packaging, place on plate. 7– 9 min. 15–30 min.
Butter
250g/8.8 oz
(1 packet)
If foil wrapped, remove from wrapper and place on a plate 3– 4 min. 5–10 min.
Fruit
225g/8 oz
Soft berry fruits
Place in a single layer in a shallow d ish. 5– 6 min. 5–10 min.
450g/1 lb
Soft berry fruits
Place in a single layer in a shallow d ish.
7– 8 min. 5–10 min.
Plate d m eal
400g/14 oz
Cover with a plate or non P.V.C. cling fi lm.
To reheat, microwave on 100% (800W)for 3–4 minutes.
7– 8 min 5–10 min.
Vegetables
It is not necessary to defrost vegetables before cooking. All
vegetables can be thawed and cooked on
100% (800W)
Defrosting Tips
1. It is better to und e re stimate defrosting time if you are unsure. Food will continue to defrost during the stan d in g
time.
2. Separate food as soon as possible.
3. Turn large items, e.g. joints, halfway through the defrosting time.
4. Remove any thawed food as soon as possible.
5. Remove or open any packaging before defrosting.
6. Plac e fo o d in a larger contai n e r th an that which it was frozen in, this will a llo w for easy stirring.
7. Begin thawing poultry, breast side down and turn over halfway through defrosting time or at pause. Delicate
areas such as wing tips can b e sh ielded with small pieces of smooth foil.
Standing time is very important, particu larly for large, dense foo d s which can not be stirred to ensure that the
centre is completely defros te d before cooking .
Recommendations for Manual Defrost
EMS20202
í===========================================
English
19
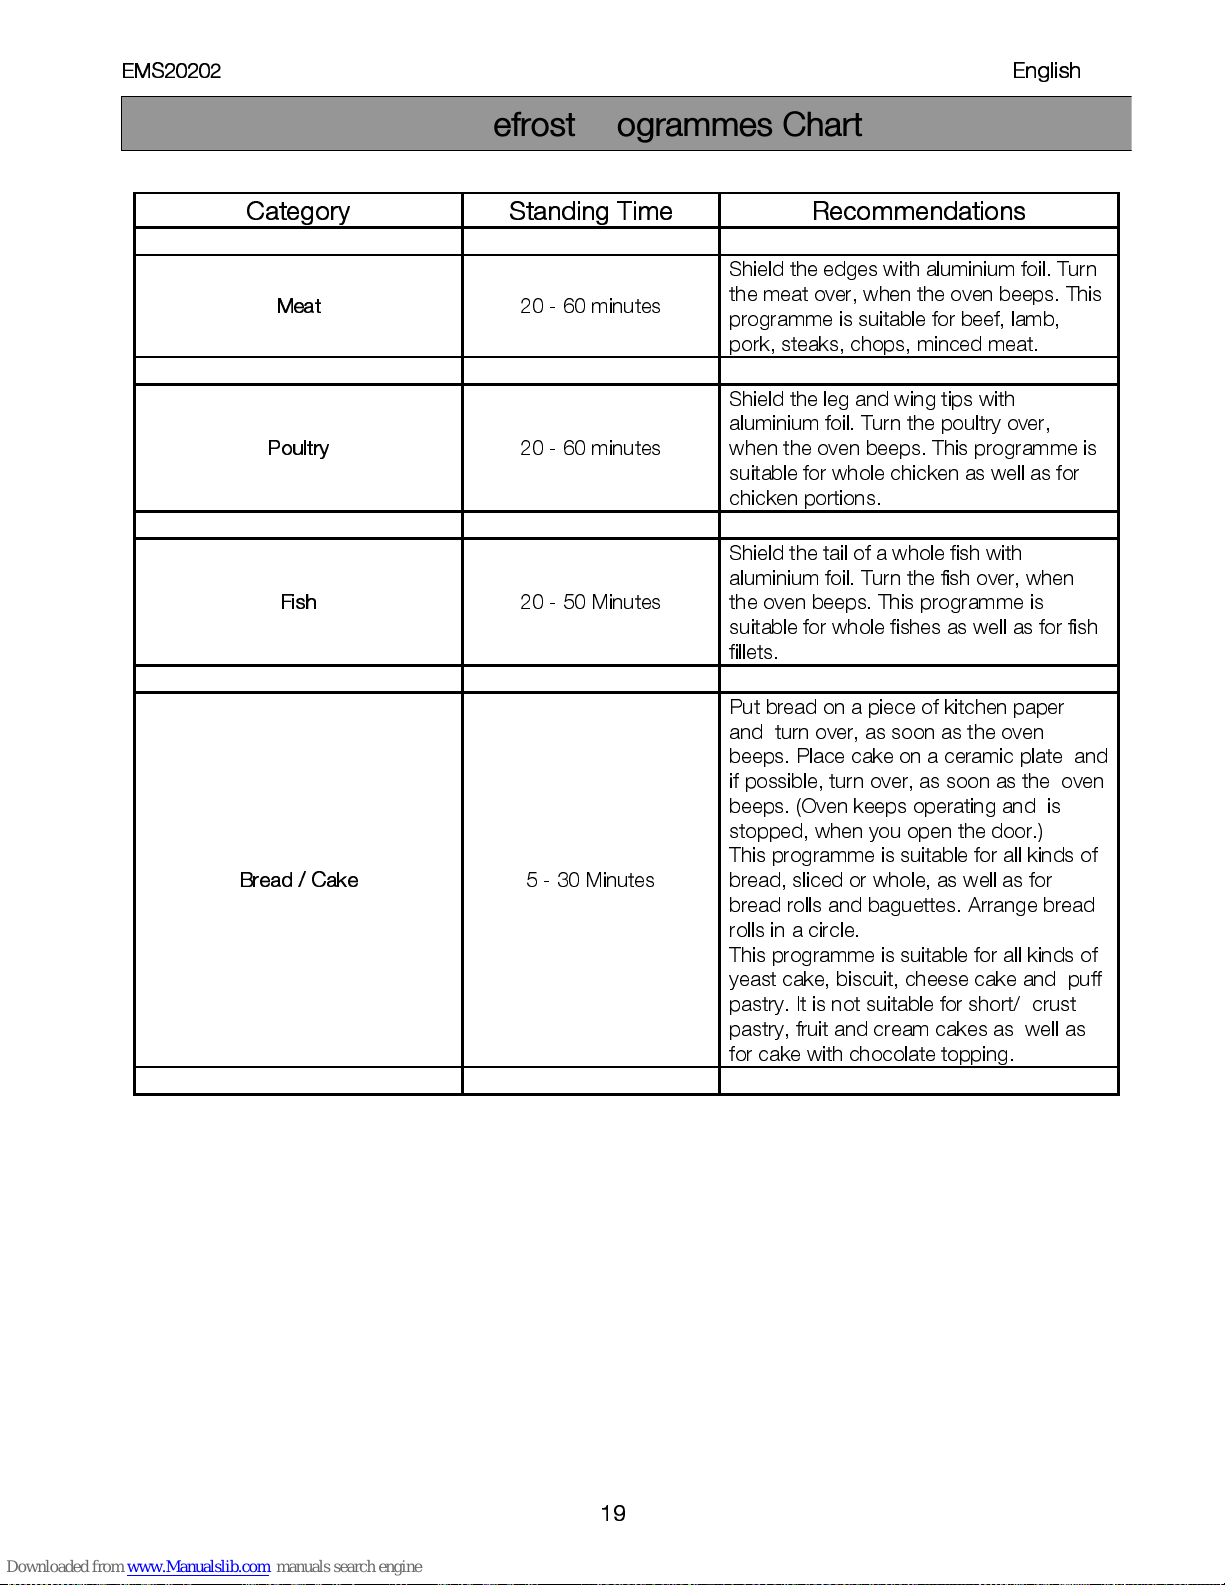
Category Standing Time Recommendations
Meat
20 - 60 minutes
Shield the edg e s with aluminium foil. Turn
the meat over, when the oven beeps. This
programme is suitable for beef, lamb,
pork, steaks, chops, minced meat.
Poult r y
20 - 60 minutes
Shield the leg and wing tips with
aluminium foil. Turn the poultry over,
when the oven beeps. This programme is
suitable for whole chicken as well as for
chicken p ortions.
Fish
20 - 50 Minutes
Shield the tail of a whole fish with
aluminium foil. Turn the fish over, when
the oven beeps. This programme is
suitable for whole fishes as well as fo r fish
fillets.
Bread / Cake
5 - 30 Minutes
Put bread on a piece of kitche n paper
and turn over, as soon as the oven
beeps. Place cake on a ceramic plate and
if possible, turn over, as soon as the oven
beeps. (Oven keeps operating a n d is
stopped, when you open the door.)
This programme is s uitable for all kinds of
bread, sliced or whole, as well as for
bread rolls and baguettes. Arrange bread
rolls in a circle.
This programme is s uitable for all kinds of
yeast cake, biscuit, cheese cake and puff
pastry. It is not suitable for short/ c ru st
pastry, fruit and cream cakes as well as
for cake with chocolate top ping.
Auto Defrost Programmes Chart
EMS20202
í===========================================
English
20
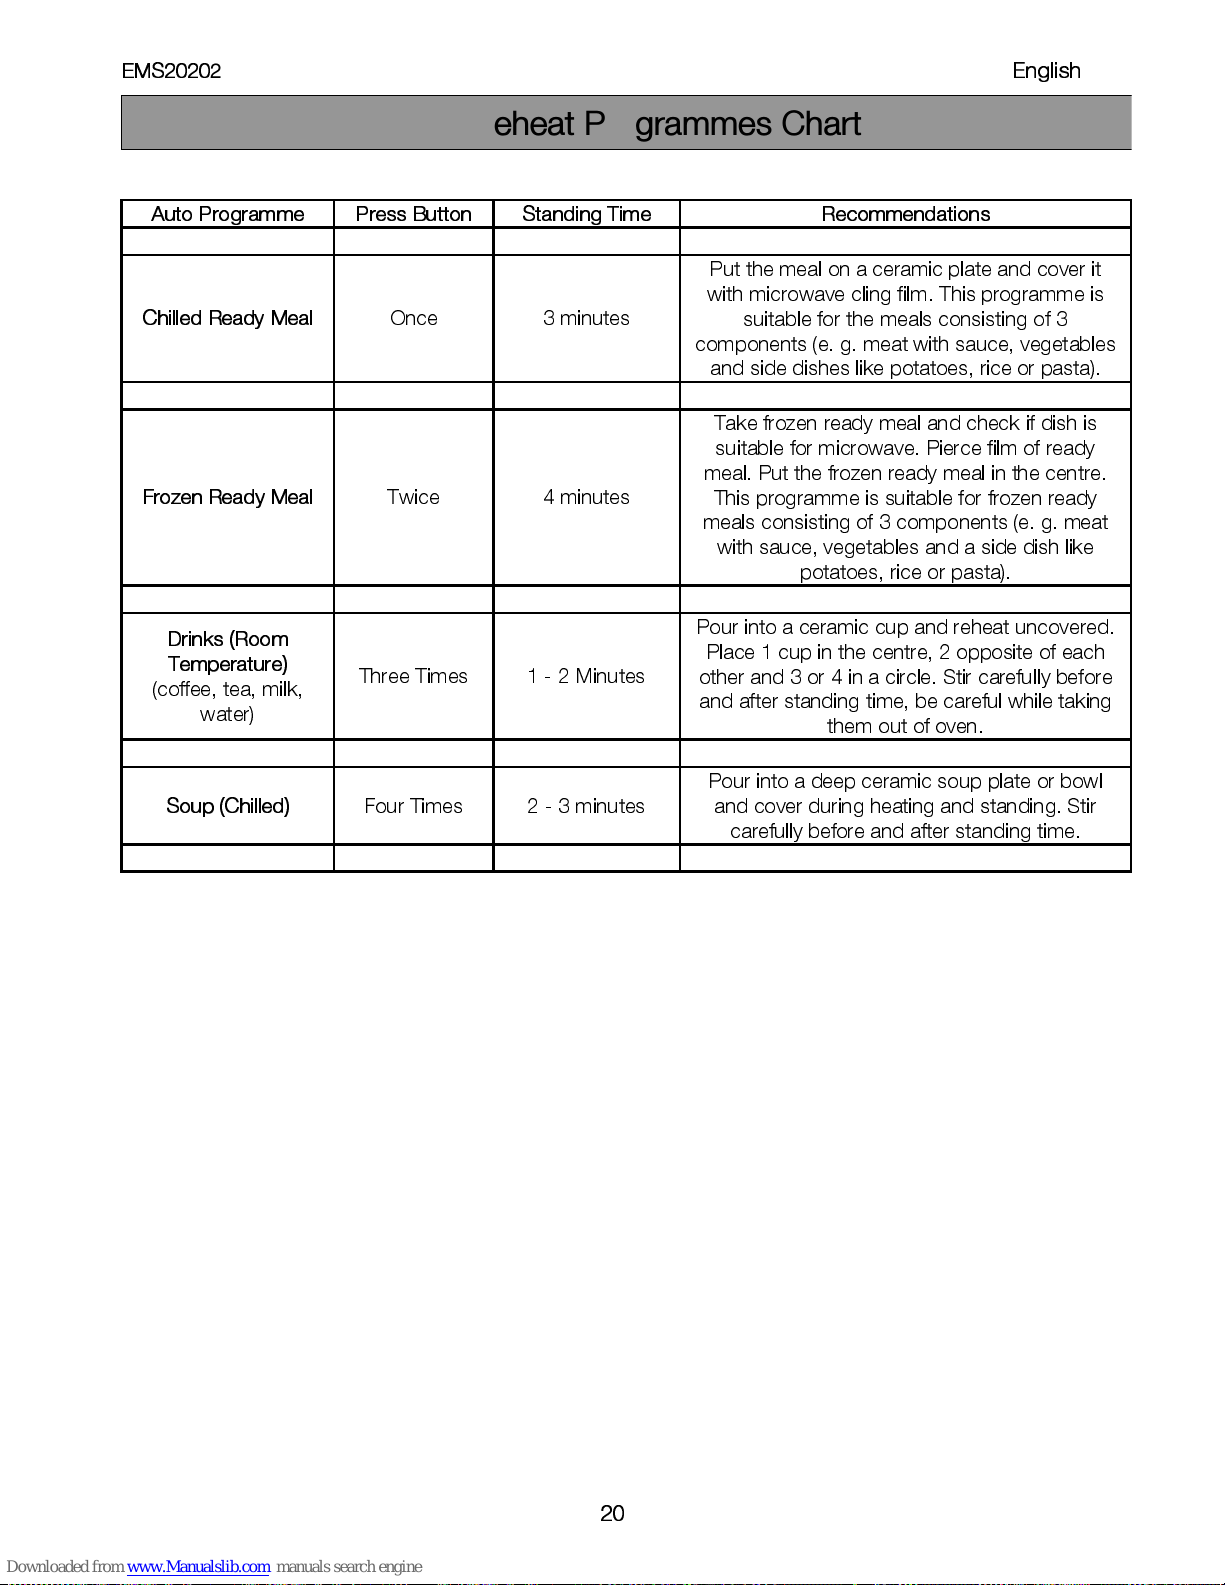
Auto Programme Press Button Standing Time Recommendations
Chilled Ready M eal
Once 3 minutes
Put the meal on a ceramic plate and cover it
with microwave cling film. This programme is
suitable for the meals consisting of 3
components (e. g. me at with sauce, vegetables
and side dishes like potatoes, rice or pasta).
Frozen Ready Meal
Twice 4 minutes
Take frozen ready meal and check if dish is
suitable for microwave. Pierce film of ready
meal. Put the frozen ready meal in the centre.
This programme is s u ita b le for fro z en ready
meals consisting of 3 components (e. g. meat
with sau ce, vegetable s and a side dish like
potatoes, rice or pasta).
Drinks (Room
Temp erature)
(coffee, tea, milk,
water)
Three Times 1 - 2 Min utes
Pour into a ceramic cup and reheat uncovered.
Place 1 cup in the centre, 2 opp osite of each
other and 3 or 4 in a circle. Stir carefully before
and after standing time, be ca reful while taking
them out of oven.
Soup (Chilled )
Four Times 2 - 3 minutes
Pour into a deep ceramic soup plate or bowl
and cover during heating and standing. Stir
carefully before and after standing time.
Auto Reheat Programmes Chart
EMS20202
í===========================================
English
21
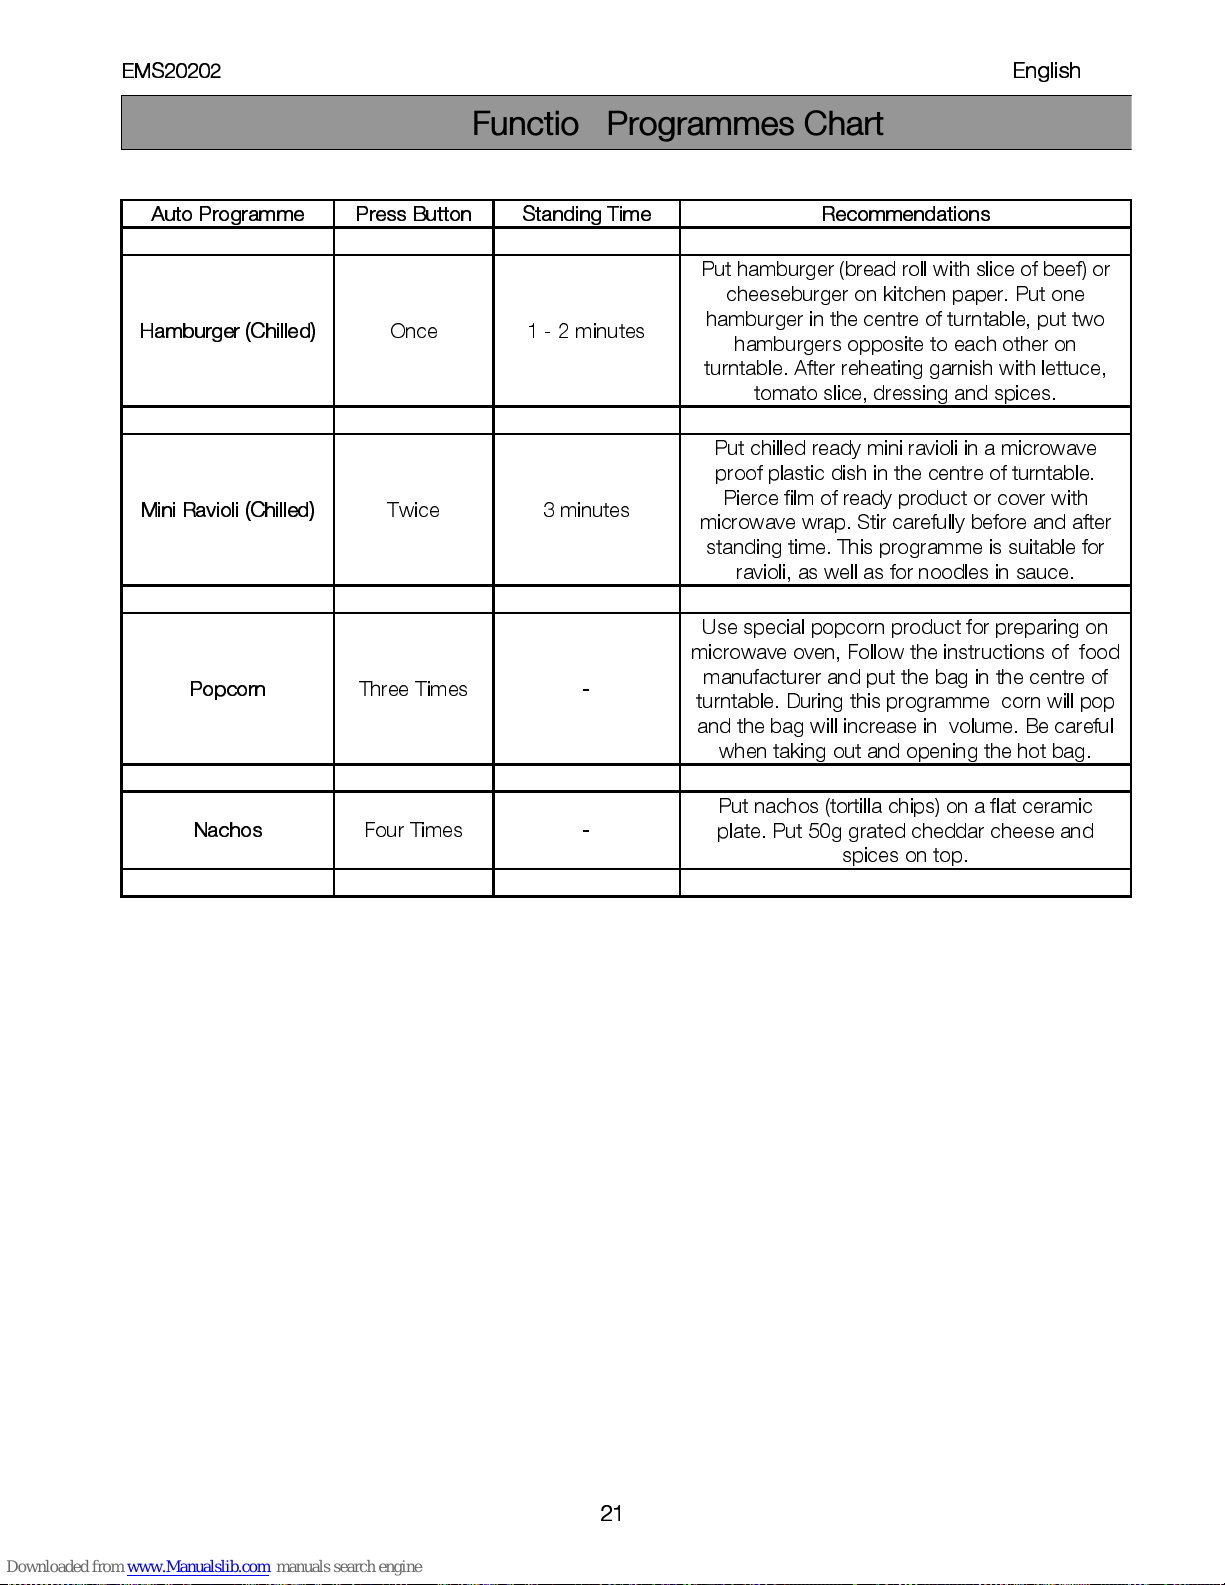
Auto Programme Press Button Standing Time Recommendations
Hamburger (Chilled)
Once 1 - 2 minutes
Put hamburger (bread roll with slice of beef) or
cheeseburger on kitchen paper. Put one
hamburger in the ce ntre of turntable, put two
hamburgers opposite to each other on
turntable. After reheating ga rnish w ith lettuce,
tomato slice, dressing and spices.
Mini Ravioli (Chilled)
Twice 3 minutes
Put chilled rea dy mini ravioli in a microwave
proof plastic dish in the centre of turntable.
Pierce film of ready produc t or cover with
microwave wrap. Stir carefully before a nd after
standing time. This programme is suitable for
ravioli, as well as for noodles in sauce.
Popcorn
Three Times
-
Use special popcorn product for preparing on
microwave oven, Follow the instructions of food
manufacturer and put the bag in the centre of
turntable. During this programme corn will pop
and the bag will increase in volume. Be careful
when taking out and opening the hot bag.
Nachos
Four Times
-
Put nachos (tortilla chips) on a flat c e ra mic
plate. Put 50g grated cheddar cheese and
spices on top.
Snack Function Programmes Chart
EMS20202
í===========================================
English
22
•
Always keep the oven clean – a void sp ill-ov ers and
do not forget to clean under the glass tray and the
inside of the door.
•
Preferably use round or oval casseroles with a lid
when cooking in your microwave oven.
•
Do not use metal or m e tal decorated casseroles.
Certain plastic materials can melt and be warped
by hot food.
•
Cover the food when cooking. Use a glass lid, a
plate or grease proof paper.
•
Pastry, bread and the like can be defrosted directly
in a bread basket or on a paper towel.
•
If frozen food is heated in its packaging, the
packaging sho uld be opened. Pack a g i ng
containing metal or metal decoration m ust not be
used unless specifically recommended for use in
the microwave. Remove metal clips and wire ties.
•
Smaller pieces of aluminium foil can be used to
cover parts that easily over cook suc h as chicken
legs.
•
Food with peel or skin should be pierced with a
fork – e.g. potatoes and sausag es. Do not boil
eggs in the microwave oven as they can explode.
•
Put large, thick pieces close to the edge of the
casserole and try to cut the food in to even sized
pieces. Always place the food in the centre of the
oven.
•
The food will be evenly cooked if you stir or turn it a
few times.
•
Always set a shorter cook ing time than indicated in
your recipe to avoid over cooking. The larger the
amount of food the longer it ta ke s.
•
Use little or no water for vegetables.
•
Use less salt and spices than for ‘normal’ cooking.
•
Season afterwards.
•
Allow a few minutes ‘standing’ time after the oven
has switched off to ensure complete and even
cooking results.
•
Always ensure food is piping hot throughout before
serving.
•
Use pot holders or gloves when taking dishes and
food from the oven.
•
Softening Honey
If you have a jar of honey which has
crystallised, remove lid and place the ja r in th e
oven, microwave on medium power for 2
minutes.
•
Melting Cho col ate
Break 100g of chocolate into squares, place in
A bowl and heat on high power for 1-2 minutes
and stir well.
•
Softening or Melting Butter
Melting takes a few seconds on high power.
Softening is best done more gently o n lo w
power.
•
Freshen or Warm Bread
Use medium power for few seconds.
•
Peeling Garlic easily
Heat 3 or 4 cloves of garlic on high power for
15 seconds. Squeeze at one end until the clove
pops out.
•
Fruit Juice
Citrus fruits will yield mo re jui c e if they are
heated on high power for 15 seconds before
squeezing.
•
Cooking Porridge
Porridge is easily cooked in the serving dish
with no sticky pan to wash. Follow food
manufacturers’ recommendations.
Microwave Hints Microwave Tips
EMS20202
í===========================================
English
23
The oven m u st a lways be clean. Re sid u e of food from spillovers or sp a tters will attract microwave energy causing
it to burn on. This could reduce the efficiency of the oven and may cause bad odours. Do not atte mpt to tamper
with or make a ny adjustments or repairs to any part of the oven. Repairs should only be d o ne by a qualified
service technician.
Be sure the oven is disconnected from the electricity supply before cleaning.
Warning : Failure to maintain the oven i n a clea n co ndition co ul d lead to deter ior ation of the surface that co uld adverse ly
affect the life of the appliance and possibly result in a hazardous situation
Clean them with mild detergent after removing them from the cavity. The turntable support should be carefully
handled.
CAUTION:
The inside of the oven and turntable get very hot, so do not touch them im m e diately after use.
Always keep the inside of the o v en clean. Wipe up spill-overs and food sp a tters immediately. Deposits that are
allowed to remain on the oven walls, door seal and door surface will absorb microwave energy, reduce the
efficiency of the oven, and possibly damage the oven interior. Use mild, liquid detergent, warm water and a soft,
clean cloth to remove deposits.
NEVER USE ABRASIVE CLEANER S, COMM ERCIAL OVEN CLEAN ER S OR STEEL WOOL PA DS ON AN Y PART
OF THE MICROWAVE OVEN.
To loosen difficult deposits, boil a cup of water in the microwave oven for 2 or 3 minutes.
NEVER USE A KNIFE OR ANY UTE NSI L TO REMOVE D EPOSITS FROM OVE N SUR FAC ES.
To remove odours from the oven interior, boil a cu p of water plus 2 tablespoons of lemon juice for 5 minutes.
The turntable motor is sealed. Ne vertheless, be careful to avoid the water penetrating under the turntable spindle
when the bottom of the oven is being cleaned.
Open the oven door when cleaning the control panel. This w ill p re vent the oven fro m being turned o n
accidentally. You should clea n outside surfaces of the oven with mild liquid detergent and water followed by a
wiping with clear water to remove any excess detergent. Dry with a soft cloth.
Spray-on window cleaners or all purpose spray-on kitch en cleaners can also be used. Ne ver use abrasive
cleaners, scouring pads or harsh chemicals on outside surfaces of your ove n. To prevent damage to the working
parts, do not allow water to seep into ventilation openings.
Care and cleaning
Cleaning the accessories (turntable and support)
Cleaning the interior
Cleaning the exterior
EMS20202
í===========================================
English
24
Electrolux offer the following guarantee to the first purchaser of this appliance:
1. The guarantee is valid for 24 months commencing when the appliance is handed over to the first retail
purchaser, which must be verified by purchase invoice or similar documentation. The guarantee does not
cover commercial use.
2. The guarante e covers all parts or components which fail due to faulty workmanship or faulty material. The
guarantee does not cover appliances where defects or poor performance are due to misuse, accidental
damage, neglect, faulty installation, unauth o rise d modification or a tte mpted repair, comm ercial use or fa ilu re
to observe requirements and recomm endations set out in the instruction book. This guarantee does not
cover such parts as light bulbs, removable glassware, or plastic.
3. Should guarante e repairs be necessary the purchaser must i nform the nearest customer service office
(ELECTROLUX's service or authorised agent). ELECTROLUX reserves the right to stipulate the place of repair
(i.e. the customer's home, p lace of installation or ELE C TR O LUX workshop).
4. The guarante e or free replacement includes bo th labour and materials.
5. Repairs carried out under guarantee do not extend the guarantee period for the appliance. Parts removed
during guarantee repairs become the property of ELECTROLUX.
6.
The Purchaser's statutory rights are not affec ted by this guarantee.
European Guarantee
If you should move to another country within Eu rope then your guarantee mo ves w ith you to your new home
subject to the following qualifications:
•
The guarantee starts from the date you first purchased your product
•
The guarantee is for the same period and to the same extent for labour and pa rts a s e xists in th e new country
of use for this brand or range of products
•
This guarantee relates to you and cannot be transferred to another user
•
Your new home is within the European Community (EC) or European Free Trade Area
•
The product is installed and used in accordance with our instructions and is only used domestically, i.e. a
normal household
•
The product is installed taking into account regulations in yo u r n ew country
Before you move please contact your nearest Customer C a re centre, listed below, to give them details of yo ur
new hom e . T h e y will then ensu re that the local S ervice Organisation is aware of your m o ve and able to lo o k
after you and your appliances.
France Senlis +33 (0) 3 44 62 20 13
Germany Nürnberg +49 (0) 800 234 7378
Italy Pordenone +39 (0) 800117511
Sweden Stockholm +46 (0) 20 78 77 50
UK Slough +44 (0) 1753 219898
GUARANTEE CONDITIONS

EMS20202
É
3
Преди да използвате фурната
4
Технически характеристики
4
Инструкции за безопасност
5
–
Съдове за готвене и безопасност
5
–
Тестване на съдовете за готвене
6
–
Мерки за безопасност при обработка на храни
6
–
Съдове за фурна и аксесоари
7
–
Разопаковане
7
Kak
да работим с микровълновата фурна
8
–
Наименовани е и функции на частите
8
–
Монтиране на въртящата се чиния
8
–
Контролен панел
9
–
Настройка на часовника
10
–
Детска безопасност
10
–
За да спрете фурната
10
–
Изключване на звуковия сигнал
11
–
Бърз старт
11
–
Ръководство за настройка на мощноста
11
–
Микровълново готвене
12
–
Автоматично размразяване
13
–
Автоматично притопляне
14
–
Бърза функция
15
–
Препоръки за ръчно размразяване
16
––
Таблица с програми за автоматично притопляне
17
–
Таблица с програми за автоатично размразяване
18
–
Таблица с програма за бързо готвене
19
Съвети при готвене с микровълнова фурна
20
Грижа и почистване
21
–
Почистване на аксесоарите
(
въртяща се чиния
иподдръжка
) 21
–
Почистване на вътрешността
21
–
Почистване на външната част
21
Условия на гаранцията
22
Съдържание
EMS20202
É
4
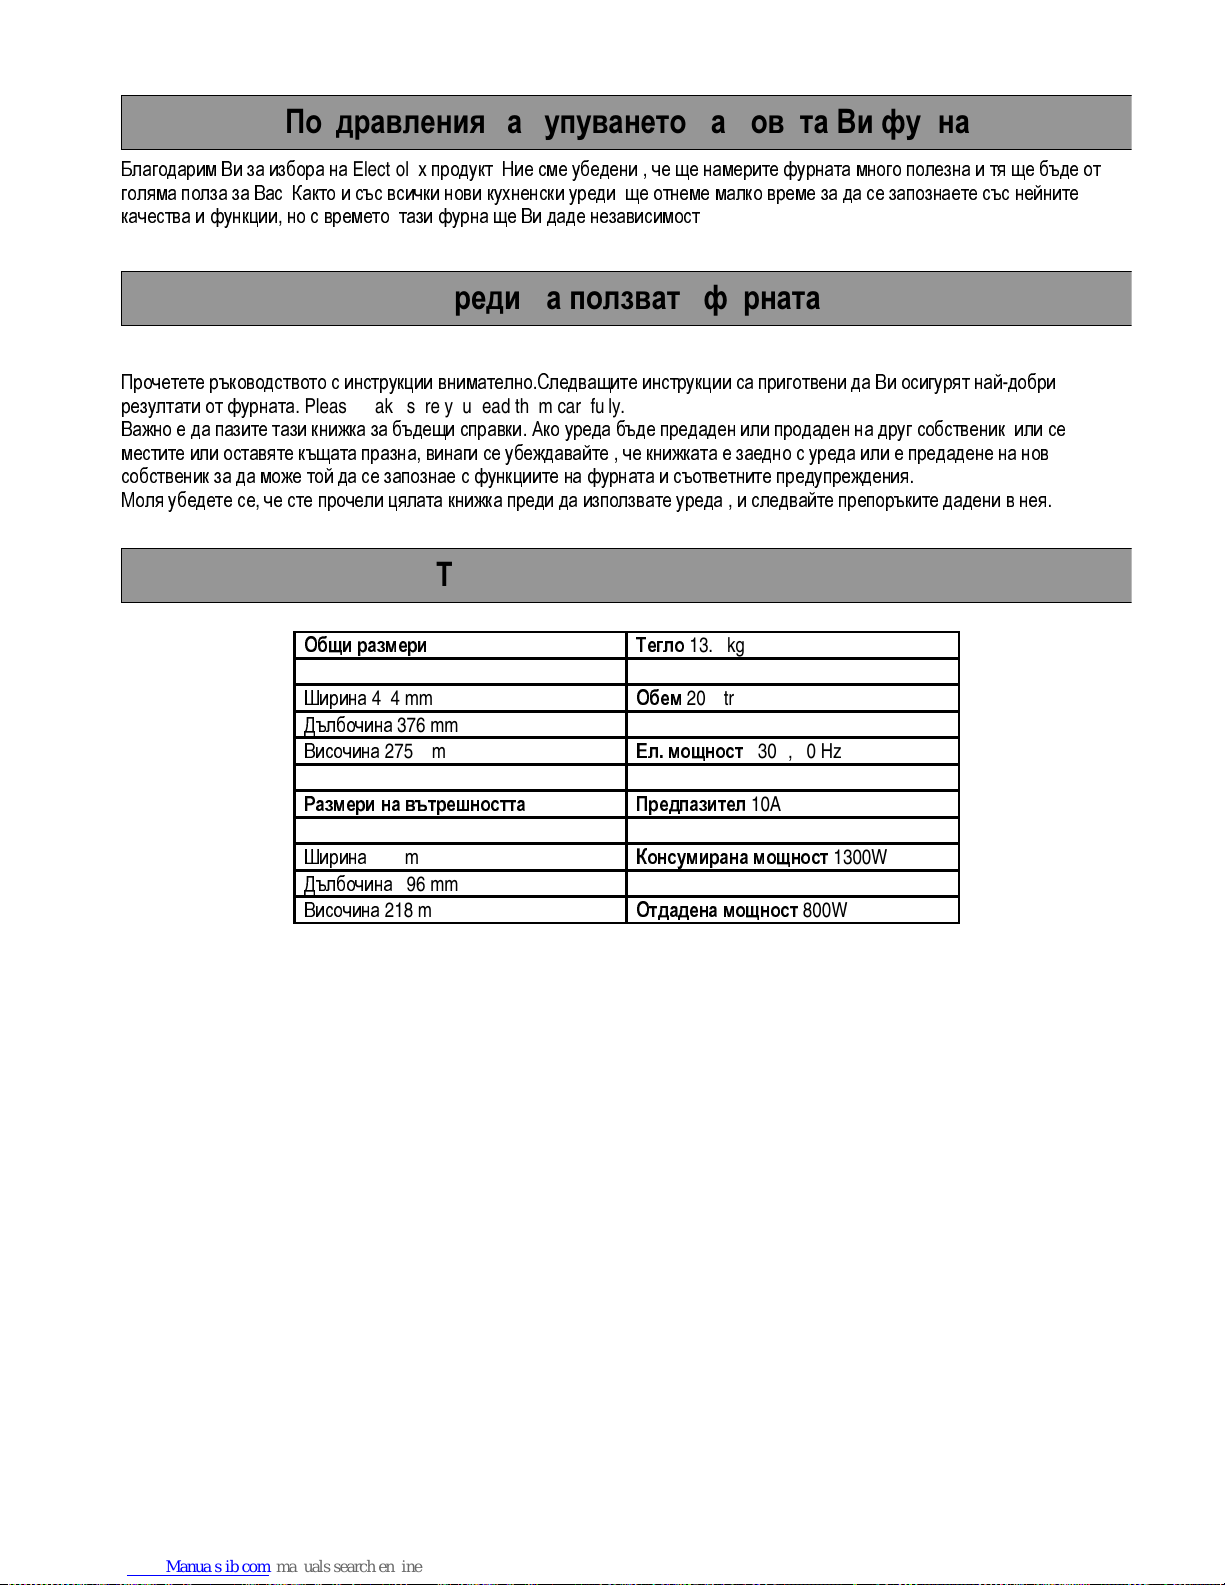
Благодарим Ви за избора на
Electrolux
продукт. Ние сме убедени
, че ще
намерите фурната много полезна и тя ще бъде от
голяма полза за Вас. Както и със всички нови кухненски уреди, ще отнеме малко време за да се запознаете със нейните
качества и функции, но с времето, тази фурна ще Ви даде независимост
.
Прочетете ръководството с инструкции внимателно.Следващите инструкции са приготвени да Ви осигурят най-добри
резултати от фурната
. Please make sure you read them carefully.
Важно е да пазите тази книжка за бъдещи справки. Ако уреда бъде предаден или продаден на друг собственик, или се
местите или оставяте къщата празна, винаги се убеждавайте
, че
книжката е заедно с уреда или е предадене на нов
собственик за да може той да се запознае с функциите на фурната и съответните предупреждения
.
Моля убедете се, че сте прочели цялата книжка преди да използвате уреда
, и
следвайте препоръките дадени в нея
.
Общи размери
Тегло
13.5 kg
Ширина
484 mm
Обем
20 Litre
Дълбочина
376 mm
Височина
275 mm
Ел. мощност
230V, 50 Hz
Размери на вътрешността
Предпазител
10A
Ширина
323 mm
Консумирана мощност
1300W
Дълбочина
296 mm
Височина
218 mm
Отдадена мощност
800W
Поздравления за купуването на новата Ви фурна
Преди да ползвате фурната
Технически характеристики
EMS20202
É
5
•
Вградената система за сигурност предотвратява
включване на фурната докато вратата на фурната е
отворена
..
•
Не се месете в тази система, или не се опитвайте да
работите с фурната докато вратата на фурната е
отворена, защото отворената врата може да доведе до
излагане на микровълнови вълни
..
•
Не позволявайте на храна да се разлива или почистващ
препарат да остава върху уплътнението на вратата
.
Вижте раздела Почистване и Грижа за инструкции
.
•
Не работете с фурната ако тя е повредена
,
докато не се
поправи от квалифицир ана личност
.
•
Особено важно е врата да се затваря добре и да няма
повреди по
: (1)
врата
(
основната
), (2)
пантите
ключалките (счупени или несигурни
), (3)
уплътнителите и
повърхноста срещу тях
.
•
При никакви обстоятелства не се опитвайте да
поправяте уреда сами. Поправки направени от
неквалифицирана особа могат да доведат до
наранявания или сериозни проблеми. Свържете се с
местният сервизен център
.
•
Не махайте външната облицовка, вратата или
контролния панел по никое време. Правейки го може да
се изложите на голямо електрическо напрежение
.
•
Монтирайте и сложете фурната само в съгласие с
“
Монтажните инструкции
”
дадени в тази книжка
.
•
Използвайте тази фурна само за цели
, за
които е
направена и в съгласие с инструкц иите дадени в
книжката. Не използвайте корозивни химикали в този
уред. Тази фурна е специално проектирана да
to
притопля, готви,илиr размразява храна. Тя не е
проектирана за индустриална или лабораторна
,
както и
за търговска цел защото това ще анулира гаранцията
..
•
Не работете с празна фурна
..
Ако няма вода или храна
във фурната да абсорбира микро
-
вълновата
енергия,магнетронната лампа може да се повреди
.
•
Наглеждане на фурната е необходим о при работа на
деца с нея
.
•
Не съхранявайте фурната навън. Не използвайте уреда
в близост до вода
.
•
Не се опитвайте да сушите вестници или кърпи във
фурната. Тези обекти могат да се запалят
.
•
Не използвайте вътрешноста на фурната за
съхраняване. Не оставяйте хартия, готварски съдове или
храна във фурната
,
когато не я използвате
.
Съдове за готвене и безопасност
Повечето стъклени, стъкло-керамични и топлоустойчиви
съдове са отлични за употреба във микровълнова фурна
.
Повечето стъклени и керамични съдове няма да се загреят
от микровълните, но те могат да се нагреят от храната вътре
в тях. Употребата на готварски ръкавици се препоръчва
.
&
Нормално е пара да се изпуска около вратата или
замъгляване да се появи по врата или дори водни
капки да се появят под вратата по време на процеса
на готвене. Тази обикновена кондензация
предизвикана от топлината не оказва влияние на
сигурността на фурната. Уплътнението на вратата
не е предвидено да изолира вътрешността напълно
.
•
Не насилвайте въртящата се чиния с ръка. Това може да
предизвика повреда
.
•
Волтова дъга може да се появи във фурната при
употреба на метални съдове. Повтарящи се волтови
дъги могат да повредят уреда
t.
Спрете готвенето и
проверете съдовете
.
•
Мерки трябва да се вземат да не се задръстват
въздушните отвори за вентилация в горната, задната
,
страничната и долната част на уреда
.
m
Не използвайте тази фурна за търговски цели
.
Тази фурна е направена само за домашна
употреба
.
Инструкции за безопасност
EMS20202
É
6
•
Сложете съда във фурната заедно с чаша наполвина
пълна с вода
.
Загрейте на
1000 W (100%) за
една
минута. Ако съда е нагорещен, не бива да го използвате
.
Ако е просто леко топъл, може да го използвате за
притопляне но не и за готвене. Ако съда е със стайна
температура, може да го използвате за микровълново
готвене
.
•
Хартиени кърпички, восъчна хартия, хартиени кърпи
,
чинии, чаши, картони, опаковки за фризер и картонени
съдове са много подходящи съдове. Винаги се
убеждавайте, че съдовете са пълни с храна за да
абсорбират енергията и по този начин се избягва
прегряване
.
•
Много пластмасови съдове, чаши, съдове за фризер и
пласмасови фолиа могат да се използват във фурната
.
Следвайте инструкциите на производителя при работа с
пластмаса във фурната. Избягвайте употреба на
пласмасови съдове заедно с храна с високо съдържание
на мазнини и захари, защото те достигат висока
температура и могат да размекнат някои пластмаси
.
•
Метални съдове и съдове с метална декорация не бива
да се използват в микровълновата фурна, с изключение
на специално предназначените
.
•
Контейнери с тесни отвори, като бутилки, не трябва да
се използват за микровълново готвене
.
•
Мерки трябва да се вземат при махане на капак или
друго покритие от съдовете поради опасност от
изгаряния от излизащата пара
.
ВНИМАНИЕ
:
Не оставяйте фурната без наблюдение и
я наглеждайте от време на време
,
когато
готвите в пластмасов и
,
хартиени или
други леснозапалими контейнери. Ако се
забележи пушек, дръжте вратата
затворена, изключете фурната или я
откачете от ел. мрежа
,
докато пушека
спре
.
•
Не загрявайте храна в консерва.Винаги
вадете храната от консервата преди да я
готвите
.
•
Силно запържване с много мазнина не бива да се
извършва във микровълновата фурна, поради
невъзможност от контрол на температурата, опасни
ситуации могат да възникнат
.
•
Пуканки могат да се приготвят във фурната, но само в
специална опаковка или съд. Такава готварска операция
никога не бива да остава без наблюдение
.
•
Продупчете храни с непореста кожа или мембрана
,
поради опасност от натрупване на пара във вътрешноста
на храната и избухване. Ябълки
,
картофи, пилешки
дробчета, и жълтъци са примери за продукти, които
трябва да се продупчват
..
ВНИМАНИЕ: Когато подгрявате течности, в това число супи
,
сосове и напитки във Ваш ат а фурна, ниво над точката на
кипене може да се достигне без явните за това признаци
.
Това може да доведе до изкипяване на гореща течност. За
да предотвратите това, следните стъпки трябва да се
направят
:
1.
Избягвайте съдове със стесняващи се страни и тесни
гърла
..
2.
Не презатопляйте
.
3.
Разбъркайте течноста преди да я сложите във фурната и
още веднъж на половината време от подгряването
.
4.
След подгряването, оставете течноста за кратко във
фурната, разбъркайте отново и внимателно извадете
съда
..
•
Някои продукти като цели яйца и такива във консерви
–
например, затворен стъклен буркан
–
могат да
експлоадират и не трябва да се подгряват във
микровълнова фурна. Възможно е, яйца на очи да
експлоадират по време на готвене. Винаги дупчете
жълтъка, след това покрийте и оставете около една
минута преди да откриете
.
ЗАБЕЛЕЖКА
:
•
Не насилвайте въртящата се чиния с ръка. Това може да
предизвика повреда
.
*
Волтова дъга може да се появи във фурната
при употреба на метални съдове. Повтарящи
се волтови дъги могат да повредят уреда
t.
•
Мерки трябва да се вземат за незадръстване на
въздушните отвори за вентилация
разположени отгоре, отзад, отдолу и отстрани
на уреда
.
Не използвайте тази фурна за търговски цели
.
Тя е предназначена само за домашни цели
.
Пазете тези инструлции
.
Тестване на съдовете за готвене
Мерки за безопасност при обработка
на храни
EMS20202
É
7
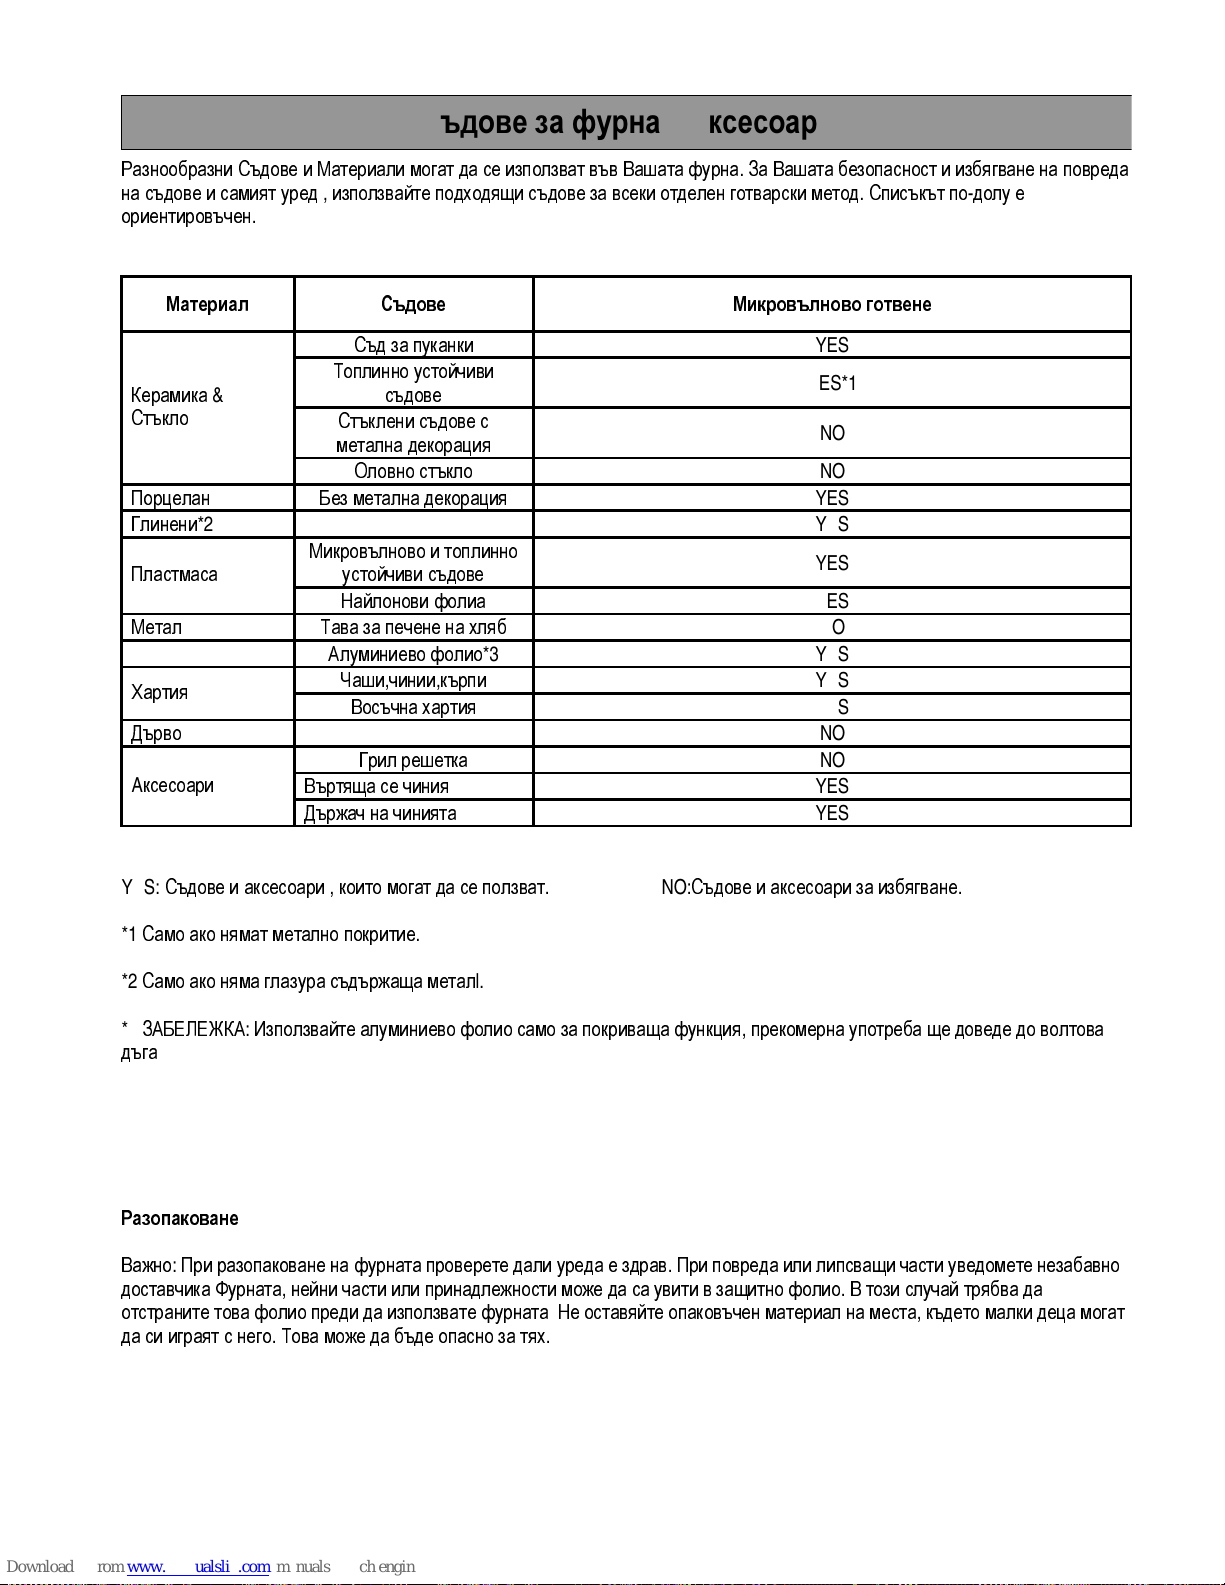
Разнообразни Съдове и Материали могат да се използват във Вашата фурна. За Вашата безопасност и избягване на повреда
на съдове и самият уред
,
използвайте подходящи съдове за всеки отделен готварски метод. Списъкът по-долу е
ориентировъчен
.
Материал
Съдове
Микровълново готвене
Съд за пуканки
YES
Топлинно устойчиви
съдове
YES*1
Стъклени съдове с
метална декорация
NO
Керамика
&
Стъкло
Оловно стъкло
NO
Порцелан
Без метална декорация
YES
Глинени
*2
YES
Микровълново и топлинно
устойчиви съдове
YES
Пластмаса
Найлонови фолиа
YES
Метал
Тава за печене на хляб
NO
Алуминиево фолио
*3
YES
Чаши,чинии,кърпи
YES
Хартия
Восъчна хартия
YES
Дърво
NO
Грил решетка
NO
Въртяща се чиния
YES
A
ксесоари
Държач на чинията
YES
YES:
Съдове и аксесоари
,
които могат да се ползват
. NO:
Съдове и аксесоари за избягване
.
*1
Само ако нямат метално покритие
.
*2
Само ако няма глазура съдържаща метал
l.
*3
ЗАБЕЛЕЖКА: Използвайте алуминиево фолио само за покриваща функция, прекомерна употреба ще доведе до волтова
дъга
.
Разопаковане
Важно: При разопаковане на фурната проверете дали уреда е здрав. При повреда или липсващи части уведомете незабавно
доставчика.Фурната, нейни части или принадлежности може да са увити в защитно фолио. В този случай трябва да
отстраните това фолио преди да използвате фурната. Не оставяйте опаковъчен материал на места, където малки деца могат
да си играят с него. Това може да бъде опасно за тях
.
Съдове за фурна и аксесоари

EMS20202
É
8
----------------------------------------
1.
Готварско отделение. Забърсвайте до чисто след
готвене
.
2.
Прозорец за наблюдение. Храната може да се
наблюдава, докато фурната работи
.
3.
Врата на фурната. Вратата трябва да бъде винаги добре
затворена
.
4.
Безопасно заключване и система за затваряне
.
5.
Контролен пане л
.
6.
Задвижване на въртящата се чиния
.
7.
Въртяща се чиния
.
8.
Държач на въртящата се чиния
.
1.
Поставете държача на въртящата се чиния на дъното на
вътрешноста
.
2.
Поставете въртящата се чиния върху държача както е
показано на диаграмата. Убедете се, че държача е добре
поставен върху задвижването. Никога не поставяйте
въртящата се чиния наобратно
.
•
Двете, и държача и въртящата се чиния трябва винаги да
се използват по време на готвене
.
•
Всичката храна и съдове с храна трябва да се поставят
върху тази чиния
.
•
Тази чиния се върти по часовниковата и срещу
часовниковата стрелка. Това е нормално
.
Въртяща се чиния
Държач на чинията
Задвижване
1
2
3
5
4
6
7
8
4
Как да работим с микровълновата фурна
Наименование и функция на
частите
Монтиране на въртящата се чиния
 Loading...