

Page 1
MICROWAVE OVEN
INSTRUCTION BOOK
Model EMS1760
Page 2

Page 3

CONTENTS
Important safety instructions . . . . . . . . . . . . . . . . . . . . . . . . . . . . . . . . . . . . . . . . . . .2 - 3
Oven & accessories . . . . . . . . . . . . . . . . . . . . . . . . . . . . . . . . . . . . . . . . . . . . . . . . . . .4
Control panel . . . . . . . . . . . . . . . . . . . . . . . . . . . . . . . . . . . . . . . . . . . . . . . . . . . . . . .5
Before operation . . . . . . . . . . . . . . . . . . . . . . . . . . . . . . . . . . . . . . . . . . . . . . . . . . . . .6
Setting the clock . . . . . . . . . . . . . . . . . . . . . . . . . . . . . . . . . . . . . . . . . . . . . . . . . . . . .6
What are microwaves? . . . . . . . . . . . . . . . . . . . . . . . . . . . . . . . . . . . . . . . . . . . . . . . . .7
Suitable ovenware . . . . . . . . . . . . . . . . . . . . . . . . . . . . . . . . . . . . . . . . . . . . . . . . . . . .7
Tips & advice . . . . . . . . . . . . . . . . . . . . . . . . . . . . . . . . . . . . . . . . . . . . . . . . . . . .8 - 10
Microwave power levels . . . . . . . . . . . . . . . . . . . . . . . . . . . . . . . . . . . . . . . . . . . . . . .11
Manual operation . . . . . . . . . . . . . . . . . . . . . . . . . . . . . . . . . . . . . . . . . . . . . . . . . . .11
Other convenient functions . . . . . . . . . . . . . . . . . . . . . . . . . . . . . . . . . . . . . . . . . .12 - 13
Auto programmes operation . . . . . . . . . . . . . . . . . . . . . . . . . . . . . . . . . . . . . . . . . . . .14
Auto programmes charts . . . . . . . . . . . . . . . . . . . . . . . . . . . . . . . . . . . . . . . . . . .15 - 17
Recipes for auto programmes AC-6 & AC-7 . . . . . . . . . . . . . . . . . . . . . . . . . . . . . .17 - 18
Cooking charts . . . . . . . . . . . . . . . . . . . . . . . . . . . . . . . . . . . . . . . . . . . . . . . . . .19 - 21
Recipes . . . . . . . . . . . . . . . . . . . . . . . . . . . . . . . . . . . . . . . . . . . . . . . . . . . . . . .21 - 25
Care & cleaning . . . . . . . . . . . . . . . . . . . . . . . . . . . . . . . . . . . . . . . . . . . . . . . . . . . .26
What to do if... . . . . . . . . . . . . . . . . . . . . . . . . . . . . . . . . . . . . . . . . . . . . . . . . . . . . .27
Service & spare parts . . . . . . . . . . . . . . . . . . . . . . . . . . . . . . . . . . . . . . . . . . . . . . . . .28
Customer care . . . . . . . . . . . . . . . . . . . . . . . . . . . . . . . . . . . . . . . . . . . . . . . . . . . . . .28
Guarantee conditions . . . . . . . . . . . . . . . . . . . . . . . . . . . . . . . . . . . . . . . . . . . . . . . . .29
Specifications . . . . . . . . . . . . . . . . . . . . . . . . . . . . . . . . . . . . . . . . . . . . . . . . . . . . . .30
Important information . . . . . . . . . . . . . . . . . . . . . . . . . . . . . . . . . . . . . . . . . . . . . . . . .30
Installation . . . . . . . . . . . . . . . . . . . . . . . . . . . . . . . . . . . . . . . . . . . . . . . . . . . . .31 - 32
1
Page 4
IMPORTANT SAFETY INSTRUCTIONS
IMPORTANT SAFETY INSTRUCTIONS: READ CAREFULLY AND KEEP FOR FUTURE REFERENCE
To avoid the danger of fire.
The microwave oven should not be left
unattended during operation. Power levels
that are too high, or cooking times that are
too long, may overheat foods resulting in a
fire.
The electrical outlet must be readily accessible so that
the unit can be unplugged easily in an emergency.
Do not store or use the oven outdoors.
If food being heated begins to smoke, DO
NOT OPEN THE DOOR. Turn off and unplug
the oven and wait until the food has
stopped smoking. Opening the door while
food is smoking may cause a fire.
Only use microwave-safe containers and
utensils. See Page 7.
Do not leave the oven unattended when
using disposable plastic, paper or other
combustible food containers.
Clean the waveguide cover, the oven
cavity, the turntable and turntable support
after use. These must be dry and free from
grease. Built-up grease may overheat and
begin to smoke or catch fire.
Do not place flammable materials near the oven or
ventilation openings. Do not block the ventilation
openings.
Remove all metallic seals, wire twists, etc., from food
and food packages. Arcing on metallic surfaces may
cause a fire.
Do not use the microwave oven to heat oil for deep
frying. The temperature cannot be controlled and the
oil may catch fire.
To make popcorn, only use special microwave
popcorn makers.
Do not store food or any other items inside the oven.
Check the settings after you start the oven to ensure
the oven is operating as desired.
See the corresponding hints in operation manual.
To avoid the possibility of injury
WARNING:
Do not operate the oven if it is damaged or
malfunctioning. Check the following before use:
a)The door; make sure the door closes properly and
ensure it is not misaligned or warped.
b)The hinges and safety door latches; check to make
sure they are not broken or loose.
c) The door seals and sealing surfaces; ensure that
they have not been damaged.
d)Inside the oven cavity or on the door; make sure
there are no dents.
e)The power supply cord and plug; ensure that they
are not damaged.
Never adjust , repair or modify the oven
yourself. It is hazardous for anyone other
than a competent person to carry out any
service or repair operation which involves the
removal of a cover which gives protection
against exposure to microwave energy.
Do not operate the oven with the door open or alter
the door safety latches in any way.
Do not operate the oven if there is an object between
the door seals and sealing surfaces.
Do not allow grease or dirt to build up on
the door seals and adjacent parts. Follow
instructions for “Care and Cleaning”, Page
26. Failure to maintain the oven in a clean
condition could lead to a deterioration of
the surface that could adversely affect the
life of the appliance and possibly result in
a hazardous situation.
Individuals with PACEMAKERS should check with their
doctor or the manufacturer of the pacemaker for
precautions regarding microwave ovens.
To avoid the possibility of electric shock
Under no circumstances should you remove the outer
cabinet.
Never spill or insert any objects into the door lock
openings or ventilation openings. In the event of a
spill, turn off and unplug the oven immediately and
call your local Service Force Centre.
Do not immerse the power supply cord or plug in
water or any other liquid.
Do not allow the power supply cord to run over any
hot or sharp surfaces, such as the hot air vent area at
the top rear of the oven.
Do not attempt to replace the oven lamp yourself or
allow anyone who is not authorised by Service Force
to do so. If the oven lamp fails, please consult your
dealer or contact your local Service Force Centre.
If the power supply cord of this appliance is damaged, it
must be replaced with a special cord. The exchange must
be made by an authorised Service Force technician.
2
Page 5
IMPORTANT SAFETY INSTRUCTIONS
To avoid the possibility of explosion and
sudden boiling:
WARNING: Liquids and other foods must
not be heated in sealed containers since
they are liable to explode.
Never use sealed containers. Remove seals and lids
before use. Sealed containers can explode due to a build
up of pressure even after the oven has been turned off.
Take care when microwaving liquids. Use a widemouthed container to allow bubbles to escape.
Microwave heating of beverages can result in
delayed eruptive boiling, therefore care has
to be taken when handling the container.
To prevent sudden eruption of boiling liquid and
possible scalding:
1. Stir liquid prior to heating/reheating.
2. It is advisable to insert a glass rod or similar utensil
into the liquid whilst reheating.
3. Let liquid stand in the oven at the end of cooking
time to prevent delayed eruptive boiling.
Do not cook eggs in their shells, and whole
hard boiled eggs should not be heated in
microwave ovens since they may explode
even after microwave cooking has ended.
To cook or reheat eggs which have not
been scrambled or mixed, pierce the yolks
and the whites, or the eggs may explode.
Shell and slice hard boiled eggs before
reheating them in the microwave oven.
Pierce the skin of such foods as potatoes, sausages
and fruit before cooking, or they may explode.
To avoid the possibility of burns
Use pot holders or oven gloves when removing food
from the oven to prevent burns.
Always open containers, popcorn makers, oven
cooking bags, etc., away from the face and hands to
avoid steam burns.
To avoid burns, always test food temperature
and stir before serving and pay special
attention to the temperature of food and
drink given to babies, children or the elderly.
Temperature of the container is not a true indication of
the temperature of the food or drink; always check the
food temperature.
Always stand back from the oven door when opening
it to avoid burns from escaping steam and heat.
Slice stuffed baked foods after heating to release
steam and avoid burns.
Keep children away from the door to prevent them
burning themselves.
To avoid misuse by children
WARNING: Only allow children to use the
oven without supervision when adequate
instructions have been given so that the child
is able to use the oven in a safe way and
understands the hazards of improper use.
Do not lean or swing on the oven door. Do not play
with the oven or use it as a toy.
Children should be taught all important safety
instructions: use of pot holders, careful removal of
food coverings; paying special attention to packaging
(e.g. self-heating materials) designed to make food
crisp, as they may be extra hot.
Other warnings
Never modify the oven in any way.
This oven is for home food preparation only and may
only be used for cooking food. It is not suitable for
commercial or laboratory use.
To promote trouble-free use of your oven
and avoid damage.
Never operate the oven when it is empty.
When using a browning dish or self-heating material,
always place a heat-resistant insulator such as a
porcelain plate under it to prevent damage to the
turntable and turntable support due to heat stress. The
preheating time specified in the dishes instructions
must not be exceeded.
Do not use metal utensils, which reflect microwaves and
may cause electrical arcing. Do not put cans in the oven.
Only use the turntable and the turntable support
designed for this oven. Do not operate the oven without
the turntable.
To prevent the turntable from breaking:
(a) Before cleaning the turntable with water, leave the
turntable to cool.
(b) Do not put hot foods or hot utensils on a cold
turntable.
(c) Do not put cold foods or cold utensils on a hot
turntable.
Do not place anything on the outer cabinet during
operation.
NOTE:
If you are unsure how to connect your oven, please
consult an authorised, qualified electrician.
Neither the manufacturer nor the dealer can accept
any liability for damage to the oven or personal injury
resulting from failure to observe the correct electrical
connection procedure.
Water vapour or drops may occasionally form on the
oven walls or around the door seals and sealing
surfaces. This is a normal occurrence and is not an
indication of microwave leakage or a malfunction.
3
Page 6
OVEN & ACCESSORIES
1
2
3
4
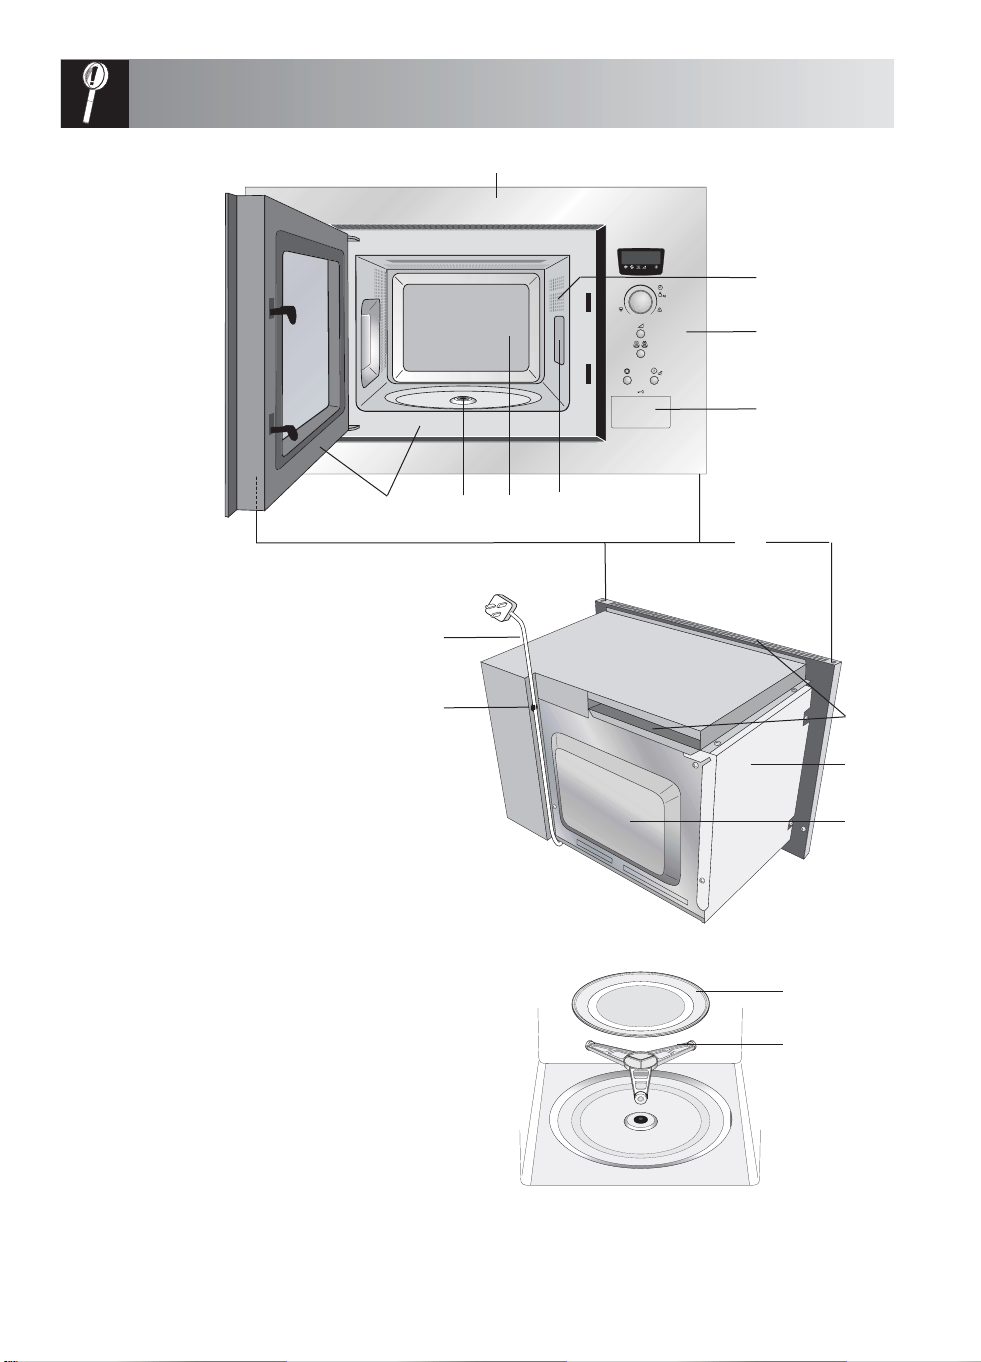
1 Front trim
2 Oven lamp
3 Control panel
4 Door opening button
5 Waveguide cover
6 Oven cavity
7 Seal packing
8 Door seals and sealing surfaces
9 Fixing points (4 points)
10 Ventilation openings
11 Outer cover
12 Rear cabinet
13 Power supply cord support clip
14 Power supply cord
ACCESSORIES:
Check to make sure the following accessories are
provided:
(15) Turntable (16) Turntable support
(17) 4 fixing screws (not shown).
•Place the turntable support in the seal packing on
the floor of the cavity.
• Then place the turntable on the turntable support.
•To avoid turntable damage, ensure dishes or
containers are lifted clear of the turntable rim when
removing them from the oven.
NOTE: When you order accessories, please mention
two items: part name and model name to your dealer
or
local Service Force Centre.
14
13
78
56
9
10
11
12
15
16
4
Page 7
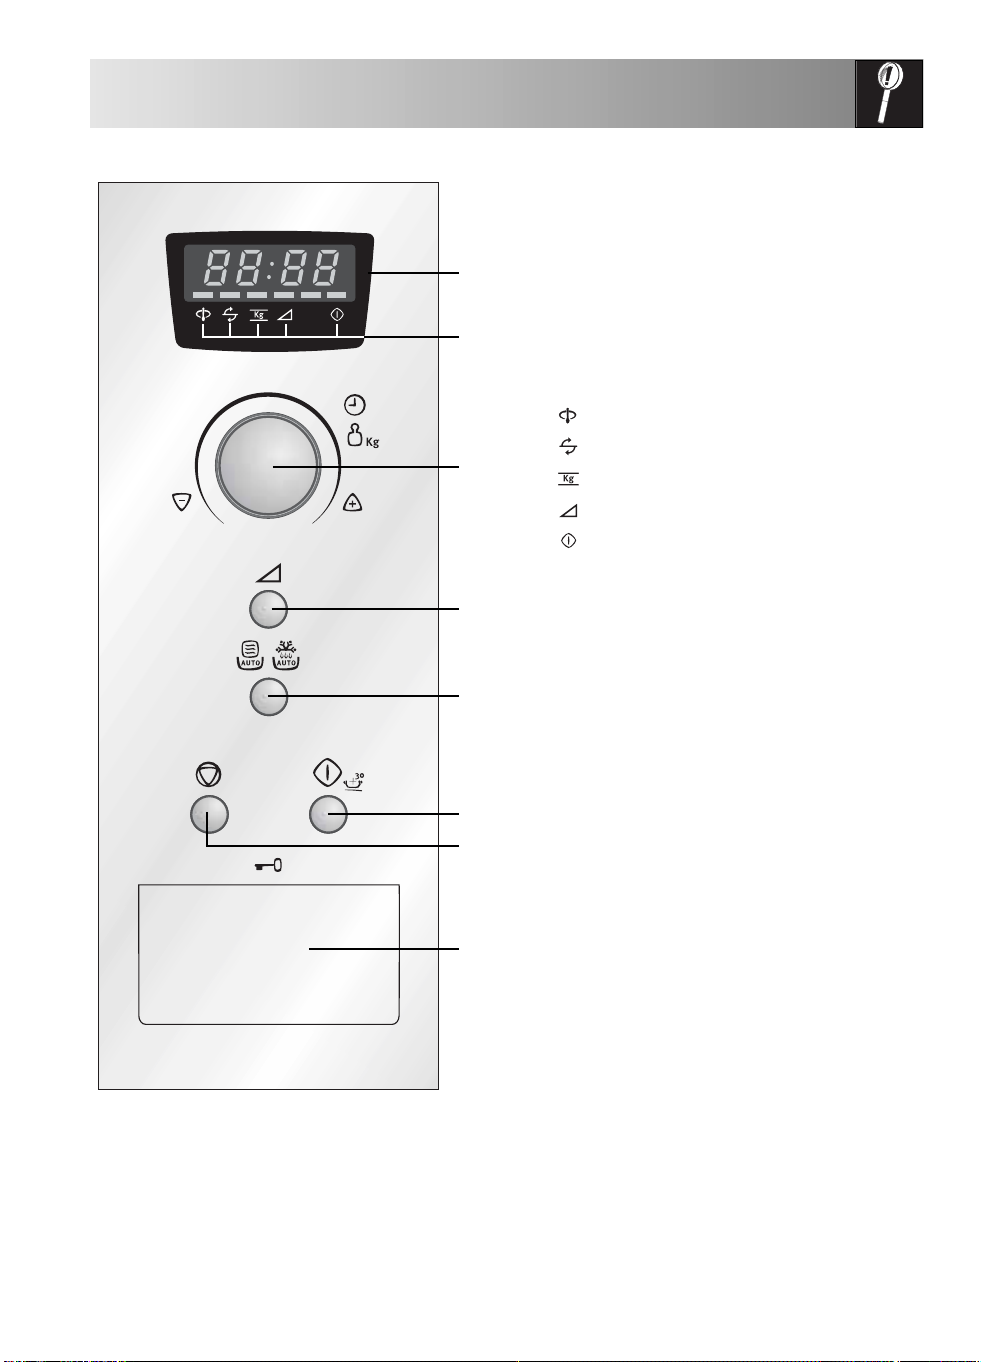
CONTROL PANEL
1 Digital Display
2 Indicators
1
2
3
4
5
The appropriate indicator will flash or light up,
just above each symbol according to the
instruction. When an indicator is flashing, press
the appropriate button (having the same
symbol) or carry out the necessary operation.
Stir
Turn over
Weight
Microwave power level
Cooking in progress
3 TIMER/WEIGHT knob
4MICROWAVE POWER LEVEL button
5 AUTO PROGRAMMES button
Press to select one of the 12 automatic
programmes.
6START/+30 button
7 STOP button
8DOOR OPEN button
6
7
8
5
Page 8
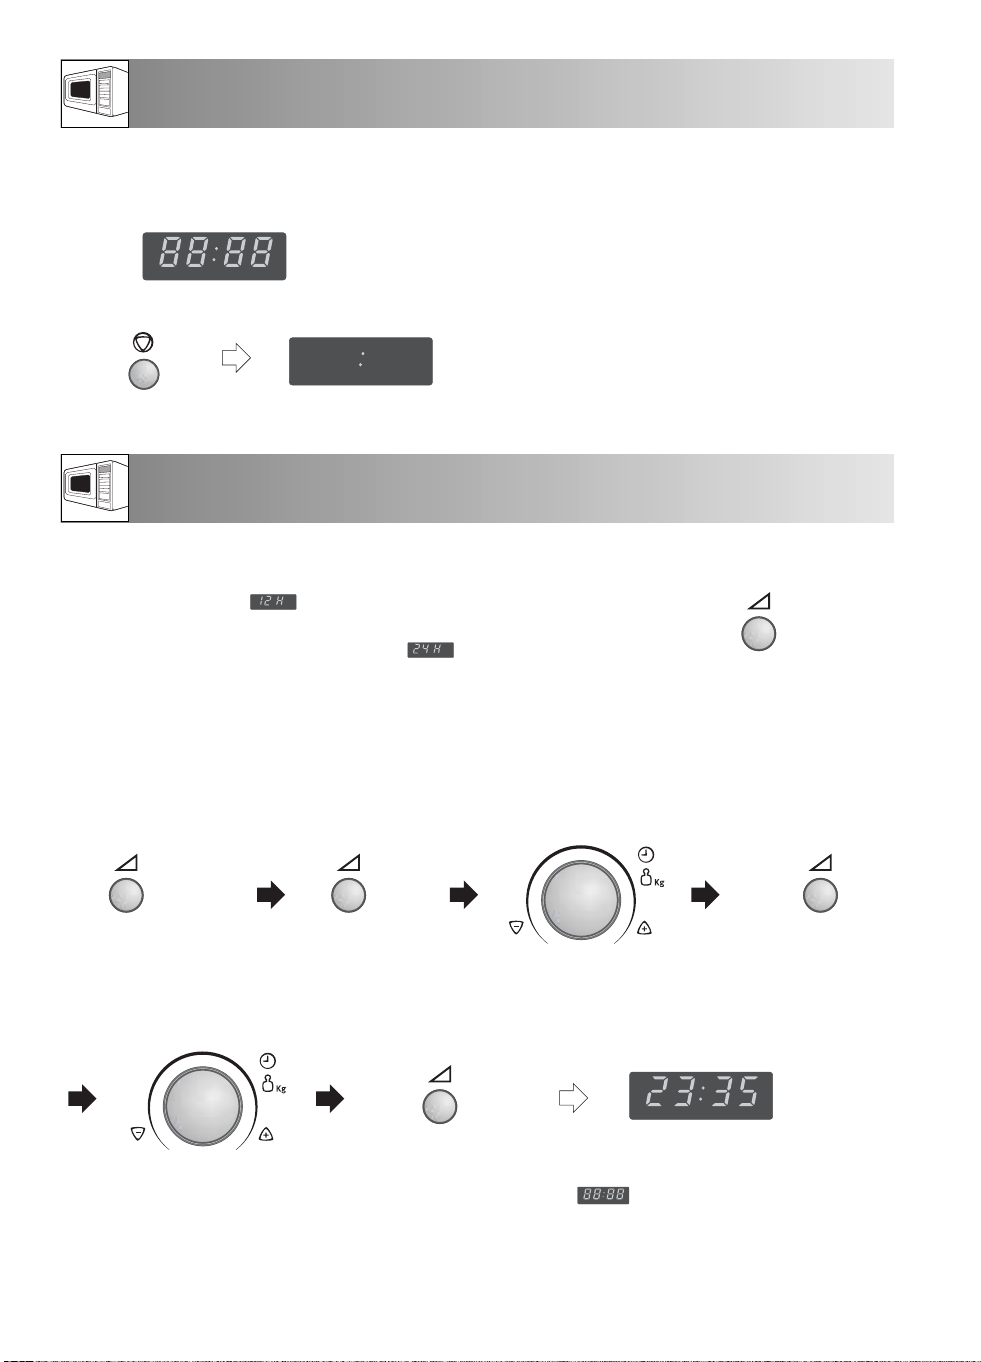
BEFORE OPERATION
Plug in the oven.
1. The oven display will flash:
Using the STOP button
Use the STOP button to:
1. Erase a mistake during programming.
2. Stop the oven temporarily during cooking.
3. Cancel a programme during cooking, touch twice.
2. Touch the STOP button the display will show:
x1
To set the clock, see below.
SETTING THE CLOCK
There are two setting modes: 12 hour clock and 24 hour clock.
1.
To set the 12 hour clock, hold the MICROWAVE POWER
down for 3 seconds. will appear in the display.
2. To set the 24 hour clock, press the MICROWAVE POWER LEVEL button once
more after Step 1, in the example below will appear in the display.
To set the clock, follow the example below.
Example:
To set the 24 hour clock to 23:35.
1. Choose the clock function.
(12 hour clock)
Choose the 24 hour
clock.
2. Set the hours.
LEVEL button
Rotate the TIMER/WEIGHT
knob until the correct hour is
displayed (23).
x1 and hold
for 3 secs.
3. Press the MICROWAVE
POWER LEVEL button
to change from hours to
minutes.
x1 and hold
for 3 secs.
4. Set the minutes.
Rotate the TIMER/WEIGHT
knob until the correct minute is
displayed (35).
x1 x1
5. Press the MICROWAVE POWER
LEVEL button to start the clock.
NOTE:
1. You can rotate the TIMER/WEIGHT knob
clockwise or counter-clockwise.
2. Press the STOP button if you make a mistake
during programming.
3. If the electrical power supply to your microwave
oven is interrupted, the display will intermittently
Check the display.
x1
show after the power is reinstated. If this
occurs during cooking, the programme will be
erased. The time of day will also be erased.
4. When you want to reset the time of day, follow the
above example again.
6
Page 9
WHAT ARE MICROWAVES?
Microwaves are generated in the microwave oven by a magnetron and cause the water molecules in the
food to oscillate. Heat is generated by the friction which is caused, with the result that the food is thawed,
heated or cooked.
SUITABLE OVENWARE
GLASS AND CERAMIC GLASS
Heat-resistant glass utensils are very
suitable. The cooking process can be
observed from all sides. They must
not, however, contain any metal (e.g.
lead crystal), nor have a metallic
overlay (e.g. gold edge, cobalt blue finish).
CERAMICS
Generally very suitable. Ceramics must be glazed,
since with unglazed ceramics moisture can get into
the ceramic. Moisture causes the material to heat up
and may make it shatter. If you are not certain
whether your utensil is suitable for the microwave,
carry out the utensil suitability test.
PORCELAIN
Very suitable. Ensure that the porcelain does not have
a gold or silver overlay and that it does not contain
any metal.
PLASTIC AND PAPER UTENSILS
Heat resistant plastic utensils which are suitable for use
in the microwave can be used to thaw, heat and cook
food. Follow the manufacturer's recommendations.
Heat-resistant paper made for use in a microwave
oven is also suitable. Follow the manufacturer's
recommendations.
KITCHEN PAPER
can be used to absorb any moisture which occurs
in short heating methods, e.g. of bread or products
in bread crumbs. Insert the paper between the food
and the revolving plate. The surface of the food will
stay crispy and dry. Covering greasy food with
kitchen paper will catch splashes.
MICROWAVE CLING FILM
This, or heat-resistant film, is very suitable for covering
or wrapping. Please follow the manufacturer's
recommendations.
ROASTING BAGS
Can be used in a microwave oven. Metal clips are
not suitable for fastening them since the roasting bag
foil might melt. Fasten the roasting bag with string and
pierce it several times with a fork. Non heat-resistant
food wraps are not recommended for use in a
microwave oven.
BROWNING DISH
A special microwave dish made from ceramic glass with
a metal alloy base, which allows food to be browned.
When using the browning dish a suitable insulator,
e.g. a porcelain plate, must be placed between the
turntable and the browning dish. Be careful to adhere
exactly to the pre-heating time given in the
manufacturer's instructions. Excessive pre-heating can
damage the turntable and the turntable stand or can
trigger the safety-device which will switch off the oven.
METAL
Generally speaking, metal should not be used, since
microwaves do not pass through metal and therefore
cannot reach the food. There are, however, exceptions:
small strips of aluminium foil may be used to cover
certain parts of the food, so that these do not thaw too
quickly or begin to cook (e.g. chicken wings). Small
metal skewers and aluminium containers (e.g. of readycooked meals) can be used. They must, however, be
small in relation to the food, e.g. aluminium containers
must be at least
recommended that you transfer the food into a dish
suitable for use in the microwave. When using
aluminium containers or other metal utensils there must
be a gap of approx. 2 cms between them and the
walls of the cooking area, otherwise the walls could be
damaged by possible arcing.
2
/3to 3/4filled with food. It is
NO UTENSIL SHOULD HAVE A METAL
OVERLAY -
parts such as screws, bands or handles.
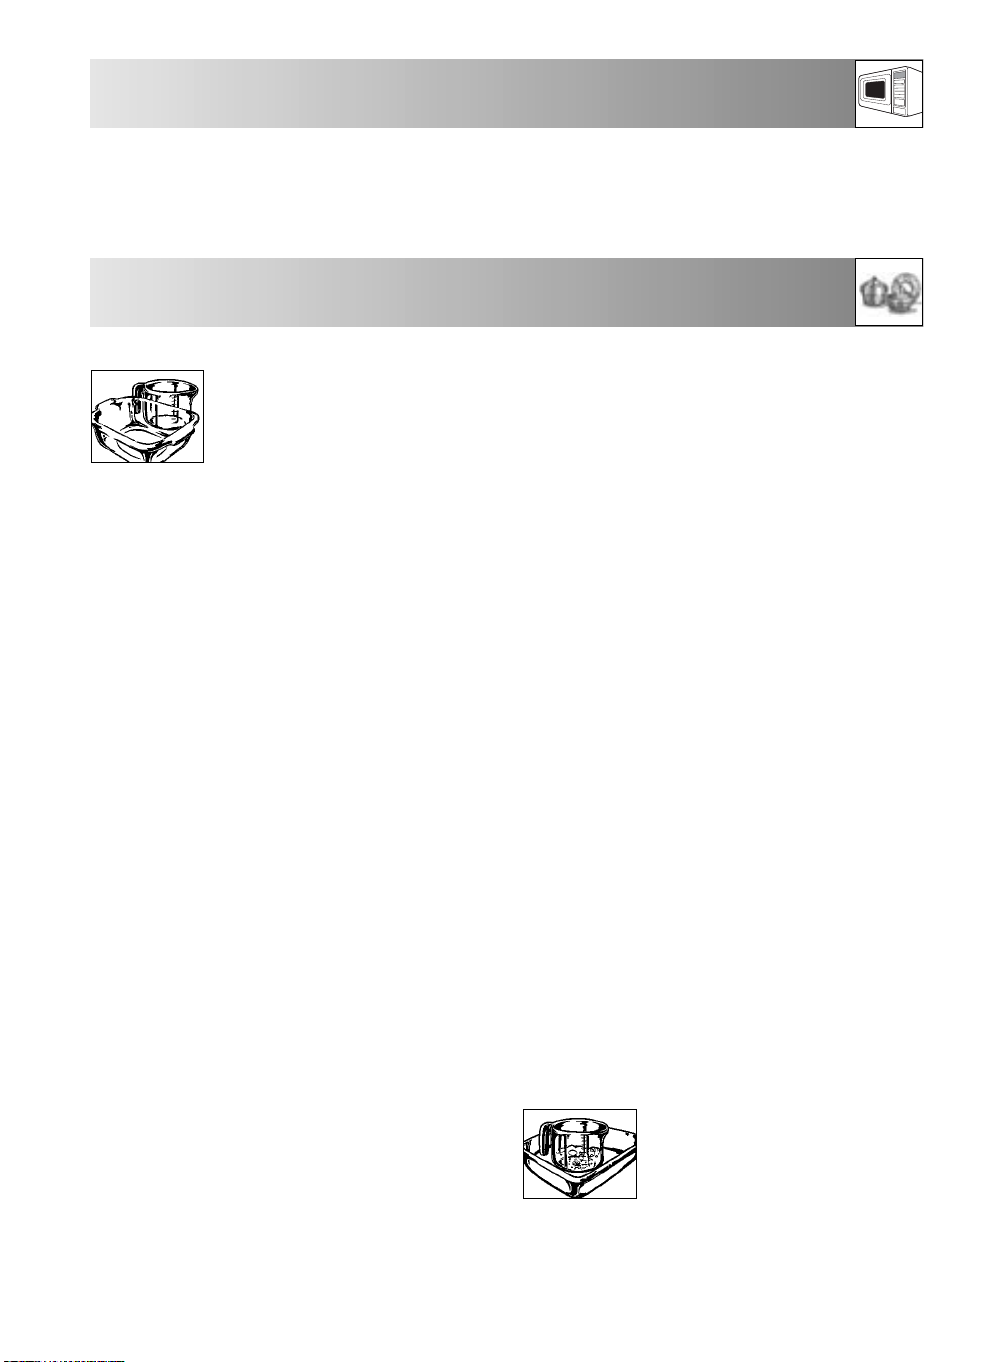
UTENSIL SUITABILITY TEST
If you are not sure whether your utensil is suitable for
use in your microwave oven, carry
out the following test: Place the
utensil into the oven. Place a glass
container filled with 150 ml of
water on or next to the utensil. Switch on the oven at
800 W power for 1 to 2 minutes. If the utensil stays
cool or just warm to the touch, it is suitable. Do not
use this test on a plastic utensil. It could melt.
7
Page 10

TIPS & ADVICE
TIME SETTINGS
In general the thawing, heating and cooking times
are significantly shorter than when using a
conventional cooker or oven. For this reason you
should adhere to the recommended times given in
this book. It is better to set the times too short,
rather than too long. Test the food after it has been
cooked. It is better to have to cook something for a
little longer than to overcook it.
INITIAL TEMPERATURES
Thawing, heating and cooking times are dependent
upon the initial temperature of the food. Deep-frozen
food and food stored in a refrigerator, for example,
requires longer than food which has been stored at
room temperature. For heating and cooking, normal
storage temperatures are assumed (refrigerator
temperature approx. 5° C, room temperature
approx. 20° C). For thawing the temperature of the
deep freeze is assumed to be - 18° C.
COOKING TIMES
All the times given in this book are guidelines,
which can be varied according to the initial
temperature, weight and condition of the food
(water or fat content etc.).
SALT, SPICES AND HERBS
Food cooked in your microwave retains its
individual flavour better than it does when
conventional preparation methods are used. For
this reason you should use salt very sparingly and
normally add it only after cooking. Salt absorbs
liquid and dries out the outer layer of the food.
Herbs and spices can be used as normal.
ADDITION OF WATER
Vegetables and other foods with a high water
content can be cooked in their own juice or with
the addition of a little water. This ensures that many
vitamins and minerals are preserved.
FATTY FOODS
Food ‘marbled’ with fat or with layers of fat cook
faster than lean meat. You should therefore cover
these parts with some aluminium foil, and place the
food fatty side downward.
FOOD IN SKINS OR SHELLS
Food such as sausages, chickens, chicken legs,
baked potatoes, tomatoes, apples, egg yolks or such
like should be pricked or pierced with a fork or small
wooden skewer. This will enable the steam which
forms to dissipate without splitting the skin or shell.
LARGE AND SMALL QUANTITIES
Microwave times are directly dependent upon the
amount of food which you would like to thaw, heat
or cook. This means that small portions cook more
quickly than larger ones. As a rule of thumb:
TWICE THE AMOUNT = ALMOST TWICE THE TIME
HALF THE AMOUNT = HALF THE TIME
DEEP AND SHALLOW CONTAINERS
Both containers have the same capacity, but the
cooking time is longer for the deeper one. You
should therefore choose as flat a container as
possible with a large surface area. Only use deep
containers for dishes where there is a danger of
overcooking, e.g. for noodles, rice, milk etc.
ROUND AND OVAL CONTAINERS
Food cooks more evenly in round or oval containers
than in containers with corners, since the
microwave energy concentrates in the corners and
the food in these areas could become overcooked.
COVERING
Covering the food retains the moisture within it and
shortens the cooking time. Use a lid, microwave
cling film or a cover. Foods which are to be crispy,
e.g. roasts or chickens, should not be covered. As
a general rule, whatever would be covered in a
conventional oven should also be covered in a
microwave oven. Whatever would be uncovered
in a conventional oven can also be left uncovered
in a microwave oven.
IRREGULAR SHAPED FOOD
Place the thicker, more compacted end of the food
pointing towards the outside. Place vegetables
(such as broccoli) with the stalks pointing outward.
STIRRING
You need to stir the food because the microwaves
heat the outer areas first. Stirring the food
balances the temperature and the food heats
evenly.
ARRANGING
Arrange individual portions (pudding moulds, cups
or baked potatoes) in a circle on the turntable.
Leave space between the portions for the
microwave energy to penetrate from all sides.
TURNING
Medium-sized items, such as hamburgers and
steaks, should be turned over once during cooking,
in order to shorten the cooking process. Large
items, such as roasts and chickens, must be turned,
since the upper side receives more microwave
energy and could dry out if not turned.
8
Page 11
TIPS & ADVICE
STANDING TIME
Keeping to the standing time is one of the most
important rules with microwaves. Almost all foods,
which are thawed, heated or cooked in the
microwave, require a certain amount of time to stand,
during which temperature equalisation takes place
and the moisture in the food is evenly distributed.
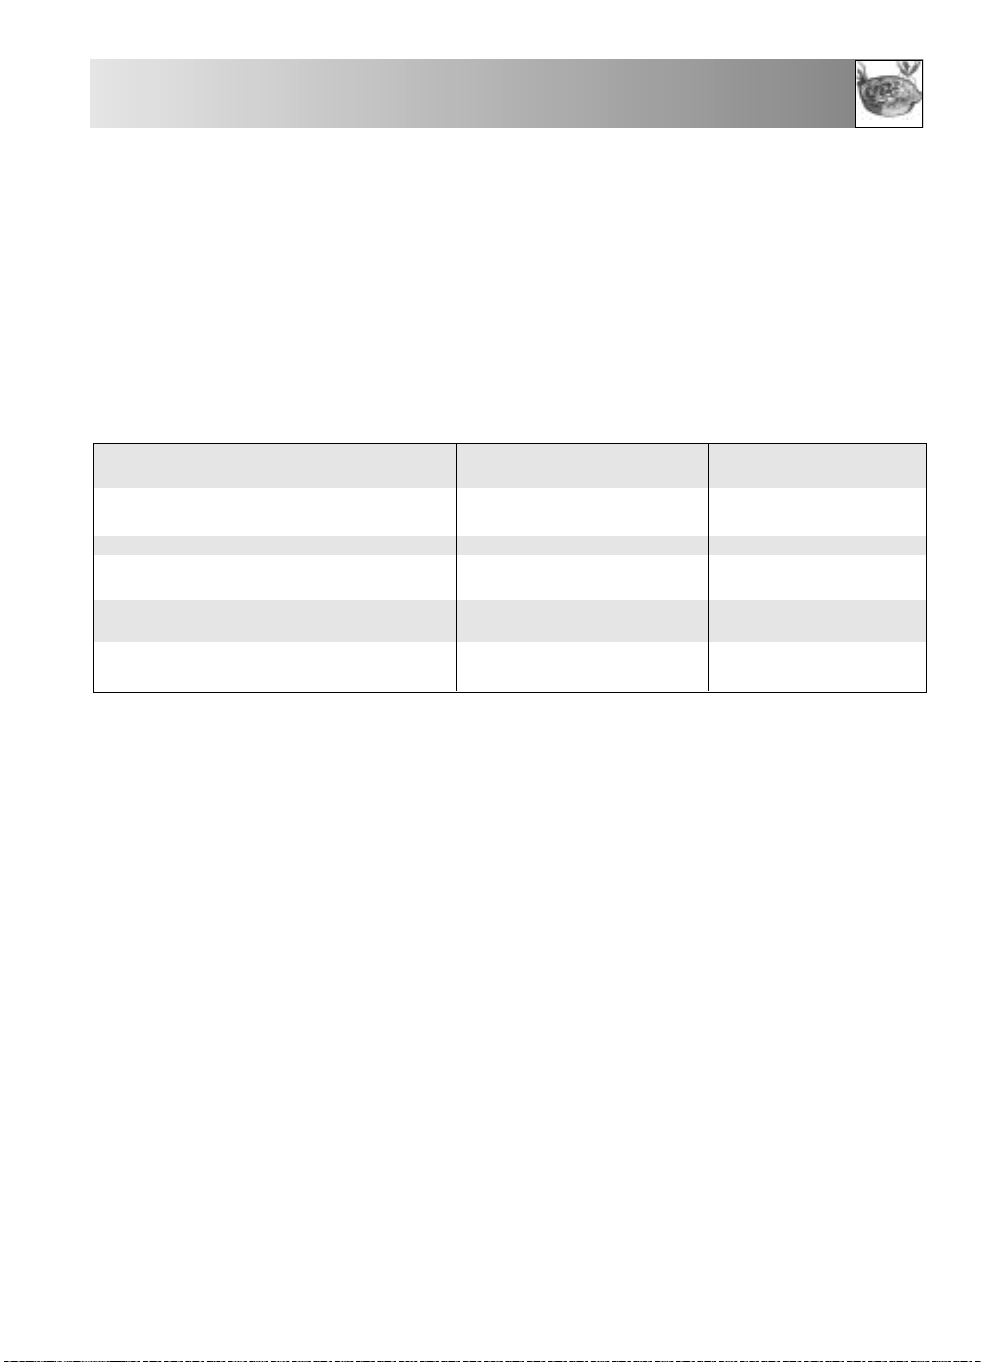
BROWNING AGENT
Melted butter and dried paprika
Dried paprika
Soya sauce
Barbecue and Worcestershire sauce, Gravy
Rendered down bacon fat or dried onions
Cocoa, chocolate flakes, brown icing,
honey and marmalade
Poultry
Oven baked dishes"Cheese
toasties"
Meat and poultry
Roasts, Rissoles, Small roasted
items
Oven baked dishes, toasted
items, soups, stews
Cakes and desserts
HEATING
● Ready-prepared meals in aluminium containers
should be removed from the aluminium container
and heated on a plate or in a dish.
● Remove the lids from firmly closed containers.
● Food should be covered with microwave cling
film, a plate or cover (obtainable from stores),
so that the surface does not dry out. Drinks need
not be covered.
● When boiling liquids such as water, coffee, tea or
milk, place a glass stirrer in the container.
● If possible, stir large quantities from time to time, to
ensure that the temperature is evenly distributed.
● The times are for food at a room temperature of
20° C. The heating time for food stored in a
refrigerator should be increased slightly.
● After heating allow the food to stand for 1-2
minutes, so that the temperature inside the food can
be evenly distributed (standing time).
● The times given are guidelines, which can be varied
according to the initial temperature, weight, water
content, fat content or the result which you wish to
achieve.
THAWING
Your microwave is ideal for thawing. Thawing times
are usually considerably shorter than in traditional
methods of thawing.
BROWNING AGENTS
After more than 15 minutes cooking time food
acquires a brownness, although this is not
comparable to the deep brownness and crispness
obtained through conventional cooking. In order
to obtain an appetising brown colour you can use
browning agents. For the most part they
simultaneously act as seasoning agents. In the
following table you will find some suggestions for
substances you might use for browning and some
of the uses to which you might put them.
DISH
Coat the poultry with the
butter/paprika mixture
Dust with paprika
Coat with the sauce
Coat with the sauce
Sprinkle pieces of bacon or
dried onions on top
Sprinkle pieces on top of cakes
and desserts or use to glaze
Here are a few tips. Take the frozen item out of its
packaging and place on a plate for thawing.
METHOD
BOXES AND CONTAINERS
Boxes and containers suitable for microwaves are
particularly good for thawing and heating food, since
they can withstand temperatures in a deep freeze
(down to approx. –40° C) as well as being heatresistant (up to approx. 220° C). You can therefore use
the same container to thaw, heat and even cook the
food, without having to transfer it.
COVERING
Cover thin parts with small strips of aluminium foil
before thawing. Thawed or warm parts should likewise
be covered with aluminium strips during thawing. This
stops the thin parts becoming too hot while thicker
parts are still frozen.
CORRECT SETTING
It is better to choose a setting which is too low rather
than one which is too high. By so doing you will
ensure that the food thaws evenly.
If the microwave setting is too high, the surface of the
food will already have begun to cook while the inside
is still frozen.
9
Page 12

TIPS & ADVICE
TURNING/STIRRING
Almost all foods have to be turned or stirred from
time to time. As early as possible, separate parts
which are stuck together and rearrange them.
SMALL AMOUNTS
Thaw more quickly and evenly than larger ones.
We recommend that you freeze portions which are
as small as possible. By so doing you will be able
to prepare whole menus quickly and easily.
FOODS REQUIRING CAREFUL HANDLING
Foods such as gateaux, cream, cheese and bread
should only be partially thawed and then left to
thaw completely at room temperature. By so doing
you will avoid the outer areas becoming too hot
while the inside is still frozen.
STANDING TIME
This is particularly important after thawing food, as
the thawing process continues during this period. In
the thawing table you will find the standing times
for various foods. Thick, dense foods require a
longer standing time than thinner foods or food of
a porous nature. If the food has not thawed
sufficiently, you may continue thawing it in the
microwave oven or lengthen the standing time
accordingly. At the end of the standing time you
should process the food as soon as possible and
not re-freeze it.
COOKING FRESH VEGETABLES
● When buying vegetables try to ensure that, as
far as possible, they are of similar size. This is
particularly important when you want to cook
the vegetables whole (e.g. boiled potatoes).
● Wash the vegetables before preparing them,
clean them and only then weigh the required
quantity for the recipe and chop them up.
● Season them as you would normally, but as a
rule only add salt after cooking.
● Add about 5 tbsps of water for 500 g of
vegetables. Vegetables which are high in fibre
require a little more water. You will find
information about this in the table.
● Vegetables are usually cooked in a dish with a
lid. Those with a high moisture content, e.g.
onions or boiled potatoes, can be cooked in
microwave cling film without adding water.
● After half the cooking time has elapsed
vegetables should be stirred or turned over.
● After cooking allow the vegetables to stand for
approx. 2 minutes, so that the temperature
disperses evenly (standing time).
● The cooking times given are guidelines and
depend upon the weight, initial temperature and
condition of the type of vegetable in question.
The fresher the vegetables, the shorter the
cooking times.
COOKING MEAT, FISH AND POULTRY
● When buying food items, try to ensure that, as
far as possible, they are of similar size. This will
ensure that they are cooked properly.
● Before preparation wash meat, fish and poultry
thoroughly under cold running water and pat them
dry with kitchen paper. Then continue as normal.
● Beef should be well hung and have little gristle.
● Even though the pieces may be of a similar size,
cooking results may vary. This is due, amongst
other things, to the kind of food, variations in
the fat and moisture content as well as the
temperature before cooking.
● After the food has been cooking for 15 minutes it
acquires a natural brownness, which may be
enhanced by the use of a browning agent. If, in
addition, you would like the surface to be crisp you
should either use the browning dish or sear the
food on your cooker and finish cooking it in your
microwave. By doing this you will simultaneously
obtain a brown base for making a sauce.
● Turn large pieces of meat, fish or poultry half
way through the cooking time, so that they are
cooked evenly from all sides.
● After cooking cover roasts with aluminium foil
and allow them to stand for approx. 10 minutes
(standing time). During this period the roast
carries on cooking and the liquid is evenly
distributed, so that when it is carved a minimum
amount of juice is lost.
THAWING AND COOKING
Deep-frozen dishes can be thawed and cooked at the
same time in one process in your microwave. You will
find some examples in the table. Do take note,
however, of the general advice given on "heating"
and "thawing" food. Please refer to the manufacturer's
instructions on the packaging when preparing deepfrozen dishes. These usually contain precise cooking
times and offer advice on preparation.
10
Page 13
MICROWAVE POWER LEVEL
Your oven has 5 power levels. To choose the power level
for cooking, follow the advice given in the recipe section.
Generally the following recommendations apply:
800 W used for fast cooking or reheating e.g. soup,
casseroles, canned food, hot beverages, vegetables,
fish, etc.
560 W used for longer cooking of dense foods such as
roast joints, meat loaf and plated meals, also for
sensitive dishes such as cheese sauce and sponge
cakes. At this reduced setting, the sauce will not boil
over and food will cook evenly without over cooking at
the sides.
400 W for dense foods which require a long cooking
time when cooked conventionally, eg. beef dishes, it is
advisable to use this power setting to ensure the meat
will be tender.
240 W to defrost, select this power setting, to ensure
that the dish defrosts evenly. This setting is also ideal
for simmering rice, pasta, dumplings and cooking egg
custard.
80 W For gentle defrosting, eg. cream gateaux or
pastry.
W = Watt.
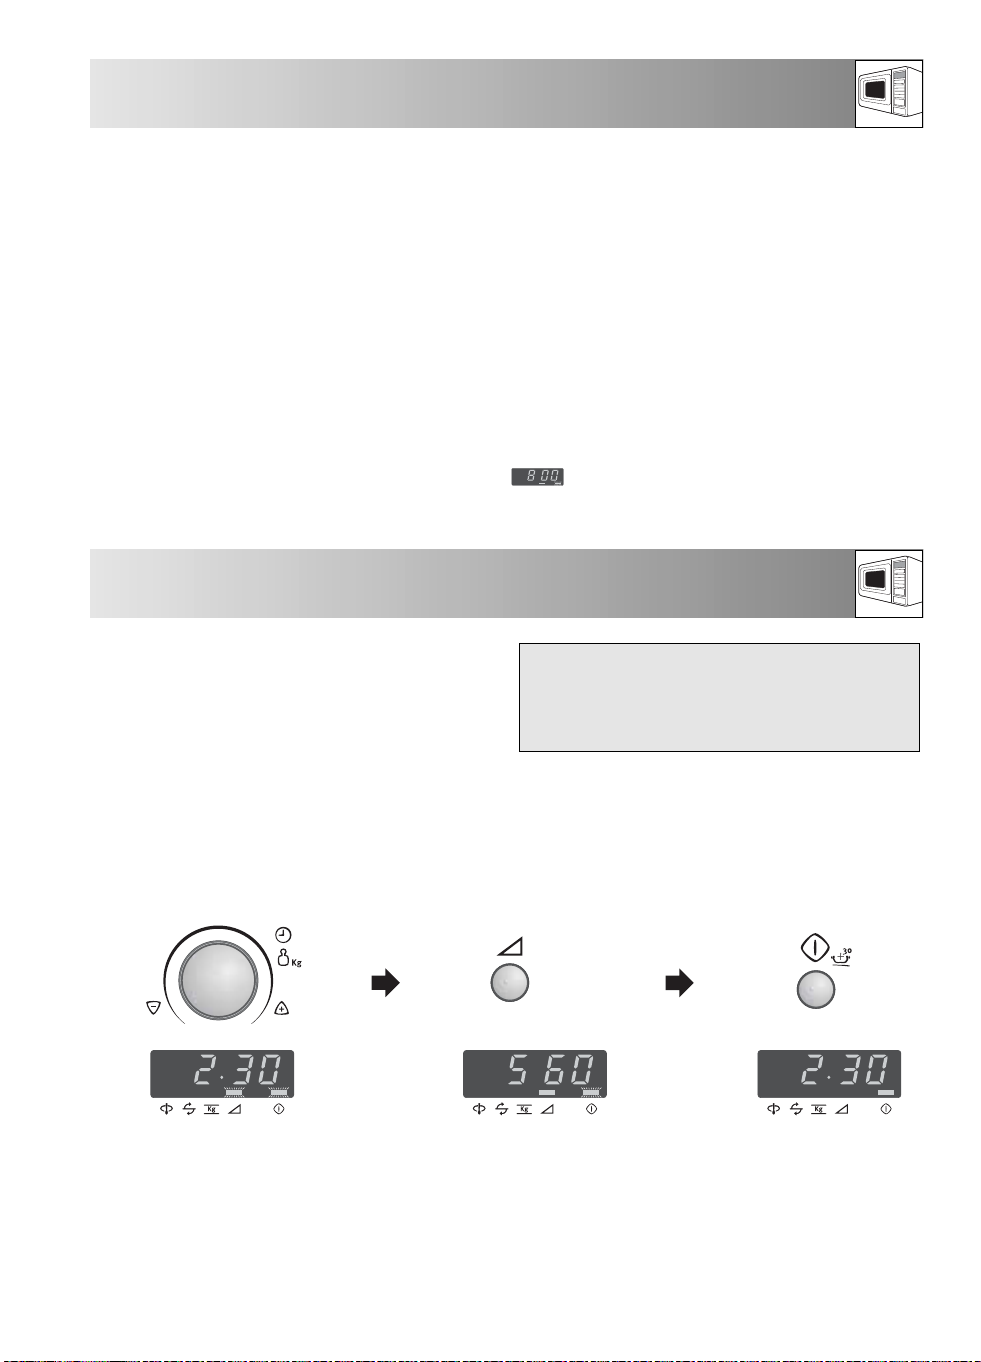
To set the power, touch the MICROWAVE POWER LEVEL button until the desired level is displayed. If
MICROWAVE POWER LEVEL button is touched once, will be displayed. If you miss your desired level,
continue touching the MICROWAVE POWER LEVEL button until you reach the level again. If the level is not
selected, the level 800 W is automatically set.
MANUAL OPERATION
Your oven can be programmed for up to 90 minutes.
(90.00) The input unit of cooking (defrosting) time
varies from 10 seconds to five minutes. It depends on
the total length of the cooking (defrosting) time as
shown on the table.
Cooking time Increasing unit
0-5 minutes 10 seconds
5-10 minutes 30 seconds
10-30 minutes 1 minute
30-90 minutes 5 minutes
Example:
Suppose you want to heat soup for 2 minutes and 30 seconds on 560 W microwave power.
1. Enter the desired cooking time by
rotating the TIMER/WEIGHT
knob clockwise. (2 min. & 30 sec.)
2. Choose desired power
by pressing the
MICROWAVE POWER
3. Press the START/
+30 button to begin
cooking.
LEVEL button twice.
x2
Check the display.
x1
NOTE:
1. When the door is opened during the cooking process, the cooking time on the digital display stops
automatically. The cooking time starts to count down again when the door is closed and the
START/+30 button is pressed.
2. If you wish to know the power level during cooking, press the MICROWAVE POWER LEVEL button.
As long as your finger is touching the MICROWAVE POWER LEVEL button, the power level will be displayed.
3. You can rotate the TIMER/WEIGHT knob clockwise or counterclockwise. If you rotate the knob
counterclockwise, the cooking time will decrease from 90 minutes by degrees.
11
Page 14
OTHER CONVENIENT FUNCTIONS
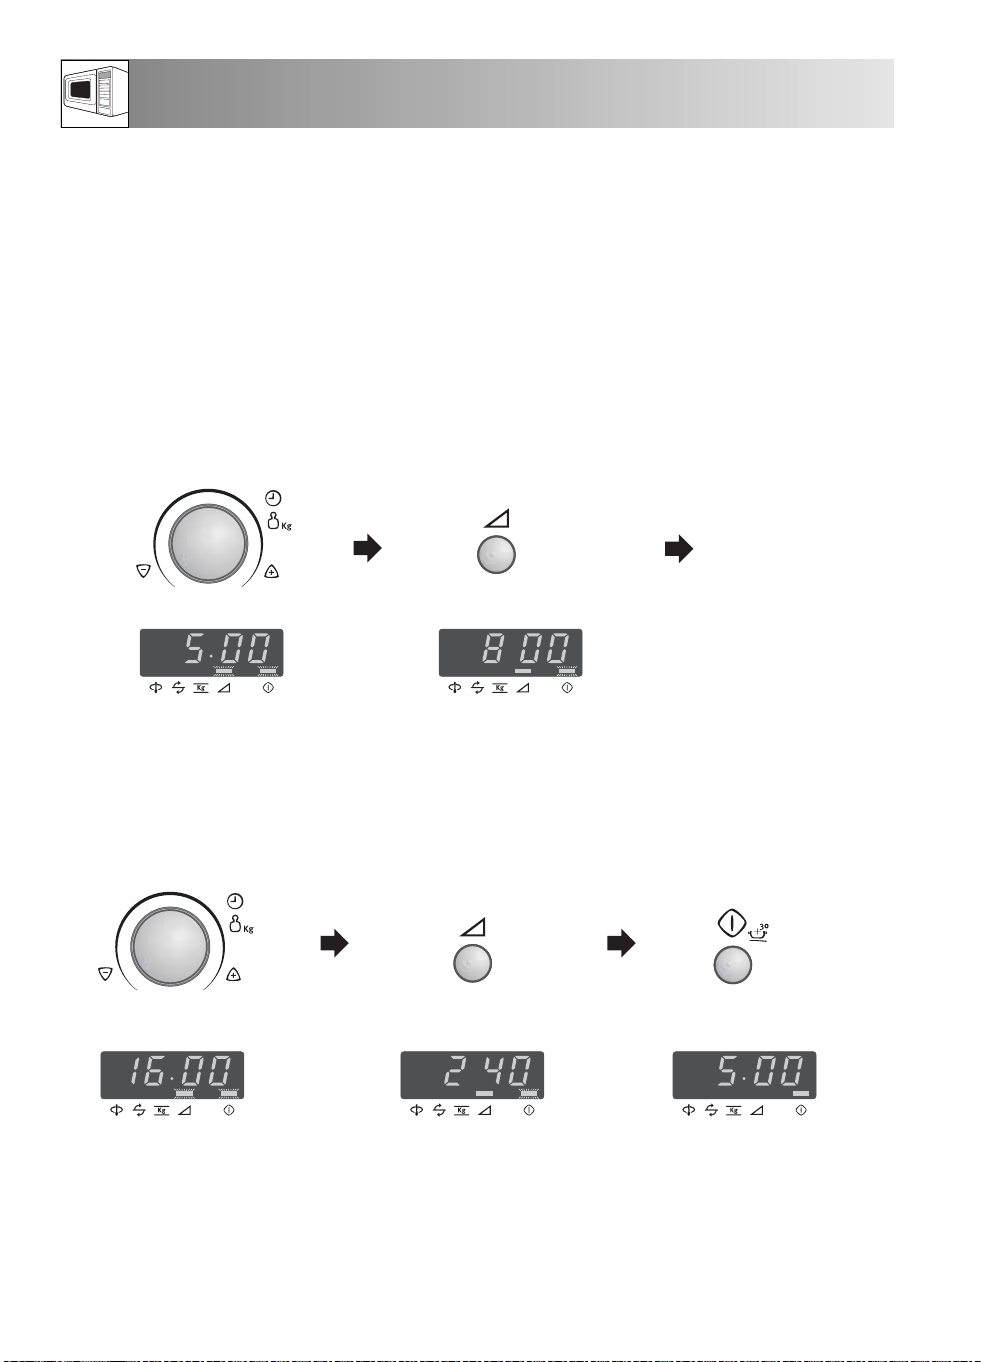
1. MULTIPLE SEQUENCE COOKING
A maximum of 3 sequences can be input, consisting of manual cooking time and mode.
Example:
To cook: 5 minutes on 800 W power (Stage 1)
16 minutes on 240 W power (Stage 2)
STAGE 1
1. Enter the desired cooking time
by rotating TIMER/WEIGHT
knob.
2. Choose the desired power level
by pressing the MICROWAVE
POWER LEVEL button once.
x1
STAGE 2
3. Enter desired time by
rotating TIMER/WEIGHT
knob.
(The oven will begin to cook for 5 minutes on 800 W, and then for 16 minutes on 240 W).
4. Choose the desired power
level by pressing the
MICROWAVE POWER
LEVEL button four times.
x4
5. Press the START/
+30 button once to
begin cooking.
Check the display.
12
x1
Page 15
OTHER CONVENIENT FUNCTIONS
2. ADD 30 SECONDS FUNCTION
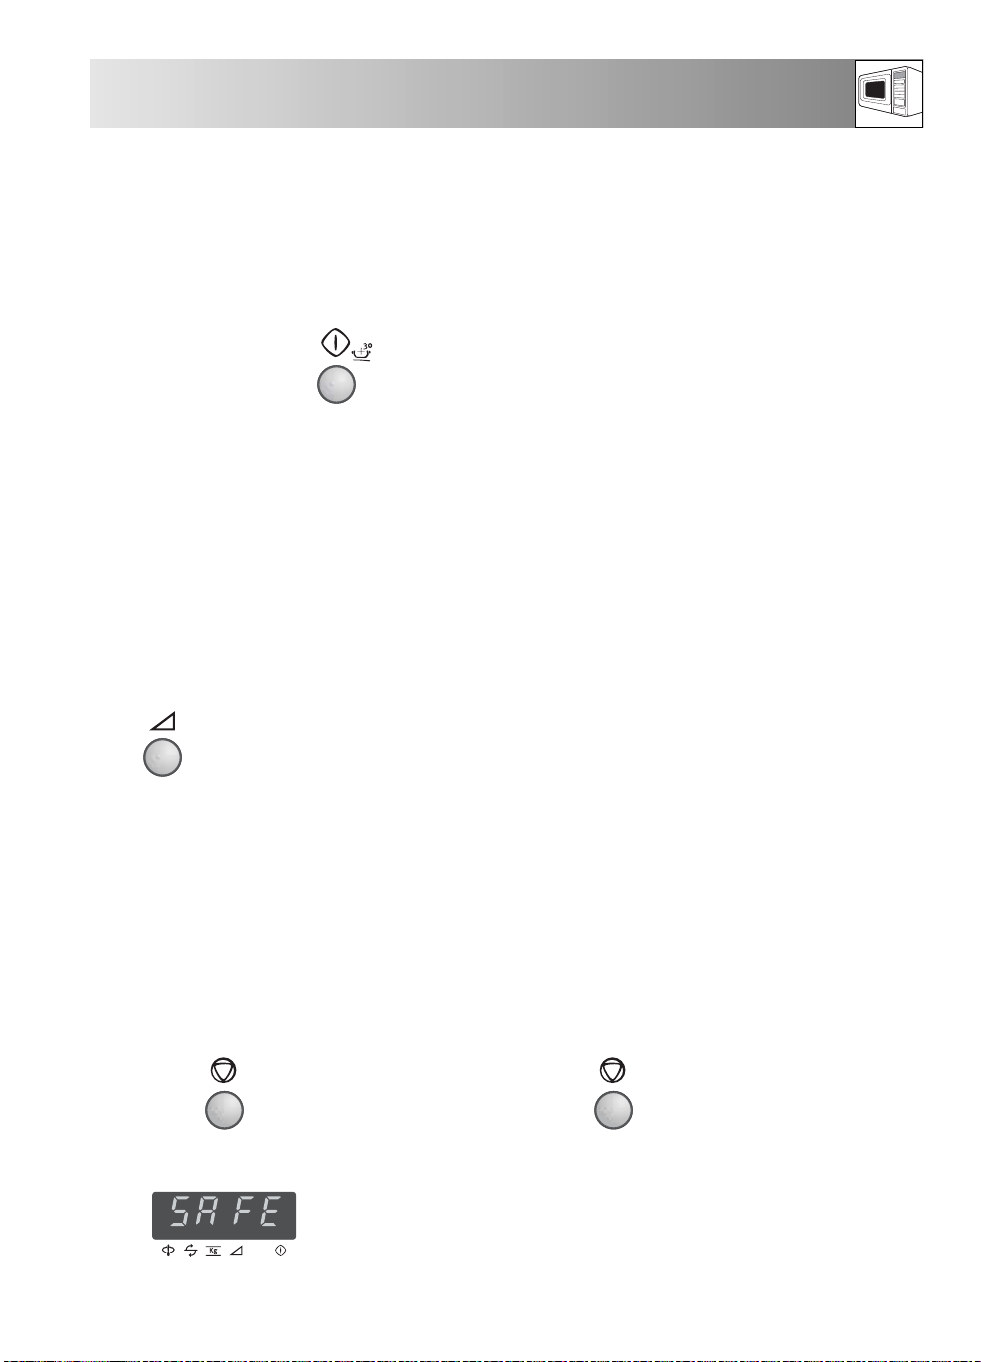
The START/+30 button allows you to operate the two following functions:
a. Direct start
You can directly start cooking on 800 W microwave power level for 30 seconds by pressing the
START/+30 button.
NOTE:
To avoid the misuse by children the START/+30 button can be used only within 3 minutes after
preceding operation, i.e., closing the door, pressing the STOP button or cooking completion.
b. Extend the cooking time
You can extend the cooking time during manual cooking for multiples of 30 seconds if the button is
pressed while the oven is in operation.
3. TO CHECK THE POWER LEVEL
To check the microwave power level during cooking press the MICROWAVE POWER LEVEL button.
x1
As long as your finger is touching the MICROWAVE POWER LEVEL button the power level will be
displayed.
The oven continues to count down although the display shows the power level.
4. SAFETY LOCK FUNCTION
TO SET THE SAFETY LOCK FUNCTION
1. Press and hold the STOP key for 3
seconds.
x1 for 3 seconds x1 for 3 seconds
The display will show:
NOTE: When the Safety Lock is set you cannot input any buttons except the STOP button.
TO CANCEL THE SAFETY LOCK FUNCTION
1. Press and hold the STOP key for 3 seconds.
The display will show the
time of day, if set.
13
Page 16
AUTO PROGRAMMES OPERATION
The AUTO PROGRAMMES function automatically
works out the correct cooking mode and cooking time.
You can choose from 7 AUTO COOK menus and 5
AUTO DEFROST menus. What you need to know when
using this automatic function:
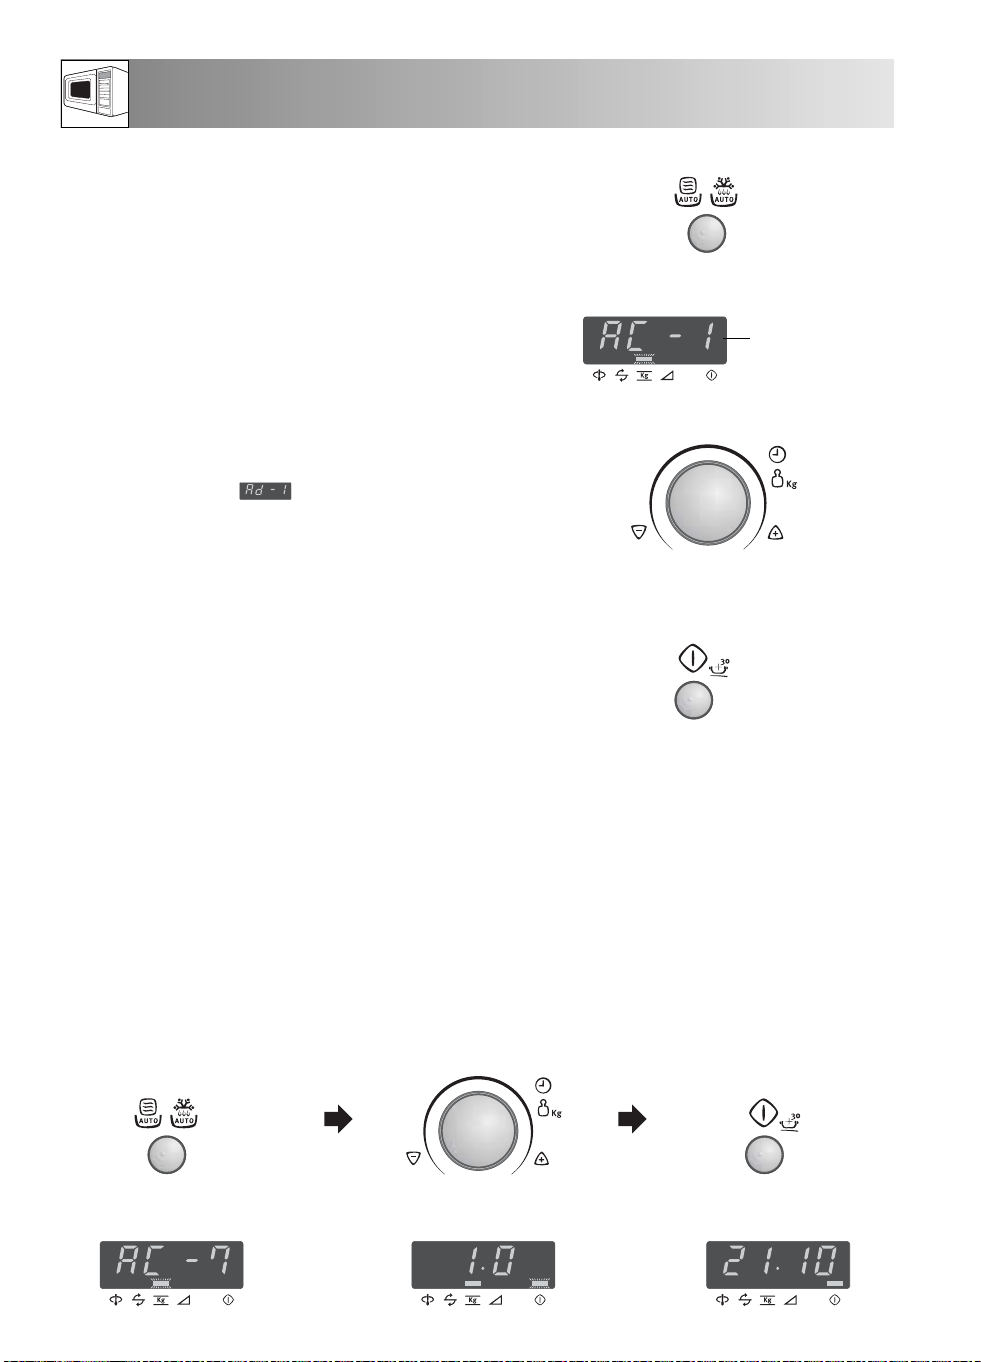
1. Press the AUTO PROGRAMMES button once, the
display will appear as shown.
The menu can be chosen by pressing the AUTO
PROGRAMMES button until the desired menu
number is displayed. See pages 15 - 17 “AUTO
PROGRAMMES charts”.
To select a defrost menu, press the AUTO
PROGRAMMES button at least 8 times. If you press
the button 8 times, will appear in the display.
The menu will be changed automatically by holding
down the AUTO PROGRAMMES button.
2. The weight or quantity of the food can be input by
rotating the TIMER/WEIGHT knob until the desired
weight is displayed.
• Enter the weight of the food only. Do not include the
weight of the container.
• For food weighing more or less than weights given in
the automatic chart, use manual programmes. For best
results, follow the cooking charts on pages 19 - 21.
3. To start cooking press START/+30 button.
When action is required (e.g. to turn food over), the
oven stops and the audible signals sound, remaining
cooking time and any indicator will flash on the
display. To continue cooking, press the START/+30
button.
1.
x1
AUTO PROGRAMMES button
Menu number
2.
TIMER/WEIGHT knob
3.
START/+30 button
The final temperature will vary according to the
initial food temperature. Check food is piping hot
after cooking. If necessary, you can extend the
cooking time and change the power level.
Example:
To cook gratin weighing 1,0 kg using AUTO COOK AC-7.
1. Select the menu required by
pressing the AUTO
PROGRAMMES button
seven times.
x7
2. Enter the weight by rotating
the TIMER/WEIGHT knob
clockwise.
14
3. Press the START/+30
button.
x1
Check the display.
Page 17
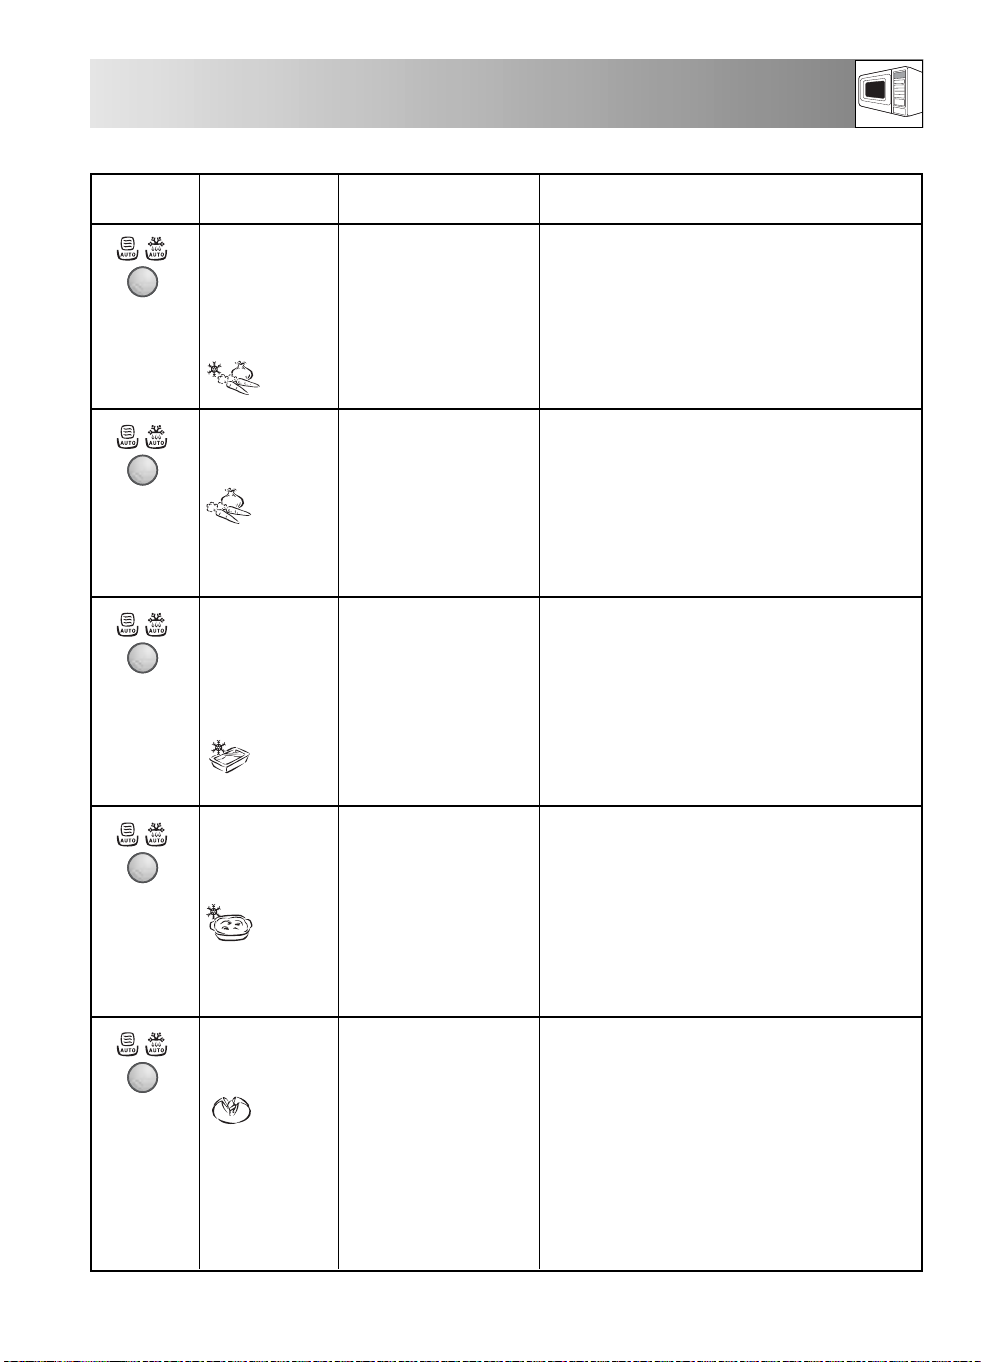
AUTO PROGRAMMES CHARTS
BUTTON
AUTOCOOK
AC-1 Cook
Frozen Vegetables
e.g. Brussel sprouts,
x1
green beans, peas,
mixed vegetables,
broccoli
AC-2 Cook
Fresh Vegetables
x2
AC-3 Cook
Frozen Ready
Meals
x3
Stirrable type e.g.
Noodles, Bolognese,
Chinese Menus.
AC-4 Cook
Frozen Gratin
e.g. macaroni
x4
gratin, lasagne, etc.
AC-5 Cook
Boiled Potatoes
Jacket Potatoes
x5
NO.
WEIGHT (Increasing
Unit) / UTENSILS
0,1 - 0,6 kg (100 g)
(initial temp -18° C)
Bowl and lid
0,1 - 0,6 kg (100 g)
(initial temp 20° C)
Bowl and lid
0,3 - 1,0 kg* (100 g)
(initial temp -18° C)
Bowl and lid
* If the manufacturer instructs
to add water, calculate the
total amount for the
programmes with additional
liquid.
0,2 - 0,6 kg (100 g)
(initial temp -18° C)
Shallow, oval gratin dish
and microwave cling
film or original container
and microwave cling
film
0,1 - 0,8 kg (100 g)
(initial temp 20° C)
Bowl & lid
PROCEDURE
• Add 1 tbsp water per 100 g and salt as
desired. (For mushrooms no additional water
is necessary).
• Cover with a lid.
• When audible signal sounds, stir and re-cover.
• After cooking, let stand for approx. 2 minutes.
NOTE: If frozen vegetables are compacted
together, cook manually.
•Cut into small pieces, eg. strips, cubes or slices.
• Add 1 tbsp water per 100 g and salt as
desired. (For mushrooms no additional water
is necessary).
• Cover with a lid.
• When audible signal sounds, stir and re-cover.
• After cooking, let the food stand for approx 2
minutes.
•Transfer meal to suitable microwave-proof dish.
• Add some liquid if recommended by the
manufacturer.
• Cover with a lid.
• Cook without cover if the manufacturer
instructs.
• When audible signal sounds, stir and re-cover.
• After cooking, stir and let stand for approx. 2
minutes.
• Remove the frozen gratin from the package.
If the container is not suitable for microwave
ovens, transfer gratin to a suitable microwave
proof dish.
•Cover with microwave cling film.
• If the container is suitable for microwave
ovens, remove original paper cover and cover
with microwave cling film.
• After cooking, let stand for approx. 5 minutes.
Boiled Potatoes: Peel the potatoes and cut them
into similar sized pieces.
Jacket Potatoes: Choose potatoes of similar size
and wash them.
• Put the boiled or jacket potatoes into a bowl.
• Add the required amount of water (per 100 g),
approx 2 tbsp and a little salt.
• Cover with a lid.
• When audible signal sounds, stir and re-cover.
• After cooking, let the potatoes stand for
approx. 2 minutes.
15
Page 18
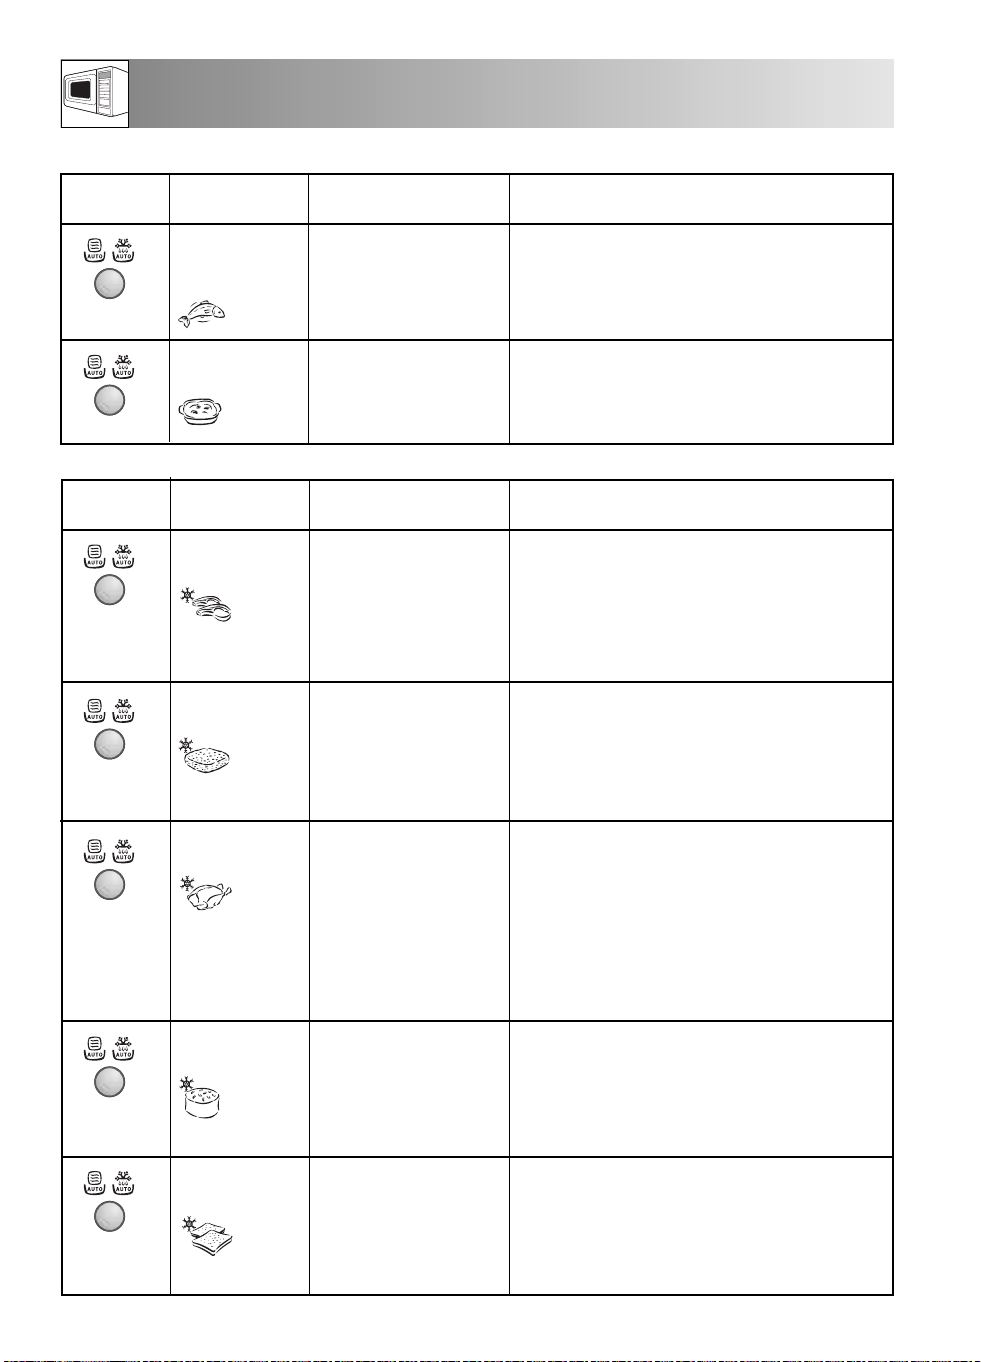
AUTO PROGRAMMES CHARTS
BUTTON
x6
x7
BUTTON
x8
x9
x10
x11
x12
AUTOCOOK
NO.
AC-6 Cook
Fish fillet with
sauce
AC-7 Cook
Gratin
AUTO
DEFROST NO.
Ad-1 Defrost
Steak and Chops
Ad-2 Defrost
Minced Meat
Ad-3 Defrost
Poultry
Ad-4 Defrost
Cake
Ad-5 Defrost
Bread
WEIGHT (Increasing
Unit) / UTENSILS
0,4 - 1,2 kg* (100 g)
(initial temp fish 5° C,
Sauce 20° C)
Gratin dish & microwave
cling film
0,5 - 1,5 kg* (100 g)
(initial temp 20° C)
Gratin dish
WEIGHT(Increasing
Unit) / UTENSILS
0,2 - 0,8 kg (100 g)
(initial temp -18° C)
(See note on page 17)
0,2 - 0,8 kg (100 g)
(initial temp -18° C)
(See note on page 17)
0,9 - 1,5 kg (100 g)
(initial temp -18° C)
(See note on page 17)
0,1 - 1,4 kg (100 g)
(initial temp -18° C)
Plate
0,1 - 1,0 kg (100 g)
(initial temp -18° C)
Flan dish
(Only sliced bread is
recommended for this
programme.)
PROCEDURE
• See recipes for Fish Fillet with Sauce on page
17.
*Total weight of all ingredients.
• See recipes for Gratin on page 18.
*Total weight of all ingredients.
PROCEDURE
• Place the food in a flan dish in the centre of the
turntable.
• When the audible signal sounds, turn the food
over, rearrange and separate. Shield thin parts and
warm spots with small pieces of aluminium foil.
•After defrosting, wrap in aluminium foil for 10 15 minutes, until thoroughly defrosted.
• Place the block of minced meat in a flan dish in
the centre of the turntable.
• When the audible signal sounds, turn the food
over. Remove the defrosted parts if possible.
•After defrosting cover with aluminium foil, stand
for 5 - 10 minutes, until thoroughly defrosted.
• Place the poultry in a flan dish in the centre of the
turntable.
When the audible signal sounds, turn over and
•
shield thin parts and warm spots with small pieces of
aluminium foil.
•After defrosting, rinse with cold water, cover with
aluminium foil and stand for 15 - 30 minutes until
thoroughly defrosted.
• Finally clean the poultry under running water.
• Remove all packaging from the cake.
• Place directly on the turntable, or on a plate in the
middle of the turntable.
•After defrosting, cut the cake into similar sized
pieces keeping space between each piece and let
stand for 10 - 30 minutes until evenly defrosted.
Distribute in a flan dish in the centre of the turntable.
•
For 1,0 kg distribute directly on the turntable.
• When the audible signal sounds, turn over, rearrange and remove defrosted slices.
•After defrosting cover in aluminum foil and stand
for 5 - 15 minutes, until thoroughly defrosted.
16
Page 19
AUTO PROGRAMMES CHARTS
NOTES: Auto Defrost
1 Steaks and Chops should be frozen in one layer.
2 Minced meat should be frozen in a thin shape.
3 After turning over, shield the defrosted portions with small, flat pieces of aluminium foil.
4 The poultry should be processed immediately after defrosting.
5 Gateaux topped and coated with cream are very sensitive to microwave energy. For the best result, if
the cream begins to soften rapidly, it is best to remove it from the oven immediately and stand for 10 30 minutes at room temperature.
RECIPES FOR AUTO PROGRAMMES AC-6 & AC-7
FISH FILLET WITH SAUCE (AC-6)
Fish fillet with piquant sauce
Ingredients
0,4 kg 0,8 kg 1,2 kg
140 g 280 g 420 g canned tomatoes (drained)
40 g 80 g 120 g corn
4 g 8 g 12 g chilli sauce
12 g 24 g 36 g onion (finely chopped)
1 tsp 1-2 tsp 2 tsp red wine vinegar
mustard, thyme, cayenne pepper
200 g 400 g 600 g fish fillet
salt
Preparation
1. Mix ingredients for the sauce.
2. Place the fish fillet in a round gratin dish with
the thin ends toward the centre and sprinkle
with salt.
3. Spread the sauce on the fish fillet.
4. Cover with microwave cling film and cook on
AUTOCOOK AC-6, “Fish Fillet with Sauce”.
5. After cooking, let stand for approx. 2 minutes.
FISH FILLET WITH SAUCE (AC-6)
Fish fillet with curry sauce
Ingredients
0,4 kg 0,8 kg 1,2 kg
200 g 400 g 600 g fish fillet
salt
40 g 80 g 120 g banana (sliced)
160 g 320 g 480 g ready-made curry sauce
Preparation
1. Place the fish fillet in a round gratin dish with
the thin ends toward the centre and sprinkle
with salt.
2. Spread the banana and the ready-made curry
sauce on the fish fillet.
3. Cover with microwave cling film and cook on
AUTOCOOK AC-6, “Fish Fillet with Sauce”.
4. After cooking, let stand for approx. 2 minutes.
17
Page 20
RECIPES FOR AUTOMATIC AC-6 & AC-7
GRATIN (AC-7)
Spinach gratin
Ingredients
0,5 kg 1,0 kg 1,5 kg
5 g 10 g 15 g butter or margarine (to
grease the dish)
150 g 300 g 450 g leaf spinach (
15 g 30 g 45 g onion (finely chopped)
salt, pepper & nutmeg
150 g 300 g 450 g boiled potatoes (sliced)
35 g 75 g 110 g cooked ham (diced)
50 g 100 g 150 g crème fraîche
123eggs
40 g 75 g 115 g grated cheese
paprika powder
GRATIN (AC-7)
Potato-courgette-gratin
Ingredients
0,5 kg 1,0 kg 1,5 kg
200 g 400 g 600 g boiled potatoes (sliced)
115 g 230 g 345 g courgette (finely sliced)
75 g 150 g 225 g crème fraîche
123eggs
1
/
2 12clove of garlic (crushed)
salt & pepper
40 g 80 g 120 g feta cheese (diced)
10 g 20 g 30 g sunflower kernel
paprika powder
defrosted, drained)
Preparation
1. Mix together the leaf spinach with the onion
and season with salt, pepper and nutmeg.
2. Grease the gratin dish. Place alternate layers of
potato slices, diced ham and spinach in the
dish. The top layer should be spinach.
3. Mix the eggs with crème fraîche, add salt and
pepper and pour over the vegetables.
4. Cover the gratin with the grated cheese,
sprinkle with paprika powder and cook on
AUTOCOOK AC-7, “Gratin”.
5. After cooking, let stand for 5-10 minutes.
Preparation
1. Grease the gratin dish and place alternate
layers of potato slices and courgette in the dish.
2. Mix the eggs with crème fraîche, season with
salt, pepper and garlic and pour over the
vegetables.
3. Crumble the feta cheese and sprinkle over the
gratin.
4. Finally sprinkle the gratin with sunflower kernel
and paprika powder and cook on
AUTOCOOK AC-7, “Gratin”.
5. After cooking, let stand for 5-10 minutes.
18
Page 21
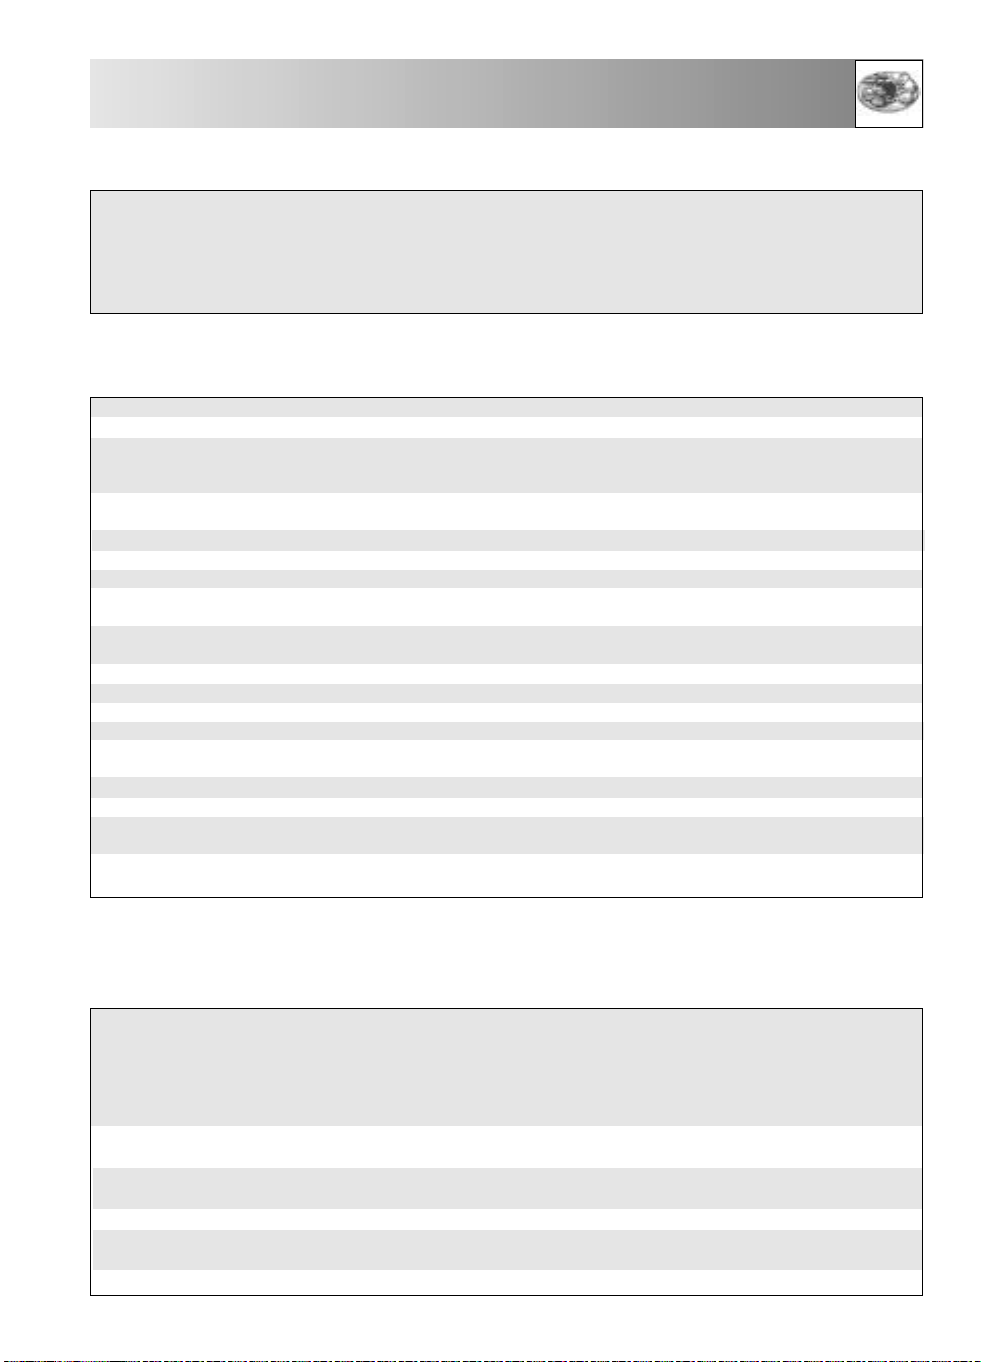
tbsp = tablespoon
tsp = teaspoon
l.p. = large pinch
s.p. = small pinch
Cup = cupful
Sach. = sachet
COOKING CHARTS
ABBREVIATIONS USED
KG = kilogram
g = gram
l = litre
ml = millilitre
cm = centimetre
DFC = dry fat content
DF = deep frozen
MW = microwave
MWO = microwave oven
min = minutes
sec = seconds
dm = diameter
Food / Drink Quantity Power Time Hints
Coffee, 1 cup 150 800 W approx.1 do not cover
Milk, 1 cup 150 800 W approx.1 do not cover
Water, 1 cup 150 800 W 1
6 cups 900 800 W 10-12 do not cover, bring to the boil
1 bowl 1000 800 W 111/2-13 cover, bring to the boil
Platters 400 800 W 3-6 sprinkle some water onto the sauce, cover
(Vegetables, meat and trimmings) stir half way through the heating time
Stew 200 800 W 11/2-21/2cover, stir after heating
Clear soup 200 800 W 11/2-2 cover, stir after heating
Cream soup 200 800 W 11/2-21/2cover, stir after heating
Vegetables 200 800 W 2-21/
Garnishes 200 800 W 2-21/
Meat, 1 slice* 200 800 W 3-4 thinly spread sauce over the top, cover
Fish fillet* 200 800 W 2-3 cover
Sausages 2 180 560 W approx.2 pierce the skin several times
Cake, 1 piece 100 400 W1/
Baby food, 1 glass 190 400 W approx.1 remove the lid, after heating stir well and test the
Melting butter or margarine* 50 800 W1/2 -1
Melting chocolate 100 400 W 2-3 stir from time to time
Dissolving six sheets of gelatine 10 400 W1/
Glazing for a tart for 1/41 of liquid 10 400 W 5-6 mix the sugar in 250 ml of liquid, cover, stir well
* Refrigerator temperature
-g/ml- -Setting- -Min-
1
/2 -2 do not cover, bring to the boil
2
if necessary add some water, cover
500 800 W 4-5 stir half way through the heating time
2
sprinkle with water, cover and stir from time to
500 800 W 4-41/
2
time.
2
place on a cake stand
temperature
2
dip into water, squeeze thoroughly and place in
a soup bowl, stir from time to time
during and after heating
TABLE: HEATING FOOD AND DRINK
TABLE: COOKING MEAT, FISH AND POULTRY
Fish and Poultry Quantity Power Time Hints Standing time
Roasts 500 800 W 8-10* season to taste, place in a shallow flan dish 10
(pork, 400 W 10-12 turn over after *
veal, lamb) 1000 800 W 19-21* 10
Roast beef (medium) 1000 800 W 9-11* season to taste, place in a quiche dish, 10
Minced meat 1000 800 W 16-18 prepare the minced meat mixture (half pork/half beef) 10
Fish fillet 200 800 W 3-4 season to taste, place on a plate, cover 3
Chicken 1200 800 W 21-24 season to taste, place in a casserole dish, 3
Chicken legs 200 800 W 3-4 season to taste, place on a plate, cover 3
-g- -Setting- -Min- -Min-
400 W 11-14
1500 800 W 33-36* 10
400 W 13-17
400 W 5-7 turn over after *
place in a shallow casserole dish
turn half way through cooking time
19
Page 22
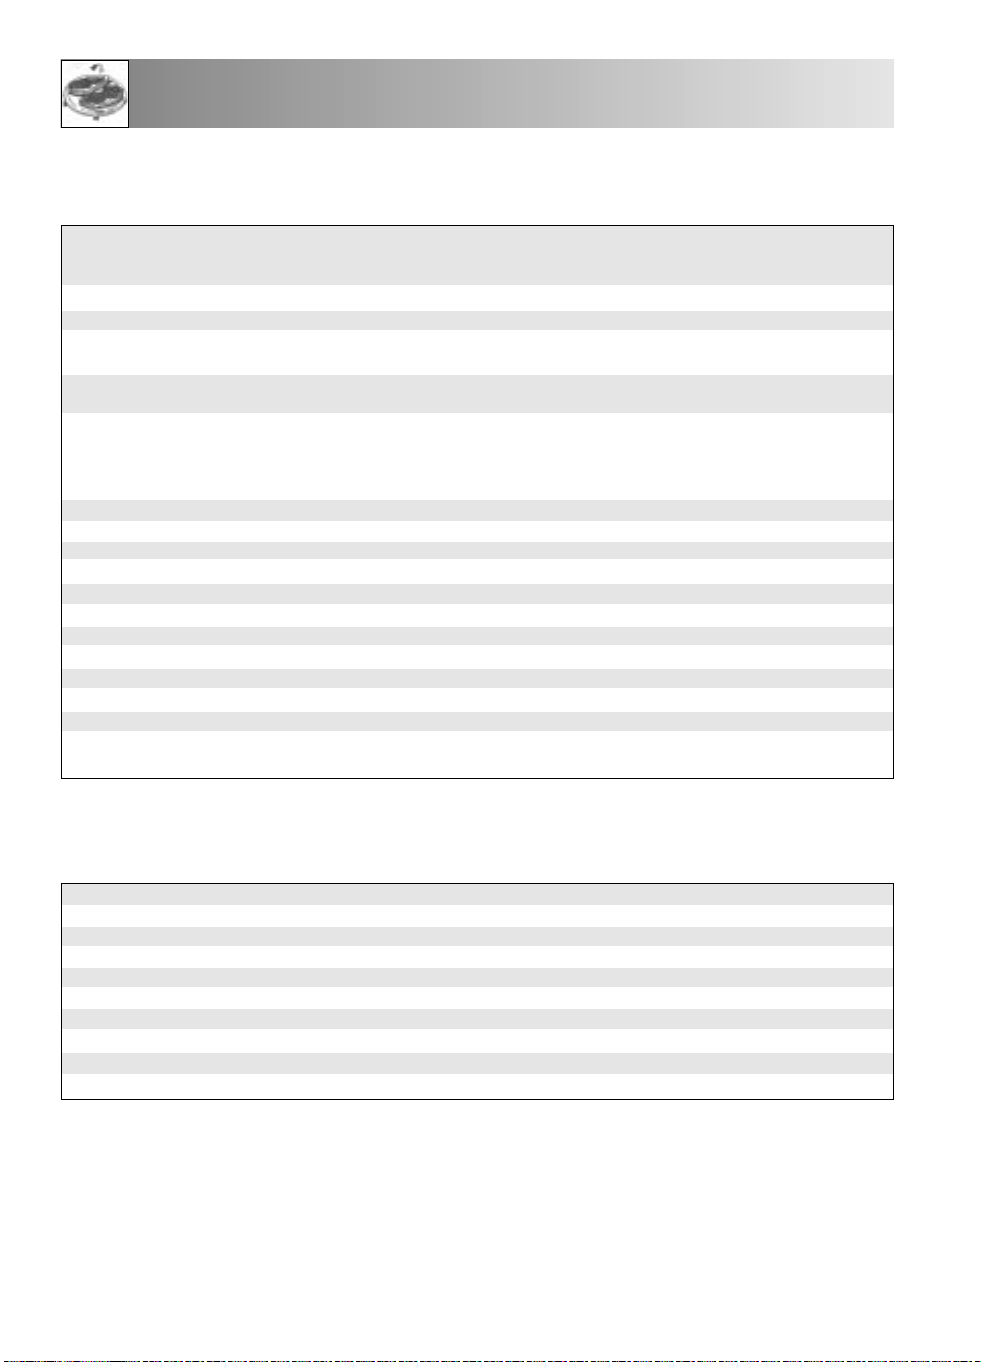
COOKING CHARTS
Food Quantity Power Thawing time Hints Standing time
Roast meat (e.g. pork, beef, 1500 80 W 58-64 place on an upturned plate, turn 30-90
lamb, veal) 1000 80 W 42-48 half way through thawing time 30-90
Steaks, escalopes, cutlets, liver 200 80 W 4-5 turn half way through thawing time 30
Goulash 500 240 W 8-12 separate and stir half way through thawing time 10-15
Sausages, 8 600 240 W 6-9 place next to each other, 5-10
4 300 240 W 4-5 turn half way through thawing time 5-10
Duck, turkey 1500 80 W 48-52 place upon an upturned plate, 30-90
Chicken 1200 80 W 39-43 place upon an upturned plate, 30-90
Chicken legs 200 240 W 4-5 turn half way through thawing time 10-15
Whole fish 800 240 W 9-12 turn half way through thawing time 10-15
Fish fillet 400 240 W 7-10 turn half way through thawing time 5-10
Crabs 300 240 W 6-8 turn half way through thawing time 30
Rolls, 2 80 240 W app.1 only partially thaw Sliced bread for toasting 250 240 W 2-4 remove outer slices after each minute has passed 5
White loaf, whole 750 240 W 6-8 turn half way through thawing time (centre still frozen) 30
Cakes, per piece 100-150 80 W 2-5 place on a cake stand 5
Cream cake, per piece 150 80 W 3-4 place on a cake stand 10
Whole gateau, Ø 25cm 80 W 18-20 place on a cake stand 30-60
Butter 250 240 W 2-4 only partially thaw 15
Fruit such as strawberries 250 240 W 4-5 spread them out evenly 5
raspberries, cherries, plums turn half way through thawing time
-g- -Setting- -Min- -Min-
500 80 W 19-23 30-90
turn half way through thawing time
turn half way through thawing time
1000 80 W 33-37 place upon an upturned plate, 30-90
turn half way through thawing time
TABLE: THAWING
TABLE: THAWING AND COOKING
Food Quantity Power Cooking time Added water Hints Standing time
Fish fillet 300 800 W 10-12 - cover 1-2
Trout, 1 fish 250 800 W 5-7 - cover 1-2
One-plate meal 400 800 W 9-11 - cover, stir after 6 minutes 2
Leaf spinach 300 800 W 6-8 - cover, stir once or twice during cooking 2
Broccoli 300 800 W 7-9 3-5
Peas 300 800 W 7-9 3-5
Kohlrabi 300 800 W 7-9 3-5
Mixed vegetables 500 800 W 11-13 3-5
Brussels sprouts 300 800 W 7-9 3-5
Red cabbage 450 800 W 10-12 3-5
-g- -Setting- -Min- -
tbsps
/ml- -Min-
tbsps
tbsps
tbsps
tbsps
tbsps
tbsps
cover, stir half way through cooking time 2
cover, stir half way through cooking time 2
cover, stir half way through cooking time 2
cover, stir half way through cooking time 2
cover, stir half way through cooking time 2
cover, stir half way through cooking time 2
20
Page 23
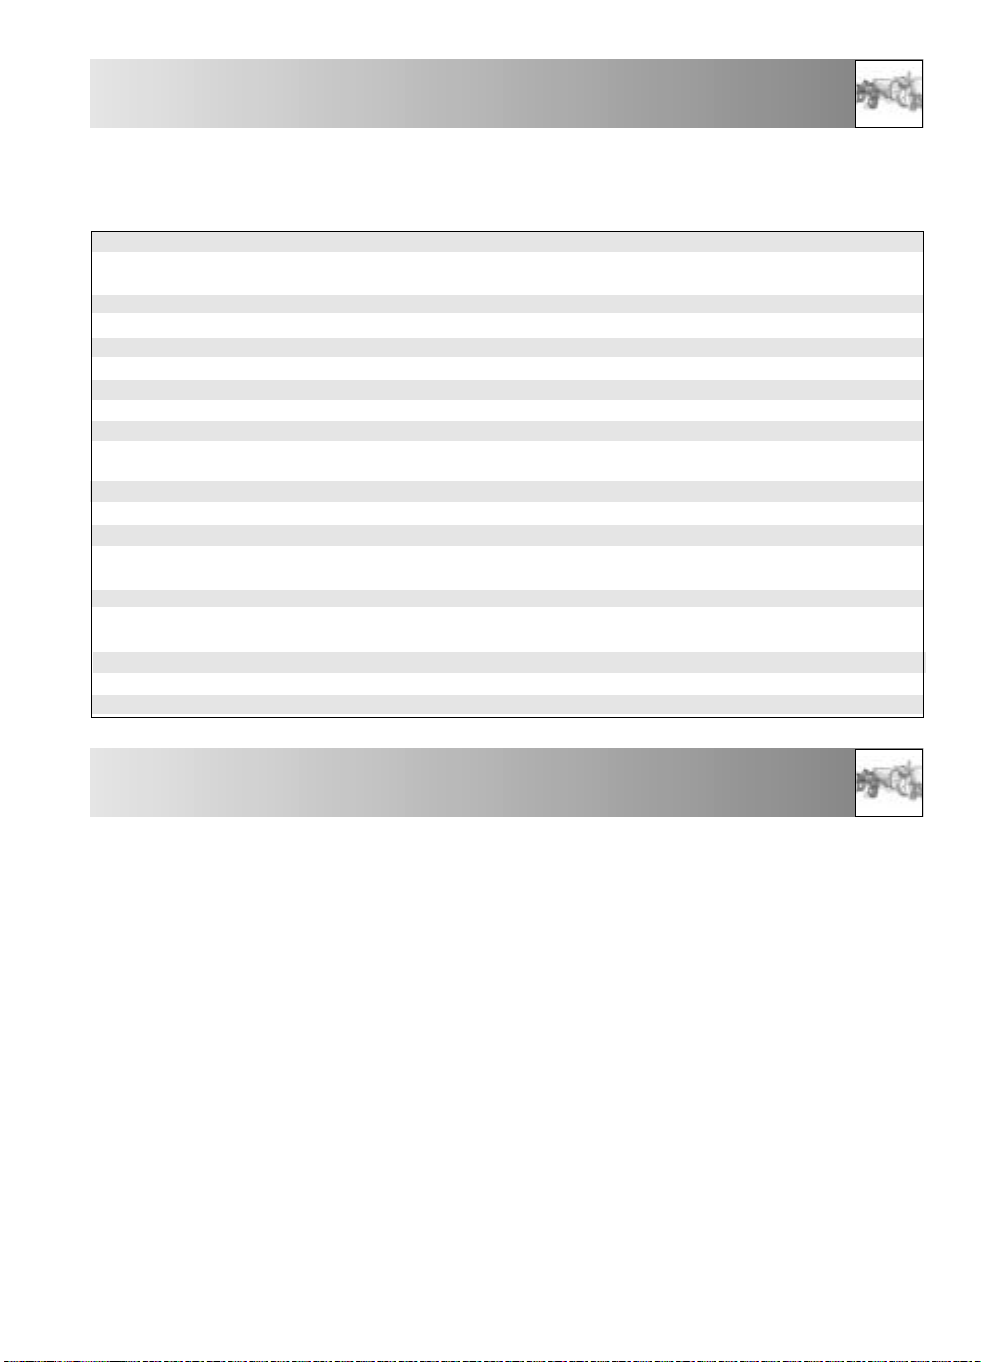
COOKING CHARTS
TABLE: COOKING FRESH VEGETABLES
Vegetable Quantity Power Time Hints Added Water
Leaf Spinach 300 800 W 5-7 wash dry well, cover, stir once or twice during cooking Cauliflower 800 800 W 15-17 1 whole head, cover, divide into florets, stir 5-6
Broccoli 500 800 W 9-11 divide into florets, cover, stir occasionally during cooking 4-5
Mushrooms 500 800 W 8-10 whole heads, cover, stir occasionally during cooking Chinese leaves 300 800 W 9-11 cut into strips, cover, stir occasionally during cooking 4-5
Peas 500 800 W 9-11 cover, stir occasionally during cooking 4-5
Fennel 500 800 W 9-11 cut into quarters, cover, stir occasionally during cooking 4-5
Onions 250 800 W 5-7 whole, cook in microwave cling film Kohlrabi 500 800 W 10-12 dice, cover, stir occasionally during cooking 50ml
Carrots 500 800 W 10-12 cut into rings, cover, stir occasionally during cooking 4-5
Green peppers 500 800 W 7-9 cut into strips, stir once or twice during cooking 4-5
Boiled potatoes (skins on) 500 800 W 9-11 cover, stir occasionally during cooking 4-5
Leeks 500 800 W 9-11 cut into rings, cover, stir occasionally during cooking 4-5
Red cabbage 500 800 W 15-17 cut into strips, stir once or twice 50ml
Brussels sprouts 500 800 W 9-11 whole sprouts, cover, stir occasionally during cooking 50ml
Boiled Potatoes (salted) 500 800 W 9-11 cut into large pieces of a similar size, add a little salt, 150ml
Celery 500 800 W 9-11 dice finely, cover, stir occasionally during cooking 50ml
White cabbage 500 800 W 15-17 cut into strips, cover, stir occasionally during cooking 50ml
Courgettes 500 800 W 9-11 slice, cover, stir occasionally during cooking 4-5
-g- -Setting -Min- -tbsps/ml-
500 800 W 10-12 during cooking 4-5
300 800 W 7-9
during cooking
cover, stir occasionally during cooking
tbsps
tbsps
tbsps
tbsps
tbsps
tbsps
tbsps
tbsps
tbsps
tbsps
tbsps
ADAPTING RECIPES FOR THE
MICROWAVE OVEN
If you would like to adapt your favourite recipes for
the microwave, you should take note of the
following:
Shorten cooking times by a third to a half. Follow
the example of the recipes in this book.
Foods which have a high moisture content such as
meat, fish, poultry, vegetables, fruit, stews and
soups can be prepared in your microwave without
any difficulty. Foods which have little moisture,
such as platters of food, should have the surface
moistened prior to heating or cooking.
The amount of liquid to be added to raw foods,
which are to be braised, should be reduced to
about two thirds of the quantity in the original
recipe. If necessary, add more liquid during
cooking.
RECIPES
The amount of fat to be added can be reduced
considerably. A small amount of butter, margarine
or oil is sufficient to flavour food. For this reason
your microwave is excellent for preparing low-fat
foods as part of a diet.
HOW TO USE RECIPES
● All the recipes in this book are calculated on the
basis of 4 servings - unless otherwise stated.
● Recommendations relating to suitable utensils
and the total cooking times are given at the
beginning of every recipe.
● As a rule the quantities shown are assumed to
be wholly consumable, unless specifically
indicated otherwise.
● When eggs are given in the recipes they are
assumed to have weight of approx. 55 g
(grade M).
21
Page 24

RECIPES
Germany
CAMEMBERT TOAST
Total cooking time: approx. 11/2
Utensil:
Ingredients
4 slices of bread for toasting
2 tbsp butter or margarine (20 g)
150 g camembert
4 tsp cranberry jelly
cayenne pepper
Netherlands
1
/2
-2
minutes
MUSHROOM SOUP
Champignonsoep
Total cooking time: approx. 13-17 Minutes
Utensil: Bowl with Lid (2 l Capacity)
Ingredients
200 g mushrooms, sliced
1 onion (50 g), finely chopped
300 ml meat stock
300 ml cream
1
2
/
tbsps flour (25 g)
2
1
2
/
tbsps butter or margarine (25 g)
2
salt & pepper
1 egg
150 g crème fraîche
1. Toast the bread and spread with butter.
2. Cut the Camembert into slices and arrange on
top of the toast. Put the cranberry jelly in the
middle of the cheese and sprinkle with cayenne
pepper.
3. Place the toast on a plate and heat for
1
1
/2-21/2 min. 800 W
Tip:You can vary this recipe according to your
taste. For example, you can use fresh
mushrooms and grated cheese or cooked ham,
asparagus and Emmental cheese.
1. Place the vegetables and the stock in the bowl,
cover and cook.
8-9 min. 800 W
2. Blend all the ingredients in the mixer.
3. Mix the flour and butter to a dough and smooth
into the soup. Season with salt and pepper, cover
and cook. Stir after cooking.
4-6 min. 800 W
4. Mix the egg yolk with the cream, gradually stir
into the soup. Heat for a short time, but do not let
it boil!
1-2 min. 800 W
Allow the soup to stand for about 5 minutes after
cooking.
22
Page 25

RECIPES
Switzerland
ZÜRICH VEAL IN CREAM
Total cooking time: approx. 11-15 minutes
Utensil: dish with lid (2 l capacity)
Ingredients
600 g veal fillet
1 tbsp butter or margarine
1 onion (50 g), finely chopped
100 ml white wine
seasoned gravy browning, for approx.
300 ml cream
1 tbsp parsley, chopped
France
1
/
2
l gravy
SOLE FILLETS
Total cooking time: approx. 13-16 minutes
Utensil: shallow,oval oven dish with microwave
cling film (approx. 26 cm long)
Ingredients
400 g sole fillets
1 lemon, whole
2 tomatoes (150 g)
1 tsp butter or margarine for greasing
1 tbsp vegetable oil
1 tbsp parsley, chopped
salt & pepper
4 tbsps white wine (30 ml)
2 tbsps butter or margarine (20 g)
1. Cut the fillet into finger-width strips.
2. Grease the dish all over with the butter. Put the
onion and the meat into the dish, cover and
cook. Stir once during cooking.
7-10 min. 800 W
3. Add the white wine, gravy browning and cream,
stir, cover and continue cooking. Stir occasionally.
4-5 min. 800 W
4. Test the veal, stir the mixture once more and allow
to stand for approx. 5 minutes. Serve garnished
with parsley.
1. Wash the sole fillets and pat them dry. Remove
any bones.
2. Cut the lemon and the tomatoes into thin slices.
3. Grease the oven dish with butter. Place the fish
fillets inside and drizzle the vegetable oil over
them.
4. Sprinkle parsley over the fish, place the tomato
slices on top and season. Place the lemon slices
on top of the tomatoes and pour the white wine
over them.
5. Place small pats of butter on top of the lemon,
cover and cook.
13-16 min. 800 W
After cooking allow the fish fillets to stand for
approx. 2 minutes.
Tip: This recipe can also be used for Haddock,
Halibut, Mullet, Plaice or Cod.
Greece
BRAISED LAMB WITH GREEN BEANS
Total cooking time: approx. 20-24 minutes
Utensil: shallow oval soufflé mould with lid
(about 26 cm long)
Ingredients
1-2 tomatoes (100 g)
400 g lamb, boned
1 tsp butter or margarine for greasing the bowl
1 onion (50 g), finely chopped
1 clove garlic, crushed
salt & pepper
sugar
250 g tinned green beans
1. Skin and remove the stalks of the tomatoes, then
purée in a blender or food processor.
2. Cut the lamb into large chunks. Grease the bowl
with butter. Add meat, onions and garlic, season,
cover and cook.
9-11 min. 800 W
3. Add beans and puréed tomatoes to the meat,
cover and continue cooking.
11-13 min. 560 W
After cooking, leave the lamb to stand for
approximately 5 minutes.
Tip:If you prefer to use fresh beans, these should
be pre-cooked.
23
Page 26

RECIPES
Italy
LASAGNE
Total cooking time 22-26 minutes
Utensils: Bowl with lid (2 l capacity)
shallow square soufflé mould with lid
(approx 20 x 20 x 6 cm)
Ingredients
300 g tinned tomatoes
50 g ham, finely cubed
1 onion (50 g), finely chopped
1 clove of garlic, crushed
250 g minced meat (beef)
2 tbsp mashed tomato (30 g)
salt & pepper
oregano, thyme, basil, nutmeg
150 ml cream (crème fraîche)
100 ml milk
50 g grated Parmesan cheese
1 tsp mixed chopped herbs
1 tsp olive oil
1 tsp vegetable oil to grease the mould
125 g lasagne verde
1 tbsp grated Parmesan cheese
1 tbsp butter or margarine
1. Cut the tomatoes into slices, mix with the ham
and onion, garlic, minced meat and mashed
tomato. Season and cook with the lid on.
7-9 min. 800 W
2. Mix the cream with the milk, Parmesan cheese,
herbs, oil, and spices.
3. Grease the soufflé mould and cover the bottom of
the mould with about
1
/
of the pasta. Put half of
3
the minced meat mixture on the pasta and pour
on some sauce. Put an additional
1
/
of the
3
pasta on top followed by another layer of the
minced meat mixture and some sauce, finishing
with the remaining pasta on top. Finally, cover the
pasta with lots of sauce and sprinkle with
Parmesan cheese. Place butter flakes on top and
cook with the lid on.
15-17 min. 560 W
After cooking, let the lasagne stand for
approximately 5-10 minutes.
France
RATATOUILLE
Total cooking time 19-21 minutes
Utensils: Bowl with lid (2 l capacity)
Ingredients
5 tbsp olive oil (50 ml)
1 clove garlic, crushed
1 onion (50 g), sliced
1 small aubergine (250 g), cut into cubes
1 courgette (200 g), into cubes
1 pepper (200 g), cut into large cubes
1 small fennel (75 g) cut into large cubes
1 bouquet garni
200 g tinned artichoke hearts, cut into quarters
salt & pepper
1. Place the olive oil and garlic clove in the bowl.
Add the prepared vegetables, except the
artichoke hearts, and season with pepper. Add
the bouquet garni, cover and cook, stirring once.
19-21 min. 800 W
For the last 5 minutes, add the artichoke hearts
and heat.
2. Season the ratatouille to taste with salt and
pepper. Remove the bouquet garni before
serving. After cooking, leave the ratatouille to
stand for around 2 minutes.
Tip: Ratatouille can be served hot with meat
dishes. Served cold, it also makes an
excellent starter.
A bouquet garni consists of: one stalk of
parsley, a bunch of herbs suitable for
seasoning soup, one stalk of lovage, one stalk
of thyme, several bay leaves.
24
Page 27

RECIPES
Spain
BAKED POTATOES
Total cooking time 12-16 minutes
Utensils: Bowl with lid (2 l capacity)
China plate
Ingredients
4 medium sized potatoes (400 g)
100 ml water
60 g ham, cut into fine cubes
1
/
2
onion (25 g) finely cubed
75-100 ml milk
2 tbsp grated Parmesan cheese (20 g)
salt & pepper
2 tbsp grated Emmental cheese
Denmark
FRUIT JELLY WITH VANILLA SAUCE
Total cooking time 10-13 minutes
Utensils: Dish with lid (2 l capacity)
(1 l capacity)
Ingredients
150 g redcurrants, washed and stalks removed
150 g strawberries, washed and haulms removed
150 g raspberries, washed and haulms removed
250ml white wine
100 g sugar
50 ml lemon juice
8gelatin leaves
300 ml milk
inside of
30 g sugar
15 g food thickener
1
/
vanilla pod
2
1. Place the potatoes in a dish, add the water, cover
and cook. Rearrange halfway through cooking.
8-10 min. 800 W
Leave to cool.
2. Cut the potatoes lengthwise and carefully remove
the potato from the skin. Mix the potato with the
ham, onion, milk and Parmesan cheese to an
even consistency. Season with salt and pepper.
3. Fill the potato skins with potato mixture and
sprinkle with Emmental cheese. Place potatoes on
a plate and cook.
4-6 min. 800 W
After cooking, leave to stand for approximately
2 minutes.
1. Put some of the fruit to one side for decoration.
Purée the rest of the fruit with the white wine, put
it into a dish, cover and heat.
7-9 min. 800 W
Fold in the sugar and the lemon juice.
2. Soak the gelatin in cold water for approx. 10
minutes, then take it out and squeeze dry. Stir the
gelatin in with the hot purée until it has dissolved.
Place the jelly in the refrigerator and leave to set.
3. To make the vanilla sauce; put the milk into the
other dish. Slit the vanilla pod and remove the
inside. Stir this in with the milk, together with the
sugar and the food thickener, cover and cook,
stirring during cooking and again at the end.
3-4 min. 800 W
4. Turn out the jelly onto a plate and decorate with
the whole fruit. Add the vanilla sauce.
Tip:You can also use defrosted frozen fruits.
25
Page 28

CARE & CLEANING
CAUTION: DO NOT USE COMMERCIAL
OVEN CLEANERS, STEAM CLEANERS,
ABRASIVE, HARSH CLEANERS, ANY THAT
CONTAIN SODIUM HYDROXIDE OR
SCOURING PADS ON ANY PART OF YOUR
MICROWAVE OVEN.
Oven exterior
The outside of your oven can be cleaned easily
with mild soap and water. Make sure the soap is
wiped off with a moist cloth, and dry the exterior
with a soft towel.
Oven controls
Open the door before cleaning to de-activate the
oven controls. Care should be taken when cleaning
the oven control. Using a cloth dampened with
water only, gently wipe the panel until it becomes
clean. Avoid using excessive amounts of water.
Do not use any sort of chemical or abrasive
cleaner.
Oven Interior
1. For cleaning, wipe any splatters or spills with a
soft damp cloth or sponge after each use while
the oven is still warm. For heavier spills, use a
mild soap and wipe several times with a damp
cloth until all residues are removed. Do not
remove the waveguide cover.
2. Make sure that mild soap or water does not
penetrate the small vents in the walls which may
cause damage to the oven.
3. Do not use spray type cleaners on the oven
interior.
Turntable and turntable support
Remove the turntable and turntable support from
the oven. Wash the turntable and turntable support
in mild soapy water. Dry with a soft cloth. Both the
turntable and the turntable support are dishwasher
safe.
Door
To remove all trace of dirt, regularly clean both
sides of the door, the door seals and sealing
surfaces with a soft, damp cloth.
NOTE: A steam cleaner should not be used.
26
Page 29
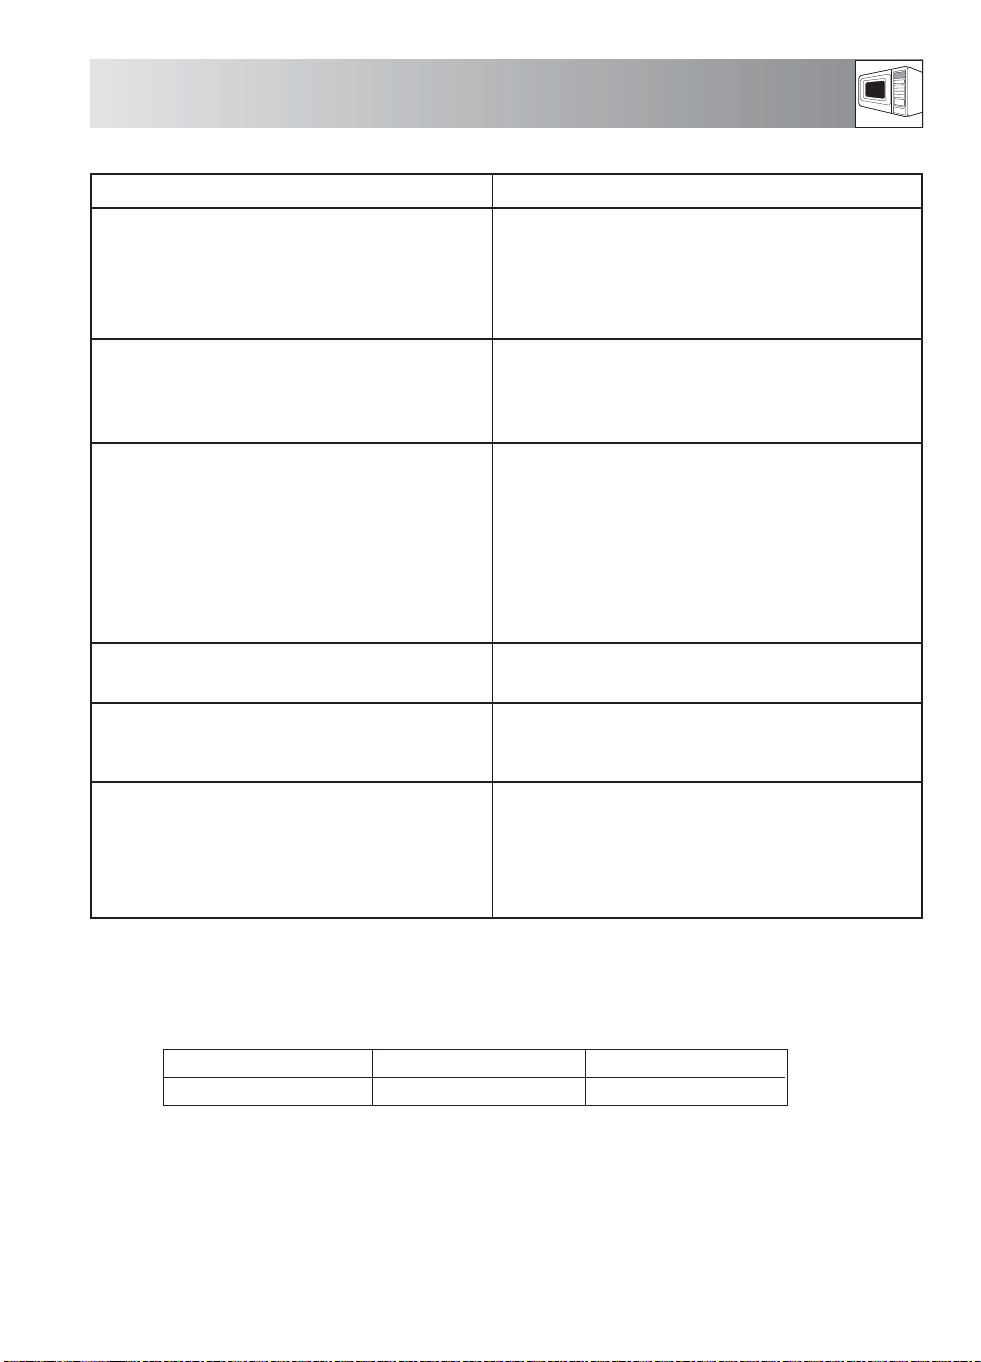
WHAT TO DOIF...
SYMPTOM
... the microwave appliance is not
working properly?
... the microwave mode is not working?
... the turntable is not turning?
... the microwave will not switch off?
... the interior light is not working?
POSSIBLE SYMPTOMS/REMEDIES
Check that
- the fuses in the fuse box are working,
- there has not been a power outage.
- If the fuses continue to blow, please contact a
qualified electrician.
Check that
- the door is properly closed,
- the door seals and their surfaces are clean,
- the START-button has been pressed.
Check that
- the turntable support is correctly connected to the
drive,
-the ovenware does not extend beyond the
turntable,
-food does not extend beyond the edge of the
turntable preventing it from rotating.
- there is nothing in the well beneath the turntable.
- Isolate the appliance from the fuse box.
- Call your local Service Force Centre.
- Call your local Service Force Centre. The interior
light bulb can be exchanged only by a trained
Service Force technician.
... the food is taking longer to heat
through and cook than before?
NOTE: If you cook the food over the standard time with only 800 W, the power of the oven will lower
automatically to avoid overheating. (The microwave power level will be reduced to 560 W).
After pausing for 90 seconds, 800 W power can be reset.
Cooking Mode
Microwave 800 W
Standard time
20 minutes
- Set a longer cooking time (double quantity =
nearly double time) or
- if the food is colder than usual, rotate or turn from
time to time or
- set a higher power setting.
Reduced Power
Microwave 560 W
27
Page 30
SERVICE & SPARE PARTS
In the event of your appliance requiring service, or if you wish to purchase spare parts, please contact
your local Service Force Centre by telephoning:
08705 929 929
Your telephone call will be automatically routed to the Service Force Centre covering your post code area.
For the address of your local Service Force Centre and further information about Service Force, please visit
the website at www.serviceforce.co.uk.
For Customer Service in Ireland please contact us at the address below:
Electrolux Group (Irl) Ltd
Long Mile Road
Dublin 12
Republic of Ireland
Tel: + 353 (0)1 4090753
Email: [email protected]
Before calling out a technician, please ensure you have read the details under the heading ‘What to do if’.
When you contact the Service Force Centre you will need to give the following details:
1. Your name, address and post code.
2. Your telephone number.
3. Clear and concise details of the fault.
4. The model and serial number of the appliance (found on the rating plate).
5. The purchase date
Please note that a valid purchase receipt or guarantee documentation is required for
in-guarantee service calls.
CUSTOMER CARE
For general enquiries concerning your Electrolux appliance or for further information on Electrolux
products, please contact our Customer Care Department by letter or telephone at the address below or
visit our website at www.electrolux.co.uk.
Customer Care Department
Electrolux
55-77 High Street
Slough
Berkshire
SL1 1DZ
Tel. 08705 950950 *
* Calls may be recorded for training purposes.
28
Page 31

GUARANTEE CONDITIONS
Standard Guarantee conditions
We, Electrolux, undertake that if within 12 months
of the date of the purchase this Electrolux
appliance or any part thereof is proved to be
defective by reason only of faulty workmanship or
materials, we will, at our option repair or replace
the same FREE OF CHARGE for labour, materials
or carriage on condition that:
• The appliance has been correctly installed and
used only on the electricity supply stated on the
rating plate.
• The appliance has been used for normal
domestic purposes only, and in accordance with
the manufacturer’s instructions.
• The appliance has not been serviced,
maintained, repaired, taken apart or tampered
with by any person not authorised by us.
•All service work under this guarantee must be
undertaken by a Service Force Centre.
• Any appliance or defective part replaced shall
become the Company’s property.
• This guarantee is in addition to your statutory
and other legal rights.
Home visits are made between 8.30am and
5.30pm Monday to Friday.
Visits may be available outside these hours in
which case a premium will be charged.
Exclusions
This guarantee does not cover:
• Damage or calls resulting from transportation,
improper use or neglect, the replacement of any
light bulbs or removable parts of glass or plastic.
• Costs incurred for calls to put right an appiliance
which is improperly installed or calls to
appliances outside the UK.
• Appliances found to be in use within commercial
or similar environment, plus those which are
subject to rental agreements.
• Products of Electrolux manufacture which are not
marketed by Electrolux.
European Guarantee
If you should move to another country within
Europe then your guarantee moves with you to
your new home subject to the following
qualifications:
• The guarantee starts from the date you first
purchased your product.
• The guarantee is for the same period and to the
same extent for labour and parts as exist in the
new country of use for this brand or range of
products.
• This guarantee relates to you and cannot be
transferred to another user.
•Your new home is within the European
Community (EC) or European Free Trade Area.
• The product is installed and used in accordance
with our instructions and is only used
domestically, i.e. a normal household.
The electrical supply complies with the
specification given in the rating label.
• The product is installed taking into account
regulations in your new country.
Before you move, please contact your nearest
Customer Care centre, listed below, to give them
details of your new home. They will then ensure
that the local Service Organisation is aware of
your move and able to look after you and your
appliances.
France Senlis +33 (0) 3 44 62 22 22
Germany Nürnberg +49 (0) 911 323 2600
Italy Pordenone +39 (0) 1678 47053
Sweden Stockholm +46 (0) 20 78 77 50
UK Slough +44 (0) 1753 219 898
29
Page 32
SPECIFICATIONS
AC Line Voltage
Distribution line fuse/circuit breaker
AC Power required: Microwave
Output power: Microwave
Microwave Frequency:
Outside Dimensions:
Cavity Dimensions
Oven Capacity
Turntable
Weight
Oven lamp
* Internal capacity is calculated by measuring maximum width, depth and height.
Actual capacity for holding food is less.
This oven complies with the requirements of Directives 89/336/EEC and 73/23/EEC as
SPECIFICATIONS ARE SUBJECT TO CHANGE WITHOUT NOTICE AS PART OF
: 230-240 V, 50 Hz, single phase
: Minimum 10 A
: 1.2 kW
: 800 W (IEC 60705)
: 2450 MHz
: 592 mm (W) x 370 mm (H) x 316 mm (D)
: 285 mm (W) x 202 mm (H) x 298 mm (D) *
: 17 litres *
: ø 272 mm, glass
: approx. 15.5 kg
: 25 W/240 - 250 V
amended by 93/68/EEC.
CONTINUOUS IMPROVEMENT
IMPORTANT INFORMATION
Ecologically responsible disposal of packaging materials and old
appliances
Packaging materials
Electrolux microwave ovens require effective packaging to protect them during transportation.
Only the minimum packaging necessary is used.
Packaging materials (e.g. foil or styrofoam) can place children at risk.
Danger of suffocation. Keep packaging material away from children.
All packaging materials used are environment friendly and can be recycled. The cardboard is made from
recycled paper and the wooden parts are untreated. Plastic items are marked as follows:
«PE» polyethylene eg packaging film
«PS» polystyrene eg packaging (CFC-free)
«PP» polypropylene eg packaging straps
By using and re-using the packaging, raw materials are saved and waste volume is reduced.
Packaging should be taken to your nearest recycling centre.
Contact your local council for information.
Disposal of old appliances
Old appliances should be made safe before disposal by removing the plug, and cutting off and disposing
of the power cable.
It should then be taken to the nearest recycling centre. Check with your local Council or Environmental
Health Office to see if there are facilities in your area for recycling the appliance.
30
Page 33
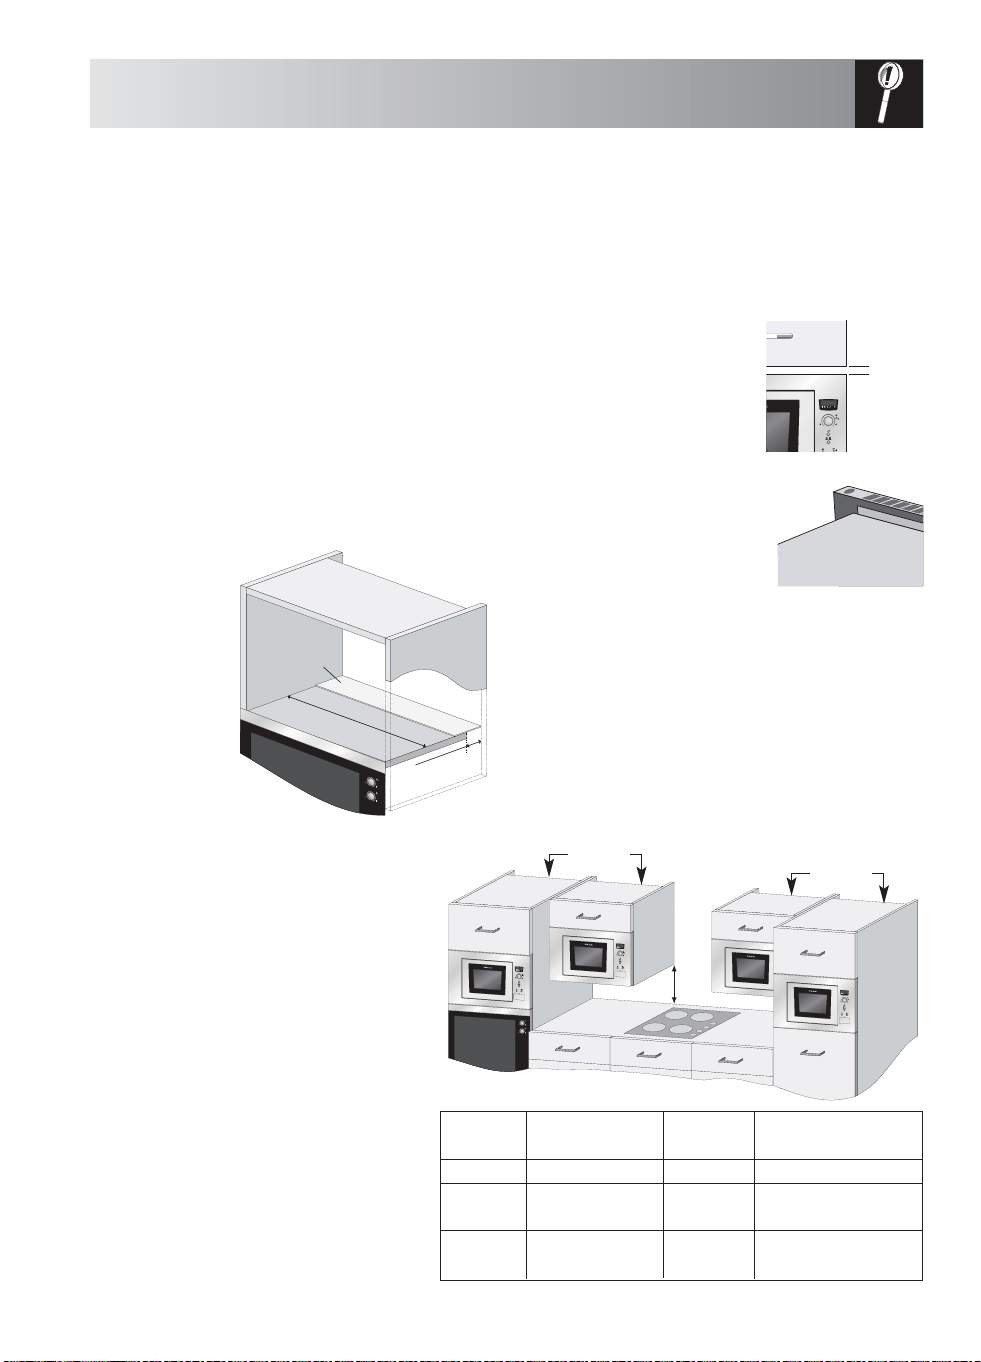
INSTALLING THE APPLIANCE
INSTALLATION
1. Remove all packaging and check carefully for
any signs of damage.
2. This oven is designed to fit into a 360mm high
cupboard as standard.
When fitting into a 350mm high cupboard:Unscrew and remove the 4 feet from the bottom
of the oven. There are 3 tall feet and 1 short
foot. Replace the 3 tall feet with those provided
in the accessory pack. Do not replace the short
foot.
3. If fitting the microwave oven above a
conventional oven (position A) then use the mylar
sheet provided.
a. Cut the Mylar sheet to fit the internal width of
the unit.
b. Peel back
the
protective
cover on the
tape and fix
Mylar sheet
to the rear of
the shelf so
Internal width
that it covers
the service
gap. (See
Conventional
oven
Service gap
diagram).
4. Fit the appliance into the kitchen cupboard
slowly, and without force, until the front frame of
the oven seals against the front opening of the
cupboard.
5. Ensure the appliance is
stable and not leaning.
Ensure that a 5mm gap is
5 mm
kept between the cupboard
door above and the top of
the frame (see diagram).
6. Fix the oven in position with the
screws provided.
The fixing points are located
on the top and bottom
corners of the oven (see
diagram, item 9, on page 4).
7. It is important to ensure that the installation of
this product conforms to the instructions in this
operation manual and the hob or conventional
oven manufacturer’s installation instructions.
SAFE USE OF THE APPLIANCE
If fitting the microwave in position B or C:
• The cupboard must be a minimum of 500
mm (E) above the worktop and must not be
installed directly above a hob.
• This appliance has been tested and approved
for use near domestic gas, electric and
induction hobs only.
• Sufficient space between hob and
microwave should be allowed to prevent
overheating of microwave oven,
surrounding cupboard and accessories.
• Do not operate the hob without pans when
the microwave oven is operating.
• Care should be taken when attending to the
microwave oven while the hob is on.
Chimney
Position A
Conventional
oven
POSITION NICHE SIZE CHIMNEY Gap Between
A 560 x 550 x 360 50 50
B + C 560 x 300 x 350 18 50
D 560 x 500 x 350 18 50
Position B
E
WD H (min) Cupboard & Ceiling
560 x 300 x360 18 50
560 x 500 x360 18 50
Position C
Chimney
Position D
D
Measurements in (mm)
31
Page 34
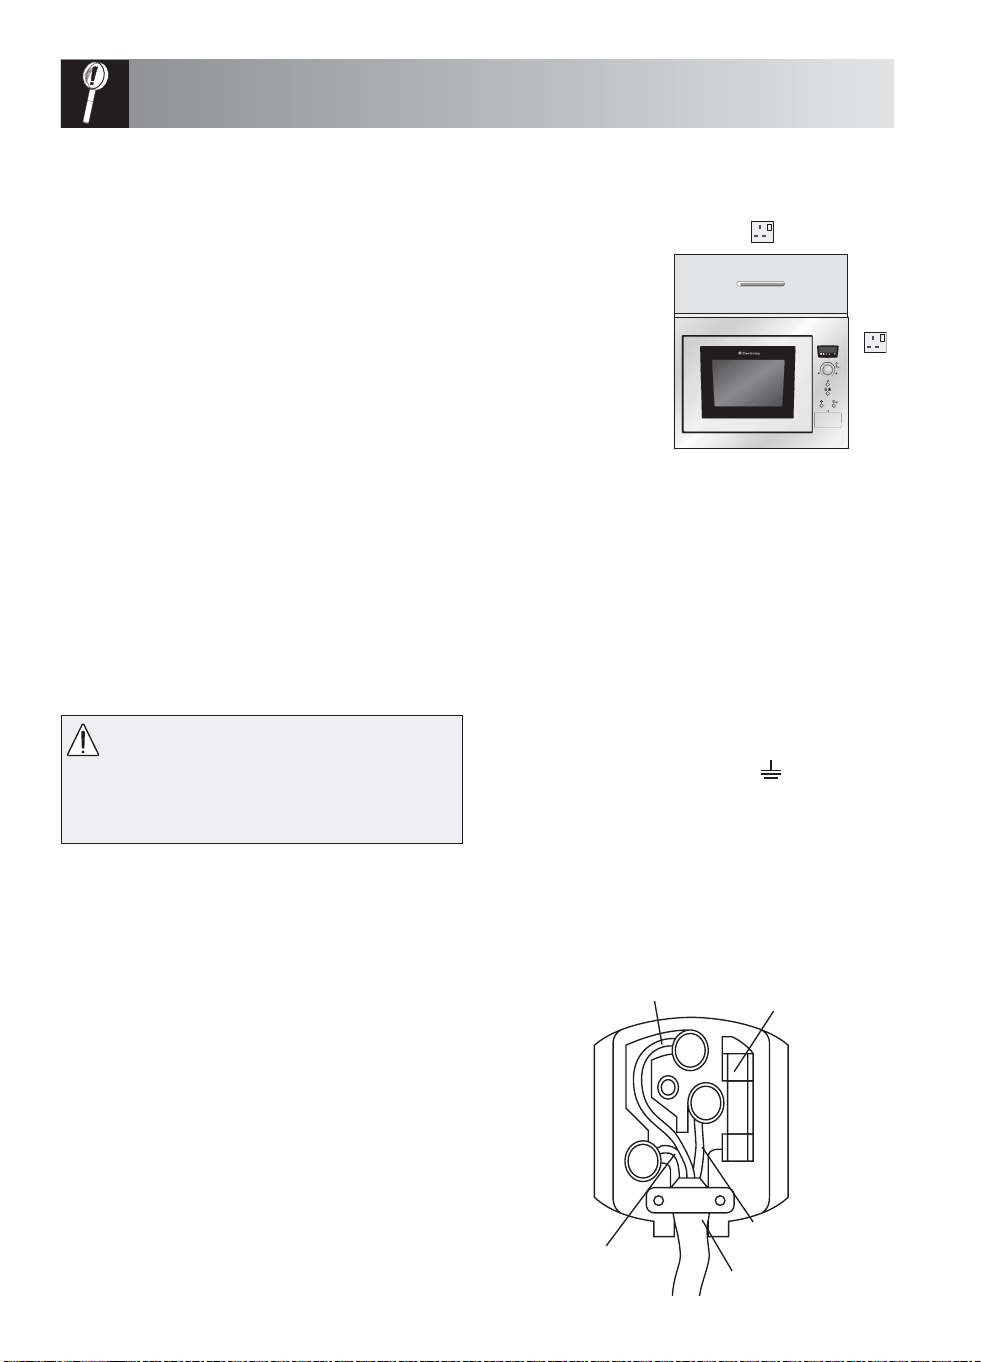
INSTALLATION
13 AMP
GREEN & YELLOW
13 AMP FUSE
BROWN
CORD CLAMP
BLUE
CONNECTING THE APPLIANCE TO THE POWER SUPPLY
• The electrical outlet should be readily accessible so that
the unit can be unplugged easily in an emergency.
• The socket should not be positioned behind the cupboard.
• The best position is above the cupboard, see (A).
When not connecting the power supply cord to position (A) it should
be removed from the support clip (see diagram, item 13, on page 4)
and routed under the oven.
• Connect the appliance to a single phase 230-240V/50Hz alternating
current via a correctly installed earth socket.
The socket must be fused with a ≥10A fuse.
• If the appliance is to be operated in a non-European
country, the supply voltage, current type and frequency of the appliance indicated on
the rating plate must correspond with the specification of your power supply. The
rating plate can be found on the inside face of the control panel.
• The power supply cord may only be replaced by an electrician.
• Before installing, tie a piece of string to the power supply cord to facilitate connection to point (A) when
the appliance is being installed.
• When inserting the appliance into the high-sided cupboard, DO NOT crush the power supply cord.
ELECTRICAL CONNECTIONS
WARNING:
THIS APPLIANCE MUST BE EARTHED
The manufacturer declines any liability
should this safety measure not be
observed.
• If the plug that is fitted to your appliance is not
suitable for your socket outlet, it must be cut off
and the appropriate plug fitted.
• Remove the fuse from the cut off plug. The cut off
plug should then be disposed of to prevent the
hazard of shocks in case it should be plugged
into a 13 Amp socket in another part of your
home.
IMPORTANT
The wires in the mains lead are coloured in
accordance with the following code:
GREEN AND YELLOW EARTH
BLUE NEUTRAL
BROWN LIVE
If you fit your own plug, the colours of the wires in
the mains lead of your appliance may not
correspond with the markings identifying the
terminals in your plug, proceed as follows:
(A)
• Connect the green and yellow (earth) wire to the
terminal in the plug which is marked with the
letter ”E” or the earth symbol ( ) or coloured
green and yellow.
• Connect the blue (neutral) wire to the terminal in
the plug which is marked with the letter ”N” or
coloured black.
•Connect the brown (live) wire to the terminal in
the plug which is marked with the letter ”L” or
coloured red.
32
Page 35

Page 36

1
The Electrolux Group. The World’s No.1 choice.
The Electrolux group is the world’s largest producer of powered appliances for the kitchen, cleaning and outdoor use.
More than 55 million Electrolux Group products (such as refrigerators, cookers, washing machines, vacuum cleaners,
chain saws and lawn mowers) are sold each year to a value of approx. USD 14 billion in more than 150 countries
around the world.
© Electrolux plc 2004
TINS-A385URR0
Page 37

documentation manual, user maintenance, brochure, user reference, pdf manual
This file has been downloaded from:
User Manual and User Guide for many equipments like mobile phones, photo cameras, monther board, monitors, software, tv, dvd, and othes..
Manual users, user manuals, user guide manual, owners manual, instruction manual, manual owner, manual owner's, manual guide,
manual operation, operating manual, user's manual, operating instructions, manual operators, manual operator, manual product,
 Loading...